If you’ve got oven-bake clay and a little curiosity, you’re already set up for some seriously satisfying wins. I’m sharing my favorite beginner-friendly projects that look cute, feel useful, and don’t require fancy tools or advanced sculpting skills.
Oven-Bake Marbled Trinket Dish
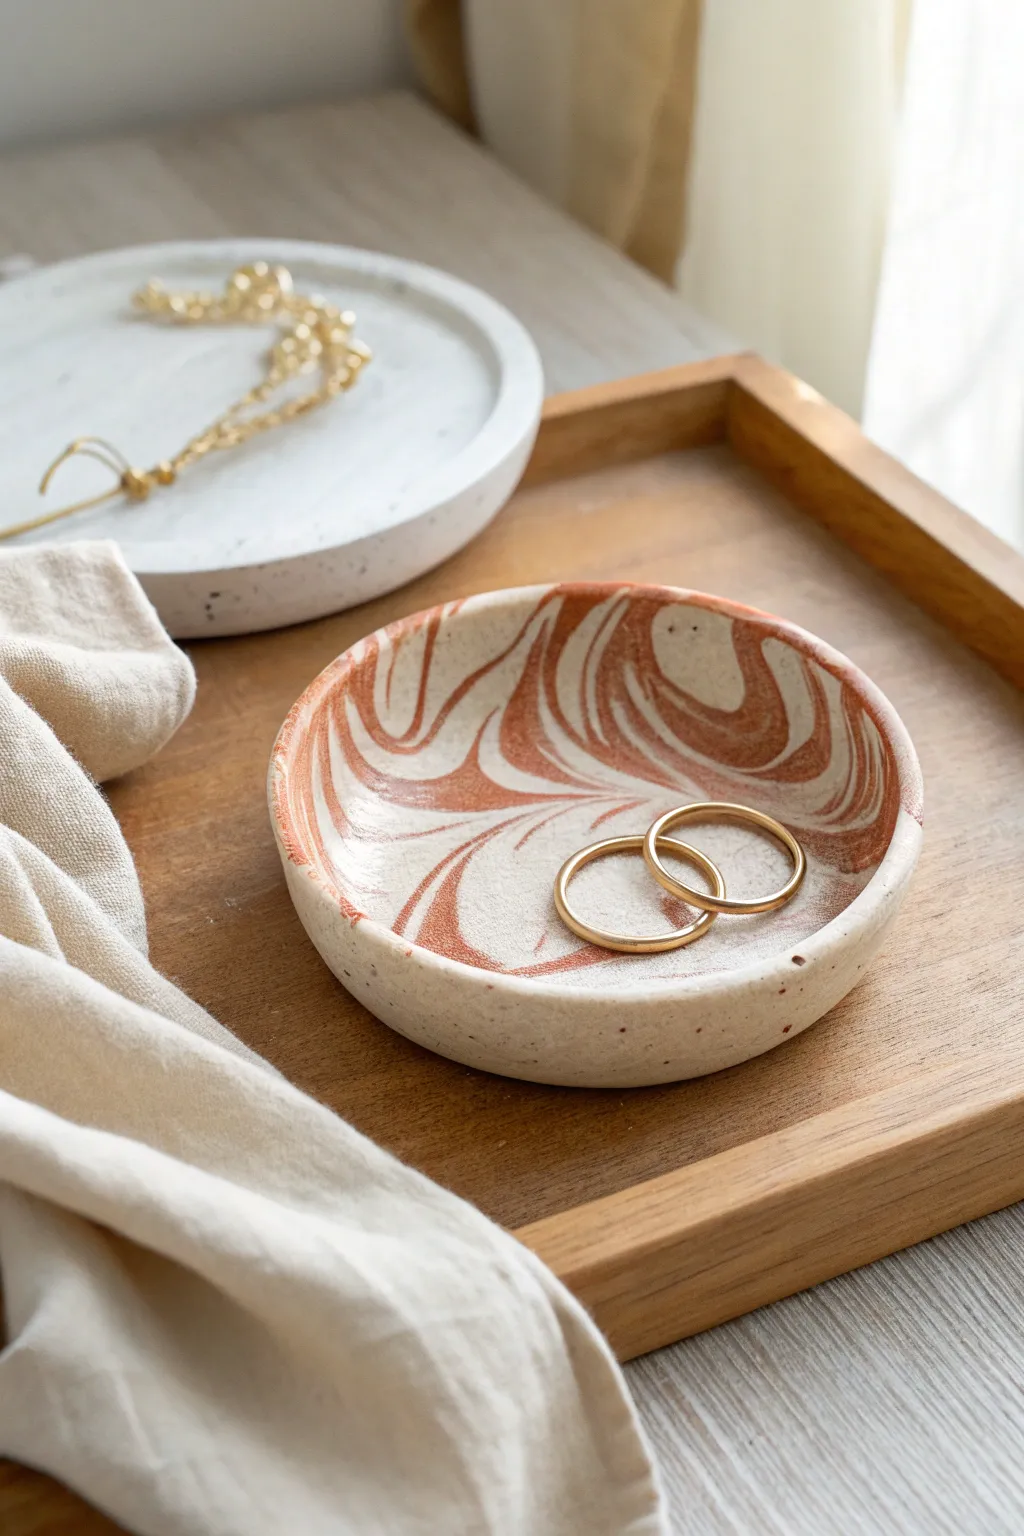
Bring earthy warmth to your dresser or vanity with this simple yet stunning marbled trinket dish. The rusty orange and speckled cream swirls create a unique, organic pattern that looks high-end but is perfectly beginner-friendly.
Step-by-Step Guide
Materials
- Polymer clay (white or cream)
- Polymer clay (terracotta or burnt orange)
- Small rolling pin or acrylic roller
- Course black pepper or faux granite clay mix (optional for speckles)
- Round cookie cutter or bowl (approx 4-5 inches)
- Oven-proof bowl (for forming shape)
- Craft knife or scalpel
- Sandpaper (fine grit)
- In oven thermometer
- Gloss or matte varnish (optional)
Step 1: Preparing and Mixing the Clay
-
Condition the base clay:
Start with a block of white or cream polymer clay. Knead it in your hands until it becomes soft, warm, and pliable. This conditioning step prevents cracks later on. -
Add speckling (optional):
To achieve the speckled stoneware look seen in the photo, mix a tiny pinch of coarse black pepper or pre-mixed granite-effect clay into your white base. Knead thoroughly until the specks are evenly distributed. -
Prepare the accent color:
Condition a smaller amount of terracotta or burnt orange clay. You’ll want a ratio of roughly 1 part accent color to 4 parts base color to keep the design airy. -
Create clay snakes:
Roll both the base color and the accent color into long, thin snake shapes on your work surface. Make the white snake significantly thicker than the orange one. -
Combine the ropes:
Twist the two clay snakes together securely into one long, two-toned rope. Then, fold this rope in half and twist it again.
Muddy Colors?
If your colors look blended instead of marbled, you over-kneaded the ball. Stop mixing as soon as the distinct streaks are visible to keep the contrast sharp.
Step 2: Creating the Marble Pattern
-
Ball it up:
Squash your twisted rope into a single ball. Don’t over-knead at this stage, or the colors will blend into a muddy solid color rather than distinct swirls. -
Roll out the slab:
Using your acrylic roller, flatten the ball into a smooth slab about 1/4 inch thick. As you roll, you’ll see the marble pattern emerge. -
Check the pattern:
If you aren’t happy with the swirl distribution, fold the slab in half and roll it out one more time. I usually find that rolling it twice creates the most natural-looking flow lines.
Step 3: Shaping and Refining
-
Cut the circle:
Place your circle cutter or an upside-down bowl onto the most attractive part of your clay slab. Press down firmly to cut a clean circle shapes. -
Smooth the edges:
Gently run your finger along the cut edge of the clay circle to smooth out any sharpness or roughness left by the cutter. -
Add texture to the rim:
To mimic the slightly rustic rim in the photo, gently tap the very edge of the circle with your finger or a sponge to soften the perfect machined look. -
Form the dish shape:
Pick up your clay circle and gently drape it inside an oven-safe bowl. Press it down lightly so it takes the curved shape of the bowl’s bottom.
Smooth Operator
Before baking, wipe the clay surface gently with a tiny bit of baby oil on a finger. This removes distinct fingerprints and creates a silky smooth finish.
Step 4: Baking and Finishing
-
Bake the project:
Place the bowl containing your clay dish into the oven. Follow the temperature instructions specifically for your brand of clay, usually around 275°F (135°C). -
Cool down completely:
Once baked (usually 15-30 minutes), remove it from the oven and let it cool completely inside the shaping bowl before trying to pop it out. -
Sand the imperfections:
Dip your sandalwood paper in a little water and gently buff the edges of the dish. This wet-sanding technique keeps dust down and creates a porcelain-smooth finish. -
Seal the surface:
If you plan to put jewelry on it, you can leave it matte. However, a light coat of water-based polyurethane varnish adds durability and a professional sheen.
Place your new dish on a wooden tray and enjoy the chic, organizational upgrade to your space.


Oven-Bake Geometric Earrings
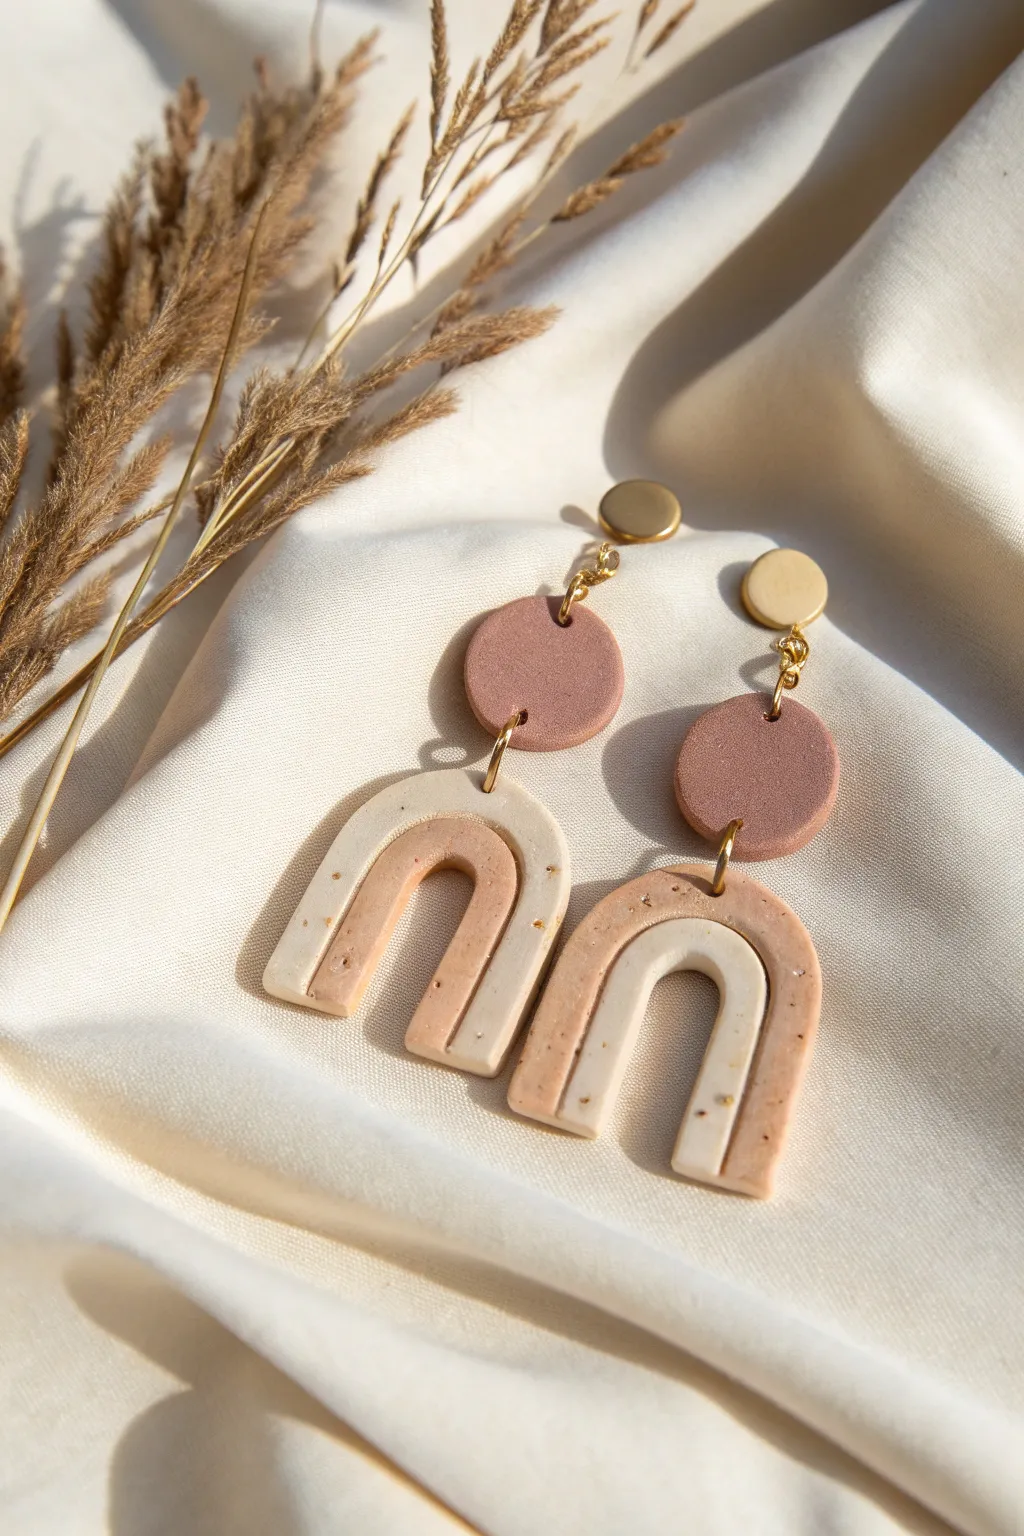
These stylish earrings feature a trendy U-shaped arch design with a lovely mix of textures and earthy tones. The combination of speckled cream, terracotta, and soft gold creates a sophisticated look that pairs perfectly with casual or dressy outfits.
Step-by-Step Tutorial
Materials
- Polymer clay in three colors: speckled cream (or white mixed with pepper/sand), terracotta/dusty rose, and beige/light tan
- Rolling pin or pasta machine
- U-shaped clay cutter (or a sharp craft knife and a template)
- Small circle clay cutter (approx. 1 cm diameter)
- Even smaller circle cutter (approx. 0.6 cm diameter) for the studs
- Gold earring posts (ball or flat pad style) and backings
- Gold jump rings (approx. 6mm or 8mm)
- Jewelry pliers (flat nose and round nose)
- Hand drill or needle tool
- Baking sheet and parchment paper
- Super glue or jewelry adhesive
Step 1: Preparing the Clay
-
Condition the Clay:
Begin by kneading each color of clay separately in your hands until it becomes soft and pliable. This prevents cracking later on. -
Mix Custom Shades:
If you don’t have pre-speckled clay, mix a tiny pinch of black pepper or sand into your cream clay to achieve that organic, stone-like texture seen in the photo. -
Roll Out Sheets:
Using your rolling pin or pasta machine, roll each color out onto a flat surface. Aim for a uniform thickness of about 3mm—thick enough to be sturdy but light enough for ears.
Sticky Situation?
If clay sticks to your cutter, dip the cutter in cornstarch or water before pressing down. This helps create clean edges and easy release.
Step 2: Creating the U-Shapes
-
Cut the Base Arches:
For the bottom component, use your U-shaped cutter on the speckled cream clay sheet. Cut two identical arches. -
Cut the Inner Arches:
Using a slightly smaller U-cutter, or carefully trimming with a knife, cut two smaller arches from the terracotta clay. -
Alternative Method: Inlay:
If you want the two-tone look shown on the left earring in the image, cut a speckled arch, then use a smaller cutter to remove the inner section. Replace that inner section with a cutout of the terracotta clay, gently pressing the seams together so they bond. -
Texture Check:
Smooth out any fingerprints on the surface using a tiny bit of baby oil or cornstarch on your fingertip.
Step 3: Cutting the Connector Pieces
-
Cut Middle Circles:
Take your terracotta clay sheet and use the small circle cutter to punch out two discs. These will connect the stud to the arch. -
Create the Studs:
From the beige or gold-colored clay, punch out two very small circles for the top stud component. -
Pierce Holes:
Before baking, use a needle tool or toothpick to poke holes for the jump rings. You need one hole at the top of the U-arch, two holes in the terracotta circle (top and bottom), and no holes in the stud piece.
Make it Shine
For a glossy finish, coat the baked pieces with a thin layer of UV resin or water-based polyurethane varnish to make the colors pop.
Step 4: Baking and Assembly
-
Bake:
Arrange all your pieces on a baking sheet lined with parchment paper. Bake according to your polymer clay package instructions (usually 275°F/135°C for 15-30 minutes). -
Cool Down:
Let the pieces cool completely on the tray before handling them to ensure they harden properly. -
Drill (If needed):
If your holes closed up during baking, use a small hand drill to carefully reopen them now. -
Attach the Posts:
Flip the small beige studs over. Apply a dab of strong glue to the flat pad of the earring post and press it firmly onto the back of the clay. Let dry. -
Connect the Components:
Use your pliers to open a jump ring. Loop it through the top of the U-arch and the bottom of the terracotta circle. Close the ring securely. -
Final Connection:
Depending on your post style, either attach the top of the terracotta circle directly to the post loop with a jump ring, or glue the post to the back of the terracotta circle if you are omitting the top beige stud. -
Assemble Top Tier:
For the exact look in the photo, connect the beige stud to the terracotta circle using a small jump ring. This means your beige stud needs a small hole at the bottom. Alternatively, glue the post directly to the beige stud.
Wear your new handmade statement earrings with pride and enjoy the lightweight feel.


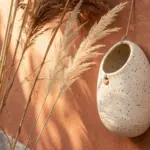
Oven-Bake Initial Keychain Tag
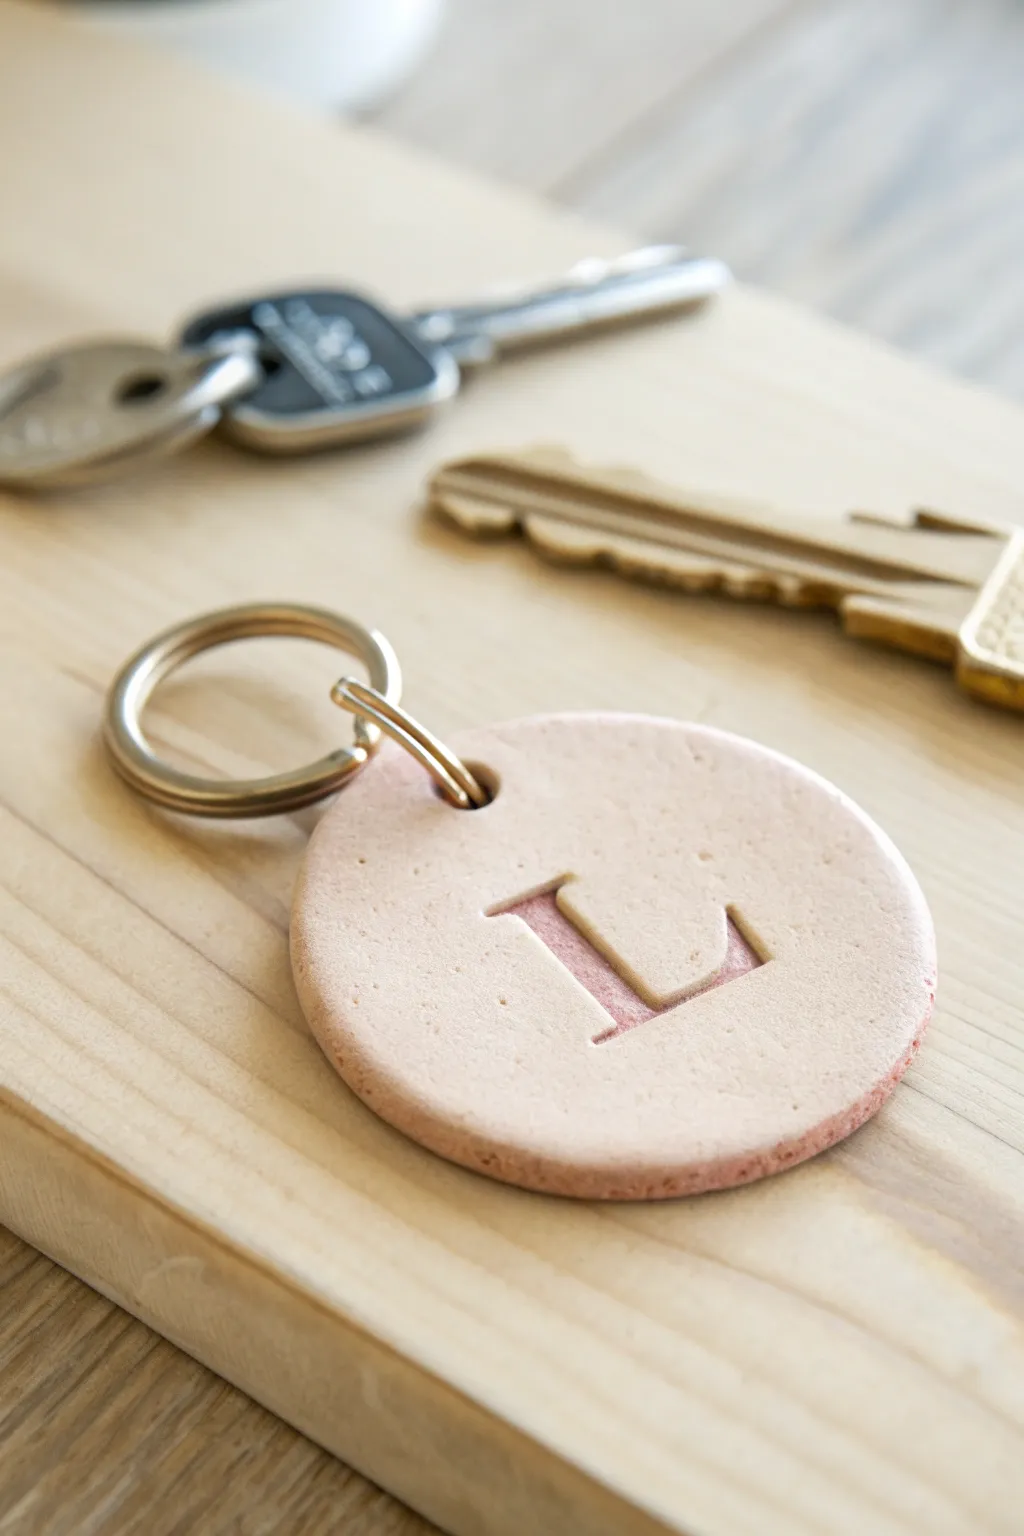
Simple yet stylish, this personalized keychain turns a ball of clay into a meaningful accessory with a soft, speckled finish. It features a clean, stamped initial highlighted with a touch of glossy color, making it perfect for your own keys or as a thoughtful handmade gift.
Step-by-Step
Materials
- Oven-bake clay (pale terracotta or beige)
- Small rolling pin
- Round cookie cutter (approx. 2 inches)
- Letter stamp or embossing tool
- Straw or small hole cutter
- Parchment paper
- Baking sheet
- Fine sandpaper
- Light pink acrylic paint
- Small paintbrush
- Polyurethane varnish (optional)
- Gold split ring keychain
Step 1: Shaping the Disc
-
Preparation:
Begin by conditioning your block of oven-bake clay. Knead it in your hands until it becomes soft, pliable, and easy to work with without cracking. -
Rolling:
Place the clay ball onto a smooth surface with parchment paper to prevent sticking. Use your small rolling pin to roll it out to a uniform thickness, roughly 1/4 inch thick. -
Cutting:
Using your round cookie cutter, press firmly into the clay sheet to punch out a perfect circle. Gently peel away the excess clay from the outside. -
Smoothing edges:
Lift the clay circle carefully. Run your finger dipped in a tiny bit of water or baby oil around the perimeter to smooth down any rough cutting edges.
Step 2: Stamping and Baking
-
Creating the hole:
Take a drinking straw or a small cylindrical cutter and punch a hole near the top edge of the circle. Ensure it isn’t too close to the very rim to prevent breakage later. -
Letter placement:
Position your letter stamp in the center of the disc. I usually verify the orientation with the hole at the top before committing. -
Impressing the initial:
Press the stamp down firmly and evenly into the clay. You want a deep impression for the paint to sit in later, but be careful not to push all the way through. -
Baking:
Transfer the parchment paper with your clay tag onto a baking sheet. Bake according to the specific temperature and time instructions on your package of clay. -
Cooling:
Remove the tray from the oven and let the tag cool completely before handling it. Hardening continues as the clay cools.
Clean Lettering Tip
Dust your letter stamp lightly with cornstarch before pressing it into the clay. This prevents the clay from sticking inside the stamp’s crevices.
Step 3: Finishing Touches
-
Sanding:
Once cool, inspect the edges. If there are any stray rough spots, lightly buff them away with fine-grit sandpaper for a professional finish. -
Filling the letter:
Dip a fine-tip paintbrush into your pink acrylic paint. Carefully fill the bottom surface of the impressed letter ‘L’. -
Cleaning up:
If you get paint on the raised surface, quickly wipe it away with a damp paper towel before it sets, leaving color only in the recessed area. -
Sealing (Optional):
For extra durability, apply a thin coat of polyurethane varnish over the paint or the entire tag to protect it from key scratches. -
Assembly:
Open the jump ring on your keychain hardware (or the split ring itself) and thread it carefully through the hole in the clay tag. -
Final check:
Ensure the ring is securely closed so your beautiful new tag stays safe.
Faux Stone Look
Mix some ground black pepper or dried used coffee grounds into your clay before rolling it out to create a trendy speckled granite effect.
Now you have a durable, custom keychain ready to organize your keys or gift to a friend


Oven-Bake Clay Coasters
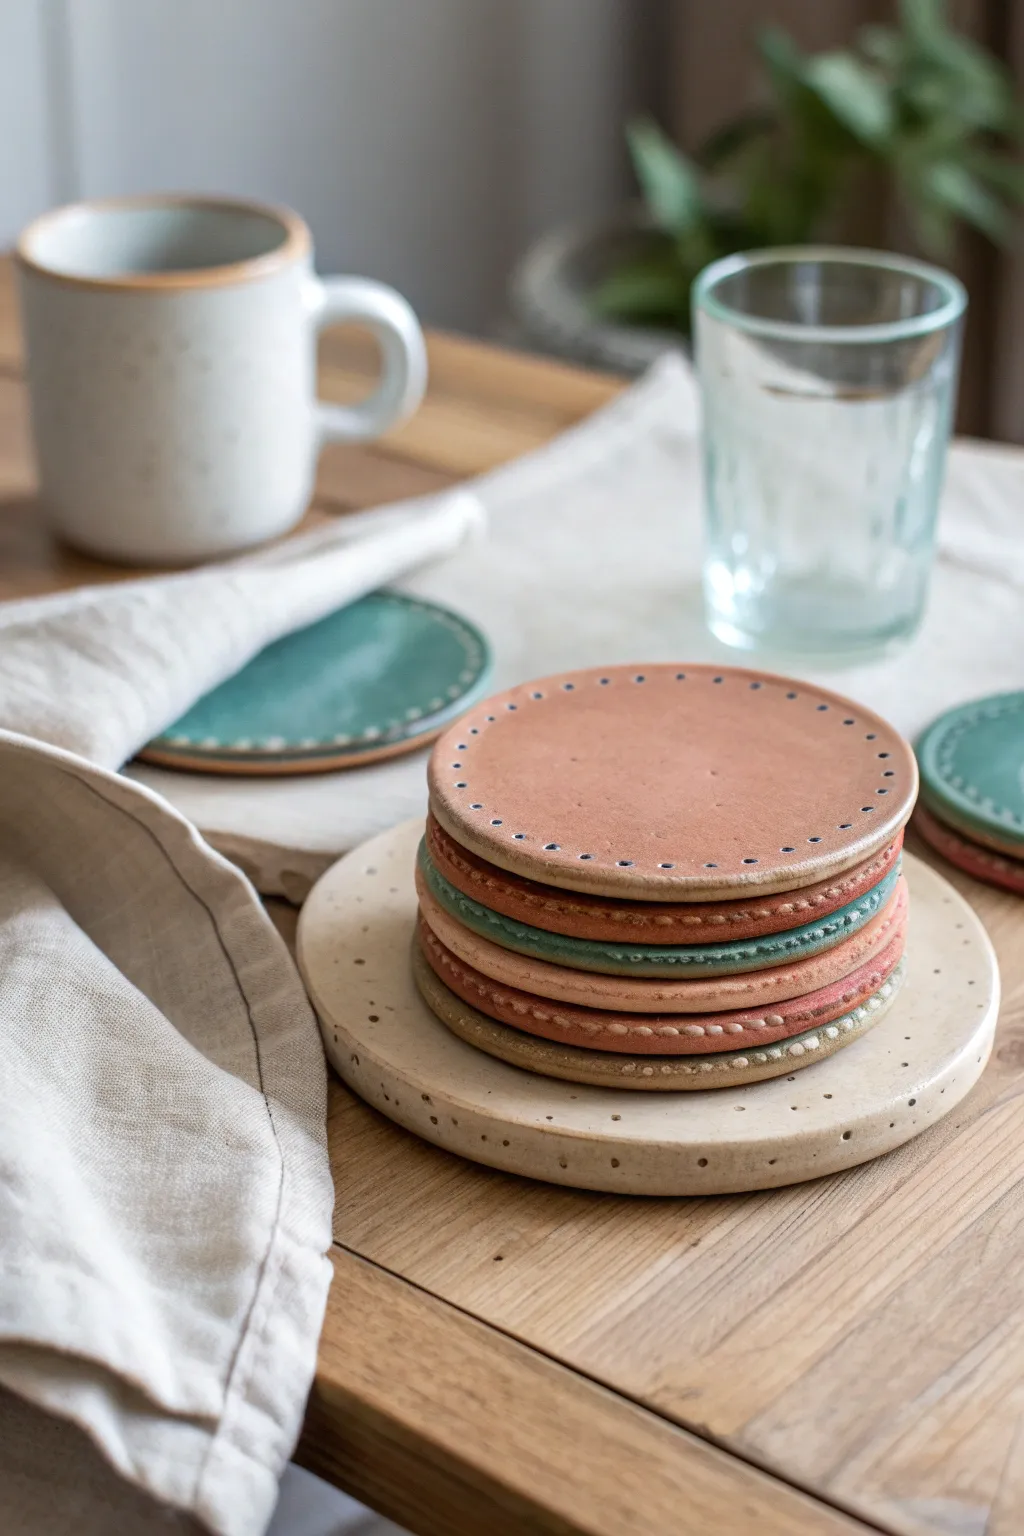
These charming coasters combine the rustic warmth of terracotta tones with modern, muted teals, all tied together with a unique “stitched” detail around the rim. Perfect for beginners, this project creates a stackable set that looks like handmade ceramic pottery without needing a kiln.
Step-by-Step Tutorial
Materials
- Oven-bake polymer clay (terracotta, mute pink, teal/sage green, cream)
- Acrylic rolling pin or clay machine
- Round cookie cutters (approx. 3.5″ for coasters, 5″ for base)
- Needle tool or toothpick
- Small dotting tool or dull pencil tip
- Parchment paper
- Baking sheet
- Fine-grit sandpaper (optional)
- Matte water-based varnish
Step 1: Preparing the Clay
-
Condition the clay:
Start by warming the clay in your hands to condition it until it’s soft and pliable. Since we are making a stack, prepare balls of your different colors: terracotta, dusty pink, and teal. -
Roll out the slab:
Place a ball of clay on a sheet of parchment paper. Use your acrylic roller to flatten it into an even slab. Aim for a thickness of about 1/4 inch (6mm) so the coasters feel substantial and sturdy. -
Check surface quality:
Inspect the surface for any air bubbles. If you see one, gently pop it with a needle tool and smooth the area with your finger before cutting.
Clean Cuts Pro-Tip
Place a piece of plastic wrap over the clay before pressing your cutter down. This softens the edge immediately, creating a rounded, ‘domed’ rim that requires much less sanding later.
Step 2: Cutting and Detailing
-
Cut the shapes:
Press your round cookie cutter firmly into the clay slab. Give it a little wiggle to ensure a clean cut, then lift away the excess clay. Repeat this process to make 4-6 coasters. -
Create the base plate:
To make the larger base shown in the photo, roll out a slab of cream or speckled clay. Use a larger cutter or trace around a bowl to cut a circle about 1-2 inches wider than your coasters. -
Smooth the edges:
Dip your finger in a tiny bit of water (or baby oil if the clay is sticky) and run it gently around the cut edges of each circle to soften any sharp ridges left by the cutter. -
Mark the stitch guide:
Using a needle tool, very lightly score a guideline circle about 1/4 inch in from the edge. This helps keep your pattern consistent, though you can skip this if you trust your freehand spacing. -
Add the dots:
Take your needle tool or a small dotting tool. Press small holes into the clay along the rim, following the curve. Space them evenly, about 1/8 inch apart. -
Create the stitched look:
To mimic the thread look seen in the teal and pink coasters, engage the needle tool deeper and give it a slight drag between two points, or simply alternate distinct deep holes with lighter dashed indentations. -
Texture the base (optional):
For the larger cream base, use a larger dotting tool to create a simpler pattern of spaced divots around the rim and randomly across the surface for a speckled, stone-like appearance.
Level Up: Faux Stone
Mix black pepper or dried tea leaves into your cream clay before rolling. This creates realistic speckles that mimic the stoneware pottery look shown in the base plate.
Step 3: Baking and Finishing
-
Prepare for baking:
Transfer the parchment paper with the clay circles directly onto a baking sheet. Ensure they are perfectly flat so they don’t warp in the oven. -
Bake the clay:
Bake according to your clay package instructions (usually 275°F/130°C for 15-30 minutes per 1/4 inch of thickness). It is better to bake slightly longer at the correct low temp than to rush it. -
Cool down:
Let the coasters cool completely on the baking sheet. They are soft when hot but will harden as they return to room temperature. -
Sand the edges:
Once cool, inspect the edges. I find that a quick pass with fine-grit sandpaper (400-600 grit) under running water makes the rim look professionally smooth. -
Seal the surface:
Apply a thin layer of matte water-based varnish to the top and sides. This protects the clay from moisture and stains from mugs without adding an artificial glossy shine.
Now you have a stylish set of coasters ready to protect your table with a handcrafted touch

The Complete Guide to Pottery Troubleshooting
Uncover the most common ceramic mistakes—from cracking clay to failed glazes—and learn how to fix them fast.
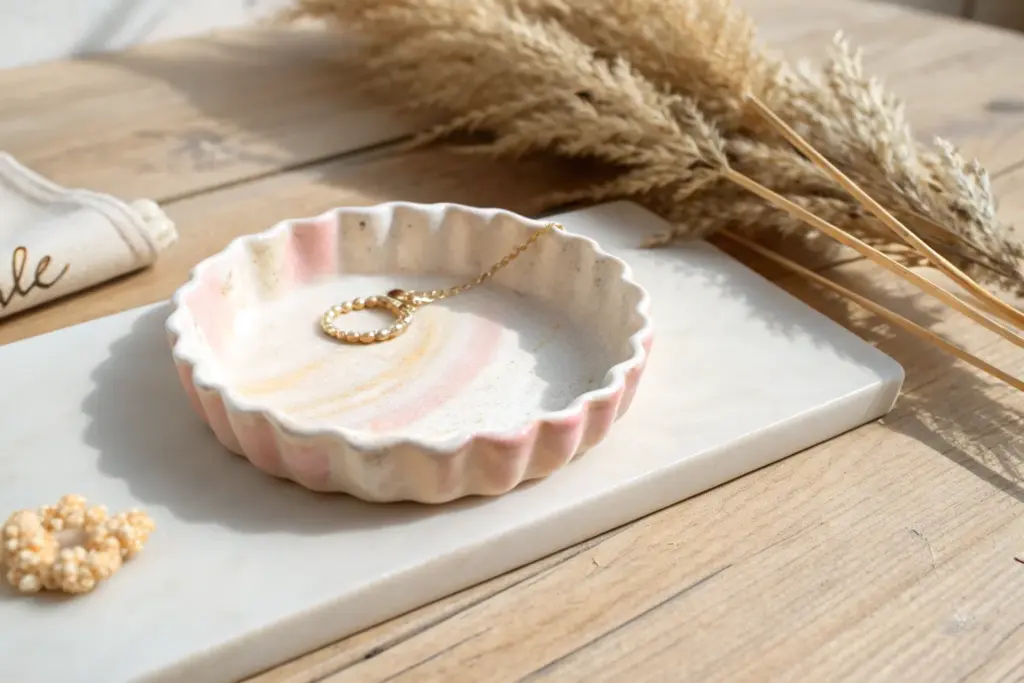
Oven-Bake Ring Cone Holder
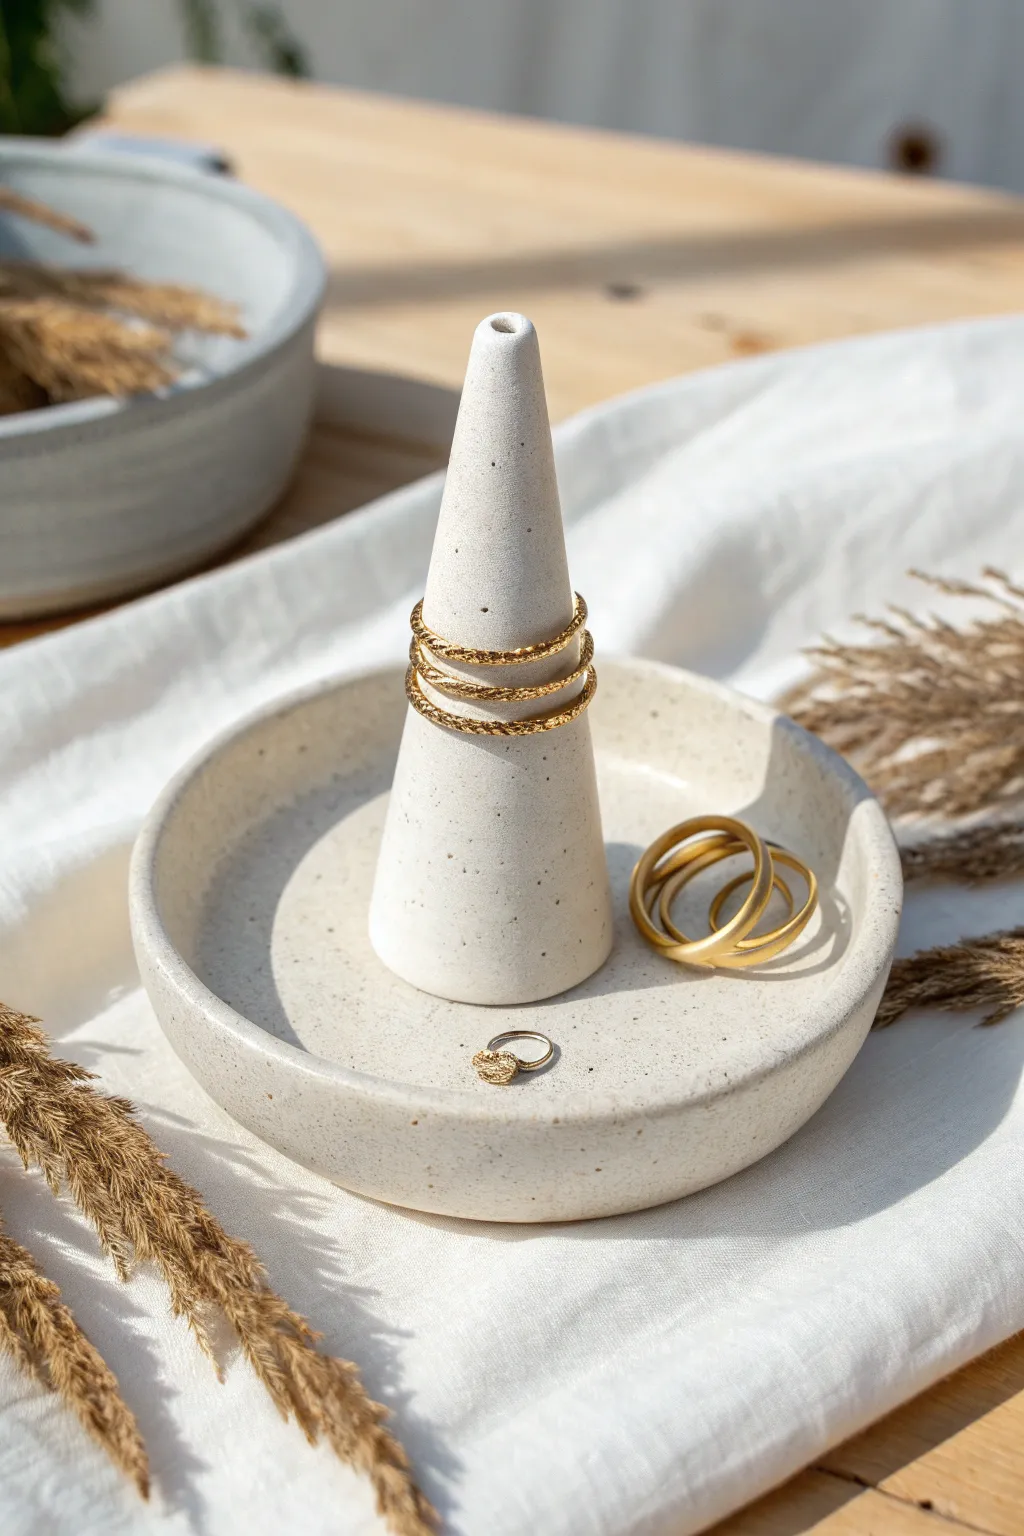
This elegant ring holder combines a classic catch-all dish with a functional central cone, perfect for keeping your rings organized and safe. The faux-stone speckled finish gives it a high-end ceramic look without needing a kiln, making it a sophisticated addition to any vanity.
Step-by-Step
Materials
- White oven-bake polymer clay (approx. 2-3 oz)
- Black pepper or black sand (for speckling)
- Acrylic rolling pin or glass bottle
- Circle cutter (approx. 4-5 inches diameter)
- Small sponge or oven-safe bowl (for shaping the dish)
- Flexible cutting blade or craft knife
- Liquid polymer clay (Bake & Bond)
- Fine grit sandpaper (400-800 grit)
- Matte varnish (optional)
Step 1: Preparing the Speckled Clay
-
Condition the clay:
Begin by warming the white polymer clay in your hands, kneading it thoroughly until it is soft and pliable. This conditioning step is crucial to prevent cracks later on. -
Add the speckles:
Flatten the clay into a pancake and sprinkle a generous pinch of ground black pepper or very fine black sand over the surface. I like to fold the clay over and knead it repeatedly until the specks are evenly distributed throughout the white base. -
Roll out the slab:
Using your acrylic roller, roll the speckled clay out on a smooth surface until it is about 1/4 inch thick. Aim for an even thickness to ensure the dish sits flat.
Step 2: Forming the Dish Base
-
Cut the circle:
Place your large circle cutter onto the rolled slab and press down firmly to cut out the base. Peel away the excess clay but don’t discard it; you will need it for the cone. -
Smooth the edges:
Run your finger gently along the cut edge of the circle to soften the sharp angle. A little bit of water on your fingertip can help smooth out any imperfections. -
Shape the curve:
Gently lift the clay circle and place it inside a shallow, oven-safe bowl that has a slightly larger diameter. Press it gently so it takes on the curved shape of the bowl to form the rim while keeping the bottom flat.
Stone Effects Pro Tip
Don’t stop at pepper! Mix in tiny amounts of translucent clay or dried tea leaves to add depth and variance to your faux stoneware texture.
Step 3: Creating the Cone
-
Form the initial shape:
Take the remaining speckled clay and roll it into a ball about the size of a large grape. Begin rolling it between your palms, applying more pressure on one side to create a teardrop or carrot shape. -
Refine the cone:
Place the teardrop upright on your work surface. Use your fingers or a flat tool to gently roll and press the sides until you have a smooth, symmetrical cone that stands about 2-3 inches tall. -
Flatten the base:
Simply tap the bottom of the cone on your table to ensure it is perfectly flat. This flat surface is essential for a strong bond with the dish. -
Hollow the top (optional):
For a detail matching the photo, use a small dotting tool to create a tiny, shallow indentation at the very tip of the cone.
Rim Variation
Instead of a smooth rim, gently pinch the edges of the bowl slightly inward at three points to create a wavy, organic ‘hand-thrown’ pottery aesthetic.
Step 4: Assembly and Baking
-
Position the cone:
Place the cone in the exact center of your unbaked clay dish. Eyeball it from multiple angles to ensure it isn’t leaning. -
Bond the pieces:
Lift the cone slightly and apply a drop of liquid polymer clay (or scoring the surfaces) to the bottom of the cone. Press it back down firmly into the center of the dish to secure it. -
Check the connection:
Use a silicone tool or your finger to smooth the seam where the cone meets the dish if you want a seamless look, or leave it distinct as shown in the image. -
Bake the project:
Place the bowl (with the clay inside) onto a baking sheet. Bake according to your clay package instructions, usually at 275°F (135°C) for about 30 minutes. -
Cool down:
Let the piece cool completely inside the oven or on a wire rack before attempting to remove it from the shaping bowl.
Step 5: Finishing Touches
-
Sand for texture:
Once fully cool, lightly wet-sand the surface with fine-grit sandpaper. This removes fingerprints and exposes the pepper flakes slightly more. -
Wash and dry:
Rinse off any sanding dust and dry the piece thoroughly with a lint-free cloth. -
Apply protection (optional):
If you want extra durability or a specific sheen, brush on a thin layer of matte varnish. However, leaving the raw clay often yields the best ‘stone’ effect.
Now you have a chic, minimalist display for your favorite rings that looks like expensive boutique ceramic.
Oven-Bake Mini Food Charms
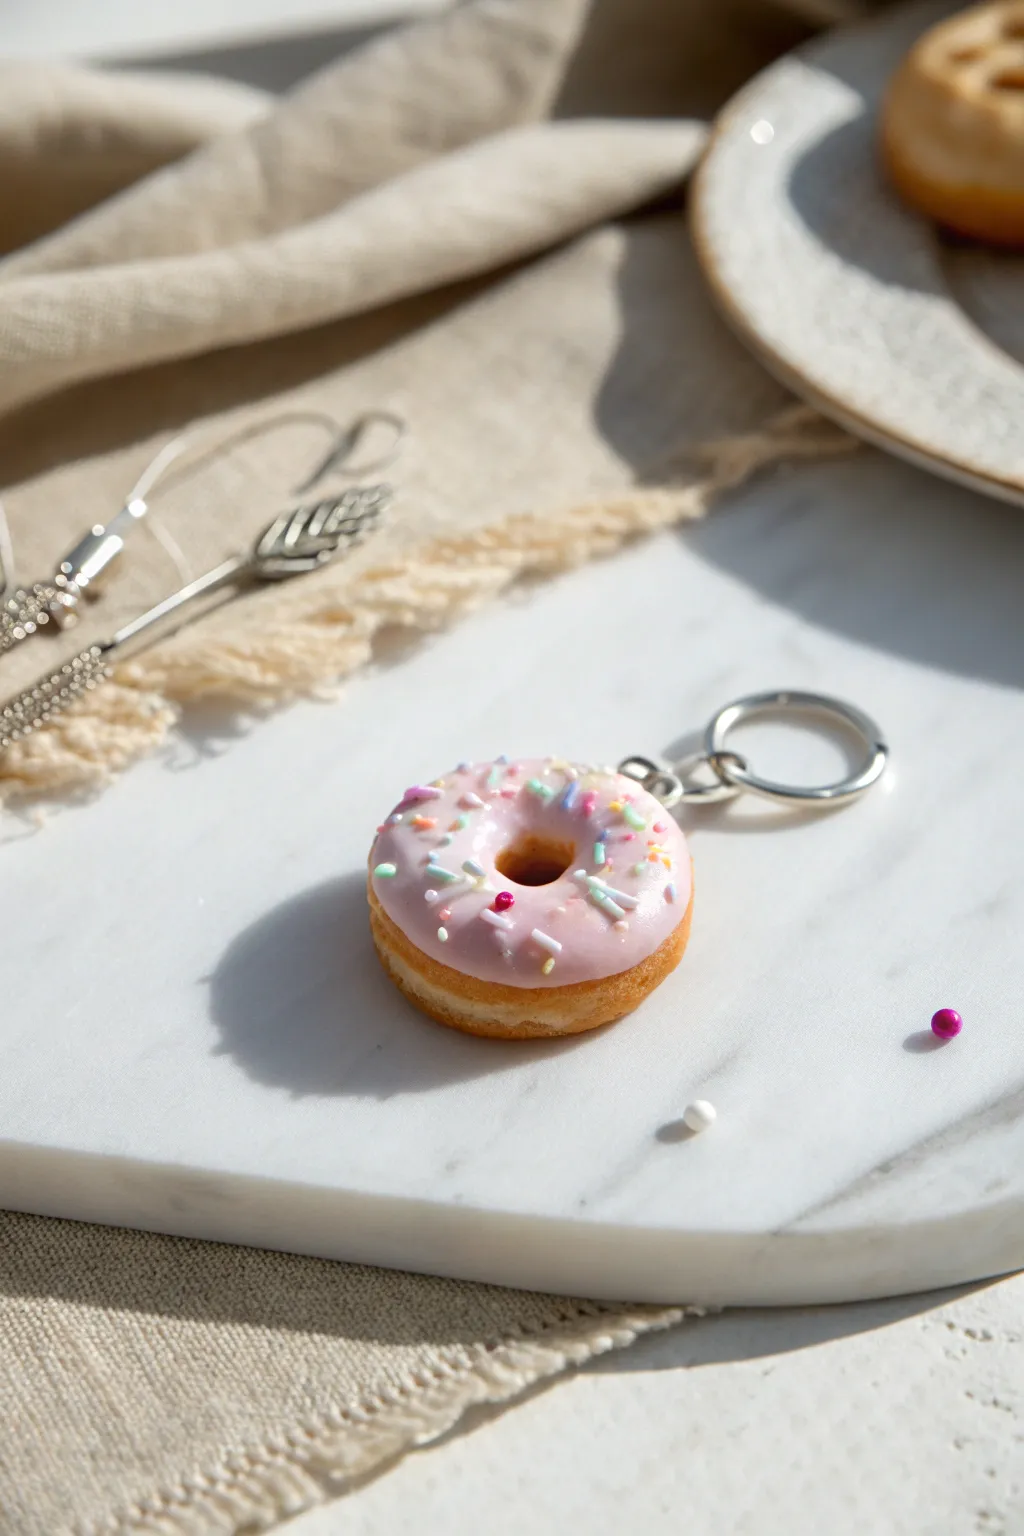
Create a sweet little accessory that looks good enough to eat with this hyper-realistic donut charm tutorial. This beginner-friendly project focuses on mastering the texture of baked dough and achieving that perfect, glossy icing drip.
Step-by-Step Tutorial
Materials
- Tan or beige polymer clay (dough color)
- Pastel pink polymer clay (icing color)
- Assorted polymer clay scraps (for sprinkles)
- Translucent liquid polymer clay (optional but recommended for sheen)
- Gloss glaze or UV resin
- Eye pin or screw eye
- Keychain hardware (jump ring and split ring)
- Toothbrush or texturing tool
- Needle tool or toothpick
- Small round cutter or straw
- Chalk pastels (orange/brown shades) and soft brush
- X-Acto knife or clay blade
Step 1: Shaping the Dough Base
-
Condition the Clay:
Begin by taking a small amount of tan or beige clay, roughly the size of a large marble. Knead it in your hands until it is soft, pliable, and free of cracks. -
Form the Base Shape:
Roll the clay into a smooth ball between your palms, then gently flatten it into a thick disc shape. Be careful not to make it too thin; you want a nice, fluffy-looking donut. -
Round the Edges:
Use your fingers to gently smooth and round off the sharp edges of the disc so it has a natural, domed curve on the top and bottom. -
Punch the Center:
Use a small round cutter, a straw, or the back of a paintbrush to punch a hole directly in the center. If the clay deforms slightly, use your fingers to reshape it back into a perfect circle. -
Texture the Dough:
Take a clean toothbrush and gently tap the bristles all over the surface of the clay, avoiding the very center hole area. This mimics the porous texture of fried dough. -
Create the Bake Line:
Use a needle tool or toothpick to gently draw a shallow, indented line around the exact middle of the donut’s side. This represents the lighter strip of dough often seen on real fried donuts. -
Add Golden Tones:
Scrape a bit of orange and light brown chalk pastel into a powder. Using a soft, dry brush, gently dust the top and bottom of the donut, leaving the center ‘bake line’ unpainted to keep it lighter.
Liquid Clay Mixing Secret
Mix a drop of liquid clay with your pink solid clay to make an icing ‘paste.’ It spreads more realistically and self-levels like real glaze.
Step 2: Icing and Decoration
-
Prepare the Sprinkles:
While the base sets, roll out tiny snakes of scrap clay in various pastel colors (blue, yellow, white, pink) until they are extremely thin. Bake these strands for 5 minutes just to harden them, then chop them into tiny bits with a blade. -
Flatten the Icing:
Take a small ball of pink clay and flatten it into a very thin, organic shape. It doesn’t need to be a perfect circle; uneven edges look more like poured icing. -
Apply the Icing:
Gently drape the pink clay over the top of your textured donut. Use your fingers or a silicone tool to press it down so it conforms to the curve of the donut. -
Create Drips:
Using a needle tool, gently drag the edges of the pink clay downward in a few spots to simulate gravity pulling the icing down the sides. I usually aim for three or four distinct drips. -
Open the Center:
Pierce through the icing where it covers the donut hole. Use a dotting tool or the back of a small brush to push the pink clay down into the hole for a neat finish. -
Add the Hardware:
Insert an eye pin or screw eye into the top of the donut. If using a screw eye, you can add a tiny dab of liquid clay or bake-and-bond to the threads for extra security. -
Sprinkle It:
Press your pre-baked clay sprinkles into the raw pink icing. Push them in slightly so they embed well and won’t fall off after baking.
Fixing Fingerprints
If you smudge the texture while applying the icing, lightly re-tap the area with your toothbrush before baking to restore the crumb look.
Step 3: Baking and Assembly
-
Bake the Charm:
Place your donut on a tile or baking sheet lined with parchment paper. Bake according to your specific clay brand’s instructions (usually 275°F/130°C for 15-30 minutes). -
Cool Completely:
Allow the charm to cool completely before handling. Polymer clay is slightly soft when hot and achieves its full hardness only after cooling. -
Glaze the Icing:
Carefully apply a coat of gloss glaze or UV resin ONLY to the pink icing and sprinkles. This creates a realistic contrast between the matte ‘fried’ dough and the shiny sugar glaze. -
Attach Chains:
Once the glaze is fully dry or cured, use pliers to open a jump ring. Loop it through the eye pin on the donut and attach it to your keychain ring, then close the jump ring securely.
Enjoy admiring your delightful new accessory or gifting it to a friend with a sweet tooth


What Really Happens Inside the Kiln
Learn how time and temperature work together inside the kiln to transform clay into durable ceramic.
Oven-Bake Clay Bead Bracelet

Capture the warmth of earthy tones with this stunningly simple bead bracelet tutorial. Using oven-bake clay, you will create a strand of smooth, matte-finished beads in terracotta and cream that mimic natural wood and stone.
How-To Guide
Materials
- Oven-bake polymer clay (Terracotta/Burnt Sienna color)
- Oven-bake polymer clay (Cream/Off-White color)
- Bead piercing tool or thick needle
- Parchment paper-lined baking sheet
- Light brown macramé cord or waxed cotton cord (approx. 1mm thick)
- Fine-grit sandpaper (400 – 800 grit)
- Ruler
- Clay blade or knife
- Oven
Step 1: Preparing the Clay Beads
-
Condition the clay:
Start by warming up your terracotta-colored clay in your hands. Knead and roll it until it becomes soft, pliable, and free of any air bubbles. -
Create a log:
Roll the conditioned clay into a long, even snake or log shape on a clean work surface. Aim for a diameter of about 1/2 inch (1.2 cm). -
Section the clay:
Using your clay blade, slice the log into equal segments. Consistency is key here to ensure all your beads end up roughly the same size. -
Roll spheres:
Take each segment and roll it between your palms to form a smooth sphere. You’ll need about 18-20 terracotta beads for the main loop. -
Repeat for accent beads:
Condition the cream-colored clay and follow the same process: roll a log, slice, and form 3 spheres of the same size as the terracotta ones. -
Create smooth texture:
Gently examine each bead for fingerprints. If you see any, lightly buff them out with your finger or roll them gently on the table again to ensure a flawless matte finish. -
Make the slider beads:
Roll a very thin snake of cream clay (about 1/4 inch thick) and cut 6-7 small, thin discs. Pierce a hole through the center of each to create small spacer beads for the closure mechanism.
Fingerprint Eraser
Before baking, lightly brush your unbaked beads with a tiny amount of cornstarch or baby powder. This magical step helps smooth out stubborn fingerprints instantly.
Step 2: Piercing and Baking
-
Pierce the main beads:
Carefully insert your bead piercing tool through the center of each sphere. Rotate the tool as you push through to prevent squashing the bead’s shape. -
Check the hole size:
Ensure the hole is wide enough for your cord to pass through twice if needed (for the closure), or test against the cord thickness. I like to wiggle the tool slightly to widen the heavy clay slightly. -
Arrangement for baking:
Place all pierced beads onto a parchment-lined baking sheet. Arrange them so they aren’t touching each other to prevent sticking. -
Bake the clay:
Bake according to your clay manufacturer’s specific instructions (usually around 275°F/135°C for 15-30 minutes). Do not overbake. -
Cool down:
Allow the beads to cool completely on the baking sheet before handling them, as they are fragile when hot. -
Sanding (Optional):
Once cool, inspect your beads. If there are any rough spots near the holes, gently use fine-grit sandpaper to smooth them out for a professional feel.
Distorted Holes?
If beads squish while piercing, let the clay sit for 15 minutes to firm up (leach out plasticizer) or refrigerate briefly before trying to pierce again.
Step 3: Assembly and Stringing
-
Cut the cord:
Cut a generous length of macramé cord, roughly 24 inches, to give yourself plenty of room for knotting. -
String the pattern:
Thread the beads onto the cord. Follow the pattern from the image: string the terracotta beads first, then place the 3 cream accent beads together in a group. -
Create the loop:
Feed the full strand of beads to the center of the cord. Bring the two cord ends together to close the circle of beads. -
Add the slider mechanism:
Thread both loose cord ends through the stack of small cream spacer beads you made earlier. These act as a sliding closure to adjust the fit. -
Add end stoppers:
Tie a simple overhand knot at the very end of each cord tail. You can add a small leftover terracotta bead before the knot for a decorative touch as seen in the photo. -
Final adjustment:
Trim any excess cord past the knots and test the slider mechanism to ensure the bracelet opens and closes smoothly.
Wear your new earthy accessory proudly or gift it as a handmade treasure.
Oven-Bake Tealight Holder
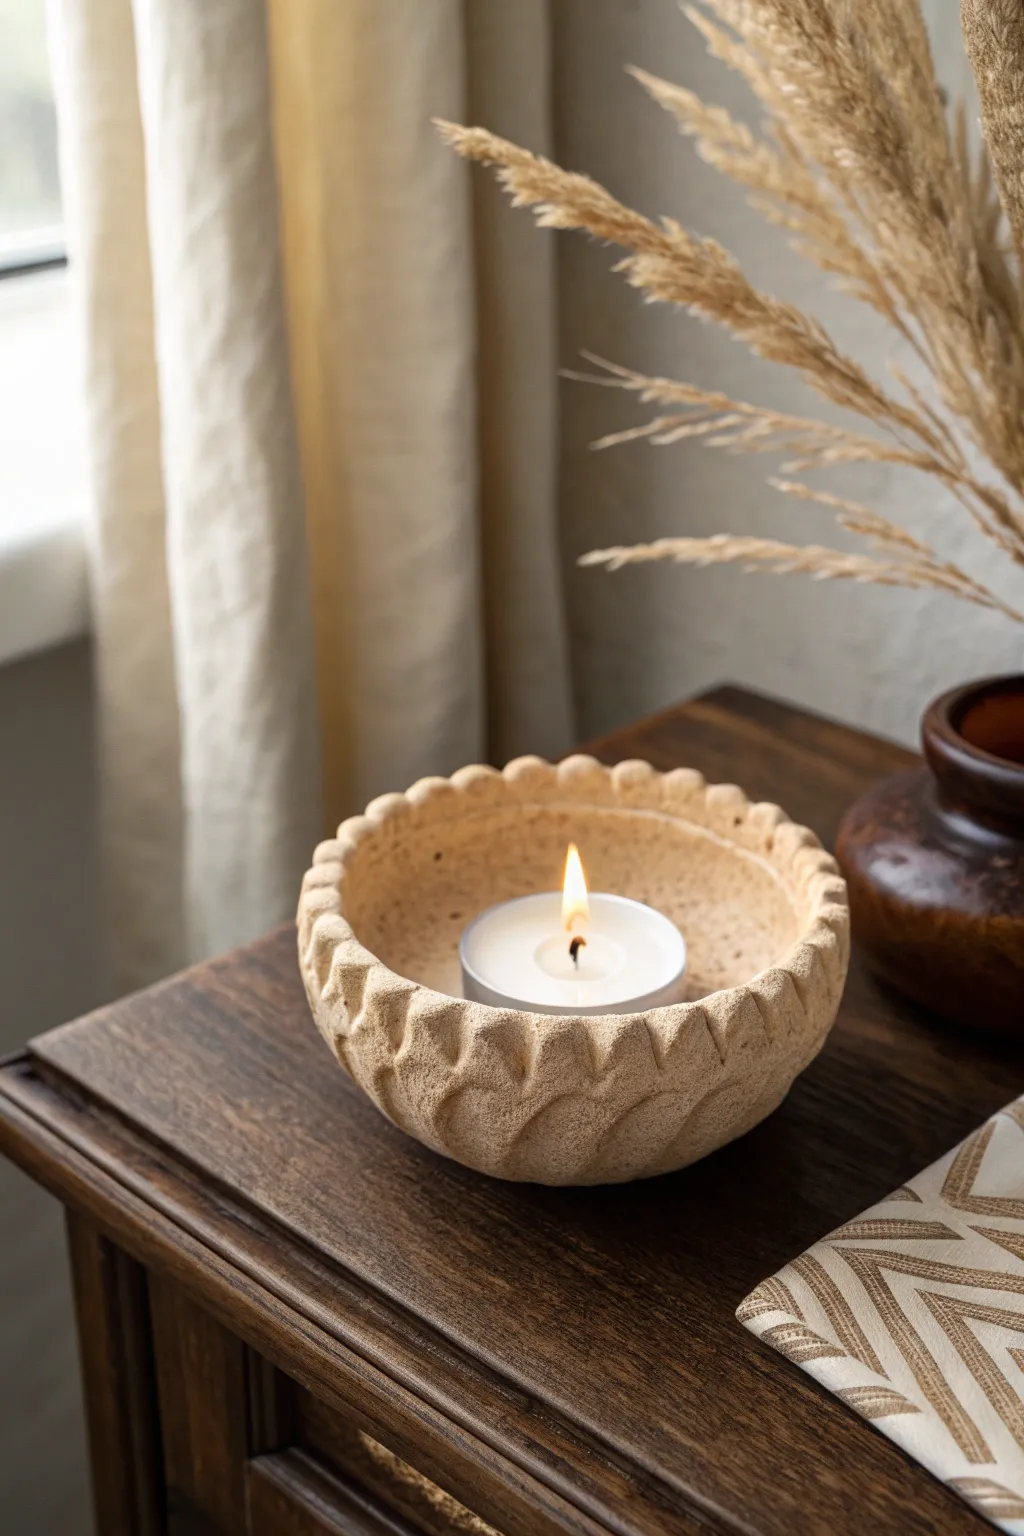
This rustic, textured tealight holder mimics the look of carved sandstone without the arduous work of actual stone carving. With its scalloped edge and natural, earthy finish, it brings a warm, organic touch to any tabletop or nightstand.
Step-by-Step Tutorial
Materials
- Beige or tan oven-bake polymer clay (approx. 4-6 oz)
- Small rolling pin
- Round cookie cutter (approx. 4 inches) or a bowl to trace
- Small glass or ceramic bowl (oven-safe) to use as a mold
- Modeling tool with a curved, spoon-like tip (or a small metal spoon)
- Texture sponge or stiff-bristled toothbrush
- Cornstarch (for release)
- Tealight candle for sizing
- Baking sheet
- Oven
Step 1: Forming the Base
-
Condition the clay:
Begin by kneading your beige polymer clay until it is soft, pliable, and free of cracks. This warm-up phase is crucial for preventing fissures later. -
Roll out the slab:
Roll the clay onto a clean surface to an even thickness of about 1/4 inch. You want it sturdy enough to hold the carving detail but not overly heavy. -
Cut the circle:
Use your round cookie cutter or trace around a small cereal bowl to cut out a perfect circle, roughly 4-5 inches in diameter. -
Prepare the mold:
Lightly dust the outside of your oven-safe glass bowl with cornstarch. This ensures the clay wont stick to the glass during the shaping process. -
Shape the bowl:
Gently drape your clay circle over the bottom of the inverted glass bowl. Smooth it down carefully with your palms so it hugs the curve without stretching thin.
Step 2: Texturing and Carving
-
Create the stone texture:
Before adding the pattern, dab a coarse sponge or a stiff toothbrush all over the surface of the clay. This creates that gritty, realistic sandstone appearance. -
Mark the rim:
Using a needle tool or toothpick, lightly mark even intervals around the rim of the bowl. These will be the guide points for your scalloped carving. -
Carve the first scallop:
Take your curved modeling tool or the back of a small spoon. Press it into the clay at the rim, dragging it downwards slightly to create a concave, scooped indentation. -
Repeat the pattern:
Continue this scooping motion all around the perimeter. Try to keep the pressure consistent so each scallop is roughly the same depth. -
Refine the ridges:
As you press the indentations, small ridges will form between them. Gently pinch or smooth these ridges with your fingertips to make them look distinct but soft, rather than sharp. -
Re-texture if needed:
I find that handling the clay smooths out my initial texture, so I like to go back in with the sponge and lightly dab the carved areas again. -
Flatten the bottom:
Gently press the very bottom of the bowl (which is currently at the top of your mold) against the table to create a small flat spot. This ensures the finished holder sits stable.
Sticky Situation?
If the clay refuses to release from the glass bowl after baking, place the whole assembly in the freezer for 5 minutes. The clay will contract slightly and pop right off.
Step 3: Baking and Finishing
-
Double-check the fit:
If you are concerned about sizing, briefly place a tealight on the flat bottom to ensure the curve isn’t too steep, though do this gently to avoid warping. -
Bake carefully:
Place the glass bowl with the clay still on it onto a baking sheet. Bake according to your clay package instructions (usually 275°F for 15-30 minutes). -
Cool down completely:
Let the piece cool completely inside the oven with the door cracked open. Sudden temperature drops can sometimes cause cracks. -
Demold the piece:
Once cool, carefully pop the clay form off the glass bowl. The cornstarch layer created earlier should help it release easily. -
Final touches:
If there are any sharp edges on the rim, give them a quick pass with fine-grit sandpaper for a professionally smooth finish.
Pro Tip: Faux Stone
Mix a tiny pinch of black pepper or used dried coffee grounds into your beige clay before rolling. This adds incredibly realistic speckles that look just like natural mineral deposits.
Place your favorite scented tea light inside and enjoy the warm, flickering glow against the textured clay

TRACK YOUR CERAMIC JOURNEY
Capture glaze tests, firing details, and creative progress—all in one simple printable. Make your projects easier to repeat and improve.
Oven-Bake Incense Holder Tray

Bring a sense of calm to your space with this minimalist, earthy incense holder featuring a textured speckled finish in warm cream tones. This elongated tray design catches ash effortlessly while serving as a beautiful decorative object for your windowsill or coffee table.
How-To Guide
Materials
- Oven-bake polymer clay (granite, beige, or white with faux speckles)
- Acrylic rolling pin
- Clay knife or craft blade
- Long rectangular template (paper or cardstock)
- Needle tool or toothpick
- Coarse sandpaper or clean toothbrush (for texturing)
- Parchment paper
- Baking sheet
- Oven
Step 1: Base Construction
-
Condition the Clay:
Begin by warming the speckled clay in your hands, kneading it thoroughly until it serves as a pliable, soft dough without any cracks. -
Roll the Sheet:
Place the clay on parchment paper and use your acrylic roller to flatten it into a long, even sheet about 1/4 inch thick. Aim for a consistent thickness to ensure even baking later. -
Cut the Shape:
Lay your rectangular template (approx. 10 inches by 3 inches) over the rolled clay and carefully trace around it with your craft knife to cut out the main base. -
Create the Sidewalls:
Reroll your excess clay into long snakes, then flatten them into strips that match the thickness of your base. These will become the raised rim. -
Attach the Rim:
Score the edges of your base and the bottom of your rim strips gently. Press the strips onto the perimeter of the base, smoothing the seams together with your finger or a smoothing tool until the join is invisible.
Angle Check
Test your incense hole angle with a real stick before baking! The stick should lean over the tray so ash falls safely inside, not onto the table.
Step 2: Detailing & Refining
-
Add the Divider:
Create a small, low wall of clay and place it about two inches from one end of the tray to create a separate compartment for cones or matches. Smooth the seams just like you did with the rim. -
Smooth the Form:
Use your fingertips and a tiny bit of baby oil or clay softener to round off the top edges of the rim, removing any sharp angles for that soft, handmade pottery look. -
Create Texture:
I like to gently tap the entire surface with an old toothbrush or a crumpled ball of aluminum foil to enhance the stone-like texture, making the speckles feel more organic. -
Punch Ventilation Holes:
Using a needle tool, poke a pattern of small holes at the bottom of the larger section. These are purely decorative but add to the visual complexity. -
Create the Incense Socket:
Decide where your incense stick will stand. Use a slightly larger tool (like the back of a paintbrush) to create an angled hole that will hold the stick securely at a slight slant.
Step 3: Baking & Finishing
-
Final Inspection:
Check your incense hole again to ensure it hasn’t closed up during handling. Make sure the bottom is flat so the tray won’t wobble. -
Bake:
Transfer the parchment paper and tray to a baking sheet. Bake according to your customized clay package instructions (usually around 275°F for 15-30 minutes). -
Cool Down:
Allow the tray to cool completely in the oven with the door open. Moving it while it’s still hot can cause the long shape to warp. -
Sand Edges:
Once hardened and cool, take a fine-grit sandpaper to the top rim to smooth out any remaining fingerprints or rough spots. -
Optional Glaze:
If you want a glossy ceramic look, apply a thin coat of water-based polyurethane varnish, or leave it matte for the natural stone aesthetic shown in the photo.
Faux Stone Effect
Mix black pepper or dried tea leaves into plain beige clay to create your own custom speckles if you can’t find pre-mixed granite clay.
Enjoy the peaceful atmosphere your new handmade creation brings to your home
Oven-Bake Photo Card Holder
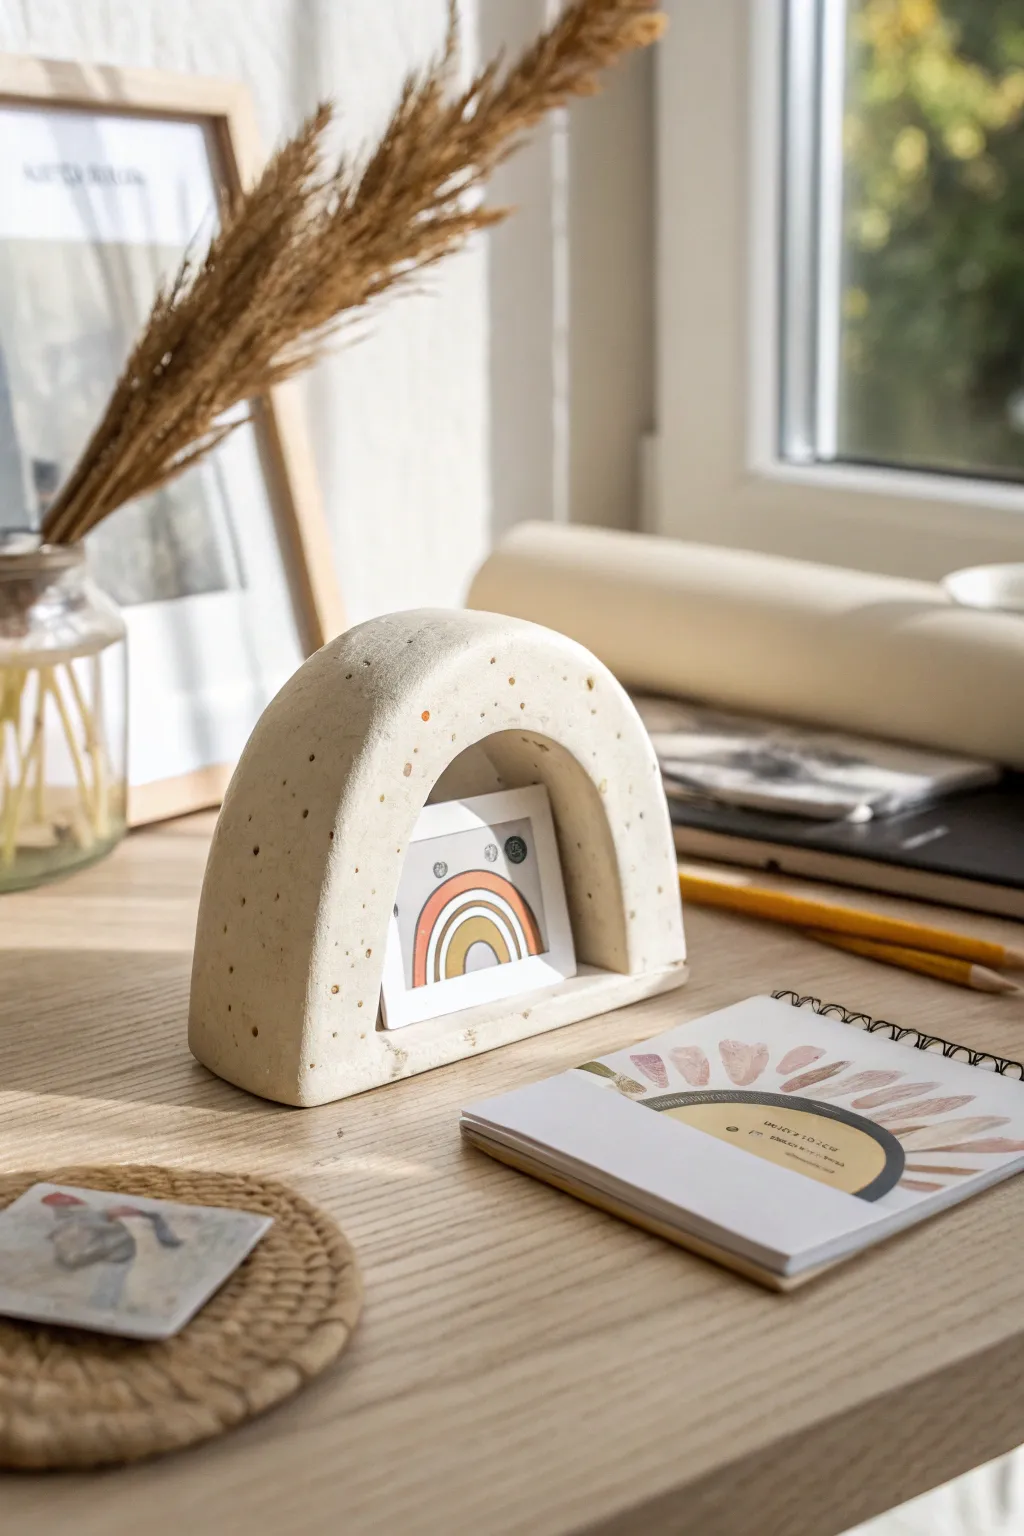
This minimalist, arch-shaped photo holder adds a modern, organic touch to any desk or shelf. Its speckled, stone-like finish gives it a high-end look while remaining a surprisingly simple project perfect for clay beginners.
Step-by-Step Tutorial
Materials
- Oven-bake polymer clay (granite or white with faux speckles)
- Acrylic rolling pin
- Sharp clay blade or craft knife
- Parchment paper or baking mat
- Cardboard or stiff paper (for template)
- Scissors
- Sandpaper (fine grit)
- Ruler
- Baking sheet
Step 1: Preparation & Shape
-
Create your template:
Sketch a sturdy arch shape on a piece of cardboard or stiff paper. You want the base to be wide enough to stand on its own, generally about 4 to 5 inches wide and 3 to 4 inches tall. Cut this shape out with scissors. -
Condition the clay:
Take your block of speckled polymer clay and knead it in your hands until it becomes soft and pliable. If the clay is too hard, I find that rolling it back and forth on the table helps warm it up quicker. -
Roll the slab:
Place the clay on parchment paper and use your acrylic roller to flatten it. Aim for a distinct thickness—about 3/4 of an inch to 1 inch thick. This chunkiness is key to the aesthetic and stability. -
Cut the arch:
Lay your cardboard template on top of the thick slab. Using a sharp clay blade, slice straight down around the template to cut out the main arch shape. Try not to drag the blade, as this can warp the thick edges. -
Cut the inner window:
Using a smaller arch template or freehanding carefully, cut out the inner ‘window’ where the photo will sit. Ensure you leave a thick border (at least 1 inch) all around to maintain structural integrity.
Slumping Arch?
If your clay is too soft and the arch sags, create a crumpled foil core or use cardstock to prop up the inside of the arch while you bake it. Remove supports after cooling.
Step 2: Details & Assembly
-
Smooth the edges:
Dip your finger in a tiny bit of water or baby oil and run it along all the cut edges to smooth out any sharp corners or drag marks from the blade. Gentle pressure is all you need. -
Create the photo groove:
Now, you need a way to hold the photo. On the back side of the front arch piece (or on a separate base piece if you choose to attach one), carefully carve a shallow horizontal slit or groove using a tool. Alternatively, this design often works by sandwiched layers. -
Making the base strip (Alternate Method):
For the specific style in the photo, the arch sits on a flat base. Roll a thinner strip of clay, about 1/4 inch thick, matching the width and depth of your arch’s footprint. -
Attach the arch to the base:
Place the arch on top of the base strip. Press them together firmly. If the clay isn’t sticking, you can use a little liquid fancy clay or ‘bake and bond’ adhesive. I like to blend the seam slightly with a modeling tool for a seamless look. -
Add a back support (The Photo Slot):
To create the physical slot for the photo, roll small ‘logs’ of clay and place them behind the front arch face, then attach a second, thinner arch or simple backing bar behind that, creating a sandwich with a gap in the middle for the card. -
Texturize (Optional):
If your clay isn’t pre-speckled, you can gently press coarse black pepper or sand into the surface now for that organic look, but the pre-mixed granite clay works best.
Step 3: Baking & Finishing
-
Bake carefully:
Place your sculpture on a baking sheet lined with parchment paper. Follow the temperature instructions on your specific package of clay—usually around 275°F (130°C). -
Timing:
Because this piece is thick, bake it for at least 45 to 60 minutes. Longer baking at the correct low temperature makes the clay stronger. -
Cool down:
Turn off the oven and let the piece cool down completely inside with the door slightly ajar. This prevents thermal shock cracks. -
Sand for perfection:
Once fully cool, use fine-grit wet/dry sandpaper under running water to gently sand any fingerprints or uneven edges. This gives it that professional, stone-like matte finish. -
Add the photo:
Slide your favorite mini artwork or Polaroid into the slot you created.
Level Up: Color Pop
Before baking, adhere tiny, flattened balls of terracotta or mustard-colored clay onto the surface to create a custom terrazzo pattern instead of simple granite speckles.
Now you have a stylish, durable display for your favorite memories that looks like it came from a boutique home goods store
Oven-Bake Hair Clip Charms
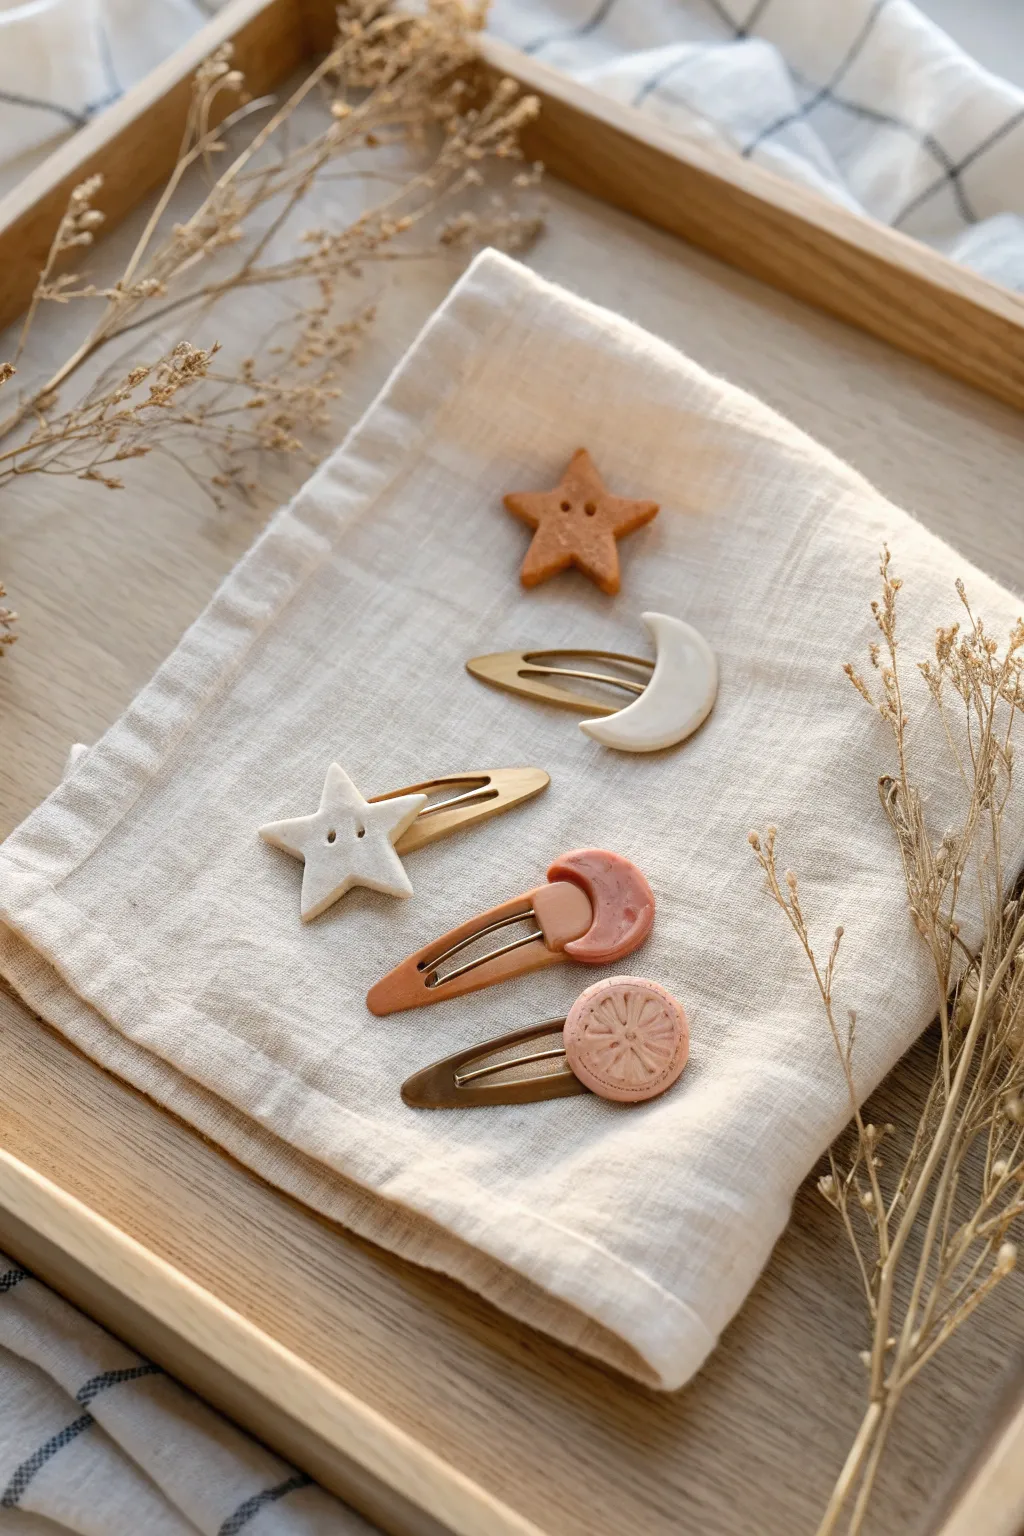
These simple yet enchanting hair clips combine earthy star and moon motifs with soft, muted tones. Perfect for beginners, this project transforms basic snap clips into boutique-style accessories using simple cutters and minimal tools.
Detailed Instructions
Materials
- Oven-bake polymer clay (white, terracotta/burnt orange, beige)
- Metal snap hair clips (gold or bronze finish)
- Small star and moon cookie cutters (mini size)
- Rolling pin (acrylic or glass)
- Parchment paper or ceramic tile
- Super glue (gel type recommended) or E6000
- Needle tool or toothpick
- Citrus slice stamp or texture tool (optional for the round clip)
- Exacto knife or clay blade
- Fine-grit sandpaper (optional)
- Gloss or matte varnish (optional)
Step 1: Prepping the Clay Shapes
-
Condition the Clay:
Begin by warming the polymer clay in your hands. Knead the white, terracotta, and beige clays separately until they are soft and pliable. This conditioning step is crucial to prevent cracking later. -
Roll It Out:
Place the conditioned clay on a piece of parchment paper or a smooth ceramic tile. Use your acrylic roller to flatten the clay into an even sheet, aiming for a thickness of about 3mm to 4mm—sturdy enough to hold up but not too heavy. -
Cut the Stars:
Using your mini star cutter, press firmly into the white and terracotta clay sheets. If the clay sticks to the cutter, gently push it out from the back or use a soft brush with a tiny bit of cornstarch on the cutter beforehand. -
Create the Button Effect:
For the star charms seen here, take a needle tool or toothpick and poke two small, symmetrical holes in the center of each star. Wiggle the tool slightly to widen the holes just enough to mimic a button look. -
Cut the Moons:
Use the moon cutter on the beige and terracotta clay. Alternatively, if you don’t have a moon cutter, you can use a small circle cutter twice—once to cut a circle, and a second time to bite a crescent shape out of that circle. -
Texture the Round Charm:
For the pinkish round charm, roll a small ball of clay and flatten it into a disc. Gently press a citrus slice stamp or a patterned button into the surface to create the radial design shown in the image.
Clean Cuts Every Time
To avoid fingerprints and lint, wipe your hands and tools with a baby wipe before handling light-colored clay (especially white!).
Step 2: Baking and Assembly
-
Smooth the Edges:
Before baking, inspect your shapes very carefully. Use your fingertip, lightly dipped in baby oil or water, to smooth out any rough edges or fingerprints on the clay surface. -
Bake the Clay:
Arrange your clay pieces on a baking sheet lined with parchment paper. Bake according to the manufacturer’s instructions on your specific package of clay (usually 275°F/135°C for about 15-20 minutes depending on thickness). -
Cool Down:
Once the baking time is up, turn off the oven but I prefer to let them cool inside with the door slightly ajar to prevent thermal shock. Wait until they are completely cool to the touch before handling. -
Sand for Perfection:
If there are still any rough spots after baking, gently buff them away with fine-grit sandpaper. Wipe away any dust with a damp cloth. -
Prepare the Clips:
While your charms are ready, take your metal snap clips and ensure the flat pad area is clean and dry. You can scuff the metal slightly with sandpaper to help the glue adhere better. -
Glue the Charms:
Apply a small dot of strong gel super glue or E6000 to the back of a clay charm. Press it firmly onto the end of the snap clip, ensuring it is centered and not interfering with the clip’s snapping mechanism. -
Set and Dry:
Leave the clips undisturbed for at least 24 hours to allow the glue to fully cure. Propping them up so the charm stays flat while drying prevents sliding. -
Optional Finishing:
If you want a glossy finish or extra protection, brush a thin layer of polymer clay glaze over the charms. Let this dry completely before wearing.
Clip Pop-Offs?
If a charm falls off the metal clip, the surface was likely too smooth. Sand both the back of the clay and the metal clip to create texture before re-gluing.
Now you have a custom set of celestial accessories ready to style or gift to a friend
Oven-Bake Fridge Magnets

Brighten up your kitchen with these charming, arch-shaped rainbow magnets that blend earthy and vibrant tones. This beginner-friendly project uses simple coils of clay to create a modern, slightly rustic aesthetic perfect for holding up photos or notes.
How-To Guide
Materials
- Polymer clay in muted red/terracotta, orange, and sage green
- Rolling tool (acrylic roller or pasta machine)
- Clean work surface (ceramic tile or glass)
- Small round magnets (neodymium or strong ceramic)
- Craft knife or clay blade
- Super glue or E6000 adhesive
- Oven and baking sheet
- Parchment paper
Step 1: Prepping and Rolling
-
Condition the clay:
Start by warming up your clay colors individually in your hands. Knead and squish each color until it becomes soft, pliable, and free of any cracks. -
Roll the first snake:
Take a portion of the green clay and roll it on your work surface using your palm to create a long, even cylinder (snake). Aim for a thickness of about 1/4 inch. -
Roll the remaining colors:
Repeat the rolling process for the orange and terracotta clays. Try specifically to keep the thickness consistent across all three colors for a uniform look. -
Check lengths:
Lay your snakes side by side. Ensure the orange one is slightly longer than the green, and the red one slightly longer than the orange, as they will need to wrap around each other.
Sticky Situation?
If your clay gets too soft and sticky to handle, pop it in the fridge for 10 minutes. This firms it up, making it much easier to roll smooth, fingerprint-free coils.
Step 2: Forming the Rainbow
-
Create the inner arch:
Curve the green snake into a U-shape on your work surface. This will be the innermost arch of your rainbow. -
Add the middle arch:
Take the orange snake and gently curve it securely over the top of the green arch. Press them lightly together along the seam so they adhere without smashing the round profile. -
Add the outer arch:
Place the terracotta red snake over the orange arch, pressing it snugly against the curve to complete the rainbow shape. -
Trim the bottom:
Using your clay blade or craft knife, specificially cut straight across the bottom of the rainbow legs to create a clean, flat base where all colors are flush. -
Smooth the back:
Gently flip the rainbow over. I find that lightly smearing the clay seams together on the back side helps add structural integrity, though it isn’t strictly necessary if your bond is good.
Step 3: Baking and Assembly
-
Prepare for baking:
Transfer your clay rainbow onto a baking sheet lined with parchment paper. -
Bake the clay:
Bake the project according to the manufacturer’s instructions on your clay package (usually 275°F/135°C for 15-30 minutes, depending on thickness). -
Cool down:
Once baked, remove the tray from the oven and let the clay cool completely. It will harden fully as it returns to room temperature. -
Attach the magnet:
Apply a small dot of strong adhesive (like super glue or E6000) to the center back of the rainbow. -
Secure and dry:
Press your magnet firmly into the glue. Allow the adhesive to cure fully according to the glue’s instructions before placing it on your fridge.
Pro Design Tip
For a seamless look, sink the magnet into the clay before baking. Press the magnet into the back to make an indent, bake, then glue the magnet into that recessed spot.
Step 4: Making the Mini Rainbow (Optional)
-
Roll thinner snakes:
If you want to make the matching tiny rainbow seen in the inspiration photo, roll much thinner snakes of clay using leftover scraps. -
Form micro arches:
Repeat the arching process on a miniature scale. You can swap colors here, perhaps putting a blue or green on the inside for variety. -
Bake and finish:
Bake these tiny pieces for slightly less time if they are very thin, let cool, and glue a smaller magnet to the back.
Now you have a cheerful set of custom magnets ready to organize your important notes
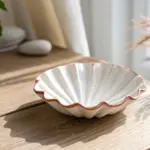
Oven-Bake Mini Succulent Planter

This charming little planter combines a rustic, hand-carved texture with a soft, two-tone color palette. Its bowl shape is perfect for grouping tiny succulents together, making it a delightful addition to any windowsill garden.
Step-by-Step
Materials
- White polymer clay (oven-bake)
- Terra cotta or soft pink pastel chalk (soft pastels)
- Small paintbrush (for applying pastel)
- Clay roller or acrylic rolling pin
- Circle cutter or a round bowl/cup to use as a template (approx. 4 inches)
- Pottery rib tool or sculpting spatula (for texture)
- Aluminum foil
- Oven
- Baking sheet
- Glaze or sealant (optional)
Step 1: Shaping the Base
-
Prepare the workspace:
Begin by cleaning your work surface thoroughly to avoid dust getting into the white clay. Condition your white polymer clay by kneading it in your hands until it becomes soft and pliable. -
Roll out the slab:
Using your acrylic roller, flatten the clay into a smooth, even slab. You want it to be about 1/4 inch thick so the walls of the pot will be sturdy. -
Cut the base:
Use a circle cutter or place a bowl upside down on the clay to cut out a perfect circle. This will form the base of your pot. Set this circle aside on a piece of parchment paper. -
Create the walls:
Roll out a long, rectangular strip of clay. The width determine the height of your pot (aim for about 2.5 inches) and the length should be enough to wrap around the circumference of your base circle.
Slumping Walls?
If the bowl walls won’t stay upright, create an internal support mold using crumpled aluminum foil. Bake the clay with the foil inside, then remove it once cooled.
Step 2: Building and Texturing
-
Attach the wall:
Wrap the long strip around the edge of your base circle. Gently press the edges together where the ends meet, and smooth the join on both the inside and outside so the seam disappears. -
Blend the bottom seam:
Work around the bottom edge where the wall meets the base. Use your thumb or a modeling tool to blend the clay together, ensuring a tight seal so no soil will leak out later. -
Shape the curve:
Gently push the walls slightly outward from the inside to create a rounded, bowl-like shape. If the clay feels floppy, I sometimes ball up some aluminum foil and place it inside to support the walls while I work. -
Refine the rim:
Smooth the top rim of the pot with your finger or a damp sponge to get a nice, rounded edge. -
Add vertical texture:
Use a pottery rib tool or the side of a sculpting spatula to press vertical indentations into the exterior. Press deeply enough to create ridges, spacing them evenly all the way around the pot.
Step 3: Coloring and Baking
-
Create pastel powder:
Take your terra cotta or pink pastel chalk and scrape it with a craft knife or sandpaper to create a small pile of fine colored powder. -
Apply the color:
Dip a soft paintbrush into the pastel powder. Dust the powder onto the upper third of the pot’s exterior, letting it fade naturally as you go down. The texture you carved will catch the powder beautifully. -
Prepare for baking:
Place the pot on a baking sheet lined with paper or foil. Double-check that the shape hasn’t slumped; if it has, reshape it gently. -
Bake the clay:
Bake the project according to the manufacturer’s instructions on your package of clay. Typically, this is around 275°F (135°C) for 15-30 minutes depending on thickness. -
Cool down:
Let the pot cool completely in the oven with the door open. This prevents thermal shock and cracking. -
Optional sealing:
Once cool, you can apply a matte varnish to protect the pastel finish, though leaving it raw gives it a nice stone-like feel.
Clean Texture Lines
Work the texture from bottom to top. Stopping the carving tool just before the rim keeps the top edge smooth and professional while adding contrast.
Fill your new handmade pot with soil and your favorite succulents to bring a touch of green to your home.
Oven-Bake Garden Markers
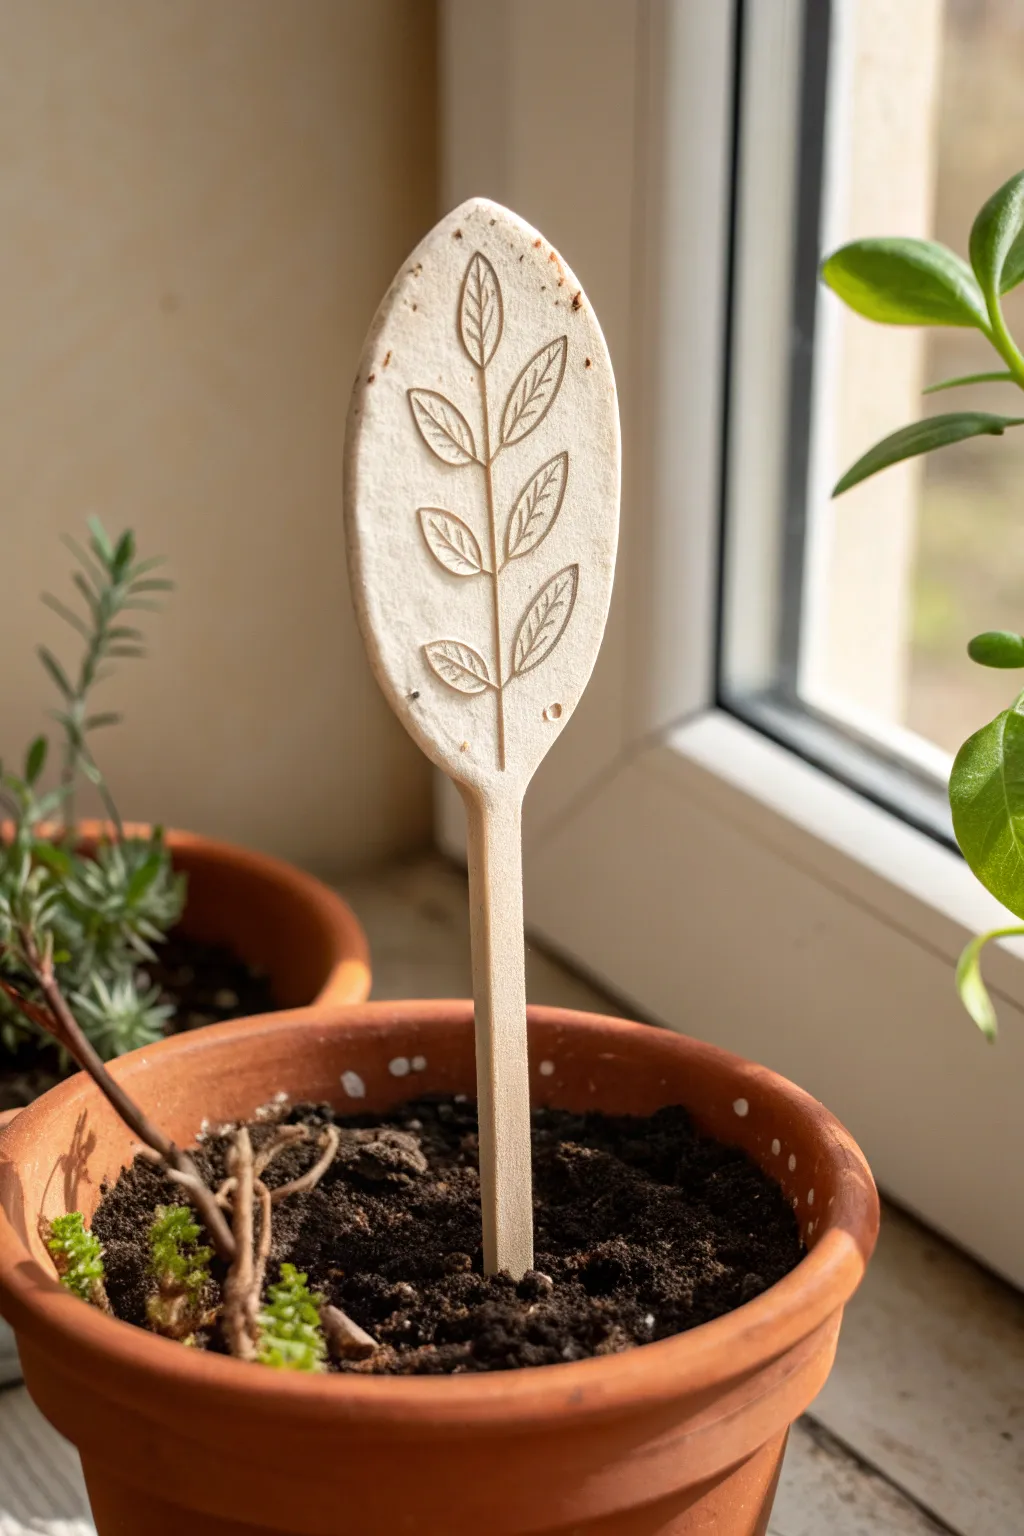
These charming, spoon-shaped markers bring a touch of rustic elegance to your indoor pots. The simple, incised leaf design mimics a botanical drawing, creating a subtle but beautiful way to label your plants or just decorate your soil.
How-To Guide
Materials
- White or cream-colored oven-bake clay (like Sculpey or Fimo)
- Rolling pin or acrylic roller
- Wooden craft sticks or flat popsicle sticks (for the handle core)
- Parchment paper
- Sharp crafting knife or X-Acto blade
- Needle tool or a sharp toothpick
- Small oval cookie cutter (optional)
- Fine-grit sandpaper (400-600 grit)
- Oven and baking sheet
Step 1: Shaping the Base
-
Condition the Clay:
Start by warming a chunk of white or cream clay in your hands. Knead and fold it repeatedly until it becomes soft, pliable, and free of cracks. -
Roll it Out:
Place the clay on a sheet of parchment paper. Use your roller to flatten it into an even slab, aiming for a thickness of about 1/4 inch (6mm). -
Cut the Spoon Shape:
Using a crafting knife, freehand cut an elongated oval shape that tapers at the bottom—resembling the bowl of a spoon. Alternatively, use an oval cookie cutter and gently stretch the clay to elongate the top. -
Prepare the Stick:
Take a wooden craft stick. If it’s too wide for your clay oval, carefully trim the top section narrower so it will be completely hidden inside the clay. -
Insert the Handle:
Gently push the wooden stick into the bottom tapered end of your clay oval. Be careful to insert it straight up the center so it doesn’t poke through the front or back surfaces. -
Secure the Seam:
Pinch the clay firmly around the entry point of the stick to seal it. Use your finger to smooth the clay down onto the wood slightly for a seamless transition.
Why is my clay cracking?
Cracks usually happen if the clay wasn’t conditioned enough initially or if it was baked at too high a temperature. Always use an oven thermometer.
Step 2: Adding the Design
-
Smooth the Canvas:
Before drawing, give the surface of the clay a final smoothing with your fingertip. Remove any fingerprints or dust specks. -
Draw the Stem:
Using a needle tool, lightly score a vertical line starting from near the bottom of the oval and reaching almost to the tip. This is your central stem. -
Outline the Leaves:
Working in pairs, gently sketch small leaf shapes branching off the central stem. Angle them upwards. Five to six pairs of leaves usually fit nicely. -
Deepen the Lines:
Once you are happy with the placement, go back over your lines with slightly more pressure to create a distinct groove. I find it helpful to wipe the needle tool frequently to remove clay crumbs. -
Add Leaf Veins:
Inside each leaf outline, draw a tiny central vein line. Keep these lines lighter than the main outline for a delicate look. -
Add Texture (Optional):
For the slightly rustic look seen in the photo, you can gently tap the surface with a coarse brush or sandpaper to add tiny pits and imperfections.
Smoother Lines Tip
Place a piece of cling film over the clay before drawing your pattern. Pressing through the plastic creates soft, rounded edges rather than sharp burrs.
Step 3: Baking and Finishing
-
Prepare for Baking:
Transfer the marker (still on its parchment paper) to a baking sheet. Ensure the handle is supported so it lies flat. -
Bake:
Bake according to your clay manufacturer’s instructions. Usually, this is around 275°F (135°C) for 15-20 minutes depending on thickness. -
Cool Down:
Let the marker cool completely inside the oven with the door slightly ajar. This helps prevent cracking from sudden temperature changes. -
Sand the Edges:
Once fully cool, inspect the edges of the clay. Use fine-grit sandpaper to gently buff away any sharp spots or rough transitions where the clay meets the wood. -
Highlight the Etching:
To make the leaves pop, you can rub a tiny amount of diluted brown acrylic paint into the grooves and wipe the surface clean immediately, leaving the dark color only in the drawing.
Pop your new marker into a pot and enjoy the handmade charm it adds to your greenery
Oven-Bake Pressed Botanical Ornament
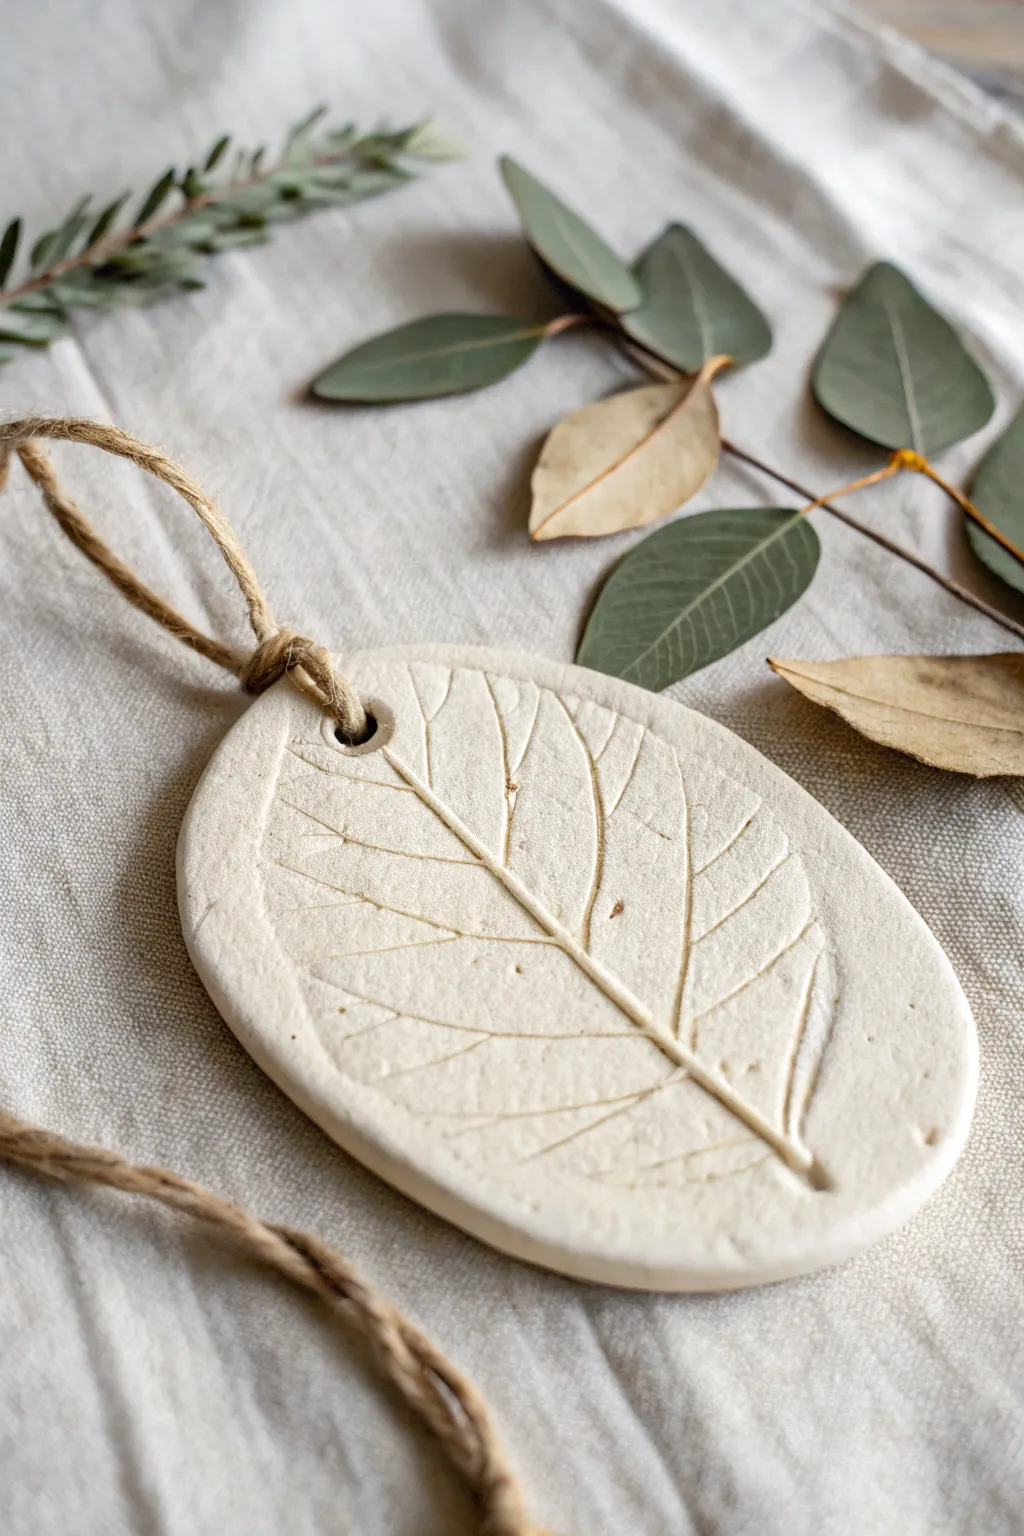
Capture the delicate details of nature with this simple and elegant oven-bake clay project. By pressing a real leaf into soft white clay, you’ll create a textured, fossil-like ornament perfect for hanging on a tree or using as a unique gift tag.
Detailed Instructions
Materials
- White oven-bake clay (Sculpey or Fimo)
- Fresh leaf with prominent veins (eucalyptus, fern, or similar)
- Rolling pin (acrylic or a dedicated clay roller)
- Parchment paper or a silicone craft mat
- Oval cookie cutter (approximately 3-4 inches wide)
- Darning needle, skewer, or drinking straw
- Natural jute twine
- Fine-grit sandpaper (optional)
- Gloss or matte glaze (optional)
- Clean work surface
Step 1: Preparing the Clay Base
-
Condition the Clay:
Start by taking a chunk of white oven-bake clay and kneading it thoroughly in your hands. You want it to be warm, pliable, and free of any cracks before you begin rolling. -
Roll the Slab:
Place the ball of conditioned clay onto a piece of parchment paper or a silicone mat. This prevents sticking and makes it easier to move later. -
Flatten It Out:
Using your rolling pin, roll the clay out to an even thickness of about 1/4 inch. Try to keep the surface smooth and level, avoiding any dips or lumps. -
Position the Cutter:
Take your oval cookie cutter and gently press it onto the clay just to mark the shape—don’t cut all the way through yet. This gives you a guide for where to place your botanical element.
Vein Definition
Using a fresh, green leaf works best. Dry leaves tend to crack and crumble into the clay, leaving debris that is hard to pick out. Thick, waxy leaves usually leave the deepest impression.
Step 2: Creating the Botanical Impression
-
Select and Place the Leaf:
Choose a fresh leaf that fits nicely inside your marked oval. Place the leaf face-down onto the clay so the prominent veins on the back are touching the surface. -
Roll Over the Leaf:
Gently glide your rolling pin over the leaf. Apply firm, even pressure to push the veins deep into the clay without thinning the slab too much. -
Peel and Reveal:
Carefully find the stem or an edge of the leaf and slowly peel it away from the clay. This is my favorite part because you instantly see the intricate skeleton of the leaf revealed in the clay. -
Cut the Shape:
Re-align your oval cutter over the impression, centering the leaf pattern exactly how you want it. Press down firmly to cut the shape completely out. -
Remove Excess Clay:
Peel away the scrap clay from outside the cutter first, then gently lift the cutter away. You should be left with a clean oval shape. -
Smooth the Edges:
Dip your finger in a tiny bit of water (or baby oil if the clay is sticky) and gently run it along the cut edge of the oval to smooth out any roughness from the cutter. -
Add a Hole:
Use a skewer or a straw to punch a hole near the top of the oval for the twine. Make sure the hole isn’t too close to the edge to prevent tearing.
Antique Wash
After baking, dilute brown acrylic paint with water and brush it into the grooves. Wipe the surface quickly with a paper towel, leaving dark paint only in the veins for a vintage fossil look.
Step 3: Baking and Finishing
-
Transfer to Baking Sheet:
Carefully lift the parchment paper with the clay piece on it and transfer it to a baking sheet. Do not lift the raw clay by hand, as it might warp the shape. -
Bake the Clay:
Bake the ornament according to the specific temperature and time directions on your package of clay. Typically, this is around 275°F (135°C) for 15-30 minutes. -
Cool Down:
Once baked, remove the tray from the oven and let the clay cool completely. It will harden fully as it cools down. -
Sand Imperfections:
If there are any sharp edges or rough spots after baking, lightly buff them away with fine-grit sandpaper for a professional finish. -
Add String:
Cut a length of natural jute twine, about 8-10 inches long. Thread it through the hole you made earlier. -
Secure the Knot:
Bring the ends of the twine together and tie a secure overhand knot near the ends to create a loop for hanging. -
Optional Glaze:
If you want a glossy or satin finish, you can brush on a layer of clay glaze now, or just leave it matte for the natural stone look shown in the photo.
Hang your new botanical creation in a bright spot where the light can catch the subtle textures of the leaf impression
Oven-Bake Moon Phase Garland
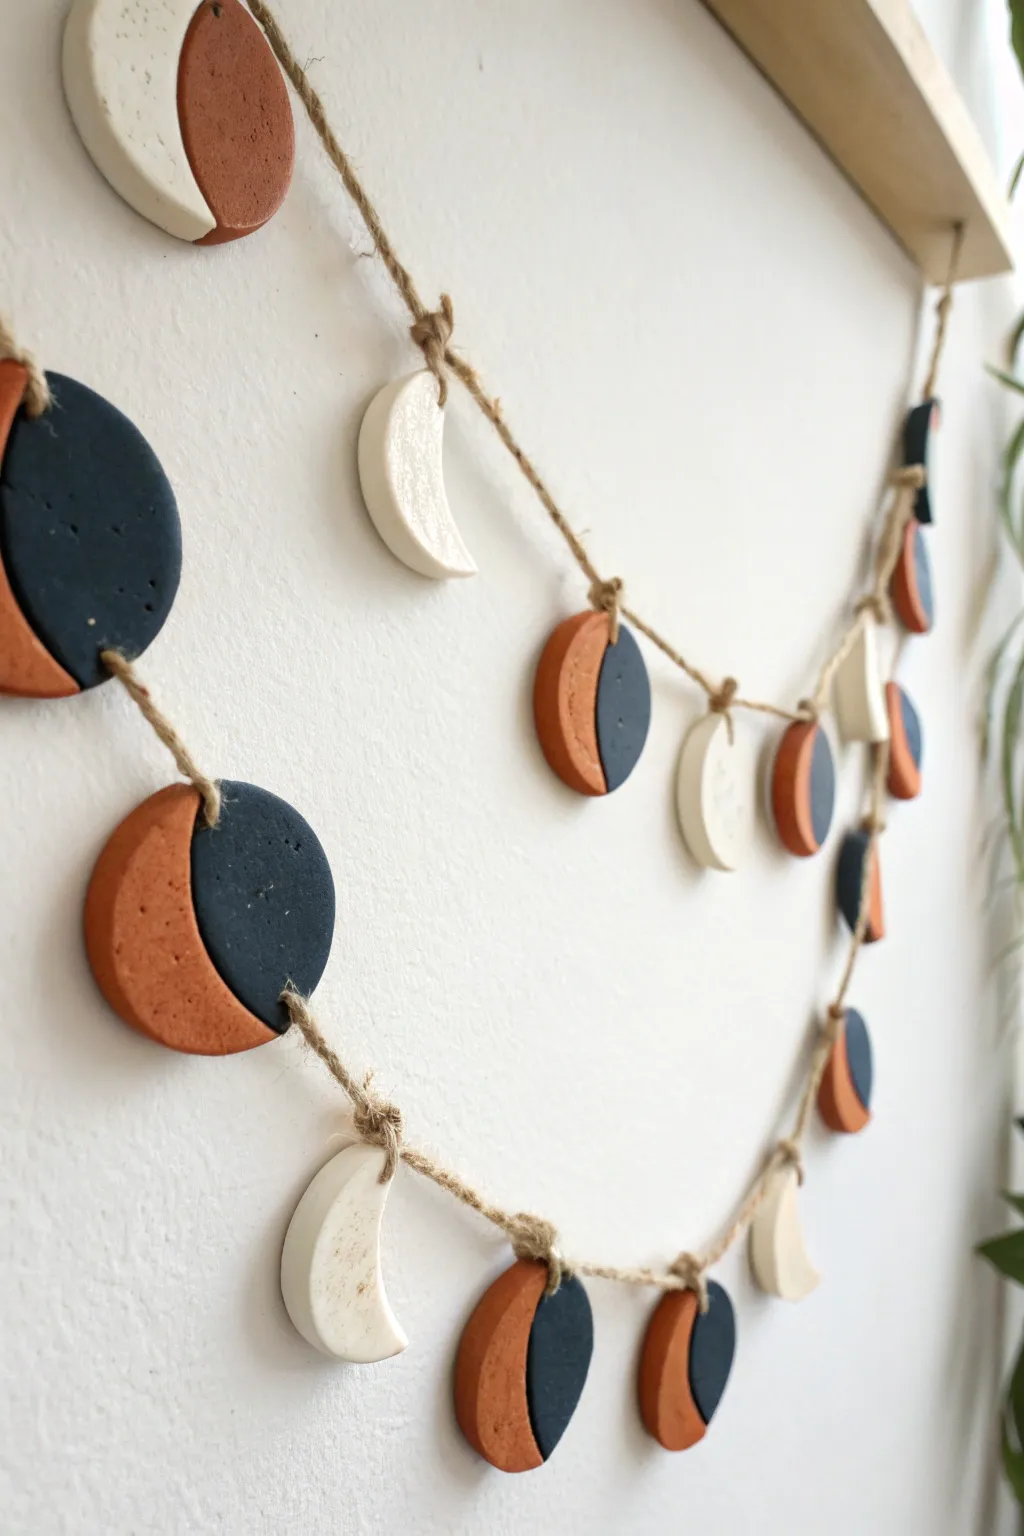
Bring the magic of the night sky indoors with this understated, bohemian moon phase garland. By combining earthy terracotta, deep slate, and creamy white tones in geometric shapes, you’ll create a sophisticated piece of wall art that looks straight out of a boutique.
How-To Guide
Materials
- Oven-bake polymer clay (Terracotta, Black, and White/Pearl colors)
- Acrylic rolling pin or clay roller
- Circle cookie cutters (two sizes: 2-inch and 2.5-inch)
- Needle tool or toothpick
- Jute twine or hemp cord
- Parchment paper
- Baking sheet
- Sandpaper (optional, fine grit)
- Wooden dowel or hanging branch (optional)
Step 1: Preparing the Clay
-
Condition the clay:
Start by warming up each color of clay in your hands independently. Knead and roll them until they are soft, pliable, and free of any cracks. -
Roll out slabs:
Using your acrylic roller, flatten each color onto a piece of parchment paper. Aim for a consistent thickness of about 1/4 inch (6mm) so the pieces hang with a nice weight. -
Check for bubbles:
Inspect your rolled slabs for air bubbles. If you see any, gently pierce them with a needle tool and smooth the area with your finger before cutting.
Clean Cuts Only
Use cornstarch on your cutters or rub a little baby oil on the cutting edge. This prevents the clay from sticking inside the cutter and distorting your perfect circles.
Step 2: Cutting the Shapes
-
Cut the base circles:
Using your circle cutters, punch out several full circles from each color. These will become your full moons and the base for your crescent and gibbous shapes. -
Create the crescents:
To make a crescent, take a white circle and use the same cutter to slice off an offset curve, leaving a moon sliver behind. Save the scrap clay for re-rolling. -
Form the two-tone phases:
For the half-moons and gibbous phases seen in the photo, you will use a technique called inlay. Cut a circle of terracotta and a circle of black. -
Slice and swap:
Cut a curved section out of the terracotta circle. Take the black circle and cut a matching curve. I find it easiest to use a slightly larger cutter for the interior cut to simulate the moon’s shadow. -
Join the seams:
Place the black curved piece into the empty space of the terracotta piece (or vice versa). Gently press the seam together with your finger or roll over it very lightly with the roller to bond them. -
Smooth the edges:
Once your composite shapes are formed, use your finger to gently soften the sharp cut edges of the clay so they look finished and organic.
Step 3: Baking and Assembly
-
Pierce holes:
Before baking, use a needle tool or toothpick to poke holes at the top of each shape. For vertical hanging, poke one hole at the top and one at the bottom so they can be linked. -
Hole sizing tip:
Make sure your hole is large enough for your specific twine to pass through easily, twisting the toothpick slightly to widen it. -
Bake the pieces:
Arrange all your moon phases on a parchment-lined baking sheet. Bake according to the specific temperature and time directions on your clay package (usually around 275°F for 15-30 minutes). -
Cool down:
Let the pieces cool completely on the baking sheet. They are fragile while warm but will harden as they return to room temperature. -
Sand imperfections:
If you have any rough edges or fingerprints, now is the time to lightly buff them away with fine-grit sandpaper under running water. -
Cut the twine:
Measure a long length of jute twine. Determine how low you want the garland to swoop and add an extra foot on each end for tying. -
Knot the first piece:
Thread the twine through the hole of your first moon shape. Tie a simple overhand knot right at the hole to secure it in place. -
Space and secure:
Move about 3-4 inches down the twine and attach the next moon shape with another knot. Continue this pattern, alternating colors and phases until your garland is complete.
Textured Touch
Before cutting shapes, gently press a piece of coarse sandpaper or a rough sponge onto the raw clay slab to give the moons a stone-like, cratered texture.
Now hang your finished garland on a wall or mantle and enjoy the serene, modern vibe it brings to your space
Oven-Bake Terrazzo Napkin Rings
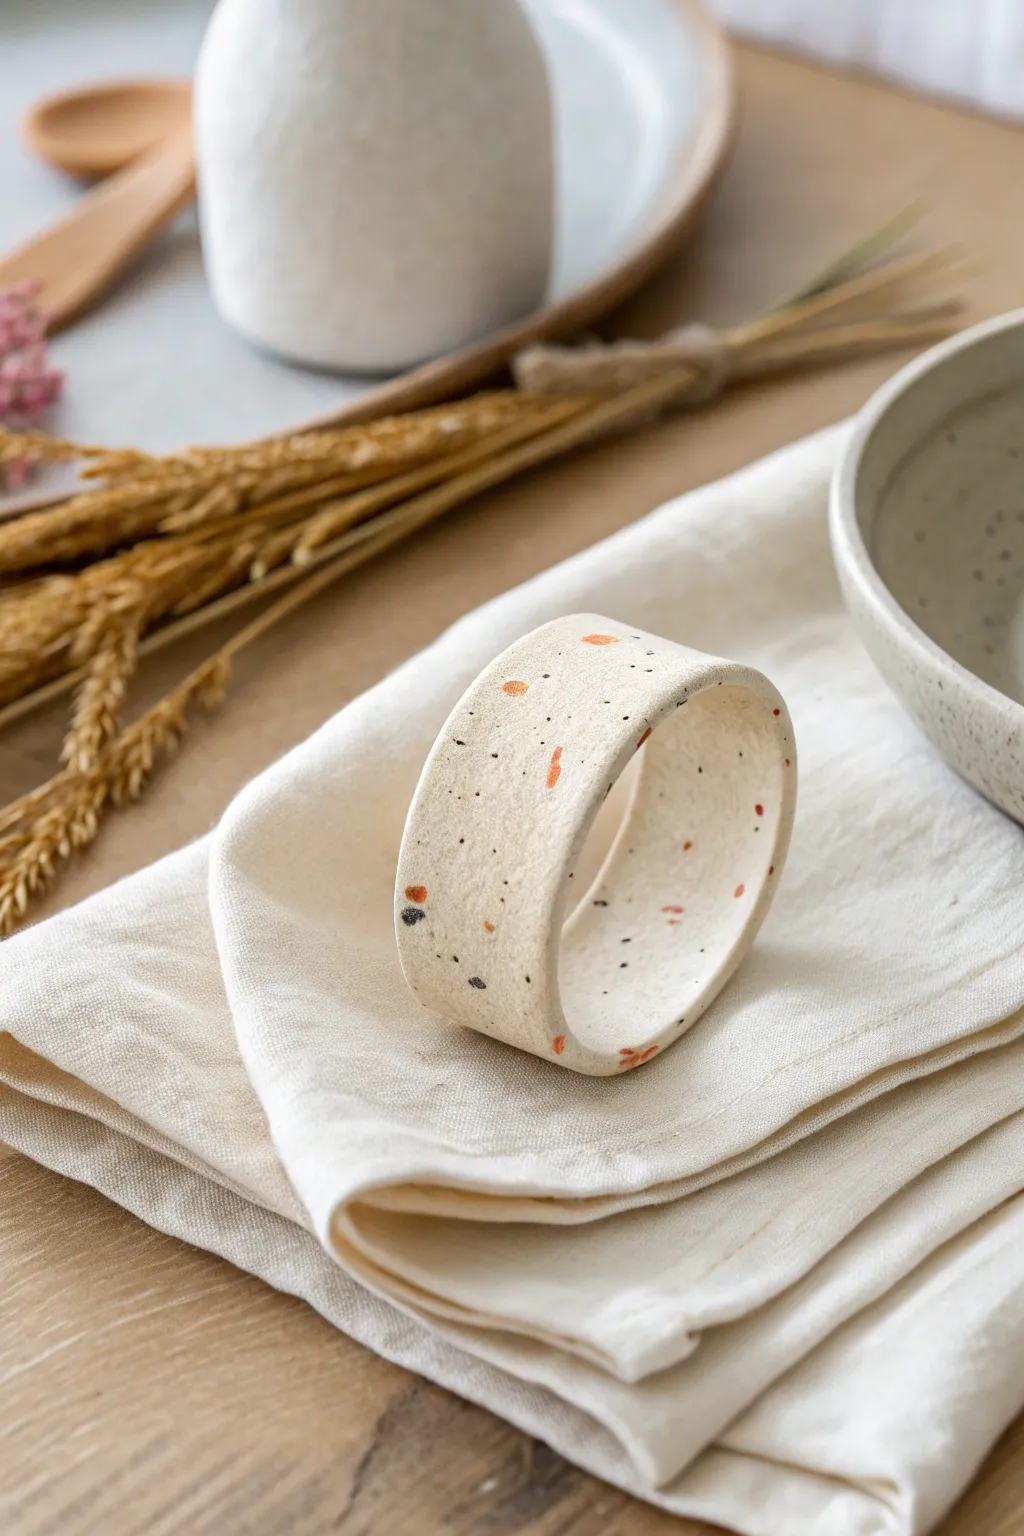
These elegant napkin rings bring a touch of modern artistry to your dining table with their speckled terrazzo pattern. The creamy base dotted with organic flecks of terracotta and charcoal creates a sophisticated, stone-like ceramic finish using simple oven-bake clay.
Step-by-Step Guide
Materials
- White or cream oven-bake polymer clay (e.g., Sculpey Premo or Fimo Soft)
- Terracotta or rust-colored polymer clay
- Black polymer clay
- Clay roller (acrylic roller or pasta machine)
- Sharp craft blade or tissue blade
- Empty toilet paper roll or round cookie cutter (approx. 1.5-2 inches diameter)
- Small piece of parchment paper
- Smooth work surface (ceramic tile or glass mat)
- Fine-grit sandpaper (400 to 1000 grit) for finishing
- Oven thermometer (optional but recommended)
Step 1: Prepping Your Palette
-
Condition the base clay:
Start by warming up your white or cream clay in your hands. Knead it thoroughly until it is soft, pliable, and free of any air bubbles. -
Create the chips:
Take a tiny amount of the terracotta and black clays. Condition them separately, then roll each color into a very thin sheet, almost paper-thin. -
Bake the chips (optional method):
For cleaner edges on your terrazzo, I like to partially bake these thin color sheets for just 5-10 minutes. This makes them brittle and easier to chop into sharp shards, though raw clay works too if you prefer a softer look. -
Chop the colors:
Using your sharp blade, chop the colored clay sheets into tiny, irregular jagged pieces. Aim for a variety of sizes, from mere specks to slightly larger flakes.
Clean Cuts Only
Chill your clay sheet in the fridge for 10 minutes before cutting your final strips. The precision will save you so much time trying to fix warped edges later.
Step 2: Forming the Slab
-
Roll the base sheet:
Roll out your conditioned white clay into a slab that is about 1/4 inch thick. Make sure it’s even, as this will be the final thickness of your ring. -
Scatter the chips:
Gently sprinkle your chopped terracotta and black clay pieces over the white slab. Be random with your placement, allowing some areas to be denser than others for a natural stone look. -
Embed the pattern:
Lay a piece of parchment paper over the dotted clay to prevent sticking to your roller. Gently roll over the slab again to press the colored chips flush into the white base. -
Roll to final thickness:
Continue rolling until the surface is completely smooth and the slab is slightly thinner than before, ensuring the chips are fully integrated.
Stone Texture Trick
After baking and sanding, use an old toothbrush to flick a tiny bit of diluted brow acrylic paint over the surface for an even more realistic, gritty stone speckle.
Step 3: Shaping the Ring
-
Cut linear strips:
Use your long blade or a ruler to cut a clean, straight strip from your terrazzo slab. The strip should be roughly 1.5 inches wide and 6 inches long. -
Prepare the mold:
Wrap a strip of parchment paper around your toilet paper roll or cylindrical form. This ensures the clay won’t stick to the cardboard during baking. -
Wrap the clay:
Carefully pick up your clay strip and wrap it around the parchment-covered tube. Bring the two ends together gently. -
Join the seam:
Slice through both overlapping ends of the clay simultaneously with your blade at a 45-degree angle. Remove the excess clay scraps. -
Smooth the connection:
Push the two fresh cut edges together. Use your fingertip or a rubber shaping tool to gently smooth the seam until it disappears into the pattern. -
Slight shaping:
If the ring looks a little boxy from handling, gently roll the tube on your work surface to restore the perfect circle shape.
Step 4: Baking and Finishing
-
Bake the rings:
Place the cardboard tube with the clay on it directly into your oven or on a baking sheet. Bake according to the clay manufacturer’s instructions, usually at 275°F (130°C) for 30 minutes. -
Cool down:
Remove from the oven and let the clay cool completely before sliding it off the cardboard tube. The clay is fragile while hot. -
Sand the edges:
Once cool, use fine-grit sandpaper to smooth out the top and bottom rims of the ring. -
Buff the surface:
Lightly sand the outside surface if needed to remove fingerprints and give the ring a matte, stone-like feel. Wipe away any dust with a damp cloth.
Now you have a chic set of faux-stone napkin holders ready to elevate your next dinner party setting.
Oven-Bake Geometric Mobile
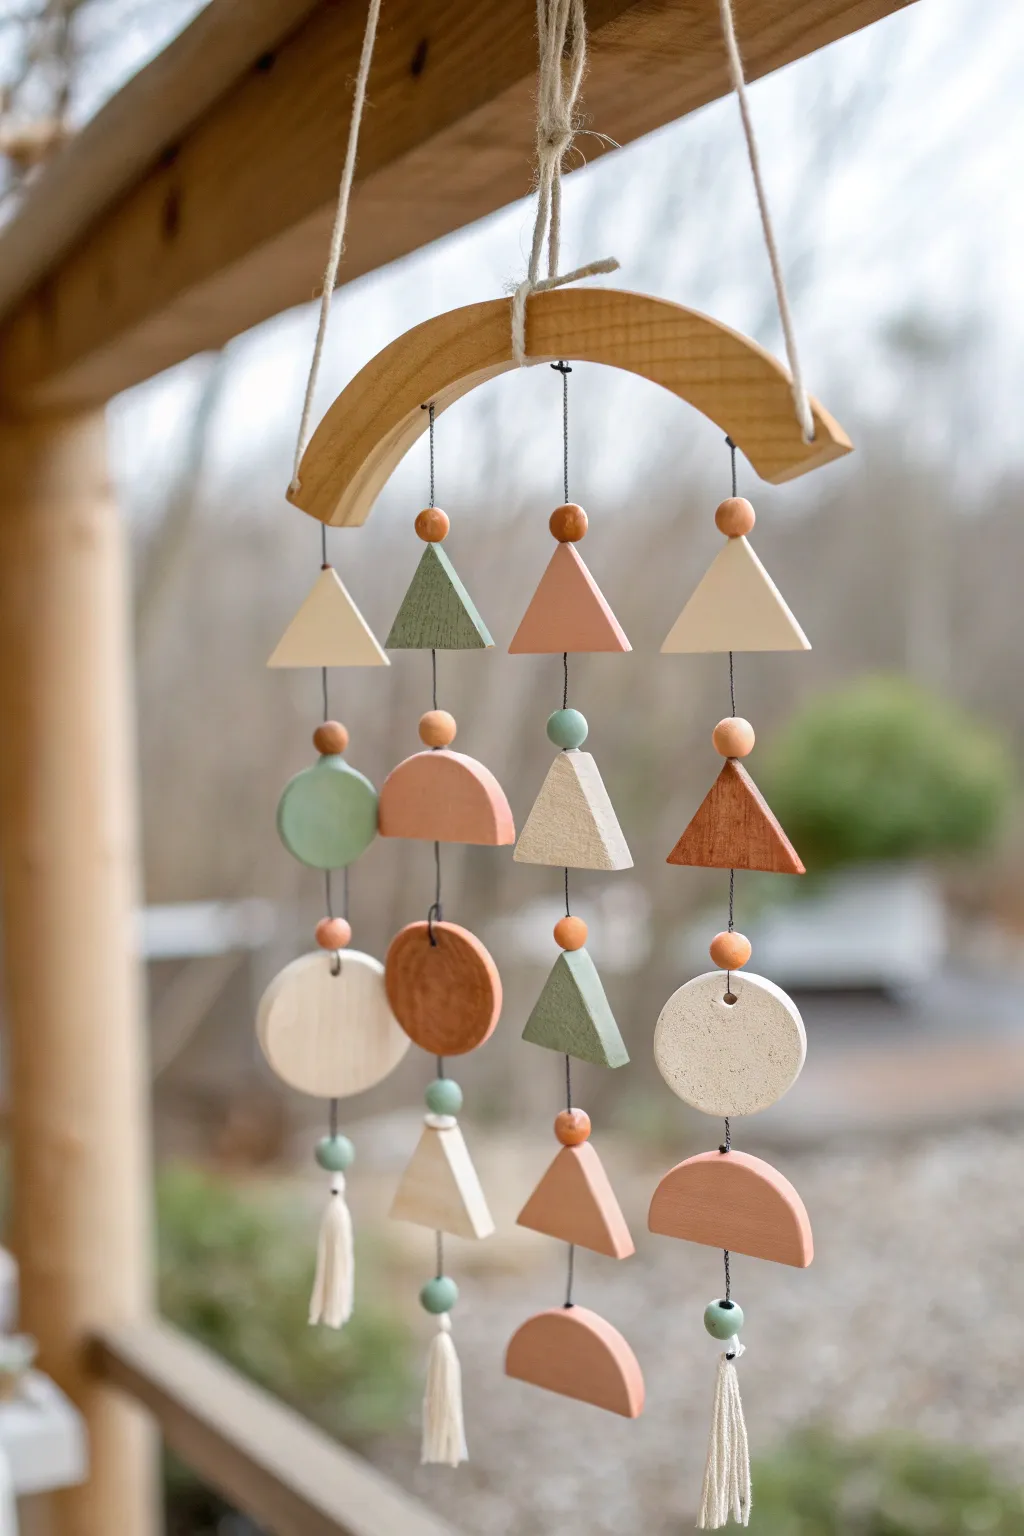
Add an air of modern tranquility to your space with this stunning hanging mobile featuring earthy tones and simple geometric shapes. The combination of natural wood and matte clay creates a balanced, artistic piece that looks intricate but relies on basic techniques.
How-To Guide
Materials
- Oven-bake clay (terracotta, sage green, cream, white)
- Rolling pin or clay machine
- Geometric clay cutters (triangle, circle, semi-circle)
- Wooden dowel arch or half-circle wood piece
- Small wooden beads
- Thin black or dark grey cord/twine
- Macramé cord (for tassels and hanging)
- Embroidery needle
- Hand drill with tiny bit or clay poking tool
- Baking sheet and parchment paper
- Scissors
Step 1: Shaping the Clay Elements
-
Conditioning:
Start by warming up your clay colors (terracotta, sage, cream, and white) in your hands until they are soft and pliable. This prevents cracks later on. -
Rolling out:
Roll each color out onto a smooth surface to an even thickness of about 1/4 inch. Thickness consistency is key for the pieces to hang straight. -
Cutting shapes:
Using your cutters, press out a variety of shapes. You’ll need about 4-5 triangles, 3-4 circles, and several semi-circles in varying sizes and colors to match the photo. -
Adding texture:
For the sandy-looking cream pieces, I sometimes mix in a pinch of real sand or black pepper before rolling to create a speckled, stone-like effect. -
Creating holes:
Before baking, use a needle tool or toothpick to poke holes through the vertical center of each shape. Make sure the hole is wide enough for your cord to pass through. -
Double holes:
For pieces that will sit in the middle of a strand, you need a hole at the top and the bottom to continue the line.
Step 2: Baking and Prep
-
Baking:
Arrange your shapes on a parchment-lined baking sheet and bake according to your clay manufacturer’s instructions, usually around 275°F (135°C) for 15-30 minutes. -
Cooling:
Let the pieces cool completely on the baking sheet. They are fragile when hot but harden as they return to room temperature. -
Measuring cords:
Cut four lengths of the thin black cord. Vary the lengths slightly if you want a staggered look, but keeping them around 18-24 inches gives you plenty of room to work. -
Drilling the arch:
If your wooden arch doesn’t have holes, carefully drill four evenly spaced small holes along the bottom curve.
Keep it Clean
Baby wipes are essential! Clean your hands and tools when switching between colors, especially before handling the white clay, to avoid murky stains.
Step 3: Assembly
-
Starting the strands:
Start assembling your first strand by threading a cord through the top hole of your first shape. Secure it by tying a knot or adding a small wooden bead beneath it. -
Layering elements:
Continue adding shapes up the cord. Between clay pieces, add small wooden beads as spacers to add visual separation. -
Knotting technique:
To keep shapes floating in specific positions, tie a knot in the cord right below where you want a bead or shape to sit. -
Repeating the process:
Build all four strands, varying the order of shapes (triangles, circles, semi-circles) and colors to create an interesting, asymmetrical composition. -
Making tassels:
Create small tassels using the cream macramé cord. Wrap the cord around three fingers 10 times, tie off the top, cut the bottom loops, and comb the fringe. -
Attaching tassels:
Tie these tassels to the very bottom end of each of your four decorative strands. -
Final connection:
Thread the top of each completed strand up through the holes in your wooden arch and secure with a sturdy double knot on the top side of the wood. -
Hanging loop:
Attach a longer piece of macramé cord to the center or sides of the wooden arch to create the main hanger for your mobile.
Uneven Hanging?
If a strand tilts because a clay piece is heavier on one side, add a tiny dab of glue inside the bead sitting directly on top of it to lock the angle in place.
Hang your new mobile near a window and watch the shapes catch the light beautifully
Oven-Bake Fairy Garden Mushrooms
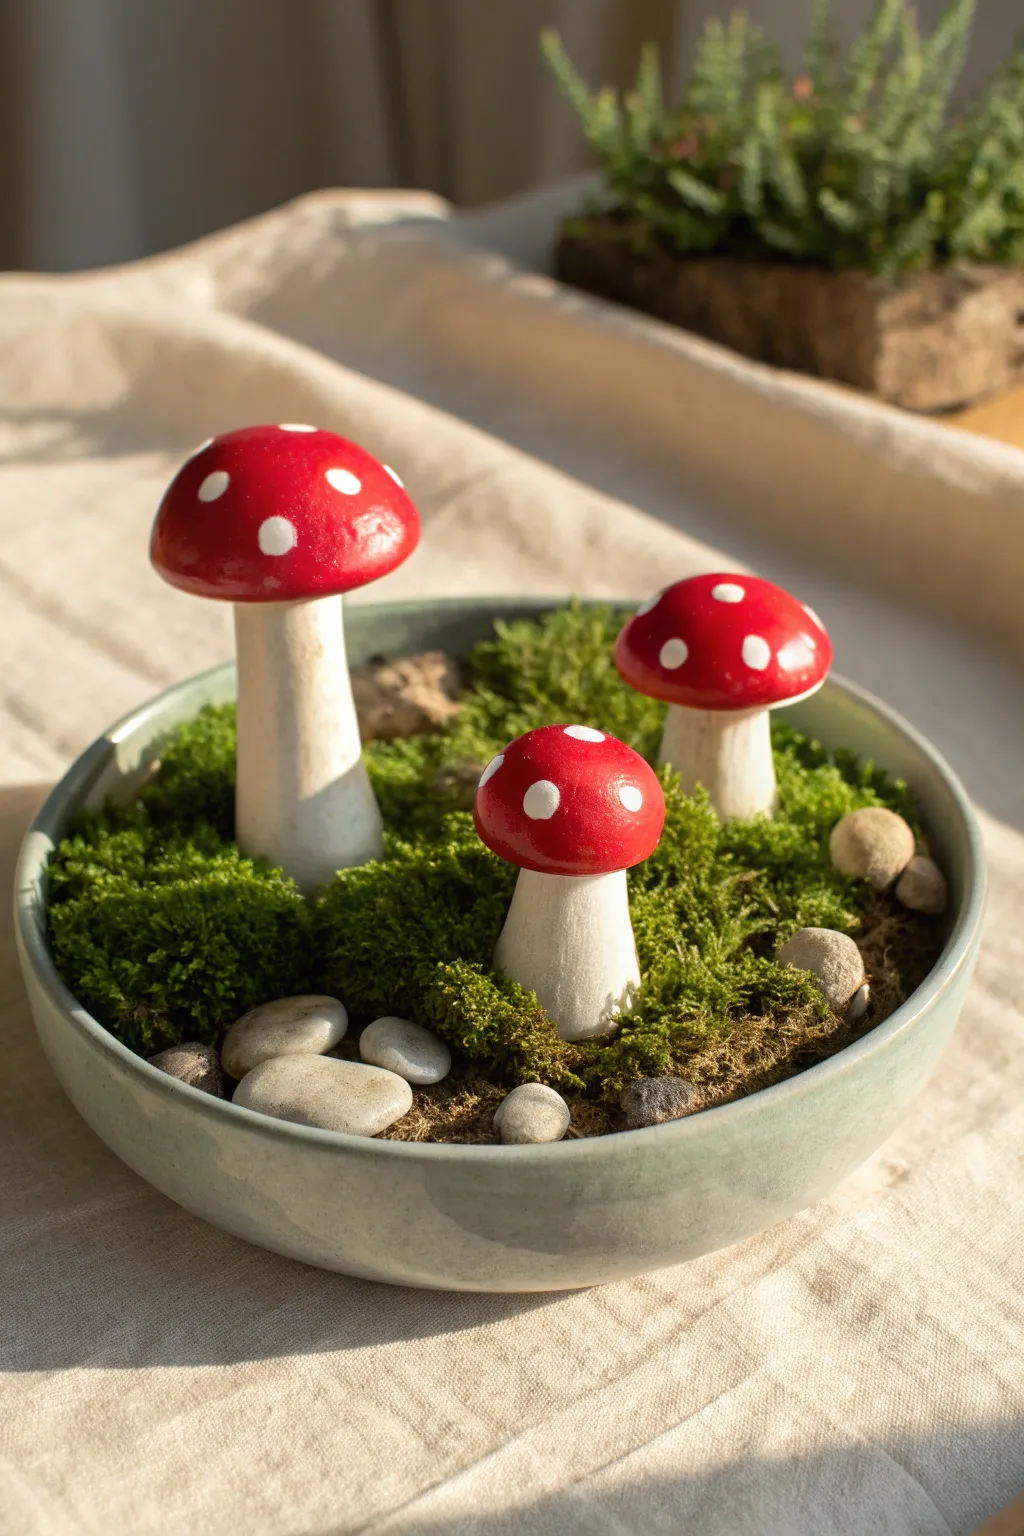
Bring a touch of forest magic indoors with these charming toadstools, featuring classic bright red caps and sturdy white stems. Arranged in a mossy dish, they create an enchanting miniature scene perfect for a desk or windowsill.
Step-by-Step Guide
Materials
- White or translucent polymer clay (oven-bake)
- Red polymer clay (or white clay + red acrylic paint)
- Aluminum foil
- Liquid polymer clay or bake-and-bond adhesive
- White acrylic paint
- Small paintbrush or dotting tool
- Gloss glaze or polyurethane varnish (for the caps)
- Matte varnish (optional, for the stems)
- Small shallow bowl or planter
- Preserved craft moss
- Small decorative river stones
- Sand or foam block (for drying/baking support)
Step 1: Shaping the Stems
-
Prepare the core:
Since the mushrooms are relatively thick, start by crumbling small pieces of aluminum foil into cone-like cylinders. This saves clay and helps them bake evenly without cracking. -
Condition the white clay:
Knead your white polymer clay until it is soft and pliable. Roll it into a sheet or flatten pieces with your fingers. -
Cover the armature:
Wrap the clay around your foil cores smoothly. Shape them into thick, sturdy stems that are slightly wider at the base for stability. -
Refine the texture:
Use your fingers to smooth out any seams. You can leave slight vertical imperfections or fingerprints to mimic the organic texture of a real mushroom stalk. -
Vary the sizes:
Create three stems of varying heights—one tall, one medium, and one short and stout—to create visual interest in your final arrangement.
Step 2: Forming the Caps
-
Create the cap shape:
Take a ball of red clay (or white, if you plan to paint later) and flatten the bottom while doming the top. You want a classic rounded ‘button’ shape. -
Hollow the underside:
Press your thumb gently into the flat bottom of the cap to create an indentation. This is where the stem will connect. -
Test the fit:
Place the caps onto the stems to ensure the proportions look right. The caps should overhang the stems slightly. -
Secure the pieces:
Apply a drop of liquid polymer clay or bake-and-bond to the top of the stem, then press the cap firmly onto it. Smooth the seam underneath if necessary.
Uneven Baking?
If your mushrooms darken or burn, tent a piece of aluminum foil over them during baking. This protects the color while ensuring the heat circulates.
Step 3: Baking and Painting
-
Bake carefully:
Place your mushrooms on a baking sheet or stuck into a foil ball for support. Bake according to your clay package instructions (usually around 275°F or 130°C for 15-30 minutes). -
Cool down:
Allow the mushrooms to cool completely before handling. I usually leave them inside the oven with the door open to cool gradually. -
Paint element (if using white clay):
If you used white clay for the caps, paint them with two coats of bright red acrylic paint now, letting each coat dry thoroughly. -
Add the dots:
Dip the handle end of a paintbrush or a dotting tool into white acrylic paint. Dab irregular white spots onto the red caps. -
Vary dot sizes:
Make some dots large and others tiny to keep the look natural rather than perfectly geometric. -
Seal the work:
Once the paint is fully dry, coat the red caps with a high-gloss glaze to make them look wet and fresh. Leave the stems matte for contrast.
Add Realism
Before baking, lightly brush darker soft pastel powder or brown eyeshadow near the base of the white stems to make them look ‘dirty’ and freshly picked.
Step 4: Assembly
-
Prepare the base:
Take your shallow bowl and fill it with floral foam, dry soil, or just a layer of gravel to create a base level. -
Place the mushrooms:
Nestle your three mushrooms into the bowl. If they are top-heavy, you can glue their bases to the bottom of the bowl or use a bit of clay to anchor them. -
Add the moss:
Tuck clumps of preserved green moss tightly around the stems, covering the entire base of the bowl. -
Finishing touches:
Scatter a few smooth river stones around the edge of the moss and near the mushroom bases to complete the woodland floor look.
You now have an adorable piece of permanent nature decor to brighten up your shelf or desk