I never get tired of how a simple handprint plate can hold a whole moment in time—tiny fingers, a specific year, and all that sweet chaos. Here are my favorite handprint plate ideas, starting with the classic keepsakes and moving into more playful, artsy transformations.
“Cookies” Holiday Handprint Plate
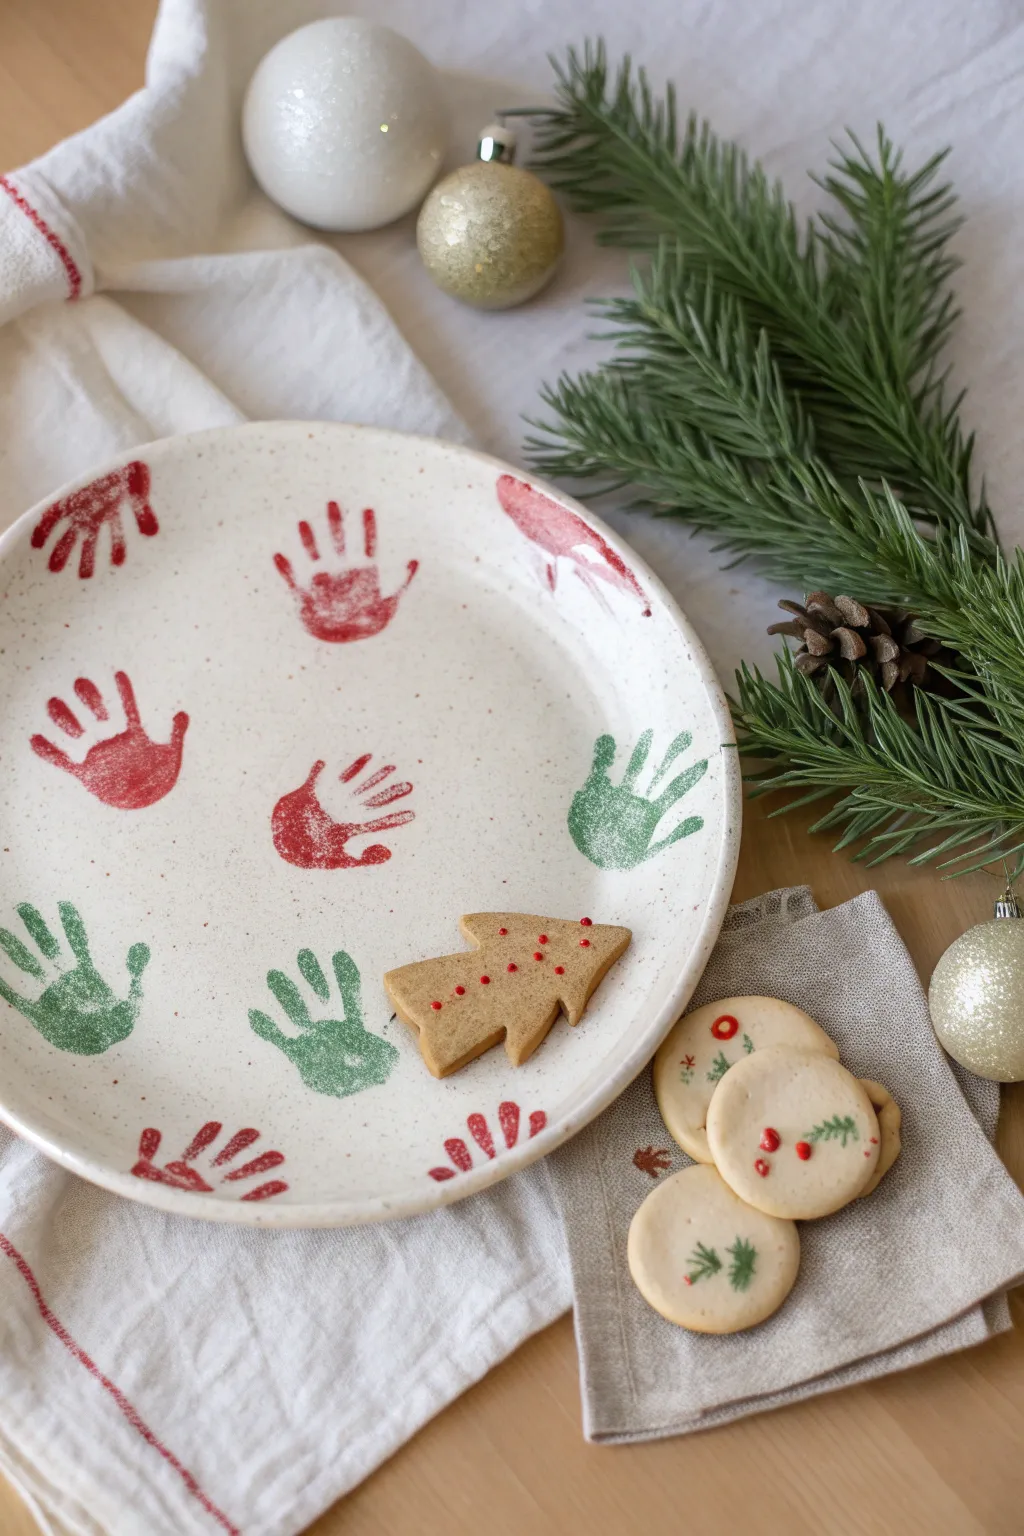
Capture the magic of holiday memories with this charming ceramic keepsake plate, featuring an array of sweet red and green handprints scattered like falling leaves. It is the perfect platter for leaving out treats for Santa or serving festive cookies at your family gathering.
How-To Guide
Materials
- Large white ceramic plate (bisque or glazed ceramic depending on paint choice)
- Non-toxic ceramic or enamel paint (Red and Green)
- Sponge brushes or medium-sized flat paint brushes
- Paper plates or palette (for holding paint)
- Baby wipes or damp paper towels
- Clear ceramic sealant or food-safe glaze (optional, based on paint type)
- Oven (if baking is required to set the paint)
Step 1: Preparation
-
Clean surface:
Begin by thoroughly washing your white ceramic plate with soap and water to remove any grease or dust. Dry it completely with a lint-free towel. -
Wipe with alcohol:
For extra adhesion, give the surface a quick wipe with rubbing alcohol on a cotton ball. This ensures there are no oils from your fingers left on the ceramic. -
Setup the station:
Set up your workspace with paper towels and baby wipes within easy reach. Squeeze a generous amount of red ceramic paint onto a paper plate palette.
Clean Edges Trick
Keep a damp Q-tip handy while printing. If a finger smudges, instantly wipe the edge clean before the paint sets for a sharp look.
Step 2: Red Handprints
-
Test prints:
Do a quick practice print on a piece of scratch paper first. This helps determine how much paint is needed on the hand to get a clear impression without smudging. -
Apply red paint:
Using a sponge brush, apply an even, thin layer of red paint to the palm and fingers of the hand. Avoid globs of paint, as these will slide on the slick ceramic surface. -
Position first print:
Guide the hand to an open spot on the plate. Press firmly down on the palm and each finger individually to ensure contact with the ceramic. -
Lift carefully:
Lift the hand straight up—not dragging it—to leave a crisp impression. -
Repeat red prints:
Clean the hand if paint is drying, re-apply fresh red paint, and add 2-3 more red handprints scattered randomly around the plate. Leave plenty of white space for the green ones. -
Clean up red:
Thoroughly clean the hand with warm soapy water or baby wipes before switching colors to avoid muddy prints.
Add Names or Dates
Use a fine-tip paintbrush or ceramic marker to write the child’s name and the year in small text near the bottom rim for a true keepsake.
Step 3: Green Handprints
-
Prep green paint:
Squeeze your green ceramic paint onto a fresh section of your palette. -
Apply green paint:
Coat the clean, dry hand with the green paint using a fresh sponge brush. I find working quickly here prevents the paint from getting tacky before the print happens. -
Fill the gaps:
Look for the larger empty spaces between your red prints. Press the green handprint carefully into these gaps. -
Angle variation:
Try angling the hand slightly differently for each print to create a dynamic, scattered pattern rather than uniform rows. -
Check for partials:
If you have space near the rim, feel free to do a partial handprint off the edge to make the design feel continuous.
Step 4: Setting the Design
-
Clean edges:
Inspect the rim of the plate. If any stray smudges occurred during handling, wipe them away immediately with a damp Q-tip. -
Dry time:
Allow the paint to air dry completely. This usually takes at least 24 hours, but check your specific paint bottle instructions. -
Curing process:
Most ceramic paints require curing in a home oven to become durable. Place the plate in a *cold* oven, set the temperature as directed (usually 300-350°F), and start the timer once it reaches temperature. -
Cool down:
Once the baking time is up, turn the oven off and leave the plate inside to cool down gradually with the oven. Removing it too fast can cause cracking. -
Final check:
Once fully cooled, your plate is ready. If you used food-safe specific glaze or paint, it’s ready for cookies; otherwise, use it for decorative display or with a clear glass liner plate.
This delightful plate is now ready to become a cherished part of your holiday traditions for years to come


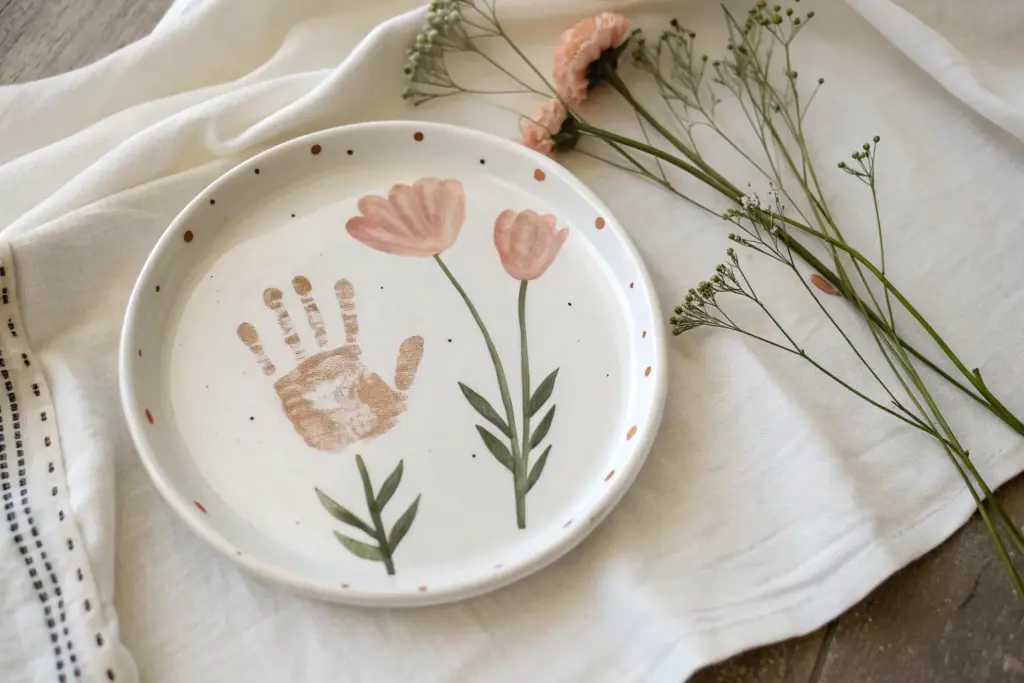
Mother’s Day Handprint Flower Bouquet Plate
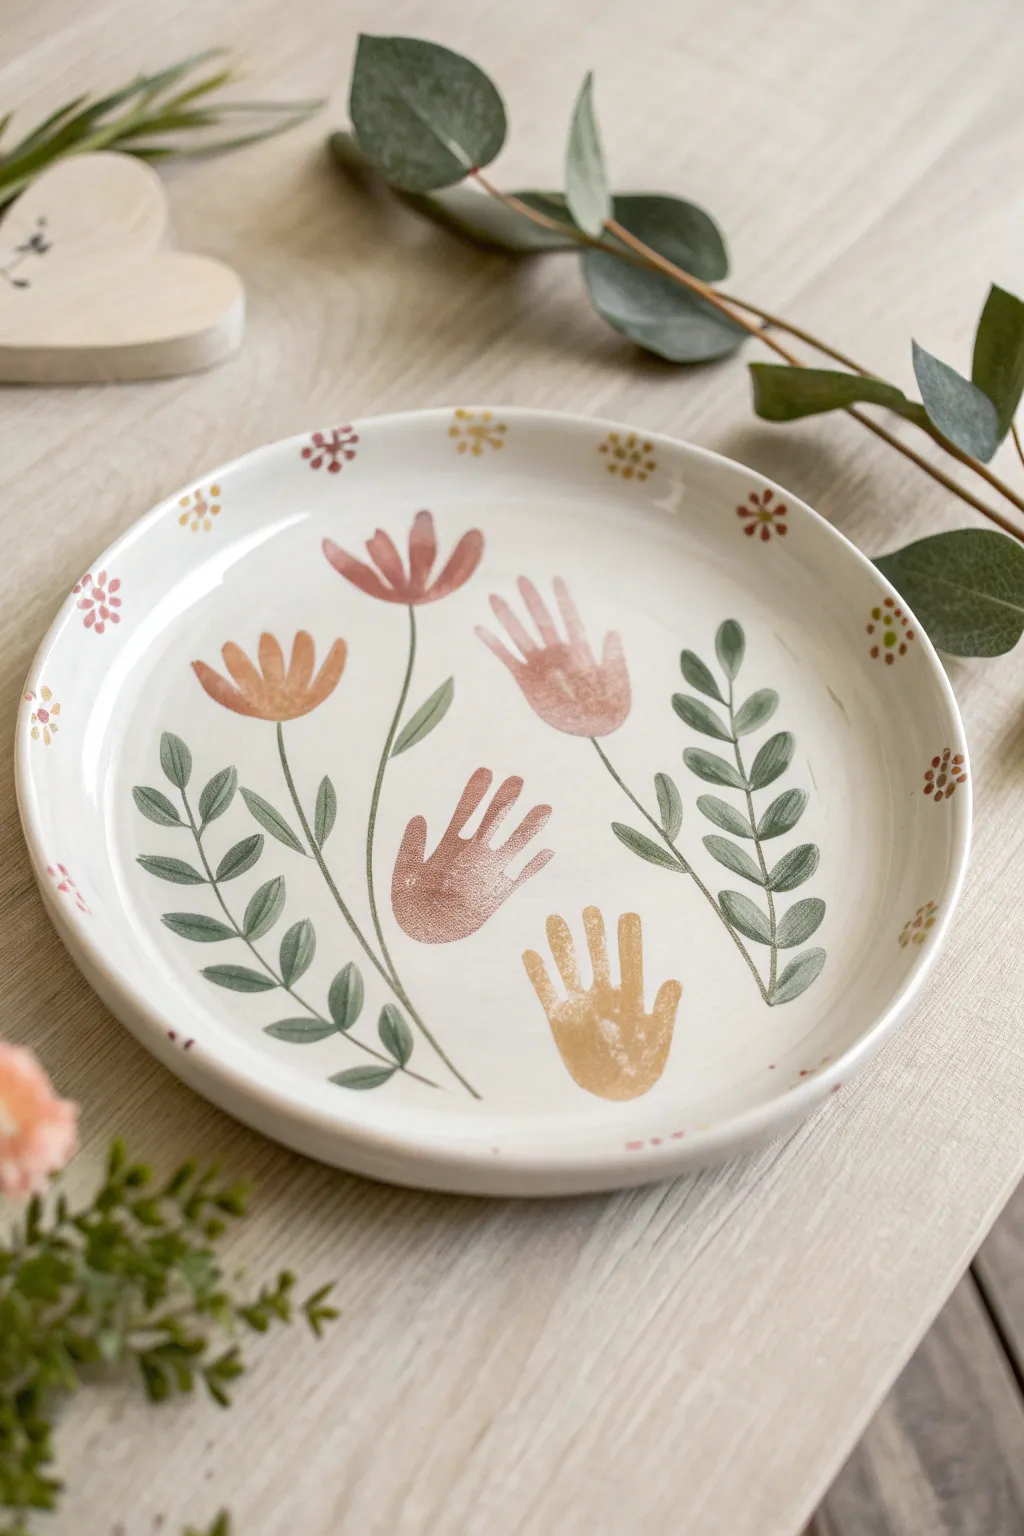
Transform tiny handprints into a forever garden with this sweet Mother’s Day keepsake plate. Using soft pastels and delicate brushwork, you’ll create a bouquet where each flower is a memory to cherish.
Step-by-Step
Materials
- White ceramic plate (round, dinner or salad size)
- Ceramic or enamel paints (terracotta, dusty pink, mustard yellow, sage green, dark green)
- Small foam brush or sponge dabber
- Fine liner paintbrush (size 0 or 00)
- Round paintbrush (size 2 or 4)
- Rubbing alcohol
- Paper towels
- Oven (if using bake-to-set paints)
Step 1: Preparation
-
Clean the Surface:
Before anything touches the plate, wipe the entire surface thoroughly with rubbing alcohol and a paper towel. This removes oils or fingerprints that might prevent the paint from adhering properly. -
Plan the Layout:
Visualize where your three handprints will go. You want them staggered at different heights in the center of the plate to mimic a natural flower arrangement.
Clean Prints Pro-Tip
Practice the handprint on paper first to gauge how much paint you need. Too much paint causes slipping and sliding; a thin, even coat stamped firmly gives the crispest details.
Step 2: Setting the Handprints
-
Prepare the First Print:
Squeeze a small amount of terracotta-colored paint onto a palette. Use a foam brush to apply an even, thin layer of paint to the child’s palm and fingers. -
Stamp the Center Flower:
Guide the child’s hand to the upper-middle section of the plate. Press down firmly on the palm and each finger to ensure a clear impression, then lift straight up. Wipe the hand clean immediately. -
Add the Pink Bloom:
Switch to your dusty pink paint. Apply it to the hand again and stamp this print slightly to the left and lower than the first one, angling the fingers outward slightly like an opening bloom. -
Add the Yellow Bloom:
Using the mustard yellow paint for the final print, place this one low and to the right. I like to tilt this handprint slightly so the fingers point towards the upper right, creating movement in the bouquet. -
Touch Ups:
If any parts of the prints are too faint, you can carefully dab a tiny bit of matching paint into the distinct areas with your finger or a brush, but try to keep the natural texture of the skin prints. -
Initial Dry:
Let the handprints dry to the touch (about 15-20 minutes) before starting the stems so you don’t accidentally smudge them.
Level Up: Personalized
Use a super fine black paint pen to write the year or the child’s name in small script along the curve of one of the green stems for a subtle signature.
Step 3: Painting the Foliage
-
Draw the Main Stems:
Load your fine liner brush with sage green paint. Draw a single, slender line extending downward from the center of each palm print, curving them together so they meet near the bottom rim of the plate. -
Create Leaf Shapes:
Switch to the round brush. Along the stems, paint simple leaf shapes by pressing the belly of the brush down and lifting up to a point. Add pairs of leaves going up the sides of the bouquet space. -
Add Greenery Texture:
To give the leaves depth like in the photo, dip your liner brush into a slightly darker green (or mix sage with a dot of black). Add a thin vein line down the center of each leaf. -
Fill the Gaps:
Add a few standalone leafy sprigs or fern-like branches in the empty white spaces between the handprint flowers to make the bouquet look full and lush.
Step 4: Decorative Rim
-
Start the Border Pattern:
Using your fine liner brush or the rounded end of a paintbrush handle, create small flower motifs around the rim. -
Dot the Petals:
Make groups of 5 small dots in a circle using the terracotta, pink, and yellow colors used for the hands. Space these clusters evenly around the edge of the plate. -
Add Contrast Centers:
Once the petal dots are dry, add a single contrasting dot in the very center of each cluster (green centers for pink flowers, pink centers for yellow ones). -
Final Cure:
Allow the plate to dry for at least 24 hours. Follow the specific instructions on your paint bottle for baking the plate in the oven to make the design permanent and dishwasher safe.
This blooming keepsake is now ready to be gifted or displayed on a stand for everyone to admire


Father’s Day High-Five Handprint Plate
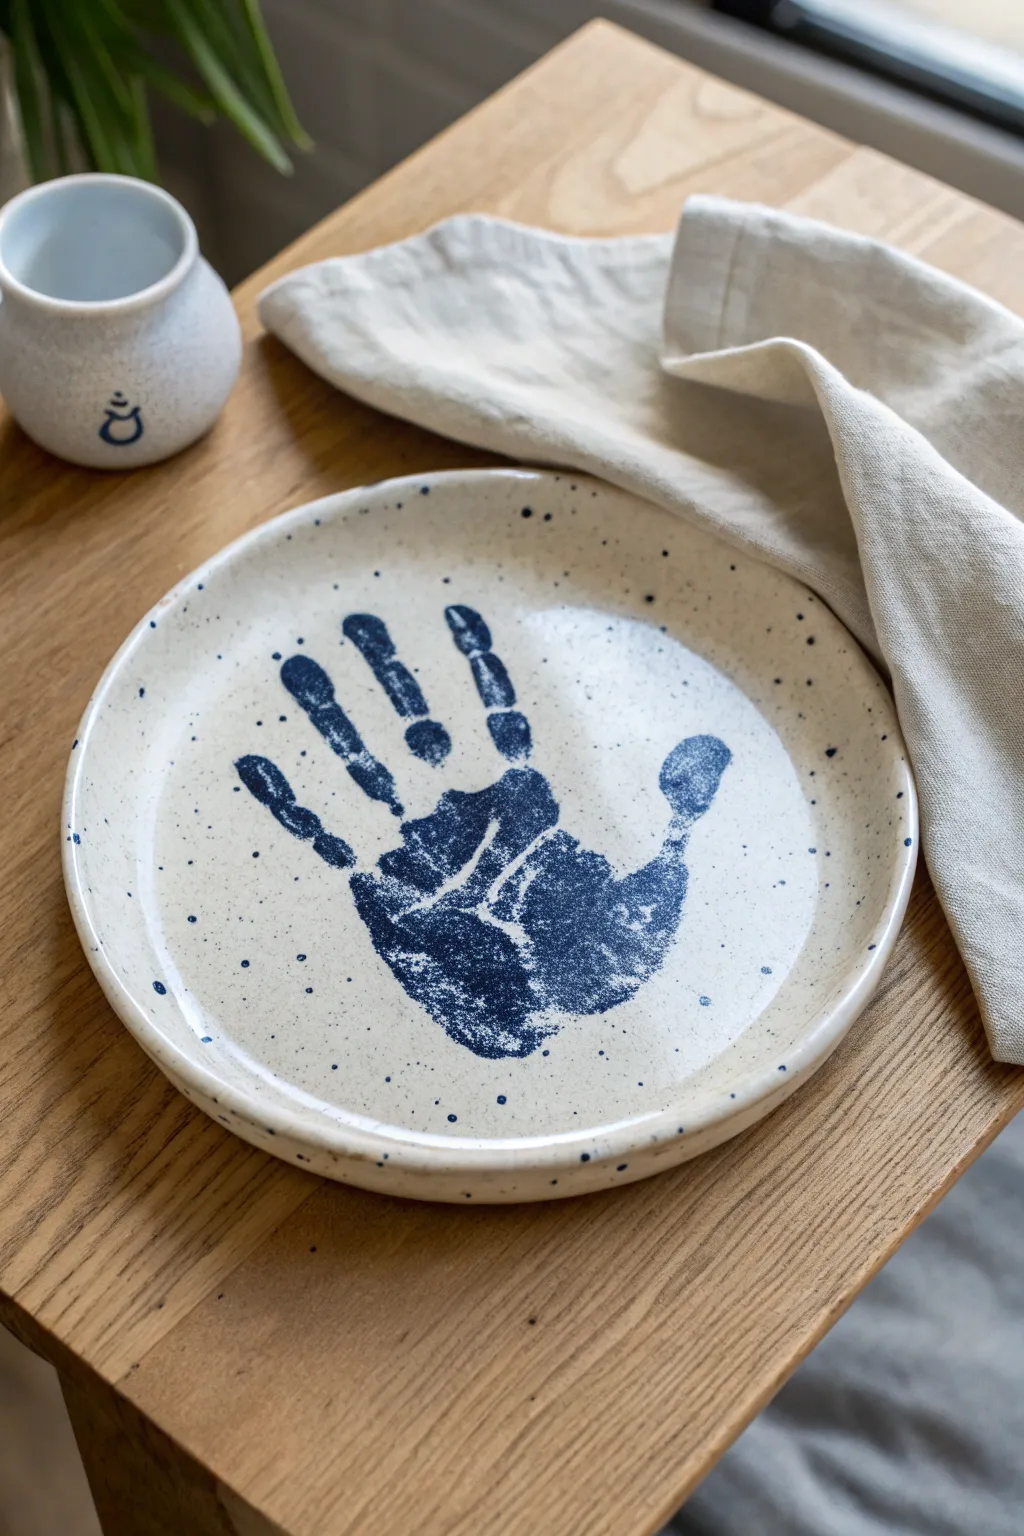
Capture a moment in time with this rustic and charming handprint plate, perfect for honoring dad with a permanent high-five. The design features a striking deep indigo handprint against a speckled cream ceramic background, creating a timeless piece of pottery that feels both modern and sentimental.
How-To Guide
Materials
- Bisque ceramic plate (dinner size, roughly 10-11 inches)
- Non-toxic ceramic underglaze (Cream/Off-White)
- Non-toxic ceramic underglaze (Deep Indigo/Navy Blue)
- Wide flat paintbrush (1-2 inch)
- Medium round paintbrush
- Stiff bristle toothbrush or splatter brush
- Clear dipping glaze (food safe)
- Sponge
- Water bowl
- Wet wipes or paper towels
Step 1: Base Preparation
-
Clean the Bisque:
Start by taking your bisque plate and wiping it down gently with a slightly damp sponge. This removes any dust from the firing process which can prevent glaze from adhering properly. -
Apply Base Coat:
Pour a small amount of the cream or off-white underglaze onto a palette. Using your wide flat brush, apply a smooth, even coat across the entire top surface of the plate. -
Layering Up:
Let the first coat dry until it’s chalky to the touch. Apply a second coat perpendicular to the first stroke direction to ensure full coverage without brush marks. -
Checking Consistency:
Inspect the surface for any thin spots where the raw bisque is showing through and touch them up. You want a solid, creamy canvas for the handprint. -
Speckling Process:
To achieve that rustic pottery look, dip an old toothbrush or stiff bristle brush into the deep indigo underglaze. I like to test the spray on a piece of paper first to control the droplet size. -
Apply Speckles:
Hold the brush over the plate and run your thumb across the bristles to flick tiny blue specks onto the creamy background. Aim for random distribution, keeping the splatter relatively light. -
Dry Completely:
Allow the base coat and speckles to dry completely before moving on to the handprint. This prevents the blue handprint from muddying the cream background.
Clean Print Secret
Does the child have wiggly fingers? Practice the ‘high five’ motion on a paper towel first. This gets them used to the sensation before committing to the plate.
Step 2: Creating the Handprint
-
Prep the Hand:
Clean the child’s hand thoroughly and dry it well. Oils or dirt can act as a resist against the glaze. -
Apply Indigo Glaze:
Using a sponge brush or large soft brush, generously coat the palm and fingers of the hand with the deep indigo underglaze. Ensure it’s wet and thick, but not dripping. -
Verify Coverage:
Quickly check that every ridge of the fingerprint and palm lines is covered. Speed is key here so the glaze doesn’t dry on the skin before printing. -
Positioning:
Hover the hand over the center of the plate to align it. Help the child spread their fingers slightly for a classic ‘high five’ look. -
The Transfer:
Press the hand firmly down onto the center of the plate. Gently press down on each finger and the center of the palm to ensure good contact with the ceramic surface. -
The Lift:
Instruction the child to lift their hand straight up—not sliding or peeling—to keep the print edges crisp and avoid smudging. -
Clean Up Edges:
If there are any accidental smudges on the rim, use a damp cotton swab to carefully wipe away the unwanted blue glaze. -
Detail Enhancement:
If the print is too faint in critical areas, you can use a very fine brush to lightly dab a tiny bit more glaze into the impression, but be careful not to lose the natural texture of the skin print.
Smudged the print?
If the handprint smears, don’t panic. Gently sponge off the blue glaze with water while it’s wet. Since the cream base is dry, you can wipe softly without ruining it.
Step 3: Finishing Touches
-
Final Speckle:
Once the handprint is dry, add a very light second layer of blue speckles over the whole plate, including the handprint, to integrate the design fully. -
Drying Time:
Let the entire plate dry for at least 24 hours to ensure all moisture has evaporated from the underglaze. -
Clear Glaze Application:
Dip the plate into a clear food-safe dipping glaze. Hold it submerged for a count of three, then lift and shake gently to remove excess. -
Kiln Firing:
Place the plate in a kiln and fire it according to the specifications of your clay and glaze (usually Cone 06 or Cone 6) to vitrify the piece and make it food safe.
Once fired, you will have a durable, food-safe keepsake that freezes a moment of childhood in time


Handprint and Pawprint Plate
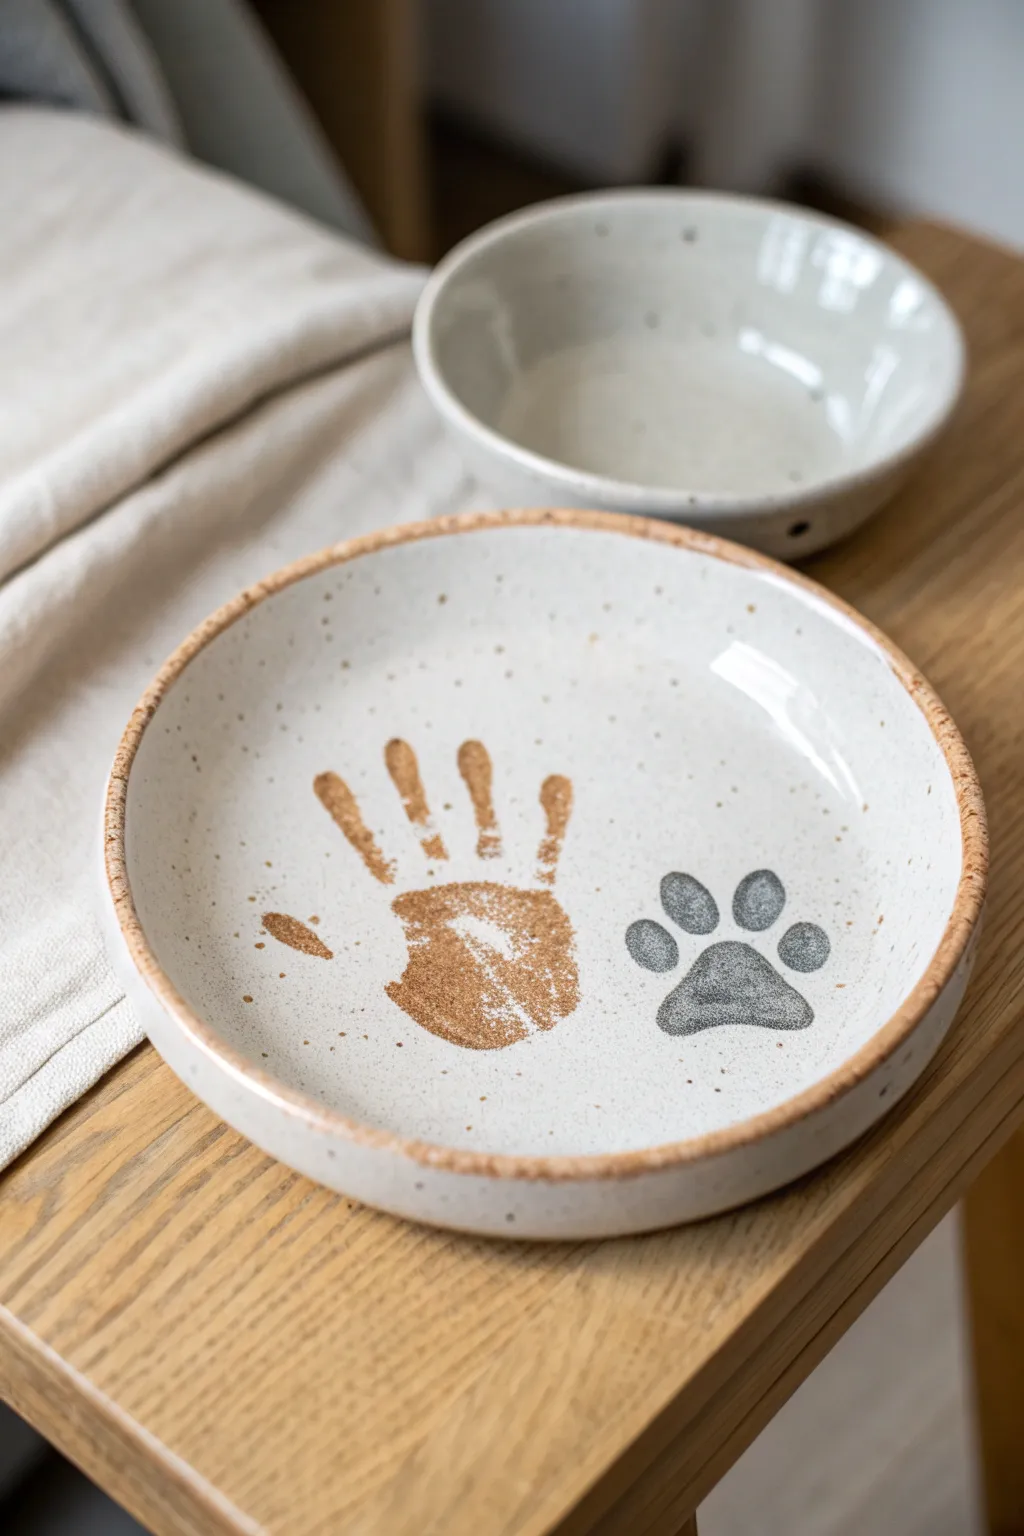
Celebrate the special bond between you and your furry companion with this minimalist ceramic keepsake. This project features a warm, earthy handprint alongside a classic grey pawprint on a speckled cream plate, perfect for pet lovers.
Step-by-Step Tutorial
Materials
- Bisque-fired ceramic plate (cream or speckled clay body)
- Brown ceramic underglaze (terra cotta shade)
- Dark grey ceramic underglaze
- Clear dipping glaze (transparent)
- Wide foam brush or sponge brush
- Small round detail brush (size 2 or 4)
- damp sponge
- Paper towels or baby wipes
- Kiln access (for firing)
Step 1: Preparation & Handprint
-
Prepare the surface:
Begin by wiping down your bisque plate with a slightly damp sponge. This removes any dust that could prevent the glaze from adhering properly. -
Mix the brown underglaze:
Shake your terra cotta brown underglaze well. Pour a small amount onto a palette or paper plate to ensure it’s accessible. -
Apply glaze to the hand:
Using a wide foam brush, apply an even coat of the brown underglaze to the palm and fingers of your hand. You want the coverage to be wet and shiny, but not dripping. -
Position the hand:
Hover your hand over the left side of the plate. Aim to place the heel of the palm slightly below the center line, angling the fingers upward. -
Press firmly:
Press your hand down onto the clay surface. Use your other hand to gently press on the top of each finger and the center of the palm to ensure a solid transfer. -
Lift carefully:
Lift your hand straight up without sliding to avoid smudging the print. Immediately clean your hand with wipes or warm water. -
Clean up stray marks:
If there are any accidental smudges around the print, use a fine damp sponge or a clean brush with water to wipe them away.
Practice Makes Perfect
Before printing on the plate, do a test print on a piece of paper to gauge how much pressure you need and check that your glaze coverage isn’t too thick or thin.
Step 2: Pawprint & Finishing
-
Plan the paw placement:
Visualize where the pawprint will go on the right side of the plate. It should sit slightly lower than the fingertips of the handprint for a balanced composition. -
Stamp or paint the paw pad:
For the main pad, uses the dark grey underglaze. You can gently press your pet’s actual paw if they are cooperative, or I often prefer to hand-paint a stylized version for a cleaner look like the example. -
Painting the main pad:
If painting manually, use your round detail brush to create a rounded, triangular shape with a slight indentation at the top center. Fill it in with two flowing coats. -
Adding the toes:
Paint four small oval shapes above the main pad to represent the toes. Keep them evenly spaced in an arch. -
Refining the edges:
Use the tip of your brush to tidy up the edges of the grey print, creating a crisp contrast against the light clay background. -
Apply the rim:
Dip your sponge brush lightly into the terra cotta brown underglaze. Gently run it along the very top edge of the plate’s rim to create a subtle, framing border. -
Let it dry:
Allow the underglaze designs to dry completely. The surface should look matte and chalky. -
Clear glaze application:
Once dry, dip the entire plate into a clear transparent glaze. Ensure you shake off excess drips gently. -
Kiln firing:
Fire the plate in the kiln according to the clay and glaze manufacturer’s instructions (typically cone 06 or cone 6 depending on your materials).
Smudged the Print?
If the handprint smears, don’t panic! Since underglaze sits on top of bisque, you can wash the entire plate off with water, let it dry for 20 mins, and try again.
Now you have a timeless piece of art that captures a moment of friendship forever

The Complete Guide to Pottery Troubleshooting
Uncover the most common ceramic mistakes—from cracking clay to failed glazes—and learn how to fix them fast.
Rainbow Ombre Handprint Plate
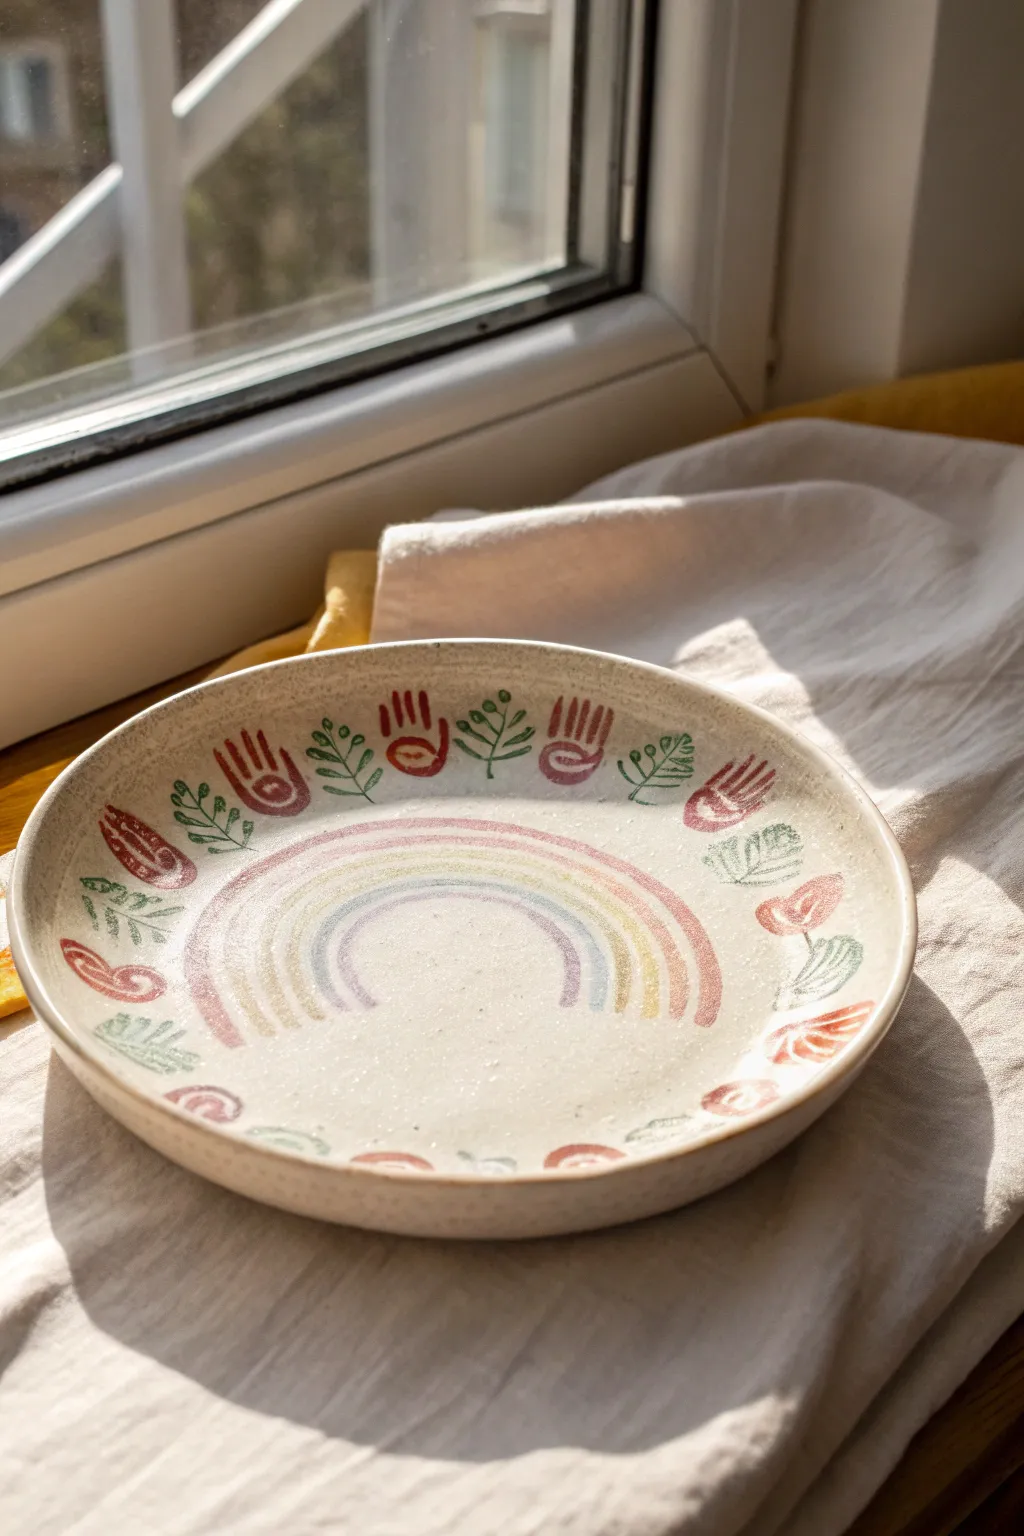
Capture a touch of handmade charm with this delightful ceramic plate design featuring a soft pastel rainbow center and a lively border of stylized red hands and green botanical motifs. The speckled clay body adds an earthy texture that perfectly complements the gentle glaze strokes for a cozy, artisanal finish.
Step-by-Step Guide
Materials
- Bisque-fired ceramic plate (shallow bowl shape, speckled clay preferred)
- Underglazes (Muted Pink, Butter Yellow, Soft Lavender/Blue, Terracotta Red, Leaf Green)
- Clear matte or satin glaze (food safe)
- Small round paintbrush (size 4 or 6)
- Fine liner brush (size 0 or 1)
- Pencil for sketching
- Damp sponge
- Kiln access (or use oven-bake ceramic paints for a non-food-safe alternative)
Step 1: Painting the Central Rainbow
-
Prepare the surface:
Begin by wiping down your bisque-fired plate with a damp sponge to remove any dust or debris. This ensures your underglazes adhere smoothly to the clay surface without crawling. -
Sketch the arch:
Lightly sketch the rainbow arch in the center of the bowl using a pencil. Don’t worry about the lines being visible later; the graphite will burn off in the kiln. -
Paint the outer arch:
Load your round brush with the Muted Pink underglaze. Paint the outermost curve of the rainbow with a single, confident stroke if possible. aim for a slightly translucent, watercolor-like effect rather than solid opacity. -
Add the yellow layer:
Rinse your brush thoroughly. Paint the next arch inward using Butter Yellow. Leave a tiny sliver of unpainted clay between the pink and yellow stripes to keep the colors distinct and show off the speckled clay body. -
Finish the rainbow:
Complete the inner arch with Soft Lavender or Blue. Try to mirror the curve of the previous stripes, keeping the stroke loose and organic rather than rigid. -
Let it dry:
Allow the center design to dry until it is powdery to the touch before moving your hand over it to work on the rim.
Step 2: Creating the Rim Pattern
-
Plan the spacing:
Using your pencil, lightly mark alternating positions around the rim for the handprints and the leaves. This guides your spacing so the pattern meets up evenly at the end. -
Paint the stylized hands:
Dip your brush into the Terracotta Red underglaze. At your first marked spot, paint a simplified ‘U’ shape for the palm. -
Add the fingers:
Add four vertical lines extending from the ‘U’ shape to represent fingers. These should be simple strokes—think abstract primitive art rather than anatomical precision. -
Detail the palm:
Using a fine liner brush and the unpainted clay as your ‘negative space’, you can either scratch back a spiral design into the red palm or paint it carefully around a reserved space. Scratching back (sgraffito) acts nicely here. -
Repeat the hands:
Continue painting these red hand motifs at the marked intervals all around the rim. I find rotating the plate on a banding wheel makes this process much smoother. -
Paint the leaves:
Switch to your Leaf Green underglaze. In the spaces between the red hands, paint a central stem line composed of small, connected segments. -
Add leaf details:
Branching off the central stem, add small oval or teardrop shapes for the leaves. Create variety by tipping some leaves left and some right. -
Refine the border:
Check your spacing. If a gap feels too large, add an extra leaf sprig or a small dot of color to balance the visual weight of the rim.
Stroke Confidence
Don’t overwork the brushstrokes. A little unevenness in opacity adds to the watercolor aesthetic and highlights the handmade quality.
Step 3: Glazing and Firing
-
Clean up:
If any underglaze smudged onto the underside of the rim or the foot of the plate, wipe it away cleanly with a sponge. -
Apply clear glaze:
Once the underglaze is bone dry, apply two to three even coats of a clear matte or satin glaze over the entire interior of the plate. This seals the design and makes it food safe. -
Fire the piece:
Load the plate into the kiln and fire it according to the specific temperature guidelines of your clay and glaze (typically Cone 5 or 6 for stoneware). Allow the kiln to cool completely before unloading.
Stamp It Instead
Carve a custom stamp from a gum eraser for the red hand shape. This speeds up the rim pattern and ensures consistent sizing all around the plate.
Once fired, you will have a beautiful, durable piece of art ready for serving snacks or displaying on a shelf
Negative-Space Resist Handprint Plate

This stunning keepsake reverses the typical handprint craft, revealing a stark white impression surrounded by a deep, glossy blue glaze. By using a resist technique, you capture every tiny line and detail of the palm without painting the hand itself.
How-To Guide
Materials
- Bisque-fired ceramic plate (white stoneware or porcelain)
- Liquid wax resist or latex masking fluid
- Soft fan brush or wide glaze brush
- Deep cobalt blue ceramic glaze (food safe)
- Sponge
- Water bowl
- Kiln access (or a paint-your-own-pottery studio)
Step 1: Preparation and Resist
-
Clean the bisque:
Begin by wiping down your bisque-fired plate with a slightly damp sponge. This removes any dust that might prevent the glaze or resist from sticking properly. -
Prepare the hand:
Ensure the hand being printed is clean and dry. Instruct your helper (or child) to relax their hand; a stiff hand creates a less natural impression. -
Apply the resist agent:
Dip the hand directly into a shallow dish of liquid wax resist or latex masking fluid. Alternatively, I prefer to use a sponge brush to coat the palm and fingers evenly to ensure full coverage without dripping. -
Press onto the plate:
Firmly press the wax-coated hand onto the center of the plate. Press down on the palm and each individual finger to transfer the resist material. -
Lift carefully:
Lift the hand straight up without sliding to avoid smearing the outline. You won’t see much yet, as the wax is often clear or pale green, but the barrier is there. -
Let it dry completely:
Allow the resist to dry fully. Wax resist usually dries in 10-15 minutes, while latex might take a bit longer. It must be dry to the touch before glazing.
Glaze Beading Up?
If glaze sticks to the wax, simply wipe it off with a damp sponge while wet. The wax repels water, so the glaze wipes right off the print.
Step 2: Glazing Process
-
Mix your glaze:
Stir your deep cobalt blue glaze thoroughly. The consistency should be similar to heavy cream for the best coverage. -
Apply the first coat:
Load a soft fan brush with blue glaze. Brush it confidently over the entire face of the plate, going right over the wax handprint. -
Watch the resist work:
As you brush over the handprint, the glaze will bead up and pull away from the wax. This is the magic of the resist technique. -
Clean the print:
While the glaze is still wet, use a damp sponge or a clean brush to gently wipe away any beads of blue glaze that are sitting on top of the wax handprint. -
Dry the first layer:
Let this first coat of glaze dry until it loses its sheen and feels chalky to the touch. -
Apply second coat:
Apply a second coat of blue glaze, brushing in a cross-hatch direction (perpendicular to your first strokes) to ensure an even, solid blue background. -
Final clean up:
Do one last check on the handprint area. Use a damp cotton swab to pick up any stray specks of blue glaze inside the hand shape to ensure the final print is stark white. -
Rim detail:
For the rustic brown edge shown in the photo, dip a small sponge in an iron oxide wash or a dark bronze glaze and gently dab it along the rim of the plate.
Add a Date
Before glazing, use a scratching tool (sgraffito) to carve the name and date into the wax resist. The glaze will fill the lines for a blue-text effect.
Step 3: Firing
-
Fire the piece:
Place the plate in the kiln. If you used wax resist, it will burn off during firing, leaving the bare clay underneath. If you used latex, peel it off before firing. -
Cool and inspect:
Once the kiln cycle finishes and cools, unload your plate. The blue glaze should now be glossy and glass-like, contrasting beautifully with the matte, unglazed texture of the handprint.
This sophisticated take on the handprint plate creates a timeless piece of decor that preserves a moment in time