
Whenever I’m painting mugs for the guys in my life, I keep it simple: bold lines, clean shapes, and just enough personality to feel custom. These ideas are all about that cozy, everyday “grab it for coffee” vibe—rugged, funny, and totally doable with paint pens or ceramic paint.
Bold Initials and Block Monogram
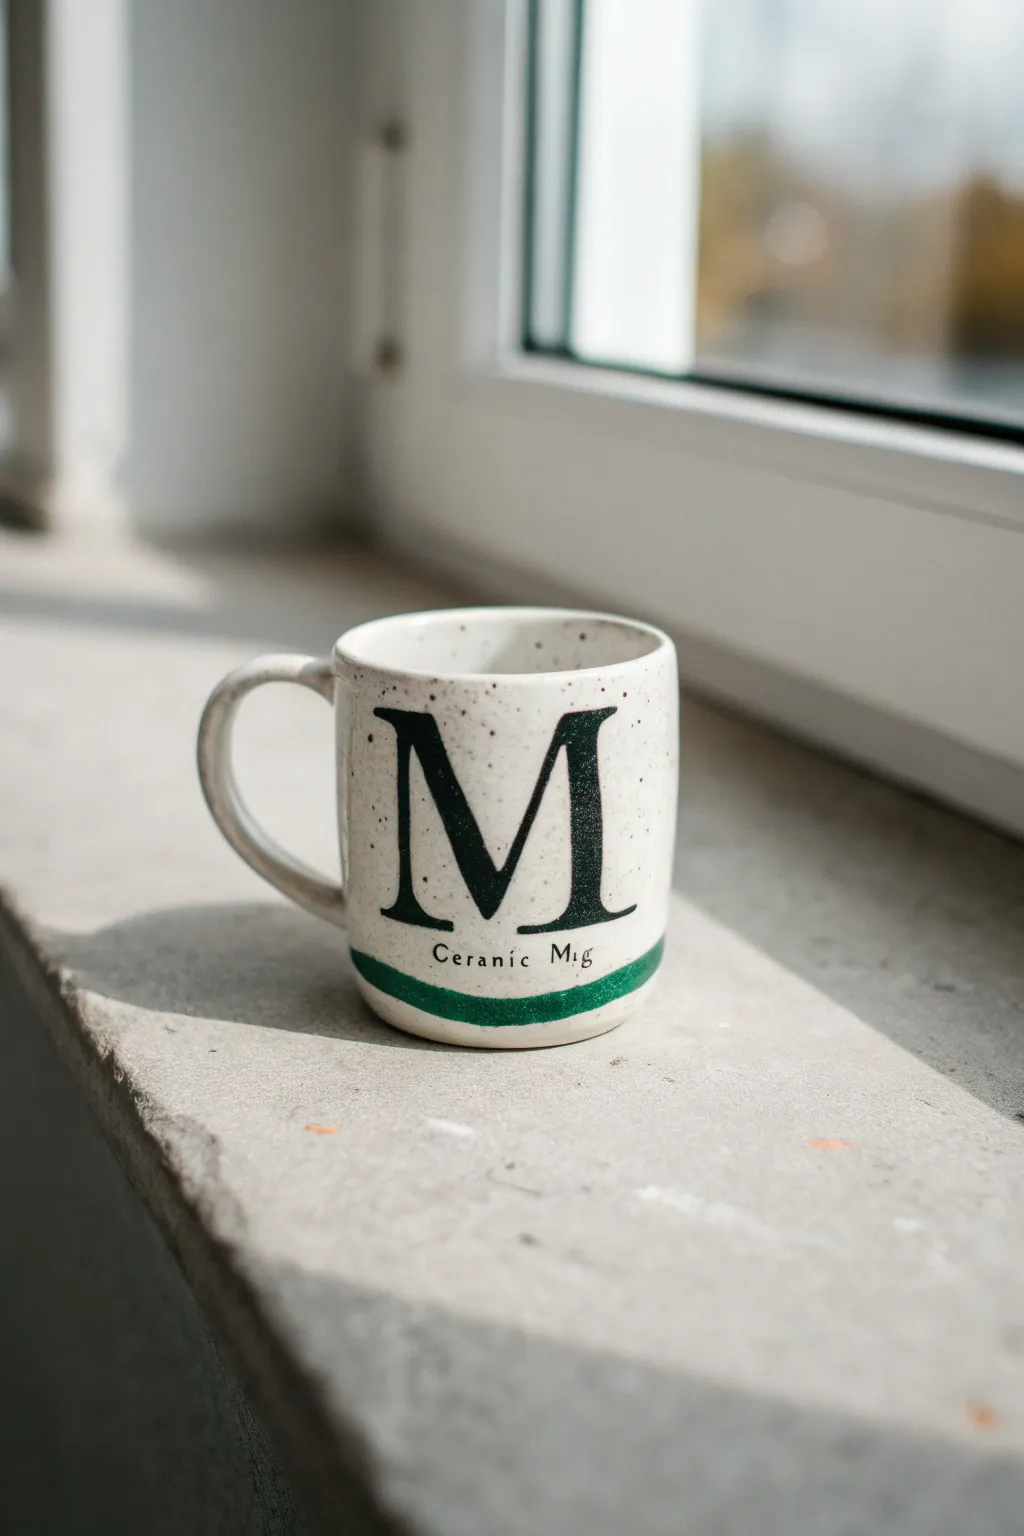
This project combines a rustic, speckled stoneware aesthetic with the clean, masculine lines of traditional typography. By using a bold serif initial and subtle accent text, you can create a personalized mug that feels both handmade and highly professional.
Step-by-Step Tutorial
Materials
- White or cream ceramic mug (preferably stoneware)
- Black porcelain or ceramic paint (gloss finish)
- Forest green porcelain/ceramic paint
- Flat shader brush (size 4 or 6)
- Detail liner brush (size 0 or 00)
- Rubbing alcohol
- Cotton pads
- Masking tape or painters tape
- Printout of a serif letter ‘M’ (or chosen initial)
- Graphite transfer paper
- Pencil
- Old toothbrush or stiff bristle brush
Step 1: Preparation and Speckling
-
Clean the surface:
Before applying any paint, wipe the entire outer surface of the mug with rubbing alcohol on a cotton pad to remove oils and fingerprints. -
Create the speckle mix:
Mix a small amount of black ceramic paint with a tiny drop of water to thin it slightly. You want a consistency that flicks easily but isn’t runny. -
Apply the speckles:
Dip an old toothbrush or stiff bristle brush into the thinned black paint. Hold it near the mug and run your thumb across the bristles to flick tiny splatters randomly across the surface. -
Refine the randomness:
Rotate the mug as you splatter to ensure even coverage. If any blobs get too big, dab them gently with a paper towel. Let this base layer dry completely, usually for about an hour.
Fixing Smudges
Smudged the black paint? Wait for it to dry completely, then gently scrape the excess off with a toothpick or craft knife for a clean edge.
Step 2: Transferring the Monogram
-
Prepare the stencil:
Print your chosen serif letter (like the ‘M’ shown) at a size that fits comfortably on the mug face—usually about 2 to 2.5 inches tall. -
Position the transfer:
Cut a piece of graphite transfer paper slightly larger than your letter. Tape the transfer paper (dark side down) and your printed letter onto the center of the mug. -
Trace the outline:
Using a pencil and firm pressure, trace the outline of the letter. Don’t forget to trace the smaller text underneath—’Ceramic Mvg’ or your chosen name—if you are including it. -
Remove and inspect:
Peel back the paper to reveal the faint graphite guidelines on the ceramic surface. If lines are faint, lightly reinforce them with a pencil.
Step 3: Painting the Design
-
Outline the initial:
Load your liner brush with unthinned black ceramic paint. Carefully paint the outline of the large ‘M’, keeping your hand steady to maintain crisp serif edges. -
Fill in the block letter:
Switch to your flat shader brush to fill in the body of the letter. Apply the paint somewhat thickly to get that opaque, glossy look, but avoid drips. -
Refine edges:
Go back with the liner brush to sharpen the points of the serifs. I find holding my breath for just a second helps stabilize my hand on these sharp corners. -
Paint the subtext:
Using the very tip of your detail brush (size 00), carefully paint the smaller text below the main initial. Use short, deliberate strokes for this typewriter-style font. -
Let the black dry:
Allow the black paint to dry to the touch (about 30 minutes) before moving to the green accent stripe to prevent smudging.
Make it Matte
For a more modern, industrial look, use a matte finish medium over the painted areas before baking to remove the gloss shine.
Step 4: Adding the Green Accent
-
Start the stripe:
Load a clean flat shader brush with forest green paint. You want to create a swooping curve beneath the text. -
Paint the swoop:
Start slightly to the left of the text and pull the brush in a gentle, upward-curving motion toward the right. The line should naturally taper off at the end. -
Clean up:
If any paint went astray, use a damp cotton swab or a toothpick to scrape away mistakes while the paint is still wet. -
Cure the mug:
Follow the specific instructions on your paint bottle for curing. Most require air drying for 24 hours, followed by baking in a home oven to make the design dishwasher safe.
Once baked, your custom monogram mug will be ready for morning coffee and rugged enough for daily use


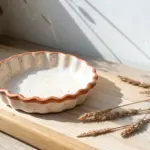
Two-Tone Band With a Clean Edge
This project creates a sophisticated, masculine look with clean lines and subtle texture. By combining a speckled cream top with a solid, dusty slate blue base, you achieve a modern aesthetic that feels both handmade and professional.
Detailed Instructions
Materials
- Plain white ceramic mug (straight sides work best)
- Ceramic paint or porcelain markers (cream/off-white and slate blue/grey)
- Pebeo Porcelaine 150 paints (recommended for durability)
- Masking tape or painter’s tape
- Soft flat paintbrush (medium width)
- Old toothbrush (for speckling)
- Rubbing alcohol
- Paper towels
- Oven (for baking/setting)
Step 1: Preparation and Taping
-
Clean surface:
Begin by washing your plain mug with soap and water. -
Degrease:
Wipe the entire outer surface with rubbing alcohol on a paper towel to remove any invisible oils or fingerprints, ensuring the paint adheres perfectly. -
Measure the band:
Decide where you want the color blocking to start. For this look, aim for the bottom third of the mug. -
Apply tape:
Wrap a strip of masking tape around the circumference of the mug at your chosen height. -
Seal the edge:
Press the bottom edge of the tape down firmly with your thumbnail. This is crucial for getting that crisp line without paint bleeding underneath.
Crisp Line Secret
To prevent paint bleeding under the tape, paint a thin layer of the mug’s base color (white) over the tape edge first to seal it.
Step 2: Painting the Base
-
Mix your color:
Prepare your slate blue paint. If you need to mix colors to get that muted tone, try adding a tiny dot of black or brown to a standard blue. -
First coat:
Apply the slate blue paint to the area below the tape. Use horizontal strokes that follow the curve of the mug. -
Check coverage:
Don’t worry if the first coat looks streaky; thin layers are better for durability. -
Dry slightly:
Let the first coat set for about 15-20 minutes. -
Second coat:
Apply a second layer of blue to deepen the opacity, ensuring you paint slightly onto the tape to guarantee a straight edge. -
Remove tape:
While the paint is still slightly tacky (not fully dry), carefully peel off the masking tape at a 45-degree angle.
Level Up: Texture
Mix baking soda into your acrylic paint before applying the blue base to give the bottom section a gritty, stone-like feel.
Step 3: Detaling and Speckling
-
Prep the top section:
If your mug isn’t already a creamy off-white, paint the upper section carefully, avoiding the blue line you just created. -
Add the rim:
Using a very fine brush and a warm brown paint, carefully trace the very top lip of the mug to create a rustic rim. -
Prepare speckle paint:
Dilute a small amount of brown or dark grey paint with a tiny drop of water. -
Speckle technique:
Dip an old toothbrush into the diluted paint. Test it on a piece of paper first by running your thumb over the bristles. -
Apply texture:
Gently flick the toothbrush bristles to spray fine speckles over the upper cream section of the mug. -
Clean up:
If any large blobs land on the mug, quickly dab them away with a cotton swab.
Step 4: Finishing
-
Cure time:
Allow the mug to air dry for at least 24 hours. I usually leave mine for a full day to be safe. -
Bake:
Place the mug in a cold oven, then turn it to 300°F (150°C). Bake for 30-35 minutes. -
Cool down:
Turn the oven off and let the mug cool completely inside the oven before removing preventing cracking.
Enjoy your morning coffee in a mug that looks like custom pottery from a high-end studio


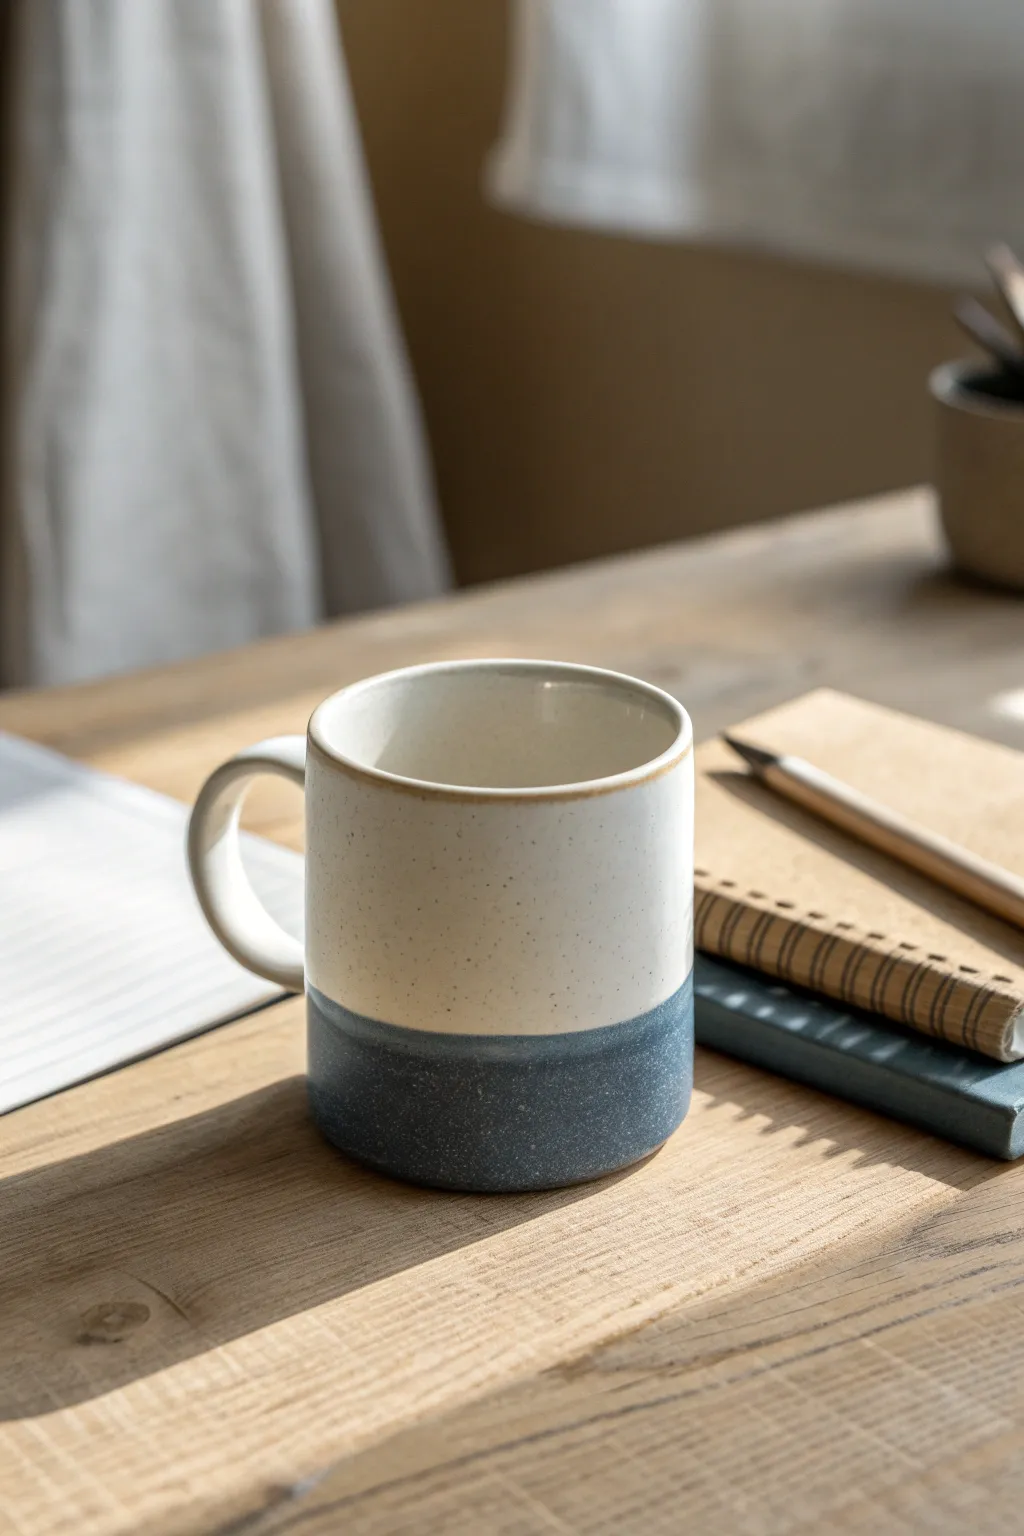
Minimal Geometric Stripes
This mug combines clean lines and rustic charm with a pattern that feels both modern and grounded. The alternating bands of diagonal stripes frame a central row of geometric mountains, making it a perfect, understated design for anyone who appreciates minimal aesthetics.
How-To Guide
Materials
- Plain cream or speckled ceramic mug (clean and dry)
- Black oil-based paint marker (fine tip) OR porcelain paint pen
- Rubbing alcohol
- Cotton pads
- Masking tape or painter’s tape (optional)
- Ruler or soft measuring tape
- Pencil (optional)
- Oven (for curing, if required by your paint pen)
Step 1: Preparation & Layout
-
Clean surface:
Before you start, wipe the entire surface of the mug with rubbing alcohol on a cotton pad. This removes any oils or fingerprints that could prevent the paint from adhering properly. -
Plan the bands:
Visually divide the height of your mug into three approximately equal horizontal sections. You can lightly mark these dividing lines with a pencil if you want a guide, but freehand yields a more organic look. -
Create the framework:
Draw two horizontal lines around the circumference of the mug. These lines will separate the top striped band, the middle triangle band, and the bottom striped band.
Fixing Slips
Make a mistake with the marker? While the ink is wet, a cotton swab dipped in rubbing alcohol acts like a magic eraser. Dry the spot fully before repainting
Step 2: Painting the Design
-
Start the top band:
Beginning at the top rim, draw diagonal lines slanting downward from right to left using your black paint pen. -
Spacing the lines:
Keep the spacing consistent, roughly a quarter-inch apart, but don’t worry about perfection; small variations add character. Stop each line when it hits your first horizontal divider. -
Outline the triangles:
In the middle band, draw a series of triangles resting on the lower horizontal line. The peaks should touch the upper horizontal line. -
Fill solid triangles:
Select every other triangle to be solid. Fill these in completely with the black marker. You might need a second layer for full opacity after the first one dries slightly. -
Fill striped triangles:
For the remaining alternating triangles, draw small horizontal lines inside them. Start from the base and work your way up to the peak. -
Start the bottom band:
Move to the bottom section of the mug. Here, you’ll draw diagonal lines again, but slant them in the opposite direction (downward from left to right). -
Connect the pattern:
Start these lines at the lower horizontal divider and extend them down to the base of the mug. -
Refine the lines:
Check your horizontal divider lines. I find it helps to re-trace over these main dividing lines once the patterns are done to make the borders crisp and bold. -
Check consistency:
Look for any gaps in your solid black triangles or shaky spots in your lines. Use the fine tip to touch up edges carefully.
Rustic Texture
Use a toothpick to gently scratch fine lines into the solid black triangles while the paint is still tacky to create a ‘sgraffito’ woven texture effect
Step 3: Finishing & Curing
-
Let it dry:
Allow the mug to sit undisturbed for at least 24 hours. This ensures the paint is fully dry before the curing process. -
Clean errors:
If you spot any stray marks or smudges outside the design area, carefully scratch them off with a toothpick or wipe with a damp Q-tip before baking. -
Place in cool oven:
Place your mug into a cool, room-temperature oven. Do not preheat the oven, as the sudden temperature change can crack the ceramic. -
Bake the design:
Set the oven to 350°F (175°C) or the temperature specified on your paint pen instructions. Once the oven creates that temp, bake for 30 minutes. -
Cool down slowly:
Turn the oven off and leave the mug inside until the oven has cooled completely. This gradual cooling prevents thermal shock.
Now you have a custom, geometric mug that looks like artisan pottery ready for your morning coffee


Classic Flannel Grid Pattern
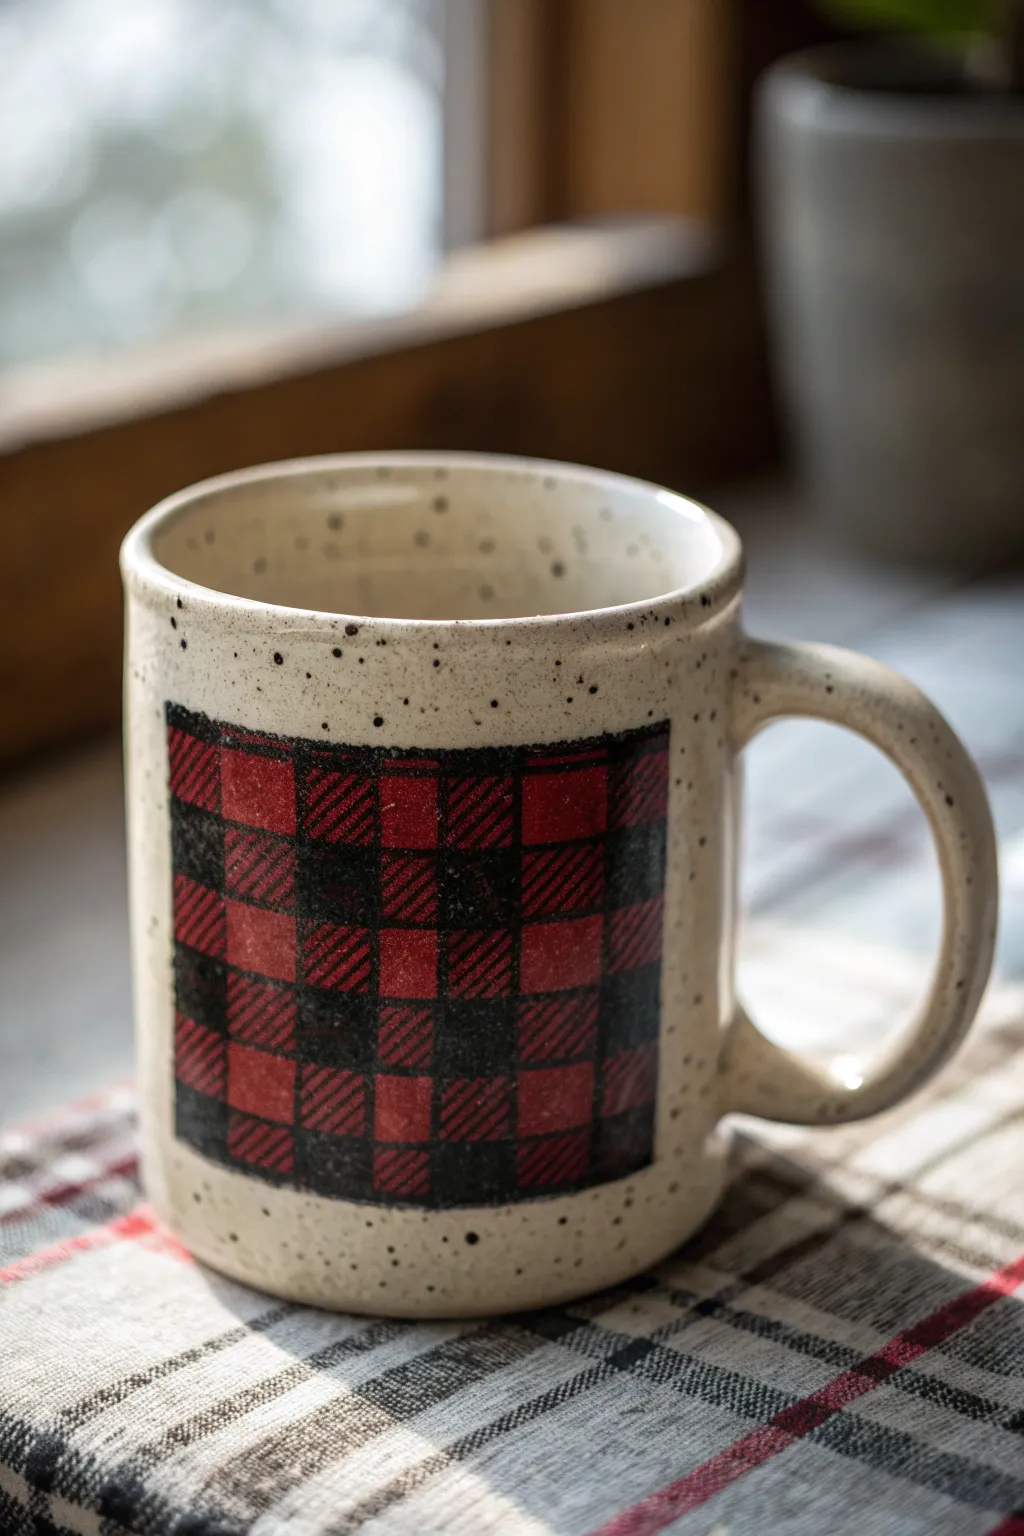
Channel the rugged coziness of a lumberjack shirt with this simple yet striking flannel grid design. The speckled mug base combined with a bold red and black buffalo check creates an instant cabin-in-the-woods classic that any guy will appreciate.
Step-by-Step Tutorial
Materials
- Speckled ceramic mug (cream or beige)
- Pebeo Porcelaine 150 paint (Ruby Red)
- Pebeo Porcelaine 150 paint (anthracite Black)
- Painter’s tape or masking tape (1/4 inch width is ideal)
- Flat shader brush (size 6 or 8)
- Fine liner brush (size 0 or 00)
- Rubbing alcohol
- Cotton rounds
- Ruler
- Oven for baking
Step 1: Preparation and Base Layer
-
Clean the Surface:
Before putting any paint on ceramic, it’s crucial to remove oily fingerprints. Wipe the entire exterior of the mug surface thoroughly with a cotton round soaked in rubbing alcohol and let it air dry completely. -
Tape the Main Boundary:
Decide on the size of your flannel patch. Use painter’s tape to mark off a large, perfect rectangle on the front of the mug. Press the edges of the tape down firmly with your thumbnail to prevent paint seepage. -
Paint the Red Base:
Load your flat shader brush with Ruby Red paint. Apply a solid coat inside your taped rectangle. Since ceramic paint can be translucent, you may need a second coat after the first is touch-dry to get that deep, saturated flannel red. -
Dry Completely:
Allow this red base block to dry completely before attempting any detailed line work. Hurrying this step is the easiest way to muddy your colors, so give it at least an hour.
Step 2: Mapping the Grid
-
Mark Vertical Guidelines:
Once the red paint is hard to the touch, use a pencil lightly or small bits of tape to mark even intervals across the top of your rectangle. These will guide your vertical stripes. -
Paint Vertical Stripes:
Mix a small amount of black into your red to create a dark maroon shadow tone. Using the flat brush, paint vertical stripes over the red base at the intervals you marked. Keep these semi-transparent so the red still glows through slightly. -
Paint Horizontal Stripes:
Repeat the process horizontally using the same maroon mixture. Where the vertical and horizontal stripes cross, the color naturally gets darker, starting to form that signature buffalo plaid check pattern.
Uneven Lines?
If your hand is shaky, cut thin strips of low-tack washi tape to mask off the internal grid lines. Paint over them, then peel for perfect geometric squares.
Step 3: Detailing the Texture
-
Define the Darkest Squares:
Identify the squares where the vertical and horizontal maroon stripes intersect. Fill these specific squares in with solid Anthracite Black paint to create the deepest contrast points in the pattern. -
Create the Diagonal Texture:
Buffalo plaid isn’t just solid blocks; it looks like woven fabric. Switch to your fine liner brush and load it with black paint. I like to thin the paint slightly with a drop of water for smoother flow here. -
Hatching the Light Squares:
In the squares that are still pure red (no stripes), paint very fine, diagonal hatch marks. This mimics the thread texture of flannel fabric. -
Hatching the Medium Squares:
Add similar diagonal hatch lines to the maroon striped sections, but orient them in the opposite direction if you want to create a woven look, or keep them uniform for a simpler style. -
Clean Up Edges:
Carefully peel away the main border tape while the paint is still slightly tacky to avoid chipping. If any paint bled under the tape, use a damp Q-tip or a toothpick to gently scrape it away for a crisp rectangular edge.
Make It Personal
Add a custom touch by painting a small ‘leather’ patch silhouette in the corner of the plaid with the recipient’s initials in gold or tan paint.
Step 4: Finishing Touches
-
Add Texture Details:
The image shows a slightly rustic, imperfect look. You can gently stipple a little dry black paint over the solid black squares to soften them so they don’t look like stickers. -
Wait for Cure Time:
Most porcelain paints require a significant air-drying time—usually 24 hours—before baking. Don’t rush this, or the paint might bubble in the oven. -
Bake to Set:
Place the mug in a cold oven. Set the temperature to 300°F (150°C) and bake for 35 minutes. Turn the oven off and let the mug cool down completely inside before removing it to prevent cracking.
Once baked, this sturdy mug is ready for black coffee and early mornings at the campsite

The Complete Guide to Pottery Troubleshooting
Uncover the most common ceramic mistakes—from cracking clay to failed glazes—and learn how to fix them fast.
Camping Badge Icon
Capture the spirit of the outdoors with this clean, badge-style line art design that looks professionally printed. The stark contrast of black ink on white ceramic creates a rugged yet modern aesthetic perfect for waiting out the sunrise with a hot coffee.
Step-by-Step
Materials
- White ceramic mug (clean and dry)
- Black oil-based paint marker (fine point)
- Black oil-based paint marker (extra-fine point)
- Graphite transfer paper (optional)
- Pencil and eraser
- Printed template or sketch paper
- Masking tape
- Rubbing alcohol
- Cotton rounds
- Oven (for curing)
Step 1: Preparation & Layout
-
Clean surface:
Before making a single mark, wipe down the entire exterior of the mug with rubbing alcohol and a cotton round to remove any oils or fingerprints handling. -
Draft the badge shape:
Sketch a simple shield or crest shape on a piece of scrap paper first to get the proportions right. It should be a five-sided polygon: flat top, two vertical sides, and two angled bottom lines meeting at a point. -
Transfer or freehand:
If you aren’t confident freehanding, tape your paper sketch over a piece of graphite transfer paper directly onto the mug. Trace the outline firmly with a pencil. -
Establish the shield outline:
Using the fine point black marker, carefully draw the main outer border of the shield. Keep your hand steady and pull the pen towards you rather than pushing it away for cleaner lines.
Fixing Smudges
Smudged a line? Don’t panic. Wait for it to dry completely, then gently scrape the error off with a craft knife or a wooden toothpick before redrawing.
Step 2: Drawing the Base Elements
-
Draw the tent triangle:
Find the visual center of your shield. Draw a medium-sized equilateral triangle for the front of the tent. Add a vertical line down the middle to represent the tent flaps. -
Add dimension to the tent:
Draw diagonal lines extending back from the base and peak of the triangle to create a 3D effect shown in the example. Connect them to form the side wall of the tent. -
Fill the tent opening:
Color in the triangular opening of the tent completely with the fine marker. This solid block of black anchors the design and draws the eye. -
Create the banner:
Draw a horizontal ribbon banner across the bottom third of the shield, overlaying the bottom of the tent. Ensure the ends of the ribbon fold back behind the main strip for depth. -
Add banner text:
Switch to your extra-fine point marker. Carefully letter a short phrase inside the banner, like ‘CAMP LIFE,’ a name, or a date. Use simple block capital letters.
Custom Colors
Make the tent pop by using a deep forest green or burnt orange paint marker for the canvas area, keeping the rest of the line work strictly black.
Step 3: Adding Nature Details
-
Placement of the trees:
Position vertical lines on either side of the tent to serve as tree trunks. I find varying the heights slightly makes the composition feel more organic. -
Draw pine branches:
Using the extra-fine marker, draw downward-sloping zigzag lines starting from the top of the trunks. Keep the strokes loose and spaced out to mimic evergreen branches. -
Add the crescent moon:
In the upper center space above the tent, draw a small crescent moon shape. Outline it first, then fill it in solid black for high contrast. -
Scatter the stars:
Draw two or three diamond-shaped stars (four curved lines meeting at points) around the moon. Add tiny dots elsewhere to fill negative space without cluttering it. -
Refine the lines:
Go back over your main shield outline to thicken it slightly, giving the badge a bold, sticker-like appearance.
Step 4: Cleanup & Curing
-
Correct mistakes:
If a line went stray, use a cotton swab dipped in rubbing alcohol to wipe it away. Do this immediately while the paint is wet for best results. -
Dry thoroughly:
Let the mug sit undisturbed for at least 24 hours to allow the paint solvents to evaporate completely before baking. -
Bake to set:
Place the mug in a cool oven, then heat to 375°F (190°C). Bake for 45 minutes to cure the paint and make it dishwasher resistant. -
Cool down:
Turn off the oven and leave the mug inside until it cools completely to room temperature prevents the ceramic from cracking due to thermal shock.
This rugged, personalized mug is now ready to be a trusty companion on your next outdoor adventure
Topographic Map Lines
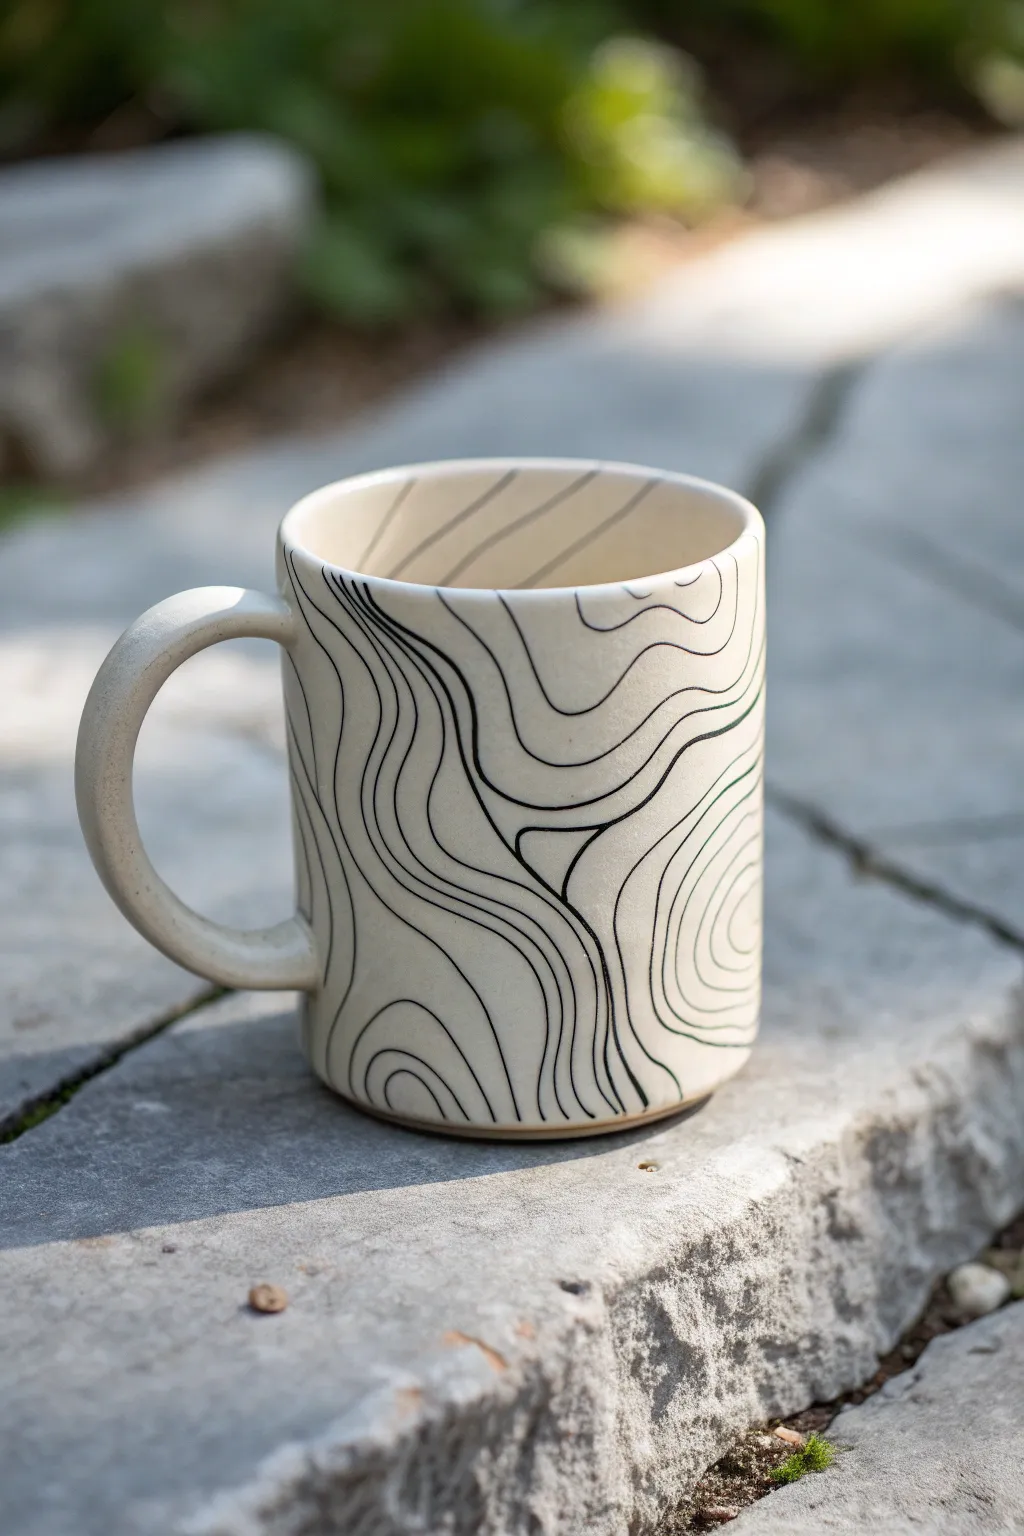
Capture the rugged spirit of the outdoors on your morning coffee cup with this topographic map design. The organic, wavy lines mimic elevation contours, creating a sophisticated and modern look that is surprisingly easy to achieve.
How-To Guide
Materials
- Plain cream or off-white ceramic mug (glazed or bisque)
- Black porcelain paint pen (fine tip) OR black underglaze with a liner brush
- Rubbing alcohol and cotton pads
- Pencil (optional)
- Small container of water (if using glaze)
- Clean rag or paper towels
- Oven (for curing paint) or Kiln (if using underglaze)
Step 1: Preparation
-
Clean surface:
Begin by thoroughly cleaning the exterior of your mug with rubbing alcohol applied to a cotton pad. This removes any oils or fingerprints that might resist the paint or glaze. -
Dry completely:
Let the mug air dry for a few minutes. Avoid touching the main body of the mug with your bare hands after this point; try to hold it by the handle or the inside rim. -
Plan your peaks:
Visualize where your ‘mountains’ will be. Topographic maps usually have two or three main focal points where the circles are smallest. You can lightly sketch these focal points with a pencil if you’re nervous, but freehanding often feels more organic.
Step 2: Drawing the Base Contours
-
Start the first peak:
Using your fine-tip black porcelain pen or liner brush, draw a small, slightly irregular oval or bean shape. This represents the highest point of elevation on your map. -
Create the second ring:
Draw a second line around the first shape. Don’t make it a perfect parallel; let the distance between the lines vary slightly, getting closer in steep areas and farther apart in flatter areas. -
Add a second peak:
Move to a different area of the mug, perhaps near the handle or lower down. Draw another small, irregular starting shape to anchor a separate elevation zone. -
Expand the contours:
Continue drawing rings around your starting points. Keep your hand loose and allow the lines to wobble naturally—perfect lines look artificial, while shaky lines look like rugged terrain. -
Check line weight:
Ensure your lines remain consistent in thickness. If using a brush, reload frequently to avoid dry brushing. I find that maintaining a steady, moderate speed helps prevent ink blobs.
Smudge Patrol
Make a mistake? If the paint is wet, wipe with alcohol on a cotton swab. If dry, utilize a razor blade to gently scratch off the errant line without damaging the glaze underneath.
Step 3: Connecting the Terrain
-
Determine convergence:
As your concentric rings grow larger, they will eventually meet the rings from your other peak. When they get close, stop drawing full circles. -
Merge the lines:
Instead of crossing lines, begin drawing lines that wrap around *both* distinct peaks, essentially encasing them in a larger contour line. This unifies the map. -
Fill the gaps:
Look for empty creamy spaces between line groups. Add ‘saddle’ lines—gently curved lines that sit between two peaks without fully circling either one. -
Mind the handle:
When you reach the handle, decide on a style: either stop the lines abruptly at the handle attachment or carefully trace lines that disappear ‘under’ it to continue on the other side. -
Extend to the rim:
Continue the pattern all the way up. Allow some lines to run off the top edge of the rim for an immersive infinite-pattern look. -
Address the bottom:
similarly, bring your wavy lines all the way down to the foot of the mug. A clean stop right before the unglazed bottom ring usually looks best. -
Review and refine:
Step back and look at the whole mug. If a gap looks too wide compared to the rest, simply add an intermediate line between two existing ones.
Level Up: Elevation Markers
Add tiny numbers (e.g., ‘4500’) periodically along a few thicker lines to mimic real elevation markers found on actual topographic maps.
Step 4: Finishing Touches
-
Clean up errors:
If you made a smudge with a paint pen, use a damp Q-tip or a toothpick to gently scrape or wipe it away while it’s still wet. -
Interior detail:
For a pro touch, continue two or three lines just over the lip and onto the inner wall of the mug, fading them out as they go down. -
Dry time:
Allow the paint or underglaze to dry completely. For paint pens, this is usually 24 hours. For underglaze, wait until it’s chalky and dry to the touch. -
Bake or fire:
If using a porcelain paint pen, bake the mug in your home oven according to the manufacturer’s specific temperature instructions. If using ceramic underglaze, apply a clear glaze over the top and have it fired in a kiln.
Now you have a rugged, custom vessel ready for your next adventure


What Really Happens Inside the Kiln
Learn how time and temperature work together inside the kiln to transform clay into durable ceramic.
Night Sky and Constellation Dots
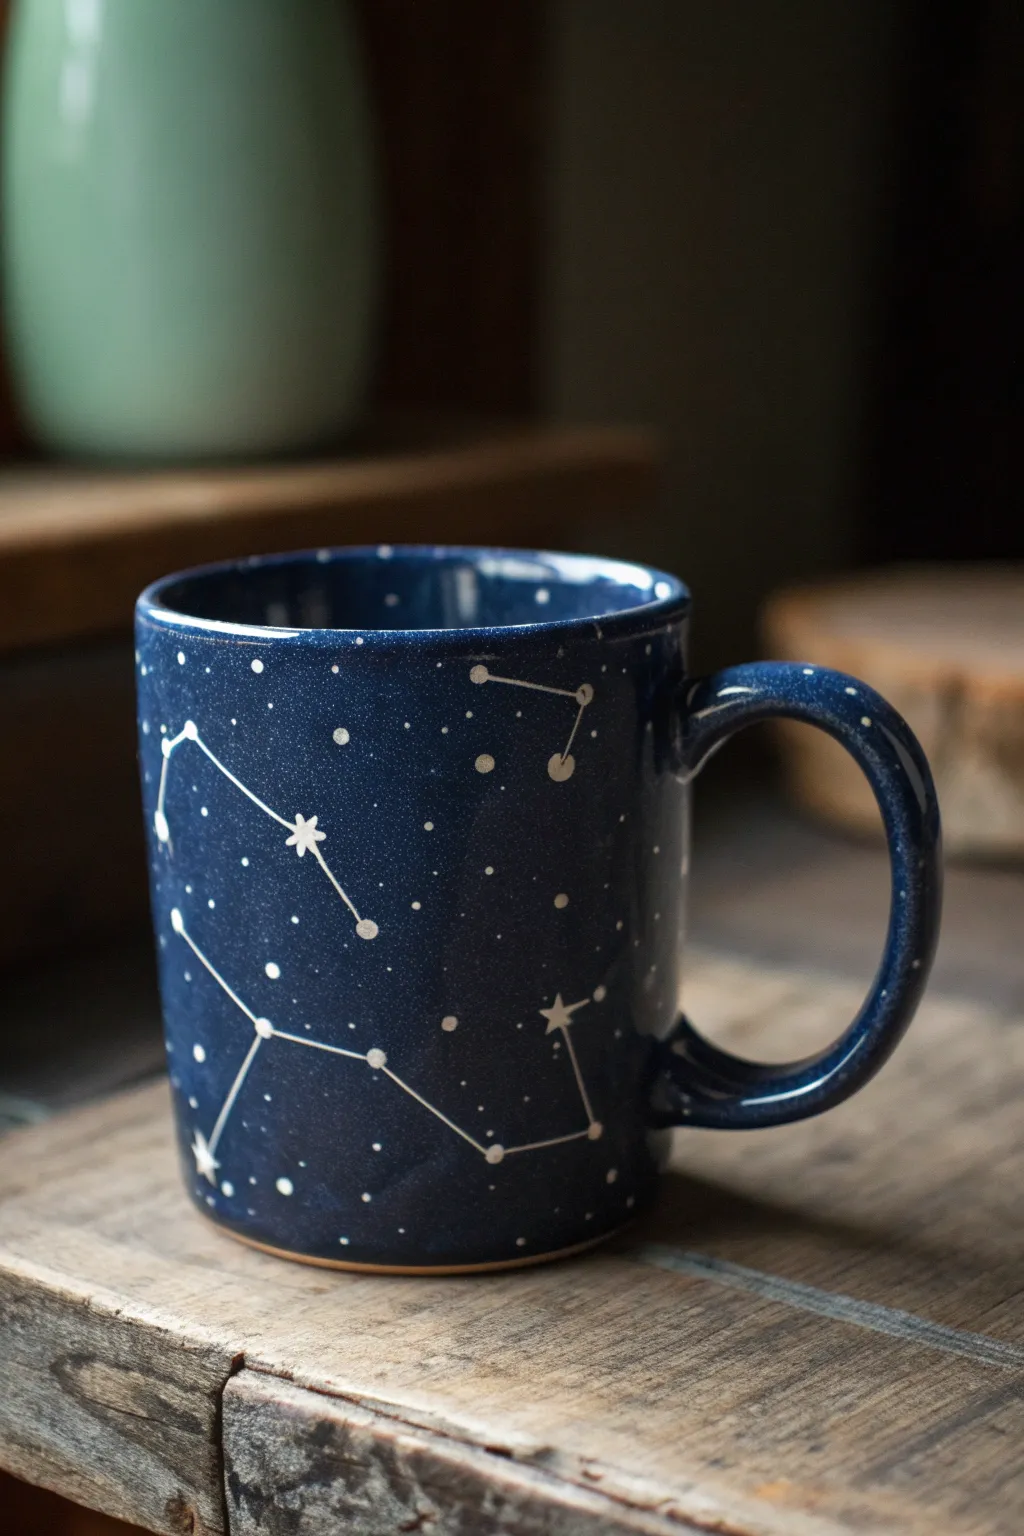
Transform a plain mug into a stunning window to the cosmos with this detailed constellation design. By layering a deep, galaxy-blue base with delicate white speckles and precise constellations, you’ll create a sophisticated piece that looks professionally glazed.
Step-by-Step Guide
Materials
- Plain white ceramic mug (clean and dry)
- Deep glossy blue ceramic paint (e.g., Pebeo Porcelaine 150 or similar enamel)
- White ceramic paint or paint pen
- Silver ceramic paint (optional, for star accents)
- Flat shader brush (medium size)
- Fine detail liner brush (size 0 or 00)
- Old toothbrush
- Rubbing alcohol
- Soft cloth
- Oven (for curing)
Step 1: Preparation & Base Coat
-
Clean surface:
Begin by wiping down your ceramic mug thoroughly with a cloth dampened in rubbing alcohol. This removes any finger oils or dust that might prevent the paint from adhering properly. -
First layer application:
Using your flat shader brush, apply an even coat of the deep blue ceramic paint. Work in smooth, horizontal strokes to minimize brush texture. Don’t worry if it looks slightly streaky; subsequent coats will fix this. -
Handle coverage:
Carefully paint the handle, ensuring you get into the crevices where the handle meets the mug body. Leave the very bottom rim unpainted so the mug can sit flat in the oven later. -
Dry and repeat:
Let the first coat dry for about an hour (or according to your paint brand’s instructions). Apply a second, perpendicular coat to ensure rich, opaque coverage that mimics a deep glaze. -
Full dry time:
Allow the blue base to dry completely for at least 24 hours. The surface needs to be hard and non-tacky before we add the delicate stars.
Step 2: Creating the Galaxy
-
Prepare the speckles:
Dilute a small mount of white ceramic paint with a tiny drop of water or paint thinner just to make it fluid. Dip the bristles of an old toothbrush into this mixture. -
Splatter technique:
Hold the toothbrush about 6 inches from the mug. Run your thumb across the bristles to flick tiny specks of white paint onto the blue surface. Rotate the mug to get coverage on all sides, including the handle. -
Refining the stars:
If any splatters land too clumped together, quickly wipe them away with a damp Q-tip. You want a fine mist that resembles distant stars. -
Allow to set:
Let these speckles dry for about 30 minutes so you don’t smudge them while painting the constellations.
Starry Splatter Advice
Test your toothbrush flicking technique on a piece of dark scrap paper or cardboard first. This helps you gauge how much pressure to use for fine mist versus large drops.
Step 3: Mapping the Constellations
-
Plotting star points:
Using a fine detail brush or a white paint pen, place larger dots where the main stars of your chosen constellation will be. Common choices like the Big Dipper or Orion work perfectly here. -
Adding star variation:
To make the main stars stand out, paint small 5-point star shapes over a few of your larger dots. I find that varying the size of these main stars adds depth to the design. -
Connecting the dots:
With the finest liner brush you have (or a fine-tip paint pen), draw thin, straight lines connecting your star points. Use a steady hand and try to make these lines thinner than the stars themselves. -
Adding highlight dots:
Dip the back end of your paintbrush (the wooden handle) into white paint. Dot a few extra medium-sized stars randomly around the constellations to fill empty visual space. -
Optional silver accent:
For a subtle shimmer, add a tiny dot of silver paint to the center of the largest stars once the white paint is touch-dry.
Level Up: Hidden Message
Use your white paint pen to write a small date or initials on the bottom of the mug or inside the rim, commemorating a special night sky event.
Step 4: Curing
-
Final drying phase:
Let the finished design air dry for a full 24 hours. This is crucial—if moisture is trapped under the surface, the paint might bubble in the oven. -
Oven loading:
Place the mug into a cold oven. Do not preheat the oven, as the sudden temperature change can crack the ceramic. -
Baking process:
Set the oven to 300°F (150°C) or the temperature specified by your paint manufacturer. Once the oven hits that temperature, bake for 35 minutes. -
Cooling down:
Turn the oven off and leave the mug inside until it is completely cool. Removing it while hot can cause the glaze to weaken.
Enjoy your morning coffee while gazing into your own personal galaxy
Simple Beard or Profile Line Art
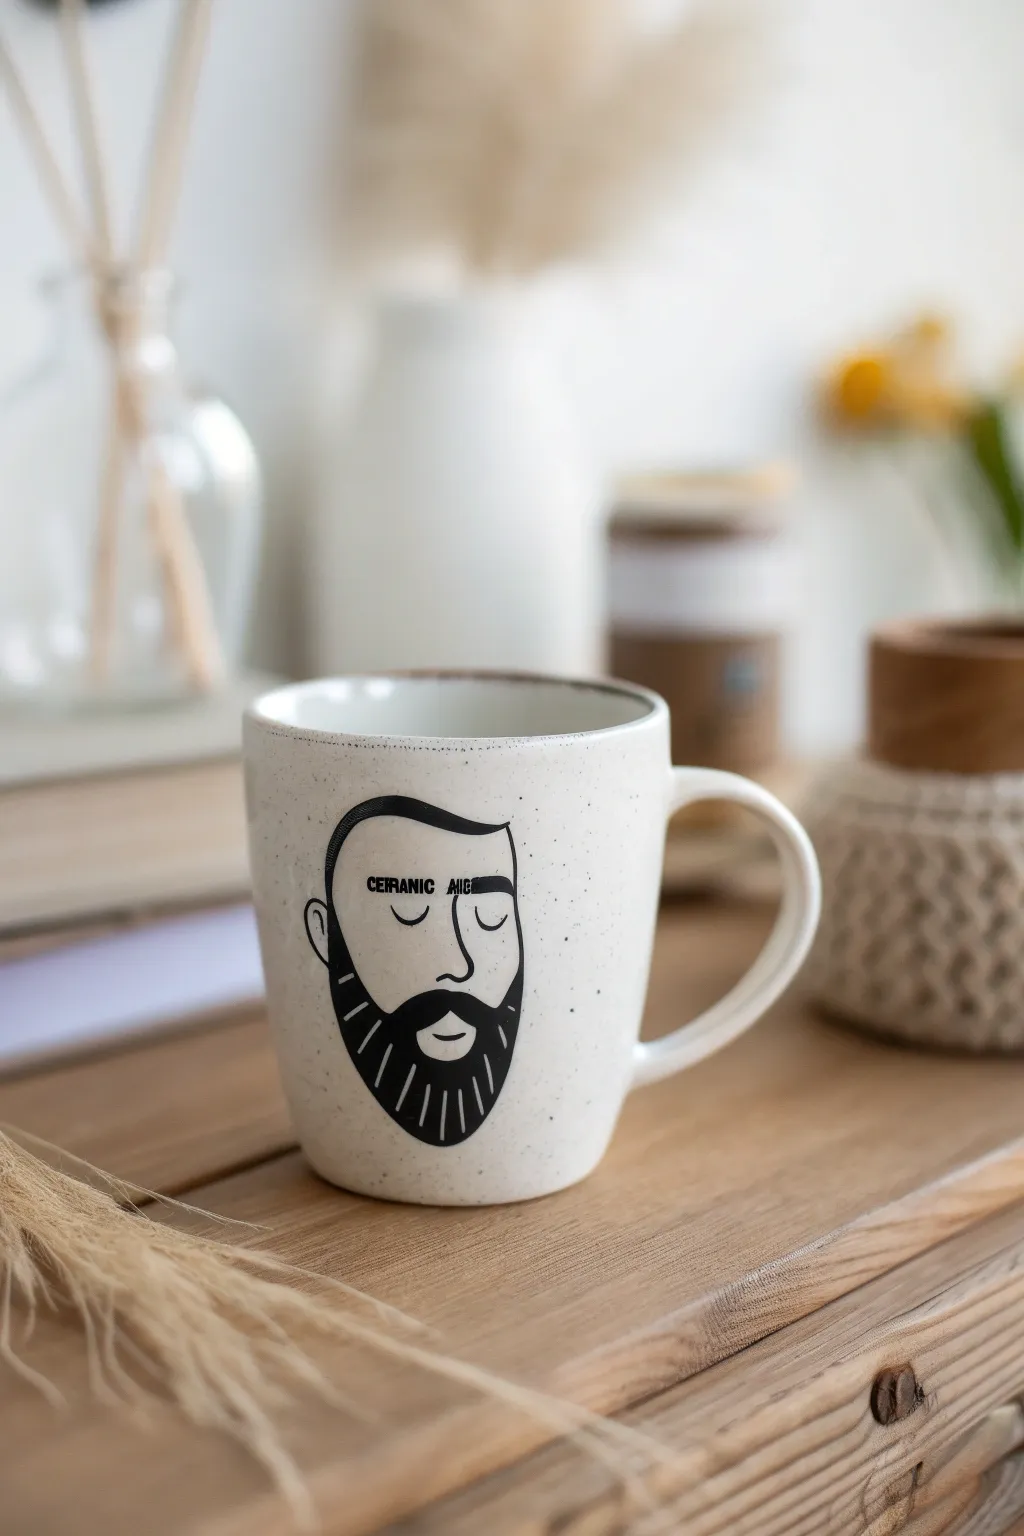
Transform a plain mug into a personalized piece with this minimalist bearded portrait design, perfect for gifting or adding character to your morning coffee. The speckled ceramic base combined with bold black lines creates a modern, masculine aesthetic that looks professionally crafted yet is surprisingly simple to achieve.
Step-by-Step
Materials
- Plain white or cream ceramic mug (preferably speckled)
- Black oil-based paint pen (fine point)
- Black oil-based paint pen (medium point)
- Graphite transfer paper
- Pencil
- Painter’s tape
- Rubbing alcohol
- Cotton pads
- Cotton swabs
- Oven for baking
Step 1: Preparation & Planning
-
Clean the Surface:
Before you begin any drawing, thoroughly wipe down the entire outer surface of the mug with rubbing alcohol and a cotton pad. This removes oils and fingerprints that could prevent the paint from adhering properly. -
Draft Your Design:
Sketch your bearded face design on a piece of paper first to get the proportions right. Aim for a simple U-shape for the beard, a curved line for the hair, and closed semi-circles for the eyes. Size the sketch so it fits comfortably on the front of your mug. -
Transfer the Outline:
Cut a piece of graphite transfer paper slightly larger than your design. Tape your sketch over the transfer paper onto the desired spot on the mug. Trace over your lines firmly with a pencil to leave a faint guide on the ceramic.
Shake It Up
Store your oil-based paint pens horizontally before use. Shake vigorously for 30 seconds to ensure the pigment is fully mixed for opaque, solid black lines.
Step 2: Outlining the Portrait
-
Test Your Pen:
Give your black oil-based paint pen a good shake and press the nib down on a scrap piece of paper to get the paint flowing smoothly before touching the mug. -
Draw the Hairline:
Using the medium point pen, start at the top of the head. Draw a confident curve for the hair swoop, extending from the left side of the forehead across to the right. -
Define the Ear and Jaw:
Continue the line down the left side to create the ear loop, then extend it downwards to form the sideburn area. -
Shape the Beard Outline:
Draw the outer contour of the beard, creating a deep U-shape that defines the jawline and chin, connecting back up to the right side of the face. -
Inner Face Details:
Switch to the fine point pen for delicate features. Draw two simple downward curves for the closed eyes and a small curved line for the nose bridge. -
Add the Mustache:
Switch back to the medium point pen. Draw the mustache shape directly under the nose, making it thick and prominent. Leave a small negative space or draw a thin line for the mouth just below it.
Add Personality
Customize the portrait to match the recipient! Add glasses, change the hairstyle, or shape the beard differently to verify it looks like your friend or partner.
Step 3: Filling & Refining
-
Fill the Beard:
Carefully fill in the main mass of the beard with the medium pen. Instead of solid black, draw vertical lines close together to simulate hair texture, or fill it solid if you prefer a graphic look. The reference design uses a solid fill with white stripes left out, so plan your negative space beforehand if copying exactly. -
Detail the Hair:
Fill in the hair section on top, ensuring the black ink is opaque and even. I find doing a second coat here helps avoid streakiness. -
Clean Up Mistakes:
If a line goes astray, dip a cotton swab in rubbing alcohol and gently wipe away the wet paint. Let the area dry completely before re-drawing. -
Add Text (Optional):
If you want to include the ‘CERAMIC MUG’ text on the forehead like the original, use the fine point pen and write in small block letters. This adds a quirky, modern touch. -
Final Inspection:
Look over the entire illustration. Thicken any lines that look weak and ensure the black areas are fully saturated. Let the mug dry for at least 24 hours.
Step 4: Curing
-
Bake to Set:
Place the mug in a cold oven. Turn the heat to 350°F (175°C). Once the oven reaches temperature, set a timer for 30 minutes. -
Cool Down:
Turn off the oven but leave the mug inside until the oven cools down completely. Removing it while hot can cause cracking due to thermal shock.
This custom mug is now ready to hold your favorite hot beverage and start conversations

TRACK YOUR CERAMIC JOURNEY
Capture glaze tests, firing details, and creative progress—all in one simple printable. Make your projects easier to repeat and improve.
Workshop Tools Mini Icons
For the fixer-upper or DIY enthusiast, this workshop-themed mug features clean, line-art icons of wrenches, screwdrivers, and tools scattered across a speckled surface. The design relies on simple geometric shapes and confident linework to create a modern, masculine aesthetic.
Step-by-Step Guide
Materials
- Plain ceramic mug (cream or off-white works best)
- Black oil-based paint marker (fine point)
- Black oil-based paint marker (extra-fine point)
- Rubbing alcohol
- Cotton pads
- Graphite transfer paper (optional)
- Pencil and scrap paper
- Oven (for curing)
Step 1: Preparation & Planning
-
Clean the surface:
Before laying down any ink, wipe the entire exterior of the mug with rubbing alcohol and a cotton pad. This removes invisible oils from your fingers that can prevent the paint from adhering properly. -
Sketch your icons:
On a piece of scrap paper, practice drawing simple tool shapes. Focus on open-ended wrenches, screwdrivers with distinct handles, and generic tool silhouettes. Keep them small—about half an inch to an inch in size. -
Plan the layout:
Visualize a random, tossed patterns. You don’t want the tools to line up in rows; instead, rotate them at different angles to create a dynamic, scattered effect like tools thrown on a workbench.
Fixing Smudges
If you accidentally smudge wet ink with your hand, don’t panic. Use a Q-tip dipped in nail polish remover for precise cleanup, rather than a broad wipe which smears it further.
Step 2: Drafting the Design
-
Initial outline (Optional):
If you aren’t confident freehanding, use a pencil to lightly sketch the placement of your largest tools directly on the ceramic. Because the mug is glazed, pencil marks will wipe off easily later. -
Anchor the pattern:
Start by drawing three or four large wrenches spaced far apart using the fine point marker. These will serve as your main anchor points to build the rest of the pattern around. -
Draw the wrenches:
For the wrenches, draw a ‘C’ shape for the head and two parallel lines for the handle. Close the bottom with a small curve. I like to add a tiny line inside the handle to suggest a grip area. -
Add screwdrivers:
In the spaces between wrenches, add screwdrivers. Draw a thin rectangle for the shaft and a wider, slightly tapered rectangle for the handle. Add a small horizontal line where the shaft meets the handle. -
Fill the gaps:
Look for larger empty spaces and fill them with other shapes like simple chisels or nut drivers. Rotate the mug constantly as you work to ensure you aren’t favoring one angle.
Step 3: Refining & Detailing
-
Thicken selected lines:
Go back over the main outlines of the tools with your fine point marker. A slightly bolder outline helps the tools pop against the cream background. -
Add internal details:
Switch to your extra-fine point marker. Add tiny details like the threads on a screwdriver handle or the hole at the end of a wrench handle. -
Create the ‘speckled’ look:
This mug has a faux-stone finish. Create this by gently tapping the tip of your extra-fine marker against the ceramic to make tiny dots. -
Vary dot density:
Cluster some dots closer to the tool icons and leave other areas sparser. Include a few slightly larger dots (press harder) to make the texture look natural and uneven. -
Check the rim:
Don’t forget the areas near the rim and the handle. Add a partial tool icon peeking over the bottom edge or near the handle to make the pattern feel continuous. -
Clean up mistakes:
If a line went crooked, dampen a cotton swab with a little rubbing alcohol and carefully wipe the error away. Let that spot dry completely before redrawing.
Level Up: Hardware Handles
Paint the handle of the mug solid black or grey to mimic the heavy rubber grip of a power tool, or draw measuring tape increments along the handle’s spine.
Step 4: Curing
-
Dry time:
Let the mug sit undisturbed for at least 24 hours. This allows the oil-based paint to surface-dry and settle before the heat treatment. -
Load the oven:
Place the mug into a cold oven. Do not preheat the oven, as the sudden temperature change can crack the ceramic. -
Bake the design:
Set the oven to 350°F (175°C). Once it reaches temperature, set a timer for 30 minutes. The heat cures the paint to the glaze. -
Cool down:
Turn off the oven and leave the door closed. Let the mug cool down completely inside the oven (usually a few hours) before removing it.
Now you have a rugged, custom vessel worthy of the morning workshop coffee break
Sporty Number Circle Emblem
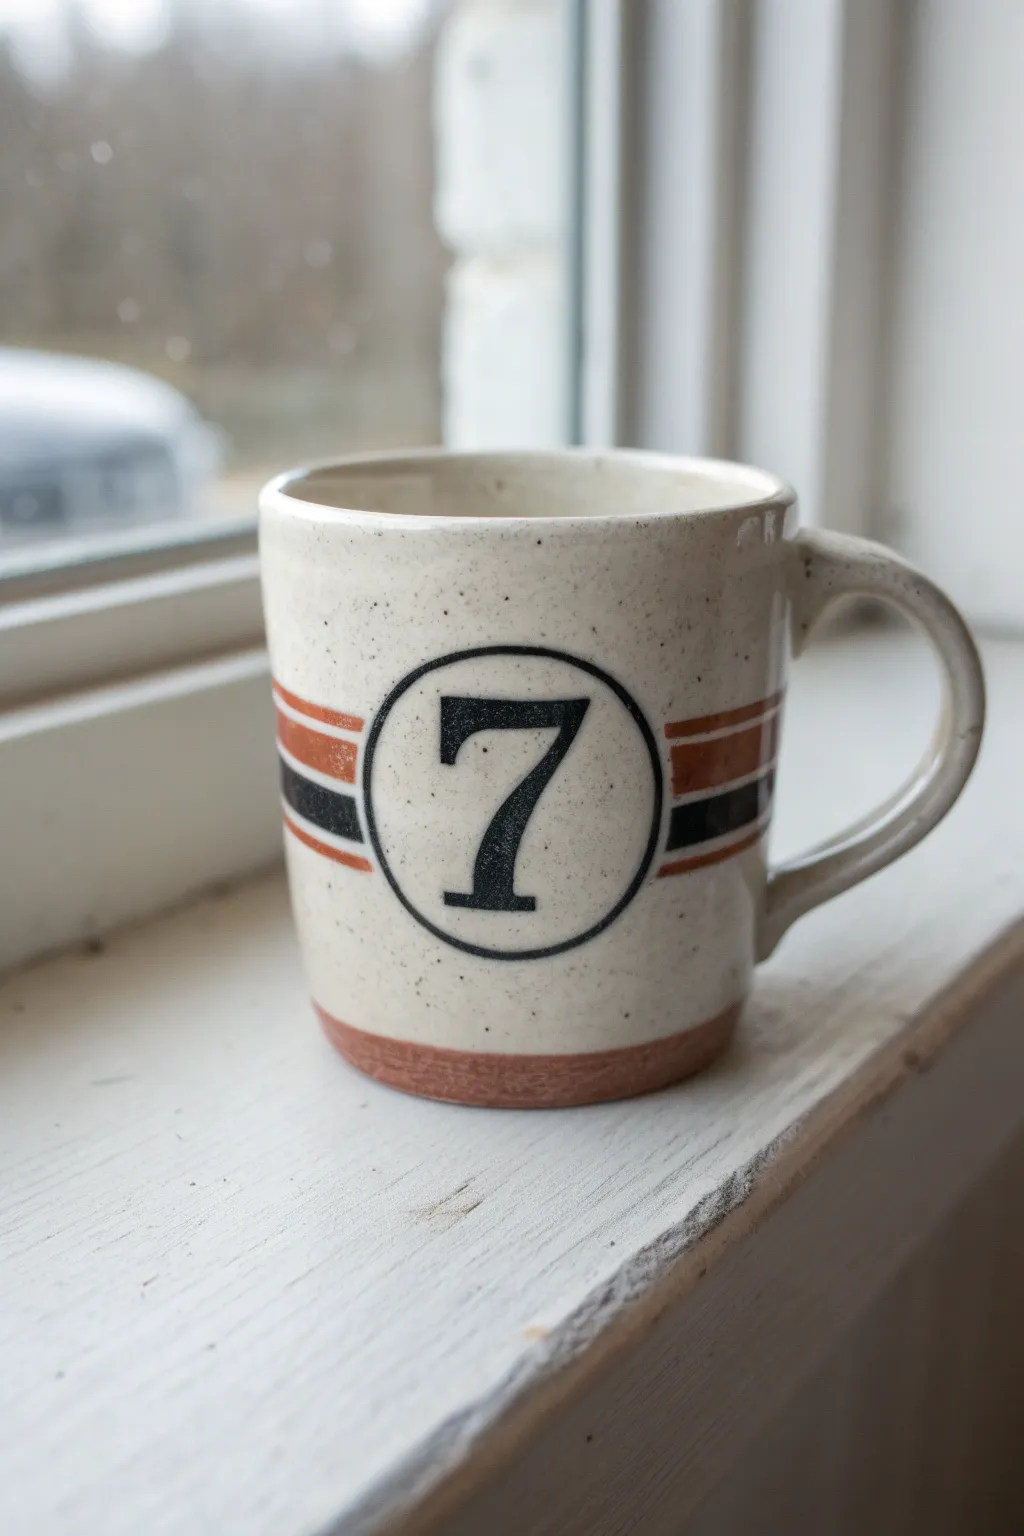
Channel a vintage sports vibe with this bold, minimalist design featuring classic racing stripes and a number emblem. The combination of clean lines, rustic speckles, and retro colors makes this a timeless gift that looks professionally crafted.
Step-by-Step Tutorial
Materials
- White or cream ceramic mug (preferably with a speckled glaze)
- Pebeo Porcelaine 150 paints (Black, Rust/Terracotta)
- Rubbing alcohol
- Cotton pads
- Fine liner brush (size 00 or 0)
- Flat shader brush (size 4 or 6)
- Masking tape or painter’s tape (1/4 inch width is ideal)
- Pencil and paper (for stencil)
- Scissors
Step 1: Preparation and Stenciling
-
Clean surface:
Begin by thoroughly wiping down the outside of your mug with rubbing alcohol on a cotton pad to remove any oils or fingerprints that could prevent paint adhesion. -
Create number template:
Draw a circle about 2 inches in diameter on a piece of paper, and sketch a classic serif number ‘7’ (or your chosen number) inside it to create a template. -
Transfer positioning:
Cut out your paper circle and tape it temporarily to the center of the mug’s face to verify the size and position feels right before painting. -
Draw the circle guideline:
Once satisfied with the placement, lightly trace around your paper circle using a pencil; the graphite will burn off later in the oven.
Uneven Circles?
If painting a perfect circle is tough, trace the rim of a small shot glass or bottle cap directly onto the mug with a pencil first.
Step 2: Painting the Emblem
-
Outline the circle:
Load your fine liner brush with black porcelain paint. Carefully paint over your pencil circle line, keeping your hand steady to maintain a consistent line thickness. -
Clean up edges:
If the circle isn’t perfectly round, use a slightly damp cotton swab or toothpick to gently nudge or wipe away excess wet paint. -
Sketch the number:
Freehand the number ‘7’ inside the circle using your pencil guideline first, paying attention to the serif shape at the top and base. -
Paint the number:
Using the same black paint and fine liner brush, fill in the number. Take your time with the corners to keep them sharp and crisp. -
Dry the emblem:
Allow the number and circle to dry for at least 30 minutes before moving on to the stripes to avoid smudging your work.
Step 3: Adding Racing Stripes
-
Taping the top stripe:
Apply two horizontal strips of masking tape about 5mm apart, starting from the handle and ending right at the edge of your black circle. -
Paint the rust stripe:
Fill the space between the tape with Rust/Terracotta paint using your flat shader brush. I find distinct brushstrokes add to the handmade charm here. -
Remove tape:
Carefully peel back the tape while the paint is still slightly wet to ensure a clean, crisp edge. -
Taping the bottom stripe:
Position new tape strips below the rust stripe to create a gap for the black stripe. This stripe should align with the lower portion of the central circle. -
Paint the black stripe:
Fill this second taped area with black paint, ensuring it visually connects to the black circle outline without overlapping it clumsily. -
Repeat on other side:
Recreate the rust and black stripe process on the other side of the circle, extending them toward the handle. -
Add base details:
Use the Rust paint to add a solid band around the very bottom rim of the mug. You can freehand this by resting your brush hand on the table and slowly rotating the mug.
Speckled Effect
To mimic the stone finish, dilute some black paint and flick a toothbrush over the mug before painting the main design.
Step 4: Finishing Touches
-
Inspect and refine:
Check for any uneven edges on your stripes or number. Use a toothpick to scrape away tiny mistakes once the paint is semi-dry. -
Curing process:
Let the mug dry for 24 hours. Then, place it in a cool oven, heat to 300°F (150°C), bake for 35 minutes, and let it cool completely inside the oven.
Now you have a custom, rugged mug perfect for morning coffee or display on a desk
Retro Racing Stripes

Channel the classic aesthetics of vintage sports cars with this minimalist yet striking design. The combination of clean, bold stripes against a speckled stoneware background creates a masculine, timeless look that’s perfect for a morning coffee ritual.
How-To Guide
Materials
- Bisque ceramic mug (preferably stoneware)
- Speckled cream or oatmeal glaze
- Underglaze pencil or soft graphite pencil
- Painter’s tape (1/4 inch and 1/2 inch widths)
- Deep navy blue underglaze
- Burnt orange or rust underglaze
- Small flat shader brush (size 4 or 6)
- Clear dipping or brushing glaze (if using underglazes)
- Damp sponge
- Ruler or measuring tape
Step 1: Base Preparation
-
Clean the Bisque:
Before you begin, wipe the entire mug surface with a damp sponge. This removes any dust from the shelf that might prevent the glaze from adhering properly. -
Initial Speckle Layer:
If you aren’t using a clay body that is already speckled, apply 2-3 coats of a speckled cream base glaze first. Allow this to dry completely until it’s chalky and room temperature to the touch. -
Mark the Guidelines:
Using a flexible measuring tape, find the vertical center of the mug opposite the handle. Lightly mark the top and bottom rim with a pencil to guide your stripe placement.
Step 2: Creating the Design
-
Tape the First Stripe:
Place a strip of painter’s tape vertically down the mug. This will serve as the left boundary for your blue stripe. Smooth it down firmly with your fingernail to prevent bleed-through. -
Tape the Gap:
To create the blue stripe’s width, place a second piece of tape to the right of the first, leaving about a 1/2 inch gap exposed. Ensure the tape lines are perfectly parallel. -
Tape the Orange Stripe:
Leave a very narrow gap (barely 1/8th of an inch) to the right of your blue stripe area, then place another piece of tape. This tiny gap will be the unpainted ceramic line separating the colors. -
Define the Right Edge:
Finally, place your last piece of tape to define the right edge of the orange stripe. The orange section should be roughly the same width as the blue one, creating visual balance. -
Seal the Edges:
Run your thumb firmly over all tape edges again. I usually double-check the rim and bottom curve, as these are the trickiest spots where paint likes to sneak under.
Straight Line Secret
Applying tape to a curved surface is tricky. Cut small slits horizontally into the tape every inch or so. This lets the tape overlap itself and curve around the mug without buckling.
Step 3: Painting the Stripes
-
Apply Blue Underglaze:
Dip your flat shader brush into the deep navy underglaze. Apply the first coat to the left stripe using long, smooth vertical strokes from rim to base. -
Apply Orange Underglaze:
Clean your brush thoroughly (or use a fresh one) and apply the burnt orange underglaze to the right stripe section. Be careful not to cross over the taped barrier in the middle. -
Layering Colors:
Let the first coats dry until they lose their wet sheen. Apply a second coat to both stripes to ensure opaque, solid coverage without brushstrokes showing through. -
Third Coat Check:
Depending on your specific glaze brand, a third coat might be necessary for full saturation. If the color looks thin or streaky, go ahead and add that final layer now. -
Remove the Tape:
Do not let the glaze dry completely before removing the tape, as it can chip the edges. Carefully peel the tape away while the paint is still slightly damp but set. -
Clean Up:
If any glaze bled under the tape or the lines look ragged, use a stiff, damp brush or a sharp wooden tool to gently scrape away the excess and tidy the edges.
Uneven Edges?
If your stripes look jagged after removing the tape, wait for the underglaze to fully dry, then use an X-Acto knife or needle tool to gently scratch off the excess for a razor-sharp line.
Step 4: Finishing Touches
-
Final Clear Coat:
Once the stripes are bone dry, dip the entire mug into a clear transparent glaze (or brush it on). This seals the underglaze design and makes the mug food-safe. -
Check the Foot:
Use a sponge to wipe any glaze off the very bottom ‘foot ring’ of the mug so it doesn’t fuse to the kiln shelf during firing. -
Fire the Mug:
Load the mug into the kiln for the glaze firing, following the temperature instructions specific to your clay and glaze combination.
Once fired, you will have a durable, stylish mug that brings a touch of vintage racing flair to your kitchen cupboard
Funny One-Liner Typography
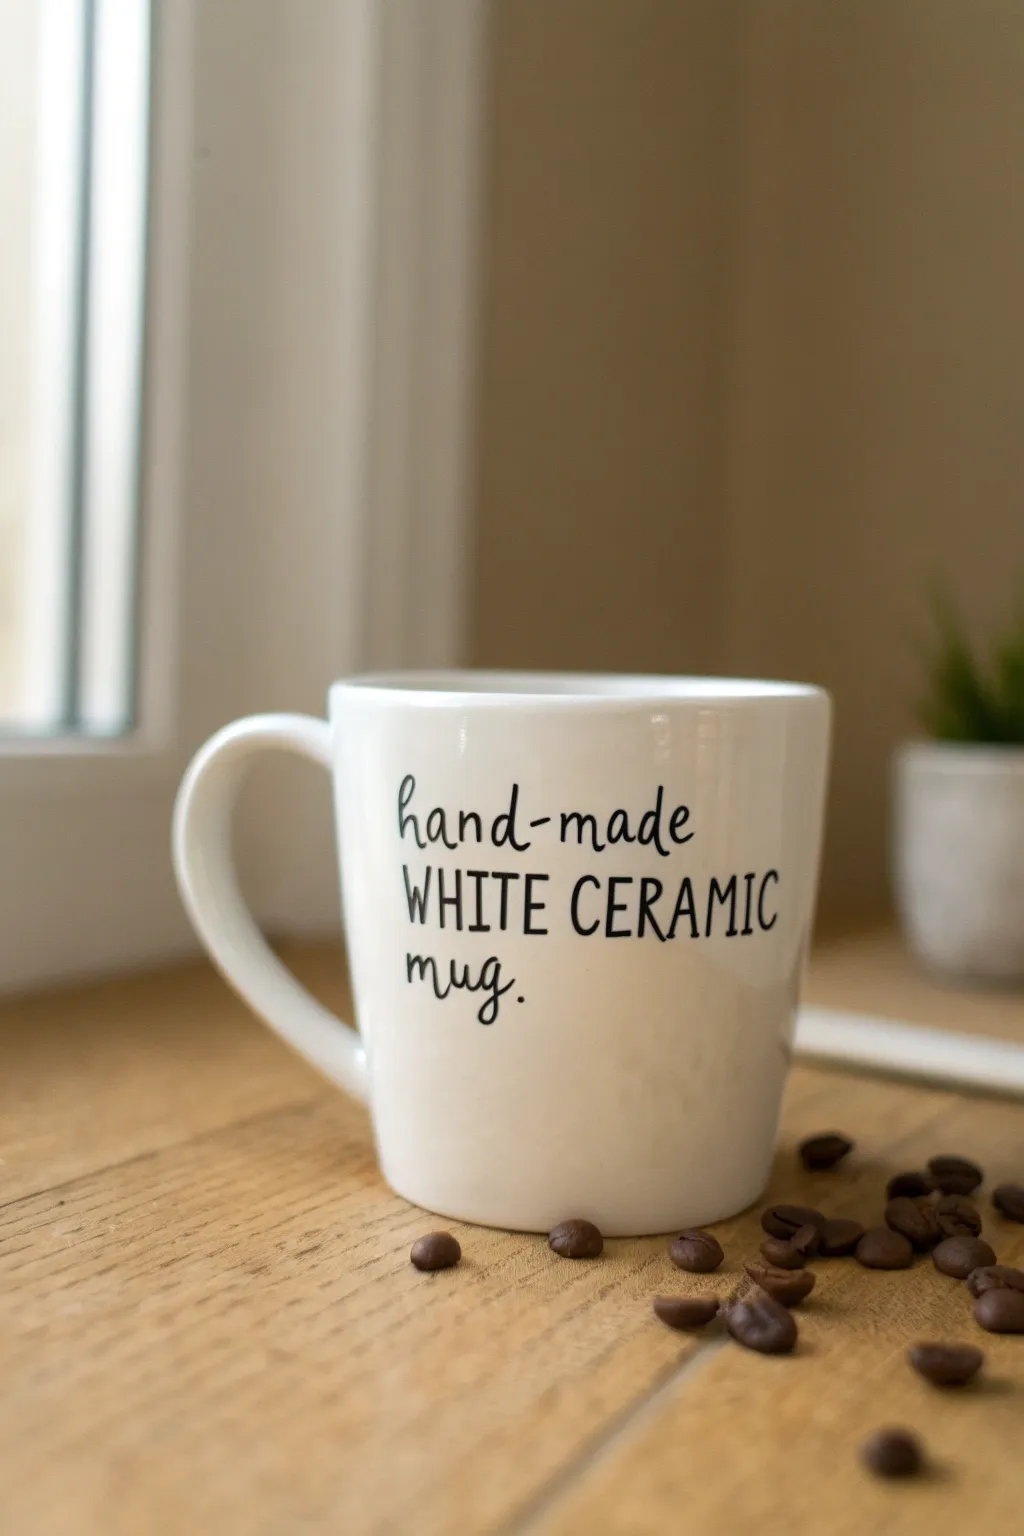
Embrace the beauty of the obvious with this cleverly simple typography project that labels itself. The minimalist black-on-white design offers a dry, witty aesthetic perfect for the guy who appreciates straightforward humor and clean lines.
Step-by-Step Guide
Materials
- White ceramic mug (clean and dry)
- Rubbing alcohol
- Cotton pads or paper towel
- Oil-based black paint marker (fine point)
- Pencil (optional)
- Oven for curing
Step 1: Preparation
-
Clean surface:
Begin by thoroughly cleaning the exterior of your white ceramic mug with soap and water to remove any grease or dust. -
Deep degrease:
Once it’s dry, wipe the surface down again with rubbing alcohol on a cotton pad. This is crucial because even natural oils from your fingers can prevent the paint from adhering properly. -
Handle positioning:
Place the mug in front of you with the handle turned to the left side, as shown in the reference. This ensures the text will be visible to a right-handed drinker while they hold it.
Step 2: Sketching the Layout
-
Visualizing the grid:
Visualize three invisible horizontal lines centered on the face of the mug. The middle line will be the longest, while the top and bottom lines will be shorter. -
Pencil draft:
Use a pencil to very lightly sketch out your text. Don’t press hard; you just want a faint guide. Write ‘hand-made’ on the top line, ‘WHITE CERAMIC’ in the middle, and ‘mug.’ on the bottom. -
Check alignment:
Take a step back and look at your pencil marks. Ensure the block of text feels centered vertically between the rim and the base.
Ink Flow Secret
Store your paint pen horizontally when not in use. Before starting the project, pump the nib on cardboard 10-15 times to ensure the black is opaque, not watery gray.
Step 3: Lettering
-
Prime the marker:
Shake your black oil-based paint marker well and press the tip onto a scrap piece of paper until the ink flows smoothly and blackly. -
First line script:
Start with the top line ‘hand-made’. Use a casual, slightly cursive script style. Keep the letters lowercase and playful. -
Stroke confidence:
Try to make each letter in a continuous motion. Hesitation can lead to shaky lines, so commit to the stroke. -
Middle line capitals:
Move to the second line ‘WHITE CERAMIC’. Switch your style to tall, narrow block capital letters. These should be larger and bolder than the top line to act as the visual anchor. -
Spacing focus:
Pay attention to the kerning (spacing) between the letters in ‘WHITE’ versus ‘CERAMIC’ so the two words span the same width visually. -
Bottom line finish:
Finish with the third line ‘mug.’ returning to the casual cursive script used on the first line. Don’t forget the period at the end—it adds a definitive, dry humor to the statement. -
Connect the script:
Go back to your cursive words and ensure the tails of the letters flow naturally into the next letter, mimicking the ‘hand-made’ vibe. -
Cleanup:
If you made any small pencil marks that are still visible, wait until the paint is completely dry to touch, then very gently erase them. -
Fixing mistakes:
I usually keep a Q-tip dipped in rubbing alcohol nearby. If you smear a letter, you can quickly wipe it away while wet and try again.
Make It Yours
Swap the text for other literal descriptions like ‘container for BEAN JUICE’ or ‘vessel for hot CAFFEINE’ to keep the meta-humor theme going strong.
Step 4: Curing
-
Air drying:
Let the mug sit undisturbed for at least 24 hours to allow the paint to fully set before baking. -
Oven prep:
Place the mug into a cold oven. Do not preheat the oven, as the sudden temperature change could crack the ceramic. -
Baking process:
Turn the oven to 350°F (175°C). Once it reaches temperature, set a timer for 30 minutes. -
Cool down:
After 30 minutes, turn the oven off but leave the mug inside. Let it cool down gradually with the oven to room temperature.
Now you have a brilliantly understated mug that tells it exactly like it is
Minimal Coffee Meter Graphic

This project transforms a simple speckled mug into a quirky morning gauge with a sleek, minimalist thermometer graphic. It’s a perfect beginner-friendly design that brings a bit of subtle humor to your daily caffeine intake without looking cluttered.
Step-by-Step
Materials
- White or cream speckled ceramic mug
- Porcelain paint marker (Fine tip, Black)
- Porcelain paint marker (Medium tip, Red)
- Rubbing alcohol
- Cotton pads or paper towel
- Ruler or straight edge (flexible tape measure is best)
- Pencil
- Oven (for curing)
Step 1: Preparation & Planning
-
Clean the surface:
Before you start, wash the mug thoroughly with soap and water to remove any grease. Once dry, wipe the area where you’ll be drawing with rubbing alcohol on a cotton pad. This step is crucial for paint adhesion. -
Visualize the placement:
Hold the mug in your hand as if you were drinking from it. Identify the flattest part of the curve facing outward; this is your ideal canvas area. -
Sketch the baseline:
Using a pencil, lightly mark the bottom point where the bulb of the thermometer will sit. This ensures your design is centered vertically.
Step 2: Drawing the Linear Structure
-
Draw the main vertical line:
Shake your black fine-tip porcelain marker well. Press the tip on scrap paper first to get the ink flowing. Draw a straight vertical line from your pencil mark upwards, about 2.5 inches in length. I find using a flexible tape measure as a guide helps keep this line straight on the curved surface. -
Add the parallel line:
Draw a second vertical line parallel to the first one, leaving a very narrow gap between them—about 1/16th of an inch. These two lines form the empty ‘tube’ of the thermometer. -
Create the horizontal markers:
On the left side of your vertical tube, you will add the measurement dashes. Start with the bottom-most dash, drawing a short horizontal line outward. -
Add the top marker:
Draw the top-most dash at the upper end of your vertical tube. This establishes the total height of your scale. -
Fill the middle markers:
Visually divide the space between the top and bottom dashes. Draw a dash in the exact center, then fill in the remaining spaces with evenly spaced horizontal lines. Aim for about 6-8 dashes total. -
Vary line lengths (Optional):
For a more technical look, you can make every other dash slightly shorter, though sticking to consistent lengths keeps the minimalist aesthetic shown in the photo.
Placement Hack
Use a piece of masking tape to mark a straight vertical guide on the mug. Trace along the tape edge for a perfectly straight line on the curved surface.
Step 3: Adding the Color & Details
-
Draw the bulb outline:
At the very bottom of your two vertical lines, draw a small circle that connects them. This forms the reservoir bulb of the thermometer. -
Fill the bulb:
Switch to your red porcelain marker. Carefully fill in the circle you just drew at the bottom. Make sure the red ink is opaque; you might need a second coat after the first dries for a minute. -
Add the stray dots:
To mimic the speckled pottery look and integrate the design, take your black fine-tip marker and add 3-4 tiny random dots near the graphic. Keep them sparse and intentional. -
Clean up edges:
If any lines look wobbly or smudged, dip a Q-tip in rubbing alcohol and carefully erase the mistake. Let the spot dry completely before redrawing. -
Initial drying:
Let the mug sit undisturbed for at least 24 hours. This allows the paint to settle before the baking process.
Uneven Ink Flow?
If the marker skips, store it tip-down for 15 minutes. Always test on paper first. If a blob comes out, wipe immediately with alcohol.
Step 4: Curing the Design
-
Prepare the oven:
Place your mug into a completely cold oven. Do not preheat the oven, as the sudden temperature change can crack the ceramic. -
Bake the mug:
Turn the oven on to 300°F (150°C) or the specific temperature recommended on your marker brand’s instructions. Once the oven creates the target temp, set a timer for 30 minutes. -
Cool down:
Turn the oven off after the timer dings, but leave the door closed. Let the mug cool down completely inside the oven. This gradual cooling is just as important as the gradual heating. -
Final check:
Once cool, remove the mug. Run a fingernail gently over the design to ensure the paint has hardened and adhered properly.
Now you have a custom graphic mug that makes checking your coffee levels a stylish affair
Kraken or Sea Monster Wraparound
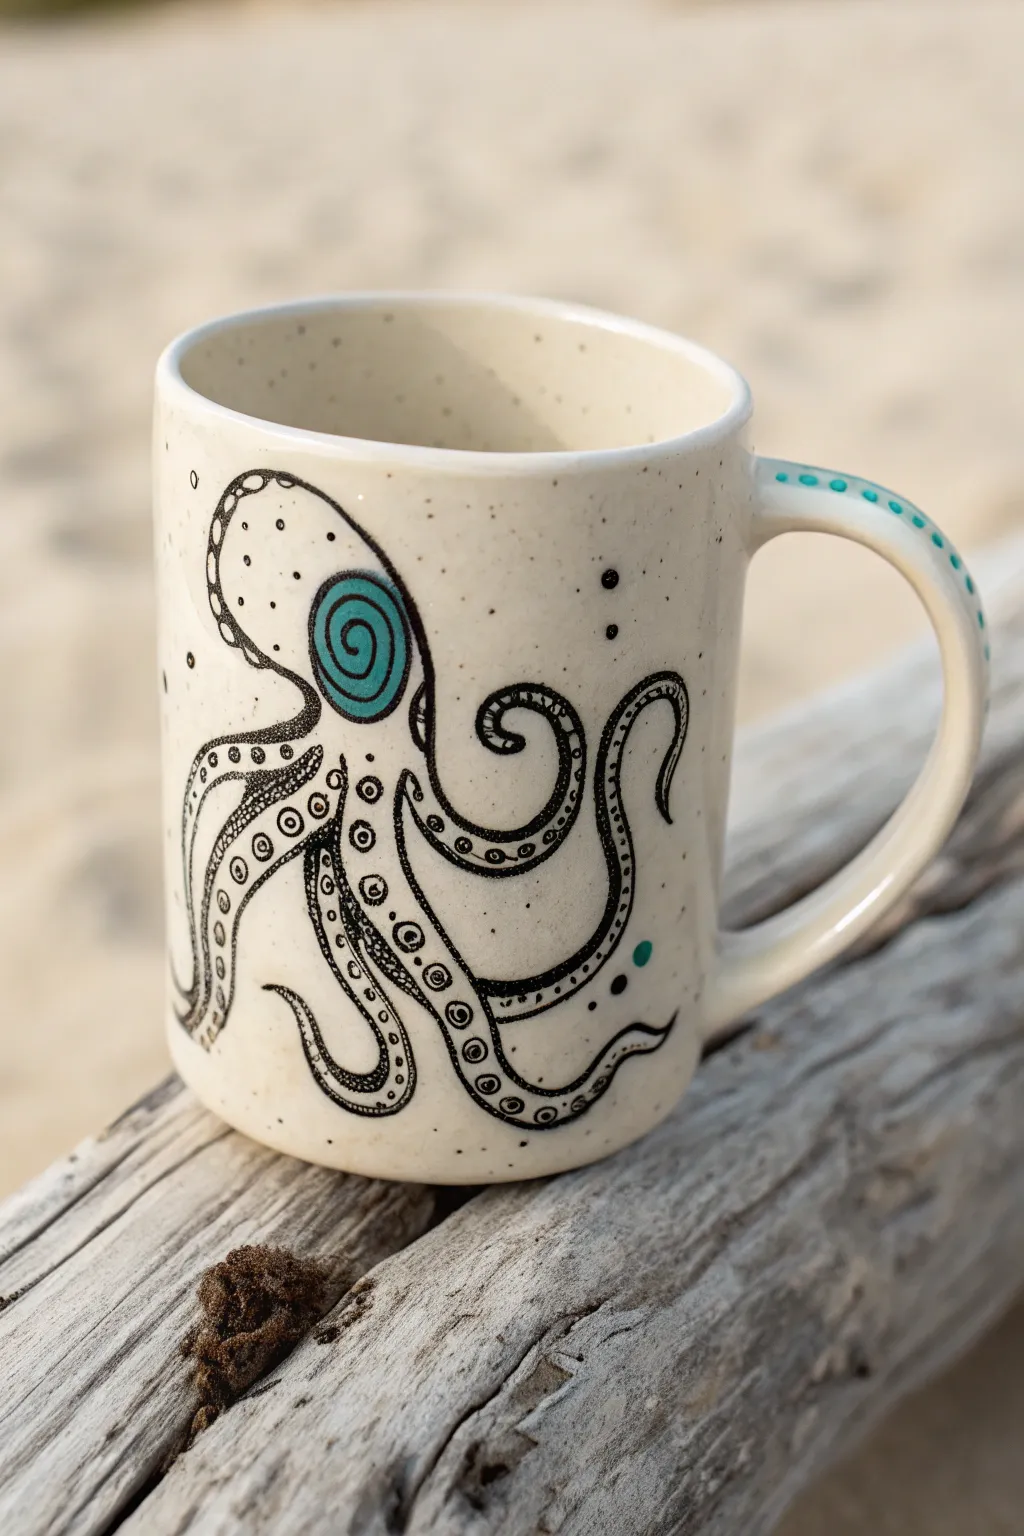
Transform a plain speckled ceramic mug into a maritime masterpiece with this illustrative octopus design. Using fine-line techniques and a pop of teal, you’ll create a stylized sea creature that feels both vintage and adventurous.
Step-by-Step Guide
Materials
- Plain ceramic mug (cream or speckled off-white)
- Black oil-based paint marker (fine point)
- Black oil-based paint marker (extra-fine point)
- Teal enamels or ceramic paint
- Small fine-detail paintbrush
- Rubbing alcohol and cotton pads
- Pencil (HB or lighter)
- Oven (for curing)
Step 1: Preparation & Outline
-
Clean surface:
Begin by thoroughly wiping down the entire exterior of your mug with rubbing alcohol. This removes any oils or fingerprints that could prevent the paint from sticking properly. -
Draft the head:
Using a pencil, lightly sketch the bulbous head of the octopus near the top rim. Think of a rounded balloon shape that tapers slightly downward. Keep your lines very faint so they can be easily wiped away later. -
Sketch the tentacles:
Draw the main tentacles flowing down and around the mug. Make them wavy and curled at the ends. Since this is an illustrative style, the arms don’t need to be anatomically perfect, but try to vary their thickness—wider at the base, tapering to a point. -
Refine the composition:
Step back and look at the placement. Extend one or two tentacles so they curve dramatically, perhaps even wrapping slightly toward the handle area to create movement.
Step 2: Inking the Design
-
Trace main lines:
Take your fine-point black oil-based marker. Go over your pencil sketch, outlining the head and the perimeter of each tentacle with a smooth, confident stroke. Shake the pen well before starting to ensure opaque ink flow. -
Add the eye spiral:
Inside the head area, draw a medium-sized circle. Leave the interior blank for now; we will fill this with color later. Outline this circle firmly. -
Create the suckers:
Switch to your extra-fine point black marker. Inside the tentacles, draw a single row of small circles running down the center of each arm. Make them smaller as the tentacle gets thinner. -
Detail the suckers:
Add a tiny dot in the center of each sucker circle. This small detail instantly adds dimension and recognition to the drawing. -
Texture via stippling:
This step requires patience. Using the extra-fine marker, add tiny dots (stippling) along the outer edges of the tentacles and the bottom of the head. This creates shading without using solid black, giving it that classic illustrative look. -
Fill the gaps:
Darken the negative space between the suckers and the outer tentacle lines with gentle hatching or heavy stippling to make the suckers pop out visually. -
Add distinct spots:
Draw a few larger, standalone dots on the octopus’s head and scattered a few millimeters away from the body in the background to simulate movement or bubbles.
Ink Smearing?
If you smudge wet ink, don’t wipe it! Wet a Q-tip with rubbing alcohol and carefully ‘erase’ the mistake by lifting it strictly vertically.
Step 3: Adding Color & Finishing
-
Paint the eye:
Dip your fine-detail brush into the teal ceramic paint. Carefully fill in the circle you reserved for the eye. You may need two thin coats for full opacity. -
Draw the pupil:
Once the teal paint is fully dry, use the black marker to draw a spiral directly on top of the teal circle creates a hypnotic, stylized eye. -
Decorate the handle:
Using the back end of your paintbrush or a dotting tool, dip it into the teal paint and stamp a row of dots down the spine of the mug handle. Space them evenly for a clean finish. -
Add accent dots:
Place one or two small teal dots near the bottom tentacles to balance the color composition. -
Cleanup:
Allow the ink to dry for roughly 15 minutes, then gently erase any visible pencil sketch lines. Be extremely careful not to scratch your fresh paint. -
Cure in oven:
Place the mug in a cold oven. Turn the heat to 350°F (175°C). Once it reaches temperature, bake for 30 minutes. Turn the oven off and let the mug cool completely inside to prevent cracking.
Pro Tip
For steadier lines on a curved surface, rest your drawing hand on a heavy book or a block of wood that is the same height as the mug.
Now you have a striking custom mug ready for your morning brew or to gift to a sea-loving friend
Faux Metal Patina and Rivets
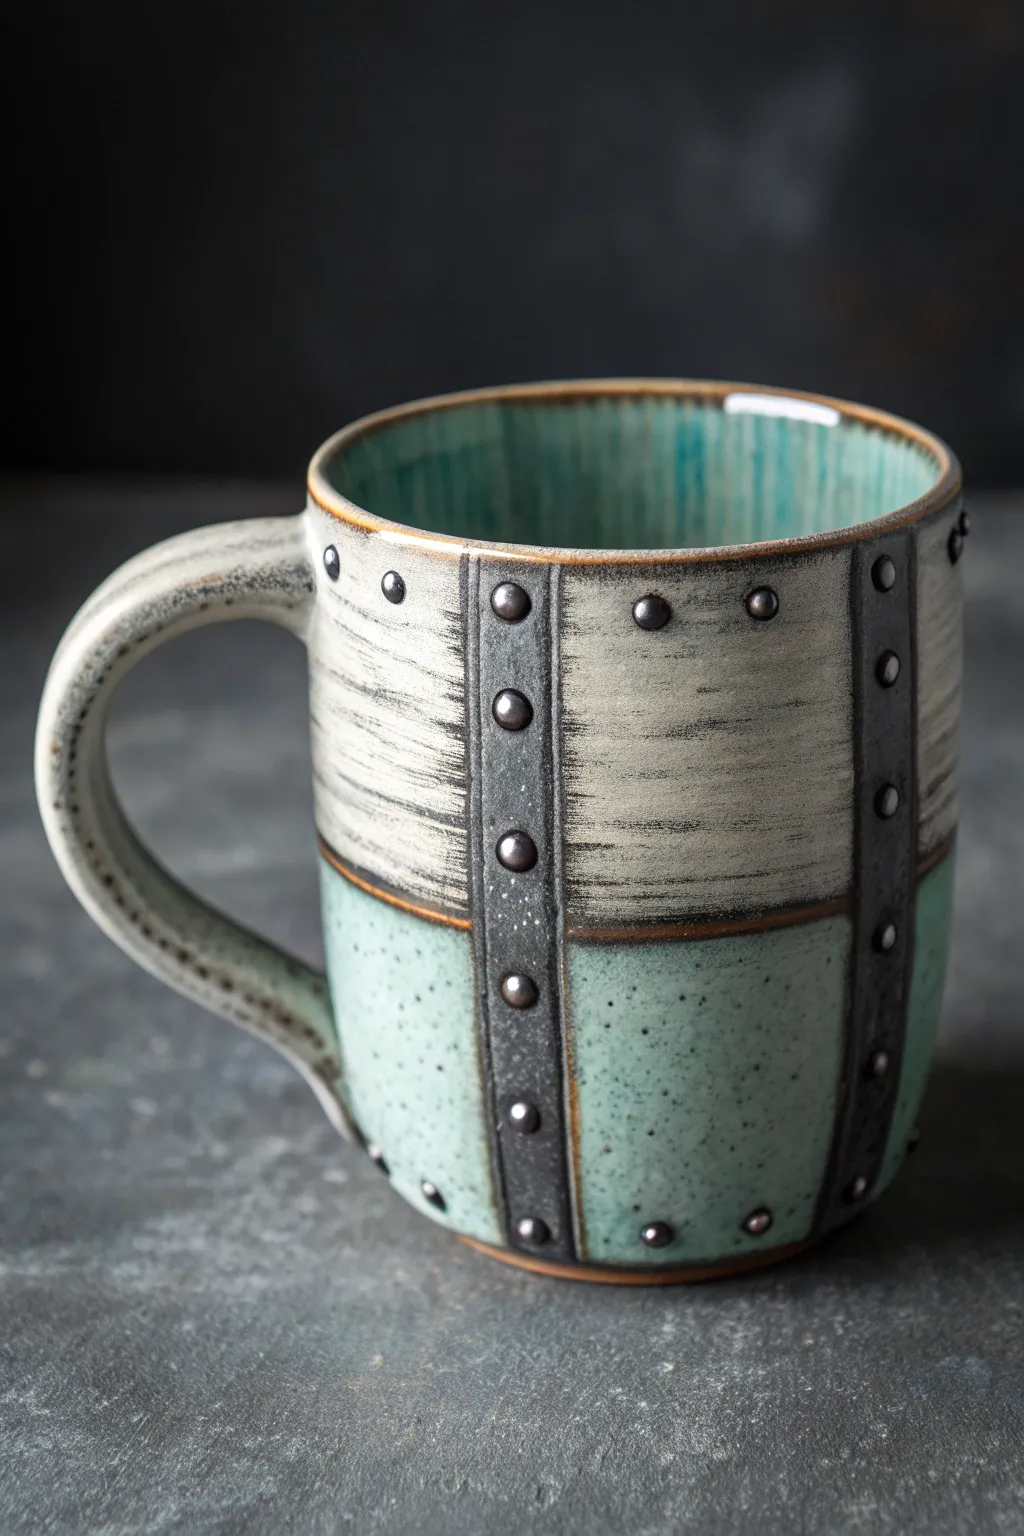
Transform a plain ceramic mug into a rugged, steampunk-inspired vessel that looks like it was forged from iron and reclaimed steel. This finish combines distressed horizontal textures with faux metal straps and rivets for a heavy-duty aesthetic that fits perfectly in any workshop or man cave.
How-To Guide
Materials
- Plain ceramic mug (white or cream base preferred)
- Ceramic paints (Porcelaine 150 or similar) in: Turquoise/Teal, Off-White/Cream, Matte Dark Grey/Black, Metallic Bronze
- Liquid ceramic relief outliner (black or pewter)
- Medium flat paintbrush
- Small round paintbrush
- Stiff bristle fan brush or old dry brush
- High-density foam sponge or pouncer
- Masking tape (low tack)
- Rubbing alcohol and paper towels
Step 1: Base Prep & Layout
-
Clean surface:
Begin by wiping the entire mug down with rubbing alcohol to remove any oils or fingerprints, ensuring the paint adheres properly. -
Mask vertical lines:
Use strips of masking tape to mark out the vertical ‘metal straps.’ Place two strips vertically down the mug, leaving about a 1/2 inch gap between them where the strap will be painted. -
Mask horizontal divider:
Apply a strip of masking tape horizontally around the circumference of the mug, about halfway down. This will separate the top ‘white’ metal plate from the bottom ‘teal’ plate.
Keep it Streaky
For the top white section, use a brush with stiff, coarse bristles. Don’t over-blend; visible brushstrokes are essential for that scratched metal look.
Step 2: Creating the Panels
-
Paint bottom section:
Using the sponge or flat brush, dab the turquoise or teal ceramic paint onto the bottom exposed sections. Don’t aim for perfect opacity; a slightly mottled look adds to the weathered effect. -
Speckle the teal:
While the teal layer is still slightly tacky, flick a tiny amount of watered-down dark grey paint onto it using an old toothbrush or stiff brush to create a speckled grit texture. -
Paint top section:
Fill in the top sections with an off-white or cream ceramic paint. Apply it horizontally. -
Distress the top:
Immediately take a dry stiff brush with a tiny amount of black paint and drag it horizontally across the wet white paint. This creates those distinct, scratched striations. -
Remove tape:
Carefully peel off all masking tape before the paint fully dries to keep the edges relatively clean.
Step 3: Ironwork & Details
-
Paint vertical straps:
Using the dark grey or black paint and a flat brush, fill in the vertical gaps you created earlier. Paint these lines solid to represent the heavy iron straps. -
Add separation lines:
Use a small round brush to paint a thin dark horizontal line where the white and teal sections meet, mimicking a gap between metal plates. -
Create rivets:
Squeeze distinct dots of the liquid relief outliner down the center of your dark vertical straps. Keep them evenly spaced. You can also add a few random rivets near the handle or rim. -
Paint the rivets:
Once the relief dots are dry, gently dab them with a metallic dark pewter or silver paint to make them pop against the black strap. -
Rim and handle:
Paint the very rim of the mug and the outer edge of the handle with a mix of the bronze and black paint for a rusty finish. -
Final weathering:
I like to take a very dry sponge with a touch of brown or bronze paint and lightly dab the separation lines and the edges of the rivets to simulate rust accumulation. -
Bake to cure:
Follow the instructions on your specific ceramic paint bottles (usually air drying for 24 hours, then baking in a home oven) to make the design dishwasher safe.
Metallic Sheen
Mix a tiny drop of silver or gunmetal metallic paint into your top and bottom base colors to give the whole mug a subtle, realistic metallic glimmer.
Your finished mug will have a satisfyingly tactile, rugged feel that makes morning coffee feel like a workshop project