If you’ve been craving some fresh ceramic animal ideas, you’re in the right mindset—playful, a little messy, and totally satisfying. I love animal projects because they can be quick and cute or wonderfully detailed, and they always end up with personality.
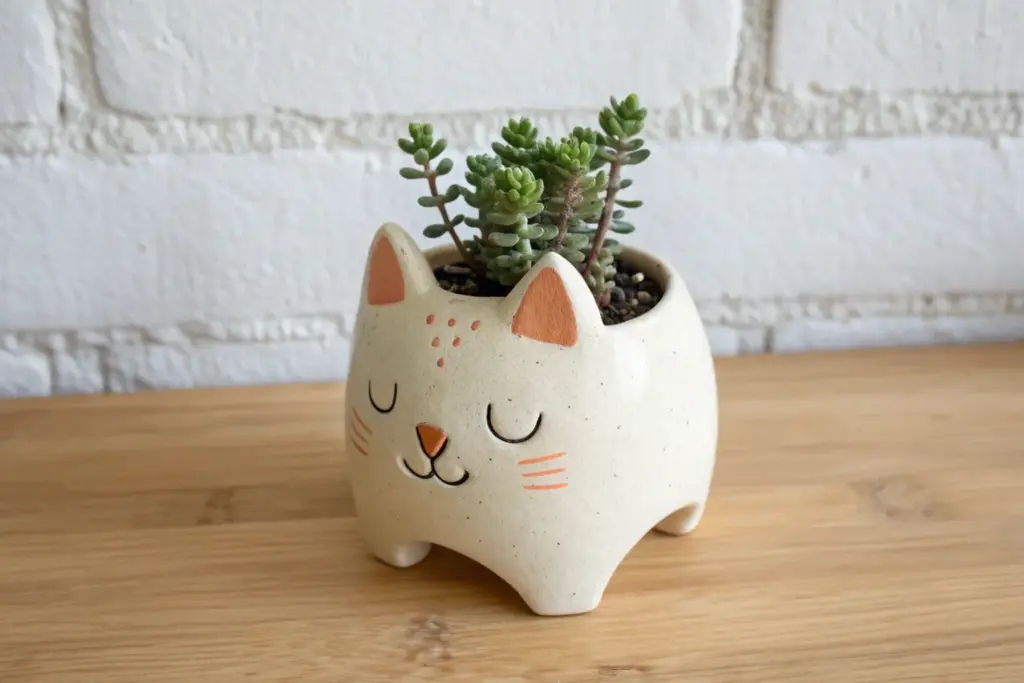
Animal Planters With Tiny Faces
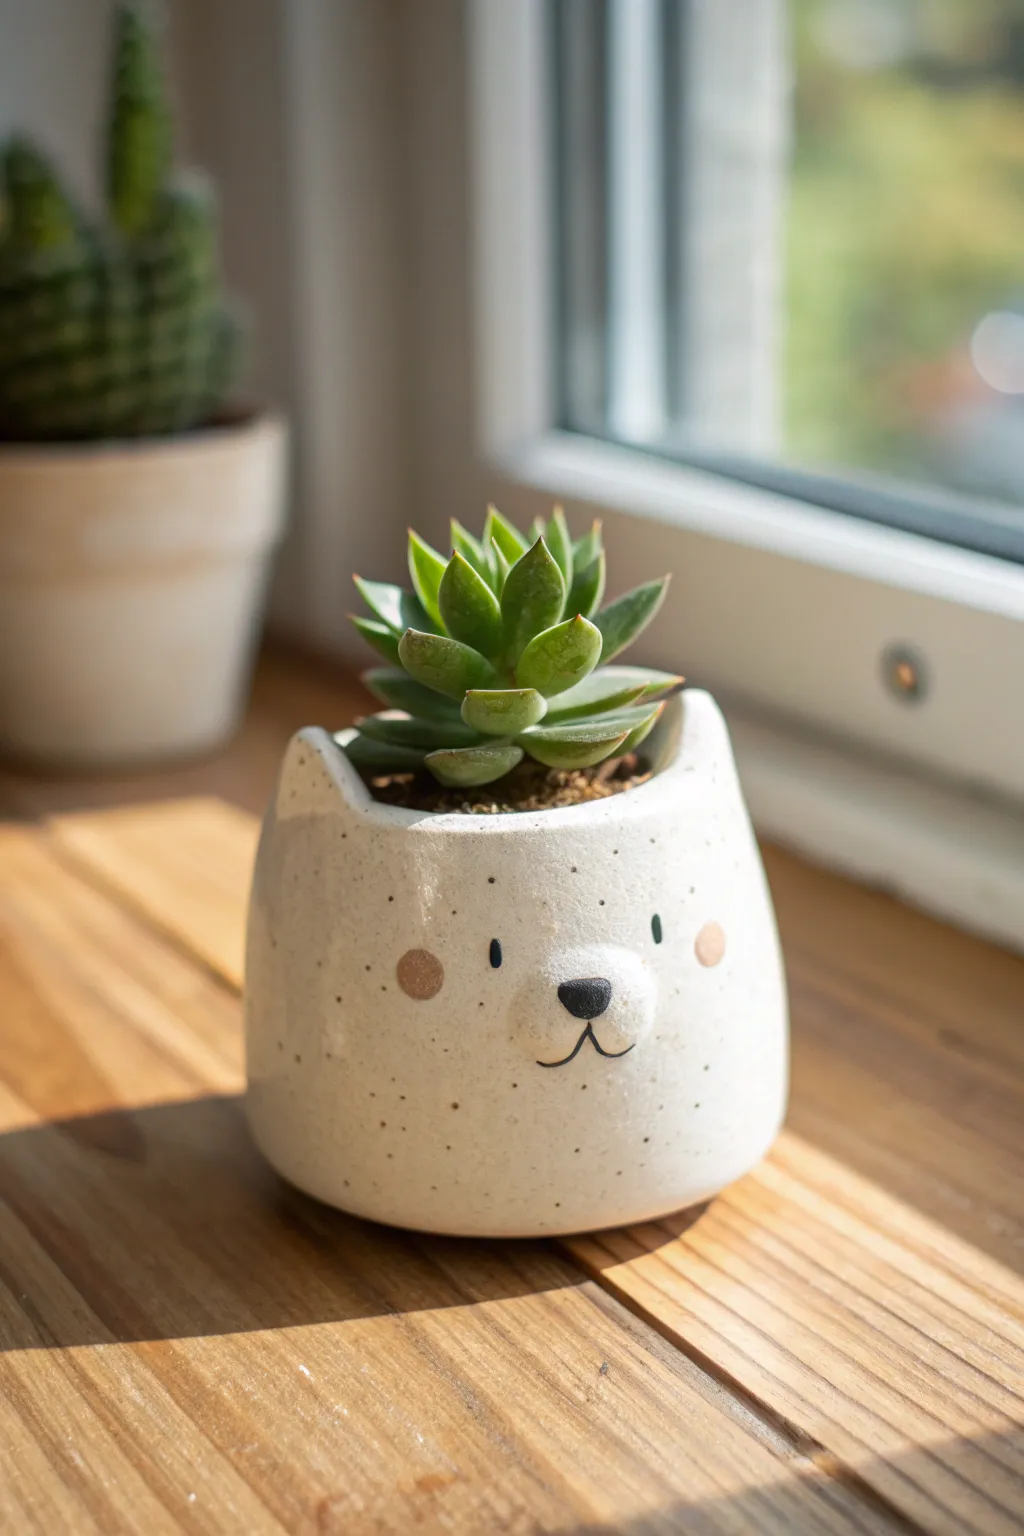
This adorable ceramic project features a minimalist bear silhouette with a charming, tiny face and a trendy speckled finish. Its creamy white glaze and simple features make it the perfect modern home for small succulents.
How-To Guide
Materials
- White stoneware clay (roughly 1lb)
- Rolling pin and guide sticks
- Pottery needle tool
- Sponge
- Slip (clay and water mixture)
- Scoring tool (or fork)
- Speckled white glaze (cone 5/6)
- Black underglaze
- Pink or terra cotta underglaze
- Fine detail paintbrush
- Small round smooth paintbrush
- Clear glaze (optional, over eyes)
- Kiln access
Step 1: Forming the Body
-
Prepare the Clay:
Begin by wedging your white stoneware clay thoroughly to remove any air bubbles. Form it into a smooth ball about the size of a grapefruit. -
Pinch Pot Method:
Press your thumb into the center of the ball, stopping about half an inch from the bottom. I usually rotate the ball in my palm while pinching the walls gently with my thumb and fingers to thin them out evenly. -
Shape the Walls:
Continue pinching upward to create a U-shaped vessel. Aim for an even thickness of about 1/4 inch all around. Tap the bottom gently on your table to create a flat, stable base. -
Smooth the Surface:
Use a damp sponge or a flexible rib tool to smooth out the fingerprint marks on both the inside and outside. The surface should be clean and rounded. -
Form the Ears:
Instead of adding clay, gently push the rim of the pot upwards at two points to form the ears. Pinch these sections lightly to create small, triangular points that blend seamlessly into the rim. -
Refine the Rim:
Smooth the area between the ears. The rim should dip slightly in the front and back to accentuate the ear shape. Make sure the edge is rounded, not sharp. -
Slow Dry:
Cover the piece loosely with plastic and let it dry to a leather-hard state. This usually takes about a day depending on humidity.
Step 2: Adding the Face
-
Create the Snout:
Roll a very small ball of clay, about the size of a marble. Flatten it slightly into an oval shape. -
Score and Slip:
Score the back of the snout and the area on the pot where the nose will go. Apply a dab of slip to both surfaces and press the snout firmly onto the center of the face. -
Blend the Seams:
Use a modeling tool or your finger to smooth the edges of the snout onto the main body so it looks like one continuous piece, but leave the center rounded and protruding. -
Add Drainage:
Since this is a planter, flip the pot over and carefully carve a drainage hole in the center of the bottom using your needle tool or a hole cutter. -
Bisque Fire:
Allow the piece to dry completely until bone dry. Fire it in the kiln to bisque temperature (usually Cone 04).
Uneven drying?
If the ears seem to be drying faster than the thicker base, cover just the rim and ears with a small strip of damp paper towel under the plastic to even out moisture loss.
Step 3: Glazing and Details
-
Base Glaze Application:
Wipe the bisque-fired pot with a damp sponge to remove dust. Pour the speckled white glaze inside, swirl to coat, and pour out. Then, dip the exterior or brush on 2-3 even coats of the glaze. -
Clean the Face Area:
If your glaze is very thick and opaque, you might want to wipe it back slightly on the snout area so the details don’t get lost, though a good stoneware glaze usually breaks nicely over texture. -
Paint the Snout:
Using the black underglaze and a fine detail brush, paint a small inverted triangle nose on the upper part of the protruding snout. -
Add the Mouth:
Paint two small curved lines coming down from the nose to create the classic ‘w’ bear mouth shape. Keep the lines thin and delicate. -
Eyes and Cheeks:
Dot two small vertical ovals for eyes just above the snout using the black underglaze. Use the pink or terra cotta underglaze to paint soft circle cheeks on either side. -
Final Fire:
Once the underglaze and glaze are dry, place the piece back in the kiln for the final glaze firing (Cone 5 or 6, depending on your clay).
Level Up: Tail
Before the first firing, attach a tiny sphere of clay to the back of the pot using the score and slip method to create a cute, round tail for your animal.
Pop in your favorite succulent once cool and enjoy your new ceramic friend


Sleepy Fox Chopstick Rests
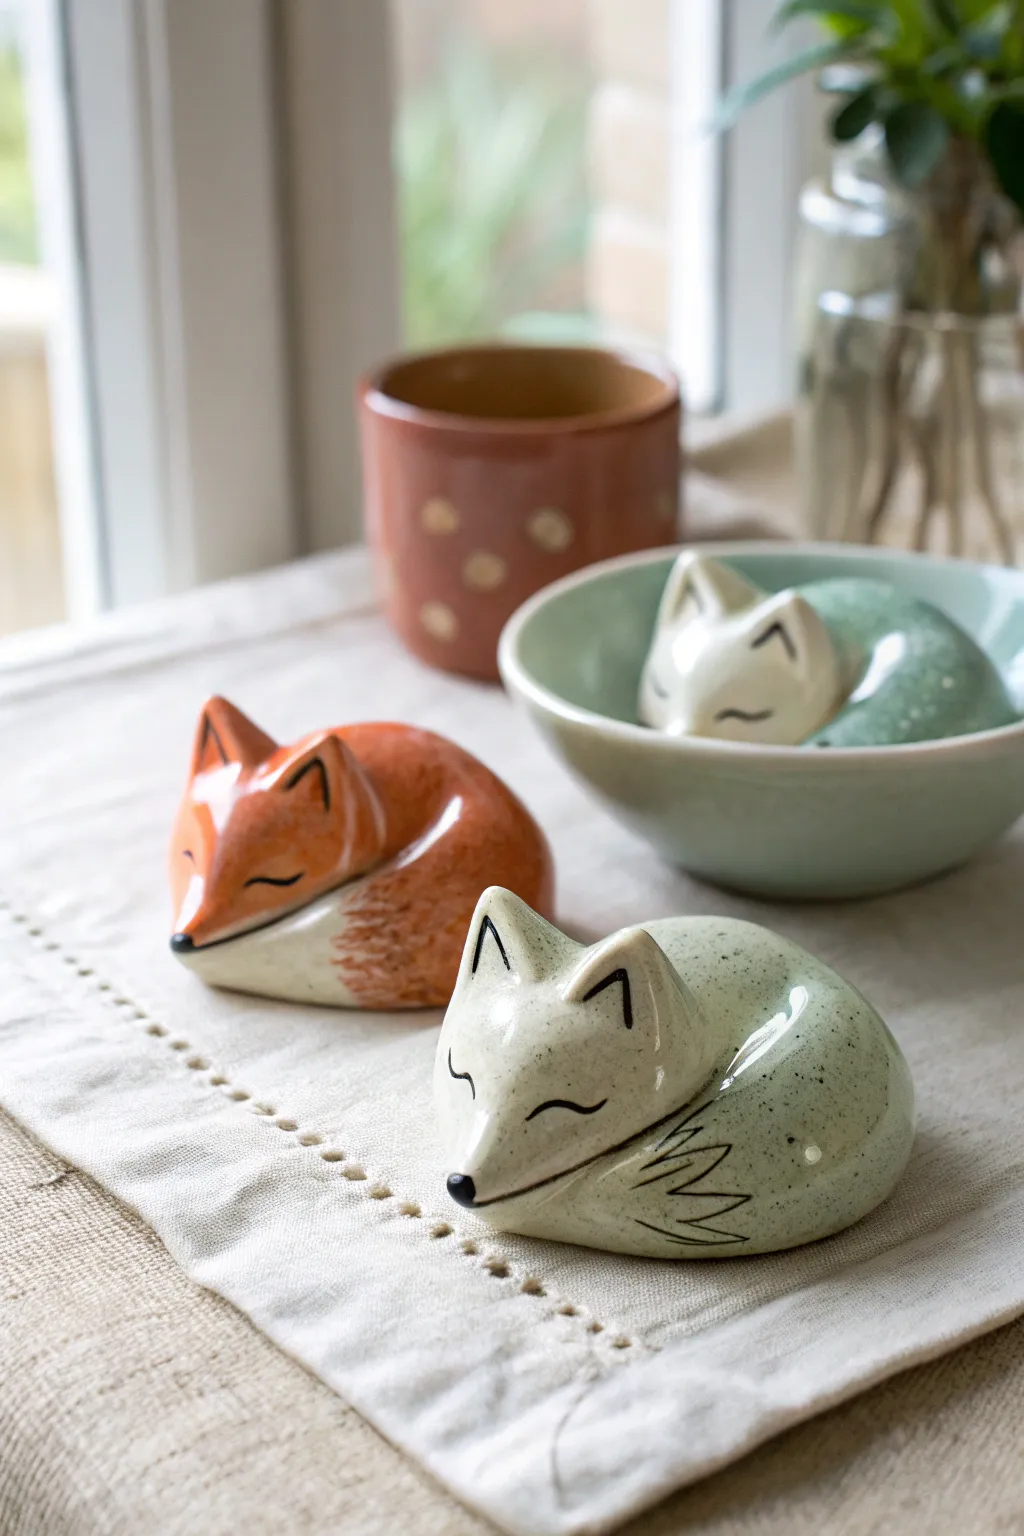
These adorable, sleeping creatures curve perfectly into smooth, palm-sized pebbles that add a touch of woodland whimsy to your table setting. Whether glazed in speckled mint or warm terracotta, their peaceful expressions make them almost too sweet to cover with chopsticks.
Step-by-Step Guide
Materials
- White stoneware or porcelain clay body
- Modeling tools (wooden knife, needle tool)
- Small sponge
- Slip (clay mixed with water)
- Scoring tool or serrated rib
- Underglaze (black for details)
- Ceramic glaze (transparent gloss, celadon green with speckles, terracotta orange)
- Fine detail brush
- Kiln access
Step 1: Sculpting the Form
-
Shape the base:
Begin with a lump of clay about the size of a golf ball. Roll it into a smooth, even sphere between your palms to remove any air pockets. -
Form the oval:
Gently press and roll one side of the sphere to elongate it into a teardrop or egg shape. This will become the curled body of the fox. -
Define the head:
At the wider end of your egg shape, gently pinch and pull the clay to form a distinct, triangular head shape. It should rest naturally against the ‘body’ section. -
Create the tail:
Smoothly curve the narrower tail end around so it wraps snugly against the side of the body, just below where the chin will be. Blend the clay slightly where the tail meets the body if you want a seamless look, or leave a definable groove. -
Refine the ears:
Pinch two small triangles of clay from the top of the head to form ears. I like to keep them upright and alert to contrast with the sleeping face. Smooth the attachment points carefully. -
Smooth the surface:
Use a slightly damp sponge to wipe over the entire form. This softens any fingerprints and creates that polished, pebble-like finish characteristic of chopstick rests.
Step 2: Detailing & Decorating
-
Carve details:
With a needle tool or small carving tool, gently incise lines to suggest fur texture on the tail tip or the separation between the tail and body. -
Dry to leather hard:
Allow your foxes to dry slowly until they are leather hard—firm to the touch but still cold. This makes them easier to handle for painting. -
Paint facial features:
Using a very fine detail brush and black underglaze, carefully paint two closed, curved eyelids. Add a small black nose at the very tip of the snout. -
Outline the ears:
Paint a thin black line outlining the inner triangle of the ears to give them depth and definition. -
Bisque fire:
Once the underglaze is dry and the clay is bone dry, fire the pieces in a kiln to a bisque temperature (usually cone 04 or 06).
Glaze Crawling?
If your glaze pulls away from the painted details, try washing the bisque ware with a slightly damp sponge before glazing to remove dust or oils from your hands.
Step 3: Glazing & Finishing
-
Apply wax resist:
Apply wax resist over the black underglaze details (eyes, nose, ear lines) if you want them to remain crisp, or rely on a transparent glaze. Don’t forget to wax the very bottom so it doesn’t stick to the kiln shelf. -
Dip glazing:
Dip one fox into a speckled celadon or mint green glaze. Ensure the coat is even. For the orange version, use a terracotta-colored glaze, leaving the chin and tail tip white if desired. -
Clean unglazed areas:
If you are doing the two-tone orange fox, use a damp sponge to wipe glaze off the snout, chest, and tail tip to reveal the white clay underneath. -
Baking the glaze:
Fire the pieces again to the glaze temperature appropriate for your specific clay and glaze (often cone 5 or 6 for stoneware). -
Final inspection:
Check the bottom for any sharp burrs after firing and sand them down if necessary with wet sandpaper. -
Cooling:
Let the foxes cool completely in the kiln to avoid thermal shock.
Mix & Match Sets
Make a family set by varying the sizes slightly or posing one fox stretching instead of sleeping. Use different earthy glazes for each family member.
Place these little guardians next to plates at your next dinner party and enjoy the smiles they bring


Penguin Minis Made From Egg Shapes
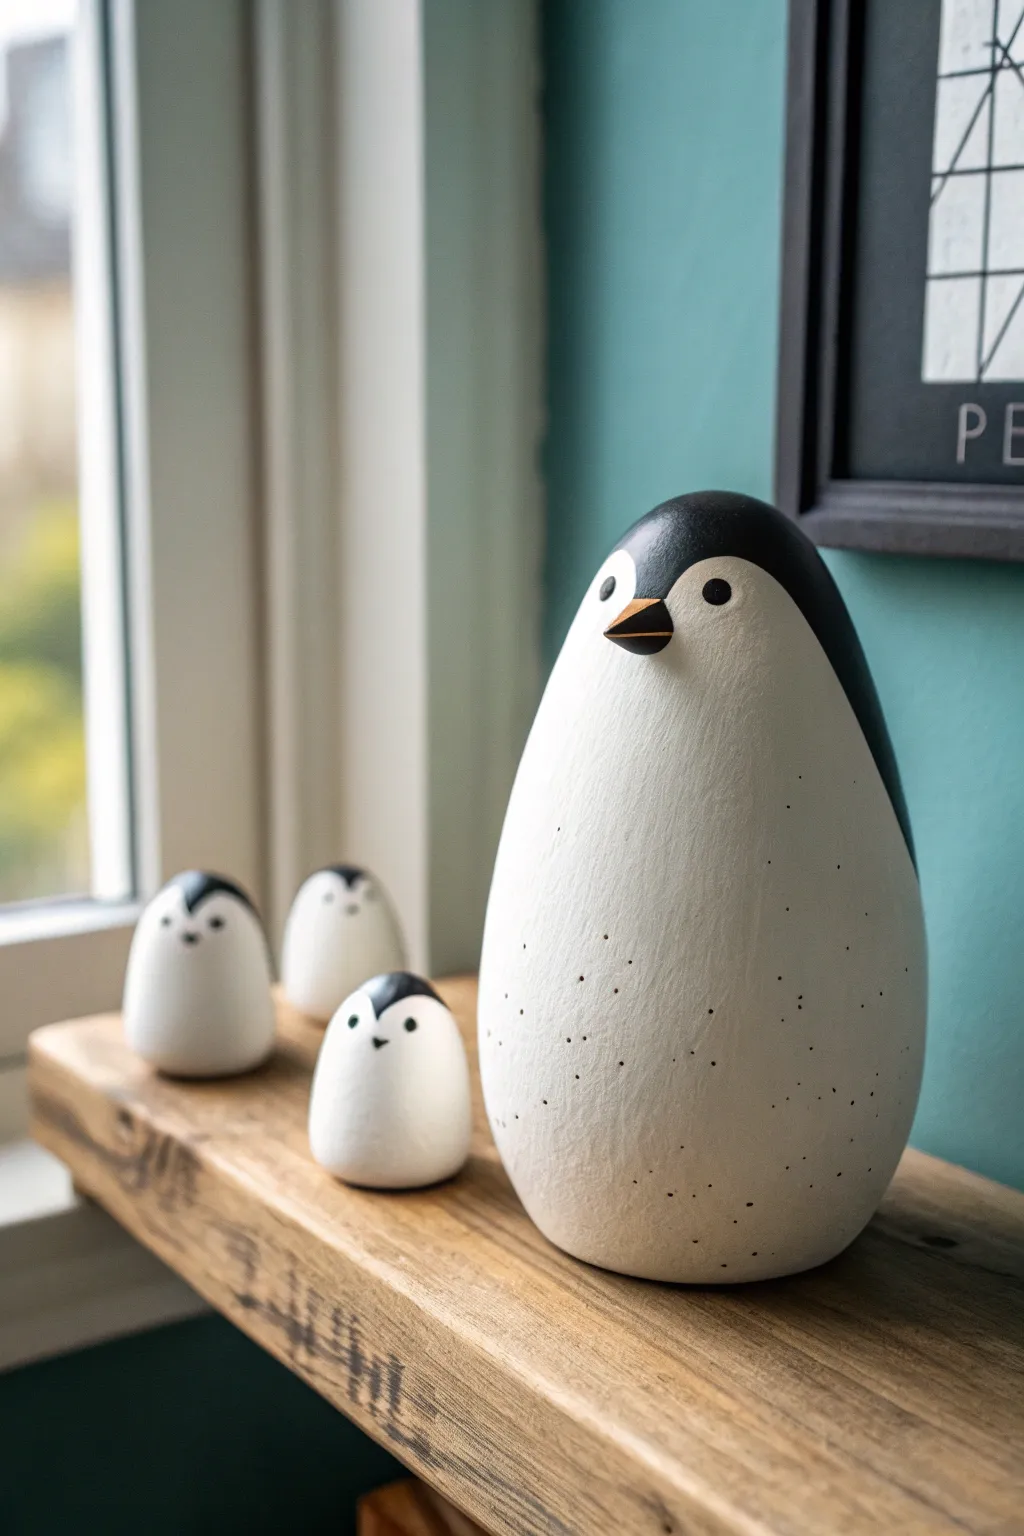
These charming, monochromatic penguins embrace simple geometry by transforming basic egg forms into a cohesive little family. The project features a smooth, speckled matte finish that mimics the look of natural pottery or stone, making them a perfect modern accent for any shelf.
Step-by-Step
Materials
- Air-dry clay or polymer clay (white)
- Egg-shaped styrofoam armatures (one large, three small)
- Pottery sponge
- Water slip (if using air-dry clay)
- Fine-grit sandpaper (400-600 grit)
- Acrylic paints: Carbon Black, Titanium White, Burnt Sienna/Orange
- Matte finish sealant varnish
- Old toothbrush (for speckling)
- Fine detail paintbrush (size 0 or 00)
- Medium flat paintbrush
- Rolling pin
Step 1: Forming the Body
-
Prepare the Armatures:
Begin by selecting your styrofoam egg shapes. You will need one large egg (approx. 5-6 inches tall) for the parent and three smaller eggs (approx. 1.5-2 inches tall) for the chicks to match the reference image. -
Roll the Clay:
Roll out your clay into a smooth, even slab about 1/4 inch thick. If you are using air-dry clay, keeping a damp cloth nearby helps prevent cracks. -
Cover the Shapes:
Wrap the clay sheet gently around the styrofoam egg. Trim away excess clay with a knife and pinch the seams together. I find using a little water on my fingertip helps meld the seams invisibly. -
Smooth the Surface:
Roll the clay-covered egg gently between your palms to smooth out any lumps. The shape should be perfectly oval, wider at the base and slightly tapering at the top. -
Flatten the Base:
Firmly tap the wide bottom of the egg onto your work surface. This creates a flat base so the penguin stands independently without wobbling. -
Refine the Drying:
Allow the clay shapes to dry completely according to the package instructions. Turn them occasionally to ensure even airflow.
Step 2: Sanding and Base Coat
-
Sand for Smoothness:
Once fully dry (and cured if baked), use fine-grit sandpaper to buff the surface. You want an ultra-smooth finish that feels like porcelain to the touch. -
Apply the Base White:
Paint the entire surface of each egg with two coats of Titanium White acrylic paint. Let the first coat dry completely before applying the second to avoid consistent brush strokes. -
Add Texture:
Create the stone-like speckled effect by mixing a very watery black paint. Dip an old toothbrush into it and run your thumb across the bristles to flick tiny droplets onto the white surface. Keep the speckles sparse and subtle.
Smoother Seams
Use a damp pottery sponge to wipe the raw clay before it dries. This lifts the ‘grain’ and removes fingerprints better than sanding later.
Step 3: Painting Features
-
Outline the Head:
Using a pencil, very lightly sketch a curved line that separates the black head area from the white belly. On the large penguin, this should dip down slightly in the center of the ‘forehead’ area. -
Paint the Black Coat:
Fill in the head and the back of the shape with Carbon Black paint. Use a steady hand or a medium flat brush to get a crisp edge along the curve you sketched. -
Define the Back:
Extend the black paint down the back of the egg shape, tapering it so it looks like folded wings, leaving the front belly area completely white. -
Paint the Eyes:
For the parent, use the back of a paintbrush handle dipped in black paint to stamp two small, round eyes on the white face area. For the chicks, make these dots much smaller using a detail brush. -
Add the Beak:
On the large penguin, paint a small, sharp triangle in the center using Burnt Sienna or muted orange. Give it a tiny center line for depth. For the chicks, just a tiny black triangular dot suffices for a minimal look. -
Seal the Work:
Once all paint is bonedry, apply a coat of matte finish sealant. This protects the paint and unifies the sheen, giving it that professional ceramic appearance.
Stone Effect
Mix a tiny amount of baking soda into your white base paint. It creates a gritty, authentic stone texture before you even add the speckles.
Arranging your polished little colony on a wooden shelf brings a lovely touch of Nordic winter design to your home


Cat Mugs With Ears on the Rim
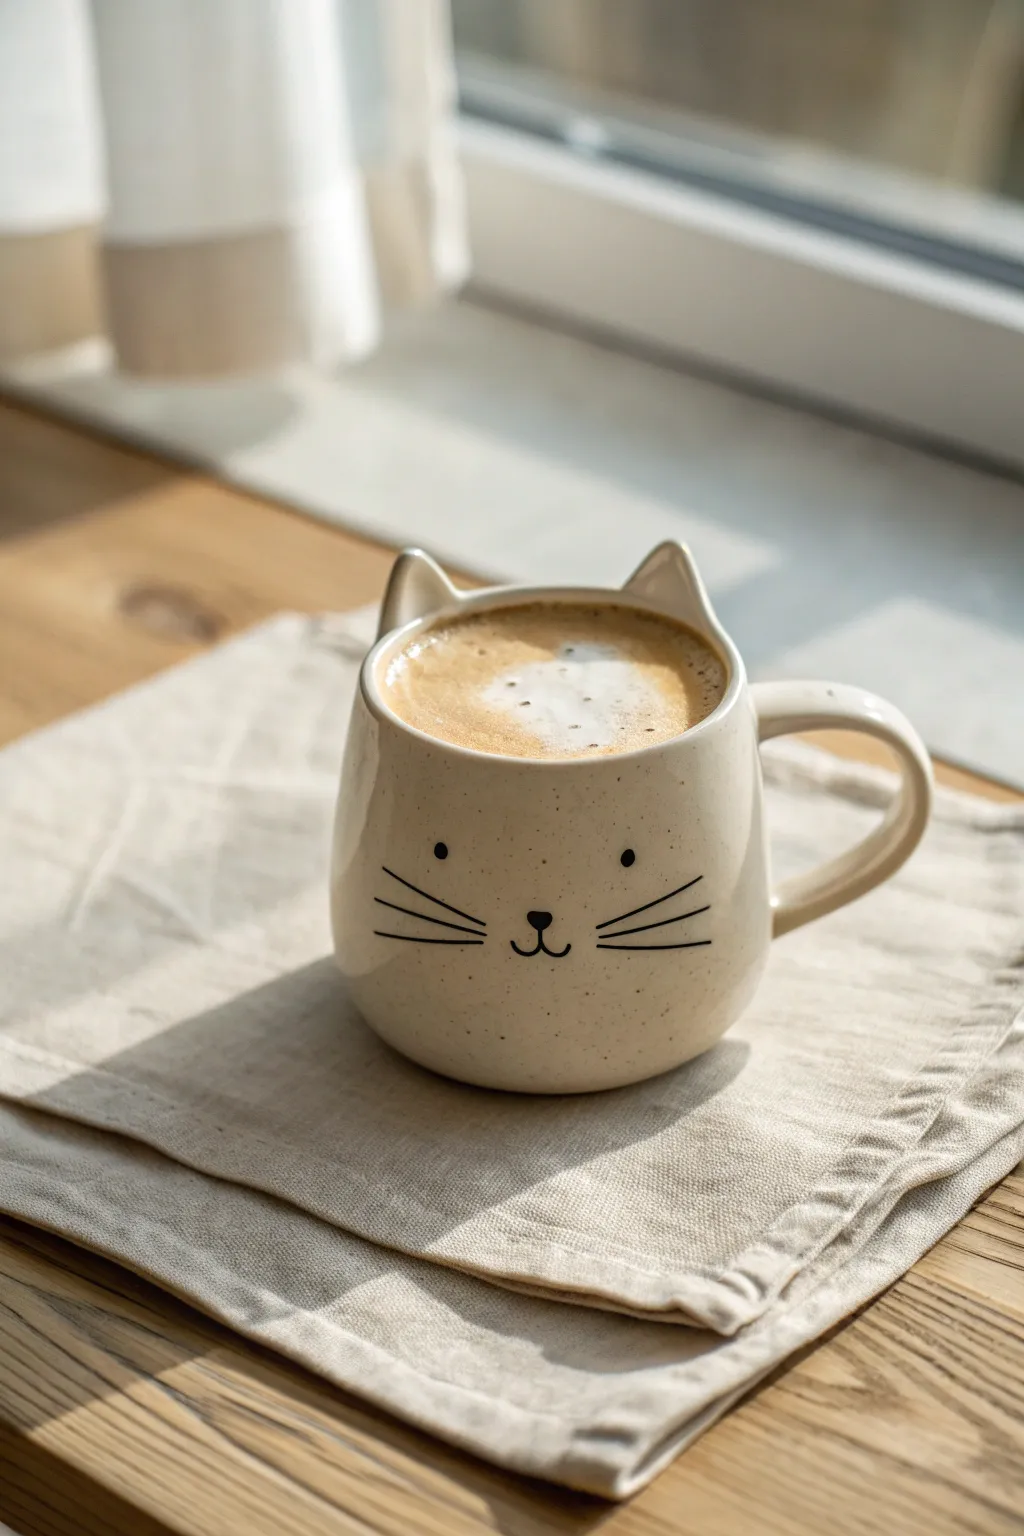
Transform a simple lump of clay into this adorable breakfast companion, featuring perky ears right on the rim and a sweet, minimalist face. The speckled cream glaze gives it a warm, handmade character perfect for holding your morning latté.
Step-by-Step Guide
Materials
- Stoneware clay (speckled or buff)
- Pottery wheel (or rolling pin for hand-building)
- Rib tool
- Needle tool
- Fettling knife
- Scoring tool
- Small sponge
- Black underglaze
- Fine detail brush
- Clear or transparent cream glaze
- Sponge or trimming tool
Step 1: Forming the Body
-
Prepare your clay:
Begin by thoroughly wedging about 1 to 1.5 pounds of speckled stoneware clay to remove any air bubbles. -
Center and open:
Secure the clay on your wheel bat, then center it and open up the form, keeping the base slightly thicker to support the rounded shape. -
Pull the walls:
Pull the walls up into a cylinder first, aiming for an even thickness of about 1/4 inch. -
Shape the belly:
Using a rib tool on the inside, gently push outward to create a rounded, bulbous ‘belly’ shape, bowing the walls out while keeping the rim slightly narrower. -
Smooth the exterior:
Refine the outside curve with a flexible metal or rubber rib to remove finger marks and ensure a smooth canvas for the face later. -
Cut the rim:
Use your needle tool to trim the rim straight and then smooth it with a chamois or sponge. Cut the mug off the bat and let it dry to leather-hard.
Ears Falling Off?
If the ears crack at the seam during drying, your slip wasn’t sticky enough. Make ‘magic water’ (water + pinch of soda ash + sodium silicate) for a super-strong bond.
Step 2: Adding Ears & Handle
-
Trim the foot:
Once leather-hard, center the mug upside down and trim a neat foot ring, rounding the bottom curve so it flows seamlessly. -
Cut ear triangles:
Roll out a small slab of clay (matching the mug’s wall thickness). Cut two small equilateral triangles for the ears. -
Attach the ears:
Score the top rim of the mug where you want the ears to sit. Slip and score the base of the triangles, then firmly press them onto the rim. -
Blend the seams:
I prefer to use a small wooden tool to smudge the clay from the ear down onto the mug wall seamlessly, then smooth with a damp sponge so they look like they grew out of the rim. -
Pull a handle:
Pull a strap handle from a lug of clay, tapering it slightly. Let it stiffen up for about 20 minutes until it holds a curve. -
Attach the handle:
Score and slip the attachment points on the side of the mug (opposite the face area). Attach the handle, blending the seams well and ensuring the loop is large enough for fingers.
Perfect Whiskers
For ultra-crisp black lines that don’t bleed, use an underglaze pencil instead of a brush for the whiskers, or use a slip-trailer with a fine metal tip.
Step 3: Painting & Glazing
-
Dry to bone dry:
Cover the mug loosely with plastic to let the handle and ears dry slowly and evenly with the body effectively preventing cracks. -
Bisque fire:
Fire the piece in the kiln to cone 04 (or your clay’s specific bisque temperature). -
Paint the face:
Using a fine detail brush and black underglaze, carefully paint two small dots for eyes, a tiny nose, a ‘w’ mouth, and three straight whiskers on each cheek. -
Apply wax resist:
Once the underglaze is dry, dab a little wax resist over the black lines if you are worried about the glaze smudging them, though this is optional if you dip carefully. -
Dip in glaze:
Dip the entire mug into a transparent cream or clear glaze. The speckles in the clay body will show through nicely. -
Clean and fire:
Wipe the foot ring completely clean of glaze with a sponge. Fire to the clay’s maturity temperature (e.g., cone 5 or 6).
Now you have a charming, handmade mug ready to make your coffee breaks a little cozier

The Complete Guide to Pottery Troubleshooting
Uncover the most common ceramic mistakes—from cracking clay to failed glazes—and learn how to fix them fast.
Dog Treat Jar With a Sculpted Lid
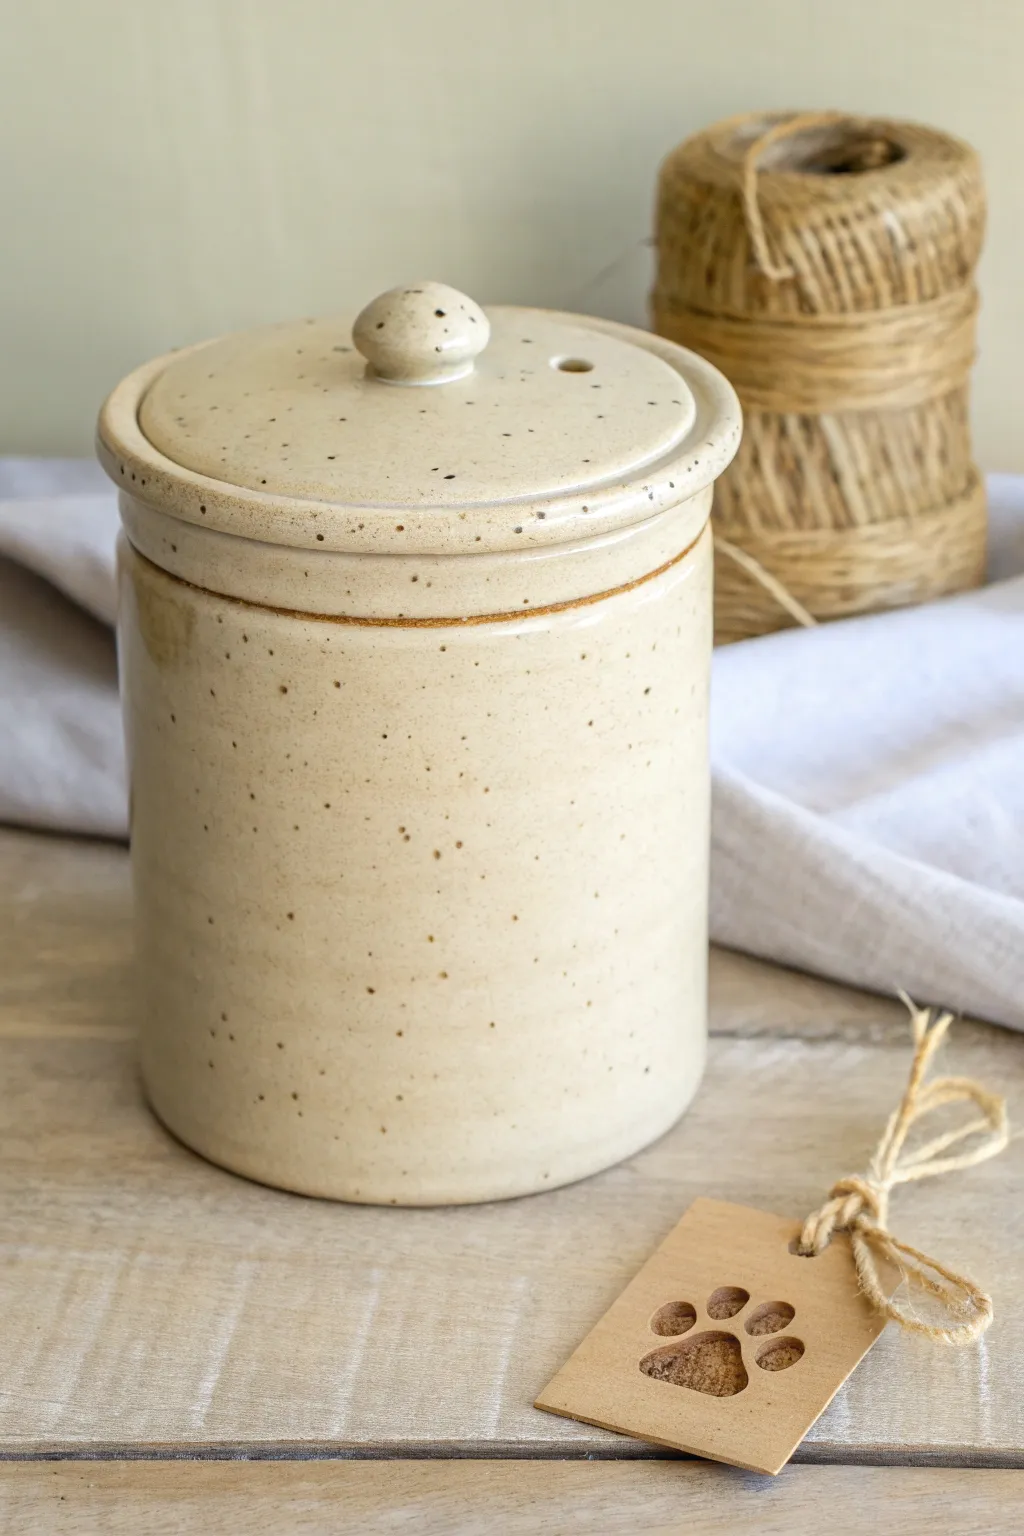
Keep your furry friend’s favorite snacks fresh in this minimalist, hand-thrown ceramic jar featuring a subtle speckled glaze and a custom paw-print tag. This project combines wheel-throwing techniques with simple slab work to create a timeless, functional piece perfect for any kitchen countertop.
Detailed Instructions
Materials
- Stoneware clay (buff or white with speckles)
- Pottery wheel
- Throwing tools (sponge, rib, wire cutter)
- Trimming tools
- Needle tool
- Rolling pin
- Paw print clay cutter or X-acto knife
- Twine or jute cord
- Clear or transparent glossy glaze
- Kiln
Step 1: Throwing the Vessel
-
Center the Clay:
Begin with about 2-3 pounds of speckled stoneware clay. Wedge it thoroughly to remove air bubbles, then slam it onto your wheel head. Center the clay using steady pressure and water until it spins without wobbling. -
Open the Form:
Open the centered clay by pressing your thumbs into the middle, leaving about a half-inch of thickness at the base. Pull the floor out to determine the width of your jar, aiming for roughly 5-6 inches across. -
Pull the Walls:
Using a sponge and your fingertips, pull the walls upward into a cylinder. Aim for straight, vertical walls with an even thickness. I like to check the thickness with a needle tool occasionally to ensure consistency. -
Form the Gallery:
At the rim, use a wooden rib or your fingers to press slightly inward and down to create a ‘gallery’—this is the internal ledge where your lid will sit. Ensure the gallery is flat and smooth to prevent a wobbly lid later. -
Refine and Clean:
Use a metal or wooden rib to smooth the exterior walls, removing throwing lines if you prefer a cleaner look. Use a sponge to soak up any water from the inside floor, then wire cut the pot from the wheel but leave it on the bat to firm up.
Shrinkage Rates
Remember clay shrinks! If you need the jar to hold specific treats, make the wet clay form 12-15% larger than your desired final size.
Step 2: Creating the Lid
-
Measure the Opening:
Before throwing the lid, use calipers to measure the exact diameter of the gallery you created on the jar. -
Throw the Lid:
Center a smaller ball of clay (about 1 pound). Flatten it into a thick disc, ensuring the width matches your caliper measurement. Creating the lid upside down (like a shallow bowl) is usually easiest. -
Refine the Fit:
Carefully refine the edge of your lid to ensure it will slide perfectly into the jar’s gallery. It’s better to leave it slightly wider and trim it down later than to make it too small. -
Create the Knob:
You can throw a small knob directly onto the lid while it’s on the wheel, or hand-build a separate mushroom-shaped handle and attach it during the leather-hard stage. -
Add Ventilation:
Once the lid has stiffened slightly, use a small hole punch or drill bit tool to create a tiny vent hole near the handle. This prevents the lid from rattling due to air pressure and just looks nice.
Step 3: Trimming and Finishing
-
Trim the Jar:
Once the jar is leather hard, center it upside down on the wheel. Use trimming tools to clean up the foot ring and remove excess weight from the bottom corners. -
Trim the Lid:
Place the lid on the wheel (you may need a chuck or a foam bat). Trim away excess clay to create a pleasing dome shape and refine the underside. -
Create the Tag:
Roll out a small slab of scrap clay. Cut out a rectangle or tag shape. Use a small paw-print cutter or sharp knife to press or cut a paw shape into the clay. -
Bisque Fire:
Allow all pieces (jar, lid, tag) to dry completely, which may take several days depending on humidity. Load them into the kiln for a bisque fire around Cone 04. -
Glazing:
For the look in the image, dip or brush a transparent or semi-transparent cream glaze over the jar and lid. The glaze should allow the natural clay speckles to show through. -
Final Fire:
Fire the pieces again to the maturity temperature of your clay body (likely Cone 5 or 6). Ensure the lid is not on the jar during firing to prevent them sticking together. -
Assembly:
Once cool, tie a piece of rustic jute twine around the neck of the jar or through the handle if desired, and attach your ceramic paw tag.
Uneven Lid?
If the lid wobbles after firing, apply a dab of grinding paste to the gallery, insert the lid, and rotate it back and forth to sand the connection smooth.
Now fill your beautiful new jar with treats and watch your pup’s tail wag with delight
Snail Succulent Holder
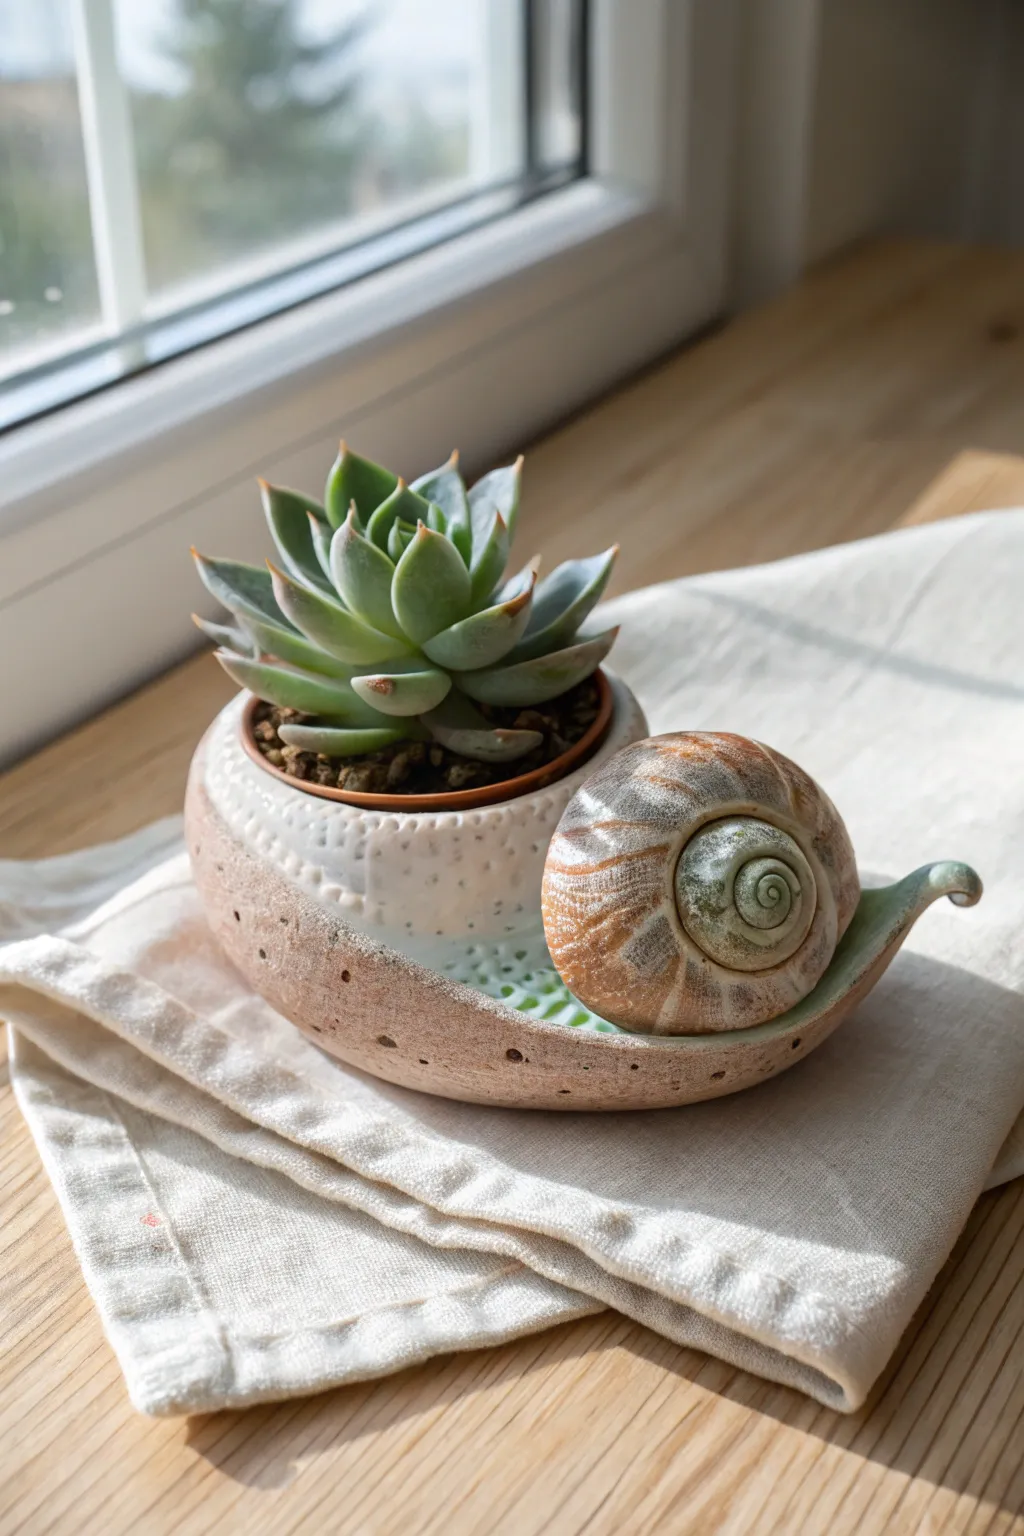
Bring slow living to your windowsill with this charming ceramic snail project. This unique succulent holder features a textured shell separate from the planter body, connected by a swooping organic tray that catches extra water.
Step-by-Step Tutorial
Materials
- White earthenware or stoneware clay
- Pottery wheel (for the main bowl) or pinch-pot tools
- Rolling pin and canvas
- Needle tool
- Scoring tool or serrated rib
- Slip (clay slurry)
- Small sponge
- Loop trimming tool
- Underglazes: Beige, light brown, grey
- Clear matte or satin glaze
- Small succulent plant (e.g., Echeveria)
Step 1: Forming the Body & Planter
-
Throw the planter bowl:
Start by throwing a small, round bowl on the wheel—this will be the ‘body’ where the plant sits. Aim for a diameter of about 3-4 inches with slightly incurved walls to hold the pot snug. -
Create the texture:
While the clay is still leather-hard, use a dull pencil or the end of a paintbrush to gently stipple the upper rim of the bowl, creating a porous, stone-like texture. -
Roll the base slab:
Roll out a slab of clay about 1/4 inch thick. Cut an elongated teardrop shape that curves slightly at the tail end; this serves as the snail’s foot and connects the shell to the planter. -
Shape the tail:
At the narrow end of your slab, pinch and curl the clay upward to form a tiny, whimsical tail point that lifts off the table. -
Curve the base walls:
Gently pinch up the edges of the slab to create a shallow rim all the way around. This curve is crucial as it creates a containment area for the shell and the planter. -
Attach the planter:
Score the bottom of your thrown bowl and the wide end of the slab base. Apply slip and firmly press the bowl onto the base, smoothing the seam so it looks like one continuous piece. -
Add drainage holes:
Using a small hole cutter or needle tool, punch decorative holes along the side of the slab base for aesthetic detail.
Weight Management
Make sure your shell isn’t solid clay! If the coil method gets too heavy, create a hollow pinch pot sphere first and carve the spiral into the surface instead.
Step 2: Sculpting the Shell
-
Coil the shell:
Roll a long, tapered coil of clay. Starting from the thin end, wind it tightly into a spiral to form the snail’s shell. -
Hollow and shape:
Once coiled, gently press the back side to dome it outwards, creating a 3D shell shape rather than a flat disc. I find it helps to cradle it in my palm while pressing to maintain the curve. -
Refine the spiral:
Use a modeling tool to deepen the grooves between the coils, ensuring the spiral remains distinct and defined. -
Fit the shell:
Place the shell onto the rear portion of the slab base to check the fit. Do not attach it permanently if you want it to be removable, or score and slip it into place for a solid sculpture.
Leaf Impressions
Before curving the slab base, press real leaves or lace into the soft clay. After firing, rub oxide into the texture to reveal organic veins on the snail’s ‘foot’.
Step 3: Finishing & Glazing
-
Bisque fire:
Allow the piece to dry slowly and completely before loading it into the kiln for a bisque firing. -
Paint the shell:
Dilute your brown and grey underglazes with a little water. Paint the shell using a wash technique, letting the darker colors settle into the spiral grooves to accentuate the depth. -
Glaze the planter:
Apply a simple white or clear glaze to the textured rim area of the planter bowl, but keep the application light so the stippled texture remains visible. -
Speckle the base:
Flick a stiff toothbrush loaded with iron oxide or brown underglaze loosely over the base to create a natural, earthy speckled effect. -
Glaze fire:
Fire the piece again according to your clay body’s temperature requirements. -
Pot the plant:
Once cool, nestle a small plastic nursery pot with an Echeveria into the bowl opening. The plastic rim should rest just below your ceramic edge.
Now you have a quiet little garden companion ready to hold your favorite succulent


What Really Happens Inside the Kiln
Learn how time and temperature work together inside the kiln to transform clay into durable ceramic.
Turtle Trinket Dish With Shell Texture
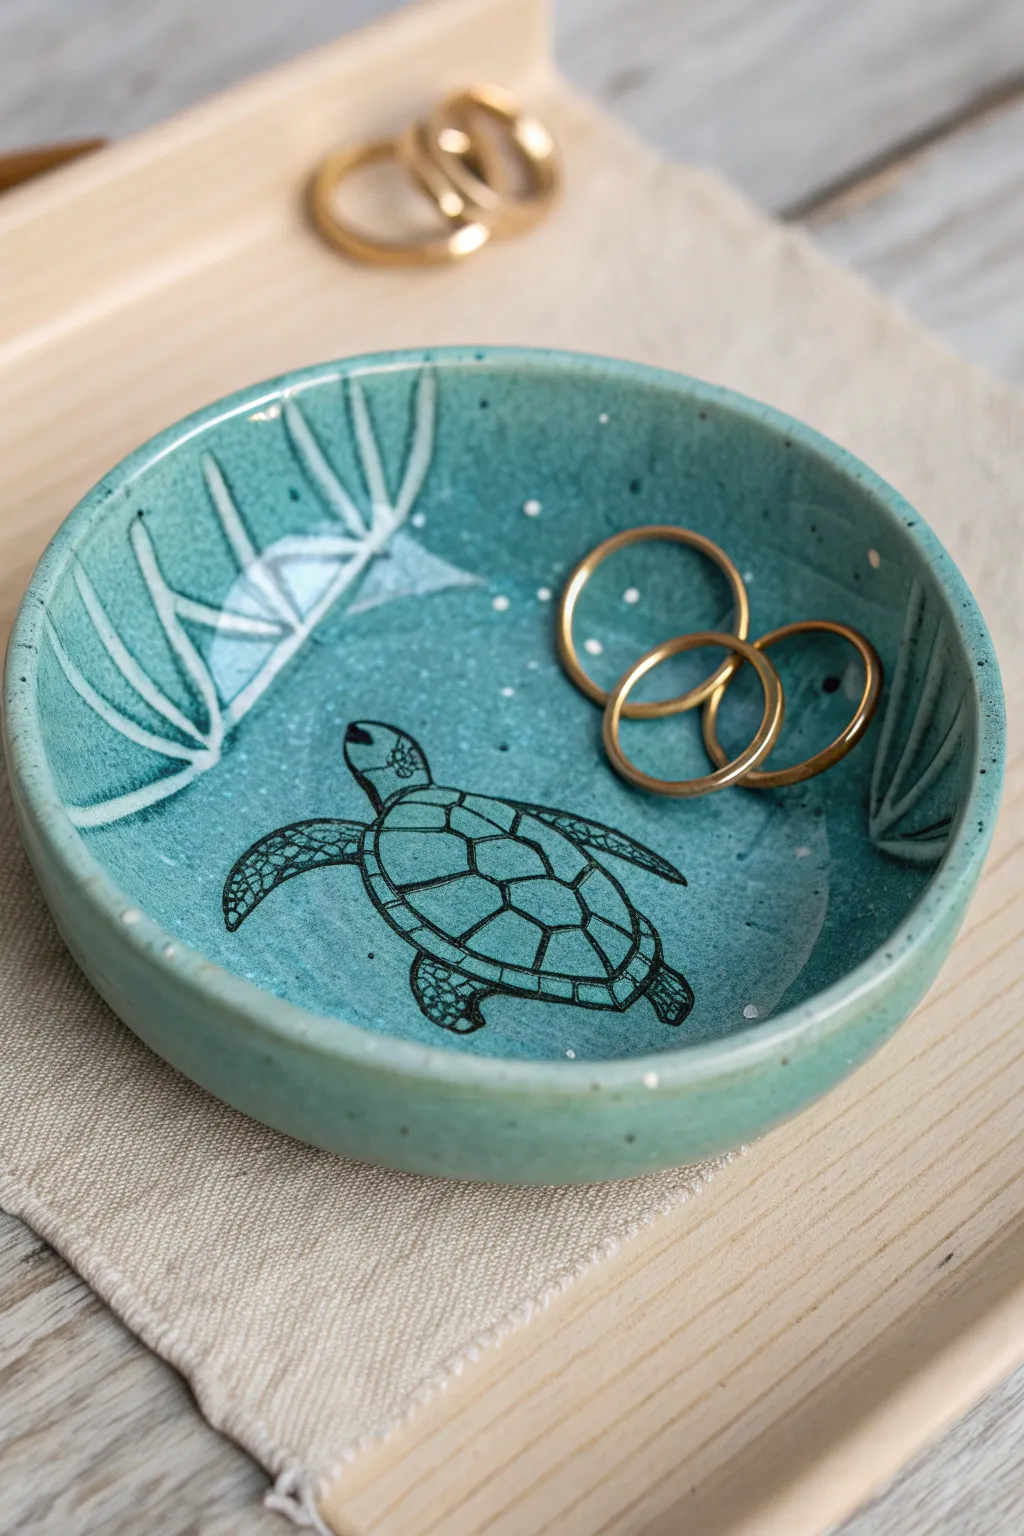
This charming ceramic piece blends the serenity of the sea with functional art, featuring a speckled turquoise glaze and a detailed turtle illustration. It’s the perfect size for holding your favorite rings or small keepsakes by the bedside.
Detailed Instructions
Materials
- Stoneware clay body (white recommended)
- Pottery wheel or rolling pin/slab mold
- Loop tools for trimming
- Carving tool or sgraffito tool
- Turquoise stoneware glaze (speckled variety)
- Black underglaze decal (turtle design) or black underglaze pencil
- White underglaze (for sea grass)
- Fine detail paintbrush
- Clear transparent glaze (optional, over decal)
- Sponge and bucket of water
- Kiln
Step 1: Forming the Dish
-
Prepare your clay:
Start by wedging about 1 pound of white stoneware clay. Ensure it is free of air bubbles to prevent any issues during the firing process. -
Throw or build the base:
If using a wheel, throw a low, wide cylinder and gently open it into a shallow bowl shape. Alternatively, roll out a slab to 1/4 inch thickness and drape it over a hump mold to form a smooth, concave dish. -
Refine the rim:
Using a chamois or a damp sponge, compress the rim to make it smooth and rounded. This step is crucial for durability and a finished look. -
Dry to leather hard:
Set the dish aside until it reaches a leather-hard state. It should be firm enough to handle without warping but still cool to the touch. -
Trim the foot:
Turn the piece over and trim a neat foot ring. This elevates the dish slightly and gives it a professional profile.
Glaze Crawling?
If the glaze pulls away from the white underglaze areas, try thinning your underglaze application or bisque firing a bit higher to burn off binders before glazing.
Step 2: Applying the Design
-
Sketch the seagrass:
While the clay is still leather hard or slightly drier, lightly sketch the placement of the seagrass fronds along the upper rim area using a needle tool or pencil. -
Apply white underglaze:
Using your fine detail brush, paint the seagrass shapes with white underglaze. I like to apply two thin coats to ensure the white stands out against the future turquoise background. -
Carve the details:
Once the underglaze is dry, use a sgraffito tool to scratch thin lines through the white underglaze, revealing the clay body underneath to define the individual blades of grass. -
Bisque fire:
Load the bone-dry dish into the kiln and bisque fire it to Cone 04. This prepares the piece for glazing.
Step 3: Glazing and Finishing
-
Wax resist the foot:
Apply wax resist to the bottom foot ring to prevent glaze from sticking to the kiln shelf. -
Apply the base glaze:
Dip the entire dish into a speckled turquoise stoneware glaze. Shake off any excess glaze and let it dry completely. If you brushed the white seagrass underglaze, the turquoise glaze should be translucent enough for it to show through, or you can carefully wipe the glaze back from the white areas. -
Prepare the turtle transfer:
If using an underglaze decal, cut out your turtle design. Soak it briefly in water until it slides easily off the backing paper. -
Apply the turtle:
Slide the decal onto the center of the glazed surface. Gently smooth out any air bubbles with a soft rubber rib or damp sponge. If you prefer hand-drawing, use a black underglaze applicator bottle or fine brush to paint the turtle directly on top of the raw glaze (maiolica style). -
Clean up imperfections:
Check the rim and the foot for any glaze drips. Smooth them out with a rubbing stone or a clean finger. -
Glaze fire:
Place the dish in the kiln for the final glaze firing, typically to Cone 5 or 6 depending on your clay and glaze specifications. -
Review the result:
Once cool, inspect the turtle. The black lines should be crisp against the speckled blue background, mimicking a turtle swimming in clear water.
Add Golden Accents
For a luxe touch, apply a small amount of gold luster to the rim or parts of the turtle shell after the glaze firing, then refire to Cone 018.
Place your new dish on a dresser to add a splash of ocean calm to your daily routine
Bird Ring Holders With a Perch

This charming, rustic ring holder combines functional storage with sculptural whimsy, featuring a gentle ceramic bird perched atop a central cone. Its textured, speckled stone finish and organic edges give it a grounded, earthy feel perfect for a bedside table or vanity.
How-To Guide
Materials
- Speckled stoneware clay (buff or sand colored)
- Slab roller or rolling pin
- Clay knife or fettling knife
- Needle tool
- Serrated rib or scoring tool
- Slip (clay mixed with water)
- Sponge
- Small wooden modeling tool
- Matte transparent glaze (optional)
- Kiln access
Step 1: Forming the Base Dish
-
Roll the slab:
Begin by rolling out a slab of speckled stoneware clay to approximately 1/4 inch thickness. You want it substantial enough to look rustic but not overly heavy. -
Cut the circle:
Use a needle tool to cut a freehand circle, about 5 to 6 inches in diameter. Don’t worry about making it perfectly round; an organic, slightly irregular shape adds to the handmade charm. -
Build the rim:
Roll a coil of clay about the thickness of your pinky finger. Score and slip the outer edge of your base slab, then attach the coil on top to create the wall of the dish. -
Blend the coil:
Using your thumb or a wooden tool, blend the coil downward into the base on both the inside and outside seams. Smooth out the transition so it looks like one cohesive piece. -
Add texture:
Pinch the rim gently between your thumb and forefinger to give it a slightly uneven, wabi-sabi aesthetic. You can use a damp sponge to soften any sharp edges, but leave some of the grainy texture visible.
Hollow it Out
If your central cone is thicker than 1 inch, hollow it out from the bottom before attaching it to the dish. This prevents explosions in the kiln and reduces drying time significantly.
Step 2: Creating the Perch
-
Shape the cone:
Take a lump of clay and roll it into a cone shape. It should be about 3 to 4 inches tall, with a base wide enough to be stable (about 1.5 inches) and tapering to a rounded point at the top. -
Test the fit:
Place the cone in the center of your dish to ensure the proportions look right. The cone needs to be tall enough to hold rings but shorter than the dish’s width for balance. -
Attach the cone:
Score the bottom of the cone and the center of the dish thoroughly. Apply slip generously to both surfaces and press the cone firmly into place. -
Reinforce the seam:
Use a small coil or simply drag clay from the base of the cone onto the dish floor to create a seamless transition. Smooth this area with a damp sponge. -
Add the mini dish:
Create a tiny pinch pot, about the size of a large coin, and attach it near the rim of the main dish. This small depression is perfect for holding stud earrings.
Gilded Wings
After the final firing, use a small brush to apply gold luster overglaze to the bird’s wings or the rim of the dish, then refire at a low temperature for a touch of elegance.
Step 3: Sculpting the Bird
-
Form the body:
Roll a small ball of clay, roughly walnut-sized. Gently pinch one side to pull out a tail feathers shape and pinch the opposite side to form a small, rounded head. -
Refine the beak:
With delicate fingers, pinch a tiny beak from the head area. Keep it subtle and integrated into the form rather than sticking it on separately. -
Detail the wings:
Use a needle tool or a small knife to gently incise wing shapes on the sides. Add small lines to suggest feathers, keeping the strokes light and directional. -
Perch the bird:
Score the top of the cone and the belly of your bird. Applying a dab of slip, press the bird onto the perch. I like to tilt the bird slightly upward so it looks like it’s about to sing. -
Final smoothing:
Check all connections once more. Use a barely damp sponge to wipe away any excess slip globs or sharp crumbs of clay, but be careful not to erase your hand-building marks.
Step 4: Firing and Finishing
-
Dry slowly:
Loosely cover the piece with plastic and let it dry slowly over several days. This is crucial because the cone is thick and needs to dry evenly with the thin dish to avoid cracking. -
Bisque fire:
Once bone dry, fire the piece in a kiln to bisque temperature (usually Cone 04). -
Glaze application:
For the look in the image, you want to preserve the raw clay texture. Apply a very thin, matte transparent glaze purely to seal the clay, or leave the outside unglazed and only glaze the inside of the dish for easier cleaning. -
Final fire:
Fire the piece to the maturity temperature of your specific clay body (e.g., Cone 5 or 6 for stoneware).
Once cooled, fill the dish with your favorite jewelry pieces and enjoy the quiet serenity it brings to your space

TRACK YOUR CERAMIC JOURNEY
Capture glaze tests, firing details, and creative progress—all in one simple printable. Make your projects easier to repeat and improve.
Whale Spoon Rest With a Curved Tail
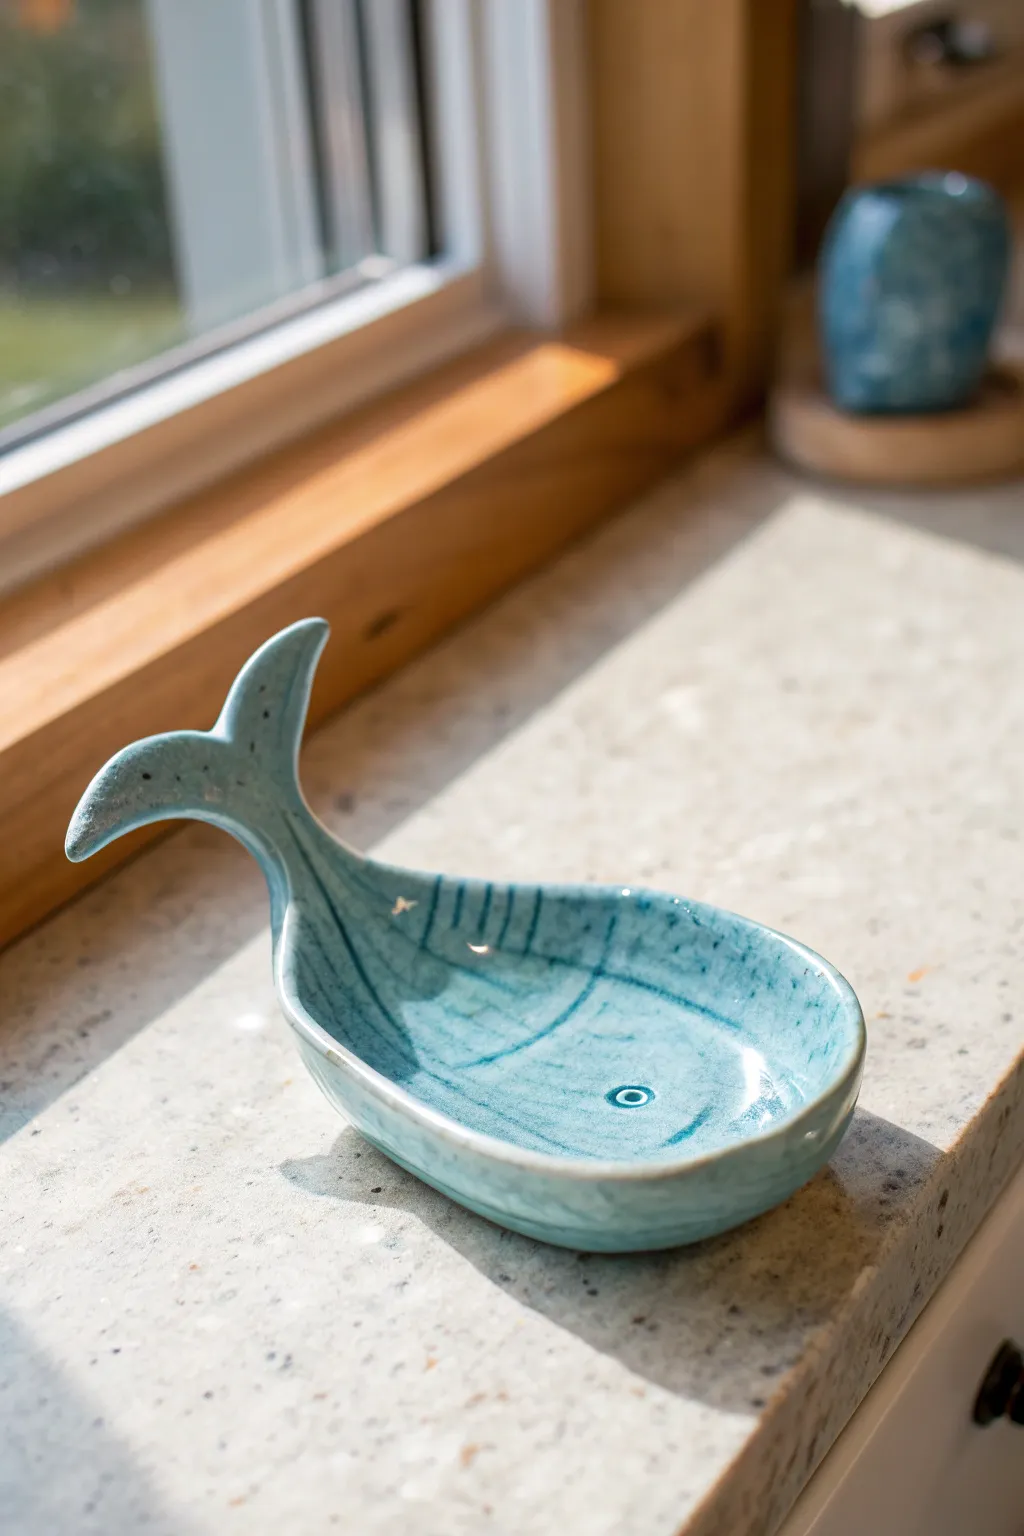
This charming ceramic spoon rest combines functionality with oceanic flair, featuring a graceful curved tail and a unique speckled blue glaze. The carved details on the body add texture while the gentle basin shape is perfect for catching drips near your stove.
Detailed Instructions
Materials
- Light-colored stoneware clay (approx. 1 lb)
- Roller or rolling pin
- Fettling knife or needle tool
- Rib tool (smooth wood or rubber)
- Modeling tool with a curved edge
- Small carving loop tool
- Sponge
- Speckled blue stoneware glaze
- Clear glossy glaze (optional)
- Kiln access
Step 1: Shaping the Whale Body
-
Roll the slab:
Begin by rolling out your stoneware clay into an even slab, approximately 1/4 to 3/8 inch thick. Compress the clay on both sides using a rib tool to align the particles and prevent warping later. -
Sketch the outline:
Using a needle tool, lightly sketch a teardrop shape for the body that transitions into a narrower neck for the tail directly onto the clay slab. Don’t cut yet; just refine your proportions until you are happy with the silhouette. -
Cut the form:
Once satisfied with the outline, use your fettling knife to cut out the whale shape. Smooth the cut edges immediately with a damp sponge or your finger to remove any sharp burrs. -
Form the pinch pot:
Gently lift the wide part of the teardrop—the whale’s body—and begin to form a shallow curve. You want to create a concave ‘bowl’ shape that will eventually hold a spoon. Use your thumb to press the center down while supporting the walls.
Step 2: Sculpting the Tail and Details
-
Shape the flukes:
At the narrow end, separate the clay slightly or mold it to flare out into two distinct tail flukes. I like to gently pinch the edges to taper them, giving the tail a more hydrodynamic, elegant look. -
Curve the tail upward:
Bend the neck of the tail upwards. This is crucial for a spoon rest, as the elevated tail prevents the messy end of a spoon from sliding off. Ensure the curve is smooth and not a sharp crease to avoid cracking. -
Add carved lines:
Using a needle tool or small modeling tool, gently carve parallel vertical lines along the side of the whale’s body to mimic the ventral pleats found on many whales. Keep the lines shallow but distinct. -
Create the eye:
Press a small hollow circle tool or the back of a paintbrush into the clay near the front of the body to create a distinct eye indentation. This fills nicely with glaze later. -
Refine the surface:
Go over the entire piece with a slightly damp sponge. Smooth out any fingerprints, especially around the rim of the bowl area, to ensure a professional finish. -
Dry slowly:
Cover the piece loosely with plastic for the first day to let the moisture even out, then uncover to dry completely strictly to the bone-dry stage. This slow drying helps maintain the tail’s upright position.
Tail Drooping?
If the tail begins to sag while the clay is wet, prop it up with a small customized wedge of spare clay or a rolled-up piece of newspaper until it becomes leather-hard and can support its own weight.
Step 3: Firing and Glazing
-
Bisque fire:
Load the bone-dry whale into the kiln and bisque fire it to roughly Cone 04 (depending on your specific clay body). This hardens the clay and prepares it for glazing. -
Wipe down:
After the bisque firing, wipe the piece with a clean, damp sponge to remove any kiln dust. This ensures the glaze adheres properly without crawling. -
Apply the glaze:
Dip or brush on your speckled blue stoneware glaze. If brushing, apply 2-3 coats, letting each dry briefly in between. Ensure the glaze gets into the carved lines and the eye indentation. -
Clean the foot:
Carefully wipe all glaze off the very bottom of the spoon rest where it will sit on the kiln shelf. Any glaze left here will fuse the piece to the shelf. -
Glaze fire:
Fire the piece a second time to the maturation temperature of your glaze and clay (typically Cone 5 or 6 for stoneware). This melts the glaze into that beautiful, glass-like finish.
Oceanic Gradient
Brush a second, darker blue glaze just on the rim and the tips of the tail before the final firing. As it melts, the colors will interact and run slightly, creating a beautiful depth.
Place this functional sculpture near your stove and enjoy a splash of ocean joy every time you cook
Frog Figures With Bumpy Skin Texture
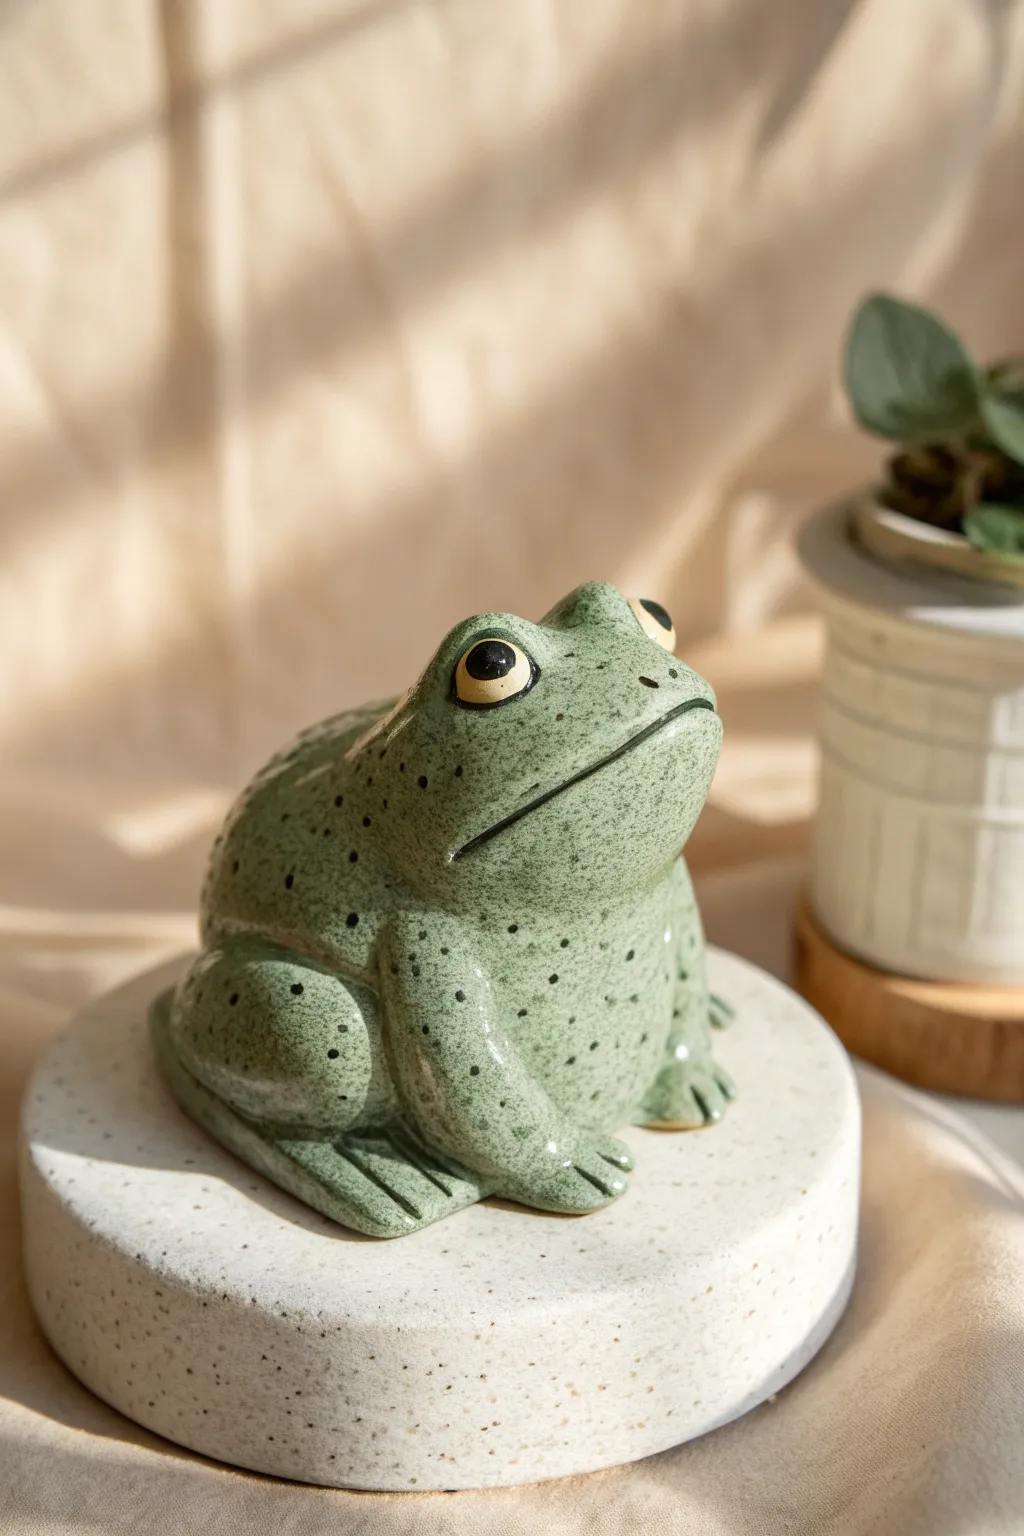
This charming ceramic frog captures the essence of a garden dweller with a beautifully textured, speckled glaze finish. Its rounded form and wide-set eyes give it a friendly personality, making it a perfect beginner-friendly sculpture project.
Step-by-Step Guide
Materials
- Stoneware clay (groggy for strength)
- Pottery tools (needle tool, rib tool, modeling tool)
- Slip and scoring tool
- Sponge
- Underglazes (black, yellow)
- Speckled green stoneware glaze (e.g., Mayco Green Tea or similar)
- Clear glaze (optional over eyes)
- Kiln
- Paintbrushes (small detail and medium fan brush)
Step 1: Sculpting the Body
-
Form the base:
Start with a softball-sized lump of clay. Roll it into a smooth ball, then gently tap it on your work surface to create a flat bottom so the frog sits securely. -
Shape the torso:
Use your hands to elongate the ball slightly into an oval. Push the front upward to create the chest area, angling the back downwards to suggest a seated posture. -
Hollow the form:
If your frog is larger than a tennis ball, you need to hollow it out. Allow the clay to firm up slightly, cut it in half horizontally with a wire tool, scoop out the center leaving 1/2 inch walls, and then score and slip the pieces back together. -
Smooth the seams:
If you hollowed the form, use a rib tool to meticulously smooth over the join line until it is invisible. Ensure the air trapped inside has a tiny vent hole poked discreetly in the bottom. -
Create the legs:
Roll two thick coils for the rear legs. Attach them to the sides of the body, blending the upper thigh into the torso while keeping the rounded knee distinct and protruding. -
Refine the feet:
Flatten the ends of the leg coils against the table. Use a modeling tool to press indentations for the toes, creating the webbed foot appearance visible in the photo. -
Add front arms:
Roll two smaller, shorter coils for the front arms. Attach them vertically beneath the chest area, blending the shoulders into the body mass. -
Detail the front hands:
Just like the rear feet, flatten the ends of the front arms and use a tool to define individual toes, splaying them slightly for a natural look.
Step 2: Defining the Face
-
Build the eye mounds:
Roll two small balls of clay. Score and slip the top of the head where the eyes will go, and attach the balls firmly. Smooth the clay around the base of the balls so they look like protrusions from the skull, not just stuck-on marbles. -
Carve the mouth:
Using a needle tool or a thin wooden knife, carve a long, sweeping line across the face for the mouth. Curve the corners slightly downward to give it that classic frog expression. -
Refine the eyelids:
I like to roll tiny, thin coils and wrap them over the top half of the eye mounds to create eyelids, blending the top edge into the head. -
Smooth the surface:
Check the entire sculpture for rough fingerprints. Use a slightly damp sponge to wipe down the frog, creating a smooth canvas for the speckled glaze. -
Vent hole check:
Double-check that your vent hole on the bottom is clear before setting the piece aside to dry slowly under plastic. -
Bisque fire:
Once bone dry, fire the piece in the kiln to a bisque temperature (usually cone 04) to prepare it for glazing.
Glaze Crawling?
If the glaze pulls away in bare patches after firing, you likely had dust on the bisque ware or applied the glaze too thickly. Wipe bisque with a damp sponge before glazing.
Step 3: Glazing and Finishing
-
Detail the eyes:
Using a small brush, paint the eyeball area with a yellow underglaze. Once dry, add a black pupil in the center. You can outline the eye in black for more definition. -
Wax resist (optional):
Apply a liquid wax resist over the painted eyes. This prevents the green glaze from covering your detailed work in the next step. -
Apply the body glaze:
Stir your speckled green stoneware glaze thoroughly to suspend the particles. Apply 2-3 even coats to the entire body, avoiding the eyes and the very bottom of the piece. -
Clean the foot:
Use a damp sponge to wipe off any glaze that may have gotten onto the bottom resting surface to prevent it from sticking to the kiln shelf. -
Glaze fire:
Fire the frog to the temperature required by your specific clay and glaze body (typically cone 5 or 6 for stoneware).
Make it a Toad
Instead of smoothing the clay in phase one, use a loop tool or the back of a paintbrush to press various sized dimples and warts all over the back for a bumpier texture.
Now you have a watchful little garden guardian ready to sit among your plants
Lizard Sculptures With Scale Detailing
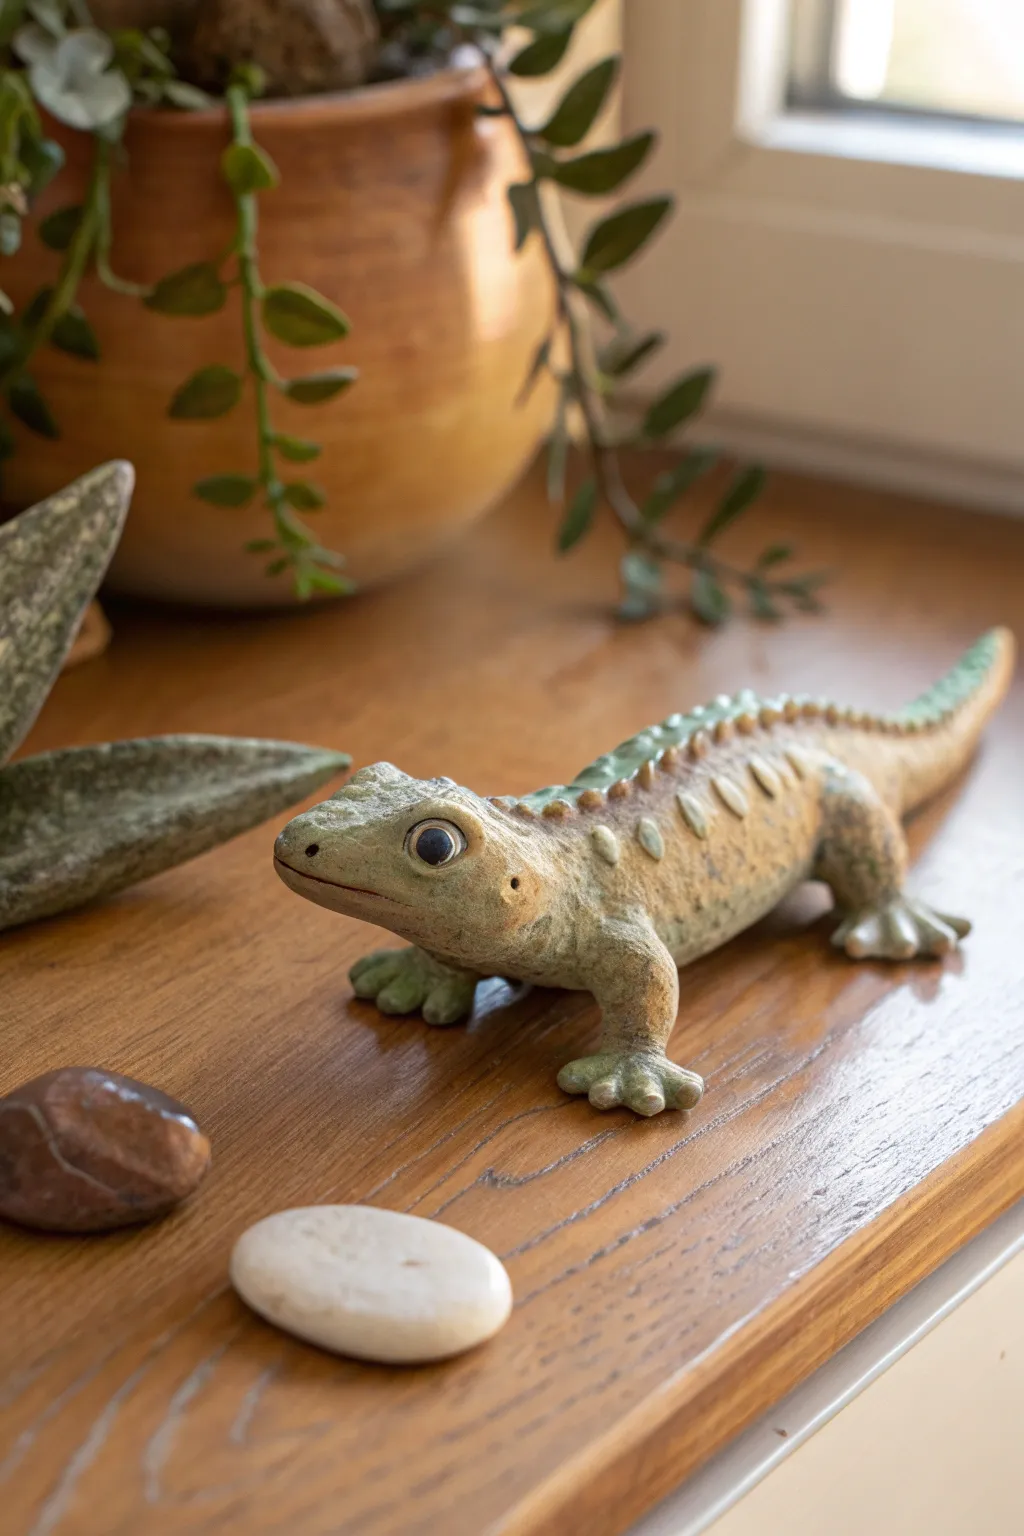
Bring a touch of reptile charm to your shelf with this handcrafted ceramic lizard, featuring gentle spinal ridges and alert eyes. The finish uses earthy washes and subtle texture to create a natural yet sculpted look that feels warm and organic.
Detailed Instructions
Materials
- Stoneware clay (buff or speckled)
- Clay carving tools (needle tool, small loop tool)
- Scoring tool or serrated rib
- Slip (clay mixed with water)
- Underglazes (Sage Green, Tan/Sand, Dark Brown)
- Clear matte glaze
- Small sponges and soft brushes
- Rolling pin
- Modeling tool with a small ball end
Step 1: Forming the Body
-
Shape the torso:
Begin with a solid cylinder of well-wedged clay, roughly the thickness of a large carrot. Taper one end gently to form the tail and keep the other end blunt for the head. -
Bend the spine:
create a gentle ‘S’ curve in the body to give the lizard a natural, resting movement. Ensure the tail curves slightly upward or sideways so it doesn’t look stiff. -
Sculpt the head:
Pinch the blunt end to define the neck and head shape. Flatten the snout area slightly and use your thumbs to press in shallow sockets where the eyes will sit. -
Form the legs:
Roll four smaller coils for the legs. Bend them at a 90-degree angle to create knees and elbows. The back legs should be slightly thicker at the thigh. -
Attach the limbs:
Score and slip the contact points on the body and the legs. Press them firmly together, smoothing the clay seams with a modeling tool until the join is invisible.
Legs Keep Collapsing?
If the belly sags, prop it up with a small sponge or ball of paper towel while you work. Consult drying times to ensure structure holds before removing props.
Step 2: Detailing and Texturing
-
Add the feet:
Flatten the ends of the legs into small pads. Use a needle tool to cut toes, then gently round each toe tip so they aren’t sharp. -
Create the eyes:
Roll two small balls of clay and press them into the eye sockets you made earlier. Roll thin coils for eyelids and attach them over the top and bottom of each eye ball for a realistic, hooded look. -
Build the spine ridge:
Pinch the clay along the center of the back to raise a ridge. Alternatively, I sometimes prefer to attach a thin coil down the spine and blend it downwards. -
Carve the scales:
Using a small loop tool or a modeling knife, press rhythmic, vertical indents along that spinal ridge to create the segmented, armored look shown in the photo. -
Texture the skin:
Use a stiff-bristled brush or a coarse sponge to dab the surface of the skin (avoiding the eyes). This creates a subtle, leathery texture rather than a perfectly smooth surface. -
Pierce the nostrils:
Use a small needle tool to poke two small nostrils at the tip of the snout. At this stage, verify the lizard sits flat without wobble.
Hollow It Out
For a sculpture thicker than 1 inch, hollow out the belly and poke a discreet air hole (pinhole) underneath to prevent explosions in the kiln.
Step 3: Underglazing & Finishing
-
Bisque fire:
Allow the lizard to dry completely (bone dry) before firing it to bisque temperature (usually cone 04) based on your clay specs. -
Apply base color:
Brush a coat of Tan or Sand underglaze over the entire belly and lower sides. Let it dry briefly. -
Add green accents:
Sponge Sage Green underglaze along the spine and top of the head. Dab gently to blend the green down into the tan, creating a soft gradient. -
Paint the details:
Use a fine brush with Dark Brown or Black underglaze to paint the pupils. Add tiny spots along the flank for texture. -
Highlight the ridges:
Wipe a damp sponge lightly over the spinal ridges to reveal some of the lighter clay body underneath, accentuating the carved texture. -
Glaze and final fire:
Apply a thin coat of clear matte glaze over the entire piece to seal it without making it look plasticky. Fire to the final glaze temperature.
Now you have a charming little garden guardian ready to sit on your windowsill
Hippo Cups With Big Mouth Rims
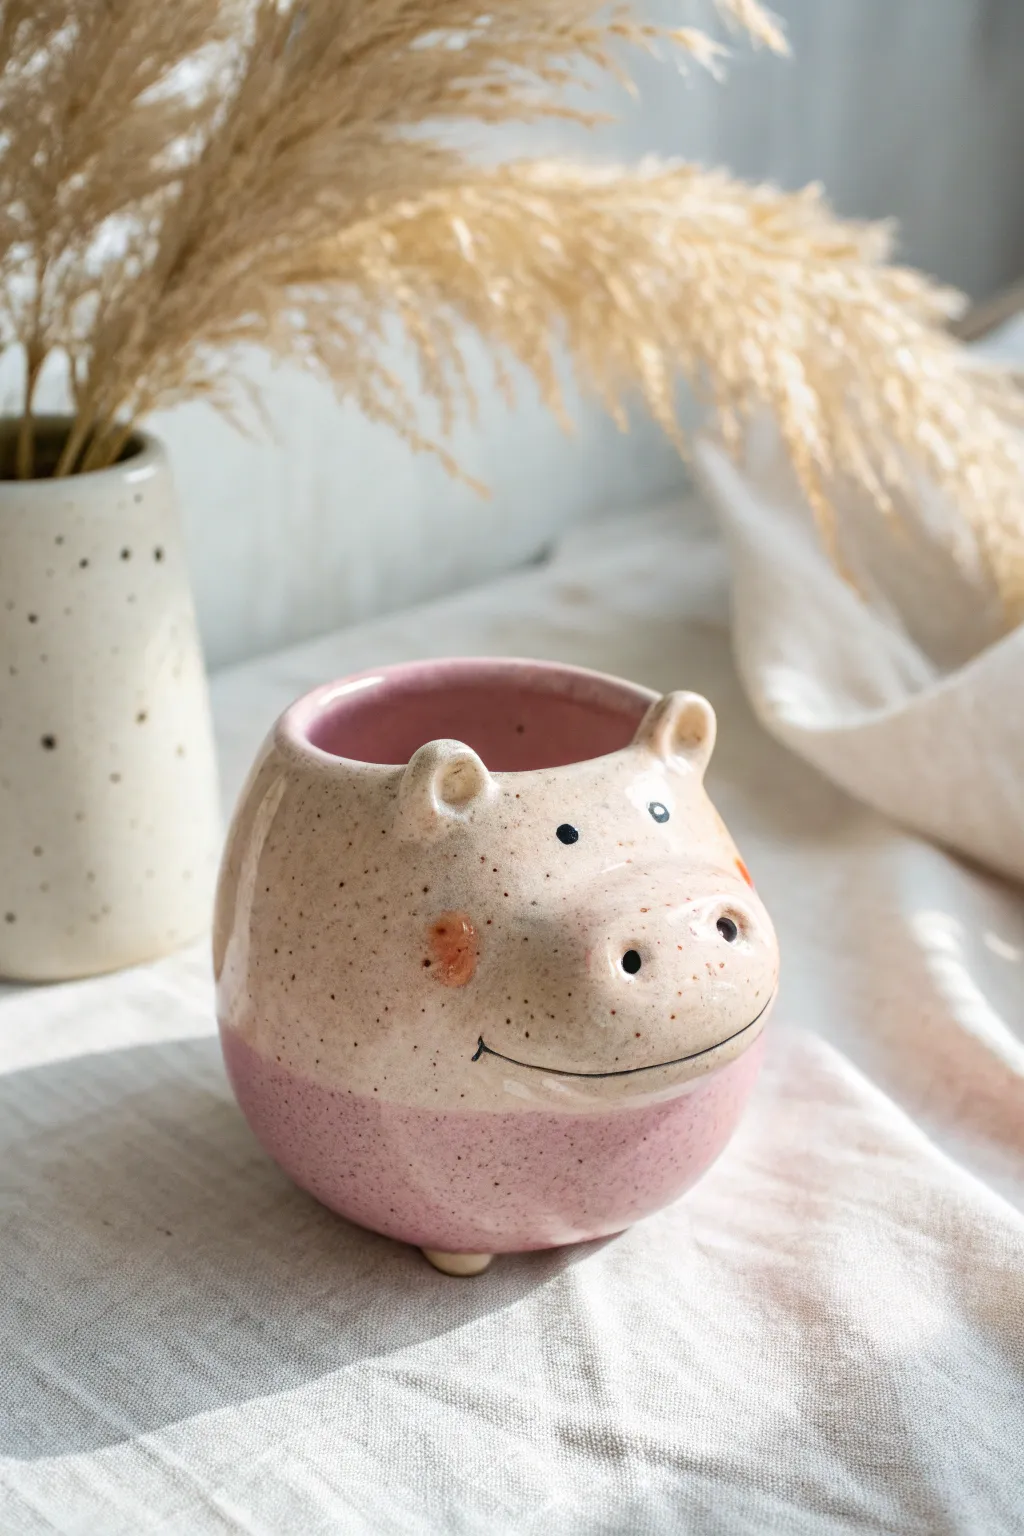
This adorable hippo planter or cup brings a smile to any windowsill with its rosy pink belly and speckled cream glaze. Sculpted by hand with a simple pinch pot technique, it features a joyful, wide snout and cute little ears that are perfect for beginners.
Step-by-Step Tutorial
Materials
- Speckled Stoneware Clay (cone 5/6)
- Pottery Tools: Needle tool, scoring rib, sponge
- Small wooden modeling tool
- Underglaze (Black, Pink, Orange/Coral)
- Clear Glaze (cone 5/6)
- Pink/Rose Glaze (compatible with stoneware)
- Small brushes
- Kiln
Step 1: Shaping the Form
-
wedge and Prep:
Begin with a ball of speckled stoneware clay roughly the size of a large orange. Wedge it thoroughly to remove air bubbles, then pat it into a smooth sphere. -
Pinch Pot Base:
Insert your thumb into the center of the ball and gently pinch the walls while rotating the clay. Aim for a consistent wall thickness of about 1/4 inch, creating a rounded cup shape that curves slightly inward at the top. -
Smooth the Surface:
Use a damp sponge or a flexible rib to smooth the exterior and interior walls. You want a nice, round belly for the hippo, so gently push the walls outward from the inside if needed. -
Form the Snout:
Roll a smaller oval of clay for the snout. Score and slip one side of the oval and the corresponding area on the front of your pot. Press the snout firmly onto the cup, blending the edges seamlessly with your thumb or a wooden tool so it looks like one piece. -
Sculpt the Nostrils:
Using the rounded end of a wooden tool or the back of a paintbrush, press two indentations into the front of the snout to create the nostrils. Angle them slightly outward for added character. -
Add the Ears:
Roll two small marble-sized balls of clay. Flatten them slightly and make a small indentation in the center of each to form the ear shape. Score and slip the top rim of the cup and attach the ears securely. -
Add Tiny Feet:
Flip the pot over gently. Create three tiny, flattened balls of clay for feet. Score and slip them onto the base in a tripod arrangement for stability. This gives the hippo a little lift.
Snout Separation Anxiety
If the snout cracks off during drying, you didn’t score deeply enough. Use a serrated rib to scratch both surfaces aggressively before adding slip next time.
Step 2: Refining and Decorating
-
Carve the Smile:
Use a needle tool to lightly carve a wide, U-shaped smile just below the snout line. Go over this line a second time to ensure it is deep enough to hold glaze later. -
Slow Drying:
Cover the piece loosely with plastic and let it dry slowly to the leather-hard stage. This prevents the added features like the snout from cracking away. -
Bisque Fire:
Once the piece is bone dry, fire it in the kiln to a bisque temperature (usually cone 04).
Pro Tip: Eye Placement
Place the painted eyes widespread and low, close to the snout line. This creates a ‘cuter,’ more innocent look compared to placing them high up near the rim.
Step 3: Glazing the Hippo
-
Wax Resist Method:
If you want a very clean line between the pink bottom and the cream top, paint a line of wax resist around the ‘waist’ of the hippo or lay down masking tape. -
Dip the Base:
Dip the bottom half of the cup into your Pink/Rose glaze. Hold it there for a few seconds to get an even coat, then lift and let the excess drip off. Clean up any drips with a sponge. -
Paint the Details:
Using a fine detail brush and Black underglaze, paint two small dots for eyes and carefully trace the carved smile line. I like to add tiny eyebrows for extra expression. -
Rosy Cheeks:
Dab a small circle of Orange or Coral underglaze onto the cheeks. You can water this down slightly for a watercolor effect or keep it opaque. -
Pink Interior:
Pour a pink glaze (or the same rose used on the bottom) into the inside of the cup. Roll it around to coat the interior fully, then pour out the excess. -
Clear Coat:
Once the underglaze details are dry, dip the top half (or brush over the entire exterior if your pink glaze is stable) with a clear transparent glaze. This allows the speckles of the clay to show through. -
Final Fire:
Load the kiln carefully and fire to the maturity temperature of your clay and glaze (likely cone 5 or 6). Let even cool completely before unloading.
Fill your finished hippo with a small fern or your favorite tea and enjoy its cheerful company
Modern Geometric Bear Figurines
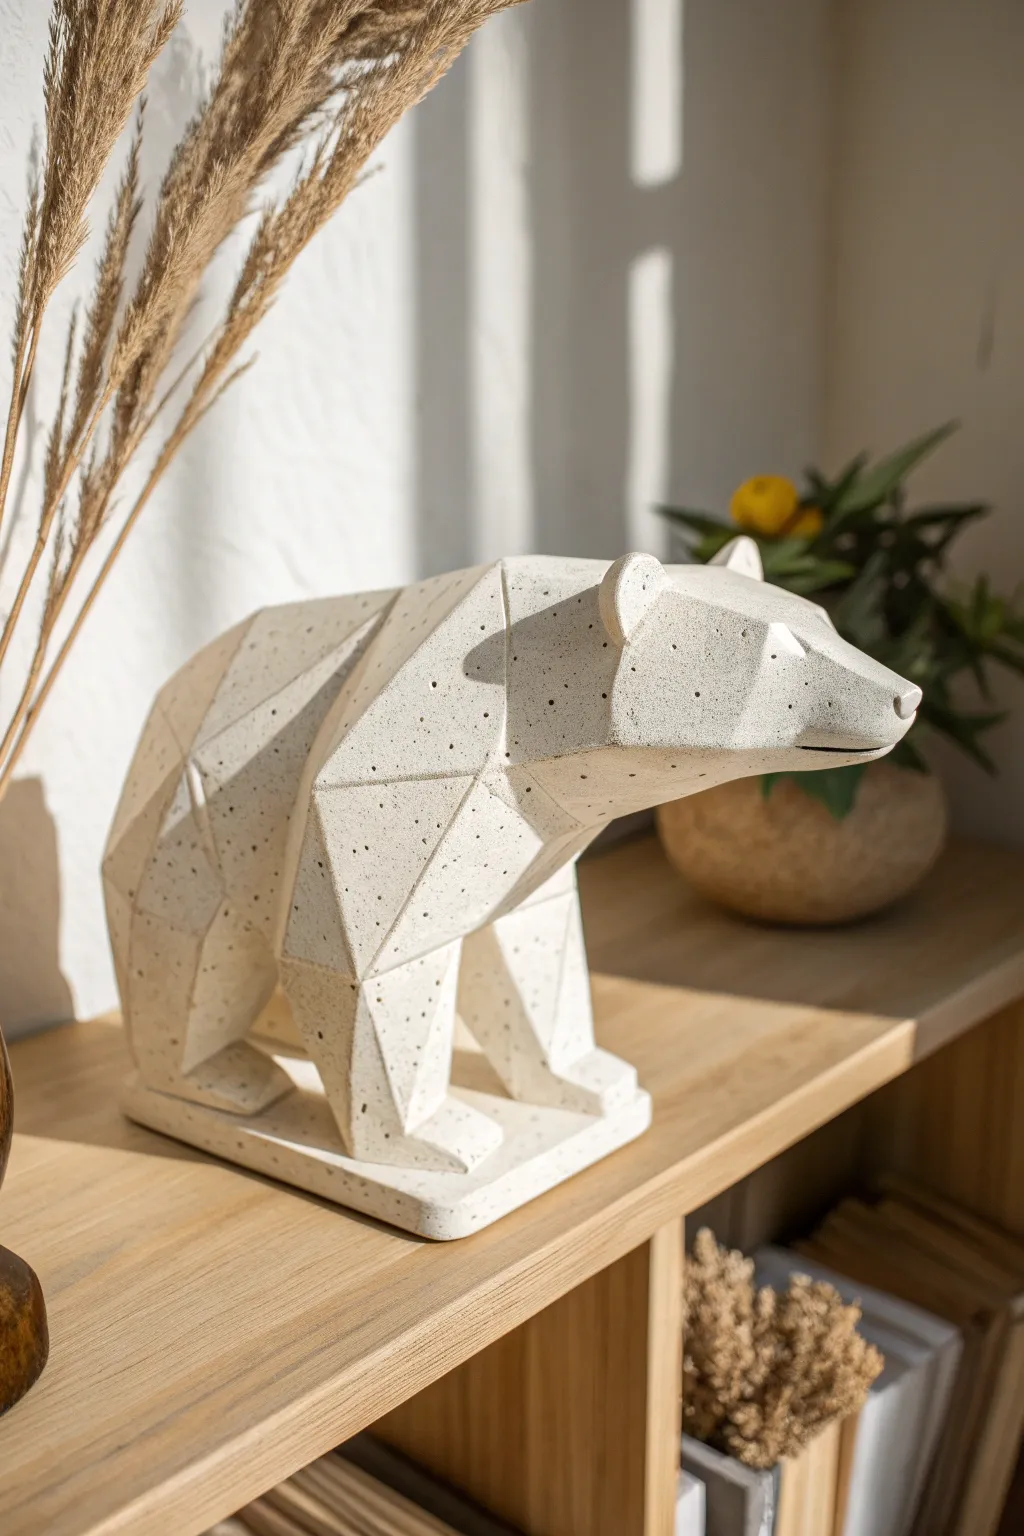
Embrace the sleek lines of modern sculpture with this low-poly bear figurine. The finished piece features a sophisticated speckled finish that mimics the look of high-end ceramic or terrazzo stone, making it a perfect accent for minimalist shelving.
How-To Guide
Materials
- White or cream air-dry clay (or polymer clay)
- Hobby knife or clay slicing tool
- Rolling pin
- Speckle inclusions: black pepper, dried coffee grounds, or black glitter
- Flexible cutting mat
- Water (for smoothing)
- Fine-grit sandpaper (220 and 400 grit)
- Matte sealant spray
- Ruler
- Reference image of a low-poly bear
Step 1: Preparation & Base Form
-
Prepare the Speckled Clay:
Begin by conditioning your block of white clay. To achieve the stone-like texture, kneed in your chosen speckle material. I like to use coarsely ground black pepper or dried coffee grounds for an uneven, natural look. Mix until the particles are evenly distributed throughout the white base. -
Form the Main Body Block:
Roll the clay into a large, thick log shape. This doesn’t need to look like a bear yet; you are essentially creating the ‘stone block’ you will carve from. Flatten the bottom so it sits securely on your work surface. -
Establish the Silhouette:
Using your hands, vaguely shape the log to have a higher hump for the shoulders and a lower section for the head. It should look like a very abstract, blocky animal shape. -
Square Off the Sides:
Use your slicing tool or a long blade to cut the rounded sides of the clay, creating flat, boxy planes on the left and right. This establishes the geometric aesthetic immediately.
Uneven Facets?
If your cuts look warped, freeze the clay for 10 minutes before slicing. Harder clay yields crisper, flatter geometric planes than soft clay.
Step 2: Carving the Geometry
-
Define the Back and Shoulders:
Start slicing angular planes along the top of the back. Instead of a curved spine, cut three or four distinct flat facets that angle downwards from the shoulder hump toward the tail. -
Cut the Facial Planes:
For the head, use precise, straight cuts to taper the snout. Create a flat plane for the top of the nose, and angled planes for the cheeks. The snout should end in a flat, vertical hexagon or rectangle shape. -
Sculpt the Legs:
Remove clay from the underside of the belly area to separate the front and back legs. Keep the cuts sharp and angular—do not smooth them into cylinders. The legs should look like faceted pillars. -
Detailing the Ears:
Form two small, flat triangles or trapezoids from leftover clay. Attach them to the head by scoring the connection point and using a dab of water. Slice the fronts flat so they integrate with the geometric planes of the skull. -
Refining the Facets:
Go over the entire sculpture with your blade. If any area looks too round or organic, slice a thin layer off to create a flat facet. The light should catch these planes distinctively. -
Create the Base Platform:
Roll out a separate slab of speckled clay about 1/4 inch thick. Cut it into a rectangle slightly larger than the bear’s footprint. Place the bear onto this slab, pressing firmly to bond the feet to the base.
Step 3: Finishing Touches
-
Smoothing Edges:
Dip your finger in a little water and very lightly run it over the sharpest edges. You don’t want to lose the geometry, but you want to remove any hanging burrs of clay. -
Dry Time:
Allow the sculpture to dry completely. For air-dry clay of this thickness, this usually takes 48 to 72 hours. Rotate it occasionally to ensure airflow to the bottom. -
Initial Sanding:
Once bone dry, use 220-grit sandpaper to sharpen the planes. Sand against a flat surface to make the facets perfectly crisp. -
Polishing:
Switch to 400-grit sandpaper for a smoother finish. This step often reveals more of the speckled inclusions, enhancing the stone effect. -
Sealing:
Take the bear to a well-ventilated area. Apply two light coats of matte sealant spray. This protects the clay and seals in the organic speckles without adding an unnatural gloss.
Pro Tip: Marble Effect
Mix a tiny drop of grey acrylic paint into just one section of clay before kneading to create subtle marble veins alongside the speckles.
Place your geometric bear in a spot with side lighting to really show off those dramatic shadows and planes
Patterned Chicken Sculptures With Sgraffito
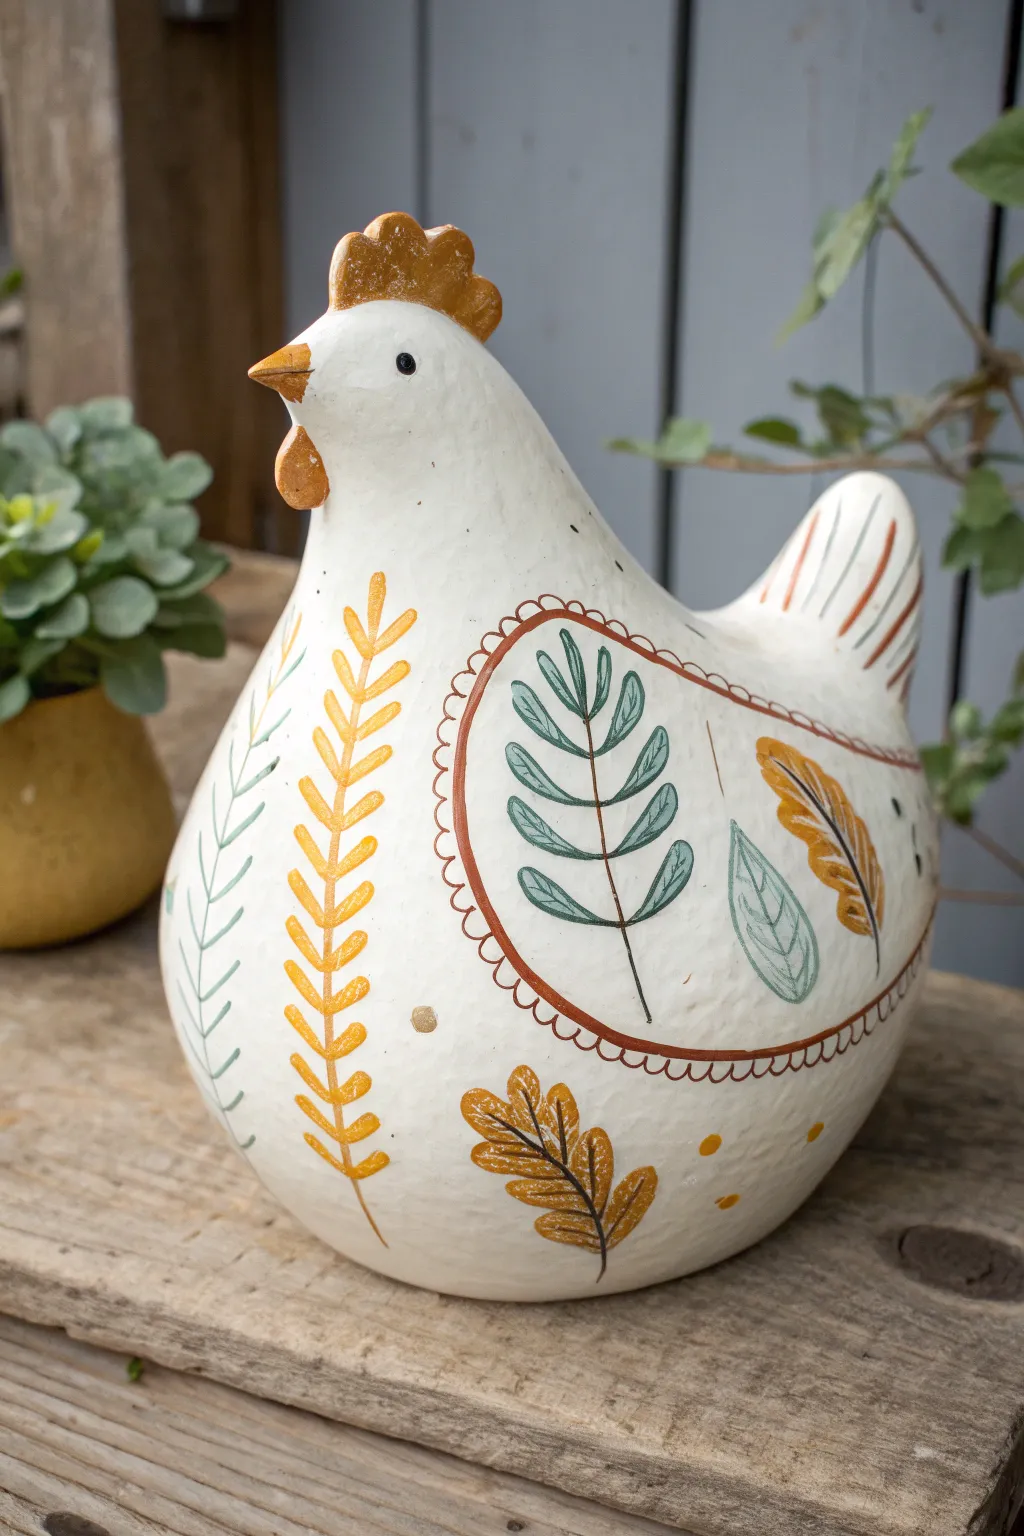
This charming ceramic sculpture combines a simple, stylized chicken form with whimsical botanical illustrations. The contrast of the creamy white clay body against warm autumn-toned leaves creates a cozy, folk-art aesthetic perfect for rustic decor.
Step-by-Step Guide
Materials
- White stoneware clay (cone 5-6)
- Pottery tools (rib, needle tool, sponge)
- Underglazes: Golden yellow, burnt orange, sage green, dark brown
- Clear matte glaze
- Fine liner brush
- Round detail brushes
- Sgraffito loop tool (small)
- Newsprint or plastic sheeting
Step 1: Sculpting the Form
-
Shape the body:
Begin with a solid lump of wedged white stoneware clay, roughly the size of a grapefruit. Use the pinch pot method or coil building to create a hollow, rounded egg shape that tapers upward to form the chest and neck. -
Refine the surface:
Once the basic hollow form is closed, use a metal or rubber rib to smooth the exterior walls. Gently paddle the shape to remove lumpiness, aiming for a smooth, organic curve that acts as your canvas. -
Form the head and tail:
Pinch and pull clay from the tapered top to form the head. On the opposite side, pull up a small, upward-curving section for the tail feathers. Keep these features stylized and simple rather than realistic. -
Add details:
Score and slip a small comb onto the top of the head and a wattle underneath the beak. Use a modeling tool to define the beak’s separation from the face. -
Texture prep:
Allow the piece to dry to a leather-hard state. This stage produces the best surface for clean painting and carving without the clay dragging.
Smudged Lines?
If underglaze smudges, wait for it to dry completely, then gently scrape the mistake away with an X-Acto knife or needle tool.
Step 2: Painting the Botanical Designs
-
Draft the layout:
Using a dull pencil, very lightly sketch your main design elements onto the leather-hard clay. Mark a large teardrop shape on the side to suggest a wing, which will frame the central leaf motif. -
Paint the leaves:
Load a round brush with sage green underglaze. Paint a central stem inside the wing area, adding alternating oval leaves. Keep the strokes fluid and slightly translucent to mimic a watercolor look. -
Add warm accents:
Paint long, stylized fronds outside the wing area using golden yellow underglaze. I like to use a single, continuous stroke for the central stem and short, decisive dashes for the leaflets. -
Detail the feathers:
Use burnt orange underglaze to paint broad stripes on the tail and a large, textured leaf shape near the base of the chicken. -
Paint the face:
Carefully paint the comb and wattle with burnt orange. Keep the beak natural or add a touch of diluted yellow ochre.
Variation Idea
Try leaving the background raw clay (no clear glaze) and only glazing the painted areas for a fun contrast in texture.
Step 3: Line Work and Finishing
-
Outline the wing:
Using a fine liner brush and dark brown underglaze, paint a scalloped line around the wing border. Add a second, thinner line inside it for depth. -
Add leaf veins:
With the same dark brown and your finest brush, paint the central veins and stems on your colored leaves. Keep these lines extremely delicate. -
Sgraffito details:
Once the underglaze is dry to the touch, use a sharp needle tool or small loop tool to scratch through the paint on the tail feathers and orange leaf, revealing the white clay underneath for texture. -
Eye placement:
Paint a small black dot for the eye. Add a tiny speck of white unpainted space or white underglaze as a highlight to bring the character to life. -
Bisque fire:
Allow the chicken to dry completely (bone dry) before bisque firing it to cone 04. -
Glaze application:
Wipe the bisque ware with a damp sponge to remove dust. Dip the entire piece into a clear matte glaze. The matte finish is crucial for maintaining that soft, papery folk-art appearance. -
Final firing:
Fire the piece to cone 5 or 6 (depending on your clay body). Ensure the bottom is wiped clean of glaze before loading it into the kiln.
Place your finished hen on a wooden shelf or kitchen counter to add a touch of handcrafted warmth to your home
Woodland Animal Family Display Sets
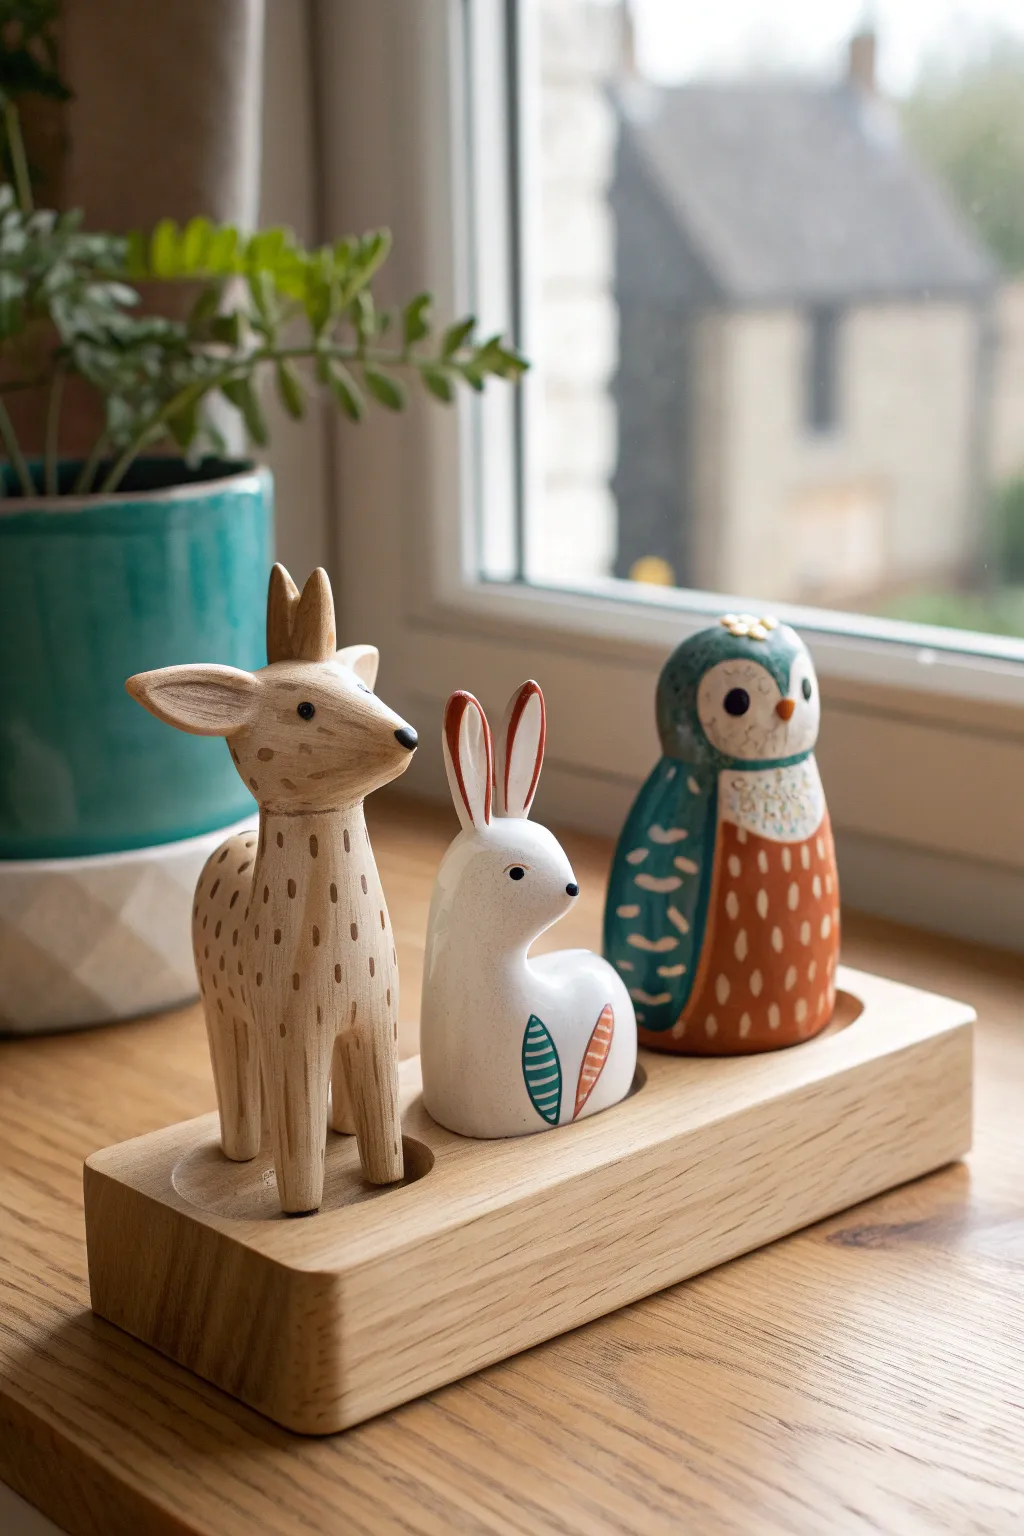
Bring the serene charm of the forest into your home with this delightful three-piece ceramic set featuring a deer, a rabbit, and an owl. Resting on a bespoke wooden plinth, these hand-painted figures combine natural wood tones with folk-art inspired details for a timeless shelf display.
How-To Guide
Materials
- White earthenware or stoneware clay (approx. 2 lbs)
- Clay sculpting tools (needle tool, rib, sponge)
- Small rolling pin
- Underglazes (Warm beige/tan, dark brown, white, teal, burnt orange, black)
- Clear transparent glaze (cone 04-06)
- Fine liner brushes (size 0 and 00)
- Medium round brush (size 4)
- Solid oak or beech wood block (approx. 8″ x 2.5″ x 1″)
- Drill press or handheld drill with Forstner bits (various sizes)
- Sandpaper (120, 220, 400 grit)
- Wood finish (Danish oil or clear matte varnish)
Step 1: Sculpting the Ceramic Figures
-
Prepare the deer form:
Start with a cylindrical lump of clay for the deer’s body. Pinch and pull four legs downwards, keeping them sturdy and slightly tapered. Smooth the connection points so the body flows naturally into the legs. -
Add the deer head:
Attach a separate, smaller oval of clay for the head using the score-and-slip method. Gently pull out a snout and attach two teardrop shapes for ears and two small conical shapes for antlers. -
Shape the rabbit:
Form a smooth, rounded ‘L’ shape for the sitting rabbit. Ensure the base is flat so it sits stable. Add two elongated, upright ears and a small, round tail. -
Mold the owl:
Create a stout, egg-like shape for the owl. Flatten the bottom for stability. Use a small tool to slightly indent the face area to define the eyes. Pinch small wings onto the sides without detaching them completely from the body mass. -
Refine and dry:
Use a damp sponge to smooth out any fingerprints or harsh tool marks on all three figures. Let them dry slowly under plastic for 24 hours, then uncover to reach bone dry state before bisque firing.
Glazing Pro-Tip
For the matte look shown in the photo, skip the clear dip glaze. Instead, fire the underglazed bisque and simply wax the raw ceramic with beeswax polish afterwards.
Step 2: Painting & Glazing
-
Base coat the deer:
Apply three coats of a translucent warm beige underglaze to the deer figure. I like to keep the brush strokes following the vertical line of the legs to simulate fur direction. -
Detail the deer:
Using a dark brown underglaze and a 00 liner brush, paint small dash marks across the deer’s back and neck. Paint the hooves, nose, and eyes solid black. -
Paint the rabbit:
Leave the majority of the rabbit the natural white of the clay or paint a solid white underglaze. On the flank, paint a stylized leaf shape using teal and burnt orange stripes. -
Decorate the owl wings:
Paint the owl’s wings in a deep teal. While the paint is drying, add small semi-circle brushstrokes in white or light blue to suggest feathers. -
Finish the owl body:
Paint the owl’s chest in burnt orange with small white dashes. Define the large eyes with black circles and paint a small orange triangle for the beak. -
Glaze and fire:
Once the underglaze is fully dry, dip or brush a clear transparent glaze over all three figurines. Fire them in the kiln according to your glaze instructions (typically cone 04 or 06).
Level Up: Seasonal Swap
Make extra figures like a fox, bear, or squirrel with the same base diameter. This lets you swap out family members on the wooden plinth whenever you want.
Step 3: Crafting the Display Base
-
Measure the wood:
Cut your hardwood block to size. It should be long enough to accommodate all three figures with about half an inch of spacing between them. -
Measure figurine bases:
Measure the diameter of the base of each fired ceramic animal. This is crucial for a snug fit. -
Drill recessed spots:
Using Forstner bits that match your measurements, drill shallow recesses (about 1/8 to 1/4 inch deep) into the wood block. This keeps the round-bottomed figures stable. -
Sand the wood:
Sand the entire block, starting with 120 grit and moving up to 400 grit. Pay special attention to rounding over the sharp corners and edges for a soft, modern look. -
Oil the base:
Apply a coat of Danish oil or matte varnish to the wood using a lint-free cloth. Wipe away excess after 15 minutes and let it cure completely.
Now you have a charming mantle display that captures the quiet beauty of the woods
Wall-Mounted Animal Heads for Decor
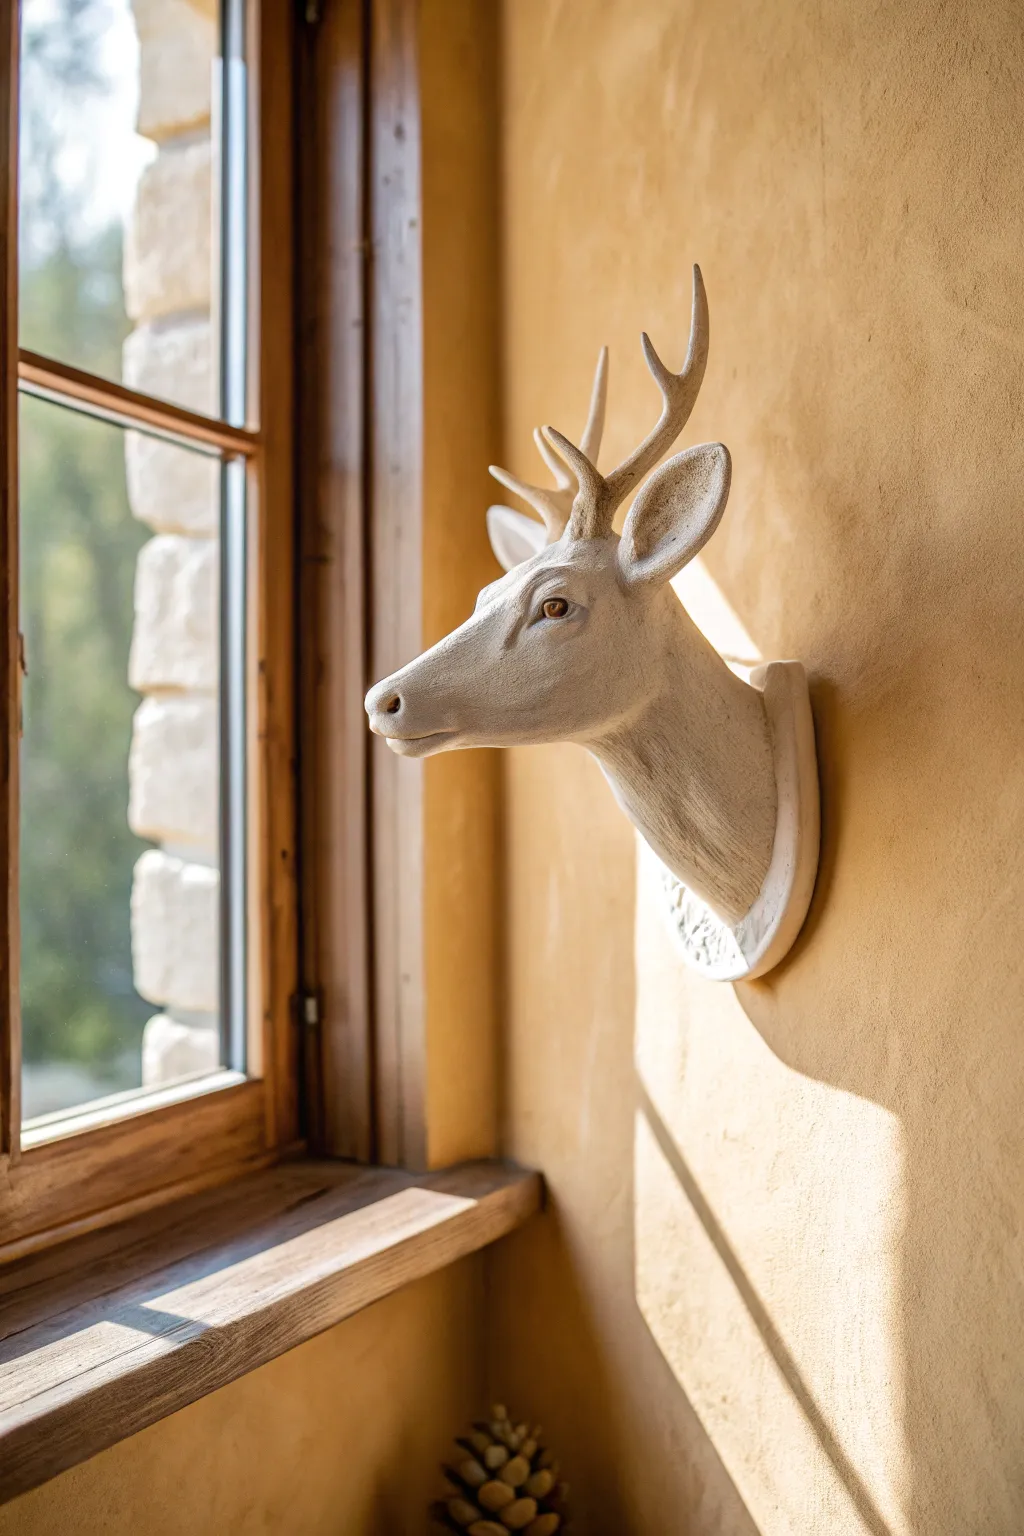
Bring the quiet elegance of the forest indoors with this sophisticated wall-mounted deer head. Finished in a soft matte white glaze, this ceramic piece captures gentle textures and realistic features for a timeless decorative accent.
Step-by-Step Guide
Materials
- White earthenware clay (approx 5-7 lbs)
- Wooden mounting armature or piping support
- Basic sculpting tools (loop tools, needle tool, wooden rib)
- Small sponges
- Slip (clay slurry)
- Scoring tool or serrated kidney
- Matte white glaze or underglaze
- Kiln access
- Wall mounting hardware (cleat or heavy-duty hook assembly)
Step 1: Building the Base Structure
-
Prepare the mounting plaque:
Begin by rolling out a thick slab of clay, roughly 1 inch thick, and cut it into an oval or shield shape. This will be the mounting plate that sits against the wall. Smooth the edges with a damp sponge. -
Form the neck core:
Using a coil-building technique, construct a hollow cylinder rising from the center of your plaque. Angle it slightly upward and outward to mimic the natural posture of a deer looking forward. -
Secure the connection:
Score and slip the connection point heavily where the neck meets the plaque. Use a wooden modeling tool to drag clay from the neck down onto the plaque to ensure a seamless, strong bond. -
Shape the head armature:
Continue building hollow coils to form the basic shape of the head. Think of it as a tapered oval attached to the neck cylinder. Keep the walls even, about 1/2 inch thick, to prevent cracking during firing.
Antler Gravity Check
If antlers keep sagging during assembly, insert a stiff wire inside the clay coils as an armature, but ensure the clay can shrink around it without cracking.
Step 2: Sculpting the Features
-
Refine the snout:
Use your fingers and a wooden rib to taper the front of the head into a delicate snout. Make sure not to make it too pointy; a deer’s muzzle is somewhat blunt and soft. -
Add volume for the eyes:
Add small pads of clay to the sides of the head where the eyes will sit. Smooth these mounds into the main form to create the brow bone and cheek structure. -
Carve the details:
With a small loop tool, carve out the eye sockets. Roll small balls of clay for the eyes, place them inside, and carefully sculpt eyelids over them using tiny coils. -
Form the ears:
Roll out two thick leaf shapes for the ears. Pinch them at the base to create a curve. Score and slip them onto the back of the head, blending the clay thoroughly so they stand upright. -
Establish the antler base:
Create the pedicles (the bone bumps where antlers grow) by adding two small distinct mounds between the ears. This is crucial for structural integrity before adding the antlers.
Make it Baroque
For a luxe twist, apply gold leaf or a gold luster overglaze strictly to the antlers after the final firing to create a glamorous, high-contrast focal point.
Step 3: Antlers and Surface Texture
-
Construct the antlers:
Roll tapered coils for the main antler beams and smaller tines. I find it helpful to let these stiffen slightly to a leather-hard state before attaching them, so they don’t droop. -
Attach the antlers:
Score and slip the antlers onto the pedicles. You may need to prop them up with foam or crumpled newspaper while the clay sets to keep them in the correct position. -
Texturize the fur:
Using a serrated rib or a needle tool, gently scratch directional lines into the clay surface. Follow the natural growth pattern of deer fur—down the neck and away from the nose—to create a subtle, lifelike texture. -
Hollow out safely:
Ensure the piece is hollow all the way through to the plaque. Puncture a discreet hole in the back of the plaque to allow hot air to escape during firing, preventing explosions. -
Dry slowly:
Cover the piece loosely with plastic. Let it dry very slowly over the course of a week to ensure the heavy plaque and delicate antlers dry at the same rate.
Step 4: Finishing and Firing
-
Bisque fire:
Once bone dry, fire the piece to the appropriate cone for your clay body (usually Cone 04). Handle with extreme care when loading the kiln, holding it by the heavy plaque, never the antlers. -
Apply the glaze:
Brush or spray on a matte white glaze. A matte finish is key here; a glossy finish can obscure the fine fur texture you sculpted. Two to three even coats should suffice. -
Glaze fire:
Fire the piece again to the glaze temperature (e.g., Cone 05 or Cone 6 depending on your materials). -
Add hanging hardware:
Use a strong epoxy to attach a heavy-duty cleat or wire hanger to the back of the ceramic plaque. Ensure it is rated for the weight of your finished sculpture.
Hang your finished sculpture near a light source to let the shadows play across the textured surface
Mythical Animal Hybrids With Playful Features
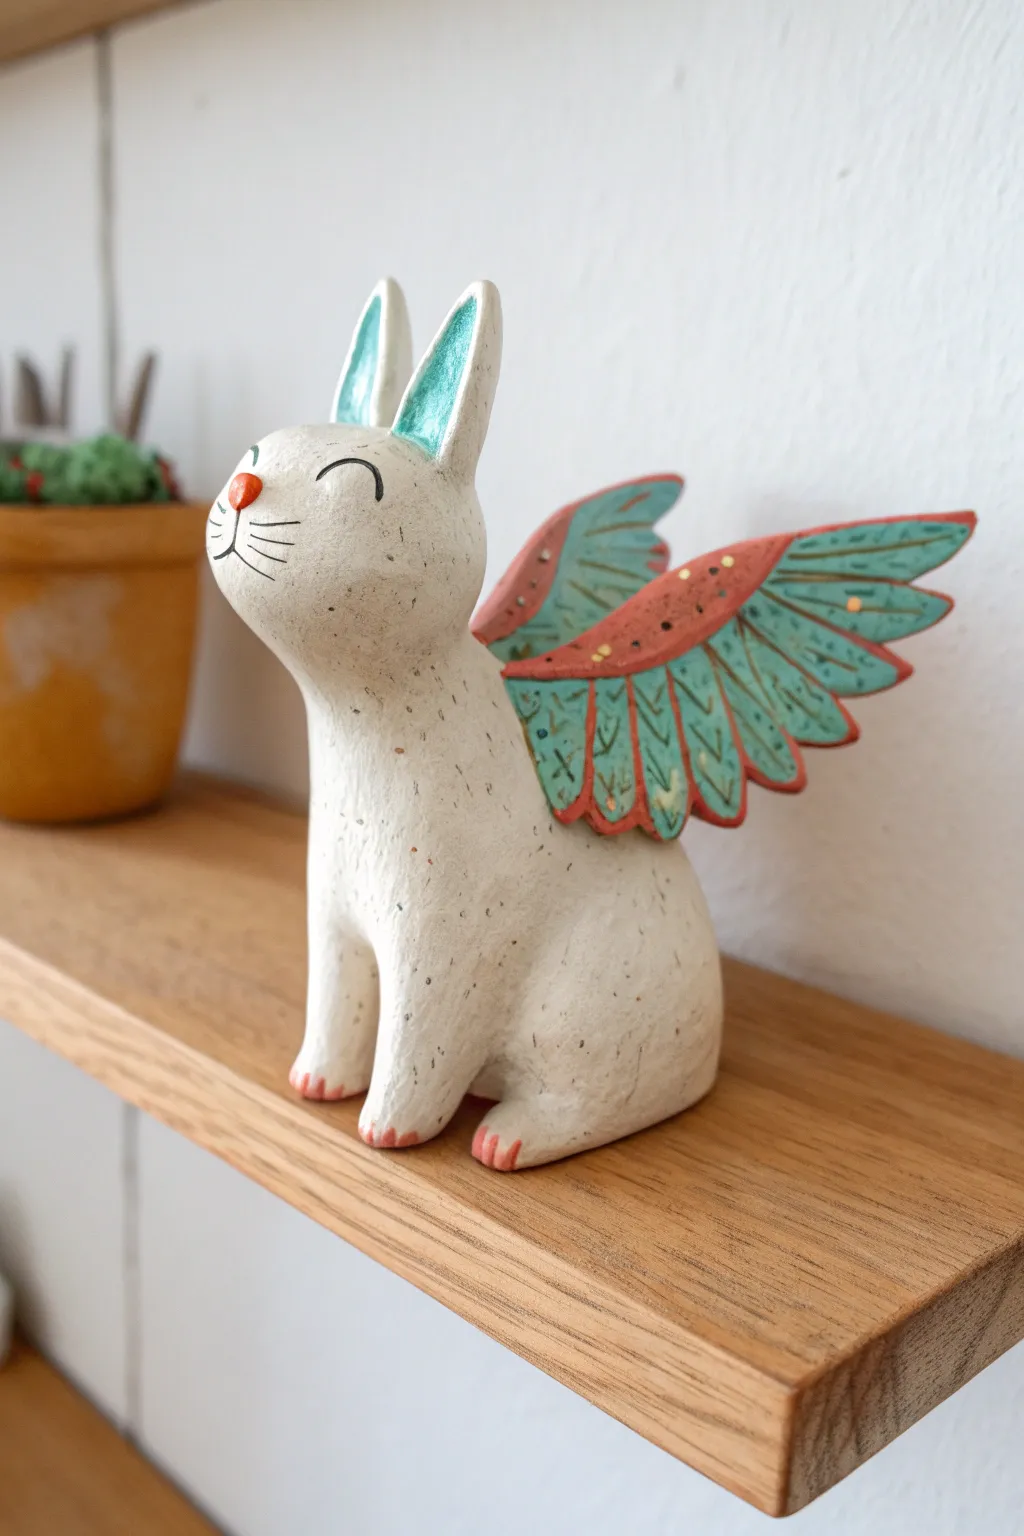
This delightful ceramic sculpture combines a cheerful bunny form with stylized, folkloric wings for a touch of everyday magic. The speckled white clay body contrasts beautifully with the teal and coral glazes, making it a perfect shelf companion for your indoor plants.
Detailed Instructions
Materials
- White stoneware clay with speckles (or plain earthenware)
- Scoring tool and slip
- Modeling tools (wooden knife, needle tool)
- Small rolling pin
- Sponge
- Underglazes (teal/turquoise, coral/terracotta, bright orange, black)
- Small detail brushes
- Gold luster (optional)
- Clear matte or satin glaze
Step 1: Sculpting the Body
-
Form the base:
Start with a ball of clay roughly the size of a large orange. Using your palms, elongate it slightly into a pear shape to create the sitting body of the rabbit. -
Define the head:
Gently pinch and smooth the narrower top part of the pear shape to define a rounded head, distinguishing it from the chest area without separating them completely. -
Pull the front legs:
From the chest area, carefully pull two small logs of clay downwards to form the front legs. They should be sturdy and straight, merging smoothly back into the main body. -
Shape the hindquarters:
Press your thumbs gently into the sides of the base to suggest the folded haunches of the back legs, creating a stable, sitting posture. -
Sculpt the ears:
Roll two small separate coils of clay, about 2 inches long. Flatten them slightly and taper the tips to create the ear shapes. I like to curve one slightly for more personality. -
Attach the ears:
Score the top of the head and the base of the ears, add a dab of slip, and firmly press them into place. Blend the clay downwards with a modeling tool so no seam is visible. -
Refine the face:
Use a damp sponge to smooth the entire surface. Then, add a tiny ball of clay for the nose and firmly attach it to the center of the face.
Smooth Seams
When attaching wings, roll a tiny ‘snake’ of clay and press it into the seam where the wing meets body. Smooth it out for an unbreakable bond.
Step 2: Creating the Wings
-
Roll out a slab:
Roll a small amount of clay into a flat slab, approximately 1/4 inch thick. -
Cut the wing shapes:
Using a needle tool, cut out two matching wing shapes. They should look like elongated teardrops or leaves with a slight curve. -
Carve feather details:
While the wings are flat on your work surface, use a needle tool to incise lines representing feathers. Draw a central spine and smaller V-shapes radiating outward. -
Attach the wings:
Score and slip the back of the rabbit and the attachment edge of the wings. Press them firmly onto the bunny’s back, angling them upwards and outwards. -
Create toes:
Use a knife tool to press small indentations into the ends of the front and back paws to suggest toes.
Pattern Play
Instead of feathers, try carving floral motifs or constellations into the wings for a different mythical vibe.
Step 3: Decorating and Firing
-
Bisque fire:
Allow the piece to dry slowly and completely for several days, then bisque fire it to cone 04 (or according to your clay’s instructions). -
Glaze the ears:
Once bisqued, paint the inner part of the ears with a bright teal or turquoise underglaze. -
Paint the wings:
Paint the outer feathers of the wings with the same teal color. Fill the inner section of the wing (closest to the body) with a coral or terracotta underglaze. -
Add facial details:
Paint the nose a bright orange. Use a very fine brush and black underglaze (or an underglaze pencil) to draw the closed eye arches and whiskers. -
Highlight the paws:
Dab a tiny amount of the coral underglaze onto the very tips of the toes specifically. -
Apply clear glaze:
Apply a coat of clear matte or satin glaze over the entire piece to seal it while preserving the raw clay texture. -
Final firing:
Fire the piece again to the maturation temperature of your glaze and clay body. -
Optional gold accent:
If desired, apply small dots of gold luster to the wings after the glaze firing and fire a third time at a much lower temperature (cone 018) to set the gold.
Now you have a charming, one-of-a-kind mythical creature ready to guard your bookshelf.