When I want a quick jewelry win in the studio, clay bead earrings are the first thing I reach for—easy, lightweight, and ridiculously fun to color-play with. Here are my go-to heishi bead earring ideas, starting with the classics and ending with a few curveballs you’ll want to try.
Classic Color-Block Clay Bead Hoops
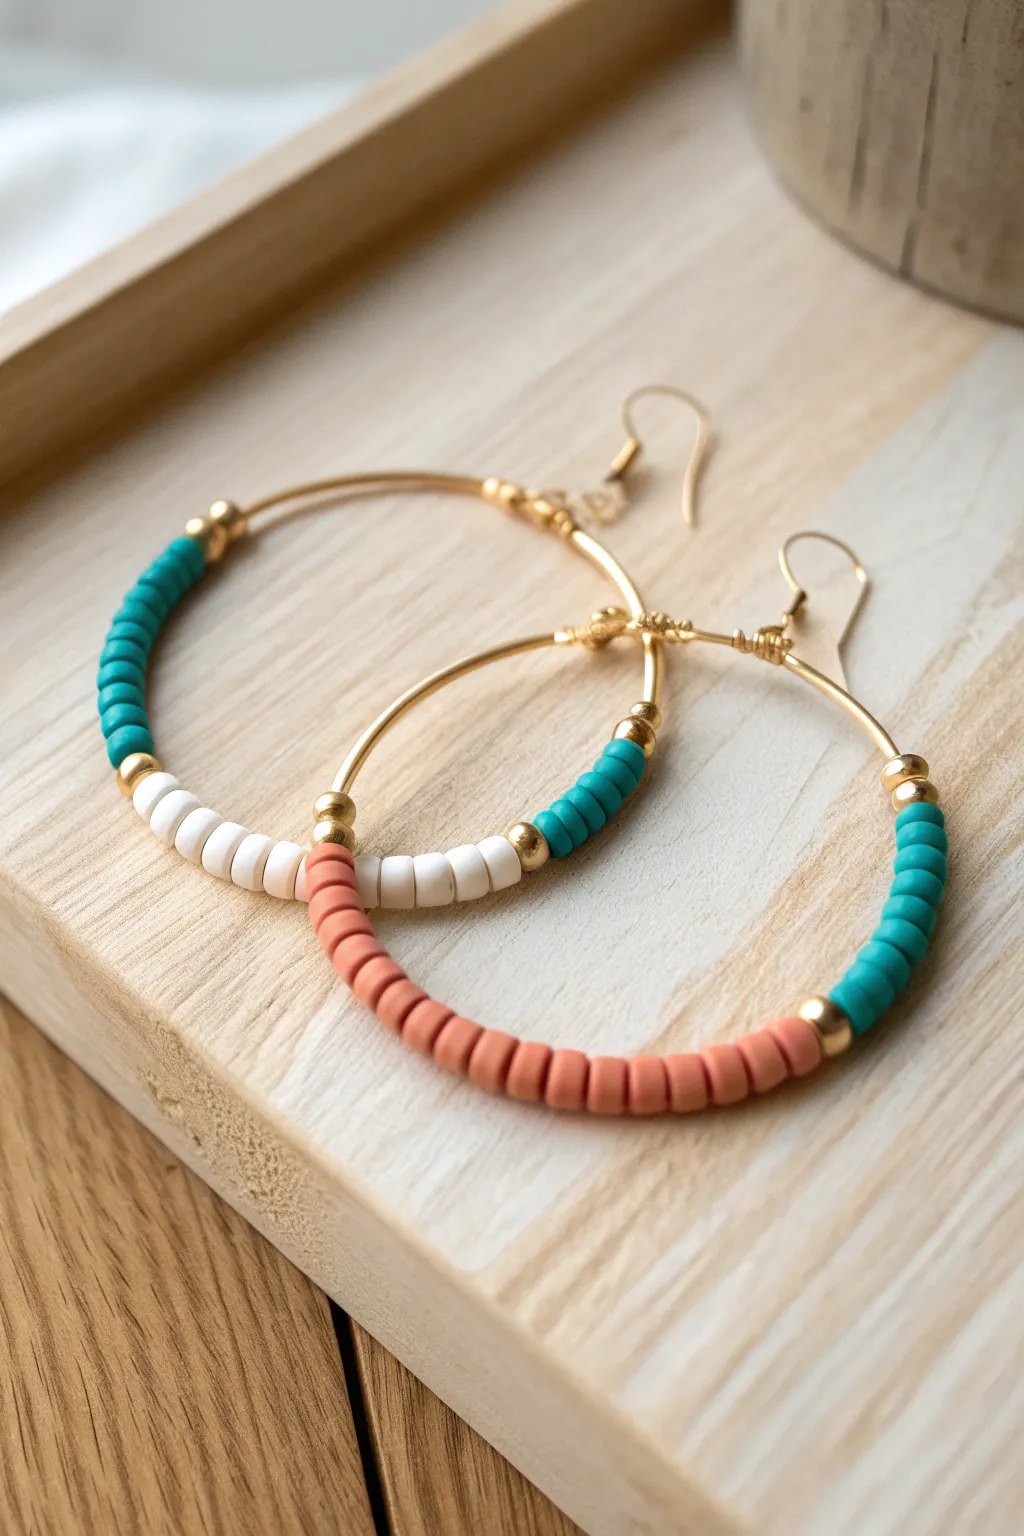
These elegant hoop earrings combine the matte texture of heishi clay beads with the shine of gold accents for a versatile, boutique-style accessory. The bold color-blocking of teal, white, and coral creates a balanced design that feels both modern and timeless.
Step-by-Step Guide
Materials
- 2 Large gold-filled hoop earring findings (approx. 40-50mm diameter)
- Polymer clay heishi disc beads (teal, white, coral/salmon)
- Small gold spacer beads (3mm or 4mm round)
- Jewelry wire cutters (optional, usually not needed for pre-made hoops)
- Flat nose pliers or chain nose pliers
- Bead mat or small tray
Step 1: Preparing the Components
-
Assess the hoop mechanism:
Examine your hoop findings. Most of this style have a small loop or catch at one end and a straight wire arm that feeds into it. Identify the side that opens to accept beads. -
Open the hoop wire:
Gently unhook the straight wire arm from the loop catch. If the end makes a sharp 90-degree turn, you simply slide beads over it; if it has a small crimp, you may need to straighten it slightly with your flat nose pliers to let beads pass. -
Sort your beads:
Pour a small amount of teal, white, and coral clay heishi beads onto your bead mat. You will also need eight gold spacer beads total—four for each earring.
Hold it Steady
Use a small piece of painter’s tape or a bead stopper at the very end of the wire hoop while you work. This prevents beads from accidentally sliding off the back end while you are focused on threading the front.
Step 2: Designing the Pattern
-
Visual planning:
Before threading, decide on the proportions. The example uses three distinct color blocks separated by gold spacers. The bottom block (coral) is the longest to weight the design visually. -
Count your beads:
To ensure symmetry, count out your stacks ahead of time. I like to use roughly 15-18 teal beads, 8-10 white beads, and 20-25 coral beads per earring, depending on the thickness of your specific clay discs.
Step 3: Assembling the First Earring
-
Start with the first gold accent:
Slide one gold spacer bead onto the straight wire arm of the hoop. This will sit closest to the wearer’s ear lobe. -
Thread the teal section:
Begin stringing your teal heishi beads. Add them one by one until your first color block is complete. -
Verify the length:
Hold the hoop up to check the length. The teal section should cover roughly the first quarter of the curve. -
Add separation:
Slide on a second gold spacer bead to cap off the teal section and define the transition. -
Create the white accent:
Thread on your white clay beads. This section is typically shorter than the others, acting as a bright highlight in the center of the hoop. -
Second transition:
Add the third gold spacer bead after the white stack, preparing for the final color block. -
Thread the main color block:
String the coral/salmon heishi beads. This needs to be the longest section to drape nicely at the bottom of the hoop. -
Final gold cap:
Finish the bead stack with the fourth and final gold spacer bead for this earring.
Mix Up textures
Replace the central white block with faceted glass crystal beads or freshwater pearls. The contrast between matte clay and shimmering crystal instantly elevates the design for evening wear.
Step 4: Securing and Finishing
-
Check the spacing:
Ensure there is at least 1/4 to 1/2 inch of bare wire left at the end of the hoop. You need this space for the closure mechanism to function without crushing the clay beads. -
Secure the end (if needed):
Some hoops require bending the very tip of the wire up slightly with pliers to prevent beads from sliding off when earrings are open. Bending just the last 2mm at a slight angle works well. -
Bend the catch arm:
If you straightened the end wire earlier to fit the beads, use your flat nose pliers to gently bend the tip back to its original 90-degree angle so it locks securely into the hoop loop.
Step 5: The Second Earring
-
Mirror the design:
Repeat the entire threading process for the second hoop. -
Double-check bead counts:
Before closing the second hoop, hold it directly next to the first one. Ensure the color blocks align perfectly; add or remove a single heishi disc if the heights are uneven. -
Final closure test:
Test the clasp on both earrings to make sure they click shut firmly and the beads move freely without being too tight.
Now you have a stunning pair of custom hoops ready to complement your favorite summer outfit


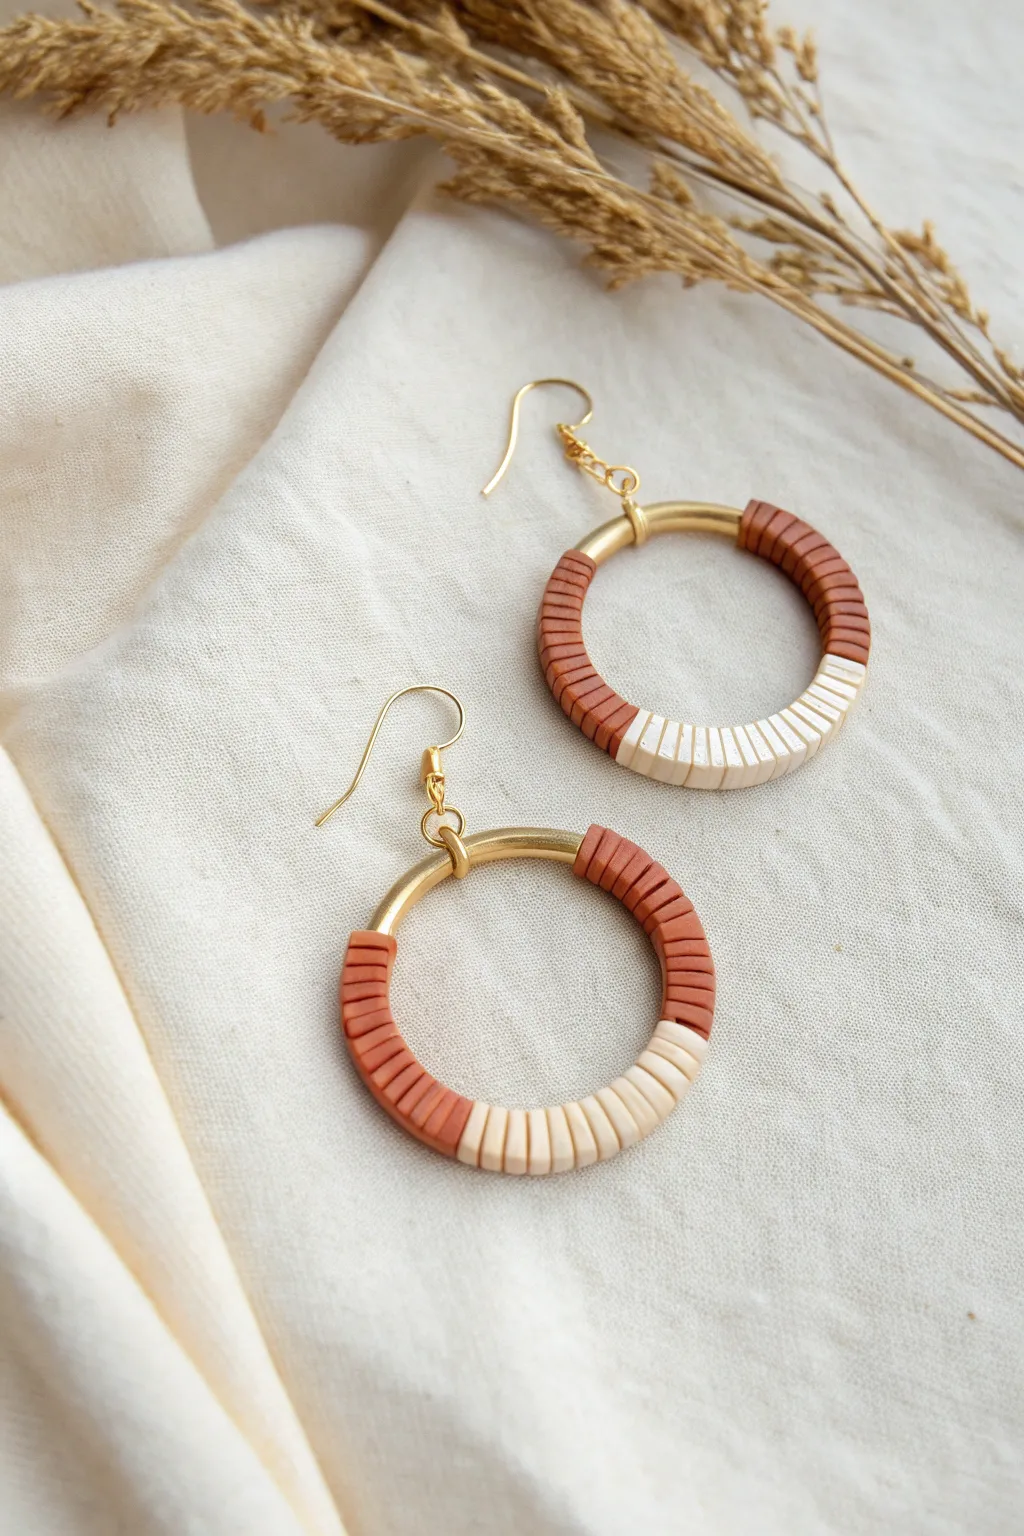
Ombre Gradient Heishi Hoop Earrings
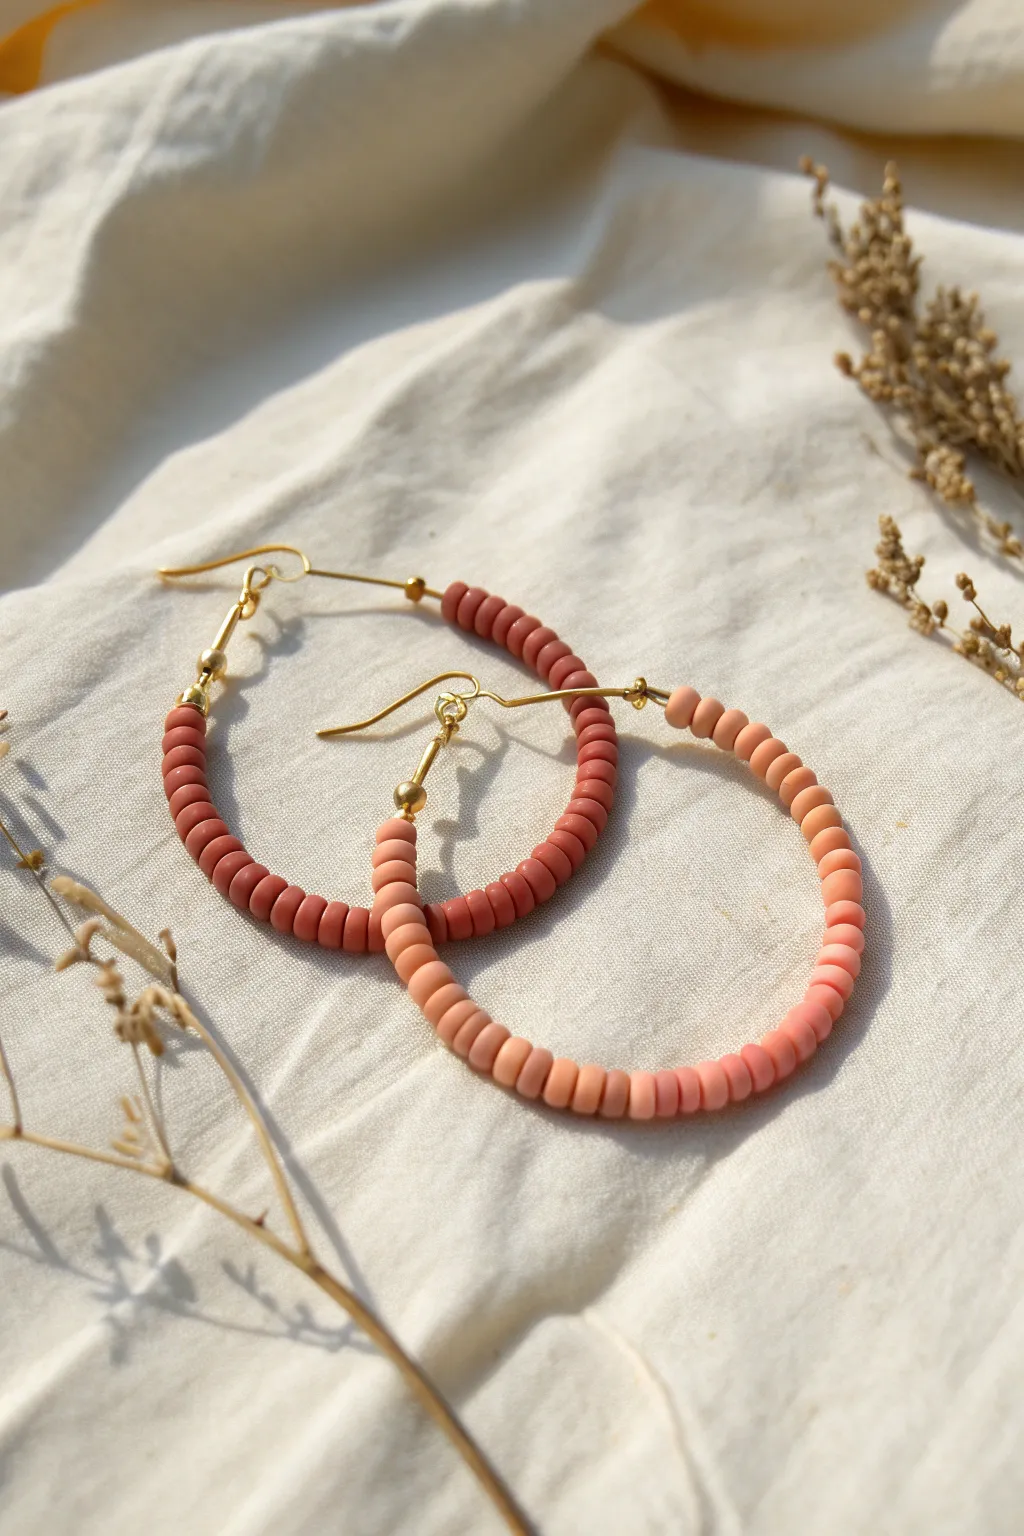
Capture the soft glow of golden hour with these stunning ombre polymer clay hoop earrings. By arranging flat heishi beads in a seamless gradient from deep terra cotta to pale peach, you create a sophisticated yet effortless piece of jewelry perfect for any season.
Step-by-Step
Materials
- Polymer clay heishi beads (6mm diameter) in 3-4 gradient shades (terra cotta, blush, peach, pale nude)
- 2 Large gold-tone hoop earring findings (approx. 40-50mm diameter)
- 2 Gold-tone fishhook ear wires
- 2 Gold-tone jewelry headpins (ball end preferred)
- Jewelry pliers (round nose and chain nose)
- Wire cutters
- 4 Small gold spacer beads (optional, for connecting the hoop to the hook)
Step 1: Planning the Gradient
-
Sort your palette:
Begin by laying out your polymer clay heishi beads on a flat surface or a bead board. Separate them into distinct color groups: dark terra cotta, medium coral, soft peach, and pale nude. -
Test the transition:
Before threading, line up a small row of beads on your workspace to test the gradient. You want the colors to flow smoothly into one another, rather than having harsh stripes. -
Determine the midpoint:
Decide on your pattern strategy. For the look in the photo, the darkest terra cotta color sits at the bottom center of the hoop, with the colors getting lighter as they move upward symmetrically on both sides.
Uneven Color Flow?
If the colors look striped instead of blended, mix 1 bead of the new color in with the last 2 beads of the old color to blur the transition line.
Step 2: Constructing the Hoop
-
Prepare the hoop:
Take your wire hoop component. If it has a confusing closure mechanism, open it up completely so you have a straight wire section to thread onto. -
Bend the catch:
Use your round nose pliers to create a tiny outward-facing 90-degree bend at one end of the wire hoop. This acts as a stopper so beads don’t slide off immediately while you work. -
Start threading the lightest shade:
Begin threading your lightest color (pale nude) onto the open end of the wire. Add about 10-12 beads, or enough to cover the top curve near the ear wire. -
Transition to medium:
Switch to your next shade darker (soft peach). Thread on roughly 8-10 beads. -
Add the dark center:
Thread on your darkest terra cotta beads. This section should be slightly longer than the others, usually about 15-20 beads, to create that visual weight at the bottom of the loop. -
Reverse the gradient:
Now, mirror your work. Switch back to the medium peach shade for 8-10 beads to begin climbing up the other side of the hoop. -
Finish the beading:
Complete the beading sequence with your lightest nude shade, matching the count exactly to the very first section you created.
Make it Luxe
Add tiny gold spacer discs between every color change or every 5th bead to add a subtle metallic shimmer and break up the matte clay texture.
Step 3: Assembly and Finishing
-
Secure the hoop wire:
Once all beads are on, slide the straight end of the wire into the small loop or catch at the other end of the hoop finding. -
Lock the shape:
Using your chain nose pliers, gently bend the wire end back on itself or crimp the closure mechanism tightly so the hoop forms a permanent circle. I like to double-check this connection is secure so beads don’t escape later. -
Prepare the connector:
Take a gold ball-end headpin. Thread on one single gold spacer bead, followed by the top loop of your beaded hoop. -
Add the top finish:
Add a second spacer bead on top of the hoop connection so the hoop is sandwiched between two gold accents. -
Create a loop:
Use your round nose pliers to bend the remaining wire of the headpin into a simple loop just above the top spacer bead. -
Trim excess wire:
Before closing that loop completely, trim any excess wire from the headpin using your wire cutters. -
Attach the ear wire:
Slide the loop of your fishhook ear wire into the loop you just created on the connector. -
Final closure:
Use your pliers to twist the connector loop shut securely. Repeat the entire process for the second earring, ensuring your bead counts match exactly.
Now you have a chic pair of earrings ready to add a warm pop of color to your outfit


Confetti Mix Clay Bead Statement Hoops
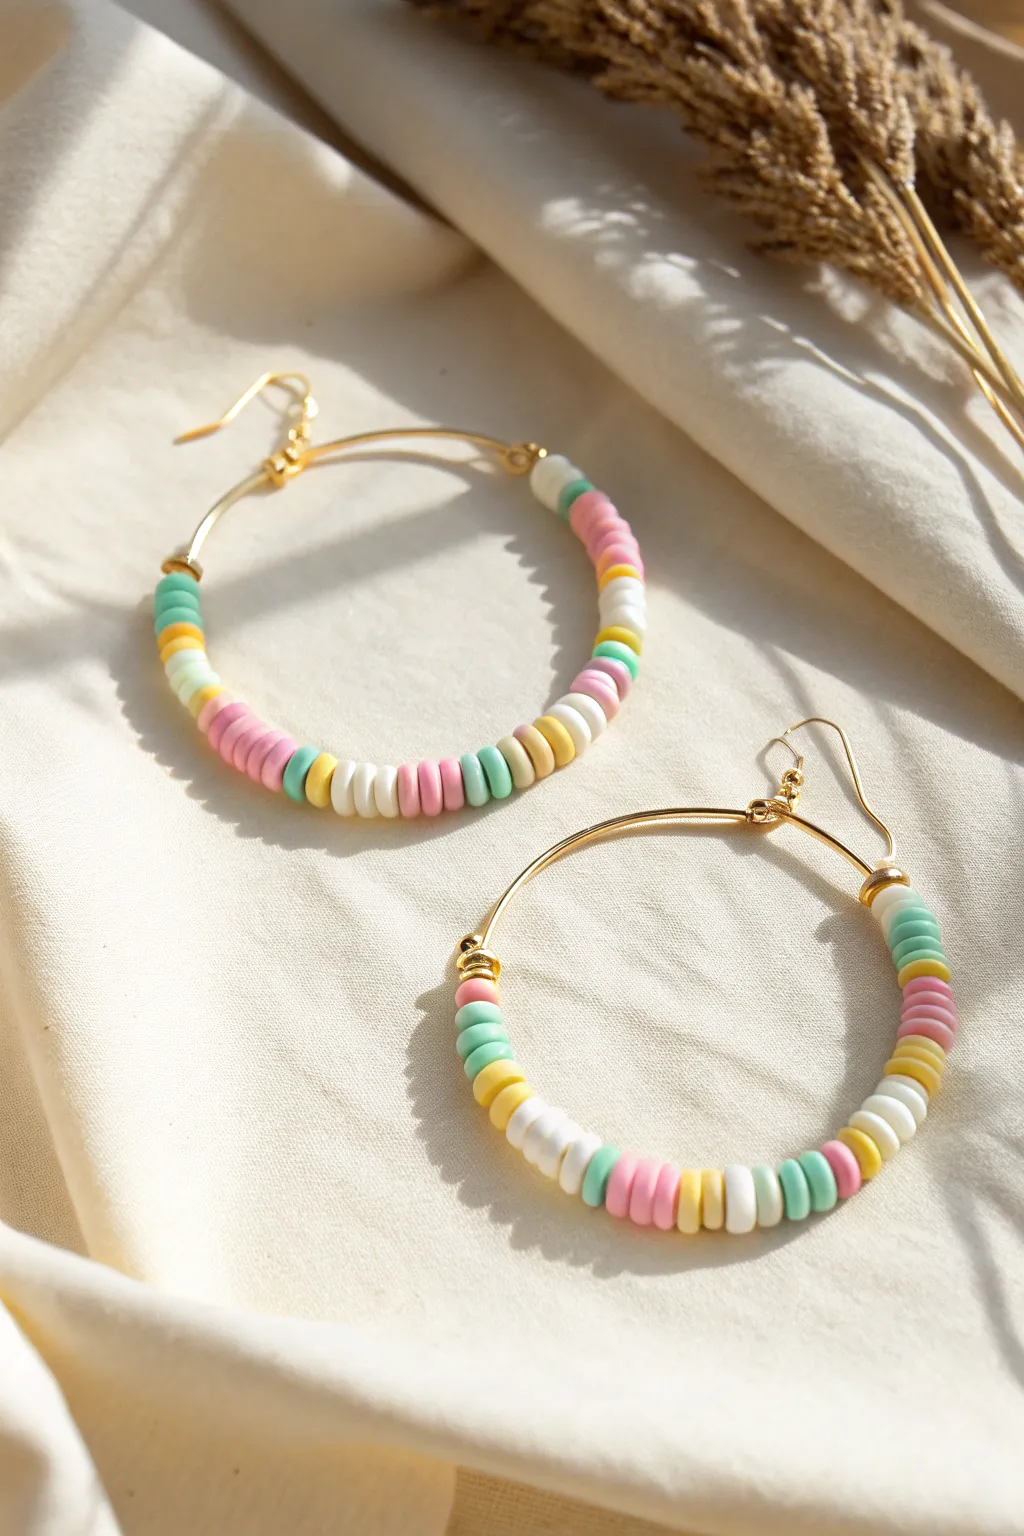
Brighten up any outfit with these playful statement hoops featuring a festive confetti-style mix of pastel polymer clay beads. The combination of soft pinks, minty teals, sunny yellows, and crisp whites creates a versatile accessory that feels like summer in jewelry form.
Step-by-Step Tutorial
Materials
- Large gold-tone wire hoop earring findings (approx. 40-50mm diameter)
- 6mm polymer clay Heishi beads in pastel pink
- 6mm polymer clay Heishi beads in mint/teal
- 6mm polymer clay Heishi beads in sunny yellow
- 6mm polymer clay Heishi beads in white
- Bead mat or small tray
- Jewelry pliers (flat nose or chain nose)
Step 1: Preparing the Hoop and Beads
-
Open the hoop:
Locate the latch mechanism on your gold hoop earring finding. Gently unhook the wire arm from the catch so the hoop is open and ready for beading. -
Bend the catch arm:
Using your flat nose pliers, carefully bend the small end of the wire (the part that goes through your ear) upward to a 90-degree angle. This creates the ‘stop’ that prevents beads from falling off that end while you work. -
Check the bead fit:
Test sliding one clay bead onto the wire. If the bead hole feels tight or has debris, gently ream it out with a bead reamer or a thick needle before threading. -
Sort your palette:
Pour a small amount of each color—pink, mint, yellow, and white—onto your bead mat. Having them spread out makes it easier to spontaneously grab colors for the random ‘confetti’ look.
Clean Edges Only
inspect your clay beads before stringing. Discard any with jagged edges or uneven thickness to keep the finished hoop looking polished and high-end.
Step 2: Creating the Pattern
-
Establish a rhythm:
Start threading the beads onto the hoop. Unlike strict patterns, this design relies on ‘controlled randomness.’ Aim for small clusters of 2-4 beads of the same color. -
Add first color block:
Slide on a cluster of about three mint green beads to begin the sequence. -
Switch to a contrast:
Follow the mint with a small group of two or three yellow beads. Push them snugly against the green ones. -
Incorporate the white:
Add a few white beads next. The white acts as a palate cleanser between the brighter colors and makes the pastels pop. -
Introduce the pink:
Thread on a section of pink beads. I like to vary the number slightly here—maybe do four to give it a bit of visual weight. -
Mix up the order:
Continue adding small blocks of color. Don’t simply repeat the pattern A-B-C-D. Try going from pink to white, then back to yellow, or put mint next to pink for variety. -
Fill the curve:
Keep threading until you have covered almost the entire curve of the hoop. Pause occasionally to push the beads down the wire to ensure they are sitting flush against each other. -
Leave a gap:
Stop beading when you are approximately 1/4 to 1/2 inch away from the hinge mechanism. You need this empty wire space so the beads don’t interfere with your earlobe when wearing them.
Step 3: Finishing the Earring
-
Secure the end:
Normally, beads stay put by friction on the curve, but for extra security, you can place a tiny drop of jewelry glue on the wire right before the last bead and slide it over. -
Alternative securing method:
If your wire gauge is thin and the beads are loose, you might crimp a small gold crimp bead at the very end of your bead strand to lock them in place. -
Adjust the wire angle:
Use your pliers to gently bend the ear-wire end back down to its original angle, ensuring it aligns perfectly with the catch mechanism. -
Close and test:
Latch the earring closed to make sure the wire hasn’t warped during beading. The closure should snap shut securely. -
Repeat for second earring:
Create the second hoop following the same loose confetti logic. Remember, they are sisters, not twins—the color blocks don’t need to match identically.
Add Metallic Sparkle
To elevate the look, add a thin gold spacer disc bead between every third or fourth color block. This ties the beads visually to the gold hoop wire.
Enjoy wearing your vibrant new hoops that add a customized pop of color to your day


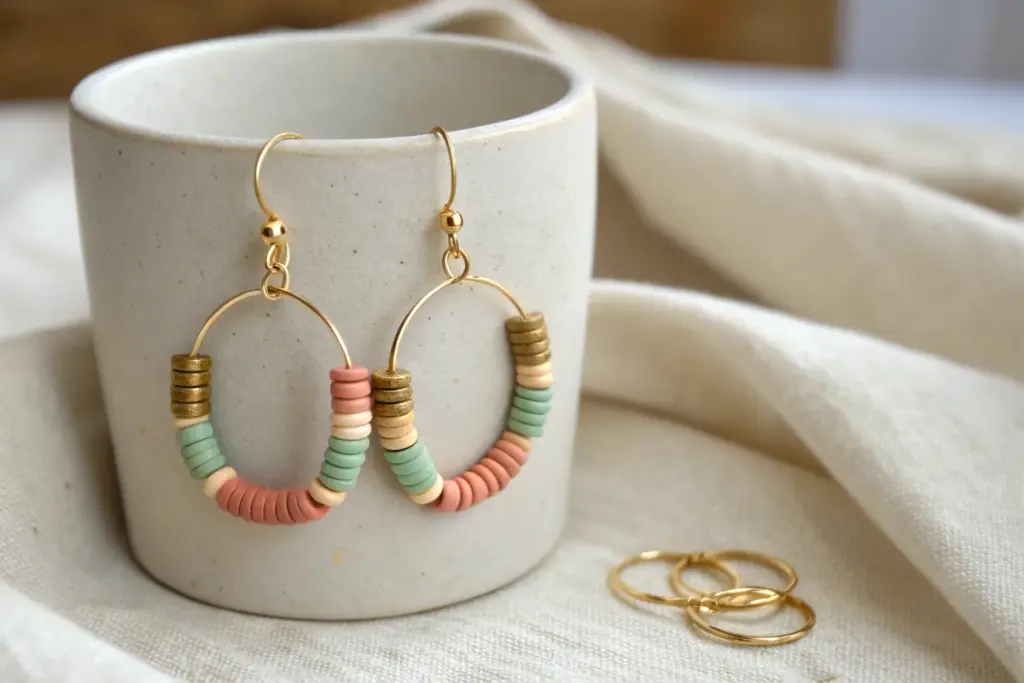
Minimal Neutral Clay Bead Huggie Hoops
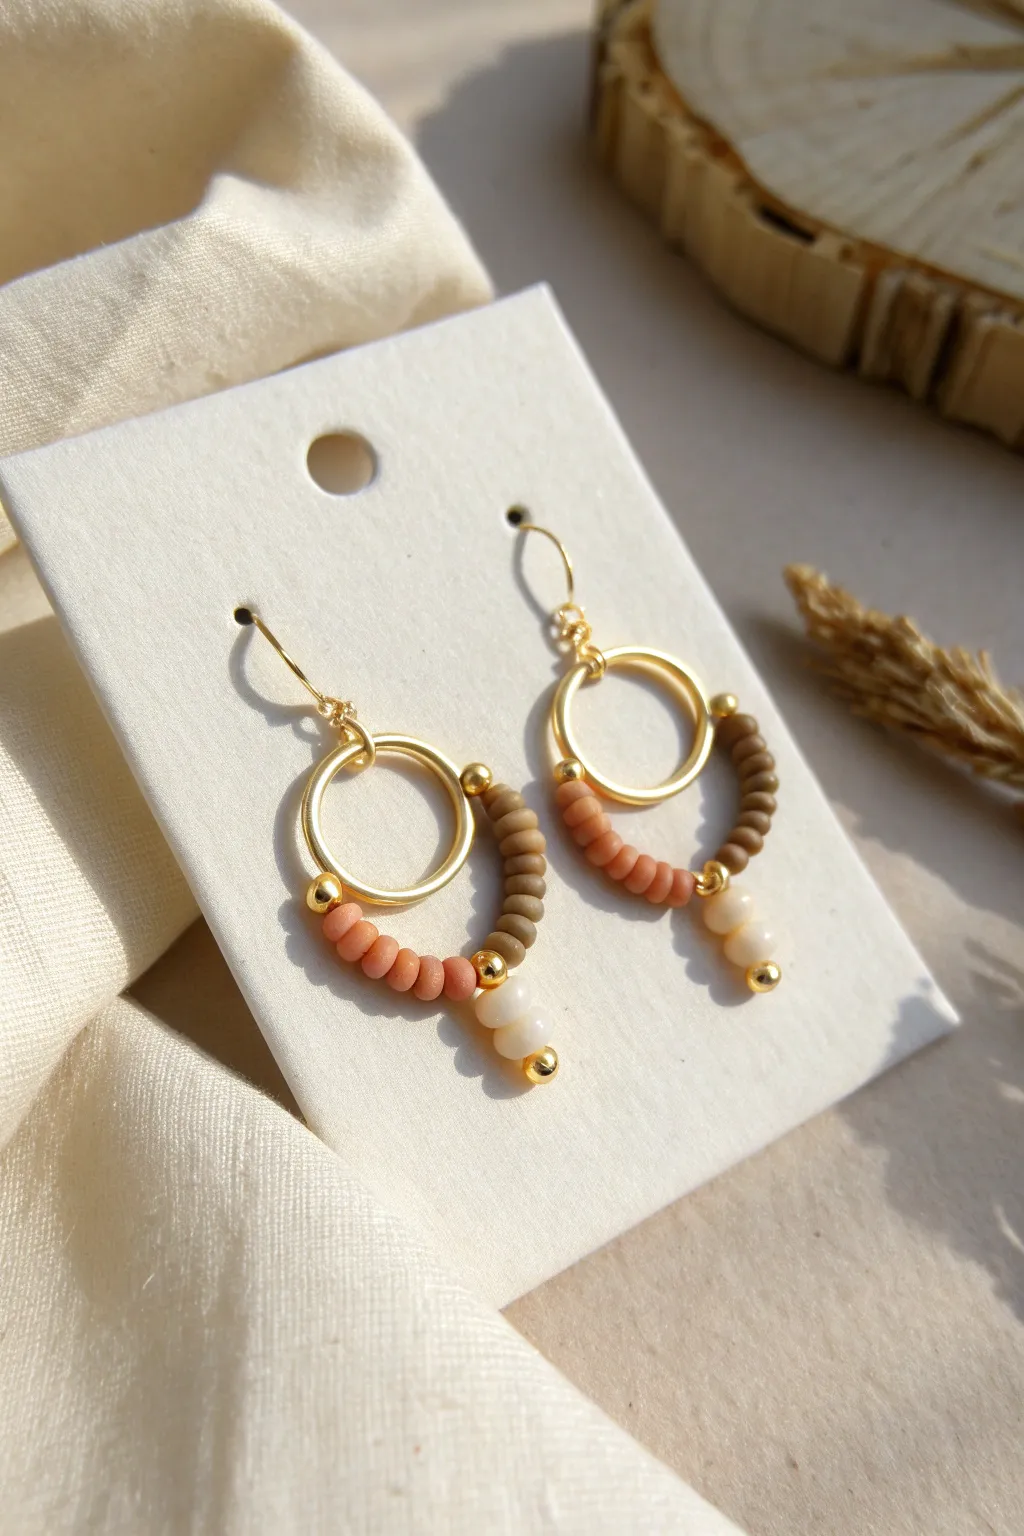
These charming dangle earrings combine minimalist gold loops with the earthy texture of polymer clay heishi beads for a sophisticated bohemian look. The soft palette of terracotta, mocha, and cream creates a versatile accessory perfect for everyday wear.
Step-by-Step Guide
Materials
- Gold-tone earring hooks
- 2 Gold open circle connectors or infinity rings (approx. 15-20mm)
- Small gold jump rings (4mm or 5mm)
- 28-gauge or 26-gauge gold craft wire
- Terracotta or peach flat clay heishi beads (approx. 4mm)
- Mocha brown flat clay heishi beads (approx. 4mm)
- Tiny gold spacer beads (2mm)
- Small white or cream round accent beads (approx. 3mm)
- Gold headpins
- Round nose pliers
- Chain nose pliers
- Wire cutters
Step 1: Preparing the Center Dangle
-
Prepare the headpin:
Start by taking a gold headpin. This will form the small vertical dangle at the very bottom of your earring design. -
Stack the accent beads:
Slide two of the small white or cream round beads onto the headpin. Add a single tiny gold spacer bead on top of them. -
Create a wrapped loop:
Using your round nose pliers, grasp the wire just above the top gold spacer bead. Bend the wire 90 degrees. -
Form the eye:
Reposition your pliers to form a loop with the tail of the wire. Before closing or wrapping it completely, pause here—we need to attach this later, but for this specific design, it’s often easier to make a fully closed loop now and attach it to the beading wire in the next phase. -
Secure the component:
Wrap the tail of the wire around the stem below the loop 2-3 times for a tidy finish. Trim any excess wire with your wire cutters. Repeat these steps to make a second identical dangle for the other earring.
Loose Beads?
If your bead loop keeps sliding around the metal ring, add a tiny dot of clear jewelry glue (E6000) over the wire coils where they attach to the gold hoop to lock them in place.
Step 2: Beading the Lower Loop
-
Cut the beading wire:
Cut a piece of your 26-gauge or 28-gauge gold craft wire, approximately 3 inches long. This gives you plenty of room to work without struggling. -
Anchor the wire:
Take your large gold open circle connector. Wrap one end of your cut wire securely around the hoop at roughly the 4 o’clock position (if imagining a clock face). Wrap it tightly 3-4 times so it doesn’t slide. -
Trim the start:
Use your flush cutters to trim the short tail of the wire very close to the coil, pinching it down with pliers so no sharp edges remain. -
String the first color:
On the loose end of the wire, thread a tiny gold spacer bead first. Follow this with about 6-7 terracotta (peach) clay heishi beads. -
Add the center dangle:
Thread loop of the white bead dangle you created in the first phase onto the wire. It should sit right in the middle of your beaded swag. -
Complete the pattern:
Now, thread on 6-7 mocha brown clay heishi beads onto the other side of the center dangle. Finish this sequence with one last tiny gold spacer bead. -
Secure the other side:
Bring the end of the wire up to the gold circle connector, aiming for the 8 o’clock position. The beads should hang in a gentle ‘U’ shape below the gold metal ring. -
Wrap to finish:
Coil the wire tightly around the gold hoop 3-4 times to match the first side. Pull tight with your pliers to ensure tension. -
Trim excess wire:
Snip off the remaining wire tail as close to the coil as possible and tuck the sharp end in with your chain nose pliers.
Step 3: Final Assembly
-
Open the ear wire:
Take your gold earring hook. Use your pliers to gently twist open the small loop at the base. -
Connect the hoop:
Slide the top of your beaded gold hoop component onto the open loop of the earring hook. I find it helps to check that the ‘front’ of your wire wraps is facing forward. -
Close the loop:
Twist the loop back vertically to close it securely. Repeat the entire process for the second earring.
Texture Play
Swap the bottom white bead dangle for a tiny tassel made of embroidery protect floss or a small baroque pearl to give the earrings a softer, more organic silhouette.
Now you have a stunning pair of mixed-media earrings that look professionally crafted and ready to gift or wear

The Complete Guide to Pottery Troubleshooting
Uncover the most common ceramic mistakes—from cracking clay to failed glazes—and learn how to fix them fast.
Gold Spacer Accent Clay Bead Hoops
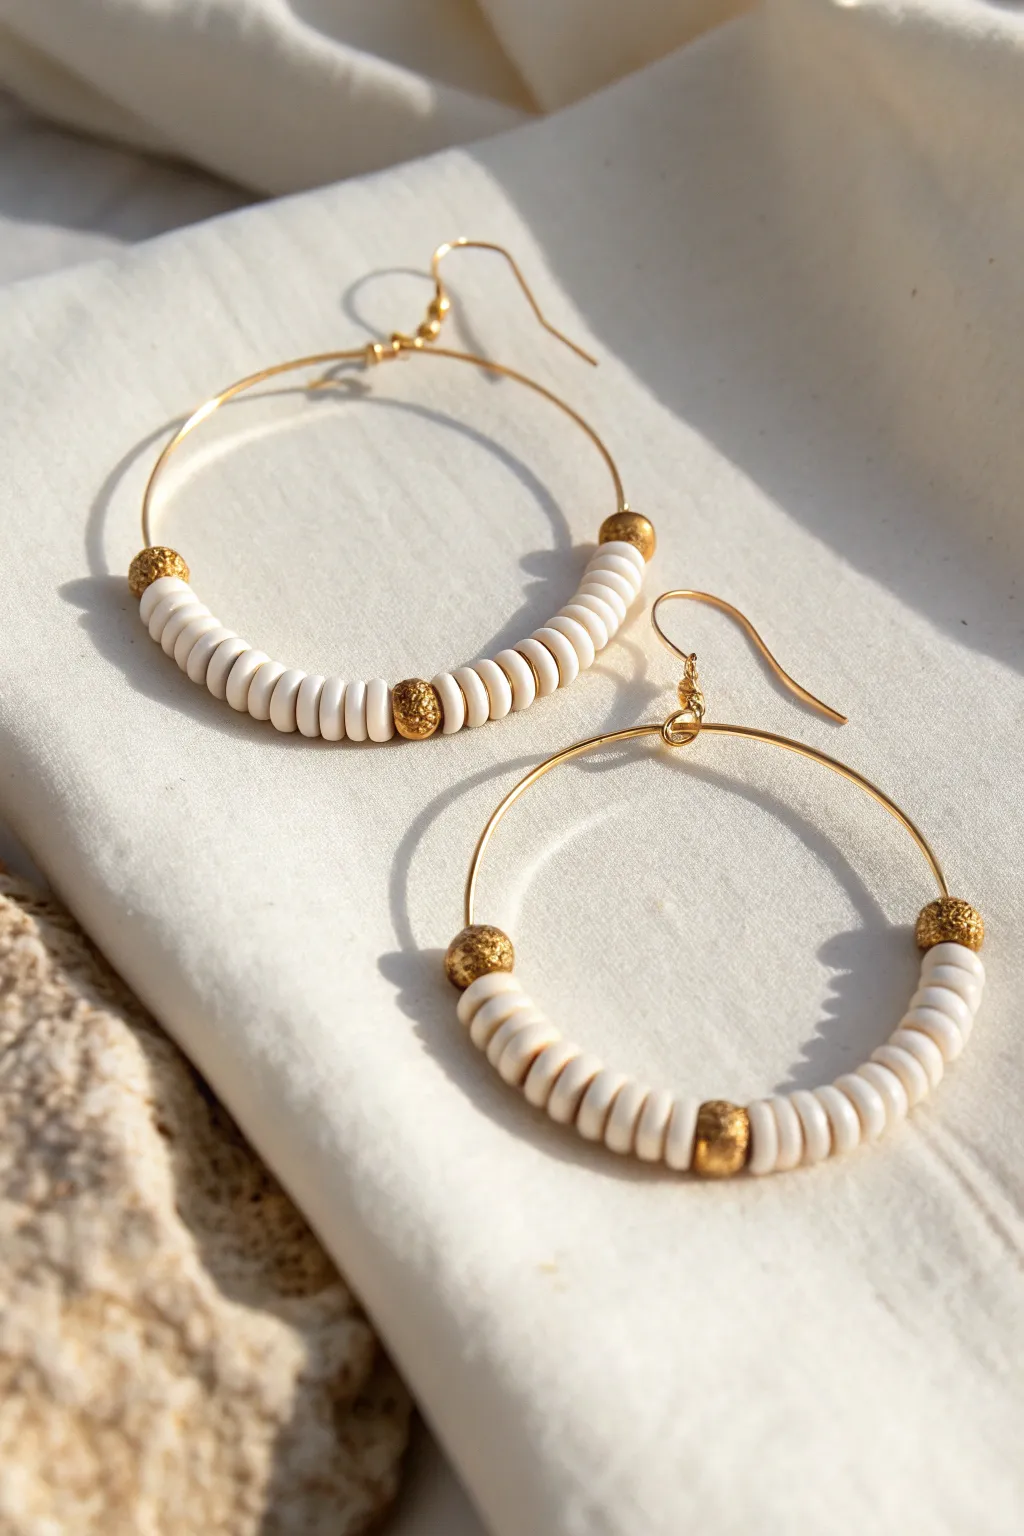
These elegant hoop earrings combine the earthy texture of white polymer clay discs with the refined gleam of gold. The design features a symmetrical arrangement punctuated by textured gold spacers, creating a versatile accessory that feels both beachy and high-end.
Step-by-Step
Materials
- 2 Large gold hoop earring findings (approx. 40-50mm diameter)
- White or cream flat polymer clay heishi beads (approx. 4-6mm)
- 6 Textured gold round spacer beads (approx. 4mm)
- 2 Gold French hook ear wires
- Jewelry pliers (flat nose and chain nose)
- Small bead mat or tray
Step 1: Preparing the Components
-
Check your findings:
Inspect your gold hoops. Many of these pre-made hoops have a locking mechanism or a bent end that needs to be opened to slide beads on. Locate the opening end. -
Straighten the wire:
If the insertion end of the hoop has a sharp bend for closure, you may need to gently straighten just that tiny tip with your flat nose pliers to allow the beads to pass over it smoothly. -
Layout design:
Before threading, lay out your pattern on a bead mat to ensure symmetry. You typically need three sections of white clay beads separated by the gold spacers.
Keep Them Snug
If beads slide too much, add a tiny drop of clear jewelry glue inside the final gold end beads to freeze them in place on the wire.
Step 2: Beading the First Hoop
-
Start the sequence:
Begin by sliding one textured gold spacer bead onto the hoop wire. This will act as the top stop for the first side. -
Add first clay section:
Thread approximately 10 to 12 white heishi beads onto the wire. Push them snug against the gold spacer. -
Position the center accent:
Slide on your second gold textured spacer bead. This will sit at the very bottom curve of the hoop, acting as the centerpiece. -
Complete the clay beading:
Add another set of 10 to 12 white heishi beads, mirroring the count you used on the first side exactly. -
Finish the row:
Slide on the final gold textured spacer bead. Your beaded section should now occupy the bottom third to half of the hoop. -
Secure the beads:
If you are using hoops that require a bent end to lock, use your chain nose pliers to re-bend the tip of the wire back to its original 90-degree angle.
Step 3: Attaching the Ear Wire
-
Locate the loop:
Look at the top of your hoop finding. There is usually a small loop or hole designed for attachment. -
Open the ear wire:
Take a gold French hook. Locate the loop at the bottom of the hook and gently twist it open sideways (never pull it apart) using your pliers. -
Connect the pieces:
Slide the open loop of the ear wire through the top loop of your beaded hoop. -
Close the loop:
Using your pliers, gently twist the ear wire loop back into a closed position, ensuring there is no gap for the hoop to slip out.
Tight Fit?
If clay beads won’t fit over the hoop wire tip, use a bead reamer or a thick needle to gently widen the bead holes before threading.
Step 4: Finishing Up
-
Repeat the process:
Repeat all the steps for the second earring. I find it helpful to hold the two hoops side-by-side before closing the second one to verify the bead counts match perfectly. -
Final adjustment:
Gently massage the bead row with your fingers to ensure the beads are sitting flat against each other and curve nicely along the wire. -
Polish markings:
If your pliers left any small marks on the gold wire, you can buff them out gently with a jewelry polishing cloth.
Enjoy styling these fresh, neutral accessories with your favorite summer outfits
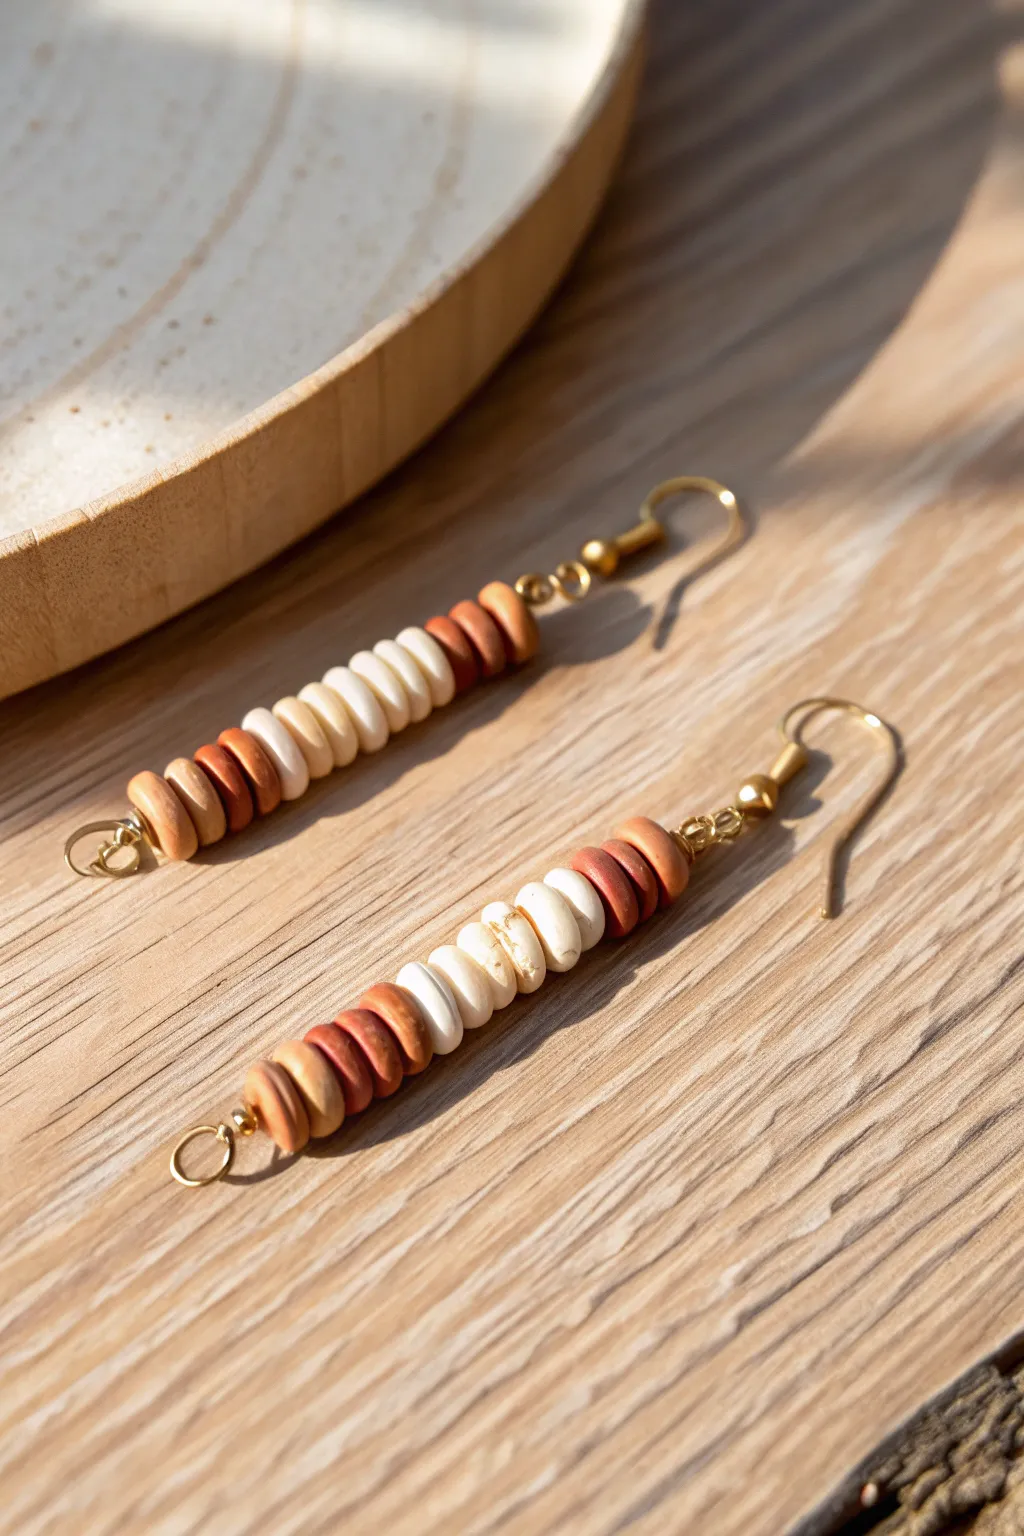
Simple Stacked Clay Bead Dangle Earrings
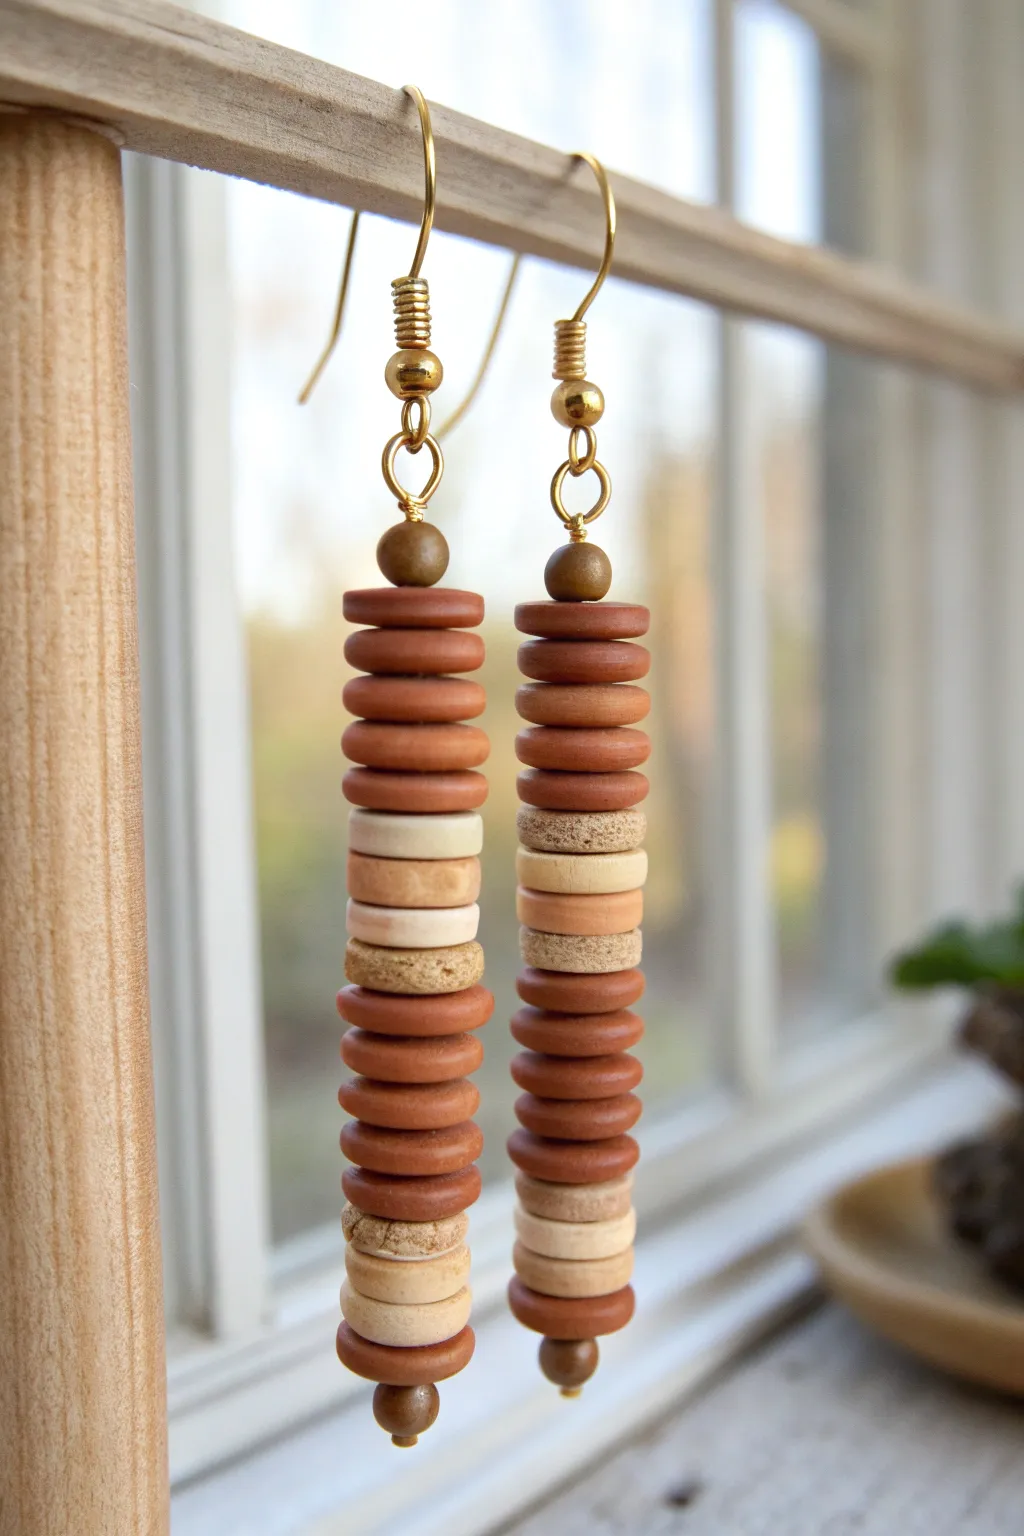
Create a stunning pair of earrings that celebrates organic textures and warm, earthy palettes using stacked heishi beads. This long, linear design combines terracotta and cream tones with touches of bronze for a sophisticated bohemian look.
Step-by-Step Tutorial
Materials
- Polymer clay heishi disc beads (terracotta/rust color)
- Polymer clay heishi disc beads (cream/beige color)
- Polymer clay heishi disc beads (textured/stone effect beige)
- 4 Small round bronze or antique gold spacer beads (approx. 4mm)
- 2 Gold-tone French hook ear wires with coil detail
- 2 Gold-tone eye pins (approx. 2 inches long)
- Round nose pliers
- Chain nose pliers
- Wire cutters
Step 1: Planning the Stack
-
Analyze the pattern:
Before you start stringing, observe the distinct color blocking of the design. Notice that it relies on sections of solid color broken up by contrasting bands. -
Lay out the beads:
Arrange your beads on a bead mat or soft cloth to define the pattern before threading. This prevents beads from rolling away and lets you visualize the final length. -
Create the top section:
Start your layout with 5 terracotta disc beads. This will be the uppermost block of color below the metal spacer. -
Add the contrast center:
Below the terracotta, lay out the lighter section: 1 smooth cream bead, 1 textured beige bead, 1 smooth cream bead, and 1 textured beige bead. -
Build the middle block:
Follow the light section with another block of 5 terracotta disc beads to anchor the center of the design. -
Repeat the pattern:
Create a mirrored effect at the bottom by adding a second light section: 1 textured beige bead, 1 smooth cream bead, 1 textured beige bead, and finish with a final single terracotta bead.
Straighten Up
If your bead stack looks crooked, your clay discs might have inconsistent thickness. Simply rotate individual beads on the wire until they nest together flush.
Step 2: Assembling the Earring
-
Prepare the eye pin:
Take your long eye pin. If the eye loop feels slightly open, use your chain nose pliers to gently squeeze it completely shut so no beads can slip through. -
Add the bottom accent:
Thread one small bronze round spacer bead onto the eye pin first. This acts as a decorative stopper at the very bottom of the earring. -
String the stack:
Carefully thread your pre-arranged stack of clay beads onto the eye pin, starting from the bottom-most bead of your layout and working upward. -
Top off the design:
Once all clay discs are threaded, slide the second bronze round spacer bead onto the top of the stack. -
Check the fit:
The beads should sit snugly but not be crushed. Ensure you have about 10mm (0.4 inches) of wire remaining above the top bronze bead to create a loop. -
Trim excess wire:
If I have significantly more than 10mm of wire, I like to trim the excess with wire cutters now to make bending easier.
Step 3: Finishing Touches
-
Create a 90-degree bend:
Using your chain nose pliers, grasp the wire immediately above the top bronze bead and bend it sharply to a 90-degree angle. -
Form the top loop:
Switch to your round nose pliers. Grip the end of the wire and roll it back towards the beads to create a neat, centered loop. -
Attach the ear wire:
Use your chain nose pliers to gently twist open the loop at the bottom of the French hook ear wire. Never pull the loop outward; twist it sideways like a gate. -
Connect the components:
Slide the loop you just created on top of your bead stack into the open loop of the ear wire. -
Secure the earring:
Twist the ear wire loop back into its closed position, ensuring the connection is secure. -
Repeat for the second earring:
Recreate the entire process for the second earring, double-checking that the bead patterns align perfectly when held side-by-side.
Go Longer
For a dramatic shoulder-grazing look, double the number of repetitions in the pattern or use headpins instead of eye pins for a cleaner bottom finish.
Enjoy wearing these elegant, nature-inspired accessories with your favorite casual outfits


What Really Happens Inside the Kiln
Learn how time and temperature work together inside the kiln to transform clay into durable ceramic.
Rainbow Order Clay Bead Hoop Earrings
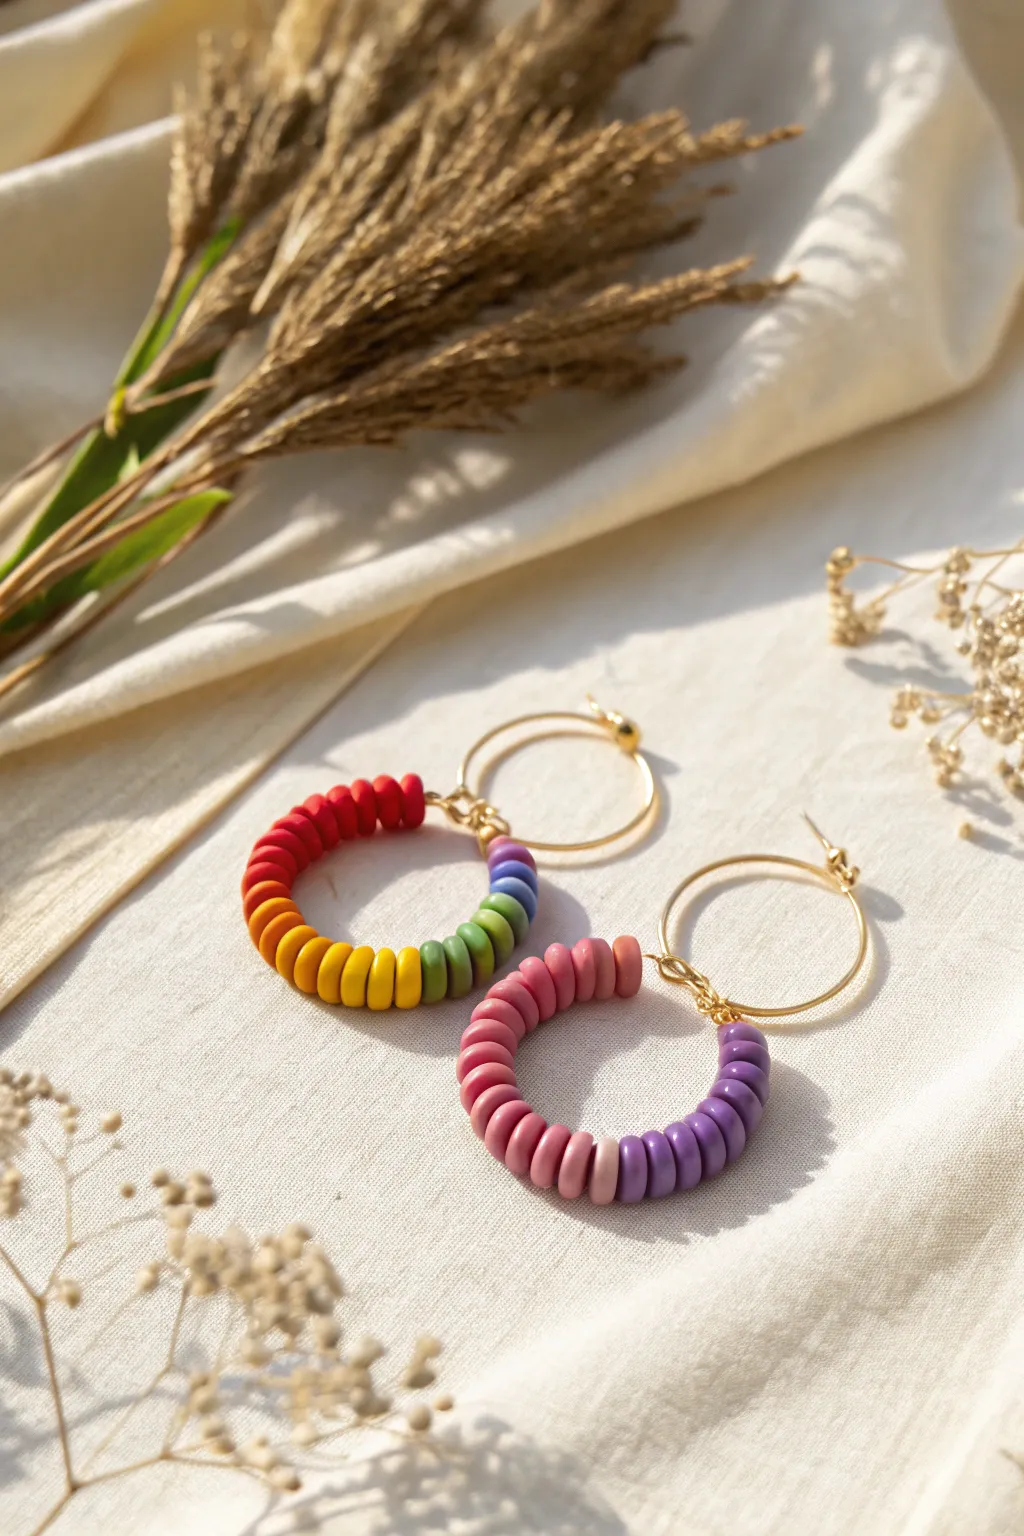
These vibrant hoop earrings combine the playful texture of polymer clay discs with the elegance of gold-tone hardware. You can choose to create a full spectrum rainbow or a sophisticated pink-to-purple gradient, both suspended from delicate gold hoops for a modern, swinging movement.
Step-by-Step
Materials
- Heishi polymer clay beads (6mm or 8mm) in rainbow colors: Red, orange, yellow, green, blue, indigo/purple
- Heishi polymer clay beads in gradient colors: Dark pink, light pink, mauve, violet/purple
- Gold-tone jewelry wire (20 or 22 gauge) or pre-formed wire hoops (approx. 25-30mm diameter)
- Small gold hoop earring findings (approx. 20-25mm diameter) with loop attachment
- 4 Gold jump rings (4mm or 5mm)
- Round nose pliers
- Chain nose pliers
- Wire cutters
Step 1: Forming the Bead Hoops
-
Cut the base wire:
Cut two pieces of your 20-gauge gold jewelry wire, each about 4 to 5 inches long. This extra length gives you plenty of room to form loops without losing beads. -
Create the first loop:
Using your round nose pliers, grasp one end of the first wire piece about a quarter-inch from the tip. Rotate your wrist to curl the wire back onto itself, creating a small, closed loop to act as a stopper. -
Establish the curve:
Gently curve the straight wire around a cylindrical object like a marker or pill bottle to give it a nice, round hoop shape before you start beading.
Wire Tension Pro-Tip
Don’t string beads too tightly! Leave a tiny sliver of space (about 1mm) before closing the loop. This allows the beads to rotate slightly and sit in a perfect curve rather than buckling.
Step 2: Designing the Rainbow Earring
-
Start with red:
Thread approximately 5 to 7 red heishi beads onto the wire. Check that they sit snugly against your stopper loop. -
Add warm tones:
Follow the red with an equal number of dark orange beads, then transition into a warm yellow. -
Introduce cool tones:
Continue the pattern by adding green beads. I find that using a slightly darker, mossy green bridges the gap to blue nicely. -
Finish the spectrum:
Complete the rainbow sequence with your blue beads, followed by indigo or a deep purple. -
Secure the beads:
Push all beads tightly together. Using your round nose pliers, create a second closed loop at the other end of the wire, as close to the final purple bead as possible to minimize gaps. -
Trim excess wire:
Use your wire cutters to snip off any remaining stick of wire extending past your new loop.
Step 3: Designing the Pink-Purple Gradient Earring
-
Prepare the second wire:
Repeat the initial wire prep steps: cut the length, form a starting loop, and curve the wire. -
Begin with deep pink:
Start this pattern with about 8 to 10 beads of your darkest pink or berry color. -
Transition to soft pink:
Add a section of lighter, soft pink beads. To make the gradient smooth, try to use the same number of beads for each color block. -
Add the mauve tone:
Thread on your mauve or dusty purple beads next. -
End with violet:
Finish the sequence with the darkest purple beads. Close off this hoop with a final wire loop just like the first one.
Level Up: Mix Metals
Add 3mm gold or silver spacer beads between every color change. This adds a hint of metallic shine that breaks up the matte clay texture and matches your hardware.
Step 4: Assembly & Finishing
-
Open jump rings:
Take two jump rings. use two pairs of pliers to twist them open laterally (side-to-side, never pulling apart). -
Connect the bead hoop:
Slide one open jump ring through both end loops of your beaded rainbow hoop. This pulls the ends together to form a complete circle. -
Attach to earring finding:
Before closing that jump ring, slip the loop of your gold earring finding onto it as well. -
Close the connection:
Use your pliers to twist the jump ring back into a perfectly closed circle. Ensure the cut ends meet flush so the ring doesn’t slip off. -
Assemble the second earring:
Repeat the jump ring process for the pink gradient hoop, attaching it securely to the second gold earring finding. -
Final adjustment:
Gently massage the beaded hoops with your fingers to ensure they are perfectly round and the beads are sitting flat against each other.
Now you have a stunning, colorful pair of hoops ready to brighten up any outfit you wear them with
Pastel Checkerboard Clay Bead Dangles
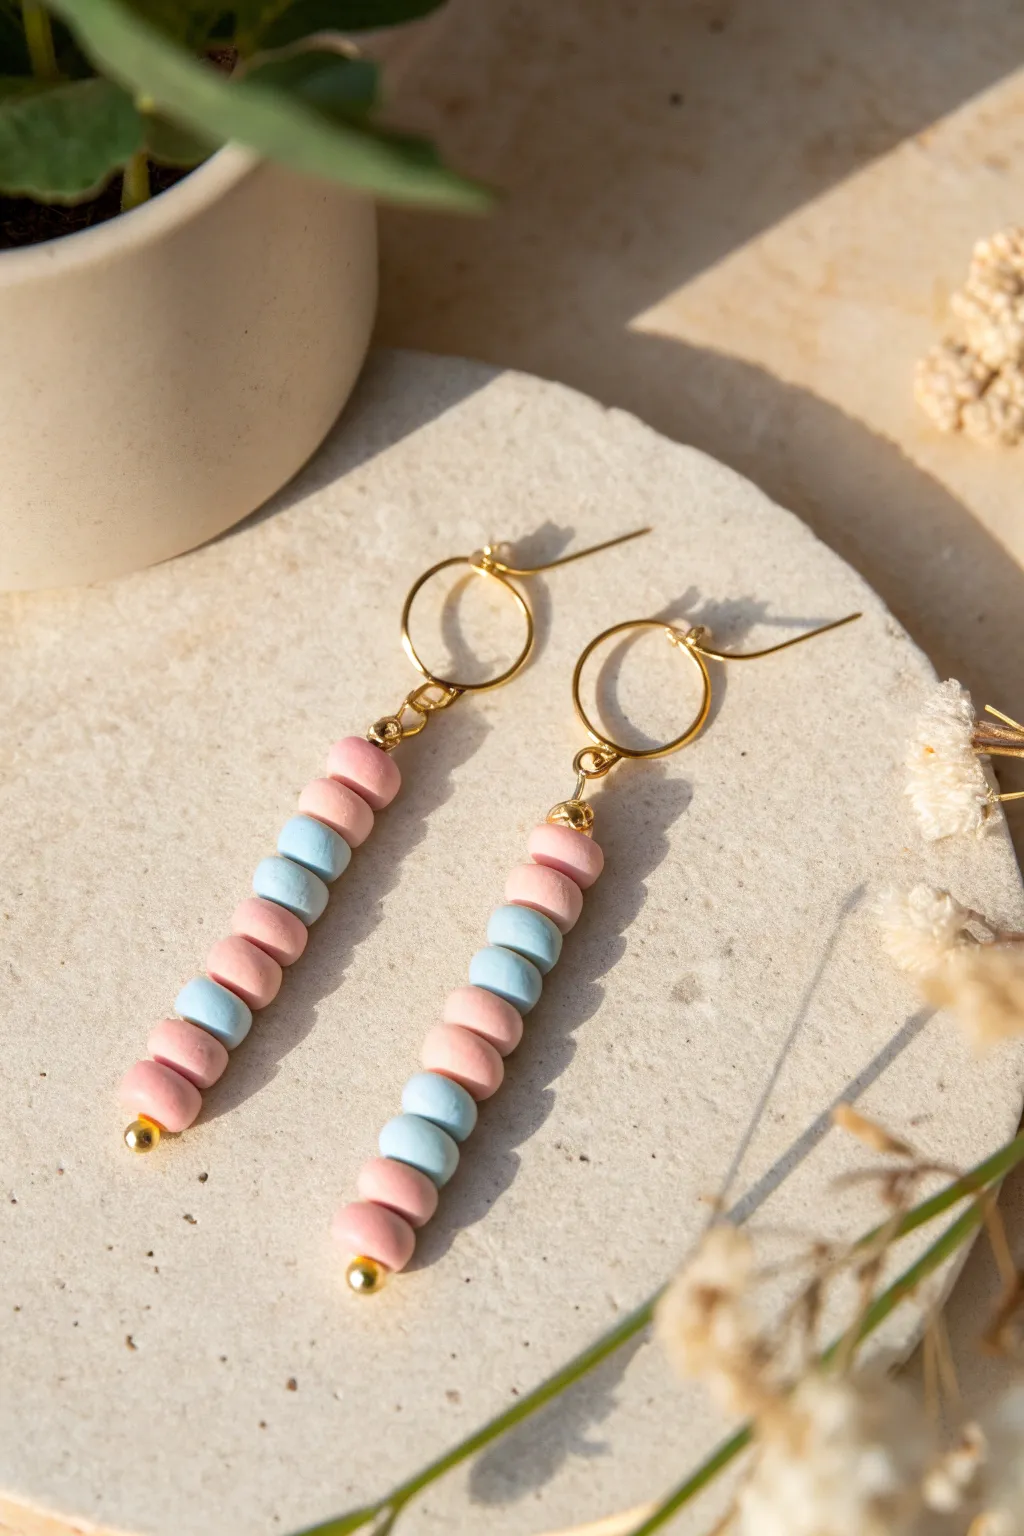
These sweet, elongated earrings feature a playful alternating pattern of soft pink and baby blue handmade clay beads. The design combines the rustic charm of organic, hand-rolled shapes with the polished elegance of gold findings for a delightful pastel accessory.
Step-by-Step Tutorial
Materials
- Polymer clay in pastel pink
- Polymer clay in pastel blue
- Gold ball-head pins (approx. 2 inches long)
- Small gold beads (2mm or 3mm)
- Gold jump rings (10mm – 12mm diameter)
- Gold earring hooks
- Clay roller or pasta machine
- Small circle cutter (approx. 6mm) or a straw
- Needle tool or toothpick
- Baking sheet and parchment paper
- Round nose pliers
- Chain nose pliers
- Wire cutters
- Oven (for baking clay)
Step 1: Creating the Clay Beads
-
Condition the clay:
Begin by thoroughly kneading your pastel pink and blue polymer clays separately until they are soft and pliable. This conditioning step prevents cracks during baking. -
Roll out slabs:
Using a clay roller or a pasta machine, roll each color into a slab of even thickness. Aim for a thickness of about 4mm to give the beads that chunky, substantial look seen in the photo. -
Cut the shapes:
Use a small circular cutter (around 6mm) to punch out small discs from both colors. You will need roughly 10 pink and 6 blue beads per earring, so cut a few extras just in case. -
Refine the edges:
Gently smooth the edges of each cut circle with your fingertip. You want them to look organic and slightly rounded, not perfectly sharp cylinders. -
Pierce the holes:
Using a needle tool or toothpick, carefully pierce a hole through the center of each bead. I find twisting the tool gently as it goes through helps keep the bead round without squashing it. -
Bake the beads:
Arrange your beads on a baking sheet lined with parchment paper. Follow the temperature and timing instructions on your specific brand of clay packaging, then let them cool completely before handling.
Sticky Situation?
If clay sticks to your cutter, dip the cutter into cornstarch or water before pressing down. This acts as a release agent for cleaner edges.
Step 2: Assembling the Earrings
-
Prepare the headpin:
Take a long gold ball-head pin. This type of pin has a decorative gold ball at the bottom which will serve as the stopper for your beads. -
Start the stack:
Thread a single pink clay bead onto the headpin first so it rests against the gold ball. -
Create the pattern:
Follow the alternating pattern shown in the image. Thread on beads in this order: Pink, Blue, Pink, Pink, Blue, Pink, Pink, Blue, Pink, Pink. Or create your own preferred rhythm! -
Add the top accent:
Once your clay stack is complete, thread one small gold metal bead onto the top. This adds a finished look and covers the top of the clay hole. -
Trim the wire:
Hold the stack tight and use your wire cutters to trim the excess headpin wire, leaving about 1cm (roughly 0.4 inches) of wire protruding from the top bead. -
Form a loop:
Use your round nose pliers to grasp the tip of the wire and roll it backward towards the beads to create a neat loop. Don’t close it fully just yet if you find it easier to attach rings this way, though usually, we close it and use jump rings.
Make It Glossy
For a ceramic look, coat baked beads with a thin layer of UV resin or gloss varnish before assembly. This adds durability and shine.
Step 3: Final Connections
-
Open the jump ring:
Take a large gold jump ring (10-12mm). Use two pairs of pliers to twist it open—moving one side forward and one back—rather than pulling it apart, to maintain its shape. -
Connect the components:
Slide the loop you made at the top of your bead stack onto the open jump ring. Then, slide the loop of your earring hook onto the same jump ring. -
Close the ring:
Use your pliers to twist the jump ring closed again, ensuring the ends meet perfectly so nothing slips off. -
Repeat for second earring:
Follow all the assembly steps again for the second earring, ensuring your color pattern matches the first one exactly.
Now you have a charming pair of handmade pastel dangles ready to wear or gift.

TRACK YOUR CERAMIC JOURNEY
Capture glaze tests, firing details, and creative progress—all in one simple printable. Make your projects easier to repeat and improve.
Monochrome Clay Bead Earrings With One Pop
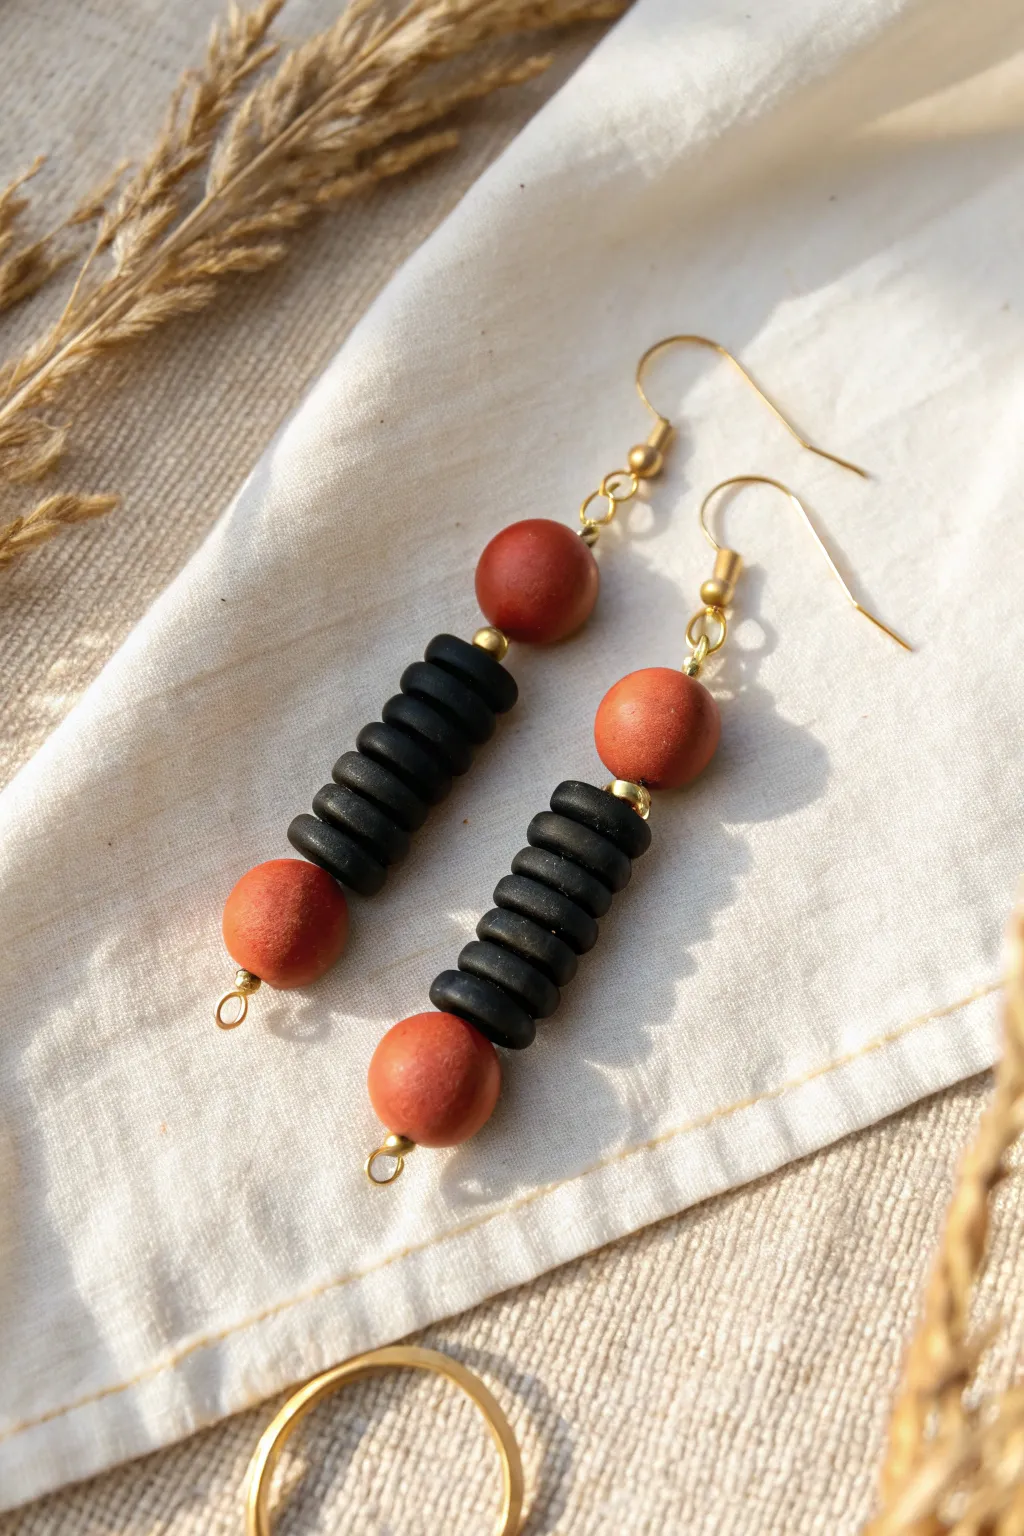
Embrace the beauty of contrast with these striking earrings that pair earthy terracotta tones with sleek matte black discs. The stacked silhouette offers a contemporary architectural vibe while remaining lightweight enough for all-day wear.
Step-by-Step Guide
Materials
- Polymer clay (terracotta or reddish-brown color)
- Polymer clay (black)
- Gold-tone jewelry wire (20 or 22 gauge) or eye pins
- Gold-tone earring hooks
- Small gold-tone spacer beads (tiny metal rounds)
- Gold-tone jump rings
- Clay roller or pasta machine
- Small round cutter (approx. 6-8mm)
- Needle tool or toothpick
- Jewelry pliers (round nose, chain nose, and wire cutters)
- Baking sheet and parchment paper
- Sandpaper (optional, fine grit)
Step 1: Crafting the Teracotta Spheres
-
Condition the clay:
Begin by warming the terracotta-colored polymer clay in your hands. Knead it thoroughly until it is soft, pliable, and free of any air bubbles. -
Form the spheres:
Pinch off small amounts of clay and roll them between your palms. You aim to create four identical spheres, each roughly 12mm in diameter. -
Pierce the beads:
Gently hold a sphere without squishing it. Using your needle tool, pierce a hole straight through the center. Rotate the tool as you push to keep the hole clean and prevent distortion. -
Refine the shape:
After piercing, give the beads a quick, gentle roll again to smooth out any fingerprints or unevenness caused by the needle tool.
Clean Edges Only
Before baking, lightly dust your finger with cornstarch and rub it over the raw clay beads. This helps eliminate fingerprints without distorting the shape.
Step 2: Creating the Black Discs
-
Condition black clay:
Repeat the conditioning process with your black polymer clay until it is smooth and ready to work with. -
Roll out a sheet:
Using an acrylic roller or pasta machine, roll the black clay into a thick, even sheet. Aim for a thickness of about 3-4mm so the discs have a chunky, substantial look. -
Cut the discs:
Use your small round cutter to punch out circles. For the design shown, you will need approximately 14-16 discs total (7-8 per earring). -
Create center holes:
Just like with the spheres, use your needle tool to pierce the center of each black disc. Try to be as centered as possible to ensure they stack neatly later. -
Bake the clay:
Arrange all your beads on a parchment-lined baking sheet. Bake according to the specific temperature and duration instructions on your package of clay. -
Cool down:
Once baked, turn off the oven and let the beads cool completely before handling them to ensure they reach their full hardness.
Uneven Stack?
If your black discs look crooked when stacked, the holes might be off-center. Use a slightly larger drill bit to widen the holes post-baking for wiggle room.
Step 3: Assembly
-
Prepare the wire base:
Cut a segment of gold jewelry wire about 3 inches long. Create a small loop at one end using your round nose pliers to act as a stopper. Alternatively, use a pre-made eye pin. -
Start the stack:
Thread one gold spacer bead onto the wire, followed by one of your baked terracotta spheres. -
Add the contrast:
Slide on about 7 or 8 of the black disc beads. I prefer to rotate them slightly as I stack them so they sit flush against each other. -
Finish the bead sequence:
Top the stack with another tiny gold spacer bead, followed by the second terracotta sphere. -
Secure the top:
Add a final gold spacer bead on top of the second sphere. Using your pliers, bend the remaining wire at a 90-degree angle just above this last bead. -
Create the connector loop:
Trim the excess wire to about 1 cm, then use round nose pliers to roll that tail into a neat, closed loop. -
Attach the hook:
Open the loop on your earring hook (always twist sideways, never pull apart) and attach it to the loop you just made at the top of the bead stack. Close it securely. -
Add the bottom charm (Optional):
If you used an eye pin or created a loop at the very bottom, insert a small jump ring there to give the design a finished, dangling look, exactly like the reference image.
Now you have a bold pair illustrating how simple shapes create sophisticated style
Pearl-and-Heishi Clay Bead Hoop Combo
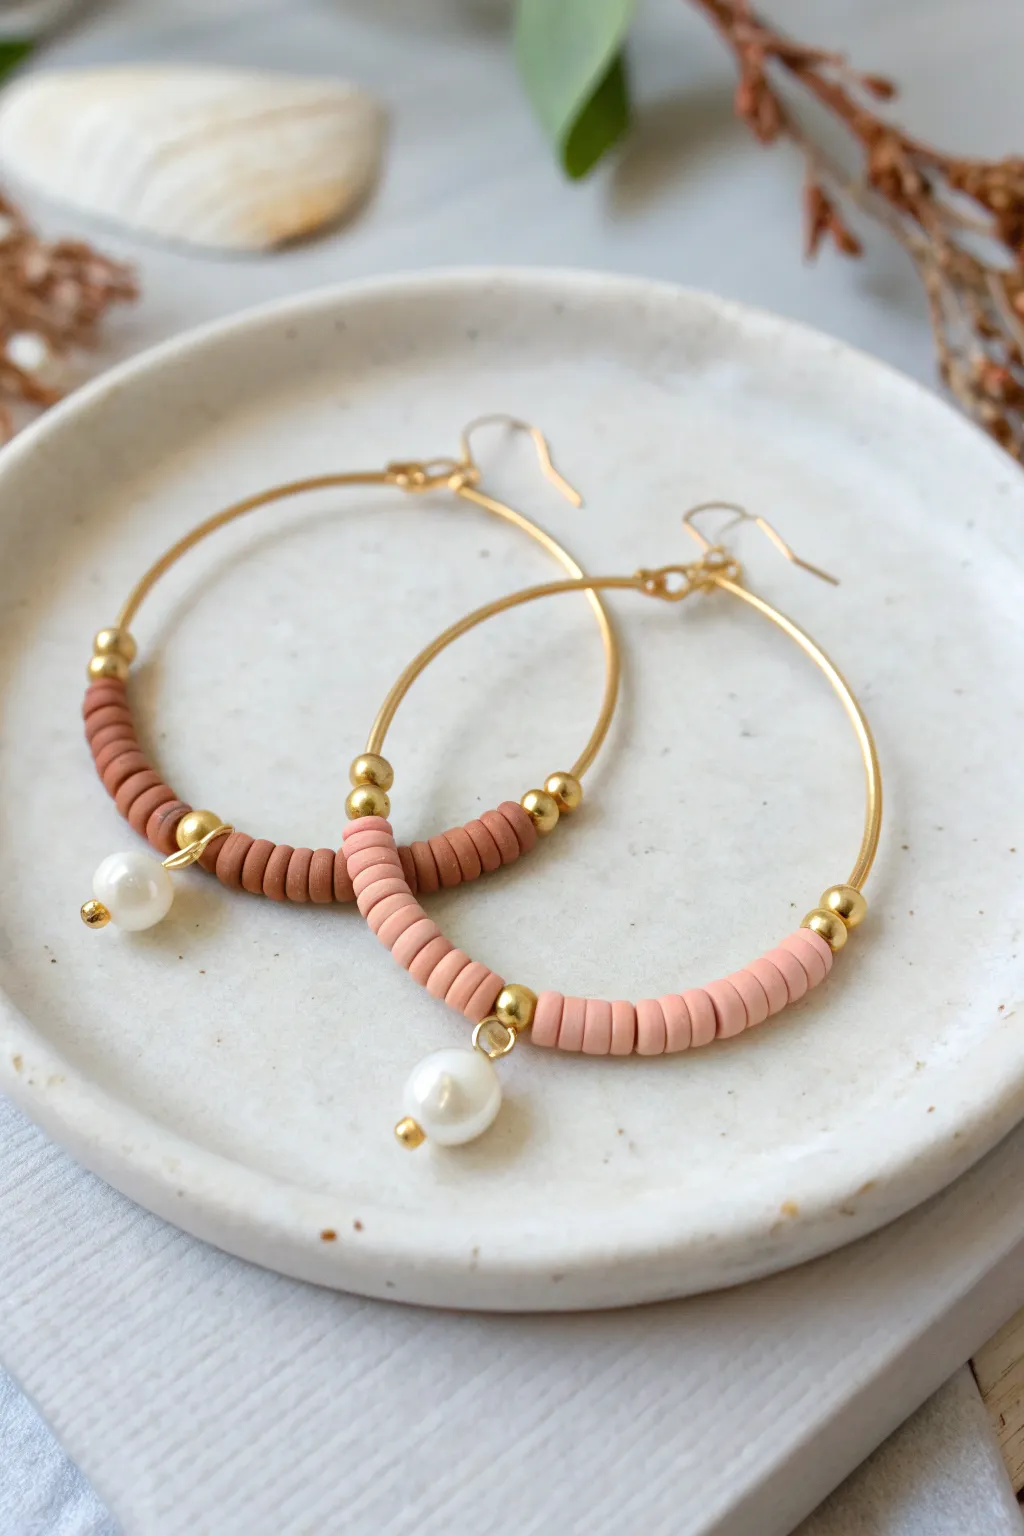
These elegant earrings combine earthy clay textures with the luxury of gold and pearls for a perfectly balanced accessory. The design features a two-tone heishi bead arrangement on a classic gold hoop, punctuated by a delicate pearl drop that adds just the right amount of movement.
Detailed Instructions
Materials
- Large gold hoop earring findings (approx. 40-50mm diameter)
- Polymer clay heishi beads (terracotta or reddish-brown)
- Polymer clay heishi beads (light peach or dusty pink)
- Small gold spacer beads (approx. 3-4mm)
- 2 small white pearl beads (approx. 6-8mm)
- 2 gold headpins
- Jewelry pliers (round nose and chain nose)
- Wire cutters
Step 1: Creating the Pearl Charm
-
Prepare the headpin:
Take a gold headpin and slide a small gold spacer bead onto it first. This adds a tiny decorative detail at the bottom of your charm. -
Add the pearl:
Thread one white pearl onto the headpin, letting it rest directly on top of that initial gold spacer. -
Top it off:
Place another small gold spacer bead on top of the pearl. This sandwiches the pearl between gold accents for a polished look. -
Create a loop:
Using your round nose pliers, grasp the wire just above the top gold spacer. Bend the wire 90 degrees. -
Trim and finish:
Trim the excess wire to about 1cm. Use the round nose pliers to roll the remaining wire into a neat, closed loop. Repeat this entire phase to make a second charm for the other earring.
Loose Beads?
If the clay beads slide around the hoop too much, add a tiny dab of clear jewelry glue inside the very last gold spacer bead to lock the whole row in place.
Step 2: Assembling the First Hoop
-
Open the hoop:
Take one of your gold hoop findings and gently unhook the catch so the wire is open and ready for beading. -
Start with gold:
Thread a single gold spacer bead onto the hoop wire first. This acts as a stopper and visual bookend for your clay beads. -
Add the darker clay beads:
Begin threading the terracotta (darker) heishi beads. You’ll want a stack of about 15-20 beads, filling roughly one-quarter of the hoop’s lower arc. -
Insert the center spacer:
Slide on one gold spacer bead after your dark clay stack. This marks the center transition point. -
Attach the charm:
Slip the loop of your prepared pearl charm onto the hoop wire. It should sit freely right next to that center gold spacer. -
Secure the charm:
Add another gold spacer bead immediately after the charm loop. The charm is now nestled between two gold beads. -
Add the lighter clay beads:
Thread on your stack of peach (lighter) heishi beads. I recommend counting them to ensure you use the exact same number as the dark side for perfect symmetry. -
Finish the beading:
End the sequence by sliding on a final gold spacer bead to mirror the start. -
Secure the design:
If your beads slide too freely, you might gently pinch the hoop wire slightly (or use a tiny crimp bead if preferred, though friction often holds them well on larger hoops) to keep the design centered at the bottom.
Pro Tip: Beading Needle
Running wire through clay beads can be tricky. If the hoop wire is blunt, use a reamer tool to slightly widen the holes of the heishi beads before threading.
Step 3: Creating the Mirrored Pair
-
Prepare the second hoop:
Open your second gold hoop finding. -
Reverse the colors:
To create a mirrored pair like in the photo, start this hoop with the PEACH beads first (after the initial gold spacer), rather than the terracotta ones. -
Assemble the center:
Add the gold spacer, the second pearl charm, and the next gold spacer, just like before. -
Finish with dark beads:
Complete the beading with the stack of terracotta heishi beads and the final gold spacer. -
Close it up:
Refasten the hoop wire into its catch. Double-check that both fasteners are secure.
Now you have a stunning pair of mixed-media hoops ready to elevate any outfit with their warm, earthy tones
Personalized Letter Clay Bead Dangle Earrings
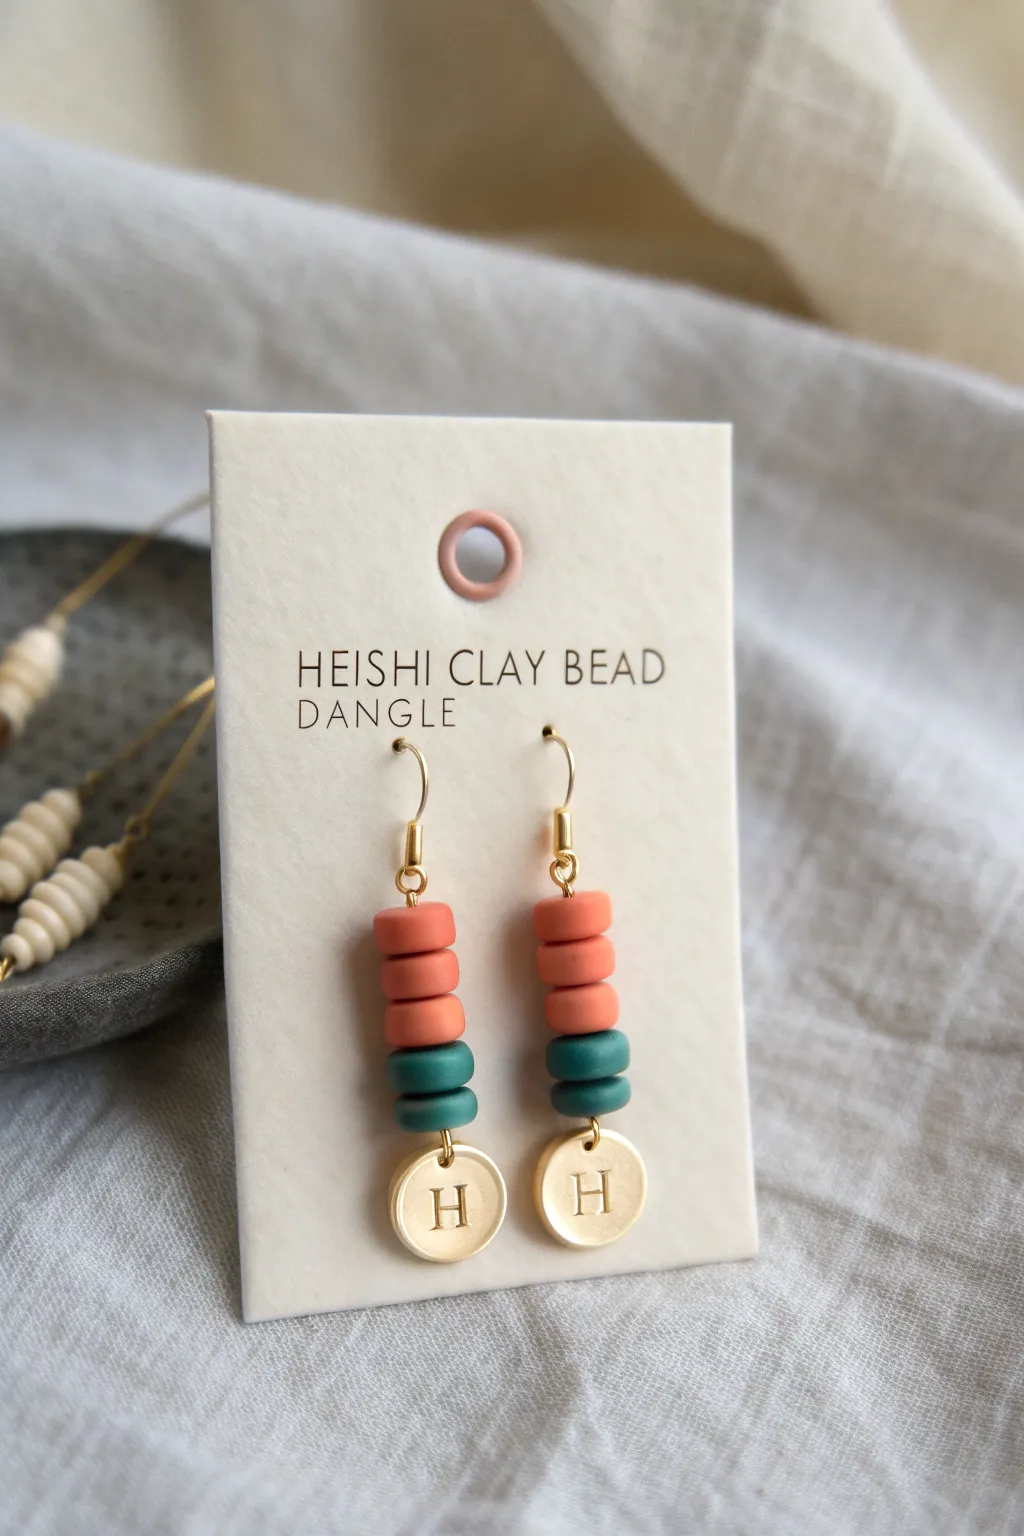
These charming dangle earrings combine the matte texture of heishi clay beads with the shine of a personalized gold charm. The stacked design features a warm coral red paired with a deep teal, creating a modern color block effect that leads down to a stamped initial pendant.
How-To Guide
Materials
- Polymer clay heishi beads (approx. 6mm) in coral red
- Polymer clay heishi beads (approx. 6mm) in deep teal
- 2 small gold-plated circle charms with initial ‘H’ (or your choice)
- 2 gold-plated eye pins (approx. 2 inches long)
- 2 gold-plated French hook ear wires
- Round nose pliers
- Chain nose pliers
- Wire cutters
Step 1: Preparing the Base
-
Select your charms:
Start by identifying your two gold initial charms. These discs will sit at the very bottom of your earring stack, acting as both a visual anchor and a personal touch. -
Inspect the eye pins:
Take out your two gold eye pins. The ‘eye’ is the small loop at one end. Check that the loop is fully closed; if there’s a small gap, use your chain nose pliers to gently squeeze it shut so your charm won’t slip off. -
Attach the charm:
Gently twist open the loop of your first eye pin using chain nose pliers. Be sure to twist it sideways (like opening a door) rather than pulling it apart, which weakens the metal. -
Secure the connection:
Slide the jump ring or hole of the initial charm onto the open loop. Twist the loop back into a closed position, ensuring the ends meet perfectly flush.
Pro Tip: Bead Sorting
Heishi clay beads vary in thickness. Pre-stack your beads on a table before threading to ensure both earrings are exactly the same height.
Step 2: Stacking the Beads
-
Sort your clay beads:
Organize your heishi beads. For this design, you need exactly 3 coral red beads and 2 deep teal beads per earring. -
Start with teal:
Thread two of the deep teal heishi beads onto the eye pin first. These will rest directly on top of the gold charm. -
Check the fit:
Ensure the beads sit flat against each other. Sometimes clay beads have uneven cuts; I prefer to double-check their thickness so the stack looks uniform. -
Add the coral layer:
Thread three coral red heishi beads onto the pin, stacking them directly on top of the teal ones.
Step 3: Creating the Loop
-
Measure the wire:
With all five beads stacked, hold the top bead down firmly. You need about 1cm (roughly 0.4 inches) of wire extending above the top bead to create a loop. Trim any excess wire with your wire cutters. -
Bend the wire:
Using your chain nose pliers, grasp the wire just above the top coral bead and bend it at a 90-degree angle. -
Form the loop:
Switch to your round nose pliers. Grip the end of the wire and roll it back towards the beads to form a perfect circular loop. -
Align the loop:
Before closing the loop entirely, check that it is centered over the bead stack for a professional, straight hang.
Level Up: Mix Metals
Try sandwiching a tiny gold spacer bead between the teal and coral sections to add an extra touch of separation and shine.
Step 4: Final Assembly
-
Open the ear wire:
Take a French hook ear wire and find the small loop at the base. Gently twist this loop open sideways using your chain nose pliers. -
Connect the components:
Hook your beaded pendant onto the open loop of the ear wire. Make sure the ‘front’ of the initial charm is facing forward relative to how the ear hook sits. -
Close the finding:
Twist the ear wire loop back into a closed position securely. -
Repeat for the second earring:
Follow all the previous steps to create the matching earring, ensuring your bead count and wire length match the first one exactly.
Now you have a personalized pair of colorful earrings perfect for everyday wear or gifting
Mismatched But Coordinated Clay Bead Earrings
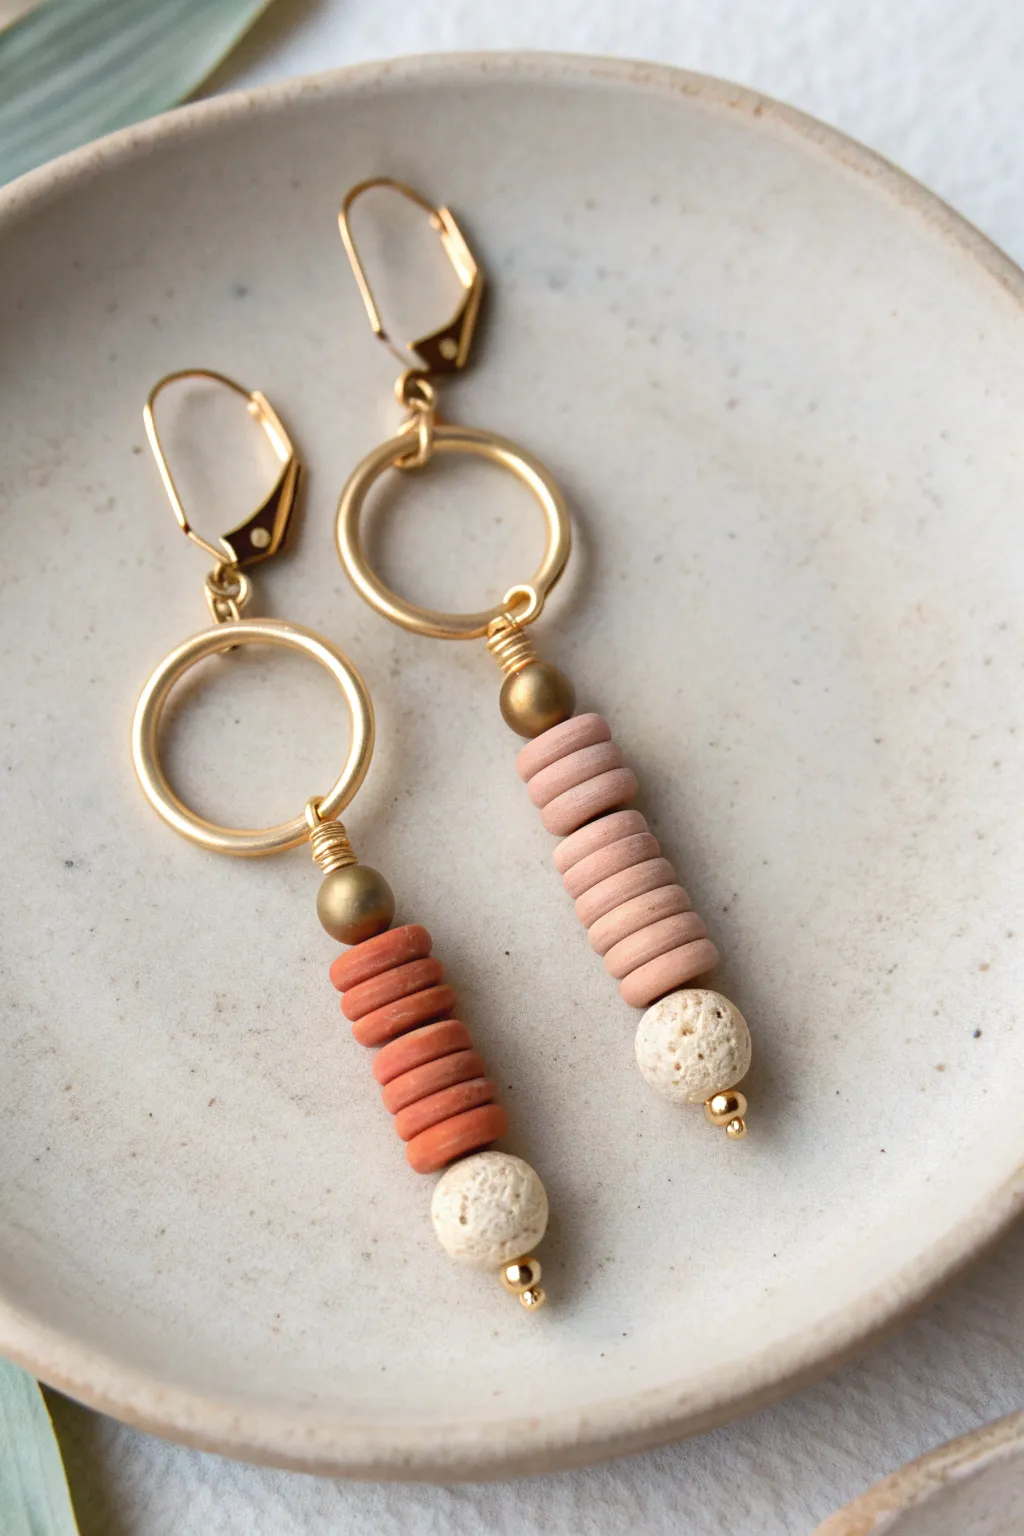
Embrace the beauty of imperfection with these mismatched but perfectly coordinated drop earrings. Featuring a mix of matte polymer clay heishi beads, textured lava stones, and sleek gold accents, this design balances earthy tones with varied lengths for a modern, artisanal look.
Step-by-Step Guide
Materials
- Polymer clay heishi beads (rust/terracotta color)
- Polymer clay heishi beads (dusty rose/pale pink color)
- 2 Large gold connector rings (approx. 20-25mm)
- 2 Gold leverback ear wires
- 2 White lava rock or textured stone beads (8-10mm)
- 2 Gold round spacer beads (6-8mm)
- 2 Gold ball-head pins (2 inches long)
- 24-gauge gold craft wire
- Round nose pliers
- Chain nose pliers
- Wire cutters
Step 1: Creating the Bead Dangles
-
Prepare the head pins:
Start by selecting two gold ball-head pins. These have a small decorative ball at the bottom instead of a flat nail head, adding a nice finish to the bottom of your earring. -
Thread the bottom bead:
Slide one white lava rock bead onto each head pin. The texture here provides a lovely contrast to the smooth metal and matte clay. -
Stack the clay beads (Earring A):
For the first earring (the ‘short’ one), thread about 6 to 8 rust-colored heishi beads onto the pin directly above the lava stone. -
Stack the clay beads (Earring B):
For the second earring (the ‘long’ one), thread roughly 8 to 10 dusty rose heishi beads onto its pin. I like to stack a few more here to create the deliberate length difference. -
Add the gold accent:
Top both bead stacks with a single gold round spacer bead. This acts as a visual cap and transitions nicely into the wire wrap. -
Begin the wire wrap:
Grasp the wire just above the gold bead with your chain nose pliers and bend the wire 90 degrees. -
Create the loop:
Using your round nose pliers, grab the bent wire and roll it back towards you to form a loop. Before closing it completely, slide the large gold connector ring into the loop. -
Finish the wrap:
Hold the loop firmly with pliers and wrap the tail of the wire around the stem (the space between the loop and the gold bead) 3 or 4 times for a messy-chic coiled look. Trim the excess wire.
Uneven Stacks?
Polymer heishi beads often vary slightly in thickness. Don’t rely on counting them; measure the stack height against a ruler to ensure your asymmetry is intentional, not accidental.
Step 2: Assembling the Top Component
-
Prepare the top connection:
Cut a small piece of 24-gauge gold wire, about 2 inches long. You will need one piece for each earring. -
Attach to the ring:
Loop one end of this new wire piece through the top of the large gold connector ring. -
Secure the wire:
Just like you did with the bead dangle, wrap the short end of the wire around the longer stem to secure it to the ring. -
Connect to ear wire:
Form a simple loop at the top of this wire. Open the loop slightly gently using pliers. -
Attach the leverback:
Slide the loop of your gold leverback ear wire onto the open wire loop you just created. -
Close the loop:
Close the wire loop securely. For a cleaner finish, create a small wrapped coil at the base of this loop as well, matching the style of the bottom wrap. -
Repeat for second earring:
Repeat the upper assembly process for the second earring, ensuring the wire wraps look similar in style. -
Final adjustment:
Hold both earrings up to check that the rings face forward. If they twist, gently grasp the wire loops with flat pliers and rotate them slightly until the components hang straight.
Essential Oils
Add a drop of essential oil to the porous white lava stone at the bottom. It acts as a natural diffuser, letting you carry a calming scent with you throughout the day.
Now you have a stunning, modern pair of earrings that proves symmetry is overrated
Half-And-Half Split Clay Bead Hoops
These elegant earrings combine earth-toned warmth with modern simplicity, featuring a striking color-block design. Using flat heishi clay beads on gold hoops creates a professional, boutique-style accessory that looks far more expensive than it is to make.
Detailed Instructions
Materials
- Rust or terracotta heishi clay beads (approx. 6mm)
- Cream or off-white heishi clay beads (approx. 6mm)
- Gold-colored memory wire or pre-made beading hoop wire (approx. 30mm diameter)
- Gold ear hooks (French hook style)
- Gold jump rings (4mm or 5mm)
- Round nose pliers
- Chain nose pliers
- Wire cutters
- Super glue or jewelry adhesive (optional)
Step 1: Preparing the Hoop Base
-
Select your wire:
Choose a sturdy gold-colored wire that holds its shape well. Memory wire is excellent for this, or you can use pre-formed hoop components designed for beading. -
Cut to size:
If using memory wire, cut two identical circles using your heavy-duty wire cutters. Aim for a diameter of about 30mm to match the scale seen in the photo. -
Create the first loop:
Using your round nose pliers, grasp one end of the first wire hoop. Roll the pliers away from you to create a small, neat loop. This will act as the stopper for your beads. -
Secure the loop:
Ensure the loop is completely closed so the thin heishi beads cannot slip off. Use chain nose pliers to gently squeeze it shut if necessary. -
Bend the angle:
Just above the loop you created, use your chain nose pliers to bend the loop outwardly at a 90-degree angle relative to the circle. This creates the attachment point for the ear hook.
Smooth Transitions
Add 1-2 small gold spacer beads between the rust and cream sections. It adds a tiny metallic flash that makes the color change look intentional and refined.
Step 2: Beading the Pattern
-
Plan your ratio:
For the half-and-half look, you aren’t aiming for a 50/50 physical split, but rather a visual balance. In this design, the terracotta section covers about two-thirds of the hoop. -
String the darker beads:
Begin threading the rust/terracotta heishi beads onto the open end of the wire. Add enough beads to cover roughly 60% of the hoop’s circumference. -
Check the fit:
Slide the beads all the way down to the stopped loop. Hold the hoop up to verify you like the coverage amount before proceeding. -
Add the contrast beads:
Start threading the cream or off-white heishi beads. You want this section to cover the bottom curve and part of the other side. -
Finish the bead row:
Stop adding beads when there is approximately 1/2 inch of bare wire left at the end. This space is crucial for creating the closing loop. -
Tighten the stack:
Gently push all beads together so they sit flush against one another without gaps, but not so tight that the hoop warps.
Step 3: Closing and Assembly
-
Form the closing loop:
Using your round nose pliers, grasp the remaining tail of the wire. Roll it inwards (towards the bead stack) to create a matching loop. -
Adjust the angle:
Like the first loop, bend this one out slightly so it meets the other loop. You want the two loops to overlap or sit side-by-side at the top of the hoop. -
Connect the loops:
Open a gold jump ring using two pairs of pliers (twist sideways, don’t pull apart). Thread it through both wire loops at the top of your hoop to lock the circle closed. -
Attach the ear hook:
While the jump ring is still open, slide on your gold ear hook. Ensure the hook is facing the correct direction so the half-and-half pattern hangs nicely. -
Close the jump ring:
Twist the jump ring back into a closed position, ensuring the ends meet perfectly flush so nothing slips out. -
Repeat for the second earring:
Follow the same steps for the second hoop. I find it helpful to line the two hoops up side-by-side to ensure the color transition happens at the exact same spot on both sides.
Make It Matte
Polished heishi beads look great, but for an earthy, organic vibe, lightly sand the beads with a fine-grit nail buffer block before stringing to remove any shine.
Now you have a chic pair of color-blocked hoops ready to elevate your everyday outfits
Fringe-Style Clay Bead Earrings With Multiple Strands
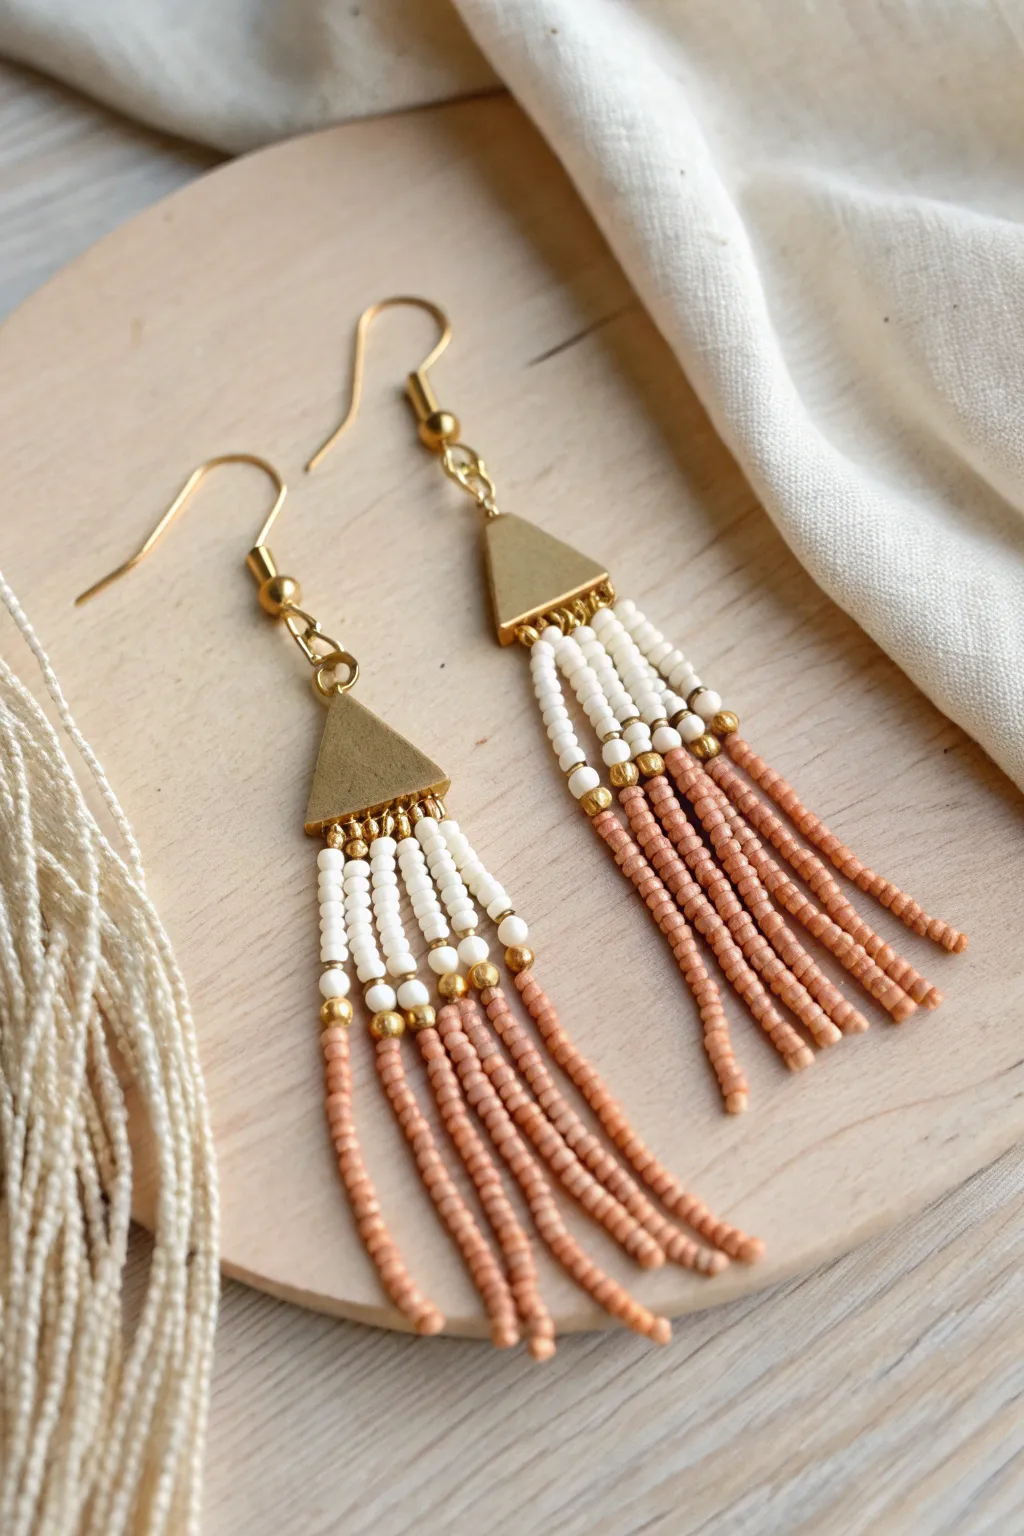
These elegant earrings combine the structural appeal of gold geometric findings with the soft movement of seed bead fringe. The two-tone design transitions from crisp white to warm terracotta, punctuated by metallic gold accents for a sophisticated bohemian look.
How-To Guide
Materials
- Gold triangle chandelier connectors (with 5-7 bottom loops/holes)
- Gold fishhook ear wires
- Size 11/0 seed beads in opaque white
- Size 11/0 seed beads in terracotta/peach matte finish
- Size 11/0 or 15/0 seed beads in metallic gold
- Beading needle (size 10 or 12)
- Beading thread (like Nymo or Fireline) in white or beige
- Scissors or thread zapper
- Jewelry pliers (flat nose and round nose)
- Jump rings (4mm gold)
Step 1: Preparation and Foundation
-
Prepare your thread:
Cut a comfortable length of beading thread, about 2-3 feet per earring to avoid running out mid-project. Thread your beading needle. -
Secure the connector:
Tie the end of your thread securely to the first hole on the bottom edge of your gold triangle connector. I like to use a double knot here and add a tiny dab of jewelry glue for extra security, though glue involves drying time. -
Hide the tail:
Trim the tail end of the thread close to the knot, but leave just enough to weave back in later if you prefer not to use glue.
Stiff Fringe Fix
If your fringe stands straight out instead of hanging loosely, your tension is too tight. Gently massage and pull on the strands to loosen the thread slightly before tying off.
Step 2: Creating the Fringe
-
Start the first strand:
With your needle attached to the first hole, begin stringing your beads. The pattern in the image starts with a section of white beads. -
String the white section:
Pick up approximately 8-10 white seed beads. Adjust this number based on how long you want the upper section to be, but keep count so you can match the other strands. -
Add the gold transition:
Slide on one metallic gold bead. This acts as a beautiful spacer between the two main colors. -
String the terracotta section:
Now pick up your terracotta beads. String about 20-25 beads to create a long, flowing tail. This section should be significantly longer than the white section. -
Secure the strand end:
Skip the very last terracotta bead you just strung. Insert your needle back up through the second-to-last bead and continue passing the needle all the way up through every bead in the strand. -
Anchor the strand:
Once your needle exits the top white bead, pass it through the *same* hole in the triangle connector that you started from, or sometimes moving to the next hole immediately works depending on the connector style. Pull the thread gently until the slack is gone, but not so tight that the fringe becomes stiff. -
Move to the next position:
Pass your needle through the next hole on the bottom of the triangle connector to prepare for strand number two. -
Repeat the pattern:
Repeat the stringing process: white section, gold spacer, terracotta section. Ensure your counts match exactly to create a uniform block of color. -
Complete the fringe:
Continue this process until every hole on the bottom of the triangle connector has a beaded strand dangling from it. The image shows about 5-7 strands per earring. -
Finish the thread:
After securing the final strand, weave your remaining thread back down through a few beads of the last strand and tie a discreet knot between beads. Weave through a few more beads to bury the tail, then trim.
Pro Tip: Thread Choice
Use Nymo thread in size B or D for the best drape. Fishing line is often too stiff for fringe earrings and won’t give you that fluid movement seen in the photo.
Step 3: Final Assembly
-
Attach the ear wire:
Use your flat nose and round nose pliers to gently twist open the loop on your fishhook ear wire. Never pull the loop open; always twist sideways. -
Connect the components:
Slide the top loop of the gold triangle connector onto the open ear wire loop. If the triangle doesn’t have a loop, use a small jump ring to connect them. -
Close the loop:
Twist the ear wire loop back into a closed position, ensuring the gap is fully shut so the connector doesn’t slip out. -
Repeat for the second earring:
Follow all the previous steps to create the matching earring, double-checking your bead counts to ensure both earrings are symmetrical.
Enjoy the gentle sway of your new handmade statement earrings
Marbled Palette Clay Bead Dangle Earrings
These simple yet striking earrings feature a gradient of earth-toned polymer clay disc beads stacked to create a textured, bohemian look. The warm terracotta, beige, and cream beads capture the essence of a natural marbled palette, perfect for everyday wear.
Step-by-Step Tutorial
Materials
- Polymer clay in terracotta (burnt orange), beige, and off-white/cream
- Gold-tone jewelry headpins (2 inches or longer)
- Gold-tone earring hooks
- Round nose pliers
- Chain nose pliers
- Wire cutters
- Small bead roller or acrylic roller (for making the clay sheets)
- Small circle cutter (approx. 4-6mm) or a straw
- Needle tool or toothpick
- Oven for baking clay
Step 1: Creating the Clay Beads
-
Condition the clay:
Begin by kneading each color of your polymer clay—terracotta, beige, and off-white—individually until they are soft and pliable. -
Roll out sheets:
Roll each color into a flat, even sheet. Aim for a thickness of about 2-3mm. If you have a pasta machine designated for clay, a middle setting works perfectly. -
Cut the discs:
Use your small circle cutter or a sturdy straw to punch out numerous small discs from each color sheet. You will need approximately 14-16 beads per earring. -
Pierce the holes:
Gently poke a hole through the exact center of each disc using a needle tool or toothpick. Twisting the tool slightly as you push through helps keep the hole clean without squashing the bead. -
Create marbled effects (optional):
For a few beads, twist small snakes of white and beige together, roll into a ball, and flatten to create a subtle marbled look before cutting. -
Bake the beads:
Arrange your raw clay beads on a baking sheet lined with parchment paper. Bake according to your polymer clay package instructions (usually around 275°F/135°C for 15-30 minutes). Let them cool completely before handling.
Step 2: Assembling the Earrings
-
Prepare the wire:
Take a gold headpin. If you are using a simple wire instead, create a small loop at one end using your round nose pliers to act as a stopper. -
Plan your pattern:
Lay out your cooled beads on a flat surface to visualize the gradient. I like to start with 3-4 terracotta beads, transition to 2 beige, then 5-6 white/cream, back to 2 beige, and finish with 3-4 terracotta. -
Thread the beads:
Slide the beads onto your headpin according to your planned pattern. Ensure they sit flush against each other but aren’t squeezed too tightly. -
Check the length:
Verify that you have enough wire left at the top to create a closure loop—you’ll need about 1cm (roughly 0.4 inches) of exposed wire. -
Bend the wire:
Using your chain nose pliers, bend the excess wire at a 90-degree angle right above the top bead. -
Trim excess wire:
Use your wire cutters to trim the bent wire, leaving just enough length to form a round loop (about 8-10mm). -
Form the top loop:
Grasp the tip of the wire with your round nose pliers and roll it back towards the beads to create a neat, closed loop. -
Attach the hook:
Twist open the small loop at the base of your earring hook using pliers. Slide on the looped top of your bead stack, then twist the hook’s loop closed securely. -
Repeat for the second earring:
Follow all assembly steps for the second earring, ensuring the bead pattern matches the first one exactly.
Uneven Bead Holes?
If your holes distort while piercing, try refrigerating the raw clay discs for 10 minutes beforehand. This firms them up, allowing the needle to pass through cleanly without squashing shapes.
Smooth Edges Pro Tip
After baking and cooling, you can lightly sand the edges of your clay discs with a high-grit nail buffer or sandpaper to remove any fingerprints or rough spots for a truly professional finish.
Now you have a stylish set of handmade earrings that bring a warm, earthy touch to any outfit
Sculptural Big-Bead Focus Clay Bead Hoops

These elegant earrings combine the earthiness of clay with the delicate shine of gold hoops for a sophisticated yet natural look. The design features a focused row of heishi-style clay beads anchored by a striking, handcrafted terracotta pendant.
Step-by-Step Guide
Materials
- Polymer clay (terracotta/rose pink color)
- Polymer clay (light tan/beige color) or pre-made heishi beads
- Gold-tone hoop earring findings (approx. 40-50mm diameter)
- Gold-tone jump rings (4mm or 5mm)
- Clay roller or pasta machine
- Small circular cutter (approx. 10-12mm)
- Needle tool or toothpick
- Craft knife or tissue blade
- Baking sheet and parchment paper
- Jewelry pliers (flat nose and round nose)
- Wet/dry sandpaper (optional)
- Oven
Step 1: Creating the Pendant Beads
-
Condition the Clay:
Begin by taking a small amount of your terracotta-colored polymer clay and kneading it in your hands until it becomes soft, pliable, and warm to the touch. -
Roll a Slab:
Using an acrylic roller or a pasta machine, roll the conditioned clay out into a flat, even sheet. Aim for a thickness of about 3mm—thick enough to be sturdy but light enough to hang comfortably. -
Cut the Circles:
Use your small circular cutter to punch out two identical circles. If you want a slightly textured look like the photo, you can gently press a piece of sandpaper onto the surface before cutting. -
Create the Hanger Hole:
Take a jump ring and gently press it into the top edge of the clay circle to mark where the hole should go. Then, using a needle tool, carefully pierce a hole through the clay at that spot, ensuring it’s large enough for your jump ring to move freely. -
Smooth the Edges:
Gently run your finger around the perimeter of the cut circles to soften any sharp edges created by the cutter.
Uneven Snake Rolling?
If your clay snake is lumpy, place an acrylic block on top of the clay and roll it back and forth on your work surface. This applies even pressure for a perfect cylinder.
Step 2: Making the Spacer Beads (Optional)
-
Prepare Tan Clay:
If you are making your own spacer beads instead of buying them, condition your light tan clay. -
Roll a Snake:
Roll the clay into a long, even snake that matches the thickness you want for your beads (around 3-4mm diameter). -
Slice the Beads:
Using your tissue blade, slice thin, consistent discs from the clay snake. While cutting, try to rotate the snake occasionally to keep it from flattening on one side. -
Pierce the Centers:
Use your needle tool to poke a hole through the center of each small disc. Ensure the hole is wide enough to slide onto your wire hoop later.
Stone-Effect Tip
Mix black pepper or dried tea leaves into your terracotta clay before rolling. This creates realistic specks that mimic natural stone or pottery textures.
Step 3: Baking and Finishing
-
Bake the Components:
Arrange your pendant circles and spacer beads on a parchment-lined baking sheet. Bake according to the manufacturer’s instructions for your specific brand of clay—usually around 275°F (135°C) for 15-30 minutes. -
Cool Down:
Allow the clay pieces to cool completely before handling them. They are fragile when hot -
Attach Jump Rings:
Using your pliers, twist open a gold jump ring. Thread it through the hole in your terracotta pendant bead and close the ring securely.
Step 4: Assembly
-
Prepare the Hoops:
Take your gold hoop earring findings. Identify the end that opens (usually a hook or a straight wire that slides out of a catch). -
Start Beading:
Thread approximately 15-20 of the tan spacer beads onto the hoop. I like to test the visual balance here to ensure they cover about a quarter of the hoop’s circumference. -
Add the Pendant:
Slide the jump ring (with the terracotta pendant attached) onto the hoop, pushing it flush against the row of tan beads. -
Finish Beading:
Add the remaining 15-20 tan spacer beads to the other side of the pendant. This sandwiches the pendant in the exact center of the beaded section. -
Check Symmetry:
Hold the earring up to check that the beads cover the bottom arc of the hoop evenly. Add or remove spacers if necessary. -
Repeat:
Repeat the entire assembly process for the second earring, ensuring the bead count matches perfectly. -
Final Secure:
If the beads are loose enough to slide excessively, you can add a tiny dab of jewelry glue to the last bead on each side to hold the arrangement in place, though gravity usually does the job well.
Enjoy styling these versatile hoops that bring a touch of artisan warmth to any outfit