When you’re searching for clay pictures ideas, what you really want is that instant spark: a small, super-makeable clay project that looks adorable in a photo. I pulled together my favorite beginner-friendly ideas that photograph beautifully and still feel totally doable at your kitchen table.
Mini Fruit Characters With Cute Faces
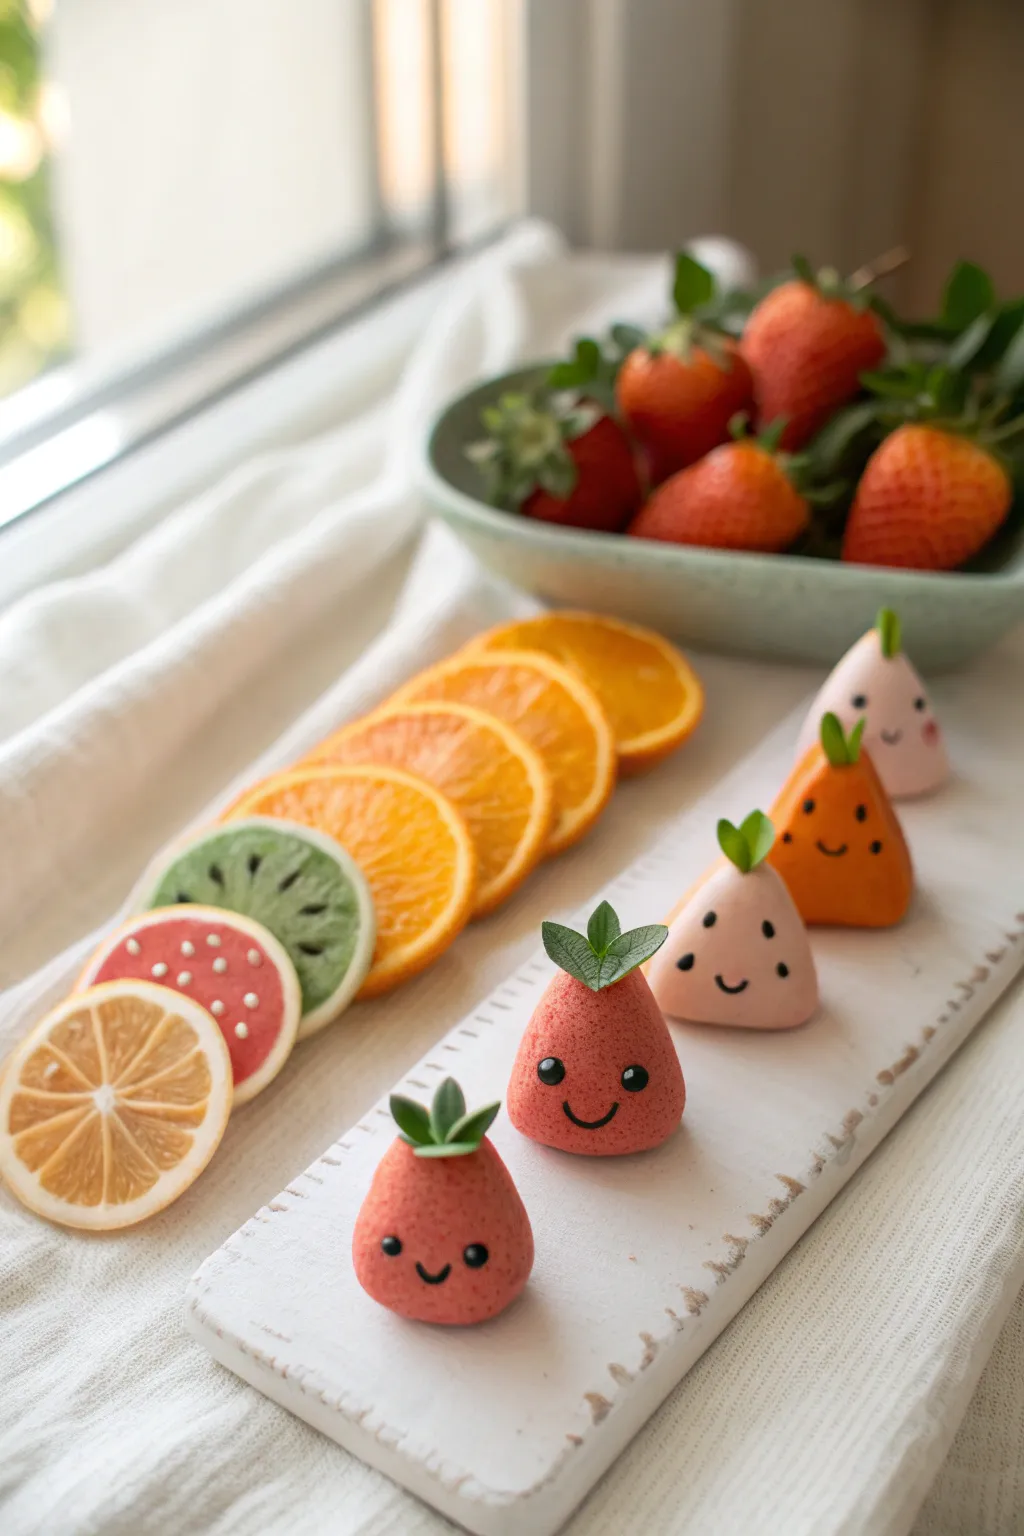
Brighten up any windowsill with this adorable set of mini fruit characters made from polymer clay. These pyramid-shaped sweets feature charming little faces and leafy tops, offering a simple yet heartwarming sculpting project.
Step-by-Step
Materials
- Polymer clay (pink, red, orange, white, pastel green, dark green, black)
- Clay roller or pasta machine
- Sharp clay blade or X-Acto knife
- Needle tool or toothpick
- Small ball stylus tool
- Soft pastel chalks (red/pink/dark orange) and a soft brush
- Texture sponge or toothbrush
- Liquid polymer clay or bake and bond (optional)
- Baking sheet and parchment paper
- Oven
Step 1: Shaping the Base Friends
-
Mix your colors:
Before starting, condition your clay well. You’ll need a soft dusty pink for the strawberries, a gentle peach or white for the watermelon base, and bright orange for the citrus friend. -
Form the basic shapes:
Roll your conditioned clay into smooth balls about the size of a large grape. Gently flatten the bottom of each ball against your work surface so it stands upright. -
Create the pyramid style:
Using your thumb and forefinger, pinch and smooth the top of the ball into a soft, rounded point. You want a shape that is somewhere between a cone and a rounded triangle, creating a chubby, stable base. -
Texture the strawberries:
For the pink strawberry characters, I find that lightly pressing a clean toothbrush or texture sponge over the surface gives them a realistic, plush fruit skin texture. Avoid the very front where the face will go if you want a smooth smile.
Clean Lines Pro Tip
Keep baby wipes or rubbing alcohol nearby. Clean your hands and tools between colors, especially before touching the light peach or pink clay, to avoid smudging dark lint or pigments onto them.
Step 2: Creating the Faces
-
Roll the eyes:
Take a tiny amount of black clay and roll unbelievably small spheres for the eyes. You’ll need two for each fruit. -
Place the eyes:
Using a needle tool or small ball stylus, make tiny divots on the front of your fruit shapes where you want the eyes to sit. Gently press the black spheres into these indentation so they don’t pop off later. -
Add the smiles:
Roll a very thin ‘snake’ of black clay. Cut tiny segments and curve them into a ‘U’ shape. Press these gently between the eyes to create happy little smiles. -
Make the seeds:
For the watermelon character (the light peach/pink one), take small bits of black clay, roll them into teardrops, and flatten them onto the body to mimic seeds. -
Detail the orange:
For the orange character, use your needle tool to poke small dots randomly around the body for a citrus peel texture, avoiding the immediate face area.
Step 3: Leafy Toppings & Finishing
-
Prepare the leaves:
Roll out a thin sheet of dark green clay. Use your X-Acto knife to cut out small teardrop or oval leaf shapes. You’ll need 2-3 small leaves per fruit. -
Detail the veins:
To add realism, gently score a center line down each leaf using your needle tool. You can curve the leaves slightly so they look organic. -
Attach the stems:
Cluster the leaves together at the pointed top of each fruit character. You can use a tiny drop of liquid clay here to ensure a strong bond during baking. -
Apply shading:
Scrape some red or dark pink pastel chalk into a powder. Using a soft brush, gently dust the bottom and the very top of the strawberry characters to give them a ripened gradient look. -
Bake carefully:
Arrangement your fruit friends on a parchment-lined baking sheet. Bake according to your customized clay package instructions (usually 275°F/135°C for 15-30 minutes). -
Cool down:
Let the figures cool completely in the oven with the door cracked open to prevent thermal shock cracks.
Character Variations
Try making different expressions by changing the mouth shape to an ‘o’ for surprise, or adding tiny pink clay ovals under the eyes for permanent blushing cheeks.
Now you have a whole bowl of cheerful fruit buddies to keep you company on your desk


Tiny Dessert Charms and Keychain Minis
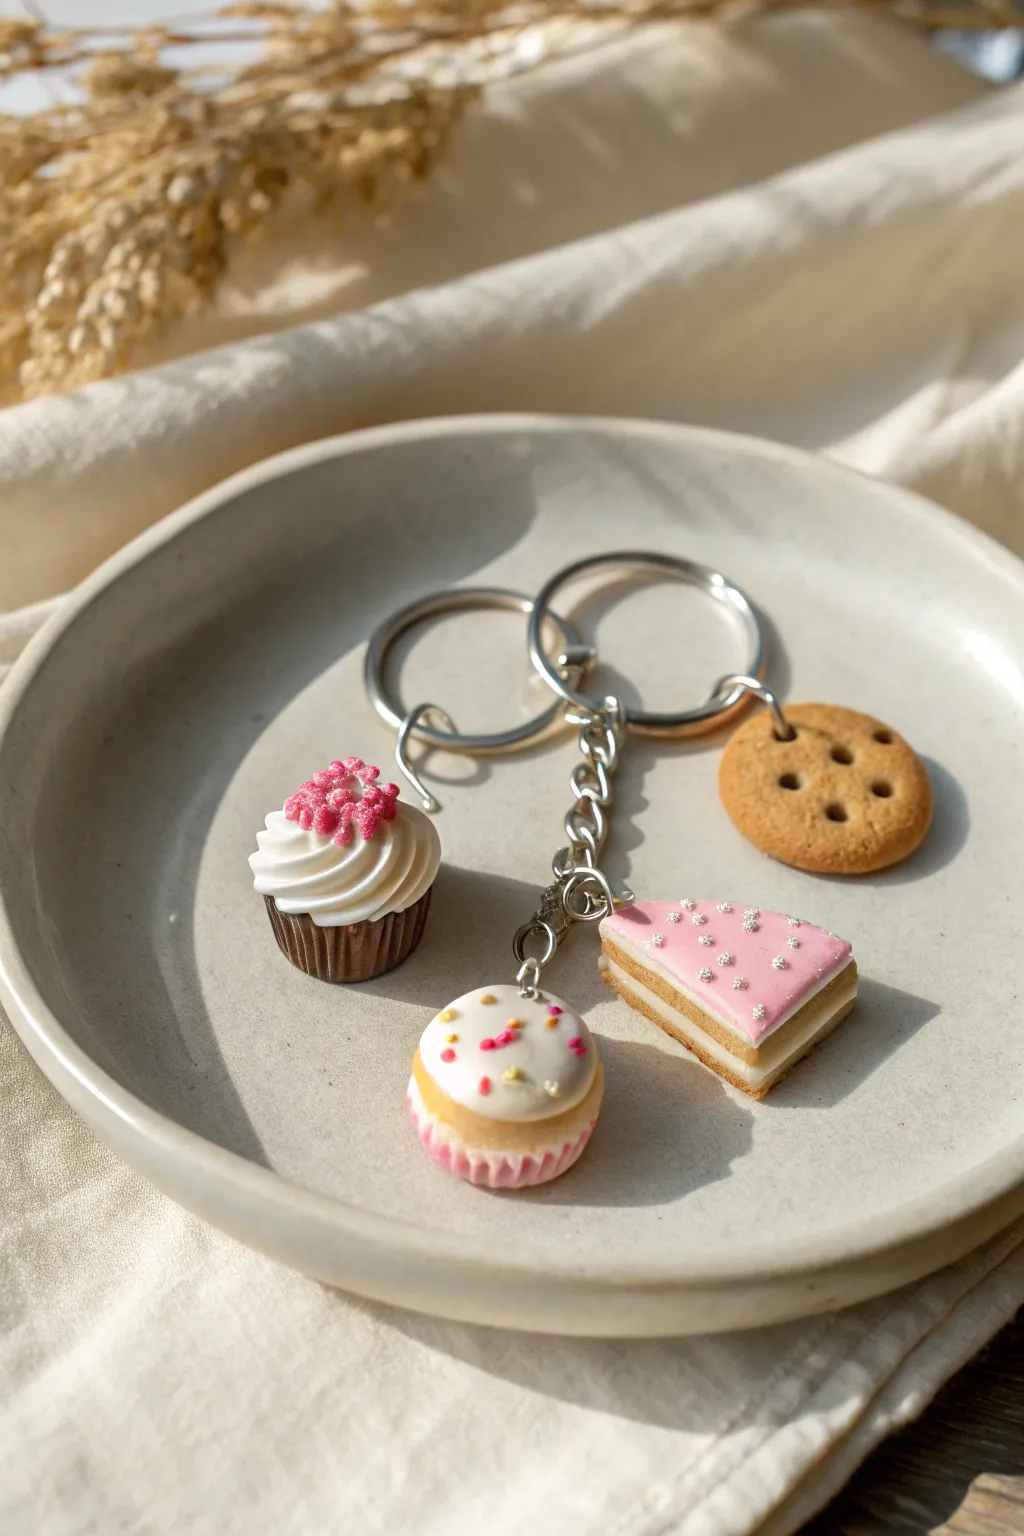
Carry a little sweetness everywhere you go with this adorable polymer clay keychain featuring four distinct miniature treats. It includes a chocolate cupcake, a pink-frosted cake slice, a vanilla confetti cupcake, and a classic cookie, all crafted with realistic textures for a charming finish.
How-To Guide
Materials
- Polymer clay (white, chocolate brown, tan/beige, translucent, pink)
- Liquid polymer clay (Translucent Liquid Sculpey or similar)
- Chalk pastels (orange, yellow ochre, brown)
- Miniature round cutters (for cookie)
- Blade or X-Acto knife
- Needs/needle tool or toothpick
- Toothbrush or texturing tool
- Eye pins (silver)
- Jump rings and keychain hardware
- Gloss glaze (optional)
Step 1: Baking & Prep
-
Conditioning the clay:
Begin by conditioning all your clay colors until they are soft and pliable. Clean your hands or wear gloves between colors to keep the white clay pristine.
Step 2: Chocolate Cupcake
-
Forming the base:
Roll a small ball of chocolate brown clay and press it into a mini cupcake mold if you have one. If not, shape a tapered cylinder by hand and use a needle tool to press vertical lines all around for the cupcake wrapper texture. -
Adding frosting:
Roll a thin snake of white clay. Twist it gently to look like piped icing and coil it onto the chocolate base, tapering to a point at the top. -
Sprinkle topping:
Take a tiny bit of pink clay and chop it into microscopic bits. Gently press these ‘sprinkles’ onto the very top swirl of the white frosting. -
Insert hardware:
Trim an eye pin to size and insert it straight down through the frosting into the base.
Sticky Situation
If your clay gets too soft and sticky to detail, pop it in the fridge for 10 minutes. The cooler temperature firms it up, making fine details easier to handle.
Step 3: Vanilla Confetti Cupcake
-
Making the pink liner:
Create the base using pink clay this time. Like the chocolate one, create vertical ridges around the side to mimic a paper liner. -
Adding the cake:
Shape a small dome of tan clay and press it onto the pink base to represent the baked cake rising out of the cup. -
Glazing the top:
Mix a small amount of white clay with liquid clay to create a thick ‘icing’ paste. Spread this over the tan dome, letting it drip slightly down the sides. -
Adding confetti:
While the liquid clay is wet, drop tiny specks of pink and yellow clay on top for sprinkles. Insert an eye pin before baking.
Bakery Aroma
Mix a tiny drop of vanilla or chocolate scented oil into the clay before sculpting. Your charms will smell like a real bakery for weeks after baking!
Step 4: Pink Cake Slice
-
Layering the cake:
Roll out a sheet of tan clay and a thinner sheet of white clay. Stack them: tan, white, tan. This creates the cake layers and filling. -
Cutting the slice:
Use your blade to cut a clean triangle shape from your stack. Texture the tan sides gently with a needle tool to simulate crumbs. -
Frosting the slice:
Roll a thin sheet of pink clay and cut a triangle to match the top. Press it gently onto the slice. Add a tiny strip of white clay along the back edge for back frosting. -
Decoration:
Press tiny silver beads or balls of grey clay onto the pink frosting for edible pearls. Insert your eye pin into the center top.
Step 5: Classic Cookie
-
Shaping the dough:
Flatten a ball of tan clay into a thick disk. Use a toothbrush to tap the surface vigorously, creating a realistic baked texture. -
Detailing the cookie:
Use a small ball tool or the end of a paintbrush to indent five dots in the center for that classic tea biscuit look. -
Shading for realism:
Here I prefer to shave some brown and orange chalk pastel into dust. Brush this dry powder over the edges and textured top to make it look golden baked. -
Hardware prep:
Carefully insert an eye pin through the side or top edge of the cookie.
Step 6: Assembly
-
Baking:
Bake all four charms according to your clay package directions (usually 275°F/135°C for 15-30 minutes). Let them cool completely. -
Securing pins:
Once cool, gently pull the eye pins out, add a dab of superglue to the shaft, and reinsert them for a permanent hold. -
Attaching to keychain:
Use jump rings to attach the cookie to the main ring and the other three charms to a short chain extension for varied lengths.
Now you have a zero-calorie, incredibly sweet accessory to brighten up your keys or bag


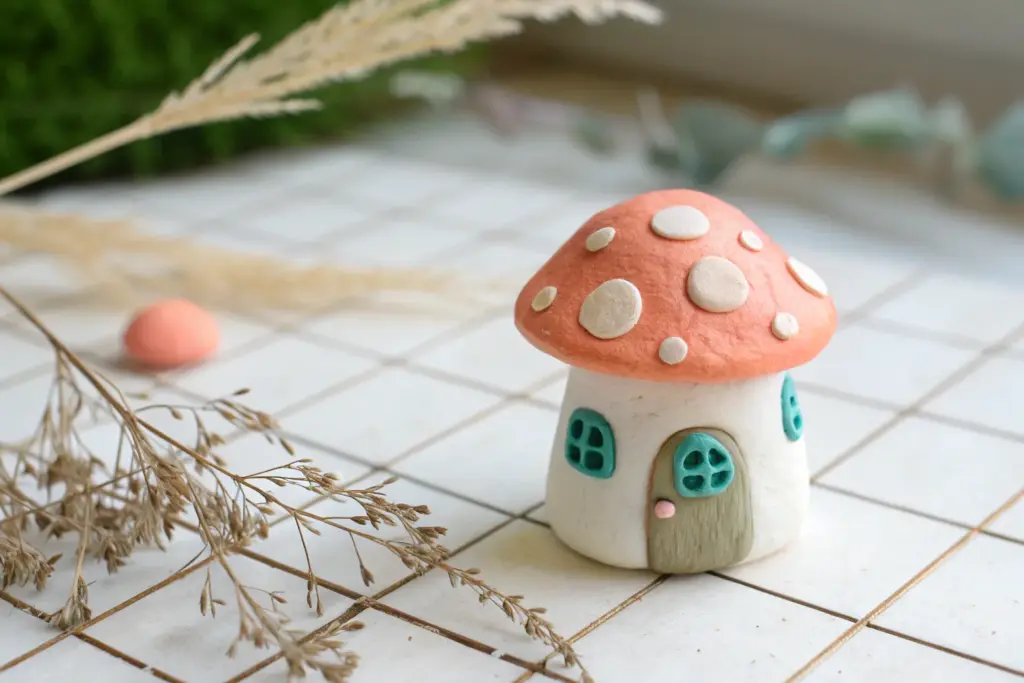
Mushroom Cottage Mini Scene
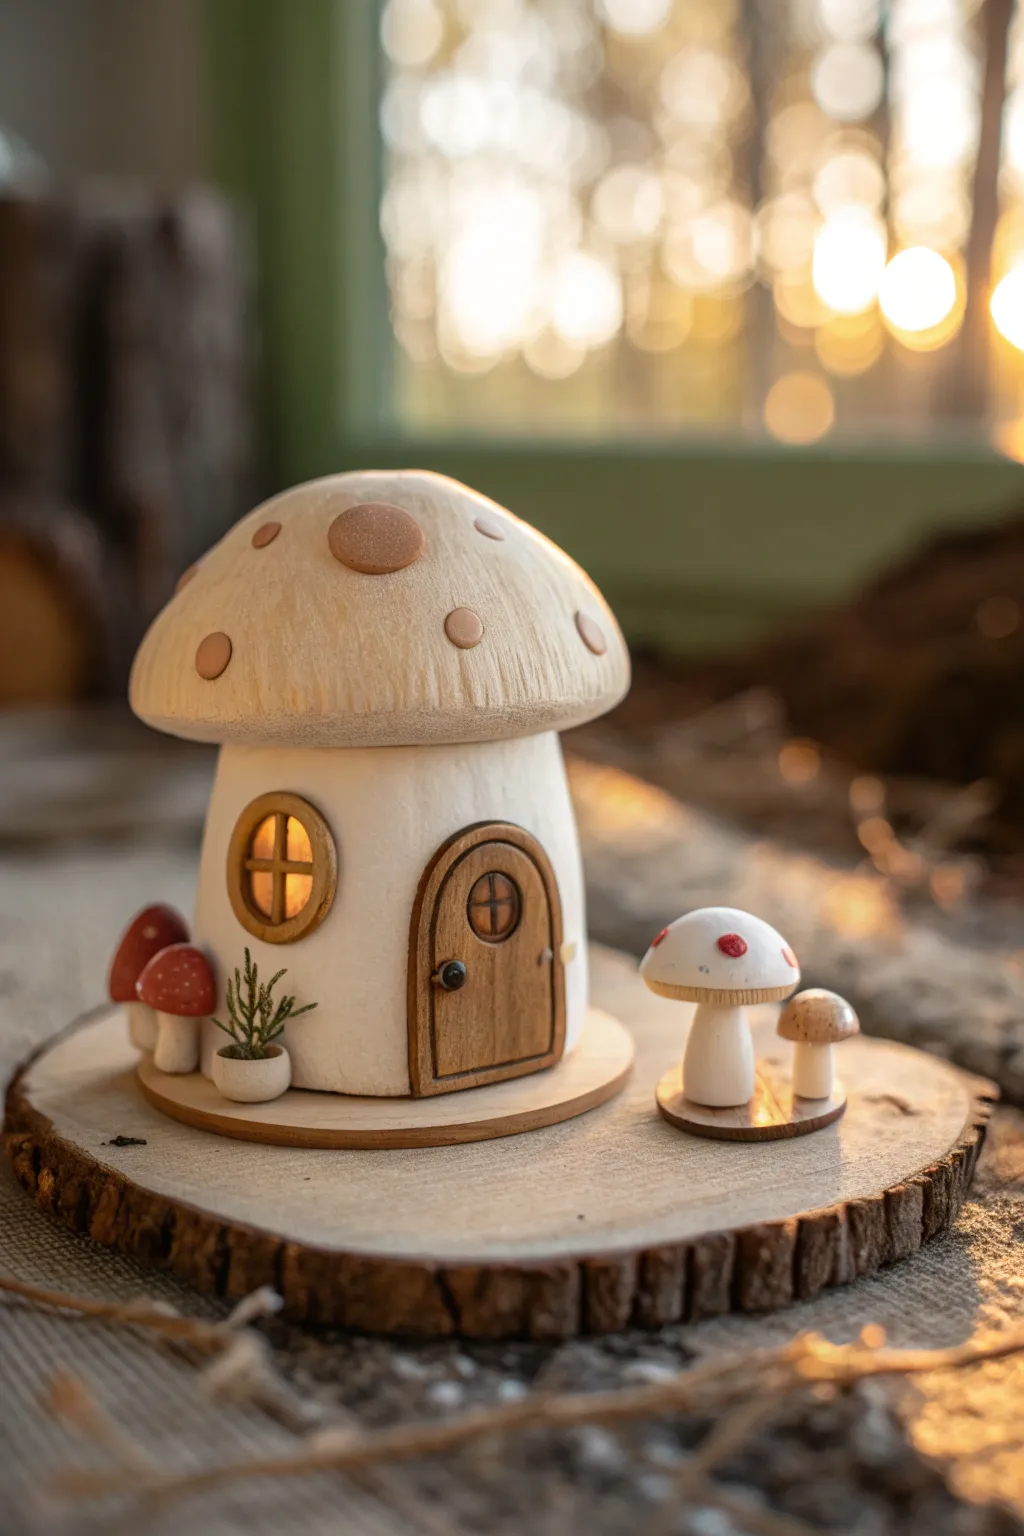
Step into a fairytale with this enchanting miniature mushroom cottage, crafted to look like carved wood and soft stone. This project features a cozy illuminated interior, rustic textures, and adorable tiny companions that bring the scene to life.
Step-by-Step Tutorial
Materials
- White or beige polymer clay
- Brown polymer clay
- Red polymer clay
- Green moss or tiny faux plant clippings
- Texturing tools (needle tool, toothbrush, wire brush)
- Small round cookie cutter or jar lid
- Rolling pin
- Liquid clay or bake-and-bond
- Acrylic paints (browns, creams, dark unmber)
- LED tea light or fairy lights
- Small wood slice base
- Gloss varnish (optional)
Step 1: Constructing the Base and Walls
-
Prepare the base:
Roll out a thin sheet of beige clay and cut a circle using your cookie cutter. This will serve as the floor of your cottage. -
Form the main structure:
Create a cylinder of white or light beige clay. It should be hollow if you plan to put a light inside, or solid if not. I prefer wrapping a clay sheet around a small glass votive holder (dust it with cornstarch first!) to keep the shape perfect. -
Carve the door opening:
Before baking or hardening, use a craft knife to cut out an arched doorway. Save the piece of clay you cut out; it’s perfect for sizing the actual door later. -
Add window details:
Cut a small circular window on the side. Roll a tiny snake of brown clay to frame it, and add a cross shape inside to mimic window panes. -
Texture the walls:
Gently press a toothbrush or a ball of aluminum foil against the exterior walls to give them a stucco or rough stone appearance.
Pro Texture Tip
For realistic ‘gill’ lines on the mushroom cap rim, use an old clean comb or a stiff wire brush. Drag it from the edge upward for uniform spacing.
Step 2: Sculpting the Mushroom Cap
-
Shape the roof:
Roll a large ball of beige clay and flatten the bottom while keeping the top domed. Hollow out the underside slightly so it sits securely on your wall cylinder. -
Create distinct textures:
Using a needle tool or a wire brush, scratch vertical lines starting from the top center down to the rim of the cap. This mimics the gills or fibrous texture of a real mushroom. -
Add the spots:
Flatten small balls of light brown clay into discs. Press these firmly onto the roof. You want them to look slightly raised, like natural warts on a toadstool. -
Check the fit:
Place the cap onto the base cylinder to ensure the proportions look right. Don’t glue it down yet if you need access to the inside.
Step 3: The Tiny Door and details
-
Make the wooden door:
Take brown clay and cut it into an arch shape that fits your doorway. Use a needle tool to score vertical lines, creating a wood plank effect. -
Frame and hardware:
Add a thin border of brown clay around the door edge. Roll a microscopic black ball for the doorknob and a tiny circle window near the top with crossbars. -
Attach the door:
Use a dab of liquid clay to secure the door into the frame. You can leave it slightly ajar for a welcoming look. -
Sculpt side mushrooms:
Create two tiny mushrooms with white stems and red caps. Attach them to the left side of the house using liquid clay. -
The planter pot:
Form a tiny white bowl shape. Fill it with a scrap of green clay or glue in tiny faux plant clippings after baking.
Troubleshooting: Sagging Roof
If the heavy mushroom cap sags while baking, support the overhang with balls of polyester batting or crumpled paper towels. They won’t burn at low clay temps.
Step 4: Finishing Touches
-
Create the companion toadstools:
On a separate small disk of brown clay or wood, sculpt a medium white mushroom with red dots and a tiny brown mushroom companion. -
Bake carefully:
Bake all clay components according to your package instructions. Tent with foil to prevent scorching the white clay. -
Antiquing wash:
Once cool, mix brown acrylic paint with water (very diluted). Brush it over the textured roof and walls, then immediately wipe it off with a paper towel. The dark paint will stay in the grooves, highlighting the texture. -
Assembly display:
Glue your finished cottage onto a rustic wood slice. Place an LED tea light inside or underneath if you left the bottom open.
Now you have a magical little dwelling ready to bring charm to your bookshelf or desk


Pumpkin Patch and Little Ghost Set
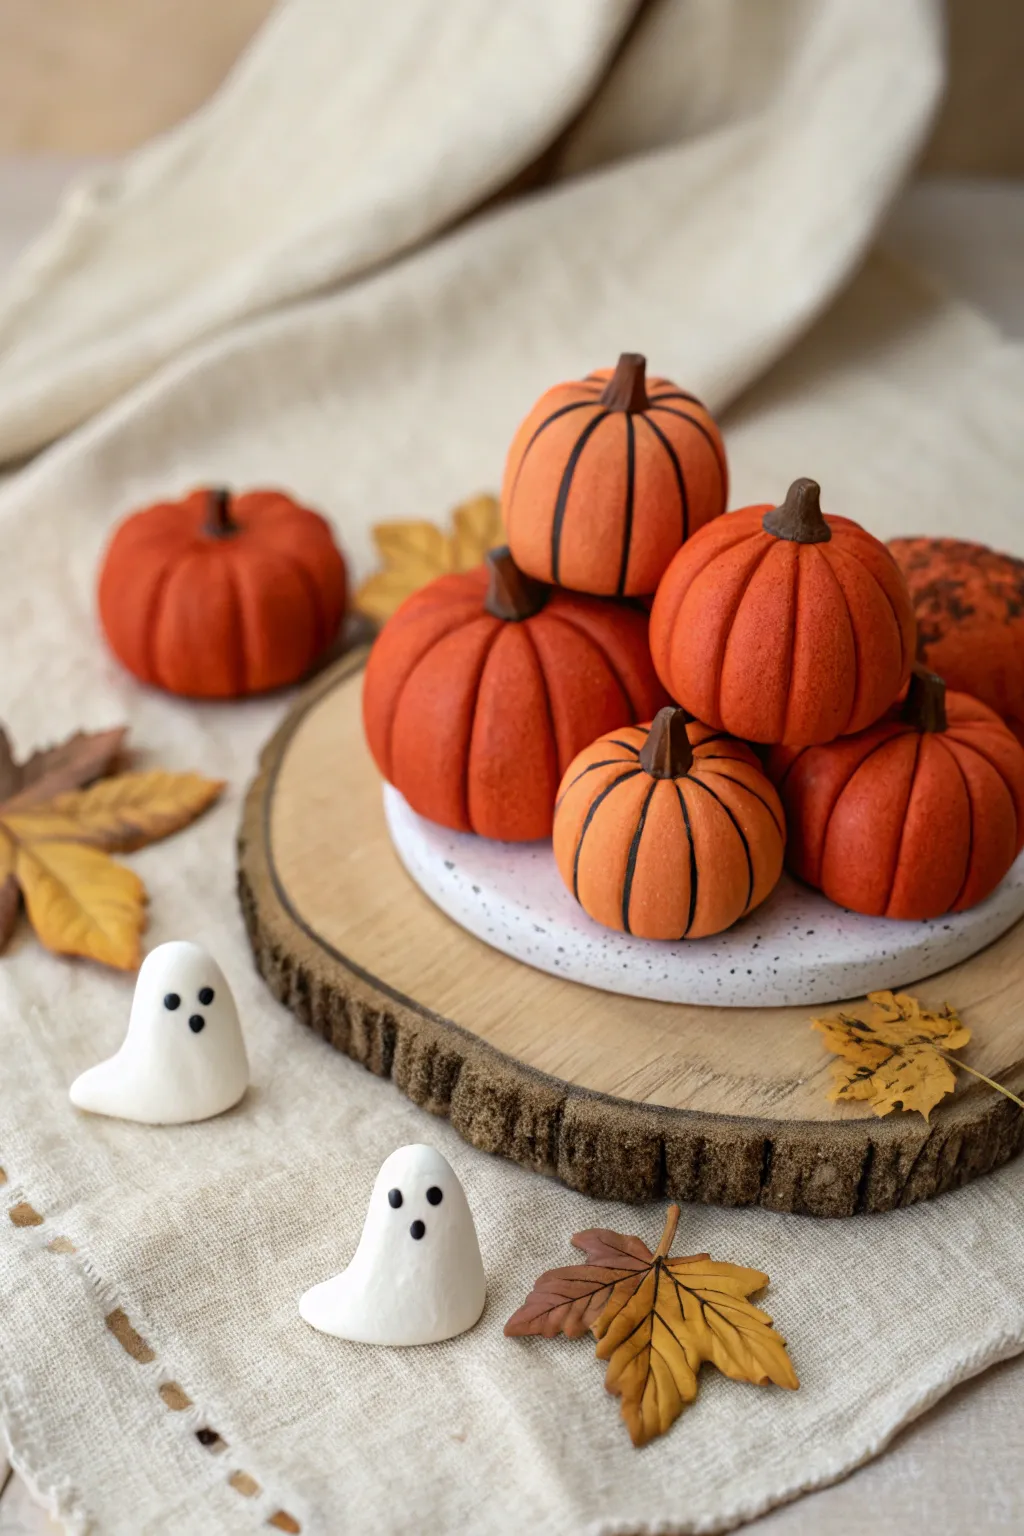
Embrace the spooky season with this adorable set involving textured pumpkins and minimalist ghosts. Perfect for a tiered tray or mantel display, these clay creations capture the essence of autumn with warm oranges and a touch of whimsy.
Step-by-Step Guide
Materials
- Polymer clay (burnt orange, black, white, brown)
- Needle tool or toothpick
- Small ball stylus tool
- Soft pastel chalks (black, dark brown)
- Small paintbrush
- Acrylic rolling pin
- Blade or craft knife
- Baking sheet and parchment paper
- Gloss glaze (optional for eyes)
Step 1: Shaping the Pumpkins
-
Prepare the base color:
Start by conditioning your burnt orange clay until it is soft and pliable. Roll various sizes of balls for your pumpkins, ensuring they range from about 1 inch to 1.5 inches in diameter for variety. -
Create the ribs:
Take a ball and use your needle tool to press vertical lines from the top center down to the bottom center. Go all the way around the sphere to create the pumpkin’s segments. -
Deepen the shape:
Use your thumb and forefinger to gently pinch each segment, softening the lines slightly so they look organic and puffy rather than sharp cuts. Press down slightly on the top and bottom to give the pumpkin a squat, realistic shape. -
Add texture:
For a more realistic skin texture, gently roll a piece of sandpaper or a textured sponge over the surface of the clay, being careful not to distort the ribs you just made. -
Form the stem indentation:
Use a medium-sized ball stylus to press a deep indentation into the very top center of each pumpkin where the stem will eventually sit.
Step 2: Stems & Detailing
-
Create stems:
Roll small snakes of dark brown clay. Cut them into 1/2 inch pieces and taper one end slightly. -
Attach stems:
Press the tapered end of the brown clay into the indentation on top of your pumpkins. You can twist the stem slightly or bend it to permit a natural, vine-ripened look. -
Shading the creases:
Scrape a little bit of dark brown or black soft pastel chalk into a powder. Pick up the powder with a dry paintbrush and dust it deep into the crevices of the pumpkin ribs to create depth and shadow. -
The striped variation:
For the specific pumpkins in the image that have black stripes, roll extremely thin snakes of black clay. Carefully lay them into the indented ribs of the pumpkin and roll the whole shape gently in your palms to embed the black lines flush with the surface.
Clean Clay Tip
Keep baby wipes nearby! Orange and black clay can stain your hands. Wipe your hands thoroughly before touching the white ghost clay to keep it pristine.
Step 3: Sculpting the Ghosts
-
Form the ghost body:
Roll a smooth ball of white clay, then shape it into a cone. Gently pull the bottom edges outward to create a trailing ‘sheet’ effect, making the base flat so it stands upright securely. -
Soften the peak:
Round off the top of the cone so the ghost has a smooth, friendly head rather than a sharp point. Give the body a slight curve or tilt for personality. -
Add facial features:
Roll tiny specks of black clay into balls for the eyes and mouth. Press them onto the face area. I prefer to use a needle tool to make tiny pilot holes first so the eyes sit flush.
Make it a Scene
Make tiny flat leaves out of yellow and brown clay. Texture them with a needle tool and bake them alongside the pumpkins to scatter around your display.
Step 4: Finishing Up
-
Bake:
Place all your pieces on a parchment-lined baking sheet. Bake according to your polymer clay package instructions (usually 275°F for 15-30 minutes depending on thickness). -
Cool down:
Let the pieces cool completely in the oven with the door slightly ajar to prevent cracking from thermal shock. -
Optional glaze:
If you want the ghost eyes to look wet, add a tiny drop of gloss glaze to just the black clay parts using a fine toothpick.
Now you have a charming harvest collection ready to brighten up any cozy corner of your home

The Complete Guide to Pottery Troubleshooting
Uncover the most common ceramic mistakes—from cracking clay to failed glazes—and learn how to fix them fast.
Blob-Style Animal Figurine Collection

These charmingly simple figurines rely on soft, rounded forms and minimal details for their appeal. The collection features smooth, pebble-like animal shapes nestled together, showcasing the gentle texture of unglazed clay.
Detailed Instructions
Materials
- Air-dry clay or polymer clay (in blush pink, beige, and terracotta/brown)
- Small rolling pin
- Modeling tools (or a toothpick)
- Small ball tool
- Fine-point black marker or black acrylic paint
- Fine detail paintbrush
- Water (for smoothing)
Step 1: Shaping the Base Forms
-
Prepare the clay:
Begin by conditioning your clay until it is soft and pliable. You will need three main colors: a soft blush pink, a creamy beige, and a deeper brown. -
Create the spheres:
Roll four separate balls of clay, each about the size of a large walnut or a golf ball. These will become the bodies of your creatures. -
Flatten the bases:
Gently tap the bottom of each sphere against your work surface. This creates a flat base so the figurines sit stably without rolling away. -
Refine the dome shape:
Use your palms to smooth the top of the balls into a soft, rounded dome shape. They should look like little gumdrops or mounds.
Smooth Operator
To get that ultra-smooth, stone-like texture, use a baby wipe to gently polish the raw clay before it dries. It removes lint and fingerprints effortlessly.
Step 2: Detailing the Pink & Beige Cats
-
Pinch the ears:
For the two pink figures and the beige one, use your thumb and forefinger to gently pinch two small triangles at the top of the dome to form ears. -
Smooth the transitions:
Dip your finger in a tiny bit of water and rub the area where the ears meet the head to ensure there are no sharp creases. The look should be very organic and integrated. -
Create eye indentations (Pink Cats):
For the pink figures, take a small ball tool and press two shallow dents where the eyes will go. Keep them wide-set for a cuter look. -
Paint the simple eyes:
Using a fine-point black marker or a tiny dot of black paint, fill in the small indentations on the pink figures to create beady black eyes. -
Draw the beige cat’s face:
For the beige creature, use your black marker or paint to draw two large circles. Inside each circle, place a small dot for the pupil to give it a surprised expression. -
Add the nose:
Place a tiny dot between the eyes on all three cat figures to serve as a minimal nose.
Step 3: Sculpting the Brown Seed Pod
-
Shape similar ears:
On the brown clay mound, pinch two small rounded ears similar to the other figures, but keep them slightly shorter and stubbier. -
Texture the surface:
Using a toothpick or a small needle tool, poke random holes across the front surface of the brown figure. -
Vary hole size:
Make some holes slightly larger by wiggling the tool, and keep others small. This mimics the look of a lotus seed pod or a textured sponge creature.
Make it Functional
Turn the seed-pod creature into an incense holder by making one of the holes slightly deeper and angled to hold an incense stick securely.
Step 4: Finishing Touches
-
Final smoothing:
Check all your figures for fingerprints. I like to lightly brush them with a damp soft brush to remove any final imperfections before drying. -
Dry the clay:
Allow the clay to dry completely according to the package instructions. If using polymer clay, bake it at the recommended temperature. -
Matte finish:
Leave the clay unvarnished to maintain that natural, earthy stone texture shown in the reference.
Arranging these little friends together in a bowl creates an instant conversation piece for your table.
Tiny Sea Creatures in a Micro World
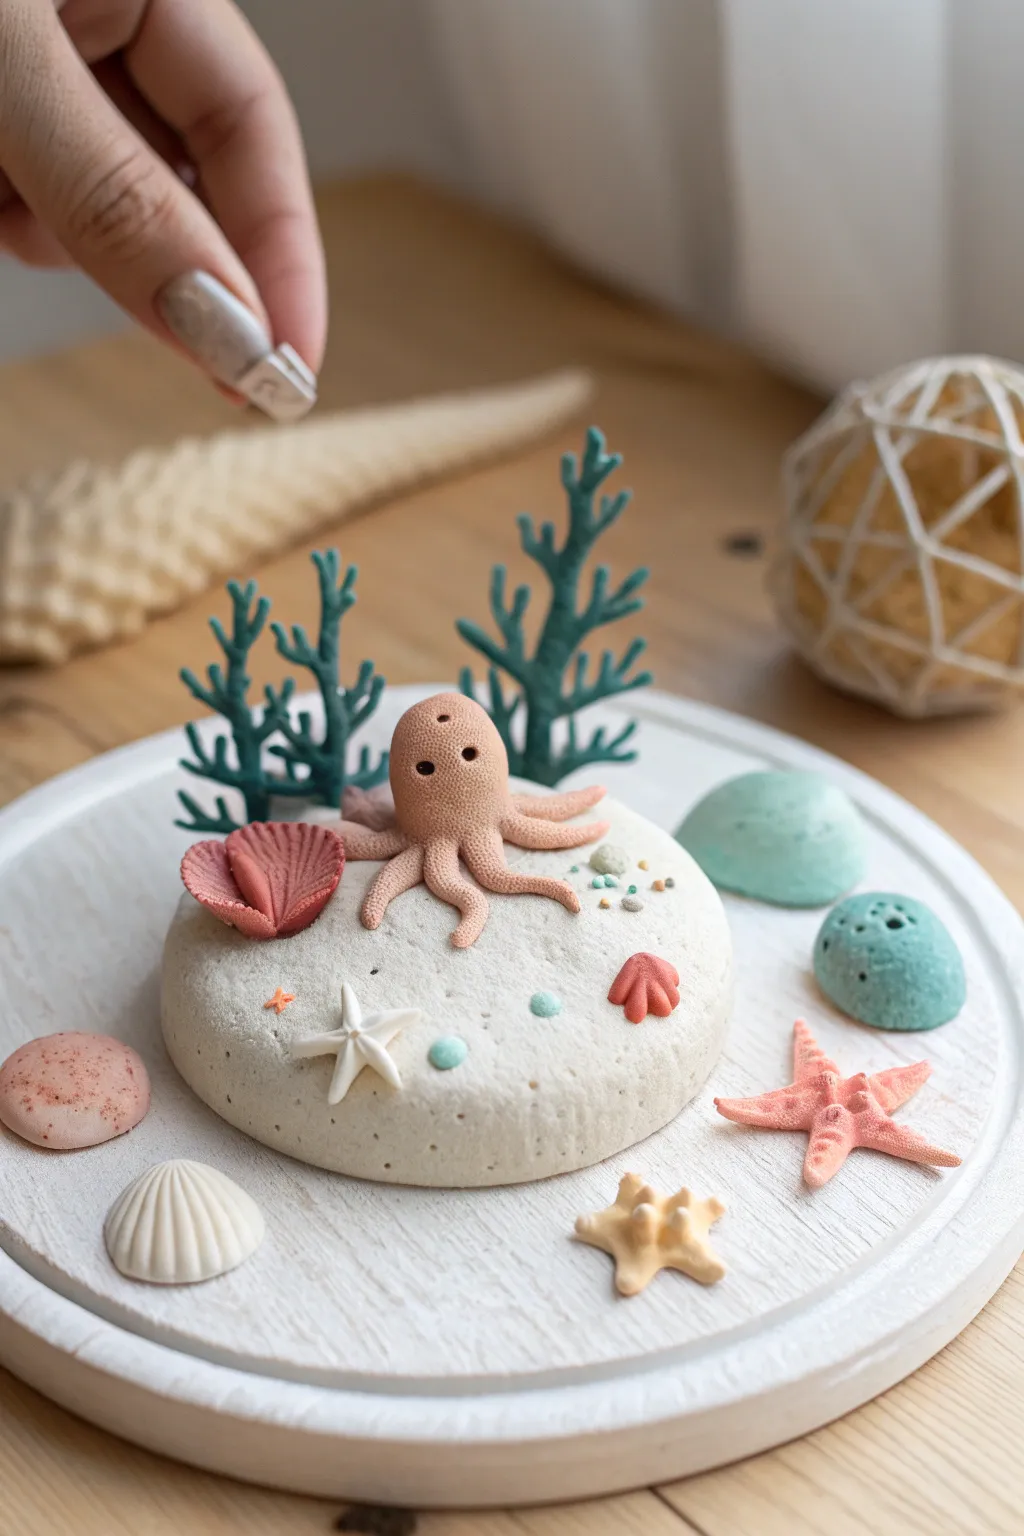
Dive into a tiny underwater world with this charming clay seascape featuring a friendly octopus perched on a textured sandbar. The combination of soft pastel colors and detailed textures makes this miniature diorama a perfect desk decoration or thoughtful handmade gift.
Step-by-Step
Materials
- White air-dry clay or polymer clay (base)
- Colored clay (peach/pink, teal, coral red, tan)
- Round wooden or ceramic coaster (base tray)
- Needle tool or toothpick
- Ball stylus tool
- Toothbrush (for texture)
- Liquid clay or PVA glue
- Small rolling pin
- Modeling knife
Step 1: Creating the Seabed Base
-
Prepare the platform:
Start with a clean, round white base; a wooden coaster painted white or a flat disc of white clay works perfectly as your foundation tray. -
Shape the sand mound:
Form a large ball of white clay (or very pale beige) and flatten it into a thick, rounded mound. Place this centrally on your tray. -
Texturizing the sand:
Gently press a clean toothbrush over the entire surface of the clay mound to create a realistic, grainy sand texture. -
Adding subtle details:
Use a small ball stylus to press tiny random dimples into the sand for extra depth, suggesting where creatures might burrow.
Floppy Coral?
If thin coral branches keep drooping, insert a small piece of wire inside the clay stem for support, or bake the coral separately before attaching it to the base.
Step 2: Sculpting the Residents
-
Form the octopus head:
Roll a small ball of peach or light pink clay into a smooth egg shape for the octopus’ body. -
Create the tentacles:
Roll 6-8 thin tapered snakes of the same clay. Attach them under the body, splaying them out naturally along the sand texture. -
Detail the octopus:
Use a needle tool or the tip of a small straw to create the eyes. Using the needle tool, stipulate tiny texture dots all over the octopus skin for a ‘bumpy’ look. -
Sculpt the coral branches:
Roll thin ropes of teal or dark green clay. Branch them out like antlers or trees, fusing the clay pieces together firmly. -
Plant the coral:
Insert the coral structures behind the octopus. I find it helps to pre-poke a hole in the base with a tool before inserting the delicate coral stems.
Level It Up
Once fully dry or baked, brush a little pearlescent mica powder or glossy varnish over the shells and octopus to make them look wet and shiny.
Step 3: Crafting Shells and Sea Life
-
Make the fan shell:
Flatten a small piece of coral-red clay into a fan shape. Use a knife tool to score deep ridges radiating from the bottom center to the top edge. -
Shape sea urchins:
Create small domes from teal or mint clay. Use a needle tool to poke many holes into the surface to mimic the texture of a sea urchin skeleton. -
Form the starfish:
Take pink or orange clay and shape a five-pointed star. Gently curve the arms so it looks like it’s crawling, rather than lying flat. -
Texture the starfish:
Use the needle tool to stipple the surface of the starfish, giving it a rough, organic skin texture. -
Create scattered pebbles:
Roll tiny spheres of various pastel clay scraps to act as sea glass or small pebbles.
Step 4: Assembly and Finishing
-
Arrange the scene:
Place your crafted shells, urchins, and starfish around the main mound and on the flat tray base. -
Secure the pieces:
If using air-dry clay, a dab of PVA glue will hold pieces in place. For polymer clay, a drop of liquid clay acts as adhesive. -
Final drying or baking:
Allow your air-dry piece to sit for 24-48 hours. If using polymer clay, bake according to the manufacturer’s instructions (usually 275°F/135°C for 15-30 minutes).
Enjoy displaying your peaceful little slice of the ocean on your desk or shelf


What Really Happens Inside the Kiln
Learn how time and temperature work together inside the kiln to transform clay into durable ceramic.
Simple Trinket Dish With Raised Icons
This charming, off-white clay dish features delicate impressed icons, elevated with a touch of gold paint for a subtle shine. Its organic, hand-shaped rim and starry motifs make it the perfect bedside keeper for your favorite rings.
Detailed Instructions
Materials
- Air-dry clay (white or cream)
- Rolling pin
- Small bowl or round cutter (approx. 4-5 inches)
- Craft knife
- Small rubber stamps (hearts, stars, flowers)
- Fine grit sandpaper
- Gold acrylic paint or gold leaf pen
- Fine detail paintbrush (size 0 or 00)
- Small sponge
- Bowl of water
- Clear varnish or sealant (glossy or matte)
Step 1: Shaping the Base
-
Prepare the clay:
Begin by taking a handful of air-dry clay and kneading it in your hands until it becomes soft, pliable, and free of air bubbles. -
Roll it out:
Place the clay on a smooth surface or a silicone mat. Roll it out to an even thickness of about 1/4 inch (6mm). Try to keep the thickness consistent so it dries evenly. -
Cut the circle:
Place your small bowl upside down on the clay as a template, or use a large round cookie cutter. Cut around the edge with a craft knife to create a perfect circle. -
Smooth the edges:
Dip your finger in a little water and run it along the cut edge of the clay circle to smooth out any roughness or sharp bits left by the knife. -
Create the curve:
Gently lift the edges of the circle upward with your fingertips to create a shallow rim. I like to pinch the clay very slightly as I go around to give it that organic, handmade look visible in the photo.
Step 2: Adding the Designs
-
Plan your layout:
Before pressing into the clay, lightly visualize where you want your icons. The example uses a central heart, scattered stars, smaller hearts, and a floral wreath accent. -
Impress the large heart:
Press a heart-shaped stamp firmly into the center-bottom area. Don’t press all the way through; you just want a clean indentation. If you don’t have a stamp, you can hand-carve the outline with a needle tool. -
Add texture dots:
Using a dull pencil tip or a dotting tool, press small dots inside the main heart and around the rim area to mimic the stippled texture shown. -
Stamp the stars and mini hearts:
Randomly press your star and smaller heart stamps around the rest of the dish. Vary the pressure slightly so some are deeper than others. -
Refine the impressions:
Check your stamped areas. If the clay pushed up around the edges of the stamps, gently smooth those raised ridges down with a damp finger or soft brush.
Clean Impressions
Dust your rubber stamps with a tiny bit of cornstarch before pressing them into the clay. This prevents sticking and ensures your icons come out with sharp, crisp edges.
Step 3: Finishing and Gilding
-
Let it dry:
Allow the dish to dry completely in a safe spot for 24-48 hours. It should turn from greyish to a bone-white color when fully dry. -
Sand for smoothness:
Once fully dry, take your fine-grit sandpaper and very gently sand the rim and the surface to remove any fingerprints or imperfections. -
Clean dust:
Wipe the dish down with a slightly damp sponge or cloth to remove all sanding dust before painting. -
Paint the impressions:
Dip your fine detail brush into the gold paint. Carefully fill in the indented lines of your hearts, stars, and dots. It helps to have very little paint on the brush to prevent it from spilling over the edges. -
Clean up stray paint:
If you get gold paint on the flat surface, quickly wipe it away with a damp Q-tip before it dries. Alternatively, you can gently sand it off after it dries. -
Paint a subtle rim:
Run a very dry brush with a tiny amount of gold paint swiftly along the very top edge of the rim for a distressed, golden border. -
Seal the piece:
Apply a coat of clear varnish or sealant over the entire dish to protect the clay and the paint from moisture and wear.
Make it Marbled
Knead a very small drop of brown or beige acrylic paint into your white clay but stop before it’s fully blended. This creates a subtle stone-like marble effect.
Place your jewelry inside your new creation and enjoy the personalized sparkle on your nightstand
Ring Holder Sculpture That Photographs Well
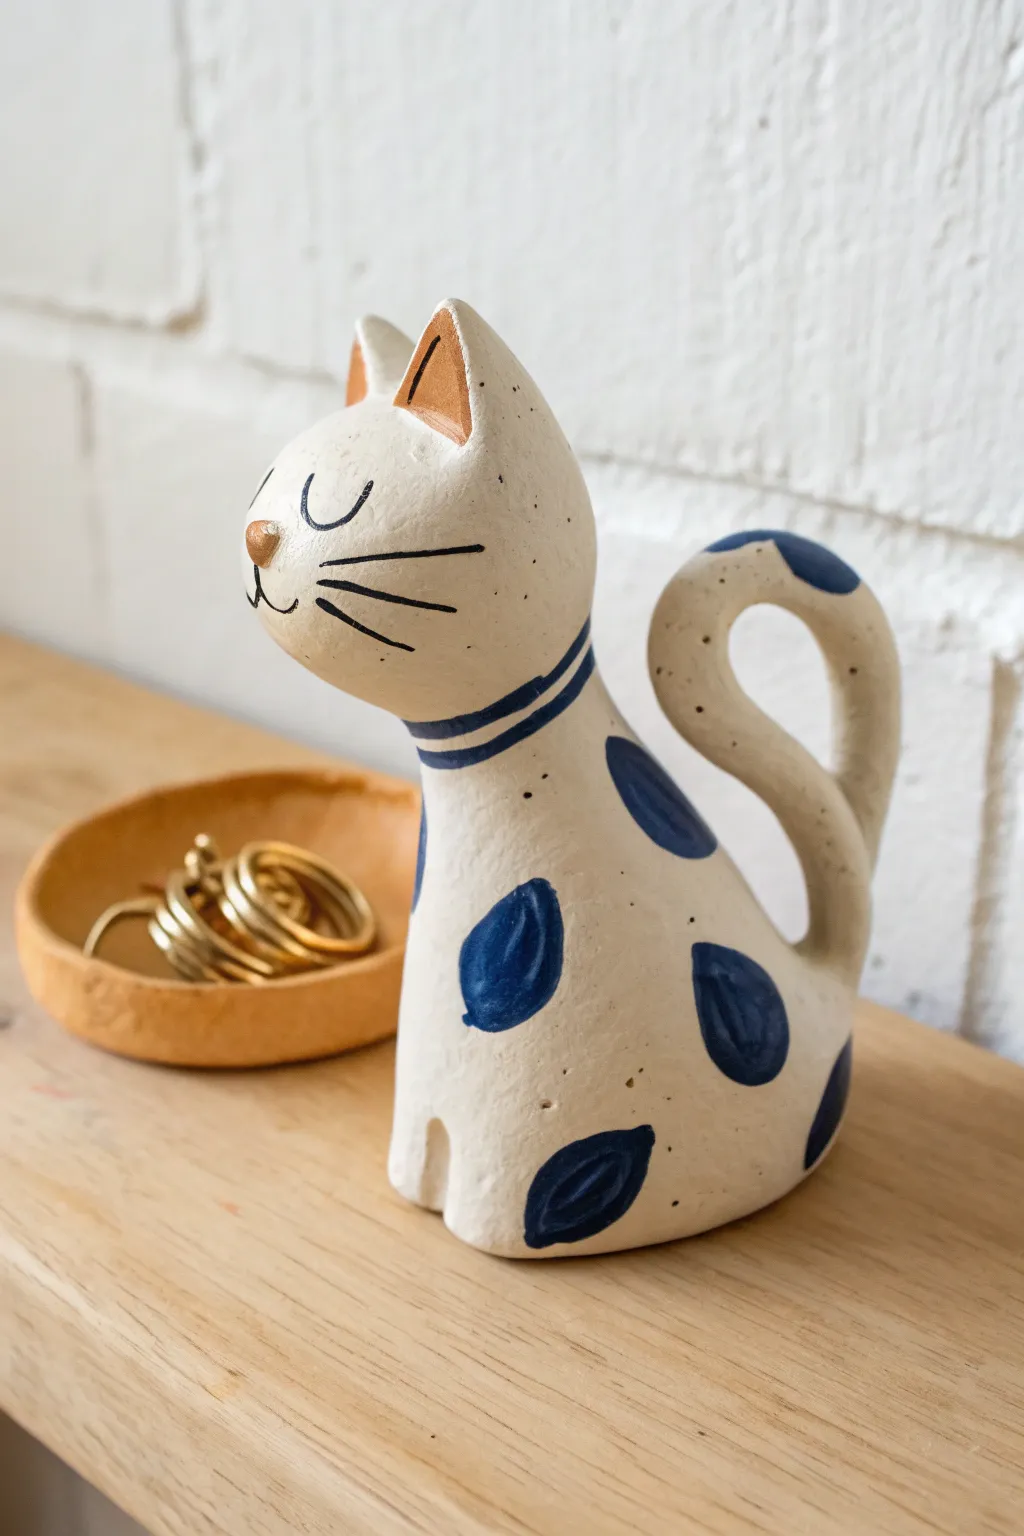
This charming feline sculpture doubles as a functional ring holder, featuring a whimsical long tail perfect for stacking your favorite bands. Its rustic, matte finish and simple blue-spotted design give it a timeless, handmade ceramic feel without needing a kiln.
How-To Guide
Materials
- Air-dry clay (stone or white variety)
- Small cup of water
- Clay sculpting tools (needle tool, smoother)
- Acrylic paints (Cream/Off-white, Navy Blue, Terracotta/Orange, Gold)
- Fine detail paintbrushes
- Matte varnish or sealant
- Sandpaper (fine grit)
Step 1: Sculpting the Body
-
Form the base:
Start with a fist-sized ball of clay. Knead it well to remove air bubbles, then roll it into a thick pear shape. This will be the cat’s body. -
Create the base stability:
Tap the bottom, wider part of your pear shape firmly against your work surface to create a flat, stable base so the cat sits upright without wobbling. -
Attach the head:
Roll a smaller ball of clay for the head. Score (scratch) the top of the body and the bottom of the head, wipe with a little water, and press them together firmly. -
Blend the neck:
Using your thumb or a smoothing tool, drag clay across the seam between the head and body to merge them into one continuous form. Smooth it out with a damp finger. -
Sculpt the ears:
Pinch two small triangles of clay. Score and attach them to the top of the head. Gently pinch and smooth the seams so they look integrated rather than just stuck on. -
Form the tail ring holder:
Roll a long, tapered coil of clay. This needs to be thick enough to support rings but thin enough for them to slide onto. Curve it into an ‘S’ shape or a gentle question mark shape. -
Attach the tail:
Score and slip the back of the cat’s body and the base of the tail. Press the tail firmly onto the lower back. I find it helpful to blend the clay upwards from the tail into the back for extra strength. -
Add the front legs:
Instead of separate legs, use a modeling tool to carve a subtle vertical line at the bottom front of the chest. This suggests two front paws sitting together.
Tail Drooping?
If the tail sags while drying, prop it up with a crumbled piece of foil or a small object until the clay hardens enough to hold its own weight.
Step 2: Refining and Painting
-
Smooth and dry:
Do a final pass over the entire sculpture with a slightly damp sponge to remove fingerprints. Let the piece dry completely for 24-48 hours until it is hard and room temperature to the touch. -
Sand imperfections:
Once dry, gently sand any rough rough patches or bumps with fine-grit sandpaper to get a smooth, paint-ready surface. -
Apply base coat:
Paint the entire sculpture with a cream or off-white acrylic paint. You may need two coats for full, opaque coverage. -
Paint the spots:
Using navy blue paint, add large, organic oval spots to the cat’s body. Don’t worry about making them perfect circles; the hand-painted look adds character. -
Add neck detail:
Paint two thin blue stripes around the neck to resemble a collar. -
Detail the face:
Using a very fine brush and black or dark grey paint, carefully paint two curved lines for closed eyes, a small mouth, and three whiskers on each cheek. -
Paint the ears and nose:
Fill in the inner triangles of the ears with a terracotta or orange paint. Paint a small, cute nose in gold or terracotta. -
Speckle effect:
Dilute a tiny bit of dark grey or brown paint with water. Load an old toothbrush or stiff brush and flick the bristles to spray fine speckles over the cat, giving it a ceramic stoneware look. -
Seal the piece:
Finish with a coat of matte varnish to protect the paint and give it a finished, professional sheen.
Faux Ceramic Look
Mix a pinch of baking soda into your cream base paint. This adds a slight gritty texture that mimics unglazed pottery.
Place your new spotted friend on your vanity to keep your rings safe and stylishly displayed

TRACK YOUR CERAMIC JOURNEY
Capture glaze tests, firing details, and creative progress—all in one simple printable. Make your projects easier to repeat and improve.
Mini Planter With a Smiley Face
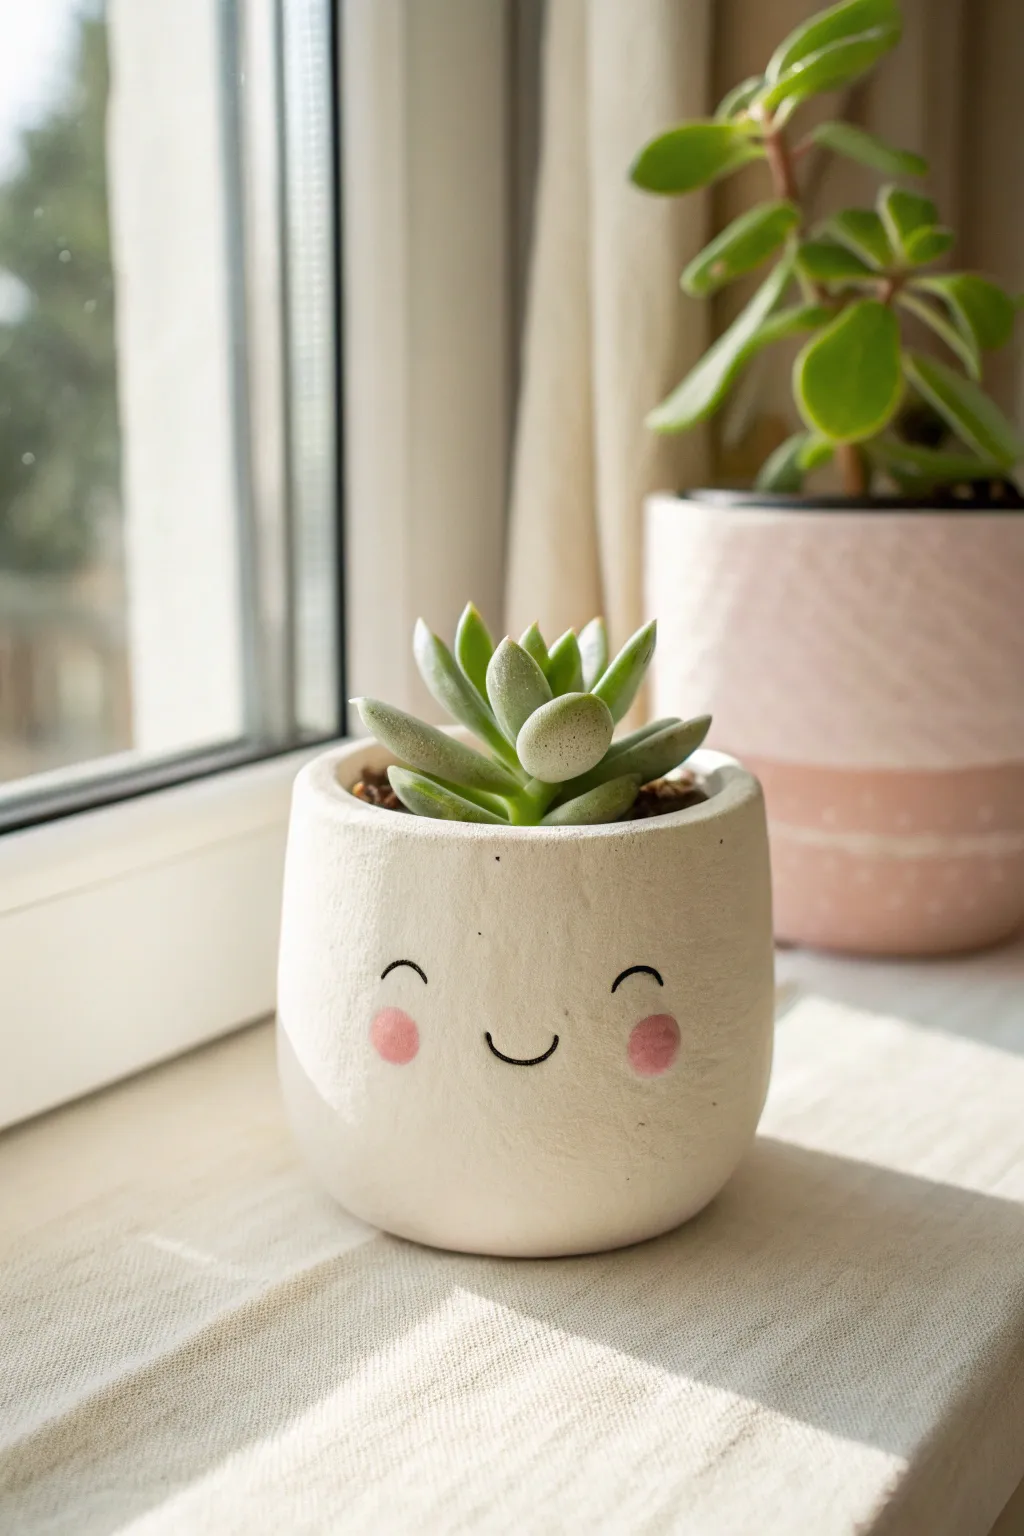
Bring a touch of cheer to your windowsill with this minimalist clay planter project. Its smooth white finish and adorable, understated expression make it the perfect home for a tiny succulent friend.
Detailed Instructions
Materials
- Air-dry clay or polymer clay (white)
- Small rolling pin
- Clay knife or craft blade
- Small bowl or cup (specifically for use as a mold)
- Sandpaper (fine grit)
- Acrylic paint (black and soft pink)
- Very fine detail paintbrush
- Small round sponge dauber or Q-tip
- Matte spray sealant or specialized clay varnish
- Water (for smoothing)
Step 1: Forming the Pot Base
-
Prepare the clay:
Start by conditioning your clay. If using polymer, knead it until soft. If using air-dry clay, ensure it’s moist but not sticky. Roll it into a smooth ball about the size of a tennis ball. -
Create the slab:
Roll out the clay on a clean, flat surface to a thickness of about 1/4 inch or slightly thicker. You want enough heft to support the soil later. -
Cut the base:
Using your knife, cut a circle for the bottom of the pot. You can trace around the bottom of your mold (the cup or bowl) to get a perfect circle. -
Build the walls:
Cut a long rectangular strip from the remaining rolled clay. The width of the strip will determine the height of your pot, and the length should be enough to wrap around the circumference of your base circle. -
Assemble the cylinder:
Wrap the strip around the circular base. Carefully join the ends of the strip together, pressing the seam firmly. Do the same where the wall meets the base. -
Smooth the seams:
Dip your finger in a little water (for air-dry clay) or baby oil (for polymer) and rub over the seams until they disappear completely. I find that spending extra time here makes the final pot look much more professional. -
Refine the shape:
Gently shape the pot with your hands to round out the bottom edge slightly, giving it that soft, cup-like appearance seen in the photo. Smooth the top rim so it is flat and even. -
Add drainage (optional):
If you plan to plant directly into the pot, use a straw to poke a small drainage hole in the center of the bottom.
Smoother Surfaces
Before drying, run a slightly damp sponge over air-dry clay to remove fingerprints. For polymer, use a brush with baby oil to smooth imperfections.
Step 2: Finishing and Painting
-
Dry or Bake:
Follow the instructions for your specific clay. Bake polymer clay according to the package, or let air-dry clay sit for 24-48 hours until completely hardened and white. -
Sand for smoothness:
Once fully cured, take your fine-grit sandpaper and lightly buff the surface. Focus on the rim and the main body to get that matte, stone-like texture. -
Dust off:
Wipe the pot down with a slightly damp cloth to remove all sanding dust before painting. -
Paint the eyes:
Using the fine detail brush and black acrylic paint, paint two small arches for the eyes. Keep them spaced widely apart to achieve the ‘kawaii’ look. -
Paint the smile:
Paint a small, simple ‘u’ shape directly between the eyes, but slightly lower. Keep the line thin and steady. -
Add the cheeks:
Dip your sponge dauber or Q-tip into the soft pink paint. Dab off the excess on a paper towel first, then gently press onto the clay just below and outside the eyes to create soft, round rosy cheeks. -
Seal the work:
Once the paint is completely dry, spray the entire pot with a matte sealant. This is crucial to protect the clay from moisture when you water your plant.
Textured Twist
Before baking/drying, gently press a piece of linen or coarse fabric against the clay surface to give the pot a subtle, fabric-like woven texture.
Once sealed and dry, your cheerful little pot is ready for a scoop of soil and its new green occupant
Clay Photo Holder With a Cute Topper
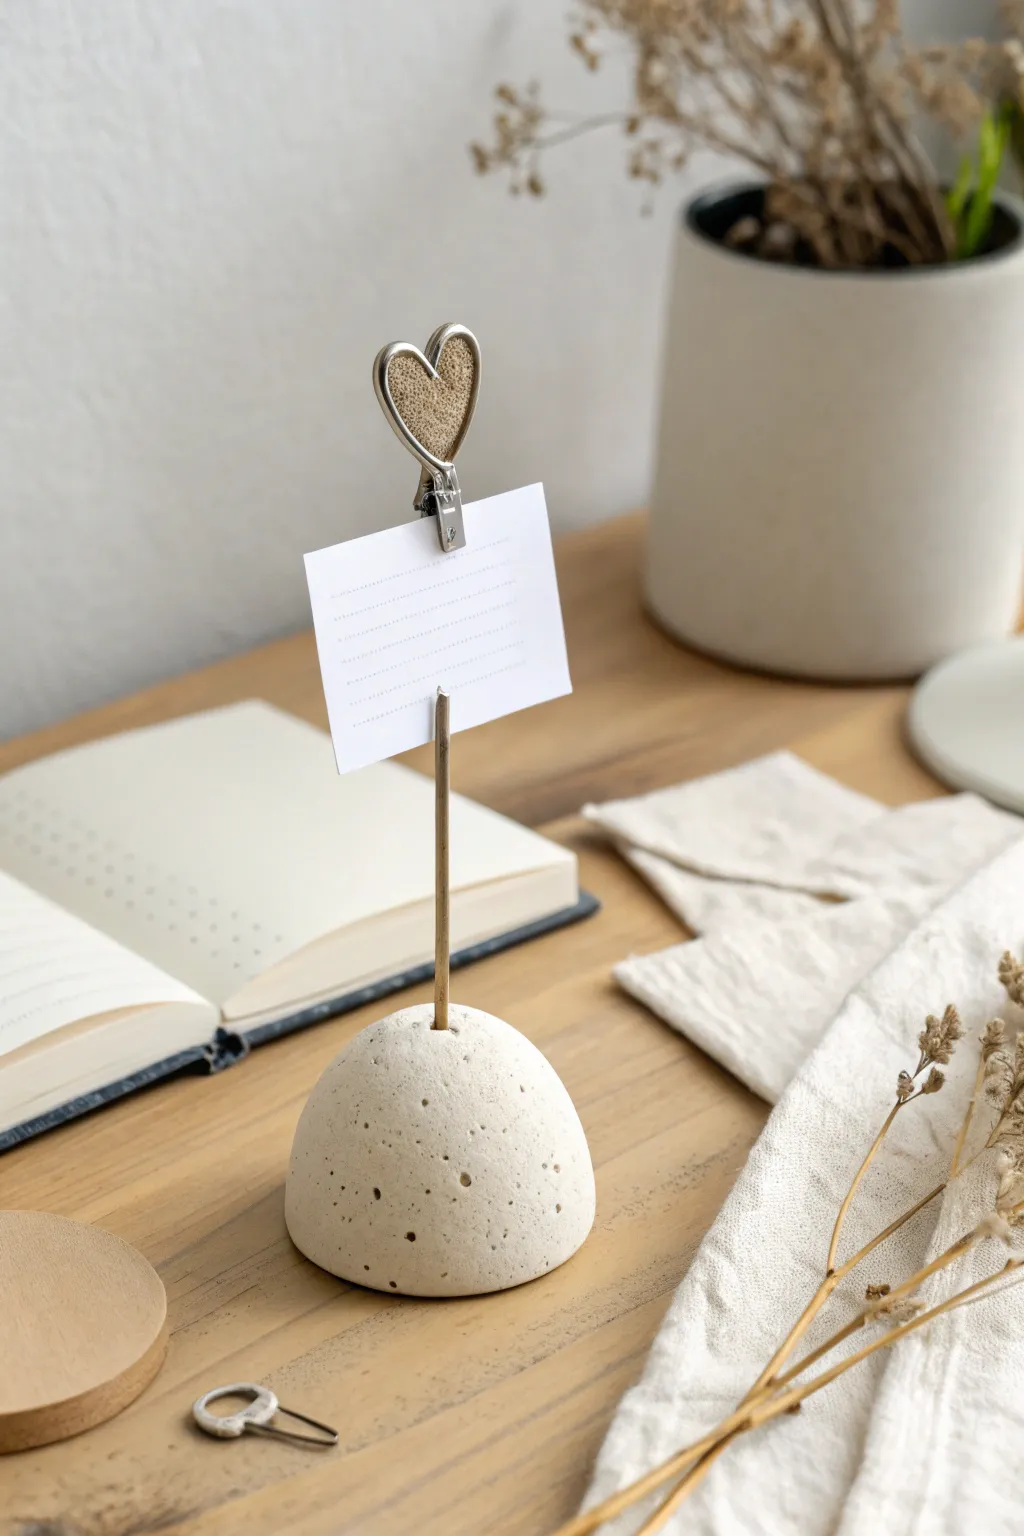
This minimalist photo holder combines the industrial chic of concrete-look clay with a sweet metallic touch. Its sturdy dome base and delicate heart topper make it the perfect functional accent for holding notes, instant photos, or place cards.
Step-by-Step Tutorial
Materials
- Air-dry clay (white)
- Black pepper or dried coffee grounds (for speckling)
- Brass or gold metal rod (approx. 2-3mm diameter)
- Strong wire cutters
- Alligator clip (flat, toothless preferred)
- Strong craft glue (E6000) or 2-part epoxy
- Silver craft wire (flexible)
- Burlap or cork scrap (small piece)
- Sandpaper (fine grit)
- Clear sealant (matte finish)
Step 1: Crafting the Base
-
Prepare the Clay:
Start by conditioning a ball of white air-dry clay roughly the size of a tangerine until it is soft and pliable. -
Add Texture:
To achieve the stone-like speckled effect seen in the photo, sprinkle a pinch of coarse black pepper or dried coffee grounds onto the clay. -
Knead the Inclusions:
Fold and knead the clay repeatedly to distribute the specks evenly throughout the ball; add more pepper if you want a denser texture. -
Shape the Base:
Roll the clay into a smooth sphere between your palms to remove any major cracks. -
Form the Dome:
Press the sphere firmly onto your work surface to flatten the bottom, creating a stable semi-circle or dome shape. -
Insert the Rod:
Cut your metal rod to your desired height (about 4-5 inches is standard). Insert it straight down into the center of the dome while the clay is wet. -
Secure the Hole:
You can leave the rod in to dry, or gently remove it to let the clay shrink slightly—I prefer leaving it in but checking it occasionally to ensure it doesn’t get stuck if the clay shrinks too tight. -
Smooth Imperfections:
Dip your finger in a little water and smooth out the surface of the dome, blending any fingerprints or uneven spots.
Uneven Drying?
If the bottom of your dome curls up while drying, gently sand it flat later, or dry it on a wire rack so air hits all sides equally.
Step 2: Creating the Topper
-
Prepare the Clip:
Take your alligator clip and ensure it’s clean and ready for assembly. -
Shape the Wire Heart:
Using silver craft wire, bend a small length into a simple heart shape that is slightly larger than the top of your alligator clip. -
Create the Texture Insert:
Cut a tiny heart shape from a scrap of burlap or thin cork that fits perfectly inside your wire heart frame. -
Assemble the Heart:
Glue the burlap insert onto the back of the wire frame, or sandwich it if you made a double-sided wire frame. -
Attach to Clip:
Glue the finished heart motif securely to the front handle of the alligator clip using strong craft epoxy. -
Mount the Clip:
Once the rod in the base is sturdy (and the glue has set on the heart), glue the base of the alligator clip to the very top of the metal rod.
Step 3: Finishing Touches
-
Sand the Base:
Once the clay is fully cured (usually 24-48 hours), lightly sand the bottom and sides to smooth out any rough texture. -
Seal the Project:
Apply a coat of matte clear sealant to the clay base to protect it from moisture and keep the pepper specks from falling out. -
Final Test:
Insert a small card into the clip to test the balance and enjoy your new custom display.
Add a Color Pop
Paint the bottom third of the dome in gold or a pastel color for a dipped look that contrasts with the raw stone texture.
This charming little stand brings a handmade warmth to any desk or shelf setup
Coil-Trim Picture Frame Border
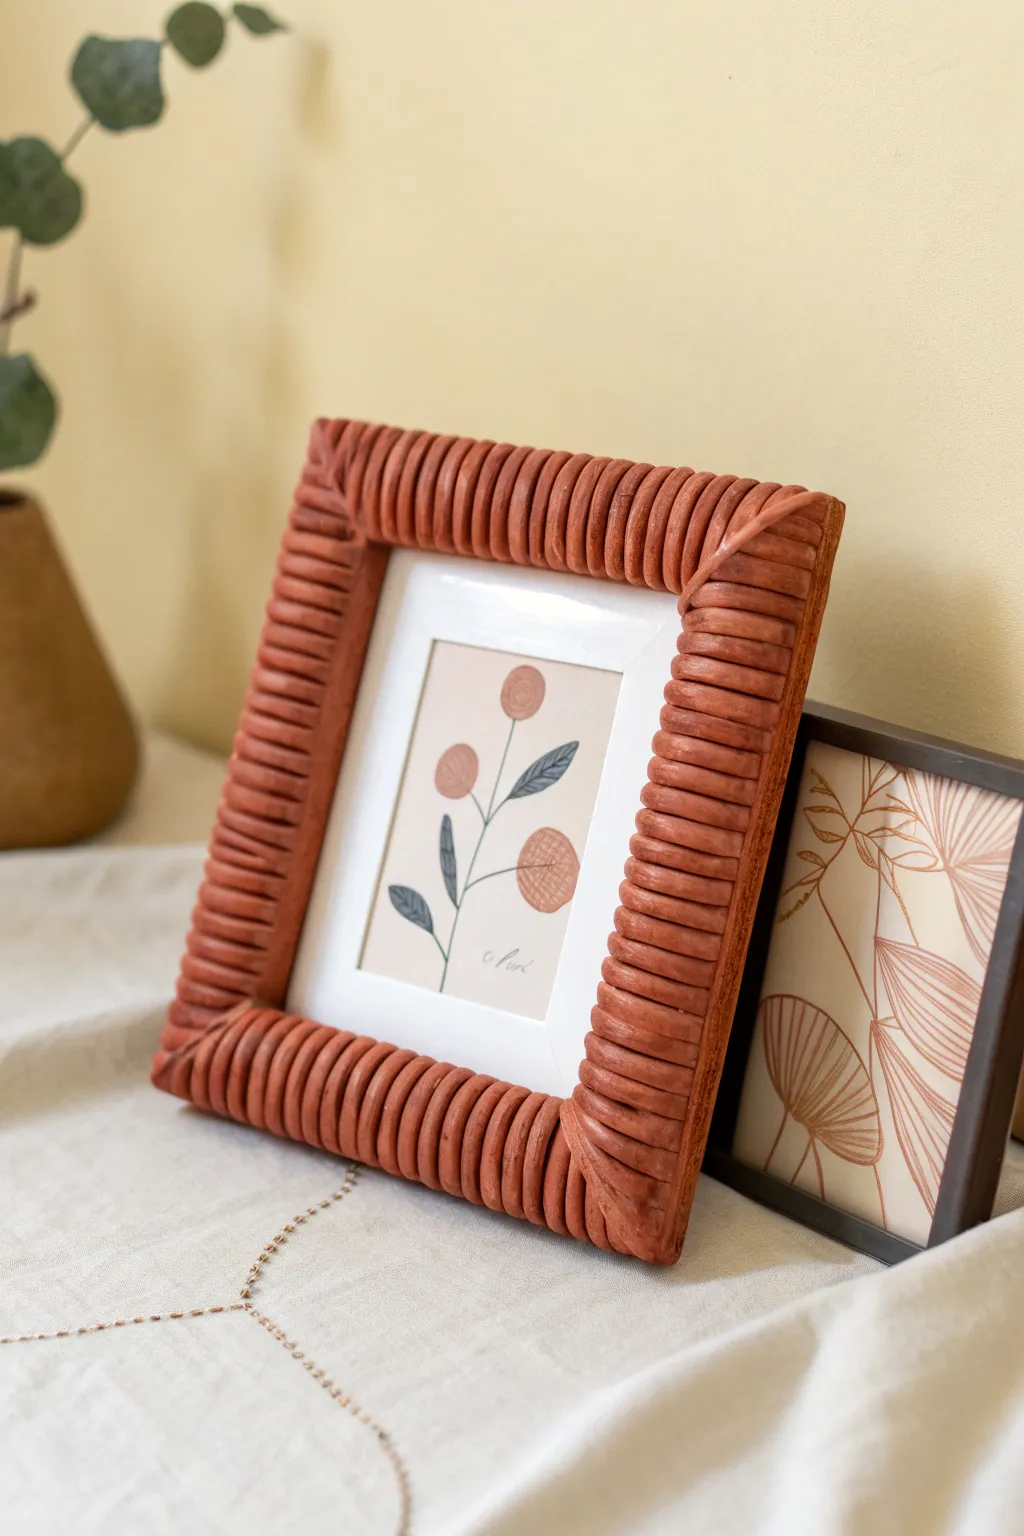
Transform a plain picture frame into a statement piece with the rustic charm of polymer clay coils. The repetitive ribbed texture creates a satisfying visual rhythm that pairs beautifully with simple botanical or line art.
How-To Guide
Materials
- Wide, flat wooden picture frame (as base)
- Terracotta-colored polymer clay (2-3 blocks)
- Clay extruder with a small round disc (optional but recommended)
- Liquid clay adhesive or strong craft glue
- Blade or craft knife
- Acrylic rolling pin
- Sandpaper (fine grit)
- Oven for baking
- Matte finish varnish (optional)
Step 1: Preparing the Base
-
Clean the surface:
Remove the glass and backing from your wooden picture frame. Wipe down the wood frame with a damp cloth to remove dust or oils, ensuring a clean surface for adhesion. -
Sand the wood:
Rough up the surface of the wooden frame slightly with sandpaper. This creates ‘tooth’ for the glue or clay to grip onto better. -
Condition the clay:
Knead your terracotta polymer clay thoroughly until it is soft, pliable, and free of cracks. Warm hands help this process go faster.
Uneven Coils?
If hand-rolling is producing lumpy snakes, use two stacks of playing cards as depth guides for your roller to ensure perfect, even thickness every time.
Step 2: Creating the Coils
-
Roll the snakes:
Roll out long, even snakes of clay slightly thicker than a pencil. For the most uniform look, I prefer to use a clay extruder, but hand-rolling works if you take your time. -
Check consistency:
Ensure all your clay coils are roughly the same diameter. Variations can look charming, but consistent thickness yields that tidy, professional ribbed effect. -
Measure the lengths:
Cut your long clay snakes into smaller segments. Each segment should be just long enough to wrap around the front face of the frame molding, covering the inner and outer edges slightly.
Step 3: Applying the Design
-
Apply adhesive:
spread a thin layer of liquid clay adhesive or bake-and-bond onto a small section of the wooden frame. -
Place the first coil:
Lay your first short coil segment across the width of the frame border. Press it down gently so it contours to the shape of the frame without flattening the roundness. -
Establish the pattern:
Place the next coil immediately adjacent to the first, touching it. Continue adding coils side-by-side, creating a ‘row of logs’ effect along the frame. -
Trim the edges:
Using your craft blade, trim the ends of the coils neatly along the inner and outer edges of the frame so they don’t overhang excessively or look ragged. -
Navigate the corners:
When you reach a corner, slice the coils at a 45-degree angle to create a mitered effect. This mimics how wooden frames are joined and looks cleaner than simply turning the corner with bent clay. -
Smooth the seams:
Gently run a finger along the cut edges where the coils meet the back of the frame to smooth any sharpness. -
Inspect the spacing:
Look over your work to ensure there are no gaps between the coils showing the wood underneath. Nudge them together gently if needed.
Two-Tone Effect
Mix two shades of clay (like beige and terracotta) but don’t fully blend them. This creates a marbled stone look for your coils.
Step 4: Finishing Up
-
Bake the frame:
Place the clay-covered frame on a baking sheet. Follow the temperature and time instructions on your specific package of polymer clay. Wood is safe to bake at clay temperatures. -
Cool down:
Let the frame cool completely before handling. Polymer clay is slightly fragile while hot and hardens fully as it cools. -
Optional varnish:
If you want a slight sheen or extra protection, brush on a coat of matte varnish. -
Reassemble:
Once dry, place the glass, your chosen artwork, and the backing board back into the frame.
Display your new textured frame on a shelf where the light can catch those beautiful ridges
Moon Phase Wall Tiles in Mini Scale
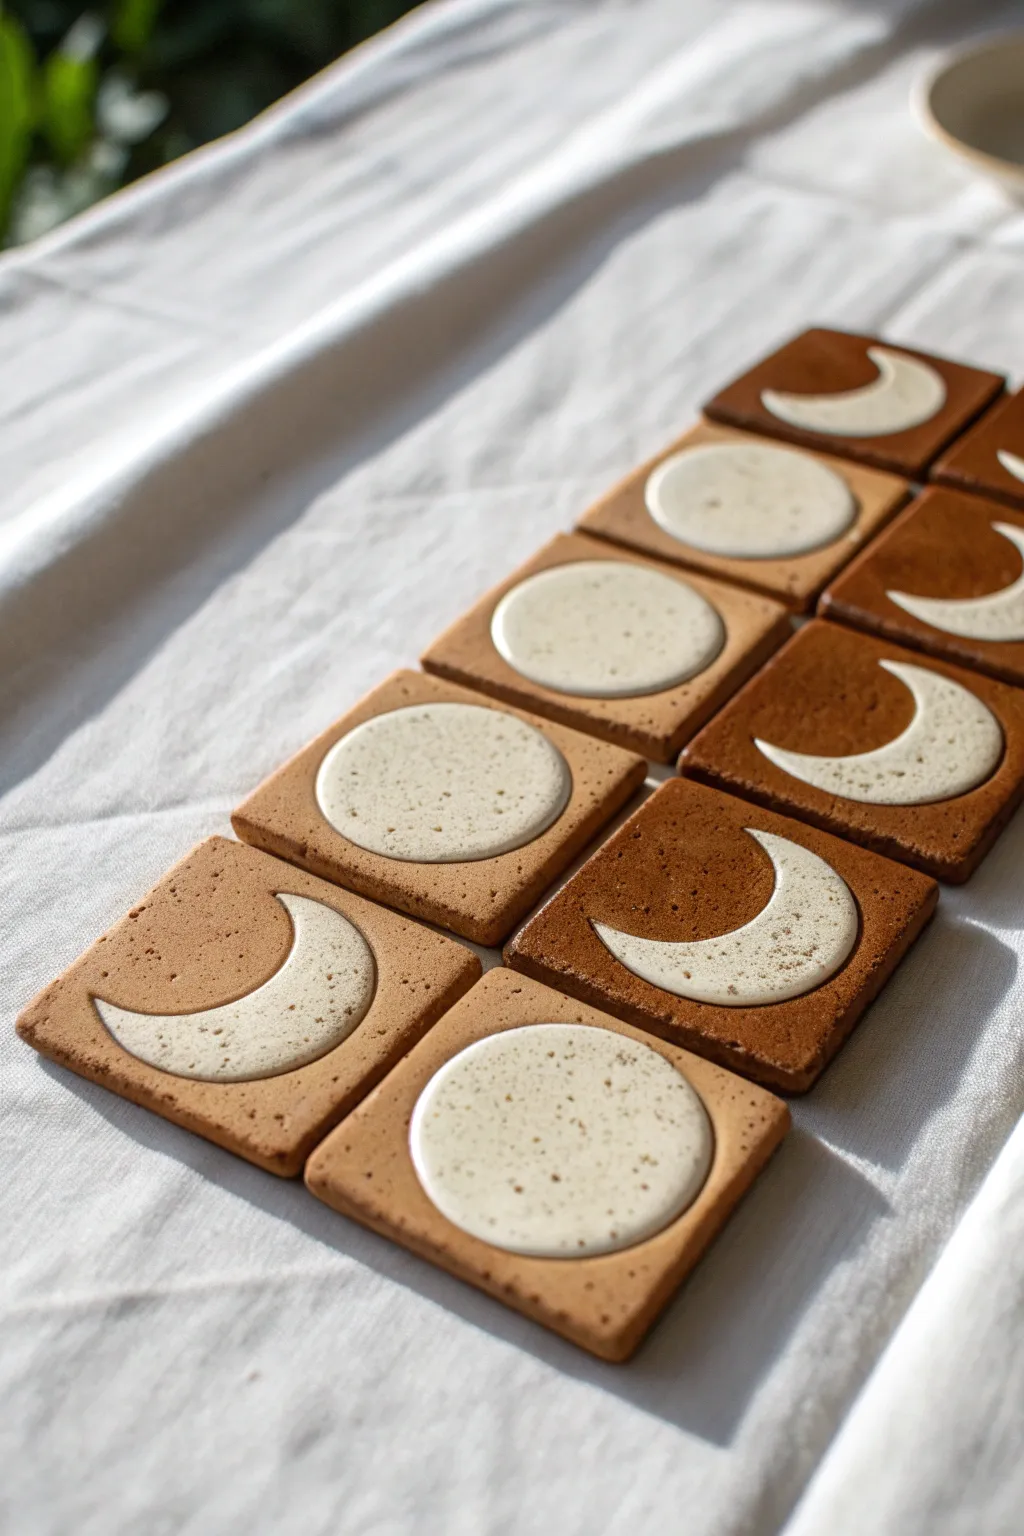
Capture the magic of the lunar cycle with these earthy, minimalist clay tiles. Mixing terracotta-toned polymer clay with a speckled cream inlay creates a stunning contrast that looks like high-end kiln-fired ceramic.
Step-by-Step Guide
Materials
- Polymer clay (terracotta or reddish-brown color)
- Polymer clay (white or cream)
- Fine black pepper or dried vanilla bean specks (for speckling)
- Square cookie cutter (approx. 1.5 – 2 inches)
- Circle cutters (various sizes matching your square)
- Acrylic rolling pin or pasta machine
- Ceramic tile or glass baking surface
- Parchment paper
- Blade or craft knife
- Sandpaper (various grits)
- Matte varnish (optional)
Step 1: Preparing the Clay
-
Condition the base clay:
Start by thoroughly conditioning your terracotta-colored polymer clay until it is soft and pliable. If the color feels too flat, try mixing in a tiny bit of translucent clay to give it depth similar to real earthenware. -
Create the speckled mix:
Take your white or cream clay and flatten it out. Sprinkle a pinch of fine black pepper or stubborn vanilla specs over the surface. Fold the clay over and roll it repeatedly until the specks are evenly distributed, mimicking a stoneware glaze effect. -
Roll out slabs:
Roll both the terracotta clay and the speckled cream clay into smooth sheets. Aim for a thickness of about 4-5mm (approx. 1/4 inch) for the terracotta base to ensure the tiles feel substantial.
Clean Cuts Pro-Tip
Place a piece of cling film over the clay before pressing your cutters down. This creates a beautifully rounded, ‘pillowed’ edge on the clay, making it look much more like fired ceramic.
Step 2: Cutting and Shaping
-
Cut the squares:
Place your terracotta slab on a sheet of parchment paper or directly on your baking tile. Use your square cutter to punch out as many tiles as you need for your moon cycle—usually 8 or 9 tiles look best for a full sequence. -
Refine the edges:
Gently gently tap the edges of the squares with your finger to soften the sharp cut lines slightly, giving them a more hand-molded ceramic look. -
Cut the moon shapes:
Take your speckled cream sheet and use the circle cutter to punch out distinct full circles. To make crescents, use the same circle cutter to take a ‘bite’ out of a previously cut circle, leaving behind the perfect crescent shape. -
Create recesses (Optional):
For a flush inlay effect, you can use your circle cutter to gently impress the shape into the terracotta squares first, then carefully scoop out that clay. Alternatively, for a relief look like the photo, skip this step.
Step 3: Assembling the Phases
-
Apply the full moons:
Place a full speckled circle onto the center of a terracotta square. Press it down mostly in the center, ensuring no air bubbles are trapped underneath. -
Apply the crescents:
Arrange your crescent shapes on other squares. Pay close attention to centering them visually—sometimes the heavy ‘weight’ of a crescent shape can make a tile look unbalanced if it’s perfectly centered mathematically. -
Bonding the clay:
Once the moon shape is positioned, place a small piece of parchment paper over the tile and gently roll over it with your acrylic roller. This presses the two clays together firmly without leaving fingerprints. -
Texture the surface:
I like to lightly tap the surface with a coarse sponge or a crumpled ball of aluminum foil before baking. This removes the plastic sheen of the polymer and replicates the grit of real stone.
Air Bubble Trouble
If you trap an air pocket under a moon shape, it will bubble during baking. Pierce the bubble with a needle tool and smooth the air out with your finger before putting it in the oven.
Step 4: Baking and Finishing
-
Baking:
Bake the tiles according to your clay manufacturer’s instructions. A common standard is 275°F (135°C) for about 30 minutes, but check your packaging. -
Cooling down:
Allow the tiles to cool completely in the oven with the door slightly ajar. This gradual cooling helps prevent any cracking. -
Sanding edges:
Once hard and cool, use fine-grit sandpaper to smooth out any rough spots on the sides of the squares. Wet sanding (using water with the sandpaper) keeps dust down and produces a smoother finish. -
Sealing:
These tiles look best with a matte finish. Apply a thin layer of matte polymer clay varnish to protect the surface, or leave them raw for a more rustic texture. -
Mounting preparation:
If you plan to hang these, glue a small flat hanging bail or heavy-duty mounting tape to the back of each tile.
Arrange your finished tiles on a wall or tray to enjoy your personal lunar cycle display
Texture-Stamped Clay Medallion Set
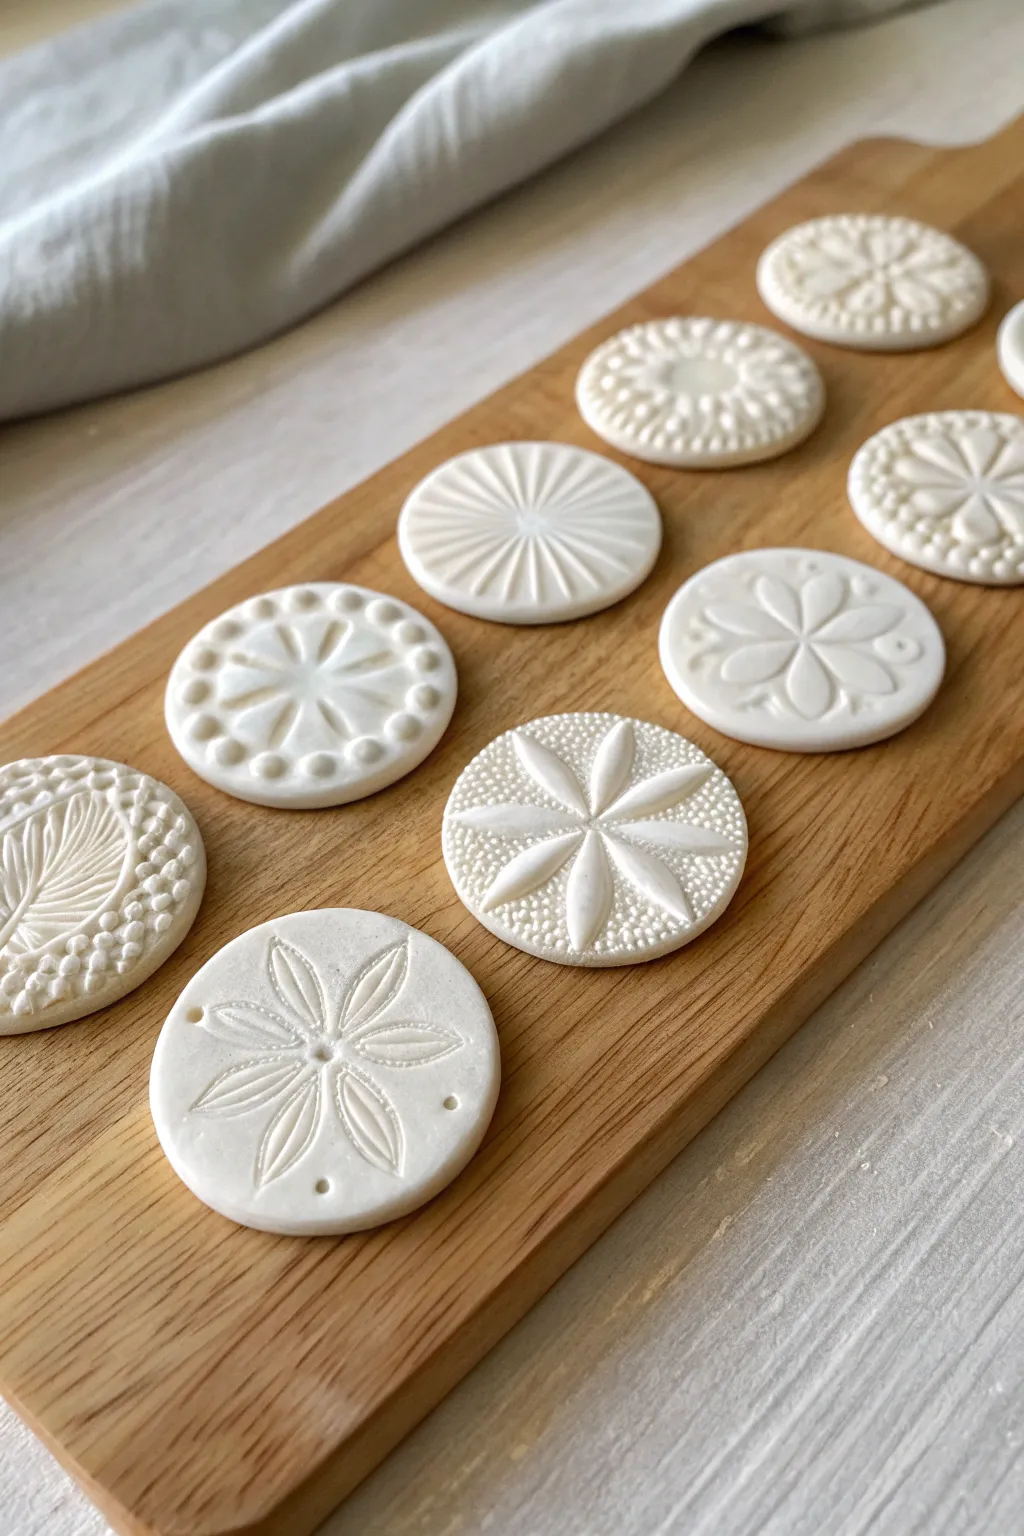
These elegant clay medallions showcase the beauty of simple patterns and clean lines, perfect for minimalist decor or unique gift tags. Each disc features a distinct botanical or geometric imprint, creating a cohesive yet varied collection with a lovely matte white finish.
Step-by-Step Tutorial
Materials
- White smooth air-dry clay (or white polymer clay)
- Round cookie cutter (approx. 2-3 inches diameter)
- Acrylic rolling pin
- Parchment paper or baking mat
- Various texture tools (rubber stamps, lace doilies, buttons, seed pods)
- Fine grit sandpaper (400-600 grit)
- Clean sponge and water
- Wooden skewer or toothpick
Step 1: Preparation and Rolling
-
Prepare your workspace:
Lay down a sheet of parchment paper or a silicone baking mat on a flat, stable surface. This prevents the clay from sticking and picking up unwanted dust. -
Condition the clay:
Take a generous handful of white air-dry clay. Knead it in your hands for a few minutes until it feels warm, pliable, and free of any lumps or air bubbles. -
Roll out the slab:
Place the clay on your mat. Using the acrylic rolling pin, roll the clay out into an even slab. Aim for a thickness of about 1/4 inch (6mm) to ensure the medallions are sturdy but not too heavy. -
Check surface smoothness:
Examine the surface of your rolled slab. If you see any cracks or wrinkles, smooth them out gently with a slightly damp finger or re-roll the clay.
Clean Release Tip
If your clay sticks to the stamps, lightly dust the stamp surface with cornstarch or baby powder before pressing it into the wet clay.
Step 2: Stamping and Cutting
-
Select your textures:
Gather your stamping tools. I like to arrange them beforehand to visualize how the different patterns—like radial lines, dots, or leaves—will look together as a set. -
Stamp the clay first:
Before cutting the circles, press your chosen stamp firmly into the clay slab. Apply even pressure to get a crisp impression, but be careful not to push all the way through the slab. -
Cut the shape:
Center your round cookie cutter over the stamped design. Press down firmly to cut the circle, capturing the pattern exactly where you want it. -
Remove the excess:
Once you have cut all your shapes, carefully peel away the excess clay from around the circles. Ball up the scraps immediately and store them in an airtight container to prevent drying. -
Lift the medallions:
To avoid distorting the circles, gently slide a thin blade or spatula under each medallion to lift it if you need to move them. Ideally, let them dry exactly where they were cut. -
Add holes (optional):
If you plan to use these as ornaments or gift tags, use a wooden skewer to poke a small hole near the edge. For the decorative dots seen in the image, gently press the blunt end of the skewer into the clay without piercing through.
Warping Woes?
If your medallions curl up while drying, place a heavy book over them (with parchment paper in between) once they are partially dry but still slightly flexible.
Step 3: Refining and Finishing
-
Initial smoothing:
Dip your finger in a little water and run it very lightly around the edges of the cut clay to soften the sharp cut lines before the drying process begins. -
Allow to dry:
Let the medallions dry completely. For air-dry clay, this usually takes 24-48 hours depending on humidity. Flip them over halfway through the drying time to prevent curling. -
Check for dryness:
The clay should look chalky white and feel room temperature, not cool to the touch. If it feels cold, there is still moisture inside. -
Sand the edges:
Once fully dry, take the fine-grit sandpaper and gently buff the edges of the discs. Remove any jagged bits left by the cutter to achieve that professional, smooth look. -
Surface refinement:
If there are minor fingerprints on the plain areas, lightly sand those away as well, being careful not to sand down the textured design. -
Clean up dust:
Wipe the medallions with a slightly damp sponge or a soft brush to remove the sanding dust. -
Final assessment:
Arrange your finished medallions on a board to admire your work. Leave them raw for a matte ceramic look, or apply a clear matte varnish if you want extra protection against moisture.
Display your beautiful new set on a wooden tray or string them up to add a handmade touch to your home
Terrazzo-Style Color Speckle Pieces
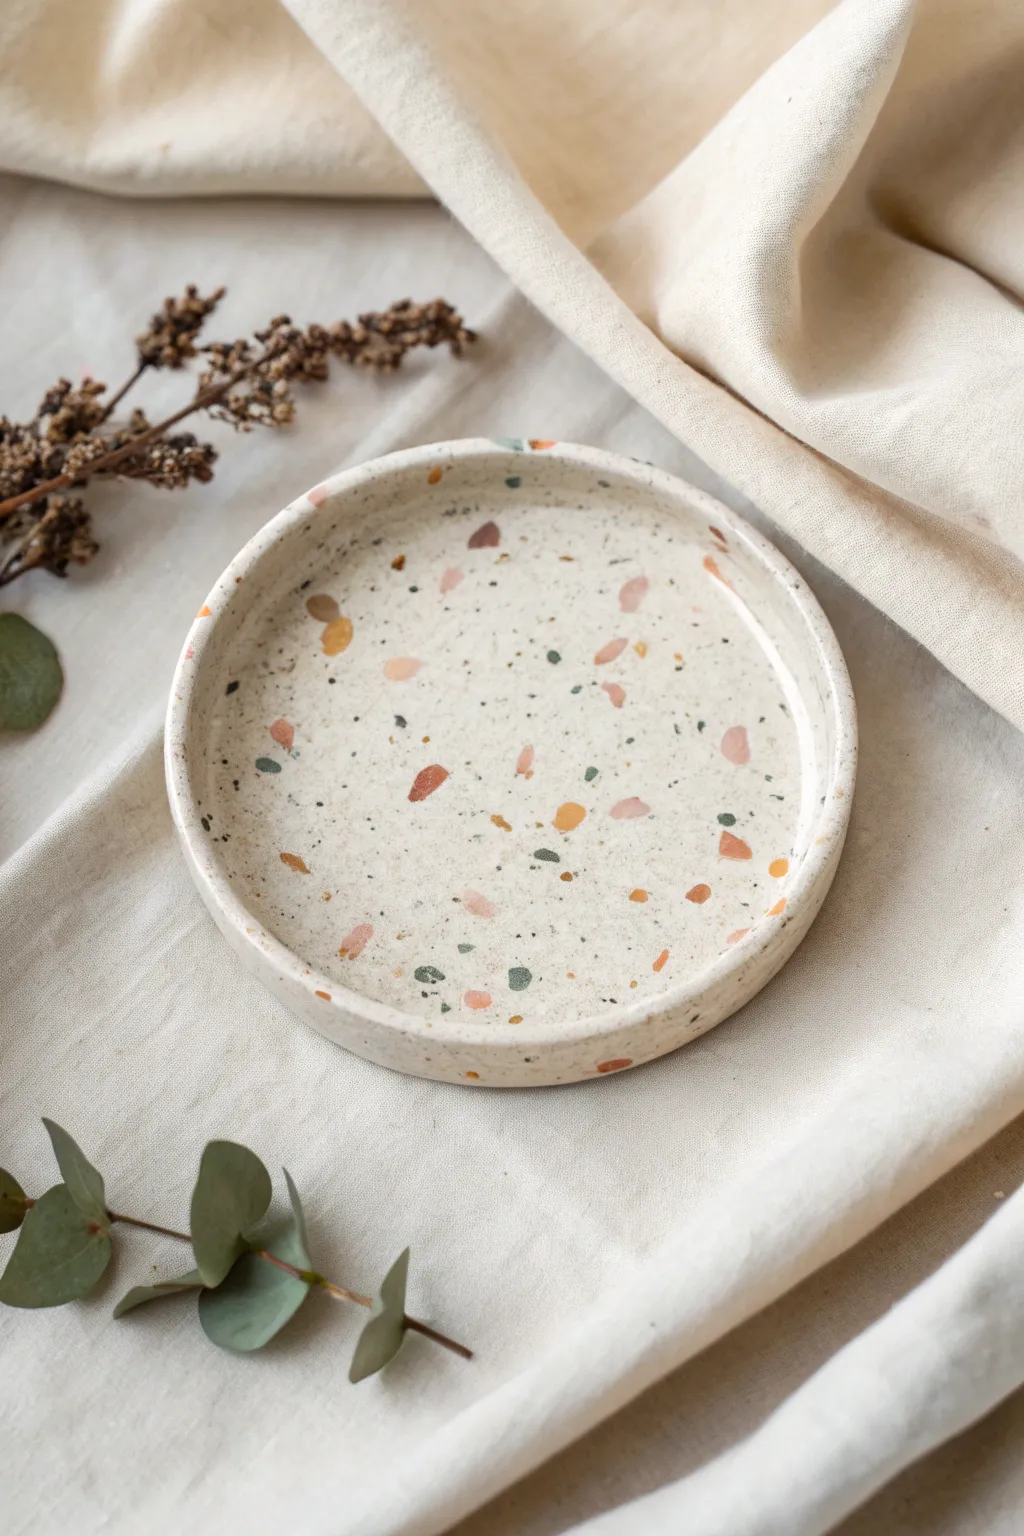
Bring the classic Italian flooring technique to your vanity with this charming speckled clay dish. The scattered chips of muted rust, sage, and peach against a sandy base create a sophisticated yet playful terrazzo design that looks much harder to make than it actually is.
Detailed Instructions
Materials
- Polymer clay (white or beige for the base)
- Polymer clay (small amounts of terracotta, sage green, mustard yellow, and pale pink)
- Fine black pepper or black sand (optional for fine speckling)
- Rolling pin or acrylic roller
- Round cookie cutter or bowl (approx. 4-5 inches)
- Craft knife or scalpel
- Small oven-safe bowl (for shaping)
- Fine sandpaper (400 to 1000 grit)
- Matte or satin varnish (optional)
Step 1: Preparing the Terrazzo Chips
-
Roll thin sheets:
Start by conditioning your colored clays (terracotta, sage, mustard, pink). Roll each color out into a very thin sheet, roughly 1-2mm thick. The thinner they are, the more natural the chips will look embedded in the final piece. -
Bake the sheets:
To get crisp chips that don’t smear, we need to partially harden these sheets. Bake them flat on a piece of parchment paper for just 5-8 minutes at the manufacturer’s recommended temperature. Let them cool completely. -
Create the confetti:
Once cool and brittle, chop these baked sheets into small, irregular fragments using your craft knife. Aim for a mix of sizes—some tiny specks and some larger, distinctive shards. Set these aside in a small pile.
Clean Cuts Matter
When slicing your hardened colored sheets, use a very sharp blade and press straight down instead of sawing. This creates those sharp, geometric edges characteristic of real terrazzo stone.
Step 2: Creating the Base
-
Prepare the base clay:
Take a large block of your white or beige clay. To replicate the sandy texture seen in the photo, I like to knead in a pinch of ground black pepper or very fine black sand. This gives that authentic gritty stone look. -
Roll the main slab:
Roll your conditioned base clay out to a thickness of about 4-5mm. Ensure it is wide enough to accommodate your chosen cutter size. -
Apply the chips:
Scatter your chopped colored fragments onto the surface of the raw clay slab. Be generous but leave some white space showing. Gently press them down with your fingers so they stick. -
Embed the pattern:
Cover the slab with a piece of parchment paper (to prevent sticking) and roll over it firmly with your rolling pin. You want the chips to sink completely into the clay so the surface becomes smooth and level again. -
Inspect the surface:
Peel back the paper. If you see sparse areas, adding a few more chips now is fine; just press and roll them in as before.
Use That Translucency
Mix a tiny amount of translucent clay into your base color. This adds visual depth akin to real stone, making the embedded chips appear to float at different levels.
Step 3: Shaping and Finishing
-
Cut the circle:
Use your round cutter or trace around a bowl to cut a perfect circle from your terrazzo-patterned slab. Remove the excess clay. -
Create the rim:
Take a long strip of excess terrazzo clay (you may need to re-roll scraps) or plain base clay. Roll it into a long, thin cylinder or cut a long rectangular strip about 1cm tall. -
Attach the wall:
Wrap this strip around the outer edge of your clay circle to create the standing rim. Blend the seam on the inside and outside using a modeling tool or your finger so it looks like one solid piece. -
Smooth the seams:
Spend time smoothing the connection point where the rim meets the base. A little baby oil on your finger can help glide over fingerprints and imperfections. -
Form the shape:
Place your clay dish inside a slightly larger oven-safe bowl to help it hold its cupped shape during baking, or simply let it stand freely if the walls are thick enough. -
Final Bake:
Bake the finished piece according to the package instructions (usually 275°F/130°C for 15-30 minutes, depending on thickness). Let it cool completely in the oven. -
Reveal the pattern:
This is the magic step. Sand the entire surface under running water using wet-dry sandpaper. Start with 400 grit to remove the top layer of clay, which makes the embedded chips pop clearly, and finish with 1000 grit for a silky smooth feel. -
Seal (Optional):
If you want a glossy finish or extra protection, apply a thin layer of polyurethane varnish, but the sanded matte finish often looks more like real stone.
Once sanded and sealed, this stylish tray is ready to keep your jewelry safe.
Alphabet Tiles for Cute Name Pics

Create a charming set of rustic, letter-pressed tiles that evoke the feeling of ancient script tablets or beachside discoveries. These simple clay squares carry a lovely organic texture and are perfect for spelling out names in flat-lay photography or as personalized home accents.
Step-by-Step Guide
Materials
- Air-dry clay (white or off-white)
- Rolling pin
- Two wooden guide strips (approx. 1/4 inch thick)
- Square cookie cutter (approx. 1.5 – 2 inches)
- Alphabet stamp set (simple sans-serif font)
- Fine-grit sandpaper
- Textured fabric (linen or canvas)
- Craft knife
- Optional: Beige acrylic paint for weathering
Step 1: Preparation and Rolling
-
Prepare your workspace:
Lay down your textured fabric (like a piece of coarse linen or canvas) onto a flat work surface. This will imprint the back of your tiles with a subtle weave pattern. -
Condition the clay:
Take a large chunk of air-dry clay and knead it in your hands until it feels warm and pliable, eliminating any potential air bubbles. -
Set up guides:
Place your two wooden guide strips on either side of the fabric. These act as rails for your rolling pin to ensure every tile has the exact same thickness. -
Roll out the slab:
Place your clay ball between the guides and use the rolling pin to flatten it into a smooth slab. Roll in multiple directions to ensure the clay is evenly distributed.
Step 2: Cutting and Stamping
-
Cut the shapes:
Using your square cookie cutter, press firmly into the clay slab to cut out your tile shapes. Try to fit as many as possible close together to minimize waste. -
Remove excess clay:
Carefully peel away the scrap clay from around your squares. Leave the squares in place on the fabric for now to avoid distorting their shape. -
Prepare the stamps:
Select the letters you need from your alphabet stamp set. If the stamps tend to stick, lightly dust the letter face with cornstarch before pressing. -
Impress the letters:
Press the stamp into the center of a clay square. Apply firm, even pressure to get a deep impression, but be careful not to push all the way through the clay. -
Repeat the process:
Continue stamping each square. I usually like to make multiples of common vowels like ‘A’ and ‘E’ so I have plenty of options for spelling later. -
Initial smoothing:
Dip your finger in a little water and very gently run it around the top edges of the squares to soften the sharp cut lines slightly.
Clean Letter Impressions
Rock the stamp gently in a tiny circular motion while pressed into the clay. This helps release the suction and ensures the deep corners of the letter are crisp.
Step 3: Finishing and Refining
-
Lift and dry:
Slide a thin blade or spatula under the tiles to lift them off the fabric. Place them on a wire rack or a clean sheet of parchment paper to dry. -
Flip occasionally:
Let the tiles dry for 24-48 hours. Turn them over every few hours to prevent the edges from curling up as the moisture evaporates. -
Sanding the edges:
Once fully bone-dry, use fine-grit sandpaper to smooth any rough burrs on the edges or corners. Sanding in a circular motion works best. -
Softening the face:
You can also lightly sand the top face of the tile. This gives it that weather-worn, matte stone look rather than a shiny synthetic finish. -
Optional coloring:
If you want the letters to pop, mix a very watery wash of beige paint. Brush it into the grooves and immediately wipe the surface clean with a damp cloth, leaving pigment only in the recessed letter. -
Final arrangement:
Arrange your finished tiles on a sandy surface or soft cloth to recreate the aesthetic in the photo.
Warped Tiles?
If tiles curl while drying, slightly dampen the concave side and place them under a heavy book overnight. Sandwich them between parchment paper to protect the surface.
Now you have a timeless set of alphabet stones ready to spell out messages for your next photo project
“Idea Grid” Collage of Tiny Clay Makes
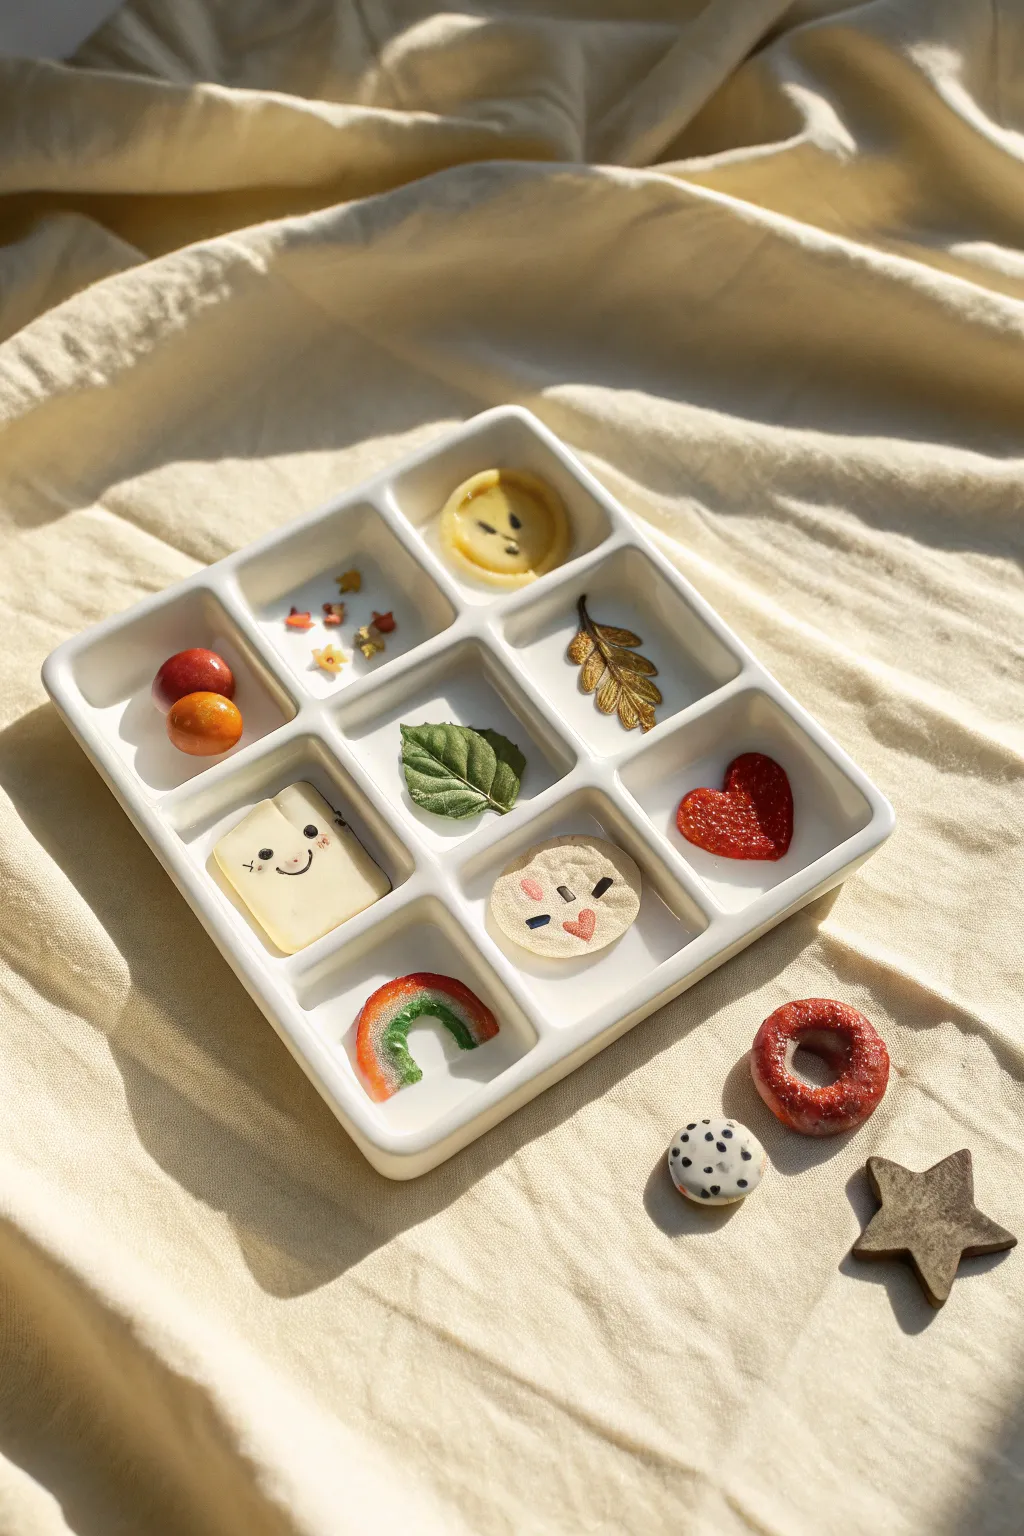
This delightful project transforms a simple grid into a charming display of tiny clay treasures, each with its own personality. From smiling snacks to nature-inspired miniatures, this collection is perfect for practicing various sculpting techniques on a micro scale.
Detailed Instructions
Materials
- White polymer clay (for base tray and mixing)
- Polymer clay in various colors (orange, yellow, green, red, brown)
- Square ceramic shadow box tray (or white clay to make one)
- Sculpting tools (needle tool, ball stylus)
- Liquid polymer clay (translucent)
- Black acrylic paint and fine detail brush
- Soft pastels (for shading)
- Gold mica powder or acrylic paint
- Sandpaper
Step 1: Creating the Grid Base
-
Prepare the tray:
If you aren’t using a pre-made ceramic dish, roll out a thick sheet of white polymer clay. Cut a 3×3 inch square base and build up walls and dividers to create nine equal compartments. -
Smooth the edges:
Use your finger or a rubber shaper to smooth all connections and round over the top edges for that soft, ceramic look. Bake this base piece first according to your clay’s instructions so it stays rigid while you fill it.
Step 2: Sculpting the Top Row
-
Orange spheres:
For the first box, roll two small balls of orange clay. Mix a tiny bit of red into one to vary the shades slightly, then place them nestled together. -
Tiny confetti:
Roll extremely thin snakes of yellow, orange, and red clay. Slice off tiny flecks and press them gently into the second compartment. Use a needle tool to fray the edges of a few pieces to resemble tiny flower petals. -
Lemon slice:
Create a cane by wrapping a yellow cylinder in a thin layer of white, then a thin layer of darker yellow skin. Slice a thick cross-section. Use a needle tool to create two dots for eyes and a small line for a mouth.
Sticky Situation
Use a tiny drop of liquid polymer clay (Bake & Bond) underneath each miniature before placing it in the grid. This ensures they don’t fall out after baking.
Step 3: Sculpting the Middle Row
-
Gilded leaf:
Shape a small piece of brown clay into an oak leaf shape. Use a needle tool to impress veins. Dust heavily with gold mica powder before baking, or paint with metallic gold acrylic afterwards. -
Green leaf:
Form a teardrop of green clay and flatten it. Use a mold or a real leaf to press texture into the surface for realistic veining. Gently curl the edges upward for dimension. -
Friendly cheese block:
Cut a square slab of pale yellow clay. Soften the corners. Use a small ball tool to indent the eyes and a mouth. I like to pre-bake this piece briefly so I don’t squish it when adding the face details.
Make it Magnetic
Instead of gluing the items into the tray, bake them separately and glue small magnets to their backs and the tray slots for an interactive fidget toy.
Step 4: Sculpting the Bottom Row
-
Strawberry heart:
Shape red clay into a heart. Use a needle tool to poke tiny seed indentations all over the surface to mimic strawberry texture. -
Cracker face:
Roll a disk of beige clay and texture it by pressing sandpaper against it. Indent two closed eyes and add a tiny pink heart for a mouth. -
Mini rainbow:
Roll tiny snakes of red, white, and green clay. Arch them together to form a rainbow shape and trim the bottom edges flat.
Step 5: Finishing Touches
-
Bake the collection:
Place your filled connection into the oven and bake according to the manufacturer’s directions for your specific brand of clay. -
Paint details:
Once cool, use a fine detail brush and black acrylic paint to fill in the eyes and mouths on the cheese, lemon, and cracker characters. -
Glazing:
Apply a gloss varnish to the fruit pieces and the eyes to make them shine, while leaving the cracker and leaves matte for contrast.
Display your tiny grid on a desk or shelf to bring a little smile to your daily routine