If you’re craving a little sunshine on your wrist, yellow clay bead bracelets are the quickest mood-lifter I know. Here are some of my favorite yellow heishi bead bracelet ideas you can mix, match, and stack until it feels perfectly you.
Classic All-Yellow Heishi Bracelet
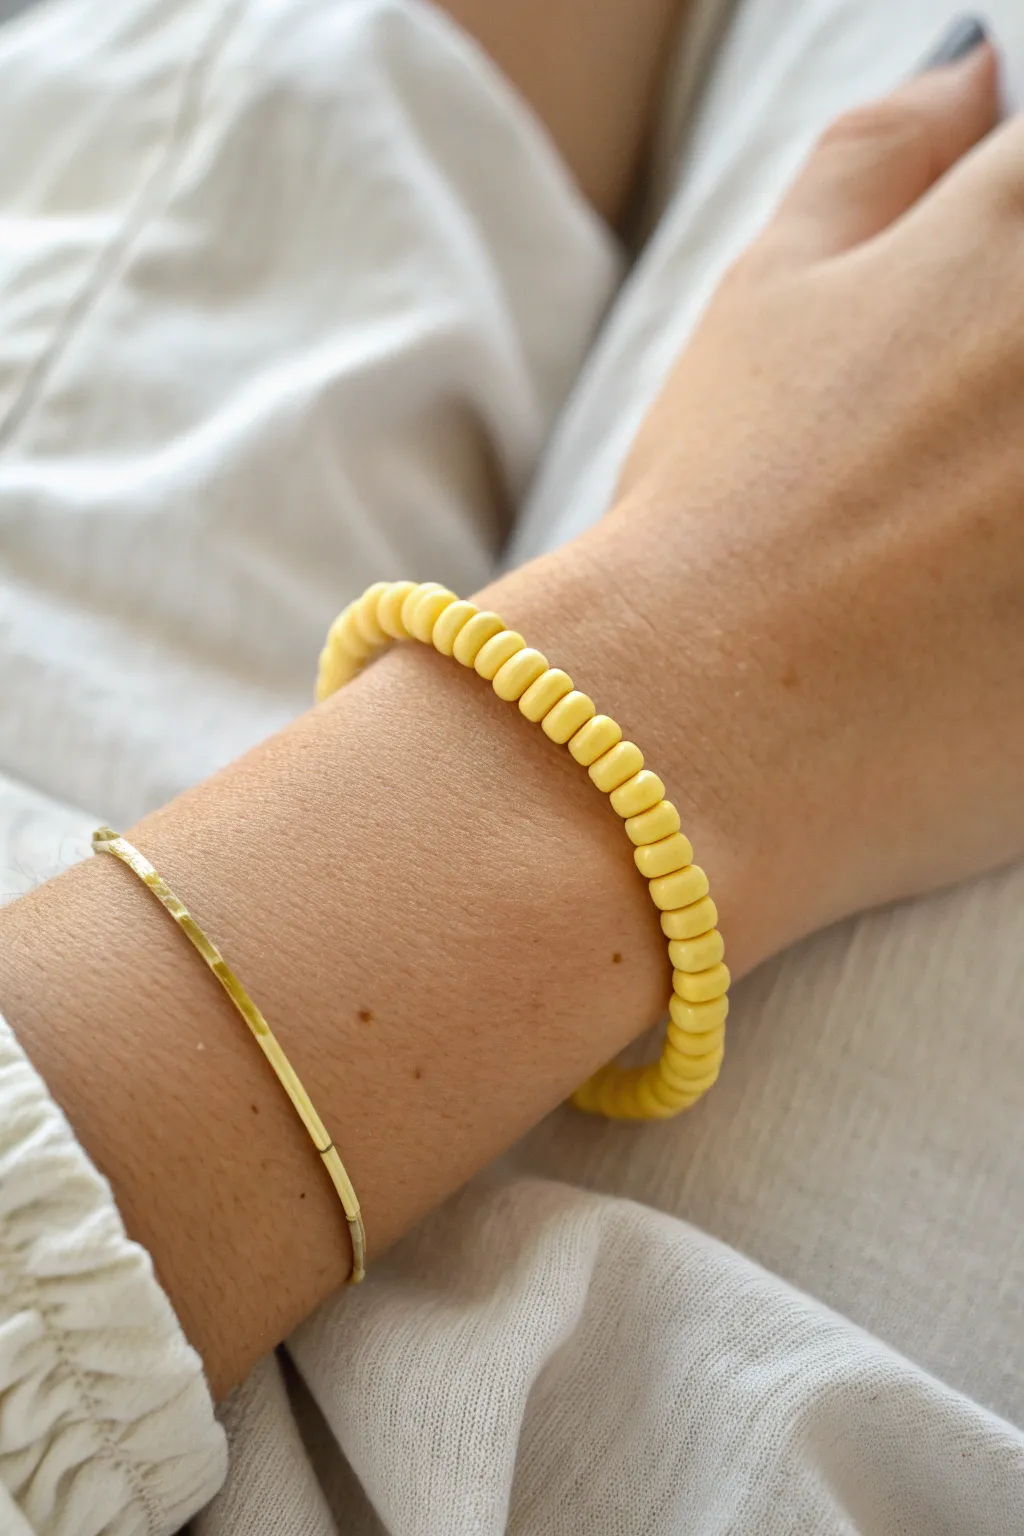
Embrace the warmth of summer with this simple yet striking monochromatic bracelet design. Using uniformly sized yellow polymer clay beads creates a bold, minimalist accessory that pops beautifully against sun-kissed skin.
Step-by-Step Tutorial
Materials
- 6mm yellow polymer clay heishi beads (disc or slightly tubular shape)
- 0.8mm clear elastic stretch cord
- Jewelry glue or clear nail polish
- Scissors
- Tape or bead stopper
- Optional: 2-3mm gold crimp covers (for hiding knots)
- Optional: Fine gold metal bracelet for stacking
Step 1: Preparation
-
Measure your wrist:
Wrap a flexible measuring tape around your wrist where you want the bracelet to sit. Note the measurement and add about 0.5 to 1 inch depending on how loose you prefer the fit. -
Cut the cord:
Cut a piece of elastic cord about 10-12 inches long. This extra length is crucial; I always find it easier to tie the final knot when I have plenty of slack to work with. -
Pre-stretch the elastic:
Hold the ends of the cord and give it a few firm tugs. Pre-stretching prevents the bracelet from sagging or loosening immediately after you wear it for the first time. -
Secure the end:
Attach a piece of tape or a bead stopper to one end of the cord. This simple step saves you the heartbreak of beads sliding off while you work.
Step 2: Stringing the Beads
-
Inspect your beads:
Pour out a small amount of your yellow heishi beads. Quickly scan them for any broken discs or uneven chips to ensure a uniform finished look. -
Begin threading:
Start threading the yellow beads onto the elastic cord one by one. Maintain the monochromatic theme by using strictly yellow beads without spacers for this specific look. -
Check the fit:
Periodically wrap the strand around your wrist to check the length. Keep adding beads until the strand completely encircles your wrist comfortably without gaps. -
Add one extra:
Once you think the length is perfect, add just one or two more beads to account for the space the knot will take up.
Knot Slipping?
If the elastic is slippery, dust the knot area with a tiny bit of cornstarch before tying. This adds friction and helps the knot hold tight while you glue it.
Step 3: Finishing Touches
-
Prepare to knot:
Remove the tape or bead stopper carefully while holding both ends of the elastic securely. -
Tie the first knot:
Cross the left end over the right and pull tight to form a basic overhand knot, bringing the beads together snugly. -
Tie a surgeon’s knot:
For the second knot, cross the strands again, but loop one end through the circle twice before pulling tight. This extra loop adds significant security handling the tension. -
Secure with glue:
Dab a tiny drop of jewelry glue or clear nail polish directly onto the knot. Allow it to dry for a minute to bond the elastic. -
Hide the knot:
Ideally, pull the knot gently inside the hole of the adjacent bead. If the hole is too small, you can cover the knot with a gold crimp cover for a professional finish. -
Trim the excess:
Once the glue is fully cured, use sharp scissors to trim the excess tail of the elastic cord close to the knot.
Layer It Up
Make two more bracelets in different shades of yellow (mustard and pastel lemon) to create an ombré stack effect that mimics a sunrise.
Slip on your bright new accessory and enjoy the pop of color it brings to your day


Yellow and White Alternating Pattern
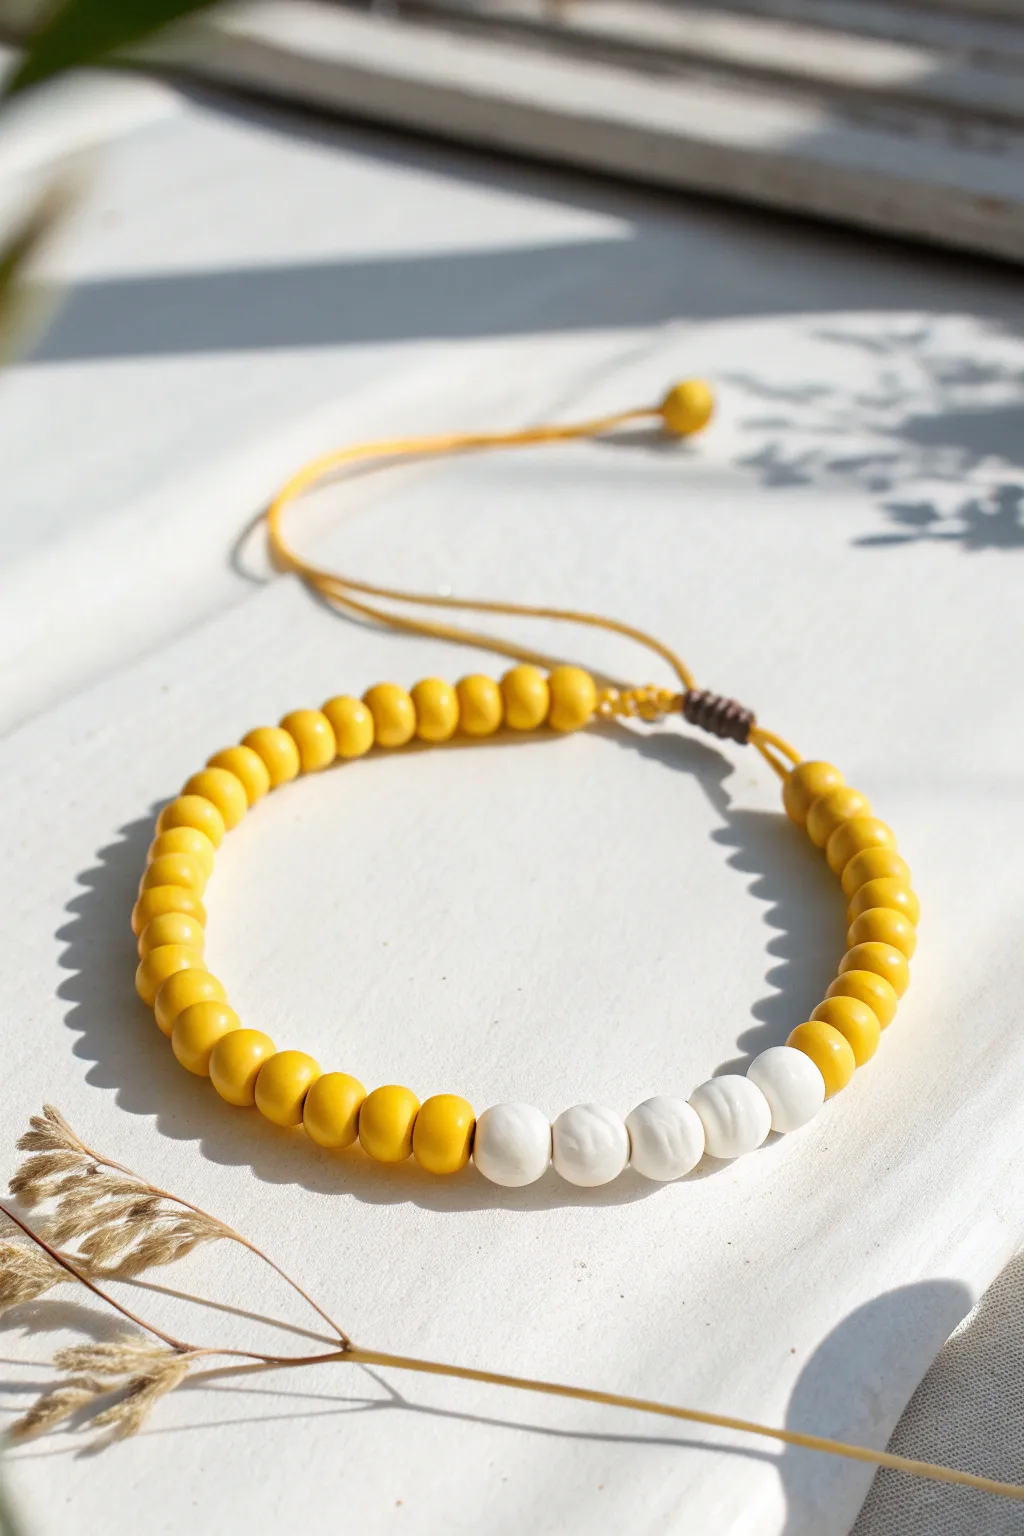
Brighten up any outfit with this cheerful polymer clay bracelet that combines vibrant sunshine yellow with a calm, creamy white accent. The adjustable sliding knot closure adds a professional touch while making it easy to slip on and off.
Detailed Instructions
Materials
- Polymer clay in sunflower yellow
- Polymer clay in cream or white
- Yellow waxed cotton cord (1mm thickness)
- Dark brown waxed cord for accent (optional)
- Clay roller or pasta machine
- Small round bead cutter or straw
- Bead piercing pin or toothpick
- Oven and baking sheet
- Scissors
Step 1: Creating the Clay Beads
-
Condition the clay:
Start by warming up your yellow polymer clay in your hands. Knead it thoroughly until it is soft, pliable, and free of cracks. Do the same for a smaller amount of cream clay. -
Roll spheres:
Pinch off small, equal-sized pieces of the yellow clay. Roll each piece between your palms to form smooth, uniform spheres roughly 6-8mm in diameter. You will need about 30-35 yellow beads. -
Create the accent beads:
Repeat the rolling process with the cream clay to create exactly five beads of the same size as your yellow ones. -
Pierce the holes:
Gently hold a bead and use your piercing pin or a toothpick to create a hole through the center. Rotate the pin as you push to avoid squashing the sphere shape. -
Bake the beads:
Arrange all your pierced beads on a baking sheet or tile. Bake according to the manufacturer’s instructions on your clay package (usually around 275°F/135°C for 15-30 minutes). Let them cool completely before handling.
Step 2: Stringing the Design
-
Prepare the cord:
Cut a length of yellow waxed cord approximately 12 inches long. This gives you plenty of room for the sliding knot mechanism. -
Start stringing:
Thread the yellow beads onto the cord. I find it helpful to stiffen the end of the cord with a dab of super glue or clear nail polish to make it act like a needle. -
Add the focal point:
Once you have strung about half of your yellow beads, string the five cream beads in a row. -
Finish the strand:
Continue stringing the remaining yellow beads until the beaded section wraps comfortably around your wrist with a little gap between the ends.
Smooth Surface Trick
Before baking, lightly dust your clay spheres with cornstarch and gently rub them. This removes fingerprints and gives the clay a velvety matte finish.
Step 3: The Sliding Knot Closure
-
Form the circle:
Bring the two ends of the yellow cord together so they overlap and run parallel to each other, creating a circle. -
Start the knot:
Using one of the tail ends, create a loop over the main strands and wrap it back around itself 3-4 times. This forms a basic sliding knot structure. -
Tighten gently:
Pull the end tight carefully so the coils lay neat and flat next to each other. Repeat this process on the other side if you want a double sliding knot, or use a separate piece of cord to tie a single adjustable macramé square knot over both strands. -
Add the brown accent:
Create a decorative wrap knot using a small piece of dark brown cord right next to the sliding mechanism for that subtle contrast seen in the project image. -
Secure the ends:
Tie a simple overhand knot at the very tip of each yellow cord tail. You can add a single yellow clay bead to one of the tails before knotting for a finished look. -
Trim excess:
Trim any excess cord close to the knots. You can carefully melt the tips of synthetic cord with a lighter to prevent fraying, or use a tiny drop of glue for natural fibers.
Fixing Wonky Holes
If your bead holes closed up slightly during baking, use a small hand drill or a heated needle to carefully re-open them without cracking the bead.
Enjoy wearing your new handmade accessory that captures the warmth of summer in a simple design


Bold Yellow Color-Block Sections
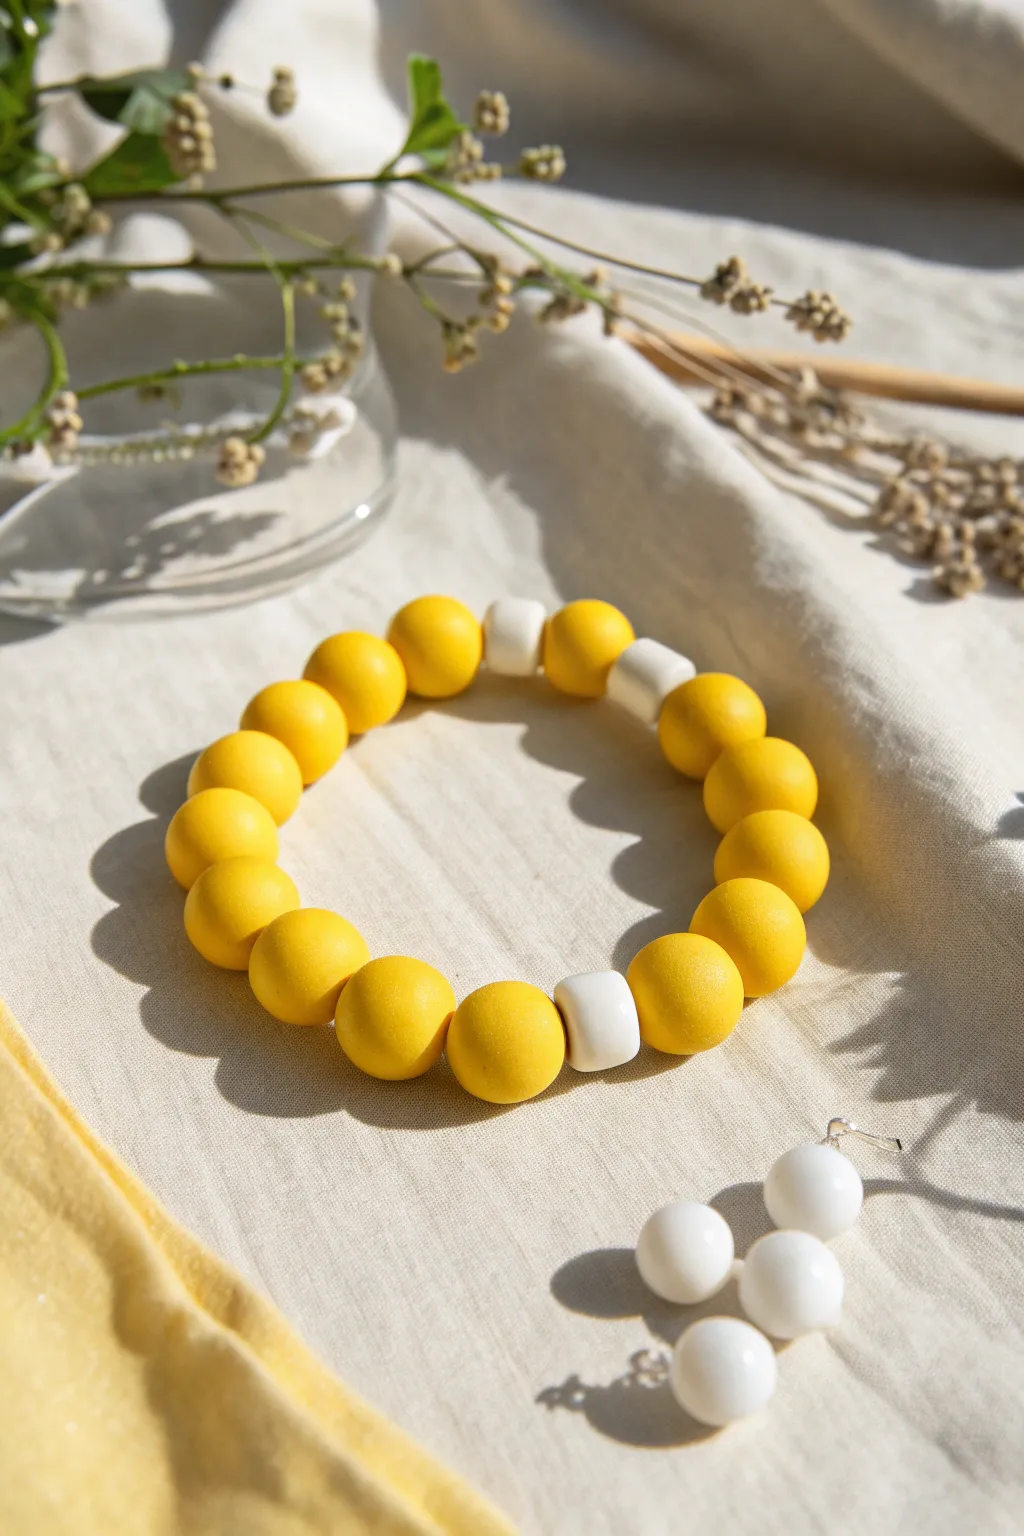
Brighten up your accessories collection with this cheerful yellow beaded bracelet featuring crisp white accents. The matte finish of the clay beads gives it a modern, sophisticated look, while the color-blocking adds a playful rhythm that pairs perfectly with summer outfits or neutral tones.
How-To Guide
Materials
- Polymer clay in ‘Sunflower Yellow’ (or bright yellow)
- Polymer clay in ‘White’
- Elastic beading cord (0.8mm or 1mm clear)
- Bead roller tool (optional, for uniform spheres)
- Acrylic roller or pasta machine
- Ceramic tile or glass work surface
- Needle tool or toothpick
- Razor blade or tissue blade
- Oven (for baking clay)
- Super glue or jewelry cement
- Scissors
Step 1: Prepping the Clay
-
Condition the yellow clay:
Start by warming up your yellow polymer clay in your hands. Knead and roll it until it becomes soft, pliable, and free of any cracks or air pockets. -
Condition the white clay:
Repeat the conditioning process with your white clay. Be sure to wash your hands or wipe down your work surface between colors so the yellow pigment doesn’t transfer to the pristine white clay. -
Roll out sheets:
Using your acrylic roller or pasta machine, roll the yellow clay into a thick sheet, approximately 1/4 inch thick. Do the same for the white clay, keeping the thickness consistent.
Fingerprint Fix
If you notice fingerprints on your raw clay beads, lightly brush them with a drop of baby oil or cornstarch before baking to smooth the surface flawlessly.
Step 2: Forming the Beads
-
Cut uniform portions:
To ensure all your yellow beads are the same size, use a small circle cutter or grid lines to cut equal portions of clay from your sheet. You’ll need about 14-16 portions for the yellow beads. -
Roll yellow spheres:
Take each yellow portion and roll it between your palms to create a smooth, round ball. I find using a gentle circular motion helps eliminate seams faster. -
Refine the shape:
Check that your spheres are roughly 10-12mm in diameter. Getting them perfectly round is key to the polished look of the final bracelet. -
Create white cylinders:
Cut 3 smaller portions of white clay. Instead of spheres, roll these into short, thick logs or cylinders. They should be slightly smaller in diameter than your yellow beads but about the same width. -
Flatten the cylinder ends:
Gently tap the ends of the white logs on your work surface to flatten them, creating a clean cylindrical ‘spacer’ shape rather than a tube.
Step 3: Piercing and Baking
-
Pierce the yellow beads:
Hold a yellow sphere gently so you don’t squash it. Use a needle tool to pierce a hole straight through the center. Twist the tool as you push to reduce drag. -
Pierce the white beads:
Pierce the white cylinders through their length (end to end). Make sure the hole is centered. -
Double check holes:
It helps to re-insert the needle tool from the opposite side of each bead to ensure the exit hole is clean and wide enough for your elastic. -
Bake the beads:
Arrange your beads on a ceramic tile or baking sheet lined with parchment paper. Bake according to your polymer clay package instructions (usually around 275°F/135°C for 30 minutes). -
Cool completely:
Let the beads cool down completely inside the oven or on the counter before handling. Polymer clay is fragile when hot and hardens fully as it cools.
Clean Cuts
To prevent the white clay from getting dirty, wipe your tools with an alcohol wipe or baby wipe immediately after working with the yellow clay.
Step 4: Assembly
-
Prepare the elastic:
Cut a piece of elastic cord about 10 inches long. Pre-stretch it by pulling it firmly a few times; this prevents the bracelet from stretching out permanently later. -
Plan the pattern:
Lay out your design on the table. Following the image, group about 5 yellow beads, then add 1 white cylinder spacer. Repeat this pattern three times to create the specific color-blocked rhythm. -
String the beads:
Thread the beads onto the elastic cord in your established order. If the hole is tight, cutting the elastic tip at a sharp angle can help guide it through. -
Check the fit:
Wrap the strung beads around your wrist to check the sizing. Add or remove a yellow bead from the groups if you need to adjust the circumference. -
Tie the knot:
Tie a surgeon’s knot (looping the elastic through twice on the first throw) and pull tight. Add a drop of super glue specifically to the knot for security. -
Finishing touches:
Once the glue is dry, trim the excess elastic tails close to the knot. Ideally, gently tug the knot inside one of the bead holes to hide it.
Now you have a stunning, handcrafted accessory ready to wear or gift to a friend who loves bold colors


Sunshine Ombre Yellow Gradient
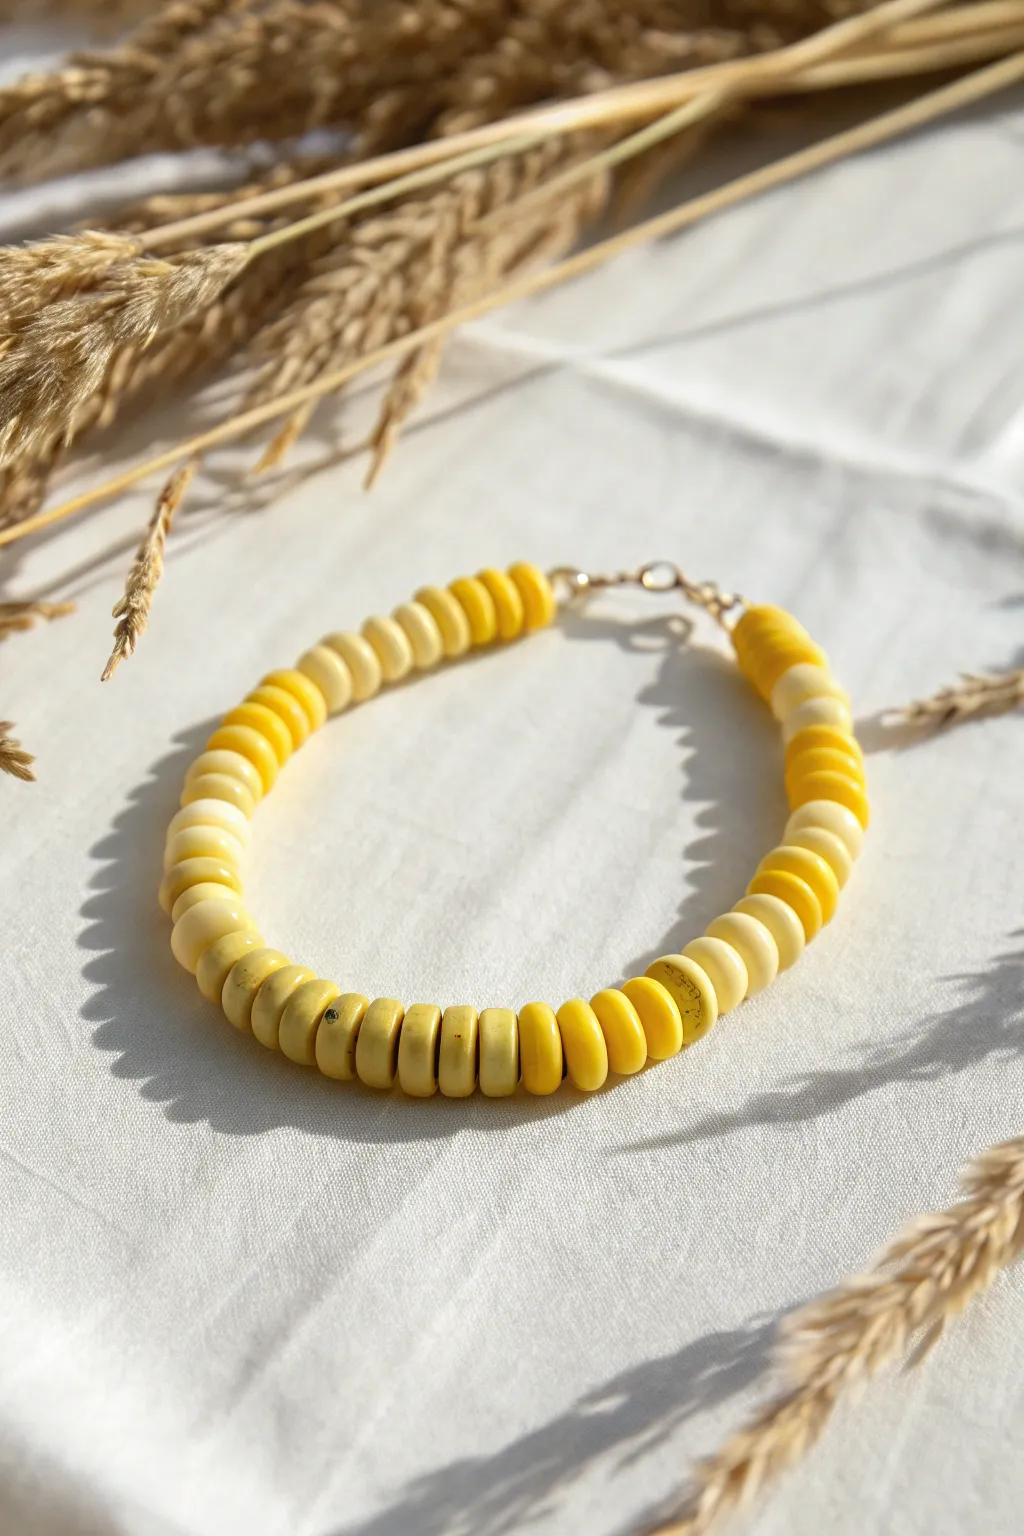
Capture the warmth of a summer day with this cheerful gradient bracelet that blends sunny yellows into creamy whites. The flat disc beads create a sleek, modern texture that sits comfortably on the wrist and adds a pop of brightness to any outfit.
Step-by-Step Tutorial
Materials
- Polymer clay disc beads (heishi beads) in dark yellow/mustard
- Polymer clay disc beads in bright lemon yellow
- Polymer clay disc beads in pale buttercream yellow
- Polymer clay disc beads in cream or off-white
- Gold-filled lobster clasp
- Two gold jump rings (4mm or 5mm)
- Two gold crimp beads (2mm)
- Two gold bead tips or clam shell covers (optional but recommended for a clean finish)
- Flexible beading wire (Tiger Tail or similar quality, 0.38mm)
- Jewelry pliers (flat nose and chain nose)
- Wire cutters
- Bead design board or a piece of felt
Step 1: Preparation and Design
-
Measure your wrist:
Wrap a flexible measuring tape around your wrist to find your size, then add about half an inch for a comfortable fit. -
Cut the wire:
Cut a length of beading wire approximately 10-12 inches long. This gives you plenty of extra room to work with the clasp without struggling. -
Plan the gradient:
Lay out your beads on your design board or felt cloth. To mimic the photo, organize them in sections: start with the darkest mustard hue, transition to the bright lemon, then the pale yellow, and finish with the cream color. -
Refine the ombre effect:
Look closely at your layout. You want distinct blocks of color rather than a mixed scatter. Aim for about 1.5 to 2 inches of each shade, depending on your total wrist size.
Step 2: Stringing the Beads
-
Secure the start:
Thread a crimp bead onto one end of your wire, followed by a jump ring or the loop of your clasp. Pass the wire back through the crimp bead. -
Crimp the end:
Using your flat nose pliers, squeeze the crimp bead firmly to lock the wire in place. I like to give it a gentle tug to ensure it’s secure. -
Hide the tail:
Thread the short tail end of your wire through the first few beads as you string them to hide it neatly. -
Start with the darkest shade:
Begin threading your mustard yellow beads. String enough to cover about a quarter of your bracelet’s length. -
Transition to lemon yellow:
Switch to your bright lemon yellow beads. Continue stringing until this section matches the length of the first block. -
Add the pale yellow:
Now, thread on the pale buttercream beads. Keep checking the length against your wrist or ruler to keep the sections even. -
Finish with cream:
Complete the beading sequence with your lightest cream or off-white beads. The subtle shift from yellow to white creates that lovely ‘sunshine fading’ look. -
Check the fit:
Carefully wrap the unsealed bracelet around your wrist to verify the size. If it feels too tight, add a few more cream beads now.
Stiff Bracelet?
If your bracelet feels rigid, you strung the beads too tightly. Leave a tiny gap (about a hair’s width) near the clasp before crimping to allow movement.
Step 3: Finishing Touches
-
Prepare the final crimp:
Thread a crimp bead onto the open end of the wire. Then, add the jump ring that will connect to your lobster clasp. -
Create the loop:
Pass the wire back through the crimp bead and pull it tight, but leave just enough slack (about 1mm) so the beads can move flexibly and don’t bunch up stiffly. -
Seal the deal:
Flatten the crimp bead securely with your pliers. Ensure the wires aren’t crossed inside the bead for the strongest hold. -
Trim the excess:
Thread the remaining wire tail back through two or three neighboring clay beads, then trim the wire cleanly with your flush cutters close to the beads. -
Attach the clasp:
Open one of your jump rings using two pairs of pliers (twist sideways, don’t pull apart) and attach your lobster clasp. Close the ring securely.
Add a Little Sparkle
Intersperse a tiny gold spacer bead every 5-10 clay beads. It breaks up the matte texture and catches the light wonderfully.
Enjoy wearing your slice of sunshine on your wrist, perfect for brightening up even the cloudy days

The Complete Guide to Pottery Troubleshooting
Uncover the most common ceramic mistakes—from cracking clay to failed glazes—and learn how to fix them fast.
Yellow With Gold-Tone Spacers
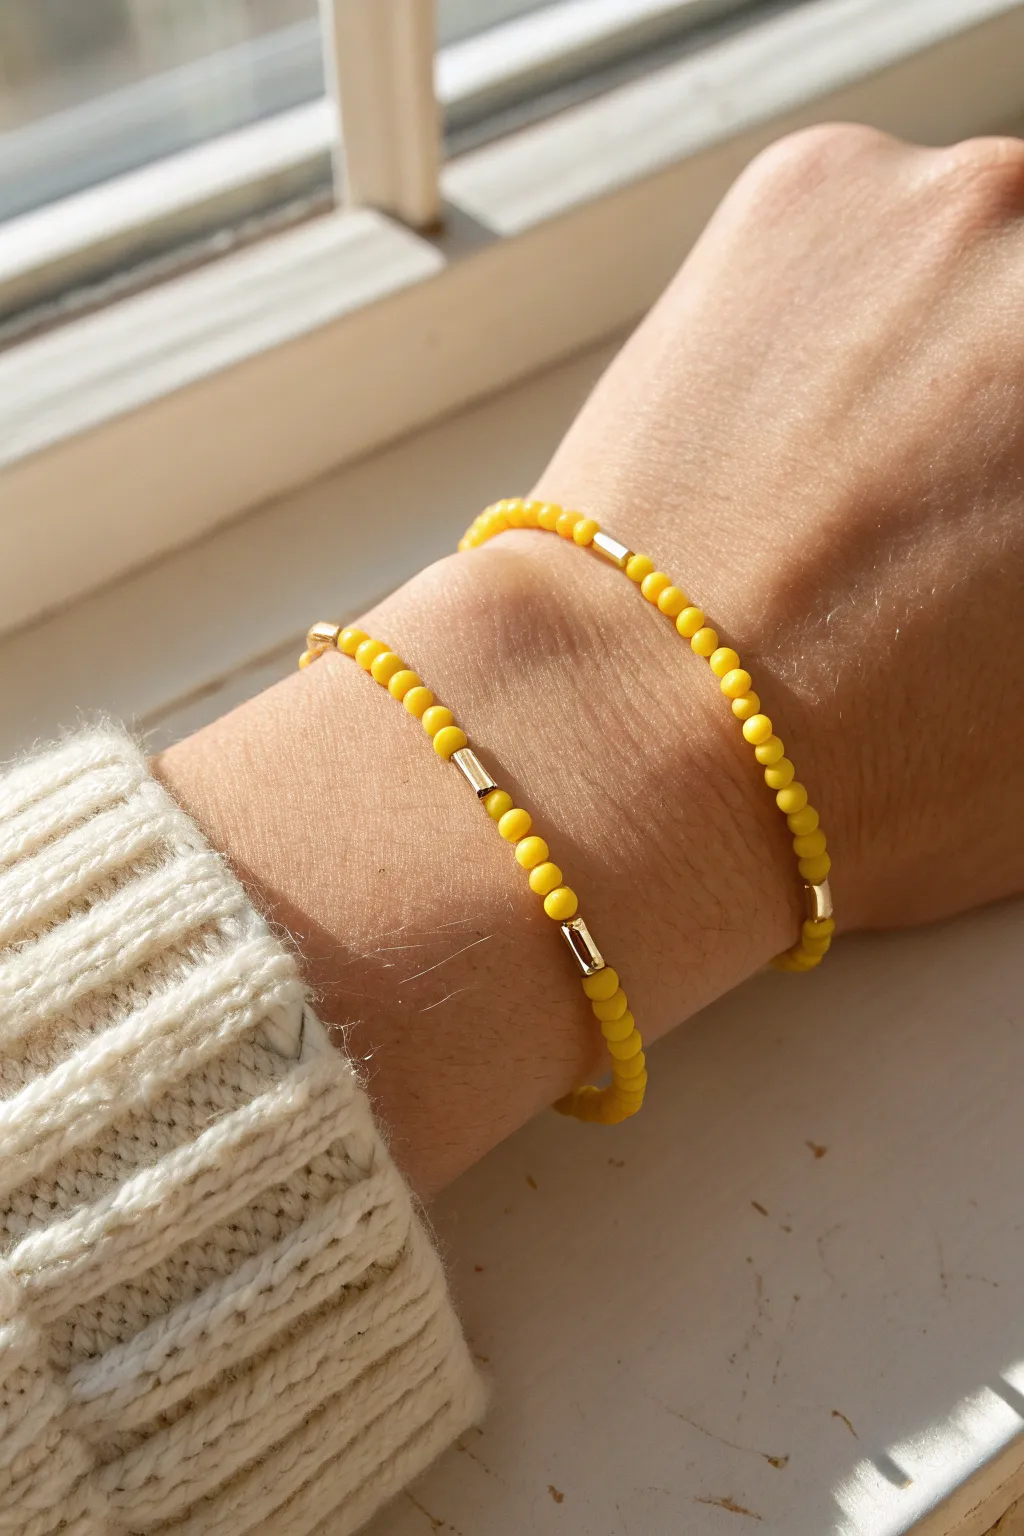
Brighten up your wrist stack with these cheerful yellow beaded bracelets, accented with sleek gold-tone spacers for a touch of elegance. The matte finish of the beads paired with the metallic shine creates a modern, sophisticated look that is perfect for everyday wear.
Detailed Instructions
Materials
- Matte yellow glass seed beads (size 6/0 or 8/0)
- Gold-tone tube spacer beads (approx. 2mm x 4mm)
- Elastic stretch cord (0.5mm or 0.7mm)
- Jewelry glue or clear nail polish
- Scissors
- Tape or bead stopper
- Ruler or measuring tape
Step 1: Preparation
-
Measure your wrist:
Wrap a measuring tape securely around your wrist where you want the bracelet to sit. Note the measurement and add about 1/2 inch to ensure a comfortable fit. -
Cut the cord:
Cut a piece of elastic cord roughly 10-12 inches long. Having this extra length makes it much easier to tie the finishing knot later without struggling. -
Pre-stretch the elastic:
Hold the cord at both ends and give it several gentle tugs. This pre-stretching step helps prevent the elastic from loosening up immediately after you’ve made your bracelet. -
Secure one end:
Place a piece of tape over one end of the cord or attach a bead stopper. This crucial step stops your beads from sliding right off while you work.
Knot Security Tip
When tightening your final knot, pull on the elastic strands individually, then pull the knot itself to cinch it tightly from all directions.
Step 2: Stringing the Design
-
Start with yellow beads:
Thread approximately 10 to 12 matte yellow beads onto the elastic cord. The exact number will depend on how frequently you want the gold spacers to appear. -
Add a gold spacer:
Slide one gold-tone tube spacer onto the cord. This creates the first metallic accent section. -
Create the repeating pattern:
Continue adding sections of 10-12 yellow beads followed by one gold tube spacer. -
Alternative pattern ideas:
For the second bracelet shown in the photo, vary the pattern slightly—try spacing the gold tubes further apart, perhaps every 25 beads, or placing two gold spacers closer together for visual interest. -
Check the length:
Periodically wrap the beaded cord around your wrist to check the fit. You want the ends to meet comfortably without stretching the elastic visibly. -
Adjust bead count:
Add or remove a few yellow beads at the very end to ensure the pattern looks balanced and the size feels just right.
Level Up: Mixed Textures
Mix in a few freshwater pearls or clear crystal beads alongside the yellow ones to add varied textures and light reflection to your stack.
Step 3: Finishing the Bracelet
-
Prepare to tie:
Remove the tape or bead stopper carefully while holding the end of the cord securely. -
Tie the first knot:
Bring both ends together and tie a simple overhand knot. Pull it tight enough so the beads sit snugly together, leaving no gaps of exposed cord. -
Secure with a surgeon’s knot:
Follow up with a surgeon’s knot for extra security. To do this, cross the ends as if tying a normal knot, but loop one end through the circle twice before pulling tight. -
Apply glue:
Dab a tiny drop of jewelry glue or clear nail polish directly onto the knot. I find using a toothpick helps apply it precisely without getting glue on the beads. -
Let it dry:
Allow the glue to dry completely according to the manufacturer’s instructions before moving on. -
Hide the knot:
If possible, gently tug the elastic so the knot slides inside the nearest gold tube bead or larger seed bead, hiding it from view. -
Trim excess cord:
Use your scissors to trim the remaining tail ends of the elastic cord close to the knot (or the bead hiding the knot).
Enjoy wearing your new sunny stack as a daily reminder of brightness and warmth
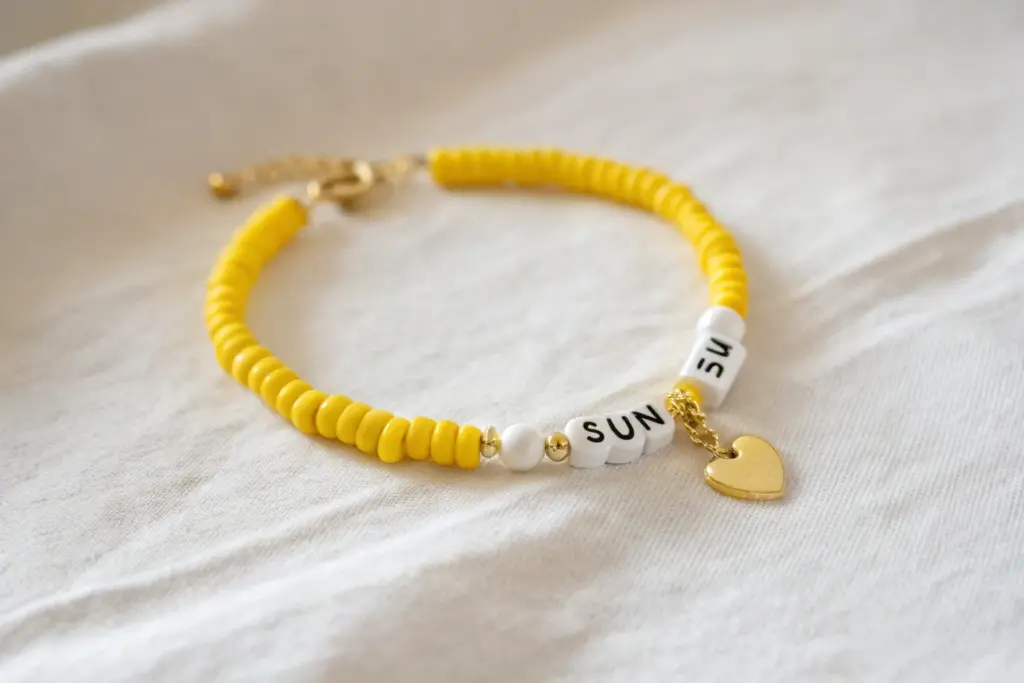
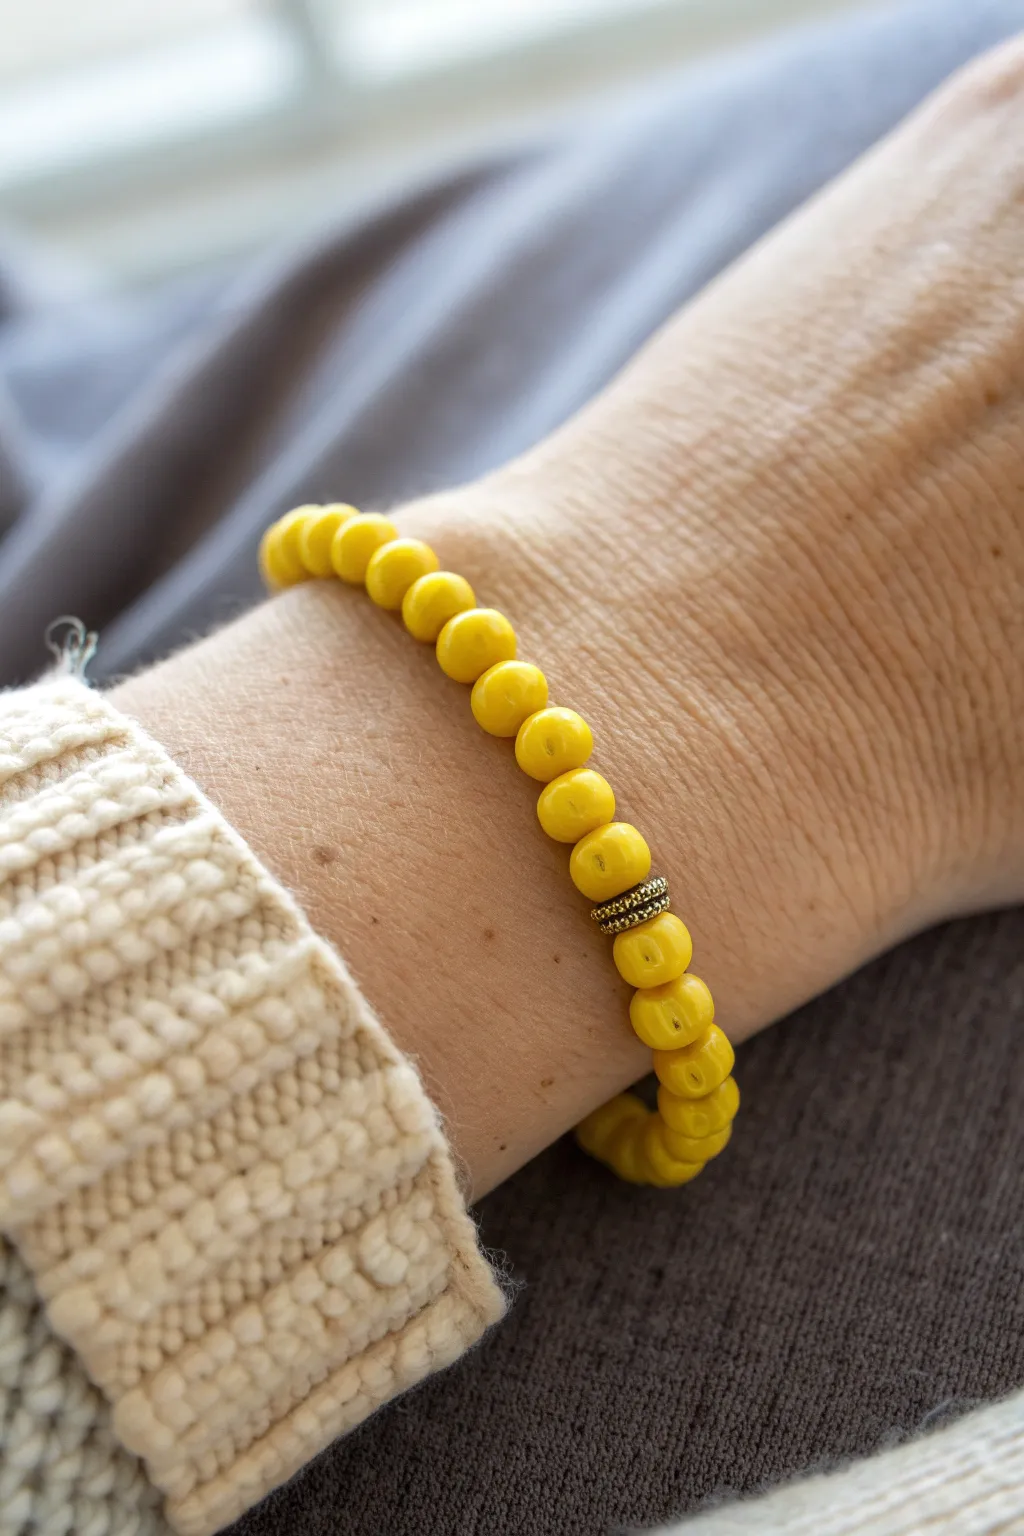
Minimal Center Charm on Yellow Beads
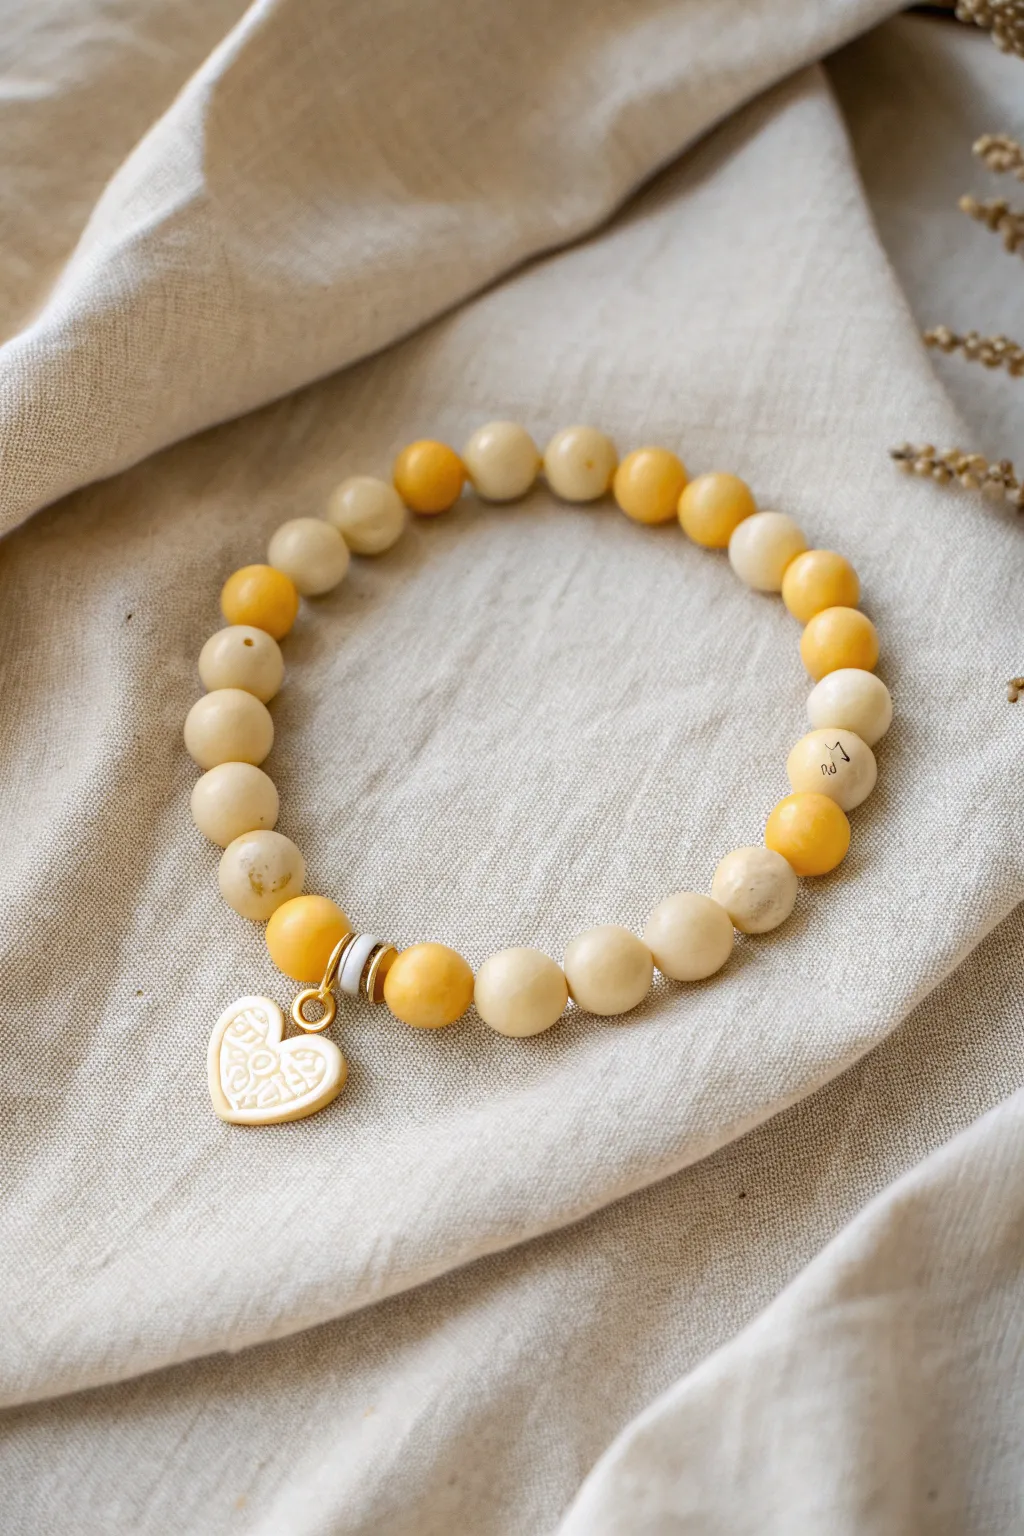
This charming bracelet combines natural bone-colored tones with warm mustard yellow accents for a look that feels both earthy and bright. Featuring a delicate heart charm as the focal point, its simple pattern makes it perfect for everyday wear or a thoughtful handmade gift.
Step-by-Step Guide
Materials
- 8mm round gemstone or clay beads (creamy bone/off-white)
- 8mm round gemstone or clay beads (mustard yellow)
- Elastic beading cord (0.8mm or 1mm thickness)
- Gold heart charm with embossed details
- Gold jump ring (4mm or 5mm)
- 2 small gold spacer beads (flat disc or heishi style)
- 2 small white spacer beads (flat disc or heishi style)
- Beading needle (optional but helpful)
- Scissors
Step 1: Preparation
-
Measure your wrist:
Wrap a piece of string or a soft measuring tape around your wrist to find your size. Add about half an inch to this measurement to ensure the bracelet fits comfortably without being too tight. -
Cut the elastic:
Cut a piece of elastic cord about 10-12 inches long. Having this extra length makes it much easier to tie the finishing knots securely later on. -
Pre-stretch the cord:
Hold both ends of your cut elastic and give it a firm tug a few times. This pre-stretching step helps prevent the bracelet from sagging or loosening up immediately after you finish making it. -
Secure the end:
Attach a piece of tape or a bead stopper to one end of the cord so your beads don’t slide off while you are working.
Step 2: Creating the Pattern
-
String the first section:
Start by stringing about 6 of the bone-colored beads onto the cord. This will form the back section of the bracelet. -
Add first color accent:
Slide on one mustard yellow bead. Follow this with a single bone-colored bead. -
Continue the side pattern:
Add another mustard yellow bead, followed by three bone-colored beads. This creates a gentle rhythm leading toward the front of the bracelet. -
Build the second side:
Repeat the pattern inversely or randomly if you prefer an organic look, but generally, aim for symmetry. Add another yellow bead, a bone bead, and another yellow bead.
Knot Security
Add a tiny drop of flexible super glue or clear nail polish to the knot before hiding it inside a bead. This creates a permanent bond.
Step 3: The Focal Point
-
Prepare the center:
String two bone-colored beads to sit just before the central focal point. -
Start the charm section:
Thread on one mustard yellow bead. This is the left anchor for your charm assembly. -
Add spacers:
Thread on one small white disc spacer, followed immediately by a thin gold spacer bead. -
Attach the charm:
Open your jump ring using pliers, slip the heart charm onto it, and close the ring. Slide this jump ring directly onto the elastic cord next to the gold spacer. -
Finish the center:
Mirror the spacers by adding another gold spacer, then a white spacer. Finish the focal section with a second mustard yellow bead.
Elastic Issues
If the knot won’t hide inside a bead, carefully ream the bead hole slightly larger with a bead reamer tool, or ensure you are using a bead with a large enough bore.
Step 4: Finishing
-
Complete the loop:
Fill in the rest of the cord with bone-colored beads until you reach your desired length. Check the fit by wrapping it around your wrist. -
Tie the knot:
Remove the tape or bead stopper. Cross the two ends of the elastic and tie a simple overhand knot, pulling it tight. I like to follow this with a surgeon’s knot for extra security. -
Hide the knot:
Trim the excess cord, leaving tiny tails. Gently tug the bracelet so the knot slides inside the hole of a neighboring bead, hiding it from view.
Step 5: Optional Variation
-
Ink detail:
If you want to replicate the exact look in the photo, you can use a fine-tip permanent marker to draw a tiny symbol or initial on one of the side bone beads for a personalized touch.
Now you have a beautifully balanced bracelet ready to stack or wear on its own


What Really Happens Inside the Kiln
Learn how time and temperature work together inside the kiln to transform clay into durable ceramic.
Lemon Theme With Yellow Beads

Brighten up your accessory collection with this sunny, citrus-inspired bracelet that perfectly captures the essence of summer. Featuring uniform yellow clay beads and a striking realistic lemon slice focal piece, this design is both playful and chic.
Step-by-Step Tutorial
Materials
- Bright yellow polymer clay
- Translucent white polymer clay
- White opacity polymer clay
- Green polymer clay (sage or olive tone)
- Cream or pale beige polymer clay
- Elastic stretch cord (0.7mm or 0.8mm)
- Clay roller or pasta machine
- Small circular clay cutter (approx. 1.5 cm)
- Needle tool or toothpick
- Clay blade or slicing tool
- Super glue or jewelry adhesive
- Oven for baking
- Bead rolling tool (optional but helpful)
Step 1: Crafting the Yellow Beads
-
Condition the yellow clay:
Start by warming the bright yellow polymer clay in your hands until it is soft and pliable. This conditioning step prevents cracks later on. -
Portion the clay:
Roll the yellow clay into a long, even ‘snake’ or log shape. Use your clay blade to slice equal sized segments. You will need about 18-20 segments for a standard adult wrist. -
Form the spheres:
Roll each segment between your palms to create smooth, round spheres. Try to keep them as uniform as possible, roughly 8-10mm in diameter. -
Add texture (optional):
If you want a slight citrus peel texture, gently roll the surface of the unbaked beads over a piece of fine sandpaper or tap them lightly with a toothbrush. -
Pierce the beads:
Use your needle tool to carefully poke a hole through the center of each yellow sphere. Inspect the hole to ensure it’s clean on both sides.
Hole Distortion?
If your bead holes squish when piercing unbaked clay, let the beads chill in the fridge for 10 minutes first, or drill the holes after baking instead.
Step 2: Creating the Lemon Slice Focal
-
Make the lemon segments:
Create a small cane by wrapping a teardrop-shaped log of translucent yellow clay with a thin sheet of white clay. This mimics the pith around juice sacs. -
Assemble the lemon wheel:
Arrange 8-10 of these teardrop logs in a circle, points facing inward, to form the inner fruit section. -
Add the rind:
Wrap the assembled circle with a layer of white clay for the inner pith, followed by a layer of bright yellow clay for the outer zest. -
Reduce and slice:
Gently compress and roll the cane to adhere the layers, then slice a thick disk (about 4-5mm) for your charm. -
Drill the charm:
Unlike the beads, pierce this slice horizontally through the side so it will lay flat against the wrist. Be very gentle to avoid squishing the pattern.
Step 3: Making Accent Beads & Baking
-
Form the cream accent:
Take a small amount of cream or pale beige clay and roll a single bead, slightly smaller than your yellow ones. -
Create the textured green bead:
Roll a bead using the sage green clay. Use a needle tool to create small divots or a sponge to give it a rough, leafy texture. -
Pierce accent beads:
Create center holes in both the cream and green beads using your needle tool. -
Bake everything:
Arrange all your beads and the lemon slice on a baking sheet lined with parchment paper. Bake according to your brand of clay’s instructions (usually 275°F/135°C for 15-30 minutes). -
Cool down:
Allow the beads to cool completely in the oven before handling. This annealing process makes the clay stronger.
Finish It Off
After baking, brush a thin layer of gloss glaze or UV resin over just the lemon slice ‘pulp’ to make it look wet and juicy.
Step 4: Assembly
-
Cut the cord:
Cut a piece of elastic cord about 10-12 inches long. I always cut extra to make knotting easier. -
Pre-stretch the elastic:
Give the cord a few good tugs. This pre-stretching prevents the bracelet from growing loose after the first few wears. -
String the beads:
Thread your yellow beads onto the cord. Stop when you’ve filled about half the length needed for your wrist. -
Add the focal section:
Thread on the cream bead, then the lemon slice charm, and finally the textured green bead. This creates the centerpiece seen in the photo. -
Finish stringing:
Continue adding the remaining yellow beads until the bracelet reaches your desired length. -
Tie the knot:
Tie a strong surgeon’s knot (right over left, left over right, loop through twice). Pull tight to secure. -
Hide the knot:
Apply a tiny dot of super glue to the knot. Once dry, trim the excess cord and gently pull the knot inside one of the adjacent yellow beads.
Slip this cheerful bracelet on your wrist and enjoy the pop of summer color it brings to your outfit
Bee-Inspired Yellow and Black Accents
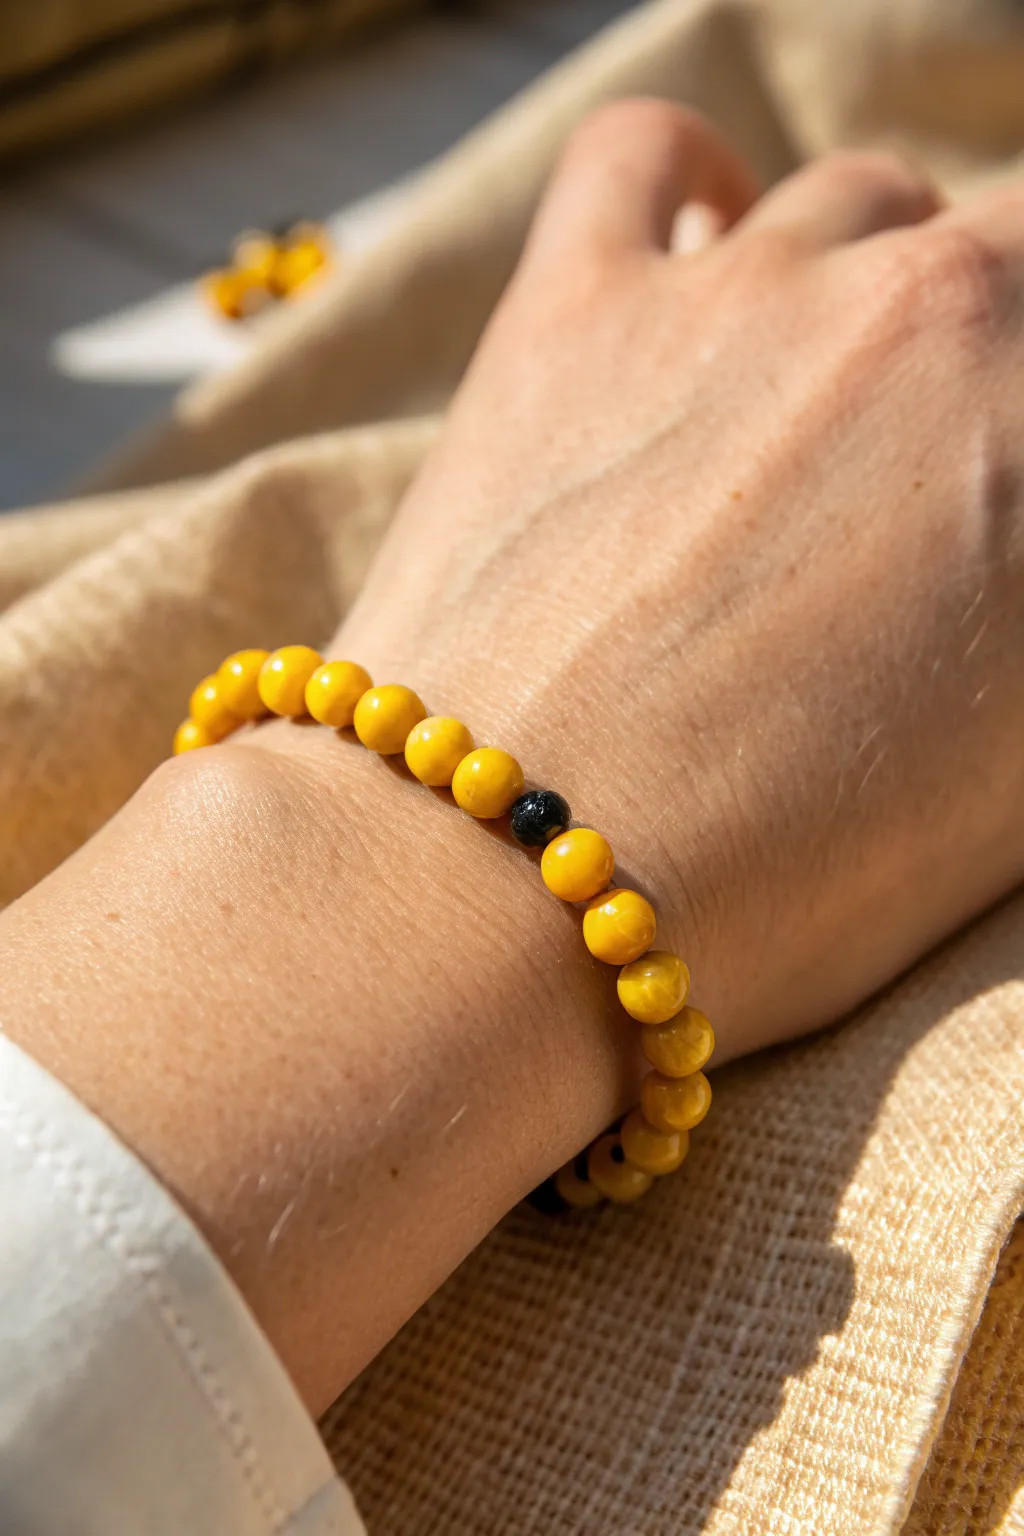
Capture the buzzing energy of summer with this simple yet striking beaded bracelet. Featuring vibrant yellow clay beads punctuated by a single black accent, this design mimics the classic colors of a honeybee in a chic, wearable format.
How-To Guide
Materials
- Bright yellow polymer clay (approx. 2 oz)
- Black polymer clay (small scrap amount)
- Bead roller or acrylic block
- Elastic beading cord (0.8mm or 1mm)
- Beading needle (optional but helpful)
- Super glue or jewelry adhesive
- High-gloss glaze or polyurethane varnish
- Soft paintbrush
- Toothpicks or bead pins
- Baking sheet and cardstock (or bead rack)
- Wet sandpaper (400, 600, and 1000 grit)
- Scissors
Step 1: Shaping the Beads
-
Condition the clay:
Begin by thoroughly kneading your bright yellow polymer clay until it is soft, pliable, and warm to the touch. -
Portion the yellow clay:
Roll the conditioned yellow clay into a long, even snake or log shape, roughly 1/2 inch thick. -
Cut equal segments:
Use a tissue blade or craft knife to slice the snake into equal-sized segments. You will need about 20-22 segments for a standard wrist, but cut a few extra just in case. -
Roll the spheres:
Roll each yellow segment between your palms or use a bead roller to create perfectly round spheres. -
Create the accent bead:
Repeat the conditioning and rolling process with a tiny amount of black clay to create one single black sphere the same size as your yellow ones. -
Pierce the holes:
Gently twist a toothpick or bead pin through the center of each sphere to create the stringing hole. Be careful not to flatten the bead as you push through. -
Smooth the edges:
Inspect the holes for any jagged clay and smooth them down with your finger for a polished look.
Step 2: Baking and Finishing
-
Bake the beads:
Arrange your beads on a baking sheet lined with cardstock or suspend them on a bead rack. Bake according to your polymer clay manufacturer’s instructions (usually 275°F for 15-30 minutes). -
Cool down:
Allow the beads to cool completely before handling them, as the clay is fragile while hot. -
Sand for smoothness:
Dip your beads into water and lightly sand them with 400, then 600, and finally 1000 grit sandpaper to remove any fingerprints or imperfections. -
Apply the glaze:
Using a soft brush, coat each bead with a high-gloss glaze to achieve that shiny, ceramic-like finish seen in the photo. I suggest skewering them on toothpicks stuck into a foam block or cardboard box so they can dry without touching anything. -
Let it cure:
Allow the glaze to dry fully according to the bottle directions, ensuring the surface is hard and tack-free.
Consistent Sizing Trick
Use a small circle cookie cutter or a dedicated clay cutter to punch out circles from a flattened sheet of clay. This ensures every single bead starts with the exact same volume of material.
Step 3: Assembly
-
Measure the cord:
Cut a piece of elastic cord about 10-12 inches long to give yourself plenty of room to tie knots later. -
Pre-stretch the elastic:
Give the elastic cord a few firm tugs. This pre-stretching prevents the bracelet from becoming loose after you wear it a few times. -
String the pattern:
Thread your yellow beads onto the cord. Once you have strung about half of them, add the single black accent bead, then finish with the remaining yellow beads. -
Check the fit:
Wrap the strand around your wrist to check the size. Add or remove yellow beads until it fits comfortably but isn’t too loose. -
Tie the knot:
Tie a secure surgeon’s knot (right over left, left over right) and pull it tight. -
Secure with glue:
Place a tiny drop of super glue or jewelry adhesive directly onto the knot. -
Hide the knot:
Before the glue fully hardens, gently tug the knot inside the hole of the nearest bead to hide it. -
Trim the ends:
Once the glue is dry, trim the excess elastic cord carefully with scissors, being sure not to clip the main knot.
Texture Twist
Before baking, gently roll the black accent bead over a piece of coarse sandpaper or a lava rock to give it a porous, textured look that contrasts beautifully with the smooth, glossy yellow beads.
Now slip on your new accessory and enjoy the sunny pop of color it adds to your day

TRACK YOUR CERAMIC JOURNEY
Capture glaze tests, firing details, and creative progress—all in one simple printable. Make your projects easier to repeat and improve.
Smiley Accent in a Yellow Palette
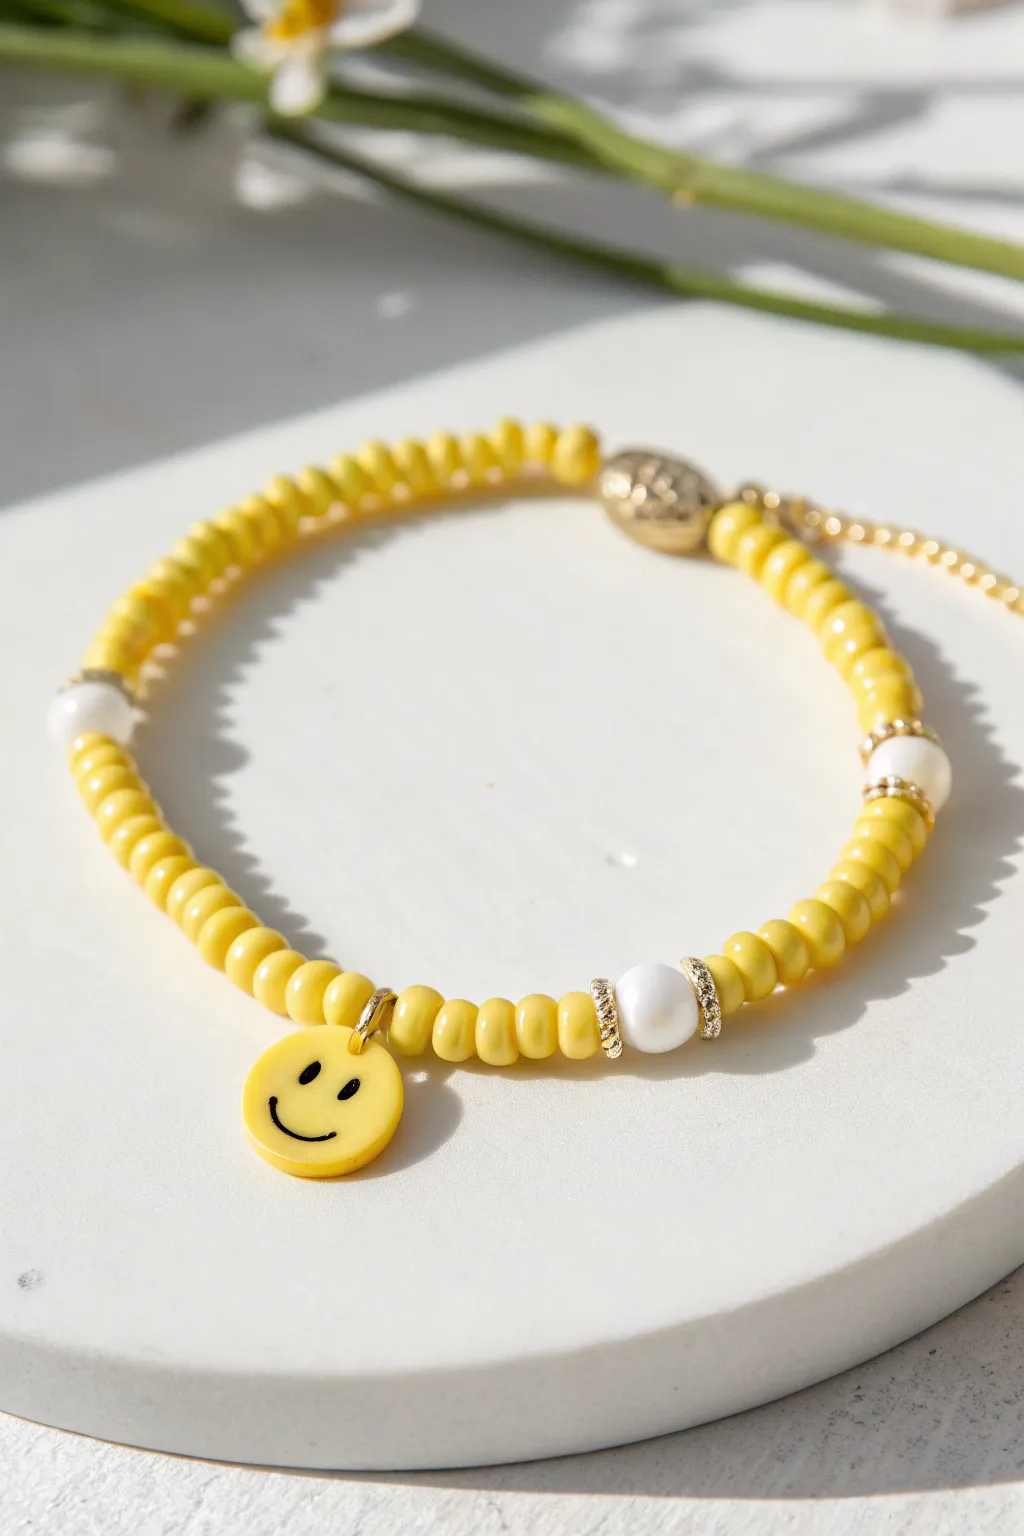
Brighten up your accessories with this cheerful yellow beaded bracelet, featuring a playful smiley face charm as the centerpiece. The combination of opaque yellow beads, lustrous pearls, and gold accents creates a high-end look perfect for summer styling.
Step-by-Step
Materials
- Bright yellow glass seed beads (size 6/0 or 8/0)
- Yellow smiley face charm with gold jump ring
- 3 white faux pearl beads (approx. 6mm or 8mm)
- 6 gold rhinestone rondelle spacer beads
- Gold tone lobster clasp
- Gold tone extension chain
- 2 Gold tone crimp beads
- 2 Gold tone wire guards (optional but recommended)
- Beading wire (gold color or clear)
- Wire cutters
- Crimping pliers
- Chain nose pliers
- Tape or bead stopper
Step 1: Planning and Prep
-
Measure the wire:
Cut a piece of beading wire approximately 10-12 inches long. This gives you plenty of extra room to work with the clasp ends without struggle. -
Secure the end:
Place a piece of tape or a bead stopper on one end of your wire so your beautiful beadwork doesn’t slide right off as you string. -
Map out your pattern:
Lay your beads out on a mat to visualize the spacing. The pattern involves segments of yellow seed beads separated by pearls flanked by gold spacers.
Spacer Sparkle Tip
Ensure your rhinestone spacers are facing the correct way so the stones fit snugly against the round curve of the pearl bead.
Step 2: Stringing the Beads
-
Start the first segment:
Begin stringing your yellow seed beads. Thread on approximately 15-18 yellow beads to create the first solid section of color. -
Add a pearl accent:
Slide on one gold rhinestone rondelle spacer, followed by a white pearl bead. -
Finish the pearl accent:
Add a second gold rhinestone rondelle spacer immediately after the pearl. This sandwiches the pearl in sparkle. -
Second yellow segment:
String another section of yellow seed beads. Count them to match your first section precisely for symmetry, usually around 10-12 beads depending on your wrist size. -
Attach the charm:
Thread the jump ring of your yellow smiley face charm onto the wire so it rests in the center of the design. -
Third yellow segment:
Add another section of yellow seed beads, matching the count of the segment just before the charm. -
Second pearl accent:
Repeat the accent cluster: one gold rhinestone spacer, one white pearl, and one gold rhinestone spacer. -
Fourth yellow segment:
String your next run of yellow seed beads. -
Third pearl accent:
Add your final pearl cluster with the spacers. -
Final yellow segment:
Finish stringing with a final set of yellow seed beads to complete the circle.
Step 3: Finishing Touches
-
Check the fit:
Carefully wrap the strand around your wrist to ensure it’s the right length, remembering the clasp adds about half an inch. -
Prepare the first crimp:
Remove the tape/stopper. Slide a crimp bead onto the wire, followed by a wire guard (if using) and the loop of the lobster clasp. -
Thread back:
Pass the wire tail back through the crimp bead and pull it snug, leaving just a tiny bit of slack so the clasp can move freely. -
Secure the crimp:
Use your crimping pliers to flatten or fold the crimp bead securely. I like to give it a gentle tug to make sure it holds. -
Trim excess wire:
Trim the short tail of wire close to the crimp bead, or tuck it into the adjacent bead holes. -
Attach the extension chain:
Repeat the crimping process on the other end of the bracelet, attaching the extension chain instead of a clasp.
Stacking Style
Create a matching bracelet using only the white pearls and gold spacers for a sophisticated layered stack.
You now have a radiant, happy accessory ready to wear or gift.
Yellow and Turquoise Summer Combo
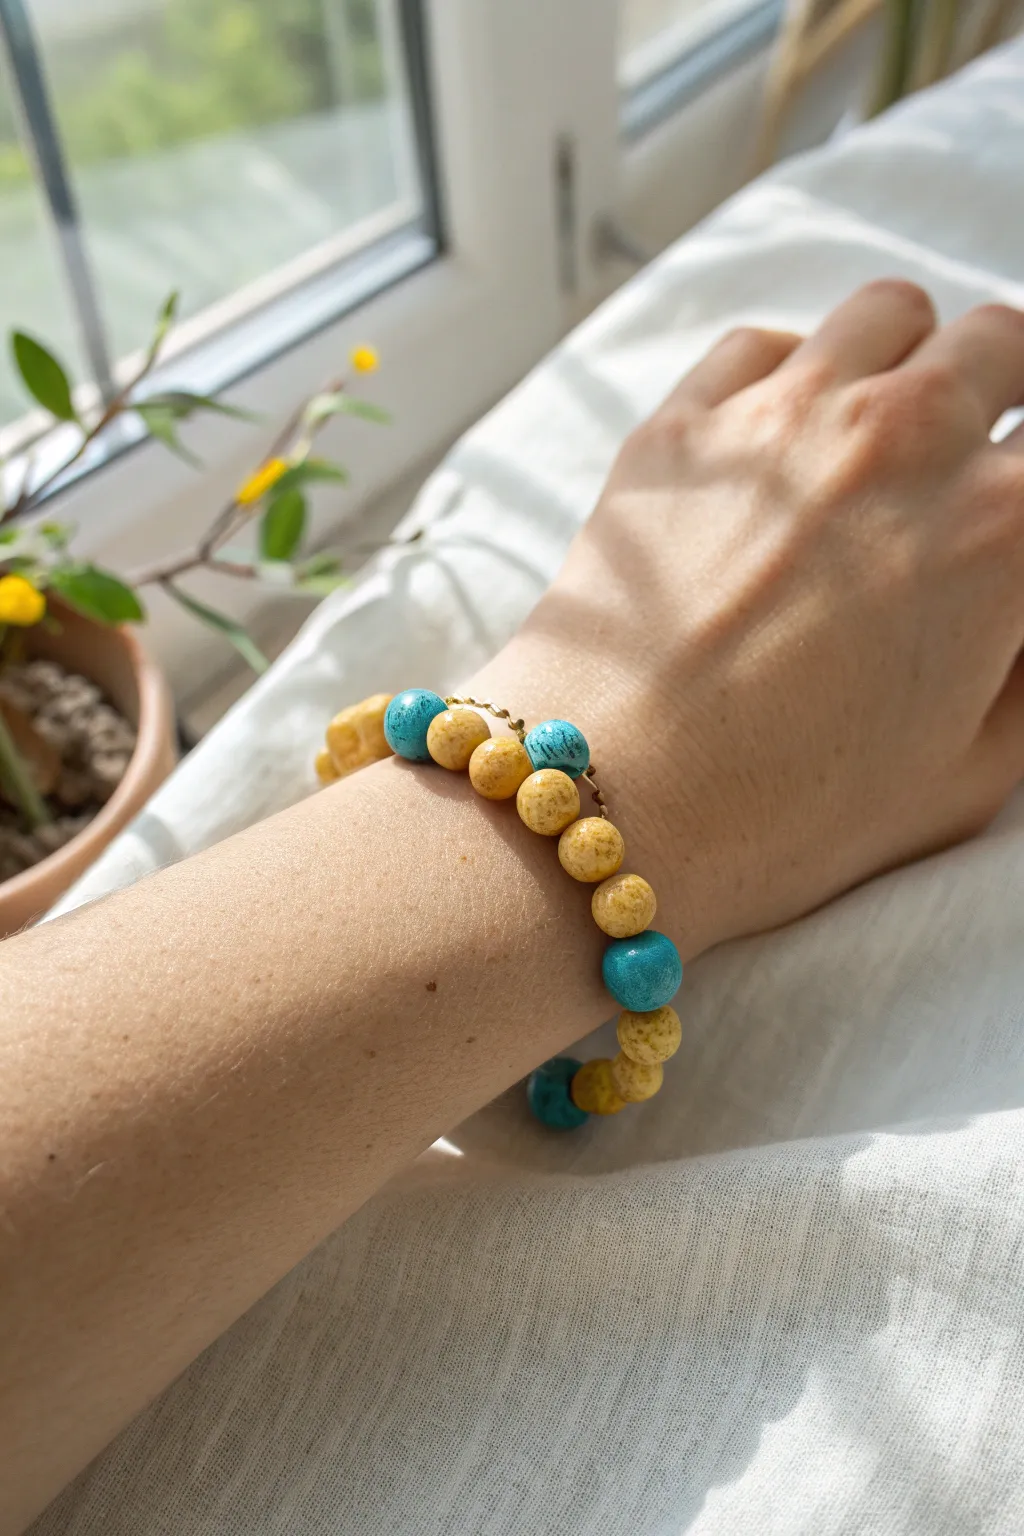
Brighten up your wrist stack with this cheerful combination of mustard yellow and vibrant turquoise beads that perfectly captures the warmth of a summer afternoon. The organic, speckled texture of the yellow beads adds a beautiful rustic charm when paired with the cool, smooth pop of blue.
Step-by-Step Tutorial
Materials
- Approximately 20-25 round mustard-yellow beads (8-10mm)
- 6-8 Turquoise round beads (8-10mm) with black matrix/veining
- Strong elastic bead cord (0.8mm or 1mm thickness)
- Bead stopper or binder clip
- Jewelry glue (hypo-cement)
- Scissors
Step 1: Planning and Preparation
-
Measure your wrist:
Before cutting any string, take a loose measurement of your wrist where you want the bracelet to sit. Add about half an inch to this number to account for the bulk of the larger beads. -
Cut the cord:
Cut a piece of elastic cord about 10-12 inches long. Having this extra length is crucial for tying a secure knot later without struggling. -
Pre-stretch the elastic:
Give your cut piece of elastic a few firm tugs. This pre-stretching step helps prevent the bracelet from loosening up and sagging immediately after you wear it. -
Secure the end:
Attach a bead stopper or simple binder clip to one end of the cord. This simple safety measure saves you from the frustration of beads sliding right off while you work.
Step 2: Designing the Pattern
-
Layout your beads:
Lay your beads out on a bead board or a soft towel. This prevents them from rolling away and lets you visualize the color balance before threading. -
Create the segments:
Look at the image: the pattern isn’t perfectly alternating. Arrange a sequence of about 4 to 5 yellow beads followed by a single turquoise bead. -
Adjust the variation:
For a more organic look, I sometimes like to vary the pattern slightly—maybe do three yellow, one blue, then five yellow, one blue. It keeps the design feeling handmade and custom. -
Check the visual weight:
Ensure your turquoise ‘pops’ are spaced somewhat evenly so the color surrounds the wrist rather than clumping on just one side.
Sticky Situation?
If the knot won’t fit inside a bead hole because the hole is too small, simply trim the tails very close and dab clear nail polish on the knot to smooth it down.
Step 3: Stringing and Finishing
-
Begin threading:
Start sliding your beads onto the elastic cord, following the pattern you laid out. Keep the tension light; don’t force them. -
Check the fit:
Once all chosen beads are on, carefully wrap the strand around your wrist. The ends should touch comfortably without stretching the elastic yet. -
Remove the stopper:
Bring both ends of the cord together and carefully remove the bead stopper, holding the ends firmly to prevent spillage. -
Tie the first knot:
Cross the ends and tie a simple overhand knot. Pull it snug to bring the beads together into a circle. -
Secure with a surgeon’s knot:
For the main security, tie a surgeon’s knot: cross the threads, wrap one end through the loop twice, and pull tight. This extra wrap provides significant friction. -
Apply adhesive:
Dab a tiny drop of jewelry glue or hypo-cement directly onto the knot. You don’t need much, just enough to seep into the fibers. -
Hide the knot:
While the glue is still slightly tacky, pull the elastic firmly so the knot slides inside the hole of the nearest large bead. -
Trim the excess:
Once the glue has fully dried (wait at least 15 minutes), use your sharp scissors to trim the excess cord tails close to the bead hole.
Add Some Shine
Elevate this earthy look by adding a small gold spacer bead or a flat gold disc on either side of the turquoise beads for a touch of metallic contrast.
slip this sunny accessory on your wrist and enjoy the warm, handmade vibe it brings to your outfit
Yellow and Lavender Color-Pop Mix
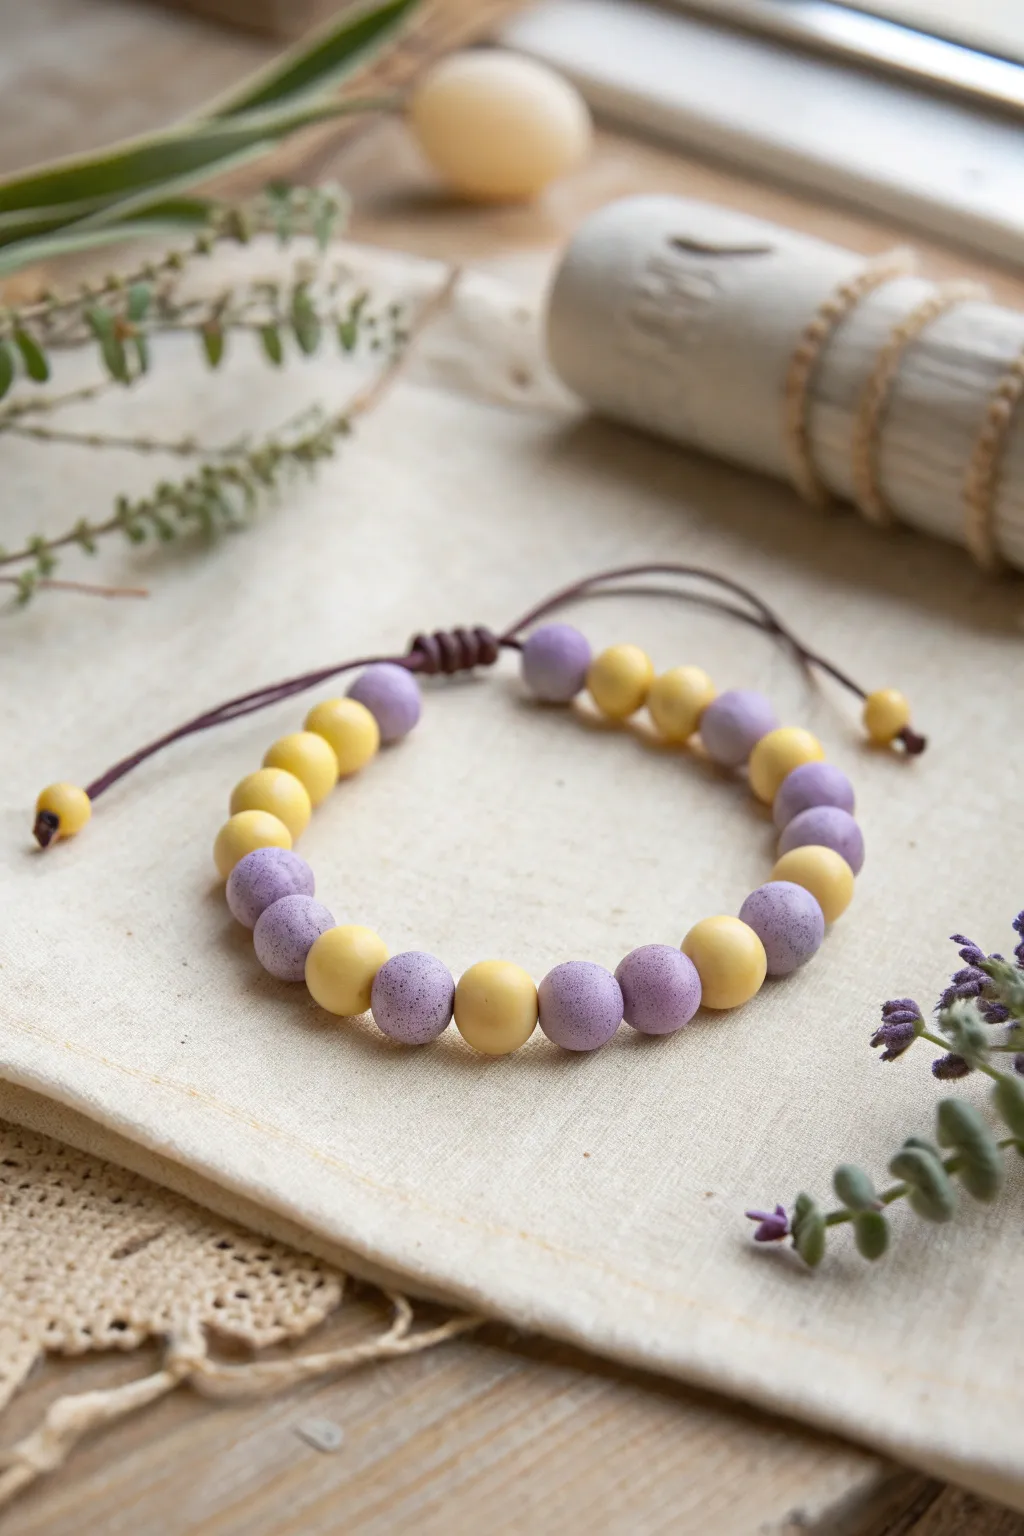
This charming bracelet captures the essence of a summer field with its playful mix of sunny yellow and speckled lavender beads. The textured finish on the purple clay mimics the grainy feel of natural stone, creating a delightful contrast against the smooth, buttery yellow accents.
Step-by-Step
Materials
- Polymer clay (sunny yellow)
- Polymer clay (lavender/light purple)
- Coarse salt or sandpaper (for texturing)
- Dark brown waxed cotton cord (1mm thickness)
- Bead reamer or toothpick
- Ruler
- Scissors
- Oven for baking clay
Step 1: Crafting the Clay Beads
-
Condition the yellow clay:
Start by warming the sunny yellow polymer clay in your hands, kneading it until it is soft and pliable. -
Size the yellow beads:
Roll the yellow clay into a long, even log about 1/2 inch thick, then slice it into equal segments to ensure your beads will be uniform in size. -
Roll spheres:
Roll each yellow segment between your palms to form perfectly smooth, round spheres. -
Prepare the lavender clay:
Condition the lavender clay just as you did the yellow, rolling it into a log and cutting equal segments. -
Apply texture:
Roll the lavender segments into balls. To get that unique speckled look, I like to gently roll the raw bead over a sheet of coarse sandpaper or lightly press coarse salt into the surface (brushing the salt off after baking). -
Create holes:
Using a toothpick or bead reamer, carefully pierce a hole through the center of every bead. Rotate your tool while pushing through to avoid squashing the sphere. -
Bake the beads:
Arrange all your beads on a baking sheet lined with parchment paper. Bake according to your clay package instructions (usually around 275°F/130°C for 15-30 minutes). Allow them to cool completely.
Sticky Situation?
If fingerprints are showing up on your smooth yellow beads, lightly brush them with a drop of baby oil or cornstarch before baking to smooth them out.
Step 2: Stringing and Assembly
-
Cut the cord:
Cut a piece of waxed brown cord approximately 12 inches long. This will be your main bracelet strand. -
Stiffen the tip:
Briefly burn the very tip of the cord with a lighter or apply a dab of glue and roll it to create a stiff ‘needle’ for easier stringing. -
Arrange the pattern:
Plan your pattern on your workspace. The image shows a repeating sequence: two yellow, one purple, one yellow, one purple, and so on, though you can randomize it for an organic feel. -
String the beads:
Thread the beads onto the cord in your chosen pattern until the beaded section measures about 6 to 6.5 inches. -
Check the fit:
Wrap the beaded section around your wrist to ensure it covers the top and sides comfortably without overlapping underneath.
Step 3: Creating the Adjustable Closure
-
Prepare for the knot:
Cross the two loose ends of the bracelet cord over each other to form a circle. -
Cut the knotting cord:
Cut a separate piece of brown cord, about 10 inches long. -
Tie the square knots:
Center the new 10-inch cord under the crossed bracelet threads. Begin tying macramé square knots around those crossed threads. Continue for about half an inch. -
Secure the closure:
Trim the excess tails of the knotting cord (not the bracelet cords!) close to the knots. Dab a tiny bit of glue on the cut ends or carefully melt them to secure the sliding mechanism. -
Add stopper beads:
Slide one small yellow bead onto each remaining tail of the main bracelet cord. -
Knot the ends:
Tie a simple overhand knot at the very end of each tail to keep the stopper beads in place, then trim any excess cord.
Add Some Sparkle
Mix a tiny pinch of silver mica powder into the lavender clay before rolling. It adds a subtle shimmer that catches the light like morning dew.
Now you have a refreshing, handmade accessory perfect for brightening up any outfit
Yellow and Cream Checkerboard Blocks
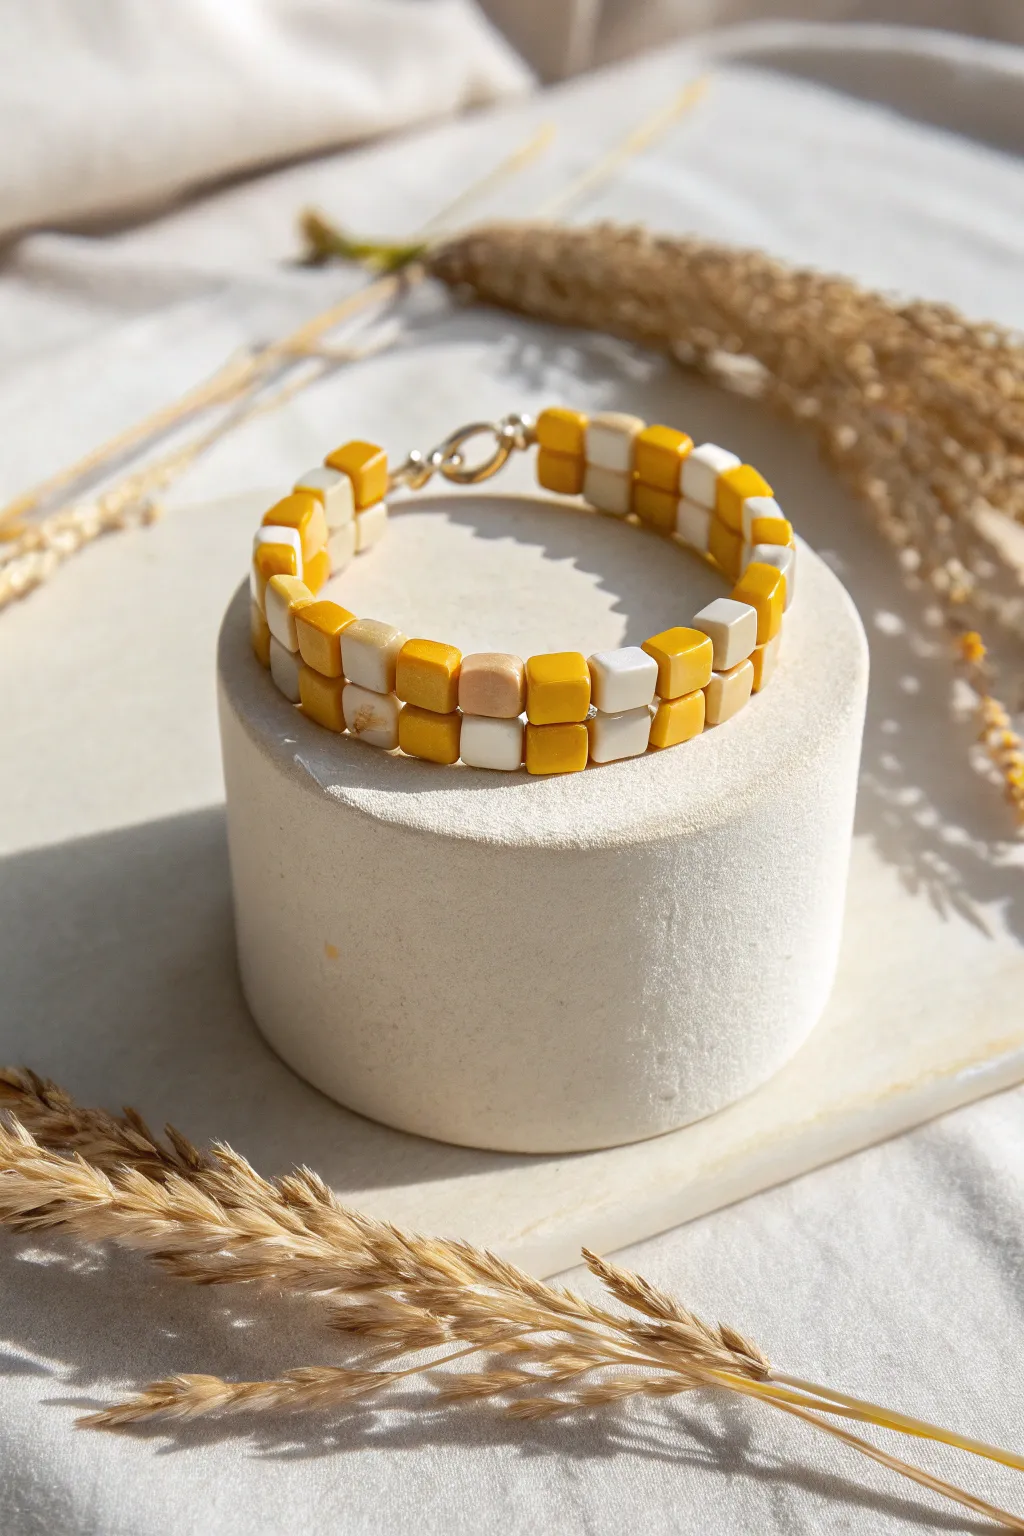
Brighten up your wrist stack with this cheerful design that alternates vibrant mustard yellow with soft cream and subtle peach tones. This project uses two-hole tile beads to create a flat, structured band that feels as good as it looks.
Step-by-Step Guide
Materials
- 5mm square two-hole beads (Mustard Yellow)
- 5mm square two-hole beads (Cream/Off-White)
- 5mm square two-hole beads (Pale Peach/Beige)
- Beading thread (like Fireline or Nymo) in white or beige
- Two beading needles (size 10 or 12)
- Jump rings (4mm or 5mm, silver or gold tone)
- Lobster clasp closure
- Scissors
Step 1: Setting Up
-
Cut and Thread:
Cut a generous length of beading thread, about 4-5 feet (1.5 meters). This style is best made using a two-needle technique for stability. -
Needle Prep:
Thread a needle onto each end of your single piece of thread. You will be working with both needles simultaneously. -
Attach the First Jump Ring:
Slide one jump ring to the very center of your thread. This will serve as the connection point for half of your clasp. -
Secure the Ring:
Pass one needle back through the jump ring so the thread loops around it securely, ensuring the ring stays centered.
Tension Is Key
Keep thread tight but not rigid. If the bracelet creates a ‘wave’ when laid flat, your tension might be too high; loosen slightly.
Step 2: Weaving the Body
-
First Row Setup:
Pick up one yellow bead. Pass the left needle through the left hole and the right needle through the right hole of the same bead. -
Tighten the Bead:
Slide the bead all the way down to the jump ring. Ensure the thread tension is snug so the bead sits flush against the ring. -
Second Bead Addition:
Repeat the process with a cream bead. Pass the left needle through the left hole and the right needle through the right hole, stacking it directly below the yellow bead. -
Establishing the Pattern:
Begin your checkerboard pattern. For the third row, switch back to yellow or introduce the peach accent bead depending on your desired regularity. -
Double Needle Technique:
Continue adding one bead at a time. The key is to always pass both needles through their respective sides of the new bead simultaneously or one after the other before sliding it down. -
Creating the Grid:
As you build length, the two parallel threads running through the beads keep them perfectly aligned in a straight column. -
Check fit:
Periodically wrap the developing bead column around your wrist. Remember the clasp will add about half an inch to the final length.
Step 3: Adding the Second Column
-
Reversing Direction:
Once the first column is the correct length, exit the last bead. Instead of adding a clasp yet, we need to build the second column upwards. -
Bridge the Gap:
Pick up a new bead for the second column (use a contrasting color to the adjacent bead in column one). Usually, this means if your last bead was yellow, pick up cream. -
Stitching Through:
Pass your needle through the empty second hole of the new bead, then pass it SIDEWAYS through the side of the bead from column one. This is how many multi-hole bead patterns connect, though strict ladder stitching works best here. -
Simplifying the Stack:
Actually, for a simpler construction shown here, many crafters bead two separate columns and stitch them together, or use 2-hole beads that are actually double-width. If using single squares, simply repeat the first column steps to make a second identical strand. -
Joining Columns:
Lay your two beaded columns side-by-side. Using a fresh thread, stitch back and forth between the inner holes of the left column and the inner holes of the right column to zip them together securely.
Mixed Finishes
Mix varying finishes like matte yellow with glossy cream or pearlescent peach to add sophisticated depth to the simple pattern.
Step 4: Finishing Touches
-
Closing the Ends:
At the top and bottom of your now double-wide bracelet, bring your threads out through the final beads. -
Attaching Clasp Hardware:
Loop the threads through your second jump ring multiple times to secure it firmly to the beadwork. -
Knotting Off:
Weave your thread ends back down into the beadwork, tying several half-hitch knots between beads to secure the thread. -
Add the Clasp:
Open your jump rings using pliers and attach the lobster claw clasp to one end. -
Final Trim:
Trim any excess thread close to the beadwork carefully, ensuring you don’t nick your knots.
Enjoy wearing your geometric, sunny accessory individually or stacked with other textures
Speckled Terrazzo-Style Yellow Beads
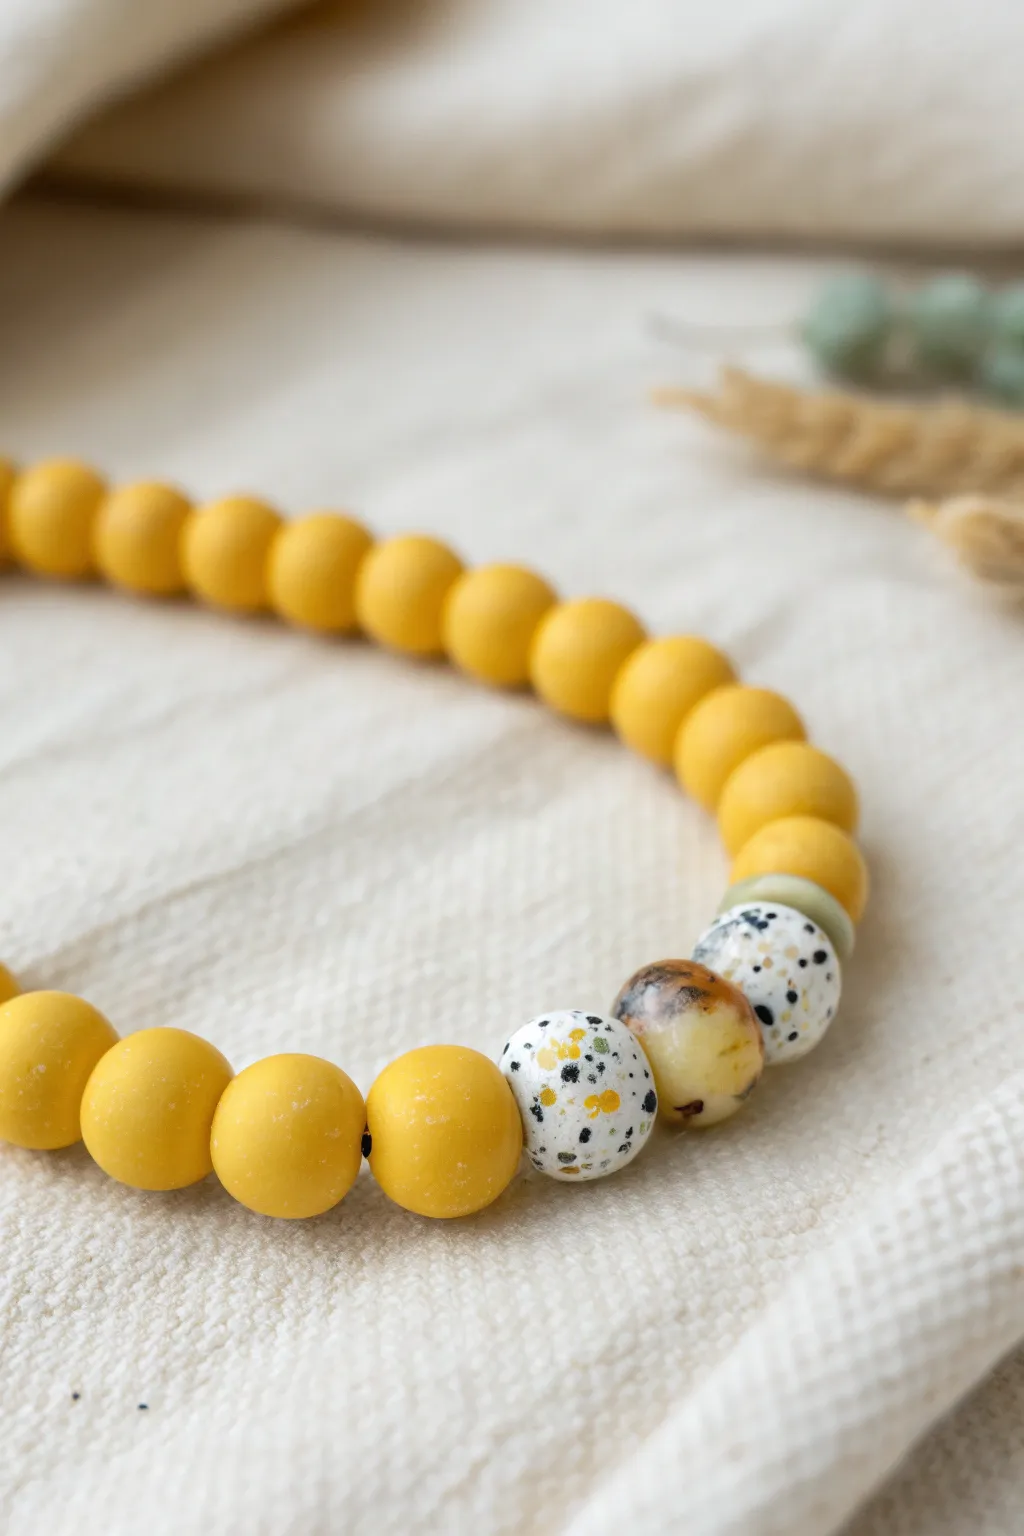
This cheerful bracelet combines smooth matte yellow beads with vibrant terrazzo-style accents for a playful, modern look. The custom polymer clay beads mimic stone textures, adding an artistic focal point to a sunny accessory.
Step-by-Step Tutorial
Materials
- Polymer clay in sunflower yellow, white, black, and translucent amber/brown
- Bead rolling tool or acrylic block
- Toothpicks or a bead piercing pin
- Elastic stretch cord (0.7mm or 0.8mm)
- Super glue or jewelry cement
- Scissors
- Needle nose pliers (optional)
- Baking sheet and parchment paper
- Wet/dry sandpaper (400-800 grit)
- Soft cloth or denim for buffing
Step 1: Creating the Base Beads
-
Condition the yellow clay:
Start by warming up your sunflower yellow polymer clay in your hands until it becomes soft and pliable. This conditioning step prevents cracks during baking. -
Measure equal portions:
Roll the conditioned yellow clay into a long snake about 1/2 inch in diameter. Use a blade to slice off roughly 20-25 equal-sized segments to ensure your beads will be uniform. -
Roll the spheres:
Take each segment and roll it between your palms to form a rough ball. For a perfectly spherical finish, I like to use a bead roller or gently swirl the ball under a flat acrylic block on your work surface. -
Pierce the holes:
While the clay is still raw, gently twist a toothpick or piercing pin through the center of each yellow sphere. Rotate the bead as you pierce to keep the shape from distorting.
Clean Hands, Clean Clay
White clay picks up lint easily. Use baby wipes to clean your hands and work surface thoroughly before switching to the white clay steps.
Step 2: Making the Terrazzo Accent Beads
-
Prepare the speckles:
Take tiny pinches of black and yellow clay. Rub them between your fingers to create very fine crumbs or ‘sprinkles’. Keep these separate for now. -
Form the white base:
Condition a piece of white clay and roll it into a ball slightly similar in size to your yellow beads to serve as the base for your terrazzo accents. -
Apply the terrazzo bits:
Roll the white ball over your scattered black and yellow clay crumbs. Gently press the crumbs into the surface so they embed completely into the white clay. -
Smooth the surface:
Re-roll the speckled bead between your palms to smooth out the surface again, ensuring the speckles are flush with the white base. Repeat this process to make a second speckled bead if desired, perhaps varying the colors like the black-only dalmatian style shown. -
Create the faux amber bead:
Mix a small amount of translucent amber clay with a tiny touch of brown opaque clay. Don’t mix it thoroughly; stop when you have a marbling effect. -
Shape the focal bead:
Roll this marbled mixture into a ball. This bead will sit between your speckled ones, adding a warm, natural stone look. -
Pierce accent beads:
Carefully pierce holes through your terrazzo and amber accent beads, ensuring the holes are large enough for your elastic cord.
Varnish Variation
For a glossy ceramic look instead of matte, coat your finished baked beads with a thin layer of UV resin or polymer clay gloss varnish.
Step 3: Baking and Finishing
-
Bake carefully:
Arrange all your beads on a parchment-lined baking sheet. Bake according to your clay manufacturer’s instructions (usually 275°F for 15-30 minutes). -
Cool down:
Let the beads cool completely before handling. They are fragile when hot and harden as they cool. -
Buff for matte finish:
Once cool, lightly buff the yellow beads with specialized wet/dry sandpaper or a piece of denim to achieve that velvety matte texture shown in the photo.
Step 4: Assembly
-
Cut the cord:
Cut a piece of elastic cord about 10 inches long. Pre-stretch it by pulling firmly on the ends a few times to prevent the bracelet from loosening later. -
String the beads:
Thread your beads onto the cord. Start with the main run of yellow beads, then add your focal section: first a terrazzo bead, then the amber bead, and finally the second speckled bead. -
Check the fit:
Wrap the strand around your wrist to check the size. Add or remove yellow beads as needed for a comfortable fit. -
Tie the knot:
Tie a surgeon’s knot (loop the cord through twice on the first pass, then tie a standard overhand knot on top). Pull tight to secure. -
Secure and trim:
Dab a tiny drop of super glue on the knot. Allow it to dry, then trim the excess cord ends close to the knot. Optionally, hide the knot inside one of the hole openings.
Now flip your wrist and admire how the sunlight catches those playful speckled details
Marbled Yellow and White Swirl Focals
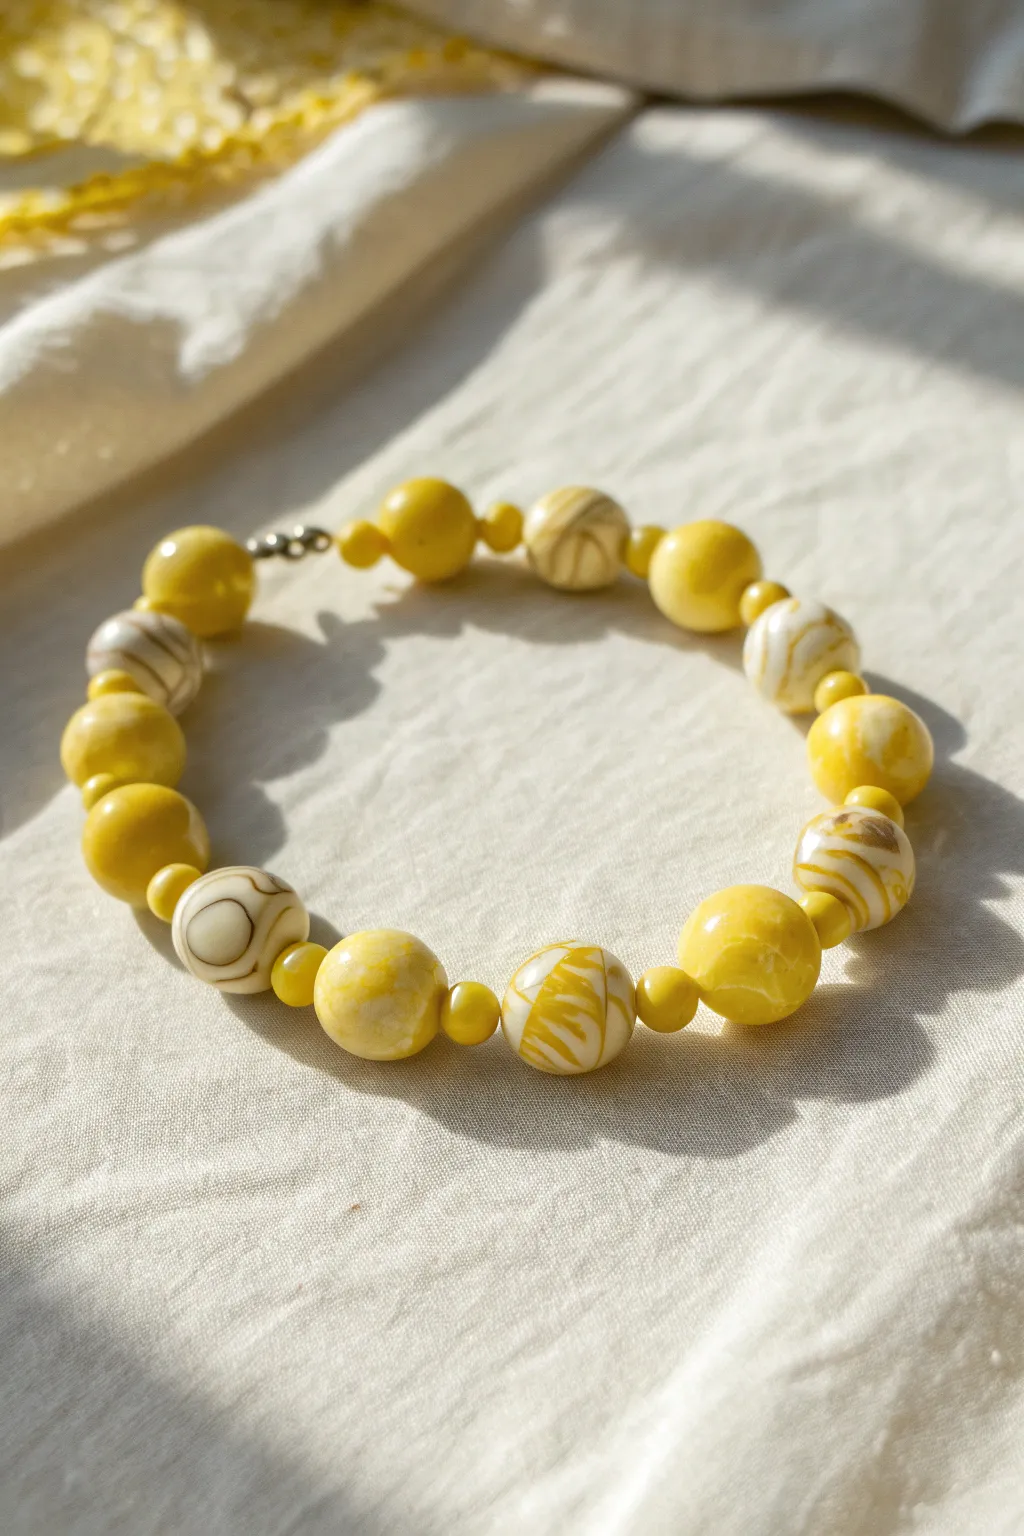
Brighten up your accessories collection with this cheerful bracelet featuring handmade polymer clay beads. The design alternates between solid sunny yellow spheres and intricate white-and-yellow marbled focal beads, creating a delightful rhythm of color and pattern.
Step-by-Step
Materials
- Polymer clay in ‘Sunflower Yellow’ (or similar bright yellow)
- Polymer clay in ‘White’ and ‘Translucent’
- Bead roller tool (optional but helpful for uniform shapes)
- Needle tool or thick toothpick for piercing
- Baking sheet and cardstock paper
- Wet/dry sandpaper (400, 600, 1000 grits)
- Buffing wheel or denim cloth
- Gloss glaze (optional)
- Small yellow spacer beads (glass or acrylic, approx 3-4mm)
- Beading elastic cord (0.8mm or 1mm)
- Jewelry glue (E6000 or similar)
- Crimp bead cover (optional to hide the knot)
- Small silver clasp (optional, if not making it stretch)
Step 1: Creating the Clay Canes
-
Condition the Clay:
Begin by thoroughly conditioning your yellow and white polymer clay separately until they are soft and pliable. Warm clay helps creating smoother blends later. -
Prepare the Marbling Mix:
To achieve the swirled look, take a chunk of white clay and a smaller chunk of yellow clay. Roll each into a snake shape. -
Twist and Fold:
Twist the two snakes together like a candy cane. Fold the twisted log in half and twist again. Repeat this process until you see fine streaks of yellow running through the white, stopping before the colors fully blend into a light yellow. -
Add Variation:
For some beads, add a tiny sliver of translucent clay into the mix. This adds depth to the marble effect once baked.
Smooth Surface Secret
Before baking, lightly dust your fingers with cornstarch and give the beads one final roll. This helps smooth out microscopic ridges and prevents fingerprints.
Step 2: Forming the Beads
-
Portion the Clay:
Cut your solid yellow clay and your marbled clay log into equal-sized segments. You’ll need roughly 8-10 solid pieces and 6-8 marbled pieces, depending on your wrist size. -
Roll the Spheres:
Roll each segment between your palms to create smooth, round spheres. Aim for a diameter of about 10-12mm for the main beads. -
Refine the Shape:
I like to use an acrylic bead roller here to get them perfectly spherical, but rolling them gently in circular motions on a tile works too. -
Pierce the Holes:
While the beads are still raw, gently twist a needle tool or toothpick through the center of each bead. Twist as you push to avoid squishing the shape. -
Double Check Holes:
Poke the hole from the opposite side as well to ensure a clean exit channel without jagged edges.
Step 3: Baking and Finishing
-
Bake the Beads:
Place your beads on a baking sheet lined with cardstock (to prevent shiny flat spots). Bake according to your clay manufacturer’s instructions, usually around 275°F (130°C) for 30-45 minutes. -
Cool and Sand:
Allow the beads to cool completely. Dip them in water and sand lightly with 400, then 600, then 1000 grit sandpaper to remove any fingerprints or imperfections. -
Buff to Shine:
vigorously rub the beads with a piece of denim or use a buffing wheel to bring out a natural satin sheen. If you prefer high gloss, apply a thin coat of glaze now.
Pattern Play
Try swapping the small spacer beads for tiny gold metal beads or crystal rondelles. The metallic sheen adds a touch of elegance to the playful clay.
Step 4: Assembly
-
Cut the Cord:
Cut a piece of elastic cord about 10 inches long. Pre-stretch it by pulling it firmly a few times to prevent the bracelet from sagging later. -
Start Stringing:
Secure one end of the cord with a piece of tape or a bead stopper. Begin threading your beads. -
Create the Pattern:
Follow the pattern shown in the image: Thread one large bead (alternating between solid yellow and marbled), followed by a small yellow spacer bead. Repeat until you reach the desired length. -
Check the Fit:
Wrap the strand around your wrist to check the fit. Add or remove beads as necessary, ensuring the pattern stays consistent. -
Tie the Knot:
Tie a secure surgeon’s knot (right over left, left over right). Pull tight. -
Secure and Trim:
Add a tiny drop of jewelry glue to the knot. Let it dry, then trim the excess cord. If possible, tug the knot inside one of the larger clay beads to hide it.
Wear your sunny creation with pride or gift it to someone who needs a little brightness in their day
Texture Mix: Discs and Round Yellow Beads
Brighten up your accessory collection with this cheerful yellow beaded bracelet, featuring smooth, round clay beads that radiate warmth. The design gets a touch of sophistication from a central stack of textured metallic spacer beads, breaking up the color with a subtle shimmer.
Step-by-Step Tutorial
Materials
- Round yellow polymer clay beads (approx. 6mm or 8mm)
- Antique gold or brass textured spacer beads (disc shape, approx. 4-5mm)
- Stretch cord (0.8mm or 1mm clear elastic)
- Bead stopper or masking tape
- Jewelry adhesive (e.g., G-S Hypo Cement)
- Scissors
Step 1: Preparation
-
Measure your wrist:
Wrap a flexible measuring tape around your wrist where you want the bracelet to sit. Note the measurement and add about 1/2 inch to ensure a comfortable fit that isn’t too tight. -
Prepare the cord:
Cut a piece of stretch cord about 10-12 inches long. Having this extra length makes it much easier to tie the finishing knots securely later on. -
Pre-stretch the elastic:
Hold the cord at both ends and give it several firm tugs. I consider this a crucial step because it prevents the bracelet from loosening up and sagging after the first few times you wear it. -
Secure the end:
Attach a bead stopper to one end of the cord, or simply fold a piece of masking tape over the tip, to create a barrier that stops beads from sliding off while you work.
Sticky Situation?
If the knot is too large to fit inside a bead hole, widen the hole slightly using a bead reamer or a small drill bit twisted by hand.
Step 2: Creating the Pattern
-
Check bead holes:
Before stringing, quickly inspect your yellow clay beads. Use a needle or pin to clear out any excess clay residue from the holes to ensure the cord passes through smoothly. -
Start stringing yellow beads:
Thread approximately half of your required yellow round beads onto the cord. This will form one side of the bracelet leading up to the focal point. -
Add the first metal spacer:
Slide on one of the antique gold disc spacers. Its flat surface will sit flush against the round curve of the yellow bead. -
Create the focal stack:
Depending on the thickness of your spacers, add 2-3 more metal discs. In the example, we use a small stack of textured rings to create a single, unified metal band effect. -
Finish the yellow strand:
Continue stringing the remaining yellow clay beads until the beaded section matches your determined wrist length. -
Check the fit:
Carefully wrap the beaded strand around your wrist to check the sizing. The ends should meet comfortably without gaps, but without stretching the cord yet.
Variation Idea
Swap the central gold stack for a single, larger patterned bead or a charm to change the bracelet’s focal point completely.
Step 3: Finishing Touches
-
Remove the stopper:
Hold both ends of the cord securely so no beads escape, then remove the bead stopper or tape from the tail end. -
Tie the first knot:
Cross the left cord over the right and pull tight to perform a simple overhand knot. Pull the elastic taut to bring the beads snugly together. -
Tie a surgeon’s knot:
Cross the cords again, but this time loop one end through the circle twice before pulling tight. This extra loop adds significant friction to hold the knot in place. -
Apply adhesive:
Dab a tiny drop of jewelry adhesive directly onto the knot. This seals the elastic and prevents it from unraveling over time. -
Let it set:
Allow the glue to dry for at least 15 minutes before handling. Don’t rush this part, or the knot might slip while the glue is wet. -
Hide the knot:
Trim the excess cord ends close to the knot, leaving about 1mm. Gently pull the elastic to slide the knot inside the hole of the nearest yellow bead to conceal it.
Slip on your new sunny accessory and enjoy the pop of color it brings to your outfit
Sunset Stack With Yellow as the Hero
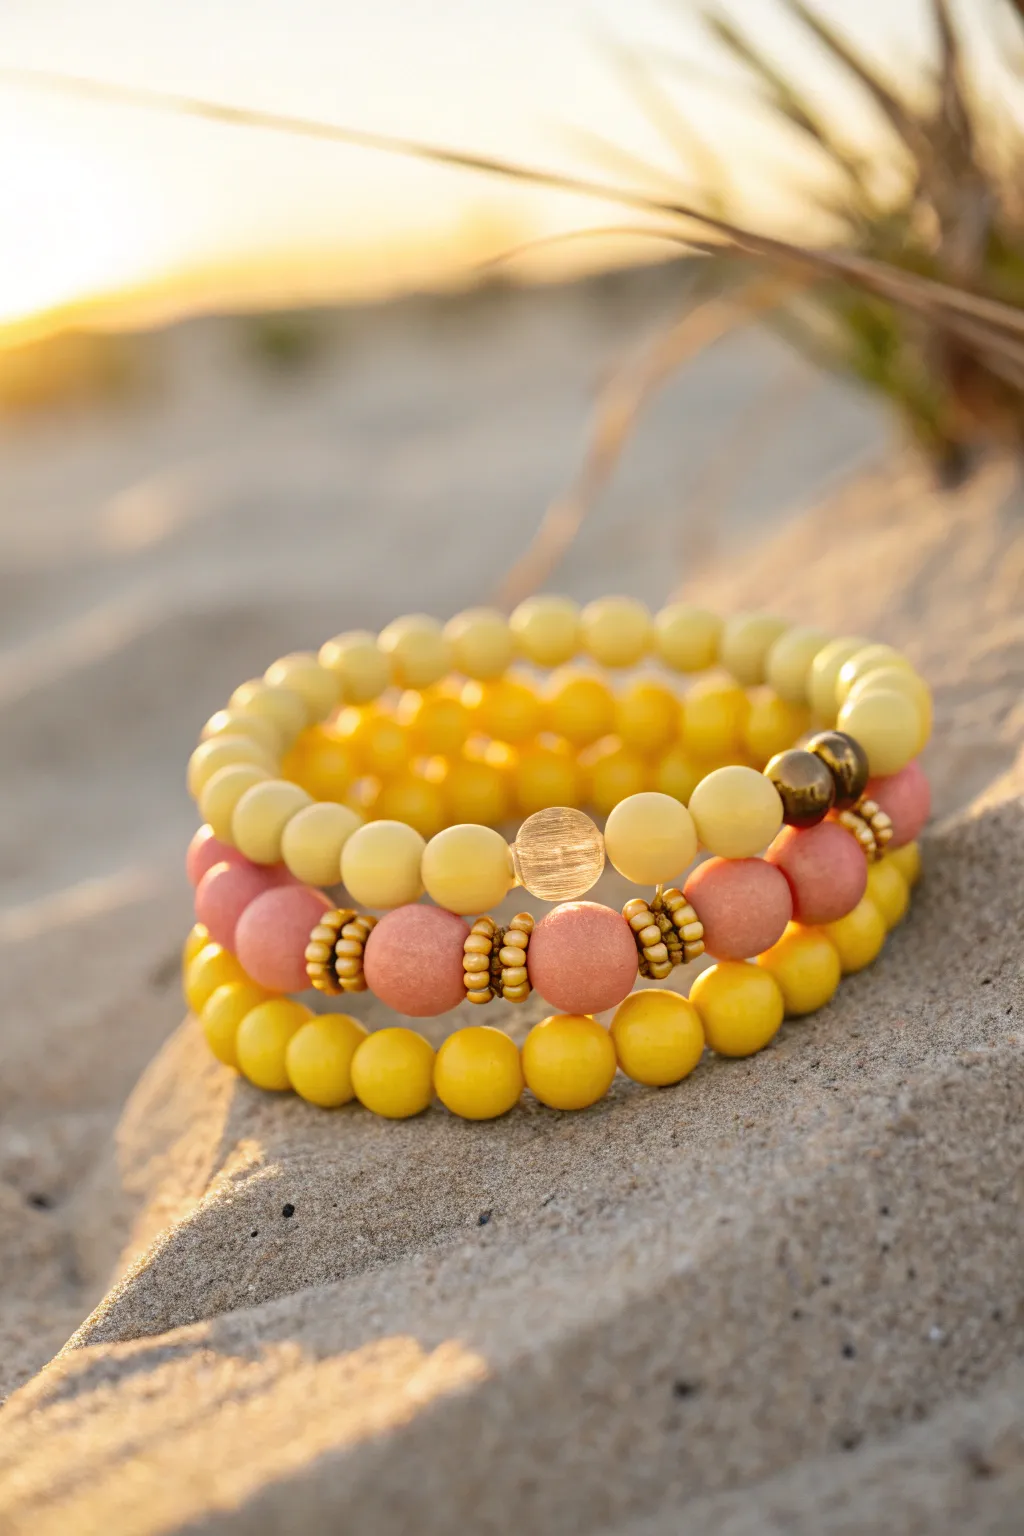
Capture the golden hour with this stunning set of three stretch bracelets featuring varied shades of yellow, soft peachy pink, and textured metallic accents. The mix of matte, glossy, and natural finishes mimics the warmth of sunlight hitting the sand.
How-To Guide
Materials
- 0.8mm clear elastic stretch cord
- 8mm matte yellow beads (top bracelet)
- 8mm translucent/glass yellow focal bead
- 8mm peach/coral round wood or matte stone beads (middle bracelet)
- Small gold disc spacers or heishi beads
- 8mm glossy bright yellow beads (bottom bracelet)
- Two large bronze/antique gold metal beads (top bracelet)
- Small gold spacer beads for ends
- Jewelry glue (e.g., G-S Hypo Cement)
- Scissors
Step 1: Golden Haze (Top Bracelet)
-
Prepare the cord:
Cut a piece of elastic cord about 10-12 inches long. Give it a gentle pre-stretch to prevent the finished bracelet from sagging later. -
Start the pattern:
Begin by stringing approximately 10-12 of your matte pale yellow beads. These form the bulk of the bracelet’s calm, sandy tone. -
Add the focal point:
Slide on one translucent or clear yellow glass bead to catch the light. Follow this immediately with one matte pale yellow bead. -
Add metallic accents:
String on the two large bronze or antique gold metal beads. Their darker tone grounds the airy yellow colors. -
Finish the strand:
Continue adding the matte pale yellow beads until the strand reaches your desired wrist size (standard is about 7 inches). -
Tie it off:
Tie a secure surgeon’s knot (right over left, left over right). Add a tiny dab of jewelry glue to the knot before trimming the excess cord.
Step 2: Peach Horizon (Middle Bracelet)
-
Start the second strand:
Cut another length of elastic cord and pre-stretch it just as before. -
Create space:
String on about 4-5 of the matte peach/coral beads to begin. These add that soft sunset warmth to the stack. -
Build the gold sections:
To create the textured gold separators, stack 3-4 small gold disc spacers or heishi beads together. Follow this with one matte peach bead. -
Repeat the texture:
Repeat the previous step (3-4 gold spacers, then a peach bead) two more times so you have three distinct gold sections. -
Complete the loop:
Fill the rest of the strand with the remaining peach beads until it matches the size of your first bracelet. -
Secure the bracelet:
Knot the elastic securely, apply your adhesive, let it dry for a moment, and trim the tails closely.
Knot Security
When tying elastic, pull the cord tightly enough that the beads bunch slightly. This ensures no gaps appear when the bracelet stretches over your hand.
Step 3: Sunlight Pop (Bottom Bracelet)
-
Prepare the final cord:
Cut your third piece of elastic cord, remembering to pre-stretch it to remove the initial slack. -
String the brights:
This simple layer uses only the glossy bright yellow beads. String them continuously until you have a full circle. -
Check the fit:
Before tying, hold this strand against the other two completed bracelets to ensure they are all the exact same diameter. -
Final connection:
Tie your final surgeon’s knot, glue specifically on the knot, and trim excess cord carefully. -
Hide the knots:
If possible, gently tug the elastic so the knots slip inside one of the adjacent beads to hide them from view.
Texture Play
Swap the matte peach beads for lava stone beads. You can add a drop of essential oil to them, turning your stack into a diffuser bracelet.
Now you have a beautifully coordinated stack that brings warmth to any outfit