
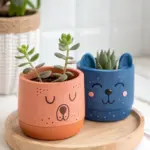
Halloween pottery painting is basically my favorite excuse to play with bold color, moody silhouettes, and tiny little details that make a piece feel alive. Here are my go-to ideas that look amazing on the shelf and still feel totally doable at a cozy studio table.
Classic Jack-o’-Lantern Faces

Transform a plain bisque pumpkin mug into a festive fall favorite with this classic Jack-o’-Lantern design. The vibrant orange glaze and crisp black features create a cheerful, timeless look perfect for sipping hot cider.
How-To Guide
Materials
- Bisque pumpkin mug (pre-molded shape)
- Bright orange underglaze (e.g., Duncan Concepts ‘Neon Orange’ or similar)
- Jet black underglaze
- Clear dipping glaze or brush-on clear glaze
- Large soft fan brush
- Medium round brush
- Fine liner brush or detail brush
- Damp sponge
- Pencil (optional)
Step 1: Preparation and Base Coat
-
Clean the bisque:
Start by wiping down the entire pumpkin mug with a damp sponge. This removes any dust from the shelf that could prevent the glaze from adhering properly. -
First coat of orange:
Using a large soft fan brush, apply your first coat of bright orange underglaze to the exterior of the mug. Brush horizontally around the pumpkin shape, ensuring you get into the deep grooves. -
Check coverage:
Don’t worry if the first coat looks streaky; underglazes are designed to be layered. Just make sure you haven’t missed any significant white spots, especially near the handle attachment. -
Dry and repeat:
Let the first coat dry until it loses its sheen (usually 5-10 minutes). Apply a second generous coat, brushing in a slightly different direction if possible to smooth out brushstrokes. -
Third coat for vibrancy:
Applying a third coat is key for that solid, opaque pumpkin color seen in the photo. Let this final orange layer dry completely before moving on. -
Interior glazing:
For the inside, you can either continue with the orange or choose a contrasting color like yellow or black. Use your fan brush to apply three solid coats to the interior, ensuring the bottom is well covered.
Fixing Wobbly Lines
If your black lines look shaky, wait for them to dry. Then, take a small stiff brush dampened with water and gently ‘push’ the black glaze back into a straight line.
Step 2: Adding the Face
-
Sketch the features:
If you’re nervous about freehand painting, use a regular pencil to lightly sketch the triangle eyes and nose, and the curved mouth. The pencil lead will burn off in the kiln, leaving no trace. -
Outline the eyes:
Switch to your fine liner brush loaded with jet black underglaze. Carefully outline the two triangular eyes. I find resting my pinky on the table helps stabilize my hand for these straight lines. -
Fill the eyes:
Using a small round brush, fill in the triangle outlines with black. Apply 2-3 coats to ensure the black is solid and doesn’t look washed out after firing. -
Paint the nose:
Paint the small triangle nose in the center, positioning it slightly lower than the eyes. Keep the edges sharp and clean. -
Draft the smile:
Use the liner brush to paint the long, curved line of the mouth. Start from the center and work outward to keep it symmetrical, adding small vertical ticks for the ‘teeth’ marks. -
Thicken the mouth line:
Go back over the mouth line to thicken it slightly, giving it that carved look. Just like the eyes, ensure you apply enough layers of black so it stands out against the bright orange.
Make It Glow
For a ‘lit from within’ look, paint the eyes and mouth bright yellow first, then outline them thinly in black instead of filling them in completely solid.
Step 3: Finishing Touches
-
Clean up smudges:
If any black glaze strayed outside the lines, wait for it to dry, then gently scratch it off with a toothpick or a stiff clean brush. You can touch up with a dab of orange if needed. -
Let it dry completely:
Allow the entire mug to dry overnight or for several hours. The bisque should feel room temperature, not cool to the touch. -
Clear glazing:
If you have access to a dipping tank, dip the mug once into clear glaze using dipping tongs. If brushing, apply two coats of clear brush-on glaze over the entire piece, letting it dry between coats. -
Wipe the foot:
Use a wet sponge to wipe all glaze off the bottom ‘foot’ of the mug where it sits on the table. This prevents it from fusing to the kiln shelf. -
Fire the piece:
Load the mug into the kiln and fire to cone 06 (or the temperature specified by your clay and glaze manufacturer). Once cooled, your jack-o’-lantern is ready for coffee.
Enjoy using your festive handmade mug for all your autumn beverages


Black Cat Plates With Bright Eyes
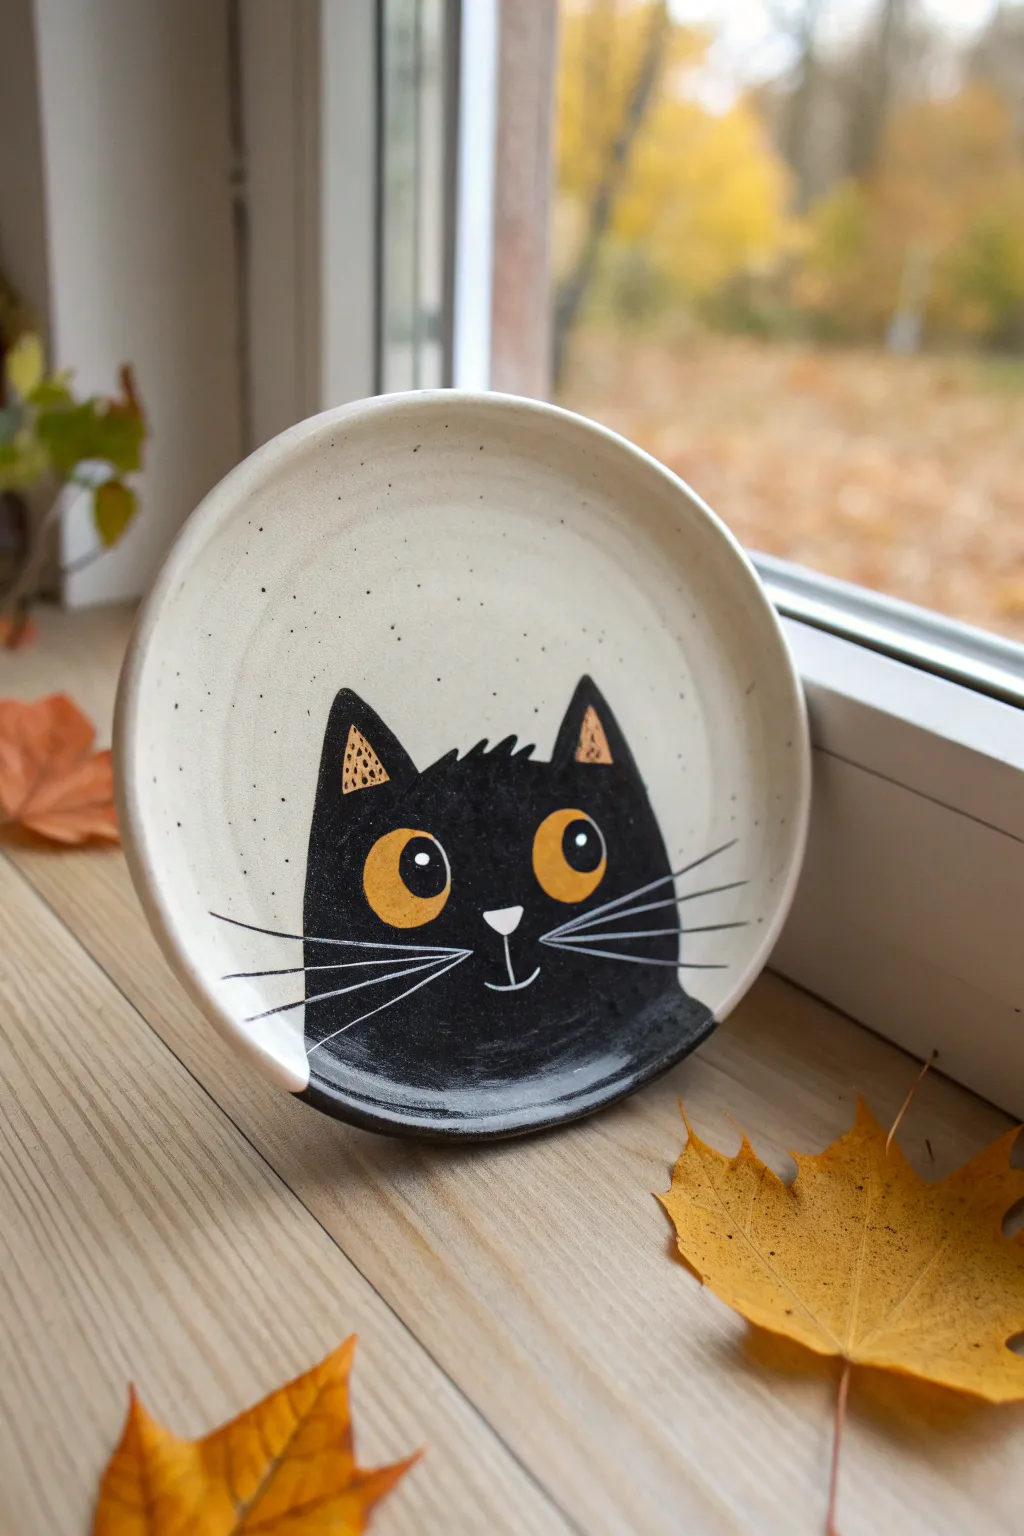
Capture the charm of Halloween with this adorable black cat design that peeks up from the bottom of your ceramic plate. The contrast between the speckled white glaze and the glossy black feline creates a striking, modern look perfect for seasonal decor or everyday use.
Detailed Instructions
Materials
- Bisque ceramic plate (rimmed or coupe style)
- Black underglaze
- Speckled white glaze (such as Mayco ‘Speckled Stroked & Coat’ or simliar)
- Bright yellow or amber underglaze
- Solid white underglaze (for details)
- Clear dipping glaze (if not using a gloss glaze)
- Pencil (for sketching)
- Medium round brush
- Small detail brush or liner brush
- Sponge for cleaning
Step 1: Preparation & Sketching
-
Clean the bisque:
Start by wiping down your bisque plate with a slightly damp sponge to remove any dust or oils that might prevent the glaze from adhering properly. -
Map out the horizon:
Using a pencil, lightly draw a curved line across the lower third of the plate. This will define the top of the cat’s head. -
Add the ears:
Sketch two triangle shapes sticking up from your curved line to form the cat’s ears. Keep them spaced slightly apart to leave room for the face features. -
Draw the features:
Lightly sketch two large circles for eyes, a small triangular nose below them, and a little anchor shape for the mouth. Add small triangles inside the ears for the inner ear detail.
Clean Lines
For ultra-crisp whiskers, dilute your white underglaze slightly with water until it has an ink-like consistency. This helps the liner brush glide smoothly.
Step 2: Painting the Background
-
Apply the speckled base:
Using your medium round brush, apply the speckled white glaze to the entire upper portion of the plate, carefully painting around the cat’s head outline. -
Build opacity:
Let the first coat dry until it feels chalky, then apply two more coats of the speckled white glaze to ensure full coverage and a nice density of speckles. -
Clean up edges:
If you accidentally got white glaze inside the cat outline, use a stiff, damp brush or a clean tool to gently scrape or wipe it away.
Spooky Surprise
Make the eyes glow in the dark! Swap the standard yellow underglaze for a specialty glow-in-the-dark glaze to give a fun surprise when the lights go out.
Step 3: Creating the Cat
-
Fill the black silhouette:
Load your brush with black underglaze and fill in the main body of the cat. Be very careful to paint around the eye circles and the inner ear triangles so they remain bare bisque for now. -
Refine the fur:
At the top of the head between the ears, use just the tip of your brush to add small, jagged strokes to simulate a little tuft of fur sticking up. -
Deepen the black:
I allow the black to dry completely before adding a second and third coat; solid black needs to be opaque so brushstrokes don’t show through later. -
Paint the eyes:
Using amber or bright yellow underglaze, fill in the large eye circles. You likely need 2-3 coats for the color to pop against the dark surroundings. -
Inner ear details:
Use a mix of the speckled glaze (or a light tan) to fill the small triangles inside the ears. Add tiny dots of black over this lighter color for texture.
Step 4: Defining Details
-
Add the pupils:
Once the yellow eyes are bone dry, use your smallest detail brush to paint large black circles inside them. Leave the yellow visible as a ring around the outside. -
Highlight the eyes:
Dip the handle of a brush or a stylus into thick white underglaze and place a dot near the top of each black pupil for a ‘sparkle’ effect. -
Nose and mouth:
With a fine liner brush and white underglaze, carefully trace over your pencil sketch for the nose and the anchor-shaped mouth. -
Draw the whiskers:
Using the same fine liner brush and thinned white underglaze, paint three long, sweeping whiskers extending from each cheek area across the black fur. -
Final inspection:
Check the rim of the plate. If you want a clean edge, wipe it down, or carry the speckled glaze all the way over the edge. -
Firing:
Once completely dry, dip the entire piece in clear glaze (if your paints require it) and fire according to your clay body’s instructions, typically cone 06 or cone 6.
Now you have a charming feline companion ready to hold your favorite fall treats


Bats Around a Full Moon Rim

This celestial-themed serving bowl combines rustic charm with spooky elegance, featuring a realistic full moon centerpiece surrounded by a flurry of silhouetted bats. The creamy, speckled glaze provides the perfect atmospheric backdrop for your Halloween candy or autumn soups.
Detailed Instructions
Materials
- Bisque pottery bowl (shallow, wide rim)
- Cream or oatmeal speckled glaze (matte finish)
- Black underglaze
- Tan/light brown underglaze
- Dark brown underglaze
- Fan brush
- Small round detail brush (size 0 or 1)
- Medium round brush
- Pencil
- Sponge
- Clear dipping glaze (optional, depending on base glaze used)
Step 1: Base and Moon Preparation
-
Clean the bisque:
Start by wiping down your bisque bowl with a damp sponge to remove any kiln dust, which ensures your glaze adheres properly. -
Map out the moon:
Using a pencil, lightly trace a large circle in the very center of the bowl. Don’t worry about the pencil marks; they will burn off in the kiln. -
Apply the base coat:
Using a fan brush, apply 2-3 coats of your cream or oatmeal speckled glaze to the entire bowl, avoiding the circle you just drew in the center. Let each coat dry until it’s chalky to the touch before adding the next.
Batter Up
Look at photos of real bats in flight while sketching. Varying the wing shapes (some gliding, some flapping) makes the scene feel dynamic rather than stamped.
Step 2: Painting the Moon
-
Base moon color:
Fill in the center circle with a very light wash of tan underglaze. Keep this layer thin and watery to let the clay body shine through slightly for texture. -
Create craters:
Dab a sponge into a slightly darker brown glaze and blot off most of the paint. Gently tap textures onto the moon’s surface to create the look of craters and mares. -
Add deep shadows:
With a medium round brush and dark brown glaze, paint irregular shapes on the moon’s surface, focusing on the right side to create dimension. I find softening the edges with a clean, damp brush helps it look more realistic. -
Define the edge:
Use a thin wash of the dark brown to outline the moon’s circumference very lightly, blending it inward so there isn’t a harsh cartoon line.
Step 3: The Bat Silhouette Border
-
Sketch the layout:
Lightly sketch the positions of your bats, stars, and crescent moons around the rim using a pencil. Vary their angles and sizes to create a sense of movement. -
Paint bat bodies:
Using your smallest detail brush and solid black underglaze, paint the small bodies of the bats first. Step back occasionally to ensure the spacing feels balanced. -
Add bat wings:
Carefully paint the scalloped wings extending from the bodies. Create sharp points on the wing tips for a classic silhouette look. -
Ensure opacity:
Apply a second coat of black to the bats if the first layer looks streaky; solid, opaque silhouettes pop best against the cream background. -
Paint stars and crescents:
Fill in the remaining pencil sketches with black underglaze, adding small four-pointed stars, tiny dots, and crescent moons between the bats. -
Clean up:
If you made any smudges, gently scrape them away with a toothpick or clean up lines with a stiff, damp brush. -
Final glaze and fire:
If your speckled base glaze isn’t self-sealing, apply a clear dipping glaze over the entire piece. Fire according to the glaze manufacturer’s instructions.
Glow Up
Add tiny dots of glow-in-the-dark glaze to the stars or the light parts of the moon for a hidden surprise that appears when the lights go out.
Once fired, this bowl becomes a stunning centerpiece that captures the eerie beauty of a crisp October night


Spiderweb Corners on Mugs
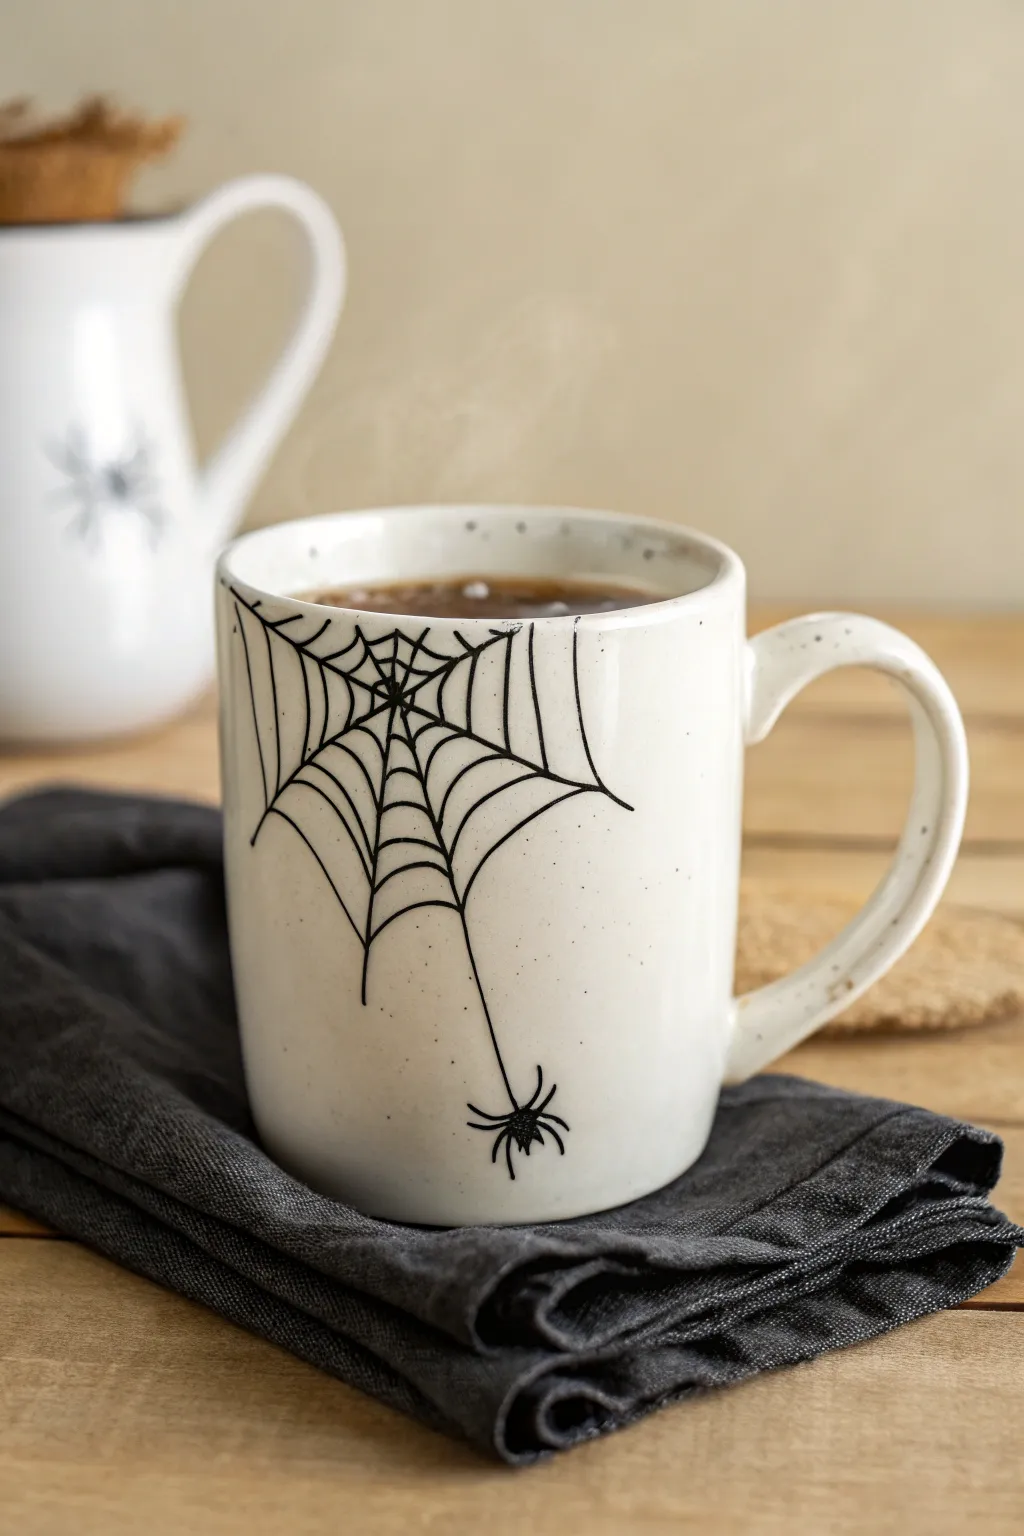
Transform a plain ceramic mug into a spooky seasonal favorite with this simple yet striking spiderweb design. The minimalist black-on-white aesthetic creates a modern look, featuring a delicate web draped over the rim and a friendly little crawler dropping down to say hello.
Step-by-Step Guide
Materials
- Bisque-fired ceramic mug (straight-sided works best)
- Creamy-white underglaze or glaze (speckled optional)
- Black underglaze
- Fine liner brush (size 0 or 00)
- Fan brush or large flat brush
- Pencil (No. 2)
- Small round sponge
- Clear dipping glaze
- Clean water
Step 1: Base Coat Application
-
Clean the bisque:
Start by wiping down your bisque mug with a damp, clean sponge to remove any kiln dust or oils from your hands. This ensures the glaze adheres perfectly. -
Load the large brush:
Dip your fan brush or large flat brush into the creamy-white underglaze. You want the brush fully loaded but not dripping. -
Apply first layer:
Apply a smooth, even coat of the cream color all over the exterior of the mug. Use long, horizontal strokes to minimize brush marks. -
Dry and repeat:
Let the first coat dry until it’s chalky and cool to the touch. Apply a second and, if necessary, a third coat to ensure solid, opaque coverage. -
Add speckles (optional):
If your base glaze isn’t pre-speckled, dip an old toothbrush into a tiny bit of black or brown underglaze and flick the bristles to create a subtle speckled effect over the wet cream base.
Step 2: Drafting the Design
-
Position the web:
Visualize the web originating from the top-left rim of the mug. I like to lightly sketch the main anchor lines with a pencil first—the graphite will burn off in the kiln, leaving just your design. -
Draw anchor lines:
Sketch 5 to 7 straight lines radiating outward from a single point on the rim. Make them varying lengths, with the longest line extending about halfway down the mug. -
Connect the curves:
Starting near the center point, draw small scalloped curves connecting the anchor lines. Continue moving outward, making the scallops slightly larger as the web expands. -
Add the drop line:
From one of the lower points of the web, draw a long, straight vertical line descending towards the bottom third of the mug. This will hold your spider.
Shaky Hands?
If you struggle with fine lines, use a black underglaze applicator bottle with a fine metal tip. It works like a pen and offers much more control than a brush.
Step 3: Painting the Details
-
Prepare the black:
Put a small amount of black underglaze onto a palette. Add a drop of water to thin it slightly to an ink-like consistency, which helps with flowing lines. -
Trace main lines:
Using your fine liner brush, carefully trace over your pencil anchor lines. Use very light pressure to keep the lines thin and delicate. -
Paint the webbing:
Fill in the scalloped connecting lines. Don’t worry if they are slightly shaky; it adds to the organic, spooky feel of a real cobweb. -
Thicken intersections:
Go back and add tiny dots or slightly thicken the paint where the lines intersect. This mimics how real webs connect and adds structural weight to the design. -
Paint the spider body:
At the end of your drop line, paint a small oval for the spider’s abdomen and a smaller dot for the head. -
Add spider legs:
Using the very tip of your brush, flick out four legs on each side of the body. Make the front legs reach forward and the back legs trail slightly behind. -
Final inspection:
Check for any smudges or missed spots. If you made a mistake, you can gently scratch off the dry black underglaze with a toothpick.
Level Up: Hidden Spooks
Paint a tiny spider or a single fly on the INSIDE bottom of the mug. It will be a fun surprise for the user as they finish their coffee or tea.
Step 4: Finishing
-
High-fire glazing:
Once your design is completely dry, the mug needs to be dipped in clear glaze. If you are at a pottery studio, simple hand it over to the staff for this step. -
Kiln firing:
Fire the piece in the kiln according to the clay and glaze specifications (usually cone 06 or cone 6).
Enjoy sipping your warm autumn drinks from your new handcrafted spooky mug

The Complete Guide to Pottery Troubleshooting
Uncover the most common ceramic mistakes—from cracking clay to failed glazes—and learn how to fix them fast.
Skull Trinket Dishes in Simple Linework
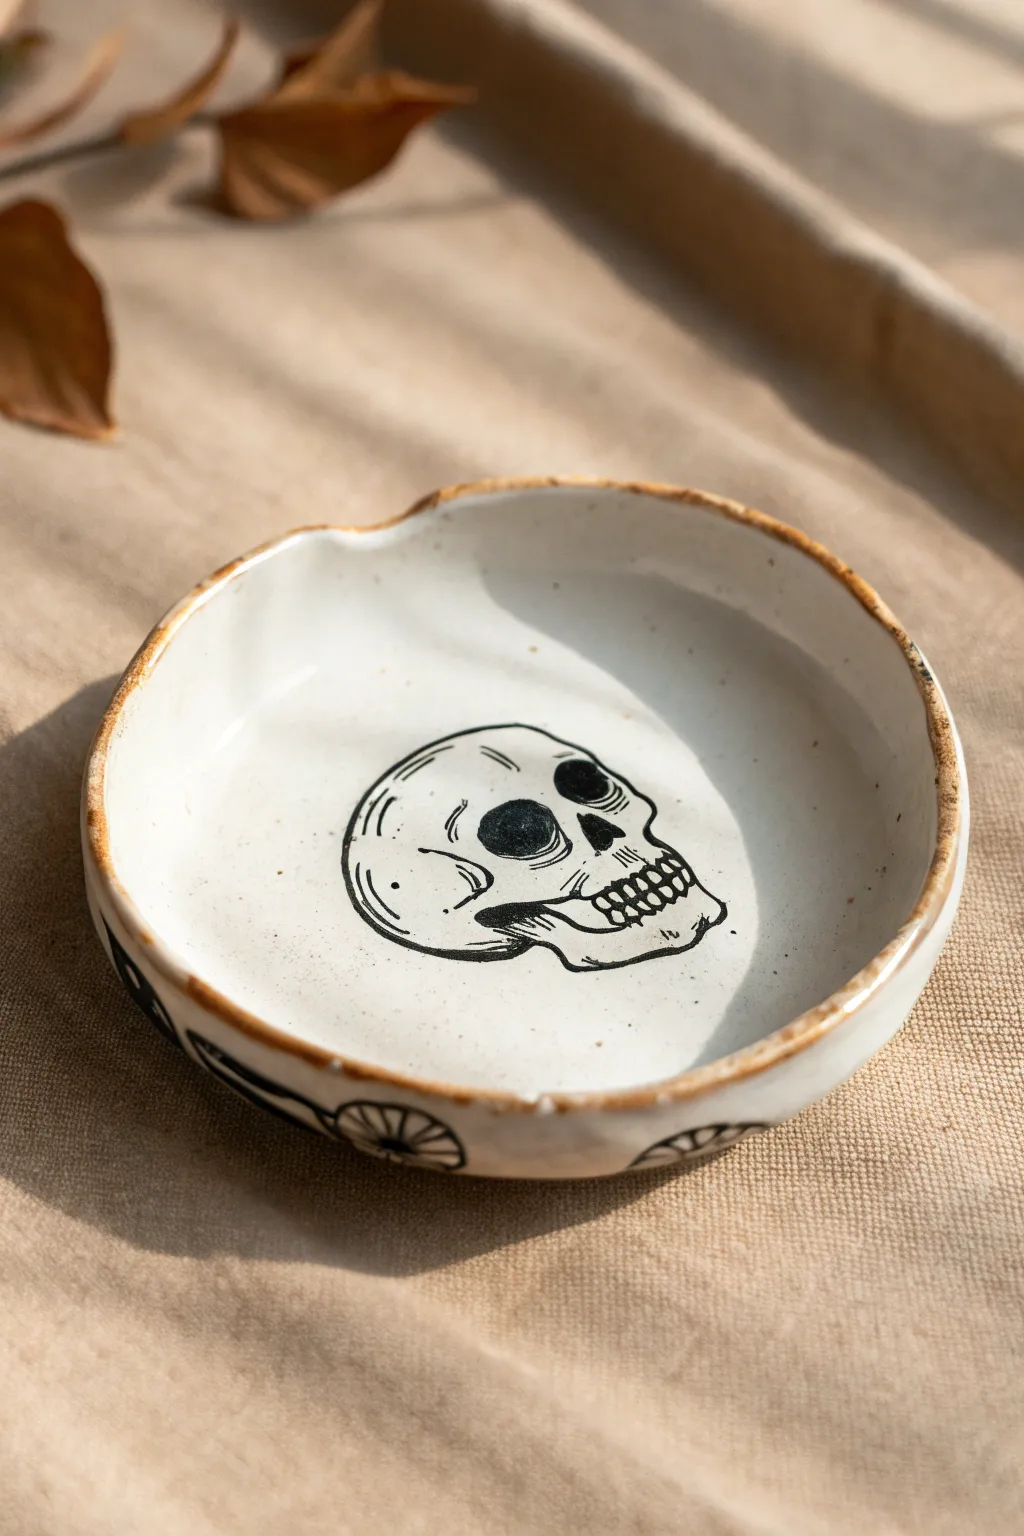
Embrace the eerie season with this understated, handcrafted trinket dish featuring a classic skull illustration in bold linework. The organic shape and rusty rim give it an aged, excavated look that’s perfect for holding jewelry or sage bundles.
Step-by-Step Guide
Materials
- Air-dry clay or kiln-fire clay (white)
- Rolling pin
- Small bowl (to use as a mold)
- Circular cookie cutter or knife
- Sponge
- Water cup
- Small fine-point paintbrush (size 0 or 00)
- Black underglaze or acrylic paint (depending on clay type)
- Clear glossy glaze or sealant
- Brown oxide wash or watered-down brown paint
- Pencil
Step 1: Shaping the Clay Body
-
Roll your slab:
Start by rolling out a ball of white clay into an even slab, aiming for about 1/4 inch thickness. Rotate your rolling pin frequently to keep the thickness consistent. -
Cut the circle:
Place your circular cutter or a round bowl upside down on the clay and cut out your base shape. Don’t worry about being perfectly geometric; a slightly organic edge adds character. -
Form the curve:
Gently lift your clay circle and drape it inside your small bowl mold. Press it down lightly so it takes on a concave, dish-like shape. -
Create the organic rim:
Use your fingers to pinch and manipulate the rim. I like to create slight waves or dips—specifically one prominent dip on the side—to make it look hand-molded rather than factory-made. -
Smooth the edges:
Dip a sponge in a little water and run it over the rim to soften any sharp cutting marks. Smooth the interior surface where you will be painting later. -
Initial drying:
Let the clay dry to a ‘leather hard’ state if firing, or until firm if using air-dry clay. This provides a stable surface for detailed painting.
Wobbly Lines?
If your hand is shaking, rest your pinky finger on the dry part of the dish to stabilize your brush strokes while painting the intricate teeth.
Step 2: The Bare Bones Design
-
Sketch the outline:
Using a pencil, very lightly sketch the skull shape in the center of the dish. Start with a rounded cranium top and sketch down to the cheekbones and jaw. -
Draft the features:
Mark the large eye sockets, the triangular nose cavity, and the grimacing teeth. Keep lines faint; the pencil will burn off in a kiln or can be erased later. -
Outline with black:
Load your fine-point bush with black underglaze (or acrylic). With a steady hand, trace your pencil lines. Vary the line weight slightly—thicker on the outer skull, thinner for detail lines—to create depth. -
Fill the voids:
Fill in the eye sockets and nose cavity completely with solid black. Leave small white gaps if you want a highlight effect, or fill them solid for a hollow look. -
Add texture lines:
Paint tiny, thin hatching lines near the temples and jaw to suggest bone texture and shadowing. These small details really elevate the illustration style. -
Side details:
If desired, paint partial decorative elements like wheel spokes or abstract shapes on the outer walls of the dish for extra visual interest.
Gold Rush
Instead of the brown rustic edge, paint the rim with liquid gold leaf after the final glaze is fired/dried for a glamorous, luxe halloween vibe.
Step 3: The Aged Finish
-
Apply the rim stain:
Dip your sponge or a rough brush into the brown oxide wash (or watered-down brown paint). Dab it unevenly along the very edge of the rim. -
Blend the edge:
Allow the brown color to bleed slightly down the inner and outer walls. This mimics the look of vintage enamelware that has rusted slightly at the seams. -
Speckle the surface:
Flick the bristles of a toothbrush dipped in the brown wash over the dish to add tiny contrasting speckles. -
Final dry:
Let all paint and underglaze dry completely before moving to the sealing stage. -
Glazing:
Apply a clear glossy glaze over the entire piece. If you used real ceramic clay, fire it in the kiln according to manufacturer instructions. -
Sealing (Air Dry Option):
If using air-dry clay, apply a coat of high-gloss varnish or resin to seal the paint and give it that ceramic shine.
Now you have a hauntingly beautiful dish ready to guard your smallest treasures
Friendly Skeleton Dance Plates
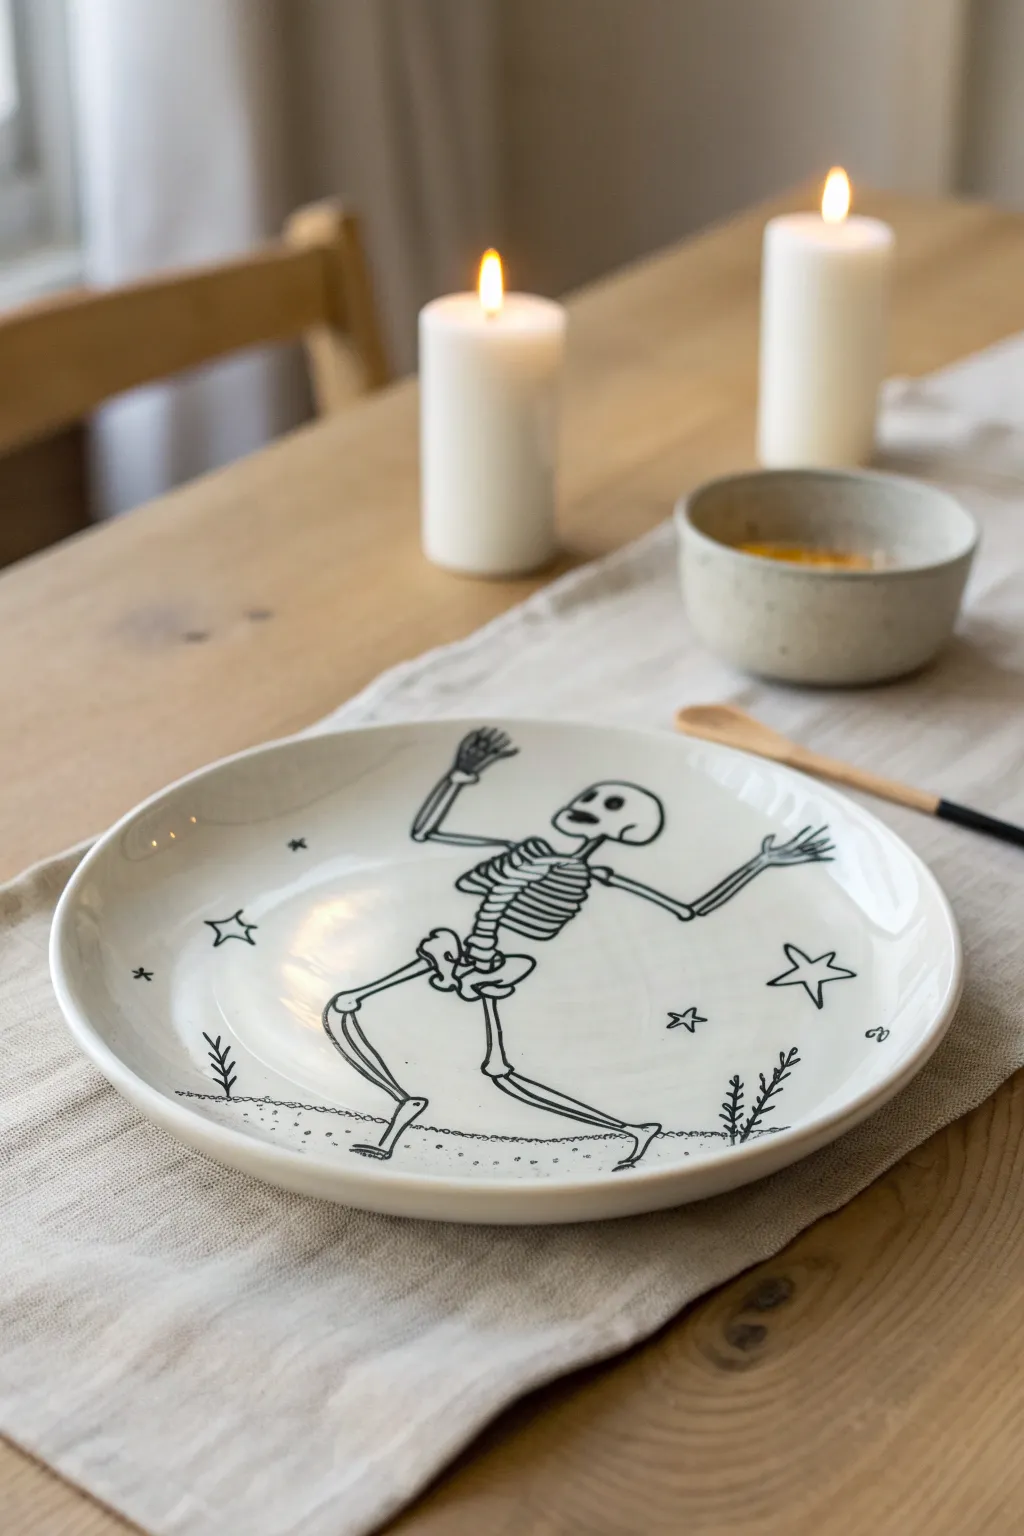
Bring a touch of whimsical spookiness to your Halloween table with this charming, minimalist design featuring a skeleton caught mid-dance. The clean black lines against white ceramic create a modern, playful look that’s perfect for festive dining or seasonal decor.
Step-by-Step Tutorial
Materials
- White ceramic dinner plate (bisque or glazed, depending on method)
- Black underglaze (if using bisque) or porcelain paint marker (if using glazed ware)
- Fine liner brush (size 0 or 00)
- Pencil for sketching
- Carbon paper (optional for tracing)
- Clear dipping glaze (if using bisque)
- Kiln (or kitchen oven if using porcelain markers)
- Damp sponge
- Reference image of dancing skeleton
Step 1: Preparation & Sketching
-
Clean the Surface:
Begin by wiping your ceramic plate with a damp sponge to remove any dust or oils. If you are painting on bisque, ensure it is completely bone dry before starting. For glazed plates, a wipe with rubbing alcohol helps markers adhere better. -
Plan the Skeleton’s Pose:
Lightly sketch the skeleton in the center of the plate using a pencil. Start with a simple stick figure to get the gesture right—capture that joyful, mid-stride dance move with arms thrown up and knees bent. -
Flesh Out the Bones:
around your stick figure, start defining the shapes. Draw the rib cage as a curved, almost basket-like shape, and add the distinct dog-bone shapes for the arms and legs. Keep the hip bone simple and slightly tilted to emphasize the movement. -
Refine the Skull:
Sketch the skull with a happy, open mouth and large eye sockets. Don’t worry about anatomical perfection; a slightly oversized head adds to the friendly, cartoonish appeal. -
Add Celestial Details:
Scatter a few stars around the skeleton to fill the negative space. Draw simple five-pointed stars and a few tiny cross-shaped sparkles. Mark a bumpy ground line near the bottom for the skeleton to dance on.
Step 2: Painting the Design
-
Load Your Brush:
Shake your black underglaze or prime your porcelain marker well. If using a brush, thin the underglaze slightly with water until it has an ink-like consistency that flows smoothly from a fine liner brush. -
Outline the Rib Cage:
Start with the torso to anchor your drawing. Carefully trace your pencil lines for the ribs, keeping the pressure consistent to maintain a uniform line width. -
Define the Limbs:
Work your way out to the arms and legs. Use confident strokes to outline the long bones, ensuring you leave small gaps at the joints (knees and elbows) to suggest articulation without cluttering the drawing. -
Detail the Hands:
Paint the fingers splayed wide. Simple lines work best here—just four or five thin strokes at the end of each arm to represent phalanges. -
Paint the Skull Features:
Fill in the eye sockets and nose cavity with solid black. Outline the jaw and teeth carefully. I find that leaving the teeth as simple white negative spaces rather than drawing individual lines keeps the expression lighter. -
Ground the Figure:
Draw the bumpy, uneven ground line beneath the feet. Add a few small dashed lines and dots under the line to suggest soil or texture. -
Add Flora:
sketch two small, simple sprigs of plants or weeds growing out of the ground line on either side of the skeleton, using quick, short strokes for leaves. -
Ink the Stars:
Outline your star shapes in the background. Keep the lines crisp. You can leave them hollow or add a tiny dot in the center for interest.
Steady Hand Trick
Rest your pinky finger on the plate surface as a pivot point while painting. This stabilizes your hand for smoother, more consistent linework.
Step 3: Finishing Touches
-
Clean Up Mistakes:
If you smudge a line, use a damp Q-tip or a toothpick to gently scrape away the excess paint while it’s still damp. This works especially well on bisque ware. -
Dry Thoroughly:
Let the black work dry completely. If you used underglaze, it should look matte and chalky. If you used a marker, follow the manufacturer’s drying time instructions. -
Clear Glaze Application:
For pottery projects, dip the entire plate into a clear glaze. Shake off excess drips and ensure the foot of the plate is wiped clean. -
Fire the Piece:
Load the kiln and fire to the appropriate cone for your clay and glaze. If using oven-bake markers, bake the plate in your home oven according to the marker instructions to set the design.
Glow Up
Use glow-in-the-dark paint for the stars or the skeleton’s bones. In daylight it looks white, but it reveals a spooky surprise when the lights go out.
Once fired, this cheerful skeleton is ready to serve up treats at your next Halloween gathering


What Really Happens Inside the Kiln
Learn how time and temperature work together inside the kiln to transform clay into durable ceramic.
Monster Face Planters With Stitches
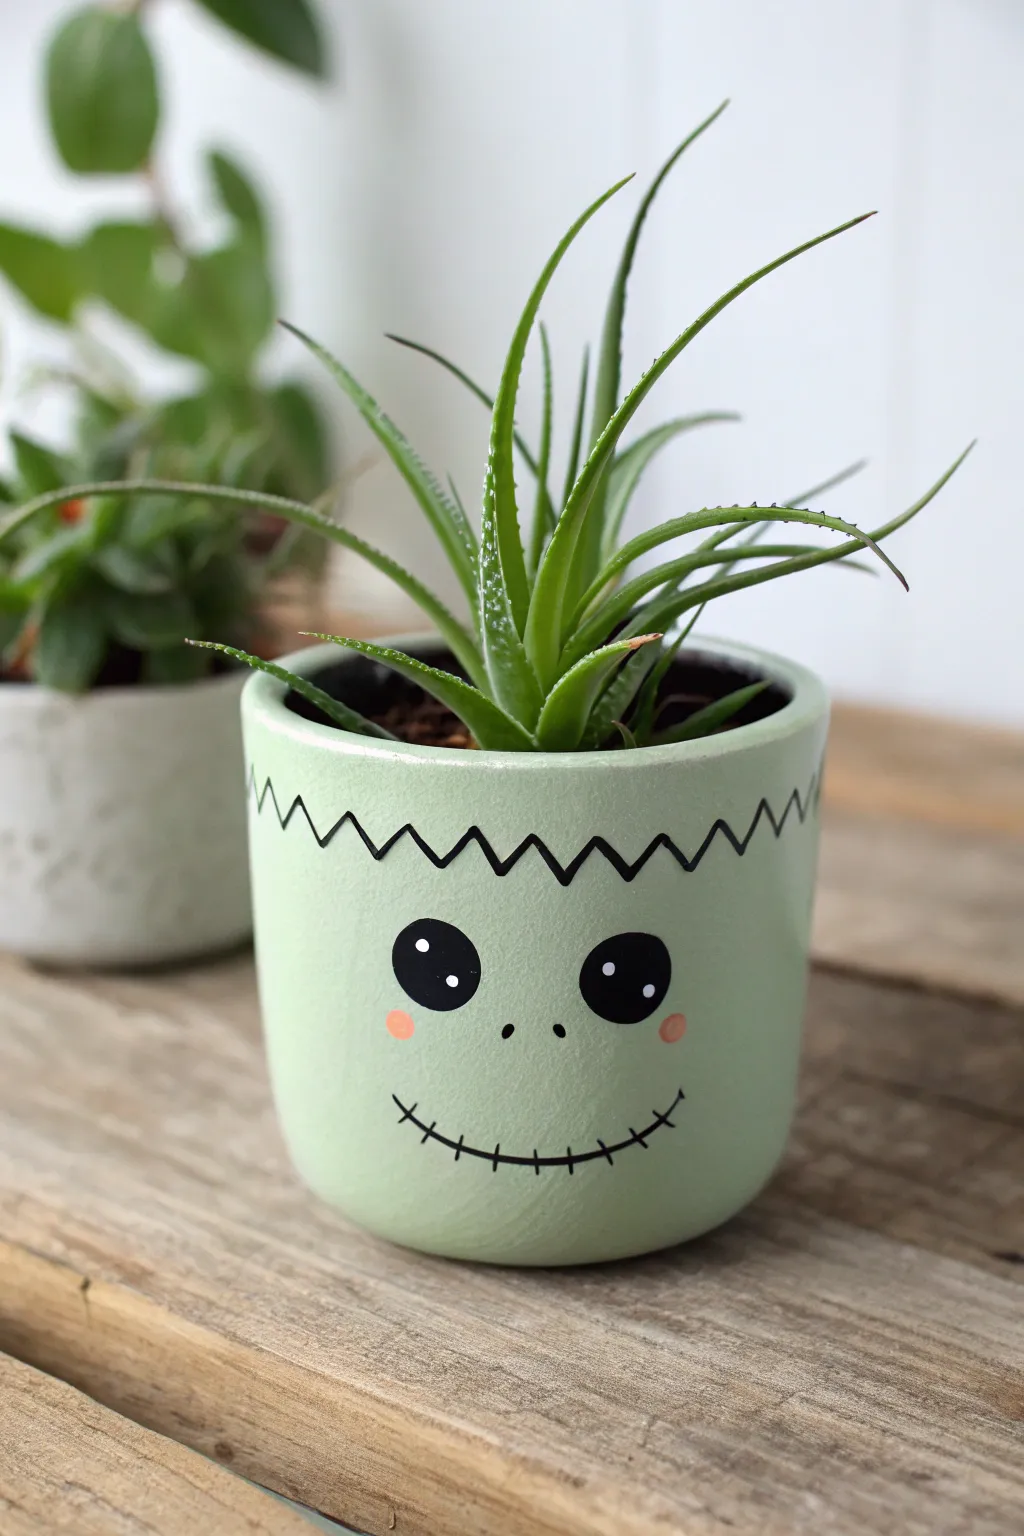
Transform a plain ceramic pot into an adorable monster buddy with just a few strokes of paint. This Frankenstein-inpired design features classic stitches and a zig-zag hairline, making it the perfect spooky yet sweet home for your favorite succulent.
Detailed Instructions
Materials
- Small ceramic planter (bisque or glazed)
- Pale mint green acrylic paint (multi-surface or ceramic specific)
- Black acrylic paint or paint pen
- White acrylic paint or paint pen
- Light pink acrylic paint
- Flat paintbrush (medium)
- Fine detail paintbrush or liner brush
- Pencil for sketching
- Matte or satin sealant spray (optional)
Step 1: Base Coat Application
-
Clean surface:
Begin by wiping down your ceramic pot with a damp cloth to remove any dust or oils, ensuring a clean surface for the paint to adhere to. -
Mix the green:
If you don’t have the perfect minty shade, mix a small amount of white into a standard green to soften it into a pale, undead complexion. -
Apply first coat:
Using your medium flat brush, apply a smooth, even layer of the mint green paint over the entire exterior of the pot. -
Let it dry:
Allow the first coat to dry completely to the touch; this usually takes about 15-20 minutes depending on your paint brand. -
Second coat:
Apply a second coat of green to ensure full opacity, covering any streaks from the first layer.
Fixing Wobbly Lines
If your black lines get shaky, wait for them to dry completely. Then, use a small brush with your base green color to ‘cut in’ and tidy up the edges.
Step 2: Sketching the Features
-
Plan the hairline:
Once the green base is bone-dry, lightly use a pencil to draw a zig-zag line around the upper rim to mark the hairline. -
Placement of eyes:
Mark two oval spots for eyes in the middle of the pot, keeping them relatively far apart for a cute, innocent look. -
Adding the mouth:
Sketch a gentle, wide U-shape curve for the smile near the bottom third of the pot.
Step 3: Painting the Details
-
Outline the hair:
Using a fine detail brush or a black paint pen, carefully trace over your pencil zig-zig line at the top rim. -
Fill the eyes:
Paint the two large ovals solid black. I find a paint pen offers the most control here for crisp edges. -
Draw the nose:
Add two tiny black dots in the center of the face, just below the eye line, to create nostrils. -
Stitch the smile:
Trace the main curve of the smile with black, then add small vertical hash marks across the line to create the signature stitched look. -
Add rosy cheeks:
Dip the back end of a small paintbrush handle into light pink paint and stamp a small dot under the outer corner of each eye. -
Eye highlights:
Once the black eyes are fully dry, add a small white dot in the upper corner of each pupil to bring the character to life. -
Final touches:
Check your zig-zag lines and stitches for any unevenness and touch up with green if needed. -
Seal the work:
If you plan to keep this outdoors or near moisture, spray a light coat of matte sealant over the finished dry piece to protect your artwork.
Add Bolts
For extra detail, glue small grey wooden beads or squares to the sides of the pot before painting to mimic Frankenstein’s neck bolts.
Pop in a spiky aloe or succulent to give your new monster friend a wild hairstyle
Witchy Celestial Motifs for Halloween
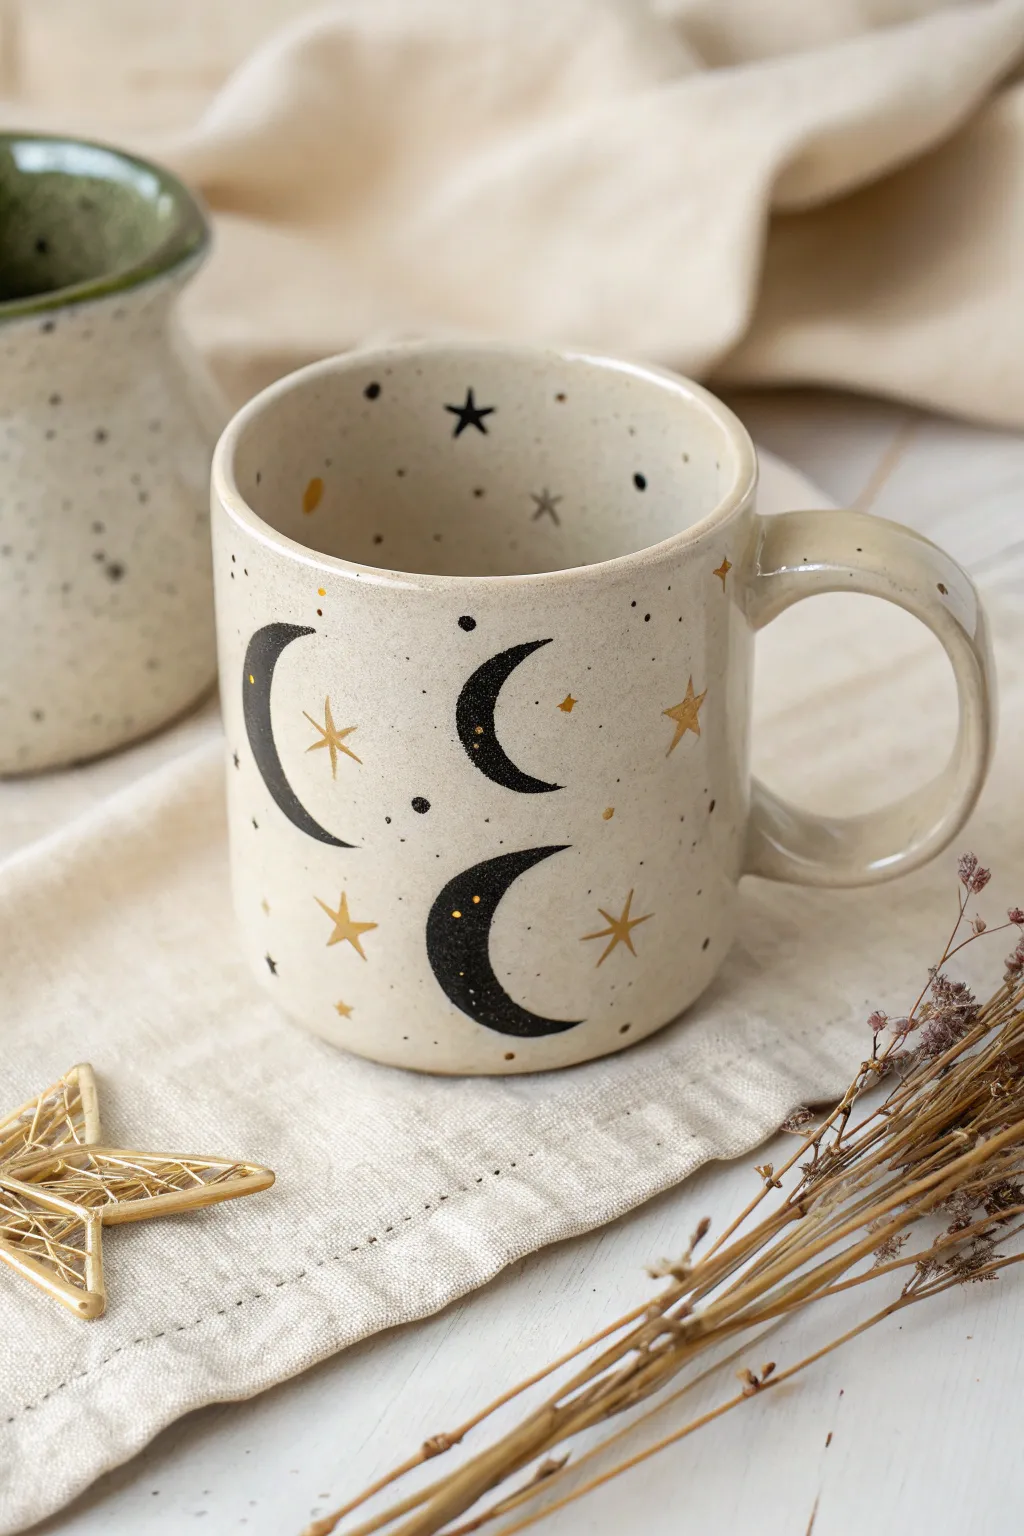
Channel a mystical autumn evening with this elegantly simple celestial design. The combination of deep black crescents and shimmering gold stars on a speckled cream base creates a witchy aesthetic that feels both modern and timeless.
Step-by-Step Guide
Materials
- Bisque ceramic mug (preferably a stoneware style or simple cylinder)
- Speckled cream or ‘oatmeal’ ceramic glaze
- Black underglaze
- Metallic gold overglaze or gold luster (if firing twice)
- A small round brush (size 2 or 4)
- A fine liner brush (size 0 or 00)
- Pencil
- Clear dipping glaze (if not using a glossy speckled glaze)
Step 1: Base Preparation
-
Clean the bisque:
Start by wiping down your bisque mug with a damp sponge to remove any dust. This ensures your glaze adheres perfectly without crawling. -
Apply base color:
Coat the entire mug—inside and out—with 2-3 layers of your speckled cream glaze. Allow each coat to dry until it’s chalky to the touch before adding the next. -
Let it dry completely:
Wait until the base glaze is thoroughly dry. It should feel room temperature, not cool to the touch.
Smudged Stars?
If your gold paint runs into the wet base glaze, wait for the base to be bone dry. Use a slightly drier brush for the details to prevent bleeding.
Step 2: Painting the Moons
-
Sketch the crescents:
Once the base is dry, lightly sketch the crescent moon shapes with a pencil. Don’t worry about the graphite; it will burn off in the kiln. -
Plan placement:
Scatter the moons randomly around the exterior. I like to vary the angles slightly so they aren’t all facing the exact same way. -
Fill with black:
Using your small round brush and black underglaze, carefully fill in the crescent shapes. You want a solid, opaque coverage, so apply 2-3 thin coats rather than one thick gloopy one. -
Refine the points:
Switch to your liner brush to sharpen the tips of the crescent moons. Crisp, pointy ends make the design look much more professional.
Add Texture
Use a toothbrush to flick black and gold underglaze onto the mug for a more organic, galaxy-spray effect instead of manually painting every dot.
Step 3: Starry Details
-
Paint larger stars:
Using the gold overglaze (or a gold-colored underglaze if you prefer a one-fire method), paint five-point or four-point stars in the empty spaces between moons. -
Add tiny sparkles:
Use the very tip of your liner brush to add small diamond shapes or simple crosses to represent distant twinkling stars. -
Create the galaxy dust:
Dip the back end of your paintbrush in black underglaze and gently dot it around the mug to create tiny black speckles. Do the same with the gold for extra shimmer. -
Interior details:
Don’t forget the inside! Paint a small black star or a few dots on the inner rim of the mug for a delightful surprise while drinking.
Step 4: Finishing Touches
-
Check the rim:
If you want a rustic look, you can gently sponge a very light amount of darker glaze or oxide on the rim, though the example keeps it clean. -
Clear glaze application:
If your base speckled paint wasn’t a glossy glaze, dip the entire mug into a clear glaze now. If you used a glossy base, you can skip this step. -
First firing:
Fire the mug according to the clay and glaze specifications (usually cone 06 or cone 6). -
Gold luster (optional):
If you are using real gold luster for maximum shine, apply it now to the star areas over the already fired glaze. -
Final firing:
If you applied gold luster, fire the piece one last time at a much lower temperature (usually cone 018) to set the metallic finish.
Enjoy your morning coffee with a touch of cosmic magic

TRACK YOUR CERAMIC JOURNEY
Capture glaze tests, firing details, and creative progress—all in one simple printable. Make your projects easier to repeat and improve.
Creepy-Cute Eyeball Bowls
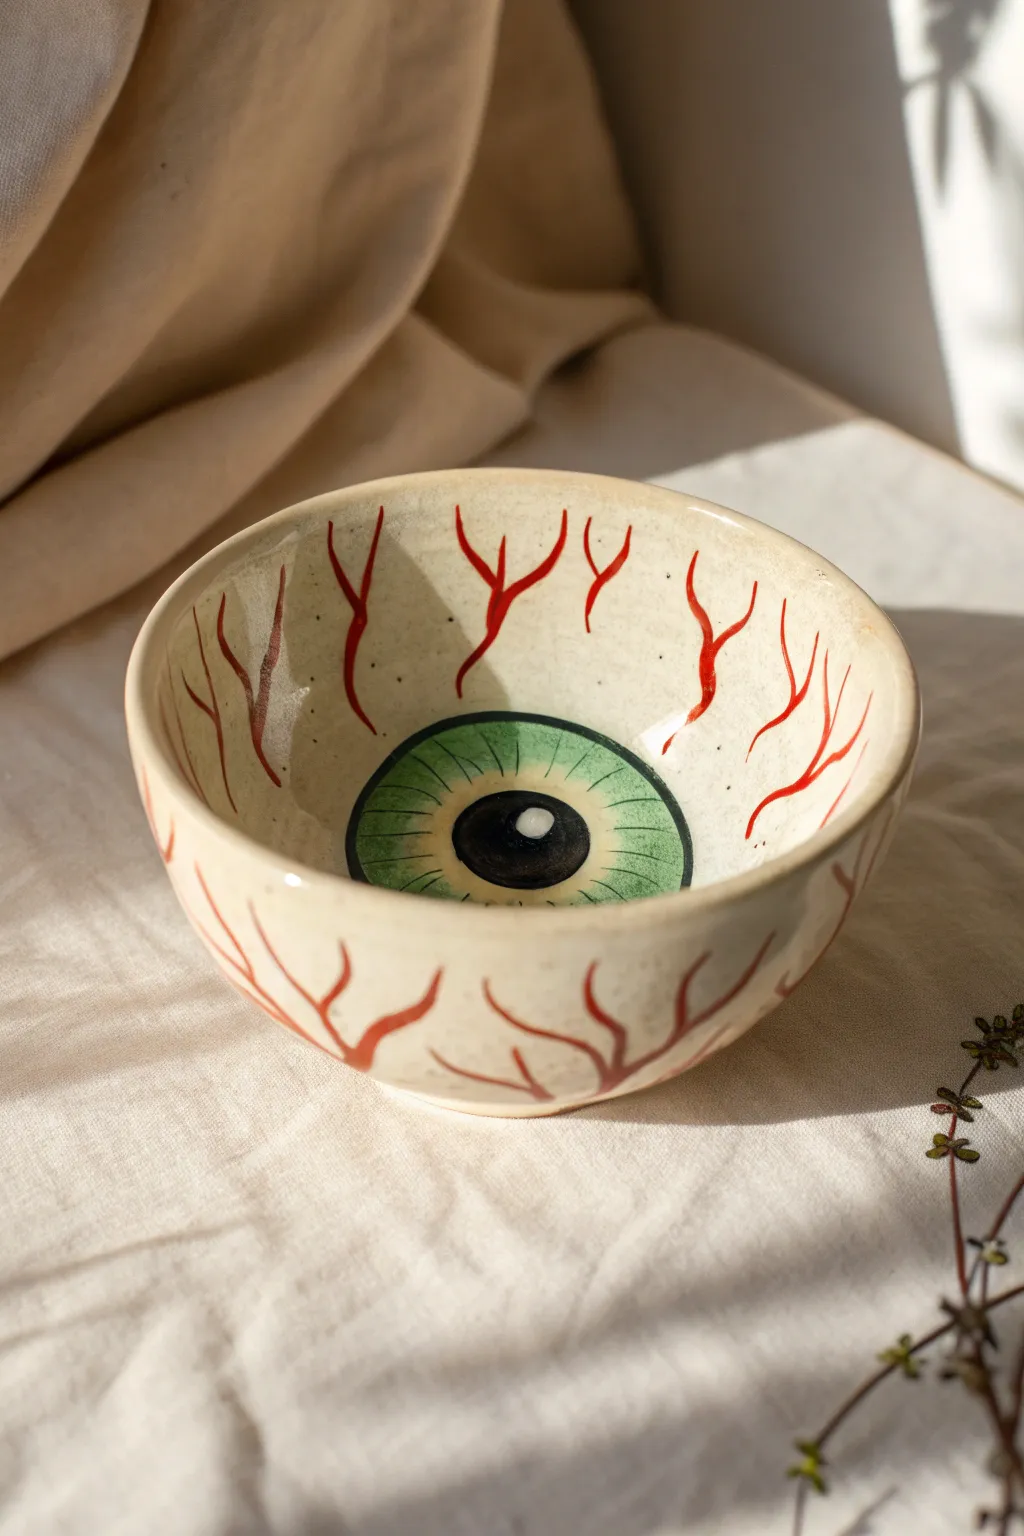
Transform a simple ceramic bisque bowl into a spooky yet charming conversation piece that stares right back at you. This eyeball design uses clever placement to turn the interior curve of the bowl into a giant, bloodshot eye.
Step-by-Step
Materials
- Small to medium ceramic bisque bowl (smooth, round shape works best)
- Underglaze (Cream/Off-White for the sclera)
- Underglaze (Green for the iris)
- Underglaze (Black for the pupil and details)
- Underglaze (Red for the veins)
- Underglaze (White for the highlight)
- Fan brush or wide flat brush
- Small round detail brush
- Medium round brush
- Pencil
- Clear dipping glaze or brushing glaze
Step 1: Setting the Scene
-
Clean your bisque:
Start by wiping down your bisque bowl with a slightly damp sponge. This removes any dust that might prevent the glaze from adhering properly. -
Map out the pupil:
Using a pencil, lightly sketch a circle in the very center of the bottom of the bowl. Don’t worry about the graphite marks; they will burn off in the kiln. -
Define the iris:
Sketch a larger circle around your pupil to define the iris. Try to make sure it’s centered, but a little asymmetry can actually make it look more organic. -
Base coat application:
Using a fan brush, apply a creamy off-white underglaze to the entire bowl, both inside and out. Avoid the circles you just drew in the center. -
Layer the white:
Apply two to three coats of the off-white, letting each layer dry until it’s chalky before adding the next. This ensures solid coverage without streaks.
Step 2: Painting the Eye
-
Fill the iris:
Switch to a medium round brush and fill in the larger circle with green underglaze. Apply three coats for a solid, vibrant color. -
Add texture details:
Once the green is dry, mix a tiny bit of black into the green or use a darker green shade. Use a detail brush to paint thin, radiating lines from the pupil outward to create muscle texture in the iris. -
Paint the pupil:
Fill the center circle with jet black underglaze. Be careful to keep the edge crisp where it meets the green iris. -
Outline the iris:
Using your finest detail brush and black underglaze, paint a thin, steady line around the outer edge of the green iris to define it sharply against the white background. -
The crucial highlight:
Dip the handle end of a paintbrush into bright white underglaze and dot it onto the upper right section of the black pupil and slightly overlapping the green. This ‘glint’ brings the eye to life.
Paint Dragging?
If your fine lines are dragging or skipping, your brush is too dry. Add a tiny drop of water to your red underglaze to make it flow smoothly across the surface.
Step 3: Veins and Finishing
-
Start the veins:
Thin your red underglaze slightly with a drop of water so it flows like ink. Using your detail brush, start painting veins from the rim of the bowl moving downward. -
Vary the line weight:
Press harder at the start of the stroke (near the rim) and lift gradually as you move toward the center to create tapered, root-like lines. -
Branch out:
Add smaller ‘Y’ shaped branches coming off the main vein lines. I find that making them slightly wiggly looks much more realistic than straight lines. -
Repeat on exterior:
Don’t forget the outside of the bowl. Continuing the vein pattern on the exterior makes the piece look like a disembodied eye sitting on the table. -
Final check:
Inspect your work for any accidental smudges and gently scrape them away with a craft knife or clean up with a damp brush. -
Clear glaze:
Once the underglazes are completely dry, dip the entire piece in clear glaze (or apply three coats of brushing clear glaze). -
Fire it:
Fire the piece according to the clay and glaze specifications (usually Cone 06 for low-fire pottery) to realize that glossy, wet finish.
Pro Tip: Depth Control
Make the iris darker near the outer ring and lighter near the pupil. This gradient adds instant 3D depth and realism that flat color can’t achieve.
Enjoy serving snacks in your spooky new creation
Spooky Story Scenes With Tiny Characters
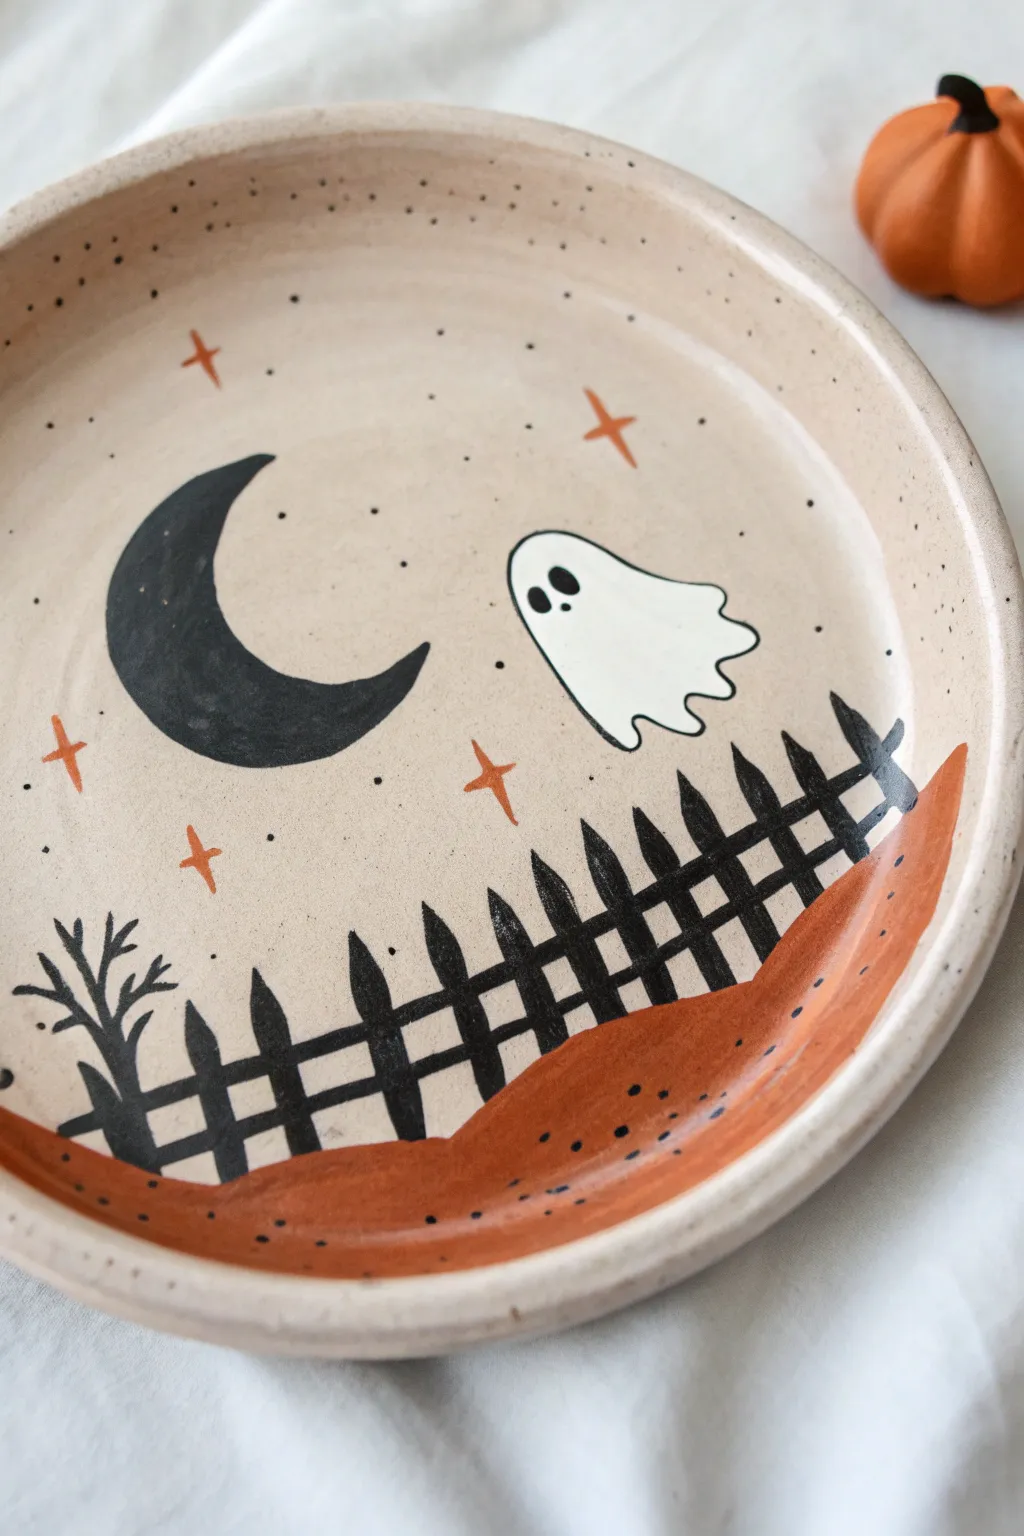
Capture the magic of a spooky storybook night on a simple ceramic plate. This project features a charming scene with a floating ghost, a crescent moon, and a crooked fence against a speckled beige background, perfect for serving treats or displaying as seasonal decor.
Step-by-Step Guide
Materials
- Bisque ceramic plate (rimmed dinner or salad plate)
- Underglaze pencil (optional, for sketching)
- Underglaze paints: Beige/Tan (speckled if available), Black, White, Pumpkin Orange
- Fan brush (for base coat)
- Round brushes (sizes 2 and 6)
- Fine liner brush (size 0 or 00)
- Clear dipping glaze or brush-on clear glaze
- Water cup and paper towels
- Old toothbrush (for speckling)
- Kiln access (for firing)
Step 1: Setting the Scene
-
Preparation:
Wipe down your bisque plate with a damp sponge to remove any dust. This ensures the underglaze adheres properly to the surface. -
Base coat application:
Using a fan brush, apply 2-3 coats of a light beige or tan underglaze to the entire front of the plate. If you want the natural speckled look shown in the inspiration, choose a ‘speckled’ glaze variety or leave the background bare if using speckled clay. -
Drying time:
Allow the base coat to dry until it’s chalky and cool to the touch but not wet. This is crucial before adding detailed designs on top. -
Creating the speckles:
To mimic the starry night texture, dilute a tiny drop of black underglaze with water. Dip an old toothbrush into it, point the bristles toward the plate, and run your thumb along them to flick fine mist over the beige background. Keep it light.
Fixing Smudges
Make a mistake with the black paint? Wait for it to dry completely, then gently scratch the error away with a toothpick or a cleanup tool before reapplying the correct color.
Step 2: Blocking in the Hills and Sky
-
Sketching the layout:
Lightly sketch your design using a pencil or underglaze pencil. Draw a rolling hill at the bottom, a large crescent moon on the left, and a ghost shape on the right. Remember, regular pencil graphite will burn off in the kiln. -
Painting the hills:
Load a size 6 round brush with pumpkin orange underglaze. Paint the rolling hill section at the bottom right, sweeping the brush in smooth curves. Apply 3 coats for solid opacity, letting each coat dry in between. -
Adding the moon:
Switch to black underglaze. Carefully fill in your crescent moon shape on the left side. I find it easiest to outline the shape first with a smaller brush, then fill the center. -
Painting the ghost:
Using white underglaze, fill in the ghost shape. White can be tricky over a beige base, so you will definitely need 3 to 4 coats to ensure the ghost is bright and opaque.
Dimension Tip
For the ghost’s eyes, leave a tiny spec of white unpainted inside the black pupils. This ‘catchlight’ makes the character look much more alive and friendly.
Step 3: Spooky Details
-
Drawing the fence posts:
Once the orange hill is dry, use a size 2 round brush and black underglaze to paint vertical fence posts. Vary their heights slightly and make the tops pointed for a rustic look. -
Connecting the fence:
Paint horizontal rails connecting the fence posts. The lines don’t need to be perfectly straight; a little wobble adds character to the spooky scene. -
Adding the tree:
On the far left, paint a small, bare tree silhouette rising from behind the fence line. Use quick, light strokes for such thin branches to keep them delicate. -
Defining the ghost:
Check that the white ghost paint is bone dry. Using your fine liner brush and black underglaze, outline the ghost with a thin, steady line. Add two ovals for eyes and a smaller oval for the mouth. -
Adding stars:
Dip your fine liner brush into the orange underglaze. Paint simple four-point stars (cross shapes) scattered around the sky. Vary the sizes to create depth. -
Final touches:
Add tiny black dots to the orange hill for texture, and place a few more orange stars near the moon if the composition looks empty.
Step 4: Finishing Up
-
Clean up:
Examine the rim of the plate. If any stray paint marks landed there, wipe them away gently with a damp sponge for a professional finish. -
Clear glazing:
Once the entire design is thoroughly dry (give it a few hours), apply a coat of clear dipping glaze or brush-on clear glaze over the entire piece. -
Firing:
Place the plate in the kiln and fire it according to the specific instructions for your clay and glaze type (usually Cone 06 or Cone 6).
Enjoy using your new spooky plate for serving seasonal treats or simply admiring your handiwork on a shelf