When I’m playing with clay structure ideas, I always start with a strong base—think slab building, coil building, and a few smart supports—then I let the details do the talking. Here are my favorite buildable forms that feel like tiny architecture projects, with lots of cutouts, arches, and sturdy little silhouettes you’ll be proud to display.
Slab-Built Mini Cottage
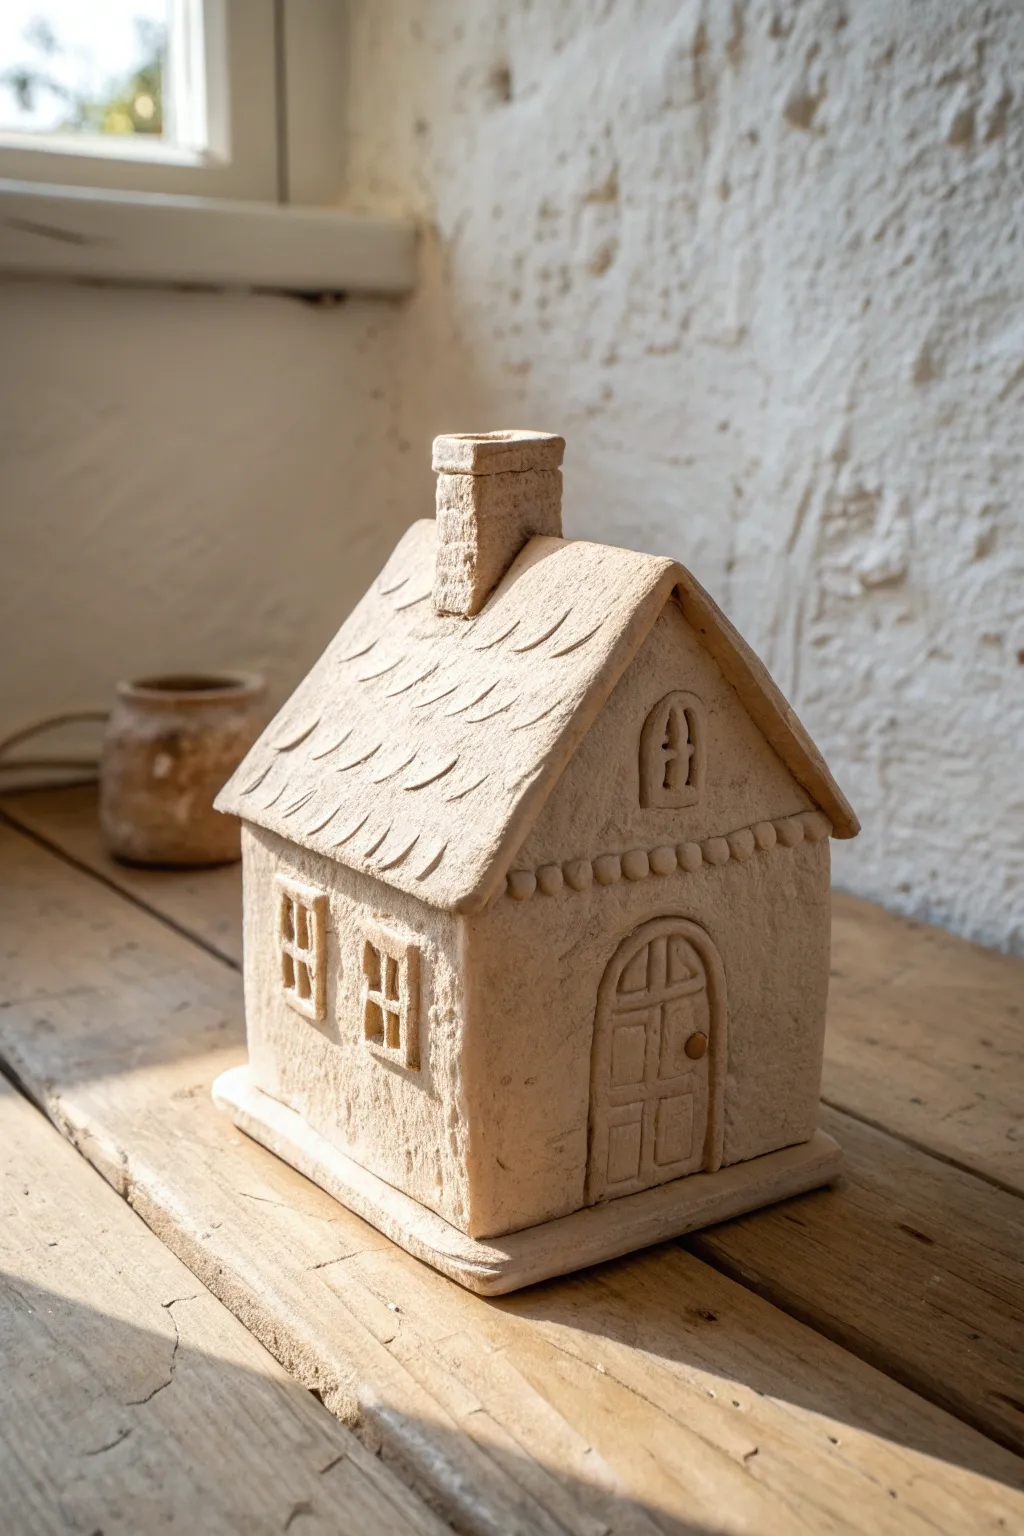
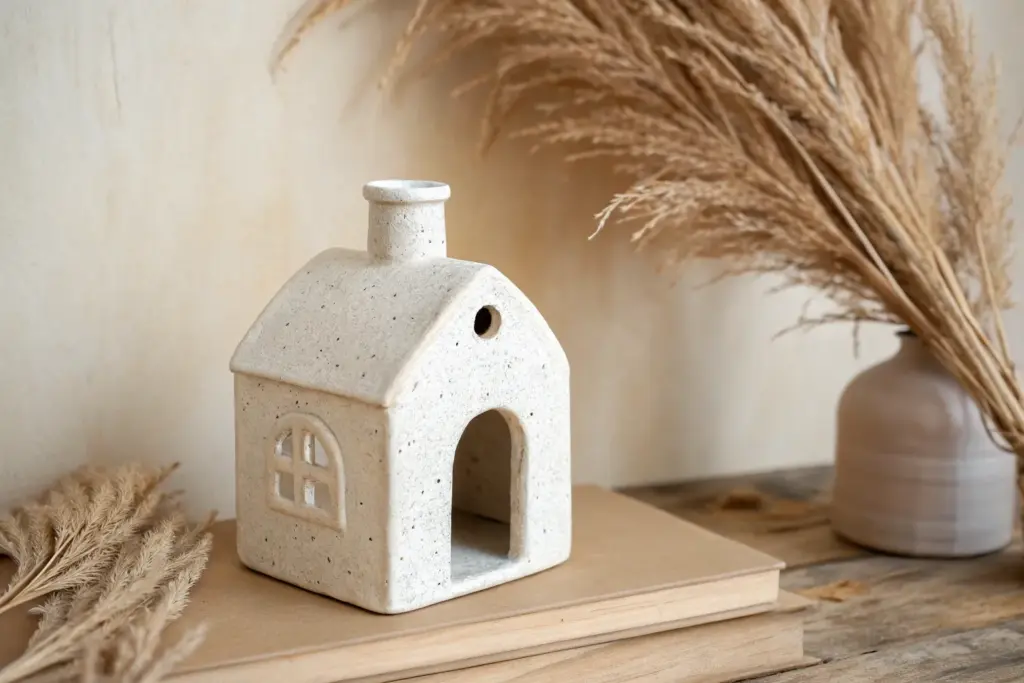
This charming miniature house project captures the rustic warmth of unglazed stoneware with delightful architectural details. Perfectly imperfect roof tiles and hand-carved windows give this slab-built piece a timeless, storybook feel that looks wonderful on a windowsill.
Detailed Instructions
Materials
- Stoneware clay (buff or speckled)
- Rolling pin with guide strips (approx. 1/4 inch thick)
- Clay knife or fettling knife
- Needle tool
- Scoring tool (serrated rib or fork)
- Slip (clay mixed with water)
- Small loop tool or carving tool
- Wooden modeling tool
- Ruler
- Paper templates (Wall front/back, side walls, roof panels, base)
Step 1: Preparing the Slabs
-
Roll out the clay:
Begin by rolling out a medium-sized block of stoneware clay. Use guide strips or wooden dowels on either side of your clay to ensure an even thickness of about 1/4 inch throughout. -
Cut the shapes:
Using your paper templates, gently trace and cut out two pentagon shapes (for the front and back facades), two rectangular side walls, two roof rectangles, and a rectangular base that extends slightly wider than the house footprint. -
Stiffen the slabs:
Let the cut pieces sit out on a ware board until they reach a ‘leather-hard’ state. They should be firm enough to stand up without bending but still soft enough to join and carve.
Keep it Straight
Make 45-degree miter cuts on the edges of your wall slabs before joining them. This increases the surface area for the slip and creates much stronger, cleaner corners than butt joints.
Step 2: Assembling the Core Structure
-
Score and slip the base:
Mark the footprint of the walls onto the large base slab. Vigorously score (scratch) these lines and the bottom edges of all four wall pieces, then apply a generous amount of slip. -
Erect the walls:
Attach one side wall to the front facade first. I like to press a thin coil of soft clay into the interior corner to reinforce the seam, smoothing it down with a modeling tool. -
Complete the box:
Attach the remaining walls to create the full house structure. Ensure corners are square and seams are thoroughly blended on both the inside and outside so no join lines are visible. -
Add the roof:
Score the top angled edges of the front and back walls. Place the two roof slabs on top, ensuring they meet at the peak and overhang the sides slightly. Blend the peak seam together securely.
Turn it into a Luminary
Before the clay hardens completely, cut out the window panes entirely instead of just carving them. Place a battery-operated tea light inside after firing to make the cottage glow.
Step 3: Adding Architectural Details
-
Construct the chimney:
Form a small rectangular tube from leftover slab scraps. Cut the bottom at an angle to match the slope of the roof, score the attachment points, and secure it near the roof peak. -
Texture the roof:
Using a U-shaped loop tool or a wooden modeling tool, gently press scallop shapes into the roof clay. Start from the bottom edge and work row by row upward to mimic overlapping shingles. -
Detail the chimney:
Add a tiny rim of clay to the top of the chimney stack for a finished look. -
Sculpt the door trim:
Roll a very thin coil of clay and attach it in an arch shape on the front wall to frame the door. Flatten it slightly with your finger to integrate it. -
Carve the door:
Using a needle tool, lightly draw the door panels inside the arch. Add a tiny ball of clay for the doorknob. -
Create the windows:
Apply small squares of fresh clay to the side walls and the gable. Use a needle tool to carve out the window panes, leaving a raised cross shape for the mullions. -
Add decorative beading:
Roll tiny balls of clay and arrange them in a horizontal row right where the triangle of the roof gable meets the square of the wall. Slip and score each one into place for a charming decorative belt.
Step 4: Finishing Touches
-
Create surface texture:
To achieve the rustic, stone-like texture seen in the photo, gently dab the flat wall surfaces with a stiff bristle brush or a crumpled ball of aluminum foil. -
Clean up edges:
Use a damp sponge or your finger to soften any sharp edges on the base or roof corners, but keep that lovely handmade texture intact. -
Slow drying:
Cover the cottage loosely with plastic to let it dry very slowly. This prevents the seams from cracking as the clay shrinks. -
Firing:
Once bone dry, bisque fire the piece. You can leave it unglazed to highlight the raw clay texture, or apply a matte wash before the final firing.
Enjoy the process of building your own little architectural village


Fairy House Luminary With Windows
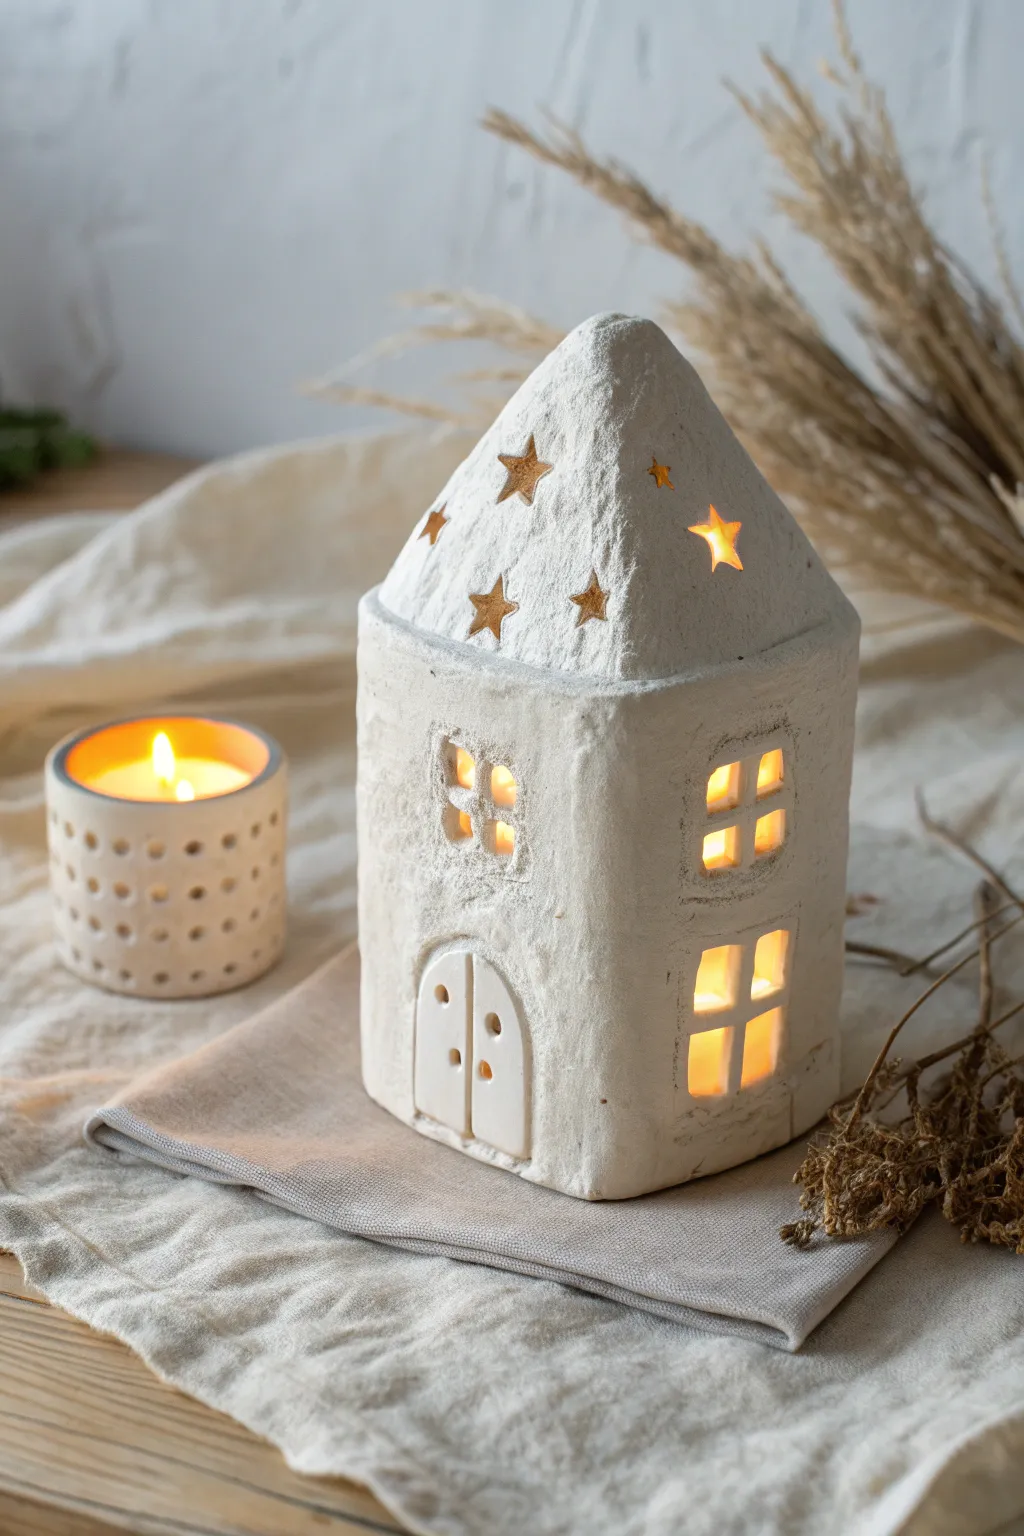
This enchanting ceramic luminary mimics the coziness of a snow-dusted cottage, featuring star-shaped roof cutouts that cast magical shadows when lit. The textured white clay gives it a rustic, handcrafted charm perfect for winter evenings or a whimsical garden display.
Step-by-Step Guide
Materials
- White stoneware or air-dry clay (with grog/texture preferred)
- Clay slab roller or rolling pin
- Fettling knife or craft knife
- Star-shaped mini clay cutters (various sizes)
- Square cutter or ruler for windows
- Slip and scoring tool (toothbrush works well)
- Wooden sculpting tools
- Sponge and water
- Tea light candle or LED votive
Step 1: Constructing the Base
-
Roll the Slabs:
Begin by rolling out your clay to an even thickness, approximately 1/4 inch thick. You will need one long rectangular strip for the walls and four triangular pieces for the roof. -
Cut the Walls:
Measure and cut a rectangular slab that is tall enough for two stories of windows. Ensure the ends are cut at a straight 90-degree angle so they join flush later. -
Create Window Openings:
While the slab is flat, use a small square cutter or knife to remove clay for the windows. Create two rows: one for the ground floor and one for the upper floor. -
Add Window Panes:
Roll tiny, thin coils of clay. Carefully attach them inside the window frames to create a cross shape, scoring and slipping slightly so they bond securely. -
Form the Cylinder:
Stand the wall slab up and curve it into a cylinder or a rounded square shape. Score and slip the connecting edges, then smooth the seam inside and out so it becomes invisible.
Step 2: Roof and Details
-
Shape the Roof:
Cut four triangles that are slightly wider than the top of your house walls. Bevel the edges at a 45-degree angle where they will touch each other to create a pyramid shape. -
Cut Out Stars:
Before assembling the roof, use your star cutters to punch holes randomly across the roof slabs. I like to vary the sizes for a more magical effect. -
Assemble the Roof:
Score and slip the bottom of the roof pieces and the top of the house walls. Join the roof panels together at the peak and onto the walls, blending the clay gently with a wooden tool. -
Refine the Shape:
Working from the inside if possible, or gently from the outside, ensure the roof seams are solid. Use a damp sponge to smooth any harsh fingerprints, but keep the natural clay texture. -
Add Texture:
If your clay is too smooth, dab it gently with a stiff-bristled brush or a piece of coarse sandpaper to mimic the stone-like texture seen in the photo.
Sagging Roof?
If the roof slumps inward while constructing, wad up dry newspaper and stuff it inside the house structure to support the clay while it firms up.
Step 3: Doors and Finishing
-
Form the Door:
Roll a small, separate slab and cut an arched double-door shape. It should be slightly thicker than the walls to stand out. -
Detail the Door:
Use a needle tool to scribe a vertical line down the center of the arch. Use a small ball tool to create indentations for door handles. -
Attach the Entrance:
Score and slip the back of the door piece and press it firmly onto the front of the house, ensuring no air is trapped behind it. -
Final Smoothing:
Check all window panes and star points for sharp burrs. Smooth these gently with a slightly damp brush. -
Drying and Firing:
Allow the house to dry slowly under loose plastic to prevent warping. Once bone dry, fire it in a kiln according to your clay’s specifications (or let dry completely if using air-dry clay).
Make it Sparkle
After firing or drying, lightly brush the roof peaks with a pearlescent white acrylic paint or diluted glitter glue to mimic glistening frost.
Place a warm LED light inside to see your stars twinkle and bring the cottage to life


Coil Tower Vase With Arch Openings
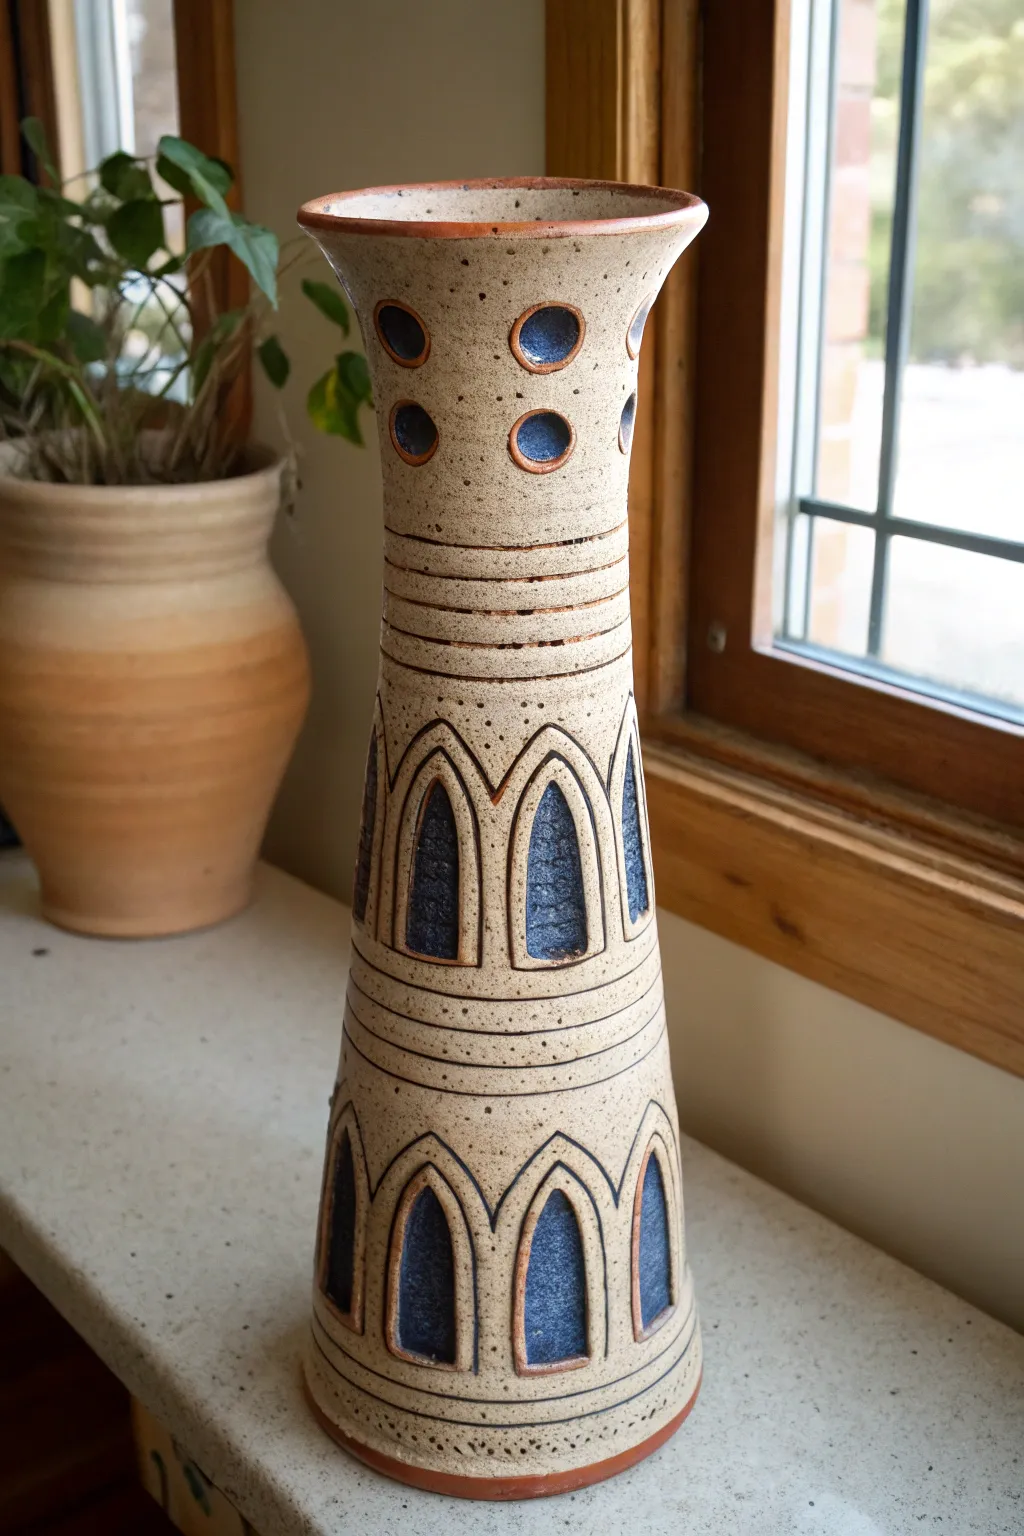
This striking stoneware vase combines architectural elegance with rustic charm, featuring two tiers of Gothic-style arches and a decorative perforated neck. The contrast between the warm, speckled oatmeal clay and the deep indigo insets creates a timeless piece perfect for holding dried floral arrangements.
Detailed Instructions
Materials
- Stoneware clay (speckled or sand-coloured)
- Rolling pin
- Clay knife or fettling knife
- Scoring tool and slip
- Cylindrical form or PVC pipe (approx. 3-4 inches diameter)
- Wooden modeling tools
- Needle tool
- Circular clay cutter (small)
- Indigo or dark blue underglaze
- Clear matte or satin glaze
- Sponge
Step 1: Building the Base Form
-
Prepare the slab:
Begin by rolling out a medium-thick slab of clay, aiming for about 1/4 to 3/8 inch thickness. You want it sturdy enough to stand tall without buckling. -
Cut the main cylinder:
Cut a large rectangle from your slab. The height should be roughly 14-16 inches and the width should be slightly tapered to create a cone shape—wider at the bottom and narrower at the top. -
Form the cylinder:
Stand the clay slab up and wrap it to form a tall, tapering cylinder. Score and slip the vertical seam thoroughly, blending the clay so the join is invisible on both the inside and outside. -
Add a base:
Cut a circle of clay slightly larger than the bottom opening. Score and slip the bottom edge of your cylinder and attach it to the circle. Trim away any excess clay flush with the wall. -
Refine the shape:
Use a paddle or your hands to smooth the exterior, ensuring the taper is consistent. If the clay is too soft, stuff the inside with newspaper to help it hold its shape while it stiffens slightly.
Slumping Walls?
If your tall cylinder sags, let the slab stiffen to ‘leather hard’ before forming the tube. You can also work in two stages, attaching the top half after the bottom stiffens.
Step 2: Carving the Details
-
Mark the sections:
Using a needle tool, lightly spin the vase on a banding wheel to scribe horizontal bands. You need a band near the bottom for the first row of arches, a middle band for texture, another band for the second row of arches, and a top band for the circles. -
Sketch the arches:
Lightly draw the pointed Gothic arch shapes into the clay within your designated bottom and middle sections. Space them evenly around the circumference. -
Carve the arch relief:
Instead of cutting all the way through, use a loop tool or carving tool to recess the inside of each arch. Remove about half the wall’s thickness to create depth. -
Add outline details:
Use a sharp tool to carve a deep outline groove around each arch, separating the recessed area from the main vase body. -
Impress the top circles:
On the neck of the vase, use a small circular cutter or a rounded tool to press in circular indentations. Like the arches, these should be recessed divots, not varying holes. -
Create horizontal texture:
Between the tiers of arches and on the neck, carve continuous horizontal grooves. These mimic the look of coil construction and add visual interest to the negative space.
Step 3: Glazing and Finishing
-
Slow drying:
Allow the piece to dry very slowly under plastic to prevent warping, then bisque fire it according to your clay body’s instructions. -
Apply blue underglaze:
Using a small brush, carefully paint the indigo underglaze into the recessed areas: inside the arches and inside the top circles. -
Wipe back mistakes:
If you get any blue on the raised surface, wipe it away cleanly with a damp sponge before it dries completely. -
Wax resist (optional):
Here I prefer to apply liquid wax over the blue underglazed areas. This prevents the top glaze from clouding the deep blue color during firing. -
Apply main glaze:
Dip or brush the entire vase with a clear matte or a light oatmeal glaze. If using a speckled clay body, a transparent glaze will let those natural iron spots show through. -
Enhance the grooves:
To accentuate the horizontal lines and arch outlines, you can brush an iron oxide wash into the crevices and sponge off the high points, leaving the dark color only in the deep recesses. -
Final fire:
Fire the vase to cone 5/6 (or your clay’s maturity temperature). The heat will fuse the glaze and bring out the rich speckles in the clay.
Clean Recesses
When glazing the recessed arches, use a syringe or slip trailer to apply the blue glaze precisely. This avoids messy brush marks on the surrounding beige clay walls.
Place this vase near a window to let the light play across the textured carvings and deep blue insets


Carved Stone Ruin Block
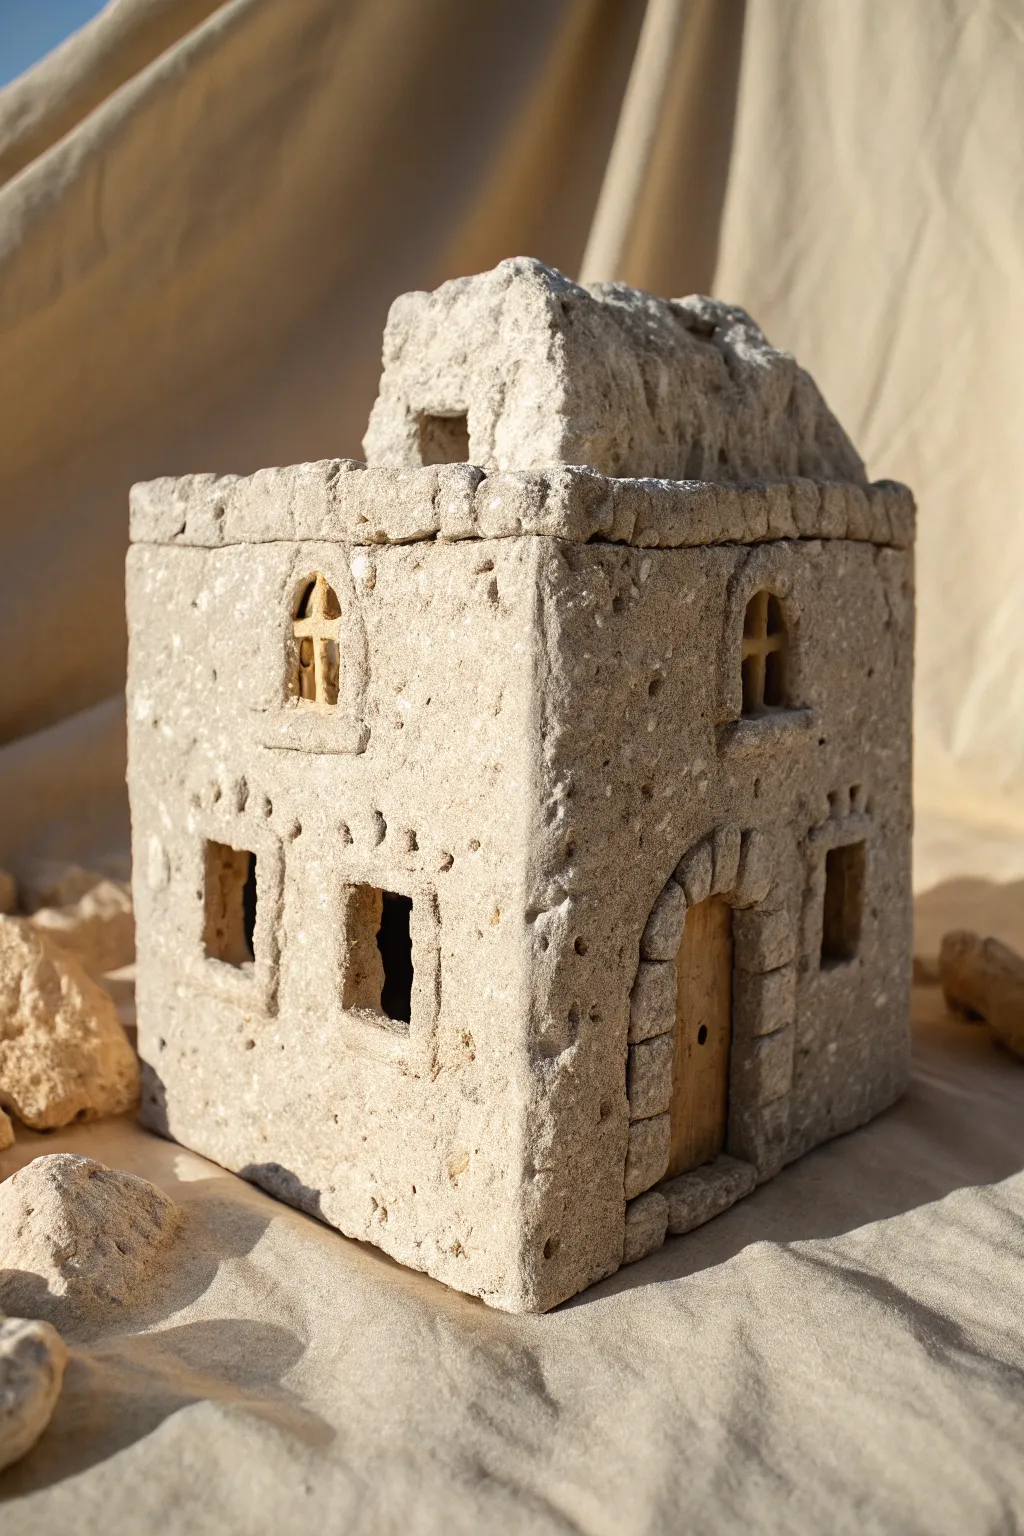
Sculpt your own piece of history with this rugged, stone-textured miniature dwelling. This project focuses on achieving a weathered, realistic limestone finish that mimics the look of ancient ruins baking in the desert sun.
Step-by-Step
Materials
- Air-dry stone clay or concrete-effect modeling paste
- High-density foam block (as a lightweight core)
- Sculpting tools (needle tool, small loop tool)
- Texture tools: Real rocks, stiff bristle brush, crumpled foil
- Balsa wood scraps (for the door and window crosses)
- PVA glue or tacky glue
- Acrylic paints: Beige, raw umber, white, black
- Sandpaper (medium grit)
- Hobby knife
Step 1: Forming the Structure
-
Cut the Core:
Cut your high-density foam into a cube shape roughly 4 to 5 inches tall. This acts as a lightweight armature so you don’t use too much heavy clay. -
Add the Upper Story:
Cut a smaller, rectangular piece of foam for the roof structure and glue it centrally on top of the main cube. -
Roll the Slabs:
Roll out your air-dry stone clay to about 1/4 inch thickness. You want it relatively thick to allow for deep texture carving later. -
Clad the Walls:
Apply a thin layer of PVA glue to the foam, then press your clay slabs onto the four sides and top surfaces. Smooth the seams where the clay pieces join on the corners using a wet finger. -
Texturize While Wet:
Before the clay hardens, press a real rock or crumpled aluminum foil firmly against every surface. This imitates the natural pitting of ancient limestone.
Step 2: Carving Details
-
Draft the Openings:
Using a needle tool, lightly sketch the outlines for the arched windows on the upper and lower levels, and the large arched doorway. -
Carve the Recesses:
Use a loop tool to dig out the clay in the window and door areas. Carve deeply enough to create a shadow but stop before hitting the foam core. -
Sculpt the Stonework:
Around the main doorway and windows, press distinct stone shapes into the clay. I find using the back of a hobby knife helps define the gaps between these archway stones. -
Add Decorative Features:
Roll tiny snakes of clay to form the decorative sill ledges under the windows and the small corbels (the protruding blocks) above the lower windows. Attach these with a little water and score the connection points. -
Define the Roof Edge:
At the top of the main cube, carve a horizontal groove to separate the roofline from the wall, creating a visual ‘cap’ as seen in the photo. -
Enhance Weathering:
Poke random holes of varying sizes into the walls with your needle tool to simulate erosion and pockmarks.
Cracks Appearing?
If the clay shrinks and cracks while drying on the foam, don’t panic. Fill wider cracks with a fresh slurry of wet clay, or leave hairline cracks as natural ‘ruin’ details.
Step 3: Woodwork & Finishing
-
Create Window Crosses:
Cut very thin strips of balsa wood. Glue them into the upper window arches to form a simple cross shape. -
Build the Door:
Cut a piece of balsa wood to fit the doorway recess. Scribe vertical lines into it to simulate planks, and drill a tiny hole for the handle. -
Stain the Wood:
Wash the wooden pieces with watered-down brown paint to age them before gluing the door into place. -
Dry and Sand:
Allow the entire structure to dry completely (usually 24-48 hours). Once hard, lightly sand any unnatural sharp peaks, but leave the rough texture intact. -
Base Coat:
Paint the entire stone surface with a mix of beige and white. Dab the paint on rather than brushing to get into the crevices. -
Apply a Dark Wash:
Mix a very watery raw umber paint. Brush it over the stone and immediately wipe the surface with a rag, leaving the dark color only in the deep textures and pits. -
Final Dry Brush:
Using a dry brush with almost no white paint on it, lightly whisk over the edges and high points to make the texture pop.
Mossy Overgrowth
For an abandoned look, dab spots of PVA glue in the deepest crevices and sprinkle fine green flocking or dried tea leaves to simulate moss growing on the stone walls.
Now you have a timeless architectural piece ready to display on a shelf or as part of a diorama

The Complete Guide to Pottery Troubleshooting
Uncover the most common ceramic mistakes—from cracking clay to failed glazes—and learn how to fix them fast.
Spiral Staircase Tower Sculpture
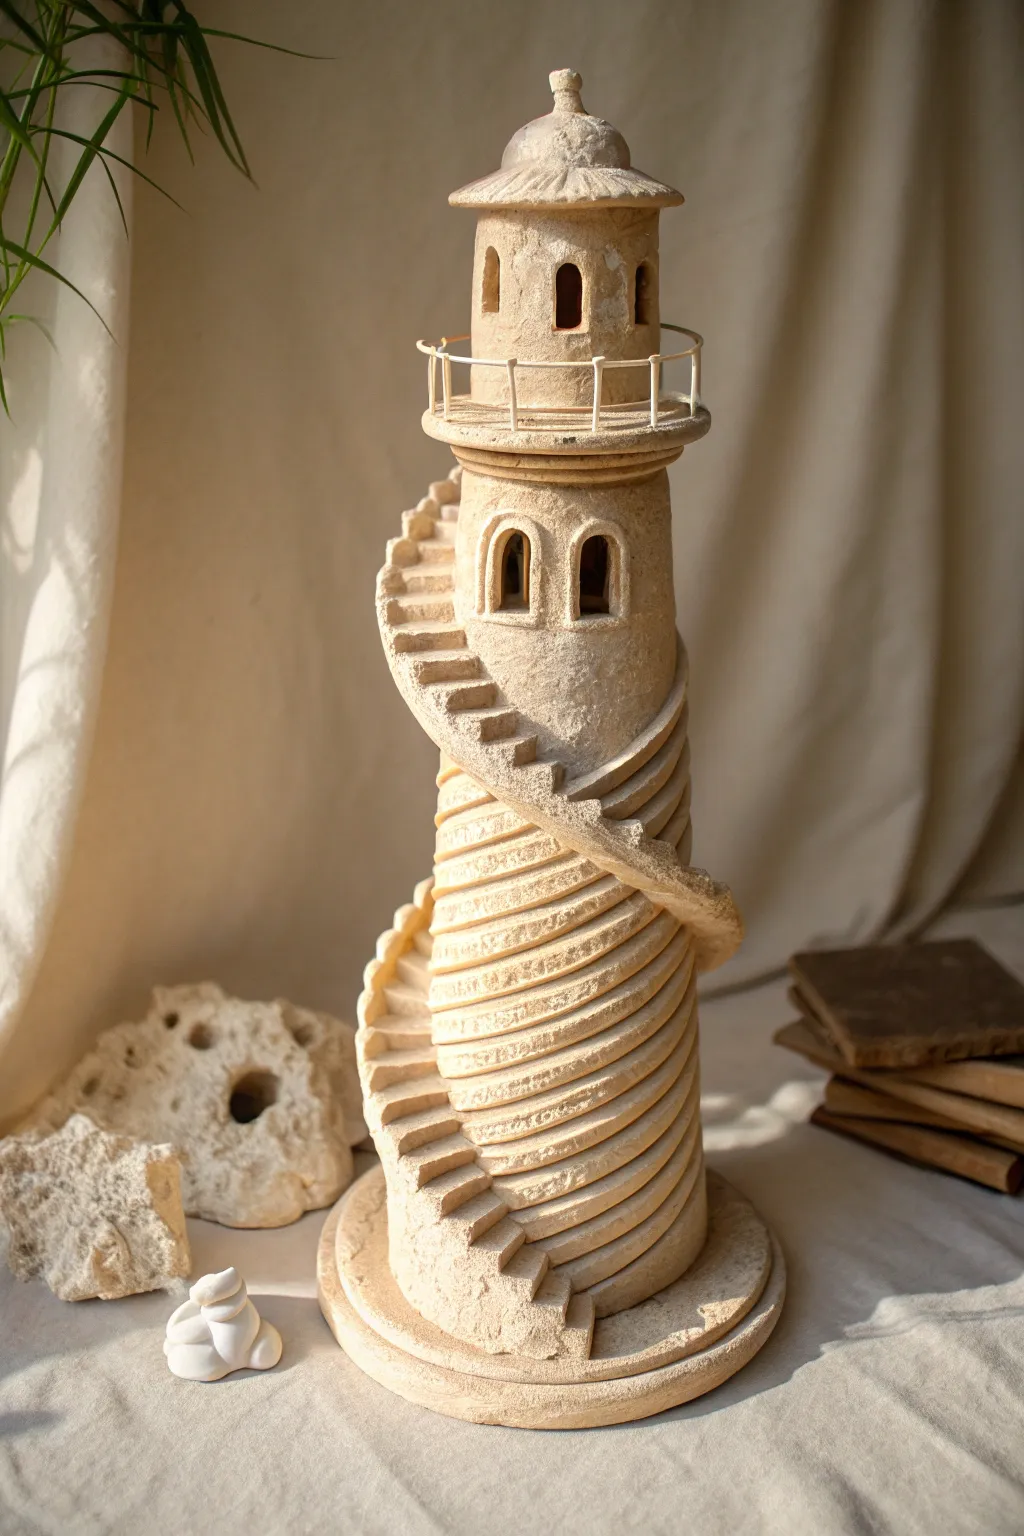
Transport yourself to a coastal fairytale with this stoneware lighthouse sculpture, featuring a captivating exterior spiral staircase and charming arched windows. The piece mimics the texture of ancient sandstone, making it a perfect decorative accent or a unique garden lantern.
Step-by-Step Tutorial
Materials
- Grogged stoneware clay (buff or sandstone color)
- PVC pipe or cardboard tube (approx. 3-inch diameter) for armature support
- Rolling pin and guide sticks (1/4 inch thickness)
- Needle tool and fettling knife
- Slip and scoring tool (serrated rib or old toothbrush)
- Small geometric cutters (arch shape)
- Thin crafting wire or cut paperclips (for the railing)
- Texture sponge or stiff bristle brush
- Wooden modeling tools
Step 1: Building the Core Structure
-
Prepare the Clayslab:
Begin by rolling out a substantial slab of clay to a uniform 1/4 inch thickness. I find using wooden guide sticks on either side of my roller ensures the walls are perfectly even. -
Form the Cylinder:
Cut a rectangular piece large enough to wrap around your chosen tube form. Wrap the clay around the tube, overlap the edges slightly, score, slip, and press the seam firmly together to create a tall cylinder. -
Remove Armature:
Once the clay can stand under its own weight (usually after 10-15 minutes), carefully slide the tube out. If you leave it in too long, the clay will shrink around it and crack. -
Close the Top and Bottom:
Roll out a slab for the base and cut a circle slightly larger than your cylinder. Score and slip it onto the bottom. Repeat this for the ceiling of the main tower shaft, sealing it closed. -
Add Surface Texture:
Before adding details, gently pat the entire surface with a coarse sponge or a stiff brush. This stippling effect mimics the eroded stone look seen in the photo.
Step 2: Constructing the Spiral Staircase
-
Mark the Path:
Lightly trace a spiral line ascending the tower with a needle tool. This will be the guide for where your stairs will attach. -
Create the Foundation Ridge:
Roll a long, thin coil of clay. Score along your traced spiral line and attach the coil, flattening it slightly against the wall. This acts as a support shelf for the individual steps. -
Cut the Steps:
Roll a slab slightly thicker than the walls. Cut numerous small rectangles or slight trapezoids for the stairs. You will need quite a few, so cut more than you think you need. -
Attach the Stairs:
Starting from the bottom, score and slip each step onto the foundation ridge. Overlap them slightly as you climb, tilting them just a hair to create that fanned spiral effect. -
Build the Outer Wall:
Roll a long, flat strip of clay. Attach this to the outer edge of the stairs, winding it upwards. This creates the smooth, continuous balustrade that hides the sides regarding the steps. -
Blend Seams:
Where the balustrade meets the stairs, used a small wood tool to smooth the connection underneath, ensuring it looks like one solid piece of carved stone.
Slumping Stairs?
If the spiral staircase starts drooping, prop up the lowest steps with pieces of sponge or crumpled paper towel. Leave these props in place until the clay is leather-hard and creates its own support.
Step 3: The Lantern Room & Details
-
Construct the Observation Deck:
Cut a clay ring (like a donut) and attach it to the top of the main tower, letting it overhang slightly to create a walkway. -
Build the Upper Chamber:
Form a smaller cylinder for the lantern room and attach it to the center of the observation deck. -
Carve Windows:
Use a small arch cutter or a sharp knife to carefully excise windows from the upper chamber and two accent windows on the main tower shaft. Be gentle so you don’t warp the walls. -
Form the Roof:
Shape a shallow cone or dome for the roof. Add a small knob or finial to the peak for decoration, then score and slip it onto the lantern room. -
Install the Railing:
Cut small lengths of wire for the vertical posts and insert them into the clay rim of the observation deck. Run a longer wire horizontally across the tops, securing it with a dot of superglue after the piece is fired, or bury the ends in the clay if firing temp permits. -
Final Texture Check:
Go over any smoothed areas from your joining process with the texture sponge again to ensure the finish is consistent. -
Drying:
Let this dry very slowly under loose plastic. Because the stairs vary in thickness from the walls, uneven drying can cause the spiral to crack away from the body.
Grout for Texture
To enhance the antique stone look, mix a little sand or grog into your slip before joining parts. This adds grit to the seams so they disappear perfectly into the textured surface.
Once fired, the natural stoneware color shines through, leaving you with a timeless architectural miniature to admire
Book Nook Mini Room Structure
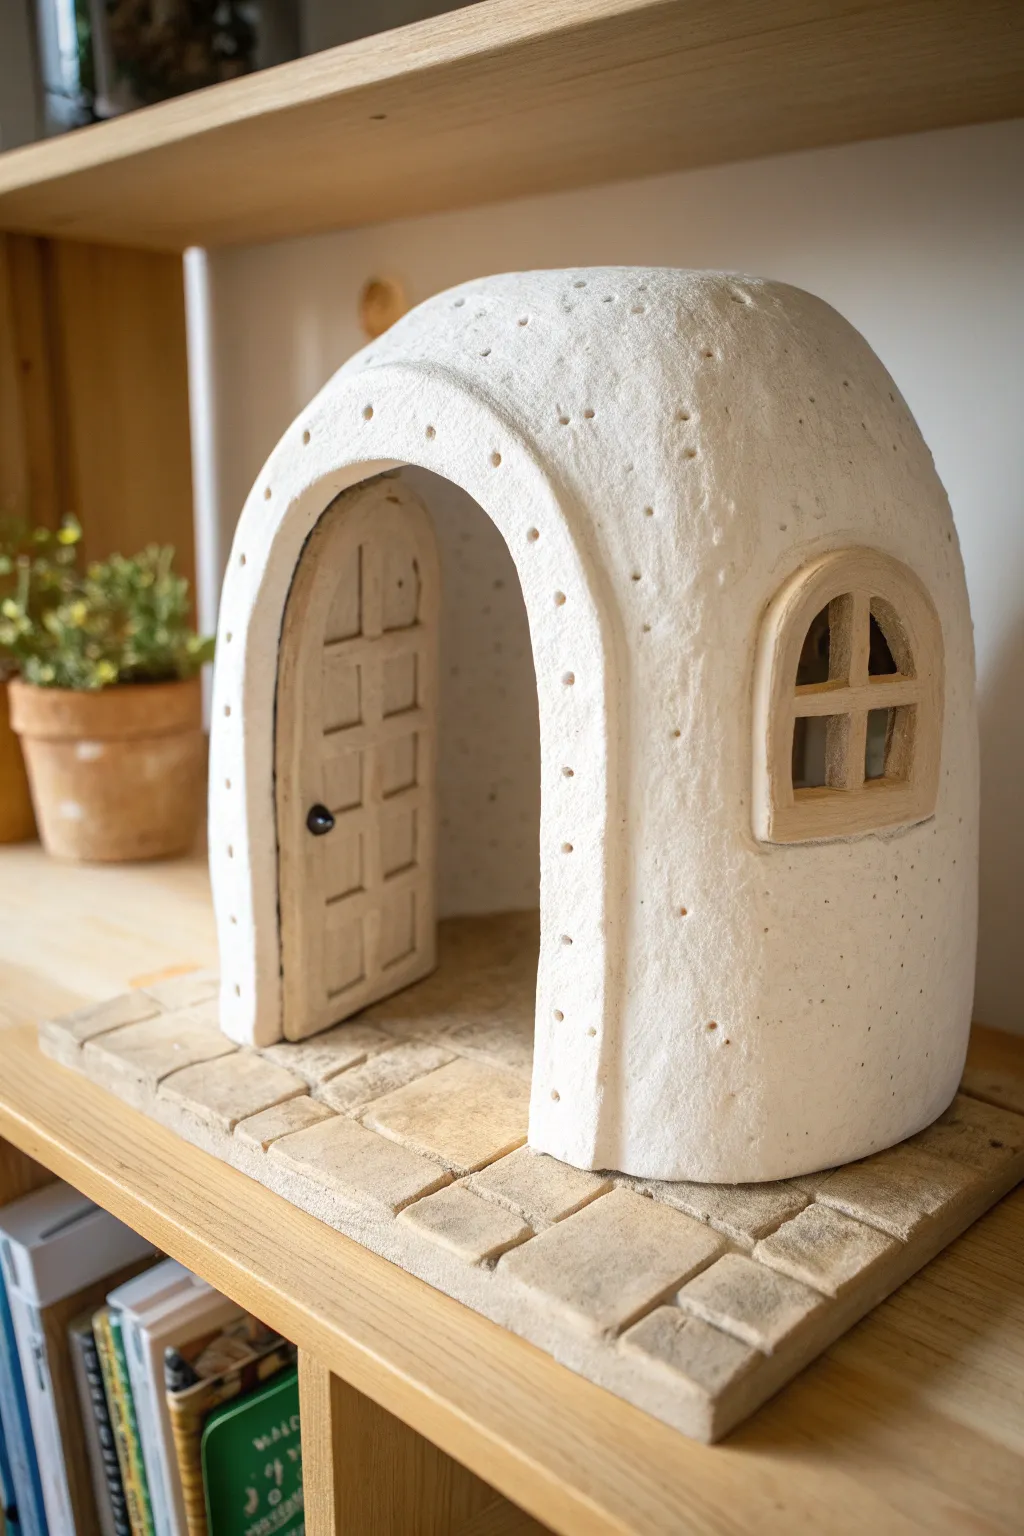
This charming miniature dwelling brings a touch of rustic fantasy to your bookshelf, featuring a textured adobe-style finish and a welcoming arched doorway. The project combines structure building with detailed clay work to create a cozy hideaway perfect for imaginary tiny inhabitants.
How-To Guide
Materials
- Air-dry clay (white or light stone color)
- Cardboard or foam core (for the base armature)
- Rolling pin
- Paving stone texture tool or dull knife
- Needle tool or toothpick
- Balsa wood scraps or craft sticks
- Wood glue or tacky glue
- Acrylic paints (creams, browns, slate greys)
- Fine grit sandpaper
- Sculpting tools
- Small black bead (for doorknob)
- Matte sealant spray
Step 1: Base and Armature Construction
-
Cut the foundation:
Begin by cutting a rectangular base from sturdy cardboard or foam core to fit your shelf space. This will serve as the ground for your cobblestone path and the house itself. -
Form the house skeleton:
Create an arched armature for the house using cardboard. Cut two identical arch shapes for the front and back walls, and connect them with curved strips of cardstock to form the roof’s dome shape. Secure everything firmly with masking tape. -
Define the openings:
Before adding clay, cut out the doorway on the front arch and a window space on the side of your cardboard structure. This ensures you won’t have to carve through thick dried clay later.
Natural Texture Hack
Press raw clay with a real stone from your garden before applying it to the model. It transfers organic, non-repeating patterns that tools can’t mimic.
Step 2: Sculpting the Stonework Base
-
Lay the clay ground:
Roll out a slab of clay about 1/4 inch thick and adhere it to your rectangular base using a little PVA glue to help it stick. -
Carve the pavers:
Using a knife tool or a flat-edged sculpting tool, press a grid of rectangular paving stones into the wet clay. Vary the sizes slightly to make it look rustic and aged. -
Texturing stones:
Gently tap the surface of each ‘stone’ with a crumpled ball of aluminum foil or a stiff bristle brush to give it a weathered, realistic rock texture.
Cracked Clay Rescue
If you see cracks forming as it dries, mix a small amount of fresh clay with water to make a ‘slip’ paste and fill the cracks, then smooth over.
Step 3: Building the House
-
Cover the armature:
Roll out a large sheet of clay. Carefully drape it over your cardboard house form. Trim the excess at the bottom where it meets the cobblestone base. -
Refine the shape:
Smooth the clay over the dome, blending any seams with a bit of water on your finger. Wrap the clay around the edges of the doorway and window openings for a neat finish. -
Add surface texture:
To achieve that signature porous, adobe look, lightly stipple the entire surface with a toothbrush or stiff sponge. Don’t smooth it out perfectly; the imperfections are key. -
Detail the archway:
Using a needle tool, poke a series of small, evenly spaced holes following the curve of the doorway arch and vertically down the sides. I like to add scattered random holes across the walls for extra character.
Step 4: Woodwork and Details
-
Construct the door:
Measure the doorway opening. Cut balsa wood or craft sticks to fit inside the arch. Glue vertical planks together, then add horizontal cross-beams to create a panel effect. -
Make the door frame:
Add a thin strip of clay or wood around the inner edge of the clay arch to act as a jamb. Once the door is dry, glue it in a slightly open position to look welcoming. -
Install the window:
Build a small window frame from balsa wood strips—a simple outer square with a cross in the middle. Glue this into the recessed window opening you created earlier. -
Final hardware:
Glue a tiny black bead onto the door to serve as the handle. If you don’t have a bead, a small ball of black polymer clay works perfectly.
Step 5: Finishing Touches
-
Dry completely:
Let the structure dry for at least 24-48 hours. Air-dry clay shrinks slightly, so ensure it dries slowly away from direct heat to prevent cracking. -
Sand rough spots:
Once fully cured, use fine-grit sandpaper to gently smooth any sharp edges on the base or around the door frame, but leave the wall texture intact. -
Paint the base:
Paint the cobblestones with a wash of watered-down grey and beige acrylics. Wipe away excess paint with a rag so the color settles into the cracks, highlighting the grout lines. -
Seal the work:
Finish with a light coat of matte spray varnish to protect the clay and wood from moisture and dust over time.
Place your completed mini-dwelling on a shelf near some greenery to create an enchanting little world.