
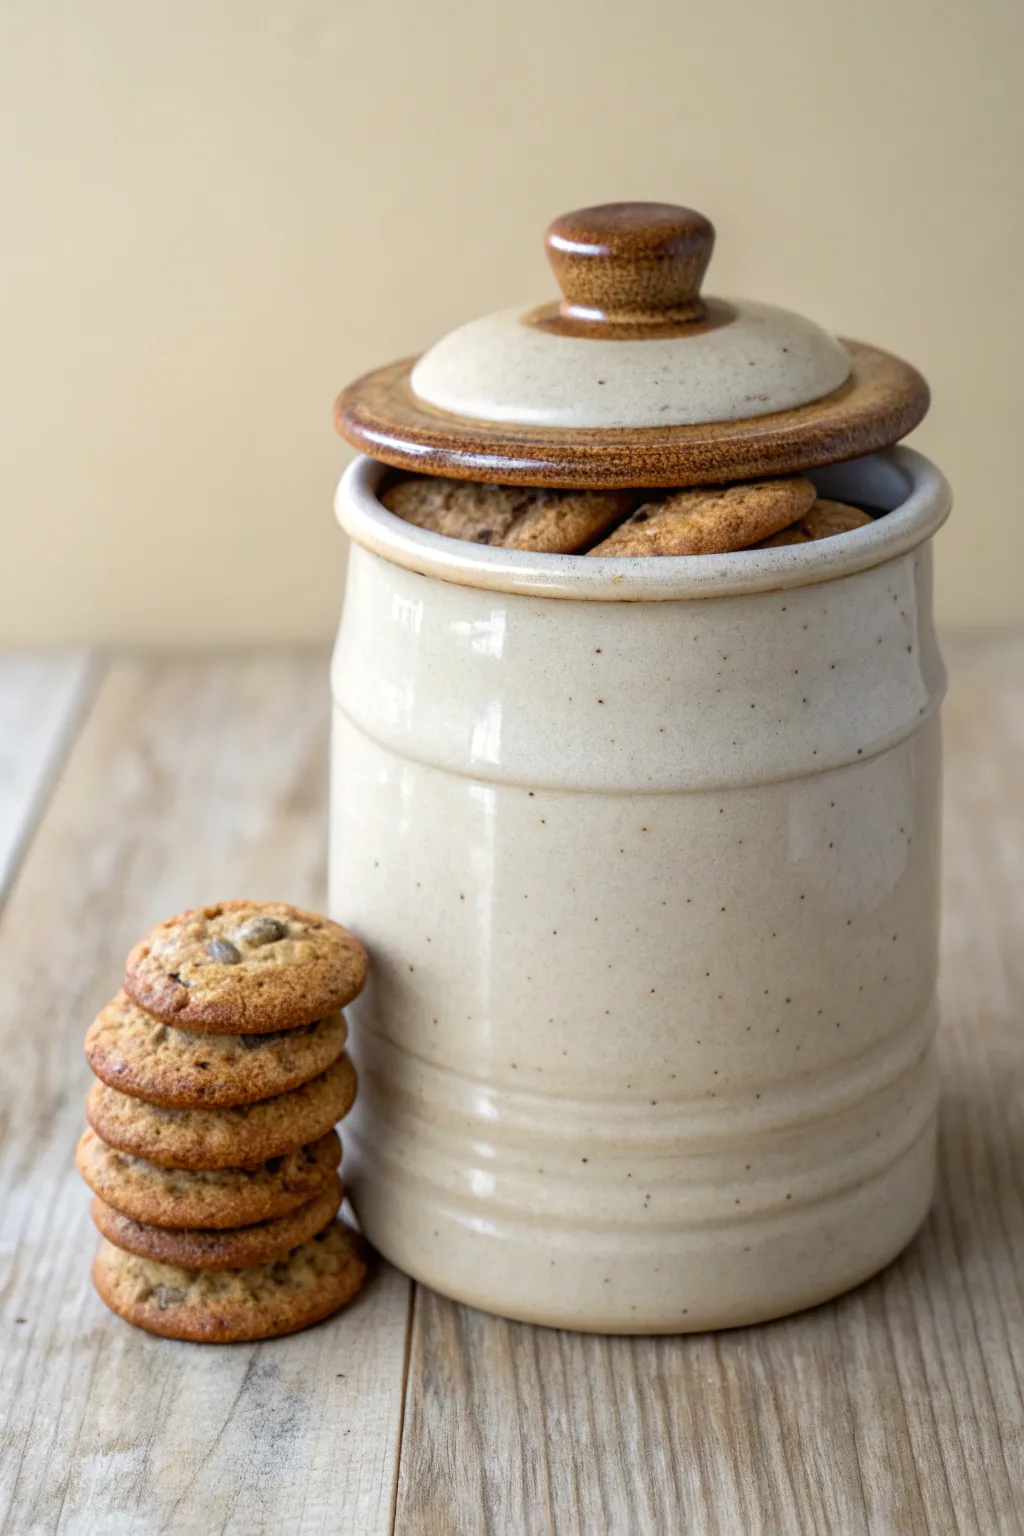
A good ceramic cookie jar is that perfect mix of useful and adorable—something you actually grab every day but still want to show off on the counter. Here are my favorite ceramic cookie jar ideas, starting with the timeless classics and drifting into the delightfully weird stuff I can’t resist making in the studio.
Classic Wheel-Thrown Cookie Jar
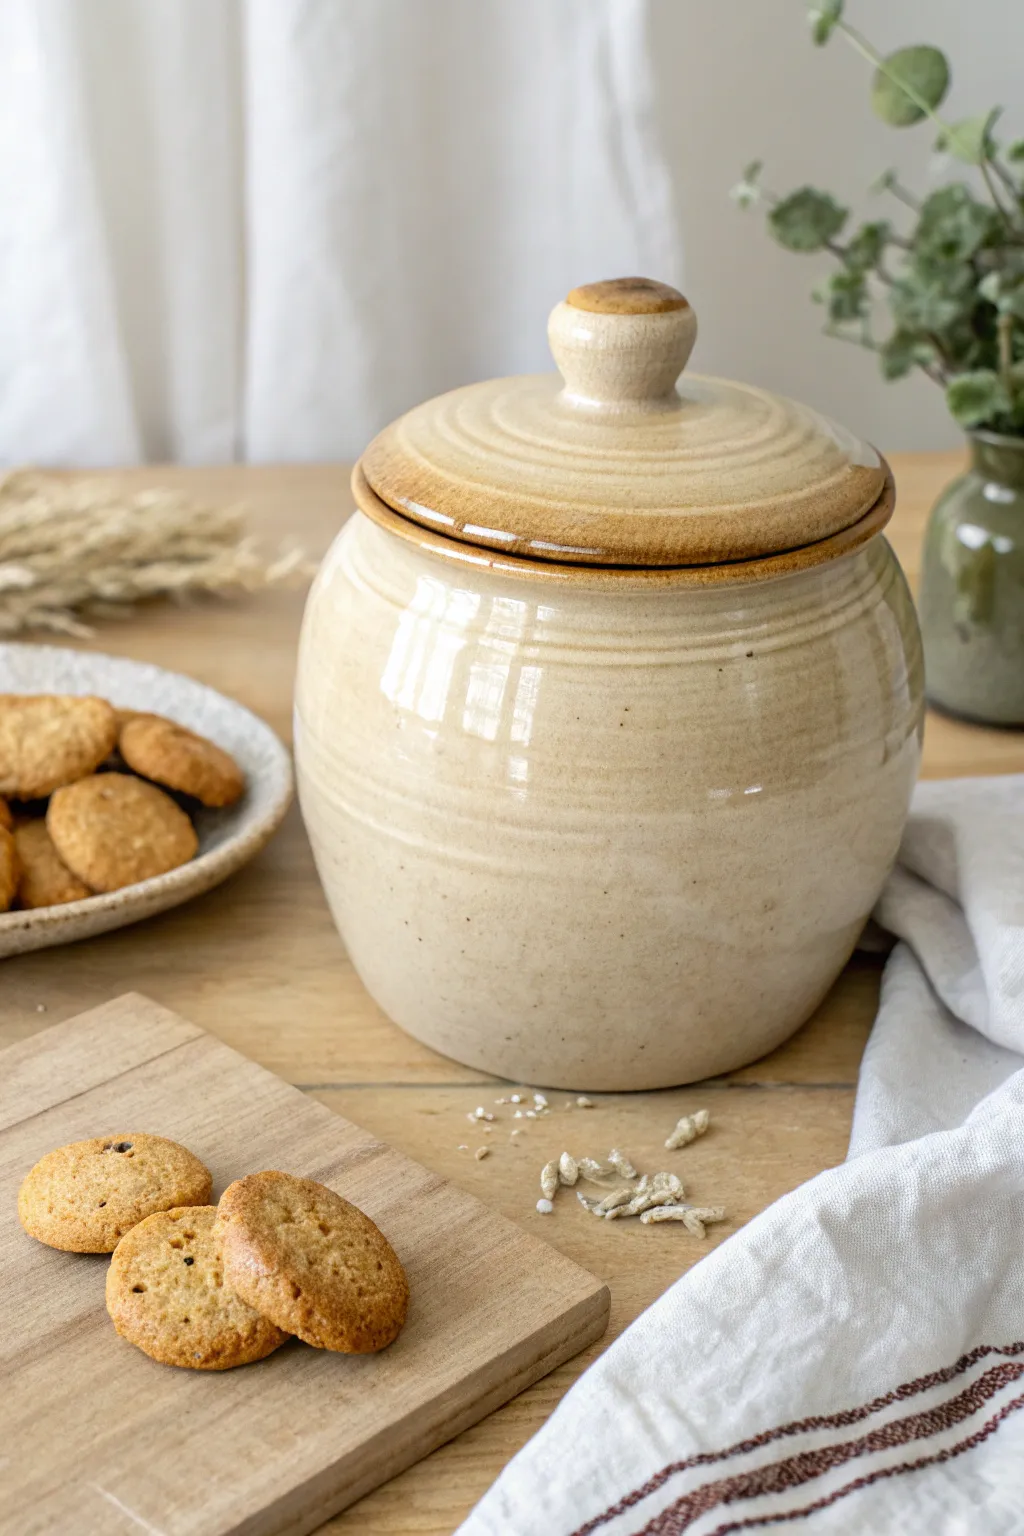
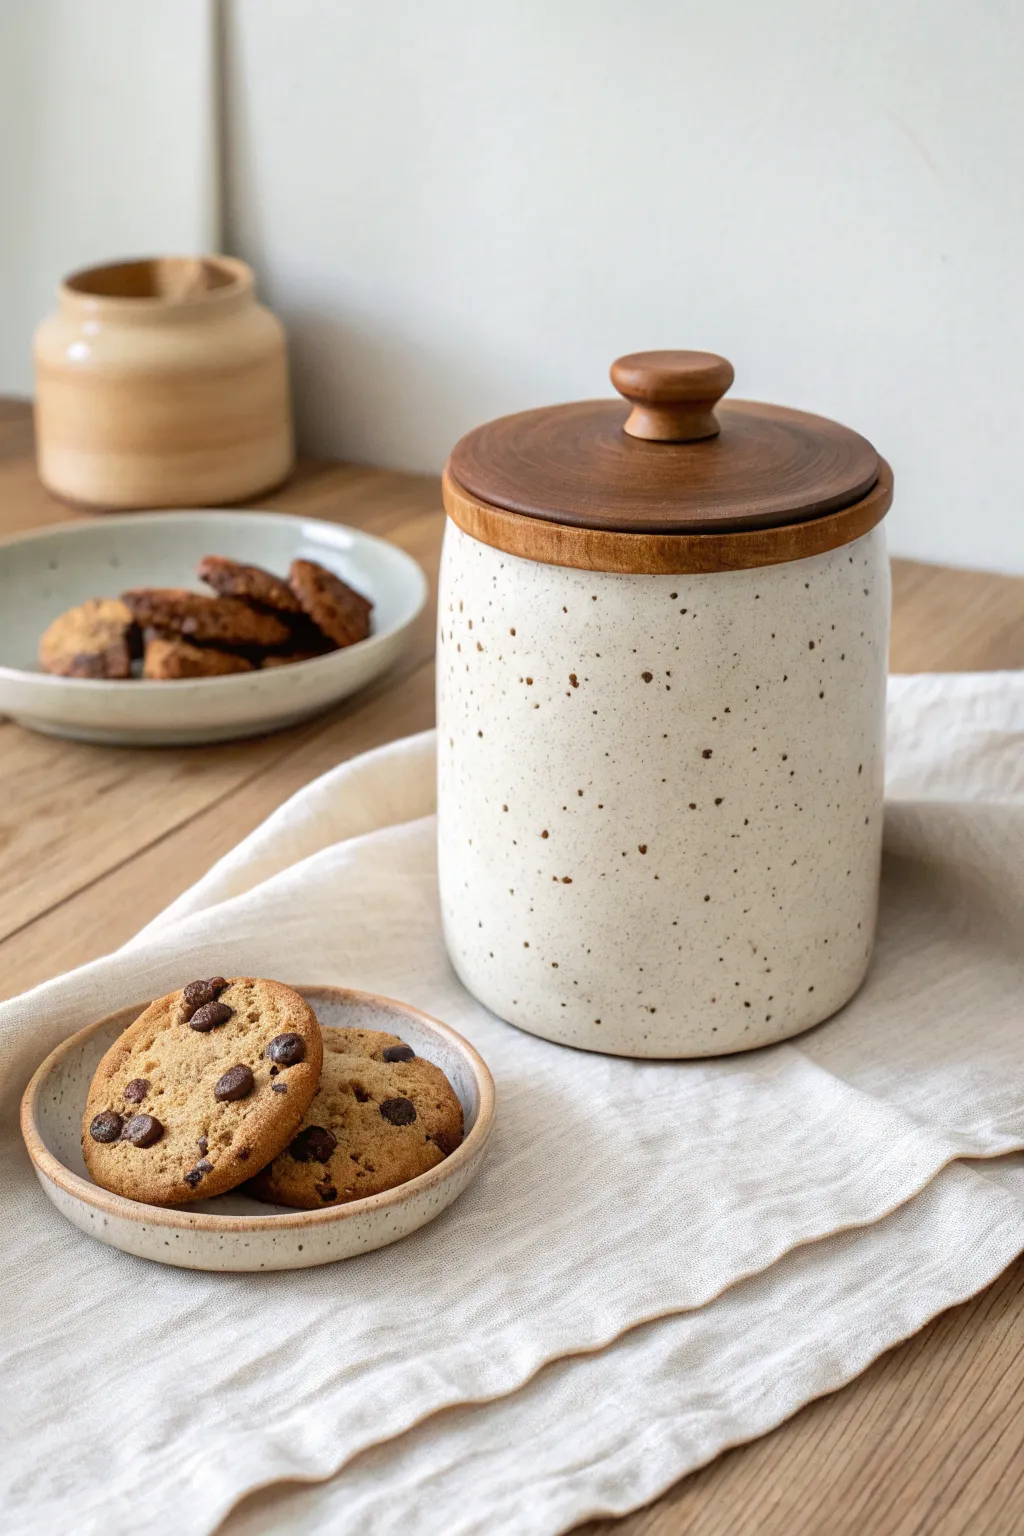
This classic ceramic cookie jar features a creamy, oatmeal-colored glaze with subtle speckles and warm brown accents on the rim and knob. Its rounded, generous form and snug-fitting lid make it both a functional kitchen staple and a charming piece of handmade decor.
Step-by-Step Tutorial
Materials
- Stoneware clay (buff or speckled)
- Pottery wheel
- Throwing tools (sponge, wooden rib, needle tool, wire tool)
- Trimming tools
- Calipers
- Creamy oatmeal glaze
- Iron oxide wash or dark brown glaze (for accents)
- Kiln
Step 1: Throwing the Jar Body
-
Center the clay:
Start with about 3-4 pounds of wedged clay. Throw it onto the wheel head and center it securely using steady pressure and water. -
Open and widen:
Open the centered clay and compress the floor. Pull the floor out until it reaches the desired width of your jar’s base—around 5-6 inches is a good start for a cookie jar. -
Pull the walls:
Begin pulling the walls upward. Maintain a cylindrical shape for the first pull, then gently belly out the form from the inside on subsequent pulls to create that classic rounded shape. -
Form the gallery:
At the rim, thicken the clay slightly and split it with your finger or a tool to create a gallery (a ledge) for the lid to sit on. This ledge should be flat and precise so the lid fits snugly. -
Refine the shape:
Use a wooden rib on the outside while pushing gently from the inside to smooth the curve and define the final bulbous silhouette. Leave visible throwing rings if you like the textured look shown in the photo. -
Measure the gallery:
Use calipers to measure the exact inner width of the gallery where the lid will rest. Lock the calipers in place; you’ll need this measurement for the lid.
Wobbly Lid?
If the lid rocks after firing, use a circular grinding stone or some grinding paste. Rotate the lid back and forth on the jar gallery to grind the high spots down until it sits perfectly flat.
Step 2: Creating the Lid
-
Center new clay:
Take a smaller ball of clay (about 1-1.5 pounds) and center it on the wheel head or a bat. -
Throw the lid shape:
Flatten the clay into a thick disk. Throw it upside down (as a bowl shape) or right-side up depending on your preferred lid style. For this project, throwing it right-side up with a solid knob is often easier. -
Match the measurements:
Check the diameter frequently with your calipers. The flange of the lid needs to fit perfectly inside the gallery of your jar. -
Form the knob:
If throwing off the hump or right-side up, shape a sturdy, rounded knob in the center. Give it a slight undercut to make it easy to grip. -
Add texture:
Use a modeling tool to create concentric rings on the top surface of the lid, mimicking the gentle texture of the jar body.
Step 3: Trimming and Assembly
-
Dry to leather hard:
Allow both the jar and the lid to dry slowly to a leather-hard state. Cover them loosely with plastic so they dry evenly. -
Trim the jar:
Invert the jar on the wheel (use a chuck or foam bat if the rim is delicate). Trim the bottom to create a neat foot ring that elevates the form slightly. -
Trim the lid:
Place the lid on the wheel (often utilizing the jar itself as a chuck if it’s strong enough) to clean up the underside and refine the fit. -
Check the fit:
Test the lid on the jar. It should sit flush without wobbling. If it’s too tight, carefully sand or trim the edge; remember clay shrinks, so a tight fit now is better than a loose one later.
Add a Seal
For a truly airtight cookie jar, make the lid fit slightly loose, then glue a thin rubber or silicone gasket ring around the flange after the final firing.
Step 4: Glazing and Firing
-
Bisque fire:
Fire the pieces in the kiln to cone 04 (or your clay’s bisque temperature). -
Apply base glaze:
Dip or pour a creamy oatmeal glaze over the entire jar and lid. Wipe the foot ring and the contact points (where the lid touches the jar) completely clean to prevent sticking. -
Add accents:
Using a brush or sponge, apply an iron oxide wash or a darker brown glaze to the rim of the lid and the top of the knob. Let it drip or feather slightly for a natural look. -
Glaze fire:
Fire the jar to the final maturity temperature of your clay and glaze (typically cone 5 or 6). I prefer a slow cooling cycle if possible to enhance the glaze crystals.
Fill your new handmade jar with your favorite treats and enjoy the warmth it brings to your kitchen counter


Gallery-Lid Cookie Jar for a Snug Fit
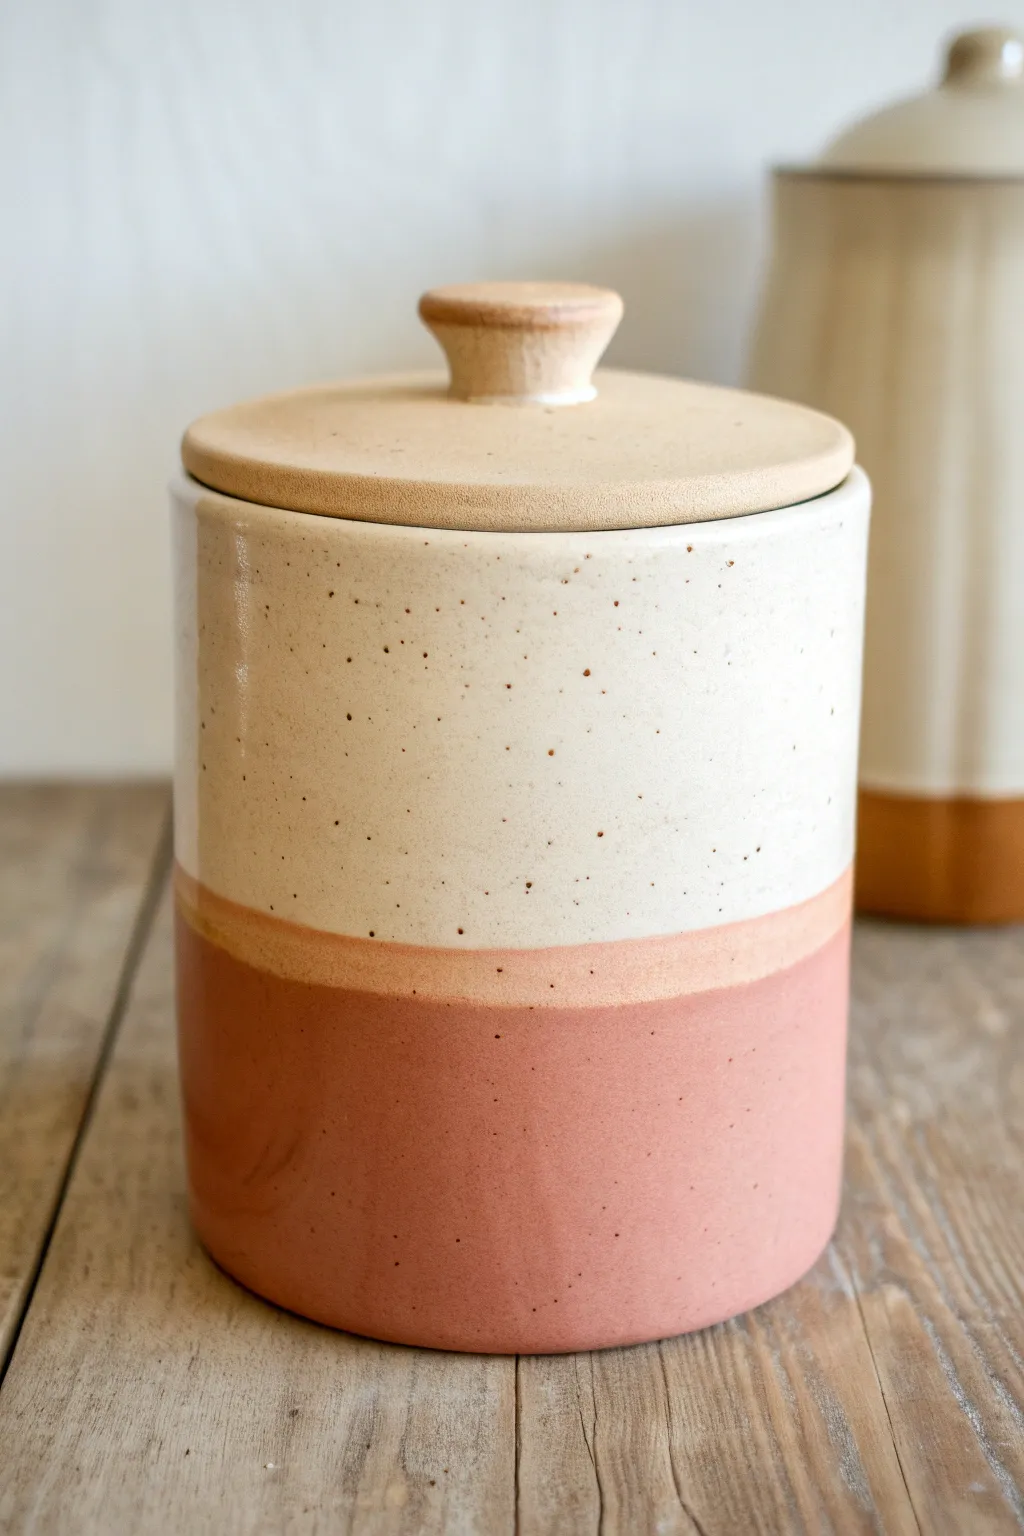
This project guides you through throwing a sturdy, speckled stoneware jar featuring a classic gallery rim for a snug-fitting lid. The finish captures a natural, earthy aesthetic with a warm white glaze that lets the clay’s character shine through.
How-To Guide
Materials
- Speckled stoneware clay (approx. 3-4 lbs)
- Pottery wheel
- Throwing sponge
- Needle tool
- Wooden rib tool
- Metal rib tool
- Wire cutter
- Trimming tools
- Calipers
- Warm white/creamy matte glaze
- Kiln
Step 1: Throwing the Body
-
Center the clay:
Start with about 2.5 lbs of speckled stoneware clay. Wedge it thoroughly to remove air bubbles, then slam it onto the wheel head. Center the clay using steady pressure and water until it spins without wobbling. -
Open and widen:
Press your thumbs into the center to open the well, stopping about a half-inch from the bottom. Pull the clay outward to establish the floor width, aiming for about 5-6 inches for a decent cookie capacity. -
Compress the floor:
Use a sponge or wooden rib to compress the floor of the pot. This is crucial for preventing chaotic S-cracks during drying and firing. -
Pull the walls:
Begin pulling the walls upward. Keep your pulls steady and slow, maintaining a cylinder shape initially. Make 3 to 4 passes until you reach your desired height, leaving the rim slightly thicker than the walls. -
Shape the belly:
Using a wooden rib on the outside and your hand on the inside, gently push the belly of the jar outward to create a slight curve, narrowing slightly again at the neck. -
Create the gallery:
At the rim, use the handle end of a needle tool or your thumb to split the rim. Push the inner half down about a half-inch to create a shelf (the gallery) where the lid will sit. Keep the outer wall vertical to act as a stopper. -
Measure and cut:
Use calipers to measure the exact interior diameter of the gallery shelf. Lock the calipers at this measurement. Use a wire cutter to slice the pot off the wheel and set it aside on a bat to stiffen to leather hard.
Shrinkage Check
Since clay shrinks, always measure your lid fit when the clay is leather hard, not wet. If the lid is tight at the leather-hard stage, it will likely fit perfectly after firing.
Step 2: Creating the Lid
-
Throw the lid:
Center a smaller amount of clay (about 1 lb). Flatten it into a thick pancake shape. You will be throwing this upside down or trimming it to fit later, but throwing right-side up is often easier for this style. -
Size the flange:
Using your caliper measurement, ensure the outer edge of the lid matches the gallery diameter. It’s often safer to throw it slightly wider and trim it down than to throw it too small. -
Refine the curve:
Shape the top of the lid with a gentle dome. Smooth the surface with a metal rib to compress the clay particles and remove throwing lines. -
Make the knob:
You can throw a small knob directly on the lid if there’s enough clay, or throw a separate small knob to attach later. For the look in the photo, a simple, flat button-style knob is ideal.
Iron Oxide Wash
To enhance the speckles or the rim color, sponge a very diluted Red Iron Oxide wash onto the bare clay areas before glazing. This adds depth and warmth to the exposed stoneware.
Step 3: Trimming and Assembly
-
Trim the jar:
Once leather hard, center the main jar upside down on the wheel. secure it with clay lugs. Trim the bottom to create a foot ring and clean up the lower curve of the belly. -
Fit the lid:
Place the lid on the wheel (upside down if needed) and trim the edge until it fits perfectly into the jar’s gallery. It should conform without rattling but not be so tight it jams. -
Attach the knob:
If you didn’t throw the knob in one piece, score and slip the center of the lid and the bottom of your knob. Press them together firmly and clean up the seam with a modeling tool. -
Bisque fire:
Allow both pieces to dry slowly and completely. Bisque fire them to Cone 04 (or your clay body’s recommendation).
Step 4: Glazing
-
Wax the contact points:
Apply wax resist to the gallery shelf on the jar and the underside rim of the lid. This prevents the lid from fusing to the jar during the glaze firing. -
Apply glaze:
Dip or pour a warm white, satin-matte glaze over the jar and lid. I find dipping gives the most consistent coverage. Wipe away any drips. -
Reveal the rim:
Take a damp sponge and gently wipe the glaze off the very top outer rim of the jar and the edge of the knob to reveal the raw clay body, creating that beautiful brown accent line seen in the image. -
Glaze fire:
Fire the kiln to the maturity temperature of your clay and glaze (likely Cone 5 or 6). Let the kiln cool naturally before unloading.
Once cooled, fill your new handmade jar with treats and enjoy the satisfy clink of the ceramic lid settling into place


Gingham-Painted Cookie Jar
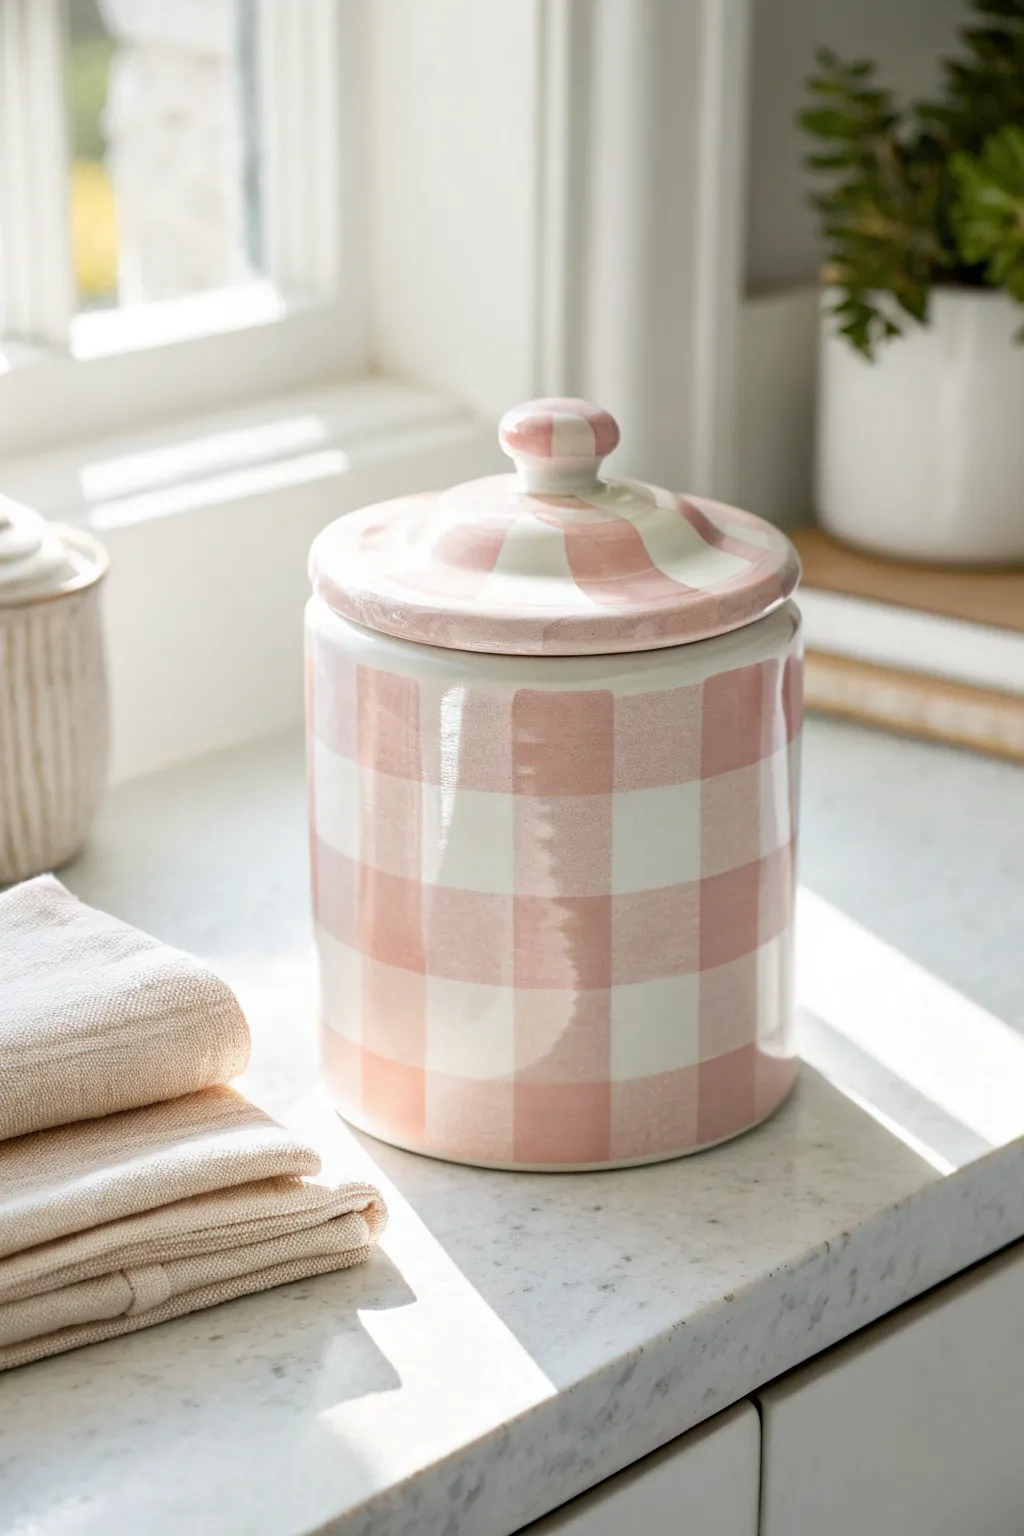
Bring a touch of cottagecore charm to your kitchen counter with this sweet pink and white gingham cookie jar. By using a clever layering technique with translucent glaze, you can mimic the woven texture of fabric right on your ceramics.
Step-by-Step
Materials
- Bisque-fired ceramic cookie jar with lid
- Soft pink underglaze or ceramic paint
- Clear transparent glaze (if using underglaze)
- Flat shader brush (approx. 1/2 inch to 1 inch wide)
- Detail round brush
- Pencil
- Ruler or soft tape measure
- Painter’s tape or masking tape (optional for straighter lines)
- Palette or small dish for mixing
- Water cup
- Sponge
Step 1: Preparation and Planning
-
Clean the bisque:
Start by wiping down your bisque-fired cookie jar with a slightly damp sponge. This removes any kiln dust or oils from your hands that might resist the glaze. -
Mark vertical guides:
Using a soft pencil and a measuring tape, make small tick marks around the top rim of the jar base. Space them apart exactly the width of the squares you want (about 1 inch is standard for this look). The pencil marks will burn off in the kiln. -
Mark horizontal guides:
Repeat the marking process vertically down the side of the jar. This grid will help you keep your hand-painted lines consistent without needing to draw the entire grid, which can get messy.
Step 2: Painting the Gingham Base (Verticals)
-
Load your brush:
Load your flat shader brush generously with your pink underglaze. You want the consistency of heavy cream so it flows smoothly but isn’t drippy. -
Paint vertical stripes:
Starting from the top rim, paint vertical stripes down the body of the jar. Use the flat width of your brush to make a single stroke if possible. Skip one brush-width of space between each pink stripe. -
Refine edges:
If your edges are a bit wobbly, use a clean, damp angled brush to tidy them up while the paint is still wet. Don’t worry about perfection; the hand-painted look adds character to the gingham style. -
Let it dry completely:
This step is critical. Allow the vertical stripes to dry until they are chalky and cool to the touch. If you paint the next layer too soon, you’ll smear the first set of lines.
Pro Tip: The Watercolor Effect
Use a semi-transparent underglaze rather than an opaque one. Opaque colors hide the layers underneath, ruining the crucial “woven” look where the lines intersect.
Step 3: Creating the Checkered Pattern
-
Water down the paint slightly:
For the horizontal stripes, I like to water down the glaze just a tiny bit. This increases translucency, which is the secret to the gingham effect: where the stripes cross, the color will naturally appear darker. -
Paint horizontal stripes:
Paint horizontal bands around the jar, using your pencil guides. Again, paint a stripe, skip a space, paint a stripe. -
Overlap carefully:
As you paint over the dry vertical stripes, don’t overwork the brush. Lay the color down in one confident stroke to create those darker intersections that mimic woven fabric. -
Check the density:
Step back and look at the jar. You should see three tones: the white of the jar, the medium pink of single layers, and the dark pink where they overlap. If the overlap isn’t dark enough, dab a little extra glaze on just those squares.
Level Up: Mixed Media look
Instead of a standard clear glaze, use a clear crackle glaze for the top coat. Rub dark ink into the cracks after firing to give it an instant vintage farmhouse antique vibe.
Step 4: Did the Lid
-
Plan the radial design:
For the lid shown in the project, we want a sunburst or radial stripe pattern rather than a grid. Mark center points around the rim of the lid. -
Paint the lid stripes:
Using the detail round brush or the edge of your flat brush, paint stripes that start wider at the rim and taper toward the central knob. Follow the curve of the lid. -
Paint the knob:
Finish the lid by painting simple horizontal bands or a solid cap on the knob handle to tie the look together.
Step 5: Finishing Touches
-
Clean the bottom:
Flip the jar over and wipe the bottom foot ring with a wet sponge. Any glaze left here will fuse to the kiln shelf. -
Apply clear glaze:
Once all your pink design work is bone dry, apply two to three coats of clear transparent glaze over the entire piece (inside and out) to make it food-safe and glossy. -
Fire the piece:
Load the jar into the kiln and fire according to your clay and glaze specifications (usually Cone 06 or Cone 6).
Fill your freshly fired jar with homemade biscotti or sugar cookies for a delightful countertop display


Striped Cookie Jar With a Pop of Color
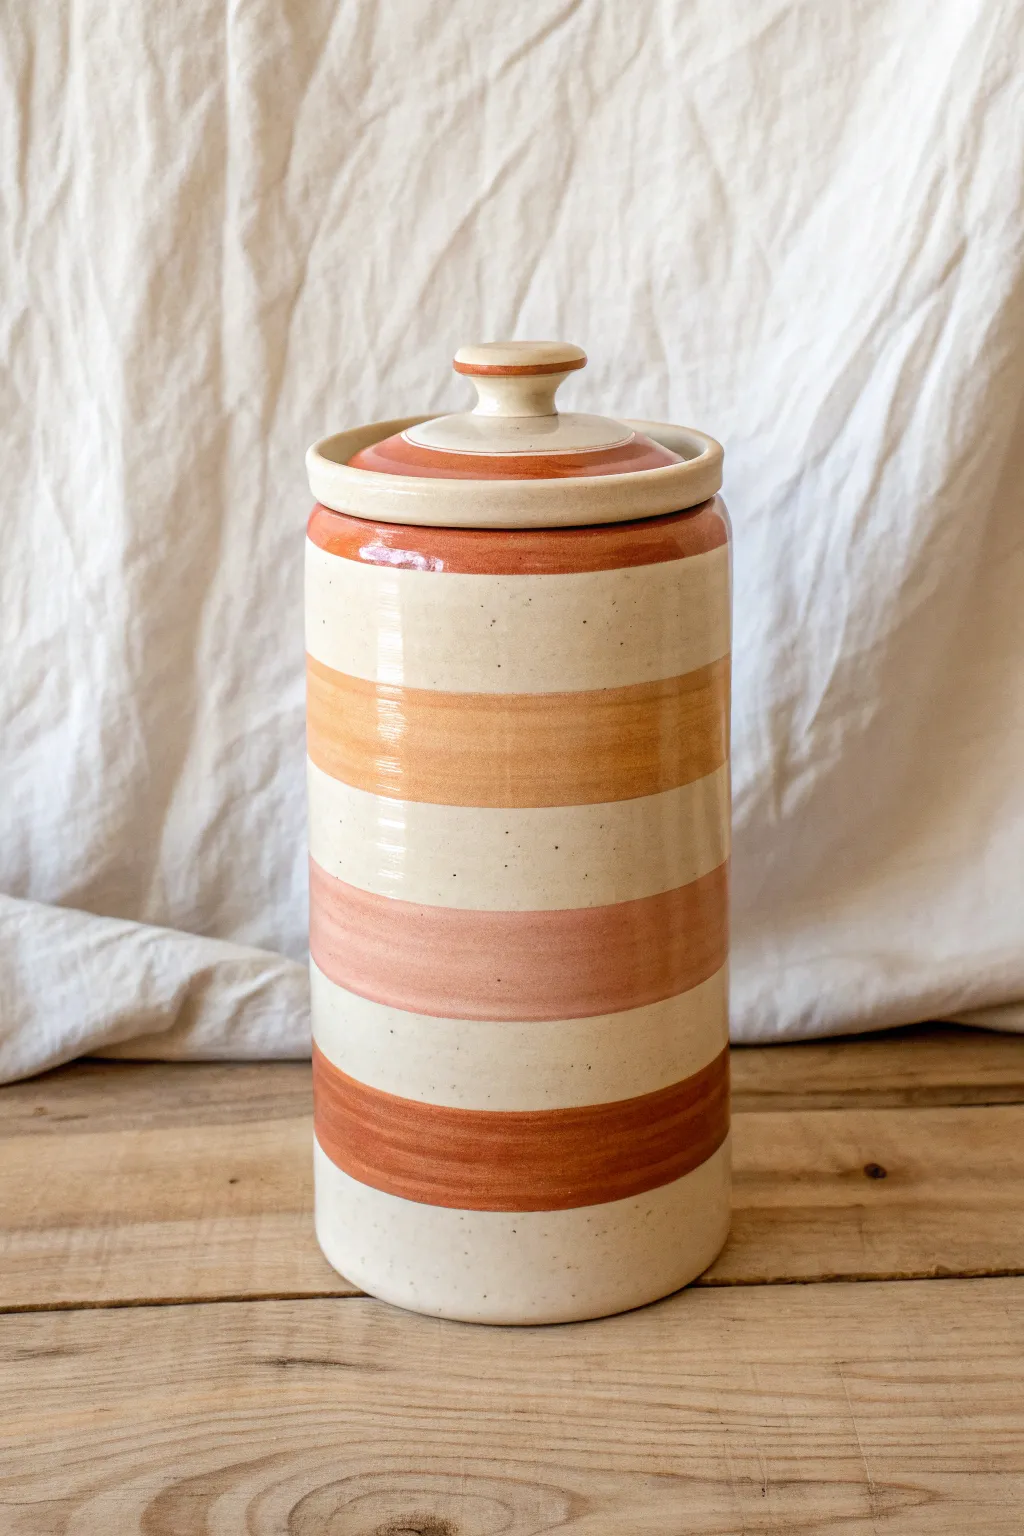
Bring a cozy, earthy aesthetic to your kitchen counter with this hand-painted ceramic cookie jar. Featuring broad horizontal bands of terracotta, mustard, and blush pink on a speckled cream base, this project combines simple geometry with warm, inviting colors.
Step-by-Step Guide
Materials
- Bisque ceramic jar with lid (tall cylinder shape)
- Underglaze paints: Rust/Terracotta, Mustard/Ochre, Blush Pink
- Speckled Clay glaze or a clear glaze with speckles
- Clear dipping glaze (if using standard underglazes)
- Potter’s wheel or banding wheel
- Flat shader brushes (medium and large)
- Fine liner brush
- Sponge
- Water container
- Pencil
Step 1: Preparation & Base Coat
-
Clean the bisque:
Start by wiping down your bisque jar and lid with a damp sponge. This removes any dust that might prevent the glaze from adhering properly. -
Apply the base color:
If your clay body isn’t naturally speckled cream, apply 2-3 coats of a speckled cream underglaze to the entire exterior of the jar and the top of the lid. Ensure each coat is dry before applying the next. -
Center the piece:
Place your jar on a potter’s wheel or a banding wheel. Centering it as accurately as possible is crucial for getting even stripes later.
Wobbly Stripes?
Rest your arm on a stack of books or a steady leverage point while painting. Keeping your hand anchored while the wheel spins does the work for you.
Step 2: Painting the Stripes
-
Mark the bands:
While gently spinning the wheel, lightly touch a pencil to the jar to mark out where your color bands will go. Aim for equal width, leaving alternating bands of the cream base showing. -
Paint the bottom stripe:
Load a flat shader brush with the Rust/Terracotta underglaze. Spin the wheel slowly and hold the brush steady against the bottom-most marked section to create the first band. -
Paint the rim:
Use the same Rust color to paint the top rim of the jar body. This frame connects visual attention to the lid. -
Apply the middle stripe:
Switch to your Blush Pink underglaze. Using a clean brush, paint the band just above the bottom rust stripe, leaving a gap of cream in between. -
Add the ochre band:
Clean your brush thoroughly and load it with Mustard or Ochre. Paint the wide band in the upper middle section of the jar. -
Layering the color:
I usually apply three coats of underglaze for solid opacity. Let the stripes dry until they are chalky and matte between layers to prevent dragging the previous coat. -
Clean up edges:
If any paint wobbled outside the lines, use a damp stiff brush or a specialized cleanup tool to gently scrape or wipe away the excess while the wheel spins.
Step 3: Finishing the Lid
-
Detail the knob:
Paint the very top rounded part of the knob handle with the Rust color. Use a smaller brush here for better control. -
Create the lid ring:
Spin the lid on the banding wheel and paint a medium-width ring of Rust around the center slope of the lid. -
Check consistency:
Ensure the density of color on the lid matches the body of the jar. Apply additional coats if the brushstrokes look streaky.
Add Texture
Before the underglaze dries, use a sgraffito tool to scratch thin vertical lines through the colored bands to reveal the white clay beneath.
Step 4: Glazing & Firing
-
Dry completely:
Allow the underglaze to dry completely, ideally overnight, to ensure all moisture has evaporated. -
Clear glaze application:
Dip the entire jar and lid into a clear glossy glaze. If you don’t have a dipping tank, you can brush on 2-3 coats of clear brushing glaze. -
Wipe the foot:
Use a wet sponge to thoroughly clean the bottom of the jar and the rim where the lid sits so they don’t fuse to the kiln shelf during firing. -
Fire the piece:
Load the kiln and fire to the temperature specified by your clay and glaze manufacturer (typically cone 5 or 6 for stoneware).
Once cooled, fill your new jar with homemade treats and enjoy the beautiful organization it brings to your counters

The Complete Guide to Pottery Troubleshooting
Uncover the most common ceramic mistakes—from cracking clay to failed glazes—and learn how to fix them fast.
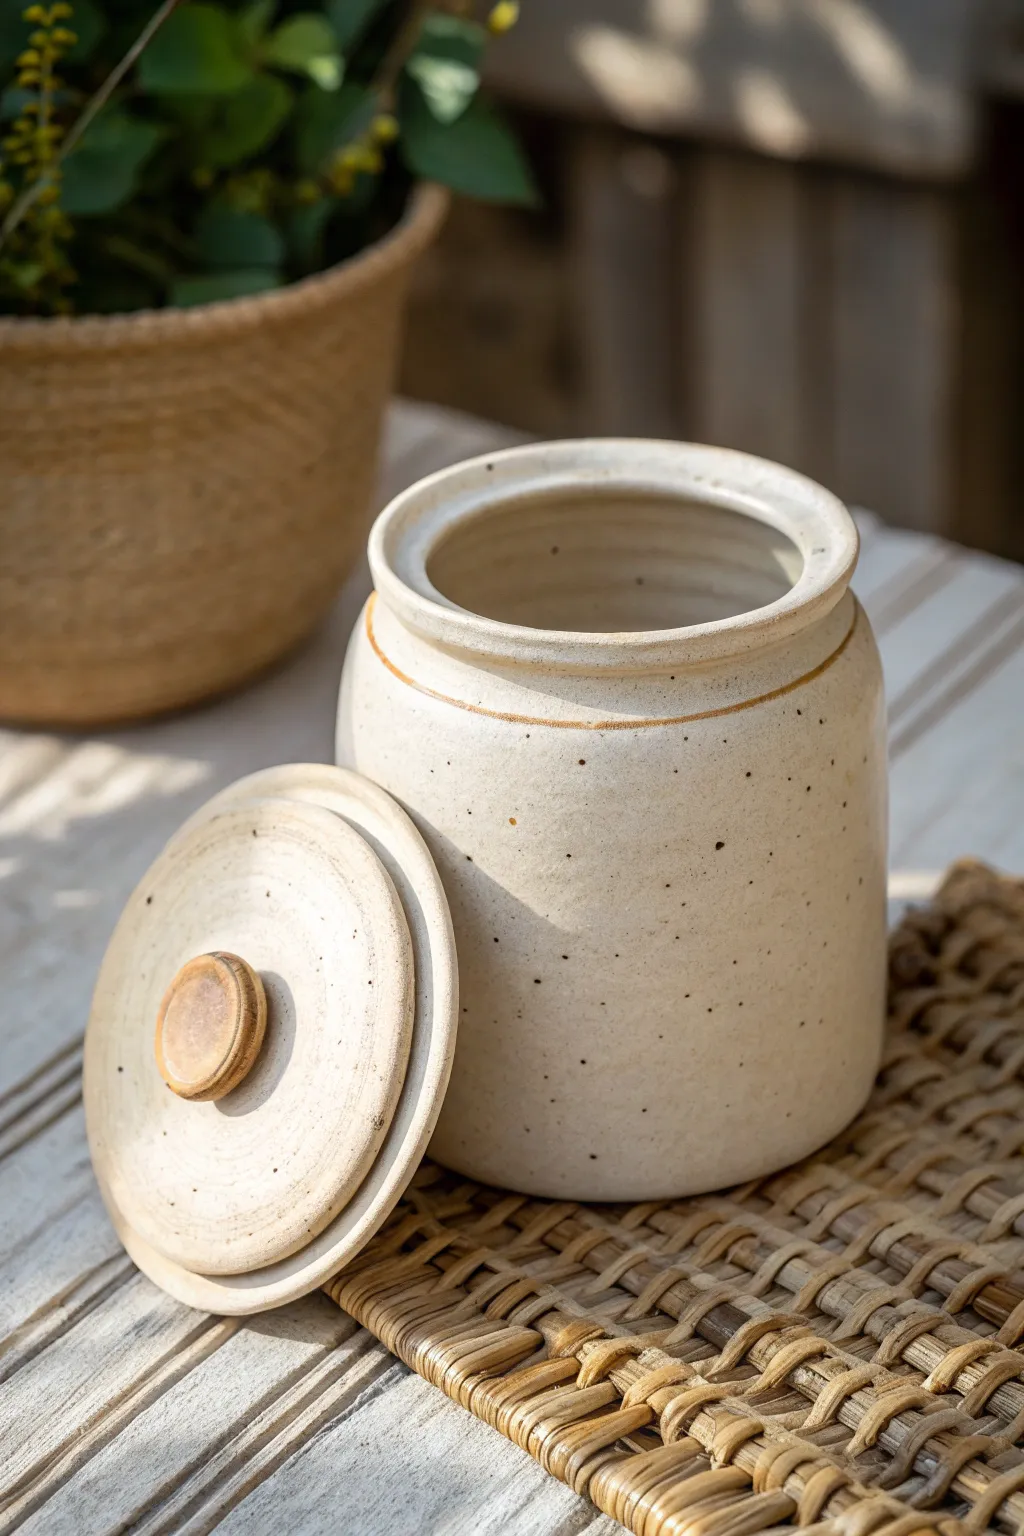
Speckled Stoneware Cookie Jar
This project combines the rustic charm of speckled clay with clean, modern lines to create a timeless kitchen staple. The creamy white glaze showcases the natural iron spots in the clay body, perfectly complemented by a warm, turned walnut lid.
How-To Guide
Materials
- Speckled stoneware clay (approx. 3-4 lbs)
- Pottery wheel
- Throwing sponge
- Wire cutter
- Wooden rib tool
- Metal kidney scraper
- Needle tool
- Calipers (optional but helpful)
- Trimming tools
- White or cream satin-matte glaze (cone 5/6)
- Kiln
- Hardwood blank (walnut or cherry) for the lid
- Wood lathe and turning tools
- Food-safe wood finish (mineral oil or beeswax)
Step 1: Throwing the Cylinder
-
Center the clay:
Begin by wedging your speckled stoneware clay thoroughly to remove air bubbles. Slam the ball onto the wheel head and center it using firm pressure and medium wheel speed. The centering needs to be precise as this is a fairly large vessel. -
Open the vessel:
Open the centered clay mound, leaving about a half-inch floor thickness. I like to compress the floor with a wooden tool at this stage to prevent cracking later. -
Pull the walls up:
Slow the wheel down. Perform your first pull to gain height, keeping your hands steady. Aim for a straight, vertical cylinder rather than a bowl shape. -
Refine the shape:
Continue pulling the walls, thinning them evenly from bottom to top until you reach a height of about 7-8 inches. Ensure the rim stays slightly thicker for durability. -
Define the gallery (optional):
Since we are making a wooden lid that sits *on top* with an inner lip, you don’t necessarily need a clay gallery. However, ensure the rim is perfectly flat and level using a needle tool or chamois. -
Smooth the exterior:
Use a metal kidney scraper to remove throwing lines and compress the clay particles on the outside wall. This creates that smooth canvas for the speckles to shine through. -
Cut and dry:
Run a wire cutter under the pot and carefully lift it off the wheel. Allow it to dry to a leather-hard state.
Wobbly Rim?
If your rim isn’t perfectly level after throwing, use a cheese cutter or needle tool to slice off the top 1/4 inch while the wheel spins slowly. This creates a fresh, flat surface for the lid.
Step 2: Trimming and Firing
-
Center for trimming:
Place the leather-hard jar upside down on the wheel. Use lugs of clay to secure it in place. -
Trim the foot:
Use a sharp trimming tool to define the foot ring and remove excess weight from the bottom of the jar. The bottom should feel balanced with the walls. -
Bisque fire:
Once fully bone dry, load the jar into the kiln for a bisque firing (usually Cone 04). This prepares the ceramic for glazing. -
Apply the glaze:
Dip the bisque-fired jar into a bucket of satin-matte cream glaze. Hold it upside down to let excess drip off. Ensure the glaze isn’t too thick, or it might obscure the lovely speckles in the clay. -
Wipe the foot:
Carefully wipe the glaze off the bottom foot ring with a damp sponge so it won’t stick to the kiln shelf. -
Glaze fire:
Fire the jar to the maturity temperature of your clay and glaze combination (typically Cone 5 or 6). Let the kiln cool completely before opening.
Step 3: Creating the Wooden Lid
-
Measure the opening:
Using calipers, measure the exact inner diameter of your fired ceramic jar. Ceramics shrink, so always measure *after* the final glaze firing. -
Mount the wood:
Secure your walnut blank onto the wood lathe faceplate. -
Turn the insert:
Turn a tenon (or rabbit) on the underside of the wood that matches the inner diameter of your jar. It should fit snugly but not be tight. -
Shape the top:
Shape the top profile of the lid. Create a gentle dome or flat top, based on your preference. Turn a small knob in the center for easy lifting, integrating it seamlessly into the lid design. -
Sand and finish:
Sand the wood while it’s spinning, moving from 120 grit up to 400 grit for a silky smooth feel. Apply a generous coat of food-safe mineral oil or beeswax to seal the wood and bring out the grain.
Add a Silicone Seal
For an airtight fit to keep cookies fresh, turn a groove into the wooden lid’s tenon and slip on a rubber O-ring or silicone gasket. This adds a professional, functional touch.
Fill your new handmade jar with your favorite treats and display it proudly on your counter
Color-Block Modern Cookie Jar
Give your kitchen storage a modern, earthy update with this two-tone ceramic painting technique. By layering speckled finishes over a simple color-blocked base, you can transform a plain cylindrical jar into a piece that looks handmade on the potter’s wheel.
Detailed Instructions
Materials
- Plain cylindrical ceramic canister with lid (glazed or unglazed)
- Sandpaper (fine-grit, if using a glazed jar)
- Adhesive primer spray (for slick surfaces)
- Painter’s tape (high-quality)
- Cream or off-white acrylic paint
- Terracotta or rusty pink acrylic paint
- Burnt umber or dark brown acrylic paint (for speckles)
- Flat paintbrushes (medium width)
- Old toothbrush or stiff bristle brush
- Matte clear sealant spray
- Water cup and paper towels
Step 1: Preparation
-
Clean the surface:
Start by thoroughly washing your canister and lid with warm soapy water to remove any grease or manufacturer oils. Let it dry completely. -
Create a grip:
If your canister is already glazed and shiny, lightly scuff the surface with fine-grit sandpaper. This helps your new paint layers adhere better. -
Prime the surface:
Apply a thin, even coat of adhesive primer to both the canister body and the lid. Let this cure according to the can’s instructions before moving on.
Bleeding Lines?
If paint bled under your tape, wait for it to dry completely. Then, use a small, stiff brush dipped in your top cream color to carefully touch up the edge.
Step 2: Painting the Base
-
Apply the top color:
Paint the entire canister body and the lid with your cream or off-white acrylic paint. You may need two or three coats to get a solid, opaque finish. Allow it to dry fully between coats. -
Set the line:
Once the cream base is 100% dry, decide where you want your color block to start. Wrap a piece of painter’s tape around the cylinder horizontally. I find measuring up from the bottom at several points helps ensure the tape is level. -
Seal the tape:
Press the edge of the tape down firmly with your fingernail or a credit card edge to prevent bleed-through. -
Paint the bottom section:
Apply your terracotta or rusty pink paint to the area below the tape. Brush downwards, away from the tape edge, to further minimize bleeding. -
Layer the color:
Apply a second coat of the terracotta color if the first looks streaky. If you want that slight textural variation seen in the photo, dab the paint on with a sponge or dry brush for the final layer. -
Reveal the line:
While the final coat of terracotta paint is still slightly tacky (not fully dry), carefully peel off the painter’s tape at a 45-degree angle.
Faux Glaze Effect
For a ‘dipped glaze’ look, apply a high-gloss varnish only to the bottom terracotta section while leaving the top cream section matte.
Step 3: Adding the Speckled Texture
-
Prepare the speckle mix:
Dilute a small amount of burnt umber or dark brown acrylic paint with water until it reaches an ink-like consistency. -
Test your spray:
Dip an old toothbrush into the thinned paint. Hold it over a piece of scrap paper and run your thumb across the bristles to flick droplets. Practice until you get a fine mist rather than large globs. -
Speckle the top:
Hold the toothbrush about 6-8 inches away from the cream section of the canister and flick the bristles to create the speckled pottery effect. Rotate the jar to cover all cream areas evenly. -
Speckle the lid:
Repeat the flicking process on the lid. Don’t worry if a few speckles land on the terracotta section—it adds to the natural, handmade look. -
Soften mistakes:
If you get a splatter that is too large, quickly blot it gently with a damp paper towel to diffuse it before it dries.
Step 4: Finishing Touches
-
Dry time:
Allow the entire project to sit and dry overnight to ensure the speckles are completely set. -
Seal everything:
Start with light coats of matte clear sealant spray. A matte finish is crucial here to mimic the look of unglazed or bisque ceramic. -
Protect the inside:
Ensure you are only sealing the outside surfaces if you plan to store loose food items, or use a food-safe sealant specifically if the inside rim is painted.
Place your finished jar on the counter to bring a warm, artisan touch to your kitchen organization


What Really Happens Inside the Kiln
Learn how time and temperature work together inside the kiln to transform clay into durable ceramic.
Photo-Transfer Keepsake Cookie Jar
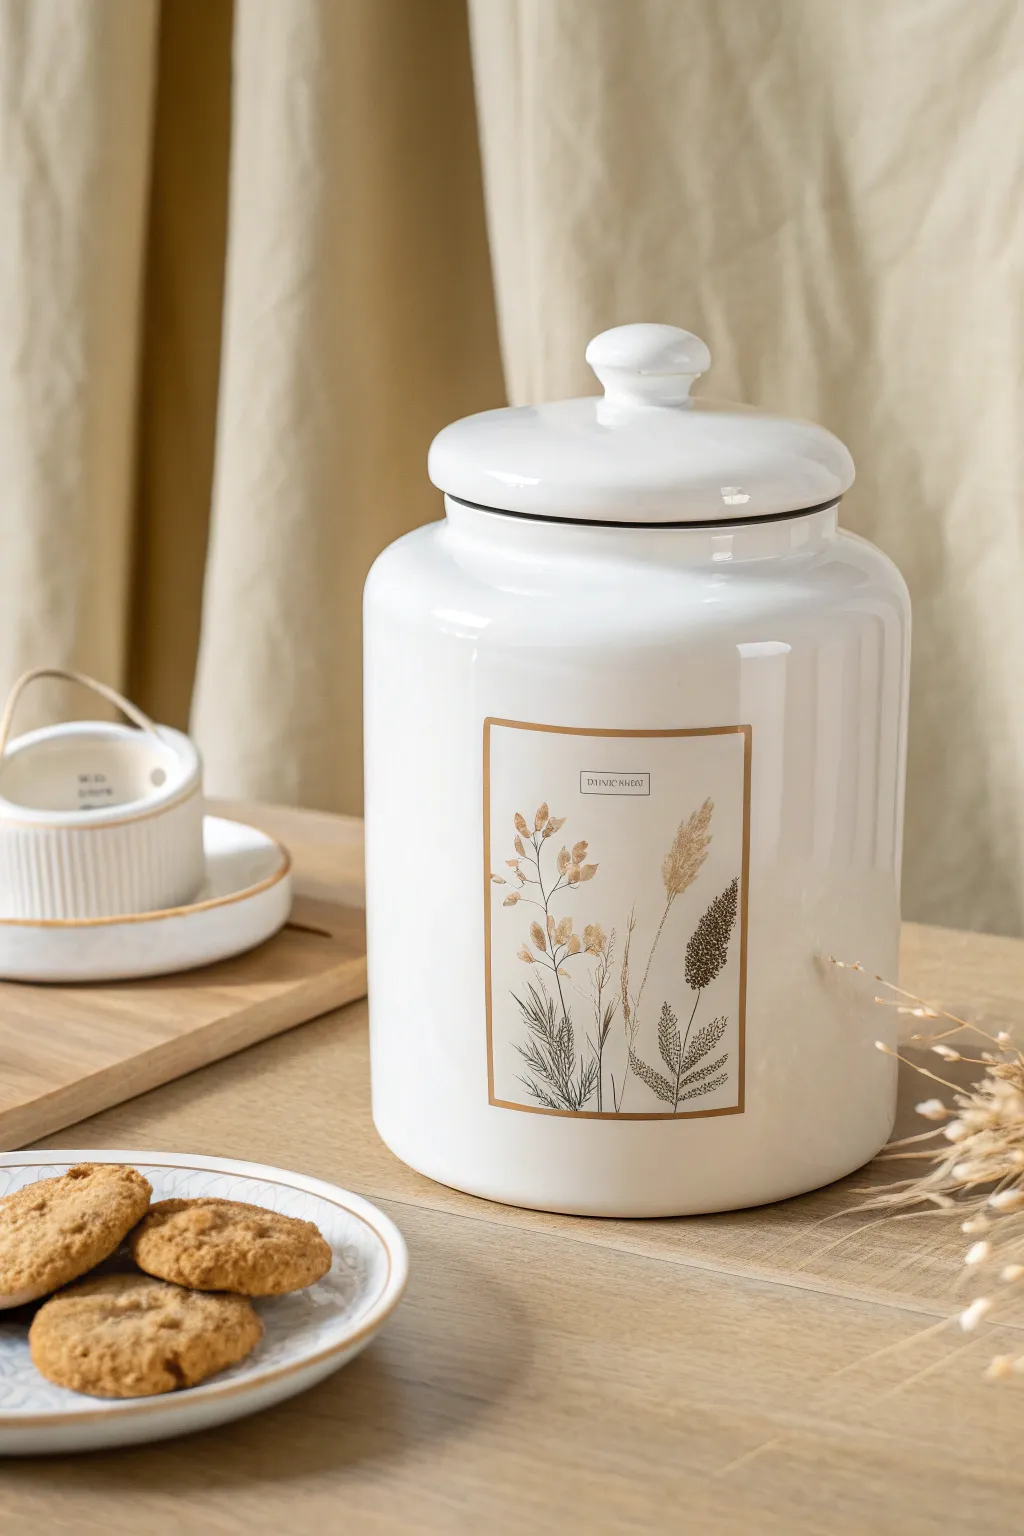
Transform a plain ceramic jar into a boutique-style piece using the magic of waterslide decal paper. This project features a clean, minimalist aesthetic with delicate dried wheat and grass illustrations encased in a structured gold border.
Detailed Instructions
Materials
- Plain white ceramic cookie jar with lid
- Inkjet or Laser Waterslide Decal Paper (clear)
- Inkjet or Laser printer
- Clear acrylic spray sealant (gloss or matte)
- Bowl of lukewarm water
- Scissors or craft knife
- Ruler
- Rubber squeegee or soft sponge
- Paper towels
- Rubbing alcohol
- Lint-free cloth
- Botanical line art digital file
Step 1: Preparation & Design
-
Prepare the surface:
Begin by thoroughly cleaning the exterior of your white ceramic jar. Wipe the surface down with rubbing alcohol and a lint-free cloth to remove any oils or fingerprints that might interfere with adhesion. -
Source your artwork:
Find high-resolution botanical clip art featuring dried grasses, wheat, or wildflowers. Arrange them digitally inside a thin rectangular border. For this specific look, choose a sepia, gold, or muted brown color palette. -
Sizing check:
Measure the height and width of the smooth, flat area of your jar. Adjust your digital design to fit comfortably within these dimensions, leaving at least an inch of white space above and below. -
Print a test copy:
Print your design on standard printer paper first. Cut it out and hold it against the jar to verify the scale and placement before using the more expensive decal paper.
Step 2: Creating the Decal
-
Print on decal paper:
Load your waterslide decal paper into the printer according to the manufacturer’s instructions (usually glossy side up). Print your final design on the ‘Clear’ decal paper. -
Seal the ink:
Take the printed sheet to a well-ventilated area. Spray a thin, even coat of clear acrylic sealant over the printed image. Let it dry for about 10 minutes. -
Repeat sealing:
Apply two more coats of sealant, allowing brief drying time between each. I like to rotate the page 90 degrees for each coat to ensure full coverage. This step is crucial to prevent the ink from bleeding in water. -
Full cure time:
Allow the final coat of sealant to dry completely for at least an hour, or until it is no longer tacky to the touch. -
Trim the design:
Using sharp scissors or a craft knife and ruler, cut out your rectangular design. Cut exactly along the printed border line for a sharp, professional edge.
Sealant Secret
Don’t skip the sealant spray steps! Water causes inkjet ink to bleed instantly. Three light coats are far better than one heavy, dripping coat.
Step 3: Application
-
Soak the decal:
Fill a bowl with lukewarm water. Submerge your trimmed decal for about 30 to 60 seconds. You will see the paper curl up and then flatten out again. -
Test the slide:
Remove the paper from the water. Gently try to slide the top transparent film against the backing paper using your thumb. If it moves easily, it is ready. -
Position on jar:
Moisten the surface of the jar slightly with water. Place the decal (still on the backing paper) against the jar in your desired position. -
Slide and stick:
Hold the transparent film against the ceramic with one finger and gently slide the white backing paper out from underneath, smoothing the decal onto the jar as you go. -
Remove air bubbles:
While the decal is still wet and movable, make minor adjustments to straighten it. Use a rubber squeegee or damp sponge to gently push out all water and air bubbles, working from the center outward. -
Blot dry:
Very gently dab the surface with a paper towel to absorb excess moisture. Be careful not to lift the edges or shift the position. -
Final drying:
Let the jar sit undisturbed for 24 hours to allow the decal to cure and adhere fully to the ceramic surface. -
Bake to set (Optional):
For extra durability, place the jar in a cold oven. Set temperature to 230°F (110°C) and bake for 15-20 minutes. Let the oven cool completely before removing the jar to prevent cracking.
Vintage Vibe
After applying the decal, use a fine-tip gold paint pen to trace over the rectangular border on your design. This adds dimensions and a real metallic shine.
This sophisticated canister will add a serene, gallery-like touch to your kitchen countertop or pantry shelf
Botanical Cookie Jar With Carved Leaves
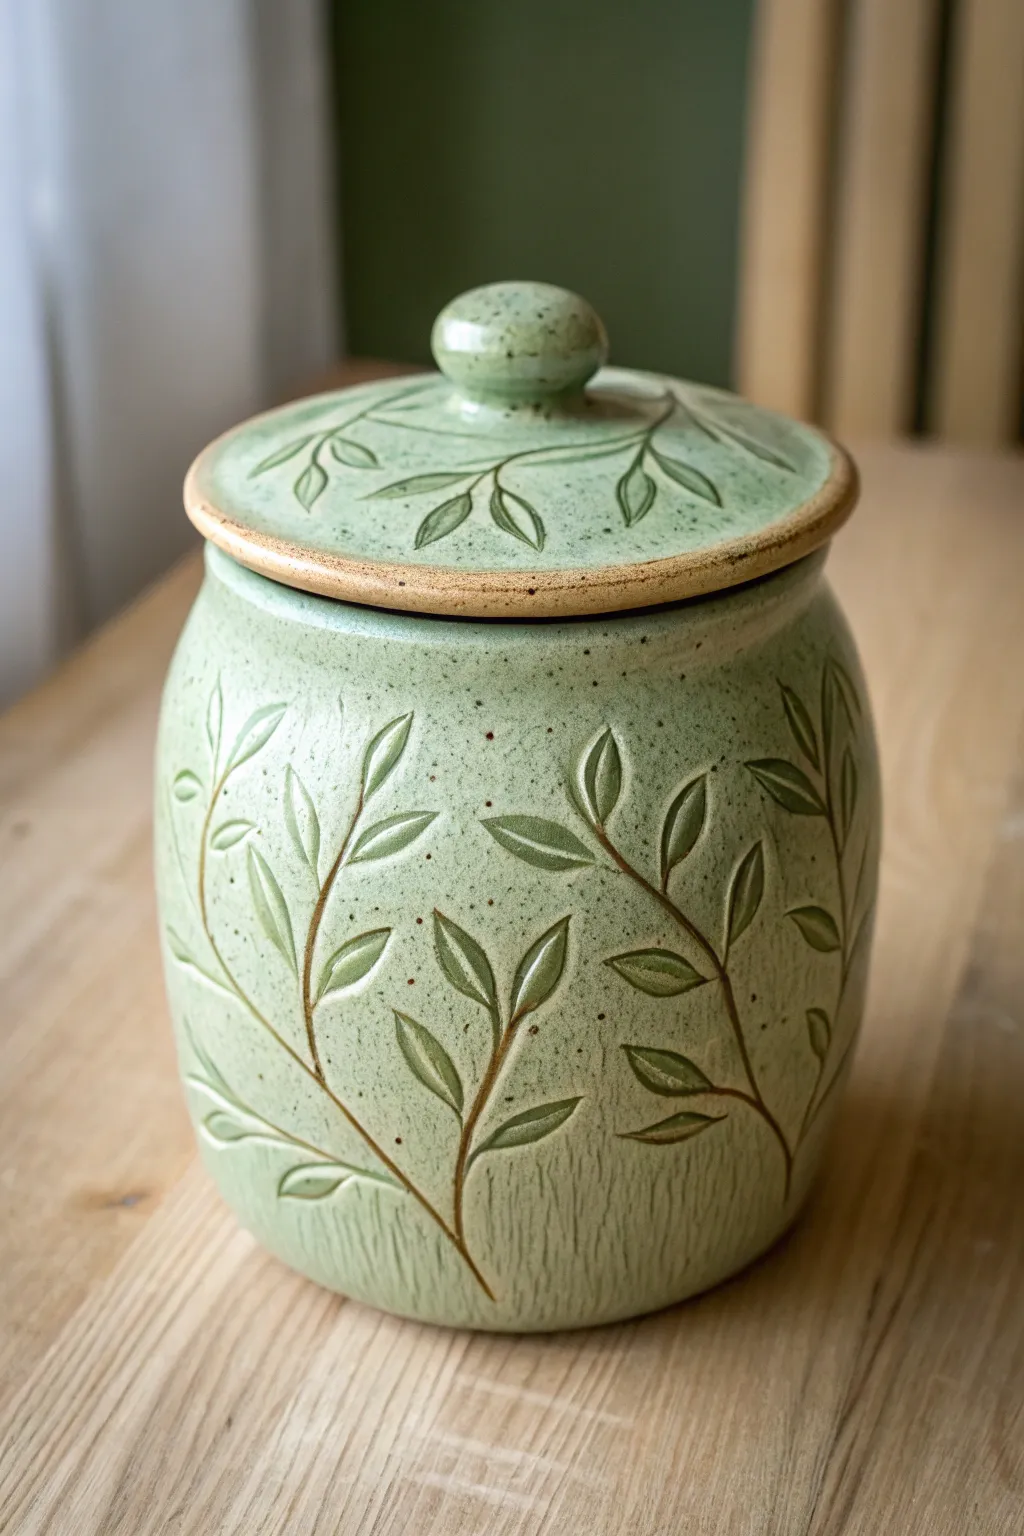
Bring the calming influence of nature into your kitchen with this handcrafted ceramic jar featuring delicate leaf carvings. The soft sage green glaze breaks beautifully over the textured clay, highlighting the organic vine and leaf patterns for a timeless, rustic look.
How-To Guide
Materials
- Stoneware clay body (smooth, speckled buff recommended)
- Pottery wheel
- Throwing tools (sponge, wire cutter, ribs)
- Trimming tools (loop tools)
- Sgrafitto or carving tool (small loop or stylus)
- Wax resist
- Soft brush
- Celadon or breaking satin green glaze
- Kiln
Step 1: Throwing and Shaping
-
Center and open:
Begin with about 3-4 lbs of wedged stoneware clay. Center it firmly on the wheel and open the mound to create a flat internal floor. -
Pull the walls:
Pull the walls up into a cylinder, keeping some thickness at the rim for the lid gallery later. Aim for an even wall thickness of about 1/4 inch. -
Belly the form:
Using a rib on the inside and your hand on the outside, gently push the clay outward to create a rounded belly shape. Don’t go too wide too fast, or the walls may collapse. -
Create the gallery:
At the rim, use a wooden tool or your finger to press a recessed ledge (gallery) into the inside edge. This is where your lid will sit. -
Refine and cut:
Smooth the exterior with a flexible metal rib to remove throwing lines. Cut the jar from the bat with a wire tool. -
Throw the lid:
Using a smaller amount of clay, throw a lid ‘right side up’ or ‘off the hump’. Measure the gallery diameter with calipers first to ensure a snug fit. Add a small knob to the center.
Clean Lines Pro Tip
After carving, don’t brush away the clay crumbs immediately. Wait until the piece is bone dry, then use a stiff brush. This prevents smearing the crisp edges of your leaves.
Step 2: Carving the Botanical Design
-
Leather hard stage:
Allow both the jar and lid to dry to a leather-hard consistency. This is crucial for clean carving without burying your tool in sticky clay. -
Trim the foot:
Invert the jar onto the wheel head (use a chuck if needed) and trim a neat foot ring. Trim the underside of the lid as well. -
Sketch the vines:
Lightly scratch the main vine lines onto the surface with a needle tool. I find it helpful to start these stems from the bottom and curve them upwards organically. -
Carve the stems:
Using a small loop tool or V-tip carving tool, follow your guide lines to carve the stems deeper. Vary the pressure slightly to give the vine a natural, undulating thickness. -
Outline the leaves:
Draw leaf shapes branching off the stems. Place them in alternating patterns or small clusters to mimic real foliage. -
Carve leaf details:
Carve out the interior of the leaf shapes, removing a thin layer of clay to create a recessed area. Alternatively, outline the leaf deeply and add a central vein line. -
Add vertical texture:
For the subtle vertical texture seen at the base of the jar in the photo, use a wire brush or serrated rib to gently comb the clay vertically between the leaves. -
Decorate the lid:
Repeat the leaf carving process on the top of the lid, radiating the pattern outward from the central knob.
Level Up: Iron Wash
Before glazing, paint a diluted iron oxide wash into the carved lines and wipe it back with a sponge. This deepens the contrast and makes the botanical design pop.
Step 3: Glazing and Finishing
-
Bisque fire:
Once bone dry, fire the pieces to bisque temperature (usually cone 04 or 06) to prepare them for glazing. -
Clean and wax:
Wipe the bisque ware with a damp sponge to remove dust. Apply wax resist to the foot ring and the contact points where the lid meets the jar. -
Expose the clay:
For the rim effect shown, apply wax resist to the very edge of the lid and the jar’s gallery rim so the raw, speckled clay remains unglazed. -
Apply glaze:
Dip the jar and lid into a translucent celadon or satin green glaze. These glazes pool in the carved recesses, making the leaves appear darker and emphasizing the texture. -
Wipe back (optional):
If your glaze is very opaque, gently wipe the raised surfaces with a damp sponge to reveal more of the clay texture, enhancing the carved look. -
Final firing:
Load the kiln and glaze fire to the maturity temperature of your clay and glaze (typically cone 5/6 or cone 10).
Now you have a functional piece of art ready to store your favorite treats

TRACK YOUR CERAMIC JOURNEY
Capture glaze tests, firing details, and creative progress—all in one simple printable. Make your projects easier to repeat and improve.
Geometric Pattern Cookie Jar
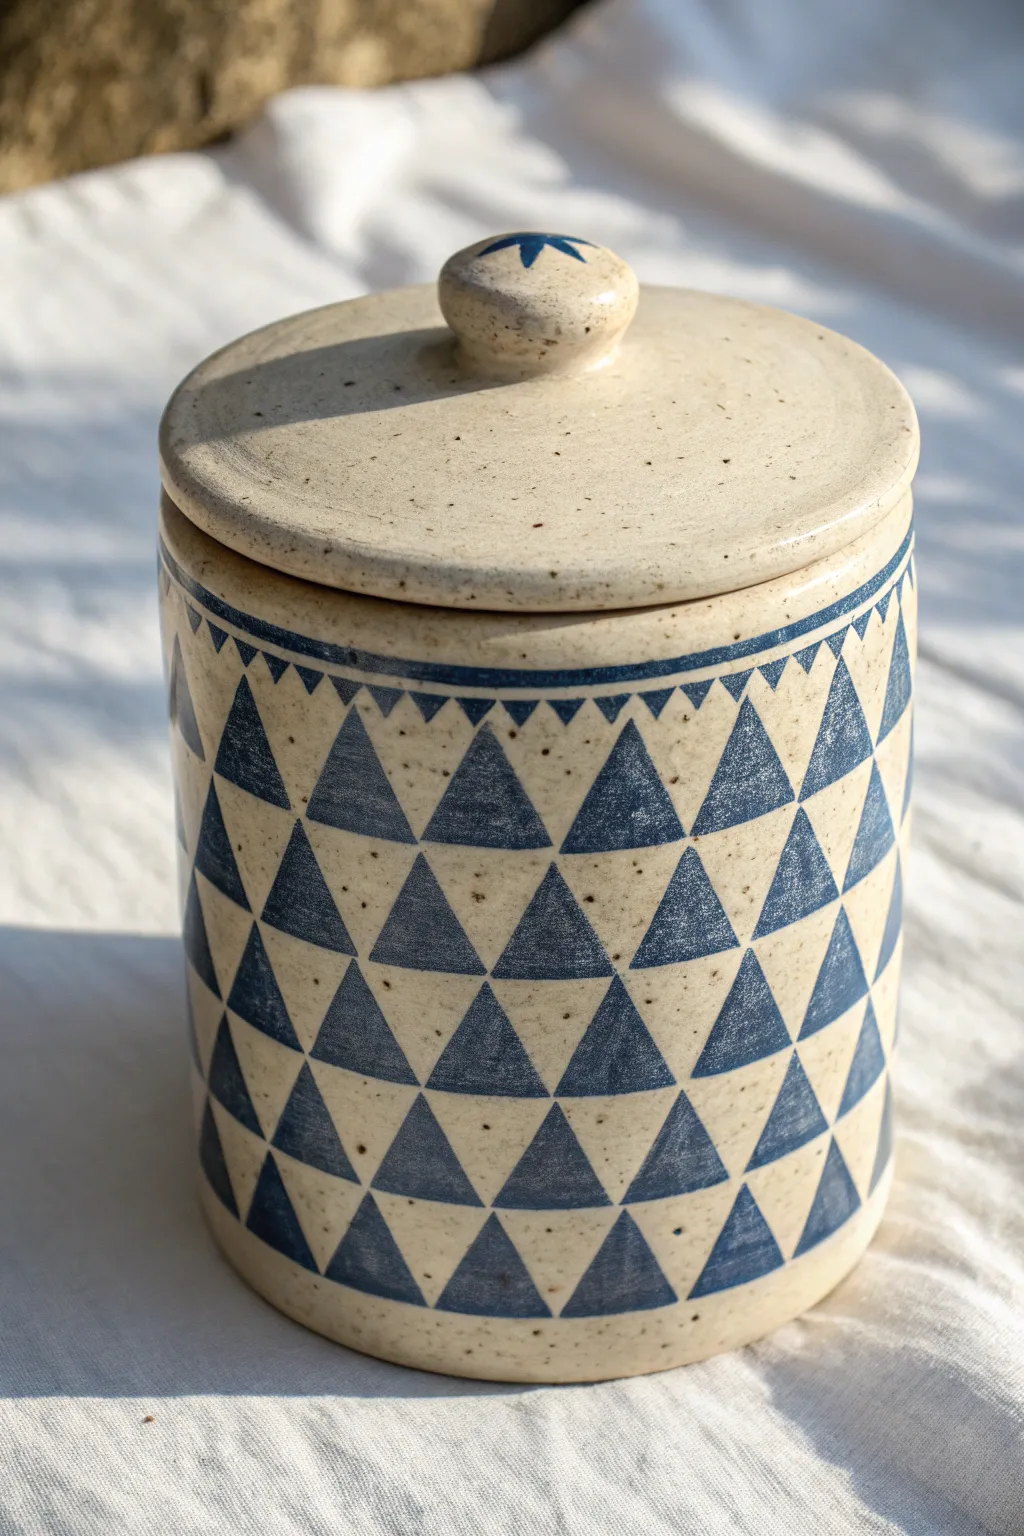
This speckled ceramic jar features a striking geometric pattern of repeating triangles in a deep indigo blue, contrasting beautifully with the natural clay body. It combines wheel-thrown precision with hand-painted underglaze work to create a modern yet rustic kitchen storage piece.
Step-by-Step
Materials
- Speckled stoneware clay (approx. 3-4 lbs)
- Pottery wheel and basic throwing tools (sponge, rib, wire tool)
- Trimming tools
- Underglaze (Deep Indigo or Royal Blue)
- Small flat brush (synthetic bristles)
- Detail liner brush
- Clear matte or satin glaze
- Measuring tape or paper strip
- Pencil or needle tool
- Ruler
Step 1: Throwing and Trimming
-
Center the clay:
Start by wedging your speckled stoneware clay thoroughly to remove air bubbles. While centering on the wheel, keep your hands steady to ensure the base is wide enough for a substantial jar. -
Open and pull the cylinder:
Open the clay and pull the walls up into a straight-sided cylinder. Aim for a height of about 6-7 inches and a consistent wall thickness of roughly 1/4 inch. -
Form the gallery:
At the rim, use your finger or a tool to gently press inwards and down to create a gallery shelf. This recessed ledge is crucial for the lid to sit securely inside the rim. -
Throw the lid:
Measure the diameter of your gallery using a caliper. Throw a flat lid on a bat that matches this measurement perfectly, adding a small knob in the center for lifting. -
Dry to leather hard:
Allow both the jar and the lid to dry slowly to a leather-hard state. I find covering them loosely with plastic overnight helps equalize the moisture. -
Trim the pieces:
Invert the jar on the wheel to trim the base, creating a neat foot ring. Refine the lid shape as well, ensuring it fits snugly into the jar’s gallery without binding.
Clean Lines Tip
If you struggle with freehand painting, use thin automotive masking tape or vinyl tape to mask off the triangles before applying underglaze. Remove the tape when the paint is damp.
Step 2: Mapping the Geometric Grid
-
Measure the circumference:
Wrap a paper strip or measuring tape around the exterior of the jar. Mark the total length, then take the strip off and divide that length into equal segments. -
Mark vertical guides:
Place the paper strip back on the jar and make small tick marks at the top and bottom rims corresponding to your segments. Lightly scribe vertical lines connecting these points using a needle tool. -
Establish horizontal bands:
While the jar is spinning slowly on a banding wheel, hold a pencil or needle tool steady to create horizontal guide lines spaced evenly apart (about 1.5 inches). These will define the height of your triangle rows. -
Sketch the triangles:
Connect the intersection points of your grid diagonally to form the triangle shapes. Alternate the orientation—one pointing up, the next pointing down—to create the tessellated pattern. -
Add rim details:
Just below the rim, sketch a narrow band. Inside this band, draw a row of tiny, downward-pointing saw-tooth triangles to mimic the main pattern on a smaller scale.
Texture Twist
For a tactile variation, gently carve out the unpainted triangles slightly before bisque firing. This creates a relief effect where the painted sections stand out.
Step 3: Painting and Finishing
-
Outline the shapes:
Using your detail liner brush and deep blue underglaze, carefully trace the outlines of the triangles you want to fill. A steady hand is key here. -
Fill the large triangles:
Switch to a small flat brush to fill in the larger triangles. Apply the underglaze in smooth, even strokes. You may need 2-3 coats to achieve full opacity. -
Paint the rim band:
Using the liner brush again, fill in the horizontal lines bordering the top detail band and carefully paint the tiny triangles within it. -
Decorate the lid:
Don’t forget the knob! Paint a simple starburst or flower shape on top of the lid knob to coordinate with the geometric theme. -
Bisque fire:
Once the underglaze is completely dry, fire the piece to bisque temperature (usually cone 04 or 06) to set the design permanently. -
Glaze application:
Dip or brush a clear matte or satin glaze over the entire interior and exterior. The clear glaze will seal the clay while letting the speckles and sharp blue design show through clearly. -
Final wipe:
Wipe the foot ring clean with a damp sponge to prevent it from sticking to the kiln shelf. -
Glaze fire:
Fire the kiln to the maturity temperature of your clay body (likely cone 5 or 6) to vitrify the jar and melt the glaze.
Fill your beautiful new handmade jar with cookies and enjoy the geometric charm on your counter.
Animal Face Lid Cookie Jar
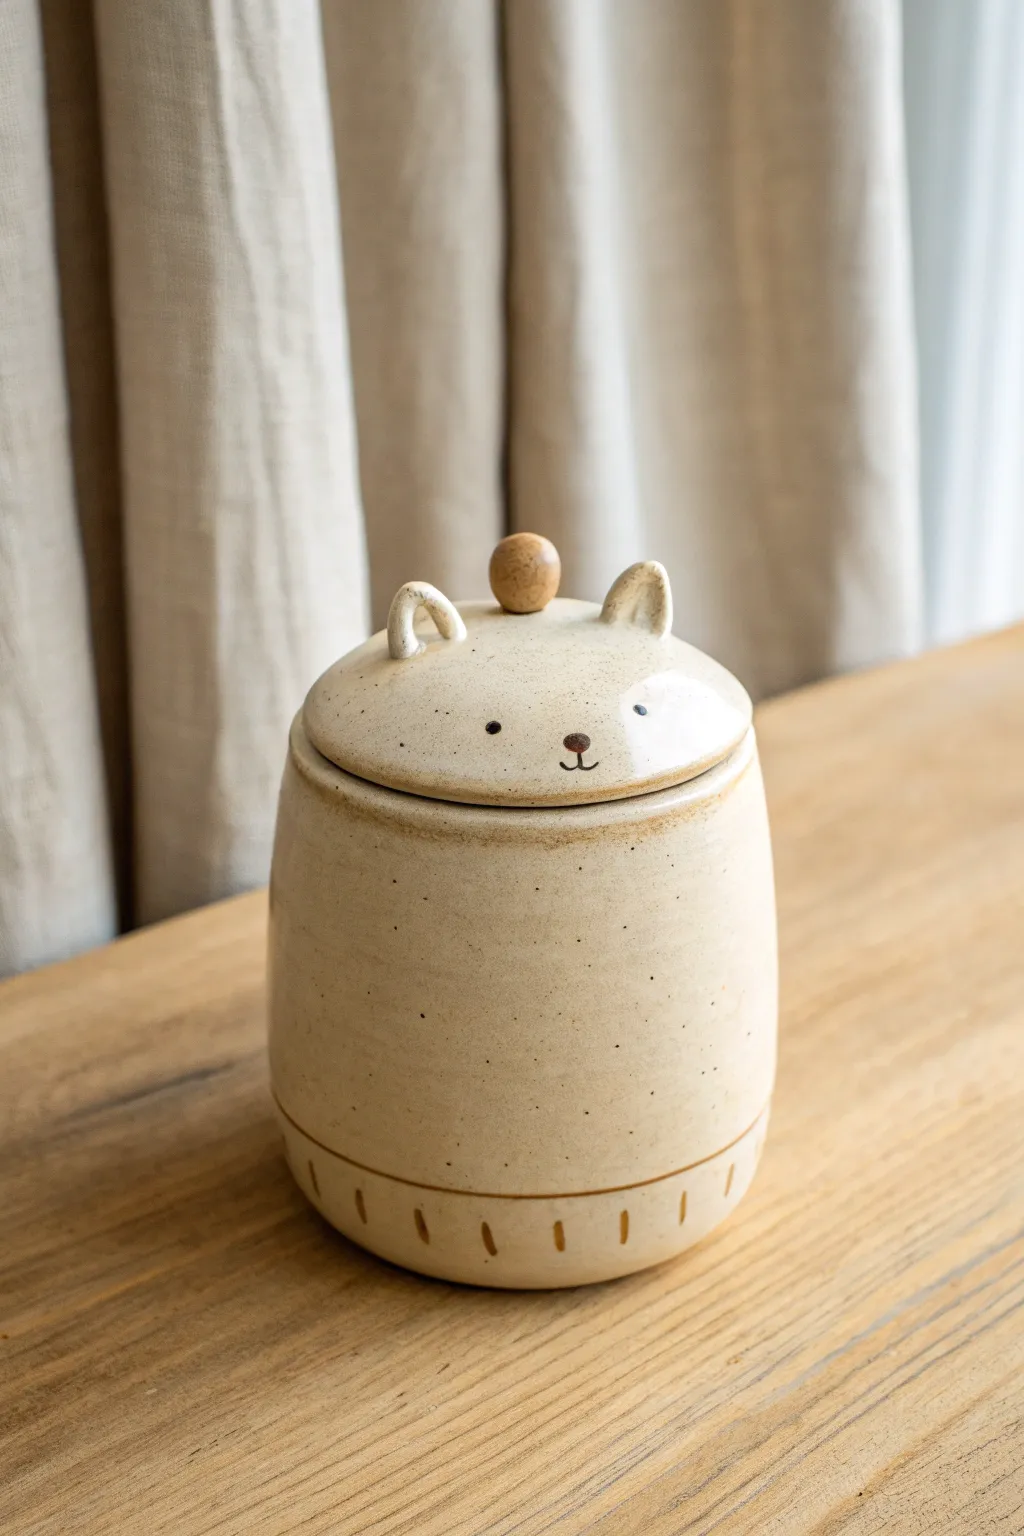
This charming ceramic jar features a sweet bear face lid and subtle textural details that bring warmth to any kitchen counter. The speckled cream glaze and wooden knob combine for a rustic, handmade aesthetic perfect for storing cookies or teas.
Step-by-Step Guide
Materials
- Stoneware clay (speckled or buff)
- Pottery wheel
- Throwing tools (sponge, needle tool, rib, wire)
- Trimming tools
- Wooden modeling tool
- Underglaze (dark brown or black)
- Fine detail brush
- Small wooden knob (pre-made or turned)
- Clear or cream speckled glaze (food safe)
- Epoxy or strong ceramic glue
- Kiln
Step 1: Throwing and Shaping the Body
-
Center and Open:
Begin with about 2-3 lbs of well-wedged clay on your wheel. Center it firmly and open the vessel, aiming for a flat interior floor about 4-5 inches wide. -
Pull the Walls:
Pull up the walls to form a cylinder. Create a subtle curve by gently pressing outward from the inside as you pull up, giving the jar a slightly rounded belly rather than straight vertical sides. -
Refine the Rim:
Detailed attention to the rim is crucial for a good lid fit. Compress the rim and use a rib to maintain a clean, flat top edge. Use calipers to measure the inner diameter for your future lid. -
Dry to Leather Hard:
Wire the pot off the wheel and set it aside to dry until leather hard—firm enough to handle without deforming but still cool to the touch. -
Trim the Foot:
Once leather hard, flip the jar, center it on the wheel, and trim the bottom. Create a distinct foot ring, leaving a small vertical band near the base for decoration.
Glaze Consistency
For the speckles to show without blurring the face, thin your glaze slightly with water. A thinner application prevents the glaze from running and obscuring the bear’s expression.
Step 2: Creating the Bear Lid
-
Throw the Lid:
Using a smaller amount of clay (about 1 lb), throw a domed lid. Measure frequently with your calipers to ensure the flange fits snugly inside the jar’s gallery. -
Trim the Dome:
When the lid is leather hard, trim the outer curve into a smooth, rounded dome shape reminiscent of a bear’s head. -
Sculpt the Ears:
Hand-build two small, hollow triangles or curved pinch-pot shapes for ears. Score and slip the attachment points on the lid, pressing the ears firmly into place. -
Smooth the Transitions:
Use a small modeling tool or a damp finger to smooth the seams where the ears attach, blending the clay so they look like organic extensions of the lid. -
Create the Knob Hole:
Since we are using a wooden knob later, use a needle tool to pierce a small hole in the very center of the lid to allow air to escape during firing, or create a small flat depression where the glue will sit.
Wobbly Lid Fix
If the lid rattles after firing, apply a thin line of water-based grinding paste to the rim and twist the lid back and forth to grind the contact points until they sit flush and silent.
Step 3: Decorating and Glazing
-
Carve Base Details:
On the main jar body, use a carving tool to incise a horizontal line just above the foot. Then, carve short vertical dashes evenly spaced around the base ring for texture. -
Paint the Face:
Using a fine brush and dark brown underglaze, carefully paint two small dots for eyes and a small nose and mouth directly onto the bisqued or leather-hard clay. -
Bisque Fire:
Load the thoroughly dried pieces into the kiln and bisque fire to cone 04 (or your clay’s specific bisque temperature). -
Wax Resist:
Apply wax resist to the painted face details if you want the raw clay to show through, or simply plan to use a translucent glaze. Definitely wax the bottom foot and the lid flange. -
Glaze Application:
Dip or brush your chosen cream speckled glaze over the entire exterior and interior. If you leave the face details unwaxed, ensure the glaze is transparent enough for the underglaze to show through cleanly. -
Final Firing:
Fire the jar to the maturity temperature of your clay and glaze (typically cone 5 or 6 for stoneware).
Step 4: Assembly
-
Attach the Knob:
Once the ceramic is completely cool, take your small wooden knob. Apply a strong two-part epoxy to the base of the knob and center it between the ears. -
Cure:
Let the epoxy cure for the full recommended time before lifting the lid by the knob.
Now you have a delightful, functional piece of art ready to guard your favorite snacks
Full-Body Animal Cookie Jar
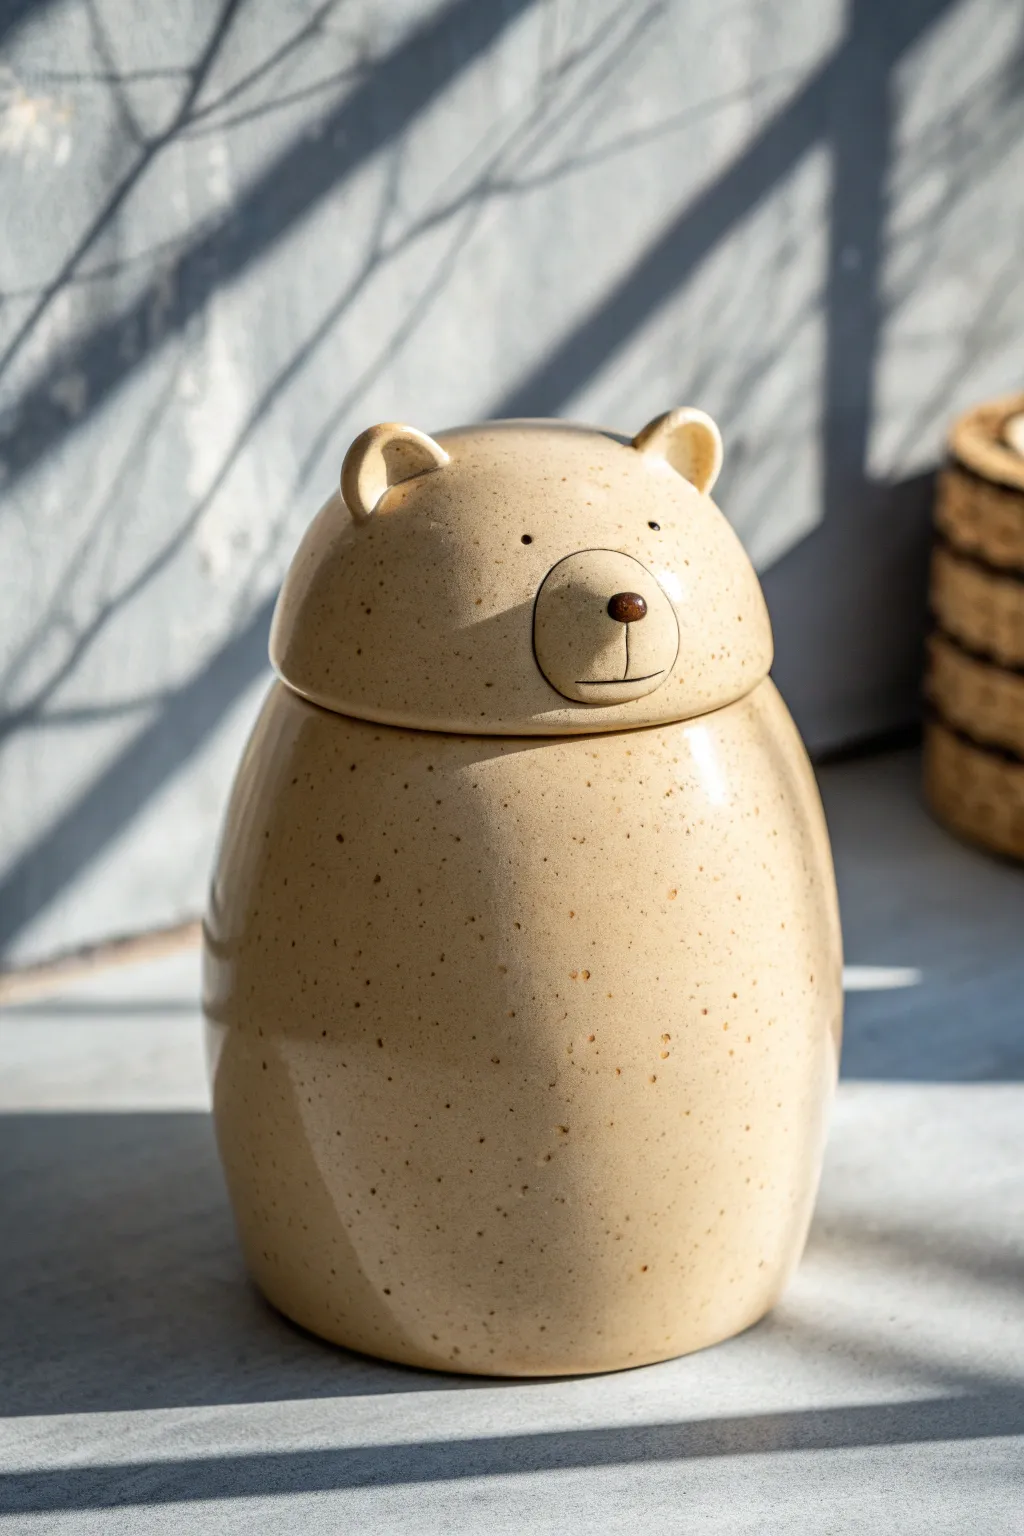
Embrace the charm of simplicity with this stoneware bear cookie jar, featuring a smooth, egg-like silhouette and subtle speckled glaze. This wheel-thrown project combines a generous bellied body with a precisely fitted lid that creates the bear’s adorable head.
Step-by-Step
Materials
- Speckled stoneware clay (approx. 5-7 lbs)
- Pottery wheel
- Throwing tools (sponge, metal rib, wooden rib, wire cutter)
- Needle tool
- Trimming tools
- Scoring tool or serrated rib
- Slip
- Small paintbrush
- Clear or transparent beige glaze (food safe)
- Small amount of dark underglaze (brown or black)
Step 1: Throwing the Body
-
Center and open:
Begin with about 4 pounds of clay. Center it firmly on the wheel head and open up the form, ensuring you leave a floor that is at least 1/2 inch thick to support the tall walls. -
Pull the walls:
Pull the clay up into a tall cylinder. As you pull, keep the walls even. For this specific shape, you want a significant amount of height, so aim for at least 8-9 inches tall before shaping. -
Belly out the form:
Using a rib tool on the outside and your hand on the inside, gently push the clay outward from the belly area to create that nice, rounded curvature. Taper the neck in slightly at the very top. -
Create the gallery:
At the rim, use a wooden tool or your thumb to split the rim and press down the inner section, creating a gallery (a ledge) for the lid to sit on. Smooth this area carefully with a chamois.
Lid Wobble Fix
If the fired lid rattles slightly, apply a tiny amount of water-based valve grinding compound to the gallery and grind the lid back and forth until it sits flush.
Step 2: Throwing the Lid (Head)
-
Throw the lid off the hump:
Using the remaining clay, center a ball and throw a bowl shape upside down. Measure the diameter of your jar’s gallery frequently with calipers to ensure this bowl will fit perfectly inside. -
Shape the dome:
Shape the bowl so it has a rounded, dome-like profile which will become the bear’s forehead and ears. Cut it off the wheel and let both pieces stiffen to leather-hard.
Step 3: Trimming and Assembly
-
Trim the body:
Once leather-hard, center the jar body upside down on the wheel. Trim away excess weight from the bottom and refine the curve so it feels continuous from top to bottom. -
Trim the lid:
Trim the lid right-side up on a chuck or simply clean up the rim. Ensure the fit into the gallery is snug but not tight, accounting for glaze thickness later. -
Form the ears:
Hand-build two small, hollow half-spheres or thick pinch pots for the ears. Score and slip the top of the lid, then attach the ears firmly. Use a modeling tool to blend the seams until invisible. -
Sculpt the snout:
Roll a small ball of clay and flatten it into a thick discrete disk. Score and slip this onto the front of the lid-head. This creates the bear’s snout. -
Add facial details:
With a needle tool, gently impress two small dots for eyes. Using a small tool or thin coil, create the vertical line and nose structure on the snout.
Sweater Weather
Carve a texture into the body section before the clay dries to mimic a knitted sweater pattern, making the bear look bundled up for winter.
Step 4: Finishing
-
Bisque fire:
Allow the jar to dry slowly and completely, ideally covered loosely with plastic for a day or two to equalize moisture. Fire to bisque temperature (usually cone 04). -
Wax the contact points:
Apply wax resist carefully to the gallery ledge on the body and the rim of the lid where they will touch. This prevents the lid from fusing to the jar during firing. -
Glaze the interior:
Pour your food-safe liner glaze into the interior of the jar, swirl it to coat completely, and pour out the excess. -
Glaze the exterior:
Dip or spray the exterior with a transparent or semi-opaque beige glaze. If using a dipping method, hold the jar by the foot and submerge quickly and evenly. -
Detail the face:
Before the main glaze dries fully, carefully dab a tiny amount of dark brown underglaze or oxide onto the nose tip and inside the eye impressions to make the features pop. -
Final fire:
Fire the piece to the maturity temperature of your clay body (likely cone 5 or 6 for stoneware). Be careful when loading ensuring the lid sits properly if firing together.
Fill your new ceramic friend with your favorite treats and enjoy the warmth it brings to your countertop
Whimsical Monster Cookie Jar
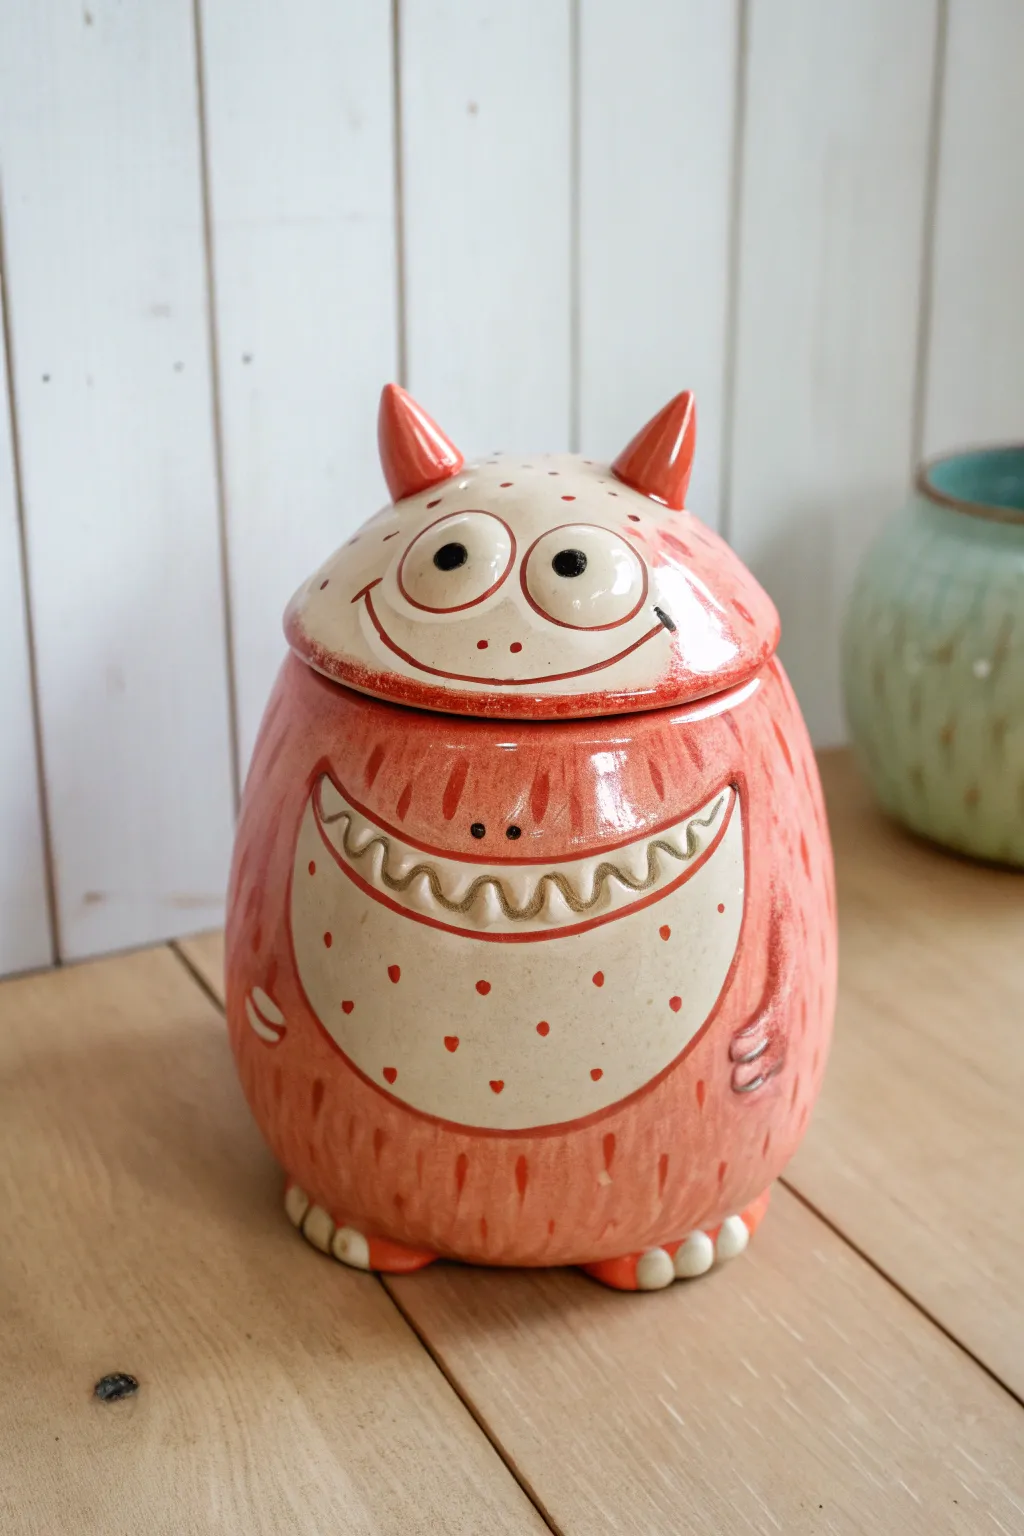
This delightful ceramic jar brings a friendly monster to life with its textured orange glaze and goofy grin. The two-part construction creates a cheeky surprise when you lift the horned lid to reveal the treats inside.
Detailed Instructions
Materials
- Stoneware clay (approximately 3-4 lbs)
- Pottery wheel (or can be hand-built with coils)
- Throwing tools: sponge, ribs (wood and metal), wire cutter
- calipers
- Needle tool
- Loop tool for trimming
- Modelling tools for sculpting details
- Underglazes: Orange/Coral, Cream/White, Black
- Clear transparent glaze
- Small brushes for detail work
Step 1: Forming the Body and Lid
-
Throwing the main body:
Begin with about 2.5 lbs of wedged clay on the wheel. Center it and open it up, pulling the walls into a rounded, ovoid shape that tapers slightly inward at the top. This will be the monster’s belly and torso. -
Creating the gallery:
At the rim of the body, carefully split the clay or use a tool to create a gallery (a small inner ledge) where the lid will sit. Measure the diameter of this gallery with calipers for the next step. -
Throwing the lid:
Center a smaller amount of clay (about 1 lb) for the lid. Throw a low, domed shape—bowl-like but inverted when finished—ensuring the rim matches your caliper measurements to fit the body’s gallery snugly. -
Refining the shape:
Smooth both pieces with a metal rib to remove throwing lines and create a nice canvas for your textures later. Let both pieces dry to a leather-hard state.
Step 2: Sculpting the Monster
-
Trimming the bases:
Trim the bottom of the body to create a neat foot ring. Then, trim the top of the lid (which was the bottom when thrown) into a smooth, rounded dome shape. -
Adding feet:
Hand-build two small slabs with little toes carved into them. Score and slip these onto the bottom front of the jar so the monster has cute feet to stand on. -
Adding arms:
Roll two small coils or create relief shapes for the arms. Attach these to the sides of the body using the score and slip method, curving them slightly around the belly. -
Sculpting the horns:
Make two small cones of clay. Attach them to the top of the lid for horns, blending the seams smoothly so they look like they grew there. -
Creating the face:
Form two flat circular disks for eyes and attach them to the front of the lid. I find adding a tiny coil around them can make them pop. Use a needle tool to carve a simple, wide smile line across the lid just below the eyes. -
Defining the belly:
Using a needle tool, lightly outline a large U-shape on the main body to define the lighter belly patch area. Inside this patch, carve a secondary, toothy grin or zigzag line just below the rim to match the lid’s smile.
Lid Fit Issues
If your lid wobbles after trimming, use a little grinding paste or valve-grinding compound between the lid and gallery after firing to sand them into a perfect fit.
Step 3: Decoration and Glazing
-
Bisque firing:
Allow the piece to dry slowly and completely before firing it to bisque temperature (usually cone 04). -
Base painting:
Apply a cream or off-white underglaze to the eye circles, the belly patch, and the face area on the lid. You want these areas to stand out against the orange body. -
Adding the orange texture:
Paint the rest of the monster’s body and lid with an orange or coral underglaze. To get the fur effect shown, use short, vertical brushstrokes of a slightly darker orange or red oxide over the base color. -
Detailing the features:
Use a fine brush and black underglaze to paint the pupils, the smile lines, small dots on the belly, and the zigzag mouth detail. Don’t forget the tiny nostrils on the lid! -
Applying clear glaze:
Once the underglaze is dry, dip or brush a clear transparent glaze over the entire piece (except the foot ring and the lid seating area). -
Final firing:
Fire the piece to your clay body’s maturity temperature (e.g., cone 6). Ensure the lid is not on the jar during firing unless you have used wax resist or alumina hydrate to prevent sticking.
Texture Play
Before the clay dries, gently press a stiff bristle brush into the orange areas to create physical fur texture that the glaze will break over beautifully.
Now fill up your friendly beast with cookies and enjoy the smiles he brings to your kitchen counter
Cookie-Stack Lid Cookie Jar
Create a charming, farmhouse-style cookie jar that looks like it came straight from a pottery studio. This project focuses on throwing a sturdy cylinder and mastering the glazing techniques to achieve that signature speckled cream and warm brown finish.
Step-by-Step Guide
Materials
- Speckled buff stoneware clay (approx 4-5 lbs)
- Pottery wheel
- Throwing tools (sponge, wire cutter, rib, needle tool)
- Trimming tools
- Calipers
- Cream/White speckled glaze (cone 5/6)
- Iron wash or rutile glaze (for the rim and knob)
- Wax resist
- Kiln
Step 1: Throwing the Body
-
Center and Open:
Start with about 3-4 lbs of speckled buff clay. slam it onto the wheel head and center it thoroughly. Open the clay wide enough to accommodate a good-sized cookie, leaving the floor about 1/2 inch thick. -
Pull the Walls:
Pull the clay upward into a tall cylinder. Aim for straight, vertical walls, keeping the thickness consistent from bottom to top. You want a height of at least 7-8 inches to hold plenty of treats. -
Shape the Profile:
Using a rib on the outside against your hand on the inside, gently press outward to create the subtle ribs or rings seen in the jar’s profile. Create a distinct indentation near the top and another near the bottom for visual interest. -
Define the Gallery:
At the rim, use a wooden tool or your fingers to split the clay slightly or simply smooth and flatten the rim to accept a lid. Measure the diameter with calipers so you can size the lid correctly. -
Cut and Dry:
Wire the jar off the wheel head and set it aside on a ware board. Let it dry to leather hard.
Step 2: Creating the Lid
-
Throw the Lid:
Take the remaining clay and center it. Throw a flat disk that matches your caliper measurements from the jar body. Ensure the flange (the part that sits inside the jar) is deep enough to prevent sliding. -
Add the Knob:
You can throw the knob directly from the hump of clay while making the lid, or attach a small ball of clay to the center after trimming. Shape it into a rounded, mushroom-style knob for an easy grip. -
Trim the Set:
Once both pieces are leather hard, center the jar upside down to trim the foot ring. Then, refine the underside of the lid and clean up the knob shape. Test the fit—it should be snug but have a tiny bit of wiggle room for glazing.
Lid Wobble?
If the lid rocks after trimming, use a tiny amount of grinding paste between the lid and jar rim after firing. Spin the lid back and forth to grind them into a perfect match.
Step 3: Glazing and Firing
-
Bisque Fire:
Fire both pieces to cone 04 (or your clay body’s bisque temperature). -
Wax Resist:
Apply wax resist to the bottom foot of the jar and the contact points where the lid touches the jar rim to prevent them from fusing shut. -
Apply Base Glaze:
Dip the entire jar and the lid into a creamy white speckled glaze. I find counting to three ensures an even coat without getting too thick. Shake off excess drips. -
Accent the Rim:
Dip a sponge or detail brush into an iron wash or a darker brown reactive glaze. Carefully paint or sponge this onto the very edge of the lid’s rim. -
Highlight the Knob:
Apply the same brown accent glaze to the knob. Let the glaze pull slightly down the sides of the knob for a natural transition. -
Wipe Back:
If the glaze looks too thick near the wax lines, gently sponge it back to ensure a clean foot. -
Glaze Fire:
Load the kiln and fire to cone 5 or 6, depending on your clay and glaze specifications. Allow the kiln to cool completely before unloading.
Personalize It
Before the clay dries, stamp ‘COOKIES’ or a family name into the wet clay on the side of the jar. The glaze will break beautifully over the texture of the letters.
Fill your new handmade heirloom with fresh baking and display it proudly on your counter.