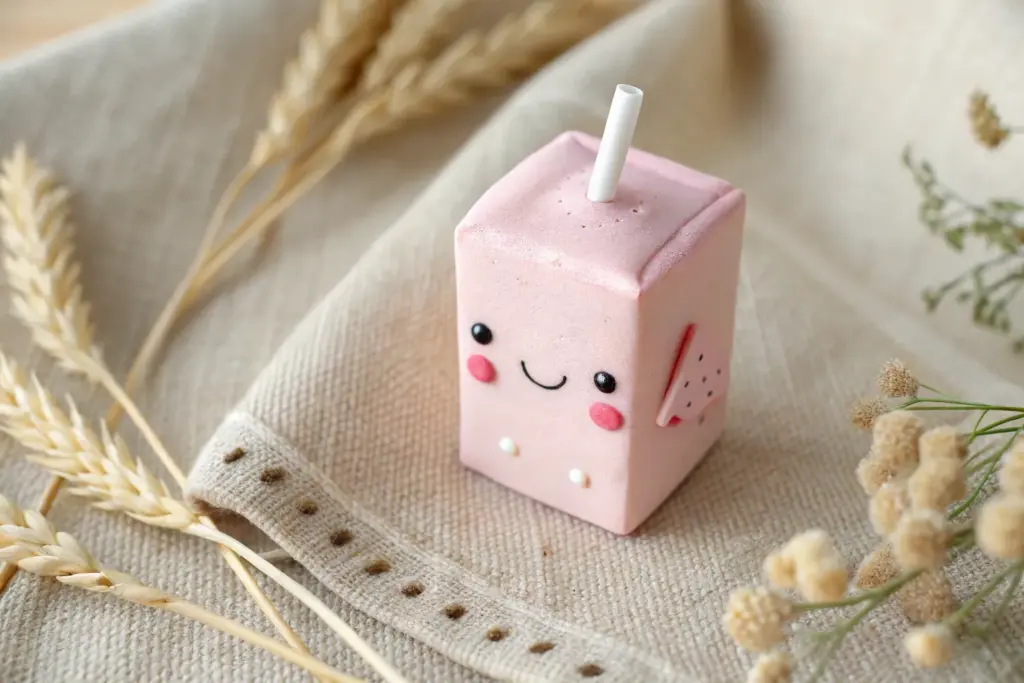
Foam clay is basically my go-to when I want something cute, puffy, and low-stress—those rounded edges just happen naturally. If you’re craving quick wins and adorable results, these cute foam clay ideas will keep your studio table happily cluttered.
Chubby Bunny Mini Figures
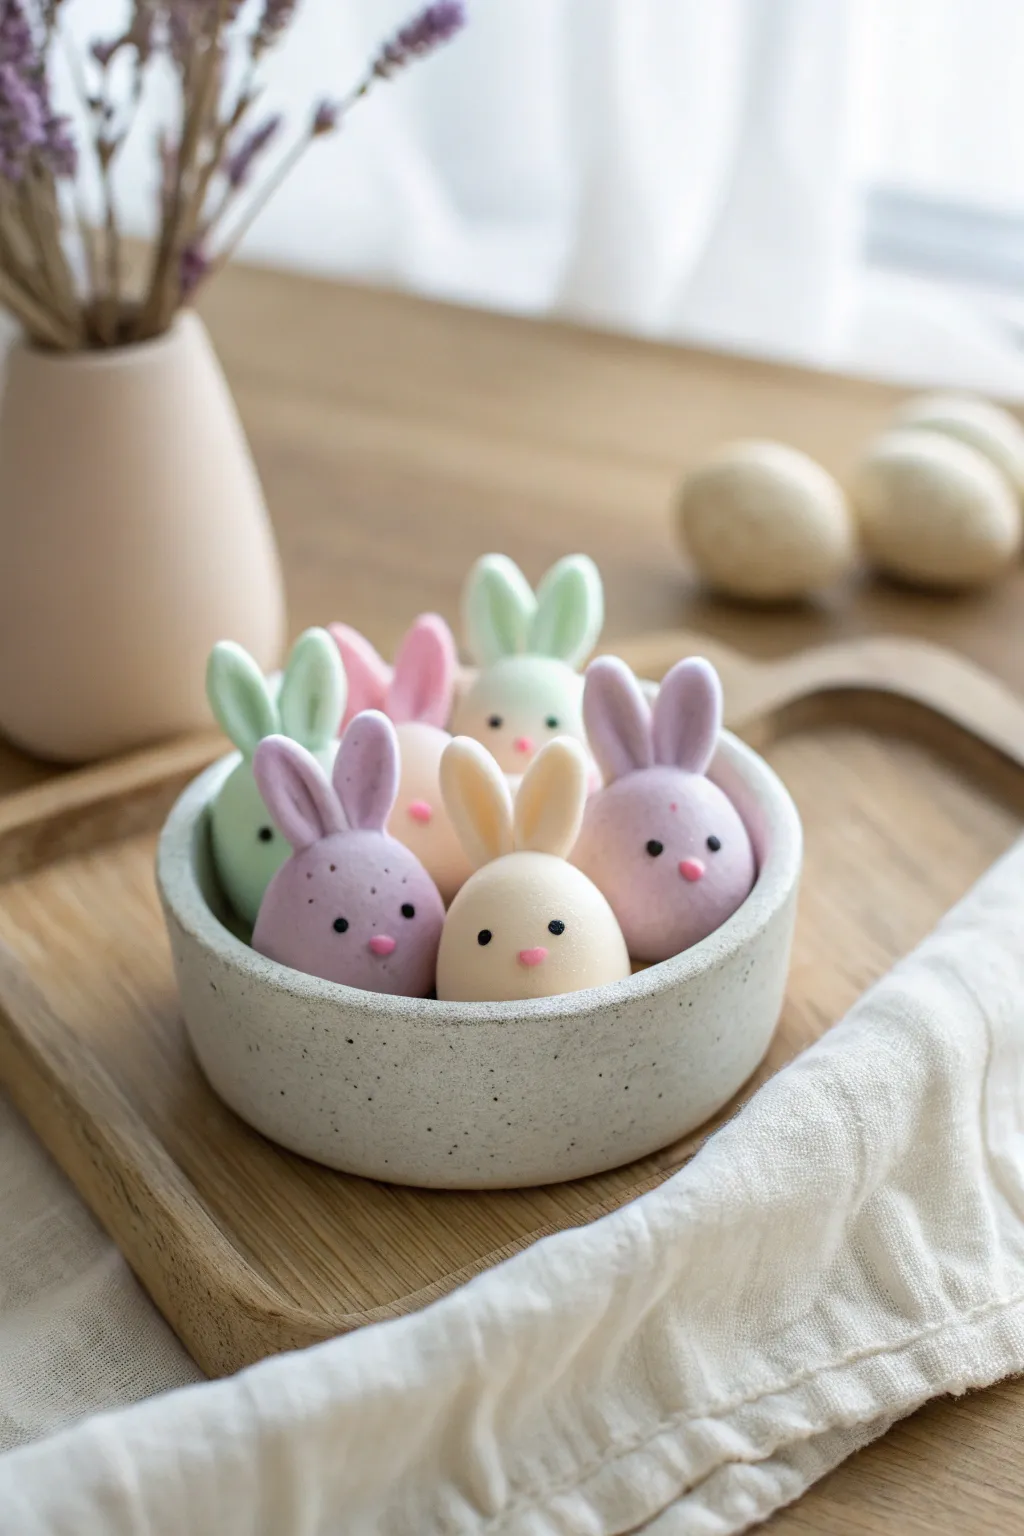
These marshmallow-soft foam clay bunnies are almost too cute to handle with their perfectly round bodies and perky ears. The smooth, matte finish of foam clay gives them a delightful squishy appearance that mimics candy, making them perfect for springtime decor or kawaii desk companions.
Step-by-Step
Materials
- Lightweight air-dry foam clay (white, pastel pink, mint green, lavender)
- Black foam clay (tiny amount) or black acrylic paint
- Modeling tools (specifically a ball tool)
- Toothpicks or a dense bristle brush for texturing (optional)
- Small bowl or egg carton (for drying)
- Clean work surface (silicone mat recommended)
Step 1: Shaping the Bodies
-
Prepare your clay:
Start by kneading your foam clay to warm it up. If you only have white clay, mix in tiny drops of acrylic paint or marker ink to create your pastel green, pink, purple, and cream shades now. -
Roll the base:
Take a walnut-sized amount of clay and roll it between your palms. Aim for a distinct egg shape—slightly wider at the bottom and tapered at the top—rather than a perfect sphere. -
Smooth the surface:
Check for any cracks or seams. Gently rub them with your finger to smooth them out; foam clay is very forgiving, so a little friction usually erases any lines. -
Create a stable base:
Tap the bottom of your egg shape lightly against your table. This creates a small flat spot so your bunny won’t roll over once it’s finished.
Seamless Smoothness
To get that flawless, marshmallow-smooth finish, dip your finger in a tiny drop of water and glide it over the clay before it dries to polish away fingerprints.
Step 2: Adding the Ears
-
Form the ear pieces:
Pinch off two smaller, pea-sized balls of the same color clay for the ears. Roll them into teardrop shapes that are slightly elongated. -
Flatten and shape:
Gently press the teardrops flat. I like to use a small ball tool or just my pinky finger to create a slight indentation down the center of each ear for depth. -
Attach to the head:
Press the wider bottom part of the ears onto the top of the egg body. Because the clay is fresh, it should stick on its own without glue. -
Blend the seams:
Use a modeling tool to smooth the clay where the ears meet the head, ensuring a seamless transition so they don’t look like they were just stuck on.
Step 3: Face and Details
-
Position the eyes:
Take two microscopic specs of black clay and roll them into tiny balls. Press them into the face about halfway down the body, spacing them somewhat wide apart for that ‘kawaii’ look. -
Add the nose:
Take a tiny bit of bright pink clay and roll a small oval. Place it right between the eyes, slightly lower, to create the snout. -
Embed the features:
Gently press the eyes and nose flush with the face surface so they don’t bulge out too much. -
Add blush (optional):
For the bunny with spots or extra detail, you can use a dry brush with a tiny bit of pink chalk pastel to dust rosy cheeks under the eyes. -
Create speckles:
If you want the speckled egg look shown on the purple bunny, use a stiff brush or toothpick to stipple tiny indents or dots of darker clay onto the lower body.
Magnetic Personality
Embed a small, strong magnet into the back of the bunny while the clay is still wet to turn these cute figures into adorable fridge magnets.
Step 4: Drying and Display
-
Let them set:
Place your bunnies in a safe spot to dry. Air-dry foam clay needs about 24-48 hours to cure completely depending on humidity. -
Rotate occasionally:
Flip or rotate the figures gently every few hours so the bottoms dry evenly and don’t stay soft. -
Arrange the scene:
Once fully hardened, arrange them in a small ceramic bowl or tray to replicate the cozy gathering shown in the photo.
Now you have a whole basket full of sweet, squishy friends to brighten up your shelf.


Pocket Duckling Parade
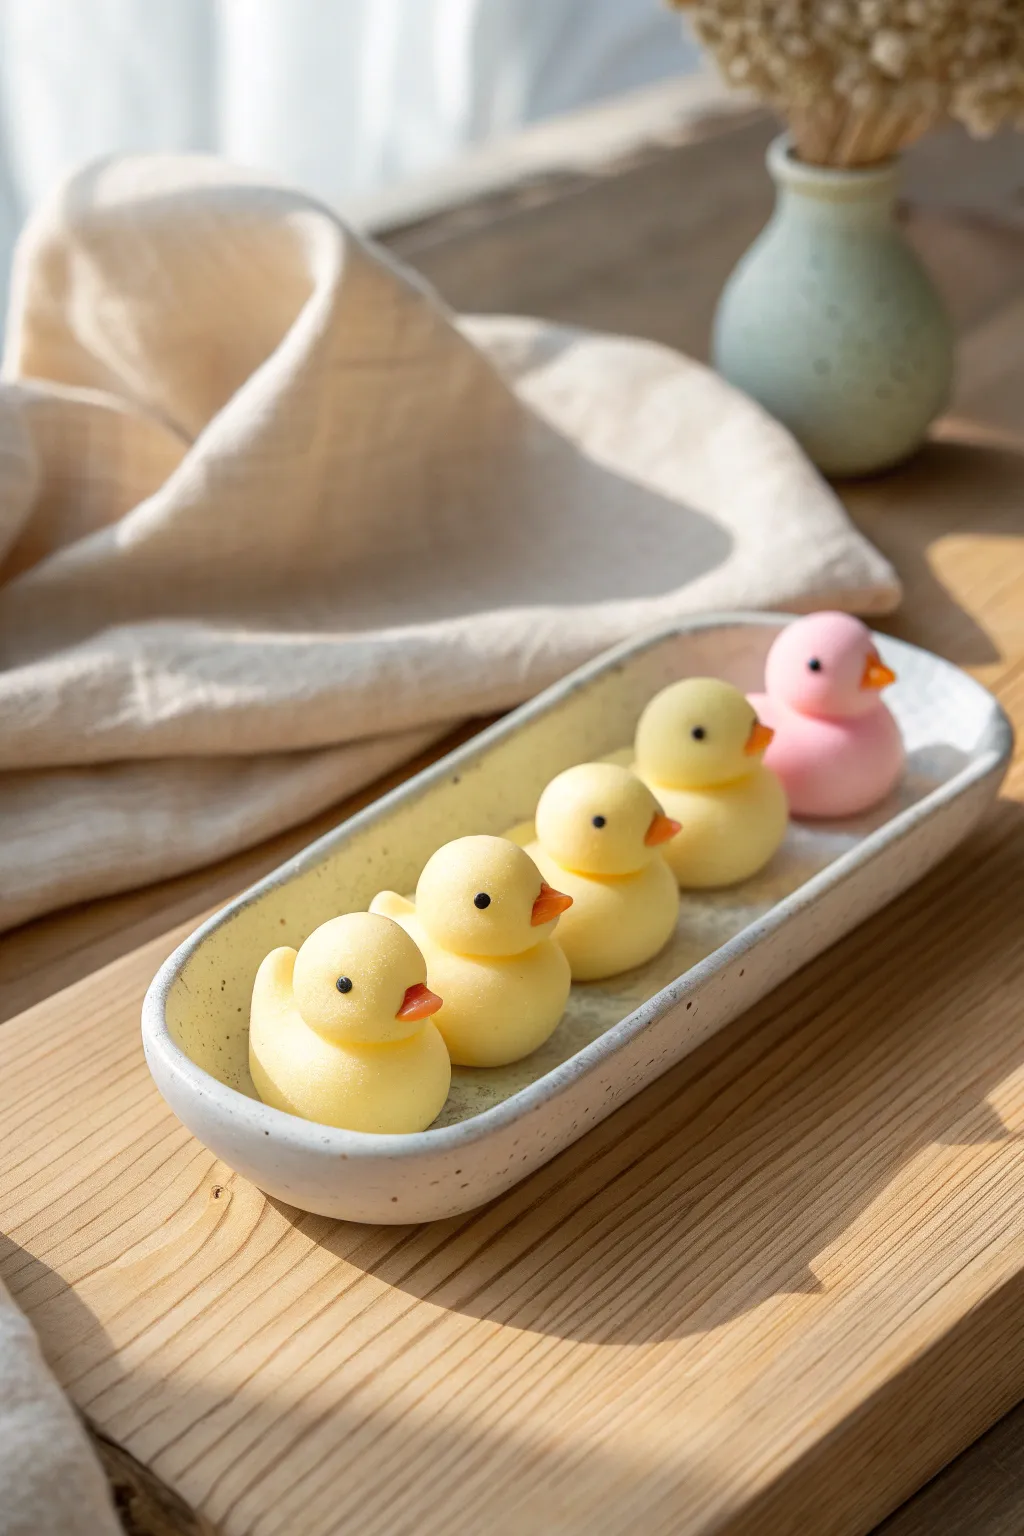
Create a cheerful lineup of these impossibly smooth and adorable ducklings using soft foam clay. With their matte finish and minimalist features, these little figurines are perfect for gifting or brightening up your desk space.
Detailed Instructions
Materials
- Yellow air-dry foam clay
- Pink air-dry foam clay
- Orange air-dry foam clay
- Black air-dry foam clay (or black acrylic paint)
- Small ball tool or toothpick
- Smooth work surface (silicone mat recommended)
- Damp cloth (for keeping hands clean)
Step 1: Shaping the Bodies
-
Prepare the clay:
Start by kneading your yellow foam clay until it is warm and pliable. This removes air bubbles and ensures a crack-free finish. -
Form the base:
Pinch off a walnut-sized amount of yellow clay and roll it between your palms into a perfect sphere. -
Create the teardrop shape:
Gently roll one side of the sphere against your work surface to taper it slightly, creating a fat teardrop shape. This will be the duck’s body. -
Flatten the bottom:
Tap the wider end of the teardrop gently onto the table so the duckling will sit flat without rolling over. -
Curve the tail:
Use your thumb and forefinger to delicately pinch the tapered end upward, forming a cute little tail kick. -
Repeat for the flock:
Create three more yellow bodies and one pink body using the same method, trying to keep them roughly the same size for a cohesive look.
Smooth Operator
If you notice fingerprints on your clay, dip your finger in a tiny bit of water and rub it gently over the surface to polish them away before drying.
Step 2: Adding the Heads
-
Roll the head spheres:
Take a slightly smaller amount of yellow clay (about 1/3 the size of the body) and roll it into a very smooth ball. -
Attach the head:
Place the head ball onto the front, rounded part of the body. Foam clay usually sticks to itself, but you can dab a tiny drop of water if needed. -
Blend slightly:
If you want a seamless look, use a modeling tool to gently blend the neck seam, though leaving it distinct adds a cute ‘toy’ aesthetic. -
Make the pink duckling:
Repeat the head creation process with the pink clay for your special standout duckling.
Accessories Upgrade
Make tiny accessories for your ducks! Try crafting a miniature bow tie, a tiny top hat, or a flower crown using leftover scraps of colored clay.
Step 3: Creating the Wings
-
Form tiny teardrops:
Roll two very small balls of matching colored clay for each duck, then taper them into tiny teardrops. -
Flatten the wings:
Press the teardrops flat between your fingers to create small wing shapes. -
Attach to the body:
Press one wing onto each side of the duck’s body, positioning them slightly lower than the neck line.
Step 4: Facial Features
-
Shape the beaks:
Take a tiny speck of orange clay and roll it into a minuscule cone shape. -
Position the beak:
Press the flat side of the orange cone onto the center of the face, slightly lower than the horizontal midline. -
Refine the beak shape:
I like to gently press the sides of the beak to make it look a bit wider and flatter, like a real duck bill. -
Create the eyes:
Use the tiniest specks of black clay you can manage—no bigger than a poppy seed—and roll them into balls. -
Place the eyes:
Press the black specks onto the face on either side of the beak. Alternatively, use a ball tool to make tiny indents and paint the eyes inside with black acrylic.
Let your little flock dry completely for 24 hours before arranging them in a row


Happy Rice Ball Keychains
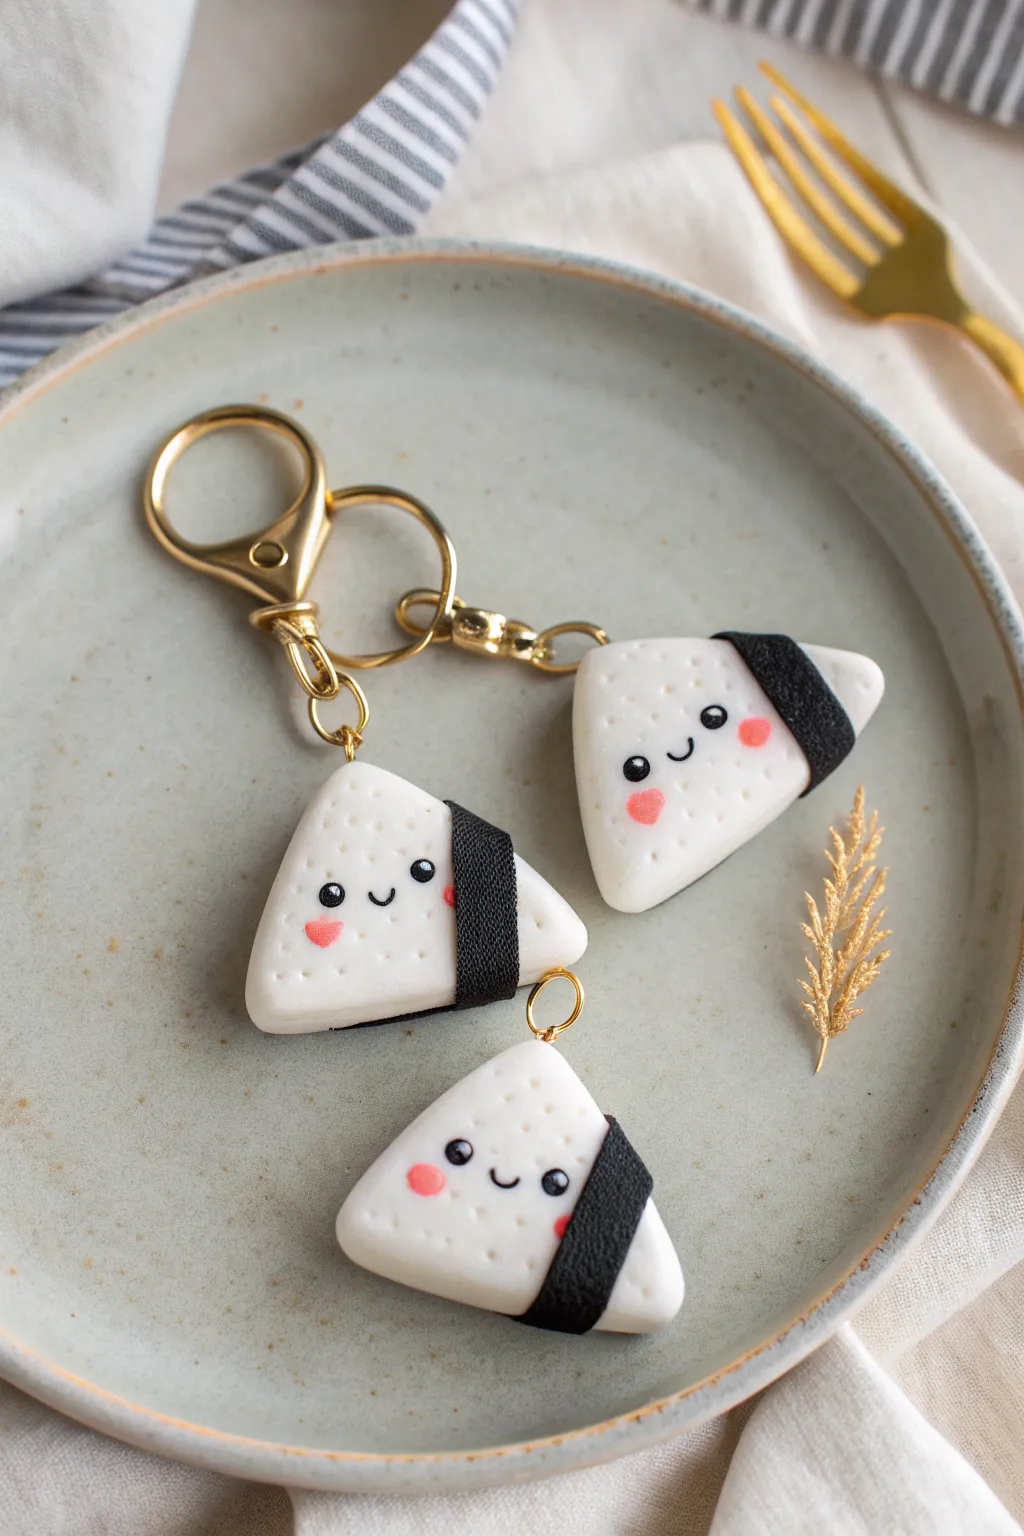
Brighten up your keyring with these irresistibly cute onigiri charms made from lightweight foam clay. Their happy little faces and textured rice bodies make them a perfect beginner sculpting project that looks professional and sweet.
Step-by-Step Tutorial
Materials
- White foam clay
- Black foam clay
- Pink foam clay (or pink acrylic paint)
- Black acrylic paint
- Old toothbrush or stiff bristle brush
- Dotting tool or toothpick
- Small fine-liner brush
- Gold screw-eye pins
- Gold jump rings
- Gold keychain clasp
- Gloss varnish or UV resin (optional for eyes)
- Small needle nose pliers
Step 1: Shaping the Rice Ball
-
Condition the clay:
Start by taking a gumball-sized amount of white foam clay. Knead and stretch it in your hands until it becomes warm, pliable, and smooth, ensuring there are no cracks. -
Create a sphere:
Roll the clay between your palms to form a perfectly smooth ball. This base shape helps ensure your final triangle will have even thickness. -
Flatten gently:
Place the ball on your work surface and gently press down with your palm until it forms a thick, rounded disc about 1/2 inch thick. -
Form the triangle:
Using your thumb and forefinger, gently pinch and press the top of the disc to form a point. Do the same for the bottom corners, tapping the shape on the table to flatten the bottom edge into a soft triangle. -
Round the corners:
Use your fingertips to smooth out the sharp points of the triangle. Onigiri are naturally rounded, so you want soft, pillowy corners rather than sharp geometric angles. -
Add texture:
Take an old clean toothbrush or a stiff bristle brush and gently tap it all over the surface of the white triangle. This stippling motion creates the realistic appearance of individual rice grains.
Wrinkled Clay?
If your foam clay has cracks while shaping, dip your finger in a tiny bit of water and smooth it over the crack until it disappears.
Step 2: Adding Details
-
Create the nori wrapper:
Roll out a small piece of black foam clay into a thin, flat strip. It should be about 1/4 inch wide and long enough to wrap around the bottom third of your rice ball. -
Attach the nori:
Place the black strip centered at the bottom of the triangle. Fold it up over the front and back sides gently. Since foam clay is sticky while fresh, it should adhere on its own without glue. -
Texture the seaweed:
Use your toothbrush again to lightly tap just the black strip. This gives the nori wrapper a realistic, slightly rough texture similar to dried seaweed. -
Insert the hardware:
While the clay is still wet, take a gold screw-eye pin. Dip the tip in a tiny bit of white school glue or super glue for extra security, and twist it carefully into the top center of the rice ball. -
Dry completely:
Set your rice ball aside to dry completely. Depending on the humidity and brand of foam clay, this usually takes 24 to 48 hours for the inside to fully harden.
Step 3: Bringing it to Life
-
Paint the eyes:
Once dry, use a large dotting tool (or the non-bristle end of a paintbrush) dipped in black acrylic paint to stamp two wide-set eyes onto the face area. -
Paint the smile:
Using a very fine liner brush and black paint, carefully draw a tiny, shallow ‘U’ shape between the eyes for a happy little smile. -
Add rosy cheeks:
You can use tiny bits of pink clay flattened onto the face, or simply paint two small pink ovals under the eyes for a flushed, happy look. -
Add eye highlights:
Dip a toothpick into white paint and add a tiny white dot in the upper corner of each black eye. This ‘catchlight’ is essential for the cute kawaii effect. -
Seal the eyes:
For extra durability and a wet look, I like to apply a tiny drop of UV resin or gloss varnish just over the black eyes. -
Assemble the keychain:
Using needle nose pliers, open a jump ring and attach your rice ball charm to the main keychain clasp. Close the ring securely.
Pro Tip: Clean Textures
Texture the white ‘rice’ part BEFORE adding the black strip. If you texture after adding the black clay, you might accidentally smear black onto the white.
Hook this little buddy onto your bag and enjoy your new handmade accessory


Cloud and Rainbow Magnets
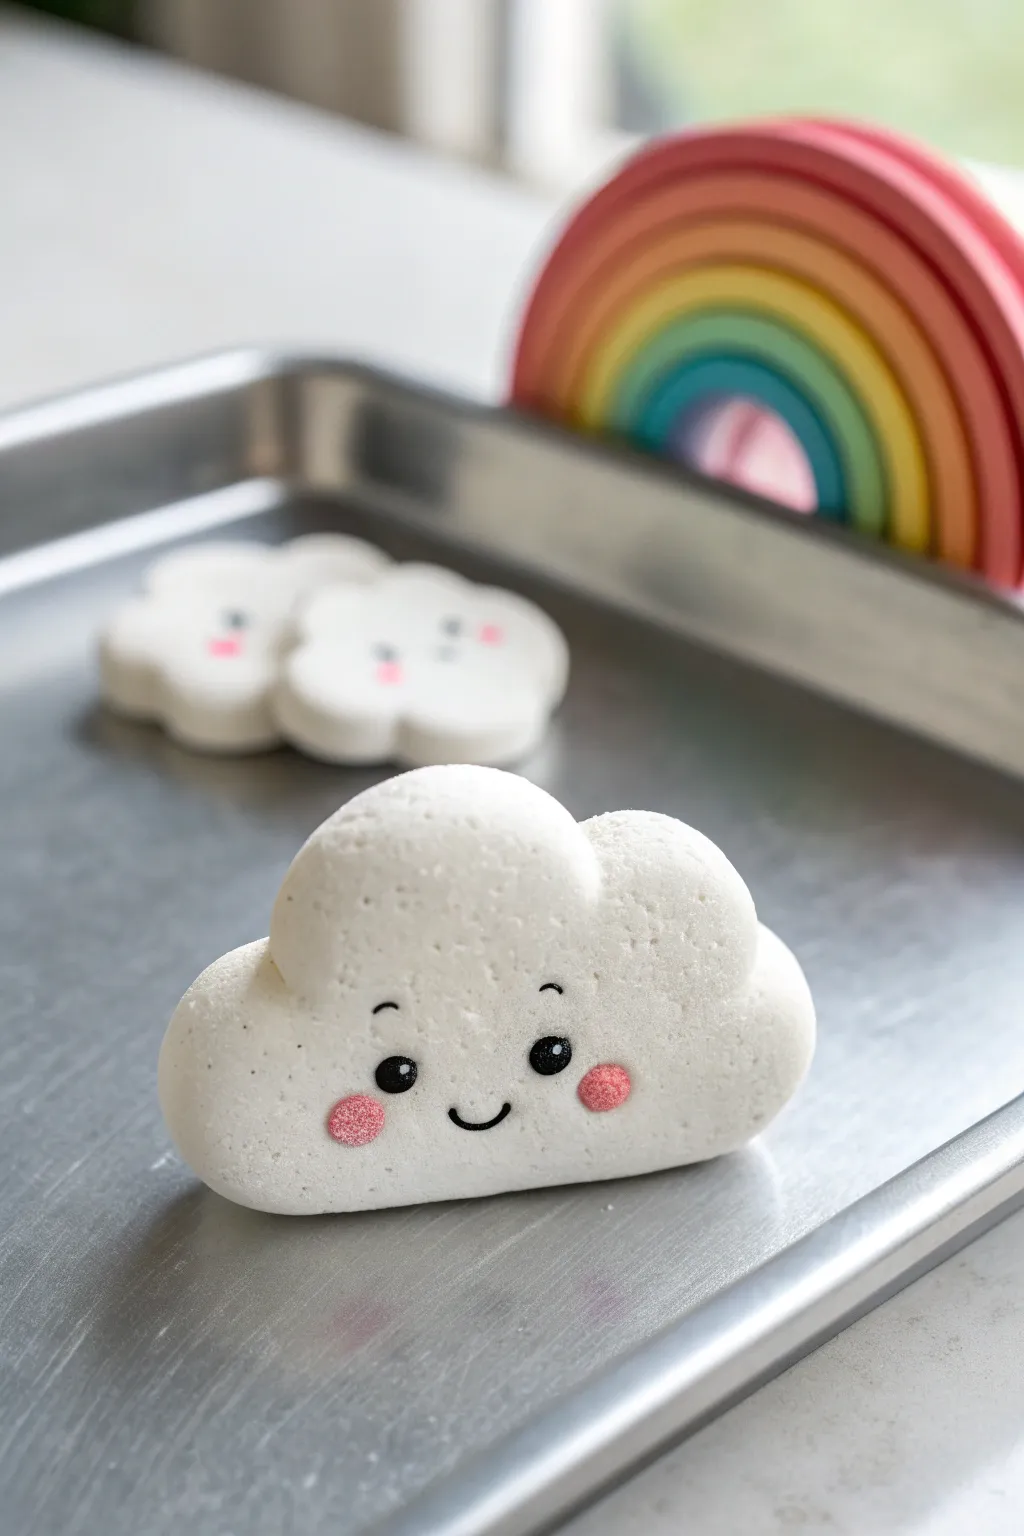
Brighten up your fridge or magnetic board with these adorable fluffy companions crafted from lightweight foam clay. Their happy little faces and smooth, marshmallow-like texture make them a joy to sculpt and display.
Step-by-Step Tutorial
Materials
- White air-dry foam clay
- Pink air-dry foam clay (or red to mix)
- Black acrylic paint or black Posca paint pen
- Small round sculpting tool or toothpick
- Round magnet (approx. 1 inch)
- Strong craft glue (like E6000 or super glue)
- Rolling pin (optional)
- Cloud cookie cutter (optional)
Step 1: Sculpting the Cloud Body
-
Condition the clay:
Begin by taking a generous amount of white foam clay and kneading it in your hands until it feels warm, pliable, and stretchy. -
Form the base shape:
Roll the clay into a smooth ball to remove any major seams or cracks. -
Flatten slightly:
Gently press the ball down onto your work surface until it is about 1/2 to 3/4 inch thick. You want it to look puffy, not flat like a pancake. -
Create the bumps:
Using your fingers, gently pinch and push the edges of the oval inwards to create the three distinct ‘humps’ of a cloud—one larger one in the middle and two smaller ones on the sides. -
Refine the surface:
Dip your finger in a tiny bit of water and smooth over the surface to erase any fingerprints or creases, ensuring the cloud looks seamless and soft. -
Let it firm up:
Allow the cloud shape to sit for about 15-20 minutes. This forms a slight skin, making it easier to handle without squishing the shape while adding details.
Smooth Operator
If your foam clay starts drying too fast or cracking while you work, wet your fingertips with a small amount of water to smooth the surface back out instantly.
Step 2: Adding the Kawaii Face
-
Mix the cheek color:
Take a tiny pea-sized amount of pink foam clay. If you only have red, mix a speck of red with a larger chunk of white to get a soft pastel pink. -
Position the cheeks:
Divide the pink clay into two equal, tiny spheres. Press them gently onto the lower half of the cloud face, spacing them wide apart. -
Texture the cheeks:
I like to take an old toothbrush or a stiff bristled brush and tap the pink circles gently to give them a rough, blushed texture. -
Paint the eyes:
Using a black paint pen or a fine brush with acrylic paint, draw two solid black circles just inside the pink cheeks. -
Add the eye highlights:
Once the black paint is fully dry, use a dotting tool or the tip of a toothpick to add a tiny white reflection dot in the upper corner of each eye. -
Draw the smile:
Carefully draw a small, U-shaped smile right between and slightly below the eyes using your black paint pen or a very fine liner brush. -
Add eyebrows:
Draw two tiny, curved lines above the eyes for eyebrows to give the cloud an extra cheerful expression.
Step 3: Finishing Touches
-
Full drying time:
Let the cloud fully cure for at least 24 to 48 hours. Foam clay shrinks slightly as it dries, but it will remain lightweight. -
Create a recess (optional):
If your magnet is thick, you can gently press it into the back of the foam clay while it’s still wet to create a socket, then remove it to dry. -
Attach the magnet:
Once the clay is completely dry and hard, apply a dab of strong craft glue to the back of the cloud. -
Secure the backing:
Press your round magnet firmly into the glue and let it set according to the glue manufacturer’s instructions.
Make it a Set
Create a whole sky scene by making a matching sun with yellow clay triangles, or sculpt a multi-colored rainbow arc to hang alongside your little cloud friend.
Once dry, snap your cheerful new friend onto the fridge to hold up your most important notes and photos

The Complete Guide to Pottery Troubleshooting
Uncover the most common ceramic mistakes—from cracking clay to failed glazes—and learn how to fix them fast.
Cozy Mushroom Sprite Minis
Bring a touch of forest magic to your desk or shelf with this adorable duo of happy mushroom sprites. Crafted from lightweight foam clay with sweet, cheerful expressions, they sit perfectly on a custom-made mossy green base.
How-To Guide
Materials
- Foam clay (white, brown, red, green, blue/teal, yellow)
- Acrylic paints (black, white, pink)
- Fine detail paintbrush
- Ball stylus tool or toothpick
- Aluminum foil (for armature core)
- Water
- Matte varnish (optional)
Step 1: Shaping the Stems
-
Create the Tall Stem Core:
Start by scrunching a small piece of aluminum foil into a teardrop shape. This saves clay and keeps the figurine light. It should be slightly wider at the bottom for stability. -
Cover with Beige Clay:
Mix white foam clay with a tiny dot of brown to create a soft beige or oatmeal color. Flatten a piece of this clay and wrap it fully around your foil core, smoothing out any seams with your finger. -
Refine the Shape:
Roll the stem gently on your work surface to make it smooth. Keep the base wide and rounded, tapering slightly as you go up toward where the cap will sit. -
Create the Short Stem:
Repeat this process for the smaller mushroom, using yellow foam clay mixed with a tiny bit of orange or brown for a warm, golden hue. Make this stem shorter and stout, like a little pumpkin shape.
Fixing Cracks
If you see cracks forming as the clay dries, dip your finger in water and gently massage the area to smooth the clay back together.
Step 2: Sculpting the Caps
-
Form the Red Cap:
Take a generous amount of dusty red or terracotta-colored foam clay. Roll it into a smooth ball first, then press your thumb into the center of one side to create a hollow, bowl-like shape. -
Shape the Curve:
Gently pinch and pull the edges of the bowl shape while rotating it to create a classic mushroom cap dome. I find it helpful to test the fit on the tall stem frequently to ensure the proportions look cute. -
Attach the Tall Cap:
Press the red cap firmly onto the tip of the beige stem. You can use a tiny drop of water at the connection point to act as glue. Smooth the clay underneath slightly to bond them. -
Form the Teal Cap:
For the smaller mushroom, use a muted teal or sea-green clay. Create a smaller, rounder cap shape, almost like a half-sphere, following the same hollow-ball technique. -
Attach the Short Cap:
Mount the teal cap onto your stout yellow stem. Press down gently so it looks like the cap is hugging the stem snuggly.
Step 3: Adding Details & Expressions
-
Make the Spots:
Roll tiny balls of pale cream or white foam clay. Press these flat onto the mushroom caps in random patterns. Vary the sizes—some large, some tiny dots—for a natural look. -
Texture the Stems:
Using a stiff bristled brush or a toothbrush, gently tap the surface of the dried stems to give them a slight organic, porous texture rather than leaving them perfectly smooth. -
Paint the Faces:
Once the surface is dry to the touch, use a fine detail brush and black acrylic paint to create small, wide-set eyes. Add a tiny U-shaped smile right between them. -
Add Highlights:
Dip the tip of a toothpick into white paint and add a tiny sparkle dot to the upper corner of each black eye. This instantly brings them to life. -
Rosy Cheeks:
Dilute a tiny bit of pink paint with water or use a dry-brush technique to dab soft, rosy circles just below the eyes.
Level-Up: Texture
Before the clay dries completely, press real dried moss or tiny pebbles into the green base for an authentic mixed-media forest floor look.
Step 4: Structuring the Base
-
Mix the Green Base:
Blend green foam clay with a little white and grey to achieve a muted, stone-like sage green color. You want a substantial amount to hold both figures. -
Shape the Platform:
Flatten the clay into an irregular oval disc, about half an inch thick. Keep the edges slightly rounded and organic, resembling a mossy river stone. -
Create Texture:
Press a crumpled piece of aluminum foil or a textured rock onto the surface of the green base to imprint realistic bumps and divots. -
Assembly:
While the base is still fresh, press your finished mushrooms firmly into the foam. The two wet-ish clay surfaces should bond, but you can add a touch of water or craft glue for extra security.
Let your charming mushroom duo dry completely for 24 hours before displaying them in your favorite nook
Sweet Animal Stack Totems
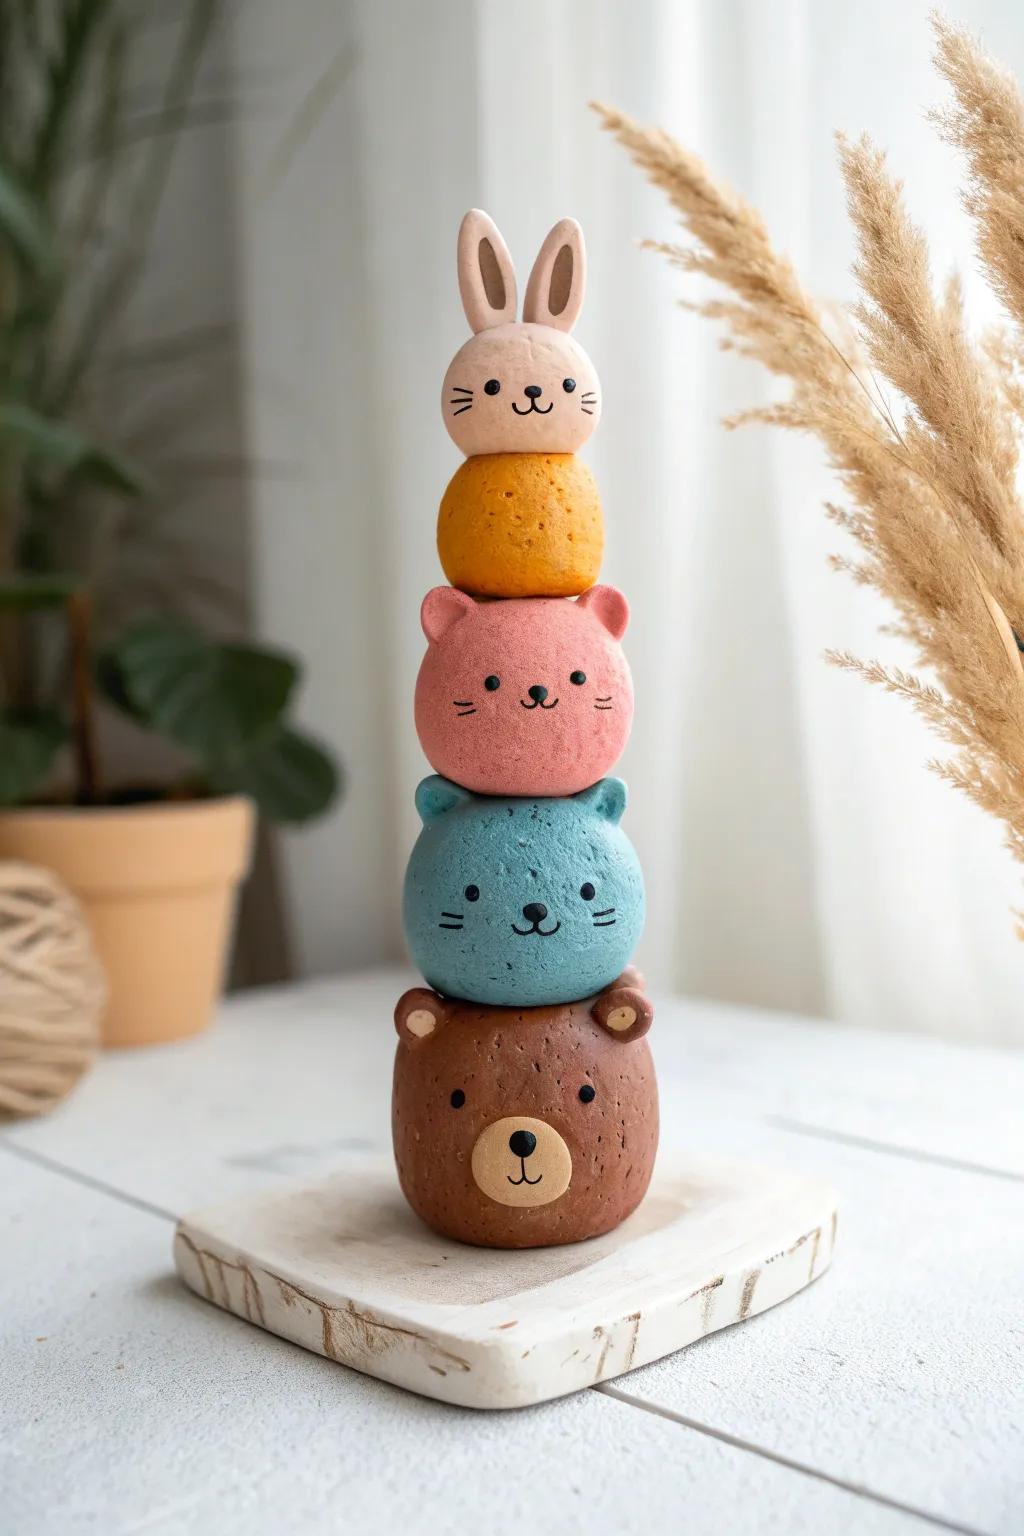
Bring a touch of forest charm to your desk with this adorable stacked sculpture featuring a bear, two kitties, and a bunny. Textured foam clay gives these friends a delightful, marshmallow-like finish that is lightweight and fun to shape.
Detailed Instructions
Materials
- Foam clay (brown, teal, pink, orange, beige)
- Black foam clay or fine-tip black posca marker
- Modeling tools (ball tool, needle tool)
- Toothpicks or a thin wooden dowel (for internal structure)
- Small wooden coaster or base
- White craft glue
Step 1: Base and Bear Builder
-
Prepare the Big Bear:
Start by rolling a large ball of brown foam clay to serve as the sturdy base of your totem. Aim for a slightly flattened sphere shape so it sits stable on your work surface. -
Add Ears:
Pinch off two small pieces of brown clay and roll them into tiny balls. Press these onto the top corners of the head, using a ball tool to create small indentations in the center for the inner ear. -
Create the Snout:
Take a pinch of beige clay and flatten it into an oval. Press this firmly onto the lower center of the brown sphere. -
Facial Features:
Use a tiny dot of black clay for the nose and place it on the beige snout. Then, use your needle tool or black marker to draw the mouth and small eyes directly onto the foam. -
Internal Structure:
Insert a toothpick or thin wooden skewer vertically into the center of the bear’s head. Leave enough sticking out to secure the next layers.
Step 2: Stacking the Mid-Layers
-
Teal Cat Creation:
Roll a slightly smaller ball of teal blue foam clay. Gently push this onto the support stick until it rests atop the bear. -
Shape the Blue Ears:
Form two small triangles from teal clay and attach them to the top of the blue sphere, blending the seams with your finger or a smoothing tool. -
Cat Face Details:
Using your black marker or tiny strands of black clay, add the eyes, a small nose, and three whiskers on each cheek. -
Pink Cat Layer:
Repeat the previous process with pink foam clay, making this ball just a fraction smaller than the blue one. Slide it onto the skewer. -
Pink Ears and Face:
Add small rounded triangle ears to the pink head. Draw or sculpt a simple face with eyes, a nose, and whiskers similar to the blue cat below it. -
The Orange Spacer:
Roll a small ball of orange foam clay. This acts as a colorful neck or spacer for the bunny on top. Slide it onto the stack and gently flatten it.
Smoother Seams
dip your finger in a tiny bit of water to smooth out fingerprints or join lines between the ears and heads before the foam dries.
Step 3: The Bunny Topper
-
Bunny Head:
Form a ball of beige clay, matching the size of the orange spacer. Secure this as the final piece at the very top of your totem. -
Tall Ears:
Roll two long, thin ovals of beige clay. Flatten them slightly and pinch the bottoms. Attach these vertically to the top of the head. -
Inner Ear Detail:
I like to take a tiny amount of darker brown or pink clay, flatten it into a long teardrop, and press it into the center of each ear for depth. -
Final Face:
Complete your stack by adding the bunny’s face—two eyes, a nose, whispers, and a cute mouth—using your marker or black clay. -
Display:
Once the clay is fully dry and hardened (usually 24 hours), use a dab of white glue to secure the bottom bear onto your wooden coaster.
Creative Twist
Swap the animals for seasonal themes! Try stacking pumpkins, ghosts, and bats for Halloween, or snowmen sections for winter decor.
Enjoy your charming new desk companion as it brightens up your creative space