Painting a ceramic sugar skull is one of those projects that feels instantly festive, even if you’re keeping it simple. Here are my favorite sugar skull painting ideas—starting with the classic looks and moving into the fun, unexpected twists.
Classic Floral Forehead And Cheek Motifs
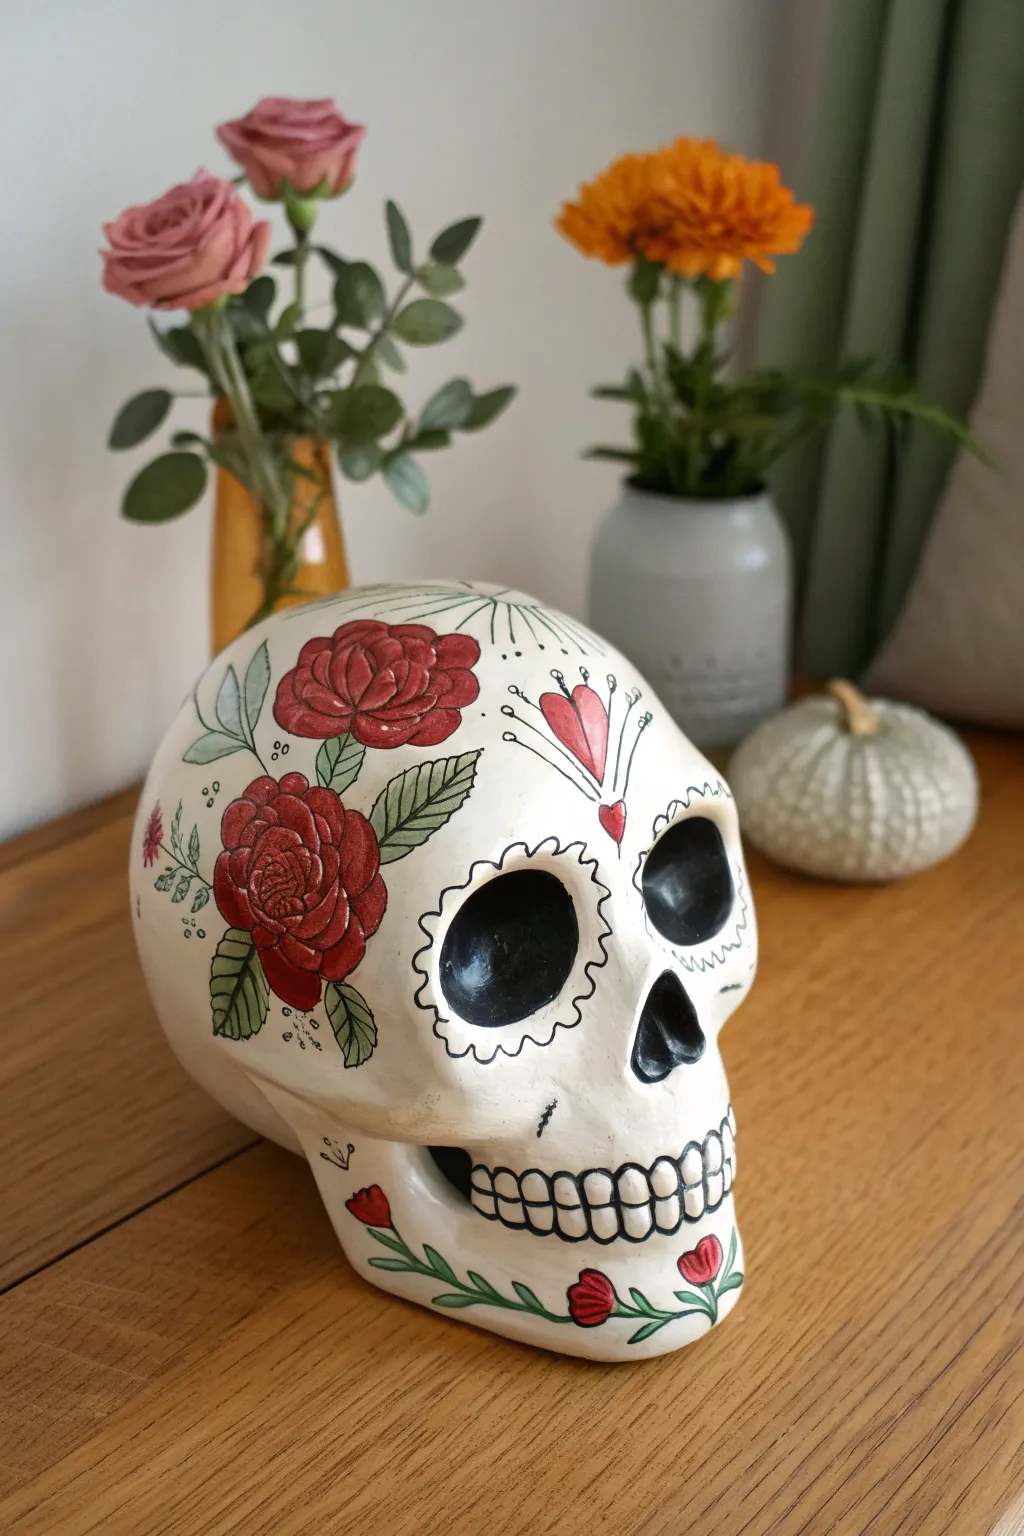
Capture the spirit of Dia de los Muertos with a ceramic skull featuring timeless floral motifs. This design balances bold red roses against crisp black detailing for a look that is both classic and strikingly elegant.
Step-by-Step
Materials
- White ceramic skull blank
- Acrylic paints: Bright red, deep crimson, forest green, sap green, white, black
- Fine liner brushes (sizes 00 and 0) for outlining
- Small round brushes (sizes 2 and 4) for filling color
- Pencil for sketching
- Eraser
- Palette
- Water cup and paper towels
- Spray sealant (matte or satin finish)
Step 1: Planning and Sketching
-
Clean the surface:
Wipe down your ceramic skull with a damp cloth to remove any dust or oils that might prevent the paint from adhering properly. -
Map out the roses:
Using a light pencil, sketch two large circular shapes for the roses on the left temple and cheek area. Add basic oval shapes for the surrounding leaves. -
Refine the floral details:
Inside your rose circles, lightly sketch the simplified swirling petal shapes. You don’t need every single line perfect, just a guide for where the color blocks will go. -
Sketch the forehead heart:
Center a heart shape on the forehead just above the eyebrows. Add a smaller heart shape at the very bottom point of the main heart. -
Outline the eye sockets:
Draw a scalloped edge around both eye sockets. This mimics the traditional marigold petal designs often found on sugar skulls.
Clean Lines Secret
Thin your black acrylic paint slightly with water (to an inky consistency) for the outlining stage. This helps the brush glide smoothly over the ceramic surface.
Step 2: Painting the Base Colors
-
Fill the eye sockets and nose:
Paint the inside of the eye sockets and the nose cavity with solid black acrylic paint. You may need two coats to get a truly deep, opaque black. -
Block in the roses:
Mix your bright red with a tiny touch of crimson to create a rich base color. Fill in the rose shapes completely. -
Paint the leaves:
Use a sap green or a slightly muted green to fill in the leaf shapes around the roses. Don’t worry about the veins yet; focus on solid coverage. -
Color the heart:
Using a slightly lighter red or a red-pink mix, fill in the heart on the forehead. I prefer to keep this separate from the rose red so the elements remain distinct.
Step 3: Adding Details and Line Work
-
Detail the rose petals:
Once the red base is dry, use a fine liner brush and black paint to draw the swirling petal outlines. Start from the center of the rose and work outward in expanding curved strokes. -
Add leaf veins and shading:
Using your fine liner, outline the green leaves in black. Add a central vein down the middle of each leaf and small diagonal veins branching off. -
Decorate the forehead heart:
Outline the heart in black paint. Add thin radiating lines coming off the top curves of the heart, finishing each line with a tiny dot or teardrop shape. -
Create the eye scalloping:
Trace over your pencil scalloped lines around the eyes with the fine black liner. Inside each scallop, you can add a tiny dot for extra texture. -
Define the teeth:
Paint the teeth outlines across the mouth area. Use vertical lines to separate the teeth, then connect them with curved lines for the gum line. -
Add the chin vine:
Paint a flowing green vine traversing the chin area. Add small red buds or mini-hearts along the vine to balance the color from the top of the skull. -
Final flourish accents:
Look for empty white spaces—like near the temple or jaw—and add delicate sprigs, tiny dots, or small floating hearts to fill the space without overcrowding it. -
Erase guidelines:
Once everything is completely bone dry, very gently erase any visible pencil marks. Be careful not to scrub the paint. -
Seal the artwork:
Take the skull to a well-ventilated area and apply a light coat of clear spray sealant to protect your design from chipping.
Add Dimension
Mix a tiny bit of white into your red paint and add highlights to the top edges of the rose petals before you do the black outlining for a pop of 3D volume.
Place your finished skull on a mantel or shelf to add a touch of handcrafted artistry to your seasonal decor


Bold Black Base With Bright Pop Colors
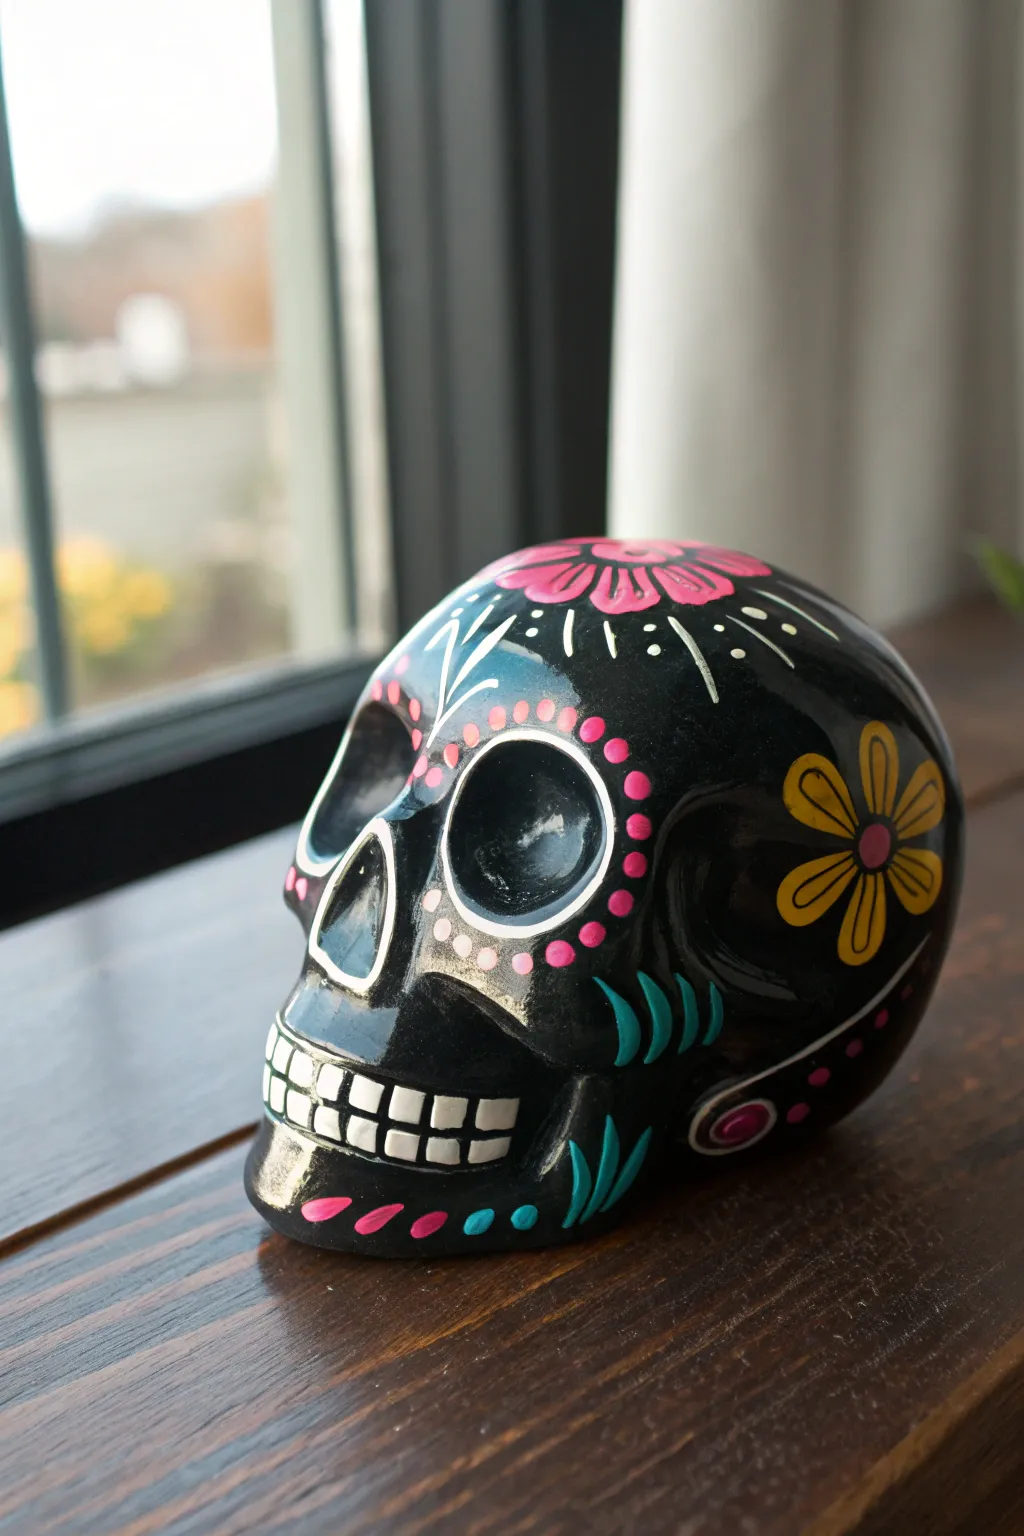
For a striking twist on traditional Día de los Muertos decor, this project uses a deep, glossy black base to make neon colors truly pop. The high contrast creates a dramatic, modern look that highlights the intricate floral and geometric details painted on the surface.
Detailed Instructions
Materials
- Unfinished ceramic skull
- High-gloss black acrylic paint or spray paint
- Acrylic paints: Bright pink, yellow, teal/turquoise, white
- Detail brushes (sizes 0, 1, and 3/0 liner)
- Flat shader brush (size 6 or 8)
- Pencil (optional for sketching)
- Gloss varnish or clear coat sealant
- Water cup and palette
Step 1: Preparation and Base Coat
-
Clean surface:
Begin by wiping down your ceramic skull to ensure there is no dust or ceramic powder, which can create a gritty texture. -
Apply black base:
Coat the entire skull in high-gloss black paint. For the smoothest finish, I prefer using a spray paint for this step, but brushing on acrylics works too if you apply two thin, even coats. -
Dry thoroughly:
Allow the base coat to dry completely. If you used brush-on acrylics, wait at least one hour; if spray paint, follow the can’s instructions carefully before touching.
Paint opacity issues?
Bright colors like yellow often look transparent on black. Paint the shape with white first, let it dry, then paint the color over it for maximum vibrancy.
Step 2: Facial Features
-
Outline the eyes:
Using a size 0 brush and white paint, carefully outline the rim of the eye sockets. This line doesn’t need to be perfect as we’ll add dots over it later. -
Dot the eyes:
Dip the handle end of a brush or a dedicated dotting tool into bright pink paint. Place evenly spaced dots all around the white rim of the eye sockets. -
Detail the nose:
Using a fine liner brush and white paint, outline the inverted heart shape of the nose cavity to define it against the black background. -
Paint the teeth:
With a small flat brush and white paint, block in rectangular shapes for the teeth. Keep the lines crisp and square to create a stylized grin. -
Add spacing lines:
Once the white teeth dry, use a very fine liner brush with black paint to redefine the vertical lines between each tooth and the horizontal line separating the top and bottom rows.
Add some sparkle
Make the eyes truly captivating by gluing small faux gemstones or flat-backed rhinestones into the center of the largest flower petals.
Step 3: Floral and Geometric Designs
-
Paint the side flower:
On the temple area, paint a simple five-petal flower using bright yellow paint. Start from the center and pull your brush outward for each petal. -
Add flower details:
Once the yellow is dry, add a pink center to the flower and outline the petals with a thin black line if you need more definition, though the black base usually suffices. -
Create the top bloom:
On the very top of the skull, paint a large pink flower. Focus on creating rounded petal shapes that radiate from the center crown. -
Add white accents:
Using your liner brush and white paint, add radiating lines and small teardrop shapes around the top flower to create a sunburst effect. -
Add forehead designs:
Paint a small, stylized white sprig or leaf shape directly between the eyes on the forehead. -
Cheekbone accents:
On the cheekbones, paint three curved, claw-like marks using teal or turquoise paint. These should curve upwards towards the ear area. -
Chin decoration:
Mirror the teal accents on the chin area with smaller curved strokes, perhaps mixing in a few pink strokes for variety. -
Jawline details:
Add a small swirl or circle detail near the back of the jawline in pink with a yellow or white center dot.
Step 4: Final Touches
-
Review and refine:
Look over the skull for any smudges or areas where the black base shows through the bright colors too much. Apply a second coat to the neon colors if needed for opacity. -
Seal the work:
Once all paint is perfectly dry, apply a coat of clear gloss varnish. This protects the paint and unifies the sheen of the black base with your colorful designs.
Place your finished skull near a window or light source to let the glossy finish really shine


Clean White Base With Traditional Color Blocking
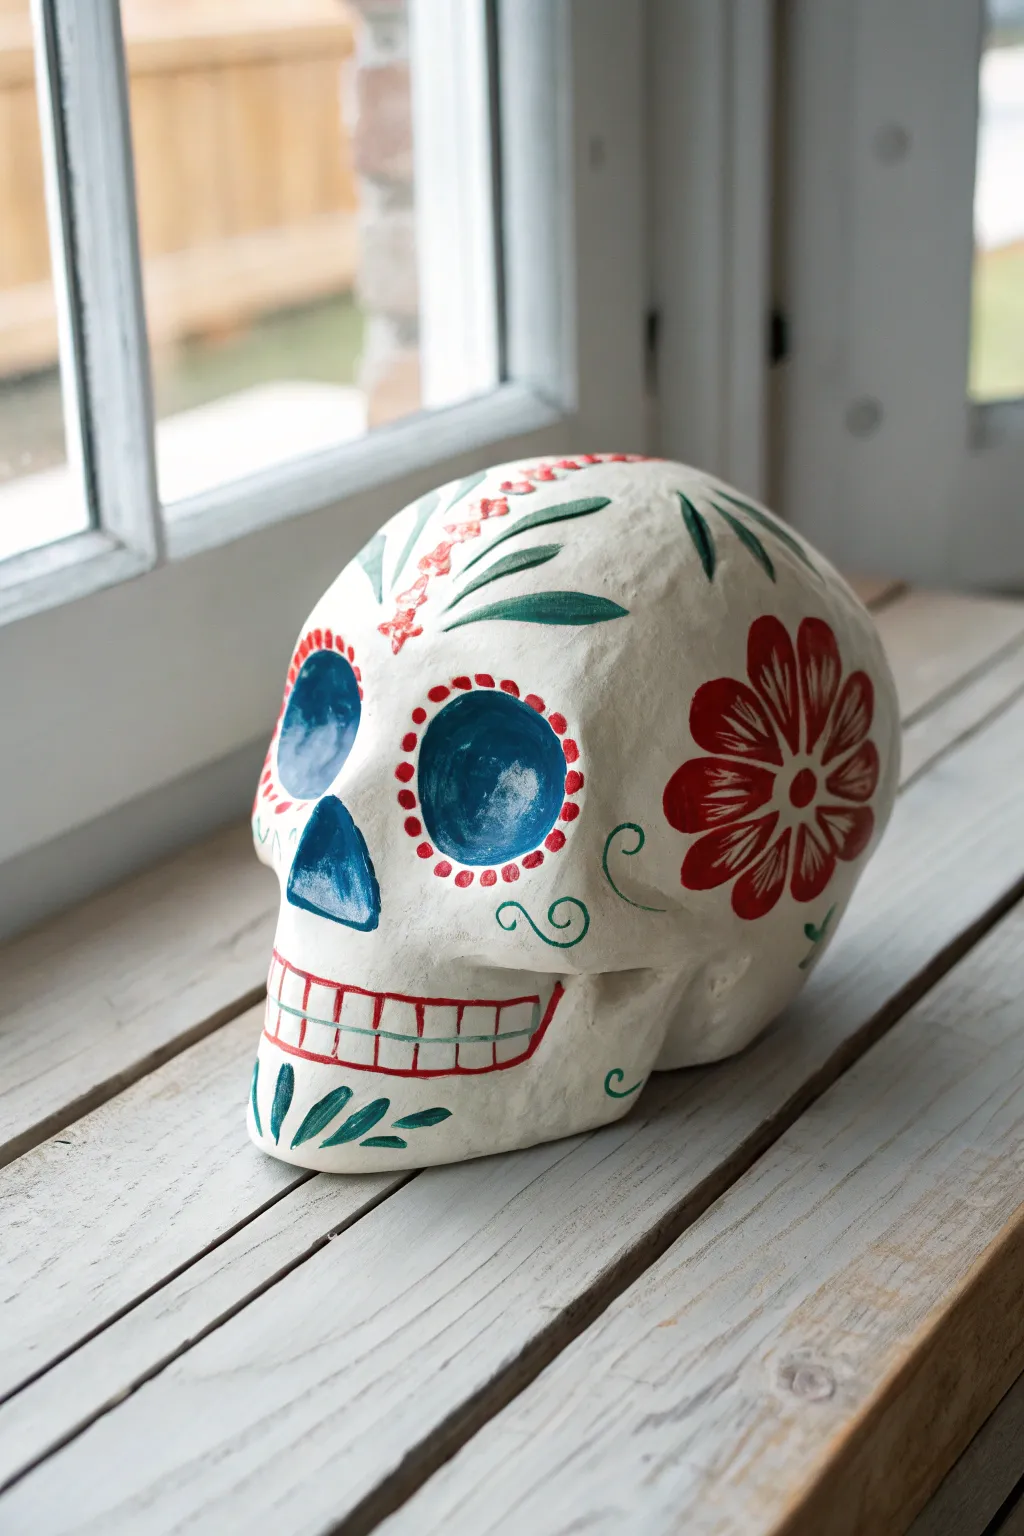
Embrace a clean, folk-art aesthetic with this project that pairs a stark white foundation with classic red, teal, and green accents. The airy negative space allows the bold floral motifs and traditional color blocking to really pop, creating a striking centerpiece.
How-To Guide
Materials
- Unfinished ceramic skull
- Acryla gouache or matte acrylic paint (White, Teal/Turquoise, Deep Red, Forest Green)
- Wide flat brush (for base coat)
- Small round brush (size 2 or 4)
- Fine liner brush (size 0 or 00)
- Pencil for sketching
- Matte spray varnish (optional)
Step 1: The Foundation
-
Prime the surface:
Begin by wiping down your ceramic skull to remove any dust or oils. Using your wide flat brush, apply a smooth, even coat of matte white paint over the entire piece. -
Build opacity:
Ceramic often soaks up the first layer, so apply a second or third coat of white until you have a solid, opaque finish with no clay showing through. Let this dry completely before moving on. -
Map the features:
Lightly sketch your design with a pencil directly onto the white paint. Mark circles around the eyes, the triangular nose cavity, the mouth grid, and the large flower placement on the side of the head.
Step 2: Bold Blocking
-
Fill the eye sockets:
Load a round brush with teal or turquoise paint. Fill the deep recessed area of the eye sockets first, ensuring you get into the corners. -
Define the nose:
Using the same teal shade, paint the triangular nose cavity. Paint firmly along the edges to create a crisp, sharp outline against the white bone. -
Paint the side bloom:
Switch to your deep red paint. Focus on the large flower on the right temple. Paint a center circle, then carefully stroke outward to create six or seven distinct petals. The petals should have a slightly textured, brush-stroke look rather than being perfect geometric shapes.
Clean Lines Pro Tip
For perfectly round eye-socket dots, dip the non-brush end (the handle) of your paintbrush into the red paint and stamp it onto the ceramic.
Step 3: Vibrant Details
-
Outline the eyes:
This step brings the personality. Using your smallest round brush and the deep red paint, create a ring of small dots around each eye socket. Try to keep the spacing consistent, like a string of beads. -
Add the greenery:
Dip a liner brush into forest green paint. Paint three long, sweeping leaves extending from the top center of the forehead down toward the eyes. -
Lower jaw details:
Paint three similar leaf shapes on the chin, fanning diagonally outward from the center. -
Forehead Florals:
Between the green leaves on the forehead, use the red paint to dab small floral clusters or a trailing vine pattern down the center line of the skull.
Add Some Sparkle
Mix a tiny amount of glitter medium into the teal eye paint or glue small flat-backed rhinestones into the center of the red flower petals for extra texture.
Step 4: Fine Lines & Finishing
-
Draft the teeth:
Use your fine liner brush and red paint to draw the mouth. Start with a long horizontal line across the upper and lower jaw area. -
Define the grid:
Complete the teeth by painting short vertical lines across your horizontal guide. Keep the lines relatively thin to mimic the look of etched bone. -
Fill the floral center:
Go back to the large red flower on the side. Use a tiny dot of white or a contrasting color in the very center to add depth. -
Add decorative swirls:
With the forest green paint and your finest brush, add delicate curlicues on the cheekbones, just under the eye sockets. These filigree lines add a touch of whimsy to the rigid bone structure. -
Review and refine:
Check your edges. If any red dots smudged or the teal bled, use a tiny bit of white paint to clean up lines once the colors are dry. -
Seal the work:
Once absolutely dry, a light mist of matte varnish will protect your painting without adding an unwanted glossy shine.
Place your finished skull near a sunny window or among candles to let the white finish glow


Marigold-Inspired Warm Color Palette
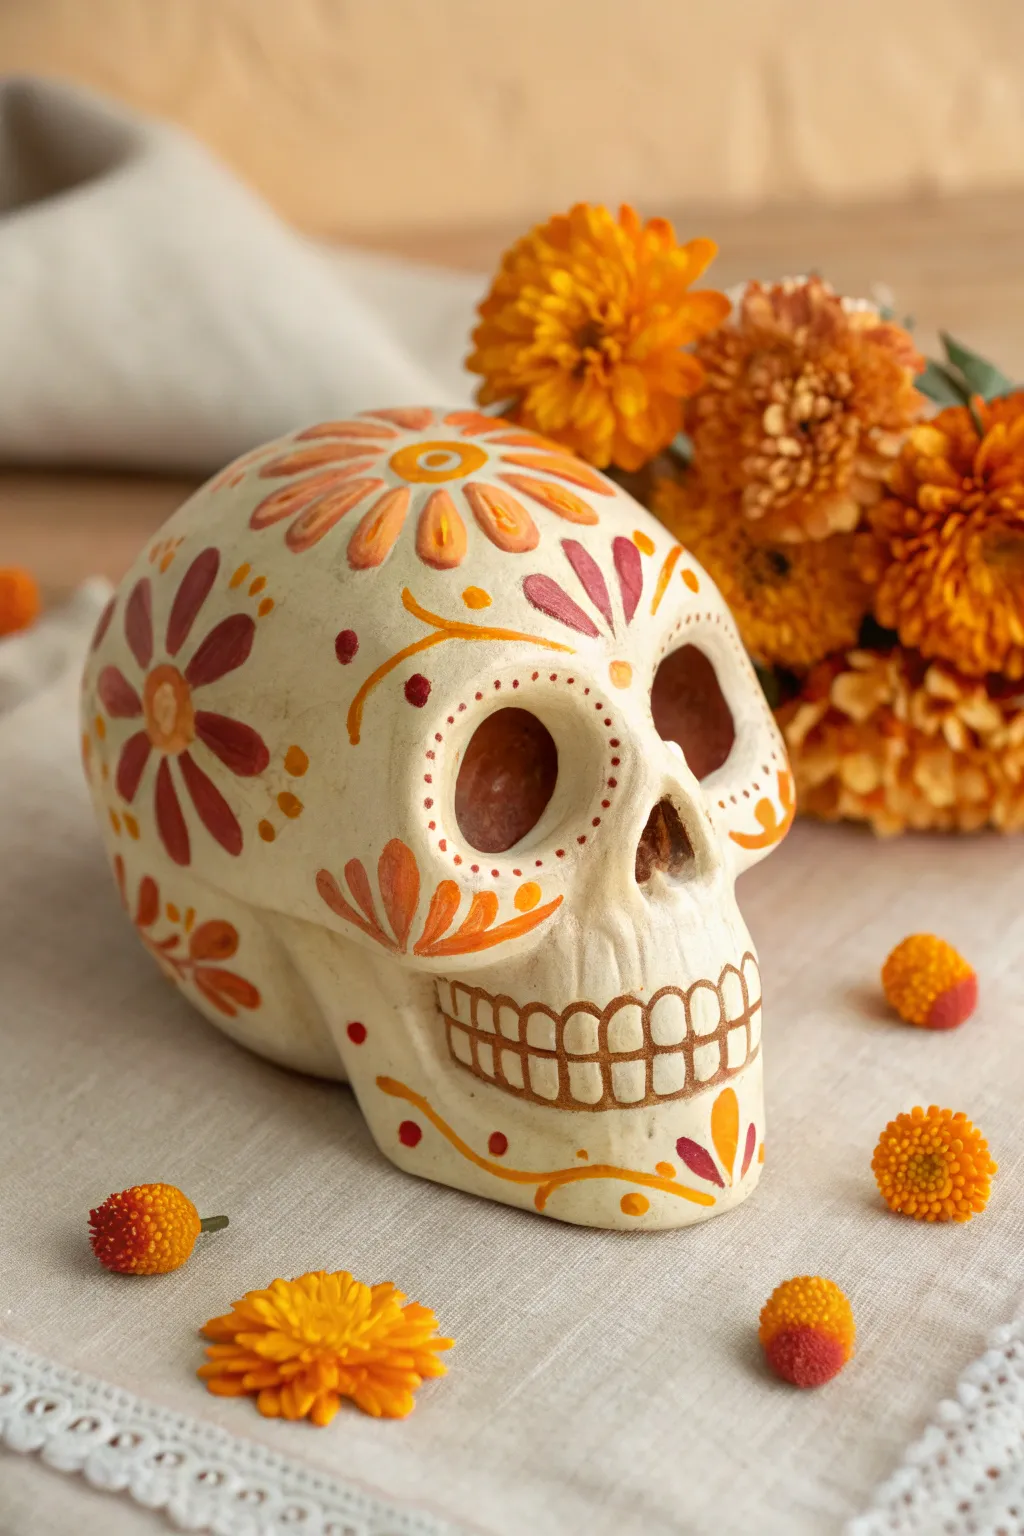
Capture the warmth of autumn with this elegant ceramic sugar skull, featuring a sophisticated palette of marigold oranges, rusty reds, and sunny yellows. This project uses simple floral motifs and fine details to create a festive piece that feels both traditional and modern.
Step-by-Step
Materials
- Unfinished ceramic or bisque skull (smooth finish)
- Acrylic paints: Cream/Off-White (base), Marigold Yellow, Burnt Orange, Deep Red/Burgundy, Metallic Gold (optional)
- Flat synthetic brush (medium size)
- Round detail brush (size 0 or 1)
- Ball stylus tool or toothpick
- Palette or small plate
- Paper towels
- Cup of water
- Matte or satin clear sealant spray
Step 1: Base Preparation
-
Clean surface:
Before you begin, wipe your ceramic skull with a slightly damp paper towel to remove any dust or ceramic powder. Let it dry completely. -
Apply base coat:
Using your flat synthetic brush, cover the entire skull with the cream or off-white acrylic paint. This creates a warm, neutral bone canvas. -
Ensure opacity:
Let the first coat dry for about 15-20 minutes. If the ceramic is still showing through, apply a second coat for solid, even coverage and let it cure fully.
Oops! Uneven Lines?
If a line goes wonky, wait for it to dry completely. Then, use a small brush with your cream base color to paint over the mistake and ‘erase’ it.
Step 2: Main Floral Elements
-
Paint the crown flower:
Start at the very top center of the head. Using a small round brush, paint a circle in marigold yellow. Once dry, add a smaller orange dot in its center. -
Add crown petals:
Paint elongated teardrop shapes radiating from the top center circle, alternating between burnt orange and a lighter yellowish-orange. Keep the strokes loose but distinct. -
Side flower placement:
Locate the ‘temple’ area on the side of the skull. Paint a small orange center circle here. -
Side flower petals:
Using your deep red or burgundy paint, create larger, rounded petals around the temple center. I like to press the belly of the brush down and lift up to create a nice petal shape naturally.
Step 3: Facial Features
-
Eye socket detailing:
Outline the eye sockets with small, evenly spaced dots using the tip of your smallest brush or a ball stylus tool. Use the deep red color for contrast against the cream background. -
Cheek accents:
On the cheekbone area, paint a fan-like motif using three or four teardrop shapes in burnt orange, pointing outward away from the nose. -
Nose emphasis:
The nose cavity is naturally dark, but you can highlight the bottom edge or the septum area with a very subtle wash of burnt orange to define the shape without making it too heavy. -
Define the teeth:
Using your finest detail brush and thinned brown or dark gold paint, carefully outline each tooth. Keep the lines very thin to define the individual teeth without colouring them in.
Make it Sparkle
Stick tiny adhesive rhinestones in the centers of your flowers or use gold puff paint for the dots to add a 3D texture that catches the candlelight.
Step 4: Decorative Flourishes
-
Forehead vines:
Paint delicate, curving lines sweeping from the center of the forehead outward above the eye sockets. Use the marigold yellow for these vine-like swirls. -
Leaf accents:
Add small, simple leaf shapes in burgundy attached to the forehead vines to balance the warm yellows. -
Jawline details:
mirroring the forehead, add sweeping curved lines along the jawline in orange. Add a small three-petal design at the very center of the chin. -
Dot work:
Using the back of your brush handle or a stylus, add various sizes of dots in empty spaces—specifically around the forehead flower and along the jawline swirls—to add texture. -
Final dry:
Allow the painted skull to dry undisturbed for at least an hour. Acrylics dry fast, but thicker dots may need extra time. -
Sealing:
Take the skull outside or to a well-ventilated area. Spray a light, even coat of matte or satin sealant to protect your design from dust and fading.
Place your finished skull on an ofrenda or mantel surrounded by real marigolds to complete the look

The Complete Guide to Pottery Troubleshooting
Uncover the most common ceramic mistakes—from cracking clay to failed glazes—and learn how to fix them fast.
Flower Eyes With Layered Petal Rings
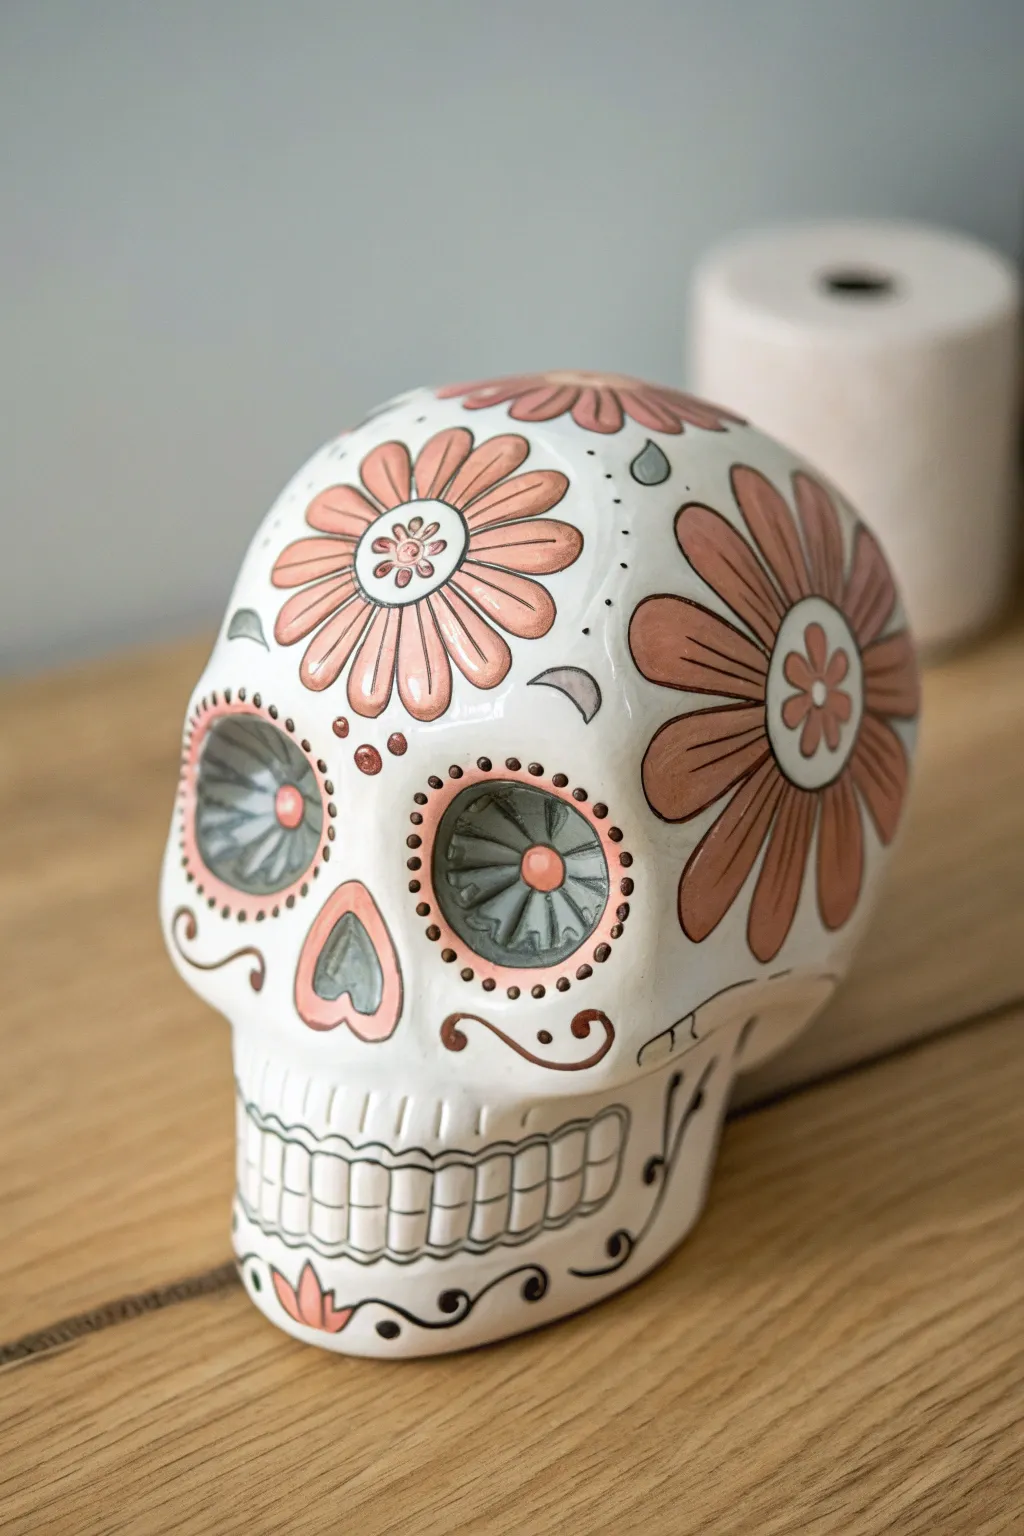
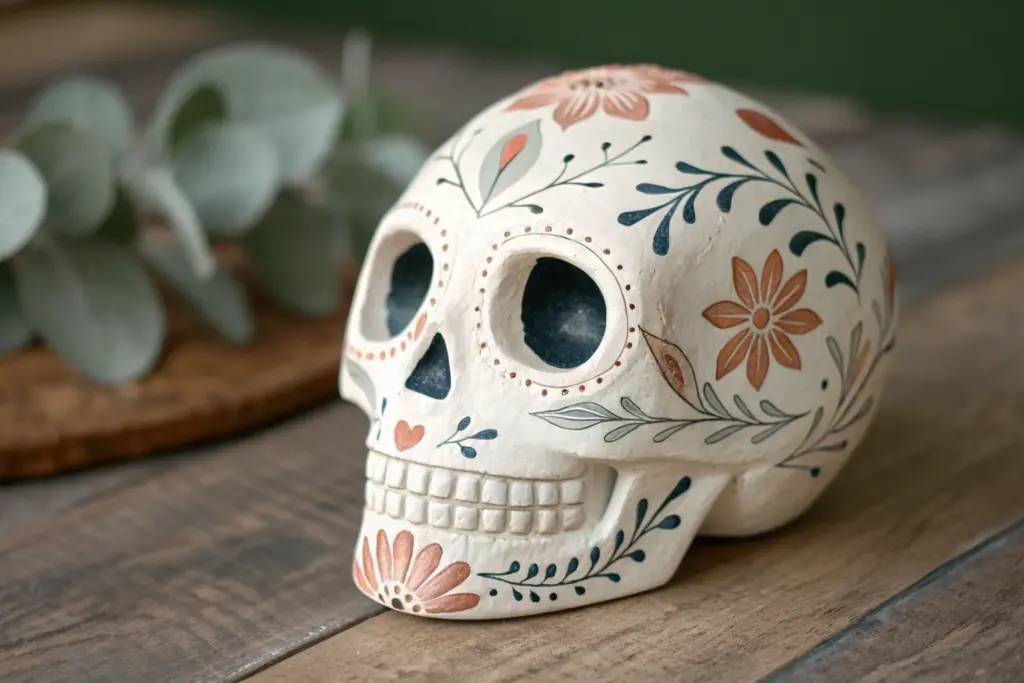
Embrace a softer side of spooky with this elegant ceramic sugar skull featuring layered floral motifs in warm peach and grey tones. The design uses delicate line work and simple petal shapes to transform a plain white ceramic base into a festive piece of decor.
How-To Guide
Materials
- White ceramic skull blank (glazed or bisque)
- Acrylic paints: warm peach/coral, soft grey, white, metallic copper (optional)
- Fine liner brush (size 00 or 000)
- Small round brush (size 2 or 3)
- Black acrylic paint or paint marker (fine tip)
- Water cup and palette
- Paper towels
- Clear sealant spray (gloss or matte)
Step 1: Base Preparation & Eye Sockets
-
Clean surface:
Begin by wiping down your ceramic skull with a slightly damp cloth to remove any dust or oils that might prevent the paint from adhering properly. -
Paint socket background:
Using your grey paint, fill in the deep recessed areas of the eye sockets. You don’t need to be perfectly neat at the edges yet, as the decorative border will cover them. -
Add socket center:
Once the grey is dry, paint a small peach circle right in the center of the eye socket to act as the flower’s center. -
Detail the inner petals:
With a fine liner brush and darker grey or thinned black paint, draw radial lines extending from the peach center to the edge of the socket to create the illusion of petals inside the eye.
Paint Slipping?
If paint streaks on slick glazed ceramic, do not add water. Use undiluted heavy body acrylics or dab the first layer with a sponge for “tooth.”
Step 2: Floral Forehead Design
-
Outline the main flower:
Focus on the forehead. Imagine a central circle, then lightly sketch or paint the outline of a large daisy-like flower with long petals radiating outward. -
Fill the petals:
Use your peach paint to fill in these petals. You may need two coats to get a solid, opaque color on the slick ceramic surface. -
Create the center:
Paint a white circle in the center of your forehead flower. Let it dry completely. -
Detail the center:
Inside the white center circle, use your fine liner to paint a tiny six-petaled flower shape in peach outline or fill. -
Side flower addition:
Repeat this large flower process on the side of the skull (temple area), making this bloom even larger, perhaps wrapping slightly around the curve.
Gilded Edges
Trace the black outlines of the main flower petals with a metallic gold or copper paint pen for a shimmering, luxurious finish.
Step 3: Facial Features & Line Work
-
The nose heart:
Paint the nose cavity with grey paint. Outline the cavity in peach, creating an upside-down heart shape with a thick border. -
Eye socket border:
Using the peach paint, create a scalloped or dotted border around the rim of the eye sockets. I find small, deliberate dabs work best here. -
Adding dots:
Dip the handle end of a paintbrush into black or dark grey paint and dot it around the peach eye borders to add texture and contrast. -
Mouth stitching:
With your thinned black paint or a paint marker, draw a horizontal line across the mouth area. Then, draw vertical lines to create the teeth. Curved lines at the top and bottom of each ‘tooth’ add realism. -
Jaw swirls:
Paint delicate black swirls and curlicues along the jawline and chin area to fill the negative space. -
Final outlining:
Go back to your large peach flowers. Use your finest brush and black paint to outline every petal and the center circle to make the design pop.
Step 4: Finishing Touches
-
Chin detail:
Add a small, simple flower or leaf motif on the very center of the chin using the peach and grey palette. -
Highlighting:
Add tiny white dots or strokes to the peach petals and the center of the eyes to create a ‘shiny’ highlight effect. -
Seal:
Allow the paint to cure for at least 24 hours, then spray with a clear sealant to protect your work from chipping.
Display your painted skull on a mantel or bookshelf to add a touch of artistic flair to your seasonal decor
Mandala Dot Painting Around The Eye Sockets
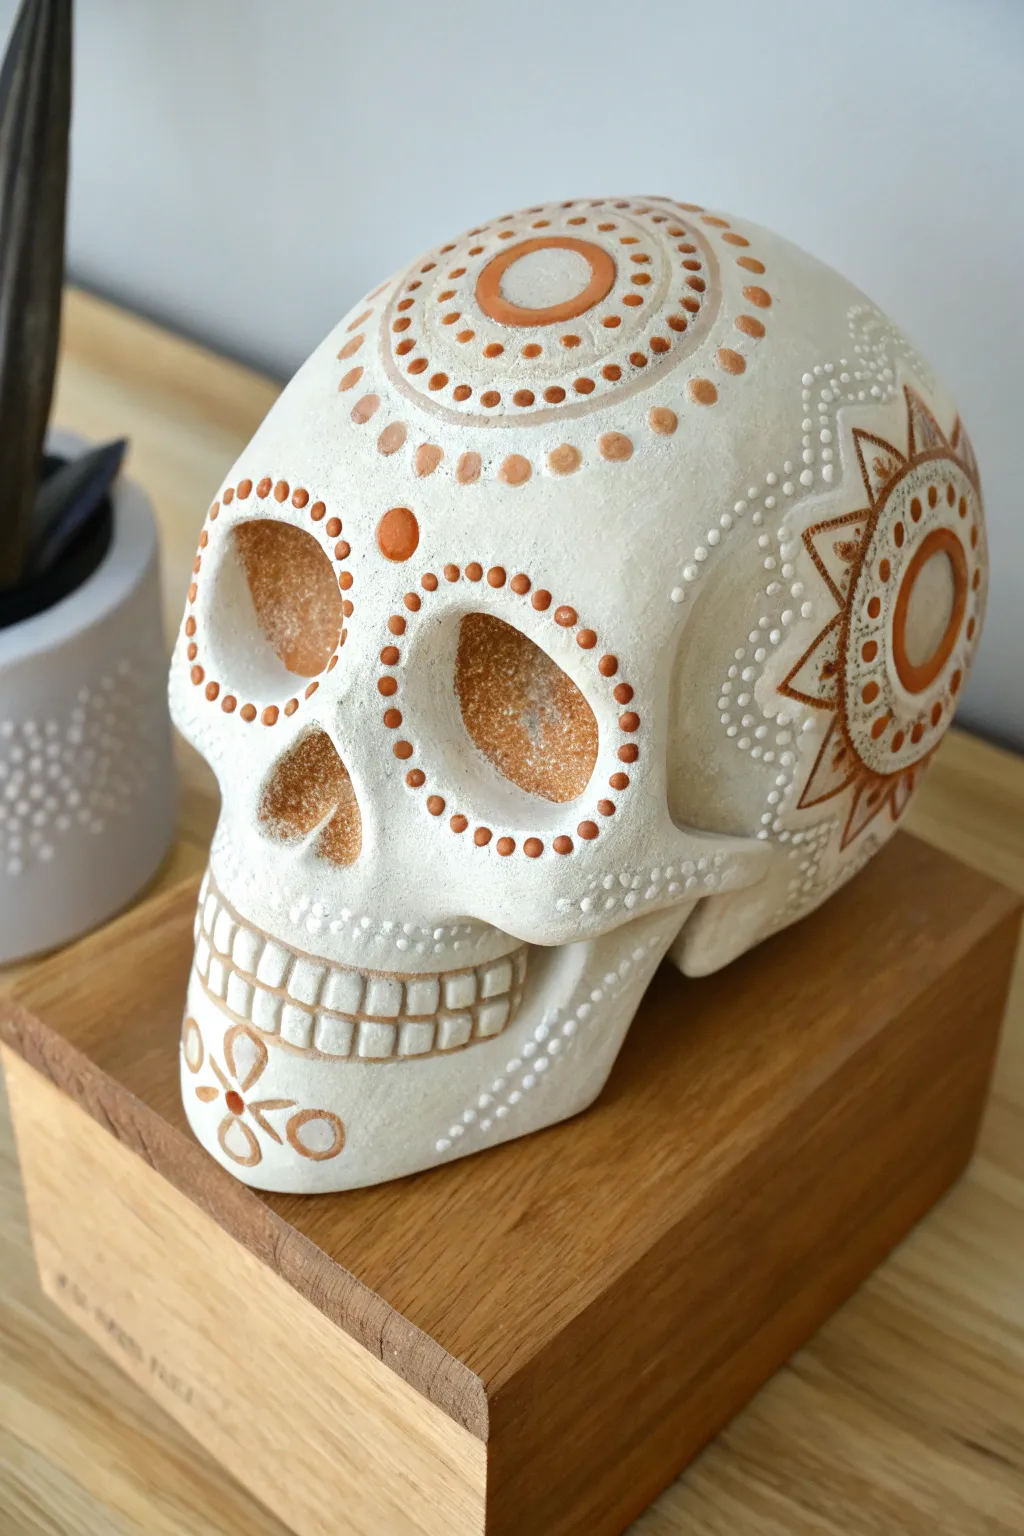
Transform a plain ceramic skull into a stylish, bohemian decor piece using simple dot painting techniques and a warm, earthy color palette. This project combines precise mandala patterns with a rustic terra cotta finish for a look that is both spooky and sophisticated.
Detailed Instructions
Materials
- White ceramic skull (bisque or glazed)
- Terra cotta acrylic paint
- White acrylic paint
- Set of dotting tools (various sizes)
- Small fine-liner paintbrush
- Damp cloth or cotton swabs (for cleanup)
- Matte finish spray sealer (optional)
Step 1: Preparation & Base Features
-
Clean surface:
Begin by wiping down your ceramic skull with a damp cloth to remove any dust or oils. Let it dry completely before starting. -
Paint eye sockets:
Load a medium brush with terra cotta paint and fill in the interior of the eye sockets. You don’t need to be perfectly neat at the very edge, as we will cover the rim with dots later. -
Create the nose:
Using the same terra cotta shade, paint the inside of the nose cavity. I find two thin coats often look smoother than one thick glob of paint. -
Highlight the brow:
In the center of the forehead, just above the space between the eyes, place a single large terra cotta dot using a large dotting tool. -
Detail the teeth:
Mix a very small amount of terra cotta with white to create a pale sandy beige. Carefully outline the individual teeth with a fine-liner brush to give them definition without making them too dark.
Oops! Uneven Dots?
Don’t panic! If a dot is misshapen, let it dry briefly, then use a damp Q-tip to wipe it away cleanly before trying again.
Step 2: Eye Mandalas & Forehead
-
First eye ring:
Select a medium-sized dotting tool. Dip it in terra cotta paint and create a ring of evenly spaced dots immediately surrounding the left eye socket. -
Second eye ring:
Repeat the process for the right eye socket, trying to keep the spacing consistent with the first eye for symmetry. -
Forehead center circle:
Moving to the top of the skull, paint a solid terra cotta circle about an inch in diameter. This will be the center of your crown mandala. -
Crown inner dots:
Using a small tool and white paint (or the pale sandy mix), place tiny dots inside the terra cotta circle you just painted. -
Crown radiation:
Create concentric rings of dots radiating outward from the crown circle. Alternating between terra cotta and white dots in varying sizes creates that intricate mandala effect. -
Side temple burst:
On the side of the skull (the temple area), paint another terra cotta circle. Use a fine liner brush to draw triangles radiating from it like a sunburst. -
Temple details:
Fille the sunburst triangles with small white dots to add texture.
Step 3: Jaw & Finishing Touches
-
Cheekbone accents:
Along the cheekbone turning into the jaw, use white paint to create a swoop of small, descending dots. This accentuates the bone structure. -
Chin flower:
On the center of the chin, paint a small flower motif. Start with a center dot, then paint four petal shapes extending outward in an ‘X’ formation using terra cotta paint. -
Chin details:
Add a tiny white dot in the center of your chin flower petals for extra dimension. -
Final smooth check:
Look over the skull for any smudges. If you made a mistake with a dot, simply wait for it to dry and gently scrape it off, or paint over it with white. -
Seal the work:
Once the paint is fully cured (give it at least 24 hours), spray the entire piece with a matte sealer to protect the design and unify the sheen.
Try Metallic Accents
Swap the white paint for gold or copper metallic acrylics for a more glamorous, shimmering finish.
Place your finished skull on a wooden shelf or amidst some succulents to enjoy your handiwork


What Really Happens Inside the Kiln
Learn how time and temperature work together inside the kiln to transform clay into durable ceramic.
Swirly Filigree And Curl Patterns

Capture a sophisticated, nature-inspired look with this elegant ceramic skull design featuring warm brown filigree and delicate curls. The monochromatic palette allows the intricate swirled patterns to take center stage, creating a piece that feels both festive and timeless.
Step-by-Step
Materials
- Unfinished ceramic skull (bisque)
- Acrylic paint (Cream or Off-White for base)
- Acrylic paint (Burnt Sienna or Warm Brown for details)
- High-gloss varnish or sealant
- Wide flat brush
- Fine liner brush (size 0 or 00)
- Water cup and palette
- Pencil (optional)
- Damp cloth
Step 1: Base Preparation
-
Clean surface:
Begin by wiping down your ceramic skull with a slightly damp cloth to remove any dust or ceramic debris. A clean surface ensures the base coat adheres smoothly. -
Apply base coat:
Using a wide flat brush, paint the entire skull with a creamy off-white acrylic paint. This provides a warm, neutral canvas that contrasts beautifully with the brown details later. -
Dry and repeat:
Let the first coat dry completely to the touch. Apply a second or even third coat until you have a solid, opaque finish with no ceramic showing through. -
darken eye sockets:
Mix a small amount of water into your burnt sienna paint to create a wash. Paint the interior of the eye sockets and the nasal cavity with this darker shade, allowing it to naturally pool in the crevices for depth.
Fluidity is Key
For smooth swirls, thin your brown acrylic paint with a drop of water until it has an ink-like consistency. This stops the brush from dragging.
Step 2: Drafting and Outlining
-
Sketch guides:
If you’re nervous about freehanding, lightly sketch your main floral and swirl placements with a pencil. Focus on the forehead flower, the cheek swirls, and the chin motif. -
Center forehead motif:
Switch to your fine liner brush and the undiluted burnt sienna paint. Start at the top center of the forehead with a vertical leaf or petal shape, flanked by two curved leaves radiating outward. -
Add side flourishes:
Extend the forehead design by painting two large, graceful scrolls that curve down towards the temples. Keep your paint consistency fluid so the brush glides easily. -
Eye detailing:
Paint a scalloped or wavy line around the upper rim of the eye sockets. On the lower rim and bridge of the nose, use tiny dots to create a delicate stippled border.
Gold Leaf Glamour
After sealing, apply small accents of liquid gold leaf to the centers of the flowers or the tips of the swirls for an elegant metallic highlight.
Step 3: Cheek and Jaw Patterns
-
Cheek scrolls:
On the prominent part of the cheekbone, paint a large spiral that curves inward towards the nose. Add a double line to the spiral’s tail to give it visual weight. -
Jawline filigree:
Move to the side of the jaw. Create large S-curves and loose swirls that flow backwards towards the ear area. I like to vary the line thickness here by pressing harder on the downstrokes. -
Stipple accents:
Enhance your swirls by adding clusters of tiny dots inside the open loops or along the spine of the curves. This mimics the look of traditional henna art. -
Embellish the nose:
Between the eyes and the nasal cavity, paint a small starburst or floral shape made of tear-drop strokes. -
Chin flower:
On the front of the chin, paint a simplified daisy or flower shape. Use the liner brush to create petals that radiate from a small center circle. -
Bottom jaw vines:
Connect the chin flower to the rest of the design by painting horizontal vines with small curled ends along the bottom edge of the jaw.
Step 4: Finishing Touches
-
Fill gaps:
Step back and look for empty spaces that feel unbalanced. Fill them with small accent curls, single dots, or tiny leaf shapes to unify the design. -
Define teeth:
Outline the individual teeth with a very thin line of brown paint. You can add a subtle wash of the brown between the teeth to create separation and dimension. -
Final dry:
Allow the detailed painting to dry completely, preferably overnight, to ensure the distinct lines don’t smudge during sealing. -
Seal the work:
Apply a coat of satin or matte varnish over the entire piece to protect your artwork and give the ceramic a finished, professional sheen.
Now you have a stunning piece of decor that blends spooky tradition with elegant artistry
Crisp Tooth Details With Alternating Colors
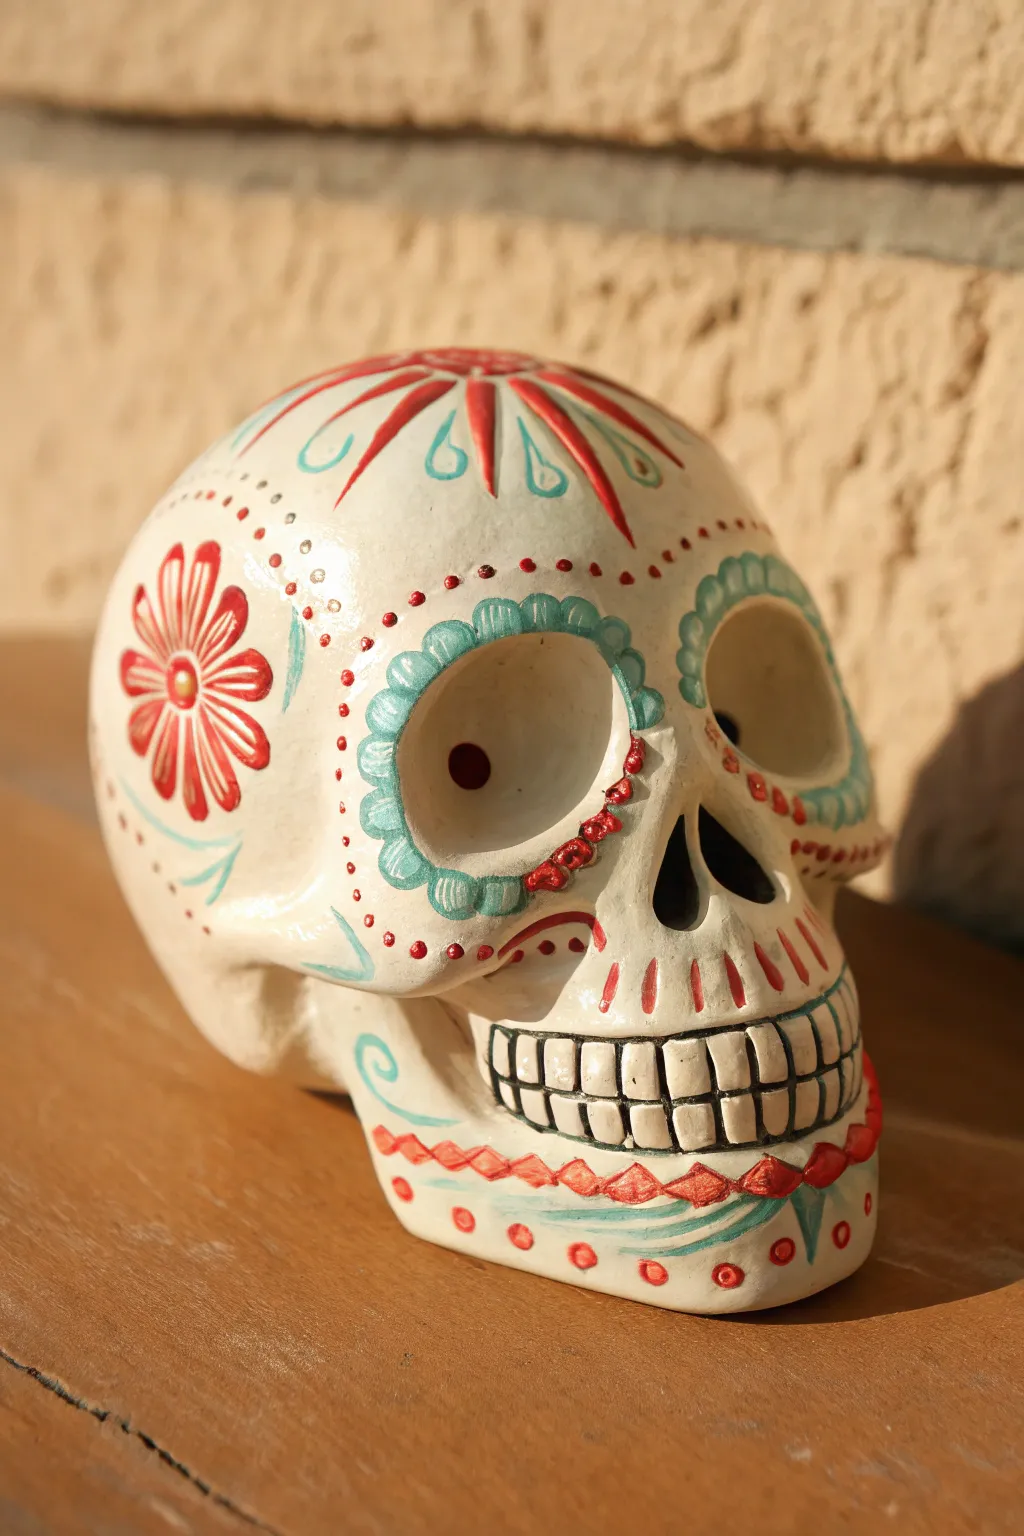
Embrace the festive spirit of Día de los Muertos by bringing a plain ceramic skull to life with striking red and teal accents. This design features crisp scalloped eye sockets, delicate dot work, and uniquely detailed teeth that give the piece a polished, professional finish.
Step-by-Step Tutorial
Materials
- Unpainted white ceramic skull (bisque ware)
- Acrylic paints (bright red, teal/turquoise, black, white)
- Fine detail brushes (round sizes 0 and 1)
- Small flat brush (size 2 or 4)
- Dotting tools (or toothpicks/ends of paintbrushes)
- Water cup and paper towels
- Gloss varnish or clear sealer spray
Step 1: Base and Eyes
-
Prime the surface:
Ensure your ceramic skull is free of dust. If the ceramic is a bit gray or uneven, apply a thin coat of white acrylic paint all over to create a bright, clean canvas. Let this base coat dry completely. -
Paint the eye sockets:
Use your smallest round brush to carefully outline the inner eye sockets. You don’t need to fill the deep black hole yet, just establish the area where the scalloped design will sit. -
Create the scalloped rim:
Mix a light teal shade using turquoise and a touch of white. Using a small round brush, paint a series of connected “U” shapes around the entire rim of both eye sockets to create a scalloped flower-petal effect. -
Double the scallop:
Once the teal scallops are dry to the touch, load a fine detail brush with darker turquoise. Outline the inner edge of your light teal scallops to add depth and definition to the eye area.
Wobbly Lines?
If your brush slips while painting the teeth outlines, wait for the black mistake to dry completely, then paint over it with opaque white. Try again once the correction is dry.
Step 2: Floral and Facial Dotted Details
-
Paint the side flower:
Locate a smooth area on the side of the skull (the temple). Paint a small red circle for the center, then radiate six to eight elongated red petals outward. Leave small gaps between the petals so the white background shows through. -
Add petal details:
Inside the flower center, add a tiny yellow or white dot. Then, trace thin curved teal lines springing from the bottom of the flower to suggest leaves or movement. -
Create the forehead sunburst:
On the very top center of the head, paint red teardrop shapes radiating outward. Between each red teardrop, use your teal paint to add curved flourishes or simple lines, creating a balanced sunburst pattern. -
Start the dot chains:
Dip a dotting tool (or the back of a brush handle) into red paint. Carefully place a line of dots following the curve of the cheekbones, curving down from the eye sockets towards the jaw. -
Detail the forehead dots:
Switch to a smaller dotting tool. Add a delicate arch of tiny red dots above each eye socket, framing the scalloped design you created earlier. -
Add accent dots:
Look for empty white spaces around the nose and jaw. Add single red dots or small clusters of three to fill the negative space without overcrowding the design.
Step 3: The Mouth and Jaw
-
Outline the teeth:
Mix a very watery black or dark grey paint. Use your thinnest liner brush (size 0) to outline the individual rectangular shapes of the teeth. Keep the lines extremely thin and crisp. -
Define the separation:
Paint a solid black horizontal line separating the upper and lower teeth. This center line should be slightly thicker than the vertical lines between the teeth. -
Alternate the tooth colors:
This is the signature step for this look. I find it helpful to squint slightly to see the pattern clearly: leave the teeth white, but every other vertical line between the teeth gets a tiny accent. -
Paint the tooth roots:
Above the upper teeth and below the lower teeth, paint short, vertical red lines (or elongated teardrops) extending from the gum line. These mimic the roots and add a vertical rhythm to the mouth. -
Decorate the chin:
Paint a zig-zag or diamond pattern across the chin using red paint. Once dry, outline these diamonds with very thin teal lines to make the red pop. -
Final flourishing strokes:
Use the teal paint one last time to add swirled, S-shaped flourishes on the jawline, tucking them under the red diamond pattern.
Pro Tip: Dot Consistency
For perfectly round dots, reload your dotting tool with fresh paint for every single dot. If the paint starts to gloop on the tool, wipe it clean before dipping again.
Step 4: Finishing Touches
-
Paint the nose cavity:
Fill the inverted heart shape of the nose cavity with solid black paint. This provides a necessary high-contrast anchor for the colorful face. -
Check for symmetry:
Step back and look at your skull from the front. If one side has more red dots than the other, add a few more to balance it out. -
Seal the artwork:
Allow the paint to cure for at least 24 hours. Finish by applying a spray gloss varnish to give the ceramic a shiny, glazed appearance and protect your detailed work.
Place your finished skull on a mantle or altar to admire the vibrant interplay of teal and red against the crisp white ceramic.

TRACK YOUR CERAMIC JOURNEY
Capture glaze tests, firing details, and creative progress—all in one simple printable. Make your projects easier to repeat and improve.
Metallic Accents For A Shiny Finish
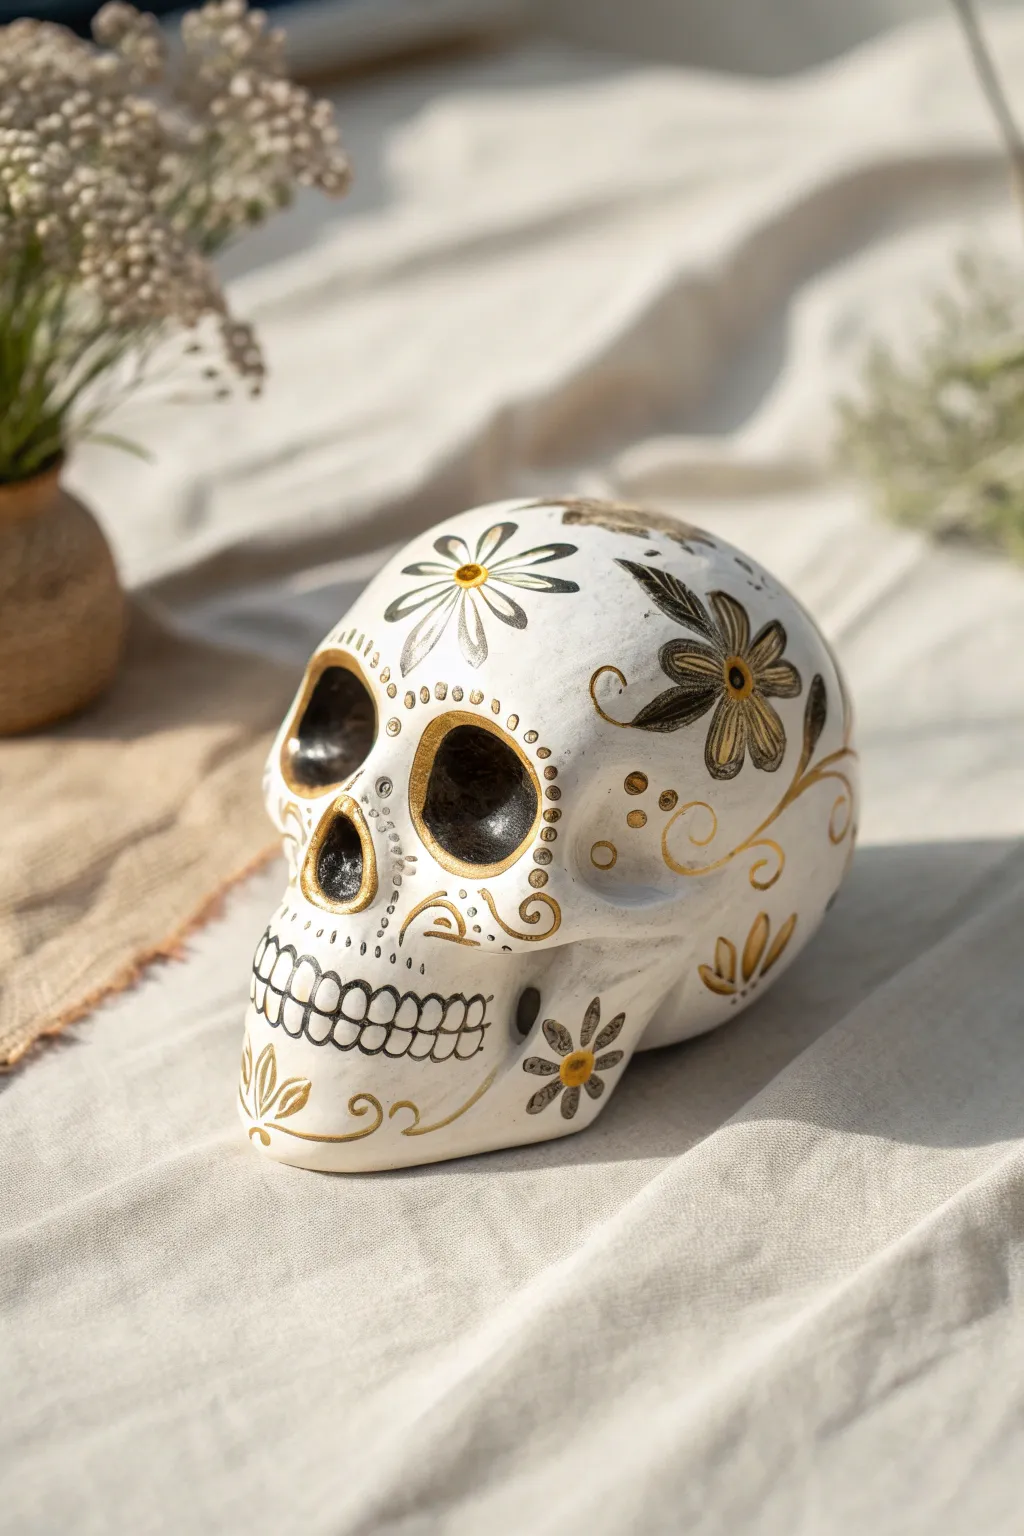
This elegant take on the traditional sugar skull moves away from vibrant primary colors, embracing a sophisticated palette of white, black, grey, and gold. The result is a stunning, minimalist piece where delicate metallic accents bring the floral designs to life against a matte ceramic canvas.
How-To Guide
Materials
- Bisque ceramic skull (unpainted)
- Matte white acrylic paint (full coverage)
- Metallic gold acrylic paint (high shine)
- Black acrylic paint
- Grey acrylic paint (or mix black and white)
- Small round paintbrush (size 2 or 3)
- Fine liner brush (size 0 or 00)
- Palette for mixing
- Water cup and paper towels
- Matte varnish spray (optional, for final seal)
Step 1: Base Preparation
-
Clean the surface:
Wipe down your ceramic skull with a slightly damp cloth to remove any dust or debris from sitting on the shelf. Let it dry completely. -
Apply the base coat:
Using a larger brush, paint the entire skull with matte white acrylic paint. You may need two coats to ensure the finish is opaque and unstreaky. Allow the first coat to dry fully before applying the second.
Clean Lines Pro Tip
For the sharpest fine lines, slightly water down your black paint to an ink-like consistency. It will flow off the liner brush much smoother without dragging.
Step 2: Mapping the Features
-
Darken the sockets:
Mix a small amount of black with a tiny drop of gold to create a warm, deep black. Paint the inside of the eye sockets and the nose cavity with this mixture for depth. -
Outline the gold rims:
Dip your medium round brush into the metallic gold paint. Carefully paint a thick, smooth rim around both eye sockets and the nose cavity. The gold should sit slightly on the outer edge, framing the dark hollows. -
Dotting the eyes:
Once the gold rims are dry, take your fine liner brush and black paint (or grey) to create a ring of small, evenly spaced dots surrounding the gold eye sockets. This adds texture and frames the eyes beautifully.
Level Up: Antique It
Mix a tiny drop of translucent brown glaze and lightly brush it into the crevices of the teeth or around the gold rims, then wipe it back for an aged, vintage bone look.
Step 3: Floral Details
-
Forehead daisy center:
Place a distinct gold dot in the center of the forehead to start the main flower. -
Painting the petals:
Using grey paint and a round brush, paint simple, elongated petals radiating from the gold center. Keep the paint somewhat translucent or diluted for a softer, watercolor-like effect if desired. -
Defining the petals:
With your fine liner brush and black paint, outline each grey petal. Add a small line down the center of each petal for detail. -
Side temporal flowers:
Repeat this flower process on the temples near the ear area. Create a gold center, paint larger, darker grey or black petals sweeping back, and add gold highlights inside the petals for dimension. -
Chin accents:
Paint smaller, simpler flowers on the jawline using the same gold-center and grey-petal technique to balance the design.
Step 4: Swirls and Mouth
-
Cheek scrolling:
Load your liner brush with fluid gold paint. Paint delicate swirls and scrolling vines starting from the cheekbones and curling towards the jaw. Variation in line thickness makes these look more organic. -
Drafting the teeth:
Using the fine liner brush and black paint, carefully draw the vertical lines of the teeth first, extending past the mouth line slightly. -
Connecting the teeth:
Paint the horizontal line through the middle of the vertical lines to separate top and bottom teeth. Round off the tops and bottoms of the lines to create the tooth shapes. -
Adding the mustache scroll:
Above the mouth, paint a symmetrical, mirrored scroll design in gold that mimics a mustache shape, curling upwards at the ends. -
Gold accents:
Add tiny gold dots or ‘seeds’ drifting off the floral designs and filling empty spaces on the cheeks for a little extra sparkle.
Once dry, display your chic skull in a well-lit spot where the gold can catch the sun
Soft Ombre Fade From Crown To Jaw
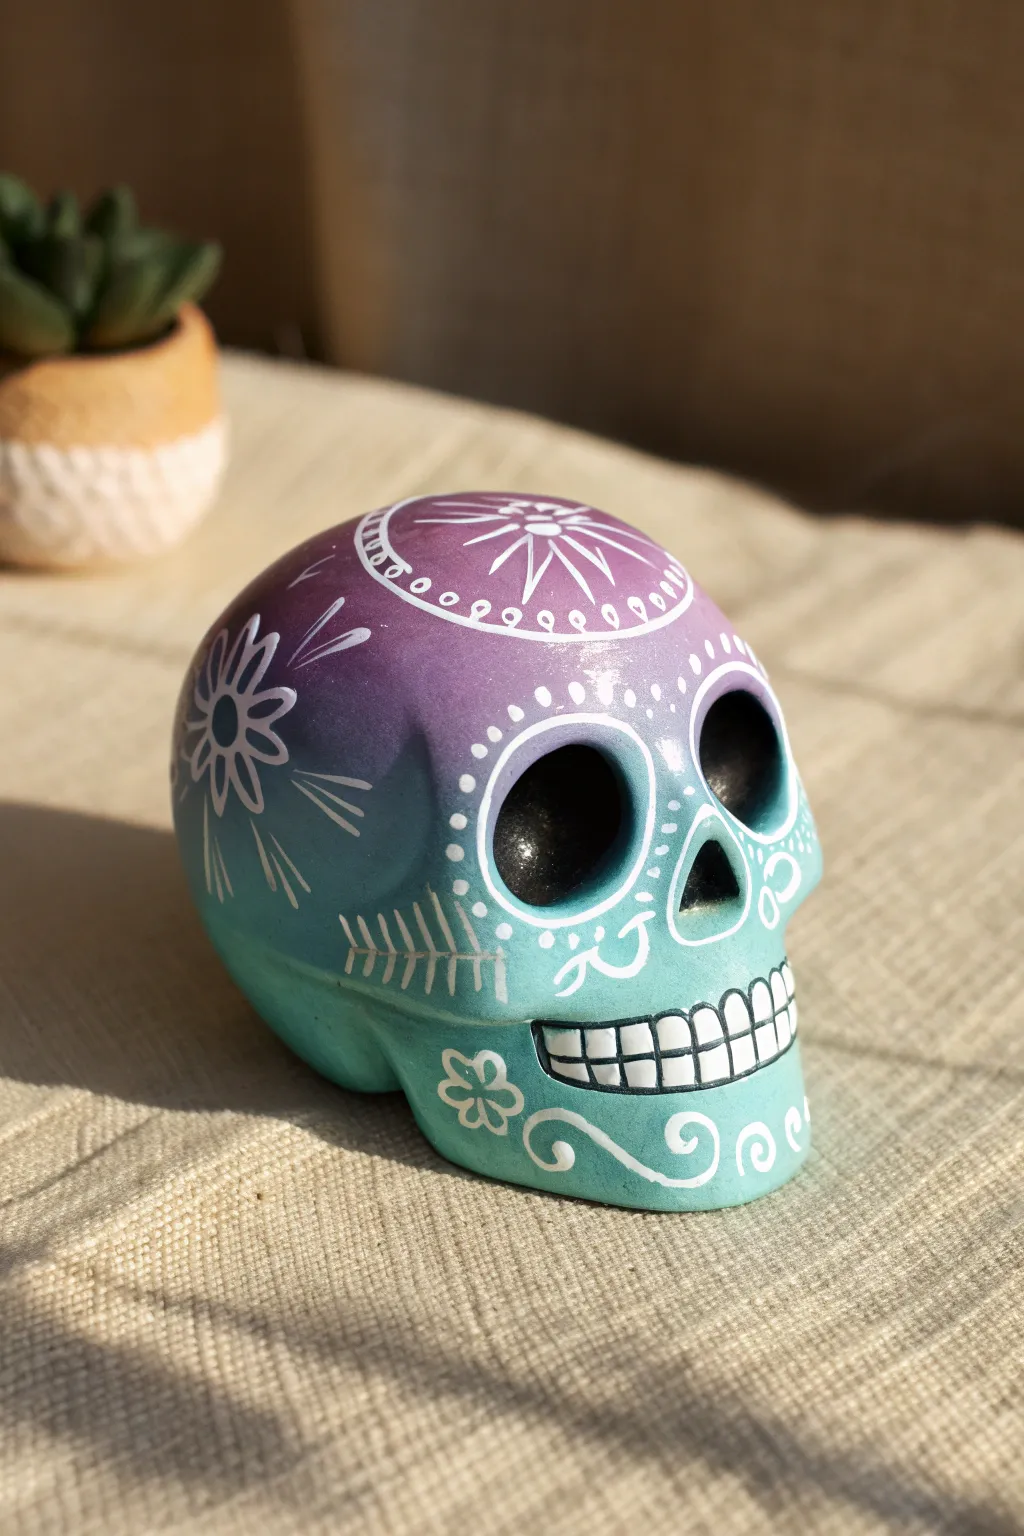
Capture the magic of dusk with this gentle purple-to-teal gradient design. The soft ombre base provides a stunning backdrop for delicate white linework, creating a modern and serene take on the traditional sugar skull.
Step-by-Step
Materials
- Bisque ceramic skull
- Acrylic paints: Lavender/Light Purple, Teal, Turquoise, White, Black
- Makeup sponges or soft blending brush
- Fine detail brush (liner brush size 0 or 00)
- Small flat brush
- Palette or paper plate
- Gloss varnish or sealant spray
- Water cup and paper towels
Step 1: Creating the Ombre Base
-
Prepare the surface:
Wipe down your ceramic skull with a slightly damp tack cloth or paper towel to remove any bisque dust. This ensures the paint adheres smoothly without bumps. -
Apply the purple crown:
Load a makeup sponge with lavender acrylic paint. Sponge the color onto the very top of the skull’s head, covering the crown area completely. -
Begin the fade:
While the purple is still tacky, mix a tiny drop of teal into your lavender on the palette. Sponge this transition shade just below the purple crown, tapping gently to blur the line where the colors meet. -
Apply the teal mid-section:
Apply pure teal paint to a fresh sponge. Dab this onto the forehead, eye sockets, and nose area, blending upward into the transition shade you just created. -
Finish with turquoise:
For the jaw and chin, switch to a brighter turquoise paint. Blend this upward into the teal section so the skull gets progressively lighter and brighter toward the bottom. -
Let it cure:
Allow the ombre base coat to dry completely. I prefer to wait at least 30 minutes to ensure the damp sponge work doesn’t lift when we add details.
Fixing Ombre Lines
If your color transition looks like a harsh stripe, re-wet your sponge slightly with the lighter color and tap repeatedly over the line until it blurs softly.
Step 2: Adding the Features
-
Darken the sockets:
Using black acrylic paint and a small flat brush, fill in the deep recesses of the eye sockets and the nose cavity. This adds immediate depth and contrast to the soft pastels. -
Paint the teeth:
Use a small brush to paint the teeth area white. Don’t worry about the individual tooth lines yet; just create a solid white band across the mouth. -
Outline the teeth:
Once the white band is dry, use your finest liner brush and black paint to carefully draw the vertical lines separating the teeth and outline the entire mouth shape.
Step 3: Detailing the White Line Art
-
Draw the crown motif:
Load your liner brush with white paint thinned slightly with water for better flow. On the top center of the purple area, paint a burst or star shape with radiating lines. -
Add the crown border:
Paint a curved line framing the starburst, then decorate it with small dots and loops to create a lace-like effect. -
Create the eye border:
Using small white dots, stipple a circle around the outer ridge of each eye socket. This brightens the dark eyes instantly. -
Paint the side flower:
On the temple area where the purple fades to blue, paint a simple daisy-like flower with long petals stretching backward. -
Add decorative flourishes:
Fill the empty space on the cheeks with swirls and abstract leaf shapes. Try to keep your hand loose to get smooth, scrolling curves. -
Detail the chin:
Paint a small flower on one side of the chin and balance it with a swirl on the other side. -
Embellish gaps:
Look for empty spots, like the bridge of the nose or jawline, and add tiny dots, teardrops, or hatch marks (like fish bones) to tie the design together. -
Seal the work:
Once all paint is fully dry, apply a coat of gloss varnish or spray sealant to protect the finish and make the colors pop.
Add Some Sparkle
Before sealing, apply tiny stick-on rhinestones to the centers of the flowers or the middle of the forehead starburst for a touch of texture and glam.
Now you have a serene, beautifully blended piece of art ready for display
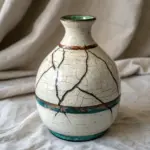
Faux Cracked Glaze Painted Illusion
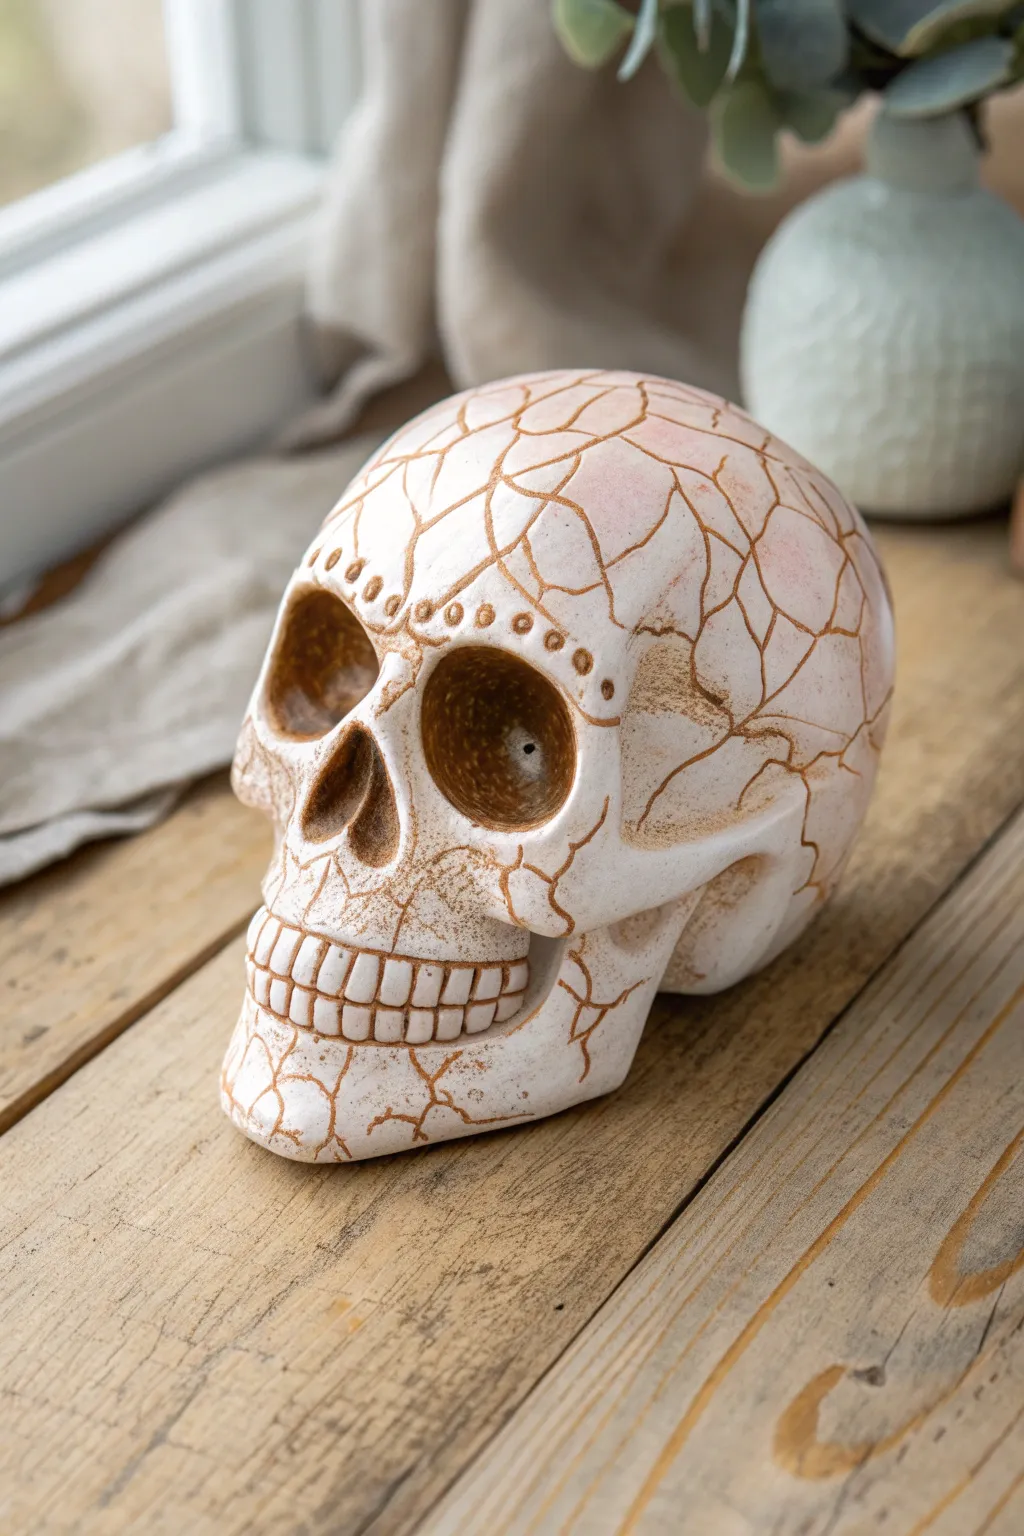
Transform a plain ceramic skull into an ancient-looking artifact with this sophisticated faux finish. This technique employs fine liner work and strategic antiquing to mimic the appearance of weathered, crackled porcelain without the need for a kiln.
Step-by-Step Tutorial
Materials
- Bisque ceramic skull
- Cream or off-white acrylic paint
- Soft pink blush or pastel pink chalk pastel
- Medium brown acrylic paint (burnt umber)
- Metallic gold fluid acrylic paint
- Fine liner brush (size 00 or 000)
- Small flat brush
- Soft blending brush
- Paper towels
- Matte spray sealer
Step 1: Base Coating
-
Prime the Surface:
Begin by wiping the ceramic skull down with a damp cloth to remove any dust. Using the flat brush, apply an even coat of cream or off-white acrylic paint over the entire piece. -
Build Opacity:
Once the first layer is dry, apply a second coat of the cream paint. You want a solid, matte finish that hides the raw ceramic texture underneath. Let this base coat cure completely for at least an hour. -
Dusting the Cheeks:
To give the porcelain look some life, gently apply a very faint dusting of soft pink blush or crushed pink pastel to the upper cheekbone area using a soft, dry blending brush. Blend it out until it’s barely perceptible.
Uneven Lines?
If your lines are too thick, don’t wipe them off. Wait for them to dry, then use your base cream color to ‘cut’ back into the line, thinning it down.
Step 2: Creating the Crackle
-
Plan the Veins:
Visualize a spiderweb or a shattered glass pattern. The cracks should originate from stress points, like the edges of the eye sockets or the top of the cranium. -
Mix the Crackle Color:
Mix a small amount of metallic gold fluid acrylic with the medium brown paint. Thin this mixture slightly with water to an ink-like consistency so it flows smoothly off your liner brush. -
Paint Main Fissures:
Using your fine liner brush, paint long, wandering lines starting from the top of the skull down towards the eyes. Keep your hand loose; shaky lines actually look more realistic here. -
Intersecting Lines:
Connect the main fissures with smaller, jagged intersecting lines. Create irregular polygon shapes, resembling a dried riverbed or broken eggshell. -
Detailing the Brow:
Along the brow ridge, add a decorative touch by painting a row of small dots just above the eye sockets using the brown-gold mixture. This mimics traditional Day of the Dead embossing. -
Cracking the Jaw:
Continue the crack pattern down onto the jaw and chin area, ensuring the lines wrap around the curves naturally rather than looking flat.
Add Real Texture
Before painting, lightly score the raw bisque ceramic with a needle tool to create physical grooves, then paint the brown wash into them for true depth.
Step 3: Antiquing and Eye Sockets
-
Darken the Eyes:
Mix a darker wash using mostly burnt umber with a drop of water. Paint the inside of the eye sockets completely, ensuring the deep recesses are the darkest points. -
Shade the Nose:
Apply height same dark brown wash to the nasal cavity. While the paint is still wet, dab the edges with a paper towel to soften the transition from the dark hole to the face. -
Define the Teeth:
Using a very dilute wash of the brown paint, trace the outlines of the individual teeth. Lightly brush over the teeth horizontally to settle pigment into the crevices between them. -
Weathering the Cracks:
I like to take a nearly dry flat brush with a tiny bit of plain brown paint and gently smudge it over some of the painted crack intersections. This creates a stained, aged look where dirt would naturally accumulate. -
Highlighting Edges:
If your antiquing got too dark, dry brush a tiny amount of the original cream base color over the highest points of the cheekbones and brow to bring the dimension back. -
Final Inspection:
Step back and look at the overall balance. If any areas look too clean, add a few tiny micro-cracks or specks of brown paint to break up the white space. -
Sealing the Piece:
Protect your delicate line work by applying a matte spray sealer. Hold the can about 10 inches away and do two light coats rather than one heavy one to prevent drips.
Place your finished piece near a window where natural light can catch the subtle metallic glints in the weathered cracks
Watercolor-Style Washes And Loose Florals
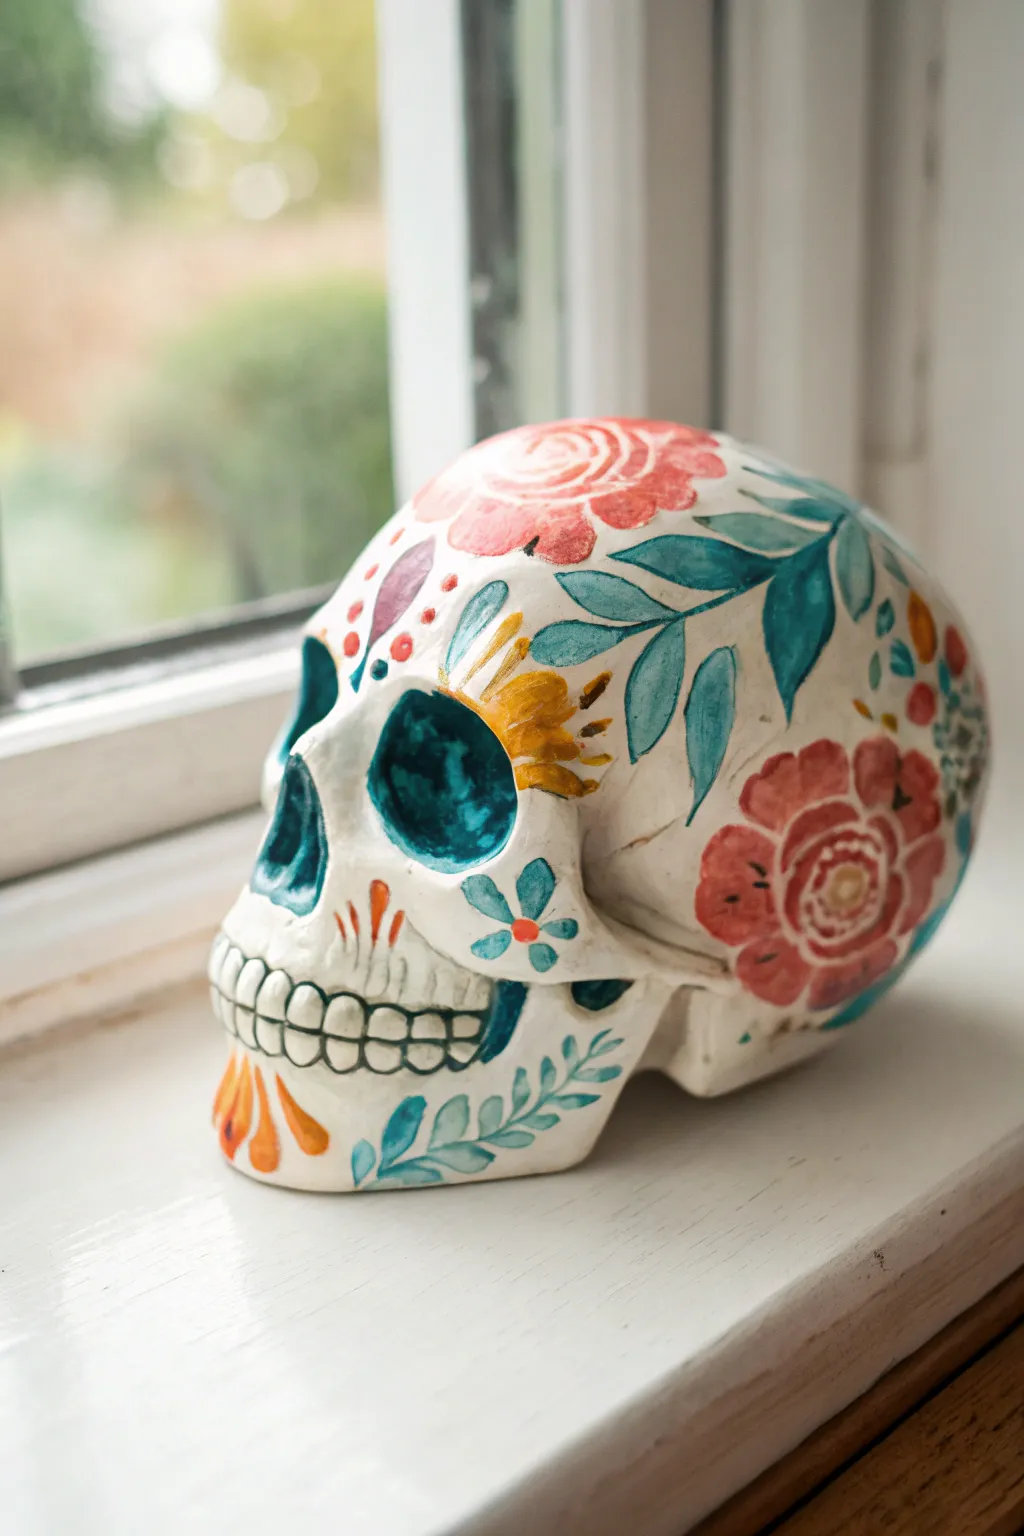
This project transforms a plain ceramic skull into a vibrant piece of folk art using translucent washes and loose brushwork. The result mimics the soft, bleeding effect of watercolors while maintaining crisp floral details, perfect for a bright windowsill display.
How-To Guide
Materials
- Bisque or smooth ceramic skull
- Acrylic paints (White, Teal/Turquoise, Coral/Salmon Pink, Burnt Orange, Leaf Green, Yellow Ochre)
- Glazing medium or water for thinning paint
- Assorted brushes (various sizes of rounds and liners)
- Palette for mixing
- Paper towels
- Clear spray sealant (matte or satin)
Step 1: Preparation and Base Coat
-
Clean surface:
Begin by wiping down your ceramic skull with a slightly damp cloth to remove any dust or oils that might repel the paint. -
Prime the skull:
Paint the entire skull with a solid coat of creamy white or off-white acrylic paint. This creates a uniform canvas and helps the subsequent colored washes stand out. -
Feature wash:
Mix a vibrant teal with a good amount of water or glazing medium to create a transparent wash. Apply this into the eye sockets and the nasal cavity, letting the color pool naturally in the deepest areas for depth. -
Soften edges:
While the teal is still damp in the sockets, use a clean, slightly wet brush to feather the edges outward just a tiny bit, avoiding hard lines.
Pro Tip: Watercolor Effect
Mix glazing medium rather than just water into your acrylics. This increases transparency without breaking down the paint’s binding properties.
Step 2: Painting the Main Florals
-
Top rose placement:
Mix a salmon pink or coral color. On the very top of the curved cranium, sketch out a large, loose circular shape using curved brushstrokes. -
Define the rose layers:
Load your brush with slightly less water to get a stronger pigment. Paint concentric ‘C’ shapes inside your pink circle to suggest petals, leaving small gaps of the white base show through. -
Side flower:
Repeat the rose technique on the temporal bone area (the side of the skull) using a deeper red-orange or burnt orange mixed with pink. -
Add the center:
Once the side flower is dry, dab a small circle of yellow ochre in the center, surrounding it with tiny dots of red for pollen detail. -
Mustard accents:
Paint a smaller, simpler flower shape or bud near the eye socket using a mustard yellow or yellow ochre, keeping the strokes loose and painterly.
Step 3: Leaves and Vines
-
Major leaves:
Using a teal or blue-green shade, paint large, simple leaf shapes flowing downwards from the top rose. Don’t worry about perfect symmetry. -
Leaf detailing:
While the leaf paint is wet, you can lift a thin line of paint from the center using a dry brush to suggest a vein, or paint a darker vein line once dry. -
Jawline vines:
Create a delicate vine along the jawline. Paint a thin sweeping stem in teal, then press your brush down and lift up to create small leaves attached to it. -
Chin accents:
On the chin, add splashes of orange using simple teardrop shapes that mirror the floral colors above.
Level Up: Metallic Pop
Once the matte sealer is dry, come back with liquid gold leaf or metallic gold paint to highlight the flower centers or teeth outlines.
Step 4: Details and Finishing
-
Forehead decoration:
Above the eyes and nose, add small decorative dots or teardrops. Use a mix of your pinks and greens to tie the color palette together. -
Teeth definition:
Outline the teeth using a very fine liner brush and thinned dark teal or gray paint. Keep the lines thin. -
Teeth shading:
Wash a very diluted amount of the teal or green over the teeth area to shadow them slightly, so they don’t look stark white. -
Small filler flowers:
Look for empty white spaces that feel unbalanced. Add tiny five-petal flowers in teal with small orange centers to fill these gaps. -
Correcting mistakes:
If any lines feel too harsh, you can gently scrub them with a damp brush to soften them before the acrylic fully cures. -
Final dry:
Let the skull sit for a few hours to ensure all layers, especially the wetter washes, are completely dry. -
Seal the work:
Spray with a clear matte or satin sealant. This protects the delicate washes and gives the ceramic a unified, professional finish.
Place your finished skull near natural light to let the translucent layers glow beautifully
Painted Jewel And Gemstone Embellishments
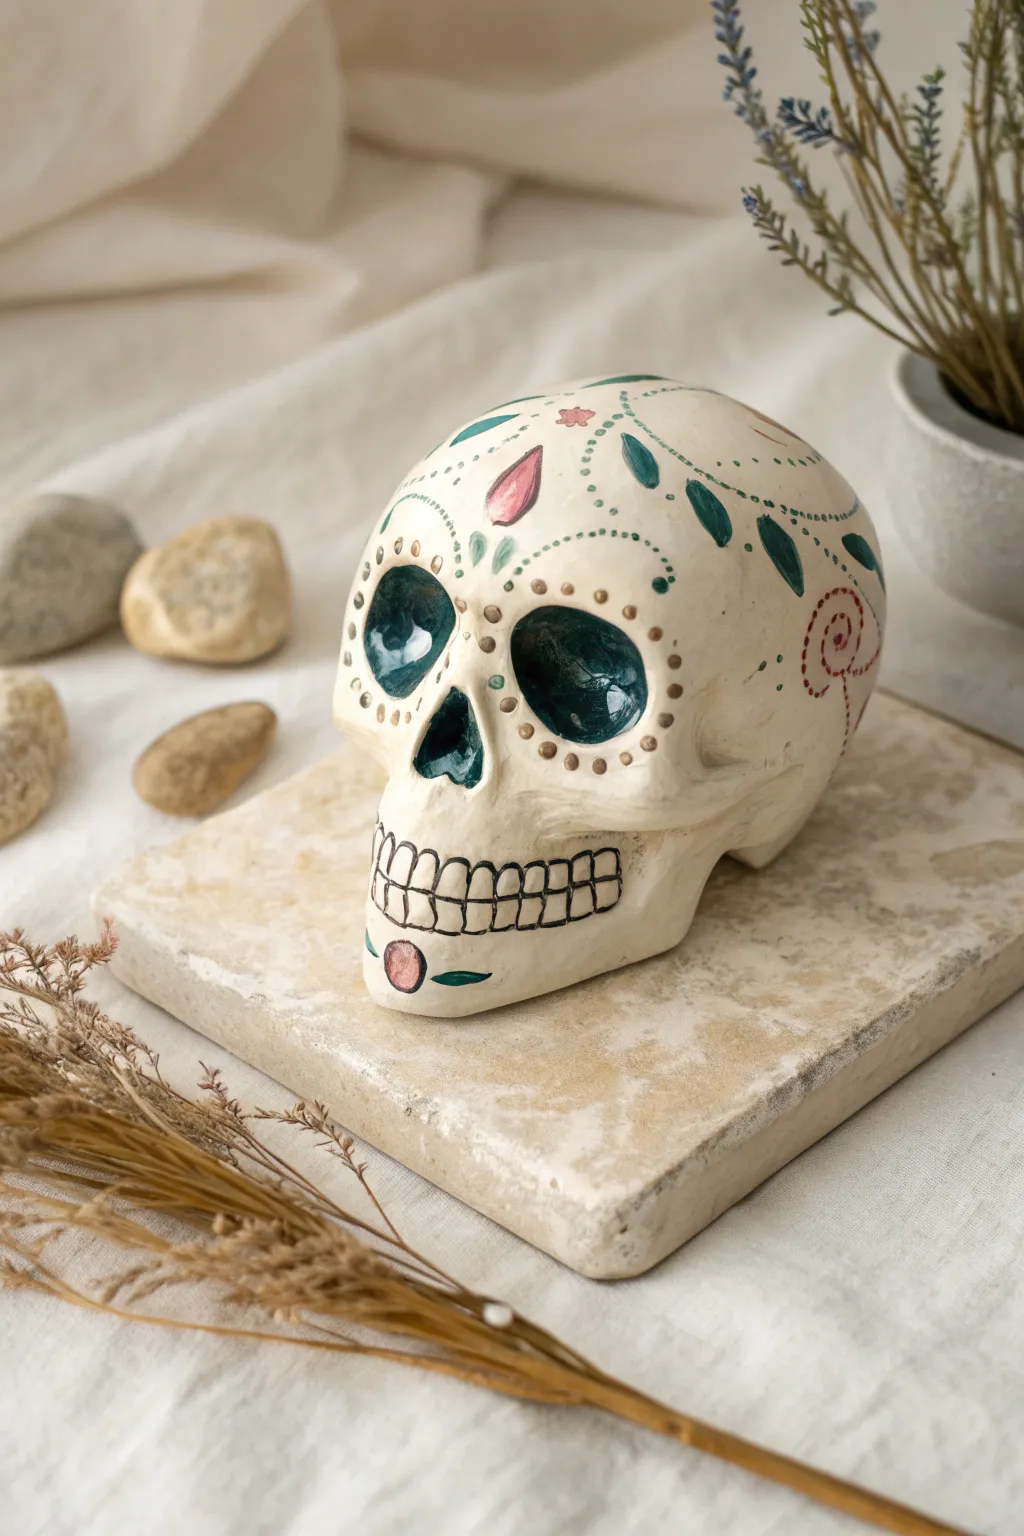
Recreate this serene and beautifully detailed sugar skull that combines classic Day of the Dead motifs with a soft, elegant color palette. The design features hand-painted faux gemstones and delicate dotted mandalas for a sophisticated finish.
Step-by-Step
Materials
- Bisque or unglazed ceramic skull
- Acrylic paints (Teal/Deep Turquoise, Soft Pink, Antique Gold/Bronze, Black, White, Sage Green)
- Fine detail brushes (size 0 and 00)
- Small flat brush (size 2 or 4)
- Dotting tools (various sizes)
- Matte or satin sealant spray
- Water cup and paper towels
- Pencil (optional for sketching)
Step 1: Base Preparation
-
Clean surface:
Wipe the ceramic skull with a slightly damp cloth to remove any dust or oils from the surface. Let it dry completely. -
Fill the cavities:
Using your small flat brush and the deep turquoise or teal paint, carefully fill in the eye sockets and the nose cavity. You might need two coats for opaque coverage. -
Dry the base:
Allow the dark paint to dry fully before moving on to delicate details to prevent smudging.
Uneven Dots?
If your painted dots look uneven or have peaks, gently tap the bottom of the skull on the table while the paint is wet to settle them flat.
Step 2: Eye Detailing
-
Select dotting tool:
Choose a medium-sized dotting tool or the back end of a paintbrush handle. -
Frame the eyes:
Dip the tool into your antique gold or bronze paint. Carefully create a ring of evenly spaced dots around the rim of each eye socket. -
Add inner details:
Using a smaller dotting tool, add a second, tighter ring of smaller dots just inside the first ring, or slightly offset between the larger dots. -
Create teardrop accents:
With a fine detail brush and sage green paint, add small teardrop shapes pointing outward from the eye sockets, specifically focusing on the brow area.
Jewel Brilliance
For extra dimension on the ‘gemstone’ areas, add a layer of clear gloss varnish or even a dab of dimensional glaze over just the colored gems.
Step 3: Forehead and Floral Motifs
-
Central gem placement:
Paint a prominent teardrop shape in the center of the forehead using the soft pink paint. This acts as our central ‘gemstone’. -
Gem outline:
Once the pink is dry, use your thinnest brush and the gold paint to outline the pink teardrop, giving it a bezel-set appearance. -
Leaf embellishments:
Using deep teal, paint two curved leaves or petals flanking the central pink gem. Add a central vein line in a lighter green if desired for depth. -
Dotted swags:
Create delicate swags or draped lines across the forehead using the smallest dotting tool and green or gold paint. Think of these as beaded chains connecting the floral elements. -
Side spirals:
On the temples, paint loose, flowing spirals or floral whirls in red or deep pink. Use a very light touch to keep the lines crisp. -
Vine accents:
Connect the temple spirals to the forehead design with sweeping green vine lines and small leaf brushstrokes.
Step 4: Mouth and Chin
-
Sketch the teeth:
Lightly trace the vertical lines for the teeth with a pencil if you aren’t confident freehanding them. -
Paint tooth outlines:
Use a liner brush and black paint to draw the vertical lines of the teeth on the upper and lower jaw. Add a horizontal line across the center to separate the rows. -
Refine the bite:
Thicken the lines slightly at the roots of the teeth to simulate the gum line details shown in the inspiration. -
Chin floral:
At the very center of the chin, paint a small pink circle or oval. Once dry, outline it in black or gold. -
Chin leaves:
Paint two small green leaves extending horizontally from the sides of the pink chin detail.
Step 5: Finishing Touches
-
Highlighting gems:
Add a tiny speck of white paint to the upper corner of the pink forehead gem and the chin detail to create a reflective shine. -
Final inspection:
Check for any uneven spots or mistakes. You can gently scrape away errant dried acrylic with a toothpick or paint over it with the base color. -
Seal the work:
Spray the entire piece with a matte or satin sealant to protect your handiwork and unify the finish.
Display your elegant ceramic skull on a shelf or altar to enjoy its intricate details year-round
Glow Look With Neon And Starry Speckles
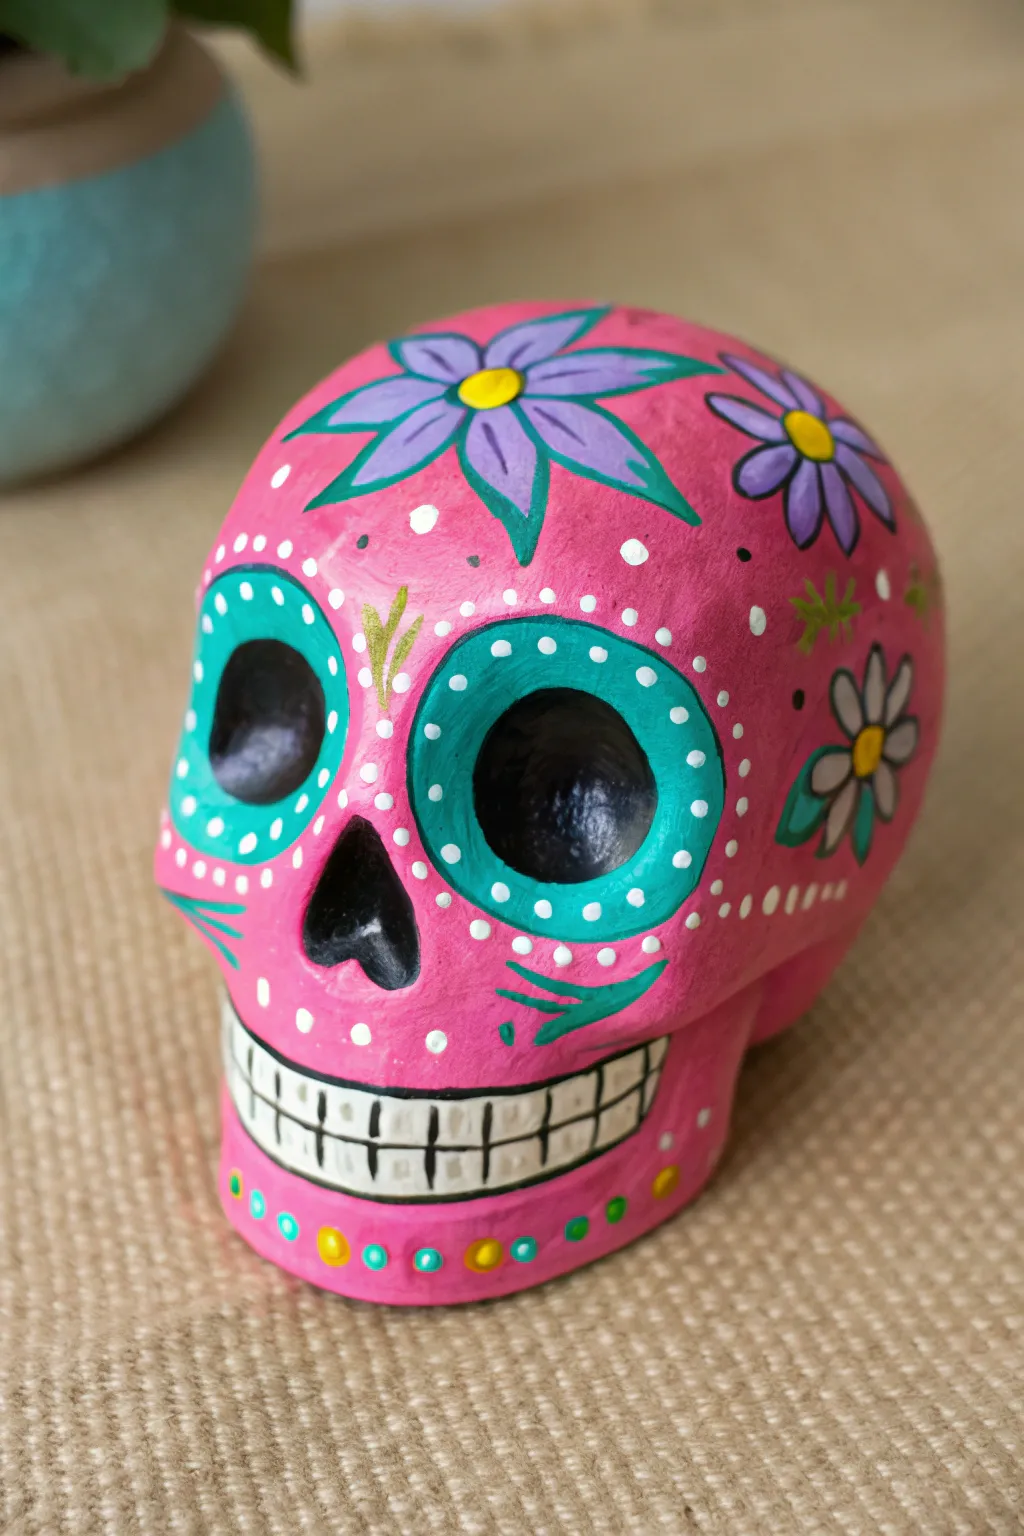
Bring a vibrant pop of color to your Dia de los Muertos celebration with this eye-catching pink skull design. Featuring bold teal accents, hand-painted flowers, and delicate white speckles, this piece captures a playful yet traditional spirit.
Step-by-Step Tutorial
Materials
- Ceramic skull bisque
- Bubblegum pink acrylic paint
- Bright teal/turquoise acrylic paint
- Lilac or light purple acrylic paint
- Sunflower yellow acrylic paint
- Black acrylic paint
- White acrylic paint
- Gold metallic paint (optional)
- Medium flat brush
- Small round detail brush
- Thin liner brush
- Dotting tool or toothpick
- Clear sealant spray (optional)
Step 1: Base and Features
-
Base coat:
Begin by painting the entire ceramic skull with bubblegum pink acrylic paint. You will likely need two or three coats to get a solid, opaque coverage without streaks. Let each coat dry completely before applying the next. -
Eye sockets and nose:
Using black paint and a small round brush, carefully fill in the deep hollows of the eye sockets and the nose cavity. Take your time near the edges to keep the shapes clean and distinct. -
Eye outlines:
Once the black is dry, mix a bright teal color. Use a round brush to paint a thick, even ring around each black eye socket. This ring should be approximately a quarter-inch wide, framing the darkness of the eyes. -
Teeth foundation:
Paint a wide, curved rectangle shape across the mouth area in white. The edges should be slightly rounded to mimic the shape of a jawline. Let this white base dry fully while you work on other details. -
Floral sketching:
Using a very light pencil touch or thinned white paint, lightly sketch the placement for the large flower on the forehead and the smaller flowers on the sides.
Step 2: Floral Details
-
Forehead flower petals:
With your lilac or light purple paint, fill in the petals of the large flower centered on the forehead. Aim for five or six pointed petals that radiate outward. -
Side flowers:
Repeat the petal painting process for the flowers on the sides of the skull. You can alternate colors here if you wish, but using white or a softer lilac creates a nice balance against the bright pink. -
Flower centers:
Dip a small brush into sunflower yellow paint and dab a solid circle into the center of each flower. -
Leaves and greenery:
Using the same teal from the eyes (or a slightly greener mix), paint small leaves between the flower petals. Add simple tear-drop shapes peaking out from behind the blooms. -
Petal outlines:
Switch to your teal paint and a liner brush. Carefully outline the purple petals of the main forehead flower to make them pop against the pink background.
Paint Consistency Tip
If your white dots aren’t raising slightly or look flat, let your paint sit on a palette for 5 minutes to thicken before dipping your tool.
Step 3: Intricate Decor
-
Eye dots:
Take a dotting tool or the back end of a small paintbrush dipped in white paint. Create a ring of small, evenly spaced dots inside the teal circle around the eyes. -
Defining the teeth:
Return to the white mouth area. Use a thin liner brush with black paint to draw a horizontal line splitting the top and bottom teeth. Then, draw vertical lines to separate individual teeth. -
Cheek accents:
With the teal paint and a liner brush, paint three small whisker-like strokes on each cheekbone, curving slightly upwards. -
Chin decoration:
Paint a curved teal line along the very bottom edge of the chin. Above this line, add a row of yellow dots alternating with smaller teal dots for a festive border. -
Scattered speckles:
To add texture, use your smallest brush or toothpick to add tiny white dots randomly across the forehead and cheeks, filling in empty pink spaces. -
Finishing touches:
Add small yellow accents or additional leaves in any remaining large gaps. If you have gold paint, adding a tiny dot to the center of the yellow flower pistils adds a lovely shimmer.
Glow in the Dark
Swap the white dot details for glow-in-the-dark acrylic paint. In daylight it looks normal, but at night your skull’s details will float eerily.
Now you have a stunning, colorful centerpiece ready to brighten up your shelf or altar