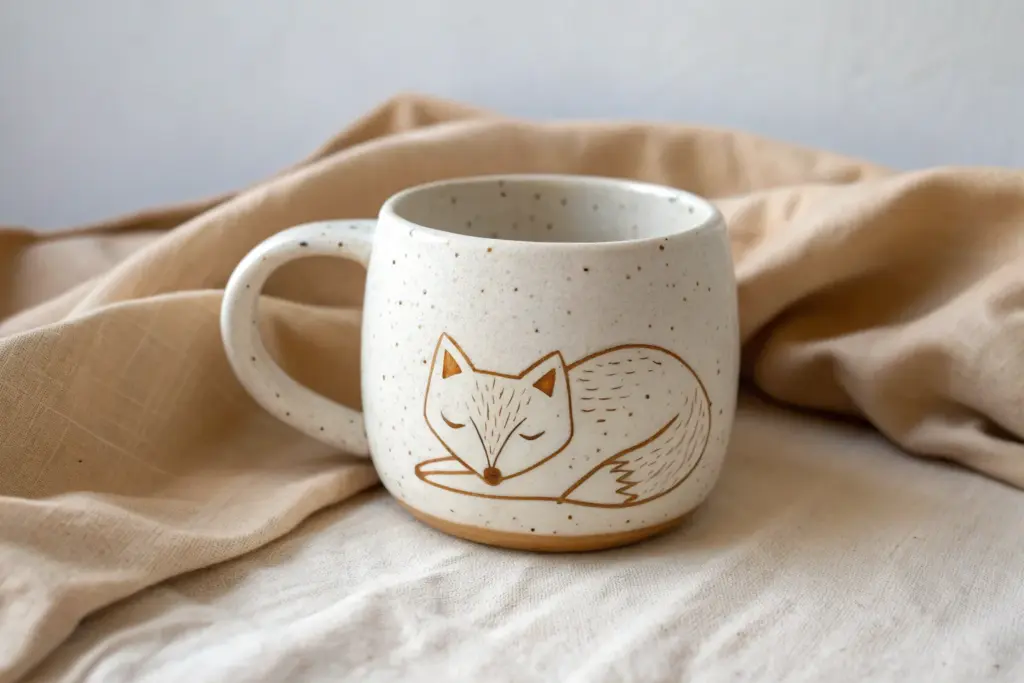
Animal mugs are my favorite kind of pottery project because they’re functional and totally personality-packed. If you want your mug to actually become the creature (not just wear a painted picture), these ideas will get you there fast.
Cat Handle With Curled Tail Grip
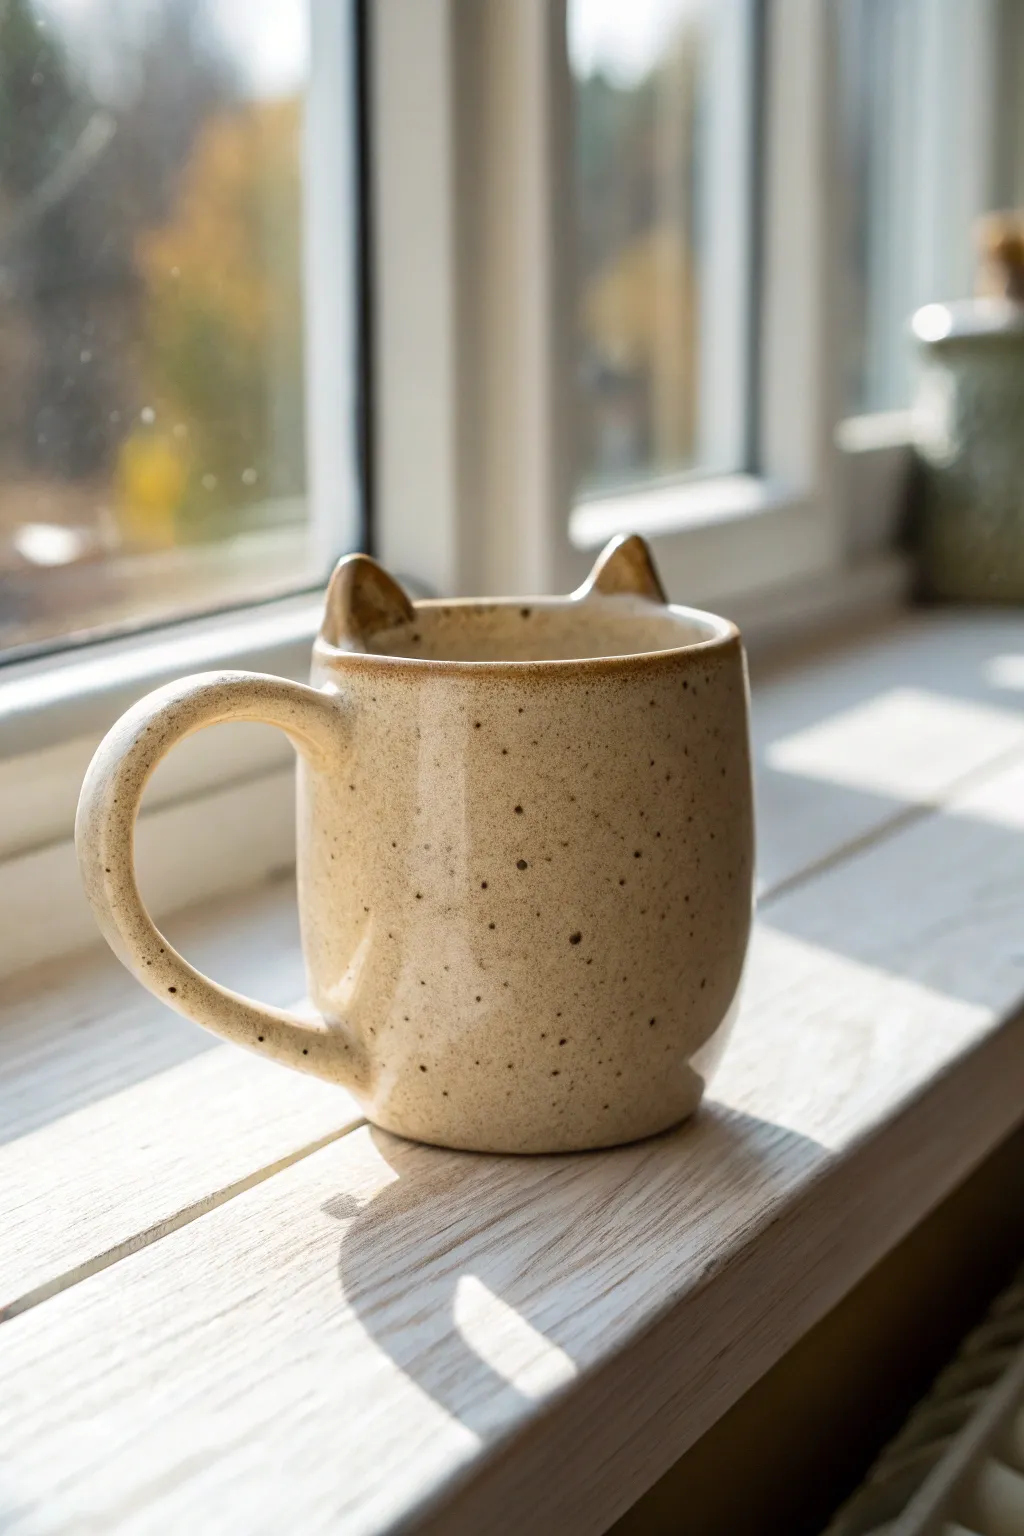
This charming project creates a warm, speckled beige mug featuring distinctive triangular cat ears perched on the rim. The design creates a cozy, minimalist aesthetic perfect for your morning coffee or afternoon tea.
Step-by-Step Guide
Materials
- Stoneware clay (preferably speckled)
- Pottery wheel (or rolling pin for hand-building)
- Needle tool
- Sponge
- Loop tool for trimming
- Scoring tool or fork
- Slip (clay slurry)
- Beige/oatmeal reactive glaze
- Clear glaze (food safe)
- Kiln
Step 1: Forming the Body
-
Prepare the Clay:
Begin by thoroughly wedging about 1 to 1.5 pounds of speckled stoneware clay to remove air bubbles and ensure consistency. -
Center and Open:
Center the clay on the pottery wheel. Open up the middle, leaving a floor thickness of about a quarter-inch. -
Pull the Walls:
Pull the walls up slowly to create a cylinder. Aim for a slightly rounded bottom that tapers very gently inward toward the rim for a huggable shape. -
Refine the Rim:
Using a chamois or sponge, compress the rim to make it smooth and rounded. This is crucial since you will be adding ears later. -
Initial Drying:
Wire the mug off the bat and let it dry to a ‘leather hard’ state. The clay should be firm enough to handle without deforming but still hold moisture. -
Trim the Foot:
Once leather hard, flip the mug over (using a chuck or directly on the wheel head) and trim the excess clay from the bottom to define a clean foot ring.
Fixing Wobbly Ears
If ears slump while attaching, prop them up with small balls of paper towel or foam until the clay stiffens enough to hold its own weight.
Step 2: Adding the Ears and Handle
-
Sculpt the Ears:
Roll out a small slab of clay, roughly 1/4 inch thick. Cut two equal triangles. Slightly curve them and soften the points with your fingers so they aren’t sharp. -
Attach the Ears:
Score the top rim of the mug where you want the ears to sit. Score the bottom of the triangles. Apply slip and press them firmly onto the rim. -
Blend the Seams:
I like to use a small wooden tool to smooth the clay where the ears meet the rim, blending the seams completely so the ears look like they grew out of the mug. -
Pull a Handle:
Pull a strap of clay for the handle. Allow it to sit until it holds a curve but isn’t brittle. Cut it to the desired length. -
Attach the Handle:
Score and slip the attachment points on the side of the mug. Press the handle on firmly, ensuring the top curve aligns pleasingly with the height of the rim. -
Clean and Dry:
Wipe away any excess slip with a damp sponge. Cover the mug loosely with plastic to let it dry very slowly, which prevents the ears or handle from cracking.
Step 3: Glazing and Firing
-
Bisque Fire:
Once bone dry, load the mug into the kiln for a bisque fire (typically cone 04 or 06) to harden the clay. -
Wax the Bottom:
Apply wax resist to the foot of the mug and the bottom quarter-inch of the exterior to prevent glaze from running onto the kiln shelf. -
Glaze Application:
Dip the entire mug into a speckled beige or oatmeal-colored glaze. If your clay body is already speckled, a semi-transparent cream glaze works best to let the speckles show through. -
Refine the Glaze:
Check the ears carefully. If the glaze is too thick in the crevices of the ears, it might crawl, so dab away excess with a finger. -
Wipe the Foot:
Use a sponge to wipe any stray glaze droplets off the waxed foot ring. -
Glaze Fire:
Fire the mug to the temperature required for your specific clay and glaze (often cone 6 for stoneware).
Add Paw Prints
While the clay is leather hard, you can gently imprint a small paw print on the bottom interior of the mug as a hidden surprise for the drinker.
Now you have a purr-fectly unique mug ready for your favorite warm beverage


Fox Face Mug With Perky Ears
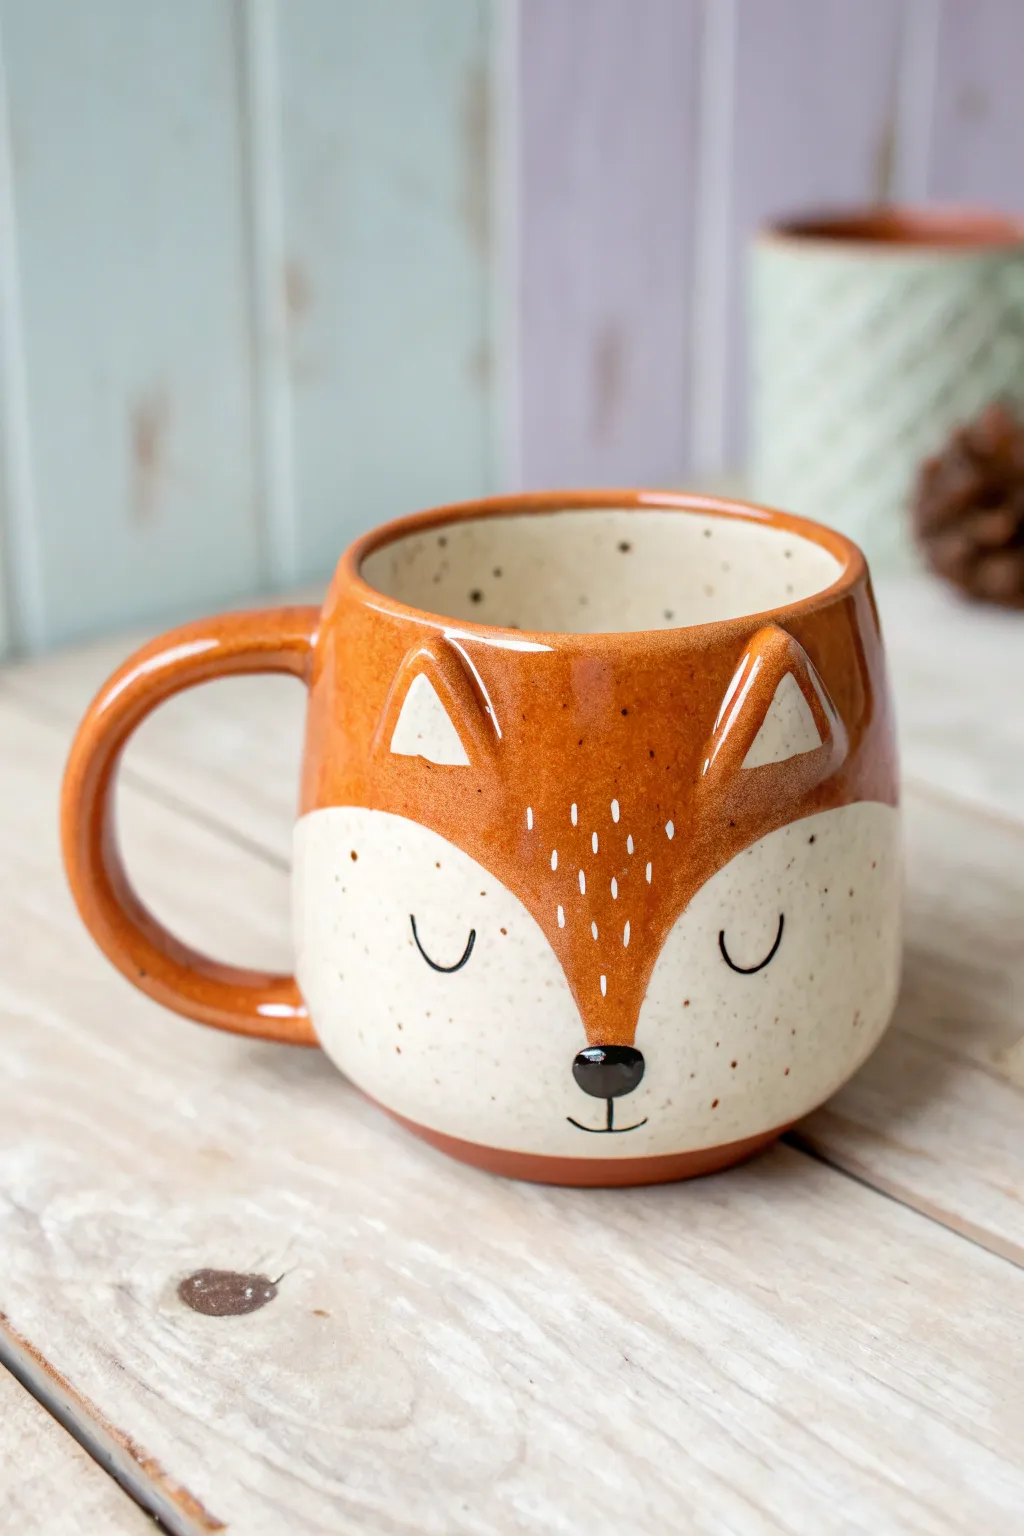
This charming ceramic project transforms a simple rounded mug form into a peaceful, sleeping fox. With its distinctive molded ears and speckled glaze finish, it’s the perfect vessel for wrapping your hands around a warm cup of cocoa.
Step-by-Step Tutorial
Materials
- Stoneware clay body (white or buff)
- Pottery wheel (or slab roller/rolling pin for hand-building)
- Rib tool (kidney shaped)
- Needle tool
- Small sponge
- Scoring tool
- Slip
- Underglazes: Burnt Orange, Black, White
- Clear transparent glaze
- Ceramic paintbrush (detail liner and small round)
- Kiln
Step 1: Forming the Base Mug
-
Throw the body:
Begin with about 1 pound of wedged clay on the wheel. Center it and open the floor, keeping it slightly thicker than usual to support the rounded belly shape. -
Shape the belly:
Pull the walls up, keeping the cylinder fairly stout. Use a rib tool on the inside to push the belly out, creating a gentle, round curve that tapers slightly inward at the rim. -
Refine the rim:
Compress the rim with a chamois or sponge. The rim needs to be relatively thick to support the ears later, so avoid thinning it too much. -
Trim the foot:
Once leather hard, trim away excess weight from the bottom to create a neat foot ring that complements the rounded body.
Fixing the Seams
If the ear seams crack during drying, score the crack, add a tiny coil of wet clay, and smooth it over. Compress with a rib to rebound the particles.
Step 2: Sculpting the Features
-
Pull the handle:
Pull a medium-thick strap handle from a separate lug of clay. Let it set up to a soft leather-hard stage. -
Create the ears:
Roll two small triangles of clay. Gently curve them to match the contour of the rim. Use water to smooth the edges so they aren’t sharp. -
Attach the ears:
Score the top rim where the ears will sit. Slip and attach the triangles, blending the clay downwards into the mug body on the outside so the seam disappears. -
Define the inner ear:
Using a modeling tool or your thumb, gently press an indentation into the front of each triangle to create the ‘inner ear’ hollow. -
Attach the handle:
Score and slip the back of the mug opposite the face. Attach your handle in a ‘C’ shape, smoothing the connection points thoroughly for strength. -
Bisque fire:
Allow the mug to dry slowly and completely before loading it into the kiln for a bisque firing.
Step 3: Glazing and Decoration
-
Apply the creamy base:
Dip the entire mug into a cream or oatmeal-colored speckled glaze. Clean the foot ring immediately. -
Map the face shape:
Using a pencil (the graphite will burn off), lightly sketch a curved ‘V’ shape starting from under the ears down to the nose area. -
Paint the orange fur:
Using burnt orange underglaze or glaze, carefully paint the upper section of the mug, covering the ears (except the inner triangles) and following the ‘V’ line you sketched. I find two coats usually give the best coverage. -
Add the nose:
With a small round brush and black underglaze, paint a small oval nose right at the tip of the ‘V’ where the orange meets the cream. -
Detail the eyes and mouth:
Switch to your finest liner brush. Paint two simple ‘U’ shapes for sleeping eyes on the cream section, and a tiny vertical line and smile beneath the nose. -
Add texture marks:
using white slip or underglaze, dab tiny vertical dashes in the center of the forehead area to mimic fur texture. -
Final clear coat:
If your underglazes aren’t glossy, apply a thin layer of clear glaze over the painted areas, or dip the whole mug if you used underglaze on bare bisque. -
Glaze fire:
Fire the mug to the temperature recommended for your specific clay and glaze combination (likely Cone 5 or 6).
Tail Handle
Make the handle look like a fox tail! Before attaching the coil handle, taper one end to a point and gently curve it upwards at the bottom attachment point.
Enjoy cozy mornings sipping from your adorable handmade fox mug


Cow Mug With Little Horns and Nose
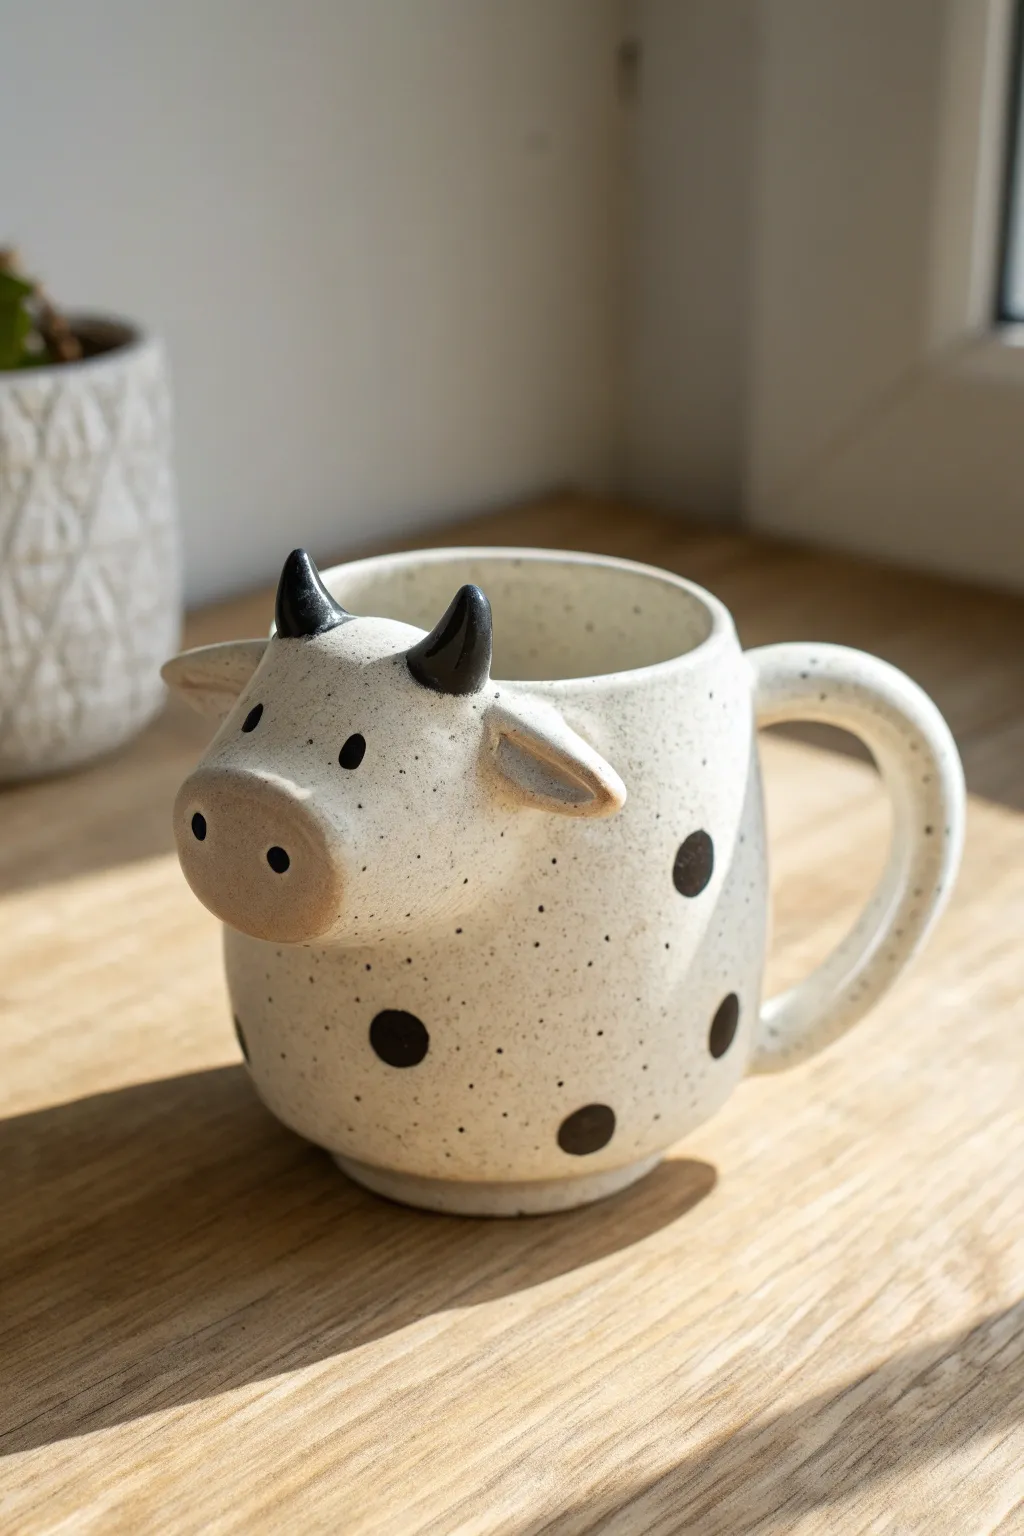
This whimsical ceramic project transforms a simple vessel into a charming cow character complete with 3D features and a rustic speckled finish. The protruding snout, perky ears, and little black horns add a delightful tactile element to your morning coffee routine.
Step-by-Step Guide
Materials
- White speckled stoneware clay (or white stoneware with added grog)
- Pottery wheel (optional, can be hand-built)
- Wooden modeling tools
- Needle tool
- Scoring tool or serrated rib
- Slip (clay mixed with water)
- Sponge
- Underglaze (Black and Warm Beige/Tan)
- Clear transparent glaze (food safe)
- Small paintbrush
- Kiln
Step 1: Forming the Body
-
Throw or Build the Base:
Start by either throwing a cylindrical mug form on the wheel or building one using the slab method. Aim for a distinct, rounded belly shape that tapers slightly inward at the rim. -
Trim the Foot:
Once the clay is leather hard, trim a defined foot ring at the bottom. This elevates the mug and gives it a professional finish akin to the reference photo. -
Create the Handle:
Pull a sturdy handle from a slug of clay. Attach it to the side opposite where the face will go, ensuring the curve is comfortable for gripping. Smooth the attachment points seamlessly.
Step 2: Sculpting the Cow Face
-
Form the Snout:
Roll a small ball of clay and flatten it slightly into an oval shape. This will be the main snout. -
Score and Slip:
Score the surface of the mug near the upper third and the back of your snout piece. Apply slip generously to both surfaces. -
Attach the Snout:
Press the snout firmly onto the mug body. Use a wooden modeling tool to blend the edges of the clay onto the mug so it looks like it’s emerging naturally from the cup, not just stuck on. -
Add Nostrils:
Using the back of a small paintbrush or a rounded tool, press two indentations into the front of the snout to create the nostrils. -
Sculpt the Ears:
Shape two small tear-drop pieces of clay. Flatten them slightly and use a tool to create an indentation in the center of each representing the inner ear. -
Attach the Ears:
Attach the ears just behind and slightly above the snout on either side. Angle them backward slightly for a relaxed expression. -
Make the Horns:
Roll two very small cones of clay for the horns. They should be short and slightly curved. -
Position the Horns:
Score and slip the horns onto the ‘forehead’ area, just between the ears. Ensure they are attached securely as small protrusions can be fragile.
Cracks around the snout?
If the snout separates during drying, your clay was likely too dry when attaching. Wrap the mug in plastic to rehydrate slightly, compress the seam, and dry extremely slowly.
Step 3: Decorating and Glazing
-
Bisque Fire:
Let the mug dry slowly completely to the greenware stage, then fire it in the kiln to bisque temperature (usually cone 04). -
Sand and Sponge:
Once cool, wipe the bisque ware with a damp sponge to remove any dust. Lightly sand any sharp spots on the sculpted features if necessary. -
Paint the Snout:
Apply a warm beige or tan underglaze to the snout area. I like to feather the edges slightly so it blends softly into the white clay body. -
Paint Features Black:
Use black underglaze to paint the horns fully. Then, carefully paint the inside of the nostrils and two small ovals for the eyes just above the snout. -
Add Spots:
Paint random circular spots around the body of the mug using the black underglaze. Vary the sizes to keep the look organic and playful. -
Apply Clear Glaze:
Dip or brush the entire mug with a clear, food-safe glaze. This will seal the clay and make the speckles in the clay body pop. -
Final Firing:
Fire the mug again to the maturation temperature of your clay and glaze (typically cone 6 for stoneware).
Customize the Herd
Make a whole set by varying the spot patterns or horn shapes. Try creating a highland cow version by adding small coils of clay for ‘hair’ between the horns before firing.
Enjoy sipping your favorite beverage from your new bovine friend


Bunny Mug With Long Ear Rim

This adorable ceramic project features tall, expressive rabbit ears rising directly from the rim and a cozy two-tone design. The speckled pink glaze contrasts beautifully with the raw, textured base, making it a perfect functional piece for your morning coffee.
Step-by-Step
Materials
- Stoneware clay (smooth or speckled)
- Pottery wheel (or slab roller/hand-building tools)
- Needle tool
- Rib tool (kidney)
- Sponge
- Loop tool for trimming
- Scoring tool
- Slip (liquid clay)
- Underglaze pencil or fine brush (black and gold/brown)
- Pink speckled glaze
- Clear glaze (optional for inside)
- Kiln
Step 1: Throwing the Body
-
Center and open:
Begin by centering about 1-1.5 lbs of clay on the wheel. Open the clay to create a flat, even floor, keeping it slightly wider than a standard cylinder to achieve that rounded, comforting mug shape. -
Pull the walls:
Pull the walls up, gently collaring in at the very top to create a slightly tapered rim. The wall thickness should be even, roughly ¼ inch thick. Smooth the rim with a chamois or sponge. -
Shape the belly:
Using a rib tool on the inside, gently push the belly of the mug outward while supporting the outside with your hand or a sponge. You want soft curves, not sharp angles. -
Refine and wire off:
Clean up the bottom edge with a wooden knife tool. Pass a wire tool underneath the pot to detach it from the bat, then set it aside to stiffen to a leather-hard state.
Step 2: Ears and Handle
-
Pull the handle:
Pull a traditional handle strap from a slug of clay. Curve it into an ear-shape or question mark shape and let it stiffen until it holds its form without sagging. -
Create the ears:
Roll out a small slab of clay (about ¼ inch thick). Cut two elongated oval shapes for the ears. They should be roughly 3-4 inches long and slightly tapered at the top. -
Sculpt the inner ear:
Use a modeling tool or your thumb to gently depress the center of each ear, creating the concave inner ear structure while leaving a raised rim around the edge. -
Attach the ears:
Score the bottom edge of the ears and the back rim of the mug. Apply slip and firmly press the ears onto the rim. I like to smooth a small coil of clay at the join on the back side for extra stability. -
Attach the handle:
Score and slip the contact points for the handle on the side of the mug. Attach firmly, checking that the loop is large enough for fingers. Smooth all seams with a damp sponge.
Pro Tip: Ear Stability
If the long ears droop while drying, prop them up with a small piece of foam or crumpled newspaper until the clay is bone dry.
Step 3: Detailing and Glazing
-
Carve the texture:
Once the mug is leather hard, use a needle tool or small loop tool to carve vertical lines around the bottom third of the mug. Space them somewhat irregularly for an organic look. -
Bisque fire:
Allow the mug to dry completely (slowly, so the ears don’t crack). Fire it to bisque temperature (usually cone 04/06). -
Paint the face:
On the bisque ware, use a fine brush with black underglaze to paint two small eye dots and whiskers. Use a golden-brown underglaze for the heart-shaped nose. -
Apply wax resist:
Paint liquid wax resist over the facial features and the entire bottom textured section (up to where the belly curves inward). -
Dip glaze:
Dip the top two-thirds of the mug (including the ears) into a pink speckled glaze. The wax will protect the face and bottom texture. Wipe away any stray glaze beads. -
Inner ear detail:
Carefully wipe the glaze off the inner part of the ears if you want them to be lighter, or layer a white glaze inside for contrast. -
Final fire:
Load into the kiln carefully—watch that ear height! Fire to the maturity temperature of your clay and glaze (typically cone 5 or 6).
Level Up: Tail Detail
Add a small sphere of clay to the back, opposite the face. Score and slip it on, then rough it up with a needle tool to create a fluffy ‘cotton tail’.
Enjoy sipping from your charming bunny creation and showing it off to friends

The Complete Guide to Pottery Troubleshooting
Uncover the most common ceramic mistakes—from cracking clay to failed glazes—and learn how to fix them fast.
Panda Mug With Puffy Cheeks
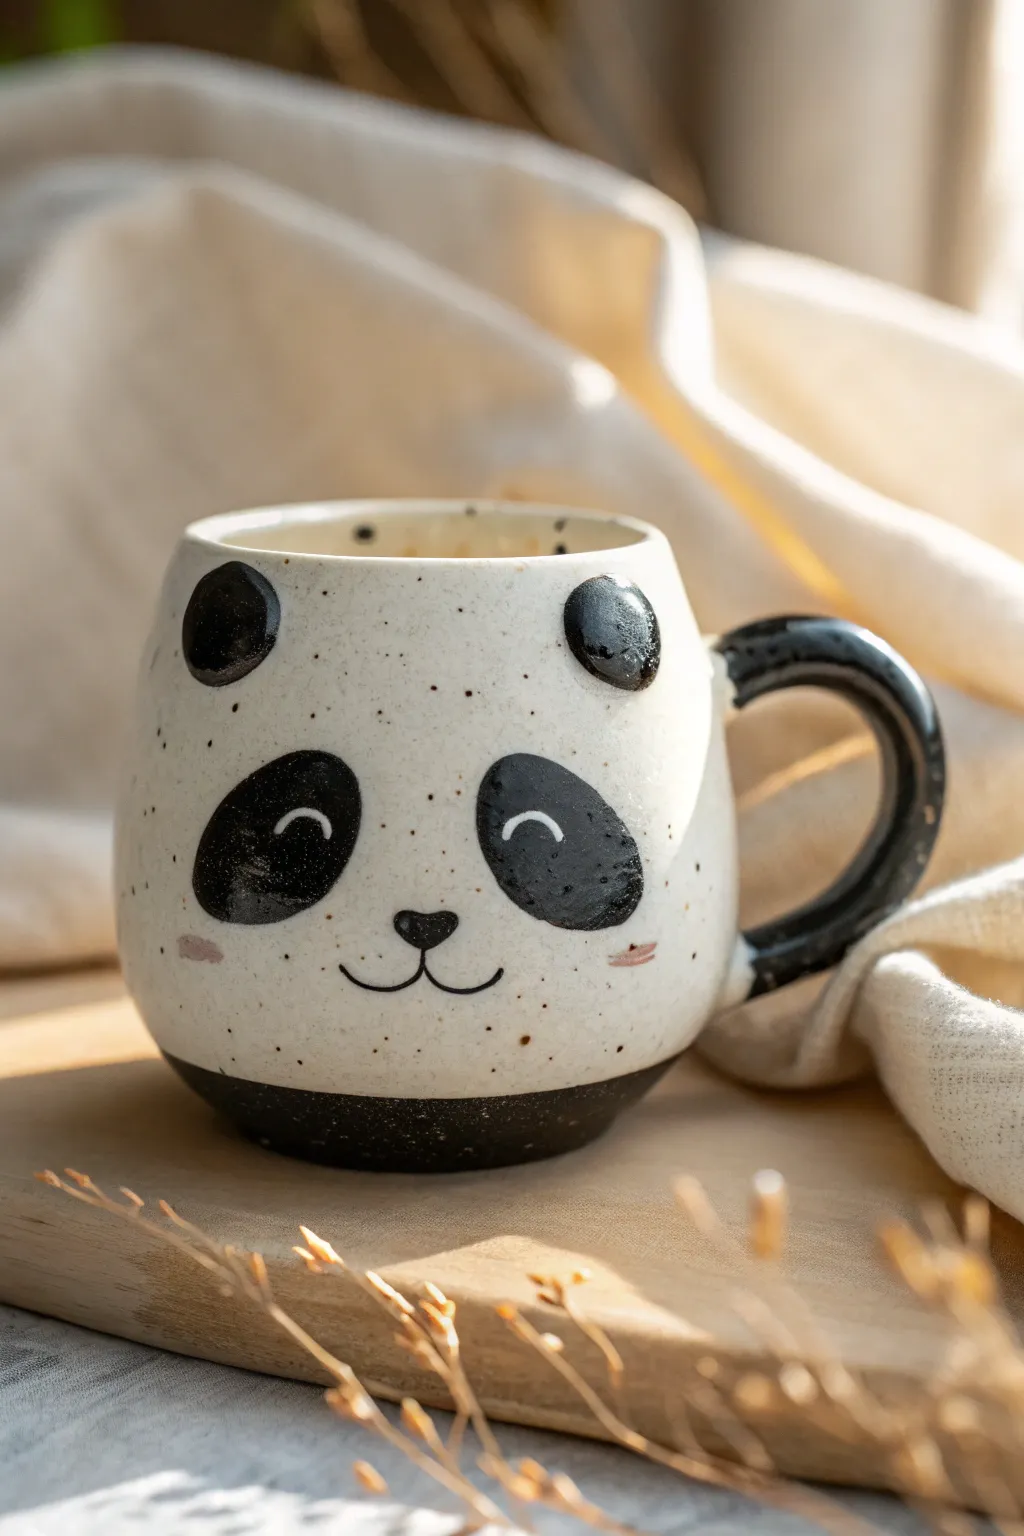
This adorable mug combines the charm of hand-built pottery with a minimalist panda design. Featuring a lovely speckled glaze, relief-sculpted ears, and a sweet, sleepy expression, it makes a perfect companion for your morning coffee.
Step-by-Step Tutorial
Materials
- Stoneware clay (preferably a speckled body)
- Pottery wheel (optional, can be hand-built)
- Needle tool
- Scoring tool or fork
- Slip (liquid clay)
- Black underglaze
- Pink or blush underglaze
- Clear or speckled glossy glaze
- Fine detail paintbrush
- Sponge
- Loop tool for trimming
- Kiln
Step 1: Forming the Body
-
Shape the vessel:
Begin by either throwing a cylinder on the wheel or pinching a ball of clay into a rounded cup shape. Aim for a slightly bulbous bottom that tapers gently toward the rim to give the panda a chubby, cute look. -
Refine the walls:
Smooth out the walls using a rib tool or your fingers. If you are pinching, ensure the thickness is even throughout. Keep the rim slightly thick and rounded for comfortable sipping. -
Create the base:
If wheel-throwing, trim a small foot ring once the clay is leather hard. If hand-building, flatten the bottom slightly so it sits stable, creating a defined line where the black ‘pants’ of the panda will go.
Smudged Pot?
If your black underglaze smudges onto the white area while painting, wait for it to dry completely, then gently scrape the mistake off with an X-Acto knife or needle tool.
Step 2: Adding Features
-
Sculpt the ears:
create two small, flattened semi-circles from a scrap of clay. They should be roughly thumb-sized and thick enough to stand up. -
Attach the ears:
Score the attachment points on the upper rim of the mug and the bottom of your ear pieces. Apply slip and press the ears firmly onto the mug just below the rim. I like to smooth the seams with a wooden tool so they look integrated. -
Pull the handle:
Pull a medium-sized handle from a carrot-shaped piece of clay. Curve it into a ‘C’ shape that complements the roundness of the mug body. -
Attach the handle:
Score and slip the back of the mug and attach the handle. Ensure it’s aligned opposite the face area. Reinforce the connection points with a small coil of clay if necessary and smooth everything down.
Make it 3D
Instead of painting the nose, attach a tiny ball of clay for a 3D nose before bisque firing. This adds a lovely tactile element when you are holding the warm mug.
Step 3: Decorating and Glazing
-
Bisque fire:
Allow the mug to dry essentially slowly to bone dry status, then bisque fire it in the kiln according to your clay body’s specifications. -
Paint the black zones:
Using black underglaze, paint the bottom half inch of the mug to create the base. Also, paint the entire handle and the relief ears black. You may need 2-3 coats for solid opacity. -
Paint the eye patches:
Paint two large, slightly tilted oval shapes for the eye patches using the black underglaze. Make them large enough to look expressive but leave space in the middle for the nose. -
Add facial details:
With a very fine brush and black underglaze, paint a small heart-shaped nose and a thin ‘W’ mouth connecting to it. Add two small horizontal dashes with pink underglaze for the puffy cheeks. -
Create the eyes:
To make the panda look happy or sleepy, use a detail tool or a scratching tool (sgraffito) to scratch away a curved line inside the black eye patches to reveal the white clay underneath. Alternatively, paint a white underglaze curve over the dry black patch. -
Apply clear glaze:
Once the underglaze is dry, dip the entire mug into a clear glossy glaze. This will make the colors pop and seal the mug for food safety. If you didn’t use speckled clay, use a ‘speckled eggshell’ glaze instead. -
Final firing:
Glaze fire the piece to the temperature required for your specific clay and glaze combination.
Enjoy your cozy new panda mug with your favorite hot beverage
Owl Mug With Wide Eyes and Feather Texture
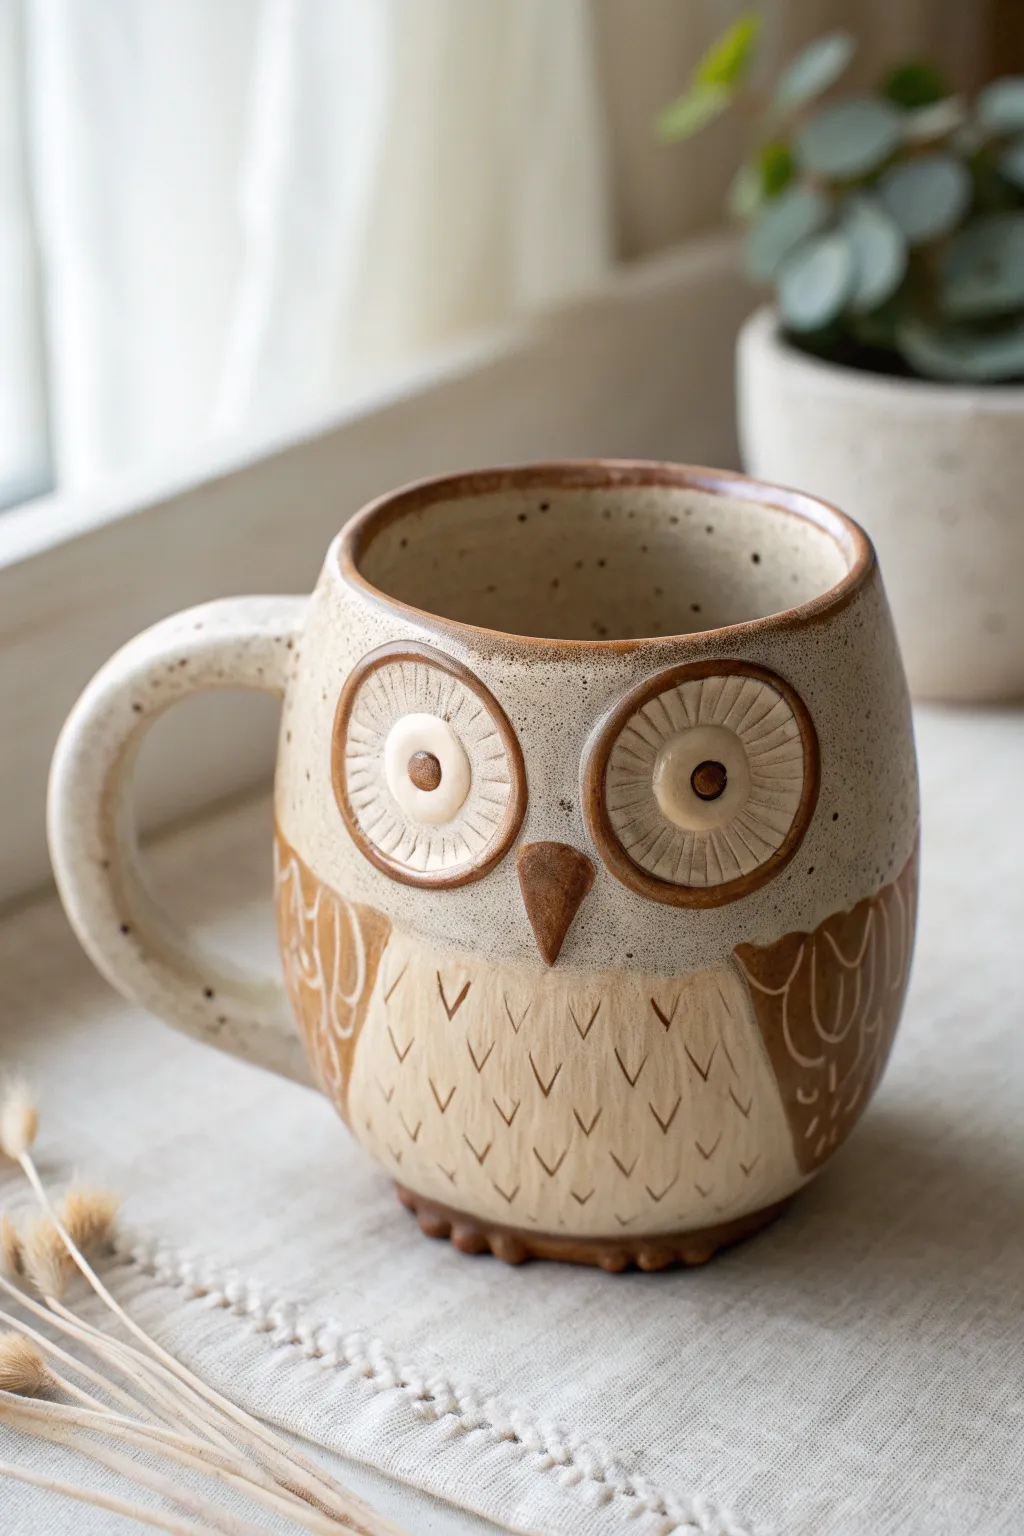
This charming ceramic mug features a prominent owl face with large, expressive eyes and a beautifully etched feather texture. The warm, speckled cream glaze combined with earthy brown accents gives it a rustic, handcrafted feel perfect for your morning coffee.
How-To Guide
Materials
- Stoneware clay (speckled or buff)
- Pottery wheel (or slab roller for hand-building)
- Rib tool
- Needle tool
- Small loop tool or carving tool
- Slip and scoring tool
- Sponge
- Brown underglaze or stain
- Clear matte or satin glaze
- Fine paintbrush
- Kiln
Step 1: Forming the Body
-
Throw the basic cylinder:
Start by throwing a cylinder on the wheel with about 1 lb of clay. Aim for a slightly rounded bottom that tapers gently inward toward the rim to give it a ‘body’ shape. -
Shape the belly:
While the clay is still plastic, use a rib tool from the inside to belly out the lower half of the mug, creating a rounded, plump owl physique. Smooth the outside with a flexible rib. -
Create the handle:
Pull a medium-thick handle from a separate piece of clay. Allow it to firm up to a soft leather-hard stage, creating a generous curve that mimics the roundness of the mug. -
Attach the handle:
Score and slip the attachment points on the left side of the mug body. Press the handle firmly into place, blending the seams for a smooth transition, and verifying the loop is large enough for comfortable gripping.
Clean Eye Detail
When texturing the eyes, work from the outside in to avoid distorting the circular shape. Use a very light touch with the needle tool for clean lines.
Step 2: Sculpting the Face
-
Make the eyes:
Roll out a small slab of clay and cut two large circles (about 1.5 inches diameter). Bevel the edges slightly so they sit flush against the curved mug surface. -
Attach eye discs:
Score and slip the area on the upper front of the mug. Press the circles onto the surface, ensuring they are symmetrical. -
Texture the irises:
Using a needle tool or small carving tool, press radiating lines into the eye discs, starting from the center and moving outward to create an iris texture. -
Add pupils:
Roll two small balls of clay, flatten them slightly, and attach them to the center of each eye disc using slip. Press a tiny indentation into the center of each pupil for depth. -
Sculpt the beak:
Form a small triangular cone of clay. Attach it securely between and slightly below the eyes, pointing downward. Smooth the edges so it feels integral to the face. -
Define the eye outlines:
Roll two very thin coils of clay. Wrap one around the perimeter of each eye disc to create a defined rim or ‘spectacle’ look, blending the outer edge onto the mug body.
Glaze Running?
If using a runny glaze, leave a slightly larger margin unglazed at the bottom near the feet. The texture can cause glaze to pool and drip.
Step 3: Adding Textures and Foot
-
Carve belly feathers:
On the lower front section (the ‘belly’ area), use a needle tool or small V-gouge to carve small ‘V’ shapes in staggered rows to mimic downy feathers. -
Define the wings:
Lightly incise curved lines on the sides of the mug to demarcate where the wings start, separating the smooth belly from the wing area. -
Add wing details:
Inside the wing areas, carve deeper, longer scalloped lines to suggest flight feathers. -
Create the feet:
Attach three small nubs of clay at the very bottom front of the mug to represent toes peeking out, or simply crave vertical notches into the bottom clay rim.
Step 4: Glazing and Finishing
-
Bisque fire:
Let the mug dry slowly to the bone-dry stage. Fire it in the kiln to cone 04 (or your clay’s specific bisque temperature). -
Apply brown accents:
Paint a warm brown underglaze or stain onto the rim of the eyes, the pupils, the beak, and the wing areas. I like to wipe back the underglaze on the wings slightly so it stays mostly in the recesses. -
Highlight the eyes:
Leave the whites of the eyes (the textured iris part) bare or use a very light cream underglaze to make them pop against the brown rims. -
Glaze the body:
Dip or brush the entire mug in a clear matte or satin glaze. If your clay is naturally speckled, a transparent glaze will let those beautiful spots show through. -
Final firing:
Fire the mug to the glaze temperature (typically cone 5 or 6 for stoneware). Ensure the foot is wiped clean so it doesn’t stick to the kiln shelf.
Once cooled, your feathered friend is ready to hold your favorite warm beverage.


What Really Happens Inside the Kiln
Learn how time and temperature work together inside the kiln to transform clay into durable ceramic.
Elephant Trunk Handle Mug
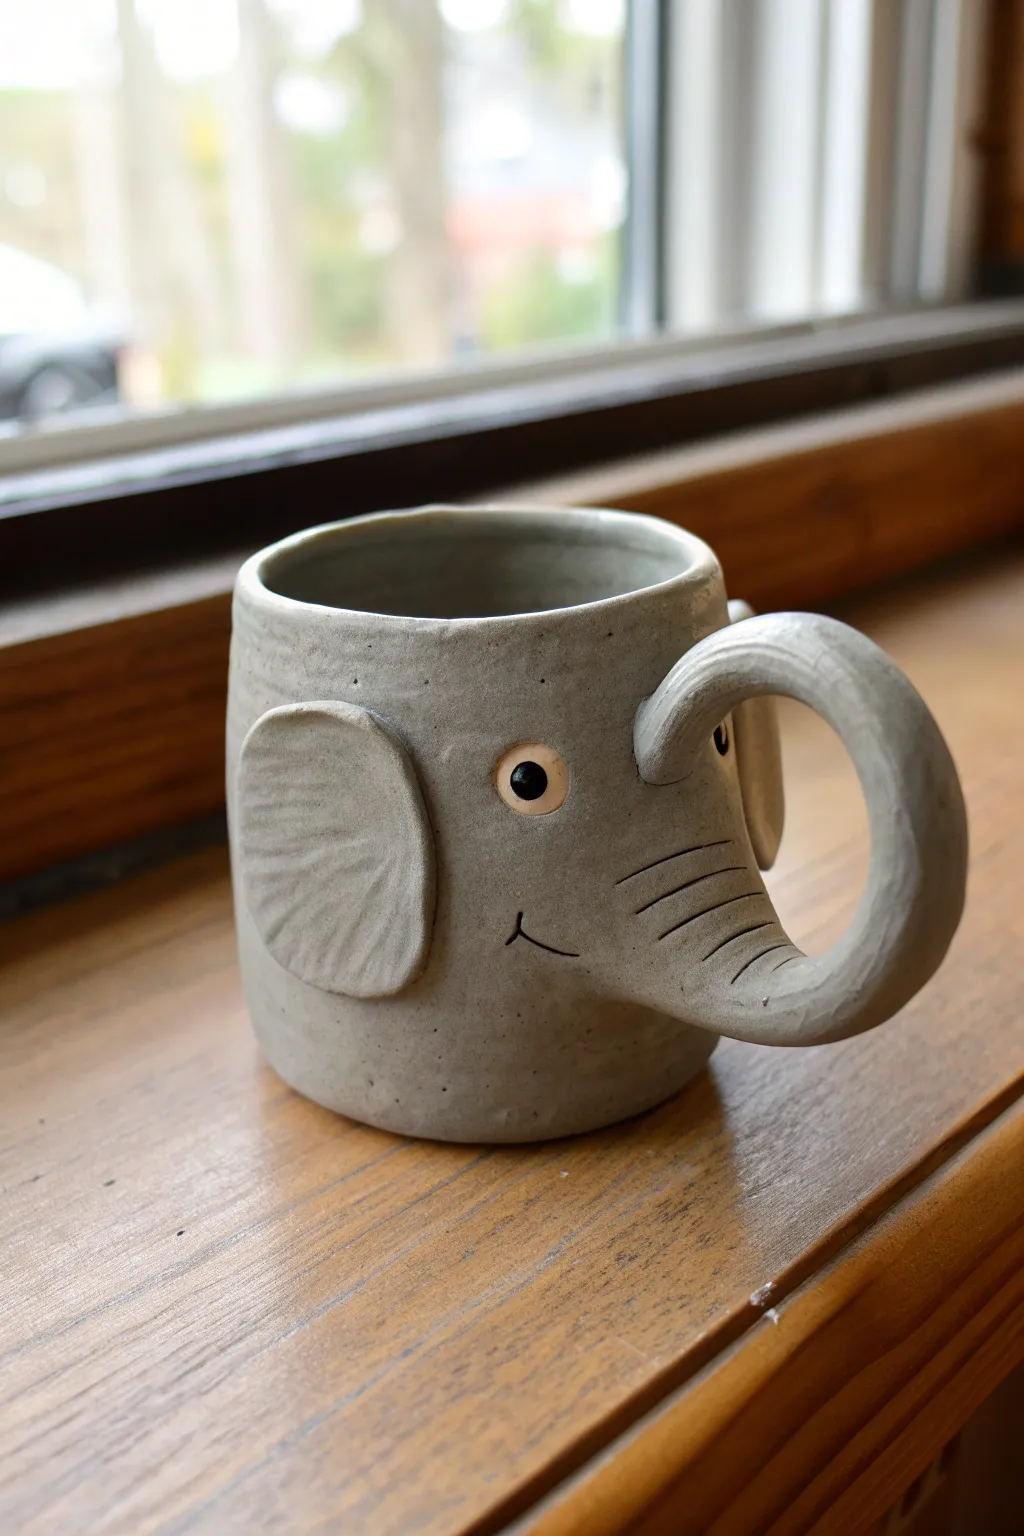
Transform a simple slab-built or wheel-thrown cylinder into a whimsical elephant companion for your morning coffee. This grey stoneware mug features a clever trunk that doubles as a sturdy handle, along with textured ears and lively eyes that bring the character to life.
Step-by-Step Guide
Materials
- Grey stoneware clay
- Pottery wheel (optional, can be slab built)
- Needle tool
- Scoring tool or serrated rib
- Slip (clay slurry)
- Small sponge
- Wooden modeling tool
- Fettling knife
- Black underglaze
- White underglaze
- Clear glaze
- Small paintbrush
Step 1: Forming the Base Body
-
Create the cylinder:
Start by throwing a cylinder on the wheel or rolling out a slab to create a hand-built tube. Aim for a wall thickness of about 1/4 inch and a height of roughly 3.5 to 4 inches. If throwing, leave the rim slightly rounded rather than sharp. -
Trim and smooth:
Once the clay is leather hard, trim away excess clay from the bottom to create a clean foot. Use a smooth rib to remove any throwing lines or canvas textures from the exterior, giving you a blank canvas for the elephant’s face. -
Prepare the surface:
Lightly sponge the surface to ensure it’s receptive to attachments. I like to gently tap the mug into a slightly oval shape at the rim before it dries too much, which can make drinking easier, though a perfect circle works too.
Trunk Troubles?
If the trunk starts to sag while shaping, prop it up with a small piece of foam or a wad of newspaper while it dries to the leather-hard stage to maintain the arch.
Step 2: Sculpting the Features
-
Roll the trunk coil:
Roll a thick coil of clay for the trunk handle. One end should be quite thick (about an inch) to attach to the face, tapering down slightly towards the ‘snout’ end. The coil needs to be long enough to loop comfortably for your fingers. -
Shape the handle:
Bend the coil into a ‘C’ shape. Flatten the thick end slightly where it will join the mug. Round off the snout end so it looks like the tip of an elephant’s trunk. -
Attach the trunk:
Score the mug surface and the thick end of your trunk coil heavily. Apply slip to both sides and press the trunk firmly onto the mug, placed centrally relative to the face. The trunk should curve downward and outward. -
Secure the handle connection:
Blend the clay from the trunk onto the mug body using a wooden tool to ensure a seamless underlying connection, then smooth it over with a damp sponge. This joint must be strong as it will support the full weight of the mug. -
Add texture to the trunk:
Using a needle tool or a dull knife, gently carve three or four horizontal curved lines across the top of the trunk curve. These creases mimic the natural wrinkles an elephant has when lifting its snout.
Step 3: Ears and Expressions
-
Cut the ears:
Roll out a small slab of clay, roughly 1/4 inch thick. Cut out two large, teardrop-shaped pieces using a fettling knife. These will become the floppy ears. -
Texture the ears:
Use a needle tool to scratch delicate radiating lines into the ears, starting from the attachment point and fanning outward to simulate skin texture. Smooth the outer edges with your finger. -
Attach the ears:
Score and slip the narrow ends of the teardrop shapes. Attach one on each side of the face, aligning the top of the ear roughly with the top of the trunk connection. Press firmly to adhere. -
Add the eyes:
Roll two small balls of white clay (or use the main body clay and paint later) and flatten them into discs. Slip and score them onto the face above the trunk. Use a tool to poke a small pupil indentation in the center of each. -
Carve the mouth:
Using a needle tool, draw a simple, small curved line underneath the trunk attachment on one side to suggest a smile. This tiny detail gives the elephant a friendly personality.
Pro Tip: Eye Engagement
Make the eyes look sideways rather than straight ahead by shifting the black pupil dot slightly off-center. This gives the elephant a more candid, playful expression.
Step 4: Finishing and Glazing
-
Bisque fire:
Allow the mug to dry very slowly under plastic to prevent the handle from cracking away from the body. Once bone dry, bisque fire the piece according to your clay body’s specifications. -
Apply underglaze details:
Paint the eye discs with white underglaze (if you didn’t use white clay). Carefully drop a dot of black underglaze into the pupil indentation. Use a wash of black underglaze to darken the ear textures and trunk creases, wiping away the excess with a sponge to leave color only in the recesses. -
Glaze the interior:
Pour a food-safe clear or grey glaze inside the mug, roll it around to coat the entire interior, and pour out the excess. -
Glaze the exterior:
Dip or brush the exterior with a clear glaze (matte or glossy, depending on preference) to seal the clay while letting the natural grey clay body show through. Avoid glazing the very bottom foot. -
Final firing:
Fire the mug to the maturity temperature of your clay and glaze (typically Cone 6 for stoneware). Let the kiln cool completely before retrieving your new friend.
Enjoy sipping from your handmade pachyderm creation knowing it’s truly one of a kind
Giraffe Neck Handle With Spots
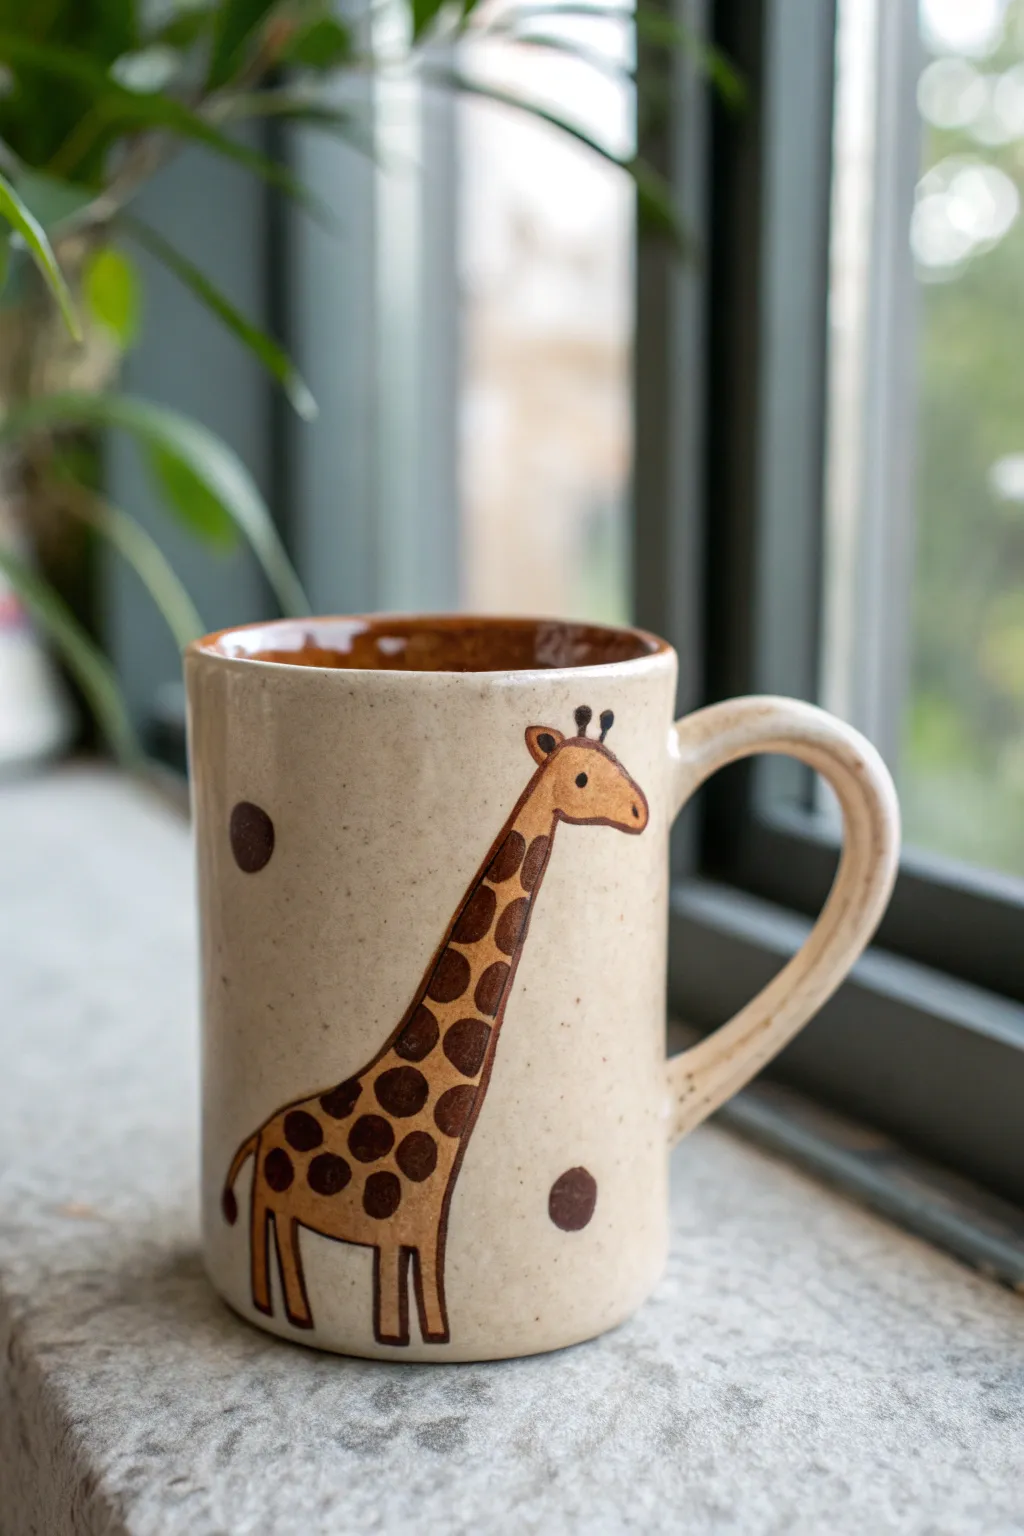
This charming handmade mug features a tall giraffe stretching up the side, painted with warm earthy tones on a speckled clay body. The design uses the vertical space of the mug perfectly, creating a whimsical companion for your morning coffee.
How-To Guide
Materials
- Speckled stoneware clay (mid-fire)
- Pottery wheel (or slab roller for hand-building)
- Needle tool
- Rib tool
- Trimming tools
- Sponge
- Scoring tool or serrated rib
- Slip
- Underglaze (dark brown, medium brown, reddish-brown)
- Fine detail paintbrush
- Clear food-safe glaze
- Wax resist
Step 1: Forming the Mug Body
-
Throw the Cylinder:
Begin by centering about 1 pound of speckled stoneware clay on your wheel. Open the ball and pull up a straight-walled cylinder, aiming for a height of about 4-5 inches to accommodate the giraffe’s long neck. -
Refine the Shape:
Use a rib tool to smooth the outside walls, ensuring they are even and the surface is free of throwing rings, which provides a better canvas for your painting. -
Wait for Leather Hard:
Allow the cylinder to dry slowly until it reaches a leather-hard state. I find this stage crucial because the clay is firm enough to handle but still accepts attachments easily. -
Trim the Foot:
Place the leather-hard cylinder back on the wheel, center it, and trim the bottom to create a neat foot ring, removing any excess weight.
Step 2: Attaching the Handle
-
Pull the Handle:
Pull a strap of clay from a carrot-shaped lug. You want a traditional ‘ear’ shape that is comfortable to hold but not overly thick. -
Shape and Dry:
Curve the pulled strap into a shape that complements the cylinder and let it set up slightly until it holds its curve without sagging. -
Score and Slip:
Determine where the handle will go. Score the attachment points on both the mug body and the handle ends vigorously, then apply a generous amount of slip. -
Secure the Attachment:
Press the handle firmly onto the mug. Use your thumb to smooth the clay around the joints, ensuring a seamless connection.
Smudged Lines?
If you smudge raw underglaze, don’t wipe it while wet! Let it dry completely, then gently scrape the mistake off with a sharp needle tool or exacto knife.
Step 3: Painting the Design
-
Outline the Giraffe:
Using a very fine brush and dark brown underglaze, lightly outline the giraffe’s body. Start with the legs at the bottom, draw the sloping back, and extend the long neck up near the rim. -
Add Facial Details:
Paint the head shape at the top of the neck, adding two small ossicones (horns) and ears. Place a small dot for the eye and a line for the mouth. -
Paint the Spots:
Fill the body and neck with irregular geometric shapes using a medium-brown underglaze. Leave small channels of the raw speckled clay visible between the spots to create the pattern. -
Fill the Base Coat:
If you want a richer color, you can gently wash a very diluted reddish-brown inside the spots, or leave them as just the medium brown. Keep the strokes neat. -
Darken the Legs:
Paint the thin legs and hooves using the darker brown outline color to make them stand out against the speckled background. -
Add Floating Spots:
Paint one or two large, circular spots ‘floating’ in the negative space around the giraffe to balance the composition. -
Rim Detail:
Carefully paint a thin band of the reddish-brown underglaze along the rim of the mug to frame the design.
Make it Pop
Use a slightly translucent honey or amber celadon glaze instead of clear. The amber tone will warm up the speckles while keeping the giraffe design visible.
Step 4: Glazing and Firing
-
Bisque Fire:
Once the mug is bone dry, place it in the kiln for a bisque firing (usually around Cone 04) to harden the clay and set the underglaze. -
Wax the Bottom:
Apply wax resist to the foot ring of the mug to prevent glaze from sticking to the kiln shelf. -
Clear Glaze Application:
Dip the entire mug into a clear, glossy glaze. Shake off excess gently to ensure the coat isn’t too thick, which could cloud the painting. -
Glaze Fire:
Fire the mug a final time to the temperature appropriate for your clay body (likely Cone 5 or 6). This will melt the glaze and bring out the speckles in the clay.
Enjoy your beautiful new mug that brings a touch of the savannah to your kitchen

TRACK YOUR CERAMIC JOURNEY
Capture glaze tests, firing details, and creative progress—all in one simple printable. Make your projects easier to repeat and improve.
Bear Paw Thumb Rest and Snout
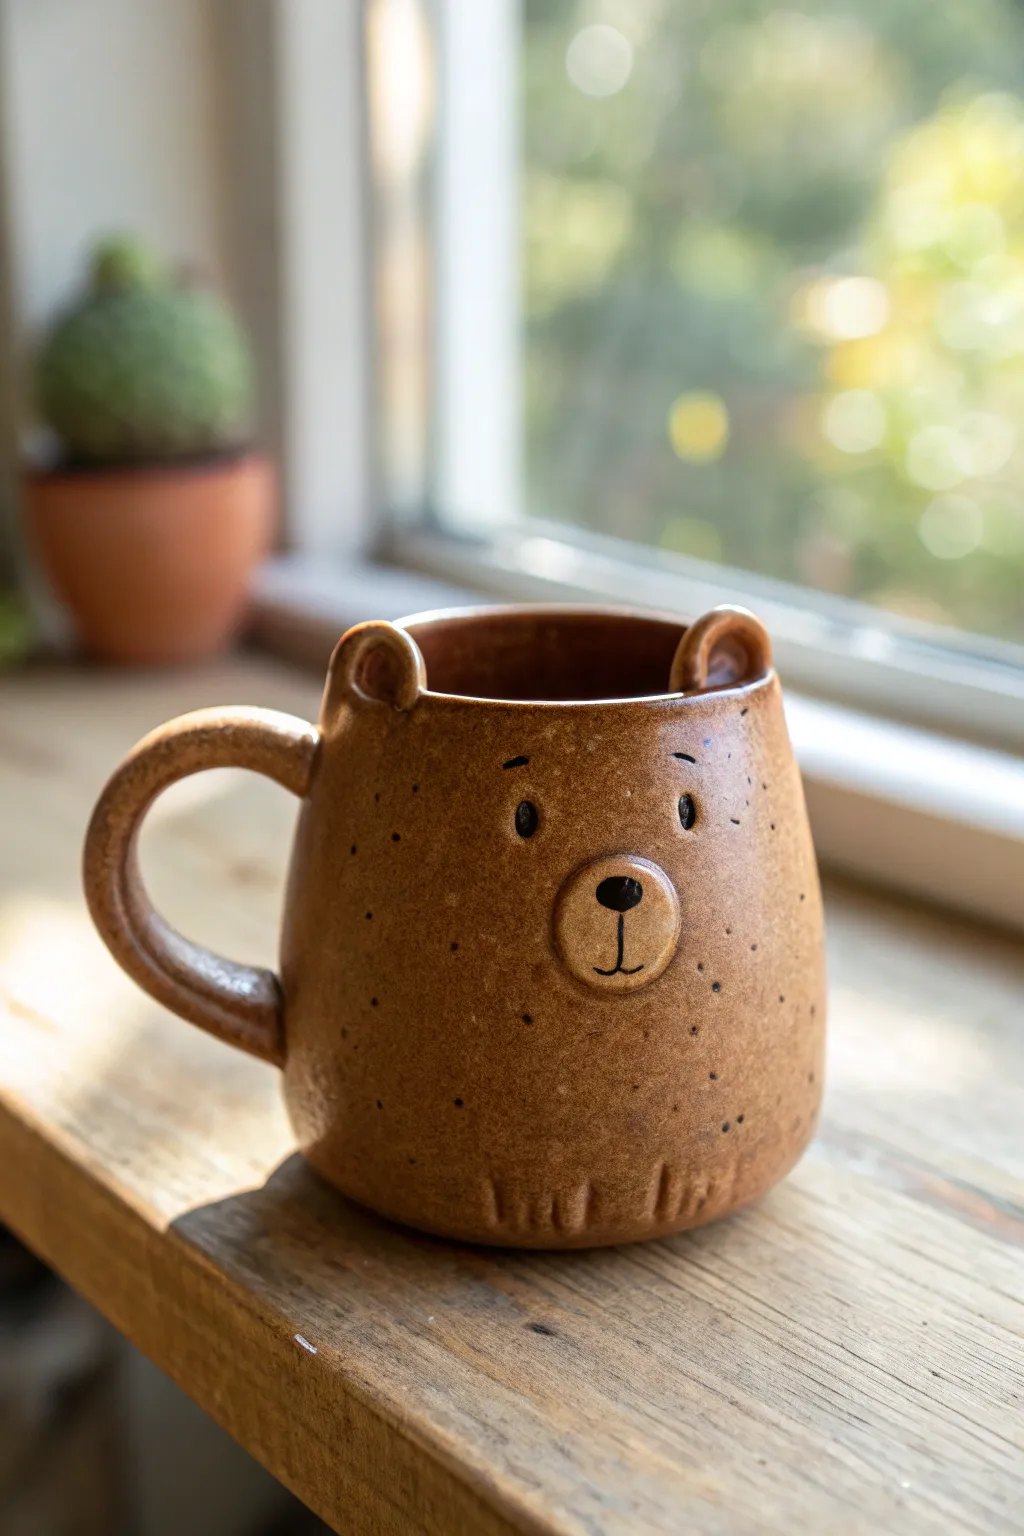
This charming ceramic mug captures a friendly bear’s face with warm brown speckles and subtle, sculpted details. Its rounded form and sweet expression make it the perfect vessel for wrapping your hands around a hot beverage on a chilly day.
Detailed Instructions
Materials
- Stoneware clay (speckled or brown preferred)
- Pottery wheel (or tools for pinch pot method)
- Needle tool
- Scoring tool (ribbed kidney or fork)
- Slip (clay and water slurry)
- Small sponge
- Modelling tool or wooden knife
- Carving tool
- Underglaze (black)
- Clear or translucent honey glaze
- Kiln
Step 1: Forming the Body
-
Throw the base cylinder:
Begin by centering your clay on the wheel and throwing a cylinder. Instead of pulling straight up, gently belly out the walls from the inside to create a rounded, chubby shape that taper slightly inward at the rim. -
Smooth the exterior:
While the wheel is spinning slowly, use a flexible metal or rubber rib to smooth the outside curve, removing any throwing lines if you prefer a cleaner look like the reference image. -
Trim the base:
Once leather hard, trim the bottom to create a neat foot ring, ensuring the weight is balanced and not too heavy at the base.
Step 2: Sculpting the Bear Features
-
Create the snout:
Take a small ball of clay, flatten it slightly into a disc, and score both the back of the disc and the spot on the mug where the nose will go. Apply slip and press the snout firmly onto the center of the mug face. -
Smooth the snout transition:
Using a modelling tool or your finger, blend the edges of the snout completely into the mug body so it looks like it grew there rather than being stuck on. -
Add the ears:
Roll two small equal-sized balls of clay. Press your thumb into each to create a concave ear shape. Score and slip the rim of the mug, then attach the ears securely, blending the clay downwards into the rim. -
Attach the handle:
Pull a strap handle or roll a coil. Attach it opposite the face, ensuring the curve is comfortable for gripping. I like to make the top attachment point slightly thicker for better support. -
Carve the paws:
At the very bottom of the mug, just above the foot, use a carving tool to make small vertical indentations. Group them in threes or fours to suggest little bear claws or toes.
Ears Falling Off?
If the ears crack or detach during drying, you likely didn’t score deep enough. Really scratch up both surfaces before adding slip to create a velcro-like bond.
Step 3: Detailing and Glazing
-
Paint the facial features:
Using a fine brush and black underglaze, carefully paint two small ovals for eyes just above the snout. Paint a rounded triangle nose on the snout bump and a simple ‘J’ curve for the mouth. -
Bisque fire:
Allow the mug to dry completely (bone dry) before placing it in the kiln for a bisque firing. -
Apply speckles (if needed):
If your clay body isn’t naturally speckled, you can flick a toothbrush loaded with iron oxide wash or dark brown underglaze across the surface to create random spots. -
Glazing:
Dip or brush the entire mug with a translucent honey or clear glaze. This allows the brown clay body and underglaze details to show through clearly. -
Wipe the foot:
Use a damp sponge to meticulously wipe any glaze off the bottom foot ring to prevent it from sticking to the kiln shelf. -
Glaze fire:
Fire the mug again to the glaze’s recommended temperature (usually cone 5 or 6 for stoneware).
Make it a Panda
Swap the brown clay for white porcelain. Use black underglaze to paint large patches around the eyes and color the ears entirely black for a panda look.
Once cooled, your sturdy bear mug is ready to be a comforting companion for your morning coffee routine
Pig Mug With Peek-a-Boo Piglet Pocket

Embrace the charm of the farmyard with this adorable, rounded pig mug that stands on its own four feet. Featuring a speckled pink glaze and sweet sculptured details like perk ears and a snout, this project is perfect for cozying up with your favorite warm drink.
Step-by-Step Tutorial
Materials
- Stoneware clay (preferably white or light-colored to show glaze well)
- Pottery wheel (optional, can be pinch-potted)
- Needle tool
- Scoring rib or serrated kidney tool
- Slip (clay mixed with water)
- Wooden modeling tool
- Sponge
- Pink speckled glaze (food safe)
- Black underglaze
- Small detail brush
- Fan brush for glazing
- Kiln
Step 1: Forming the Body
-
Throw the belly:
Begin by wedging your clay thoroughly to remove air bubbles. Center about 1 to 1.5 lbs of clay on the wheel and open it as you normally would for a mug. -
Shape the roundness:
Pull the walls up, but focus on ballooning the belly of the mug outward to create that plump, piggy shape. Keep the rim slightly narrower than the widest part of the body to enhance the rounded look. -
Smooth the exterior:
Use a smooth rib on the outside while supporting the inside with your hand to remove throwing lines and create a seamless, skin-like surface. -
Trim the bottom:
Once the piece is leather hard, trim the bottom. Unlike a standard mug, create a rounded bottom rather than a flat foot ring, as we will be adding legs later.
Step 2: Sculpting the Pig Features
-
Create the legs:
Roll four small, equal-sized balls of clay. Gently tap them onto a surface to flatten one side slightly, creating sturdy little hooves. -
Attach the legs:
Turn your leather-hard mug upside down. Score and slip the four contact points on the belly and the flat tops of the legs. Press them on firmly and blend the seams so they look like they are growing out of the body. -
Check stability:
Flip the mug right-side up and gently press down to ensure all four legs touch the table evenly and the mug is level. -
Form the snout:
Roll a small oval of clay and flatten it. Score and slip the area on the front of the mug, then attach the oval. Use a small tool to press two nostrils into the snout. -
Shape the ears:
Pinch two small triangles of clay. Gently curve them forward to give the pig an alert expression. Score and slip them near the rim of the mug, blending the clay downwards for a strong bond. -
Pull the handle:
Pull a traditional handle from a nugget of clay. I find a simple ear-shaped curve works best to balance the visual weight of the animal body. -
Attach the handle:
Score and slip the contact points on the back of the mug (opposite the snout). Attach the handle firmly, ensuring it’s straight, and clean up any excess slip with a damp sponge.
Wobbly Pig?
If the legs are uneven after attaching, gently tap the mug on a flat wooden board while the clay is still soft. This levels the feet instantly without misshaping them.
Step 3: Glazing and Firing
-
Bisque fire:
Allow the mug to dry very slowly to prevent cracking, especially around the thick legs. Once bone dry, bisque fire the piece to Cone 04 (or your clay’s specification). -
Wax the bottom:
Apply wax resist to the bottom of each foot to prevent the glaze from fusing your mug to the kiln shelf. -
Apply the pink glaze:
Using a fan brush or by dipping, apply 2-3 coats of a glossy pink speckled glaze. Ensure the glaze gets into the crevices around the ears and snout but watch for drips on the legs. -
Paint the eyes:
Once the glaze is dry to the touch, use a tiny detail brush and black underglaze (or a glaze-on-glaze product) to dot two small eyes above the snout. Add small dots to the nostrils if your glaze obscured the indentations. -
Final fire:
Glaze fire the mug to the temperature recommended for your specific glaze (typically Cone 5 or 6 for stoneware). Let the kiln cool completely before opening.
Pro Tip: Ear Placement
Place ears slightly below the rim, not directly on top. This makes drinking easier and prevents the ears from chipping if the mug is set upside down in a cupboard.
Now you have a whimsical, handcrafted companion for your morning coffee that is sure to make everyone smile
Hedgehog Mug With Textured Spines Band
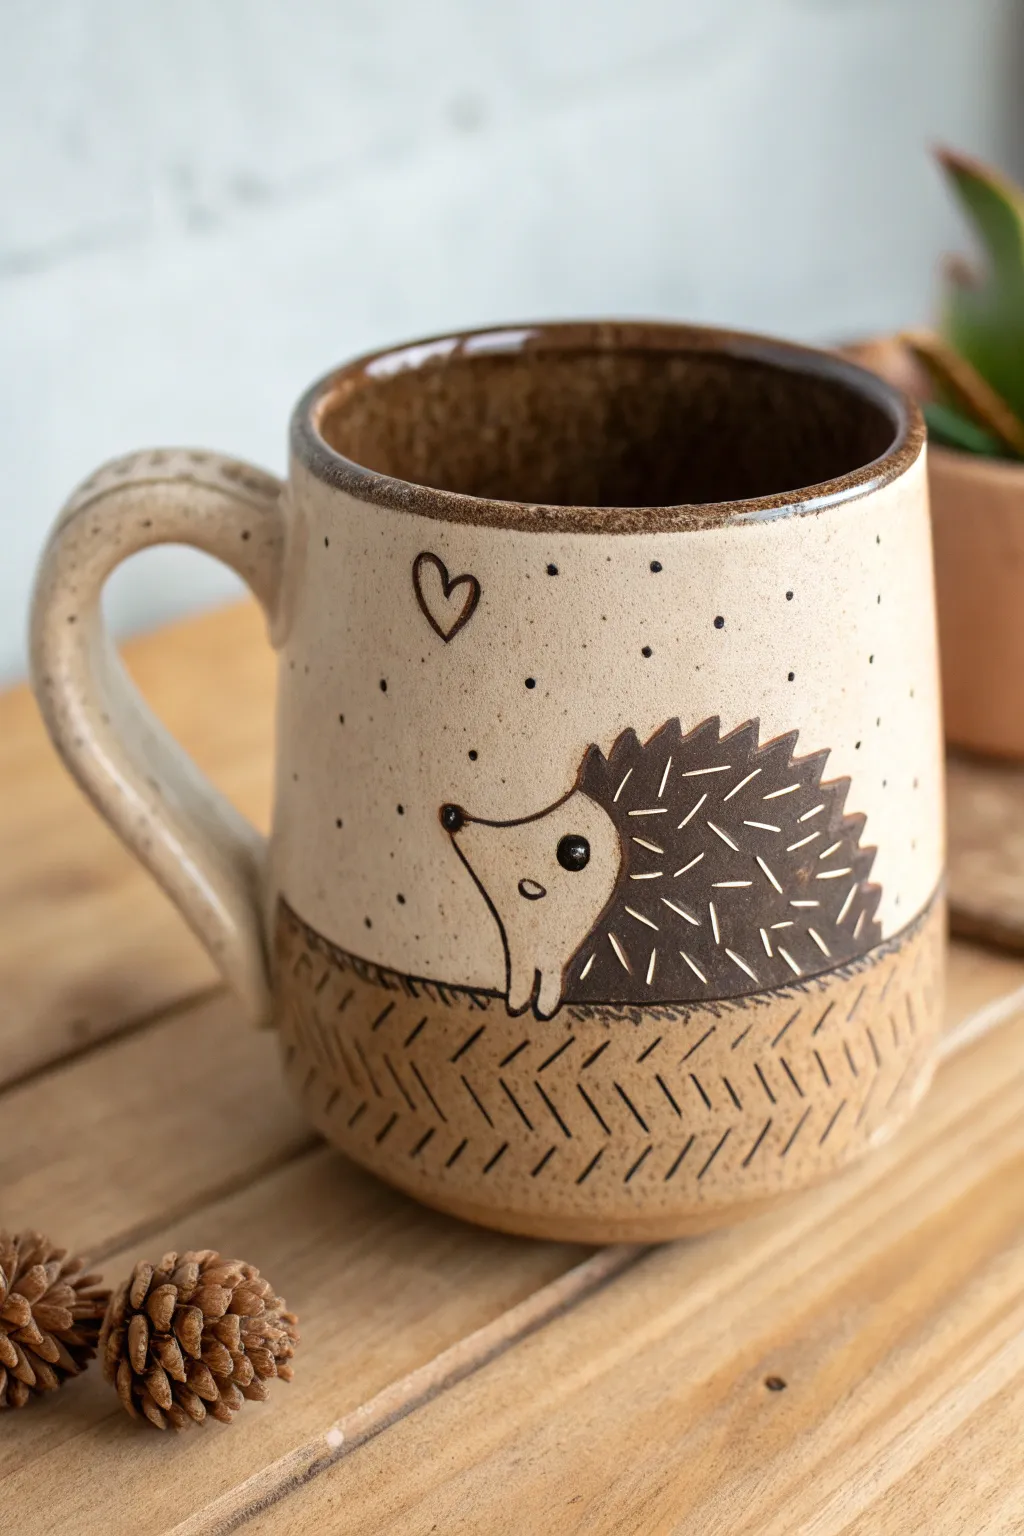
This charming ceramic mug features a wheel-thrown or hand-built body with a delightful hedgehog illustration etched into the clay. The warm, speckled glaze and textured herringbone band at the base give it a cozy, rustic feel perfect for your morning coffee.
How-To Guide
Materials
- Stoneware clay (speckled or buff)
- Pottery wheel (or rolling pin for slab building)
- Needle tool
- Rib tool (wood or metal)
- Underglaze pencil or fine brush (black)
- Dark brown underglaze or slip
- Carving tool or sgraffito tool
- Clear or transparent matte glaze
- Sponge
- Kiln
Step 1: Forming the Mug Body
-
Prepare the Clay:
Begin by wedging your stoneware clay thoroughly to remove air bubbles. A pound of clay is usually a good starting point for a standard mug size. -
Throw the Cylinder:
Center your clay on the wheel and throw a straight-sided cylinder. Aim for walls about 1/4 inch thick to ensure durability without excessive weight. -
Shape the Belly:
Gently belly out the form using a rib tool on the inside while supporting the outside. This mug has a slight curve, tapering in just a tiny bit at the rim to keep heat in. -
Refine the Rim:
Compress the rim with a piece of chamois or your sponge to make it smooth and pleasant for drinking. -
Trim the Base:
Once the pot is leather hard, trim the bottom to create a neat foot ring. This defines the silhouette and gives the mug a professional finish.
Smudging Lines?
If your black underglaze lines smear when you apply the clear glaze, try dabbing the glaze over the drawing gently with a sponge first rather than dipping or brushing vigorously.
Step 2: Adding the Handle & Texture
-
Pull the Handle:
Pull a handle from a lug of clay, aiming for a comfortable C-curve shape. Let it stiffen slightly until it holds its form when bent. -
Attach the Handle:
Score and slip the contact points on both the mug and the handle. Press the handle firmly onto the mug body, blending the seams smoothly with your thumb or a modeling tool. -
Define the Texture Band:
Use a needle tool or a dull pencil to lightly mark a horizontal line around the bottom third of the mug. This separates the design area from the textured base. -
Create the Herringbone Pattern:
Using a sharp carving tool, incise diagonal lines into the clay below your marked line. Alternate the direction of the diagonals to create a herringbone or chevron pattern that mimics the ground texture.
Level Up: 3D Quills
Instead of carving (sgraffito), try slip-trailing the hedgehog’s spines using a bulb syringe and thick slip for a texture you can actually feel when holding the mug.
Step 3: Creating the Hedgehog Design
-
Sketch the Outline:
Lightly sketch the hedgehog body profile onto the smooth upper section using a needle tool. Focus on the softly curved back and the small, pointed snout. -
Apply Dark Slip:
Paint a layer of dark brown slip or underglaze inside the hedgehog’s body shape (the spiny area), avoiding the face and feet. -
Sgraffito the Quills:
Once the slip is leather hard but not bone dry, use a sgraffito tool to scratch short, sharp lines through the dark slip to reveal the lighter clay body underneath. This creates the ‘spines’ look. -
Draw the Details:
Use a fine liner brush with black underglaze (or a black underglaze pencil) to draw the hedgehog’s eye, nose, mouth, and cute little paws. Add a small heart floating above its head for extra charm. -
Add Atmospheric Dots:
Scatter small black dots around the background using the tip of your brush to give the scene a whimsical, snowy, or starry feeling.
Step 4: Glazing and Firing
-
Bisque Fire:
Load the mug into the kiln for a bisque firing (usually Cone 04 or 06). This prepares the clay for the final glaze. -
Apply Interior Glaze:
Pour a food-safe dark brown or amber glaze into the interior of the mug. Pour it out quickly to coat the inside evenly, then wipe any drips off the rim. -
Dip the Clear Coat:
Dip the exterior of the mug into a clear or transparent matte glaze. This seals the underglaze design and the raw clay texture while letting the speckles show through. -
Wipe the Foot:
Use a damp sponge to meticulously wipe all glaze off the bottom foot ring to prevent it from sticking to the kiln shelf. -
Final Fire:
Fire the mug to maturity (Cone 5 or 6 for most stoneware). Allow the kiln to cool completely before removing your new favorite mug.
Enjoy the comforting weight of your handmade mug as you sip your favorite warm drink
Frog Mug With Lily Pad Saucer Foot
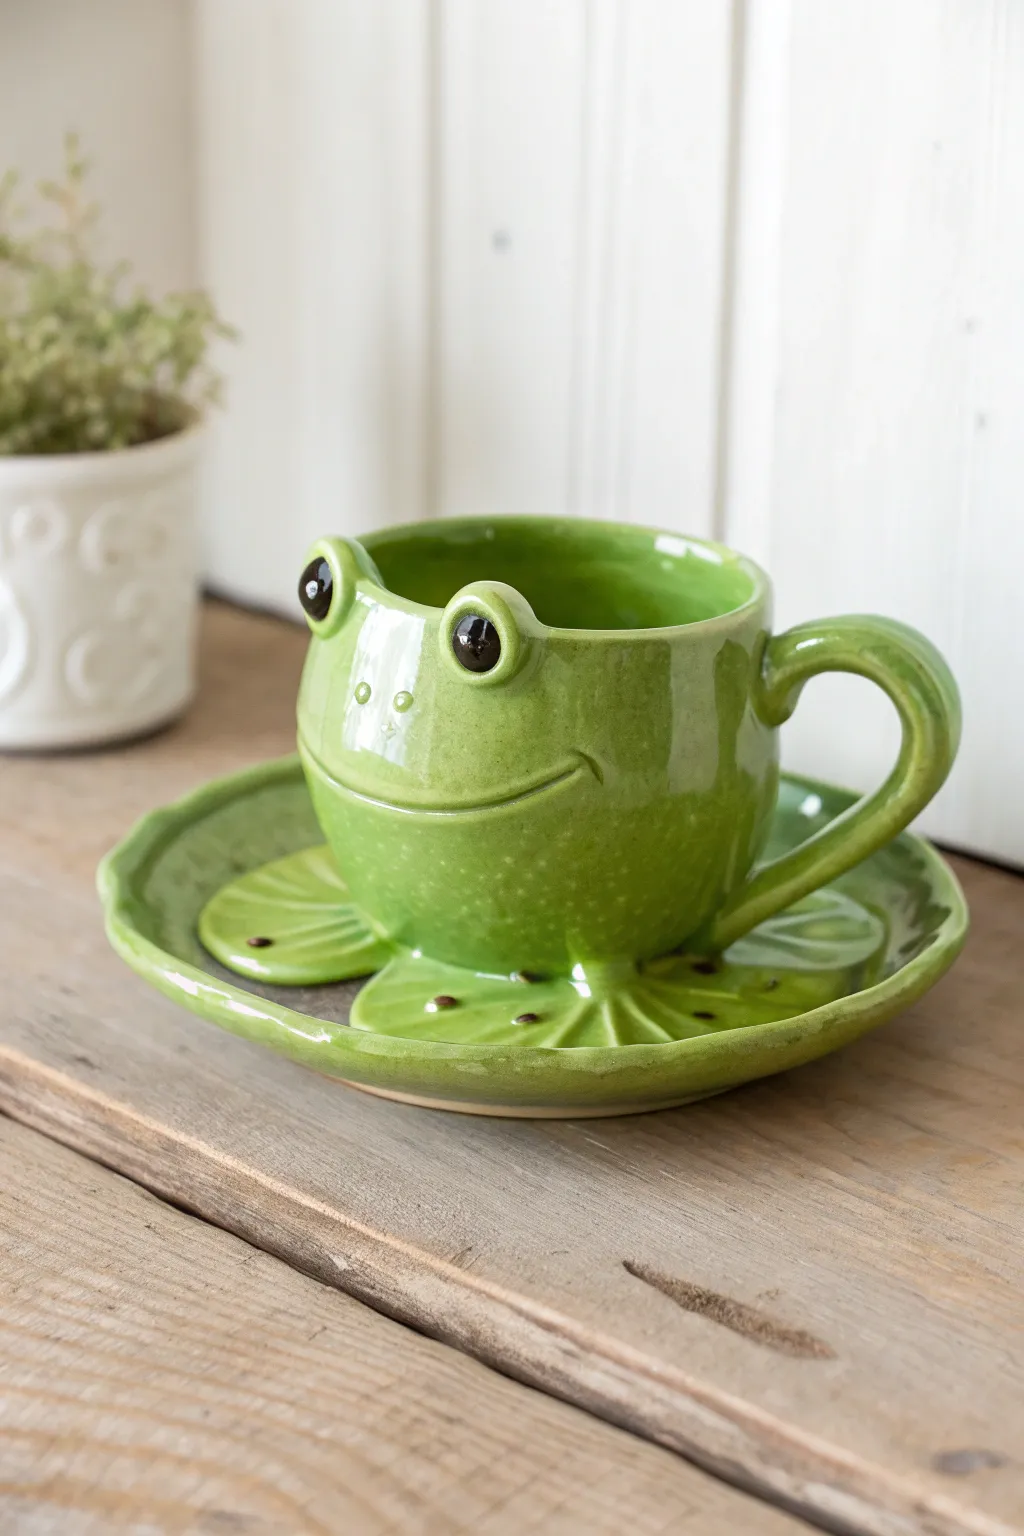
Bring a touch of whimsical pond life to your morning coffee with this delightful frog-shaped mug and matching lily pad saucer. The glossy green glaze and sculpted eyes give this piece a friendly personality that pairs perfectly with the organic leaf textures.
Detailed Instructions
Materials
- Stoneware clay (cone 5/6 recommended)
- Pottery wheel (optional, can be hand-built)
- Rolling pin and guide sticks
- Score and slip tool (needle tool and rib)
- Small sponge
- Green underglaze or glaze (glossy)
- Black and white underglaze (for eyes)
- Clear glaze (if using underglaze)
- Modeling tools
- Kiln
Step 1: Creating the Frog Mug Body
-
Prepare the cylinder:
Begin by throwing a medium-sized cylinder on the wheel, or slab-build one if you prefer hand building. Aim for a slightly rounded belly shape rather than straight walls to mimic a frog’s round form. -
Shape the rim:
While the clay is still plastic, gently flare the rim slightly if desired, though a straight rim keeps the ‘head’ shape distinct. Smooth the lip with a chamois. -
Add the eyes:
Roll two small balls of clay, about the size of large marbles. Score and slip the top rim of the mug where the eyes will sit, then attach the balls firmly. Smooth the clay from the back of the eyes down into the mug body to secure them. -
Sculpt eye details:
Use a modeling tool to gently press an indentation into the center of each eye ball for the pupil, or leave them smooth to paint later. Add small clay coils around the base of the eyes to create eyelids for extra expression. -
Form the smile:
Using a curved modeling tool or a needle tool, carve a wide, gentle smile into the front of the mug. I like to deepen the corners of the mouth slightly to emphasize the happy expression. -
Attach the handle:
Pull a sturdy handle from a slug of clay. Attach it to the side or back relative to the face using the score and slip method. Ensure the curve is comfortable for gripping.
Step 2: Sculpting the Lily Pad Saucer
-
Roll the slab:
Roll out a slab of clay to about 1/4 inch thickness. This will form the base of your saucer. -
Cut the leaf shapes:
Cut out multiple large teardrop or rounded shapes to resemble lily pads. You can create one large pad or overlap 2-3 smaller pads for a clustered look, which also helps stabilize the mug. -
Add texture:
Use a modeling tool to draw veins radiating from the center of each leaf outward. Gently life the edges of the leaves to give them a natural, floating appearance. -
Combine into a saucer:
Arrange your leaf shapes into a saucer form. Score and slip them together where they overlap. Ensure the center area is flat enough to hold the mug securely. -
Create the foot ring:
Flip the saucer assembly over (once leather hard) and attach a small coil ring to the bottom to create a foot. This prevents the saucer from rocking.
Uneven Glaze Check
If your glaze pools too thickly in the leaf veins, it can obscure the texture. Wipe a damp sponge lightly over the high points of the lily pad before firing to highlight the details.
Step 3: Feet Details & Finishing
-
Attach frog feet (optional):
For the specific look in the image, create small, flattened clay toes and attach them to the bottom of the mug body so they rest on the saucer when paired, or fuse them directly to the saucer as a coaster element. -
Dry slowly:
Cover both pieces loosely with plastic to dry slowly. This is crucial for the handle and detailed attachments to prevent cracking. -
Bisque fire:
Once bone dry, fire the greenware in your kiln to bisque temperature (usually cone 04). -
Glaze application:
Dip or brush a bright, glossy green glaze over the entire mug and saucer. Avoid glazing the bottom of the foot rings. -
Details:
c Paint the pupils black and add a tiny dot of white for a highlight using underglaze or glaze. You can also add small dots on the frog’s skin for texture. -
Final firing:
Fire the pieces again to the maturity temperature of your clay and glaze (often cone 5 or 6). Let the kiln cool completely before opening.
Add a Fly!
For a fun hidden detail, sculpt a tiny fly using a speck of clay and attach it to the inside of the rim, or paint one under the handle as a secret snack for your frog.
Enjoy sipping from your cheerful new swamp-dwelling friend
Sea Turtle Mug With Shell Belly Texture
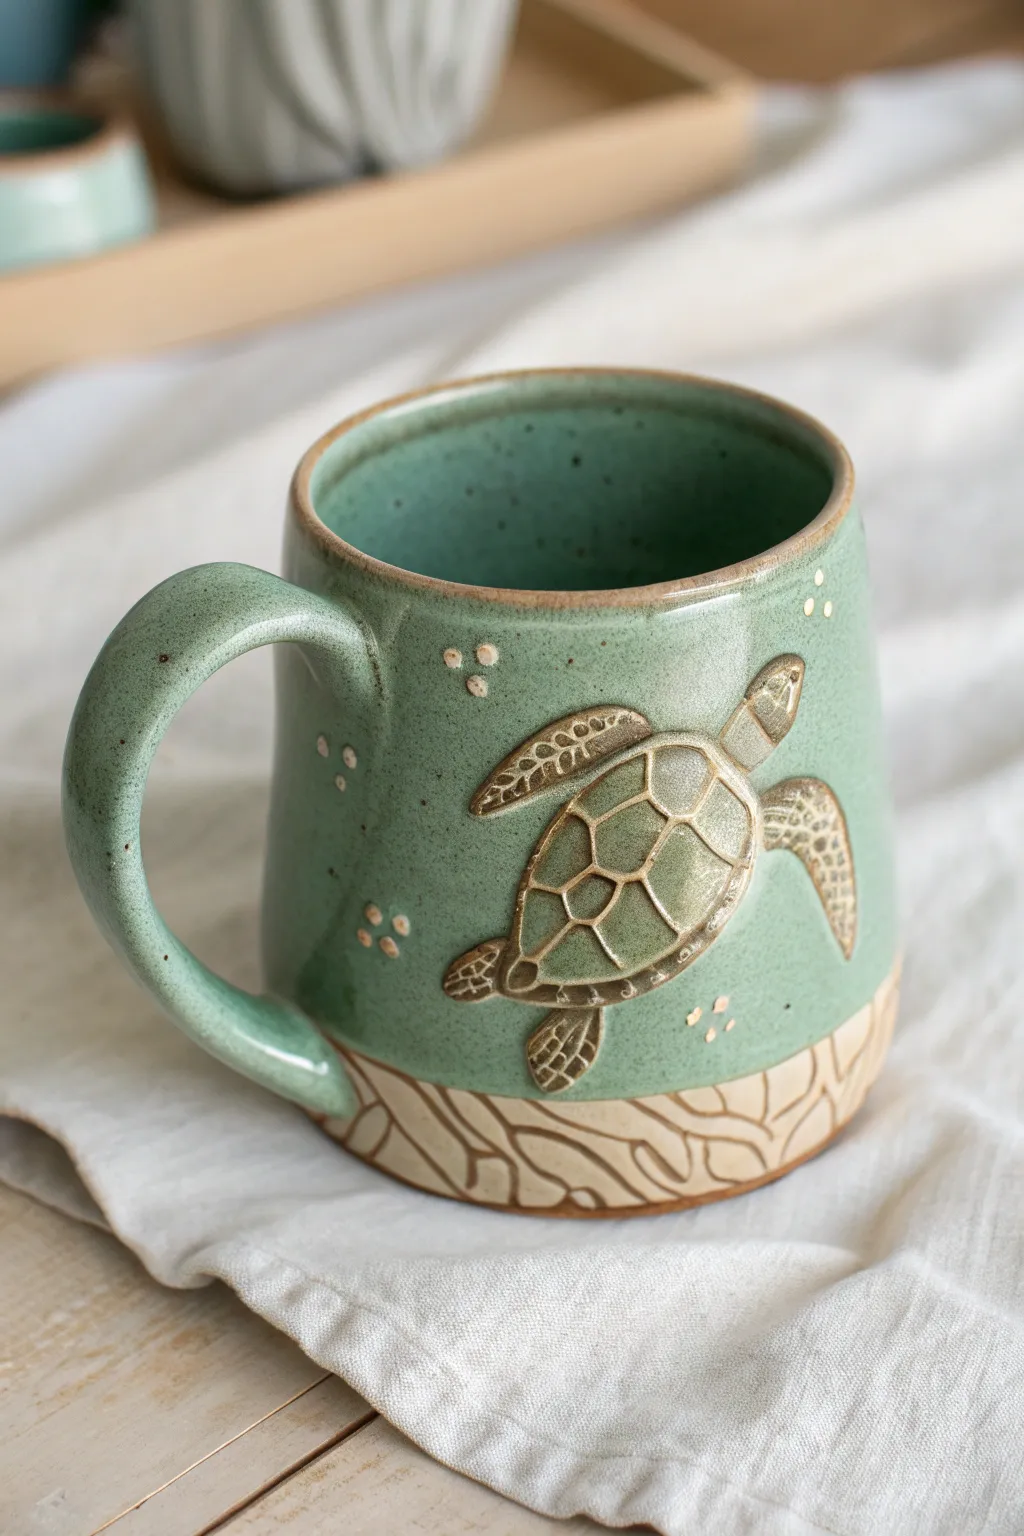
Bring the calming vibes of the ocean to your morning coffee with this hand-built or wheel-thrown mug featuring a relief-carved sea turtle. The design contrasts a smooth, speckled sea-glass green glaze against raw, sandy-textured clay at the base for a tactile finish.
Step-by-Step
Materials
- Stoneware clay (smooth buff or speckled body)
- Pottery wheel (optional, can be hand-built)
- Needle tool
- Rib tool (wooden or silicone)
- Small loop carving tool
- Scoring tool (or serrated rib)
- Specific glaze: Speckled celadon or translucent sea green
- Wax resist
- Slip (liquid clay)
- Rolling pin (if hand-building)
- Sponge
Step 1: Forming the Mug Body
-
Throw or Build the Cylinder:
Begin with about 1 lb of clay. If throwing, center your clay and pull a cylinder with slightly tapered walls, keeping the rim fully rounded. If hand-building, roll a slab to 1/4 inch thickness, cut a rectangle, and join the seam to create your form. -
Shape the Profile:
Gently balloon the belly of the mug outward using a rib tool from the inside to create a soft curve, ensuring the bottom third remains somewhat straight for the carving detail later. -
Trim the Foot:
Once leather hard, trim the bottom to create a defined foot ring. Clean up any throwing lines on the exterior with a smooth metal rib. -
Pull and Attach Handle:
Pull a strap handle that tapers slightly. Attach it firmly to the side opposite where you plan to place the turtle. Use the score and slip method, blending the clay seamlessly.
Step 2: Sculpting the Turtle
-
Trace the Outline:
While the mug is still leather hard, use a needle tool to lightly sketch the outline of a sea turtle swimming diagonally upwards on the mug’s belly. -
Add Material for Relief:
Roll a small, thin oval of clay for the shell and attach it to the sketched area with slip. Smooth the edges down so it rises gently from the surface rather than sitting like a lump. -
Sculpt Head and Flippers:
Add smaller flattened teardrop shapes for the head and four flippers. Blend these onto the mug body, ensuring the front flippers extend elegantly. -
Define the Shell Scutes:
Using a needle tool or small carving tool, press lines into the added shell clay to create the hexagonal scute pattern. Don’t cut all the way through; just define the boundaries. -
Texture the Skin:
Use the very tip of your needle tool to poke tiny, shallow holes or scales onto the flippers and head to mimic the texture of reptilian skin. -
Add Bubble Accents:
Roll tiny balls of clay, flatten them slightly, and attach them randomly around the turtle using a drop of slip to represent air bubbles.
Glaze Tip: The Break
Choose a ‘breaking’ glaze (often celadons). These glazes are translucent but pool darker in textures, making the turtle shell pop without needing multiple colors.
Step 3: Carving the Seafloor
-
Mark the Base Line:
Lightly scribe a wavy line around the bottom inch of the mug. This area will remain unglazed. -
Carve the Sand Patterns:
Using a small loop tool, carve varied, wavy gouges into the clay below your scribed line. These should mimic ripples in the sand or brain coral textures. -
Clean the Burrs:
Once bone dry, rub the carved area gently with a green scouring pad or a soft sponge to remove any sharp clay crumbs or burrs.
Enhance the Carving
Rub a red iron oxide wash into the bottom carved area and sponge it off before glazing. This deepens the shadows in the ‘sand’ texture for an antique look.
Step 4: Glazing and Firing
-
Bisque Fire:
Fire the mug to cone 04 (or your clay’s specific bisque temperature). -
Wax Resist Application:
Apply wax resist carefully to the entire carved bottom section and the foot ring to prevent glaze adherence. I also like to wax the tiny added bubbles so they remain raw clay color. -
Glaze the Interior and Exterior:
Pour your sea green speckled glaze inside, swirl, and pour out. Then, dip the exterior of the mug fully, stopping just at the wax line if possible, or letting the wax do the work. -
Highlight the Shell:
The glaze will naturally break (thin out) over the raised ridges of the shell and settle into the recesses, highlighting the texture automatically. No extra painting needed. -
Clean and Fire:
Use a damp sponge to wipe any stray glaze droplets off the waxed bottom section. Fire to cone 6 (or your glaze’s maturity temperature).
Now you have a stunning, ocean-inspired vessel ready for your favorite hot drink
Octopus Mug With Tentacle Wrap Handle
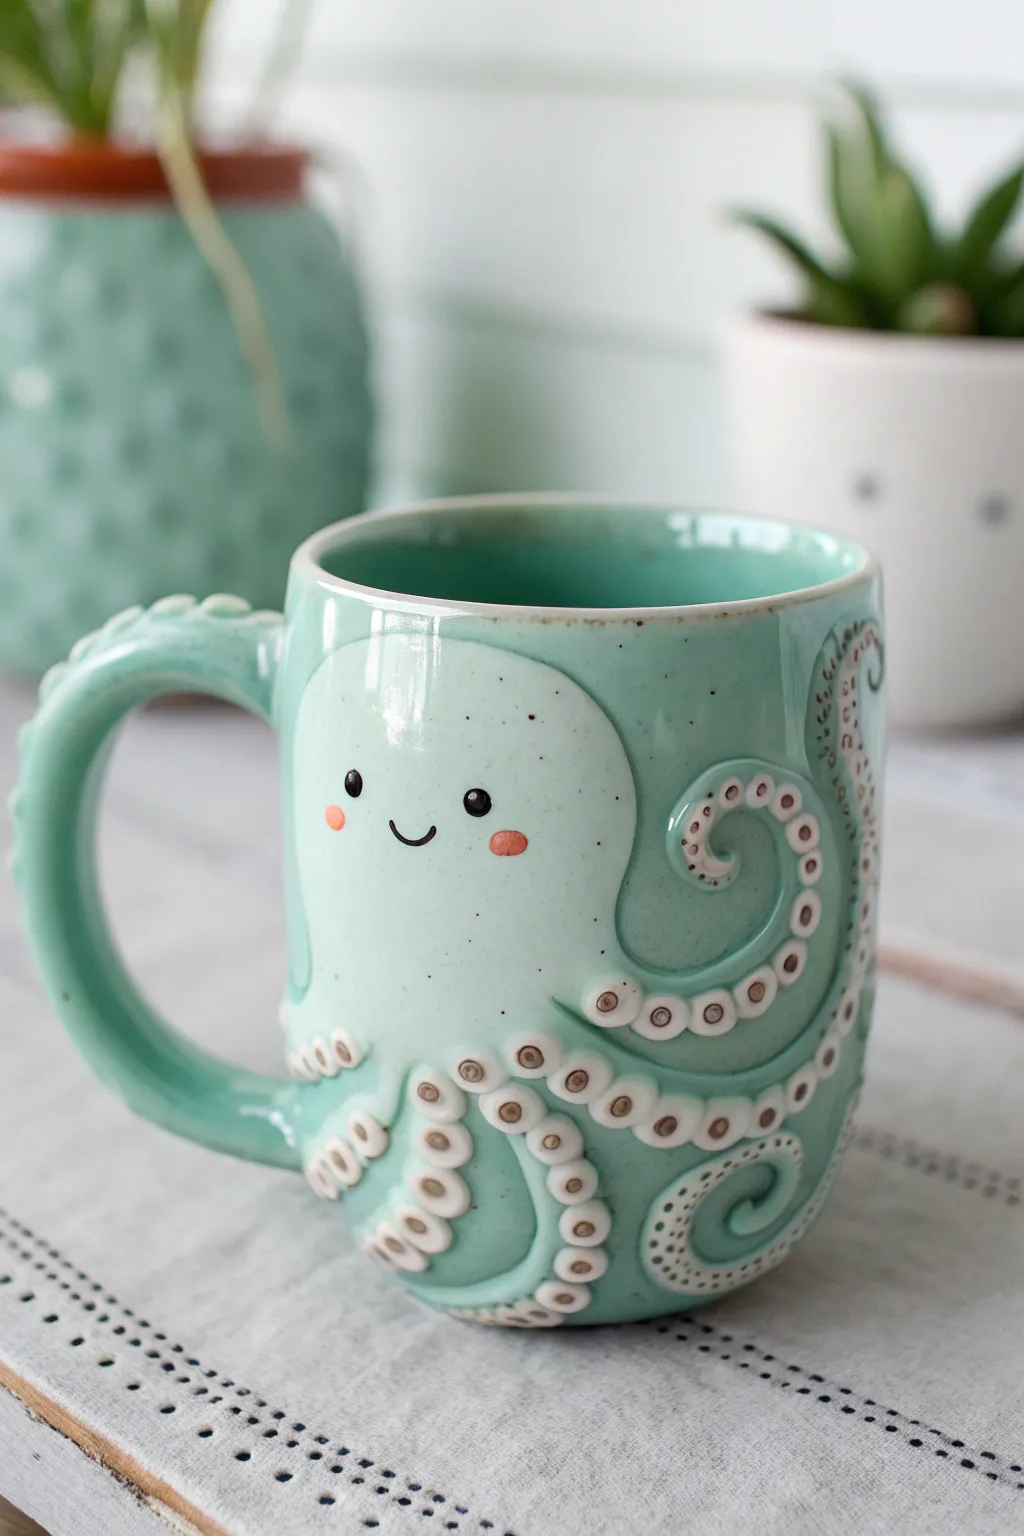
This whimsical ceramic project combines function and character with a sculpted octopus hugging a simple cylindrical mug. The standout feature is the handle, seamlessly flowing from the creature’s body as a textured tentacle, all finished in a serene sea-glass teal glaze.
Step-by-Step
Materials
- Stoneware clay (smooth body)
- Slab roller or rolling pin with thickness guides
- Rolling pin
- Bisque mold or cylindrical form (approx. 3-4 inches diameter)
- Needle tool
- Scoring tool (serrated rib or needle)
- Slip (clay and water mixture)
- Small loop tool or carving tools
- Small round piping tip or drinking straw (for suction cups)
- Soft paintbrush
- Sponge
- Teal/Turquoise celadon glaze
- Underglaze (black, pink/coral)
- Clear glaze (optional)
Step 1: Forming the Mug Body
-
Roll the slab:
Begin by rolling out a slab of stoneware clay to an even thickness of about 1/4 inch. Smooth the surface with a rubber rib to compress the clay particles. -
Cut the rectangle:
Measure and cut a rectangle that will wrap around your cylindrical form with a slight overlap for the seam. The height should be the desired finished mug height plus shrinkage allowance. -
Join the cylinder:
Wrap the slab around your form. Score and add slip to the overlapping edges, then press them firmly together. Blend the seam inside and out until it is invisible. -
Add the base:
Cut a circle slightly larger than the cylinder’s diameter from the remaining slab. Score the bottom of the cylinder and the edge of the base circle, apply slip, and join them. Trim excess clay flush with the wall. -
Smooth the rim:
Run a damp sponge or piece of chamois leather around the rim to soften the edge, ensuring it will be comfortable to drink from.
Handle Security Check
The handle tentacle supports the mug’s weight. Reinforce the attachment points by adding tiny coils of clay at the seams and blending them smooth to prevent cracking.
Step 2: Sculpting the Octopus
-
Shape the head:
Roll a flat, rounded oval piece of clay for the octopus’s head. It should be slightly thinner than the mug wall. Score the mug surface and the back of the clay piece, apply slip, and attach it firmly to the front of the cylinder. -
Roll coils for tentacles:
Roll out several tapered coils of varying lengths. These will become the tentacles. Flatten them slightly so they aren’t perfectly round. -
Create the handle tentacle:
Choose your thickest coil for the handle. Attach the thicker end to the side of the octopus body and curve it outward to form a comfortable C-shape grip. Attach the tapered end lower down on the mug body, blending the connection points thoroughly for strength. -
Attach decorative tentacles:
Arrange the remaining thinner coils on the mug surface. Curl them in spirals or waves, making sure some overlap or touch the handle tentacle for a cohesive look. Score, slip, and blend them onto the mug. -
Sculpt the face:
Smooth out the head area. I like to gently press the edges so the head looks like it’s emerging from the mug rather than just stuck on top.
Step 3: Detailing and Finishing
-
Add suction cups:
Roll tiny balls of clay and press them along the underside of the tentacles. Alternatively, use a small piping tip or straw to stamp small circles directly into the clay coils to simulate suction cups. -
Refine the texture:
Using a small loop tool, create a small indentation in the center of each applied suction cup to give it depth. This texture will catch the glaze beautifully. -
Bisque fire:
Allow the mug to dry slowly under plastic to prevent handle cracking. Once bone dry, bisque fire the piece to cone 04 (or your clay body’s specifications). -
Apply facial details:
Using a fine brush, apply small dots of black underglaze for the eyes and a curve for the mouth. Add small dabs of pink or coral underglaze for the cheeks. -
Glazing:
Dip or brush the entire mug with a translucent teal or turquoise celadon glaze. This type of glaze breaks over edges, highlighting the relief of the tentacles and suction cups while remaining transparent enough to show the underglaze face. -
Final wipe:
Wipe the foot ring clean of any glaze with a damp sponge. -
Glaze fire:
Fire the mug to the maturation temperature of your glaze (typically cone 5 or 6 for stoneware).
Hidden Surprise
Sculpt a tiny starfish or a second smaller octopus inside the bottom of the mug. It will only be revealed as the user finishes their drink!
Enjoy sipping from your aquatic creation, knowing you sculpted every curve and coil yourself.