
If you’re craving that sweet spring color palette, Easter clay bead bracelets are the quickest way to get it on your wrist. I’m sharing my favorite Easter-inspired combos—think bunnies, eggs, carrots, and a little bit of meaningful message-making.
Classic Pastel Rainbow Heishi Bracelet
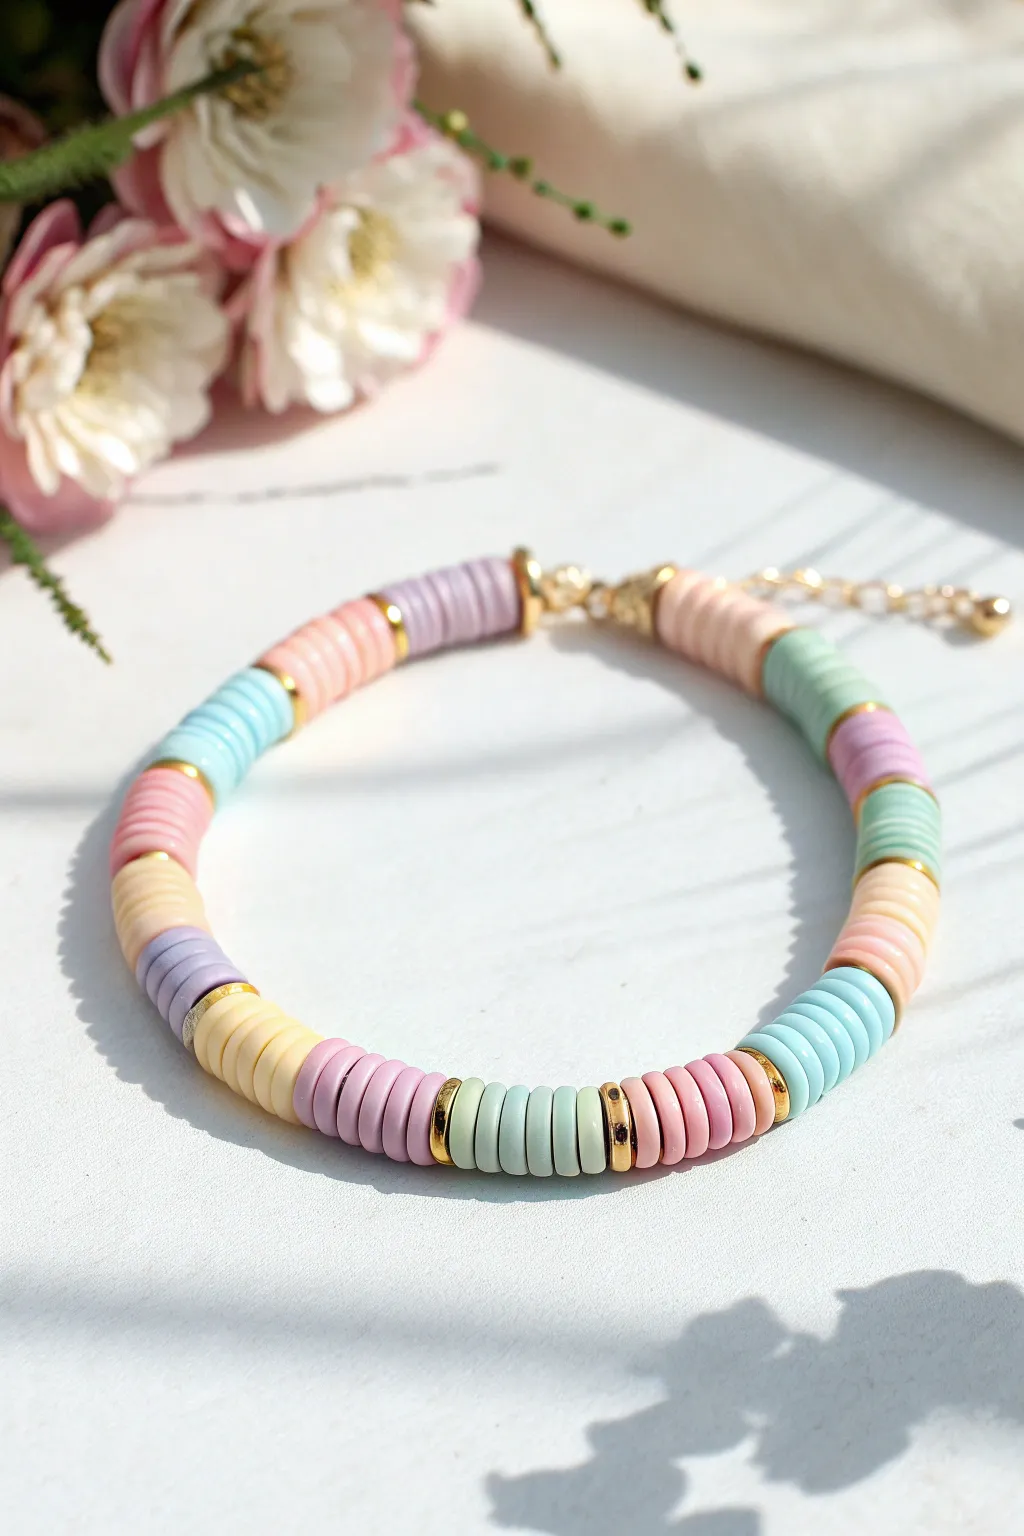
Celebrate spring with this delightful accessory featuring soft pastel hues separated by shining gold accents. The flat disc beads create a satisfyingly smooth texture that makes this piece perfect for stacking or wearing as a standalone statement.
Step-by-Step
Materials
- Polymer clay heishi beads (6mm or 4mm) in pastel pink, peach, mint, baby blue, lavender, and cream
- Gold plated spacer beads (flat disc or small round)
- Small gold accent rings or beads with cubic zirconia/rhinestone detailing (optional)
- Elastic beading cord (0.8mm or 1mm)
- Super glue or jewelry cement
- Scissors
- Tape or a bead stopper
- Gold jump rings
- Gold lobster clasp
- Extension chain (optional)
Step 1: Planning and Preparation
-
Measure Your Wrist:
Before cutting any cord, wrap a measuring tape loosely around your wrist to determine the needed length. Add about 3-4 inches to this measurement to ensure you have plenty of slack for tying knots later. -
Prepare the Cord:
Cut your elastic cord to the calculated length. To prevent beads from sliding off while you work, secure one end with a piece of tape or attach a bead stopper. -
Sort Your Palette:
Pre-sort your clay heishi beads by color. For this specific look, you will need approximately 6-8 beads of each color per segment to create uniform blocks.
Uneven Blocks?
Clay beads can vary slightly in thickness. Instead of counting beads, measure each color block with a ruler (e.g., each section is exactly 1cm) to ensure perfect visual uniformity.
Step 2: Stringing the Pattern
-
Start the First Segment:
Begin by threading a gold spacer bead onto the cord, followed by a set of about 7-8 lavender clay beads. Consistency is key, so count your beads carefully. -
Transition to Peach:
Add a gold spacer bead to close the lavender section. Next, string on 7-8 peach or light coral beads. -
Add the Blue Tones:
Slide on another gold spacer, then follow with a block of baby blue beads. The cool tone contrasts beautifully with the peach. -
Incorporate Pink:
Place a gold spacer, then add a segment of soft pink beads. I like to double-check my pattern occasionally to ensure no colors are repeating too close together. -
The Cream Section:
After the next gold spacer, string on your cream or pale yellow beads. This neutral tone helps ground the brighter pastels. -
Adding Texture:
If you are using the textured or rhinestone-studded gold accent rings shown in the photo, substitute a standard gold spacer for one of these special beads every few segments to add a little sparkle. -
Continue the Gradient:
Repeat the color blocking pattern—purple, peach, blue, pink, cream, mint—separating each block with a gold spacer until you reach the desired length. -
Create the Mint Section:
Don’t forget the mint green! Add a gold spacer and then thread on the mint green beads to complete the classic pastel rainbow spectrum. -
Check fit:
Wrap the unfinished strand around your wrist to verify the size. Remember the clasp will add about half an inch to the final length, so account for that gap.
Make it Personal
Replace one of the gold spacer beads with a letter bead to add an initial, or swap one color block entirely for gold beads to create a metallic focal point.
Step 3: Finishing the Ends
-
Prepare for Closure:
Once the beading is complete, remove the tape or stopper from the end. If you are making a stretch bracelet without a clasp, simply knot it securely now. For the clasp method shown, proceed to the next step. -
Attach the Jump Rings:
Tie a secure overhand knot around a gold jump ring on one end of the elastic. Thread the tail back through the last few beads to hide it. -
Secure the Knot:
Apply a tiny dot of super glue or jewelry cement to the knot at the jump ring. Let it dry completely before trimming any excess cord close to the bead. -
Add the Clasp:
Using pliers, open the jump ring slightly and slide on your gold lobster clasp. Close the jump ring securely so there is no gap for the cord to slip through. -
Final Connection:
Repeat the knot and glue process on the other end of the bracelet, attaching a jump ring and an optional extension chain.
Enjoy styling your fresh, spring-ready wristwear with any casual outfit


Bunny Charm With Soft Pastel Beads
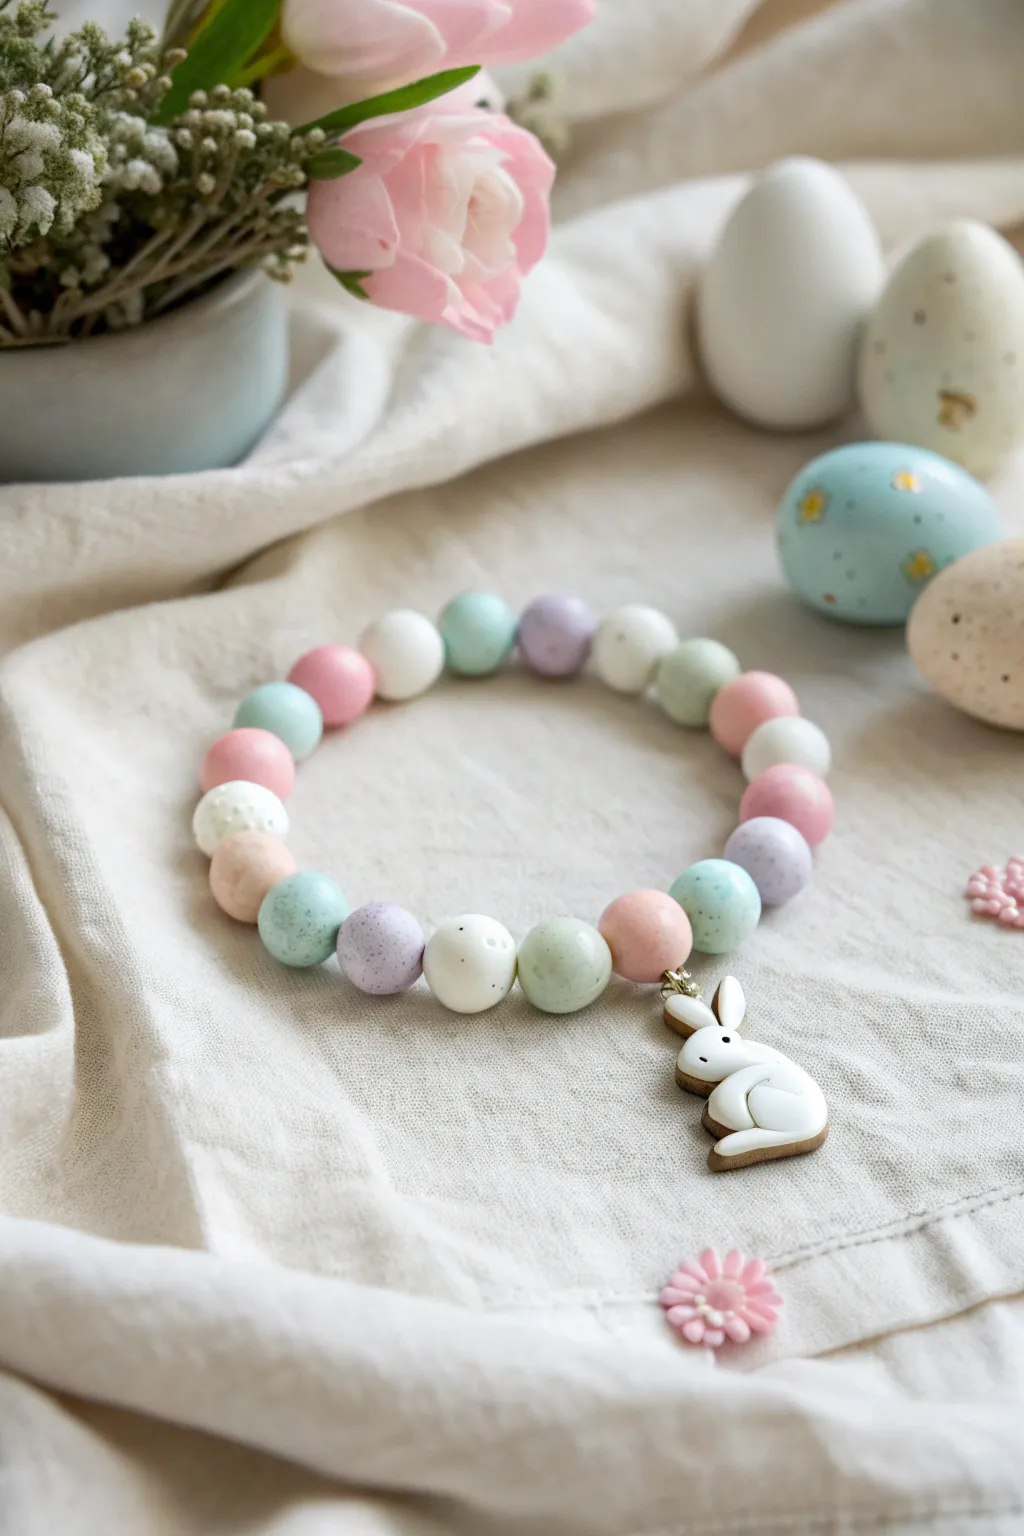
This sweet and simple bracelet captures the essence of spring with its soft, speckled pastel beads and an adorable custom bunny charm. It is the perfect beginner-friendly clay project that results in a high-quality accessory suitable for Easter baskets or everyday wear.
How-To Guide
Materials
- Polymer clay in white, pastel pink, mint green, baby blue, and lavender
- Coarse ground black pepper or dried vanilla bean specks (for the speckled effect)
- Bead roller (optional but helpful for consistent size)
- Toothpick, bamboo skewer, or needle tool
- Elastic stretch beading cord (0.8mm or 1mm)
- Gold-tone jewelry eye pin
- Small gold-tone jump ring
- Jewelry adhesive (e.g., E6000 or super glue)
- Sculpting tools (needle tool, small ball stylus)
- Oven and baking sheet/tile
- Gloss or matte glaze (optional)
Step 1: Creating the Speckled Beads
-
Prepare the Clay:
Condition each color of polymer clay by kneading it until soft and pliable. Keep white separate to ensure it stays clean. -
Add Speckles:
To create the organic, egg-shell look, mix a tiny pinch of coarse ground black pepper or dried vanilla bean specks into each colored clay ball. Knead thoroughly until the specks are evenly distributed. -
Portion the Clay:
Roll each color into a long snake of even thickness. Cut the snakes into equal-sized segments to ensure your finished beads will be uniform. -
Roll the Beads:
Take each segment and roll it between your palms to form a smooth sphere. I find using a slight circular motion helps eliminate creases. Aim for beads that are approximately 10-12mm in diameter. -
Pierce the Holes:
Using a toothpick or needle tool, carefully pierce the center of each bead. Twist the tool gently as you push through to avoid squashing the round shape. -
Check Entrance and Exit:
Flip the bead over and poke the hole from the other side to ensure the opening is clean and neat on both ends.
Step 2: Sculpting the Bunny Charm
-
Form the Body:
Take a larger piece of white clay and shape it into a flattened, rounded teardrop for the bunny’s main body. -
Create the Thigh:
Roll a smaller ball of white clay and flatten it slightly. Press this onto the bottom rear of the teardrop to form the bunny’s haunch or thigh. -
Add the Head:
Roll a medium-sized ball for the head and attach it to the top of the body, smoothing the seam slightly with a clay tool so it bonds well. -
Shape the Ears:
Create two small tapered logs for ears. Press them gently onto the top of the head. Use the side of your needle tool to make a tiny indentation inside the ear for depth. -
Detail the Face:
Use a needle tool or the very tip of a black marker (after baking, or use black clay before) to create a tiny dot for the eye. Add a tiny pink nose if desired, or keep it minimal like the photo. -
Insert the Eye Pin:
Trim a gold eye pin so the shaft is short (about 1cm). Dip the tip in a tiny bit of liquid clay or bake-and-bond adhesive and insert it into the top of the bunny’s head.
Smoother Shaping
To remove fingerprints from your raw clay beads before baking, lightly brush them with a tiny amount of baby oil or cornstarch.
Step 3: Baking and Assembly
-
Bake the Components:
Arrange your beads and bunny charm on a baking tile or sheet lined with parchment paper. Bake according to your clay manufacturer’s instructions (usually 275°F/135°C for 15-30 minutes). -
Cool Completely:
Allow all pieces to cool completely before handling. This hardens the clay and prevents fingerprints or distortion. -
Measure the Cord:
Cut a length of elastic cord about 10-12 inches long. Is usually safer to have extra length than to run short while tying. -
String the Beads:
Thread the beads onto the elastic cord. Follow the pattern seen in the image: mix the pastels randomly (pink, mint, white, blue, lavender) to create a playful rhythm. -
Attach the Charm:
Open a gold jump ring using two pairs of pliers. Slide it through the loop of the eye pin on the bunny, then hook the jump ring onto the elastic cord between two beads. Close the ring securely. -
Tie the Knot:
Bring the ends of the elastic together. Tie a strong surgeon’s knot (right over left, left over right twice). Pull tight to secure. -
Secure and Hide:
Add a tiny drop of jewelry glue to the knot. Once dry, trim the excess cord and gently tug the cord so the knot slides inside the hole of a neighboring bead, hiding it from view.
Golden Touch
Add a glamorous touch by painting the very bottom edge or the tail of the bunny with liquid gold leaf after the clay has been baked.
Now you have a charming accessory perfect for celebrating the season with style


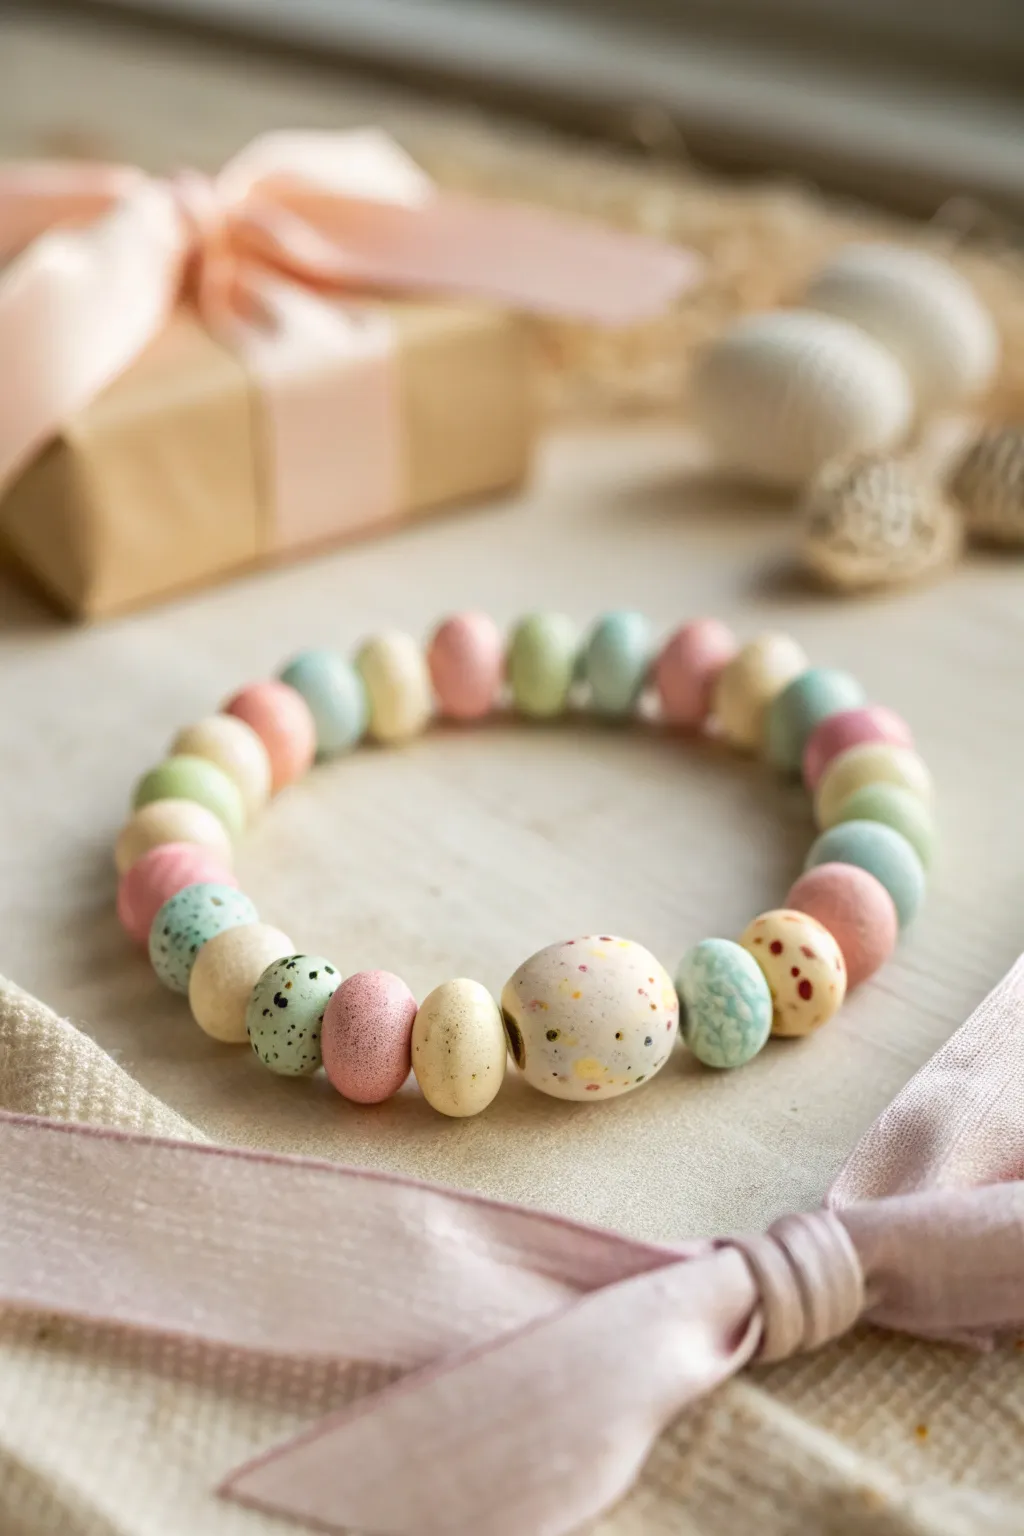
Speckled Easter Egg Bead Mix
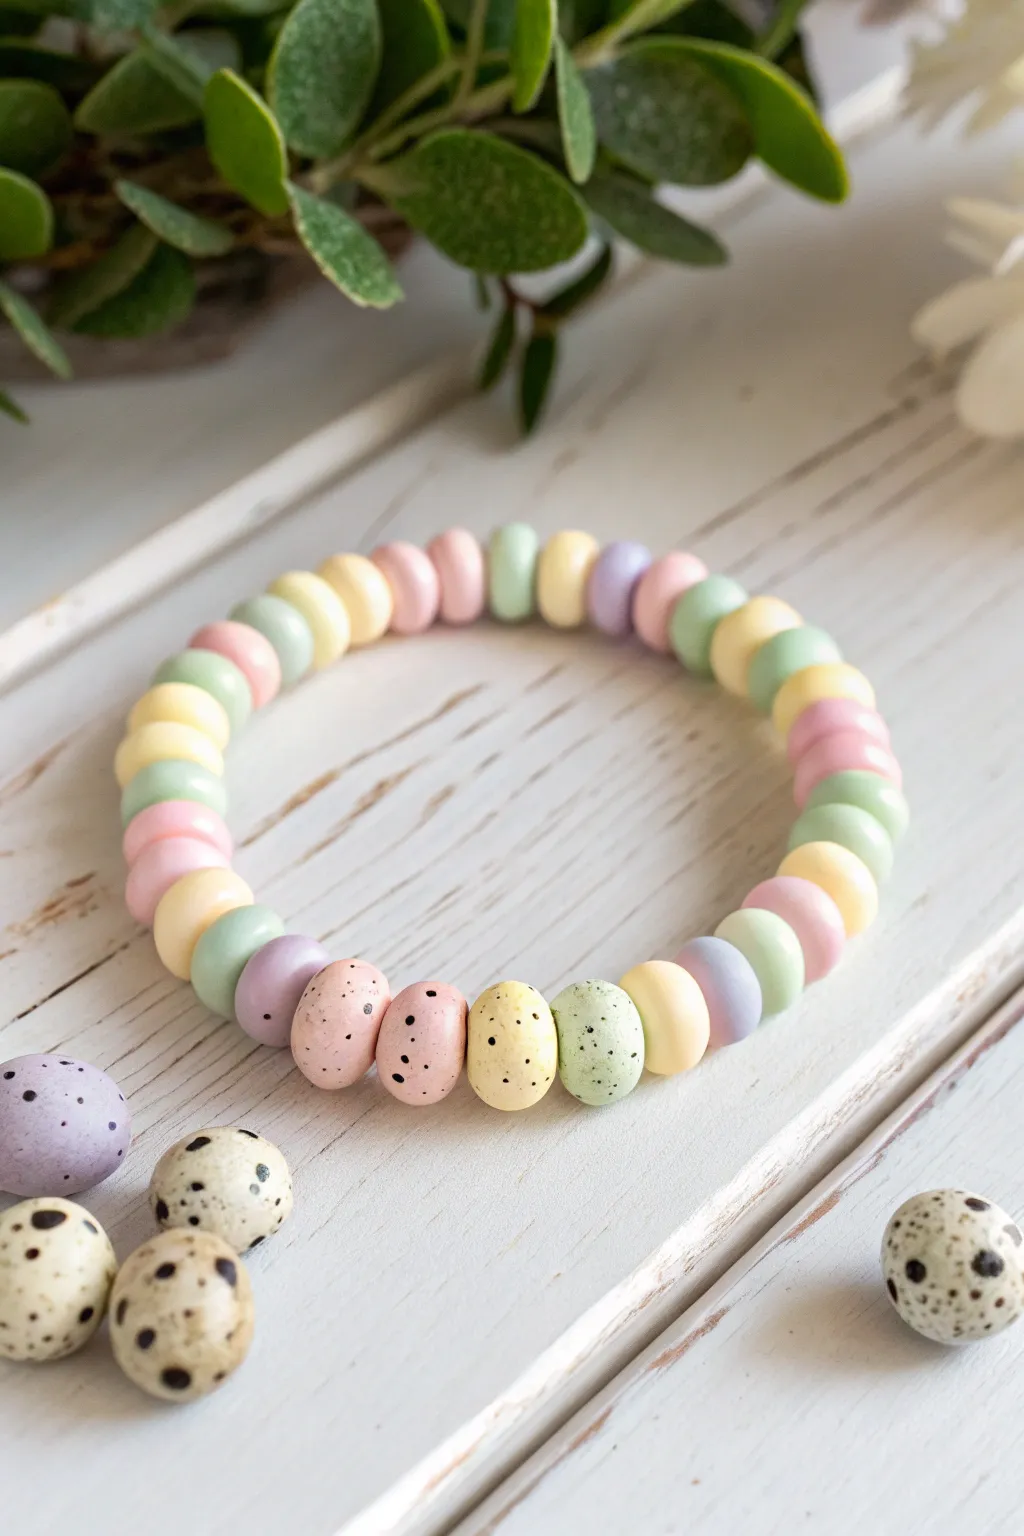
Capture the delicate beauty of spring with this charming Easter bracelet featuring soft pastel tones and unique speckled focal beads. It combines smooth polymer clay heishi beads with textured ones that mimic the look of real speckled bird eggs.
Step-by-Step Guide
Materials
- Polymer clay in pastel shades: Butter Yellow, Soft Pink, Mint Green, Lavender
- Acrylic paint: Black and Brown
- Old toothbrush or stiff bristle brush
- Rolling pin or pasta machine
- Small round circle cutter (approx. 8-10mm)
- Toothpick or bead piercing pin
- Elastic jewelry cord (0.8mm recommended)
- Super glue or jewelry adhesive
- Baking sheet and parchment paper
- Small loose speckled eggs for photo styling (optional)
Step 1: Prepping the Clay
-
Condition the clay:
Start by warming up your polymer clay blocks in your hands. Knead each color—pink, yellow, green, and lavender—separately until they are soft and pliable essential for preventing cracks later. -
Roll flattened sheets:
Using a rolling pin or a pasta machine on a thick setting (about 3-4mm), zero in on creating even sheets of each pastel color. I find a pasta machine makes this much more consistent. -
Create the rounded shape:
Instead of flat heishi discs, we want rounded, donut-like shapes. Roll small snakes of clay, cut them into equal segments, and roll each segment into a smooth ball about the size of a pea before flattening it slightly.
Paint Smearing?
If acrylic speckles smear when you glaze or handle them, bake the paint onto the clay first, or seal with a light spray varnish before stringing.
Step 2: Creating the Speckled Beads
-
Select focal beads:
Choose about four of your slightly flattened beads (one or two of each color) to transform into the speckled ‘egg’ focal points. Set these aside on your work surface. -
Prepare the speckle mix:
Dilute a very small amount of black and brown acrylic paint with water until it’s quite fluid but still opaque. -
Apply the speckles:
Dip an old toothbrush into the paint mixture. Hold it over your selected focal beads and run your thumb across the bristles to flick tiny splatters of paint onto the raw clay. Practice on paper first to control the spray. -
Let the paint dry:
Allow the paint flecks to dry completely on the raw clay before handling them, which usually takes about 10-15 minutes.
Make It Matte
To get that chalky, realistic eggshell texture, lightly sand the baked beads with fine-grit sandpaper or skip the glossy glaze entirely.
Step 3: Forming and Baking
-
Pierce the holes:
Using a toothpick or a piercing pin, carefully poke a hole through the center of every bead—both the plain and the speckled ones. Rotate the pin as you push to keep the bead shape round. -
Arrange on baking sheet:
Place all the pierced beads on a baking sheet lined with parchment paper. Ensure they aren’t touching each other so they bake evenly. -
Bake the beads:
Bake the clay according to the manufacturer’s instructions (typically 275°F/135°C for 15-30 minutes). Be careful not to burn the light pastel colors. -
Cool down:
Once baked, remove the tray from the oven and let the beads cool completely. The clay hardens fully as it cools.
Step 4: Assembly
-
Plan the pattern:
Lay out your beads on a design board or towel. The pattern in the image alternates colors (e.g., pink, green, yellow, lavender) with the four speckled beads grouped together in the center as the highlight. -
Measure the cord:
Cut a piece of elastic cord about 10 inches long. This gives you plenty of extra length for knotting. -
String the beads:
Thread the beads onto the elastic cord following your laid-out pattern. Start with the plain pastel beads and position the speckled ones in the middle. -
Check the size:
Wrap the strung beads around your wrist to check the fit. Add or remove plain beads from the ends if necessary. -
Tie the knot:
Tie a secure surgeon’s knot (right over left, left over right, looping through twice on the second pass). Pull it tight to secure the beads. -
Secure and trim:
Place a tiny drop of super glue on the knot for extra security. Once dry, trim the excess elastic ends close to the knot, and tuck the knot inside a neighboring bead if possible.
Now you have a sweet, seasonal accessory perfect for hopping into spring festivities


Carrot Pop Accent Bracelet
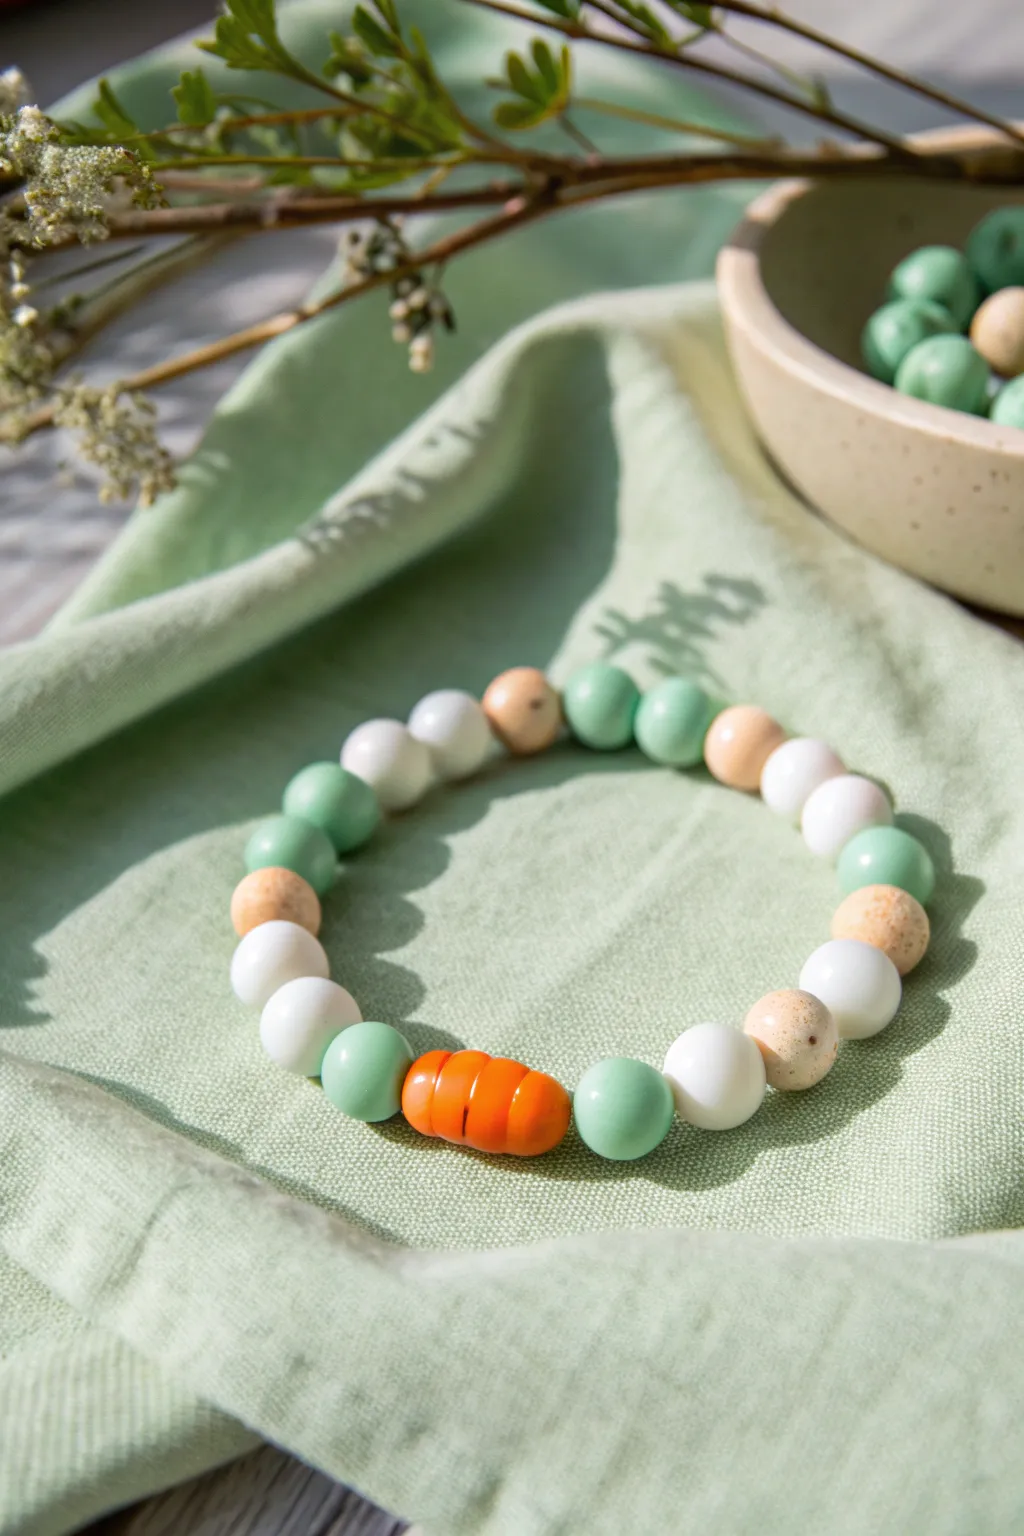
This charming bracelet features a subtle nod to the Easter bunny’s favorite snack with a single, vibrant orange focal bead. The soft pastel palette of mint green, creamy white, and speckled beige creates a fresh, spring-ready look that is perfect for seasonal stacking.
How-To Guide
Materials
- Polymer clay (Orange)
- Polymer clay (Mint Green)
- Polymer clay (White)
- Polymer clay (Beige or light tan)
- Ground pepper or clean sand (for speckling effect)
- Needle tool or toothpick
- Rolling pin or acrylic roller
- Elastic stretch cord (0.8mm or 1mm)
- Bead reamer (optional)
- Small circle cutter (optional, for uniform sizing)
- Gloss glaze (optional)
- Jewelry glue
Step 1: Crafting the Beads
-
Condition the Clay:
Begin by warming up your polymer clay in your hands until it is soft and pliable. You’ll need separate piles for the mint green, white, beige, and orange. -
Mix the Speckled Beige:
Take your beige clay and flatten it out. Sprinkle a tiny pinch of ground black pepper or very fine clean sand onto the surface. Fold the clay over and knead it thoroughly until the specks are evenly distributed to create a stone-like effect. -
Portion the Round Beads:
Roll the mint, white, and speckled beige clays into long, even snakes. Cut them into equal segments. I find using a small circle cutter on a flattened sheet ensures every bead starts with the exact same amount of clay. -
Roll the Spheres:
Roll each cut segment between your palms to create smooth, perfect spheres. Aim for beads that are approximately 8-10mm in diameter. -
Create the Carrot Focal Bead:
Take a slightly larger portion of orange clay. Roll it into a thick cylinder shape, similar to a bead but slightly longer—about 12-14mm long. -
Texturize the Carrot:
Using the side of a needle tool or toothpick, gently press vertical indentations around the circumference of the orange cylinder. This creates the segmented, pumpkin-like or carrot-slice texture shown in the photo. -
Pierce the Beads:
Carefully pierce a hole through the center of every bead using your needle tool. Twist the tool gently as you push through to avoid distorting the shape. For the orange bead, pierce it lengthwise. -
Bake:
Arrange your beads on a baking sheet lined with parchment paper. Bake according to the manufacturer’s instructions on your chosen brand of polymer clay (usually around 275°F/135°C for 15-30 minutes). -
Cool and Finish:
Let the beads cool completely. If desired, you can apply a light coat of water-based gloss glaze to the orange bead to make it pop, leaving the others matte for contrast.
Step 2: Assembly
-
Measure the Cord:
Wrap your elastic cord loosely around your wrist and add about 4 inches of extra length before cutting. This gives you plenty of room to tie the knot later. -
Pre-stretch the Elastic:
Give the cord a few firm tugs. Pre-stretching prevents the bracelet from loosening up and sagging after you wear it a few times. -
Start Stringing:
Begin threading your beads. Start with one mint green bead, then the orange focal bead, followed by another mint green bead to frame the centerpiece. -
Create the Pattern:
Continue stringing beads in a random or repeating pattern. A nice sequence to mirror the photo is: white, speckled beige, mint green, white. Repeat this around the bracelet. -
Check the Fit:
Wrap the strand around your wrist to check the size. Add or remove beads until it sits comfortably without digging into your skin. -
Tie the Knot:
Tie a surgeon’s knot (right over left twice, then left over right twice) to secure the bracelet. Pull the elastic tight so the knot is compact. -
Secure and Hide:
Place a tiny dab of jewelry glue on the knot. Once dried, trim the excess cord ends and gently tug the knot inside the hole of the nearest large bead to hide it.
Hole Perfection Pro-Tip
Make the bead holes slightly larger than you think you need. Clay shrinks slightly when baked, and a larger hole hides the elastic knot much easier.
Level Up: Greenery
Add two tiny green clay discs or a small metal leaf charm on either side of the orange bead to make it look even more like a fresh carrot from the garden.
Now you have a delightful, subtle Easter accessory that captures the colors of spring beautifully

The Complete Guide to Pottery Troubleshooting
Uncover the most common ceramic mistakes—from cracking clay to failed glazes—and learn how to fix them fast.
Daisy-and-Pastel Spring Bracelet
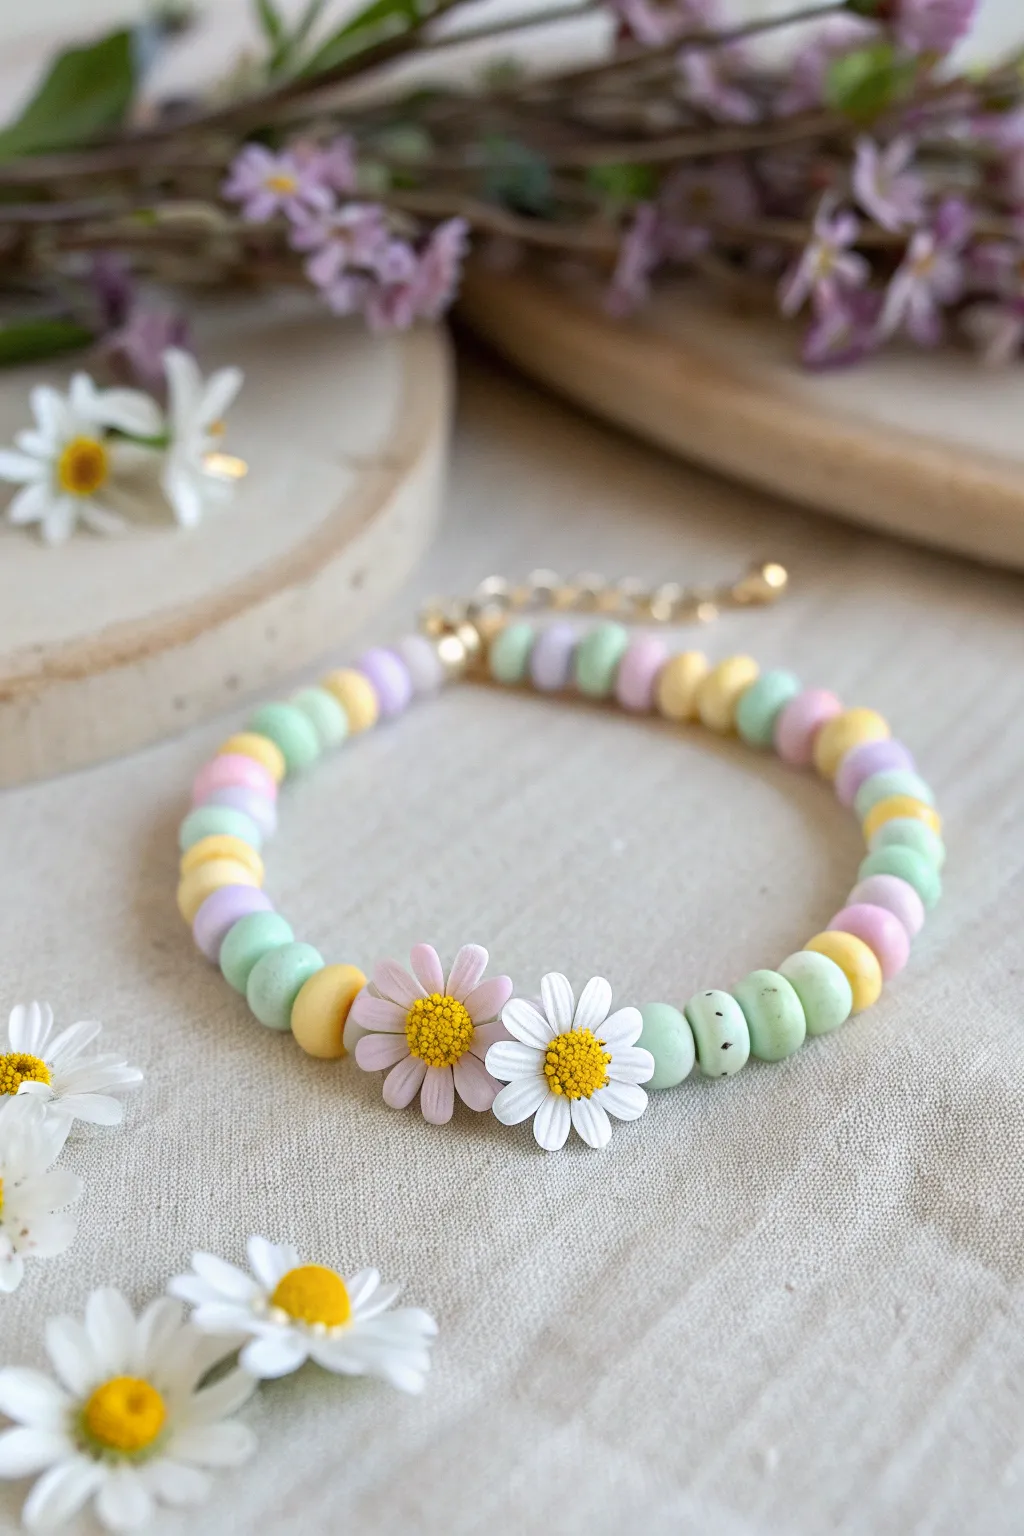
Capture the fresh, hopeful essence of Easter with this delicate polymer clay bracelet featuring soft candy-colored saucer beads and two focal daisies. With its sweet interplay of matte textures and gentle hues of mint, lemon, lavender, and blushing pink, this accessory evokes spring gardens in full bloom.
Detailed Instructions
Materials
- Polymer clay (white, pastel pink, pastel purple, pastel yellow, mint green, white)
- Small circle cutter (approx. 5-6mm)
- Needle tool or piercing pin
- Liquid polymer clay (translucent or white)
- X-Acto knife or clay blade
- Yellow chalk pastel (scraped into dust) or yellow acrylic paint
- Elastic stretch cord (0.7mm or 0.8mm)
- Gold tone crimp beads and covers
- Gold tone jump rings and lobster clasp
- Extension chain (optional)
- Jewelry pliers (flat nose and round nose)
- Soft paintbrush
- Toothbrush or texturing sponge
Step 1: Creating the Saucer Beads
-
Condition the clay:
Start by thoroughly conditioning your pastel clays—purple, mint green, yellow, and blush pink—until they are soft and pliable. I find this prevents cracking later on when we pierce the beads. -
Roll the snakes:
Roll each color into a uniform snake or log, roughly the thickness of a pencil (about 7-8mm in diameter), ensuring they are all consistent. -
Slice the discs:
Use your clay blade to slice these logs into small, even discs. You want them slightly thicker than a standard heishi bead, looking more like a small candy or saucer shape, about 3-4mm thick. -
Smooth the edges:
Gently pick up each disc and tap the edges with your finger to round them off slightly. They shouldn’t be perfect cylinders; a soft, rounded bead shape looks organic and sweeter for this design. -
Pierce the holes:
Using your needle tool, carefully pierce a hole through the center of face of each disc. Twist the needle as you push through to avoid distorting the circular shape. -
Bake the beads:
Arrange the beads on a baking sheet or tile. Bake according to your brand’s instructions (usually 275°F/130°C for 15-20 minutes). Let them cool completely before handling.
Step 2: Sculpting the Daisy Focal Points
-
Prep daisy colors:
Condition a small amount of white clay for one flower and a soft blush pink for the second flower. -
Form the petals:
Roll tiny teardrop shapes—eight to ten for each flower. Flatten them slightly with your finger to create elongated oval petals. -
Assemble the flower base:
Arranging the petals in a circle so their points meet in the center. Gently press them together where they touch. -
Add petal details:
Use the back of your knife or a needle tool to impress a single line down the center of each petal for a realistic floral texture. -
Create the center:
Roll a small ball of yellow clay for the flower center. Flatten it slightly into a dome shape. -
Texture the center:
Before attaching the yellow center, use a toothbrush or a needle tool to stipple the surface, giving it a pollen-like, fuzzy texture. -
Attach the center:
Place a tiny dot of liquid clay in the middle of your petal ring and press the textured yellow dome firmly on top. -
Pierce the flowers:
Carefully pierce a horizontal channel through the side of the flower assembly, near the base of the yellow center, so the elastic can pass through later. Alternatively, you can bake them first and glue a pre-baked bead to the back. -
Final Bake:
Bake the two finished daisies following package directions. Allow them to cool.
Fingerprint Fixer
If you notice fingerprints on your raw clay beads, lightly brush them with a little baby oil or cornstarch before baking to smooth the surface instantly.
Step 3: Assembly
-
Measure the cord:
Cut a piece of elastic cord about 9 inches long. Pre-stretch it by pulling firmly on both ends a few times to prevent it from sagging later. -
Plan the pattern:
Lay out your beads on a mat. Create a repeating pattern like mint, mint, yellow, pink, purple. This randomized pastel look mimics a candy necklace. -
String the beads:
String your beads onto the elastic. Thread the white daisy and the pink daisy next to each other as the centerpiece, then continue the bead pattern. -
Check for sizing:
Wrap the strand around your wrist to check the fit. Add or remove beads as needed to get the perfect length. -
Tie the knot:
Tie a surgeon’s knot (right over left twice, left over right once) and pull tight. Add a tiny drop of superglue or jewelry glue to the knot for security. -
Finish with hardware:
For a more professional finish shown in the photo, instead of tying, use crimp beads on each end to attach jump rings and a lobster clasp. Cover the crimps with gold covers for a polished look.
Pro Tip: Daisy Centers
For ultra-realistic flower centers, shave a bit of brown pastel chalk over the textured yellow clay before baking to add depth and shadow.
Enjoy wearing your lovely handmade slice of spring all season long
Pastel Ombre “Egg Dye” Fade
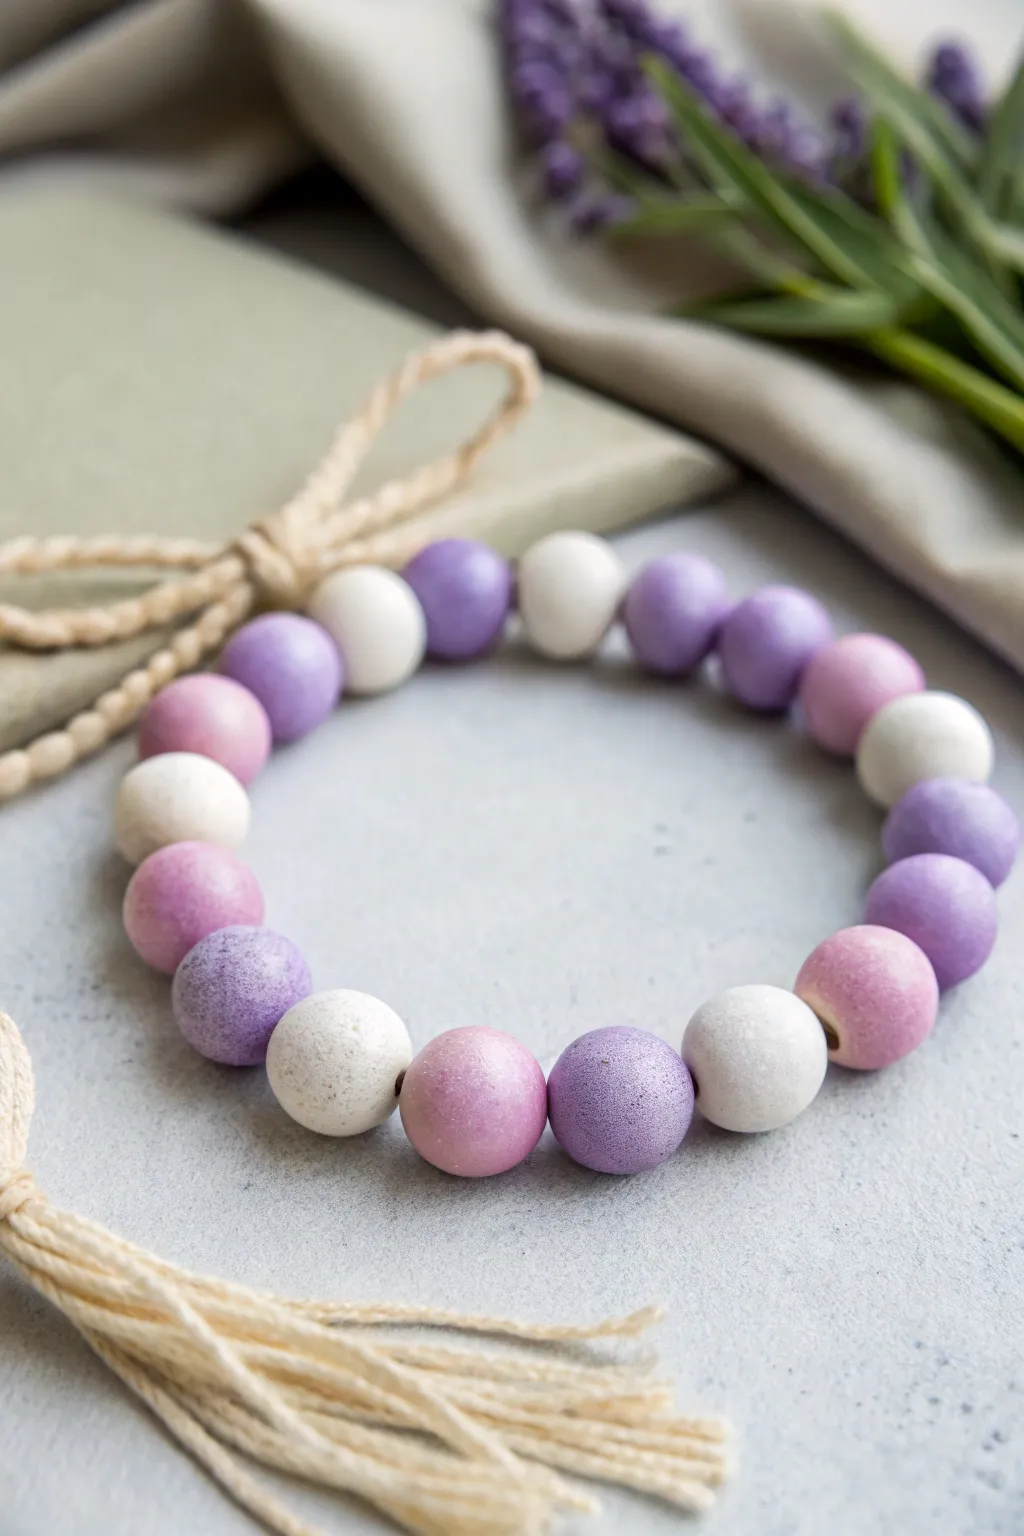
Capture the soft, whimsical essence of spring with this textured clay bead bracelet featuring a gentle gradient of purple, lavender, pink, and white. The matte, stone-like finish of the beads gives them a sophisticated feel, perfect for a subtle Easter accessory.
Step-by-Step Guide
Materials
- Polymer clay (White, Purple, Pink)
- Acrylic paint (white and lilac) for speckling
- Old toothbrush or stiff bristle brush
- Bead piercing tool or toothpick
- Baking sheet
- Parchment paper
- Elastic jewelry cord (0.8mm or 1mm)
- Super glue or jewelry cement
- Scissors
- Wet sandpaper or denim fabric (for finishing)
Step 1: Mixing the Clay Palette
-
Condition the white clay:
Start by warming up a significant block of white polymer clay in your hands until it becomes soft and pliable. Divide this white clay into four equal piles. -
Create the lavender shade:
Take a small pinch of purple clay and mix it thoroughly into one of your white piles. Knead until the color is completely uniform, aiming for a medium lavender tone. -
Mix the pale pink:
Take a tiny amount of pink clay and mix it into the second white pile. You want a very soft, blush-like pink, so add color sparingly. -
Create the deep purple:
For the darkest shade, mix a larger amount of purple clay into the third pile. This should be distinct from the lavender but still pastel-leaning. -
Leave the white pure:
Keep the fourth pile as pure white. You now have your four base colors: white, blush pink, lavender, and deep purple.
Sticky Situation?
If your fingerprints are showing up on the raw clay, lightly dust your fingertips with cornstarch before rolling. This smoothens the surface instantly.
Step 2: Forming and Texturing
-
Measure the beads:
Pinch off equal-sized pieces of clay from each color pile. Aim for pieces that are roughly 1/2 inch in diameter when rolled. I find using a small cookie cutter on a flattened sheet helps keep sizing consistent. -
Roll spheres:
Roll each piece between your palms to create smooth, round spheres. Don’t worry if they aren’t geometric perfection; a little organic shape adds to the handmade charm. -
Add the stone texture:
To achieve that matte, stone-like look seen in the photo, gently roll the unbaked beads over a piece of medium-grit sandpaper or dab them lightly with an old toothbrush. -
Pierce the holes:
Using your bead piercing tool or a toothpick, carefully drill a hole through the center of each bead. Rotate the bead as you pierce to prevent flattening the shape.
Step 3: Baking and Speckling
-
Bake the beads:
Arrange the beads on a parchment-lined baking sheet. Bake according to your brand of polymer clay instructions (usually around 275°F or 135°C for 15-30 minutes). -
Cool down:
Let the beads cool completely before handling. They will be slightly soft when hot but harden as they cool. -
Prepare the speckle paint:
Dilute a very small amount of white and lilac acrylic paint with water until it’s fluid but not dripping. -
Apply the egg-dye speckle:
Load an old toothbrush with the diluted paint. Run your thumb over the bristles to flick tiny droplets onto the beads. Keep this subtle; you just want a hint of texture. -
Seal (Optional):
If you want extra durability, apply a thin layer of matte varnish. Avoid glossy finishes to maintain the natural egg-shell look.
Level Up: Scented Beads
Knead a drop of lavender essential oil into the clay after baking (on porous clay) or use aroma-beads as spacers for a bracelet that smells like spring.
Step 4: Assembly
-
Layout the pattern:
Arrange your beads on a table. Alternate the colors randomly or in a recurring pattern (e.g., White, Lilac, Purple, Pink) to mimic the photo’s balanced mix. -
String the beads:
Cut a piece of elastic cord about 10 inches long. Thread your beads onto the cord, checking the fit around your wrist as you go. -
Tie the knot:
Once you have the desired length, tie a surgeon’s knot (right over left, left over right) and pull it tight. Stretch the cord slightly and retighten to secure it. -
Secure and hide:
Add a tiny drop of super glue to the knot. once dry, snip the excess cord ends and gently tug the cord to hide the knot inside one of the bead holes.
Enjoy wearing your handmade pastel bracelet as a lovely nod to the season


What Really Happens Inside the Kiln
Learn how time and temperature work together inside the kiln to transform clay into durable ceramic.
Striped Color Blocks Like Decorated Eggs
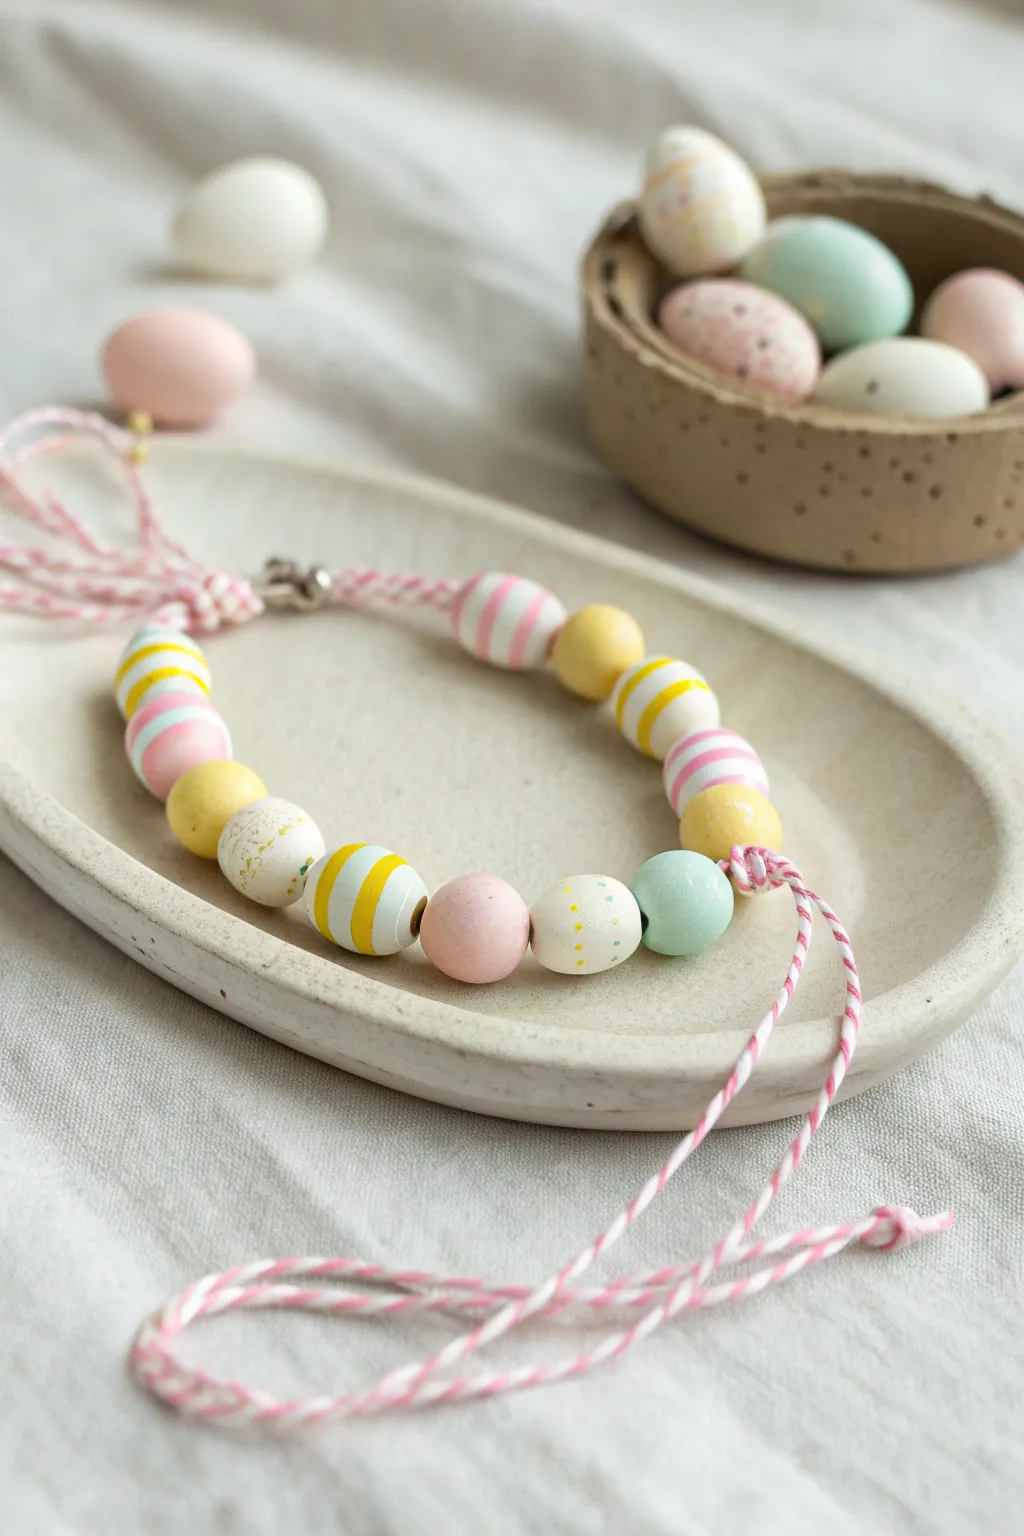
Capture the charm of hand-painted Easter eggs with this delightful wooden bead bracelet. Featuring soft pastels, playful stripes, and speckles strung on classic baker’s twine, it’s a nostalgic accessory perfect for spring.
Step-by-Step
Materials
- Unfinished round wooden beads (approx. 16mm-20mm)
- Acrylic craft paints (pastel pink, yellow, mint green, white)
- Small flat paintbrush
- Fine detail paintbrush or toothpick
- Pink and white baker’s twine
- Washi tape or masking tape
- Skewers or toothpicks (for holding beads while painting)
- Small piece of cardboard or foam block
- Scissors
- Clear matte sealant spray (optional)
Step 1: Prepping and Planning
-
Set up your drying station:
Before you unscrew a single paint cap, push several wooden skewers into a foam block or a sturdy piece of cardboard. This simple rig will hold your beads securely, allowing you to paint all sides without getting messy fingerprints on your work. -
Select your beads:
Choose about 13-15 wooden beads, depending on your wrist size. Slide each bead onto a skewer. If they slip down, you can wrap a tiny bit of tape around the skewer shaft to hold the bead in place near the top. -
Plan your palette:
Decide on your color scheme based on the image: a mix of sunny yellow, soft pink, robin’s egg blue, and plain white. Pour a small amount of each acrylic paint onto a palette or paper plate.
Sticky Situation?
If beads keep spinning on the skewer while you paint, wrap a small rubber band or a piece of masking tape around the skewer shaft just below the bead to create a stopper.
Step 2: Painting the Base Coats
-
Paint solid colors:
Start by painting several beads in solid colors. For the look in the photo, create a few solid yellow, a few solid pink, and one or two mint jelly bean green beads. Leave a few beads completely raw wood for a natural touch. -
Apply white base coats:
For the beads that will have stripes later, paint them a solid white first. This ensures the pastel stripes will pop and look bright rather than soaking into the wood grain. -
Let them dry:
Allow all your base coats to dry completely. Acrylics dry fast, but giving them 15-20 minutes ensures you won’t smudge the base when adding details.
Add Some Shine
Mix a tiny amount of metallic gold paint with water and splatter it over the finished painted beads for a chic, gilded speckle effect that catches the light.
Step 3: Creating the Striped and Speckled Designs
-
Create the striped beads:
Take your white-painted beads. Using a steady hand and a small flat brush, paint horizontal bands of color around the bead. Try alternates like a thick pink band with thin yellow stripes. -
Add detail stripes:
For finer lines, switch to a very thin detail brush. On some yellow beads, add thin white stripes. The key is manual imperfection; the lines don’t need to be mechanically straight to look charming. -
Paint the speckled egg effect:
Take a white or light cream bead. Dip a stiff-bristled brush or an old toothbrush into yellow or blue paint. Use your thumb to flick the bristles, splattering tiny dots onto the bead for a speckled egg look. -
Create color-blocked beads:
For a bold look, use washi tape to mask off half of a raw wooden bead. Paint the exposed half a solid color like yellow or pink, then peel the tape while the paint is still wet for a crisp line. -
Final drying and sealing:
Let all your decorated beads dry thoroughly on their skewers. I usually give them an hour to be safe. If you want durability, give them a light mist of clear matte sealant.
Step 4: Assembly
-
Cut the twine:
Cut a generous length of pink and white baker’s twine, about 24 inches. Fold it in half to double the strand for extra strength and visual texture. -
Create the loop closure:
At the folded end, tie a simple overhand knot to create a small loop. Ensure the loop is large enough for your closure knot to pass through later, but intimate enough to stay secure. -
String the beads:
Ideally, wrap a small piece of tape around the cut ends of your twine to make a ‘needle.’ Thread your dried beads onto the double strand. Arrange them intentionally—alternating striped, solid, and speckled patterns. -
Check the fit:
Wrap the strung beads around your wrist. Add or remove beads until the ends meet comfortably without being too tight. -
Secure the end:
Once satisfied with the length, push the beads snugly together toward the loop knot. Tie a sturdy overhand knot right against the last bead to lock them in place. -
Make the toggle knot:
Leave a small gap of exposed twine (about 1 inch) after the securing knot, then tie a second, bulky knot. This second knot acts as the ‘button’ that will slip through your starting loop. -
Trim the tails:
Trim any excess twine after your toggle knot, leaving short, cute tails about an inch long to fray slightly for a decorative finish.
Now you have a festive piece of handmade jewelry that celebrates the season with playful color
Tiny Egg-Shaped Focal Bead Bracelet
Celebrate spring with this charming bracelet featuring handmade polymer clay beads shaped like miniature Easter eggs. The soft pastel palette and realistic speckled details give it a festive, organic feel perfect for the season.
Step-by-Step Tutorial
Materials
- Polymer clay in pastel colors (baby pink, mint green, butter yellow, pale blue)
- White polymer clay
- Brown and black acrylic paint
- Old toothbrush or stiff paintbrush
- Bead piercing pin or thick needle
- Elastic beading cord (0.8mm)
- Super glue or jewelry cement
- Baking sheet and parchment paper
- Gloss or matte glaze (optional)
Step 1: Shaping the Eggs
-
Condition the Clay:
Begin by kneading your pastel polymer clay colors until they are soft and pliable. If you don’t have pre-mixed pastels, mix white clay with tiny amounts of saturated colors to achieve soft, candy-like hues. -
Measure the Spacer Beads:
Pinch off small, pea-sized amounts of clay for the regular beads. Aim for roughly equal sizes, about 8-10mm in diameter, keeping the colors varied. -
Form the Egg Shape:
Roll each piece into a smooth ball first, then gently roll just one side between your fingers to taper it slightly, creating that distinctive oval egg silhouette. -
Create the Focal Bead:
Select a color for your centerpiece bead—white or cream works beautifully—and use about double the amount of clay compared to the smaller beads. Shape this into a larger, more prominent egg. -
Pierce the Holes:
Using your bead pin, carefully pierce a hole through the center of each egg from the wider bottom to the tapered top. Gently rotate the pin as you push through to avoid distorting the shape.
Hiding Fingerprints
Before baking, lightly brush your raw clay beads with baby powder or cornstarch. This smooths out any accidental fingerprints and leaves a soft, matte texture.
Step 2: Speckling and Baking
-
Prepare the Paint:
Dilute a small dab of brown or black acrylic paint with a drop of water. You want an inky consistency that splatters easily but isn’t too runny. -
Apply the Speckles:
Dip the bristles of an old toothbrush into the paint mixture. Hold the brush over your raw clay beads and run your thumb across the bristles to flick tiny droplets of paint onto the surface. I like to practice on a paper towel first to control the spray. -
Check Coverage:
Rotate the beads slightly (being careful not to squish them) to ensure the speckles hit all sides, giving them that realistic bird’s egg appearance. -
Bake the Beads:
Arrange the beads on a parchment-lined baking sheet. Bake according to your clay manufacturer’s instructions, typically around 275°F (135°C) for 15-30 minutes. -
Cool Down:
Allow the beads to cool completely on the baking sheet. They will harden fully as they return to room temperature. -
Optional Glaze:
If you prefer a ceramic look, brush a thin layer of gloss glaze over the cooled beads. For a natural eggshell finish, leave them unvarnished or use a matte sealer.
Step 3: Assembly
-
Cut the Cord:
Cut a piece of elastic cord about 10-12 inches long. This gives you plenty of extra slack for tying the knot later. -
Plan the Pattern:
Lay your beads out on a surface to finalize the color order. Place your large focal bead in the center and alternate the pastel colors on either side for a balanced look. -
String the Beads:
Thread the beads onto the elastic cord, following your planned pattern. Ensure the holes are clean and the cord passes through easily. -
Check the Fit:
Wrap the strung beads around your wrist to check the sizing. Add or remove small spacer beads as needed for a comfortable fit. -
Tie the Knot:
Tie a secure surgeon’s knot (right over left, left over right) and pull it tight. The elastic should be stretched slightly as you knot it to prevent future sagging. -
Secure and Trim:
Place a tiny drop of super glue on the knot for extra security. Once dry, trim the excess cord ends close to the knot, and if possible, tuck the knot inside the large focal bead.
Uneven Holes?
If piercings distort your egg shape too much, try letting the clay rest in the fridge for 10 minutes before piercing. The firmer clay holds its shape better.
Wear your speckled creation with pride or wrap it up as a thoughtful Easter basket surprise

TRACK YOUR CERAMIC JOURNEY
Capture glaze tests, firing details, and creative progress—all in one simple printable. Make your projects easier to repeat and improve.
Chick Yellow With White and Mint
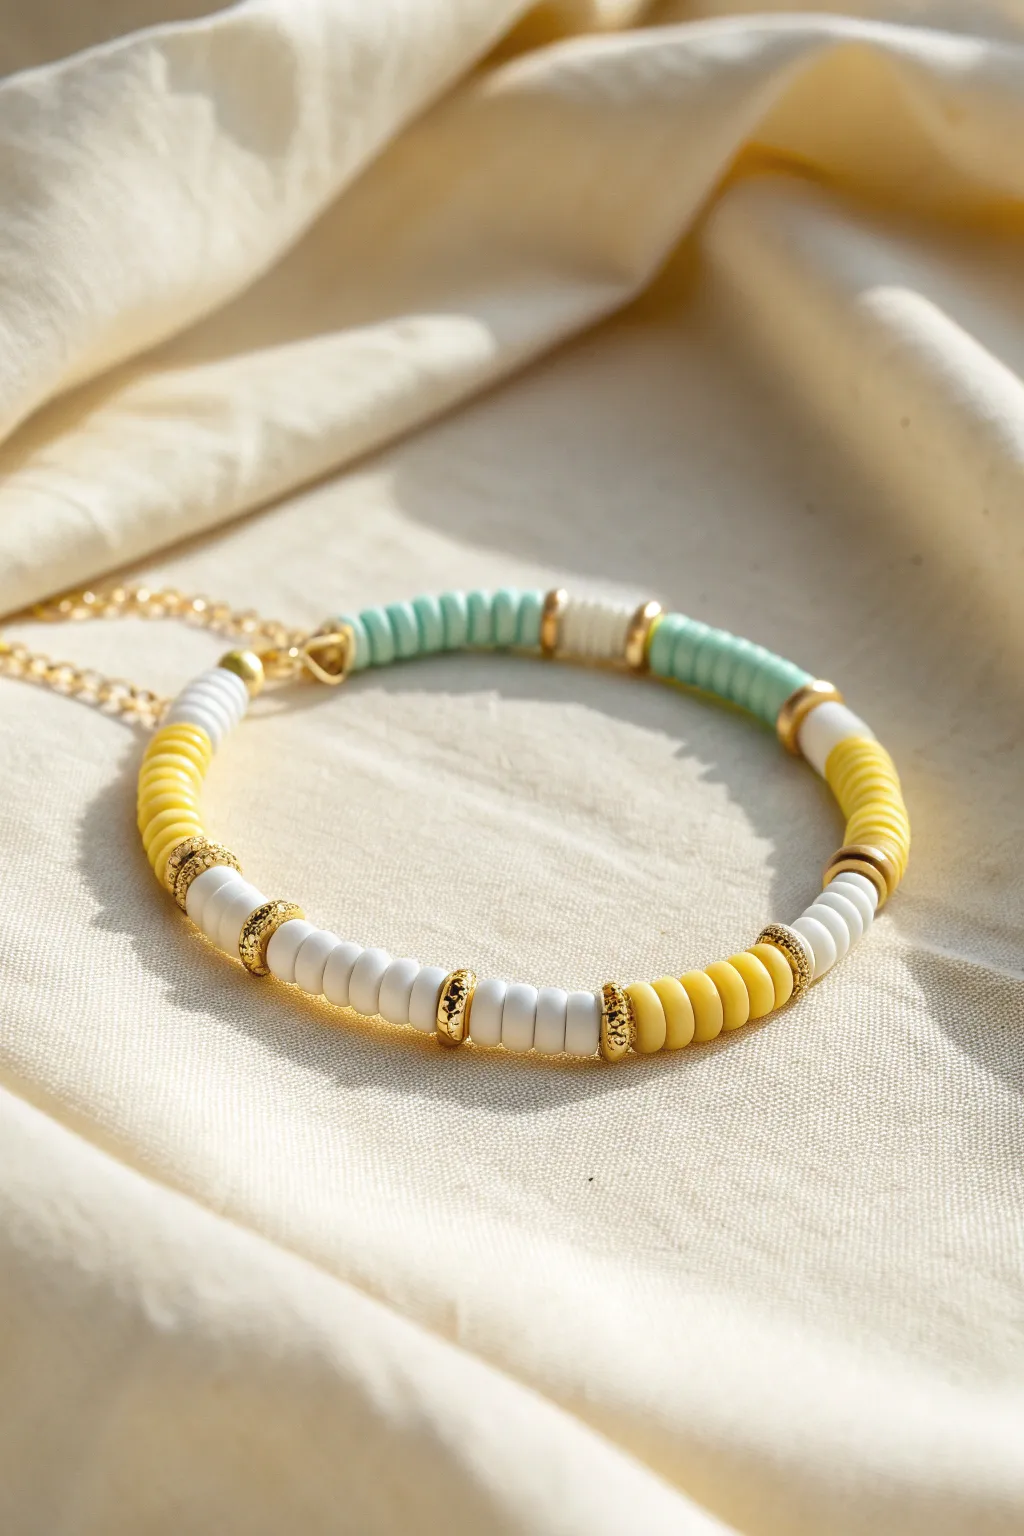
Capture the fresh, sunny vibe of Easter with this delightful beaded bracelet featuring alternating sections of chick yellow, crisp white, and soft mint green. Gold spacer accents add a touch of elegance to the playful clay discs, making it a perfect accessory for spring gatherings.
Step-by-Step Guide
Materials
- Polymer clay heishi beads (flat disc beads) in pale yellow
- Polymer clay heishi beads in white
- Polymer clay heishi beads in mint green
- Gold rounded spacer beads (smooth finish)
- Gold textured or rhinestone rondelle spacer beads
- Elastic beading cord (0.8mm or 1mm)
- Small gold jump rings
- Gold lobster claw clasp
- Short length of gold extender chain
- Bead stopper or painter’s tape
- Scissors or jewelry wire cutters
- Jewelry pliers (flat nose)
Step 1: Preparation
-
Measure the cord:
Cut a piece of elastic beading cord about 10-12 inches long. This gives you plenty of extra room to tie knots later without the beads sliding off. -
Secure the end:
Attach a bead stopper to one end of your cord, or simply tape it down to your work surface prevents beads from escaping while you work. -
Plan the pattern:
Visualize your sections. This design relies on color blocking rather than random mixing. You will be creating distinct segments of yellow, white, and mint.
Uneven Blocks?
Don’t stress if bead counts aren’t exact. Clay disc beads vary slightly in thickness. Use a ruler to measure section length (e.g., 1 inch) rather than counting individual beads.
Step 2: Beading the Sections
-
Start with mint:
Begin by threading on approximately 15 to 20 mint green clay discs. The exact number depends on how chunky you want your color blocks to be. -
Add first transition:
Slide on a smooth gold spacer bead, followed by a small section of about 5 or 6 white clay discs. -
Second transition:
Add another smooth gold spacer bead to cap off this small white accent section. -
Mint continuation:
Thread another long section of mint green beads, matching the length of your first mint section for symmetry. -
Gold texture accent:
Now, add a textured or rhinestone gold spacer bead. These are slightly larger and add a nice sparkle compared to the smooth spacers. -
Yellow segment:
Thread on a section of yellow clay beads. Aim for about 10-12 beads here. -
White center block:
Place a textured gold spacer, followed by a substantial block of white beads (about 15-20), and then another textured gold spacer. -
Repeat the pattern:
Continue adding sections, alternating your colors (yellow, white, mint) and separating them with your gold spacers. -
Check the length:
Wrap the strand around your wrist occasionally. I like to stop when the beaded portion reaches just around the wrist bone, leaving room for the clasp. -
Final bead:
Ensure your pattern ends with a gold spacer bead or crimp cover for a polished look where the clasp attaches.
Level Up: Easter Charm
Add a tiny enamel bunny or egg charm to the jump ring near the clasp. It creates a cute dangle effect that emphasizes the Easter theme without altering the main pattern.
Step 3: Finishing Touches
-
Prepare the closer:
Since this uses a clasp rather than just a stretch knot, thread a crimp bead (if using) or tie a secure surgeon’s knot onto a closed jump ring at one end. -
Attach the clasp:
Open a jump ring using your pliers and attach the lobster claw clasp to one end of your beaded strand. -
Attach the chain:
On the opposite end of the bracelet, attach the small length of gold extender chain using another jump ring. -
Secure knots:
If you tied knots directly, place a tiny dab of jewelry glue on the knot and let it dry before trimming the excess cord close.
Now you have a refreshing, pastel accessory that perfectly captures the spirit of the season
Easter Basket Green With Pink Highlights
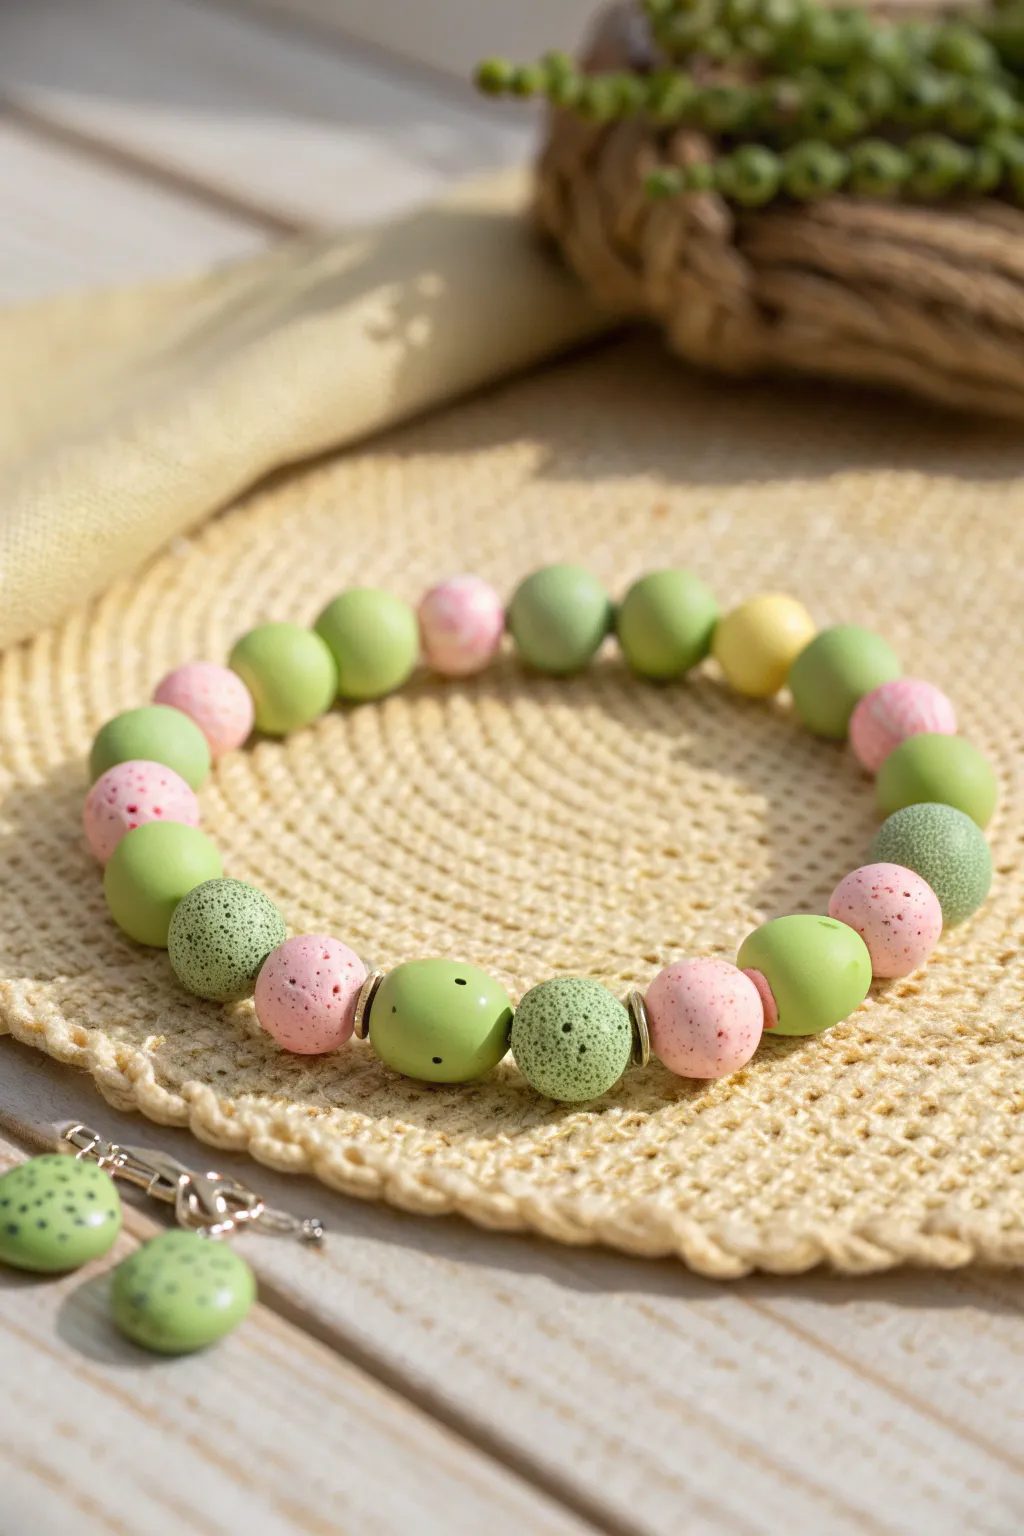
Capture the fresh, burgeoning feel of early spring with this polymer clay bead bracelet, featuring a mix of smooth pastels and organic, moss-like textures. The gentle interplay of soft sage greens and speckled pinks creates a sophisticated yet playful accessory perfect for your Easter basket.
How-To Guide
Materials
- Polymer clay (light sage green, bright pastel green, pastel pink, white)
- Acrylic paint (black or dark brown)
- Coarse salt or sandpaper (for texturing)
- Stretch cord (0.8mm or 1mm)
- 2 small metal spacer beads (gold or brass tone)
- Toothpicks or a fine bead reamer
- Gloss or satin varnish (optional)
- Needle tool
- Old toothbrush (for speckling)
- Jewelry glue
- Oven for baking clay
Step 1: Preparing the Clay Colors
-
Mix your base greens:
Start by conditioning your light sage green clay until it is soft and pliable. If you want a variety of tones like the bracelet shown, mix a small amount of white into half of your green clay to create a lighter, milkier shade. -
Prepare the pink clay:
Condition the pastel pink clay. To achieve the marbled look seen on some beads, take a tiny pinch of white clay and incompletely mix it into a portion of the pink clay, stopping while streaks act as marble veins. -
Create the ‘mossy’ green base:
For the textured beads, mix a darker sage green. If you don’t have a darker shade, mix a tiny dot of black or brown into your standard green.
Pro Tip: Consistent Sizes
Use a small circular cookie cutter or a dedicated clay cutter to punch out identical circles of flattened clay before rolling. This ensures every bead has the exact same volume.
Step 2: Forming & Texturing Beads
-
Roll uniform spheres:
Pinch off equal amounts of clay for all your colors. Roll them between your palms into smooth, even balls, aiming for about 10-12mm in diameter. -
Create the smooth beads:
Set aside the smooth solid green, pastel yellow (if using), and marbled pink beads. Ensure they are perfectly round with no fingerprints. -
Texture the moss beads:
For the specific ‘mossy’ green beads, roll the unbaked clay balls gently over sandpaper or press coarse salt into the surface (which you’ll wash off after baking) to create a pitted, organic surface. -
Add speckles to pink beads:
Take your smooth pink beads. Dip an old toothbrush into slightly watered-down specific pink or reddish-brown acrylic paint and flick the bristles to create a fine spray of speckles on the raw clay. Alternatively, you can mix ground pepper or spices into the clay before rolling for an internal speckled look. -
Texture the specific green speckled beads:
For the green beads that have both texture and black specks, you can press a stiff brush into the clay surface to pit it, then lightly flick black paint over them. -
Piercing the beads:
Use a needle tool or toothpick to carefully pierce a hole through the center of each bead. Rotate the bead while piercing to avoid flattening the shape.
Level Up: Scented Clay
Before baking, mix a drop of essential oil like lavender or mint into the clay. The porous, textured beads will hold a subtle scent, making your bracelet act as a diffuser.
Step 3: Baking & Finishing
-
Bake the beads:
Arrange your beads on a baking sheet or tile. Bake according to the manufacturer’s instructions for your specific brand of polymer clay (usually around 275°F/135°C for 15-30 minutes). -
Cool and clean:
Allow the beads to cool completely. If you used the salt technique for texture, soak the beads in warm water and scrub with a brush to dissolve the salt, revealing the pits. -
Paint details:
Using a very fine detail brush or a toothpick, add the two tiny black dots (eyes) to the smooth green accent bead to give it a whimsical character, as seen in the center of the bracelet. -
Seal (Optional):
If you want extra durability, apply a thin coat of satin varnish to seal the paint, but the matte look of raw clay is also quite lovely for this natural style.
Step 4: Assembly
-
Cut the cord:
Cut a piece of stretch cord about 10-12 inches long. Pre-stretch the cord by pulling it gently a few times; this prevents the bracelet from loosening later. -
Plan your pattern:
Lay out your beads on a bead board or towel. A nice pattern is to group greens, then transition to pinks, or alternate textures. -
Add accent spacers:
Place the two thin gold spacer beads on either side of your central focal bead (perhaps the one with the painted dots) or the textured pink bead. -
String the beads:
Thread all beads onto the elastic cord, maintaining your prepared pattern. -
Knot the bracelet:
Tie a surgeon’s knot (right over left, left over right twice). Pull the knot tight. -
Secure the knot:
Dab a tiny drop of jewelry glue on the knot. I like to let this dry briefly before sliding the knot inside the hole of a neighboring bead to hide it. -
Trim excess cord:
Once the glue is fully cured, trim the excess cord ends carefully with sharp scissors.
Wear your finished bracelet as a sweet reminder of spring’s arrival or wrap it up as a handmade gift.
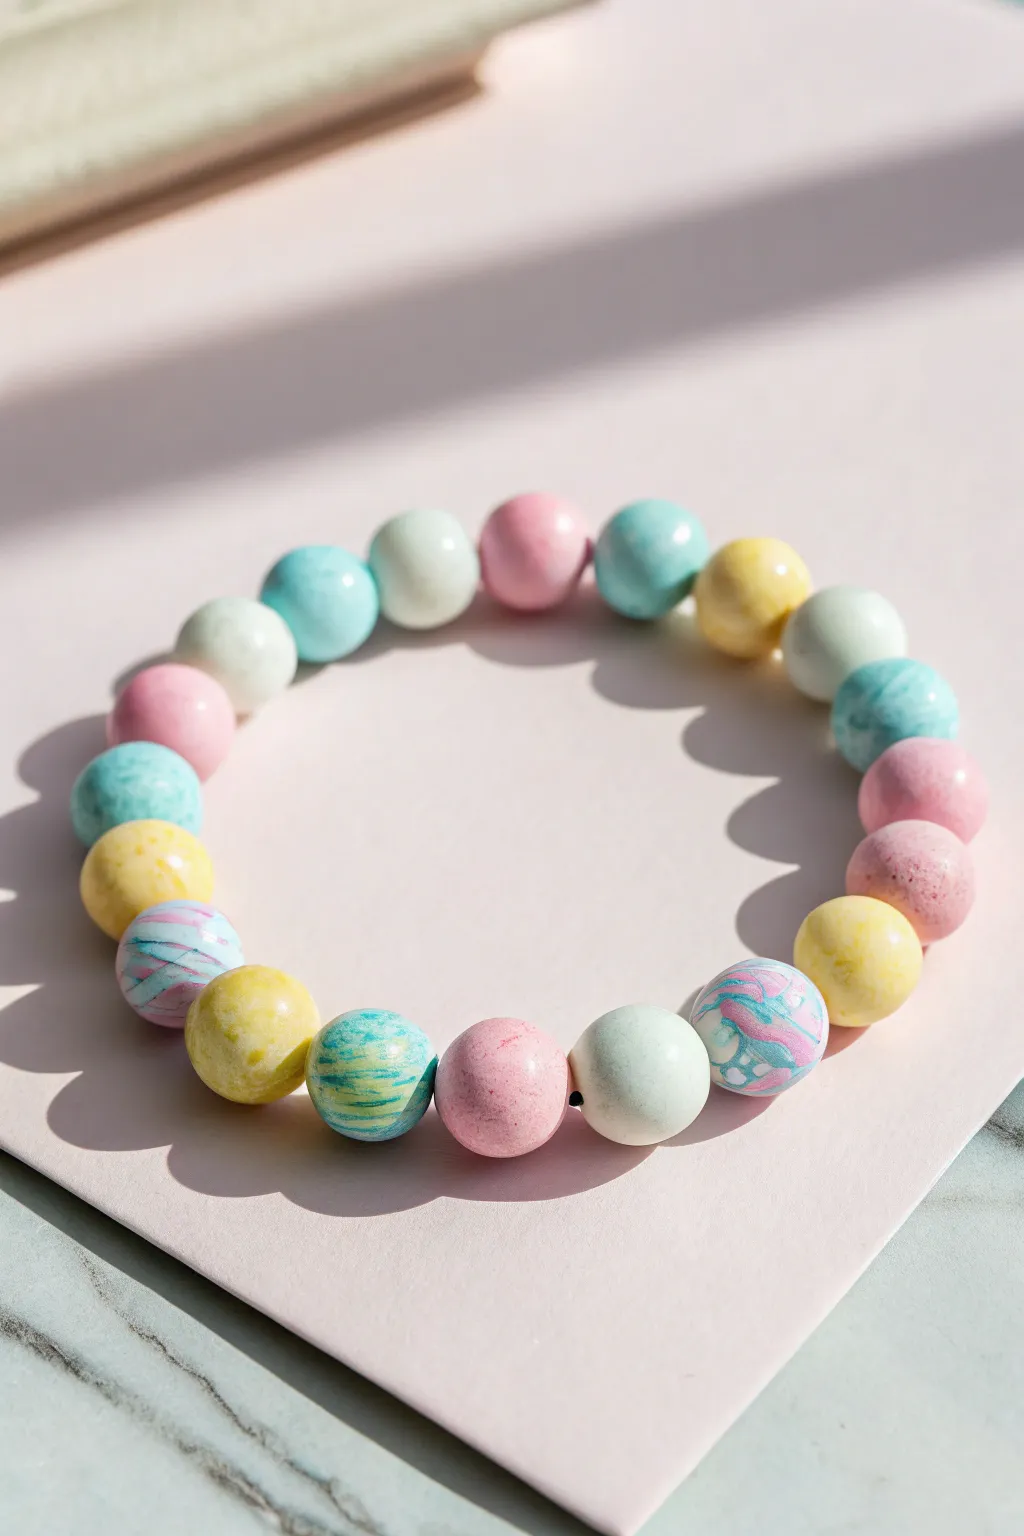
Sunday Best Pastels With Gold Spacers

Evoke the soft, airy feel of a spring morning with this classic pastel bracelet. Combining creamy round beads in Easter hues with elegant gold spacers creates a sophisticated accessory perfect for pairing with your Sunday best.
Step-by-Step Guide
Materials
- Round polymer clay or ceramic beads (8mm or 10mm) in pastel yellow, mint green, powder pink, and lavender
- Gold seed beads (size 8/0 or 6/0) or small gold heishi spacer beads
- Strong elastic cord (0.8mm or 1.0mm recommended)
- Beading needle (optional but helpful)
- Scissors or jewelry snips
- Super glue or jewelry cement (E6000)
- Bead design board or soft cloth
- Masking tape
Step 1: Preparation & Design
-
Measure your wrist:
Wrap a flexible measuring tape around your wrist to find your size. Add about half an inch to this measurement to ensure the bracelet fits comfortably without being too tight against the skin. -
Cut the elastic:
Cut a piece of elastic cord approximately 10-12 inches long. Having this extra length makes the final knotting process significantly easier and prevents accidental bead spills. -
Pre-stretch the cord:
Hold the ends of your cut elastic and give it a few firm tugs. Pre-stretching is crucial because it prevents the bracelet from sagging or loosening up after you wear it a few times. -
Secure the end:
Fold a small piece of masking tape over one end of the elastic cord to act as a bead stopper, or simply attach a binder clip. This keeps your work safe if you need to step away. -
Plan your pattern:
Lay out your pastel beads on a bead board or cloth to visualize the pattern. For the look in the image, try a random mix or a gentle repeating sequence like yellow, mint, lavender, pink.
Step 2: Beading Process
-
Start with a pastel bead:
Thread your first large pastel bead onto the elastic. I prefer starting with a bead that has a larger hole if possible, as it can help hide the knot later. -
Add the first spacer:
Slide one gold seed bead or spacer onto the cord so it rests directly against the pastel bead. -
Continue the sequence:
Add your next pastel bead color, followed immediately by another gold spacer. -
Check the spacing:
Continue stringing in this alternating pattern—one pastel bead, one gold spacer—until you have filled the cord. Ensure the gold spacers sit flat and aren’t getting twisted. -
Verify the length:
Review your work periodically by wrapping the strand around your wrist. The ends should meet comfortably with just a little slack. -
Finish the stringing:
End your pattern with a gold spacer so that when you tie the bracelet, the pattern remains unbroken (since you started with a pastel bead).
Knot Slipping?
If your elastic is slippery, try sanding the very ends where you tie the knot with rough sandpaper before tying. This texture helps catch the knot.
Step 3: Finishing Touches
-
Remove the stopper:
Carefully remove the tape or clip from the end of the elastic, holding both ends firmly so no beads escape. -
Tie the first knot:
Cross the ends and make a simple overhand knot, pulling it tight against the beads to remove any gaps. -
Tie the surgeon’s knot:
For the secure hold, create a surgeon’s knot: cross the threads, loop one end through twice, and pull tight. This extra loop prevents slipping. -
Apply adhesive:
Place a tiny drop of super glue or jewelry cement directly onto the knot. Use a toothpick to apply it precisely if the nozzle is too large. -
Let it cure:
Allow the glue to dry completely according to the package instructions before manipulating the bracelet further. -
Hide the knot:
Once dry, trim the excess elastic ends close to the knot. Gently pull the elastic to slide the knot inside the nearest large pastel bead to conceal it.
Add a Charm
Make it festive by attaching a small enamel bunny or egg charm to a jump ring, then loop it onto the elastic between two gold spacers.
Now you have a charming, springtime accessory ready to brighten up any outfit
Tie-Dye Swirl Beads Like Marbled Eggs
Capture the whimsical charm of a pastel Easter basket with this delightful handmade bracelet. By using specific marbling techniques, you can transform simple clay into beads that mimic the look of dyed eggs and sugary candies.
How-To Guide
Materials
- Polymer clay in pastel colors (baby pink, mint green, baby blue, pale yellow, white)
- Bead rolling tool or acrylic block
- Bamboo skewers or a large needle tool
- Glossy glaze or polyurethane varnish (water-based)
- Elastic jewelry cord (0.7mm or 0.8mm)
- Super glue or jewelry cement
- Baking sheet and parchment paper
- Oven (for curing polymer clay)
Step 1: Preparing the Clay
-
Condition the clay:
Start by taking small amounts of each pastel color. Knead each piece individually until it is soft, pliable, and warm to the touch. -
Create base colors:
Divide your conditioned clay into two piles. One pile will remain solid colors (like the solid pink, yellow, blue, and white beads seen in the bracelet). Roll these into small, equal-sized spheres about 1cm in diameter. -
Prep the marble mix:
For the marbled beads, take tiny pinches of pink, blue, and white. Roll each pinch into a thin snake. -
Twist the colors:
Gather the snakes of different colors together and twist them into a single rope. Fold the rope in half and twist again to start blending the pigments.
Step 2: Forming the Marbled Beads
-
Roll into a ball:
Roll your twisted rope into a ball. If the marble pattern isn’t swirled enough for your liking, roll it back into a snake, twist, and ball it up again. -
Check the pattern:
Aim for a subtle swirl that looks like dye in water rather than fully blended mud. Stop mixing before the colors merge completely. -
Repeat for variety:
Create several variations: a blue/green mix, a pink/blue mix, and a yellow/white mix. This mimics the assorted dyed eggs in the image. -
Ensure uniform size:
Compare your marbled beads with your solid color beads. Add or remove small bits of clay to ensure they are all roughly the same 1cm diameter. -
Smooth the surface:
Gently roll each bead between your palms or using an acrylic block to remove any fingerprints and ensure a perfect sphere.
Muddy Colors?
If your marbled beads turn brown or gray, you are over-mixing. Stop twisting the clay strands sooner. The colors should look distinct, like toothpaste stripes, before rolling into a ball.
Step 3: Piercing and Baking
-
Pierce holes:
Using a bamboo skewer or needle tool, carefully pierce a hole through the center of each bead. Rotate the bead gently as you push to avoid squishing the shape. -
Check the exits:
Look at the exit hole of the bead; if the clay has pushed out, gently smooth it back down with your finger so the bead sits flush when strung. -
Bake the beads:
Arrange the beads on a parchment-lined baking sheet. Bake according to your clay manufacturer’s instructions (usually around 275°F or 135°C for 15-30 minutes). -
Cool completely:
Let the beads cool fully before handling. They are fragile when hot but harden as they return to room temperature.
Add Sparkle
Before baking, roll your solid-colored beads in ultra-fine white glitter or embossing powder. This gives them a sugary, ‘peep-like’ texture perfect for Easter themes.
Step 4: Finishing and Assembly
-
Glaze (optional):
To get that shiny, candy-coated look shown in the photo, apply a thin coat of water-based gloss glaze. I like to string them loosely on a spare skewer to let them dry without touching a surface. -
Plan the design:
Lay out your beads on a surface. Alternate between solid colors and your marbled ‘egg’ beads to create a balanced pattern. -
String the beads:
Cut a piece of elastic cord about 10 inches long. Thread your beads onto the cord in your chosen order. -
Tie the knot:
Bring the ends together and tie a sturdy surgeon’s knot (right over left, left over right). Pull tight to secure. -
Secure and trim:
Add a tiny drop of super glue to the knot. Once dry, trim the excess cord and tug the knot gently inside one of the bead holes to hide it.
Wear your new pastel accessory with pride and enjoy the spring vibes it brings to your outfit
Confetti-Speckle “Sprinkle Egg” Bracelet

Capture the whimsy of Easter candy with this charming bracelet that mimics the look of speckled malted milk eggs. Using simple polymer clay techniques, you’ll create custom beads with delicate pastel speckles that look good enough to eat.
Step-by-Step Tutorial
Materials
- Polymer clay (white, pastel pink, pastel yellow, pastel orange, pastel blue)
- Acrylic rolling pin or clay pasta machine
- Small circle cutter (approx. 1 cm)
- Needle tool or bead piercing pins
- Old toothbrush or stiff bristle brush
- Brown and black acrylic paint
- Rubbing alcohol
- Elastic jewelry cord (0.7mm or 0.8mm)
- Super glue or jewelry cement
- Scissors
Step 1: Creating the Bead Base
-
Condition the white clay:
Start by thoroughly kneading a large block of white polymer clay until it is soft and pliable. This warm-up prevents cracking later. -
Mix pastel tones:
If you don’t have pre-mixed pastels, mix tiny amounts of standard colors into white clay to achieve soft, candy-like hues of pink, yellow, and orange. -
Roll out sheets:
Roll your white clay into a thick sheet, roughly 1/4 inch thick. Do the same for your pastel colors if you want some solid colored beads in the mix. -
Cut equal portions:
Use your small circle cutter to punch out rounds from the clay sheets. This ensures every bead starts with the exact same amount of material for uniform sizing. -
Form the spheres:
Roll each punched circle between your palms to create a smooth, perfect sphere. I like to do this gently to avoid trapping air bubbles.
Step 2: The Speckling Technique
-
Prepare the speckle paint:
Dilute a small drop of brown acrylic paint with water until it has an inky consistency. It should be thin enough to fly off a brush. -
Apply the first speckles:
Dip an old toothbrush into the thinned paint. Hold it over your unbaked beads and run your thumb across the bristles to flick tiny droplets onto the clay. -
Add dimension:
Repeat the splatter process with a tiny bit of black paint mixed in, or introduce colored splatter (pink or yellow) onto the plain white beads for that confetti look. -
Roll to set:
Once the paint is dry to the touch, very gently roll the beads between your palms again. This embeds the paint specks slightly into the clay surface so they don’t rub off. -
Pierce the beads:
Using a needle tool, carefully pierce a hole through the center of each bead. Twist the tool as you push to prevent flattening the sphere.
Clean Hands Tip
Keep baby wipes nearby when rolling different clay colors. Even tiny residues of dark or bright clay can transfer onto your pristine white beads and look muddy.
Step 3: Baking and Assembly
-
Bake the beads:
Place your pierced beads on a baking sheet or bead rack. Bake according to your clay manufacturer’s instructions (usually around 275°F for 15-30 minutes). -
Cool down completely:
Let the beads cool fully before handling. They are fragile when warm; patience here ensures they harden properly. -
Measure the cord:
Cut a length of elastic cord about 10-12 inches long. This gives you plenty of extra room for tying knots without struggling. -
Pre-stretch the elastic:
Tug firmly on the elastic cord several times. This pre-stretching prevents the bracelet from sagging or becoming loose after you wear it a few times. -
String the beads:
Thread your speckled beads onto the cord. Alternate colors or create a random pattern that mimics a bowl of mixed candy eggs. -
Check the fit:
Wrap the strung beads around your wrist. Add or remove beads until it sits comfortably without gaps, usually around 6.5 to 7 inches for an average wrist. -
Tie the knot:
Tie a secure surgeon’s knot (right over left, left over right, looping through twice). Pull it tight. -
Secure and trim:
Add a tiny drop of super glue to the knot. Once dry, trim the excess cord ends close to the knot and tuck the knot inside a bead hole.
Glossy Finish
For a ‘wet’ candy look, glaze your finished baked beads with a coat of polyurethane gloss varnish or UV resin before stringing them.
Wear your new festive accessory or stack a few together for a delightful spring statement
Bunny Tail White Puff Accent Bracelet
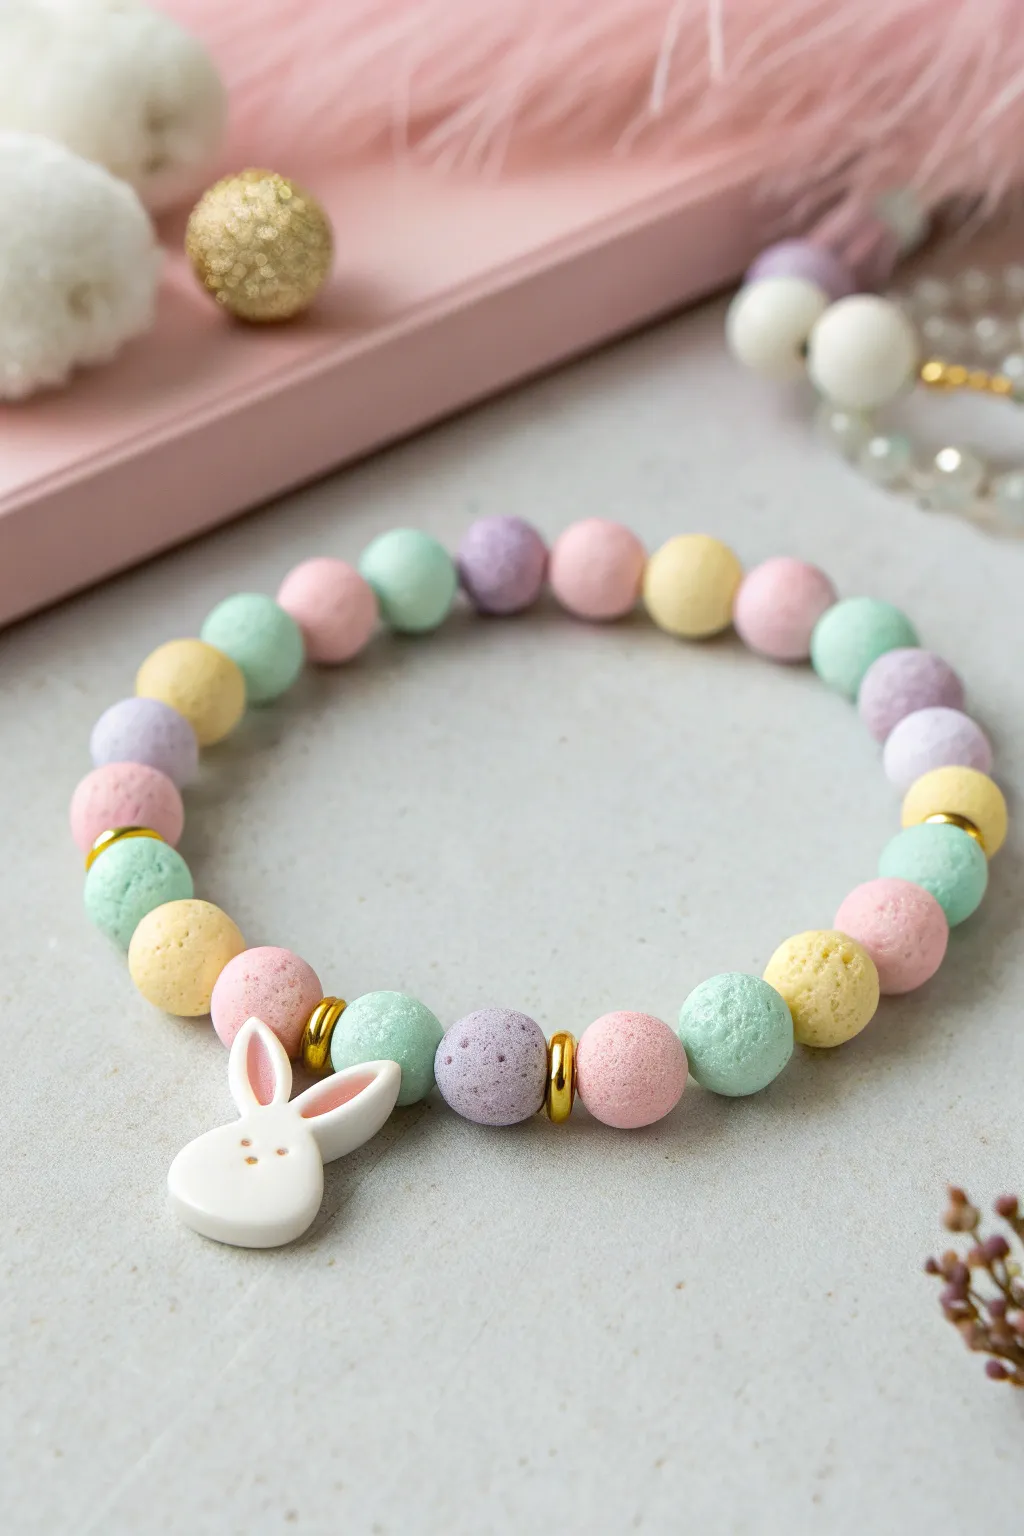
This charming bracelet features textured pastel beads that resemble sugared candy, perfectly capturing the sweetness of Easter. Paired with a delicate white bunny charm and gold accents, it makes for an adorable accessory that feels festive yet elegant.
Step-by-Step Tutorial
Materials
- Polymer clay in pastel colors: pink, purple, yellow, mint green, and white
- Coarse sandpaper, salt, or sugar (for texturing)
- Small white bunny charm (polymer clay or pre-made ceramic/resin)
- Gold tone spacer beads or jump rings
- Elastic beading cord (0.8mm clear)
- Super glue or jewelry cement
- Beading needle (optional)
- Scissors
Step 1: Crafting the Beads
-
Condition the clay:
Start by conditioning your pastel polymer clay colors separately until they are soft and pliable. If you are mixing custom shades, do this now by blending white with small amounts of saturated colors. -
Review size:
Pinch off small portions of clay and roll them into spheres. Aim for beads that are approximately 8-10mm in diameter. Consistency is key, so try to keep them relatively uniform. -
Texture the surface:
To achieve the sugared, porous look seen in the photo, roll each raw clay bead gently over a piece of coarse sandpaper. -
Alternative texturing:
Other methods work too; I sometimes gently press the beads into a bowl of coarse salt or sugar to create indentations, then brush off the excess before baking, though sandpaper is less messy. -
Pierce the beads:
Using a bead pin or a thick needle, carefully pierce a hole through the center of each bead. Rotate the needle as you push through to avoid squishing the perfectly round shape. -
Create the bunny charm:
If making your own charm, shape a flat, rounded bunny head from white clay. Add two long ears, indent the centers, and fill with a tiny bit of pink clay. -
Reference the face:
Use a needle tool or dotting tool to create two small eyes and a nose/mouth area. You can paint these gold later or use tiny bits of gold clay for details before baking. -
Add a connector:
Ensure the bunny charm has a horizontal hole running through the top of the head or ears so it can sit flat on the string, or attach a small metal screw eye at the top. -
Bake the batch:
Arrange your beads and charm on a baking sheet or tile. Bake according to your polymer clay manufacturer’s instructions, typically around 275°F (135°C) for 15-30 minutes.
Sticky Situation?
If your textured clay beads attract lint or dust before baking, lightly wipe them with a baby wipe or a Q-tip dipped in rubbing alcohol to clean the surface.
Step 2: Assembly
-
Prepare the cord:
Cut a length of elastic cord about 10-12 inches long. This gives you plenty of extra room to tie the knot comfortably later. -
Pre-stretch:
Give the elastic cord a few firm tugs to pre-stretch it. This crucial step prevents the finished bracelet from sagging after the first wear. -
Plan the pattern:
Lay out your cooled beads on a bead board or towel. The pattern shown roughly alternates colors: pink, purple, yellow, mint, pink, etc. Experiment until the sequence pleases you. -
Add gold accents:
Locate the spot where you want the bunny charm to sit. Place a gold spacer bead on either side of the two beads flanking the bunny charm, as shown in the inspiration photo. -
String the beads:
Thread the beads onto the elastic cord, following your pattern. If the bead holes are tight, use a collapsible eye beading needle to help guide the cord through. -
Attach the bunny:
Slide the bunny charm onto the cord, positioning it between the two accent beads flanked by gold spacers. -
Check the fit:
Wrap the strand around your wrist to check the size. Add or remove beads as needed to ensure a comfortable fit without gaps. -
Tie the knot:
Tie a surgeon’s knot (right over left, then left over right through the loop twice). Pull the elastic tight so there is tension, but not so much that the beads pucker. -
Secure and hide:
Apply a tiny dot of super glue or jewelry cement to the knot. Let it dry completely, then trim the excess cord and gently tuck the knot inside the hole of a neighboring bead.
Pro Tip: Weight Matters
Make the bunny charm slightly curved on the back side rather than perfectly flat. This helps it sit flush against the curve of your wrist rather than flipping over.
Now you have a sweet, textured accessory ready to wear for your Easter celebrations
Mix-and-Match Easter Bracelet Stack Set
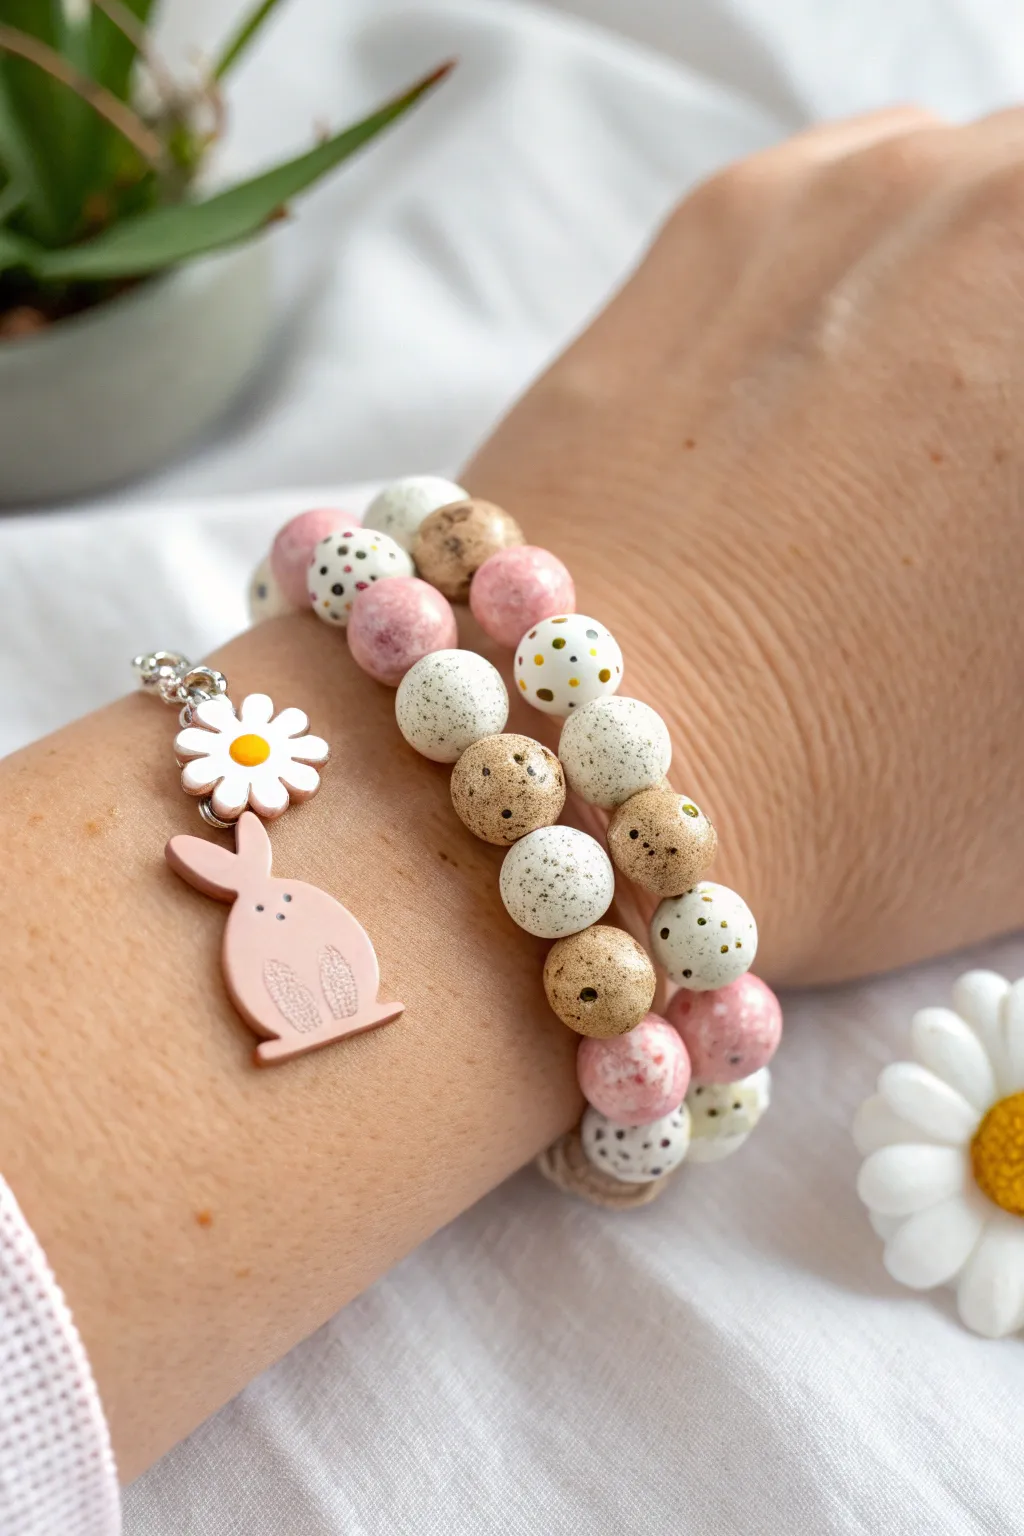
Celebrate spring with this adorable duo of beaded bracelets featuring speckled egg textures and a sweet bunny silhouette. The soft pink, white, and tan palette mimics natural eggs, making this stack a subtle yet festive accessory for your Easter outfit.
How-To Guide
Materials
- Polymer clay (white, beige/tan, soft pink)
- Acrylic paint (black, gold, brown)
- Old toothbrush or stiff bristle brush
- Gloss glaze or resin (for the bunny)
- White or pink daisy charm
- Pink bunny silhouette charm (or pink shrink plastic/clay to make one)
- Strong elastic cord (0.8mm recommended)
- Jump rings (silver tone)
- Jewelry pliers
- Bead roller or acrylic block
- Toothpick or bead needle
- Super glue or jewelry glue
Step 1: Crafting the Speckled Beads
-
Prepare Clay Colors:
Condition your polymer clay by kneading it until soft. You will need three main colors: a creamy white, a soft beige or tan, and a muted rose pink. Rolling them into equal-sized logs helps portion them later. -
Form the Beads:
Cut small, uniform sections from your clay logs. Roll each piece between your palms to create smooth, round spheres approximately 8-10mm in diameter. -
Add Texture:
For the tan and white beads that look like stone, mix in a tiny pinch of cracked black pepper or sand into the clay before rolling, or use a coarse sponge to gently press a surface texture after rolling. -
Pierce the Beads:
Using a toothpick or a bead needle, carefully pierce a hole through the center of each sphere. rotate the bead as you push the tool through to prevent it from squishing out of shape. -
Bake the Beads:
Arrange your beads on a baking sheet or tile. Bake according to your brand of polymer clay instructions (usually 275°F/135°C for 15-30 minutes). Let them cool completely. -
Create the Speckles:
Dilute a small amount of brown and black acrylic paint with water. Dip an old toothbrush into the mixture, then run your thumb over the bristles to flick tiny splatters of paint onto the cooled beads. This mimics a bird’s egg effect. -
Add Gold Accents:
On selected white beads, use a fine-point dotting tool or toothpick to add tiny gold dots for a playful, festive touch. Let all paint dry thoroughly.
Paint Won’t Stick?
Polymer clay can have an oily residue. Wipe baked beads with a little rubbing alcohol or acetone on a cotton pad before painting to ensure the speckles adhere perfectly.
Step 2: Preparing the Charms
-
Select Your Charms:
You will need a pink bunny silhouette charm and a white daisy charm. If you can’t find a metal bunny, you can cut a silhouette shape from rolled-out pink clay or shrink plastic. -
Detail the Bunny:
If your bunny charm is plain, use a fine-tip permanent marker or a tiny paintbrush to add three dots for the eyes and nose, and small dashed lines to suggest fluffy ears. -
Attach Jump Rings:
Using two pairs of jewelry pliers, twist open a jump ring. Loop it through the top of the bunny charm and the daisy charm. Wait to close it until you are ready to attach it to the bracelet loop.
Pro Tip: Seamless Holes
To avoid fingerprint distortion, bake your beads directly on the needle or toothpick supported by a foil rack. This keeps the hole distinct and the bead perfectly round.
Step 3: Assembly
-
Measure the Cord:
Wrap the elastic cord loosely around your wrist and add about 3-4 inches of extra slack for tying knots. Cut two pieces of this length. -
Pre-stretch Elastic:
Give your elastic segments a few firm tugs. This pre-stretching step helps prevent the finished bracelet from sagging soon after you wear it. -
String the First Bracelet:
Thread your speckled egg beads onto the first cord, alternating colors randomly (white, tan, pink) to create an organic, natural flow. I like to check the length against my wrist periodically. -
Add Charms:
On this first strand, thread the jump ring holding your bunny and flower charms onto the elastic between two beads so it hangs freely. -
Knot the First Strand:
Tie a surgical knot (left over right, right over left) and pull tight. Apply a tiny drop of super glue to the knot before trimming the excess cord. -
String the Second Bracelet:
Repeat the stringing process for the second bracelet using the remaining beads. This stack looks best when the second bracelet is just simple beads without charms to balance the look. -
Hide the Knots:
Once the glue is dry, gently tug the elastic to slide the knot inside the hole of the nearest bead, hiding it from view.
Slip on your new stack and enjoy the fresh, speckled spring vibes.