A cute clay box is one of my favorite projects because it’s equal parts practical storage and tiny sculpture. If you can make a simple container with a lid, you can turn it into a little character, snack, or garden scene that makes you smile every time you open it.
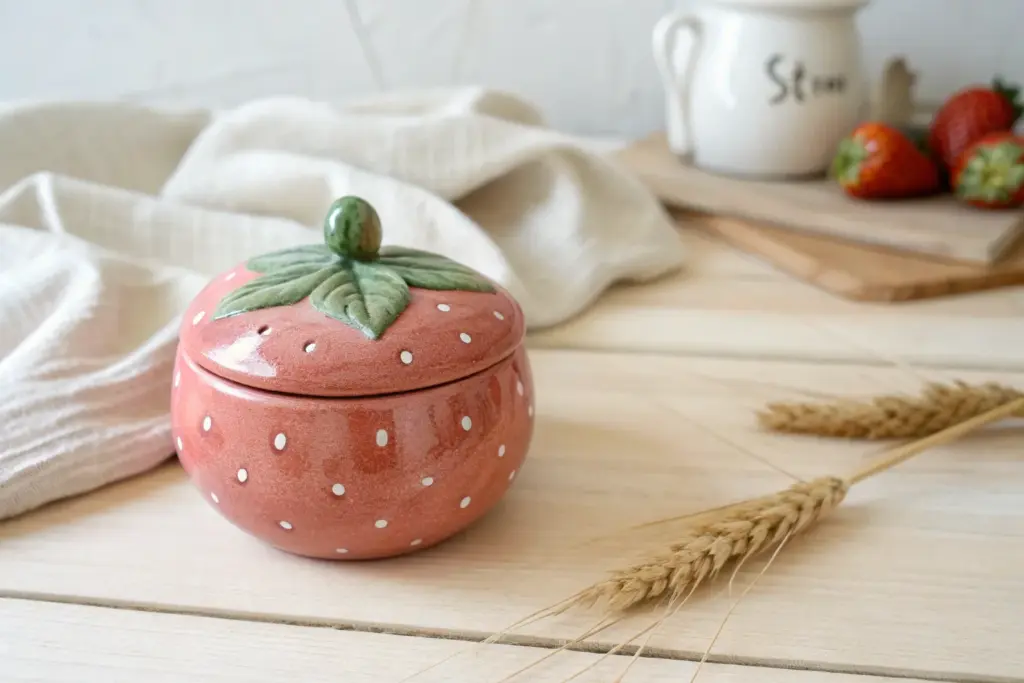
Strawberry Box With Seed Details
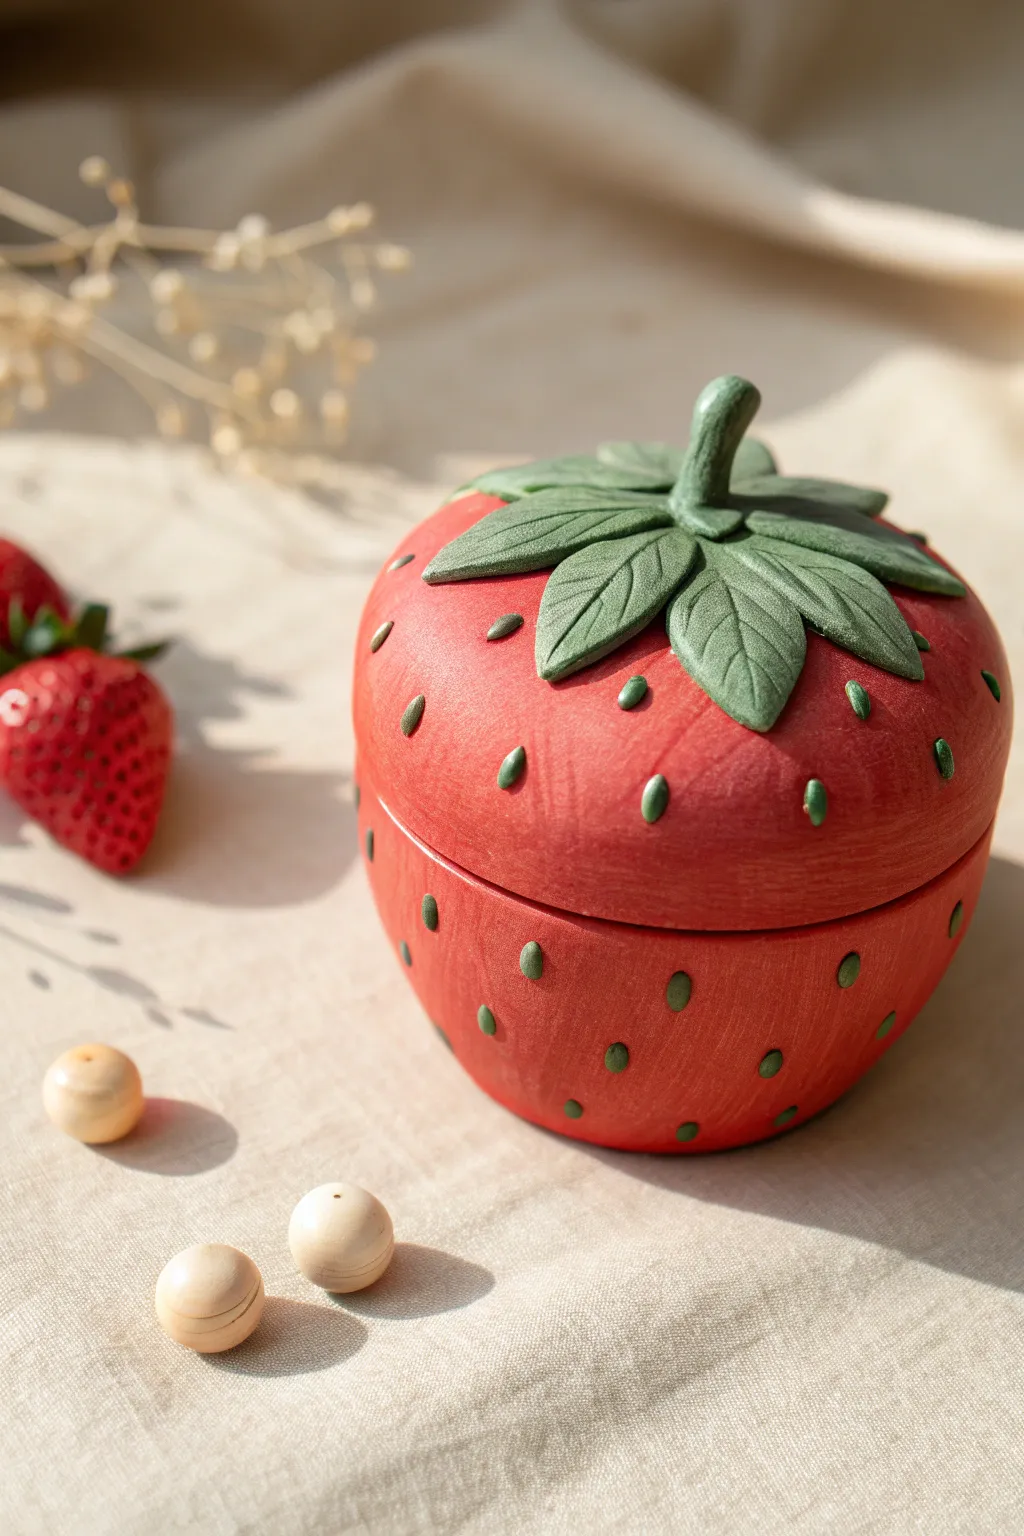
This delightful little trinket box captures the essence of a ripe strawberry with its vibrant red body and textured green leafy top. Perfect for holding small treasures like rings or earrings, this project uses polymer clay to create a functional and adorable piece of decor.
Step-by-Step Tutorial
Materials
- Red polymer clay (approx. 2-3 blocks depending on desired size)
- Green polymer clay
- Yellow or light green polymer clay (for seeds)
- Circular cookie cutter or jar lid
- Clay carving tools (needle tool, ball stylus)
- Rolling pin or pasta machine
- Aluminum foil
- Medium-grit sandpaper
- Matte or satin varnish (optional for finish)
- Oven (for baking according to clay package instructions)
Step 1: Foil Core & Base Construction
-
Shape the Foil Armature:
Start by scrunching a large piece of aluminum foil into a tight ball. Flatten the top and bottom slightly to create an oblate sphere shape, resembling a plump strawberry. This saves clay and keeps the box lightweight. -
Create the Cut Line:
Using a sharp blade, carefully slice your foil form horizontally, roughly 1/3 down from the top. This separates the ‘lid’ section from the ‘base’ section. -
Prepare the Red Clay:
Condition your red polymer clay by kneading it until soft and pliable. Roll it out into a sheet about 3mm thick using your rolling pin or pasta machine. -
Cover the Base Interior:
Cut a circle of red clay and press it into the bottom hollow of your foil base if you removed the foil, or simply cover the foil completely. If creating a hollow box, I prefer to form the clay *over* the foil form, bake it briefly to set the shape, cut it open, and then remove the foil carefully. -
Form the Base Exterior:
Wrap the red clay sheet around the exterior of the bottom foil section. Smooth the seams with your fingers or a clay tool so they disappear completely. Ensure the top rim is flat and even.
Sticky Lid Situation?
If you’re worried about the lid fusing to the base during baking, brush a tiny amount of cornstarch or baby powder on the rim where the two pieces meet.
Step 2: Lid & Lip Creation
-
Cover the Lid Section:
Repeat the covering process with the smaller top section of your foil form. Smooth the red clay over the dome shape. -
Draft the Inner Lip:
Roll a snake of red clay and flatten it into a ribbon. Attach this ribbon to the *inside* rim of the bottom base, allowing it to stick up about 3-4mm. This creates a lip that will hold the lid securely in place. -
Test the Fit:
Gently place the lid onto the base to ensure it sits snugly over the new inner lip. Adjust the shape if necessary while the clay is still soft.
Step 3: Sculpting Details
-
Leafy Base Layer:
Condition the green clay. Roll it flat and cut out a star-like shape or several individual teardrop shapes to form the calyx (sepal) leaves. -
Texture the Leaves:
Using a needle tool or a small knife, gently score a central vein down each green leaf. Add delicate angled lines branching off the center vein for realistic texture. -
Attach the Stem:
Roll a small cylinder of green clay for the stem. Attach it to the center of the leaves on the lid, blending the clay at the base so it connects seamlessly. -
Drape the Greenery:
Place your completed leafy structure onto the center of the red lid. Gently press the leaves down so they curve slightly over the rounded top of the strawberry.
Add Realism
Before baking, brush a tiny bit of red pastel dust or darker red paint into the crevices around the leaves to create depth and shadow.
Step 4: Seeding & Finishing
-
Create Seed Indentations:
Take a small ball tool or the rounded end of a paintbrush handle. Press gently into the red clay all over the surface of both the lid and base to create small, evenly spaced divots. -
Form the Seeds:
Roll tiny, rice-grain sized bits of yellow or light green clay. These need to be very small to look proportional. -
Embed the Seeds:
Place one tiny seed into each indentation you created. Press them in gently so they stay put but still protrude slightly for texture. -
Surface Smoothing:
Give the whole piece a final once-over. Smooth out any accidental fingerprints using a tiny bit of clav baby oil or cornstarch on your finger. -
Bake:
Bake the assembled box (with the lid slightly ajar or separate to prevent sticking) according to your clay manufacturer’s temperature and time instructions. -
Finishing Touches:
Once cool, you can lightly sand any rough edges on the rim. Apply a matte varnish if you want to protect the surface and give it a finished look.
Your charming strawberry box is now ready to hold your sweetest little keepsakes


Orange Slice Box With Segments
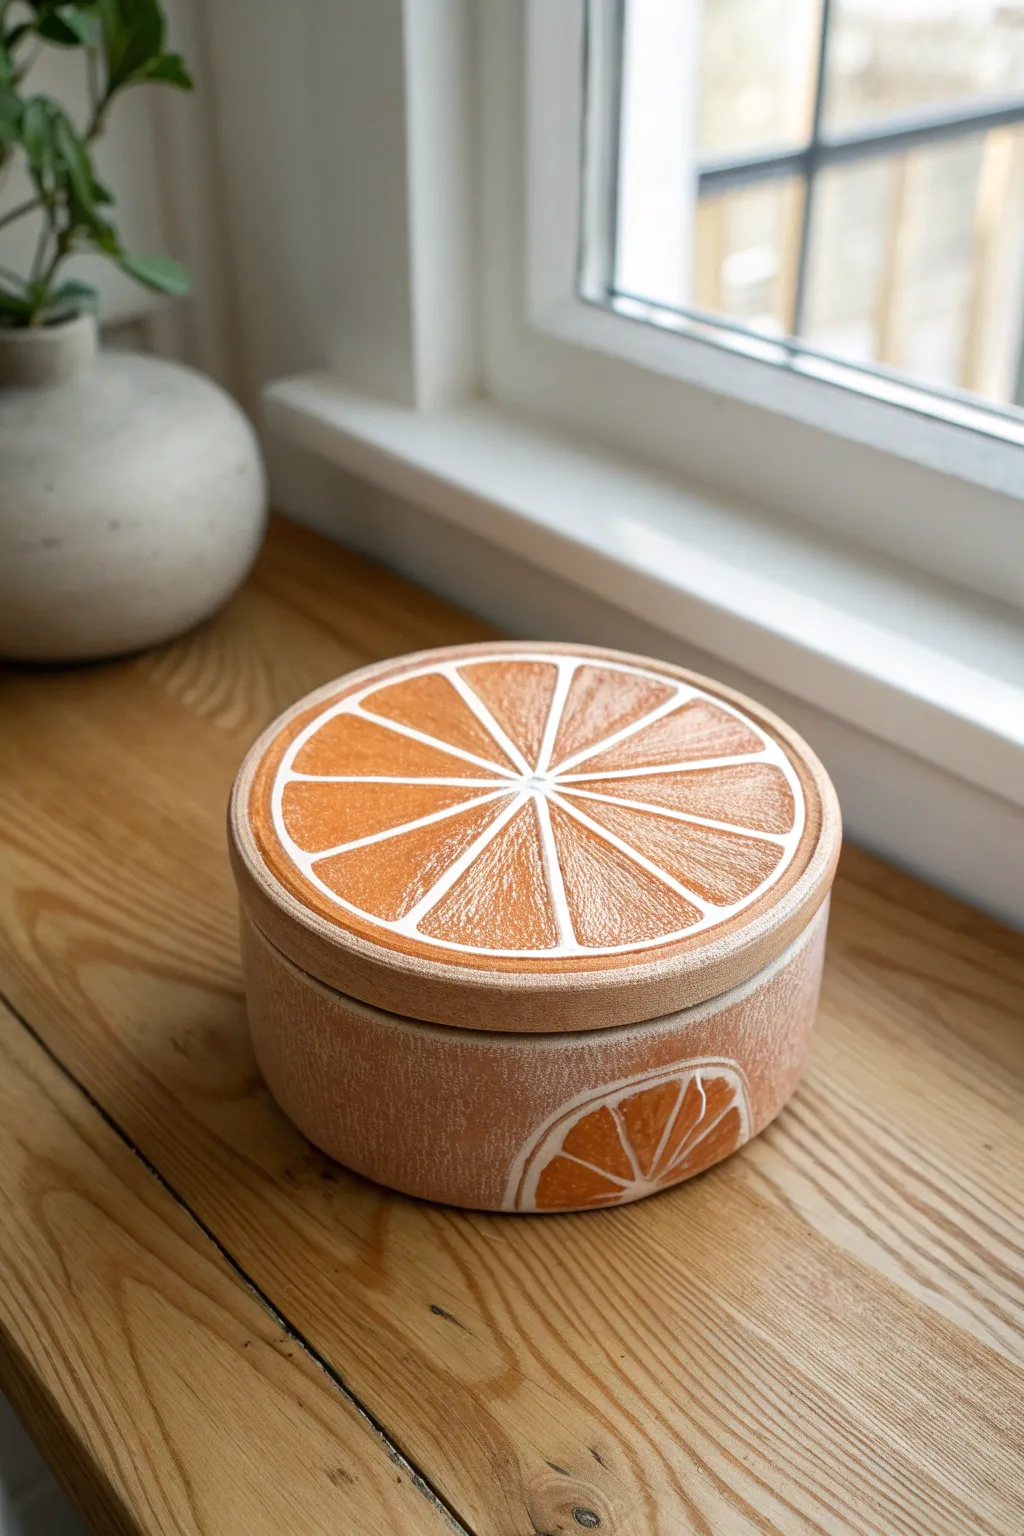
Brighten up your shelf with this delightful lidded clay box that captures the juicy cross-section of a fresh orange. Featuring textured segments and creamy white pith details, this functional piece is perfect for holding trinkets or simply adding a pop of color to your decor.
Detailed Instructions
Materials
- Terracotta or stoneware clay (smooth or with fine grog)
- Rolling pin and guide slats (approx. 1/4 inch thickness)
- Circular clay cutters or templates (large for base/lid, slightly smaller for inner rim)
- Needle tool
- Fettling knife
- Scoring tool or serrated rib
- Slip (clay mixed with water)
- Underglazes: Bright Orange, White
- Clear glaze (food safe if using for edibles)
- Small stiff-bristled brush (for texture)
- Fine liner brush
- Medium flat brush
- Sponge
Step 1: Building the Box Base
-
Roll the slabs:
Begin by wedging your clay to remove air bubbles. Roll out a consistent slab about 1/4 inch thick using your guide slats to ensure evenness. -
Cut the components:
Using your large circular cutter or a paper template, cut two identical circles. One will be the base, and one will be the lid. Set the lid circle aside on a flat board. -
Create the wall:
Measure the circumference of your base circle. Cut a long rectangular strip of clay from your slab that matches this length plus slight overlap, with a height of about 2.5 to 3 inches. -
Attach the wall:
Score the outer edge of the base circle and the bottom edge of your rectangular strip. Apply slip generously. -
Seal the seam:
Wrap the wall around the base, pressing firmly. Where the ends overlap, cut through both layers at a 45-degree angle (bevel cut), score, slip, and join them for a seamless wall. -
Smooth the exterior:
Use a rib tool or your fingers to smooth the connection between the wall and base. I like to reinforce the inside coil with a tiny added snake of clay for extra durability.
Uneven Lid Issues?
If your lid wobbles after firing, apply a dab of grinding paste (valve grinding compound) to the rim and rotate the lid back and forth against the base to sand them perfectly flush.
Step 2: Creating the Lid and Flange
-
Make the flange:
Roll a narrow strip of clay, about 1/2 inch tall. Measure it to fit just *inside* the rim of your box base. It needs to sit snugly but not get stuck. -
Attach flange to lid:
Score and slip the underside of your lid circle (about 1/4 inch in from the edge). Attach the narrow strip here so it hangs down, creating the mechanism that keeps the lid from sliding off. -
Dry check:
Place the lid gently on the box to check the fit. If it’s too tight, trim the flange slightly; if too loose, you can gently flare it out.
Level Up: Glossy Juice
For ultra-realistic fruit flesh, use a heavy application of a high-gloss clear glaze ONLY on the orange segments, leaving the white pith lines matte or satin.
Step 3: Surface Decoration and Texture
-
Refine surfaces:
Once the leather-hard stage is reached, sponge away any rough crumbs. The surface should be clean but not slick. -
Draft the segments:
On the top of the lid, lightly sketch a center point with your needle tool. Draw radiating lines like wheel spokes to define the orange segments. -
Carve the relief:
Using a loop tool or small carving tool, gently carve out the ‘meat’ of the orange segments slightly lower than the ‘pith’ (the lines you just drew), creating a shallow relief. -
Add side detail:
On the side of the box, sketch a semi-circle rising from the bottom edge to mimic a slice viewed from the side. Carve the segment lines here as well. -
Texturize:
Take a stiff-bristled brush and stipple (poke repeatedly) the depressed segment areas to mimic the juicy texture of fruit flesh. Leave the raised pith lines smooth.
Step 4: Painting and Finishing
-
Initial bisque fire:
Allow the piece to dry completely (bone dry) before bisque firing it according to your clay body’s instructions. -
Apply base color:
Paint the textured segments with 2-3 coats of bright orange underglaze. Be careful to keep the color inside the carved areas. -
Highlight the pith:
Use a fine liner brush and white underglaze to paint the raised lines between segments. You can also paint a rim of white around the very edge of the circle. -
External wash:
For the rest of the box body (the ‘rind’), you can either leave the raw terracotta (if using) or apply a diluted wash of orange underglaze for a softer, organic look. -
Glaze and final fire:
Apply a clear glaze over the entire piece (or just the painted areas if you prefer a contrast in texture). Fire again to the glaze temperature.
Once fired, you’ll have a refreshing piece of ceramic art that looks good enough to eat


Bento Box With Mini Food Toppers
This adorable storage box tricks the eye with a hyper-realistic scoop of rice serving as the lid handle. The simple speckled clay body and charming blue painted details give it a cozy, handmade ceramic feel without needing a kiln.
Detailed Instructions
Materials
- Air-dry clay (stone or granite effect for speckles)
- White polymer clay (for the rice)
- Translucent liquid polymer clay (optional)
- Acrylic paints (navy blue, moss green, deep green)
- Fine grit sandpaper
- Rolling pin with guide rings
- Rectangular cookie cutter or template
- Craft knife
- Needle tool
- Old toothbrush or stiff bristle brush
- Gloss varnish or resin
Step 1: Shaping the Box Base
-
Prepare the slab:
Start by conditioning your speckled air-dry clay. Roll it out into a uniform slab about 1/4 inch thick using a rolling pin. -
Cut the base:
Use your rectangular cutter or a paper template to cut out the bottom base of your box. Set this aside on a flat board. -
Build the walls:
Cut a long strip of clay for the walls, ensuring it is the same thickness as the base. Measure the perimeter of your base rectangle to get the correct length. -
Assemble the structure:
Score the edges of the base and the bottom of the wall strip. Apply a little water or slip, then attach the wall to the base, wrapping it around the perimeter. -
Smooth the seams:
Blend the seams where the wall meets the base and where the two ends of the wall join. Use a modeling tool or your finger with a bit of water to make the join invisible. -
Refine the shape:
Gently push the corners inward to create a soft, rounded rectangular shape rather than sharp 90-degree angles. Let the base dry completely, usually for 24-48 hours.
Step 2: Creating the Lid
-
Cut the lid slab:
Roll out more clay for the lid. It should be slightly larger than your box base to account for a slight overhang. -
Add the inner lip:
Flip the lid over. Roll a thin snake of clay and attach it to the underside in a rectangle shape that fits effectively inside the box walls. This keeps the lid from sliding off. -
Create the rice mount:
While the lid is still damp, score a small circle in the very center. Add a small mound of clay here to act as the core for your rice ball. Let the lid dry. -
Sand for finish:
Once both pieces are fully dry, use fine-grit sandpaper to smooth out any fingerprints or rough edges. Wipe away dust with a slightly damp cloth.
Rice Texture Fix
Rice looking like noodles? Make sure you taper the ends of every single grain. It takes time, but blunt ends ruin the illusion immediately.
Step 3: The Rice Topper & Decor
-
Make the rice grains:
Switch to white polymer clay. Roll tiny, thin tapered logs—hundreds of them. I find this tedious but essential for realism. Cut them into grain-sized bits. -
Assemble the scoop:
Coat the dried clay mound on the lid with a strong glue or liquid polymer clay. Begin sticking the rice grains onto the mound, piling them up until the underlying mound is hidden and it looks like a fluffy scoop. -
Add the garnish:
Mix a tiny amount of chopped green polymer clay (or mix green paint into white clay). Crumble it finely to look like chopped scallions or herbs and press it onto the very top of the rice pile. -
Bake or cure:
If using polymer clay for the rice on an air-dry base, you can carefully bake the lid according to the polymer clay package instructions (air dry clay is generally safe in the oven at low temps), or use air-dry clay for the rice to avoid heat.
Level Up: Bento Filling
Don’t stop at the outside! Paint the interior bottom pink or add sculpted clay ‘pickled plum’ details inside for a surprise when opened.
Step 4: Painting & Glazing
-
Paint the rim:
Using a steady hand and a fine detail brush, paint a thick navy blue line around the top edge of the lid. -
Add the pattern:
Paint evenly spaced navy blue polka dots on the lid surface. For the box base, paint small, teardrop-leaf shapes in a vertical repeat pattern. I like to keep these loose for a hand-painted look. -
Seal the piece:
Apply a coat of gloss varnish to the entire box (except the rice) to mimic a glazed ceramic finish. -
Final rice touches:
Dab a tiny bit of gloss on the ‘garnishes’ to make them look fresh, but leave the white rice mostly matte for textural contrast.
Now you have a functional piece of art that looks good enough to eat.


Little Monster Box With Goofy Eyeballs
This delightful ceramic box is equal parts functional storage and whimsical friend, featuring a speckled peach finish and double sets of goofy eyeballs. Its soft, rounded square shape and expressive face make it a perfect beginner slab-building project that brings a smile to any shelf.
Detailed Instructions
Materials
- Earthenware or stoneware clay (white or light-colored)
- Roller or rolling pin
- Wooden guide strips or depth guides (approx. 1/4 inch)
- Needle tool
- Fettling knife
- Scoring tool or serrated rib
- Slip (clay slurry)
- Square template (paper or craft foam)
- Small round sponge
- Underglaze (peach or light coral)
- Underglaze (black)
- Underglaze (white)
- Clear transparent glaze
- Small detail paintbrush
- Kiln
Step 1: Building the Box Base
-
Roll the Slabs:
Begin by wedging your clay to remove air bubbles. Roll out a large slab using wooden guide strips to ensure an even thickness of about 1/4 inch across the entire sheet. -
Cut the Walls:
Using your square template, cut four equal squares for the walls and one square for the base. For the lid, cut a square that is slightly larger (about 1/4 inch wider on all sides) than the base piece. -
Texture the Clay:
Before assembling, create the signature speckled texture. Use the tip of a needle tool to gently poke shallow, random dots all over the exterior surfaces of the wall pieces and the top of the lid. Don’t puncture all the way through. -
Miter the Edges:
For a cleaner corner joint, cut the vertical edges of your four wall pieces at a 45-degree angle using a bevel cutter or fettling knife. This helps the box come together without thick seams. -
Score and Slip:
Aggressively score the mitered edges of the walls and the perimeter of the base slab. Apply a generous amount of slip to these rough areas. -
Assemble the Walls:
Attach the walls to the base and to each other. Press firmly to secure the bonds, wiping away excess slip on the inside with your finger or a damp brush. -
Reinforce the Seams:
Roll a very thin coil of clay and press it into the interior corners of the box. Smooth this coil down to reinforce the structural integrity. -
Shape the Form:
Once assembled, gently paddle the outside of the box with a wooden paddle or your hands to round out the corners, giving it that soft, organic ‘puffed’ look rather than a sharp cube.
Step 2: Creating the Lid and Features
-
Form the Lid Flange:
Flip your lid slab over. Roll a coil and attach it to the underside of the lid, inset about 1/4 inch from the edge. This flange will keep the lid from sliding off the base. -
Shape the Lid:
Adding a slight curve makes the creature look ‘full.’ Place the lid right-side up on a piece of foam and gently press the center to dome it slightly upwards before the clay stiffens. -
Sculpt the Top Eyes:
Roll two medium-sized balls of clay for the eyeballs that sit on top of the lid. Score and slip the bottom of the balls and attach them firmly to the center-top of the lid. -
Add Exterior Eyes:
Roll two smaller, flatter discs of white clay. Attach these to the front face of the box base to create the second set of ‘painted’ eyes. -
Refine the Surface:
Once the clay is leather hard, use a damp sponge to smooth any rough edges on the lid and box rim, ensuring they fit together comfortably.
Uneven Lid Fit?
Dry the lid on the box! Place a piece of paper or newsprint between the lid and base during the drying phase. This ensures they shrink together and maintain a matching shape.
Step 3: Decoration and Glazing
-
Bisque Fire:
Allow the piece to dry slowly and completely before loading it into the kiln for a bisque firing. -
Apply Base Color:
Apply 2-3 coats of peach or coral underglaze to the entire exterior of the box and lid, carefully painting around the white eyeballs on the lid and the flat eye discs on the face. -
Paint the Details:
Using a fine detail brush and black underglaze, paint the pupils on both sets of eyes. Add small freckles near the cheeks and a simple, curved line for the smile. -
Highlight the Texture:
To emphasize the poked texture, I sometimes wash a slightly darker pigment over the holes and wipe it back, or simply ensure the glaze settles nicely into those divots. -
Clear Glaze Application:
Once the underglaze is dry, apply a coat of clear transparent glaze over the entire piece to seal it and make the colors pop. -
Final Fire:
Stilt the lid and box separately in the kiln and fire to the temperature recommended for your specific clay and glaze body.
Creating the Speckles
Instead of poking holes individually, mix granular manganese or coarse grog into your clay body before building. When fired, these specks will bleed through the glaze naturally.
Now you have a charming little storage companion ready to guard your treasures

The Complete Guide to Pottery Troubleshooting
Uncover the most common ceramic mistakes—from cracking clay to failed glazes—and learn how to fix them fast.
Cheese Wedge Box With Tiny Hole Texture
This delightful ceramic project combines functional storage with playful sculpture, featuring a striking cheese wedge lid and an adorable mouse topper. Using yellow clay or underglaze creates that classic Emmental cheese look, complete with realistic holes and a smooth, semi-gloss finish.
Step-by-Step
Materials
- Light-colored stoneware or earthenware clay (white firing)
- Rolling pin and guide strips (canvas cloth optional)
- Scalpel or clay knife
- Slip and scoring tool
- Various sized hole cutters or circular clay cutters
- Ball stylus tools
- Yellow underglaze (sunshine or golden yellow)
- White, pink, and black underglaze (for the mouse)
- Clear transparent glaze
- Sponge and water
- Kiln
Step 1: Constructing the Base Box
-
Roll the Slabs:
Begin by rolling out an even slab of clay, approximately 1/4 inch thick. Use guide strips to ensure uniform thickness, which is crucial for box construction to prevent warping. -
Cut the Base and Walls:
Cut a square for the base (e.g., 5×5 inches). Then, cut four rectangular strips for the walls. The height can be shallow, around 1.5 to 2 inches tall. -
Assemble the Box:
Score the edges of the base and the bottom of the wall strips. Apply slip generously. Attach the walls to the base, blending the seams on both the inside and outside for strength. I like to use a small coil in the interior corners to reinforce them. -
Add Texture to Walls:
While the clay is leather hard but still workable, use various tools to create a subtle texture on the exterior walls to mimic the rind or surface of cheese. -
Create the Front Handle:
Fashion a small, irregular ring or loop of clay that looks like a cheese crumb. Attach this securely to the center of the front panel to act as a decorative handle or pull.
Step 2: Sculpting the Wedge Lid
-
Form the Lid Base:
Cut a square slab that is slightly smaller than the opening of your box so it can sit partially inside, or create a flanged lid that sits on top. Ensure it fits snugly. -
Construct the Wedge:
Roll more slab and cut three triangles: two large right-angled triangles for the sides and one long rectangular strip for the sloping back. Assembling this is tricky; score and slip all edges to create a hollow 3D triangle form on top of your flat lid base. -
Add Swiss Cheese Holes:
This is the fun part. Using hole cutters of various diameters, punch holes into the wedge walls and the flat parts of the lid. Don’t go all the way through if you want the box sealed, but deep indentations work best. Smooth the edges of every hole with a damp sponge. -
Refine the Surface:
Smooth out all sharp angles on the cheese wedge. Real cheese is soft, so you want slightly softened, rounded corners rather than sharp geometric edges.
Smooth Operator
Use a soft, slightly damp makeup sponge to smooth the edges of the cut holes. This prevents sharp burrs after firing and gives that glossy, melted cheese appearance.
Step 3: The Tiny Mouse Sculptures
-
Shape the Bodies:
Roll small balls of clay into teardrop shapes for the mouse bodies. You’ll need one for the top of the wedge and one as a separate companion if desired. -
Add Ears and Tails:
Attach tiny flattened discs for ears and roll incredibly thin coils for the tails. Score and slip these delicate parts carefully. Their fragility means you must handle them gently. -
Mount the Main Mouse:
Select the highest point of the cheese wedge. Score the spot and the mouse’s belly, then attach it firmly. It should look like it’s conquering a cheese mountain.
Make It a Set
Use your leftover clay scraps to make matching flat cheese-slice coasters! Roll a slab, cut squares, punch holes, and fire them alongside your box.
Step 4: Glazing and Finishing
-
Bisque Fire:
Allow the entire piece to dry slowly to avoid cracking, especially where the wedge joins the lid. Bisque fire according to your clay body’s specifications. -
Apply Yellow Underglaze:
Coat the box and the cheese wedge in a bright yellow underglaze. Apply 2-3 coats for opacity. -
Detail the Mouse:
Leave the mouse white (or paint white). Use a tiny brush to add pink to the inside of the ears and a dab of black for the eyes. -
Clear Glaze and Final Fire:
Once the underglaze is dry, dip or brush the entire piece in a clear transparent glaze. This will seal the clay and make the yellow pop. Fire the piece a final time to complete your cheese masterpiece.
Once cooled from the kiln, your whimsical cheese box is ready to hold trinkets or serve as the cutest conversation starter in your kitchen