If your desk is drowning in pens, I swear a handmade clay pencil holder is one of the quickest wins you can sculpt in an afternoon. Here are my favorite clay pencil holder ideas—from classic shapes you can’t mess up to playful designs that feel like tiny desk sculptures.
Classic Cylinder Pencil Holder
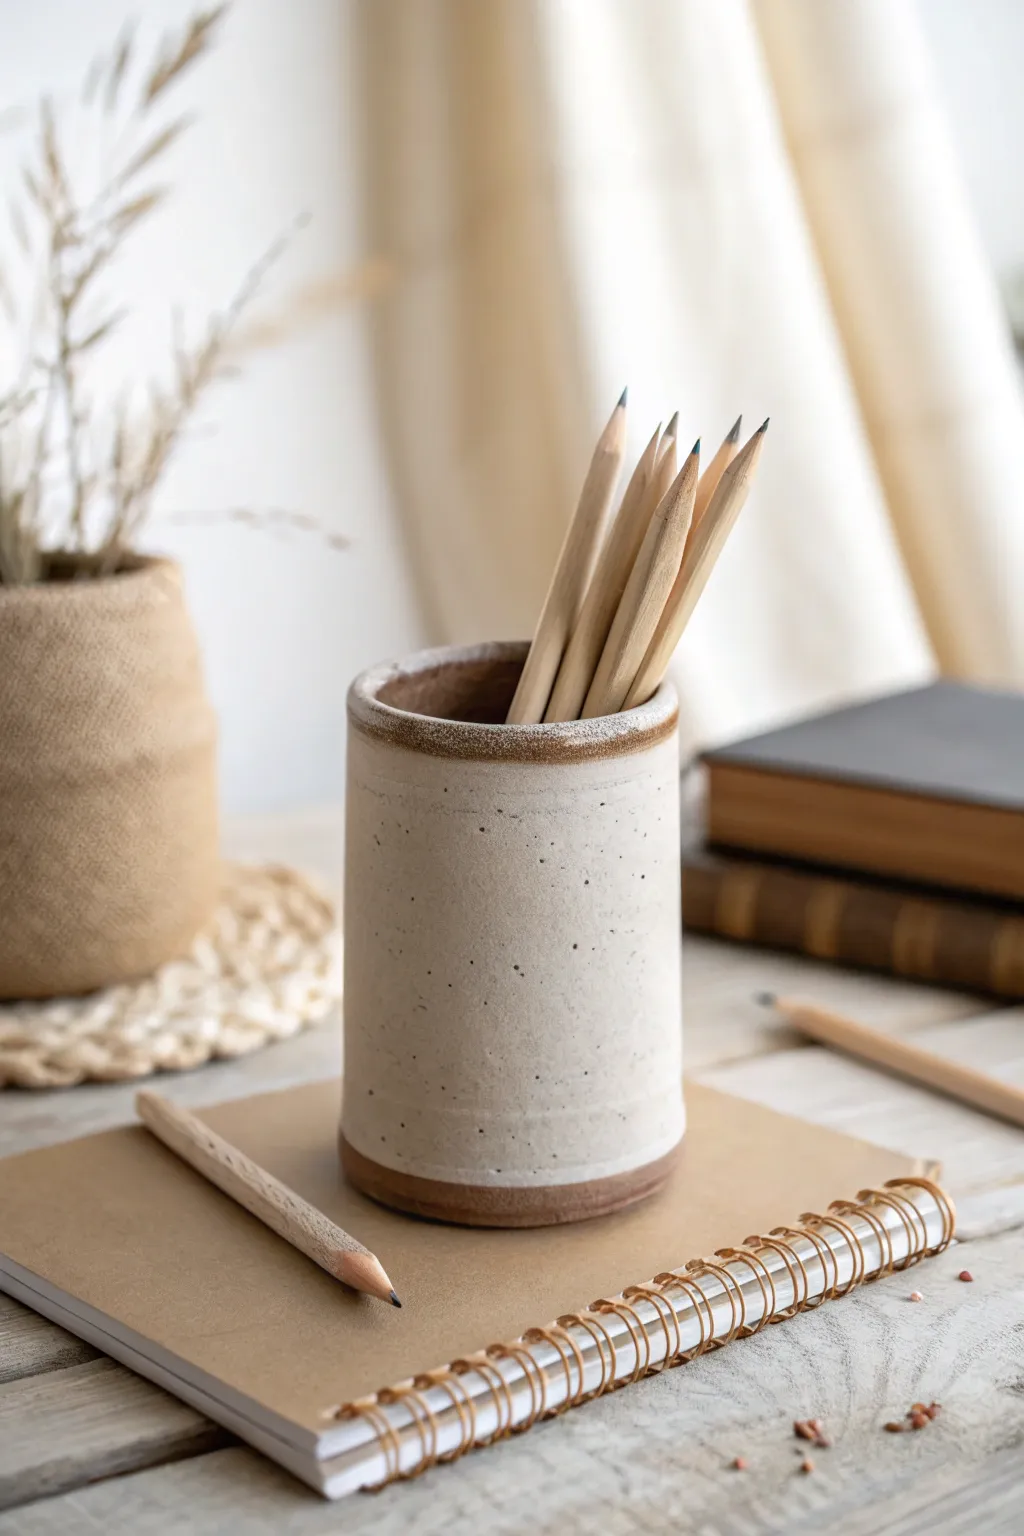
Embrace the beauty of simplicity with this minimalist cylindrical pencil holder, featuring a lovely contrast between raw clay rims and a smooth, speckled cream glaze. Its sturdy form and earthy tones make it a timeless addition to any desk arrangement.
Detailed Instructions
Materials
- Stoneware clay (speckled or buff)
- Rolling pin
- Canvas mat or cloth
- Needle tool
- Fettling knife
- Guide sticks (1/4 inch thick)
- Scoring tool or serrated rib
- Slip (clay water mixture)
- Cylinder mold (like a PVC pipe or can)
- Newsprint or paper
- Sponge
- Cream or antique white speckled glaze
- Kiln
Step 1: Preparing the Slab
-
Roll the clay:
Begin by wedging your stoneware clay to remove air bubbles. Place it on your canvas mat between two 1/4 inch guide sticks. Roll the clay out into a smooth, even slab until the rolling pin rests flat on the guides. -
Measure the circumference:
Determine the size of your cylinder mold. Wrap a piece of paper around your chosen mold (a PVC pipe works perfectly) and mark the overlap to determine the length needed for your slab. -
Cut the rectangle:
Using a ruler and your fettling knife, cut a clean rectangle from the clay slab. The height should be roughly 4-5 inches depending on your preference, and the length should match your circumference measurement plus a tiny bit of overlap. -
Cut the base:
Cut a separate circle from the remaining slab that is slightly larger than the diameter of your mold. This will serve as the floor of your cup.
Step 2: Assembling the Cylinder
-
Prep the mold:
Wrap your PVC pipe or can in a sheet of newsprint or paper. This crucial step ensures the clay won’t stick to the form and allows you to slide the mold out easily later. -
Form the wall:
Gently lift your rectangular slab and wrap it around the paper-covered mold. Bring the two short ends together. -
Score and slip the seam:
Score (scratch) both ends where they will meet. Apply a generous amount of slip. Press the ends firmly together to create a bond. -
Blend the seam:
Use a modeling tool or your thumb to smudge the clay across the seam line, blending it until the join is invisible. I usually smooth the inside seam first, then the outside. -
Attach the base:
Score the bottom edge of your cylinder and the outer edge of your circular base. Apply slip, then place the cylinder on top of the base. -
Secure the bottom:
Use a wooden tool to blend the base upward into the wall of the cylinder. Smooth the connection thoroughly so it is watertight. -
Trim excess:
If the base circle extends past the cylinder walls, use your knife to trim it flush, creating a straight vertical profile.
Uneven Seams?
If your vertical seam looks lumpy, run a metal rib or a straight edge gently up the side of the cylinder while the clay is leather-hard to compress and flatten the join.
Step 3: Refining and Glazing
-
Smooth the rims:
Use a damp sponge to round off the top rim. It should feel comfortable to the touch. Also, slightly bevel the bottom edge for a finished look. -
Slow dry:
Cover the pot loosely with plastic and let it dry slowly to the bone-dry stage. Once dry, bisque fire it in the kiln according to your clay’s specifications. -
Wax resist application:
Before glazing, apply liquid wax resist to the bottom half-inch of the cup and the top rim if you want to leave those areas bare as shown in the photo. This creates that lovely raw clay accent. -
Glaze dip:
Stir your cream speckled glaze thoroughly. Holding the cup by the waxed foot (or using tongs), dip the piece into the glaze for 3 seconds. Pull it out and let the excess drip off. -
Clean up:
Use a damp sponge to wipe any glaze droplets off the wax resist areas. The wax pushes glaze away, but a quick wipe ensures crisp, clean lines at the rim and base. -
Final firing:
Load the piece into the kiln for the glaze firing. Ensure it doesn’t touch other pots. Fire to the maturity temperature of your clay and glaze combination.
Texture Twist
Instead of smooth sides, gently press a piece of coarse linen or burlap into the slab before rolling it into a cylinder to add a subtle tactile fabric texture.
Once cooled, your new ceramic holder is ready to organize your workspace with elegant simplicity


Square Slab Pencil Holder
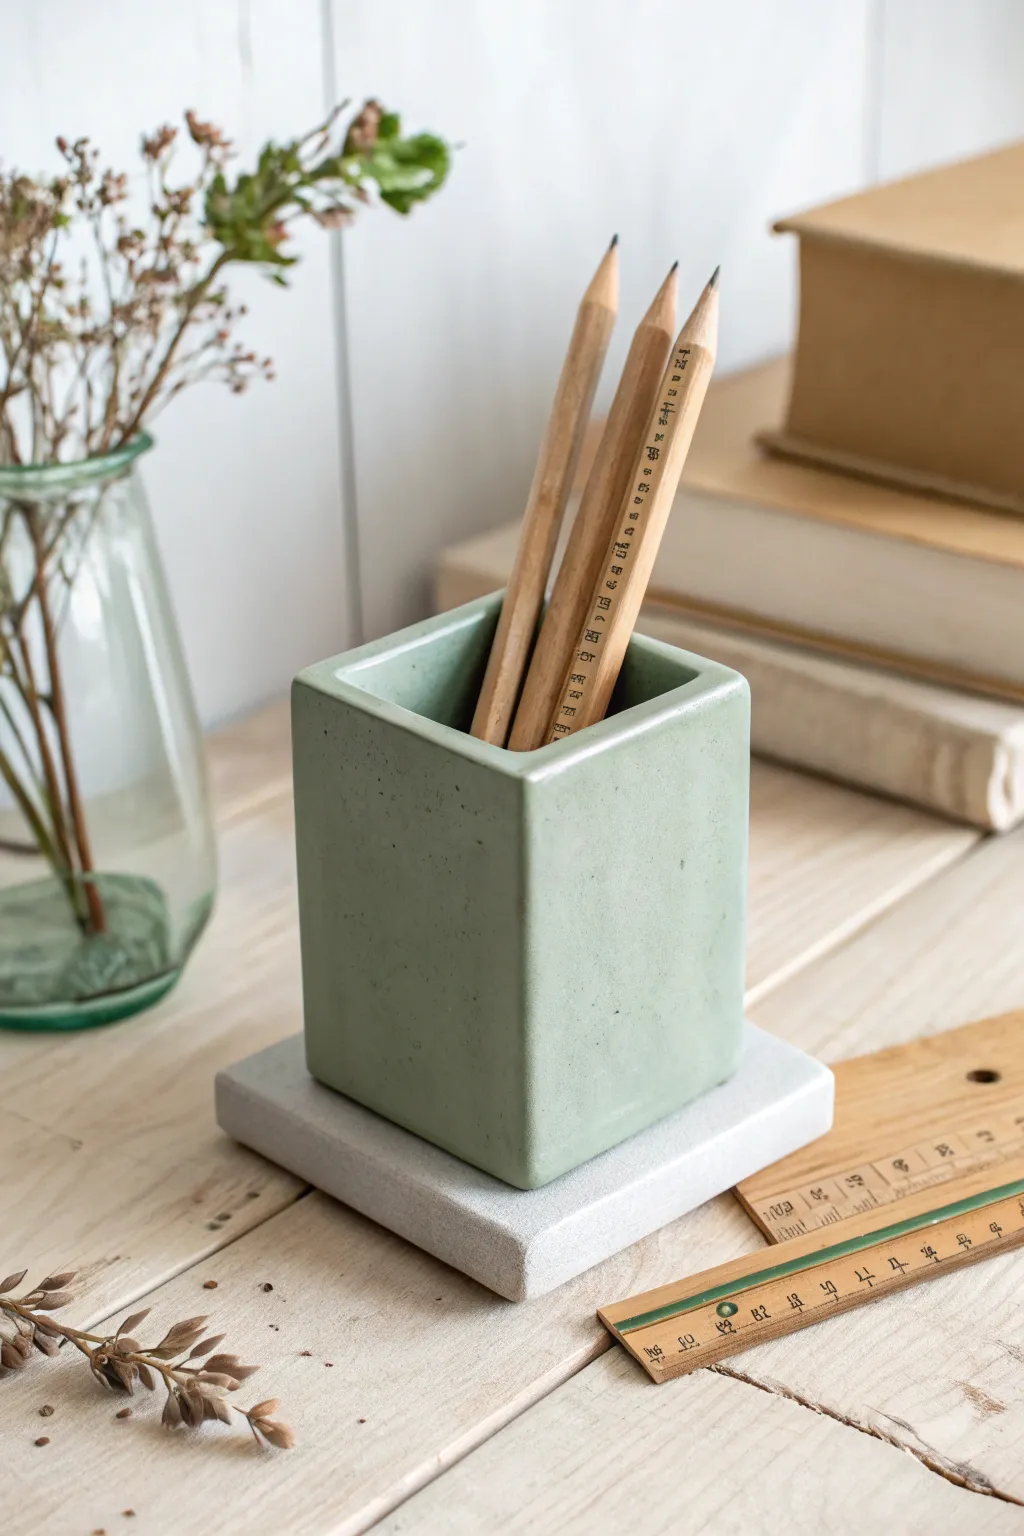
Embrace the beauty of clean lines and minimalist design with this two-tone square pencil holder. Its soft sage green body resting upon a concrete-grey base creates a calming, modern desk accessory that proves simple shapes make the boldest statements.
Step-by-Step Tutorial
Materials
- Air-dry clay or polymer clay (white or light grey base)
- Acrylic rolling pin
- Square cookie cutter (approx. 2.5-3 inches)
- Ruler
- Craft knife or clay blade
- Slip (water mixed with clay) or liquid clay adhesive
- Sage green acrylic paint (matte finish)
- Pale grey acrylic paint (matte finish)
- Small flat paintbrush
- Fine-grit sandpaper (400 and 800 grit)
- Matte spray varnish
Step 1: Forming the Base Slab
-
Condition and Roll:
Begin by conditioning a portion of your clay until it is smooth and pliable. Roll it out into an even slab that is fairly thick, around 1/2 to 3/4 of an inch, to give the base visual weight. -
Cut the Base Square:
Use your square cookie cutter or a ruler and craft knife to cut a perfect square. This will act as the plinth for your holder. It should be slightly wider than the pencil cup itself. -
Refine Edges:
Smooth the cut edges with your finger dipped in a little water. You want the corners to remain sharp but not jagged. -
Initial Drying:
Set this square aside on a flat board to begin drying or curing while you work on the main vessel. If using air-dry clay, flip it occasionally to prevent warping.
Step 2: Constructing the Main Vessel
-
Roll the Walls:
Condition a larger amount of clay. Roll it out into a long, even slab, slightly thinner than your base—about 1/4 inch thick is ideal for the walls. -
Measure and Cut:
Cut a long rectangular strip that will form the four walls of your pencil cup. The height is up to you, but 3.5 to 4 inches usually works well for standard pencils. The length should equal the perimeter of your desired square shape plus a tiny overlap for joining. -
Cut the Vessel Floor:
Cut another square from your slab that matches the dimensions you want for the bottom of the cup. This piece will be hidden inside, so fit is more important than finish. -
Assemble the Walls:
Stand the long clay strip up around your square floor piece. Score the contact points and apply slip or adhesive. Wrap the wall around the square base, ensuring the corners are crisp 90-degree angles. -
Seamless Joining:
Where the two ends of the wall meet on a flat side, slice through both overlapping layers at an angle. Remove the excess clay and press the fresh edges together for a perfect invisible seam. -
Reinforce Corners:
Gently pinch and smooth the four corners to define that sharp, geometric look. I like to use a flat tool or a ruler against the side to ensure the walls aren’t bowing outward. -
Smooth the Rim:
Run a wet finger or a damp sponge along the top rim to round it off slightly. This softens the look and makes it more comfortable to use. -
Full Cure:
Allow both the vessel and the base square to dry or cure completely according to your clay manufacturer’s instructions. Air-dry clay may take 24-48 hours.
Wobbly Walls?
If your clay walls keep bowing or collapsing while wet, deliver support by placing a rectangular object (like a small box wrapped in parchment paper) inside the cup as a temporary mold until it stiffens.
Step 3: Finishing and Painting
-
Sanding for Smoothness:
Once fully rigid, take your fine-grit sandpaper and gently sand all flat surfaces. Focus on removing any fingerprints or uneven textures to achieve that faux-concrete smoothness. -
Painting the Base:
Paint the bottom flat square slab with the pale grey acrylic paint. You might need two coats to get a solid, stone-like opacity. Let it dry. -
Painting the Vessel:
Paint the entire pencil cup—inside and out—with the sage green matte paint. Use long, even strokes to minimize brush marks. Ensure the paint gets into the corners inside the cup. -
Final Assembly:
Apply a strong adhesive (like E6000 or heavy-duty craft glue) to the bottom of the green cup. Center it perfectly onto the grey base slab and press down firmly. -
Sealing:
Finish the piece with a light coat of matte spray varnish. This protects the paint from chipping and gives the holder a unified, professional finish without adding unwanted gloss.
Faux Stone Texture
For a realistic concrete look, mix a tiny pinch of black pepper or fine sand into your paint. It creates subtle speckling that mimics real stone texture instantly.
Place your favorite sketching pencils inside and enjoy the organized calm this piece brings to your workspace


Terrazzo Speckle Pencil Holder
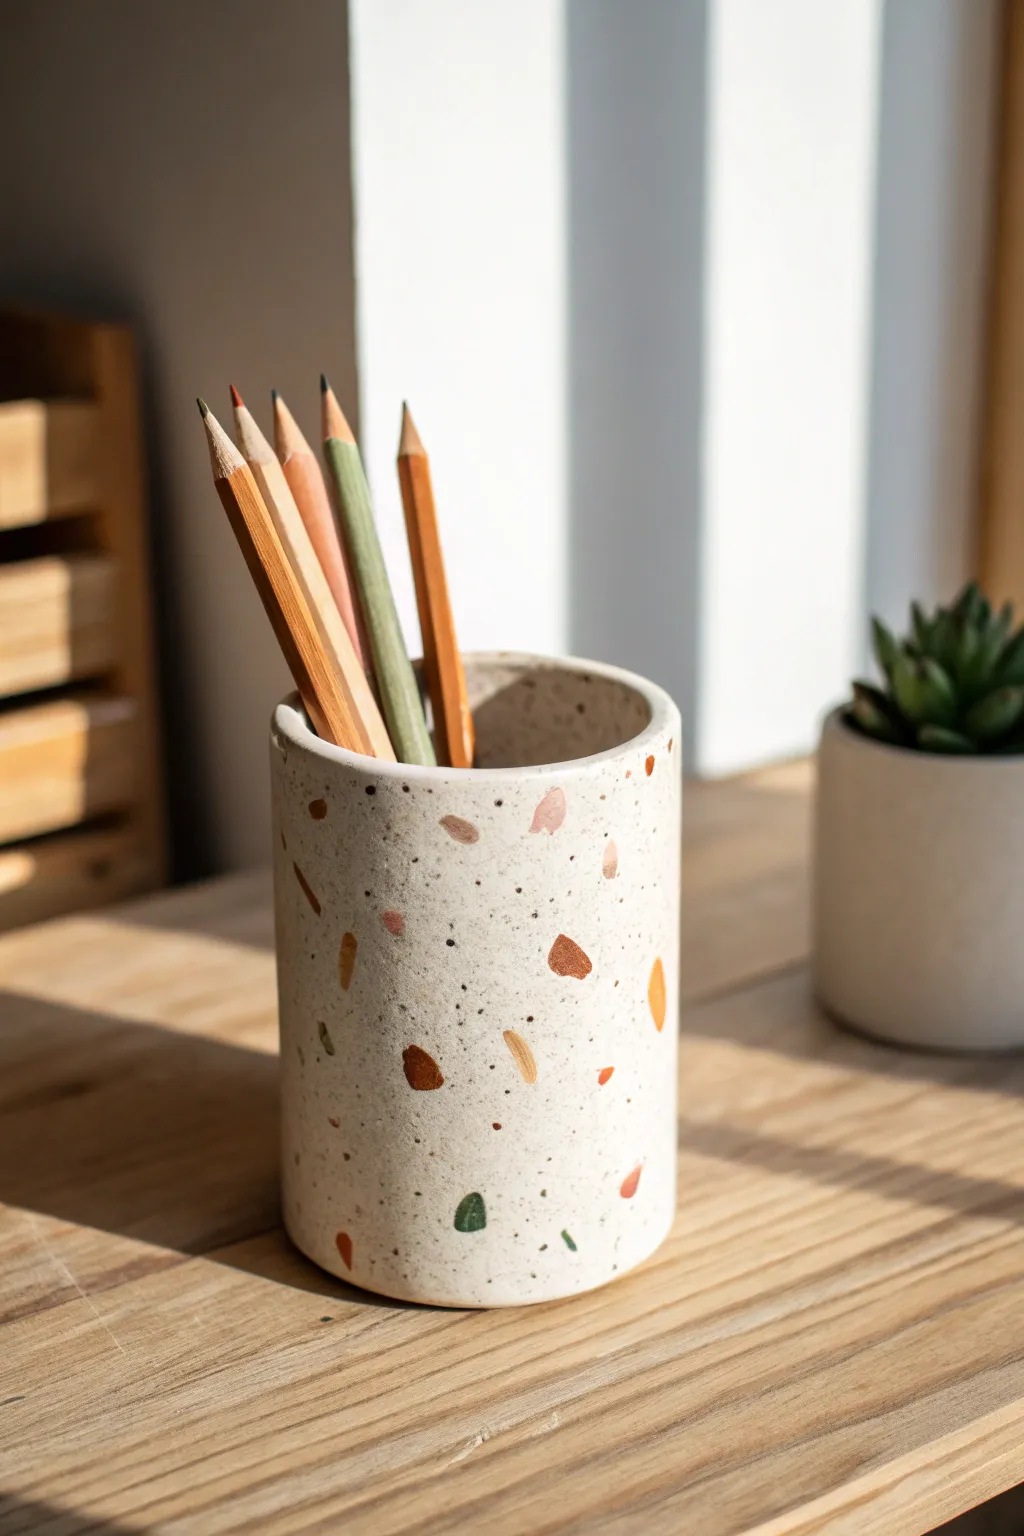
Bring a touch of playful modernism to your desk with this faux-terrazzo pencil holder. By embedding colored clay chips into a white base, you achieve that classic Italian stone look without the heavy weight of concrete.
Step-by-Step
Materials
- White polymer clay (approx. 4oz)
- Small amounts of colored polymer clay (terracotta, forest green, mustard yellow, dusty pink)
- Acrylic rolling pin
- Craft knife or tissue blade
- Cylindrical mold (empty clean soup can or glass jar)
- Parchment paper
- Needle tool
- Fine-grit sandpaper (400 and 600 grit)
- Matte varnish or sealant (optional)
Step 1: Preparing the Chips
-
Flatten colors:
Start by conditioning your colored clays separately. Roll each color out into a very thin sheet, roughly 1-2mm thick. -
Create the heavy chips:
Using your craft knife, cut the colored sheets into irregular, jagged shapes. Aim for varied sizes, from tiny specks to larger triangles, mimicking real stone fragments. -
Partial bake:
Place these colored fragments on a parchment-lined baking sheet and bake them for only 5-10 minutes at the temperature recommended on your clay package. This makes them firm enough to hold their shape during rolling later.
Clean Cuts Pro-Tip
Chill your clay slab in the fridge for 10 minutes before the cutting and sanding phases. Firm clay distorts less and sands much cleaner than warm clay.
Step 2: Building the Base
-
Condition white clay:
While the chips cool, condition your white polymer clay until it is soft and pliable. This will form the main body of the cup. -
Roll the sheet:
Roll the white clay out into a rectangular slab about 4-5mm thick. Ensure it is long enough to wrap around your chosen cylinder mold. -
Apply the chips:
Scatter your pre-baked colored chips randomly across the surface of the white clay slab. Press them gently so they stick. -
Embed the pattern:
Cover the slab with parchment paper to prevent sticking, then roll over the clay again firmly. You want to press the colored chips flush into the white clay until the surface is smooth and even. -
Trim edges:
Use your blade to trim the ragged edges of the slab, creating a neat rectangle with straight sides.
Step 3: Forming the Cup
-
Prepare the mold:
Wrap your metal can or glass jar with a layer of parchment paper. This is crucial so you can remove the clay later. -
Wrap the clay:
Carefully lift your terrazzo slab and wrap it around the mold. Bring the two short ends together. -
Seam the sides:
Use a modeling tool or your finger to smooth the seam where the ends meet. Blend the white clay together until the join is invisible. -
Create the base:
Roll out a separate piece of white clay for the bottom. Place your wrapped cylinder on top of it and cut around the base to get the perfect circle size. -
Attach the bottom:
Press the circular base onto the bottom of the cylinder. Use your finger to smooth the seam between the wall and the floor of the cup. -
Smooth the rim:
Check the top rim of the cup. If it’s uneven, trim it gently with your blade or smooth it with a touch of baby oil on your finger.
Variation Level-Up
Mix black pepper or dried tea leaves into the white clay base before rolling. This creates tiny natural speckles that sit behind the larger colored chips for extra depth.
Step 4: Finishing Touches
-
Final Bake:
Bake the project on the mold according to the manufacturer’s instructions, usually 15-30 minutes depending on thickness. -
Cool and remove:
Let the piece cool completely before attempting to slide it off the mold. The clay hardens as it cools. -
Initial sand:
Start with 400-grit wet/dry sandpaper. Sand the outside under running water to reveal the crisp edges of the colored chips and remove any fingerprints. -
Polish:
Step up to 600-grit sandpaper for a smoother finish. I find the water helps keep the dust down and results in a beautiful, stone-like feel. -
Seal:
If desired, apply a thin coat of clear matte varnish to protect the surface from pencil marks, though polymer clay is durable enough on its own.
Place your favorite pens inside and enjoy the burst of color on your workspace


Marbled Swirl Pencil Holder
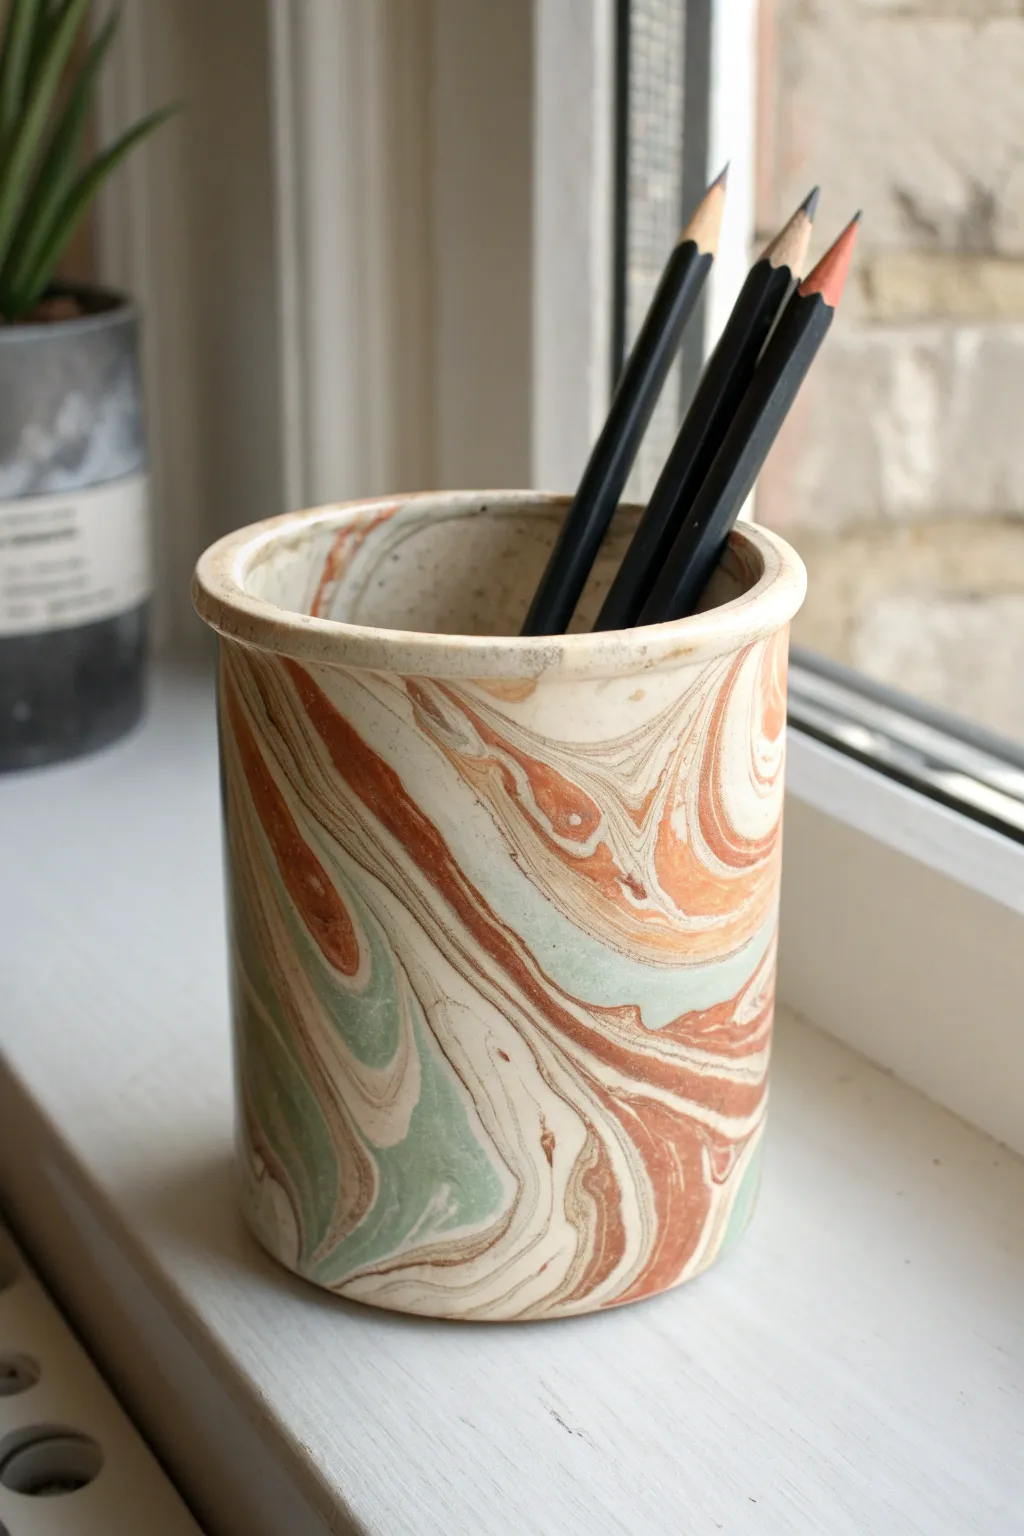
Achieve the sophisticated look of wheel-thrown pottery using accessible polymer clay in this striking project. By combining rusted terracotta, sage green, and creamy beige tones, you’ll create a functional pencil holder that brings an organic, elegant touch to any desk.
Detailed Instructions
Materials
- Polymer clay (terracotta or rust color)
- Polymer clay (white or beige)
- Polymer clay (sage green)
- Acrylic rolling pin
- Empty soda can or glass jar (to use as a mood)
- Craft knife or tissue blade
- Ceramic tile or work surface
- Smooth work surface (glass or polished stone)
- Gloss or satin polymer clay varnish/glaze
- Soft paintbrush
- Sandpaper (wet/dry, various grits ranging 400-1000)
Step 1: Preparing the Clay Palette
-
Condition the white base:
Begin by thoroughly conditioning a large block of white or beige clay until it is soft and pliable. This will act as your primary background color, so you’ll need roughly double the amount compared to the other colors. -
Mix the accent colors:
Condition the terracotta and sage green clays separately. If your colors feel too bright, I like to mix in a tiny pinch of brown or grey to mute them into those earthy, pottery-like tones seen in the photo. -
Create logs:
Roll each color into a long, snake-like cylinder. Make the white cylinder the thickest, while the terracotta and sage cylinders should be thinner, varying slightly in width for organic variation.
Clean Cuts Matter
To avoid distorting your marbled pattern when trimming the clay slab, push your blade straight down rather than dragging it through the clay like a pizza cutter.
Step 2: Creating the Marble Pattern
-
Combine the ropes:
Gather your clay snakes and twist them together into one large, thick rope. Fold this rope in half and twist it again. -
Repeat the twist:
Repeat the twisting and folding process 2-3 times. Be careful not to over-mix; you want distinct ribbons of color, not a muddy blend. -
Form a ball:
Roll the twisted rope into a smooth ball. Check the surface to ensure you can see visible striations of all three colors. -
Roll out the slab:
Place the ball on your work surface and use the acrylic roller to flatten it into a long rectangular slab about 1/4 inch thick. Roll in different directions to stretch the swirl pattern organically. -
Trim to size:
Using your craft knife, trim the marbled slab into a clean rectangle. Measure the circumference of your soda can (or mold) to determine the length needed, adding a small overlap for the seam.
Air Bubble Troubles?
If you see a bump or bubble while rolling, pierce it gently with a needle tool and smooth the air out immediately. Trapped air can crack the piece during baking.
Step 3: Refining the Form
-
Prepare the base:
From your leftover mixed clay remnants, roll out a small circle to serve as the bottom of the cup. It should be slightly larger than the diameter of your mold. -
Wrap the mold:
Carefully wrap your rectangular slab around the soda can or jar. Gently press the seam together where the ends meet. -
Blend the seam:
Use a modeling tool or your finger to smooth the vertical seam until it disappears completely. The marbling helps hide this join, but take your time here. -
Attach the bottom:
Place the wrapped cylinder onto the circular base. deeply blend the clay of the walls onto the base piece, smoothing the transition inside and out to ensure a watertight bond. -
Refine the rim:
Gently flare the top rim slightly outward with your thumb to mimic a thrown pottery lip. Smooth any rough edges on the top. -
Bake:
Bake the piece according to your specific clay brand’s temperature and time instructions. Usually, this means baking at 275°F (130°C) for about 30-45 minutes to ensure durability.
Step 4: Finishing Touches
-
Cool and removal:
Allow the piece to cool completely before attempting to remove it from the mold. If it sticks, pop it in the freezer for a few minutes to help the clay contract. -
Wet sanding:
Under running water, sand the entire surface starting with 400 grit and working up to 1000 grit. This removes fingerprints and creates a professional, stone-smooth texture. -
Seal the piece:
Apply a thin coat of gloss or satin varnish to the interior and exterior. This protects the surface and makes those earthy swirl colors pop beautifully.
Now you have a stunning, stone-effect vessel ready to organize your workspace

The Complete Guide to Pottery Troubleshooting
Uncover the most common ceramic mistakes—from cracking clay to failed glazes—and learn how to fix them fast.
Stamped Pattern Pencil Holder
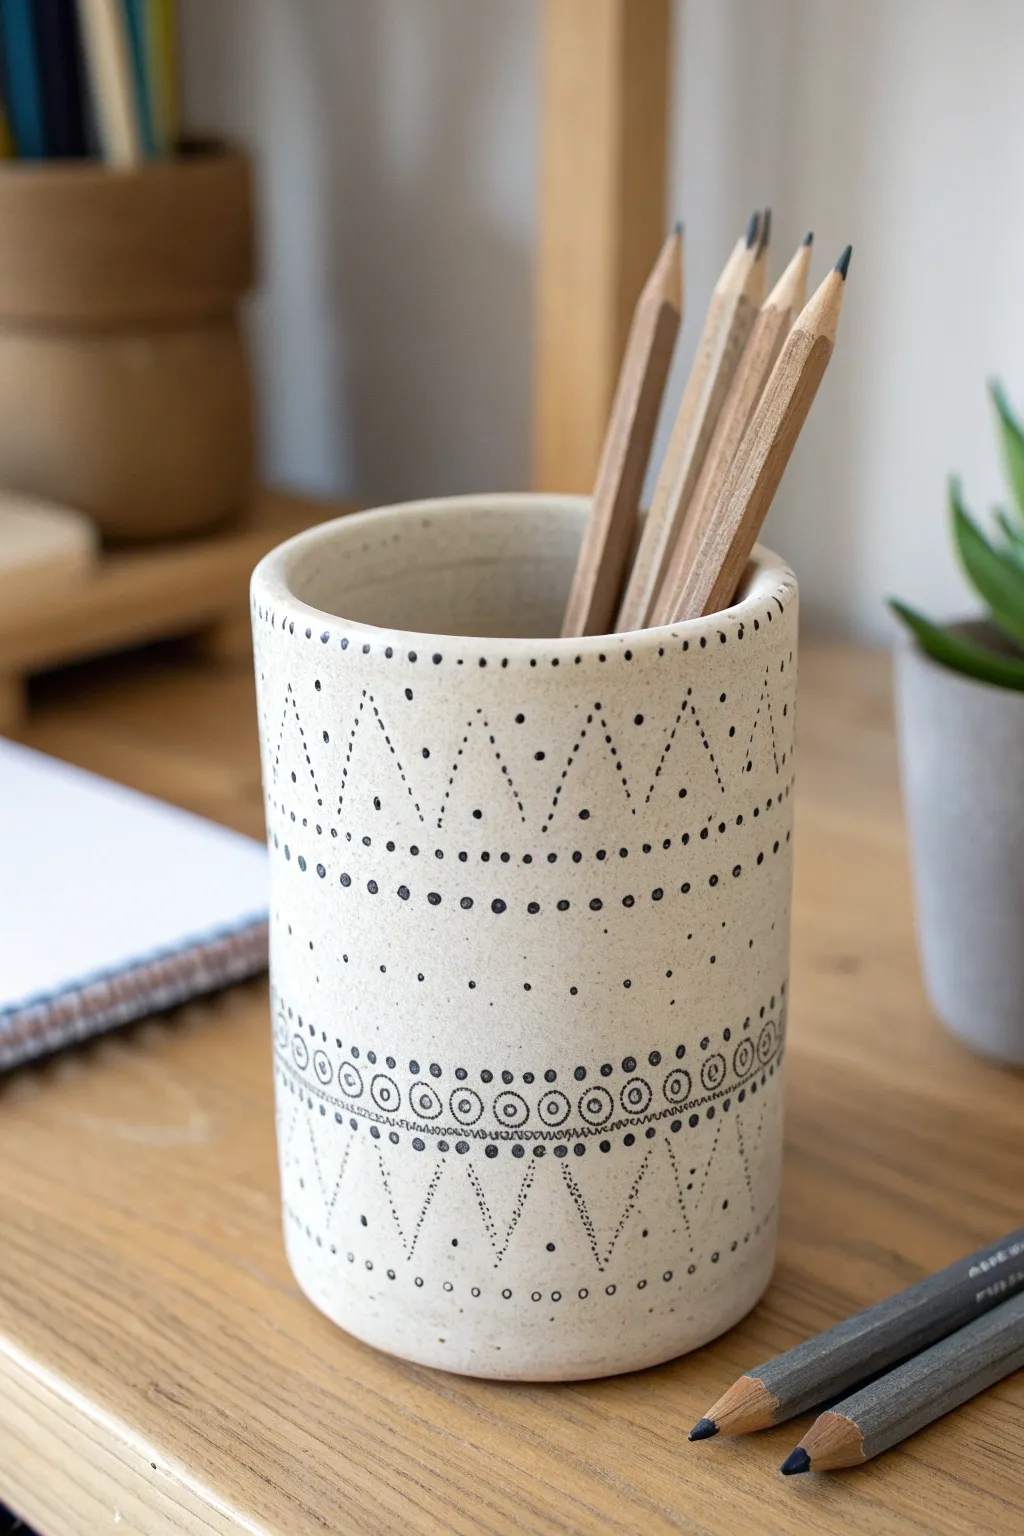
Achieve a modern, earthy look for your desk with this hand-built clay pencil holder featuring delicate stamped patterns. The combination of natural clay tones and crisp black geometric designs creates a sophisticated yet handmade feel.
Step-by-Step
Materials
- White or light stoneware clay (speckled clay works best)
- Rolling pin
- Canvas mat or slab roller
- Needle tool
- Fettling knife
- Ruler
- Circular cookie cutter or jar lid (for base)
- Slip and scoring tool (or fork)
- Black underglaze
- Small foam stamps (circles, dots) or fine-tipped brush
- Underglaze applicator bottle (optional but helpful)
- Clear matte glaze
- Sponge
Step 1: Building the Form
-
Roll the Slab:
Begin by wedging your clay to remove air bubbles, then roll it out into a consistent slab. Aim for a thickness of about 1/4 inch across the entire piece for stability. -
Cut the Rectangle:
Using a ruler and fettling knife, cut a long rectangle. The height determines how tall your cup will be (around 4-5 inches is standard), and the length needs to match the circumference of your base plus a little overlap. -
Cut the Base:
Use a circular cookie cutter or trace around a jar lid to cut a perfect circle from the remaining slab to serve as the bottom of your holder. -
Score and Slip:
Rough up the outer edge of the circular base and the bottom long edge of your rectangle wall with a scoring tool. Apply clay slip generously to these textured areas. -
Assemble the Cylinder:
Wrap the rectangular slab around the circular base. Carefully join the wall to the base, ensuring no gaps remain. -
Join the Seams:
Where the two ends of the wall meet to form the cylinder, score and slip the vertical seam. Press it firmly together and smooth it inside and out with your finger or a rib tool so the join becomes invisible. -
Smooth the Rim:
Run a slightly damp sponge over the top rim to round off any sharp edges and create a professional finish.
Step 2: Adding the Decoration
-
Leather Hard Stage:
Allow the pot to dry to a leather-hard state. It should be firm to the touch but still cold, ensuring it holds its shape while you decorate. -
Plan the Pattern:
Lightly trace your design guidelines using a dull pencil. Mark horizontal bands where your patterns will sit to keep everything straight. -
Dot the Triangles:
Using a fine-tip underglaze applicator or a very small brush dipped in black underglaze, create the upper row of dotted triangles. Space the dots evenly to form the peaks. -
Add the Belt Line:
Paint a solid horizontal line of black dots around the middle of the pot. Below this, add a second line of slightly larger dots. -
Stamp the Circles:
For the distinct circles in the middle band, use a small foam stamp or the back end of a drill bit dipped in underglaze. Stamp a repeating circle pattern between your dotted lines. -
Detail the Circles:
Once the stamped circles are dry, add a tiny dot in the center of each one using your finest brush or applicator tip. -
Lower Triangles:
Create the bottom row of inverted triangles using the same dotted technique as the top rim, ensuring they mirror the upper design. -
Final Clean Up:
Check for any smudges of underglaze. If you find mistakes, you can gently scrape them away with a knife tool once the underglaze is dry.
Stamp Hack
Don’t have stamps? Use common household items dipped in underglaze—straws create perfect small open circles, and pencil erasers make solid dots.
Step 3: Firing and Glazing
-
Bisque Fire:
Let the piece dry completely (bone dry) before loading it into the kiln for a bisque firing. -
Glaze Application:
Dip the bisqued pot into a clear matte glaze. I find a matte finish preserves the earthy, tactile quality of the speckled clay better than a glossy one. -
Stilt and Fire:
Wipe the bottom of the pot clean of any glaze with a sponge to prevent sticking to the shelf. Fire for the final time according to your clay body’s temperature guide.
Fixing Smudges
If you smear the black underglaze while painting, don’t wipe it wet! Let it dry completely, then gently scratch the error off with a needle tool.
Fill your new handmade vessel with your favorite art supplies and enjoy the upgrade to your workspace.
Carved Texture Pencil Holder
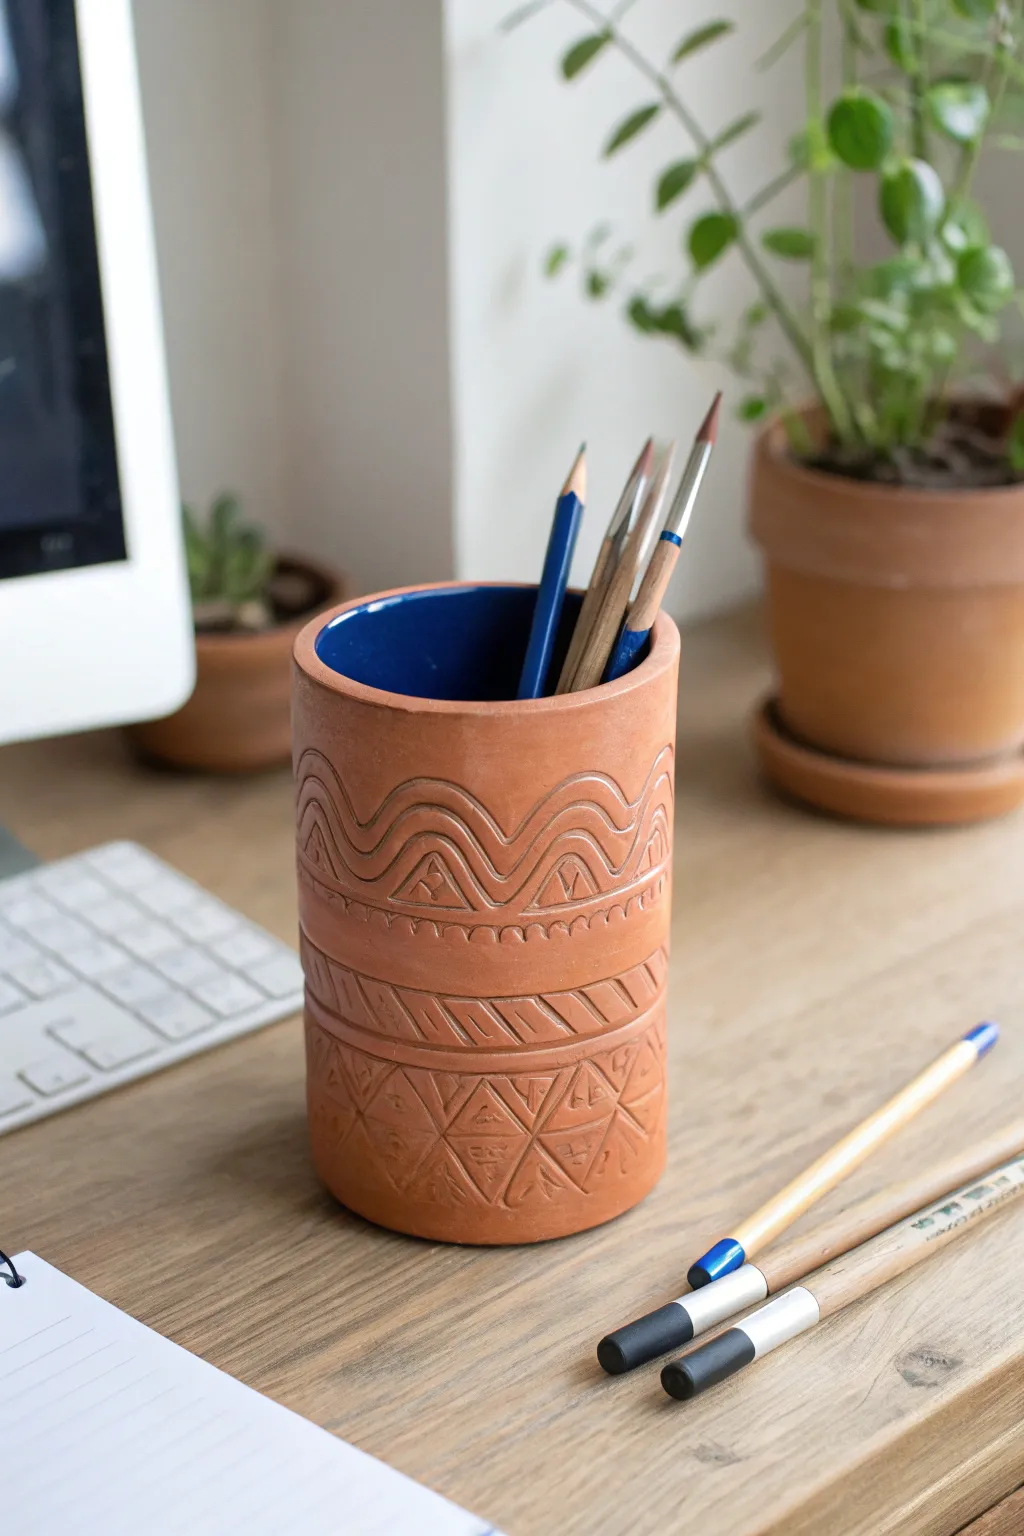
Bring earthy warmth to your workspace with this hand-carved pencil holder that balances rustic charm with modern geometry. Featuring a rich terracotta exterior intricately etched with tribal-inspired patterns, it surprises with a deep, glossy blue interior for a pop of hidden color.
Step-by-Step Tutorial
Materials
- Terracotta air-dry clay or kiln-fire clay
- Rolling pin
- Cardboard cylinder or PVC pipe (for mold)
- Parchment paper
- Clay knife or fettling knife
- Needle tool or toothpick
- Loop carving tool (small)
- Small sponge
- Water cup
- Deep blue acrylic paint (for air-dry) or blue glaze (for kiln-fire)
- High-gloss varnish (for air-dry)
- Ruler
- Scoring tool or fork
- Slip (clay mixed with water)
Step 1: Forming the Cylinder
-
Prep your workspace:
Begin by covering your mold (the cardboard tube or PVC pipe) with parchment paper. This crucial step prevents the clay from sticking to the form and makes removal much easier later. -
Roll the slab:
Roll out your terracotta clay into a smooth, even slab about 1/4 inch thick. Aim for a consistent thickness to ensure the holder dries evenly without cracking. -
Cut to size:
Measure the circumference and height of your mold. Using a ruler and clay knife, cut a rectangle from your slab that is tall enough for your pencils and wide enough to wrap around the mold with a slight overlap. -
Wrap the form:
Carefully lift the clay slab and wrap it around your parchement-covered mold. Bring the two short ends together. -
Score and slip:
At the seam where the ends meet, rough up the edges with a scoring tool or fork. Apply a dab of clay slip (watery clay) to act as glue. -
Create the seam:
Press the scored edges together firmly. Use your thumb or a modeling tool to smooth the clay over the seam until it disappears completely and the cylinder looks seamless. -
Add the base:
Place your wrapped cylinder onto a fresh piece of rolled clay. Trace around the bottom with your knife to cut out a circular base. Score and slip the bottom edge of the cylinder and the new base piece, then press them together to seal.
Cracks happen!
If small cracks appear while drying, mix a tiny amount of clay with vinegar to make a paste. Fill the cracks, smooth it over, and let it dry slowly away from direct heat.
Step 2: Carving the Design
-
Initial drying:
Let the cylinder sit for a short while—about 30 to 60 minutes depending on humidity. You want it ‘leather hard,’ where it’s firm enough to hold its shape but soft enough to carve without chipping. -
Mark horizontal guides:
Using a needle tool and a ruler (or steady hand), lightly trace three horizontal lines around the cylinder to divide it into three distinct bands for your patterns. -
Carve the waves:
In the top band, use a small loop tool to carve a continuous wavy line. Remove the clay to create a recessed channel rather than just a scratch. -
Add arches:
Underneath the wave crests, carve concentric arches. I like to vary the pressure slightly to give the lines a hand-hewn organic feel. -
Detail the middle band:
For the narrow middle strip, carve short, diagonal hash marks. Keep them closely spaced to create a texture that contrasts with the open waves above. -
Create the bottom triangles:
In the lowest section, carve large triangles. Inside the triangles pointing up, etch small spirals or symbols; inside the downward-pointing triangles, carve vertical lines or smaller triangles for variety. -
Smooth the edges:
Once your carving is complete, take a slightly damp sponge and very gently run it over the surface to soften any sharp burrs left by the carving tools.
Go deeper
After the exterior is dry, rub a small amount of white acrylic paint into the carved lines and wipe off the excess. This whitewash technique makes the carving pop!
Step 3: Finishing Touches
-
Final drying:
Allow the piece to dry completely. If using air-dry clay, this takes 24-48 hours. If using kiln clay, follow your specific firing schedule. -
Remove the mold:
Once the clay has stiffened significantly (but before it shrinks too much if using kiln clay), carefully slide the cardboard or PVC mold out. -
Paint the interior:
Pour deep blue acrylic paint or glaze into the interior. Brush specifically up to the rim, creating a crisp line where the blue meets the terracotta lip. -
Seal (Air-Dry Only):
If you used air-dry clay, apply a high-gloss varnish only to the blue painted interior to mimic a ceramic glaze. Leave the exterior matte to preserve the natural clay texture.
Place your favorite pencils inside and enjoy the tactile satisfaction of your handmade desk accessory


What Really Happens Inside the Kiln
Learn how time and temperature work together inside the kiln to transform clay into durable ceramic.
Scalloped Rim Pencil Holder
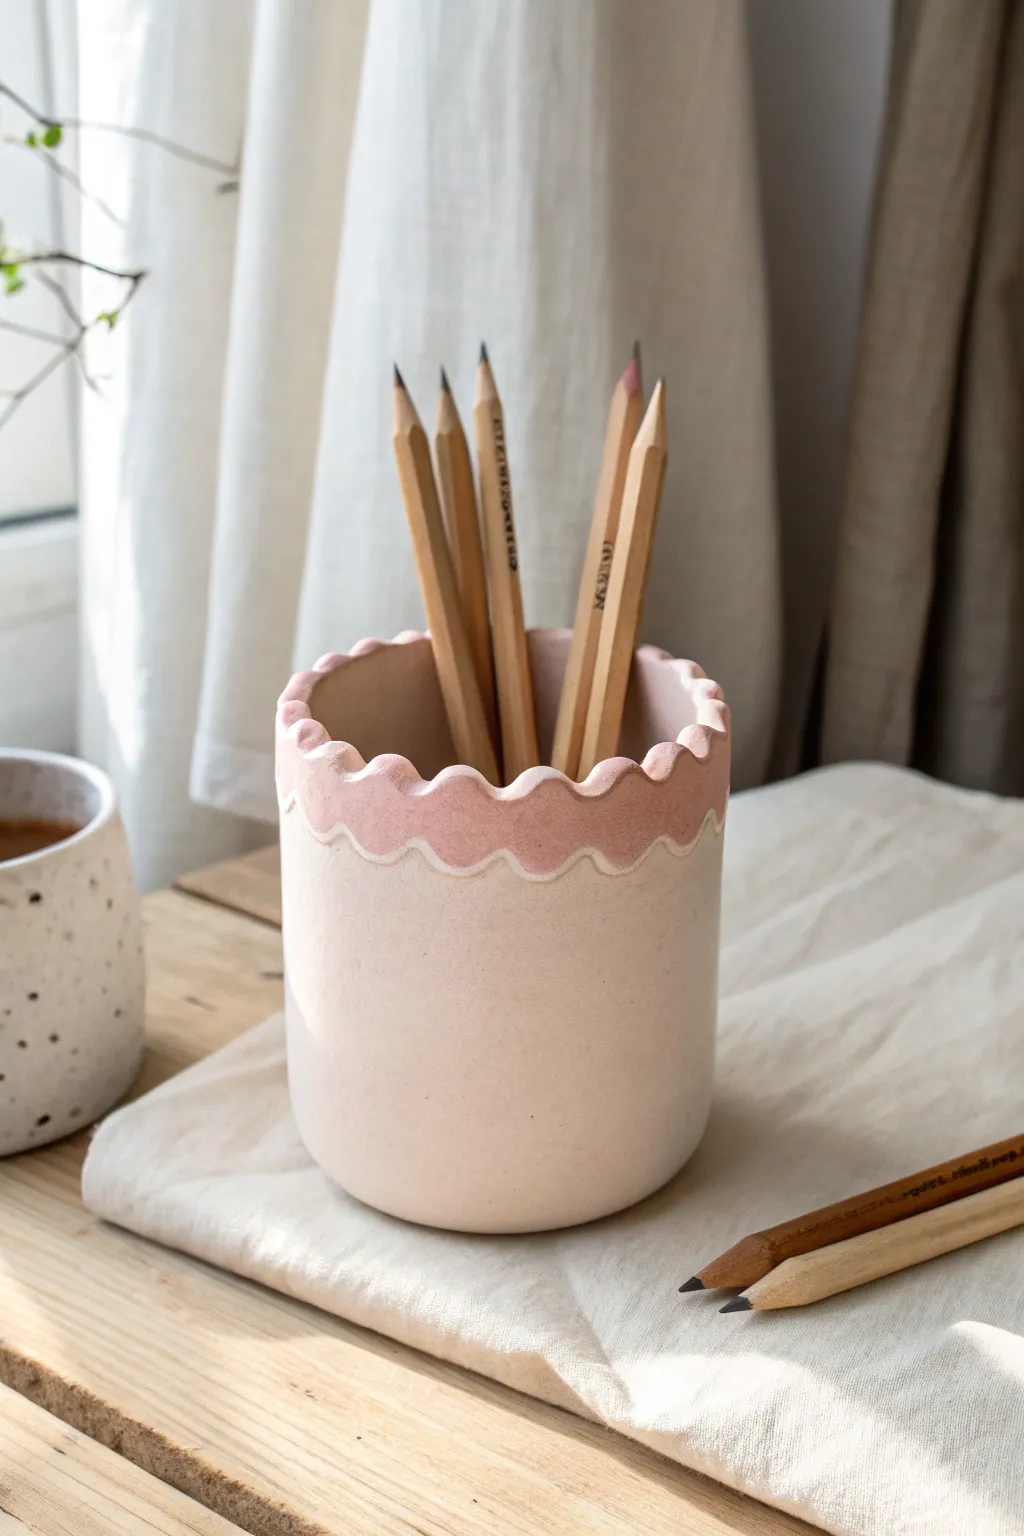
This charming, minimalist pencil holder features a distinct wavy rim that softens its simple cylindrical form. The two-tone pastel finish, combining pale pink scallops with a natural creamy clay body, creates a serene and artisanal look perfect for a cozy desk setup.
Detailed Instructions
Materials
- Air-dry clay (white or cream)
- Acrylic rolling pin
- Clay knife or craft blade
- Small round cookie cutter or a bottle cap
- Slip (clay mixed with water)
- Small sponge
- Fine grit sandpaper
- Acrylic paints (pale pink, cream/white)
- Flat paintbrush
- Matte varnish or sealant
- Canvas or silicone mat for rolling
Step 1: Forming the Base Cylinder
-
Prepare the clay slab:
Begin by conditioning a large ball of air-dry clay in your hands until it’s pliable. Roll it out on your canvas or mat to an even thickness of about 1/4 inch (6mm). Using depth guides can ensure the thickness is consistent throughout. -
Cut the rectangle:
Determine the height and circumference you want for your pencil holder. Use a ruler and your craft knife to cut a clean, straight rectangle from the clay slab to these dimensions. -
Cut the base:
From the remaining rolled clay, cut a circle that matches the diameter of the cylinder you are creating. You can use a round cutter or trace around a circular object. -
Score and slip:
Take your clay knife and score cross-hatch marks along the short edges of your rectangle and the outer edge of your circular base. Brush a little water or slip onto these scored areas. -
Assemble the cylinder:
Carefully stand the rectangle up and wrap it around the circular base. Join the two short ends of the rectangle first, pressing them firmly together to close the cylinder. -
Attach the base:
Press the cylinder walls onto the base circle. Use a modeling tool or your finger to smooth the seams on both the inside and outside until the joins are invisible.
Uneven Seams?
If the vertical seam where you joined the cylinder is visible, roll a thin coil of fresh clay, press it into the groove, and smooth it out thoroughly with a wet finger.
Step 2: Creating the Scalloped Detail
-
Prepare the scalloped strip:
Roll out a separate, thinner strip of clay, roughly 1/8 inch thick. It needs to be long enough to wrap around the top circumference of your cylinder. -
Cut the waves:
Use a small round cutter or a bottle cap to remove semi-circles from one long edge of this strip. By cutting adjacent semi-circles, you will create a continuous wavy or scalloped pattern. -
Attach the rim:
Score and slip the top outer edge of your main cylinder. Carefully wrap the scalloped strip around the top, pressing it gently to adhere. The waves should sit flush against the cylinder wall. -
Blend the bottom edge:
To make the scallop look integrated rather than just stuck on, I like to gently blend the *bottom* straight edge of the scalloped strip into the main cylinder using a wet finger or tool, leaving the top wavy edge distinct. -
Smooth the imperfections:
Dip your sponge in a little water and gently run it over the entire piece to remove fingerprints and smooth out harsh edges. Pay special attention to the peaks and valleys of the scallops.
Step 3: Finishing Touches
-
Let it dry entirely:
Allow the piece to dry completely. This usually takes 24 to 48 hours depending on humidity. Rotate it occasionally so it dries evenly and maintains its round shape. -
Sand for a smooth finish:
Once bone dry, use fine-grit sandpaper to buff the surface. Focus on the rim to ensure the scallops are soft and flowing, not sharp or jagged. -
Apply the base color:
Paint the main body of the holder with a cream or off-white acrylic paint. You may need two coats for full, opaque coverage. -
Paint the scallops:
Using a small flat brush, carefully paint the scalloped rim section in a pale, dusty pink. Follow the wavy line precisely where the added clay strip meets the body. -
Seal the piece:
Finish by applying a coat of matte varnish. This protects the paint and gives the piece a finished, ceramic-like quality without adding too much artificial shine.
Texture Twist
Before painting, use a toothbrush to gently flick tiny speckles of dark brown paint onto the surface for a trendy ‘speckled ceramic’ pottery effect.
Now you have a serene, custom-made vessel that brings a soft, artisanal touch to your workspace
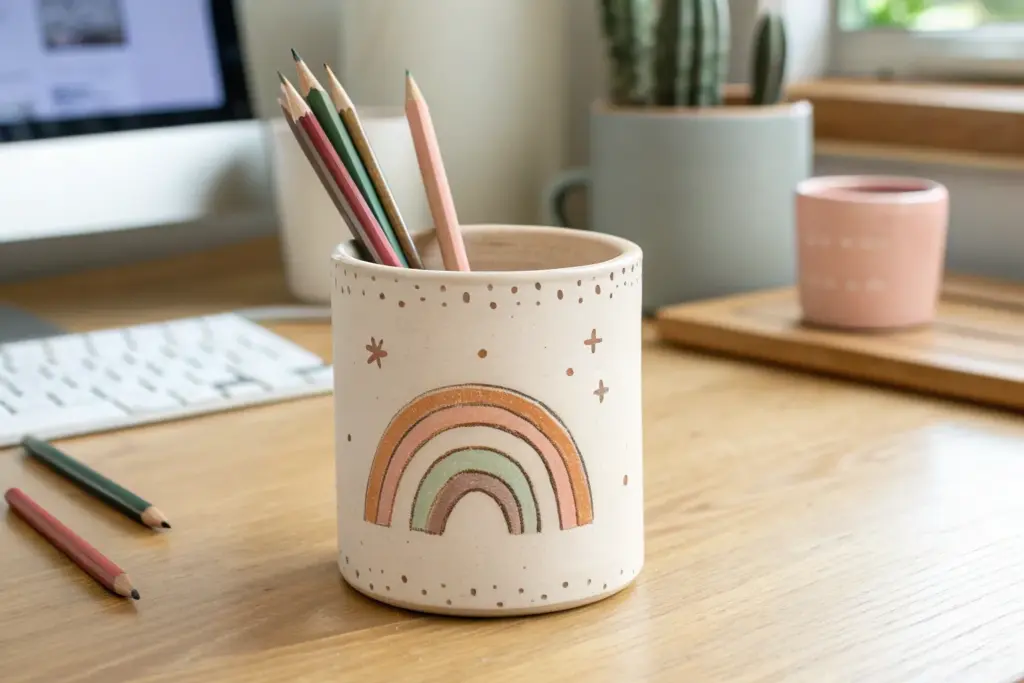
Rainbow Arch Pencil Holder Stand
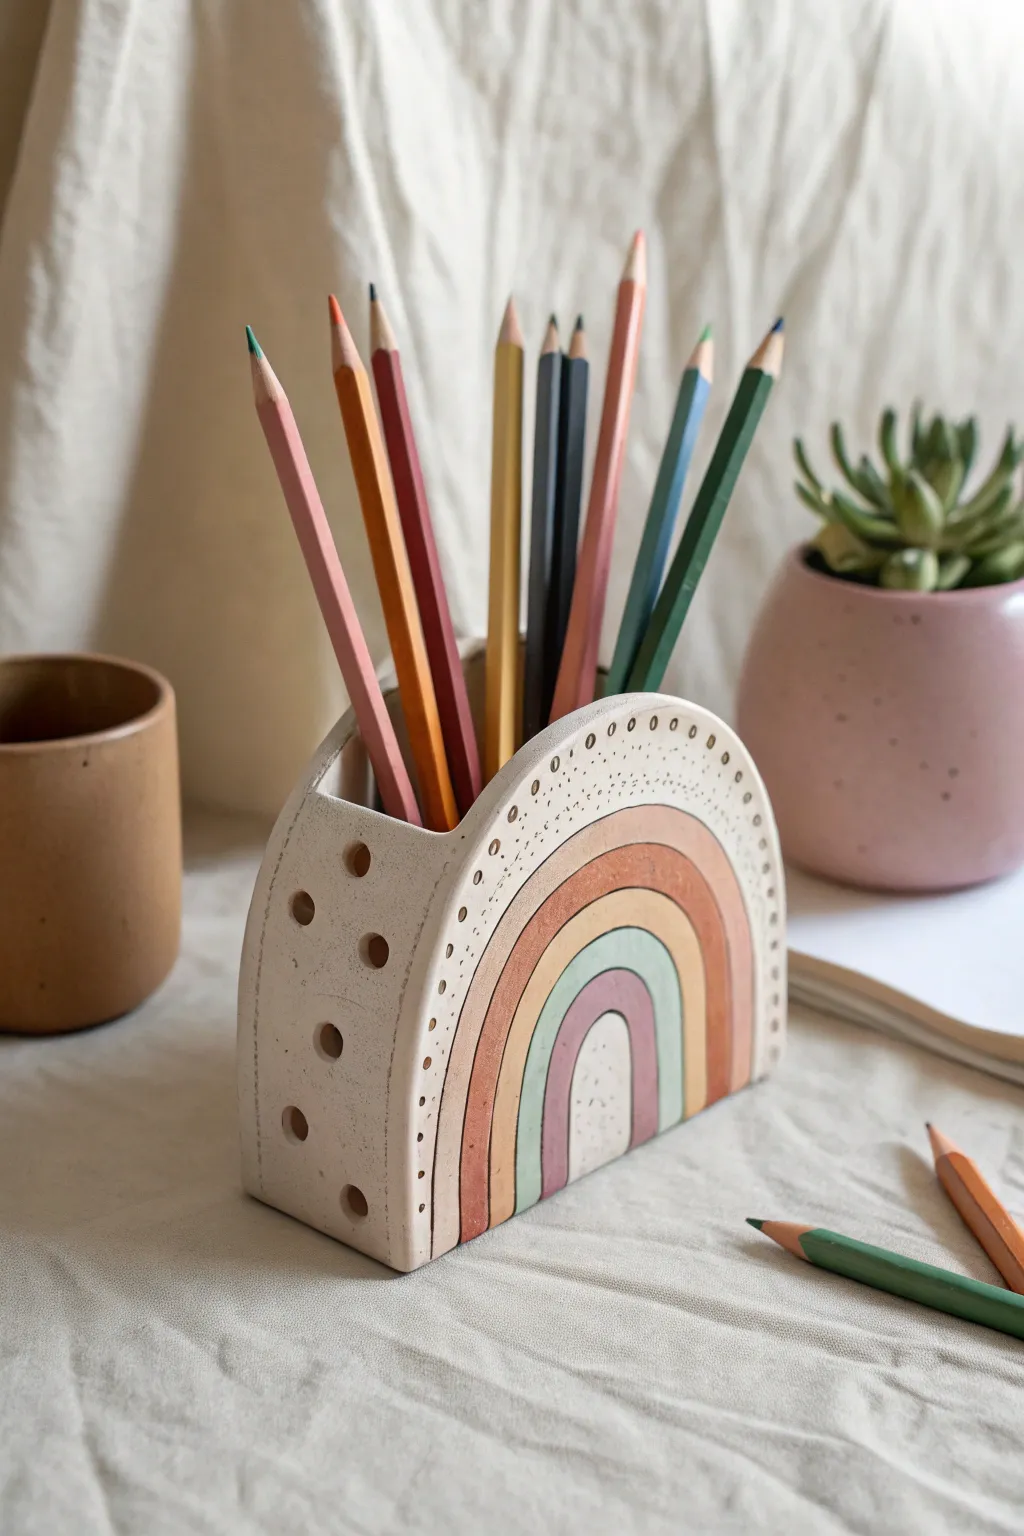
Bring a touch of whimsical organization to your desk with this charming rainbow arch pencil holder. With its muted, earthy tones and delicate dotted details, it serves as both a functional storage piece and a lovely sculptural accent.
Step-by-Step
Materials
- Air-dry clay or polymer clay (white or beige base)
- Acrylic paints (terracotta, mustard yellow, sage green, mauve, cream)
- Rolling pin
- Craft knife or scalpel
- Cardstock for templates
- Clay sculpting tools (needle tool specifically)
- Slip and score tool (or an old toothbrush)
- Fine grit sandpaper
- Matte varnish or sealant
- Small flat paintbrush
- Water cup (for bonding)
Step 1: Preparation and Base Construction
-
Draft your templates:
Begin by sketching an arch shape on cardstock that matches your desired size—roughly 5 inches wide by 4 inches tall is a good standard. Cut out two identical arches (front and back) and a rectangular strip for the base and sides (about 1.5 inches wide). -
Roll out the slab:
Condition your clay and roll it out into a smooth, even slab approximately 1/4 inch thick. Aim for consistent thickness to ensure sturdy walls. -
Cut the components:
Place your cardstock templates onto the clay. Using your craft knife, carefully cut out the front arch, the back arch, and the long rectangular side/bottom strip. -
Add texture details:
On the front arch piece, lightly sketch the concentric rainbow arcs using a needle tool. Don’t cut deep; just make guidelines for painting later. Around the outermost rim, poke a series of tiny holes or indentations to create the decorative border pattern seen in the reference.
Slumping Walls?
If the clay walls sag during assembly, wad up dry paper towels or newspaper and stuff them inside the holder to support the shape while it dries or bakes.
Step 2: Assembly
-
Score the edges:
Take your back arch and the rectangular strip. ‘Score’ (make rough hatch marks) on the contact edges where the pieces will join. Do the same for the inner edge of the front arch. -
Apply slip or binder:
Dab a little water or liquid clay (if using polymer) onto the scored areas to act as glue. This creates a strong bond between the walls. -
Attach the side wall:
Wrap the rectangular strip along the curved edge of the back arch panel to create the U-shaped enclosure. Smooth the seam on the outside so it looks like one continuous piece, but leave the top open. -
Attach the front panel:
Place the front rainbow arch onto the assembly, aligning it with the side strip. Press firmly but gently to seal the seams. I like to use a flat modeling tool to blend the clay together invisibly on the exterior. -
Create decorative punctures:
Using a straw or a larger circular cutter, punch a few random holes on the side panels if you want the perforated look shown in the image. Clean up any rough edges from the holes. -
Dry or bake:
If using air-dry clay, let the piece sit undisturbed for 24-48 hours until bone dry. If using polymer clay, bake according to the manufacturer’s instructions.
Step 3: Finishing and Painting
-
Sand for smoothness:
Once fully cured or dry, use fine-grit sandpaper to smooth out any fingerprints, sharp edges, or bumps on the surface. Wipe away dust with a slightly damp cloth. -
Apply the base coat:
Paint the entire piece in a creamy off-white or speckled beige to mimic raw ceramic. You might need two coats for full opacity. -
Paint the rainbow arcs:
Using a small flat brush, paint the concentric arches within the guidelines you made earlier. Use muted, earthy tones: a dusty rose for the center, followed by sage green, mustard yellow, and a darker terracotta for the outer ring. -
Add speckles:
To achieve that stoneware pottery look, dilute a tiny bit of brown paint with water. Load an old toothbrush or stiff brush and flick tiny speckles across the surface. -
Seal the piece:
Finish by applying a coat of matte varnish. This protects the paint from chipping and gives the holder a professional, finished feel without being overly glossy.
Simulated texture pro-tip
Mix dried coffee grounds or sand into your white paint base coat. This creates a convincing gritty, speckled ceramic texture without needing special stoneware clay.
Place your favorite colored pencils inside and enjoy your handcrafted desk accessory

TRACK YOUR CERAMIC JOURNEY
Capture glaze tests, firing details, and creative progress—all in one simple printable. Make your projects easier to repeat and improve.
Two-Tone Dip-Dyed Pencil Holder
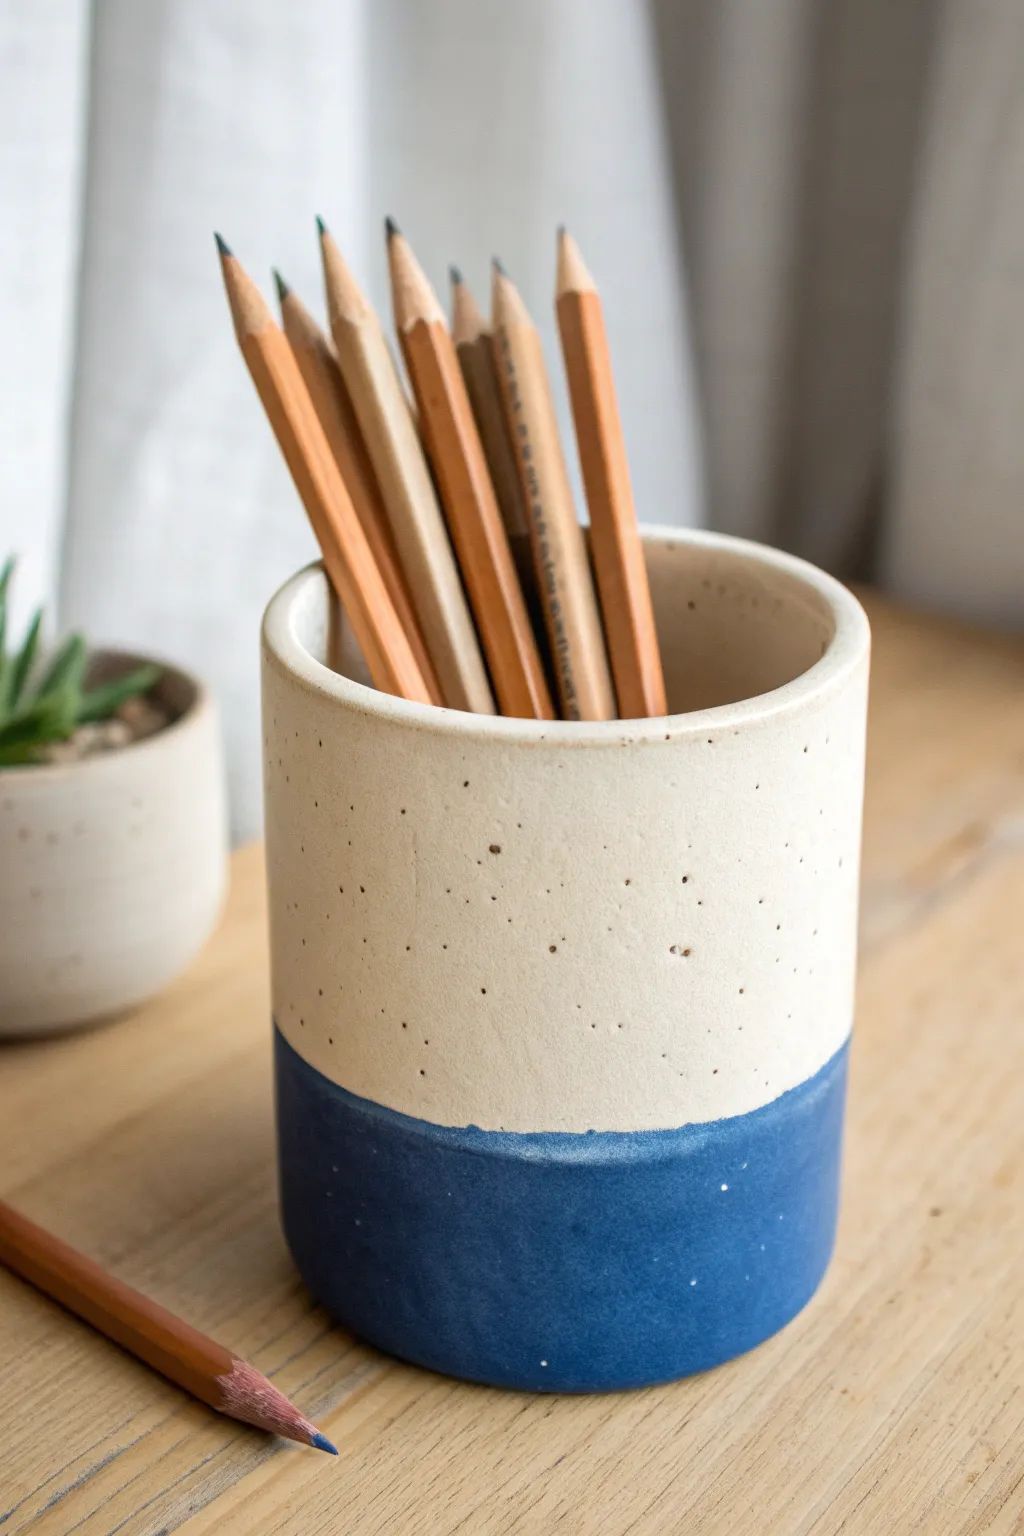
Achieve a modern, minimalist aesthetic with this ceramic pencil holder featuring a crisp two-tone design. The speckled cream body contrasts beautifully with the dipped matte blue base, creating a grounded and serene addition to any desk.
How-To Guide
Materials
- White stoneware clay with speckles (or standard white clay plus grog/speckles)
- Pottery wheel (or rolling pin for slab building)
- Needle tool
- Rib tool (metal or wood)
- Wire cutter
- Sponge
- Trimming tools
- Masking tape (optional, for crisp lines)
- Matte white glaze (transparent if using speckled clay)
- Cobalt blue dipping glaze (matte finish)
- Wax resist
- Kiln
Step 1: Forming the Cylinder
-
Prepare the Clay:
Begin by thoroughly wedging about 1 to 1.5 pounds of speckled white stoneware clay to remove air bubbles and ensure consistency. -
Center on the Wheel:
Throw the clay onto the pottery wheel head and center it using wet hands and steady pressure. -
Open the Form:
Press your thumbs into the center of the mound to open it, leaving about a half-inch of thickness at the bottom for the base. -
Pull the Walls:
Slowly pull the walls upward to create a cylinder. Aim for a height of about 4-5 inches, keeping the walls even—roughly a quarter-inch thick. -
Refine the Shape:
Use a rib tool on the exterior while supporting the interior with your hand to smooth the surface and remove throwing lines for that clean, modern look. -
Smooth the Rim:
Compress the rim with a piece of chamois or a damp sponge to make it rounded and durable. -
Cut and Dry:
Run a wire cutter under the pot to separate it from the wheel, then let it dry to a leather-hard state.
Uneven Dipping Line?
If you struggle to get a straight line by hand, apply a strip of masking tape or automotive detailing tape around the pencil holder before dipping the blue section.
Step 2: Trimming and Bisque Firing
-
Trim the Base:
Once leather-hard, center the pot upside down on the wheel. Use a trimming tool to clean up the bottom and carve a slight foot ring if desired. -
Smooth Imperfections:
Wipe the surface gently with a barely damp sponge to smooth out any rough texture or grog that trimming might have engaged. -
Bone Dry:
Allow the piece to dry completely until it is bone dry. It should feel room temperature to the touch, not cool. -
Bisque Fire:
Load the piece into the kiln and bisque fire it to cone 04 (or your clay body’s specific bisque temperature).
Create a Trio
Make two more cups in varying heights—one shorter for paperclips and one taller for rulers—to create a complete, cohesive desk organization set.
Step 3: Glazing the Two-Tone Design
-
Clean the Bisqueware:
Wipe the fired pot with a wet sponge to remove any dust, which ensures the glaze adheres properly. -
Apply Interior Glaze:
Pour the matte white (or transparent) glaze into the cup, swirl it to coat the entire interior, and pour out the excess. Wipe the rim clean. -
Seal the Bottom:
Apply wax resist to the very bottom foot of the pot to prevent glaze from sticking to the kiln shelf. -
Upper Glaze Application:
Dip the top two-thirds of the exterior into the matte white glaze. I find precise timing helps here—hold it for about 3 seconds for good coverage. -
Dip the Base:
Once the white glaze is dry to the touch, carefully dip the bottom third of the pot into the matte cobalt blue glaze. Try to keep the pot level to create a straight horizon line. -
Check the Overlap:
If the blue glaze is thick, you may want to slightly sponge the overlap area to prevent a heavy ridge, though a little texture adds character. -
Clean Up:
Use a sponge to wipe away any glaze droplets that may have landed on the waxed bottom. -
Final Firing:
Fire the piece in the kiln to the maturity temperature of your clay and glaze (typically cone 5 or 6 for stoneware).
Once cooled, fill your new handmade vessel with your favorite pencils and enjoy the organized calm it brings to your workspace
Leaf Relief Pencil Holder
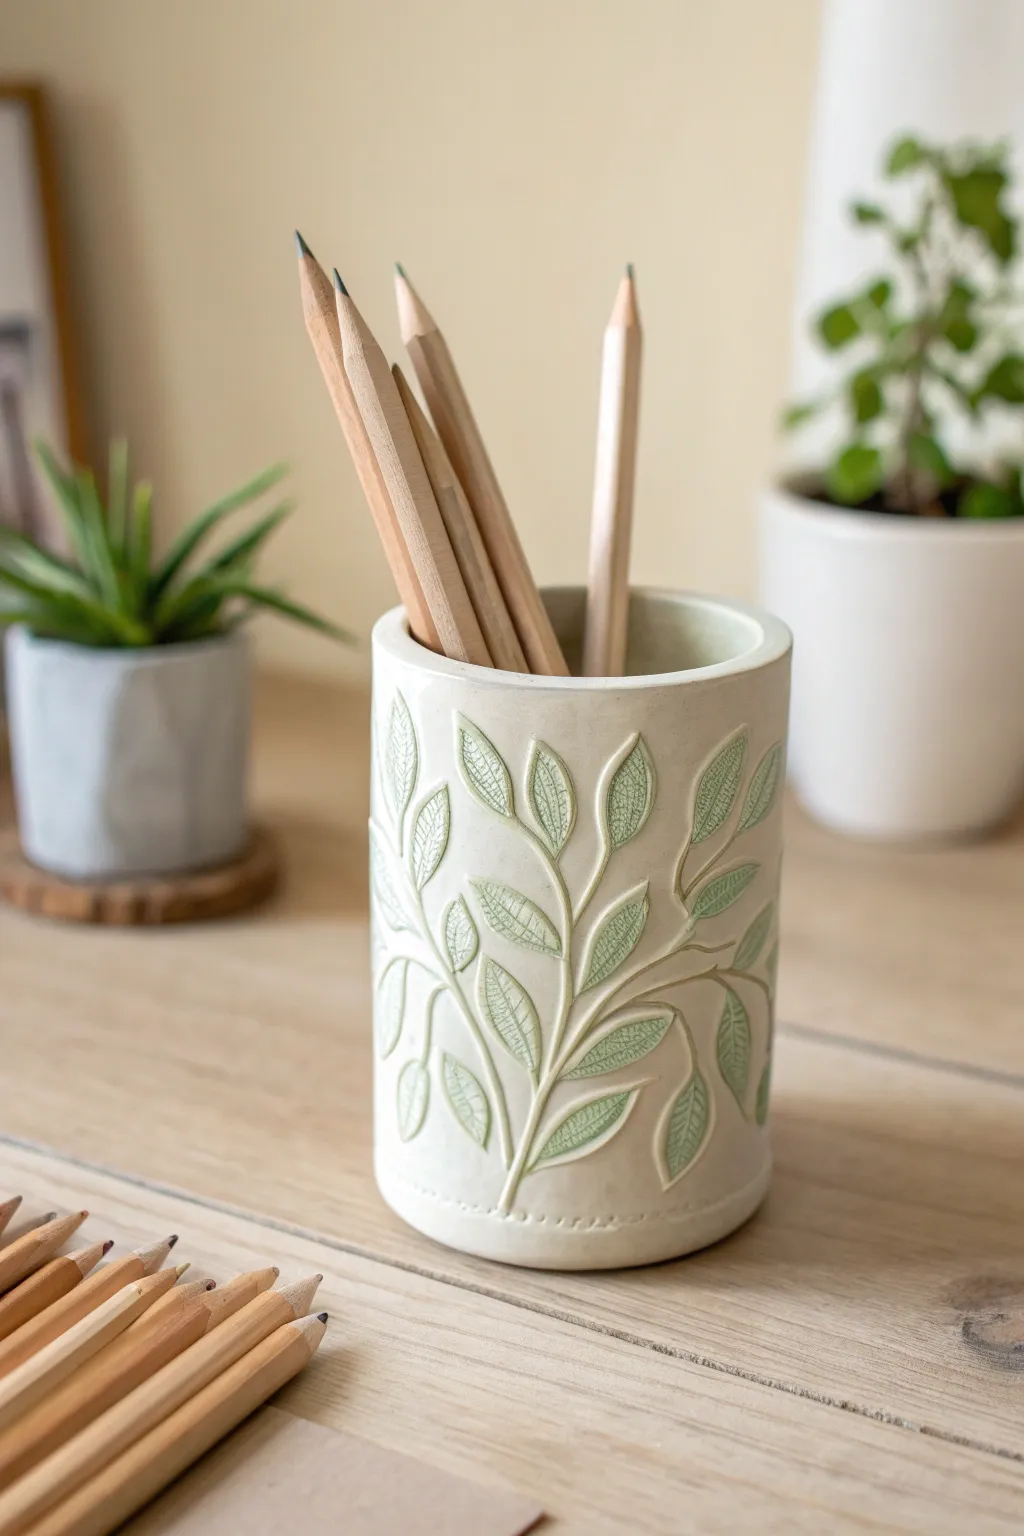
Bring a touch of botanical calm to your desk with this elegant clay pencil holder featuring a delicate leaf relief design. The subtle sage green inlay against the creamy white clay creates a sophisticated, organic look that feels both modern and handmade.
Step-by-Step Tutorial
Materials
- White stoneware or porcelain clay body
- Rolling pin with guide strips (approx. 1/4 inch)
- Small carving loop tools (smeared-end tools)
- Needle tool
- Slip trailer or small brush for inlay
- Sage green underglaze or colored slip
- Clear matte or satin glaze
- Cardstock or paper template (rectangle)
- Scoring tool (serrated rib)
- Sponge and water bucket
- Cylindrical form (like a PVC pipe or rolling pin) for shaping
- Metal scraping tool
Step 1: Forming the Cylinder
-
Prepare the slab:
Begin by wedging your white clay thoroughly to remove air bubbles. Roll it out into a smooth slab using guide strips or slats to ensure an even thickness of about 1/4 inch. -
Cut the clay:
Place your rectangular cardstock template onto the slab. Using your needle tool, cut cleanly around the edges. You’ll also need a circular piece for the base, cut slightly larger than the cylinder’s eventual diameter. -
Create the texture canvas:
Before assembling, I like to smooth the surface of the slab with a damp sponge or a soft rib to remove any canvas marks or imperfections. This creates a perfect blank canvas for your carving later. -
Bevel the edges:
Cut the two short vertical edges of your rectangle at a 45-degree angle. This beveling allows for a stronger, seamless join when you roll the clay into a tube. -
Roll and join:
Carefully lift the slab and wrap it around your cylindrical form or simply curl it by hand. Score the beveled edges, apply a dab of water or slip, and press them firmly together. Smooth the seam inside and out so it disappears completely. -
Attach the base:
Score the bottom rim of your cylinder and the outer edge of your circular base piece. Press them together firmly. Trim away any excess clay from the base using a needle tool and smooth the join with your finger or a wooden tool. -
Refine the rim:
While the clay is still workable, use a damp sponge to round off the top rim. It should feel smooth to the touch. You might also add small decorative indentations near the bottom edge if desired, as seen in the inspiration piece.
Step 2: Carving and Inlaying
-
Leather hard stage:
Let the piece dry slowly until it reaches a ‘leather hard’ state. This is crucial—the clay should be firm enough to handle without warping but soft enough to carve cleanly. -
Sketch the design:
Lightly sketch your vine and leaf pattern onto the surface with a pencil or a dull styling tool. Plan for the stems to curve naturally up the sides of the cup. -
Carve the relief:
Using a small loop tool, carve out the interior of the leaves and stems. Go just deep enough to create a distinct recess, but be careful not to puncture the wall. Keep the edges of your carving sharp. -
Detail the veins:
Inside the carved leaf shapes, use a needle tool or a very fine point to lightly scratch in vein textures. This texture will catch the glaze later. -
Clean up debris:
Brush away any clay crumbs with a soft, dry brush. Do not use water yet, as this can wash away your crisp carving lines. -
Apply the color:
Using a slip trailer or a small brush, fill the carved recessed areas generously with your sage green underglaze or colored slip. It’s okay if it overflows the edges slightly. -
Initial dry:
Allow the underglaze to dry until it is chalky and matte. It needs to be drier than the clay body for the next step.
Clean Lines Pro-Tip
When scraping back the excess underglaze, scrape diagonally across the carving rather than parallel to it. This prevents the tool from digging into the recess and scooping out your green color.
Step 3: Finishing Touches
-
Scrape back (Mishima):
This technique is often called Mishima. Using a sharp metal scraper or a stiff rib, carefully scrape away the excess underglaze from the surface. The color will remain trapped in the carved recesses, revealing the clean white clay surface around it. -
Final smooth:
Once the design is revealed cleanly, wipe the uncarved surface gently with a barely damp sponge to brighten the white clay, being extremely careful not to smudge the green inlay. -
Bisque fire:
Let the piece dry completely (bone dry) and fire it to bisque temperature in your kiln according to your clay’s specifications. -
Glaze application:
Dip the entire piece into a clear matte or satin glaze. A glossy glaze can work, but matte finishes tend to enhance the texture of relief carvings better. -
Final firing:
Fire the piece a second time to the glaze maturity temperature. Once cool, sand the bottom if necessary to ensure it sits flat on your desk.
Level Up: Texture Pop
Instead of a single sage green, try mixing a tiny bit of darker forest green into the slip for half the leaves. This subtle variation adds incredible depth to the botanical design.
Now you have a serene, custom-made vessel ready to organize your creative tools
Sunflower Wrap Pencil Holder
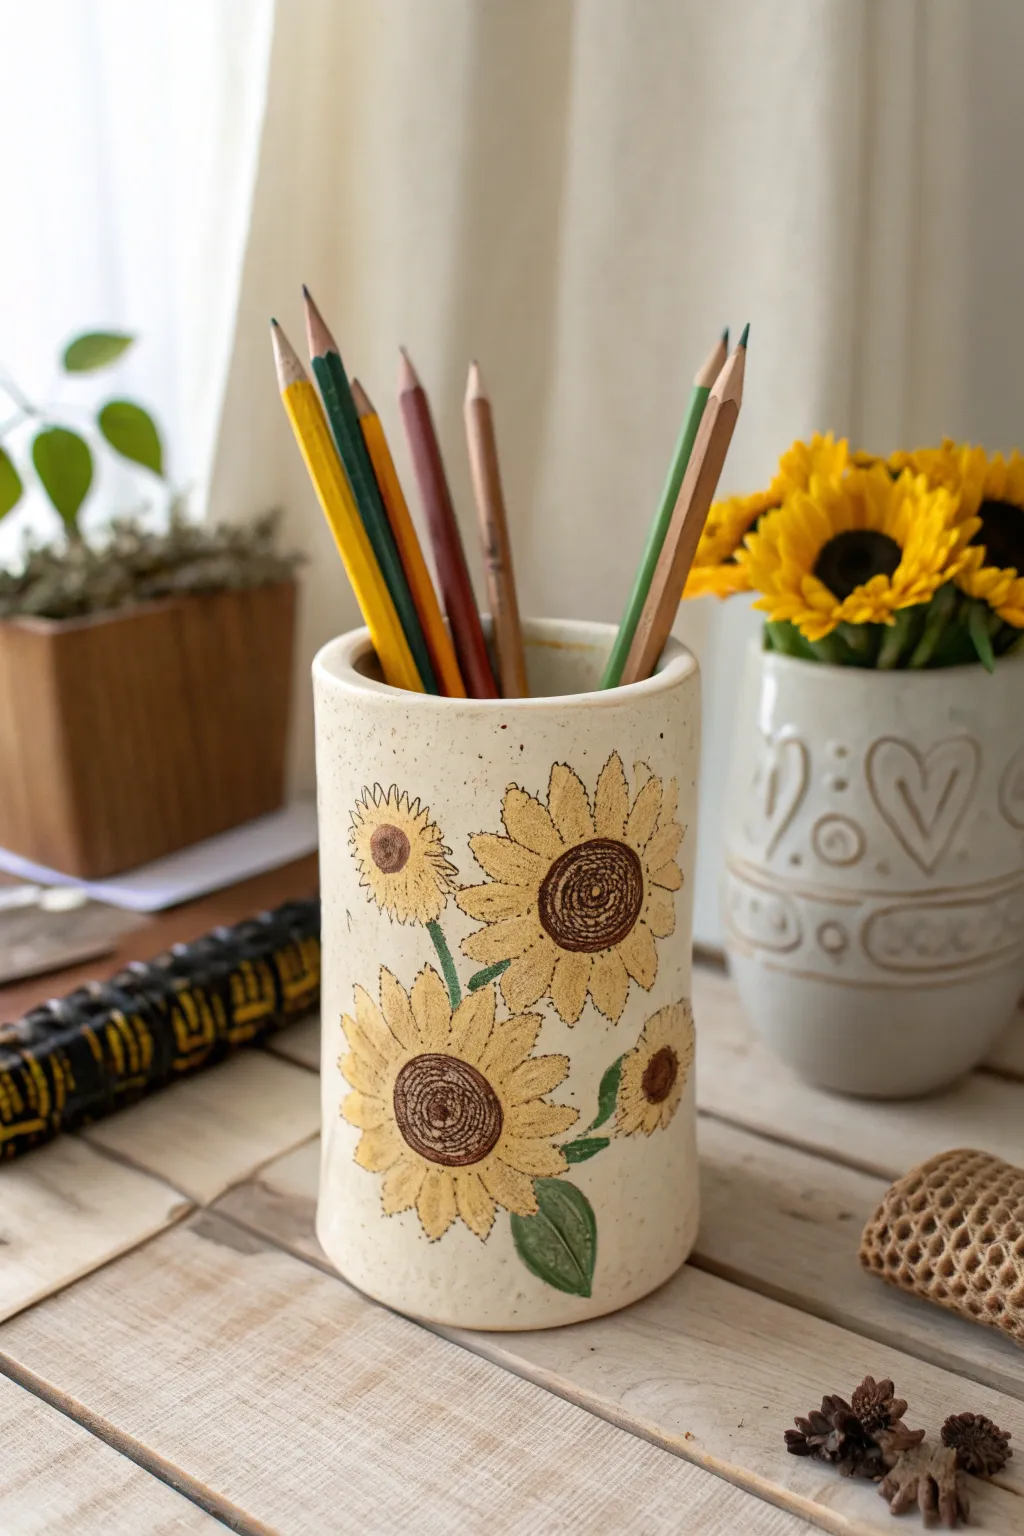
Bring the warmth of summer to your desk with this charming cylindrical pencil holder featuring hand-painted sunflowers on speckled clay. This project balances rustic pottery vibes with delicate floral details, making it a perfect functional art piece for holding your favorite drawing tools.
How-To Guide
Materials
- White or speckled light-colored polymer clay (or air-dry clay)
- Rolling pin
- Empty soda can or glass cylinder (as a mold)
- Parchment paper
- Needle sculpting tool or toothpick
- Ball stylus tool
- Acrylic paints (Yellow ochre, dark brown, leaf green, cream)
- Fine detail paintbrushes
- Matte finish varnish or glaze
- Craft knife
- Clay adhesive (like liquid polymer clay or slip)
Step 1: Forming the Cylinder
-
Condition the clay:
Begin by thoroughly kneading your white or speckled clay until it is soft, pliable, and free of cracks. Warm clay is much easier to work with and ensures a smoother finished surface. -
Roll out the slab:
Roll your clay out into a long, rectangular slab. Aim for a thickness of about 1/4 inch (6mm) to ensure the holder is sturdy enough to stand upright. -
Prepare the mold:
Wrap your glass cylinder or soda can in parchment paper. This crucial step prevents the clay from sticking to your mold and makes removal much easier later. -
Cut to size:
Trim your clay slab into a clean rectangle that is tall enough for standard pencils (about 4-5 inches) and wide enough to wrap fully around your mold with a little overlap. -
Wrap and seam:
Carefully wrap the clay rectangle around your parchment-covered mold. Where the edges meet, slice through both layers at an angle with your craft knife to create a bevel, then remove the excess clay. -
Smooth the join:
Press the beveled edges together gently. Use your finger or a clay tool to blend the seam until it disappears completely, smoothing clay from one side to the other. -
Add the base:
Place the cylinder on a fresh piece of rolled clay and cut a circle around the base. Join this circle to the bottom of your cylinder, blending the edges upward to create a watertight seal.
Seamless Texture Trick
Before baking, lightly roll a crumpled ball of aluminum foil over the entire surface of the blank clay. This mimics the texture of stoneware pottery.
Step 2: Sculpting the Sunflowers
-
Outline the design:
While the clay is still on the mold, lightly etch the outlines of three or four large sunflowers using a needle tool. Vary their heights—place some lower and some higher for a natural look. -
Texture the centers:
Using a needle tool or small ball stylus, create the seed texture in the center of each flower. I prefer to make concentric circles or a spiral pattern of tiny dots to mimic the real flower head. -
Define the petals:
Gently press into the clay to define the individual petals radiating from the centers. You don’t need to add extra clay; just impress the shape into the surface to create a slight relief effect. -
Add leaves over the seam:
Sculpt a few leaves near the bottom. This is a great trick to hide any imperfections in your original seam while adding balance to the composition. -
Bake or Dry:
If using polymer clay, bake according to the package instructions with the mold still inside (if it’s oven-safe) or carefully remove the mold before baking. If using air-dry clay, let it cure for 24-48 hours until fully hard.
Step 3: Painting and Finishing
-
Base coat the petals:
Once cool and dry, mix a warm yellow ochre with a touch of cream. Paint the petals carefully, applying two thin coats for opaque coverage. -
Darken the centers:
Paint the textured centers with a rich dark brown. While the paint is wet, you can dab it with a dry cloth to highlight the texture we created earlier. -
Add floral details:
Using a very fine brush and slightly diluted brown paint, add swift, thin lines to the center of the petals to give them dimension and separation. -
Paint the leaves:
Fill in the leaf shapes with a deep forest green. Allow the natural clay color to show through as the background; do not paint the negative space. -
Speckle effect (Optional):
If you didn’t use speckled clay, you can flick a toothbrush loaded with watered-down brown paint over the surface to create that rustic pottery look. -
Seal the piece:
Protect your work with a coat of matte varnish. This seals the paint and gives the holder a professional, finished ceramic feel.
Make it bloom
Instead of painting flat, roll tiny teardrops of clay and press them onto the cylinder to create 3D petals that physically pop off the surface.
Pop in your favorite set of colored pencils and enjoy the sunny vibes on your desk year-round.
Ocean Wave Pencil Holder
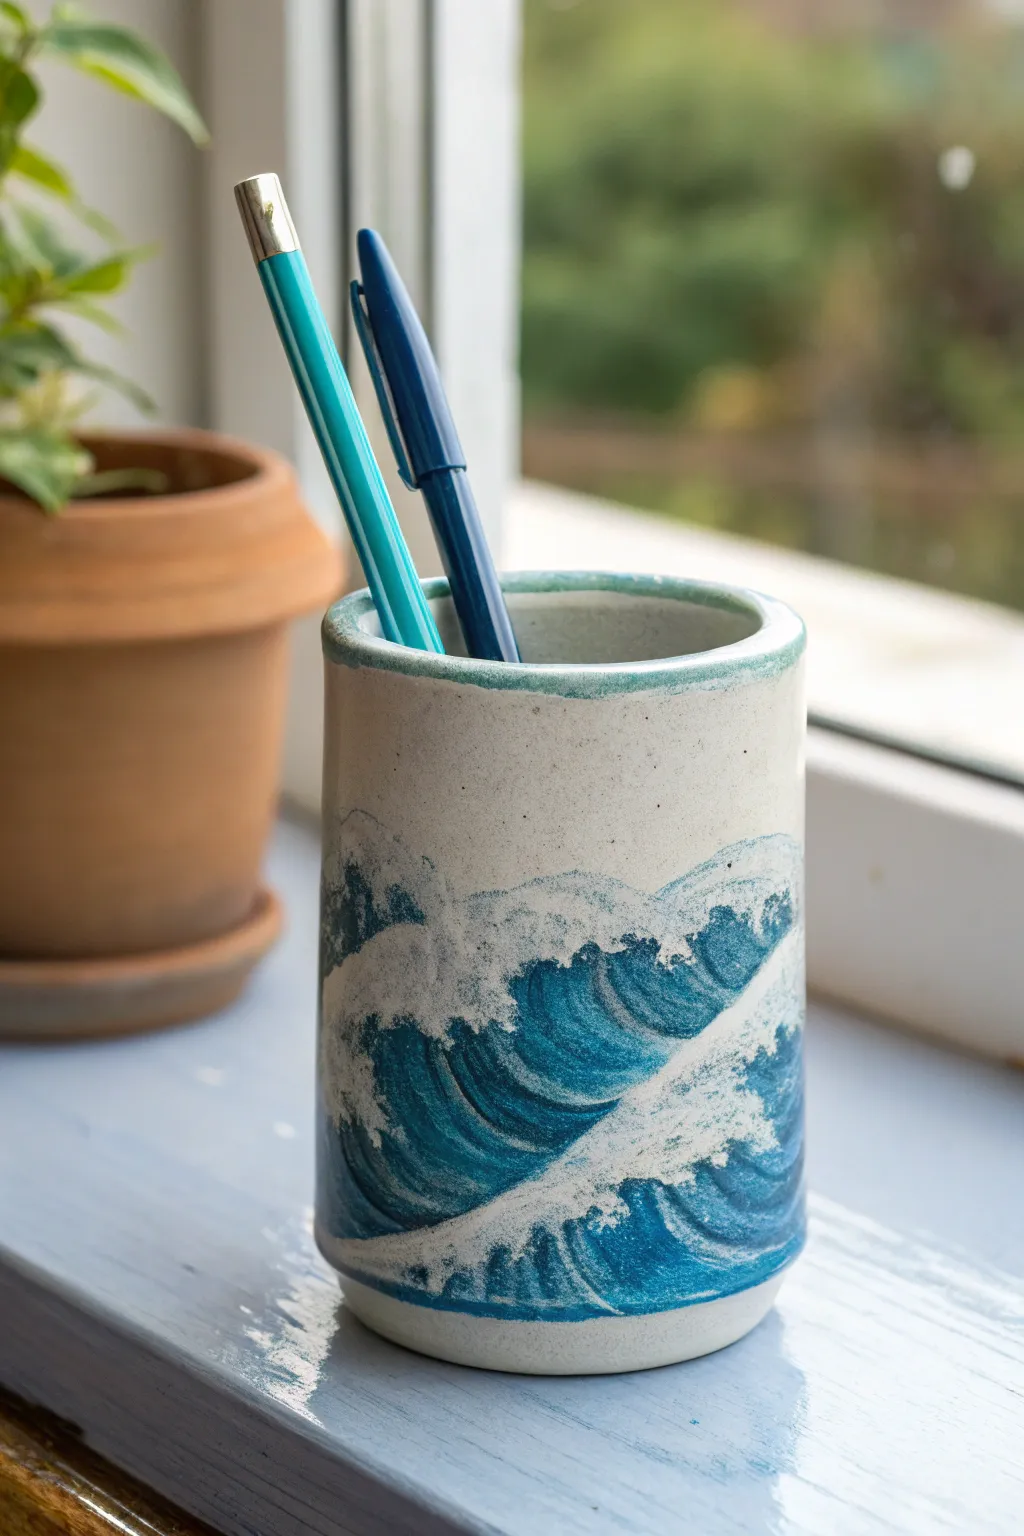
Channel the power of the ocean with this serene, Hokusai-inspired pencil holder. This project combines simple hand-building techniques with sgraffito-style carving to create a textural, crashing wave design that looks perfectly at home on any windowsill.
Step-by-Step Tutorial
Materials
- White stoneware clay (cone 5 or 6 recommended)
- Rolling pin and guide strips (approx. 1/4 inch)
- Cylindrical form or template (can or jar)
- Loop carving tools (small and medium)
- Needle tool
- Slip and scoring tool
- Underglazes (Deep Indigo, Teal, White)
- Clear glossy glaze
- Sponge and water
- Paintbrushes (detail and flat shader)
Step 1: Building the Cylinder
-
Roll the slab:
Begin by wedging your white stoneware clay to remove air bubbles. Roll it out into a smooth, even slab about 1/4 inch thick using guide strips to ensure uniformity. -
Cut the rectangle:
Measure the circumference and height of your desired pencil holder. Cut a rectangle from the slab, adding about half an inch to the length for the overlap or seam. -
Cut the base:
Using your cylinder form or a compass, cut a circle from the remaining slab that matches the diameter of your eventual cylinder. -
Score and slip:
Score the short edges of your clay rectangle and apply a generous amount of slip. Carefully stand the rectangle up and bring the edges together to form a tube. -
Seam the cylinder:
Press the scored edges together firmly. Use a modeling tool or your finger to smooth the seam inside and out until it is invisible. -
Attach the base:
Score the bottom edge of the cylinder and the outer edge of your clay circle. Apply slip, place the cylinder on the base, and smooth the clay together to create a watertight seal. -
Refine the rim:
Gently smooth the top rim with a slightly damp sponge or chamois cloth to ensure it is rounded and comfortable to touch. Let the piece dry to a leather-hard state.
Step 2: Carving the Waves
-
Sketch the design:
Once leather-hard, lightly sketch the wave outlines directly onto the clay using a pencil or needle tool. Focus on large, sweeping curves that wrap around the form. -
Define the relief:
Using a small loop tool, begin carving away the negative space around the waves. I prefer to carve slightly deeper near the base of the waves to create dramatic shadows. -
Add wave texture:
Carve long, rhythmic grooves inside the wave bodies to mimic the flow of water. Keep these lines parallel and following the curve of the wave. -
Create the foam:
Leave the crests of the waves slightly raised and uncarved to represent the white foam. You can gently stipple these areas with a rough tool for added texture. -
Clean up burrs:
Once your carving is complete, gently brush away any clay crumbs with a soft, dry brush. Smooth any sharp edges with a fingertip but keep the carving crisp.
Keep it Clean
Wipe the rim with a damp sponge after glazing to reveal the raw clay stripe shown in the photo. It frames the design beautifully.
Step 3: Glazing and Finishing
-
Bisque fire:
Let the piece dry completely (bone dry) before firing it in the kiln to a bisque temperature suitable for your clay body. -
Apply base color:
Paint the carved recessed areas of the water with a deep indigo underglaze. Ensure the underglaze gets into all the deep grooves. -
Add highlights:
While the indigo is still damp, blend in a teal underglaze on the upper portions of the waves to create depth and a color gradient. -
Detail the foam:
Carefully paint the raised crests and foam caps with white underglaze (or leave raw if your clay is bright white). Clean the rim with a damp sponge. -
Clear glaze:
Once the underglaze is dry, dip or brush the entire piece with a clear glossy glaze. This will make the colors pop and seal the clay. -
Final firing:
Fire the piece again to the final glaze temperature (cone 5 or 6). Allow the kiln to cool completely before removing your new ocean-inspired artwork.
Go Deeper
For a ‘mishima’ effect, carve lines, fill them completely with blue slip, let it dry, then scrape the surface flush to leave just thin blue lines.
Now you have a functional piece of art that brings a calming rhythm to your desk space
Mountain Skyline Pencil Holder
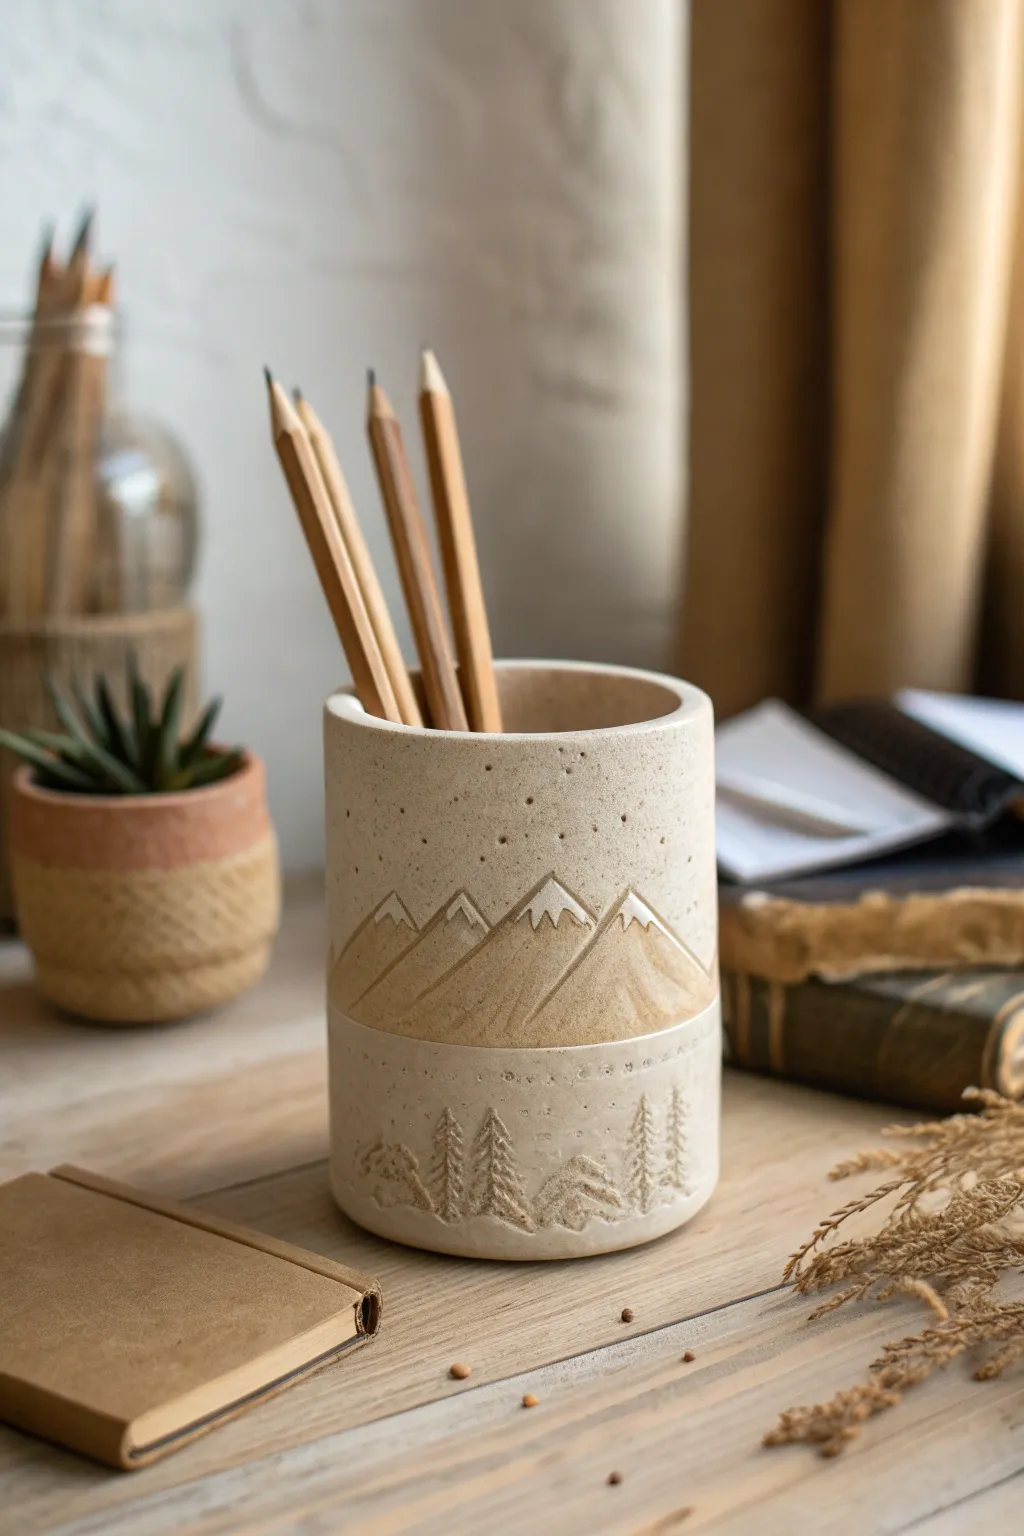
Bring the serene beauty of the alpine wilderness to your desk with this textured clay pencil cup. Featuring a carved mountain range and a delicate forest skyline, this two-tone piece combines rustic charm with functional design.
Step-by-Step Guide
Materials
- Speckled stoneware clay (white or light beige)
- Rolling pin
- Canvas mat or slab roller
- Cylindrical mold or PVC pipe (approx. 3-4 inches diameter)
- Needle tool
- Serrated rib tool
- Loop carving tool (small)
- Small carving knife or X-acto knife
- Modelling tool with a pointed tip
- Slip (clay mixed with water)
- Sponge
- Clear matte glaze
- Iron oxide wash (or a brownish underglaze)
Step 1: Forming the Cylinder
-
Prepare the slab:
Begin by rolling out your speckled stoneware clay into a smooth, even slab. Aim for a thickness of about 1/4 inch (approx. 6mm). If you want that natural stone look shown in the photo, ensure your clay body has some fine grog or speckling. -
Cut to size:
Measure the circumference of your cylindrical mold. Cut a rectangular strip of clay that matches this length plus a tiny bit of overlap, and is roughly 5 inches tall. -
Create the base:
Place your mold on the remaining slab and cut out a circle for the bottom of the cup. Set this aside for a moment. -
Score and slip:
Score the short edges of your rectangular strip and the outer edge of your circular base. Apply a generous amount of slip to these roughened areas. -
Assemble the cylinder:
Wrap the rectangular slab around your mold (wrap a piece of newspaper around the mold first to prevent sticking). Press the scored edges together firmly to create a seam. Smooth the seam inside and out so it becomes invisible. -
Attach the bottom:
Place the cylinder onto the scored base. Use a modeling tool to blend the clay from the walls down onto the base, sealing the join completely. Smooth the transition with your finger or a sponge.
Clean Lines Tip
When carving the mountain lines, wait until the clay is ‘leather hard.’ If it’s too wet, the clay will drag and create crumbs; too dry, and it might chip.
Step 2: Carving the Landscape
-
Establish the horizon:
Lightly mark a horizontal line around the cylinder, about one-third of the way up from the bottom. This will separate your forest floor from the mountain range. -
Outline the mountains:
Above the horizon line, use your needle tool to sketch a series of jagged triangles for the mountain peaks. Vary the heights to keep it looking organic. -
Carve the relief:
Using a small loop tool, carefully carve away a thin layer of clay *around* the mountain triangles, making the mountains slightly raised. Alternatively, line the mountains deeply with a carving knife to define them. -
Detail the peaks:
Use a knife to carve smaller triangles at the very tips of your mountains to represent snowcaps. Leave these smooth. -
Add mountain texture:
Below the snowcaps, scratch vertical lines down the sides of the mountains to mimic ridges and slopes. This adds that crucial depth seen in the inspiration image. -
Sketch the forest:
In the bottom third section, lightly sketch small pine tree shapes. I find it helpful to vary the spacing so it doesn’t look too uniform. -
Carve the trees:
Use a sharp pointed tool to carve the texture of pine needles. Think of making creating downward-pointing ‘V’ shapes or frantic vertical scratches to mimic the bristly texture of evergreens. -
Add the stars:
In the negative space above the mountains (the sky), poke small, gentle holes with your needle tool to create a stippled starry night effect.
Step 3: Finishing and Glazing
-
Bisque fire:
Let the piece dry slowly to the bone-dry stage, then bisque fire it according to your clay’s specifications. -
Apply the oxide wash:
Mix iron oxide with water. Brush this wash specifically onto the mountain section (excluding the snowcaps) and lightly into the deep grooves of the tree texture. -
Wipe back:
Take a damp sponge and wipe away most of the oxide wash. The dark color should remain only in the carved crevices and textured lines, distinctively popping the design. -
Clear glaze:
Dip or brush a coat of clear matte glaze over the entire interior and exterior. This seals the clay while letting the speckled texture and your oxide details shine through. -
Final fire:
Glaze fire the piece to the recommended temperature for your clay body (usually cone 6 for stoneware).
Winter Wonderland
Instead of wiping oxides into the tree carvings, fill the engraved tree lines with a white underglaze before the final clear coat for a heavy snow look.
Once cooled, your new pencil holder is ready to organize your workspace with a touch of alpine spirit
Bunny Rim Topper Pencil Holder
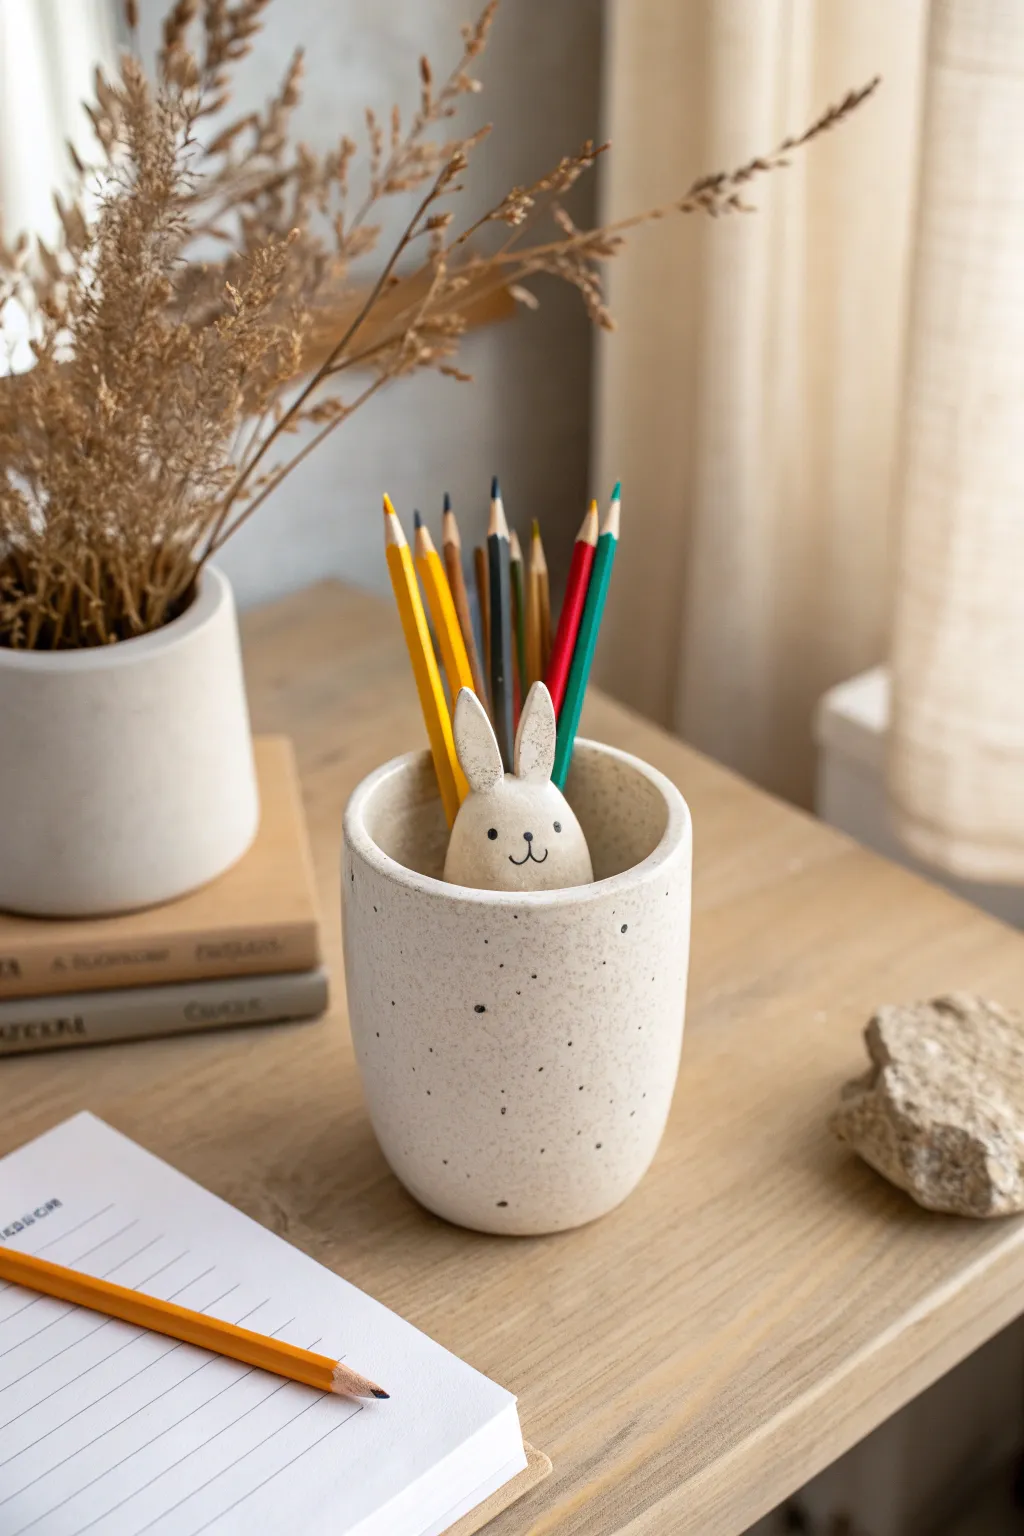
Add a touch of whimsy to your workspace with this charming speckled ceramic-style pencil holder. A tiny, minimalist bunny peeks over the rim to keep you company while you work or draw.
Step-by-Step
Materials
- Air-dry clay (white or light grey)
- Smoothing sponge
- Rolling pin
- Clay knife or craft blade
- Slip (clay mixed with water)
- Small cup or cylinder (to use as a mold)
- Sandpaper (fine grit)
- Acrylic paint (black for details)
- Fine detail paintbrush
- Matte sealant or varnish
- Old toothbrush (for speckling)
- Brown or grey watered-down acrylic paint (for speckles)
Step 1: Forming the Base Cup
-
Roll the clay:
Begin by conditioning your clay, kneading it until it’s pliable. Roll it out into a flat, even slab about 1/4 inch thick. Aim for a consistent thickness to ensure the drying process is even later on. -
Cut the base:
Using your chosen cup or cylinder mold as a guide, cut out a circle for the base of your pencil holder. Set this creating aside for a moment. -
Measure and cut the wall:
Measure the circumference of your base circle. Cut a long rectangular strip of clay that matches this length plus a little extra for overlap, and decide on your desired height—about 4 to 5 inches works well for standard pencils. -
Wrap the wall:
Wrap your strip of clay around the cylinder mold (you might want to wrap the mold in parchment paper first to prevent sticking). Join the two ends of the rectangle by scoring them with a needle tool and adding a dab of slip. -
Initial smoothing:
Blend the seam together using your thumb or a smoothing tool. Do this on both the inside and outside until the join is invisible. -
Attach the base:
Score the bottom edge of your cylinder wall and the outer edge of your base circle. Apply slip to both scored areas. -
Secure the join:
Press the cylinder onto the base firmly. Use your modeling tool or fingers to smudge the clay from the wall down onto the base, sealing them together seamlessly. -
Refine the shape:
Remove the mold carefully if you can, or leave it in for structural support if the clay is very soft. Smooth the top rim with a damp sponge so it’s rounded and pleasant to touch.
Clay Cracking?
Cracks often happen if clay dries too fast. if you spot a crack while drying, mix a tiny bit of fresh clay with water to make a paste and fill the gap immediately.
Step 2: Adding the Bunny Character
-
Shape the bunny head:
Roll a small ball of clay, slightly flattening it into an egg shape. This will be the bunny’s head. Test the size against your cup’s rim to make sure it looks proportional. -
Create the ears:
Roll two small, thin logs of clay for the ears. Flatten them slightly and taper the ends. Attach the ears to the top of the head using the score-and-slip method. -
Position the bunny:
You want the bunny to look like it’s peeking out. Score the inside rim of the cup where you want the bunny to sit, and score the bottom/back of the bunny head. -
Secure the character:
Press the bunny firmly onto the inner rim. I find it helps to blend the clay from the back of the bunny’s head into the inner wall of the cup for extra stability. -
Final smoothing:
Do a final pass over the entire piece with a slightly damp sponge to remove fingerprints and ensure the transition between the bunny and cup is smooth. -
Dry thoroughly:
Let the piece dry completely. This can take 24-48 hours depending on humidity. Rotate it occasionally so it dries evenly.
Sanding Secret
For a truly professional ceramic look, wipe the sanded piece with a slightly damp cloth before sealing. This removes dust that can make the varnish look gritty.
Step 3: Decoration and Finish
-
Sand the surface:
Once bone dry, use fine-grit sandpaper to gently smooth out any bumps or rough edges on the rim and the bunny. -
Paint the face:
Using a very fine brush and black acrylic paint, add two small dots for eyes and a simple ‘Y’ shape for the nose and mouth. Keep it minimalist. -
Create the speckles:
Dilute some brown or grey acrylic paint with water. Dip an old toothbrush into the mixture and run your thumb across the bristles to flick tiny speckles all over the white cup. -
Seal the piece:
Finish with a coat of matte varnish or sealant. This mimics the look of unglazed ceramic and protects your clay from moisture.
Pop in your favorite colored pencils and enjoy your adorable new desk companion
Sheep Textured Pencil Holder
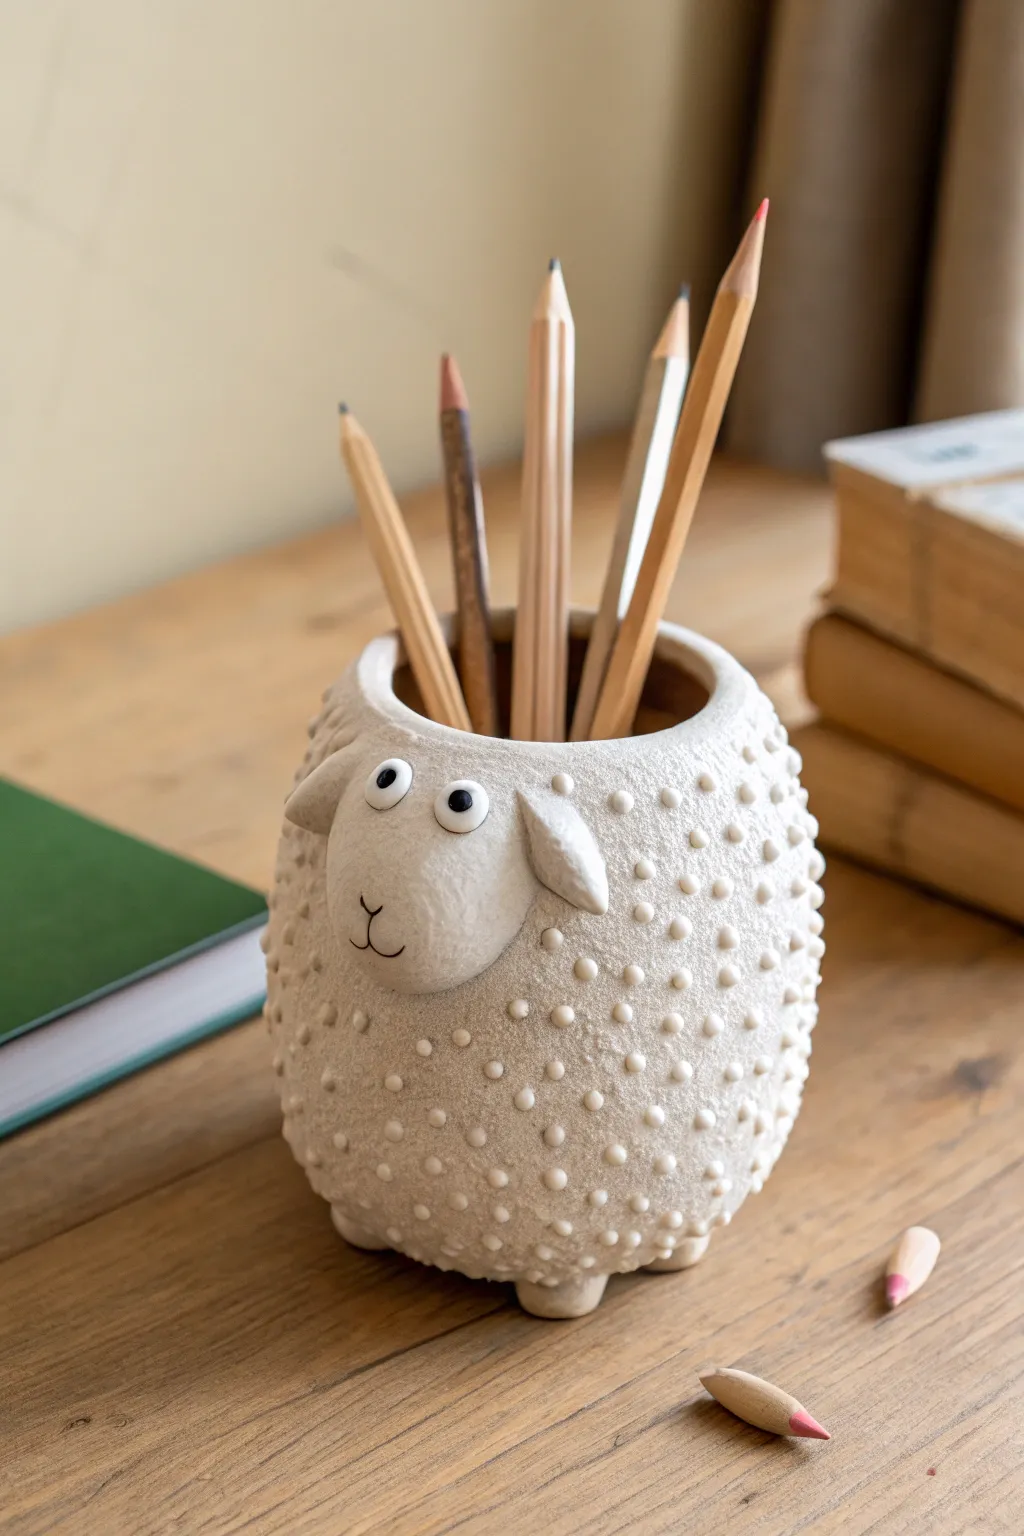
Bring a touch of farmhouse charm to your desk with this adorable sheep-shaped pencil holder. Its chunky, textured body mimics wool curls, and the friendly face adds personality to a functional storage piece.
Step-by-Step Guide
Materials
- Air-dry clay (white or light grey)
- Wide rolling pin
- Empty can or jar (for armature/support)
- Small spherical sculpting tool (ball stylus)
- Needle tool or toothpick
- Plastic wrap
- Slip (clay mixed with water)
- Scoring tool or old toothbrush
- Round cookie cutter (approx. 4-inch)
- Small paintbrush
- Black acrylic paint
- Clear matte varnish
- Knife or clay scalpel
Step 1: Forming the Base Structure
-
Prepare the workspace:
Clear a flat surface and lay down a piece of canvas or parchment paper to prevent sticking. Wrap your empty can or jar loosely with plastic wrap; this will act as the mold for your holder. -
Roll out the slab:
Roll your clay out into a rectangular slab about 1/4 inch thick. It needs to be long enough to wrap around your can with a slight overlap and tall enough to cover the height. -
Wrap the form:
Lift the slab and wrap it around the plastic-covered can. Where the ends meet, cut through both layers at an angle (belling the cut) to create a clean seam. -
Seal the seam:
Score the cut edges with a needle tool, add a dab of slip, and press the edges together firmly. Smooth the join with your finger or a rib tool so it becomes invisible. -
Create the bottom:
Roll a smaller piece of clay for the base. Place your wrapped cylinder on top of it and trace around the bottom. Cut out this circle. -
Attach the base:
Score and slip the bottom edge of the cylinder and the rim of the base circle. Press them together firmly and blend the clay upwards to seal the container completely. -
Shape the rim:
Gently curve the top rim inward slightly to give the pot a soft, rounded shoulder rather than a sharp cylinder edge.
Step 2: Adding the Wool Texture
-
Mark the guide:
Lightly sketch an oval shape on the front of the pot where the face will go later. You want to keep this area smooth and texture-free. -
Begin texturing:
Using the small ball stylus tool, gently press into the clay surface to create small, uniform dimples. Start from the bottom and work your way up. -
Create depth:
For the ‘popcorn’ wool effect seen in the image, instead of just indenting, roll dozens of tiny clay balls (about the size of peppercorns). I find this meditative, though it takes a moment. -
Attach the wool balls:
Score the surface lightly, apply a thin layer of slip, and press the tiny balls all over the body, avoiding the face area. Pack them relatively close together but leave some negative space. -
Blend the texture:
Once the balls are on, use your thumb or a flat tool to gently press them down slightly so they adhere well and look like soft, nubby wool rather than perfect spheres.
Smooth Seams Tip
Use a tiny bit of vinegar on your finger when smoothing seams or cracks. The acid breaks down the clay particles slightly, creating a specific slurry that acts like strong glue and filler.
Step 3: Sculpting the Face and Features
-
Form the head:
Roll a smooth, flattened oval of clay for the face. It should be thick enough to stand out from the body (about 1/2 inch thick). -
Attach the face:
Thoroughly score the smooth patch you left on the pot and the back of the head piece. Apply slip and press the head firmly onto the body. -
Ear placement:
Shape two teardrop-shaped pieces for ears. Attach them to the sides of the head, blending the connection point so they look seamless. Fold them slightly forward for a floppy look. -
Create the eyes:
Roll two small white balls for eyes and press them onto the upper part of the face. Use a tool to flatten them slightly against the head. -
Add feet:
Flip the pot gently (if the clay is firm enough) or prop it up. Attach four small, rounded nubbins to the bottom for feet to elevate the sheep slightly.
Blush Effect
For an extra cute factor, lightly dust the sheep’s cheeks with real pink powder blush or soft pastel chalk before sealing it with spray varnish.
Step 4: Finishing Touches
-
Remove the core:
Once the clay is leather hard (firm to the touch but not dry), carefully slide the can and plastic wrap out. Don’t wait until it’s fully dry, or the clay shrinks and might crack against the can. -
Painting details:
After the clay is completely bone dry, paint tiny black pupils on the eyes and use a very fine brush to paint a simple ‘Y’ shape for the nose and mouth. -
Protect the piece:
Finish with a coat of clear matte varnish to protect the clay and give it a finished, ceramic-like quality.
Now your workspace has a cozy, handcrafted companion ready to organize your tools
Modular Stackable Pencil Holder Totem
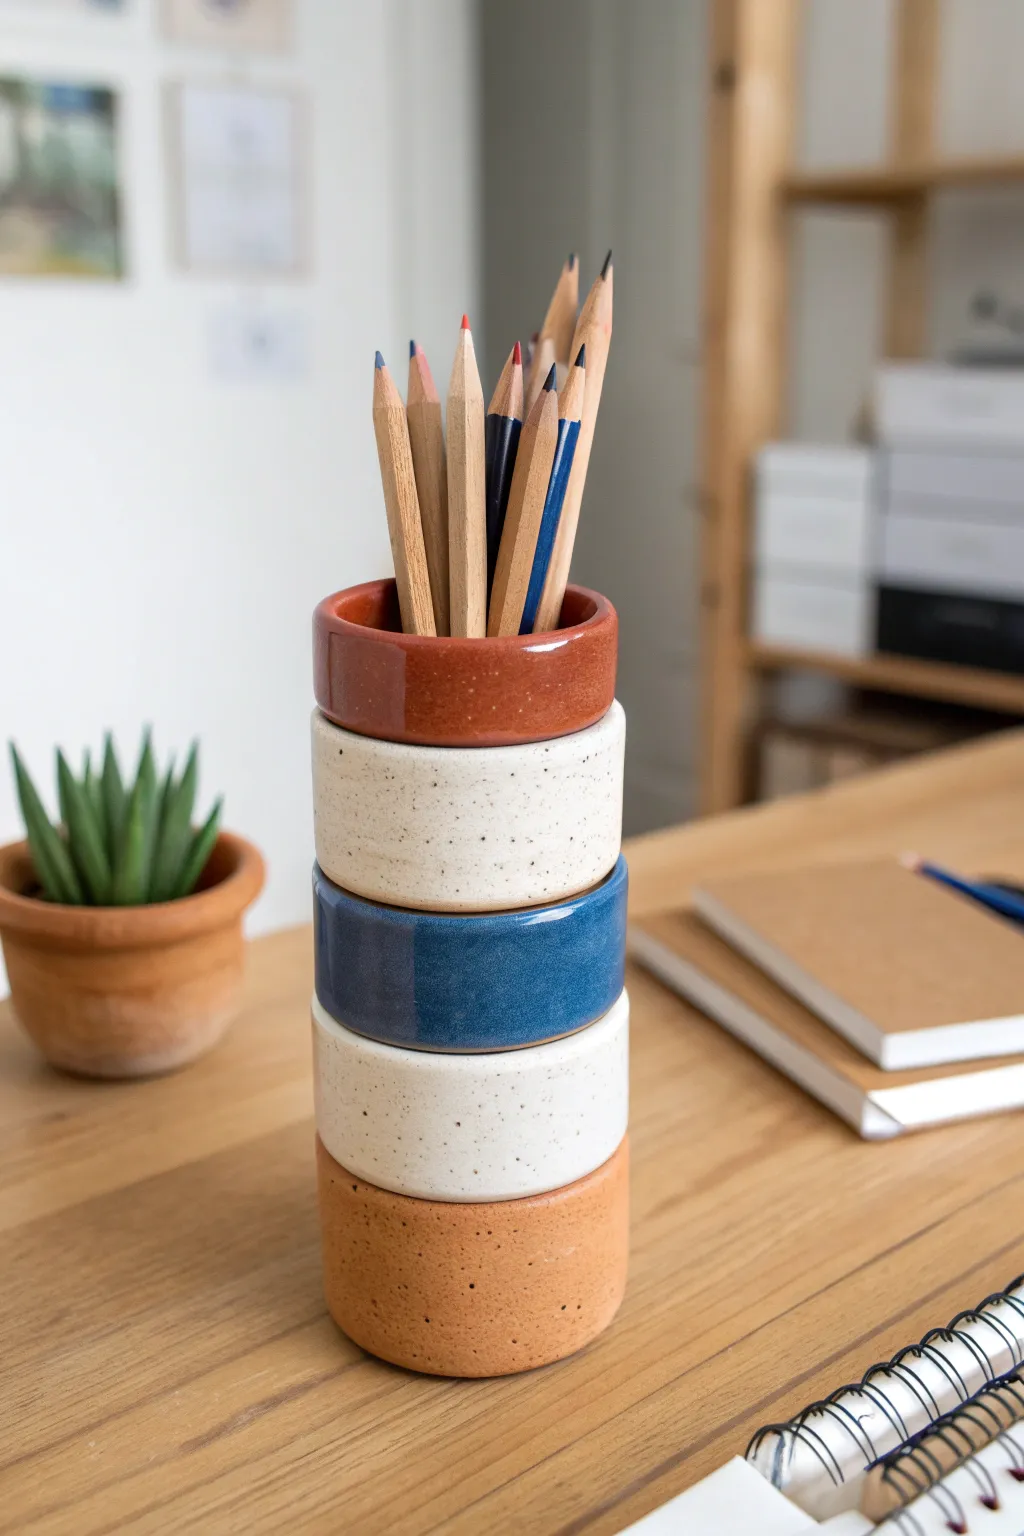
Create a modern, architectural desk accessory with this clever stackable design that keeps your pencils high and mighty. This project features interchangeable rings in earthy terracotta, speckled cream, and deep ocean blue which can be rearranged to suit your daily mood.
Step-by-Step Tutorial
Materials
- Polymer clay or air-dry clay (Terracotta, White/Beige with speckles, Navy Blue)
- Faux granite or speckled clay effects (optional: coarse black pepper or sand)
- Circle cutters (2 sizes: one for outside diameter, one slightly smaller for nesting lip)
- Acrylic rolling pin
- Depth guides or playing cards
- Clay blade or craft knife
- Sanding sponge or fine-grit sandpaper
- Gloss varnish or resin (optional for ceramic look)
Step 1: Planning and Prep
-
Determine Dimensions:
Decide on the diameter of your totem. A 3-inch outer diameter is standard for a pencil cup. You will need to create rings that stack securely, so precise measurements are key. -
Condition the Clay:
Begin by conditioning your clay colors separately until they are soft and pliable. If you want that trendy speckled pottery look but only have plain clay, knead in a tiny pinch of coarse black pepper or craft sand into your white clay.
Wobbly Tower?
If rings rock when stacked, tape fine-grit sandpaper to a flat table and rub the bottom of each ring in circles until perfectly flat.
Step 2: Forming the Rings
-
Roll the Slabs:
Roll out your clay into thick slabs, approximately 1/2 inch to 3/4 inch thick. Use depth guides to ensure every slab is perfectly even, as uneven thickness will make stacking unstable. -
Cut the Outer Rings:
Using your larger circle cutter, punch out five thick discs: two terracotta, two speckled white, and one blue. If you don’t have a cutter deep enough, cut strips and wrap them around a form, smoothing the seam meticulously. -
Cut the Centers:
Use a smaller circle cutter to remove the centers from four of the discs, turning them into rings. Leave one terracotta disc solid to serve as the heavy base.
Level Up: Gradient Glaze
Mix your clay colors to create transition rings (e.g., marbled blue and white) for an ombre effect going up the totem stack.
Step 3: Creating the Mechanics
-
Form the Locking Lip:
To make them stackable, you need a nesting mechanism. Roll a thinner sheet of clay (about 1/4 inch). Cut strips that are slightly narrower than the height of your rings. -
Attach Inner Collars:
Insert these strips inside the rings so they protrude slightly from the top edge (about 1/8 inch). This protruding rim will slot into the ring above it. Blend the clay on the inside so the strip and the outer ring become one solid unit. -
Refine the Base:
For the solid bottom piece, attach the protruding collar strip just like the others, but ensure the floor of the cup is well-sealed to the sides. -
Check the Fit:
Before baking or drying, gently stack your pieces to ensure the ‘male’ protruding lip fits comfortably into the ‘female’ bottom of the next ring. I usually like to powder them lightly with cornstarch to prevent sticking during this test fit. -
Smooth the Edges:
Use a finger dipped in a little oil (for polymer) or water (for air-dry) to round over the top outer edges of each ring for that soft, hand-thrown ceramic aesthetic.
Step 4: Finishing Touches
-
Bake or Dry:
Follow the manufacturer’s instructions for your specific clay. If baking polymer clay, tent foil over the pieces to prevent scorching the light colors. -
Cool and Sand:
Once fully cured and cooled, use a sanding sponge to buff out any fingerprints. Pay special attention to the nesting rims—sand them slightly if the fit is too tight. -
Seal:
For a glossy, high-end ceramic look, apply a coat of gloss varnish or UV resin to the exterior of the rings. Leave the stacking rims matte to prevent them from sticking together over time.
Enjoy arranging your new desk sculpture and organizing your favorite stationery tools