I’m obsessed with how a teapot planter instantly makes a space feel a little more magical—like your plants are part of a tiny story. If you’ve got an old teapot tucked away (or one that’s chipped or cracked), these teapot planter ideas will help you turn it into something you’ll actually want to display.
Classic Teapot Succulent Planter
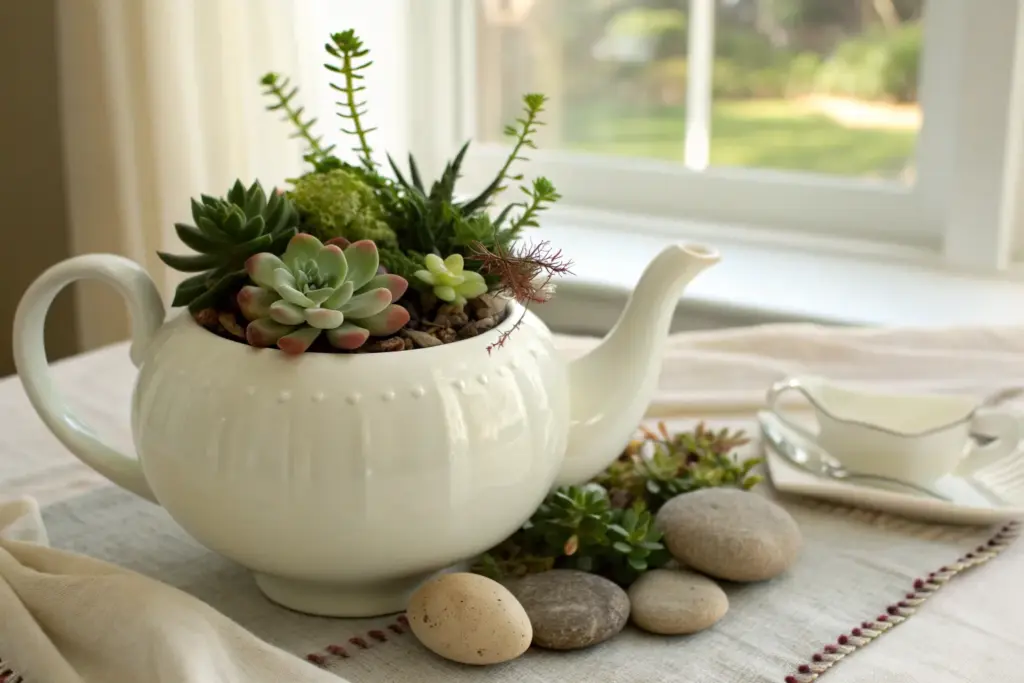
Transform a discarded ceramic teapot into a whimsical home for your favorite succulents with this classic upcycle project. The result is a charming, low-maintenance centerpiece that blends vintage aesthetics with natural beauty.
Step-by-Step
Materials
- Old ceramic teapot (wider openings are better)
- Small gravel or hydro-ton pebbles (for drainage)
- Activated charcoal
- Succulent and cactus potting mix
- Various small succulents (Echeveria, Haworthia, Sedum)
- Drill with ceramic/diamond bit (optional but recommended)
- Masking tape
- Small paintbrush or spoon
- Spray bottle with water
Step 1: Preparation & Drainage
-
Clean the vessel:
Start by thoroughly washing the teapot with warm, soapy water to remove any tea stains or residue, then dry it completely. -
Prepare for drilling (Optional):
If you want true drainage, apply a piece of masking tape to the bottom center of the teapot; this prevents the drill bit from slipping on the slick glaze. -
Create a drainage hole:
Using a ceramic or diamond-tipped bit, slowly drill a hole through the tape and bottom of the pot. Keep the area wet with a little water while drilling to keep the bit cool. -
Add a gravel layer:
If you opted not to drill a hole, or even if you did, pour a 1-inch layer of small gravel or hydro-ton pebbles into the bottom of the teapot to act as a water reservoir. -
Add activated charcoal:
Sprinkle a thin layer of activated charcoal over the gravel. I find this helps keep the soil fresh and prevents mold, especially in containers without perfect airflow.
Watering Wisdom
Does your teapot have a spout? Tilt the pot gently after watering to let excess moisture drain out through the spout, preventing root rot.
Step 2: Planting & Arrangement
-
Fill with soil:
Add your specialized succulent soil mix, filling the teapot until it is about an inch or so below the rim. -
Prepare the plants:
Gently remove your succulents from their nursery pots, massaging the root balls lightly to loosen tightly packed soil. -
Place the anchor plant:
Start with your largest or tallest succulent—like the spiked Haworthia or a taller Sedum seen in the image—and nestle it slightly off-center for visual interest. -
Add the focal point:
Position your rosette-shaped succulent, such as an Echeveria, near the front edge so it dips slightly over the rim. -
Fill the gaps:
Tuck smaller varieties into the remaining spaces. Using a mix of textures, like the fuzzy trailing Sedum or spiky Sempervivum, creates a lush, diverse look. -
Secure the roots:
Add more soil around each plant, pressing down gently with your fingers or the back of a small spoon to eliminate air pockets.
Step 3: Finishing Touches
-
Clean the leaves:
Use a soft, dry paintbrush to sweep away any stray soil particles that may have landed on the succulent leaves during planting. -
Add top dressing (Optional):
For a polished look, you can add a thin layer of decorative grit or sand over the exposed soil, though the dense planting shown here often covers most of the dirt naturally. -
Initial watering:
Wait about two days before watering to allow any broken roots to callus over. Then, use a spray bottle or a syringe to water the soil directly, avoiding the leaves. -
Placement:
Set your new planter in a spot that receives bright, indirect sunlight, such as a windowsill.
Tea Set Theme
Use the teapot’s original lid as a decorative accent nearby, or fill matching teacups with single tiny succulents to create a full garden tea set.
Now you have a quaint, living decoration that breathes life into your kitchen shelf or windowsill


Kitchen Herb Teapot With Label
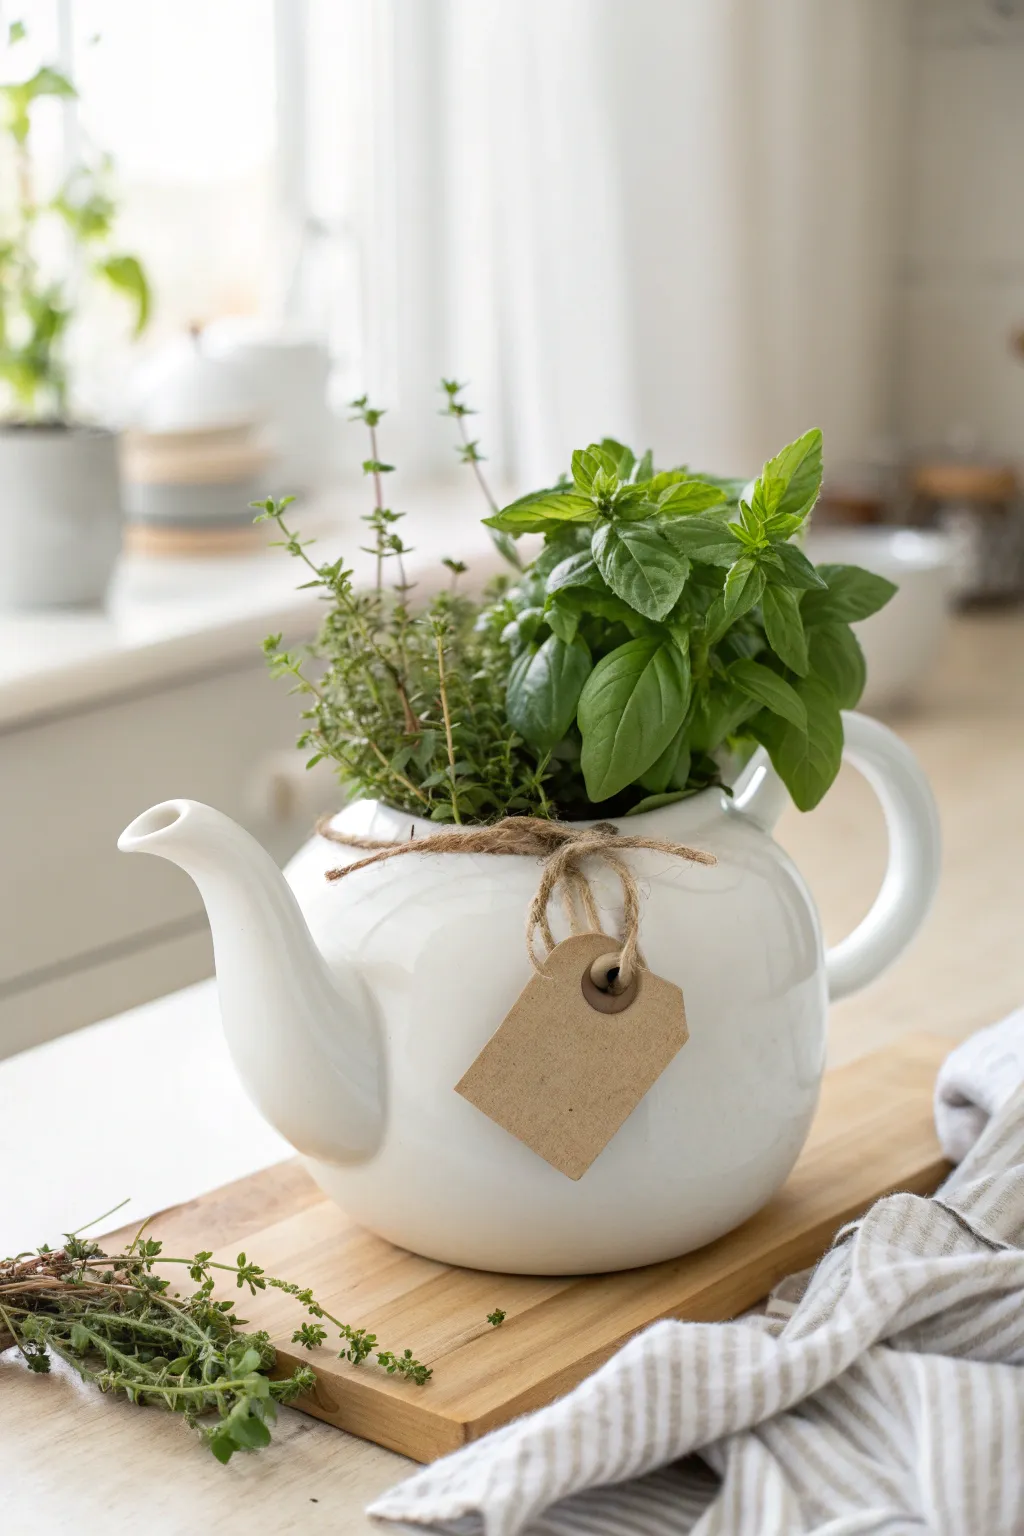
Transform a classic white ceramic teapot into a charming indoor herb garden that brings fresh flavor and greenery right to your countertop. This project combines the clean lines of porcelain with rustic twine and Kraft paper for a cozy, farmhouse-inspired look.
Step-by-Step Tutorial
Materials
- White ceramic teapot (standard size)
- Small thyme plant
- Small basil plant
- Potting soil mixed with perlite
- Gravel or small pebbles (for drainage)
- Natural jute twine
- Blank Kraft paper tag with reinforced eyelet
- Black fine-point pen or marker (optional)
- Scissors
Step 1: Preparing the Vessel
-
Clean the teapot:
Begin by thoroughly washing your teapot with warm soapy water to remove any dust or residue, then dry it completely with a soft cloth. -
Create a drainage layer:
Since most teapots don’t have holes in the bottom, add a 1-inch layer of gravel or small pebbles to the base. This created reservoir prevents the roots from sitting in standing water. -
Add the base soil:
Scoop a small amount of potting soil over the gravel layer, filling the pot about one-quarter of the way up.
Don’t Drown Roots
Teapots limit evaporation. Check soil moisture by inserting a finger an inch deep before watering; if it’s damp, wait another day to prevent root rot.
Step 2: Planting the Herbs
-
Select your arrangement:
For this look, we are using thyme and basil. The woody, spreading thyme provides nice texture, while the basil adds height and lush, broad leaves. -
Prepare the thyme:
Gently remove the thyme from its nursery pot. Loosen the root ball slightly with your fingers to encourage outward growth. -
Position the thyme:
Place the thyme towards the back or side of the teapot opening. I find angling it slightly outward helps it spill over the rim naturally. -
Prepare the basil:
Remove the basil from its container, shaking off excess loose soil so it fits snugly next to the thyme. -
Insert the basil:
Nestle the basil plant into the remaining space in the opening. The two root balls should be touching but not crushed together. -
Fill the gaps:
Carefully specific soil into any empty spaces around the roots and between the two plants. A spoon works well for getting soil into tight crevices without making a mess. -
Secure the topsoil:
Gently press down on the soil surface to secure the plants in place, ensuring the soil level is about half an inch below the rim to allow for watering. -
Clean the exterior:
Brush off any stray soil crumbs from the white ceramic exterior or the handle to keep that crisp, clean look.
Pinch for Bushiness
Regularly pinch off the top set of leaves on your basil. This prevents it from getting leggy and encourages the plant to grow full and wide.
Step 3: Adding the Final Touches
-
Measure the twine:
Cut a piece of natural jute twine roughly 24 inches long. You want enough length to wrap around the pot and tie a generous bow. -
Position the twine:
Wrap the twine around the neck of the teapot opening, just below where the herbs spill out. Ensure it sits securely in the groove if your teapot has a rim. -
Prepare the tag:
Take your Kraft paper tag. You can leave it blank for a minimalist look as shown, or write ‘Herbs’ or the specific plant names in a script font. -
Thread the tag:
Slide the tag onto one end of the jute twine before you tie the final knot. -
Tie the bow:
Tie a simple shoelace bow, positioning it centrally on the face of the teapot. The tag should hang naturally from the center of the knot. -
Adjust the hang:
Tweak the tag so it tilts slightly, giving it a casual, organic appearance rather than hanging perfectly straight. -
Water carefully:
Give the herbs a light drink of water, pouring slowly at the base of the stems to settle the soil without flooding the drainage layer.
Place your new planter on a sunny windowsill where you can easily snip fresh leaves for your next meal


Hanging Teapot Planter By the Handle
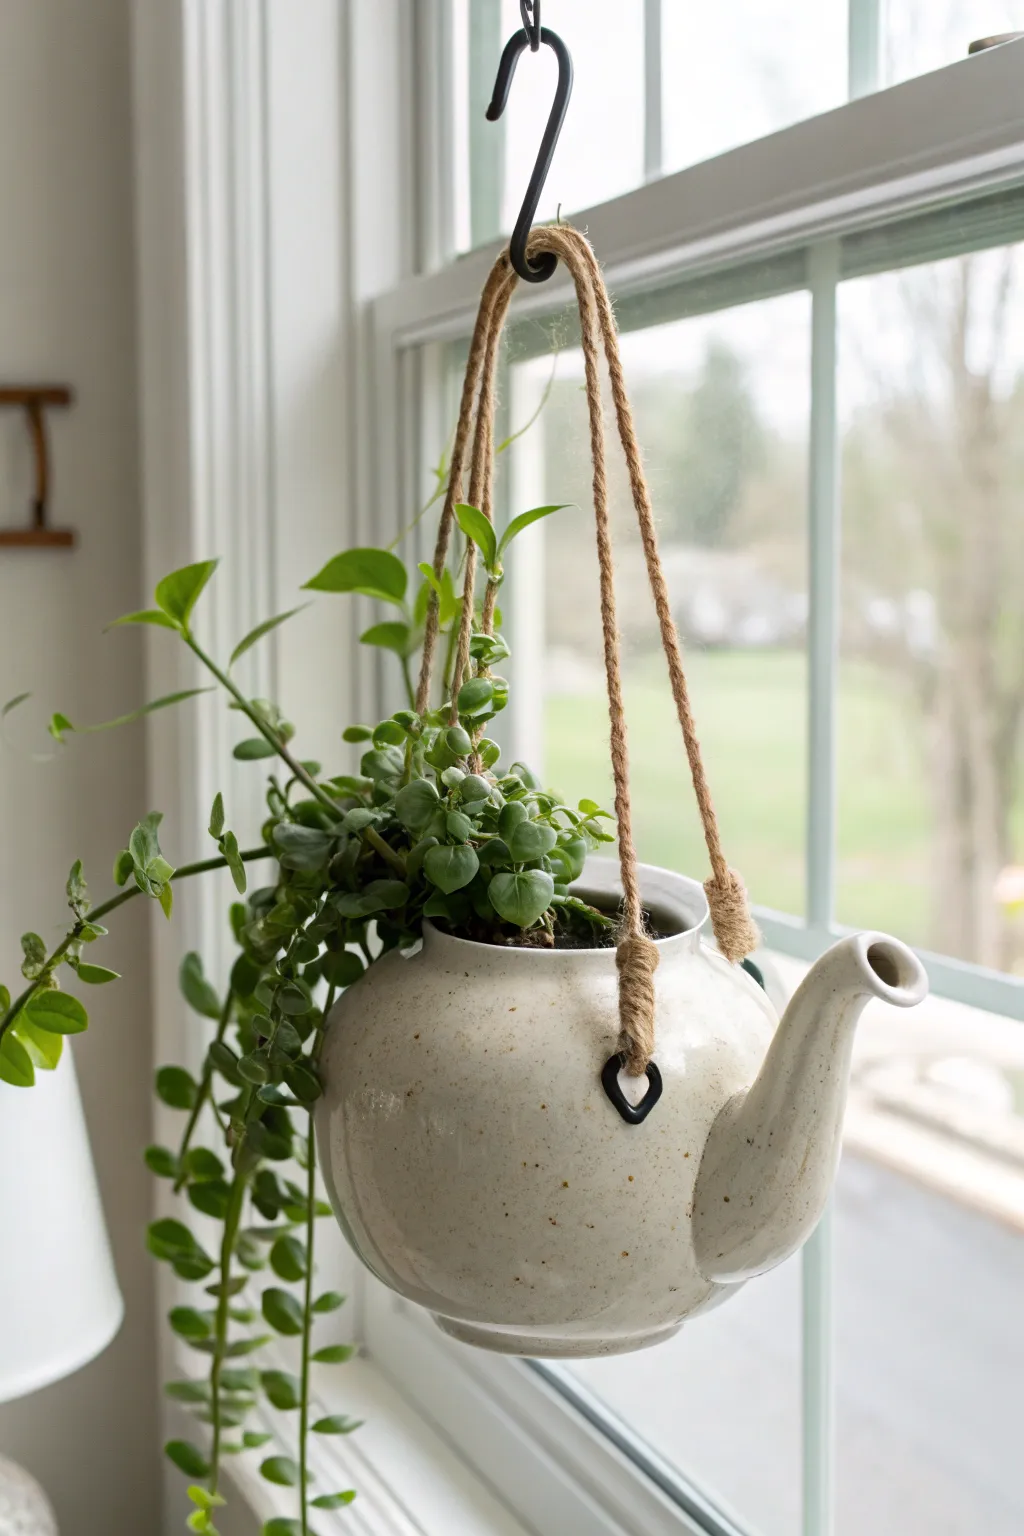
Transform a ceramic teapot into a charming floating garden that catches the light by your favorite window. This project repurposes a speckled stoneware pot into a hanging planter using rustic jute twine and a few carefully drilled holes for a look that blends vintage cottage vibes with modern greenery.
How-To Guide
Materials
- Ceramic or stoneware teapot (speckled cream finish ideal)
- Jute twine or thick hemp rope (approx. 4-5mm thickness)
- Power drill
- Diamond drill bit or masonry bit (appropriate for ceramic)
- Masking tape or painter’s tape
- Water spray bottle or small cup of water
- S-hook (black metal)
- Potting soil (well-draining mix)
- Trailing plant (such as String of Turtles, Dischidia, or Peperomia)
- Gravel or pebbles for drainage
- Scissors
- Towel or soft cloth
Step 1: Preparing the Pot
-
Clean and Dry:
Begin by thoroughly washing your teapot to remove any potential tea residue or dust. Dry it completely inside and out. -
Remove Lid:
Set the teapot lid aside; you won’t need it for this hanging planter version unless you want to glue it askew for decoration, but generally, the opening is left clear for planting. -
Mark Hole Locations:
Visualize three points spaced evenly around the top opening of the teapot. You want these drill holes to be about 0.5 to 1 inch down from the rim. I like to form a triangle shape: perhaps one hole near the handle, one near the spout, and one on the opposite side to balance the weight. -
Tape the Spots:
Place a small piece of masking tape over each spot where you intend to drill. This crucial step prevents the drill bit from slipping on the slick glaze and helps reduce chipping.
Step 2: Drilling the Ceramic
-
Secure the Teapot:
Place the teapot on a folded towel or soft cloth to keep it stable and cushioned during drilling. You don’t want it rolling away while you work. -
Begin Drilling:
Insert your diamond or masonry bit into your drill. Start drilling slowly at a 45-degree angle to create a divot in the glaze, then slowly move the drill to a 90-degree angle (perpendicular to the surface). -
Keep it Cool:
Friction creates heat that can crack ceramic. Frequently spray water on the drilling spot or have a helper drizzle a tiny stream of water while you drill to keep the bit and pot cool. -
Drill Through:
Apply gentle, consistent pressure—don’t force it. Let the drill do the work until you puncture through the wall of the teapot. Repeat for all three marked spots. -
Optional Drainage Hole:
If you wish to hang this outdoors or plan to water heavily, carefully flip the pot and drill a drainage hole in the center of the bottom using the same technique. -
Clean Up:
Rinse the teapot to remove ceramic dust and remove the masking tape.
Drill Bit Tip
Using a regular twist bit will almost certainly crack the pot. A diamond holing bit is essential for a clean cut through glazed stoneware.
Step 3: Creating the Hanger
-
Cut the Twine:
Cut three equal lengths of coarse jute twine. Measure based on how low you want the pot to hang from your window frame, adding an extra 6-8 inches for knotting. -
Insert Lower Ends:
Take one piece of twine and feed the end through one of your drilled holes from the outside in. -
Secure with Knots:
Tie a sturdy double or figure-eight knot on the inside of the teapot. Pull it tight against the inner wall to ensure it won’t slip back through the hole. Repeat for the other two holes. -
Gather the Top:
Pull all three loose ends of the twine upward. Hold the teapot by the strings to check for balance. Adjust the lengths if the pot is tilting awkwardly; you want it to hang level. -
The Final Loop:
Once balanced, knot the three strings together at the top into a single loop. Ensure this knot is extremely tight. -
Finishing Trim:
Trim any excess twine sticking out of the top knot for a neat appearance.
Style Upgrade
Add wooden beads to the jute strings before tying the top knot for a touch of boho texture, or braid the three strands together for a thicker look.
Step 4: Planting and Display
-
Add Drainage Layer:
If you didn’t drill a bottom hole, place an inch of small gravel or pebbles at the bottom of the teapot to prevent root rot. -
Fill with Soil:
Add your potting mix, filling the teapot about halfway. -
Insert the Plant:
Gently remove your trailing plant from its nursery pot and nestle it into the soil. Ensure the trailing vines drape elegantly over the side opposite the handle or spout for visual interest. -
Top Off:
Fill in gaps with more soil, gently pressing down to secure the roots. -
Hang It Up:
Attach your S-hook to a secure point on your window frame or ceiling hook, then loop the jute knot onto the S-hook.
Enjoy the gentle sway of your new recycled planter every time a breeze comes through the window


Teapot Planter With Teacup Sidekicks
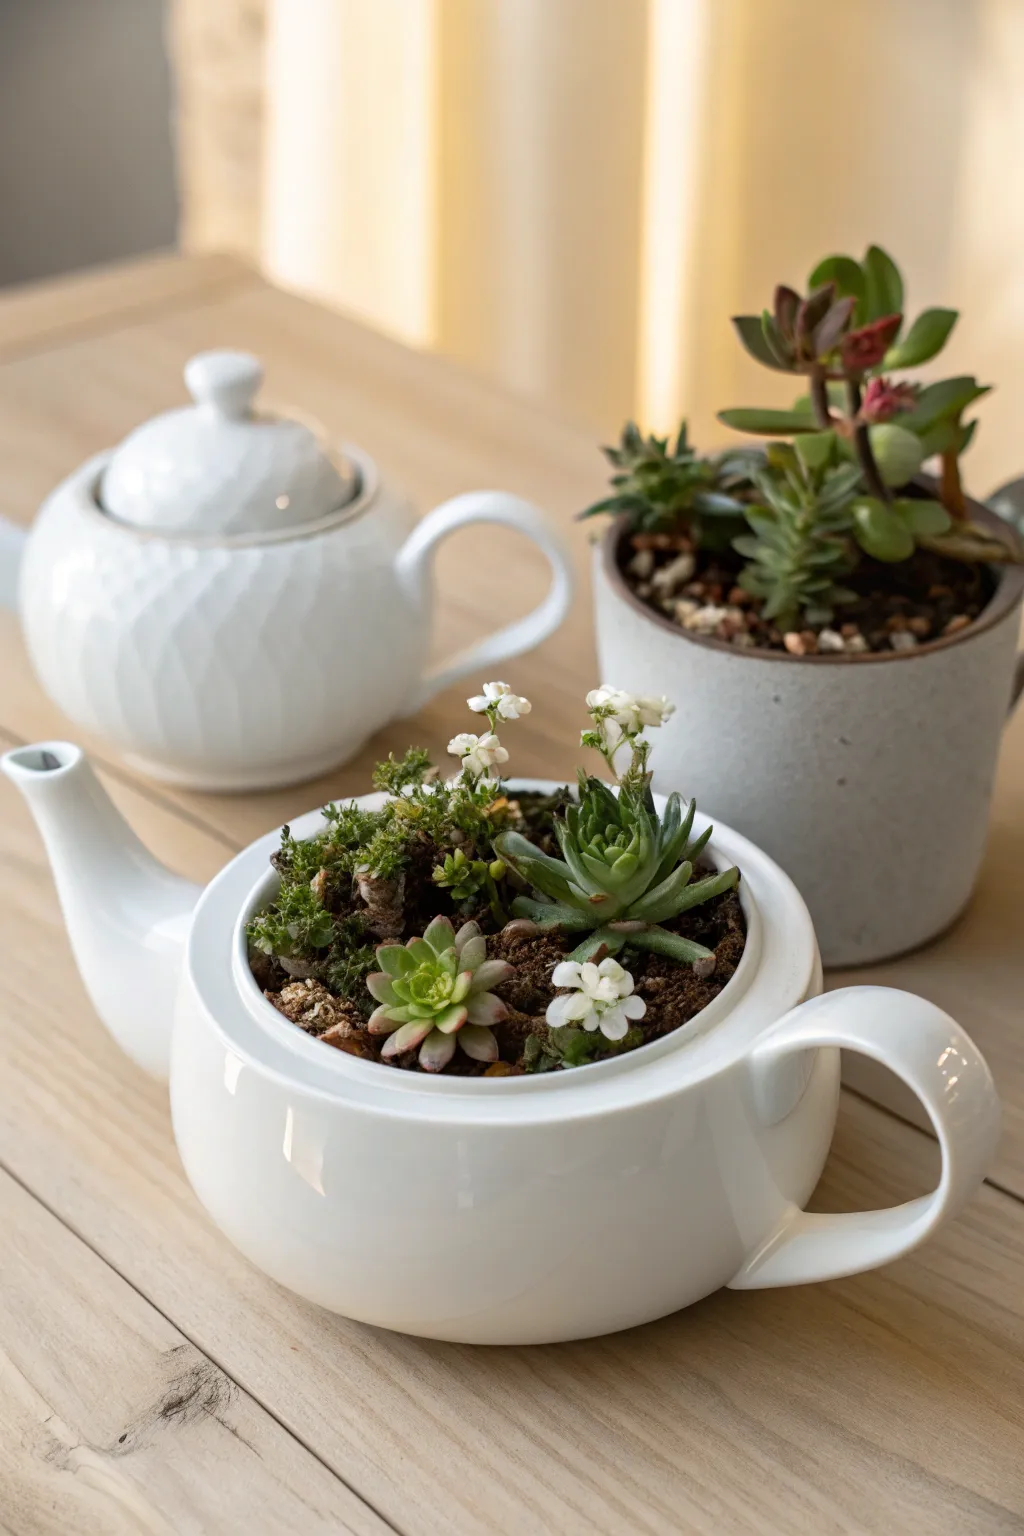
Transform a classic white ceramic teapot into a charming miniature garden that doubles as a conversation piece. This project combines the clean elegance of porcelain with the rugged textures of succulents and delicate white blooms for a beautiful tabletop display.
Step-by-Step Guide
Materials
- A white ceramic teapot (lid removed)
- Small gravel or pebbles (for drainage)
- Activated charcoal (optional but recommended)
- Succulent potting mix
- Small succulent varieties (e.g., Sempervivum, Echeveria of varying sizes)
- Tiny flowering filler plants (like Sweet Alyssum or a flowering sedum)
- Moss fragments (for texture)
- A spoon or small scoop
- Chopstick or tweezers
- Drafting brush or soft paintbrush
Step 1: Preparation and Drainage
-
Clean the Vessel:
Begin by thoroughly cleaning your white teapot. If it’s a vintage find, ensure there is no residue inside that could harm the plants. Remove the lid and set it aside for another use. -
Assess Drainage Needs:
Check if your teapot has a built-in strainer at the base of the spout. If not, don’t worry—we will create a drainage layer inside since drilling ceramic can be risky. -
Add the Gravel Base:
Pour a layer of small gravel or pebbles into the bottom of the teapot. This layer should be about an inch deep to create a reservoir for excess water to sit away from roots. -
Add Charcoal Layer:
Sprinkle a thin layer of activated charcoal over the gravel. I like to do this to keep the soil fresh and prevent mold, especially in containers without drainage holes.
Water Warnings
Since teapots often lack drainage holes, be extremely careful not to overwater. Only water when the soil feels completely dry to the touch to prevent root rot.
Step 2: Planting the Garden
-
Add Potting Soil:
Spoon in the succulent potting mix, filling the teapot until it is about an inch or so below the rim. Don’t pack it down too tightly yet. -
Plan Your Arrangement:
Before planting, arrange your succulents on a table to verify the layout. Place taller succulents, like the rosette variety shown, slightly off-center for visual interest. -
Plant the Main Succulent:
Make a small well in the soil with your spoon. Gently remove the largest succulent from its nursery pot, loosen the roots, and nestle it into the soil. -
Add the Secondary Succulent:
Place a smaller, complementary succulent rosette near the front edge. Position it so it slightly overhangs the rim, breaking the clean line of the ceramic. -
Incorporate Flowers:
Tuck in small clumps of tiny white flowers (like alyssum) or flowering sedum around the succulents. These add height and softness to the rigid succulent leaves. -
Fill in with Moss:
Use small pieces of moss to fill the gaps between the plants. This not only looks lush but helps hold moisture in the soil.
Step 3: Finishing Touches
-
Secure the Roots:
Use the back of your spoon or a chopstick to gently press the soil and moss down around the roots of all plants to eliminate air pockets. -
Clean the Rim:
Take a soft paintbrush or drafting brush and sweep away any loose soil particles from the white ceramic rim and the leaves of the succulents. -
Water Sparely:
Using a pipette or a very small watering can, water the soil specifically at the base of the plants. Avoid soaking the foliage.
Color Coordination
For a cohesive look like the photo, choose plants with hues that complement the pot. Here, the white flowers mimic the porcelain, tying the whole piece together.
Place your new teapot garden in a bright spot and enjoy your miniature landscape

The Complete Guide to Pottery Troubleshooting
Uncover the most common ceramic mistakes—from cracking clay to failed glazes—and learn how to fix them fast.
Tiered Teapot Planter Centerpiece Stack
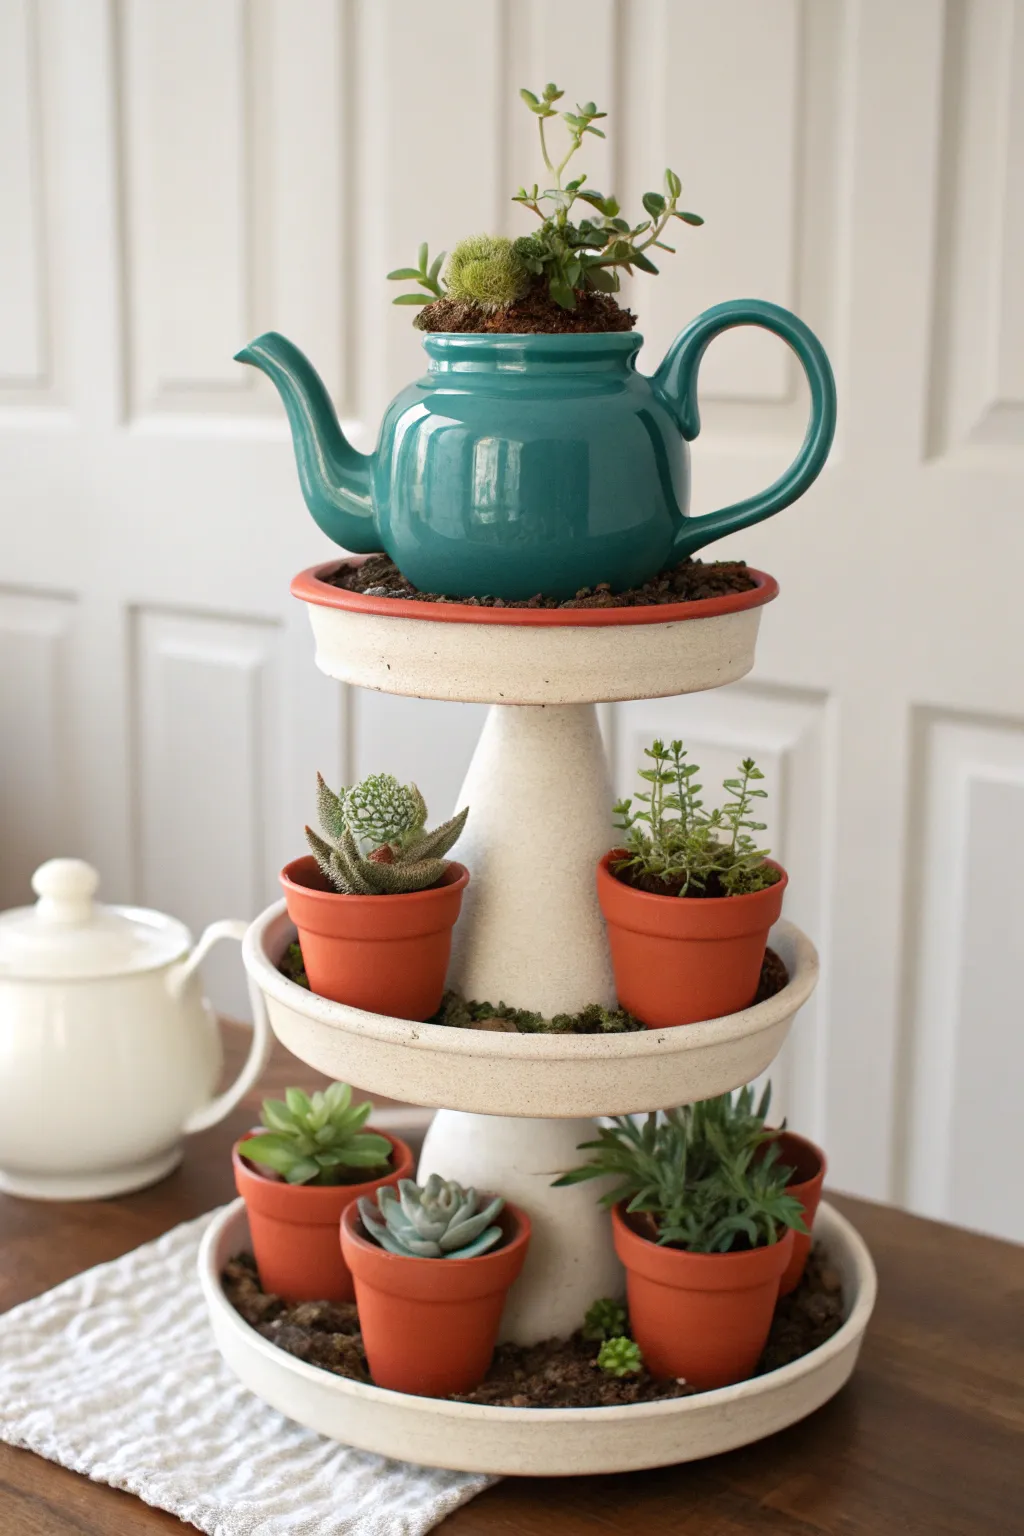
Elevate your indoor garden with this charming three-tiered centerpiece that combines vintage tea-time aesthetics with modern succulent care. By stacking ceramic trays and crowning them with a planted teapot, you create a stunning vertical display perfect for a dining table or sunroom.
Step-by-Step Tutorial
Materials
- One ceramic teal teapot (approx. 4-6 cup capacity)
- Two large shallow ceramic planter saucers or bowls (approx. 10-12 inches diameter)
- One medium shallow ceramic planter saucer (approx. 8 inches diameter)
- Two sturdy ceramic candlesticks or turned wood pedestals (painted white to match)
- Strong craft adhesive (E6000 or construction adhesive)
- Four to five small 2-inch terracotta pots
- Assorted succulents (Sedum, Echeveria, Haworthia)
- Cactus potting mix
- Natural moss or dark decorative gravel
- Drill with ceramic bit (optional, for drainage)
- Small gravel or pebbles for drainage layers
Step 1: Constructing the Tower
-
Prepare the base:
Select your largest ceramic saucer to serve as the sturdy foundation. Clean the center thoroughly with rubbing alcohol to ensure a strong bond for the adhesive. -
Attach the first riser:
Apply a generous ring of strong adhesive to the bottom rim of your first candlestick or pedestal. Press it firmly into the exact center of the base saucer. -
Add the middle tier:
Apply adhesive to the top of the first pedestal. Carefully center the medium-sized ceramic saucer on top and press down. Use a level here to make sure your tower isn’t leaning. -
Install the second riser:
Glue the base of the second candlestick/pedestal into the center of the middle saucer. I like to let this assembly cure for at least 24 hours before adding any weight to ensure structural integrity. -
Top with the teapot saucer:
Attach the smallest saucer or a dedicated flat platform to the top of the second pedestal. This will be the resting place for your teapot.
Pro Tip: Stability First
Before gluing, dry-stack your ceramic pieces and pedestals to ensure they fit well together. Sand any glossy surfaces where glue will be applied to create a rougher texture for a stronger grip.
Step 2: Planting the Teapot
-
Create drainage:
If you are comfortable using a drill, carefully create a hole in the bottom of the teal teapot using a ceramic bit. If not, fill the bottom inch of the pot with small pebbles to create a water reservoir. -
Fill with soil:
Add cactus potting mix to the teapot, filling it nearly to the rim but leaving space for the root balls of your plants. -
Arrange the main plants:
Select a taller succulent or a trailing variety to spill slightly over the opening. Plant it securely in the main opening of the teapot. -
Clean the exterior:
Wipe away any stray soil from the glossy teal surface with a damp cloth to keep the ceramic looking polished.
Level Up: Seasonal Swaps
Keep the small terracotta pots loose rather than gluing them down. This lets you swap out the plants for seasonal decor, like mini pumpkins in autumn or ornaments in winter.
Step 3: Styling the Tiers
-
Pot the mini succulents:
Fill your small terracotta pots with cactus mix and plant individual succulents in each one. Choose a variety of textures, like spiky Haworthia and rosette-shaped Echeveria. -
Position the pots:
Arrange the potted succulents on the bottom and middle tiers. Place three or four on the wider bottom tier and two on the middle tier to balance the visual weight. -
Add the final touch:
Place the planted teal teapot on the very top tier. Ensure it sits stable and flat. -
Fill the gaps:
To hide the plain ceramic base of the trays and stabilize the pots, scatter dark decorative soil, pebbles, or bits of moss around the base of the terracotta pots. -
Water carefully:
Use a squeeze bottle or syringe to water the soil directly, avoiding the foliage and preventing water from pooling in the ceramic trays.
Now you have a tiered garden display that brings a spot of unexpected joy to any corner of your home
No-Drill Teapot Planter With Drainage Layers
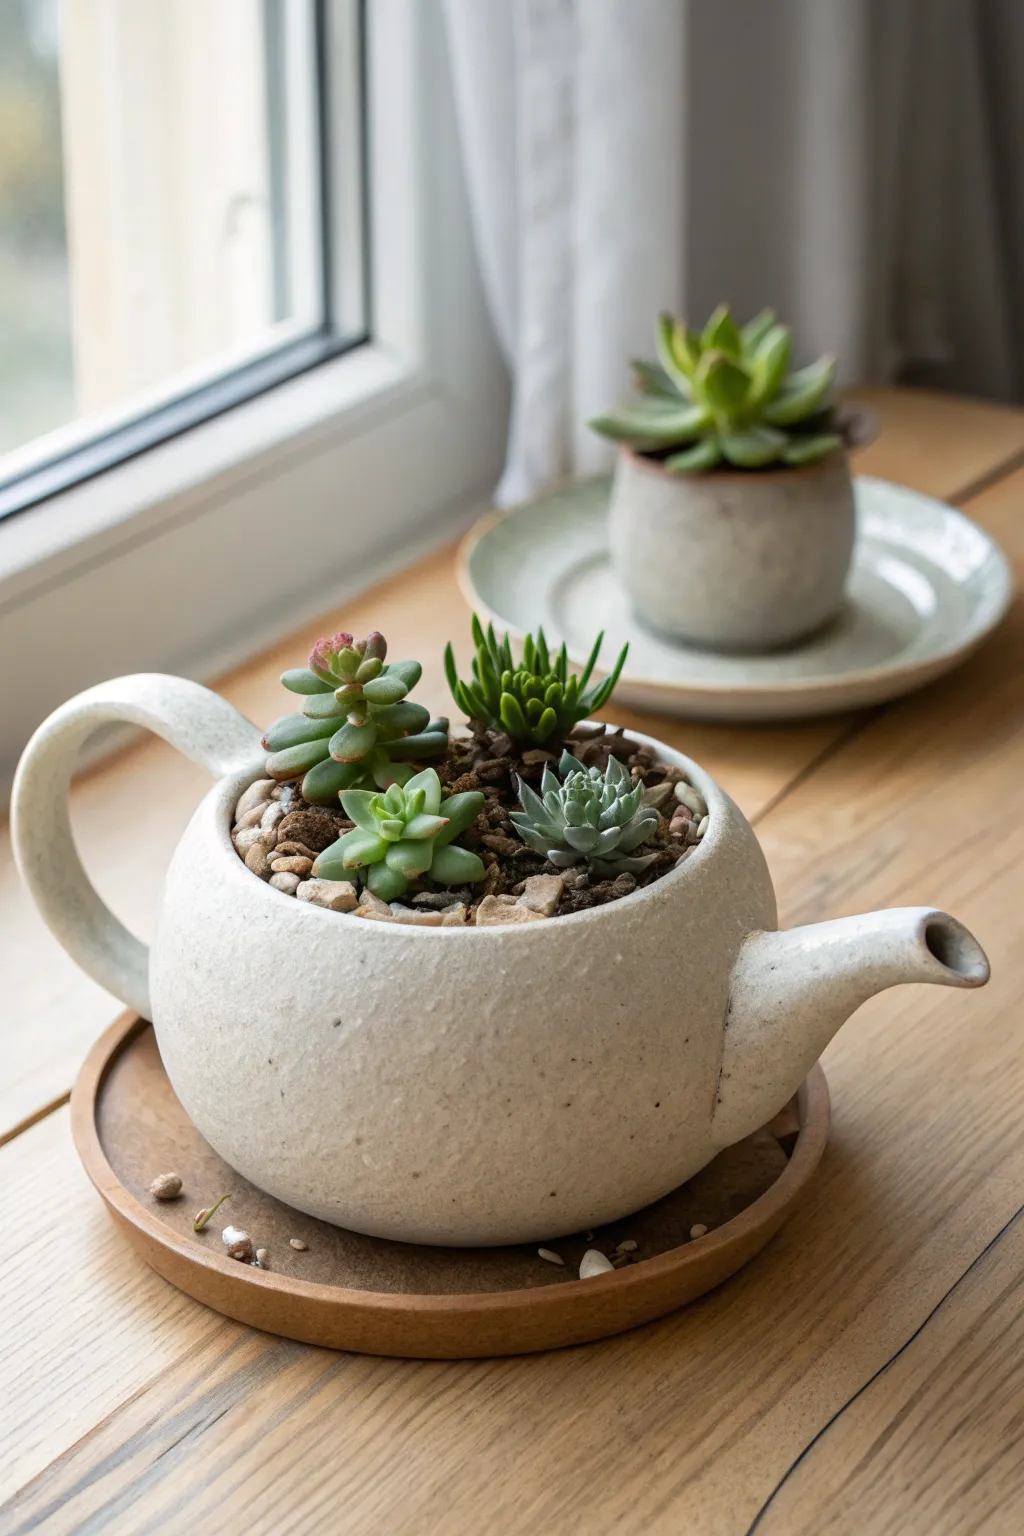
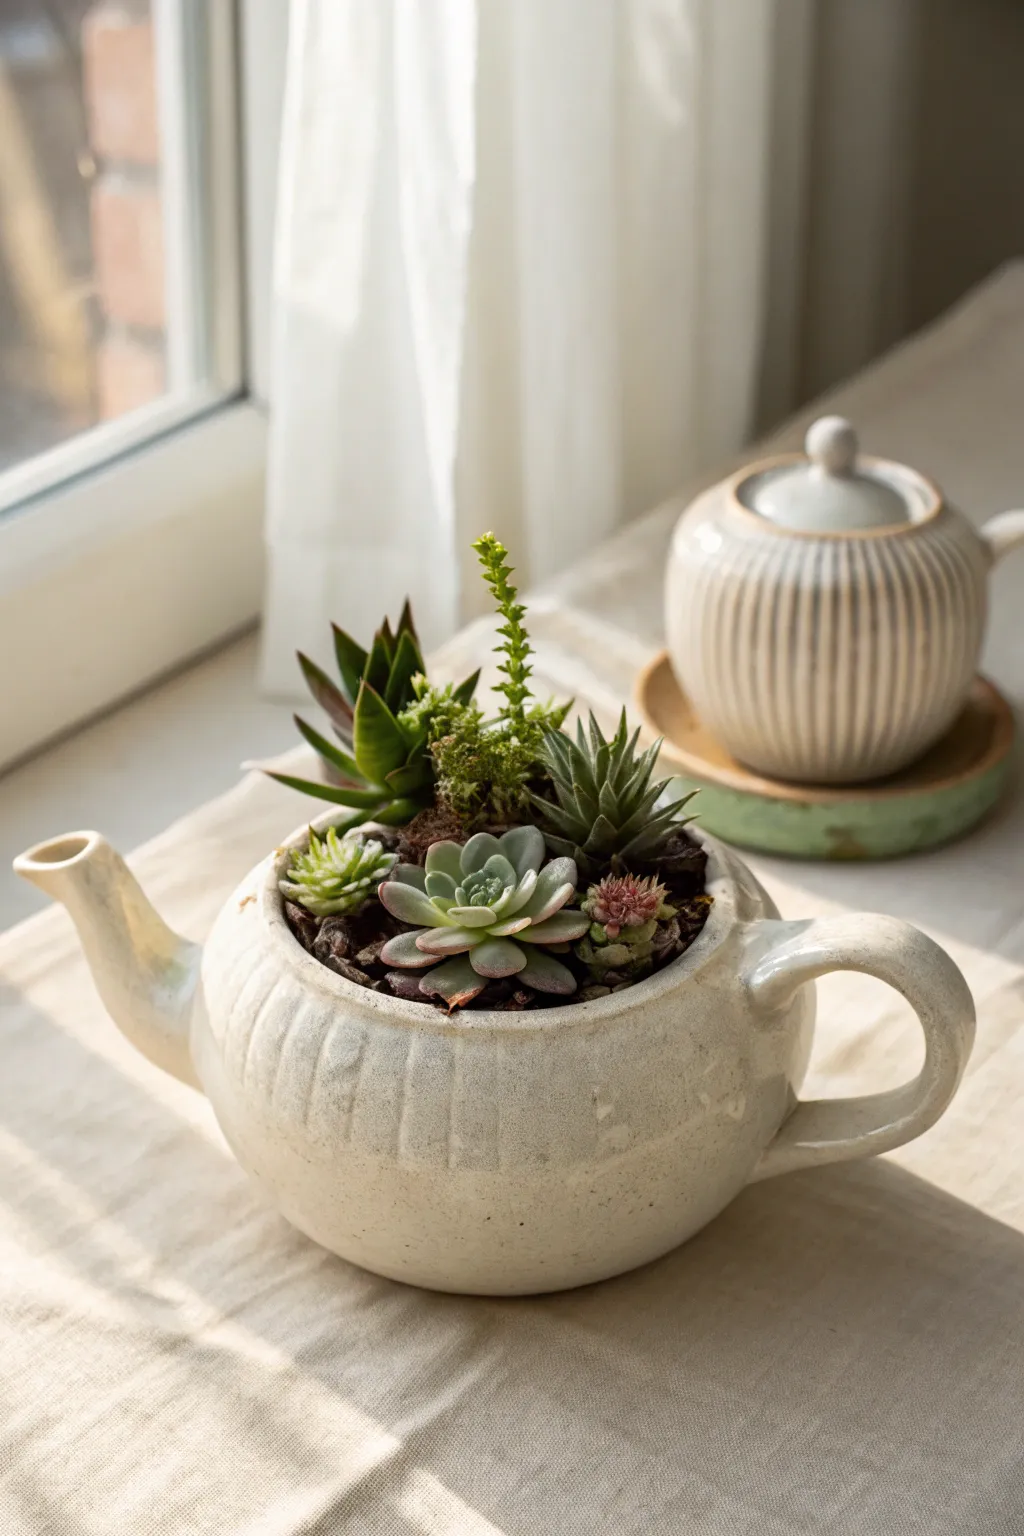
Transform a charming ceramic teapot into a cozy home for tiny succulents with this no-drill planter method. By layering drainage materials inside, you can create a safe, rot-free environment that looks adorable on any windowsill.
Step-by-Step Guide
Materials
- Ceramic or stoneware teapot (speckled white/cream finish preferred)
- Small pebbles or gravel (for drainage)
- Activated charcoal (optional, for filtration)
- Cactus/succulent potting mix
- Small top-dressing stones or coarse sand
- 3-4 small succulent plugs (e.g., Sedum, Echeveria, Sempervivum)
- Spoon or small scoop
- Chopstick or long tweezers
- Saucer or wood coaster (optional for display)
Step 1: Preparation & Drainage Layer
-
Clean the teapot:
Begin by washing your teapot thoroughly with warm soapy water to remove any dust or residue, then dry it completely, including the spout. -
Add base drainage:
Since we aren’t drilling a hole, pour a layer of small pebbles or gravel into the bottom of the teapot, about 1 to 1.5 inches deep. -
Level the stones:
Give the teapot a gentle shake to level out the pebble layer so it provides a stable base for the soil. -
Add charcoal layer:
Sprinkle a thin layer of activated charcoal over the pebbles; this helps keep the water at the bottom fresh and prevents funky odors in a closed container. -
Create a soil barrier:
I find it helpful to place a small piece of mesh or landscape fabric over the rocks if you have it, though carefully spooning soil works too.
Water Warnings
Since there is no drain hole, water very sparingly. If the soil stays soggy, tip the teapot carefully over a sink to drain excess water through the spout.
Step 2: Planting & Arrangement
-
Add soil base:
Spoon in your cactus or succulent mix, filling the teapot until it is about an inch or so below the rim. -
Plan your layout:
Arrange your chosen succulents on a table first to see which composition looks best—try mixing heights and textures like spiky leaves vs. round rosettes. -
Prepare the plants:
Gently remove the succulents from their nursery pots and carefully loosen the root balls to remove excess old soil. -
Dig small wells:
Use a spoon or your finger to make small indentations in the soil relative to where each plant will sit. -
Insert the first plant:
Start with the largest or tallest succulent, placing it slightly off-center or toward the back for visual balanace. -
Add companions:
Nestle the smaller succulents into the remaining spaces, ensuring their roots are covered but leaves remain above the soil line. -
Secure the roots:
Use a chopstick to gently push soil down around the roots of each plant to eliminate large air pockets without compacting the dirt too much.
Theme It Up
Match the succulents to the teapot style. Use vintage-looking Echeverias for floral china, or stark, architectural Haworthias for modern monochromatic pots.
Step 3: Finishing Touches
-
Top dressing:
Carefully spoon a thin layer of small decorative stones or coarse sand over the exposed soil surface to keep moisture in and give it a finished look. -
Brush off debris:
Use a soft paintbrush or clean makeup brush to sweep away any stray dirt or sand from the succulent leaves and the rim of the teapot. -
Initial watering:
Wait about a week before watering to let any roots heal, then water very sparingly, aiming the stream at the soil rather than the leaves. -
Final display:
Place your finished teapot planter on a wooden coaster or saucer near a bright window to keep the plants compact and colorful.
Now you have a quaint, living decoration that brings a touch of greenery to your tea time


What Really Happens Inside the Kiln
Learn how time and temperature work together inside the kiln to transform clay into durable ceramic.
Cracked Teapot Turned Planter Treasure
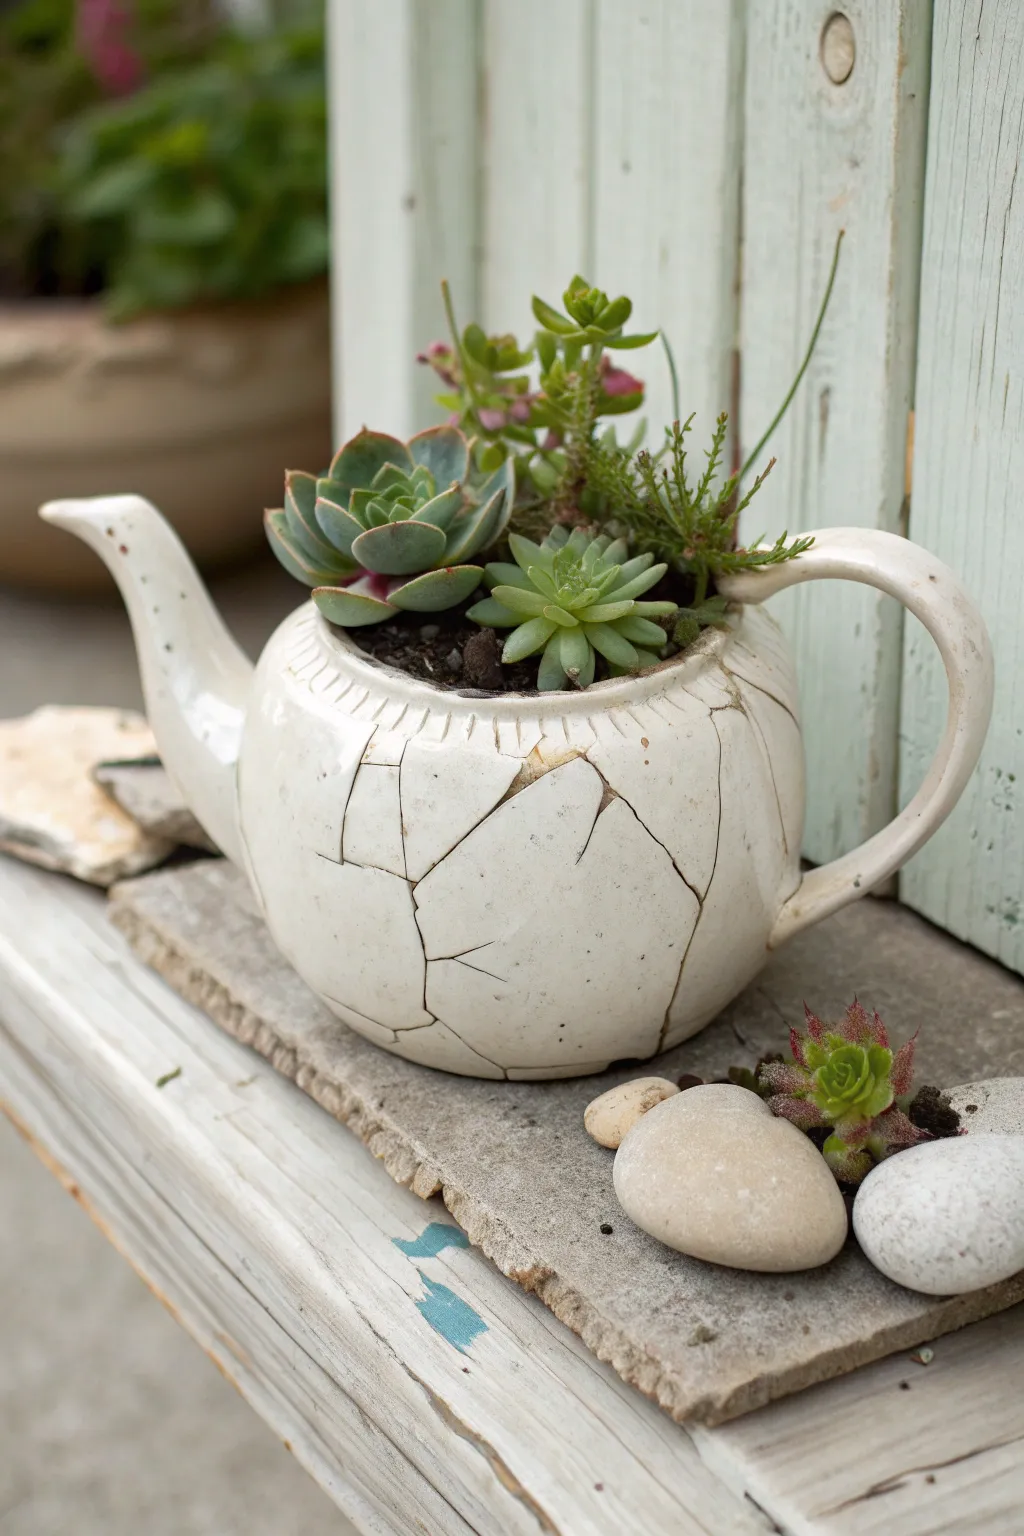
Turn a shattered misfortune into a rustic masterpiece by reassembling a broken ceramic teapot into a charming planter. The visible cracks add character and history, creating the perfect weathered home for a collection of hardy succulents.
Detailed Instructions
Materials
- Old ceramic teapot (white or cream)
- Hammer and towel (if breaking manually)
- Safety glasses
- Strong ceramic adhesive or epoxy (clear)
- Masking tape or painter’s tape
- Succulent potting soil
- Perlite or small gravel (for drainage)
- Small echeveria succulents (various sizes)
- Creeping sedum or moss
- Decorative river stones (white and beige)
- Flat slate or stone slab (for display base)
- Small paintbrush (for cleaning cracks)
Step 1: Preparation & Breaking
-
Safety First:
Before starting, ensure you have safety glasses on. If you are starting with an intact teapot that you want to distress, wrap it completely in a thick towel. -
Create the Shards:
Gently tap the wrapped teapot with a hammer. You want large, clean breaks rather than tiny smithereens, so use controlled force. Aim for 5-8 main body pieces. -
Clean the Edges:
Carefully remove the pieces from the towel. Use a small, dry paintbrush to sweep away any tiny ceramic dust or crumbs from the fractured edges to ensure a tight glue bond later. -
Dry Fit the Puzzle:
Before gluing, arrange the pieces on your table to understand how they fit back together. Identify the base piece which will anchor the reconstruction.
Step 2: Reassembly
-
Begin the Base:
Apply a thin line of ceramic adhesive to the edge of the base piece. Press the first matching wall piece against it firmly. -
Secure with Tape:
Immediately place a strip of masking tape across the seam to hold the pieces tightly together while the glue sets. This prevents shifting. -
Build Upwards:
Continue gluing pieces one by one, working your way up the body of the teapot. I find it easier to let each connection dry for about 5 minutes before adding the next heavy piece. -
Leave Some Imperfections:
Don’t worry if small chips are missing or if the fit isn’t 100% perfect. These gaps aid drainage and add to the ‘ruined’ aesthetic we are aiming for. -
Reattach Spout and Handle:
These are the heaviest parts. Apply ample glue and use multiple strips of tape to secure them against gravity. Let the entire pot cure for the time recommended on your glue bottle, usually 24 hours.
Glued Shut?
If your glue job is too watertight and you have no drainage holes, be incredibly sparing with water. Use a spray bottle to mist only the soil surface once a week.
Step 3: Planting & Styling
-
Create Drainage Layer:
Since the bottom is glued, fill the bottom inch of the teapot with small gravel or perlite to prevent root rot. -
Add Soil:
Scoop in your succulent potting mix, filling the teapot until it is about an inch from the rim. Lightly tamp it down. -
Position the Hero Plant:
Take your largest echeveria and nestle it slightly off-center on the left side. Angle it so the rosette faces outward. -
Add Texture:
Plant smaller succulents and sprigs of tall, vertical greenery (like sedum) on the right side to create height and balance against the spout. -
Fill the Gaps:
Tuck small bits of moss or soil into any large cracks in the ceramic body if you want a specifically overgrown look, though leaving them open is fine too. -
Prepare the Display Base:
Place a flat slate or stone slab on your table. This acts as a saucer and enhances the rustic vibe. -
Final Arrangement:
Set your planted teapot on the slab. Arrange two or three smooth river stones next to the base. -
The Tiny Detail:
For the finishing touch, tuck a tiny, loose succulent rosette (a ‘pup’) into the crevices between the river stones on the slate base.
Golden Seams
Mix a tiny amount of gold mica powder into your clear epoxy before gluing. This creates a faux ‘Kintsugi’ effect, highlighting the cracks with gold veins.
Place your reconstructed treasure in a sunny spot and enjoy the resilience of beauty growing from broken things
Mini Fairy Garden Inside a Teapot Planter
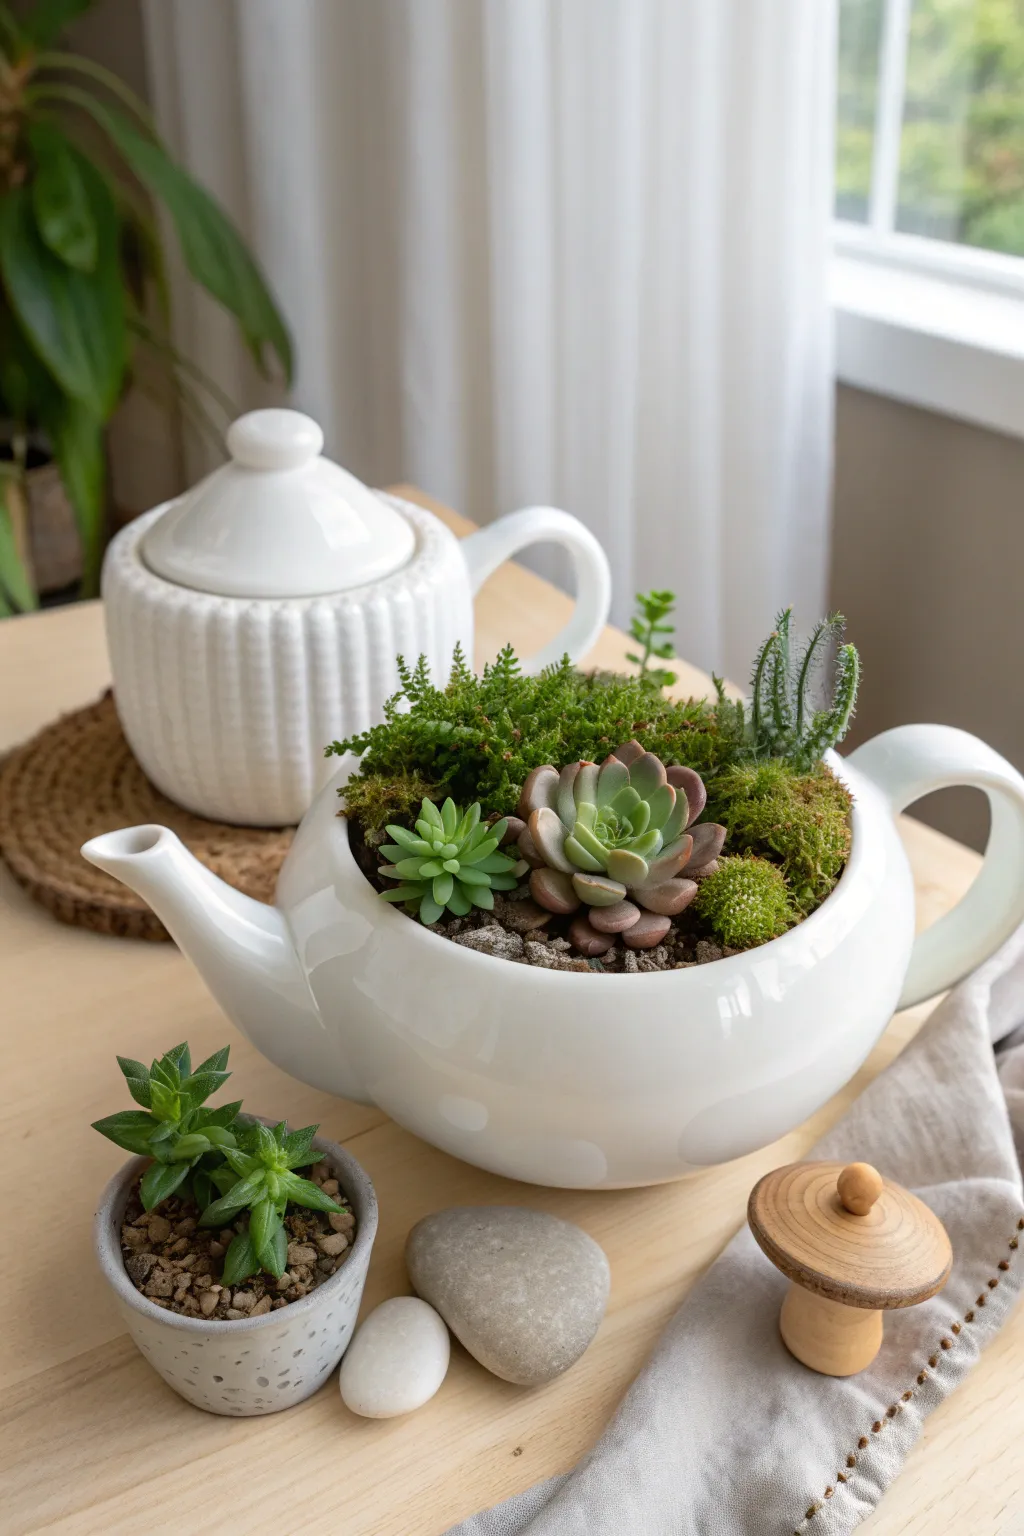
Transform a classic white teapot into a lush, miniature landscape brimming with succulents and soft moss textures. This elegant centerpiece combines the cozy charm of tea time with the refreshing vibrancy of a living garden.
Step-by-Step Guide
Materials
- Two plain white ceramic teapots (one rounder, one slightly taller)
- Small gravel or pebbles (for drainage)
- Activated charcoal (optional)
- Cactus/succulent potting soil mix
- Various small succulents (Echeveria rosette, Sedum, Haworthia)
- Irish moss or sheet moss
- Small stones or river rocks (for decoration)
- Wooden mushroom figurines (optional decor)
- Small ceramic pot (for side arrangement)
- Tweezers or long-handled planting tools
- Spoon or small scoop
- Water spray bottle
Step 1: Preparation
-
Select your vessel:
Begin with a clean white ceramic teapot. If it doesn’t have a drainage hole, you’ll need to create a drainage layer inside to keep roots healthy. -
Create drainage layer:
Pour a layer of small gravel or pebbles about 1-2 inches deep into the bottom of the teapot. This is crucial since most teapots lack drainage holes. -
Add charcoal buffer:
Sprinkle a thin layer of activated charcoal over the pebbles. I find this really helps keep the soil fresh and prevents odors in enclosed containers without holes. -
Fill with soil:
Add your cactus or succulent potting mix on top of the charcoal. Fill the teapot until the soil level is about an inch below the rim, leaving room for the plants.
Watering Woes
If you overwater, carefully tip the teapot sideways to drain excess liquid through the spout. Let it dry out completely for 2 weeks.
Step 2: Planting the Main Teapot
-
Prepare the focal point:
Take your largest rosette succulent (like an Echeveria) out of its nursery pot. Gently massage the root ball to loosen the soil. -
Position the centerpiece:
Nestle the rosette succulent slightly off-center in the teapot. Dig a small hole with your spoon and place the roots in, firming the soil around the base. -
Add vertical interest:
Select a taller, spiky succulent like a Haworthia or Aloe. Plant this near the back or handle side of the opening to create height and contrast against the rounder rosette. -
Fill the gaps:
Tuck smaller succulents, such as tiny Sedum clusters, into the remaining open spaces. Use tweezers to gently guide their delicate roots into the soil without disturbing the main plants.
Fairy Magic
Add a tiny ceramic door to the base of the teapot or a miniature ladder leaning against the spout to create a heavy fairy garden vibe.
Step 3: Adding Texture and Detail
-
Layer the moss:
Tuck pieces of Irish moss or fresh sheet moss around the base of the succulents. This covers the exposed soil and gives the arrangement a lush, finished fairy-garden look. -
Secure the moss:
Gently press the moss down so it makes contact with the soil. You want it to look like a soft green carpet growing naturally around the plants. -
Clean the rim:
Use a small brush or cloth to wipe away any stray soil particles from the white ceramic rim or the leaves of the succulents. -
Water carefully:
Using a spray bottle or a syringe, water the soil directly at the base of the plants. Avoid soaking the rosette leaves to prevent rot.
Step 4: Styling the Scene
-
Create a companion pot:
Take a small, separate ceramic cup or mini pot. Fill it with soil and plant a single, small trailing succulent to accompany your main teapot. -
Top dress the companion:
Add a layer of small grit or decorative sand on top of the soil in the small pot for a polished look. -
Arrange the display:
Place the finished teapot planter on a wooden table or mat. Position the second teapot (with its lid on) in the background to reinforce the tea party theme. -
Add decorative elements:
Set smooth river stones and a small wooden mushroom figurine near the teapot to complete the whimsical, nature-inspired vignette.
Place your new teapot garden in a bright spot and enjoy the serene atmosphere it brings to your space

TRACK YOUR CERAMIC JOURNEY
Capture glaze tests, firing details, and creative progress—all in one simple printable. Make your projects easier to repeat and improve.
Air Plant Teapot Planter With Spout Display
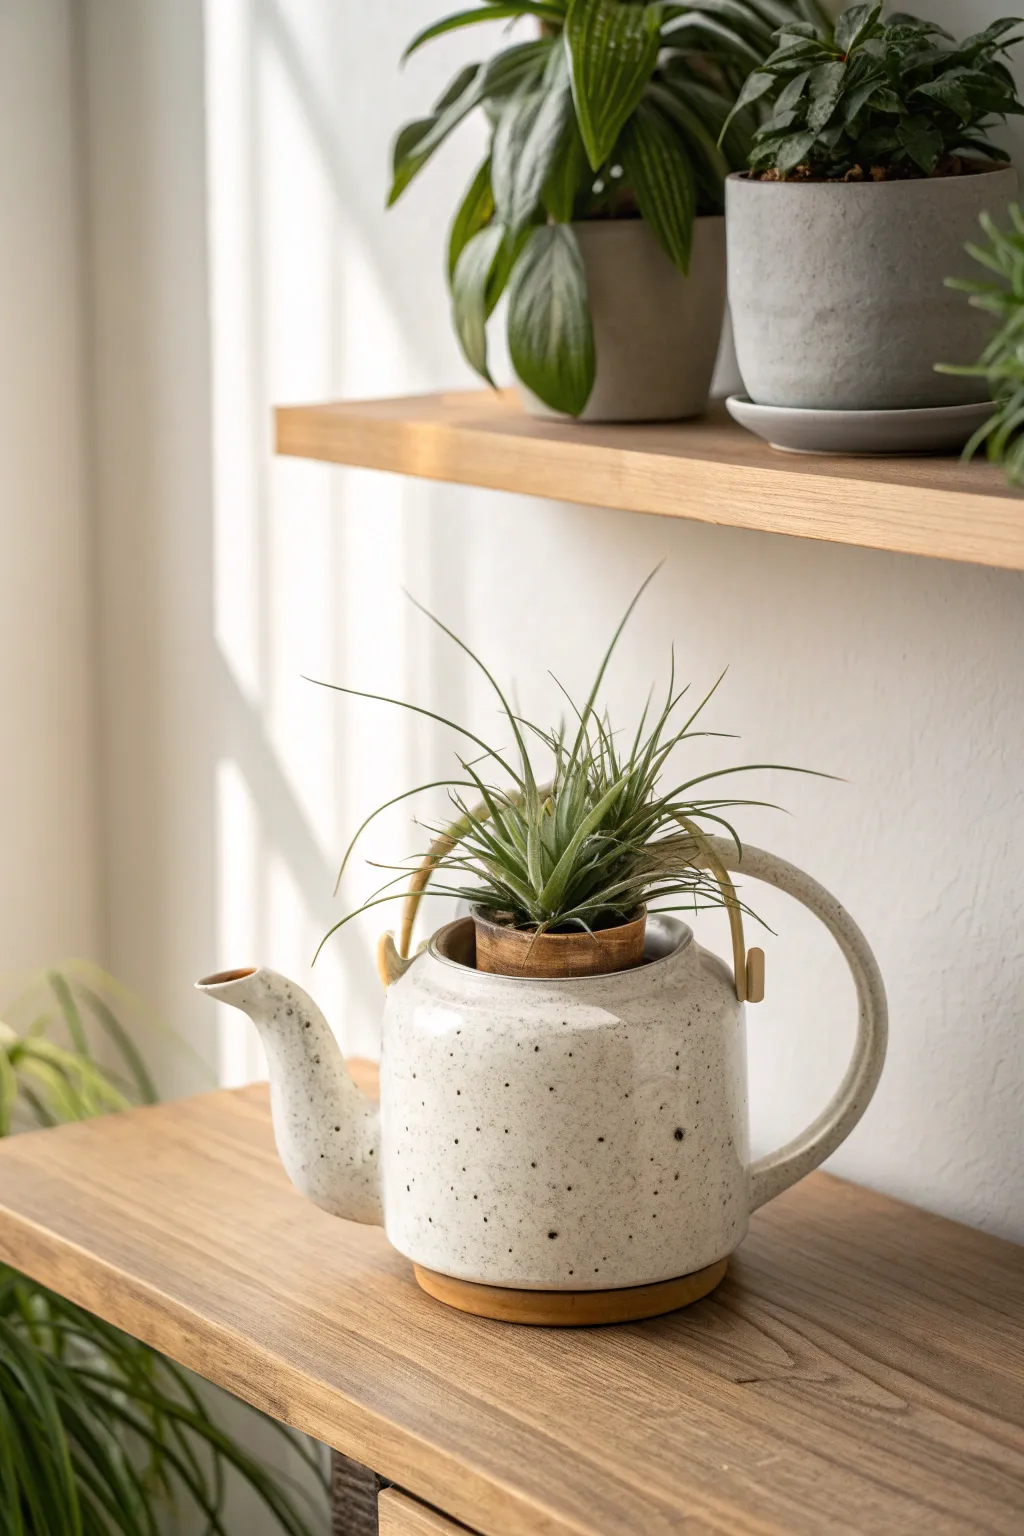
Transform a charming ceramic teapot into a unique home for your air plants without the mess of soil or complicated drainage. This project combines the rustic elegance of speckled pottery with the spiky, architectural beauty of a Tillandsia for a low-maintenance, high-impact display.
Step-by-Step
Materials
- White or cream speckled ceramic teapot (approximately 6-8 inches wide)
- Medium-sized Tillandsia (air plant), such as a Tillandsia ionantha
- Small wooden bowl or saucer (must fit snugly into the teapot opening)
- Small bamboo or rattan handle (optional, if teapot lacks one)
- Wooden coaster or base (slightly larger than teapot bottom)
- Sandpaper (medium grit)
- Craft glue or E6000 adhesive
- Small pebbles or decorative gravel (optional for weight)
- Natural wood stain (light oak or teak)
- Clean cloth
Step 1: Preparing the Base
-
Selecting the Vessel:
Begin by sourcing a ceramic teapot. Look for one with a wide top opening and a speckled glaze finish to match the aesthetic. Vintage shops often carry pots without lids, which are perfect for this project. -
Cleaning the Pot:
Thoroughly wash the inside and outside of the teapot with warm soapy water to remove any dust or residue. Dry it completely with a soft cloth. -
Preparing the Base:
Take your wooden coaster or base. If the wood looks unfinished, lightly sand the edges to smooth out any roughness. -
Staining the Wood:
Apply a light coat of natural wood stain to the coaster using a clean cloth. Wipe away excess stain immediately to keep the tone light and natural, matching the organic feel of the air plant. -
Attaching the Base:
Once the stain is dry, apply a ring of adhesive to the bottom rim of the teapot. Center the teapot onto the wooden coaster and press down firmly to secure it.
Loose Plant?
If the air plant sits too low or feels loose in the wooden opening, place a few small river stones or moss at the bottom of the cup to prop it up.
Step 2: Creating the Plant Mount
-
Sizing the Holder:
Find a small wooden bowl, egg cup, or even a cut-down wooden cup that fits inside the teapot’s main opening. It should rest on the rim without falling through. -
Adjusting the Height:
If the wooden holder sits too low, you can fill the bottom of the teapot with some decorative gravel or pebbles to create a platform for the holder to rest on. -
Matching the Wood Tones:
If your wooden holder is a different shade than your base, lightly sand it and apply the same wood stain used previously. This creates a cohesive look across the mixed materials. -
Securing the Holder:
While you can leave the holder loose for easy cleaning, I prefer to add a small dab of glue to the rim where the wood meets the ceramic if the fit is loose. This prevents wobbling.
Step 3: Handle and Plant Styling
-
The Handle Detail:
If your teapot doesn’t have a handle, or you want to replicate the specific look, attach a bent bamboo or rattan handle. Secure the ends into the existing handle lugs or glue them carefully to the sides near the rim. -
Prepping the Plant:
Inspect your air plant and gently trim away any brown or dried leaves at the base. Ensure the plant is dry before placing it to prevent rot. -
Drafting the Position:
Place the air plant into the wooden holder. Adjust the leaves so they spill naturally over the edges, mimicking the ‘steam’ rising from the pot. -
Final Adjustments:
Rotate the plant until the most attractive side faces the same direction as the spout for a balanced composition. -
Display Placement:
Position your new planter on a shelf where it will receive bright, indirect light, which is crucial for the air plant’s health.
Watering Tip
Never actully water the plant inside the teapot. Always remove the air plant entirely to soak it, and let it dry upside down before returning it to the display.
Enjoy the serene and modern vibe this clever botanical arrangement adds to your space