When I’m craving that laid-back country style, I reach for clay bead bracelets that feel a little dusty, sun-warmed, and totally wearable with denim. Here are my favorite country clay bead bracelet ideas—from classic turquoise stacks to fun western sayings and bold patterns that still feel easy to make.
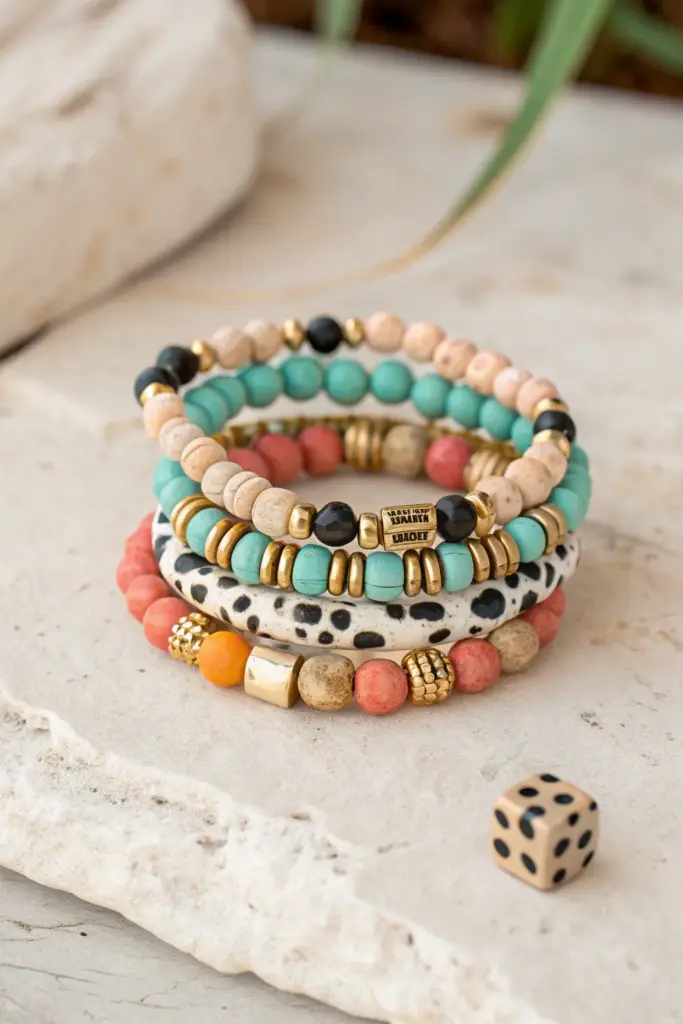
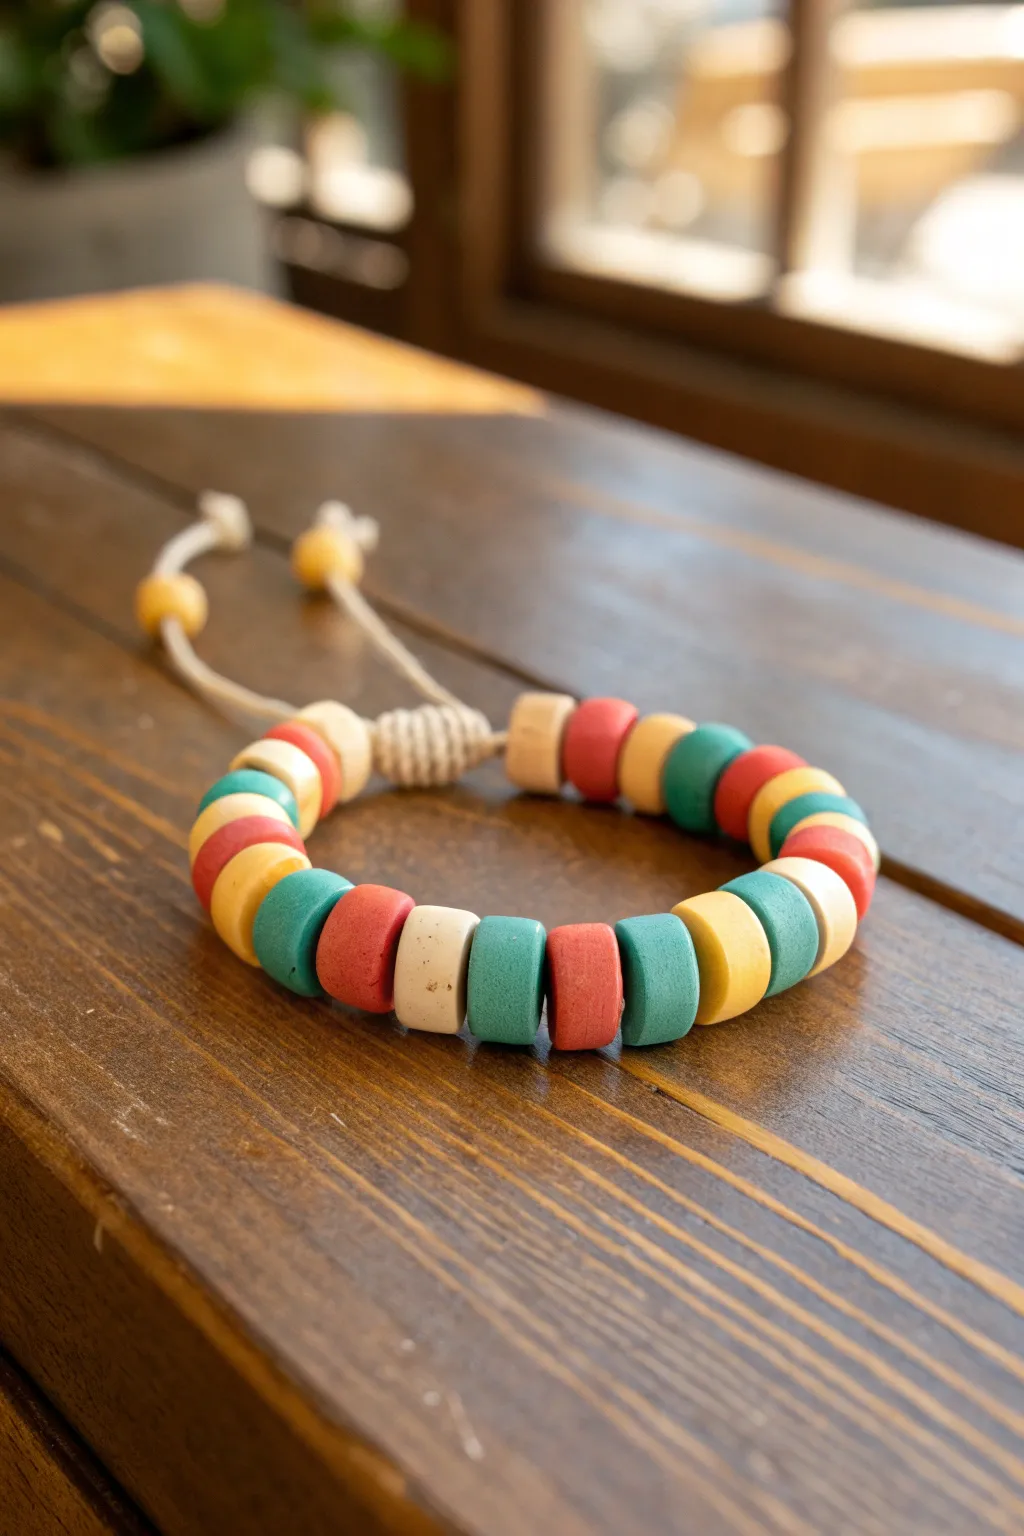
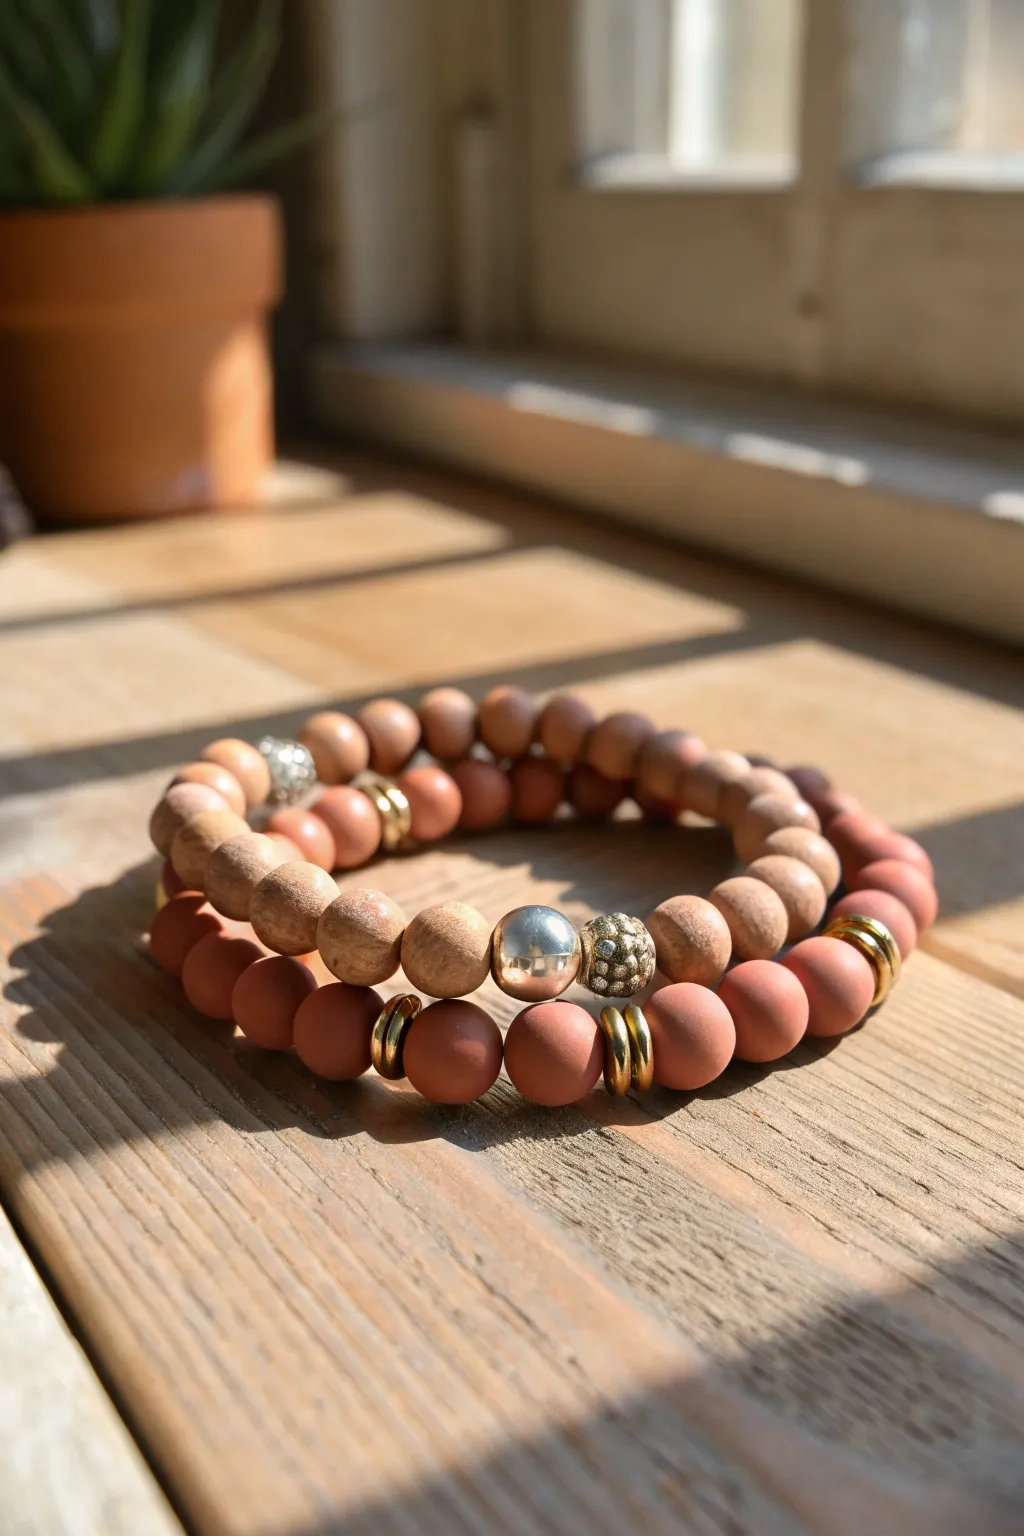
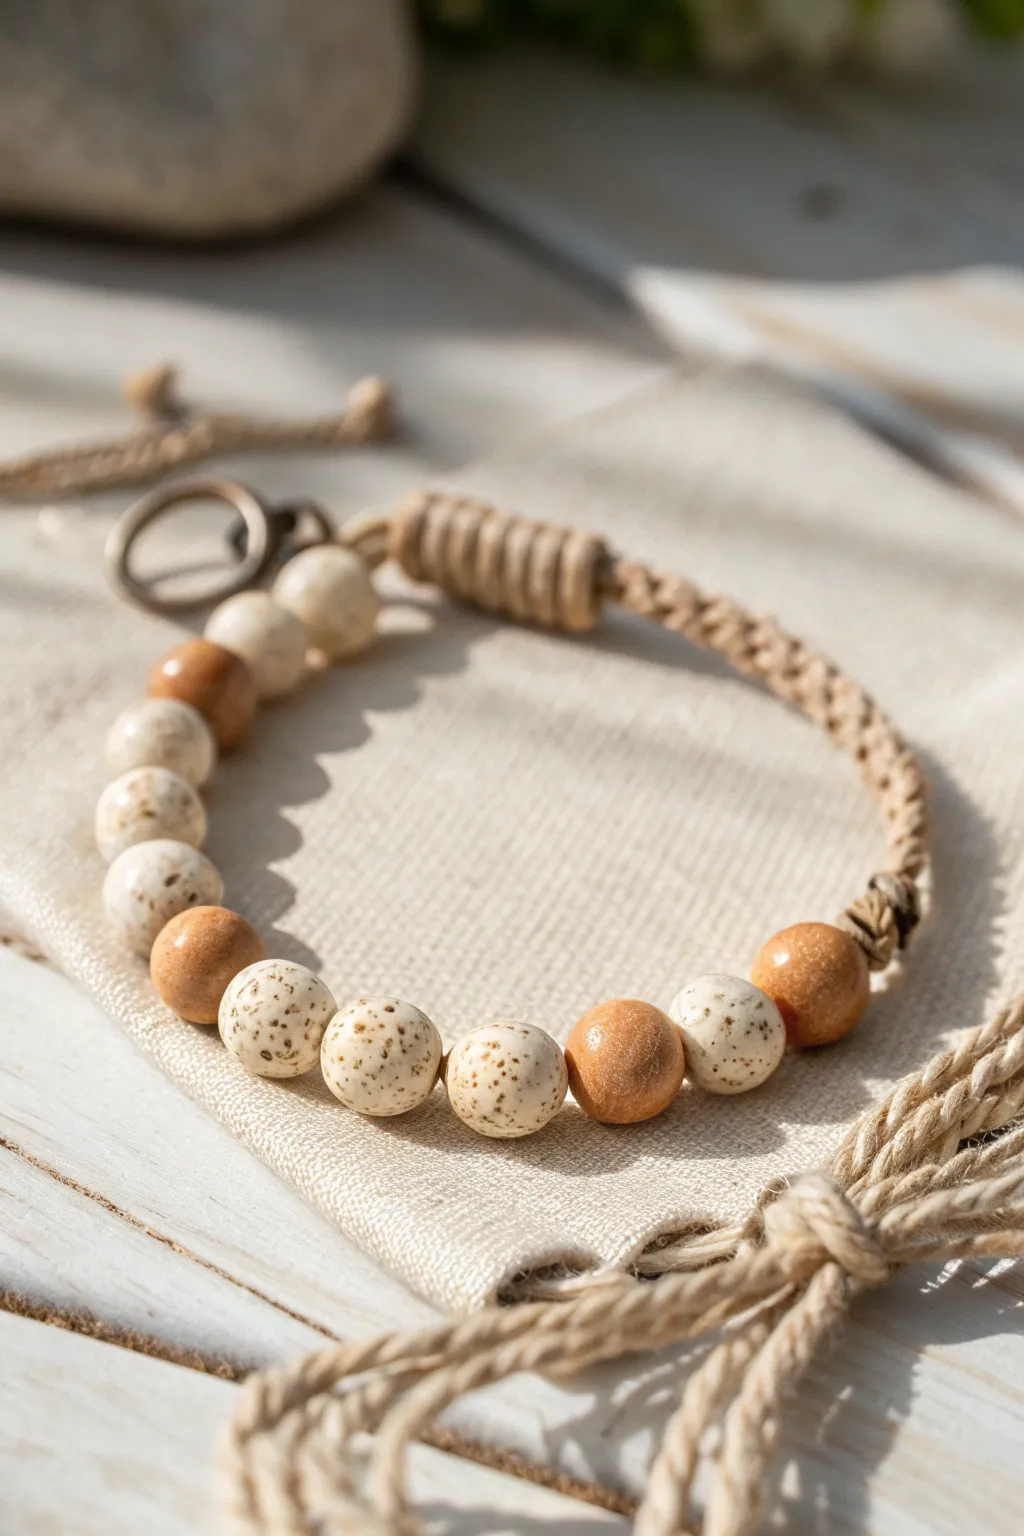
Classic Turquoise and Cream Stack
Embrace a rustic yet elegant vibe with this stunning bracelet stack that pairs matte turquoise hues with earthy cream tones and warm gold accents. The combination of smooth round beads and textured metals creates a balanced, handcrafted look perfect for everyday wear.
Step-by-Step Tutorial
Materials
- Matte turquoise/teal round beads (approx. 8mm)
- Rustic cream/off-white clay or bone beads (approx. 8-10mm)
- Elastic beading cord (0.8mm or 1mm thickness)
- Gold tone flat disc spacer beads
- Gold tone textured artisan round beads (approx. 10mm)
- Bead stopper or masking tape
- Scissors
- Jewelry glue or clear nail polish
Step 1: Planning the Design
-
Measure your wrist:
Before cutting any cord, measure your wrist with a flexible tape measure. Add about half an inch to this measurement to ensure the bracelets sit comfortably without pinching. -
Pre-stretch the cord:
Cut four lengths of elastic cord, each about 10-12 inches long. Firmly pull on each piece a few times to pre-stretch the elastic, which prevents the finished bracelet from sagging later. -
Secure the ends:
Attach a bead stopper or simply place a piece of masking tape on one end of each cord segment to keep your beads from sliding off while you work.
Knot Slipping?
If your elastic knot feels loose, try tying it while the elastic is slightly stretched. You can also roughen the cord ends with sandpaper before tying for extra grip.
Step 2: Creating the Turquoise Strands
-
Start the first strand:
Begin threading the matte turquoise beads onto your first cord. Aim for a solid block of color initially. -
Insert gold spacers:
Once you have strung about half the beads needed for your wrist size, add a visual break by threading on three or four thin gold disc spacers. This creates a shimmering focal point. -
Complete the loop:
Continue adding turquoise beads until the strand reaches your desired length. Check the fit around your wrist before tying off. -
Repeat for the second strand:
Recreate this exact pattern on your second cord. I like to vary the placement of the gold spacers slightly on this second bracelet so they don’t line up perfectly, giving it a more organic stacked look.
Step 3: Assembling the Cream Strands
-
Select your base bead:
For the bottom two bracelets, potential variation in the cream beads adds character. Pick out your favorite rustic clay or bone beads to start. -
Thread the first section:
String approximately 5 to 7 cream beads onto the third cord. -
Add the focal bead:
Slide on one large, textured gold round bead. This larger metallic element anchors the lighter color palette. -
Continue the pattern:
Add another section of cream beads, followed by a second gold accent bead. Spacing these metallic beads evenly (about every 6-8 cream beads) creates a nice rhythm. -
Finish the third strand:
Fill the rest of the cord with cream beads until it matches the length of your turquoise bracelets. -
Create the final strand:
Repeat the cream and gold pattern on your fourth and final cord. Ensure the gold beads are positioned similarly to the previous strand for a cohesive look.
Add a Charm
Personalize the stack by attaching a small gold leaf or initial charm to one of the turquoise strands using a jump ring near the disc spacers.
Step 4: Finalizing the Stack
-
Prepare to knot:
Remove the bead stoppers carefully. Bring the two ends of the cord together, ensuring there are no gaps between the beads. -
Tie the surgeon’s knot:
Tie a surgeon’s knot for extra security: Create a standard overhand knot, but loop the end through the circle a second time before pulling tight. -
Secure with glue:
Put a tiny dab of jewelry glue on the knot. Pull the knot tight and let it dry for a distinct moment before trimming. -
Hide the knot:
Trim the excess cord close to the knot, then gently tug the bracelet so the knot slides inside the hole of a neighboring bead, making it invisible.
Slip on your beautiful new stack of bracelets and enjoy the rustic charm they bring to your outfit


Desert Sunset Ombre

Capture the fleeting beauty of a desert dusk with this warm, earthy accessory. By arranging hand-rolled clay beads in a seamless gradient, you create a piece that transitions gently from pale sand to deep terracotta.
How-To Guide
Materials
- Polymer clay in White, Beige, Terracotta, and Dark Brown
- Bead rolling tool or flat acrylic block
- Toothpicks or a bead piercing pin
- Baking sheet with parchment paper
- Elastic jewelry cord (0.8mm clear)
- Jewelry glue or clear nail polish
- Fine-grit sandpaper (optional for texture)
Step 1: Mixing the Clay Gradient
-
Establish your base colors:
Begin by conditioning four main blocks of polymer clay: a pure white/cream, a sandy beige, a warm terracotta, and a deep reddish-brown. Knead them until they are soft and pliable. -
Create the transition shades:
To achieve a smooth ombre, you need intermediate colors. Start by mixing equal parts of the cream and beige clay to create a light sand tone. -
Blend the warm mid-tones:
Mix a portion of beige with a small amount of terracotta. You want a soft, peachy earth tone that bridges the gap between the neutral sand and the bolder red. -
Deepen the reds:
Combine the terracotta with a tiny pinch of the dark brown. This will create a rich, burnt sienna shade for the darkest part of the gradient. -
Lay out the palette:
Arrange your mixed clay balls in a line from lightest to darkest. You should aim for about 5-6 distinct shades to replicate the subtle shift seen in the photo.
Step 2: Forming the Beads
-
Portion the clay:
Pinch off equal-sized pieces from each color group. Aim for pieces roughly the size of a large pea, as these will form 8mm to 10mm beads. -
Roll spheres:
Roll each piece between your palms to form a rough sphere. For a perfectly round shape, use a bead roller or gently circle firmly using a flat acrylic block on a work surface. -
Add texture (optional):
The beads in the image have a lovely matte, slightly stone-like texture. You can achieve this by gently rolling the raw clay spheres over a piece of coarse sandpaper before baking. -
Pierce the holes:
Using a toothpick or bead pin, carefully pierce the center of each bead. Twist the tool gently as you push through to avoid deforming the round shape. -
Check the exit hole:
Inspect the spot where the tool exited the bead. If the clay poked out, gently smooth it back down with your finger so the bead sits flush when strung.
Fixing Wonky Holes
If the hole deforms slightly while piercing, let the bead sit in the fridge for 10 minutes to firm up, then re-pierce it carefully before baking.
Step 3: Baking and Assembly
-
Bake the beads:
Arrange the beads on a parchment-lined baking sheet. Bake according to your clay manufacturer’s instructions—usually around 275°F (135°C) for 15-30 minutes. -
Cool completely:
Let the beads cool fully before handling. They harden as they cool, so touching them while hot might leave fingerprints. -
Layout the design:
Place your beads on a bead board or towel. Arrange them in the ombre pattern: start with the darkest reds, transition through terracotta and peach, and finish with the sandy creams. -
Measure the cord:
Directly cut a piece of elastic cord about 10-12 inches long. Having extra length makes tying the final knot much easier than struggling with a short tail. -
Pre-stretch the elastic:
Give the elastic cord a few gentle tugs. This pre-stretching step helps prevent the bracelet from sagging or loosening immediately after you wear it. -
String the beads:
Thread the beads onto the cord, following your laid-out gradient pattern. I usually double-check the transition midway to ensure the colors flow smoothly. -
Tie the knot:
Once all beads are on, tie a surgeon’s knot (right over left, left over right, looping through twice). Pull it very tight. -
Secure and hide:
Dab a tiny drop of jewelry glue on the knot. Once dry, trim the excess cord and gently pull the knot inside the hole of the nearest bead to hide it.
Essential Oil Diffuser
Use terracotta or porous air-dry clay for the darker beads but leave them unsealed; they will act as a personal essential oil diffuser all day long.
Enjoy wearing your slice of the desert sunset on your wrist


Cow Print Clay Disc Pattern
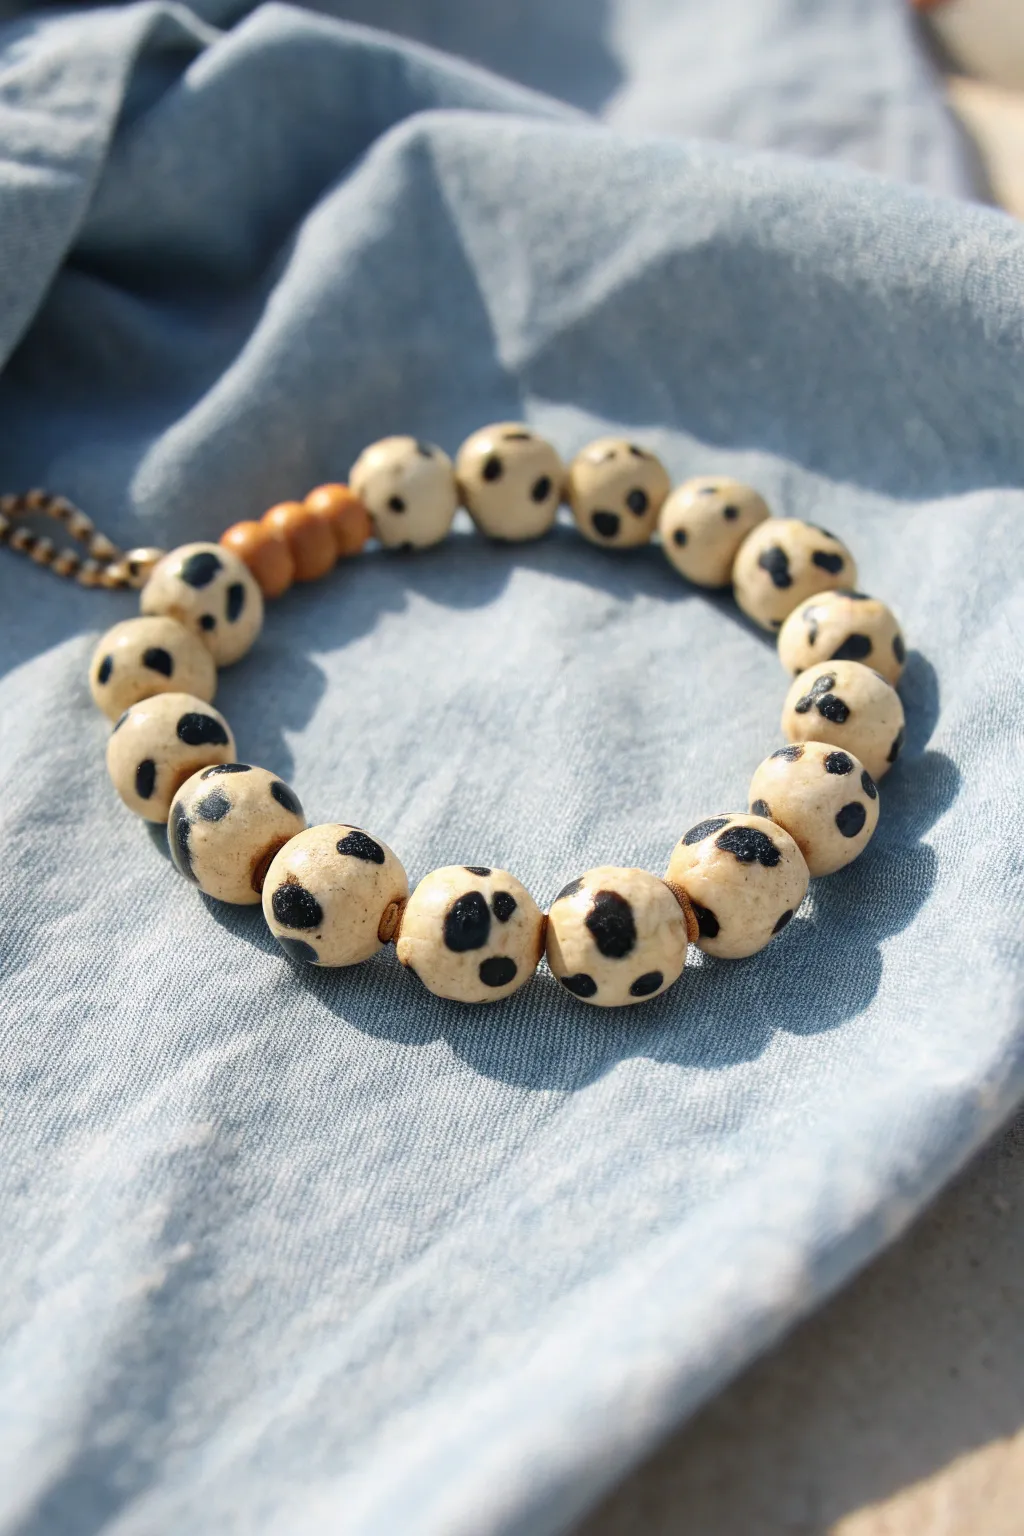
Channel a bit of rustic charm with this playful cow print bracelet featuring hand-rolled clay beads. The organic, irregular spots give each bead personality, while a small accent of wooden spacers adds a warm, earthy finish.
Detailed Instructions
Materials
- Polymer clay (White or cream color)
- Polymer clay (Black)
- Small round wooden spacer beads (approx. 4-6mm)
- Elastic cord (0.8mm or 1mm)
- Beading needle (optional but helpful)
- Clay roller or pasta machine
- Toothpick or bead piercing tool
- Super glue or jewelry adhesive
- Scissors
- Baking sheet and oven (for curing clay)
Step 1: Creating the Bead Base
-
Condition the white clay:
Start by warming up your white or cream polymer clay in your hands until it becomes soft and pliable. This conditioning step prevents cracks later on. -
Form the base spheres:
Pinch off equal-sized chunks of the white clay. Roll each chunk between your palms to create smooth, round spheres. Aim for beads about 10-12mm in diameter for a chunky look. -
Prepare the black spots:
Take a very small amount of black polymer clay and roll it into a thin snake. Cut off tiny, unequal bits—these will become your cow spots. -
Apply the spots:
Gently press the tiny black bits onto your white spheres. Don’t worry about pattern or regularity; random placement looks more natural. -
Roll to embed:
Once the spots are placed, pick up a bead and roll it between your palms again. Apply gentle pressure until the black clay is completely flush with the white surface, creating a smooth sphere.
Fixing Smudges
If black clay smears onto white while rolling, wipe the raw bead gently with a little rubbing alcohol on a cotton swab or baby wipe before baking.
Step 2: Piercing and Baking
-
Pierce the bead holes:
Hold a bead gently without squishing it. Using a toothpick or bead piercing pin, carefully drill a hole through the center. I find twisting the tool while pushing helps prevent deformation. -
Refine the shape:
After piercing, the bead might have gone slightly out of round. Give it a gentle roll or pat to reshape it while keeping the hole open. -
Check all beads:
Repeat this for all your spotted beads. Ensure the holes are wide enough to accommodate your elastic cord, perhaps wiggling the toothpick slightly to widen them. -
Bake the beads:
Arrange your beads on a baking sheet lined with parchment paper. Bake according to your brand of polymer clay instructions (usually around 275°F or 130°C for 15-30 minutes). -
Cool down completely:
Let the beads cool fully before handling. They harden as they cool, so patience here ensures they won’t fingerprint or dent.
Step 3: Assembly
-
Measure your cord:
Cut a length of elastic cord about 10-12 inches long. This extra length makes tying the knot much easier than working with a short piece. -
Pre-stretch the elastic:
Give your elastic cord a few firm tugs. This pre-stretching step is crucial so your bracelet doesn’t loosen up immediately after you wear it. -
String the beads:
Thread your clay cow print beads onto the elastic one by one. You can use a collapsible eye needle if threading by hand is difficult. -
Add the accent:
Once your main beads are on, add 3-4 small wooden spacer beads side-by-side. This creates a textural break and hides the knot effectively later. -
Check size:
Wrap the strand around your wrist to check the fit. Add or remove clay beads as needed until it sits comfortably. -
Tie the knot:
Tie a surgeon’s knot (right over left, left over right twice). Pull the elastic tight so the knot is secure and the beads sit snugly together. -
Secure and trim:
Apply a tiny dab of super glue to the knot. Let it dry for a moment, then trim the excess cord, leaving about 2-3mm tails. -
Hide the knot:
Gently pull the knot inside the hole of one of the wooden spacer beads, or one of your larger clay beads if the hole is big enough.
Texture Twist
Before baking, gently roll your raw beads over a piece of sandpaper or a textured fabric to give the clay a matte, stone-like surface.
Slip on your new bracelet and enjoy the trendy farmhouse vibe you’ve created.


Serape Stripe Color Blocks
Capture the warmth of a rustic cottage with this charming serape-inspired bracelet. Using polymer clay to create custom disc beads in muted tones, you’ll string together a durable and stylish accessory perfect for everyday wear.
Step-by-Step Tutorial
Materials
- Polymer clay in teal, coral red, mustard yellow, and cream/beige
- Rolling pin or pasta machine for clay
- Small round cutter (approx. 10-12mm diameter)
- Small straw or toothpick (for poking holes)
- Baking sheet and parchment paper
- Waxed cotton cord or hemp cord (approx. 1mm thick, cream color)
- Scissors
Step 1: Creating the Clay Beads
-
Condition the clay:
Start by warming up your polymer clay blocks in your hands. Knead each color—teal, coral red, mustard yellow, and cream—separately until they are soft and pliable. -
Roll out the sheets:
Using a rolling pin or a dedicated pasta machine, roll out each color of clay into a flat slab. Aim for a thickness of about 4-5mm so the beads have a nice chunky substance to them. -
Cut the discs:
Take your small round circle cutter and punch out numerous discs from each color slab. You will need roughly 4-6 discs of each color depending on your wrist size. -
Create the holes:
Use a toothpick or a small straw to pierce a hole directly through the center of each disc. Ensure the hole is wide enough to accommodate two strands of your chosen cord. -
Shape the round beads:
With the leftover yellow scraps, roll two small spheres by hand. Poke a hole through the center of these as well; they will act as the stoppers for the pull cords. -
Bake the beads:
Arrange all your discs and the two round beads on a parchment-lined baking sheet. Bake according to your brand of polymer clay’s instructions (usually around 275°F or 135°C for 15-30 minutes). -
Cool down:
Once baked, turn off the oven and let the beads cool completely before handling them to ensure they harden properly.
Smooth Edges
Before baking, gently rub your finger over the cut edges of the raw clay discs. A drop of baby oil on your finger helps smooth out any rough bits from the cutter for a pro finish.
Step 2: Stringing and Assembly
-
Cut the main cord:
Cut a length of your waxed cotton cord, approximately 24 inches long. Fold it in half so you have a loop at one end and two loose tails at the other. -
Plan your pattern:
Lay out your cooled beads on a table to establish your pattern. The image uses a repeating sequence like: Teal, Coral, Cream, Teal, Coral, Yellow. Feel free to mix up the ‘Serape’ stripes. -
Thread the beads:
Thread the two loose ends of the cord through the first bead. Push the bead down, but leave about 4 inches of cord loop at the folded end. -
Continue stringing:
String the rest of your beads, feeding both cord tails through every single disc. Keep the tension snug so the flat sides of the discs sit flush against each other. -
Check the fit:
Wrap the beaded section around your wrist. Add or remove beads until the beaded portion covers the top and sides of your wrist comfortably.
Step 3: Knotted Closure
-
Secure the ends:
Once all beads are on, tie a simple overhand knot with both cords tight against the last bead to lock everything in place. -
Create the sliding join:
Bring the two tail ends and the initial loop end together, overlapping them. You can cut the initial loop so you have two strands on that side as well. -
Start the macramé knot:
Cut a separate 10-inch piece of cord. Lay it under the bundle of overlapping bracelet cords. Tie a square knot (macramé flat knot) around the main bundle. -
Build the slider:
Continue tying square knots for about half an inch. This creates the sliding mechanism seen in the photo. Trim the excess from this knotting cord and tuck or glue the ends. -
Finish the tails:
You now have loose tails dangling from the sliding knot. Tie a knot about an inch down on each pair of tails. -
Add stopper beads:
Thread one of your small yellow round beads onto each tail set. Tie a sturdy double knot immediately after the bead so it can’t fall off. -
Final trim:
Trim any excess cord sticking out past the final knots on the tails for a clean finish.
Textured Touch
For an earthier look, gently press coarse sandpaper or a stone onto the raw clay surface before baking. This gives the beads a subtle, stone-like texture.
Enjoy styling your new handmade accessory with your favorite casual outfits

The Complete Guide to Pottery Troubleshooting
Uncover the most common ceramic mistakes—from cracking clay to failed glazes—and learn how to fix them fast.
Wild and Free Word Bracelet
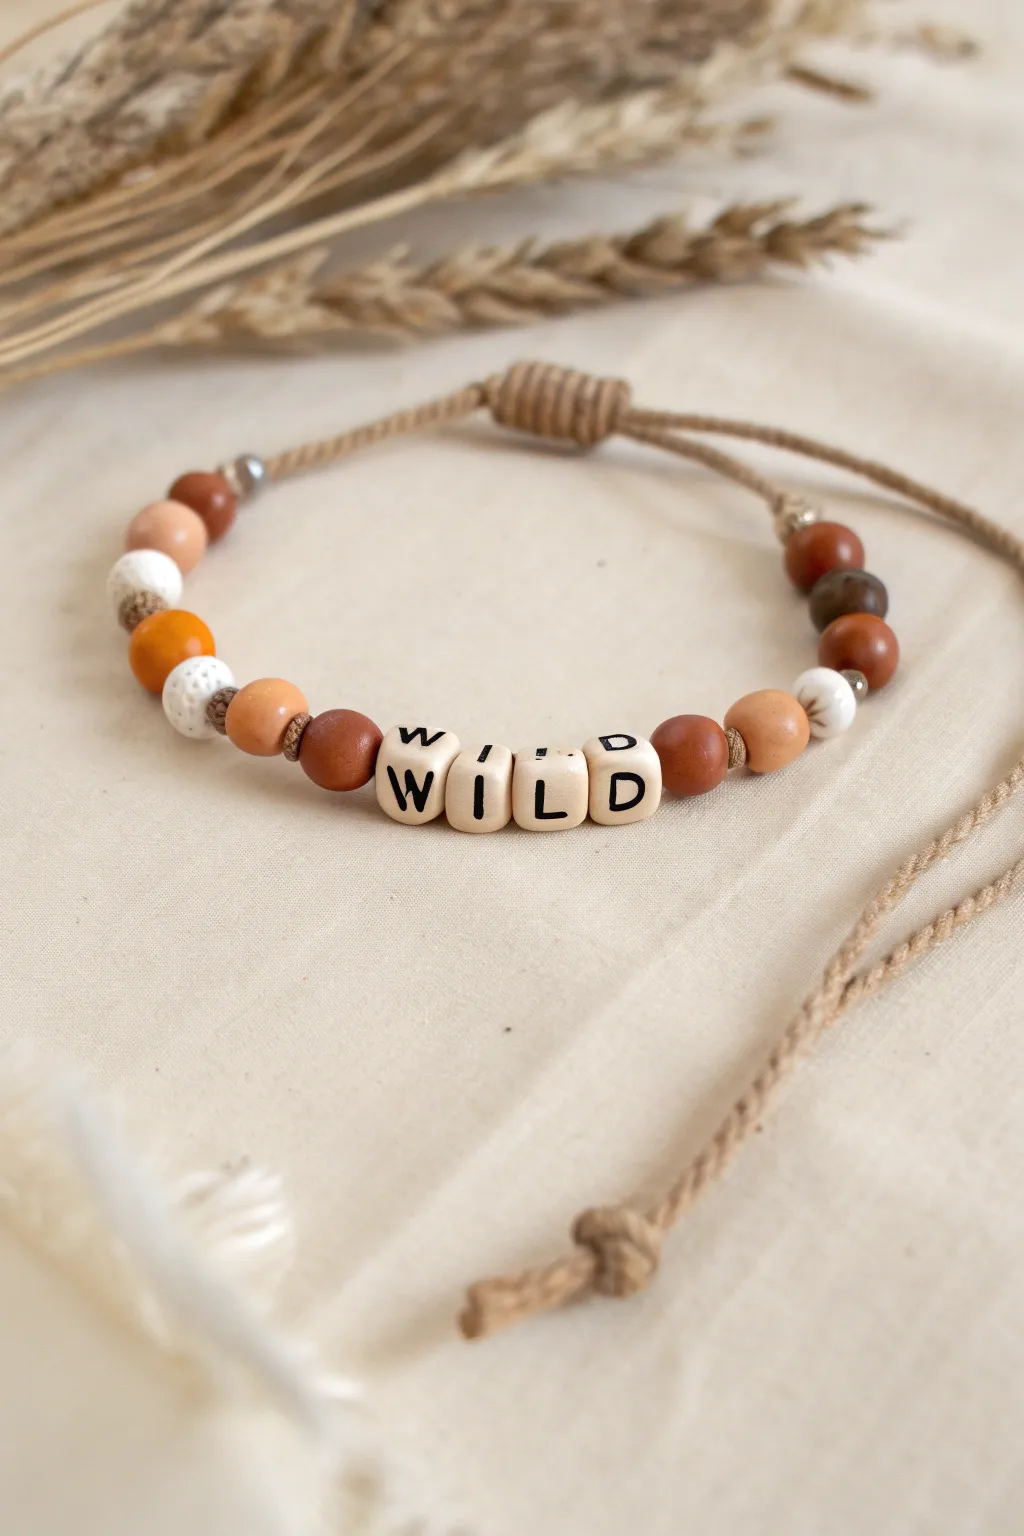
Embrace a rustic, bohemian spirit with this textured clay bead bracelet featuring the word ‘WILD’ at its heart. The design combines warm terracotta tones, natural wood, and speckled accents strung on organic hemp cord for a grounded, hand-crafted aesthetic perfect for everyday wear.
Step-by-Step Guide
Materials
- Hemp or jute cord (approx. 1mm thick, natural beige)
- Square wooden alphabet beads spelling ‘WILD’
- Polymer clay or ceramic round beads (approx. 6-8mm) in: Terracotta/Rust, Peach/Tan, White with black speckles, Dark brown/Bronze
- Small metal crimp beads or silver spacer balls (optional)
- Scissors
- Tape or a clip board
- Measuring tape
Step 1: Preparing the Cord
-
Measure and cut:
Cut a length of hemp cord approximately 12-14 inches long. This generous length ensures you have plenty of room for the adjustable sliding knot later. -
Pre-stretch the cord:
Hemp can sometimes be a bit stiff or kinky from the spool. I like to run the cord through my fingers a few times to warm it up and straighten it out for easier threading. -
Secure the end:
Tie a simple overhand knot about 3 inches from one end. This acts as a temporary stopper so your beads don’t slide off while you work. You can tape this end to a table for stability.
Fraying Cord Ends?
If the hemp frays while threading beads, dip the tip in white glue or clear nail polish and roll it between your fingers. Let it dry into a hard ‘needle’ point.
Step 2: Stringing the Pattern
-
Start the left side:
Begin threading your beads. Based on the photo, start with a small silver spacer or knot, followed by a dark brown bead, then a rust-colored bead. -
Build the color gradient:
Continue the pattern inward: add a peach/tan bead, a white speckled bead, an orange glazed bead, another speckled bead, and finally a peach bead. -
Add a spacer knot:
To create a little separation before the focal point, tie a very small overhand knot in the hemp cord right against the last bead, or insert a tiny dark spacer bead. -
Insert the word:
Thread your square wooden alphabet beads in order: W – I – L – D. Ensure they are all facing the correct direction so the word is legible. -
Mirror the pattern:
After the ‘D’, add another small knot or dark spacer bead to frame the word just like the left side. -
Complete the right side:
Reverse the bead sequence from earlier: Peach bead, White speckled bead, Orange glazed bead, White speckled bead, Peach bead. -
Finish the bead row:
End the sequence with the darker tones: Rust bead, Dark brown bead. Check that the design looks symmetrical and balanced on either side of the word.
Scent Your Bracelet
Use porous lava stone beads for the dark accent beads. You can add a drop of essential oil to them, turning your rustic accessory into a personal diffuser.
Step 3: Creating the Adjustable Closure
-
Secure the beads:
Once all beads are on, tie a matching overhand knot at the end of the bead row to lock them in place. Remove your tape or starter knot. -
Form the loop shape:
Curve the bracelet into a circle, overlapping the two long tail ends of the cord so they lay next to each other parallel. -
Start the macramé sliding knot:
Cut a fresh 6-inch piece of hemp cord. Place this short piece under the two overlapped tail ends. -
Tie the square knots:
Using the short piece, tie a series of square knots (macramé style) over the two bracelet tails. You’ll need about 5-6 knots to create the barrel-like closure seen in the image. -
Trim the slider:
Pull the square knots tight and trim the excess tails of the knotting cord (step 12) closely. You can add a dab of glue here to secure the knot ends, careful not to glue the main bracelet cords. -
Finish the tails:
Adjust the bracelet to its widest setting. Tie a knot at the very end of each bracelet tail cord to prevent them from slipping through the slider. Trim any excess fuzz.
Now you have a beautifully textured reminder to stay wild and free on your wrist
Faith-Inspired Initial Bracelet
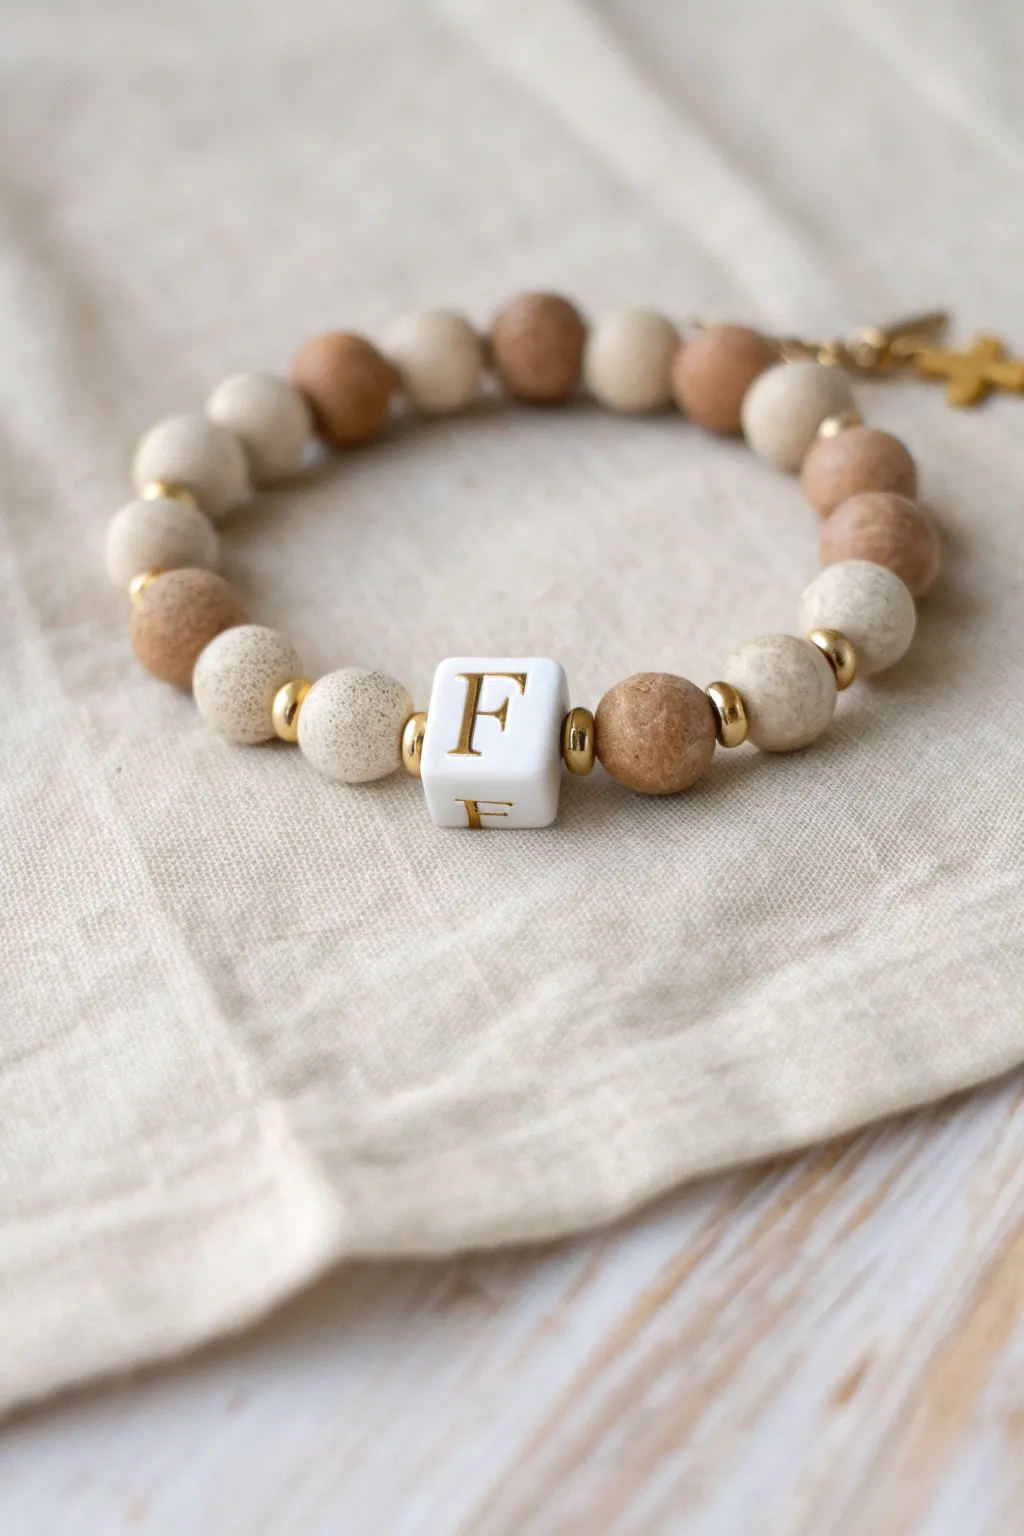
This Faith-Inspired Initial Bracelet masterfully blends rustic textures with a personalized touch. By combining speckled, matte clay beads in natural tones with gleaming gold accents, you’ll create a piece that feels both organic and refined.
Detailed Instructions
Materials
- Stretch cord (0.8mm or 1.0mm recommended)
- Round polymer clay or ceramic beads (approx. 10mm) in matte cream/beige with speckles
- Round polymer clay or ceramic beads (approx. 10mm) in matte light brown/tan with speckles
- Square white alphabet bead with gold lettering (letter of choice)
- Small gold spacer beads (smooth round or rondelle discs, approx. 3-4mm)
- Gold charm (cross shape)
- Jump ring (gold)
- Jewelry adhesive (e.g., E6000 or Hypo Cement)
- Scissors
Step 1: Preparation
-
Measure the Cord:
Cut a length of stretch cord about 10-12 inches long. This generous length prevents beads from slipping off while you work and makes tying the final knot much easier. -
Pre-stretch the Cord:
Hold the ends of your cut cord and give it a few gentle but firm tugs. This pre-stretching step helps prevent the bracelet from sagging or loosening after the first few wears. -
Plan the Design:
Lay out your beads on a bead board or a soft towel to visualize the pattern before stringing. This prevents beads from rolling away and helps you catch any asymmetry early.
Sticky Situation
If the knot keeps sliding out of the bead hole, use a toothpick to gently push it deeper inside the bead while the glue is still slightly tacky.
Step 2: Stringing the Basics
-
Start the Pattern:
Begin stringing with your clay beads. Notice the subtle pattern in the image: alternating groups of beige and brown. -
Create the First Section:
Thread on two or three beige speckled clay beads to form the back section of the bracelet where the knot will eventually hide. -
Add Accent Spacers:
Slide on a small gold spacer bead. These metallic touches elevate the design from simple to chic. -
Introduce Color Variation:
Add a light brown clay bead next. The matte texture of these beads contrasts beautifully with the shiny gold spacers. -
Continue the Rhythm:
Repeat the pattern around the sides: two or three clay beads (alternating colors as desired), punctuated by a gold spacer bead every few beads.
Stack Attack
Make two companion bracelets without letters—one primarily beige and one brown—to create a coordinated, chunky stack for your wrist.
Step 3: The Centerpiece
-
Frame the Center:
When you have strung enough beads to reach the halfway point of your desired length, slide on a gold spacer bead, followed closely by a single beige clay bead. -
Add Initial Flanking:
Place one more gold spacer bead right before the centerpiece to act as a golden frame. -
Place the Initial:
Slide on your white square alphabet bead. Ensure the letter is facing the correct direction relative to how you want it to sit on the wrist. -
Complete the Focal Point:
Mirror the design on the other side of the letter: add a gold spacer bead, followed by a beige clay bead, and another gold spacer.
Step 4: Finishing Touches
-
Finish the Strand:
Continue your alternating beige and brown clay bead pattern until the bracelet reaches the desired total length (usually about 7 inches for an average wrist). -
Check the Fit:
Wrap the unfinished strand around your wrist to verify the size. It should sit comfortably without pinching or hanging too loose. -
Prepare the Charm:
Open a gold jump ring using two pliers (or your fingers if the gauge is light enough) by twisting the ends away from each other laterally. -
Attach the Charm:
Slip your gold cross charm onto the jump ring. Then, loop the jump ring around the cord between the last two beads or simply attach the jump ring itself to the cord end. -
Close the Jump Ring:
Twist the jump ring ends back together until they are flush and the gap is completely closed so the charm won’t fall off. -
Tie the Knot:
Bring the two ends of the stretch cord together. Tie a surgeon’s knot (right over left, left over right twice) and pull it tight securely. -
Secure and Trim:
Apply a tiny dab of jewelry adhesive to the knot. Let it dry for a moment, then trim the excess cord ends close to the knot using your sharp scissors. -
Hide the Evidence:
Gently pull the elastic so the knot slides inside the hole of the nearest large clay bead, hiding it completely from view.
Now you have a stunning, personalized accessory that carries meaning alongside style


What Really Happens Inside the Kiln
Learn how time and temperature work together inside the kiln to transform clay into durable ceramic.
Bandana Red and White Stripe Mix
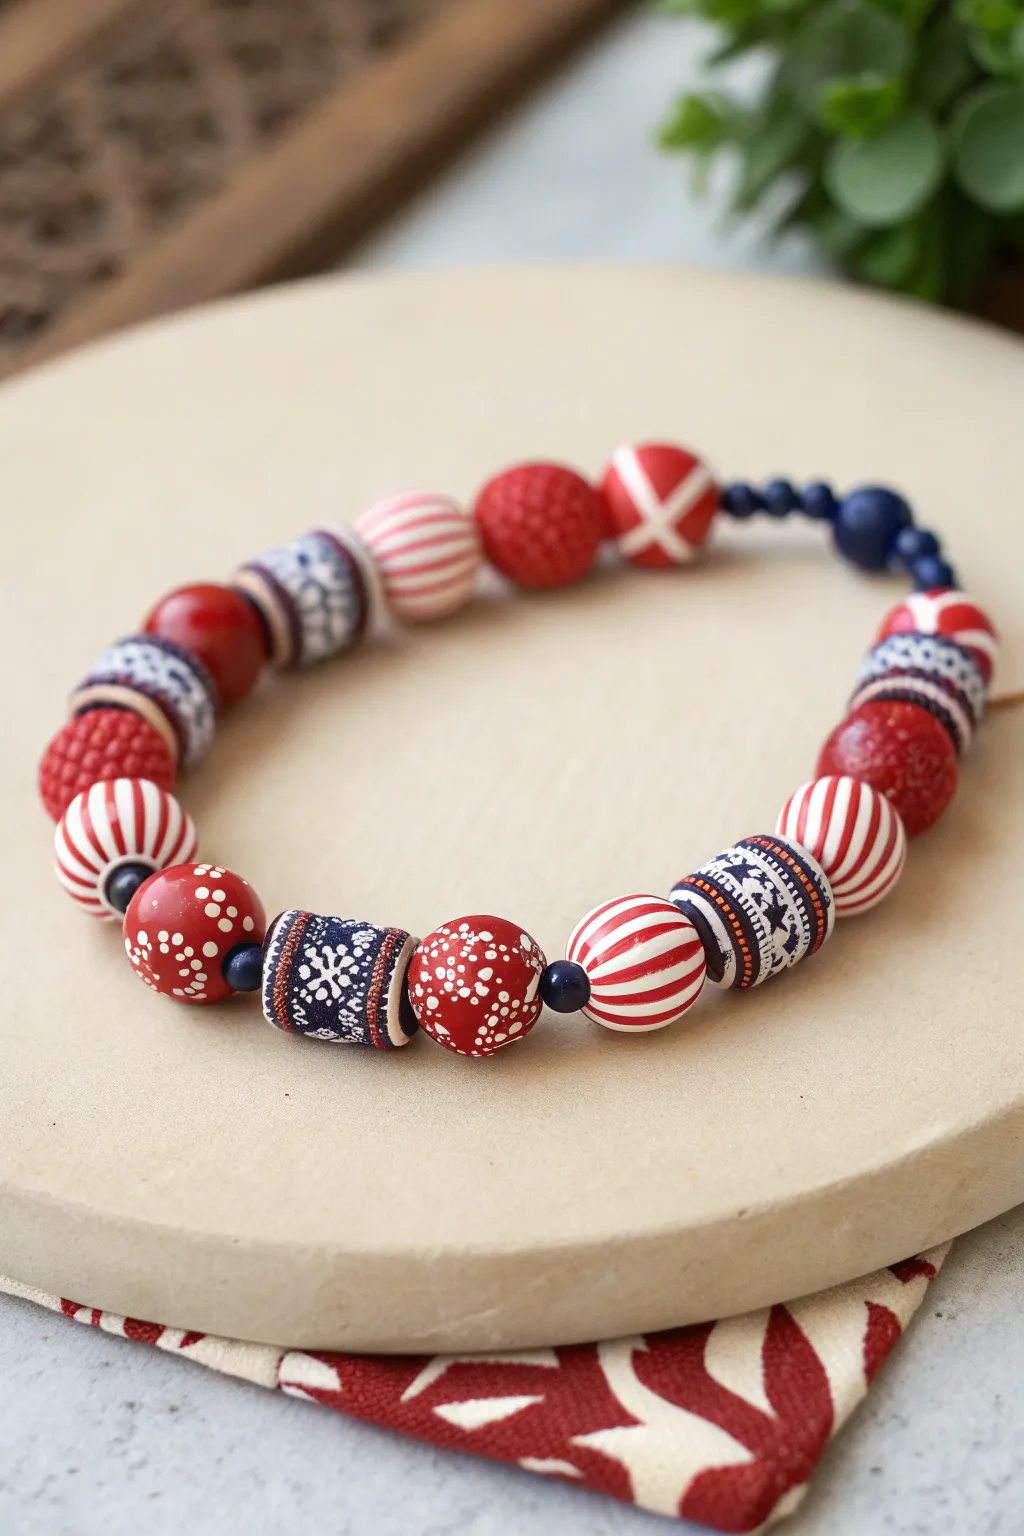
This rustic bracelet combines bold bandana vibes with classic country charm using a mix of hand-patterned clay beads. The alternating red, white, and blue textures create a playful piece perfect for Fourth of July picnics or everyday denim looks.
How-To Guide
Materials
- Polymer clay in red, white, and navy blue
- Acrylic paint (white, red)
- Small detail paintbrush
- Toothpicks or a bead piercing tool
- Elastic cord (0.8mm or 1mm)
- Gloss or matte glaze (optional)
- Oven for baking clay
- Work surface (tile or glass)
- Super glue or jewelry cement
Step 1: Shaping the Base Beads
-
Condition the clay:
Start by thoroughly kneading your red, white, and blue polymer clay until it is soft and pliable. This prevents cracks during baking. -
Form the round beads:
Roll several medium-sized balls of red clay (about 1.5 cm diameter) and a few white balls for the striped beads. Aim for a consistent size for a uniform look. -
Create the cylinder beads:
Take your navy blue clay and roll it into thick logs, then cut them into short cylinders about 1.5 cm long. Smooth the cut ends gently with your fingertip. -
Pierce the holes:
Using a toothpick or piercing tool, carefully poke holes through the center of each bead. Rotate the tool as you push through to avoid squishing the shape. -
Bake the beads:
Place all your formed beads on a baking sheet or tile. Bake according to your clay package instructions (usually 275°F/135°C for 15-30 minutes). -
Cool down:
Allow the beads to cool completely before moving on to painting. Painting on hot clay can make the acrylic dry too fast and clump.
Step 2: Adding the Country Patterns
-
Paint the red stripes:
Take the white round beads you baked. Use a fine brush and red acrylic paint to carefully draw vertical stripes from hole to hole. I like to brace my hand against the table for steadier lines. -
Create the splatter beads:
On several of the plain red round beads, use white acrylic paint to create a splatter or dotted effect. You can dip a toothpick in paint and dot it on for better control than flicking a brush. -
Detail the navy cylinders:
For the blue cylinder beads, paint intricate white patterns reminiscent of bandanas. Think small snowflakes, X-shapes, or tiny geometric diamonds. -
Add stripe accents:
To mimic the bead in the image, paint thin red or orange lines bordering your white patterns on the navy beads. -
Texture the red accents:
If you didn’t texture the clay before baking, you can mimic the ‘bumpy’ red bead look by using thick, textured craft paint or by dabbing a sponge with red paint over a plain bead. -
Seal the designs:
Once all paint is thoroughly dry, apply a coat of glaze to protect the designs from chipping. A matte finish looks more rustic, while gloss adds a nice pop.
Uneven Stripes?
If your painted stripes look shaky, use thin strips of masking tape or washi tape to mask off the white areas before painting the red.
Step 3: Assembly
-
Measure the cord:
Cut a piece of elastic cord about 10 inches long. This gives you plenty of slack for tying the final knot comfortably. -
Plan your pattern:
Lay your beads out on a bead board or towel. Alternate the bead types: try placing a small blue faceted spacer bead between the larger clay beads to separate the patterns. -
String the beads:
Thread your beads onto the elastic following your layout. Be consistent—maybe follow a pattern like: Striped, Spacer, Navy Cylinder, Spacer, Red Polka Dot. -
Add spacer accents:
Don’t forget the tiny dark blue spacer beads between the main focal beads; they act as a visual break that prevents the patterns from looking chaotic. -
Tie the knot:
Once all beads are strung, bring the ends together. Tie a surgeon’s knot (a square knot with an extra loop through) and pull tight. -
Secure and hide:
Place a tiny drop of super glue on the knot. Once dry, trim the excess cord and gently tug the knot inside one of the larger beads to hide it.
Rustic Texture Upgrade
Before baking, roll the red clay balls over a piece of sandpaper or a textured fabric to give them a gritty, stone-like surface.
Now you have a charming, handcrafted accessory that adds a touch of country flair to any outfit
Denim Blue and Saddle Tan Layers
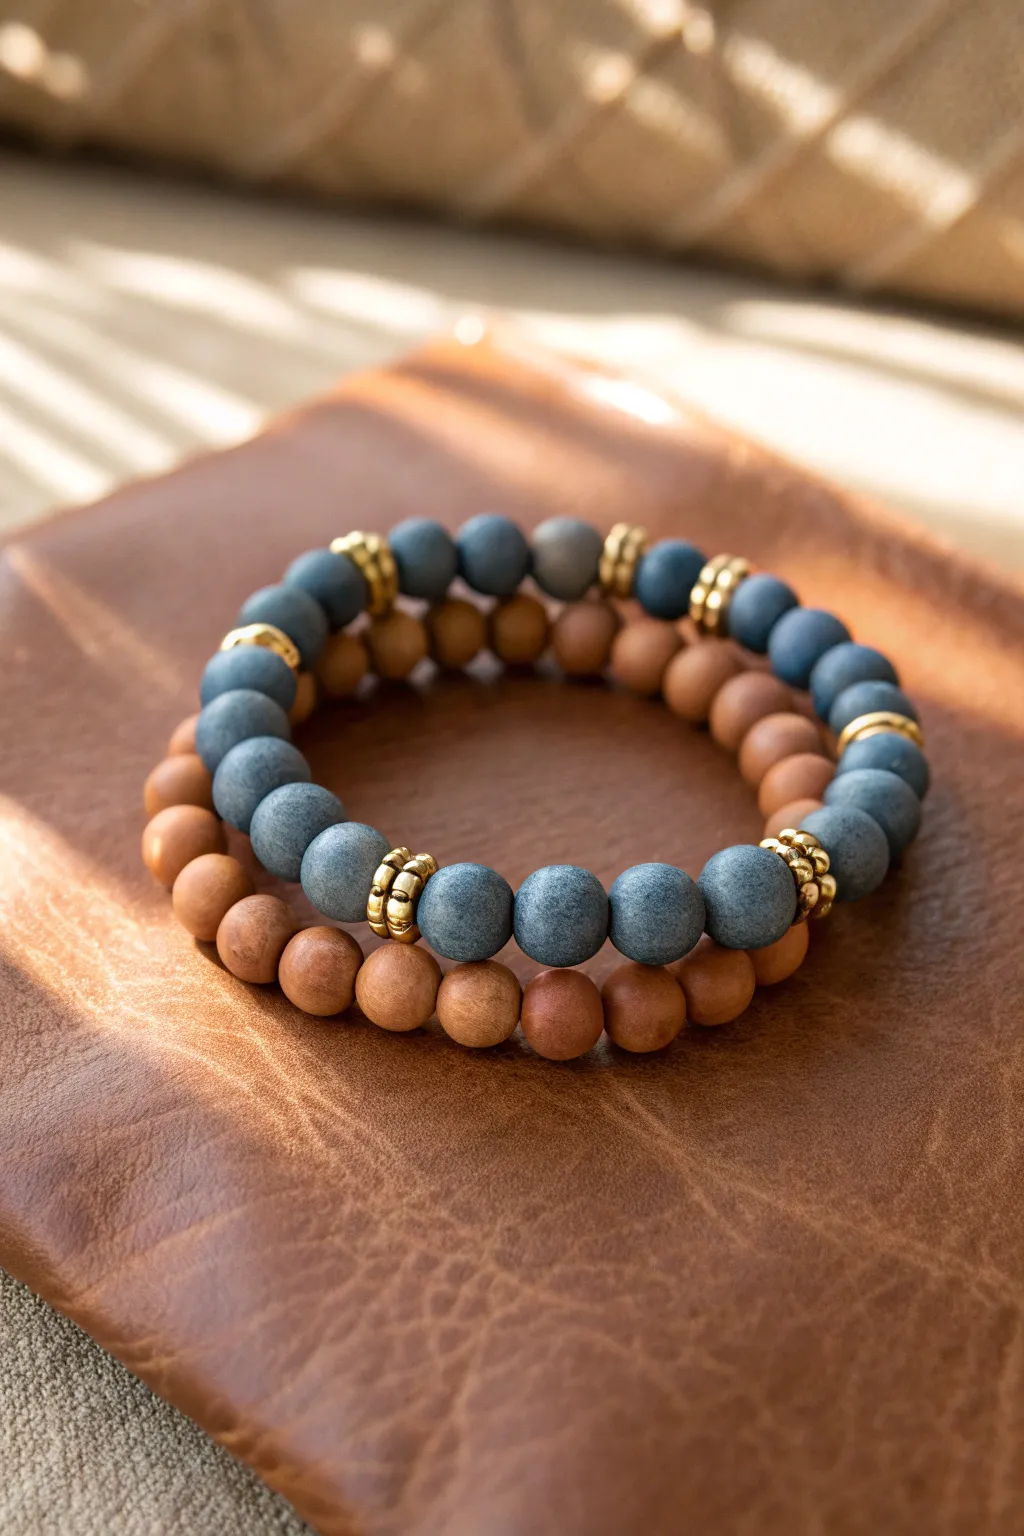
Capture the rugged elegance of the countryside with this sophisticated duo, pairing the industrial cool of matte denim-blue beads with the natural warmth of saddle tan wood. The gold accents act as the perfect bridge between these textured layers, creating a versatile stack that looks great with everything from jeans to dresses.
Step-by-Step Guide
Materials
- 8mm matte finish polymer clay beads (denim blue)
- 8mm round wood beads (saddle tan/reddish-brown)
- Gold tone heishi spacer beads (metal or metallized plastic)
- Gold tone larger spacer beads (flat or chunky texture)
- High-quality elastic cord (0.8mm or 1.0mm)
- Jewelry glue or clear nail polish
- Scissors
- Bead stopper or tape
- Measuring tape
Step 1: Planning and Preparation
-
Measure your wrist:
Wrap a measuring tape comfortably around your wrist where you want the bracelets to sit. Add about 1/2 inch to this measurement to ensure the bracelets roll on easily without snapping the elastic. -
Prepare the elastic:
Cut two lengths of elastic cord, making each one about 10-12 inches long. This extra length gives you plenty of room to tie secure knots later without struggling with tiny ends. -
Secure the ends:
Attach a bead stopper or simply place a piece of folded tape at one end of each elastic strand to prevent your beads from sliding off while you design your pattern.
Taming Woody Holes
Prepare wooden beads by poking a needle through first. Rough interiors can shred elastic over time or make threading difficult.
Step 2: The Denim Blue Layer
-
Start the pattern:
Begin threading your matte blue clay beads onto the first cord. Aim for a solid run of about 5-6 beads to start the foundation of the bracelet. -
Add first gold accent:
For the metallic breaks seen in the photo, slide on a combination of gold spacers. You might use two thin heishi spacers creating a sandwich around a slightly larger gold bead. -
Continue the sequence:
Resume stringing the blue clay beads, creating sections of roughly 5 beads between each gold accent groupings. Variation is key here; some sections can be longer than others for an organic feel. -
Check the fit:
Wrap the strand around your wrist to check the length. You want the beads to touch end-to-end comfortably without stretching the elastic visibly.
Step 3: The Saddle Tan Layer
-
Begin the second strand:
Pick up your second piece of prepared elastic and start threading the saddle tan wooden beads. -
Create a minimal design:
For this complementary layer, keep it simpler to let the wood texture shine. String a continuous line of the wooden beads without frequent interruptions. -
Insert subtle gold details:
If you wish to enhance the coordination, add a single gold spacer bead at the halfway point, or leave it entirely wood for a purer, earthy look that grounds the blue bracelet. -
Verify the size:
Compare this strand against the blue one you just finished. They should be roughly the same circumference, though the wooden beads might sit slightly differently due to their material.
Pro Tip: Texture Mix
Mix bead finishes like matte clay and polished wood. The contrast makes even simple designs look high-end and curated.
Step 4: Securing the Knots
-
Pre-stretch the cord:
Before tying, give both ends of the elastic a gentle tug. I find this pre-stretching step crucial as it prevents the bracelets from sagging immediately after you wear them. -
Tie the surgeon’s knot:
Remove the bead stopper. Cross the ends, loop one side under twice, pull tight, then make a standard overhand knot on top. This is the gold standard for elastic jewelry. -
Apply adhesive:
Place a tiny drop of jewelry glue or clear nail polish directly onto the knot. Be careful not to get glue on the surrounding beads, as it can mar the matte finish of the clay. -
Hide the knot:
Once the glue is tacky but not fully hard, slide the knot inside the hole of the nearest large bead. The wooden beads usually have larger holes, making this step easier on the tan layer. -
Final trim:
After the glue has dried completely (give it at least 15 minutes), trim the excess elastic cord close to the bead hole using sharp scissors.
Slip your new stack onto your wrist and enjoy the instant style upgrade these earthy tones provide

TRACK YOUR CERAMIC JOURNEY
Capture glaze tests, firing details, and creative progress—all in one simple printable. Make your projects easier to repeat and improve.
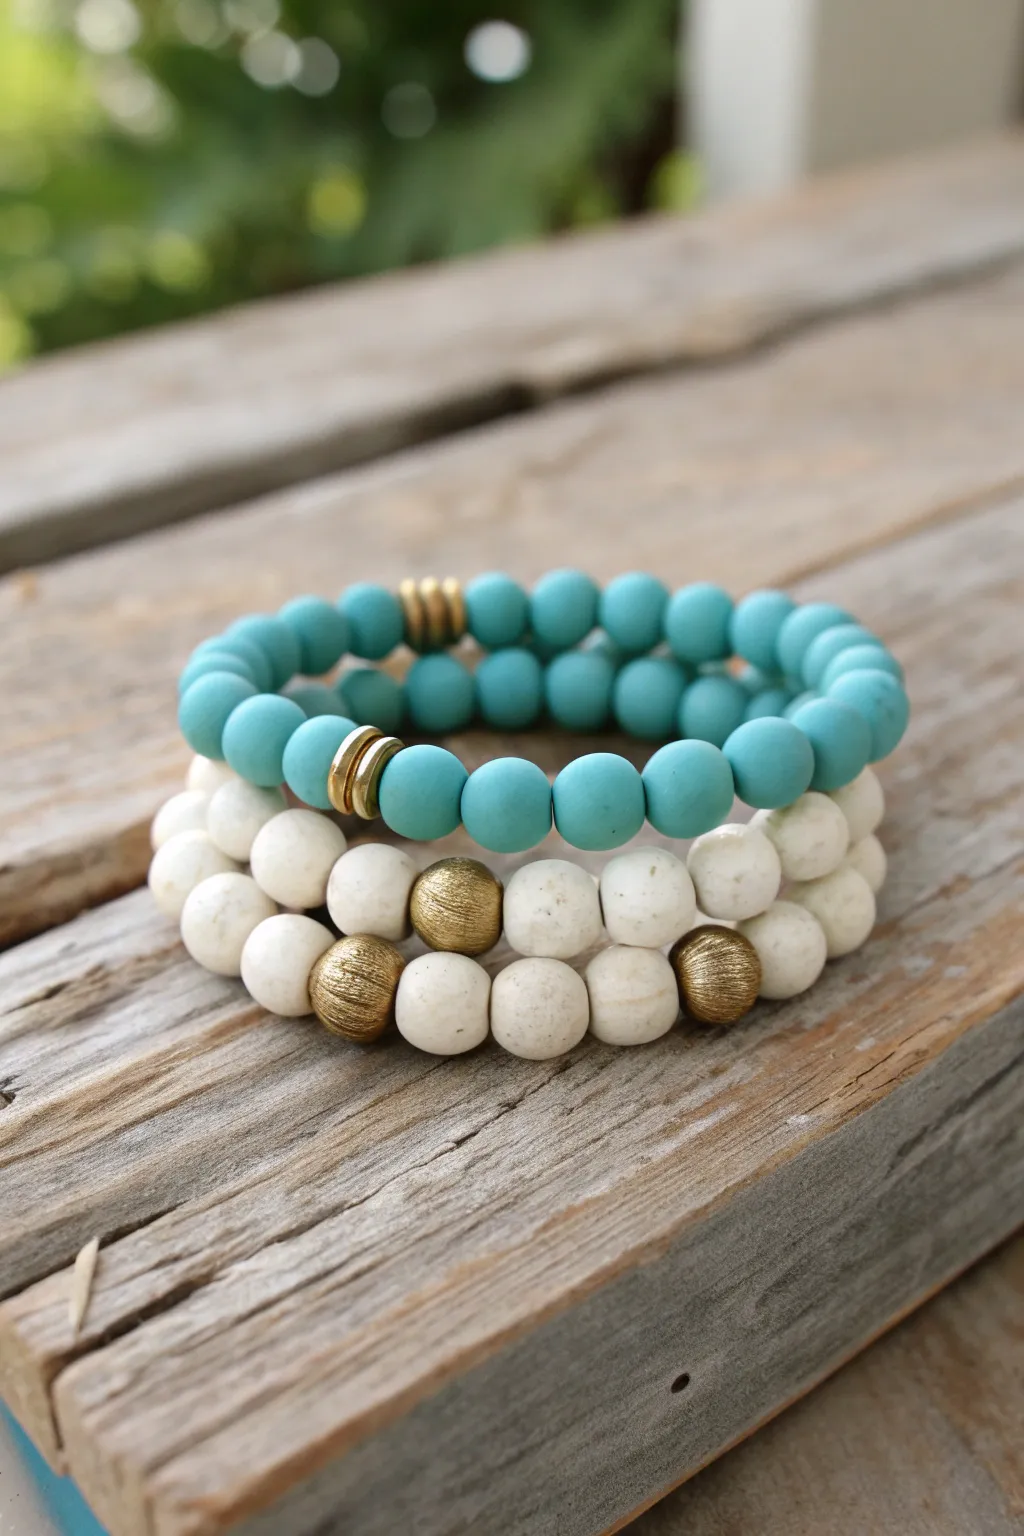
Rustic Neutrals With Wood Spacers

Capture the warmth of nature with this rustic bracelet featuring a mix of textured wood and smooth matte beads in soothing neutral tones. The alternating pattern of creams, tans, and deep browns creates a versatile accessory that pairs perfectly with casual linen or cozy knits.
Detailed Instructions
Materials
- 1mm elastic stretch cord (clear or brown)
- Deep espresso brown round wooden beads (10mm or 12mm)
- Reddish-brown matte clay or wood beads (10mm or 12mm)
- Raw natural wood beads with visible grain (10mm or 12mm)
- Cream or off-white matte beads (10mm or 12mm)
- Light tan wooden spacers or beads (10mm or 12mm)
- Beading needle (collapsible eye works best)
- Scissors
- Hypo cement or strong jewelry glue
- Bead stopper or masking tape
Step 1: Preparation & Sorting
-
Measure your wrist:
Wrap a flexible measuring tape around your wrist where you want the bracelet to sit. Add about 0.5 to 1 inch to this measurement depending on how loose you prefer the fit. -
Visualizing the tonal gradient:
Before restringing, lay your beads out on a bead board or soft cloth. Notice how the example mixes textures: use the rougher, dark espresso beads sparingly as sophisticated anchors, and group the lighter creams and raw wood grains to create brightness. -
Establish a repeating rhythm:
The pattern shown isn’t strictly A-B-C but follows a loose rhythm. Try laying out a sequence like: Dark Brown -> Reddish Brown -> Raw Grain -> Cream -> Reddish Brown. Shuffle them until the transition of colors feels organic and balanced. -
Prepare the cord:
Cut a piece of elastic cord about 10-12 inches long. This generous length makes tying the final knot much easier than fighting with short ends. -
Pre-stretch the elastic:
Hold the cord between your hands and give it a few firm tugs. I almost always do this to prevent the bracelet from stretching out and becoming loose after the first few wears. -
Secure the end:
Place a bead stopper or a piece of masking tape on one end of the cord to prevent your skillfully arranged beads from sliding right off as you work.
Step 2: Stringing the Design
-
Thread the needle:
Thread the other end of your elastic onto a collapsible eye needle. This is optional if the bead holes are large, but it speeds up the process significantly. -
Begin stringing:
Start transferring your laid-out pattern onto the cord. Start with a bead that has a slightly larger hole if possible, as this will help hide the knot later. -
String the dark accents:
Add your dark espresso beads. Notice these rugged beads add a visual ‘weight’ to the design, grounding the lighter tones. -
Add the mid-tones:
Slide on the reddish-brown (terracotta color) beads. These act as a bridge between the dark espresso and the lighter wood tones. -
Incorporate texture:
Project tip: Pay attention to the grain direction on the raw wood beads. Lining up the grain horizontally or mixing it up can subtly change the finished look. -
Highlight with cream:
Add the cream or off-white matte beads. These provide a necessary pop of light contrast against the earthy spectrum. -
Check the length:
Once all beads are strung, carefully wrap the strand around your wrist to check the fit. There should be no gaps between beads, but they shouldn’t be so tight that the bracelet kinks.
Sticky Situation
If the knot refuses to stay inside the bead hole, try carefully reaming the hole slightly larger with a bead reamer or a small round file to give it more space.
Step 3: Finishing Touches
-
Prepare for the knot:
Remove the bead stopper and needle. Bring the two ends of the elastic together, ensuring there is no slack in the bead line. -
Tie a surgeon’s knot:
Make a standard overhand knot, but loop the end through twice instead of once before pulling tight. This extra pass creates friction that holds the elastic secure. -
Tighten securely:
Pull the cords firmly—but not to the breaking point—to cinch the knot tight. You should see the elastic stretching slightly at the knot base. -
Apply adhesive:
Dab a tiny drop of Hypo cement or jewelry glue directly onto the knot. Be careful not to get glue on the surrounding wooden beads, as it can stain the matte finish. -
Hide the knot:
While the glue is still tacky, gently pull the cord so the knot slides inside the hole of the nearest bead. This creates that professional, seamless finish where no mechanics are visible. -
Trim the ends:
Once the glue has fully dried (wait at least 15 minutes), use your sharp scissors to trim the excess cord as close to the bead hole as possible without nicking the main strand.
Scent of Nature
For a sensory bonus, use unfinished wood beads for the ‘raw’ ones and add a drop of essential oil like cedarwood or sandalwood to turn this into a passive diffuser.
Now you have a beautifully grounded accessory ready to stack or wear solo
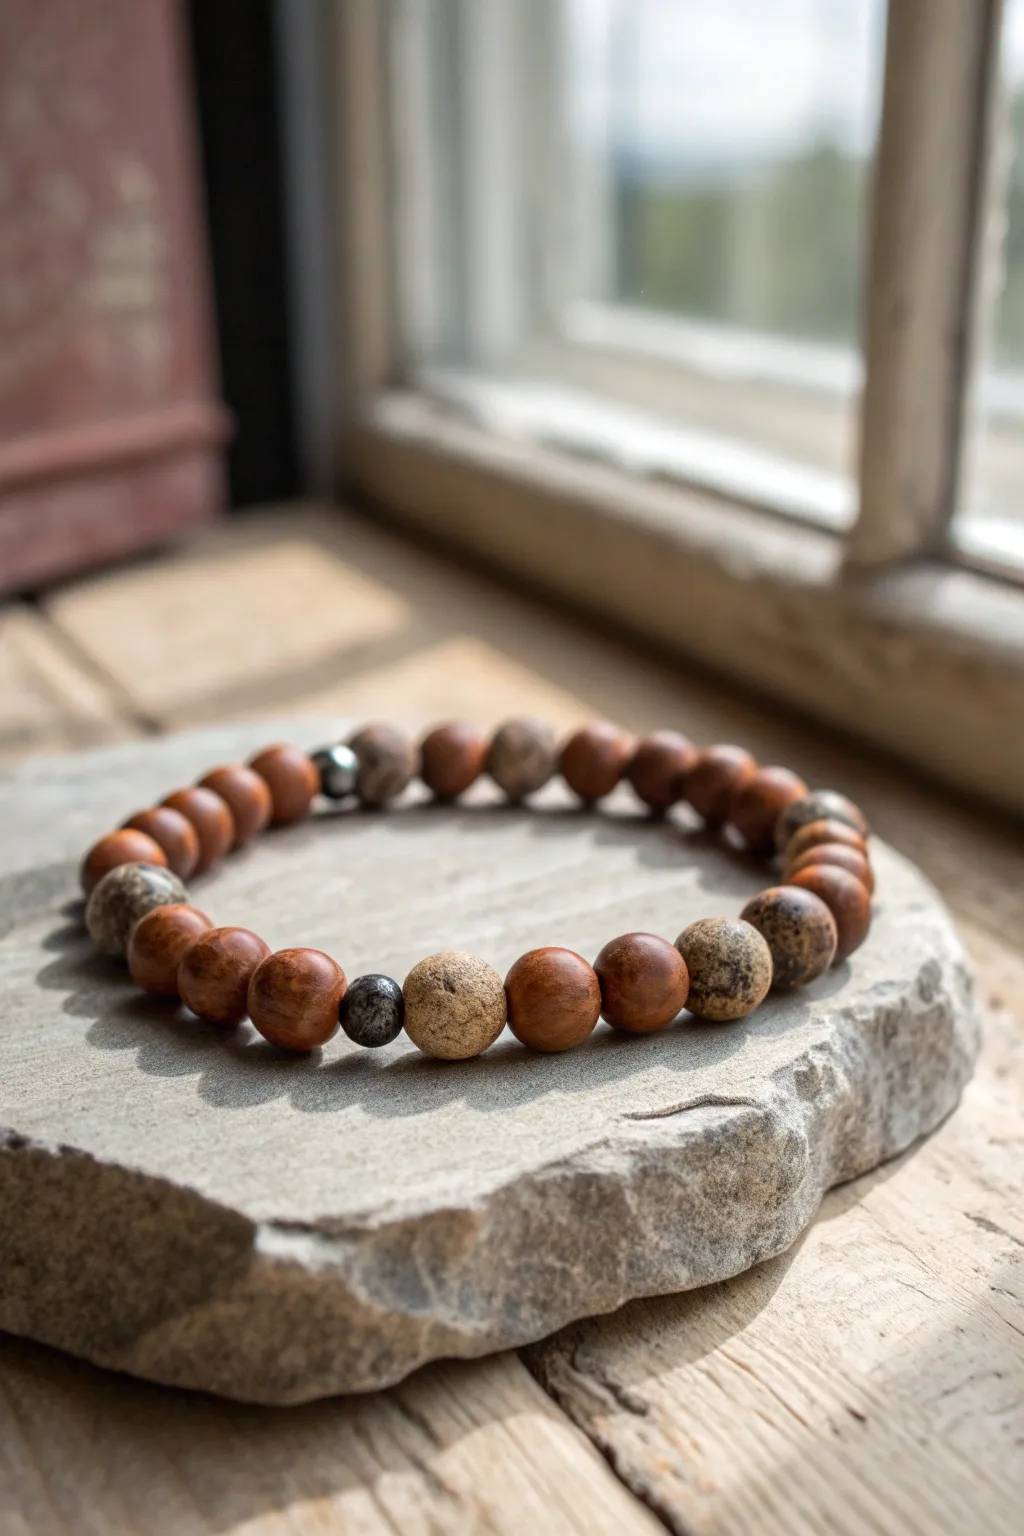
Rodeo Metallic Accents
Capture the rustic warmth of the countryside with this duo of bracelets that pairs matte terracotta tones with natural wood textures. The gleam of gold and silver spacers adds just the right amount of polished ‘rodeo’ flair to these earthy accessories.
How-To Guide
Materials
- Matte terracotta-colored round clay beads (8mm or 10mm)
- Natural light wood beads (8mm or 10mm)
- Gold metallic textured spacer rings/discs
- Silver metallic round focal bead (smooth finish)
- Gold metallic textured accent bead (round)
- Silver rhinestone spacer bead (rondelle shape)
- Strong elastic beading cord inside (0.8mm or 1mm recommended)
- Jewelry glue or clear nail polish
- Scissors
Step 1: Designing the Terracotta Band
-
Measure your wrist:
Before cutting any cord, wrap a measuring tape around your wrist to find your size. Add about half an inch to this measurement for a comfortable fit. -
Prepare the elastic:
Cut a piece of elastic cord about 10-12 inches long. I like to pre-stretch the elastic by pulling it gently a few times; this prevents the bracelet from stretching out permanently later. -
Secure one end:
Place a bead stopper or simply a piece of strong tape on one end of your cord so your beads don’t slide off while you work. -
Begin the pattern:
Thread on three of your matte terracotta clay beads to start the sequence. -
Add metallic accents:
Slide on three gold metallic spacer rings. These rings should be thin and sit flush against each other to create a small gold ‘barrel’ effect. -
Continue the rhythm:
Repeat the pattern: add three to four clay beads followed by the trio of gold spacers. -
Check the length:
Continue this alternating pattern until the strand wraps comfortably around your wrist. Aim for a symmetrical finish if possible. -
Tie the knot:
Remove the tape, bring the ends together, and tie a secure surgeon’s knot (right over left, left over right). Pull tight to secure. -
Secure and trim:
Dab a tiny drop of jewelry glue on the knot. Let it dry, then trim the excess cord, tucking the knot inside a bead hole if it fits.
Loose Elastic?
If your bracelet feels flimsy, switch to a thicker cord (1mm) or double up a thinner 0.5mm cord. Jewelry glue on the knot is non-negotiable for longevity.
Step 2: Crafting the Wood & Silver Companion
-
Prepare the second cord:
Cut another length of elastic cord, pre-stretch it just like the first one, and secure the end. -
Start with wood base:
String on your natural light wood beads for approximately half of the bracelet’s length. -
Insert the sparkle:
Add a single silver rhinestone spacer bead. This adds a subtle glint that catches the light differently than the solid metals. -
Add more wood:
Continue adding wood beads until you are about three beads away from completing the circle. -
Design the focal point:
Now, create the centerpiece. Thread on one smooth silver metal bead, followed by one textured gold metal bead. -
Mixing metals:
The contrast between the smooth silver and the bumpy gold texture is key here. Ensure they sit right next to each other. -
Close the loop:
Add any final wood beads needed to reach your size requirements. -
Final knotting:
Tie off this second bracelet using the same surgeon’s knot technique. Pull firmly to ensure the wood beads sit snug against the metal focal beads. -
Finish and dry:
Apply your glue to the knot, allow it to set, and trim the ends carefully.
Level Up: Scent Infusion
Since you’re using unfinished wood beads, place a drop of essential oil (like cedar or sandalwood) on them. They act as a diffuser for a subtle, lasting scent.
Slip both bracelets onto your wrist for a warm, stylish stack that feels perfectly grounded
Boot-Stitch Inspired Pattern
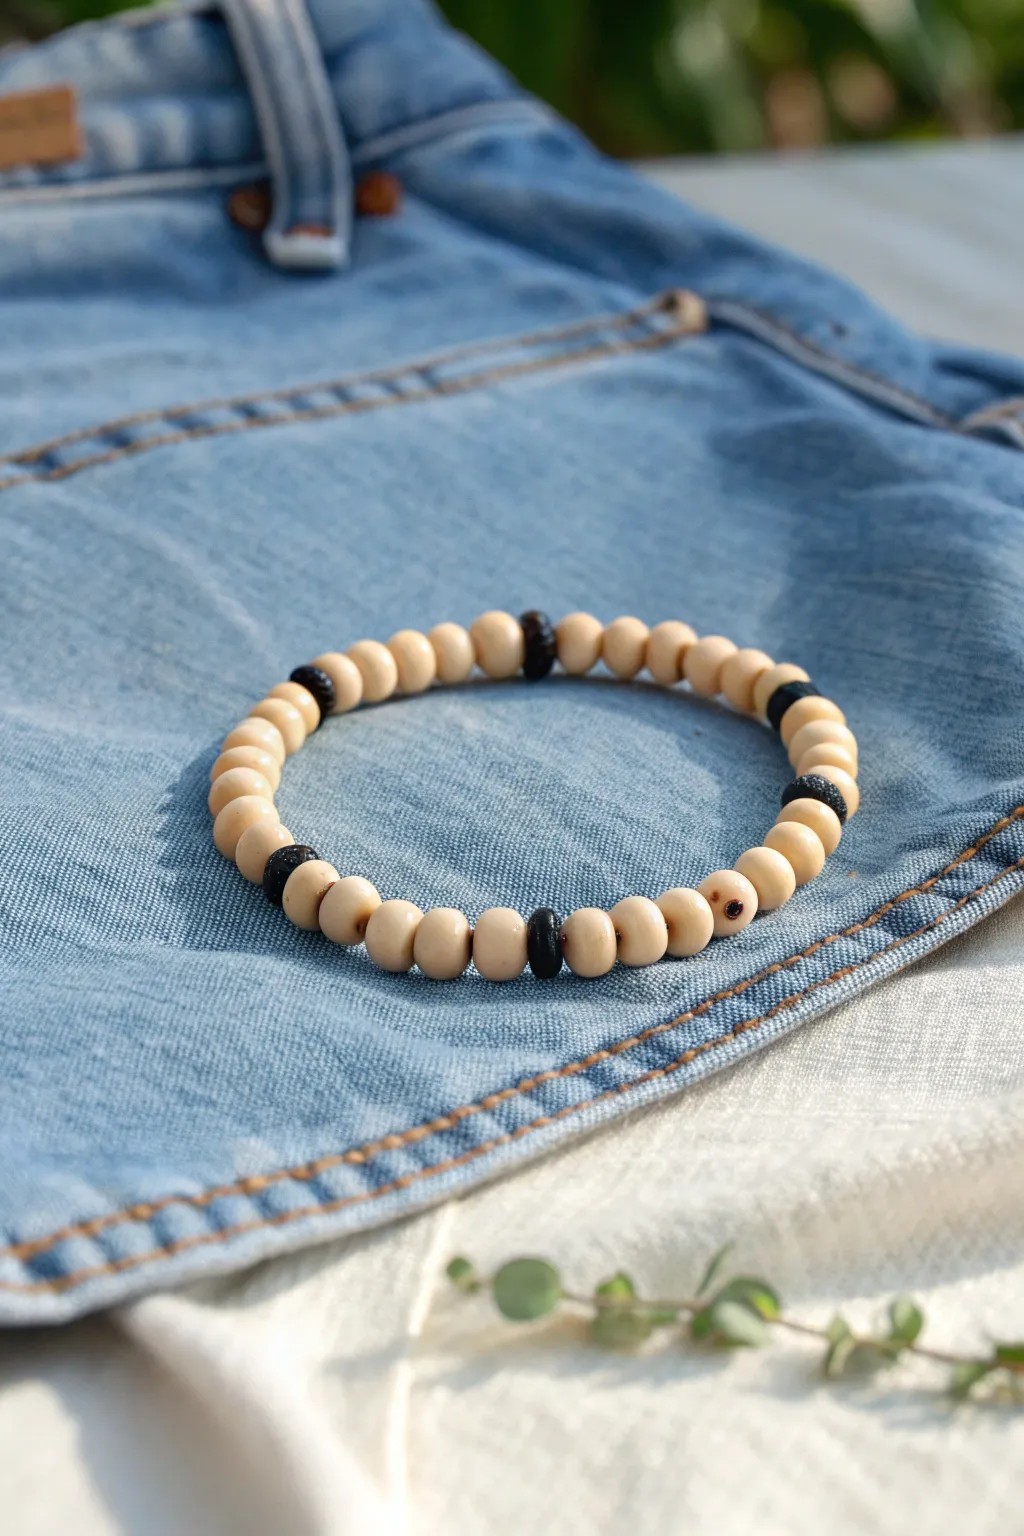
Capture the laid-back spirit of a country afternoon with this simple yet striking beaded bracelet. Combining creamy clay beads with bold black accents, this accessory mimics the classic contrast of boot stitching against rugged denim.
Step-by-Step Guide
Materials
- Cream or light beige polymer clay beads (6mm or 8mm round)
- Black lava stone or textured clay accent beads (same size as main beads)
- 0.8mm clear elastic stretch cord
- Jewelry adhesive or super glue
- Scissors
- Bead stopper or masking tape
- Ruler or measuring tape
Step 1: Planning the Pattern
-
Measure your wrist:
Wrap a measuring tape loosely around your wrist to find your comfortable size. Add about half an inch to this measurement to account for the bulk of the beads. -
Calculate bead count:
Lay your beads out along a ruler to match your total length. This specific design relies on spacing, so having a visual layout before stringing is helpful. -
Establish the sequence:
Create the ‘boot-stitch’ rhythm by arranging groups of the cream clay beads separated by single black accent beads. A good ratio is 5-7 cream beads between each black bead. -
Test the visuals:
Before committing to the string, look at your layout. If the black accents feel too crowded, add one or two more cream beads to the spacing sections.
Knot Security Trick
Use a toothpick to apply glue precisely into the center of the knot. This prevents glue from flooding the elastic, which can make it brittle and prone to snapping.
Step 2: Stringing the Design
-
Prepare the cord:
Cut a piece of elastic cord about 10-12 inches long. This extra length is crucial for tying a secure knot later without struggling. -
Secure the end:
Attach a bead stopper to one end of the cord, or simply tape it down to your table so your beads don’t slide off into oblivion. -
Pre-stretch the elastic:
Give the elastic cord a few gentle tugs before you start. I always do this to prevent the bracelet from stretching out and sagging immediately after the first wear. -
String a cream section:
Begin by threading your first group of cream beads. If you are following the photo exactly, start with a set of about five beads. -
Add the contrast:
Slide on one black accent bead. The texture of lava stone works beautifully here to add that rugged ‘country’ feel. -
Continue the pattern:
Repeat the sequence—group of cream beads, followed by one black bead—until you reach your desired length. -
Check the fit:
carefully lift the cord by both ends and wrap it around your wrist. The ends should meet comfortably without pulling the elastic taut.
Add a Charm
Customize your bracelet by adding a small silver horseshoe or cowboy boot charm next to one of the black accent beads for extra country flair.
Step 3: Finishing Touches
-
Prepare for the knot:
Remove the bead stopper or tape. Bring the two ends of the elastic together, ensuring there are no gaps between the beads. -
Tie the surgeon’s knot:
Cross the right end over the left, loop it under, and pull tight. Then, cross the left over the right, looping it under *twice* before pulling tight. This double loop is key for security. -
Apply adhesive:
Dab a tiny drop of jewelry glue directly onto the knot. Be careful not to glue the beads to the cord, just the knot itself. -
Hide the knot:
While the glue is still tacky but not wet, slide a bead (preferably one with a slightly larger hole) over the knot to conceal it. -
Trim the excess:
Once the glue is fully dry, use your scissors to snip the remaining tail ends of the elastic cord close to the bead. -
Final stretch test:
Give the finished bracelet a gentle pull in all directions to settle the knot inside the bead and ensure the tension is even around the circle.
Now slip on your new accessory and enjoy the simple, rugged charm it adds to your outfit
Cactus Green Desert Pop
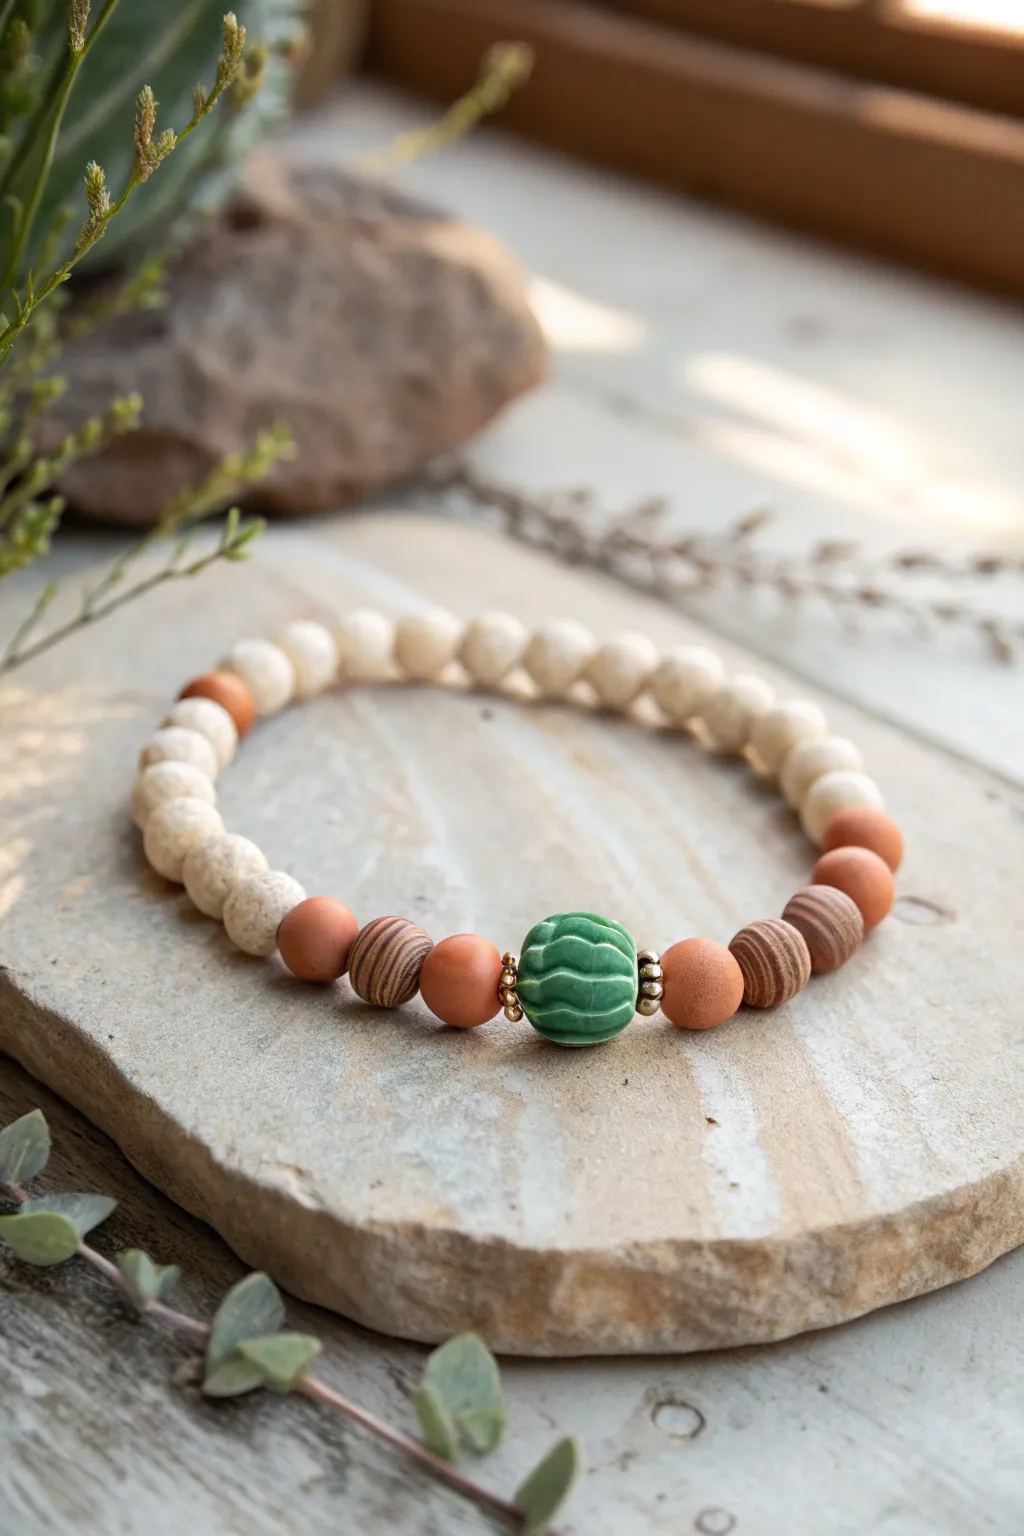
Evoke the serene beauty of the desert with this earthy, textured bracelet featuring a striking cactus-green focal bead. The combination of porous lava stone, warm terracotta tones, and wood grain patterns creates a harmonious, nature-inspired accessory perfect for everyday wear.
Step-by-Step Tutorial
Materials
- 1 Large cactus-green textured focal bead (polymer clay or ceramic, approx. 12-14mm)
- 2 Small gold metallic spacer rings
- 2 Terracotta clay round beads (8mm)
- 2 Wood-grain patterned brown beads (8mm)
- 2 Additional terracotta clay round beads (8mm)
- 2 Additional wood-grain patterned brown beads (8mm)
- 10-14 Cream-colored lava rock beads or pitted clay beads (8mm)
- 1 Terracotta clay accent bead (8mm)
- Elastic stretch cord (0.8mm clear)
- Super glue or jewelry cement
- Scissors
Step 1: Preparation
-
Measure your wrist:
Before cutting any cord, wrap a measuring tape around your wrist to determine the correct size. Add about half an inch to this measurement for a comfortable fit that isn’t too tight. -
Prepare the cord:
Cut a length of clear elastic stretch cord approximately 10-12 inches long. Having this extra length makes tying the final knots much easier than struggling with short ends. -
Pre-stretch the elastic:
Give your cut piece of elastic a few gentle tugs. This pre-stretching technique helps prevent the bracelet from loosening up significantly after your first few wears. -
Secure the end:
Attach a piece of tape or a bead stopper to one end of your cord to prevent your carefully arranged beads from sliding off while you work.
Step 2: Creating the Focal Section
-
Center the cactus bead:
Thread the large, green textured focal bead onto the cord first. This will be the centerpiece of your design. -
Add gold spacers:
Slide one small gold metallic spacer ring onto the cord on each side of the green focal bead. These add a subtle shimmer that frames the main color pop. -
Place the first terracotta beads:
On both sides of the gold spacers, thread on one smooth terracotta-colored clay bead. I like to double-check symmetry here to ensure the pattern builds outwards evenly. -
Add wood grain texture:
Next, add one wood-grain patterned bead to each side. The striped texture contrasts beautifully with the smoothness of the clay. -
Repeat the pattern:
Add another terracotta bead to each side, followed by a second wood-grain bead on each side. You should now have a balanced section extending from the green center.
Knot Slipping?
If your elastic knot feels slippery, try coating the knot area with a bit of clear nail polish before sliding it into a bead. It dries slightly rougher than glue, adding friction.
Step 3: Completing the Loop
-
Create the asymmetry:
On the right side only (or left, just pick one), add one final single terracotta bead. This creates the slight asymmetrical color break seen in the reference. -
Add the neutral base:
Fill the rest of the cord with the cream-colored lava rock beads. Thread them on until the bracelet reaches your desired length. -
Check the fit:
Wrap the unfinished strand around your wrist to verify the size. Add or remove cream beads as necessary to get the perfect fit. -
The final accent:
Depending on your wrist size, you may want to insert one final terracotta bead among the cream stones on the back side for an extra pop of color, though this is optional.
Aromatic Upgrade
Use the porous cream lava stones as essential oil diffusers. Add a drop of cedarwood or sage oil to the white beads for a scent that matches the desert aesthetic.
Step 4: Finishing Touches
-
Tie the knot:
Remove the tape or bead stopper. Bring both ends of the elastic together and tie a surgeon’s knot (loop the thread through twice before pulling tight) to secure the circle. -
Secure with glue:
Place a tiny drop of super glue or jewelry cement directly onto the knot. This is crucial for longevity. -
Hide the knot:
While the glue is still tacky, gently pull the elastic so the knot slides inside the hole of the nearest generic bead (a lava bead usually has a larger hole perfect for this). -
Trim excess:
Once the glue is fully dry, use your scissors to trim the excess cord ends as close to the bead hole as possible without nicking the knot.
Slip on your new bracelet and enjoy the subtle desert vibes it brings to your outfit
Sunflower Yellow Warm-Up Stack
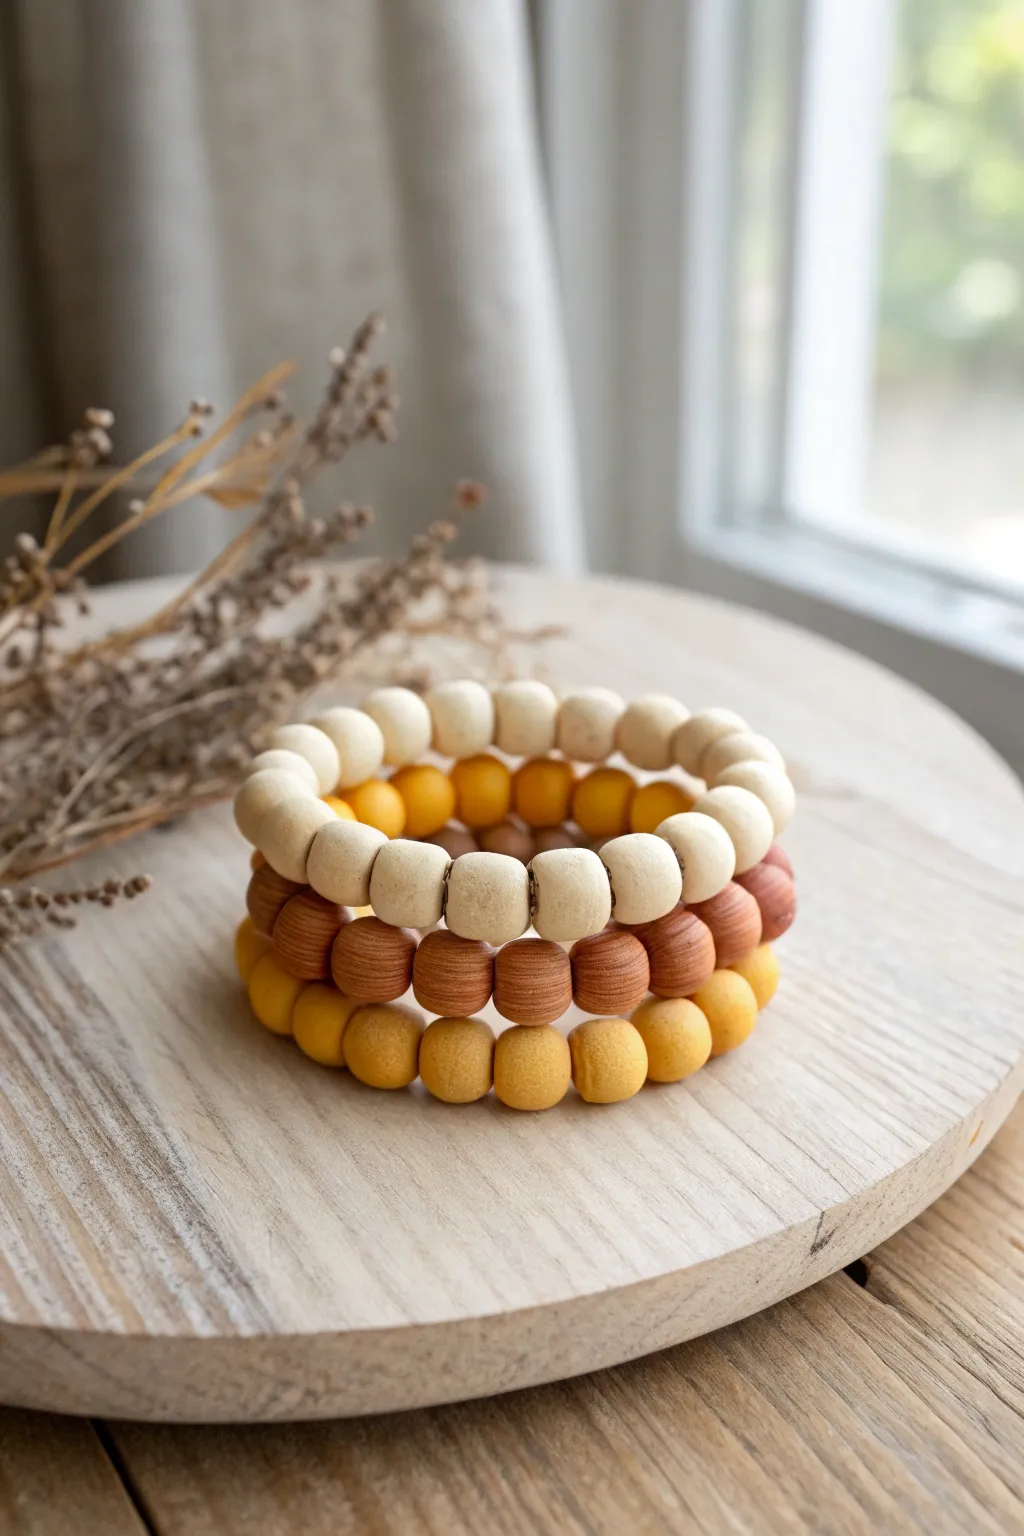
Capture the warmth of late summer sunlight with this trio of textured wooden bead bracelets. The combination of creamy ivory, rich terracotta, and mustard yellow creates a cozy, earthy palette perfect for transitioning seasons.
Detailed Instructions
Materials
- 10mm – 12mm round unfinished wood beads (approx. 20-25)
- 10mm round dyed wood beads in mustard yellow (matte finish)
- 10mm round dyed wood beads in terracotta or reddish-brown (wood grain visible)
- 0.8mm clear elastic stretch cord
- Hypo-cement or jewelry glue
- Scissors
- Beading needle (collapsible eye, optional but helpful)
- Ruler or tape measure
- Small piece of tape or a bead stopper
Step 1: Preparation & Sorting
-
Measure your wrist:
Before styling, wrap a measuring tape around your wrist to find your size. Add about 0.5 to 1 inch to this measurement depending on how loose you like your stack to fit. -
Sort the beads:
Separate your beads into three distinct piles: the creamy unfinished wood, the warm terracotta, and the mustard yellow. This project relies on color blocking, so organization is key. -
Cut the cord:
Cut three lengths of elastic cord, each about 10-12 inches long. Having extra length makes the final knotting process much easier than struggling with short ends. -
Secure the ends:
Place a bead stopper or a simple piece of masking tape on one end of each cord. This prevents your first few beads from sliding right off while you work.
Knot Slipping?
If the elastic feels slippery, dust the knot area with a tiny bit of rosin or rough up the cord ends slightly with sandpaper before tying for extra grip.
Step 2: Stranding the Cream Bracelet
-
Pre-stretch the cord:
Gently give your first piece of elastic a few tugs. Pre-stretching helps prevent the bracelet from sagging or loosening up immediately after you wear it. -
String the beads:
Thread the unfinished, creamy wood beads onto the cord one by one. I usually find that 18 to 22 beads work well for an average wrist, but test the length against your wrist as you go. -
Check the fit:
Wrap the strand around your wrist. The ends should touch comfortably without gaps, but the elastic shouldn’t be stretched tight yet.
Step 3: Creating the Colored Layers
-
Start the terracotta strand:
For the second bracelet, repeat the pre-stretching process with a new cord. Begin easy threading with the reddish-brown terracotta beads. -
Match the sizing:
Hold this new strand up against your finished cream strand. Ensure they have the same number of beads or length so they sit uniformly when stacked. -
Yellow strand assembly:
Using the mustard yellow beads, create the third and final strand. These beads often have a matte, almost clay-like finish, so handle them gently to avoid scratching the coating.
Add Texture
Swap one plain wood bead on each bracelet for a brass spacer bead or a crushed gold nugget bead to add a hint of metallic shine to the matte stack.
Step 4: Finishing the Stack
-
The surgeon’s knot:
Take the ends of the cream bracelet first. Remove the tape and cross left over right, then right over left, looping the top cord through twice before pulling tight. This double-loop creates a secure surgeon’s knot. -
Tighten securely:
Pull all four strands (the two tails and the two loop sides) firmly to lock the knot. You want the beads to touch snugly but not bunch up. -
Apply adhesive:
Dab a tiny drop of hypo-cement or jewelry glue directly onto the knot. Let it dry for a few minutes before trimming; this ensures the elastic won’t slip undone. -
Hide the mechanism:
Once the glue is tacky or dry, trim the excess cord ends to about 2mm. Gently tug the knot inside the hole of the nearest bead to hide it from view. -
Repeat for all layers:
Perform the knotting, gluing, and hiding steps for both the terracotta and yellow bracelets. Once complete, roll them onto your wrist one at a time.
Enjoy the satisfying click of your new wooden stack as you wear it throughout the day
Coastal Cowgirl Shell Accent

Embrace the breezy, rustic elegance of the coast with this handcrafted bracelet that blends natural textures with luxurious gold details. Featuring ribbed bone-style beads and a charming cowrie shell charm, this piece is the perfect accessory for beach days and country twangs alike.
Step-by-Step Tutorial
Materials
- Cream-colored ribbed bone beads (approx. 6mm or 8mm)
- Gold rondelle spacer beads (textured or smooth)
- Gold bead caps (small)
- Small natural cowrie shell (drilled or pre-set with a loop)
- Gold open jump ring (4mm or 6mm)
- Gold lobster clasp
- Gold extension chain (tiny links)
- Gold crimp beads (2)
- Gold crimp bead covers (2, optional)
- Beading wire (gold color, flexible)
- Wire cutters
- Flat nose pliers
- Chain nose pliers
- Crimping pliers
Step 1: Preparation and Charm Setup
-
Measure your wrist:
Before cutting any wire, wrap a flexible measuring tape around your wrist to find your size. Add about 1/2 to 1 inch to this measurement to ensure a comfortable fit that isn’t too tight. -
Cut the beading wire:
Using your wire cutters, snip a length of beading wire approximately 10-12 inches long. Having extra length makes it much easier to finish the ends without frustration. -
Prepare the charm:
If your cowrie shell doesn’t have a bail, locate the drilled hole at the top. Using two pairs of pliers, gently twist open the gold jump ring sideways—never pull it apart. -
Attach the shell:
Slide the cowrie shell onto the open jump ring. Close the ring securely by twisting it back into place, ensuring the ends meet perfectly so the shell doesn’t slip off.
Sticky Shells?
If the cowrie shell bead holes are blocked by natural grit, gently reaming them with a bead reame or a thick needle before stringing helps the wire pass right through.
Step 2: Stringing the Design
-
Start the sequence:
Begin stringing your beads. The pattern shown relies on repeating segments. Thread on three or four of the cream-colored ribbed beads to start. -
Add gold accents:
Slide on one gold rondelle spacer bead. This creates the rhythmic flash of metal that breaks up the monochromatic cream tones. -
Continue the pattern:
Resume threading the cream ribbed beads. Continue this pattern—three cream beads, one gold spacer—until you reach the halfway point of your desired bracelet length. -
Position the focal point:
Once you hit the middle, slide on the jump ring holding your cowrie shell charm. It should hang freely between two ribbed beads or nestled against a gold spacer, depending on where your pattern lands. -
Complete the stringing:
Mirror the design on the second half of the bracelet. Continue alternating the ribbed beads and gold spacers until the strand reaches your measured length minus the clasp size. -
Check the fit:
Wrap the unfinished strand around your wrist to verify the length. Remember that the clasp will add a small amount of length, so adjust beads as necessary.
Step 3: Finishing Touches
-
Start the crimping process:
Thread a gold crimp bead onto one end of the beading wire, followed immediately by the jump ring attached to your lobster clasp. -
Create the loop:
Loop the wire tail back through the crimp bead and pull it tight, leaving just a tiny bit of slack so the clasp can move freely. -
Secure the crimp:
Use your crimping pliers to flatten the crimp bead securely. I always give a gentle tug here to make sure the wire doesn’t slip. -
Hide the tail:
Thread the excess wire tail back through the first couple of cream beads for a clean look, then trim the wire flush against the bead using cutters. -
Finish the other end:
Repeat the crimping process on the opposite end. Slide on a crimp bead, then the extension chain (or a simple closed jump ring). -
Loop and tighten:
Pass the wire back through the crimp bead and pull tight, ensuring there are no large gaps between your beads, but keep enough flexibility so the bracelet drapes nicely. -
Final crimp:
Crimp the bead firmly with pliers, feed the tail back through the neighboring beads, and trim the excess wire cleanly. -
Add covers (optional):
If you want a polished, professional look, place a gold crimp cover over each flattened crimp bead and gently close it with pliers so it looks like a round gold bead.
Layer Up!
Make a stacked set by creating a second bracelet using only the gold spacers and small seed beads in a turquoise or sand color for deeper coastal vibes.
Now you have a stunning, beach-ready accessory that captures the spirit of the shore
Southwestern Triangle Pattern Beads

This rustic bracelet captures the warm tones of the desert with its blend of turquoise, black, brown, and creamy beige. Using wooden beads as a base, you’ll hand-paint geometric patterns to create a unique, textured accessory full of Southwestern charm.
Step-by-Step Guide
Materials
- Round wooden beads (approx. 10-12mm)
- Small black wooden spacer beads (4-6mm)
- Acrylic paints (Cream, Turquoise, Black, Burnt Orange)
- Fine detail paint brushes (00 and 0 sizes)
- Matte or satin spray varnish
- Wooden skewers or toothpicks
- Elastic stretch cord (0.8mm)
- Super glue or jewelry cement
Step 1: Prepping the Beads
-
Mount the beads:
Place your large wooden beads onto skewers or toothpicks. This gives you a handle to rotate them easily while painting without getting fingerprints on your work. -
Base coat application:
Paint all the large beads with a coat of cream or light beige acrylic paint. You may need two thin coats for full opacity, allowing the first to dry completely before adding the second.
Use Tape for Lines
For crisp lines on the turquoise triangles, cut tiny strips of washi tape to mask off the area before painting. Peel it off while the paint is still slightly wet.
Step 2: Painting the Turquoise Pattern
-
Select your beads:
Separate half of your cream-coated beads for the turquoise design. This pattern relies on large, bold shapes. -
Outline the triangles:
Using your turquoise paint and a fine brush, lightly mark out two large triangles on opposite sides of the bead. The points of the triangles should face inward toward the center equator of the bead. -
Fill the color:
Fill in these triangular shapes with turquoise paint. Don’t worry if the edges aren’t razor-sharp yet; the rustic look is part of the charm. -
Add definition:
Once the turquoise is dry, subtle scratch marks or a very light wash of diluted brown paint can be added over the turquoise to mimic the matrix found in real stone.
Faux Stone Texture
Mix a tiny amount of baking soda into your turquoise paint before applying. This adds a gritty, realistic stone texture to the painted areas.
Step 3: Creating the Aztec Zigzag Pattern
-
Drafting the design:
On the remaining cream beads, use a very fine brush or a black fine-tip paint pen to draw a zigzag line around the center circumference of the bead. -
Adding color accents:
In the upper ‘V’ shapes created by your zigzag line, paint small triangles using Burnt Orange or a rust-colored paint. Leave the bottom ‘V’ shapes cream for high contrast. -
Thickening the lines:
Go back over your black lines with the fine brush. Create a second, parallel black zigzag line just below the first one to add visual weight to the pattern. -
Final details:
Add small black dots or tiny dashes inside the orange triangles if you have a steady hand, replicating the intricate look of traditional pottery.
Step 4: Sealing and Assembly
-
Seal the work:
While the beads are still on the skewers, spray them with a matte or satin varnish. I prefer to do two light coats to protect the paint from chipping during wear. -
Prepare the cord:
Cut a length of elastic cord about 10 inches long. Pre-stretch the cord by pulling it gently a few times; this prevents the bracelet from loosening later. -
Stringing the pattern:
Thread your beads onto the cord, alternating between a painted bead and a small black spacer bead. Alternate the turquoise pattern beads with the zigzag pattern beads for variety. -
Tyring the knot:
Once you have enough beads to fit your wrist comfortably, tie a secure surgeon’s knot (right over left, left over right, and loop through again). -
Securing the finish:
Apply a tiny dab of super glue or jewelry cement to the knot. Let it dry for a minute before trimming the excess cord close to the knot. -
Hiding the knot:
Gently pull the elastic so the knot slides inside the hole of one of the larger wooden beads, hiding it from view.
Now you have a striking piece of wearable art that adds a touch of the Southwest to any outfit
Lasso Loop Charm Focus
Embrace the charm of natural textures with this earthy beaded bracelet design. Combining speckled clay beads with sturdy hemp cord and a unique lasso-style closure creates a piece that feels both grounded and effortlessly stylish.
Detailed Instructions
Materials
- Natural hemp cord (1mm or 1.5mm thickness)
- Speckled cream clay beads (8mm or 10mm)
- Polished caramel/tan jasper or wood beads (8mm or 10mm)
- Antique bronze metal ring or washer (approx. 15mm diameter)
- Scissors
- Craft glue or clear nail polish
- Clip or tape for securing work
Step 1: Setting the Foundation
-
Prepare the Cord:
Cut two lengths of hemp cord, each measuring about 30 inches. This generous length ensures you have plenty of room for knots and handling. -
Attach to Ring:
Fold both cords in half to find the center point. There should now be a loop at the fold. -
Lark’s Head Knot:
Pass the folded loop end through the center of your antique bronze ring. Pull the four loose tail ends through the loop and tighten it down securely against the metal ring. -
Secure the Base:
Tape the metal ring to your work surface or use a clipboard to hold it steady. Separate the four strands into two groups of two.
Stiff Cord Tip
If the hemp is fraying while stringing beads, dip the ends in white glue or clear nail polish and let them dry. This creates a stiff ‘needle’ for easy threading.
Step 2: Creating the Braided Section
-
Start the Braid:
Begin a simple four-strand round braid or a standard braided section using the hemp cords. This section creates the decorative ‘rope’ look before the beads start. -
Continue Braiding:
Continue the braid for approximately 1.5 to 2 inches, depending on how much cord you want visible on the wrist side. -
Knot the End:
Tie a secure overhand knot with all strands together to finish the braided section. This knot also acts as a stopper to keep the beads in place. -
Prepare for Beading:
For the beaded section, you will use two strands as the core carriers for the beads and let the other two strands run alongside or trim them inside the knot if you prefer a thinner look. I generally keep all four for durability.
Step 3: Adding the Beads
-
String the Pattern:
Thread your beads onto the central cords. The pattern shown alternates between two or three speckled cream beads and one caramel bead. -
Check the Length:
Continue adding beads until the bracelet covers the top of your wrist comfortably. A typical length for the beaded section is about 5 to 6 inches. -
Closing Knot:
Once the beading is complete, tie another tight overhand knot with all cord strands right up against the last bead to lock everything in place.
Keep it Tight
If your whipping knot feels loose, the loop size might change. Maintain constant tension while wrapping the final closure coil to ensure the toggle stays secure.
Step 4: The Wrapped Closure
-
Form the Loop:
Fold the remaining cord ends back towards the beads to create a loop large enough for your metal ring to pass through, but snug enough to hold it. -
Begin the Wrap:
Take a separate piece of hemp cord (about 12 inches) or use one of the long tails. Lay it along the folded area to create a ‘gathering knot’ or whipping knot. -
Wrap Tightly:
Wrap the cord tightly around the bundle of strands multiple times, creating a solid cylinder of cord that looks like a coil. Aim for about 0.5 inches of wrapping. -
Secure the End:
Thread the end of the wrapping cord through the loop you created at the start of the wrap and pull the other end to trap it underneath the coil. -
Trim and Glue:
Trim any excess cord ends from the wrap very close to the coil. Apply a tiny dab of craft glue to the cut ends to prevent fraying. -
Final Trim:
Trim the main tail cords that emerge from the wrapped loop, leaving them slightly frayed for a rustic tassel effect, or cut them short for a cleaner look.
Now you have a rugged, nature-inspired accessory ready to pair with your favorite denim or casual wear
Barnwood Brown With Speckled Beads
Capture the essence of an old country farmhouse with this simple yet striking bracelet design. Featuring a warm mix of smooth wood-tone clay beads and textured speckled accents, this piece is perfect for everyday wear.
How-To Guide
Materials
- Stretch cord (0.8mm or 1mm thickness)
- Reddish-brown polymer clay beads (8mm or 10mm round)
- Speckled beige/grey jasper or polymer clay spacer beads (8mm or 10mm)
- One small metallic spacer bead (gunmetal or silver finish)
- Super glue or jewelry adhesive
- Scissors
- Bead stopper or tape
- Ruler or tape measure
Step 1: Preparation & Bead Selection
-
Measure Your Wrist:
Begin by measuring your wrist with a flexible tape measure to determine the length needed. Add about 0.5 to 1 inch to this measurement significantly to ensure a comfortable fit that isn’t too tight. -
Cut the Cord:
Cut a piece of stretch cord about 3-4 inches longer than your final bracelet length. This extra length gives you plenty of room to tie the final knot securely without struggling. -
Pre-stretch the Cord:
Before adding any beads, give the stretch cord a few gentle tugs. This crucial step prevents the bracelet from stretching out and becoming loose after the first few times you wear it. -
Secure the End:
Attach a bead stopper or simply place a piece of tape on one end of your cord. This acts as a safety net so your beads don’t slide right off while you are designing your pattern. -
Sort Your Beads:
Lay your beads out on a flat surface or bead mat. Separate the solid reddish-brown beads from the speckled ones so you can visualize the pattern easily before threading.
Step 2: Stringing the Pattern
-
Start the Main Sequence:
Thread approximately 4-5 of the solid reddish-brown wood-tone beads onto the cord. This establishes the primary base color of the bracelet. -
Add a Speckled Accent:
Slide on one of the speckled beige beads. These add that lovely natural stone look that contrasts with the warmth of the brown beads. -
Continue the Pattern:
Repeat the previous sequence: add 4-5 brown beads followed by a speckled one. Adjust the number of brown beads based on your wrist size, keeping the spacing consistent. -
Create the Focal Point:
For the center focal area, thread a speckled bead, followed by the small gunmetal spacer bead, and then another speckled bead side-by-side. This breaks up the rhythm nicely. -
Finish the Loop:
Continue threading the remaining brown beads until the bracelet reaches your desired length minus about half an inch (to account for the stretch). -
Check the Fit:
Carefully wrap the unknotted strand around your wrist to check the sizing. Ideally, the ends should meet comfortably without leaving large gaps between beads.
Knot Slipping?
If the elastic feels slippery and the knot won’t hold, try rubbing the knot area with a little beeswax or roughing the cord ends slightly with sandpaper before tying.
Step 3: Finishing Touches
-
Prepare to Knot:
Remove the bead stopper or tape from the end. hold both ends of the elastic firmly to ensure no beads slip off during the tying process. -
Tie the First Knot:
Cross the ends and tie a simple overhand knot, pulling it tight so the beads sit flush against each other. Be careful not to pull so hard that the cord snaps. -
Tie a Surgeon’s Knot:
For extra security, loop one end through the knot twice before pulling tight. This is known as a surgeon’s knot and it holds elastic much better than a standard knot. -
Secure with Glue:
I like to add a tiny drop of super glue or jewelry adhesive directly onto the knot. Let this dry for a few minutes to ensure the knot is permanently fused. -
Hide the Knot:
Once the glue is tacky but not fully hard, try to slide the knot inside the hole of the nearest large bead if the hole is wide enough. -
Trim Excess Cord:
After the glue has fully cured, use your scissors to snip off the excess tail ends of the cord as close to the knot as possible.
Pattern Variation Tip
Swap the single gunmetal spacer for a raw wooden bead to make the bracelet feel more rustic, or use a lava stone bead there to turn it into an essential oil diffuser.
Now you have a rugged, earth-toned bracelet ready to stack with your other favorite accessories
Mismatch Country Stack With Personal Phrases
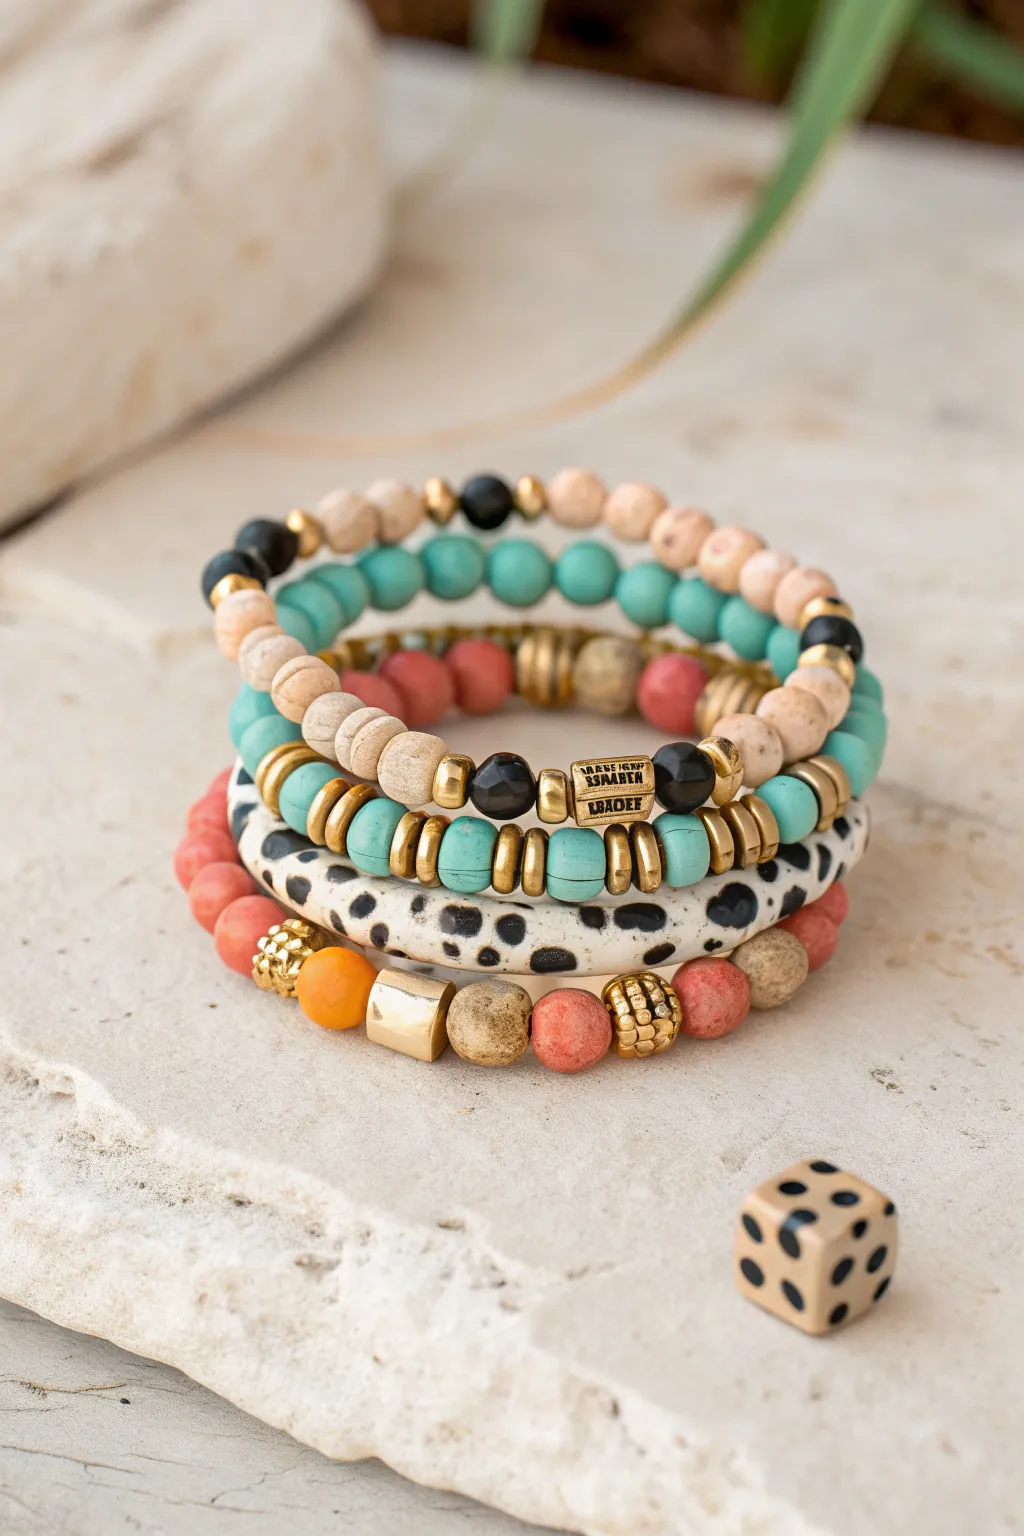
Embrace a rustic, eclectic vibe with this trio of mismatched bracelets that combine warm clay textures, bold turquoise pops, and personalized charm accents. The combination of matte wood, polished stone, and animal print creates a visually interesting stack perfect for everyday wear.
Detailed Instructions
Materials
- Elastic beading cord (0.8mm or 1mm transparent)
- Beading needle (collapsible eye)
- Super glue or jewelry knot cement
- Scissors
- Turquoise dyed stone or clay heishi beads (6mm)
- Natural wood beads (unpolished, roughly 8mm)
- Black onyx or glass round beads (6mm or 8mm)
- Gold finish spacer beads (rondelle and flat disc styles)
- Gold finish word/phrase bead (rectangular slider)
- Large animal print geometric beads (white with black spots, irregular oval shape)
- Coral/terracotta stone or matte glass beads (8mm)
- Textured gold accent bead (large hole)
- Gold rhinestone rondelle spacers
- Small beige/sandstone accent beads
Step 1: Turquoise & Wood Accent Bracelet
-
Prepare the Cord:
Cut a piece of elastic cord about 10-12 inches long. This gives you plenty of room to work. I like to pre-stretch the elastic slightly by pulling on both ends gently to prevent it from sagging later. -
Start the Pattern:
Using your beading needle, thread on a sequence of the turquoise heishi beads. Aim for a section about 3 inches long to form the colorful base of the bracelet. -
Add Decorative Spacers:
Slide on a gold rondelle spacer, followed by a lighter natural wood bead, and another gold spacer. This creates a transition zone. -
Build the Focal Section:
Thread on two larger natural wood beads. Between them, place your gold word slider bead. If the slider has a large hole, you might want to flank it with small black onyx beads for contrast. -
Complete the Circle:
Continue adding turquoise beads and wood accents until the bracelet measures your desired wrist size (usually 6.5 to 7 inches). -
Secure the Knot:
Tie a secure surgeon’s knot (right over left, left over right). Apply a tiny dab of jewelry glue to the knot before trimming the excess cord.
Knot Hiding Trick
Plan your patterns so the knot ends up next to a bead with a large hole (like the wood or animal print ones). Carefully pull the knot inside the bead to hide it.
Step 2: Animal Print Statement Strand
-
String the Base:
Cut another length of elastic. Start this strand by threading alternating turquoise heishi beads and gold flat disc spacers. This repetition creates a rich, metallic ridge texture. -
Introduce the Prints:
Select your large animal print beads. The irregular oval shape is key here. Thread 3 or 4 of these statement beads onto the cord. -
Break Up the Pattern:
Between each large animal print bead, insert a single flat gold spacer or a small black bead to keep the large beads from grinding against each other. -
Balance the Design:
Finish the rest of the strand with the alternating turquoise and gold spacer pattern you started with, ensuring the animal print section sits centered on top of the wrist. -
Final Tie-Off:
Knot the elastic firmly using a surgeon’s knot, add your dot of glue, let it dry for a moment, and trim the tails.
Step 3: Coral & Gold Charm Bracelet
-
Establish the Color Palette:
Cut your third piece of elastic. Begin threading the coral/terracotta matte beads. Use about 5 or 6 to start the chain. -
Create Texture:
Add a gold rhinestone rondelle spacer, followed by a textured beige sandstone bead. This adds a nice grit that contrasts with the smooth coral beads. -
Add the Gold Accent:
Thread on a prominent gold geometric bead (like a cube or heavy cylinder). I prefer placing this near the center of the design as a counterweight. -
Mirror the Pattern:
On the other side of the gold accent, repeat the bead sequence: sandstone bead, rhinestone spacer, and then back to the coral beads. -
Adjust Length:
Check the length against the other two bracelets. Add more coral beads to the back section until it matches the others perfectly. -
Finish and Stack:
Knot and glue this final bracelet just like the previous ones. Once dry, slide all three onto your wrist to enjoy your custom country stack.
Elastic Issues
If your elastic keeps slipping while tying, try passing the cord through the loop twice on the first half of the knot to create more friction before tightening.
Wear your new stack with denim or a summer dress for that perfect effortless look