If you’re new to polymer clay, the fastest way to build confidence is with small, cute projects that finish in one cozy baking session. These beginner polymer clay ideas are all about simple shapes, bright color, and that instantly-gratifying “I made this!” feeling.
Smiling Donut Charms
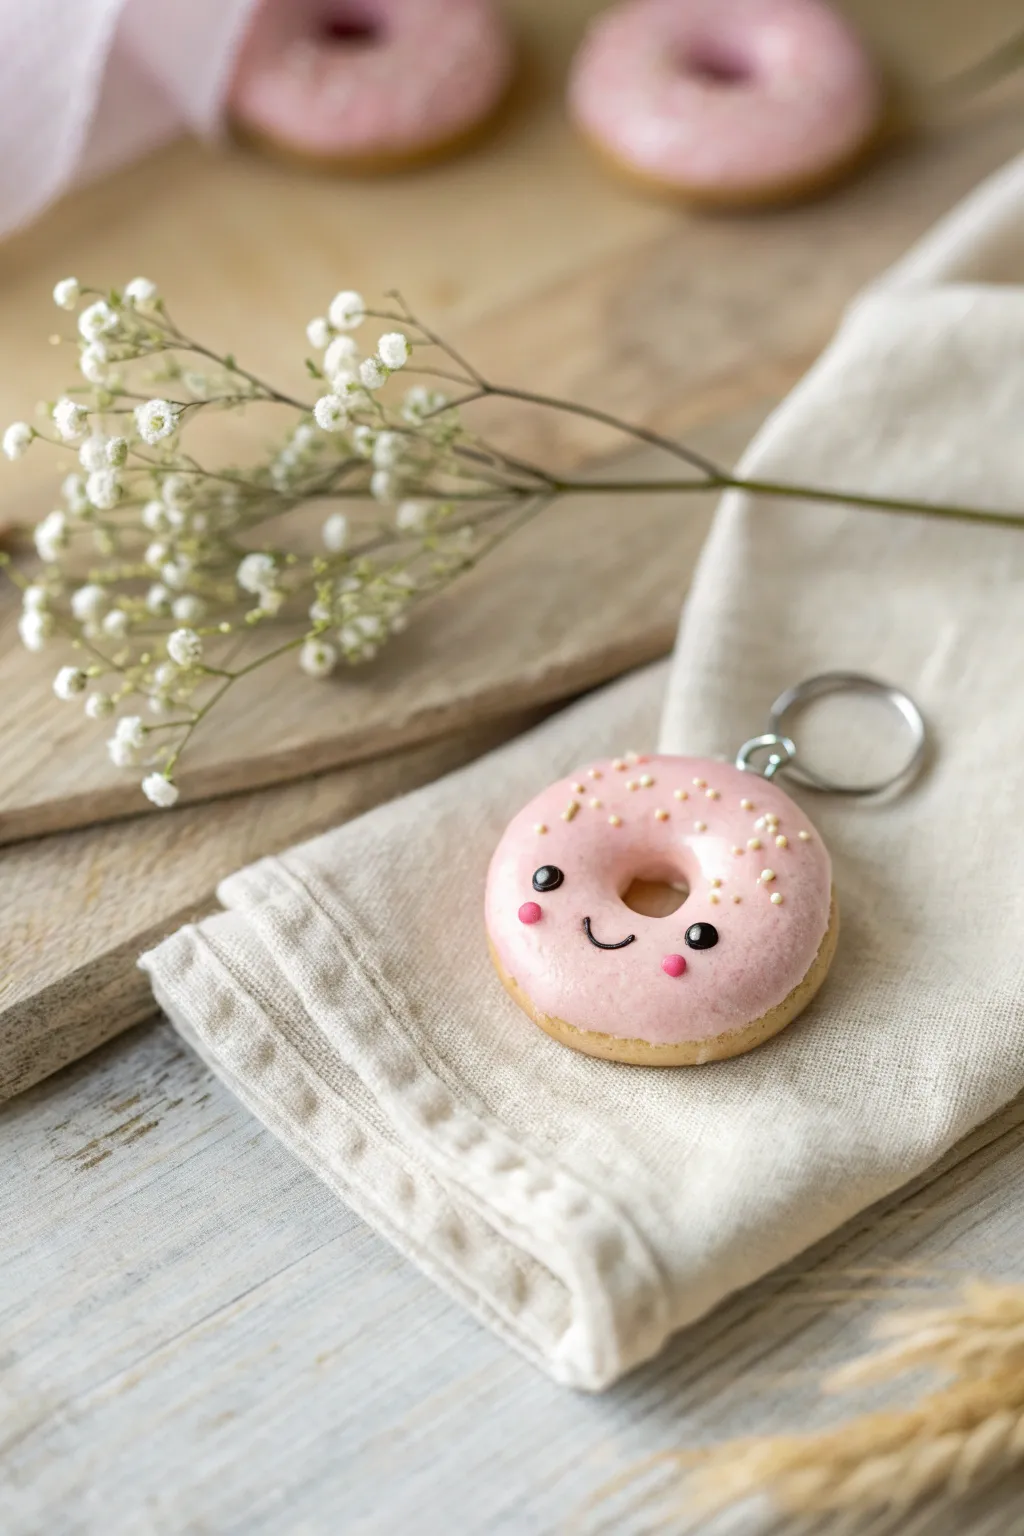
Brighten up your keychain collection with this adorable, smiling pink donut charm made from polymer clay. This beginner-friendly project features a realistic baked dough texture topped with glossy pink icing and a cheerful little face that is sure to make everyone smile.
Detailed Instructions
Materials
- Tan or beige polymer clay (dough color)
- Light pink polymer clay (icing color)
- Black polymer clay (eyes and mouth)
- Dark pink polymer clay (cheeks)
- White or cream polymer clay (sprinkles)
- Translucent liquid polymer clay (optional but helpful for icing)
- Gloss glaze or polyurethane varnish
- Eye pin
- Jump ring and keychain hardware
- Ball tool or small rounded sculpting tool
- Needle tool or toothpick
- Round cutters (approx. 1 inch and 0.25 inch)
- Old toothbrush or sandpaper (for texturing)
- Soft artist pastel (orange/brown for shading)
- Small paintbrush
Step 1: Shaping the Dough Base
-
Condition the Clay:
Start by kneading a chunk of your tan or beige clay until it is soft, pliable, and free of any cracks. -
Form a Sphere:
Roll the conditioned clay into a smooth ball approximately the size of a large marble or a walnut, depending on how big you want your final charm. -
Flatten the Dough:
Gently press the ball down onto your work surface with your palm to create a thick, rounded disc. Don’t flatten it too much; you want it to look puffy like a yeasted donut. -
Cut the Center Hole:
Use your smallest round cutter to punch a hole slightly off-center or directly in the middle. If you don’t have a small cutter, the back end of a paintbrush works perfectly here. -
Soften the Edges:
The cutter will leave sharp edges around the hole. Gently pat these with your finger to round them off so the dough looks naturally baked and risen. -
Add Texture:
Take an old toothbrush or a piece of coarse sandpaper and gently tap it all over the surface of the tan clay. This mimics the porous texture of fried dough. -
Shade for Realism:
Scrape a little bit of orange or brown soft pastel into a powder. Use a dry paintbrush to dust this powder lightly around the edges and bottom of the donut to give it a ‘golden brown’ baked look.
Step 2: Adding the Icing and Decor
-
Create the Icing Layer:
Condition a smaller piece of light pink clay and flatten it into a thin sheet using a rolling pin or pasta machine. -
Cut the Icing Shape:
Use a round flower cutter or simply cut a wavy, irregular circle with your blade that is slightly smaller than your donut base. -
Apply the Icing:
Place the pink sheet onto the textured donut. Gently press the wavy edges down so they hug the curves of the donut. Poke a hole through the center to match the donut hole underneath. -
Smooth the Connection:
To make the icing look melted, use your finger to smooth the edges downwards slightly. I find adding a tiny drop of liquid clay underneath helps it bond securely. -
Insert the Eye Pin:
Take a metal eye pin and trim it to size if it’s too long. Push the straight end into the top of the donut (through the icing and dough) until only the loop is visible.
Secret Ingredient
Mix a drop of Translucent Liquid Sculpey with your pink clay to make a sticky ‘icing’ paste for a more realistic, drippy effect.
Step 3: Bringing It to Life
-
Make the Eyes:
Roll two tiny specks of black clay into balls. Press them gently onto the lower half of the donut face, spacing them apart fairly wide for a cute look. -
Add Eye Highlights:
Roll even tinier specks of white clay and place one small dot in the upper corner of each black eye to create a lively sparkle. -
Sculpt the Smile:
Roll a very thin ‘snake’ of black clay. Cut a tiny u-shaped segment and place it centered between the eyes. Press it down gently with a needle tool. -
Apply Cheeks:
Take two small balls of dark pink clay, flatten them slightly, and place them just outside and below the eyes for rosy cheeks. -
Add Sprinkles:
Roll a very thin snake of cream or white clay. Chop it into tiny bits and sprinkle them onto the top portion of the pink icing, pressing them in lightly so they stick. -
Bake the Charm:
Place your donut on a tile or baking sheet. Bake according to your brand of polymer clay instructions (usually 275°F/135°C for 15-30 minutes). Let it cool completely. -
Glaze and Assemble:
Once cool, brush a coat of gloss glaze over the pink icing (avoiding the textured dough area) to make it look wet and sugary. Finally, attach your jump ring and keychain to the eye pin loop.
Fingerprint Fix
If you smudge the smooth icing while adding the face, lightly brush it with a tiny amount of baby oil or cornstarch before baking to smooth it out.
Attach your new sweet friend to your keys or bag and enjoy the smiles it brings


Kawaii Toast Pins
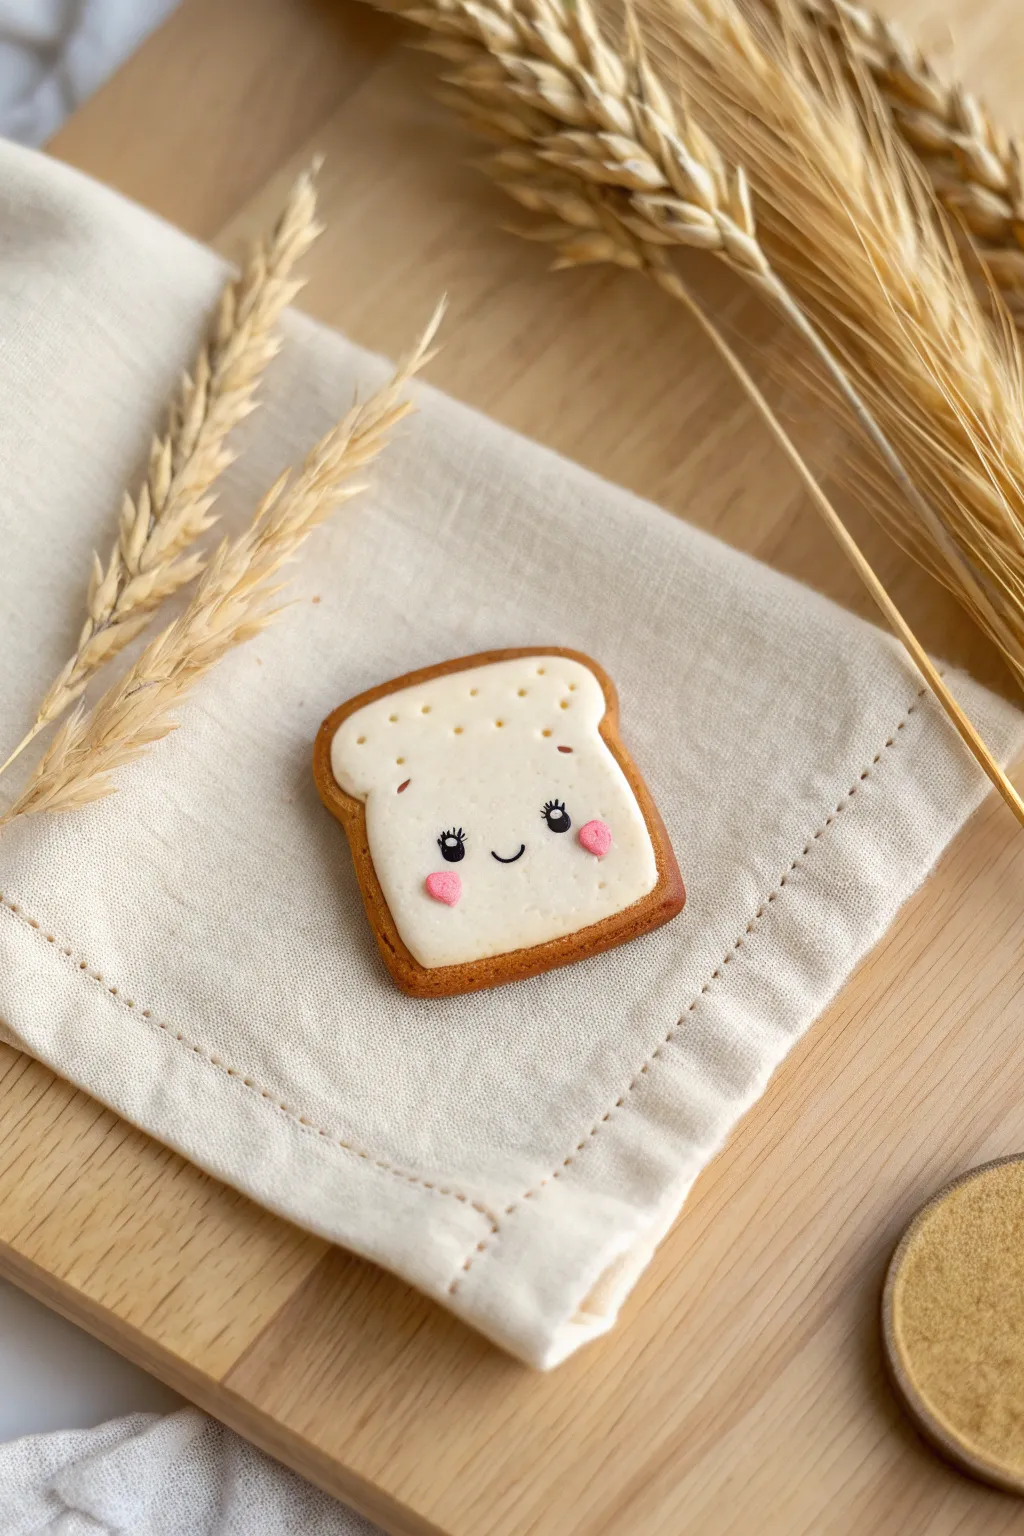
This adorable toast slice charm brings a classic breakfast staple to life with a sweet, blushing face. The gentle gradient on the crust and the tiny heart cheeks add a whimsical touch that turns a simple shape into an irresistibly cute accessory.
Step-by-Step
Materials
- Polymer clay (translucent, white, dark brown/ochre, pink)
- Soft pastels (brown and orange shades)
- Black acrylic paint
- Fine detail paintbrush or dotting tool
- Needle tool or toothpick
- Rolling pin
- Blade or X-Acto knife
- Gloss glaze (optional)
- Pin backing and strong glue
Step 1: Shaping the Base
-
Mix the dough color:
Start by mixing translucent clay with a generous amount of white and a tiny speck of dark brown or ochre. You want a realistic, creamy off-white shade that mimics white bread. -
Roll out the sheet:
Roll your mixed ‘bread’ clay into a sheet that is approximately 4-5mm thick. It needs enough substance to hold its shape. -
Cut the shape:
Use a blade to cut a rectangle, then gently round the bottom corners with your fingers. For the top, create a dip in the center to form that classic mushroom-top loaf shape. -
Mix the crust color:
In a separate mix, blend brown clay with a little translucent and orange to create a warm, toasted crust color. -
Wrap the crust:
Roll the crust clay into a long, thin snake and flatten it slightly. Wrap this strip around the outer edge of your white bread shape. Smooth the seam where the ends meet at the bottom.
Fix Sticky Clay
If your white clay is getting dirty or sticky while working, pop it in the fridge for 10 minutes or wipe your hands with a baby wipe before handling light colors.
Step 2: Texturing and Toasting
-
Add bread texture:
Gently poke the white surface repeatedly with a toothbrush or a ball of aluminum foil. This creates the porous texture of real bread, but keep the center slightly smoother for the face. -
Create the crust shading:
Using a blade, scrape some powder from your brown and orange soft pastels. Pick up the powder with a soft brush. -
Apply the shading:
Brush the pastel powder along the edges of the white clay where it meets the brown crust. Feather it inward to make the bread look authentically toasted. -
Make the top indents:
Use a needle tool to poke three or four distinct little holes across the very top edge of the white part, mimicking air bubbles in the crust.
Step 3: The Kawaii Face
-
Prepare the cheeks:
Take a tiny amount of pink clay and roll two very small balls. Flatten them slightly or shape them into minuscule hearts. -
Place the cheeks:
Press the pink cheeks onto the lower half of the toast face, spacing them wide apart for maximum cuteness. -
Bake the piece:
Bake your clay toast according to the manufacturer’s instructions on your clay package. Let it cool completely before painting. -
Paint the eyes:
Using black acrylic paint and a fine detail brush or dotting tool, dab two small circles just above the cheeks. -
Add eye details:
Carefully pull three tiny lashes upward from the outer corner of each eye using the very tip of your brush. -
Adding the sparkle:
Once the black paint is dry, use a toothpick to add a tiny white dot inside the black of the eyes for a reflection. -
Draw the smile:
Paint a small, U-shaped mouth right between the cheeks using a thin liner brush. -
Attach the backing:
Flip the toast over and glue a metal pin backing to the center using strong adhesive like E6000 or super glue.
Make it Sweet
Before baking, add a tiny pat of yellow clay as ‘butter’ on the corner, or use liquid polymer clay mixed with brown chalk to drip ‘syrup’ down the side to create French toast.
Now you have a charming little breakfast companion to brighten up any jacket or backpack


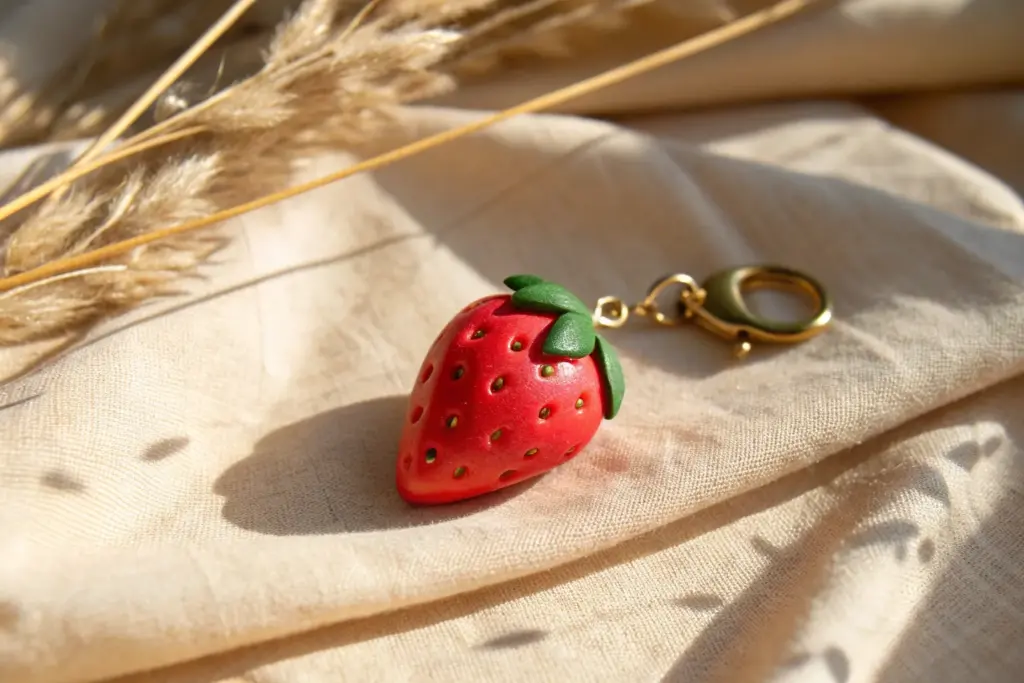
Strawberry Earrings

Capture the essence of summer all year round with these delightful miniature strawberry earrings. Their classic red hue and playful green tops make for a charming accessory that looks impressive but is surprisingly beginner-friendly.
How-To Guide
Materials
- Red polymer clay
- Green polymer clay
- Liquid polymer clay (optional)
- Needle tool or toothpick
- Acrylic paint (white or pale yellow)
- Small paintbrush
- Eye pins (gold)
- Earring hooks (gold)
- Jewelry pliers
- Gloss glaze (optional)
Step 1: Shaping the Berries
-
Condition the Clay:
Start by warming up a small amount of red polymer clay in your hands. Knead and roll it until it becomes soft, pliable, and free of any cracks. -
Form the Base:
Divide the red clay into two equal pea-sized balls to ensure your earrings will match in size. -
Create the Strawberry Shape:
Take one red ball and gently roll it between your fingers, tapering one end slightly to create a soft cone or teardrop shape. Flatten the wider top just a tiny bit. -
Repeat for the Second Berry:
Repeat the shaping process with the second ball of clay, holding them side-by-side to check that their size and shape remain symmetrical. -
Add Texture:
Using a needle tool or a toothpick, gently press small indentations all over the surface of the red cones to mimic seed pockets. Don’t press too deep; just enough to catch the light.
Step 2: Adding the Greens
-
Prepare the Green Clay:
Condition a very small piece of green clay. Roll it out into a thin sheet or flatten a small ball with your thumb. -
Cut the Leaves:
Use a small cutter or a craft knife to cut out a tiny star shape or simply hand-shape 4-5 tiny teardrops for the calyx (the leafy top). -
Attach the Leaves:
Place the green star or individual leaves onto the flat top of the strawberry. Gently press the center so it bonds with the red clay. -
Refine the Leaves:
I like to use a toothpick to gently curve the tips of the leaves downward, so they look like they are hugging the fruit naturally. -
Insert the Eye Pin:
Trim a gold eye pin to be slightly shorter than the length of your strawberry. Push it straight down through the center of the green leaves and into the red body. -
Secure the Pin:
If the clay feels loose around the pin, gently pinch the green clay around the wire base to secure it.
Loose Eye Pins?
If the pin slides out after baking, pull it out, add a dab of super glue to the wire stem, and reinsert it into the hole for a permanent hold.
Step 3: Finishing Touches
-
Bake the Clay:
Place your strawberries on a baking tile or parchment-lined tray. Bake according to your polymer clay package instructions (usually 275°F/135°C for about 15-30 minutes). -
Highlight the Seeds:
Once cool, dip a tiny brush or toothpick into white or pale yellow acrylic paint. Carefully dab a microscopic amount of paint into the seed indentations. -
Wipe Excess Paint:
Quickly wipe the surface with a damp paper towel or your finger to remove excess paint from the surface, leaving color only deep inside the pits. -
Glaze (Optional):
For a juicy, fresh-picked look, apply a thin coat of gloss glaze over the red part of the strawberry, avoiding the leaves if you prefer a matte texture there. -
Attach Hardware:
Using your jewelry pliers, open the loop on your gold earring hooks. Slide the eye pin loop onto the hook. -
Close the Loop:
Gently twist the earring hook loop closed to secure your dangle. Repeat for the second earring.
Realistic Texture
Before baking, lightly texture the green leaves with an old toothbrush or a needle tool to mimic veining, giving contrast to the smooth fruit.
Wear your new fruity creations with a sundress or gift them to a friend for a hand-crafted surprise


Watermelon Slice Keychains
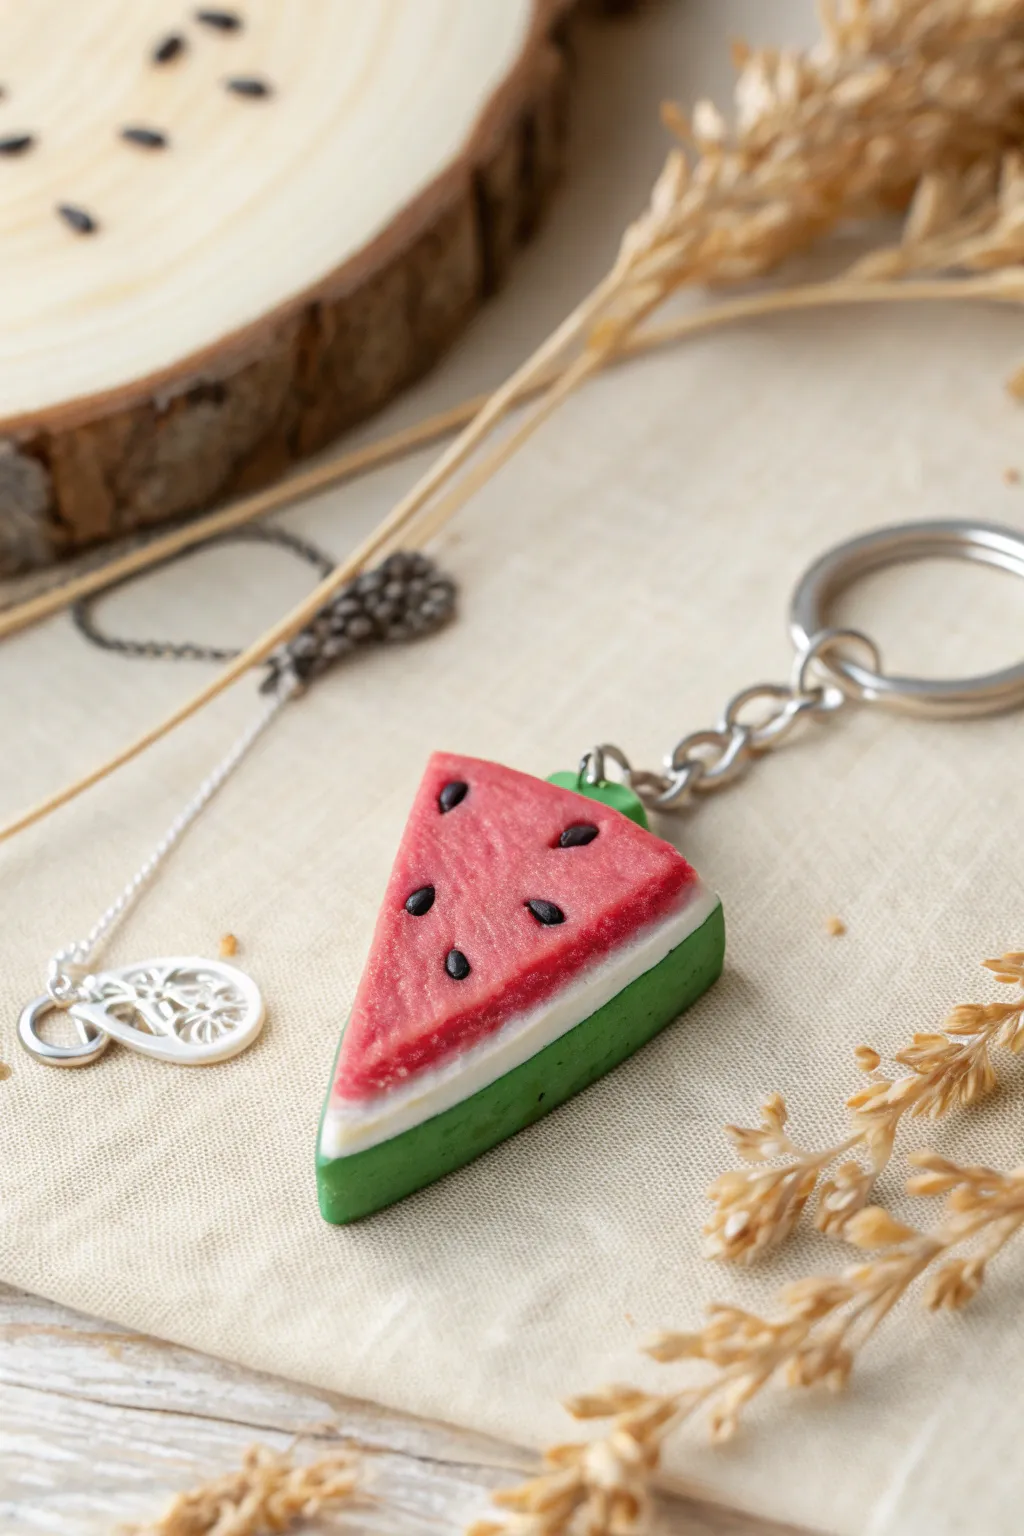
This delightful watermelon slice keychain brings a pop of summer fun to your keys or bag. With its realistic textures and vibrant layers of red, white, and green, this polymer clay project is as satisfying to make as it is to look at.
Step-by-Step
Materials
- Red polymer clay
- White polymer clay
- Green polymer clay
- Black polymer clay
- Rolling pin or pasta machine
- Craft knife or tissue blade
- Needle tool or toothpick
- Toothbrush or crumpled foil (for texturing)
- Eye pin
- Keychain ring and chain
- Gloss glaze (optional)
Step 1: Creating the Cane Stack
-
Condition the Clay:
Start by kneading your red, white, and green clay separately until each is soft and pliable. This prevents cracking and makes blending layers much easier. -
Shape the Red Center:
Take the red clay and roll it into a thick log or cylinder. This will form the juicy fruit part of the watermelon. -
Pinch the Triangle:
Gently pinch one side of the red cylinder along its entire length to turn the round shape into a long triangular prism. Smooth the sides with your fingers. -
Prepare the Rind Layers:
Roll out a sheet of white clay and a sheet of green clay. You want these to be relatively thin, with the green layer slightly thicker than the white one. -
Wrap with White:
Place the red triangular prism onto the white sheet. Trim the white clay so it covers only the bottom two sides of the triangle (not the top flat face), creating the inner rind. -
Wrap with Green:
Repeat the previous step with the green sheet, layering it directly over the white layer. Smooth the seams gently so the layers fuse together.
Step 2: Slicing and Texturing
-
Slice the Cane:
Using a sharp tissue blade, slice a piece off your triangular cane about 1/4 inch thick. This is your main watermelon slice base. -
Clean Up Edges:
If slicing squished the shape slightly, gently reshape the triangle with your fingers to ensure clean, sharp corners. -
Add Texture:
Take a clean toothbrush or a ball of crumpled foil and gently tap it over the surface of the red clay. This stippled effect mimics the natural texture of fruit flesh perfectly. -
Make the Seeds:
Roll tiny, rice-sized tear drops out of black clay. You’ll need about 5 or 6 seeds for a slice of this size. -
Embed the Seeds:
Place the seeds onto the red area in a random pattern. I like to press them in slightly with a needle tool to make them look embedded rather than just sitting on top.
Keeping It Clean
Work from lightest to darkest colors (white, red, green, black) and wash hands between colors. Red pigment loves to stain white clay!
Step 3: Finishing Touches
-
Insert Hardware:
Trim an eye pin to the right length and insert it into the center of the green rind at the top of the slice. securing it with a touch of liquid clay helps if you have it. -
Bake:
Bake the piece according to your polymer clay package instructions (usually around 275°F or 130°C for 15-30 minutes). -
Cool Down:
Allow the piece to cool completely before handling. Polymer clay is still slightly soft when hot and hardens as it cools. -
Glaze (Optional):
For a ‘juicy’ look, paint a thin layer of gloss glaze over the red part of the watermelon only. -
Assemble:
Use pliers to open the jump ring on your keychain finding and attach it securely to the eye pin on your watermelon slice.
Make It a Set
Don’t just make one slice! Create a smaller pair of slices using the same technique and attach earring hooks for a matching jewelry set.
Now you have a refreshing accessory that keeps summer vibes close at hand all year round

The Complete Guide to Pottery Troubleshooting
Uncover the most common ceramic mistakes—from cracking clay to failed glazes—and learn how to fix them fast.
Tiny Heart Pendants
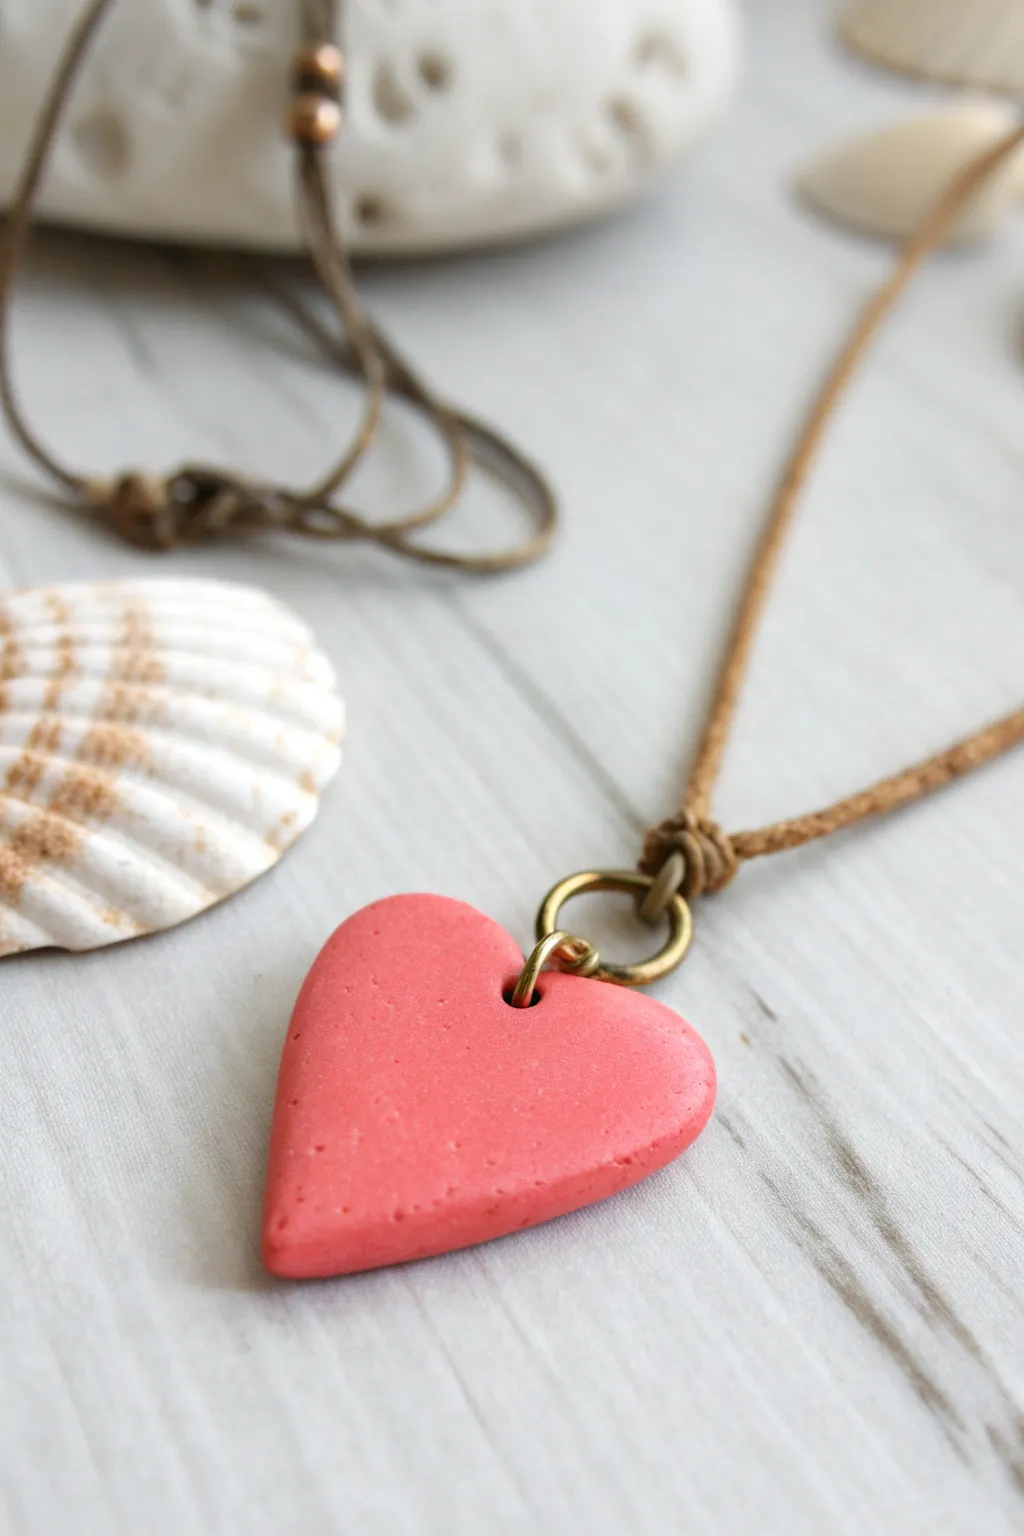
This simple yet striking pendant captures a laid-back coastal vibe with its soft, coral-pink hue and rustic texture. It’s an ideal first project because the organic finish doesn’t require perfection, making it forgiving and fun to create.
How-To Guide
Materials
- Polymer clay in coral pink or salmon
- Rolling pin or smooth glass jar
- Heart-shaped cookie cutter (approx. 1.5 inches)
- Toothpick or small dotting tool
- Sandpaper (medium grit) or a clean toothbrush for texturing
- Large bronze jump ring (around 10mm)
- Smaller bronze jump ring (around 6mm)
- Pliers (round nose and flat nose)
- Brown waxed cotton cord or hemp twine
- Oven and baking sheet
- Parchment paper
Step 1: Shaping the Clay
-
Condition the Clay:
Begin by warming a small block of coral pink polymer clay in your hands. Knead it thoroughly for a few minutes until it is soft, pliable, and free of any cracks. -
Roll it Out:
Flatten the ball of clay onto your work surface. Use your rolling pin to roll it out into an even slab. Aim for a thickness of about 4-5mm—you want it slightly chunky to give the pendant substance. -
Cut the Heart:
Position your heart-shaped cutter over the clay slab. Press down firmly and evenly to cut out your heart shape. Wiggle it slightly to ensure a clean cut before lifting the cutter away. -
Soften the Edges:
Use your fingertip to gently smoothing the sharp edges left by the cutter. The goal is a soft, rounded look rather than crisp, geometric lines.
Step 2: Details and Texture
-
Add Subtle Texture:
To mimic the sandy, sea-worn look in the photo, lightly tap the surface of the clay with a piece of sandpaper or the bristles of a clean toothbrush. You don’t want deep gouges, just a fine, matte stippling. -
Create the Hanging Hole:
Using a toothpick or a small tool, poke a hole near the top center of the heart, right in the cleavage of the shape. Ensure the hole is large enough for your smaller jump ring to pass through freely. -
Refine the Hole:
Once you’ve pierced through, gently rotate the toothpick to enlarge and smooth the inside of the hole. Check the back of the pendant and smooth down any clay that pushed through. -
Final Shape Check:
Give the heart a final inspection. If the handling has distorted the shape, gently nudge it back into a plump, symmetrical heart.
Fingerprints Begone
If you notice fingerprints on your clay before baking, lightly brush the surface with a tiny amount of baby oil or cornstarch to smooth them away instantly.
Step 3: Baking and Assembly
-
Bake the Piece:
Place your heart on a parchment-lined baking sheet. Bake according to the manufacturer’s instructions on your clay package (usually around 275°F or 130°C for 15-30 minutes). -
Cool Down:
Allow the clay to cool completely inside the oven or on a wire rack. It needs to be fully cool and hard before you attach any hardware. -
Open the Small Ring:
Using your pliers, twist the smaller bronze jump ring open sideways (never pull it apart outwards). -
Attach the Charm:
Slide the open small ring through the hole in your clay heart. Before closing it, slip the larger bronze jump ring onto the small ring as well. -
Close the Ring:
Use the pliers to twist the small jump ring back into a closed circle, securing the large ring to the pendant. -
Prepare the Cord:
Cut a length of brown waxed cotton cord to your desired necklace length. Fold the cord in half to find the center point. -
Knot the Pendant:
Thread the cord through the large jump ring. Tie a loop knot (or larks head knot) right above the ring to secure it in place, exactly like the rustic knot in the photo.
Make it Sparkle
For a sun-kissed look, brush a tiny amount of gold mica powder or metallic eyeshadow over the textured surface before baking to catch the light.
Now you have a charming, beach-ready necklace that looks perfect with a summer outfit or as a heartfelt gift
Mini Mushroom Charms
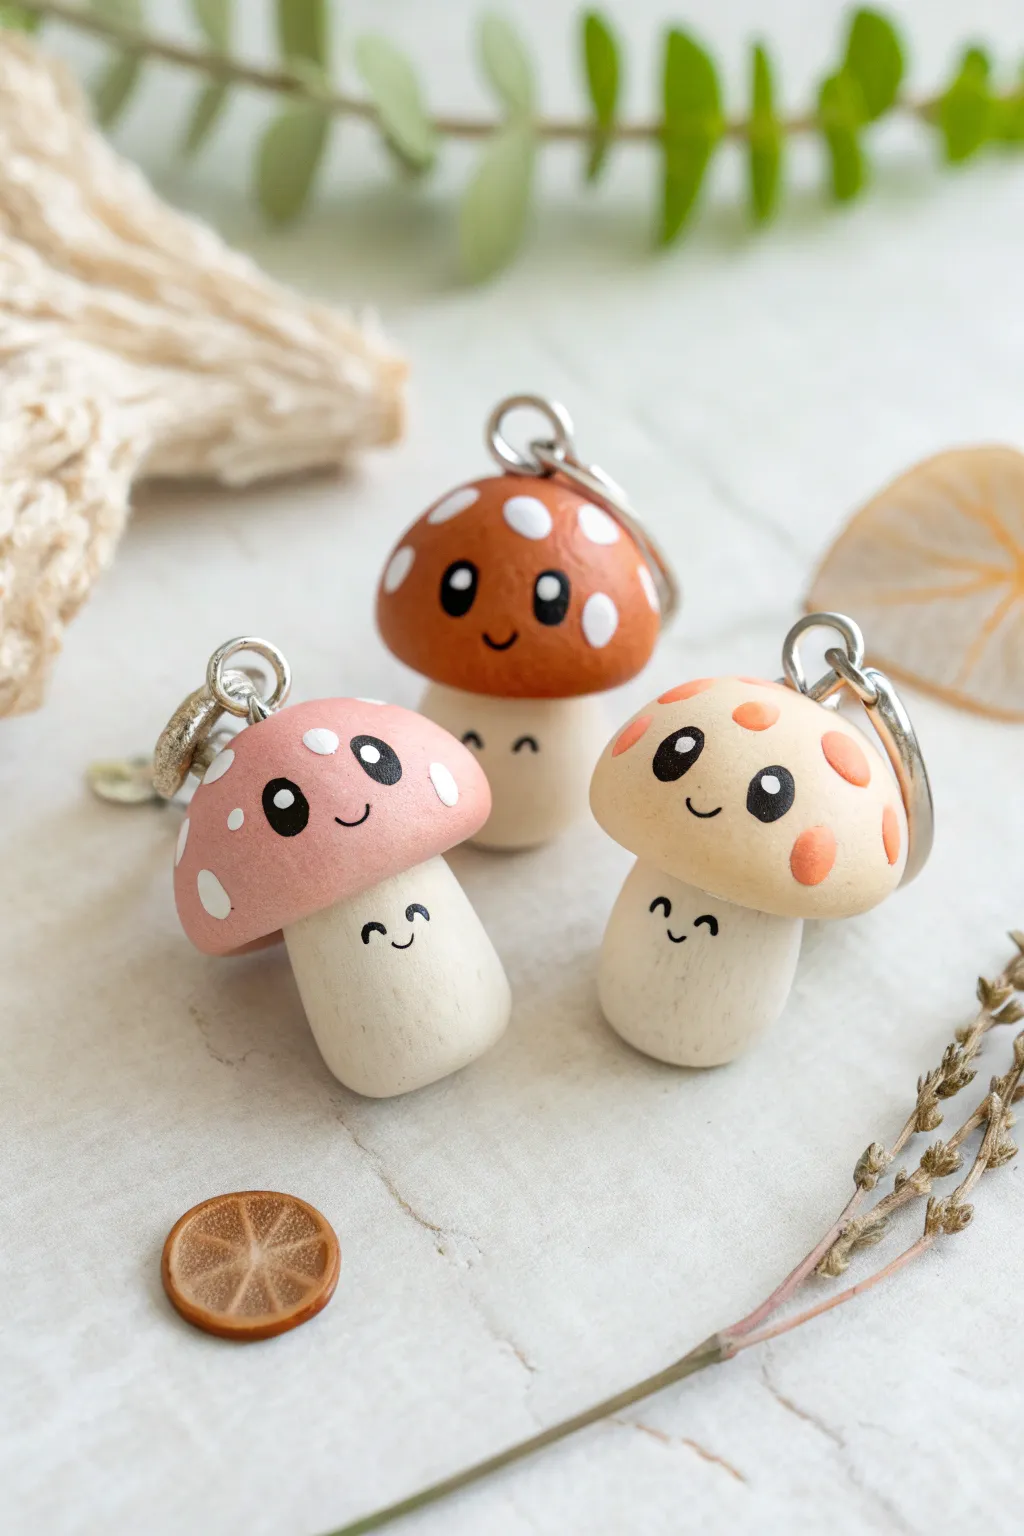
These adorable little fungi feature sweet smiling faces on both their caps and stems, making them double the fun. With their soft, matte finish and simple shapes, they are the perfect beginner project for practicing facial expressions on clay.
Detailed Instructions
Materials
- Polymer clay (white, beige, terracotta, and soft pink)
- Acrylic paints (black, white, orange)
- Small detail paintbrush (size 00 or 000)
- Dotting tool or toothpick
- Eye screws or headpins to turn them into charms
- Aluminum foil (optional, for armature)
- Oven
- Matte varnish or sealant
Step 1: Shaping the Stems
-
Condition the clay:
Start by warming up a chunk of white or light beige polymer clay in your hands until it’s soft and pliable. -
Roll the base:
Roll the clay into a thick cylinder shape, about the thickness of your thumb. -
Shape the stalk:
Gently taper the top of the cylinder slightly so it’s narrower than the bottom, creating a robust mushroom stalk shape. -
Flatten the bottom:
Tap the bottom of the stalk against your work surface so the mushroom can stand up on its own. -
Smooth the surface:
Run your finger over the clay to remove any fingerprints; a tiny bit of baby oil can help smooth it out perfectly.
Smudging Paint?
If you mess up the face, don’t panic. Use a q-tip slightly dampened with rubbing alcohol or nail polish remover to gently wipe away the wet acrylic paint and try again.
Step 2: Creating the Caps
-
Form the cap ball:
Take a piece of colored clay—terracotta, beige, or pink—approximately the same volume as your stem piece, and roll it into a smooth ball. -
Flatten into a dome:
Gently press the ball onto a flat surface to create a hemisphere or dome shape. -
Hollow the underside:
Use your thumb or a rounded tool to slightly indent the bottom center of the cap where it will join the stem. -
Check the fit:
Place the cap onto the stem to see if the proportions look right; adjust the size if the cap feels too heavy or too small. -
Add the hardware:
Before attaching the two parts, insert an eye screw firmly into the top center of the cap. -
Attach cap to stem:
Press the cap firmly onto the stem. You can use a dab of liquid polymer clay (Bake & Bond) for extra security.
Woodland Vibe
Try lightly dry-brushing the bottom of the stem with a soft brown pastel or paint before sealing. It mimics dirt and makes the mushroom look like it was just plucked from the earth.
Step 3: Adding Details & Baking
-
Pre-bake prep:
Ensure your mushroom is standing straight and the eye screw is secure. -
Bake:
Bake the charms according to your clay package instructions (typically 275°F/135°C for 15-30 minutes). -
Cool down:
Let the mushrooms cool completely before painting; painting on warm clay can make the paint dry clumpy.
Step 4: Painting the Faces
-
Paint the cap details:
Using a dotting tool or small brush, add decorative spots to the mushroom cap. Use white for the darker caps and orange for the beige cap. -
Draw the cap eyes:
With black acrylic paint and a fine detail brush, paint two large oval eyes on the front of the cap. -
Add eye sparkles:
Once the black is dry, add a tiny white dot in the upper corner of each eye to give it life. -
Paint the cap smile:
Paint a tiny, thin ‘U’ shape between the eyes for a smile. -
Draw the stem face:
Repeat the process on the stem, but make the face simpler: two small black curved lines for closed happy eyes and a little smile. -
Finish with varnish:
Coat the entire charm in a matte varnish to protect the paint and give it that soft, professional finish.
Now you have a trio of friendly forest companions ready to hang on your bag or keys


What Really Happens Inside the Kiln
Learn how time and temperature work together inside the kiln to transform clay into durable ceramic.
Chubby Cat Face Charms
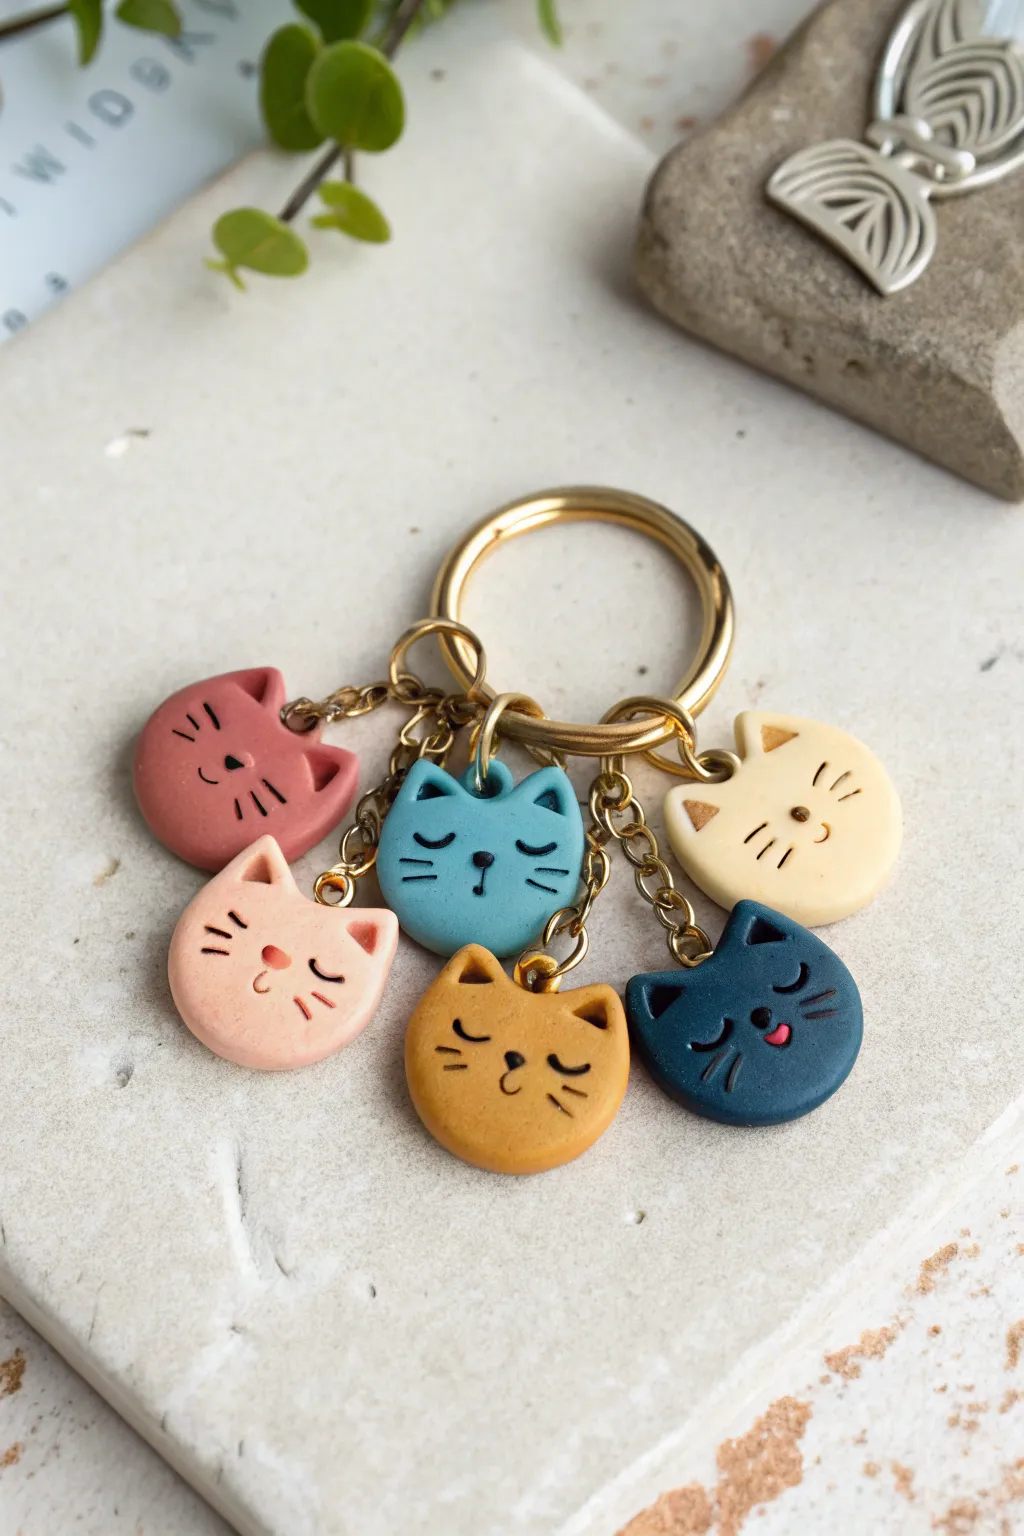
These adorable cat face charms are perfect for using up scraps of clay and make delightful gifts for feline enthusiasts. With their smooth, rounded shapes and minimalist painted expressions, they create a sweet, cohesive cluster on a gold keyring.
Step-by-Step Tutorial
Materials
- Polymer clay in muted colors (terracotta, blush pink, teal, mustard yellow, cream, navy)
- Black acrylic paint
- Very fine detail paintbrush (000 size)
- Small circle cutter (approx. 1 inch)
- Small dotting tool or toothpick
- Gold screw-eye pins (6 pieces)
- Gold jump rings (6 pieces)
- Small gold chains (6 short lengths)
- Gold keyring
- Jewelry pliers
- Clay roller or pasta machine
- Gloss glaze (optional)
Step 1: Shaping the Faces
-
Condition the clay:
Start by thoroughly conditioning your chosen polymer clay colors until they are soft and pliable. You want a smooth consistency to avoid cracks during baking. -
Roll out sheets:
Roll your clay into a medium-thick sheet, roughly 1/4 inch (6mm) thick. You want the charms to be sturdy and chubby, not thin and fragile. -
Cut the circles:
Use your small circle cutter to punch out six discs in your various colors. If edges are rough, gently smooth them with your finger. -
Form the ears:
Instead of adding separate clay for ears, pinch the top two ‘corners’ of the circle gently between your thumb and forefinger to pull out triangular ear shapes directly from the main circle. -
Smooth the contours:
Use a silicone tool or your fingertip to smooth the transition between the ears and the head, ensuring the shape remains rounded and organic rather than sharp. -
Add hardware:
While the clay is still raw, gently screw a gold screw-eye pin into the top center of each cat head, right between the ears. Ensure it goes in straight and deep enough to be secure.
Step 2: Adding Details & Baking
-
Pre-bake prep:
Place your charms on a ceramic tile or baking sheet lined with parchment paper. Double-check that no fingerprints are visible. -
Bake the charms:
Bake the clay according to the manufacturer’s instructions (usually 275°F/135°C for 15-30 minutes per 1/4 inch of thickness). Let them cool completely before handling. -
Paint the features:
Using a 000 detail brush and black acrylic paint, carefully paint two curved lines for sleek, sleeping eyes. I find resting my hand on the table helps steady the brush. -
Add whiskers and noses:
Paint three tiny whiskers on each cheek and a small triangular nose in the center. For lighter cats, a black nose works well; for darker cats, you might mix a tiny bit of white into the black for a charcoal grey, or use pink. -
Paint the mouths:
Add a tiny ‘w’ shape for the mouth below the nose. On one or two cats, you can paint a tiny pink tongue sticking out for extra personality. -
Detail the ears:
Mix a slightly darker or contrasting shade of acrylic paint (like gold or brown) and paint small triangles inside the ears to give them depth. -
Seal the piece:
Once the paint is fully dry, apply a thin coat of matte or satin varnish over the painted areas to protect the design from scratching.
Use Liquid Clay
Before inserting the screw-eye pin, dip the threaded end into a tiny bit of liquid polymer clay (like Bake & Bond). This acts as a glue during baking.
Step 3: Assembly
-
Prepare the chains:
Cut six small lengths of gold jewelry chain. Varying the lengths slightly (between 0.5 to 1 inch) creates a nice cascading effect. -
Attach to charms:
Use your jewelry pliers to open a jump ring, thread it through the screw-eye pin on a cat charm, attach one end of a chain, and close the ring securely. -
Attach to keyring:
Open the jump ring at the other end of the chain and attach it directly to the large main keyring. Repeat this process for all six cats.
Add Texture
Before baking, use a toothbrush to gently tap the surface of the clay. This creates a subtle ‘furry’ texture that looks great once glazed.
Now you have a jingly, joyful set of feline companions to keep your keys safe
Spherical Owl Minis
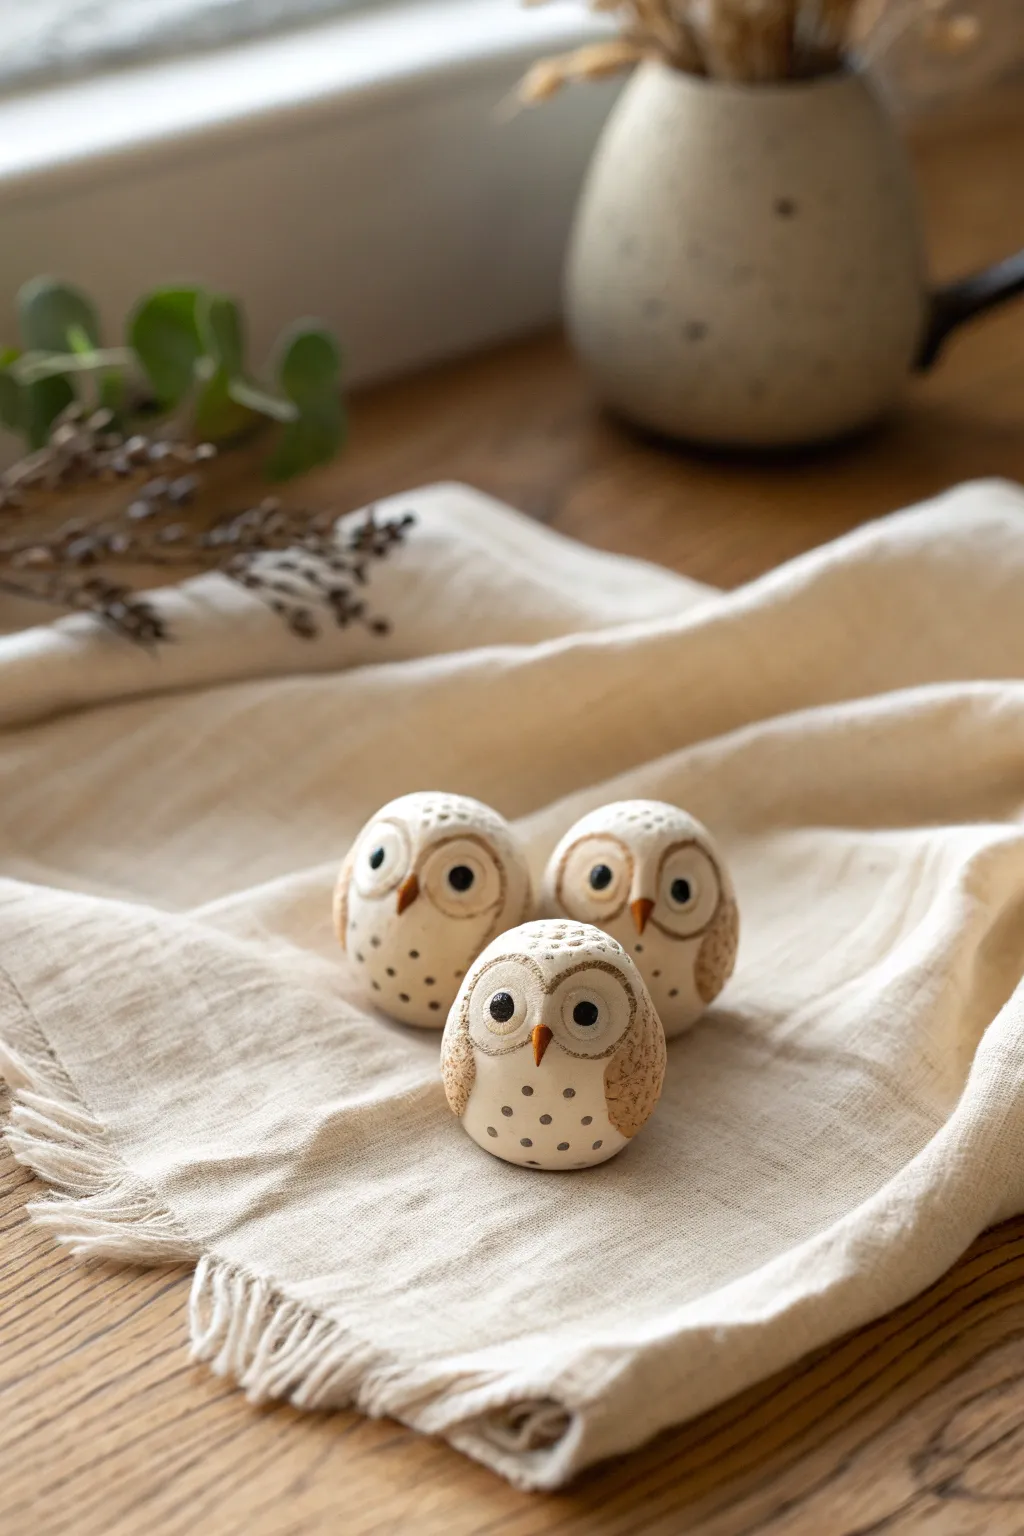
These adorable, round little owls are remarkably easy to make, relying on simple spherical shapes and basic textures. Their calm, neutral color palette gives them a modern ceramic look without needing a kiln.
Detailed Instructions
Materials
- White or cream polymer clay
- Beige or tan polymer clay (granite or speckled effect is great)
- Black polymer clay
- Yellow-orange polymer clay
- Needle tool or toothpick
- Small ball stylus tool
- Round cutter (very small) or a straw
- Soft brush for smoothing
- Baking sheet and parchment paper
- Oven
Step 1: Forming the Body
-
Create the base:
Start by conditioning your white polymer clay until it is soft and pliable. Roll a piece into a smooth, even ball about the size of a walnut or a large marble, depending on how big you want your owl. -
Flatten the base:
Gently tap the ball on your work surface to create a flat bottom. This ensures your owl will sit upright without rolling away. -
Shape the head contour:
While keeping the general spherical shape, very slightly push down on the top of the ball to create a subtle dome for the head area, keeping the form organic and round.
Clean Clay Tip
Work with the lightest colors first (white) and wash your hands thoroughly before switching to darker colors like black to avoid staining the pristine white body.
Step 2: Adding Wings and Texture
-
Prepare the wings:
Take your beige or tan clay. Roll two smaller balls of equal size, then press them flat into oval or teardrop shapes. -
Attach the wings:
Place these flattened shapes on the sides of the white body, curving them slightly to hug the round form of the owl. -
Texture the wings:
Using a needle tool or toothpick, gently stipple the surface of the beige wings. Poke small, shallow holes all over the wing area to create a feathered, stone-like texture. -
Detail the chest:
With the same needle tool or a small ball stylus, add a few decorative dots to the white chest area between the wings. A simple triangular pattern of dots works beautifully here.
Make it an Ornament
Before baking, insert a small metal eye pin into the top of the owl’s head. Once baked, you can string a ribbon through it to create a cute hanging decoration.
Step 3: Creating the Face
-
Make the eye sockets:
Roll two small balls of the beige clay and flatten them into circles. These will form the distinctive spectacle-like rings around the eyes. -
Position the eye rings:
Press these beige circles onto the upper front of the face, ensuring they touch in the middle. They should cover a significant portion of the face for that cute, wide-eyed look. -
Texture the eye rings:
Just like the wings, gently texture the outer edges of these eye rings, or create a rim pattern using your needle tool to define them against the white body. -
Add the pupils:
Roll two tiny balls of black clay. Press them firmly into the center of the beige eye rings. Flatten them slightly so they don’t bulge out too much. -
Create the beak:
Take a tiny amount of yellow-orange clay and roll it into a small cone or rice-grain shape. -
Attach the beak:
Place the beak right where the two beige eye rings meet at the bottom. Press the wider end into the face so the point sticks out slightly.
Step 4: Finishing Touches
-
Refine the surface:
Give the whole piece a once-over. Smooth out any accidental fingerprints on the white clay using a soft brush or your finger tip. -
Texture the head:
I like to add a tiny bit of texture to the very top of the head using the needle tool, mimicking small feathers or giving it a more rustic, handcrafted feel. -
Bake:
Place your owl on a baking sheet lined with parchment paper. Bake according to your clay manufacturer’s instructions (typically around 275°F or 130°C for 15-30 minutes, depending on thickness). -
Cool down:
Turn off the oven and let the figurines cool down completely inside the oven before moving them to prevent cracking.
Now you have a charming little parliament of owls to decorate your shelf or gift to a friend

TRACK YOUR CERAMIC JOURNEY
Capture glaze tests, firing details, and creative progress—all in one simple printable. Make your projects easier to repeat and improve.
Little Ghost Desk Buddies
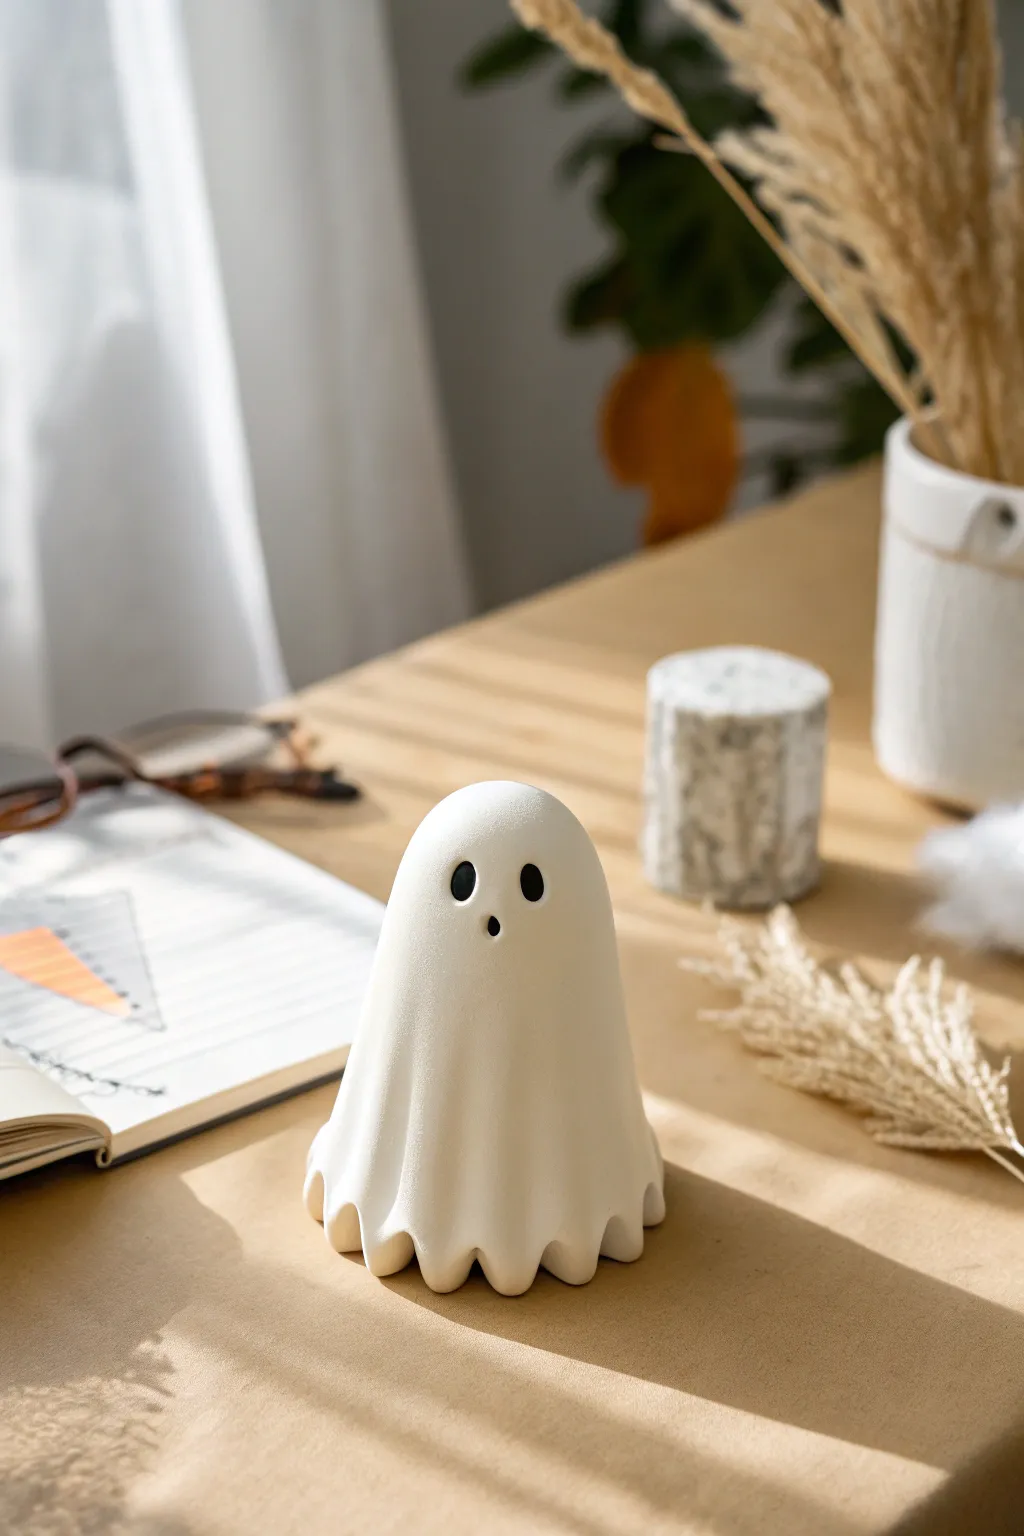
Add a touch of haunting charm to your workspace with this adorable, minimalist ghost figurine. With its smooth matte finish and gentle drapery folds, it looks like a high-end ceramic piece but is surprisingly simple to sculpt at home.
Step-by-Step
Materials
- White original sculpey or similar polymer clay
- Ball stylus tool (medium and large)
- Black acrylic paint
- Small fine-point paintbrush
- Smooth work surface (ceramic tile or glass)
- Aluminum foil
- Translucent liquid sculpey (optional)
- Matte varnish (optional)
- Baby wipes or rubbing alcohol
Step 1: Forming the Core
-
Prepare the foil core:
Crumple a piece of aluminum foil into a tight, slightly elongated dome shape. This saves clay and keeps the ghost lightweight. Aim for a shape slightly smaller than your desired final ghost. -
Condition the clay:
Take a block of white polymer clay and knead it thoroughly in your hands until it is warm, soft, and pliable. Proper conditioning prevents cracking later. -
Create a clay sheet:
Flatten the conditioned clay into a pancake shape. It should be thick enough to be sturdy (about 1/4 inch) but wide enough to cover your foil core completely.
Fixing Fingerprints
Can’t get a smooth finish? Lightly brush the raw clay with a little baby oil or rubbing alcohol before baking. It melts the top layer slightly, erasing prints.
Step 2: Sculpting the Ghost
-
Cover the core:
Drape the clay sheet over your foil dome. Gently press and smooth the clay down the sides, ensuring no air bubbles are trapped between the foil and the clay. -
Shape the head:
Use your palms to gently round out the top of the ghost, creating a smooth, seamless dome for the head. -
Elongate the body:
Gently pull and smooth the clay downward to create the length of the ghost’s body. The shape should taper slightly, getting wider towards the base. -
Define the folds:
At the bottom edge, use your fingers to pinch the clay into waving folds. Push the clay in and out to mimic a sheet draping on the floor. -
Refine the bottom edge:
Use a modeling tool or your finger to smooth the very bottom edge of the folds so they look soft and fabric-like, rather than sharp or jagged. -
Smooth the surface:
Take a moment to check for fingerprints. I like to lightly brush the surface with a little baby oil or cornstarch to smooth out any imperfections before baking.
Step 3: Adding the Face
-
Mark the eye placement:
Decide where you want the face. Use a needle tool to make two tiny guide dots for the eyes to ensure they are even. -
Indent the eyes:
Take a medium-sized ball stylus and press firmly into the clay at your guide marks to create distinct, round sockets for the eyes. -
Create the mouth:
Use a smaller ball stylus to create a smaller, circular indentation below the eyes for the surprised ‘O’ mouth. -
Clean up edges:
If the indentation process pushed up any ridges of clay around the holes, gently smooth them back down with your finger or a silicone tool.
Glow Up
Swap the standard white clay for glow-in-the-dark polymer clay. Your desk buddy will look normal by day, but turn into a spooky glowing specter at night.
Step 4: Finishing Touches
-
Bake the ghost:
Place your ghost on a ceramic tile or baking sheet. Bake according to your specific clay package instructions (usually 275°F for 15-30 minutes per 1/4 inch of thickness). -
Cool down:
Turn off the oven and open the door slightly, letting the ghost cool down completely inside. This gradual cooling makes the clay stronger. -
Paint the features:
Once cool, dip a fine-point brush into black acrylic paint. Carefully fill in the indented eye and mouth sockets. The indentation helps keep the paint neat. -
Applying varnish:
If you want a truly ceramic look, apply a thin coat of matte varnish over the entire piece. Avoid gloss, as the matte texture helps sell the ‘sheet’ illusion.
Place your little phantom on your desk to keep you company during late-night study sessions
Star and Moon Studs
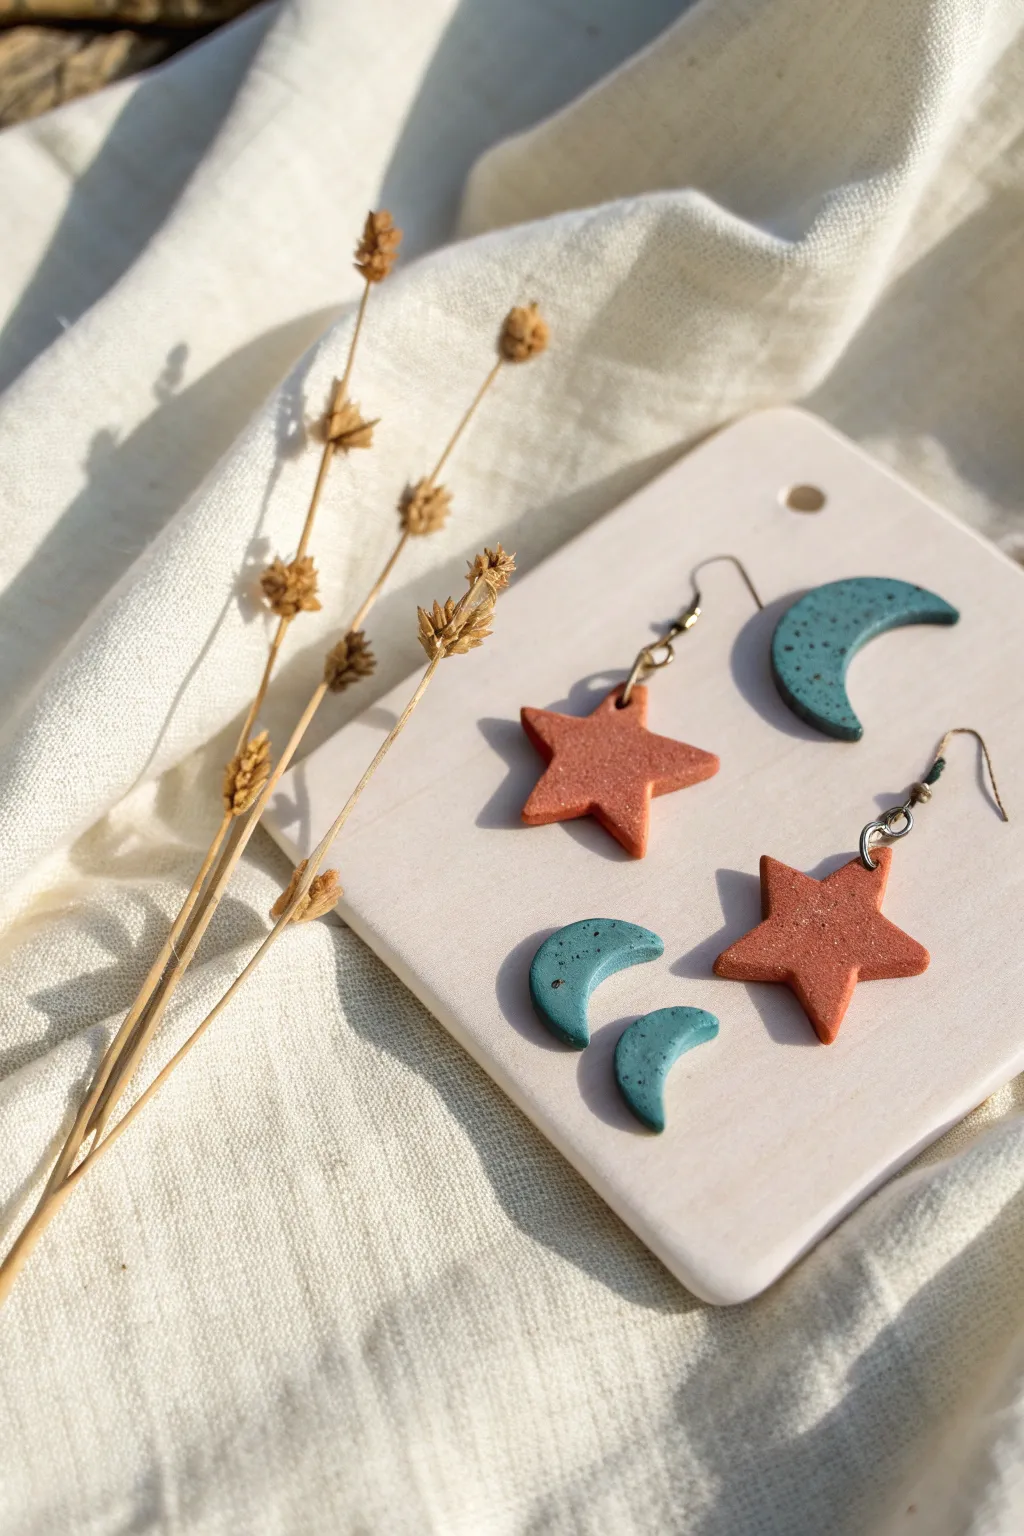
Capture the magic of the night sky with these charming star and crescent moon earrings. Featuring a speckled, faux-ceramic finish in warm terracotta and cool teal, this simple slab project is perfect for getting comfortable with polymer clay jewelry making.
Step-by-Step Guide
Materials
- Polymer clay (terracotta orange and teal blue)
- Black pepper or black embossing powder (for speckles)
- Acrylic rolling pin
- Pasta machine (optional)
- Star shaped cutter (approx. 1 inch)
- Crescent moon cutter (approx. 0.75 inch)
- Small jump rings (4-6mm)
- Earring hooks (fishhook style)
- Hand drill or pin tool
- Jewelry pliers (flat nose and round nose)
- Baking sheet with parchment paper
- Oven
Step 1: Preparing the Clay
-
Condition the clay:
Start by kneading your terracotta orange clay in your hands until it becomes soft, pliable, and warm to the touch. -
Add texture:
To achieve that earthy, speckled look seen in the photo, flatten your clay slightly and sprinkle a pinch of ground black pepper or coarse black embossing powder onto the surface. -
Mix the inclusions:
Fold the clay over the pepper and knead it thoroughly again to distribute the distinct black specks evenly throughout the orange mass. -
Repeat for teal:
Clean your hands or wear gloves to avoid color transfer, then repeat the conditioning and speckling process with your teal blue clay.
Natural Speckle Hack
Don’t have specialty clay? Use dried coffee grounds or black pepper for organic speckles. The heat won’t burn them, and it mimics stone perfectly.
Step 2: Cutting and Shaping
-
Roll out the slabs:
Using an acrylic roller or pasta machine, roll both colors of clay out to an even thickness, aiming for about 3mm thick for durability without heaviness. -
Cut the shapes:
Press your star cutter firmly into the orange slab and your crescent moon cutter into the teal slab. You will need two of each shape. -
Create secondary moons:
The image features smaller crescent moons as decorative accents. If you have a smaller cutter, cut two small teal moons; otherwise, hand-cut them or use a small round cutter twice to create a crescent shape. -
Smooth the edges:
Gently lift the shapes and tap the edges with your fingertip to smooth out any rough spots or drag marks from the cutters. -
Pierce holes:
Before baking, use a needle tool or toothpick to poke a hole near the top point of each star and the top tip of the larger moons. Ensure the hole is large enough for your jump rings.
Step 3: Baking and Assembly
-
Bake the pieces:
Place all your clay shapes on a baking sheet lined with parchment paper. Bake according to your specific clay brand’s manufacturer instructions (usually 275°F for 15-30 minutes per 1/4 inch thickness). -
Cool down:
Allow the pieces to cool completely on the baking sheet before handling them, as warm clay is still fragile. -
Open jump rings:
Using your flat-nose pliers and round-nose pliers, gently twist a jump ring open sideways (never pull it apart). -
Attach the stars:
Slide the open jump ring through the hole in the orange star, then thread the loop of an earring hook onto the ring. -
Close and secure:
Twist the jump ring closed so the gap is flush and tight. Repeat this process for the second star earring. -
Assemble the moons:
Since the moons in the image are shown as loose components or potentially mismatched pairs, you can attach hooks to the large teal moons just like the stars, or keep them as scatter pieces for photos.
Make it a Set
Use the small teal moons as stud earrings! Simply glue flat-pad earring posts to the back of the baked pieces using superglue or UV resin.
Enjoy wearing your new celestial creations or arrange them for a beautiful flat-lay photo