Face mugs are my favorite kind of functional pottery because they instantly feel like little characters living on your shelf. Here are a bunch of face mug ideas—from classic expressive features to weirder, artsy twists—so you can find a vibe that fits your hands and your sense of humor.
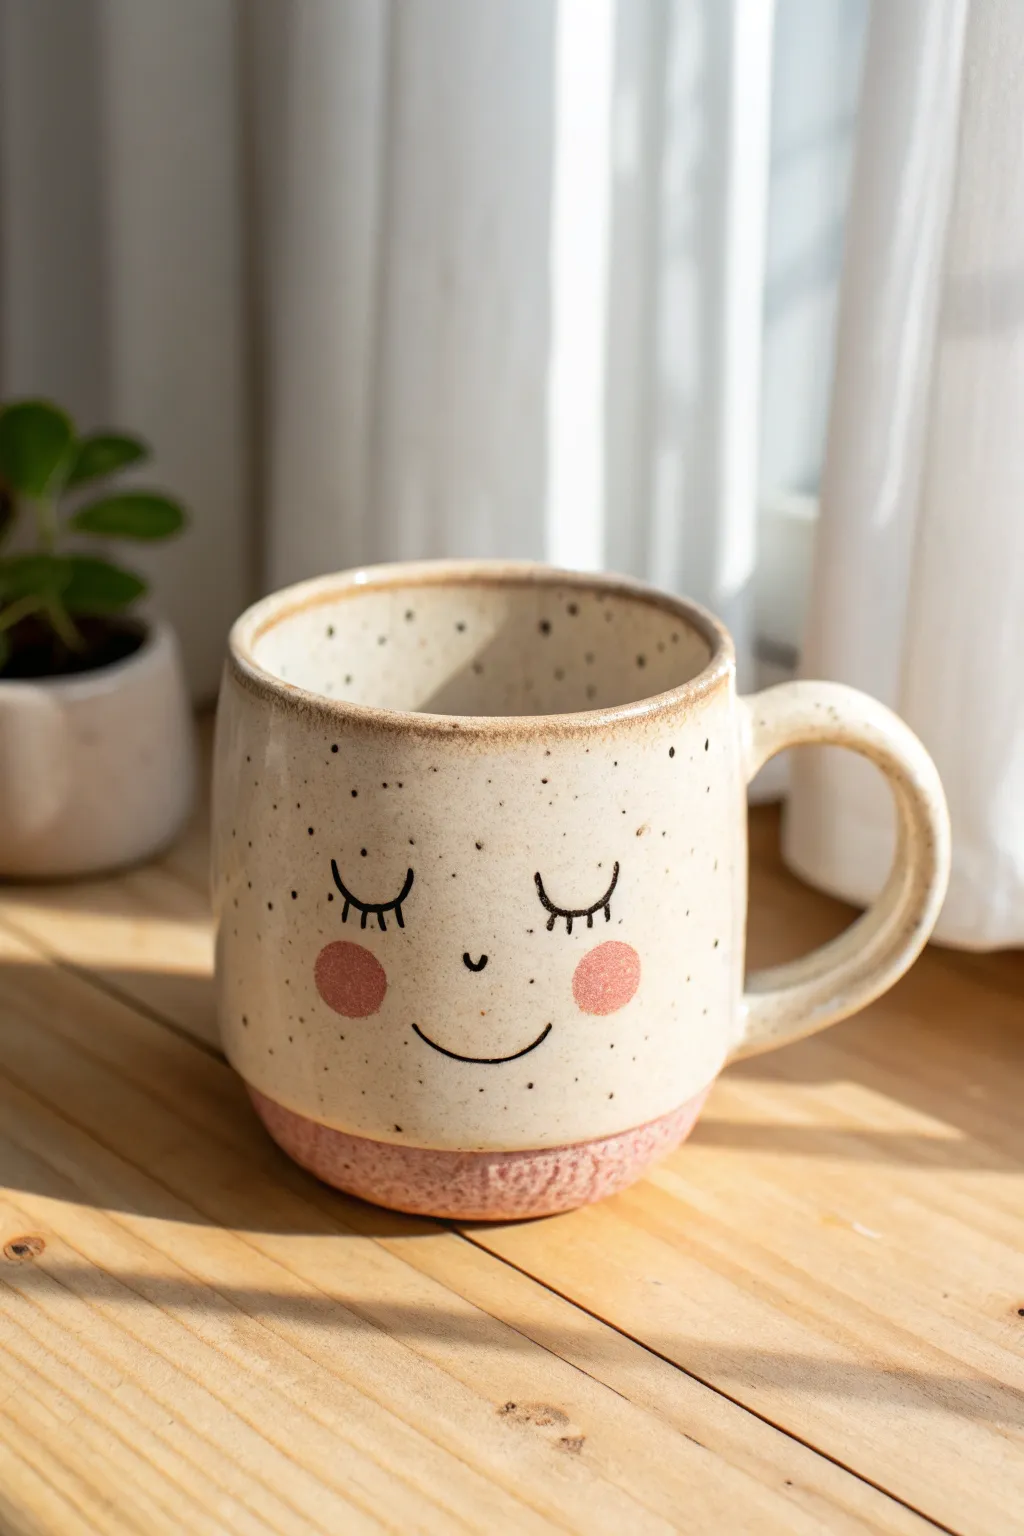
Classic Smiley Face Mug
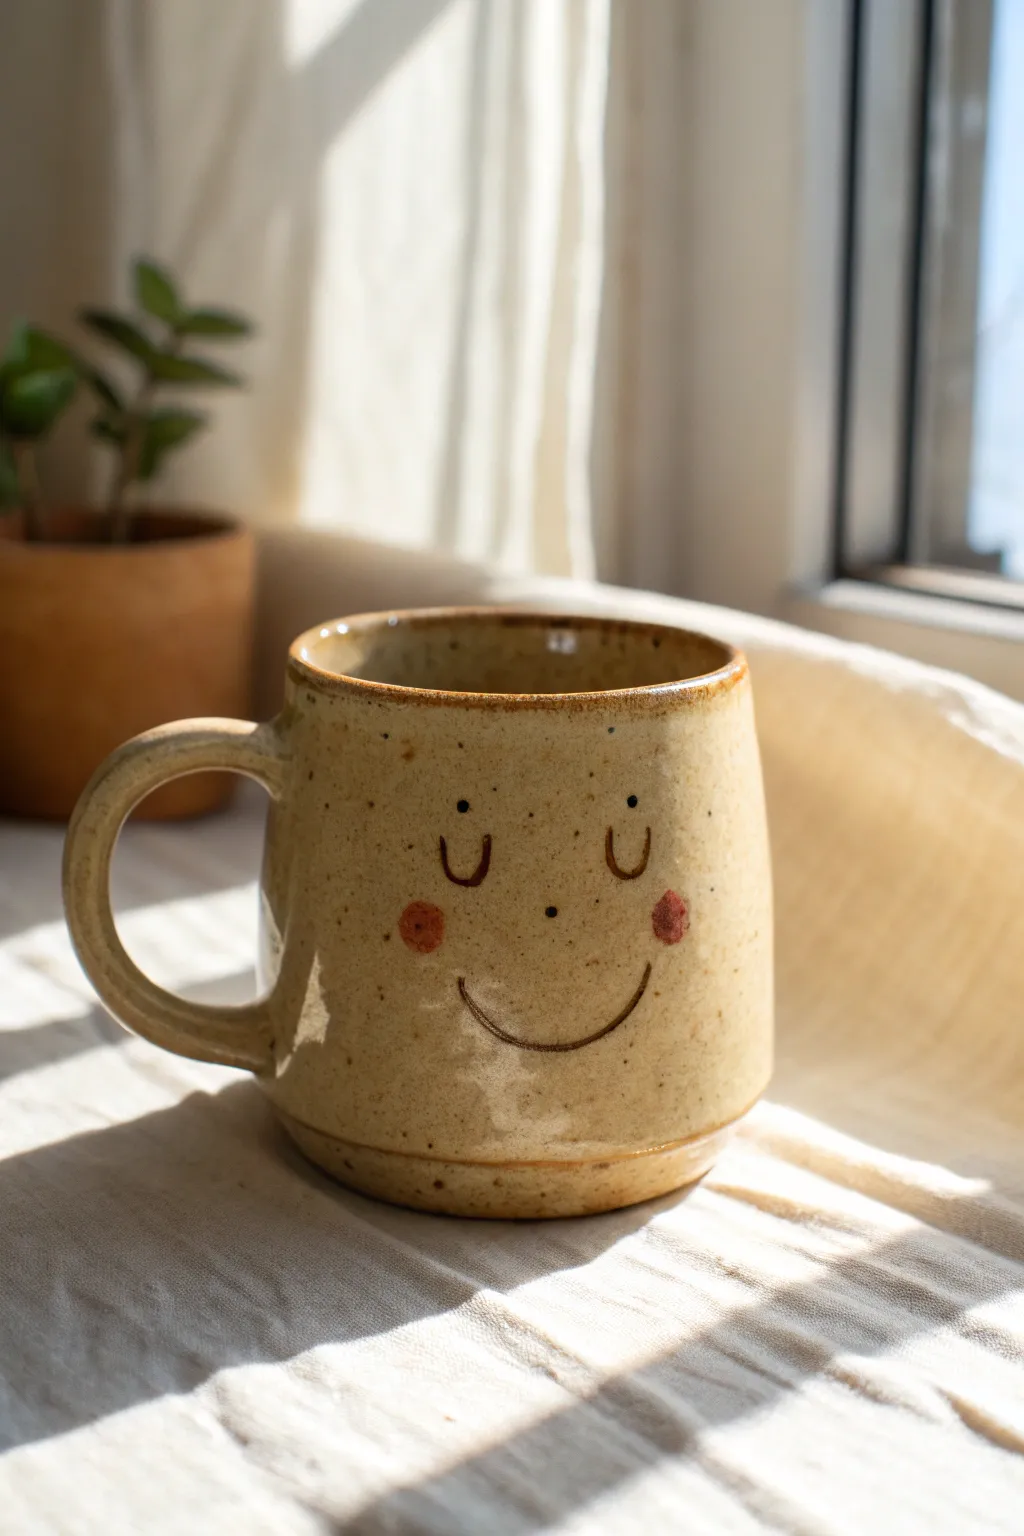
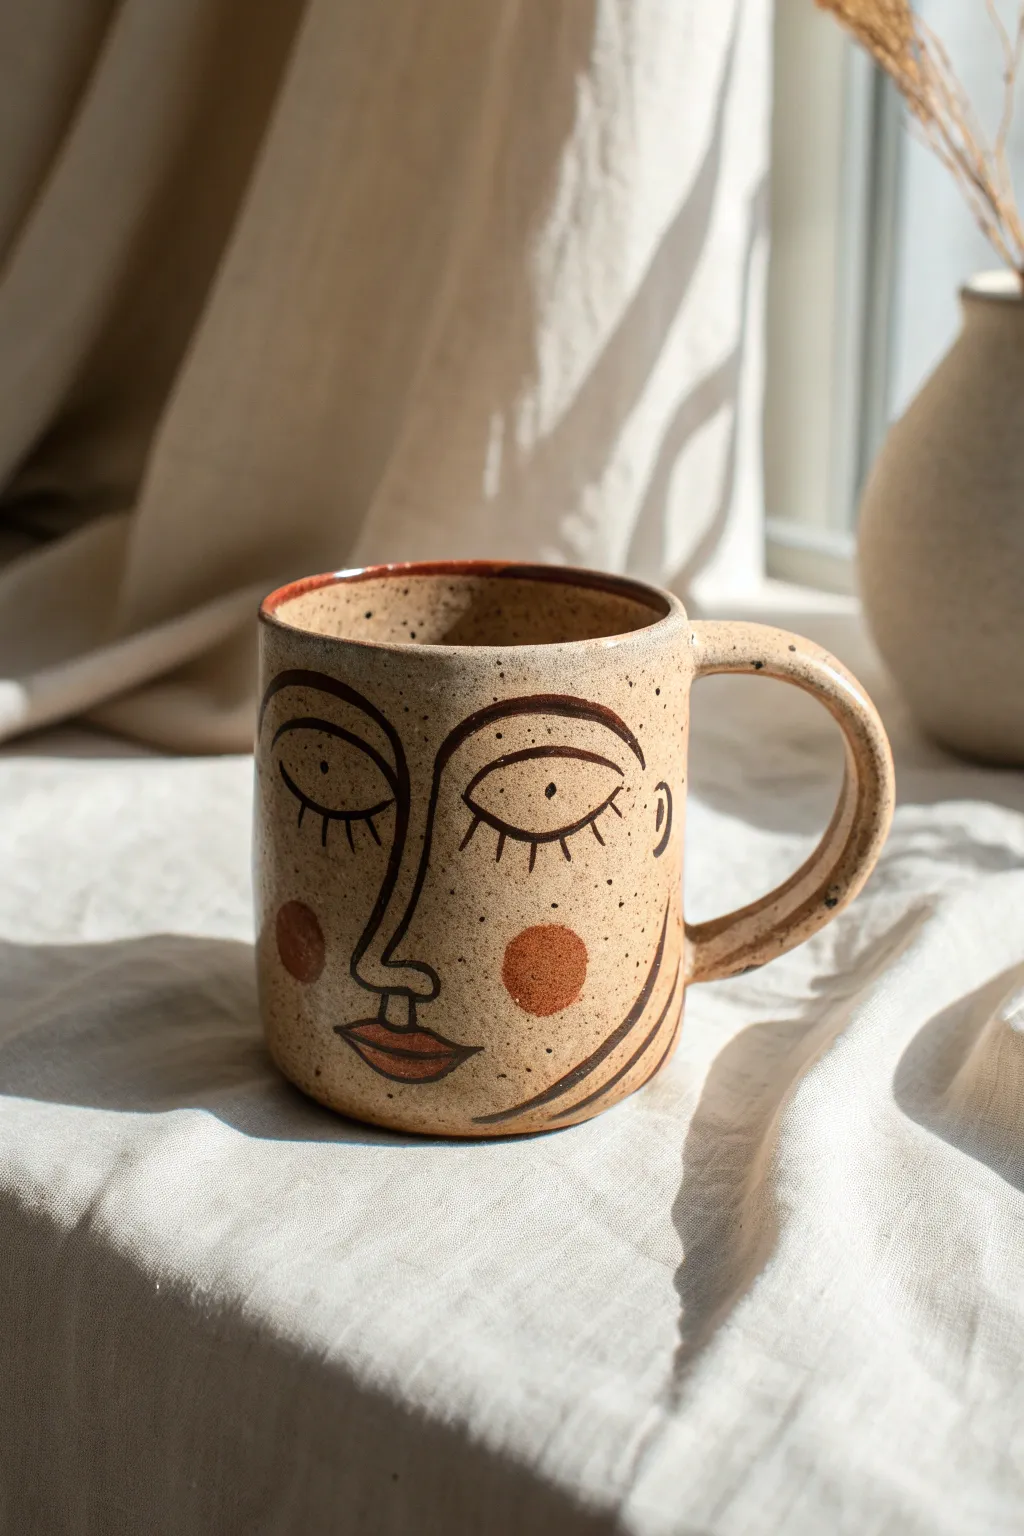
Bring a dose of wholesome cheer to your morning routine with this handmade ceramic mug featuring a simple, classic smiley face. The charm lies in the speckled clay body and the minimalist, dark-line features paired with soft rosy cheeks.
How-To Guide
Materials
- Speckled stoneware clay (mid-fire)
- Pottery wheel (or slab roller for hand-building)
- Throwing tools (sponge, wire cutter, rib, needle tool)
- Trimming tools
- Underglaze (black or dark brown)
- Underglaze (pink or coral)
- Fine detail paint brush
- Small round sponge or dabber
- Clear glossy glaze
- Kiln
Step 1: Forming the Mug Body
-
Prepare the Clay:
Begin by wedging about 1 to 1.5 pounds of speckled stoneware clay to remove air bubbles and ensure consistency. -
Center on the Wheel:
Throw the clay onto the wheel head and center it. I like to cone it up and down a few times to really get the particles aligned. -
Open and Pull:
Open the clay and pull the walls up to form a cylinder. Aim for a slightly wider base that tapers very gently inward towards the rim for that cozy, huggable shape. -
Refine the Shape:
Use a rib tool on the outside to smooth the surface and define the curve near the bottom. The bottom inch should step in slightly to create a distinct foot profile.
Clean Lines Pro-Tip
If you struggle with shaky hands when painting the smile, support your painting hand with your pinky finger resting gently on the mug’s surface for stability.
Step 2: Handle and Assembly
-
Pull a Handle:
While the body firms up to leather hard, pull a strap of clay to make the handle. It should be sturdy but comfortable to grip. -
Shape the Curve:
Bend the handle into a ‘C’ shape and let it stiffen slightly on a ware board until it holds its form without drooping. -
Trim the Body:
Once the mug body is leather hard, flip it over and trim the foot ring. Ensure the bottom is distinct as seen in the reference, with a slight undercut. -
Attach the Handle:
Score the mug body and the attachment points of the handle. Apply slip and press the handle firmly onto the mug, smoothing the seams with a damp sponge or modeling tool.
Level Up: Texture
Instead of painting the cheeks, press a small, rough stamp or piece of burlap into the clay at the cheek spots before bisque firing to add tactile texture.
Step 3: Painting the Face
-
Plan the Face:
Before painting, lightly sketch the smiley face features onto the leather-hard clay with a pencil. The graphite will burn off in the kiln, leaving you with a perfect guide. -
Paint the Eyes and Smile:
Dip a fine detail brush into black or dark brown underglaze. Paint two small dots for eyes and thin, curved lines for the ‘U’ shaped eyebrows above them. -
Add the Grin:
Carefully trace your pencil line to paint a wide, simple smile. Keep the line weight consistent with the eyebrows for a cohesive look. -
Apply Rosy Cheeks:
Using a pink or coral underglaze, add the cheeks. You can paint small circles or, for a softer look, dab a small round sponge lightly onto the clay surface. -
Bisque Fire:
Allow the mug to dry completely, which may take several days. Load it into the kiln for a bisque firing (usually cone 04 or 06).
Step 4: Glazing and Finishing
-
Clean and Prep:
Wipe the bisque-fired mug with a damp sponge to remove any dust that might prevent the glaze from adhering properly. -
Dip in Clear Glaze:
Dip the entire mug into a clear, glossy glaze. This will seal the clay and make the speckles and underglaze pop without hiding the design. -
Wipe the Foot:
Thoroughly clean the glaze off the bottom foot ring with a sponge or wax resist before dipping to prevent the mug from sticking to the kiln shelf. -
Glaze Fire:
Fire the mug again to the maturity temperature of your clay body (likely cone 5 or 6 for stoneware).
Now you have a cheerful companion for your morning coffee that is sure to start your day on a positive note


Wide-Eyed Goofy Grin Mug
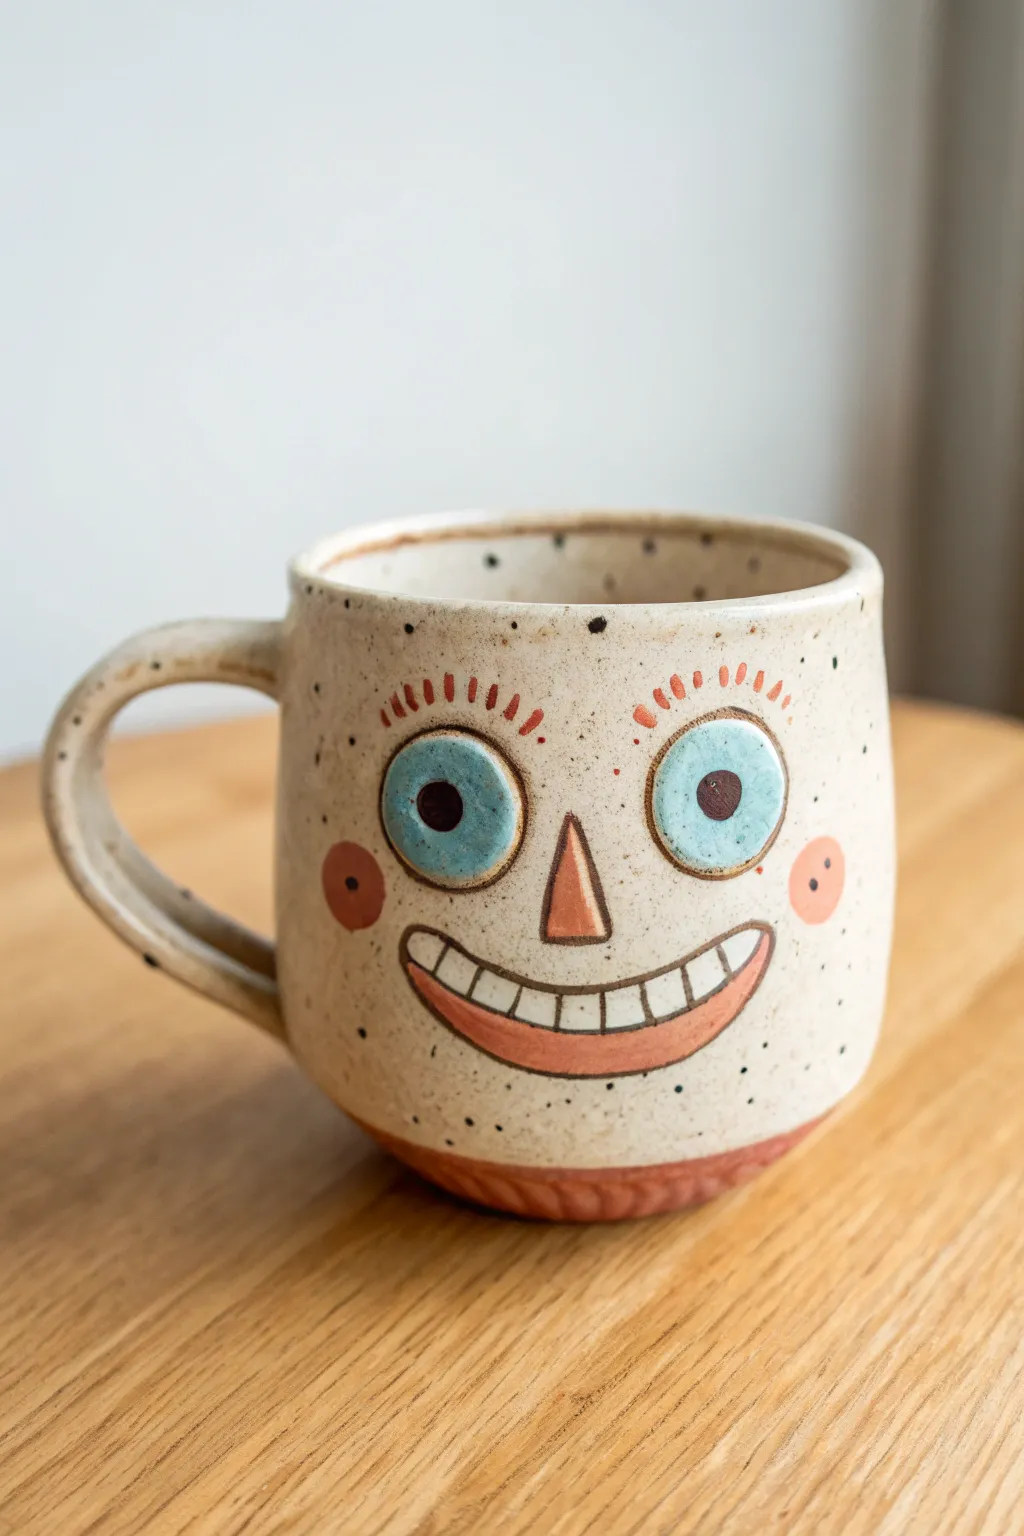
Brighten your morning coffee routine with this charming speckled mug featuring a wildly enthusiastic face. With its oversized blue eyes and toothy smile, this hand-built ceramic piece brings a playful, whimsical energy to your kitchen cupboard.
Step-by-Step Guide
Materials
- Speckled buff stoneware clay
- Pottery wheel (or slab roller for hand-building)
- Small sponge
- Needle tool
- Rib tool (wooden or silicone)
- Scoring tool or serrated kidney
- Clay slip
- Loop tool (for trimming)
- Underglazes: Light Blue, Orange/Terra Cotta, Dark Brown/Black
- Small paintbrush (detail brush)
- Clear transparent glaze
- Kiln
Step 1: Forming the Mug Body
-
Throw the Cylinder:
Begin by centering about 1 pound of speckled buff clay on your wheel. Open the center and pull up the walls to create a straight-sided cylinder, aiming for a consistent thickness of about a quarter-inch. -
Shape the Belly:
Using a rib tool against the inside of the spinning pot, gently push outward to create a rounded belly at the bottom while slightly tapering the rim inward. This gives the mug its friendly, stout shape. -
Refine the Rim:
Compress the rim with your sponge or a piece of chamois leather to ensure it’s smooth and pleasant to drink from. -
Trim the Base:
Once the piece has dried to leather-hard, trim the bottom using a loop tool. Carve a distinct foot ring, leaving the bottom rounded to mirror the interior curve.
Don’t Hide the Specs
When painting underglaze, avoid painting the main ‘skin’ of the face. Leaving the buff clay bare allows the natural iron speckles to show through the clear glaze for texture.
Step 2: Adding the Handle and Face
-
Pull a Handle:
Pull a strap of clay for the handle. Let it stiffen slightly into a curve that mimics an ear shape, ensuring it’s proportional to the mug body. -
Attach the Handle:
Score the attachment points on both the mug and the handle. Apply slip and press the handle firmly into place, smoothing the seams with your thumb or a modeling tool. -
Sculpt the Eyes:
I usually roll two small balls of clay and flatten them into thick discs. Score the mug surface where the eyes will sit, apply slip, and press the discs on, smoothing the edges slightly to integrate them. -
Add the Nose:
Shape a small triangular prism of clay for the nose. Score and slip it into the center of the face, right between and slightly below the eyes. -
Carve the Smile:
Rather than adding clay, carve the outline of a wide, crescent smile directly into the leather-hard clay using a needle tool. -
Define the Teeth:
Inside the smile outline, lightly scratch vertical lines to define the goofy teeth. Keep the lines somewhat shallow so they hold the glaze nicely later.
Step 3: Painting and Glazing
-
Bisque Fire:
Once the mug is bone dry, fire it in the kiln to bisque temperature (usually Cone 04 or 06) to prepare it for decoration. -
Paint the Eyes:
Apply 2-3 coats of light blue underglaze to the raised eye discs. Be careful to stay neatly within the raised circle boundaries. -
Add Cheeky Details:
Using the terracotta or orange underglaze, paint two round circles for cheeks, the triangular nose, and the lower lip of the smile. Add small dashes above the eyes for eyebrows. -
Outline with Dark Brown:
With a very fine brush and dark brown underglaze, paint the pupils in the center of the blue eyes. Outline the eyes, the nose, the smile, and trace the lines between the teeth. -
Wax Resist (Optional):
If you want the raw clay texture on the foot ring, apply wax resist to the bottom and up the side about a quarter inch. -
Apply Clear Glaze:
Dip the entire mug into a clear transparent glaze. This will seal the underglaze work and make the speckled clay body shine without obscuring the dots. -
Glaze Fire:
Load the kiln carefully and fire to the maturation temperature of your clay body (likely Cone 5 or 6). Let the kiln cool completely before unloading.
Undercut Issues
If your attachments pop off during drying, you likely didn’t score deep enough. Really scratch up both surfaces to create a muddy ‘velcro’ bond before connecting pieces.
Enjoy your morning brew in a mug that’s always happy to see you


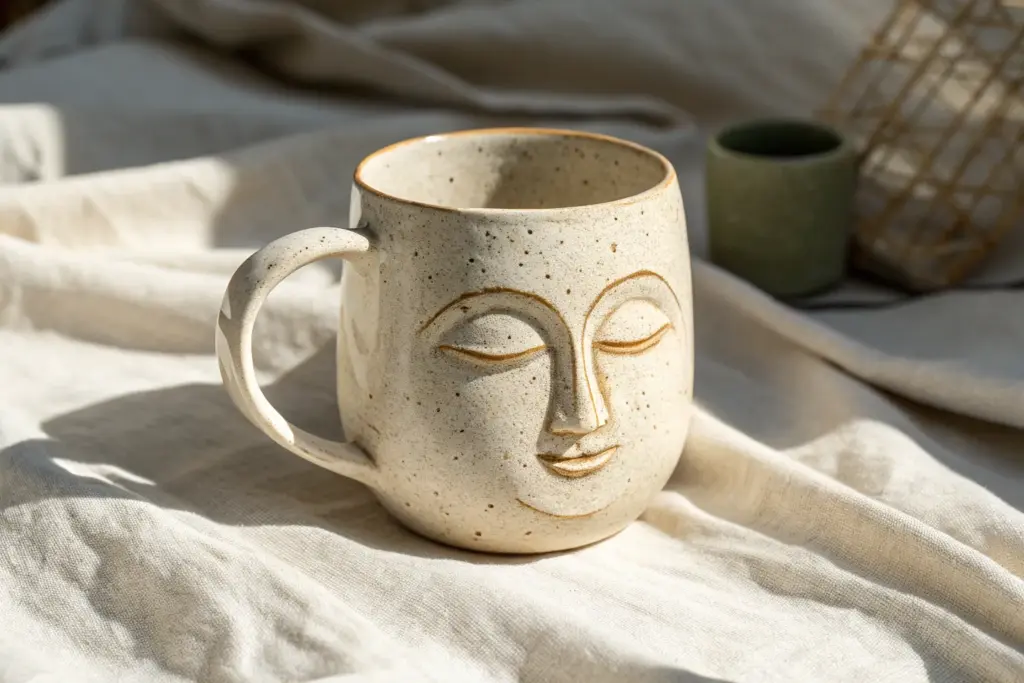
Sleepy Closed-Eyes Face Mug
Capture the peaceful essence of a quiet morning with this speckled ceramic face mug. This project combines simple sculptural elements with elegant gold luster to create a functional piece of art that looks like it’s sweetly dreaming.
Step-by-Step Tutorial
Materials
- White or cream stoneware clay (speckled variety preferred)
- Pottery wheel (or rolling pin for hand-building)
- Needle tool
- Rib tool
- Loop tool for trimming
- Small sponge
- Underglaze in pink or terracotta (for cheeks)
- Damp box or plastic sheet
- Clear or white speckled manufacturing glaze
- Real gold overglaze (luster)
- Dedicated detail liner brush for luster
- Kiln firing access (Bisque, Glaze, and Luster firings)
Step 1: Forming the Mug Body
-
Wedge the clay:
Start with a ball of speckled stoneware clay, wedging it thoroughly to remove air bubbles and align the particles for smoother throwing or building. -
Throw the cylinder:
Center your clay on the wheel and pull up a cylinder. Aim for a slightly rounded, bulbous bottom that tapers gently toward the rim, giving the ‘head’ a soft, organic shape. -
Refine the shape:
Use a rib tool to smooth the outside walls, removing throwing rings to create a perfect canvas for the face. It needs to be relatively smooth. -
Create the handle:
While the body sets up slightly, pull a medium-thick strap handle. Shape it into a generous ‘C’ curve that mimics the mug’s rounded aesthetic and set it aside to stiffen. -
Attach the handle:
Once the mug is leather hard, score and slip the contact points and attach the handle firmly. Smooth the seams with a damp sponge or modeling tool so it looks seamless.
Gold Luster Wisdom
Gold luster is incredibly runny and smelly. Work in a ventilated area and apply a thin, even coat. Too thick, and it will drip or turn purple.
Step 2: Sculpting the Features
-
Outline the face:
Using a needle tool, lightly sketch the placement of the eyes, nose, and mouth directly onto the leather-hard clay to ensure symmetry before committing. -
Shape the nose coil:
Roll a very tiny, tapered coil of clay for the nose. Score the center of the face and attach this coil, blending the edges into the mug surface so it creates a raised 3D relief. -
Carve the closed eyes:
Carefully incise the curved lines for the sleeping eyelids. I find it easiest to make one smooth, confident stroke for the main arch rather than short sketchy lines. -
Add eyelash details:
Using the very tip of your needle tool or a fine carving tool, make small, deliberate ticks downwards from the eyelid arches to represent the lashes. -
Sculpt the mouth:
Carve a small, subtle boat shape for the lips near the bottom center. You can slightly excavate the clay here to give the mouth definition. -
Apply the cheeks:
Dip a round paintbrush into pink or terracotta underglaze. Paint two perfect circles on either side of the nose for the rosy cheeks. Apply 2-3 coats for opacity.
Step 3: Glazing and Gilding
-
Bisque fire:
Load your bone-dry mug into the kiln and fire to cone 04 (or your clay’s specific bisque temperature) to prepare it for glazing. -
Apply base glaze:
Dip the entire mug into a clear or semi-opaque creamy white glaze. If your clay isn’t naturally speckled, choose a ‘speckled vanilla’ style glaze to achieve the look. -
Leave the base bare:
Wipe the foot ring and slightly up the side of the base clean with a sponge. This exposed raw clay creates a nice textural contrast at the bottom. -
Glaze fire:
Fire the mug again to the maturation temperature of your glaze and clay body (typically cone 5 or 6 for stoneware). -
Apply gold luster:
Once the mug is cool and clean, use a dedicated liner brush to carefully paint liquid gold luster over the raised nose bridge, the eye carvings, the lips, and the top rim. -
Third firing:
Place the mug in the kiln for a final time, firing to cone 018 or 019 for the gold luster. Ensure the kiln is well-ventilated for this step.
Glaze Crawling?
If the glaze pulls away from the underglaze cheeks, your underglaze might have been too thick or dusty. Sponge cheeks lightly before dipping in clear.
Enjoy your morning coffee in a mug that reminds you to take a peaceful pause in your day


Surprised O-Mouth Face Mug
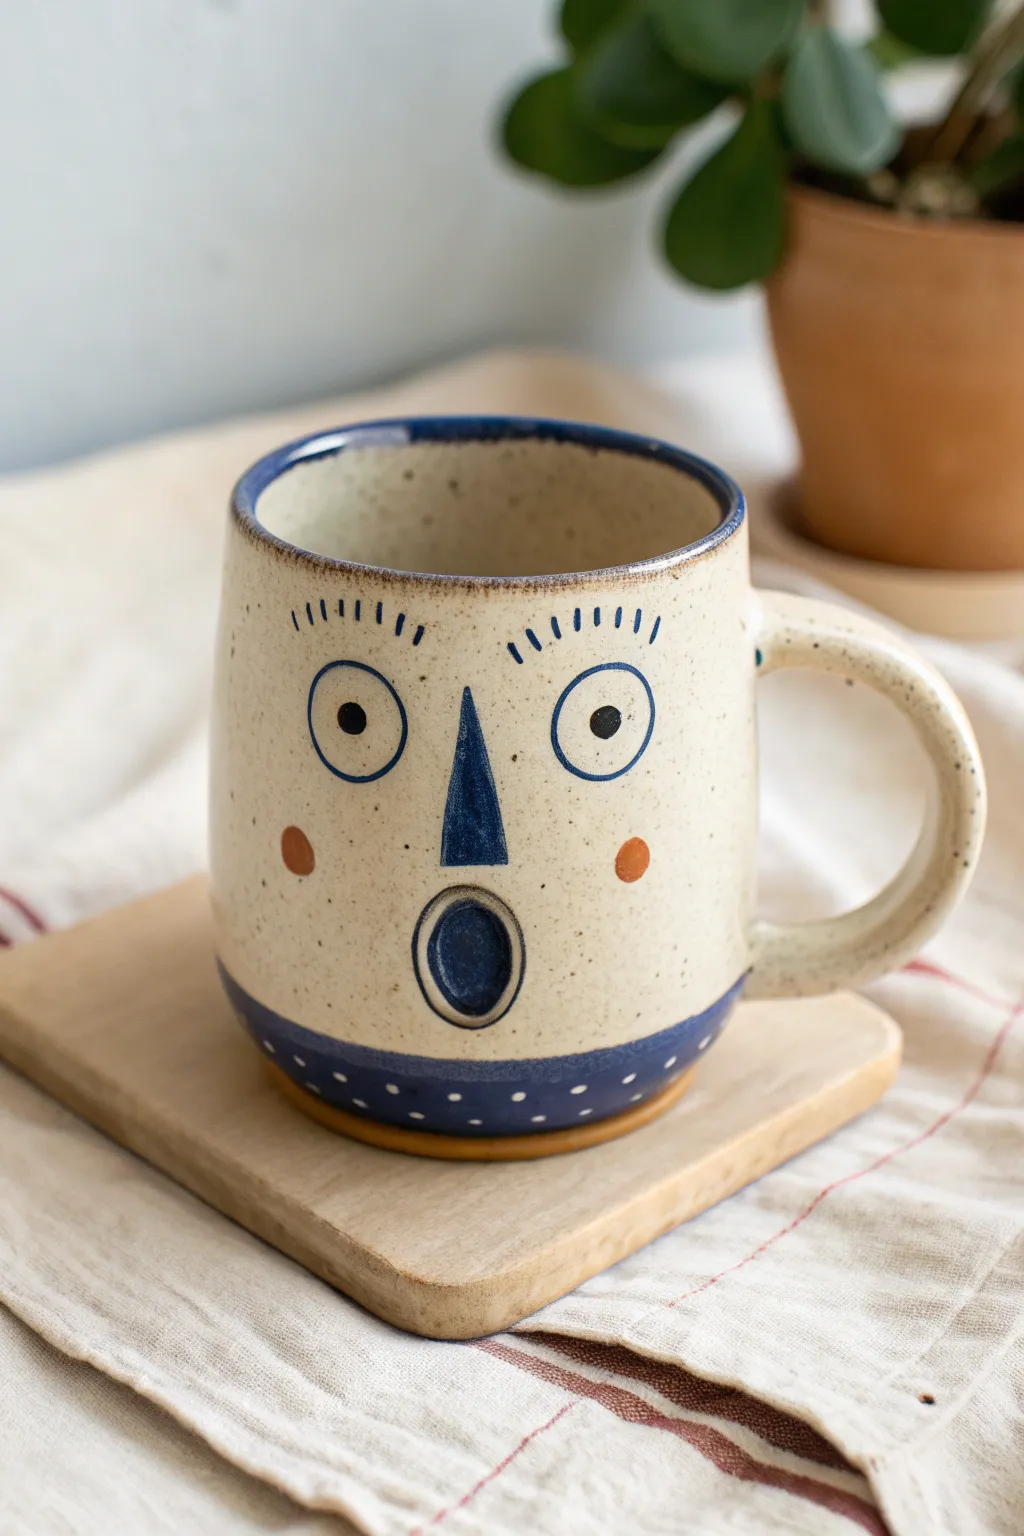
Capture a perpetually astonished expression with this charming stoneware mug tutorial. Featuring a speckled clay canvas, deep blue accents, and an iconic O-mouth, this piece adds character to every coffee break.
Detailed Instructions
Materials
- Speckled stoneware clay (mid-fire)
- Pottery wheel (or slab roller for hand-building)
- Needle tool
- Rib tool (kidney)
- Underglaze pencil or fine brush
- Cobalt blue underglaze
- Burnt orange underglaze
- Clear transparent glaze
- White or light cream slip (optional)
- Small round brushes (sizes 0 and 2)
- Sponge
- Wire cutter
Step 1: Forming the Vessel
-
Throw the cylinder:
Begin by centering your speckled clay on the wheel. Open the ball and pull up the walls to create a straight-sided cylinder with a slightly rounded bottom curve. Aim for uniform wall thickness. -
Refine the shape:
Use a rib tool to smooth the exterior and slightly compress the clay particles. This is where I like to ensure the surface is pristine for the face illustration later. -
Form the rim:
Gently compress the rim with a chamois or your fingers to round it off, ensuring it’s comfortable for drinking. -
Create the handle:
Pull a strap handle from a separate piece of clay. Let it set up slightly until it can hold an arch shape without collapsing. -
Attach the handle:
Score and slip the attachment points on both the mug body and handle ends. Press firmly to attach, creating a roomy C-shape ear on the side. -
Initial Drying:
Allow the mug to dry slowly to a leather-hard state. This firmness is crucial for clean painting lines without gouging the clay.
Fix Smudged Lines
If you smear underglaze while painting, don’t wipe it wet! Let it dry completely, then gently scrape the mistake off with a sharp needle tool or knife.
Step 2: Designing the Face
-
Map out the features:
Lightly sketch the face placement using a needle tool or an underglaze pencil. Mark two large circles for eyes, a central triangle for the nose, and a vertical oval for the mouth. -
Outline the eyebrows:
Using a very fine liner brush and cobalt blue underglaze, paint the eyebrows. Instead of solid lines, use short, vertical dashes arranged in an arc above the eye area. -
Paint the eyes:
Using the same blue, carefully outline the large circular eyes. Place a solid black or dark blue dot in the center of each circle for the pupils. -
Fill the nose:
Paint the long, triangular nose solid blue. Ensure the top point is quite sharp and the base sits just above the mouth. -
Create the iconic mouth:
Paint a thick dark blue oval outlines for the mouth. Fill the interior with the same dark blue to create a deep, open void look. -
Add rosy cheeks:
Switch to burnt orange underglaze. Paint two small, solid circles on the outer edges of the cheeks, aligned roughly with the bottom of the nose.
Make It Pop
Carve the nose and mouth areas slightly (sgraffito style) before painting them. This adds tactile depth and makes the features literally stand out.
Step 3: Detailing and Glazing
-
Rim decoration:
Apply a thin band of blue underglaze along the very top edge of the rim to frame the face. -
The polka-dot base:
Paint a solid band of blue around the bottom quarter of the mug. Once this layer is dry to the touch, carefully scratch away tiny dots or use wax resist to create the white polka dot pattern. -
Bisque fire:
Once bone dry, load the mug into the kiln for a bisque firing (usually Cone 04 or 06) to harden the clay and set the underglaze. -
Apply clear glaze:
Dip the entire bisqued mug into a clear transparent glaze. Shake off excess gently to prevent distinct drip marks. -
Wipe the foot:
Use a damp sponge to meticulously clean any glaze off the very bottom foot ring to prevent it from sticking to the kiln shelf. -
Final firing:
Fire the mug to maturity (Cone 5 or 6 depending on your clay). The speckles in the clay will pop through the clear glaze during this final heat work.
Now pour yourself a hot drink and enjoy the company of your delightfully startled new kitchen friend

The Complete Guide to Pottery Troubleshooting
Uncover the most common ceramic mistakes—from cracking clay to failed glazes—and learn how to fix them fast.
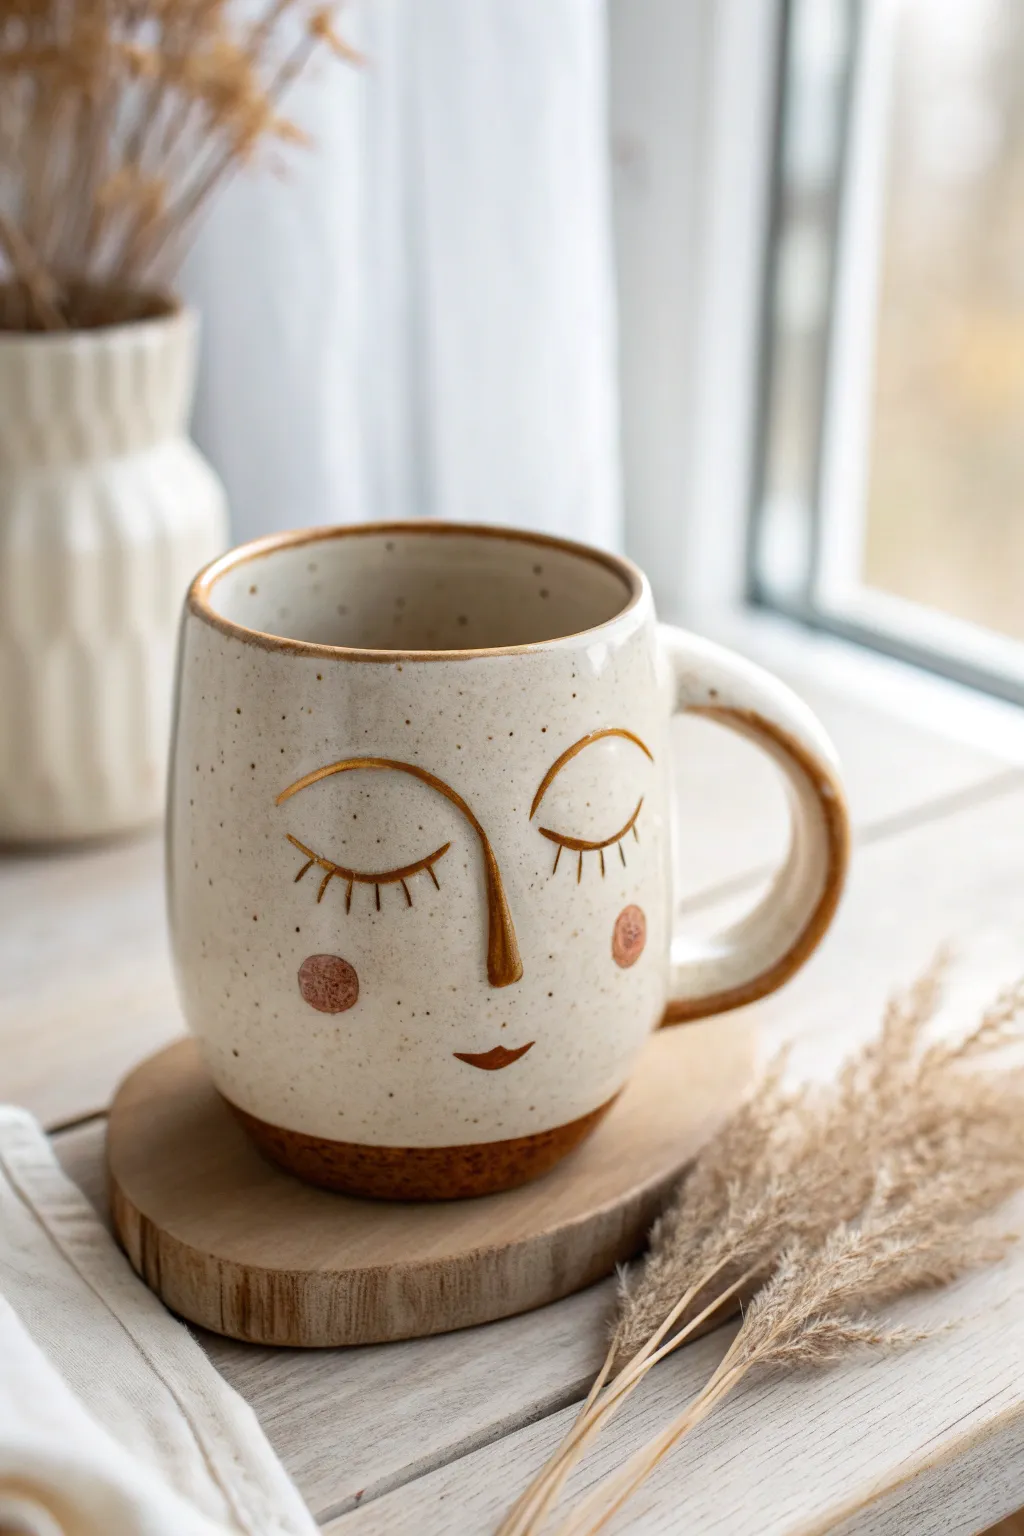
Winking Face Mug
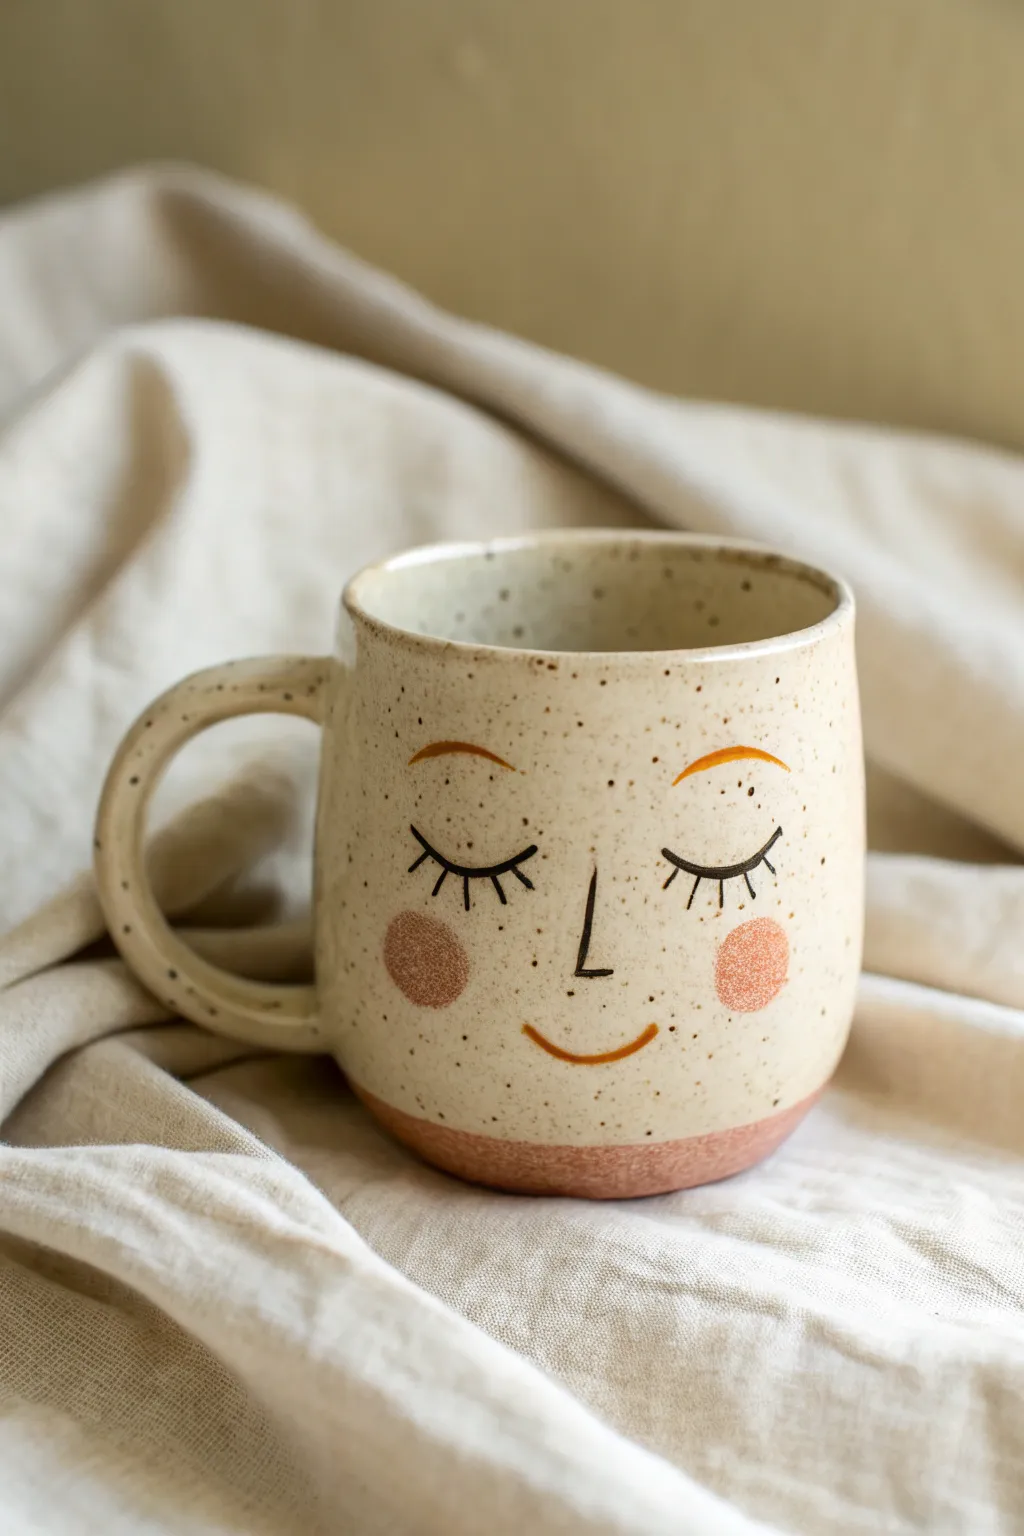
Capture the peaceful feeling of a morning nap with this charming ceramic mug design. Featuring a speckled cream glaze over a raw clay base, the project uses simple line work and soft blush accents to create a sweetly dozing face.
Step-by-Step Guide
Materials
- Bisque-fired ceramic mug (wheel-thrown or cast)
- Speckled cream stoneware glaze
- Wax resist (liquid latex or wax emulsion)
- Small round paintbrush (size 1 or 2)
- Medium flat paintbrush
- Ceramic underglaze pencil or fine liner brush (black/dark brown)
- Pink or coral underglaze (for cheeks)
- Burnt orange underglaze (for eyebrows and mouth)
- Clear dipping glaze (optional, if not using a gloss glaze)
- Sponge and water bucket
Step 1: Preparation & Base Design
-
Clean the bisque:
Start by wiping down your bisque-fired mug with a damp sponge. This removes any dust or oils from handling, ensuring your glazes and underglazes adhere properly to the surface. -
Mark the base line:
Decide how much of the raw clay base you want exposed. Measure about half an inch to an inch up from the bottom rim and lightly sketch a guideline around the circumference with a regular pencil. The graphite will burn off later in the kiln. -
Apply wax resist:
Using your medium flat brush, carefully apply a layer of wax resist to the bottom of the mug and up the sides to your pencil line. This crucial step prevents the glaze from sticking to the base, creating that lovely dipped look shown in the photo. -
Plan facial placement:
Lightly sketch the face features onto the bare bisque using a pencil. Center the nose first, then evenly space the closed eyes on either side. Place the eyebrows slightly high for a relaxed expression and mark the spots for the rosy cheeks.
Smudged Lines?
If your underglaze lines smear when dipping, try bisque firing the piece *after* painting the face but *before* glazing. This sets the design permanently so it won’t move.
Step 2: Painting the Features
-
Paint the eyelashes:
Dip a fine liner brush into black or dark brown underglaze. With a steady hand, paint the two downward-curving arcs for the closed eyes. Add three or four delicate lashes extending downward from each arc. -
Draw the nose:
Paint a simple ‘L’ shape or a straight vertical line with a small hook at the bottom between the eyes. Keep lines thin and consistent for a minimalist aesthetic. -
Add the smile:
Using a burnt orange underglaze and a small round brush, paint a gentle upward curve for the mouth below the nose. Taper the ends slightly so the line doesn’t look too blocky. -
Define the eyebrows:
With the same burnt orange shade, paint two arching eyebrows above the eyes. I find it helps to make the start of the brow slightly thicker and taper it off toward the temples. -
Create the cheeks:
Load a round brush with coral or pink underglaze. Instead of painting a solid circle, gently stipple or dab the brush onto the cheek area to create a soft, textured circle that mimics a natural flush. -
Let underglaze set:
Allow all your painted features to dry completely. Underglaze dries quickly, but give it at least 20 minutes to ensure it won’t smear during the glazing process.
Step 3: Glazing & Firing
-
Apply wax over features:
If you want the raw clay texture to show through on the face details (wax resist technique), carefully paint wax over your dried underglaze artwork. However, for a smooth finish under the glaze like the photo, skip this step and let the speckled glaze cover the drawing. -
Prepare the speckled glaze:
Stir your speckled cream glaze thoroughly. The heavy speckling agents tend to settle at the bottom, so mix until you have a consistent heavy cream texture. -
Dip the mug:
Holding the mug by the foot (or using glazing tongs), dip the entire mug into the bucket of cream glaze. Submerge it fully for about 3 seconds, then lift it out in one smooth motion to avoid drip marks. -
Clean the foot:
The wax resist on the bottom should repel the glaze. Use a damp sponge to wipe away any stray droplets of glaze that might have beaded up on the waxed area, ensuring a clean line between the glaze and the raw clay base. -
Check the interior:
Pour glaze inside the mug, swirl it to coat the entire interior, and pour out the excess. Ensure the rim is smooth and well-covered, as this is where lips will touch. -
Final drying:
Let the glazed mug dry for at least 24 hours before firing to ensure all moisture has evaporated from the clay body. -
Kiln firing:
Fire the mug in a ceramic kiln according to the clay and glaze specifications (typically Cone 5 or 6 for stoneware). Once cooled, sand the bottom raw clay lightly if it feels rough.
Glaze Consistency
For translucent specks where the face shows through clearly, thin your dipping glaze slightly with water. A too-thick application will obscure your delicate underglaze work.
Now you have a cozy, custom mug perfect for slow Sunday mornings and warm coffee.
Big Lips Statement Face Mug
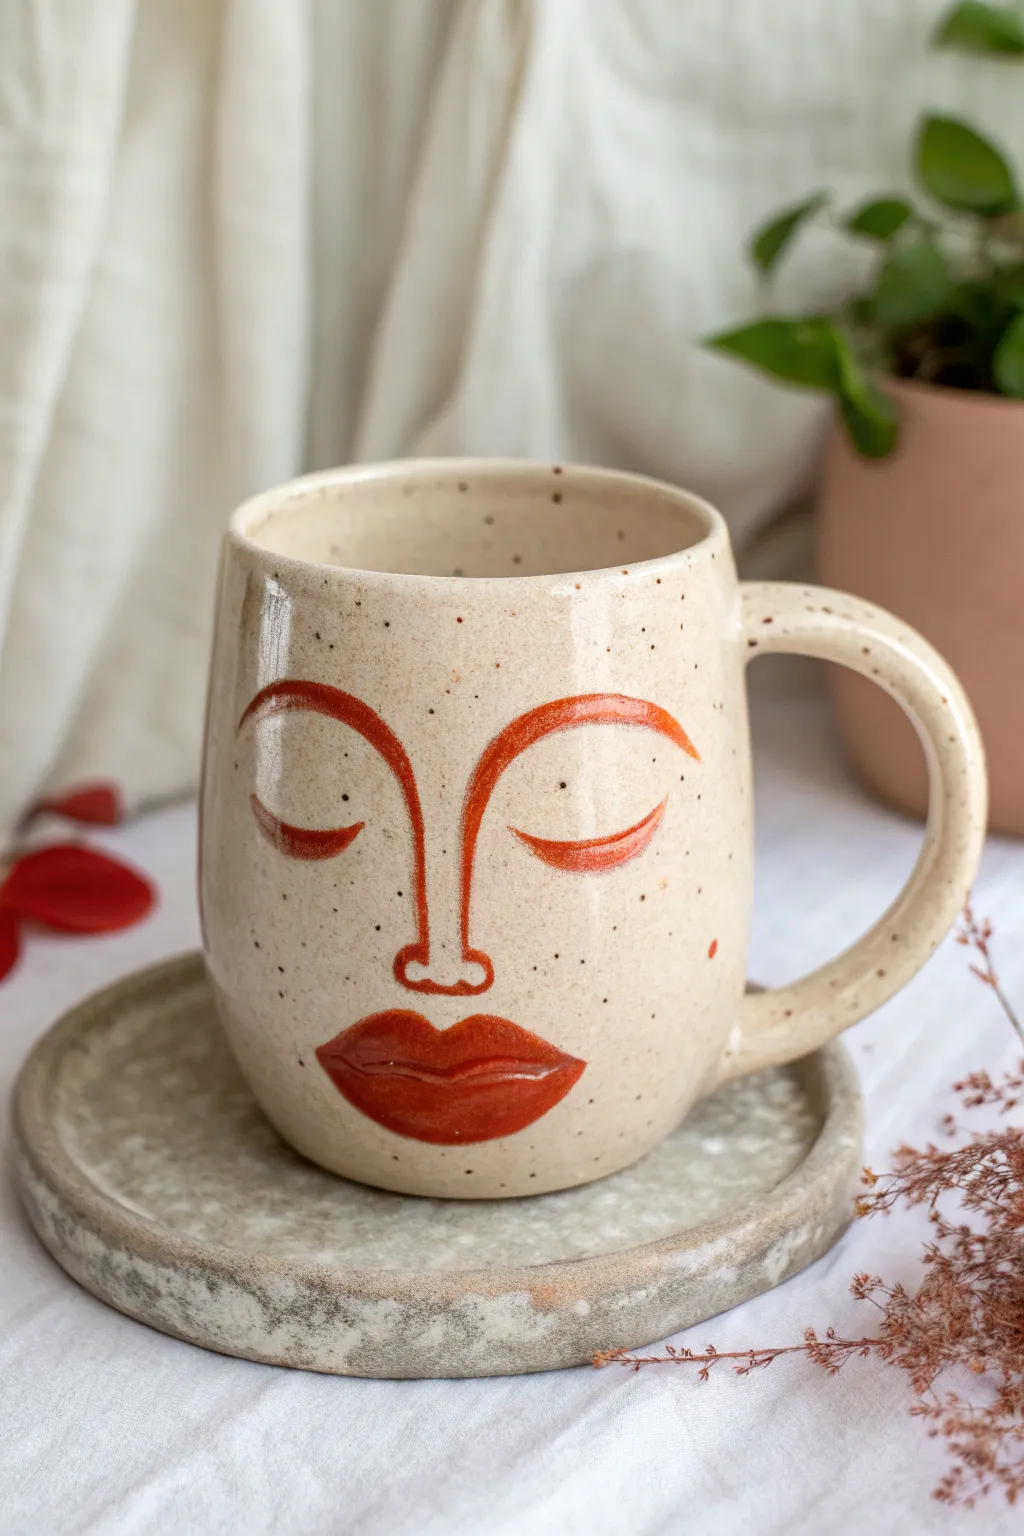
Capture a look of peaceful contemplation with this beautiful ceramic project featuring expressive lines and bold, terracotta-colored lips. The speckled clay body provides a warm, natural canvas for the minimalist face design, making it a functional piece of art for your morning coffee.
Detailed Instructions
Materials
- Speckled cream stoneware clay (cone 5/6)
- Pottery wheel (or slab roller for hand-building)
- Needle tool
- Rib tool (kidney)
- Sponge
- Wire cutter
- Loop trimming tool
- Scoring tool or serrated rib
- Slip (clay slurry)
- Terracotta or rust-colored underglaze
- Fine detail brush (size 0 or 1)
- Medium round brush
- Clear transparent glaze (cone 5/6)
- Kiln
Step 1: Forming the Vessel
-
Wedge and Center:
Begin with about 1.5 lbs of speckled stoneware clay. Wedge it thoroughly to remove air bubbles, then center it firmly on the pottery wheel head. -
Throw the Cylinder:
Open the clay and pull up the walls to create a cylinder. Aim for a slightly rounded, barrel-like shape rather than perfectly straight walls to give the face a softer structure. -
Refine the Shape:
Use a rib tool to smooth the outside and compress the clay. Gently push the belly of the mug out from the inside to create a gentle curve. -
Form the Rim:
Chamois or smooth the rim with a damp sponge to ensure it is comfortable for drinking. Cut the pot from the bat with a wire tool. -
Drying Phase 1:
Allow the cylinder to dry to a leather-hard state. It should be firm enough to handle without deforming but still retain some moisture.
Step 2: Adding the Handle and Trimming
-
Trim the Foot:
Place the leather-hard mug back on the wheel (upside down) and center it. Use a loop tool to trim a clean, defined foot ring. -
Pull the Handle:
Pull a strap of clay for the handle. Aim for a simple C-shape that provides a good grip but doesn’t distract from the face design. -
Attach the Handle:
Score the attachment points on both the mug and the handle. Apply slip, press firmly to attach, and smooth the seams with your thumb or a modeling tool.
Bleeding Lines?
If your underglaze lines are bleeding, the clay might be too wet. Wait until the piece is firmly leather-hard. Also, insure your clear glaze doesn’t contain zinc, which can shift colors.
Step 3: Painting the Face
-
Plan the Layout:
Lightly sketch the face design onto the leather-hard clay using a needle tool or pencil. The design relies on symmetry: two arched eyebrows connecting to a long nose bridge. -
Paint the Eyebrows:
Using your terracotta underglaze and a detail brush, paint the arched eyebrows. Start thick at the center and taper significantly as they curve outward. -
Form the Nose Bridge:
Continue the line from the inner brow downwards to create a long, thin nose bridge. I find it helps to use a single steady stroke here if possible. -
Define the Nostrils:
At the bottom of the nose bridge, paint a small loop or ‘U’ shape for the tip of the nose, extending slightly outward for nostrils. -
Add the Eyelids:
Beneath the brow arches, paint simple semi-circles for closed eyelids. Keep these lines thinner than the eyebrows for a delicate look. -
Create the Statement Lips:
Switch to a medium round brush. Outline the bold lips first—a distinct cupid’s bow on top and a full curve on the bottom. Fill them in completely with the terracotta underglaze. -
Refine Lip Details:
Once the initial fill is dry, add a slightly darker line or a second coat through the center of the lips to define the separation between top and bottom.
Add Cheek Color
For a softer look, water down a tiny bit of pink or peach underglaze and dab it onto the ‘cheek’ area with a sponge before the bisque firing for a faint blush effect.
Step 4: Glazing and Firing
-
Bisque Fire:
Once bone dry, load the mug into the kiln for a bisque fire (usually cone 04 or 06). This hardens the clay and sets the underglaze. -
Apply Clear Glaze:
Dip the bisque-fired mug into a clear transparent glaze. Ensure the glaze is thin enough that it won’t cloud the speckles or the underglaze design. -
Wipe the Foot:
Use a damp sponge to meticulously wipe all glaze off the bottom foot ring to prevent the mug from sticking to the kiln shelf. -
Glaze Fire:
Fire the mug to maturity (cone 5 or 6, depending on your clay body). Let the distinct speckles pop through the glossy finish.
Enjoy using your new mug for a calm and artistic start to your day


What Really Happens Inside the Kiln
Learn how time and temperature work together inside the kiln to transform clay into durable ceramic.
Chunky Nose and Brow Face Mug
Bring a touch of abstract art to your morning coffee with this charming face mug, featuring a continuous line design that connects bold brows to a prominent nose. The natural speckled finish and warm terracotta accents give it a cozy, handcrafted feel perfect for any kitchen.
How-To Guide
Materials
- Bisque-fired ceramic mug (wheel-thrown or cast)
- Speckled cream or oatmeal stoneware glaze
- Underglaze pencil or distinct dark brown underglaze
- Terracotta or rust-colored underglaze
- Clear transparent glaze (optional, if stoneware glaze isn’t self-sealing)
- Small round detail brush (size 0 or 1)
- Medium round brush (size 4)
- Clean sponge
- Kiln access
Step 1: Preparation & Base Glaze
-
Clean the bisque:
Begin by wiping down your bisque-fired mug with a slightly damp sponge to remove any dust or oils from handling. This ensures the glaze adheres properly. -
Apply the base color:
Dip the entire mug into your speckled oatmeal or cream stoneware glaze. If you prefer brushing, apply three even coats, allowing the glaze to dry to the touch between layers. -
Check the coverage:
Ensure the glaze is even and smooth. If you spot any drips or thick spots, gently smooth them out with your finger while the glaze is still powdery.
Glaze Crawling?
If the dark lines break or pull apart during firing, your underglaze might be too thick. Add a tiny drop of water to your paint for smoother, thinner lines next time.
Step 2: Painting the Face
-
Plan your placement:
Visualize where the face will sit. The nose should be central, slightly opposite the handle for balance. -
Draw the central line:
Using a dark brown underglaze and a fine liner brush, start the signature ‘chunky nose.’ Begin at the forehead area, sweeping down in a continuous line to form the long nose bridge. -
Form the nose:
At the bottom of your line, curve outward to create a rounded nostril shape, then draw a small horizontal line for the septum. -
Add the brows:
Connect the top of the nose bridge directly into deep, arched eyebrows. Make the lines slightly thicker here to give the face character. -
Outline the eyes:
Paint two large, almond-shaped outlines beneath the brows. They don’t need to be perfectly symmetrical; slight variation adds to the hand-painted charm. -
Add eyelids and lashes:
Draw curved lines inside the almond shapes to indicate heavy eyelids. Use quick, short strokes to add eyelashes extending downward from the outer corners. -
Paint the pupils:
Place a small dot in the center of each eye. You can leave them as dots or add a tiny circle around them for emphasis. -
Create the mouth:
Below the nose, paint the outline of the lips. Keep the shape simple and slightly stylised. -
Detail the ear:
Near the handle side of the face, paint a simple ‘C’ shape with an inner curl to represent an ear. -
Add contour lines:
Sweep a curved line along the jawline area, reaching up towards the ear, to frame the face.
Step 3: Adding Color & Finishing
-
Fill the cheeks:
Switch to your medium round brush and the terracotta underglaze. Paint two solid circles on the cheeks for a rosy flush. -
Color the lips:
Carefully fill in the lip outline with the same terracotta color. I find two coats usually provide the best opacity here. -
Rim the top:
Using the terracotta underglaze again, carefully paint a thin band along the very rim of the mug to frame the design. -
Clean the foot:
Wipe the bottom of the mug (the foot ring) completely clean of any glaze with a wet sponge to prevent it sticking to the kiln shelf. -
Final fire:
Fire the mug in the kiln according to the specific temperature guidelines of your clay and glaze combination (usually Cone 5 or 6 for stoneware).
Brush Control
Rest your pinky finger on the mug surface while painting detailed lines. This stabilizes your hand and prevents shaky strokes on the curved surface.
Enjoy your warm beverage in a piece of art that smiles back at you every morning
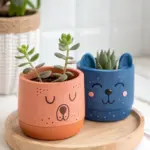
Rosy Cheeks Cute Face Mug
Transform a plain ceramic mug into a heartwarming companion for your morning coffee with this sweet face design. The speckled finish and soft pink accents give it a cozy, handcrafted charm that feels right at home on any kitchen shelf.
Detailed Instructions
Materials
- Plain cream or speckled ceramic mug (bisque or glazed)
- Black porcelain paint pen (fine tip) or ceramic overglaze
- Soft pink ceramic paint or underglaze
- Small round paintbrush (size 2 or 4)
- Rubbing alcohol and cotton pads
- Oven (for curing paint) or kiln (if using glazes)
- Pencil (optional)
- Paper towel
Step 1: Preparation
-
Selecting the base:
Choose a mug that already has a speckled finish if possible, as this adds instant texture. If using a plain cream mug on bisque ware, you can splatter a diluted brown underglaze with a toothbrush to create faux speckles before starting. -
Cleaning the surface:
Wipe down the entire outer surface of the mug with rubbing alcohol on a cotton pad. This removes any finger oils or dust that might prevent the paint from adhering properly. -
Planning the placement:
Hold the mug in your hand as if you were about to drink from it. Note where the ‘face’ should sit so it isn’t too high near the rim or hidden by the curve of the bottom. The center of the mug body usually works best. -
Sketching the face:
Lightly sketch the features using a pencil. Draw a wide gap between where the eyes will go to give it a sweet, innocent look. The graphite will burn off in the oven or kiln, so don’t worry about mistakes.
Uneven Cheeks?
If painting circles is tricky, dip a round foam pouncer or the eraser end of a pencil into the paint and stamp the cheeks on for perfect symmetry.
Step 2: Painting the Features
-
Drawing the eyes:
Using your fine-tip black porcelain marker, trace over your pencil lines for the eyes. Create two downward curves like upside-down shallow ‘U’ shapes. -
Adding eyelashes:
Carefully draw three small vertical lines extending upward from each eyelid curve. Keep them varying slightly in length for a natural, whimsical look. -
Creating the nose:
Right in the center between the eyes, draw a tiny ‘u’ shape for a button nose. Keep this very small and delicate. -
Drawing the smile:
Draw a wider upward curve below the nose for the smile. Ensure the line weight matches the eyes for consistency. -
Mixing the cheek color:
If your pink ceramic paint is too bright, mix in a tiny dot of white or cream to soften it into a pastel, rosy blush tone. -
Painting the rosy cheeks:
Dip your round brush into the pink paint. Blot excess paint onto a paper towel—you want a semi-dry brush to control the edges. -
Applying the blush:
Gently stipple or dab the pink paint onto the cheek areas in a circular shape. I like to keep the edges slightly soft rather than perfectly crisp circles to mimic real makeup blush. -
Adding the base detail:
To match the reference, paint the bottom rim or foot of the mug with a textured layer of the same pink, or a slightly darker terracotta shade if you prefer contrast.
Step 3: Finishing Touches
-
Initial drying:
Let the mug sit untouched for at least 24 hours. This allows the paint solvents to evaporate and the design to set before baking. -
Checking for errors:
Before curing, give the design one last look. Use a damp cotton swab or toothpick to gently scrape away any stray marks or clean up the edges of the circles. -
Baking preparation:
Place the mug into a cold oven. Do not preheat the oven, as the sudden temperature change can crack the ceramic. -
Curing the paint:
Set the oven to the temperature recommended by your specific paint manufacturer (usually around 300°F – 350°F). Bake for roughly 30-40 minutes. -
Cooling down:
Turn the oven off and leave the mug inside until the oven is completely cool. This gradual cooling prevents thermal shock.
Make It Last
Even after baking, hand washing is best. Harsh dishwasher detergents and high heat cycles can fade your delicate hand-painted face over time.
Now you have a charming new mug that brings a smile to your face every time you take a sip

TRACK YOUR CERAMIC JOURNEY
Capture glaze tests, firing details, and creative progress—all in one simple printable. Make your projects easier to repeat and improve.
Handle-as-Ear Face Mug
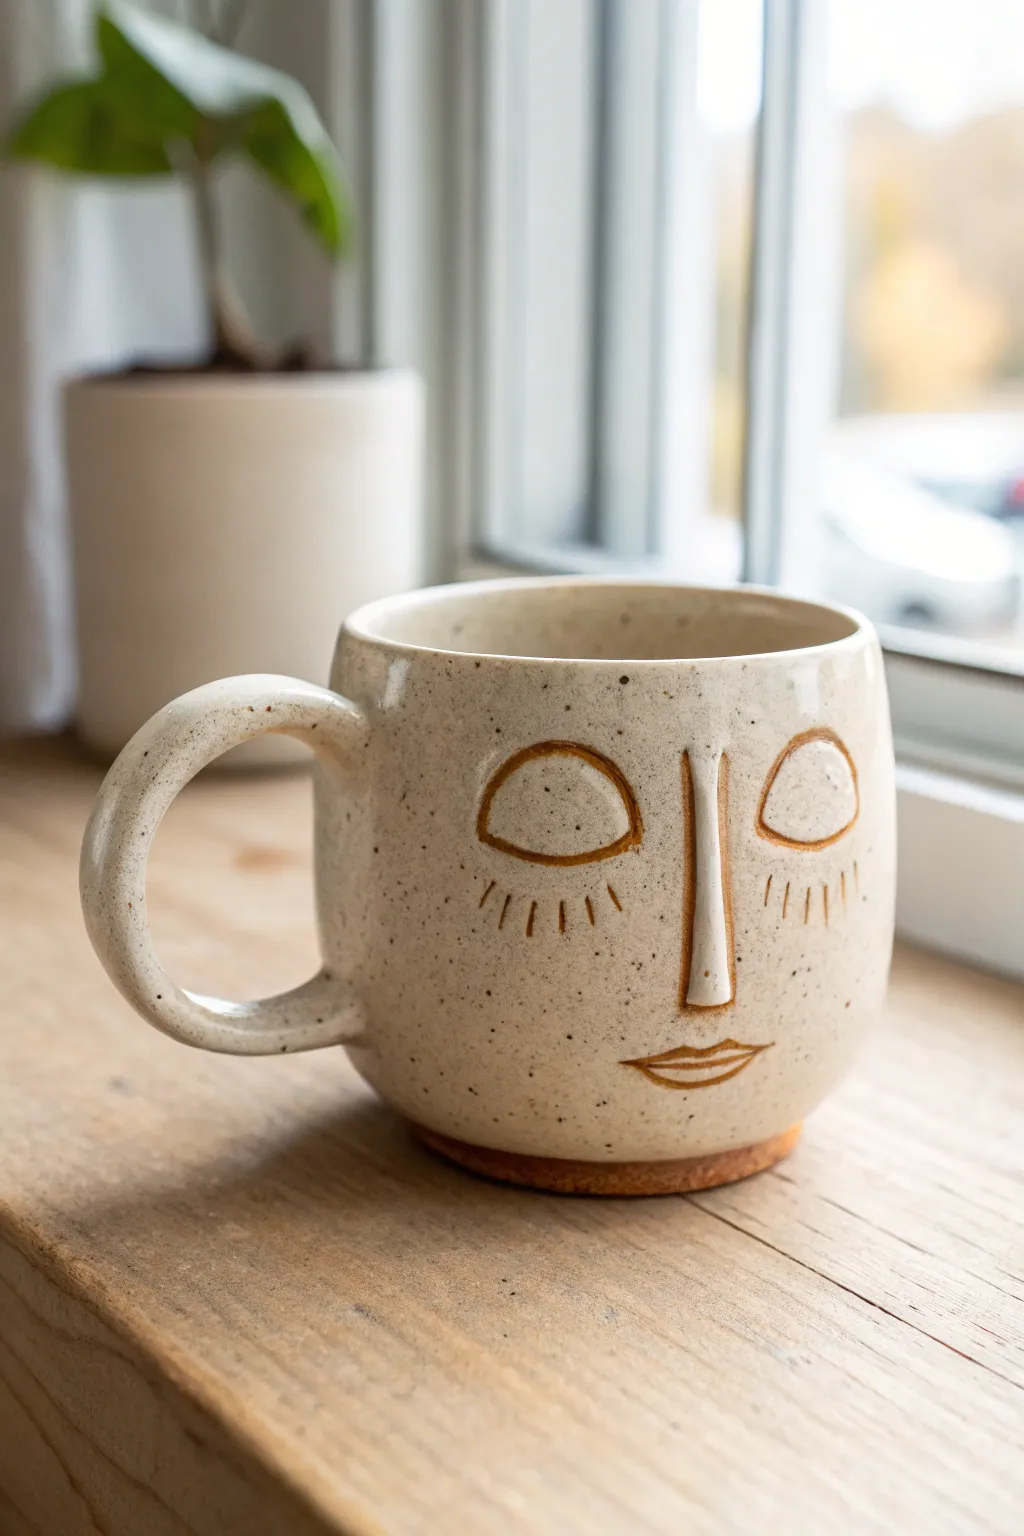
This serene ceramic mug features a minimalist line-drawn face carved directly into speckled clay. The warmth of the raw clay body outlines the eyes, nose, and mouth, creating a peaceful expression that pairs perfectly with a milky white glaze.
Step-by-Step Guide
Materials
- Speckled stoneware clay (cone 5/6)
- Pottery wheel (or slab roller for hand-building)
- Needle tool
- Loop trimming tool
- Rubber kidney rib
- Sponge
- Slip (clay slurry)
- Scoring tool
- Carving tool (small loop or sgraffito tool)
- Wax resist
- Milky white semi-transparent glaze
- Thin paintbrush
Step 1: Throwing the Form
-
Center the clay:
Start with about 1-1.5 lbs of speckled stoneware clay. Center it firmly on the wheel head, ensuring there is no wobble before opening. -
Open and pull:
Open the clay and begin pulling the walls up into a cylinder. Aim for a slightly rounded belly rather than vertical walls to give the ‘head’ a softer shape. -
Shape the rim:
Compress the rim with a sponge or chamois to keep it smooth and drinkable. Slightly taper the rim inward to hold heat better. -
Refine the surface:
Use a rubber kidney rib to smooth the outside walls, removing throwing lines to create a blank canvas for the face. Cut the mug from the bat with a wire tool.
Uneven Wax Lines
If you drip wax where you don’t want it, let it dry completely and scrape it off gently with a knife. Don’t try to wipe wet wax; it smears and seals the pores.
Step 2: Trimming and Handle
-
Leather hard stage:
Let the mug dry to a leather-hard state. It should be firm enough to handle without deforming but soft enough to carve. -
Trim the foot:
Secure the mug upside down on the wheel. Use a loop tool to trim away excess weight from the bottom and define a clean foot ring. -
Pull a handle:
Pull a strap of clay for the handle. For this design, aim for a simple C-shape that mimics the curve of an ear. Let it stiffen slightly. -
Attach the handle:
Score and slip the attachment points on both the mug and the handle. Press the handle firmly onto the side of the mug, smoothing the seams with your thumb or a wooden tool.
Use Iron Wash
To make the facial lines pop more, paint a thin red iron oxide wash into the carvings before waxing. This deepens the raw clay color significantly.
Step 3: Sculpting the Face
-
Sketch the design:
Lightly sketch the facial features onto the mug surface with a needle tool. Place the nose centrally, opposite the handle. -
Carve the outlines:
Use a small carving tool to incise the lines for the eyes, lashes, nose, and lips. I find a small U-shaped loop tool works best for getting clean, consistent line width. -
Raise the nose:
Instead of just carving, shape a small coil of clay into a long, thin wedge. Score and slip it onto the face to build a 3D nose bridge, blending the edges seamlessly into the mug wall. -
Refine the features:
Go back over your carved lines. Smooth any clay burrs with a damp sponge or soft brush to ensure the lines are crisp. -
Add texture:
If your clay isn’t naturally speckled, you can flick iron oxide wash or brown underglaze onto the surface now using a toothbrush.
Step 4: Glazing and Firing
-
Bisque fire:
Fire the mug to bisque temperature (usually cone 04) to prepare it for glazing. -
Cleaning:
Wipe the bisqued mug with a damp sponge to remove any kiln dust. -
Resist the features:
Carefully apply wax resist directly into the carved lines of the eyes, lashes, and mouth. Paint a line of wax down the ridge of the nose if you want that raw clay look there too. -
Wax the foot:
Apply wax resist to the bottom foot ring to prevent glaze from sticking to the kiln shelf. -
Dip in glaze:
Dip the entire mug into a milky white or oatmeal glaze. The glaze should be semi-transparent or break over edges so the speckles show through. -
Clean up:
Once the glaze is dry, use a damp sponge to wipe any stray glaze droplets off the waxed facial features. The clay body should be exposed in those carved areas. -
Glaze fire:
Fire the mug to the final temperature appropriate for your clay and glaze (typically cone 5 or 6). Let the kiln cool completely before unloading.
Enjoy sipping your morning coffee from a mug that smiles back at you with quiet charm
Hair Texture Fringe Face Mug
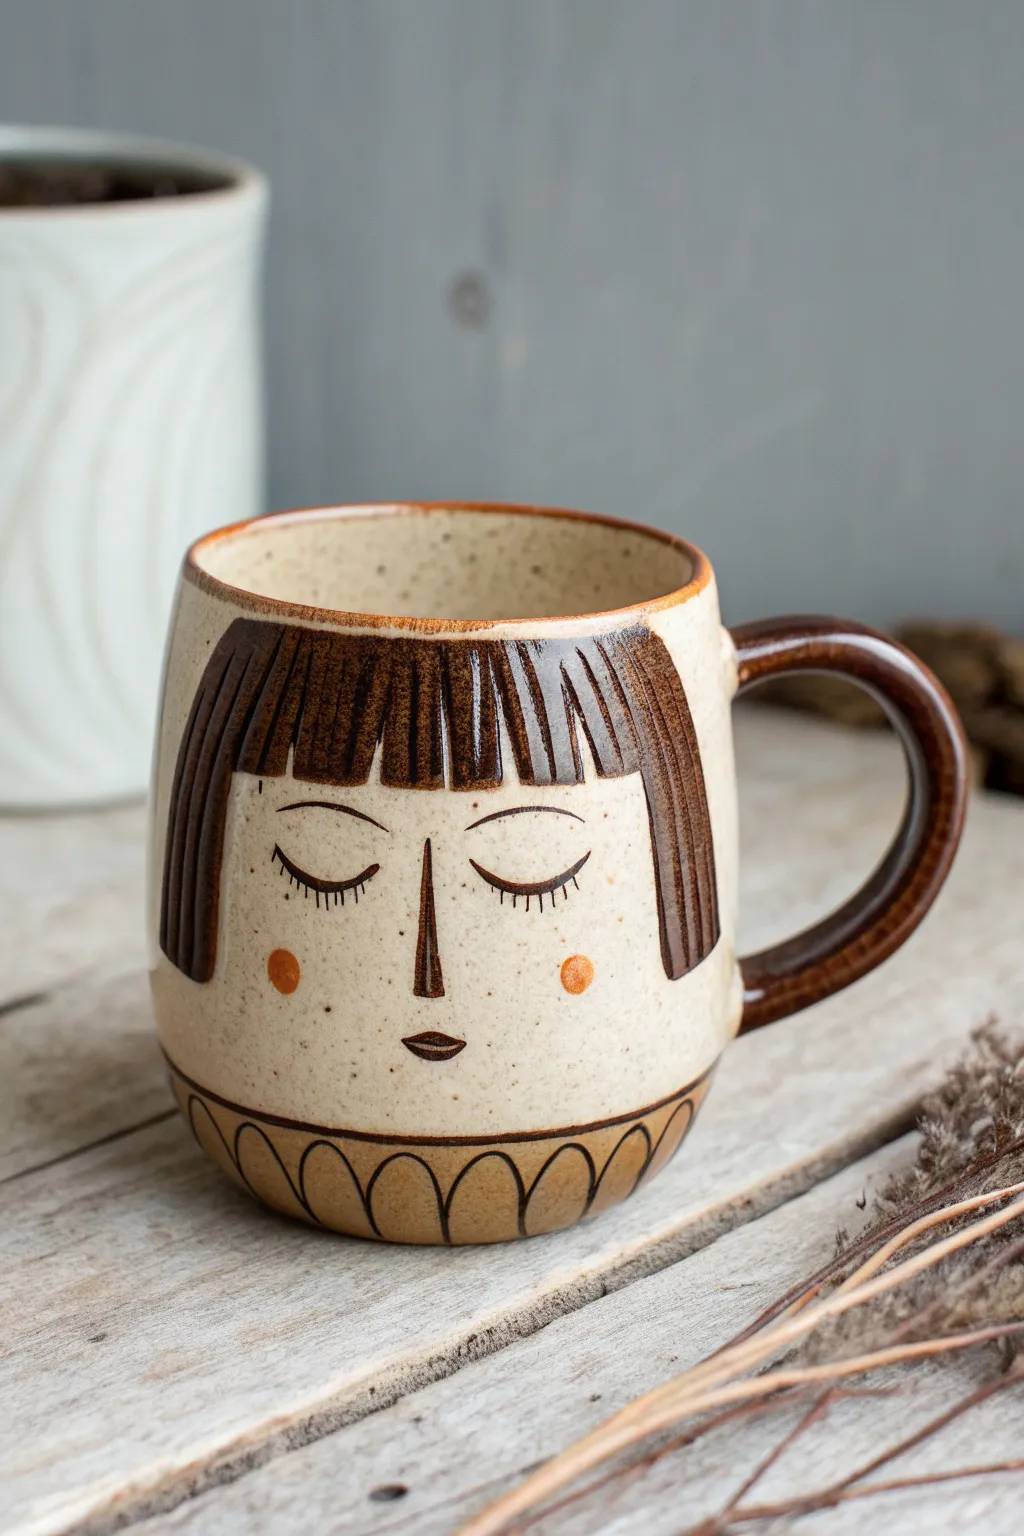
This charming ceramic mug features a serene sleeping face framed by a textural, carved fringe hairstyle. With its warm speckled clay body and rich brown glazes, it combines whimsical illustration with comforting earth tones.
How-To Guide
Materials
- Speckled stoneware clay (mid-fire)
- Pottery wheel (or rolling pin for hand-building)
- Needle tool
- Loop carving tool (small U-shape)
- Rib tool (wood or metal)
- Fettling knife
- Scoring tool or serrated rib
- Slip (clay slurry)
- Underglaze (Dark Brown and Orange/Terracotta)
- Fine detail brush (liner brush)
- Clear glaze (transparent)
- Sponge
Step 1: Forming the Body
-
Prepare the Clay:
Begin by thoroughly wedging your speckled stoneware clay to remove air bubbles. A speckled clay body is essential here to get those lovely little spots that show through the unpainted areas of the face. -
Throw or Build the Cylinder:
Throw a medium-sized cylinder on the wheel with walls about 1/4 inch thick. If you are hand-building, roll out a slab and form a clean cylinder, smoothing the seam invisible. Aim for a slightly rounded bottom edge rather than a sharp 90-degree angle. -
Refine the Shape:
Use a rib tool to smooth the exterior and gently swell the form slightly in the middle, giving the ‘face’ area a gentle curve. This softness makes the character look friendlier. -
Trim the Foot:
Once the clay is leather-hard, trim the bottom to create a neat foot ring. This defines the separation between the mug and the table.
Clean Lines Tip
If your underglaze lines for the eyes look shaky, wait for them to dry, then gently scratch away mistakes with a wooden toothpick for sharp edges.
Step 2: Carving & Handle
-
Pull the Handle:
Pull a strap handle from the same clay. It should be relatively thick and comfortable. Attach it to the side of the mug using the score and slip method, ensuring the curve mimics a standard ‘C’ shape. -
Map Out the Hair:
Using a needle tool, very lightly sketch the outline of the bob haircut. Draw the straight fringe line across the forehead and the side pieces framing where the cheeks will be. -
Carve the Hair Texture:
Take your small loop tool and carve vertical vertical grooves into the hair area. Start at the top rim and pull down towards the fringe line. Vary the depth slightly to create the look of separated strands. -
Carve the Base Pattern:
At the very bottom of the mug, sketch a scalloped or petal-like border. Use the loop tool again to define these shapes, carving away the negative space slightly to make the scallops pop.
Make it 3D
Add a tiny ball of clay to the nose tip before firing to give the face actual dimension, rather than just painting the nose flat.
Step 3: Painting the Features
-
Apply Brown Underglaze:
Paint the carved hair area with a rich dark brown underglaze. Make sure to get the color deep into the carved grooves. I find doing two coats ensures it isn’t transparent after firing. -
Glaze the Handle and Base:
Apply that same dark brown underglaze to the handle and the scalloped design at the bottom, tying the design together. -
Paint the Face Details:
Using your finest liner brush and the dark brown underglaze, carefully paint the facial features. Paint two curved arches for closed eyes, add tiny vertical dashes for eyelashes, a long narrow triangle for the nose, and a small almond shape for the mouth. -
Add Rosy Cheeks:
Dip a small round brush into orange or terracotta underglaze. Paint two perfect circles on the cheeks. Keep the application fairly opaque so the color stands out against the speckles. -
Bisque Fire:
Allow the mug to dry completely (bone dry) and fire it to bisque temperature (usually cone 04 or 06 depending on your clay).
Step 4: Finishing
-
Clear Glazing:
Wipe the bisque-fired piece with a damp sponge to remove dust. Dip the entire mug into a clear, transparent glaze. This will seal the clay and make the underglaze colors vibrant. -
Wipe the Foot:
Clean the glaze off the very bottom of the foot ring with a sponge so it doesn’t stick to the kiln shelf. -
Final Fire:
Fire the mug to maturity (typically cone 5 or 6 for stoneware). The heat will bring out the natural iron speckles in the clay body, completing the look.
Fill your new handmade mug with coffee or tea and enjoy the serene company of your ceramic friend
Beard and Mustache Face Mug
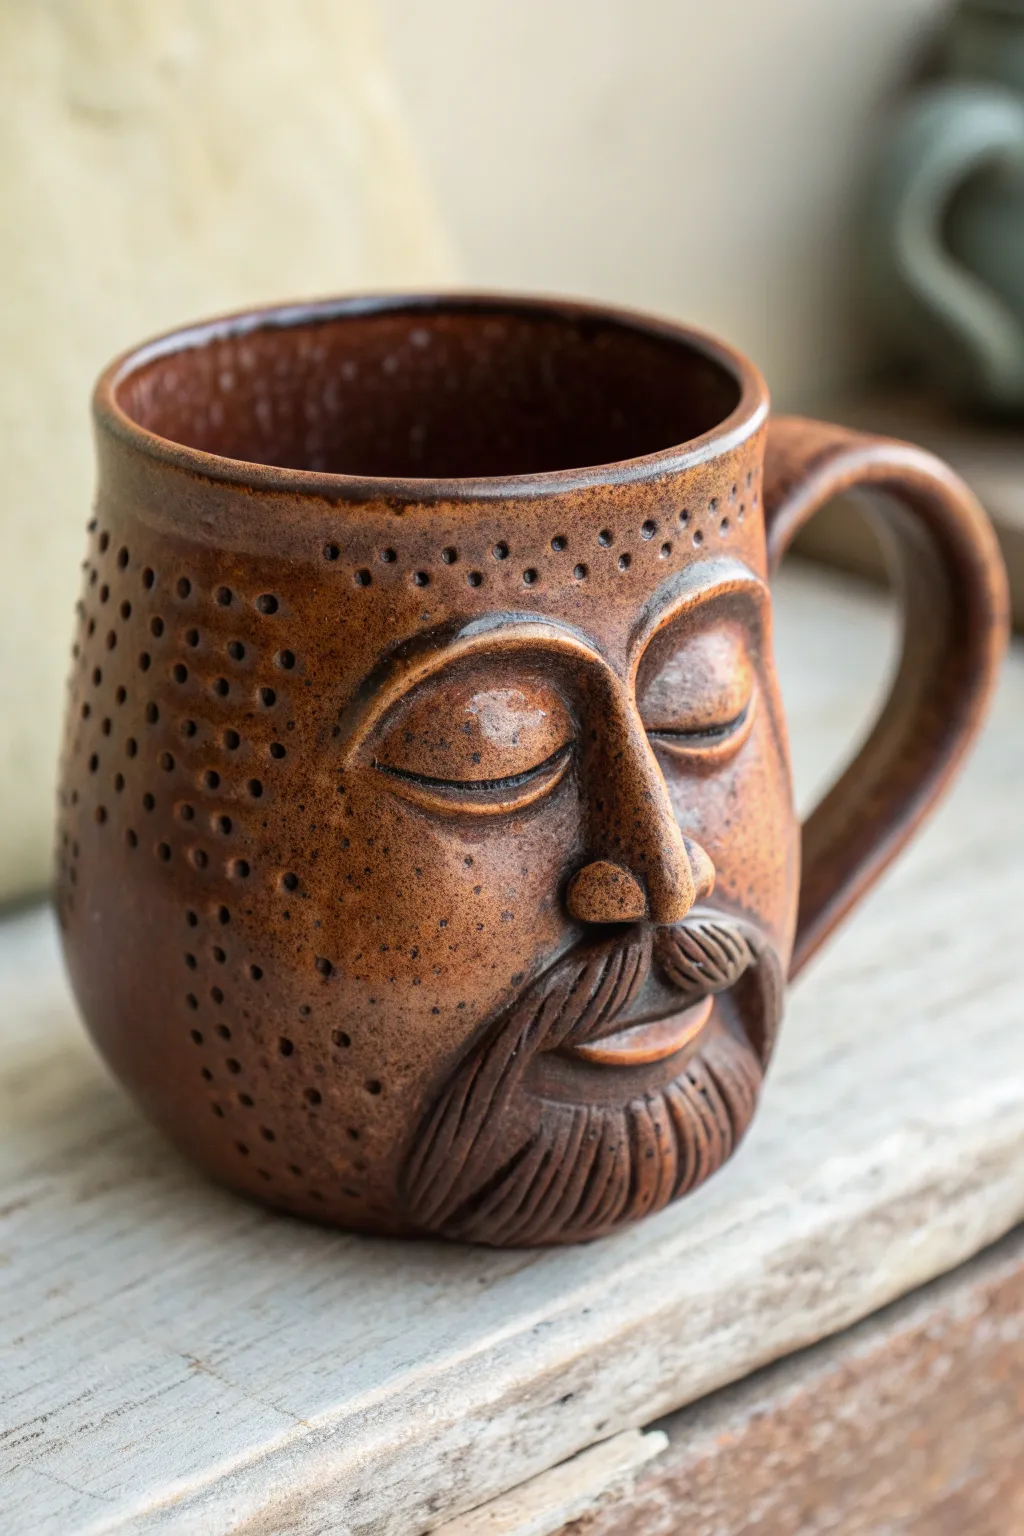
This rustic brown stoneware mug features a serene, sleeping face emerging directly from the clay body, characterized by defined eyelids, a strong nose, and a detailed beard and mustache. The textured dotted pattern framing the face adds a tactile quality that contrasts beautifully with the smooth facial features.
Detailed Instructions
Materials
- Stoneware clay (brown or speckled)
- Pottery wheel (or slab roller for handbuilding)
- Wooden modeling tools
- Loop tools (smalls)
- Needle tool
- Slip and score tool
- Sponge
- Iron oxide wash or brown glaze
- Clear or transparent matte glaze
- Kiln
Step 1: Forming the Base
-
Throw the Body:
Begin by throwing a cylinder on the wheel with about 1 lb of clay. Aim for a slightly bulbous bottom that tapers gently toward the rim to give it a cozy, rounded feel. -
Refine the Wall Thickness:
Keep the walls slightly thicker than a standard mug, especially on the side where you plan to sculpt the face, to allow enough material for pushing out from the inside if needed. -
Attach a Handle:
Pull a sturdy handle and attach it to the side opposite where the face will go. Ensure the curve is comfortable for gripping and smooth the connection points with slip. -
Leather Hard Stage:
Allow the mug to dry slowly to a leather-hard state. The clay needs to be firm enough to hold detail without warping, but soft enough to carve and add clay.
Face Falling Off?
If added features crack or detach during drying, your base was likely too dry. Score deeper, use more vinegar-rich slip, and cover the mug with plastic to equalize moisture.
Step 2: Sculpting the Features
-
Map the Face:
Lightly sketch the position of the eyes, nose, and mouth area with a needle tool. Placing the features slightly lower on the mug body often creates a more whimsical look. -
Add Clay for the Nose:
Score and slip a small wedge of clay onto the center of your map. Smooth this down to form the bridge and bulb of the nose, ensuring no air bubbles are trapped. -
Build the Eye Insets:
Add small, flat ovals of clay for the eyelids. Smooth the edges into the mug body so they look like they are rising from the surface, rather than just stuck on. -
Refine the Eyelids:
Use a small wooden tool to carve a definitive line separating the upper and lower lids. The eyes should look peacefully closed, so create a gentle downward curve. -
Sculpt the Mustache:
Attach two thick coils of clay directly under the nose. Shape them to drape downwards over where the mouth would be, joining them in the center. -
Carve Mustache Hair:
Using a needle tool or a fine knife tool, carve deep, flowing lines into the mustache coils to simulate coarse hair texture. Follow the direction of natural hair growth. -
Form the Beard:
Add a larger mass of clay below the mustache for the beard. Blend the bottom edge smoothly into the mug wall so the beard seems to grow out of the cup. -
Detail the Beard:
Carve corresponding hair lines into the beard mass. I prefer to make these lines slightly thicker and deeper than the mustache hair to create visual distinction. -
The Lips:
Carefully sculpt a small lower lip just visible beneath the center of the mustache. This hints at the mouth without needing to sculpt the entire opening.
Smooth Transitions
Use a damp paintbrush (not a sponge) to smooth the tiny areas around the eyelids and nose. This removes tool marks without washing away your sharp details.
Step 3: Texture and Glazing
-
Stipple the Skin:
To create the background texture on the cheeks and forehead, use a needle tool to poke rows of small holes. Vary the density, keeping them tighter near the face and spreading out toward the handle. -
Bisque Fire:
Once bone dry, bisque fire the mug according to your clay body’s specifications (usually Cone 04 or 06). -
Apply Oxide Wash:
Brush an iron oxide wash over the entire piece. Wipe it back with a damp sponge so the dark color remains trapped in the carved hair lines, the eye creases, and the stippled holes. -
Glaze Application:
Dip or brush a thin layer of transparent matte glaze or a semi-transparent amber glaze over the mug. This preserves the clay’s natural color while sealing the surface. -
Final Firing:
Glaze fire the piece to the maturity temperature of your stoneware (typically Cone 5, 6, or 10).
Enjoy your morning coffee with this peaceful, handcrafted companion suitable for any weary sailor.
Freckled Face Mug

Capture a moment of total calm with this wheel-thrown mug featuring a gently smiling face and natural clay freckles. The warm, earthy tones and minimalist line art create a cozy, artisanal feel perfect for your morning coffee ritual.
Step-by-Step Tutorial
Materials
- Stoneware clay body (speckled buff preferred)
- Pottery wheel
- Rib tool
- Wire cutter
- Sponge
- Needle tool
- Trimming tools
- Fine-point paintbrush
- Iron oxide wash or dark brown underglaze
- Clear or transparent glossy glaze
- Kiln
Step 1: Throwing the Form
-
Center the clay:
Start with a ball of speckled buff clay (about 1-1.5 lbs) on your wheel head. Center it firmly, ensuring there is no wobble before you begin opening. -
Open and pull:
Open the clay and gently pull up the walls to create a cylinder. Aim for a slightly rounded, convex shape rather than a straight-sided cylinder to give the face a softer canvas. -
Shape the belly:
Using a rib tool on the inside, gently push outward while supporting the outside to create a subtle curve or ‘belly’ in the middle of the mug. -
Finish the rim:
Compress the rim with a chamois or sponge to ensure it is smooth and pleasant to drink from. -
Wire off and dry:
Run your wire cutter underneath the pot to release it from the bat. Set it aside to dry until it reaches a leather-hard state.
Smudged Lines?
If your oxide lines smudge during glazing, try dabbing the glaze over the painted area with a sponge first instead of dipping, or mix a little gum solution into your oxide/underglaze.
Step 2: Trimming and Painting
-
Trim the foot:
Once leather-hard, center the mug upside down on the wheel. Trim away excess clay from the bottom, creating a distinct foot ring. I like to leave the bottom portion slightly rougher or unglazed later to show the natural clay body. -
Smooth the surface:
Use a damp sponge or a smooth rib to burnish the surface slightly, removing any grog that might interfere with your painting. -
Sketch the face:
Lightly trace the facial features using a needle tool or a dull pencil. Draw two closed arches for eyes, vertical lashes, a simple nose line connecting from the brow, and a small smile curve. -
Mix the wash:
Prepare your iron oxide wash or dark brown underglaze. It should be the consistency of ink or watercolors—fluid enough to flow off the brush but opaque enough to show up. -
Paint the lines:
Using a very fine-point brush, carefully paint over your traced lines. Vary the pressure slightly—press harder on the eyelids for a thicker line and lighter on the lashes for delicacy. -
Add freckles:
Dip a stiff-bristled brush (like a toothbrush) into the oxide wash. Hold it near the mug and flick the bristles to spatter tiny dots across the cheeks and nose area. -
Bisque fire:
Allow the mug to dry completely to the bone-dry stage. Load it into the kiln for a bisque firing (usually Cone 04 or 06).
Step 3: Glazing and Finishing
-
Wax resist the base:
Apply wax resist to the bottom inch of the mug and the foot ring. This will keep the raw, speckled clay exposed at the bottom, mimicking the look in the photo. -
Prepare the glaze:
Stir your clear or transparent glossy glaze thoroughly. A transparent glaze is crucial here so the painted face and the clay’s natural speckles show through clearly. -
Dip and pour:
Dip the mug into the glaze bucket, holding it by the foot, or pour the glaze inside, swirl, dump, and then dip the exterior. -
Clean up:
Sponge off any glaze that may have beaded up on the waxed bottom section. The line between glaze and raw clay should be clean. -
Final firing:
Fire the mug again to the maturity temperature of your clay body (typically Cone 5 or 6 for stoneware). Let the kiln cool naturally before unloading.
Pro Tip: Depth of Color
For richer, darker lines like the eyelids, go over the stroke twice. The oxide tends to be translucent; a second pass ensures the focal points pop against the speckles.
Enjoy sipping from your new mug, knowing you’ve created something full of character and peace
Minimal Line-Art Face Mug
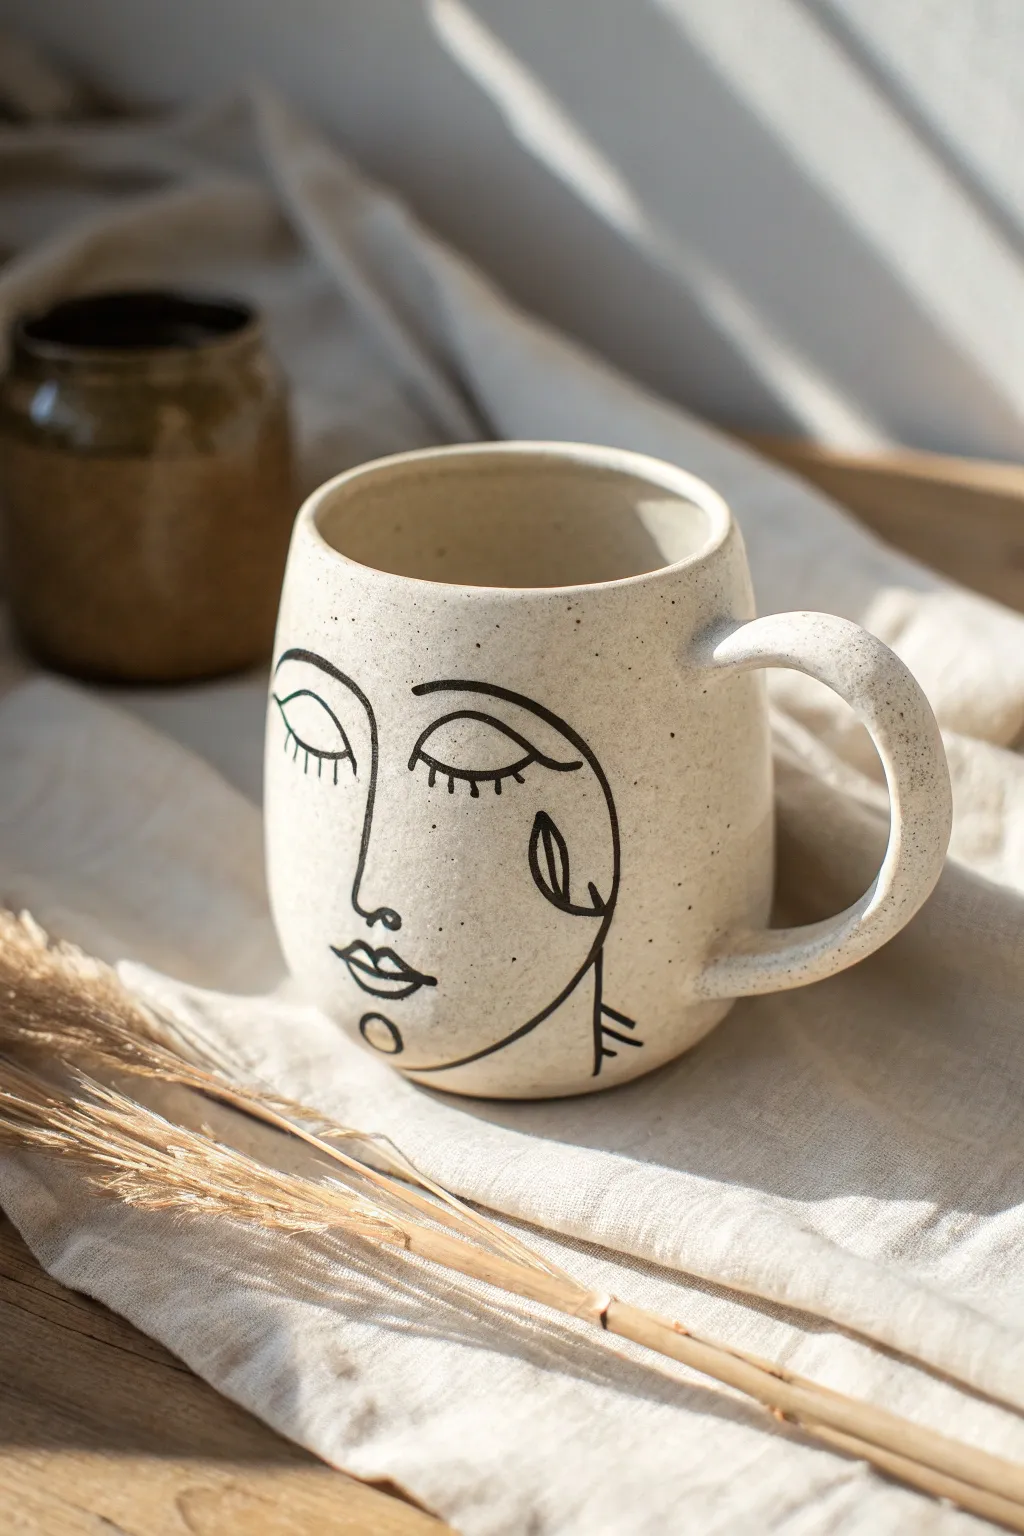
Capture the calm of a quiet morning with this elegant line-art face mug. Using simple tools on a ceramic base, you’ll create a sophisticated, speckled piece perfect for your favorite warm brew.
Step-by-Step
Materials
- Blank cream or white ceramic mug (preferably speckled finish)
- Black porcelain paint pen (fine tip)
- Black porcelain paint pen (medium tip)
- Rubbing alcohol
- Cotton pads
- Pencil
- Paper
- Scissors
- Masking tape
- Cotton swabs
- Oven (for baking the design)
Step 1: Preparation & Planning
-
Clean surface:
Begin by thoroughly cleaning the surface of your mug to ensure the paint adheres properly. Wipe the entire exterior with rubbing alcohol on a cotton pad to remove any oils or fingerprints. -
Draft the design:
On a piece of paper, sketch out your minimalist face design. Aim for continuous, flowing lines focusing on closed eyes with lashes, a defined nose bridge, and simple lips. -
Size the template:
Cut your paper sketch down so it fits comfortably against the side of the mug. Hold it up to the surface to verify the scale feels right for the mug’s curvature. -
Transfer guides:
Lightly trace the key placement points onto the mug using a pencil. Since pencil doesn’t stick well to glossy glaze, I find it helpful to just mark tiny dots where the eyes and nose will start and end.
Glaze Grip Trick
If your pen slips too much on the glossy surface, put a small piece of masking tape where you want to start a line to help anchor your pen tip initially.
Step 2: Drawing the Face
-
Prime the pen:
Shake your fine-tip porcelain paint pen vigorously and press the nib down on scrap paper until the ink flows smoothly and consistently. -
Start with the nose:
Begin drawing the central line of the nose. Start nearthe top of the bridge and bring the line straight down, curving slightly at the tip to form one nostril. -
Outline the left eye:
Draw the arch of the left eye (viewer’s left). Create a smooth U-shape connected to the bridge of the nose, ensuring the line weight stays consistent. -
Add the lashes:
Using very light pressure, flick small vertical lines downward from the eye arch to create the sleeping eyelashes. Keep them spaced out for a cleaner look. -
Draw the right eye:
Move to the right side and draw the second closed eye. This one should be a separate arch, disconnected from the nose line but parallel to the first. -
Detail the right eye:
Add the downward lashes to the right eye, matching the length and spacing of the first set as closely as possible. -
Create the face outline:
Switch to your medium-tip pen if you want a bolder outer line. Draw a long, curving line starting above the right eye, swooping down the cheek, and defining the jawline. -
Add artistic elements:
Draw the tear-drop shape or leaf motif on the cheek area inside the face outline. Connect this to the main contour line for that abstract, continuous-line feel. -
Form the lips:
Back with the fine tip pen, draw the lips below the nose. Use two simple curved lines for the upper and lower lip, leaving them slightly open or touching depending on your preference. -
Chin detail:
Add a small circle or oval directly below the lips to suggest the chin or a beauty mark, balancing the bottom of the design.
Make it Metallic
Instead of black, use a gold oil-based marker for the abstract cheek shapes. The metallic sheen against the matte stone texture adds a luxurious touch.
Step 3: Finishing Touches
-
Clean up mistakes:
If any lines are wobbly or too thick, immediately dampen a cotton swab with water or rubbing alcohol and gently wipe away the wet paint interaction to correct it. -
Dry completely:
Let the mug sit undisturbed for at least 24 hours. The paint needs to fully dry before the baking process to prevent bubbling. -
Bake to set:
Place the mug in a cold oven. Set the temperature to 300°F (150°C) – or the specific temperature instructed by your paint pen brand. turning the oven on continuously ensures the ceramic heats up slowly. -
Cool down:
Once the baking time (usually 30-40 minutes) is up, turn the oven off and leave the mug inside until it is completely cool. Removing it while hot can cause cracking.
Your custom face mug is now ready to add a touch of artistic flair to your morning coffee routine
Two Faces, Front and Back Mug
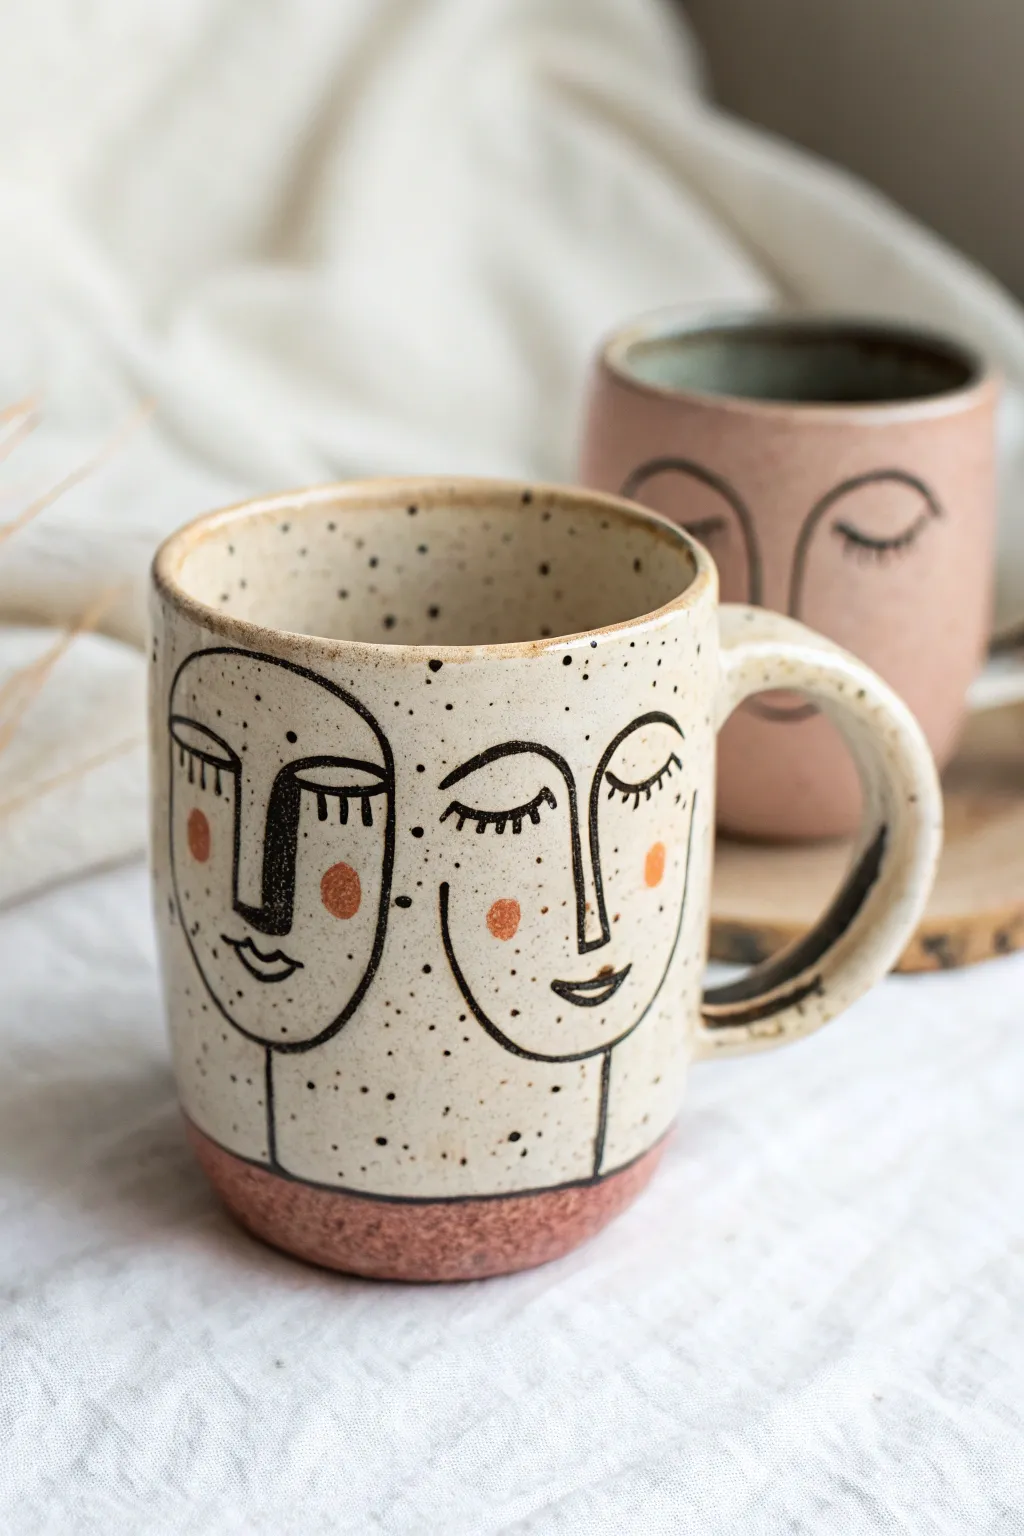
Embrace the serene vibes of line art with this charming ceramic project that features two tranquil faces sharing a single vessel. With its speckled cream glaze and raw clay base, this mug combines modern illustration with earthy textures for a truly unique morning coffee companion.
Detailed Instructions
Materials
- Bisque-fired stoneware mug (wheel-thrown or hand-built)
- Speckled cream or ‘oatmeal’ brush-on glaze
- Underglaze pencil or fine liner brush
- Black underglaze
- Terra cotta or warm orange underglaze
- Clear transparent glaze (optional, if cream glaze isn’t self-sealing)
- Wax resist emulsion
- Small round paintbrush
- Soft fan brush for glazing
- Sponge and water bucket
Step 1: Preparation and Base Layout
-
Clean the bisque:
Start by wiping down your bisque-fired mug with a damp sponge to remove any dust or oils from handling, which ensures the glaze adheres perfectly. -
Draft the faces:
Using a regular graphite pencil, lightly sketch two stylized faces on opposite sides of the mug. The graphite will burn off in the kiln, so don’t worry about mistakes. -
Refine the features:
Focus on simple, continuous lines. Draw U-shaped closed eyes with long lashes, a straight nose bridge connecting to an eyebrow, and a simple curved mouth. -
Wax the base:
Apply a band of wax resist to the bottom half-inch or inch of the mug’s exterior. This creates that lovely raw clay contrast seen at the bottom of the finished piece.
Step 2: Detailing and Illustration
-
Outline in black:
Load a fine liner brush with black underglaze. Carefully trace over your pencil lines. Alternatively, an underglaze pencil offers a bit more control if painting fine lines feels daunting. -
Add the cheeks:
Dip a small round brush into the terra cotta or orange underglaze. Gently dab two circles onto the cheek areas of each face to create a rosy blush effect. -
Let the underglaze set:
Allow the black lines and orange cheeks to dry completely. They should look chalky and matte before you move on to the next step to prevent smearing. -
Protect the illustration:
Carefully paint wax resist over the black lines and the orange cheeks. This ‘wax resist inlay’ technique will keep the raw clay showing through the lines while the rest of the mug gets glazed.
Clean Lines Pro-Tip
If you struggle with shaky hands when painting lines, rest your pinky finger on the mug surface for stability while you paint the facial features.
Step 3: Glazing and Finishing
-
Prepare the speckled glaze:
Stir your speckled cream glaze thoroughly. The speckles tend to settle at the bottom, so mix well to ensure an even distribution of spots. -
Apply the first coat:
Using a soft fan brush, apply a generous coat of the speckled glaze over the entire exterior (above the bottom wax line) and interior of the mug. -
Wipe back the wax:
While the glaze is still damp, take a clean, slightly moist sponge and very gently wipe over the waxed face designs. The glaze will slide off the wax, revealing your sharp black lines underneath. -
Layer the glaze:
Apply a second and third coat of the speckled glaze, allowing it to dry to the touch between layers. Repeat the gentle wiping over the waxed design after each coat. -
Check the interior:
Ensure the inside of the mug has three solid coats of glaze for a food-safe, watertight finish. I prefer to pour glaze inside, swirl it, and dump the excess for a smooth interior. -
Clean the foot:
Flip the mug over and ensure no glaze has dripped onto the very bottom foot ring or the unglazed raw clay band you created earlier. Wipe away any stray specks with a sponge. -
Final inspection:
Look closely at the face illustrations. If any heavy glaze is sitting on top of the waxed lines, use a precision tool or toothpick to gently scrape it off so the black remains crisp. -
Fire the piece:
Load the mug into the kiln and fire it to the recommended cone temperature for your specific clay and glaze combination (usually Cone 5 or 6 for stoneware).
Level Up: Texture
Carve the facial lines slightly into the clay (sgraffito) before applying the black underglaze for a tactile, recessed finish that feels great to hold.
Now you have a wonderfully artistic mug ready for your favorite hot beverage
Abstract Split-Face Color Block Mug
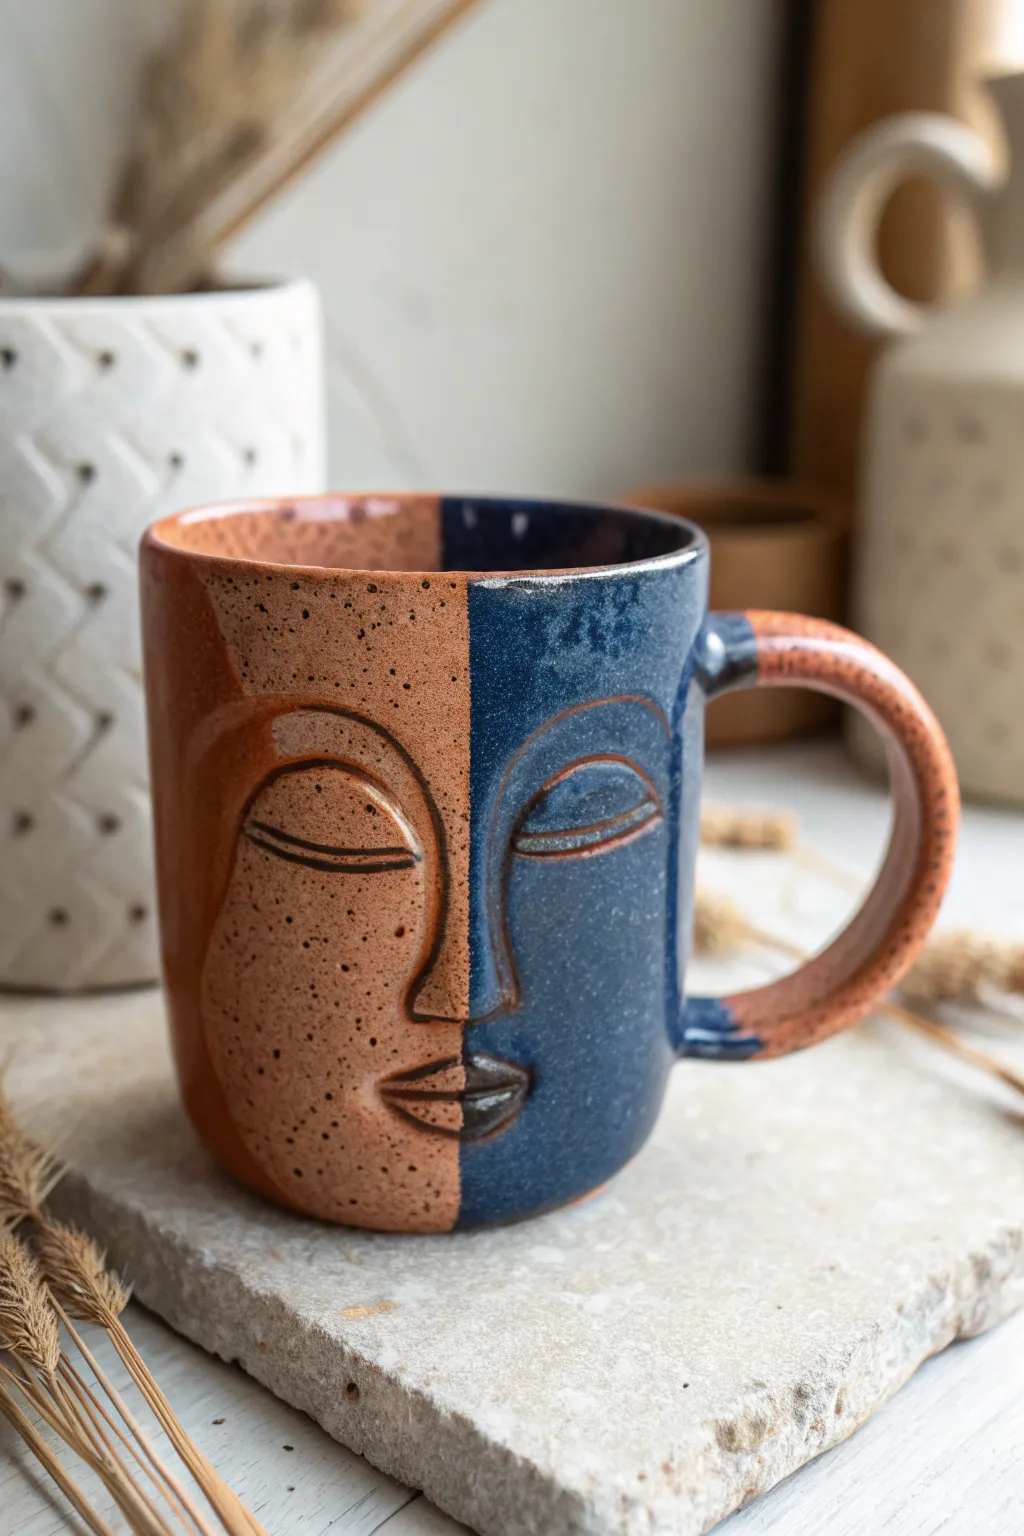
This striking ceramic project marries modern abstract art with functional pottery, featuring a serene face divided into contrasting warm terracotta and deep indigo hues. The raised features and speckled finish give it an earthy, tactile quality that feels wonderful in the hand.
How-To Guide
Materials
- Stoneware clay body (speckled buff recommended)
- Pottery wheel (or slab roller/rolling pin for hand-building)
- Needle tool
- Loop tools (small and medium)
- Small wooden modeling tool
- Rib tool (kidney)
- Scoring tool or serrated kidney
- Slip (liquid clay)
- Sponge
- Paintbrushes (glaze mop and detail brush)
- Terracotta/Rust colored speckled glaze
- Deep glossy blue speckled glaze
- Wax resist
Step 1: Forming the Mug Body
-
Throw the cylinder:
Begin by centering your clay on the wheel and throwing a standard cylinder, approximately 4-5 inches tall. Aim for walls that are slightly thicker than usual (about 1/4 to 3/8 inch) to allow depth for carving and sculpting later. -
Trim and smooth:
Use a rib tool to smooth the exterior canvas and compress the clay particles. Trim the bottom as needed, but keep the walls sturdy. -
Dry to soft leather-hard:
Allow the cylinder to dry until it reaches a soft leather-hard stage. The clay should be firm enough to hold its shape when handled, but soft enough to easily attach added clay.
Step 2: Sculpting the Face
-
Outline the features:
Lightly sketch the centerline of the face using a needle tool. Mark the positions for the eyebrows, eyes, nose, and lips. Symmetry is key here, so measure if necessary to keep the features balanced. -
Add coils for volume:
Roll out very small, thin coils of fresh clay. Score the sketched areas on the mug surface and apply slip. Attach the coils along the lines of the eyebrows, the bridge of the nose, and the contours of the lips. -
Blend the nose:
Using a wooden modeling tool, blend the added clay for the nose seamlessly into the mug body. Build up the bridge so it is the highest point of relief. -
Sculpt the eyes:
Add small pads of clay for the eyelids. Smooth them down, defining the almond shape of the closed eye. Use the edge of your tool to carve a clean, deep line separating the upper and lower lids to create the ‘sleeping’ look. -
Define the mouth:
Shape the attached coils for the lips. Press gently in the center to create the parting line between the lips, ensuring they protrude slightly from the mug surface. -
Initial smoothing:
Take a slightly damp sponge and gently wipe over the sculpting to remove harsh tool marks and unify the texture.
Uneven Glaze Line?
If your center line isn’t sharp, use an X-Acto knife to gently scrape away excess glaze before firing. A steady hand and a dry surface are crucial for a crisp split.
Step 3: Handle and Final touches
-
Pull the handle:
Pull a strap handle from a separate piece of clay. Let it curve into a ‘C’ shape and set it aside to stiffen slightly. -
Attach the handle:
Score and slip the attachment points on the side of the mug (opposite the face or to the side depending on your preference). Firmly press the handle on and smooth the joints completely. -
Bisque fire:
Allow the mug to dry slowly and completely to bone dry to prevent cracking around the added features. Bisque fire the piece according to your clay body’s specifications (usually Cone 04 or 06).
Level Up: Texture Play
Leave the terracotta side unglazed if you use a rich, toasted clay body. The contrast between raw, matte clay and glossy blue glaze looks incredibly sophisticated.
Step 4: Glazing the Split Design
-
Clean the bisque:
Wipe the bisqued mug with a damp sponge to remove any kiln dust. -
Map the divide:
Using a pencil (the graphite will burn off), draw a vertical line straight down the center of the face, bisecting the nose and lips. -
Apply wax resist:
Carefully paint wax resist over the entire LEFT side of the face and mug exterior, following your pencil line precisely. This protects the ‘warm’ side while you dip the ‘cool’ side. -
Glaze the blue side:
Dip the right side of the mug into the deep glossy blue glaze. The wax will repel the glaze from the left side. Wipe away any stray droplets immediately. -
Remove wax or dry:
If you used a peel-off latex resist, remove it now. If using wax, you’ll need to hand-paint the second glaze. I personally prefer calculating the drying time and hand-painting the second color for better control. -
Glaze the terracotta side:
Using a soft brush, apply 2-3 coats of the terracotta/rust glaze to the un-glazed side. Be extremely careful at the center seam to create a clean, sharp line without overlapping the blue. -
Split the handle:
Extend the split design to the handle. Paint the top half (or the side corresponding to the blue half) with blue glaze, and the rest with the rust glaze. -
Glaze fire:
Load the mug into the kiln and glaze fire to the temperature required for your specific glazes (typically Cone 5 or 6 for stoneware). Ensure the foot is wiped clean.
Once cooled, your two-toned mug is ready to bring a touch of sculpted serenity to your morning coffee routine
Patchwork Facial Features Collage Mug
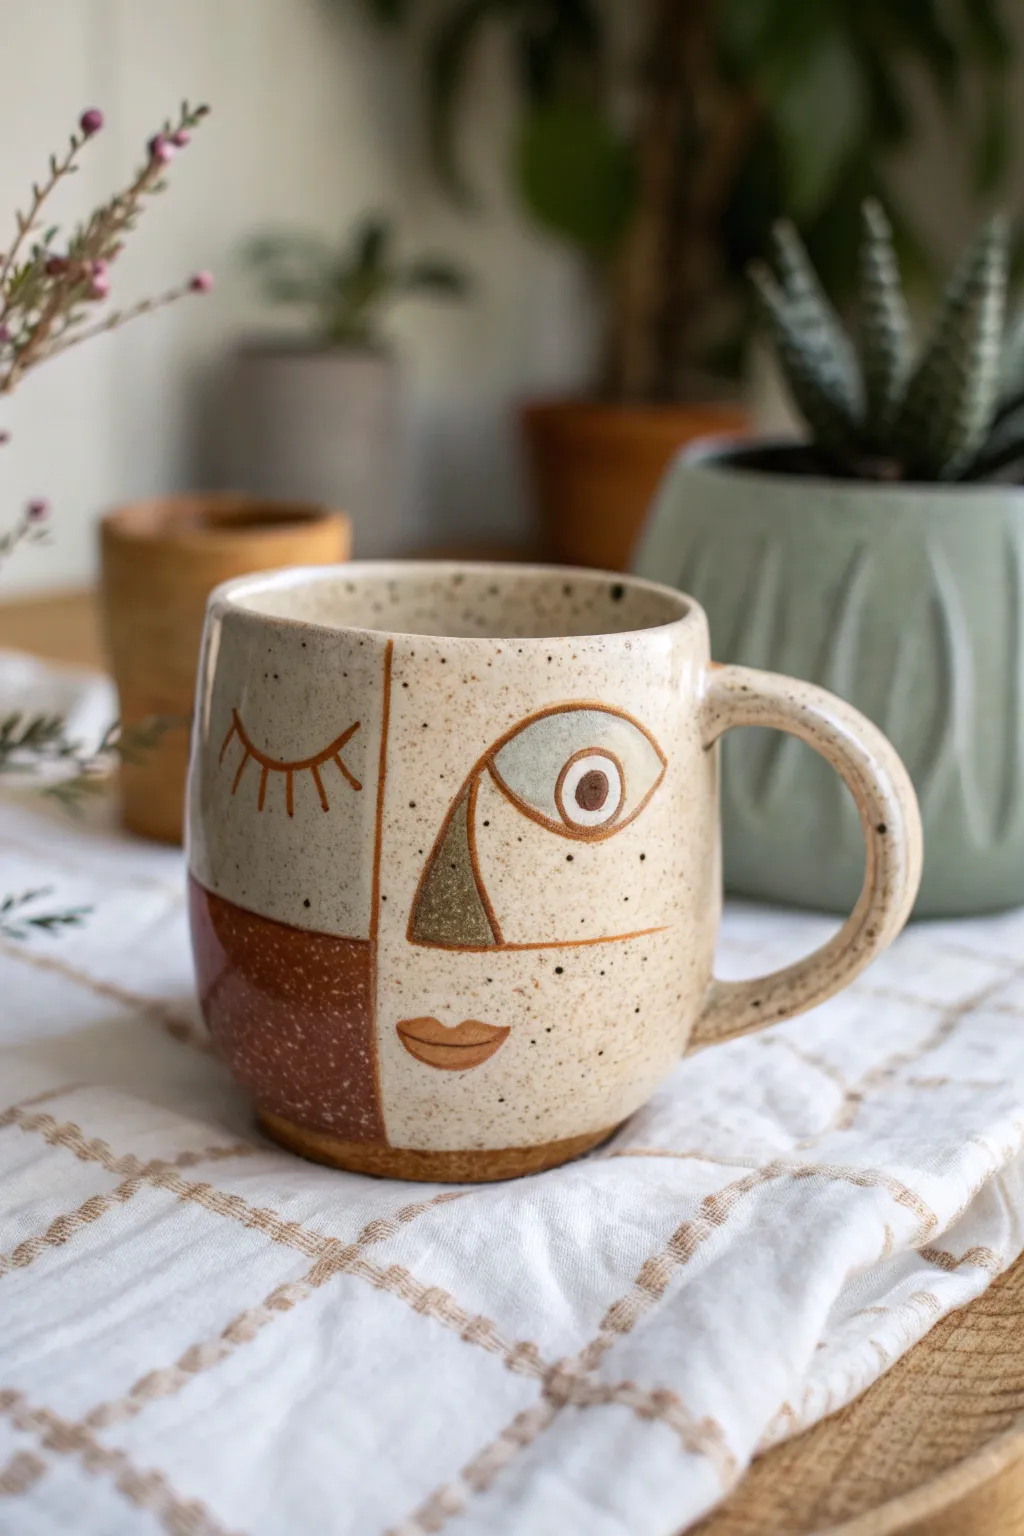
Embrace the imperfect charm of abstract art with this speckled ceramic mug featuring disjointed facial features. The design combines earthy tones with bold, simple linework to create a playful, Picasso-inspired functional piece.
Step-by-Step
Materials
- Stone-colored speckled stoneware clay (mid-fire)
- Pottery wheel (or rolling pin for hand-building)
- Needle tool
- Rib tool
- Sponge
- Underglazes: Rust red/terracotta, olive green, light blue-grey, dark brown/black
- Fine detail brush
- Medium glaze brush
- Clear transparent glaze (cone 5/6 compatible)
- Kiln
Step 1: Forming the Vessel
-
Throw the body:
Begin by centering about 1-1.5 lbs of speckled stoneware clay on your wheel. Pull up a cylinder with straight, slightly rounded walls to create the classic mug shape. -
Refine the shape:
Use a rib tool to smooth the exterior and compress the clay particles, ensuring a nice even surface for your future illustration. Trim the rim so it’s comfortable for drinking. -
Pull the handle:
Pull a strap handle from a separate piece of clay. Let it set up slightly until it can hold its arch without sagging. -
Attach the handle:
Score and slip the contact points on both the mug body and the handle. Attach firmly, smoothing the seams with your thumb or a modeling tool to make it look seamless. -
Let it firm up:
Cover the mug loosely with plastic and allow it to dry to a leather-hard state. This is crucial—if it’s too wet, carving will deform the shape.
Smudged Lines?
If your black outlines bleed into the colored sections during glazing, try using a wax resist over the finished underglaze design before dipping it into the clear glaze.
Step 2: Designing the Patchwork Face
-
Sketch the grid:
Using a needle tool with very light pressure, sketch a faint vertical line slightly off-center to divide the face. Add a horizontal line near the bottom third to mark the mouth area. -
Outline the closed eye:
On the left side of your vertical divide, lightly scratch a downward curve for the closed eyelid. Add 5-6 short, radiating lines for the lashes. -
Outline the open eye:
On the right side, draw a large almond shape. Inside, draw a circle for the iris and a smaller dot for the pupil. The style should be loose and geometric. -
Define the nose and mouth:
Draw a triangle for the nose connecting to the eye line. Below, sketch a simple almond shape for the lips. -
Carve the lines:
Now, go over your faint sketch with a carving tool or the needle tool, pressing deeper to create distinct grooves. These grooves will help catch the glaze later.
Go 3D
Instead of just painting the nose triangle, add a small slab of clay to build the nose up for a tactile, slight relief effect before you start carving.
Step 3: Painting and Glazing
-
Clean the surface:
Gently wipe the mug with a barely damp sponge to smooth any burrs created by the carving process. -
Block in the terracotta:
Using the rust-red underglaze, paint the entire bottom-left quadrant (below the horizontal line and left of the vertical line). Apply 2-3 coats for opacity. -
Paint the nose:
Fill in the nose triangle with the olive green underglaze. I like to keep the edges crisp here to contrast with the speckles. -
Add eye details:
Paint the upper eyelid area of the open eye with the light blue-grey underglaze. Fill in the lip shape with a mix of rust and brown. -
Outline deeply:
Using a very fine liner brush and dark brown or black underglaze, trace over all your carved lines. This includes the grid lines, the eyelashes, the eye outline, and the iris. -
Bisque fire:
Once the underglaze is fully dry, load the mug into the kiln for a bisque firing (usually cone 04). -
Apply clear glaze:
After the mug cools, dip it into a clear transparent glaze. Wipe the bottom foot clean with a sponge to prevent sticking in the kiln. -
Final firing:
Fire the mug to maturity (likely cone 5 or 6, depending on your clay body). The clear glaze will seal the design and allow the natural clay speckles to show through.
Pour your favorite warm beverage and enjoy the artistic flair of your new handmade mug
Mask-Like Face Mug With Hollow Eyes
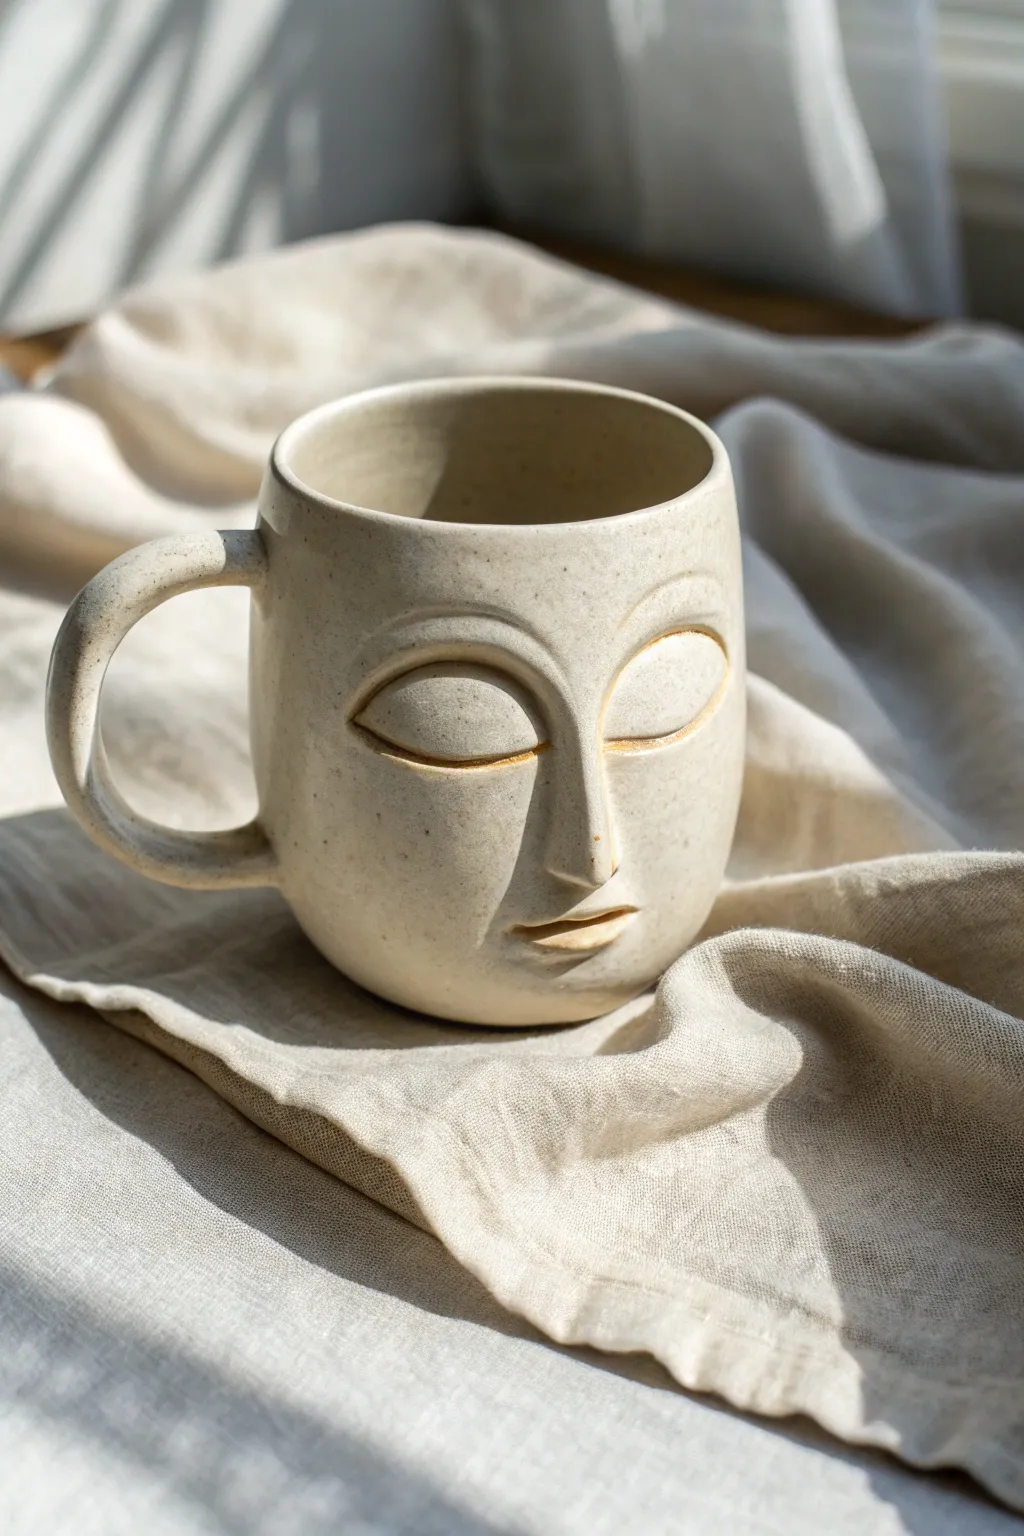
Embrace the tranquility of minimalism with this hand-built ceramic mug featuring a sculpted, mask-like visage. The serene closed eyes and gentle contours create a peaceful vessel perfect for your morning rituals, finished with a speckled cream glaze that highlights every subtle detail.
Step-by-Step
Materials
- Speckled buff stoneware clay
- Rolling pin
- Canvas texture board or mat
- Rib tool (wooden or silicone)
- Needle tool
- Fettling knife
- Scoring tool or serrated rib
- Slip (clay and water mixture)
- Modeling tools (small rounded tips)
- Sponge
- Loop tool (optional)
- Clear or cream speckled glaze (stoneware temperature)
- Kiln access
Step 1: Forming the Mug Body
-
Roll the slab:
Begin by rolling out a slab of speckled stoneware clay to an even thickness of about 1/4 inch. Ensure the clay is compressed on both sides to prevent warping later. -
Cut the rectangle:
Measure and cut a rectangle from your slab. The size depends on your desired mug height and circumference; a 4-inch by 10-inch rectangle is a good starting point for a standard mug. -
Create the cylinder:
bevel the short edges of your rectangle at opposite 45-degree angles. This will create a stronger, seamless overlap joint. -
Join the seam:
Score the beveled edges aggressively and apply slip. Bring the edges together to form a cylinder, pressing the seam firmly. Use a wooden rib to smooth the seam inside and out until it disappears. -
Attach the base:
Place your cylinder on the remaining slab and trace the circular base. Cut this circle out, score and slip the bottom edge of the cylinder and the edge of the circle, then join them. Smooth the connection with a rib tool.
Sculpting Pro Tip
Work on the face when the clay is leather-hard. If it’s too soft, the features will look muddy and undefined; too dry, and adding clay becomes difficult.
Step 2: Sculpting the Features
-
Push out the nose:
From the *inside* of the mug, gently push the clay outward with your fingers to form the rough protrusion of the nose. Support the clay on the outside with your other hand to control the shape. -
Define the nose bridge:
On the exterior, use a modeling tool or your fingers to refine the nose into a long, slender triangular shape that widens slightly at the nostrils. -
Add eye mounds:
Roll two small, flattened oval balls of clay. Score the mug surface on either side of the nose bridge and attach these ovals with slip. These will become the eyelids. -
Blend the eyes:
Carefully blend the edges of the eye mounds into the mug body so they look integrated rather than stuck on. Keep the center of the mounds raised and convex. -
Carve the eyelids:
Using a needle tool or fine carving tool, incise a deep, sweeping arch over each eye mound to define the upper eyelid crease. Make a gentle line below to suggest the closed lash line. -
Add the mouth:
Roll a very small coil for the lips. Score the area below the nose and attach the coil. Use a small tool to press a horizontal line for the mouth opening, slightly downturning the corners for a restful expression. -
Refine and smooth:
Use a damp sponge to smooth all harsh tool marks. Pay attention to the transition between the forehead and the nose, ensuring a continuous, elegant line.
Step 3: Handle and Finish
-
Pull the handle:
Pull a strap of clay for the handle or roll a coil and flatten it slightly. Curve it into a ‘C’ shape and let it stiffen for 15-20 minutes until it holds its form. -
Attach the handle:
Score and slip the attachment points on the side of the mug (opposite the face or slightly offset). Press the handle firmly onto the body and blend the clay at the joints for strength. -
Dry slowly:
Cover the mug loosely with plastic to let it dry slowly. Uneven drying can cause the handle or sculpted features to crack away from the body. -
Bisque fire:
Once bone dry, bisque fire the mug to Cone 04 (or per your clay body’s instructions). This prepares it for glazing. -
Glaze application:
Dip or brush your gloss cream glaze onto the mug. I like to carefully wipe the glaze slightly thinner on the high points of the face (nose bridge, eyelids) with a sponge to let the clay’s speckles shine through. -
Identify details:
Before firing, ensure the glaze hasn’t pooled too thickly in the eye creases or lip line, which would obscure the sculpting. Clean these lines with a pin tool if needed. -
Final firing:
Glaze fire to the maturity of your stoneware clay (typically Cone 5 or 6). The heat will melt the glaze, highlighting the contours of the serene face.
Troubleshooting Cracks
If hairline cracks appear around the added eyes or nose during drying, compress the area with a rounded tool and add a tiny amount of vinegar slip to mend the join.
Now you have a beautifully serene, functional piece of art that makes every sip a moment of calm.