If you’ve ever pressed a stamp into clay and felt that little thrill when the pattern pops, you’re in the right place. Here are my favorite ceramic stamp ideas—from classic maker’s marks to bolder motif designs you can build a whole pottery series around.
Custom Maker’s Mark Stamp
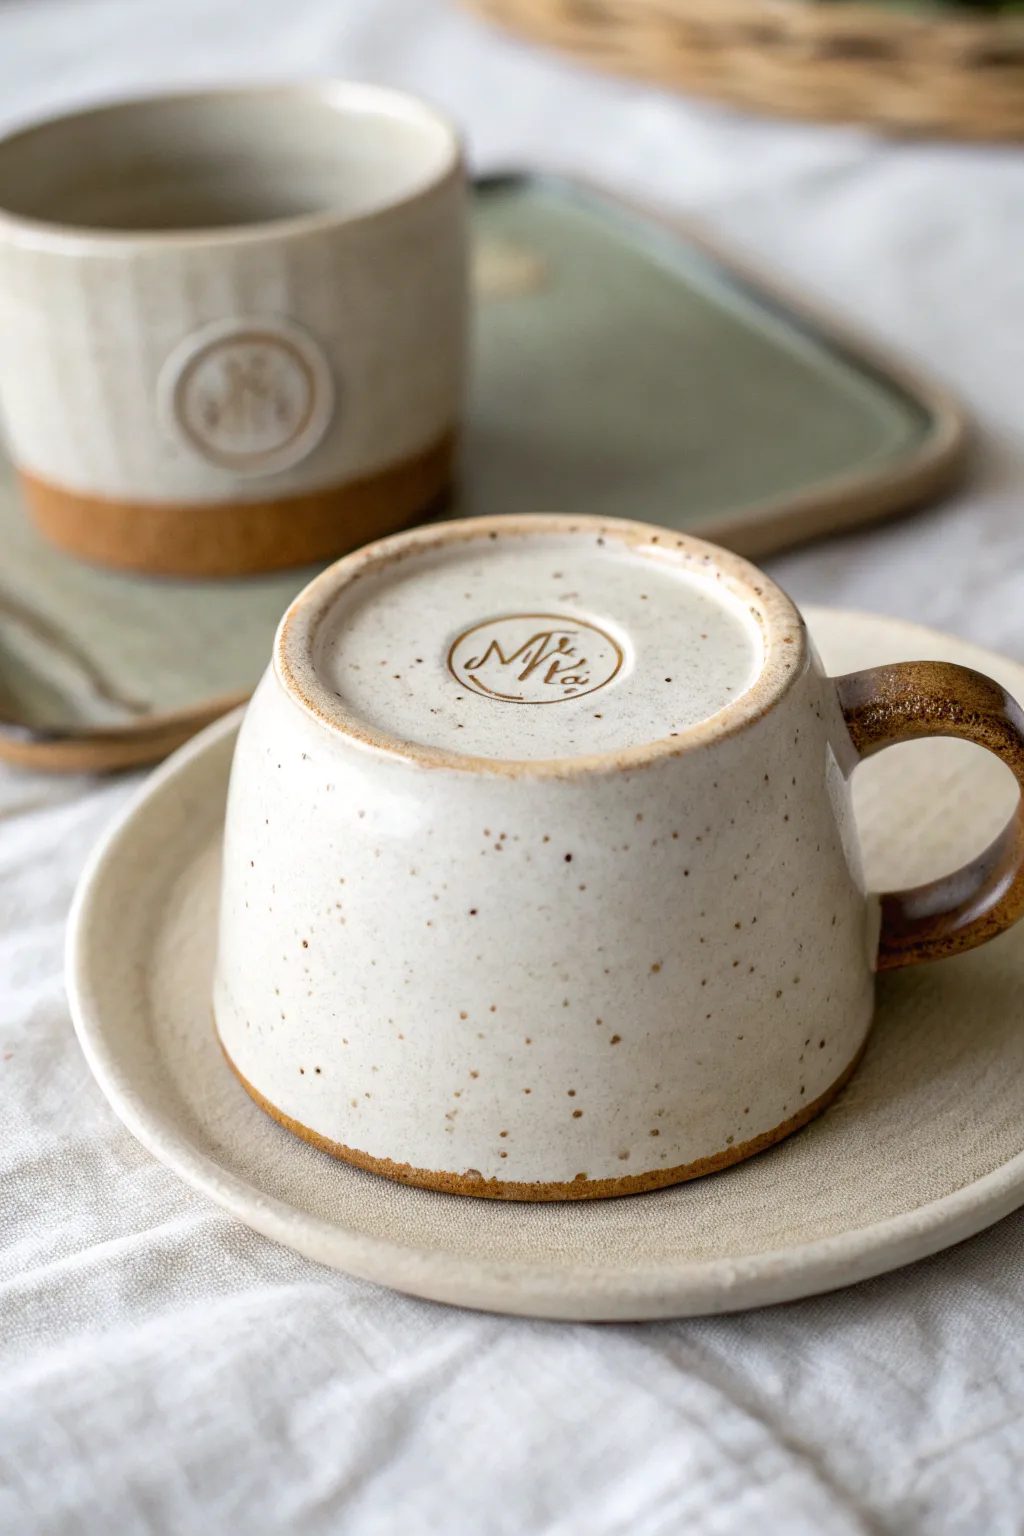
Elevate your handmade pottery with professional branding by creating a speckled stoneware mug featuring a custom maker’s mark. This project focuses on throwing a classic form and finishing it with a personalized stamped impression on the foot, giving your work a distinct, artisanal identity.
Detailed Instructions
Materials
- Speckled stoneware clay (e.g., Laguna Speckled Buff)
- Pottery wheel
- Throwing tools (sponge, rib, needle tool, wire tool)
- Trimming tools (loop tool, trimming knife)
- Custom maker’s mark stamp (brass or bisque)
- Bat or throwing board
- Wooden paddle
- Small piece of plastic wrap (optional)
- Sponge and water bucket
- Kiln and glaze of choice (glossy white shown)
Step 1: Throwing the Form
-
Wedging:
Begin by thoroughly wedging about 1 to 1.5 lbs of speckled stoneware clay. This removes air bubbles and ensures the clay is consistent, which is crucial for a smooth throwing experience. -
Centering:
Secure the clay to the wheel head and center it using firm pressure. Make sure the clay mound is perfectly symmetrical before opening. -
Opening the Floor:
Push your thumbs into the center to open the clay, leaving about a 1/2 inch of thickness at the bottom. This thicker floor is essential to accommodate the trimming and stamping process later. -
Raising the Cylinder:
Pull the walls up into a cylinder shape. Aim for even wall thickness, leaving the rim slightly thicker for durability. I like to compress the rim with a chamois after each pull to keep it strong. -
Shaping the Belly:
Using a rib on the inside and gentle pressure from the outside, push the clay outward to create a rounded belly, giving the cup a comfortable, cupped shape. -
Refining:
Smooth the exterior with a metal rib to remove throwing lines if desired, or leave them for texture. Cut the mug from the bat with a wire tool and set it aside to dry to a leather-hard state.
Step 2: Trimming and Stamping
-
Checking Consistency:
Wait until the mug is leather-hard—firm enough to handle without deforming but soft enough to carve. The bottom should feel cool and solid. -
Centering for Trim:
Place the mug upside down on the wheel head. Secure it with small lugs of fresh clay. Tap it gently to ensure it is perfectly centered while the wheel spins slowly. -
Defining the Foot Ring:
Use a trimming tool to carve away excess clay from the lower walls and define a foot ring. The inside of the foot ring should be flat and smooth to receive the stamp. -
Refining the Surface:
Smooth the trimmed area with a damp sponge or a soft rib to erase any tool marks and create a pristine surface for your logo. -
Support the Wall:
Before stamping, place one hand inside the mug (if it’s not too dry) or support the wall from the outside to prevent the pressure from warping the shape. -
Positioning the Stamp:
Locate the exact center of the trimmed foot. If your clay is a bit sticky, you can place a small piece of thin plastic wrap over the area to prevent the stamp from pulling up clay. -
Applying the Stamp:
Press your custom maker’s mark firmly and evenly into the center of the foot. Rock it very slightly in a circular motion to ensure all edges of the design transfer clearly. -
Clean Up:
Carefully lift the stamp straight up. If any edges of the impression are sharp or jagged, gently smooth them with your finger or a soft rubber rib.
Stamp Stuck?
If the clay sticks to your stamp, dust the stamp face lightly with cornstarch before pressing. This acts as a release agent and burns off completely in the kiln.
Step 3: Handle and Finishing
-
Pulling a Handle:
Pull a strap of clay for the handle. Allow it to set up slightly until it can hold an arch without collapsing. -
Attaching the Handle:
Score and slip both the attachment points on the mug and the handle ends. Press the handle firmly onto the mug wall, blending the clay seams for a strong bond. -
Drying:
Cover the mug loosely with plastic to let the handle and body dry slowly and evenly. This prevents cracking at the attachment points. -
Bisque Fire:
Once bone dry, fire the mug in a bisque kiln (typically Cone 04 or 06). This prepares the piece for glazing. -
Glazing:
Dip the mug into a glossy white glaze (or your chosen color). Wipe the foot ring thoroughly with a damp sponge so no glaze touches the kiln shelf. The unglazed clay will highlight your stamped mark nicely. -
Final Fire:
Fire the mug to maturity (often Cone 5 or 6 for stoneware). The speckles in the clay will burn through the glaze, creating that lovely rustic finish.
Color Wash
Apply an iron oxide wash or underglaze into the stamped impression before bisque firing. Wipe away the excess to make your logo pop with dark contrast after firing.
Now you have a professional-looking mug that carries your unique creative signature on every sip


Chevron and Stripe Repeat Stamp
This elegant ceramic cylinder combines crisp geometric stamping with a warm oxide inlay to create a piece that feels both rustic and modern. The repeating chevron and triangle motifs add tactile depth to the smooth creamy clay body, making it perfect for use as a utensil holder or a statement vase.
Step-by-Step Guide
Materials
- White stoneware clay (roughly 3-4 lbs)
- Rolling pin
- Slab roller or depth primitive (optional)
- Canvas work surface
- Cylindrical mold or PVC pipe (approx. 5-6 inches diameter)
- Fettling knife
- Needle tool
- Chevron repeat stamp (small/tight pattern)
- Triangle/Diamond geometric stamp
- Large chevron or zig-zag stamp
- Rib tool (metal and rubber)
- Scoring tool
- Slip
- Red iron oxide wash or brown underglaze
- Sponge
- Clear matte glaze
Step 1: Forming the Cylinder
-
Roll the slab:
Begin by wedging your white stoneware clay thoroughly to remove air bubbles. Roll out a consistent slab that is approximately 1/4 to 3/8 inch thick. If you want a perfectly even wall, use depth guides or a slab roller. -
Cut to size:
Measure the circumference of your cylindrical mold. Cut a rectangular strip of clay that is long enough to wrap around the mold with a slight overlap, and as tall as you want the final vessel (likely 7-8 inches). -
Smooth the texture:
Before assembling, run a soft rubber rib over the surface of the slab to compress the clay particles and remove any canvas texture. This provides a clean canvas for your stamping later. -
Wrap the form:
Wrap the slab around your cylindrical mold. Score and slip the edges where they meet, pressing them firmly together to create a seamless vertical join. I usually bevel the edges at 45-degree angles for a stronger, invisible seam. -
Attach the base:
Cut a circle of clay for the base, slightly larger than the cylinder’s diameter. Score and slip the bottom edge of the cylinder and the base, then press them together. Trim the excess clay flush with the wall and smooth the connection with a rib tool. -
Refine the rim:
Use a damp sponge or piece of shammy cloth to smooth and round the top rim of the cylinder while the clay is still leather hard.
Stamp Support
When stamping a hollow cylinder, always support the wall from the inside with your other hand. This prevents the form from warping or collapsing under the pressure of the stamp.
Step 2: Stamping the Design
-
Mark your zones:
Using a needle tool and a steady hand (or a banding wheel), very lightly scribe horizontal guidelines around the pot to ensure your pattern bands stay straight parallel to the rim. -
Stamp the top chevron band:
Starting about two inches down from the rim, press your small chevron repeat stamp into the clay. Apply firm, even pressure to create a deep impression, which is crucial for the inlay technique later. -
Add the decorative borders:
Use a carving tool or the edge of a ruler to impress two deep horizontal lines—one directly above and one directly below the chevron band—to frame the pattern. -
Stamp the middle geometric band:
Below the top band, create the middle section using your triangle/diamond stamp. These impressions can be slightly shallower than the top band since they won’t be inlaid with color. -
Create the lower chevron details:
For the bottom third of the vessel, use a larger zig-zag or chevron stamp. Press these vertically or diagonally to create the distinct directional texture seen in the reference image. -
Slow dry:
Cover the piece loosely with plastic to let it dry slowly to the bone-dry stage. This prevents warping or cracking. -
Bisque fire:
Once completely dry, fire the piece to bisque temperature (usually cone 04) to prepare it for glazing.
Level Up: Texture Contrast
Make the uncolored bands pop by using a satin-white glaze over them while keeping the inlaid band raw clay (unglazed) for a beautiful tactile contrast between smooth and rough.
Step 3: Inlay and Glazing
-
Apply the oxide wash:
Mix red iron oxide with water (or use a dark brown underglaze). Generously paint this dark wash only into the top chevron band, ensuring the liquid gets deep into all the impressed crevices. -
Wipe back the surface:
Using a clean, slightly damp sponge, wipe the surface of the clay in the top band. You want to remove the oxide from the raised high points while leaving it trapped in the recessed chevron lines. -
Clean up:
Ensure no stray oxide has dripped onto the white, unstamped sections. The lower two stamped bands should remain pure white clay. -
Glaze application:
Dip or spray the entire cylinder with a clear matte glaze. A matte finish will soften the look and make the texture feel great in the hand without obscuring the stamped details. -
Final wipe:
Wipe the bottom of the pot clean to prevent it from sticking to the kiln shelf. -
Glaze fire:
Fire the piece to the maturity temperature of your clay body (likely cone 5 or 6 for stoneware).
Now you have a stunning, textured vessel ready to hold your kitchen tools or a fresh bouquet of flowers


Six-Petal Flower Medallion Stamp
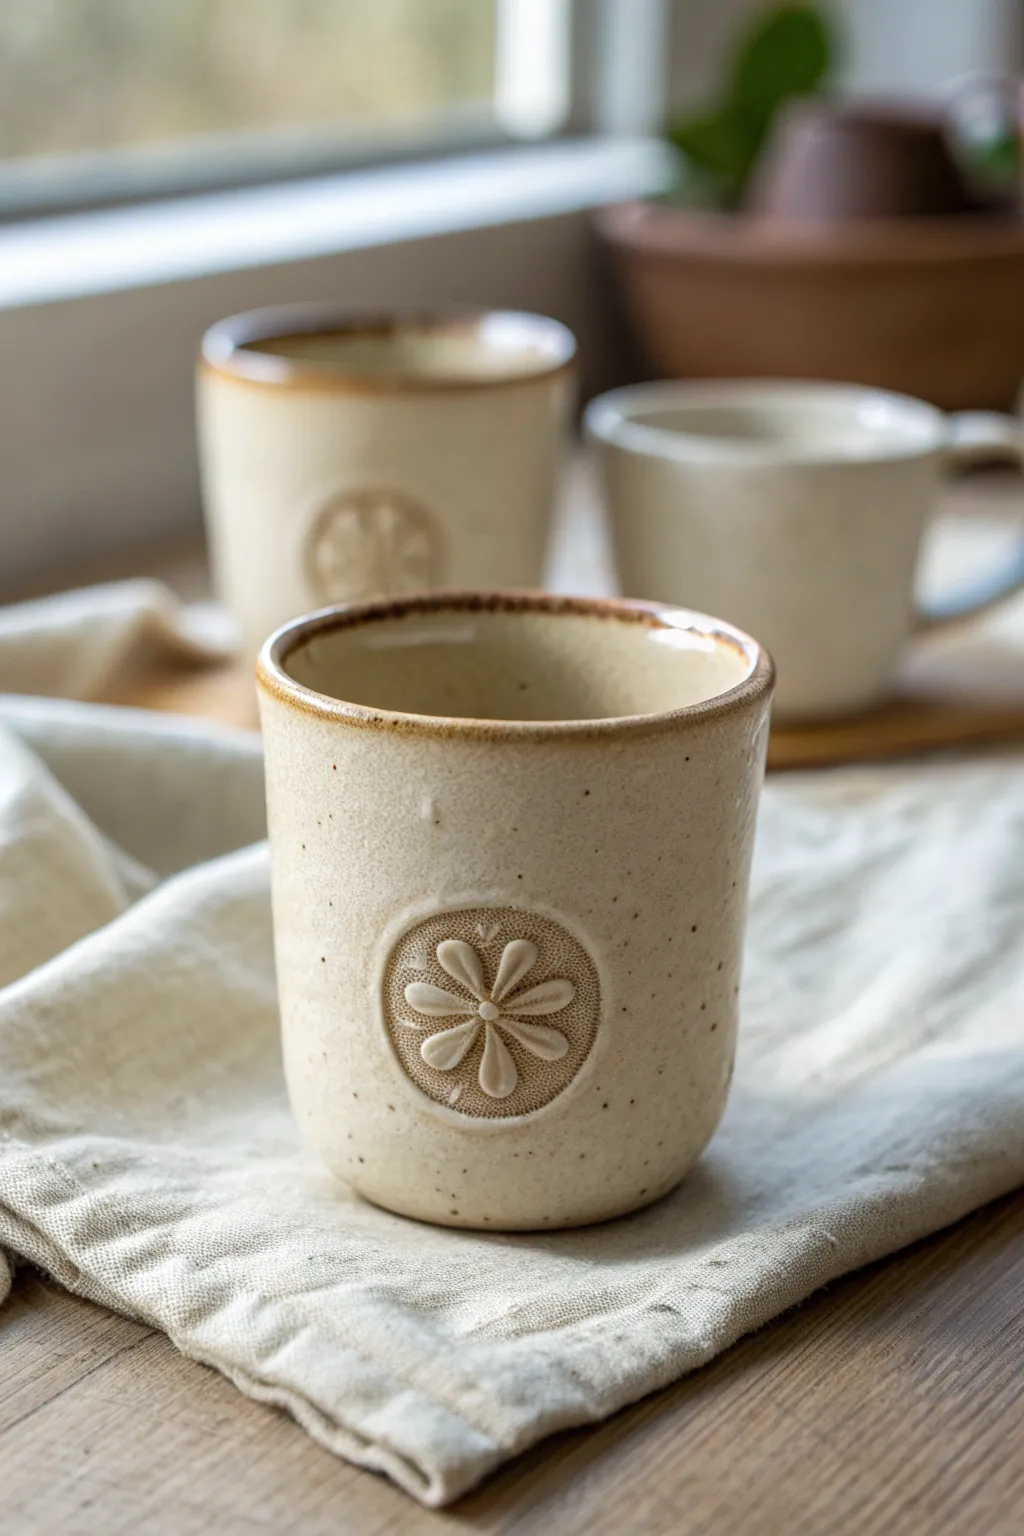
Create a serene, earthy drinking vessel featuring a delicate six-petal flower medallion pressed directly into the clay. This project combines simple hand-building with a classic speckled finish for a timeless, organic look.
Step-by-Step Tutorial
Materials
- Stoneware clay (speckled or light buff)
- Six-petal flower bisque stamp or plaster stamp
- Rolling pin
- Canvas work surface
- Circular cookie cutter or template (approx. 3-4 inches)
- Needle tool
- Scoring tool or serrated rib
- Slip (clay and water slurry)
- Sponge
- Wooden modeling tool
- Speckled cream glaze
- Iron oxide wash or brown underglaze
Step 1: Forming the Cup Body
-
Roll the slab:
Begin by rolling out a consistent slab of stoneware clay on your canvas to about 1/4 inch thickness. Ensure the clay is free of air bubbles by compressing it with a rib before cutting. -
Cut the rectangle:
Cut a clean rectangle from the slab. The height determines the cup’s depth, and the length should equal the circumference of the circle base plus a slight overlap for the seam. -
Cut the base:
Use your circular cutter or a template to cut out the base of the cup from the remaining slab. -
Bevel the edges:
use a knife or wire cutter to angle the short ends of your rectangular slab at 45 degrees. This creates a stronger, cleaner join when you roll it into a cylinder. -
Score and slip:
Rough up the beveled edges and the perimeter of the base using your scoring tool. Apply a generous amount of slip to these textured areas. -
Assemble the cylinder:
Curve the rectangle into a cylinder, matching the beveled edges together. Press firmly along the seam to bond the clay. -
Attach the base:
Place the cylinder onto the scored base. Use a wooden modeling tool to blend the clay from the outside of the cylinder down onto the base, sealing the bottom completely. -
Smooth the seams:
With the cylinder upright, reach inside and run a damp sponge or your finger along the inner seams to smooth them out. I find using a long-handled sponge on a stick helps reach the bottom if the cup is narrow.
Step 2: Stamping and Refining
-
Support the wall:
Before stamping, place your left hand inside the cup to support the wall directly behind where you plan to place the medallion. This prevents the cup from collapsing or warping under pressure. -
Impress the medallion:
Press your six-petal flower stamp firmly into the center of the cup’s exterior wall. Apply even pressure, rocking slightly if the stamp is convex, to ensure the edges of the circle impression are crisp. -
Refine the rim:
Smooth the top rim of the cup with a damp sponge or a chamois leather to ensure it is comfortable for drinking. Slightly round over the edges. -
Dry slowly:
Cover the cup loosely with plastic to let it dry slowly to the leather-hard stage, then uncover to bone dry before the bisque firing.
Stamp Stuck?
If the stamp sticks to the clay, dust the stamp face lightly with cornstarch or wait for the clay to firm up slightly before pressing.
Step 3: Glazing and Finishing
-
Bisque fire:
Fire the bone-dry piece in the kiln to cone 04 (or your clay’s specific bisque temperature). -
Wax the resist:
Once bisqued, apply wax resist to the bottom of the cup and slightly up the foot to prevent glaze from sticking to the kiln shelf. -
Apply base glaze:
Dip the cup into a bucket of speckled cream glaze. Hold it upside down for a few seconds to let excess glaze drip off, then turn it right-side up and clean any drips on the rim. -
Highlight the rim:
Using a small brush, carefully apply a band of iron oxide wash or brown underglaze along the very top rim. This recreates the toasted edge look seen in the photo. -
Highlight the stamp:
You can optionally brush a very thin wash of the brown oxide into the recessed lines of the flower stamp to make the petals pop, wiping away the excess on the high points. -
Glaze fire:
Fire the cup a final time to the maturity temperature of your clay and glaze (typically cone 5 or 6 for stoneware).
Make Your Own Tool
Carve your own custom medallion into a small block of dried clay or plaster, then bisque fire it to create a durable, unique pottery stamp.
Once cooled from the kiln, your new favorite mug is ready for a warm beverage


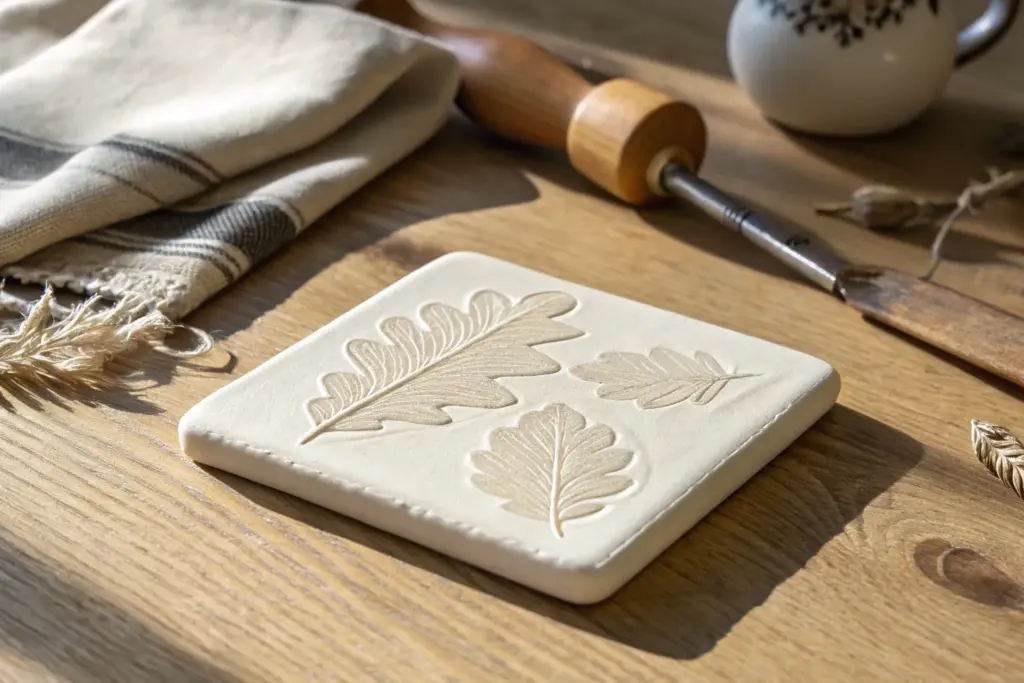
Feather Texture Stamp
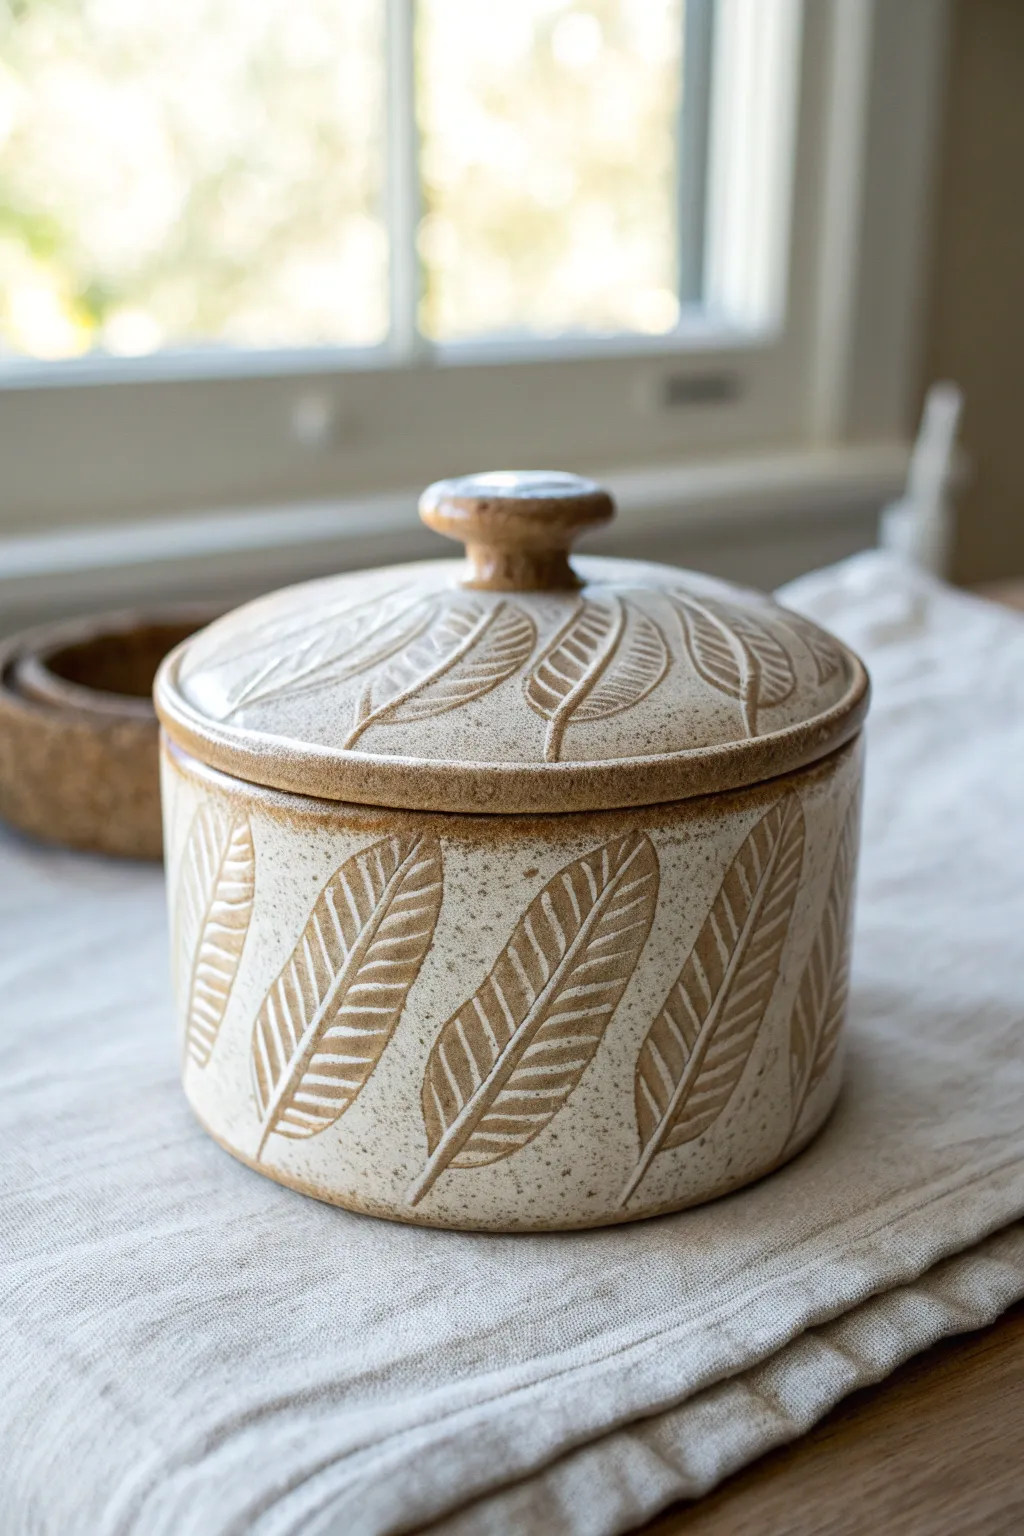
This rustic, nature-inspired lidded jar combines the warmth of speckled clay with the delicate detail of feather impressions. The organic repetition of the feather stamp creates a rhythmic texture that feels both modern and timeless.
Step-by-Step
Materials
- Speckled stoneware clay body
- Rolling pin
- Canvas work surface or slab mat
- Circle templates or compass
- Feather texture stamp (commercial or handmade bisque stamp)
- Fettling knife or needle tool
- Scoring tool (serrated rib)
- Slip (clay mixed with water)
- Sponge
- Clear or translucent white glaze
- Wax resist
- Paintbrush
Step 1: Preparing the Slab
-
Roll the slab:
Begin by wedging your speckled stoneware clay thoroughly to remove air bubbles. Roll it out into a consistent slab slightly thicker than 1/4 inch, ensuring even thickness throughout. -
Smooth the surface:
Compress the slab on both sides using a soft rib tool. This aligns the clay particles which helps prevent warping later and provides a clean canvas for your stamping.
Sticky Stamp Rescue
If your stamp is sticking to the clay, dust the clay surface lightly with cornstarch before pressing. It acts as a release agent and burns off completely in the kiln.
Step 2: Stamping and Texture
-
Test the stamp:
Before committing to your main slab, test your feather stamp on a scrap piece of clay to determine exactly how much pressure creates a clear, deep impression without sticking. -
Apply the pattern:
Working while the clay is still soft leather hard, press the feather stamp into the slab in a repeating pattern. For the look in the image, angle the feathers slightly diagonal to the vertical axis. -
Clean up edges:
If the stamping process pushed out the clay edges, gently smooth them back down without disturbing the texture.
Level Up: Oxide Wash
Before applying wax, brush a dark iron oxide wash into the stamp impressions and sponge it off the high points. This adds depth and makes the feathers pop dramatically.
Step 3: Constructing the Jar
-
Cut the components:
Measure the circumference needed for your desired jar size. Cut a rectangular strip from your stamped slab for the walls, and a separate circle from plain rolled clay for the base. -
Create the cylinder:
Curve the rectangular slab into a cylinder. Score and slip the vertical seam aggressively. I find overlapping the seam slightly and then blending it creates a stronger bond than a butt joint. -
Attach the base:
Score and slip the bottom edge of your cylinder and the outer edge of your base circle. Press them together firmly. -
Interiors and exteriors:
Use a wooden tool or your finger to smooth the interior seams. On the exterior, be careful not to smudge your beautiful feather texture while refining the shape.
Step 4: The Lid and Knob
-
Measure the opening:
Measure the inner diameter of your jar rim. You will need to create a lid with a flange that fits securely inside this opening. -
Form the lid slab:
Cut a circle slightly larger than the jar’s outer rim. Stamp this lid piece with a radial pattern, pointing the feathers inward toward the center. -
Add a flange:
Add a small coil or a second, smaller circle of clay to the underside of the lid to act as a flange, ensuring it won’t slide off the jar. -
Throw or model the knob:
Create a mushroom-shaped knob either by hand-modeling or throwing a tiny amount of clay on the wheel. Attach this securely to the center of the lid with slip.
Step 5: Glazing to Reveal Texture
-
Bisque fire:
Allow the piece to dry slowly to prevent warping, then bisque fire it according to your clay body’s specifications. -
Wax resist application:
This is the crucial step for the ‘inlay’ look. Carefully paint liquid wax resist over the stamped feather impressions and the knob. This prevents glaze from sticking to the pattern. -
Dip or pour glaze:
Dip the entire jar into a creamy, translucent white or clear glaze. The wax will repel the glaze from the feathers, leaving the raw speckled clay visible. -
Wipe back:
Use a damp sponge to wipe away any droplets of glaze that may be sitting on top of the waxed areas to ensure a crisp, clean line. -
Final firing:
Fire the piece to glaze temperature (Cone 5, 6, or 10 depending on your clay). The heat will burn off the wax, revealing the warm, toasted clay texture beneath the glossy surface.
Enjoy using your custom ceramic jar to hold small treasures or kitchen staples

The Complete Guide to Pottery Troubleshooting
Uncover the most common ceramic mistakes—from cracking clay to failed glazes—and learn how to fix them fast.
Tiny Animal Totem Stamp
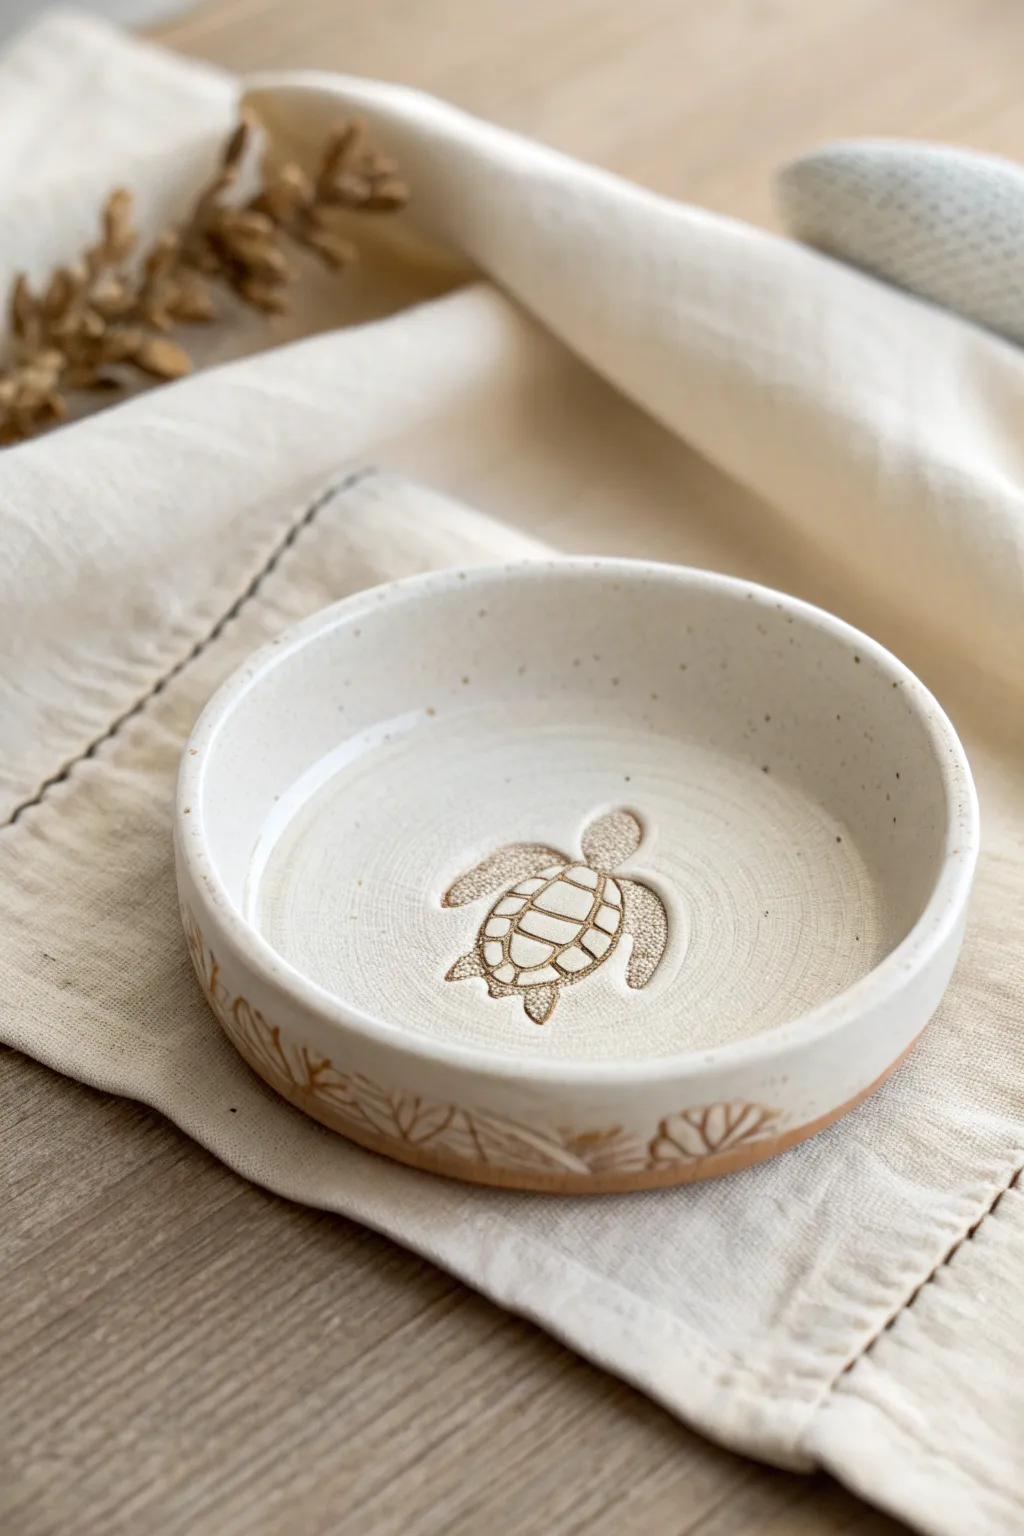
Create a serene little catch-all dish featuring a gentle sea turtle totem impressed into speckled clay. This project combines simple hand-building with stamping techniques to produce a piece that feels both earthy and refined, perfect for holding rings or small treasures.
Detailed Instructions
Materials
- Speckled stoneware clay
- Rolling pin
- Canvas mat or slab roller
- Sea turtle ceramic stamp (bisque or rubber)
- Circle cutter or template (approx. 4-5 inches)
- Pottery sponge
- Smoothing rib (rubber or wood)
- Carving tool or sgraffito loop tool
- Glossy white glaze (transparent or semi-opaque)
- Small paintbrush
- Kiln
Step 1: Preparing the Slab
-
Wedge and roll:
Begin by wedging a softball-sized ball of speckled stoneware clay to remove any air bubbles. Roll it out into an even slab about 1/4 inch thick using your rolling pin on a canvas mat. -
Compress the clay:
Take a rubber rib and gently run it over the surface of the slab. This aligns the clay particles and creates a smooth, professional canvas for your stamping. -
Cut the circle:
Using your circle cutter or a needle tool tracing around a template, cut a clean circle from the slab. Remove the excess clay. -
Smooth the edges:
Dip your finger or a small sponge in water and run it along the cut edge to soften the sharp angle. This prevents sharp edges later after firing.
Glaze too thick?
If the glaze covers your turtle design completely, gently sponge away more material before firing. You want the high points of the clay to break through the white for that antique look.
Step 2: Stamping and Shaping
-
Position the turtle:
Identify the exact center of your clay circle. Hover your sea turtle stamp over the spot to ensure alignment before committing. -
Make the impression:
Press the stamp firmly and evenly into the clay. I find rocking it very slightly in a circular motion ensures all the legs and the shell detail transfer clearly without pressing too deep. -
Lift carefully:
Pull the stamp straight up to avoid smudging the design. If any edges of the impression are rough, gently tap them down with a fingertip. -
Form the rim:
Place the clay circle on a piece of foam or cup it in your hand. Gently pinch and lift the outer 1 inch of the circle upwards to create a shallow wall. -
Refine the curve:
Smooth the interior curve where the floor meets the wall using a damp sponge, ensuring a seamless transition. The dish should look like a low, open bowl.
Add a wash
Brush an iron oxide wash into the turtle stamp before glazing. This darkens the deep lines significantly, making the totem pop with high contrast against the white glaze.
Step 3: Adding Exterior Details
-
Leather hard drying:
Allow the dish to dry until it reaches a leather-hard state. It should be firm enough to handle without warping but still soft enough to carve. -
Carve the exterior:
Turn the bowl over or hold it sideways. Using a carving tool, gently etch organic leaf or seaweed motifs around the lower outside edge of the bowl, similar to the photo. -
Clean up crumbs:
Brush away any clay crumbs created by carving with a soft, dry brush. Do not use water here, as it can fill in your crisp lines. -
Bisque fire:
Once fully bone dry, fire the piece in a kiln to bisque temperature (usually Cone 04) to prepare it for glazing.
Step 4: Glazing and Finishing
-
Wax resist (optional):
If you want the turtle to remain raw clay, apply wax resist carefully over the impressed design. However, for the look in the photo, we will glaze over it. -
Apply the glaze:
Pour a glossy white glaze into the interior of the bowl. Swirl it quickly to coat the entire inside, then pour out the excess. The glaze should pool slightly in the turtle’s shell recesses. -
Dip the exterior:
Hold the bowl by the foot or rim and dip the exterior into the glaze, stopping just before the bottom edge if you want a raw clay foot. -
Wipe the details:
While the glaze is powdery but dry, take a damp sponge and gently wipe the glaze off the raised areas of the turtle and the exterior carving. This reveals the toasted clay color while leaving glaze in the deep lines. -
Final fire:
Load the kiln and fire to the maturity temperature of your clay and glaze (typically Cone 5 or 6 for stoneware).
Now you have a charming, handmade totem dish ready to hold your daily essentials