If you’ve got a plain plate and a soft spot for anything heart-themed, painting your own design is one of the quickest ways to make it feel personal. Here are my favorite heart plate painting ideas—from classic and sweet to artsy and unexpected—so you can find a look that totally fits your style.
Classic Red Heart Center
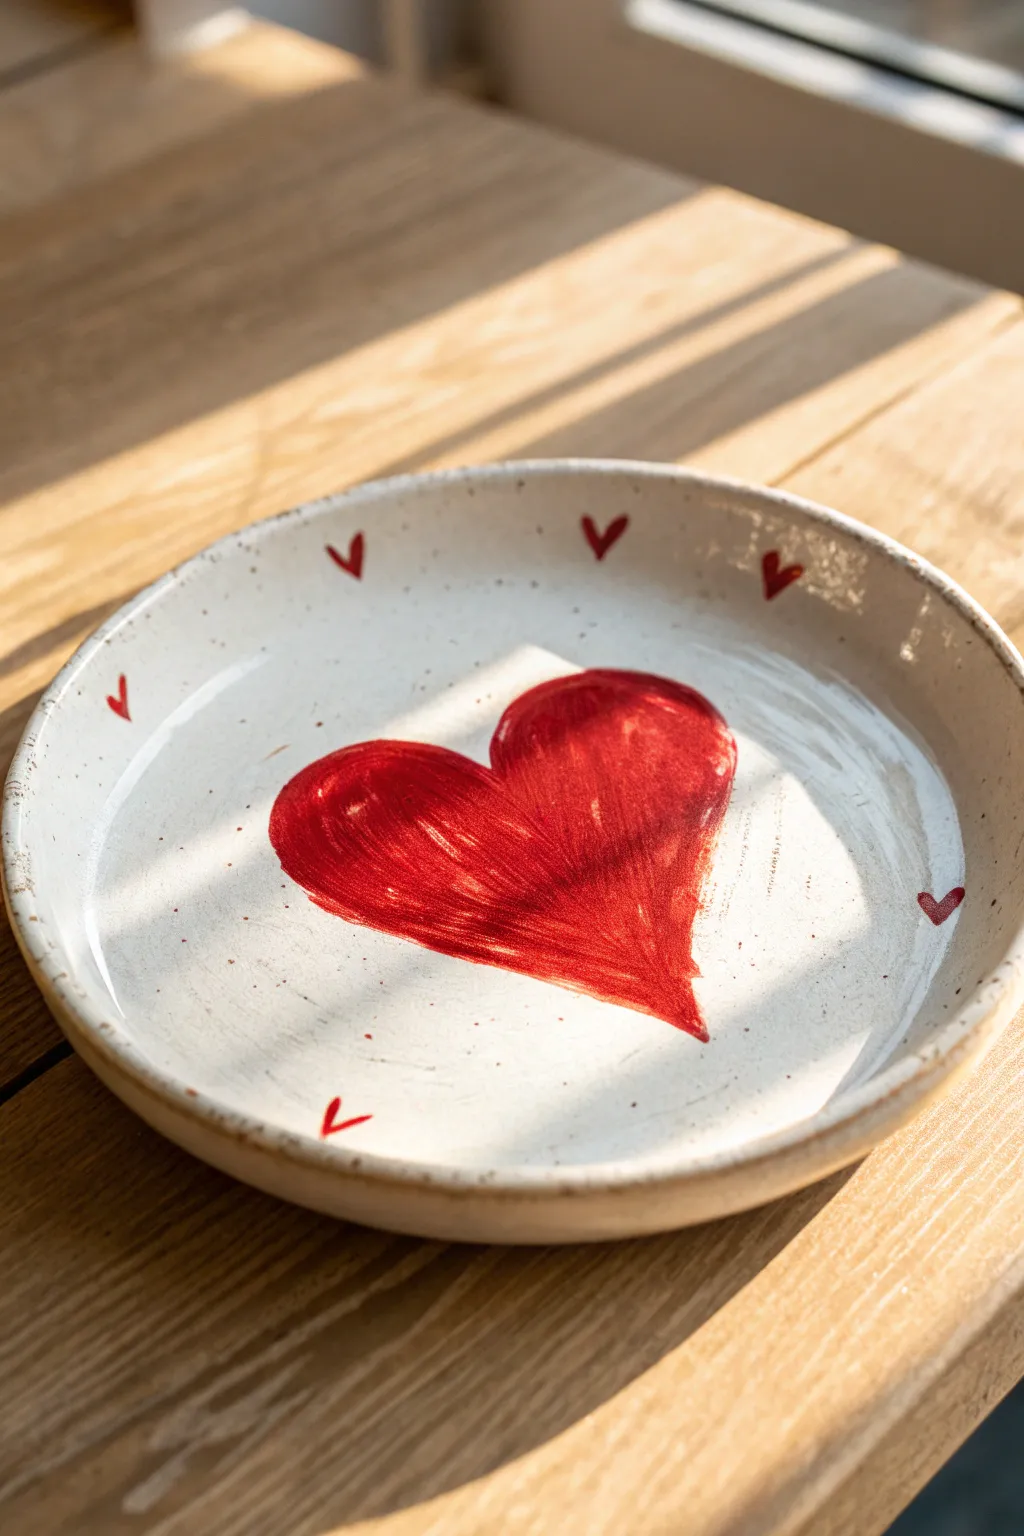
Embrace the charming imperfection of handmade ceramics with this sweetly simple design. This project focuses on creating a bold, brush-stroke textured heart surrounded by a delicate rim of tiny accents, all set against a lovely speckled creamy white glaze.
How-To Guide
Materials
- Bisque-fired ceramic plate or shallow bowl (preferably stoneware)
- Speckled white glaze (such as Mayco Stoneware Opal or similar)
- Red underglaze (bright, true red)
- Fan brush (medium size)
- Round detail brush (size 2 or 4)
- Pencil (for sketching)
- Damp sponge
- Clear dipping glaze (optional, depending on your white glaze choice)
- Kiln access
Step 1: Base Preparation
-
Clean surface:
Begin by wiping down your bisque-fired plate with a damp sponge. This is a crucial first step to remove any dust or oils that might prevent the glaze from adhering properly. -
Sketch the center:
Using a pencil, lightly sketch the outline of a large heart in the center of the plate. Don’t worry about being perfectly symmetrical; a slightly askew shape adds to the hand-painted charm. The pencil lines will burn off in the kiln. -
Mark the rim:
Lightly mark small ‘V’ shapes or dots around the inner rim where you want your tiny hearts to go. Space them out evenly, leaving about two to three inches between each one.
Step 2: Applying the Design
-
Load the brush:
Dip your medium fan brush or a flat shaders brush into the red underglaze. You want the brush fully loaded but not dripping. -
Paint the left lobe:
Starting from the top left curve of your sketched heart, sweep the brush down towards the bottom point. Allow the bristles to create visible texture; we aren’t looking for a flat, solid fill here. -
Paint the right lobe:
Repeat the motion for the right side, sweeping from the top curve down to meet the first stroke at the bottom point. It’s okay if the paint is thicker in some areas and thinner in others—that ‘streaky’ look mimics the reference image perfectly. -
Refine the shape:
Use the edge of the brush to sharpen the bottom point or the inner cleft of the heart if needed, but resist the urge to overwork the center. The visible brushstrokes give it energy. -
Let it dry:
Allow the center heart to dry until it is no longer shiny. Underglaze dries quickly, so this should only take a few minutes. -
Second layer:
Apply a second coat of red underglaze over the heart following the same brush directions. This deepens the red while maintaining that lovely hand-painted texture. -
Paint the rim hearts:
Switch to your small round detail brush. Dip it into the red underglaze and paint small, simple V-shapes over your rim marks. They shouldn’t be perfect hearts, just little suggestive dashes. -
Clean up:
If any red paint smudged where it shouldn’t be, use a clean, damp brush or a sponge tip to gently wipe it away before glazing.
Brushstroke Texture
To get that specific streaky look in the heart, let the underglaze get slightly tacky on the brush before applying. Dry-brushing creates more texture than a wet, loaded brush.
Step 3: Glazing and Firing
-
Preparing the glaze:
Stir your speckled white glaze thoroughly. The speckles tend to settle at the bottom, so mix well to ensure an even distribution of those lovely brown flecks. -
Apply first coat:
Using a clean fan brush, apply a coat of the speckled white glaze over the entire plate. Be careful when brushing over the red heart; try to float the glaze on top rather than dragging the brush hard, which might smear the underglaze. -
Alternative method:
If you are worried about smearing, I sometimes prefer to dab the glaze gently over the design area first, let it set, and then brush the rest of the plate. -
Second coat:
Once the first coat is dry to the touch, apply a second coat of the speckled white glaze to ensure full coverage and opacity. -
Check thickness:
Verify the manufacturer’s instructions for your specific glaze. Some require three coats for full opacity, which is what gives that milky, soft look. -
Wipe the foot:
Use a damp sponge to wipe any glaze off the bottom foot ring of the plate. This prevents the plate from sticking to the kiln shelf during firing. -
Final smooth:
Inspect the surface for any drips or unintentional thick spots and gently smooth them with your finger. -
Fire:
Load the plate into the kiln and fire to the temperature recommended for your specific clay and glaze combination (typically Cone 5 or 6 for stoneware).
Carved Details
Before the first firing, try using a sgraffito tool to scratch thin lines through the red heart to reveal the white clay beneath for added definition.
Once cooled, your plate is ready to bring a touch of love to your table setting


Soft Pink Ombre Heart Fade
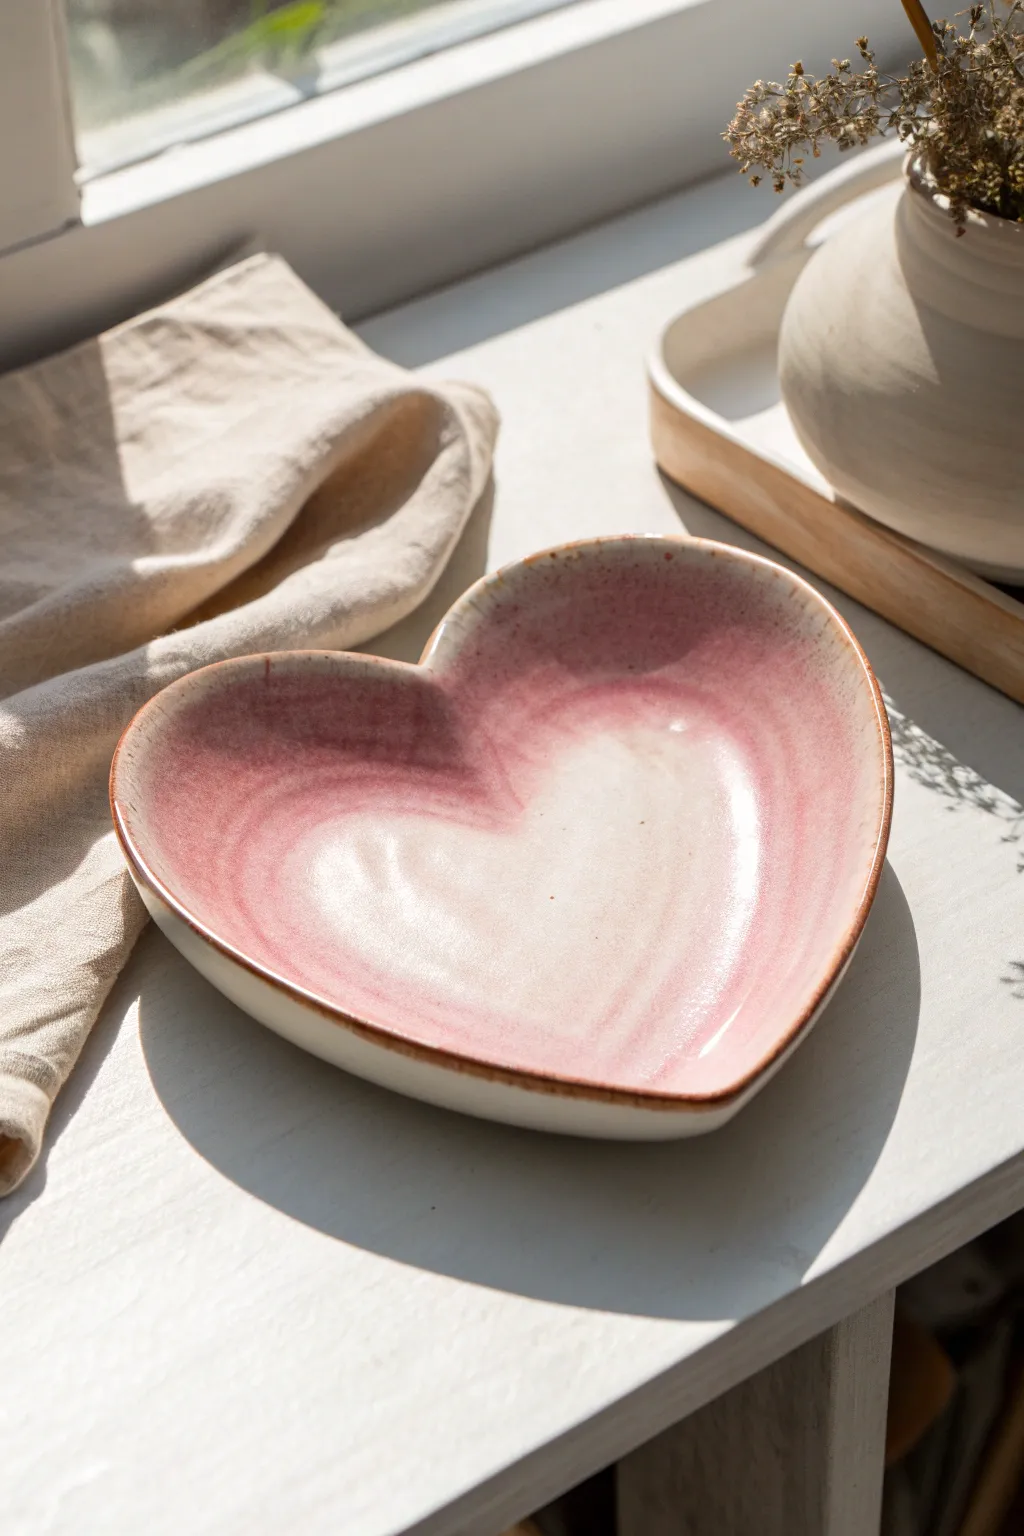
Capture the romantic essence of soft sunrise hues with this delicate heart-shaped plate project. By blending creamy whites into dusty pinks and finishing with a rustic rim, you’ll create a piece that feels both vintage and modern.
Step-by-Step Guide
Materials
- Heart-shaped bright white ceramic bisque plate
- Underglaze paints: Creamy White, Soft Baby Pink, Dusty Rose/Mauve
- Underglaze paint: Burnished Brown or Oxide (for the rim)
- Large soft fan brush
- Medium flat shader brush
- Small fine-liner brush
- Sponge (synthetic or sea sponge)
- Palette for mixing
- Water cup
- Clear transparent dipping glaze
Step 1: Base Preparation
-
Clean the bisque:
Begin by wiping down your heart-shaped bisque plate with a slightly damp sponge to remove any ceramic dust. This ensures your underglazes adhere smoothly without crawling. -
Map the center:
Visualize a smaller heart shape right in the center of the plate. This will stay the lightest color. You don’t need to draw it, just keep it in mind as your ‘light zone’.
Seamless Blending
Work wet-on-wet for the smoothest gradients. If the underglaze dries too fast, mist it lightly with water to reactivate and blend.
Step 2: Creating the Ombre Effect
-
Apply the white center:
Load your large fan brush with the Creamy White underglaze. Paint the center of the plate using sweeping strokes that follow the heart’s curve, feathering the edges outward. -
Mix the transition shade:
On your palette, mix a small amount of Soft Baby Pink with the Creamy White to create a very pale blush tone. -
Paint the middle ring:
Apply this pale blush mixture in a ring around your white center. While the paint is still damp, use clean, slightly wet strokes to blend the inner edge into the white center for a seamless transition. -
Add the pink layer:
Switch to pure Soft Baby Pink. Paint a band outside your blush layer, getting closer to the rim. Again, work quickly to blend the inner edge into the previous color while it’s still workable. -
Deepen the color:
Now, take your Dusty Rose or Mauve underglaze. Apply this to the outer third of the plate, following the curve of the heart shape. -
Blend the gradient:
I like to use a slightly damp sponge here to dab gently where the Dusty Rose meets the Baby Pink. This creates a soft, cloudy transition rather than a hard line. -
Repeat layers:
Underglazes often need 2-3 coats for full opacity. Repeat the process: white center, pink middle, mauve outer edge. Let each layer dry until matte before adding the next. -
Check for streaks:
Inspect your gradient. If you see harsh brush marks, lightly cross-hatch over them with a very slightly damp brush to smooth out the texture.
Step 3: The Rustic Rim
-
Prepare the rim color:
Pour a small amount of Burnished Brown underglaze or a ceramic oxide onto your palette. It should be the consistency of heavy cream. -
Line the edge:
Using your fine-liner brush, carefully paint the very top edge of the rim. It doesn’t need to be perfectly even; a little wavering adds to the handmade organic look. -
Add rim texture:
Load a relatively dry brush with the brown hue. Hold it perpendicular to the edge and flick it gently or drag it slightly inward to create tiny specks or imperfections along the rim. -
Optional speckling:
For extra texture, you can flick a toothbrush with a tiny amount of diluted brown paint over the whole plate, though the reference image keeps this mostly to the rim.
Personalize It
Before the final clear glaze, use a toothpick to scratch a tiny initial or date into the darkest part of the paint reveal the white clay beneath.
Step 4: Finishing
-
Final drying:
Allow the entire piece to dry completely. The underglaze should feel chalky and room temperature to the touch. -
Glazing:
Dip the plate into a clear transparent glaze. Ensure you shake off excess glaze so it doesn’t pool in the bottom of the plate. -
Firing:
Fire the piece in a kiln according to the clay and glaze specifications (typically Cone 06 for earthenware or Cone 5/6 for stoneware).
Once fired, the glossy finish will make those pink transitions glow with a lovely warmth

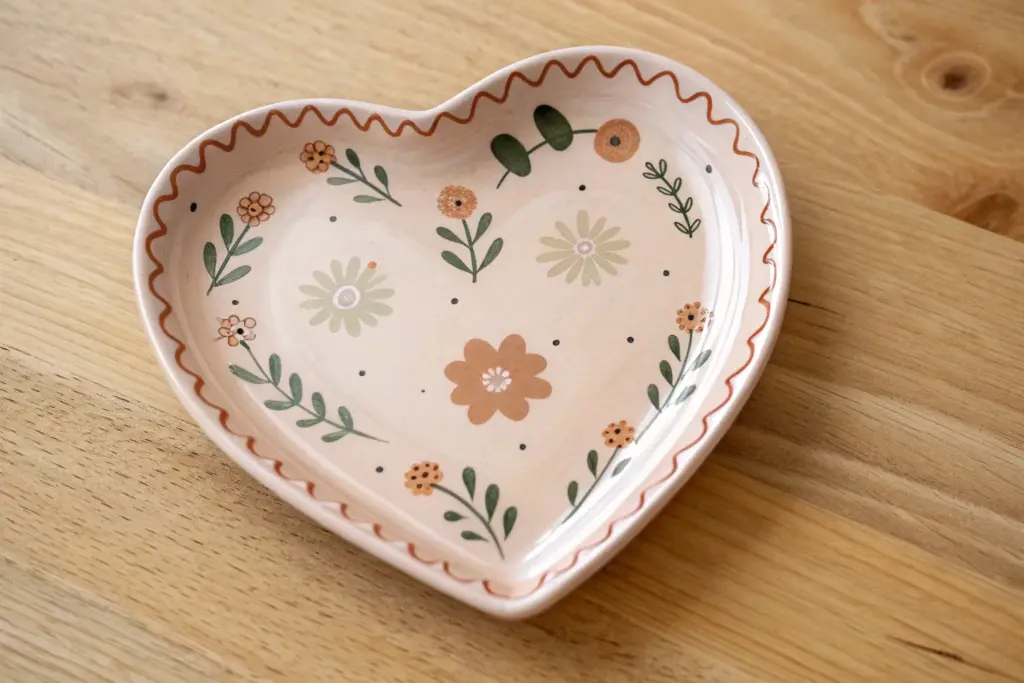
Floral Heart Wreath Border
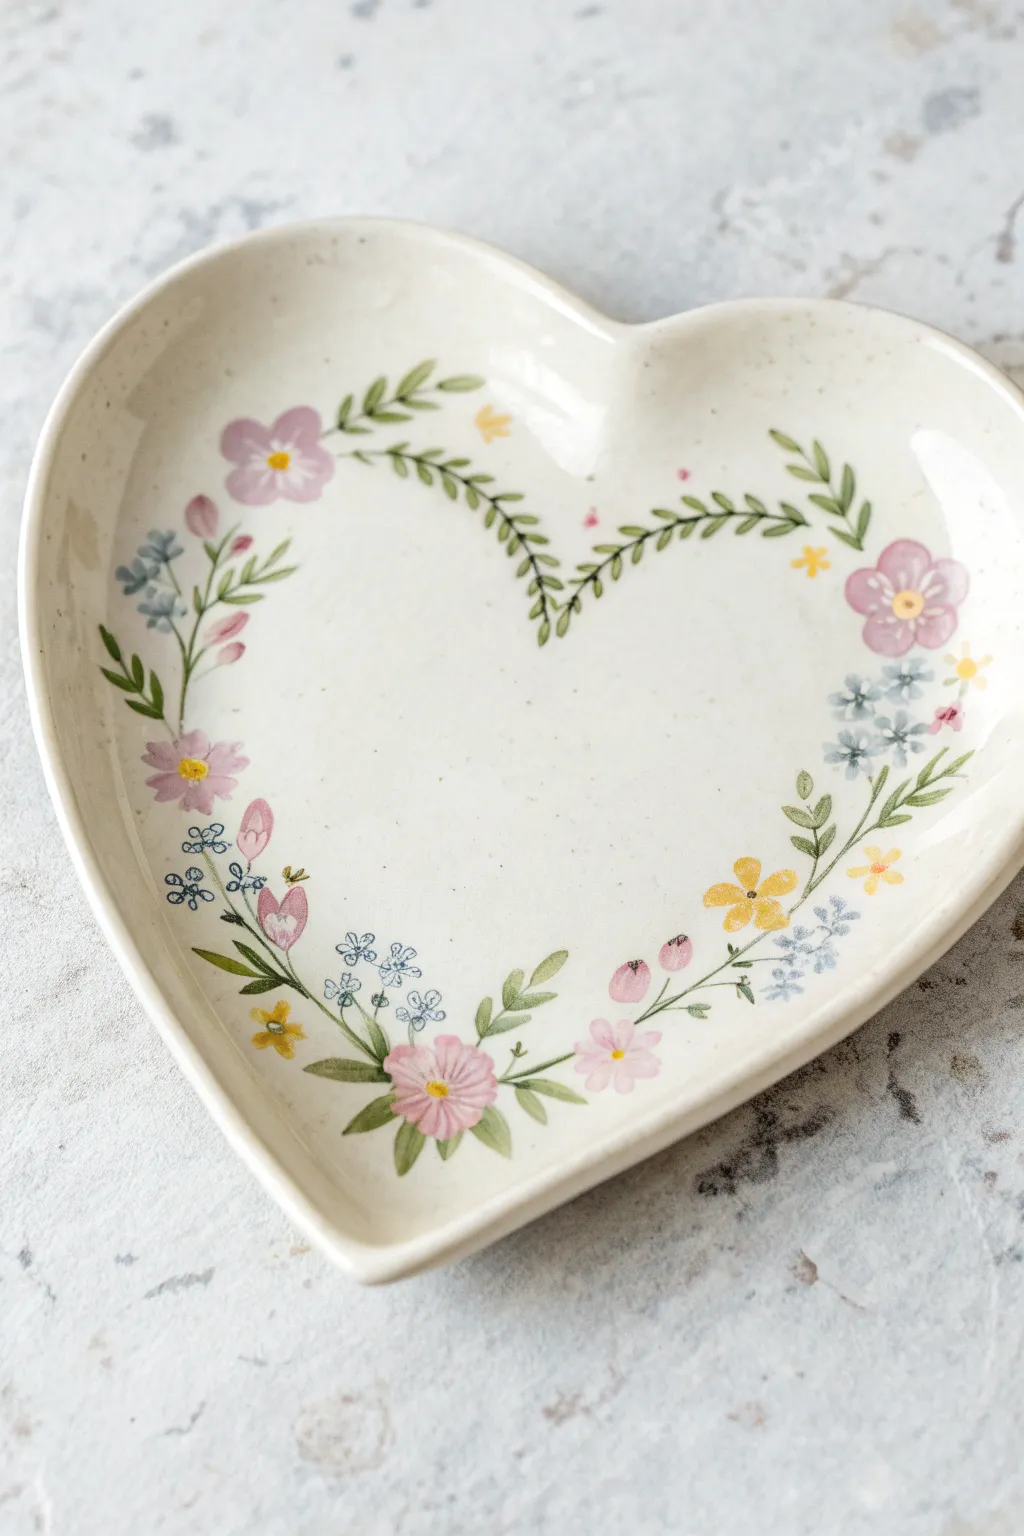
Capture the romance of a spring garden with this heart-shaped ceramic plate design featuring a delicate wreath of wildflowers. By painting two concentric heart shapes—one defined by the plate’s rim and an inner negative space—you create a beautiful framing effect perfect for holding jewelry or serving treats.
Step-by-Step Tutorial
Materials
- Heart-shaped ceramic bisque plate
- Underglaze or acrylic enamel paints (pink, lavender, light blue, yellow, leafy green)
- Round synthetic brushes (sizes 0, 2, and 4)
- Fine liner brush (size 00 or 10/0)
- Pencil (light sketch)
- Palette or small dishes
- Water cup and paper towels
- Clear glaze (if using underglazes and firing)
Step 1: Planning the Layout
-
Mark the center heart:
Begin by very lightly sketching a smaller heart shape in the exact center of your plate with a pencil. This line will act as the inner boundary for your floral wreath, keeping the center empty. -
Define the outer boundary:
Lightly mark a second, larger heart shape about half an inch from the plate’s physical rim. Your flowers and leaves will live in the channel between these two pencil lines.
Paint Consistency
Thin your paint with a tiny drop of water until it resembles heavy cream. This helps the liner brush glide smoothly when painting thin stems without breaking.
Step 2: Painting the Greenery Base
-
Start the vine structure:
Mix a vibrant leafy green paint. Using a size 0 round brush, paint a thin, continuous vine line that roughly weaves between your two pencil guides. -
Focus on the dip:
At the top dip of the heart (the vertex), paint two vine stems that curve downward and meet, creating a distinct ‘V’ shape that emphasizes the heart’s form. -
Add main leaves:
Switch to a size 2 brush to add small, almond-shaped leaves along your main vine stem. I find it easiest to press the brush belly down and lift up quickly to get a tapered point. -
Create fern-like fronds:
Near the top curves of the heart, paint finer, fern-like branches with tiny, alternating leaves using the very tip of your brush. -
Vary the foliage:
Disperse a few different leaf shapes—some rounded, some pointed—around the wreath to make it feel organic and wild.
Personalize It
Paint a monogram, a short date, or a single meaningful word like ‘Love’ or ‘Joy’ in the empty negative space at the center of the heart using a cursive script.
Step 3: Adding the Blooms
-
Paint the pink cosmos:
Using a soft pink shade and a size 4 brush, paint loose, five-petaled flowers at three or four main anchor points on the wreath. -
Detail the flower centers:
While the pink is still slightly tacky set, add a tiny dot of yellow to the center of each pink flower, letting the colors bleed slightly if you want a softer look. -
Add blue forget-me-nots:
With a light blue or periwinkle paint, cluster groups of three to four tiny dots or small petals together. Place these clusters near the larger pink flowers to fill gaps. -
Insert yellow accents:
Paint small, four-petaled yellow flowers scattered sporadically. Keep these simple and bright to add pops of cheerfulness. -
Paint flower buds:
Using a darker pink or magenta, add small tear-drop shapes at the ends of thin green stems to represent unbloomed buds.
Step 4: Fine Details
-
Add connecting stems:
Use your finest liner brush and green paint to connect any floating flowers back to the main vine structure. -
Outline delicate elements:
If desired, take a very watered-down grey or dark blue and add extremely thin outlines to just a few petals for definition, though keeping it lineless looks softer. -
Fill the gaps:
Look for any large white spaces in your wreath and fill them with tiny green dots or extra monochromatic leaves. -
Erase guidelines:
Once the paint is absolutely bone dry, gently erase any visible pencil marks from your initial sketching phase. -
Seal or fire:
If using ceramic underglazes, apply a clear glaze over the entire plate and fire it in a kiln. If using acrylics for decorative use, seal with a glossy spray varnish.
Place your finished plate on a vanity or coffee table to enjoy a touch of spring all year round


Dainty Polka Dot Hearts Pattern
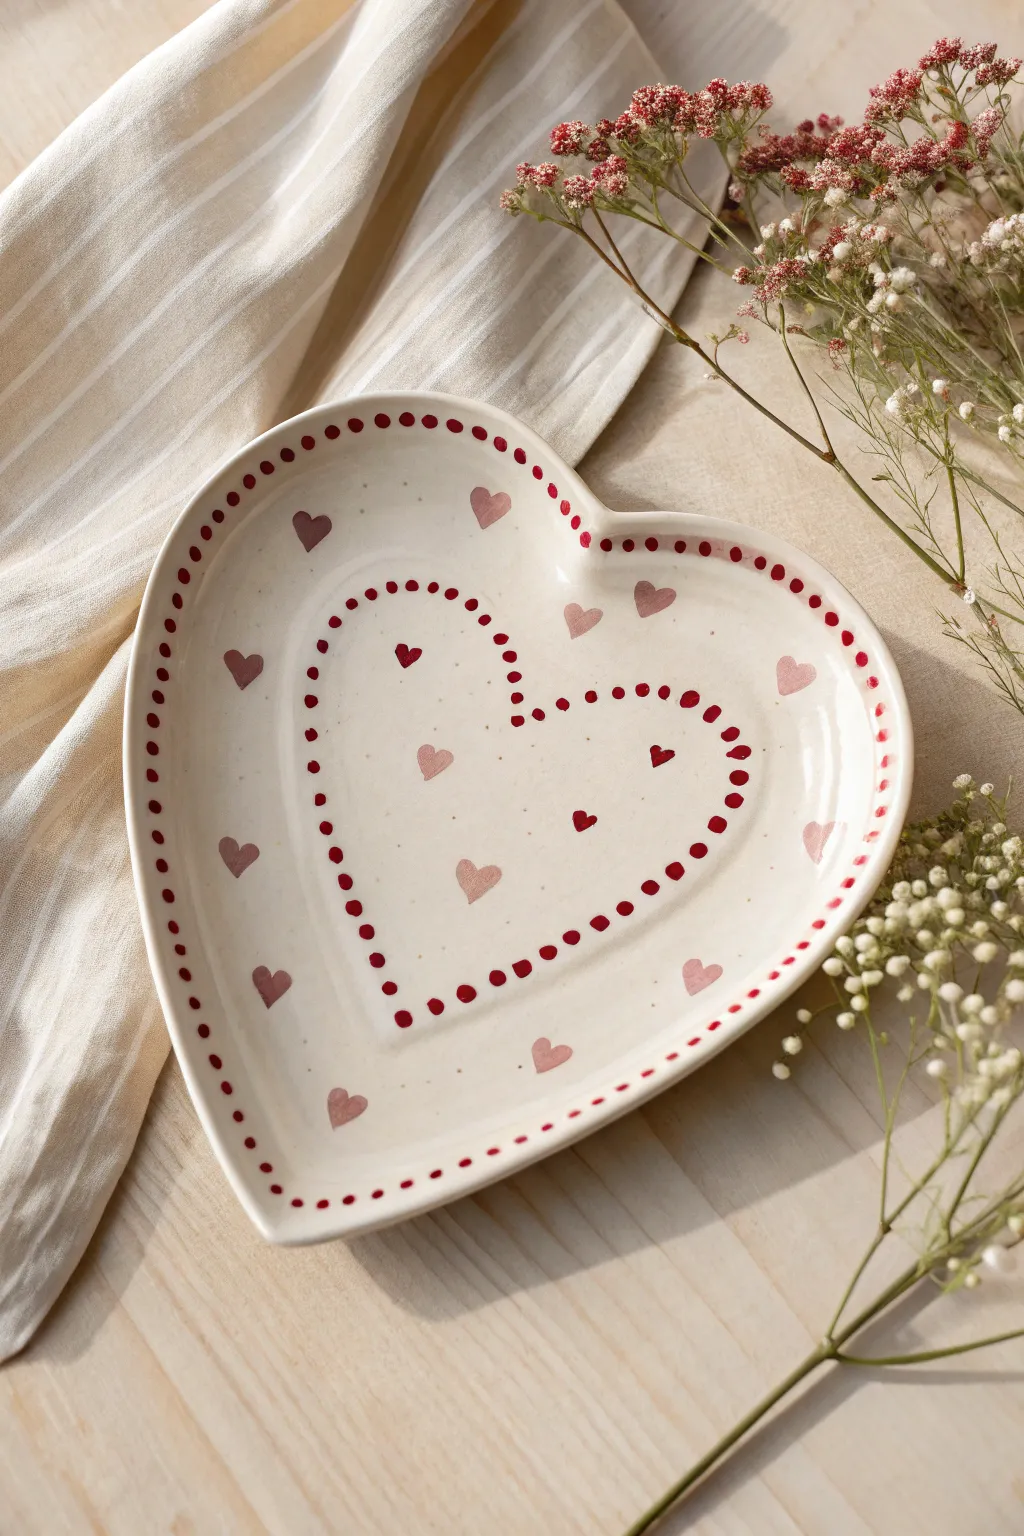
This sweet, vintage-inspired heart plate features a delicate interplay of hand-painted hearts and precision polka dots. The design uses negative space and simple motifs to create a warm, romantic piece perfect for Valentine’s treats or jewelry storage.
Step-by-Step
Materials
- Heart-shaped ceramic bisque plate
- Underglaze paints (Deep Red, Soft Pink, Creamy White for base)
- Wide flat brush (for base coat)
- Fine detail liner brush (size 0 or 00)
- Polka dotting tools (various sizes) or ends of brush handles
- Ceramic pencil or standard HB pencil
- Clear dipping glaze
- Bowl of water
- Paper towels
- Lazy Susan or turntable (optional)
Step 1: Preparation & Base Coat
-
Clean the Bisque:
Start by wiping down your ceramic bisque plate with a slightly damp sponge. This removes any kiln dust or oils from your hands that might resist the glaze. -
Apply Base Color:
Using a wide flat brush, apply a very light coat of Creamy White underglaze to the entire top surface of the plate. You want a semi-translucent look, so one or two thin coats are sufficient. -
Dry Completely:
Allow the base coat to dry until it feels chalky and room temperature to the touch. This usually takes about 10-15 minutes. -
Mark the Inner Heart:
Use a ceramic pencil to very faintly sketch the outline of the inner heart. This line will guide your large polka dot border. It should be offset about an inch from the plate’s rim.
Clean, Round Dots
To get perfectly round dots, reload your tool with fresh paint after every single dot. The first press gives the roundest shape; subsequent presses get smaller and jagged.
Step 2: Painting the Motifs
-
Mix Your Pinks:
Prepare your palette. You’ll need a pure Deep Red and a Soft Pink. I like to mix a tiny bit of the white base into my pink to make it more opaque. -
Paint the Central Hearts:
Start within the inner heart area. Using your fine liner brush, paint a scattering of tiny hearts. Alternate between red and pink randomly. -
Vary Heart Directions:
Paint some hearts upright and tilt others slightly to the left or right to give the pattern a playful, tossed-confetti feel. -
Add Outer Hearts:
Move to the space between your pencil line and the outer rim. Paint larger hearts here, spacing them out more generously than the inner section. -
Paint the Inner Rim Hearts:
Near the very edge of the plate’s interior, add small hearts that follow the curve of the rim. -
Let Hearts Dry:
Pause for a moment to let all painted hearts dry completely before you start dotting, so you don’t accidentally smudge wet paint with your hand.
Add a Personal Touch
Customize the center by painting a single initial or a short date (like an anniversary) in the very middle, surrounded by the tiny scattered hearts.
Step 3: The Polka Dot Borders
-
Load Painting Tool:
Dip a medium-sized dotting tool or the back of a paintbrush into your Deep Red underglaze. Ensure you have a nice bead of paint on the tool. -
Create the Inner Border:
Following the pencil line you sketched earlier, press dots firmly to create the heart shape that separates the two zones. Try to keep the spacing consistent between each dot. -
Refine the Points:
Pay special attention to the ‘dip’ of the heart and the bottom point. You may need to use a slightly smaller tool here to keep the shape sharp. -
Start the Rim Border:
Reload your tool with Deep Red paint. Begin adding dots along the very top edge of the plate rim. -
Dot the Perimeter:
Continue dotting all the way around the outer rim. I find it easiest to work in quadrants to ensure the spacing remains even as I go around the curves. -
Add Texture Speckles:
For that rustic, speckled pottery look, take an old toothbrush or a stiff bristle brush with watery brown or grey paint. Flick tiny specks across the whole plate. -
Final Cleanup:
Once the paint is bone dry, gently rub away any visible pencil lines with a dry finger or sponge. -
Glaze and Fire:
Dip the entire plate into clear glaze using tongs. Allow the glaze to dry, then fire the piece in a kiln according to the clay and glaze specifications.
Now you have a charming, handmade dish ready to hold keepsakes or sweets

The Complete Guide to Pottery Troubleshooting
Uncover the most common ceramic mistakes—from cracking clay to failed glazes—and learn how to fix them fast.
Sweet Candy Stripe Heart Bands
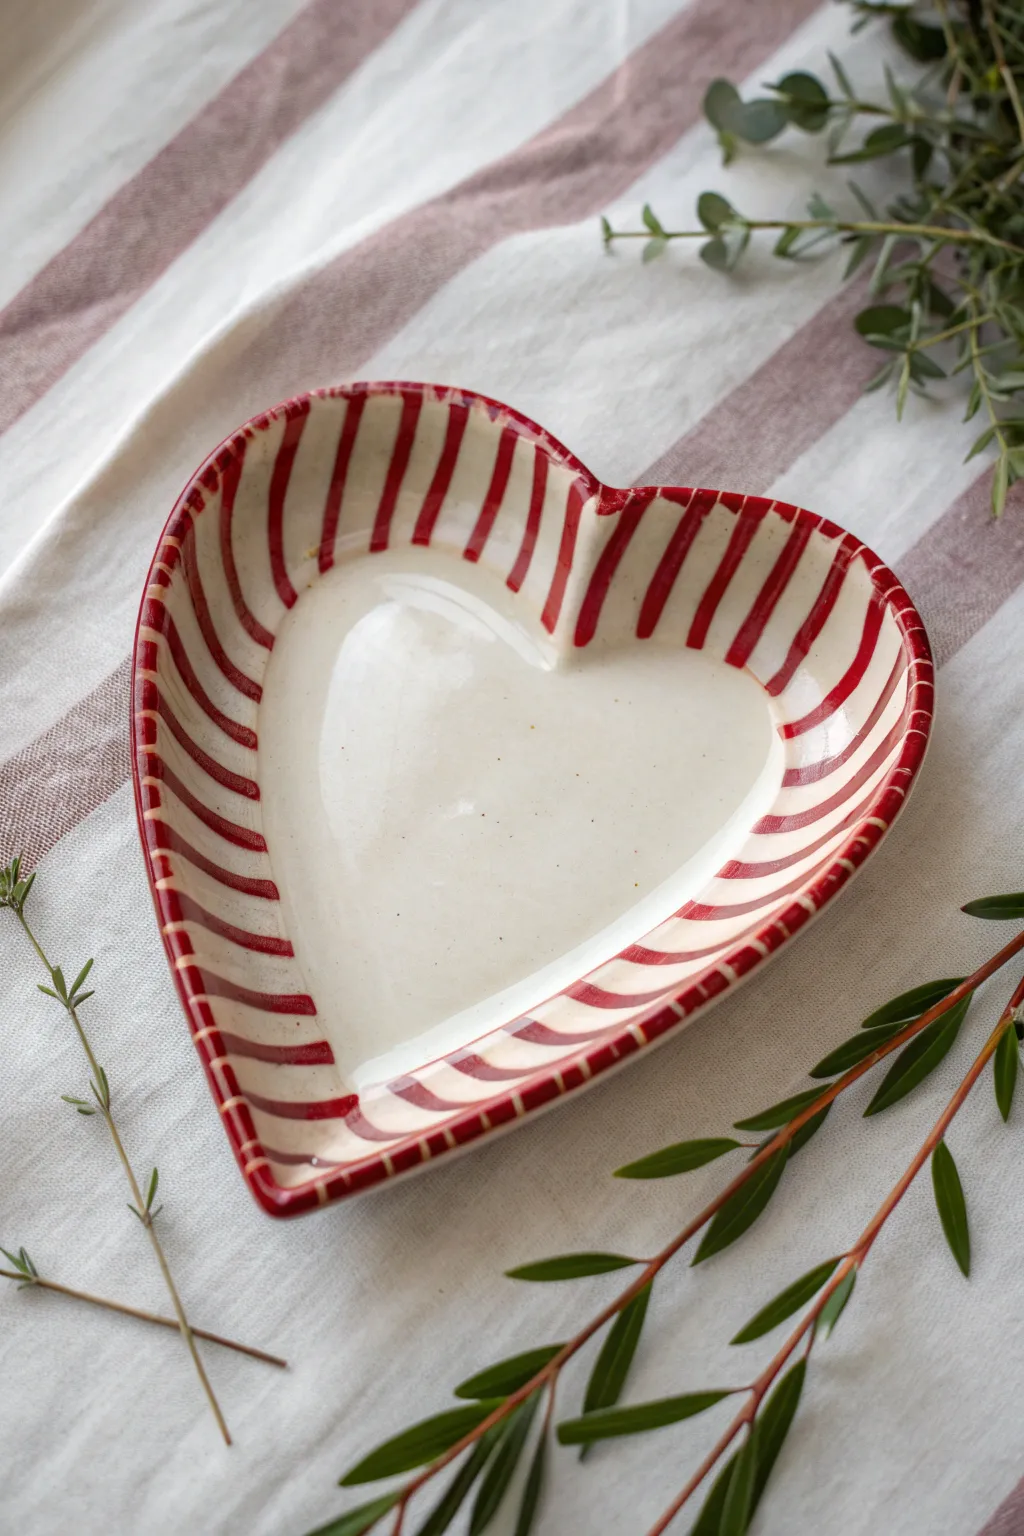
Embrace a timeless aesthetic with this lovely heart-shaped plate featuring bold red stripes that mimic vintage peppermint candy. The design keeps the center clean and creamy white, letting the vibrant rim take center stage for a charming, rustic finish.
How-To Guide
Materials
- Heart-shaped bisque plate or dish
- Ceramic underglaze (bright red)
- Clear dipping glaze
- Medium flat brush (approx. 1/2 inch) for stripes
- Small fine liner brush for touch-ups
- Clean sponge
- Pencil (optional)
- Lazy Susan or banding wheel (helpful but not required)
Step 1: Preparation & Planning
-
Clean the Bisque:
Start by wiping down your heart-shaped bisque piece with a slightly damp sponge. This removes any ceramic dust that might prevent the glaze from adhering properly. -
Map the Stripes:
Visualize where your stripes will go. They should start at the top edge of the rim and flow down toward the flat center of the plate. -
Optional Pencil Guide:
If you’re nervous about spacing, lightly mark the stripe placements with a pencil. Don’t worry about erasing; the kiln’s heat will burn the graphite away completely.
Step 2: Painting the Stripes
-
Load Your Brush:
Load your flat brush generously with the bright red underglaze. You want enough paint to make a smooth stroke, but not so much that it drips. -
Start at the Rim:
Place the tip of your flat brush at the very outer edge of the heart rim. This is your starting anchor point. -
Pull the Stroke Down:
With steady pressure, pull the brush stroke downwards, following the curve of the dish wall until you reach the flat bottom section. -
Lift Off Cleanly:
As you hit the bottom of the wall, lift your brush gracefully to create a soft, tapered end to the stripe, rather than a harsh line. -
Establish Spacing:
Paint a second stripe about a half-inch away from the first. I find it easiest to paint the four main directional points (top points and bottom point) first to ensure symmetry. -
Fill the Gaps:
Continue painting stripes in the gaps, trying to keep the white space between them equal to the width of the red stripes. -
Handle the Curves:
When you get to the tight curves at the top of the heart or the point at the bottom, slightly angle your brush strokes to fan them out naturally. -
Check the Rim:
Go back and gently dab the red glaze onto the very top edge of the rim where your strokes started, ensuring the color wraps just slightly over the lip.
Pro Tip: Steady Hands
To keep shaky hands steady while painting vertical stripes, rest your pinky finger on the dry center of the plate or the table surface as a pivot point.
Step 3: Refining & Glazing
-
Re-inforce Color Intensity:
Most red underglazes need 2-3 coats to be vibrant. Once the first layer is dry to the touch, re-trace each stripe carefully with a second coat. -
Add a Third Coat:
For that deep, candy-apple red look, apply a third coat if your glaze instructions recommend it. This prevents streaks. -
Clean Up Edges:
Use a damp, clean brush or a specialized cleanup tool to gently wipe away any unsteady edges or red smudges that strayed into the white zones. -
Dry Thoroughly:
Let the piece dry completely. The stripes should look matte and chalky before you move to the dipping phase. -
Clear Glaze Application:
Dip the entire plate into a clear dipping glaze. This will seal the red stripes and give the raw bisque that creamy, glossy finish seen in the photo. -
Fire the Piece:
Fire the plate in the kiln according to the specific temperature guidelines for your clay and glaze combination.
Level Up: Vintage Wash
Before painting the red stripes, apply a very watered-down, cream-colored wash over the whole bisque to make the final white look superbly aged and antique.
Once fired, this delightful dish is ready to hold holiday treats or trinkets with undeniable handmade charm
Minimal Line-Art Heart Face
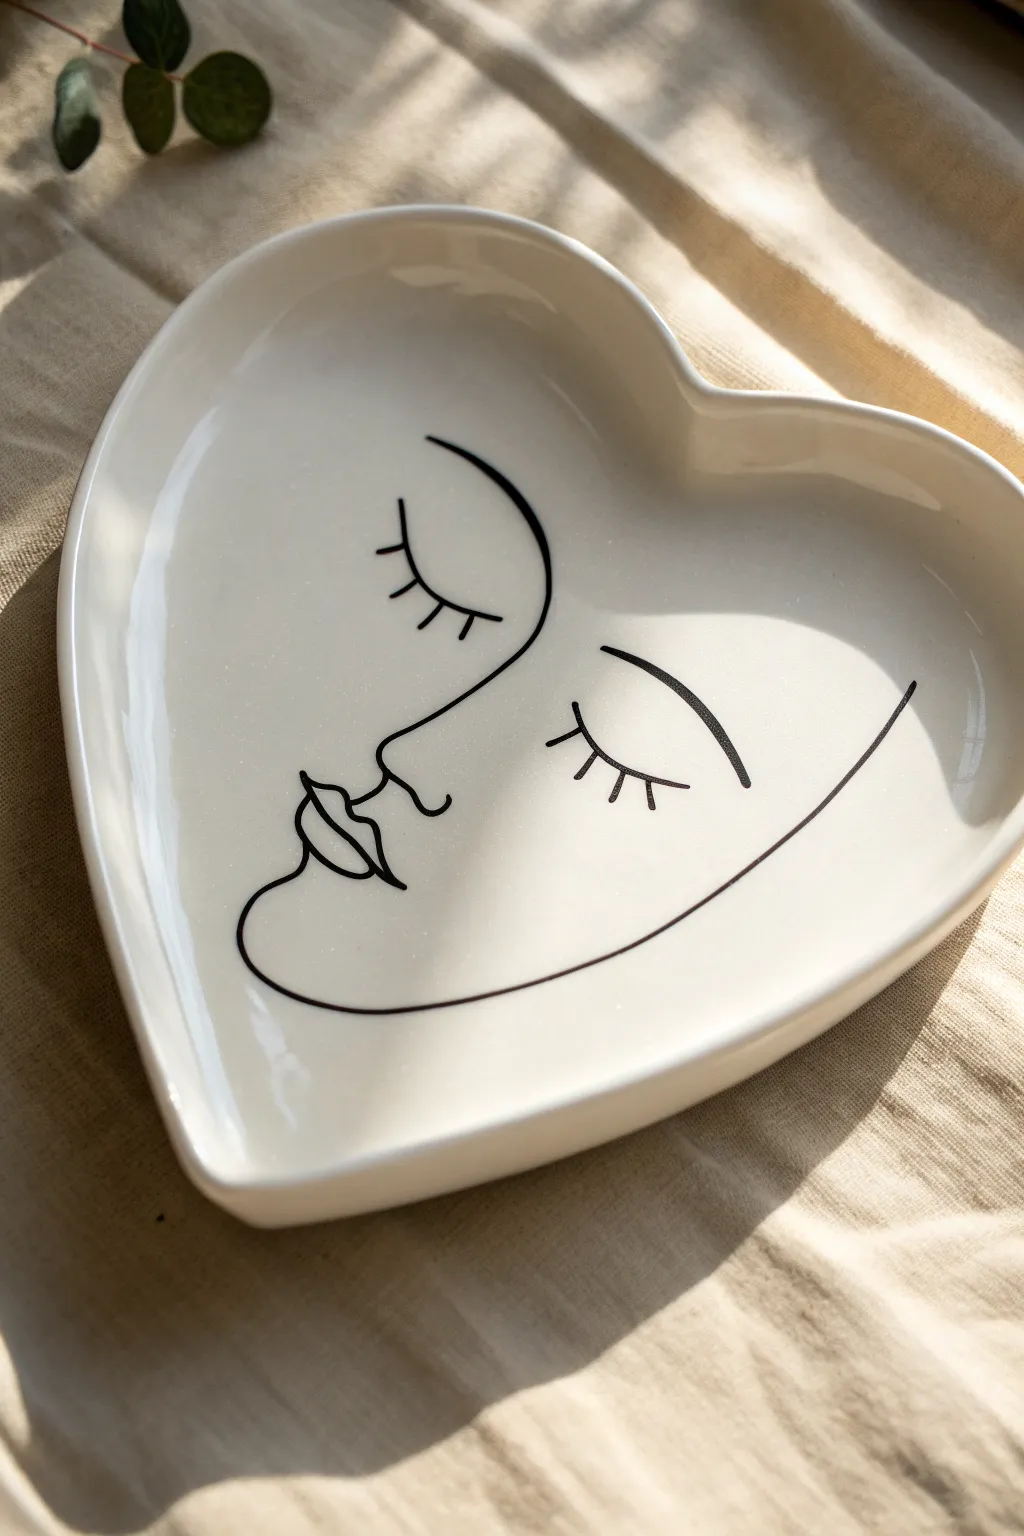
Capture the essence of tranquility with this elegant line-art project on a ceramic heart dish. The continuous-line style creates a sophisticated, modern look involving simple black strokes on a clean white background, perfect for holding jewelry or trinkets.
Step-by-Step
Materials
- White heart-shaped ceramic dish (glazed)
- Black oil-based paint marker (fine tip) or porcelain pen
- Rubbing alcohol
- Cotton pads or paper towel
- Pencil (soft lead like 4B or darker)
- Tracing paper (optional)
- Cotton swabs
- Oven (for curing, if required by your specific pen)
Step 1: Preparation & Planning
-
Surface Cleaning:
Begin by thoroughly cleaning your ceramic heart dish. Oils from your fingers can repel the marker, so wipe the entire inner surface with rubbing alcohol on a cotton pad. -
Dry Time:
Allow the alcohol to evaporate completely; the surface needs to be bone-dry before you apply any design. -
Study the Flow:
Look closely at the reference image. Notice how the line work isn’t fully continuous but mimics that look. It consists of three main strokes: the left eye/nose profile, the lips/chin curve, and the right eye/cheek contour. -
Drafting the Design:
Sketch your design lightly on a piece of paper first to get a feel for the curves. If you aren’t confident drawing freehand, draw the face on tracing paper cut to the size of the heart. -
Transfer Tip:
If using the tracing paper method, rub the back of your drawing with a soft pencil. Tape it to the dish and trace over your lines firmly to leave a faint graphite guide on the ceramic.
Oops, Shaky Hand?
Don’t panic! Wet paint wipes away easily with damp paper towel. For semi-dried mistakes, use a cotton bud dipped in nail polish remover to ‘erase’ specific lines.
Step 2: Drawing the Features
-
Prime the Pen:
Shake your porcelain pen or oil-based marker well. Depress the nib on a scrap piece of paper until the black ink flows smoothly and consistently without blobbing. -
The Left Eye Arch:
Starting near the top center-left of the heart, draw a large, smooth downward curve. This forms the forehead transition into the nose bridge. -
Adding Lashes:
Before continuing the line downward, pause to add three small perpendicular dashes to the top of that curve to represent the eyelashes of the closed eye. -
Forming the Nose:
Continue the main line down from the eye arch. Create a gentle ‘L’ shape curve that dips inward and hooks slightly up to form the tip of the nose. -
The Upper Lip:
Lift your pen slightly or pivot to start the lips. Draw the ‘cupid’s bow’ right under the nose, connecting it to a slightly fuller bottom lip stroke. -
The Chin Line:
From the bottom lip, sweep your pen downward and around to the left in a wide, confident ‘U’ shape to create the jawline and chin, ending near the bottom left edge of the heart. -
The Right Eye:
Move to the right side of the dish. Draw a simple arched line for the right eyelid, ensuring it aligns horizontally with the left one. -
Right Lashes:
Add three small lashes to this second eye, pointing downwards and slightly outwards. -
Cheek contour:
Draw a final long, sweeping curve starting above the right eye (like an eyebrow) and sweeping down the right edge of the heart to frame the face.
Pro Tip: Line Weight
Vary your pressure slightly. Press harder on the curves of the chin and cheek for boldness, and lighter on the eyelashes for a delicate, wispy effect.
Step 3: Finishing Touches
-
Cleanup:
Dip a cotton swab in a little rubbing alcohol to tidy up any lines that feel too thick or shaky. Do this while the paint is still tacky. -
Dry Time:
Let the dish sit undisturbed for at least 24 hours to ensure the pigment settles into the glaze. -
Baking:
Check your specific pen’s instructions. Most require baking in a conventional oven (usually around 300°F/150°C for 30-35 minutes) to make the design permanent and dishwasher safe. -
Cooling:
Turn the oven off and let the dish cool down completely inside the oven before removing it to prevent thermal shock cracking.
Now you have a stunning, boutique-style jewelry tray to display your favorite rings or gift to a friend.


What Really Happens Inside the Kiln
Learn how time and temperature work together inside the kiln to transform clay into durable ceramic.
Scalloped Rim With Heart Accents
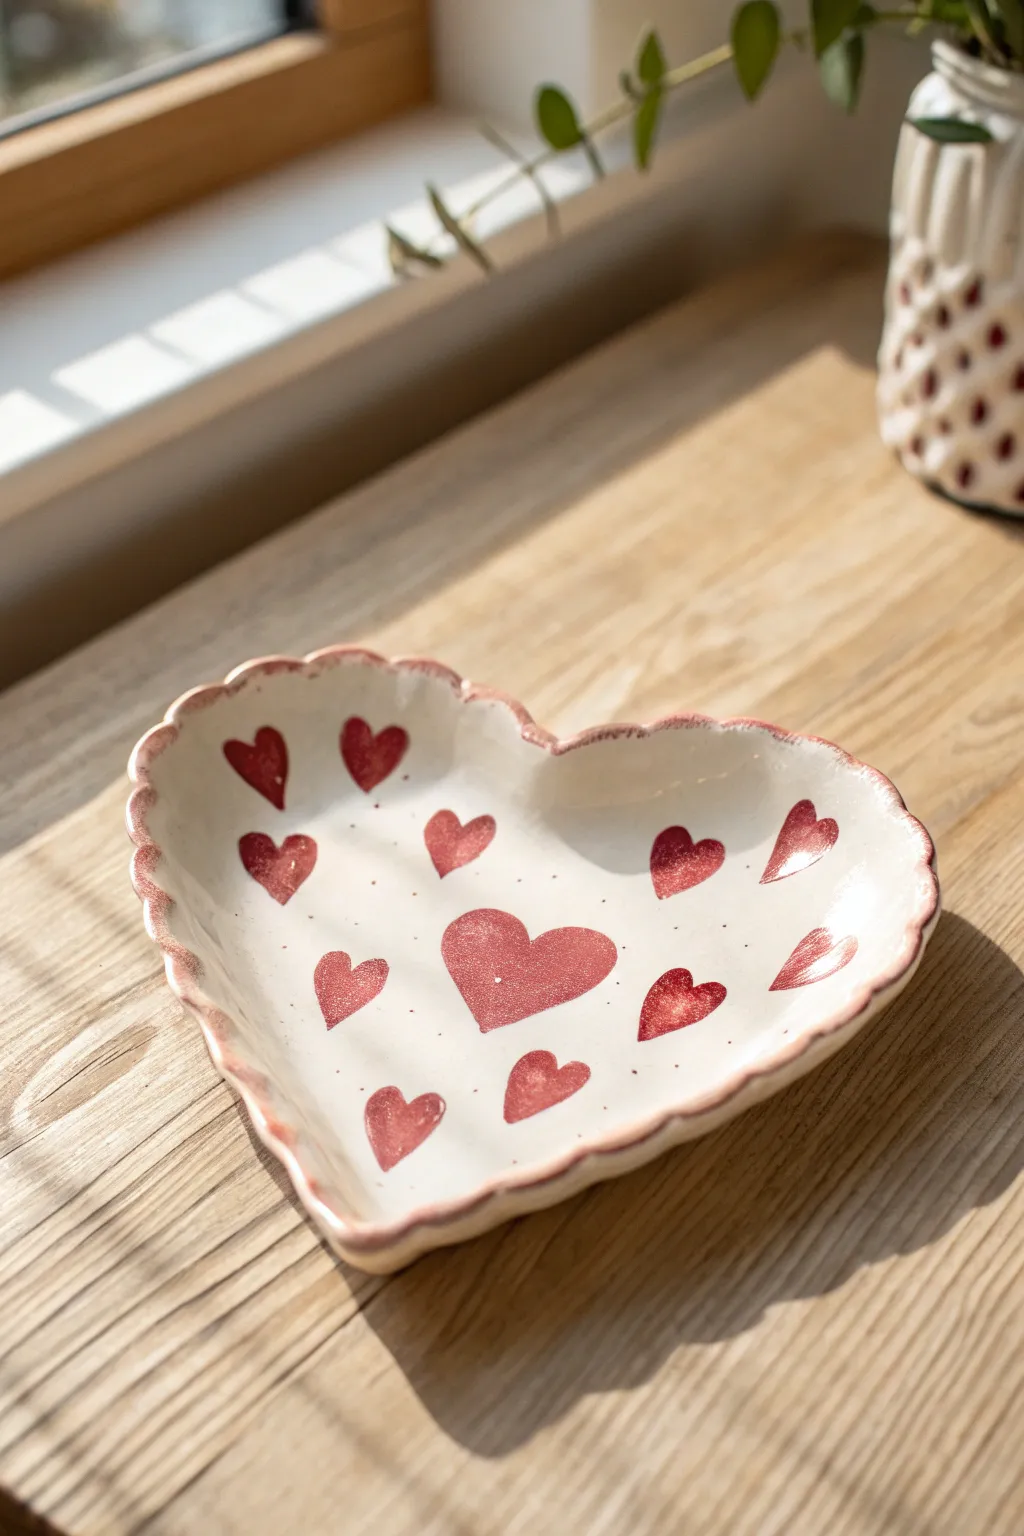
This charming ceramic project transforms a simple heart-shaped clay dish into a lovable keepsake featuring a ruffled rim and hand-painted motifs. The glossy red hearts against the creamy white base create a timeless Valentine’s look that’s perfect for holding jewelry or trinkets.
Step-by-Step Guide
Materials
- White or cream earthenware clay (or a pre-fired bisque heart dish)
- Pottery wheel or slab roller (if making from scratch)
- Heart-shaped slump mold (optional)
- Modeling tool or fingers for scalloping
- Underglaze (Cream/White for base, Deep Red for hearts)
- Clear dipping or brushing glaze
- Small round paintbrush (size 2 or 4)
- Medium flat paintbrush
- Sponge
- Kiln access
Step 1: Forming the Dish
-
Roll the slab:
Begin by rolling out your clay to an even thickness, approximately 1/4 inch thick. Smooth out any texture from the canvas using a rubber rib. -
Cut the heart shape:
Place a paper heart template or use a large heart-shaped cookie cutter to cut your base shape from the slab. -
Create the walls:
Gently lift the edges of the clay to form a shallow dish. If you are using a slump mold, press the clay gently into the form to establish the curve. -
Scallop the rim:
To create the signature ruffled edge, use your thumb and forefinger to pinch the rim at regular intervals. I find that pressing slightly inward while pinching creates that distinct scalloped look seen in the photo. -
Smooth the edges:
Run a damp sponge along the rim to soften any sharp edges created during the pinching process, ensuring the scallops look organic and soft. -
Bisque fire:
Allow the piece to dry slowly to the bone-dry stage, then load it into the kiln for a bisque firing.
Paint Consistency
Ensure your red underglaze is thick enough to be opaque (like heavy cream) but fluid enough to leave smooth edges. Too watery, and the hearts will look streaky.
Step 2: Glazing and Painting
-
Apply base color:
Once the bisque piece is cool and wiped free of dust, apply 2-3 coats of a creamy white underglaze to the entire interior surface. Let each coat dry until it’s no longer shiny before adding the next. -
Plan the heart placement:
Visualize where your red hearts will go. Aim for a random, scattered pattern rather than a perfect grid. Place a large focal heart slightly off-center near the middle. -
Paint the central hearts:
Dip your round brush into deep red underglaze. Paint the largest heart first, starting with the two upper curves and pulling the brush down to meet at the point. -
Add medium hearts:
Paint the medium-sized hearts surrounding the center. Vary their angles slightly so they don’t all look like they are marching in the same direction. -
Fill the edges:
Add smaller hearts near the rim. It’s okay if a few look like they are tucking into the curves of the plate. -
Add speckles (optional):
For that subtle spotted look seen in the reference, dip a stiff brush or toothbrush in diluted brown or red underglaze and gently flick tiny speckles across the surface. -
Rim definition:
Using a very lightly loaded brush (dry-brush style), gently sweep the red color along the very top edge of the scalloped rim. This highlights the irregular texture of the ruffles. -
Clear glaze application:
Once the underglaze design is completely dry, apply a clear glaze over the entire piece. Dipping is usually best for even coverage, but brushing works if you are careful not to smear the red hearts. -
Final firing:
Stilt the piece and fire it for a second time to the temperature required by your specific glaze (usually Cone 06 or Cone 6).
Add Gold Luster
For an extra fancy touch, outline the red hearts with real gold luster after the glaze firing. This requires a third, low-temperature firing.
Once cooled, your glossy heart dish is ready to be gifted or displayed on your vanity
Handwritten Love Note Heart Message
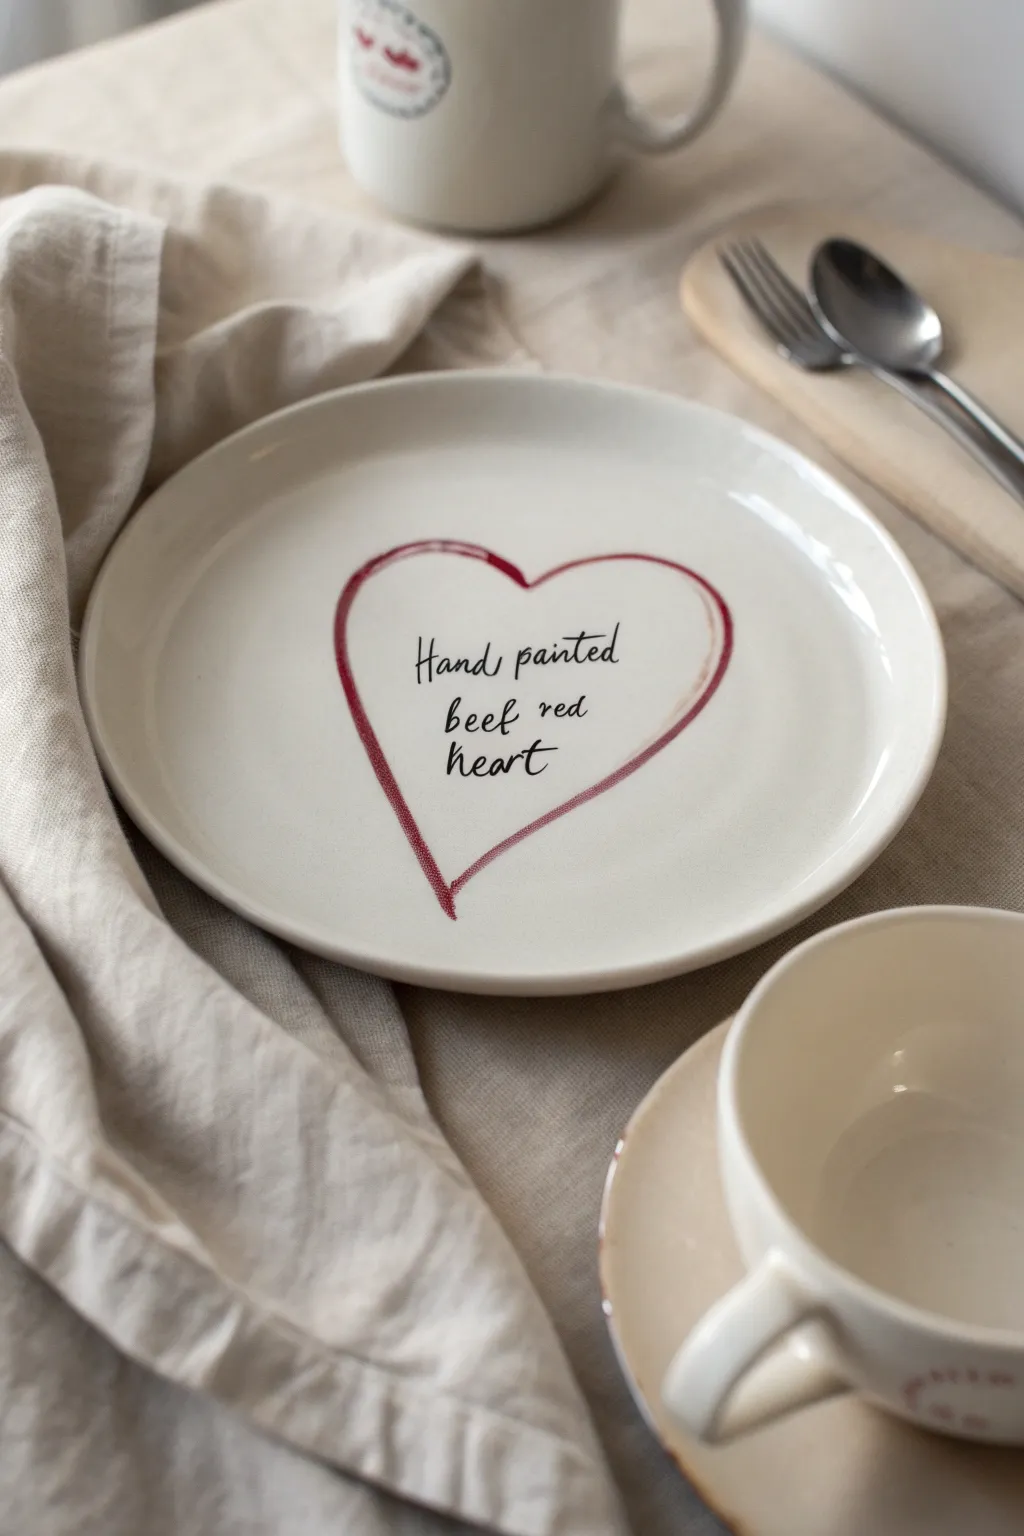
This charming project combines simple line work with heartfelt messaging to create a personalized piece of tableware. The design features a rustic, sketched red heart outline framing a custom handwritten message perfect for gifting or display.
Detailed Instructions
Materials
- White ceramic dessert plate (cleaned with rubbing alcohol)
- Red porcelain paint marker (fine tip)
- Black porcelain paint marker (fine tip)
- Graphite transfer paper (optional)
- Pencil and paper
- Cotton swabs
- Rubbing alcohol
- Oven (for curing)
Step 1: Preparation & Design
-
Clean surface:
Begin by thoroughly wiping down your ceramic plate with rubbing alcohol and a paper towel. This removes oils and fingerprints that could prevent the paint from adhering properly. -
Draft your text:
Before touching the plate, practice your handwriting on a piece of paper. You can write ‘Hand painted beef red heart’ as shown, or choose a personal message. Aim for a relaxed, cursive style with slightly uneven lettering for character. -
Sketch the heart:
On the same scrap paper, draw a loose, slightly asymmetrical heart shape that fits comfortably around your text. Sketching it freely helps capture that ‘hand-drawn’ look rather than a perfect stencil. -
Transfer the guide (optional):
If you are nervous about freehanding, place a small piece of graphite transfer paper on the plate center, lay your sketch on top, and lightly trace the heart and text. Don’t press too hard; just enough to see a faint guide.
Anchor Your Hand
To keep your handwriting steady on the slippery curved surface, rest your pinky finger on a dry part of the plate or use a bridge (like a ruler balanced on books) to rest your hand on.
Step 2: Painting the Heart
-
Prime the red marker:
Shake your red porcelain marker well and press the tip onto a scrap paper until the ink flows smoothly. Do not pump the tip directly on the plate to avoid puddling. -
Start the curvature:
Starting at the top center dip of the heart, draw the left curve down towards the bottom point. Keep your wrist loose. It’s okay if the line thickness varies naturally. -
Complete the outline:
Draw the right side of the heart, meeting at the bottom point. Don’t worry about closing the shape perfectly; a slight overlap or gap at the bottom adds to the sketchy aesthetic. -
Add sketched details:
To mimic the look in the photo, go back over parts of the line with a second, quick stroke. Leave small gaps between the lines to create a ‘sketched’ texture rather than one solid thick line. -
Dry the red ink:
Let the red heart outline dry for at least 15-20 minutes. You don’t want to accidentally smudge the red ink while your hand rests on the plate to write the text.
Ink Not Flowing?
If the marker skips on the smooth glaze, the tip might be drying out. Re-prime it on paper, or wipe the nib gently with a paper towel to remove any invisible dust or oils.
Step 3: Adding the message
-
Prime the black marker:
Just like with the red marker, shake the fine-tipped black porcelain pen and test it on paper first to ensure a consistent, thin line. -
Write the first line:
Carefully write ‘Hand painted’ in the upper third of the heart. Use a light touch to keep the letters delicate. -
Center the message:
Write the second line, making sure it sits centered relative to the top line. The photo uses a casual script, so focus on flow rather than perfect alignment. -
Finish the text:
Complete your message with the final word near the bottom point of the heart. Check for any skips in the ink. -
Cleanup errors:
If you make a mistake, quickly dampen a cotton swab with rubbing alcohol and wipe away the error while the paint is still wet. Let the area dry completely before re-writing.
Step 4: Curing & Finishing
-
Air dry:
Allow the finished plate to air dry for 24 hours. The paint needs this time to settle before the heat curing process. -
Load the oven:
Place the plate into a cold oven. Do not preheat the oven, as the sudden temperature change could crack the ceramic. -
Bake the design:
Set the oven to 300°F (150°C) and bake for 35 minutes (or follow specific instructions on your marker brand). I usually set a timer once the oven reaches temperature. -
Cool down:
Turn off the oven and leave the plate inside to cool down gradually with the door closed. Once the oven is completely cold, remove your finished artwork.
Your personalized plate is now ready to serve as a meaningful gift or a lovely decorative accent in your home

TRACK YOUR CERAMIC JOURNEY
Capture glaze tests, firing details, and creative progress—all in one simple printable. Make your projects easier to repeat and improve.
Personalized Name or Date Heart Plate
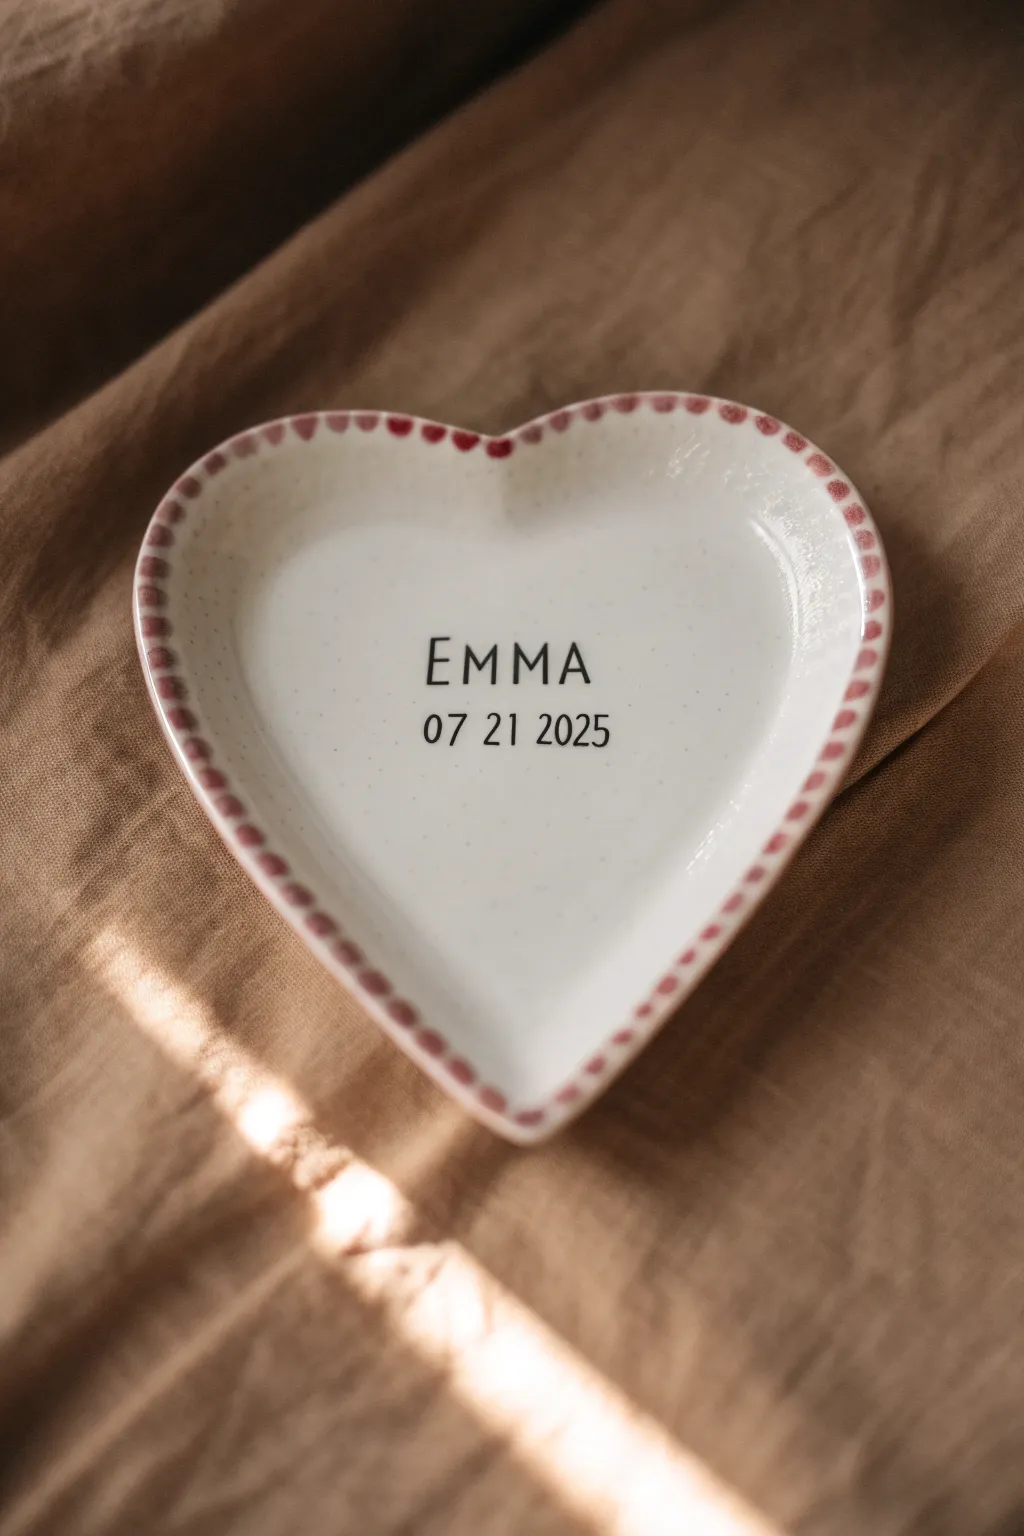
Create a beautifully simple and meaningful keepsake with this personalized heart plate project. Featuring a delicate red-dotted rim and crisp, centered typography, this piece makes a stunning ring dish or a memorable gift for a special occasion.
Step-by-Step Tutorial
Materials
- Small heart-shaped white ceramic plate (bisque or glazed depending on method)
- Pebeo Porcelaine 150 paint (Scarlet Red and Anthracite Black)
- Fine point synthetic detail brush (size 0 or 00)
- Ultra-fine paint marker (black) or porcelain pen (optional alternative to brush)
- Rubbing alcohol and cotton pads
- Pencil and eraser
- Carbon transfer paper (optional)
- Printed template of your text
- Painter’s tape
- Oven for curing (if using bake-on paints)
Step 1: Preparation and Planning
-
Clean the surface:
Before doing anything, wipe down your ceramic heart plate thoroughly with rubbing alcohol on a cotton pad. This removes invisible oils or fingerprints that could prevent the paint from adhering properly. -
Design your text:
Using a computer, type out the name and date you want to feature. For the name ‘EMMA’, choose a classic serif font with slightly wide spacing. For the date, pick a clean, legible font. -
Size the template:
Print your design on plain paper first to check sizing. Cut it out and place it inside the plate to ensure it sits perfectly in the center without feeling crowded. -
Transfer the guide:
Tape a small piece of carbon paper behind your printed text, then tape the template to the center of the plate. Gently trace the letters with a pencil to transfer a faint guideline onto the ceramic.
Fixing Wobbly Dots
Mess up a dot? Don’t smear it! Wait for it to dry completely, then gently scratch the mistake off with a craft knife or toothpick. It pops right off so you can repaint it cleanly.
Step 2: Painting the Typography
-
Prepare the black paint:
Shake your black porcelain paint well. Place a small drop on a palette or foil. If you find the paint too thick, mix in a tiny drop of thinner specifically made for porcelain paint to help it flow. -
Outline the name:
Using your finest detail brush (size 00 is perfect here), carefully paint over the transferred lines for the name. Keep your hand steady by resting your pinky finger on the table or the edge of the plate. -
Fill the letters:
For thicker parts of the font, gently widen your strokes. I usually go over the letters once for coverage, let it dry for a few minutes, and do a second pass if the black looks translucent. -
Paint the date:
Move on to the numerical date below the name. These characters are smaller, so use just the very tip of your brush. If you aren’t confident with a brush, a fine-tip porcelain paint marker is a great cheat here for crisp numbers. -
Clean up edges:
If you make a mistake or a line gets wobbly, use a damp cotton swab or a toothpick to gently scrape away the wet paint and refine the edges before it dries.
Step 3: Creating the Dotted Rim
-
Load the red paint:
Clean your brush thoroughly or switch to a fresh one. Load the tip with the Scarlet Red porcelain paint. You want enough paint to create a bead, but not so much that it drips. -
Start at the top:
Begin painting your dots at the top center dip of the heart. Press the brush tip down gently and lift straight up to create a uniform circle. -
Work symmetrically:
Instead of going all the way around in a circle, I find it helps to place a dot at the bottom point next. Then, fill in the space between the top and bottom on each side to keep spacing even. -
Maintain spacing:
Continue adding dots along the very edge of the rim, keeping them about 2-3mm apart. Try to keep the pressure consistent so every dot is roughly the same size. -
Check the opacity:
Some red pigments can be transparent. If the dots look watery after drying for 10 minutes, carefully dab a second layer of red directly on top of the existing dots.
Pro Tip: Using a Dowel
For perfectly uniform dots without a brush, dip the flat end of a wooden skewer or the handle end of a paintbrush into the paint and stamp it onto the rim.
Step 4: Curing and Finishing
-
Dry thoroughly:
Allow the plate to air dry for at least 24 hours. This is crucial—if moisture is trapped under the surface skin of the paint, it can bubble when baked. -
Bake the plate:
Place the plate in a cool oven. Turn the heat to 300°F (150°C—or whatever your specific paint brand recommends). Once the oven hits that temperature, bake for 35 minutes. -
Cool down slowly:
Turn the oven off but do not open the door. Let the plate cool down completely inside the oven. Taking it out while hot can cause the ceramic to crack due to thermal shock. -
Final inspection:
Once cool, the paint is permanent and dishwasher works (though hand washing is gentler). Lightly wipe away any remaining pencil transfer lines with a damp cloth.
Now you have a custom piece of art that freezes a special moment in time forever
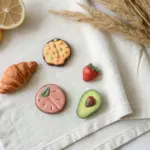
Tiny Hearts All-Over Confetti

Transform a plain ceramic dish into a piece of functional art with a scattering of tiny, hand-painted hearts in muted earth tones. This project creates a whimsical confetti effect that feels organic and modern, perfect for holding jewelry or serving sweet treats.
Detailed Instructions
Materials
- White or cream heart-shaped ceramic plate or saucer
- Ceramic paints or multi-surface acrylics (sage green, dusty pink, mustard yellow, terra cotta, slate blue)
- Small round synthetic paintbrush (size 2 or 3)
- Rubbing alcohol and paper towel
- Newsprint or palette paper
- Oven (for curing, if using bakeable ceramic paint)
- Gloss glaze (optional, for non-bakeable paints)
Step 1: Preparation and Planning
-
Clean the Surface:
Before painting, wipe down your entire ceramic plate with rubbing alcohol and a paper towel. This removes any oils or fingerprints that could prevent the paint from adhering properly. -
Prepare Your Palette:
Squeeze out small amounts of your muted colors onto your palette. I think it helps to mix a tiny bit of white into each color to achieve that soft, specked pottery look rather than harsh primary colors. -
Practice Your Hearts:
On a scrap piece of paper, practice painting tiny hearts using a simple two-stroke method. Press the brush down and lift to make one teardrop shape, then do the same in the opposite direction to meet at the point. This ensures your shapes are consistent before touching the ceramic.
Brush control tip
For perfectly uniform hearts, use the handle end of your paintbrush to dot two circles side-by-side, then drag the paint down to a V-point.
Step 2: Painting the Confetti Pattern
-
Start with the First Color:
Load your brush with the darkest color, perhaps the deep terra cotta or brown. Paint scattered hearts randomly across the plate, leaving plenty of white space between them for the other colors. -
Rotate Placement:
Vary the angle of the hearts slightly. While most should face upright relative to the heart shape of the plate, letting them tilt just a little creates a more playful, tossed-confetti look. -
Add the Second Color:
Clean your brush thoroughly and switch to the slate blue or sage green. Paint hearts in the empty spaces, trying not to place two hearts of the same color right next to each other. -
Mind the Rim:
Don’t forget the raised rim and the edges. Painting hearts that go right up to the curve emphasizes the unique shape of the plate. -
Layer in Dusty Pink:
Continue with your dusty pink shade. Fill in gaps, keeping the spacing somewhat irregular so it doesn’t look like a rigid grid. -
Finish with Mustard Yellow:
Use the mustard yellow to fill remaining small gaps. These lighter hearts add a lovely brightness to the muted palette. -
Check for Balance:
Step back and look at the overall distribution. If you see a large empty spot, add a small heart there. If a certain area feels too heavy with one color, balance it on the opposite side. -
Create Speckles (Optional):
To mimic the speckled ceramic look in the photo, dilute a tiny bit of grey-brown paint with water. Dip a toothbrush in it and run your thumb across the bristles to flick tiny specks over the plate. Practice on paper first to control the spray.
Step 3: Curing and Finishing
-
Let it Dry:
Allow the paint to dry completely. For most ceramic paints, 24 hours is the standard recommendation to ensure the design is set before curing. -
Bake to Cure:
Place the plate in a *cold* oven. Set the temperature to the manufacturer’s instructions (usually around 300°F or 350°F). Once the oven reaches temperature, bake for 30 minutes. -
Cool Down:
Turn the oven off and leave the plate inside until the oven is completely cool. Removing it while hot can cause the ceramic to crack due to thermal shock. -
Optional Glaze:
If you used multi-surface acrylics that aren’t bake-safe, apply a clear gloss sealant or dishwasher-safe Mod Podge after the paint is fully dry to protect your work.
Add metallic flair
Swap one of the matte colors for a metallic gold paint. A few shimmering gold hearts scattered among the pastels adds instant elegance.
Your lovely heart-patterned plate is now ready to add a touch of romance to your decor
Bold Color-Block Heart Halves
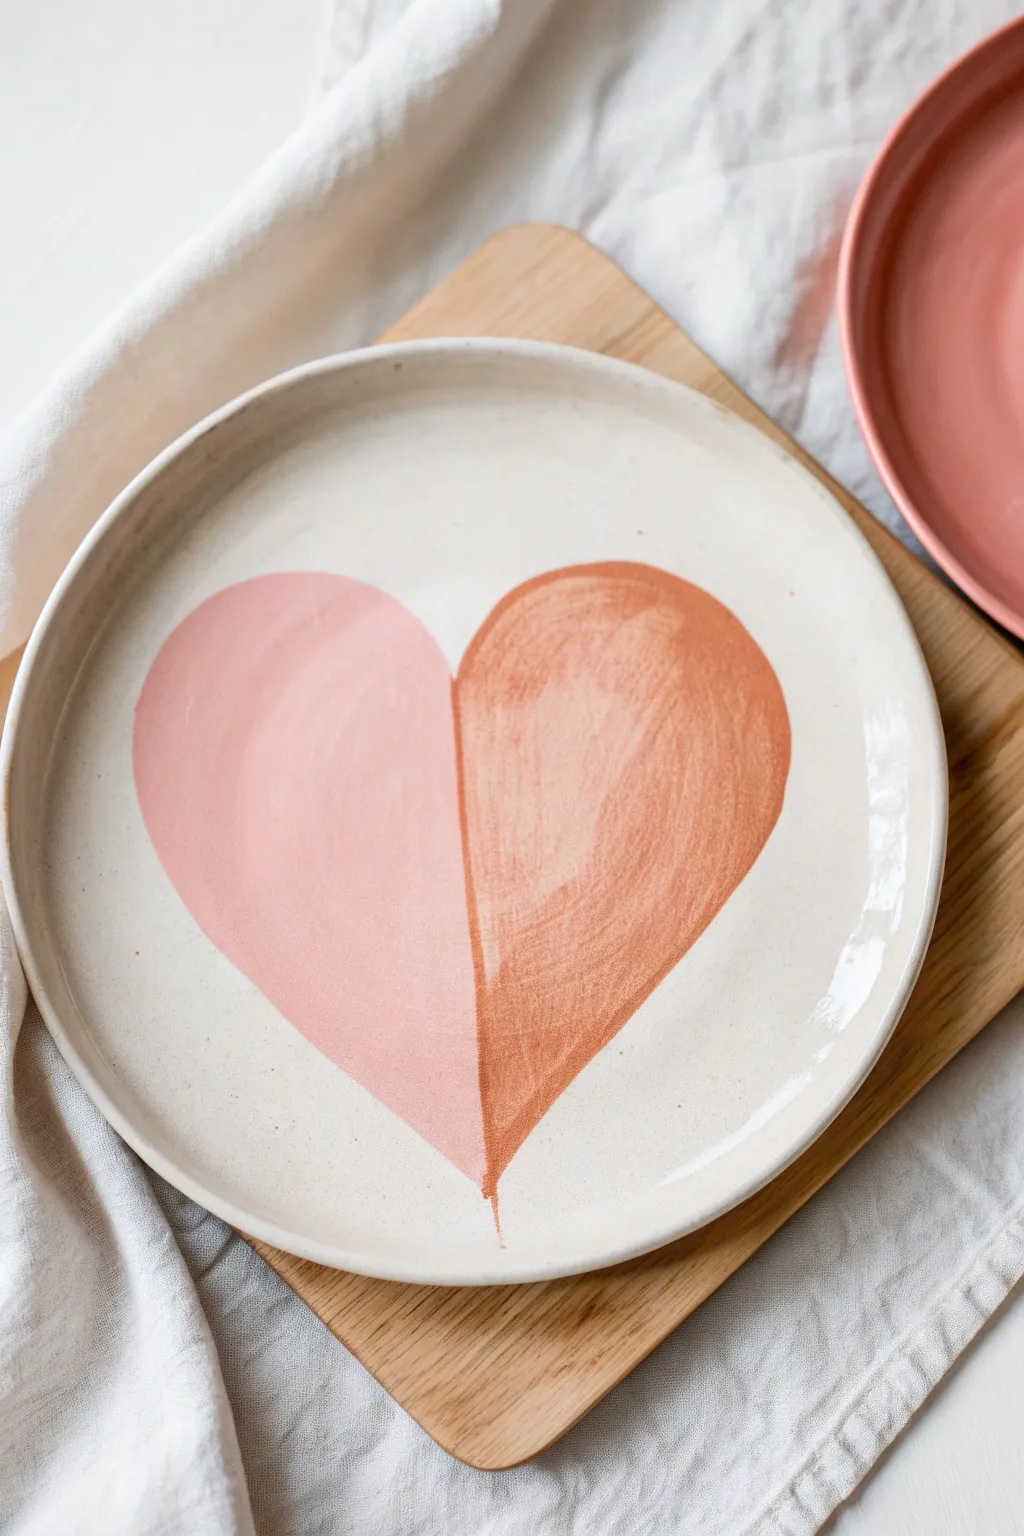
Embrace a modern, minimalist aesthetic with this dual-toned heart plate, featuring a crisp center divide and warm, complementary hues. The exposed brushstrokes add a beautiful handmade quality that contrasts perfectly with the clean geometric split.
Step-by-Step Tutorial
Materials
- Bisque ceramic plate (round, dinner or salad size)
- Food-safe ceramic glazes (pale pink, terracotta/rust, and clear glaze if needed)
- Flat shader brush (medium size)
- Pencil for sketching
- Paper plate or palette
- Container of water
- Paper towels
- Kiln access (local pottery studio)
Step 1: Preparation and Sketching
-
Clean Your Bisque:
Start by wiping down your bisque plate with a slightly damp sponge to remove any dust or debris from the shelf. This ensures the glaze adheres properly to the ceramic surface. -
Find the Center:
Using a pencil, lightly mark the vertical center line of the plate. This doesn’t need to be mathematically perfect, but aiming for the middle helps balance the design. -
Sketch the Heart Outline:
Draw a large heart shape centered on your vertical line. Sketch lightly so the graphite burns off easily in the kiln; you want the heart to fill most of the plate’s interior flat surface. -
Define the Division:
Draw a straight vertical line right down the middle of your heart, from the dip at the top to the point at the bottom, creating two distinct halves.
Clean Lines Hack
For a razor-sharp center line, apply a strip of painter’s tape or masking tape down the middle before painting the first half. Let dry, remove, and paint the second half.
Step 2: Painting the Heart
-
Mix Your First Color:
Pour a small amount of your pale pink glaze onto your palette. If the glaze is very thick, you can thin it slightly with a drop of water for smoother flow. -
Paint the Left Half Outline:
With your flat brush, carefully paint along the pencil outline of the left side of the heart. Use the edge of the brush to keep the line crisp. -
Fill in the Left Side:
Fill the rest of the left half with the pale pink glaze. Apply the strokes in a consistent direction for a neat finish, or swirl slightly for texture. -
Layering the Pink:
Let the first coat dry until it loses its sheen (usually a few minutes). Apply a second and possibly third coat to ensure the color is opaque and solid after firing. -
Switch to Terracotta:
Thoroughly rinse your brush or switch to a clean one. Pour out your rust or terracotta-colored glaze. -
Define the Center Line:
I prefer to start right at the center line when painting the second half. Carefully paint up against the pink edge without overlapping it to maintain that sharp ‘color-block’ look. -
Paint the Right Half:
Fill in the remaining right side of the heart with your rust-colored glaze, following the curved outer edge carefully. -
Build Up Color Depth:
Just like the first side, apply 2-3 coats of the rust glaze, allowing each layer to dry in between. This depth is what gives the final piece its rich, warm tone.
Add Subtle Texture
Before the final clear glaze, use a toothpick to gently scratch small patterns or initials into the colored heart sections for a sgraffito effect.
Step 3: Background and Finishing
-
Glaze the Background:
Using a clean brush, apply a clear or creamy white transparent glaze to the entire rest of the plate surface, avoiding the heart you just painted if those glazes are not meant to be covered. Check your specific glaze instructions. -
Check the Rim:
Ensure the rim of the plate is fully coated with your background glaze for a smooth, finished lip. -
Clean Up Edges:
If any glaze smudged onto the foot ring (the bottom ridge the plate sits on), wipe it off completely with a damp sponge so it doesn’t stick to the kiln shelf. -
Final Inspection:
Look closely at your center line. If there’s a gap between the colors, carefully touch it up with a tiny brush so the two halves meet perfectly. -
Fire the Plate:
Take your painted plate to a local pottery studio or use your own kiln to fire it according to the glaze manufacturer’s temperature guidelines (usually Cone 06 or Cone 6).
Once fired, you’ll have a stunning, food-safe piece of art ready for serving or display
Stained Glass Heart Segments
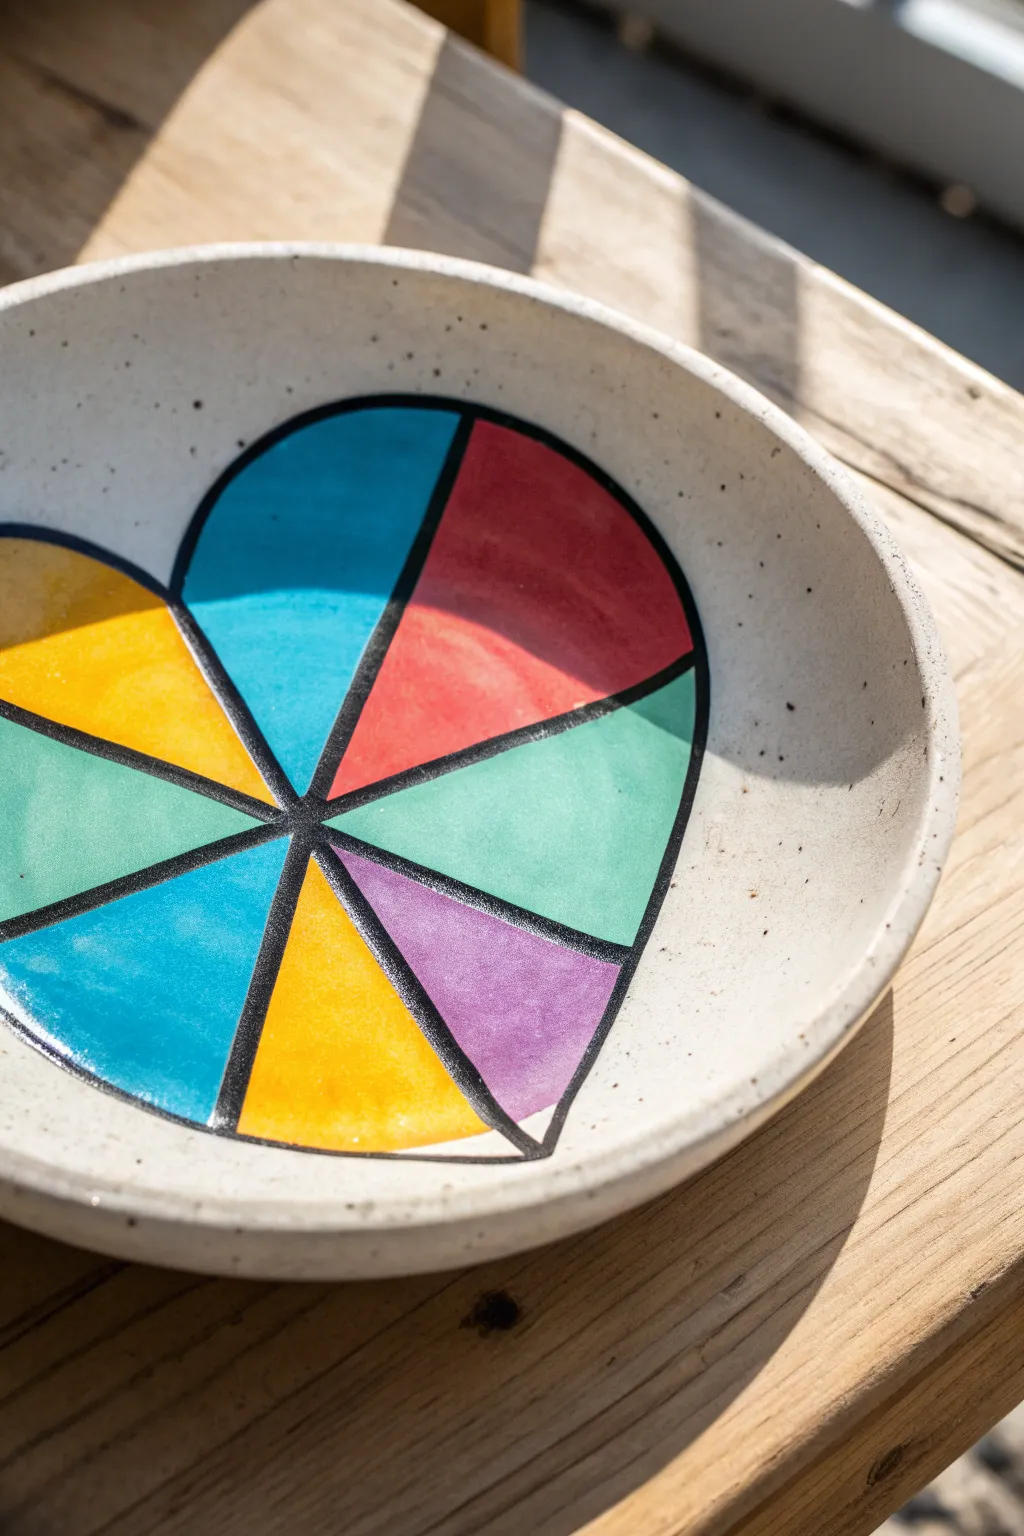
Transform a simple ceramic plate into a colorful masterpiece with this geometric heart design. The segmented, kaleidoscope-like pattern mimics the look of stained glass, making it a cheerful addition to any table setting.
Step-by-Step Guide
Materials
- Bisque ceramic plate (speckled or plain white)
- Pencil
- Underglaze paints (Red, Orange, Yellow, Teal/Light Blue, Dark Blue, Green, Purple)
- Black underglaze liner bottle or fine detail brush
- Small round paintbrush
- Medium flat paintbrush
- Bowl of water
- Sponge
- Clean cloth
- Clear glaze
Step 1: Drawing the Design
-
Clean the surface:
Begin by wiping down your bisque plate with a slightly damp sponge. This removes any dust that might interfere with the glaze adhesion. -
Outline the heart:
Using a pencil, lightly sketch a large heart shape in the center of the plate. Don’t press too hard; the pencil lines will burn off in the kiln. -
Find the center point:
Mark a small dot in the approximate middle of the heart. This doesn’t have to be perfectly mathematical, but it will serve as the anchor for all your segments. -
Draw radiating lines:
Draw straight lines extending from your center dot out to the edge of the heart outline. Think of cutting a pizza—aim for 7 or 8 distinct wedges.
Clean Lines Tip
Does your hand shake while lining? Rest your pinky finger on a dry part of the plate to anchor your hand. It acts like a kickstand for better control.
Step 2: Adding Color
-
Start with red:
Select one segment, specifically a top curve of the heart, and fill it in with red underglaze using your medium flat brush. -
Apply the first blue:
Move counter-clockwise to the next segment. I like to paint this one a bright teal or light blue to contrast sharply with the warm red. -
Continue the pattern:
Fill the next wedge with a yellow-orange tone. Painting adjacent sections with contrasting colors really helps the stained glass effect pop. -
Paint the bottom sections:
Continue working your way around the focal point. Use green for a middle wedge, followed by a darker blue and a bright yellow for the bottom tip segments. -
Finish the last wedge:
Fill the final remaining segment with purple. Ensure every wedge is fully covered. -
Apply second coats:
Once the first layer is dry to the touch (it will look chalky), apply a second coat to each color. This ensures the final fired result is solid and opaque rather than streaky. -
Add a third coat if needed:
For lighter colors like yellow or orange, a third coat is often necessary for true vibrancy. Check your specific glaze instructions to be sure.
Step 3: Lining and Finishing
-
Prepare the liner:
Shake your black underglaze liner bottle effectively to remove air bubbles. Alternatively, load a very fine detail brush with thinned black underglaze. -
Outline the exterior:
Trace over the original pencil line of the heart’s outer shape with the black glaze. Keep your hand steady and the line width consistent. -
Define the segments:
Draw the straight lines radiating from the center, covering the borders where your different colors meet. These black lines act like the lead in a stained glass window. -
Clean up stray marks:
If you smudge any black line, wait for it to dry completely, then gently scratch the mistake away with a wooden skewer or a stiff, damp brush. -
Glaze and fire:
Allow the plate to dry completely for 24 hours. Dip or brush on a clear glaze over the entire piece, then have it fired in a kiln according to your clay body’s specifications.
Gradient Effect
Instead of solid flat colors, paint each segment as a gradient (e.g., dark blue fading to light blue) for a dynamic, 3D gem appearance.
Once fired, the glossy finish will make your colorful heart design shine brilliantly against the speckled clay background
Modern Abstract Heart Brushstrokes
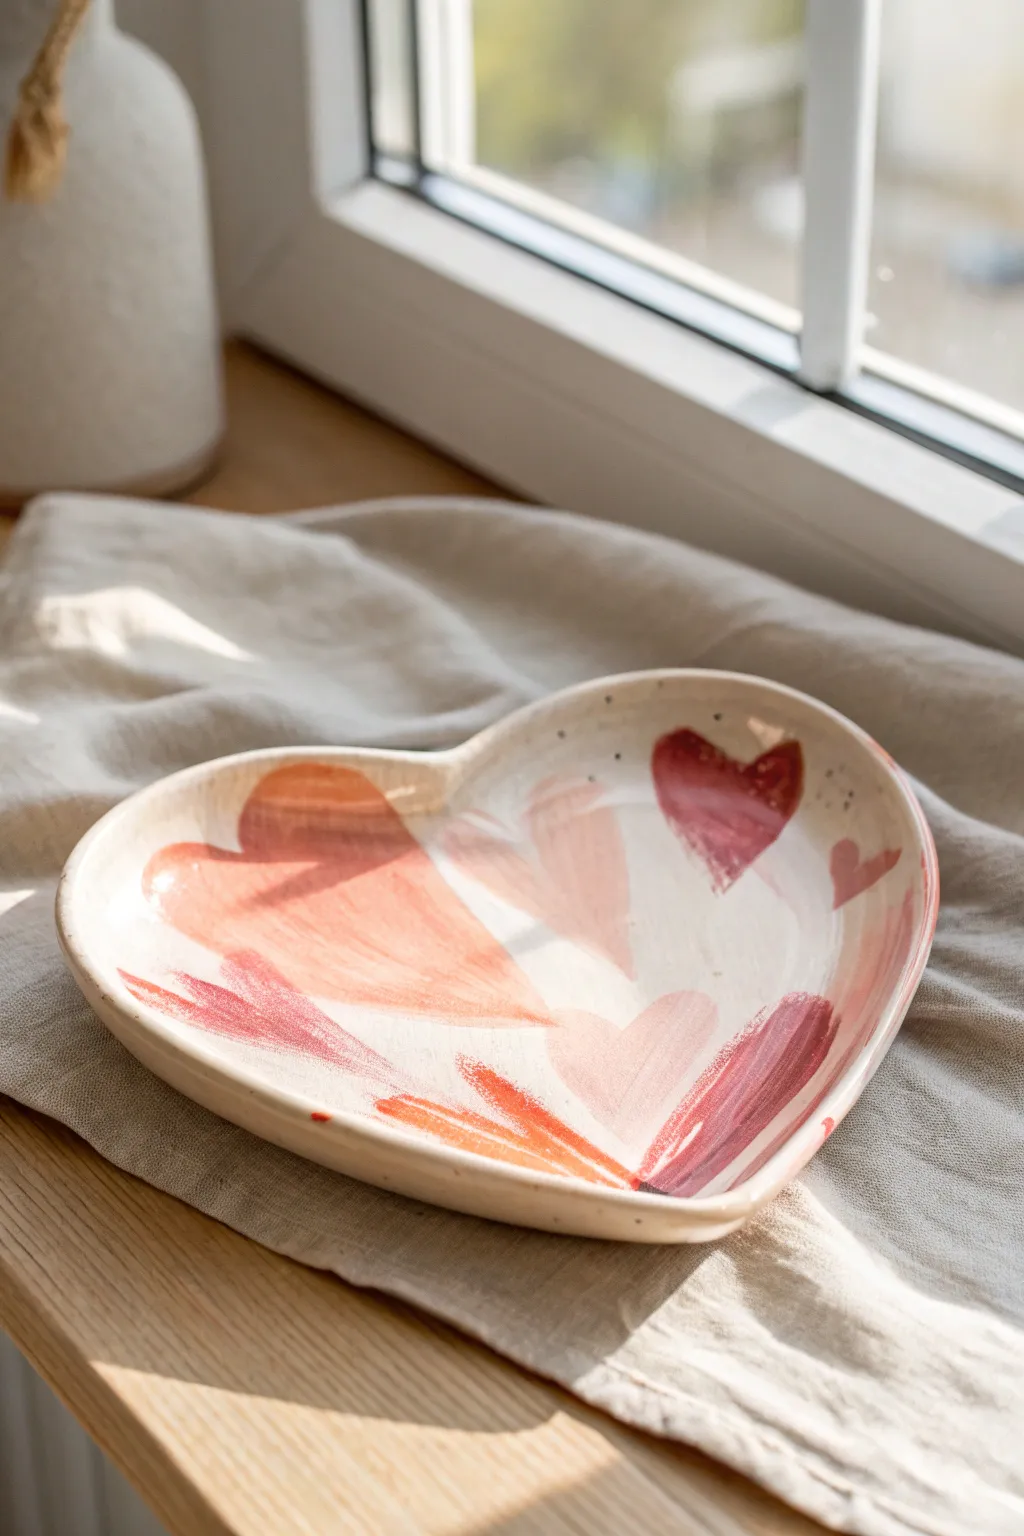
Capture a romantic, breezy aesthetic with this heart-shaped ceramic plate featuring loose, painterly heart motifs. The design uses varied brushstrokes in a palette of warm pinks, peaches, and deep reds to create overlapping hearts that feel modern and handmade rather than perfectly stenciled.
Step-by-Step Tutorial
Materials
- Bisque-fired ceramic heart-shaped plate (approx. 6-8 inches)
- Underglazes in 3 shades: deep burgundy red, coral peach, and soft dusty pink
- Clear dipping or brushing glaze (food safe)
- Flat shader brush (size 6 or 8) for broad strokes
- Round detail brush (size 2)
- Palette or small dish for mixing
- Water cup
- Damp sponge
Step 1: Preparation & Planning
-
Clean the Bisque:
Begin by wiping down your bisque plate with a slightly damp sponge. This removes any dust from the firing process which can prevent underglaze from adhering properly. -
Map the Composition:
Visualize where your hearts will go. Notice how the original artwork has a large, dominant peach heart on the left and smaller accents on the right. You can lightly sketch the placement with a standard pencil if you wish; the graphite will burn off in the kiln.
Fixing Smudges
If a red stroke goes rogue, let it dry completely. Then, scrape it off gently with a toothpick or craft knife before sponging. Wet wiping smears pigment into the clay pores.
Step 2: Painting the Base Hearts
-
Load the Brush for the Large Heart:
Dip your flat shader brush into the coral peach underglaze. Don’t overload it; you want a slightly dry-brush effect for texture. -
Create the Left Curve:
Start the large heart on the left side of the plate. Press the brush down firmly to start the curve of the heart’s lobe and sweep downward toward the point, lifting slightly as you go. -
Create the Right Curve:
Reload the brush if necessary and paint the right lobe of this large peach heart, ensuring the two strokes meet at the bottom point. It’s okay if there is variation in opacity; that adds to the watercolor look. -
Add Secondary Hearts:
Using a fresh flat brush or a rinsed one, pick up the soft dusty pink. Paint a medium-sized heart near the center, letting it slightly overlap or nestle near the peach one. -
Layering Transparent Washes:
If you want a true watercolor effect, water down the dusty pink slightly on your palette before applying. This allows the texture of the clay or the color underneath to peek through.
Step 3: Adding Depth & Details
-
Introduce the Deep Red:
Switch to your deep burgundy red underglaze. Locate the spot near the top right rim for a smaller, bolder heart. -
Paint the Bold Accent:
Apply the burgundy heart with confident strokes. Because this color is darker, it acts as a visual anchor. I like to keep the edges slightly rough to maintain that hand-painted charm. -
Add Edge Details:
Using the side of your brush or the round detail brush, add partial heart shapes or brushstrokes along the rim, as seen on the far right and bottom edges. These fragmented shapes make the design feel continuous. -
Create Texture:
Look at the bottom point of the plate. Use a fairly dry brush with the deep red to flick upward strokes, mimicking the bottom point of a heart or abstract petals. -
Add Speckles (Optional):
The original image suggests some tiny dark specks. Dip a toothbrush or stiff brush in the dark red, pull back the bristles, and gently splatter a tiny amount of mist over the design for added depth. -
Refine Edges:
Check the rim of the plate. If any underglaze smudged where you don’t want it, use a clean damp sponge to wipe it back to white.
Add Gold Luster
For a luxe finish, apply a rim of 22k gold luster to the edge of the plate after the glaze firing and fire it a third time at a very low cone (usually cone 018).
Step 4: Glazing & Firing
-
Let Underglaze Dry:
Allow your painted design to dry completely. It should look chalky and matte. -
Apply Clear Glaze:
Once dry, dip the entire plate into a clear dipping glaze or brush on three even coats of clear brushing glaze. This will seal the clay and make the colors pop. -
Check Glaze Thickness:
Ensure the clear glaze isn’t too thick, especially in the corners of the rim, as it can go cloudy. Smooth out any drips with a finger. -
Fire the Piece:
Load the plate into the kiln for a glaze firing (typically Cone 06 or Cone 6, depending on your clay body specifications).
Once fired, this lovely dish is ready to hold jewelry or sweet treats on a sunny windowsill
Cute Strawberry Heart Plate
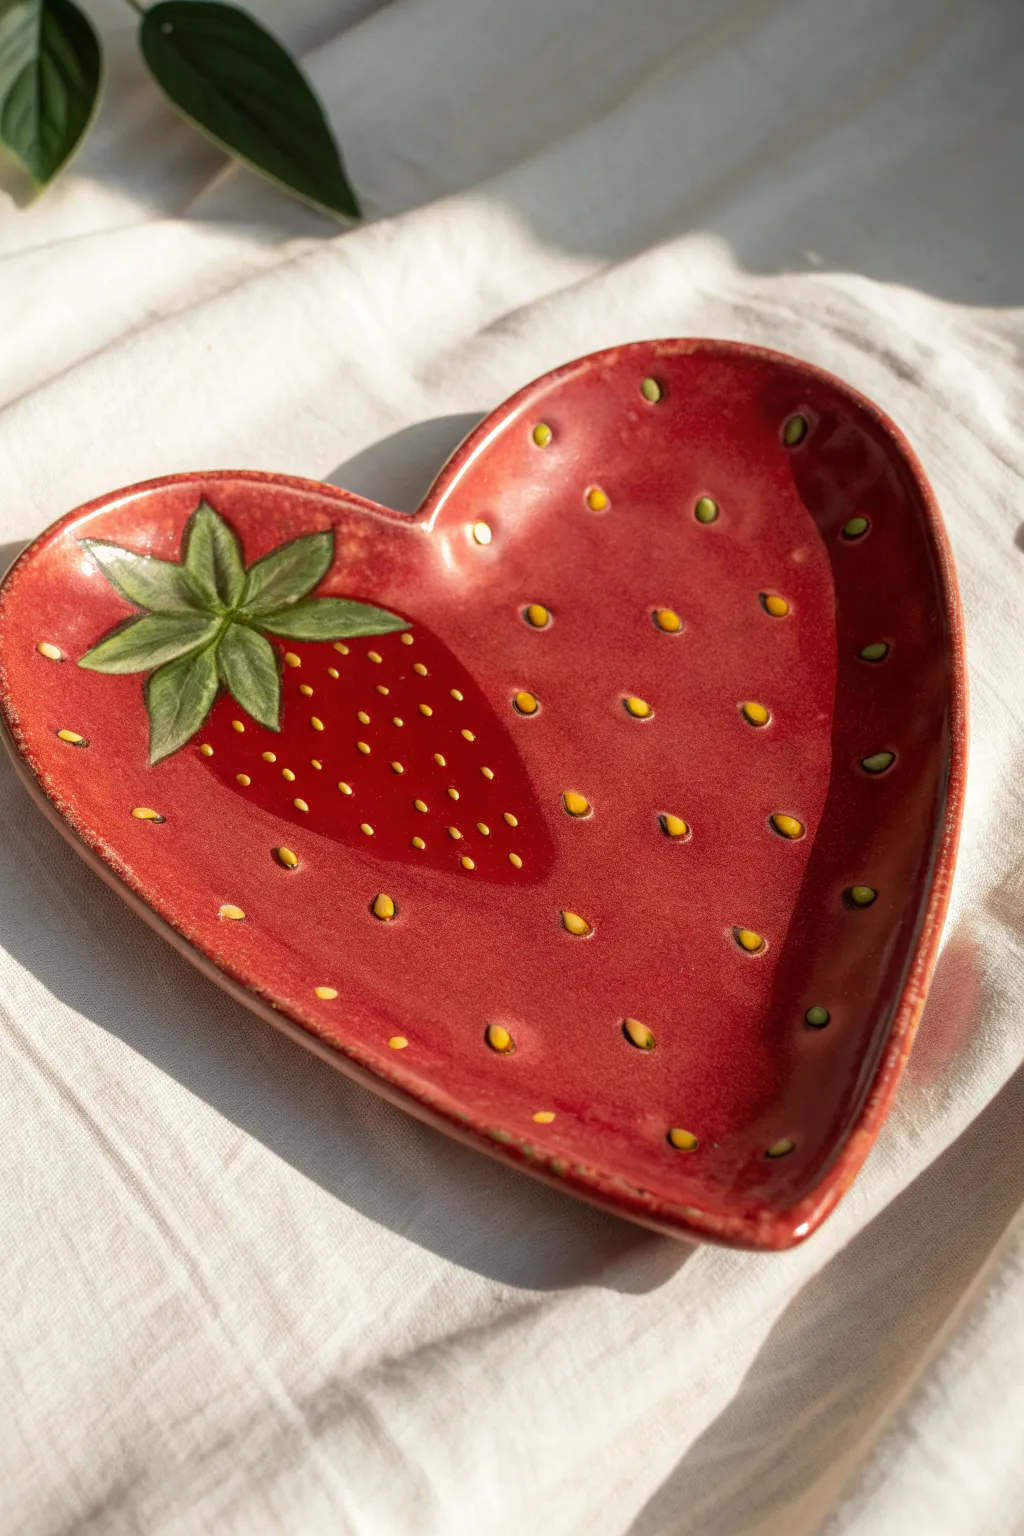
Transform a simple bisque heart plate into a glossy, oversized berry with this charming pottery painting project. Featuring luscious red glazes, impressed seed details, and a secondary strawberry motiff, this piece is perfect for serving sweets or holding jewelry.
Detailed Instructions
Materials
- Heart-shaped bisque plate
- Ceramic underglazes: Bright Red, Dark Red, Green, Dark Green, Yellow/Gold
- Clear dipping glaze or brush-on clear glaze
- Soft fan brush
- Round detail brushes (sizes #2 and #4)
- Liner brush
- Pencil
- Sponge
- Water bowl
Step 1: Preparation & Base Coat
-
Clean the bisque:
Wipe down your heart-shaped bisque plate firmly with a damp sponge. This removes any ceramic dust that could prevent the glaze from adhering properly. -
Apply the first red layer:
Using a soft fan brush, apply a coat of Bright Red underglaze to the entire top surface of the heart. Use long, smooth strokes to ensure even coverage. -
Build the opacity:
Let the first coat dry until it’s chalky and matte. Apply a second coat of Bright Red, ensuring you get into any crevices. Three coats total is usually the standard for solid, opaque color.
Seed Depth Trick
To mimic the recessed seeds in the photo, gently press the rounded end of a paintbrush handle into the wet clay before bisque firing, or paint a dark shadow under each seed.
Step 2: Painting the Mini Strawberry
-
Sketch the outline:
Once your red base is completely dry, lightly sketch a smaller strawberry shape on the left side of the heart using a pencil. Don’t worry about marks; the graphite will burn off in the kiln. -
Darken the inner strawberry:
Fill in the body of your sketched strawberry with Dark Red underglaze. This creates a subtle contrast against the brighter background red. -
Paint the leaves:
Using a size #4 round brush, paint the leafy calyx at the top of your mini strawberry using light Green. Make the leaves pointy and slightly curved for a natural look. -
Add leaf details:
Switch to a liner brush and Dark Green underglaze. Carefully outline the leaves and add a central vein line down the middle of each leaf segment to give them dimension. -
Seed the mini berry:
With the very tip of a small brush or a toothpick, dot tiny Yellow seeds onto the Dark Red strawberry body.
Go Green
Make a matching set by painting the inverse: a green ‘unripe’ strawberry plate with pale pink seeds and a dark green leafy top.
Step 3: Adding the Plate Texture
-
Plan seed placement:
Visualize a grid pattern across the rest of the plate. You want the seeds to look evenly spaced but not perfectly mechanical. -
Paint surface seeds:
Using your Yellow/Gold underglaze and a small round brush, paint teardrop-shaped seeds across the main red surface. Paint the pointed end facing upward. -
Create impressed accents:
For a tactile feel like a real strawberry, look for any small divots in your specific bisque piece. If your plate is smooth, you can create the illusion of depth by painting a tiny dark crescent shadow under each yellow seed. -
Highlight the rim:
Dip a sponge lightly in Dark Red or a brownish-red glaze. Gently dab the very edge of the heart plate to give it a slightly rustic, toasted edge.
Step 4: Glazing & Firing
-
Inspect your work:
Look closely for any accidental smudges or thin spots. Touch up the red background if needed. -
Apply clear glaze:
If using brush-on clear glaze, apply two thin coats over the entire dry design. I prefer to use a large soft brush here to avoid dragging the colors underneath. Alternatively, dip the piece if you have a dipping tank. -
Dry completely:
Allow the plate to dry fully. It should be dry to the touch before moving. -
Fire the piece:
Load the plate into the kiln. Fire to cone 06 (or the temperature specified by your clay and glaze manufacturer) to vitrify the piece and make it food safe.
Enjoy the glossy finish of your new favorite fruit plate perfect for summer snacks
Cozy Gingham Heart Background
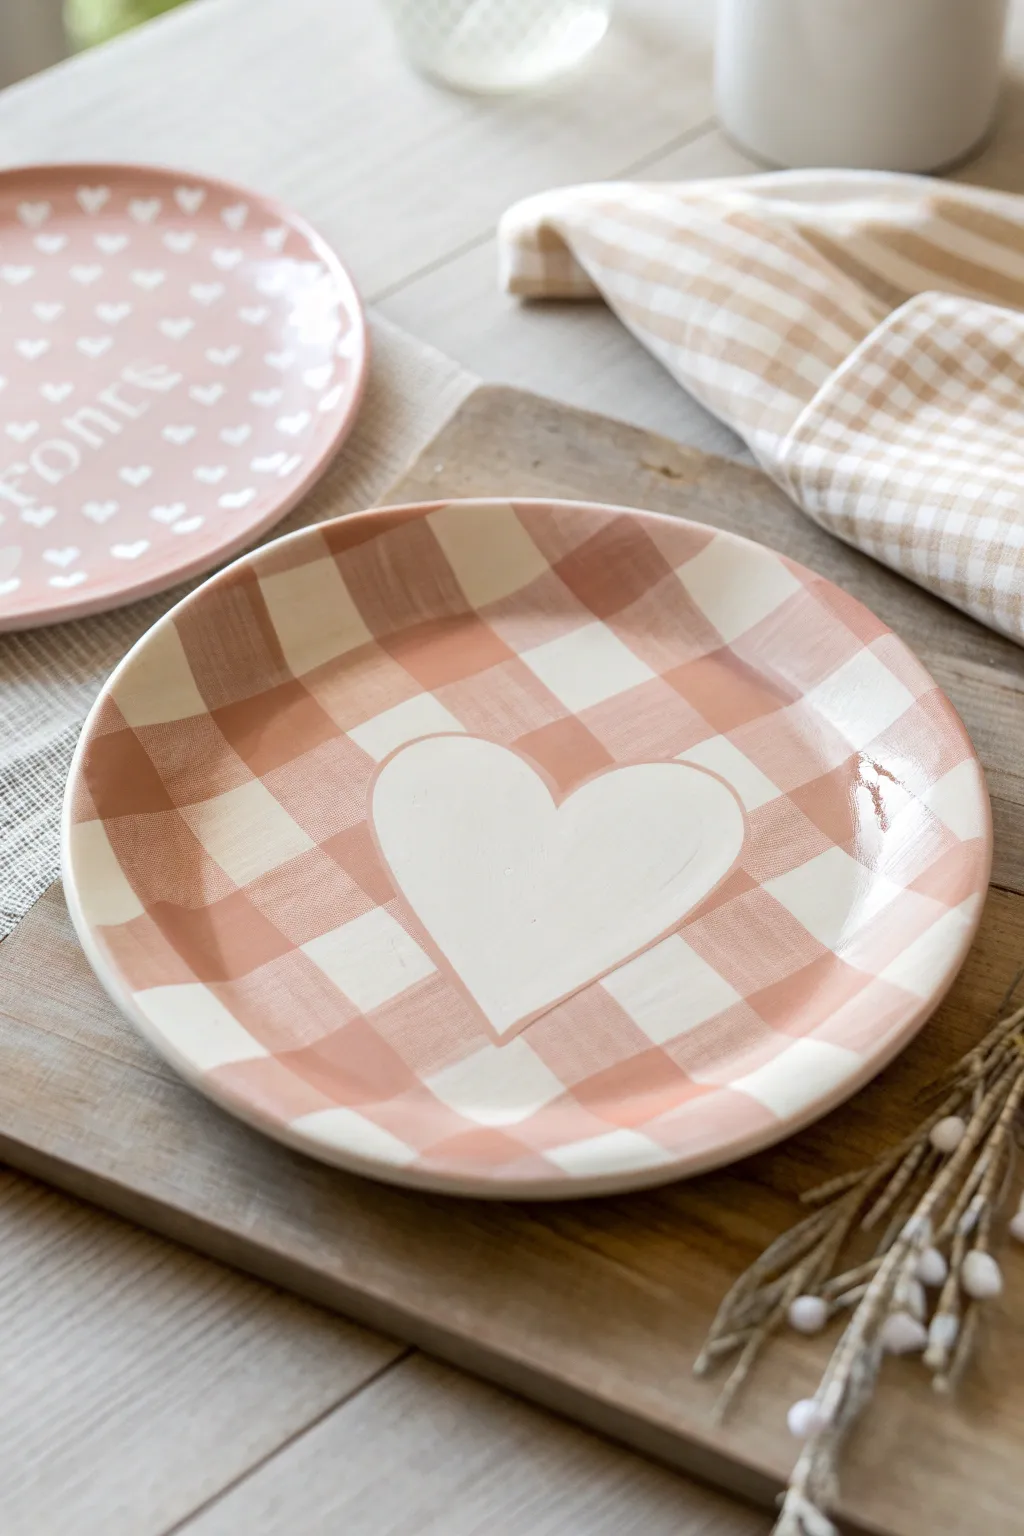
For a farmhouse-inspired look, this project combines a classic gingham pattern in soft pinks with a bold, untouched white heart center. The result is a charming everyday piece that feels both rustic and modern.
Step-by-Step
Materials
- Ceramic bisque salad plate
- Ceramic glaze (light pink)
- Ceramic glaze (darker rosy pink or terracotta)
- Ceramic glaze (opaque white)
- Flat shader brush (approx. 1 inch wide)
- Fine liner brush
- Heart-shaped paper cutout or contact paper stencil
- Pencil
- Palette or small dishes for mixing
- Ruler (optional but helpful)
Step 1: Preparation & Layout
-
Clean the bisque:
Begin by wiping down your ceramic bisque plate with a slightly damp sponge to remove any kiln dust or oils that might resist the glaze. -
Create the heart mask:
Cut a heart shape out of contact paper or sticky-backed vinyl. Place it firmly in the exact center of the plate, smoothing down the edges to prevent paint from seeping underneath. -
Plan the grid:
Using a pencil, lightly sketch a grid across the entire plate. The lines should be spaced apart by the width of your flat shader brush (about 1 inch) to make painting easier later.
Use the brush width
For perfectly even stripes without endless measuring, choose a brush that is exactly the width you want your checks to be. Simply drag the brush once for each line.
Step 2: Painting the Gingham Layers
-
Mix your base tone:
Using your light pink glaze, create a very watery wash. You want this first layer to be translucent, acting as the lightest squares in your gingham pattern. -
Paint vertical stripes:
Dip your flat shader brush into the light wash. Paint vertical stripes following your grid lines, skipping every other column. Let the white bisque show through the empty columns. -
Paint horizontal stripes:
Using the same light pink wash, paint horizontal stripes across the plate, again skipping every other row. I find it helpful to rotate the plate as I work to keep my hand steady. -
Dry completely:
Allow these first light layers to dry until they are matte and no longer shiny. This is crucial so the next layers create distinct overlaps. -
Identify the intersections:
You will now see a grid pattern: white squares, single-layer pink squares, and areas where the vertical and horizontal stripes cross. These ‘crossings’ need to be darker. -
Add the darker tone:
Switch to your darker rosy pink or terracotta glaze. Paint only the squares where the vertical and horizontal pink stripes intersect. This creates the illusion of woven fabric. -
Refine the edges:
If your brushstrokes look a bit messy, use a slightly damp brush to gently tidy up the edges of the squares, but don’t worry about perfection; the handmade look adds charm.
Pencil marks vanish
Don’t stress if your pencil grid lines are still visible after painting. Ceramic pencil lead burns off completely in the kiln, leaving no trace on your finished plate.
Step 3: Finishing the Heart
-
Remove the stencil:
Once the gingham pattern is dry to the touch, carefully peel away the contact paper heart from the center. -
Clean the outline:
If any pink glaze bled under the sticker, gently scrape it away with a craft knife or wipe it with a clean, damp brush. -
Outline the heart:
To make the heart pop, dip your fine liner brush into a slightly darker pink or diluted brown glaze. Paint a very thin, relaxed outline around the white heart shape. -
Fill the heart (optional):
If you want a brighter white than the natural bisque, paint the interior of the heart with three solid coats of opaque white glaze. -
Back of the plate:
Don’t forget to paint the back of the rim with a solid coat of the darker pink to tie the design together. -
Final inspection:
Check for any smudges or unwanted drips and clean them up before firing. -
Clear glaze and fire:
Dip the entire plate in a clear dipping glaze and fire it according to your clay and glaze manufacturer’s instructions.
Once fired, this delightful plate is ready to serve up sweets or simply brighten your table display
Folk Art Heart With Florals
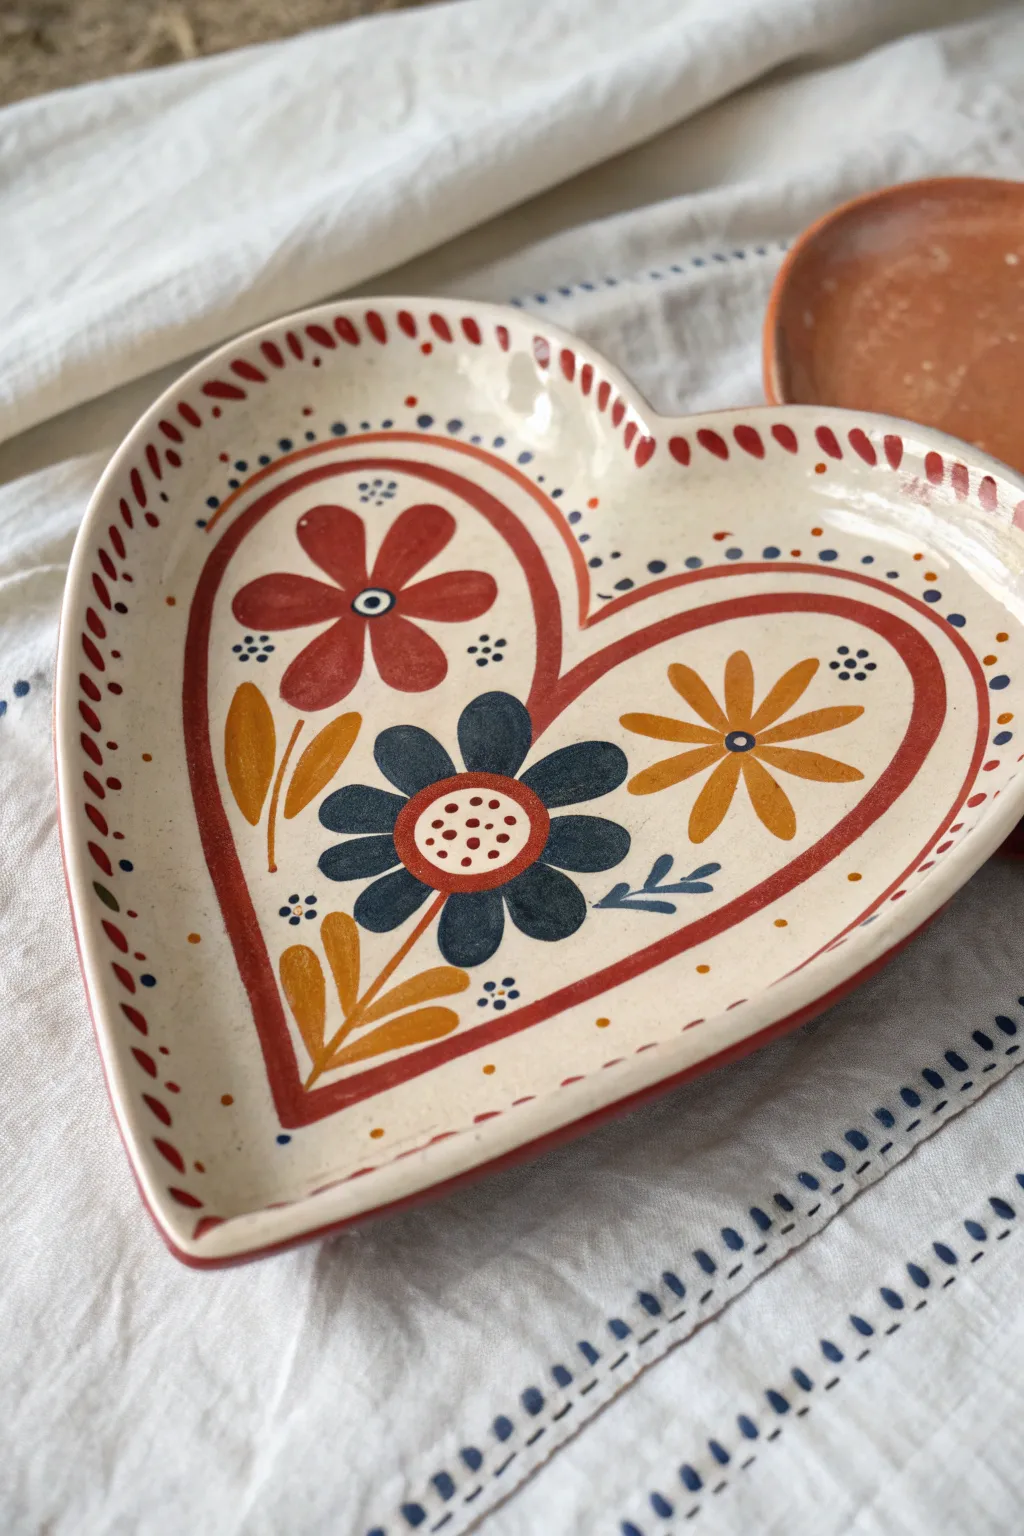
Embrace rustic charm with this folk art inspired heart plate design, featuring bold primary colors and simple floral motifs. The unrefined brushstrokes and warm palette give this piece a cozy, handcrafted feel perfect for a cottage kitchen.
Detailed Instructions
Materials
- Heart-shaped ceramic bisque plate
- Underglazes or food-safe ceramic paints (Red, Dark Blue, Mustard Yellow, White)
- Clear dipping glaze (if using underglazes)
- Round brush (size 4)
- Detail liner brush (size 0 or 1)
- Pencil
- Water cup and paper towels
Step 1: Planning and Outlining
-
Sketch the inner heart:
Using a pencil, lightly draw a large heart shape on the inside of the plate, leaving about an inch of space between your line and the plate’s rim. Don’t worry about erasing; pencil marks will burn off in the kiln. -
Outline the rim:
Load your round brush with red paint. Paint a thick, continuous line following your pencil sketch to create the central heart frame. -
Add the dashed border:
along the very edge of the plate rim, paint short, evenly spaced dashes using red paint. I like to angle the brush slightly to give them a dynamic, angled look. -
Inner details:
Switch to your detail liner brush and dark blue paint. Paint tiny dots along the inside edge of the red dashed border for extra texture.
Clean Lines
If your hand shakes while painting lines, rest your pinky finger on the dry part of the plate for stability.
Step 2: Painting the Florals
-
Position the main flowers:
Visualize three main floral elements inside the red heart: a red flower top-left, a blue flower bottom-center, and a yellow flower on the right. -
Paint the red flower:
Start with the red flower. Use your round brush to paint five simple, petal-like strokes radiating from a center point. Keep the shapes rounded and organic rather than perfect. -
Create the blue flower:
Below the red one, paint the largest flower using dark blue. Create six to eight petals, making them slightly thicker and bolder than the red flower’s petals. -
Paint the yellow flower:
On the right side, paint the yellow flower with longer, thinner petals, almost like a daisy or sunburst style. -
Add the flower centers:
Once the petals are dry to the touch, add contrasting centers. Paint a white circle in the center of the blue flower, a small blue ring in the red flower, and a blue dot in the yellow flower.
Step 3: Leaves and Accents
-
Paint the leaves:
Using mustard yellow, add simple leaf shapes. Paint two leaves stemming from the bottom of the red flower and a three-leaf sprig rising from the bottom point of the heart. -
Add blue details:
With the liner brush and blue paint, add a small sprig of leaves near the blue flower and a few cluster dots (groups of four) in empty white spaces for filler. -
Detail the center:
Return to the white center of the blue flower. Using the very tip of your liner brush and red paint, add tiny dots in a circular pattern inside the white area. -
Final border dots:
Add small red dots between the blue border dots you painted earlier, creating an alternating pattern along the rim.
Paint Consistency
Mix a tiny drop of water into your acrylics or underglaze. It helps paint flow smoothly for crisp, non-clumpy llines.
Step 4: Finishing Touches
-
Check your work:
Look over the plate for any smudges or uneven coverage. If paint looks thin, apply a second coat to make the colors opaque. -
Clean the rim:
Wipe the very edge and underside of the plate with a damp sponge to visual ensure no accidental paint splatters remain. -
Glaze and fire:
If using traditional pottery underglazes, dip the entire plate in clear glaze and fire it in a kiln according to your clay’s specifications.
Display your beautiful folk heart plate or wrap it up as a heartfelt handmade gift
Marbled Heart Swirl Effect
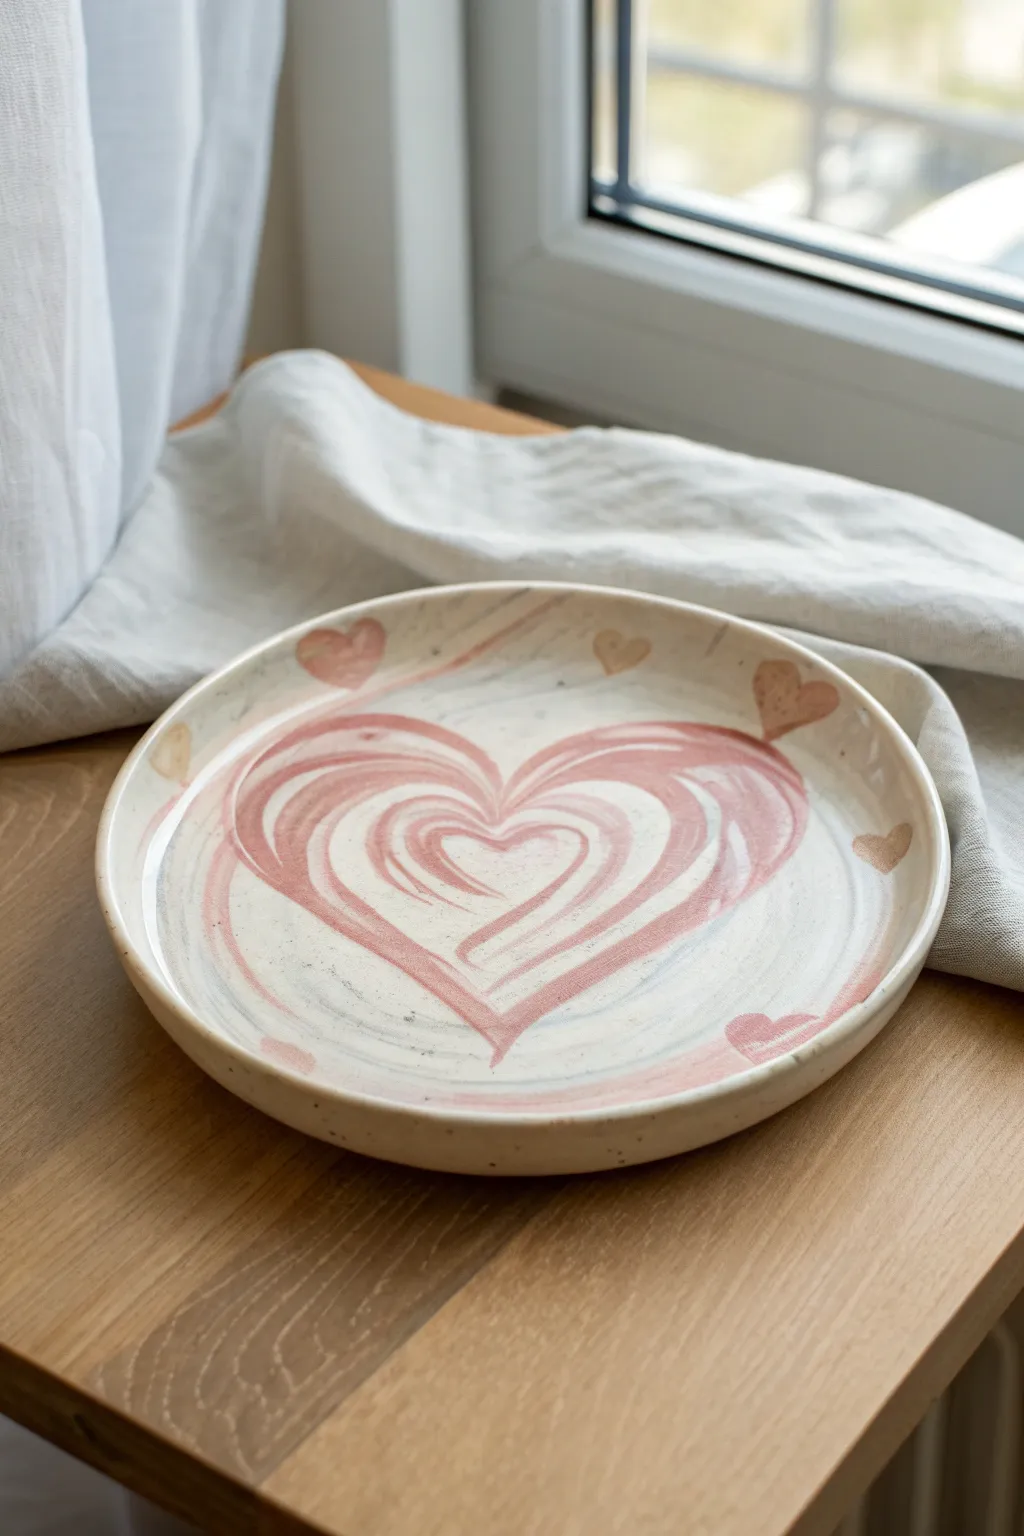
This charming ceramic project features a large, marbled heart centerpiece created with loose, expressive brushstrokes that mimic a latte-art swirl. The creamy, speckled base provides a warm, rustic canvas for the lovely dusty rose and terracotta tones.
Step-by-Step Tutorial
Materials
- Bisque-fired ceramic plate (cream or speckled clay body)
- Ceramic underglazes (Dusty Rose, Terracotta, Cream/White)
- Wide flat brush (for base coat)
- Medium round brush (size 6 or 8)
- Small detail brush (size 2)
- Clear dipping glaze (or brush-on clear glaze)
- Sponge and water bucket
- Palette for mixing
Step 1: Preparation & Base Coat
-
Clean the bisque:
Start by wiping down your bisque plate with a damp sponge. This is crucial to remove any kiln dust or oils from your hands that might resist the glaze application. -
Apply the base color:
Using a wide flat brush, apply a smooth, even coat of cream or off-white underglaze to the entire surface of the plate. If you are using a speckled clay body, you might choose to skip this step to let the natural speckles show through, or use a semi-transparent white wash. -
Layering the background:
If you want a solid opaque background, apply a second coat of the cream underglaze once the first layer is dry to the touch. Ensure your brushstrokes follow the curve of the plate for a clean finish. -
Create the subtle swirl:
Before the base is bone dry, mix a tiny drop of dusty rose into your cream glaze. With a damp brush, create a very faint, large circular motion on the plate’s face to hint at movement, blending it softly into the background.
Step 2: Painting the Marbled Heart
-
Load your brush:
Load a medium round brush generously with your dusty rose underglaze. You want the brush fully saturated so the stroke creates a fluid, continuous line without breaking. -
Paint the outer heart shape:
Start at the top left arch of the heart. Press down to widen the stroke and pull the brush down and inward towards the center bottom point. Repeat for the right side to form the main heart outline. Don’t worry about perfect symmetry; the charm is in the hand-painted feel. -
Begin the inner swirl:
While the outer shape is still wet, dip your brush (without collecting more paint) into a bit of water or lighter pink glaze. Start inside the heart shape and paint a smaller, inner heart contour that echoes the outer shape. -
Marble the colors:
Continue spiraling inward with your brush. The goal is to create concentric heart shapes that get smaller towards the center. Allow the wet glazes to bleed slightly into each other. -
Add the center accent:
With the very tip of your brush, add a tiny, defined heart right in the center of the swirl. This anchors the design and draws the eye inward. -
Refine the swirls:
I like to take a clean, slightly damp brush and gently drag it through the separation lines between the pink strokes. This softens any harsh edges and enhances the ‘latte art’ marbled effect.
Pro Tip: Fluid Strokes
Add a drop of water or glazing medium to your underglaze. This improves flow, helping you achieve that long, continuous ‘swirl’ stroke without the brush dragging.
Step 3: Adding Details & Glazing
-
Paint rim hearts:
Switch to your small detail brush. Using a terracotta or slightly darker pink shade, paint small, simple hearts freely around the rim of the plate. -
Add subtle variation:
Mix a little cream into your terracotta color and paint a second set of hearts interspersed with the first ones. Varying the opacity creates depth and visual interest. -
Create loose petals:
Near the rim hearts, add tiny, dash-like strokes or single ‘petals’ floating in the wind. These little accents prevent the design from feeling too rigid or static. -
Final dry:
Allow the plate to dry completely. Underglaze usually dries matte and chalky; wait until no damp spots remain. -
Clear glaze application:
Apply a coat of clear glaze over the entire plate. You can use a fan brush for a brush-on glaze, or dip the plate if you have a dipping tank. This will seal the design and make it food-safe. -
Check the foot:
Use a damp sponge to meticulously wipe any glaze off the ‘foot’ (the bottom ring) of the plate. Any glaze left here will fuse the plate to the kiln shelf during firing. -
Fire the piece:
Fire the plate in a kiln according to the clay and glaze manufacturer’s instructions (typically Cone 06 or Cone 6, depending on your materials).
Level Up: Sgraffito Touch
Once the pink heart is semi-dry, use a needle tool to gently scratch thin lines through the paint to reveal the white base, adding texture to the swirl.
Now you have a beautifully sweet, swirling heart plate ready for your next meal or display
Celestial Heart With Stars
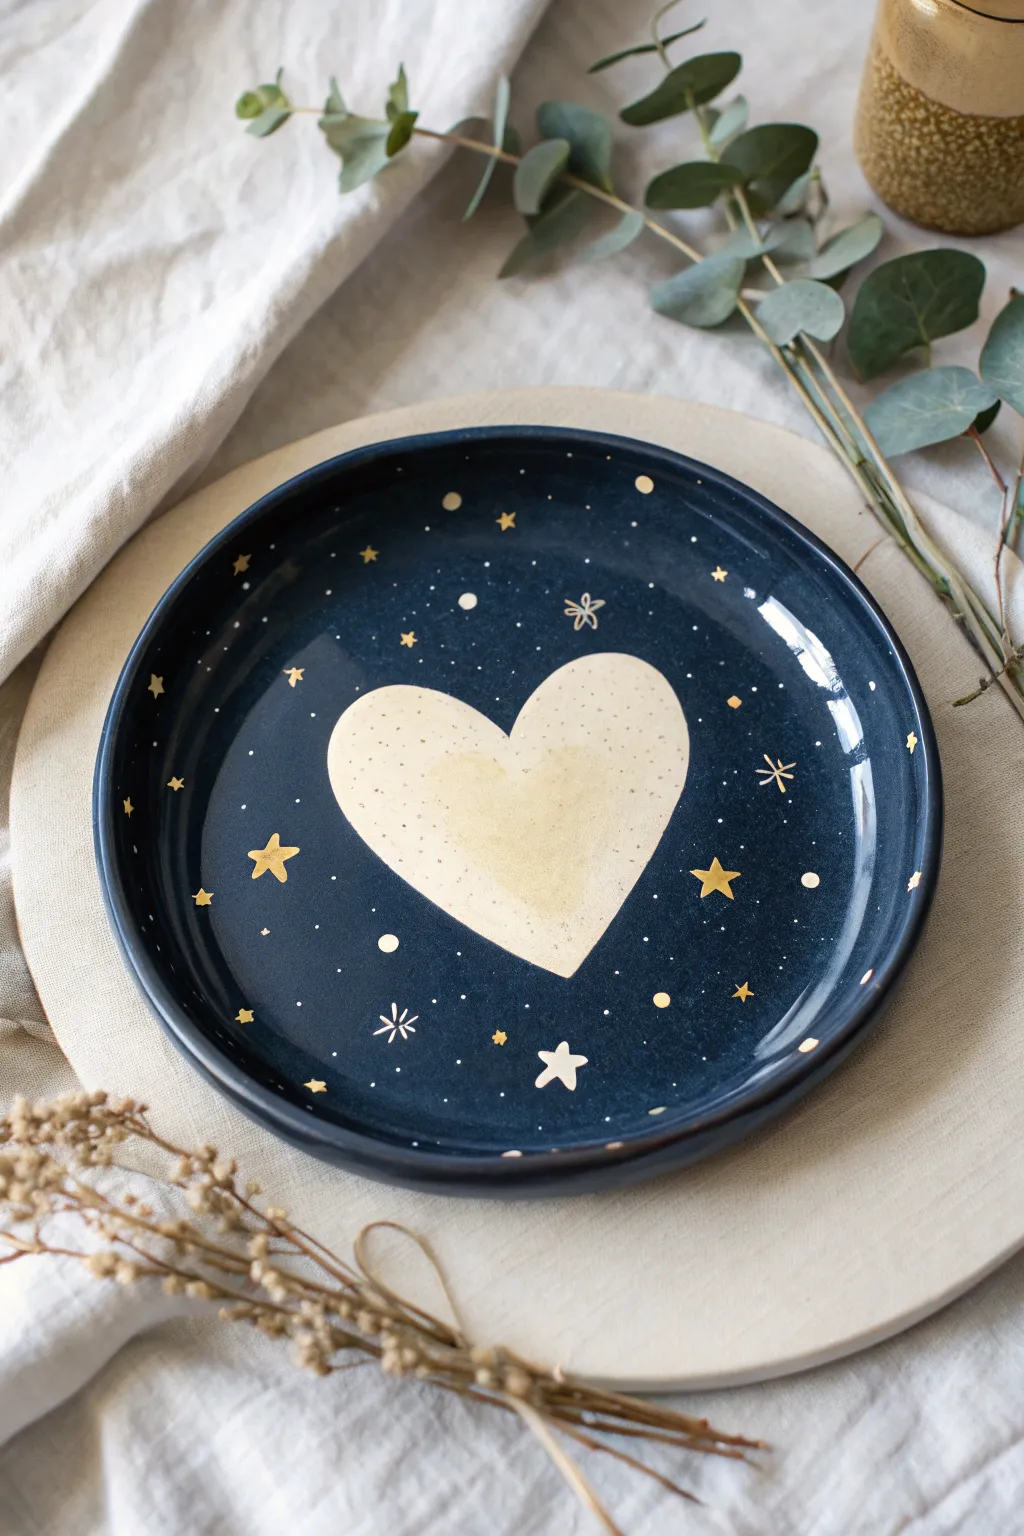
Transform a simple ceramic plate into a dreamy piece of decor with this celestial-inspired design. Featuring a deep navy void and a glowing textured heart surrounded by golden stars, this plate captures the quiet magic of a clear night sky.
Step-by-Step
Materials
- White or bisque ceramic plate (8-10 inch)
- Deep glossy navy blue ceramic glaze or porcelain paint
- Creamy white ceramic glaze or paint
- Gold metallic ceramic paint or luster pens
- Medium flat brush
- Fine liner brush (size 0 or 00)
- Small dotting tool or toothpick
- Masking tape or contact paper (optional for heart stencil)
- Scissors and pencil
- Small natural sea sponge
Step 1: Setting the Celestial Stage
-
Prep the surface:
Begin by cleaning your ceramic plate thoroughly with rubbing alcohol and a lint-free cloth. This removes any oils or dust that might repel the paint or glaze. -
Draft the heart:
You can freehand the central heart for an organic look, but I prefer sketching it lightly with a pencil first to ensure it’s centered. Alternatively, cut a heart shape from masking tape and adhere it to the center to block out the negative space. -
Apply the midnight background:
Using a medium flat brush, apply your deep navy blue paint around the heart shape. Work in smooth, curved strokes following the rim of the plate. -
Build opacity:
Let the first coat dry completely. Apply a second or even third coat of the navy blue until you achieve a rich, opaque finish with no brushstrokes showing. A glossy finish works best here to mimic the depth of space. -
Refine the edges:
If you used a tape stencil, carefully peel it away now while the paint is just barely tacky. If you freehanded, clean up the inner edges of your blue background using a damp brush to ensure the heart shape is defined but slightly soft.
Step 2: Painting the Glowing Heart
-
Base coat the heart:
Fill the center heart shape with your creamy white paint. You don’t need perfect coverage here; a slightly translucent look adds character. -
Add texture:
While the white is still wet, dip a small piece of natural sea sponge into the white paint and dab it gently over the heart. This creates a speckled, moon-like texture. -
Create the inner glow:
Mix a tiny drop of gold paint with a little water or glazing medium to create a wash. Gently paint this into the very center of the heart, feathering it outwards so it fades into the white. -
Let it cure:
Allow the entire plate to dry completely before moving on to the metallic details. If using fired glazes, check if a firing is needed between base coats and details, though usually, you can layer them.
Star Shape Struggles?
If painting tiny stars is difficult, try using a metallic gold paint marker instead of a brush. The firm felt tip offers much more control for sharp points.
Step 3: Sprinkling the Stardust
-
Plan your constellations:
Visualize where you want your larger stars. Spacing them irregularly looks more natural than a uniform pattern. -
Paint the major stars:
Dip your fine liner brush into unthinned metallic gold paint. Paint small five-pointed stars scattered across the navy background. Don’t worry if they aren’t perfect; hand-painted charm is key. -
Add variance:
Paint a few six-pointed stars or ‘glimmers’ (simple crosses with elongated vertical lines) to add variety to the sky. -
Create the galaxy dust:
Using a dotting tool or the tip of a toothpick, dip into the gold paint and place tiny dots randomly between the larger stars. Group some closer together to mimic the Milky Way. -
Detail the heart:
If you like, add a few tiny gold speckles inside the white heart itself to tie the design together, making it look like the heart is made of stardust. -
Final drying time:
Allow the metallic paint to dry for at least 24 hours. If using porcelain paint that requires baking, place the plate in a cold oven, heat to the manufacturer’s specified temperature (usually 300°F/150°C), and bake for 30 minutes.
Hidden Messages
Before baking or sealing, use your finest brush to paint a tiny date, initial, or short word hidden among the stars in the dark blue background.
Once baked or sealed, display your celestial plate on a stand to let the light catch the golden details
Negative Space Heart Outline Rim
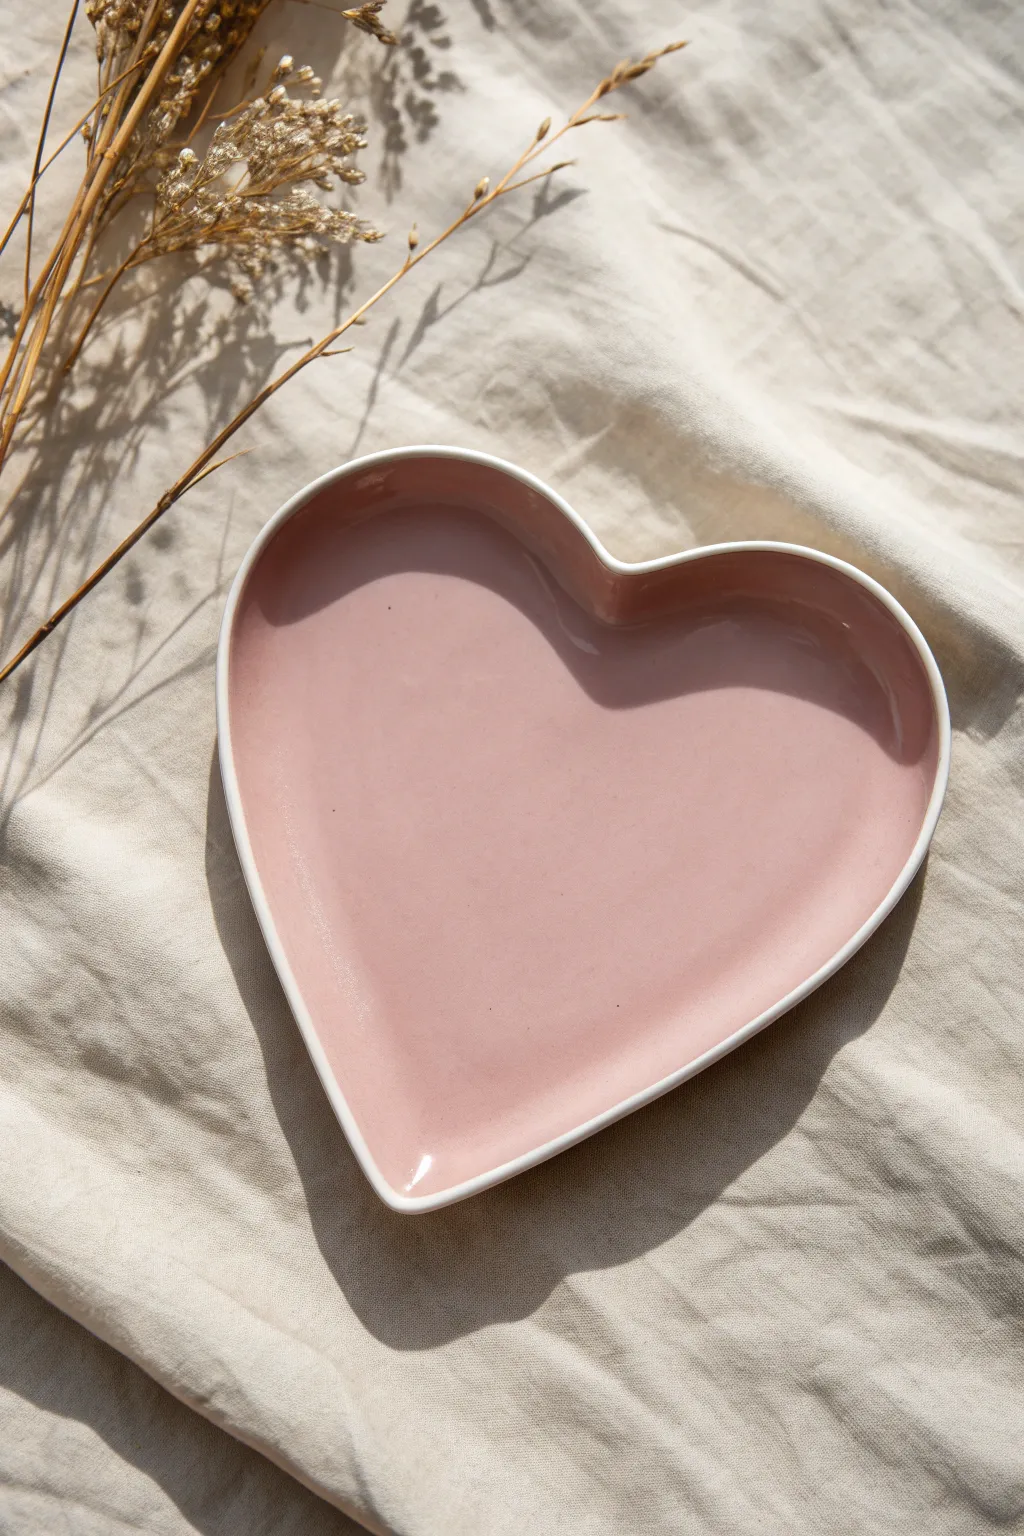
This minimalist project plays with the concept of negative space by leaving the crisp white rim of a heart-shaped plate unpainted. The result is a glossy, mauve-pink interior that pops against the raw white edge, creating a modern and sophisticated finished piece.
Detailed Instructions
Materials
- Heart-shaped ceramic bisque plate
- Dusty rose or mauve ceramic glaze
- Clear dipping glaze or brush-on clear glaze
- Medium soft flat brush (size 6 or 8)
- Small angled brush or detailing brush
- Damp synthetic sponge
- Pottery kiln (unless using air-dry paints, but glaze is best)
Step 1: Preparation
-
Wipe the Bisque:
Start by taking your heart-shaped bisque plate and wiping it down thoroughly with a damp sponge. This removes any ceramic dust that could prevent the glaze from adhering properly. -
Inspect the Rim:
Since the rim is the star feature of this design, run your finger along the edge to feel for any sharp burrs or rough spots. Lightly sand these down if necessary before you begin painting.
Clean Lines Pro Tip
Apply thin masking tape or painter’s tape along the rim before painting the center. Peel it off while the glaze is still slightly damp for a razor-sharp edge.
Step 2: Glazing the Interior
-
Load the Brush:
Shake your dusty rose glaze well. Load a medium flat brush with a generous amount of glaze, but not so much that it drips uncontrollably. -
First Coat Center:
Begin applying the glaze in the center of the plate, brushing outwards toward the edges. Use long, smooth strokes to ensure even coverage. -
Approaching the Edge:
As you get closer to the rim, slow down. You want to bring the pink color close to the edge but stop just short of the very top lip of the plate. -
Define the Line:
Switch to a smaller angled brush or a detailing brush. Carefully paint the curve of the heart, creating a clean line where the pink stops and the white rim begins. I find it helpful to anchor my pinky finger on the table for stability here. -
Let it Dry:
Allow this first coat to dry until it loses its wet sheen. This usually takes about 10 to 15 minutes depending on humidity. -
Second Coat:
Apply a second coat of the pink glaze over the same area. Change the direction of your brush strokes (cross-hatching) if possible to eliminate streaks. -
Solidify the Color:
Most commercial glazes require three coats for full opacity. Apply a third and final coat to the pink section, being extremely careful not to smudge your clean edge line.
Step 3: Refining the Edge
-
Clean Mistakes:
If any pink glaze accidentally got onto the white rim, use a damp Q-tip or a clean, stiff brush dipped in water to wipe it away immediately. The rim needs to be perfectly stark. -
Check the Back:
Ensure no decorative glaze has dripped onto the underside or the foot of the plate.
Level Up: Gold Rim
After the final firing, apply a gold luster over-glaze to the white rim and fire it again at a lower temperature for a luxurious, metallic gilded edge.
Step 4: Finishing Touches
-
Clear Glaze Application:
Once the pink interior is bone dry, the entire piece needs to be sealed. You can dip the whole plate into clear glaze using tongs. -
Brushing Option:
Alternatively, if you are brushing on clear glaze, apply two coats over the entire plate—including that unpainted white rim. This will make the white rim glossy and food-safe just like the pink center. -
Wipe the Foot:
Regardless of your method, use a wet sponge to wipe all glaze off the very bottom ‘foot’ of the plate where it touches the table, or it will stick to the kiln shelf. -
Fire:
Fire the plate in a kiln according to the instructions on your glaze bottle (usually Cone 06 for low fire or Cone 6 for stoneware).
This simple technique creates a stunning plate that looks high-end and highlights the beautiful shape of the ceramic
Patchwork Heart Quilt Blocks
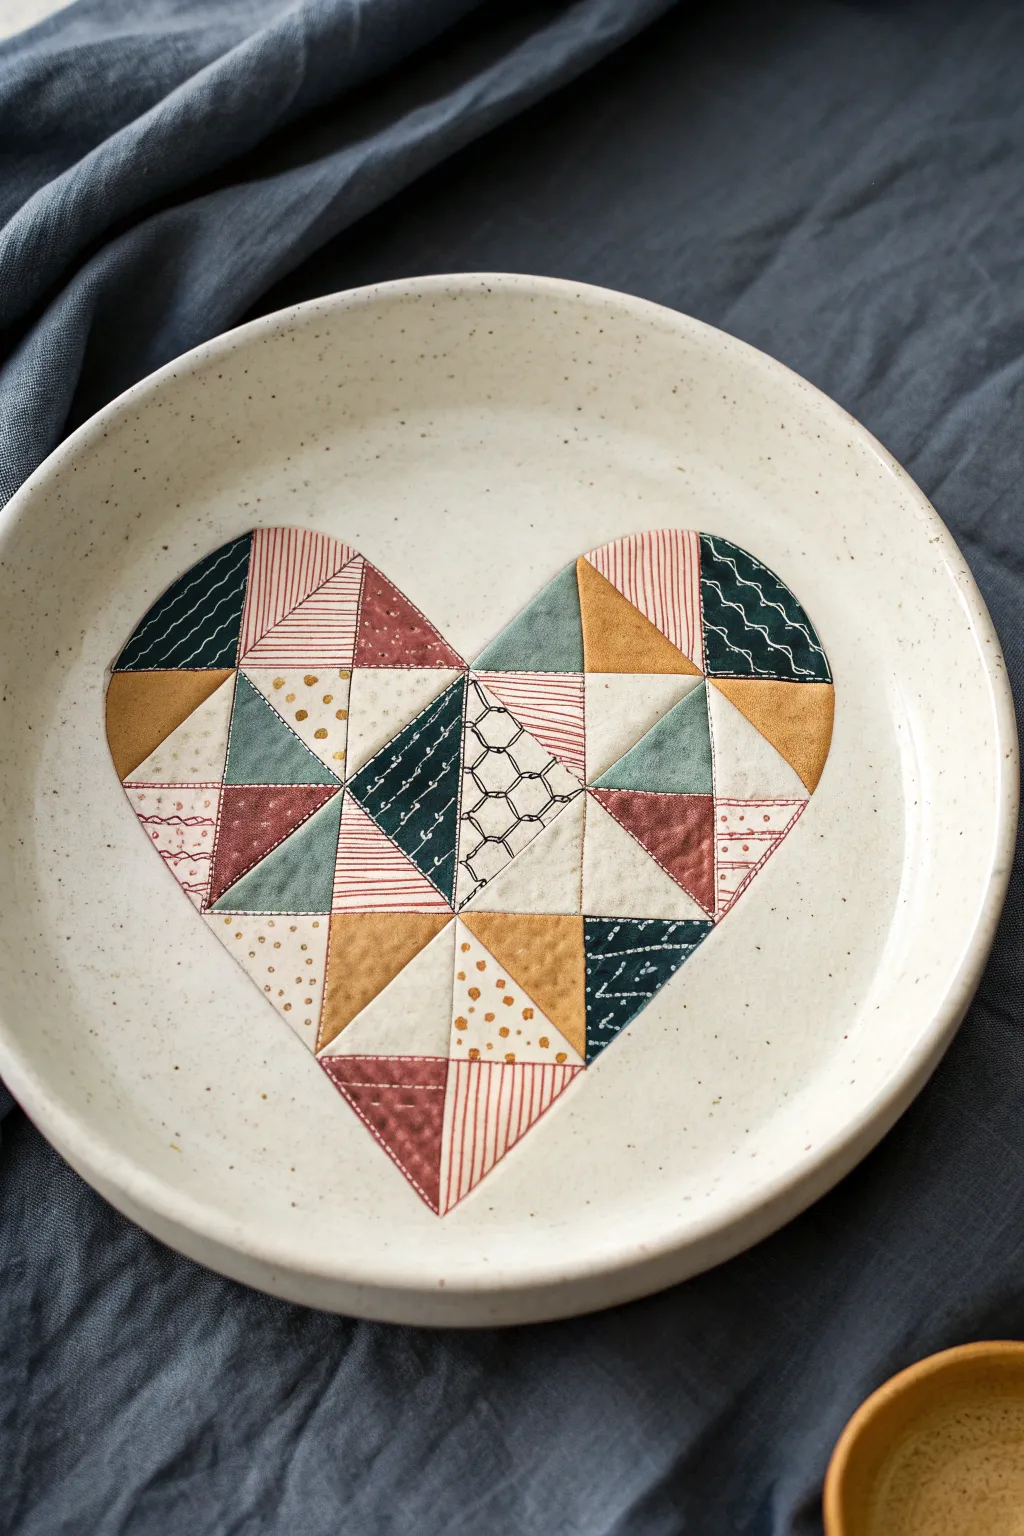
Transform a simple ceramic plate into a cozy piece of folk art with this patchwork heart design. By mimicking the look of stitched fabric scraps using paint and fine liners, you’ll create a charming keepsake that feels both modern and nostalgic.
Step-by-Step Tutorial
Materials
- White or cream ceramic plate (glazed)
- Pebeo Porcelaine 150 paints (or similar ceramic paints) in: dark teal, mustard yellow, rust red, sage green, and white
- Fine liner brushes (size 00 and 0)
- Black porcelain marker or ultra-fine detail brush with black paint
- Alcohol wipes or glazed surface cleaner
- Graphite transfer paper (optional)
- Pencil and ruler
- Cardstock for template making
Step 1: Planning the Patchwork
-
Clean surface:
Begin by thoroughly wiping down your ceramic plate with alcohol wipes to remove any oils or fingerprints. This ensures the paint adheres properly. -
Create a grid:
On a piece of scratch paper, sketch a heart shape made entirely of triangles. If you aren’t confident sketching, print a geometric heart clip-art image to use as your guide. -
Transfer the outline:
Place your paper design over the plate. Slip a piece of graphite transfer paper underneath and trace the main triangular segments of the heart onto the plate. Keep the lines faint; you just need a guide.
Step 2: Blocking in Color
-
Mix your palette:
Prepare your ceramic paints. You want an earthy, vintage palette. For the lighter triangles, mix a tiny dot of yellow or red into a large amount of white to create soft creams and pale pinks. -
Paint solid sections:
Identify which triangles will be solid colors (mustard, sage green, rust red). Using your flat shader brush, carefully fill mainly the solid triangles first. Apply thin, even layers. -
Layering opacity:
Ceramic paint can be translucent. Let the first coat dry for about 15 minutes, then apply a second coat to the solid colors to get that bold, fabric-like opacity. -
Base coat for patterns:
For the triangles that will have patterns (stripes or dots), paint a solid base coat first—usually in cream, white, or a very pale wash of the main colors. Let this base dry completely before adding details.
Faux Fabric Texture
For a worn fabric look, lightly scuff the solid usage areas with a dry, stiff brush before the paint fully cures. It adds a lovely vintage patina.
Step 3: Adding Fabric Details
-
Paint the stripes:
Using your finest liner brush (Size 00), paint varied stripe patterns on selected triangles. Some should be vertical red pinstripes, others diagonal teal lines. Varying the direction mimics real quilt scraps. -
Add polka dots:
For the dotted sections, dip the non-brush end (the handle tip) of your paintbrush into the paint and gently stamp dots onto the cream triangles for uniform size. -
Create texture:
On the dark teal sections, use white paint and a fine brush to create squiggly lines or small dashes. This mimics the texture of printed calico fabric. -
Let the paint set:
Allow all the colored sections to dry for at least an hour. They must be dry to the touch so you don’t smudge them while adding the final ‘stitching’.
Paint Blobbing?
If you get thick ridges of paint, your brush is overloaded. Wipe excess paint on a paper towel before touching the plate. Thin layers are key for ceramics.
Step 4: Stitching and Finishing
-
Draw the seams:
Using a black porcelain marker or a detail brush with thinned black paint, carefully outline each triangle. Don’t use a ruler here; a slightly wobbly hand looks more like authentic thread. -
Add running stitches:
To really sell the quilt effect, add dashed ‘running stitch’ lines just inside the border of some shapes. I find this tiny detail makes the biggest difference in realism. -
Detail geometric patterns:
Use the black marker to draw specific patterns like the honeycomb/chicken wire grid seen in the center triangle or the tiny ‘x’ stitches in the pink sections. -
Clean up edges:
If any paint went outside the heart shape, dip a cotton swab in water or alcohol and tidy up the perimeter for a crisp edge. -
Cure the plate:
Follow the manufacturer instructions for your specific paint. Usually, this involves air drying for 24 hours, followed by baking in a home oven (often at 300°F/150°C for 35 minutes) to make it dishwasher resistant.
Once baked and cooled, your plate is ready to be displayed as a heartwarming piece of wall art or used for serving treats