
If you’ve got a stack of clay pots and a little paint, you’re already halfway to something adorable. I’m sharing my favorite easy clay pot craft ideas—starting with the classics everyone loves, then drifting into the delightfully weird stuff that makes a garden corner feel like a tiny storybook.
Classic Painted Terracotta Planters
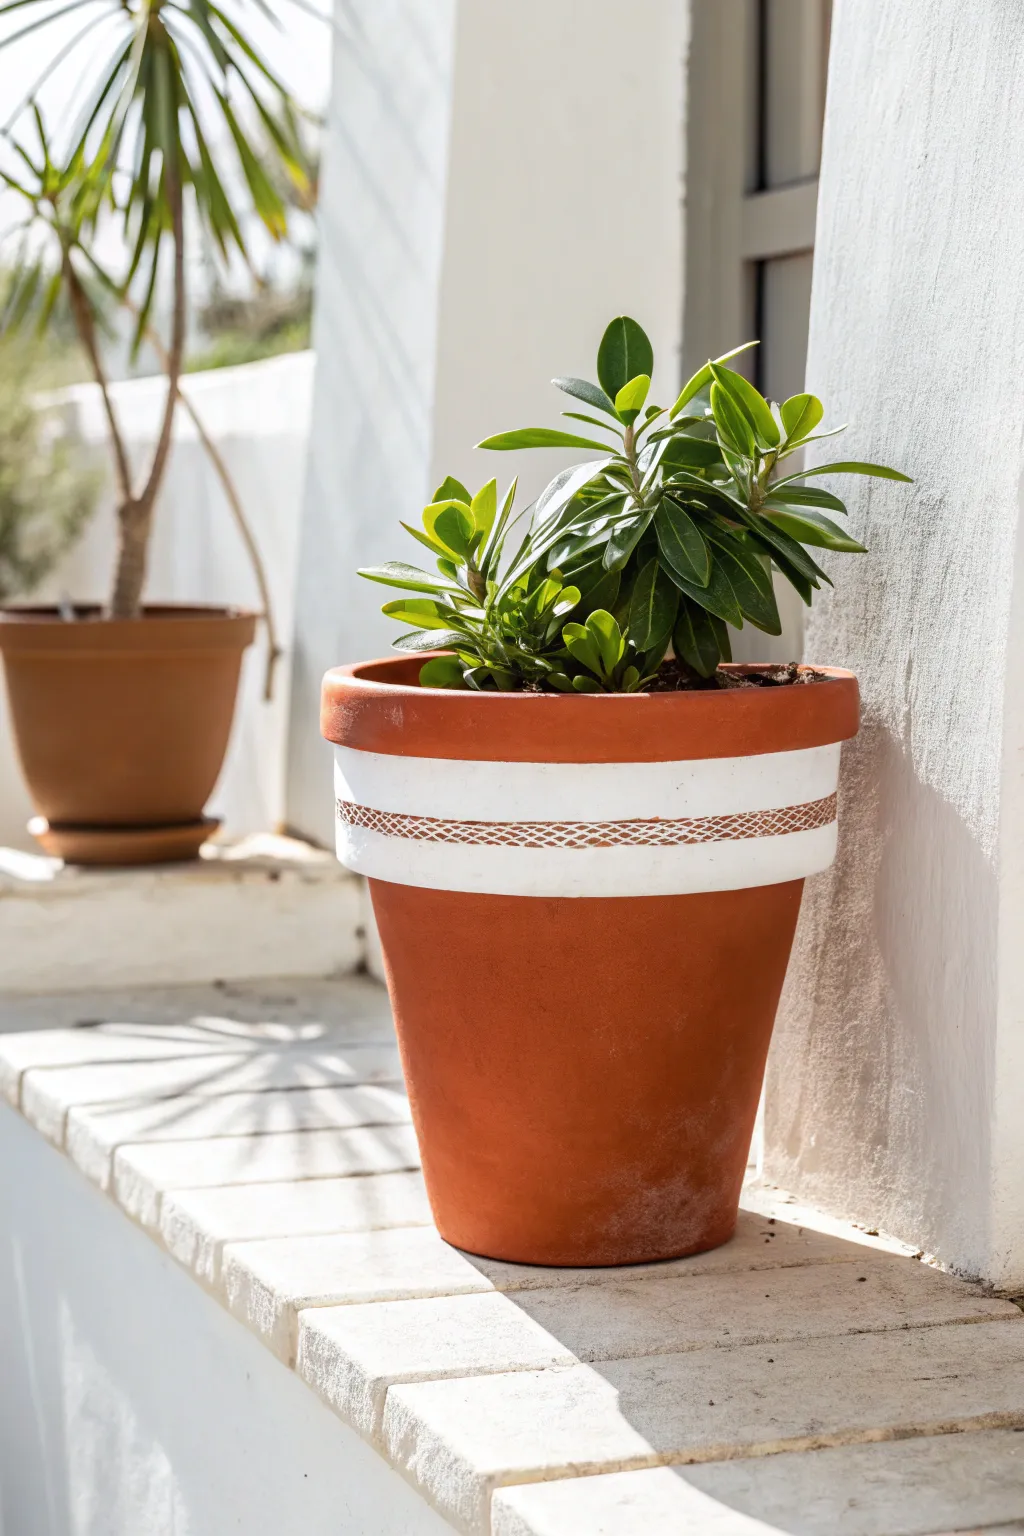
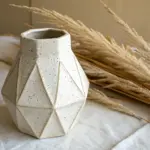
Transform a plain clay planter into a chic, textured statement piece using a simple scratching technique. This design features a crisp white band with a delicate cross-hatched pattern carved through the paint to reveal the warm terracotta underneath.
How-To Guide
Materials
- Standard terracotta pot (cleaned and dry)
- White acrylic craft paint or chalk paint
- Medium flat paintbrush
- Painter’s tape or masking tape (approx. 1-1.5 inches wide)
- Etching tool (awl, thick needle, or sturdy paperclip)
- Ruler or soft measuring tape
- Pencil
- Clear matte sealer spray (optional)
Step 1: Preparation and Painting
-
Surface Prep:
Ensure your terracotta pot is completely clean and free of dust or price sticker residue. If you washed it, let it dry for at least 24 hours so moisture doesn’t trap under the paint. -
Measure the Band:
Decide on the placement of your band. For the look in the photo, you want a wide band situated directly below the pot’s rim. Use a ruler to mark the top and bottom boundaries lightly with a pencil at several points around the circumference. -
Apply Tape:
Apply painter’s tape to mask off the areas above and below your pencil marks. Press the edges of the tape down firmly with your fingernail to prevent paint bleed. -
First Coat:
Using your flat brush, apply a coat of white acrylic paint between the tape lines. Don’t worry if it looks streaky; terracotta absorbs paint quickly. -
Second Coat:
Once the first layer is dry to the touch (usually 15-20 minutes), apply a second, thicker coat to ensure solid, opaque coverage. -
Wait for Semi-Dryness:
This is crucial: let the paint dry until it is no longer tacky but not cured rock-hard. Usually, about 30-45 minutes is the sweet spot for etching.
Clean Lines or Bust
If your paint bled under the tape, wait for it to dry completely, then gently scrape the excess away with a craft knife or razor blade for a perfect edge.
Step 2: Etching the Design
-
Remove Tape:
Carefully peel away the painter’s tape while the paint is still slightly pliable to keep the edges crisp. -
Mark the Pattern Area:
The visual interest comes from a central strip of texture within the white band. Visualize or lightly mark a thinner horizontal strip right through the middle of your white, painted section. -
Scratch Diagonal Lines:
Take your etching tool ( I find a sturdy metal awl works best here) and begin scratching diagonal lines just within that central strip. Apply enough pressure to scrape the white paint off and reveal the orange clay. -
Keep Spacing Consistent:
Try to keep your spacing relatively even, but don’t stress about perfection; the handmade look adds charm. -
Create the Cross-Hatch:
Go back over the diagonal lines you just made, scratching in the opposite direction to create little ‘X’ shapes or diamonds. -
Border Details:
To define the etched area, use your tool to scratch two horizontal straight lines: one bordering the top of your cross-hatch pattern and one bordering the bottom. -
Clean Up Dust:
You will generate little crumbs of dried paint. Gently blow them away or use a soft, dry brush to whisk them off the surface.
Step 3: Finishing
-
Touch Ups:
Inspect the white painted areas. If you accidentally scratched outside the lines, use a tiny detail brush and white paint to cover the mistake. -
Seal (Optional):
If this pot will live outdoors, spray the painted exterior with a matte clear sealer to protect your hard work from the elements. -
Potting:
Once fully cured, plant your greenery. A dark green leafy plant contrasts beautifully with the white band.
Try Sgraffito Style
Paint the band in black first, let dry, then paint white over it. When you scratch the design, you’ll reveal a bold black pattern instead of terracotta.
Place your new planter in a sunny spot and enjoy the custom texture you created


Easy Tape-Resist Geometric Pots
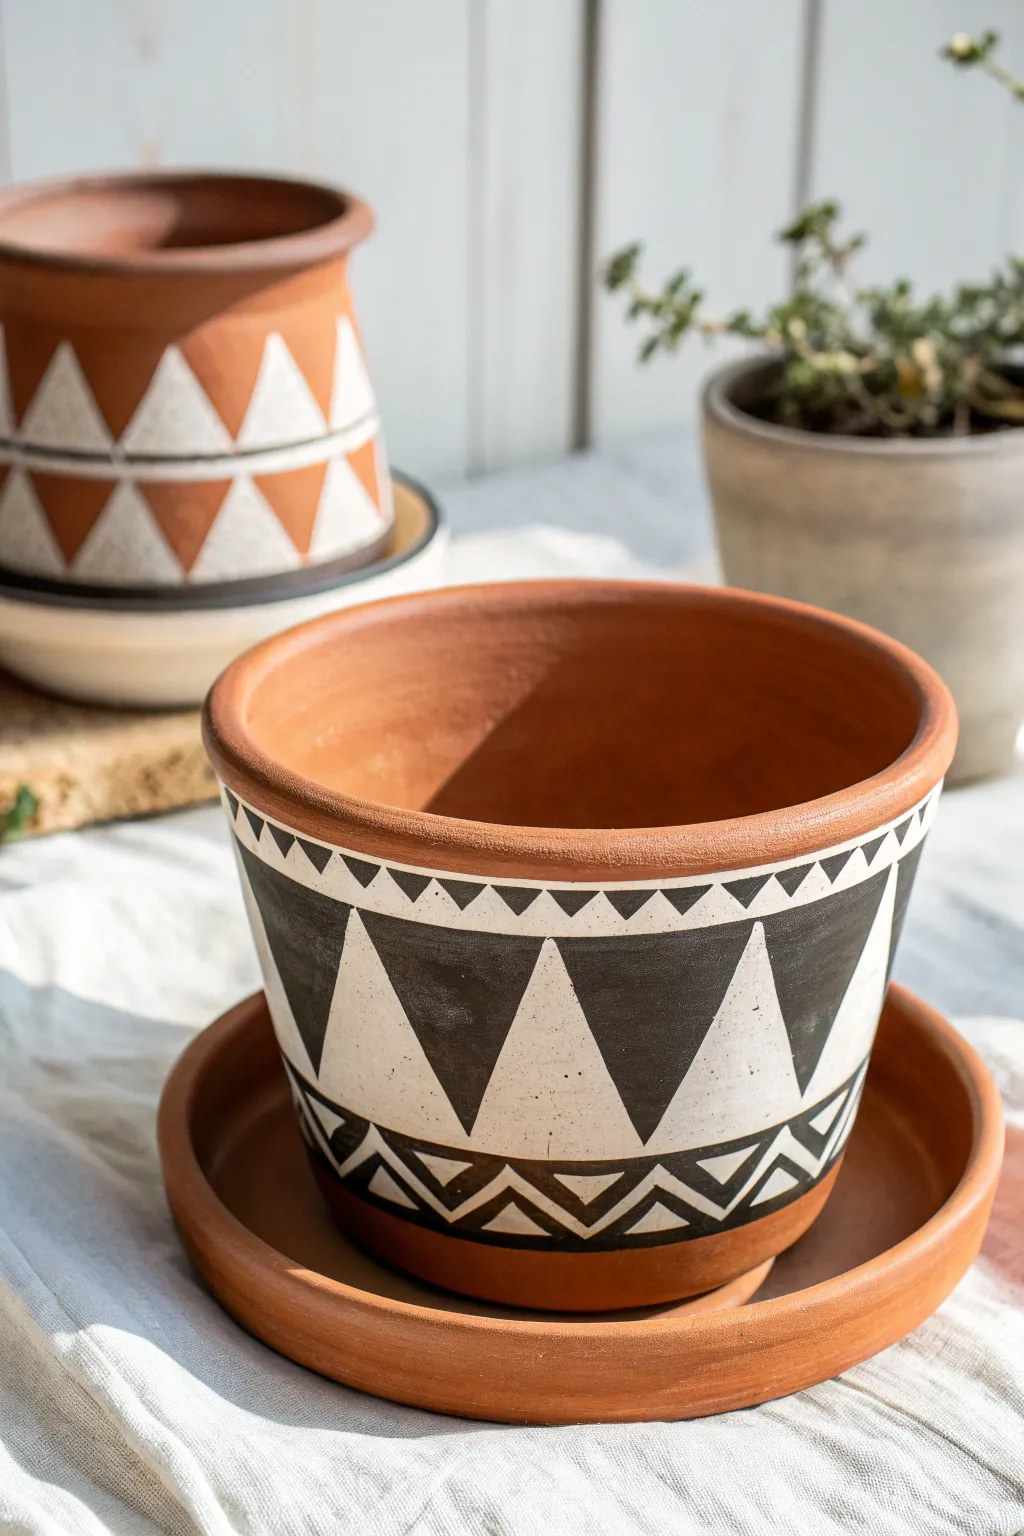
Transform a plain terracotta planter into a striking piece of decor with this high-contrast geometric design. Using simple tape-resist techniques, you’ll create crisp lines and a bold tribal-inspired pattern that looks professionally hand-painted.
Step-by-Step Guide
Materials
- Standard terracotta pot (clean and dry)
- White acrylic craft paint (matte finish)
- Black acrylic craft paint (matte finish)
- Painters tape or masking tape (various widths)
- Flat paintbrushes (medium and small)
- Scissors or craft knife
- Clear acrylic sealer spray (matte or satin)
- Pencil (optional)
- Ruler or measuring tape (optional)
Step 1: Preparation & Base Coat
-
Clean the surface:
Ensure your terracotta pot is completely free of dust and debris by wiping it down with a damp cloth and letting it dry fully. -
Tape the rim line:
Apply a strip of painter’s tape horizontally around the pot, about an inch below the rim. This will preserve the natural terracotta color at the top. -
Tape the bottom line:
Apply another strip of tape near the bottom edge of the pot to protect the lower terracotta section. -
Paint the white base:
Using a flat brush, paint the entire area between your top and bottom tape lines with white acrylic paint. -
Apply second coat:
Allow the first layer to dry (about 15-20 minutes). If the terracotta still shows through, apply a second coat of white for a solid, opaque background.
Crisp Line Secret
Before applying your black paint, brush a tiny amount of white paint over the tape edges first to seal them against bleeds.
Step 2: Creating the Main Pattern
-
Create the large triangles:
Once the white paint is bone dry, cut strips of painter’s tape to create a series of large triangles. Place them point-up on the white background. -
Seal edges:
Press down firmly on all tape edges with your fingernail or a credit card to prevent paint bleed. -
Paint the background black:
Paint over the exposed white areas with black acrylic paint. This will create the black negative space around your white triangles. -
Remove main tape:
Peel off the tape strips while the black paint is still slightly tacky to reveal crisp white triangles against the black background.
Make It Glossy
Swap the matte sealer for a high-gloss Mod Podge or varnish coat to give the pot a glazed ceramic look.
Step 3: Detailed Bands
-
Paint the top border:
Using a small detail brush, hand-paint a row of small, downward-pointing triangles directly on the white paint, just below the terracotta rim line. -
Fill the border triangles:
Carefully fill these small triangles with black paint, keeping them evenly spaced. -
Plan the bottom zigzag:
For the bottom band, use a pencil to lightly sketch a zigzag line just above the bottom terracotta section. -
Paint the lower pattern:
Follow your pencil guide with a small brush and black paint to create a continuous geometric zigzag or small triangle pattern. -
Add detail lines:
Paint thin horizontal lines above and below your main triangle field to frame the design cleanly.
Step 4: Finishing Touches
-
Remove border tape:
Carefully remove the original tape strips protecting the top rim and bottom edge to reveal the raw terracotta. -
Touch up:
Inspect your lines. If any paint bled, you can gently scrape it away with a craft knife or touch it up with a tiny bit of white paint. -
Seal the pot:
Take the pot outside or to a well-ventilated area and spray it with a clear acrylic sealer. -
Dry completely:
I usually let the sealer cure overnight before placing a plant inside to ensure the finish is durable against moisture.
Now you have a stunning, modern planter ready to house your favorite greenery


Quick Polka Dot Clay Pots
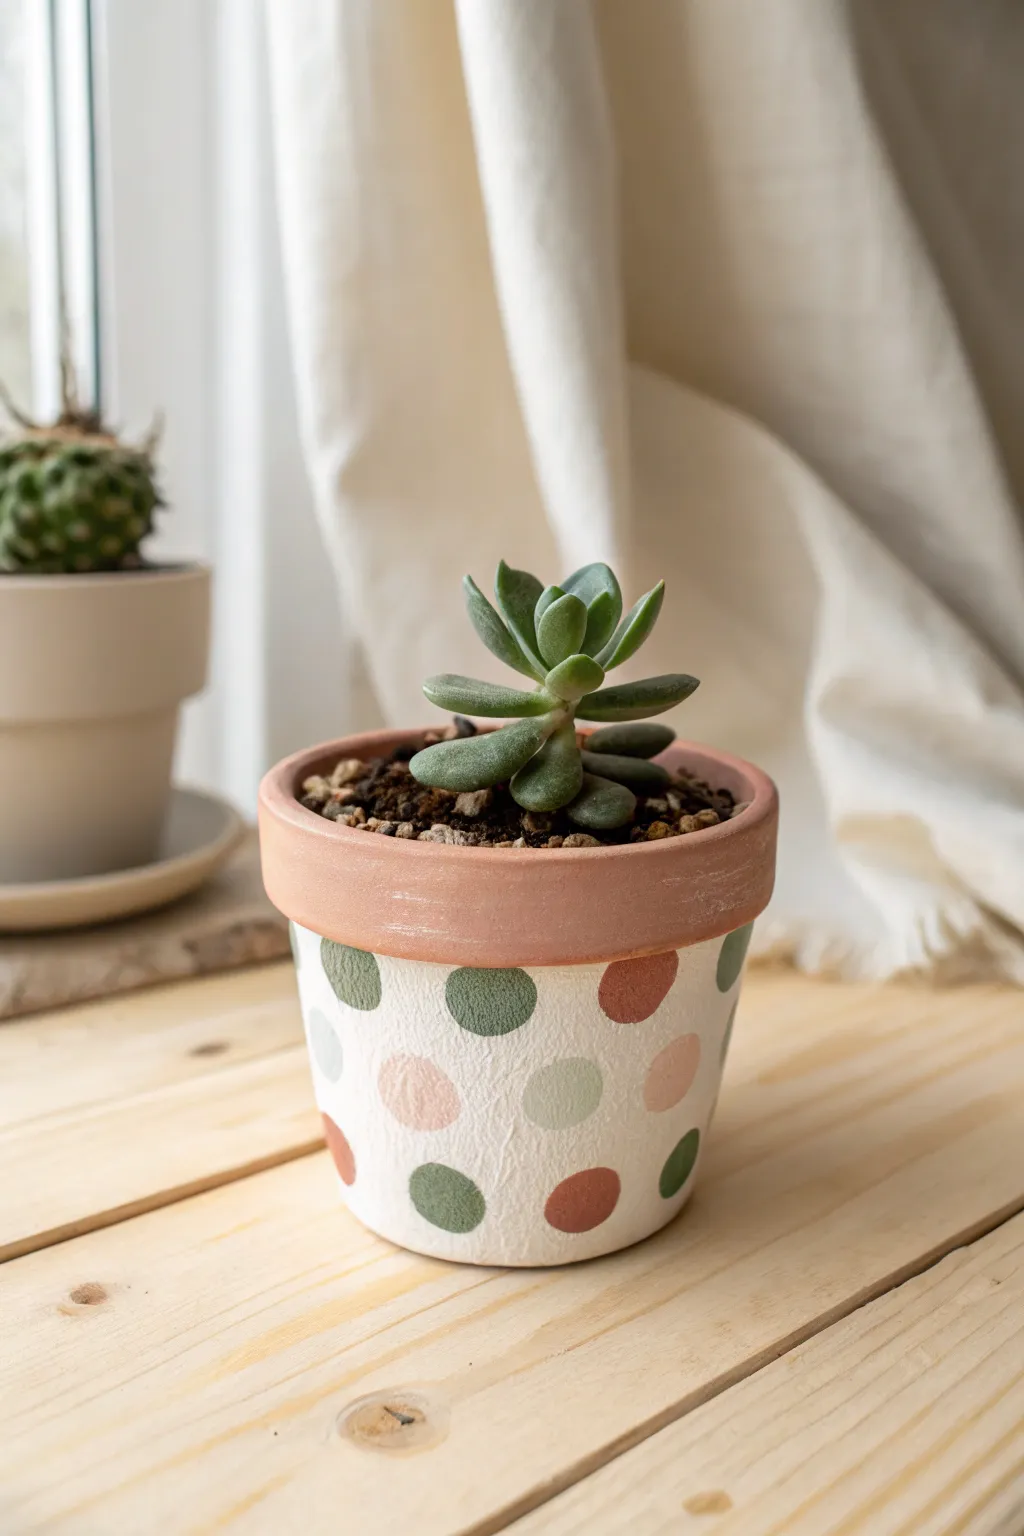
Transform a plain terracotta pot into a chic, minimalist home for your succulents with this easy polka dot design. The soft, muted palette of sage greens, dusty pinks, and earthy clays creates a modern boho look that brightens up any windowsill.
Step-by-Step Tutorial
Materials
- Small terracotta pot (approx 4-5 inches)
- White acrylic paint (priming and base coat)
- Sage green acrylic paint
- Dusty pink or peach acrylic paint
- Terracotta or rust-colored acrylic paint
- Round sponge pouncer or large round brush
- Small flat paintbrush
- Clear matte sealer spray
Step 1: Preparing the Base
-
Clean the pot:
Wipe down your terracotta pot with a damp cloth to remove any dust or manufacturing residue. Let it dry completely before starting. -
Prime the surface:
Apply a thin layer of white acrylic paint to the exterior of the pot, stopping just below the rim. This acts as a primer to help the colors pop. -
Add a second coat:
Once dry, apply a second coat of white paint to ensure solid, opaque coverage. You want a crisp white background for your dots. -
Paint the rim (optional):
Decide if you want a painted rim or a natural one. For this specific look, I prefer to leave the rim unpainted to maintain that classic terracotta warmth.
Perfect Circles Tip
Don’t have a sponge pouncer? Use the eraser end of a pencil for small dots, or a cork dipped in paint for larger, rustic circles.
Step 2: Creating the Polka Dots
-
Prepare your palette:
Pour small amounts of sage green, dusty pink, and rust paint onto a palette or paper plate. -
Load the tool:
Dip a round sponge pouncer or a round stiff-bristled brush into the sage green paint. Ensure the tool is evenly coated but not dripping. -
First color application:
Press the sage green dots onto the white surface in a random but balanced pattern. Leave plenty of white space between them. -
Clean and switch:
Clean your tool thoroughly or switch to a fresh pouncer. Load it with the dusty pink shade. -
Second color application:
Add pink dots into some of the open spaces, trying not to cluster them too close to the green ones. -
Third color application:
Finally, load your tool with the rust/terracotta color. If you don’t have this exact shade, mixing a little brown into orange works well. -
Fill the gaps:
Place the rust-colored dots in the remaining empty spots to complete the pattern. Step back occasionally to check the balance. -
Touch ups:
If any dots look uneven or transparent, carefully dab a second layer of paint over them once the first layer is dry.
Bleeding Lines?
Start with very little paint on your sponge tool. Too much paint causes slippery edges; dab excess off on paper towel before pressing.
Step 3: Finishing Touches
-
Dry time:
Allow the painted pot to sit for at least an hour until the paint is completely dry to the touch. -
Seal the deal:
Spray the entire exterior with a clear matte sealer. This protects the paint from water damage when you water your plant. -
Potting:
Fill your new planter with succulent soil and gently plant your succulent.
Place your finished pot in a sunny spot and enjoy the fresh pop of color it adds to your room

Stencil Pattern Pots for Instant Style

Transform a plain terracotta pot into a piece of custom decor with this crisp blue-and-white design that mimics classic ceramic tiles. The striking geometric patterns add instant elegance to your windowsill, and using stencils makes achieving those perfect lines surprisingly simple.
Detailed Instructions
Materials
- Clean terracotta pot (6-8 inch)
- White acrylic outdoor craft paint or chalk paint
- Navy blue acrylic craft paint
- Flat paintbrush (1-inch width)
- Stencil brush or small sponge dabber
- Geometric diamond stencil (with floral center)
- Small liner brush (size 1 or 0)
- Painter’s tape or stencil adhesive spray
- Matte clear sealant spray
Step 1: Base Preparation
-
Clean the surface:
Before starting, wipe down your terracotta pot with a damp cloth to remove any dust or oils. Let it dry completely so the paint adheres properly. -
Apply the first base coat:
Project the rim with painters tape if you want to keep the inside natural, or paint right over the edge. Using your flat brush, apply a smooth layer of white acrylic paint over the entire exterior of the pot. -
Let it dry:
Allow this first coat to dry for about 20-30 minutes. Terracotta is porous and will soak up paint quickly. -
Build opacity:
Apply a second coat of white paint. If you are using chalk paint, two coats are usually enough; standard acrylics might need a third thin layer to get that solid, opaque finish seen in the photo. Let this dry fully, preferably for an hour.
Bleed Prevention
Work with a ‘dry’ brush. Offload almost all paint onto a paper towel before hitting the stencil. Less paint equals crisper lines and zero bleeding.
Step 2: Stenciling the Diamond Motif
-
Position the stencil:
Take your geometric diamond stencil and center it on the front of the pot. Secure it firmly with painter’s tape or a light mist of stencil adhesive to prevent slipping. -
Load the dark blue paint:
Squeeze a small amount of navy blue paint onto your palette. Dip your stencil brush or sponge dabber in, then offload most of the paint onto a paper towel until the brush feels almost dry. -
Stipple the pattern:
Gently tap the brush straight up and down over the stencil openings. I find that using a vertical dabbing motion rather than brushing prevents paint from bleeding underneath the stencil edges. -
Repeat around the circumference:
Carefully lift the stencil and move it to the next position. Rotate the pot and continue applying the diamond motif until you have circled the entire vessel. Re-tape as needed to keep it straight. -
Add freehand dots:
Once the main diamonds are dry, use the handle end of a paintbrush or a dotting tool dipped in blue paint to add the small decorative dots between the diamond shapes.
Step 3: Creating the Borders
-
Select border stencil:
Use a herringbone or arrow-patterned border stencil for the top and bottom rims. If you don’t have a flexible border stencil, you can freehand this with a small liner brush. -
Stencil the top rim:
Align the border stencil just below the pot’s rim. Using the same dry-brush technique with navy paint, dab in your pattern. Make sure the arrows point in a consistent direction around the pot. -
Stencil the bottom edge:
Repeat the process for the bottom of the pot. These ‘bookend’ borders frame the central diamond design beautifully. -
Touch up details:
Inspect your work. If any blue paint bled slightly, use a small brush with white paint to clean up the edges once the blue is dry. -
Refine the lines:
Use your liner brush to strengthen any parts of the blue pattern that look too faint or disconnected, particularly the floral centers within the diamonds.
Level Up: Antique Look
After the blue paint dries, lightly sand the raised areas of the pot with fine-grit sandpaper to distress the design for a vintage, weathered tile look.
Step 4: Finishing Touches
-
Final drying time:
Allow the entire design to cure for at least 2 to 3 hours to ensure all layers are hardened. -
Prepare for sealing:
Take the pot to a well-ventilated area. Sealing is crucial if you plan to water real plants inside, as moisture seeping through the clay can bubble the paint. -
Seal the artwork:
Spray a light, even coat of matte clear acrylic sealer over the entire painted surface. This protects your hard work from water damage and sun fading.
Place your favorite houseplant inside and enjoy the fresh artisan look you created

The Complete Guide to Pottery Troubleshooting
Uncover the most common ceramic mistakes—from cracking clay to failed glazes—and learn how to fix them fast.
Decoupage Napkin Flower Pots
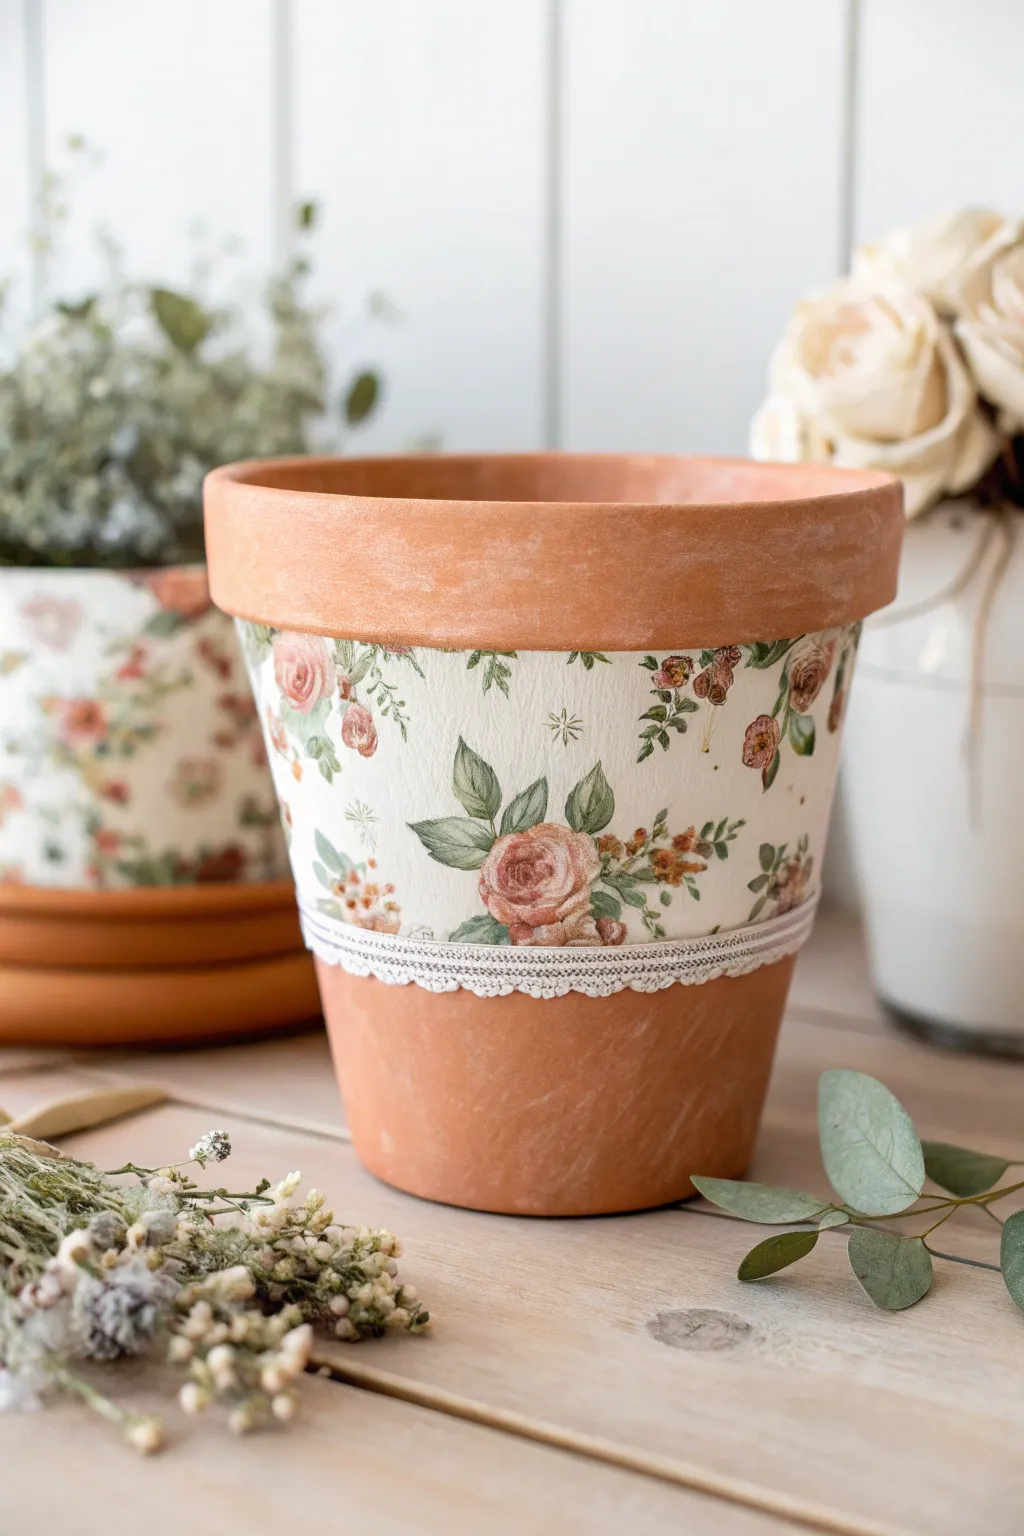
Transform a standard clay pot into a charming, cottage-core planter using delicate floral napkins and a touch of lace. This decoupage technique creates a painted-on effect that looks beautifully weathered and perfect for showcasing your favorite blooms.
Step-by-Step Tutorial
Materials
- Standard terracotta pot (medium size)
- White or ivory acrylic paint
- Paper napkin with vintage rose/floral pattern
- Mod Podge (Matte or Satin finish)
- Flat paintbrush (medium width)
- Small detail brush or foam pouncer
- Scissors
- White cotton lace ribbon (approx. 1/2 inch wide)
- Hot glue gun and glue sticks
- Clear acrylic sealer spray (Matte)
- Painter’s tape or masking tape
- Sandpaper (fine grit, optional)
Step 1: Preparation & Base Coat
-
Clean surface:
Begin by wiping the terracotta pot with a damp cloth to remove any dust or loose clay particles. Let it dry completely before starting. -
Tape the rim:
Apply painter’s tape just under the thick rim of the pot. Ensure the tape line is straight and firmly pressed down to prevent paint bleeding. -
Tape the base:
Repeat the taping process near the bottom of the pot, leaving about 2-3 inches of exposed terracotta at the base. This creates the window where your design will go. -
Apply base paint layer:
Using your flat brush, paint the area between the two tape lines with ivory or white acrylic paint. This light background is crucial for napkin decoupage as patterns show up best on white. -
Let dry and recoat:
Allow the first coat to dry for about 15-20 minutes. If the terracotta color is still showing through strongly, apply a second coat for opaque coverage. -
Remove tape:
Carefully peel away the painter’s tape while the second coat is still slightly tacky to ensure crisp, clean lines.
Wrinkle Rescue
Don’t panic if wrinkles appear while smoothing the napkin! They add to the vintage, textured charm. Just press them down gently with your brush and sealer.
Step 2: Decoupage Application
-
Prepare the napkin:
Take your floral napkin and separate the plies. You only want the very top, single printed layer. Discard the white backing layers. -
Cut the design:
Cut a strip of the napkin pattern that fits the height of your painted white section. I prefer tearing the edges slightly by hand rather than cutting perfectly straight for a softer, more blended look, though cutting works too. -
Apply decoupage medium:
Brush a thin, even layer of Mod Podge onto a small section of the painted area on the pot. Don’t cover the whole pot yet, just work 2-3 inches at a time. -
Place the napkin:
Gently press the napkin onto the wet medium. Start from the center and smooth outwards very lightly with your finger to remove air bubbles. -
Continue wrapping:
Apply more Mod Podge to the next section and continue laying down the napkin strip until the painted band is covered. If your napkin isn’t long enough, carefully match the pattern with a second piece. -
Seal the design:
Once the napkin is positioned, dip your brush in Mod Podge and gently brush over the top of the napkin. Use light strokes to avoid tearing the wet paper. -
Trim excess:
If any napkin overlaps the unpainted terracotta areas, wait until it is partly dry and gently sand it off or trim carefully with small scissors.
Make it Antique
For an aged look, mix a tiny drop of brown paint into your top coat of Mod Podge, or lightly sponge brown ink over the dried napkin edges before sealing.
Step 3: Finishing Touches
-
Dry thoroughly:
Let the entire pot sit for at least an hour until the decoupage surface is completely dry and hard to the touch. -
Measure lace:
Wrap your cotton lace ribbon around the pot to measure the length needed, adding a half-inch for overlapping. -
Attaching lace:
Apply a very thin line of hot glue directly over the bottom paint line where the white meets the terracotta. Carefully press the lace into the glue to hide the transition. -
Secure the ends:
Ensure the ends of the lace overlap neatly at the back of the pot for a clean finish. -
Final seal:
Take the pot outdoors and spray the entire surface (including the rim and base) with a matte acrylic sealer. -
Waterproofing tip:
If you plan to plant directly inside, seal the inside of the pot with a brush-on waterproof sealer to prevent moisture from bubbling your exterior design.
Enjoy styling your new vintage-inspired pot with some greenery or dried flowers for a cozy home accent
Rainbow Ombre Clay Pots
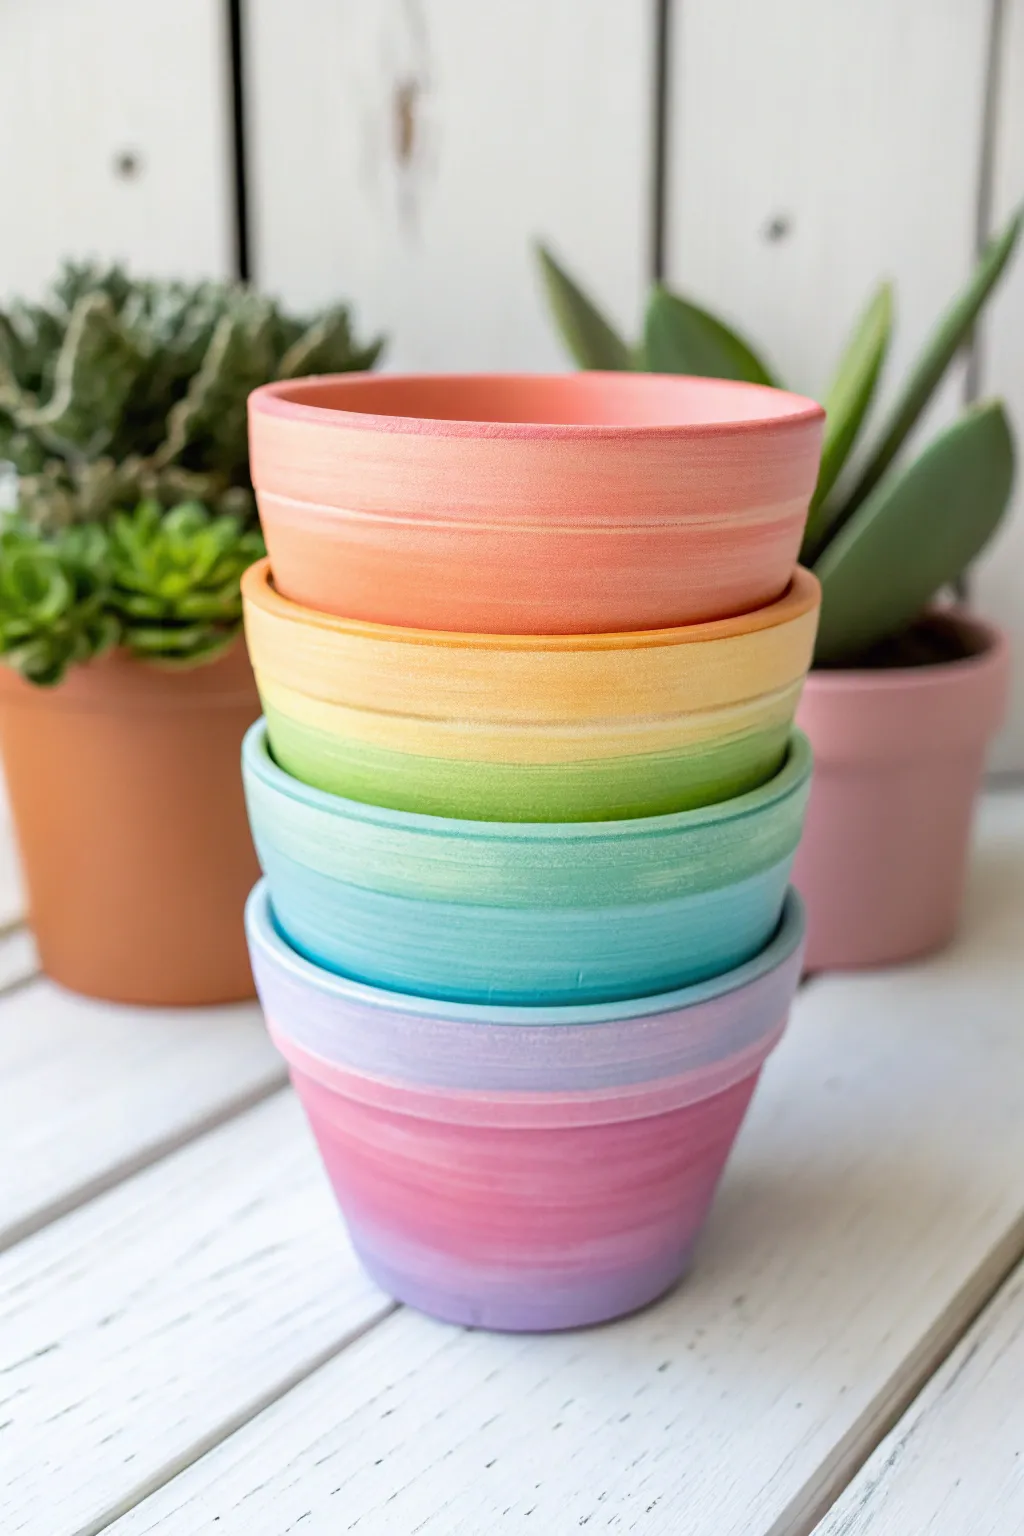
Transform plain terra cotta into a stunning stack of sunset-inspired bowls with this gradient painting technique. The soft blending of pastel hues creates an elegant ombre effect that looks beautiful with or without plants.
Step-by-Step
Materials
- 4 Small terra cotta pots (clean and dry)
- White acrylic paint (priming base)
- Acrylic paints: Peach, Yellow, Mint/Teal, Lavender, Pink, Lime Green
- Medium flat paintbrush
- Small blending sponge or soft blending brush
- Paper plate or palette
- Cup of water and paper towels
- Matte sealant spray (optional)
Step 1: Base Preparation
-
Clean the surface:
Before starting, ensure your terra cotta pots are free of dust or sticker residue. Wipe them down with a damp cloth and let them dry completely so the paint adheres smoothly. -
Prime with white:
Apply a thin, even coat of white acrylic paint to the exterior of all four pots. This neutralizes the orange clay color and ensures your pastel gradients pop. Let this coat dry fully, about 15-20 minutes.
Paint drying too fast?
If the acrylic dries before you can blend, mix a tiny drop of ‘slow drying medium’ or water into your paint blob before applying it to the pot.
Step 2: Painting the Peach Pot
-
Apply the top color:
For the top pot, brush a band of peach paint around the upper rim. Don’t worry about a perfectly straight line at the bottom edge. -
Apply the bottom color:
While the top is still wet, paint a lighter peach or cream tone around the bottom half of the pot. -
Create the blend:
Where the two colors meet in the middle, use a clean, slightly damp brush or sponge to gently feather the wet paints together horizontally until the transition looks soft and seamless.
Step 3: Painting the Yellow-Green Pot
-
Start with yellow:
On the second pot, apply a bright, sunny yellow to the top rim section. -
Add fresh lime:
Paint a lime green hue around the bottom section. I find that mixing a tiny bit of yellow into the green helps bridge the colors more naturally. -
Smooth the transition:
Using horizontal strokes, blend the yellow down into the green while both are wet to create a citrusy gradient.
Smoother Blends
Use a slightly damp makeup sponge instead of a brush for the middle section. Dab gently along the seam line for an airbrushed, flawless transition.
Step 4: Painting the Teal Pot
-
Lay down the mint:
For the third pot, coat the upper rim area in a soft mint green paint. -
Introduce the blue:
Paint a deeper teal or sky blue on the bottom half. -
Feather the middle:
Work quickly to smudge the line between mint and blue, keeping your brush strokes moving sideways to mimic the natural lines of the pot.
Step 5: Painting the Purple-Pink Pot
-
Apply lavender:
On the final pot, paint a soft lavender band around the top rim. -
Add the pink base:
Cover the bottom section with a medium pink shade. -
Perfect the gradient:
Blend the pink upward into the purple. This combination can get muddy if overworked, so stop blending as soon as the transition looks smooth.
Step 6: Finishing Touches
-
Dry completely:
Allow all pots to dry for at least one hour. The acrylics may look slightly different when fully set. -
Seal the work:
If you plan to use these outdoors or with real plants that need watering, spray the painted exteriors with a clear matte sealant to protect your handiwork. -
Check the rims:
For a polished look, you can paint just the very top lip of each pot a solid color or leave it white to unify the stack.
Enjoy your customized tower of color anywhere in your home or garden


What Really Happens Inside the Kiln
Learn how time and temperature work together inside the kiln to transform clay into durable ceramic.
Stacked Clay Pot People Planters

Transform humble garden pots into a charming, smiling garden companion with this stacked planter project. The clever arrangement creates a whimsical figure whose leafy “hair” spills down the side, perfect for adding personality to a porch or patio step.
How-To Guide
Materials
- 3 standard terracotta pots (approx. 4-6 inches diam) for the body
- 1 slightly smaller terracotta pot for the head
- Black outdoor acrylic paint (or paint pen)
- Pink/Rosy outdoor acrylic paint
- Small round paintbrush
- Fine detail paintbrush
- Strong outdoor adhesive (E6000 or similar)
- Potting soil
- Trailing plant (like Creeping Jenny, String of Hearts, or Ivy)
Step 1: Planning and Prepping
-
Clean Your Canvases:
Before creating your character, ensure all pots are clean and completely dry. If you’re reusing old pots, scrub away any dirt or salt deposits so the paint adheres properly. -
Size Up:
Arrange your three body pots upside down to test the stack. They should be roughly the same size, or slightly graduated. Place the ‘head’ pot right-side up on top to check proportions. -
Body Assembly:
Apply a ring of strong outdoor adhesive to the bottom rim (which is now the top) of the first upside-down base pot. -
Stack the Middle:
Press the second upside-down pot firmly onto the adhesive ring of the base pot. Ensure it is centered. -
Complete the Torso:
Glue the third upside-down pot onto the second one. You now have a three-pot tower that forms the body/dress of your figure. -
Secure the Head:
Apply glue to the flat bottom of your ‘head’ pot and center it on the flat bottom of the top body pot. Let the entire structure cure according to the glue manufacturer’s instructions—usually overnight is best.
Step 2: Painting the Personality
-
Button Up:
Using black paint and a small round brush, add the decorative ‘buttons.’ Paint a vertical line of small black dots down the front of the middle and top body pots. -
Dress Hem Detail:
On the very bottom rim of the base pot, paint a horizontal row of small black dots around the circumference to create a hem pattern. -
Hair Guidelines:
Moving to the head pot, visualize where the hairline should be. Using your fine detail brush and black paint, create simple, straight vertical strokes along the upper rim to suggest bangs. -
The Eyes:
In the center of the face area, paint two small, solid black circles for eyes. Place them wide enough apart to look friendly. -
The Nose:
Just below and between the eyes, add a tiny black dot for a button nose. -
A Happy Smile:
Paint a simple, thin upward-curved line for the mouth. Adding tiny tick marks at the ends of the smile gives it a sweet, stitched look. -
Rosy Cheeks:
Dip a round brush or sponge dabber into the pink paint. Blot it on a paper towel first so it’s semi-dry, then lightly stamp rosy circles on the cheeks outside the smile lines.
Clean Lines
For the buttons and eyes, dipping the non-brush end of a paintbrush into paint and stamping it creates perfect circles every time.
Step 3: The Final Flourish
-
Planting Prep:
Once the paint is fully dry, fill the top head pot with quality potting soil. Do not overpack it. -
Adding the ‘Hair’:
Transplant your trailing plant into the soil. Position the vines so they cascade down one side, creating the look of long, flowing hair. -
Placement:
Set your new friend on a step or ledge where the trailing plant has room to grow downward without obstruction.
Accessorize It
Add a ribbon tied around the ‘neck’ area where the head meets the body to hide any visible glue and add color.
Now you have a cheerful garden guardian ready to welcome guests with a smile and a fabulous green hairstyle
Friendly Frog Pot Planter
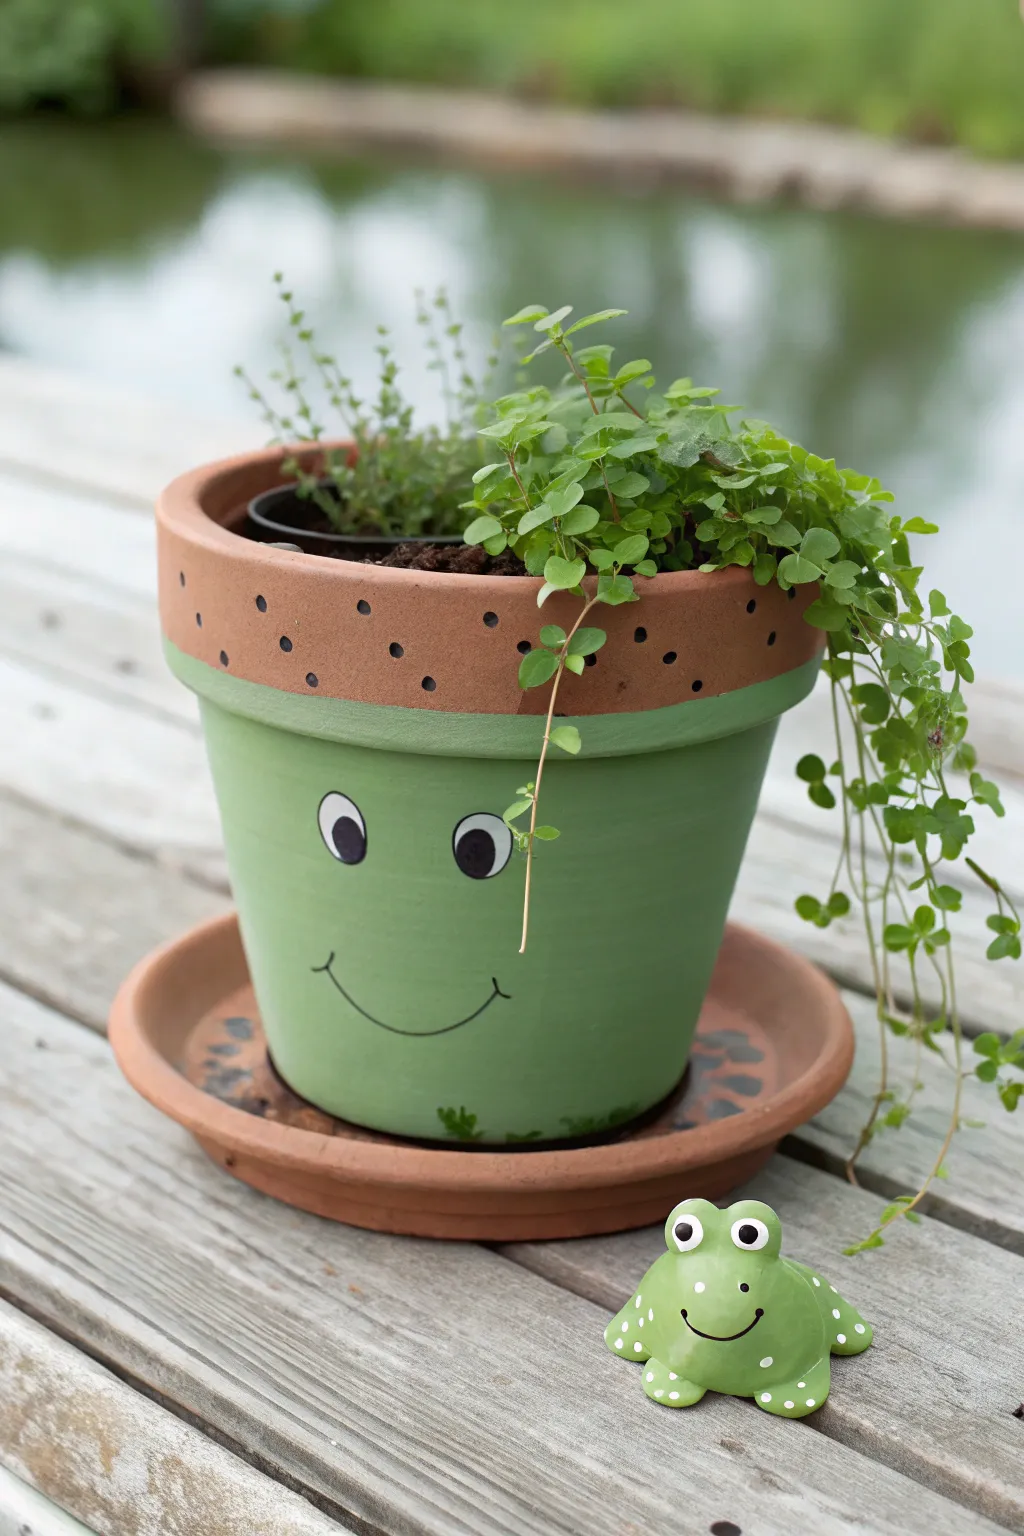
Transform a plain terracotta pot into a charming amphibious friend with just a bit of paint and creativity. This adorable frog planter features big bright eyes and a happy grin, making it the perfect home for trailing plants that mimic wild green hair.
How-To Guide
Materials
- Terracotta pot (standard 6-8 inch size)
- Matching terracotta saucer
- Acrylic craft paint: Light Green, Black, White
- Foam sponge brush (1-inch width)
- Round detail brushes (small and medium)
- Black permanent marker (fine tip)
- Pencil for sketching
- Clear acrylic sealer spray (matte or satin)
- Water bin and paper towels
- Trailing plant (like Creeping Jenny or Ivy)
Step 1: Base Prep
-
Clean the surface:
Ensure your terracotta pot is completely clean and dry. Wipe away any dust with a damp cloth and let it air dry so the paint adheres properly. -
Tape the rim:
Apply a strip of painter’s tape just below the rim of the pot. We want to keep the rim natural terracotta for a nice contrast, so mask off the main body area perfectly evenly.
Clean Lines
To get perfectly round dots on the rim without a brush, dip a Q-tip or the eraser end of a pencil into the black paint and stamp it onto the clay.
Step 2: Painting the Frog Body
-
First coat of green:
Using a foam brush, apply a coat of light green acrylic paint to the main body of the pot below the rim. Don’t worry if it looks streaky; terracotta absorbs a lot of paint initially. -
Let it dry:
Allow the first coat to dry completely for about 15-20 minutes. It should feel dry to the touch before proceeding. -
Second coat:
Apply a second layer of green paint for solid, opaque coverage. If your paint is thin, a third coat might be necessary to get that smooth froggy skin look. -
Remove the tape:
Carefully peel off the painter’s tape while the paint is still slightly tacky to get a crisp, clean line between the green body and the natural rim.
Creative Twist
Make a whole pond family! Use different sized pots for different frogs, or create a ‘fly’ charm from wire and beads to hang near the frog’s mouth.
Step 3: Adding Details
-
Sketch the face:
Lightly sketch two large oval eyes and a wide, curved smile using a pencil. I find it helpful to look at the pot from eye level to ensure the face is centered. -
Paint the eye whites:
Using a medium round brush, fill in the white ovals for the eyes. This will likely need two coats to clearly stand out against the green background. -
Outline the eyes:
Once the white is dry, use a fine detail brush or a black paint pen to draw a thin outline around the white ovals. -
Add pupils:
Paint large black circles inside the white ovals for the pupils. Placing them slightly off-center or looking sideways gives the frog a goofy, friendly expression. -
Paint the smile:
Using a very thin brush and black paint, trace over your pencil line to create the wide smile. Add small perpendicular tick marks at the ends of the smile for cheeks. -
Rim spots:
Take a small round brush or the end of a paintbrush handle dipped in black paint. Dot random spots along the unpainted terracotta rim to add texture and character. -
Saucer details:
Don’t forget the saucer! Add a few black spots to the inside or rim of the terracotta saucer to tie the whole look together.
Step 4: Finishing Touches
-
Seal the pot:
Once all paint is completely dry (wait at least an hour), spray the entire pot—inside and out—with a clear acrylic sealer. This protects the paint from water damage when you water your plant. -
Planting:
Fill the pot with potting soil and your chosen plant. A trailing plant works best as it spills over the side, looking like funny green hair for your frog friend.
Now you have a cheerful garden guardian ready to brighten up your patio or windowsill

TRACK YOUR CERAMIC JOURNEY
Capture glaze tests, firing details, and creative progress—all in one simple printable. Make your projects easier to repeat and improve.
Owl Face Clay Pot Planters
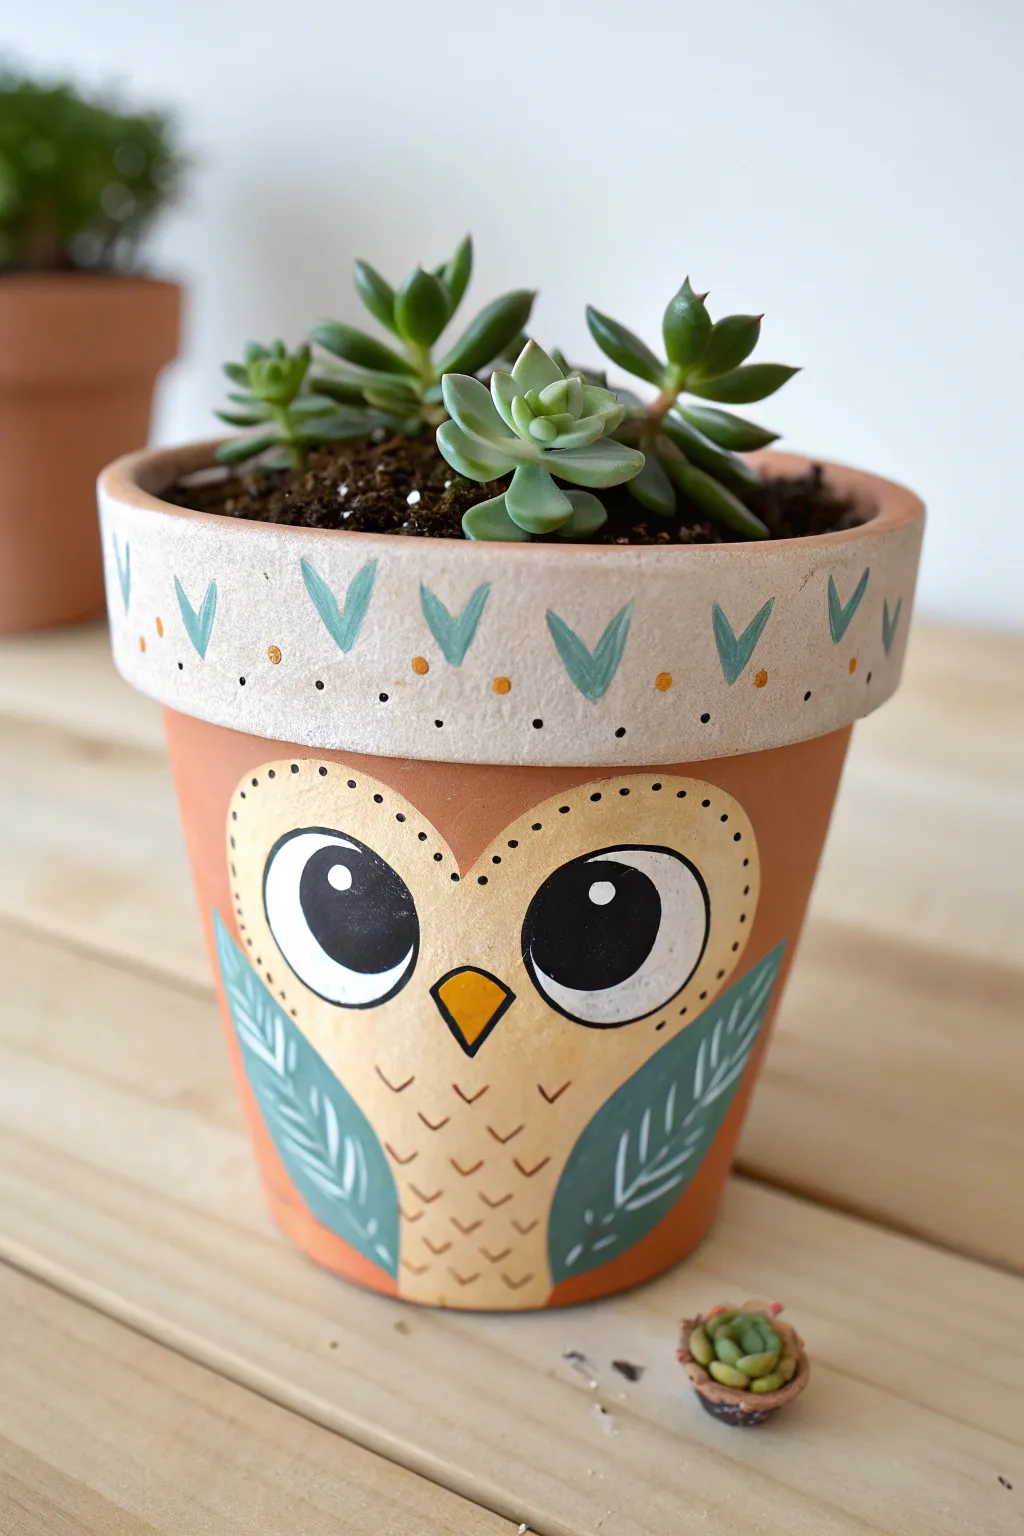
Transform a plain terracotta vessel into a charming woodland character with this adorable owl face design. Featuring a distinct heart-shaped face, leafy wings, and a decorative rim, this planter brings a wise and whimsical touch to your succulent collection.
Step-by-Step Guide
Materials
- Standard terracotta pot (4-inch size recommended)
- Acrylic paints (beige/tan, white, black, sage green/blue, golden yellow)
- Small and medium flat paintbrushes
- Fine detail paintbrush or liner brush
- Dotting tool or toothpick
- Pencil
- Clear matte acrylic sealer (spray or brush-on)
- Succulent soil and small succulent plants
Step 1: Base Preparation
-
Clean the surface:
Before starting, wipe down your terracotta pot with a damp cloth to remove any dust or oils. Let it dry completely so the paint adheres properly. -
Sketch the face:
Using a pencil, lightly sketch a large heart shape on the front of the pot. The top curves of the heart should dip slightly below the rim, and the bottom point should reach near the base. -
Sketch the wings:
Draw two elongated leaf shapes on either side of the heart to represent the owl’s folded wings. These should curve slightly upward towards the outside.
Step 2: Painting the Face
-
Fill in the face shape:
Load a medium flat brush with beige or tan acrylic paint. Fill in the entire heart shape you sketched earlier. You may need two coats for opaque coverage, letting the first coat dry for about 10 minutes. -
Add the eye circles:
Once the beige base is dry, use a pencil to lightly draw two large circles inside the upper lobes of the heart for the eyes. -
Paint the eye whites:
Paint these large circles with white acrylic paint. It’s crucial to let this dry thoroughly before adding the pupils. -
Create the pupils:
Paint large black circles inside the white ones, leaving a thick white ring visible around the edges. I find painting from the center outward helps keep the circle round. -
Add eye highlights:
Dip the handle end of a brush or a large dotting tool into white paint. Place a single white dot in the upper right quadrant of each black pupil to bring the owl to life. -
Paint the beak:
Between the eyes, paint a small, inverted triangle using golden yellow paint. Outline it thinly with black if you want extra definition.
Paint Consistency Pro-Tip
If your acrylic paint is too thick to make fine details like the breast feathers, mix in a singular drop of water. This helps the paint flow smoothly off the liner brush for crisp lines.
Step 3: Wings and Details
-
Paint the wings:
Fill in the leaf-shaped wings on the sides using a sage green or muted blue color. Ensure the paint extends to the side edges of the pot. -
Add wing details:
Once the green is dry, use a fine liner brush and white paint to add a central vein and small diagonal lines resembling feathers or leaf veins on each wing. -
Detail the feathers:
Switch to a fine detail brush with a diluted light brown or dark beige paint. Paint small ‘v’ shapes or tick marks on the beige chest area to simulate breast feathers. -
Outline the face:
Using the same brush and color (or black for higher contrast), carefully add dash marks around the upper edge of the heart shape to define the face mask.
Level Up: Texture
Mix a pinch of baking soda into the beige paint for the owl’s face. This creates a slightly fluffy, textured matte finish that mimics the feel of downy feathers.
Step 4: Rim Decoration
-
Base coat the rim:
Paint the entire rim of the pot with a very light grey or off-white color. This separates the ‘hat’ area from the orange clay body. -
Paint geometric leaves:
Using the sage green/blue color from the wings, paint small ‘V’ shapes or simple leaf shapes spaced evenly around the rim. -
Add decorative points:
Between or below each green ‘V’ shape, use a dotting tool or the back of a paintbrush to place small golden yellow dots. -
Final rim details:
Add tiny black dots along the very bottom edge of the rim using a toothpick or fine tip pen for a finished graphical look.
Step 5: Finishing Up
-
Seal the artwork:
Once all paint is completely dry (wait at least an hour), apply a clear matte acrylic sealer. This protects the paint from water damage when you water your plants. -
Plant:
Fill your new owl friend with succulent soil and arrange your succulents on top so they look like a spiky green hairdo.
Your wise little owl is now ready to perch on your windowsill and keep watch over your garden
Clay Pots With Air-Dry Clay Add-Ons
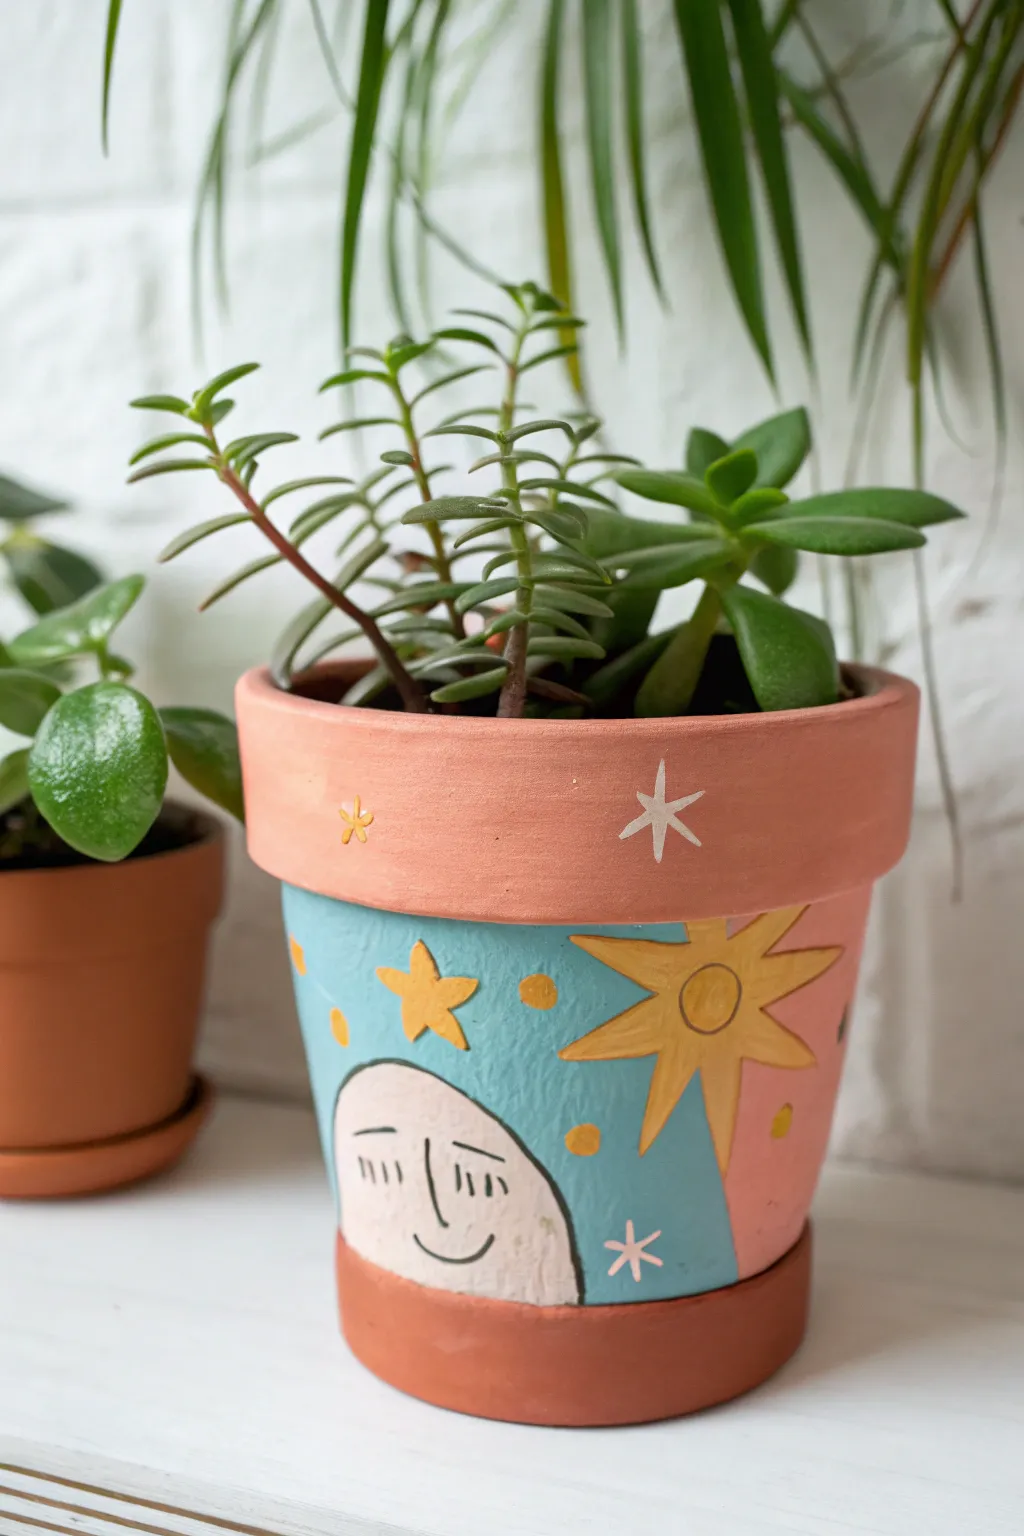
Add dimension to a standard terra cotta pot with these charming celestial reliefs. Using air-dry clay creates a tactile, raised surface for the smiling moon phase and stars, transforming a simple planter into a piece of playful art.
How-To Guide
Materials
- Terra cotta pot (4-6 inch)
- Air-dry clay (white)
- Acrylic craft paints (light blue, dusty pink, yellow, black, white)
- Flat paintbrush
- Fine detail paintbrush
- Rolling pin or smooth jar
- Craft knife or toothpick
- Strong craft glue (e.g., E6000) or super glue
- Water cup
- Clear matte sealer (optional)
Step 1: Prepping the Base
-
Clean the pot:
Wipe down your terra cotta pot with a damp cloth to remove any dust or sticker residue. Let it dry completely. -
Paint the background split:
Visualize a diagonal line splitting the pot. Paint the left side with a light blue acrylic paint and the right side with a dusty pink. You’ll likely need two coats for opaque coverage. -
Refine the line:
Use a steady hand or a piece of painter’s tape to ensure the meeting point between the pink and blue is relatively neat, though the clay add-ons will distract from minor wobbles. -
Color blocking the rim:
Paint the wide rim of the pot with a dusty terracotta or coral pink shade that complements the main body colors. Let all paint dry fully.
Adhesion Issues?
If clay pieces pop off the curved surface, try sanding the back of the dry clay slightly to rough it up, then use E6000 glue and hold in place with painters tape while drying.
Step 2: Sculpting Clay Elements
-
Roll out the clay:
Take a small ball of air-dry clay and roll it out on a clean surface until it is about 1/8 inch thick. Uniform thickness helps it stick better later. -
Cut the moon shape:
Using a craft knife or a toothpick, cut out a semi-circle shape. It should be sized to fit comfortably on the blue section of your pot. -
Cut the star shapes:
Cut out a large starburst shape (for the sun/star on the right) and several smaller 5-point stars. Don’t worry about perfection; a handmade look adds character here. -
Create small dots:
Roll tiny bits of clay between your fingers to create small spheres, then flatten them slightly to make raised polka dots. -
Test fit the pieces:
Gently hold your wet clay pieces against the curve of the pot to shape them slightly. This ensures they won’t dry perfectly flat and fail to adhere to the curved surface. -
Dry the clay:
Set all your clay pieces aside on a flat surface to dry completely according to the package instructions (usually 24 hours).
Step 3: Assembly and Detail
-
Glue the main elements:
Once the clay is hard, apply strong craft glue to the back of the moon and press it firmly onto the blue section at the bottom. Glue the large starburst near the color split line. -
Add scattered details:
Glue the smaller stars and dots randomly around the large elements to fill the negative space. -
Base coat the clay:
Paint the moon shape with a creamy white or very light beige. Paint the large starburst, small stars, and dots with a sunny yellow. -
Paint the moon face:
Using your finest detail brush and black paint, carefully draw the sleeping eyes, eyebrows, nose, and smiling mouth onto the moon relief. -
Outline the sun:
Use a darker yellow or thin ochre line to add a circle in the center of the large sunburst and outline the rays slightly for definition. -
Add rim details:
Using a small brush and white paint, add simple 6-point star/sparkle shapes directly onto the painted rim of the pot. Include a small yellow star if desired. -
Final sparkly touches:
Add a few painted white sparkles on the blue background near the moon to tie everything together. I find this creates a nice balance between the 3D and 2D elements. -
Seal the project:
If this pot will be near moisture, apply a coat of clear matte sealer over the entire exterior to protect your hard work.
Pro Tip: Surface Prep
Before gluing air-dry clay to painted terra cotta, scuff the paint slightly with sandpaper where the glue will go. This creates a much stronger bond than gluing onto smooth acrylic.
Pop in a succulent or small leafy plant to complete your celestial creation