Whenever I need a quick, feel-good project, I reach for cute clay cat designs because they’re basically built for simple shapes and big personality. These ideas work beautifully in polymer clay or air dry clay, and you can keep them super beginner-friendly or add tiny details as you go.
Classic Clay Cat Loaf Figurine
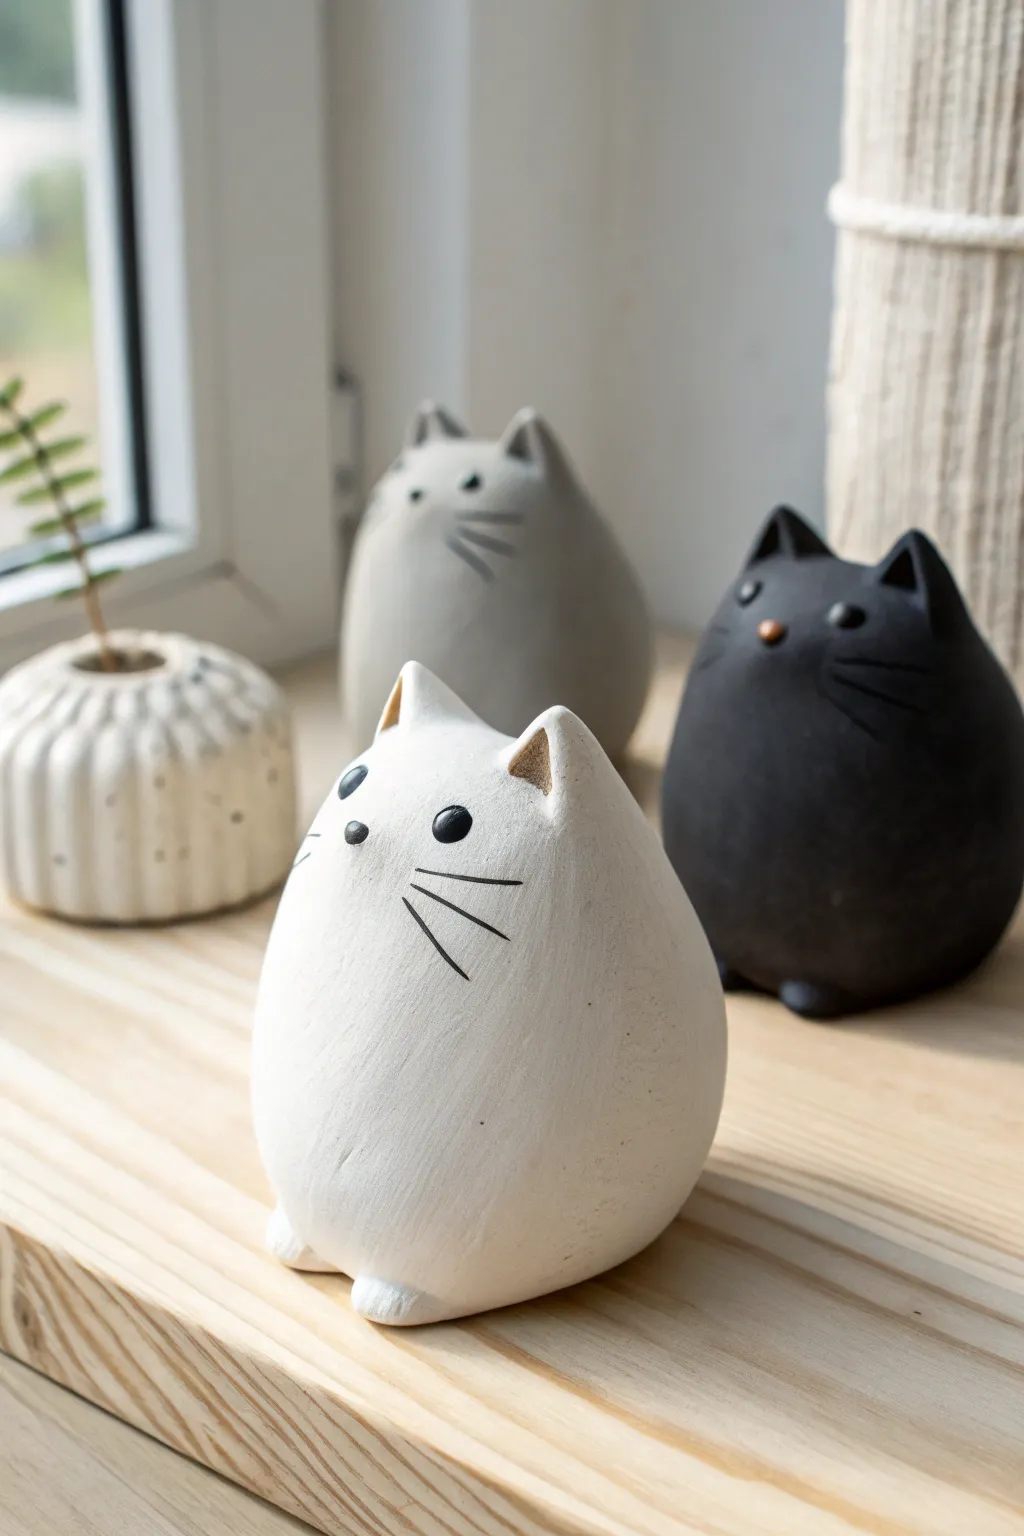
These charmingly round cat figurines capture the essence of a sitting cat with clean lines and simple geometry. Their smooth, pebble-like shape and understated facial features make them a delightful, modern addition to any shelf or windowsill.
Detailed Instructions
Materials
- White air-dry clay or polymer clay
- Acrylic paints (White, Black, Grey, Terracotta)
- Fine-grit sandpaper
- Small bowl of water
- Detail paintbrush (00 or 000 size)
- Flat paintbrush (medium size)
- Sculpting tool with a small spoon or ball end
- Rolling pin (optional)
- Matte clear varnish
Step 1: Shaping the Base Form
-
Condition the clay:
Begin by kneading a fist-sized ball of clay until it is warm and pliable. This prevents cracks from forming later in the drying process. -
Create the main body:
Roll the clay into a smooth sphere, then gently press it onto your work surface to flatten the bottom so it sits securely. -
Refine the egg shape:
Use your palms to gently taper the top half of the sphere, creating a subtle egg-like silhouette that is wider at the base and slightly narrower near the ‘head’ area. -
Smooth the surface:
Dip your finger in a little water and run it over the entire form to erase any fingerprints or bumps. Following this, I like to check the silhouette from all angles to ensure it’s symmetrical. -
Pinch the ears:
At the very top of the tapered end, pinch two small triangles of clay upwards to form the ears. Keep them close together and relatively small to maintain the round aesthetic. -
Define the ear hollows:
Use the small spoon tool or the back of a paintbrush to gently press into the front of each ear triangle, creating a shallow indentation for the inner ear. -
Create the feet:
Roll two very small, pea-sized balls of clay. Flatten them slightly and press them firmly against the bottom front edge of the body to create tiny paws peeking out. -
Blend the seams:
Use a sculpting tool or your wet finger to blend the clay from the feet into the main body so they look attached, not just stuck on.
Step 2: Refining and Drying
-
Final smoothing:
give the entire piece one last smooth pass with a little water. If you want the tail detail shown on the grey cat (implied), you can score a shallow curved line on the back, though smooth bodies are also cute. -
Allow to dry:
Let the figurine dry completely according to your clay package instructions. For air-dry clay, this usually takes 24-48 hours. Turn it occasionally so the bottom dries too. -
Sand for perfection:
Once fully cured, use fine-grit sandpaper to gently buff away any remaining imperfections or rough spots, focusing on the curve of the back.
Cracks Appearing?
If you see cracks while the clay dries, create a ‘slip’ paste by mixing a bit of fresh clay with water. Smear this into the crack and smooth it out before painting.
Step 3: Painting and Details
-
Base coat:
Paint the entire cat in your chosen solid color—white, soft grey, or matte black. You may need two coats for opaque coverage. -
Paint the inner ears:
For the white cat, mix a tiny drop of brown or terracotta into your white paint to create a warm beige. Carefully paint the inside of the ear indentations. -
Add the nose:
Using your finest detail brush, paint a very small, horizontal oval for the nose. Use black for white/grey cats, or a terracotta orange for the black cat. -
Dot the eyes:
Dip the back end of a paintbrush handle into black paint (or white for dark cats) and dot two wide-set eyes on either side of the nose. -
Paint whiskers:
With the 000 brush and thinned paint (inky consistency), flick three quick, straight lines outward from below the eye area on each cheek. -
Seal the piece:
Finish by applying a coat of matte varnish to protect the paint and give the clay a finished ceramic look.
Make it a Trio
Create variety by tilting the head angle slightly on your second cat, or making one significantly shorter and rounder to represent a kitten.
Enjoy your trio of adorably rotund kitties on a sunny windowsill


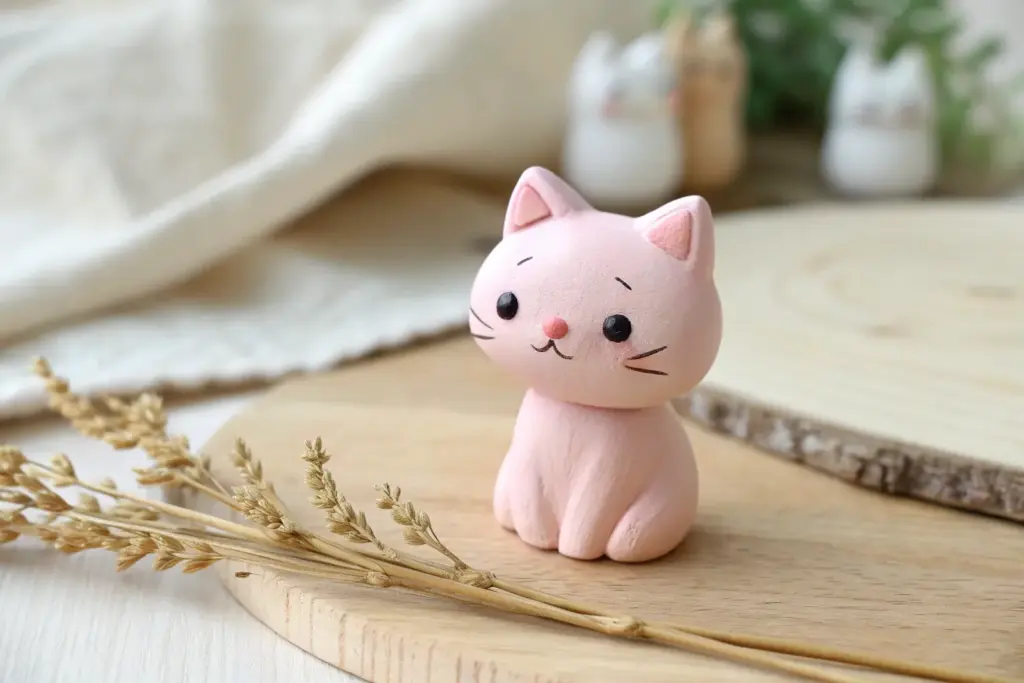
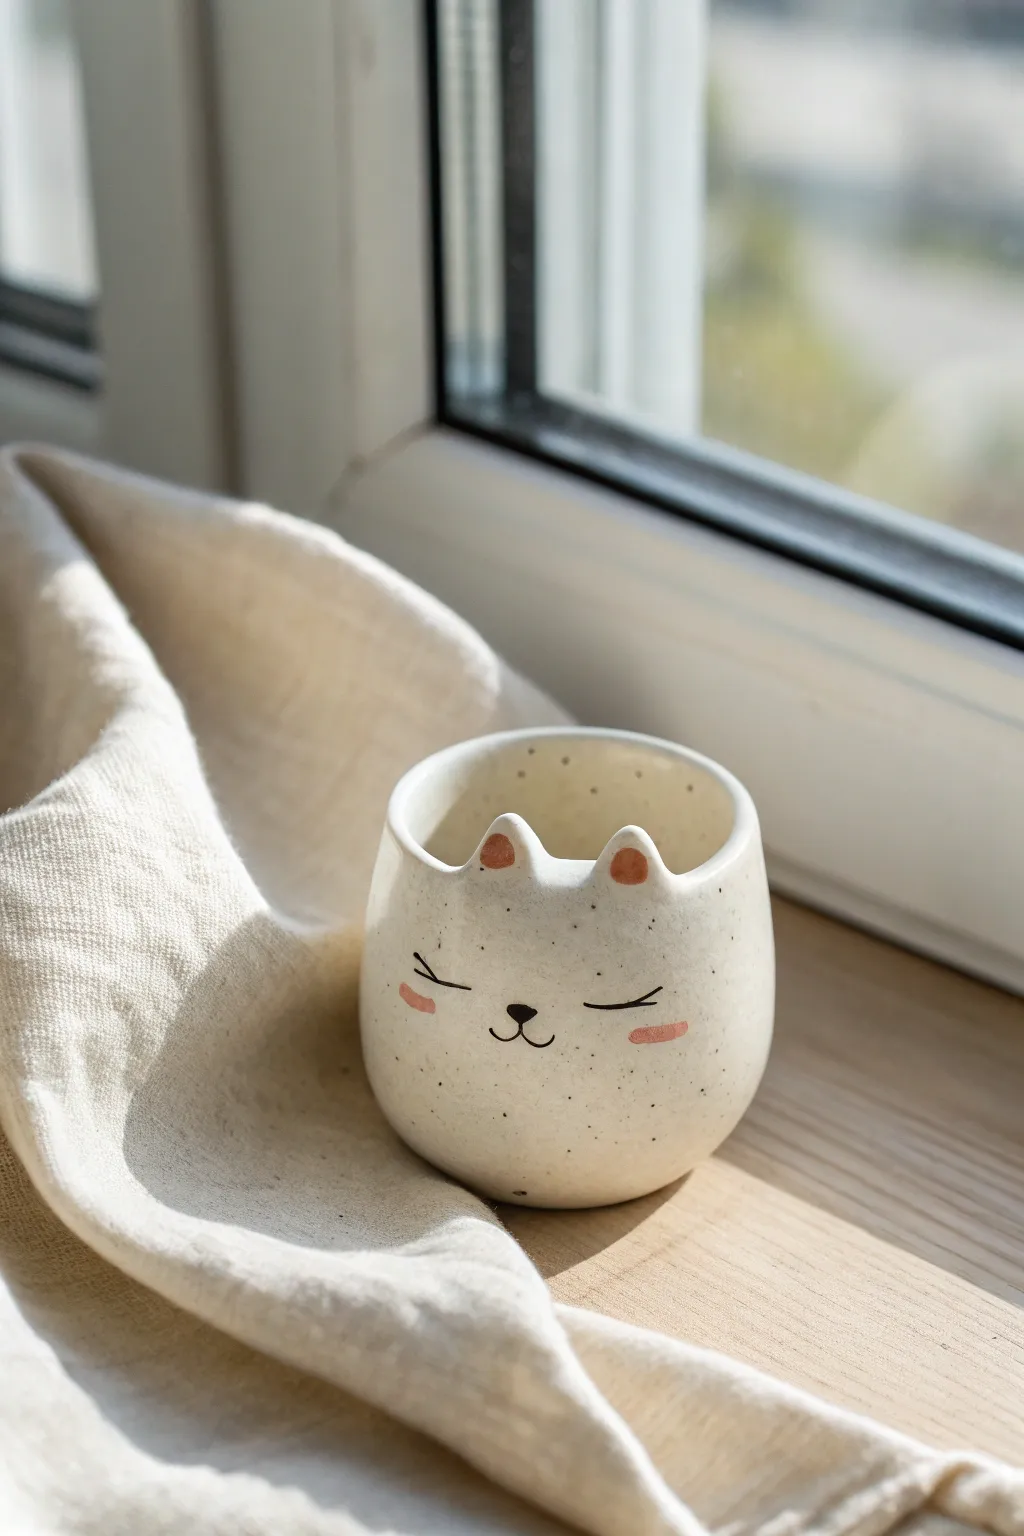
Chibi Sitting Kitty With Curled Tail
This adorable project features a smooth, matte-white clay cat with blushing cheeks and delicate pink accents. Its curled tail and minimal chibi face give it a sweet, timeless personality perfect for a desk companion.
Step-by-Step
Materials
- White polymer clay (approx. 2oz)
- Acrylic paints (black, soft pink, coral)
- Fine detail paintbrush (000 size)
- Small ball stylus tool
- Needle tool or toothpick
- Soft blush brush or Q-tip
- Matte varnish (optional)
- Aluminum foil (for armature core)
- Smoothing oil or baby oil
Step 1: Sculpting the Head & Body
-
Core Prep:
Start by scrunching a small ball of aluminum foil, about the size of a walnut. This will be the core of the head to keep the clay lightweight and prevent cracking during baking. -
Head Shape:
Condition your white clay until soft. Sheet it out and wrap it completely around the foil ball. Roll it firmly between your palms until you have a perfectly smooth, flattened sphere that is wider than it is tall. -
Body Formation:
Roll a second, slightly smaller ball of solid white clay for the body. Gently shape it into a rounded teardrop or pear shape. Press the bottom against your work surface to create a flat base so the kitty sits stable. -
Connecting Parts:
cut a short piece of wire or use a toothpick as a dowel. Insert half into the top of the body and push the head onto the other half. I like to blend the clay at the neck seam slightly for extra strength, though the collar area will hide most of this.
Lint Magnet Warning
White clay shows every spec of dust! Prepare by wiping your hands and tools with a baby wipe before starting. Keep a piece of scrap clay nearby to roll between your hands to pull off hidden grit.
Step 2: Adding Features & Limbs
-
Ears:
Form two small triangles of white clay. Gently press your thumb or a rounded tool into the center of each to create the inner ear vibe. Attach these to the top of the head, smooth the seams at the back, and curve the tips forward slightly. -
Legs:
Roll two small logs for front legs. Attach them vertically to the front of the body, blending the top edge into the chest. Use a needle tool to press two small indents into the bottom of each for paws. -
Rear Haunches:
Create two flattened ovals and press them onto the sides of the body near the base to suggest the folded rear legs of a sitting cat. Blend the edges seamless utilizing a silicone tool or your finger. -
The Curled Tail:
Roll a tapered snake of clay. Attach the thicker end to the rear base of the body. Curl the tail upward and twist the tip into a tight, snail-shell spiral, resting it against the side of the flank. -
Smoothing:
Before baking, use a drop of baby oil on your finger to gently buff away any fingerprints or lint. The surface should be pristine white.
Make it a Set
Create a whole family by varying the sizes and ear shapes. Try swapping the pink accents for soft blues or adding tiny clay accessories like a bowtie or a ball of yarn.
Step 3: Baking & Painting
-
Baking:
Bake the figurine according to your clay package instructions (usually 275°F/135°C for 15-30 minutes depending on thickness). Let it cool completely before painting. -
Inner Ears:
Mix a watery wash of pink acrylic paint. Carefully paint the inside triangles of the ears, letting the color fade slightly as it moves outward. -
Blushing Cheeks:
This is the secret to the cuteness: take a dry brush or Q-tip with a tiny amount of pink pastel powder or dry-brushed acrylic. Buff it onto the cheeks in circular motions for a soft, airbrushed look. -
Facial Features:
Using your smallest detail brush and black paint, create two oval eyes set wide apart. Add a tiny pink nose in the center, and a thin black ‘w’ mouth just below it. -
Whiskers & markings:
With a very steady hand, paint three thin whiskers on each cheek over the blush. Add small decorative dashes of coral or pink paint on the forehead and rear haunch for texture. -
Sealing:
Once the paint is fully dry, apply a coat of matte varnish to protect the surface while keeping that soft, bisque-like finish.
Place your finished kitty on a shelf or gift it to a cat lover to brighten their day


Curled-Up Sleeping Clay Cat
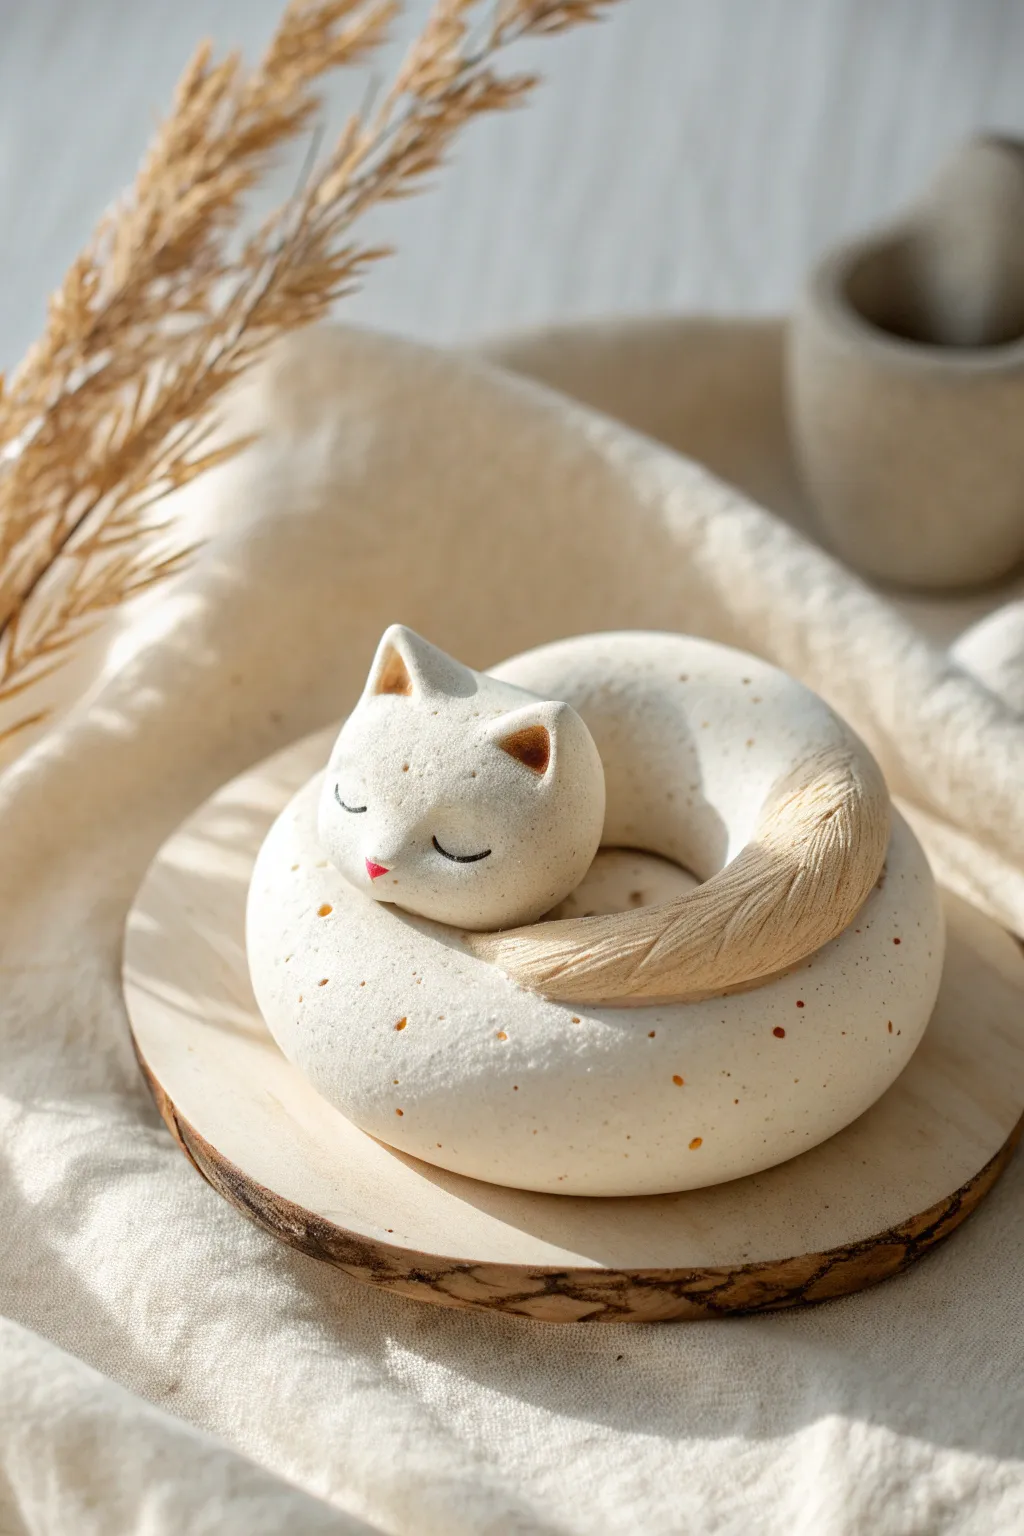
This serene project features a minimalist cat curled into a perfect donut shape, capturing the peaceful essence of a midday nap. The speckled finish and textured tail add a lovely organic feel that mimics natural stoneware pottery.
How-To Guide
Materials
- White polymer clay (granite or speckled effect preferred)
- Tan or beige polymer clay
- Light brown soft pastel (chalk)
- Small detail paintbrush
- Needle tool or toothpick
- Ball stylus tool
- Soft pink clay or acrylic paint (for the nose)
- Black acrylic paint (fine tip)
- Round wooden coaster (for display)
- Oven for baking
Step 1: Forming the Donut Body
-
Condition the clay:
Start by warming up your speckled white clay in your hands until it is pliable and smooth. If you don’t have speckled clay, mix a tiny pinch of black pepper or dried tea leaves into plain white clay for a similar look. -
Roll the main coil:
Roll a large ball of clay into a thick, even snake about 5-6 inches long. The thickness should be consistent, roughly an inch in diameter. -
Create the circle:
Gently curve the snake into a circle. Instead of joining the ends perfectly, leave a gap where the head and tail will meet. One end should be slightly rounded off to tuck under the head later. -
Smooth the shape:
Use your fingers to gently pat down the clay, ensuring the ‘donut’ shape is rounded and puffed up, not flattened against your work surface.
Fixing Fingerprints
Before baking, brush the smooth white areas with a tiny bit of baby oil or clay softener. This melts away fingerprints and gives a professional, smooth ceramic finish.
Step 2: Sculpting the Head & Face
-
Shape the head:
Roll a separate ball of white clay, slightly smaller than a golf ball. Gently flatten the bottom so it sits securely, and taper the top slightly to form a very subtle teardrop shape for the face. -
Pinch the ears:
Using your thumb and forefinger, pinch two triangles at the top of the head to form ears. Keep the tips slightly rounded for a softer look. -
Create ear depth:
Use a small ball stylus to gently press indentations into the front of the ears. This creates the inner ear area. -
Shade the ears:
Scrape a little powder from your brown soft pastel. Using a dry brush, dust this powder into the ear indentations to add warmth and depth. -
Attach the head:
Place the head onto the coil body, covering one of the ends you left open earlier. Blend the clay at the back of the neck downward into the body so the seam disappears. -
Add facial features:
Take a microscopic crumb of pink clay and press it into the center of the face for a nose. If using paint, save this for after baking. I prefer using a needle tool to gently mark where the eyes will go.
Cozy Customization
Make it a calico! Before texturing the tail, mix patches of orange and black clay into the white body for a spotted coat pattern.
Step 3: Creating the Textured Tail
-
Prepare the tail clay:
Take your tan or beige clay and roll a tapered snake. One end should be the same thickness as the body, tapering down to a blunt point. -
Add fur texture:
Before attaching, use a needle tool to scratch fine, parallel lines along the length of the tail. Vary the pressure slightly to make it look like natural fur. -
Attach the tail:
Press the thick end of the tail against the exposed end of the white body coil. Blend the seam underneath where it won’t be seen. -
Wrap the tail:
Curve the textured tail so it rests snugly against the side of the cat’s body, slightly wrapping up towards the chin. -
Add speckles (optional):
If your body clay wasn’t pre-speckled, you can flick a stiff toothbrush with diluted brown paint lightly over the body now for that ceramic effect.
Step 4: Baking and Finishing
-
Bake the piece:
Place your cat on a parchment-lined tray. Bake according to your polymer clay package instructions (usually 275°F/135°C for 15-30 minutes depending on thickness). -
Cool down:
Let the sculpture cool completely in the oven with the door cracked. This prevents cracking from thermal shock. -
Paint the eyes:
Once cool, use a super fine liner brush or a fine-tip paint pen to draw two simple downward curves for the sleeping eyes. -
Final assembly:
If desired, glue the finished cat onto a small wooden slice coaster for a rustic display base.
Place your sleeping kitty on a bedside table to bring a sense of calm to your room


Belly-Up Playful Cat Pose
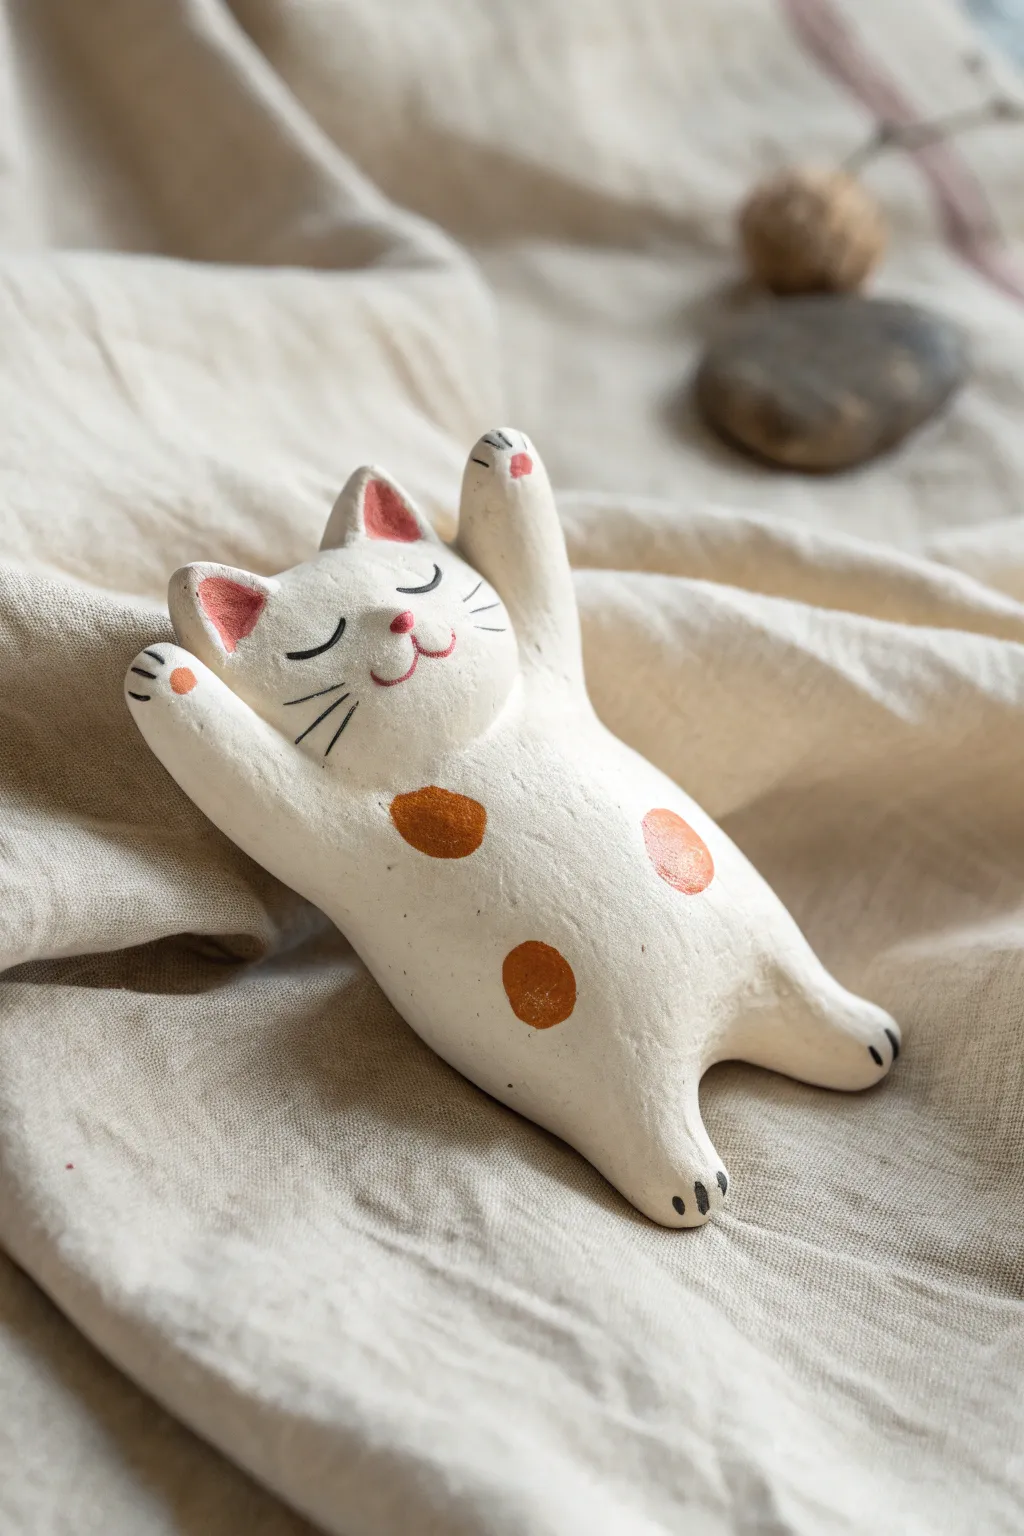
Capture the pure joy of a cat stretching in the sun with this charming belly-up figurine. This project features a smooth white clay body, delightful orange spots, and a sleeping face that radiates relaxation.
Detailed Instructions
Materials
- White air-dry clay or polymer clay
- Acrylic paints (Soft Pink, Burnt Orange, Black)
- Fine detail paintbrush (Size 0 or 00)
- Small ball stylus or toothpick for shaping
- Water cup (for smoothing)
- Matte varnish or sealant
- Sandpaper (fine grit, 400-600)
Step 1: Shaping the Base Form
-
Roll the main body:
Start with a golf-ball-sized amount of white clay. Knead it until soft and pliable, then roll it into a smooth, slightly elongated oval shape. This will become the torso and head combined. -
Define the head:
Gently pinch the top third of the oval to create a slight indentation, separating the head area from the belly area. The transition should be subtle, not a skinny neck, to keep that chubby look. -
Create the legs:
For the hind legs, pull two small nubs of clay from the bottom corners of the body. Round them off so they splay outwards slightly, creating a wide, stable stance. -
Form the arms:
Roll two small sausage shapes of equal size for the front paws. Attach them near the ‘neck’ area, blending the clay smoothly so there are no seams. Angle them upwards as if the cat is reaching for the sky. -
Add the ears:
Make two tiny triangles of clay. Attach them to the top of the head using a touch of water or slip. Smooth the seams down the back of the head so they are securely attached. -
Refine the shape:
I like to dampen my finger slightly to smooth out any fingerprints or cracks. Ensure the belly is nice and round, and the tips of the paws are rounded soft domes.
Smooth Seams Secret
use a tiny drop of water (for air-dry) or baby oil (for polymer) on your finger to ‘pet’ the clay joins until they completely disappear.
Step 2: Adding Details and Finishing
-
Dry the sculpture:
If using air-dry clay, let it sit for 24-48 hours until completely hard. If using polymer clay, bake according to the package instructions. Allow to cool completely. -
Sand for smoothness:
Once fully cured, gently sand the surface with fine-grit sandpaper. Focus on any bumps or rough patches from the clay joining process. Wipe away all dust with a slightly damp cloth. -
Paint the pink details:
Using your fine brush and soft pink paint, carefully fill in the inner triangles of the ears. Paint a tiny, delicate nose right in the center of the face, and add small pink pads to the palms of the upraised paws. -
Add the spots:
Mix a warm burnt orange color. Paint three distinctive circular spots: one on the chest, one on the lower belly, and one on the side. Keep edges soft and organic rather than perfectly round. -
Draw the face features:
Switch to black paint and your finest brush (or a thin Posca pen). Paint two downward curving crescents for sleeping eyes. Add a small ‘w’ shape under the nose for the mouth. -
Add whiskers and paws:
With the black paint, draw three thin whiskers on each cheek. Finally, add tiny little lines on the tips of the hands and feet to indicate toes or claws. -
Seal the piece:
Once all paint is visibly dry, apply a thin coat of matte varnish over the entire cat to protect the paint and give the clay a finished, professional look.
Make it a Holder
Before drying, gently press a pen or chopstick across the upraised paws to mold a groove. Now your cat is a cute desk accessory.
Place your little feline on a shelf or desk for a permanent dose of relaxation

The Complete Guide to Pottery Troubleshooting
Uncover the most common ceramic mistakes—from cracking clay to failed glazes—and learn how to fix them fast.
Kitten With a Ball of Yarn
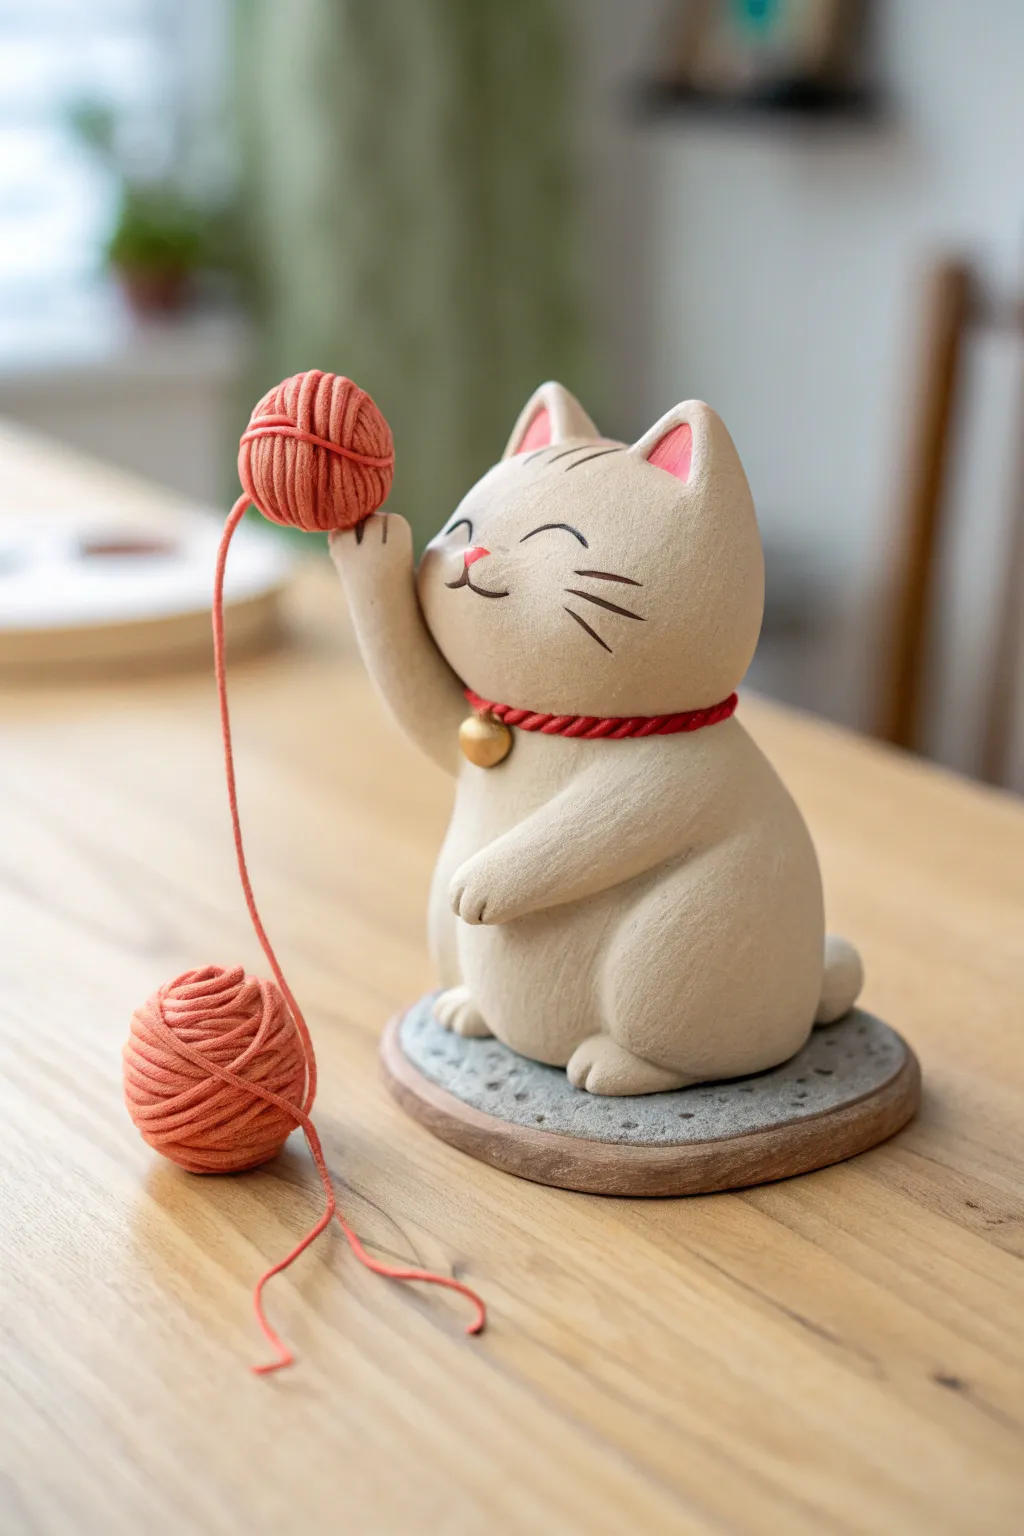
Capture the whimsy of a kitten at play with this adorable clay sculpture featuring a smiling cat holding a yarn ball aloft. The soft, matte finish and subtle texturing give this piece a gentle, handcrafted warmth perfect for any shelf.
Step-by-Step Guide
Materials
- Polymer clay (light beige/cream, coral red/pink, and gold)
- Aluminum foil (for armature)
- Sculpting tools (needle tool, ball stylus, rubber shaper)
- Texturing sponge or toothbrush
- Small rolling pin
- Wire (18-20 gauge) for support
- Red embroidery floss or thin yarn
- Strong craft glue (E6000 or super glue)
- Round wooden base
- Grey acrylic paint (for the base surface)
- Clear matte varnish (optional)
Step 1: Forming the Base Structure
-
Core construction:
Begin by crumbling a piece of aluminum foil into a pear shape. This will be the body of your cat. It saves clay and prevents cracking during baking. -
Creating the body:
Condition your light beige clay until soft. Roll it into a sheet and wrap it completely around your foil core, smoothing the seams until you have a seamless pear shape. -
Adding the head:
Roll a separate sphere of beige clay for the head. Slightly flatten the bottom and attach it to the narrower top of the body. Blend the clay at the neck area with a rubber shaper so it looks like one solid piece. -
Ears and stability:
Pinch two small triangles of beige clay. Press a smaller pink triangle into the center of each for the inner ear. Attach these to the top of the head using a touch of liquid clay or scoring to ensure a good bond.
Drooping Arm?
If the raised arm sags while sculpting, prop it up with a small block of sponge or crumpled tissue paper during the bake. Remove the prop once cooled.
Step 2: Sculpting the Features
-
Adding texture:
Before adding limbs, gently press a coarse sponge or a clean toothbrush over the entire surface of the cat. This creates a lovely ‘stone’ or fur-like texture. -
Legs and paws:
Roll two thick logs for the hind legs and shape them into rounded haunches. Press them onto the sides of the body bottom. Use a needle tool to impress two lines on the front of each ‘foot’ to create toes. -
The reaching arm:
Create the front left arm as a simple sausage shape, tucked against the chest. For the right arm—the one holding the ball—insert a small piece of wire into the shoulder area for strength. Slide a clay log over the wire, angling it upwards. -
Facial details:
Roll a tiny speck of pink clay into a triangle nose and place it in the center or the face. Use a needle tool to gently crave two curved happy eyes and whiskers on each cheek. Keep the lines clean and deep enough to see.
Step 3: Accessories and Assembly
-
The collar:
Roll a very thin snake of red clay. If you have a braiding tool, you can twist two thin strands together for a rope effect. Wrap this around the cat’s neck. -
The bell:
Form a small ball of gold clay. Poke a hole in the bottom and add a horizontal slit to mimic a bell. Attach this to the center of the collar. -
Base preparation:
Roll a flat disc of grey clay or paint a circular wooden coaster with textured grey paint to mimic stone. If using clay, texture it heavily with a rock or crumpled foil. -
Baking:
Bake your cat figurine and clay base according to the manufacturer’s instructions (usually 275°F/130°C for 15-30 minutes per 1/4 inch thickness). Let it cool completely.
Realistic Yarn Texture
Coat the yarn string with a mix of water and white glue (Mod Podge) to stiffen it. This allows you to ‘freeze’ the string in mid-air curves for a dynamic look.
Step 4: The Yarn Ball Finish
-
Making the yarn ball:
While the clay cools, create a small ball of scrap foil or clay. Take your red embroidery floss or thin yarn and wind it randomly around this core until it looks like a miniature ball of yarn. -
The string trail:
Leave a long tail of yarn hanging from the ball. Use a dab of strong glue to attach the yarn ball to the cat’s raised paw. -
Final connection:
Glue the finished cat securely to your grey base. Wind a second, smaller yarn ball if desired to place on the table, and drape the connecting string artistically down from the paw.
Now you have a charming feline friend permanently frozen in a moment of playful joy
Clay Cat on a Tiny Cushion

This serene, cream-colored feline sits peacefully atop a charming pink cushion, bringing a sense of calm to any desk or shelf. With its gentle expression and tiny golden bell, this project combines simple sculpting forms with adorable miniature details.
Step-by-Step
Materials
- Polymer clay (cream/off-white, dusty pink, white)
- Small amount of gold polymer clay or gold acrylic paint
- Sculpting tools (needle tool, ball stylus, rubber shaper)
- Small rolling pin
- Wire armature or heavy-gauge jewelry wire
- Black fine-tip permanent marker or acrylic paint
- Soft pastel chalks (pink and brown) for shading
- Small paintbrush
- Clear matte varnish (optional)
- Thin jewelry wire (silver or gold for the bell attachment)
Step 1: Sculpting the Cat
-
Form the body base:
Start with a large ball of cream clay. Roll it into a smooth pear shape, narrower at the top for the neck and wider at the bottom for the haunches. Flatten the bottom slightly so it sits securely. -
Shape the head:
Roll a smaller ball of cream clay for the head. Gently press it into a slightly oval shape. Attach it securely to the top of the body, blending the clay at the neck seam until smooth so no line is visible. -
Create the front legs:
Take two small logs of cream clay. Attach them vertically to the front of the body, blending the upper portion into the chest. Use a modeling tool to define the paws at the bottom. -
Add the tail:
Roll a long snake of clay. Wrap it around the base of the cat, curving it towards the front paws. Blend the starting point into the back of the body seamlessly. -
Sculpt the ears:
Form two small triangles of cream clay. Press a tiny bit of pink clay or pink pastel dust into the center of each for the inner ear. Attach these to the top of the head. -
Detail the face:
Use a needle tool to gently mark the placement for the eyes and mouth. Use a tiny ball of pink clay for the nose. I like to use a rubber shaper to smooth the area around the nose so it looks organic.
Unwanted Fingerprints?
Before baking, lightly brush your clay with a little baby oil or cornstarch to smooth out any accidental fingerprints or tool marks on the cat’s smooth coat.
Step 2: Accessorizing
-
Make the collar:
Roll a thin strip of dusty pink clay flat. Wrap it around the cat’s neck to cover the seam between head and body. Trim excess at the back and smooth the join. -
Add polka dots:
Roll extremely tiny balls of white clay. Press them gently onto the pink collar at regular intervals to create the polka dot pattern. Flatten them flush with the collar surface. -
Craft the bell:
Shape a small cone of gold clay (or cream clay to paint later). Poke a small hole in the bottom and use a needle tool to create the bell’s opening slit. Attach it to the collar with a tiny loop of wire.
Perfect Polka Dots
Instead of rolling tiny clay balls, bake the collar first, then use a toothpick dipped in white acrylic paint to dot on the pattern for uniform sizing.
Step 3: The Cushion Base
-
Shape the cushion:
Condition a block of dusty pink clay. Form it into a thick, soft square with rounded corners, resembling a marshmallow. This needs to be slightly larger than the cat’s base. -
Add the base layer:
Roll a thin sheet of white clay and press it onto the bottom of the pink cushion, letting the edges curve up slightly to look like a separate fabric panel. -
Create the tufting:
Use a needle tool or the back of a knife to impress grid lines across the top surface of the cushion to mimic quilting seams. Press a small indentation at each grid intersection. -
Detail the stitching:
Using a needle tool, create small tick marks along the edge where the pink and white clays meet to simulate embroidery stitching. -
Assembly:
Place the cat firmly onto the center of the cushion. Press down gently to ensure a good bond between the cat’s bottom and the cushion surface.
Step 4: Finishing Touches
-
Painting the face:
Once the sculpture is baked and cooled according to your clay package instructions, use a fine-tip black marker or paint to draw the closed eyelids and whiskers. -
Shading:
Lightly brush brown pastel dust into the crevices of the cushion tufting to add depth. You can also add a faint blush to the cat’s cheeks with pink pastel. -
Final Bell Detail:
If you didn’t use gold clay, carefully paint the bell with metallic gold acrylic paint now.
Place your finished kitty on a windowsill where the light can catch the sweet details of its peaceful face


What Really Happens Inside the Kiln
Learn how time and temperature work together inside the kiln to transform clay into durable ceramic.
Peekaboo Cat in a Cup
This adorable handmade vessel features a sleepy cat face and playful peekaboo ears rising from the rim. Using simple pinching techniques and minimal glazing, you can craft a sweet little planter or cup that brings a touch of whimsy to any windowsill.
Detailed Instructions
Materials
- Speckled stoneware clay (white or light buff)
- Pottery wheel (optional) or rolling pin for slabs
- Pin tool or needle tool
- Small sponge
- Potter’s rib (rubber or wood)
- Black underglaze
- Pink underglaze
- Fine detail brush
- Clear dipping glaze or brush-on transparent glaze
- Kiln
Step 1: Forming the Body
-
Prepare the Clay:
Begin with a ball of speckled stoneware clay roughly the size of a large orange. Wedge it thoroughly to remove air bubbles. -
Pinch the Basic Shape:
Press your thumb into the center of the ball and gently pinch the walls upward while rotating. Aim for a rounded, bulbous belly shape rather than a straight cylinder. -
Create the Rim:
Once you have your desired height—about 3 to 4 inches—smooth the rim. Ensure the walls are even in thickness, about 1/4 inch throughout. -
Refine the Surface:
Use a flexible rib tool to smooth the outside of the pot, removing visible fingerprints while maintaining that lovely organic, hand-built curve.
Smudged Lines?
If underglaze smudges, don’t wipe it while wet! Let it dry completely, then gently scratch the mistake off with a needle tool before repainting.
Step 2: Sculpting the Details
-
Mark Early Ear positions:
Visualize where the face will be. Use your needle tool to lightly mark two points on the rim where the ears should rise. -
Shape the Peekaboo Ears:
Instead of adding clay, gently push the clay of the rim upward from the inside at your marked points. Pinch these raised sections into small, rounded triangles. -
Smooth Transitions:
Use a barely damp sponge to round off the tips of the ears and smooth the transition back down to the main rim, ensuring there are no sharp edges. -
Refine the Interior:
Check the inside of the cup behind the ears. I find it helpful to use the back of a spoon or a modeling tool to smooth out the indentation created by pushing the ears up.
Pro Tip: Symmetry
Look at the pot from directly above when pinching the ears. This bird’s-eye view makes it much easier to ensure they are evenly spaced and sized.
Step 3: Decorating and Firing
-
Drying to Leather Hard:
Allow the piece to dry slowly until it is leather hard. This is the perfect stage for underglaze application as the clay is firm but still receptive. -
Paint the Inner Ears:
Using a small brush, apply a dab of soft pink or terracotta-colored underglaze to the inner triangular area of each ear. -
Draw the Face:
With a fine detail brush and black underglaze, paint two downward-curving lines for sleepy eyes. Add a small triangular nose and a curved ‘w’ shape for the mouth below it. -
Add Cheeks:
Dip your brush back into the pink underglaze and add two small dashes or ovals underneath the eyes for blushing cheeks. -
Bisque Fire:
Once the pot is bone dry, load it into the kiln for a bisque firing (usually Cone 04) to harden the clay and set the underglaze. -
Glazing:
After the bisque fire, wipe the piece down with a damp sponge to remove dust. Dip the entire piece into a clear transparent glaze to showcase the clay’s natural speckles. -
Glaze Firing:
Load the kiln for the final glaze firing according to your clay body’s specifications (often Cone 5 or 6 for stoneware). -
Final Inspection:
After the kiln cools, check the bottom for any sharp burrs, sanding them down if necessary, and enjoy your new feline friend.
Fill your finished cup with soil and a succulent or use it to hold your favorite morning tea
Stacked Round Kitty Totem
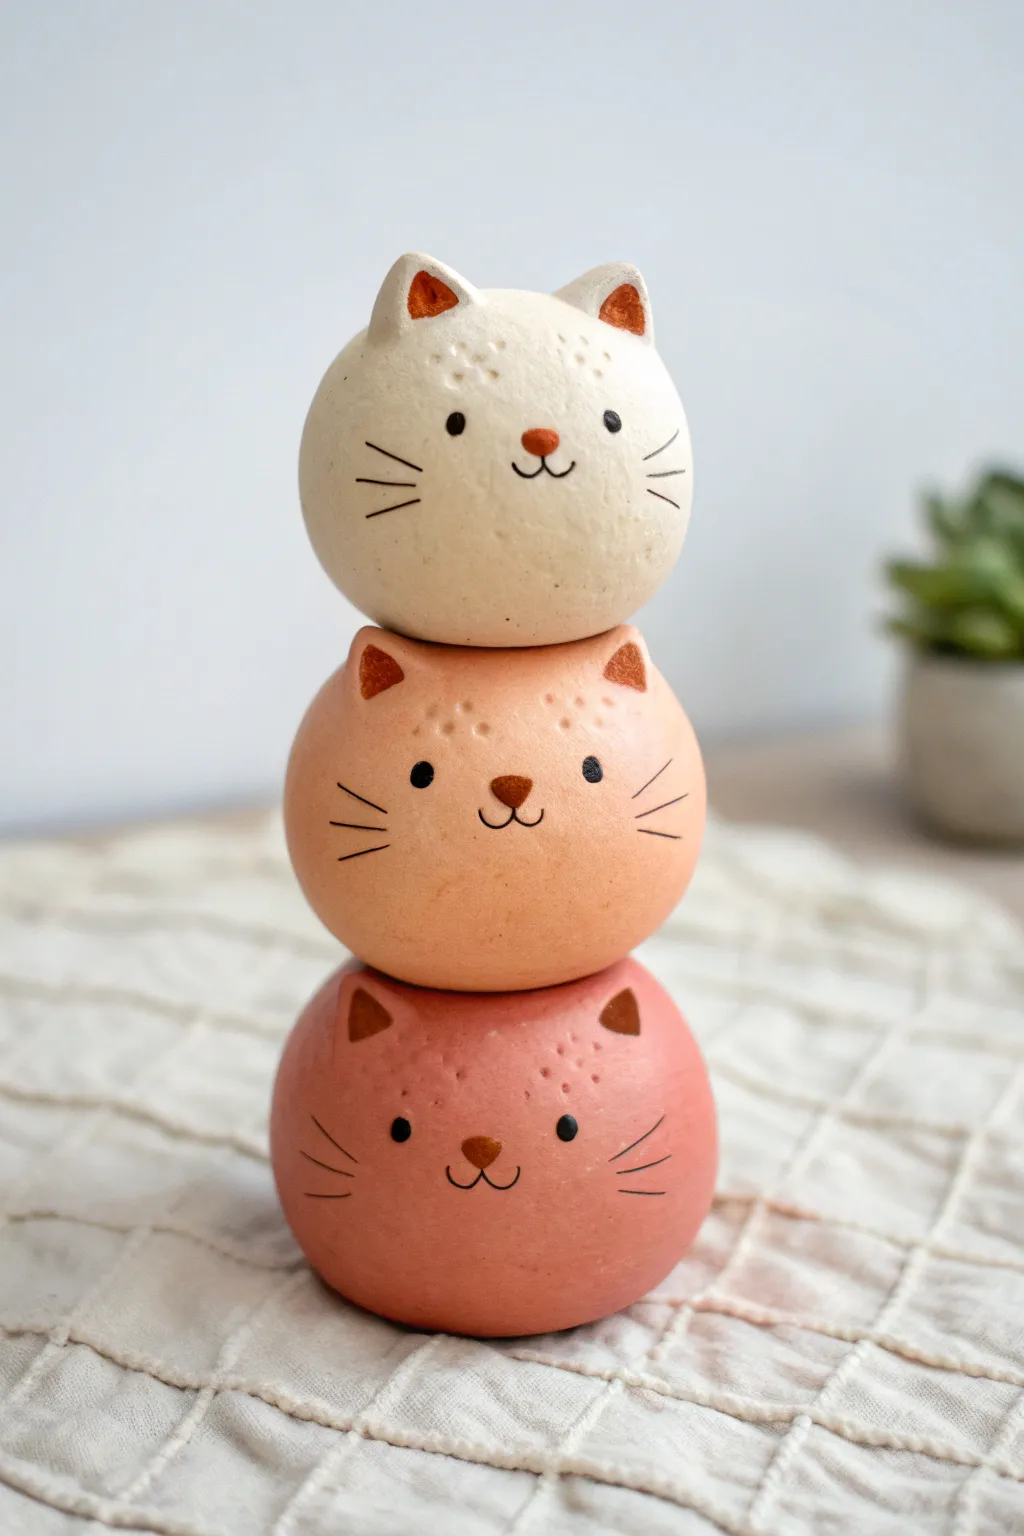
Create this adorable trio of stacked clay cats to add a playful touch to your desk or shelf. With their smooth, rounded forms and graduated pastel colors, they make for a charming beginner-friendly sculpting project.
Step-by-Step
Materials
- Polymer clay or air-dry clay (white)
- Acrylic paints (cream, peach, dusty rose, burnt sienna, black)
- Small paintbrush (detail round)
- Ball stylus tool or toothpick
- Clear matte varnish
- Strong craft glue (e.g., E6000)
- Aluminum foil (optional for core)
- Fine-grit sandpaper
Step 1: Sculpting the Base Forms
-
Condition the clay:
Start by kneading your white clay thoroughly until it becomes soft, pliable, and free of cracks. -
Roll three spheres:
Divide your clay into three equal portions. Roll each piece into a smooth, perfect sphere about the size of a golf ball or slightly larger. -
Check sizing:
Stack the spheres gently on top of each other to ensure they are roughly the same size, aiming for a consistent look for the totem. -
Flatten bottoms:
Gently press the bottom of each sphere against your work surface to create a small flat spot. This ensures they will stack securely without rolling away. -
Flatten tops (optional):
For the bottom and middle cats only, gently press the top slightly flat to create a stable resting place for the cat above it.
Step 2: Adding Details
-
Shape the ears:
Take six small, pea-sized bits of clay. Shape them into small triangles and gently pinch the tops to round them slightly. -
Attach ears:
Attach two ears to the top of each sphere. Blend the seam where the ear meets the head using a clay tool or your finger for a seamless transition. -
Texture the forehead:
Using a small needle tool or toothpick, gently poke a few tiny dots in a cluster on the forehead area between the ears to mimic fur texture. -
Dry or bake:
If using polymer clay, bake according to the package instructions. If using air-dry clay, let the pieces dry completely, usually for 24-48 hours. -
Sand for smoothness:
Once hardened, inspect your spheres. I like to use fine-grit sandpaper here to buff away any fingerprints or rough bumps for a porcelain-like finish.
Wobbly Stack?
If the cats won’t stay stacked, sand the contact points a bit more aggressively to create a rougher, flatter surface for the glue to grip.
Step 3: Painting and Assembly
-
Paint the base coats:
Paint the top cat in a cream or off-white color. Paint the middle cat a soft peach, and the bottom cat a dusty rose pink. Determine the color value by adding white to your base hues. -
Add ear details:
Using a burnt sienna or dark brown paint, carefully paint a small triangle inside each ear. -
Paint the noses:
Using the same burnt sienna shade, paint a small, rounded triangle or oval in the center of the face for the nose. -
Draw the faces:
With a very fine brush or a paint pen and black paint, add two small dots for eyes and a small ‘w’ shape for the mouth connected to the nose. -
Paint whiskers:
Add three thin whiskers on each cheek using quick, confident strokes with your finest brush. -
Seal the work:
Apply a coat of matte varnish to protect the paint and give the clay a professional finish. -
Assemble the stack:
Once the varnish is dry, apply a strong craft glue to the flat spots between the cats and stack them carefully, ensuring the faces are aligned vertically.
Level Up: Bellies
Before painting, sculpt tiny paws tucked under their chins or paint a lighter circle on their tummies for an extra bit of character.
Now you have a charming little tower of feline friends to keep you company

TRACK YOUR CERAMIC JOURNEY
Capture glaze tests, firing details, and creative progress—all in one simple printable. Make your projects easier to repeat and improve.
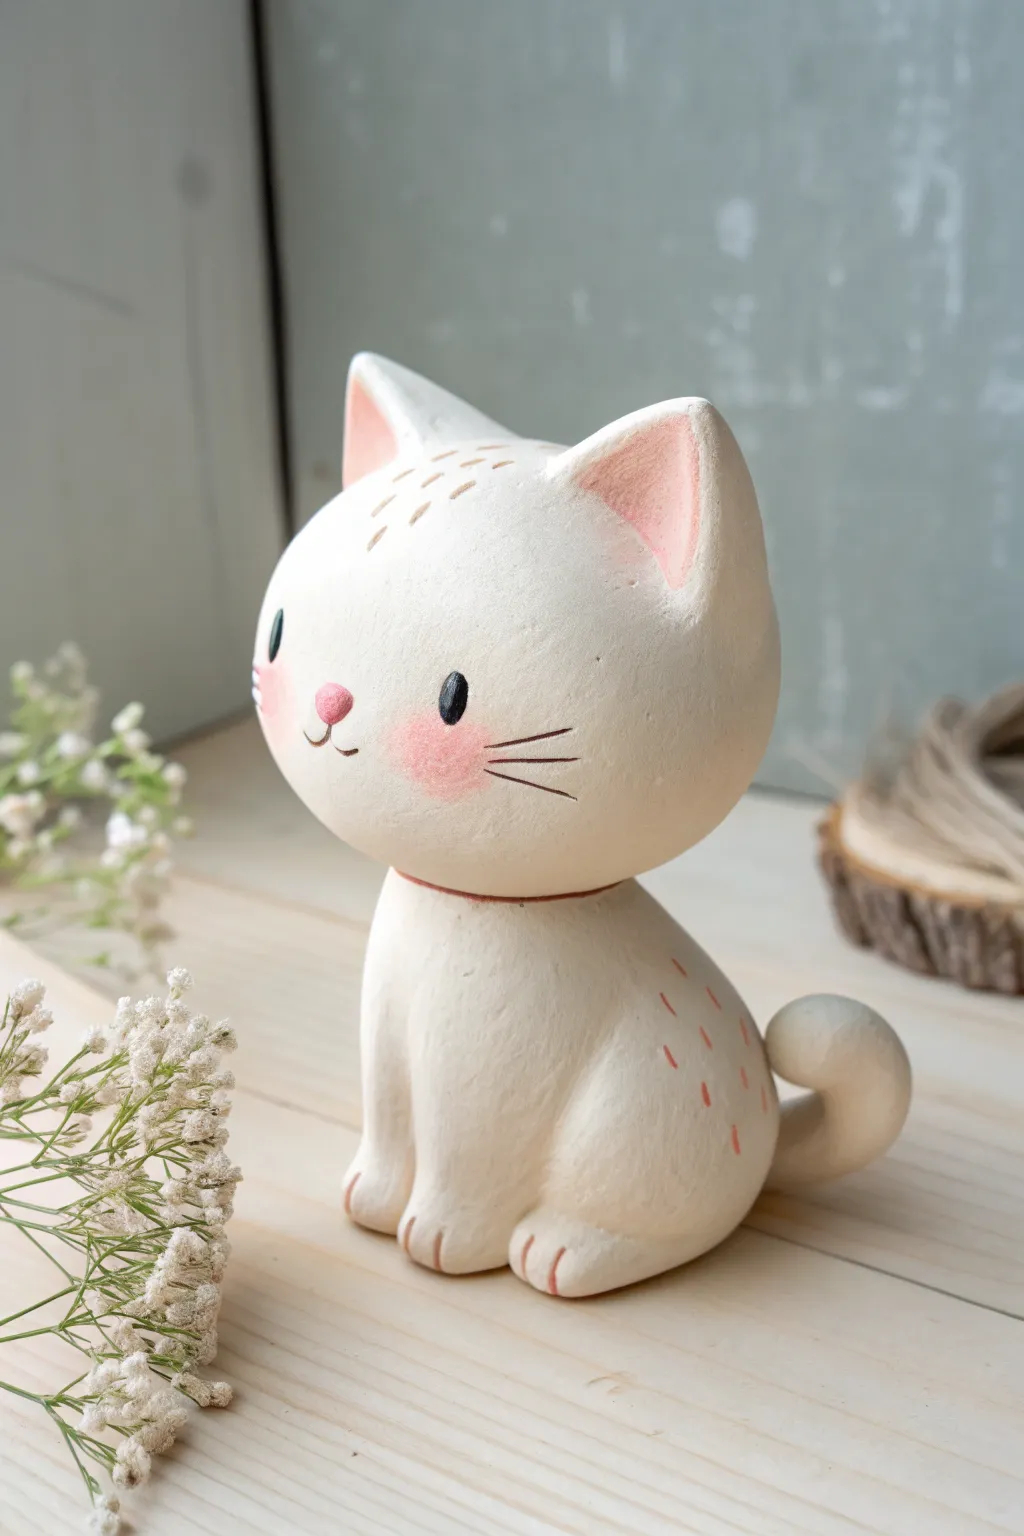
Easy Calico Cat Patchwork
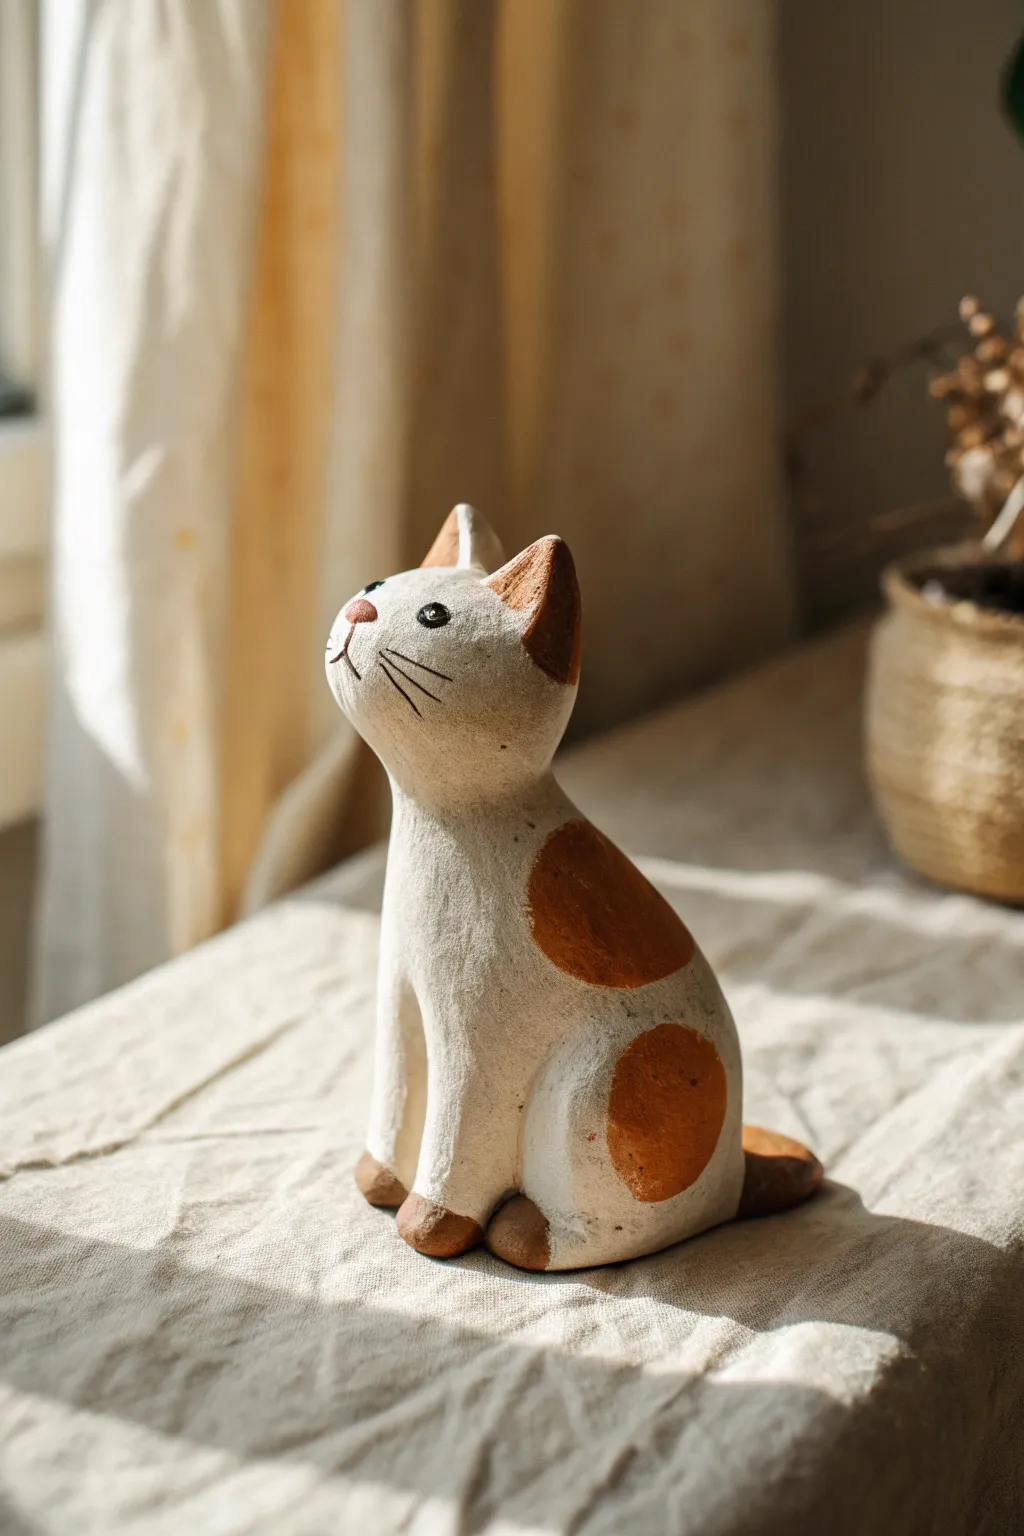
Capture the serene moment of a cat basking in sunlight with this charming clay project. The rustic, handcrafted finish and simple patchwork spots give this figurine a timeless, folk-art appeal that warms up any windowsill.
Detailed Instructions
Materials
- White air-dry clay (or polymer clay)
- Small cup of water
- Clay carving tools (needle tool, smooth modeling tool)
- Acrylic paints: Warm White, Burnt Sienna (or Terracotta), Black, Soft Pink
- Fine detail paintbrush
- Medium flat paintbrush
- Fine-grit sandpaper
- Matte varnish (optional)
Step 1: Shaping the Base Form
-
Create the core shape:
Begin with a fist-sized ball of clay. Roll it into a smooth, thick cylinder that tapers slightly towards the top, resembling a teardrop with a flattened bottom for stability. -
Define the head:
Pinch the upper third of the clay gently to distinguish the neck area. Don’t make the neck too thin; this style relies on a sturdy, connected silhouette. -
Form the head tilt:
Gently press and angle the head portion upwards. The cat should look like it is gazing at something high above, so ensure the ‘face’ plane is angled at about 45 degrees.
Pro Tip: Rustic Texture
Don’t over-sand the clay. Leaving slight surface undulations creates a more authentic ‘hand-carved’ wood look once painted with the matte white base coat.
Step 2: Refining the Details
-
Add the ears:
Form two small triangles of clay. Score the top of the head and the bottom of the ears with a needle tool, add a dab of water (slip), and press them firmly into place. -
Blend the seams:
Use a modeling tool or your finger to smooth the clay where the ears meet the head until the join is seamless. I find dipping my finger in a little water helps smooth out any stubborn cracks. -
Sculpt the legs:
The front legs are carved in relief rather than added separately. Use a modeling tool to carve two vertical lines down the front chest, creating the illusion of two legs separating from the main body mass. -
Add the tail:
Roll a small snake of clay for the tail. Attach it to the lower back side, curving it slightly around the base so it rests naturally against the hip. -
Initial smoothing:
Go over the entire piece with a slightly damp sponge or finger to remove fingerprints. Aim for a surface that is smooth but retains a bit of handcrafted texture. -
Dry thoroughly:
Let the sculpture dry completely. For air-dry clay, this usually takes 24-48 hours depending on thickness. It must be bone dry before painting.
Step 3: Painting and Finishing
-
Sand for texture:
Once dry, use fine-grit sandpaper to gently smooth any rough ridges, focusing on the ears and the base. Wipe away all dust with a dry cloth. -
Apply the base coat:
Paint the entire cat with Warm White acrylic paint. You may need two coats to get an opaque, chalky finish that hides the raw clay color. -
Add the calico patches:
Using Burnt Sienna or Terracotta paint, paint a large oval patch on the cat’s flank and another lower down near the hip. Paint one ear (usually the left) with the same color, extending slightly onto the head. -
Paint the paws and tail:
Dab the tips of the front paws and the end of the tail with the same brown hue. Keep the edges soft and slightly imperfect to match the rustic style. -
Paint the face details:
Using a tiny detail brush and Soft Pink, paint a small triangular nose. With Black paint, add two small round eyes and simple, thin whiskers on the cheeks. -
Create a weathered look:
For that vintage feel shown in the photo, mix a very watery wash of brown paint. Lightly brush it over the dried white areas and immediately wipe it off with a paper towel, leaving subtle antique tones in the crevices. -
Seal the piece:
Finish with a coat of matte varnish to protect your work without adding unnatural shine.
Troubleshooting: Cracks
If small cracks appear while drying, mix a tiny bit of fresh clay with water to make a paste (slip) and fill the cracks. Let it dry again, then sand smooth.
Place your finished cat near a window where the light can catch its upturned face
Simple Tabby Cat Stripes

This charming project features a stylized, blocky cat shape with a warm, earthy finish that highlights simple tabby markings. Its smooth, rounded form and cheerful expression make it a perfect beginner-friendly sculpture that feels both modern and handcrafted.
Step-by-Step
Materials
- Air-dry clay (stone or white)
- Small cup of water
- Clay carving tools (needle tool, smooth rib)
- Acrylic paints (beige, warm brown, black)
- Small paintbrushes (fine tip and flat)
- Fine-grit sandpaper
- Matte varnish or sealant
Step 1: Shaping the Base Form
-
Create the main body:
Start with a fist-sized ball of clay. Roll it in your hands to warm it up, then gently flatten the sides and bottom to create a rounded, rectangular loaf shape. The bottom needs to be flat enough for the cat to sit consistently without wobbling. -
Define the head:
Pinch the front top corner of your loaf shape upwards to distinguish the head from the back. Instead of adding a separate ball, pulling the clay from the main mass creates a stronger, smoother neck transition. -
Form the ears:
Using your thumb and forefinger, pinch two small triangles at the very top of the head. Keep them relatively short and rounded at the tips to match the soft aesthetic of the sculpture. -
Sculpt the legs:
At the front bottom of the sculpture, use a modeling tool or your finger to press a vertical indentation. This separates the front mass into two distinct legs. Gently round off the ‘paws’ so they look soft rather than sharp. -
Add the tail:
Roll a small coil of clay for the tail, tapering one end. Score and slip the back of the cat and the thicker end of the tail, then press them firmly together. Curve the tail slightly upwards or around the side for character. -
Smooth the surface:
Dip your finger in a little water and run it over the entire sculpture to remove fingerprints and cracks. I find that using a slightly damp sponge here gives an even better finish than just fingers.
Step 2: Drying and Refining
-
Allow to dry:
Let the sculpture sit in a dry, room-temperature area for 24-48 hours. Turn it over occasionally to ensure the bottom dries evenly. -
Sand for smoothness:
Once fully cured and hard, take a piece of fine-grit sandpaper and gently buff the surface. Focus on the ears and the tail connection point to ensure everything feels seamless. -
Clean the dust:
Wipe the entire piece down with a slightly damp cloth or a dry tack cloth to remove all sanding dust before painting.
Fixing Cracks
If cracks appear while drying, mix a small amount of fresh clay with water to make a paste (slip). Fill the cracks, smooth over, and let dry again.
Step 3: Painting the Details
-
Apply the base coat:
Mix a light beige or sandy acrylic color. Apply two thin coats over the entire cat, letting the first coat dry completely before adding the second. -
Paint the inner ears:
Mix a tiny drop of pink or orange into your base beige color. Paint small triangles inside the sculpted ears to give them depth. -
Draft the stripes:
Using a very faint pencil line, lightly sketch where the stripes will go. Plan for three or four large curving stripes across the back and smaller dashed lines around the neck. -
Paint the back stripes:
Load a flat brush with warm brown paint. Paint the bold, curved stripes on the back. Start thick at the spine and taper them as they go down the sides. -
Add the tail stripes:
Paint horizontal rings around the tail using the same warm brown. These can be slightly uneven to maintain the hand-painted charm. -
Detail the neck pattern:
Switch to a fine-tip brush. Paint small dashed lines or dots around the neck area, creating a ‘collar’ effect of broken stripes. -
Paint the face:
Using black paint and your finest brush (or a toothpick), carefully dot two eyes. Add a small brown triangle for the nose and fine black lines for the whiskers and mouth. -
Seal the artwork:
Finish by applying a coat of matte varnish. This protects the paint and gives the clay a professional, finished ceramic look.
Textured Fur
Before the clay dries, use an old toothbrush to gently tap the surface. This creates a subtle, fuzzy texture that looks great under the paint.
Now you have a sweet little desk companion that captures the cozy essence of a tabby cat
Tiny Fluffy-Texture Kitten
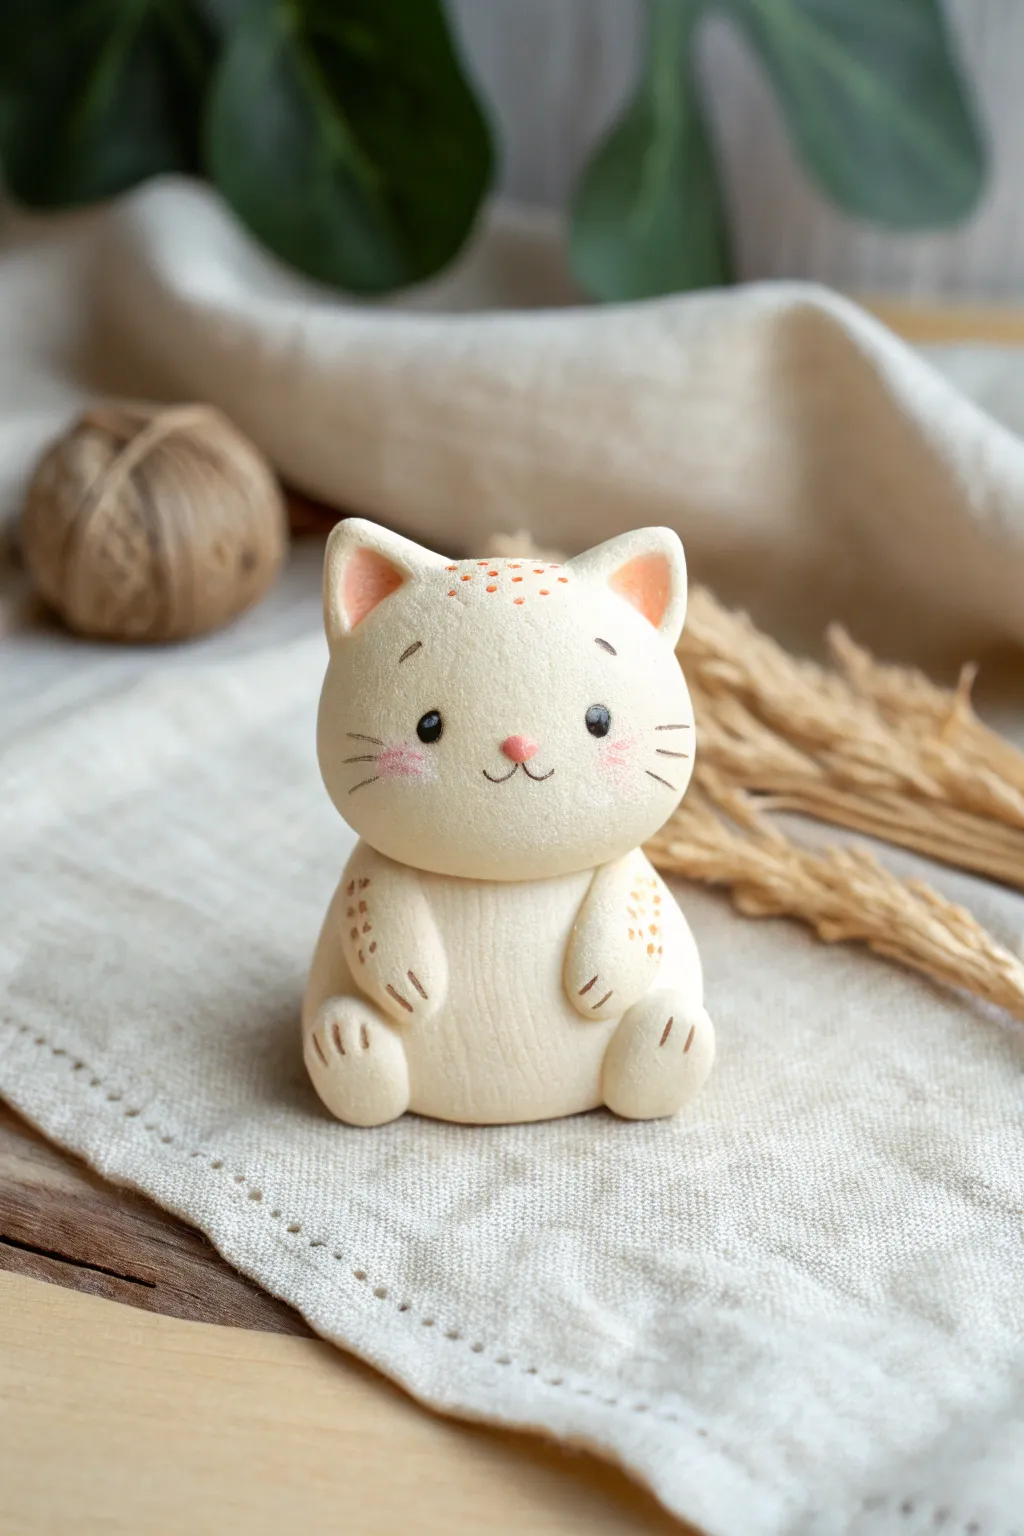
This adorable figurine captures the sweet simplicity of a sitting kitten with a soft, matte finish that resembles a freshly baked biscuit. Its rounded form and delicate speckled details make it a perfect beginner-friendly project with high-impact cuteness.
How-To Guide
Materials
- White polymer clay (fimo or sculpey)
- Beige or biscuit-colored soft pastels (for tinting)
- Reddish-brown acrylic paint
- Black acrylic paint
- Pink soft pastel or acrylic paint
- Detail brush (size 000)
- Needle tool or toothpick
- Ball stylus tool
- Texture sponge or toothbrush
- Matte varnish (optional)
Step 1: Shaping the Base
-
Prepare the Clay:
Start by conditioning your white polymer clay until it is soft and pliable. If you want that warm, creamy tone shown in the photo, mix in a tiny shaving of ochre or beige clay, or dust the raw white clay with a bit of scraped yellow-ochre pastel powder. -
Form the Body:
Roll a ping-pong ball sized amount of clay into a smooth sphere. Gently roll it on your work surface to create a slight teardrop shape, but keep it very stout and chubby. -
Create the Head:
Roll a second sphere, slightly smaller than the body. Press it gently to flatten the bottom so it sits securely on top of the body piece. You want an oversized head for that ‘chibi’ look. -
Attach Head to Body:
Press the head firmly onto the body. I like to blend the clay slightly at the neck seam using a sculpting tool to ensure they bond, but keep the definition between head and belly visible. -
Add Texture:
To get that specialized matte, almost velvety surface texture, gently dab the entire surface of the cat with a stiff-bristled toothbrush or a coarse sponge. Do this lightly so you don’t distort the shape.
Step 2: Sculpting Features
-
Form the Arms:
Roll two small, tic-tac sized logs of clay. Flatten one end of each and press them vertically against the front of the belly. Curve them slightly inward so the paws rest on the tummy. -
Add the Feet:
Create two small, flattened oval balls for the back feet. Attach these at the bottom front of the body, angling them slightly outward. -
Detail the Paws:
Use a needle tool or the dull side of a craft knife to press two or three small indentations into the ends of the arms and feet to create toe definitions. -
Shape the Ears:
Form two small triangles of clay. Gently curve them to give them a concave shape. Attach them to the top of the head, blending the back seams down into the skull so they look seamless.
Fixing Smudges
If you accidentally smudge paint on the textured clay, wait for it to dry fully, then gently scrape it off with a craft knife rather than wiping it while wet.
Step 3: Finishing Details
-
Pre-Bake Shading:
Scrape some pink soft pastel into a powder. Use a small, soft brush to dust the inside of the ears and add blushing cheeks to the face. -
Bake the Figurine:
Bake your creation according to the manufacturer’s instructions for your specific brand of clay. Let it cool completely before painting. -
Paint the Face:
Using a tiny detail brush and black acrylic paint, make two small dots for eyes. Add a tiny pink triangle for the nose. Paint a thin, black ‘w’ shape for the mouth mouth below the nose. -
Add Whiskers:
With the finest brush you have (or even a fineliner pen), draw three short, floating whisker lines on each cheek. -
Create the Speckles:
Mix a reddish-brown paint color. Using a very fine dotting tool or the tip of a toothpick, apply tiny freckles on the forehead between the ears and on the outer sides of the arm paws. -
Protect the Piece:
Since the charm of this piece is its matte texture, apply a matte varnish if you want to seal the paint, avoiding any glossy sealers.
Add a Scarf
Before baking, roll a very thin snake of colored clay and wrap it around the neck gap to create a tiny scarf, hiding any imperfect seams between head and body.
Place your little clay friend on a desk or shelf to add a touch of handcrafted warmth to your space
Stretchy “Long Cat” Clay Charm
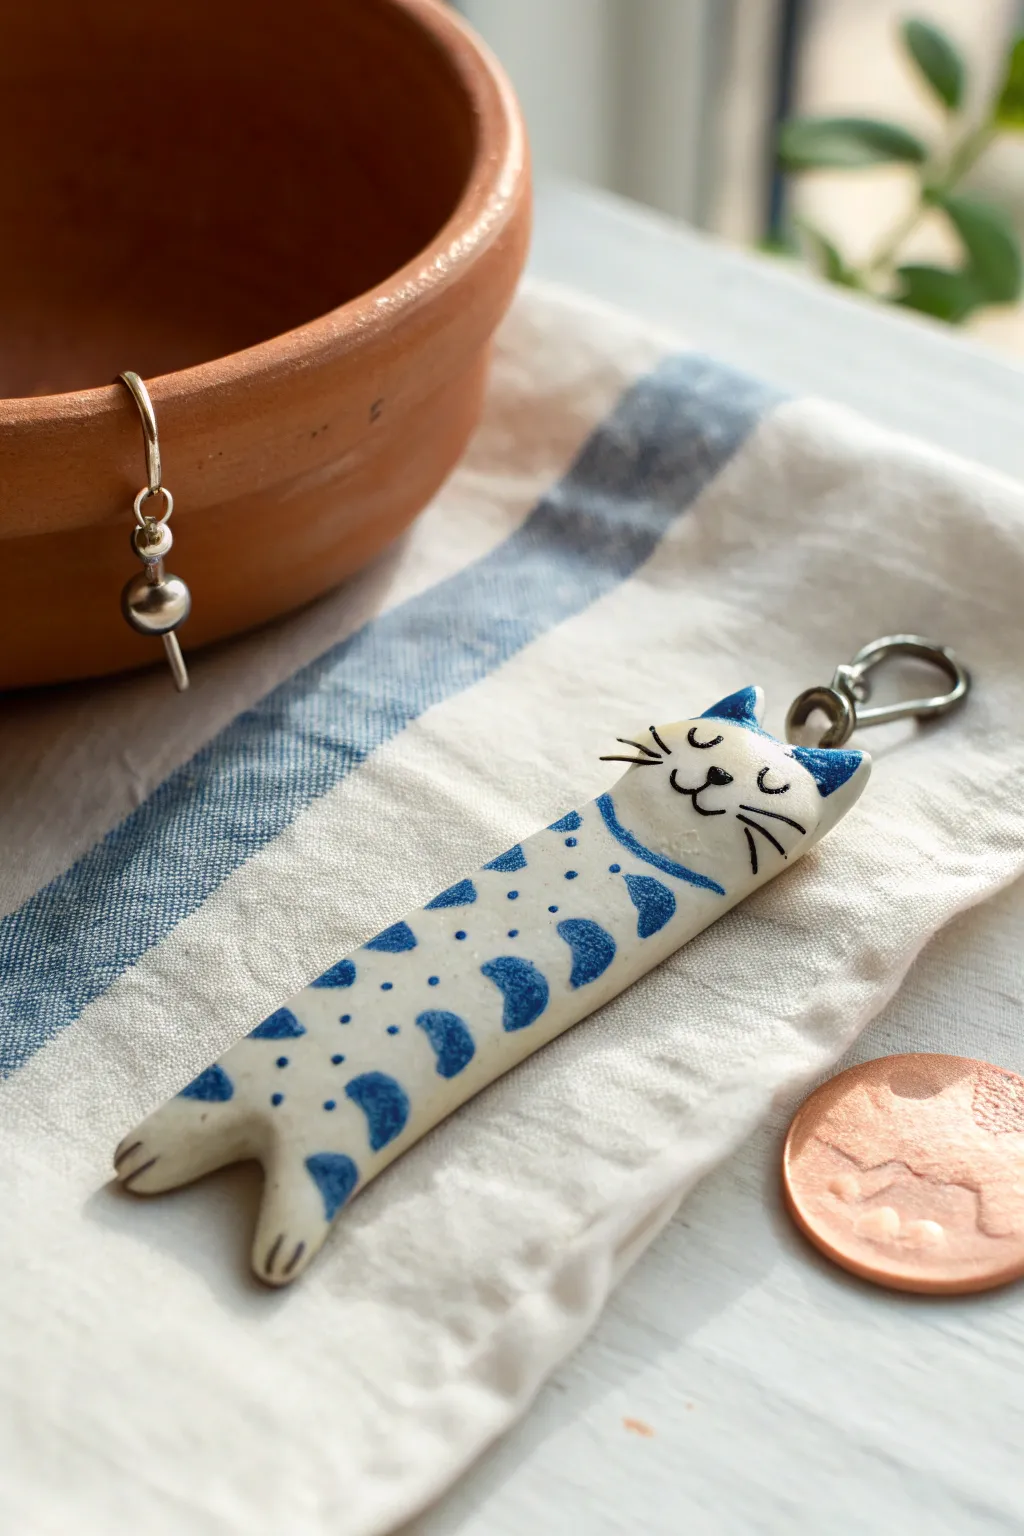
Capture the essence of a feline mid-stretch with this adorable, elongated clay charm. Featuring a simple white body decorated with charming blue spots and a sweet sleeping face, this project is perfect for beginners wanting to make a quirky keychain or pendant.
Step-by-Step Tutorial
Materials
- White polymer clay
- Acrylic rolling pin or smooth jar
- Ceramic or craft knife
- Small eye screw (silver)
- Jump ring and lobster clasp
- Blue acrylic paint (custom mix: cobalt with a touch of white)
- Black acrylic paint or fine-tip permanent marker
- Fine detail paintbrush (size 0 or 00)
- Glaze or polyurethane varnish (glossy or satin)
- Needle tool or toothpick
- Sandpaper (fine grit, optional)
Step 1: Shaping the Base
-
Condition the clay:
Start by warming a chunk of white polymer clay in your hands. Knead it thoroughly until it is soft, pliable, and free of any air bubbles. -
Roll a log:
Roll the clay into a smooth cylinder, then gently elongate it into a sausage shape. Aim for a thickness of about 1/4 inch (6mm) to ensure durability. -
Flatten and smooth:
Using your acrylic roller, gently flatten the log into a long, rectangular slab with rounded edges. It should look like a flattened finger, maintaining that uniform thickness. -
Form the ears:
At the top end, use your craft knife or fingers to gently pinch and pull the clay to form two small, triangular ears. Smooth the transition so they look like part of the head, not attached separately. -
Create the legs:
At the bottom end, use a craft knife to cut a small inverted ‘V’ shape into the center. Gently separate the two resulting sections and round off the tips to create cute little hind legs. -
Insert hardware:
Take your small metal eye screw and carefully twist it into the top of the head, right between the ears. I find twisting it in slightly, removing it, adding a dab of liquid clay or bake-and-bond, and re-inserting it ensures a secure hold. -
Smooth imperfections:
Dip your finger in a little bit of water (or baby oil if the clay is sticky) and gently run it over the surface to remove any fingerprints or dust specks. -
Bake:
Place your cat on a foil-lined baking sheet or a ceramic tile. Bake according to your clay manufacturer’s specific instructions (usually 275°F/135°C for 15-30 minutes).
Step 2: Painting & Finishing
-
Cool and prep:
Let the clay cool completely before painting. If there are any rough edges, lightly buff them with fine-grit sandpaper. -
Paint the ears:
Using a fine brush and your blue paint, carefully fill in the triangle shape of the ears. A slightly watered-down acrylic flows better into the clay pores. -
Add the collar:
Paint a thin, curved blue line across the neck area to simulate a collar. You can add a tiny dot in the center for a tag if you wish. -
Create the pattern:
Dab irregular blue spots down the length of the body. Vary the sizes—some large kidney bean shapes near the edges and smaller dots in the center create a nice organic look. -
Paint the paws:
Don’t forget to add a touch of blue to the very tips of the hind legs to match the spotted theme. -
Draw the face:
Once the blue paint is dry, use black paint or a fine-tip marker to draw two ‘U’ shapes for sleeping eyes, a tiny triangular nose, and a ‘W’ mouth. Add three whiskers on each side. -
Add paw details:
Draw two tiny lines on each hind paw to suggest toes. -
Seal the charm:
Apply a coat of glaze or varnish over the entire piece. This protects the paint from chipping and gives the charm a professional finish. -
Attach findings:
Open a jump ring with pliers, loop it through the eye screw, attach your lobster clasp or keyring, and close the ring securely.
Clean Clay Tip
White clay picks up dust instantly. Work on a clean surface and wipe your hands with a wet wipe before starting to keep your ‘Long Cat’ distinctively bright.
Hardware Loose?
If the eye screw feels loose after baking, unscrew it, add a drop of super glue into the hole, and screw it back in immediately for a permanent bond.
Now you have a charming, elongated feline friend ready to hang on your bag or keys
Over-the-Shoulder Look Cat
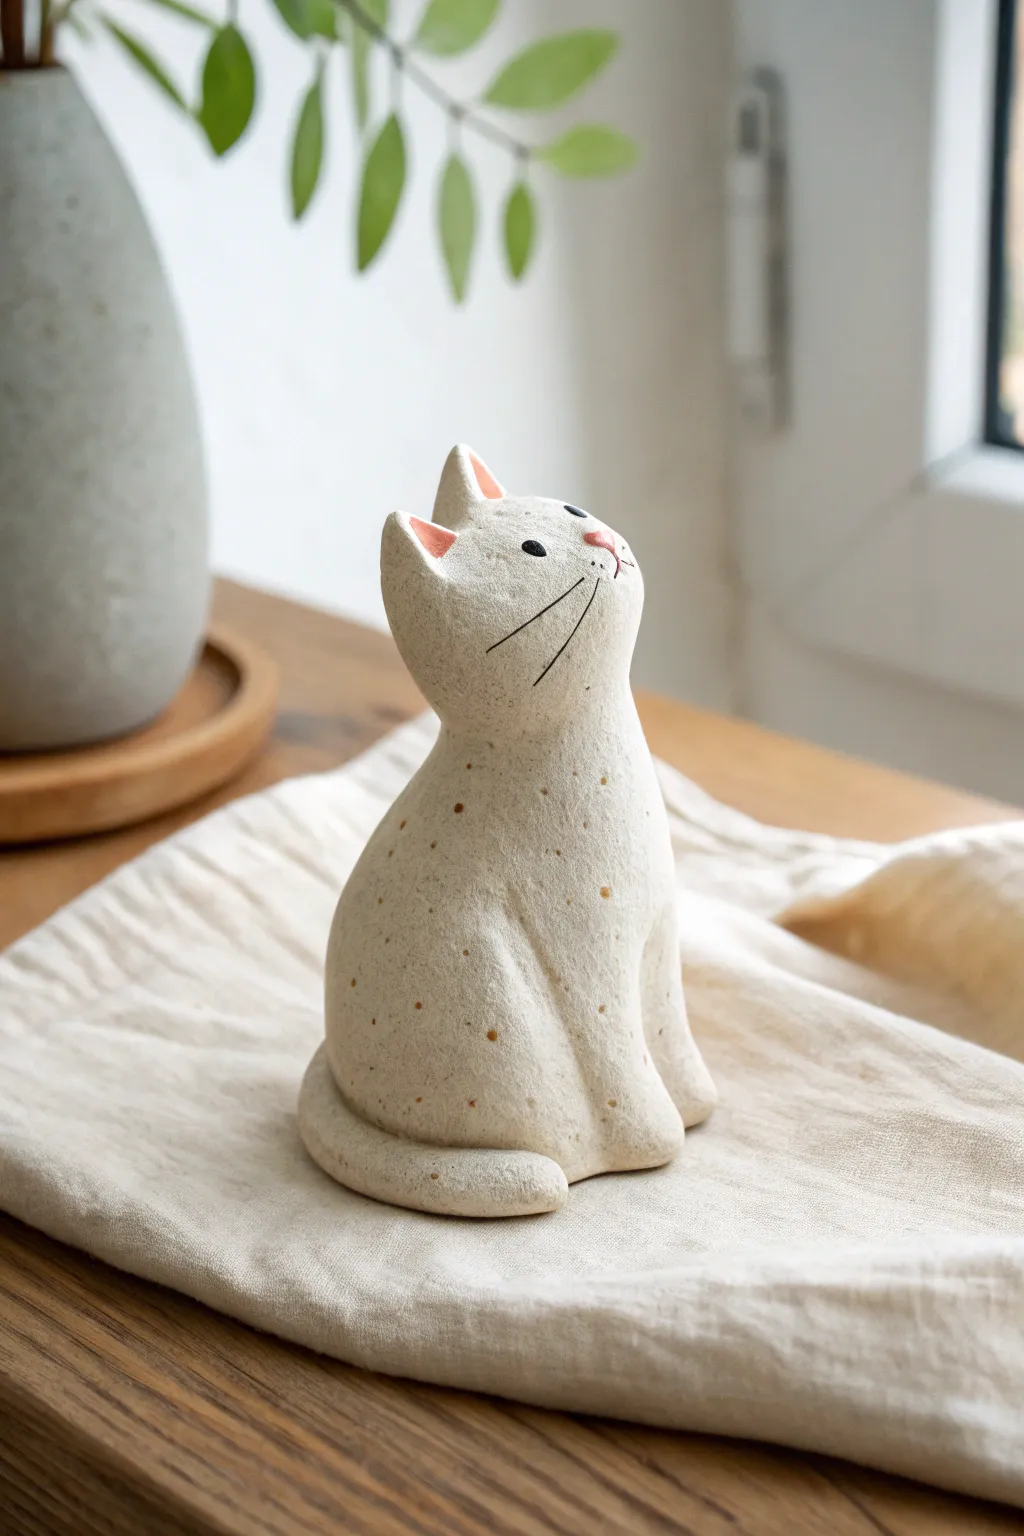
This charming, minimalist cat sculpture captures a sweet moment of curiosity with its head tilted upward. The natural speckling and soft matte finish give it a modern, organic feel perfect for any shelf decor.
How-To Guide
Materials
- White or beige air-dry clay (stone effect preferred, or plain)
- Speckled clay additive (e.g., fine sand, coffee grounds, or pre-mixed speckled clay)
- Small cup of water
- Modeling tools (or a toothpick and a dull knife)
- Fine-grit sandpaper
- Black acrylic paint or fine-tip permanent marker
- Soft pink acrylic paint
- Fine detail paintbrush
- Matte varnish or sealant
Step 1: Shaping the Base Form
-
Prepare the clay:
Start by conditioning your clay. If you are using plain white clay and want the speckled look shown, knead in a small pinch of fine sand, dry used coffee grounds, or cracked pepper until evenly distributed. -
Form the body cone:
Roll a ball of clay roughly the size of a tangerine. Gently roll it on your work surface into a tall, smooth cone shape with a wide, stable base. -
Create the head:
Roll a second, smaller ball for the head. It should be slightly flattened, resembling a marshmallow. Attach this to the top of your cone. -
Blend the neck:
Using your thumb or a smoothing tool, drag clay from the neck area down into the body and up into the head to create a seamless connection. I prefer to keep the neck somewhat thick to support the head’s pose. -
Pose the cat:
Gently tilt the head upwards and rotate it slightly to the left to create that distinctive ‘looking up’ posture. Smooth out any wrinkles formed by the movement.
Step 2: Adding Features and Details
-
Shape the ears:
Pinch two small triangles of clay. Attach them to the top of the head using a bit of water (slip) to act as glue. Blend the seams carefully so they look like they grew from the head. -
Define the front legs:
Instead of adding separate legs, use a modeling tool to carve gentle vertical grooves into the front of the body cone. This suggests the front paws are sitting together neatly. -
Create the tail:
Roll a long snake of clay. Attach one end to the lower back of the cone and wrap it around the base of the cat towards the front paws. -
Refine the tail:
Blend the glazes where the tail attaches to the body so it looks seamless, but leave the tip of the tail distinct resting near the feet. -
Smooth everything:
Dip your finger in water and run it over the entire sculpture to remove fingerprints and ensure a soft, organic surface texture. -
Let it dry:
Allow the sculpture to dry completely. This usually takes 24-48 hours depending on humidity. Rotate it occasionally so the bottom dries evenly.
Natural Texture Hack
To get those tiny speckles without buying special clay, knead in used (dried) coffee grounds or cracked black pepper before sculpting.
Step 3: Painting and Finishing
-
Sand for smoothness:
Once fully dry, use fine-grit sandpaper to gently buff away any rough spots or bumps, paying attention to the ears and the base. -
Paint the inner ears:
Mix a very soft, dusty pink color. Using your smallest brush, paint the triangular insides of the ears. -
Add the nose:
With the same pink paint, dab a tiny, inverted triangle or oval onto the center of the face for the nose. -
Draw the eyes:
Using a fine-tip black marker or black paint, place two small dots for eyes. Position them slightly wide apart to enhance the cute, innocent expression. -
Add the whiskers:
Very carefully draw three thin lines on each cheek for whiskers. Keep your hand steady and use quick, light strokes. -
Create the mouth:
Draw a tiny vertical line descending from the nose, curving slightly at the bottom to suggest a mouth. -
Seal the piece:
Apply a coat of matte varnish to protect the paint and clay. A matte finish is crucial here to maintain the natural, stone-like aesthetic.
Make It a Trio
Create two more cats in different sizes: a taller ‘parent’ and tiny ‘kitten.’ Pose their heads so they are all looking at each other.
This serene little cat is now ready to sit faithfully on your desk or windowsill
Tiny Clay Cat Face Beads
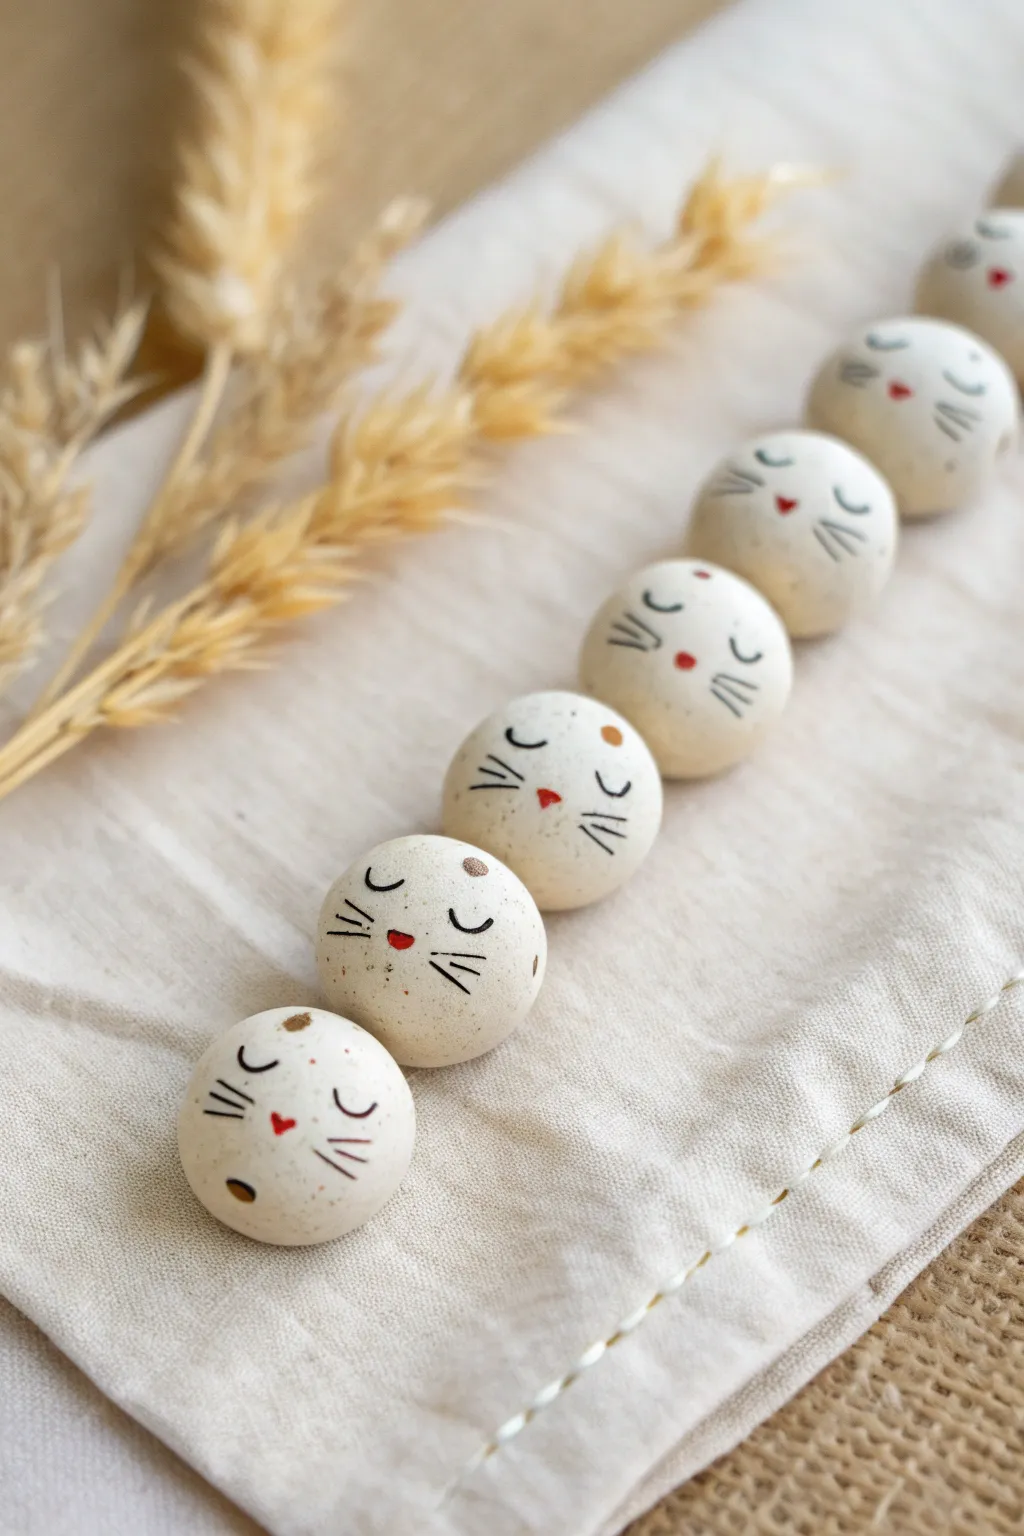
These charming little beads feature serene sleeping cat faces painted on speckled, cream-colored clay spheres. They are perfect for stringing into a unique necklace or adding a touch of feline grace to your macrame projects.
Step-by-Step Tutorial
Materials
- Polymer clay (white and translucent or pre-mixed granite/speckled beige)
- Ground black pepper or dried tea leaves (if making custom speckles)
- A bead piercing tool, toothpick, or thick needle
- Fine grit sandpaper (400-600 grit)
- Black acrylic paint or a fine tip permanent marker
- Red acrylic paint
- Very fine detail paintbrush (size 00 or smaller)
- Matte or satin varnish
- Oven for baking
- Ceramic tile or baking sheet
Step 1: Preparing the Speckled Base
-
Mix the clay:
Start by conditioning your white polymer clay until it is soft and pliable. To achieve that organic, stone-like speckled look seen in the photo, mix in a very small amount of translucent clay. -
Add texture:
Sprinkle a tiny pinch of ground black pepper or finely crushed dried tea leaves into the clay. Fold and knead the clay repeatedly until the specks are distributed evenly throughout the batch. -
Portion the clay:
Roll the clay into a log and slice it into equal segments to ensure your beads are all the same size. -
Roll spheres:
Roll each segment between your palms to form a smooth, tight ball. Aim for a diameter of about 1.5 to 2 centimeters. -
Create the hole:
Gently pierce the center of each sphere with your bead tool or toothpick. Rotate the tool as you push through to prevent flattering the bead’s shape. -
Refine the shape:
Once pierced, lightly roll the bead between your fingers again to smooth out any distortion around the hole openings.
Keeping It Round
To prevent flat spots while baking, nestle your raw beads into a bed of cornstarch or baking soda on the tray.
Step 2: Baking and Smoothing
-
Bake carefully:
Place your beads on a ceramic tile or a parchment-lined baking sheet. Bake according to your clay manufacturer’s instructions, usually around 275°F (135°C) for 30 minutes. -
Cool down:
Let the beads cool completely inside the oven or on a wire rack before handling them further. -
Light sanding:
Using fine-grit sandpaper, gently buff the surface of each bead. This removes fingerprints and creates a receptive surface for the paint.
Make It a Charm
Add tiny triangles of clay to the top before baking to create literal ears for a more sculptural cat shape.
Step 3: Painting the Faces
-
Plan the face:
Identify the ‘front’ of your bead. The hole should run horizontally through the sides, acting as the ears’ position if you were to add them, though here the bead shape simplifies the concept. -
Paint the nose:
Dip the very tip of your detail brush into red acrylic paint. Place a tiny, upside-down triangle or heart shape in the exact center of the bead’s face. -
Add sleeping eyes:
Using black paint or a fine marker, draw two small ‘U’ shapes on either side of the nose. Keep the lines thin and delicate to capture that peaceful, sleeping expression. -
Draw whiskers:
I find it helps to anchor your pinky on the table for stability here. Paint three short, straight lines radiating outward from each cheek area. -
Optional details:
If you like, add a tiny dot or distinct spot on the forehead or near an ear area using a light brown or grey paint for extra character. -
Seal the work:
Once the paint is thoroughly dry, apply a thin coat of matte or satin varnish to protect the design and give the bead a finished look. -
String them up:
Allow the varnish to cure fully before stringing your new cat faces onto cord or wire.
You now have an adorable set of custom beads ready to bring a smile to anyone who sees them
Cat Ring Dish With Tail Rim
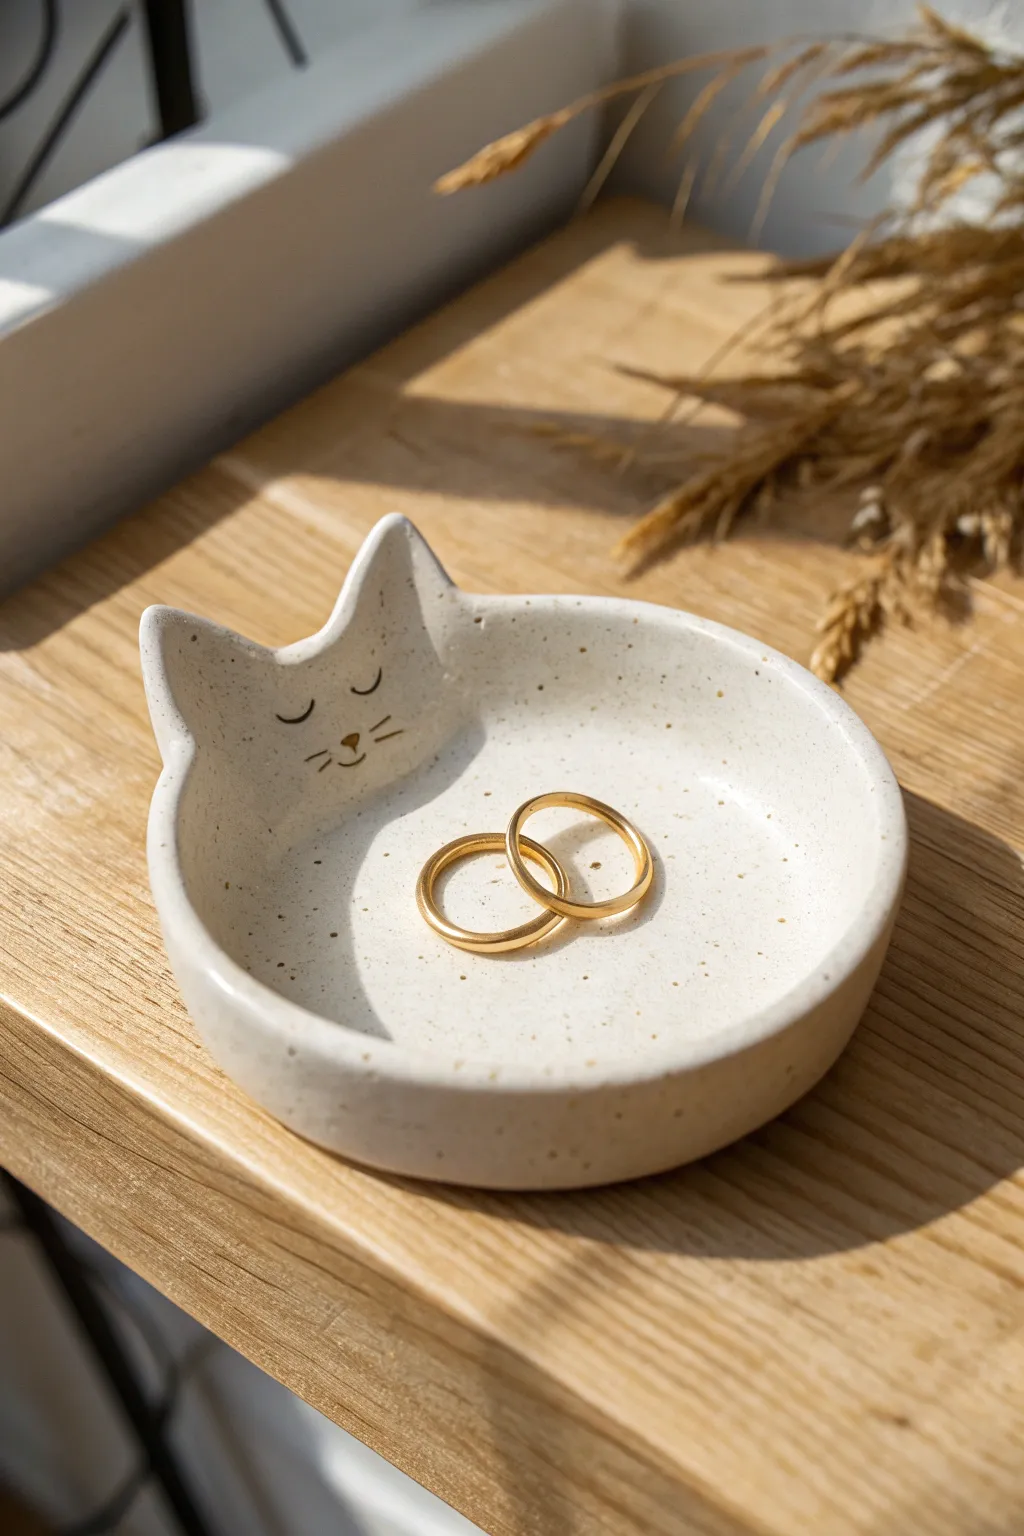
Capture the charm of a feline friend with this sleek, handcrafted ring dish. Featuring a minimalist sleeping cat face and a speckled stone finish, this small ceramic piece is perfect for safeguarding your favorite jewelry on a bedside table.
Step-by-Step
Materials
- Air-dry clay (white or light grey)
- Rolling pin
- Bowl of water
- Clay knife or craft knife
- Needle tool
- Fine-grit sandpaper
- Acrylic paints (black, gold/bronze)
- Fine detail paintbrush (size 0 or 00)
- Gloss varnish or clear sealant
- Medium round bowl or cup (about 4-5 inches diameter) for template
- Sponge
Step 1: Shaping the Base
-
Prepare the clay:
Start by taking a handful of white air-dry clay. Knead it thoroughly in your hands until it becomes warm, pliable, and free of any air bubbles. -
Roll it out:
On a clean, flat surface, roll the clay into a slab approximately 1/4 inch thick. Aim for an even thickness throughout to prevent warping during drying. -
Trace the circle:
Place your round bowl or cup upside down onto the clay slab to use as a template. Lightly trace around it with a needle tool to mark a perfect circle, but don’t cut all the way through yet. -
Add the ears:
Before cutting, freehand two triangular ear shapes extending from the top edge of your traced circle. Make them slightly rounded at the tips for a softer look. -
Cut the shape:
Using your craft knife, carefully cut out the entire silhouette, including the circular body and the attached ears. -
Smooth the edges:
Dip your finger in a little water and run it along the cut edges to smooth out any roughness or sharp debris from the cutting process.
Cracks Appearing?
If small hairline cracks appear while drying, mix a small amount of clay with water to create a paste (slip) and fill them in. Smooth over with a finger and let dry again.
Step 2: Forming the Dish
-
Create the curve:
Gently lift the clay shape and place it into a slightly larger bowl that will act as a mold. Press it down gently so the clay takes on a concave, dish-like curve. -
Refine the walls:
While it’s in the drying mold, use a damp sponge to smooth the interior surface again. Ensure the ears are curving upward slightly with the rest of the rim. -
Initial drying:
Let the dish sit in the mold for about 24 hours until it holds its shape firmly. I like to rotate it occasionally to ensure air reaches all sides. -
Remove and dry completely:
Remove the dish from the mold and place it on a wire rack. Allow it to dry for another 24-48 hours until it is bone dry and chalky white.
Step 3: Sanding and Decoration
-
Sand until smooth:
Once fully dry, use fine-grit sandpaper to gently buff the entire surface. Pay special attention to the rim and the tips of the ears to make them buttery smooth. -
Create the speckles:
To mimic the speckled ceramic look, dilute a tiny drop of brown or black paint with water. Flick the bristles of a toothbrush or stiff brush over the dish to create a fine mist of speckles. -
Sketch the face:
Lightly sketch the sleeping eyes, nose, and whiskers with a pencil. Center the face so the ears frame it nicely. -
Paint the details:
Using your finest detail brush and black acrylic paint, trace over your pencil lines for the eyes and whiskers. Use a steady hand and very little paint. -
Add the nose:
Paint a small, inverted triangle for the nose using gold or bronze paint to give it a sweet metallic accent. -
Seal the piece:
Apply two coats of gloss varnish or clear sealant to the entire dish. This protects the paint and gives it that professional, fired-ceramic shine.
Pro Tip: Weighted Drying
To prevent the bottom from puffing up while drying in the mold, place a small, smooth stone or weight in the center of the dish. This ensures the base stays flat for rings.
Now you have an adorable spot to keep your treasures safe and sound
Mini Cat Planter With Pointy Ears

This adorable mini planter perfectly captures the sweet nature of a sleepy cat, complete with perky ears and a speckled terracotta belly. The smooth, glazed top half contrasts beautifully with the warm, dotted base, making it an ideal home for your favorite little succulent.
Detailed Instructions
Materials
- White or speckled stoneware clay
- Rolling pin
- Circle cutter (approx. 3-4 inches diameter)
- Fettling knife or craft knife
- Scoring tool or old toothbrush
- Slip (clay and water mixture)
- Small sponge
- Underglaze (black and terracotta/rust orange)
- Fine detail brush
- Clear glaze (matte or glossy)
- Cylindrical form (like a sturdy cardboard tube)
Step 1: Forming the Body
-
Roll the slab:
Begin by rolling out your clay to an even thickness of about 1/4 inch. If you are using speckled clay, you’ll naturally get those lovely little dark spots seen in the original, but plain white clay works too. -
Cut the base:
Cut a circle for the base of your planter using your cutter or by tracing a round object. -
Cut the cylinder wall:
Measure the circumference of your base circle. Cut a rectangular strip of clay that matches this length plus a little extra for overlap, and stands about 3 inches tall. -
Form the cylinder:
Score the short ends of your rectangle, apply a dab of slip, and wrap it around your cylindrical form or just curve it by hand to create a tube. -
Seal the seam:
Press the overlapped ends together firmly. I like to use a wooden tool to blend the clay across the seam on both the inside and outside until the join is invisible. -
Attach the base:
Score and slip the bottom edge of your cylinder and the outer edge of your base circle. Press them together, blending the clay downwards from the wall to the base to create a seamless seal.
Smooth Seams
When joining the pot walls, support the clay wall from the inside with one hand while smoothing the outside with the other to prevent the pot from collapsing.
Step 2: Sculpting the Cat Features
-
Shape the rim:
Gently smooth the top rim of the pot with a damp sponge so it is rounded and inviting, rather than sharp. -
Create the ears:
From your clay scraps, cut two small triangles. Gently pinch the centers to curve them slightly, mimicking a cat’s ear shape. -
Attach the ears:
Select the ‘front’ of your pot. Score and slip the bottom of the ears and the rim where they will sit. Press them on firmly, ensuring they poke up alertly. -
Blend the ears:
Use a small modeling tool to blend the clay at the base of the ears into the rim, making them look like they grew naturally from the pot rather than just being stuck on. -
Smooth everything:
Give the entire piece a final pass with a slightly damp sponge to remove fingerprints. -
Bisque fire:
Let the pot dry slowly to the bone-dry stage, then bisque fire it in the kiln according to your clay’s specifications.
Step 3: Painting and Glazing
-
Paint the belly:
Mix a terracotta or rust-orange underglaze. Paint the bottom half of the pot, creating a slight curve in the line so it looks like a dipped design. -
Detail the ears:
Using the same orange color, carefully paint triangles on the front face of the ears to define the inner ear area. -
Add the spots:
Dip the non-brush end of a small paintbrush into white underglaze (or wax resist if you want the raw clay to show) and dot specific patterns onto the orange belly section. -
Draw the face:
Using a very fine liner brush and black underglaze, paint two curved lines for sleeping eyes. Add a small inverted triangle nose and long, straight whiskers extending outward. -
Add the mouth:
Paint a tiny vertical line down from the nose, splitting into a small inverted ‘V’ to create the classic cat mouth. -
Clear glaze:
Once the underglazes are dry, dip the entire pot into a clear glaze. A matte glaze gives a modern look, while glossy will make the colors pop. -
Final fire:
Fire the piece again to the maturation temperature of your glaze and clay.
Make It a Mug
Add a handle to the back before firing to turn this planter into an adorable sleepy cat mug for your morning coffee.
Pop in a small rosette succulent to complete the look of a flowery crown for your kitty
Moon-Sitting Astronaut Cat
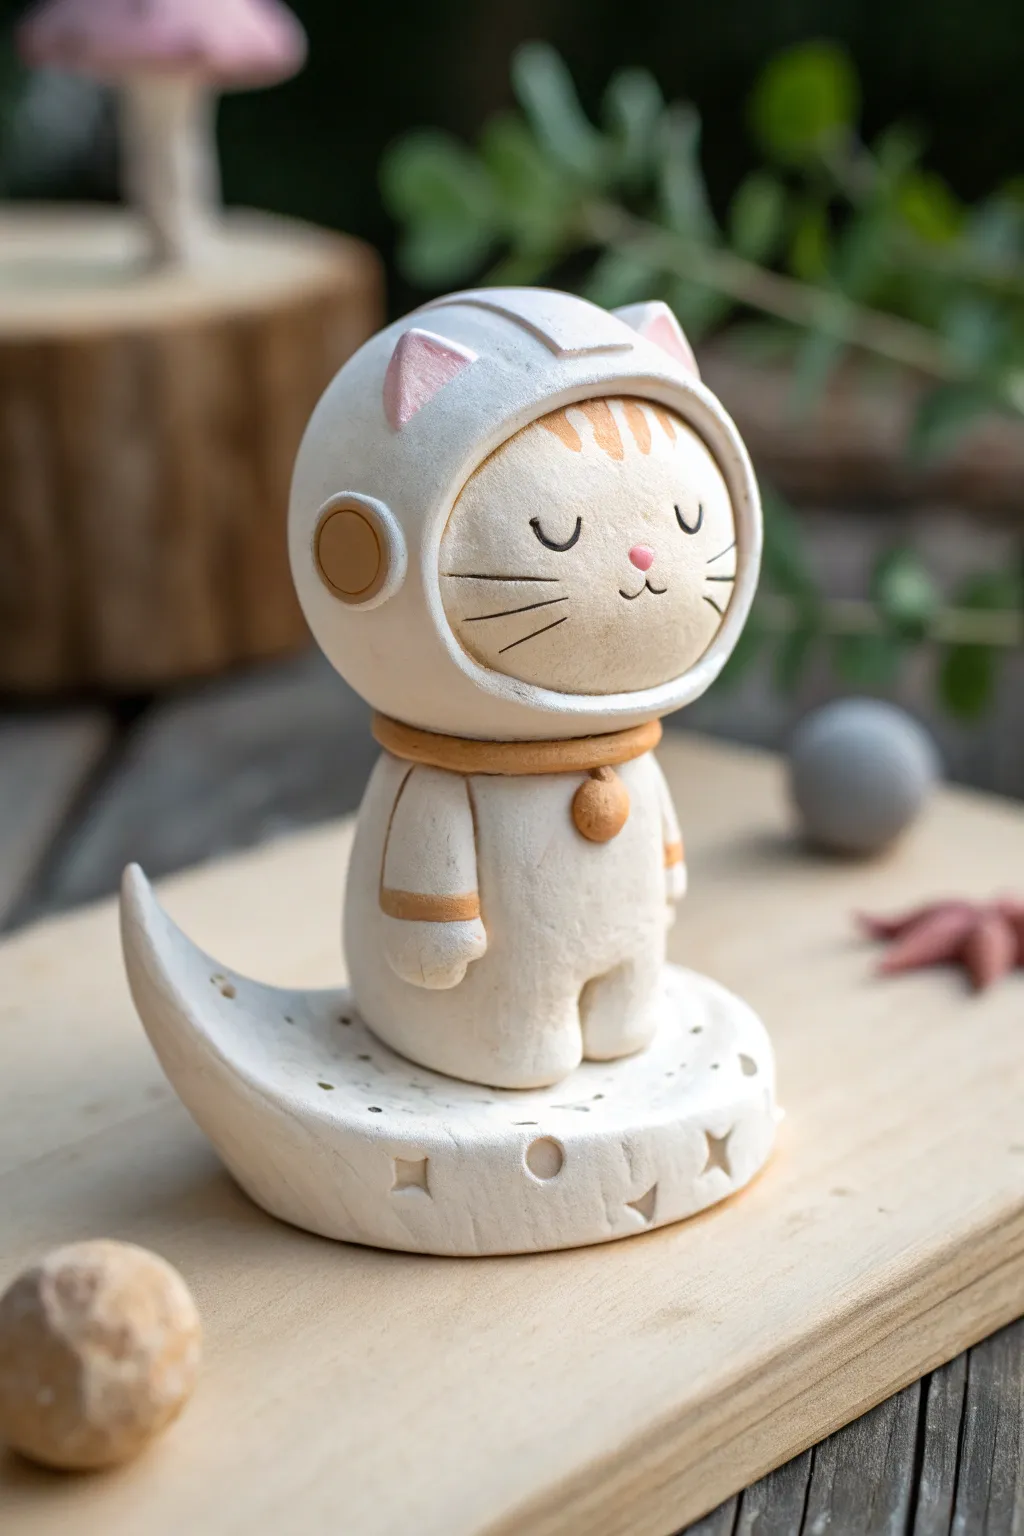
Blast off into cuteness with this adorable clay project featuring a serene cat astronaut perched atop a crescent moon. Its soft, rounded forms and simple painted details make it a perfect charming addition to any desk or shelf.
Step-by-Step Tutorial
Materials
- White polymer clay or air-dry clay
- Light orange or peach clay (for details)
- Sculpting tools (needle tool, ball stylus)
- Acrylic paints (black, pink, white)
- Fine detail paintbrush
- Circle cutter
- Aluminum foil (for armature)
- Matte varnish or sealant
Step 1: Forming the Celestial Base
-
Shape the moon core:
Start by rolling a thick log of white clay. Gently taper the ends to create points and curve the entire shape into a crescent moon. -
Refine the curve:
Press the crescent gently onto your work surface so the bottom flattens slightly; this ensures your finished piece won’t wobble. -
Add texture:
Using a small ball tool or the end of a paintbrush, press subtle craters into the moon’s surface. You can also lightly carve star shapes or small diamonds for extra galactic flair.
Gravity Issues?
If the head feels too heavy while sculpting, insert a toothpick or short wire armature through the body and into the head for internal support.
Step 2: Suit Up: The Body and Head
-
Create the torso:
Roll a smooth, sturdy cylinder of white clay for the astronaut suit’s body. Press it gently onto the center of the crescent moon to adhere. -
Form the legs:
Make two short, thick logs for legs. Attach them to the front bottom of the body, smoothing the seams so they look like a continuous part of the suit rather than separate pieces. -
Sculpt the arms:
Create two smaller sausage shapes for arms. Attach them to the sides of the body, keeping them straight down for a relaxed posture. Add a thin strip of orange clay around the cuffs for detail. -
Make the helmet base:
Roll a large sphere of white clay for the helmet. This needs to be significantly bigger than the body to give it that cute, bobblehead proportion. Press it firmly onto the neck area. -
Hollow the visor:
Gently press a large circular indentation into the front of the helmet sphere to create the opening for the face. You want a distinct ridge around the edge of this circle.
Step 3: The Kitty Cosmonaut
-
Insert the face:
Roll a slightly flattened ball of cream or very light beige clay. Press this into the helmet indentation you just made, smoothing it until it fits snugly as the cat’s face. -
Add helmet ears:
Attach two small triangles of white clay to the top of the helmet. Indent the centers and fill them with tiny triangles of pink clay for the inner ear. -
Detail the suit:
Roll a thin snake of orange clay and wrap it around the neck effectively creating the collar. Add a small orange circle on the side of the helmet for a communication earpiece. -
Add the collar tag:
Place a tiny flattened ball of orange clay in the center of the collar to mimic a bell or name tag. -
Cure the clay:
Bake your polymer clay according to the package instructions (usually 275°F/130°C for 15-30 minutes) or let air-dry clay harden completely for 24-48 hours.
Galaxy Glow
Use glow-in-the-dark clay for the moon base or the helmet’s white parts. It creates a magical nightlight effect when the lights go out.
Step 4: Mission Details
-
Paint the expression:
Once fully cured and cool, use a tiny amount of black paint on a fine brush to draw two closed, U-shaped eyes for a peaceful sleeping look. -
Add facial features:
Paint a tiny pink nose in the center and draw a small ‘w’ mouth beneath turn it. Don’t forget three delicate black whiskers on each cheek. -
Stripe details:
I like to mix a watered-down orange paint to add three gentle tabby stripes on the cat’s forehead area. -
Seal the work:
Protect your astronaut with a coat of matte varnish. This keeps the clay looking soft and velvety while preventing the paint from scratching off.
Now your space explorer is ready to dream among the stars on your display shelf
Cozy Cat Night-Light Luminary
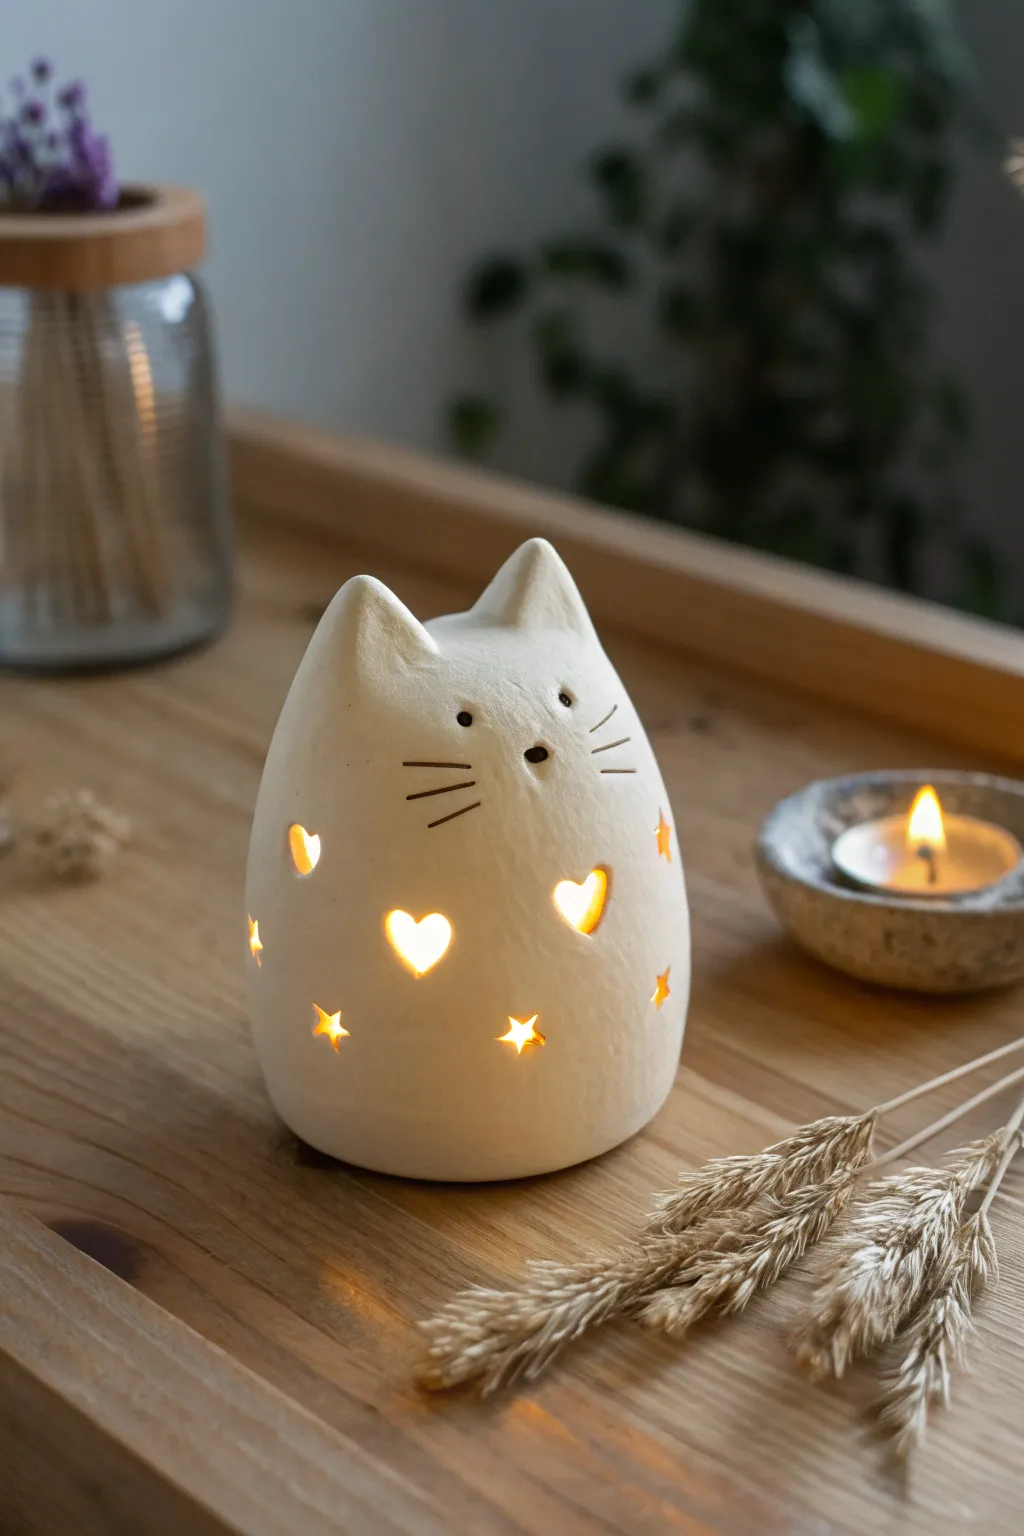
Bring a warm glow to your evenings with this adorable cat-shaped luminary, perfect for holding a flickering tea light. Its rounded form features cutout hearts and stars that cast magical shadows, making it a cozy addition to any shelf or bedside table.
How-To Guide
Materials
- White polymer clay or air-dry clay (approx. 500g)
- Small rolling pin
- Ball stylus tool or toothpick
- Small heart and star shaped cutters (mini fondant cutters work best)
- Needle tool or sharp craft knife
- Water and a small sponge (for smoothing)
- Black acrylic paint
- Fine detail paintbrush
- Fine-grit sandpaper
- Tea light candle (battery-operated recommended)
Step 1: Shaping the Form
-
Condition the clay:
Begin by kneading your clay thoroughly in your hands until it becomes warm, soft, and pliable. If you are using air-dry clay, keep your hands slightly moist to prevent cracking. -
Form the base shape:
Roll the clay into a smooth ball, then gently flatten the bottom on your work surface so it stands upright. Using your thumbs, begin to press into the center of the ball to create a hollow cavity, pinching the walls upwards similar to making a pinch pot. -
Establish the height:
Continue thinning and raising the walls until you have a domed, egg-like cylinder that is approximately 4-5 inches tall. Ensure the walls are an even thickness, about 1/4 inch, to support the cutouts later. -
Smooth the surface:
Use a damp sponge or your fingers to smooth out any fingerprints or bumps on the exterior. I like to spend a little extra time here to get that matte, flawless finish seen in the photo. -
Create the ears:
Pinch the top rim of your dome on the left and right sides to pull up two triangular shapes for the ears. Smooth the clay between them so the head has a natural curve.
Clean Cuts Hack
Wrap your clay loosely in cling film before pressing your cutters into it. When you lift the cutter, the film creates a soft, rounded edge, saving you lots of sanding time later.
Step 2: Adding Details & Cutouts
-
Draft the face:
Lightly mark the position of the eyes and nose with a needle tool to ensure symmetry before committing to the final marks. -
Punch the eyes and nose:
Using a medium-sized balled stylus or the back of a paintbrush, press firmly into the clay to create deep, small indentations for the eyes and a slightly larger oval for the nose. -
Carve the whiskers:
Use your needle tool to gently carve three straight lines on each cheek for whiskers. Don’t cut all the way through; just create a clean channel for paint later. -
Cut the hearts:
Take your mini heart cutter and press it into the belly of the cat to create windows for current light. Place them randomly but centrally. -
Cut the stars:
Using the star cutter, add smaller accents around the hearts and near the base. If the clay deforms slightly while cutting, use your finger to reshape the hole from the inside. -
Clean the edges:
If rough bits of clay remain around your cutouts, gently smooth them with a slightly damp brush or your finger.
Step 3: Finishing Touches
-
Drying or baking:
If using polymer clay, bake according to package instructions (usually 275°F for 15-30 minutes). If using air-dry clay, let it sit in a dry spot for 24-48 hours until completely hard and white. -
Sanding:
Once fully cured or dry, gently sand any rough spots, especially around the rim and base, using fine-grit sandpaper for a professional matte look. -
Paint the details:
Dip a very fine brush into black acrylic paint. Carefully fill in the indented eyes, nose, and whisker channels. Wipe away any excess immediately with a damp paper towel if you go outside the lines. -
Final wipe down:
Give the unpainted areas a quick wipe with a dry cloth to remove any sanding dust. -
Light it up:
Place a battery-operated tea light underneath or inside your new clay friend to see the shapes glow.
Collapsing Walls?
If the dome starts to sag while working, loosely crumple a ball of parchment paper or foil and place it inside the cavity to support the roof while it dries or bakes.
Now dim the lights and enjoy the cozy atmosphere created by your charming handmade luminary