Polymer clay is one of my favorite materials because it lets you make tiny, colorful, durable pieces that feel instantly satisfying. If you’re craving projects that look cool without being complicated, these ideas will keep your hands busy and your creativity humming.
Marbled Statement Earrings
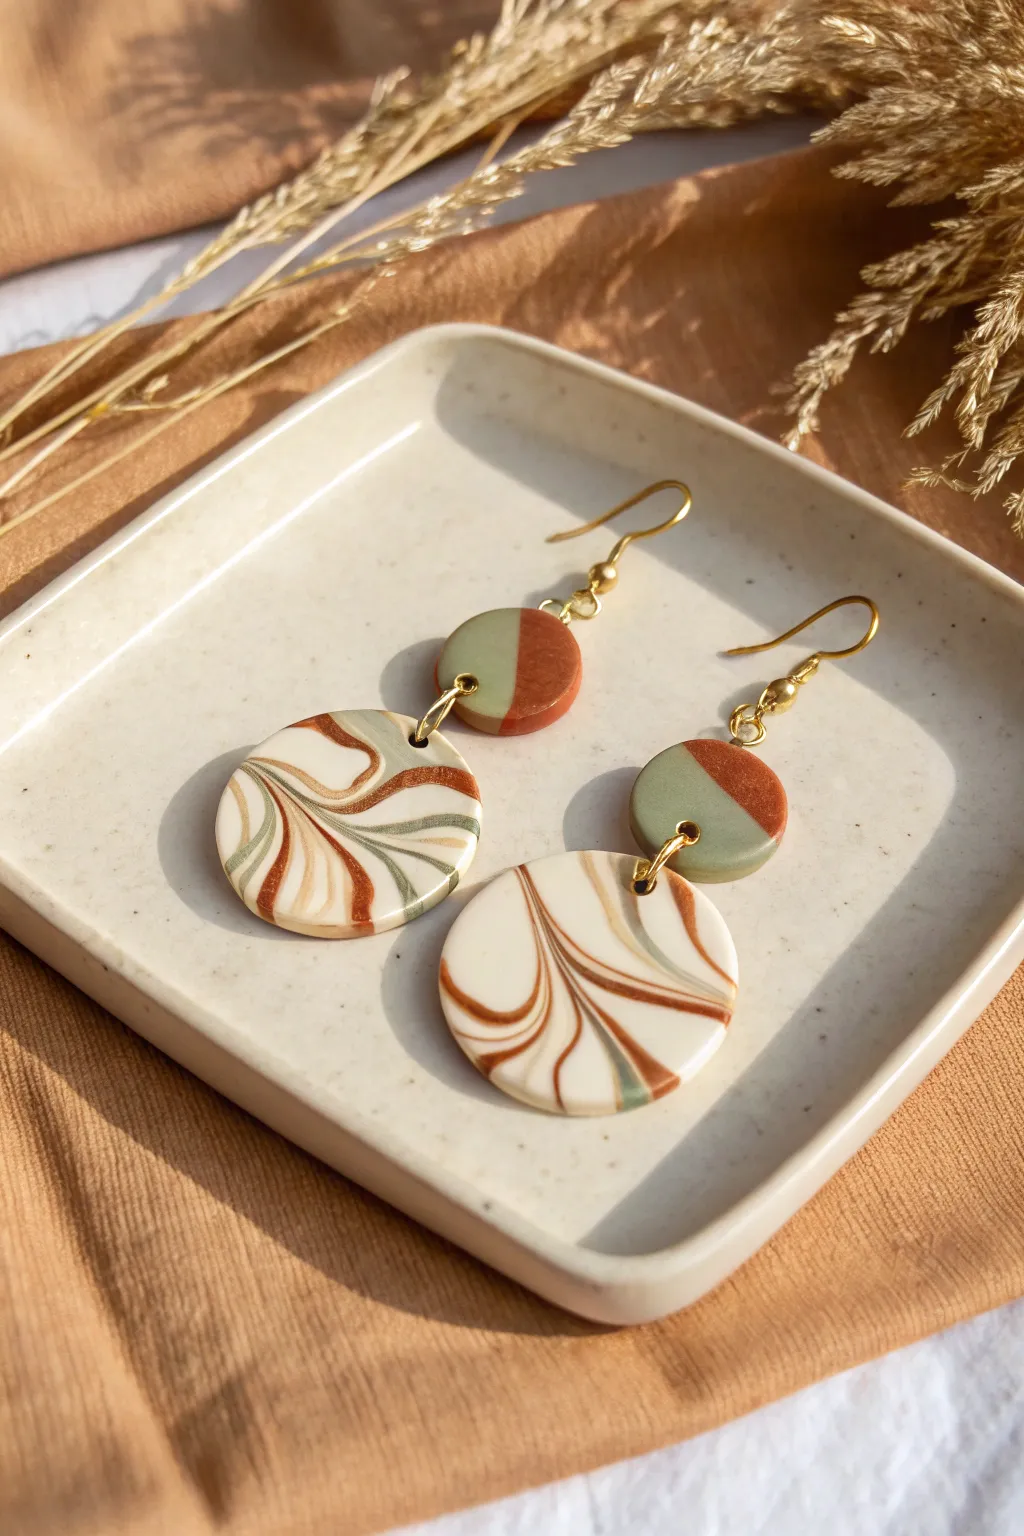
Embrace earthy elegance with these two-tone polymer clay statement earrings. The design pairs a simple half-moon stud with a mesmerically marbled drop featuring sophisticated swirls of sage, terracotta, white, and translucent clay.
Detailed Instructions
Materials
- Polymer clay in terracotta (burnt orange), sage green, white, and translucent
- Gold earring hooks (French hooks)
- Gold jump rings (6mm or 7mm)
- Small round clay cutter (approx. 10mm)
- Medium round clay cutter (approx. 25-30mm)
- Roller or pasta machine
- X-acto knife or tissue blade
- Hand drill or pin vibe
- Pliers (flat nose and chain nose)
- Parchment paper and baking sheet
Step 1: Preparing the Marbled Slab
-
Condition the clay:
Start by warming up your terracotta, sage, white, and translucent clay in your hands until they are soft and pliable. This conditioning is crucial to prevent cracking later. -
Create snakes:
Roll small snakes of each color. Since the predominant color in the marble is white, make the white snake thicker than the others. The terracotta and sage snakes should be thinner to act as accent veins. -
Combine into a bundle:
Gather your snakes together, twisting them gently into one large rope. Fold the rope in half, twist again, and roll it smooth on your work surface. -
Repeat the twist:
Repeat the twisting and folding process 2-3 times. Be careful not to over-twist, or the colors will blend into a muddy brown instead of distinct swirls. -
Ball it up:
Roll the twisted rope into a tight ball. This helps compress the lines and creates organic movement inside the clay. -
Roll the slab:
Using your acrylic roller or pasta machine, flatten the ball into a slab about 3mm thick. Look for the areas with the most interesting swirl patterns.
Step 2: Creating the Solid Studs
-
Prepare solid colors:
Roll out a small piece of pure sage green clay and a separate piece of terracotta clay to the same 3mm thickness as your marbled slab. -
Cut the join line:
Using your tissue blade, make a straight cut across both the green and terracotta pieces so you have flat edges to join. -
Fuse the seam:
Press the straight cut edge of the green clay against the straight cut edge of the terracotta clay. Gently push them together so they bond without distorting the shape too much. -
Smooth the connection:
To ensure a strong bond, I like to gently roll over the seam with the roller just once to level the surface.
Muddy colors?
If your marble looks grey or brown, you over-mixed. Stop twisting earlier next time. The distinct lines come from barely mixing the colors before rolling flat.
Step 3: Cutting and Baking
-
Cut the studs:
Position your small round cutter right over the seam line of your two-tone solid slab. Cut out two circles, ensuring each circle is half green and half terracotta. -
Cut the drops:
Using the medium round cutter, cut two circles from your beautiful marbled white slab. Try to capture a section that has nice streaks of both green and brown. -
Pierce holes:
If you are comfortable piercing raw clay, use a needle tool to poke holes near the top edge of the large circles, and both top and bottom edges of the small two-tone circles. -
Bake:
Place your pieces on a parchment-lined baking sheet. Bake according to your clay package instructions (usually 275°F/135°C for 15-30 minutes). -
Cool down:
Let the pieces cool completely on the tray before handling them, as warm clay is still fragile.
Make it Shine
After baking, sand the pieces with fine-grit sandpaper under water, then buff them with a soft cloth or apply a thin layer of UV resin for a high-gloss ceramic look.
Step 4: Assembly
-
Drill (if needed):
If you didn’t pierce holes before baking, use a hand drill to carefully make holes now. Remember the small top stud needs a hole at the top (for the hook) and bottom (for the drop). -
Open jump rings:
Use two pairs of pliers to twist open your gold jump rings. Always twist sideways, never pull them apart, to maintain the circle shape. -
Connect the pieces:
Slide a jump ring through the top of the marbled circle and the bottom of the two-tone stud. Close the ring securely. -
Attach hooks:
Open the loop on your earring hook (or use a small jump ring) and attach it to the top hole of the two-tone stud.
Wear your new earthy accessories with pride and enjoy the subtle movement of the swirls


Kawaii Animal Charm Keychains
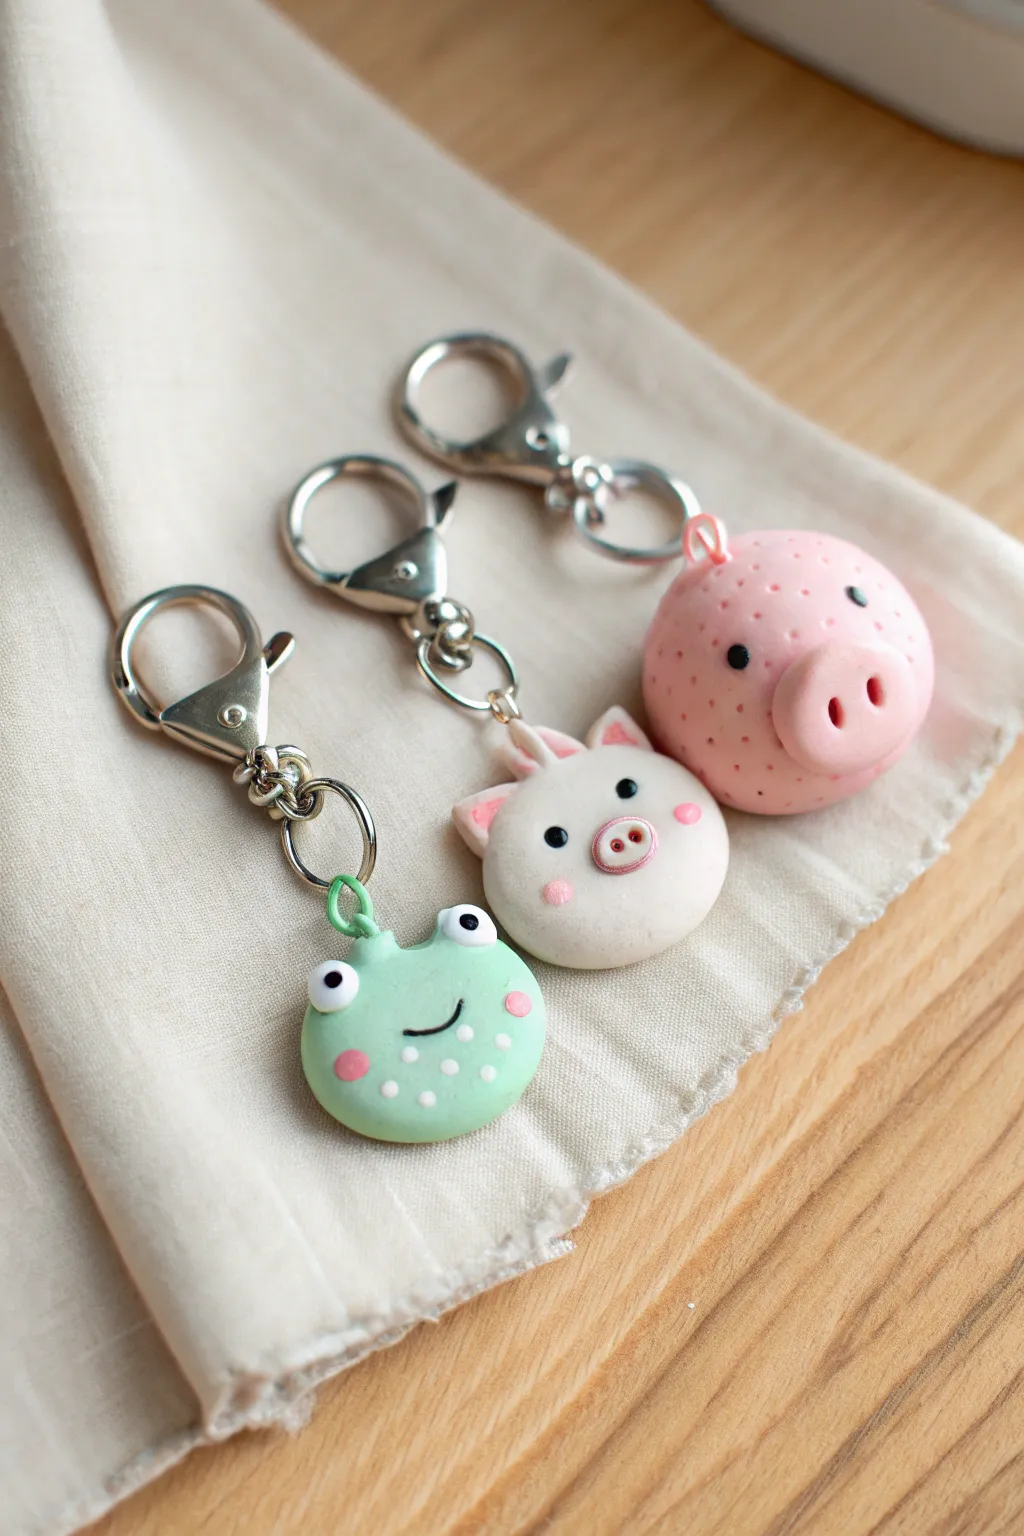
Brighten up your keyring with this adorable set of handmade polymer clay charms. Featuring a speckled frog, a blushing bunny, and a texturized pig, these chunky little friends are perfect for beginners looking to practice basic shaping and detailing techniques.
How-To Guide
Materials
- Polymer clay (Mint Green, White, Light Pink, Hot Pink, Black)
- Lobster clasp keychains in silver
- Jump rings and eye pins
- Dotting tools (various sizes)
- Needle tool or toothpick
- Polymer clay blade
- Gloss glaze or UV resin (optional)
- Oven for baking
Step 1: Shaping the Bases
-
Condition the Clay:
Begin by thoroughly kneading your mint green, white, and light pink clays until they are soft and pliable. This prevents cracks during baking. -
Form the Bodies:
Roll three balls of clay size of a large gum ball: one mint for the frog, one white for the bunny, and one pink for the textured pig. -
Flatten Slightly:
Gently press each ball down with the palm of your hand onto your work surface to create a thick, rounded disc shape—like a macaron cookie. -
Insert Eye Pins:
Trim your eye pins to about half an inch. Insert one into the top center of each clay disc. You may want to add a tiny dab of liquid clay or bake-and-bond on the wire for extra security.
Clean Clay Tip
White clay picks up lint instantly. Keep a pack of baby wipes nearby and wipe your hands and tools thoroughly before handling light colors.
Step 2: Creating the Frog
-
Add frog eyes:
For the frog (mint green base), roll two tiny white balls and press them onto the top edge of the head. Add infinitesimal black dots to the center for pupils. -
Detail the Smile:
Use a needle tool to gently imprint a wide, U-shaped smile. I like to press a tiny bit of black clay into this groove to make it pop. -
Apply Cheeks and Polka Dots:
Press two small pink circles onto the cheeks. Using a very small ball of white clay or white acrylic paint after baking, add a pattern of polka dots across the bottom half of the face.
Eye Pin Fell Out?
If the pin slides out after baking, put a drop of super glue on the wire stem and slide it back into the hole. It will hold permanently.
Step 3: Crafting the Bunny
-
Sculpt Ears:
Take two small teardrop shapes of white clay and flatten them. Press a smaller pink teardrop inside each one. Attach these ears to the top of the white base. -
Face Details:
Place two small black beads of clay for the eyes. For the nose, press a tiny pink oval in the center and use a needle tool to indent two nostrils. -
Blushing Cheeks:
Add two soft pink dots on either side of the nose to give the bunny a sweet, blushing expression.
Step 4: Detailing the Textured Pig
-
Make the Snout:
For the pink pig, create a slightly darker or thicker pink oval disc and press it onto the center of the face. Use a large dotting tool to create two deep nostril indentations. -
Add Eyes:
Place two small black clay balls wide apart, slightly above the snout line. -
Texturize the Surface:
This is the fun part: take a needle tool or small dotting tool and gently poke shallow holes all over the pink body (avoiding the snout) to create that unique, dimpled skin texture shown in the photo. -
Attach Loop:
Instead of an eye pin, this pig features a small clay loop. Roll a tiny snake of pink clay, fold it over, and blend it onto the top of the head.
Step 5: Finishing Up
-
Bake:
Bake your pieces according to the clay package instructions (usually 275°F/135°C for 15-30 minutes). -
Assembly:
Once cooled, use pliers to open the jump rings on your keychain hardware and attach them to the eye pins or clay loops. -
Glaze (Optional):
If you want a shiny finish or extra durability, apply a thin coat of polyurethane gloss or UV resin.
Enjoy clipping your new trio of friends onto your backpack or gifting them to someone special


Mini Dessert Stud Earrings
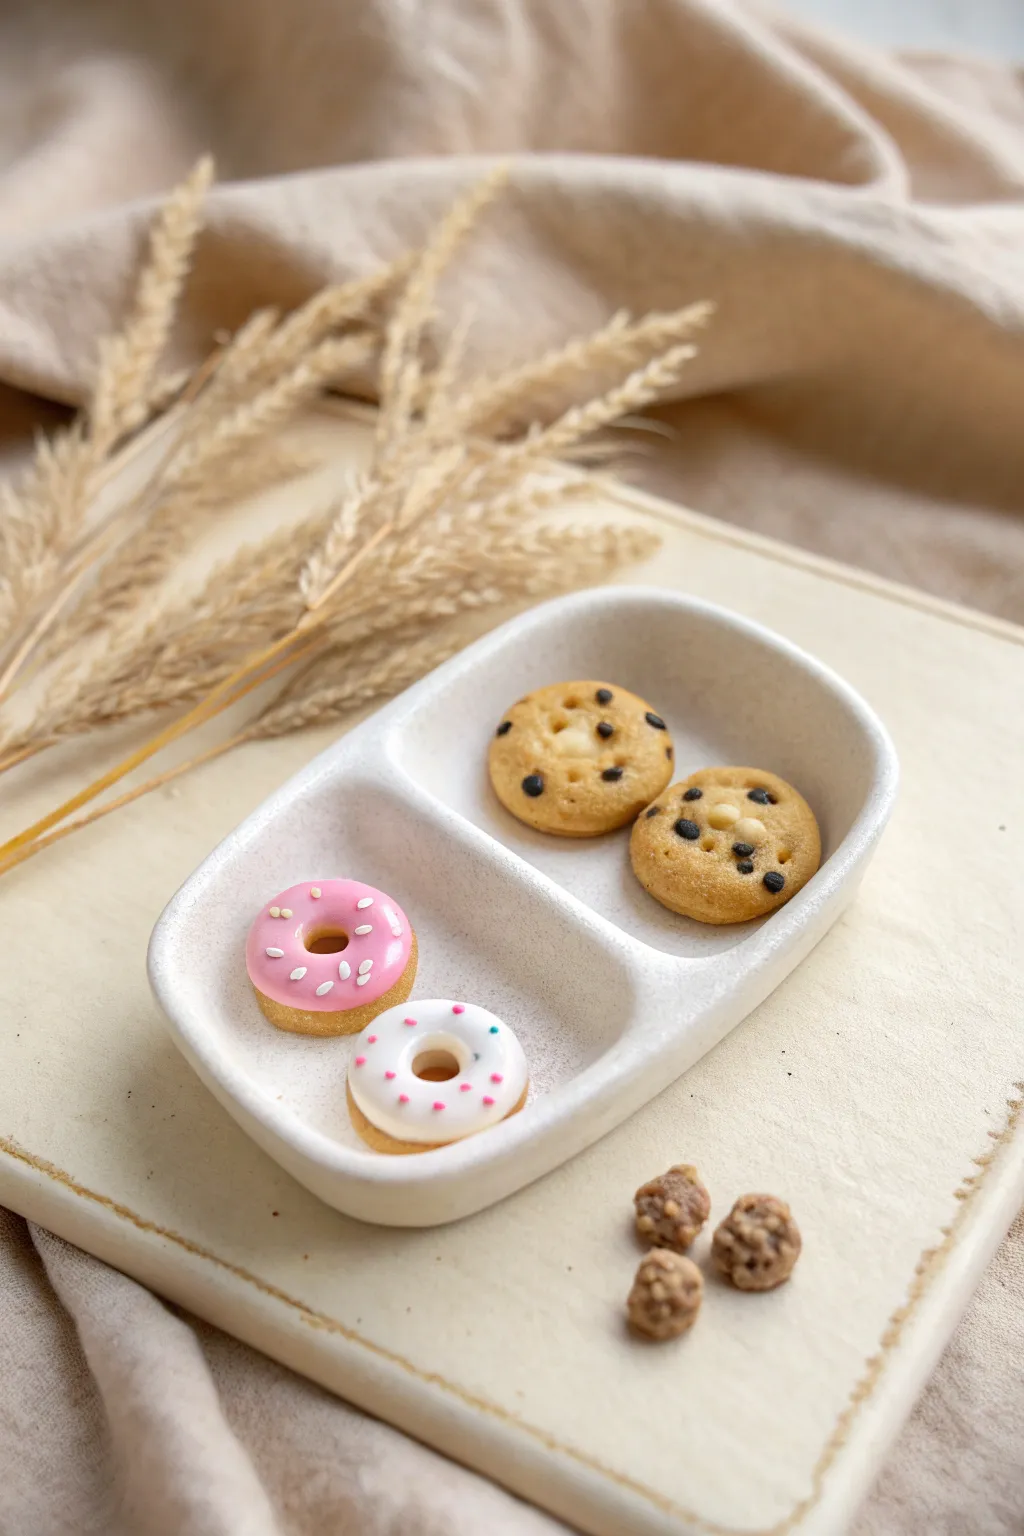
These adorable miniature desserts look good enough to eat but are perfectly sized for your ears. In this project, you’ll sculpt tiny chocolate chip cookies and glazed donuts with impressive realism using simple texturing techniques.
Step-by-Step
Materials
- Polymer clay (Tan/Beige, Dark Brown, White, Pink)
- Translucent liquid polymer clay (optional but recommended for glaze)
- Needle tool or toothpick
- Small ball tool
- Soft pastel chalks (Ochre, Brown) for shading
- Small paintbrush
- Earring posts and backs
- Strong craft glue (e.g., E6000) or UV resin
- Toothbrush or sandpaper (for texturing)
- X-acto knife or clay blade
Step 1: Baking the Batches
-
Mixing the dough color:
Start by mixing a light tan or beige polymer clay to create a realistic cookie dough and donut base color. If your tan looks too flat, knead in a tiny speck of translucent clay to give it depth. -
Shaping the cookies:
Roll two small balls of the tan clay, about 5-6mm in diameter, then gently press them flat with your finger to create thick discs. Keep the edges slightly rounded rather than sharp. -
Texturing the cookie surface:
Gently tap the surface of the flattened discs with a clean toothbrush or piece of sandpaper. This creates that crumbly, baked texture essential for realism. -
Adding chocolate chips:
Roll tiny, irregular snakes of dark brown clay and slice off minuscule bits. Press these randomly into the tops of your cookies. -
Adding macadamia nuts:
For the macadamia variation shown, take tiny bits of white or cream clay and press them into the center alongside the chocolate chips. -
Shading for a baked look:
Scrape a little brown and ochre pastel chalk into a powder. Use a dry brush to lightly dust the edges and tops of the cookies to make them look golden brown.
Sticky Situation?
If your clay gets too soft and sticky to handle, put it in the fridge for 10 minutes. This firms it up, making tiny details like sprinkles much easier to slice.
Step 2: Glazing the Donuts
-
Forming the donut base:
Roll two more balls of tan clay, similar in size to the cookies. Slightly flatten them into thick discs. -
Creating the hole:
Use a small ball tool or the smooth end of a paintbrush to press an indentation into the center. Then, push all the way through to create the classic ring shape, smoothing the hole’s edges. -
Adding texture:
Just like the cookies, lightly texture the tan part of the donut with your toothbrush to mimic fried dough. -
Preparing the icing:
Mix a small amount of liquid clay with shavings of pink clay (for strawberry) and white clay (for vanilla). Alternatively, soften regular clay with a drop of baby oil until it’s spreadable. -
Applying the glaze:
carefully apply the pink icing to one donut and white to the other using a needle tool, letting it drip naturally slightly down the sides but not covering the bottom. -
Sprinkling the toppings:
Roll incredibly thin snakes of white and pink clay. Slice minuscule sections to create sprinkles and gently press them onto the wet glaze. -
Final shading:
Dust the exposed tan areas of the donuts with your pastel chalk mixture to give them a golden-fried appearance.
Step 3: Assembly and Baking
-
First bake:
Bake your clay creations according to the manufacturer’s instructions (usually 275°F/130°C) for about 15-20 minutes. Let them cool completely. -
Creating the loose crumbs:
To make the tiny accent clusters shown in the photo, take leftover cookie dough clay, chop it roughly, mix with liquid clay, and bake as irregular tiny crumb piles. -
Attaching the hardware:
Once cool, apply a dab of strong glue to the flattest part of the back of each item. Press the earring post into the glue. -
Securing the post:
I prefer to place a tiny disc of baked clay or a drop of UV resin over the flat pad of the earring post to sandwich it securely against the dessert piece. -
Final cure:
If you used UV resin or raw clay to secure the backs, cure or bake one last time to ensure everything is permanent.
Scented Style
Mix a tiny drop of vanilla or chocolate fragrance oil into the clay before baking. Your earrings will smell as sweet as they look for a subtle sensory surprise.
Wear your new bakery treats with pride or gift them to a friend with a sweet tooth


Fruit-With-Faces Charms
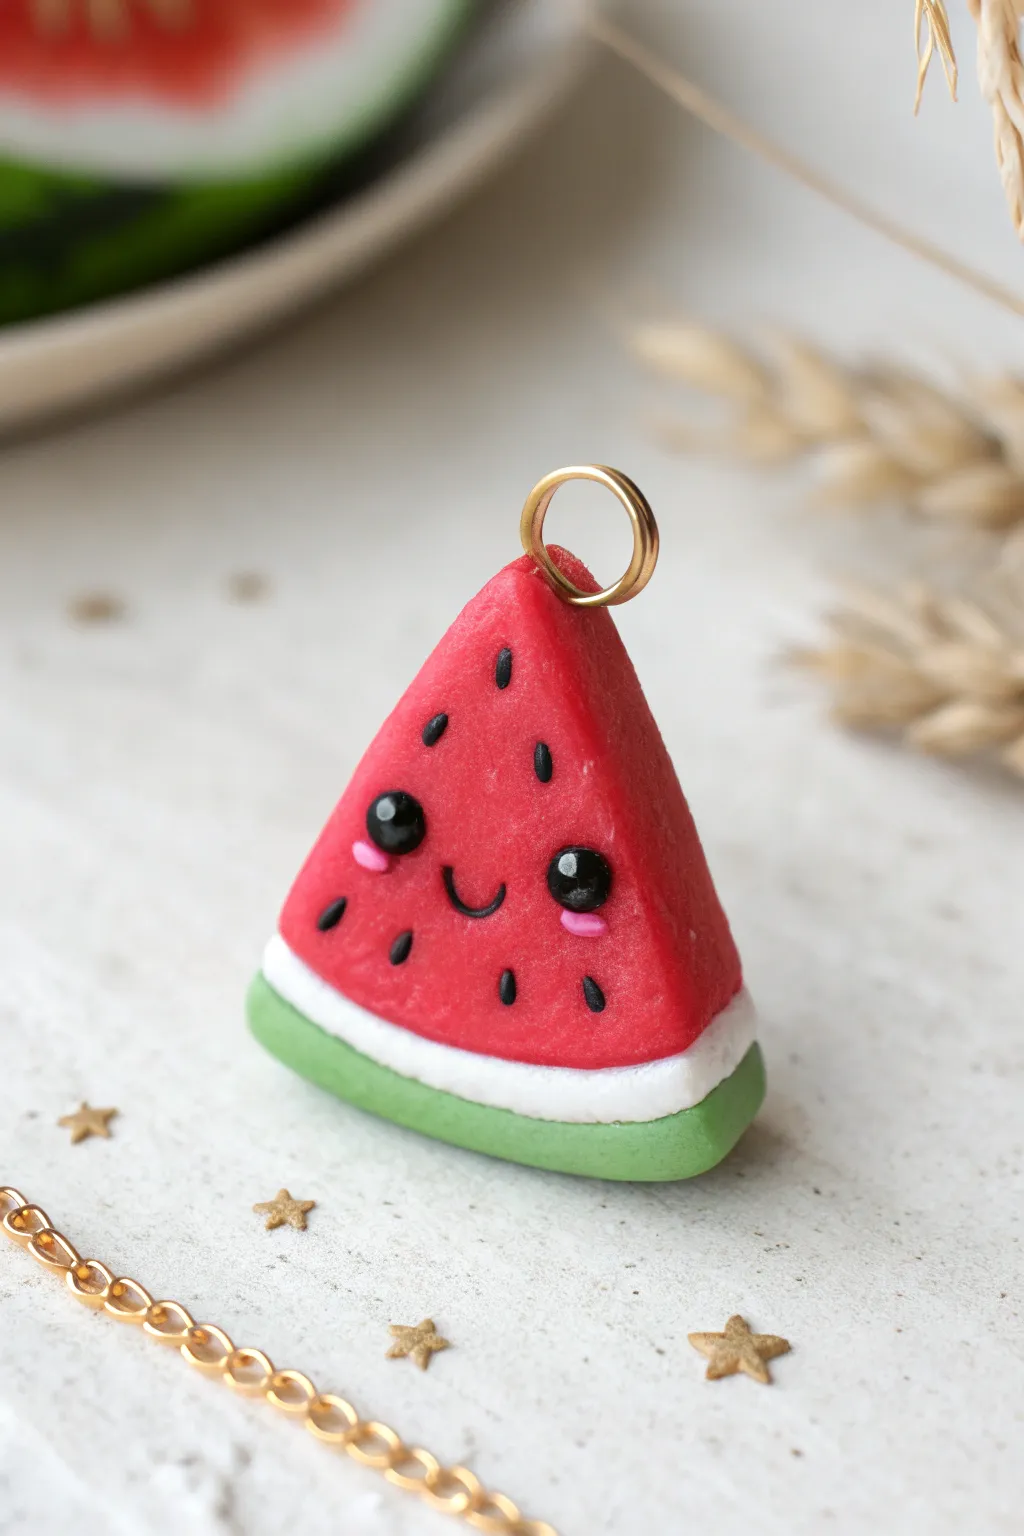
Bring a burst of summer sweetness to your jewelry collection with this miniature watermelon slice charm. Featuring the classic red, white, and green layers plus an adorable smiling face, this easy polymer clay project is almost good enough to eat.
Step-by-Step Tutorial
Materials
- Polymer clay in red, white, green, rubbing alcohol, and black
- Light pink polymer clay (tiny amount)
- Clay blade or craft knife
- Needle tool or toothpick
- Ball tool (small)
- Small eye pin or jump ring
- Liquid polymer clay (optional)
- Polymer clay or water-based gloss varnish
- Oven for baking
Step 1: Making the Cane
-
Conditioning the clay:
Start by conditioning your red clay until it is soft and pliable. Roll it into a smooth, thick log or cylinder shape about 1 inch in diameter. This will be the juicy fruit center. -
Creating the rind layer:
Roll out the white clay into a flat, even sheet, approximately 2mm thick. Wrap this white sheet entirely around the red cylinder, trimming the excess with your blade so the seams meet cleanly. Smooth the seam with your finger. -
Adding the skin:
Repeat the previous process with the green clay. Roll it into a sheet slightly thicker than the white layer. Wrap this green sheet around the white-covered cylinder, again trimming and smoothing the seam carefully to avoid trapping air bubbles. -
Reducing the cane:
Gently squeeze and roll the entire log on your work surface to compress the layers together. Elongate the cane slightly until it reaches your desired thickness for the slice size.
Step 2: Shaping the Slice
-
Slicing the disc:
Use your sharpest clay blade to cut a slice from your cane, about 5mm to 7mm thick. Try to cut straight down to keep the thickness uniform. -
Cutting the wedge:
Lay the round slice flat and cut it into wedges (like a pizza). For the look in the photo, you want a generous wedge, roughly 1/6th of the circle. This triangular shape forms the body of your charm. -
Softening edges:
Gently tap the cut edges of the red section with your finger to round them off slightly so they don’t look too sharp or geometric. -
Adding texture:
Creating a realistic texture makes a big difference here. I like to use an old toothbrush or a needle tool to gently stipple the surface of the red clay, giving it that grainy, fruity look.
Clean Cuts Only
Chill your clay cane in the fridge for 15 minutes before slicing. Firm clay distorts much less under the blade, keeping your rind layers crisp and even.
Step 3: Adding the Face & Details
-
Making eye sockets:
Use a small ball tool to press two shallow indentations into the red area where you want the eyes to sit. This helps the eyes stay in place. -
Placing the eyes:
Roll two tiny balls of black clay. Press them into the indentations you just made. To add extra life, press a minuscule speck of white clay into the upper corner of each black eye for a highlight. -
Adding the cheeks:
Roll two very small, thin ovals of light pink clay. Place these horizontally just under the outer corners of the eyes for that blushing kawaii effect. -
Forming the smile:
Roll a microscopic ‘snake’ of black clay. Cut a tiny U-shape segment and carefully place it between the eyes using a needle tool to form the mouth. -
Creating seeds:
Roll tiny balls of black clay and taper them into teardrop shapes. Flatten them slightly and press them onto the red area around the face. Arrange them randomly for a natural look. -
Adding the hardware:
Insert a gold eye pin or a jump ring into the top point of the watermelon slice. If using an eye pin, putting a dab of liquid clay on the end before insertion adds extra security.
Bite Mark Detail
Before baking, use a scalloped flower cutter to take a ‘bite’ out of one corner of the watermelon. It adds a playful narrative element to your charm.
Step 4: Baking & Finishing
-
Baking:
Place your charm on a tile or baking sheet lined with parchment paper. Bake according to your polymer clay brand’s instructions (usually around 275°F/130°C for 15-30 minutes). -
Cooling:
Let the charm cool completely inside the oven or on the tray before handling it. The clay is fragile while hot. -
Varnishing:
Once cool, apply a coat of gloss varnish to the eyes to make them sparkle, or glaze the entire charm for a shiny, polished finish.
Now you have a refreshing little charm ready to be turned into a summery necklace or keychain

What Really Happens Inside the Kiln
Learn how time and temperature work together inside the kiln to transform clay into durable ceramic.
Terrazzo Coasters in Bright Colors
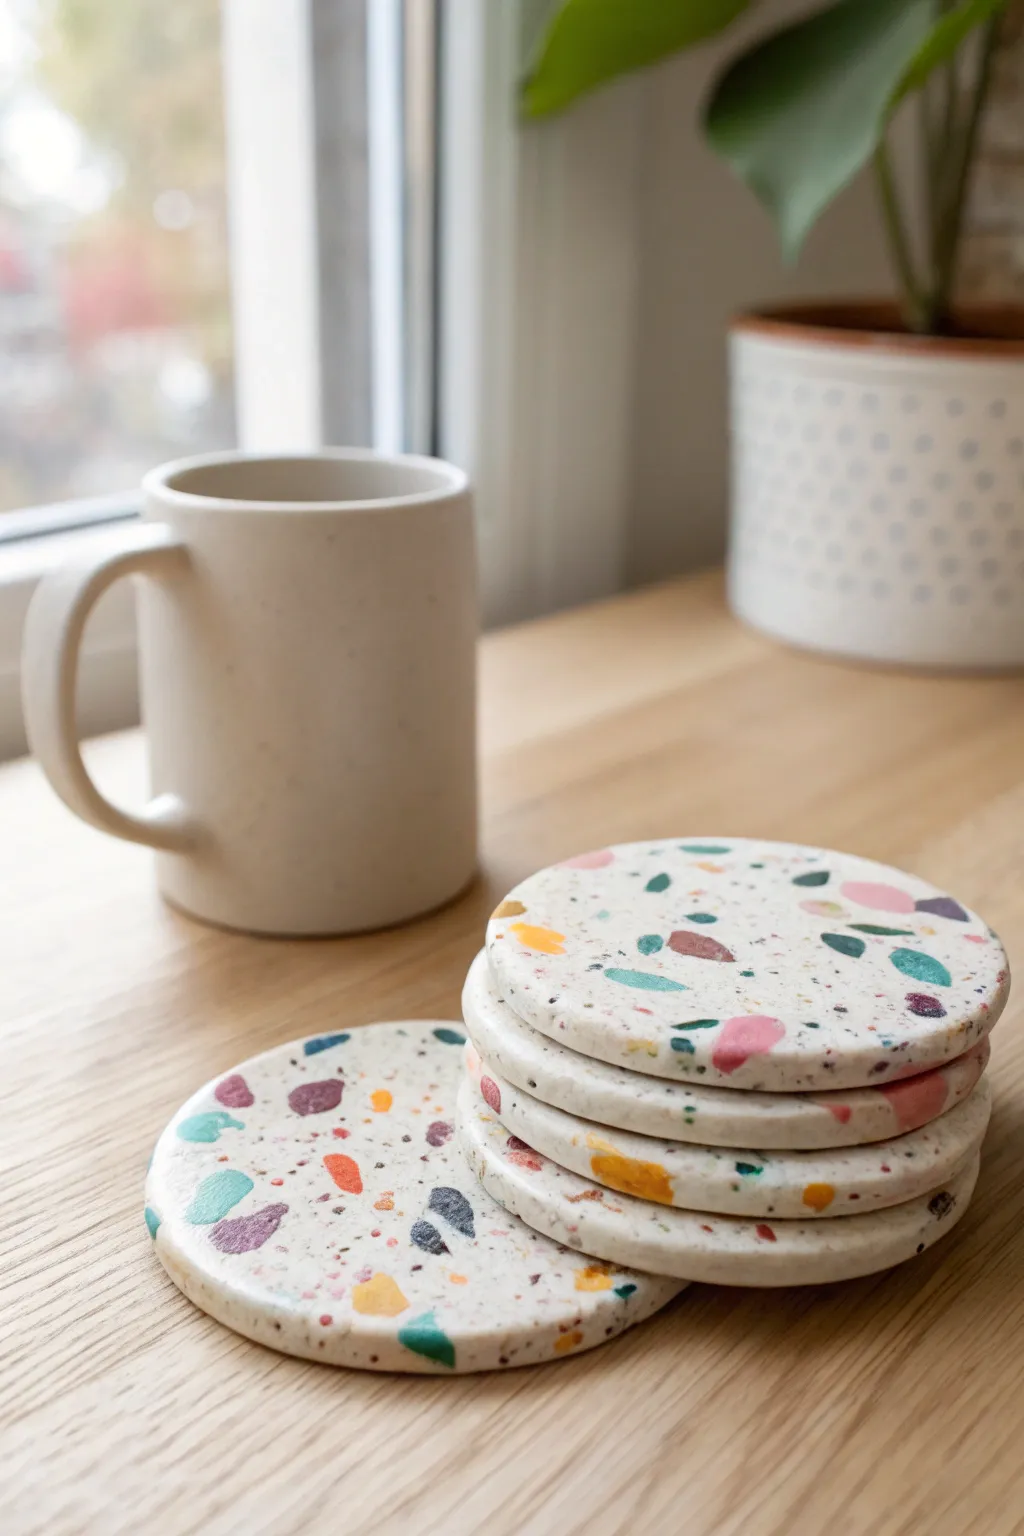
Bring a splash of playful, modern design to your coffee table with these faux-stone coasters that mimic the high-end look of real terrazzo. By embedding colorful clay fragments into a neutral base, you’ll create a durable and stylish resting place for your favorite mug.
Detailed Instructions
Materials
- White or cream polymer clay (approx. 2oz per coaster)
- Assorted colored polymer clay (teal, mustard yellow, dusty pink, purple, navy)
- Granite effect polymer clay (optional, for speckles)
- Acrylic rolling pin or pasta machine
- Round cookie cutter (approx. 4 inches)
- Craft knife or tissue blade
- Parchment paper or baking mat
- Fine-grit sandpaper (400, 600, and 1000 grit)
- Water bowl (for wet sanding)
- Gloss or matte polyurethane varnish (optional)
Step 1: Preparing the Chips
-
Roll out colors:
Condition your colored clays separately until pliable. Roll each color out into a thin sheet, roughly 1-2mm thick. These sheets will become your terrazzo chips. -
Bake the sheets:
Place your thin colored sheets onto a baking tray lined with parchment paper. Bake them for about 10-15 minutes at the temperature recommended on your clay package. Use a slightly shorter time since they are thin. -
Cool and crumble:
Once baked, let the sheets cool completely until they are hard. Break them apart with your fingers or chop them irregularly with your craft knife to create a mix of sizes, from tiny specks to larger chunks.
Step 2: Creating the Base
-
Condition the base:
Take your white or cream clay and condition it thoroughly until it is soft and warm. This base needs to be sticky enough to hold the chips. -
Add speckles (optional):
For that realistic stone look, I like to mix in a very small amount of granite-effect clay or black pepper into the white clay before adding the color chips. -
Roll the slab:
Roll your white clay out into a thick slab, approximately 1/4 inch (6mm) thick. Make sure it’s slightly larger than your cutter. -
Apply the chips:
Scatter your baked colored chips generously over the surface of the raw white slab. Press them down gently so they stick. -
Embed the chips:
Use your acrylic roller to roll over the slab again. You want to press the hard, baked chips *into* the soft raw clay until the surface is flush and smooth. -
Fill the gaps:
If you see large empty white spaces, add more chips to those specific spots and roll over them again to embed.
Clean Rolling
Wipe your roller with a baby wipe between steps. Stray colored clay can streak your white base and ruin the crisp terrazzo effect.
Step 3: Shaping and Finishing
-
Cut the shapes:
Place your round cookie cutter onto the slab. Press down firmly to cut out your coaster shape. Wiggle slightly to separate it from the excess clay. -
Smooth the edges:
Lift the circle carefully. Use your fingertip to gently smooth the raw edges, removing any sharp lines created by the cutter. -
Structure check:
Ensure the coaster is flat. If it warped during lifting, gently pat it back down onto your baking tile. -
Final Bake:
Bake the finished coasters on parchment paper for 45-60 minutes at the manufacturer’s recommended temperature. A longer bake ensures durability. -
Cool down:
Allow the coasters to cool completely. They may feel slightly flexible while warm but will harden as they cool. -
Wet sanding:
Dip the coaster and your sandpaper in water. Start with 400 grit to reveal the crisp edges of the chips, rubbing in circular motions. Move to 600, then 1000 grit for a silky finish. -
Buffing:
Dry the coasters thoroughly. Rub them vigorously with a piece of denim or a soft cotton cloth to bring out a natural sheen. -
Sealing (Optional):
If you want extra protection against coffee stains, apply a thin layer of polyurethane varnish and let it cure fully.
Trapped Air Bubbles?
If you see a bump in the clay while rolling, pierce it with a needle and gently press the air out to keep the surface perfectly flat.
Now you have a stunning set of faux-stone coasters ready to protect your surfaces in style
Mini Trinket Dish With Swirly Color
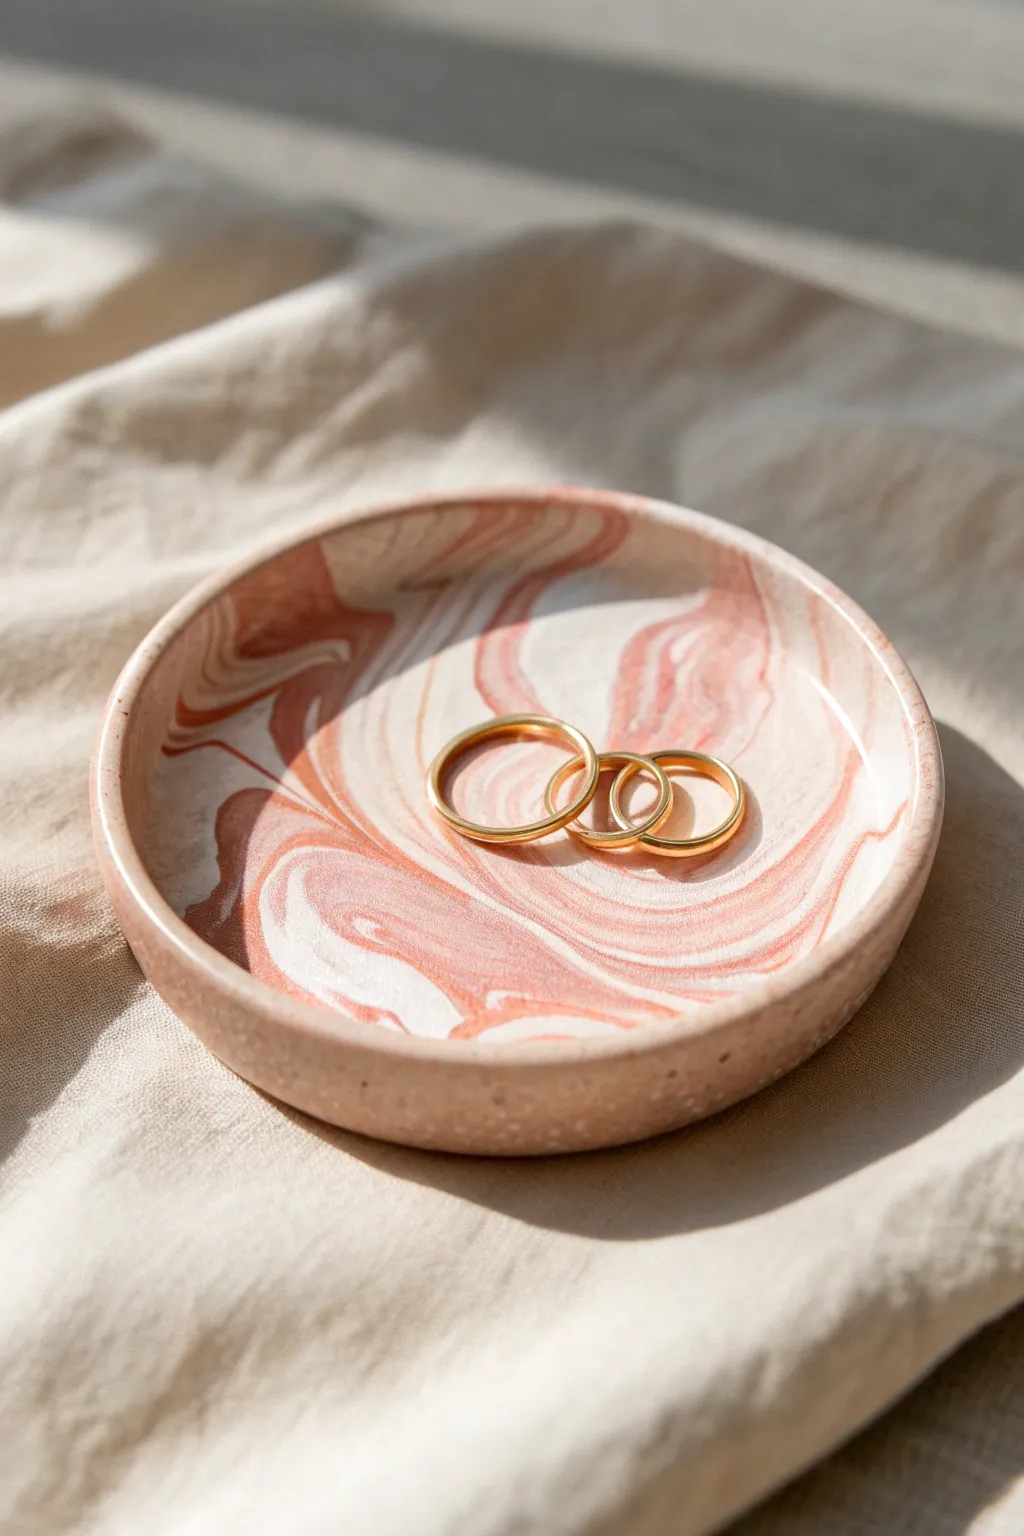
Create a stunning home for your favorite rings with this sophisticated marbled trinket dish. The beautiful swirls of terracotta pink and cream mimic the look of natural stone while offering a smooth, modern resting place for your jewelry.
Step-by-Step
Materials
- Polymer clay (terracotta/rose color)
- Polymer clay (white or cream)
- Polymer clay (translucent or granite effect – optional)
- Rolling pin or pasta machine
- Circle cutter or a small bowl (approx. 4-inch diameter)
- Craft knife
- Small oven-safe bowl (for shaping)
- Fine-grit sandpaper (400 to 1000 grit)
- Matte or satin polymer clay varnish (optional)
- Soft paintbrush
Step 1: Marbing the Clay
-
Condition the clay:
Start by warming up your clay blocks. Take a chunk of the terracotta color and a slightly smaller chunk of the white/cream clay. Knead them separately in your hands until they are soft and pliable. -
Create snakes:
Roll each color into a long, thin cylinder (snake) shape, about 6 inches long. -
Twist together:
Lay the two snakes side-by-side and twist them together tightly to form a rope. This begins the mixing process. -
Fold and roll:
Fold the twisted rope in half, then roll it out again into a long snake. Repeat this twisting, folding, and rolling process 3-4 times. Be careful not to over-mix, or the colors will blend into a single solid muddy color instead of distinct swirls. -
Form a ball:
Once you have distinct, thin streaks of color, roll the entire rope into a smooth ball. Check the surface to ensure you like the pattern distribution.
Step 2: Shaping the Dish
-
Flatten the marble:
Using your rolling pin, flatten the marbled ball into a sheet approximately 1/4 inch thick. Turn the clay as you roll to keep the shape relatively circular and ensure even thickness. -
Cut the circle:
Place your circle cutter or an upside-down bowl onto the clay sheet. Press down firmly or trace around the bowl with a craft knife to cut a perfect circle. -
Smooth the edges:
Gently run your finger along the cut edge of the circle (the rim) to soften any sharp angles left by the cutter. This makes the finished piece look more polished. -
Create the curve:
Place your clay circle inside or over your oven-safe bowl to give it a slight curve. I prefer placing it inside a larger bowl so the bottom flattens slightly for stability while the sides gently slope up. -
Refine the shape:
Press the center down gently to ensure the dish will sit flat on a table, and tap the rim to smooth out any fingerprints.
Clean Pro Tip
Keep baby wipes or hand sanitizer nearby while working. Wiping your hands between rolling colors prevents white clay from getting stained by darker pigments.
Step 3: Baking and Finishing
-
Bake:
Preheat your oven according to the manufacturer’s instructions on your specific brand of clay (usually around 275°F or 130°C). Bake the dish while it is still supported by the oven-safe bowl for about 15-20 minutes. -
Cool down:
Remove the project from the oven and let it cool completely before popping it out of the shaping bowl. The clay hardens fully as it cools. -
Sand for smoothness:
Once cool, dip your sandpaper in a little water and gently sand the rim and any rough spots on the surface. Wet sanding prevents dust and creates a silky finish. -
Clean up:
Wipe the dish clean with a damp cloth to remove any sanding residue and let it dry. -
Seal (Optional):
If you want a slight sheen or extra durability, apply a thin coat of matte or satin varnish using a soft brush. Let it dry completely according to the bottle instructions.
Level Up: Gold Rim
Add a touch of luxury by painting the very edge of the rim with liquid gold leaf or metallic gold acrylic paint after the dish has been baked and cooled.
Now place this chic little dish on your nightstand to keep your treasures safe


The Complete Guide to Pottery Troubleshooting
Uncover the most common ceramic mistakes—from cracking clay to failed glazes—and learn how to fix them fast.
Cute Incense Holders With Simple Shapes
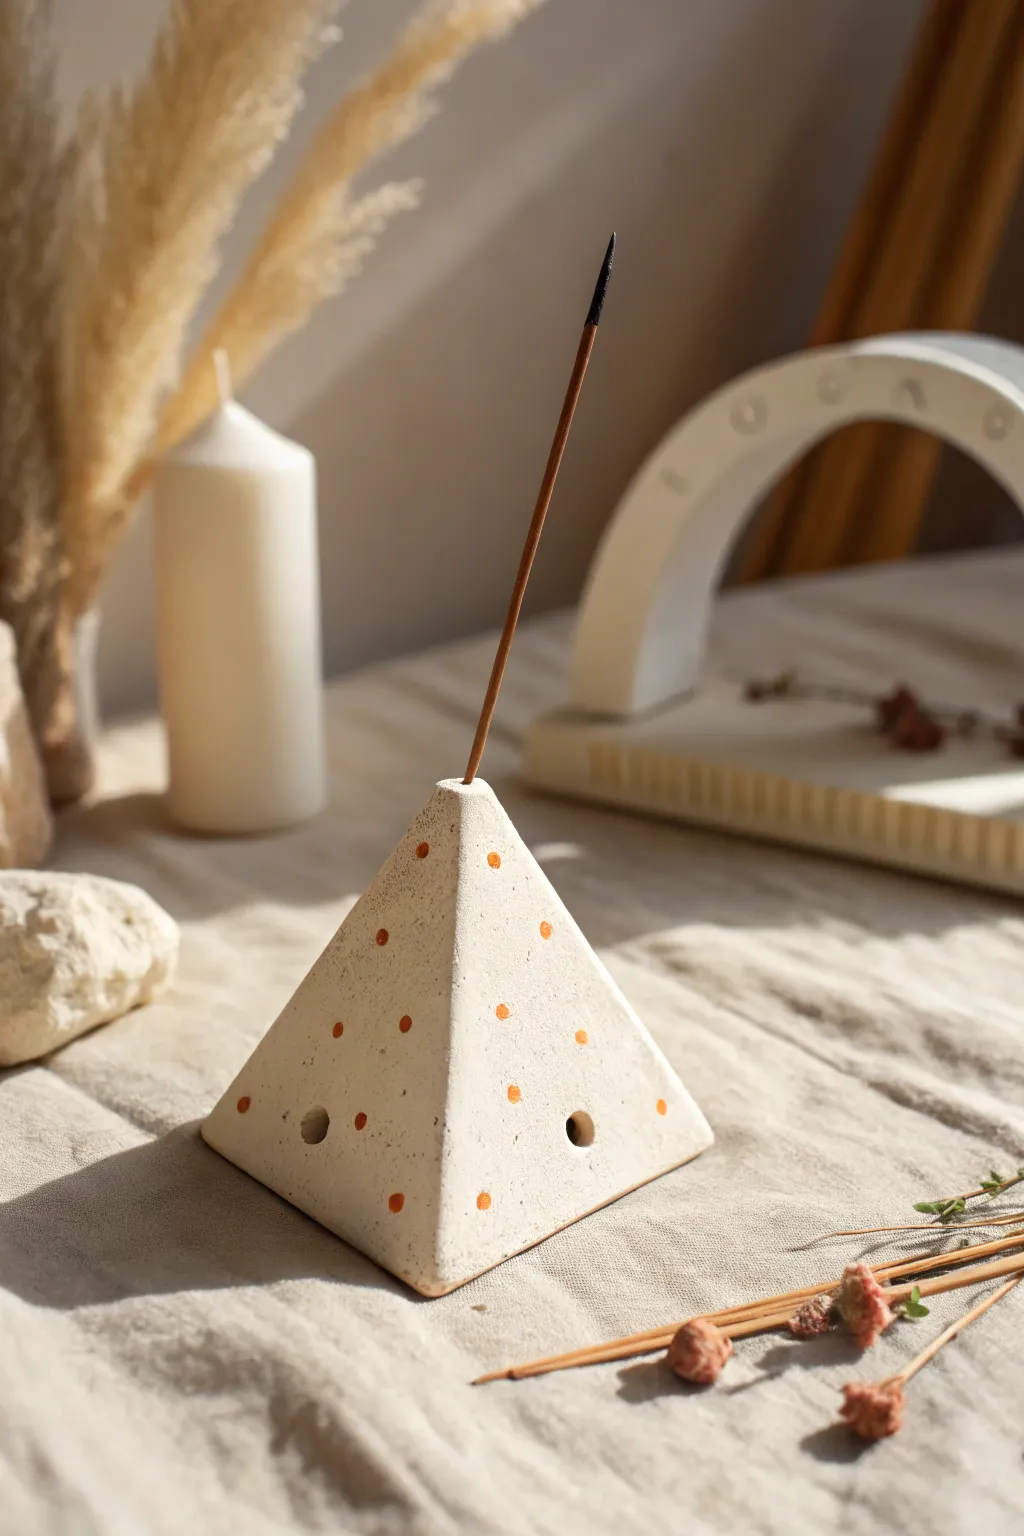
Embrace clean lines and playful details with this minimalist incense holder. Its geometric pyramid shape, accented by warm terracotta dots, brings a modern yet earthy vibe to any corner of your room.
Step-by-Step Guide
Materials
- White polymer clay (approx. 2 oz)
- Acrylic paint (terracotta or burnt orange)
- Acrylic roller or glass jar
- Sharp craft knife or tissue blade
- Ruler
- Incense stick (for sizing)
- Small paintbrush (detail brush)
- Sandpaper (fine grit)
- Drinking straw or small round cutter
- Oven and baking sheet
- Parchment paper
Step 1: Shaping the Base
-
Prepare the Clay:
Start by conditioning your white polymer clay. Knead it in your hands until it is soft, pliable, and free of cracks. If you want a speckled stone look like the photo, you can mix in a tiny pinch of black pepper or use pre-speckled ‘granite’ effect clay. -
Roll It Out:
Place the clay on a clean work surface or parchment paper. Roll it into a smooth ball first, then flatten it slightly with your palm. -
Form a Rough Pyramid:
Begin shaping the ball into a rough pyramid by pinching the top while pressing the base flat against your work surface. You are aiming for a square base. -
Refine the Walls:
Use your acrylic roller or a flat object to press gently against each of the four sides. This helps flatten the walls and sharpen the corners. Rotate the piece as you work to keep it symmetrical. -
Check the Height:
Ensure the pyramid stands about 2 to 2.5 inches tall. Adjust as needed by gently pressing down on the apex or squeezing the sides. -
Level the Base:
Pick up the pyramid and tap the bottom firmly on the table to ensure it sits perfectly flat and won’t wobble.
Step 2: Adding Functional Details
-
Create the Air Vents:
Using a small straw or a tiny circular cutter, punch a hole near the bottom center of two opposite sides. This isn’t just aesthetic; it helps with airflow if you ever use cones, though here it’s largely decorative. -
Make the Incense Hole:
Take an actual incense stick (the wooden end) and press it verticaly into the very peak of the pyramid. Create a hole about half an inch deep. Give the stick a tiny wiggle to ensure the hole is loose enough for the stick to slide in easily after baking. -
Smooth Imperfections:
Dip your finger in a little baby oil or water and gently rub over any fingerprints or rough edges on the clay surface.
Clean Lines Hack
To get super sharp pyramid edges without specialized tools, press two flat rulers against opposite sides of the clay simultaneously.
Step 3: Baking and Decorating
-
Bake the Clay:
Place your pyramid on a baking sheet lined with parchment paper. Bake according to your specific clay manufacturer’s instructions (usually 275°F for 15-30 minutes). -
Cool Down:
Let the piece cool completely in the oven or on a wire rack. The clay hardens as it cools. -
Sand for Finish:
Once cool, lightly sand the sides and sharp corners with fine-grit sandpaper to give it that matte, ceramic-like texture. -
Plan the Dots:
Lightly mark where you want your dots to go with a pencil if you’re nervous about freehanding. A random scatter looks best. -
Apply the Paint:
Dip the back end of your paintbrush handle into the terracotta acrylic paint. Gently dot the paint onto the pyramid surface. -
Vary the Pattern:
I like to vary the spacing slightly to keep it looking organic and handmade rather than mass-produced. -
Let it Dry:
Allow the paint to dry completely. Since acrylic dries fast, this should only take 10-15 minutes.
Drooping Incense?
If the incense stick leans too much, the hole is too wide or shallow. Re-drill it slightly deeper carefully by hand after baking.
Light your favorite scent and watch the smoke drift lazily from your chic new creation
Fun Polymer Clay Hair Clips
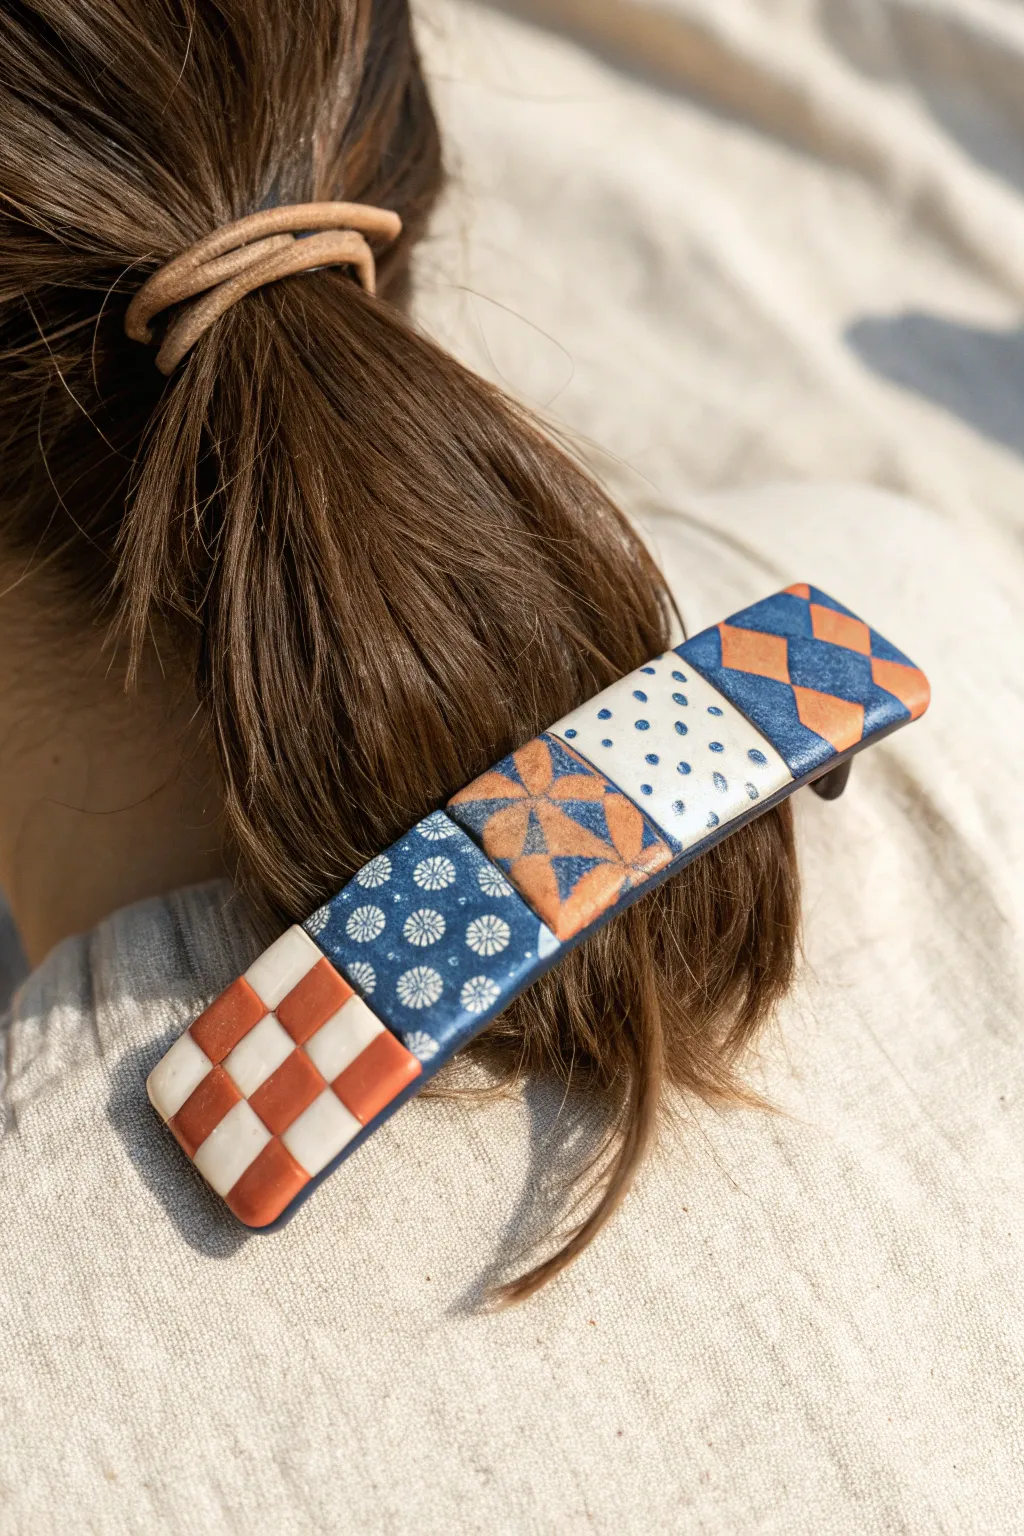
This charming barrette mimics the look of vintage ceramic tiles arranged in a patchwork. Using a clever combination of polymer clay and acrylic paints, you will create a unique, segmented hair accessory that looks like a miniature mosaic.
How-To Guide
Materials
- Polymer clay (white and translucent)
- Metal barrette blank (large rectangular size)
- Acrylic paints (terracotta orange, deep denim blue, white)
- Detail paintbrushes (fine tip)
- Square clay cutter (approx. 1 inch)
- Clay blade or craft knife
- Liquid polymer clay or bake-and-bond
- Rolling pin or pasta machine
- Ruler
- Glaze or UV resin (optional for shine)
Step 1: Base Construction
-
Prepare the clay base:
Condition your white polymer clay until it is soft and pliable. Roll it out into a sheet approximately 3-4mm thick. This needs to be sturdy enough to hold the clip but not too heavy. -
Cut the main strip:
Measure your metal barrette blank. Cut a rectangular strip of the white clay that is slightly longer and wider than the metal blank to account for shrinkage and edge finishing. -
Mark the segments:
Using the back of your blade or a ruler, gently press distinct vertical lines across the clay strip to divide it into five equal square sections. Do not cut all the way through; just create indentations to simulate separate tiles.
Step 2: Painting the Patterns
-
Base coat the tiles:
Before painting details, decide on your base colors. For this look, paint the first and fourth squares white, and the second square a deep blue. Leave the others plain for now as they will be filled with patterns. -
Create the checkerboard:
On the first square (far left), use a very fine brush and terracotta paint to create a 3×3 checkerboard pattern. Paint alternating squares, leaving the white clay visible for the lighter checks. -
Detail the floral tile:
On the second square (the blue base), use white paint to add small, circular clusters of dots. Paint six to eight dots in a ring to form flower shapes, staggering them across the blue background. -
Draft the pinwheel:
For the middle square, visualize an ‘X’ crossing the square. Paint the resulting triangular sections in alternating blue and terracotta colors against the white clay background, creating a geometric star or pinwheel effect. -
Paint the polka dots:
On the fourth square (white base), dip the end of a paintbrush handle or a dotting tool into the blue paint. Apply random, evenly spaced dots across the surface to mimic splatterware pottery. -
Paint the diamonds:
On the final square, paint a diagonal grid using blue paint. Fill in alternating diamonds with the terracotta paint to create an argyle-style pattern.
Uneven Lines?
If your painted checkerboard looks shaky, lightly score grid lines into the raw clay with a needle tool first. The paint will naturally flow into the grooves for sharper edges.
Step 3: Assembly and Finishing
-
Bake the clay:
Place your painted clay strip on a baking tile. I prefer to curve it slightly over an oven-safe form (like an empty soda can) so it matches the curve of the metal clip. Bake according to your clay package instructions. -
Cool and seal:
Let the clay cool completely. Once cool, apply a coat of matte or satin glaze to protect the paint. This gives it that authentic ceramic feel. -
Attach the hardware:
Apply a strong adhesive or liquid polymer clay to the top of the metal barrette blank. -
Final bond:
Press the clay strip firmly onto the metal blank. If using liquid clay, you will need to bake the piece again for 10-15 minutes to set the bond. If using glue, clamp gently and let it cure fully.
Ceramic Texture
Mix a tiny pinch of sand or baking soda into your terracotta paint before applying. This adds a subtle grit that mimics the texture of unglazed terra cotta pottery.
Secure the barrette in your hair to add an artistic, geometric touch to your daily style

TRACK YOUR CERAMIC JOURNEY
Capture glaze tests, firing details, and creative progress—all in one simple printable. Make your projects easier to repeat and improve.
Cactus Ring Holder With a Smile
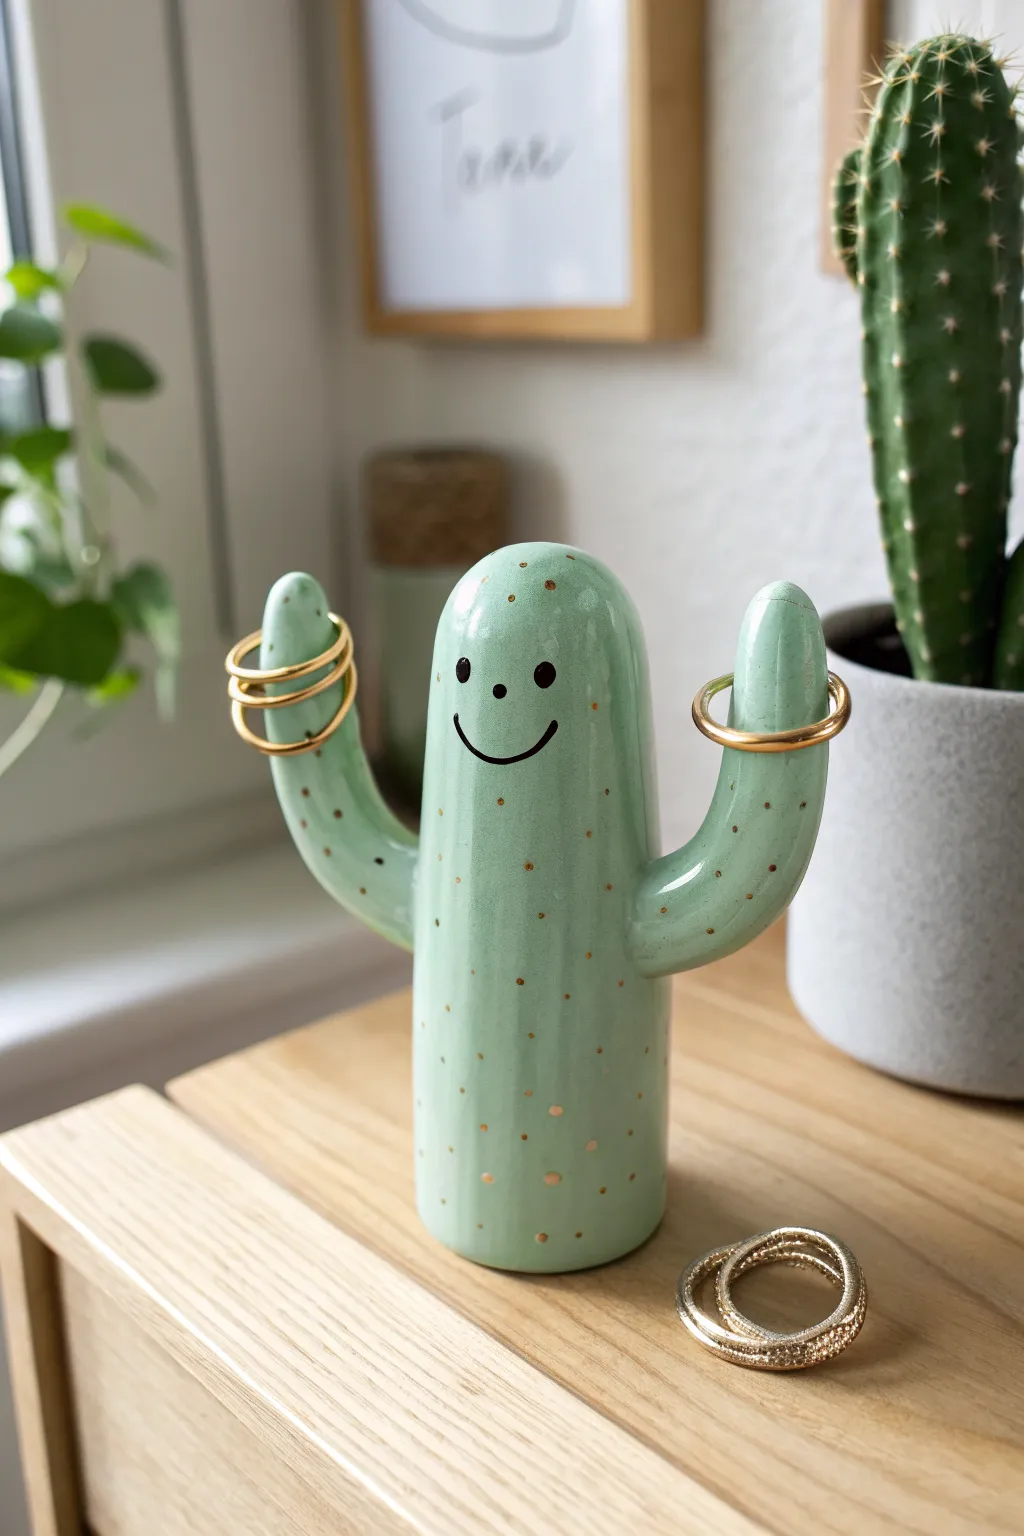
Bring a touch of desert charm to your dresser with this adorable, smiling cactus ring holder. Its smooth, glossy finish and cheerful expression make it both a practical jewelry organizer and a delightful piece of decor.
Step-by-Step Guide
Materials
- Polymer clay (pastel mint green)
- Black acrylic paint
- Gold acrylic paint or gold paint pen
- Gloss varnish or clear resin
- Small dotting tool or toothpick
- Fine detail paintbrush
- Acrylic rolling pin
- Baking sheet and parchment paper
- Cutting blade or craft knife
- Sandpaper (wet/dry, fine grit)
Step 1: Shaping the Cactus Body
-
Condition the Clay:
Begin by warming the mint green polymer clay in your hands. Knead it thoroughly until it is soft, pliable, and free of any air bubbles. -
Form the Base Cylinder:
Roll the clay into a smooth cylinder, approximately 4-5 inches tall and 1.5 inches wide. Ensure the bottom is flattened completely so the cactus will stand upright and stable. -
Create the Arms:
Take two smaller pieces of the same mint green clay and roll them into thick sausage shapes, curving them slightly upwards to resemble cactus arms. -
Attach the Arms:
Score the sides of the main body and the base of the arms slightly for better grip. Press the arms onto the body, smoothing the seams with your finger or a clay tool until the join is seamless and invisible. -
Smooth the Surface:
Check the entire piece for fingerprints or uneven spots. Gently roll the body or smooth it with a tiny amount of baby oil on your finger to get a flawless finish before baking. -
Round the Tops:
Gently gently round off the top of the main body and the tips of both arms to give them a soft, organic look rather than sharp edges. Make sure the arms curve up enough to securely hold a ring.
Seamless Smoothness
Use a tiny bit of baby oil or clay softener on your fingertips while smoothing the arm joints. It melts the clay slightly, erasing seams instantly.
Step 2: Baking and Refining
-
Bake the Piece:
Place your cactus upright on a baking sheet lined with parchment paper. Bake according to the specific temperature and time instructions on your polymer clay package. -
Cool Down:
Allow the cactus to cool completely inside the oven with the door cracked open to prevent thermal shock cracks. -
Sanding for Smoothness:
Once cool, use fine-grit wet sandpaper to gently buff away any remaining fingerprints or tiny bumps. This step is crucial for achieving that ceramic-like look. -
Clean the Surface:
Wash the piece with mild soapy water to remove sanding dust and let it dry thoroughly before painting.
Step 3: Painting and Finishing
-
Paint the Face:
Using a very fine detail brush or a black paint pen, carefull add the face. Paint two small dots for eyes, a tiny dot for a nose, and a simple curved smile. -
Add Decorative Dots:
Dip a toothpick or a small dotting tool into gold paint. Add tiny, scattered dots all over the cactus body and arms to mimic spines, keeping the spacing random but balanced. -
Let Paint Dry:
Allow the acrylic paint to dry completely. I usually give this at least an hour to ensure the paint doesn’t smear during the final step. -
Apply Varnish:
Coat the entire cactus with a high-gloss varnish or a thin layer of UV resin. This seals the paint and gives the piece that shiny, glazed porcelain appearance. -
Final Cure:
Let the varnish dry or cure the resin under a UV lamp until the surface is hard and non-tacky.
Weighted Base
Embed a heavy metal washer or a few coins into the very bottom of the clay cylinder before baking. This adds weight and prevents it from tipping over.
Once dry, this cheerful little cactus is ready to keep your favorite rings safe and bring a smile to your face
Sea Creature Pocket Charms
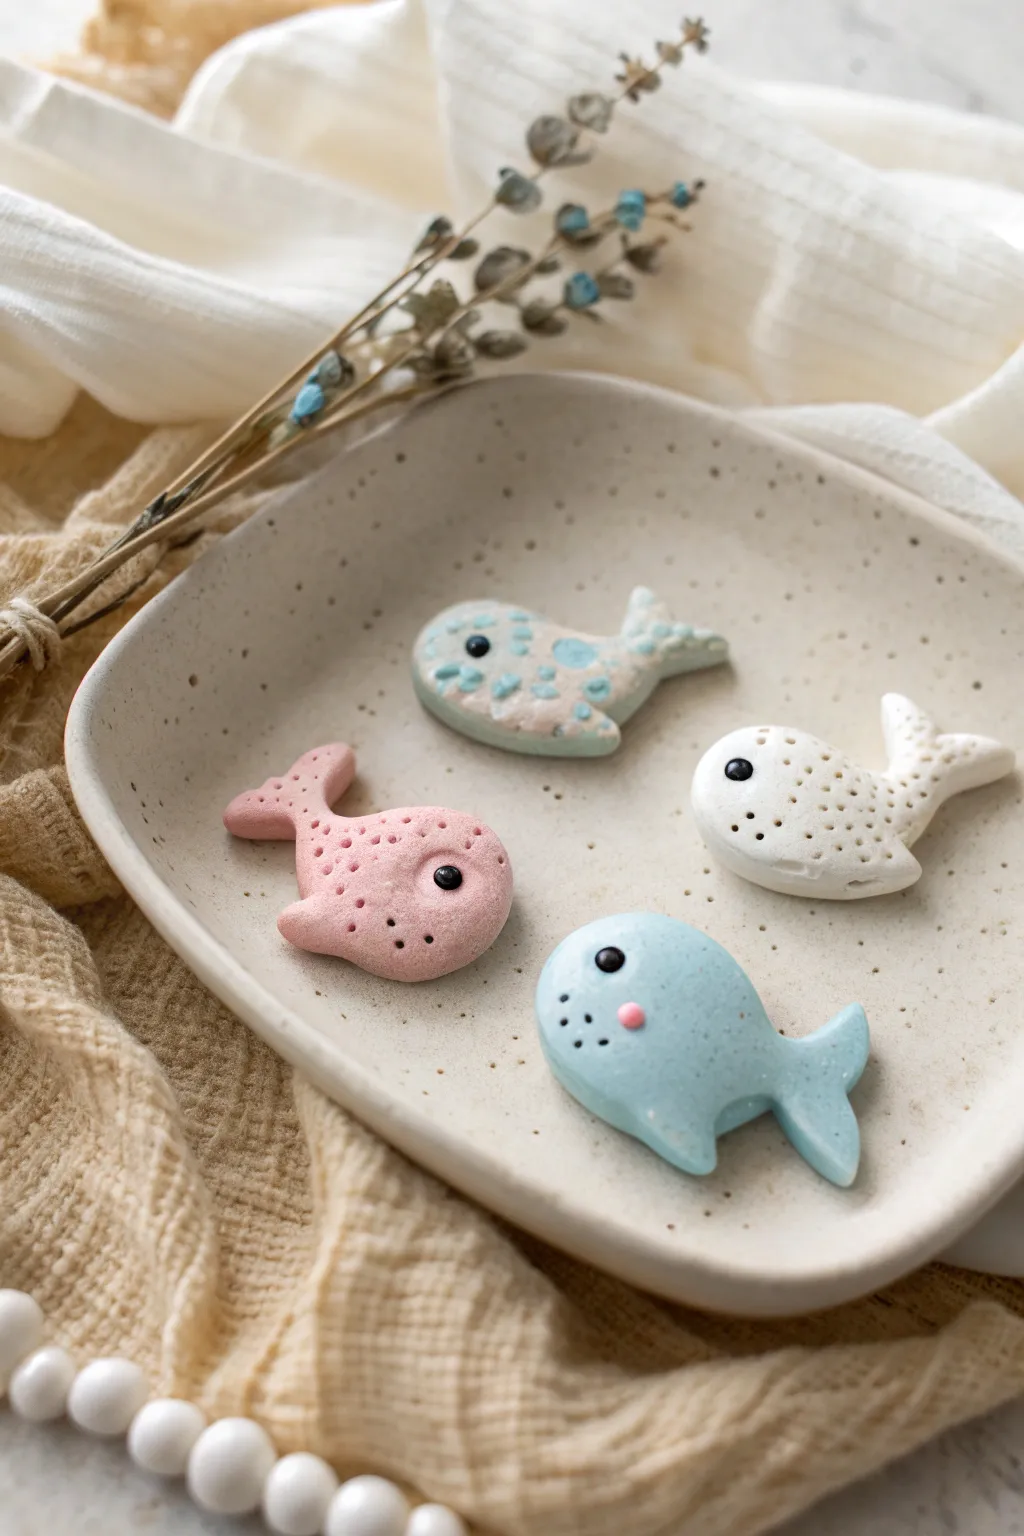
These adorable polymer clay sea creatures fit perfectly in the palm of your hand, featuring soft pastel hues and charming dotted textures. Their simple, rounded shapes make them an ideal beginner project that results in sweet, minimalistic keepsakes.
How-To Guide
Materials
- Polymer clay in pastel pink, baby blue, white, and teal
- Small black glass seed beads (for eyes)
- Needle tool or toothpick
- Clay roller or acrylic rolling pin
- Small circular cutter (optional)
- Gloss glaze or varnish (optional)
- Baking sheet and parchment paper
- Oven
Step 1: Shaping the Bodies
-
Condition the clay:
Begin by kneading your chosen colors of polymer clay until they are soft and pliable. Warm clay prevents cracking later on. -
Form the base droplet:
Take a walnut-sized ball of clay and roll it into a smooth sphere, then gently taper one side to create a fat teardrop shape. -
Flatten gently:
Place the teardrop on your work surface and press down gently with your palm or a flat tool to flatten it slightly, keeping the edges rounded and distinct. It should be about 1/4 inch thick. -
Create the tail:
Pinch the tapered end of the teardrop to flatten it further, then use a craft knife or needle tool to slice a small triangle out of the center, creating two distinct tail flukes. -
Refine the shape:
Use your fingertip to smooth the cut edges of the tail, rounding them so they flow naturally into the body. -
Curve the tail (optional):
For a swimming effect, gently bend the tail section slightly upward or to the side.
Clean Clay Pro-Tip
Keep baby wipes nearby to clean your hands between colors. White clay picks up lint easily, so roll it in your palms after applying a tiny bit of lotion to keep it debris-free.
Step 2: Adding Details & Texture
-
Insert the eye:
Press a small black seed bead firmly into the head area. I like to bury it securely so it stays flush with the rounded surface. -
Add blush cheeks:
For the blue whale, take a tiny speck of pink clay, roll it into a ball, and press it just below the eye to create a cute rosy cheek. -
Create dotted texture:
Using a needle tool, poke random, shallow holes across the body. Varying the depth slightly adds visual interest. -
Detail the patterned whale:
For the multi-colored whale, press small flattened discs of light blue clay onto a white base body before smoothing them down. Then, add texture over the top to unify the surface. -
Add fin details:
If you want a side fin, shape a tiny triangle of clay and press it onto the side of the body, blending the seam with your finger or a smoothing tool. -
Inspect the edges:
Give the charm a final check, smoothing out any accidental fingerprints with a tiny drop of baby oil.
Make it a Magnet
After baking, glue a strong neodymium magnet to the flat back of your whale. They make incredibly cute refrigerator magnets or cubicle decor.
Step 3: Baking & Finishing
-
Prepare for baking:
Place your finished whales onto a parchment-lined baking sheet. -
Bake carefully:
Bake according to your clay manufacturer’s instructions, typically around 275°F (135°C) for 15-20 minutes. -
Cool completely:
Let the charms cool fully on the baking sheet to harden. -
Seal (optional):
If you prefer a shiny finish that resembles wet skin, apply a thin coat of polymer clay gloss glaze.
Once cooled, these sweet little swimmers are ready to be gifted or displayed on your desk
Moon Phase Garland Tiles
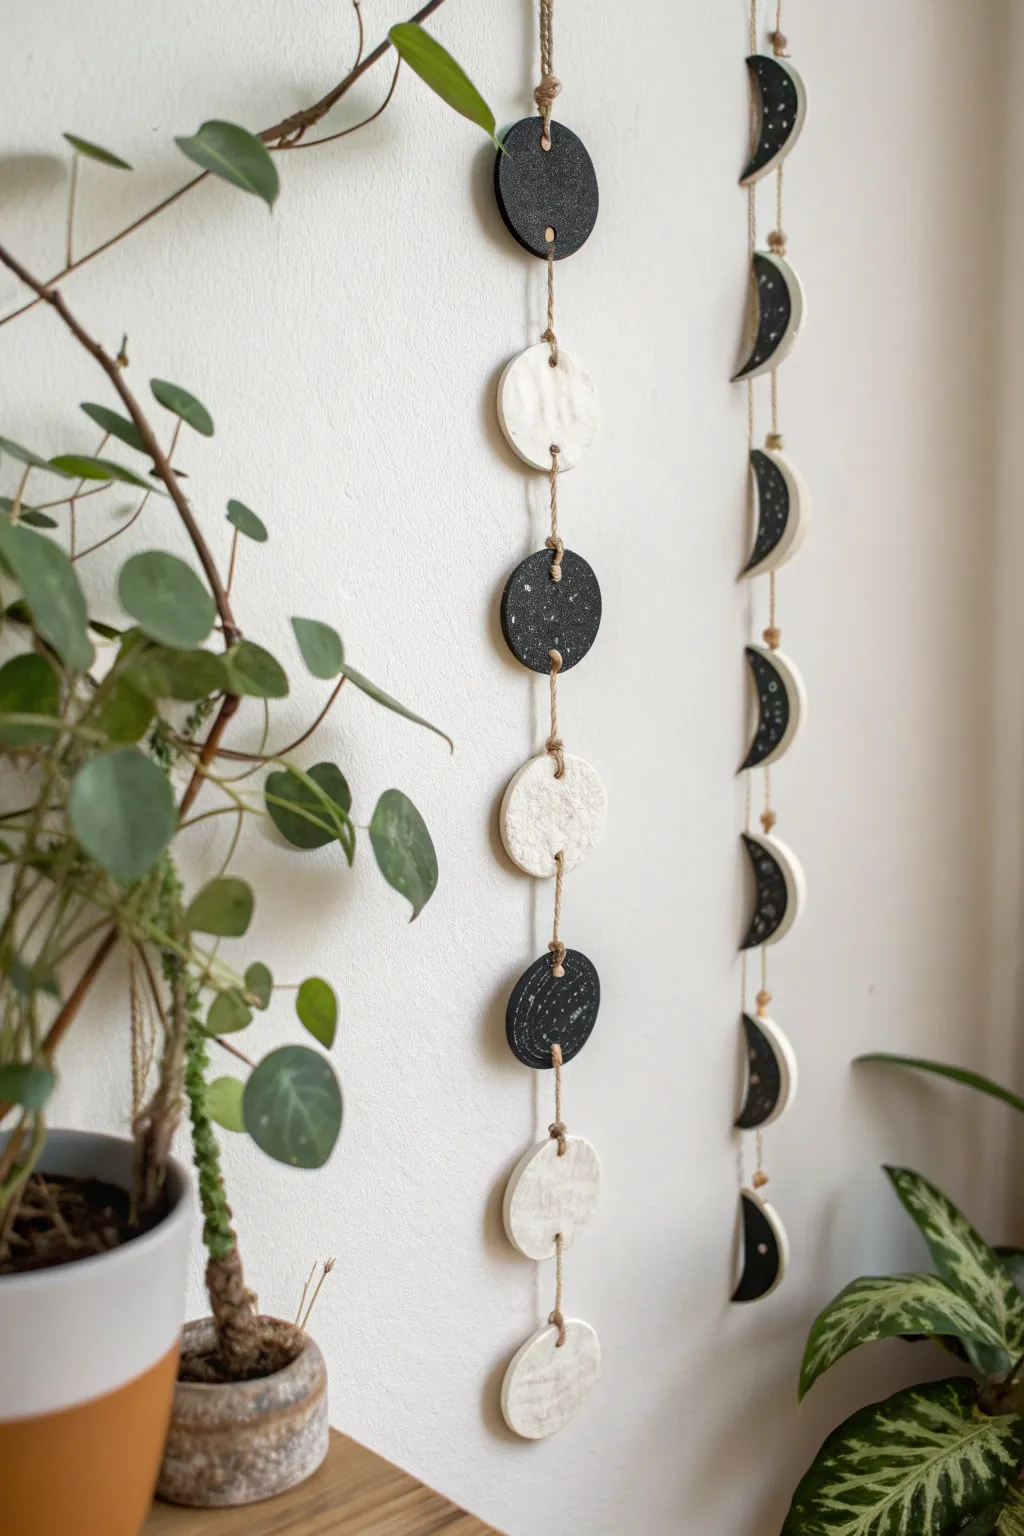
Bring a touch of cosmic magic into your space with this elegant polymer clay garland. Featuring textured crater-like full moons and sleek speckled crescents, this project perfectly balances contrasting shades for a modern bohemian look.
Step-by-Step Tutorial
Materials
- Polymer clay (black and white/translucent)
- Acrylic rolling pin
- Circle cutters (approx. 2-3 inch diameter)
- Texture tools (sandpaper, toothbrush, coarse sponge)
- White acrylic paint
- Stiff bristle paintbrush
- Toothpick or skewer
- Jute twine or hemp cord
- Oven and baking sheet
- Parchment paper
Step 1: Prepping and Cutting
-
Condition the Clay:
Begin by kneading your white and black polymer clay separately until they are soft and pliable. This conditioning step prevents cracking later on. -
Roll Out Slabs:
Use your acrylic roller to flatten the clay into even sheets, about 1/4 inch thick. Aim for a consistent thickness so all pieces bake evenly. -
Cut the Full Moons:
For the left strand, use your circle cutter to punch out several discs from both the black and white clay slabs. You’ll need about four of each color depending on your desired length. -
Cut the Crescents:
For the right strand, cut a circle from black clay. Then, offset the cutter slightly over the circle you just cut to slice away a crescent moon shape. -
Refine Edges:
Gently smooth the cut edges of your clay shapes with your fingertip to remove any burrs or sharp lines left by the cutter.
Uneven Paint Speckles?
If your ‘stars’ look like blobs, your paint is too thick. Water down the white acrylic slightly before flicking it tailored for a fine mist effect.
Step 2: Texturing and Details
-
Texture the White Moons:
Take a coarse sponge or a crumpled ball of aluminum foil and press it gently into the surface of the white discs to create a cratered, lunar surface texture. -
Speckle the Black Moons:
For the galaxy effect, dip a stiff bristle brush into white acrylic paint. Run your thumb across the bristles to flick tiny specks of paint onto the unbaked black clay shapes. -
Create Holes for Hanging:
Using a toothpick or skewer, carefully poke a hole at the top and bottom of each full moon disc. For the crescents, you may need two holes near the top arc and one at the bottom tip to ensure they hang straight. -
Check Hole Size:
Wiggle the toothpick slightly to ensure the holes are large enough to accommodate your jute twine, keeping in mind the clay might shrink minutely. -
Bake the Pieces:
Arrange all your pieces on a parchment-lined baking sheet and bake according to your clay package instructions (usually 275°F for 15-30 minutes). -
allow to Cool:
Let the pieces cool completely on the baking sheet before handling them to prevent warping while the clay is still warm.
Step 3: Assembly
-
Cut the Twine:
Measure a long length of jute twine or hemp cord. I find it helpful to cut it longer than I think I need, just to be safe. -
Start the Strand:
Thread the twine through the top hole of your first piece (starting from the bottom of the garland works best) and tie a secure knot. -
Connect the Pieces:
Thread the twine up to the bottom hole of the next piece. Tie a knot exactly where you want the piece to sit to stop it from sliding down. -
Thread Through:
Pass the twine behind the clay piece and out through the top hole. -
Continue upward:
Repeat the knotting and threading process for the remaining discs, alternating colors or shapes as desired. -
Final Loop:
Tie a loop at the very top of the twine for easy hanging on a wall hook or nail.
Add Some Shine
After baking, mix gold mica powder into a gloss glaze and paint it into the depressed texture of the white moons for a gilded, luxurious finish.
Hang your new celestial creation near a window where the light can catch the textures and enjoy the peaceful vibe it brings to the room
Smiley Planter Charms for Pots
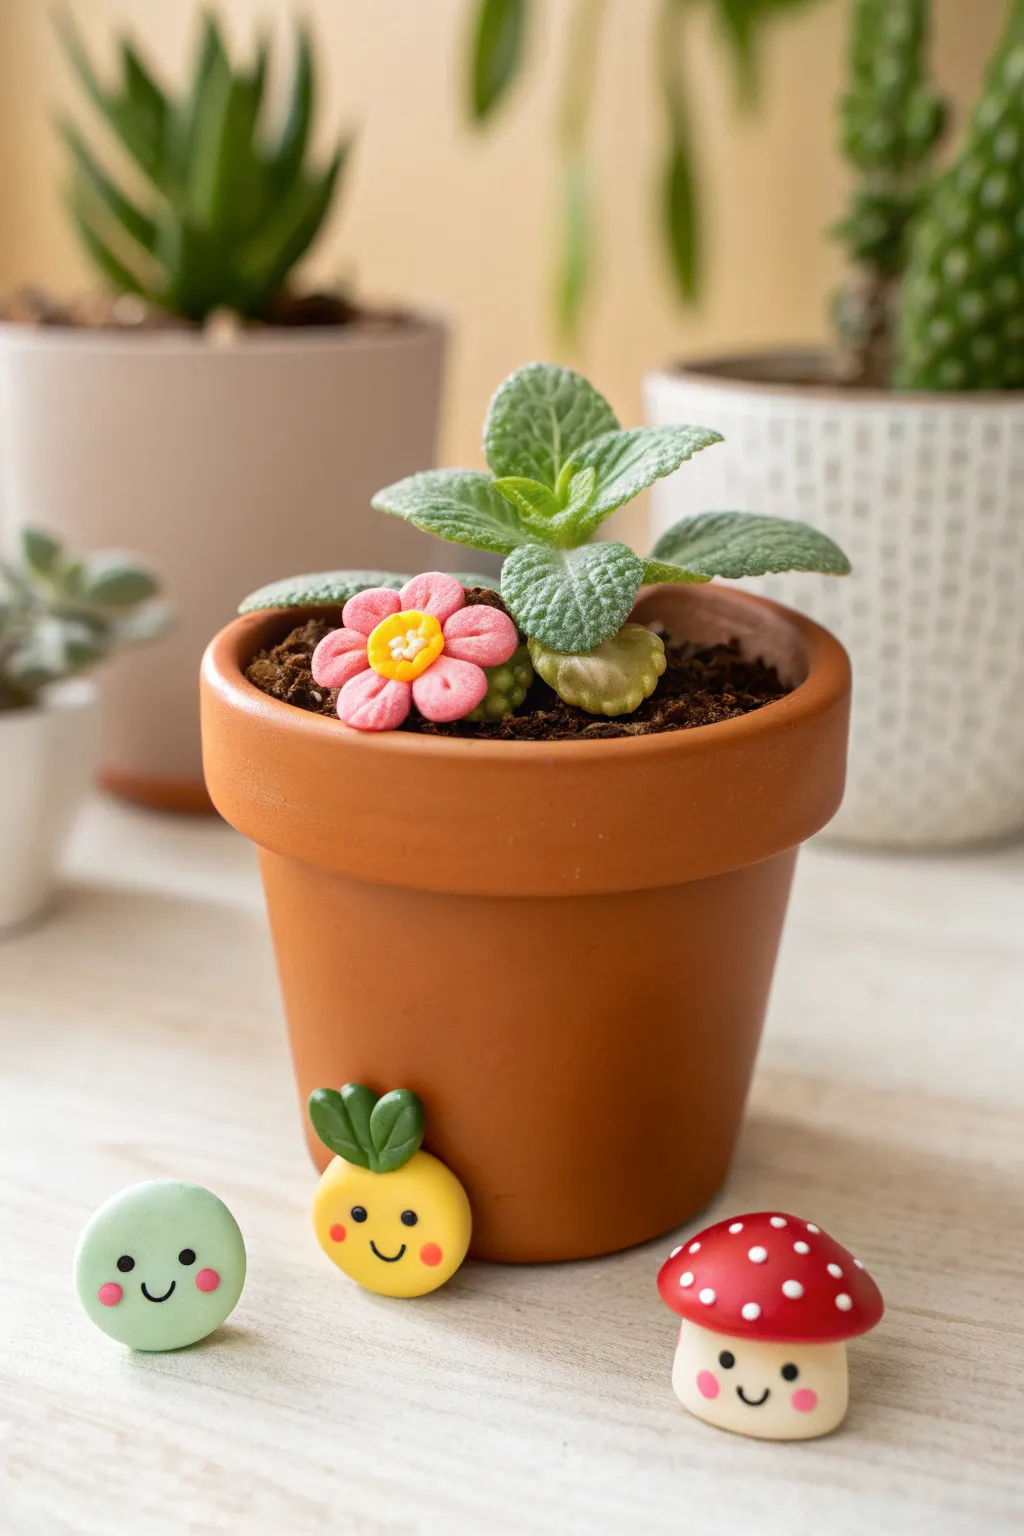
Add a dash of personality to your indoor garden with these adorable polymer clay planter charms. This tutorial guides you through creating a cheerful trio—a mushroom, a pineapple, and a pea—along with a sweet flower to nestle right into the soil.
Step-by-Step Guide
Materials
- Polymer clay (Red, White, Yellow, Green, Pink, Black)
- Small ball stylus or dotting tool
- Clean work surface (ceramic tile or glass)
- Small blade or craft knife
- Liquid polymer clay (optional, for adhesion)
- Needle tool
- Gloss glaze (optional)
Step 1: Sculpting the Mushroom Friend
-
Base shape:
Start by conditioning a small amount of white clay until soft. Roll it into a smooth ball, then flatten the bottom slightly to create a sturdy stalk shape. It should look like a squat cylinder with rounded edges. -
Create the cap:
Take a piece of red clay, slightly larger than the white piece. Roll it into a ball and then press your thumb into the center to create a hollow dome shape that will fit over the stalk. -
Assemble the mushroom:
Place the red cap onto the white stalk. Press down gently to secure it without squashing the stem. I find a tiny dab of liquid clay helps keep these parts together during baking. -
Add the spots:
Roll tiny, uniform balls of white clay. Press these gently onto the red cap to create the classic toadstool polka dots.
Sticky Situation?
If your clay is too soft and sticky, causing fingerprints, place it in the fridge for 10 minutes or leach it by pressing it between sheets of plain white paper.
Step 2: Creating the Pineapple Pal
-
Body formation:
Condition yellow clay and roll it into a flattened disk shape, roughly the size of a large coin. Smooth out any fingerprints. -
Leaf details:
Form two small teardrops from green clay. Flatten them slightly and use your needle tool to impress a central vein down each leaf. -
Attach the crown:
Press the wide ends of the green leaves onto the top edge of the yellow disk. Overlap them slightly for a playful look.
Clean Slate Tip
Keep baby wipes or hand sanitizer nearby. Clean your hands thoroughly when switching from dark colors (like red or black) to light colors to avoid staining.
Step 3: Making the Green Pea & Flower
-
Pea shape:
Roll a ball of light green clay and flatten it into a thick disk, just like the pineapple body. -
Flower petals:
For the soil decoration, roll five small balls of pink clay. Arrange them in a circle, touching at the center. Press down lightly to flatten them into petals. -
Flower center:
Place a yellow clay ball in the center. Use a needle tool to poke tiny texture holes into the yellow center, giving it a pollen-like appearance. -
Center detail:
Add three tiny balls of white clay onto the yellow center for extra detail.
Step 4: Adding Faces and Finishing
-
Eye sockets:
On all three characters (mushroom, pineapple, pea), use a small ball stylus to make two shallow indentations where the eyes will go. -
Insert eyes:
Roll tiny specks of black clay and place them into the indentations. Press gently to secure them. -
Draw the smiles:
Roll extremely thin snakes of black clay for the mouths. Curve them into ‘U’ shapes and press them onto the faces. Alternatively, you can paint these on after baking if the clay is too fiddly. -
Blush cheeks:
Flatten tiny balls of pink clay into thin disks and apply them to the cheeks of the mushroom and pea. For the pineapple, use orange or dark pink. -
Baking:
Place all pieces on a baking tray or ceramic tile. Bake according to your brand of clay’s instructions (usually 275°F/135°C for 15-30 minutes).
Once cooled, arrange your new friends around your favorite succulent for an instant mood booster
Pen Toppers With Tiny Characters

Brighten up your writing desk with this adorable, smiling cloud mascot made from polymer clay. With its gentle pastel hues and kawaii expression, this little friend brings a touch of calm whimsy to any study session.
Step-by-Step Tutorial
Materials
- White polymer clay
- Pale teal or mint green polymer clay
- Soft pink polymer clay
- Black polymer clay
- Clean work surface (ceramic tile or glass)
- Small ball tool or dotting tool
- Needle tool
- Blade or craft knife
- Oven for baking
- Matt or satin glaze (optional)
Step 1: Forming the Cloud Shape
-
Mix the teal base:
Start by conditioning a small amount of pale teal or mint green clay until it is soft and pliable. If you only have bright teal, mix in plenty of white to achieve that soft, airy pastel tone. -
Create the bottom layer:
Flatten the teal clay into a thick pancake shape, roughly 1/4 inch thick. Use your blade to trim the edges into a scalloped, bubbly shape that represents the bottom of a rain cloud. -
Condition the white clay:
Clean your hands thoroughly to avoid transferring color, then condition a larger portion of white clay for the main body. -
Shape the white cloud:
Flatten the white clay into a similar thickness as the teal piece. Gently push the edges in with your fingers to create rounded humps, forming the fluffy top part of the cloud. -
Combine the layers:
Place the white cloud shape directly onto the teal base. Press them together gently so they adhere without smashing the fluffy details. -
Refine the edges:
Using your fingertips or a silicone tool, smooth the seam where the two colors meet just slightly, or leave a crisp line if you prefer a layered cutout look.
Clean White Clay
White clay picks up dust instantly. Keep baby wipes or a scrap piece of ‘cleaning’ clay nearby to roll in your hands before handling the white sections.
Step 2: Adding the Kawaii Face
-
Make the blush:
Take two tiny amounts of pink clay and roll them into small balls. Flatten them into ovals and press them onto the white area of the cloud, spacing them wide apart for the cheeks. -
Create the eyes:
Roll two minuscule balls of black clay. I find it helpful to pick these up with the tip of a needle tool to place them accurately just inside the pink cheeks. -
Press the eyes:
Gently press the black eyes down so they flatten slightly and bond with the white clay. -
Roll the smile:
Roll a very thin ‘snake’ of black clay. Cut a tiny segment to form the mouth. -
Shape the smile:
Curve the black segment into a ‘U’ shape. Carefully place it between the cheeks using your needle tool. -
Secure the smile:
Tap the mouth gently to secure it. Ensure the ends curve upward towards the eyes to maximize the cuteness.
Step 3: Baking and Finishing
-
Preheat the oven:
Set your oven to the temperature recommended on your specific brand of polymer clay packaging (usually around 275°F or 130°C). -
Prepare for baking:
Place your cloud on a ceramic tile or a baking sheet lined with parchment paper. -
Bake the piece:
Bake for approximately 15-20 minutes depending on thickness. Monitor it to ensure the white clay doesn’t scorch or yellow. -
Cool down:
Allow the cloud to cool completely in the oven with the door slightly open to prevent cracking. -
Seal the piece:
Once cool, you can apply a thin layer of matte glaze to protect the face details and keep the white clay looking clean.
Turn it into a Topper
To attach to a pen, bake a small clay loop on the back, or glue a flat embellishment onto a pen clip using strong epoxy adhesive after baking.
Now you have a sweet little desk buddy to keep you company while you work or study
Tiny Food Magnets for the Fridge
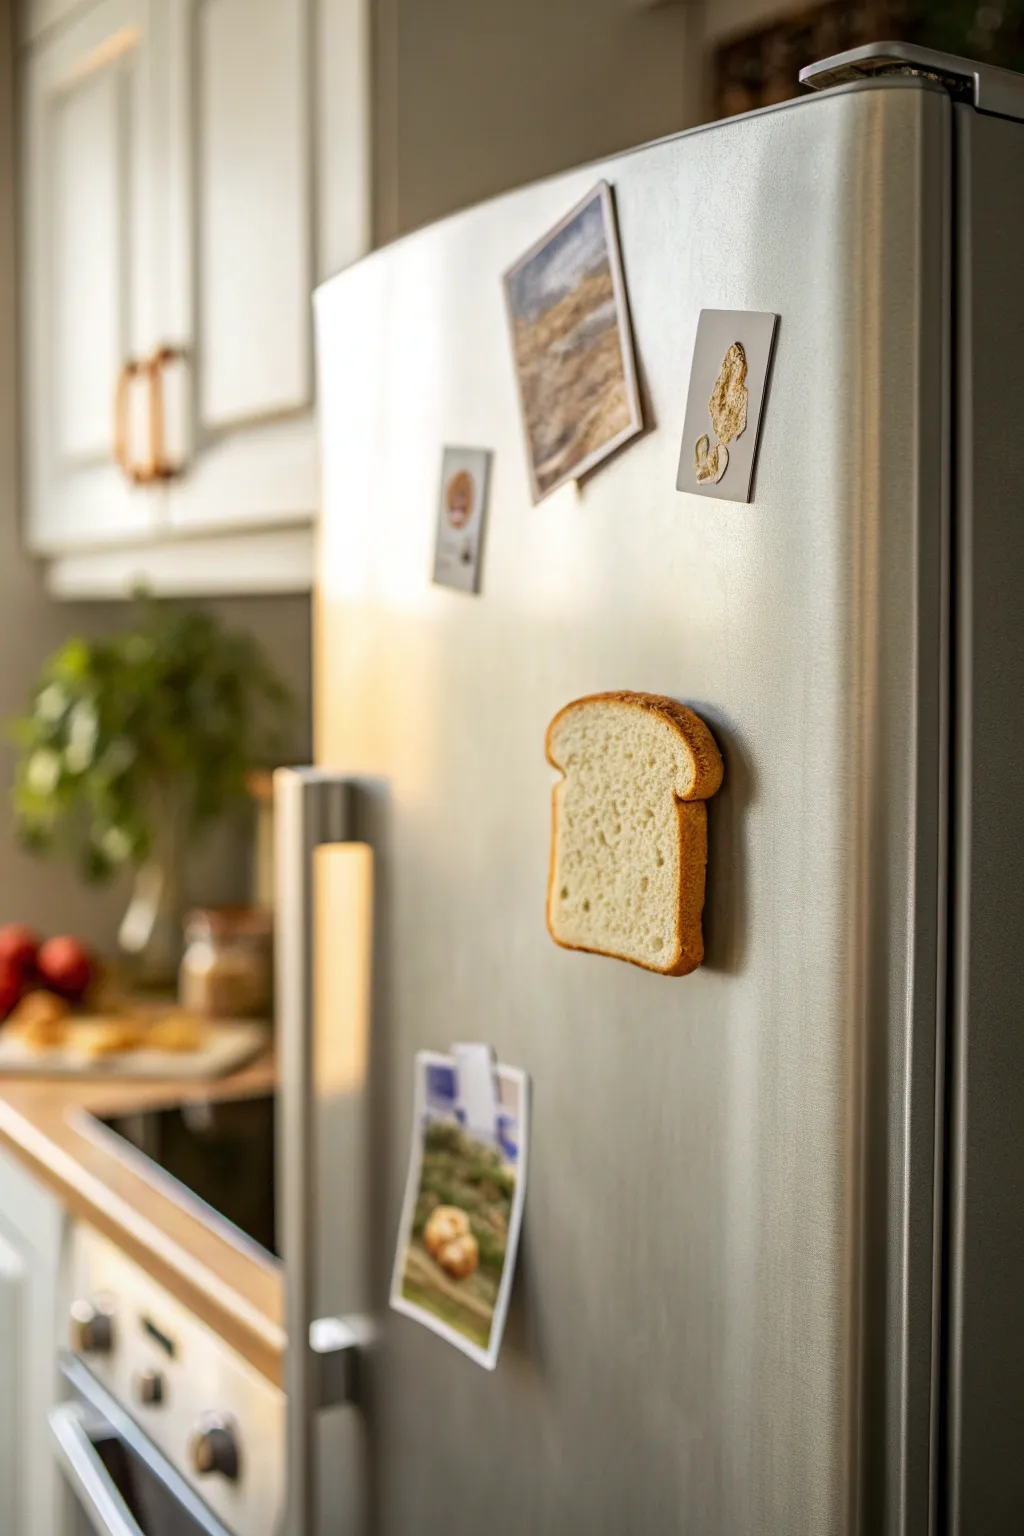
Transform your fridge door into a pantry display with this surprisingly realistic slice of white bread. Using polymer clay texturing techniques, you will create a soft, airy crumb structure that looks good enough to eat.
Step-by-Step Guide
Materials
- White or translucent white polymer clay
- Yellow ochre, sweet potato, or light brown soft pastels (chalk style)
- Liquid polymer clay (translucent)
- Old toothbrush or stiff bristle brush
- Needs or needle tool
- Dotting tool or ball stylus
- Soft paintbrush
- Rectangle clay cutter or craft knife
- Strong neodymium magnet
- Super glue (cyanoacrylate)
- Oven
Step 1: Shaping the Dough
-
Condition the Clay:
Begin by conditioning a block of white polymer clay until it is soft and pliable. If you want a slightly more realistic transparency, mix in a pea-sized amount of translucent clay with the white. -
Form the Base Shape:
Roll the clay into a sheet approximately 1/4 inch thick. You don’t want it too thin, or you’ll lose the depth needed for the texture. -
Cut the Outline:
Use a rectangular cutter or craft knife to cut a basic rectangle. Then, use your fingers to round the bottom corners slightly and curve the top to create that classic domed loaf shape. -
indent the Top:
Gently press a small indentation in the center of the top dome to mimic the natural dip often found in sandwich bread slices.
Making it Fluffy
For maximum realism, freeze the unbaked clay for 5 minutes before texturing. It makes the clay harder so the needle tears it rather than just smooshing it.
Step 2: Creating the Crumb Texture
-
Base Texturing:
Take an old toothbrush or a stiff stippling brush and press it firmly all over the surface of the clay. Move in small circular motions to break up the smooth surface completely. -
Deepening the Pores:
Use a needle tool to drag and poke deeper holes randomly throughout the surface. Real bread isn’t uniform, so vary your pressure. -
Adding Larger Aripockets:
Switch to a small ball stylus or dotting tool. Press gently into existing textured areas to create larger ‘air pockets’ or bubbles in the crumb. -
Tearing the Edges:
Use your needle tool to rough up the very edge of the white clay where it will meet the crust. This prevents it from looking like a perfect factory cut.
Toast It!
To turn this into toast, apply darker brown pastels across the entire white surface before baking, focusing on the high points of the texture.
Step 3: The Crust
-
Prepare Crust Clay:
Mix a small amount of white clay with yellow ochre and a tiny touch of brown to create a golden-tan color. -
Roll a Strip:
Roll this tan clay into a long, thin strip, roughly 2mm thick. -
Attach the Crust:
Wrap this strip around the perimeter of your textured white slice. Gently press the seam where the two clays meet so they bond. -
Blend the Seam:
Use your finger or a silicone tool to smooth the crust into the crumb on the back side, but leave a distinct line on the front face. -
Texture the Crust:
Lightly tap the toothbrush over the crust clay. It should have texture, but be smoother than the white center.
Step 4: Shading and Baking
-
Shave Pastels:
Using a blade, scrape some powder from your yellow ochre and light brown pastel chalks onto a piece of paper. -
First Pass Shading:
Dip a soft dry brush into the yellow ochre powder. Dust the entire crust liberally, and lightly dust the very edges of the white crumb to show baking heat. -
Darkening the Top:
Use the darker brown powder specifically on the top dome of the crust, as bread always browns most on top. -
Bake:
Bake the piece according to your clay manufacturer’s instructions (usually 275°F/135°C for 15-30 minutes). Let it cool completely. -
Attach Magnet:
Apply a drop of super glue to the back of the bread slice and press your neodymium magnet firmly into place. Let it cure.
Now you have a permanent snack for your kitchen decor that never goes stale
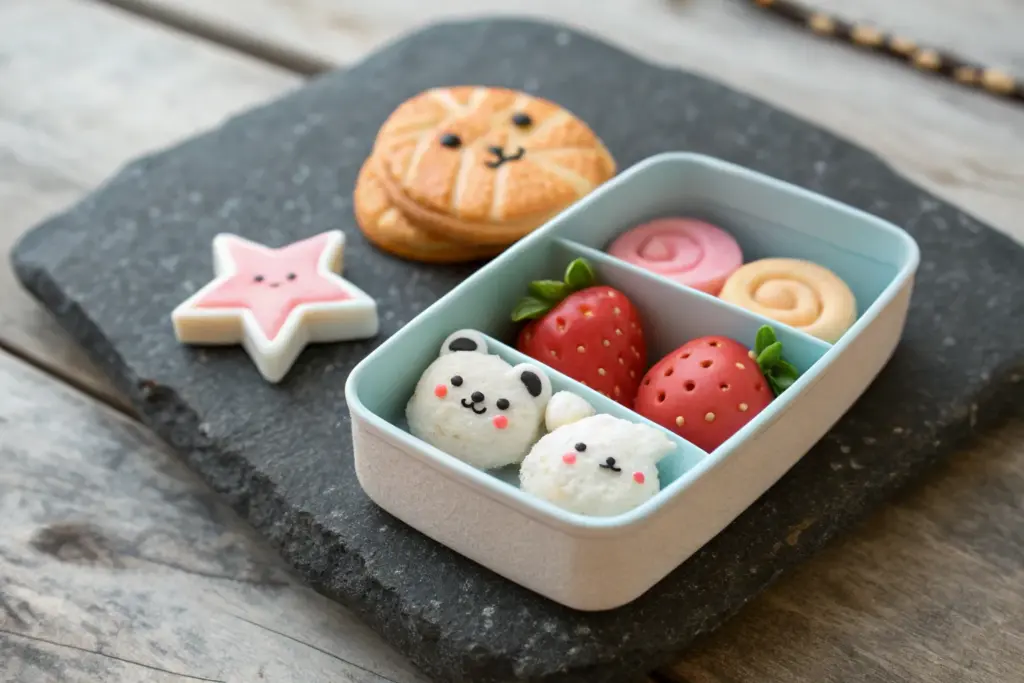
Mini “Family” of Squishy-Style Animals
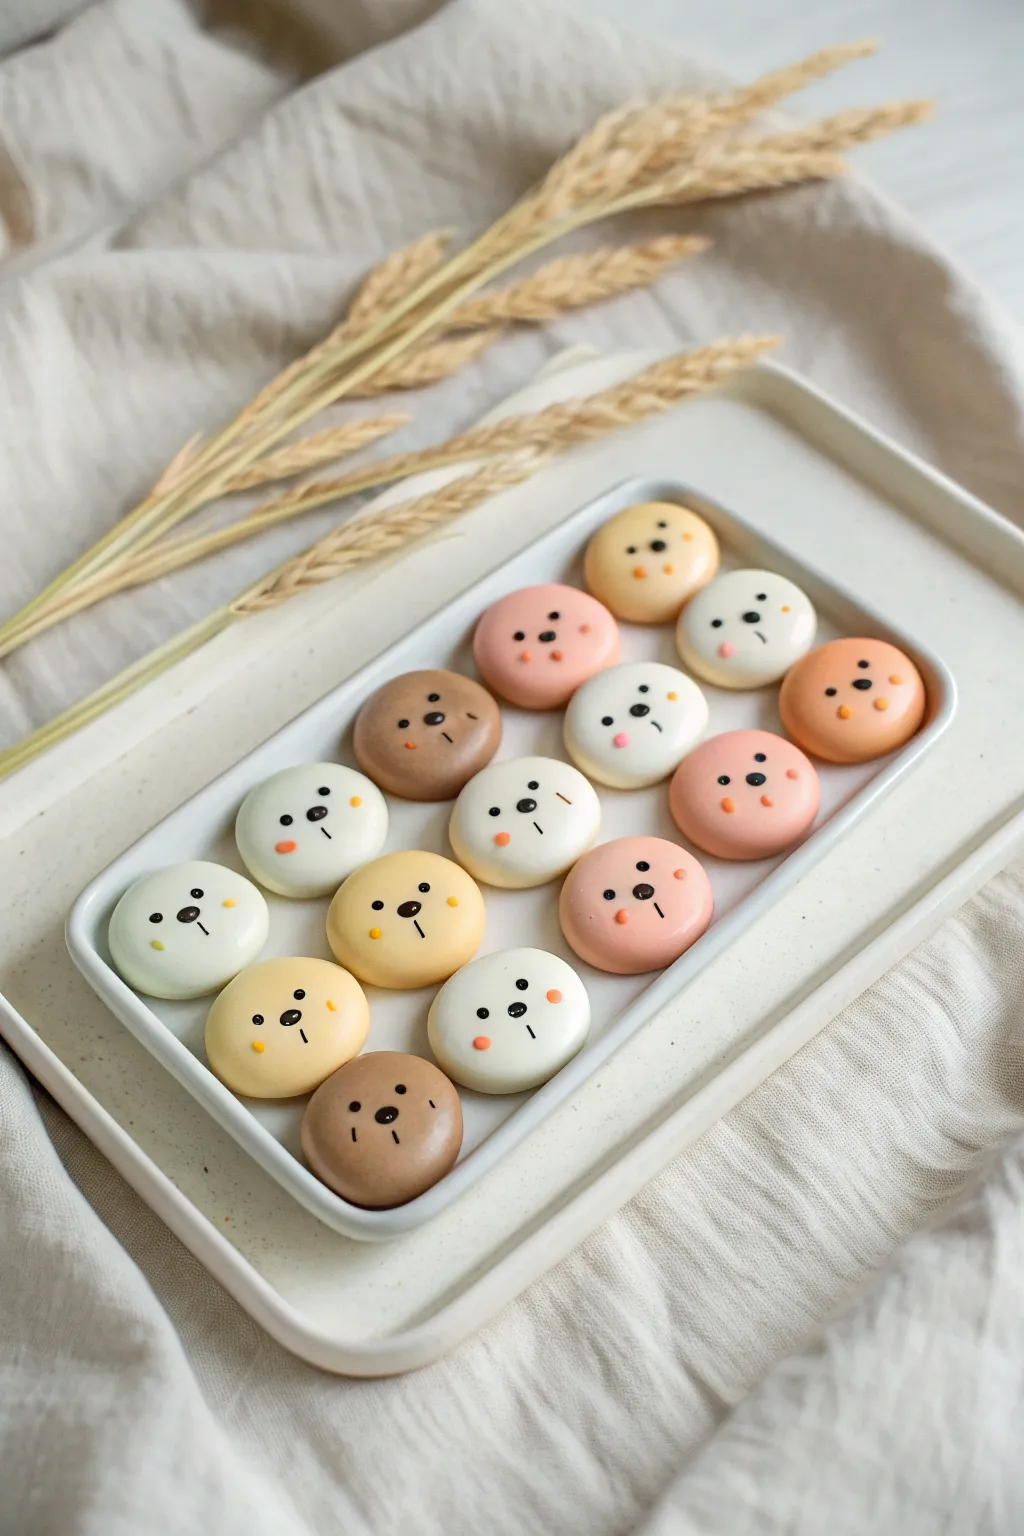
These adorable, bite-sized critters resemble stylized doughnuts or macarons with their smooth, rounded shapes and minimalist faces. With a soft pastel palette and simple dotted details, creating this entire tray of polymer clay friends is a relaxing and repetitive process perfect for beginners.
Step-by-Step Tutorial
Materials
- Polymer clay in pastel colors: white, cream, peach, soft pink, light brown, tan
- Polymer clay in black (for details)
- Circle cutter (approx. 1 inch diameter) or a bottle cap
- Acrylic roller or pasta machine
- Ball stylus tool (small and medium sizes)
- Dotting tool or toothpick
- Ceramic tile or parchment paper (for baking)
- Oven
- Gloss or matte glaze (optional)
Step 1: Shaping the Base
-
Condition the clay:
Start by kneading each color of your polymer clay until it is soft and pliable. You want a mix of earthy and pastel tones like cream, beige, pink, and chocolate brown. -
Roll out the slab:
Using your acrylic roller or pasta machine, roll the clay out to a thick, uniform sheet. Aim for about 1/4 inch thickness so the pieces have a nice, chubby look. -
Cut the rounds:
Press your circle cutter firmly into the clay to create perfect rounds. Gently push the clay out of the cutter if it sticks. -
Soften the edges:
I like to take each circle and gently run my finger around the top edge. This smooths out the sharp cut line and gives it that bouncy, ‘squishy’ bun appearance seen in the photo. -
Create the set:
Repeat this process until you have about 12-15 circles in varying colors arranged on your baking surface.
Clean Clay Only
White clay attracts dust easily. Wipe your hands and work surface with a wet wipe before handling the light colors, or dip your fingers in cornstarch.
Step 2: Adding the Faces
-
Prepare the details:
Roll a very tiny snake of black clay. You’ll need minuscule amounts for the noses and eyes. -
Place the noses:
For the nose, roll a tiny ball of black clay and press it into the center of the face. It should be slightly oval-shaped. -
Add the snout line:
Roll an impossibly thin thread of black clay. Cut a tiny segment and place it vertically directly beneath the nose to create the mouth line. -
Make the eyes:
Use a small ball stylus or dotting tool to pick up tiny specks of black clay (or use black acrylic paint later) and place them wide apart on the face. Keeping them low, near the nose line, makes them look cuter. -
Add rosy cheeks:
Choose a contrasting color for the cheeks (like orange on white, or pink on brown). Roll two tiny balls of clay and press them onto the face next to the eyes. -
Smooth the features:
Gently tap the facial features with your finger pad to ensure they adhere fully to the base clay without squashing the round shape. -
Vary the expressions:
Try slightly changing the placement of the eyes on different pieces to give them unique personalities.
Step 3: Baking and Finishing
-
Check for lint:
Before baking, examine your white and light-colored pieces. Remove any dust specs with a bit of rubbing alcohol on a Q-tip. -
Bake carefully:
Bake the pieces according to your clay manufacturer’s instructions, usually around 275°F (135°C). Since they are thick, ensure they bake long enough to cure the center. -
Cool down:
Let the pieces cool completely on the tray before handling them to prevent fingerprints. -
Optional glazing:
If you want them to look like glazed doughnuts, apply a coat of semi-gloss polyurethane varnish. For a matte ‘cookie’ look, leave them as is.
Turn Them into Magnets
Once baked and cooled, glue strong neodymium magnets to the back of each animal. They make an adorable set for holding photos on the fridge.
Arrange your finished clay family on a small tray to enjoy the full effect of their cuteness
Decoden-Style Dessert Topper Trinket Box
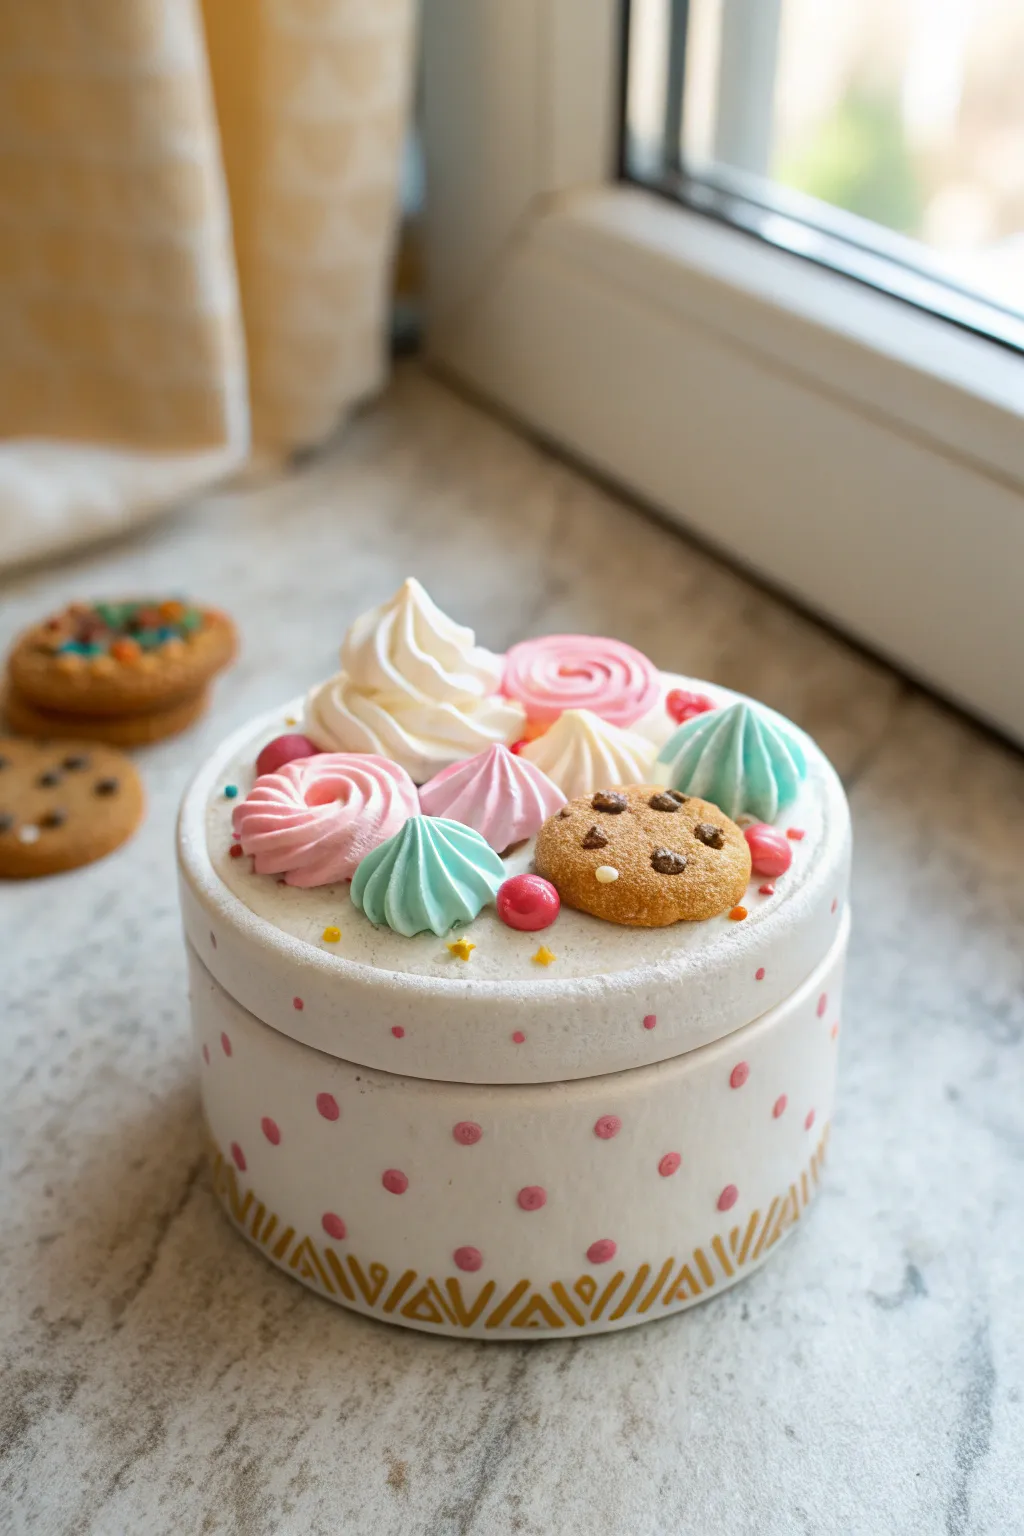
Transform a plain round box into a delightful patisserie display using polymer clay. This ‘fake bake’ project features realistic meringues, a tiny chocolate chip cookie, and pastel candies for a functional piece of art that looks good enough to eat.
Step-by-Step Guide
Materials
- Round trinket box (ceramic, wood, or sturdy cardboard)
- White or translucent white polymer clay
- Pink, light blue, and tan/beige polymer clay
- Liquid polymer clay (white or translucent)
- Star piping tip (open star)
- Small piping bag or strong plastic bag
- Brown acrylic paint or brown clay bits (for chocolate chips)
- Pink acrylic paint (for dots)
- Gold acrylic paint or gold paint pen
- Detail paintbrush or dotting tool
- Toothbrush or texturing tool
- Oven-safe adhesive (like Bake & Bond) or super glue
Step 1: Prepping the Base
-
Clean the surface:
Ensure your trinket box is completely clean and dry. If you are using a wooden or cardboard box, give it a solid base coat of white acrylic paint first to match the look of ceramic. -
Add the polka dots:
Using a dotting tool or the back end of a small paintbrush, dip into pink acrylic paint. Carefully press small, evenly spaced dots around the side of the box and the rim of the lid. Let this dry completely before moving on. -
Paint the geometric border:
With a fine liner brush and gold paint (or a gold marker for easier control), draw a zigzag pattern around the very bottom edge of the box. Add vertical lines inside the triangles to mimic the geometric design shown in the photo.
Clay Softener Tip
If your clay is too hard to pipe, add a few drops of baby oil or clay softener instead of just liquid clay. This thins it without losing the structure needed for sharp peaks.
Step 2: Creating the Clay Sweets
-
Mix the meringue colors:
Condition your white clay until it is very soft. Divide portions and mix in tiny amounts of pink and blue clay to create soft pastel shades, keeping one portion pure white. -
Prepare the clay ‘icing’:
To make the pipeable clay for the meringues, mix your conditioned clay with liquid polymer clay in a small cup. Keep adding liquid and stirring until it reaches the consistency of stiff buttercream frosting. -
Pipe the meringues:
Fit a piping bag with a star tip and fill it with your clay mixture. On a ceramic tile or baking sheet, pipe several swirls—one large white one, and several smaller pink and blue ones. Pull up quickly at the end to create sharp peaks. -
sculpt the cookie base:
Roll a small ball of tan or beige clay. Flatten it gently with your finger to form a thick disc shape for the cookie. -
Texture the cookie:
Take a clean toothbrush or texturing tool and tap it all over the surface of the beige disc. This creates that realistic crumbly baked texture. -
Add chocolate chips:
Roll tiny, irregular bits of dark brown clay (or use dark brown paint later) and press them firmly into the surface of the cookie. -
Shape the candies:
Roll tiny balls of bright pink clay to resemble round candies or gumballs. Place them alongside your other treats.
Scented Finish
Mix a tiny drop of vanilla or sugar cookie fragrance oil into the liquid clay mixture before piping. Your box will smell exactly like a real bakery when you open it!
Step 3: Assembly and Baking
-
Frost the lid:
Applying a thin layer of your white liquid clay mixture or oven-safe adhesive directly onto the center of the box lid acts as a glue for the heavier pieces. -
Arrange the centerpiece:
Carefully transfer your unbaked meringues and cookie onto the lid. I like to place the largest white meringue in the center first to anchor the composition. -
Fill the gaps:
Place the smaller blue and pink meringues around the central swirl. Lean the cookie against the meringues slightly to create dynamic height. -
Add final details:
Tuck the small pink clay ‘candies’ into any empty spaces. Sprinkle on tiny bits of yellow clay or real candy sprinkles (if they are oven safe) for extra decoration. -
Texture the ‘snow’:
If you used liquid clay on the lid, you can tap it lightly with a brush to make it look like powdered sugar or textured snow around the base of the sweets. -
Bake the project:
If your box is oven-safe (ceramic/glass), bake the entire lid assembly according to the clay manufacturer’s instructions (usually 275°F/135°C for 15-30 minutes). If the box isn’t oven-safe, simulate this arrangement on a tile, bake, and glue it on later. -
Seal (Optional):
Once cool, you can brush a matte varnish over the cookie to protect the texture, but leave the meringues plain to maintain that matte, sugary look.
Now you have a charming, sweet-themed storage spot perfect for small jewelry or keepsakes.