If you’ve got a little polymer clay and an afternoon, you can make something adorable and actually useful. Here are my favorite polymer clay DIY ideas—bite-size projects I love teaching because they’re beginner-friendly and seriously satisfying.
Modern Statement Earrings
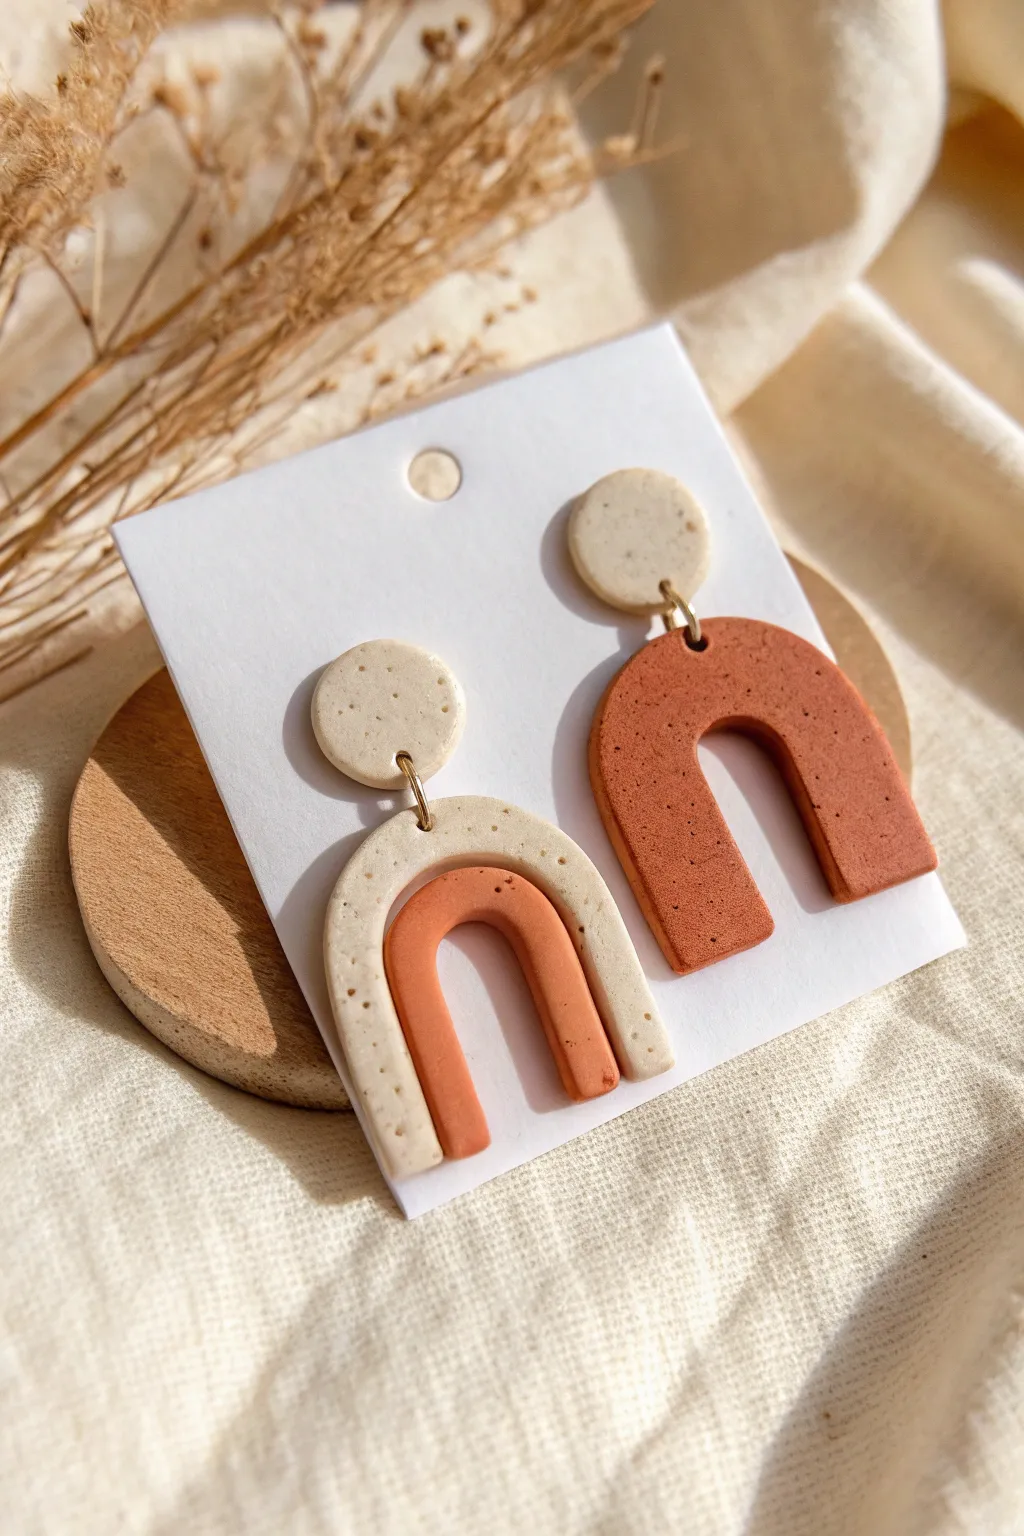
These asymmetric modern earrings mix earthy terracotta tones with a stone-effect cream clay for a striking look. The design features mismatched yet cohesive pendants—one solid arch and one double-nested arch—hanging from simple circular studs.
How-To Guide
Materials
- Polymer clay in terracotta/rust
- Polymer clay in speckled cream or granite
- Acrylic rolling pin
- U-shaped clay cutters (two sizes)
- Small circular clay cutter (approx. 10-12mm)
- Jump rings (gold)
- Earring posts and backs
- Superglue or liquid clay
- Needle tool or toothpick
- Parchment paper
Step 1: Clay Preparation
-
Condition the clay:
Begin by kneading your terracotta and speckled cream clays separately until they are soft and pliable. This prevents cracking later. -
Roll out slabs:
Using your acrylic rolling pin, flatten both colors onto parchment paper. Aim for a distinct thickness, roughly 3mm to 4mm, to ensure the arches are sturdy.
Clean Cuts Every Time
Does your clay stick to the cutter? Dip the cutter edges into cornstarch or water before pressing down to ensure an easy release and sharper edges.
Step 2: Cutting the Shapes
-
Cut the studs:
Use your small circular cutter on the speckled cream slab to create two identical circles. These will be the top studs. -
Create the solid terracotta arch:
Take your larger U-shaped cutter and press firmly into the terracotta slab. Wiggle it slightly before lifting to get a clean cut. -
Cut the nested components:
For the second earring, cut a large arch from the speckled cream clay using the same large cutter. -
Cut the inner void:
Using the smaller U-shaped cutter, cut out the center of that cream arch to create a rainbow frame. -
Make the inner arch:
Use that same smaller cutter on the terracotta clay to create the small inner arch piece that will sit inside the cream frame.
Go Glossy
For a ceramic look, coat the baked pieces in UV resin or a polyurethane gloss varnish. This makes the speckles pop and adds durability.
Step 3: Assembly and Refining
-
Smooth the edges:
Gently run your finger dipped in a little cornstarch or water along the cut edges of all pieces to remove any sharp ridges or stray bits of clay. -
Create holes:
Use a needle tool to pierce holes at the top center of each arch piece and the bottom of the circular studs. Ensure the holes are large enough for your jump rings. -
Texture check:
If you want a more organic finish, lightly dab the surface with a sponge or sandpaper before baking, though smooth is perfectly lovely too. -
Bake the pieces:
Arrangement the pieces on a parchment-lined baking sheet and bake according to your specific clay brand’s instructions (usually around 275°F/135°C for 30 minutes). -
Cool down:
Let the pieces cool completely on the tray. Handling them while warm can cause them to warp.
Step 4: Final Construction
-
Connect the nested arch:
I find it easiest to assemble the complex earring first. Lay the small terracotta arch inside the cream frame. -
Secure the layers:
Since the nested pieces hang freely in this design, simply thread a single large jump ring through both the cream frame and the terracotta inner arch. -
Attach to studs:
Connect the jump ring holding the arches to the corresponding speckled stud. Repeat for the solid terracotta arch earring. -
Affix posts:
Flip the studs over and use strong superglue (or liquid clay followed by a re-bake) to attach the metal earring posts to the backs of the circles.
You now have a sophisticated pair of earrings ready to elevate any casual outfit


Cute Charm Keychains
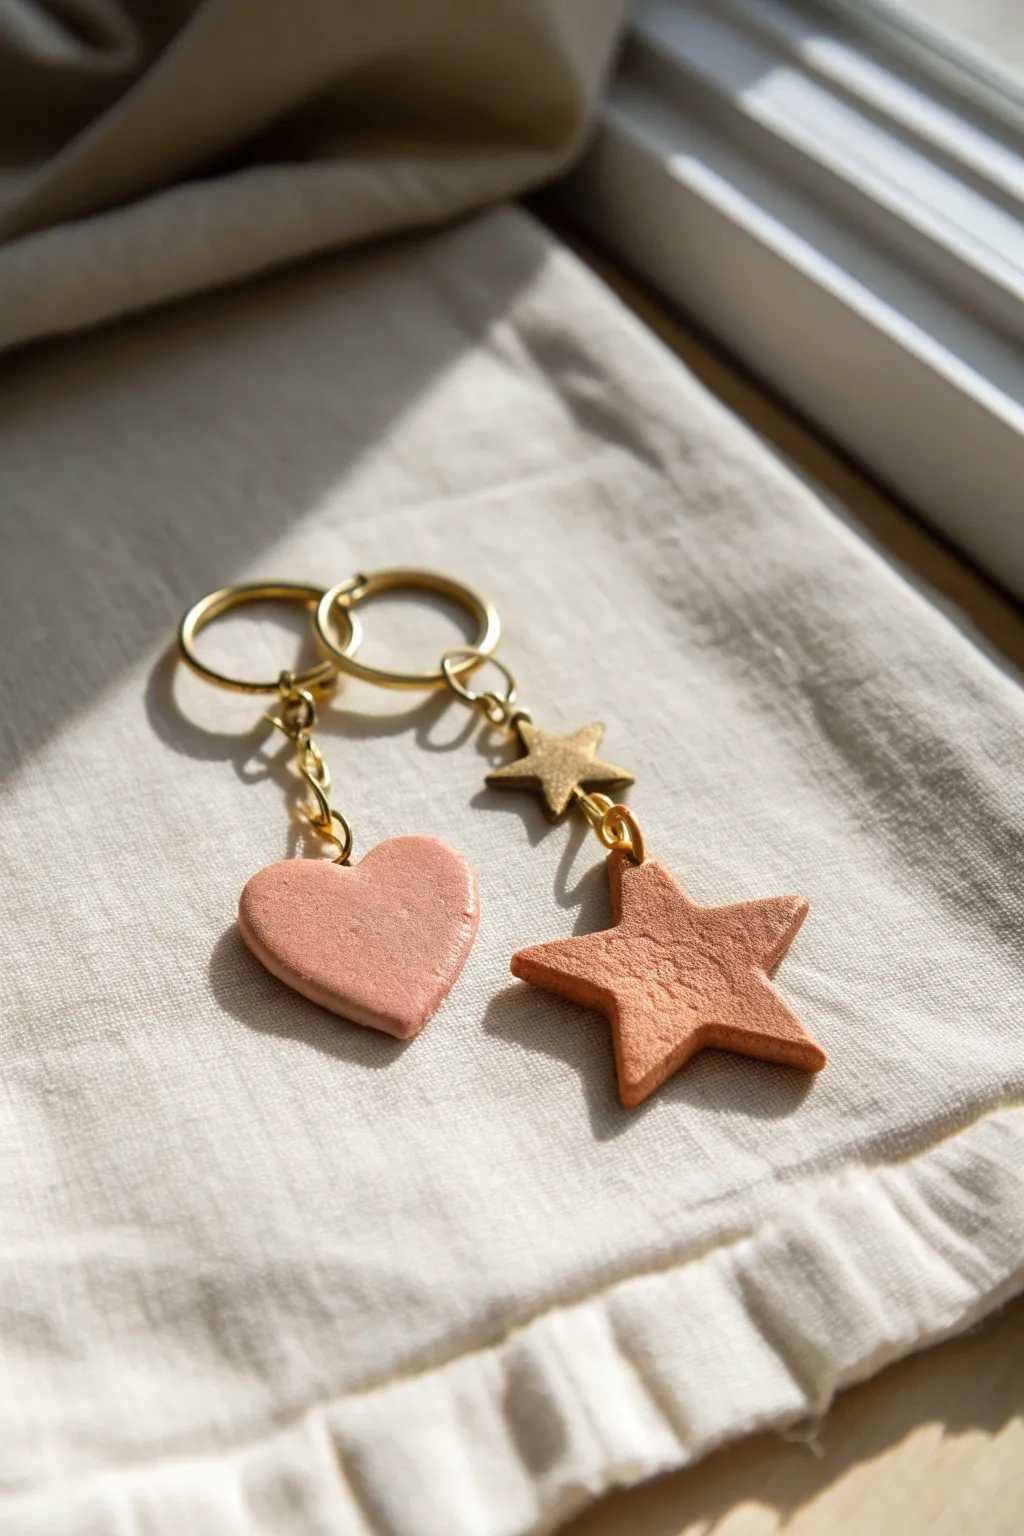
These charming keychains feature a minimalist, earthy aesthetic with their soft terracotta hue and subtle texture. Accented with golden hardware and an extra touch of shine from a small metal star, they are the perfect beginner project for diving into polymer clay jewelry making.
Detailed Instructions
Materials
- Polymer clay (terracotta or dusty rose color)
- Small heart-shaped cookie cutter
- Small star-shaped cookie cutter
- Rolling pin or acrylic roller
- Wax paper or dedicated clay work surface
- Gold tone keyrings with split rings
- Gold tone jump rings (assorted sizes)
- Gold chain
- Gold star charm (metal)
- Needle tool or toothpick
- Jewelry pliers (round nose and flat nose)
- Oven
- Baking sheet
Step 1: Shaping the Charms
-
Condition the Clay:
Begin by warming the polymer clay in your hands. Knead it thoroughly until it becomes soft, pliable, and easy to manipulate without cracking. -
Roll it Out:
Place the conditioned clay on a piece of wax paper or a smooth tile. Use your acrylic roller to flatten the clay into a slab, aiming for a thickness of about 1/4 inch (6mm) so the charms are sturdy. -
Add Texture (Optional):
If you want that slightly rustic, handmade stone look seen in the photo, gently daub the surface of the clay with a clean sponge or a crumpled piece of aluminum foil before cutting. It’s a small detail I find adds a lot of character. -
Cut the Shapes:
Press your heart cookie cutter firmly into the clay slab. Repeat with the star cutter. Wiggle them slightly to ensure a clean cut before lifting. -
Smooth the Edges:
Gently gently lift the shapes. Use your finger to smooth out any rough edges or stray bits of clay left by the cutter. -
Pierce the Holes:
Using a needle tool or a toothpick, poke a hole near the top center of the heart and the top point of the star. Make ensure the hole is large enough for your jump rings to fit through later, and wiggle the tool slightly to ensure a clean opening on both sides.
Step 2: Baking and Assembly
-
Bake the Clay:
Place your clay shapes on a baking sheet lined with parchment paper. Bake according to the manufacturer’s instructions on your specific package of clay (typically around 275°F/135°C for 15-30 minutes per 1/4 inch of thickness). -
Cool Down:
Once baked, remove from the oven and let the pieces cool completely. Do not attempt to assemble while the clay is still warm, as it can be slightly brittle. -
Prepare the Chains:
Cut two small lengths of gold chain using your wire cutters or pliers. A length of about 1 to 1.5 inches works well for a standard keychain. -
Attach Jump Rings to Charms:
Using two pairs of pliers, twist open a jump ring. Slide it through the hole in your cooled clay heart, then add one end of a chain segment. Twist the jump ring closed securely. -
Repeat for the Star:
Repeat the previous step for the clay star charm. -
Connect to Keyring:
Open another jump ring (or use the connector typically provided with keychain hardware). Attach the free end of the chain to the large keyring loop. -
Add the Metal Accent:
For the star keychain, open a small jump ring and thread on the gold metal star charm. Attach this to the chain, roughly halfway up the length, so it sits nicely above the clay star. -
Final Check:
Give all your jump rings a final squeeze with the pliers to ensure they are fully closed and secure so your charms won’t slip off.
Clean Edges Trick
Before baking, dip your finger in a tiny bit of rubbing alcohol or cornstarch and rub it over the clay edges. This melts away fingerprints and creates a professional, smooth finish.
Hole Too Small?
If you baked the clay and realized the hole is too tight for the jump ring, don’t panic. You can carefully widen it using a small hand drill or a pin vise without cracking the piece.
Now you have a set of earthy, minimalist keychains ready to organize your keys or gift to a friend


Marbled Bead Necklace
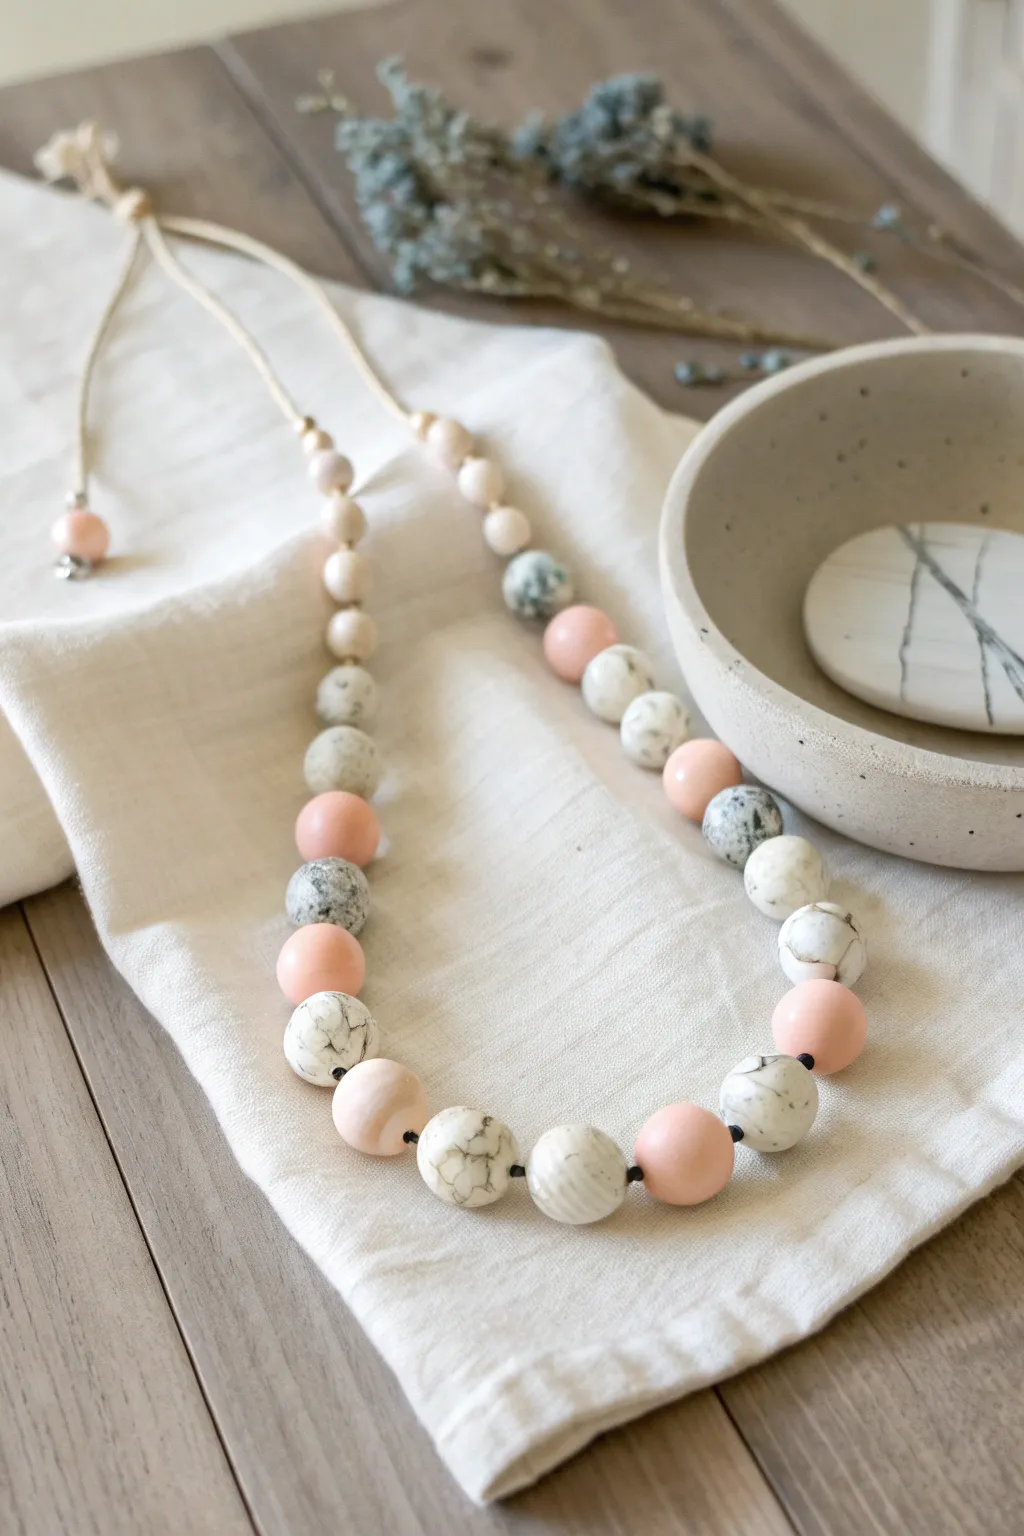
This sophisticated necklace combines the softness of peach tones with the organic beauty of faux-marble stone effects. By mixing polymer clay colors, you can achieve a high-end boutique look right from your kitchen table.
Step-by-Step Tutorial
Materials
- White polymer clay
- Black polymer clay
- Peach or pale pink polymer clay
- Translucent polymer clay (optional, for depth)
- Bead piercing tool or toothpick
- Acrylic rolling pin
- Waxed cotton cord or suede lace (cream/beige)
- Sandpaper (fine grit)
- Varnish or glaze (matte finish recommended)
- Oven for baking
Step 1: Creating the Solid Beads
-
Condition the Peach Clay:
Begin by thoroughly conditioning your peach or pale pink clay. Knead it in your hands until it becomes soft, pliable, and warm to the touch. -
Component sizing:
Roll the clay into a long, even log roughly 3/4 inch thick. Slice this log into equal segments to ensure your beads will be uniform in size. -
Shape the Spheres:
Take each segment and roll it between your palms. Apply gentle pressure initially, then lighten your touch to smooth out any fingerprints, creating perfect spheres. -
Pierce the Holes:
Using your bead piercing tool, gently twist a hole through the center of each bead. I find it helps to twist halfway through, then flip the bead and pierce from the other side to avoid distortion.
Don’t Over-Mix!
Stop twisting the clay sooner than you think. If you mix the black into the white too thoroughly, you lose the distinct veins and get a solid grey color instead.
Step 2: Creating the Marbled Beads
-
Prepare the Base:
Condition a large amount of white clay. If you want a more stone-like translucency, mix in a small amount of translucent clay at a 4:1 ratio. -
Make the Veining Color:
Take a very small amount of black clay and roll it into incredibly thin, thread-like snakes. -
Apply the Veins:
Lay the thin black threads randomly over your block or log of white clay. You don’t need to be precise here; organic placement looks better. -
Twist and Fold:
Twist the log of clay like a candy wrapper, then fold it in half. Repeat this twist-and-fold motion 2-3 times. Be careful not to over-mix, otherwise, the clay will just turn grey instead of marbled. -
Form the Marbled Beads:
Slice your marbled log into segments just like the peach clay. Roll these rapidly into balls to lock in the pattern. -
Pierce the Marbled Beads:
Create holes in these beads using the same technique as before, ensuring the holes are large enough for your chosen cord.
Fixing Distortion
If beads squish while piercing, let them rest in the fridge for 15 minutes before making the hole. The firmer clay holds its shape better against the tool.
Step 3: Baking and Assembly
-
Bake the Beads:
Arrange your beads on a baking sheet or in a bead rack. Bake according to the manufacturer’s instructions for your specific brand of clay (usually 275°F/135°C for 30 minutes). -
Cool and Sand:
Allow the beads to cool completely. If there represent any fingerprints, wet-sand them gently under running water using fine-grit sandpaper. -
Seal (Optional):
For durability, brush a thin coat of matte varnish over the beads and let them dry. -
Start Stringing:
Cut a generous length of cord (about 40 inches). Tie a knot about 10 inches from one end to start. -
Pattern the Beads:
Thread your beads, alternating between marbles and solids. Looking at the image, notice how the larger beads sit at the bottom center, tapering to smaller beads near the neck. -
Knotting Between Beads:
To keep the beads separated and distinct, tie a simple overhand knot tightly against the bead hole after threading each one. -
Finishing the Ends:
Once all beads are strung, finish the ends with an adjustable sliding knot or simple loop knots, adding a small bead at the very tail ends for a weighted finish.
Enjoy wearing your custom, artisan-style jewelry piece that looks like real stone


Terrazzo Trinket Dish
Bring a pop of modern retro style to your dresser with this handmade terrazzo trinket dish. Featuring scattered chips of turquoise, ochre, mustard, and rust red against a speckled cream base, this bowl captures the look of real stone using accessible polymer clay.
How-To Guide
Materials
- Polymer clay (White or cream base)
- Polymer clay (Teal, mustard yellow, rust red, and burnt orange)
- Black pepper or dried coffee grounds (for speckling)
- Rolling pin (acrylic preferred)
- Oven-safe bowl (to use as a form)
- Craft knife or clay slicer
- Rolling tool or glass jar
- Sandpaper (various grits: 400, 800, 1000)
- UV resin or polyurethane gloss varnish (optional)
- Oven
Step 1: Preparing the Terrazzo Chips
-
Condition the colors:
Begin by thoroughly conditioning your colored clays (teal, mustard, rust, orange). Warm them in your hands until they are soft and pliable to prevent crumbling later. -
Create thin sheets:
Roll each colored clay piece into a very thin sheet. You want these quite thin so they integrate easily into the base later without creating huge bumps. -
Bake the sheets:
Place your thin color sheets on a tile or parchment paper and bake them for 10-15 minutes at the temperature recommended on your clay package. This pre-baking makes them easier to chop into sharp shards. -
Chop into fragments:
Once the colored sheets have cooled completely, use your craft knife or clay slicer to chop them into irregular, jagged confetti-like pieces. Vary the sizes from tiny specks to small triangles.
Clean Cuts Only
Wipe your clay blade with a baby wipe or a bit of rubbing alcohol before cutting your final circle. This prevents drag marks and ensures a crisp, clean edge.
Step 2: Creating the Speckled Base
-
Condition the base clay:
Take a large block of white or cream polymer clay and condition it until soft. This needs to be a substantial amount, roughly the size of a tennis ball depending on your desired bowl size. -
Add texture:
Flatten the white clay slightly and sprinkle a small amount of ground black pepper or dried coffee grounds onto it. This adds that authentic, gritty stone texture to the background. -
Mix the inclusions:
Fold the clay over repeatedly and knead it until the specks are evenly distributed throughout the white dough. -
Roll out the slab:
Roll your speckled white clay into a thick slab, roughly 5-6mm thick. A slightly thicker slab ensures a sturdy final dish. -
Apply the terrazzo:
Scatter your pre-baked colored chips generously over the top of the white slab. Press them down gently with your fingers to tack them in place. -
Embed the chips:
Use your acrylic roller to roll over the slab again. Apply firm pressure to force the colored chips down into the white clay until the surface is completely smooth and flush.
Go Metallic
Mix in small flakes of gold leaf along with your colored clay chips before rolling. The gold will embed into the slab and add a stunning glimmer when sanded.
Step 3: Shaping and Finishing
-
Cut the circle:
Place a circular template or a bowl upside down on your slab and cut around it with your craft knife to create a perfect circle. -
Form the curve:
Gently lift your clay circle and drape it inside your oven-safe bowl. Press it lightly against the bottom and sides to take the bowl’s shape. I prefer to push from the center outward to avoid trapping air bubbles. -
Smooth the rim:
Run your finger along the rim of the clay to smooth out any sharp edges left by the cutting tool. -
Final bake:
Place the bowl (with the clay inside) into the oven. Bake for the full duration recommended by the manufacturer, typically around 30 minutes, to ensure durability. -
Cool down:
Let the piece cool completely inside the mold before attempting to pop it out. Removing it while hot can cause warping. -
Sand for exposure:
Under running water, sand the surface of the bowl starting with 400 grit sandpaper. This step is crucial as it removes the thin layer of white clay haze over the chips, making the colors pop vividly. -
Polish up:
Move to higher grit sandpapers (800, then 1000) to buff the surface to a smooth, stone-like finish. -
Seal (Optional):
If you want a glossy ceramic look, apply a thin coat of UV resin or gloss varnish. For a matte stone look, you can leave it bare.
Now you have a stylish, durable vessel perfect for holding your favorite rings and trinkets.

What Really Happens Inside the Kiln
Learn how time and temperature work together inside the kiln to transform clay into durable ceramic.
Ring Cone Stand
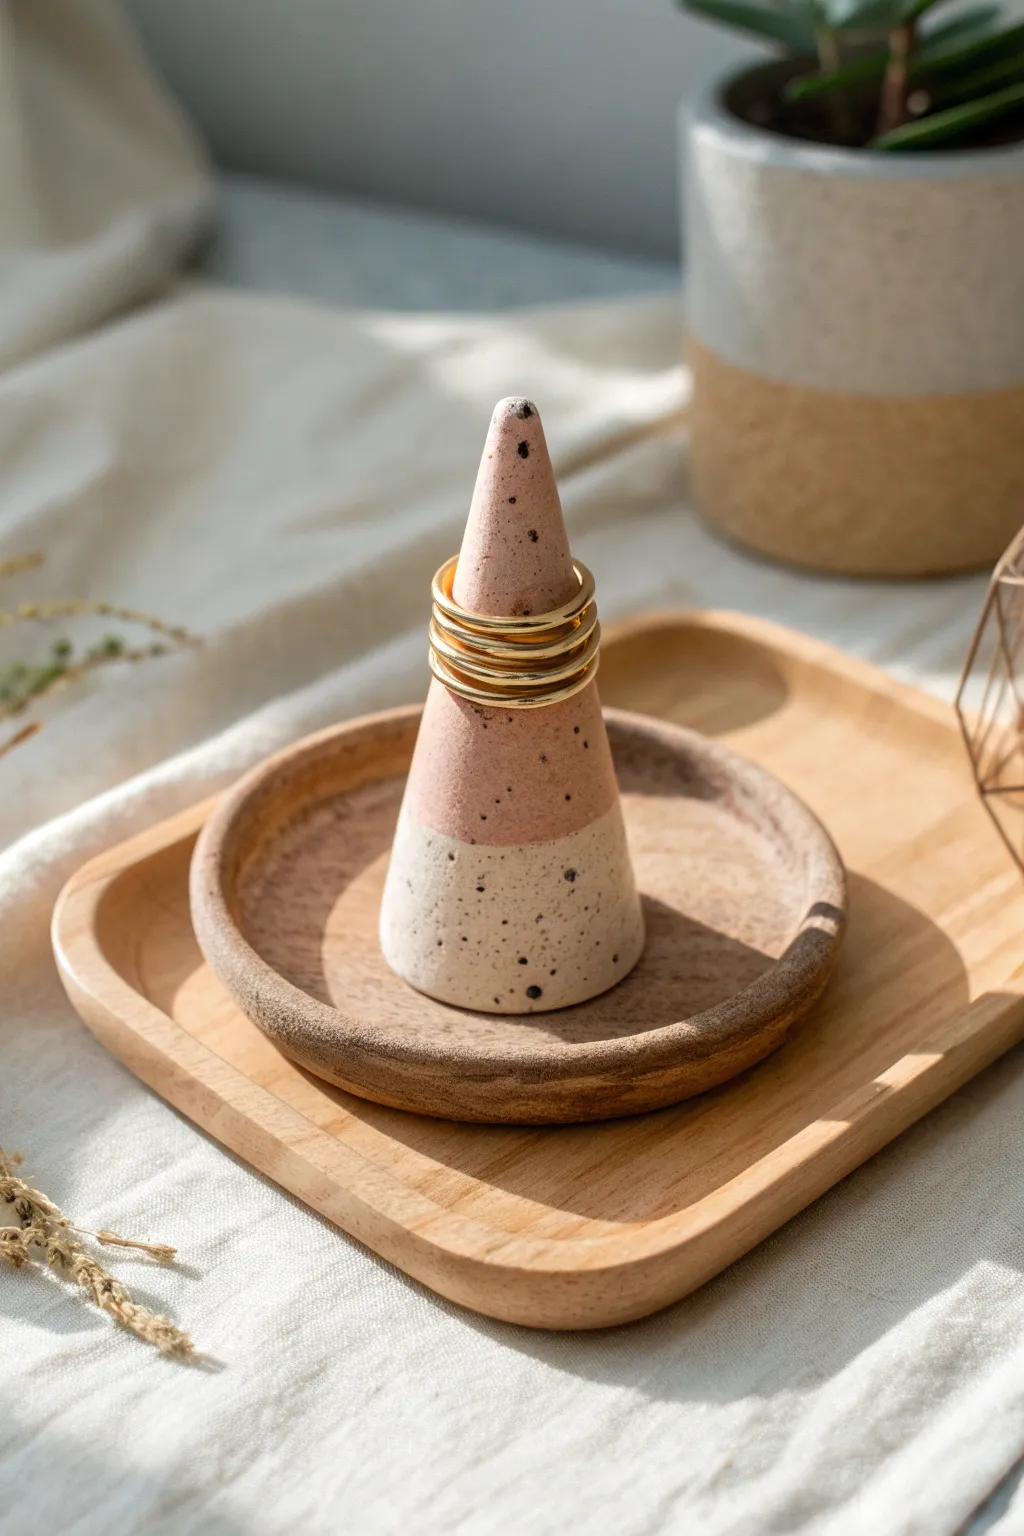
Create a minimalistic and chic jewelry organizer with this speckled polymer clay ring cone. Featuring a soft blush pink top and a creamy white base, the faux-stone effect adds a trendy, artisanal touch to your vanity.
Step-by-Step Guide
Materials
- Polymer clay (Blush Pink)
- Polymer clay (White or Beige)
- Black pepper or dried coffee grounds (for speckling)
- Rolling pin or pasta machine
- sharp crafting blade or tissue blade
- Baking sheet
- Parchment paper
- Oven
- Fine-grit sandpaper (optional)
- Matte varnish (optional)
Step 1: Preparing the Clay
-
Condition the white clay:
Start by taking a chunk of white or beige clay and kneading it in your hands until it becomes soft, pliable, and warm. This conditioning step is crucial to prevent cracks later. -
Create the speckled effect:
Flatten the conditioned white clay slightly and sprinkle a pinch of ground black pepper or dried coffee grounds onto the surface. Fold the clay over to trap the particles inside. -
Mix until uniform:
Knead the mixture repeatedly until the speckles are evenly distributed throughout the white clay. Roll it into a smooth ball. -
Prepare the pink clay:
Repeat the conditioning process with your blush pink clay. You can choose to add speckles to this portion as well for a consistent look, or leave it solid for contrast. In this project, I prefer adding speckles to both sections for that cohesive stone look. -
Roll smooth spheres:
Once both colors are speckled and conditioned, roll the pink clay into a ball slightly smaller than the white one, as it will form the narrower top section.
Keep it Clean
Baby wipes are your best friend. Wipe your hands and tools between kneading the dark speckles and handling light clay to avoid smudging the colors.
Step 2: Forming the Cone
-
Form the base cylinder:
Take the white speckled ball and roll it on your work surface into a squat, thick cylinder. This will be the sturdy bottom section of your holder. -
Form the top cone:
Take the pink ball and roll it into a cone shape. The base of this pink cone should match the diameter of your white cylinder as closely as possible. -
clean the cuts:
Using your sharp blade, make a clean, straight cut across the top of the white cylinder and the bottom of the pink cone to ensure flat, fresh surfaces for joining. -
Join the sections:
Place the pink cone directly onto the white cylinder. Press them together firmly but gently to avoid distorting the shape too much. -
Blend the seam:
Using your thumb or a smoothing tool, gently drag small amounts of clay across the seam line to bond the two pieces. Once they are mechanically joined, roll the entire shape on your work surface to smooth out the transition until the seam line disappears and the surface is flush. -
Refine the shape:
Continue rolling the clay back and forth, applying slightly more pressure at the top to accentuate the taper. Aim for a total height of about 3 to 4 inches. -
Flatten the base:
Stand the cone upright and tap it gently against the table to flatten the bottom. Make sure it stands perfectly straight without wobbling. -
Final smoothing:
Check for any fingerprints. You can lightly brush the surface with a little cornstarch or baby oil on your finger to buff them away before baking.
Step 3: Baking and Finishing
-
Bake the cone:
Place your cone on a baking sheet lined with parchment paper. Bake according to your specific clay manufacturer’s instructions. Usually, this means baking at around 275°F (130°C) for 15-30 minutes per 1/4 inch of thickness. -
Cool completely:
Remove the cone from the oven and let it cool completely before handling. The clay is still fragile when hot. -
Sand the surface:
Once cool, use fine-grit sandpaper under running water to gently sand away any remaining bumps or fingerprints, giving the piece a professional, stone-smooth feel. -
Seal the piece:
If you want extra durability, apply a thin coat of matte varnish. This will protect the clay without making it look plasticky.
Gilded Touch
Paint the seam where the two colors meet with a thin line of liquid gold leaf for a luxurious, modern geometric accent.
Now your rings have a stylish new home that looks like expensive terrazzo without the price tag
Hair Clips and Barrettes
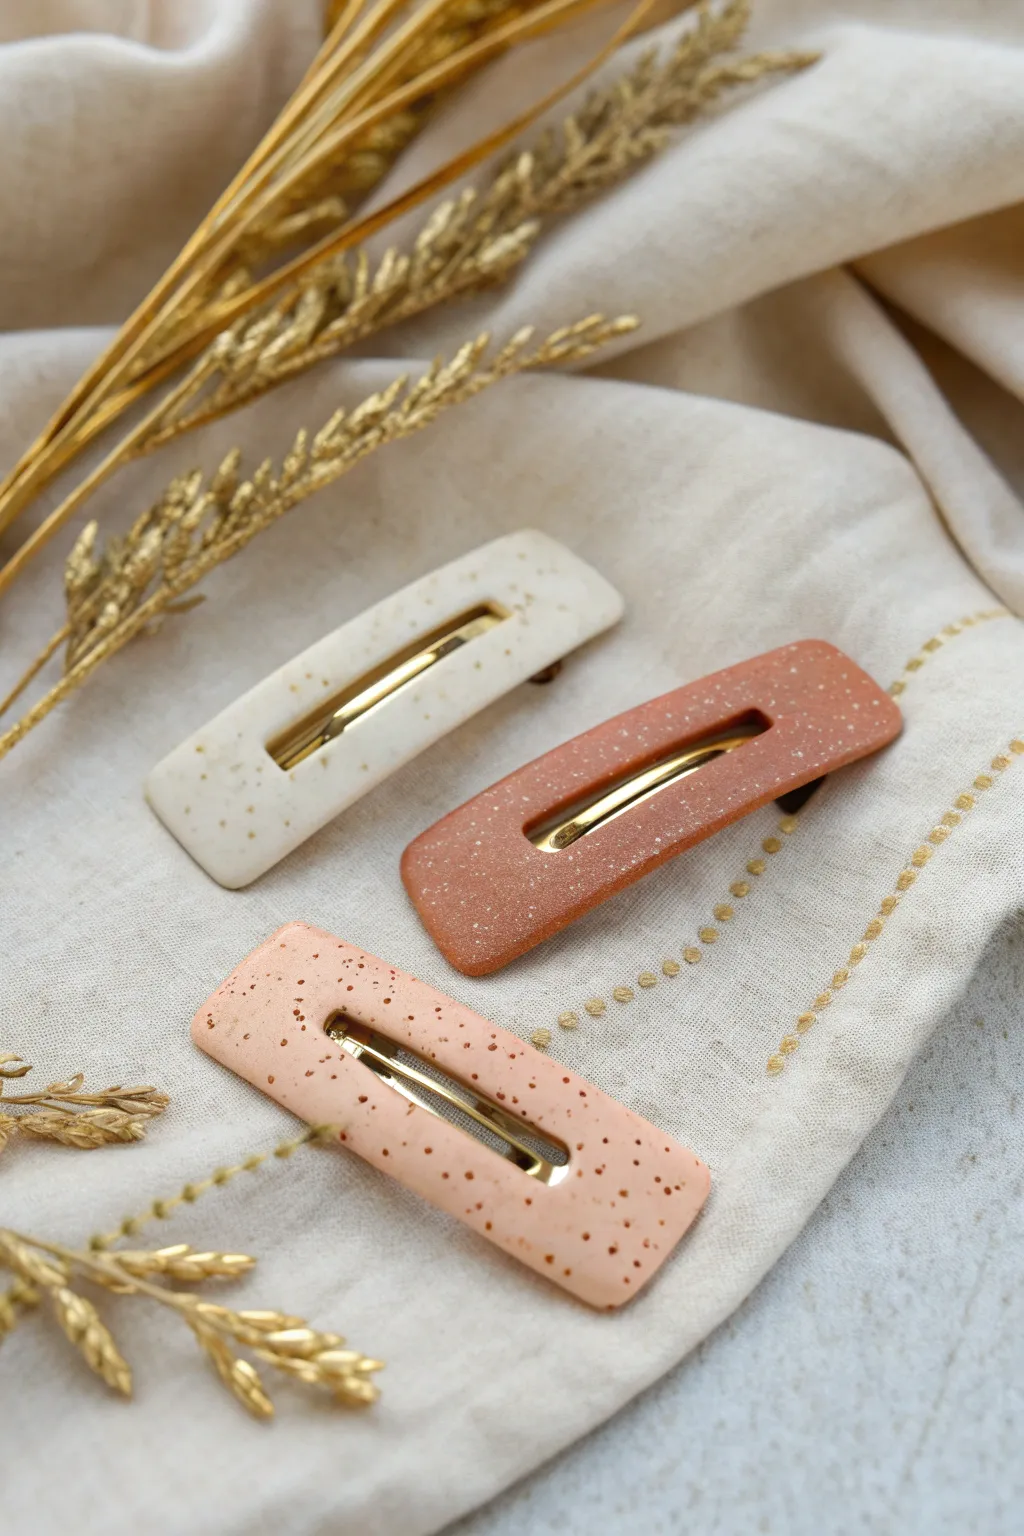
These elegant, minimalist hair clips feature an organic speckled stone effect in warm, earthy tones. The combination of gold leaf flecks and soft polymer clay creates a sophisticated accessory that looks boutique-bought but is surprisingly simple to make at home.
Step-by-Step
Materials
- Polymer clay (white/cream, terracotta, peach)
- Gold leaf flakes or fine gold glitter
- Metal alligator hair clip blanks (approx. 6-8mm wide)
- Fimo liquid gel or oven-bake adhesive
- Acrylic rolling pin or clay machine
- Tissue blade or sharp craft knife
- Barrette template (cardstock or 3D printed cutter)
- Sandpaper (400 to 1000 grit)
- Gloss glaze or UV resin (optional)
- Ceramic tile or baking sheet
Step 1: Prepping the Clay
-
Condition the base:
Begin by conditioning your polymer clay blocks until they are soft and pliable. You’ll want three distinct colors for this set: a creamy off-white, a deep terracotta rust, and a soft peachy blush. -
Add the sparkle:
Take your pinch of gold leaf flakes and crumble them slightly. Gently mix them into each color of clay. You want the flakes to be distributed throughout but not completely pulverized, so fold the clay over itself carefully rather than blending vigorously. -
Flatten the sheets:
Roll out your clay into even sheets, approximately 3-4mm thick. An acrylic roller with depth guides or a pasta machine works best here to ensure uniform thickness, which is crucial for the clip’s durability.
Clean Cuts Pro Tip
Chill your rolled clay sheet in the fridge for 10 minutes before cutting. The firmer clay resists dragging under the knife, giving you much sharper, cleaner edges.
Step 2: Shaping the Clips
-
Create a template:
If you don’t have a specific cutter, sktech a long rectangle with rounded corners on cardstock (about 2.5 inches long by 0.75 inches wide) and cut it out to use as a guide. -
Cut the shapes:
Place your template on the clay sheet. Using a sharp tissue blade or craft knife, cut carefully around the shape. Wipe your blade between cuts to keep the edges crisp and clean. -
Cut the center slot:
To accommodate the clip mechanics later, you can cut a long, thin rectangular slot in the center of the clay piece. Alternatively, leave it solid if you plan to glue the clip strictly to the back, though the slot adds a modern, integrated look. -
Smoothing edges:
Dip your finger in a tiny bit of cornstarch or baby oil and gently run it along the cut edges of the clay to smooth out any harsh angles or burrs left by the knife.
Level Up: Texture
Before baking, gently press coarse sandpaper or a toothbrush onto the surface. This adds a realistic ‘stone’ texture that looks amazing when highlighted with the gold specs.
Step 3: Baking and Assembly
-
Bake carefully:
Place your clay pieces on a ceramic tile or a baking sheet lined with plain paper. Bake according to your clay manufacturer’s instructions, usually around 275°F (130°C) for 30 minutes. Tent with foil to prevent scorching the light colors. -
Cool and sand:
Allow the pieces to cool completely. Once hard, use wet sandpaper starting at 400 grit and moving to 1000 grit to buff the edges and surface until they feel perfectly smooth. -
Add shine:
For that polished, high-end look visible in the photo, apply a thin coat of gloss glaze or UV resin to the top surface. If using resin, cure it under a UV lamp for a few minutes. -
Attach hardware:
Flip the clay piece over. Apply a strong adhesive like E6000 or specialized clay glue to the flat surface of your metal alligator clip. -
Final cure:
Press the metal clip firmly onto the back of the clay. If you cut a slot, align the clip so the spring mechanism fits neatly within or behind that space. Let the glue cure fully for 24 hours before wearing.
Enjoy styling your hair with these chic, custom-made accessories that bring a touch of earthy elegance to any outfit


The Complete Guide to Pottery Troubleshooting
Uncover the most common ceramic mistakes—from cracking clay to failed glazes—and learn how to fix them fast.
Bright Fridge Magnets
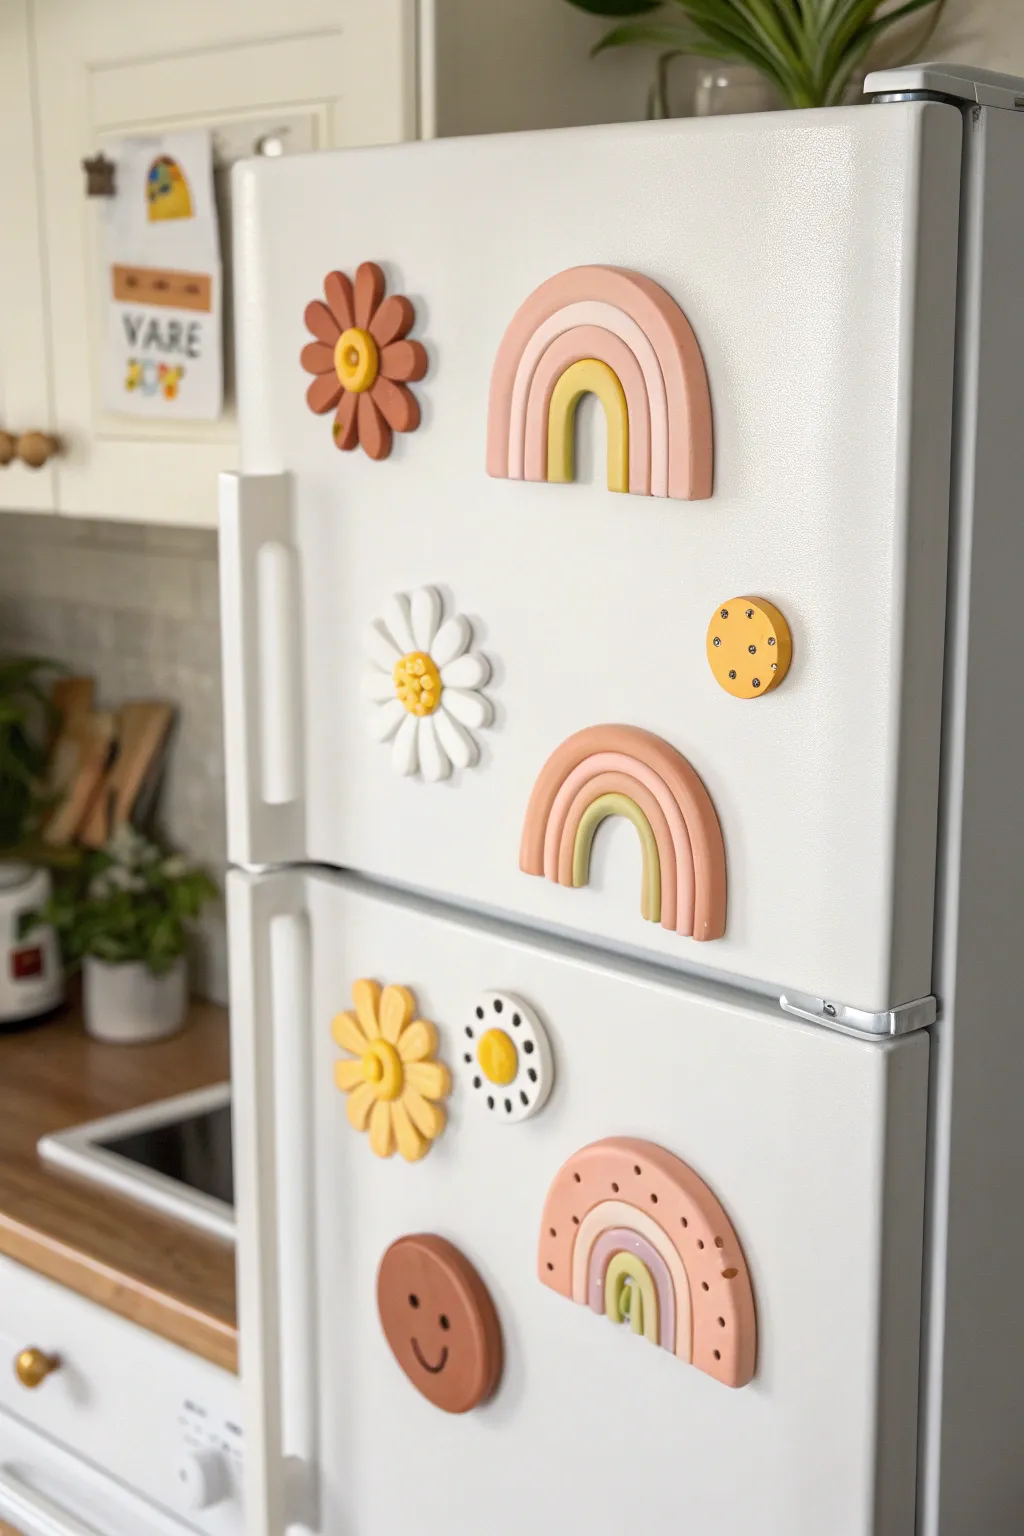
Transform your kitchen into a cheerful gallery with these matte, earthy-toned polymer clay magnets. This collection features trendy arches, sweet daisies, and simple geometric shapes that bring a touch of warm, handmade charm to any magnetic surface.
Step-by-Step Tutorial
Materials
- Polymer clay in pastel/earthy colors (terracotta, cream, muted yellow, blush pink, sage green, white)
- Strong craft magnets (neodymium or ceramic)
- Super glue or E6000 adhesive
- Rolling pin or acrylic roller
- Clay knife or X-Acto blade
- Small round cutters (optional, for circles)
- Needle tool or toothpick
- Smooth work surface (ceramic tile or glass mat)
- Oven and baking tray
Step 1: Creating the Rainbow Arches
-
Prepare the colors:
Select three or four colors for your first rainbow. Knead the clay until it is soft and pliable, which prevents cracking later. -
Roll the snakes:
Roll each color into a long, even snake about the thickness of a pencil. Try to keep the thickness consistent along the entire length. -
Form the first arch:
Take the color you want on the inside and curve it into a tight U-shape on your work surface. Cut the bottom ends straight across with your blade. -
Layer the arches:
Take the next color snake and gently press it against the outer curve of the first arch. Repeat with remaining colors until your rainbow is complete. -
Trim the bottom:
once all layers are attached, use your long blade to slice straight across the bottom of all arches simultaneously so the magnet sits flat. -
Add texture (optional):
For the pink dotted rainbow shown in the photo, use a needle tool to poke small indentations along the outer arch before baking.
Uneven Arches?
If your rainbow layers aren’t sticking together, lightly score the touching sides with a needle tool and apply a tiny drop of liquid clay or ‘Bake & Bond’ before pressing them together.
Step 2: Sculpting the Daisies
-
Make the center:
Roll a small ball of yellow or mustard clay and flatten it slightly to create the flower center. Use a toothpick to poke a grid pattern for texture. -
Form the petals:
For the petals, roll small tear-drop shapes out of white or terracotta clay. I find making 8 equal-sized balls first helps keep the petals uniform. -
Assemble the flower:
Arrange the petals in a circle, pressing the pointed ends together in the center so they fuse. -
Attach the center:
Place your textured center over the point where all the petals meet and press down gently to bond everything together.
Clean Finish
Before baking, wipe your raw clay pieces gently with a Q-tip dipped in rubbing alcohol. This removes fingerprints, lint, and dust for a perfectly smooth, professional matte finish.
Step 3: Simple Shapes & Finishing
-
Create circle accents:
Roll out a slab of clay to about 1/4 inch thickness. Use a small round cutter to make perfect circles. -
Decorate the circles:
Add tiny balls of contrasting clay (polka dots) or use a tool to press in patterns. For the smiley face, roll tiny thin snakes for the eyes and smile and press them onto a flat round base. -
Bake the clay:
Place all your creations on a baking sheet lined with parchment paper. Bake according to your specific clay brand’s instructions (usually around 275°F/135°C for 15-30 minutes). -
Cool down:
Let the pieces cool completely on the tray. They will be slightly soft when hot but harden as they cool. -
Attach magnets:
Flip your hardened clay pieces over. Apply a dab of strong super glue or E6000 to the back and press a magnet firmly into the glue. -
Final cure:
Allow the glue to cure fully (usually 24 hours for maximum strength) before placing them on your fridge.
Now you have a custom set of cheerful magnets to organize your notes and photos with style
Mini Food Charms
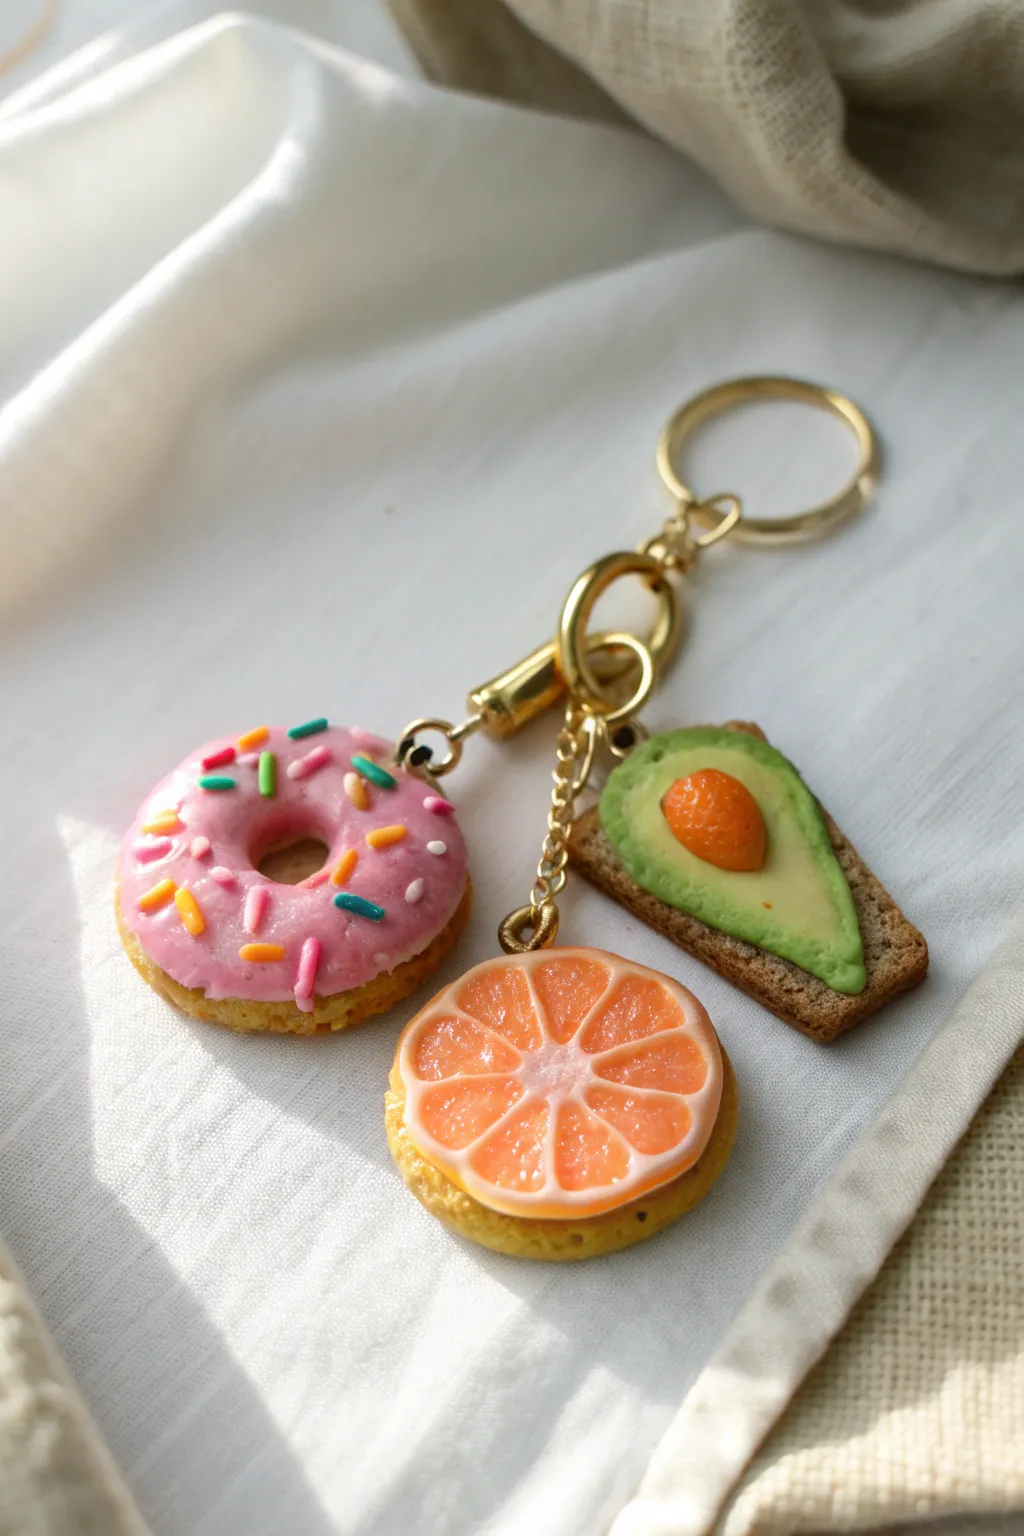
Celebrate your favorite meal of the day with this adorable trio of polymer clay charms featuring avocado toast, a citrus cookie, and a sprinkled donut all on one keychain. The glossy finish and realistic textures make these miniature snacks look almost good enough to eat.
Detailed Instructions
Materials
- Polymer clay (tan/beige, translucent, orange, pink, green, dark green, brown, various scrap colors for sprinkles)
- Liquid polymer clay (translucent)
- Gloss glaze or UV resin
- Soft pastel chalks (orange, brown, yellow ochre)
- Basic sculpting tools (needle tool, ball tool, craft knife)
- Texture tools (sandpaper, toothbrush, or crumpled foil)
- Eye pins (3)
- Jump rings and gold keychain clasp
- Oven
Step 1: The Avocado Toast
-
Shape the Bread:
Mix brown clay into your beige dough to create a whole-wheat color. Flatten a small piece and cut it into a rough, slightly irregular rectangle with a curved top to mimic a bread slice. Texture the visible edges and back with a toothbrush or needle tool for a crumb effect. -
Toast the Edges:
Shave some brown soft pastel into a powder. Use a soft brush to dust the edges of the bread slice to give it a realistic ‘toasted’ look. -
Mash the Avocado:
Take light green clay and press it onto the bread slice, leaving a small crust border. Use a needle tool to drag and stipple the clay, creating the texture of smashed avocado. -
Form the Pit:
Roll a tiny ball of orange-brown clay into an oval shape for the pit. Press it gently into the center of the green avocado layer. Insert an eye pin into the top of the toast slice.
Sticky Dough?
If your clay gets too soft or sticky while working on tiny details, pop it in the fridge for 10 minutes. A firmer clay holds fine textures like bread crumbs much better.
Step 2: The Pink Donut
-
Form the Base:
Roll a ball of beige clay and flatten it slightly into a thick disk. Use a large ball tool or the handle of a brush to poke a hole through the center, smoothing the edges to create the classic ring shape. -
Add Texture:
Gently gently run a toothbrush over the surface of the donut to create a fried dough texture. I like to lightly dust the bottom half with yellow ochre pastel for a golden-brown finish. -
Prepare the Glaze:
Mix liquid polymer clay with a tiny bit of pink clay or pigment until you have an opaque, bubblegum pink icing. Apply this carefully to the top of the donut, letting it drip naturally down the sides in a few spots. -
Sprinkle It:
Roll extremely thin snakes of clay in blue, yellow, white, and dark pink. Bake these snakes separately for 5 minutes to harden them, then chop them into tiny bits. Press these ‘sprinkles’ into the wet liquid clay icing. Insert your eye pin.
Pro Tip: Liquid Clay
For the donut icing, let the liquid clay sit for a few minutes after mixing. It will thicken slightly, giving you more control over the drips so they don’t run too far down the sides.
Step 3: The Citrus Cookie
-
Create the Cookie Base:
Using the same beige mix as the donut, create a flat, circular cookie base. Texturize the edges with crumpled foil or sandpaper to mimic a shortbread consistency. -
Make the Cane:
To make the citrus slice, form a cylinder of translucent orange clay. Wrap it in a very thin sheet of white clay. Wrap that entire cylinder in a layer of orange clay (the rind) and reduce the cane by rolling it until it matches the diameter of your cookie base. -
Refine the Citrus:
Since we want a segmented fruit look without making a complex cane, slice a thin disk of the orange clay. Use a needle tool to press radial lines into the translucent orange center, dividing it into segments. Fill these indents with tiny snakes of white clay or white liquid clay. -
Assemble:
Press the citrus slice firmly onto the cookie base. Insert the final eye pin into the top edge.
Step 4: Finishing and Assembly
-
Bake:
Bake all three charms according to your clay manufacturer’s instructions (usually 275°F/130°C for 15-30 minutes). Let them cool completely. -
Glaze:
Apply a coat of gloss glaze or UV resin to the avocado pit, the pink icing, and the citrus slice. Leave the bread and dough parts matte for realistic contrast. -
Assemble Keychain:
using pliers, open the jump rings and attach each charm to the chain links of your gold keychain clasp.
Now you have a delightfully detailed breakfast set to brighten up your keys or bag

TRACK YOUR CERAMIC JOURNEY
Capture glaze tests, firing details, and creative progress—all in one simple printable. Make your projects easier to repeat and improve.
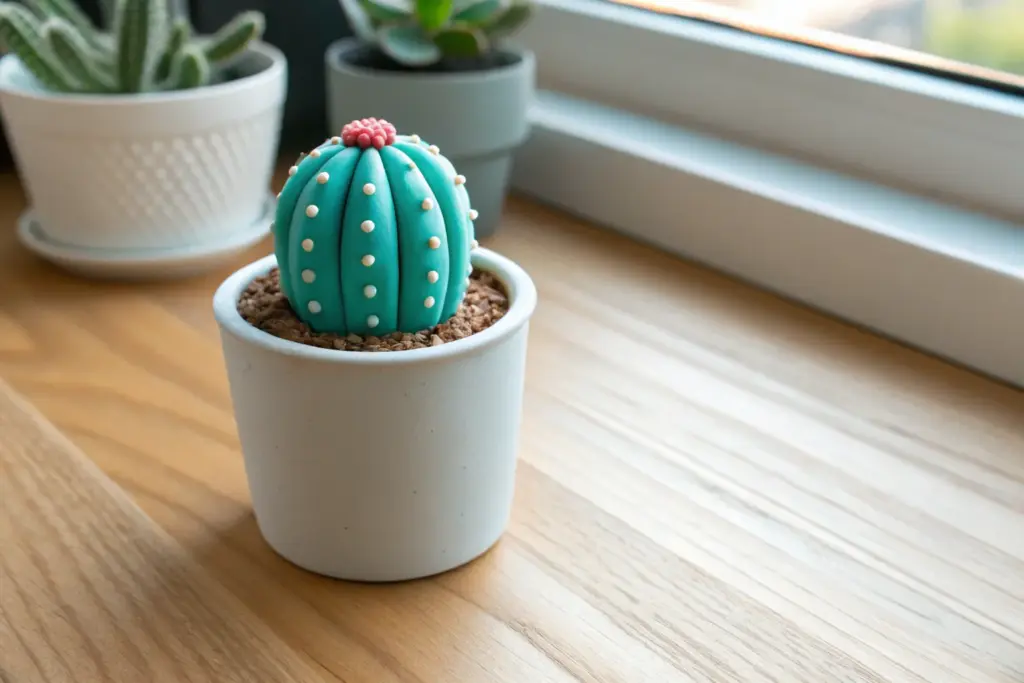
Tiny Succulent Pots
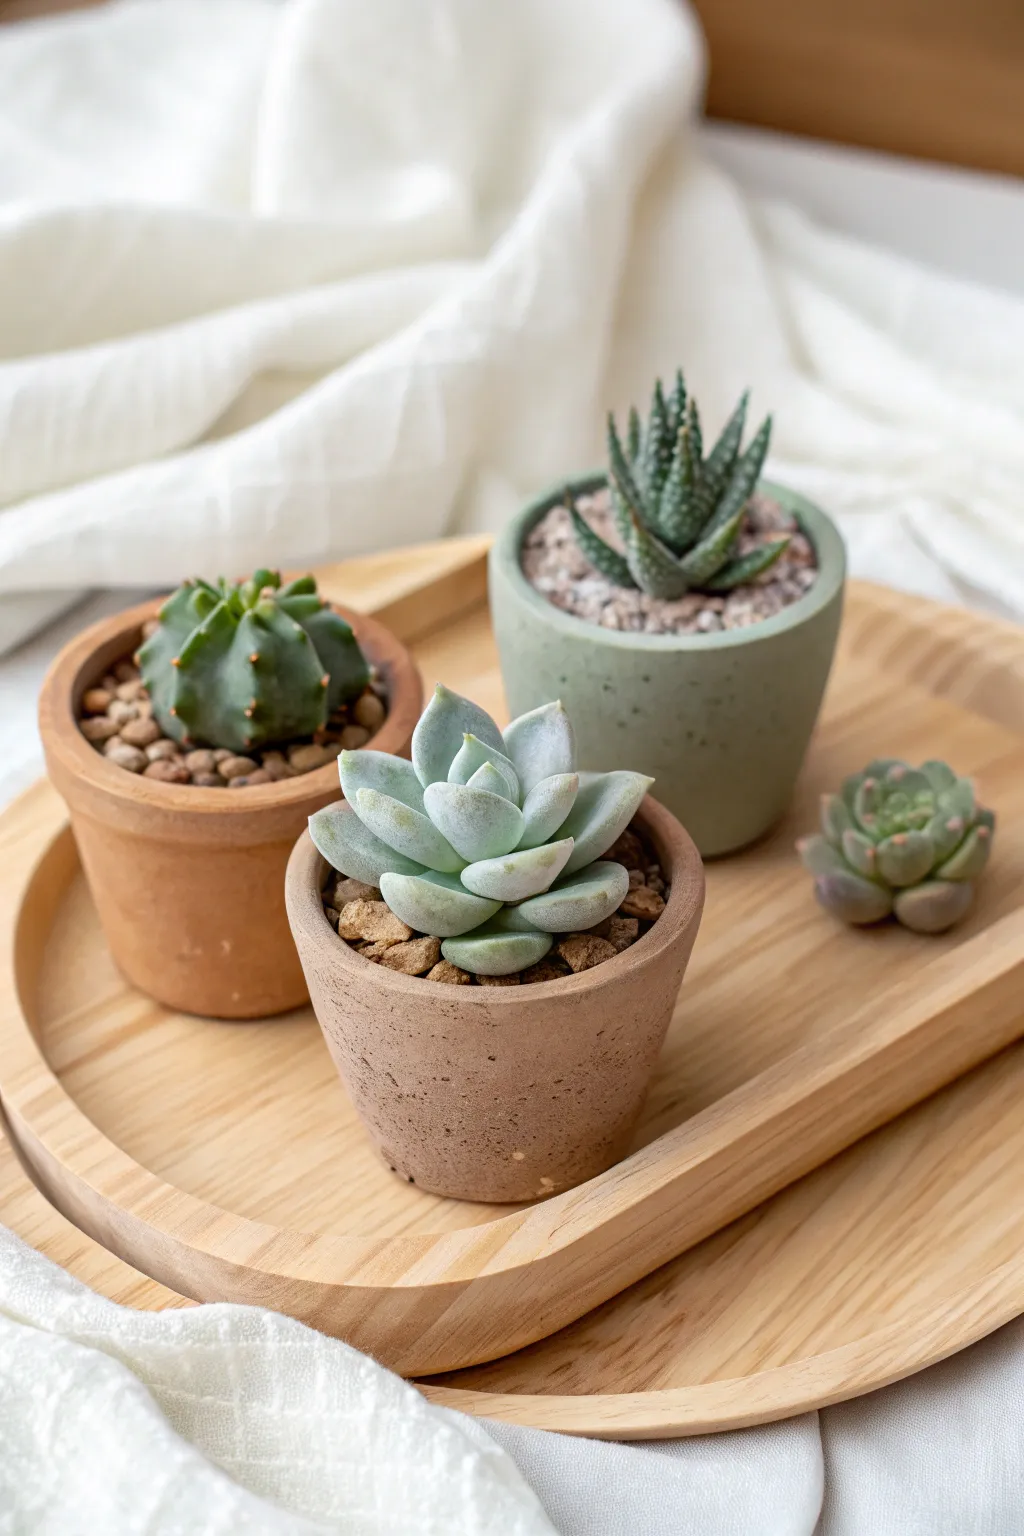
Create a serene, minimalist display with these faux terracotta and stone-style planters made entirely from polymer clay. These tiny pots perfectly mimic the earthy textures of real ceramics, providing a forever home for your crafted or real succulents.
How-To Guide
Materials
- Polymer clay (Terracotta, Granite/Grey effect, White, and Brown)
- Acrylic roller or pasta machine
- Circle cutters (approx. 2-inch diameter)
- Small jar or round cutter for shaping walls
- Coarse sandpaper or an old toothbrush (for texturing)
- Liquid polymer clay (optional)
- Potting soil texture mix: Dried coffee grounds or brown clay crumbs
- Baking tile or parchment paper
- Small craft knife
Step 1: Creating the Terracotta Pot
-
Mix Custom Colors:
Start by mixing a standard orange clay with a touch of brown and white to achieve that muted, natural terracotta shade found in real nursery pots. -
Roll the Base:
Condition your clay and roll it out to a medium thickness (about 3mm). Use your circle cutter to punch out a round base for the pot. -
Form the Walls:
Roll a long strip of the same clay, measuring the circumference of your base. Keep the strip fairly thick to mimic sturdy earthenware. -
Build the Structure:
Wrap the strip around the base circle, blending the seams on the inside and outside with a modeling tool or your finger until smooth. -
Add the Rim:
Roll a thinner, narrow snake of clay and wrap it around the top exterior edge of pot. Press it gently to adhere, creating that classic protruding lip of a terracotta pot. -
Texture the Surface:
To remove fingerprints and add realism, gently pat the exterior with coarse sandpaper or the bristles of an old toothbrush. This gives it a fired-clay look.
Seamless Blending
For invisible seams on your pots, use a tiny drop of baby oil on your finger while smoothing. It dissolves the clay slightly for a perfect join.
Step 2: Crafting the Stone-Effect Pot
-
Prepare Stone Clay:
Use a granite-effect polymer clay or mix white clay with tiny specks of black pepper and grey clay for a faux-stone appearance. -
Shape the Base Cup:
Roll a ball of your stone mixture and gently press your thumb into the center, pinching the walls upward to create a simple, modern cup shape without a rim. -
Refine the Shape:
Place the pot on your work surface and roll the sides against the table to straighten them. Tap the top upside down to ensure the rim is flat and level. -
Create Realism:
Use a crumpled ball of aluminum foil to gently dab the surface of the clay. This distresses the finish, making it look like heavy cast concrete.
Step 3: Filling and Finishing
-
Pre-Bake Preparation:
Before baking, you can add tiny drainage holes if you plan to use real plants, though these are best suited for faux clay succulents. -
Bake the Pots:
Bake the empty pots according to your clay manufacturer’s instructions, usually around 275°F (135°C) for 30 minutes. -
Create Faux Soil:
While the pots cool, crumble brown polymer clay into tiny uneven chunks, or mix loose dried coffee grounds with liquid polymer clay for a ‘dirt’ paste. -
Install the Plants:
Fill the baked pots with your soil mixture. Press your pre-made clay succulent heads firmly into the mixture. -
Add Top Dressing:
Sprinkle tiny pebbles or lighter clay crumbs on top of the ‘soil’ around the base of the succulent for a finished nursery look. -
Final Cure:
I prefer to pop the entire assembly back in the oven for 15 minutes to set the soil and secure the succulents in place. -
Matte Varnish:
Once fully cooled, apply a coat of ultra-matte varnish to the pots to protect them while maintaining that dry, unglazed ceramic texture.
Level Up: Aged Patina
After baking, dry brush a little white acrylic paint onto the textured areas of the terracotta pot to simulate salt deposits and age.
Now you have a charming set of drought-resistant miniature plants that never need watering
Texture-Stamped Coasters
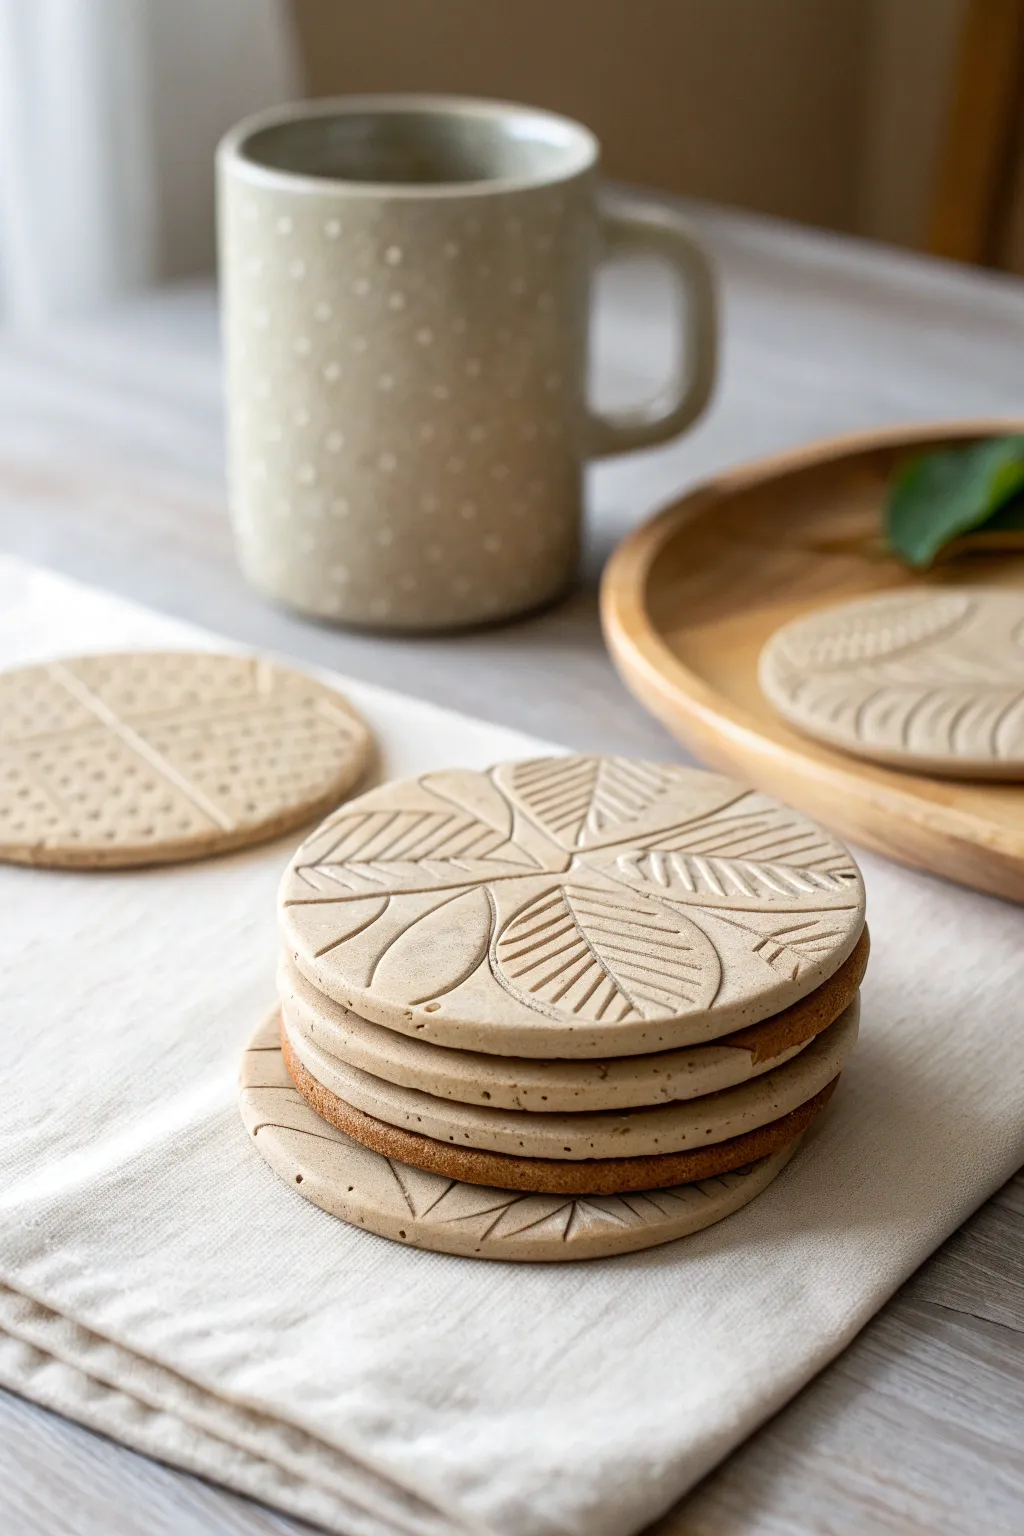
Bring an organic, artisan touch to your coffee table with these textured polymer clay coasters featuring deeply embossed botanical designs. Their speckled oatmeal tone and leaf patterns mimic the look of high-end stoneware pottery without requiring a kiln.
Detailed Instructions
Materials
- Polymer clay (beige or sand color)
- Speckled clay effects (like Fimo ‘stone’ effect or black pepper)
- Rolling pin or acrylic roller
- Circular cookie cutter (approx. 4 inches)
- Leaf-shaped texture stamps or rubber stamps
- Parchment paper
- Sandpaper (fine grit)
- Matte water-based varnish (optional)
Step 1: Preparation & Rolling
-
Condition the clay:
Begin by warming the polymer clay in your hands, kneading it thoroughly until it is soft and pliable. -
Add speckling (optional):
If your clay isn’t pre-speckled, I like to knead in a tiny pinch of cracked black pepper or faux granite powder to achieve that authentic stoneware look seen in the photo. -
Roll the slab:
Place the clay between two sheets of parchment paper to prevent sticking. Roll it out into an even slab. -
Check thickness:
Aim for a thickness of about 1/4 inch (6mm). This ensures the coaster is sturdy enough to hold a mug and won’t warp easily during baking.
Stamp Stuck?
If your stamp pulls the clay up, pop the clay in the fridge for 10 minutes before stamping. Cold, firm clay releases much cleaner details than warm, soft clay.
Step 2: Stamping & Cutting
-
Cut the shapes:
Using your large circular cutter, press firmly into the clay slab to create your coaster rounds. Don’t remove the excess clay yet. -
Select your stamps:
Choose deep-texture stamps with leaf or botanical motifs. The example uses a radiating leaf pattern that focuses on simple veins and outlines. -
Apply a release agent:
Lightly dust the surface of your clay with a tiny bit of cornstarch or spray water on your stamp to ensure it doesn’t stick to the raw clay. -
Press the design:
Press the stamp firmly into the center of the clay circle. Apply even pressure to ensure all the fine lines of the leaf veins transfer clearly. -
Refine the edges:
Remove the excess clay from around the circle now. Gently run your finger along the cut edge to smooth out any sharpness created by the cutter. -
Create variations:
For a mixed set, try using a different stamp on the next coaster, perhaps pressing a geometric grid texture as seen in the background coaster.
Pro Tip: Rustic Wash
Brush diluted acrylic brown paint into the stamped grooves after baking, then wipe the surface clean. This highlights the texture and mimics aged pottery.
Step 3: Baking & Finishing
-
Bake carefully:
Transfer the parchment paper directly to a baking sheet. Bake according to your clay package instructions (usually 275°F/135°C for 15-30 minutes). -
Flat baking tip:
To ensure they stay perfectly flat, place a second sheet of parchment paper on top of the coasters and weigh them down with a light ceramic tile while baking. -
Cool down:
Let the coasters cool completely in the oven with the door slightly ajar. This gradual cooling helps prevent cracking. -
Check the back:
Once cool, inspect the bottom. If it’s slightly uneven, you can sand it flat against a piece of sandpaper taped to your table. -
Finish the varying tones:
The image shows slight color variation (some darker brown layers). You can achieve this by layering two colors of clay before rolling, or lightly dusting the edges with brown pastel powder before baking. -
Seal (Optional):
For extra durability against moisture, apply a thin coat of matte varnish. This protects the clay without making it look plasticky.
Now you have a stunning set of faux-stone coasters ready for your next coffee break
Minimal Incense Holder
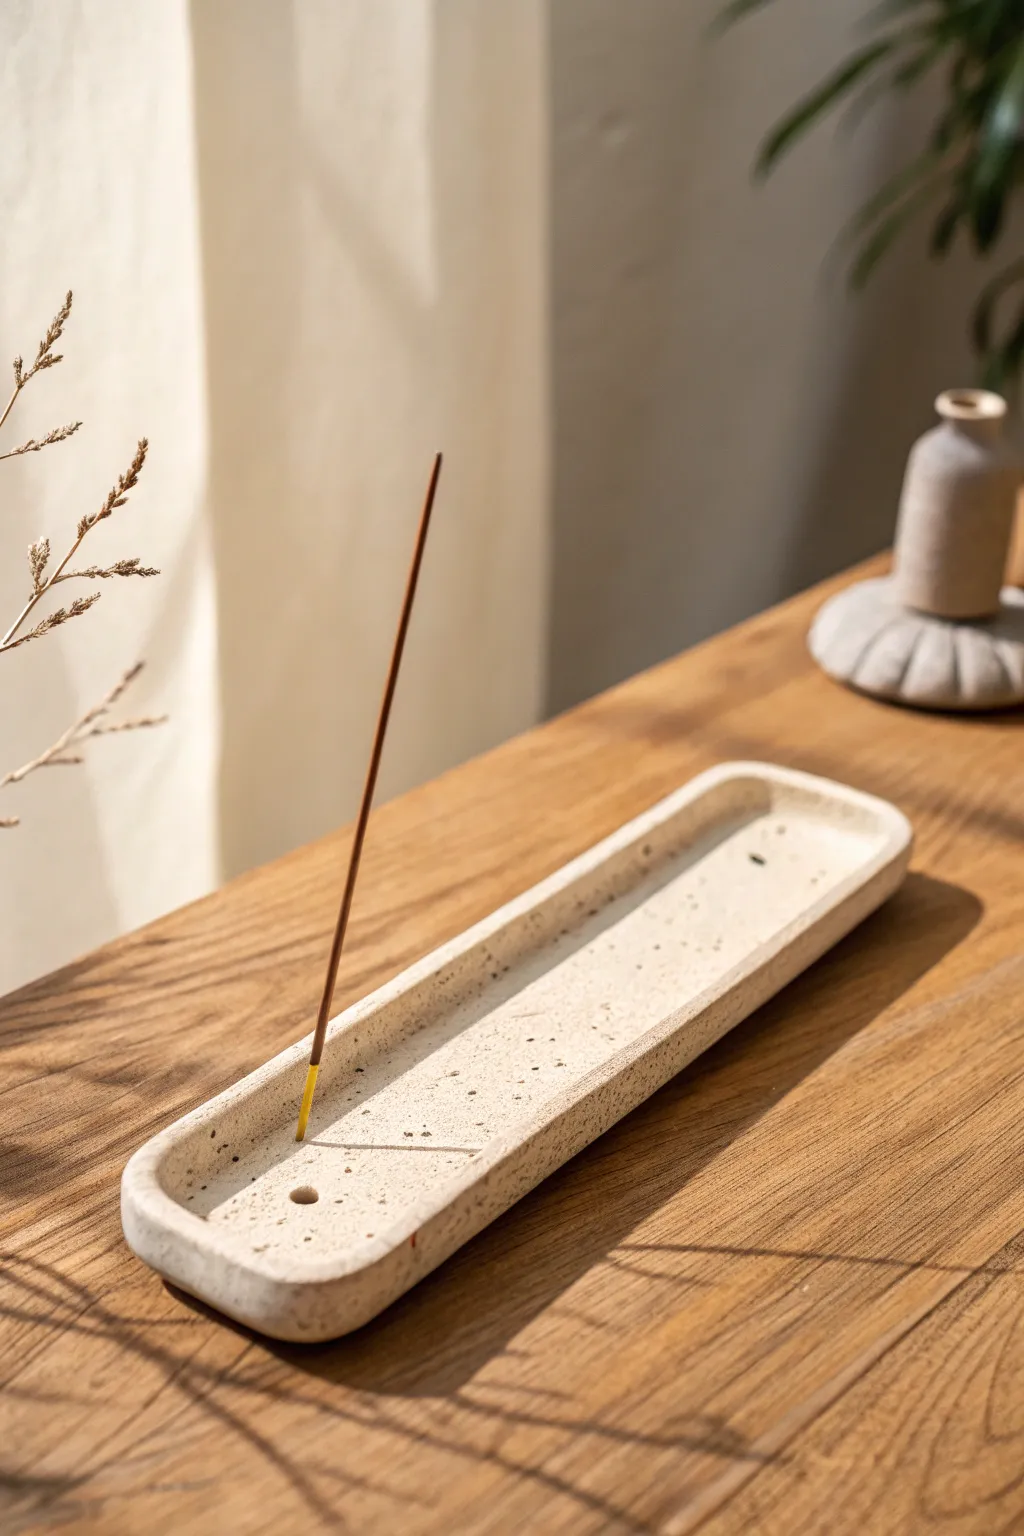
Embrace the beauty of minimalism with this long, pill-shaped incense holder that mimics the organic texture of speckled ceramic. It features a subtle raised rim and a natural, stone-like finish that brings a sense of calm to any tabletop.
Step-by-Step Guide
Materials
- White polymer clay (approx. 2oz)
- Black pepper or dried coffee grounds (for speckling)
- Translucent liquid clay (optional)
- Acrylic roller
- Craft knife or tissue blade
- Sandpaper (fine grit)
- Incense stick (for sizing)
- Small round cutter or star-shaped cutter (optional)
- Oven baking sheet and parchment paper
- Matte varnish
Step 1: Preparing the Clay
-
Condition the clay:
Start by kneading the white polymer clay in your hands until it becomes soft, pliable, and warm. This conditioning step prevents cracks later on. -
Add texture:
To achieve that faux-stone look, flatten your clay slightly and sprinkle a generous pinch of cracked black pepper or fine dried coffee grounds onto it. -
Integrate the speckles:
Fold the clay over the speckles and knead thoroughly again. Continue folding and rolling until the dark particles are evenly distributed throughout the white block. -
Roll out the base:
Roll the clay out into a thick, even slab, approximately 1/4 inch thick. You want it substantial enough to hold its shape but not too bulky.
Sticky Situation?
If your clay gets too soft and sticky while blending the rim, let it rest in the refrigerator for 15 minutes before continuing to handle it.
Step 2: Shaping the Form
-
Cut the rectangle:
Using a tissue blade or craft knife, cut a long rectangle. A good size is about 8-9 inches long and 2 inches wide, but you can adjust this to fit your space. -
Curve the corners:
Use your craft knife or a small circular cutter to gently trim the four sharp corners into soft, rounded curves creating a pill shape. -
Smooth the edges:
Dip your finger in a little bit of water or baby oil and run it along the cut edges to smooth out any harsh lines or fingerprints. -
Create the rim coil:
Take your leftover clay scraps and roll them into a long, thin snake (coil), about as thick as a standard pencil lead. -
Attach the rim:
Place the coil directly on top of the outer edge of your base slab. I find that lightly scoring the base helps the coil stick better before pressing it down. -
Blend the seam:
Using a modeling tool or your finger, gently smudge the clay from the inside of the coil down onto the base to create a seamless transition. The outside edge should remain distinct.
Clean Cuts
Wipe your craft knife with a baby wipe or a dab of rubbing alcohol before slicing; this prevents the clay from dragging and keeps your edges crisp.
Step 3: Finishing Touches
-
Refine the shape:
Go over the entire piece once more, smoothing the rim to ensure it’s uniform in height. If the clay has gotten too soft, pop it in the fridge for ten minutes to firm up. -
make the holder hole:
At one end of the tray, press an actual incense stick into the clay to create the hole. Wiggle it slightly to make the hole just a tiny bit larger than the stick to account for shrinkage. -
Deepen the hole:
Ensure the hole goes almost all the way through but not quite piercing the bottom, so the stick will stand upright securely. -
Final texture check:
If you lost some texture during smoothing, you can gently press a piece of coarse sandpaper or a toothbrush onto the surface for extra ‘stone’ detail. -
Bake the piece:
Place your holder on parchment paper and bake according to your clay package instructions (usually 275°F/135°C for 15-30 minutes per 1/4 inch of thickness). -
Sand for finish:
Once fully cooled, use wet/dry sandpaper under running water to sand the edges and surface until it feels smooth like polished stone. -
Seal it:
Apply a thin coat of matte varnish to protect the surface from ash stains while maintaining that natural, unglazed ceramic appearance.
Light your favorite scent and enjoy the peaceful atmosphere created by your handmade stone-effect tray
Tea Light Candle Collar
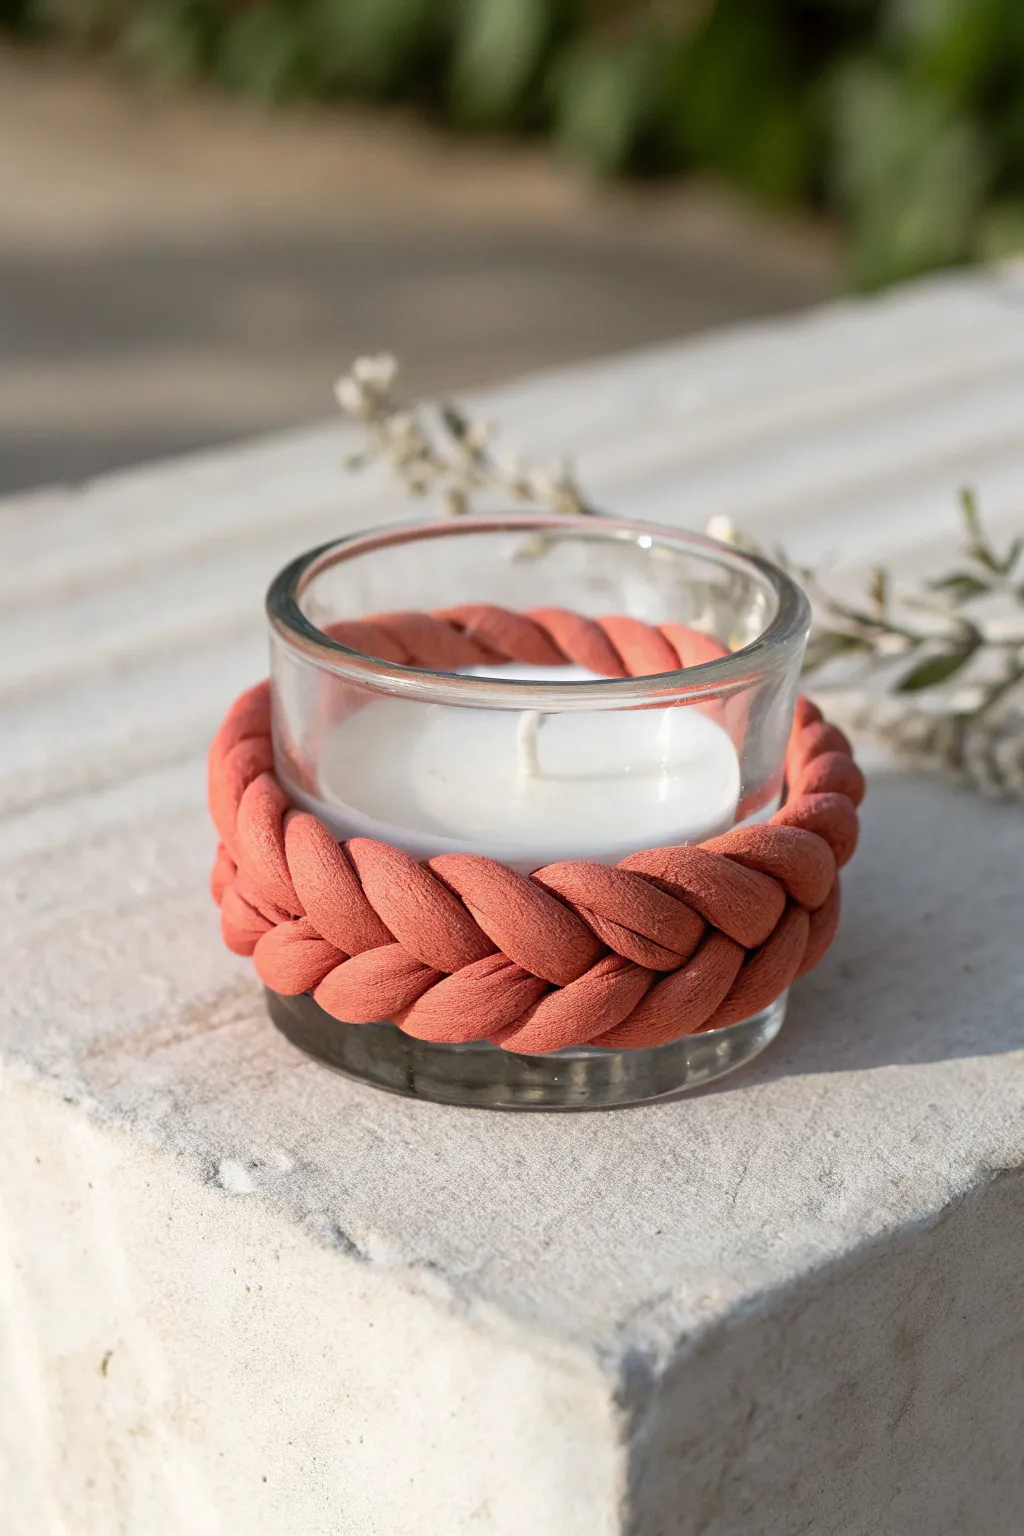
Add a touch of earthy, bohemian charm to your tea lights with this simple braided polymer clay collar. This project mimics the texture of fabric or rope but cures into a durable, solid ring that perfectly hugs your glass votive.
Step-by-Step Tutorial
Materials
- Polymer clay (terracotta or burnt orange color)
- Glass tea light holder (standard votive size)
- Acrylic roller or pasta machine
- Clay extruder (optional but helpful)
- Sharp crafting blade or X-Acto knife
- Liquid polymer clay (translucent or matching color)
- Oven for baking
- Sandpaper (fine grit)
- Cornstarch or baby powder (for release)
Step 1: Preparation & Conditioning
-
Condition the clay:
Begin by thoroughly conditioning your terracotta polymer clay. Knead it in your hands until it is soft, pliable, and free of any cracks or air bubbles. -
Create even strands:
Roll out long, thin snakes of clay. You want three strands of equal thickness, roughly 1/4 inch in diameter. Using a clay extruder with a round disc is the easiest way to get perfectly uniform snakes. -
Hand-rolling alternative:
If you don’t have an extruder, roll the snakes by hand on a smooth surface. Use a flat acrylic block to apply even pressure as you roll back and forth to prevent lumpy spots. -
Check the length:
Measure the circumference of your glass votive. Your clay strands need to be significantly longer than this measurement—aim for at least 1.5 times the circumference to account for the shrinking length that occurs during braiding.
Seamless Texture
Before baking, lightly tap the surface of the clay braid with a stiff toothbrush or a piece of denim fabric. This adds a realistic ‘fiber’ texture, making it look less like plastic.
Step 2: Braiding the Collar
-
Anchor the strands:
Pinch the three strand ends together at the top to secure them. You can tape this end to your work surface to keep it steady while you braid. -
Start the braid:
Begin a standard three-strand braid (plait). Cross the right strand over the middle, then the left over the new middle. -
Maintain tension:
Keep your tension consistent, but don’t pull too tight, as this can stretch and thin the clay. You want the braid to look plump and woven. -
Texture check:
As you braid, light fingerprints are actually desirable here—they add a fabric-like texture that mimics cotton rope. Avoid smoothing it out too perfectly. -
Test the fit:
Wrap the braid around the *base* of your glass tea light holder to check the length. It needs to fit snugly without sliding down easily.
Step 3: Fostering the Seamless Join
-
Cut the ends:
Once you have the correct length, use your sharp blade to cut straight through both ends of the braid where they will meet. -
Apply bonding agent:
Add a tiny drop of liquid polymer clay to the raw ends. This acts as a glue to help the seam fuse strongly during baking. -
Join the circle:
Carefully press the cut ends together. Try to align the strands so the braid pattern looks continuous. You can use a modeling tool to gently nudge the clay over the seam to disguise it. -
Check fit again:
Slide the clay ring onto the glass votive one last time. It needs to hold its own weight on the glass. If it’s too loose, you might need to shorten the braid slightly.
Two-Tone Twist
Use three different shades of clay (like beige, white, and terracotta) for the separate strands to create a beautiful, multi-colored woven effect.
Step 4: Baking & Finishing
-
Preheat the oven:
Preheat your oven according to the specific temperature instructions on your package of polymer clay (usually around 275°F or 130°C). -
Bake on the glass:
Place the clay collar on the glass holder and set the entire assembly into the oven. Baking it directly on the glass ensures it retains the exact shape perfectly. -
Bake time:
Bake for approximately 30 minutes. Since the clay is somewhat thick due to the braid, a longer bake time ensures strength. -
Cool down:
Turn off the oven and let the glass and clay cool down slowly inside with the door cracked open. This prevents the glass from cracking due to thermal shock. -
Final touches:
Once fully cool, the collar should be hard. If there are any sharp edges or rough spots at the seam, lightly sand them with fine-grit sandpaper. -
Secure placement:
The collar should fit snugly, but if you want it permanent, a dab of clear super glue between the glass and the clay will keep it in place forever.
Enjoy the warm glow of your candle reflecting off your new handmade accent piece
Faux Leather-Style Bookmarks
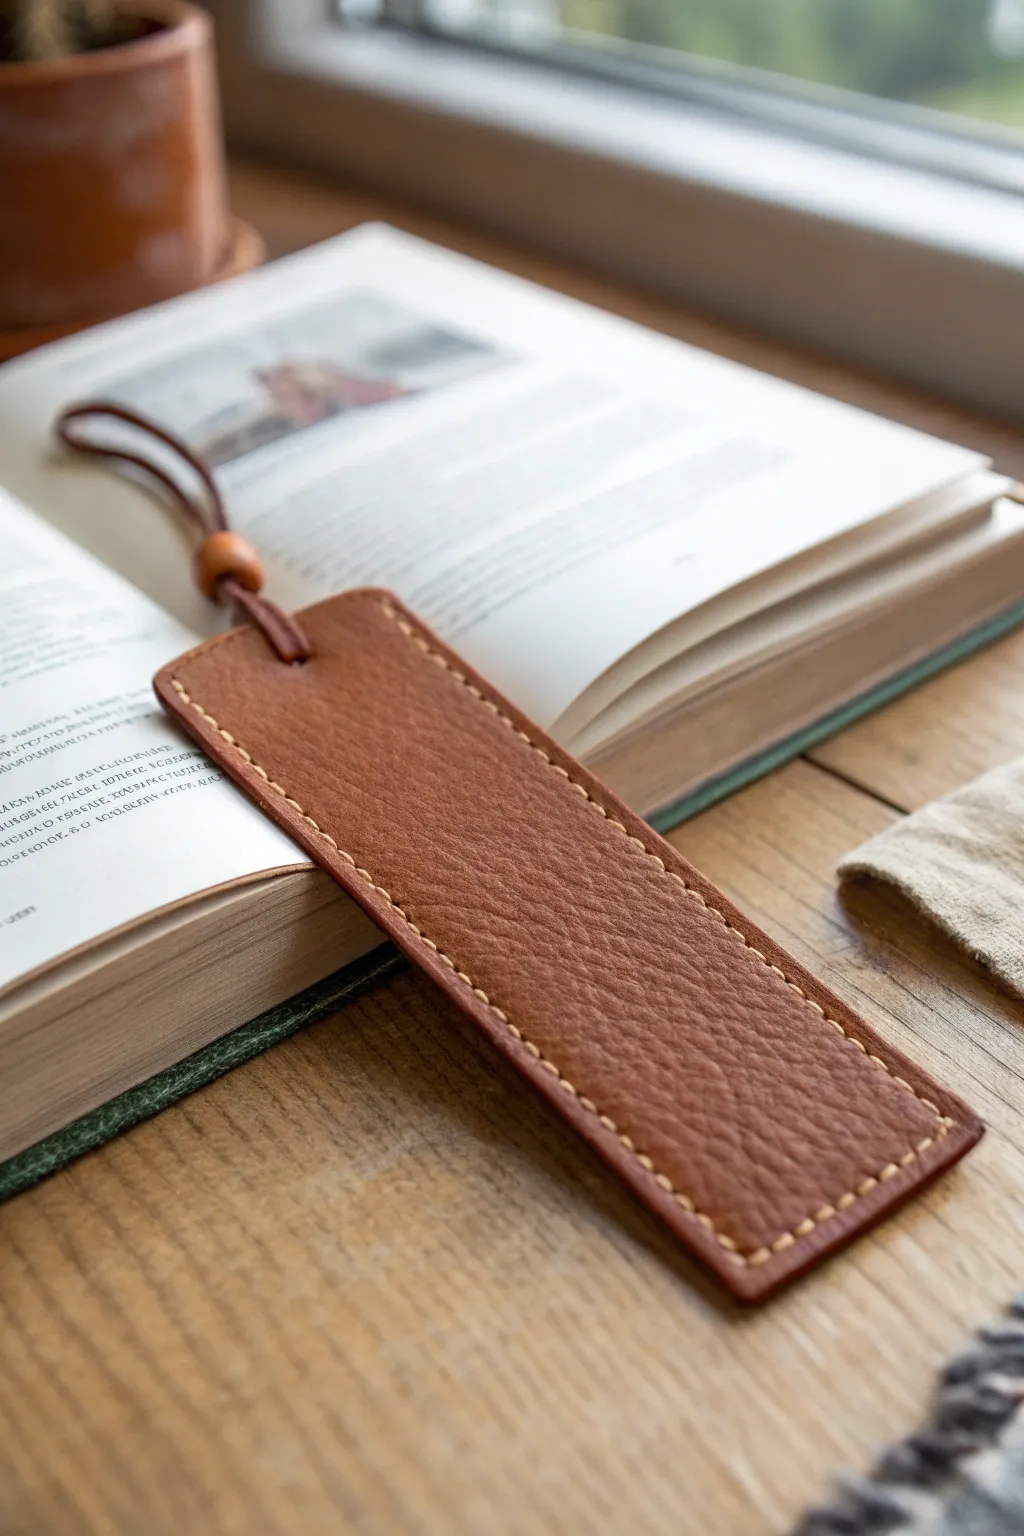
Transform ordinary polymer clay into a sophisticated, rugged accessory that looks and feels surprisingly like genuine leather. This bookmark features realistic grain texture and faux stitching details, finished with a classic cord accent perfect for keeping your place in style.
Step-by-Step Guide
Materials
- Brown polymer clay (leather effect or standard)
- Acrylic rolling pin
- Texture sheet (leather grain) or aluminum foil ball
- Sharp crafting blade or clay slicer
- Ruler
- Large sewing needle or tapestry needle
- Beige or heavy-duty embroidery thread
- Leather cord or suede lace
- Wooden bead
- Sandpaper (optional)
- Brown acrylic paint (for antiquing)
- Hobby drill or cocktail stick
Step 1: Texturing the ‘Leather’
-
Conditioning the clay:
Begin by working a block of brown polymer clay in your hands until it is soft and pliable. If you want a more varied leather tone, try mixing in a tiny pinch of black or translucent clay, but don’t blend it completely to keep a marbled elasticity. -
Rolling out the slab:
Roll the clay out into a long, flat slab using your acrylic rolling pin. You want it to be thin enough to slip into a book (about 2-3mm) but sturdy enough to hold its shape. -
Creating surface texture:
This is the crucial step for the leather look. Press a leather-grain texture sheet firmly into the clay. If you don’t have a sheet, crumple a ball of aluminum foil and roll it repeatedly over the surface to create organic, irregular dents and creases. -
Trimming to size:
Using a ruler as a guide, cut a neat rectangle from your textured slab with a sharp blade. A standard size is about 1.5 inches wide by 5 inches long, but you can adjust this to fit your favorite paperbacks. -
Rounding the corners:
For a softer, more finished look, use your blade or a small circle cutter to gently round off the four sharp corners of the rectangle.
Real Leather Smell
After baking and cooling, some crafters rub a tiny drop of essential oil (like sandalwood or cedar) on the back. It adds a sensory element that mimics the smell of real leather.
Step 2: Adding Stitch Details
-
Marking the stitch line:
Take your ruler and faint press a guide line about 1/8th of an inch away from the edge, all the way around the perimeter. This helps keep your sewing holes straight. -
Piercing the holes:
Using a needle tool or a thick tapestry needle, poke holes along your guide line. Space them evenly, about 3-4mm apart. Make sure the holes go all the way through the clay. -
Creating the top hole:
At the top center of the bookmark, punch a larger hole (approx 4-5mm) to accommodate the leather cord later. A straw works well for removing this plug of clay neatly. -
Baking the clay:
Transfer the bookmark to a baking sheet lined with paper. Bake according to your clay manufacturer’s instructions. Usually, this is around 275°F (130°C) for 15-30 minutes. -
Cooling under weight:
While the clay is cooling, place a heavy book on top of it. This prevents the bookmark from warping and ensures it stays perfectly flat.
Personalize It
Before baking, use metal alphabet stamps to press initials or a short word like ‘READ’ into the clay. The impression looks exactly like stamped leather branding.
Step 3: Assembly and Finishing
-
Antiquing (Optional):
Once cool, if the leather looks too uniform, wipe a wash of watered-down dark brown acrylic paint over the surface and immediately wipe it off with a paper towel. The paint will stick in the texture crevices, enhancing the depth. -
Starting the stitch:
Thread a needle with beige embroidery floss. Start from the back at a bottom corner, leaving a small tail of thread. -
Sewing the border:
Perform a simple running stitch or backstitch through the pre-punched holes all the way around the bookmark. The beige thread against the brown clay mimics traditional leathercraft saddle stitching. -
Securing the thread:
When you complete the circuit, tie the thread off securely on the back side. A tiny dot of super glue on the knot will ensure it never unravels. -
Preparing the cord:
Cut a length of leather cord or suede lace, roughly 8 inches long. Fold it in half to create a loop. -
Adding the bead:
Thread the loop end through the large hole at the top of the bookmark, then pass the loose ends through the loop to create a cow hitch knot. Determine where you want the bead to sit. -
Final assembly:
Slide the wooden bead onto the two loose ends of the cord. Tie an overhand knot above the bead to keep it in place, then trim any excess cord length.
Enjoy using your durable, handmade bookmark for your next reading adventure
Photo and Card Stand
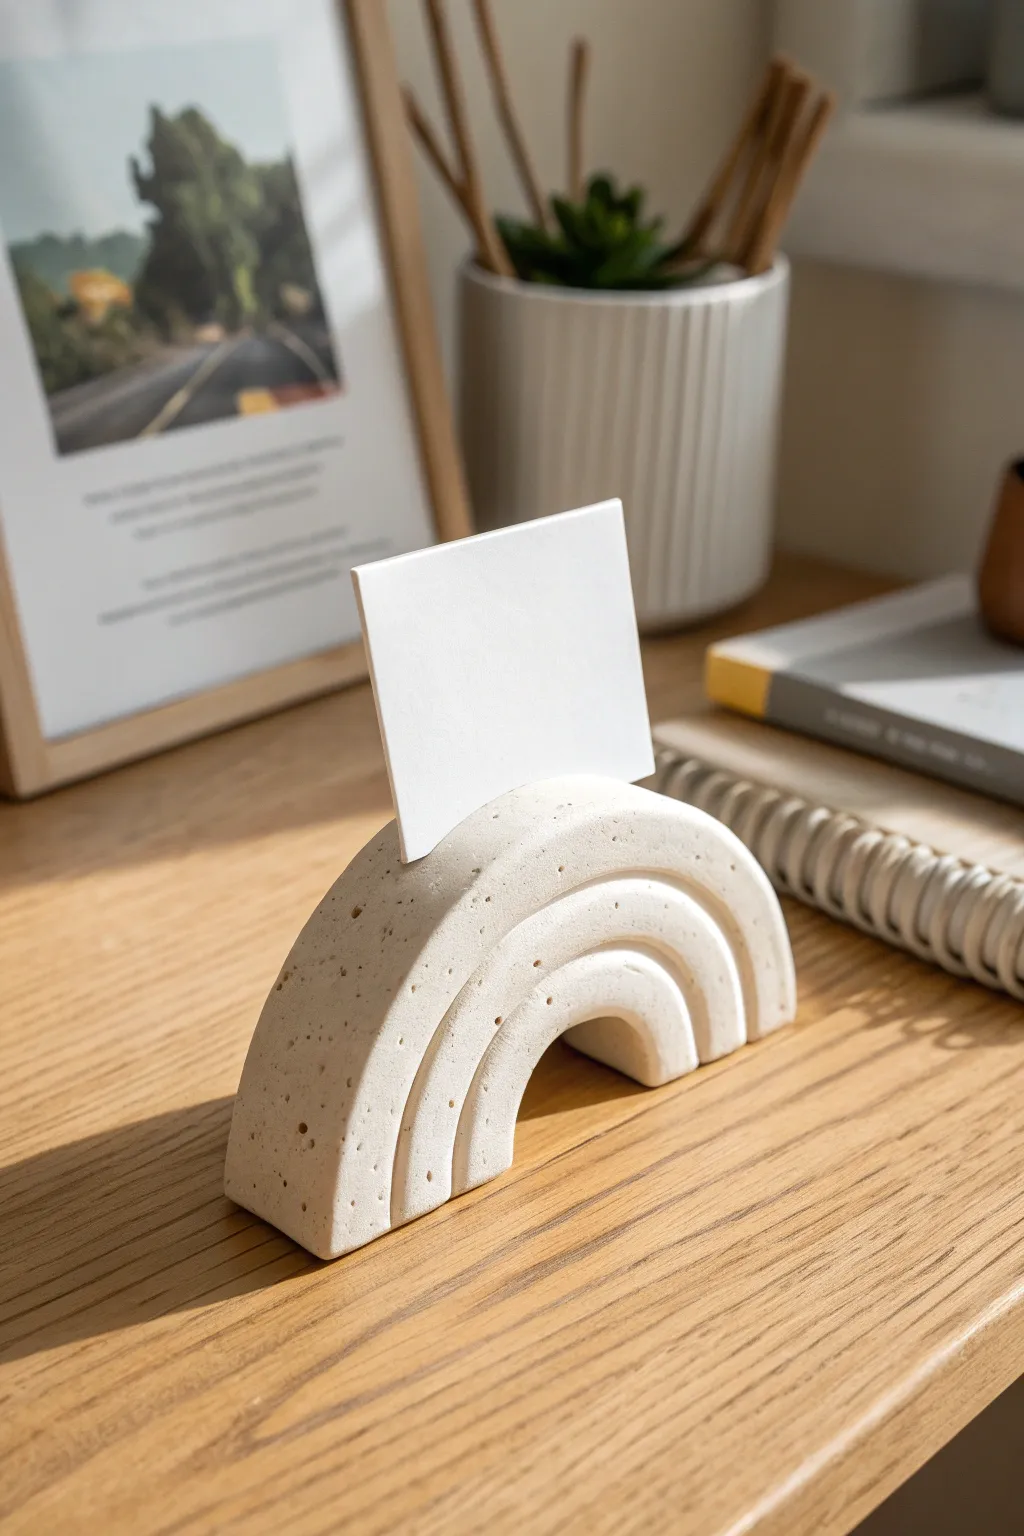
This minimalist, stone-effect rainbow arch doubles as a functional stand for your favorite photos or business cards. Using speckled polymer clay gives it a sophisticated, organic look that mimics natural ceramic or stone.
How-To Guide
Materials
- Speckled or granite-effect polymer clay (white/cream base)
- Clay rolling pin or pasta machine
- Large round cutters or circle templates (3 graduating sizes)
- Sharp craft knife or tissue blade
- Thick cardstock or old credit card (to create the slot)
- Sandpaper (fine grit)
- Baking sheet and parchment paper
- Oven
Step 1: Preparing the Base
-
Condition the Clay:
Begin by thoroughly conditioning your speckled polymer clay until it is soft and malleable. This is crucial to prevent cracking later on. -
Roll Out a Slab:
Roll your conditioned clay into a uniform slab. You want this quite thick so the stand is stable, aiming for approximately 3/4 inch (about 2cm) in thickness. -
Cut the Largest Arch:
Using your largest circle cutter or a template, cut a clean semi-circle shape from the slab. This will form the outermost layer of your rainbow.
Step 2: Building the Rainbow
-
Create the Middle Arch:
Repeat the rolling process or use the remaining slab to cut a second semi-circle that is slightly smaller than the first. Ensure the thickness matches the first piece perfectly. -
Create the Inner Arch:
Cut your third and smallest semi-circle. Place all three pieces flat on your work surface to check their proportions. -
Check the Fit:
Stack the arches together flat on your surface to form the rainbow shape. If the gaps aren’t perfectly tight, use your fingers to gently smooth the curves so they nestle together seamlessly. -
Join the Arches:
Apply a tiny amount of liquid polymer clay (Bake & Bond) or simply press the arches firmly together side-by-side if the clay is sticky enough. You want them to fuse into a single solid unit. -
Smooth the Seams:
On the back and front faces, use a clay tool or your finger to gently smooth the seams where the arches meet, though keeping the distinct ‘grooves’ between layers is key to the design.
DIY Speckles
Don’t have granite clay? Mix regular white clay with cracked black pepper or dried used coffee grounds for an instant organic stone effect.
Step 3: Adding the Functionality
-
Flatten the Base:
Stand the rainbow up on its flat bottom edge. Press it gently onto the work surface to ensure it stands completely straight and stable without wobbling. -
Create the Card Slot:
Take your thick cardstock or an old plastic card. Press it firmly into the very top center of the outer arch, pushing down about 1 cm deep. Wiggle it slightly to ensure the slot is wide enough for a photo. -
Refine the Edges:
The slot creation might have displaced some clay. Gently pat down any raised ridges around the opening to keep the top smooth. -
Add Texture (Optional):
If you want to enhance the stone look, you can use a toothbrush to gently texture the surface, though the speckled clay usually does enough heavy lifting here.
Closing the Gap
If the card slot closes up during baking, carefully insert a folded piece of sandpaper into the slot and sand back and forth to widen it again.
Step 4: Finishing Touches
-
Bake carefully:
Place your rainbow on a parchment-lined baking sheet. I advise tenting it with foil to prevent whites from scorching. Bake according to your clay package instructions (usually 275°F/130°C for at least 30 minutes due to the thickness). -
Cool Down:
Let the piece cool completely inside the oven if possible. This slow cooling helps prevent thermal shock cracks in thicker pieces. -
Check Stability:
Once cool, stand it up on a hard surface. If it rocks slightly, tape a piece of sandpaper to a table and gently rub the base of the rainbow against it to flatten the bottom. -
Final Sand:
Give the entire piece a light sanding with fine-grit sandpaper (under water is best to avoid dust) to remove any fingerprints or sharp edges.
Now you have a chic, modern display for your treasured memories that looks effortlessly high-end
Moon and Bead Garland
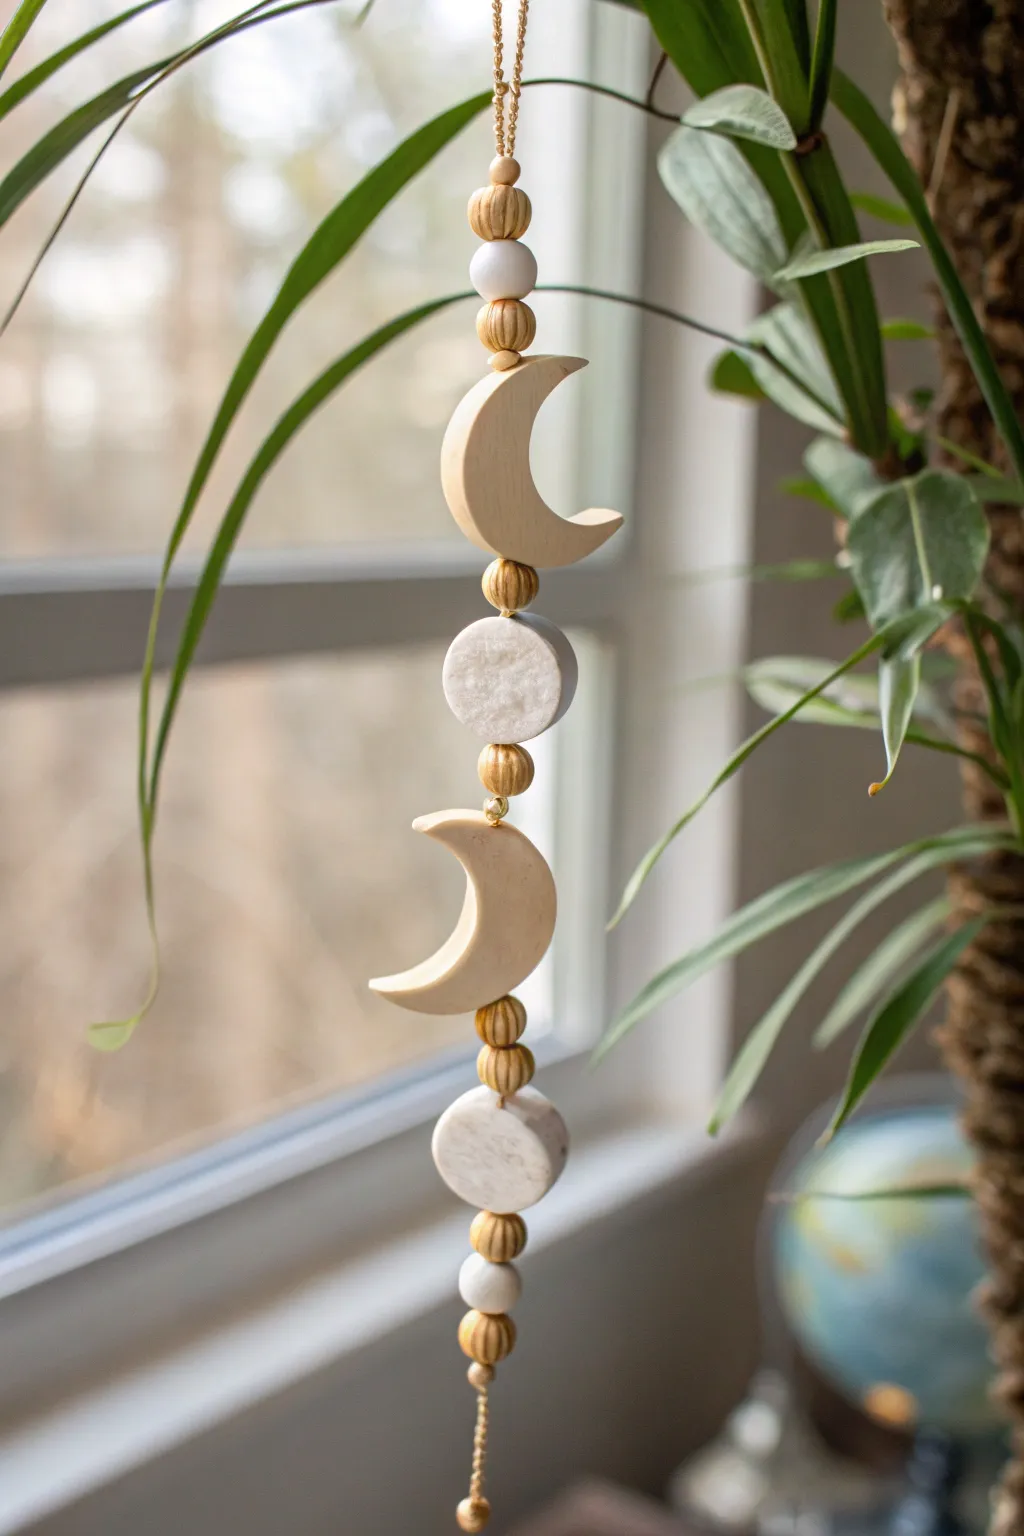
Bring a touch of cosmic energy into your home with this serene moon phase garland. Featuring soft cream crescents and marbled full moons suspended on a delicate gold chain, this piece catches the light beautifully near any window.
Step-by-Step Guide
Materials
- Polymer clay (cream/beige)
- Polymer clay (translucent or white with granite effect)
- Wooden beads (ribbed or textured, approx 10-12mm)
- Small gold space beads
- Gold jewelry chain (fine link)
- Gold eye pins
- Jump rings (gold)
- Round cookie cutter (approx 1.5 inch)
- Moon shaped cutter (or use the round cutter twice)
- Clay roller or pasta machine
- Needle tool or toothpick
- Jewelry pliers (needle nose and round nose)
- Oven and baking sheet
Step 1: Shaping the Moons
-
Condition the base clay:
Start by thoroughly conditioning your cream-colored polymer clay until it is soft and pliable. This prevents cracking later on. -
Roll out the slab:
Roll the clay out to a uniform thickness, about 1/4 inch (6mm). You want these pieces to have a nice, substantial feel, not too thin. -
Cut the crescents:
Using your moon cutter, stamp out two identical crescent shapes. If you don’t have a specific cutter, press a round cutter into the clay, then move it slightly over and press again to cut away a crescent sliver. -
Smooth the edges:
Gently run your finger dipped in a little cornstarch or water along the cut edges to smooth out any sharpness or burrs left by the cutter. -
Create the holes:
Using a needle tool, carefully pierce a hole through the top and bottom tips of each crescent moon. Ensure the hole goes all the way through vertically so they can hang straight.
Smooth Operator
Before baking, lightly brush your clay pieces with a little baby oil or clay softener. This removes fingerprints and gives the baked clay a professionally smooth, semi-matte finish.
Step 2: Creating the Marbled Moons & Beads
-
Mix the marble effect:
Take your white or granite-effect clay and mix in a tiny pinch of the cream clay. Twist and fold just enough to create a subtle stone-like marble pattern, but stop before the colors fully blend. -
Cut the full moons:
Roll this marbled mixture to the same 1/4 inch thickness and use your round cutter to create two full circles. -
Drill the circles:
pierce a hole vertically through the center of each circle, entering at the top edge and exiting at the bottom edge. -
Form the clay beads:
Use leftover clay (either plain or marbled) to roll three small, spherical beads. Two should be about 10mm wide, and one slightly smaller for the very bottom. -
Pierce the beads:
Poke a hole through the center of each clay bead. I find it helps to rotate the bead while piercing to keep the shape round.
Gold Touches
Make it luxe! After baking, paint the edges of your crescent moons with liquid gold leaf or metallic acrylic paint to catch even more sunlight.
Step 3: Baking and Assembly
-
Bake the pieces:
Arrange all your clay components on a parchment-lined baking sheet. Bake according to your clay package instructions (usually 275°F/135°C for 15-30 minutes per 1/4 inch thickness). -
Cool down:
Allow the pieces to cool completely in the oven before handling. Polymer clay is strongest once fully cooled. -
Prepare the links:
Cut your gold chain into short segments (about 1 inch each) if you prefer chain links, or use eye pins for a more rigid structure. -
Thread the top section:
Begin assembly by threading a length of chain through a ribbed wooden bead, then a clay bead, then another wooden bead. Secure this cluster. -
Attach the first moon:
Connect the top bead cluster to the top of the first crescent moon using a jump ring or by wiring directly through the hole you created. -
Add the connector beads:
Between the first crescent and the full moon perfectly, thread a wooden bead onto a headpin or piece of wire to act as a spacer. -
Build the pattern:
Continue the pattern downwards: Crescent moon -> Bead spacer -> Full moon -> Bead spacer -> Second crescent moon -> Bead spacer -> Second full moon. -
Finish the bottom:
String the final wooden bead and small clay bead at the very bottom. Finish with a small knot or crimp bead on your chain so it dangles elegantly. -
Add the hanging loop:
Attach a longer loop of gold chain to the very top wooden bead cluster so you can hang your masterpiece.
Now hang your celestial creation in a sunny spot and enjoy the peaceful vibes it brings to your space
Cute Animal Utility Holders
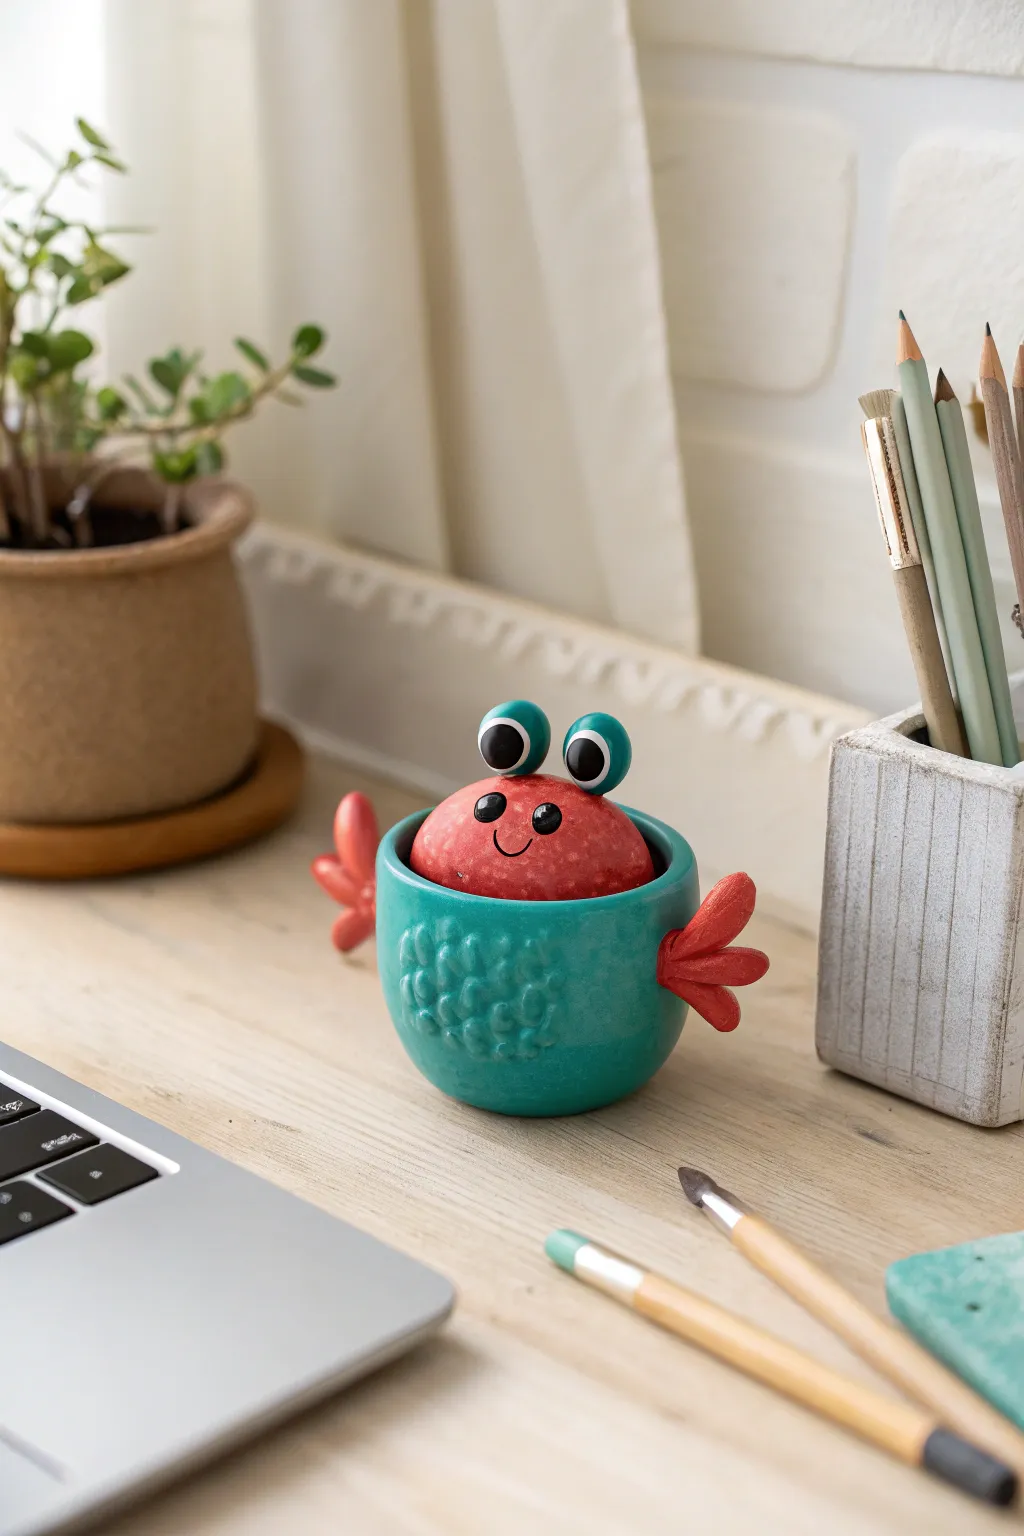
This adorable desktop companion doubles as a secret hiding spot for small treasures or paperclips. Featuring a textured teal base and a removable red crab lid with expressive eyes, it brings a cheerful pop of color to any workspace.
How-To Guide
Materials
- Teal polymer clay (approx. 2 oz)
- Red polymer clay (approx. 1.5 oz)
- White polymer clay
- Black polymer clay
- Small round cutter or jar lid (for sizing)
- Modeling tools (ball stylus, needle tool)
- Small texture sponge or sandpaper
- Liquid polymer clay (optional)
- Acrylic roller or pasta machine
- Gloss varnish (water-based)
Step 1: Forming the Pot Base
-
Condition the teal clay:
Begin by kneading the teal polymer clay until it is soft and pliable. Roll it into a smooth ball free of cracks. -
Create the pinch pot:
Push your thumb into the center of the ball and gently pinch the walls upwards while rotating. Aim for a consistent wall thickness of about 1/4 inch. -
Refine the shape:
Smooth the outside walls with your finger or a flat tool. The shape should be slightly rounded at the bottom and flat at the rim. Check that it sits flat on your work surface. -
Add texture:
Press a small piece of coarse sandpaper or a texture sponge gently against the lower front of the pot to create a bubbly, aquatic scale pattern. Leave the upper rim smooth.
Step 2: Sculpting the Crab Lid
-
Form the crab body:
Condition the red clay and roll it into a ball slightly wider than the opening of your teal pot. This will serve as the lid. -
Shape the dome:
Flatten the bottom of the red ball slightly so it rests securely on top of the teal base. Press it down gently to ensure a good fit, but don’t merge them. -
Texture the shell:
Using a crumpled piece of aluminum foil or a stiff brush, tap the surface of the red dome to give it a realistic, shell-like matte texture. -
Add the smile:
Use a needle tool or small curved blade to carve a simple, upward-curving mouth into the front of the red dome. -
Create the cheeks:
Roll two tiny specks of black clay and press them into the corner of the mouth areas for dimples, or embed small black beads for the eyes.
Sticky Situation?
If your clay gets too soft and sticky to hold its shape, pop it in the fridge or freezer for 10 minutes to firm it up before sculpting details.
Step 3: Adding Details & Assembly
-
Make the eye stalks:
Roll the remaining teal clay into two small cylinders. Attach these vertically to the top of the red dome. -
Create the eyeballs:
Roll two white balls and press them onto the teal stalks. Flatten them slightly. Add small black pupils in the center of the white circles. -
Sculpt the claws:
Shape two pieces of red clay into flat teardrops. Use a knife to cut a ‘V’ notch into the wider end of each teardrop to form the pincers. -
Attach the claws:
Press the narrow end of the claws onto the sides of the teal pot base. I find using a drop of liquid clay here helps them bond permanently during baking. -
Final smoothing:
Check all seams and connections. Smooth out any fingerprints on the smooth areas using a drop of baby oil on your finger. -
Bake carefully:
Place the pot and lid (separated) on a tile or parchment paper. Bake according to your clay package instructions, usually at 275°F (130°C) for 30 minutes. -
Cool and varnish:
Allow the pieces to cool completely in the oven. Once cold, apply a coat of gloss varnish to the eyes to make them shine.
Make It Interactive
Embed small magnets into the rim of the pot and the bottom of the lid before baking. This keeps the crab head securely attached but easy to remove.
Place this cheerful little crustacean on your desk and fill it with your favorite tiny supplies.