When your pottery studio feels set up for real life—messy clay days and calm glazing nights—you’ll make so much more work with way less stress. I’m sharing my favorite pottery studio ideas that keep things practical, easy to clean, and genuinely inspiring to be in.
Pottery Wheel by the Window
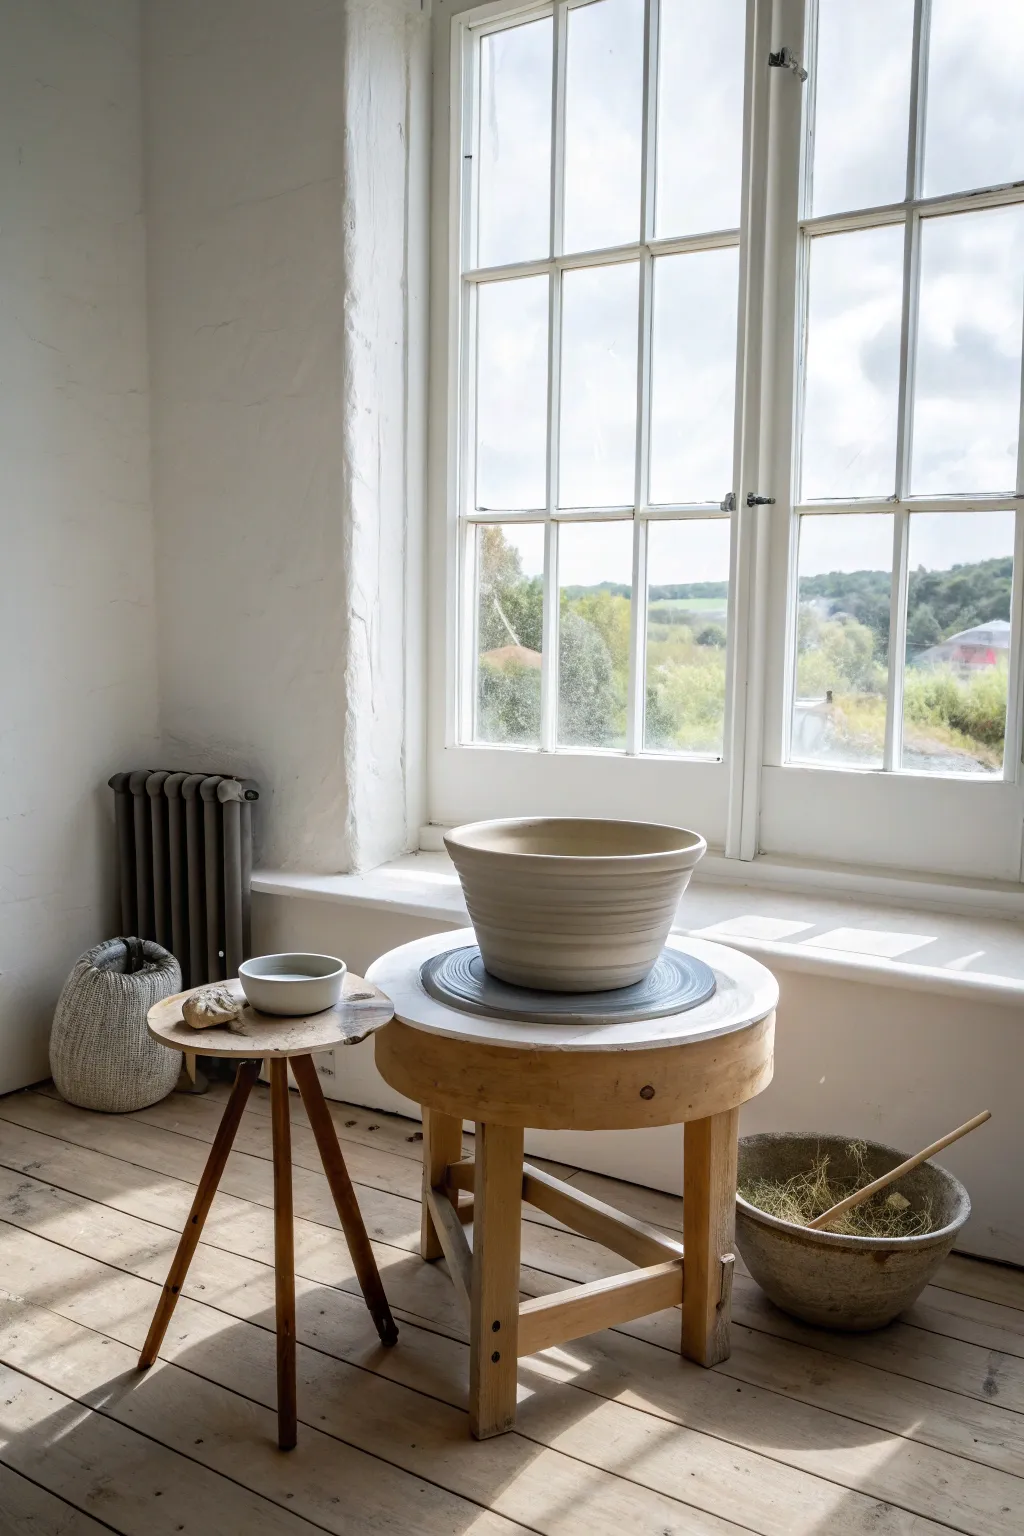
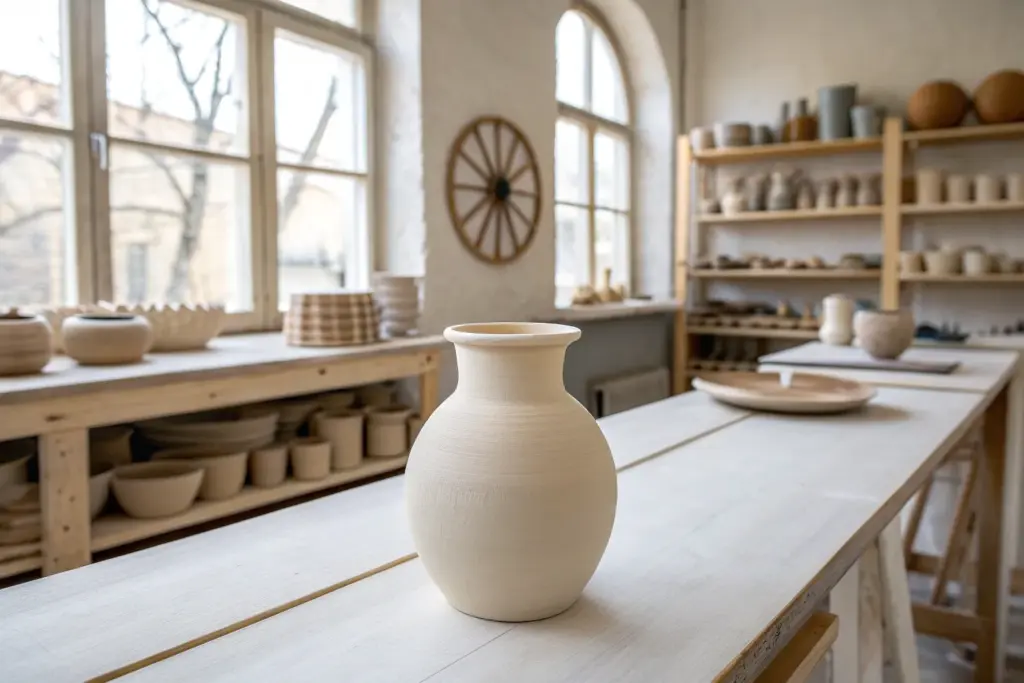
Create a stunning centerpiece for your table with this wide, rustic ceramic bowl, characterised by its gentle curve and prominent throwing rings. This project embraces the natural texture of the clay, leaving the spiral marks as a testament to the handmade process.
Step-by-Step Tutorial
Materials
- 5-6 lbs of stoneware clay (buff or white)
- Potter’s wheel
- Large round bat (wood or plastic)
- Bucket of water
- Potter’s sponge
- Needle tool
- Wooden throwing rib
- Wire cutter
- Chamois leather strip
Step 1: Preparation and Centering
-
Wedge the clay:
Begin by thoroughly wedging your 5-6 lbs of clay to remove air bubbles and ensure a uniform consistency. A spiral wedge works best for this volume of clay to get it tight and ready for the wheel. -
Attach to the bat:
Slam the clay ball down firmly onto the center of a clean, dry bat attached to your wheel head. Seal the edges by pressing the clay down against the bat with your thumb to prevent it from flying off. -
Cone up and down:
With the wheel spinning at a moderate-fast speed, use wet hands to cone the clay up into a tall beehive shape, then push it back down into a puck. Repeat this ‘coning’ process three times to fully align the clay particles. -
Final center:
Bring the clay down into a wide, low puck shape rather than a tall mound, as we are making a bowl. Ensure the top surface is flat and perfectly centred before proceeding.
Step 2: Opening and Pulling
-
Open the clay:
Find the center with your thumbs and press down vertically until you are about a half-inch from the bat. I like to check the depth with a needle tool here to ensure the bottom isn’t too thin. -
Establish the floor:
Pull your hands outwards towards your body to open the floor. For a bowl this size, create a flat, wide interior bottom about 5-6 inches across before curving upwards. -
Compress the floor:
Run your sponge or a wooden rib back and forth across the floor of the pot to compress the clay thoroughly. This step is crucial preventing ‘S-cracks’ during drying. -
First pull:
Slow the wheel slightly. Using plenty of water, pinch the clay wall between your fingers and pull upwards. Don’t worry about the width yet; focus on getting the height and an even wall thickness.
Wobbly Rim Woes?
If the rim starts to wobble as you flare it out, the clay is getting tired or too thin. Slow the wheel down immediately, compress the rim with a sponge, and stop stretching it wider.
Step 3: Shaping the Bowl
-
Subsequent pulls:
Continue pulling the walls up, but now start applying slightly more pressure from the inside hand to begin gently flaring the walls outward. Keep the rim slightly tucked in for stability until the final shaping. -
Leaving the throwing rings:
To achieve the look in the photo, relax your finger pressure slightly as you pull up, allowing your fingertips to leave subtle ridges or ‘throwing rings’ on the exterior. Do not smooth these out with a rib. -
Final shaping:
Use a wooden rib on the interior to define the smooth, continuous curve from the floor to the rim. Support the outside with a sponge, pushing the clay out against the rib to widen the bowl into its final V-shape. -
Rim compression:
Fold a small strip of chamois leather over the rim and gently hold it there as the wheel spins. This smooths and compresses the lip, making it durable and pleasant to touch.
Level Up: Glaze Dynamics
Use a breaking glaze (like a tenmoku or celadon) which will pool in the throwing rings and break over the high points, highlighting the texture you carefully preserved.
Step 4: Finishing Touches
-
Undercut the base:
Use the wooden knife tool to trim away the skirt of excess clay at the very base of the bowl where it meets the bat. This creates a neat undercut that aids in wire cutting later. -
Wire off:
Stop the wheel. Take your wire cutter, pull it taut, and slide it firmly underneath the pot to separate it from the bat. Do not lift the bowl yet as it will warp. -
Initial Drying:
Leave the bowl on the bat to firm up until it reaches a leather-hard state. Once stiff enough to handle without deforming, you can flip it for trimming the foot.
Allow your bowl to dry slowly under plastic to prevent warping before the final firing


Zoned Layout for Wet and Clean Work
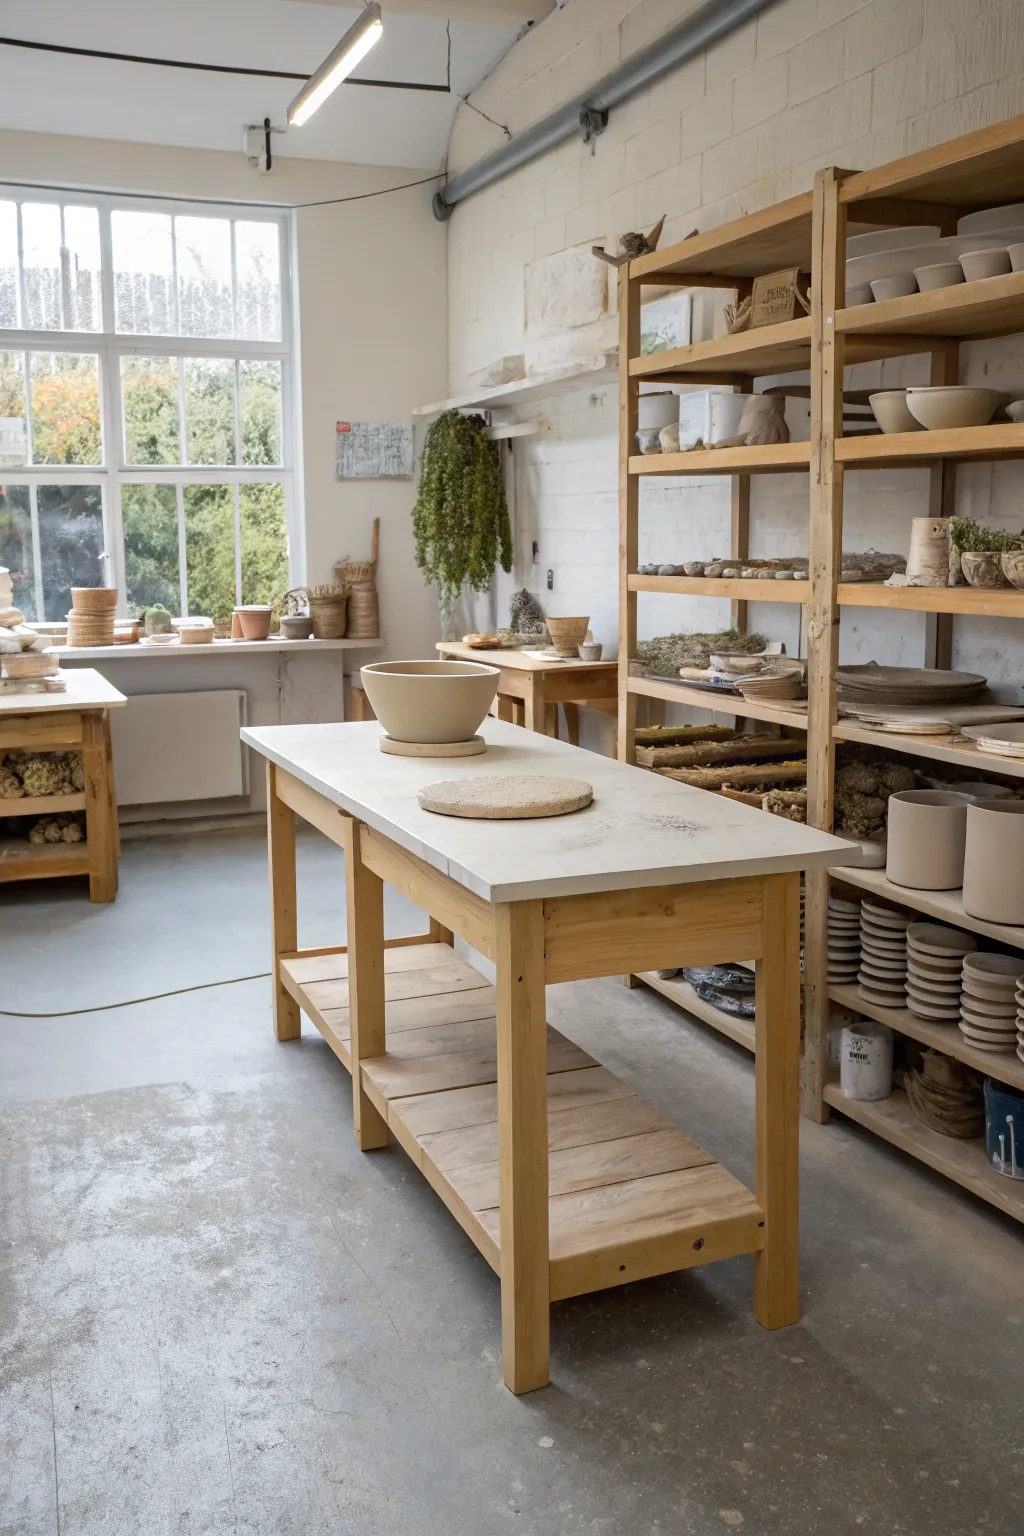
This project guides you through constructing a robust, minimalist pottery workbench that anchors a creative space with professional flair. Featuring a heavy-duty wooden frame and a smooth, easy-to-clean top, this table perfectly balances the zoning needs of a wet and clean hybrid studio.
Detailed Instructions
Materials
- 4×4 lumber (for legs)
- 2×4 lumber (for frame aprons)
- 1×6 lumber (for bottom shelf slats)
- 3/4-inch plywood (for tabletop base)
- Cement board or laminate sheet (for tabletop surface)
- Wood glue
- Pocket hole screws (2 1/2 inch)
- Wood screws (various lengths)
- Sandpaper (80, 120, 220 grit)
- Clear matte polyurethane or tung oil
- Concrete sealer (if using cement board)
- Drill and driver
- Circular saw or miter saw
- Measuring tape
- Square
Step 1: Constructing the Base Frame
-
Cut the legs:
Begin by cutting your 4×4 lumber into six legs. A standard standing workbench height is 36 inches, so cut these to roughly 35 inches to account for the tabletop thickness later. -
Prepare the aprons:
Cut the 2×4 lumber for the side and long aprons. You will need four long pieces for the length and four shorter pieces for the width to create both the top support and the lower shelf support. -
Assemble the side frames:
Construct the two short end frames first. Drill pocket holes into the ends of your short 2×4 apron pieces. Attach them between two legs using wood glue and pocket screws, positioning the bottom rail about 6-8 inches off the floor. -
Connect the sides:
Once the end frames are solid, connect them using the long 2×4 apron pieces. Ask a friend to help hold the frame steady while you clamp and drive screws into the pocket holes to ensure everything stays square. -
Add middle support:
Install the middle set of legs at the center of the long rails. This additional support is crucial for holding heavy clay loads and prevents the long table from sagging over time.
Wedging Table Upgrade
For dedicated wedging, anchor the table to the wall or add sandbags to the bottom shelf. The extra weight prevents wobbling while handling stiff clay.
Step 2: Building the Lower Shelf
-
Measure the shelf slats:
Measure the width between the lower long rails. Cut your 1×6 lumber into slats that fit snugly across this gap. -
Install support cleats:
Screw thin strips of wood (cleats) along the inside of the lower long rails. This creates a ledge for your shelf slats to sit on, keeping them flush with the frame. -
Secure the slats:
Place the 1×6 slats onto the cleats. I prefer to leave a tiny gap (about 1/8 inch) between boards to allow for wood movement and easier cleaning of clay dust. -
Fasten securely:
Screw each slat down into the cleats. This shelf adds immense structural rigidity to the table and provides designated storage for heavy clay bags.
Step 3: Creating the Work Surface
-
Cut the plywood base:
Cut your 3/4-inch plywood sheet to match the outer dimensions of your frame, adding a 1-2 inch overhang on all sides for a comfortable work edge. -
Attach base to frame:
Secure the plywood to the top frame using wood screws driven from underneath, through the apron and into the plywood, to avoid visible screw heads on top. -
Prepare the top layer:
For a true pottery surface, cut a sheet of cement backer board to match the plywood dimensions exactly. Alternatively, apply a heavy-duty laminate or canvas-covered board. -
Adhere the surface:
Glue the top surface material to the plywood using construction adhesive. If using cement board, clamp it down firmly until dry. -
Seal the surface:
If you used cement board, sand the edges smooth and apply a high-quality concrete sealer. This prevents the surface from sucking moisture out of your clay during wedging.
Surface Maintenance
If the concrete board feels too gritty or sucks water too fast, add another thin layer of sealer. It should be non-porous but still have ‘tooth’.
Step 4: Finishing Touches
-
Sand the wood frame:
Go over the entire wooden base with 120-grit and then 220-grit sandpaper. Pay special attention to corners and leg edges to prevent splinters. -
Apply protective finish:
Wipe away all sawdust and apply two to three coats of clear matte polyurethane or tung oil to the wooden legs and shelf. This protects the wood from water splashes common in pottery studios. -
Final wipe down:
Once the finish is fully cured, wipe the entire table with a damp cloth to remove any residual dust before bringing in your wheel or clay tools.
Your new workbench is now ready to anchor your creative flow and handle heavy projects for years to come.


Open Drying Shelves With Ware Boards

Create this essential piece of pottery studio furniture, designed to maximize airflow while keeping your drying wares safe and organized. This open slat shelving unit with removable ware boards brings a rustic, airy feel to your workspace while providing the sturdy support your greenware needs.
How-To Guide
Materials
- 2×2 inch pine lumber (for vertical posts)
- 1×2 inch pine lumber (for horizontal shelf supports)
- 1×3 inch pine slats (for shelf surfaces)
- 3/4 inch plywood or MDF (for removable ware boards)
- Wood glue
- 2.5 inch wood screws
- 1.5 inch wood screws
- Sandpaper (120 and 220 grit)
- Drill with pilot hole bits
- Measuring tape
- Square
- Saw (miter saw or circular saw)
- Clear matte polyurethane sealant
- Canvas drop cloth (optional for backdrop)
Step 1: Building the Frame Structure
-
Cut vertical posts:
Start by cutting four lengths of your 2×2 lumber to your desired height. For the unit shown, 6 feet is a comfortable height that allows for easy reach. -
Prepare horizontal supports:
Cut ten pieces of 1×2 lumber to serve as the side supports (the depth of your shelf). A depth of 12-14 inches is standard for most pottery ware boards. -
Mark shelf heights:
Lay your four vertical posts side-by-side on a flat surface. Measure and mark the locations for your five shelf levels, ensuring they are perfectly aligned across all posts. -
Assemble side ladders:
Construct two ladder-like side frames. Attach the short 1×2 supports between two vertical posts using wood glue and 2.5-inch screws. I find pre-drilling pilot holes here prevents the pine from splitting. -
Check for square:
Before the glue sets on your side ladders, use a carpenter’s square to ensure every angle is a perfect 90 degrees. -
Cut long stretchers:
Cut ten long pieces of 1×2 lumber for the front and back supports of each shelf level. The width depends on your space, but 30-36 inches provides ample drying room without sagging.
Airflow Master
Keep the gap between slats at least 1 inch. This allows air to circulate under the ware boards, promoting even drying for bottoms of pots.
Step 2: Assembling Shelves and Slats
-
Connect the sides:
Stand your two side ladders up (you might need a helper) and connect them using the long 1×2 stretchers. Attach these to the inside of the vertical posts, flush with the side supports. -
Secure the frame:
Drive screws through the long stretchers into the posts. Ensure the entire frame isn’t wobbling; add diagonal cross-bracing to the back if it feels unstable. -
Cut the slats:
Cut a large batch of 1×3 slats. You will need enough to cover five shelf levels, leaving roughly a 1-inch gap between each slat for airflow. -
Install slats:
Lay the slats across the horizontal supports. Secure each slat with wood glue and 1.5-inch screws or a brad nailer. Use a scrap block of wood as a spacer to keep the gaps consistent. -
Sand everything smooth:
Go over the entire unit with 120-grit sandpaper to remove rough edges, then finish with 220-grit. Smooth wood prevents snagging on clothes or scratching delicate clay.
Step 3: Finishing and Ware Boards
-
Apply sealant:
Apply two to three coats of clear matte polyurethane. This protects the wood from the high moisture levels common in drying damp pottery. -
Cut ware boards:
Cut your plywood or MDF into rectangular boards that fit loosely on top of your shelves. These allow you to move work easily without touching the clay. -
Seal ware boards (critical):
Pottery creates moisture, so seal your ware boards thoroughly even if they are MDF. Unsealed boards will warp quickly when wet clay sits on them. -
Arrange the studio space:
Once dry, place your shelving unit near a window if possible, but avoid direct hot sun which can dry clay unevenly. Hang a canvas drop cloth behind it for a soft, diffused light effect. -
Load the shelves:
Place your ware boards onto the slats. Group similar drying stages together—freshly thrown pots on the bottom, leather-hard items higher up where heat rises.
Warping Boards?
If ware boards bow over time, flip them over with every use. For permanent flatness, upgrade to marine-grade plywood or HardieBacker board.
Now you have a professional-grade drying rack ready to support your next batch of ceramic creations


Tool Wall That Clears Your Table
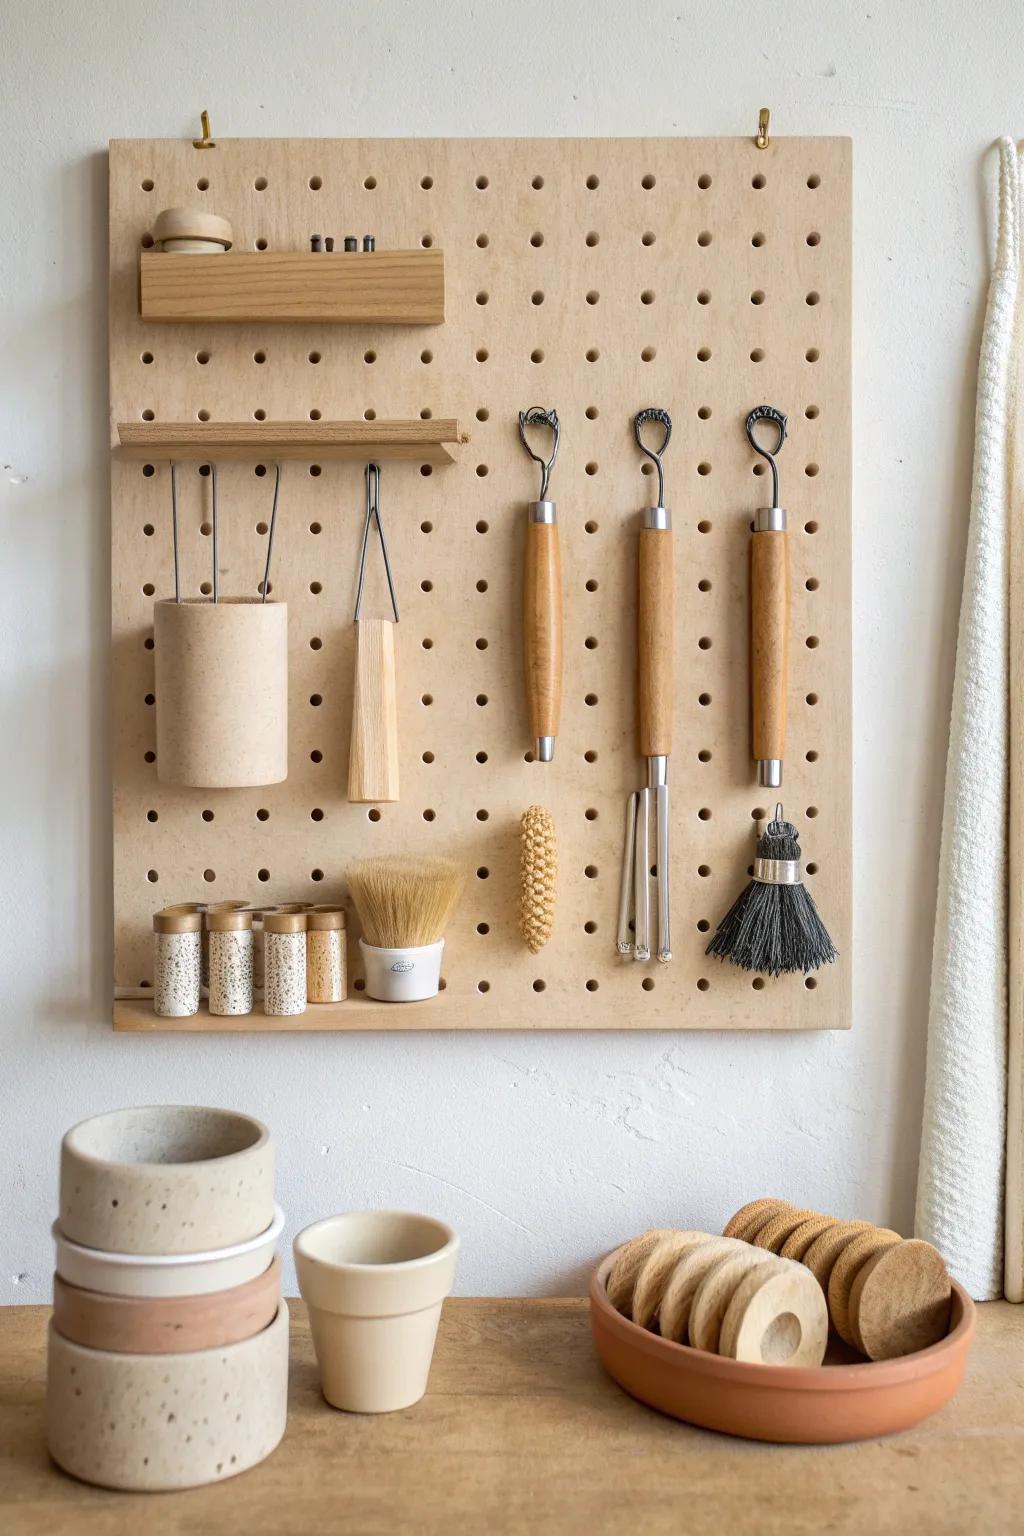
Elevate your studio organization with this minimalist, Scandinavian-inspired pegboard that turns your favorite pottery tools into a visual display. The blonde wood tones and clean lines create a serene backdrop that clears your workspace while keeping every trimming tool and brush within arm’s reach.
Step-by-Step
Materials
- 3/4-inch birch plywood project panel (approx. 24″ x 30″)
- Solid maple or oak trim wood (for shelves)
- 3/4-inch Forstner drill bit
- Measuring tape and framing square
- Pencil
- Drill press or handheld drill with guide
- Fine-grit sandpaper (120 and 220 grit)
- Clear matte polyurethane or Danish oil
- Rags or foam brush
- Metal S-hooks and custom wire loops
- 2 Brass screw eyes for hanging
- Wood glue
Step 1: Planning and Drilling
-
Size the panel:
Begin by cutting your birch plywood panel to your desired dimensions. The example shown is approximately 24 inches wide by 30 inches tall, a perfect size for a dedicated tool station. -
Mark the grid:
Lay the plywood flat. Using a framing square and a pencil, lightly mark a grid for your peg holes. Space them evenly, about 2 inches apart on center, leaving a generous 2-inch border around the perimeter. -
Double-check alignment:
Before drilling, stand back and ensure your rows and columns are perfectly straight. Use an awl or a nail to make a tiny divot at each crosshair; this helps the drill bit catch exactly where you want it. -
Drill the peg holes:
Using a 3/4-inch Forstner bit (which cuts cleaner holes than standard bits), drill through the plywood at each mark. A drill press ensures perfectly vertical holes, but a steady hand with a drill guide works too. -
Sand the surface:
Sand the entire face of the board with 120-grit sandpaper to remove pencil marks, then follow up with 220-grit for a smooth finish. Don’t forget to hand-sand inside each hole to remove splinters. -
Seal the wood:
Apply a coat of clear matte polyurethane or Danish oil. This protects the wood from clay dust and moisture. I find a rag application gives the most natural look. Let it dry completely.
Step 2: Creating Custom Storage
-
Fabricate the top shelf:
Cut a strip of solid wood (about 1 inch thick and 1.5 inches deep) to span about a third of the board’s width. This will hold small tools or stamps. -
Attach shelf backing:
Glue a thinner strip of wood to the front of this shelf to create a lip, keeping items secure. Attach this assembly to the board using wood glue and screws from the back. -
Make the floating ledge:
Create a second, simpler ledge for the middle section. Cut a flat piece of trim, bevel the front edge slightly for a refined look, and attach it directly to the board like the top shelf. -
Bend wire hangers:
For the hanging cups and odd-shaped tools, heavy-gauge steel wire works wonders. Cut lengths of wire and bend them into U-shapes or loops that can hook into the peg holes. -
Prepare the hanging hooks:
Install two brass screw eyes into the top edge of the plywood board. Measure carefully so they are equidistant from the center to ensure the board hangs level.
Pro Tip: Consistent Depth
When drilling your grid, place a scrap piece of wood underneath your project panel. This prevents the back of the plywood from splintering or ‘blowing out’ as the drill bit exits the wood.
Step 3: Assembly and Organization
-
Mount the board:
Hang the finished board on your wall. Ensure it is securely anchored, as pottery tools can get heavy collectively. -
Hang carving tools:
Place your ribbon tools and loop tools on the right side. Use S-hooks or simply hook the tool’s loop end over a peg or a custom wooden dowel inserted into a hole. -
Add the brush cup:
Utilize a ceramic cup or a wooden cylinder container for brushes. Use a bent wire hanger to suspend this from two adjacent holes on the left side. -
Position the trimming tools:
Hang your wire cutters and sponging tools. Mixing vertical hanging tools with the horizontal shelves creates a balanced visual composition. -
Organize the bottom shelf:
If you added a bottom ledge or have space on the lower holes, arrange small texture rollers or stamps. Grouping them by color or material adds to the aesthetic appeal. -
Final wipe down:
Give the whole setup one last wipe with a dry cloth to remove any installation dust before loading it up fully.
Level Up: Magnetic Strip
Route a shallow channel on the back of one of the wooden shelves and glue in strong rare-earth magnets. This lets you ‘stick’ metal needle tools or fettling knives directly to the wood without hooks.
Enjoy the calm efficiency of having your favorite tools displayed like art on your new studio wall

What Really Happens Inside the Kiln
Learn how time and temperature work together inside the kiln to transform clay into durable ceramic.
Rolling Cart for Your Daily Essentials
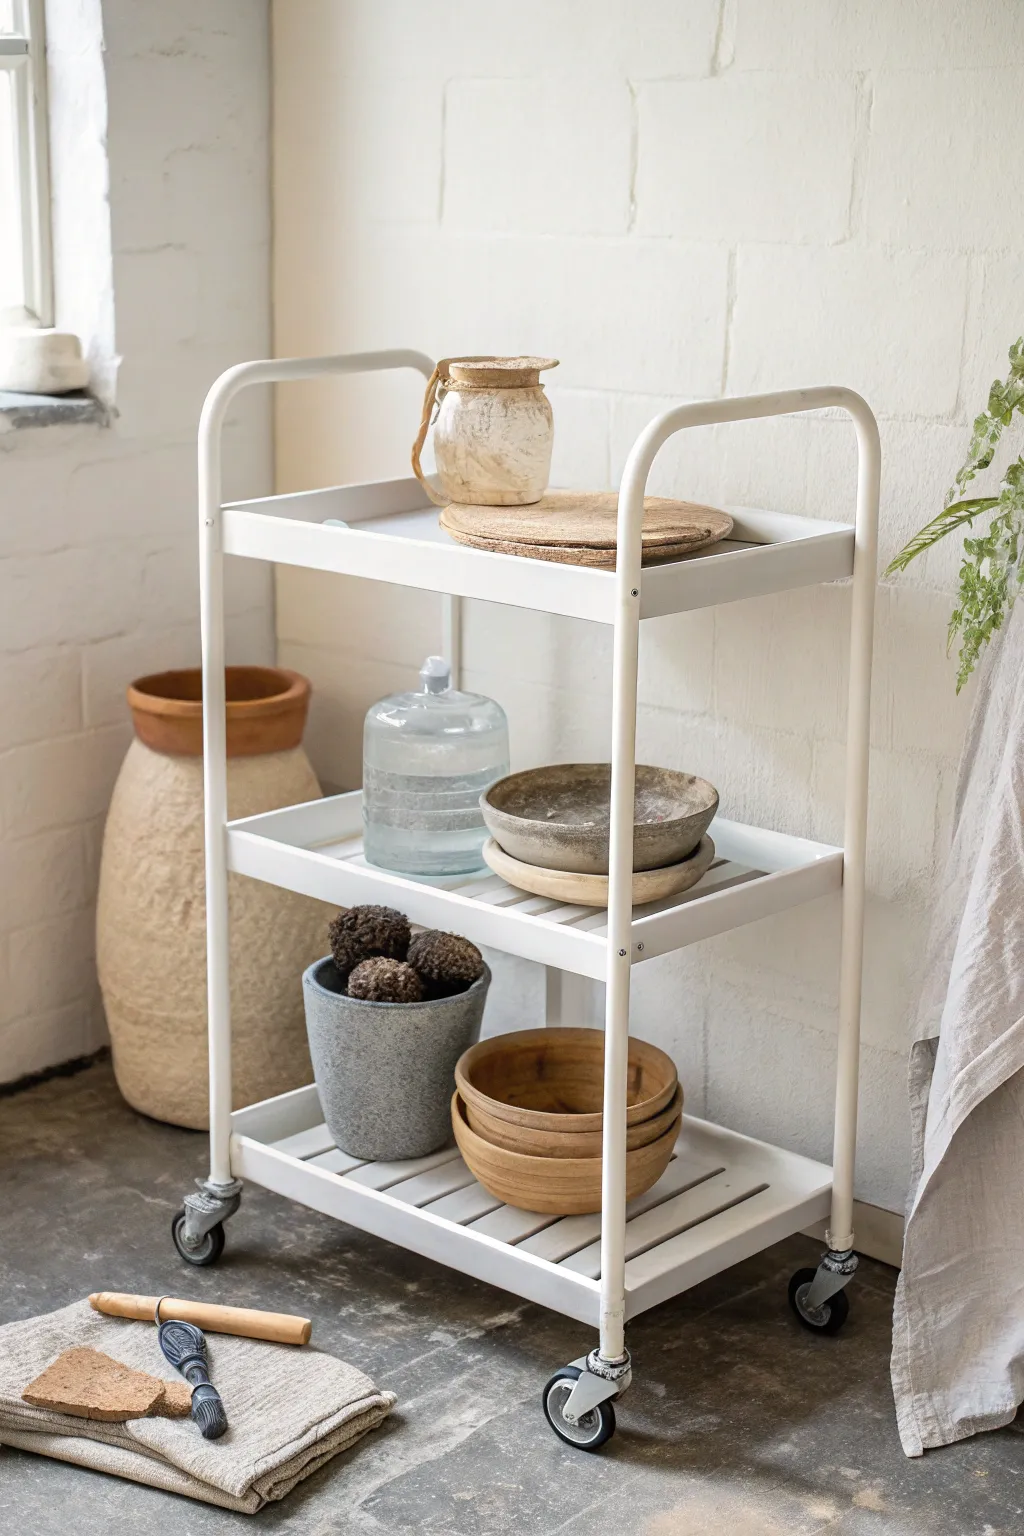
Transform a basic utility cart into a serene, mobile workstation perfect for keeping your pottery essentials within arm’s reach. This project focuses on customizing a standard cart with a clean, matte finish and organizing it with natural textures to create a calming studio aesthetic.
Step-by-Step Tutorial
Materials
- 3-tier metal utility cart (undecorated or existing color)
- Fine-grit sandpaper (220 grit)
- Clean tack cloths or microfiber rags
- Metal primer spray (white)
- Matte white spray paint (enamel or metal-specific)
- Painters tape
- Drop cloth or cardboard
- Face mask and ventilation
Step 1: Preparation
-
Clean the surface:
Before you begin, wipe down every surface of your metal cart to remove any oils, dust, or factory residue. If it’s an old cart, use a degreaser to ensure a perfectly clean base. -
Disassemble if possible:
If your cart is already assembled, it’s often easier to paint if you take the shelving tiers apart from the frame. If that’s too much hassle, just ensure you can reach all the interior angles. -
Sand for adhesion:
Lightly scuff the entire surface with 220-grit sandpaper. You aren’t trying to strip the old paint completely, just creating a ‘tooth’ for the new primer to grip onto. -
Remove dust:
Wipe away all sanding dust thoroughly using a tack cloth. Any leftover particles will create a bumpy texture in your final finish. -
Mask the wheels:
If the casters are permanently attached, wrap them completely in painter’s tape and plastic bags to protect the black rubber and metal mechanisms from overspray.
Paint Dripping?
If you notice drips forming, don’t wipe them wet! Let the drip dry completely, then sand it smooth with fine sandpaper before applying your next coat.
Step 2: Painting
-
Set up your spray zone:
Place the cart pieces on a large drop cloth or cardboard in a well-ventilated area, preferably outdoors. Wear your mask to avoid inhaling fumes. -
Prime the metal:
Apply a thin, even coat of metal primer. Keep the can moving constantly to avoid drips. I usually like to start with the undersides of the shelves first so I can flip them over to finish the visible sides last. -
Wait for primer to cure:
Let the primer dry completely according to the manufacturer’s instructions, usually about an hour or two. -
First coat of matte white:
Spray your first coat of matte white enamel. Hold the can about 8-10 inches away and use sweeping motions. Do not try to get full opacity in one pass; multiple thin coats are far superior to one thick, drippy one. -
Sand between coats:
Once the first coat is dry to the touch, very lightly run fine sandpaper over any rough spots, then wipe clean. This ensures a professional, furniture-grade finish. -
Second coat:
Apply a second coat of white paint, paying special attention to corners, the interior vertical sides of the trays, and the curved handles. -
Final drying time:
Allow the cart to cure for at least 24 to 48 hours. Metal paint takes longer to harden than wall paint, and you don’t want to scratch it when reassembling.
Step 3: Styling & Assembly
-
Reassemble the cart:
Carefully put the cart back together if you disassembled it, tightening screws gently to avoid cracking the fresh paint. -
Seal the shelves (Optional):
If you plan on resting very wet pottery tools directly on the metal, consider adding a clear matte sealer to the bottom of the trays to prevent rust over time. -
Arrange the top tier:
Place your most-used items on top. A clear water jar and a flat bat or banding wheel work well here for quick access during throwing. -
Organize the middle tier:
Use the middle shelf for tools that need to stay contained, such as large water jugs or stacks of bats. The white backdrop makes it easy to spot exactly what you need. -
Heavier items below:
Store simpler, heavier shapes like nested wooden bowls or containers of clay chunks on the bottom shelf to keep the center of gravity low and stable.
Add Texture
Line the bottom of each shelf with cork sheets or cut-to-size wooden slats. This dampens the sound of tools clanking metal and adds a warm, rustic touch.
Enjoy the calm efficiency this customized cart brings to your creative pottery sessions
Dedicated Glaze Station With Wipeable Surfaces
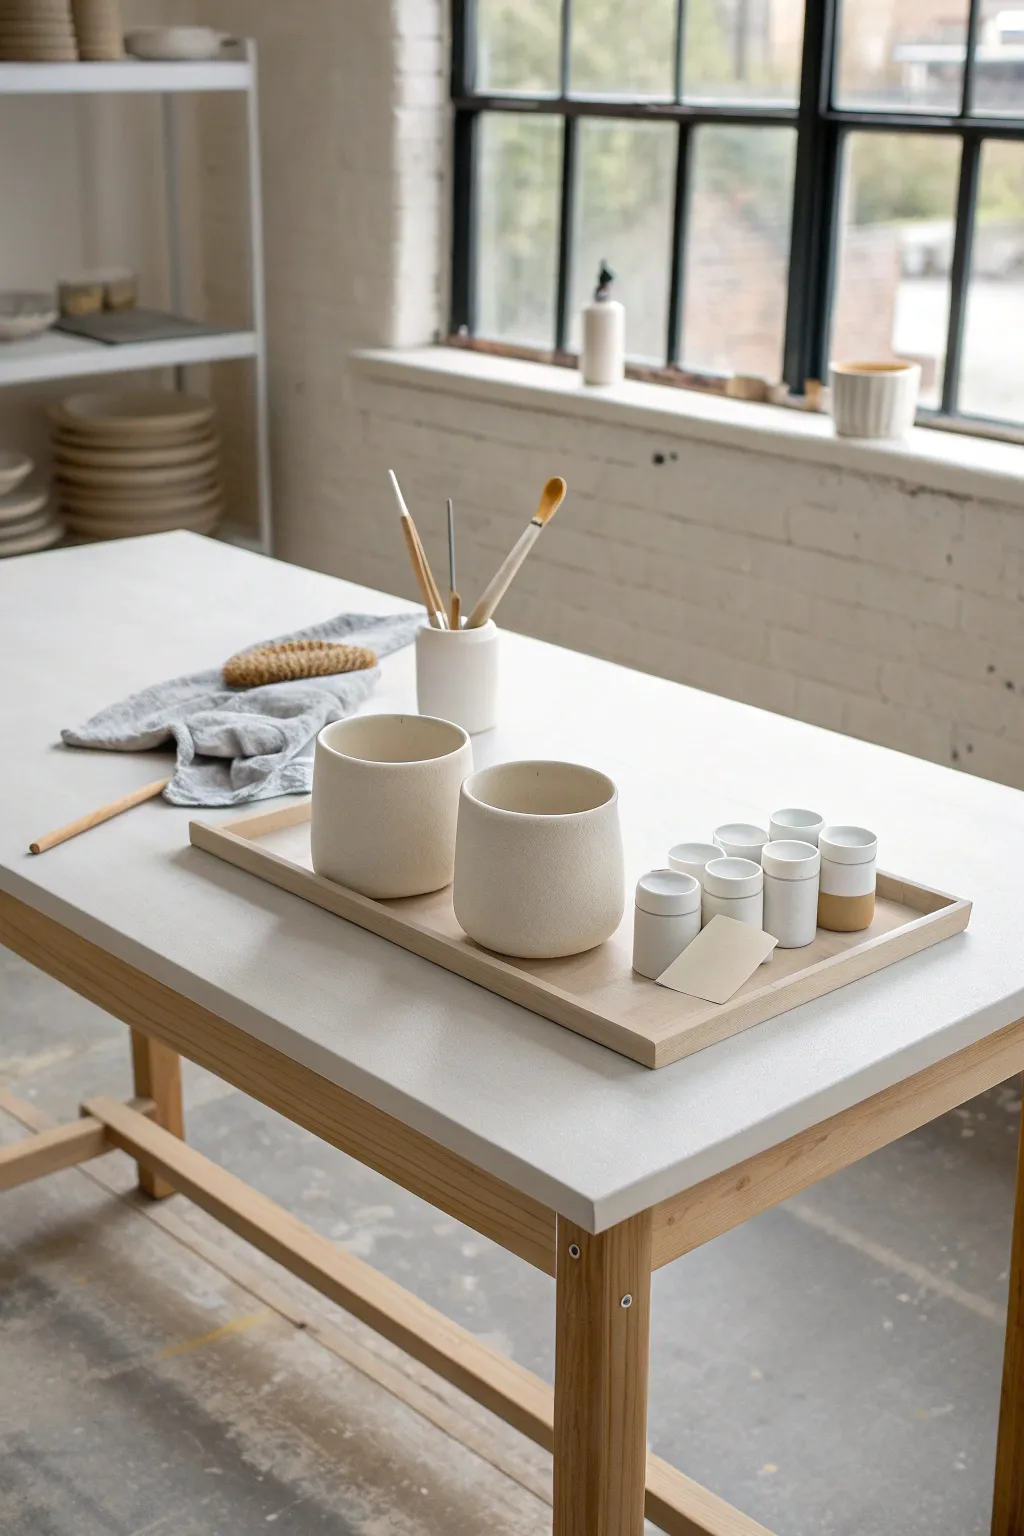
Create a serene and highly functional workspace for your glazing process with this dedicated station build. This setup combines a sturdy wooden base with a pristine, easy-to-clean top, perfect for keeping your pottery workflow organized and professional.
Step-by-Step
Materials
- Unfinished wooden table frame (flat-pack or custom built)
- Hardboard or plywood sheet (sized to table top)
- White melamine laminate sheet or high-gloss paint
- Contact cement or wood glue
- J-roller or heavy rolling pin
- Wooden tray (shallow lip)
- Sandpaper (120 and 220 grit)
- Matte polyurethane varnish (for the table legs)
- Ceramic bisque ware (cups and small pots for display)
- Glazing brushes
- Natural sponge
- White pottery jar (for tool storage)
Step 1: Building the Foundation
-
Assemble the Frame:
Start by constructing the base of your table using the unfinished wooden frame. Ensure all joints are tight and the legs are square to the ground so the surface doesn’t wobble during delicate glazing work. -
Prepare the Surface Board:
Cut your plywood or hardboard substrate to match the exact dimensions of the table frame. Sand the edges smooth to prevent any snagging later on. -
Apply the Wipeable Surface:
If using a melamine sheet, apply a layer of contact cement to both the plywood substrate and the back of the laminate. Wait for it to become tacky. -
Adhere and Rolling:
Carefully align the laminate with the substrate and press them together. Use a J-roller or a heavy rolling pin to apply firm pressure across the entire surface to remove air bubbles and ensure a permanent bond. -
Painting Alternative:
If you aren’t using laminate, prime the wood surface and apply 3-4 coats of high-gloss, water-resistant white enamel paint. Sand lightly between coats for a glass-smooth finish. -
Seal the Legs:
Protect the wooden legs from water splashes by applying two coats of matte polyurethane varnish. I like to keep the wood tone natural to contrast with the white top.
Clean Edge Pro-Tip
For the crispest table edge, iron on melamine edge-banding tape after laminating the top. It hides the plywood layers and creates a seamless, factory-finish look.
Step 2: Creating the Glazing Tray Station
-
Select a Tray:
Choose a shallow wooden tray that fits comfortably on your new tabletop. The low lip is crucial as it keeps small glaze pots contained without obstructing your hand movements. -
Arrange the Bisque Ware:
Place your larger bisque cups on the left side of the tray. This visual grouping helps you mentally separate pieces ready for glazing from your tools. -
Organize Glaze Testers:
Group your small glaze sample pots or testers on the right side of the tray. Arrange them in a grid pattern to keep your color options clearly visible. -
Add a Label Card:
Place a small card or tile next to the testers. This is useful for jotting down glaze recipes or firing notes right where you are working.
Step 3: Final Styling & Organization
-
Tool Holder Setup:
Use a heavy-bottomed ceramic jar to hold your glazing brushes. Place this centrally on the table, just behind the tray, for easy access from either side. -
Prep the Tools:
Insert your brushes handle-down into the jar. Include a variety of sizes—wide brushes for base coats and thin liners for detail work. -
The Cleaning Zone:
Fold a grey linen cloth or towel neatly to the left of the central setup. This designated soft spot is perfect for resting glazed pieces or wiping hands. -
Add Texture:
Place a natural sea sponge on top of the folded towel. Not only is it aesthetically pleasing, but it’s essential for smoothing out drips on your pottery. -
Final Light Check:
Position your table near a natural light source, ideally a window, to ensure you can see true glaze colors and surface textures clearly.
Level Up: Mobility
Add locking heavy-duty caster wheels to the table legs. This lets you wheel the station to the kiln for loading and back to the window for glazing.
Enjoy your beautifully organized, clean workspace that invites creativity with every glazing session


The Complete Guide to Pottery Troubleshooting
Uncover the most common ceramic mistakes—from cracking clay to failed glazes—and learn how to fix them fast.
Kiln Corner With Safety Clearances
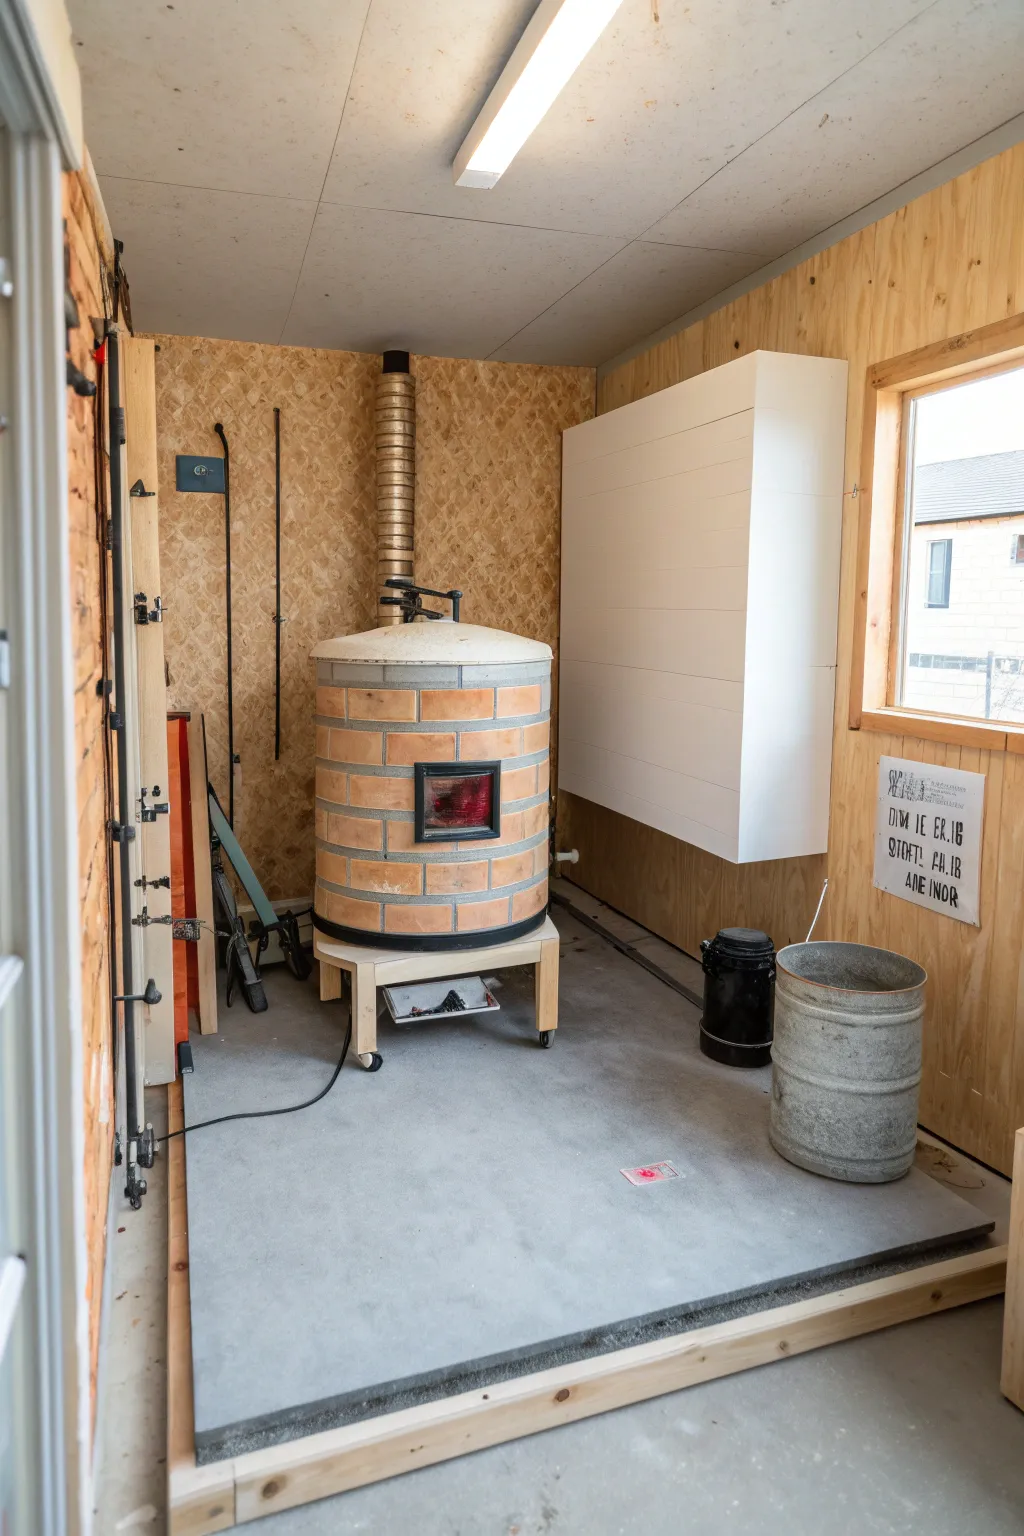
Establish a professional and safe firing zone in your pottery studio by constructing a raised, fire-resistant platform for your electric kiln. This setup features a sturdy concrete board base with ample clearance, ensuring your kiln operates safely while looking tidy against warm plywood walls.
How-To Guide
Materials
- Cement backer board (large sheets)
- Pressure-treated 2×4 lumber
- Plywood sheets (CDX or similar grade)
- Heat-shielding panel or heavy-duty drywall
- Electric kiln with stand and casters
- Galvanized metal ventilation ducting
- Construction screws
- Circular saw
- Drill/driver
- Level
- Heavy-duty metal trash can (for safety)
- White paint (for cabinet/shield)
Step 1: Preparing the Space
-
Clear and measure:
Begin by clearing the corner of your shed or studio completely. Measure a footprint that allows at least 18 inches of clearance on all sides of where your kiln will sit. -
Install wall sheathing:
Line the stud walls with plywood sheets if they aren’t already covered. The plywood adds a warm, rustic texture and provides a solid backing for mounting tools later. -
Verify window clearance:
Ensure any nearby windows, like the one on the right, have wooden frames protected or are far enough away that heat won’t crack the glass.
Step 2: Constructing the Heat-Proof Pad
-
Build the sub-frame:
Construct a rectangular frame using 2×4 lumber. This frame should be slightly larger than your intended concrete pad area to act as a containing border. -
Lay the base:
Secure the 2×4 frame to the floor. I typically add a cross-brace in the middle if the pad is particularly large to prevent any sagging. -
Cut cement board:
Using a carbide-tipped scoring knife or circular saw with a masonry blade, cut your cement backer board sheets to fit exactly within or on top of your wooden frame. -
Secure the flooring:
Screw the cement board down firmly. This non-combustible surface is crucial for catching any incidental sparks or hot debris. -
Seal the seams:
If you used multiple partial sheets of cement board, seal the seams with fire-resistant mortar or high-heat caulk to create a seamless gray surface.
Airflow matters
Leave a 1-inch air gap between your wall-mounted heat shield and the plywood wall. This circulating air prevents the wall from scorching.
Step 3: Installing Heat Shields & Ventilation
-
Mount the heat shield:
On the wall closest to the kiln (or closest to combustibles), install a large heat shield. You can build a floating wall box like the white one shown, using fire-rated drywall or heavy sheet metal painted with high-heat enamel. -
Check spacing:
Ensure this shield is mounted with an air gap behind it (using spacers) to allow airflow, which prevents heat transfer to the structural wall behind it. -
Install the vent stack:
Position your galvanized metal ducting directly above the kiln’s future exhaust port. Secure it to the wall with appropriate brackets, ensuring it vents safely outside.
Add task lighting
Install a clip-on light or an overhead LED strip above the kiln so you can clearly see inside when checking cones or loading shelves.
Step 4: Final Setup
-
Position the kiln:
Roll your electric kiln onto the center of the concrete pad. The stand should have locking casters to keep it immobile during loading and firing. -
Add safety accessories:
Place a metal trash can with a lid nearby for safe disposal of hot test tiles or debris. A large metal bucket is also useful for waste clay. -
Inspect clearances:
Do a final walk-around with a tape measure. Comply with your kiln manufacturer’s specific distance requirements from all walls and the white heat shield. -
Post safety signage:
Add a safety sign on the wall near the door or window reminding users of kiln operating procedures or hot surface warnings.
Now you have a professional-grade firing corner that protects your studio while you create your best work
Bright Task Lighting for Detail Work
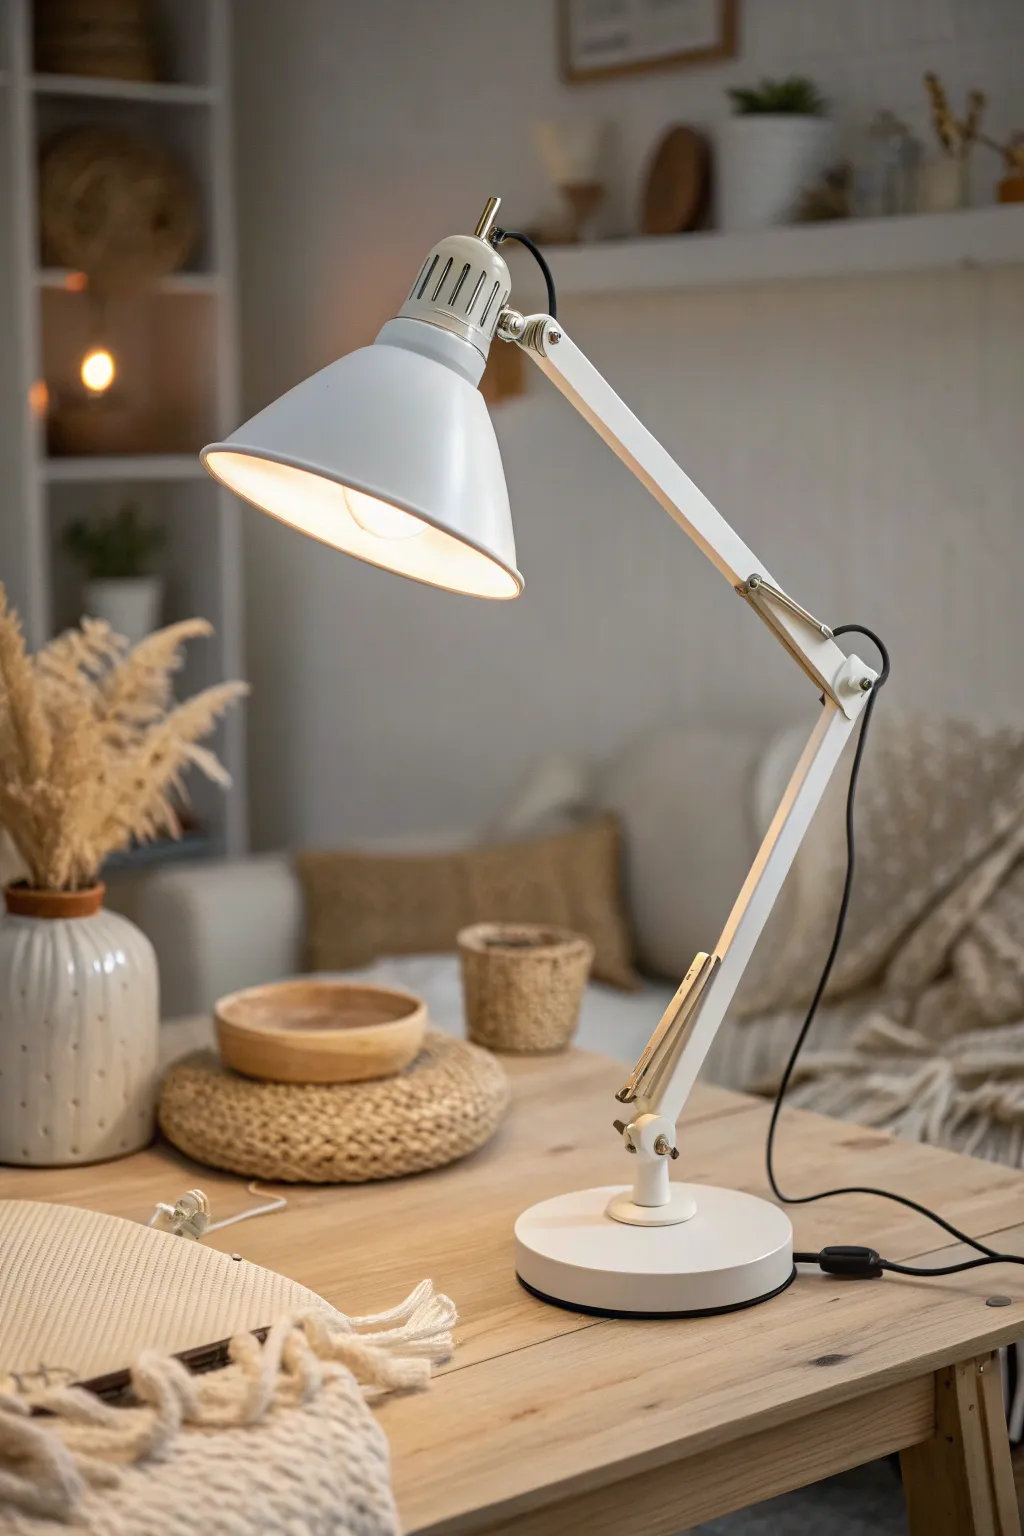
Create a cozy, rustic atmosphere in your studio with this handcrafted textured vase and matching trinket dish set. The off-white glaze and subtle repeating dot pattern give these pieces a timeless, artisanal look perfect for dried botanicals.
Step-by-Step
Materials
- White stoneware clay (mid-fire)
- Pottery wheel (or coil building supplies)
- Wooden modeling tool with a rounded end
- Pin tool
- Sponge
- Wire cutter
- Clear or satin white glaze
- Small smooth wooden bowl (for trinket dish form)
- Kiln access
Step 1: Forming the Tall Vase
-
Center the clay:
Begin with about 2-3 pounds of wedged white stoneware clay. Slam it onto the center of your wheel head and use wet hands to center it, focusing on creating a stable, dome-like mound. -
Open and pull the cylinder:
Open the clay down the center, leaving about a half-inch for the base. Widen the floor, then begin pulling up the walls slowly. Aim for a cylinder that is slightly wider at the bottom and tapers gently inward toward the neck. -
Shape the belly:
From the inside, gently push the clay outward near the bottom half to create a subtle curves or ‘belly’. Keep the neck relatively vertical and straight. -
Define the rim:
At the top, create a distinct collar by slightly thickening the rim. Use a chamois or your sponge to smooth and round it off for a professional finish. -
Add texture:
While the clay is leather hard (but not bone dry), take your wooden modeling tool. Press the rounded end gently into the clay surface in vertical columns. Start from the base and work upward, spacing the indentations about an inch apart to create the repeating vertical dotted pattern.
Clean Lines
For the cleanest texture, wipe the vase with a slightly damp sponge after impressing the dots to smooth any displaced clay burrs.
Step 2: Creating the Trinket Dish
-
Prepare a slab:
Roll out a small slab of clay, approximately 1/4 inch thick. Compress the clay with a rib to align the particles and prevent warping. -
Cut the circle:
Use a round template or a jar lid to cut a perfect circle from your slab. Smooth the edges with a damp sponge. -
Form the shallow bowl:
Gently press your clay circle into a shallow slump mold or over a reversed wooden bowl to give it a gentle curve. I like to let this stiffen up for an hour or so before removing it to ensure it holds its shape.
Step 3: Finishing and Firing
-
Dry slowly:
Loosely cover both pieces with plastic to let them dry slowly. Rapid drying can cause cracks, especially around the textured areas. -
Bisque fire:
Once bone dry, load the pieces into the kiln for a bisque firing to Cone 04. This prepares the clay to accept glaze. -
Wax the feet:
Apply wax resist to the bottom foot of the vase and the flat base of the dish to prevent them from sticking to the kiln shelf. -
Glaze application:
Dip the vase into a satin white glaze. For the texture to pop, ensure the glaze isn’t too thick, or it will fill in your indents. Glaze the trinket dish similarly, or opt to leave the outside raw clay for a nice textural contrast. -
Glaze fire:
Fire the pieces again to the maturity temperature of your clay body (likely Cone 5 or 6). Allow the kiln to cool completely before unloading. -
Sand the bottoms:
Check the bottoms for any sharp bits of clay or glaze drips. Use diamond sandpaper or a grinding stone to smooth the foot rings so they won’t scratch your furniture. -
Style carefully:
Fill your new vase with dried pampas grass or wheat stems, and place small items in the dish to complete the aesthetic.
Warped Rim?
If your vase rim warps during drying, try placing a lightweight board gently on top during the leather-hard stage to keep it level.
Enjoy the calm simplicity these handmade ceramic pieces bring to your workspace

TRACK YOUR CERAMIC JOURNEY
Capture glaze tests, firing details, and creative progress—all in one simple printable. Make your projects easier to repeat and improve.
Easy-Clean Flooring and Splash Protection
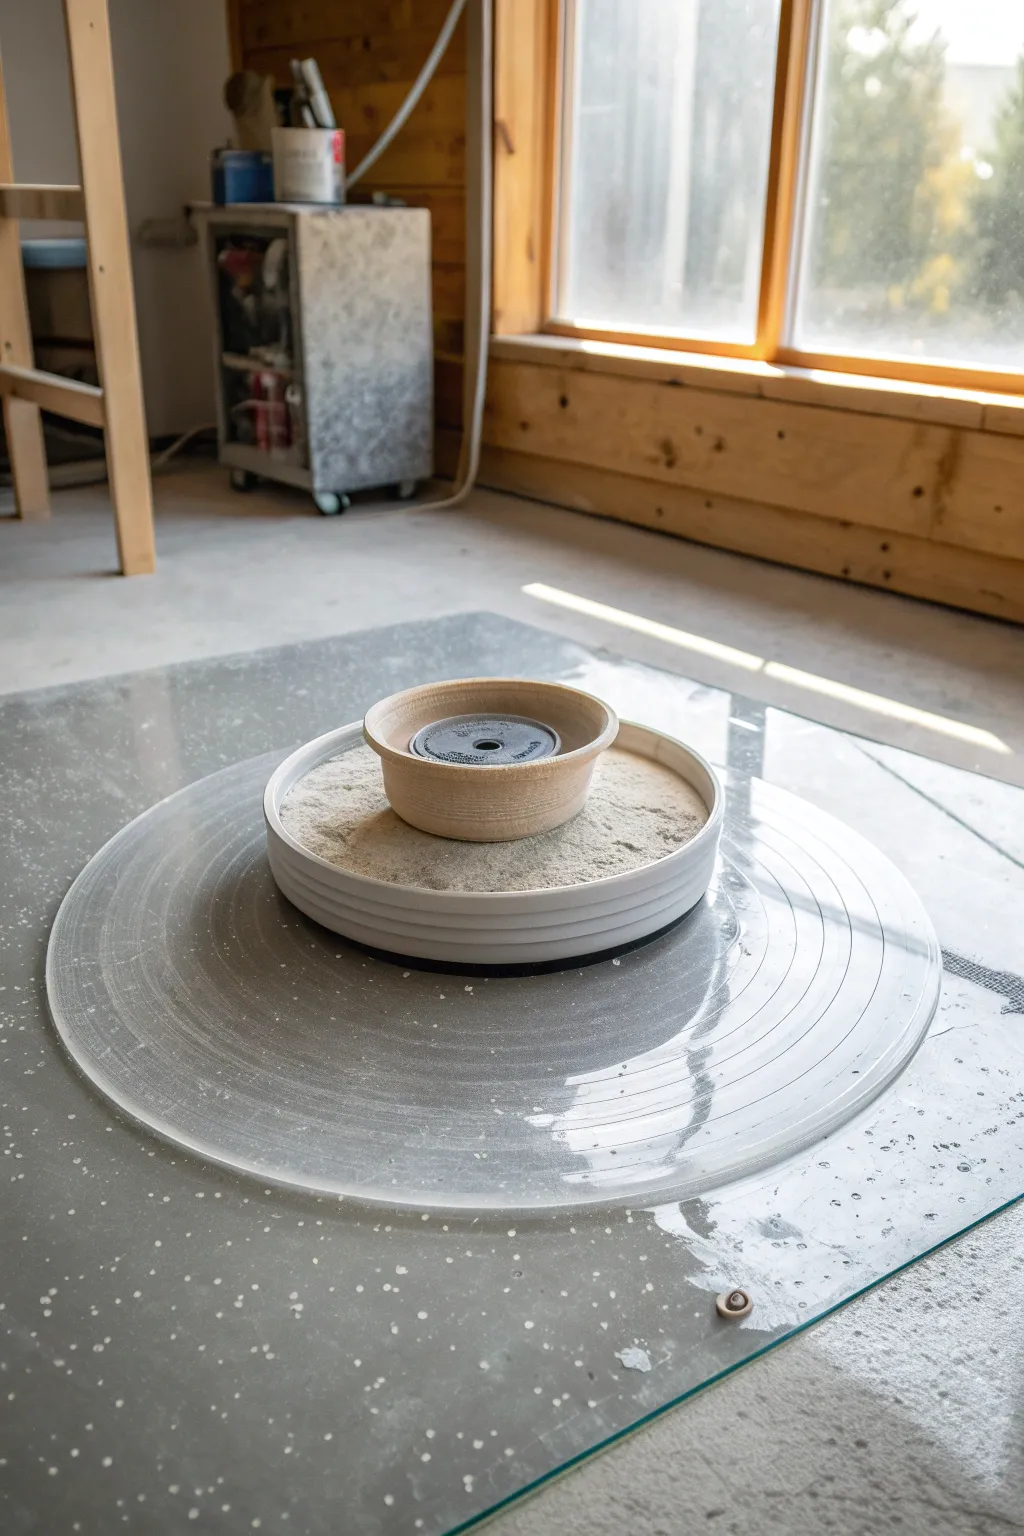
Keep your pottery studio floor pristine and your sanding process dust-free with this custom splash protection setup. This project creates a large, easy-to-clean acrylic base combined with a stabilizing sand tray for intricate detailing work.
Detailed Instructions
Materials
- Large sheet of clear acrylic or polycarbonate (approx. 4′ x 4′)
- Heavy-duty banding wheel or manual turntable
- Large white ceramic or plastic shallow bowl/tray (diameter slightly larger than your workpiece)
- Fine silica sand or grog
- Pottery piece (for testing fit)
- Rubber non-slip matting
- Glass cleaner
- Microfiber cloth
Step 1: Base Preparation
-
Prepare the workspace floor:
Begin by sweeping and mopping the area of your floor where you intend to place the station. Any grit underneath the acrylic sheet can scratch both the new material and your actual flooring. -
Position the acrylic sheet:
Lay your large acrylic or polycarbonate sheet flat on the clean floor. If the sheet has protective film on both sides, peel it off now to reveal the clear surface. -
Clean the surface:
Wipe down the top surface of the acrylic with glass cleaner and a microfiber cloth to ensure it is perfectly transparent and free of static dust. -
Add stability:
Cut a small square of rubber non-slip matting, slightly smaller than the base of your banding wheel, and place it exactly in the center of the acrylic sheet. This prevents the heavy metal wheel from sliding during use.
Wobbly Wheel?
If your sand tray isn’t level, the whole pottery piece will wobble. Use a small bubble level directly on the sand surface to ensure a perfect flat plane before starting work.
Step 2: Turntable Setup
-
Place the banding wheel:
Set your heavy-duty banding wheel directly onto the non-slip matting. Ensure it feels stable and doesn’t rock when you give it a gentle spin. -
Prepare the catch tray:
Select a shallow, wide-rimmed container. This acts as both a catch tray for debris and a stabilizing bed. A heavy ceramic bowl works well for weight, but a sturdy plastic planter saucer is a lighter alternative. -
Fill with stabilizer:
Pour fine silica sand or grog into the tray until it is about half to three-quarters full. I prefer using fine sand because it conforms better to the bottom of the pottery pieces. -
Level the sand:
Use a straight edge or just your hand to smooth the surface of the sand so it is perfectly flat and level within the tray. -
Mount the tray:
Place the sand-filled tray onto the center of the banding wheel. Spin the wheel slowly to check if the tray is centered; adjust its position until it spins true without wobbling.
Step 3: Final Assembly
-
Nest the workpiece:
Take your pottery piece—in this case, a small bowl—and nestle it gently into the center of the sand bed. Wiggle it slightly so the sand grips the bottom. -
Check clearances:
Spin the wheel again to ensure the centrifugal force doesn’t shift the bowl. The sand should hold it firmly in place. -
Test the splash zone:
Situate yourself as if you were working. Verify that the large acrylic sheet extends far enough around the wheel to catch any falling clay trimmings, glaze drips, or sanding dust that might fall during the process. -
Maintenance check:
Note how easy it is to wipe the acrylic clean. Keep a spray bottle nearby to mist down dust before wiping it up, preventing airborne particles.
Add a catch rim
For wet work, glue a flexible rubber strip around the edge of the acrylic sheet to create a dam that stops liquids from running off onto the floor.
Now you have a professional-grade, easy-clean station ready for your next masterpiece
Ventilation Setup for Clay Dust and Fumes
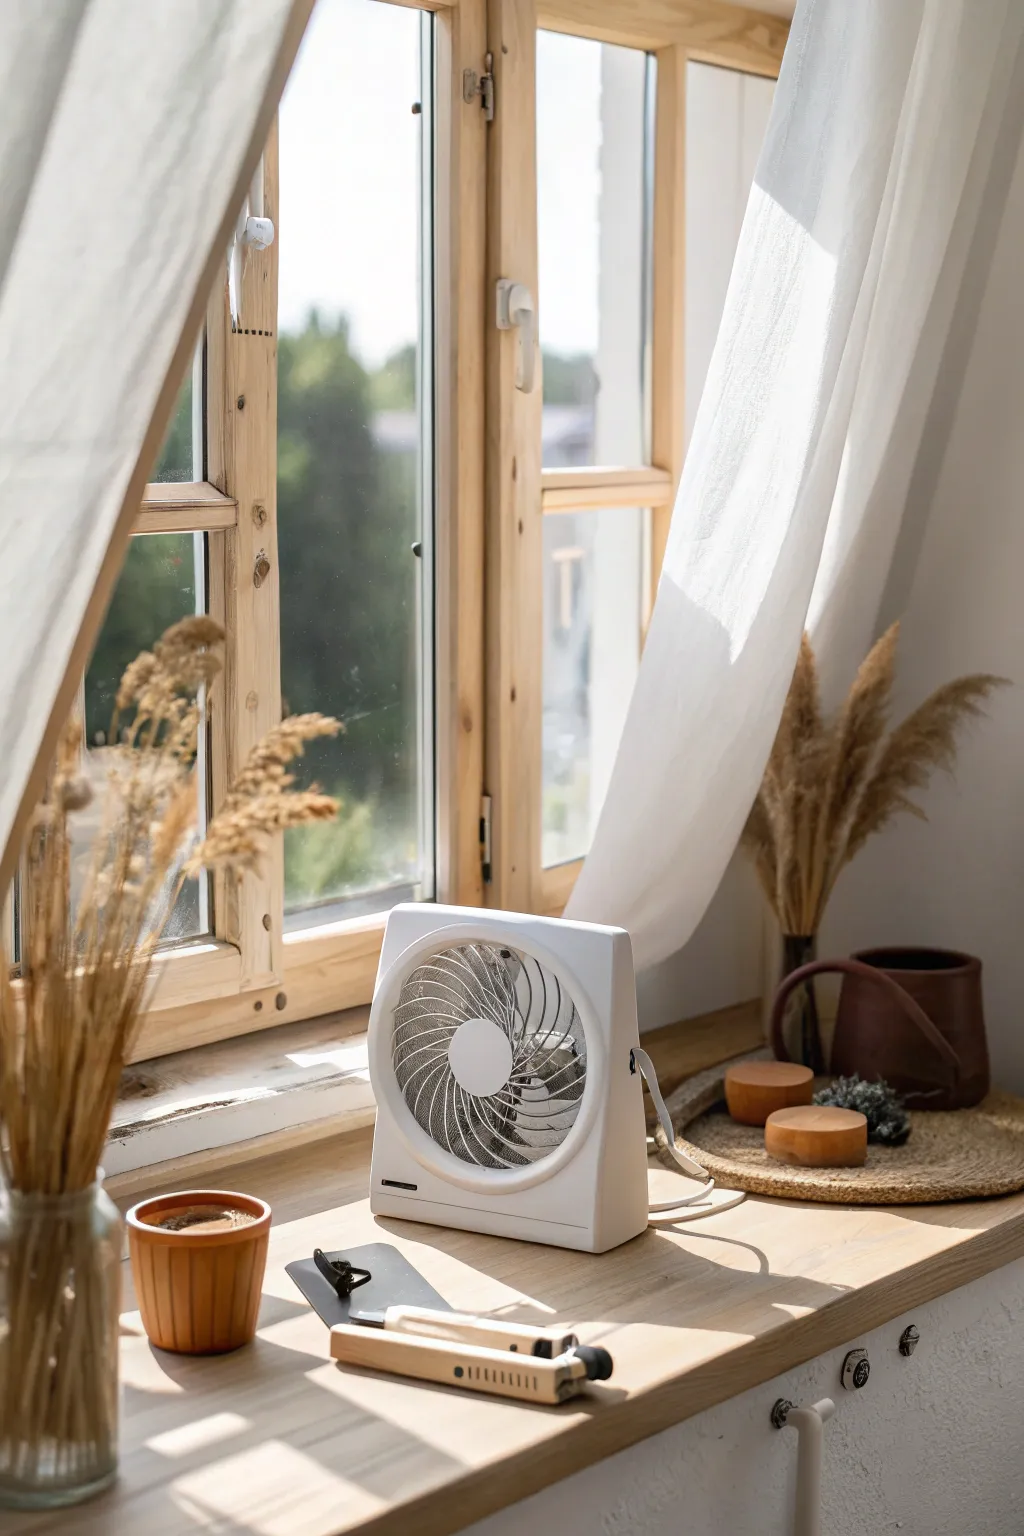
Transform a sunny corner into a safe and efficient mini-studio with this straightforward ventilation setup. By strategically placing a box fan and organizing your tools, you create an airflow system that gently directs clay dust away from your workspace.
Step-by-Step Tutorial
Materials
- Compact white box fan (approx. 10-12 inches)
- Wooden windowsill or sturdy table surface
- Small terracotta pot or ceramic vessel for slip
- Pottery tools (wooden trimming tool, metal rib, sponge)
- Dried decorative grasses (e.g., pampas grass)
- Clear glass vase
- Brown ceramic pitcher or vase
- Round woven placement mats or coasters
- Small wooden risers or blocks
Step 1: Setting the Scene & Airflow
-
Clear and clean the surface:
Begin by completely clearing your chosen windowsill or table area. Wipe down the wood with a damp cloth to remove any existing dust, ensuring you have a clean slate for your new setup. -
Determine fan placement:
Position your compact box fan directly in front of the window pane that opens. The fan should be placed so that it can blow air outwards, pulling dust away from you as you work. -
Secure the power cord:
Route the fan’s power cord neatly along the sill or down the side. I like to tuck it behind the fan base so it doesn’t snag on any tools later. -
Check the window clearance:
Ensure the window can open freely behind the fan. If you have curtains, verify they won’t be sucked into the intake; tie them back securely if necessary.
Airflow Issues?
If dust blows back at you, the wind outside might be stronger than your fan. Try closing the window slightly to reduce backdraft or wait for a calm day.
Step 2: Organizing the Workspace
-
Establish a work zone:
Designate the area directly in front of the fan as your primary work zone. This ensures that any fine dust created during trimming or sanding is immediately captured by the airflow. -
Place the slip container:
Set your small terracotta pot or slip container to the left of the fan (or your non-dominant side). This keeps it accessible but out of the direct line of your main movements. -
Arrange essential tools:
Lay out your most-used hand tools, like the black rib and wooden trimming knife, near the slip pot. Keeping them flat prevents them from rolling off the narrow sill. -
Group tools logically:
Keep sharp tools and smoothing ribs slightly separated to avoid damaging delicate edges. A small cloth or mat underneath them can stop them from sliding.
Upgrade Your Fan
Attach a furnace filter to the back (intake side) of the box fan with tape. This turns your ventilation setup into a simple air scrubber.
Step 3: Adding Aesthetic & Functional Decor
-
Position the dried florals:
On the far left of the sill, place the clear glass vase filled with tall dried grasses. This adds height and separates the workspace from the rest of the room visually without blocking light. -
Set up the right-side vignette:
On the right side of the fan, place a round woven mat. This acts as a designated spot for finished pieces or additional tools, adding texture to the setup. -
Add wooden accents:
Place two small wooden blocks or risers on the woven mat. These can be used to elevate pieces for inspection or simply to hold small accessories like sponges. -
Place the ceramic pitcher:
Behind the wooden blocks, position the brown ceramic pitcher with its own dried grasses. This balances the composition and adds a warm, earthy tone to the bright window. -
Add a touch of greenery:
Tuck a small piece of preserved moss or a tiny dried flower bundle near the wooden blocks for a subtle pop of color and texture.
Step 4: Final Adjustments
-
Test the airflow:
Turn the fan on a low setting. Hold a piece of tissue paper near your work zone to confirm the air is being pulled towards the fan and out the window, not blown back at you. -
Adjust for light:
Sit in your working position and check if the sun is blinding. You may need to adjust the sheer curtains to diffuse the light while keeping the airflow path clear. -
Final tidy:
Do a final sweep of the arrangement. Ensure no dried grasses are close enough to the fan blades to get caught, and that your water/slip pot is stable.
Now you have a functional, breathable workspace that makes pottery at home safer and more enjoyable
Three-Bucket Cleanup Station
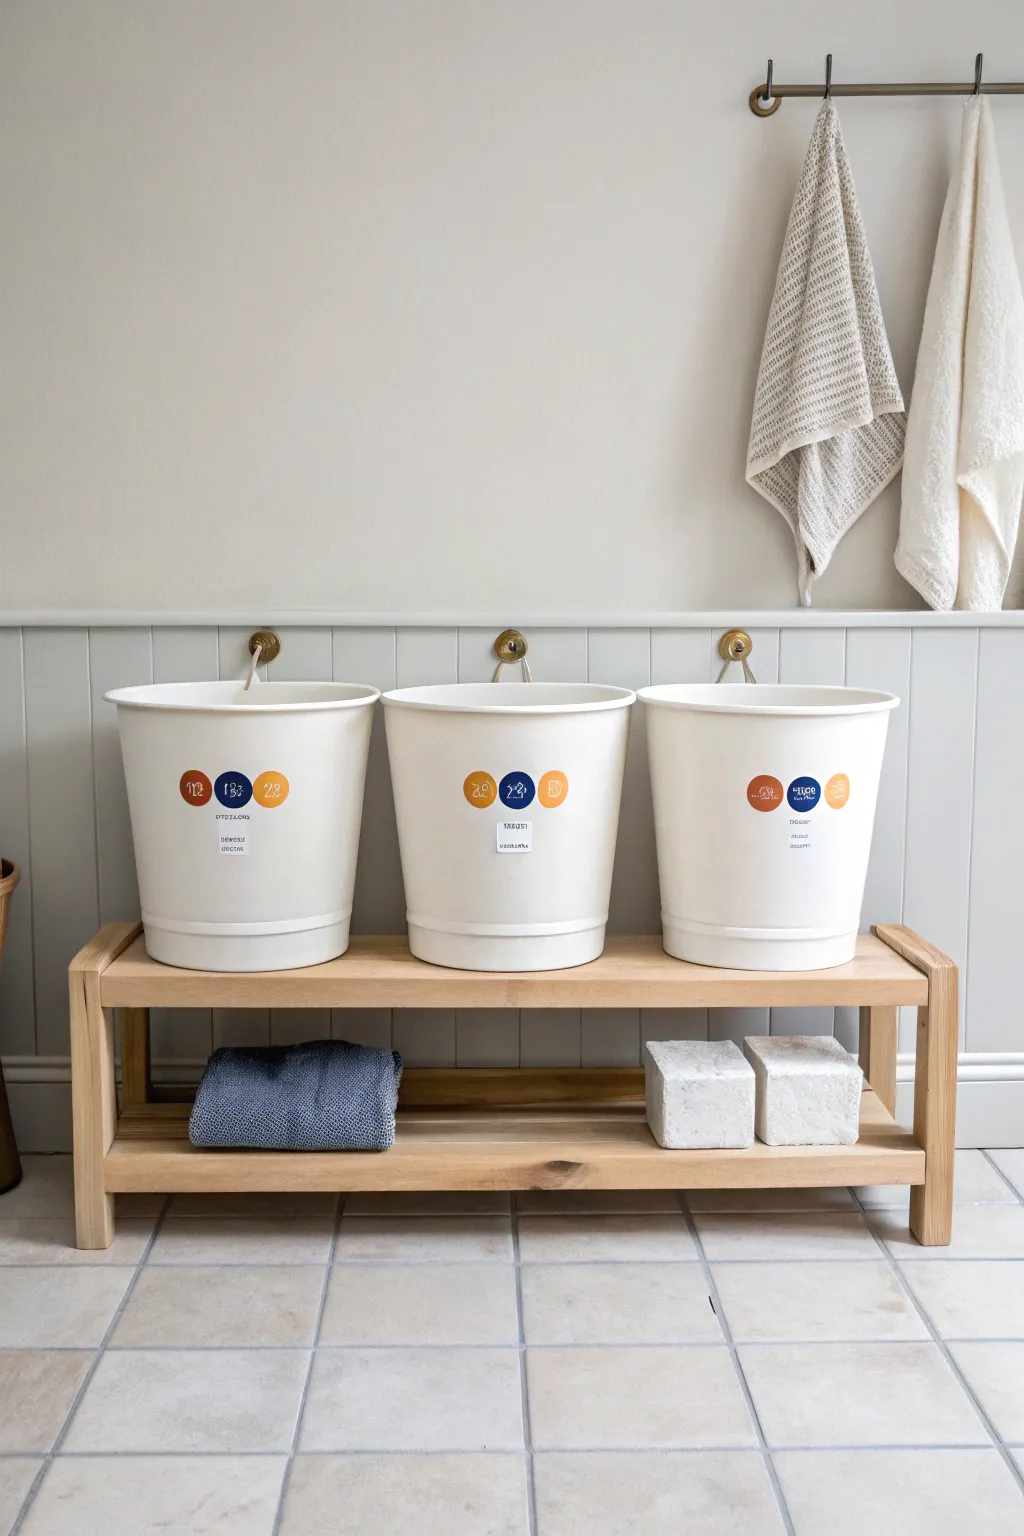
Keep your pottery drain pipes clear and your studio sparkling with this organized three-bucket wash system. This simple yet essential setup uses gravity settling to separate clay particles from water before disposal.
Step-by-Step Guide
Materials
- Three sturdy 5-gallon white plastic buckets
- Wooden bench or tiered shelving unit (approx. 40″ wide)
- Waterproof vinyl decal paper or pre-made circle labels
- Printer (inkjet or laser depending on paper type)
- Scissors or circle cutter
- Clear waterproof sealant spray (matte finish)
- Rubbing alcohol
- Lint-free cloth
- Epsom salts or flocculant solution (optional for water treatment)
- Two large sponges
- Towels for drying
Step 1: Preparing the Buckets
-
Clean surface:
Start by thoroughly cleaning the exterior of your three white buckets. Even new buckets can have a dusty film or oils from manufacturing. -
Degrease with alcohol:
Wipe down the center front area of each bucket with rubbing alcohol on a lint-free cloth. This removes invisible oils and ensures your labels will stick permanently without peeling at the edges later. -
Dry completely:
Allow the alcohol to evaporate completely before attempting to apply any stickers. This usually only takes a minute or two.
Step 2: Designing the Labels
-
Create the design:
Using graphic design software or a simple word processor, create three circular designs. I like to use a simple color-coding system—orange for heavy sludge, blue for wash water, and yellow for the final rinse. -
Add text:
Include clear text below the circles indicating the stage, such as ‘1. Sludge,’ ‘2. Wash,’ and ‘3. Rinse.’ Keep the font clean and legible from a distance. -
Print onto vinyl:
Load your waterproof vinyl decal paper into your printer. Check your printer settings to ensure it is set to ‘Glossy Photo Paper’ or ‘Label’ mode for the best ink saturation. -
Seal the ink:
If you are using an inkjet printer, lightly spray the printed sheet with a clear matte sealant and let it dry for 20 minutes to prevent the ink from running when splashed. -
Cut the shapes:
Carefully cut out your circle designs. A circle cutter tool gives the sharpest edge, but careful work with sharp scissors works perfectly fine.
Pro Tip: Clear Water
Add a teaspoon of Epsom salts to the first bucket. It acts as a flocculant, causing clay particles to clump together and settle to the bottom much faster.
Step 3: Assembly and Setup
-
Apply labels:
Peel the backing off your first decal. Position it centrally on the first bucket, about one-third of the way down from the rim. Smooth it from the center outward to push out air bubbles. -
Repeat alignment:
Line up the remaining two buckets next to the first one to ensure visual consistency. Apply the second and third decals at the exact same height. -
Position the bench:
Place your wooden bench in a convenient spot near a water source but away from high-traffic walkways. Ensure the bench is level so the buckets don’t wobble. -
Arrange buckets:
Set your labeled buckets on the bench in order: Bucket 1 (left), Bucket 2 (center), Bucket 3 (right). -
Add accessories:
Stack two large sponges or blocks on the bottom shelf for scrubbing. Fold a dark-colored towel (to hide clay stains) and place it nearby for drying hands. -
Fill the buckets:
Fill the buckets about 3/4 full with water. For the first bucket (Sludge), fill it only halfway to leave room for the displacement caused by clay-covered hands and tools. -
Install hooks (optional):
If your setup allows, install wall hooks above the station for hanging hand towels, keeping them within easy reach but off the workspace.
Level Up: Mobile Station
Attach heavy-duty caster wheels to the legs of your wooden bench. This lets you roll the entire cleaning station directly to the sink for easier water changes.
Now you have a professional-grade cleanup corner that protects your plumbing and keeps your studio efficient.
Reclaim Corner for Slop and Trimmings
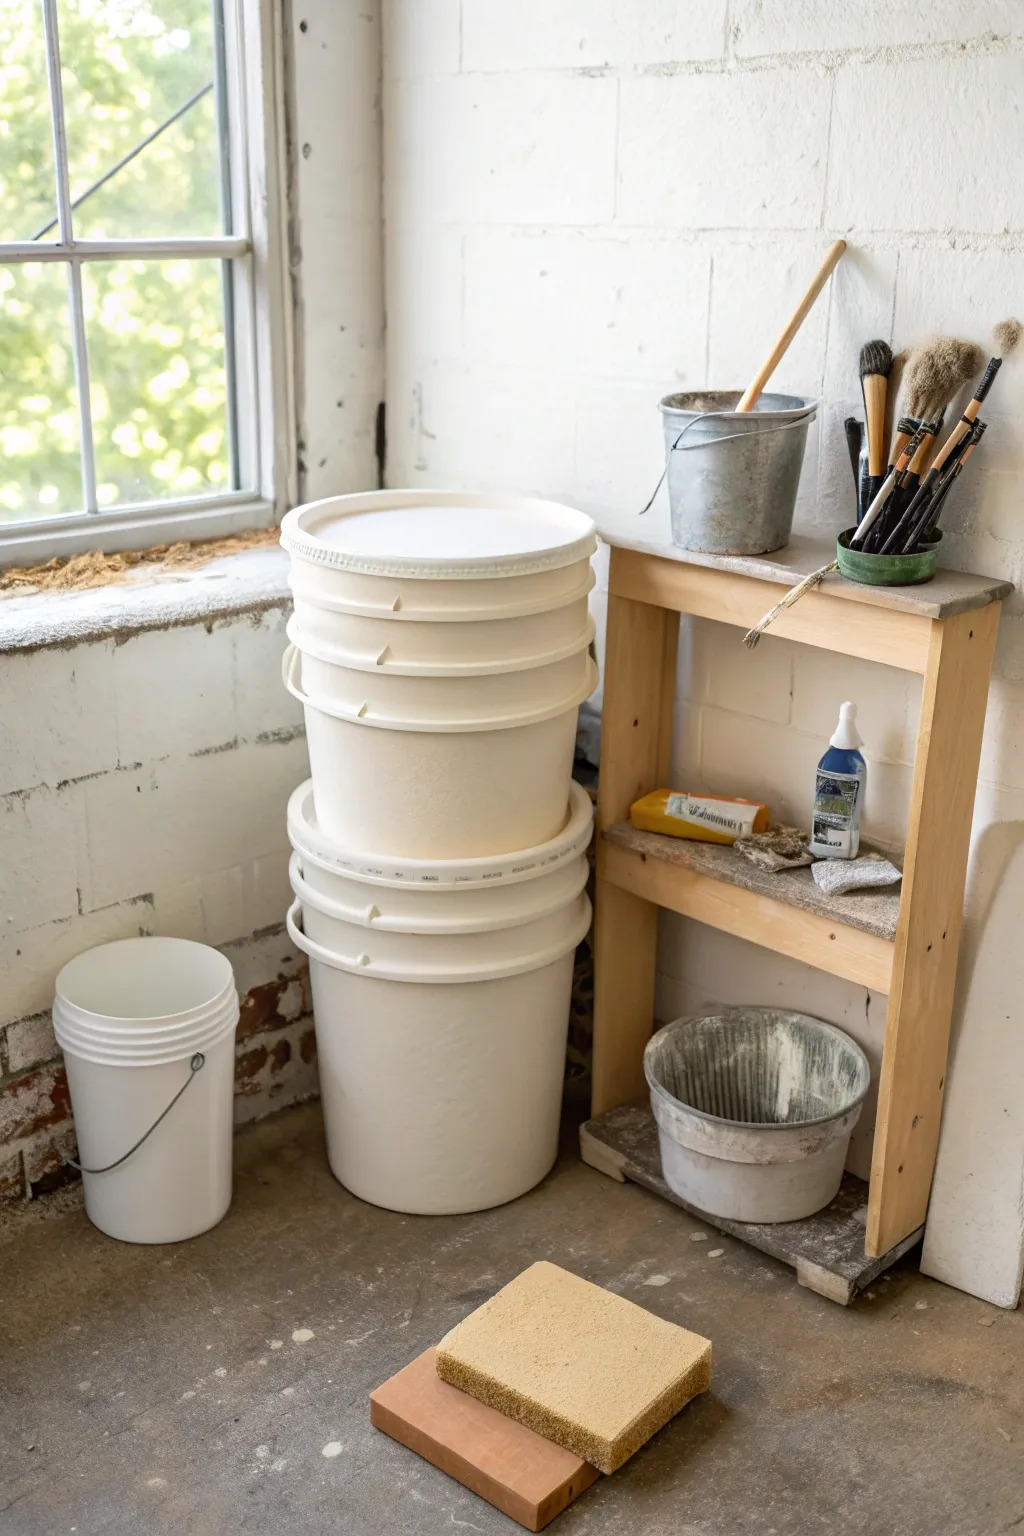
Transform a messy corner of your studio into an organized, efficient clay recycling hub using stacked buckets and a simple wooden stand. This project creates a dedicated space for processing slop and trimmings, keeping your workspace clean and your clay usable.
Detailed Instructions
Materials
- 5-gallon white plastic buckets (clean, ideally food-grade)
- Wide-mouth bucket lids
- Small 2-gallon white bucket with metal handle
- Galvanized metal pail or bucket
- Simple wooden side table or shelving unit (unfinished pine looks great)
- Large sponge blocks (cellulose or synthetic)
- Plaster bat or thick plaster slab (for drying)
- Drill with 1/4 inch bit (for drainage holes)
- Plaster of Paris (if making your own drying slab)
- Assorted pottery tools (brushes, scrapers)
- Cleaning cloths
Step 1: Setting Up the Bucket System
-
Clean and prep buckets:
Start by thoroughly cleaning all your plastic buckets. Even if they are new, give them a rinse to remove manufacturing dust. Ensure the insides are perfectly smooth so clay doesn’t stick excessively. -
Create the drainage bucket:
Select one of your 5-gallon buckets to be the sieve layer. Using your drill, create several holes in the bottom center. This allows excess water to drain into a bucket below, speeding up the drying process. -
Stack the main column:
Place a solid bucket on the floor as the base. If you have a plaster bat for drying, you can place it inside this base bucket. Then, nest the drilled drainage bucket on top if you are using that method, or simply stack your processing buckets as seen in the image for space efficiency. -
Position the small bucket:
Set your smaller 2-gallon bucket on the floor nearby. This is perfect for quick water disposal or holding smaller amounts of clay slurry that need to be poured into the main stack later.
Sticky Clay Issues?
If clay sticks stubbornly to bucket sides, spray the interior with a tiny mist of WD-40 or a wipe of vegetable oil before filling. It makes sliding the slop out much easier.
Step 2: Organizing the Work Station
-
Position the wooden stand:
Place your wooden side table or shelf next to the bucket stack. It should be close enough to reach easily while working but not so close that it blocks the window light. -
Arrange the metal pail:
Set the galvanized metal pail on the top shelf. This is ideal for holding tools or soaking hard, dry scraps of clay before they go into the main slurry bucket. -
Store lower shelf essentials:
On the lower shelf of your stand, place any additives you use, such as vinegar or sodium silicate, along with extra cleaning rags or sponges. It keeps them off the floor but ready to grab. -
Prepare the tool holder:
If you have a collection of brushes or glazing tools, place them upright in a heavy jar or tough container inside or next to the metal pail to keep bristles from getting crushed.
Pro Tip: Label Your Clay
Use masking tape to label each bucket with the clay body type (e.g., ‘Porcelain’ or ‘Stoneware’). Mixing clay bodies by accident can ruin firing results.
Step 3: Drying and Maintenance Tools
-
Prep the drying slab:
I find it helpful to keep a plaster slab or a rectangular bisque mold nearby. Place this on the floor or a low shelf. You’ll turn your thickened clay slop onto this to reach a wedgable consistency. -
Add sponge blocks:
Set a large, clean sponge on top of your drying slab or nearby on the floor. These large rectangular sponges are crucial for wiping down the rims of your buckets to prevent dried clay crumbs from falling into your recycled batch. -
Final wipe down:
Wipe down the exterior of all buckets and the wooden stand. A clean reclaim station encourages you to actually use it, rather than dreading the task. -
Inspect the window area:
If your station is by a window like this one, ensure the sill is clear of dust. Natural light helps you see impurities in your clay, so keep that light source unobstructed.
Now you have a streamlined, functional corner that makes recycling clay a simple part of your studio routine
Damp Storage Shelving for Works in Progress
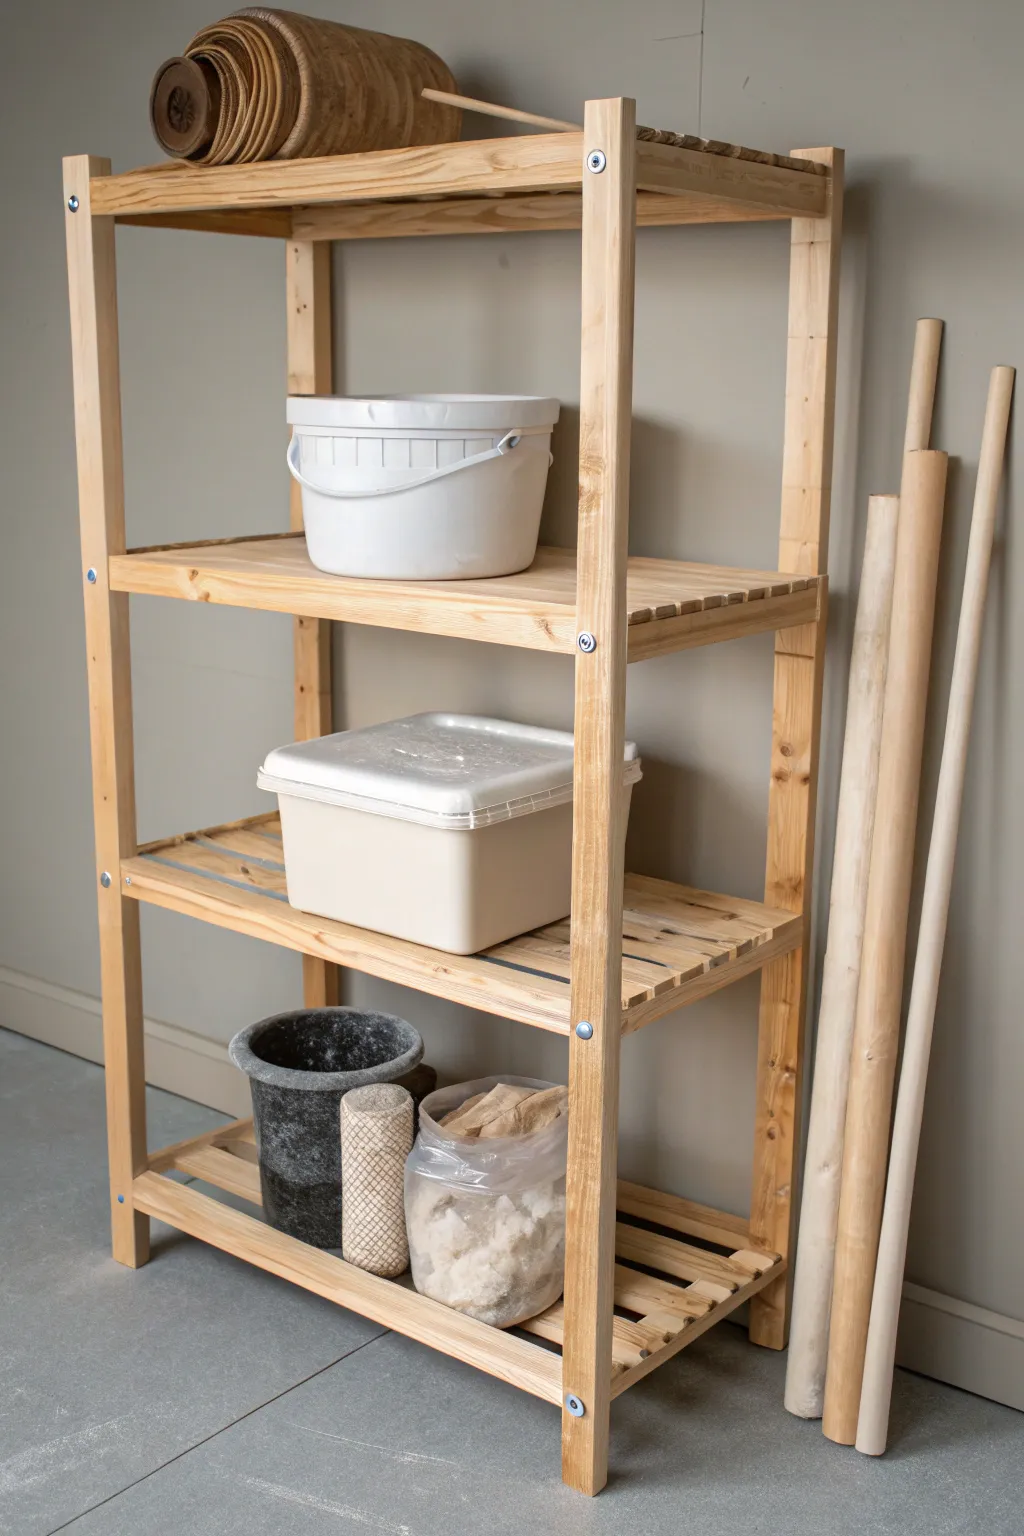
Every potter needs reliable damp storage, and this classic open-slat shelving unit is the perfect solution for airflow and accessibility. Built from sturdy pine with a natural finish, it offers adjustable utility while keeping your clay, buckets, and tools organized and within arm’s reach.
Step-by-Step Tutorial
Materials
- 4 Pine uprights (roughly 1.5″ x 1.5″ square, 6ft length)
- 8 Pine horizontal rails (long sides, approx. 1″ x 3″ boards)
- 8 Pine horizontal rails (short sides, approx. 1″ x 3″ boards)
- 20-25 Pine slats (for shelf surfaces, approx. 1″ x 2″ strips)
- Wood glue
- Sanding block and sandpaper (120 and 220 grit)
- Drill and driver set
- Hex-head structural screws or furniture bolts with barrel nuts
- Measuring tape and pencil
- Speed square
- Clear matte polyurethane or Tung oil (optional for sealing)
Step 1: Frame Preparation
-
Measure and cut uprights:
Begin by cutting your four main upright posts to your desired height. The unit shown is approximately 5 to 6 feet tall, which is ideal for reaching the top shelf without a stool. -
Sand the structural components:
Before assembly, give all the uprights and side rails a thorough sanding. Start with 120 grit to remove rough saw marks, then finish with 220 grit for a smooth touch. -
Mark shelf heights:
Lay the four uprights side-by-side on the floor to ensure they are even. Use a pencil and speed square to mark exactly where the horizontal rails will attach, ensuring your shelves will be perfectly level. -
Drill pilot holes:
Pre-drill holes at your marked locations on the uprights. Since we are using hex-head furniture bolts for that clean, semi-industrial look, you’ll want to drill all the way through the upright so the bolt passes cleanly into the rail.
Airflow is Key
Don’t skip the gaps! Leaving 0.5″ to 1″ spacing between the slats is crucial for damp storage shelves. It allows air to circulate under your ware boards, ensuring even drying for your pottery.
Step 2: Assembling the Ladder Sides
-
Position the short rails:
Take two uprights and lay the shorter ‘depth’ rails between them at your marked intervals. These short rails will form the side ladders of the bookshelf. -
Apply glue:
Dab a small amount of wood glue on the ends of the short rails before positioning them. This adds long-term rigidity to the structure. -
Bolt the sides together:
Insert your hex-head screws or bolts through the pre-drilled holes in the uprights and drive them into the short rails. Do this for both side ‘ladder’ assemblies. -
Check for square:
Before the glue sets, use your measuring tape to check diagonal measurements on your ladder frames. They should be identical to ensure the sides are perfectly rectangular.
Wobbly Frame?
If the shelf rocks on a flat floor, the uprights might be slightly uneven. Loosen the bolts on the high side, place a weight on the shelf to settle it flat, and then re-tighten the bolts.
Step 3: Main Assembly & Slats
-
Connect the two sides:
Stand your two side ladder assemblies up (having a helper here is great) and clamp the long horizontal rails into position to connect them. -
Secure the long rails:
Drill and screw the long rails into the uprights. Stagger these screws slightly vertically if they might intersect with the screws from the short rails inside the post. -
Prepare the shelf slats:
Cut your 1×2 pine slats to span the depth of the shelf. You’ll need about 5-6 slats per shelf level depending on how much gap you want for airflow. -
Spacing the slats:
Lay the slats across the long rails. I like to use a spare scrap of wood as a spacer between each slat to keep the gaps consistent without measuring every single time. -
Fasten the slats:
Screw or nail the slats down into the long horizontal rails. Two fasteners per slat end usually prevents them from twisting over time.
Step 4: Finishing Touches
-
Final sanding pass:
Once fully assembled, run your hand over the slat edges and corners. Lightly sand any sharp edges that might snag on fabric or scratch your pottery batts. -
Dust removal:
Wipe the entire unit down with a tack cloth or a slightly damp rag to remove all sawdust residue. -
Apply a sealant:
Since this will be used for damp storage, moisture protection is key. Apply a coat of clear matte polyurethane or Tung oil. This prevents the raw pine from absorbing water from your damp clay projects. -
Let it cure:
Allow the finish to dry completely according to the manufacturer’s instructions before loading it up with heavy buckets or clay.
Now you have a sturdy, custom-sized storage unit ready to organize your studio workflow
Compact Corner Studio That Actually Works
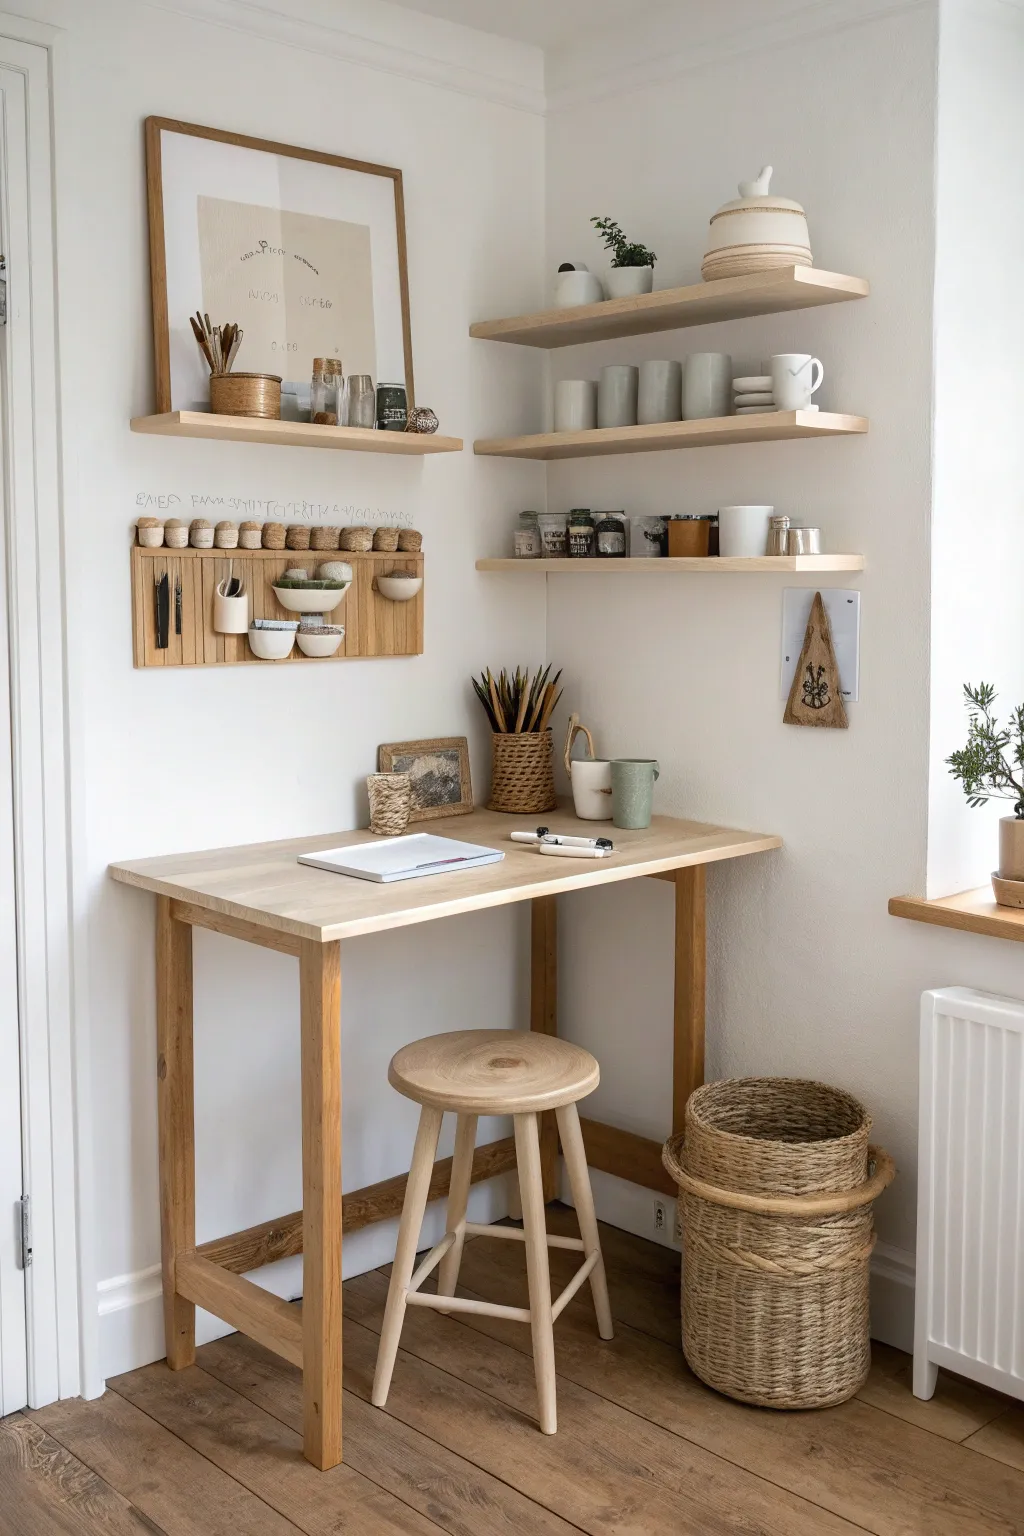
Transform an unused corner into a serene, functional pottery workspace with this custom-built compact studio setup. Combining light oak tones with clever vertical storage, this project creates a dedicated zone for throwing and hand-building that feels spacious despite its small footprint.
How-To Guide
Materials
- Solid oak or birch butcher block countertop (custom cut to corner dimensions)
- 2×2 lumber for legs and frame support
- 1×8 lumber for floating shelves
- Shelf brackets (hidden floating style)
- Wooden dowels and pegboard backing for tool rack
- Sanding block and sandpaper (120 and 220 grit)
- Matte polyurethane varnish
- Wood glue
- Drill and screws
- Level
- Stud finder
Step 1: Building the Worktable Frame
-
Measure and cut components:
Begin by measuring your corner space precisely. Cut your butcher block top to fit the desired dimensions. Cut four lengths of 2×2 lumber for the legs slightly taller than standard table height to accommodate standing work or a high stool. -
Construct side supports:
Create the H-frame side supports by attaching cross-braces between the front and back legs. Position the lower brace about 6 inches from the floor to add stability without obstructing your feet. -
Assemble the main frame:
Connect the two side leg assemblies with a long back stretcher bar. This is crucial for preventing wobble when you’re wedging clay. Use wood glue and long screws, countersinking the heads for a clean finish. -
Sand the surfaces:
Before attaching the top, give the entire frame a thorough sanding. Start with 120 grit to shape edges and remove splinters, then finish with 220 grit for a silky smooth feel. -
Attach the tabletop:
Place the butcher block on the frame. Instead of drilling through the top where clay will sit, attach it from underneath by driving screws through the frame apron up into the tabletop. -
Seal the wood:
Apply three coats of matte polyurethane. I always pay extra attention to the tabletop edges here, as they’ll see the most water and clay dust. Let each coat dry fully before lightly sanding and applying the next.
Moisture Protection Tip
For a pottery table, regular varnish isn’t enough. Use a marine-grade spar urethane for the top surface to prevent water rings and warping from wet clay.
Step 2: Installing Floating Shelves
-
Locate wall studs:
Use a stud finder to map out the strongest anchor points on your corner walls. Mark these locations carefully with a pencil. -
Prepare shelf boards:
Cut your 1×8 lumber into three lengths—two for the right wall and one for the left. Sand the edges so they are slightly rounded and pleasant to touch. -
Mount the hardware:
Install the floating shelf brackets directly into the studs. Use a spirit level repeatedly to ensure they are perfectly horizontal; uneven shelves are a disaster for drying round pottery. -
Slide on the wood:
mount the wooden planks onto the bracket rods. If the fit is tight, use a rubber mallet to gently tap them flush against the wall.
Step 3: Creating the Tool Organizer
-
Cut the base board:
Cut a rectangular piece of plywood or solid wood to serve as the backing for your wall organizer. This should be about 24 inches wide. -
Drill dowel holes:
Drill a series of holes along the top edge of the board. These should be snug enough to hold your wooden dowels tightly without glue, though a dab doesn’t hurt. -
Add storage strips:
Attach thin vertical strips of wood to the face of the board. Leave small gaps between them to create slots where you can hang wire cutters, ribs, and trimming tools. -
Mount small cups:
Screw or glue small ceramic cups or cutoff wooden containers to the organizer. These are perfect for holding sponges, needles, and smaller loose ends. -
Install the organizer:
Mount the finished organizer on the left wall at eye level, ensuring it’s within easy reach while you are seated at the wheel or table.
Add a Wedging Board
Make the table multifunctional by creating a removable canvas-covered plywood board that fits over the top for wedging clay without ruining the finish.
Step 4: Final Styling
-
Add woven storage:
Place large woven baskets on the floor under or beside the table. These texture-rich bins are ideal for storing bags of clay or hiding away unmatched bisque ware. -
Hang inspiration:
Frame a simple, neutral-toned print or sketch and hang it above the left shelf. Keep the frame wood tone consistent with your table for a cohesive look. -
Arrange your pottery:
Stack plates and line up mugs on the floating shelves by color gradient – whites to greys. This keeps the visual clutter low and the aesthetic calm.
Now you have a serene, custom-fitted creative corner ready for your next masterpiece
Garage or Basement Studio With Rugged Finishes
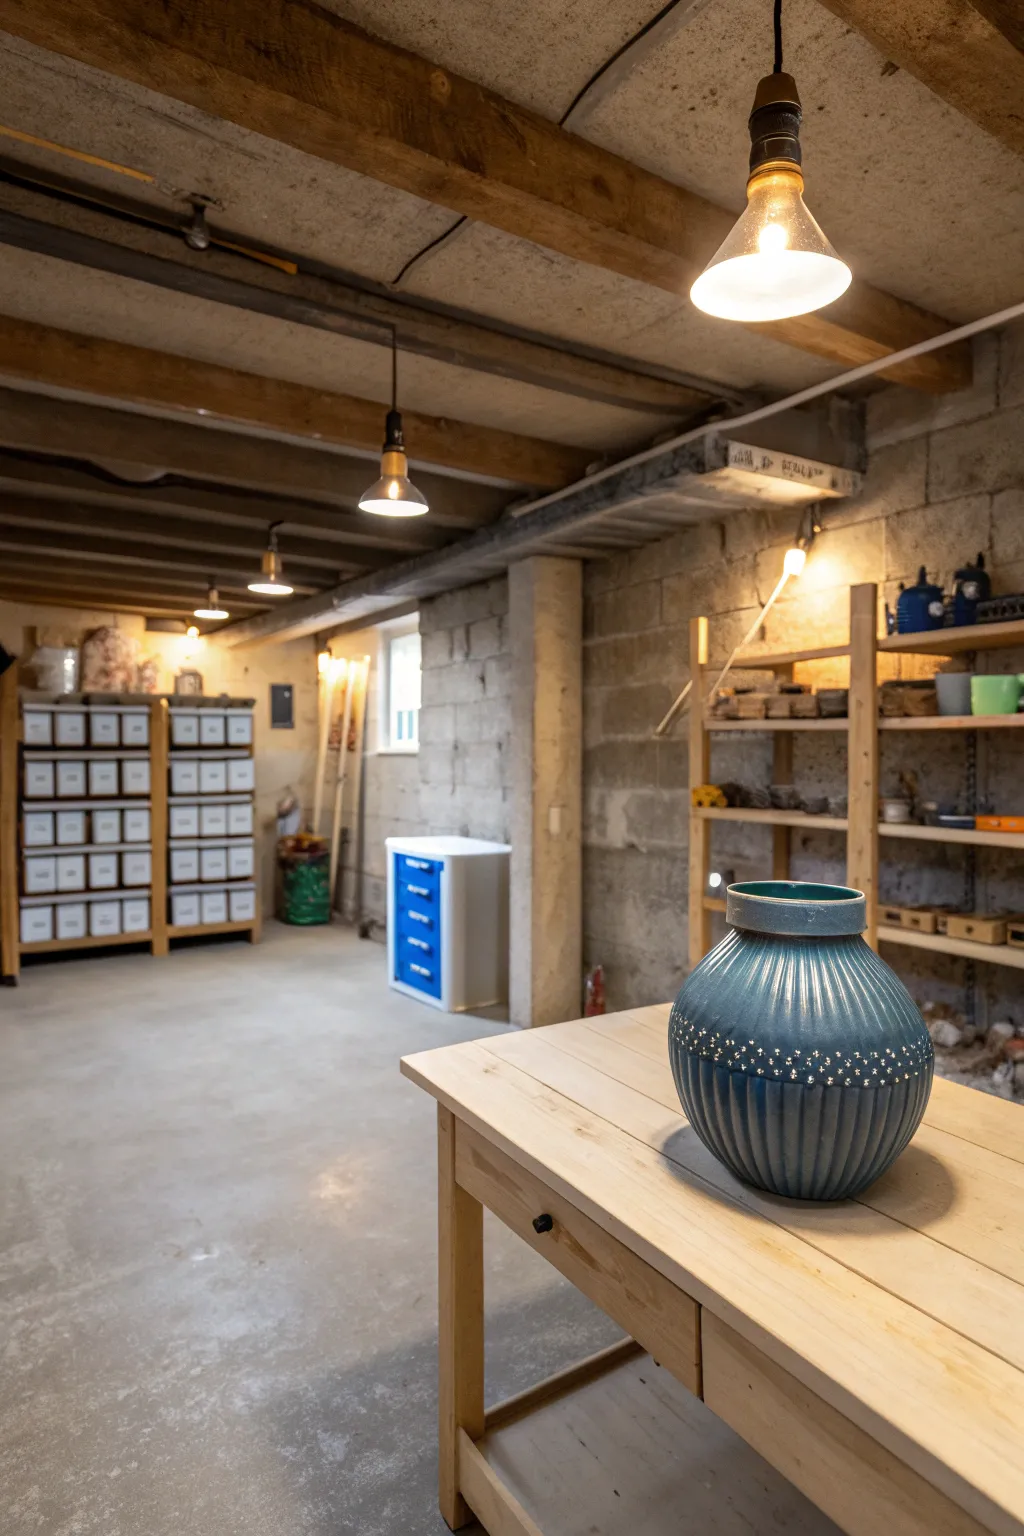
This striking vase combines classical fluted texture with a modern, deep blue glaze and delicate decorative accents. The form features a sturdy, rounded body that tapers to a defined neck, making it a perfect functional centerpiece for your rugged basement studio.
Step-by-Step
Materials
- Stoneware clay (smooth)
- Pottery wheel
- Throwing tools (sponge, wire, ribs)
- Loop tool or flute carving tool
- Needle tool
- Slip trailer or small drill bit (for the dot accents)
- Deep teal or denim blue glossy glaze
- Clear glaze (optional)
- Kiln
Step 1: Throwing the Form
-
Center the clay:
Start with a generous amount of wedged stoneware clay on your wheel head. Center it firmly, ensuring there are no wobbles before you begin creating the vessel. -
Open and lift:
Open the centered mound and establish the floor of your pot. Begin pulling the walls upward, aiming for a consistent thickness from bottom to top. -
Shape the belly:
Using a rib tool on the inside and your hand on the outside, gently push the clay outward to create a bulbous, round belly. The widest point should be slightly below the middle of the vase. -
Collar the neck:
As you move upward, gently collar the clay inward to create a distinct shoulder. Narrow the opening significantly to form a short, upright neck. -
Refine the rim:
Use a chamois or your sponge to compress and smooth the rim. A slight outward flare at the very top creates a nice visual finish. -
Trim the base:
Once the piece is leather-hard, return it to the wheel. Trim the bottom to create a clean foot ring that lifts the form slightly and defines the silhouette.
Uneven Carving Lines?
If your fluting lines wobble, try carving while the wheel is spinning solely for marking, but do the actual material removal while the pot is stationary to maintain better control.
Step 2: Carving and Decoration
-
Mark vertical guides:
Lightly mark vertical lines around the circumference of the vase using a needle tool or ruler to ensure your fluting will be evenly spaced. -
Carve the flutes:
Using a U-shaped loop tool or a specialized fluting tool, carve vertical grooves from the bottom of the foot up to the shoulder. Maintain consistent pressure for even depth. -
Stop at the shoulder:
End your carved lines cleanly just where the shoulder begins to curve inward toward the neck, leaving the upper portion smooth. -
Clean the grooves:
Once the clay is slightly drier, use a damp sponge or a soft brush to soften any sharp edges created by the carving tool, I find this makes glazing much easier later. -
Add the decorative dots:
There is a band of small indentations right at the top of the fluting. Use a small drill bit (hand-twirled) or a blunt tool to press a double row of small dots around the circumference.
Step 3: Glazing and Firing
-
Bisque fire:
Let the vase dry completely to the bone-dry stage. Load it into the kiln for a bisque firing (usually Cone 06 or 04). -
Wax the foot:
Apply wax resist to the bottom foot ring to prevent glaze from adhering to the kiln shelf. -
Apply the glaze:
Dip the vase into a deep teal or denim blue glaze. Alternatively, you can brush it on, but dipping ensures the glaze flows beautifully into the fluted grooves. -
Check the thickness:
Ensure the glaze isn’t too thick in the bottom of the carved grooves, as this can obscure the texture. Carefully dab out excess if necessary. -
Glaze fire:
Fire the piece to the maturation temperature of your chosen clay and glaze (typically Cone 6 or 10).
Breaking the Glaze
To highlight the texture, choose a glaze labeled ‘breaking.’ These glazes thin out over high points (appearing lighter) and pool in grooves (appearing darker).
Place your finished vase on a sturdy worktable to instantly add a professional touch to your studio space
Sunroom Studio With Calm, Green Styling
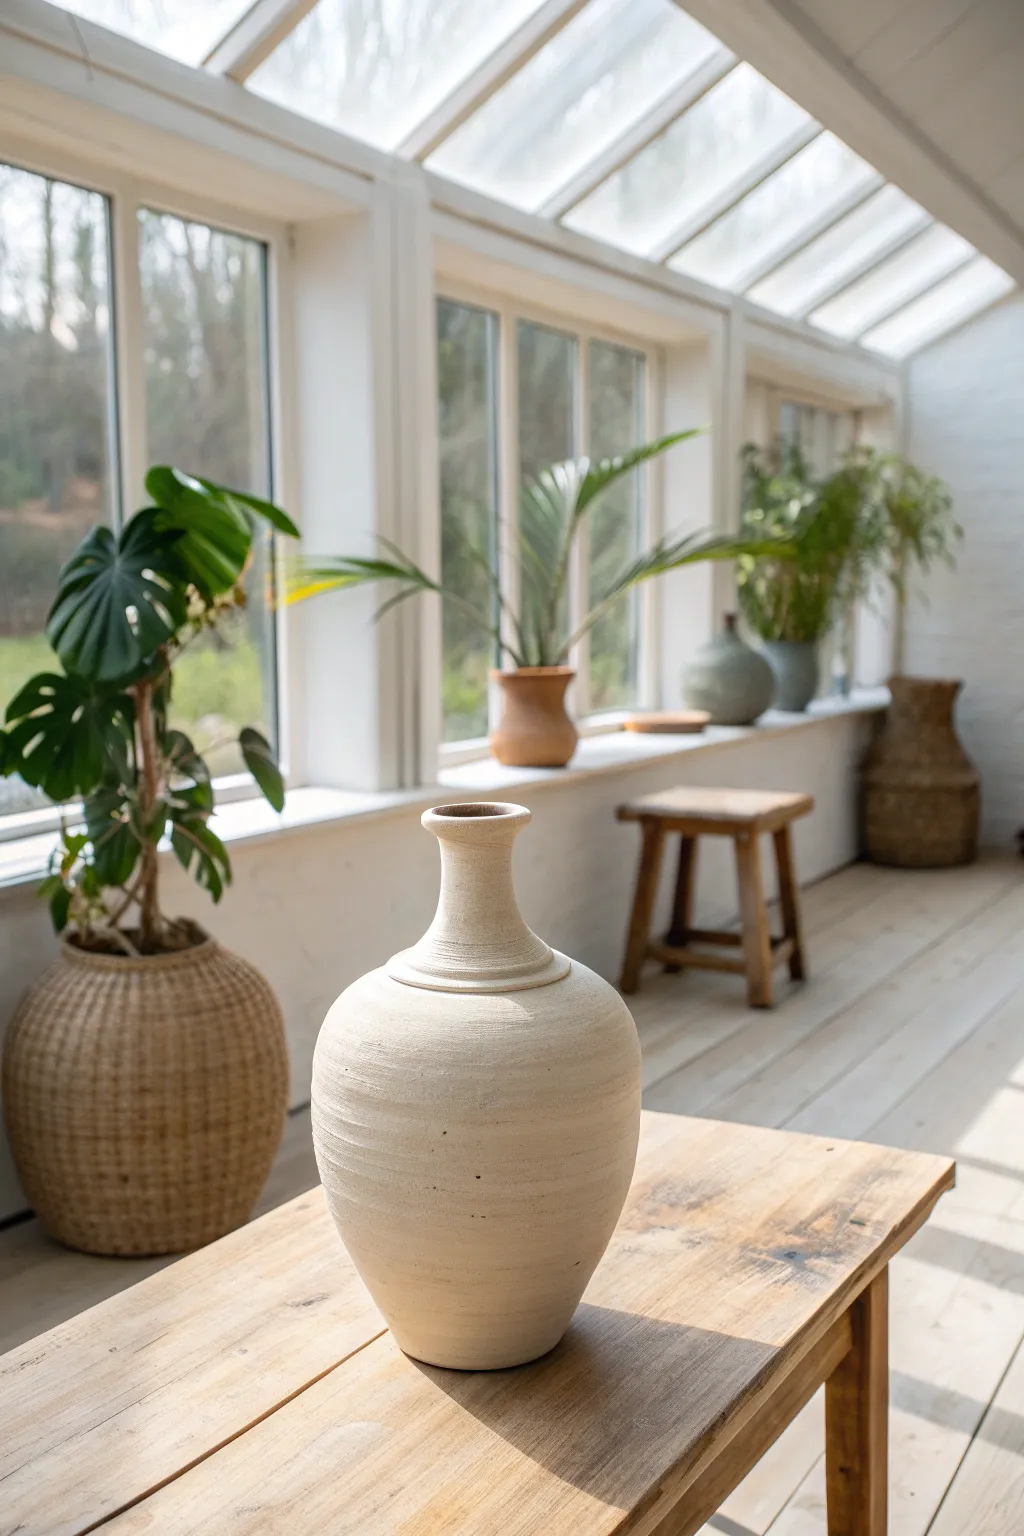
This project captures the essence of a peaceful sunroom studio with a tall, elegant bottle vase featuring a textured, matte beige finish. Its gentle curves and subtle throwing lines create an organic, earthy feel perfect for displaying dried botanicals or standing alone as a sculptural piece.
Detailed Instructions
Materials
- Stoneware clay (smooth or speckled buff)
- Pottery wheel
- Throwing sponge
- Wooden rib tool
- Metal kidney rib
- Pin tool
- Wire cutter
- Plastic bat
- Wooden modeling tool
- Chamois leather strip
- Matte beige or oatmeal glaze
Step 1: Preparing and Centering
-
Wedge the clay:
Begin by wedging about 4-5 pounds of stoneware clay to ensure it is free of air bubbles and has a consistent texture. A smooth body works best for this clean form. -
Secure to the wheel:
Throw the ball of clay firmly onto the center of a plastic bat attached to your wheel head. Pat it into a cone shape to help with centering. -
High-speed centering:
With the wheel spinning at a high speed, wet your hands and center the clay. Push down and in until the mound runs completely smooth in your hands without wobbling. -
Open the form:
Press your thumbs into the center of the mound to open it, stopping about half an inch from the bat to leave a sufficient floor thickness.
Keep the texture
Don’t over-smooth the outside with a rib. Leaving subtle spiral finger marks creates a lovely tactile surface that catches the light.
Step 2: Pulling and Shaping the Body
-
Establish the base:
Pull the opening outward to establish the width of the vase’s floor. Compress the bottom with a sponge or wooden rib to prevent cracking later. -
The first pull:
Slow the wheel down slightly. using ample water or slip, squeeze the clay wall at the base and pull upward. Focus on gaining height rather than shape at this stage. -
Build height:
Continue with two or three more pulls, keeping the walls even. I like to keep the top rim slightly thicker to support the neck we will collar in later. -
Belly out the form:
Place your inside hand against the wall and gently push outward while your outside hand supports. Create a full, rounded belly shape in the lower two-thirds of the cylinder. -
Refine the curve:
Use a flexible metal or wooden rib on the outside against the spinning clay to smooth the belly curve and remove heavy finger marks, though leaving faint spiral grooves adds to the handmade charm.
Add surface depth
Mix a small amount of grog or sand into your clay body before throwing. This creates a speckled, earthy texture that pops under matte glazes.
Step 3: Collaring the Neck
-
Begin collaring:
With the wheel at a medium speed, lubricate the top third of the vessel heavily. Place both hands around the rim and gently squeeze inward to narrow the opening. -
Pull the neck:
After each collaring move, perform a small upward pull on the neck to maintain wall thickness and regain height. The clay tends to thicken as you collar it in. -
Define the shoulder:
Use the edge of a wooden rib to create a distinct transition point where the shoulder meets the neck. Press gently to create a subtle ridge or shadow line. -
Flare the rim:
Once the neck is tall and narrow, use your fingers or the handle of a tool to gently flare the very top rim outward, giving it a classic bottle opening. -
Smooth the lip:
Wrap a damp chamois strip over the rim and gently compress it as the wheel spins to ensure it is smooth and pleasant to touch.
Step 4: Finishing and Glazing
-
Trim the foot:
Once leather hard, trim away excess clay at the base to create a clean, slight undercut that lifts the visual weight off the table. -
Bisque fire:
Dry the piece slowly to prevent warping, then bisque fire it to cone 04 (or your clay’s specific bisque temperature). -
Apply matte glaze:
Dip or spray a matte beige or oatmeal glaze. Keep the application moderately thick to achieve an opaque, stone-like finish, but careful not to obscure the throwing lines. -
Final wipe:
Wipe the foot ring clean with a damp sponge to prevent it sticking to the kiln shelf. -
Glaze fire:
Fire the vase to maturity (usually cone 6 or 10 for stoneware). Allow it to cool completely in the kiln before removing.
Place your finished vase in a spot with soft natural light to highlight its gentle contours and handcrafted texture
Photo and Packing Nook for Finished Pieces
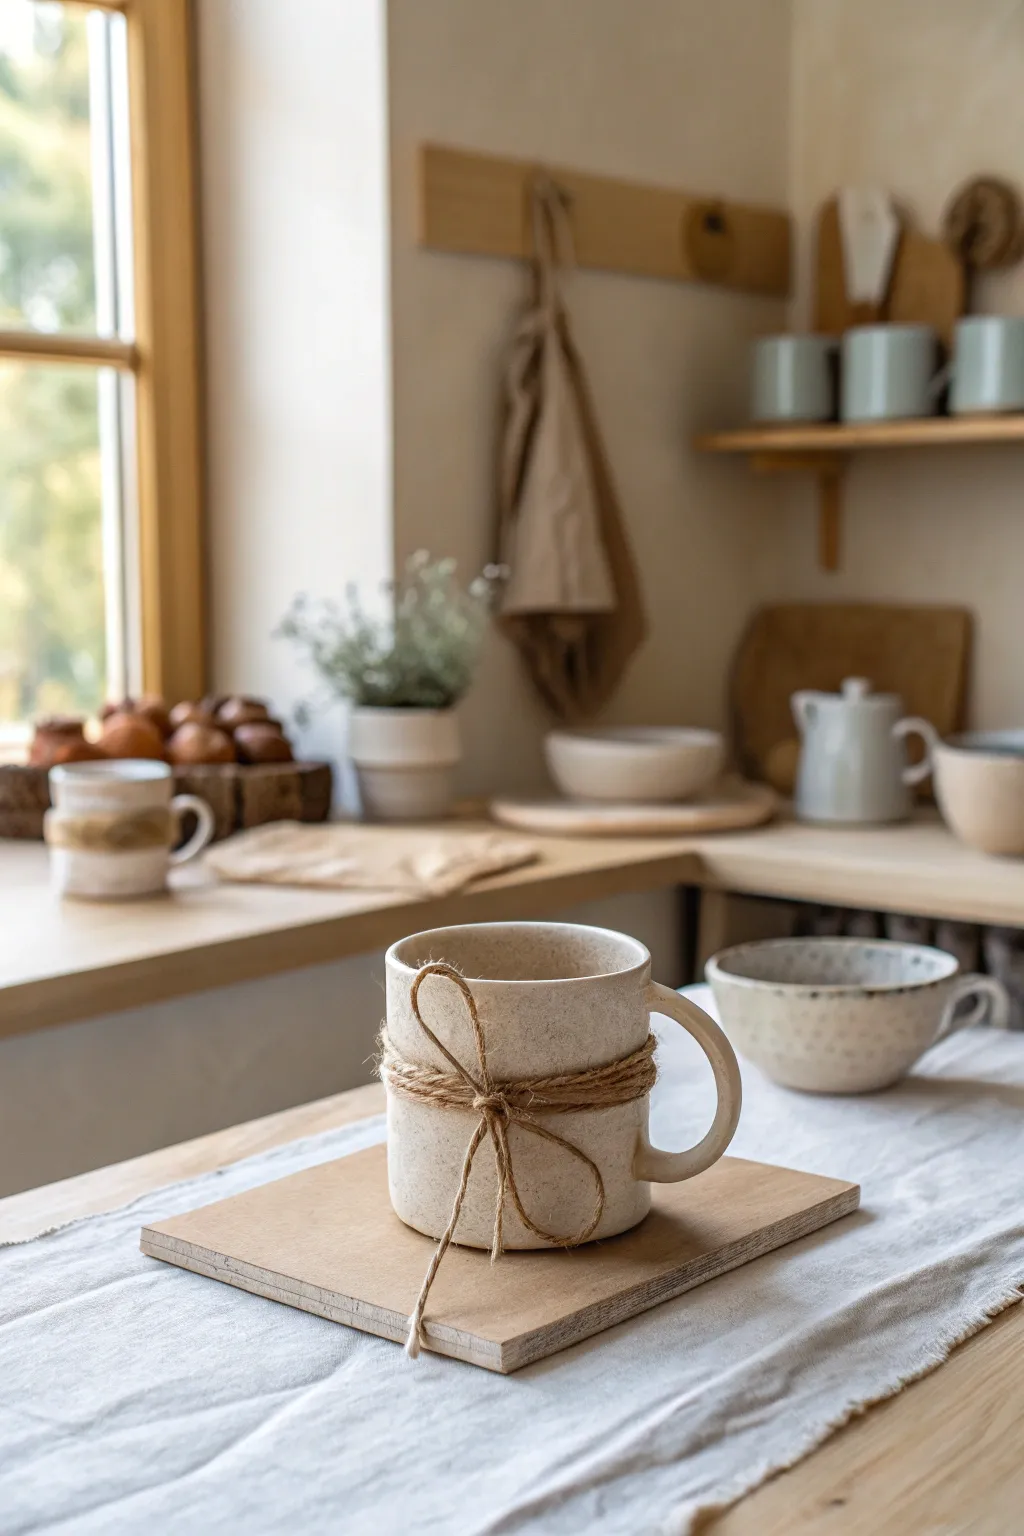
Create a cozy, handmade ceramic mug with a warm, speckled cream glaze and a touch of rustic charm. This project focuses on simple slab-building techniques to form a perfectly imperfect cylinder, finished with a decorative twine knot that makes it gift-ready straight from the kiln.
Step-by-Step Guide
Materials
- Stoneware clay (speckled or buff)
- Rolling pin
- Canvas work surface
- Needle tool
- Fettling knife
- Scoring tool or serrated rib
- Slip (clay and water slurry)
- Wooden modeling tool
- Smoothing sponge
- Cream or oatmeal speckled glaze
- Natural jute twine
- Clear matte varnish (optional, for twine ends)
Step 1: Building the Form
-
Roll the slab:
Begin by rolling out a piece of stoneware clay on your canvas surface. You want an even thickness of about 1/4 inch. If you have guide sticks, use them to ensure consistency across the entire slab. -
Cut the body:
Using a ruler and fettling knife, cut a rectangle measuring approximately 12 inches long by 4 inches high. This will form the main wall of your mug. Save the excess clay for the base and handle. -
Form the cylinder:
Carefully lift the rectangle and curve it into a cylinder, bringing the short ends together. Be gentle to avoid cracking the surface. I like to let the clay stiffen for ten minutes before this step so it holds its shape better. -
Join the seam:
Score both short ends roughly with your scoring tool and apply a generous amount of slip. Press the ends firmly together to create a bond. -
Reinforce the seam:
Use a wooden modeling tool to blend the clay across the seam line on both the inside and outside. Smooth the join until it is invisible, supporting the wall from the opposite side with your other hand. -
Create the base:
Roll a small piece of leftover clay to the same thickness as your walls. Place your cylinder on top of this piece and trace around the bottom with a needle tool, then cut out the circle. -
Attach the bottom:
Score and slip the bottom edge of your cylinder and the outer edge of the circular base. Press the cylinder onto the base firmly. Smooth the clay from the base up onto the wall to seal the connection.
Clean Rims
For the smoothest drinking experience, compress the rim with a strip of soft plastic or chamois leather while the wheel is spinning slowly (or manually) to round off sharp edges.
Step 2: Adding the Handle and Details
-
Pull or cut a handle:
For a rustic look, cut a strip of clay about 3/4 inch wide and 5 inches long. Smooth the edges with a damp sponge to remove any sharp angles. -
Shape the handle:
Curve the strip into a ‘C’ shape or an ear shape that feels comfortable for your hand. Let it sit for about 20 minutes until it holds its curve without sagging. -
Attach the handle:
Score and slip the attachment points on both the mug body and the handle ends. Press the handle firmly onto the mug, blending the clay at the joints with a modeling tool for a seamless look. -
Smooth the lip:
Run a damp sponge or a piece of chamois leather over the rim of the mug. This is crucial for drinking comfort; ensure it is rounded and smooth. -
Dry slowly:
Loosely cover the mug with plastic and allow it to dry slowly to the leather-hard stage, then uncover to bone dry. This slow drying prevents the handle from cracking away from the body. -
Bisque fire:
Fire the bone-dry mug in a kiln to bisque temperature (usually cone 04 or 06, depending on your clay body).
Step 3: Glazing and Finishing
-
Apply glaze:
Dip the bisqued mug into a bucket of cream or oatmeal-colored glaze. If brushing, apply 2-3 even coats, allowing each to dry in between. Wipe the bottom of the mug clean with a sponge to prevent it sticking to the kiln shelf. -
Glaze fire:
Fire the mug again to the maturation temperature of your glaze and clay (typically cone 5 or 6 for stoneware). Allow the kiln to cool completely before opening. -
Prepare the twine:
Cut a length of natural jute twine, approximately 24 inches long. This length gives you plenty of slack to wrap multiple times and tie a bow. -
Wrap and tie:
Wrap the twine around the middle of the mug body two or three times. The textured glaze will help hold it in place. Tie a simple bow at the front, opposite the handle. -
Secure the knot:
Tighten the bow and trim the ends to your desired length. A tiny dab of clear craft glue can be placed under the knot if you want it to be permanent for display, though keeping it removable makes washing easier.
Gift Tag Addition
Before tying the final bow, thread a small handmade ceramic tag or a kraft paper label onto the twine for personalized branding or a gift message.
Now you have a beautifully earthy mug that looks stunning on a shelf or wrapped up as a thoughtful gift.