Whenever I’m sculpting abstract human forms, I’m really chasing posture, mood, and those clean lines that still read as “human” without getting stuck in anatomy. Here are my favorite human abstract clay sculpture ideas that feel approachable, expressive, and totally customizable to your style.
Seated Contemplation Figure
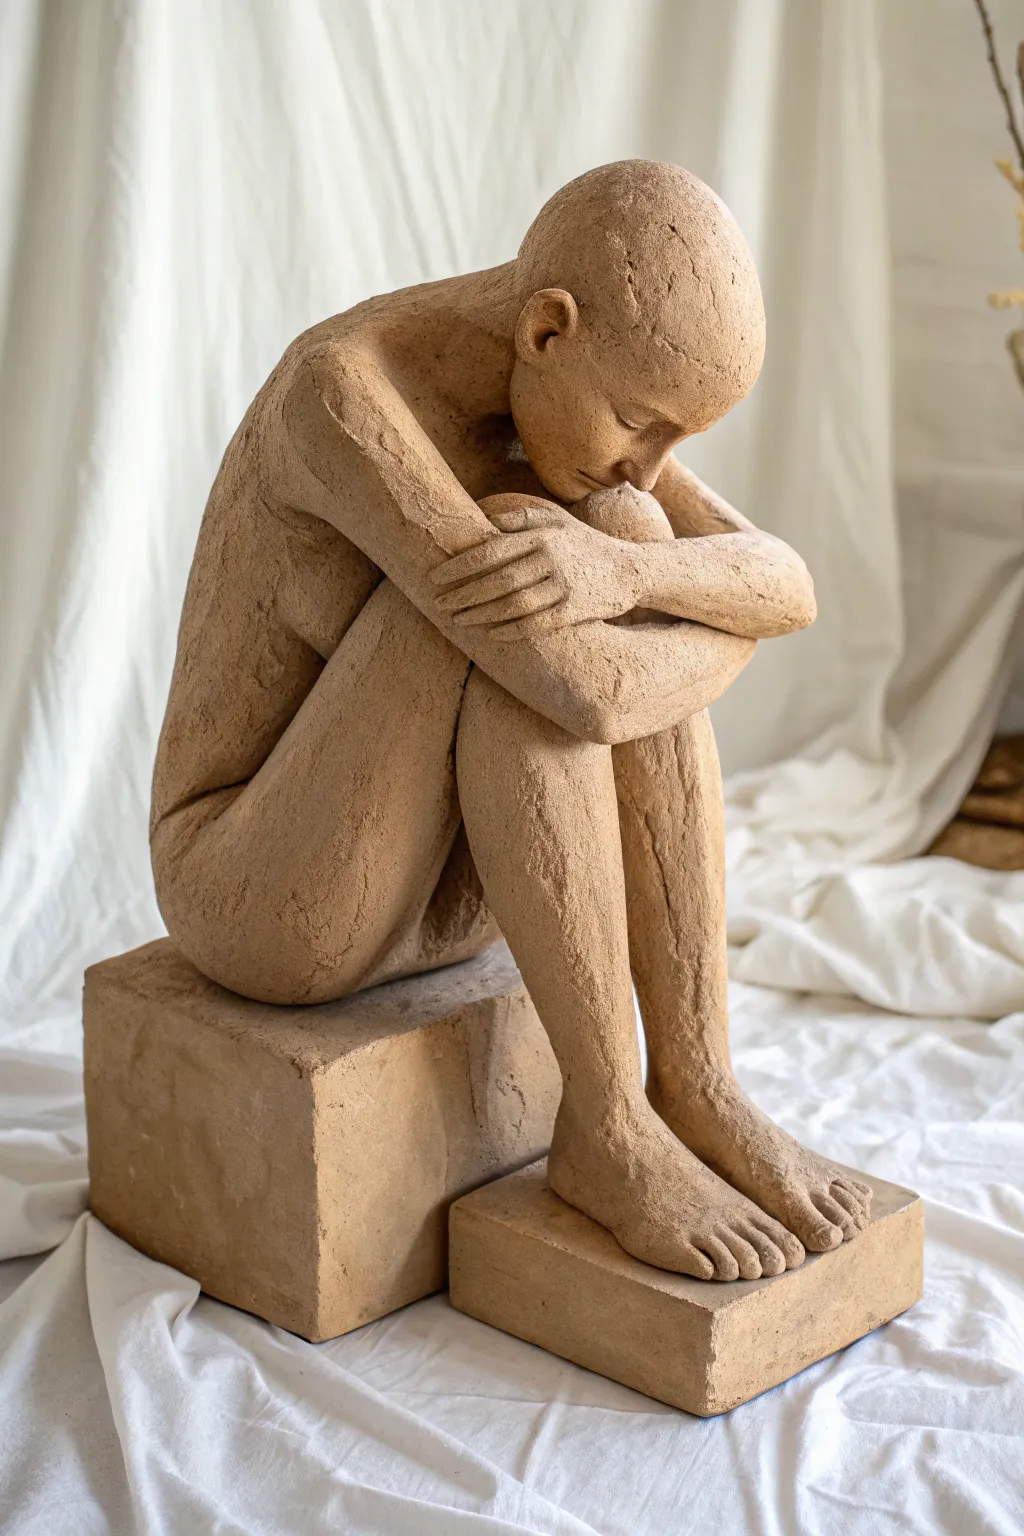
Capture the quiet introspection of the human form with this evocative clay sculpture project. Using coarse, grog-heavy stoneware, you will build a contemplative figure resting on simplistic geometric blocks, emphasizing texture and mood over anatomical perfection.
Step-by-Step Tutorial
Materials
- Heavily grogged stoneware clay (brown or buff)
- Wooden modeling tools
- Wire clay cutter
- Scoring tool or serrated kidney
- Slip (clay and water slurry)
- Wooden board or bat for working
- Sponge
- Plastic bags (for slow drying)
- Kiln (for firing)
Step 1: Forming the Base Structure
-
Prepare the Geometric Blocks:
Begin by shaping two solid rectangular blocks of clay. One should be taller and squarer for the seat, and the other lower and flatter for the footrest. Keep the edges relatively sharp but organic. -
Establish the Torso:
Roll a substantial coil or cylinder of clay to form the main torso. Bend it forward slightly to mimic the curve of a hunching spine, ensuring it’s thick enough to support the eventual weight of the limbs. -
Shape the Thighs:
Create two long, thick coils for the upper legs. Attach these firmly to the hips of your torso cylinder using the score and slip method, angling them sharply upwards as if the knees are drawn to the chest. -
Position the Figure:
Place the torso-thigh structure onto the taller clay block. Adjust the balance so the figure sits securely near the edge, pressing gently to bond the clay surfaces.
Fixing Cracks
If cracks appear at the joints during drying, fill them immediately with ‘paper clay’ (clay mixed with toilet paper pulp) and vinegar, then cover tightly.
Step 2: Adding Limbs and Head
-
Attach the Lower Legs:
Form the shins and calves. Position them vertically, connecting the knees to the lower footrest block. The feet should rest flatly on the lower block; define the toes simply with a wooden tool. -
Sculpt the Head:
Roll a sphere for the head. Refine the shape to be slightly elongated. I usually keep the facial features minimal—just hints of eyes and a nose—to maintain that abstract, timeless feel. -
Connect the Head:
Attach the head to the top of the spine, tilting it downwards so the forehead or cheek can eventually rest against the knees or arms. Secure the neck well. -
Form the Arms:
Roll out two long, thinner coils for arms. Attach the shoulders high on the torso. Drape the arms around the bent knees, crossing them over gently. -
Refine the Embrace:
Mold the hands to rest on the opposite bicep or forearm, locking the figure into a tight, self-soothing embrace. Ensure the connection points at the shoulders are blended seamlessly.
Variations
Try finishing with a darker manganese wash after bisque firing. Wipe most of it away with a sponge to leave dark shadows in the textured grooves, enhancing depth.
Step 3: Texturing and Finishing
-
Structural Check:
Step back and look at the negative space. Ensure the gap between the torso and thighs feels natural and that the spine has a convincing curve. -
Surface Texture:
Using a serrated kidney or a rough wooden tool, scrape vertically along the limbs and back. This drags the grog across the surface, creating that raw, stone-like texture visible in the image. -
Define the Muscles:
Use your thumb to press hollows into the back and sides to suggest the underlying ribcage and shoulder blades, but avoid smoothing out your texture marks too much. -
Clean the Blocks:
Sharpen the edges of the seating blocks again if they became distorted during assembly. The contrast between the organic figure and the rigid block is key. -
Hollow Out (Optional):
If your sculpture is thicker than an inch, carefully slice off the top of the head or create a hidden vent hole underneath to hollow out the torso for safe firing. -
Drying:
Cover the piece loosely with plastic. Let it dry very slowly over a week to prevent the limbs from cracking where they join the body. -
Firing:
Once bone dry, bisque fire the piece. You can leave it raw for that matte finish shown, or apply a very dry, oxide-rich wash before the final firing.
Enjoy the peaceful presence this sculpture brings to your space once it comes out of the kiln


Embracing Couple as One Shape
This minimalist sculpture captures the essence of connection through two abstract figures merging into a single, seamless form. The textured, stone-like finish gives it a timeless, organic feel perfect for modern decor.
Detailed Instructions
Materials
- Air-dry clay (stone or white color) or polymer clay
- Aluminum foil
- Armature wire (12-14 gauge)
- Masking tape
- Sculpting tools (loop tool, smoothing rib, needle tool)
- Water and sponge (for air-dry clay)
- Sandpaper (various grits: 100, 220, 400)
- Acrylic paint (cream, beige, or white)
- Texturing medium or fine sand (optional for stone effect)
- Matte sealant spray
Step 1: Building the Core Structure
-
Form the armature:
Cut two lengths of heavy-duty armature wire, roughly 12 inches long. Twist them together at the bottom third to create a shared base, leaving the top distinct for two separate torsos. -
Shape the distinct figures:
Bend the left wire slightly shorter and curved inward to represent the smaller figure. Arch the right wire (the taller figure) over the top so it appears to be embracing the smaller one. -
Bulk up with foil:
Crumple aluminum foil tightly around your wire frame. Focus on creating two distinct rounded head shapes at the top and a solid, unified mass at the base. -
Refine the foil shape:
Ensure the “arm” of the taller figure wraps around the shoulder area of the smaller figure. Compress the foil firmly so the clay layer won’t need to be too thick. -
Secure with tape:
Wrap the entire foil structure in masking tape. This smooths out sharp foil edges and helps the clay adhere better to the armature.
Weight Matters
Keep the base heavy! Add extra foil or even a small stone inside the bottom foil layer before taping. This lowers the center of gravity so the tall figure doesn’t tip over.
Step 2: Sculpting the Form
-
Apply the base layer:
Roll your clay into flat sheets about 1/4 inch thick. Begin covering the taped armature, pressing the clay firmly to remove air pockets. -
Merge the seams:
Use your thumbs or a wooden tool to blend the seams where the clay sheets meet. The goal is a unified surface with no visible join lines. -
Define the negative space:
Carve out or smooth the oval opening between the two bodies. I find using a damp sponge here helps keep the inside curves smooth and organic. -
Sculpt the embrace:
Add a coil of clay to define the taller figure’s arm wrapping horizontally across the smaller figure’s back/shoulder area. Blend the bottom edge of this arm seamlessly into the main body, leaving the top edge slightly defined to show the overlap. -
Shape the heads:
Smooth the head spheres so they are perfectly round and featureless. The taller figure’s chin should rest gently on the top or side of the smaller figure’s head. -
Establish the curve:
Check the sculpture from the side profile. Ensure the back of the taller figure has a gentle, continuous convex curve that anchors the piece. -
Initial smoothing:
Use a rubber rib or a damp sponge to go over the entire surface, erasing fingerprints and minor bumps. Let the piece dry until leather-hard.
Cracking Up?
If hairline cracks appear while drying, mix a tiny bit of clay with water to make a paste (slip). Fill the cracks, smooth it over, and cover loosely with plastic to slow the drying.
Step 3: Refining and Finishing
-
Detailed smoothing:
Once leather-hard, look for any surface imperfections. Use a small amount of water or clay slip to fill in cracks or crevices. -
Dry completely:
Allow the sculpture to dry fully (24-48 hours for air-dry clay). Do not rush this, as trapped moisture causes cracking. -
Sand the surface:
Start with 100-grit sandpaper to remove rough patches, then move to 220 and 400-grit for a satiny finish. Wear a dust mask during this step. -
Create the stone texture:
Mix a small amount of fine sand or baking soda into cream-colored acrylic paint to create a textured faux-stone paste. -
Apply the textured paint:
Stipple the paint mixture onto the sculpture using an old, stiff brush. Use a dappling motion rather than long strokes to build up a granular surface. -
Seal the artwork:
Once the paint is dry, apply two thin coats of matte spray sealant to protect the finish without adding an artificial gloss.
Place your finished sculpture near a window where shadows can play across the curves to emphasize the connection.


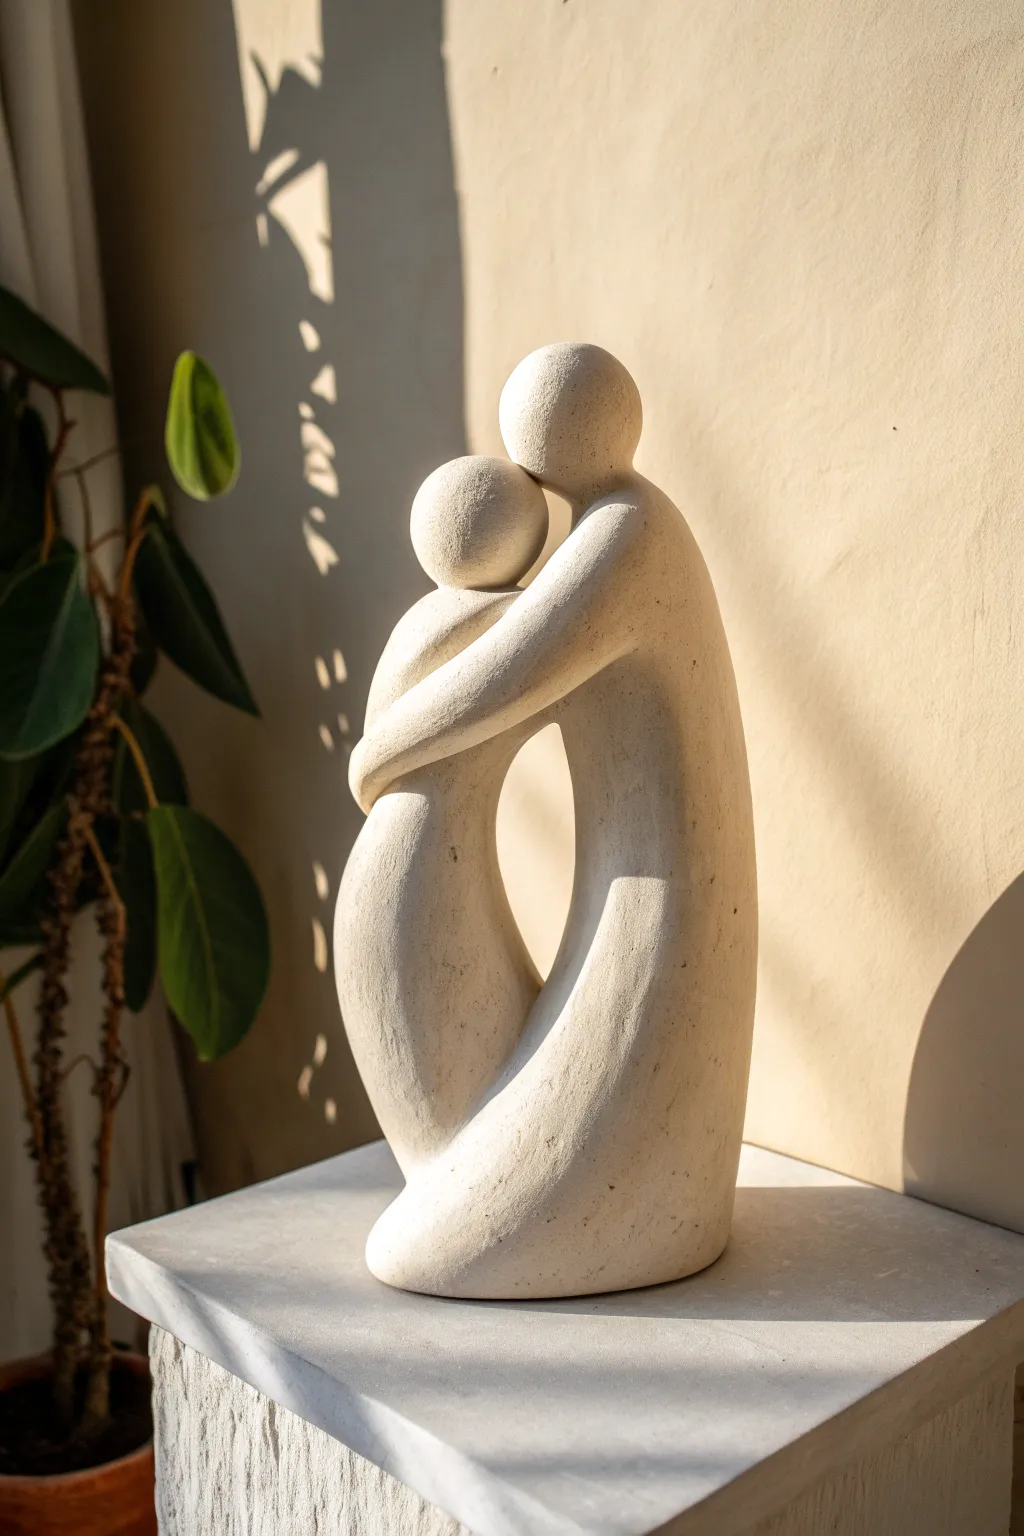
Mother-and-Child Curve Sculpture
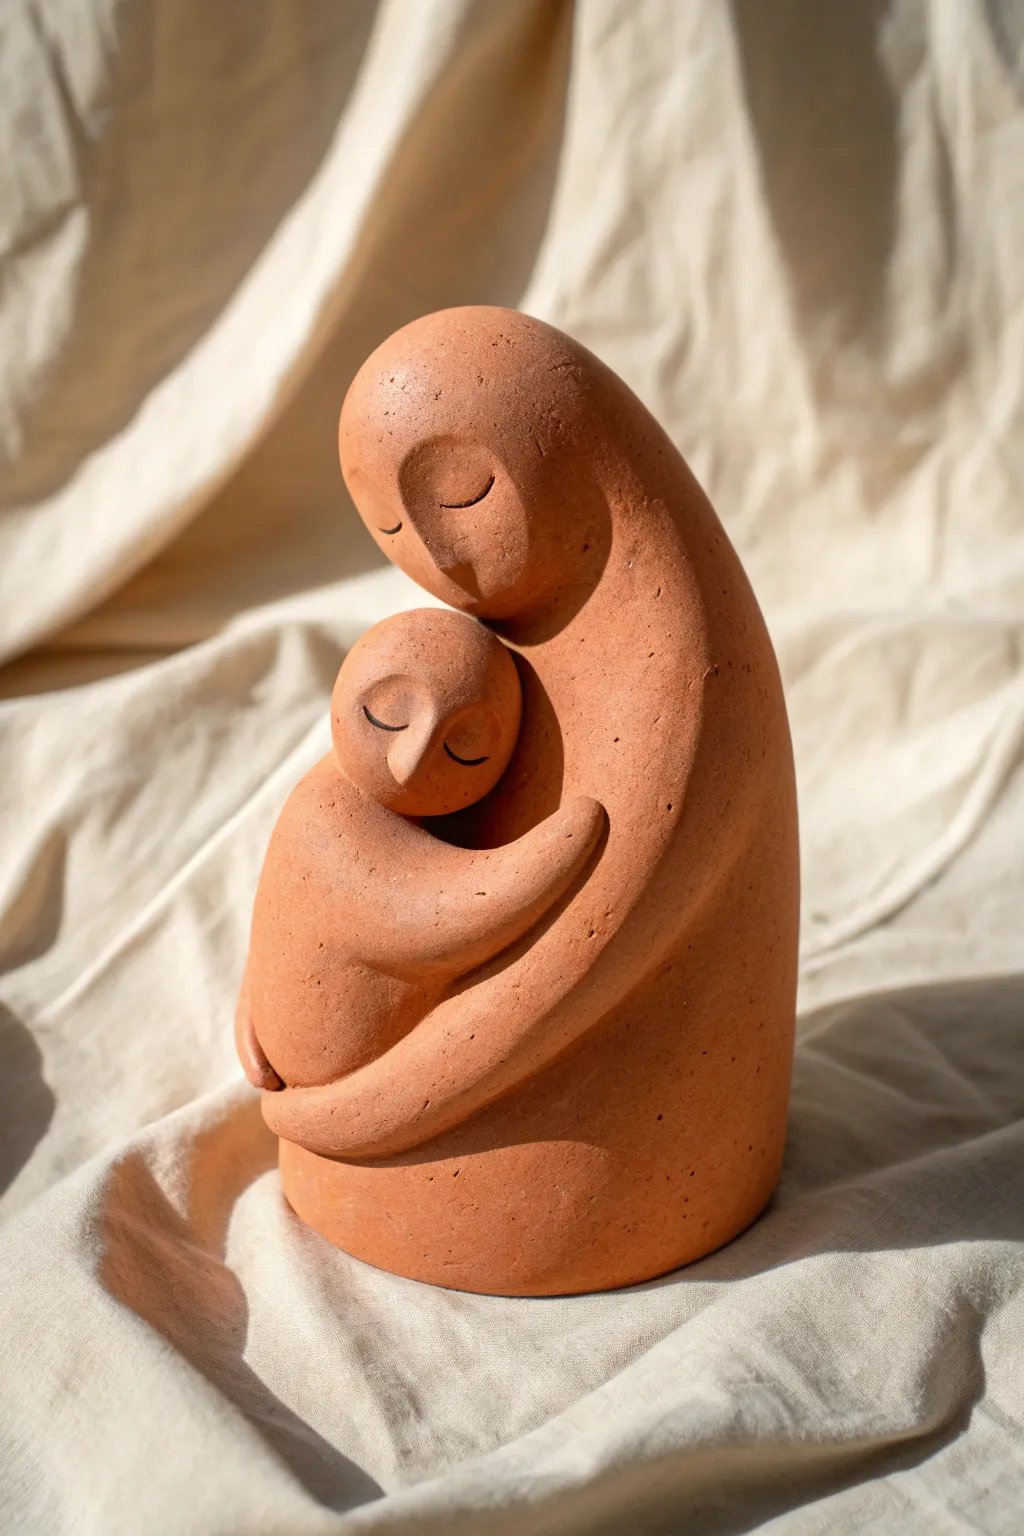
Capture the tender bond of parenthood with this minimalist sculpture that merges two figures into one seamless, flowing form. The warm, earthy terracotta finish and simplified features give it a timeless, archaic feel perfect for abstract expression.
Step-by-Step Tutorial
Materials
- Terracotta air-dry clay or firing clay (approx. 2-3 lbs)
- Clay wire cutter
- Wooden modeling tools
- Loop tool for refining
- Kidney scraper (smooth metal or rubber rib)
- Small cup of water
- Sponge
- Needle tool
Step 1: Establishing the Base Form
-
Prepare the main mass:
Start by cutting a substantial block of clay and wedding it thoroughly to remove air bubbles. Shape it into a thick, elongated cone or teardrop shape. This will form the body of the mother figure. -
Curve the spine:
Gently bend the top third of the cone forward to create the mother’s protective posture. The curve should be fluid, mimicking a C-shape that will eventually cradle the smaller figure. -
Add the mother’s head:
Round off the top tip of your curved cone into an oval shape for the head. If the clay feels too thin, add a small ball of clay, score and slip the connection points, and blend the neck seamlessly so there are no visible seams.
Cracks Appearing?
If hairline cracks appear while smoothing, your clay is drying too fast. Mist it lightly with water, score the crack, fill with soft fresh clay, and smooth over immediately.
Step 2: Adding the Child Figure
-
Form the child’s body:
Create a smaller, egg-shaped lump of clay for the child’s torso. Position this directly into the curve of the mother’s main body. I like to score both surfaces deeply and apply slip here to ensure they bond permanently. -
Attach the child’s head:
Roll a smaller sphere for the child’s head. Attach it just below the mother’s chin, tilting it slightly upward or resting against the mother’s chest. -
Initial blending:
Use your thumb or a wooden tool to roughly blend the back of the child’s body into the mother’s torso. The goal is to make them look like they are emerging from the same base mass.
Weight & Balance
To prevent the head from drooping while wet, support the mother’s curved neck with a crumpled ball of paper towel or plastic wrap until the clay stiffens.
Step 3: Sculpting the Embrace
-
Create the arm structures:
Roll a thick coil of clay for the mother’s arm. Attach it starting from her shoulder area, wrapping it all the way around the child’s lower back. The arm should visually become the bottom boundary of the sculpture. -
Add the child’s arm:
Roll a smaller, shorter coil for the child. Attach it so it reaches up to hold the mother’s shoulder or neck area. Use a modeling tool to press the clay in tight so there are no gaps. -
Refine the simplified hands:
Instead of detailed fingers, shape the ends of the arms into smooth, tapered mittens. The mother’s hand should blend into the child’s side, and the child’s hand into the mother’s chest.
Step 4: Refining and Smoothing
-
Carve the facial planes:
Use a loop tool to gently flatten the face areas. This is an abstract piece, so avoid deep sockets. Create a flat, shield-like plane for the faces. -
Define the noses:
Add tiny triangular wedges of clay to the center of each face plane. Blend the edges completely so the nose rises naturally from the surface rather than looking stuck on. -
Incise the eyes:
Using a needle tool or a fine point modeling tool, curve two simple U-shaped lines for closed eyes on both faces. This conveys peace and intimacy. -
Smooth the surface:
Take a slightly damp sponge or a rubber kidney rib and buff the entire sculpture. Remove all fingerprints and tool marks until the clay looks like smooth, polished stone. -
Final texture check:
Look for small imperfections. If you want that speckled, stone-like look seen in the photo, you can gently tap the surface with a coarse sponge or leave the natural grit of grogged clay exposed.
Allow your sculpture to dry slowly away from direct heat to preserve those gentle curves


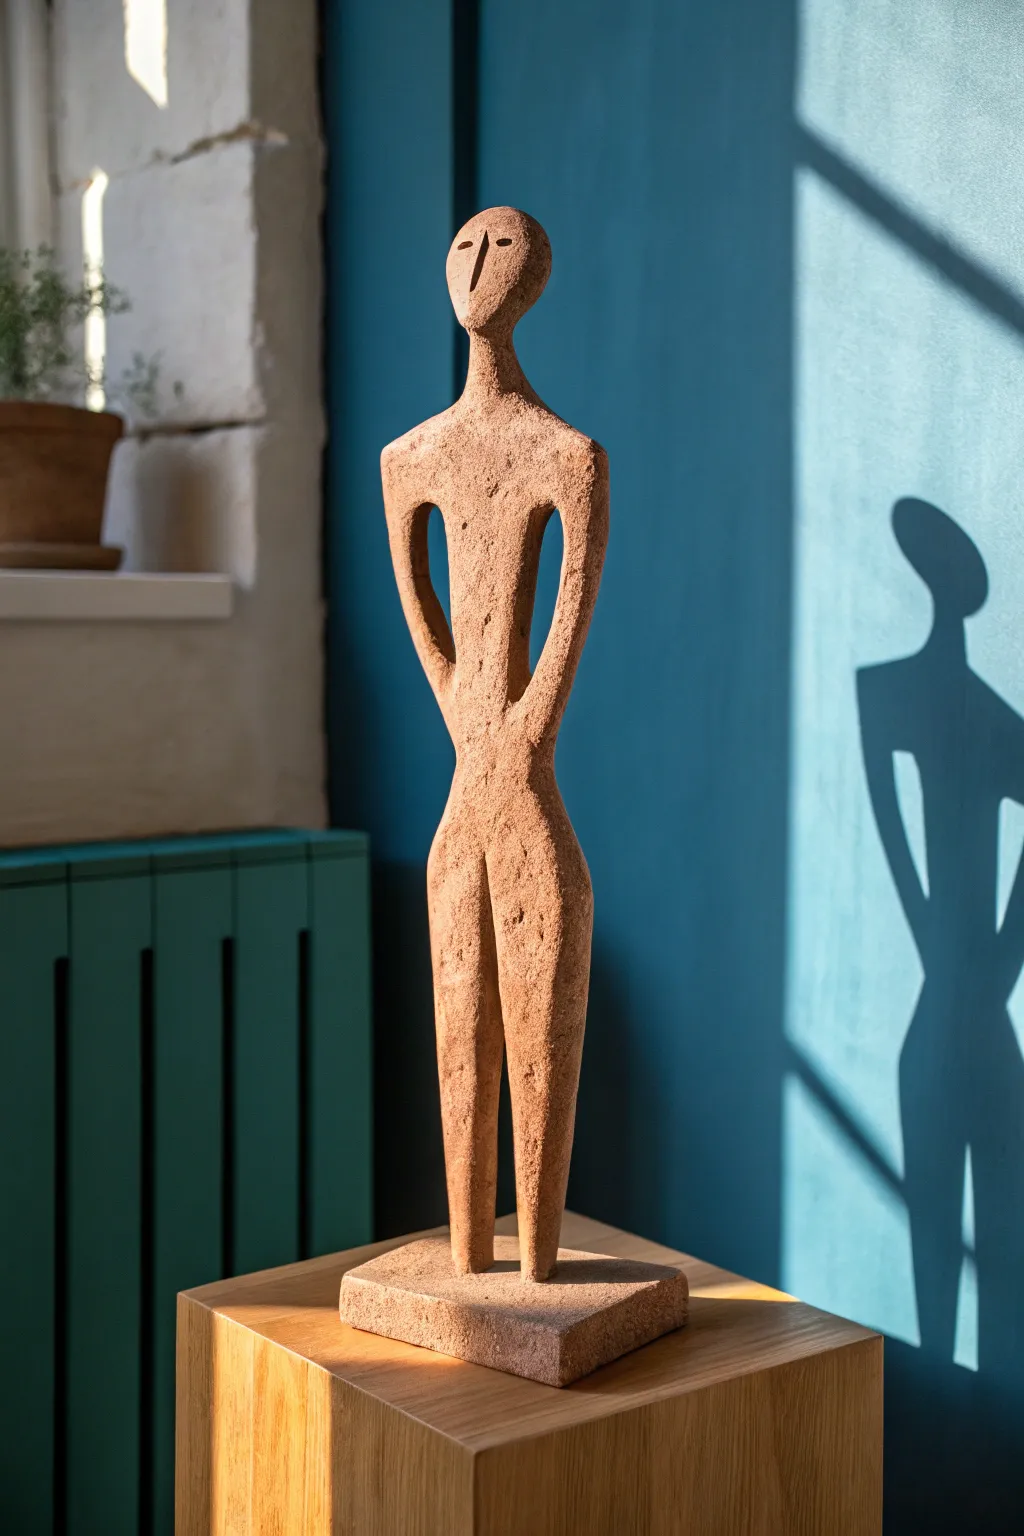
Minimal Standing Figure With Elongated Torso
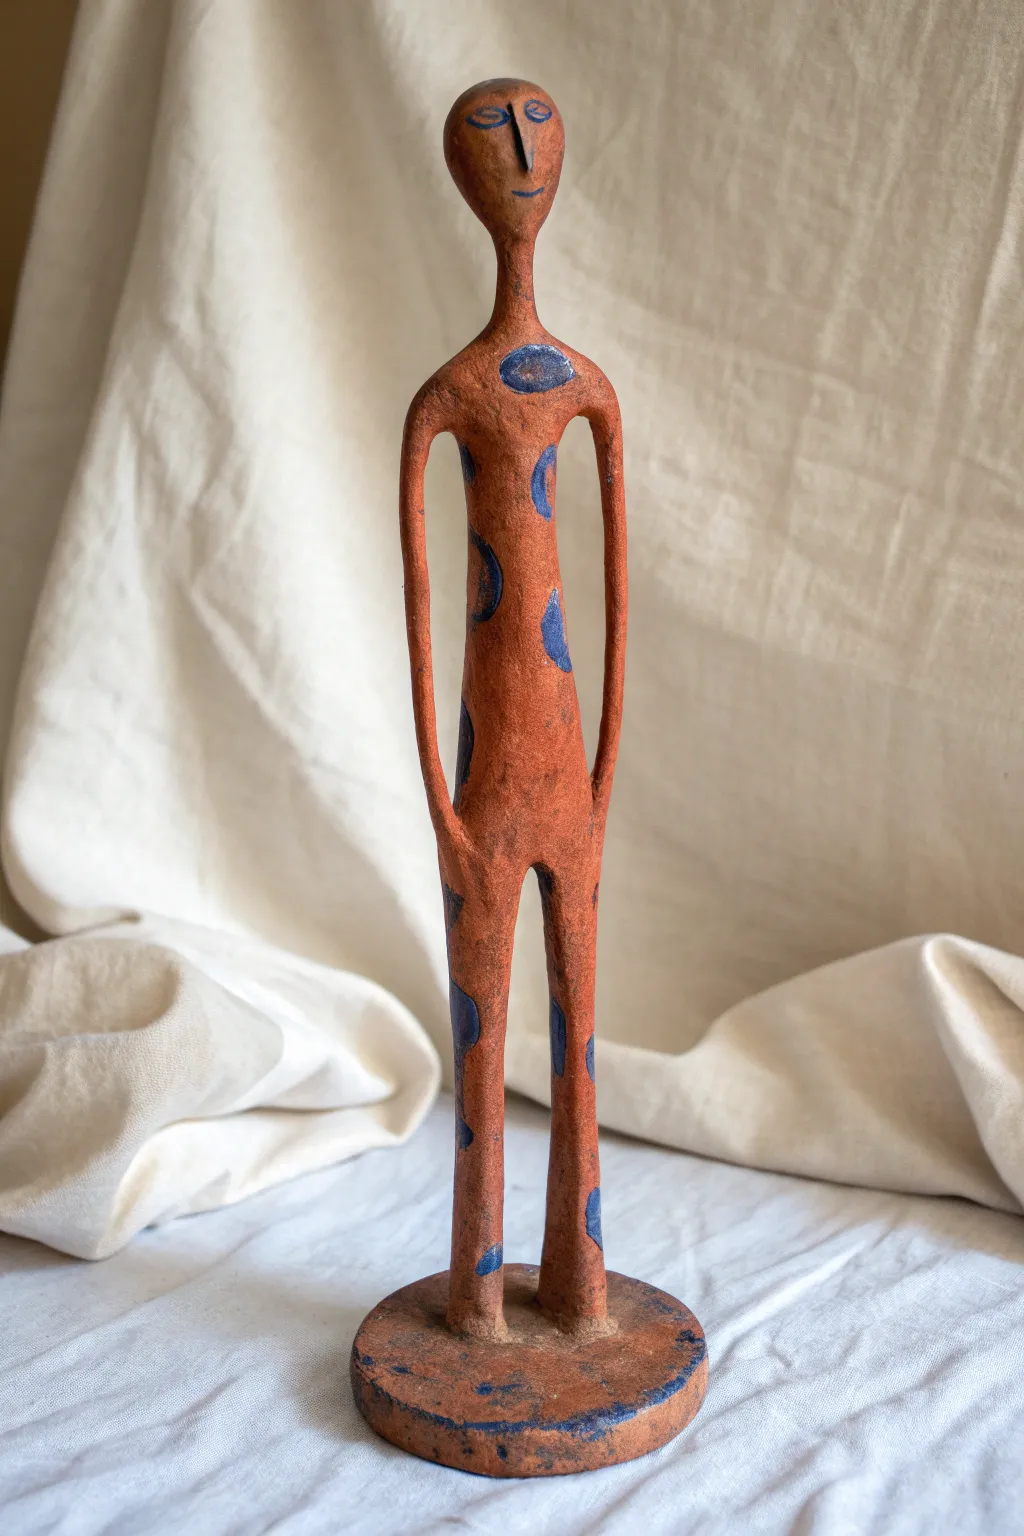
Capture the essence of human form through minimalist abstraction with this striking clay sculpture. Characterized by its exaggerated limbs, terracotta warmth, and bold blue glyph-like markings, this project explores balance and ancient aesthetics.
Step-by-Step Guide
Materials
- Terracotta air-dry clay or kiln-fire clay (red/brown body)
- Strong armature wire (aluminum or galvanized steel, roughly 12-14 gauge)
- Thinner binding wire
- Pliers and wire cutters
- Wooden sculpting tools
- Needle tool
- Blue cobalt oxide (if firing) or blue acrylic paint (if air-drying)
- Small round paintbrush
- Sponge and water cup
- Circular wooden base or clay slab for mounting
Step 1: Building the Skeleton
-
Twist the armature:
Cut a length of heavy armature wire approx 24 inches long. Fold it in half to create a loop at the top (for the head) and twist the two strands together for about 3 inches to form the neck. -
Form the torso and legs:
After the neck, separate the wires slightly to create the shoulder width, then bring them back parallel for the long torso. Split them again at the hips to form two very long legs. Leave extra wire at the bottom to secure into your base. -
Add armatures for arms:
Cut a separate piece of wire for the arms. Wrap the center of this wire tightly around the ‘shoulder’ area of your main body wire so the arms hang down freely on either side. Ensure the arm length reaches roughly to the knee area of the figure. -
Secure the stance:
Attach the bottom of the leg wires into your temporary working base or the final clay base. The figure is tall and top-heavy, so stable anchoring is crucial right now.
Cracking at the joints?
Thin limbs dry faster than thick joints. Wrap the joints in plastic while the rest dries, or score and slip any cracks immediately with vinegar water.
Step 2: Fleshing Out the Form
-
Bulk out the core:
Begin adding small snakes of clay to the torso wire. Press the clay firmly into the gaps of the twisted wire to ensure it grabs hold. Keep the torso slender but solid. -
Sculpt the legs:
Wrap clay down the length of the leg wires. Aim for a consistent, tube-like thickness. I find it easiest to roll the clay between my palms directly on the wire to smooth it out. -
Form the arms:
Add clay to the arm wires. These should be slightly thinner than the legs. Connect the clear ‘shoulder’ transition smoothly into the main torso body so it looks like one continuous piece. -
Model the head:
Form a simple oval or egg shape for the head over the top wire loop. Smooth the neck connection so it tapers elegantly from the shoulders up to the jawline.
Pro Tip: Surface Texture
Before the clay dries completely, tap the surface gently with a stiff bristle brush. This creates a pitted stone texture that holds the paint beautifully.
Step 3: Refining and detailing
-
Elongate the silhouette:
Once the clay is on, gently stroke downwards along the limbs and torso with a damp sponge. This stretches the clay slightly and removes fingerprints, enhancing that stretched, abstract look. -
Carve the gap:
Use a modeling tool to define the distinctive gap where the legs meet the torso. This negative space is key to the sculpture’s minimal aesthetic. -
Create the base:
Form a thick, circular disc of clay around the feet. Blend the clay from the ankles down into this base so the figure looks rooted. -
Sculpt the face:
Keep facial features minimal. Use a needle tool to Incise almond-shaped eyes and a tiny smile line. Attach a very small, triangular wedge of clay for the nose and blend the edges seamless.
Step 4: Finishing Touches
-
Initial drying:
Let the sculpture dry until leather hard. If using air-dry clay, wait until it’s firm to the touch but not fully chalky. -
Painting the markings:
Using a small round brush, paint abstract, glyph-like shapes on the body. Paint bold blue circles, crescents, or spots. Don’t overthink the pattern; irregular placement feels more organic. -
Detail the face:
Outline the incised eyes and nose with the same blue pigment to make the expression pop. -
Distress the finish:
If the blue looks too fresh, wait for it to dry and then lightly sand it back with fine-grit sandpaper. This gives the piece an excavated, artifact quality.
Place your finished sentinel near natural light to let the long shadows emphasize its slender form

The Complete Guide to Pottery Troubleshooting
Uncover the most common ceramic mistakes—from cracking clay to failed glazes—and learn how to fix them fast.
Single-Line Gesture Figure in Clay
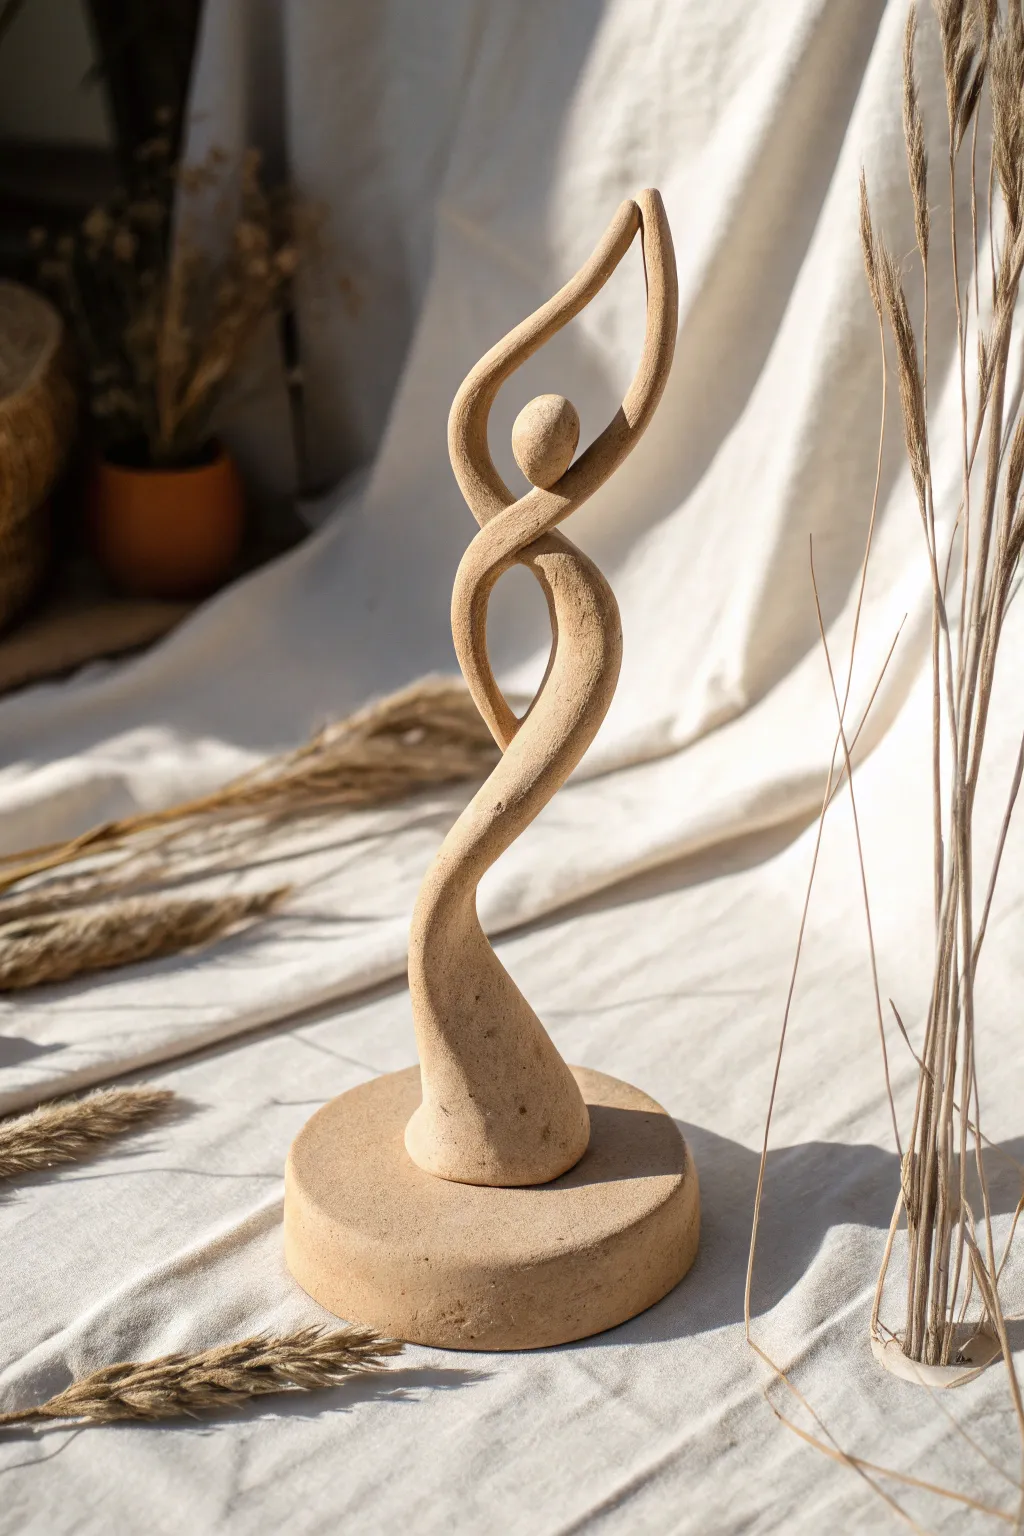
This elegant sculpture captures the essence of movement using a continuous, fluid line that spirals upward into an abstracted human form. The unglazed finish highlights the natural warmth and gritty texture of the clay, making it a perfect organic centerpiece.
Step-by-Step
Materials
- Stoneware clay with grog (for texture and strength)
- Clay wire cutter
- Rolling pin
- Score and slip tool (or needle tool and water)
- Wooden modeling tools
- Sponge
- Round cookie cutter or template (approx. 4-5 inches)
- Kiln (or air-dry clay alternative if not firing)
Step 1: Forming the Base
-
Prepare the slab:
Cut a chunk of clay and roll it out into a thick slab, approximately 3/4 to 1 inch thick. You want a substantial weight here to anchor the tall sculpture. -
Cut the circle:
Using your large round cutter or a paper template and a knife, cut a perfect circle from the thick slab to create the pedestal base. -
Smooth the edges:
Run a damp sponge or your finger along the cut edge of the base to soften the sharp corner and create a smooth, vertical wall. Set this aside on a small board to firm up slightly while you work on the figure.
Slumping Problems?
If the clay is too soft and the loop sags, prop up the arms with crumpled newspaper or a piece of foam while you work. Leave these props in place until the clay becomes leather-hard.
Step 2: Sculpting the Figure
-
Create the main coil:
Roll a long, thick coil of clay. It should be roughly the thickness of a large carrot at the bottom, tapering very gradually toward the top. -
Establish the spiral:
Take the thicker end of the coil and begin forming the central upward curve. This will be the legs and torso. Use a twisting motion to suggest a body turning in space. -
Split for the arms:
About two-thirds of the way up the coil, gently flatten the clay slightly. This is where the form will diverge into the loop that represents the arms. -
Form the upper loop:
Curve the clay upwards and around to create an oval negative space. The clay should flow up, loop over where the head will go, and reconnect back to the main ‘spine’ of the sculpture. -
Refine the connections:
Where the clay loops back and touches itself (at the chest/shoulder area), score and slip the connection points thoroughly. Blend the clay with a wooden tool so the seam disappears completely, maintaining the illusion of a single continuous line. -
Add the head:
Roll a simple, small oval of clay for the head. It shouldn’t be detailed—just a smooth, abstracted egg shape. -
Attach the head:
Score the top of the central torso twist and the bottom of the head. Attach firmly, blending the neck area so it flows seamlessly into the shoulders. -
Check the profile:
Turn the sculpture around. Ensure the curves look pleasing from all angles and that the figure isn’t leaning too dangerously to one side.
Step 3: Assembly and Finishing
-
Prepare for mounting:
Score a textured patch in the center of your round base. Do the same to the very bottom of the figure’s ‘foot’. -
Attach figure to base:
Apply slip to both scored areas and press the figure firmly onto the center of the base. wiggle it slightly to lock the clay particles together. -
Reinforce the joint:
Use a small, thin coil of clay around the seam where the figure meets the base. Blend this coil upward into the sculpture and downward into the base to create a strong, invisible transition. -
Surfacing:
I prefer to use a slightly damp sponge to wipe down the entire piece now. This removes fingerprints and exposes the grog (grit) in the clay, giving it that sandy, stone-like texture visible in the photo. -
Final drying:
Let the piece dry very slowly under loose plastic for the first few days to prevent the thin arms from drying faster than the thick base, which causes cracking. -
Firing:
Once bone dry, bisque fire the piece. For the look in the image, the piece is left unglazed and fired to maturity (likely cone 6 or 10) to bring out the natural toasted color of the stoneware.
Natural Texture
To get that speckled, sandy look, choose a clay body with high iron content and medium grog. After smoothing, buff with a scouring pad to expose the gritty texture.
Place your finished sculpture in a spot with changing daylight to watch the shadows dance across the curves.
Dance Pose With Flowing Movement
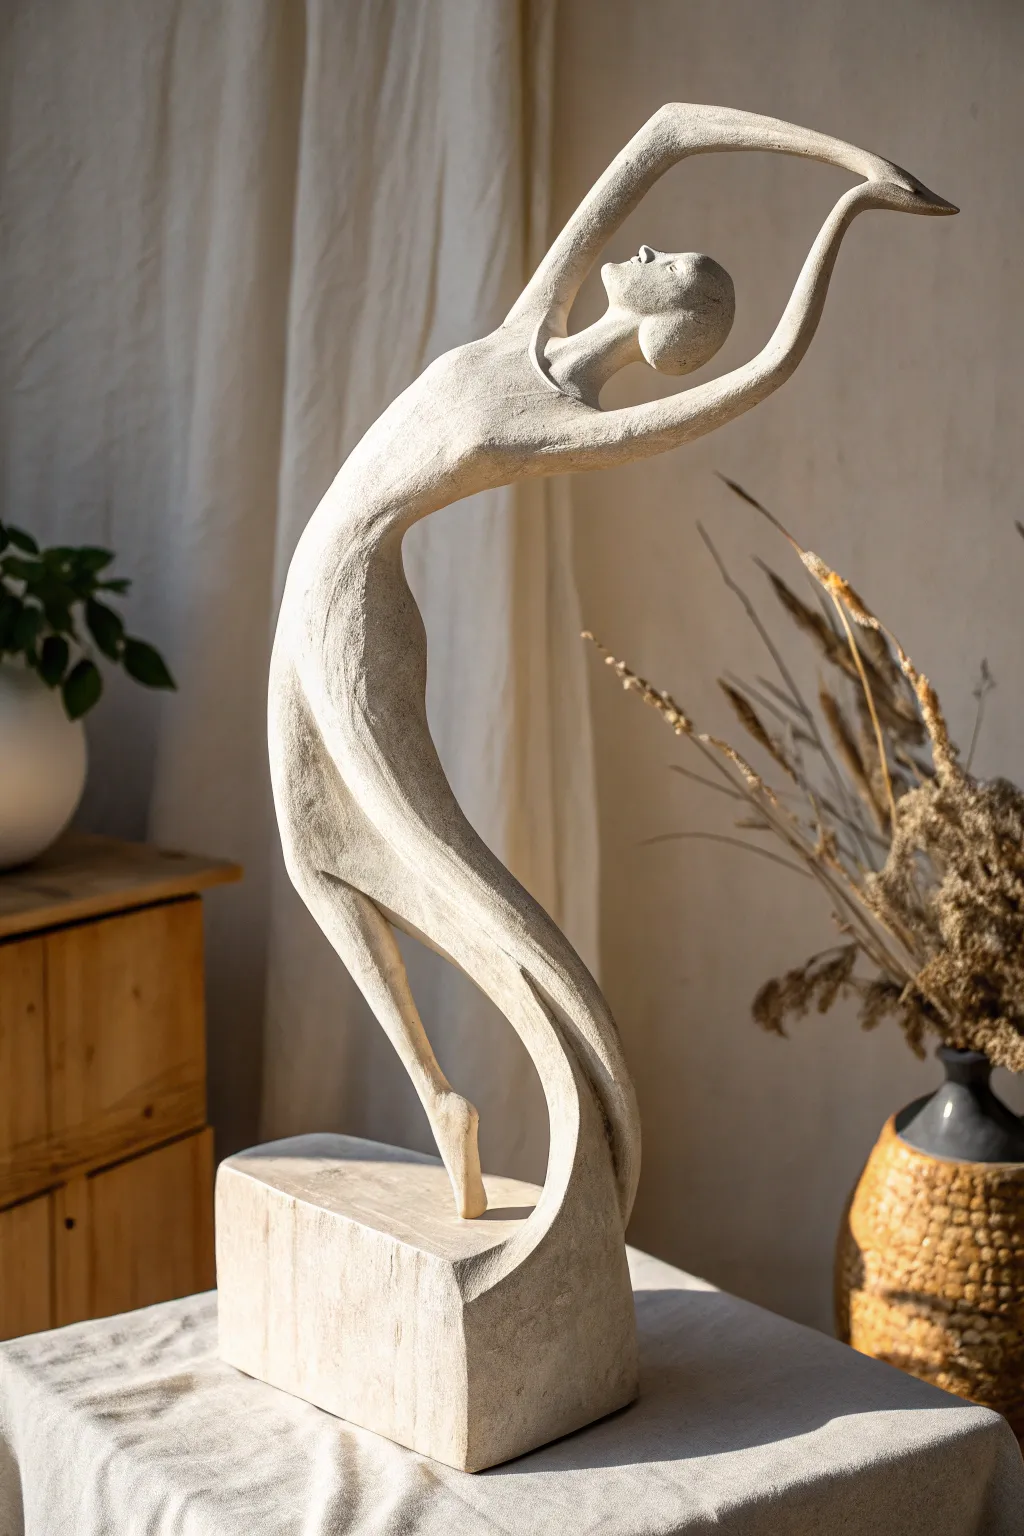
Capture the grace of movement in stillness with this elongated, abstract figure sculpture. The piece features a textured, stone-like finish and sweeping curves that mimic a dancer’s ecstatic stretch, grounded on a solid rectangular base.
Step-by-Step Tutorial
Materials
- White or buff stoneware clay (grogged for texture)
- Strong armature wire (aluminum or heavy gauge copper)
- Wooden base for armature support
- Sculpting tools (loop tools, wood modeling tools)
- Kidney scraper (serrated and smooth)
- Sponge
- Needle tool
- Slip and score tool
- Kiln (or air-dry clay alternative if firing isn’t an option)
Step 1: Building the Core Structure
-
Prepare the armature:
Since this figure defies gravity with its backward arch, a strong armature is crucial. Twist two lengths of heavy wire together to form the legs and spine, creating a distinct backward ‘C’ curve for the torso. -
Secure to the base:
Attach your wire securely to a temporary wooden working base. Ensure the wire extends upwards to support the raised arms and down into the base to prevent tipping. -
Bulk out the form:
Begin adding clay to the armature. I like to start by tightly wrapping small snakes of clay around the wire to ensure a good grip before building up the volume. -
Establish the base block:
Form a solid rectangular block of clay at the bottom. This will be the permanent base of the sculpture. Score and slip heavily to attach the foot of the figure directly into this block so they fuse during drying.
Step 2: Shaping the Abstract Figure
-
Elongate the torso:
Build up the torso using long, vertical strokes. Keep the waist very slender and the chest area wider to emphasize the stylized, stretched aesthetic. -
Create the flowing skirt:
Instead of two distinct legs, merge the lower limbs into a sweeping, skirt-like form that curves backward and connects to the base. This acts as a ‘third leg’ for structural stability. -
Form the arms:
Add clay to the upper wire sections to form the arms. They should create a continuous, fluid loop over the head, meeting at the hands. Keep them slender but thick enough to support their own weight. -
Sculpt the head:
Fashion a simple, oval shape for the head. Tilt it backwards to follow the spine’s curve. Keep facial features minimal or non-existent to maintain the abstract style. -
Refine the pointed foot:
Shape the single exposed foot resting on the block. Point the toe dramatically to enhance the feeling of weightlessness and lift.
Cracks Appearing?
If hairline cracks appear on thin limbs while drying, score the crack, add a tiny bit of vinegar or slip, and patch with fresh clay. Wrap tightly in plastic to equalize moisture.
Step 3: Texturing and Finishing
-
Smooth the transitions:
Use a wood modeling tool to smooth the connection points where the arms meet and where the ‘skirt’ flows into the base. The eye should glide over the piece without interruption. -
Apply the texture:
Using a serrated kidney or a rough sponge, gently scrape the entire surface. Cross-hatching your strokes creates that weather-worn, sandstone appearance seen in the image. -
Sharpen the edges:
Define the edges of the skirt and the sides of the torso. I find that creating a slightly sharper ‘corner’ on the abstract curves catches the light better than a perfectly round cylinder. -
Clean the base:
Use a wire cutter or knife to trim the rectangular base edges, making them sharp and geometric to contrast with the organic figure. -
Hollow out (thick sections):
If the base block is very thick, you may need to slice it from the bottom and hollow it out slightly to prevent explosions in the kiln. Reattach the bottom slab carefully. -
Drying:
Cover the sculpture loosely with plastic to dry very slowly. The thin arms will dry faster than the thick base, so slow drying prevents cracking. -
Firing or sealing:
Once bone dry, fire the piece in a kiln. If using air-dry clay, seal it with a matte varnish to protect the surface while keeping the raw look.
Bronze Effect
After firing, apply a dark bronze acrylic paint, let dry, and then dry-brush with gold or verdigris green to mimic the look of an aged metal statue.
Place your finished sculpture near a window where shadows can play across its textured curves


What Really Happens Inside the Kiln
Learn how time and temperature work together inside the kiln to transform clay into durable ceramic.
Egg Head and Tilted Neck Expression
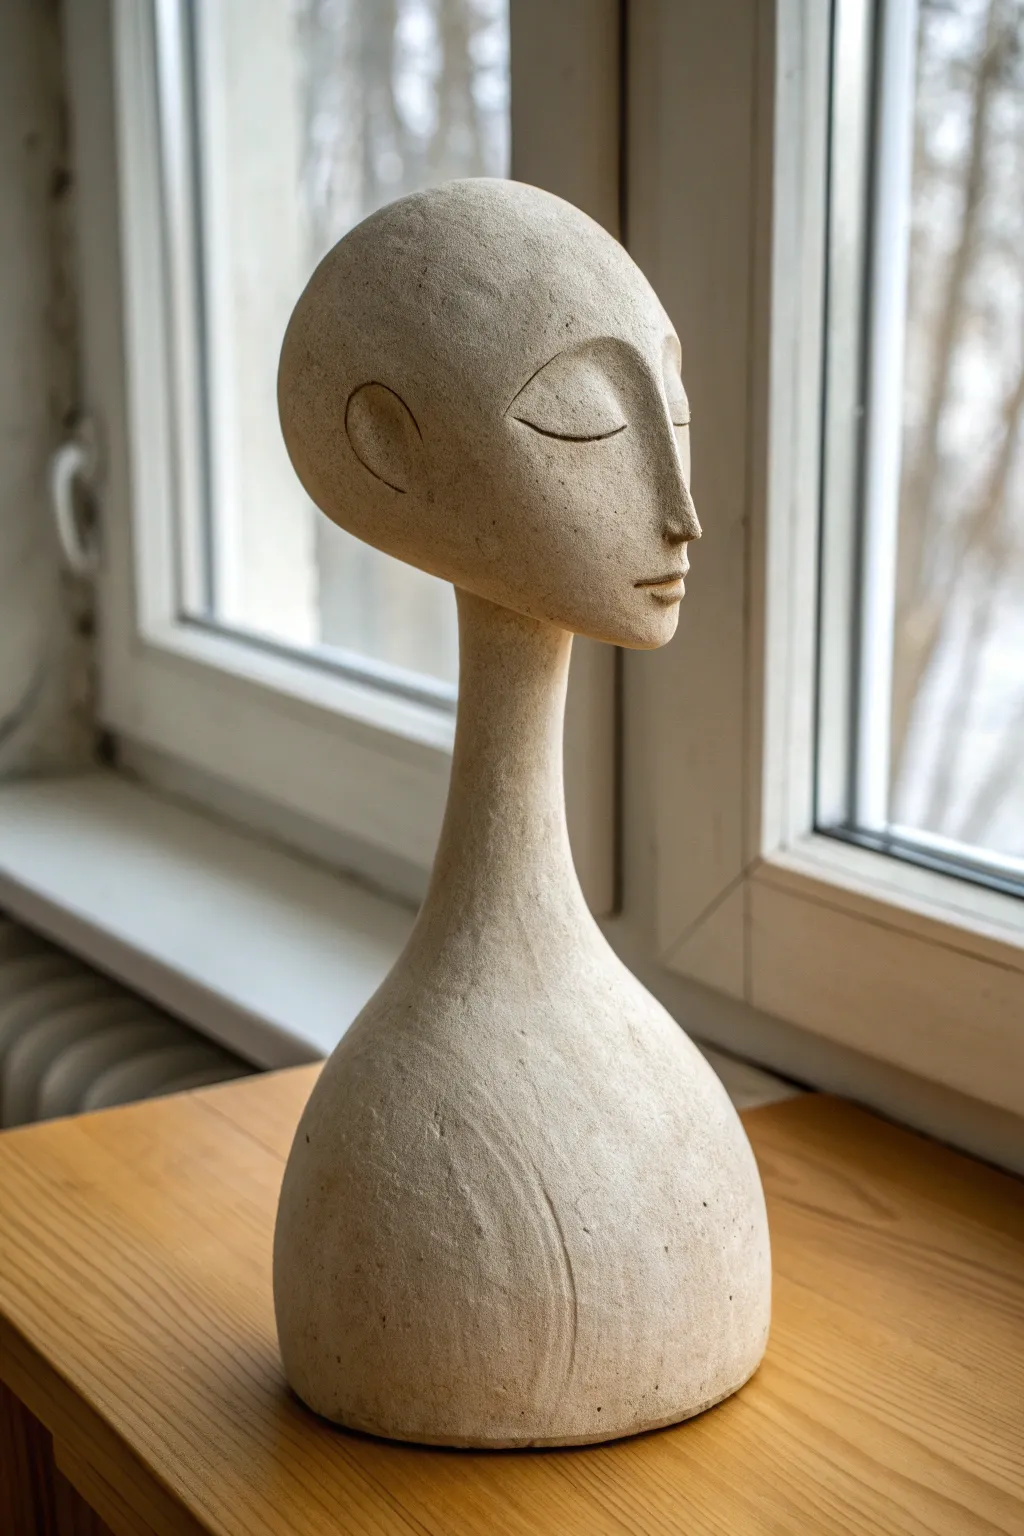
Capture a mood of tranquil contemplation with this minimalist clay bust. Featuring an iconic egg-shaped head, elongated neck, and subtle facial features, this sculpture relies on clean lines and texture rather than hyper-realism.
How-To Guide
Materials
- Stoneware clay with grog (buff or sand color)
- Kidney scraper (metal and rubber)
- Needle tool
- Wooden modeling tools
- Sponge
- Loop tool
- Scoring tool or serrated rib
- Slip (clay mixed with water)
- Plastic bag (for slow drying)
- Lazy Susan or banding wheel
Step 1: Forming the Base Structure
-
Establish the Torso:
Start with a solid lump of clay roughly the size of a grapefruit. Shape it into a rounded, dome-like mound to serve as the chest and shoulders, tapping the bottom against your table to create a flat, stable base. -
Begin the Neck Coil:
Since the neck is unusually long and slender, coil building works best here. Roll a thick coil of clay and score and slip it onto the center of your torso mound. -
Build Height:
Add 2-3 more coils to build the neck up, blending the clay downwards into the previous layer with your thumb to ensure a seamless connection. The neck should taper slightly as it goes up. -
Create the Cranium:
Form a large, hollow pinch pot for the head. It should be egg-shaped, slightly wider at the top and narrowing where the jaw would be. Keep the walls even, about half an inch thick. -
Attach Head to Neck:
Score the top of the neck and the underside of the head heavily. Apply slip, then press the head firmly onto the neck. I find that tilting the head slightly downwards and to the side adds that specific introspective feeling.
Step 2: Refining the Shape
-
Secure the Seam:
Use a wooden tool to drag clay across the seam between the neck and head, blending them until the joint is invisible. Add a small coil if there are gaps. -
Smooth the Transition:
Using a metal kidney scraper, smooth the neck into the shoulders and the jawline into the neck. You want a continuous, flowing line rather than distinct body parts. -
Elongate the Chin:
Gently pull the clay at the classic jaw area downwards and forwards to create a slightly pointed, delicate chin, which helps balance the large cranium. -
Establish Facial Planes:
Press your thumbs gently into the center of the face to create shallow indentations for the eye sockets. This naturally creating a ridge for the nose bridge.
Neck Support
If the head starts to droop or the neck bulges, insert a dowel or chopstick through the top of the open head down into the torso for internal support while working.
Step 3: Sculpting the Features
-
Build the Nose:
Add a small wedge of clay to the nose bridge area. Blend it thoroughly so it emerges organically from the face. Keep the nose long and slender with a minimal tip. -
Carve the Eyes:
Instead of adding clay for eyes, use a needle tool or small loop tool to carve two distinct, curved crescent lines for the closed eyelids. The lines should arch upwards. -
Softening the Brow:
Smooth the area above the eye lines so the forehead flows seamlessly into the brow bone. There shouldn’t be a sharp eyebrow ridge. -
Form the Mouth:
Use a flat wooden tool to press a horizontal line for the mouth. It should be small and centered. gently press below the line to create the pout of the lower lip. -
Adding the Ear:
Roll a small ball of clay, flattened into a disc. Score and slip it onto the side of the head, fairly high up. Blend the back edge into the skull while leaving the front edge raised. -
Detailing the Ear:
Carve a simple C-shape indentation inside the ear disc to suggest the inner ear structure without over-detailing it.
Make it Bronze
After firing, apply an iron oxide wash. Wipe it back with a sponge, leaving dark residue in the texture and crevices, creating a faux-bronze or antique stone look.
Step 4: Texturing and Finishing
-
Surface Texture:
Wait until the clay is leather hard. Take a slightly damp sponge and wipe the entire surface. This exposes the ‘grog’ (sand-like particles) in the clay, giving it that stone-like, ancient finish. -
Refining Lines:
Go back over the eyelid incisions and mouth line with a sharp tool to ensure they haven’t been filled in by the sponging. -
Final Smoothing:
Check the back of the skull and the curve of the shoulders. Remove any finger marks, but don’t polish it too smoothly—the rustic texture is key. -
Drying:
Cover the sculpture loosely with plastic for the first 2 days to let the moisture equalize between the thick shoulders and thin neck, then uncover to dry fully before firing.
Place your finished piece near a window where the natural light can play across the subtle facial curves.
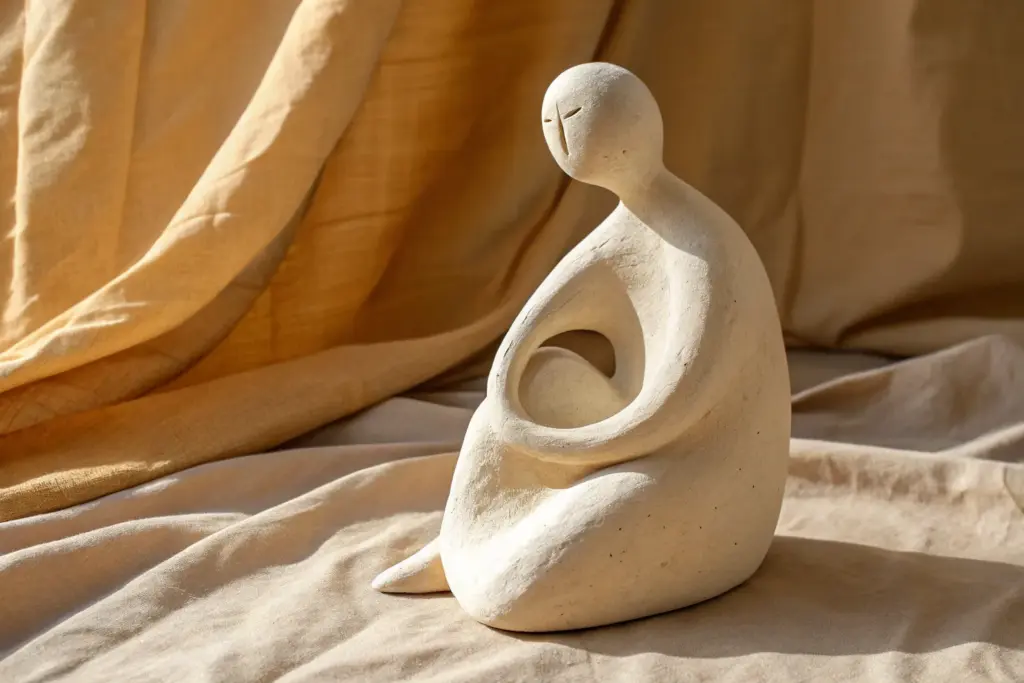
Negative Space Arms and Legs
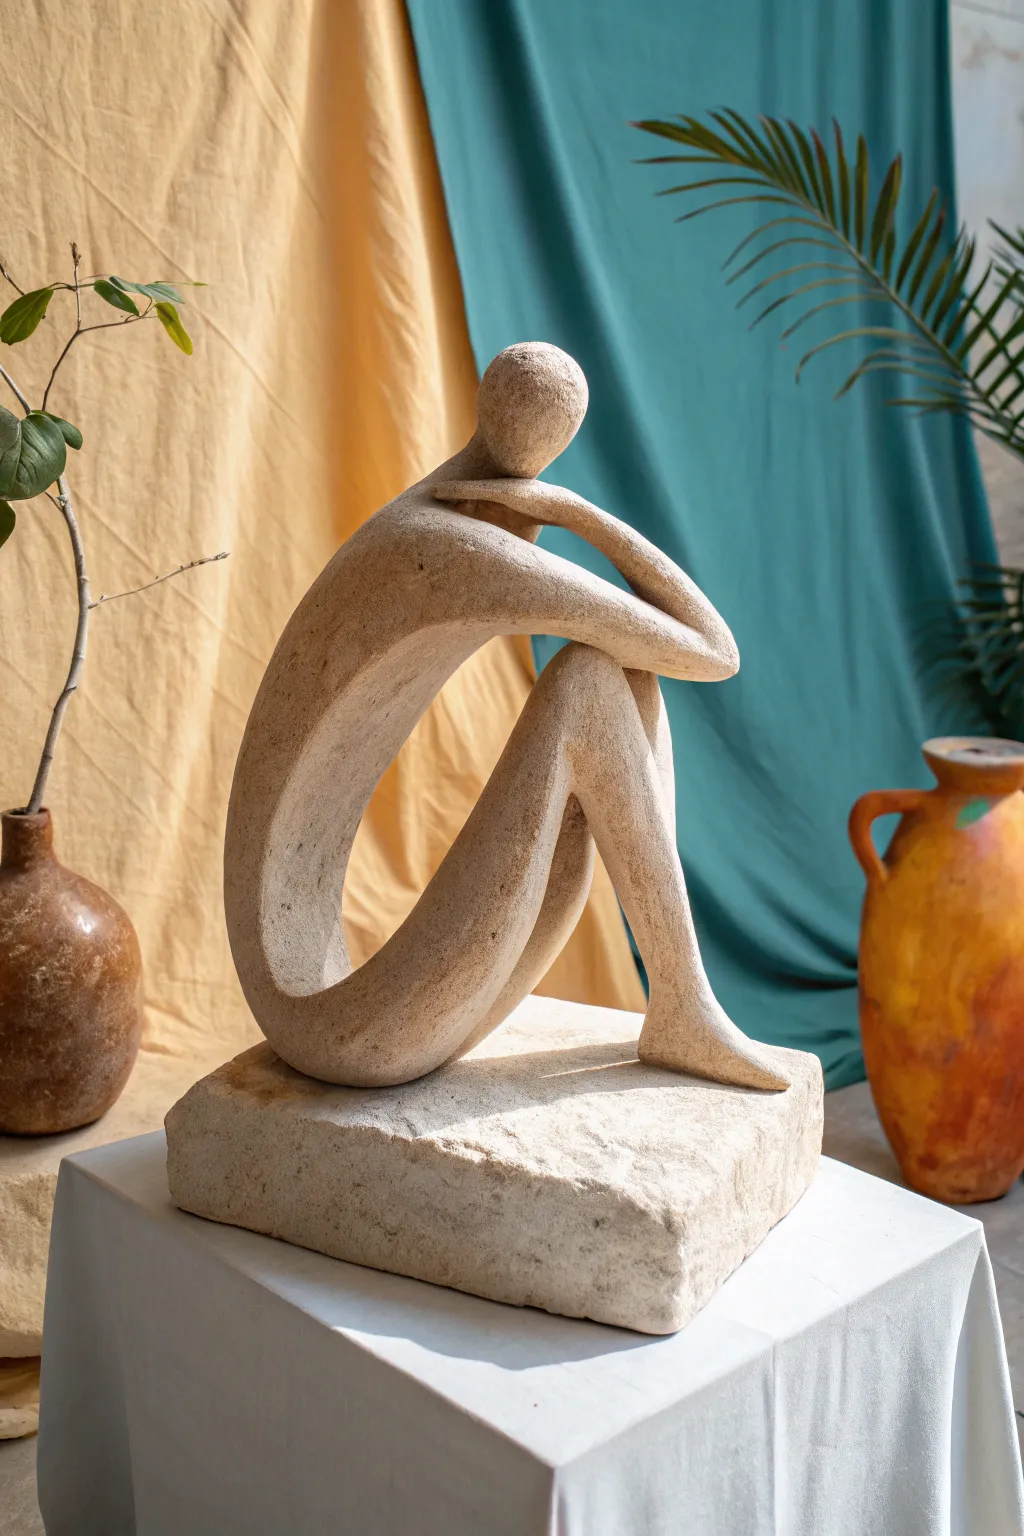
This elegant sculpture captures human emotion through simplified forms and sweeping negative space, creating a mesmerizing silhouette that changes from every angle. By capturing the texture of aged stone, this abstract seated figure brings a sophisticated, gallery-ready presence to your home.
Step-by-Step Tutorial
Materials
- High-grog stoneware clay (or air-dry clay with stone texture additive)
- Thick armature wire (aluminum or similar)
- Wooden base for support during sculpting
- Sculpting tools (loops, ribs, needle tool)
- Fettling knife
- Rough sponge or natural sea sponge
- Sandpaper (various grits)
- Stone-effect acrylic paints (beige, sand, cream)
- Matte sealant spray
Step 1: Building the Core Structure
-
Form the armature:
Begin by bending your heavy aluminum wire into the basic shape of the seated figure. Create a loop for the head, a long sweeping curve for the back, and the sharp angles for the bent knees and legs. Anchor this securely into your temporary wooden base. -
Bulk out the form:
Wrap the wire armature tightly with aluminum foil or masking tape to create volume without using solid clay. This keeps the sculpture lightweight and prevents cracking during drying. Aim for a thickness slightly less than your final desired width. -
Apply the initial clay layer:
Flatten your clay into slabs about 1/4 inch thick. Wrap these slabs around your foil core, pressing them firmly together. Score and slip any seams to ensure they bond completely. -
Define the primary curve:
Identify the ‘C’ shape created by the figure’s back curving into the legs. Smooth this entire line into a continuous, flowing motion. The beauty of this piece relies on that uninterrupted curve.
Step 2: Sculpting the Negative Space
-
Carve the gap:
The ‘negative space’ is the open area between the chest and the thighs. Use a loop tool to carefully carve away clay here, ensuring the remaining limbs look elongated but sturdy enough to support the weight. -
Shape the limbs:
Refine the legs and arms. Notice how the arms rest gently on the knees in the image. Merge the clay of the forearm onto the knee so they become a single, fluid unit rather than separate pieces stuck together. -
simplify the head:
Roll a simple oval for the head and attach it to the neck area. Tilt it slightly downward to convey contemplation. Avoid carving facial features; keep it abstract and smooth to match the body. -
Refine the resting pose:
Adjust the angle of the head so it looks like it’s resting on the hand/arm structure. I find adding a small wedge of clay under the chin helps bridge the gap between the head and the arm seamlessly.
Crack Prevention
If hairline cracks appear at the joints while drying, fill them immediately with a mixture of clay slip and vinegar (paper clay slip works best). Cover tightly to re-hydrate.
Step 3: Texturing and Finishing
-
Smooth the transition lines:
Use a rubber rib tool or your fingers to smooth out the entire surface. Pay special attention to where the feet meet the base block—blend them directly into the base so the figure emerges from the ‘stone.’ -
Create the stone texture:
Before the clay hardens, take a rough sea sponge or a crumpled ball of foil and dab it gently over the entire surface. This creates the pitted, organic look of limestone or sandstone. -
Construct the base block:
Form a rectangular block of clay beneath the figure if you haven’t already incorporated one. Texture this block heavily, perhaps even using a rock to imprint real stone patterns into the sides. -
Slow drying process:
Cover the sculpture loosely with plastic sheeting. Let it dry very slowly over several days to a week. Rapid drying is the enemy here and will cause the thin limbs to crack away from the body. -
Sanding and bisque firing:
Once bone dry, use fine-grit sandpaper to knock down any unintentionally sharp peaks, but leave the texture. If using kiln clay, fire to bisque temperature. If using air-dry, wait until fully cured. -
Base painting:
Mix a warm beige acrylic paint and cover the entire sculpture. Don’t worry about even coverage; some variations add to the natural stone effect. -
Dry brushing highlights:
Dip a dry, stiff brush into a very light cream or off-white paint. Wipe most of it off on a paper towel, then lightly brush over the raised textures. This catches the high points and mimics sun-bleached stone. -
Adding age:
Create a very watery wash of darker brown or grey paint. Apply it to the crevices—specifically under the legs and in the negative space. Wipe it away quickly with a rag, leaving shadows only in the deep textures. -
Seal the work:
Finish with a matte spray sealant to protect the paint without adding an unnatural gloss.
Faux-Stone Hack
Mix sand or used coffee grounds directly into your acrylic paint. When you dab this onto the surface, it creates an incredibly realistic, gritty stone texture instantly.
Place your finished sculpture in a spot with natural light to let the shadows play across the textured surface

TRACK YOUR CERAMIC JOURNEY
Capture glaze tests, firing details, and creative progress—all in one simple printable. Make your projects easier to repeat and improve.
Cubist Plane Face Bust
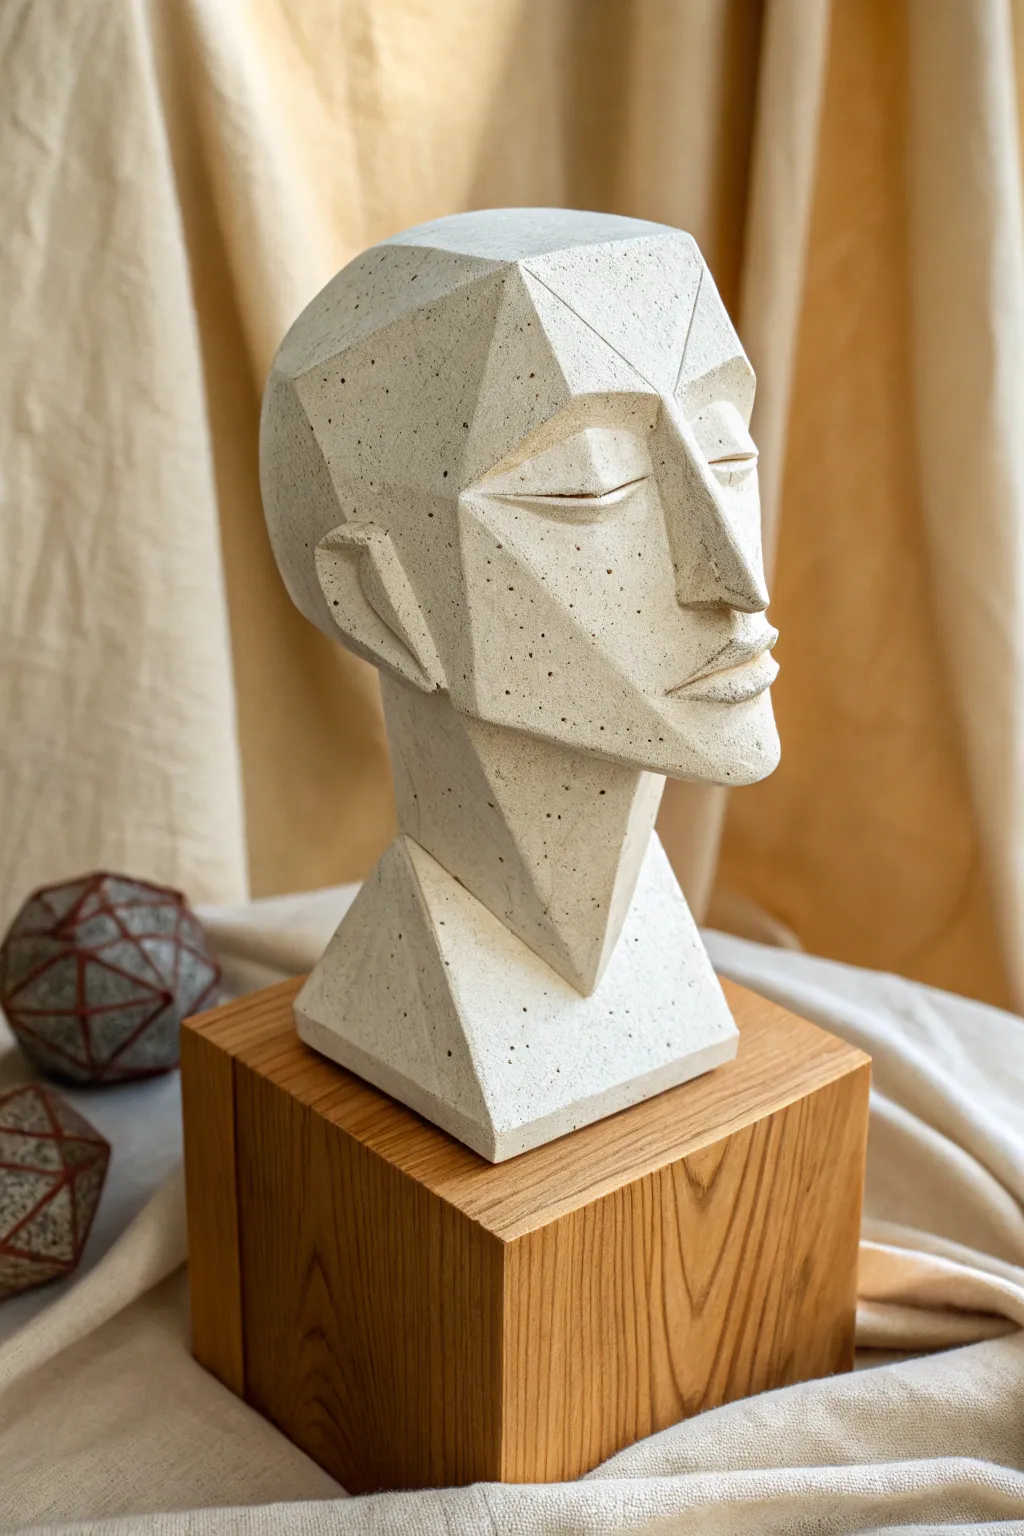
This striking sculpture blends classical bust portraiture with sharp, cubist geometry, creating a piece that feels both ancient and modern. By breaking the human face down into distinct, angular planes, you’ll capture an expression of serene contemplation in a faux-stone finish.
Detailed Instructions
Materials
- Air-dry clay (stone or white color) or polymer clay
- Wire armature kit (or sturdy aluminum wire + foil)
- Wooden base for mounting
- Clay sculpting tools (specifically cutting wire, flat wooden modeling tool, and a sharp knife)
- Ruler or straight edge
- Sanding sponge (medium and fine grit)
- Acrylic paint (cream, beige, white)
- Old toothbrush (for speckling)
- Matt varnish or sealant
- Strong epoxy glue
Step 1: Armature & Basic Massing
-
Prepare the armature:
Begin by creating a simple T-shape armature using thick aluminum wire securely attached to your temporary working base. Bulk up the head shape with crumpled aluminum foil to save on clay and reduce weight. -
Apply the bulk clay:
Roll your clay into thick sheets and cover the foil core completely. Press the clay firmly to ensure there are no air pockets between the foil and the clay. -
Form the general volume:
Using your hands, shape the clay into a generic, elongated egg shape. Don’t worry about features yet; just establish the overall mass of the head and the column of the neck. -
Establish the neck geometry:
Unlike a realistic neck, this design uses a triangular prism. Flatten the sides of the neck column to create a sharp, inverted triangle pointing down towards the chest.
Step 2: Carving the Planes
-
Map the centerline:
Use a needle tool to lightly scribe a vertical line down the center of the face. This guide is crucial for maintaining symmetry as you carve the angular features. -
Slice the cheekbones:
Take a sharp knife or wire cutter and slice away clay from the cheek area to the jawline. You want a distinct, flat plane that starts wide at the ear area and tapers down to the chin. -
Construct the nose:
Add a wedge of clay to the center face. Instead of rounding it, use a flat modeling tool to shape it into a sharp, three-sided pyramid. The bridge should be a distinct ridge. -
Define the eye sockets:
Cut deep, angular recesses for the eyes. The brow bone should overhang significantly, creating a harsh shadow. Keep the cuts clean and straight—avoid curves. -
Scult the eyelids:
Roll small triangles of clay and press them into the sockets. Flatten them to mirror the angles of the cheekbones. This creates the ‘shut eye’ look. -
Shape the forehead:
Slice the forehead area into three main planes: a central vertical plane and two receding side planes. This gives the head its robotic, structural appearance. -
Refine the jawline:
Sharpen the jawline by cutting underneath the chin. The jaw should connect to the neck prism with a clean, hard angle. -
Add the ear geometry:
Fashion simple, rectangular or triangular blocks for ears. Attach them to the side of the head, ensuring the edges are crisp and blend seamlessly into the skull planes.
Cracking Up?
If hairline cracks appear while drying, mix a small amount of fresh clay with water to create a paste (slip). Fill the cracks, smooth over, and let dry again.
Step 3: Finishing & Texturing
-
Smooth the planes:
Once the basic geometry is set, use a slightly damp sponge or a flat wooden tool to smooth every plane. I prefer to drag the tool in one direction to enhance the feeling of cut stone. -
Let it dry:
Allow the sculpture to dry completely. For air-dry clay, this might take 24-48 hours depending on thickness. It must be bone dry before the next step. -
Sand for sharpness:
Use a sanding block to sand the flat surfaces. This is the secret to getting those razor-sharp edges where the planes meet. Be gentle to avoid rounding off corners. -
Paint the base coat:
Mix a warm, creamy off-white acrylic paint. Apply two coats to the entire sculpture to create a consistent, stone-like base color. -
Create the speckle effect:
Dilute some dark gray or brown paint with water. Dip an old toothbrush into the mixture and flick the bristles with your thumb to spray fine speckles over the bust. This mimics granite or sandstone. -
Seal the work:
Apply a coat of matte varnish. A glossy finish would ruin the stone effect, so ensure your sealant is ultra-matte. -
Mount display:
Using strong epoxy glue, attach the base of your clay bust to the wooden block. Center it carefully to complete the gallery-ready look.
Sharp Edge Secret
Don’t try to get perfect edges while the clay is wet. It’s much easier to refine and sharpen the angles with a sanding block after the piece is fully dry.
Place your finished geometric bust near a window where the shifting daylight will play across its varied planes
Hollow Torso Vessel Figure
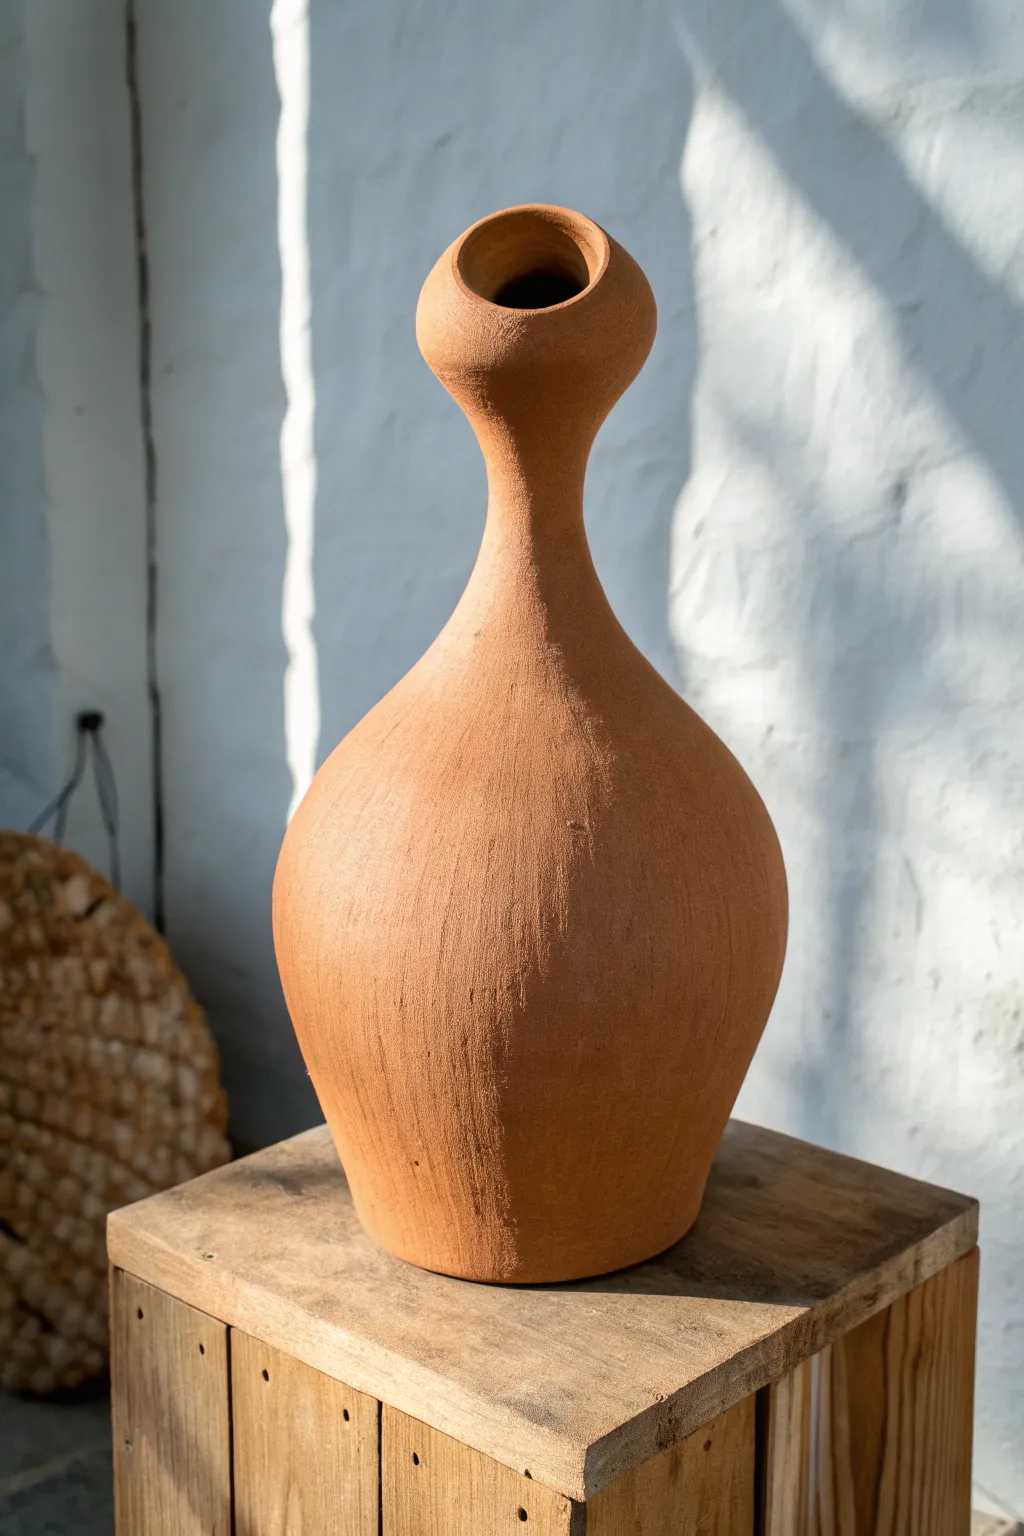
This project explores the relationship between functional vessels and abstract human forms, resulting in a striking piece reminiscent of a torso or gourd. The warm, unglazed finish highlights the raw texture of the clay, making it a perfect centerpiece for minimalist decor.
How-To Guide
Materials
- Earthenware or stoneware clay (terracotta color recommended)
- Pottery wheel (optional, but coil building is the primary method described)
- Ribs (metal and wooden)
- Serrated scraper or metal kidney
- Sponge
- Needle tool
- Paddle (wooden)
- Clay cutting wire
Step 1: Building the Base Form
-
Prepare the base slab:
Begin by rolling out a circular slab of clay approximately 1/2 inch thick and 5 inches in diameter to serve as the stable foot of your vessel. -
Create the first coils:
Roll out several snake-like coils of clay, keeping them about the thickness of your thumb. Score and slip the edge of your base slab. -
Build the lower curve:
attach the first coil to the base, blending the clay downwards on both the inside and outside to ensure a strong seal. Continue stacking coils, angling each new layer slightly outward to create the widening, bulbous bottom. -
Shape the belly:
As you build upward, use a wooden rib on the outside and your hand on the inside to push the walls out into a generous, rounded curve. This creates the ‘stomach’ of the abstract torso. -
Smooth the walls:
Pause when the vessel is about 6 inches high. Use a metal rib to scrape and smooth the exterior, unifying the coils so individual lines disappear.
Pro Tip: Symmetry Check
Use a silhouette template cut from cardboard. Hold it against the vessel while coiling to ensure both sides of the curve remain symmetrical as you build upwards.
Step 2: Forming the Neck
-
Begin tapering:
Once the body reaches its widest point, start placing your coils slightly inward. This requires patience; if you taper too quickly, the walls may collapse. -
Refine the shoulder:
Continue tapering inwardly until you have created a smooth transition from the wide body to what will become the slender neck. -
Build the vertical neck:
Stack smaller coils vertically now to extend the neck upward. Keep the walls slightly thicker here to support the weight of the flared top later. -
Elongate the form:
Continue building the neck until it is roughly one-third the height of the main body, maintaining a graceful, slender profile.
Step 3: Finishing the Top
-
Flare the opening:
At the very top of the neck, add your final coils angling outward sharply to create a cup-like or funnel shape. -
Define the rim:
Use a wet sponge to smooth the rim’s edge, making it rounded and soft rather than sharp. -
Refine the surface texture:
Allow the piece to reach a leather-hard state. Take a serrated metal scraper and drag it vertically up the body of the vessel. This creates the linear, organic texture seen in the reference image. -
Soften the texture:
After texturing, lightly brush over the surface with a damp sponge or your hand to knock down any sharp burrs while keeping the visual roughness. -
Dry slowly:
Cover the piece loosely with plastic to ensure the thin neck and thick body dry at the same rate, preventing cracks. -
Fire the vessel:
Bisque fire the piece according to your clay body’s specifications. Since the goal is a raw finish, you can skip the glazing step or apply a matte oxide wash before final firing.
Troubleshooting: Sagging Walls
If the belly starts to slump, stop building immediately. Use a heat gun or hair dryer to stiffen the lower walls slightly before adding more weight/coils.
Once fired, the distinct shape creates a captivating silhouette that changes character depending on the angle of the light
Birdcage Torso Symbol Figure
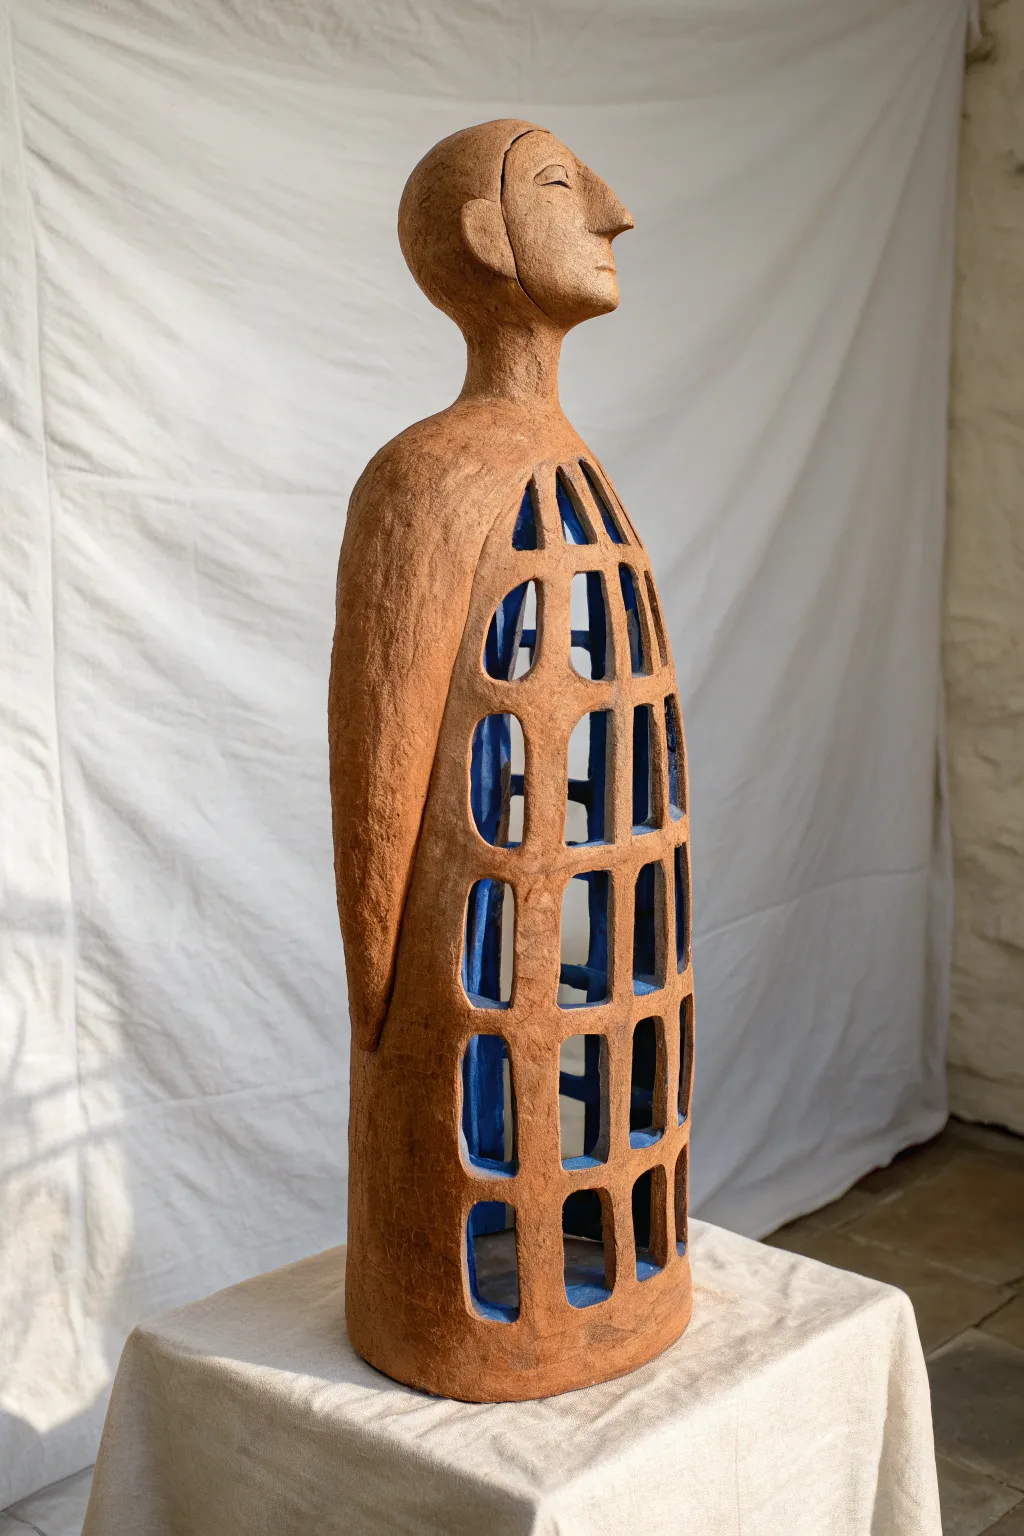
This evocative figurative sculpture merges organic human forms with structural architecture, featuring a serene head resting atop a cage-like torso. The contrast between the rough terracotta exterior and the hidden deep blue interior creates a captivating metaphor for the inner self.
Step-by-Step
Materials
- Stoneware clay (groggy or smooth depending on preference)
- Clay carving tools (loop tools, wire cutter)
- Needle tool
- Rolling pin or slab roller
- Slip and score tool
- Wooden modeling tools
- Underglaze (deep cobalt blue)
- Clear matte glaze (optional)
- Kiln access
- Cardboard or paper tube (for armature support)
Step 1: Forming the Cage Body
-
Prepare the slab:
Roll out a large, even slab of clay approximately 1/4 to 3/8 inch thick. Ensure it is wide enough to form a cylinder and tall enough for the elongated torso. -
Apply the interior color:
While the slab is flat, paint the side that will become the *interior* with deep blue underglaze. It is much easier to apply this now than trying to reach inside the finished cage later. -
Create the cylinder:
Once the underglaze is dry to the touch, form the slab into a tall cylinder. I often wrap it loosely around a paper tube covered in newsprint for support. Score and slip the seam thoroughly to join it. -
Shape the shoulders:
Gently taper the top of the cylinder inward to create sloping shoulders. You want a distinct neck area to emerge from this taper.
Pro Tip: Interior Depth
Apply 3 coats of underglaze to the slab before rolling. A patchy application looks messy inside the cage, but solid, opaque blue creates a stunning ‘void’ effect.
Step 2: Sculpting the Head and Features
-
Technique for the head:
Model the head separately using a pinch pot method or a solid block of clay that you hollow out later. Focus on a stylized profile: a prominent nose, a closed eye slit, and a smooth, rounded skull. -
Refining the face:
Use a wooden tool to carve the hairline and the ear. The aesthetic here is somewhat primitive and serene, so keep details minimal and lines strong. -
Attach head to torso:
Score the bottom of the neck and the top of the tapered torso heavily. Apply slip and join them firmly, smoothing the clay downward to create a seamless transition. -
Add the arms:
Create two long, flattened coils for arms. These should be elongated and abstract, resting flush against the sides of the cylinder. Score and slip them into place so they look integrated, not just stuck on.
Troubleshooting: Sagging
If the cage starts to slump while cutting windows, insert a balloon inside the cylinder and inflate it gently to support the walls until the clay stiffens.
Step 3: Carving the Cage Structure
-
Mapping the grid:
With the clay leather-hard, lightly sketch a grid of rectangular windows on the front and back of the torso using a needle tool. Leave distinct vertical and horizontal bars to maintain structural integrity. -
Cutting the windows:
Carefully cut out the rectangular sections. Work slowly to avoid collapsing the cylinder. If the clay is too soft, wait an hour; cutting soft clay will warp the bars. -
Refining the bars:
After cutting, smooth the cut edges of the bars with a damp sponge or finger. The blue interior should now be clearly visible through these openings. -
Clean up interior:
If any clay burrs or crumbs fell inside during cutting, carefully remove them or brush them out now.
Step 4: Finishing and Firing
-
Surface texture:
Use a rib or a slightly rough sponge to give the exterior clay a uniform, slightly gritty texture resembling stone. Do not smooth it perfectly; the texture adds character. -
Verify drying:
Allow the piece to dry very slowly under loose plastic. Because of the cage structure, uneven drying can cause the thin bars to crack. -
Texture enhancement:
Before firing, you can apply a terror sigillata or a light iron oxide wash to the exterior to enhance the earthy red tones if your clay body is pale. -
Firing:
Bisque fire the piece. If you want the blue interior to be glossy, apply a clear glaze carefully inside the windows now (though matte often looks better). Fire to the final temperature required by your clay body.
Once fired, place your sculpture near a light source to let shadows play through the openwork torso, emphasizing the hidden depths within
Fragmented Figure With Floating Parts
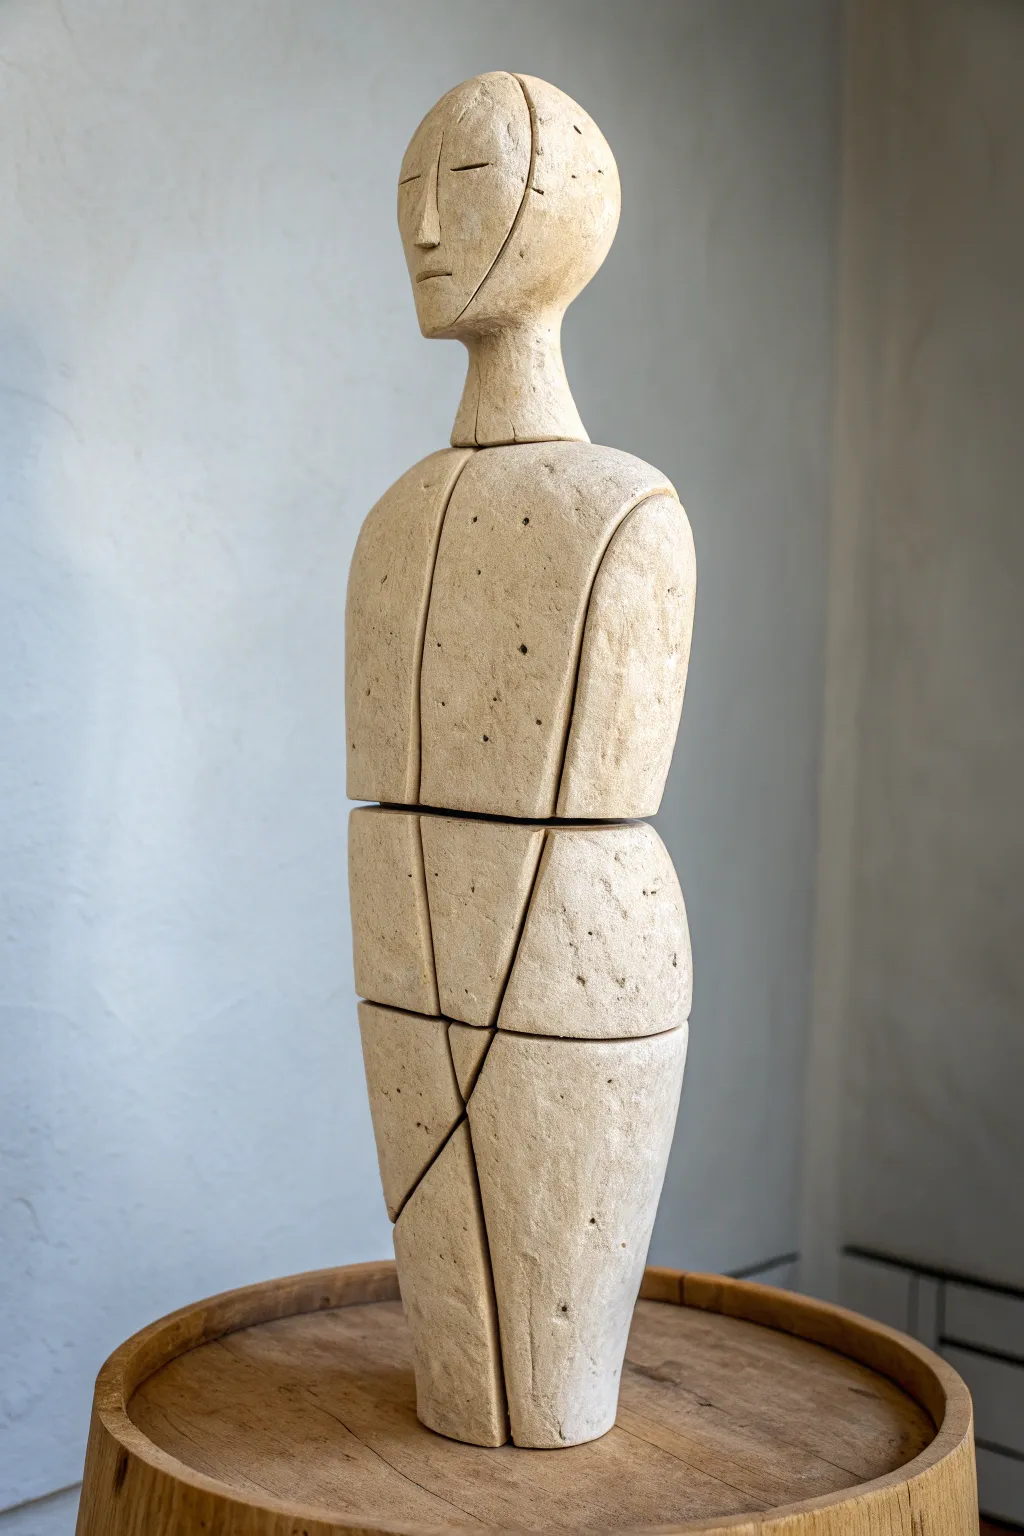
This striking segmented figure combines the ancient feel of weathered stone with a modern, fragmented aesthetic. By constructing a hollow form and strategically slicing it before firing, you can achieve this intriguing gravity-defying look where heavy sections appear to float together.
Step-by-Step Guide
Materials
- Stoneware clay (groggy texture preferred)
- Fettling knife or wire cutter
- Internal armature rod (metal or wood, for final assembly)
- Scoring tool or serrated rib
- Slip
- Rolling pin
- Pottery sponge
- Ceramic epoxy or strong adhesive
- Sculpting tools (loop tool, wooden modeling tool)
Step 1: Building the Base Form
-
Prepare the Clay:
Begin by wedging your stoneware clay thoroughly to remove air bubbles. You want a clay body with some grog (grit) in it, as this adds structural strength and creates that beautiful stone-like texture evident in the finished piece. -
Construct the Torso:
Build the main torso using a coil or slab method. Aim for a distinct oval or lozenge shape that tapers slightly at the waist. Keep the construction hollow but ensure the walls are at least 1/2 inch thick to support carving later. -
Form the Hips and Legs:
Create a lower section for the hips and legs. This should taper downwards significantly, mimicking the stylized, abstract peg-leg shape seen in the reference. Attach this to the torso if building as one piece, or build it as a separate corresponding hollow form. -
Sculpt the Head:
Model a simple, elongated egg shape for the head. Keep features minimal—faint indentations for eyes and a ridge for the nose are sufficient to capture that serene, mask-like quality. Attach a sturdy cylindrical neck. -
Refine the Silhouette:
Smooth out the entire form with a rib tool. The goal is a uniform, continuous surface without bumps, resembling a river stone. Let the piece firm up to a ‘leather hard’ state.
Warp Warning
To prevent pieces from warping and not fitting together later, dry them on a slat board or wire rack so air hits all sides evenly.
Step 2: Creating the Fragmentation
-
Plan the Cuts:
Using a needle tool, lightly sketch the segmentation lines onto the leather-hard clay surface. Draw a vertical line down the center of the chest and geometric diagonal lines across the hips and thighs to map out your separate blocks. -
Slice the Form:
Carefully slice through your lines using a thin wire cutter or a sharp fettling knife. Be precise. I find it helpful to stand over the piece to ensure my cuts go straight down through the form. -
Detail Individual Segments:
Once separated, take each individual block and smooth the cut edges slightly so they aren’t razor sharp, but keep the planes flat. You want them to look like individual stones. -
Add Texture:
Use a stiff brush or a needle tool to poke small random holes and pit marks into the surface. This imitates the porous nature of travertine or aged sandstone. -
Creation of the Internal Channel:
Before the pieces dry, bore a vertical hole through the center of every segment (neck, torso blocks, hip blocks, leg blocks). This channel will later house the armature rod that holds the stack together.
Natural Stone Look
Mix sand or crushed walnut shells directly into the clay body before sculpting to create an ultra-realistic grainy stone texture after firing.
Step 3: Firing and Assembly
-
Drying:
Allow all segmented pieces to dry slowly under plastic to prevent warping. Since the pieces must fit back together, warping is your enemy here. Dry for at least a week. -
Bisque Fire:
Fire the pieces in a kiln to bisque temperature. Arrange them so they aren’t touching, allowing heat to circulate around every facet. -
Surface Treatment:
Apply a wash of iron oxide or a matte, dry-stone glaze. Wipe most of it back with a sponge so color remains only in the pitted textures and recessed lines, enhancing the ancient look. -
Final Firing:
Fire the pieces again to your clay body’s maturity temperature. -
Prepare the Base:
Select a wooden base or plinth. Drill a hole in the center and secure your metal armature rod vertically. -
Stack and Glue:
Thread the ceramic segments onto the rod one by one, recreating your original form. Use a strong two-part epoxy between the ceramic segments to lock them in place, ensuring the vertical cut lines align perfectly.
Step back and admire how the negative space between the segments brings a dynamic energy to your static figure
Maskless Face With Texture-Only Emotion
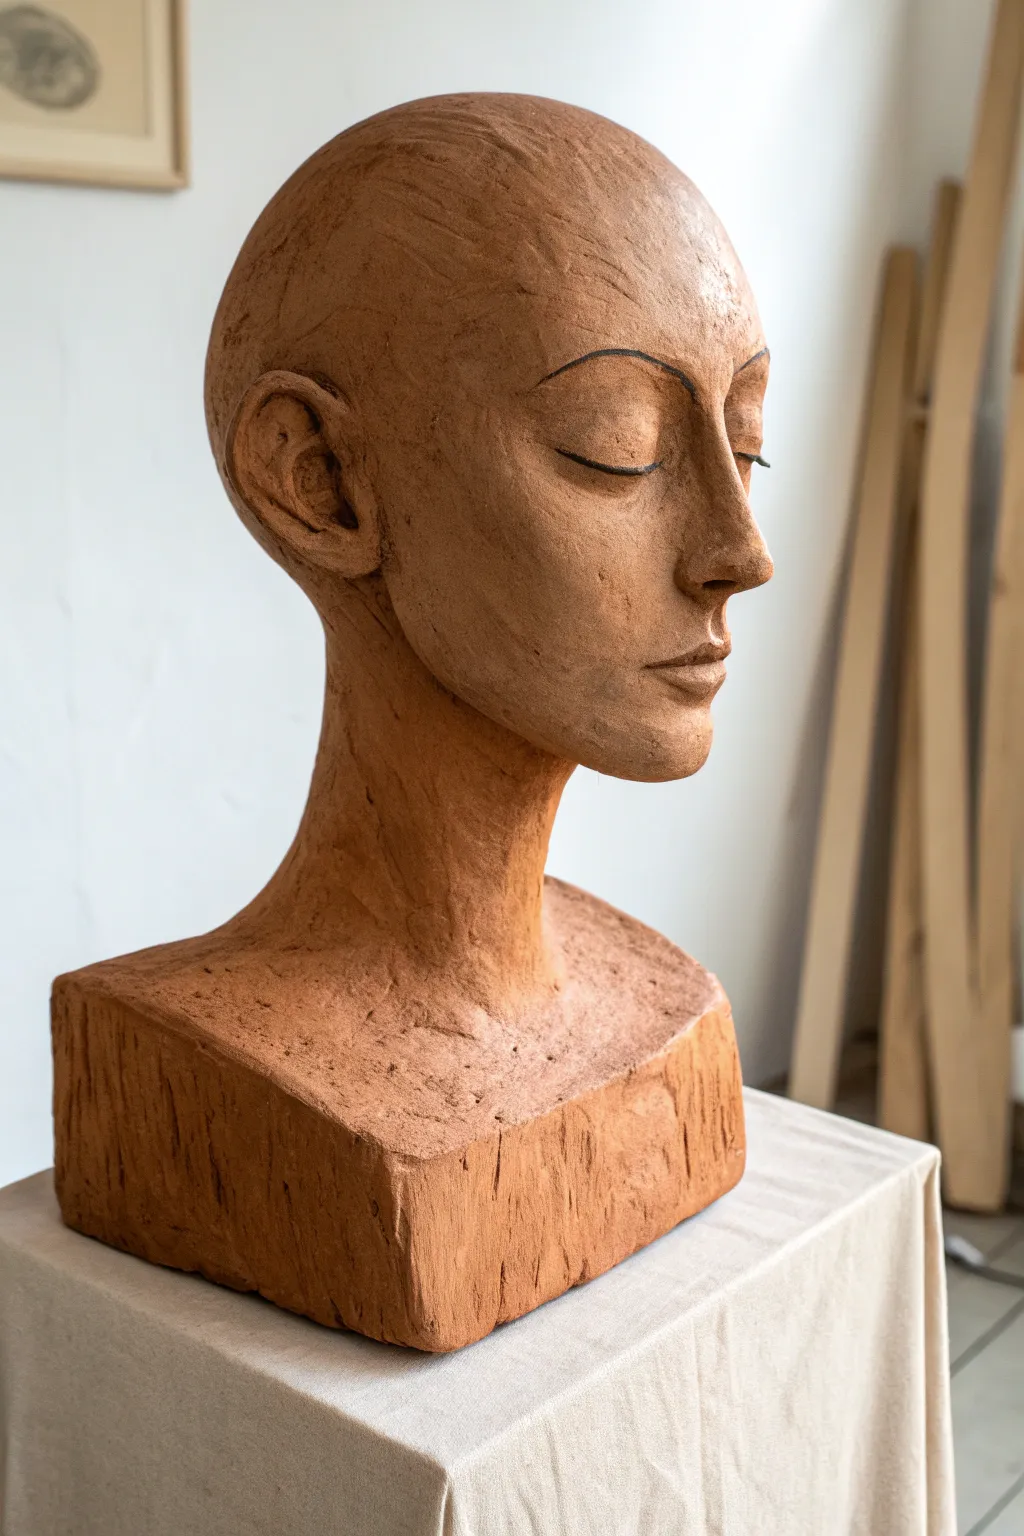
Capture a moment of quiet contemplation with this striking clay bust, featuring stylized, elongated features and a warm, earthy finish. This project focuses on building a solid structural base and refining facial planes to create a sense of texture-only emotion.
How-To Guide
Materials
- Fireable terracotta clay or air-dry clay (terracotta color)
- Strong armature wire (1/8 inch or thicker)
- Wooden base board
- Aluminum foil
- Basic sculpting tools (loop tools, wooden modeling tools)
- Serrated kidney scraper or metal rib
- Needle tool
- Sponge and water
- Black underglaze, acrylic paint, or India ink (for details)
- Fine detail brush
Step 1: Armature and Base Structure
-
Prepare the armature:
Begin by attaching a strong wire loop to your wooden base board. Create a vertical post that reaches about the height of the neck, and form a rough oval loop at the top for the head. -
Build the core volume:
Bulb out the armature using crumpled aluminum foil. Shape a dense ball for the skull and a cylinder for the neck. This saves clay and ensures even drying later. -
Apply the initial clay layer:
Slice your clay into slabs about 1/2 inch thick over the foil core. Press them firmly together, ensuring no air pockets remain between the clay and the foil armature. -
Draft the block shape:
Build up the chest and shoulders into a solid, rectangular block rather than anatomically correct shoulders. This geometric base gives the sculpture its modern, abstract feel.
Problem Solver: Cracks
If hairline cracks appear during drying, make a paste of clay and vinegar (called ‘spackle’). Press it into the cracks and compress the area with a hard tool.
Step 2: Sculpting the Features
-
Establish the head shape:
Add bulk clay to form the cranium. Keep the forehead high and the overall head shape slightly elongated for stylistic effect. -
Mark facial proportions:
Use a needle tool or wooden skewer to lightly sketch a centerline down the face and a horizontal line for the eyes, positioned exactly halfway down the head. -
Build the nose structure:
Add a wedge of clay for the nose. Blend the clay smoothly into the forehead but keep the bridge distinct. Sculpt the nostrils delicately, keeping them slightly flared. -
Form the eye sockets:
Press your thumbs firmly into the eye are to create deep sockets. The transition from the brow bone to the eye socket should be smooth but defined. -
Add the eyelids:
Instead of open eyes, roll small, flattened tapered snakes of clay. Place them in the sockets to create large, heavy upper eyelids representing closed eyes. Blend the top edge into the brow bone. -
Sculpt the mouth:
Add a small mound for the muzzle area. Cut a slit for the mouth line, then shape the lips to be full and slightly downturned at the corners to enhance the serious, meditative expression. -
Attach the ears:
Form two C-shaped pieces of clay. Attach them level with the eyes and nose. Detail the inner ear with a simple loop tool, keeping the details rugged rather than perfectly anatomical.
Pro Tip: Directional Texture
When raking texture onto the face, follow the direction of the muscle structure underneath. Drag the tool ‘down’ the cheeks and ‘across’ the forehead.
Step 3: Refining and Texturing
-
Refine the neck muscles:
Add long coils of clay to the neck to suggest the sternocleidomastoid muscles. I like to smudge these downwards into the block base to show tension. -
Create surface texture:
Instead of smoothing everything perfectly with water, use a serrated kidney tool or a piece of textured wood to scrape across the cheeks, forehead, and block base. This cross-hatching adds the ‘sketchy’ raw energy. -
Sharpen the block edges:
Use a straight edge or paddle to flatten the sides of the shoulder block. Allow the vertical scrape marks to remain visible on this base area. -
Hollow out (if firing):
If you are using kiln-fire clay, slice the top of the head off carefully once leather-hard, remove the armature and foil, and reattach the scalp with slip and scoring. If simple air-dry clay, skip this.
Step 4: Finishing Touches
-
Dry the sculpture:
Allow the piece to dry slowly under a loose plastic bag for several days to prevent cracking, then fully air dry. -
Drawing the details:
Once fully bone dry (or bisque fired), take a very fine brush with black underglaze or ink. Carefully paint a thin arched line for the eyebrows. -
Define the lash line:
Paint a single, confident black line along the seam where the upper and lower eyelids meet. This sharp graphic element contrasts beautifully with the rough clay.
Place your finished bust near a window where natural light can rake across the textured surface, highlighting the serene expression you’ve created.
Shadow-Friendly Cutout Silhouette Figure
Embrace the beauty of ancient forms with this elongated, textured clay sculpture that emphasizes negative space and strong silhouettes. The rusty, earthen finish and simplified features give it a timeless, unearthed artifact quality perfect for capturing dramatic shadows.
How-To Guide
Materials
- Grogged stoneware clay (terracotta or reddish-brown)
- Strong armature wire (10-12 gauge aluminium)
- Wooden base board (for working)
- Needle tool
- Loop tool
- Rib tool (serrated and smooth)
- Sponge
- Slip (clay and water slurry)
- Scoring tool
- Wooden clay paddle
Step 1: Planning and Armature
-
Sketch the silhouette:
Begin by drawing your figure outline on paper at a 1:1 scale. Focus on the elongated proportions—the torso should be roughly three times the length of the head, and the legs quite long and tapered. -
Construct the wire skeleton:
Bend your heavy-gauge wire to match your sketch. Create a loop for the head, a central spine, and two legs that extend down. Twist a secondary wire around the spine area to create the arm loops that will rest on the hips. -
Anchor the armature:
Secure the leg wires into a temporary wooden working base. Since the final piece has its own clay base, you just need it stable enough to stand upright while you add weight.
Slumping Issues?
If the skinny legs start bowing under the torso’s weight, prop the figure up with stick supports or foam blocks under the hips until the clay leather-hardens.
Step 2: Building the Form
-
Bullk out the core:
Press firm clumps of clay around the wire armature. I find it helps to squeeze the clay tightly to ensure no air pockets are trapped against the wire. -
Establish the base:
Form a rectangular slab of clay around the bottom of the legs. This will become the permanent plinth shown in the image, so make it thick and geometric. -
Build the torso height:
Add coils or strips of clay up the spine, smoothing them downwards to integrate. Keep the form slender; this style relies on elongation rather than realistic muscle bulk. -
Create the negative space:
Carefully pack clay around the arm wires. This is the crucial ‘cutout’ area. Use a tool to smooth the inside curves where the arms meet the torso, ensuring distinct, clean negative space. -
Shape the hips and legs:
The form widens slightly at the hips before tapering down into the legs. Merge the legs together at the very top (the crotch area) but keep a distinct vertical line separating them all the way down.
Modern Edge
Instead of a textured finish, sand the clay completely smooth before firing and paint it matte black or electric blue for a contemporary pop-art version.
Step 3: Refining and detailing
-
Sculpt the head:
Form a simplified oval shape for the head. Flatten the face are slightly to create a plane for the features. -
Carve the facial features:
Using a small knife or needle tool, carve a simple vertical ridge for the nose. press two small horizontal indentations for the eyes. Avoid adding distinct lips or ears to maintain the primitive abstract style. -
Paddle the surface:
Gently strike the flat planes of the body with a wooden paddle. This firms up the clay and creates those subtle, faceted angles seen on the chest and shoulders. -
Add surface texture:
The sculpture in the image has a rough, ‘grogged’ texture. Drag a serrated rib tool lightly over the surface to scratch it up, then dab with a damp sponge to soften the harshest marks without erasing the texture. -
Refine the silhouette:
Turn your sculpture in front of a light source to check the shadow. Use a loop tool to shave off any bulges that ruin the clean lines of the silhouette. -
Clean the base:
Use a knife to slice the sides of the rectangular base, making them crisp and vertical. This geometric base contrasts beautifully with the organic curves of the body.
Step 4: Drying and Finishing
-
Slow drying process:
Cover the sculpture loosely with plastic for the first 2-3 days. This shape is prone to cracking at the thin neck and ankles if it dries unevenly. -
Bisque firing:
Once bone dry, fire the piece to bisque temperature (around Cone 04). If you used wire that cannot be fired, ensure the clay can support its own weight or remove the armature carefully if designed to do so (though usually, we leave high-temp wire inside). -
The finish look:
To achieve the raw, matte look in the photo, you likely won’t glaze this. Instead, apply a wash of iron oxide mixed with water, then wipe most of it back with a sponge. This leaves dark color in the texture pits. -
Final wipe down:
After a final firing to set the oxide wash, use a very fine sanding sponge to smooth just the highest points, enhancing the tactile quality of the piece.
Place your finished sculpture near a window where the shifting sun can draw the silhouette across your wall throughout the day