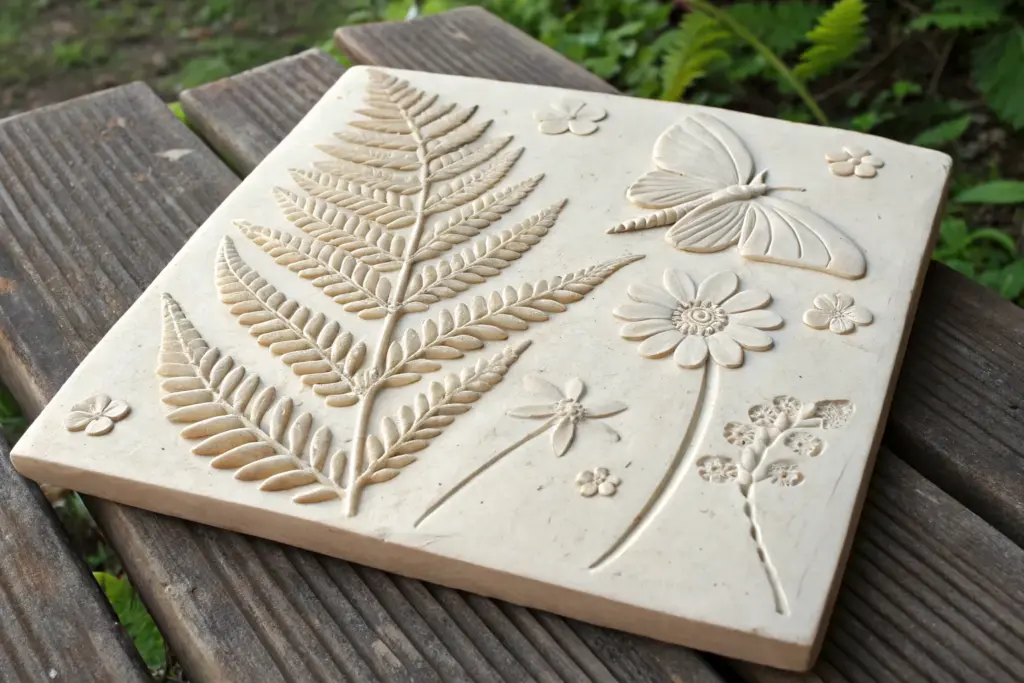
Clay tiles are my favorite little “mini canvases” because you get all the satisfaction of sculpture without committing to a huge piece. Here are clay tile art ideas that focus on relief sculpting and surface texture—the stuff that makes a flat slab feel alive.
Botanical Bas-Relief Tile
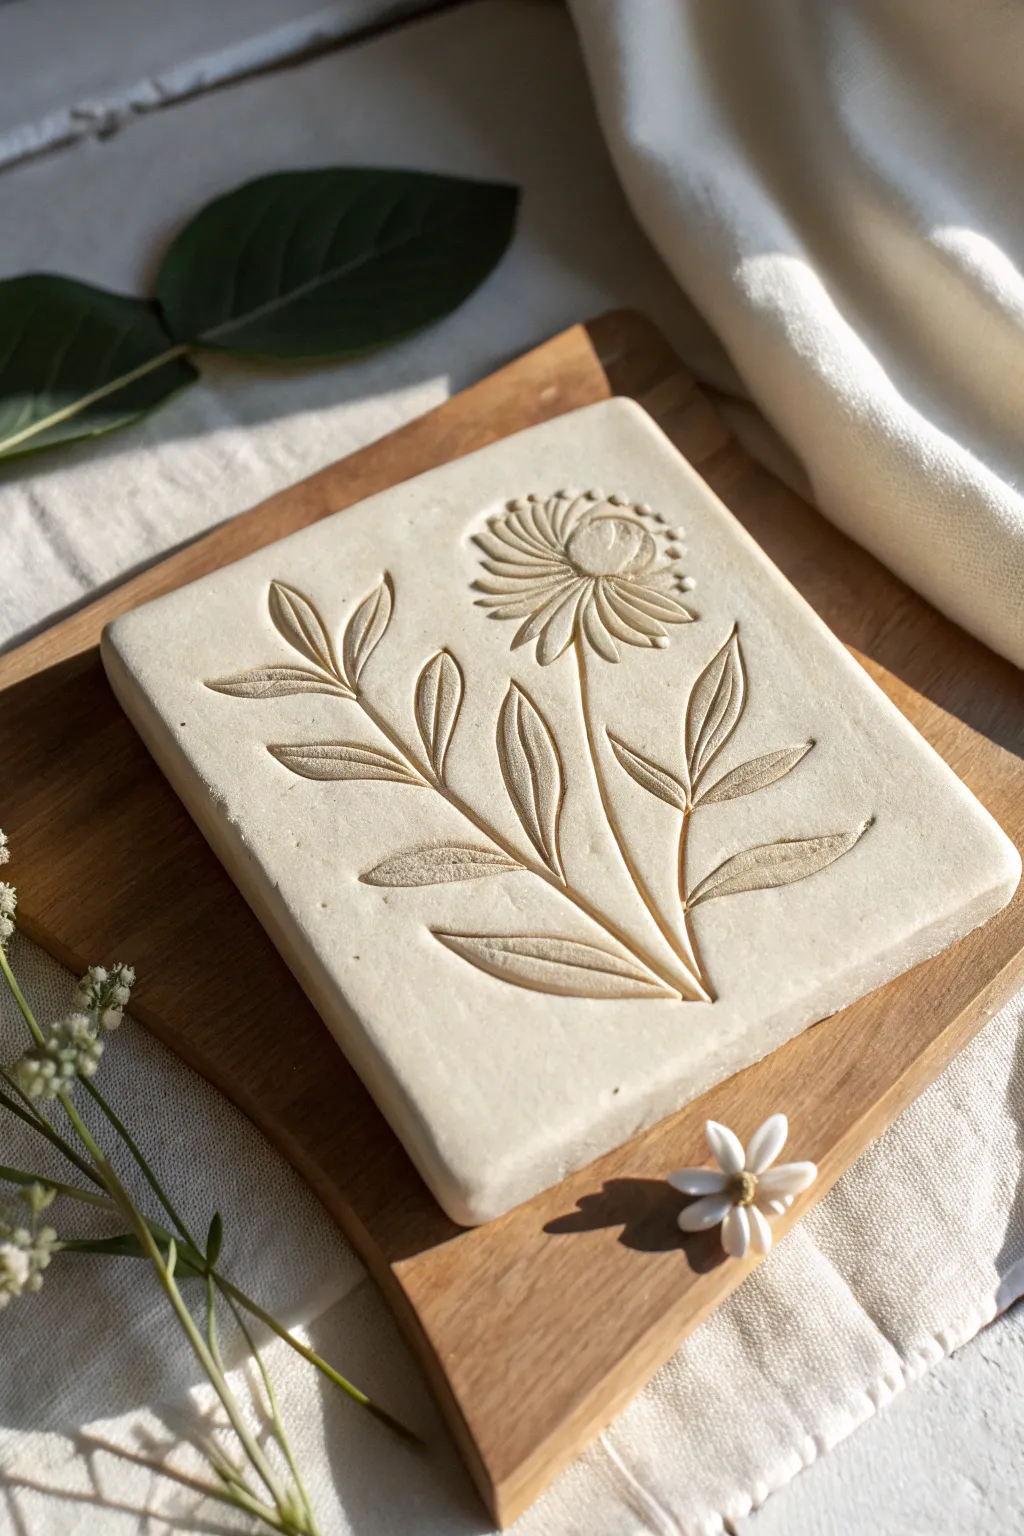
Capture the delicate beauty of nature with this minimalist clay tile project featuring a deeply impressed floral design. The smooth, cream-colored finish and precise botanical lines create a sophisticated piece of art perfect for a coaster or wall display.
Detailed Instructions
Materials
- White or cream air-dry clay (or polymer clay)
- Rolling pin
- Two wooden slats or depth guides (approx. 1/4 inch thick)
- Square cookie cutter (approx. 4×4 inches) or a knife and ruler
- Carving tools (needle tool, small loop tool, or clay sculpting set)
- Small sponge and water
- Fine-grit sandpaper (optional)
- Matte varnish or sealant
- Parchment paper or canvas working surface
Step 1: Preparation & Base
-
Prepare your workspace:
Set up a clean, flat surface covered with parchment paper or canvas to prevent sticking. Place your two wooden depth guides on either side of your working area to ensure an even thickness. -
Condition the clay:
Take a generous handful of white air-dry clay and knead it until it is soft, pliable, and free of air bubbles. If the clay feels too dry, mist it lightly with water; if it’s too sticky, let it sit for a moment. -
Roll the slab:
Place the kneaded clay between your depth guides. Using the rolling pin, roll the clay out until the pin rests on the guides, creating a perfectly uniform slab about 1/4 to 3/8 inch thick. -
Cut the shape:
Press a square cookie cutter firmly into the clay slab. Alternatively, measure a square with a ruler and cut cleanly with a sharp knife. Remove the excess clay from around the edges. -
Smooth the surface:
Dip your finger or a small sponge in a tiny bit of water and gently run it over the surface and edges of the square to remove any fingerprints or roughness. The canvas is your foundation, so make it flawless now.
Clean Lines Tip
Keep a small bowl of water nearby to constantly clean your carving tools. Clay buildup on the tool drags through the design and creates messy, jagged edges.
Step 2: Sculpting the Design
-
Sketch the outline:
Using a needle tool or a very sharp pencil, lightly sketch the main stem and the circle of the flower head onto the soft clay. Don’t press deep yet; these are just guide lines. -
Carve the stem:
Use a small loop tool or a V-gouge tool to carve out the main stem. Start from the bottom corner and sweep upwards. You want to remove a thin strip of clay to create a negative space channel. -
Outline the leaves:
Lightly draw leaf shapes branching off the stem. For the style in the image, aim for lanceolate shapes—long and tapered at both ends. -
Excavate the leaves:
Using your loop tool, carefully scoop out the clay inside your leaf outlines. Depending on your tool shape, you can press deeper in the center of the leaf and shallower at the edges to create a 3D cupped effect. -
Detail the leaf veins:
With a needle tool, draw a central vein down the middle of each scooped-out leaf. You can smooth the transition from the vein to the leaf edge with a small modeling tool. -
Carve the flower center:
Scoop out a circular area for the flower head. I like to leave a small raised mound in the very center or add a small ball of clay back in to create dimension. -
Create the petals:
Carve radiating lines or elongated teardrop shapes outward from the flower center to form the petals. Keep the separating ridges sharp to define each petal clearly. -
Add texture dots:
Using the blunt end of a small paintbrush or a dotting tool, press small indentations around the top edge of the flower head to mimic pollen or seeds. -
Refine the edges:
Go back over your carved lines. If any clay crumbs have formed, gently brush them away with a soft, dry brush. Smooth any jagged carving marks with a damp fingertip.
Use Nature directly
Instead of carving by hand, press real leaves and flowers into the wet clay slab, then remove them. This creates a perfect botanical fossil imprint instantly.
Step 3: Finishing Touches
-
Initial drying:
Let the tile sit undisturbed for about 24 to 48 hours. flip it over gently halfway through the drying process to prevent the corners from curling up. -
Sand for perfection:
Once fully bone dry, use fine-grit sandpaper to gently buff the surface and edges. This will remove any remaining burrs or sharp spots from the carving process. -
Seal the piece:
Apply a coat of matte varnish or acrylic sealant to protect the clay from moisture and dust. This also deepens the cream color slightly and gives it a professional finish.
Now you have a timeless piece of botanical art to display or gift.


Monstera Leaf Vein Texture Tile
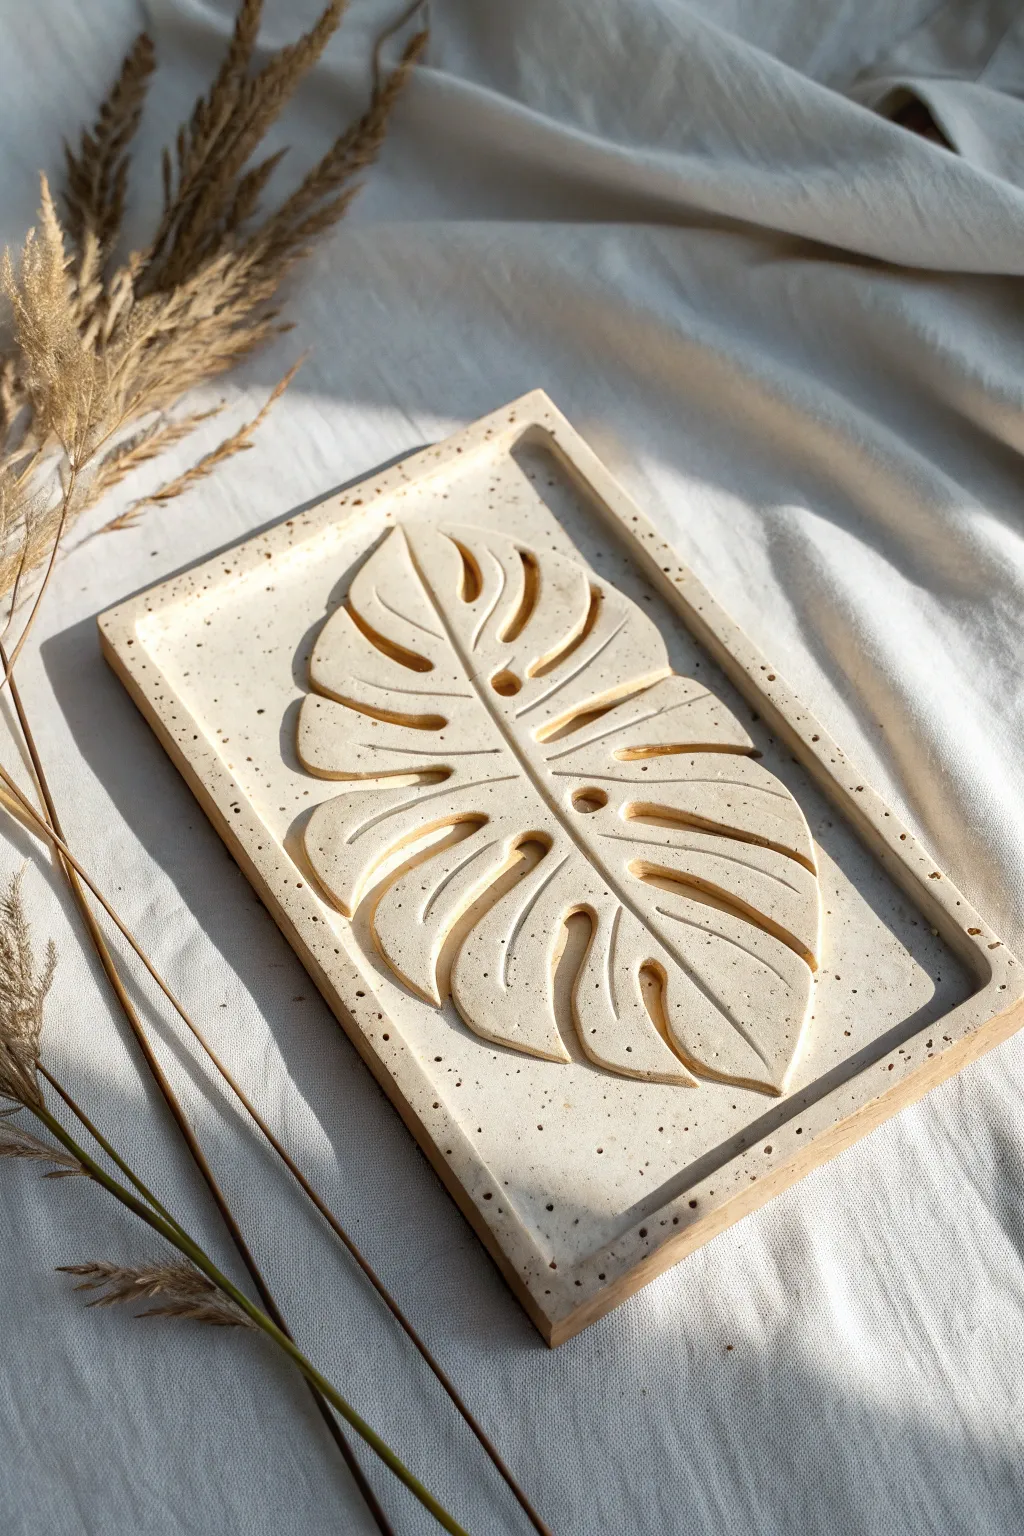
Capture the elegance of botanical forms with this sophisticated clay relief tile. By layering and carving a raised Monstera leaf design onto a speckled slab, you’ll create a minimalist piece perfect for modern home decor.
Step-by-Step Tutorial
Materials
- Air-dry clay or polymer clay (white or cream)
- Dried coffee grounds or fine black sand (for speckling)
- Rolling pin
- Two long wooden slats (approx. 0.5 cm thick guides)
- Rectangular clay cutter or ruler and craft knife
- Paper template of a Monstera leaf
- Needle tool or toothpick
- Clay carving tools (loop tool and sculpting knife)
- Sponge and water
- Fine-grit sandpaper
- Matte sealant/varnish (optional)
Step 1: Preparing the Speckled Base
-
Mix the texture:
Begin by conditioning your white clay until it is soft and pliable. To achieve the stone-like speckled effect seen in the photo, knead in a small pinch of dried coffee grounds or fine black sand until evenly distributed. -
Roll out the slab:
Place your clay ball between the two wooden slats on a clean, flat surface. Use your rolling pin to flatten the clay, ensuring the roller rides on the slats to create a perfectly even thickness. -
Cut the rectangle:
Using a ruler and a craft knife, or a sharp rectangular cutter, trim the rolled slab into a neat rectangle. This will serve as the background ’tile’ for your artwork. -
Create the frame border:
Roll thin coils of clay (snakes) and attach them to the outer perimeter of your rectangle to create a raised border. Use slip (water + clay mud) to score and attach them securely, then smooth the seams so the border looks integral to the base.
Step 2: Sculpting the Leaf
-
Outline the leaf shape:
Roll out a second, slightly thinner slab of your speckled clay. Place your Monstera paper template on top and lightly trace around it with a needle tool to cut out the basic leaf silhouette. -
Position the leaf:
Score the back of your leaf cutout and the center of your rectangular tile base. Apply a little slip or water and gently press the leaf onto the center of the tile. -
Carve the fenestrations:
Using a sharp craft knife, carve out the iconic holes (fenestrations) and deep notches characteristic of a Monstera leaf. Remove these bits of clay cleanly to reveal the tile base underneath. -
Sculpt the central vein:
Use a sculpting tool to create a deep, central channel running vertically down the leaf. Pressing down here makes the leaf appear to curve upwards from the center. -
Define the side veins:
Carve smaller channels radiating from the center vein toward the edges of each leaf segment. These shouldn’t act as cuts, but rather as depressions to give the leaf 3D volume. -
Round the edges:
I like to use a slightly damp finger or a soft silicone tool to round off all the sharp cut edges of the leaf sections. This ‘pillow’ effect gives the relief a softer, more organic look.
Cracking Issues?
If small cracks appear while drying, don’t panic. Apply a tiny amount of fresh clay mixed with water (slip) into the crack and smooth it over, then let it dry slowly again.
Step 3: Refining and Finishing
-
Smooth the surfaces:
Check the flat background areas for any fingerprints or accidental tool marks. A barely damp sponge is perfect for wiping these away without disturbing the main sculpture. -
Punctuate with dots:
If you want extra texture on the background, take a needle tool and gently poke tiny random holes or dots around the leaf, mimicking the porous nature of stone. -
Allow to dry:
Let the piece dry slowly away from direct heat or sunlight. If using air-dry clay, turn it over periodically once the top is firm to prevent warping. -
Sand the edges:
Once fully dry (or baked, if using polymer), take fine-grit sandpaper to the outer edges of the rectangular frame to make them crisp and sharp. -
Clean up details:
Gently sand inside the relief crevices if there are any burrs or rough spots left from carving. -
Seal the piece:
Finish by applying a thin coat of matte sealant. This protects the textured surface from dust while maintaining that natural, unglazed aesthetic.
Texture Pro Tip
Instead of pre-mixing speckles, flick watered-down brown acrylic paint onto the finished, dry piece with a toothbrush for a more controlled ‘granite’ look.
Now you have a stunning, minimalist relief tile that brings a permanent touch of nature into your space


Sunflower Center Texture Study Tile
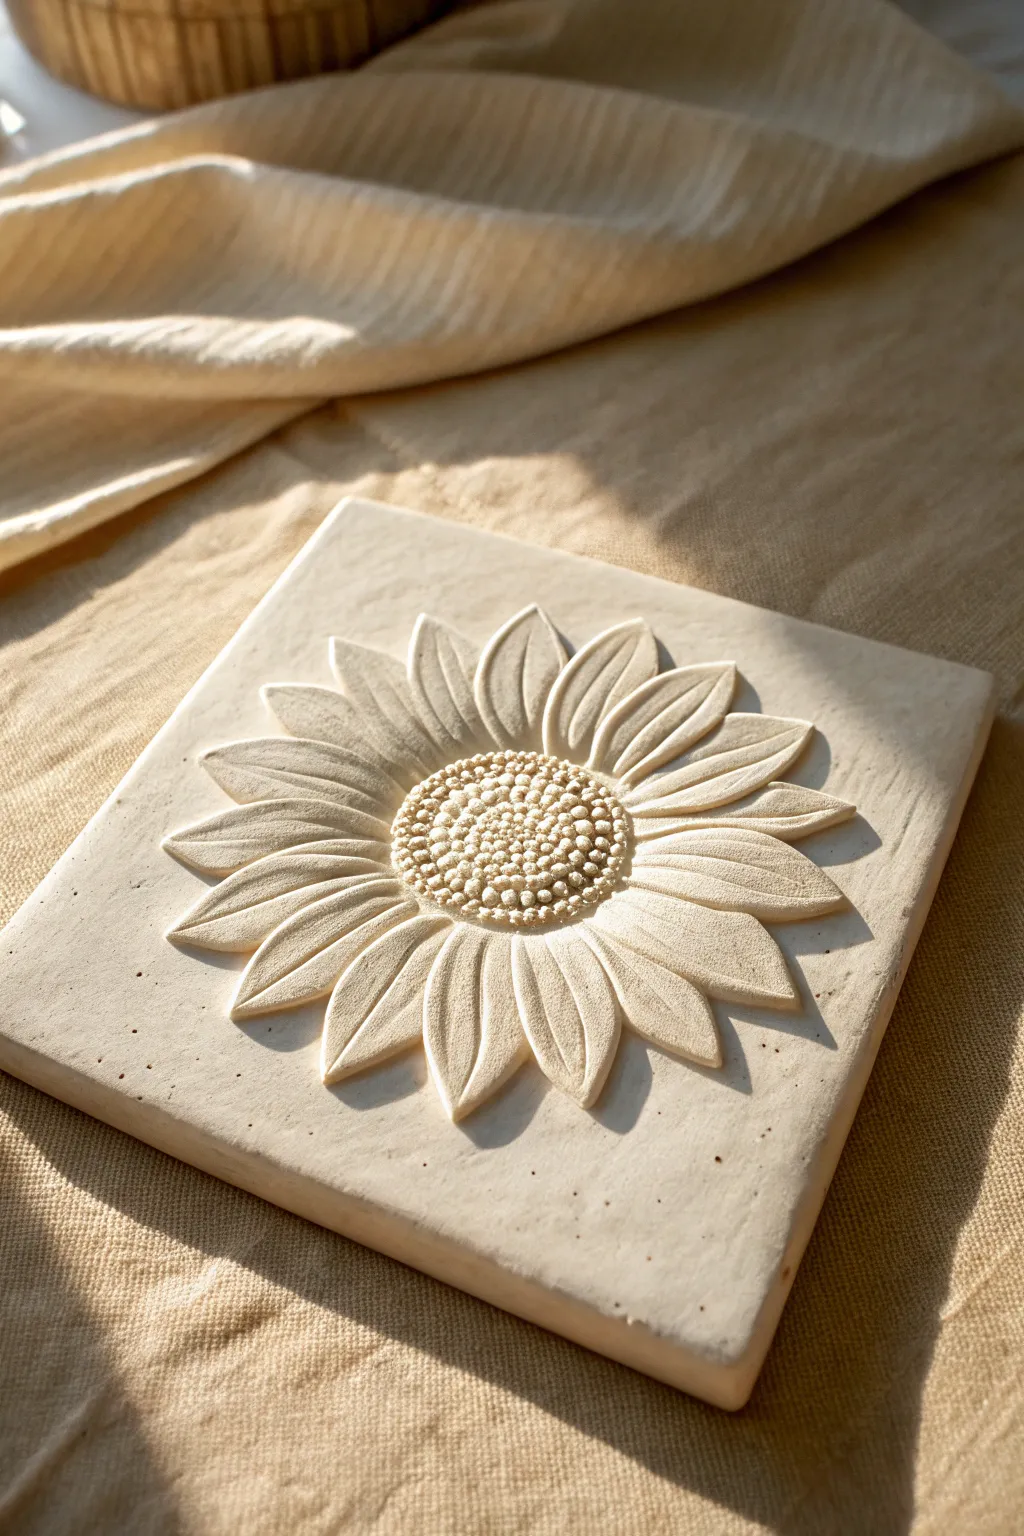
Capture the warmth of a summer afternoon with this elegant monochromatic relief tile. Using simple carving and modeling techniques, you’ll transform a plain slab of clay into a detailed sunflower study that plays beautifully with light and shadow.
How-To Guide
Materials
- Light-colored clay (air-dry or cone 6 stoneware)
- rolling pin
- Two 1/2-inch thick guide strips (wood slats)
- Square template (card stock or paper, approx 6×6 inches)
- Needle tool or X-acto knife
- Loop carving tools (small and medium)
- Ball stylus tool
- Small sponge
- Canvas board or mat for working surface
- Slip (clay slurry)
- Ware board for drying
Step 1: Preparing the Base
-
Wedge and Roll:
Begin by wedging your clay thoroughly to remove any air bubbles. Place your clay between the two guide strips on your canvas mat and use the rolling pin to create a perfectly even slab. -
Cut the Shape:
Lay your square template over the fresh slab. holding the needle tool vertical, cut straight down along the edges to create a clean square tile. -
Smooth the Canvas:
Using a slightly damp sponge, wipe the surface of the tile to remove the canvas texture and sharp cutting burrs from the edges. This creates a pristine ‘canvas’ for your carving. -
Mark the Center:
Find the rough center of your square and lightly press a small circle (about 1.5 inches in diameter) using a cookie cutter or jar lid. Do not cut through; just leave a faint impression for placement.
Step 2: Sculpting the Flower
-
Outline the Petals:
With your needle tool, faintly sketch the radiating petals around the central circle. Aim for two layers: a primary layer of larger petals appearing ‘on top’ and secondary petals peeking from underneath. -
Define the Petal Shapes:
Use a small loop tool to carve away the negative space *around* the petals. You want the background of the tile to be lower than the flower itself. Keep this carving shallow, about 1/8th of an inch deep. -
Carve Petal Contours:
Now, sculpt the individual petals. Use a smaller tool to carve a central vein or depression down the middle of each petal, creating that classic scooped sunflower shape. -
Round the Edges:
Softly run a damp finger or a smooth modeling tool along the sharp edges of each carved petal. This gentle rounding makes the flower look organic rather than mechanical. -
Layer the Depths:
For the petals that sit ‘behind’ the main ones, carve them slightly lower. This variation in height creates the illusion of depth and fullness.
Depth Perception
Work under a directional light source (like a desk lamp). The shadows cast while you work will help you gauge the depth of your carving instantly.
Step 3: Detailing the Center
-
Prepare the Seed Bed:
Score the central circle area you marked earlier and add a small, slightly flattened dome of fresh clay. This raises the center above the petal level. -
Texture the Seeds:
Using a small ball stylus tool (or the rounded end of a paintbrush), press tiny indentations repeatedly into the center dome. -
Create the Spiral:
Work in a spiral pattern, starting from the very center and moving outward. Vary the pressure slightly; deeper holes in the center and shallower ones near the edges mimic real seed growth. -
Add Tiny Spheres:
I find it adds incredible realism to roll tiny, poppy-seed-sized balls of clay and gently press them into the outer ring of the seed head using slip to adhere them.
Warping Woes?
If tile corners start curling up while drying, flip the tile upside down onto a flat surface and place a light weight (like a book) on top for a few hours.
Step 4: Finishing Touches
-
Clean Up Debris:
Use a soft, dry brush to sweep away any clay crumbs or ‘bead’ left from carving. These can stick permanently once the clay dries. -
Final Smoothing:
Run a damp sponge lightly over the flat, uncarved corners of the tile to ensure they are perfectly smooth, contrasting with the detailed center texture. -
Slow Drying:
Place a loose sheet of plastic over the tile and let it dry slowly on a ware board away from direct heat. This prevents the corners from warping upward. -
Refine Edges:
Once leather hard, you can do a final pass with a damp sponge to perfect the square edges of the tile before letting it dry completely for firing or sealing.
Once fully cured or fired, display your relief tile where sunlight can rake across the surface to highlight those beautiful textures


Koi Fish and Ripples Relief Tile
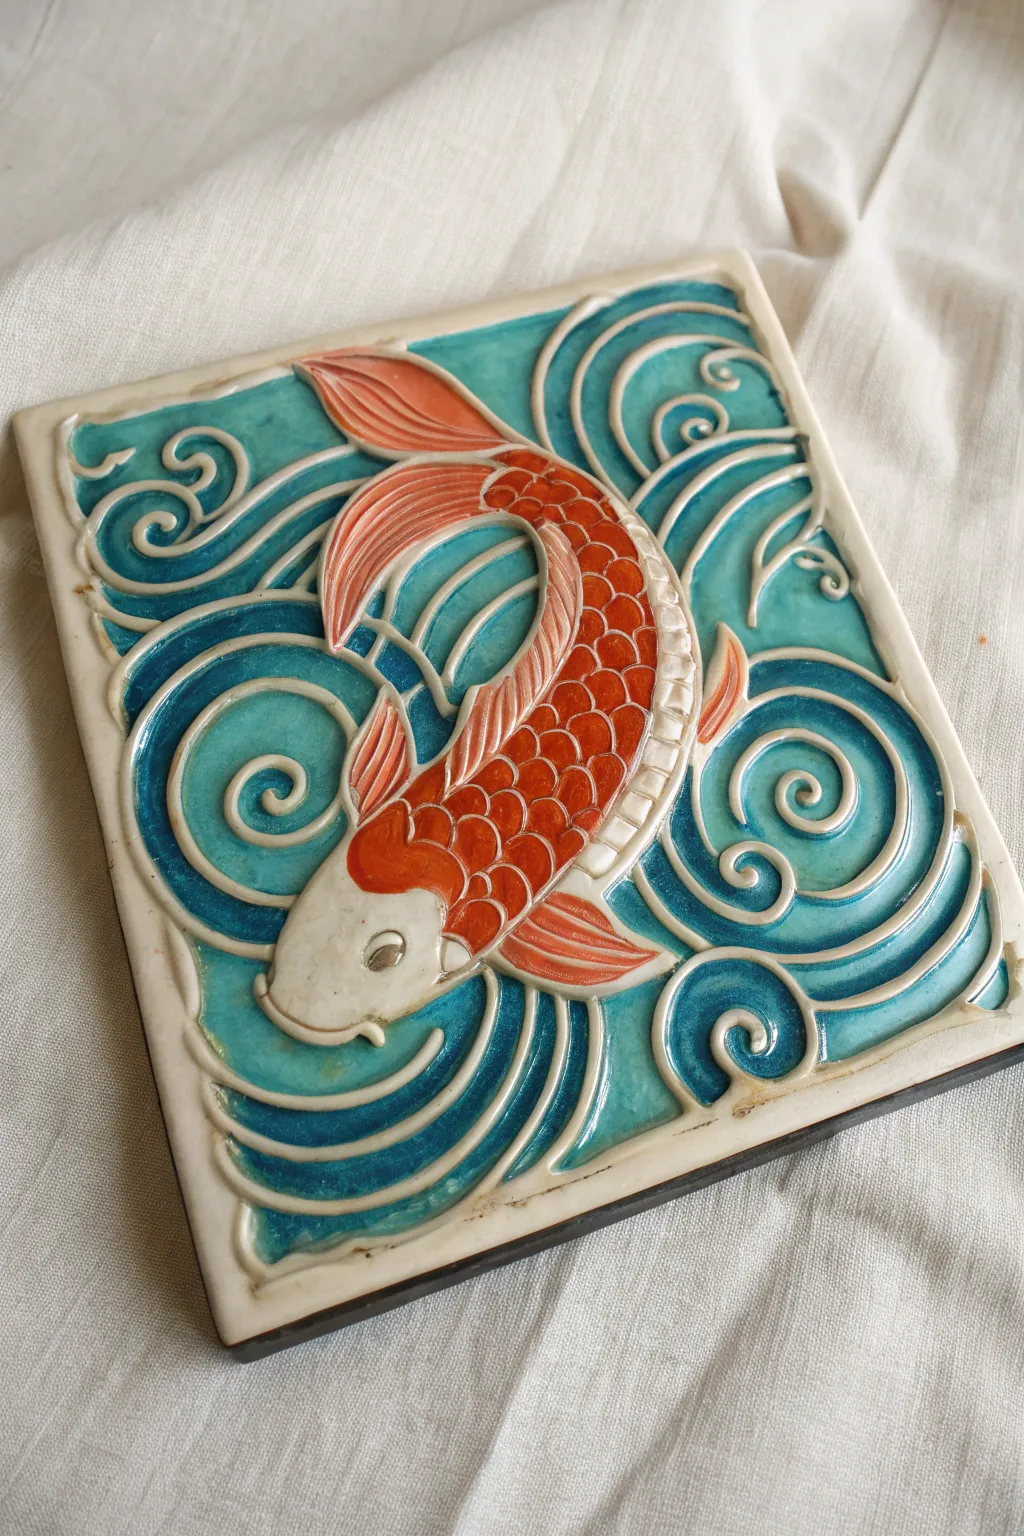
Capture the graceful movement of a koi fish amidst swirling currents in this stunning ceramic relief tile. The vibrant, glassy glazes pool in the textured recesses, creating a sense of depth and fluidity perfect for a wall hanging or trivet.
Detailed Instructions
Materials
- White or speckled stoneware clay slab (approx. 1/2 inch thick)
- Needle tool
- Loop tools and ribbon tools (various sizes)
- Rubber and metal kidney ribs
- Slip and scoring tool
- Sponge
- Underglaze pencil (optional)
- Wax resist
- Ceramic Glazes: Turquoise/Teal transparent gloss, Deep Blue gloss, Orange/Red gloss, Clear gloss
- Small soft paintbrushes
- Tile cutter or square template
Step 1: Shaping the Clay Canva
-
Prepare the slab:
Roll out a slab of stoneware clay to a uniform 1/2-inch thickness. Use a square template or ruler to cut a clean 6×6 or 8×8 inch square. Smooth the edges with a damp sponge to remove any sharpness. -
Transfer the design:
Sketch your design lightly onto the leather-hard clay using a needle tool or underglaze pencil. Draw a large C-shape for the koi’s body in the center, ensuring the tail curves dynamically. Surround the fish with swirling, circular wave patterns. -
Rough carving:
Using a loop tool, begin carving away the negative space around the fish. Lower the background surface by about 1/8 to 1/4 inch, leaving the fish body raised. Don’t worry about perfect smoothness yet; just establish the main elevations.
Clean Lines
For crisp white outlines, use a latex-based resist instead of wax. It peels off before firing, leaving zero residue and ensuring your clay lines stay perfectly raw and clean.
Step 2: Sculpting the Details
-
Define the fish:
Smooth the raised area of the fish body. Use a small tool to press gently into the clay to form the gill line behind the head. Sculpt the dorsal fin along the back and the pectoral fins on the sides, adding distinct lines for the fin rays. -
Create the scales:
Carve the scale pattern onto the body using a small U-shaped loop tool or by pressing a specialized scale tool. Start from the tail and work toward the head, layering them slightly like shingles so the glaze will catch nicely later. -
Carve the water swirls:
Return to the background area. Use a medium ribbon tool to carve deep, spiraling channels for the water. The ridges between the channels should remain high (level with the original surface) to act as lines defining the waves. -
Refine the lines:
Use a damp sponge or a soft brush with water to smooth out any rough burs or crumbs of clay. Ensure the raised lines of the waves are clean and continuous, as these will be the white unglazed highlights in the final piece. -
Add facial features:
Sculpt a small, round eye and define the mouth with a subtle indentation. Add whiskers (barbels) near the mouth if desired, keeping them raised slightly. -
Slow drying:
Sandwich the tile between two pieces of drywall or place it under plastic to dry very slowly. This step is crucial to prevent the corners from warping or curling up. Once bone dry, bisque fire the tile according to your clay body’s instructions.
Step 3: Glazing the Relief
-
Wax resist application:
Once the bisque firing is complete, wipe the tile clean. Carefully apply wax resist to the very top ridges of the water swirls, the fish’s head, the tips of the fins, and the outlines of the scales. This will keep these areas white. -
Painting the fish:
Apply the orange/red gloss glaze to the fish’s body. Let the glaze pool slightly in the recesses of the scales but wipe back any excess that sits on top of the wax resist. -
Glazing the water background:
Using a turquoise or light teal glaze, fill in all the background swirls. I find that dabbing the brush rather than stroking helps get the glaze into the deep crevices without disturbing the wax lines. -
Deepening the depths:
Apply a second, darker blue glaze only into the very deepest parts of the water carvings. This gradient adds incredible dimension to the water effect. -
Clean up:
Use a damp sponge to firmly wipe the raised waxed areas (the wave lines and fish details). This ensures the raw clay body shows through cleanly, creating that illustrative outline effect. -
Final clear coat (optional):
If your colored glazes aren’t naturally glossy, apply a thin layer of clear transparent glaze over the colored sections. Avoid the raised white clay lines if you want them to remain matte for textural contrast. -
Glaze firing:
Fire the tile a second time to the temperature required by your glazes (usually Cone 5 or 6 for stoneware). Allow the kiln to cool completely before removing your masterpiece.
Celadon Magic
Swap standard glazes for transparent Celadons. They naturally pool in textures and break over edges, automatically shading your relief carving for you.
Hang your finished tile in a bathroom or kitchen to bring a serene splash of aquatic beauty to your home

The Complete Guide to Pottery Troubleshooting
Uncover the most common ceramic mistakes—from cracking clay to failed glazes—and learn how to fix them fast.
Sea Turtle Over Wave Texture Tile
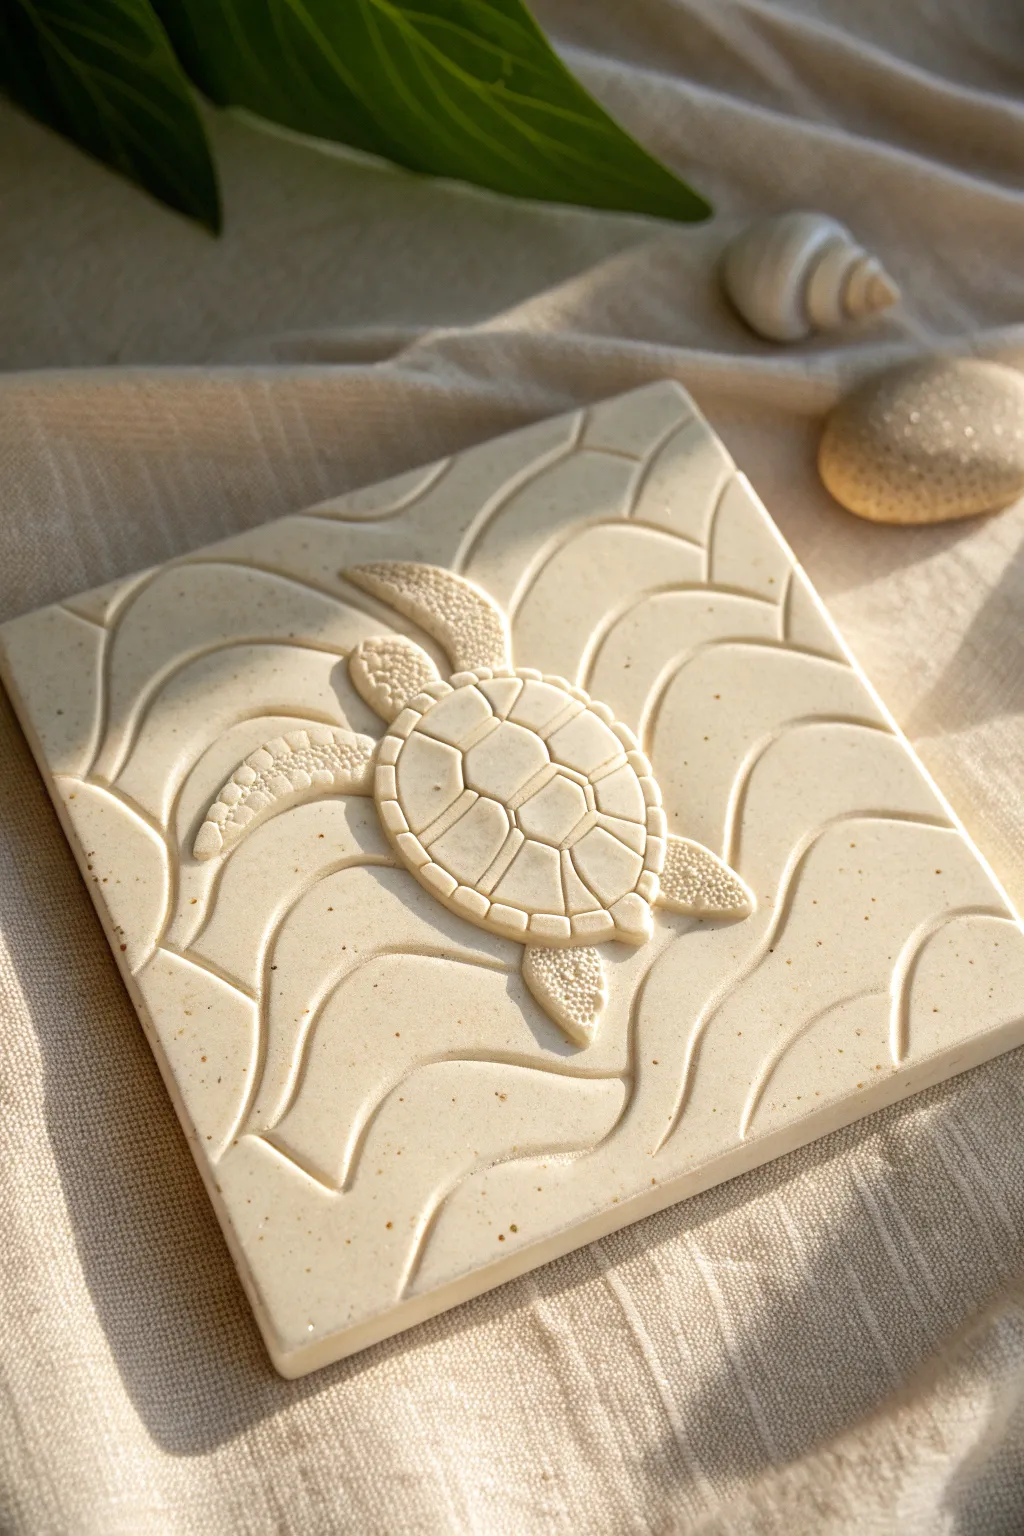
Capture the serene beauty of the ocean with this monochromatic relief tile, featuring a gentle sea turtle gliding over stylized waves. The textured, speckled clay body gives the piece a natural, sandy stone appearance that feels both modern and organic.
Step-by-Step Guide
Materials
- White or cream speckled stoneware clay (mid-fire)
- Clay slab roller or rolling pin
- Two wooden guide strips (approx 1/2 inch thick)
- Square tile cutter or fettling knife and ruler
- Needle tool
- Loop tool (small radius)
- Rib tool (rubber or silicone)
- Stylus tool or small ball tool
- Scoring tool or serrated kidney
- Slip (clay mixed with water)
- Canvas board or ware board
- Clear matte glaze (optional)
Step 1: Preparing the Base
-
Roll the Slab:
Begin by wedging your speckled clay to remove air bubbles. Roll out a smooth slab of clay, using wooden guide strips on either side to ensure an even thickness of about 1/2 inch. -
Cut the Tile:
Measure and cut a perfect square from your slab. A 6×6 inch square works well for this design. Use a ruler to ensure sharp, straight edges. -
Smooth the Surface:
Gently compress the clay surface with a rubber rib to align the clay particles. This creates that buttery smooth finish visible in the background and prevents future warping. -
Sketch the Waves:
Lightly trace your wave pattern onto the tile using a needle tool. Draw flowing, curved lines that ripple outward, creating visual movement without digging too deep yet.
Fixing Warp
If corners lift while drying, gently weigh them down with small sandbags. Always dry tiles slowly away from drafts to keep them flat.
Step 2: Sculpting the Relief
-
Carve the Grooves:
Using a small loop tool, carefully carve out the negative space along your traced wave lines. Vary the depth slightly to create shadows, but keep the cuts clean and uniform. -
Soften the Edges:
Run a damp finger or a soft sponge along the carved grooves to smooth out any sharp clay burrs. The waves should look like soft undulations in sand. -
Shape the Turtle Body:
Roll a small ball of clay and flatten it slightly into an oval for the shell. Gently press it onto the center of the tile to check sizing before attaching. -
Create Fins and Head:
Shape four flippers and a small rounded head from fresh clay pieces. The front flippers should be longer and curved backward to mimic a swimming motion. -
Attach Components:
Score the back of the shell, head, and flippers, as well as the contact points on the tile. Apply slip generously and press the pieces firmly into place. -
Refine the Connection:
Use a small modeling tool to blend the underside seams where the turtle meets the tile, ensuring a strong bond that won’t separate during firing.
Ocean Wash
Apply a diluted wash of blue underglaze into the wave grooves, then wipe the surface clean. The color stays in the recesses for depth.
Step 3: Adding Details & Texture
-
Shell Segmentation:
On the shell, lightly sketch the pattern of scutes (the hexagon-like shapes). Use a needle tool to gently press these lines in, defining the central ridge first. -
Detailing the Shell Rim:
Add small, rectangular markings around the outer perimeter of the shell to create the marginal scutes. -
Adding Flipper Texture:
This is a key detail: use a stylus or small ball tool to press tiny dimples into the head and flippers. I like to vary the pressure here to create a realistic, pebbled skin texture. -
Final Smoothing:
Check the entire piece for stray clay crumbs. Use a soft brush to sweep away debris from the textured areas without flattening your work. -
Drying:
Place the tile on a ware board and cover it loosely with plastic. Let it dry very slowly over several days to prevent the corners from curling up. -
Firing:
Once bone dry, bisque fire the tile. For the finish shown, fire to cone 5 or 6 without glaze, or apply a very thin clear matte glaze to enhance the speckles.
Display your finished tile on a stand or mount it in a shadow box frame to bring a touch of the seaside to your home
Cactus Garden Relief Tile
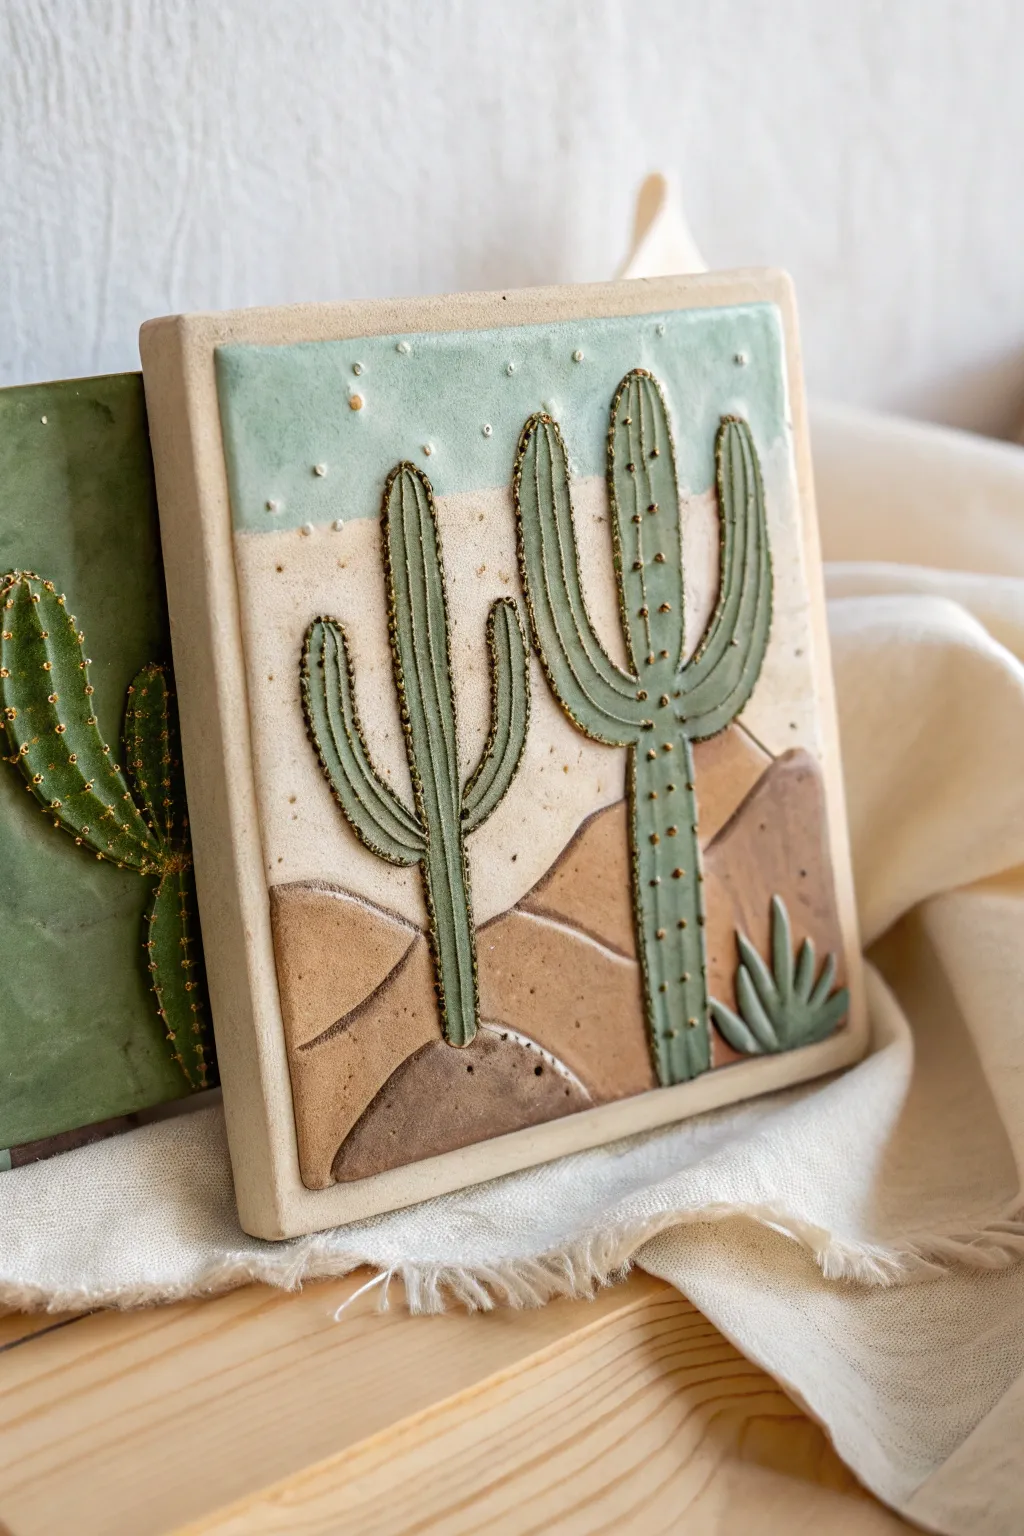
Capture the serene beauty of the desert with this textured relief tile featuring standing cacti and rolling dunes. The combination of earthy unglazed clay and soft muted glazes creates a stunning dimensional piece perfect for a wall hanging or trivet.
Step-by-Step Tutorial
Materials
- White stoneware clay slab (approx. 1/2 inch thick)
- Clay slab roller or rolling pin with thickness guides
- Paper template of cactus design
- Needle tool
- Fettling knife
- Small loop tools for carving
- Rubber kidney rib
- Underglazes (Sage Green, Tan, Chocolate Brown, Sky Blue)
- Clear matte glaze
- Gold luster (low fire) or gold acrylic paint (no-fire option)
- Fine detail paintbrush
- Scoring tool and slip
Step 1: Slab Preparation & Design Transfer
-
Roll the foundation:
Begin by rolling out a smooth slab of stoneware clay to a uniform 1/2-inch thickness. This substantial thickness prevents warping during the drying process. Cut a perfect square, about 6×6 inches, using a ruler and fettling knife. -
Smooth the surface:
Use a damp sponge or a soft rubber kidney rib to compress the clay surface gently. This removes canvas textures and aligns the clay particles, providing a clean canvas for your relief work. -
Transfer the sketch:
Lay your paper template over the wet clay. Trace the outlines of the hills, the two main cacti, and the small agave plant using a dull pencil or stylus. Press just hard enough to leave a faint impression on the clay surface.
Warping Woes?
If your tile curls up at the edges while drying, flip it over and place a heavy wooden board or book on top of it for a day. This weight helps press the clay memory back into flat submission.
Step 2: Carving & Sculpting Relief
-
Define the sky:
Using a wide loop tool, gently carve away a very thin layer of clay from the sky area. This naturally pushes the cactus and hill shapes forward, creating the first level of depth. -
Sculpt the dunes:
For the hills, you want varied depth. Carve the background hills slightly lower than the foreground hills. Use your finger to smooth and round the edges where the hills meet, simulating soft, wind-blown sand. -
Detail the cacti:
The cacti should remain the highest point of reference. Use a needle tool to lightly incise vertical ribs running up the length of the cactus arms. Don’t dig too deep; you just want surface texture. -
Create the spines:
Along the incised vertical ribs, poke small, evenly spaced holes or indentations with your needle tool. These tiny divots will catch the glaze and gold accents later, mimicking the prickly spines. -
Add the agave:
For the small plant in the bottom right, carve strictly around the leaves so they stand out sharply against the hill. Use a modeling tool to give each leaf a slight concave curve. -
Refine the edges:
Go around the outer border of the tile with a damp sponge to soften any sharp corners created during the cutting process. I always double-check the back of the tile here to smooth out rough spots.
Level Up: Sun & Stars
Before the bisque fire, press tiny crystal beads or carve small star shapes into the ‘sky’ area. After glazing, these will add a magical twinkle to your desert scene.
Step 3: Glazing & Finishing
-
The bisque fire:
Allow the tile to dry slowly under thin plastic for several days to prevent warping, then bisque fire it according to your clay body’s specifications (usually Cone 04). -
Apply sky glaze:
Paint the sky area with a semi-opaque turquoise or sky blue glaze. Apply it somewhat unevenly or wipe it back slightly with a sponge to give it that washed, watercolor look visible in the photo. -
Color landscape elements:
Use a chocolate brown underglaze for the foreground hill and a lighter tan for the background ones. You can leave some of the raw clay showing through for texture. -
Paint the cacti:
Carefully paint the cacti with a sage green underglaze. Make sure the glaze settles into those vertical incised lines, but try to keep the very tops of the ridges slightly lighter for contrast. -
Clear coat application:
Apply a thin coat of clear matte glaze over the entire piece to seal the underglazes without adding a high-gloss shine that would distract from the texture. Fire the tile to maturity (usually Cone 5 or 6). -
The golden touch:
Once the final firing is complete and the tile is cool, use a tiny brush to apply gold luster (which requires a third low-fire kiln run) or a metallic gold acrylic paint to the tiny spine dots you created earlier.
Hang your finished tile on a gallery wall or use it as a coaster to bring a bit of desert warmth into your home


What Really Happens Inside the Kiln
Learn how time and temperature work together inside the kiln to transform clay into durable ceramic.
Mountain Sunset Layered Relief Tile
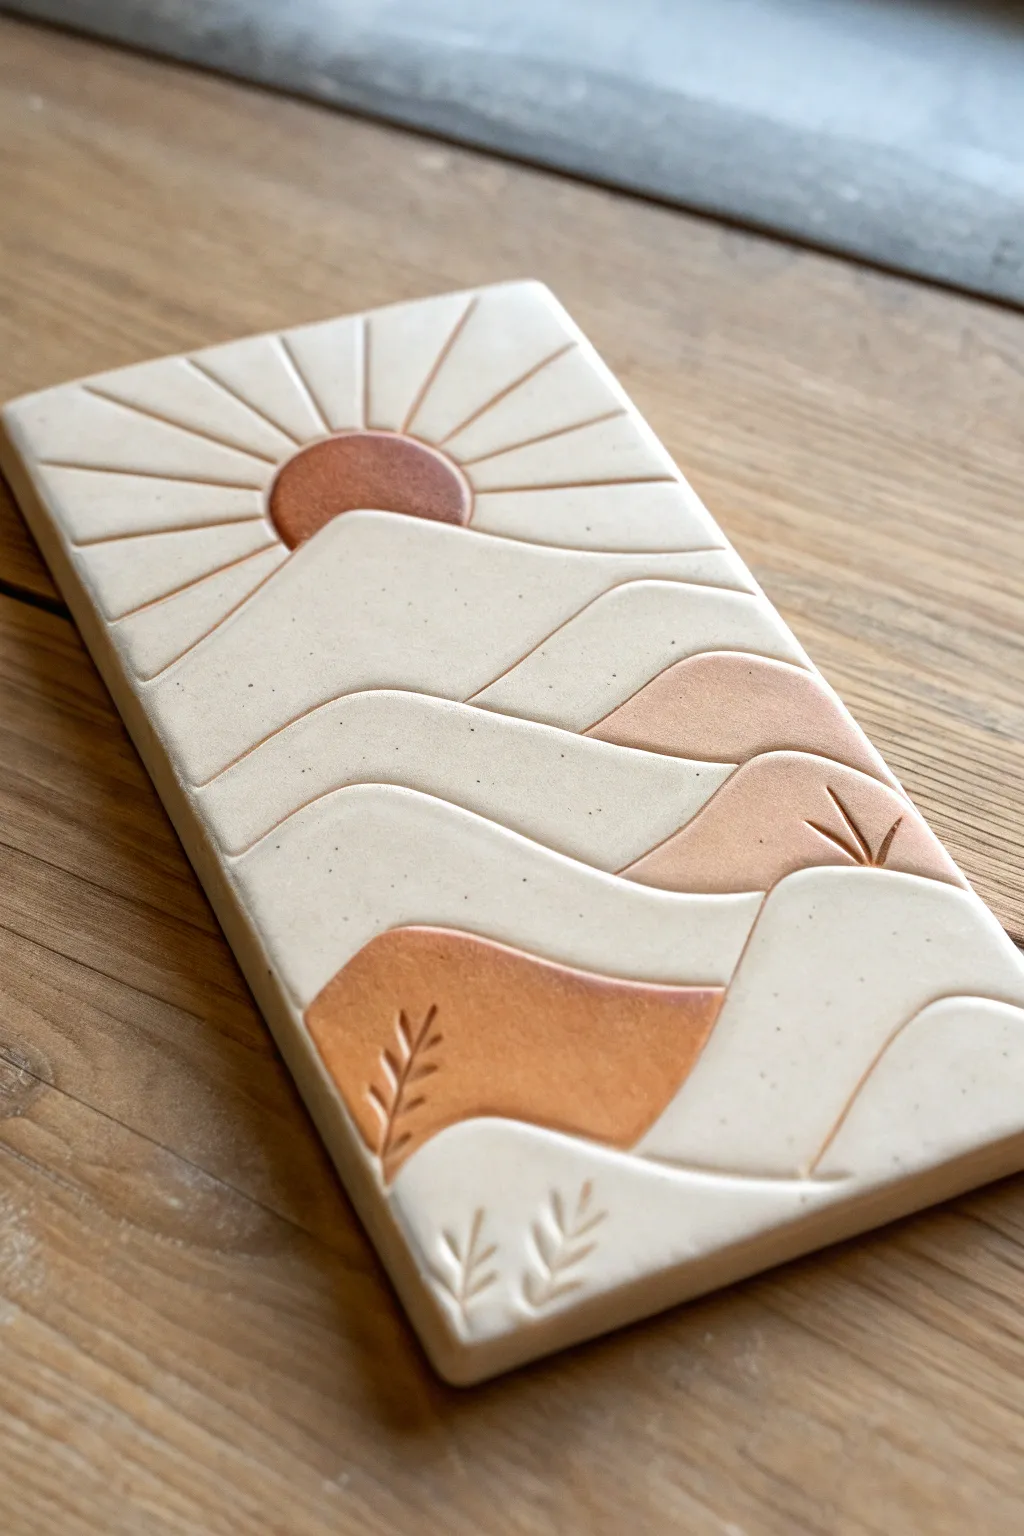
Capture the calm of a desert sunset with this minimalist clay relief tile. Using a palette of warm, natural clays, this project combines simple slab building with carving techniques to create a soothing, textured landscape perfect for a coaster or wall hanging.
How-To Guide
Materials
- Polymer clay (white/beige, terracotta, and soft brown)
- Acrylic rolling pin
- Clay knife or scalpel
- Needle tool
- Rectangle clay cutter (or ruler and knife)
- Clean work surface or ceramic tile
- Needle tool or small carving gouge
- Oven for baking (if using polymer clay)
- Sandpaper (fine grit)
Step 1: Preparing the Base
-
Condition the Clay:
Begin by thoroughly conditioning your main base color, likely a creamy beige or off-white polymer clay. Knead it in your hands until it is pliable and warm to prevent cracking later on. -
Create the Slab:
Roll out the conditioned clay into an even slab, approximately 1/4 inch thick. Use depth guides or playing cards stacked on either side of your roller to ensure a uniform thickness across the entire piece. -
Cut the Shape:
Using a rectangular cutter or a ruler and sharp blade, cut out a clean rectangle. This will be your canvas. Smooth the edges with your fingertip to remove any sharpness left by the cut.
Clean Lines
To fix smudged inlay lines, let the clay rest in the freezer for 5 minutes. The firmer clay slices cleaner, letting you re-cut crisp edges.
Step 2: Sketching and Carving
-
Outline the Design:
Before committing to deep cuts, lightly sketch your design onto the clay surface using a needle tool. Draw the horizon line for the mountains, the rolling hills in the foreground, and the semi-circle sun peeking from behind the peaks. -
Define the Layers:
Use a small carving tool or a loop tool to gently deepen the lines between the hills. The goal isn’t to cut all the way through, but to create shallow channels that define the separation between the landscape layers. -
Carve the Sun Rays:
radiance. Starting from the edge of your sun circle, carve straight lines radiating outward toward the top and sides of the tile. Keep these lines consistently spaced for a graphic, clean look.
Step 3: Adding Color Accents
-
Mix Accent Colors:
Condition small amounts of terracotta and soft brown clay. I like to mix a tiny bit of the base beige into these colors to ensure the palette feels cohesive and soft. -
Inlay the Sun:
Carefully scoop out a shallow layer of clay from the sun circle area. Roll a thin piece of the terracotta clay to match the shape and press it firmly into the recess. creating a seamless inlay. -
Inlay the Hills:
Repeat this inlay process for specific hill sections. Remove a thin layer of the beige base where you want color, then press in a correspondingly shaped piece of brown or terracotta clay. Smooth the seams with your finger or a clay tool so the surface is flush. -
Add Texture Details:
Using a sharp needle tool or knife, press small details into the foreground hills. Create simple fern or grass patterns by pressing the tool in a ‘V’ formation to mimic vegetation.
Make it a Wall Piece
Before baking, poke two small holes in the top corners. Thread leather cord through after finishing to create a modern wall hanging.
Step 4: Finishing Touches
-
Final Smoothing:
Check the entire surface for fingerprints or unwanted tool marks. You can lightly brush the clay with a little baby oil or cornstarch to smooth imperfections before baking. -
Bake the Piece:
Bake the tile according to your clay manufacturer’s instructions. Usually, this involves a low temperature (around 275°F/135°C) for 30–45 minutes depending on thickness. -
Cool and Sand:
Allow the tile to cool completely. Once cool, use fine-grit sandpaper under running water to gently sand the edges and surface, giving the piece a professional, stone-like matte finish.
This serene tile brings a touch of warmth to your space and serves as a lovely handmade coaster or decorative accent
Simple Owl Portrait Relief Tile
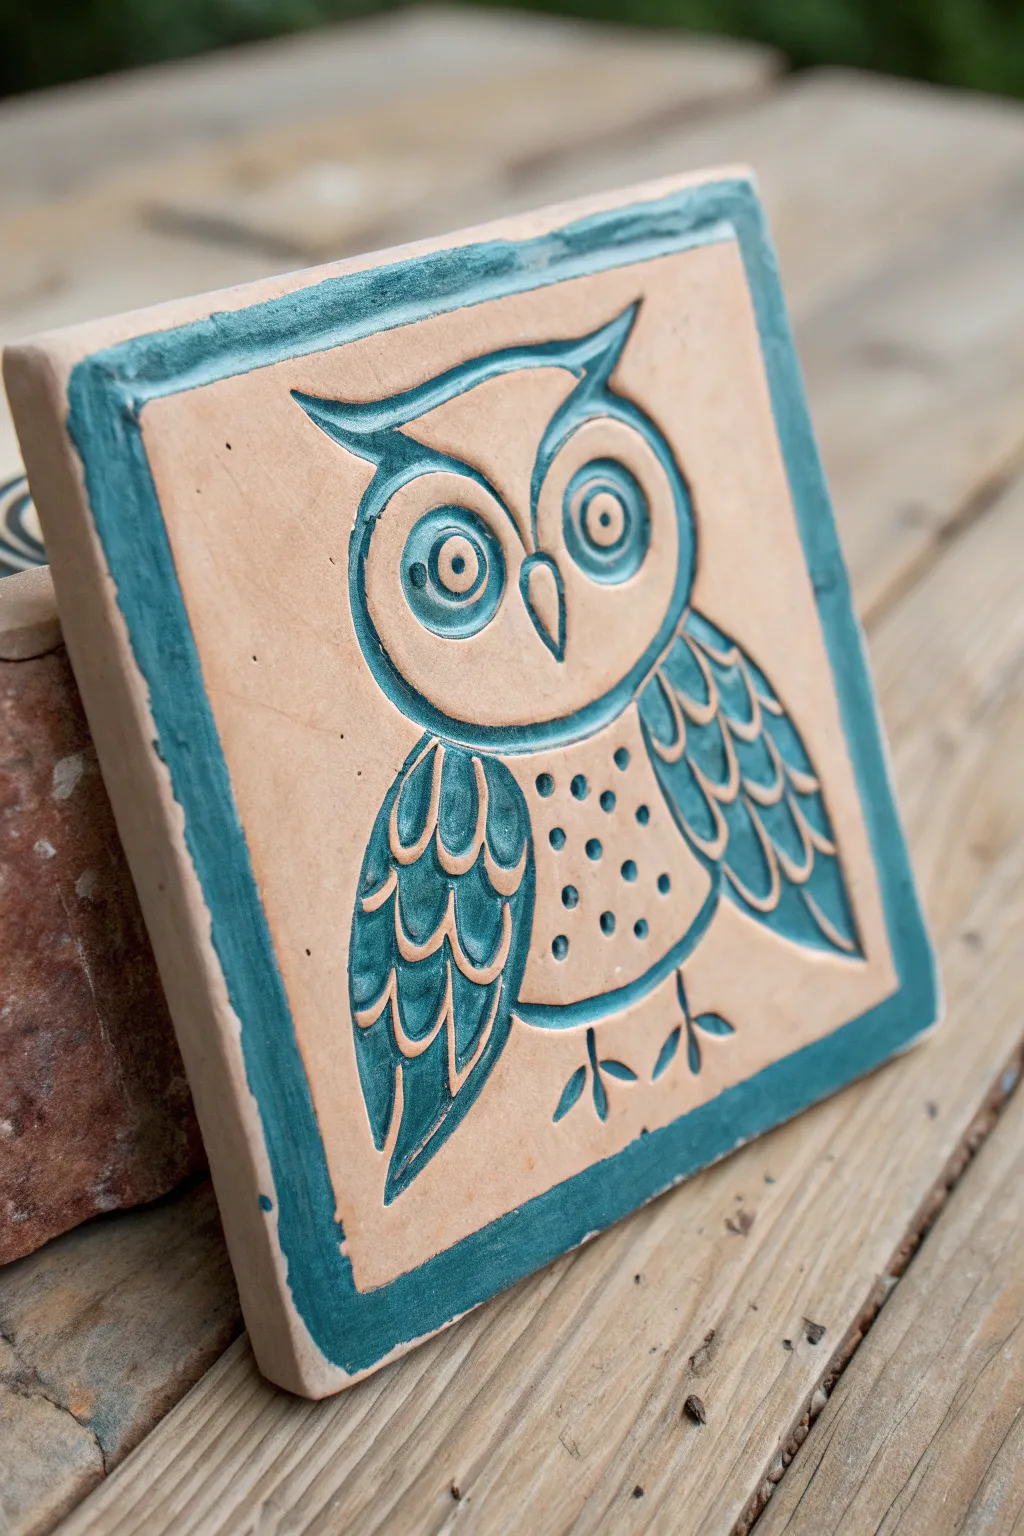
Capture the charm of woodland creatures with this approachable clay relief project featuring a wide-eyed owl. Using simple carving techniques and a striking turquoise glaze inlay, you’ll create a rustic yet modern decorative tile perfect for hanging or display.
Step-by-Step Guide
Materials
- Terra cotta or earthenware clay slab (approx. 1/2 inch thick)
- Square tile cutter or fettling knife
- rolling pin and guide slats
- Needle tool
- Loop tool or small carving gouge
- Turquoise or teal underglaze
- Clear transparent glaze (optional)
- Wait damp sponge
- Small paintbrush
- Pencil or paper for sketching design
Step 1: Shaping the Base
-
Roll out the slab:
Start by rolling out your clay into an even slab. Using wooden guide slats on either side of your rolling pin creates a uniform thickness of about 1/2 inch, which helps prevent warping later. -
Cut the square:
Measure and cut a perfect square for your tile base. A metal ruler or a dedicated square tile cutter works best here. Smooth the outer edges with your finger or a slightly damp sponge to remove any sharp burs. -
Define the border:
Using a ruler and a needle tool, lightly incise a border about 1/2 inch from the edge all the way around the square. Don’t cut too deep; this is just a guideline for where the glaze frame will eventually go.
Step 2: Carving the Design
-
Sketch the owl:
Lightly sketch your owl design directly onto the leather-hard clay using a needle tool or a dull pencil. Start with a large oval for the body and a wider, slightly pointed oval for the head. -
Outline the features:
Draw the circular eyes, the beak triangle, and the wing shapes on the sides. Add the details like the U-shaped feathers on the wings and the scattered dots on the belly. -
Carve the main lines:
Now, deepen your initial sketch lines. Use a carving tool or needle tool to go over the outline of the owl, the eyes, and the wings. You want a clear, deep channel for the glaze to settle into. -
Detailing the wings:
For the wings, carve out the negative space inside the feather shapes. I find that pressing slightly harder at the top of the feather curve creates a nice dimensional effect. -
Adding texture:
Press the end of a small brush handle or a specialized dotting tool into the clay to create the circular indentations on the owl’s belly and for the pupils of the eyes. -
Define the feet:
Carve simple, stick-figure style claws at the bottom using three straight lines for each foot. -
Clean up crumbs:
Wait until the clay is bone dry, then use a dry, stiff brush to sweep away any little clay crumbs or “burs” created during carving. Do not use water at this stage, or you’ll wash away your crisp details. -
Bisque fire:
Fire the piece in a kiln to the bisque temperature appropriate for your specific clay body (usually Cone 04-06).
Mishima Magic
This technique of filling carved lines with contrasting slip or underglaze and wiping it back is called Mishima. Change your water frequently when wiping to keep the clay body from staining.
Step 3: Glazing and Finishing
-
Apply the color:
Generously brush your turquoise underglaze over the entire carved design and the border area. You want the glaze to get deep into every carved groove and indentation. -
The wipe-back technique:
Let the glaze dry just until it loses its sheen. Take a damp (not soaking wet) sponge and wipe across the surface of the tile. -
Reveal the clay:
Continue wiping until the raised surface of the clay is clean and the natural terracotta color shows through, leaving the turquoise glaze trapped only in the recessed carved lines and the border. -
Clean the edges:
Pay special attention to the border frame. You can leave it slightly messy for a rustic look, or wipe it carefully to create a sharp, distinct teal frame. -
Final dry:
Allow the underglaze to dry completely. If you want a shiny finish, apply a coat of clear transparent glaze over the top; for a matte finish like the reference photo, you can skip this step or use a matte clear coat. -
Glaze fire:
Fire the tile a second time to the maturation temperature of your glaze and clay.
Make it a Trivet
Glue small felt pads or cork backing to the underside of your fired tile. This transforms your art piece into a functional coaster or trivet that protects your table from heat and scratches.
Once cooled, your charming owl tile is ready to add a touch of handcrafted warmth to any room

TRACK YOUR CERAMIC JOURNEY
Capture glaze tests, firing details, and creative progress—all in one simple printable. Make your projects easier to repeat and improve.
Fish Scale Pattern Texture Tile
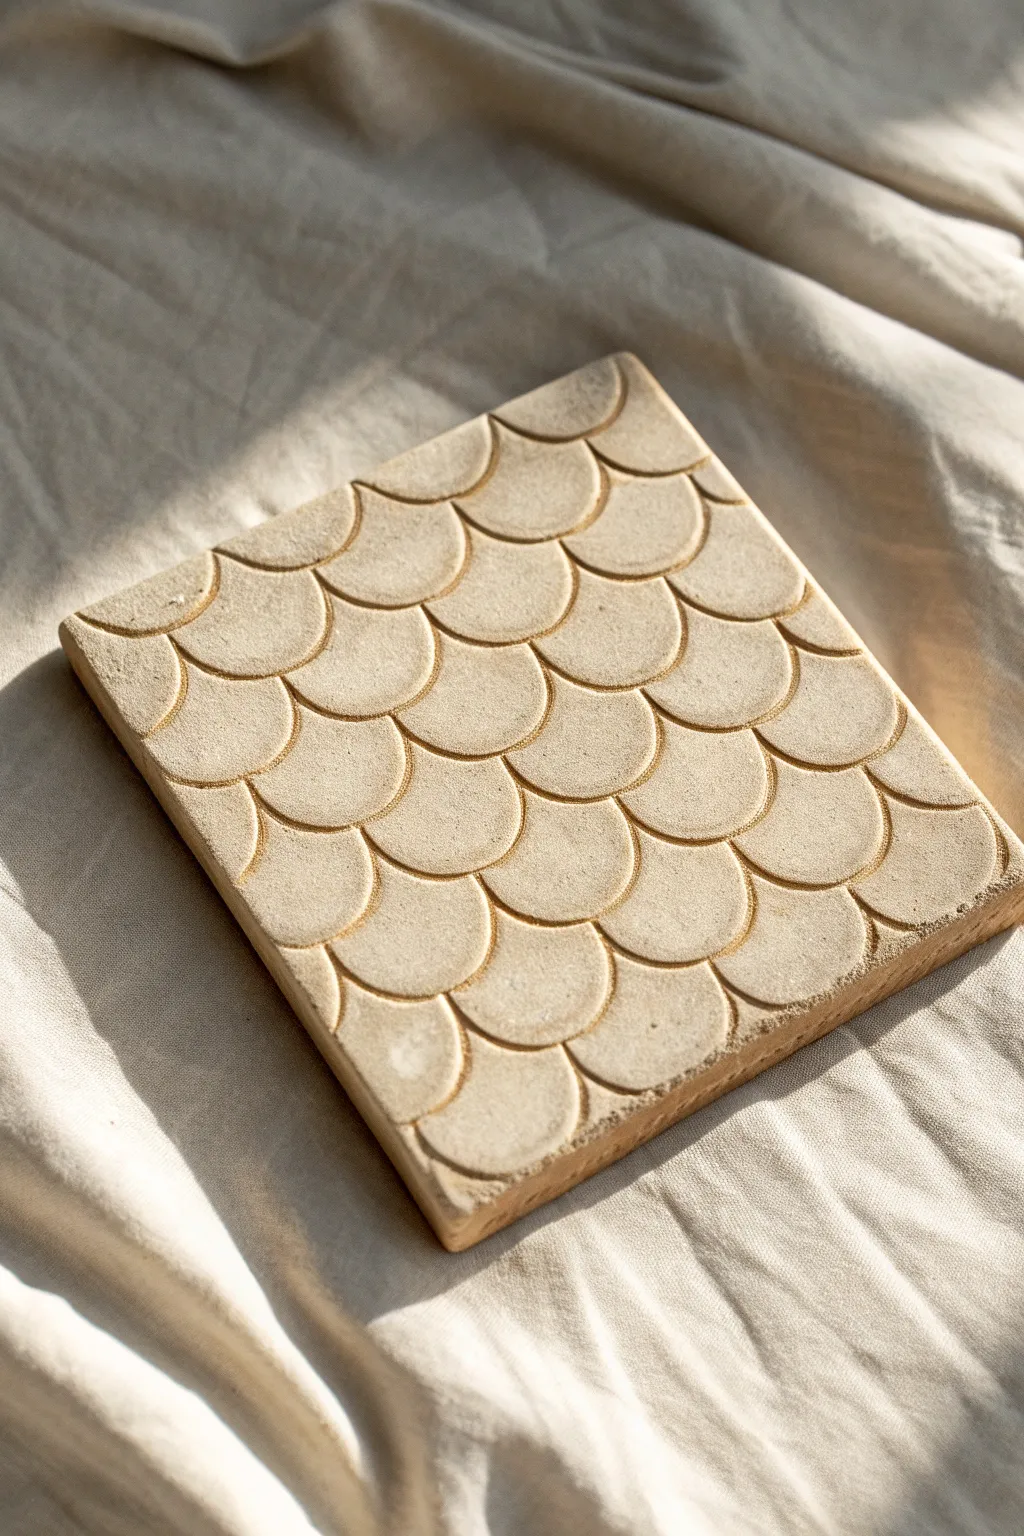
Capture the rhythmic beauty of mermaid scales or traditional Japanese waves with this minimalist clay tile project. The finished piece features a satisfyingly tactile surface with raw, sandy textures that look stunning on a coffee table or mounted as wall art.
How-To Guide
Materials
- Stoneware clay (buff or sand-colored)
- Rolling pin
- Two wooden guide strips (approx. 1/2 inch thick)
- Square template (cardboard or plastic)
- Needle tool or fettling knife
- Loop tool (small, U-shaped)
- Metal kidney scraper
- Canvas or wooden board (work surface)
- Bat or separate board for drying
- Porous sponge
Step 1: Preparing the Slab
-
Wedge the clay:
Begin by thoroughly wedging a ball of stoneware clay to remove air bubbles and ensure a uniform consistency. A well-wedged ball is crucial for a crack-free tile. -
Set up guides:
Place your wooden guide strips on either side of the clay ball on your canvas workspace. These will ensure your tile has a perfectly even thickness. -
Roll out the slab:
Using the rolling pin, flatten the clay until the pin rests on the guide strips. Roll in multiple directions to compress the clay particles, which helps prevent warping later. -
Smooth the surface:
Take your metal kidney scraper and firmly compress the surface of the slab. Drag it across the clay to remove the canvas texture and create a smooth, pristine face.
Warping Worries?
If corners lift while drying, flip the tile onto a fresh board and weigh down the corners gently with small sandbags or extra clay chunks wrapped in plastic.
Step 2: Shaping and Carving
-
Cut the square:
Lay your square template gently on the slab. Using a needle tool or fettling knife, cut straight down (holds the knife perpendicular) to create clean, sharp edges. -
Plan the pattern:
Lightly sketch a horizontal guideline across the top of the tile with a needle tool. This will be the starting point for your first row of scales. -
Carve the first row:
Using the U-shaped loop tool, carve out semi-circles along your guideline. Press firmly enough to create depth but don’t cut all the way through. -
Offset the second row:
Start the second row of scales so that the top point of each new scale meets the bottom center of the scale above it. This brick-lay or offset pattern is key to the fish scale look. -
Establish a rhythm:
Continue carving row by row. I usually find that working relatively quickly helps keep the curves fluid and natural, rather than stiff and over-calculated. -
Handling the edges:
When you reach the left and right edges, let the pattern simply drop off. Carve partial scales to imply the pattern continues beyond the frame. -
Refine the lines:
Once the full grid is carved, go back over any shallow lines with the loop tool to ensure the depth is consistent across the whole tile.
Step 3: Finishing and Drying
-
Soften ridges:
After the clay has stiffened slightly to leather-hard, use a barely damp sponge to gently wipe over the carved lines. This softens sharp burrs without erasing the texture. -
Check the edges:
Run your finger or a smoothing tool along the outer perimeter of the square to bevel the edges slightly, preventing them from being too sharp after firing. -
Initial drying:
Place the tile on a drywall board or wooden bat. Cover it loosely with plastic sheeting to allow it to dry slowly and evenly. -
Flip daily:
Once a day, gently sandwich the tile between two boards and flip it over. This exposure ensures both sides dry at the same rate, which is the best defense against curling corners. -
Bisque fire:
Once bone dry, fire the tile in a kiln to bisque temperature (usually Cone 04 or 06 depending on your clay body). -
Glazing choice:
For the look in the image, leave the tile unglazed or apply a clear matte wash to highlight the raw clay texture, then final fire to temperature.
Make it a Coaster
Scale this down to 4×4 inches and glue a thin sheet of cork to the bottom after firing. Perfect for stylish, absorbent drink coasters.
The repetitive motion of carving these scales is a meditative process that yields a wonderfully organic result
Geometric Linework Carved Tile
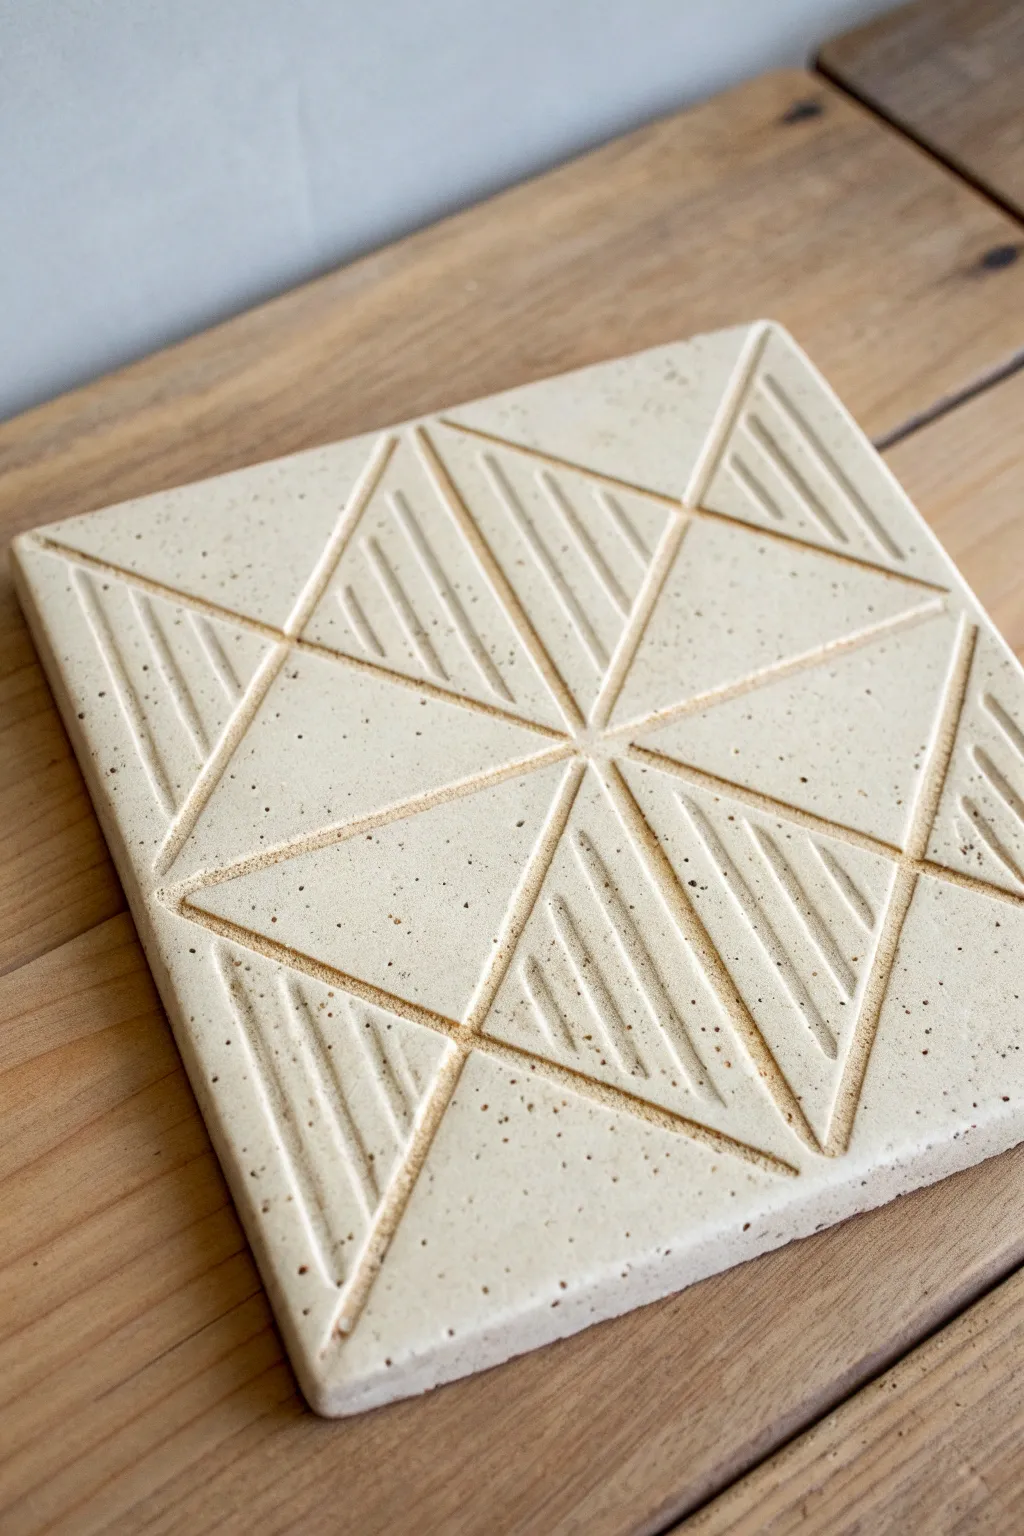
This project explores the satisfying precision of geometric carving on a simple clay canvas continuously. Using buff speckled clay, you will create a symmetrical starburst pattern that relies on clean lines and negative space for a modern, architectural look.
Step-by-Step
Materials
- Speckled buff stoneware clay (groggy clay holds shape well)
- Square tile cutter or ruler and knife
- Rolling pin with 1/4 inch depth guides
- Loop tool (small, U-shaped)
- Needle tool
- Ruler (preferably clear plastic)
- Wooden slat or ware board
- Sponge
- Canvas or cloth work surface
Step 1: Preparing the Slab
-
Roll the clay:
Begin by wedging your speckled clay to remove air bubbles. Roll it out on your canvas surface into a smooth slab. Use depth guides to ensure an even thickness of about 1/4 inch everywhere. -
Smooth the surface:
Before cutting, take a rib tool or a slightly damp sponge and compress the surface of the clay. This aligns the clay particles and creates a flawless canvas for your carving. -
Cut the square:
Measure and cut a perfect square. A 6×6 inch square is a manageable size for this level of detail. Use a sharp knife against a ruler for straight edges. -
Dry to leather hard:
Transfer the tile to a wooden ware board. Let it dry slowly until it reaches a ‘leather hard’ state. This is crucial—if the clay is too soft, the lines will be mushy; too dry, and it will chip.
Clean Lines Tip
Don’t try to remove carved clay debris while it’s wet. Let the crumbs dry completely, then brush them away with a soft paintbrush.
Step 2: Mapping the Geometry
-
Find the center:
Using a ruler, very lightly score distinct diagonal lines from corner to corner with your needle tool to find the exact center point. -
Bisect the sides:
Measure the halfway point of each of the four outer edges. Lightly score lines connecting these midpoints to the center. You should now have 8 distinct triangular sections. -
Create the inner diamond:
Mark a point about halfway down each of your 8 main radial lines. Connect these points to form a diamond shape in the middle of the tile. -
Define the outer triangles:
Connect the corners of that inner diamond to the corners of the tile. This completes the basic grid needed for the carving pattern.
Level Up: Trivet use
Glue a sheet of cork or individual felt pads to the bottom after firing to turn this art tile into a functional, modern coaster or trivet.
Step 3: Carving the Pattern
-
Select your tool:
Pick up your small U-shaped loop tool. Test it on a scrap piece of leather-hard clay first to gauge how much pressure you need for a deep, confident line. -
Carve the main grid:
Go over your initial light score lines with the loop tool. Carve deep channels to define the eight main triangular sections radiating from the center. -
Plan the fill:
Look at the pattern: triangles alternate between being empty (smooth) and filled with parallel lines. Identify which triangles will receive texture. -
Carve parallel lines:
In the textured sections, use the ruler as a guide for your loop tool. Carve parallel lines running parallel to one edge of the triangle. I prefer to start with the longest center line and work outward. -
Check the depth:
Ensure all carved channels are roughly the same depth. This consistency is what gives the tile its professional, graphic quality. -
Clean the burrs:
Wait until the tile is slightly drier (bone dry), then use a dry brush or a very gently damp sponge to knock off the little crumbs (burrs) of clay left by the carving tool.
Step 4: Finishing and Firing
-
Refine the edges:
Run a damp finger along the sharp outer edges of the square to slightly round them off, preventing glaze from crawling away or sharp edges after firing. -
Dry slowly:
Place a piece of plastic loosely over the tile to let it dry very slowly. Fast drying can cause flat tiles to warp or curl at the corners. -
Bisque fire:
Fire the piece to cone 04 (or your clay’s specific bisque temperature). -
Glaze or wash:
To mimic the image, leave the tile unglazed to show off the raw speckled clay, or apply a very thin matte clear glaze. Alternatively, wash an oxide into the lines and wipe the surface back to highlight the geometry. -
Final fire:
Fire the tile to maturity (likely cone 5 or 6 for stoneware) to finish the piece.
Once fired, the contrast between the smooth triangles and the linear texture creates a mesmerizing tactile surface you can display or use
Lace-Impressed Texture Tile
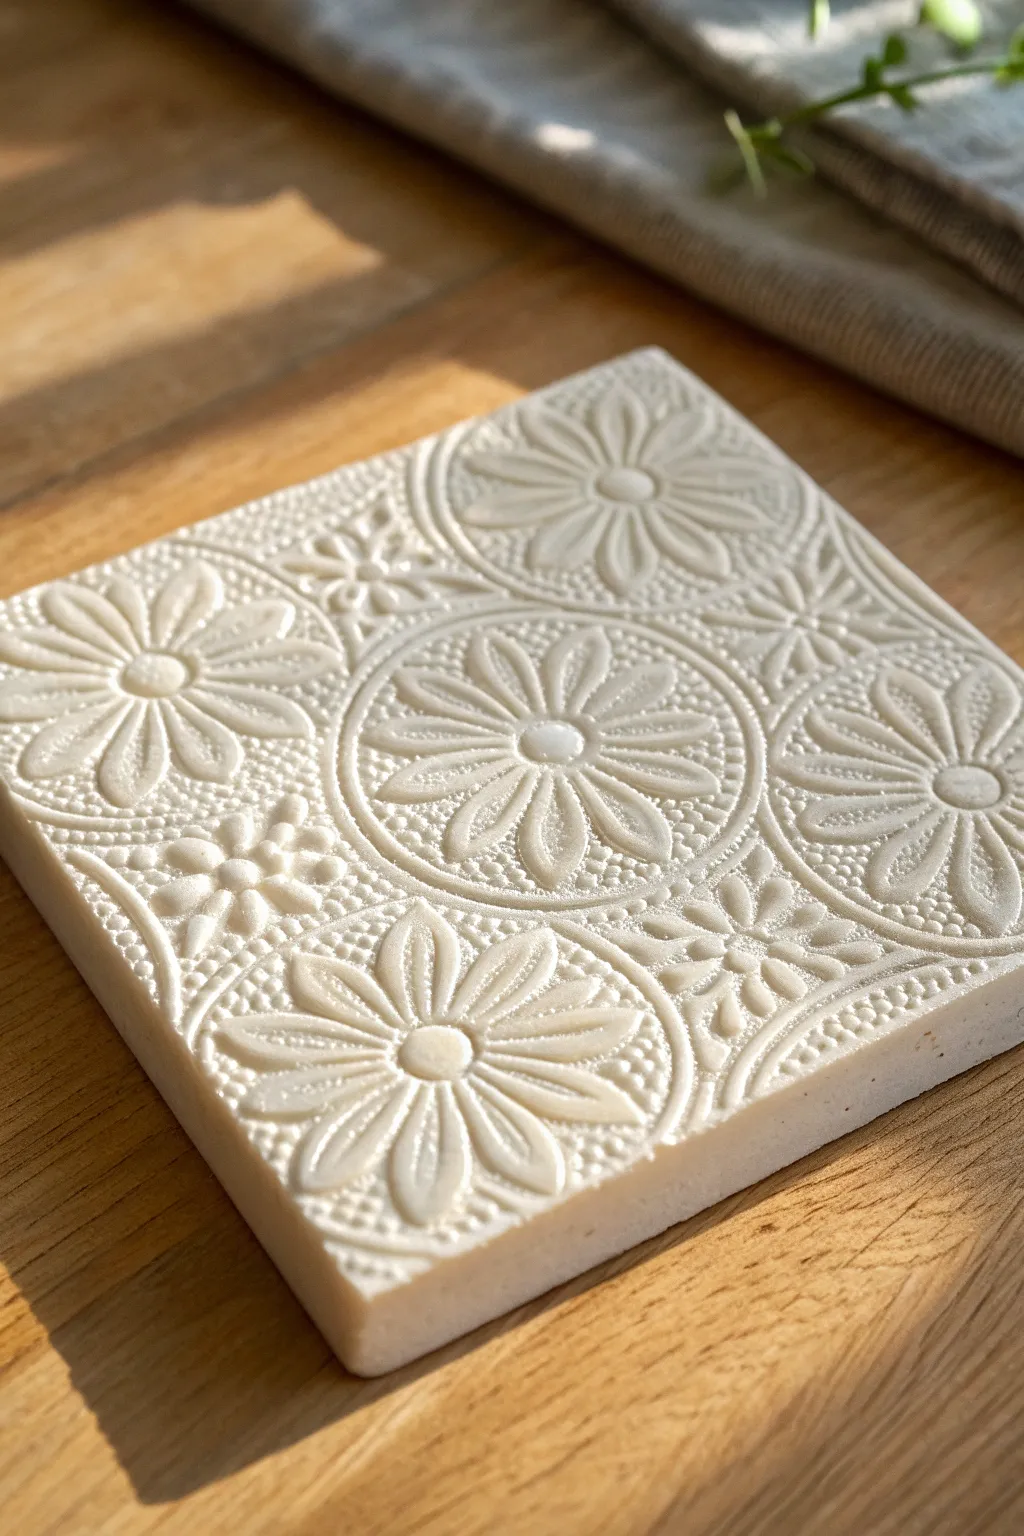
Capture the intricate beauty of lace in a permanent medium with this elegant clay project. The finished tile features a stunning, raised floral relief that contrasts beautifully with the smooth white surface, creating a sophisticated piece of textured art.
Step-by-Step Guide
Materials
- Air-dry clay (white) or polymer clay
- Rolling pin (acrylic or wooden)
- Thick crochet lace doily or textured placemat with strong relief
- Square cookie cutter or sharp knife
- Ruler (if using a knife)
- Two wooden guide strips (approx. 1/4 inch thick)
- Cornstarch or baby powder (as a release agent)
- Fine grit sandpaper
- Small sponge
- Water
- Parchment paper or non-stick craft mat
Step 1: Preparation & Rolling
-
Surface setup:
Begin by laying down a sheet of parchment paper or a non-stick craft mat on a flat, sturdy work surface. This prevents the clay from sticking and allows you to move the tile later without distorting it. -
Conditioning the clay:
Take a generous handful of white air-dry clay. Knead it thoroughly in your hands to warm it up and remove any air bubbles. You want a smooth, pliable consistency that won’t crack easily. -
Establishing guides:
Place your wooden guide strips on either side of the clay ball. These strips ensure your tile has a perfectly uniform thickness, which is crucial for even drying and a professional look. -
Initial rolling:
Using your rolling pin, roll the clay out between the guide strips until the pin rests on the wood. Flip the clay periodically to ensure it isn’t sticking to the bottom surface.
Step 2: Creating the Texture
-
Preparing the lace:
Select your lace doily or textured mat. The deeper the texture in the fabric, the better the impression will be. Lightly dust the surface of your clay with a little cornstarch or baby powder to prevent the lace from embedding permanently. -
Placement:
Lay the lace carefully over the smoothed clay slab. Choose the part of the pattern you like best—centering a large floral motif creates a strong focal point, just like in the example photo. -
The impression roll:
Firmly roll over the lace with your rolling pin. Press hard enough to push the fabric deep into the clay, but do not deform the overall slab thickness too much. One steady, firm pass is often better than rolling back and forth multiple times, which can create ghost images. -
The reveal:
Find the edge of the lace and gently peel it back from the clay. I love this moment—seeing the incredible detail transference is always satisfying. Check for any areas that didn’t take the impression well; you might be able to carefully re-press them with your fingers.
Depth Perception
Use a ‘puff paint’ pen to draw extra details on your lace or fabric before pressing. The dried puff paint adds significant height, creating deeper valleys in the clay impression.
Step 3: Cutting & Refining
-
Measuring the cut:
Place your square cookie cutter directly over the patterned area. If you don’t have a cutter, measure a perfect square using a ruler and lightly quicker mark the corners. -
Cutting the tile:
Press the cutter straight down or slice cleanly along your ruler with a sharp knife. Remove the excess clay from around the square, saving it for another project. -
Smoothing edges:
Dip your finger in a tiny bit of water and run it along the cut edges of the tile to round them off slightly and remove any sharpness or burrs left by the knife. -
Drying setup:
Slide the parchment paper with the tile onto a flat board or baking sheet. To prevent warping, I recommend placing a light weight (like a small board) on top of the corners once the surface is dry to the touch, or flipping the tile gently every few hours during the drying process. -
Full cure:
Allow the clay to dry completely according to the package instructions. This usually takes 24 to 48 hours for air-dry clay, depending on humidity and thickness.
Antique Finish
After sealing, wipe a diluted brown or grey acrylic wash over the texture and immediately wipe off the high points. The color stays in the crevices, making the pattern pop.
Step 4: Finishing Touches
-
Sanding:
Once bone dry, take fine-grit sandpaper and very lightly sand the edges and the back of the tile to ensure a professional, smooth finish. Be careful not to sand the textured face. -
Dust removal:
Use a barely damp sponge to wipe away any sanding dust or leftover cornstarch from the crevices of the pattern. -
Sealing (optional):
For durability, you can apply a matte varnish or sealant. This will keep the pure white look while protecting the intricate details from dust and moisture over time.
Enjoy displaying your sophisticated relief tile on a shelf or using it as part of a larger mosaic installation
Woodgrain and Knot Texture Tile
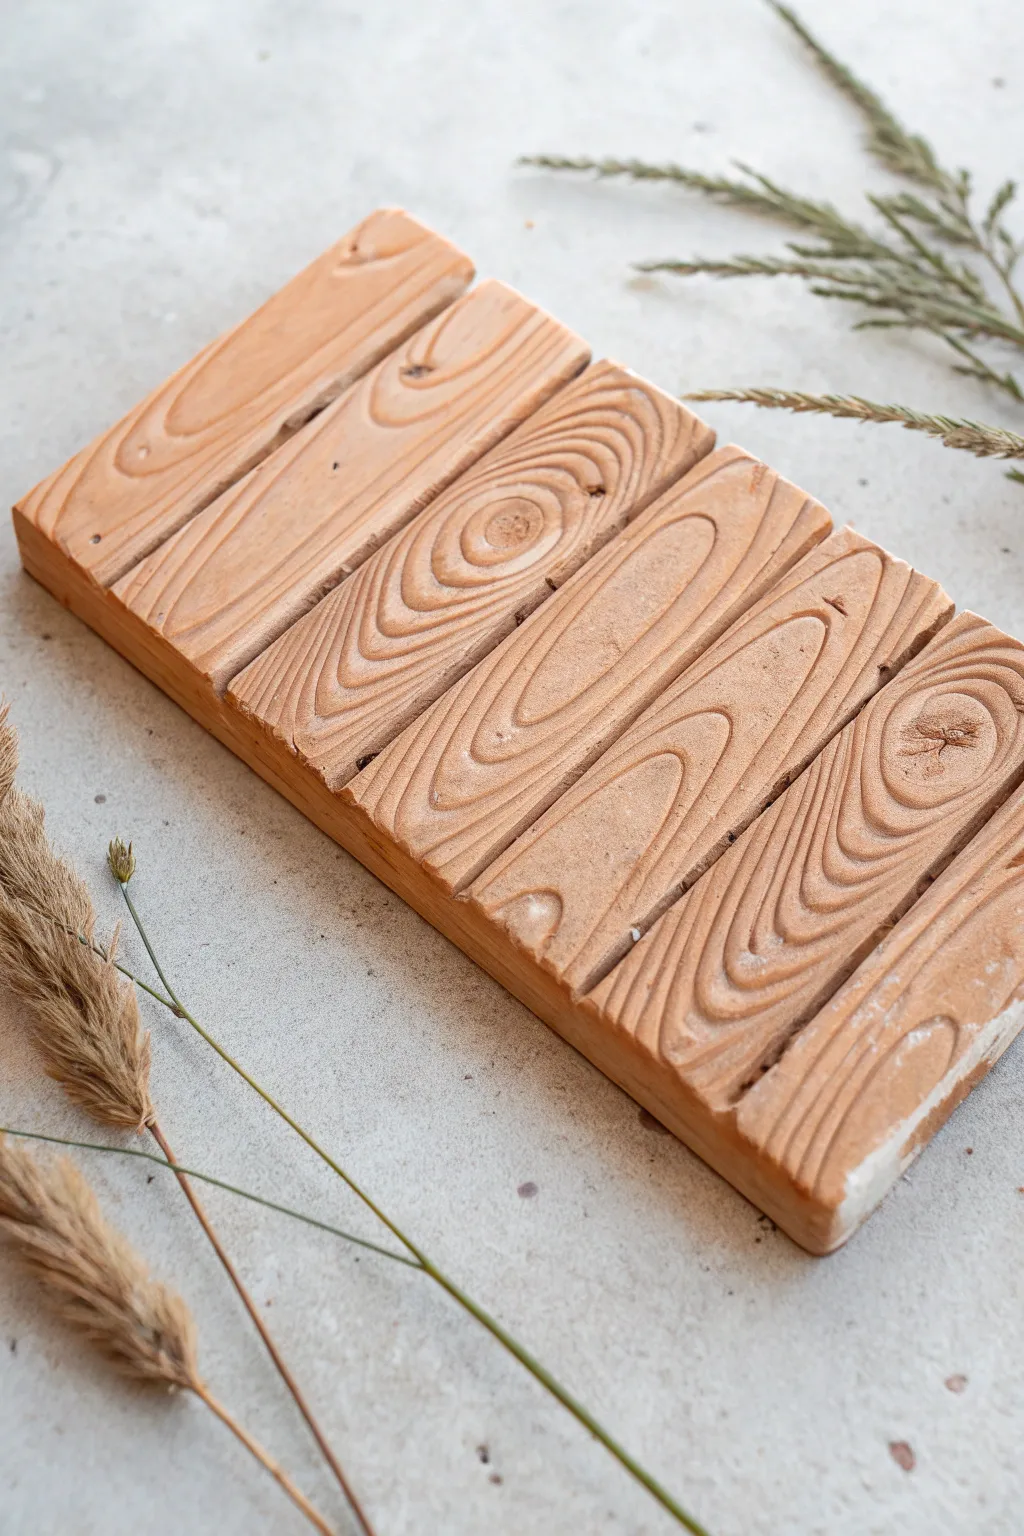
Transform a simple slab of clay into a rustic, wood-inspired masterpiece with this textural technique. The finished piece features deep grain lines and realistic knot details that make the surface feel surprisingly organic.
Step-by-Step
Materials
- Polymer clay or air-dry clay (terracotta or light brown color)
- Acrylic rolling pin
- Sharp crafting knife or blade
- Metal ruler
- Flexible rubber rib tool
- Needle tool or toothpick
- Small loop tool or carving gauge
- Texture sponge or stiff-bristled brush
- Brown acrylic paint (optional for antiquing)
- Matte varnish
Step 1: Slab Preparation
-
Condition the clay:
Begin by thoroughly conditioning your chosen clay until it is soft, pliable, and free of air bubbles. If using polymer clay, mix colors to achieve a natural light wood tone. -
Roll out the slab:
Roll the clay out into an even slab, approximately 1/2 inch thick. You want it substantial enough to carve into without making it fragile. -
Cut the rectangle:
Use your metal ruler and a sharp blade to cut a clean, perfect rectangle. Save the excess clay for testing textures later. -
Smooth the surface:
Run a flexible rubber rib or smoother over the surface to remove any fingerprints or rolling pin marks, creating a fresh canvas for your texture.
Knotty Nature
Don’t make your knots perfect circles. Real wood knots are often oblong or distorted. wiggle your tool slightly while carving the center for realism.
Step 2: Simulating Planks
-
Mark the planks:
Using the ruler as a guide, lightly score parallel lines vertically down the slab to divide it into five or six equal ‘plank’ sections. -
Carve the grooves:
Use a V-gouge or the edge of your modeling tool to deepen these scored lines, creating distinct separation between what will look like individual wooden boards. -
Soften the edges:
Gently press down the sharp edges of these grooves with your finger or a smoothing tool. Real wood planks usually have slightly beveled or rounded edges, not sharp 90-degree cuts.
Level Up: Nail Heads
Use a small straw or round piping tip to gently imprint tiny circles at the ends of each ‘plank’ to mimic the look of rustic iron nails holding the wood down.
Step 3: Creating the Grain
-
The knot foundation:
Choose two or three ‘planks’ to feature knots. Use a small loop tool to scoop out a shallow, circular depression where you want the center of the knot to be. -
Sculpting the knots:
Using a needle tool, draw tight, concentric circles or swirls inside the depression you just made. I like to make these slightly irregular to feel more natural. -
Flowing grain lines:
Start carving the main grain lines using a needle tool or small styling tool. Draw long, sweeping curves that contour around the knots you created, flowing away toward the ends of the tile. -
Varying depth:
As you draw the grain, vary the pressure. Press harder for deep, dark grain lines and lighter for subtle surface texture. -
Adding micro-texture:
Take a stiff-bristled brush or a texture sponge and lightly tap or drag it over the entire surface. This adds the tiny, porous texture of real wood that exists between the deep grain lines. -
Refining the ends:
Check the short ends of the tile. Use your blade to add grain texture here as well so the wood look is consistent from every angle.
Step 4: Finishing Touches
-
Dry or Cure:
Follow the instructions for your specific clay type. If baking polymer clay, support the slab on a flat tile to prevent warping. If using air-dry clay, let it dry slowly away from direct heat. -
Optional antique wash:
To make the grain pop, mix a small amount of dark brown acrylic paint with water. Brush it over the surface and immediately wipe it back with a damp cloth, leaving pigment only in the deep grooves. -
Seal the piece:
Once fully dry, apply a coat of matte varnish. Avoid glossy finishes, as they can make the faux wood look like plastic.
Now you have a beautifully textured piece that brings a natural, comforting warmth to your decor
Sgraffito Floral Silhouette Tile
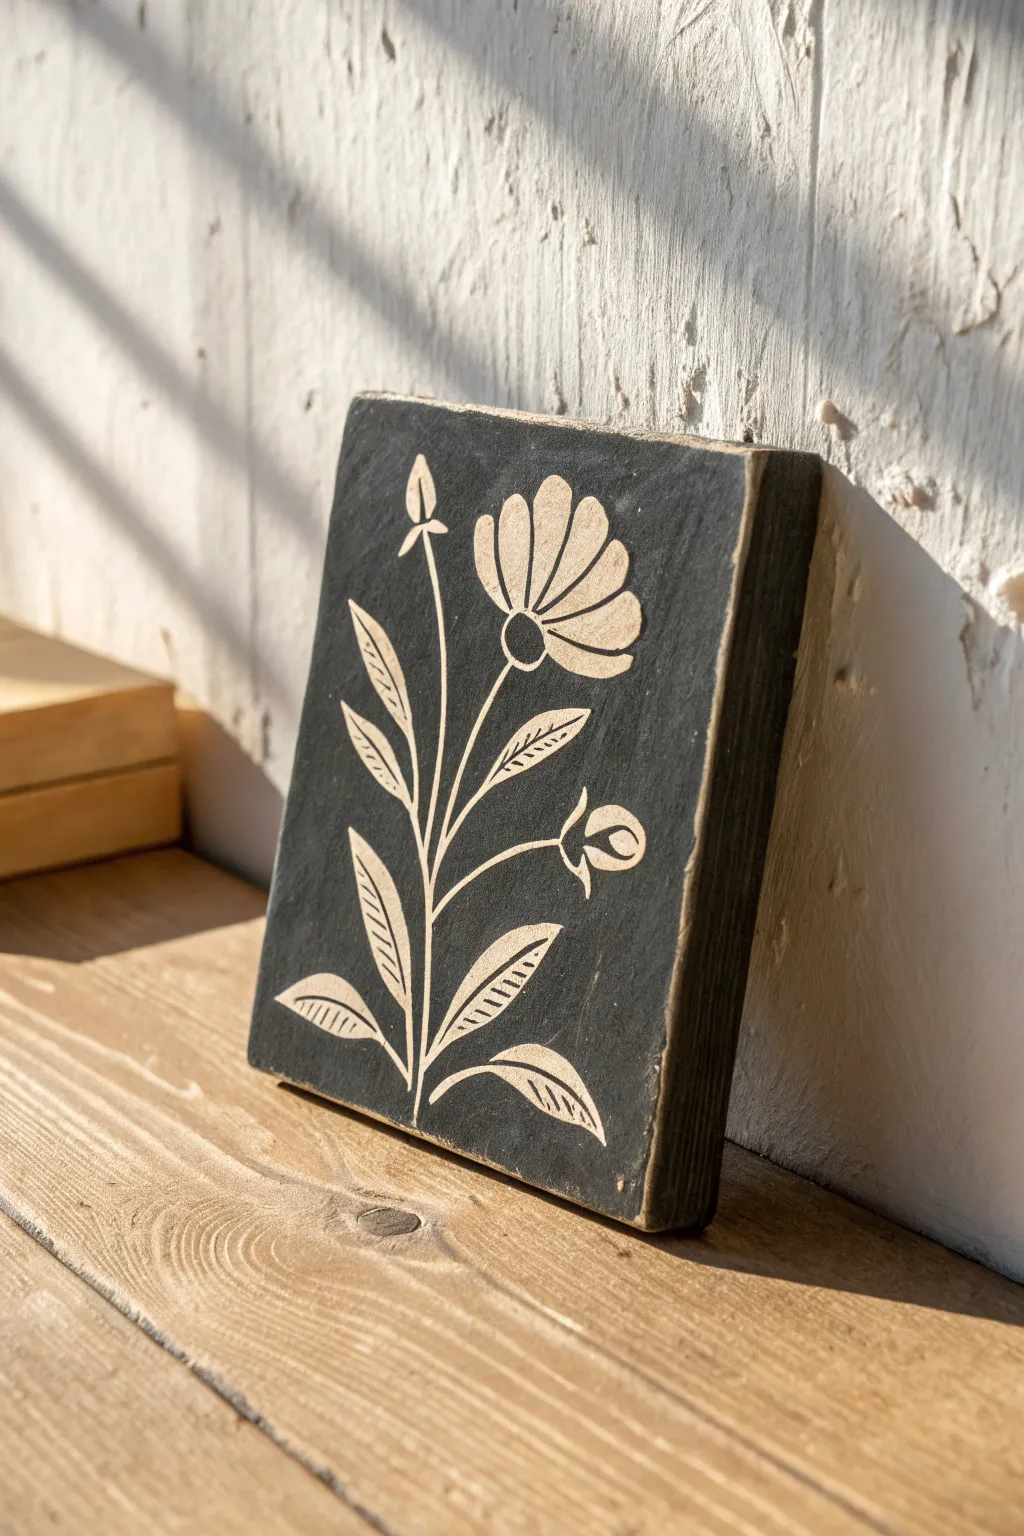
This striking project creates a bold botanical design by scratching through a dark surface layer to reveal the lighter clay underneath. It combines the rustic charm of carved wood with the precise elegance of black-and-white illustration.
Detailed Instructions
Materials
- Square ceramic bisqueware tile or 0.5-inch thick wood block
- Gesso primer (white)
- Black acrylic paint or black underglaze (depending on base)
- Medium grit sandpaper (220)
- Pencil
- Tracing paper (optional)
- Sgraffito tool or fine-point carving gouge
- Matte spray varnish or clear sealant
- Small flat paintbrush
- Ruler
Step 1: Preparation & Base Coat
-
Prepare the surface:
If using a raw wood block, sand the face and edges lightly until smooth to the touch. This ensures your paint glides on evenly without catching on wood grain. -
Prime the surface:
Apply two coats of white gesso to the front face of the block or tile. Allow the first coat to dry completely before applying the second in the opposite direction for full coverage. -
Check the contrast:
The goal is to have a bright under-layer. If your gesso looks streaky, add a third thin coat. Let this cure fully, perhaps overnight, as it needs to be hard enough to resist the scratching tool later. -
Apply the dark topcoat:
Paint the entire face of the tile with matte black acrylic paint. I find that underglaze works best if you are using actual ceramic, but heavy-body acrylic is perfect for wood or bisque. -
Second dark layer:
Apply a second coat of black to ensure opacity. You don’t want any white showing through yet. Let this layer dry until it is dry to the touch but not fully cured—usually about 20-30 minutes.
Clean Lines Pro Tip
Keep your sgraffito tool clean! Wipe the tip on a paper towel every few strokes to prevent clumps of removed paint from dragging across your design.
Step 2: Drafting the Design
-
Sketch the centerline:
Using a ruler and a white charcoal pencil or a regular pencil (if you press lightly), faintly mark a vertical center line to help orient your stem. -
Draft the main stem:
Draw a slightly curved vertical line starting from the bottom center, reaching about three-quarters up the tile. This will be the spine of your floral design. -
Add stem branches:
Sketch three to four smaller lines branching off the main stem. Vary their angles slightly to keep the look organic rather than perfectly symmetrical. -
Outline the main bloom:
At the top of your main stem, draw a scalloped, U-shape for the flower head, adding a small oval for the center. -
Place the buds:
Draw small teardrop shapes at the ends of your upper branches to represent unopened buds. -
Sketch the leaves:
Along the lower branches, draw elongated almond shapes. Keep the tips pointed for a crisp, stylized appearance.
Level Up: Color Pop
Instead of white gesso, paint your base layer a bright color like mustard yellow or teal. When you scratch off the black, the vibrant color will shine through.
Step 3: Carving the Sgraffito
-
Outline the stem:
Using your sharp sgraffito tool or a fine stylus, trace over your pencil lines with firm pressure. You want to scratch through the black paint to reveal the white gesso underneath. -
Carve the petals:
For the main flower, carve the outlines of the petals first. Then, add defining lines inside each petal to suggest volume and texture. -
Detail the leaves:
Outline each leaf shape carefully. Inside each leaf, scratch a central vein line, then add tiny, diagonal hatch marks along one side of the leaf to mimic veining. -
Refine the buds:
Carve the outline of the buds, adding a small curved line near the base of each to separate the sepals from the petals. -
Clean up debris:
As you carve, small crumbs of black paint will accumulate. Gentle blow or brush them away with a soft, dry brush to keep your workspace clean. -
Thicken main lines:
Go back over the main stem and primary structural lines, widening them slightly to make the design pop from a distance.
Step 4: Finishing Touches
-
Distress the edges:
Use your sandpaper to lightly scuff the very edges and corners of the black face. This creates a weathered, vintage look. -
Seal the artwork:
Once you are happy with the carving, spray the entire piece with a matte clear varnish. This protects the exposed gesso and locks the black paint in place. -
Paint the sides:
Finish the block by painting the sides black or leaving them natural depending on your preference; painting them black gives a gallery-wrap effect.
Now you have a stunning, hand-carved botanical piece ready to lean on a shelf or hang on the wall
Moon Phases Relief Tile Set
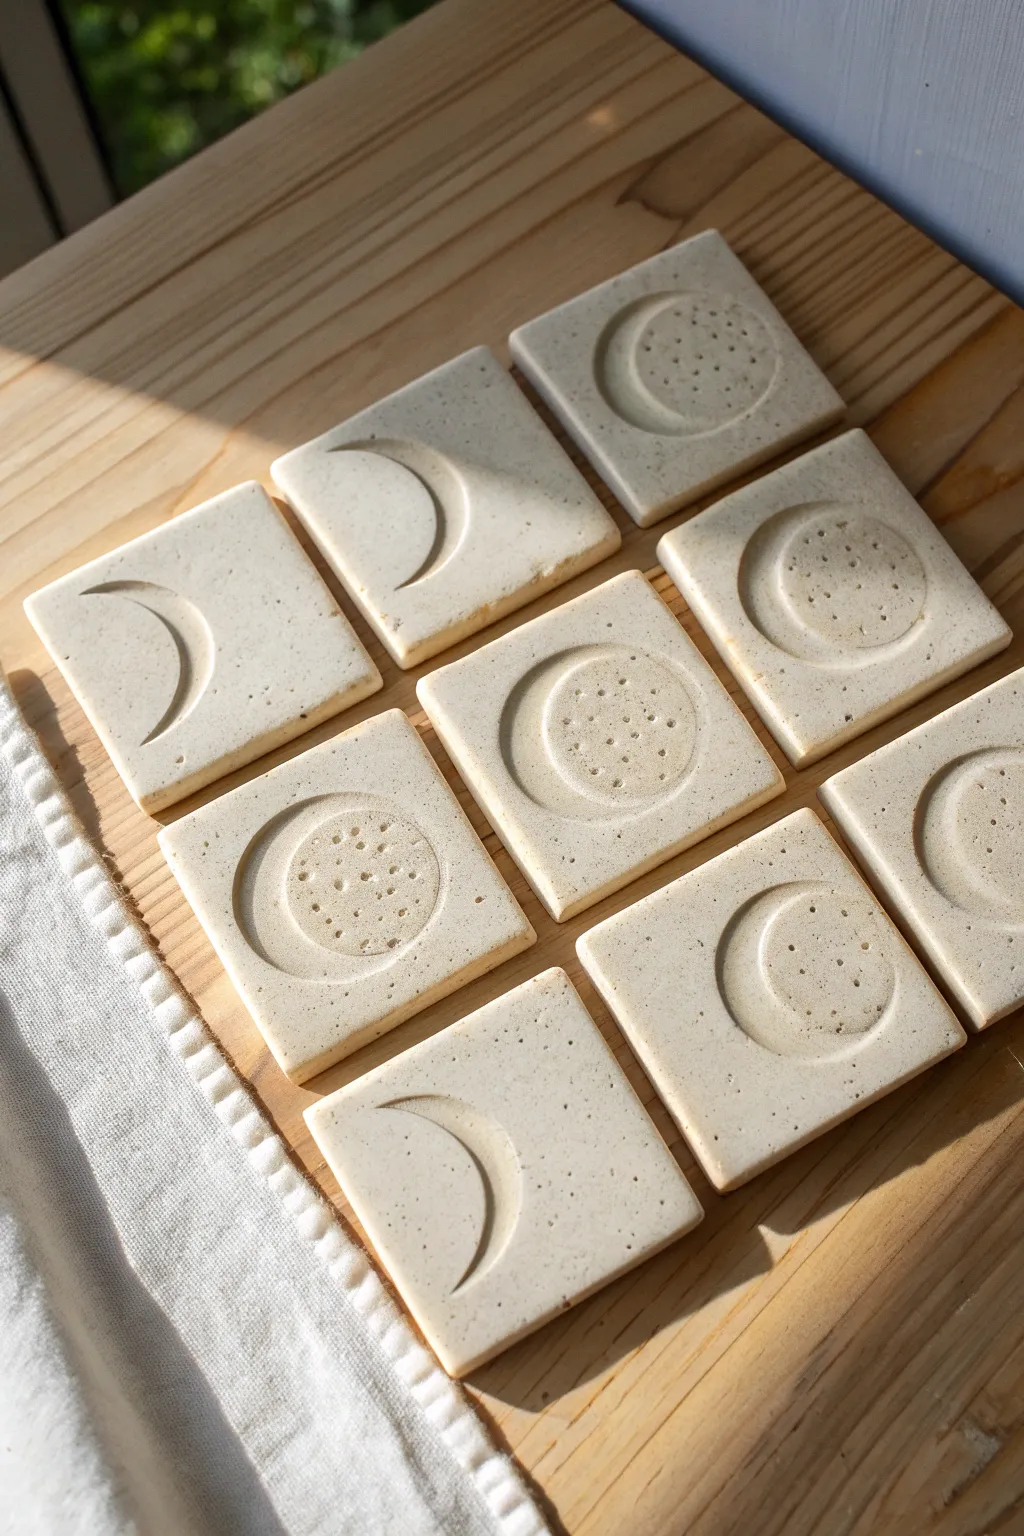
These minimalist relief tiles capture the mysterious beauty of lunar phases in a tactile, earthy medium. Using speckled clay, you will create a unified set of squares featuring both embossed crescents and textured full moons that look beautifully carved.
How-To Guide
Materials
- Speckled air-dry clay or polymer clay (granite effect)
- Square cookie cutter (approx 2.5 – 3 inches)
- Acrylic rolling pin
- Two wooden depth guides (approx 1/4 inch thick)
- Circle cutter set (various sizes)
- Needle tool or toothpick
- Fine-grit sandpaper
- Wire clay slicer or dental floss
- Piece of canvas or parchment paper
Step 1: Preparation & Base Creation
-
Prepare your workspace:
Lay down a piece of canvas or parchment paper on a flat surface. This prevents the clay from sticking and picking up unwanted textures from your table. -
Condition the clay:
Take a large chunk of your speckled clay and knead it thoroughly. If you are using polymer clay, ensure it is warm and pliable; for air-dry clay, ensure there are no air bubbles trapped inside. -
Roll out the slab:
Place your clay between the two wooden depth guides. Using the acrylic roller, flatten the clay until the roller rests on the guides, ensuring a perfectly even thickness across the entire slab. -
Cut the squares:
Press your square cookie cutter firmly into the slab to create nine identical tiles. Lift the cutter straight up to keep the edges sharp. -
Clean the edges:
Gently remove the excess clay from around the squares. If the edges of the tiles look slightly ragged, smooth them lightly with your finger or a damp sponge.
Clean Lines Pro Tip
Place a thin sheet of plastic wrap over the clay before pressing your cutters. This softens the edges slightly and prevents the clay from sticking, creating a pillow-like bevel.
Step 2: Sculpting the Phases
-
Plan the layout:
Arrange your nine wet clay squares in a 3×3 grid. Decide which tiles will feature crescent moons and which will feature fuller phases to create a balanced composition. -
Impress the outer curve:
Select a circle cutter that fits comfortably within the square with some margin. Gently press it into the first tile about halfway through the thickness of the clay to define the outer edge of the moon. -
Define the crescent:
Shift the circle cutter slightly to the side to create a crescent shape. Press down again to intersect the first circle impression. -
Scoop out negative space:
For the crescent-only tiles, use a small loop tool or drag the needle tool carefully to scoop out the clay inside the crescent shape, creating a recessed relief. Smooth the bottom of this scooped area with a finger or rounded tool. -
Create the full/gibbous shapes:
For the fuller moons, simply press the circle cutter once to create a complete or large partial circle outline without scooping anything out yet.
Step 3: Adding Texture & Detail
-
Recess the background:
On the tiles where you want a raised moon (like the gibbous phases), gently press down the clay *outside* the moon shape or scoop it away slightly so the moon appears to sit higher than the background. -
Texture the moon surface:
For the filled-in moon shapes, use a needle tool to poke small, random holes. Vary the depth and spacing to mimic craters on the lunar surface. -
Refine the impressions:
Go back over the main outline curves with a modeling tool to ensure the transition between the smooth tile surface and the moon motif is crisp and clean. -
Check for flatness:
Handling the tiles can sometimes warp them. I like to gently press a flat board over the top of the entire set to ensure the tops remain level before drying.
Fixing Warped Tiles
If air-dry tiles curl while drying, slightly dampen the concave side and place them under a heavy book overnight to flatten them back out.
Step 4: Finishing Touches
-
Drying process:
Allow the tiles to dry completely. If using air-dry clay, turn them over carefully every few hours to prevent curling. If using polymer clay, bake according to the manufacturer’s package instructions. -
Initial sanding:
Once fully cured or dry, inspect the edges. Use fine-grit sandpaper to remove any sharp burrs or roughness on the corners. -
Surface smoothing:
Lightly sand the flat top surface of the tiles to highlight the speckled texture and ensure a professional, matte finish. -
Wipe clean:
Remove all sanding dust with a slightly damp cloth or a soft brush to reveal the final speckle pattern.
Arranging these tiles in a grid creates a captivating piece of wall art that changes with the light
Tiny Tile Triptych Landscape
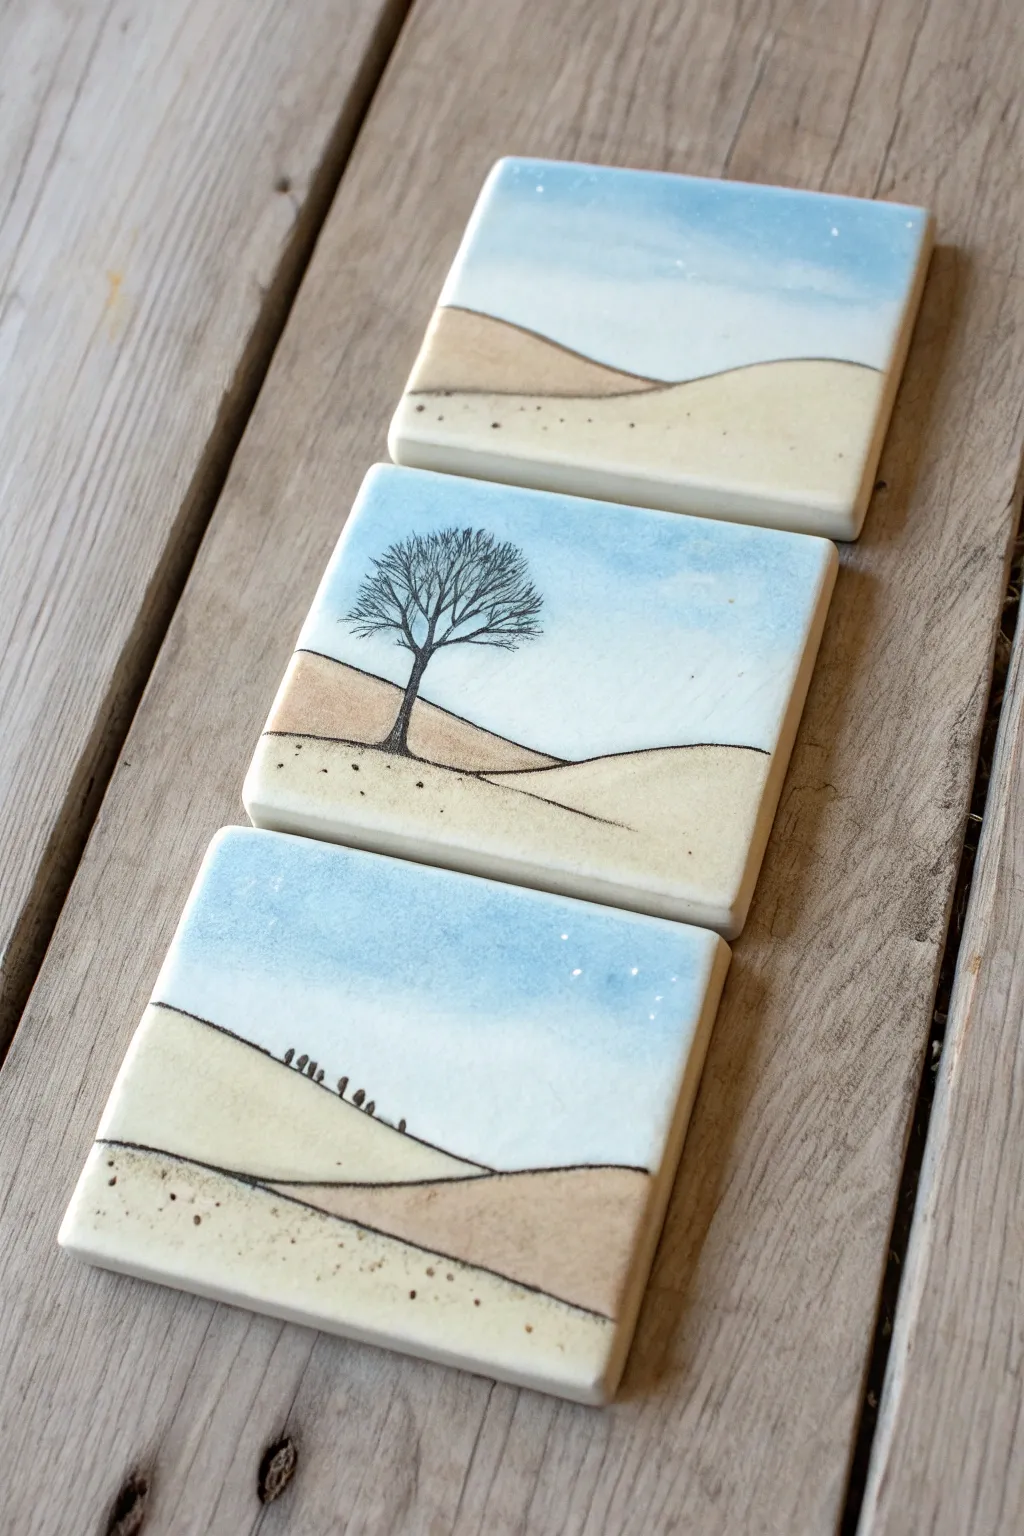
These charming little square tiles capture the serene beauty of rolling hills and open skies in a triptych format. Using simple line work and soft washes of glaze, you can create a cohesive set of miniature landscapes that look beautiful displayed together or individually.
Step-by-Step
Materials
- 3 small bisque-fired ceramic tiles (approx. 3×3 or 4×4 inches)
- Underglaze pencil (black) or a very fine detail brush
- Ceramic underglazes (sky blue, sandy beige, light brown, white)
- Small soft watercolor brushes (round size 2 and 4)
- Clear dipping glaze or brush-on clear glaze
- Sponge and water
- Kiln access (for firing to cone 04/06 depending on your clay)
Step 1: Preparation & Sketching
-
Clean the bisque:
Begin by wiping down your bisque-fired tiles with a damp sponge. This removes any dust that might resist the glaze and ensures a clean surface for your artwork. -
Map out the horizon lines:
Using a regular graphite pencil, lightly sketch the rolling hills. Each tile should have two or three layers of hills. The graphite will burn off in the kiln, so don’t worry about mistakes. -
Refine the composition:
On the middle tile, sketch the placement of the main tree. For the bottom tile, mark the tiny distant tree line along the ridge. Varied horizons create better visual interest. -
Commit to the line work:
Trace over your pencil lines with a black underglaze pencil. Keep the pressure light but firm to create a distinct, charcoal-like outline. If you prefer a smoother look, use a fine liner brush and black underglaze instead. -
Add detail to the tree:
On the middle tile, carefully draw the tree trunk and branches using the underglaze pencil. Start thicker at the base and taper out to wispy, fine lines for the twigs. -
Create texture:
Add small dots and speckles in the foreground area of the hills on all three tiles using the point of your underglaze pencil. This mimics sand, stones, or dry vegetation.
Clean Lines
If you smudge the black underglaze pencil, don’t wipe it! It will stain. Instead, lightly sand the smudge away with fine grit sandpaper.
Step 2: Painting the Landscape
-
Mix your washes:
Dilute your underglazes with a little water on a palette. You want a watercolor consistency rather than opaque coverage to let the clay texture show through slightly. -
Paint the sky:
Using a larger soft brush, apply a wash of sky blue to the top section of each tile. I suggest fading the color out as it approaches the horizon line for an atmospheric perspective effect. -
Add cloud details:
While the blue is still slightly damp, you can lift out some pigment with a clean, dry brush or dab in a tiny bit of white underglaze to suggest soft clouds. -
Color the hills:
Apply a wash of sandy beige to the foreground hills. Use the light brown wash for the hills further back to create depth and separation between the layers. -
Blend the transitions:
If the colors pool too heavily against your black outlines, use a damp brush to gently pull the color away, softening the transition. -
Enhance the shadows:
Add a slightly more concentrated layer of the beige or light brown along the very bottom of the hill curves to give them volume and dimension. -
Paint the distant trees:
On the bottom tile, use a very fine brush with dark brown or black underglaze to tap in the tiny silhouette of the distant tree line along the ridge.
Watercolor Effect
Make the sky wash intentionally uneven. Allowing water concentration to vary creates a lovely, natural watercolor bloom effect after firing.
Step 3: Finishing & Firing
-
Allow to dry:
Let the underglaze dry completely. The surface should look matte and chalky. -
Apply clear glaze:
Carefully dip the tiles into a clear dipping glaze, or apply 2-3 coats of brush-on clear glaze. Be gentle so you don’t smear the pencil lines. -
Dry and fire:
Let the glaze dry according to the manufacturer’s instructions, then fire the tiles in a kiln to the appropriate cone temperature for your materials.
Once fired, these delicate tiles are ready to be framed or used as unique coasters
Mixed Additive-and-Carved Mandala Tile
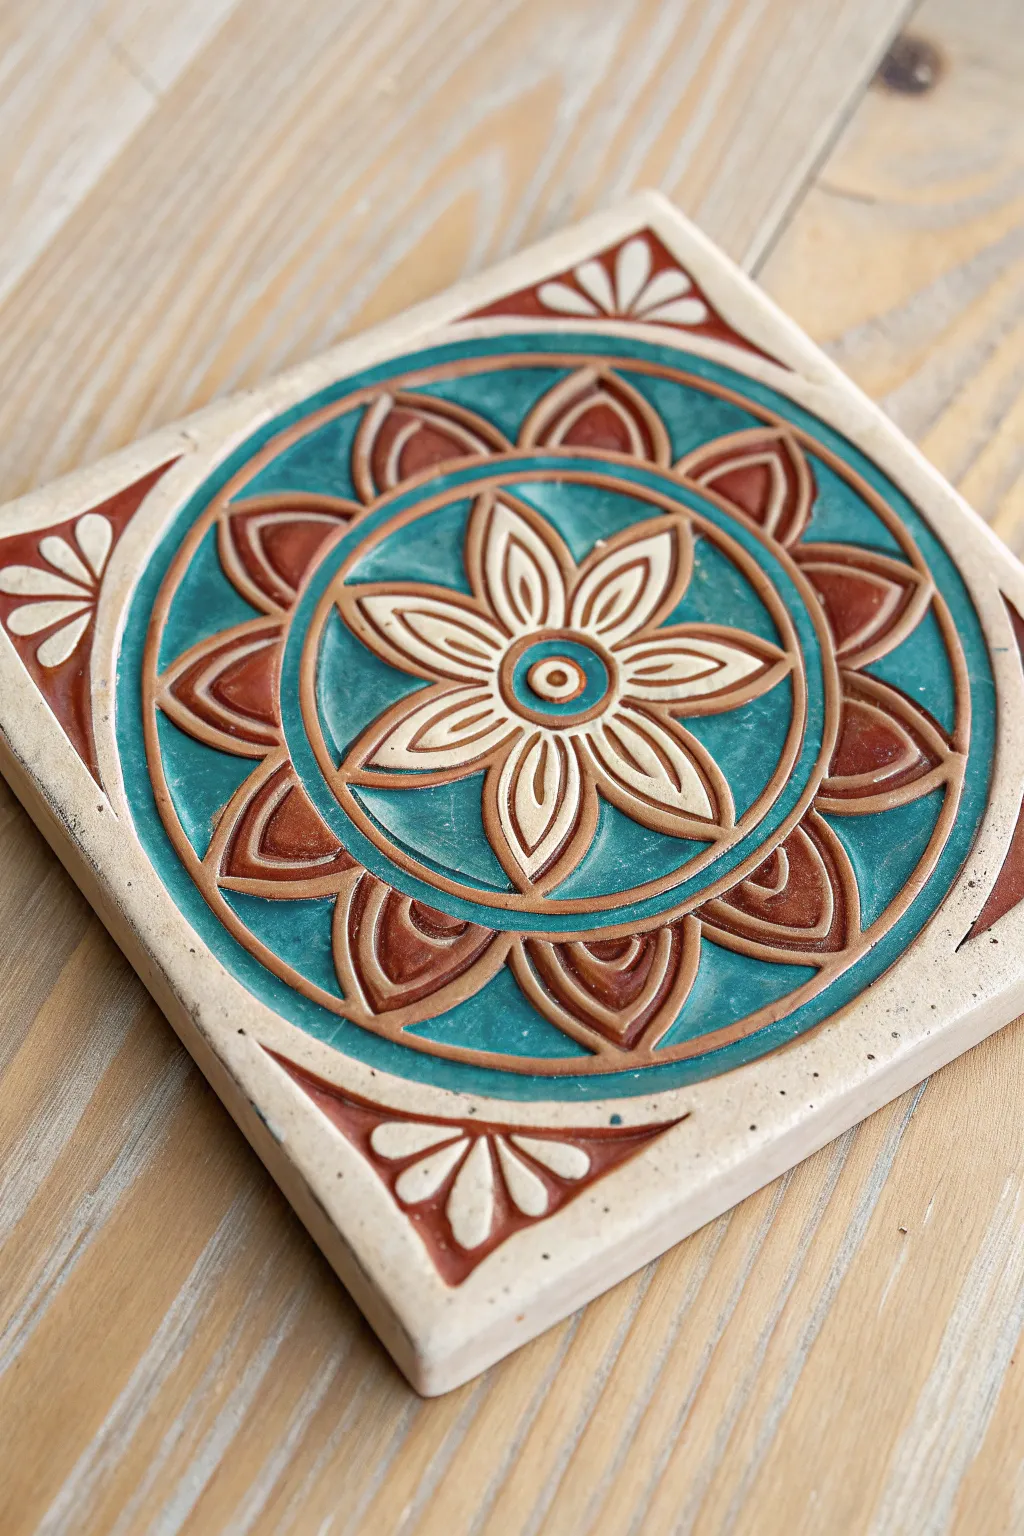
Create a stunning ceramic focal piece with this carved mandala tile, featuring rich terracotta and teal accents against natural clay. The satisfying process combines precise geometric measuring with the relaxing tactile nature of relief carving to achieve a dimensional, professional finish.
Step-by-Step Guide
Materials
- Light-colored stoneware clay slab (approx. 5/8 inch thick)
- Square template (6×6 inches)
- Needle tool
- Carving tools (small loop tool, wire end tool)
- Fettling knife
- Compass or circle templates
- Terracotta underglaze (or reddish-brown slip)
- Turquoise (teal) semitransparent glaze
- Clear matte glaze (optional)
- Small synthetic brushes
- Wax resist
- Damp sponge
Step 1: Slab Preparation & Layout
-
Roll out the slab:
Begin with a well-wedged piece of light stoneware clay. Roll it out to an even thickness of about 5/8 inch to allow depth for carving. Compress the clay on both sides with a rib to prevent warping. -
Cut the square:
Place your square template over the slab and cut cleanly around it with a fettling knife held vertically. Smooth the cut edges with a damp sponge. -
Mark the center:
Use a ruler to lightly mark an ‘X’ from corner to corner to find the exact center point. This is crucial for symmetry. -
Map the concentric circles:
Using a compass centered on your mark, lightly scribe three main concentric circles. The smallest will hold the central flower, the middle defines the floral border, and the largest stops just short of the tile edges.
Clean Lines
For sharper carving, wait until the clay is ‘leather hard’ (firm like cheddar cheese) before cutting. Soft clay drags and creates messy edges.
Step 2: Carving the Relief Design
-
Sketch the central flower:
Inside the smallest circle, lightly scratch an eight-petaled flower design with a needle tool. Add a small circle in the very center. -
Draft the outer border:
Between the middle and outer circles, sketch a ring of repeated arches or ‘scallops’ to create the secondary petal layer. Add triangular corner motifs in the four corners outside the main circle. -
Carve the negative space:
Using a small loop tool, begin carving away the background areas. You want to lower the background (the areas that will become teal) while leaving the outlines and petals raised. Carve down about 1/8 to 1/4 inch. -
Refine the ridges:
Go back over your raised lines (the cream-colored parts). Use a damp brush or rubber shaper tool to smooth any sharp burrs or jagged clay crumbs along the ridges. -
Incise detail lines:
Inside the large central flower petals and the outer border petals, use a finer tool to carve recessed ‘teardrop’ shapes. These recessed areas will later be filled with terracotta color. -
Clean up:
Before the clay gets bone dry, give the entire piece a final cleanup with a barely damp sponge to ensure all carved surfaces are smooth and ready for color.
Warping Woes
If your tile curves up at the corners while drying, flip it over onto a piece of drywall or intricate drying board and weigh down the corners gently.
Step 3: Color Application & Glazing
-
Bisque fire:
Allow the tile to dry slowly between two boards to prevent warping, then bisque fire it according to your clay body’s specifications. -
Wax the high points:
Apply wax resist carefully to all the raised outlines and the flat uncarved borders of the tile. This prevents the glaze from sticking to the areas you want to remain natural clay. -
Apply terracotta color:
Paint the terracotta underglaze into the recessed teardrop shapes inside the petals and the corner motifs. Wipe away any excess that gets on the waxed ridges with a damp sponge. -
Glaze the background:
Flood the large recessed background areas (the negative space you carved first) with the turquoise glaze. A bulb syringe or a loaded soft brush works well to pool the glaze into these deep areas. -
Clean the ridges:
I always do a final pass with a damp sponge to wipe the raised waxed areas one last time, ensuring the natural clay lines are crisp and free of stray glaze droplets. -
Final firing:
Fire the tile to the maturation temperature of your glaze and clay body.
Once fired, display your tile on a stand or lay it flat as a stunning geometric coaster
Cracked Earth Texture With Sprout Relief
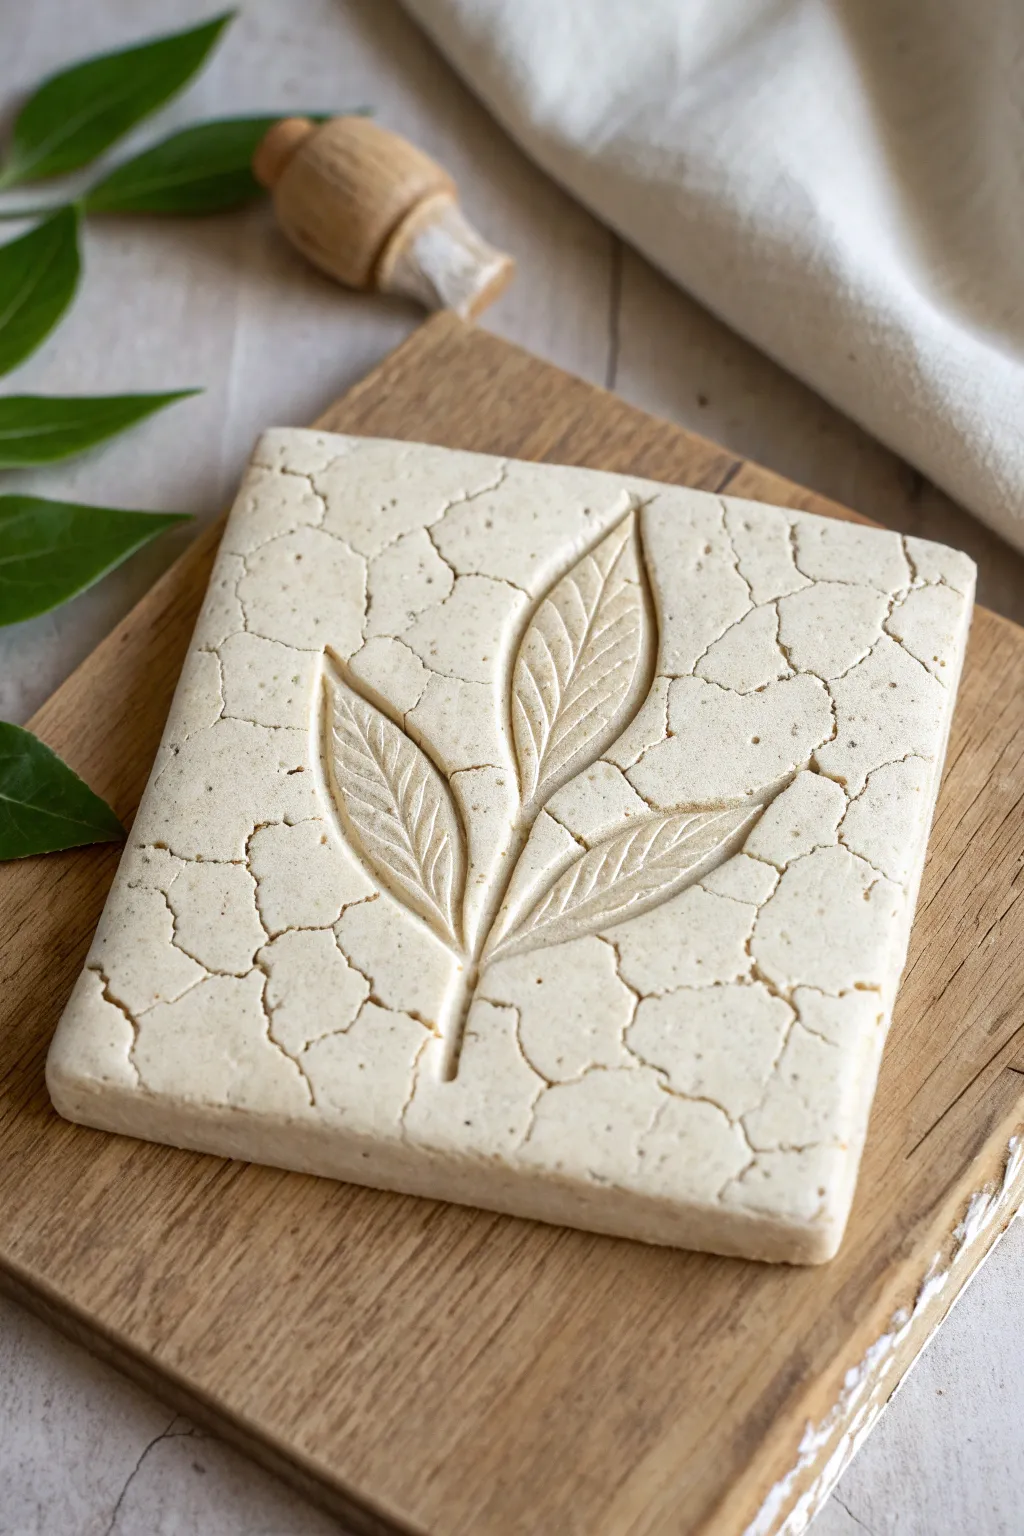
Embrace the beauty of imperfection with this textured clay project that mimics the look of parched earth. The contrast between the organic cracked surface and the smooth, deliberate lines of the leaf relief creates a striking piece of natural art.
Step-by-Step
Materials
- Air-dry clay or polymer clay (creamy beige or off-white)
- Rolling pin
- Square cookie cutter or knife and ruler
- Heat gun or hair dryer (optional, for cracking)
- Wooden sculpting tools or needle tool
- Small carving loop tool (optional)
- Fine-grit sandpaper
- Texturing stamp or crumpled foil (optional)
- Water spray bottle
- Acrylic sealer (matte)
Step 1: Base Preparation
-
Condition the clay:
Begin by kneading your chosen clay until it is soft and pliable. If you are using air-dry clay, ensure it isn’t too dry; add a drop of water if it feels crumbly. -
Roll the slab:
Roll the clay out on a smooth surface to a thickness of approximately 0.5 inches (1.2 cm). You want a substantial thickness to allow for deep carving and structural integrity. -
Cut the square:
Using a square cookie cutter or a sharp knife with a ruler, cut out a perfect square shape. A 4×4 or 6×6 inch square works well for this design complexity. -
Smooth the edges:
Dip your finger in a little water and gently run it along the cut edges to round them off slightly, removing any sharp angles or burrs.
Pro Tip: Crack Control
For deeper, more dramatic cracks, use a heat gun to rapidly dry the surface skin, then immediately roll over it with a textured rolling pin to force the dry layer to separate.
Step 2: Creating the Texture
-
Dry the surface:
This is the crucial step for the cracked effect. Let the slab sit out for about an hour, or use a hair dryer on a low setting to dry just the very top ‘skin’ of the clay. -
Apply compression:
Once the surface feels slightly leathery or dry to the touch, gently roll over it again or press down with a flat board. The differential drying should cause natural micro-cracks to form. -
Enhance cracks:
If the cracks aren’t distinct enough, I sometimes gently stretch the slab from the corners or use a needle tool to lightly trace and deepen the natural fault lines. -
Flatten completely:
Ensure the tile is perfectly flat again before moving on to the carving phase. Tap the sides to regain the square shape if it distorted during texturing.
Level Up: Antique Wash
After baking or drying, apply a diluted brown or dark grey acrylic wash over the tile and wipe it back immediately. The paint will settle into the cracks and veins for high contrast.
Step 3: Carving the Relief
-
Outline the design:
Using a very light touch with a needle tool, sketch the outline of the three leaves and the central stem directly into the center of the tile. -
Carve the negative space:
Wait until the clay is leather-hard. Instead of carving *out* the background, we are carving *into* the design. This is an incised relief. -
Deepen the leaf shapes:
Use a small loop tool or a wooden beveling tool to scoop out the clay inside your leaf outlines. You want the leaves to be concave depressions. -
Bevel the edges:
Smoothly slope the clay from the surface down into the center of each leaf shape. The deepest point should be the central vein. -
Add vein details:
Using a sharp needle tool or a fine knife, carve the central vein line down the middle of each depression. -
Create secondary veins:
Carve delicate, angled lines branching off the main vein. Press firmly enough to make the pattern distinct against the smooth interior of the leaf.
Step 4: Finishing Touches
-
Refine the texture:
Check your surface cracks. If the carving process smoothed some out near the leaves, re-introduce them by gently scratching jagged lines connecting to the main crack network. -
Slow drying:
Place the tile on a wire rack or a piece of drywall to dry slowly. Cover loosely with plastic if you are in a dry climate to prevent warping. -
Sanding:
Once bone dry (or cured, if using polymer), lightly sand the edges and the back. Avoid sanding the textured top surface to preserve the rugged look. -
Sealing:
Apply a coat of matte acrylic sealer. This protects the clay and gives the ‘cracked earth’ finish a unified, stone-like appearance without adding unnatural gloss.
Display your finished tile on a small easel or use it as a coaster to bring an organic touch to your home decor
Topographic Contour Map Tile

Embrace the soothing simplicity of minimalist geometry with this carved clay tile project. The design mimics the concentric ripples of water or topographical contour lines, creating a tactile piece that plays beautifully with light and shadow.
How-To Guide
Materials
- Air-dry clay (white or cream)
- Square rolling guides (approx. 1/2 inch thick)
- Main rolling pin
- Fettling knife or craft knife
- Loop tool (wire end tool)
- Canvas mat or wooden board for working
- Small bowl of water
- Soft sponge
- Ruler
- Compass (optional, for guidelines)
Step 1: Preparation & Slab Rolling
-
Prepare your workspace:
Set up a clean, flat surface covered with a canvas mat or a wooden board. The canvas prevents the clay from sticking, which is crucial for getting a clean slab. -
Wedge the clay:
Take a substantial chunk of air-dry clay and wedge it thoroughly. This removes air bubbles and ensures the consistency is even, making the carving process much smoother later on. -
Set up guides:
Place your wooden rolling guides on either side of the clay ball. These will ensure your tile has a perfectly uniform thickness. -
Roll the slab:
Using your rolling pin, flatten the clay until the pin rests on the depth guides. Roll in multiple directions to compress the clay particles well. -
Cut the square:
Use a ruler and your fettling knife to cut a perfect square. A size of about 6×6 inches works well for this design. Remove the excess clay and save it for future projects. -
Smooth the edges:
Dip your finger in a little water and run it along the cut edges to soften the sharp corners just slightly.
Warping Woes?
If the corners start curling up while drying, gently weigh them down with small sandbags or heavy books placed on top of a board.
Step 2: Mapping the Design
-
Find the center:
Lightly mark the exact center of your square tile. You don’t need to dig in; just a tiny dot will do. -
Sketch guidelines:
Using a compass or by tracing circular objects of varying sizes, very vividly scratch concentric circles into the surface. Leave about 1/2 to 3/4 inch of space between each ring. -
Check the spacing:
Step back and look at your guidelines. The beauty of this piece relies on the spacing being relatively even, though a little organic variation adds character.
Level Up: Stone Look
Once fully dry, lightly sand the surface with fine-grit sandpaper, then seal with a matte varnish to mimic a honed limestone finish.
Step 3: Carving the Texture
-
Begin the center channel:
Select a medium-sized loop tool. Start carving out the clay between your sketched lines. I find it easiest to start from the center and work my way outward. -
Control your depth:
Try to carve down to a consistent depth, perhaps 1/8 to 1/4 inch deep. Drag the tool smoothly towards you rather than digging straight down. -
Refine the ridges:
Leave the high points flat-topped (the original surface of the slab). You are essentially carving valleys and leaving the ridges behind. -
Clean up the channels:
As you carve, little crumbs of clay will accumulate. Brush these away with a soft, dry brush to keep your view clear. -
Detail the outer rings:
As the circles get larger and approach the corners, they will slide off the edge of the square. Simply continue your carving motion right off the edge of the tile for a seamless look.
Step 4: Refining & Finishing
-
Texture check:
Look closely at the carved valleys. If they are too rough, use a slightly damp finger or the back of a small spoon to smooth out the bottom of the grooves. -
Final sponge wipe:
Take a slightly damp sponge and gently wipe the entire surface. This softens any sharp burrs created by the carving tool, giving it that weathered, stone-like appearance. -
Slow drying:
Place a piece of plastic wrap loosely over the tile. This slows the drying process, which is critical for flat tiles to prevent warping. -
Flip and dry:
After 24 hours, carefully flip the tile over to let the bottom breathe. Continue flipping once a day until it is bone dry and chalky white.
Once dry, display your tile flat on a coffee table or mount it in a shadow box for a gallery-worthy display
Shadowbox Frame Border Relief Tile
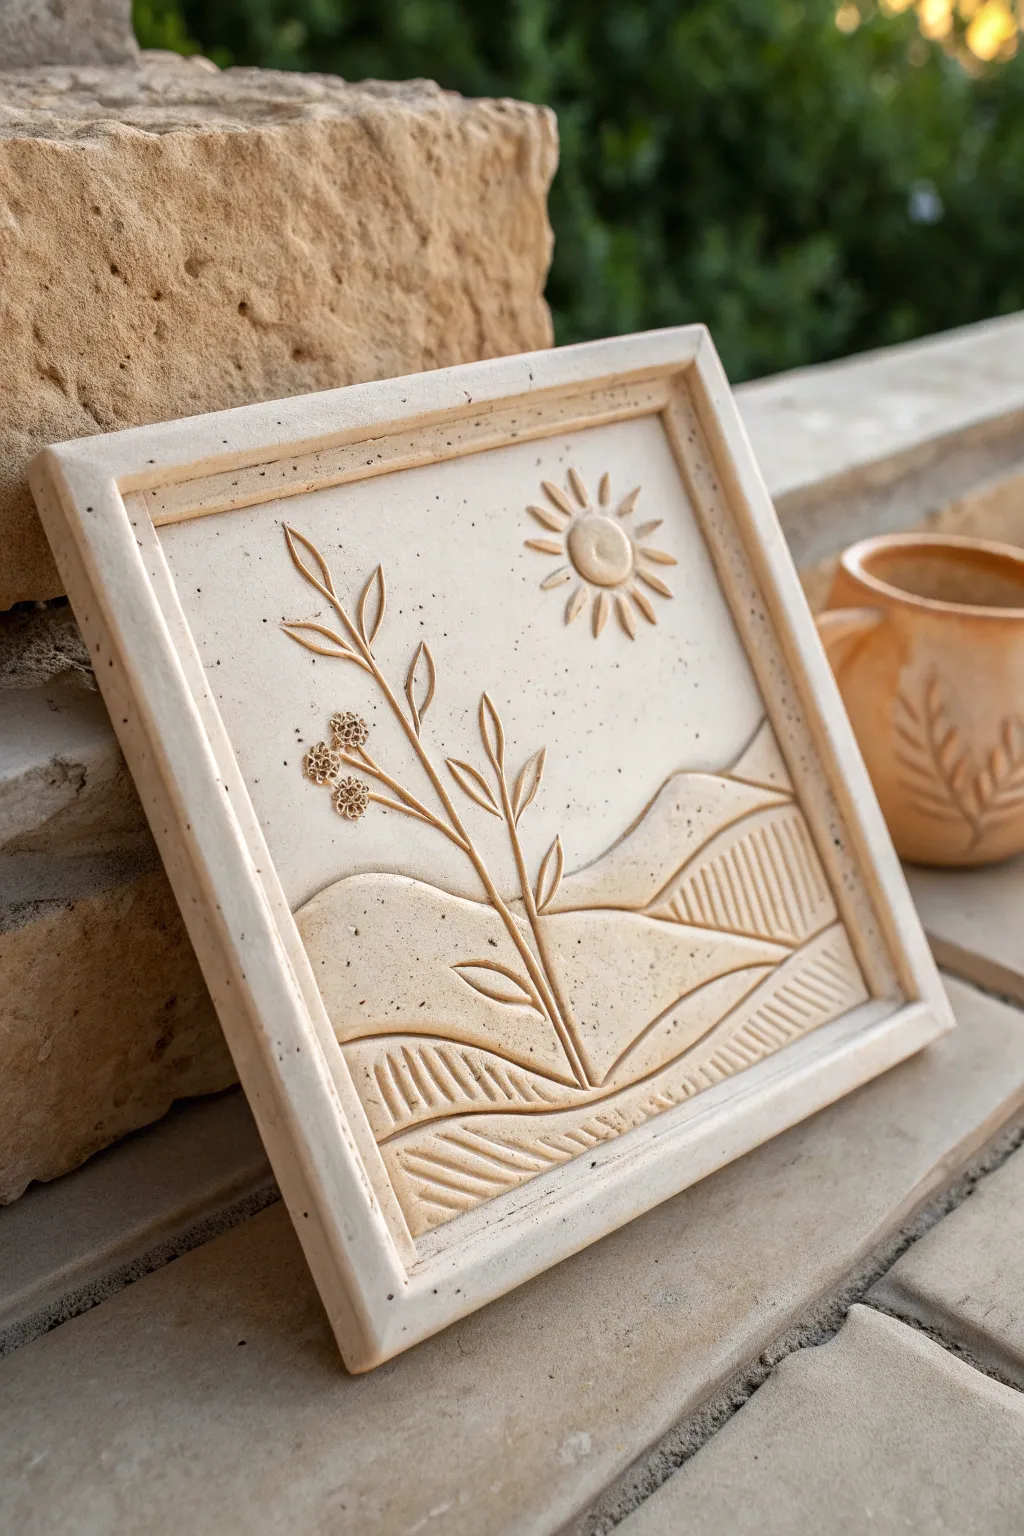
Capture the warmth of a summer landscape with this beautiful relief tile project. By carving into a thick slab of clay and building up layers, you create a charming shadowbox effect where rolling hills and delicate botanicals emerge from the surface.
Step-by-Step Guide
Materials
- Light-colored stoneware clay (smooth or with fine grog)
- Rolling pin
- Two 1/2-inch thickness strips (wood slats)
- Needle tool
- Loop carving tools (small and medium)
- Rib tool (metal or flexible rubber)
- Bevel cutter or knife
- Slip (clay mixed with water)
- Scoring tool or serrated kidney
- Small textured stamp (for flower centers)
- Ruler
- Sponge
Step 1: Creating the Base Slab
-
Roll the foundation:
Begin by wedging your clay to remove air bubbles. Place your 1/2-inch thickness strips on either side of the clay and roll it out into a uniform slab. This thickness is crucial for carving deep relief without piercing through. -
Cut the square:
Use a ruler and needle tool to cut a precise 6×6 or 8×8 inch square from your slab. Save the excess trimming clay; you’ll need it for the raised border. -
Smooth the surface:
Run a flexible rib tool gently over the surface to compress the clay particles and erase any canvas texture or rolling pin marks. A smooth canvas makes the carving stand out clearly.
Keep it clean
Brush away clay crumbs frequently with a soft, dry makeup brush. Blowing them away creates dangerous clay dust, and pressing them in ruins the smooth surface.
Step 2: Building the Frame
-
Cut border strips:
From your leftover rolled clay, cut four strips that are roughly 1/2 inch wide and the length of your tile’s sides. Miter the corners at a 45-degree angle if you want a traditional frame look, or simply butt them together. -
Score and slip:
Aggressively score the outer edges of your base slab and the underside of your border strips. Apply a generous amount of slip to the scored areas. -
Attach the frame:
Press the strips firmly onto the base to create the raised ‘shadowbox’ rim. Use your thumb or a wooden tool to blend the inside seam slightly so it looks integrated, but keep the outside sharp. -
Clean the edges:
Use a damp sponge to smooth the join lines and ensure the frame is square and level.
Add color depth
After bisque firing, apply an iron oxide wash and wipe it back with a sponge. The dark oxide will stay in the carved lines and textures, highlighting your relief work.
Step 3: Carving the Landscape
-
Sketch the design:
Lightly trace your design onto the fresh clay using a needle tool. distinct rolling hills at the bottom, a central plant stalk, and a sun in the top right corner. -
Carve the hills:
Using a loop tool, carve away the clay *behind* the hill outlines to make them visually pop forward. You aren’t adding clay here; you are subtracting the sky and background layers. -
Add texture to the hills:
On the lowest hill sections, use a small gouge tool to carve vertical or diagonal parallel lines. This indicates plowed fields or texture variation. -
Create the sun:
Roll a very small ball of clay, flatten it slightly, and score-and-slip it into the upper right corner. Then, carve radiating lines directly into the background slab around it to create the rays.
Step 4: Sculpting the Botanicals
-
Form the stem:
Roll a thin coil of clay for the main stem. Score the path on the tile where it will sit, apply slip, and press the coil down. Flatten it slightly so it isn’t too round. -
Shape the leaves:
Hand-shape small tear-drop pieces of clay for the leaves. Attach them along the stem using slip. Use a modeling tool to press a center vein into each leaf, which also helps secure it to the background. -
Make the flowers:
Roll three tiny balls of clay for the flower heads. Press them onto the ends of the branch stems. -
Texture the blooms:
Take your small textured stamp (or the head of a small screw) and press it repeatedly into the flower balls to create a dense, seeded look. -
Refine the details:
Go over the entire piece with a clean, slightly damp brush to soften any sharp burrs of clay left from carving. I find this step essential for a professional finish. -
Final drying:
Sandwich the tile between two pieces of drywall board or weigh down the corners lightly while it dries slowly to prevent the flat shape from warping.
Once fired, this durable tile can be displayed on a stand or mortared into a wall for a permanent installation
Peek-Through Negative Space Window Tile
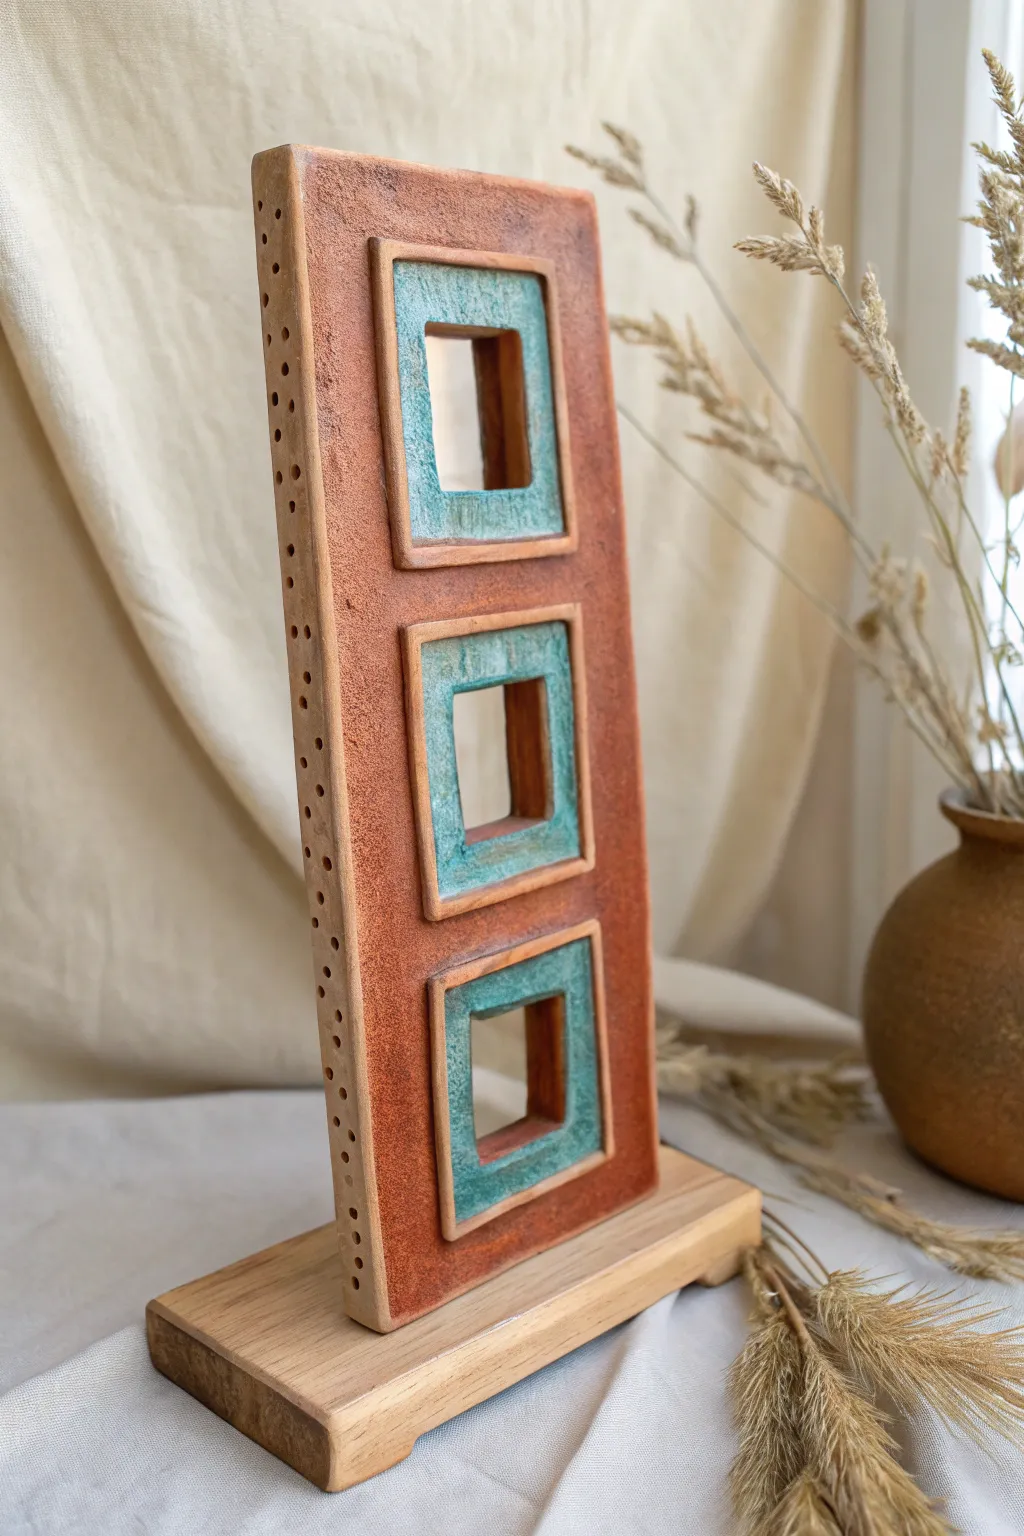
This striking ceramic sculpture balances rustic warmth with structural elegance, featuring a tall terracotta slab punctuated by three negative space windows. It uses contrasting teal glazes on raised frames to create a weathered, antique architectural feel that beautifully catches the light.
Step-by-Step Tutorial
Materials
- Stoneware clay (terracotta or grogged body recommended)
- Wooden base plinth (light oak or pine)
- Slab roller or rolling pin with thickness strips
- Square cookie cutters or template (two sizes)
- Needle tool and fetling knife
- Modeling tool with a small round tip (for texture)
- Iron oxide wash
- Turquoise or teal matte glaze
- Clear matte varnish or wax (optional for finish)
- Epoxy glue (E6000 or similar)
- Sponge and water
- Kiln
Step 1: Forming the Slab Structure
-
Roll the main slab:
Begin by rolling out a substantial slab of clay, approximately 3/8 to 1/2 inch thick. Keep it slightly thicker than standard to prevent warping during the tall vertical drying process. -
Cut the rectangle:
Measure and cut a tall, narrow rectangle. For the proportions shown, aim for a ratio of about 1:3 (e.g., 4 inches wide by 12 inches tall). Smooth the cut edges with a damp sponge. -
Establish window placement:
Lightly mark three evenly spaced squares down the center of your slab. Leave generous spacing at the top and bottom to maintain structural integrity. -
Create the raised frames:
Roll a thinner slab (about 1/4 inch). Cut out three squares that are slightly larger than your future window openings. These will serve as the raised borders. -
Attach the frames:
Score and slip the areas around your marked window spots on the main slab. Carefully place the thinner clay squares onto these scored areas and compress them gently to bond the layers. -
Cut the windows:
Using a smaller square cutter or a sharp knife, cut through both layers of clay (the frame and the base slab) in the center of each attached square to create the negative space openings. -
Refine the openings:
Smooth the inside walls of the windows. I like to use a barely damp brush or finger to soften the sharp 90-degree angle where the cut meets the face of the frame.
Warping Woes?
If your slab bows while drying, flip it daily and weigh down the corners with small sandbags. Slow drying is your best defense against warping.
Step 2: Adding Texture and Detail
-
Texturize the surface:
Using a coarse sponge or a crumpled ball of aluminum foil, gently tap the main terracotta body to give it a weathered, stone-like texture. Keep the window frames relatively smoother. -
Add side details:
along the thin vertical side edges of the slab, use a small round tool to press in a random pattern of dots. This creates visual interest from all angles. -
Dry slowly:
Sandwich the slab between drywall boards or use plastic loosely draped over it to ensure slow, even drying. This is critical to prevent the tall shape from warping or cracking. Fire to bisque temperature once bone dry.
Step 3: Glazing and Assembly
-
Apply iron oxide wash:
Brush an iron oxide wash over the entire piece, then wipe it back with a damp sponge. This will settle into the texture and deepen the natural red color of the clay. -
Glaze the frames:
Carefully brush a turquoise or teal glaze onto the raised window frames only. Apply it unevenly or wipe some areas back slightly to achieve that distressed, aged patina look. -
Fire the piece:
Fire the sculpture to the maturation temperature of your specific clay and glaze combination. -
Prepare the wooden base:
Cut a piece of light wood slightly wider than your ceramic slab. Sand it smooth and apply a clear sealant if desired. -
Mount the sculpture:
Mix strong epoxy glue. Apply it to the bottom edge of your ceramic slab and press it firmly onto the center of the wooden base. Support the slab vertically with props until the glue fully cures.
Pro Tip: Clean Lines
Use a straight edge or ruler when cutting the inner window squares to ensure the negative space looks architectural and intentional, not wobbly.
Place your finished sculpture near a window where sunlight can stream through the negative spaces, casting beautiful geometric shadows