If you’ve got a plain bowl in front of you, you’re sitting on the perfect little canvas for clay bowl painting. These ideas are the kind I teach in the studio when you want something cute, doable, and totally you—without overthinking it.
Classic Floral Center Bloom
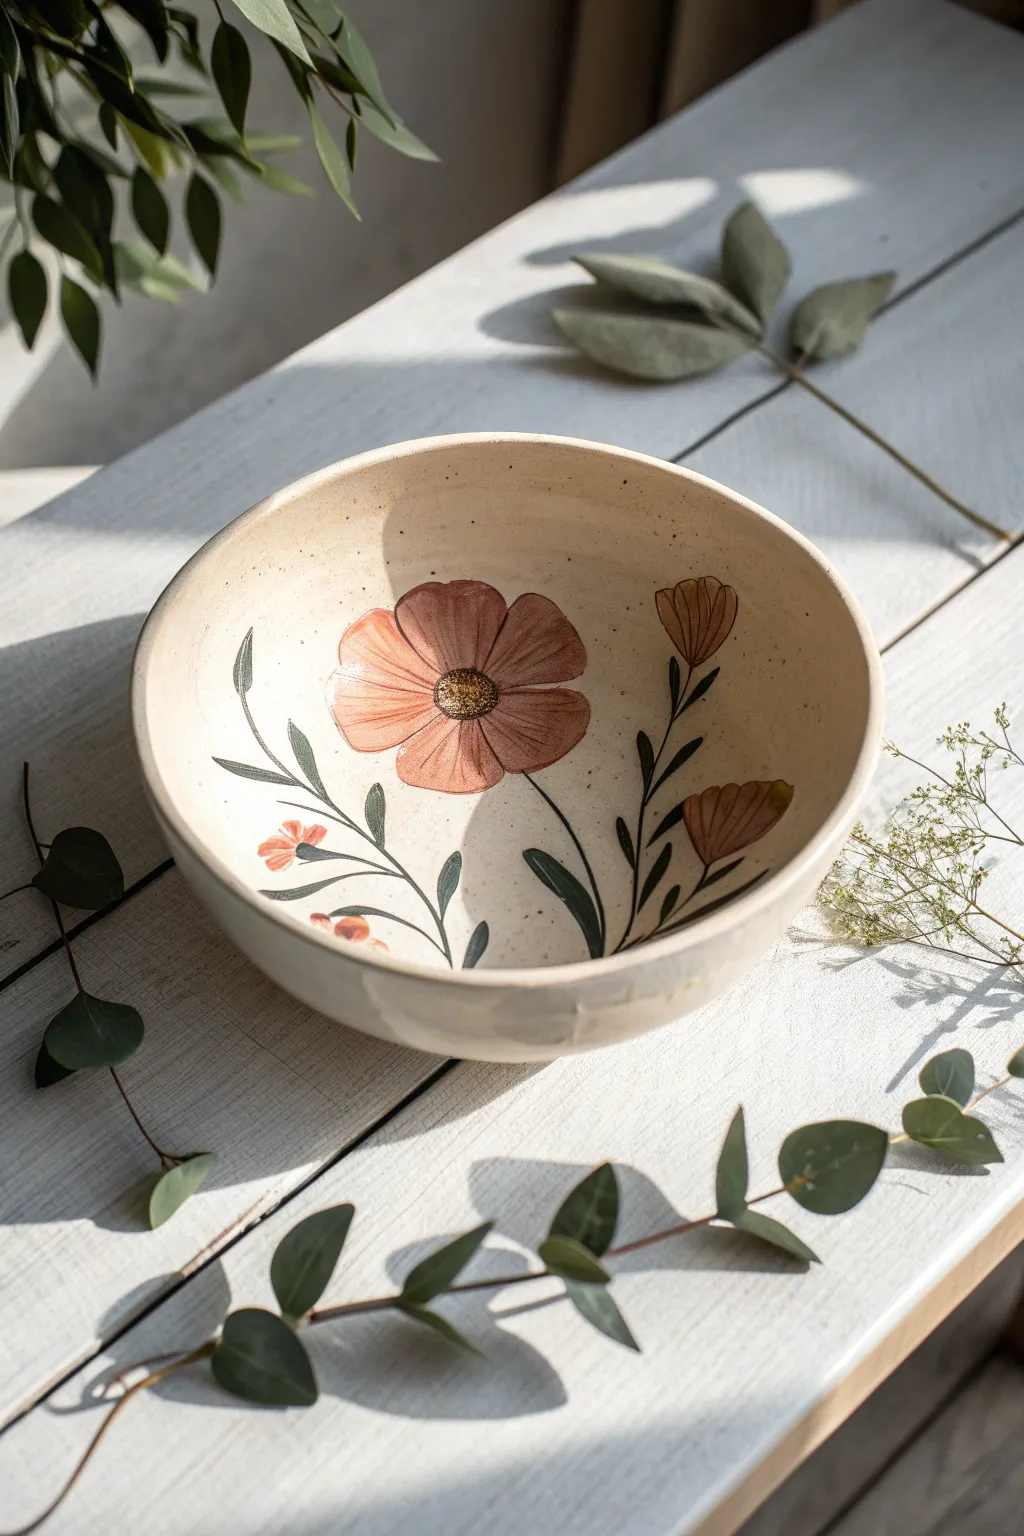
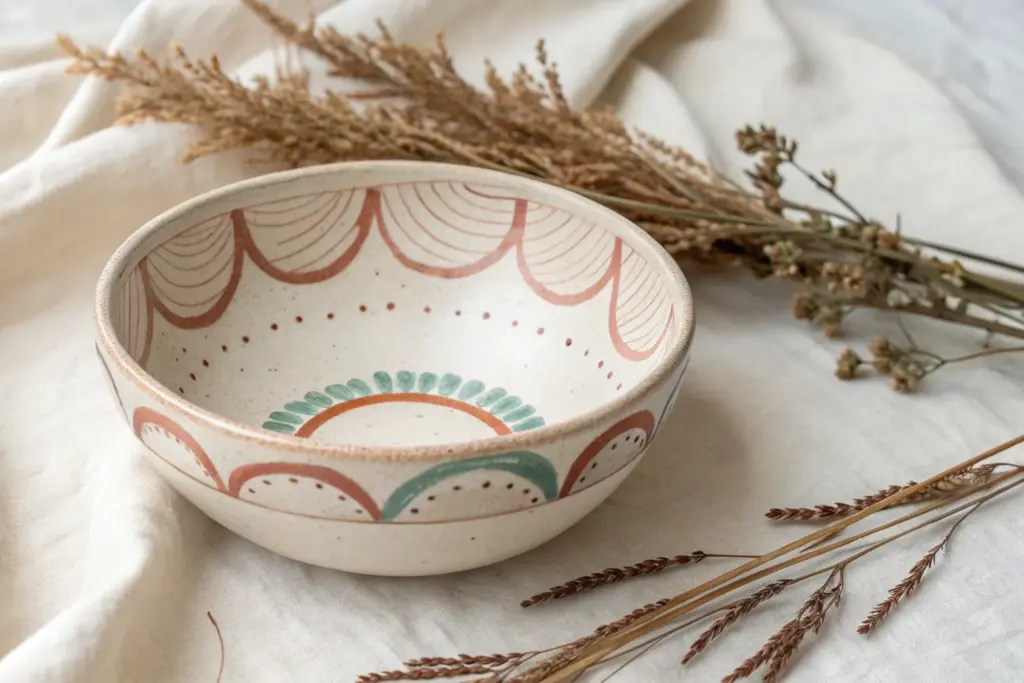
Transform a simple bisque bowl into a piece of functional art with this warm, botanical design. The combination of a speckled cream base and a prominent, hand-painted coral flower creates a cozy, artisanal feel perfect for any kitchen table.
Step-by-Step Guide
Materials
- Bisque-fired ceramic bowl (medium size)
- Speckled cream or oatmeal underglaze
- Underglaze colors: Coral pink/terracotta, Sage green, Dark olive green, Mustard yellow, Burnt umber
- Clear transparent food-safe glaze
- Fan brush (for base coating)
- Round brushes (sizes 2 and 4)
- Detail liner brush (size 0 or 00)
- Pencil
- Palette or small tray
- Water cup and sponge
Step 1: Base Preparation
-
Clean the bisque:
Start by wiping your bisque bowl with a slightly damp sponge. This removes any dust that could prevent the glaze from adhering properly. -
Apply the base coat:
Using a fan brush, apply three even coats of the speckled cream underglaze to the entire inside of the bowl. Allow the surface to become touch-dry between each layer. -
Smooth the surface:
Once the final coat is dry, gently run a clean, dry finger over the surface to smooth out any brush strokes or ridges.
Watercolor Effect
To get that soft, illustrative look on the petals, thin your underglaze slightly with water. Apply it in a single fluid layer rather than building it up thickly.
Step 2: Drafting the Design
-
Sketch the layout:
Lightly sketch your design directly onto the dry underglaze using a regular pencil. Draw a large circle off-center for the main bloom and sweeping lines for the stems. -
Detail the petals:
Refine the main flower shape by sketching five to six large, open petals radiating from the center circle. Don’t worry about the graphite marks; they will burn off in the kiln. -
Add buds and leaves:
Sketch two smaller bud shapes on the right side and a few small leaflets along the main stems to balance the composition.
Step 3: Painting the Florals
-
Block in the petals:
Load your size 4 round brush with the coral pink or terracotta underglaze. Fill in the petal shapes of the main flower. I like to keep the paint slightly translucent here so the strokes look like watercolor. -
Paint the buds:
Use the same coral shade to fill in the smaller, cup-shaped buds on the right side of the bowl. -
Create the stems:
Switch to the size 2 round brush and the dark olive green. Paint the long, sweeping stems, starting from the base of the flowers and pulling the brush downward toward the bowl’s center. -
Add the leaves:
Using the dark olive green, paint the slender, pointed leaves attached to the stems. Press down at the base of the leaf and lift as you pull away to create a sharp tip.
Smudged Design?
If you make a mistake with the underglaze, let it dry completely, then gently scrape the error away with a craft knife or needle tool before repainting.
Step 4: Adding Details & Depth
-
Define the petals:
Mix a tiny amount of burnt umber into your coral paint to create a darker shade. Use the liner brush to paint thin, radiating lines from the center of the flower outward along the petals for texture. -
Paint the flower center:
Fill the center circle of the main bloom with mustard yellow. Dab the paint on rather than stroking it to create a pollen-like texture. -
Detail the center:
Once the yellow is dry, use the very tip of your liner brush to add tiny dots of burnt umber over the yellow area, concentrating them around the outer edge of the circle. -
Highlight the stems:
Add a very thin line of sage green (a lighter shade) along the top edge of the main stems and leaves to simulate light hitting the plant. -
Outline accents:
Optionally, use a very watered-down burnt umber and the liner brush to loosely outline parts of the petals and buds. Keep the lines broken and organic, not a solid cartoon outline.
Step 5: Finishing Touches
-
Dry thoroughly:
Let the entire painted design dry completely, preferably overnight, to ensure the moisture has evaporated from the clay. -
Apply clear glaze:
Dip or brush a clear, food-safe transparent glaze over the entire bowl. Ensure full coverage to make the surface food-safe and shiny after firing. -
Final fire:
Fire the bowl in the kiln according to the clay and glaze manufacturer’s instructions (usually Cone 5 or 6 for stoneware).
Now you have a stunning, nature-inspired bowl ready to hold your morning cereal or favorite soup


Simple Two-Tone Dip Look
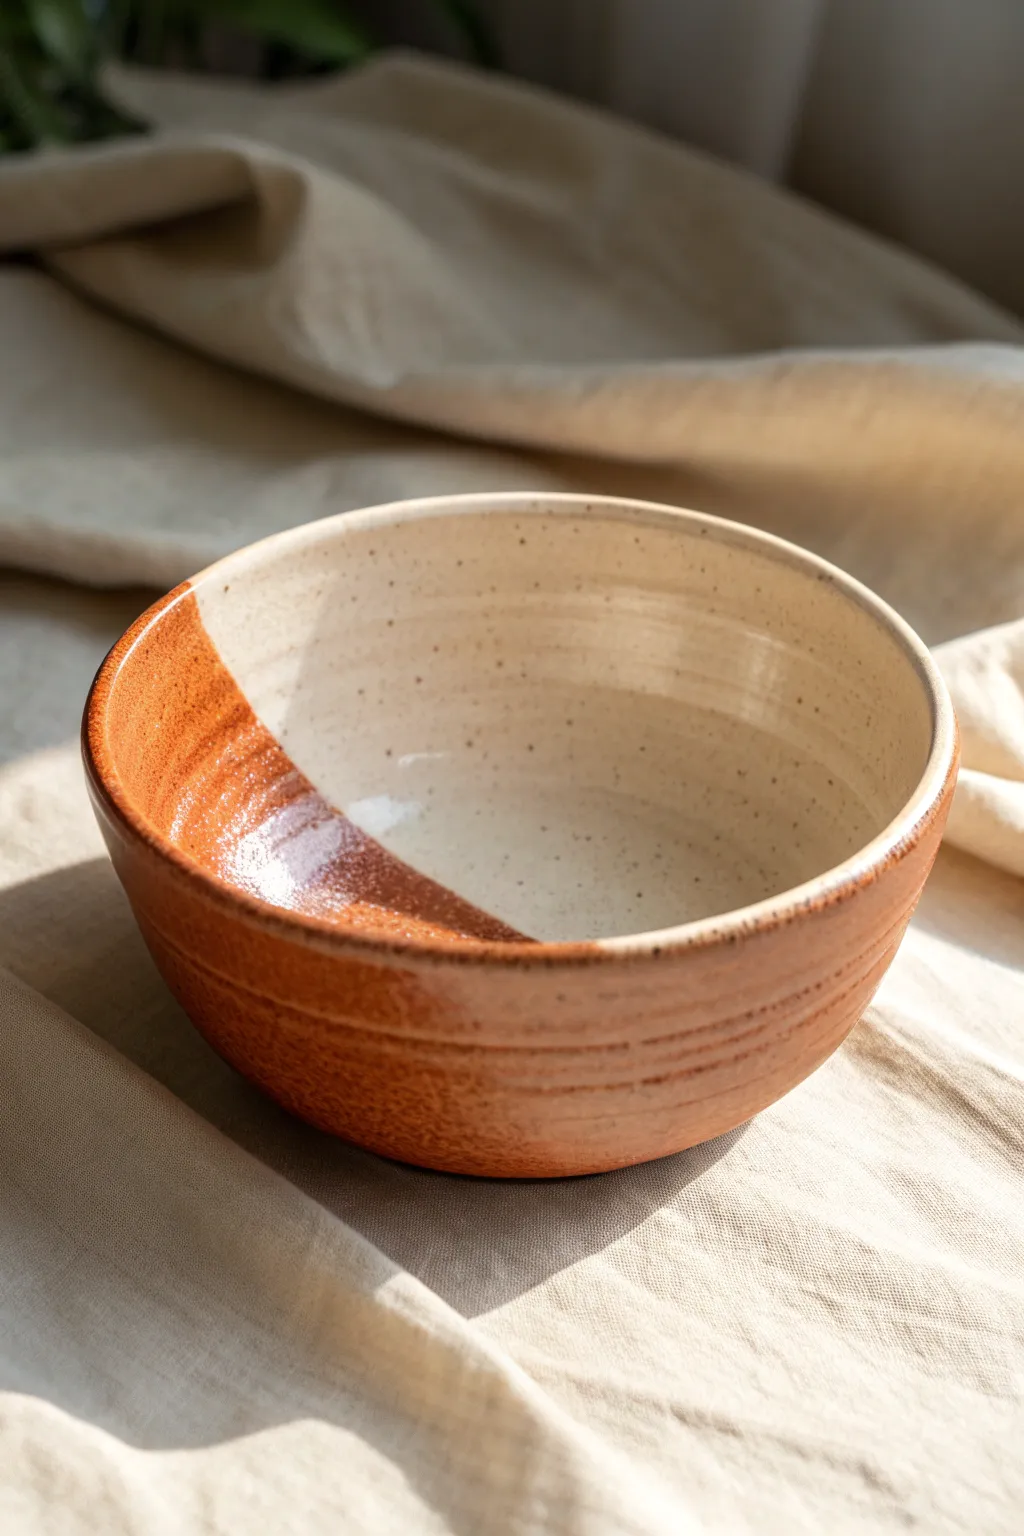
Achieve a stunning, contemporary look with this deceptive simple partial-dip technique. The result combines the raw warmth of rust orange with a creamy, speckled interior glaze for a piece that feels both rustic and modern.
Step-by-Step Tutorial
Materials
- Bisque-fired ceramic bowl (wheel-thrown or hand-built)
- Glaze 1: Glossy Rust/Terracotta (transparent or semi-transparent)
- Glaze 2: Creamy White Speckle (opaque)
- Large dipping container (wide enough for the bowl)
- Wax resist (liquid wax emulation)
- Sponge
- Brush for wax application
- Clean water
- Kiln (or access to a firing service)
Step 1: Preparation & First Dip
-
Clean the Bisqueware:
Start by wiping down your bisque-fired bowl with a damp sponge. This removes any kiln dust or oils from your hands that might prevent the glaze from adhering properly. -
Mix the Base Glaze:
Deeply stir your Creamy White Speckle glaze. Ensure all sediment at the bottom is fully incorporated so you get that lovely even spotting throughout the finish. -
Dip the Interior:
Pour the cream glaze into the interior of the bowl, swirl it quickly to coat the entire inside surface, and pour the excess back out immediately. Alternatively, use dipping tongs to submerge the whole bowl if you want the cream color on the outside rim too. -
Clean the Foot:
If any glaze dripped onto the very bottom foot ring where the bowl sits on the shelf, wipe it away completely with a stiff sponge. -
Let it Dry:
Set the bowl aside until the cream glaze is chalky and dry to the touch. I usually give this about 20-30 minutes to ensure the next layer doesn’t smudge it.
Fixing Drips
If glaze runs under your wax resist, don’t panic. Wait for it to dry completely, then use an X-Acto knife or needle tool to gently scrape the unwanted glaze off firmly before firing.
Step 2: Creating the Geometric Resist
-
Visualize the Angle:
Look at the bowl and decide where you want your dipping line. This project features a unique ‘slice’ effect where the rust color cuts diagonally across the bowl. -
Apply Wax Resist:
Using a brush you don’t care too much about, paint liquid wax resist over the areas you want to remain creamy white. Cover the majority of the interior, leaving a ‘slice’ of the interior wall exposed for the second glaze. -
Wax the Exterior Rim:
Continue painting the wax resist on the exterior upper rim if you want that area to stay cream, or leave it bare if you want the rust glaze to cover the outside completely up to the lip. -
Wait for the Wax:
Allow the wax to dry completely. It will usually turn transparent or slightly yellow and feel tacky but solid. If you dip too soon, the resist won’t work.
Step 3: The Angle Dip
-
Prepare the Rust Glaze:
Stir your Rust/Terracotta glaze thoroughly. This glaze type often relies on iron oxide, which is heavy and sinks fast, so keep it agitated. -
The Angle Dip Strategy:
Hold the bowl firmly by the rim area that is waxed. You are going to dip the bowl into the rust glaze at a steep angle. -
Execute the Dip:
Submerge the bottom and side of the bowl into the bucket of rust glaze. The goal is to cover the exterior bottom and the non-waxed ‘slice’ of the interior simultaneously. -
Hold and Count:
Hold the bowl in the glaze for a count of three (or however long the manufacturer recommends for your specific glaze thickness). -
Lift and Shake:
Pull the bowl out carefully. Give it a gentle shake to let excess glaze drip off the bottom before turning it right-side up. -
Wipe Waxed Areas:
The wax resist should repel the glaze, but small beads of rust glaze might stick to the wax. Gently sponge these beads off with a damp sponge so they don’t fire onto the white surface.
Add Texture
Before the bisque firing, carve horizontal grooves into the exterior clay body. The rust glaze will break beautifully over the high points, enhancing the ‘toasted’ look.
Step 4: Firing
-
Check the Foot Ring:
Do a final check of the foot ring. Glaze on the bottom will fuse your bowl to the kiln shelf, ruining both. Ensure there is a clean 3-5mm line of bare clay at the base. -
Load the Kiln:
Place the bowl into the kiln. Ensure it isn’t touching any other pots, as the double-glazed areas might be slightly more fluid during firing. -
Fire to Temperature:
Fire the kiln to the cone temperature required by your clay and glaze combination (commonly Cone 6 for stoneware). -
Cool Down:
Wait until the kiln is completely cool (under 200°F) before opening it. Opening too early can cause thermal shock and crack your new creation.
Once cooled, your bowl is ready to hold fresh fruit or simply sit as a striking piece of decor on your table


Easy Geometric Shapes Blocks
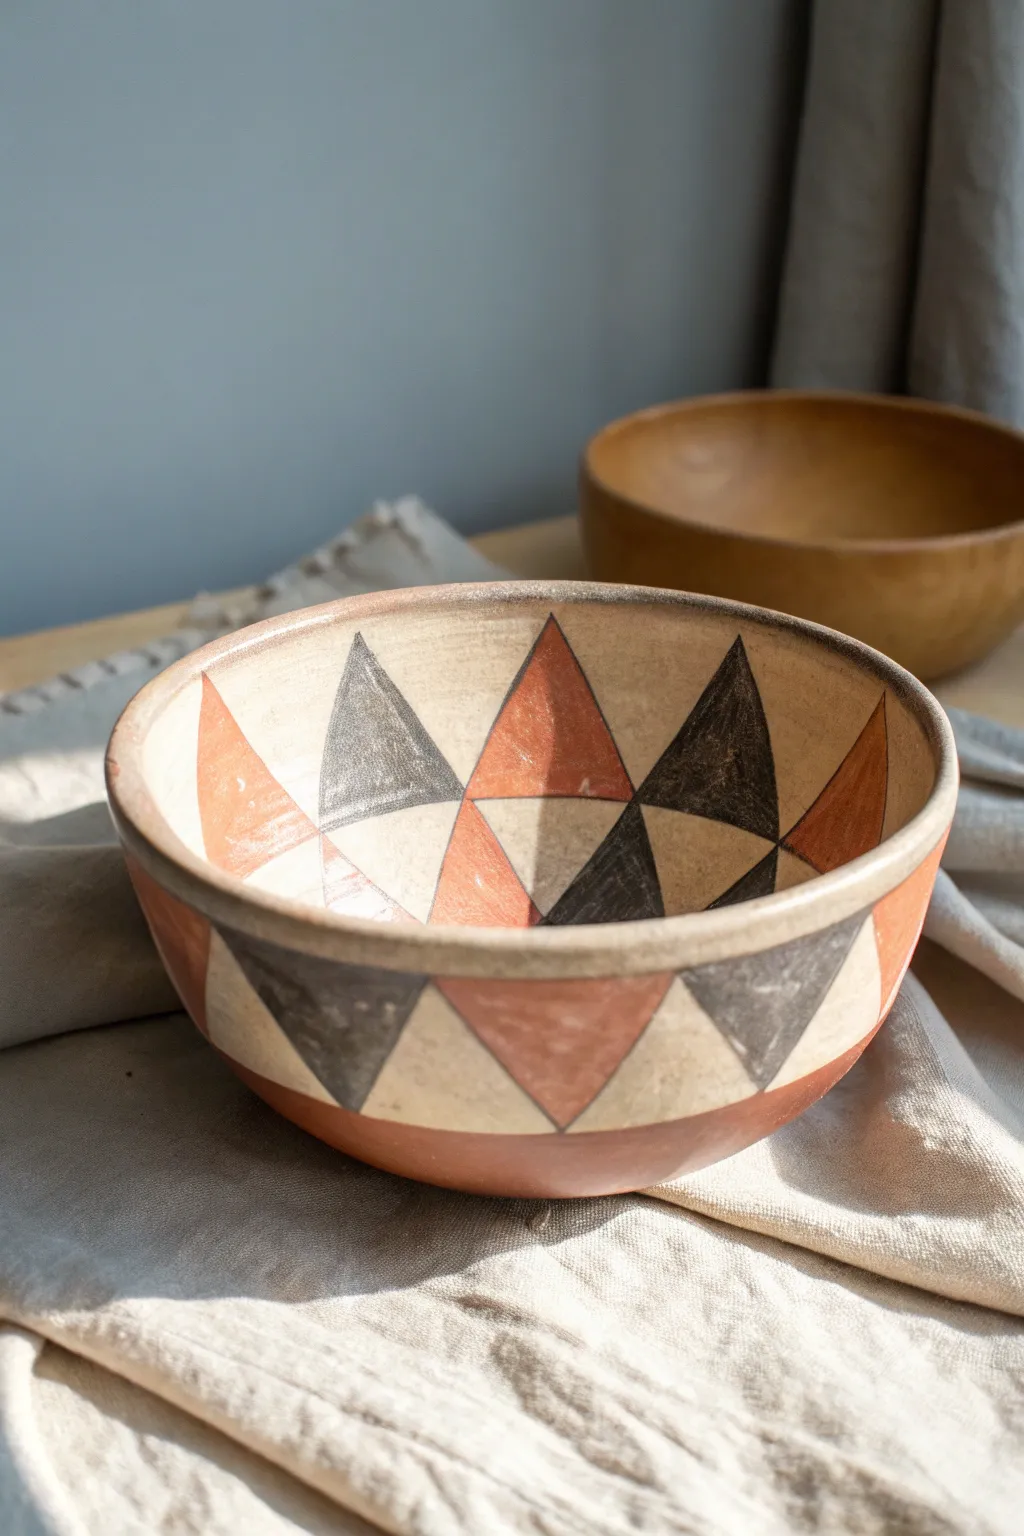
Transform a plain ceramic or clay bowl into an earthy, geometric statement piece with this bold triangle design. Featuring a repeating pattern of rust-orange and charcoal triangles against a raw cream background, this project achieves a timeless, artisanal look.
Detailed Instructions
Materials
- Bisque-fired ceramic bowl or air-dry clay bowl (smooth surface)
- Acrylic paints or underglazes (colors: Burnt Sienna/Rust, Charcoal/Black, Cream/Off-White)
- Flat shader brush (medium size)
- Detail liner brush (small)
- Pencil
- Flexible measuring tape
- Painter’s tape or masking tape (optional)
- Matte spray varnish or clear glaze
- Palette
- Water cup and paper towels
Step 1: Planning the Grid
-
Clean surface:
Begin by wiping down your bowl with a damp cloth to remove any dust or oils that might prevent the paint from adhering properly. -
Establish the outer rim:
Using your pencil, lightly draw a horizontal line around the exterior circumference of the bowl, about halfway down the side. This line will separate the top triangle band from the solid colored base. -
Mark vertical intervals:
Measure the circumference of the rim. Divide this number by an even number (like 8 or 10) to determine the width of your triangles. Mark these intervals along the rim and along your center line. -
Sketch the zig-zag:
Connect your marks to create a continuous zig-zag pattern around the upper exterior band. You should end up with a row of alternating upright and inverted triangles. -
Mirror the interior:
Repeat this measuring and sketching process on the inside of the bowl. Aim to align the points of the interior triangles with the exterior ones for a cohesive look.
Step 2: Painting the Exterior
-
Paint the base:
Load a flat shader brush with Burnt Sienna or a rust-colored paint. Paint the entire bottom section of the bowl’s exterior, below the center line you drew earlier. -
Outer triangles: Rust:
Continuing with the rust color, paint every other triangle in your exterior zig-zag band. Use the flat edge of your brush to keep the lines crisp. Let this dry completely. -
Outer triangles: Charcoal:
Switch to a charcoal or soft black paint. Fill in the remaining alternating triangles on the exterior band. If you are unsteady, I find switching to a smaller detail brush helps near the edges. -
Negative space:
If your bowl wasn’t already a cream color, carefully paint the remaining triangles (the ones pointing down) with a cream or off-white shade. If you like the raw clay look, you can leave these unpainted.
Wobbly Lines?
If freehand painting is difficult, use thin automotive detailing tape or flexible washi tape to mask off the triangles before painting. Press edges down firmly to prevent bleeding.
Step 3: Painting the Interior
-
Inner triangles: Rust:
Moving to the inside, paint the large upright triangles with the rust color. These usually look best if they mirror the placement of the rust triangles on the outside. -
Inner triangles: Charcoal:
Fill the alternating inverted triangles with the charcoal paint. The geometric contrast really starts to pop at this stage. -
Refine the rim:
Using your detail brush, carefully paint the very top rim of the bowl. A thin line of charcoal or rust here ties the interior and exterior designs together seamlessly. -
Clean up edges:
Look closely at your points where the triangles meet. Use a tiny brush with the background cream color to clean up any smudges or uneven lines for a sharper finish.
Texture Twist
Before painting, lightly scratch the triangle outlines into the clay with a needle tool. This creates a physical groove known as ‘sgraffito’ that guides your brush and adds texture.
Step 4: Finishing Touches
-
Dry thoroughly:
Allow the paint to cure fully. This usually takes at least 24 hours for acrylics, or followed by firing if you used underglazes. -
Protect the work:
Seal the bowl with a matte spray varnish or brush-on sealer to protect the design from chipping. If this is for food use, ensure you use a food-safe glaze and proper firing techniques.
Place your finished bowl on a side table to add a warm, artisanal touch to your decor


Crisp Stripes and Lines
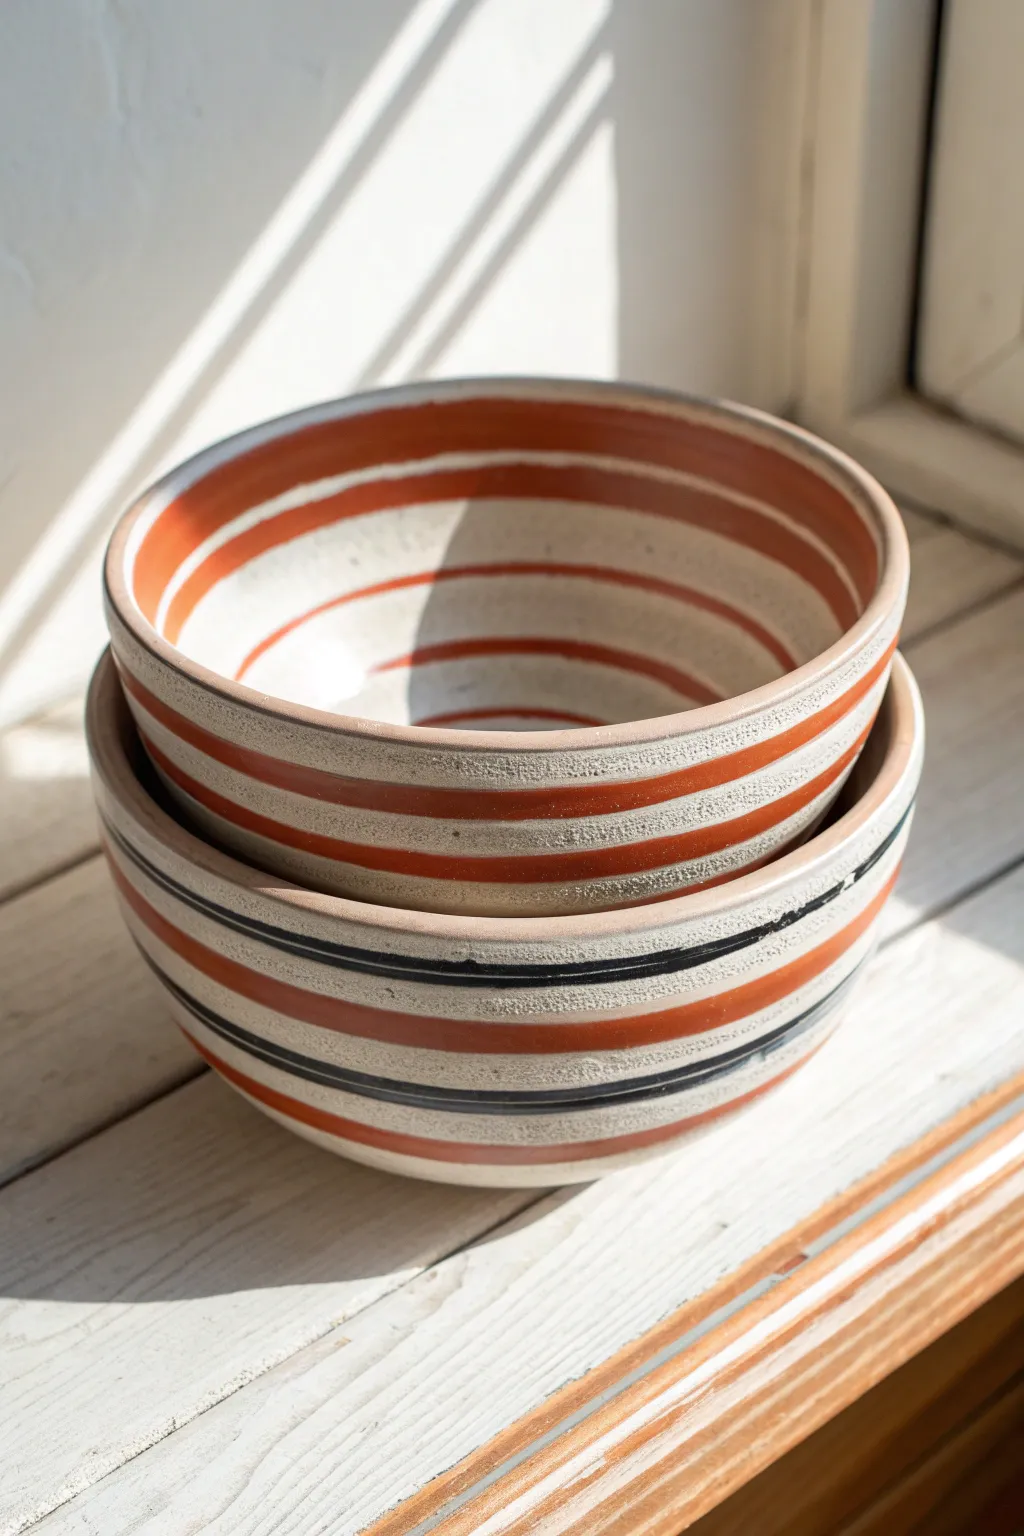
These charming nested bowls bring a touch of rustic warmth to your table with their crisp, hand-painted bands of burnt orange and charcoal. The design celebrates the natural texture of the clay while adding a clean, modern graphic element.
How-To Guide
Materials
- Bisque-fired ceramic bowls (stoneware or light terracotta)
- Underglazes: Burnt Orange/Rust and Black
- Clear matte or satin glaze
- Pottery wheel or heavy banding wheel
- Soft fan brush (for clear glaze)
- Medium round brush (size 6-8)
- Small round brush (size 2-4)
- Sponge
- Bowl of water
Step 1: Preparation
-
Clean surface:
Begin by wiping down your bisque-fired bowls with a damp sponge. This removes any kiln dust or oils from your hands that might resist the underglaze. -
Center the bowl:
Place your first bowl upside down or right-side up on your banding wheel, depending on whether you are painting the inside or outside first. Ensuring it is perfectly centered is crucial for straight continuous lines.
Step 2: Painting the Interior
-
Load the brush:
Dip your medium round brush into the burnt orange underglaze. You want the consistency to be creamy but fluid enough to flow off the brush easily. -
First interior band:
Spin the banding wheel at a steady, medium pace. Gently touch the brush to the interior wall near the rim and hold your hand steady against a support or table edge. Let the motion of the wheel create the line for you. -
Create lower bands:
Reload your brush and move lower into the bowl. Repeat the spinning process to create a second, parallel orange band about an inch below the first one. -
Add the center ring:
Paint a final, smaller ring near the bottom center of the bowl. Don’t worry if the edges have a slightly organic, hand-brushed feel; that texture adds character. -
Layering color:
Once the first coat is dry to the touch (usually just a minute or two for underglaze), apply a second coat over the same lines to ensure the orange is opaque and vibrant.
Wobbly Lines?
If you’re struggling to keep your hand steady, try resting your painting arm on a stack of books or a jar that is the same height as the bowl rim to create a solid anchor point.
Step 3: Painting the Exterior
-
Switch colors:
Clean your brushes thoroughly or switch to a fresh brush for the black underglaze if you are making the bottom bowl design. -
Top rim stripe:
On the exterior, paint a thick orange band right below the rim using the same spinning technique. I find resting my pinky finger on the wheel base helps stabilize my hand for these exterior lines. -
Middle accent:
If recreating the bottom bowl, switch to your smaller round brush and black underglaze. Paint a thin, sharp line directly beneath the orange rim hand. -
Lower body stripes:
Continue the pattern down the bowl. For the bottom bowl design, paint a thick orange band around the belly, followed by another thin black accent line below it. -
Bottom accent:
Finish the bottom bowl with one final orange stripe near the foot. Check your spacing as you go to keep the exposed raw clay proportional between the stripes. -
Top bowl variation:
For the top bowl shown in the stack, stick to a simpler pattern of repeating orange bands on the exterior to differentiate it slightly from its partner.
Elevate with Texture
Before firing, try carving thin sgraffito lines through the thick orange bands to reveal the white clay underneath, adding tactile texture to your visual stripes.
Step 4: Finishing
-
Check for mishaps:
Inspect your lines. If you smudged any underglaze onto the raw clay areas, you can gently scrape it away with a fettling knife or clean investigation tool once it’s dry. -
Bisque fire (Optional):
Some potters prefer to do a quick bisque fire here to set the underglaze, but you can proceed directly to glazing if you are careful not to smear the lines. -
Apply clear glaze:
Using a soft fan brush, apply two to three even coats of clear matte or satin glaze over the entire piece. A glossy glaze works too, but a matte finish emphasizes the rustic stone look. -
Wipe the foot:
Use a damp sponge to meticulously wipe any glaze off the foot ring of the bowl so it doesn’t fuse to the kiln shelf. -
Final firing:
Load the bowls into the kiln and fire to the temperature required by your specific clay and glaze combination (typically Cone 5 or 6 for stoneware).
Enjoy using your new set of custom-striped bowls for your next morning cereal or soup

The Complete Guide to Pottery Troubleshooting
Uncover the most common ceramic mistakes—from cracking clay to failed glazes—and learn how to fix them fast.
Playful Polka Dots All Over
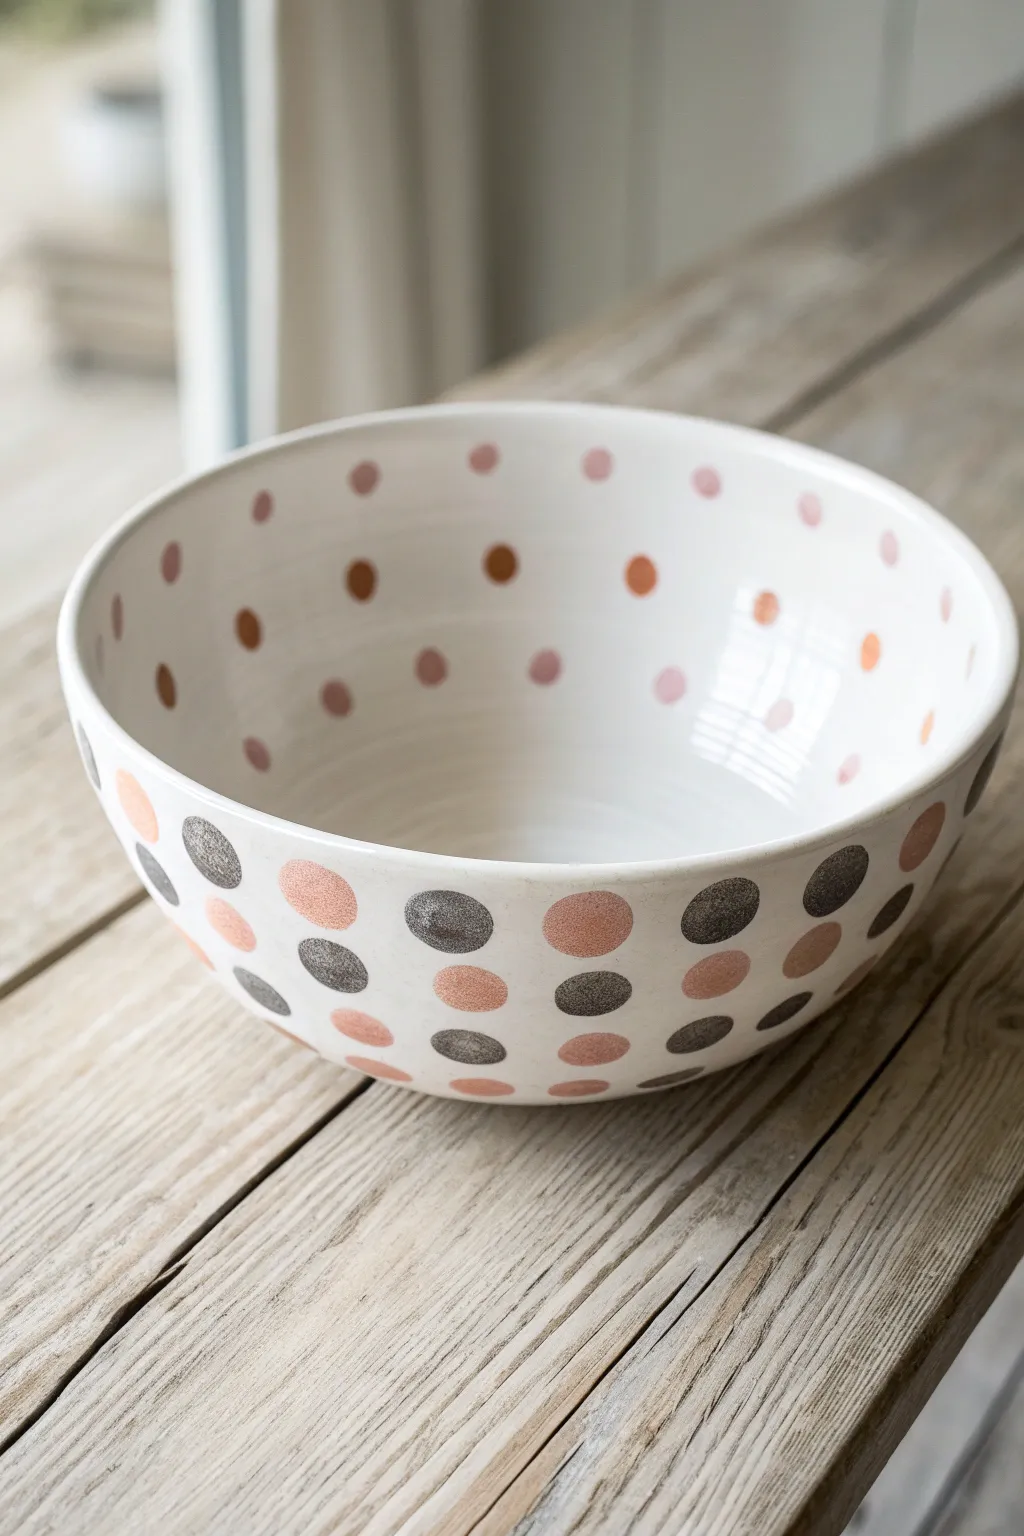
Bring a touch of playful charm to your table with this delightful polka dot bowl design. Featuring a creamy white base adorned with alternating dots of soft blush pink, warm terracotta, and sophisticated charcoal grey, this project balances rustic handmade vibes with modern patterning.
Step-by-Step Tutorial
Materials
- Bisque-fired ceramic bowl (wheel-thrown or premade)
- Ceramic underglazes: Warm White, Blush Pink, Terracotta/Burnt Orange, Charcoal Grey
- Clear transparent dipping or brushing craze-free glaze
- Round foam pouncers (small and medium sizes)
- Small round detail brush (size 2 or 4)
- Wide flat fan brush (for base coat)
- Damp sponge
- Pencil (optional)
- Palette or small dishes for paint
Step 1: Preparation and Base Coat
-
Clean the distinct surface:
Begin by wiping down your bisque bowl with a damp sponge. This removes any kiln dust or oils from your hands that might resist the glaze application. -
Apply the white base:
Using a wide fan brush, apply a smooth, even coat of Warm White underglaze to the entire interior of the bowl. Ensure your brush strokes follow the curve of the bowl for a seamless look. -
Layer the interior:
Let the first coat dry until it loses its sheen, then apply two more coats to the inside. I like to cross-hatch my brush strokes on the second layer to ensure full opacity. -
Coat the exterior:
Repeat this process for the exterior of the bowl. While three coats are standard for solid coverage, check your specific underglaze bottle instructions. -
Dry completely:
Allow the white base coat to dry fully to the touch before attempting any pattern work. This prevents the colors from muddying the pristine white background.
Smudged Perfection
Did a dot smear? Wait for it to dry completely, then gently scratch off the mistake with a needle tool or stiff brush before re-applying the white base.
Step 2: Designing the Interior Dots
-
Plan the spacing:
Visualize a grid inside the bowl. The dots inside are smaller and spaced more widely than the outside. You can lightly mark placement with a pencil if you’re nervous; the graphite will burn off in the kiln. -
Select your tool:
Dip a small round detail brush into the Terracotta underglaze. The interior dots have a slightly organic, hand-painted feel, so a brush often works better than a stamp here. -
Paint the first color:
Paint small circles of Terracotta scattered randomly but evenly across the inner surface. Keep them roughly the size of a pea. -
Add blush tones:
Clean your brush thoroughly, then switch to the Blush Pink underglaze. Fill in the empty spaces between the terracotta dots with pink dots of the same size. -
Check density:
Step back and look at the interior. The pattern should feel airy and light, not crowded. Add a few more dots near the rim if it looks too sparse.
Step 3: Creating the Bold Exterior Pattern
-
Prepare the foam pouncers:
For the exterior, the dots are larger and more uniform. Squeeze small puddles of Charcoal Grey, Blush Pink, and Terracotta onto your palette. -
Start with the darkest tone:
Load a medium-sized foam pouncer with Charcoal Grey. Press it firmly against the bowl’s exterior near the bottom third to create a crisp circle. Repeat this around the bowl, leaving space for other colors. -
Add the pink layer:
Using a clean pouncer of the same size, add Blush Pink dots in rows above or between the grey ones. Notice how the dots in the image are arranged in somewhat organized rows. -
Fill with terracotta:
Complete the pattern with Terracotta dots using a third pouncer. Aim for an alternating pattern where no two identical colors touch directly. -
Refine the edges:
If your foam pouncer left any uneven edges or bubbles, gently smooth them out with your small detail brush while the glaze is still damp. -
Layer the dots:
Most underglazes require 2-3 coats for solid color. Once the first layer of dots is dry, carefully dab a second coat over each circle to ensure they fire opaque and bold.
Pro Tip: Texture Trick
For the exterior dots, lightly twist the foam pouncer as you lift it away from the surface. This prevents suction marks and leaves a smoother finish.
Step 4: Finishing and Firing
-
Clean the foot:
Use a damp sponge to wipe any glaze off the very bottom foot ring of the bowl. This is crucial so the bowl doesn’t stick to the kiln shelf. -
Apply clear glaze:
Once all underglaze design work is bone dry, dip the entire bowl into a clear transparent glaze, or brush on two coats if you don’t have a dipping bucket. -
Final fire:
Fire the piece in a kiln according to the clay and glaze specifications (typically Cone 06 or Cone 6).
Enjoy your beautiful new bowl, perfect for serving cereal or simply displaying as a piece of handmade art
Fruit Slice Bowl Interior
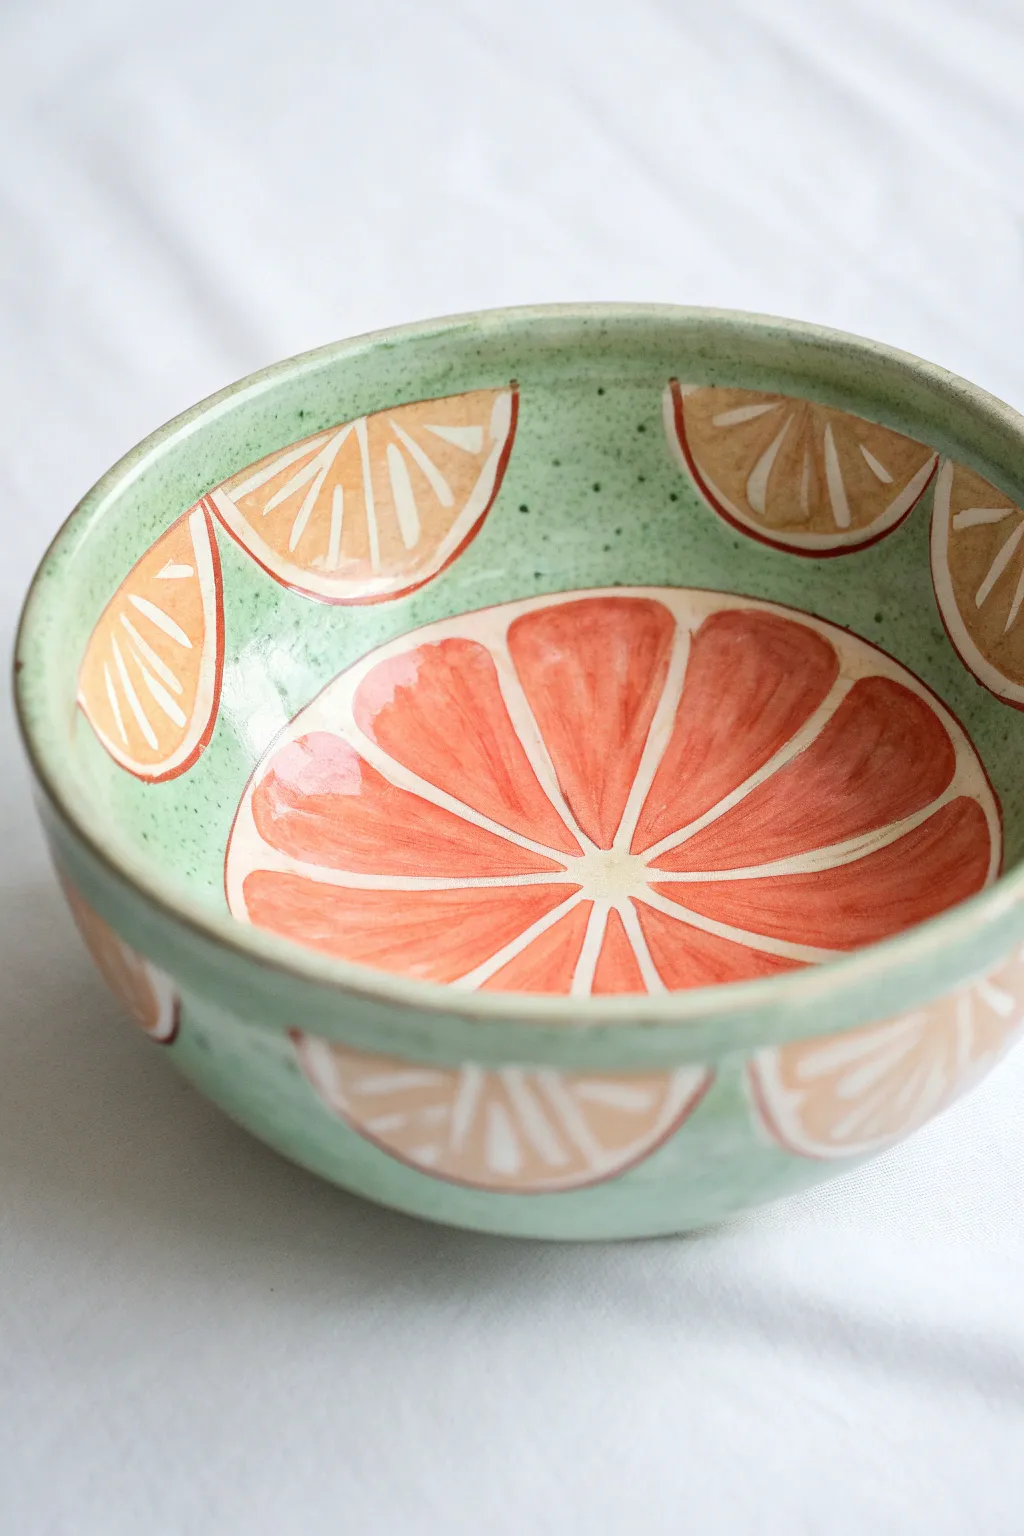
Transform a simple ceramic vessel into a refreshing burst of color with this grapefruit-inspired design. The clever placement of fruit slices creates a playful interior that reveals a juicy centerpiece as you finish your meal.
Detailed Instructions
Materials
- Bisque-fired ceramic bowl
- Underglaze pencil (soft lead)
- Speckled green underglaze (mint or sage tone)
- Pink/Coral underglaze (for the grapefruit segments)
- Orange/Peach underglaze (for the side slices)
- Wax resist (liquid, water-based)
- Fine liner brush (size 0 or 00)
- Medium round brush (size 4 or 6)
- Clear transparent glaze
- Sponge and water bowl
Step 1: Preparation & Sketching
-
Clean the Bisque:
Wipe down your bisque-fired bowl with a damp sponge to remove any kiln dust or oils from your hands. Let it dry until cool to the touch. -
Map the Center:
Using a soft underglaze pencil, lightly sketch a small circle in the very center of the bowl’s interior. This will be the pith hub where all the grapefruit segments meet. -
Draw the Segments:
Draw lines radiating outward from the center hub to the edge of the bowl’s floor, dividing the circle into triangular wedges. Aim for 10-12 segments for a realistic look. -
Add the Side Slices:
Along the upper interior rim, sketch semi-circles that look like fruit wedges peeking over the edge. Repeat this pattern on the exterior of the bowl if desired, aligning them with the interior slices.
Clean Lines Pro-Tip
If your wax resist allows paint to bead up on top, wait until the paint is semi-dry, then gently dab—don’t rub—with a damp sponge to remove the droplets without smudging.
Step 2: Waxing & Resisting
-
Establish the White Lines:
Dip your fine liner brush into liquid wax resist. Carefully paint over the pencil lines you just drew, including the central hub, the radiating lines between segments, and the white rim of each fruit slice. -
Detail the Seeds:
For extra detail, you can add tiny teardrop shapes of wax within the fruit segments to create white ‘seeds’ once the glaze is applied. -
Let the Wax Set:
Allow the wax resist to dry completely. It usually turns darker or slightly transparent when it’s ready. If you touch it too soon, you risk smearing the barrier.
Level Up: Texture
Before the first firing (greenware stage), lightly carve into the clay where the pith lines will be. The glaze will pool slightly in these grooves for added depth.
Step 3: Painting the Fruit
-
Mix the Pink Tone:
Pour out a small amount of coral or pink underglaze. I find adding a tiny drop of water helps it flow better into the large central area. -
Fill the Center:
Using the medium round brush, paint the grapefruit segments in the bottom of the bowl. Don’t worry if you brush over the wax lines; the wax will repel the paint. -
Paint the Rim Slices:
Switch to a peach or light orange underglaze for the semi-circles along the rim. This subtle color difference distinguishes the ‘orange’ slices from the ‘grapefruit’ center. -
Clean Up Edges:
Once the fruit colors are dry to the touch, use a slightly damp sponge to gently wipe away any beads of underglaze sitting on top of the waxed lines. -
Apply Second Coats:
To ensure vibrant, opaque color, apply two more coats of pink and orange to their respective areas, letting each layer dry in between.
Step 4: Background & Glazing
-
Mix the Green:
Prepare your speckled mint green underglaze. If you don’t have a speckled glaze, you can flick a stiff toothbrush dipped in dark green paint over a wet light green coat to create the effect. -
Fill the Background:
Carefully paint the green underglaze around the fruit slices on the bowl’s walls and exterior. The wax resist on the fruit rinds will help you keep a clean edge, but go slowly here. -
Build Opacity:
Apply 2-3 coats of the green background color to ensure solid coverage without brushstrokes showing through. -
Final Wax Check:
Do one last gentle wipe with a damp sponge over the waxed areas to reveal crisp white lines between your colors. -
Clear Glaze Application:
Once the underglaze is bone dry, dip the entire bowl into a clear transparent glaze to seal the design and make it food-safe. -
Final Fire:
Fire the bowl in the kiln according to the clay and glaze temperature specifications (usually Cone 5 or 6 for stoneware).
This vibrant bowl will bring a permanent splash of summer to your kitchen table regardless of the season


What Really Happens Inside the Kiln
Learn how time and temperature work together inside the kiln to transform clay into durable ceramic.
Lemons and Leaves Scatter Pattern
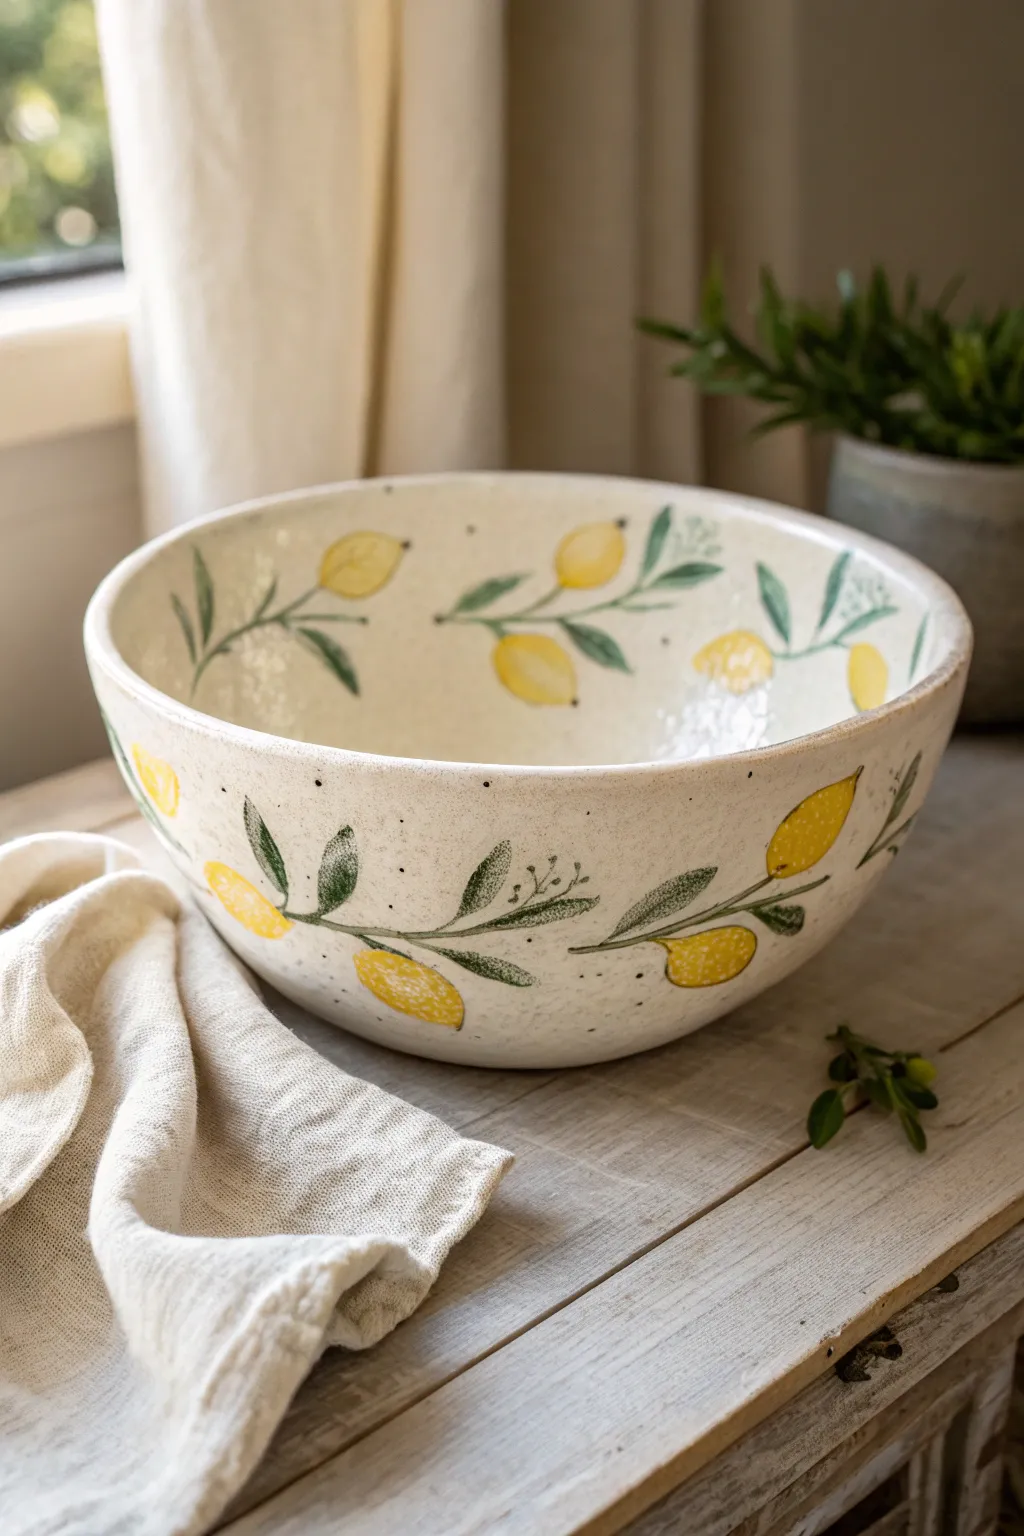
Brighten up your table with this delightfully rustic ceramic project featuring a scattered pattern of vibrant lemons and leafy sprigs. The charm of this piece lies in its hand-painted, slightly imperfect aesthetic and the lovely speckled finish that mimics traditional stoneware.
Step-by-Step
Materials
- Bisque-fired ceramic bowl (an organic, wide shape works best)
- Underglaze (Lemon Yellow, Golden Yellow, Olive Green, Dark Green)
- Clear speckled dipping glaze (or brush-on clear glaze with speckles)
- Round watercolor brushes (sizes 4 and 6)
- Fine liner brush (size 0 or 1)
- Pencil (HB or lighter)
- Palette or small dishes for mixing
- Sponge and water bowl
- Kiln (or access to a firing service)
Step 1: Planning the Pattern
-
Prep the Surface:
Begin by gently wiping down your bisque bowl with a slightly damp sponge. This removes any dust that could prevent the underglaze from adhering properly. -
Map the Elements:
Using a light pencil, sketch a loose, scattering pattern of lemon shapes around the exterior wall. Group them in pairs or singles, leaving plenty of negative space. Don’t worry about erasing; pencil marks burn off in the kiln. -
Connect the Branching:
Draw thin, flowing lines connecting your lemons to create branches. Add markings for leaves, ensuring they curve naturally along the imaginary stems. -
Mirror the Interior:
Repeat this sketching process on the inside of the bowl. I like to stagger the placement so the inside lemons don’t sit directly behind the outside ones.
Fixing Smudges
If you accidentally smear green paint onto the white clay, don’t wipe it while wet! Let it dry completely, then gently scrape the mistake off with a craft knife.
Step 2: Painting the Fruit
-
Base Large Yellows:
Load your size 6 round brush with Lemon Yellow underglaze. Fill in the lemon shapes with smooth, confident strokes. Apply two coats, letting the first dry briefly to ensure opacity. -
Add Dimension:
While the yellow is dry to the touch but not fully set, take a tiny amount of Golden Yellow on the tip of the brush. Dab it near the bottom curve of each lemon to create a subtle shadow. -
Texture the Peels:
For that realistic citrus look, use a nearly dry brush to stipple tiny dots of the darker yellow onto the lighter base. This mimics the pitted texture of lemon zest.
Fresh Twist
Swap the lemons for oranges or peaches using different underglaze palettes. Or add tiny white blossoms near the leaves for extra botanical detail.
Step 3: Adding Greenery
-
Base the Leaves:
Switch to your size 4 brush and Olive Green underglaze. Paint the leaves using a ‘press and lift’ motion—press down at the base of the leaf and lift as you reach the tip to create a tapered point. -
Deepen the Green:
Mix a little Dark Green into your Olive shade. Paint a second layer on just one half of each leaf to suggest sunlight hitting the foliage. -
Define the Stems:
Using the fine liner brush and Dark Green, trace over your pencil branch lines. Keep the lines fluid and slightly varying in thickness for a natural look. -
Add Leaf Veins:
With the very tip of the liner brush or a needle tool, gently scratch back a central vein line through the damp green underglaze, revealing the white clay beneath, or paint a thin dark line.
Step 4: Finishing Touches & Glazing
-
Create Stray Specks:
Dip a stiff toothbrush into thinned-down dark green or brown underglaze. Run your thumb over the bristles to flick tiny specks onto the background white clay. This adds to the rustic feel before the final glaze. -
Bisque Check:
Examine the bowl for any underglaze smudges on the white areas and gently scrape them away with a clean craft knife or wipe with a damp Q-tip. -
Apply the Speckled Glaze:
Stir your clear speckled glaze thoroughly to suspend the particles. Dip the entire bowl or brush on three even coats, ensuring full coverage over your painted design. -
Rim Cleanup:
Wipe the foot of the bowl clean with a sponge to prevent it from sticking to the kiln shelf. -
Final Fire:
Fire the piece to the temperature recommended for your specific clay and glaze body (typically cone 5 or 6 for stoneware).
Once cooled from the kiln, this fresh, summery bowl is ready to hold your favorite fruits or salads
Calm Wave Pattern in Blue
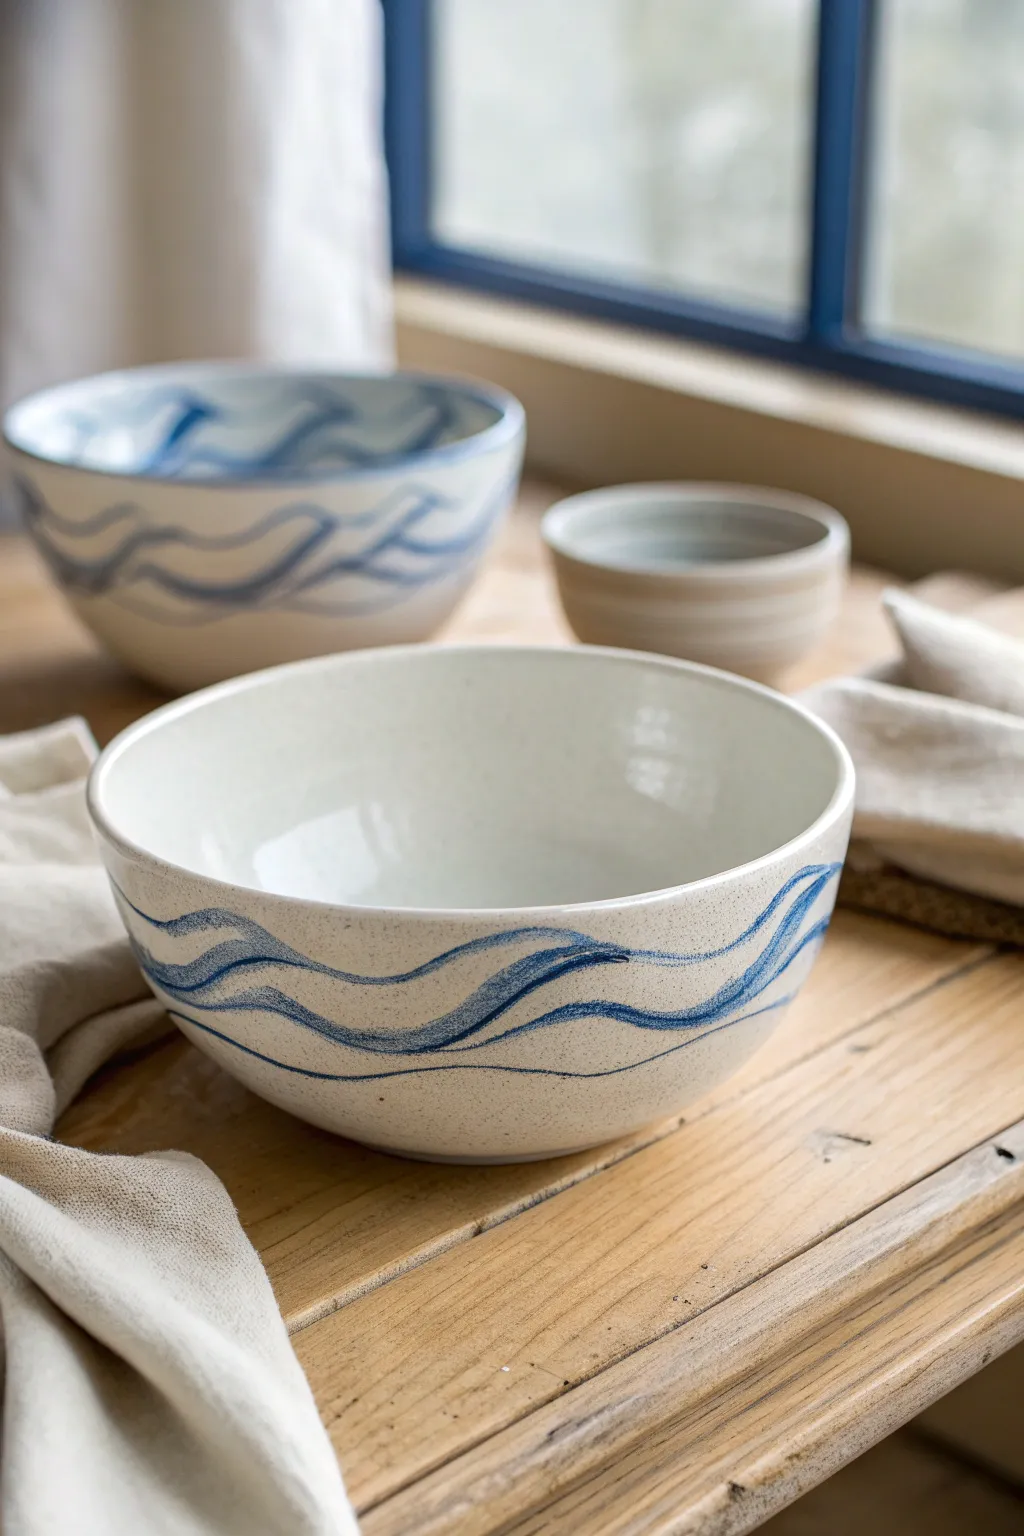
Capture the serenity of the sea with this simple yet elegant wave pattern. Using a speckled ceramic base and flowing indigo lines, you’ll create a piece that feels both rustic and refreshing.
Step-by-Step Tutorial
Materials
- Speckled clay bowl (bisque fired)
- Cobalt blue underglaze
- Medium liner brush (size 2 or 4)
- Wide glazing brush
- Clear glossy glaze
- Sponge
- Water container
- Pencil (optional)
- Turntable or banding wheel (optional)
Step 1: Preparation
-
Clean the Bisque:
Begin by wiping down your bisque-fired bowl with a damp sponge. This is crucial for removing any dust that might prevent the glaze from adhering properly. -
Plan Your Spacing:
Visualize where your wave pattern will sit. The design looks best when placed on the lower half of the bowl, leaving plenty of negative space above for a clean, modern look. -
Sketch the Guides (Optional):
If you’re nervous about freehanding, use a pencil to very lightly sketch the undulating wave line around the circumference. Remember, pencil marks will burn off in the kiln.
Fixing Smudges
Blue underglaze stains easily! If you make a mistake, don’t just wipe it; scrape the error gently with a needle tool once dry, then sponge the dust away.
Step 2: Painting the Wave
-
Load Your Brush:
Dip your medium liner brush into the cobalt blue underglaze. You want the consistency to be fluid, like heavy cream, so it flows smoothly without running. -
Paint the Primary Wave:
Starting at one point on the bowl, paint a continuous, flowing line that gently dips and rises. Keep your wrist loose to create organic, natural curves rather than rigid peaks. -
Connect the Loop:
Continue the line all the way around the bowl until you meet your starting point. Don’t worry if the lines don’t match up perfectly; you can adjust the curve slightly as you approach the join. -
Thicken the Line:
Going back over your initial wet line, broaden the stroke slightly. I find that varying the pressure on the brush creates a lovely variance in line thickness, mimicking the natural movement of water. -
Create the Second Wave:
Paint a second wave line below the first one. This line should roughly parallel the first but doesn’t need to be exact; intentional irregularity adds to the handmade charm. -
Add the Third Tide:
Add a third and final wave line below the second one, keeping it closer to the base. This provides weight to the visual design. -
Texture the Strokes:
While the underglaze is still slightly damp, dry your brush on a paper towel and lightly drag it through parts of the blue lines. This ‘dry brush’ effect creates the streaky, painterly texture seen in the reference. -
Check Consistency:
Step back and look at the bowl as a whole. If any sections of the blue look too faint, add a thin second coat to deepen the color, but leave some translucency for depth. -
Clean Up Edges:
If you made any stray marks or smudges, use a clean, damp brush or the corner of a sponge to gently wipe them away before the underglaze sets completely.
Step 3: Finishing and Glazing
-
Dry the Underglaze:
Allow the blue wave pattern to dry completely. It should look chalky and matte to the touch before you proceed. -
Prepare Clear Glaze:
Stir your clear glossy glaze thoroughly. Ensure there are no lumps and the consistency is smooth. -
Apply First Coat:
Using a wide glazing brush, apply a coat of clear glaze over the entire interior of the bowl. Use long, smooth strokes to ensure even coverage. -
Glaze the Exterior:
Apply the clear glaze to the exterior over your wave design. Be careful not to drag the brush too hard over the design to avoid smearing the underglaze. -
Dry and Repeat:
Let the first coat dry until it’s no longer tacky. Apply a second coat of clear glaze to ensure a durable, food-safe finish. -
Wipe the Foot:
Use a damp sponge to meticulously wipe all glaze off the very bottom ‘foot’ of the bowl. Any glaze left here will fuse the bowl to the kiln shelf. -
Final Fire:
Fire the bowl in the kiln according to the clay and glaze manufacturer’s instructions (usually cone 5 or 6 for stoneware).
Level Up: Gradient Waves
Mix a tiny bit of white underglaze into your blue for the top wave, and use pure blue for the bottom wave to create an ombré ocean depth effect.
Once fired, fill your new bowl with fruit or simply display it to enjoy a splash of coastal calm in your home

TRACK YOUR CERAMIC JOURNEY
Capture glaze tests, firing details, and creative progress—all in one simple printable. Make your projects easier to repeat and improve.
Mandala Dot Burst
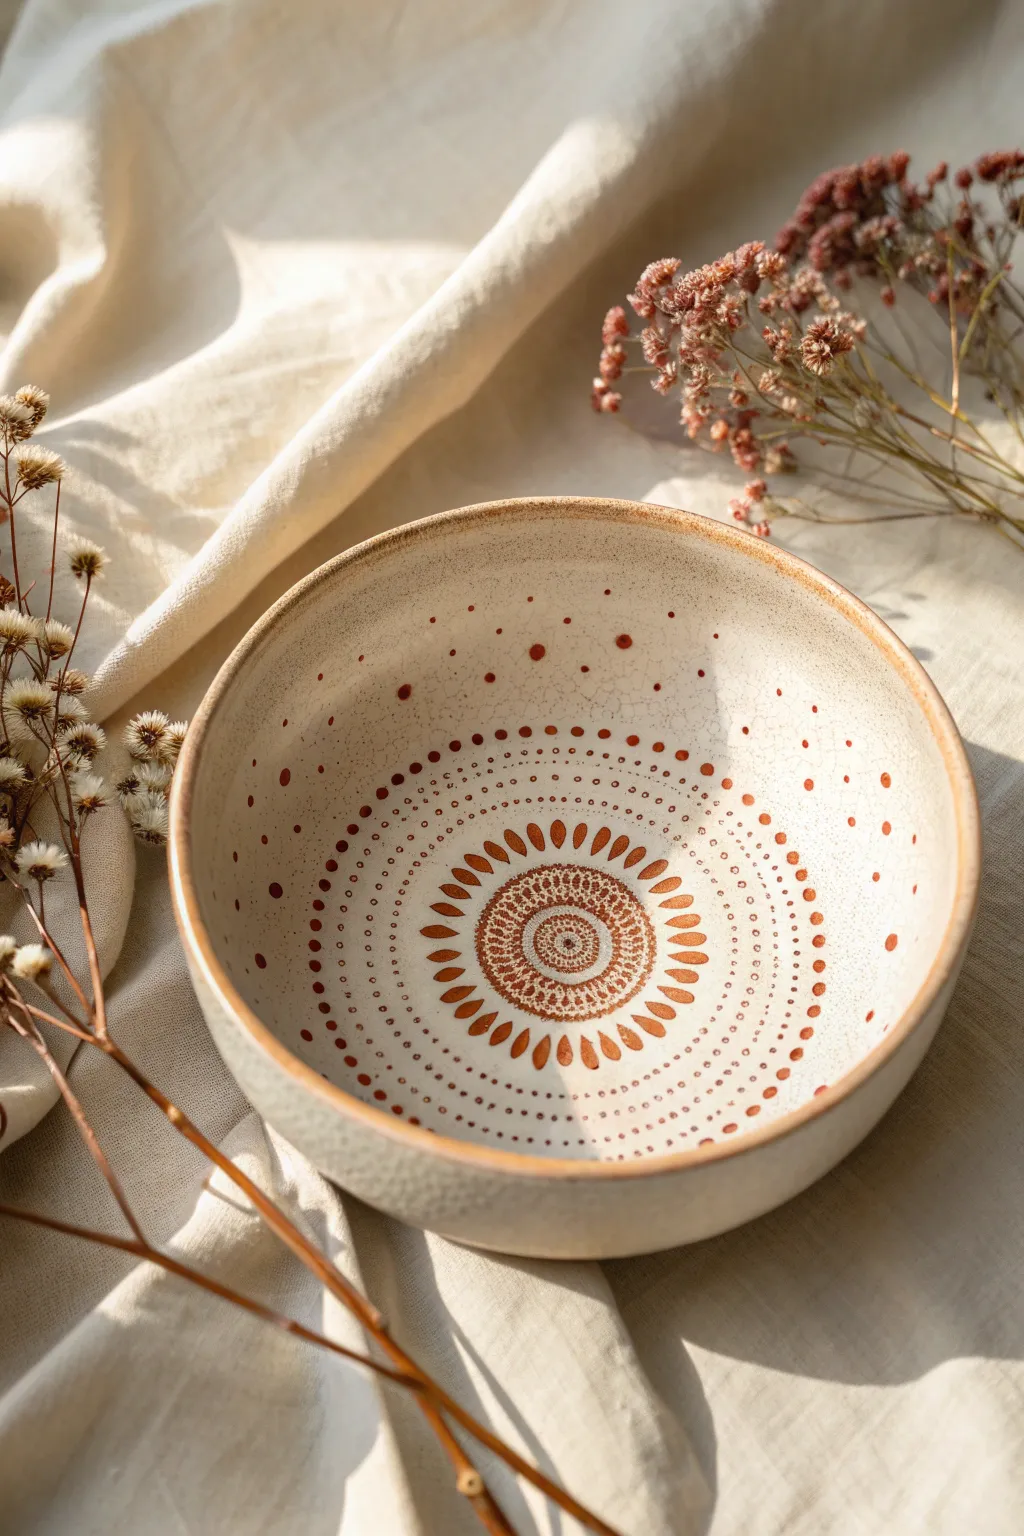
Bring warmth to your table with this stunning ceramic bowl featuring a radiating mandala design in earthy rust tones. The intricate dot-work creates a mesmerizing sunburst effect that looks complex but is built up through simple, repetitive motions.
How-To Guide
Materials
- Bisque-fired ceramic bowl (or a plain, light-colored ceramic bowl)
- Underglaze or fluid ceramic paint (Rust/Burnt Orange color)
- Clear dipping glaze or brush-on clear glaze
- Dotting tools (various sizes)
- Fine liner brush (size 0 or 00)
- Small round brush (size 2)
- Damp sponge for cleanup
- Lazy Susan or banding wheel (optional but helpful)
Step 1: Preparation & Base
-
Clean surface:
Ensure your bisque bowl is free of dust by wiping it gently with a damp sponge. Any dust can repel the glaze or paint. -
Center point:
Find the exact center of the bowl’s interior. You can mark this lightly with a pencil if needed, though standard graphite will burn off in the kiln. This center dot is crucial for symmetry.
Step 2: Painting the Core Mandala
-
Central spiral:
Using your smallest dotting tool or the very tip of a fine liner brush, dip into the rust-colored underglaze. Start at the center point and create a tight spiral of tiny dots moving outward. -
First ring:
Once the center spiral forms a small solid circle about the size of a dime, switch to a slightly larger dotting tool. create a ring of distinct, small dots around the central cluster. -
Double dotted border:
Create two concentric rings of very fine dots directly outside the previous ring. Keep these dots consistent in size and spacing. -
Teardrop petals:
Switch to your fine liner brush. Paint a ring of small teardrop shapes pointing outward from the dotted center. Press the brush down to create the belly of the drop and lift up quickly to create the point. -
Petal details:
Inside the negative space between each teardrop shape, add a single tiny dot using your smallest tool. This adds density to the pattern.
Uneven Spacing?
Don’t panic if your circle goes wonky. Fill larger gaps with tiny ‘satellite’ micro-dots to balance the visual weight without breaking the pattern flow.
Step 3: Expanding the Pattern
-
Outer lattice:
Moving outward about half an inch, start a new pattern band. Use a medium dotter to place dots in a wide circle. I like to visualize a clock face first to get the spacing even before filling in the gaps. -
Connecting dots:
Fill the space between the petal ring and this new outer ring with concentric circles of graduating dot sizes. Start small near the center and get slightly larger as you move out. -
Large accent dots:
Scattered freely near the rim and upper walls of the bowl, place larger, more random accent dots. These should feel like sparks flying off the main sunburst. -
Rim definition:
Using a round brush saturated with the rust color, run it along the very edge of the bowl’s rim. Let the brush naturally waiver slightly for an organic, handmade feel.
Two-Tone Effect
Mix a tiny bit of dark brown into your rust color for the center-most dots. This creates a subtle gradient that adds incredible depth to the mandala.
Step 4: Finishing Touches
-
Clean up:
Check for any accidental smudges or misshapen dots. If the underglaze is dry, you can gently scratch off mistakes with a wooden tool. -
Drying:
Allow the underglaze design to dry completely. It should look chalky and matte when fully dry. -
Clear glazing:
Apply your clear glaze over the entire piece. If dipping, do a quick dunk to avoid smearing the design. If brushing, pat the first coat on rather than dragging the brush. -
Firing:
Fire the piece in the kiln according to your clay and glaze specifications (typically cone 5 or 6 for stoneware).
Once fired, fill your beautiful new bowl with fruit or simply display it to enjoy the radiating warmth of your handiwork
Loose Abstract Brushstrokes
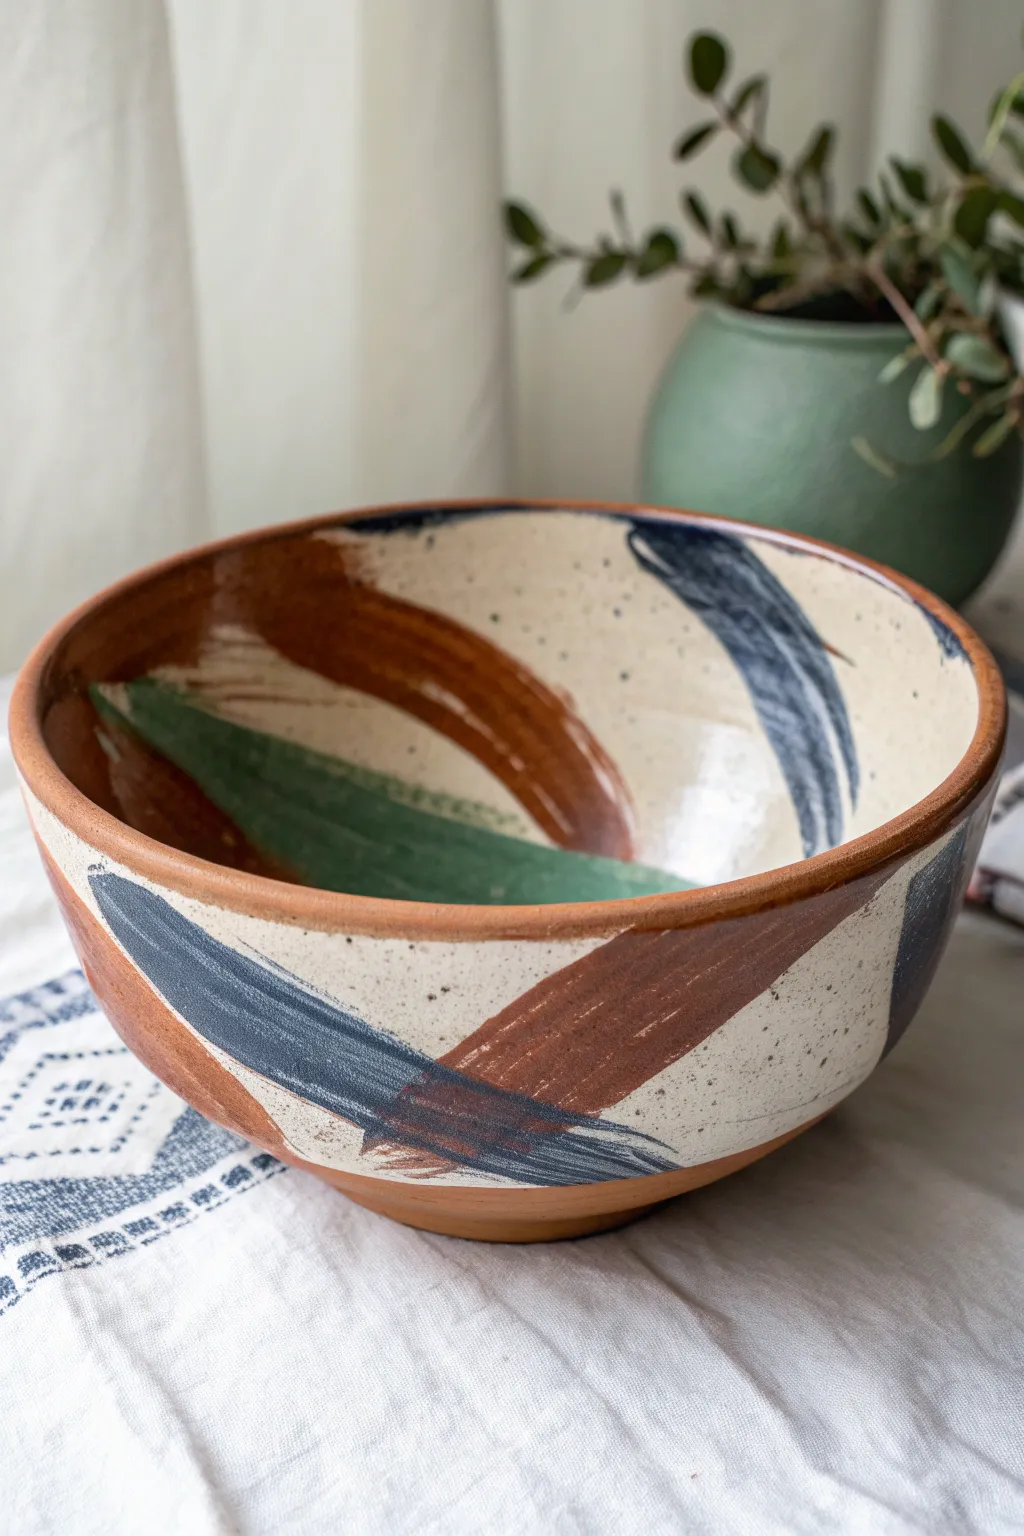
Embrace the beauty of imperfection with this loose, abstract bowl design that feels both earthy and modern. By layering bold, sweeping gestures over a speckled background, you’ll create a functional piece of art that looks right at home in a contemporary kitchen.
Step-by-Step
Materials
- Bisque-fired ceramic bowl (red clay or terracotta base recommended)
- Cream or off-white ceramic glaze (opaque)
- Speckled glaze additive or Iron Oxide wash (for speckles)
- Underglazes or colored glazes: Dark Navy, Rust/Red-Brown, Forest Green
- Wide flat brush (1-1.5 inch)
- Stiff bristle brush (e.g., old toothbrush) for splattering
- Medium round brush
- Clear transparent dipping glaze (optional, if using underglazes)
- Kiln access (or oven-bake paints if doing a non-food-safe version)
Step 1: Preparing the Base
-
Clean the bisque:
Start by wiping down your bisque-fired bow with a damp sponge. This removes any dust that could prevent the glaze from adhering properly. -
Base coat application:
Dip or brush your cream-colored glaze onto the interior and upper exterior of the bowl. Leave the bottom third and the foot ring unglazed to reveal the beautiful raw red clay. -
Adding texture:
If your cream glaze doesn’t have speckles built-in, dip a stiff brush into a watered-down iron oxide wash or brown underglaze. -
Splatter technique:
Run your thumb over the bristles to flick tiny speckles onto the wet cream glaze. I find it helpful to practice on a piece of paper first to control the density. -
Let it set:
Allow this base layer to become touch-dry before adding the colored strokes. This prevents the colors from bleeding muddy into the background.
Smudged lines?
If colors bleed into the base glaze, your base was likely too wet. Wait longer between layers, or use wax resist over the base glaze before painting stripes.
Step 2: Painting the Abstract Strokes
-
Load the wide brush:
Saturate your wide flat brush with the Rust/Red-Brown color. You want the brush fully loaded but not dripping. -
First swoops:
Create large, confident diagonal strokes across the interior of the bowl. Let the brush naturally run out of paint at the end of the stroke for a dry-brush texture. -
Mirroring the exterior:
Continue the rust lines onto the exterior of the bowl. Don’t worry about matching them perfectly; having them slightly offset creates dynamic movement. -
Switch colors:
Rinse your brush thoroughly or switch to a clean wide brush. Load it with the Dark Navy color. -
Intersecting lines:
Paint navy strokes that intersect or run parallel to the rust lines. Aim for variety—some strokes can be heavy and opaque, while others show the bristle marks. -
Adding greenery:
Using the same loose technique, add a single, bold Forest Green stroke in the center or bottom of the bowl to ground the design. -
Review and refine:
Step back and look at the composition. If a painted area looks too sparse, add a small partial stroke, but resist the urge to overwork it.
Make it a Set
Vary the stroke direction on matching mugs or plates. Keep the color palette identical, but change the dominant stripe color for a cohesive yet distinct look.
Step 3: Finishing Touches
-
Clean the foot:
Use a damp sponge to meticulously wipe any errant glaze off the bottom foot ring. This is crucial so the bowl doesn’t fuse to the kiln shelf. -
Clear coating:
If you used underglazes for the colors, apply a clear transparent glaze over the entire piece (except the foot) to make it food-safe and glossy. -
Final drying:
Let the piece dry completely for 24 hours to ensure all moisture has evaporated from the clay body. -
Firing:
Fire the bowl in the kiln according to the specific directions of your glaze manufacturer (typically Cone 5 or 6 for stoneware).
Once cooled, your bowl is ready to bring a touch of artisan charm to your table setting
Tiny Doodles and Mini Icons
Transform a plain ceramic bowl into a delightful piece of art with this charming doodle design. Featuring playful zig-zags, tiny hearts, stars, and abstract symbols, this project creates a cozy, hand-drawn look that adds character to any table setting.
Detailed Instructions
Materials
- Bisque-fired ceramic bowl (or a plain white glazed bowl if using porcelain paint)
- Black underglaze pencil or fine-tip underglaze applicator bottle
- Alternative: Fine-tip porcelain paint marker (if not firing in a kiln)
- Speckled white glaze (if strictly firing ceramic)
- Small round brush
- Clear dipping glaze (if using underglazes)
- Pencil for sketching outlines
- Damp sponge
Step 1: Planning and Base Layer
-
Prepare the surface:
Start by wiping down your bisque bowl with a damp sponge. This removes any dust that might prevent the glaze or paint from sticking properly. -
Map out the design:
Using a regular graphite pencil, lightly sketch guide lines around the exterior circumference. You’ll need one line near the rim and another about an inch below it to define the zig-zag band. -
Section the doodle area:
Lightly mark another guideline near the base of the bowl. The space between the zig-zags and this bottom line is where your main doodle icons will live.
Variation Tip
Don’t stress about perfect symmetry! The hand-drawn impurity of the lines gives this style its cozy ‘sketchbook’ feel. Wobbly lines are welcome here.
Step 2: Drawing the Exterior Patterns
-
Create the zig-zag band:
Using your black underglaze applicator or fine-tip marker, draw a continuous zig-zag line in the top band you marked out earlier. -
Add detail dots:
Place a single dot inside every upward and downward point of the zig-zag. Keep them centered for a balanced look or let them be slightly organic for charm. -
Draw the main icons:
Moving to the lower band, start drawing the featured doodles. Sketch a spiral circle, a filled triangle, a simple outline heart, and a small flower. -
Repeat the pattern:
Continue this sequence—spiral, triangle, heart, flower—all the way around the bowl. Leave about a finger-width of space between each icon. -
Fill the triangle:
Go back and carefully fill in the triangle shapes with solid black to add visual weight to the design. -
Add the bottom border:
Below your doodle icons, add a row of evenly spaced dots around the base of the bowl to frame the artwork. -
Separate the sections:
Draw a dotted horizontal line between the zig-zag band and the main doodle icons to clearly separate the two design zones.
Step 3: Decorating the Interior
-
Rim details:
Just inside the rim of the bowl, place tiny black dots about half an inch apart. This connects the inside design to the outside. -
Create the starry sky:
Randomly scatter small five-pointed asterisks (stars) across the upper half of the bowl’s interior. -
Add tiny hearts:
Interperse small, solid black hearts among the stars. I find it helpful to vary the spacing so it doesn’t look like a grid. -
Fill the gaps:
If there are large empty spaces, add a few more stars or simple dots to balance the composition.
Ink Troubleshooting
If your underglaze applicator clogs, use a thin needle to clear the tip. Don’t squeeze harder, or you might get a sudden blob of black ink on your work.
Step 4: Finishing Touches
-
Check your work:
Scan the bowl for any smudges. If you used underglaze, you can gently scratch off mistakes; if using markers, wipe quickly with a damp Q-tip. -
Glazing (Ceramics only):
If you are doing traditional ceramics, dip the entire bowl into a clear or lightly speckled cream glaze. The graphite pencil marks will burn away in the kiln. -
Baking (Marker method only):
If using porcelain markers on a finished bowl, follow the manufacturer’s instructions for baking the piece in a home oven to set the design.
Now you have a custom, hand-doodled bowl perfect for your morning cereal or as a thoughtful handmade gift
Bold Animal Print Spots
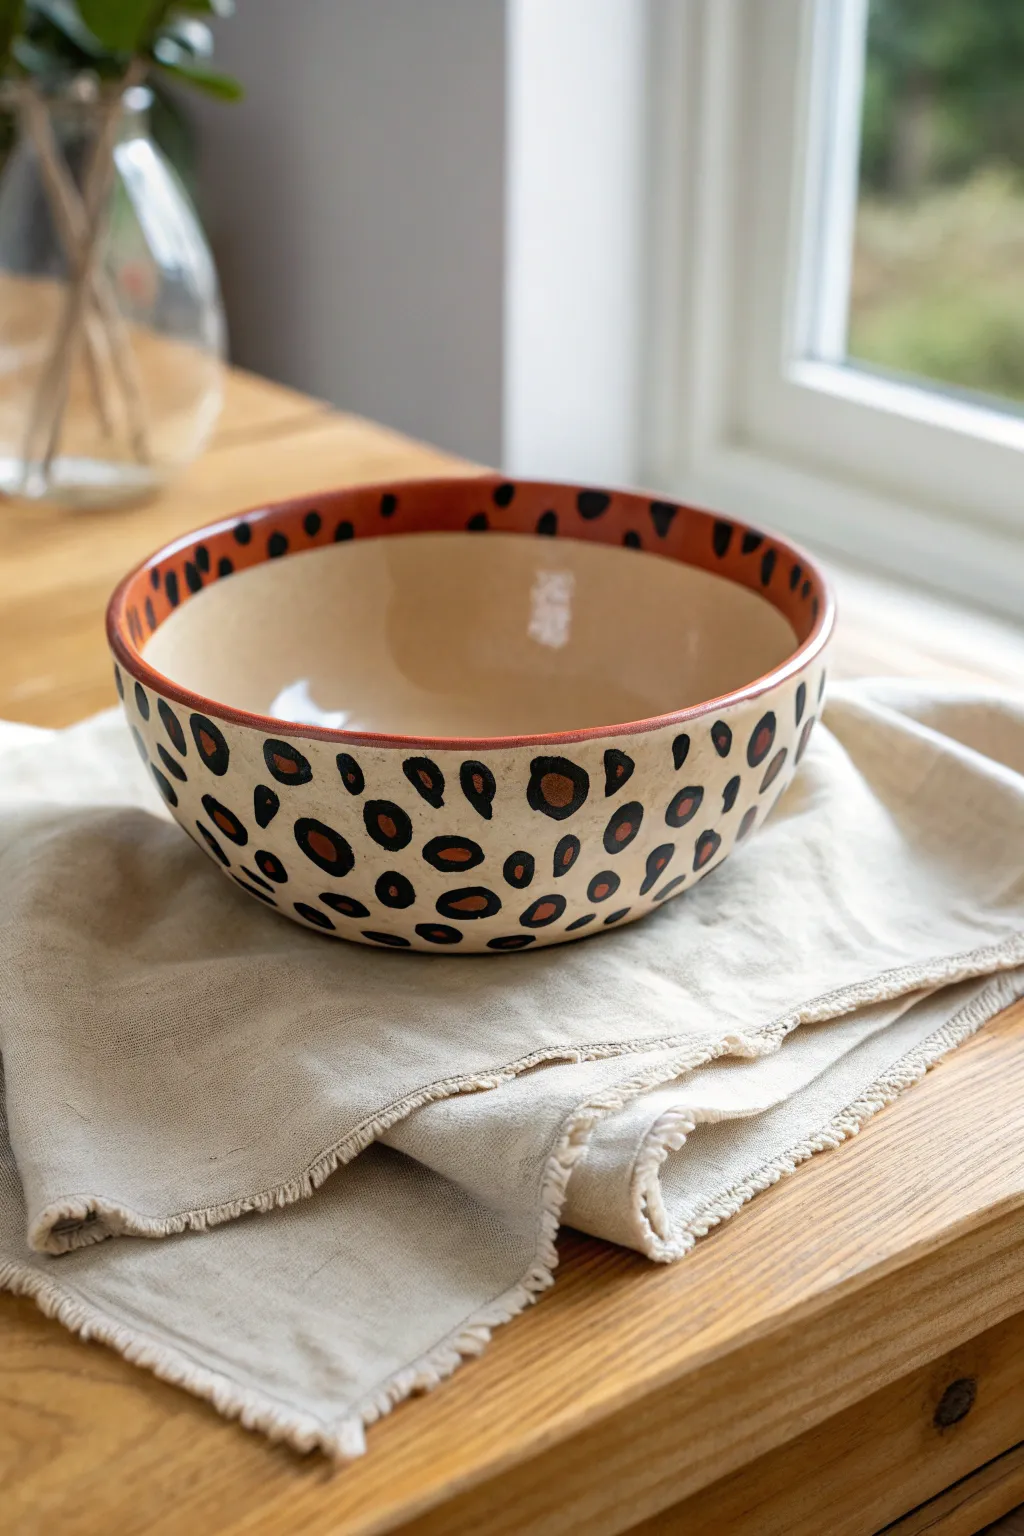
Bring a touch of the wild into your kitchen with this chic, hand-painted ceramic bowl featuring a bold leopard print design. The contrast between the creamy base, the rusty orange spots, and the crisp black outlines creates a sophisticated yet playful look perfect for modern decor.
Step-by-Step
Materials
- Bisque-fired ceramic bowl (medium size)
- Underglaze (Cream or Off-White)
- Underglaze (Rust Orange/Terracotta)
- Underglaze (Black)
- Wide soft fan brush (for base coat)
- Small round brush (size 2 or 4)
- Fine liner brush (size 0 or 00)
- Painting sponge
- Clear dipping glaze
- Water cup and paper towels
Step 1: Base Preparation
-
Clean the bisque:
Start by wiping down your bisque-fired bowl with a slightly damp sponge. This removes any kiln dust or oils from your hands that might prevent the glaze from adhering properly. -
Apply the creamy base:
Using a wide soft fan brush, apply a generous coat of cream or off-white underglaze to the entire exterior of the bowl. Ensure smooth, long strokes to minimize brush marks. -
Layering for opacity:
Let the first coat dry until it’s chalky to the touch. Apply a second and third coat to ensure a solid, opaque background. I find three layers is usually the sweet spot for a rich, consistent finish. -
Paint the interior:
Cover the entire interior of the bowl with the same cream underglaze. Use the same three-coat method as the exterior for full coverage.
Step 2: Adding the Spots
-
Mix the rust color:
Shake your rust orange or terracotta underglaze well. Pour a small amount onto a palette. You want a warm, earthy tone that contrasts nicely with the cream base. -
Paint organic shapes:
Using a small round brush (size 2 or 4), paint random, organic blob-like shapes all over the exterior of the bowl. Vary the sizes—some small dots, some larger ovals. -
Spacing is key:
Leave varying amounts of cream space between the orange shapes. Don’t worry about making them perfect circles; irregular shapes look more natural for leopard print. -
Add the rim band:
While you have the rust color out, take a steady hand or use a banding wheel to paint a solid band around the top rim of the bowl. Extend this color slightly down into the interior (about 1 inch) for a finished look. -
Interior detail:
Inside the rust-colored band you just painted on the interior rim, add a single row of small rust dots or dashes to echo the exterior pattern.
Smudged lines?
If you smudge black onto the cream, let it dry completely. Then, gently scratch the mistake off with a toothpick or craft knife before reapplying the correct color carefully.
Step 3: Defining the Print
-
Prepare the black liner:
Switch to your fine liner brush and black underglaze. Ensure the paint flows smoothly; you can add a tiny drop of water if it feels too thick or draggy. -
Outline technique:
Begin outlining your rust spots. The key to leopard print is *not* to enclose the shape completely. Draw two or three disconnected C-shapes or brackets around each orange spot. -
Vary line weight:
Press harder in some areas of the outline and lighter in others to create varying line thickness. This mimics the natural variation in animal fur. -
Fill the gaps:
Identify the empty cream spaces between your main spots. Paint small, solid black irregular dots or tic-tac shapes in these gaps to balance the composition. -
Interior rim accents:
Go back to the interior rim where you painted the rust band. Add solid black rectangular dashes or spots over the rust band, spaced evenly apart. -
Finishing touches:
Check the exterior for any areas that look too sparse and add tiny black specks if needed. Allow the bowl to dry completely overnight. -
Glazing and firing:
Once fully dry, dip the bowl into a clear transparent glaze. Wipe the foot of the bowl clean with a sponge so it doesn’t stick to the kiln shelf, and fire it according to your clay’s specifications.
Go metallic
For a glamorous twist on this classic look, use a gold luster overglaze on the rim band after the initial firing. It requires a third, lower-temp firing but adds incredible luxury.
Your stylish animal print bowl is now ready to serve as a stunning centerpiece on your dining table
Night Sky Speckles and Stars
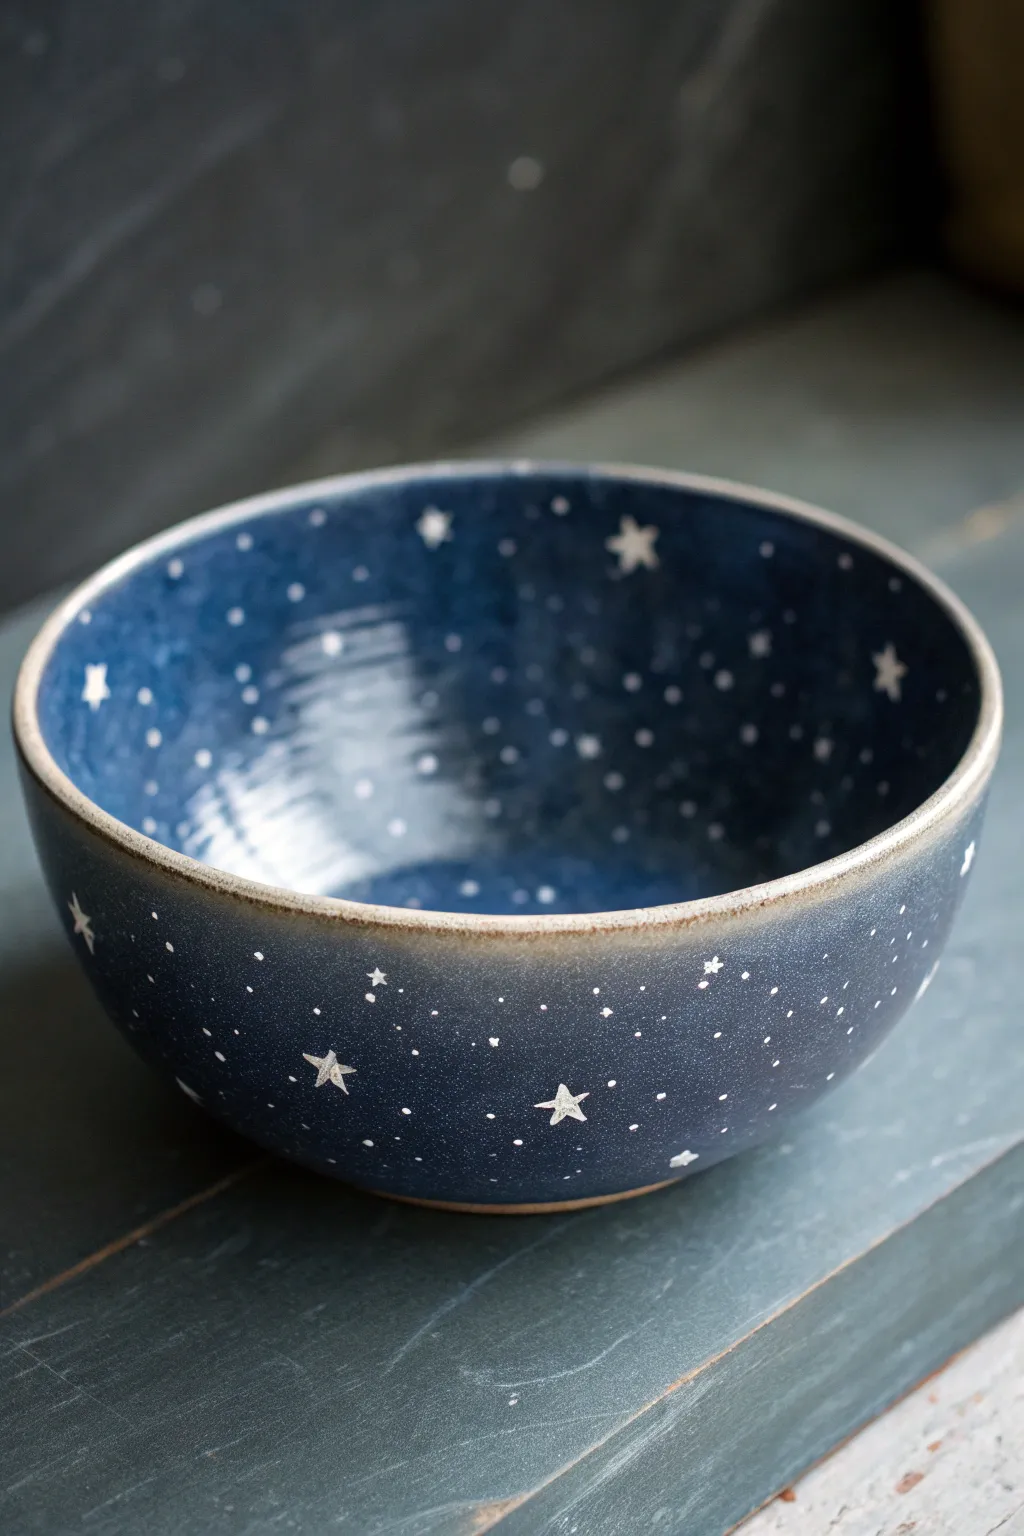
Transform a simple bisque bowl into a window to the cosmos with this stunning deep blue glaze application. The scattering of delicate stars and nebular speckles creates a magical, dreamy finish that makes every meal feel special.
How-To Guide
Materials
- Bisque-fired ceramic bowl
- Deep midnight blue underglaze
- Bright white underglaze
- Clear dipping glaze or brush-on gloss glaze
- Wide soft fan brush (for base coat)
- Fine detail brush (size 0 or 00)
- Old toothbrush or stiff bristle brush
- Sponge
- Bowl of water
- Palette or small plate
- Wax resist (optional)
Step 1: Base Coat Application
-
Prep the surface:
Begin by wiping down your bisque-fired bowl with a slightly damp sponge to remove any dust or oils from handling. -
Apply the first layer:
Load your wide fan brush with the deep midnight blue underglaze. Apply a smooth, even coat to the entire interior of the bowl, working in long, sweeping strokes. -
Coat the exterior:
Repeat the process on the outside of the bowl. Be careful to stop just short of the bottom rim (foot ring) to prevent sticking in the kiln. -
Check opacity:
Let the first coat dry until it’s chalky to the touch. Apply a second and possibly third coat to ensure a solid, opaque dark blue background. You don’t want the clay body showing through the blue. -
Wipe the rim:
Using a clean, damp sponge, carefully wipe away the blue glaze from just the very top lip of the rim. This exposes the raw clay body, creating the rustic transition seen in the reference photo.
Star Placement Secret
Don’t evenly space your hand-painted stars. Group two close together occasionally or leave larger gaps elsewhere. This randomness mimics the natural night sky.
Step 2: Creating the Galaxy
-
Prepare the splatter:
Pour a small amount of bright white underglaze onto your palette. Add a tiny drop of water to thin it slightly; it should be fluid enough to flicker off a clear brush. -
Test the consistency:
Before hitting your bowl, test your splatter technique on a piece of paper. The specks should be fine and round, not globs. -
Interior splatter:
Dip an old toothbrush or stiff brush into the thinned white glaze. Hold it inside the bowl and run your thumb across the bristles to flick a fine mist of ‘stars’ onto the blue surface. -
Exterior splatter:
Repeat the splattering process on the exterior. I find that varying the distance of the brush creates a nice mix of dense clusters and lonely stars. -
Review density:
Step back and look at your galaxy. You want a good dusting of white specks, but leave enough negative space for the larger stars.
Too Many Blobs?
If your splatter technique created large, unintentional blobs of white, wait for them to dry. Gently scratch them off with a needle tool or toothpick, then dab a little blue over the spot.
Step 3: Painting the Stars
-
Load the detail brush:
Switch to your Size 0 or 00 fine detail brush. Load it with the un-thinned bright white underglaze for maximum opacity. -
Paint main stars:
Paint classic five-pointed stars scattered randomly across the interior and exterior. Keep them relatively small and delicate. -
Vary the star sizes:
Make some stars slightly larger than others to create depth, but ensure none are overwhelming. The charm lies in their hand-painted irregularity. -
Refine the shapes:
Go back over your painted stars with a second coat of white if the blue background is showing through too much. -
Clean the foot:
Double-check the bottom foot ring of the bowl. Wipe away any stray blue or white glaze with a sponge so it sits cleanly on the kiln shelf.
Step 4: Finishing Glaze
-
Dry thoroughly:
Allow the underglaze design to dry completely, preferably overnight, to prevent smearing during the next step. -
Apply clear glaze:
Dip the entire bowl into a clear dipping glaze, or apply 2-3 coats of brush-on clear gloss glaze. This will seal the design and give it that deep, glassy shine. -
Clear the rim (optional):
If you want the clay texture on the rim to be matte, wipe the clear glaze off the rim. Otherwise, leave it for a glossy finish over the raw clay color. -
Final wipe:
One last time, sponge the foot ring perfectly clean. -
Fire:
Fire the piece in the kiln according to the clay and glaze manufacturer’s instructions (typically cone 5 or 6 for stoneware).
Once fired, you will have a durable, dreamy piece of pottery perfect for serving or display.
Glossy-Look Drip Rim Design
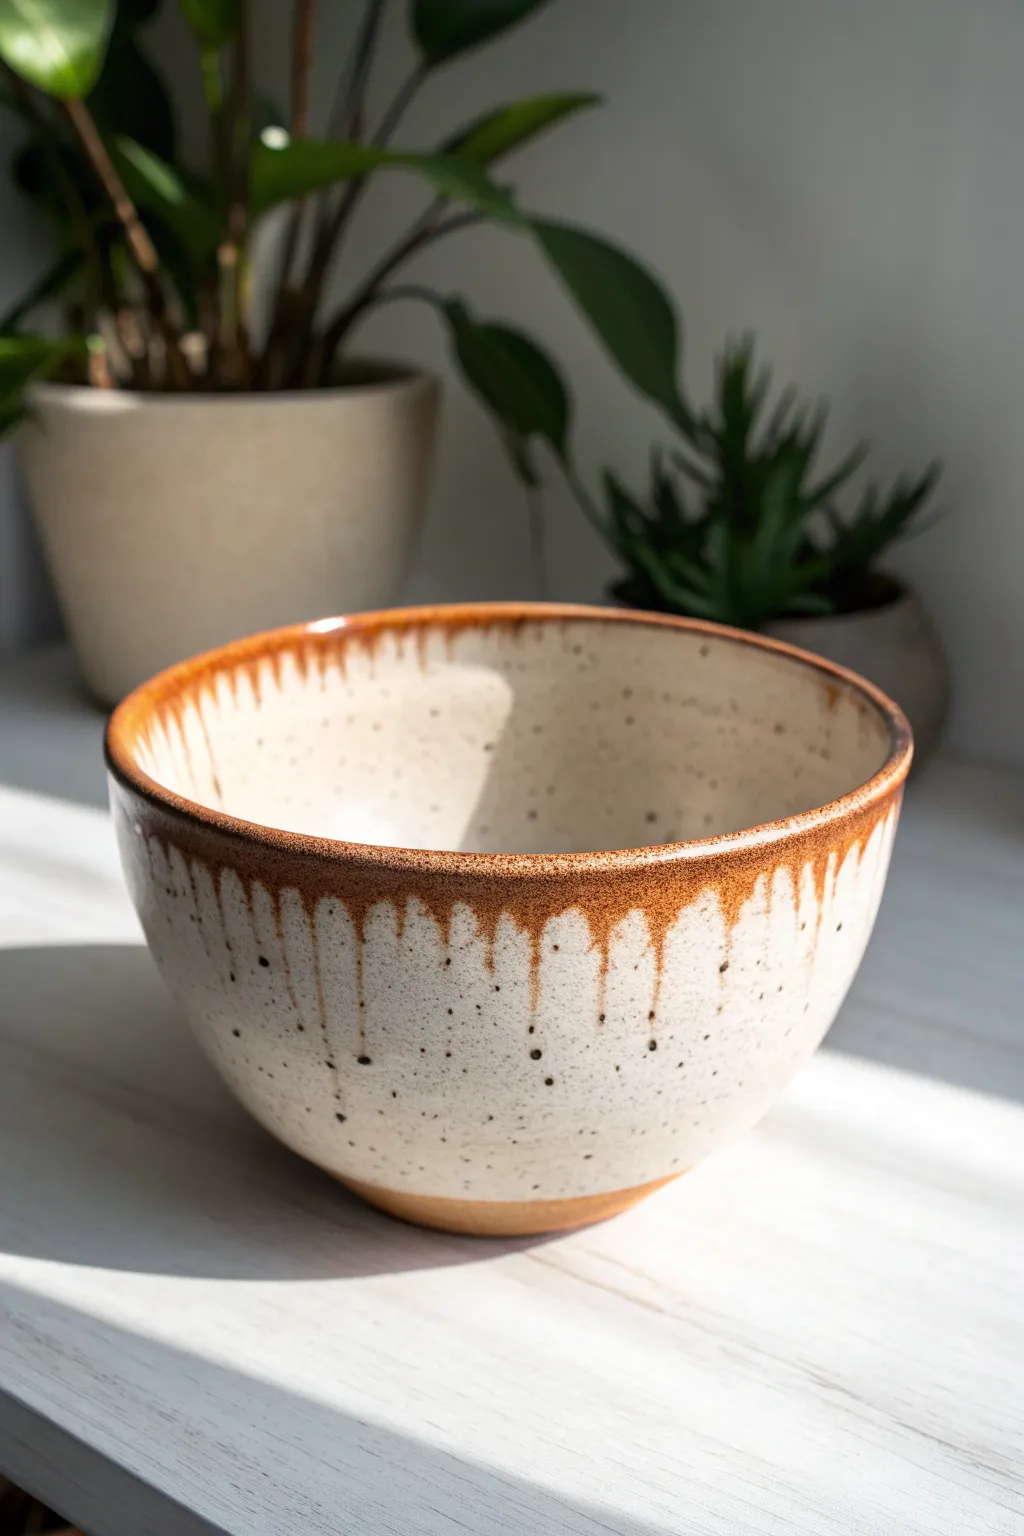
Embrace the natural beauty of pottery with this organic design, featuring a warm, honey-brown drip that cascades comfortably over a speckled cream base. The high-gloss finish gives it a professional kiln-fired appearance that feels right at home in a cozy kitchen.
Step-by-Step Guide
Materials
- Bisque-fired ceramic bowl (or air-dry clay bowl, sealed)
- Speckled cream or off-white glaze (pottery glaze or acrylic equivalent)
- Amber/Honey brown glaze (translucent)
- Soft fan brush
- Small round detail brush
- Sponge
- Water container
- Lazy Susan or banding wheel (optional but helpful)
- Clear high-gloss food-safe sealer (if using acrylics)
Step 1: Base Preparation
-
Clean the Surface:
Before applying any color, take a slightly damp sponge and wipe down your bisque-fired bowl to remove any dust or kiln debris. -
Mask the Foot:
If you want that exposed clay look at the bottom, apply a strip of wax resist or painter’s tape around the very base (the foot) of the bowl. This keeps the bottom raw and adds a nice textural contrast.
Step 2: Applying the Speckled Base
-
Mix the Base Glaze:
Stir your speckled cream glaze thoroughly. If your glaze doesn’t come pre-speckled, I like to mix a tiny pinch of coarse black iron oxide or dried coffee grounds (for non-fired clay) into a plain vanilla color. -
First Coat Application:
Using a soft fan brush, apply a smooth, even coat of the cream glaze to the interior of the bowl. -
Exterior Coverage:
Continue brushing the cream glaze onto the exterior, stopping just where your wax resist or tape line begins near the bottom. -
Drying Time:
Allow this first coat to dry until it loses its sheen and feels chalky to the touch. -
Second Coat:
Apply a second layer of the cream glaze to ensure solid opacity, but keep the application smooth to avoid unwanted brush textures. -
Third Layer (Optional):
If your glaze is particularly translucent, add a third coat now. Let the entire piece dry completely before moving to the rim.
Control The Flow
Glaze running too fast? Let it sit open for 20 mins to thicken slightly. If it’s too thick to drip, add water drop-by-drop until it flows like heavy cream.
Step 3: Creating the Drip Rim Effect
-
Load the Brush:
Dip a round detail brush heavily into your amber or honey-brown glaze. You want the brush to be fully saturated and dripping slightly. -
Apply to the Rim:
Press the loaded brush gently against the very top edge of the bowl’s rim. Let the excess fluid pool there. -
Encourage Flow:
Instead of brushing sideways, dab the brush repeatedly along the edge, allowing gravity to pull the accumulation of glaze down the sides naturally. -
Vary the Drips:
Create visual interest by adding more glaze in some spots to create long drips, and less in others for short drips. The irregularity is what makes it look handmade. -
Inner Drips:
Don’t forget the inside! Allow some of that amber glaze to spill over and run down the interior walls just slightly. -
Refine the Transition:
If a drip looks too harsh or artificial, use a barely damp clean brush to feather the bottom edge of the drip into the cream base while it’s still wet.
Add Metallic Flair
Layer a thin line of metallic gold luster over the brown rim after the initial firing (or drying) for a touch of elegance that catches the light.
Step 4: Finishing Touches
-
Remove Resist:
Carefully peel off your painter’s tape or wipe away any wax resist residue from the foot of the bowl. -
Clean the Foot:
Use a damp sponge to wipe the unglazed bottom clean, ensuring no stray glaze drops will fuse the bowl to the kiln shelf. -
Final Fire or Seal:
If using ceramic glazes, fire the bowl according to the clay and glaze manufacturer’s cone rating. If using acrylics on decorative pottery, apply two coats of high-gloss clear sealant to mimic that shiny, wet look.
Now you have a stunning, artisan-style bowl ready to display or serve your favorite snacks
Faux Terrazzo Speckle Bowl
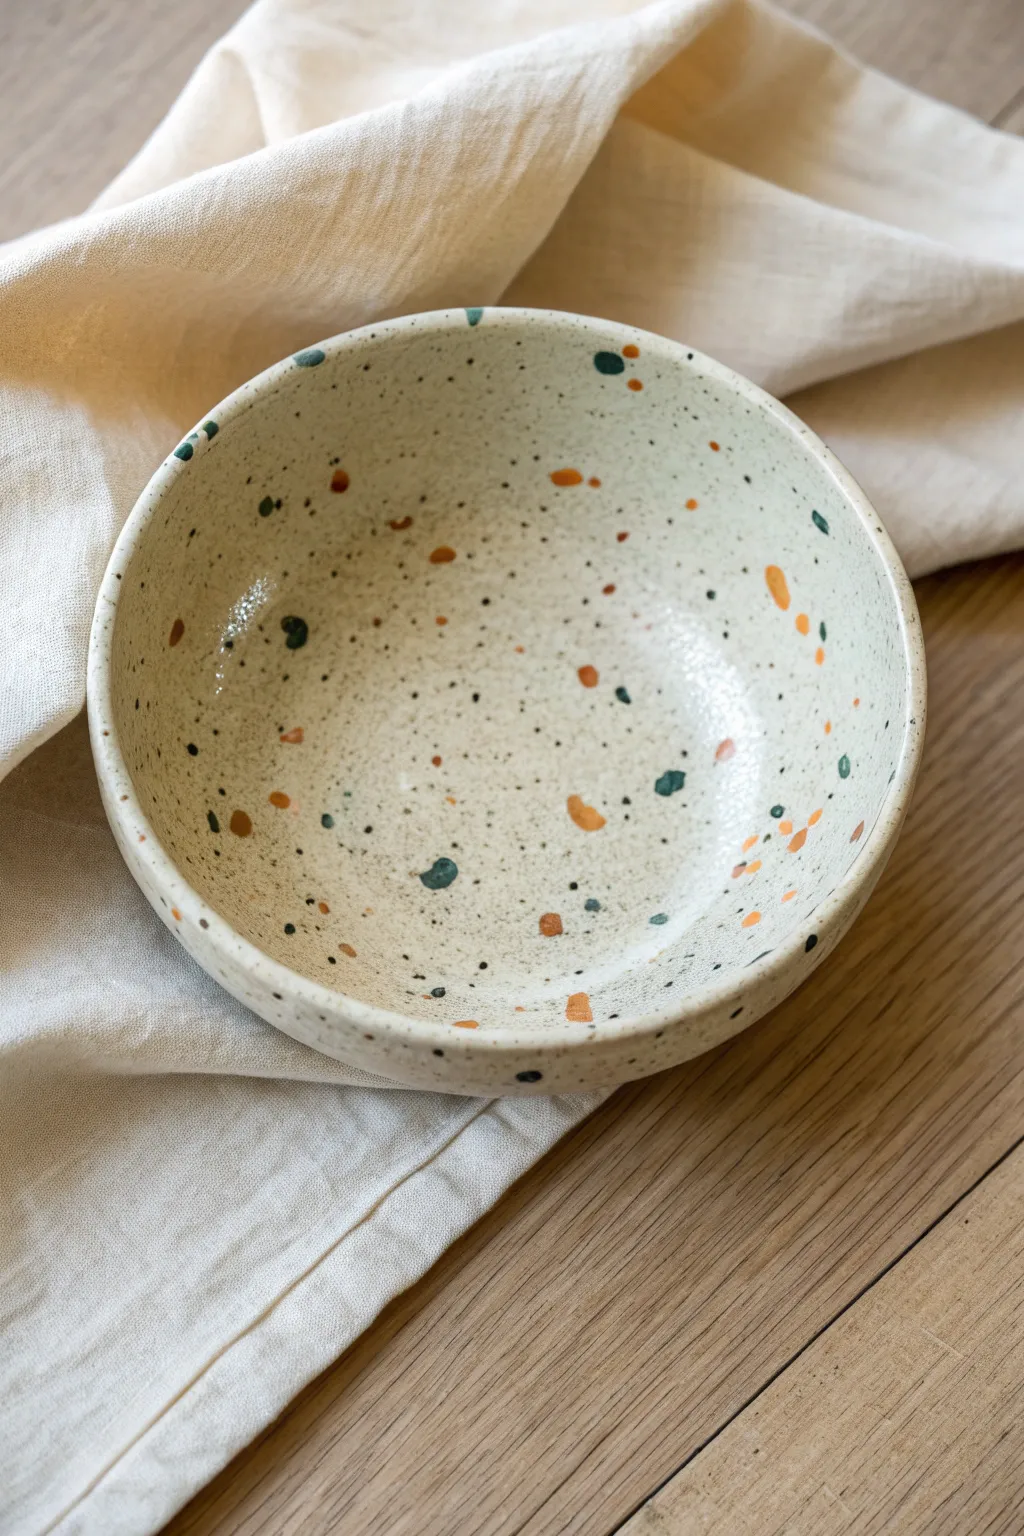
Achieve a high-end ceramic look without the kiln by mimicking the random beauty of terrazzo stone. This technique transforms a plain bowl into a trendy, speckled statement piece featuring earthy burnt orange and deep teal accents.
How-To Guide
Materials
- Bisque ceramic bowl or air-dry clay bowl (smooth finish)
- Acrylic sealant or primer
- Cream or off-white acrylic paint (base color)
- Burnt orange acrylic paint
- Deep teal or forest green acrylic paint
- Black or dark grey acrylic paint
- Small fine-point paintbrush
- Old toothbrush or stiff bristle brush
- Glossy clear varnish or food-safe sealant (if using for food)
- Palette or paper plate
- Water cup and paper towels
Step 1: Base Preparation
-
Clean surface:
Begin by wiping down your bowl with a slightly damp cloth to remove any dust or oils that might prevent the paint from adhering properly. -
Prime the bowl:
Apply a thin, even coat of acrylic primer to the entire surface. This helps seal the porous clay and ensures your base color goes on smoothly without soaking in too much. -
Apply base color:
Paint the entire bowl, inside and out, with your creamy off-white shade. Use long, smooth strokes to minimize brush marks. -
Second coat:
Once the first layer is dry to the touch, apply a second coat of the cream paint for full, opaque coverage. Let this dry completely before starting the speckling process.
Step 2: Creating the Terrazzo Effect
-
Plan the palette:
Pour a small amount of burnt orange and deep teal paint onto your palette. We will work with one color at a time to control the distribution. -
Paint large orange chips:
Using a fine-point brush, paint irregular, organic shapes with the burnt orange paint. Think of them as broken shards of stone rather than perfect polka dots. -
Vary size and placement:
Scatter these orange shapes randomly around the inside and outside of the bowl. Make some larger and some tiny to create depth, leaving plenty of empty cream space between them. -
Add teal accents:
Clean your brush and switch to the deep teal paint. Paint similar organic ‘chip’ shapes in the empty spaces, ensuring they don’t touch the orange spots directly. -
Balance the composition:
Step back and look at the bowl from a distance. If you notice any large empty patches, add a small chip of whichever color feels less dominant. -
Dry the chips:
Allow these hand-painted shapes to dry for about 10-15 minutes so they don’t smear during the next splatter step.
Uneven Splatter?
If the toothbrush creates streaks instead of dots, the paint is too thick. Add water drop by drop until it flicks easily. Test on paper first.
Step 3: The Fine Speckle Texture
-
Prepare splatter paint:
Dilute a small amount of black or dark grey paint with a few drops of water. It should be the consistency of ink—fluid but not watery. -
Load the tool:
Dip an old toothbrush or a stiff bristle brush into the diluted black paint. Tap off the excess on a paper towel so it doesn’t drip. -
Flick the spray:
Hold the brush near the bowl’s surface and run your thumb across the bristles to flick a fine mist of tiny dots onto the clay. -
Rotate and repeat:
Slowly rotate the bowl while flicking to ensure even coverage. Aim for a light dusting of black dots that overlaps both the cream base and the colored chips. -
Control the density:
I prefer to go lighter on the splatter at first; you can always add more density, but you can’t easily take it away. -
Clean up stray drops:
If any large, unwanted droplets land on the bowl, quickly dab them up with a corner of a paper towel or turn them into an intentional ‘chip’.
Add Dimension
Mix a tiny bit of white into your teal or orange for a second, lighter tone. Layering these slightly different shades creates a realistic stone depth.
Step 4: Sealing and Finishing
-
Let it cure:
Allow the paint to dry completely. For best results, leave it overnight to ensure all moisture has evaporated from the clay. -
Apply first varnish coat:
Brush on a layer of glossy sealant. The gloss finish mimics the polished look of real terrazzo stone. -
Final protection:
Apply a second or third coat of sealant, letting each layer dry in between. If this bowl is intended for food, ensure you use a certified food-safe resin or sealant.
Now you have a chic, modern vessel that brings a touch of artistic flair to your table setting
Hidden Message Inside the Bowl
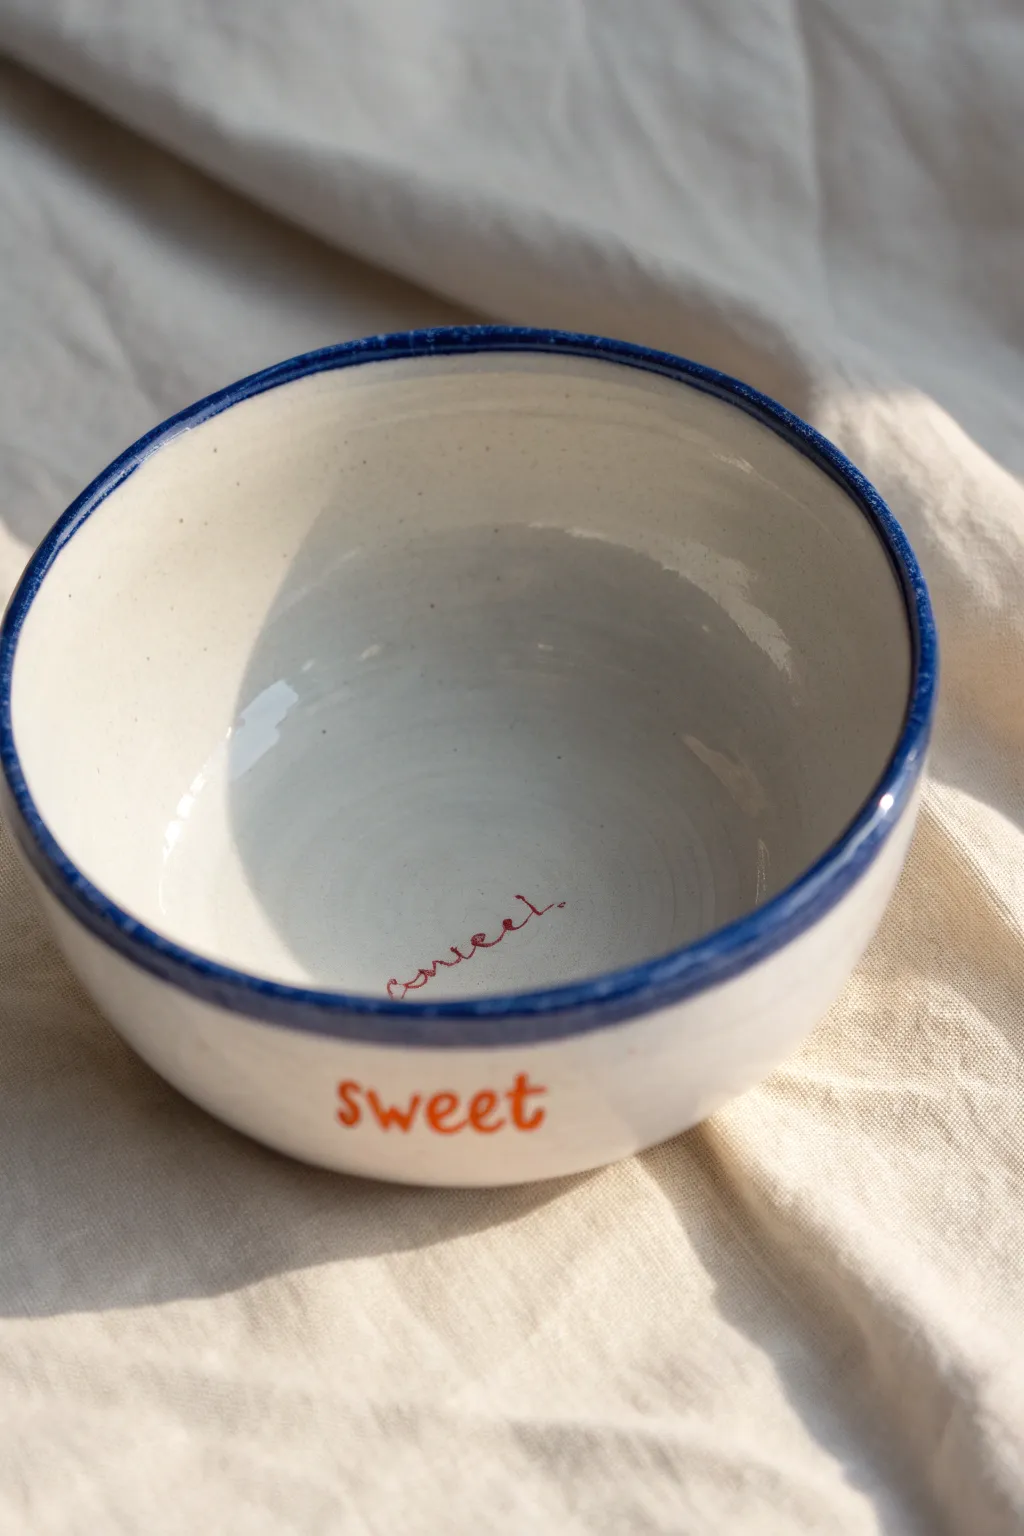
Create a delightful dining experience with this simple yet charming ceramic project featuring a hidden message waiting at the bottom. The classic combination of a crisp white glaze, deep blue rim, and playful orange lettering gives this piece a cozy, cottage-core aesthetic perfect for ice cream or cereal.
Step-by-Step
Materials
- Bisque-fired ceramic bowl
- Underglaze pencil or fine liner brush (Rust/Red-Brown)
- Underglaze (Orange, Deep Blue)
- Small round brush (Size 2 or 4)
- Detail brush (Size 0 or 00)
- Clear transparent glaze
- Banding wheel (optional but helpful)
- Clean sponge and water
- Kiln access (for firing)
Step 1: Preparation & Hidden Message
-
Clean the bisque:
Start by wiping down your bisque-fired bowl with a slightly damp sponge. This removes any dust that might prevent the glaze from adhering properly. -
Plan the center text:
Look into the bottom of the bowl to find the center. You can lightly sketch your word—in this case, ‘sweet’—using a regular pencil first, as graphite will burn off in the kiln. -
Write the script:
Using an underglaze pencil or a very fine liner brush dipped in rust-colored underglaze, carefully trace over your sketched word. -
Check the flow:
Keep the cursive script loose and organic. If you’re using a brush, slightly thin the underglaze with water so it flows like ink rather than dragging on the porous pottery.
Step 2: Exterior Details
-
Position the outer text:
Turn your attention to the exterior wall of the bowl. Ideally, you want the outer word to align with the inner word so they relate to each other. -
Sketch the letters:
Sketch the word ‘sweet’ in lowercase print letters using a pencil. Aim for a friendly, rounded font style roughly halfway up the side of the bowl. -
Paint the letters:
Load a size 2 round brush with orange underglaze. Carefully fill in your sketched letters. -
Apply a second coat:
Underglaze can be translucent. Once the first layer is dry to the touch, apply a second coat to the orange letters to ensure the color pops after firing. -
Clean up edges:
If you went outside your lines, use a stiff, damp brush or a scratching tool to gently gently clean up the edges of the lettering.
Script Pro-Tip
If you don’t have a super steady hand for the inside text, use an underglaze applicator bottle with a fine metal tip. It acts just like a pen.
Step 3: The Rim & Glazing
-
Prepare the blue:
Pour out a small amount of deep blue underglaze. Ensure it is mixed well so the pigment isn’t settled at the bottom. -
Load the brush:
Saturate your brush with the blue. I find holding the brush steady and rotating the bowl works better than trying to move your hand around the rim. -
Paint the rim:
Apply the blue along the top edge of the lip. Allow natural variations in thickness; this hand-painted look adds to the rustic charm. -
Refine the line:
Let the blue bleed slightly over the edge onto the interior and exterior surfaces, creating a defined frame for your bowl. -
Dry completely:
Let all your underglaze decoration dry completely. It should look chalky and matte before you proceed. -
Apply clear glaze:
Dip the entire bowl into a clear transparent glaze, or brush it on if you don’t have a dipping container. Ensure an even coat covers all your painted designs. -
Wipe the foot:
Use a sponge to wipe all glaze off the very bottom foot of the bowl so it doesn’t stick to the kiln shelf. -
Final Fire:
Place the bowl in the kiln for a glaze firing according to your clay and glaze specifications (usually Cone 5 or 6 for stoneware).
Smudge Control
If you smudge the underglaze while painting the outside, let it dry completely, then gently scrape the mistake away with an X-Acto knife.
Once fired, fill your new bowl with your favorite treat and enjoy revealing the hidden message bite by bite