Making a ceramic clock is one of my favorite studio projects because it’s equal parts practical and playful. Here are 20 ceramic clock ideas to help you pick a shape, a surface style, and a vibe that feels like you.
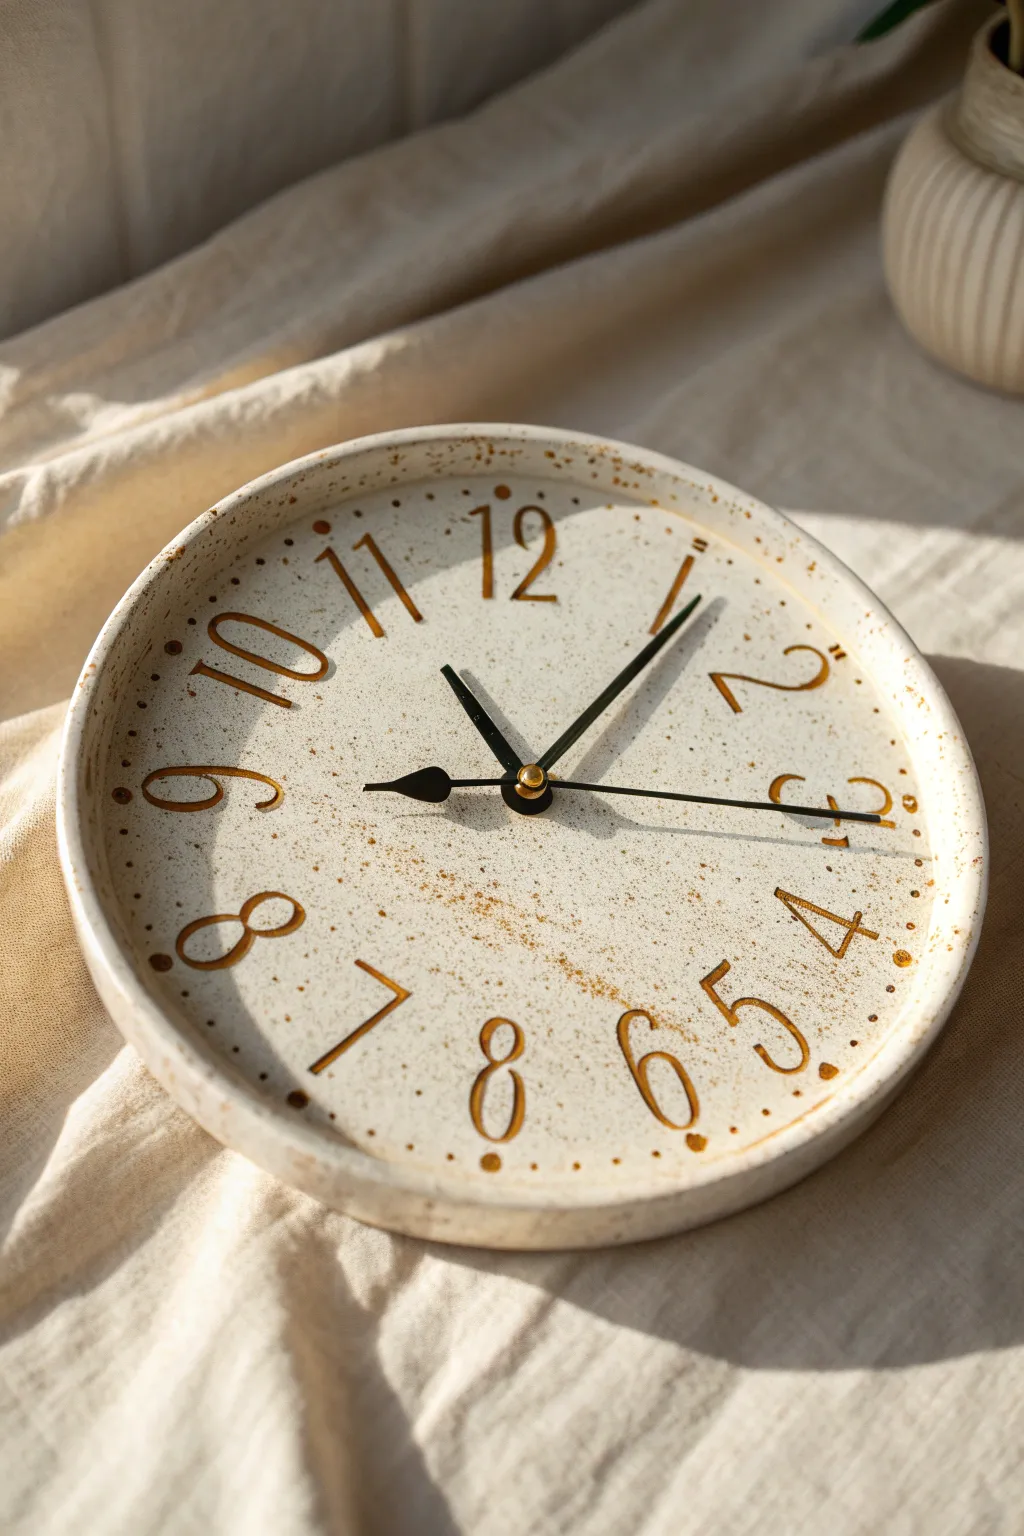
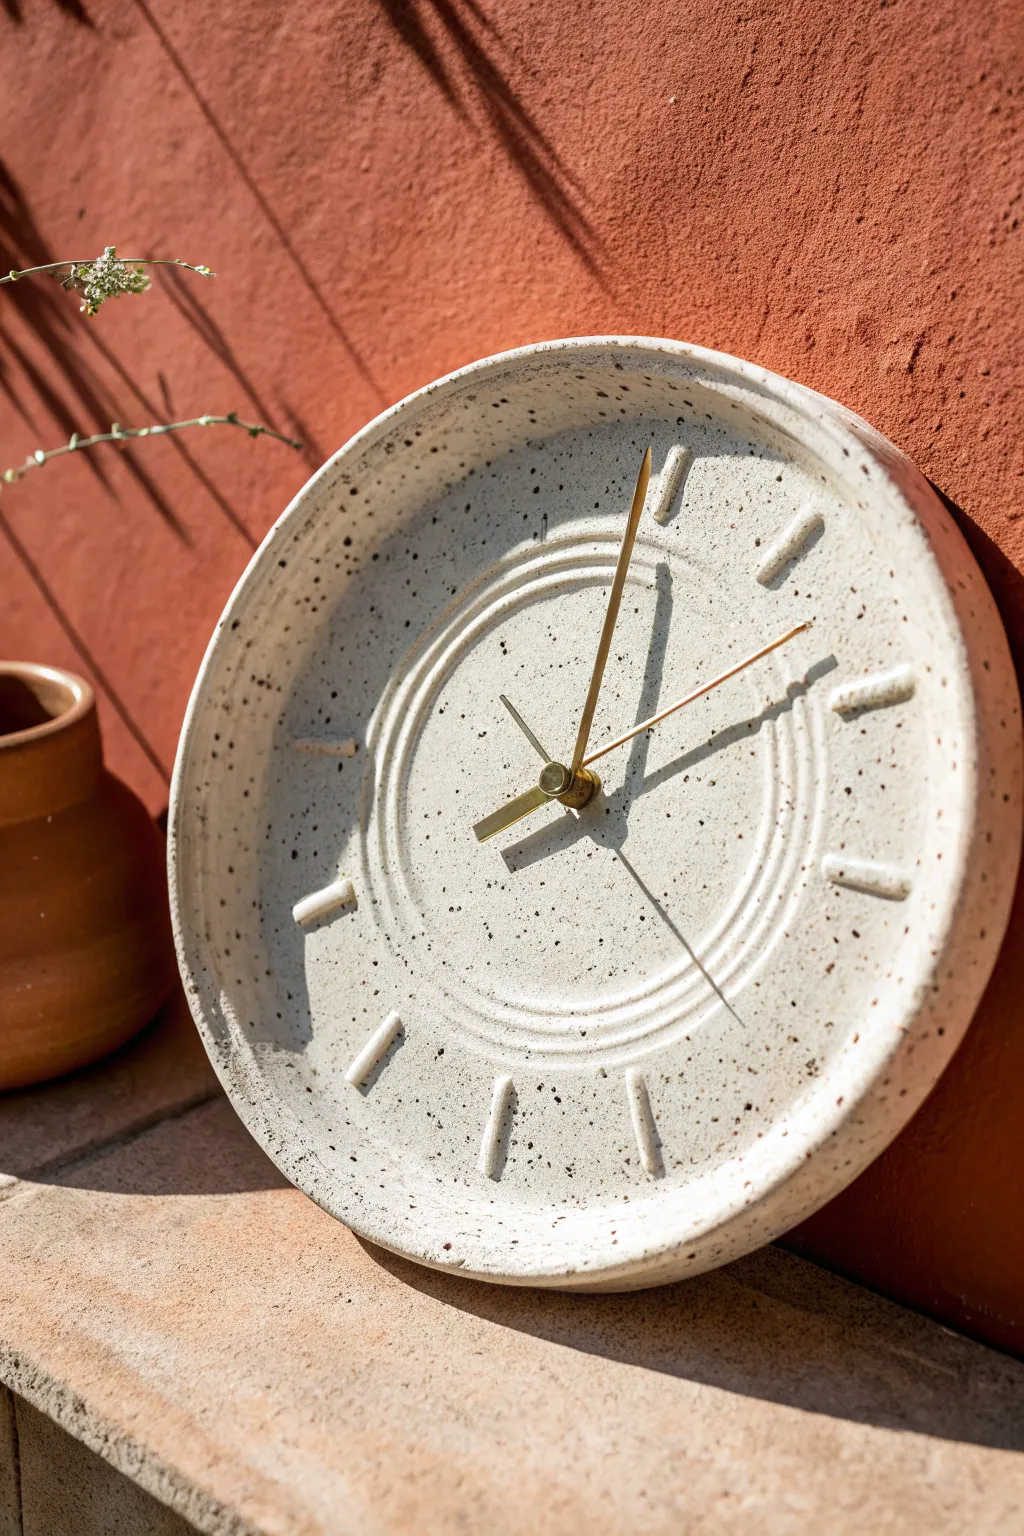
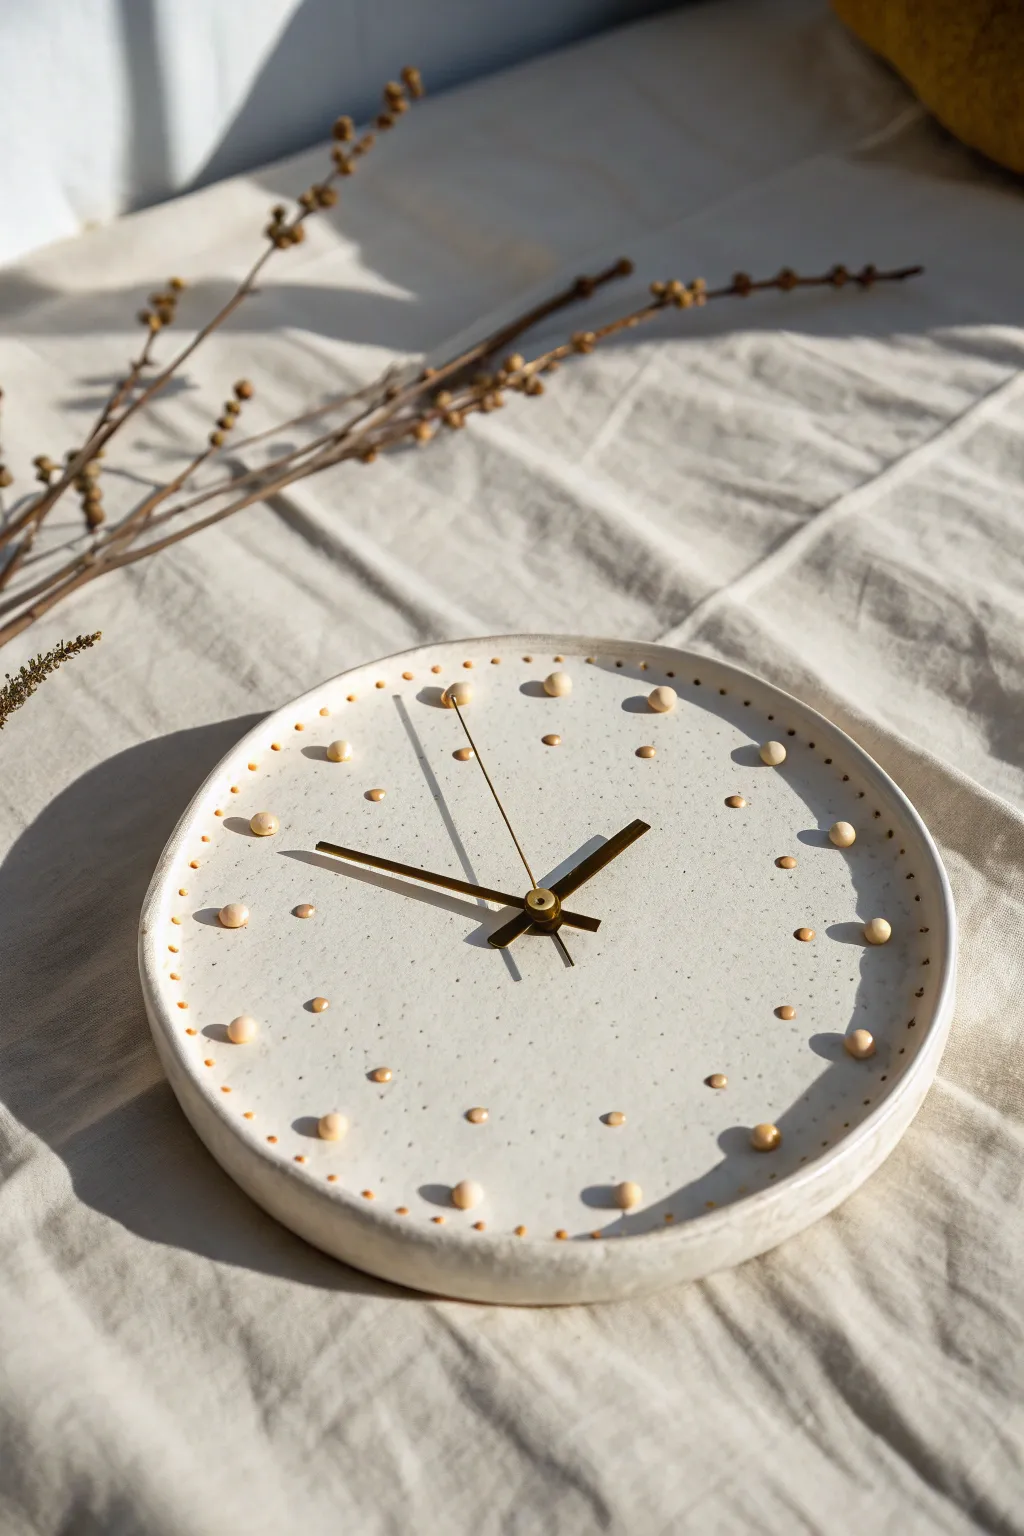
Classic Round Slab Wall Clock
This elegant wall clock captures a warm, minimalist aesthetic with its speckled beige finish and dimensional dotted detailing. The beauty of this project lies in the hand-built slab construction, creating a thick, organic rim that frames a subtly shimmering face.
Detailed Instructions
Materials
- White or speckled buff stoneware clay (approx. 3-4 lbs)
- Rolling pin and guide sticks (3/8″ thickness)
- Fettling knife or needle tool
- Large round template (paper or plate, approx. 10-12″)
- Slip and scoring tool
- Small round piping tip or stylus tool (for making dots)
- Number stamps or small clay cutters (3, 6, 9, 12)
- Clock movement kit (high torque recommended)
- Drill bit (sized for your clock shaft)
- Creamy matte glaze
- Pearl luster overglaze (optional)
Step 1: Slab Construction
-
Roll the base:
Begin by rolling out a substantial slab of clay to an even 3/8-inch thickness, ensuring it’s wide enough for your desired diameter. -
Cut the circle:
Place your circular template onto the slab and carefully trace around it with a needle tool to cut out the clock face. -
Create the rim strip:
Re-roll remaining clay into a long strip, about 1.5 inches wide and slightly thinner than the base (around 1/4 inch). -
Attach the rim:
Score and slip the outer edge of your circular base and one long edge of your rim strip. Gently stand the strip up along the edge of the circle, pressing firmly to join. -
Smooth the joint:
Take time to blend the seam where the rim meets the base on both the inside and outside, using a modeling tool or your finger to ensure a seamless transition.
Warp Watch
Rim warping is a common headache. Dry your clock very slowly on a bat, flipping it (carefully!) or rotating it daily. Weighted bags of rice in the center can help keep the base flat.
Step 2: Detailing the Face
-
Mark the center:
Find the precise center of your circle and pierce a hole large enough to accommodate the shaft of your specific clock movement kit. -
Plan the layout:
Lightly mark the positions for the 12, 3, 6, and 9 hours. I find it helpful to lay a paper template over the wet clay to get the spacing perfect. -
Create decorative dots:
Roll tiny balls of leftover clay (about 2mm wide). Score and slip the area where the numbers would be, and attach these tiny dots in circular or linear patterns to act as hour markers. -
Add perimeter texture:
Press a small stylus or the rounded end of a paintbrush into the clay along the inner edge of the rim to create a border of recessed dots. -
Apply numbers:
Roll a very thin coil or use small cutters to create the numerals 12, 3, 6, and 9. Slip and score them into their designated positions. -
Final smoothing:
Once all elements are attached, use a soft, damp sponge to wipe down any sharp edges or rough spots on the rim and face.
Gilded Hours
Instead of pearl luster, apply real gold overglaze to just the raised dots and numbers for a high-contrast luxury look. This requires the same third low-fire kiln cycle.
Step 3: Finishing and Assembly
-
Bisque fire:
Allow the piece to dry slowly under plastic to prevent warping, especially around the rim, then bisque fire to cone 04. -
Glaze application:
Dip or brush on a creamy beige matte glaze. Use a sponge to wipe the glaze back slightly on the raised dots and numbers to let the clay body peek through. -
Glaze fire:
Fire the piece again to the temperature required by your specific clay and glaze combination (usually cone 5 or 6). -
Optional luster:
For that pearlescent sheen shown in the photo, apply a thin coat of mother-of-pearl luster over the glaze and fire a third time at a very low temperature (around cone 018). -
Install mechanism:
Insert the clock movement shaft through the back hole. secure it with the washer and nut provided in the kit. -
Attach hands:
Gently press the hour, minute, and second hands onto the shaft, ensuring they are parallel so they don’t catch on each other.
Hang your new timepiece and enjoy the handmade warmth it brings to your wall


Minimalist Clock With Simple Tick Marks
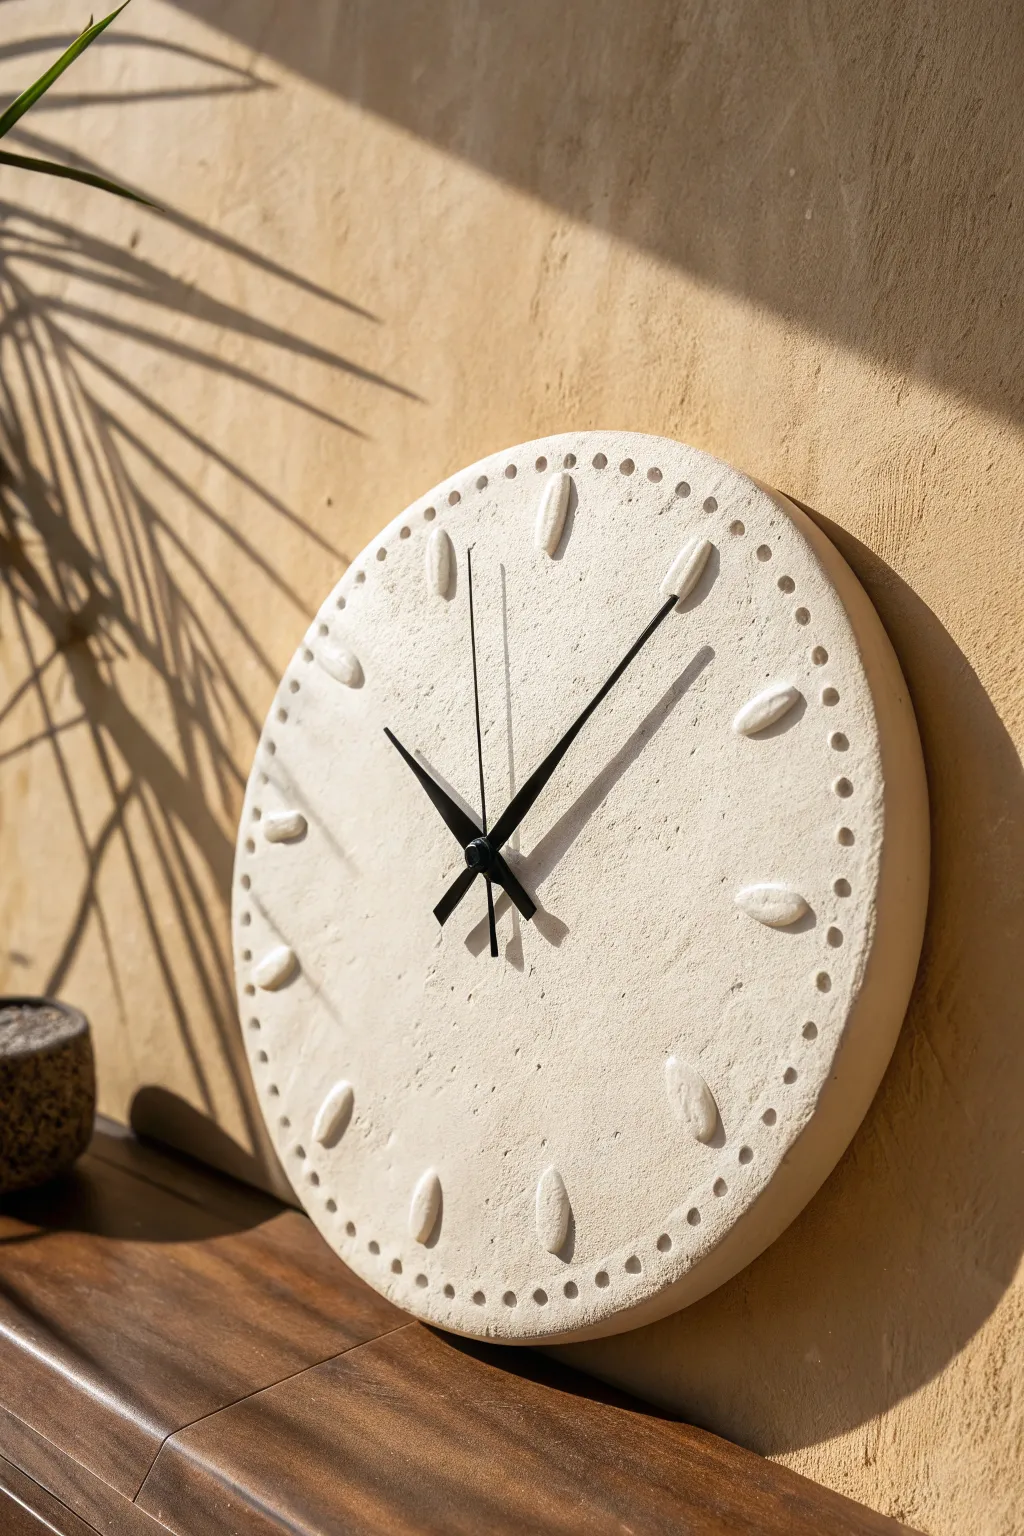
Embrace the beauty of raw materials with this minimalist ceramic clock, featuring organic tick marks and a speckled, stone-like finish. Its tactile surface and neutral tones make it a serene addition to any modern interior.
Step-by-Step Tutorial
Materials
- Light-colored stoneware clay (smooth or fine grog)
- Rolling pin
- Two wooden guide strips (approx. 1/4 inch thick)
- A round template (paper or circular object, approx. 10-12 inches)
- Needle tool
- Fettling knife
- Smoothing rib (rubber or metal)
- Small drill bit or hole punch tool (for clock mechanism shaft)
- Slip (clay mixed with water)
- Scoring tool or old toothbrush
- Small round tool (like the end of a paintbrush) for dot details
- Clock mechanism kit (hands and motor)
- Protective matte varnish (optional)
Step 1: Shaping the Base
-
Prepare your clay:
Begin by wedging your stoneware clay thoroughly to remove any air bubbles. This ensures your clock won’t crack during firing. -
Roll out the slab:
Place your clay between two wooden guide strips on a canvas or cloth-covered surface. Roll the clay out into a smooth, even slab. I like to flip the clay over once or twice during rolling to prevent warping. -
Smooth the surface:
Before cutting, take a rubber rib and gently compress the surface of the slab. This aligns the clay particles and creates that lovely, professional finish. -
Cut the circle:
Place your round template onto the slab. Using a needle tool held perpendicular to the table, trace around the template to cut out your perfect circle. -
Refine the edges:
Once the circle is cut, use a damp sponge or your finger to smooth the sharp edges of the rim slightly.
Step 2: Creating the Hour Markers
-
Make the marker coils:
Roll a small amount of leftover clay into a coil about the thickness of a pencil. -
Form the oval shapes:
Cut the coil into 12 equal segments, roughly 3/4 of an inch long. Gently flatten and shape each piece into a smooth, elongated oval ‘pillow’ shape. -
Mark the positions:
Lightly mark the 12 hour positions on your clock face. Think of it like a pizza: find 12, 3, 6, and 9 first, then fill in the two spots between each. -
Score and slip:
Score the back of each oval marker and the corresponding spot on the clock face using a scoring tool. Apply a dab of slip to both scored areas. -
Attach the hours:
Press the oval markers onto the face firmly but gently. Wiggle them slightly to ensure a strong bond, then smooth away any excess slip that squishes out.
Warping Worries?
Flat slabs love to warp. Dry it very slowly under plastic or sandwiched between wooden boards. Flip the boards daily for even airflow.
Step 3: Adding Minute Details
-
Plan the minute dots:
Visualize the space between your hour markers. You will need four evenly spaced dots between each hour marker to represent the minutes. -
Indent the texture:
Using the back of a paintbrush or a small rounded tool, press gently into the clay to create small, uniform divots near the rim. Keep them aligned with the curve of the clock. -
Create the center hole:
Find the exact center of your circle. Use a hole punch or small drill bit to create a hole for the clock mechanism shaft. Make sure it’s slightly larger than the shaft to account for clay shrinkage.
Go Speckled
Mix grog or even used coffee grounds into your clay body before rolling. When fired, these burn out or melt to create a gorgeous speckled texture.
Step 4: Drying and Finishing
-
Controlled drying:
Place the clock face between two boards or drywall pieces to dry slowly. This sandwich method is crucial for keeping flat objects from warping. -
Bisque fire:
Once bone dry, fire the piece to bisque temperature in a kiln (usually roughly Cone 04). -
Apply finish:
For the look in the photo, leave the clay unglazed to show off the texture. If you want protection, apply a clear matte sealer or a very thin matte transparent glaze. -
Final firing (if glazing):
If you applied a glaze, fire the piece again to the appropriate temperature for your clay body. -
Install the mechanism:
Insert the clock movement from the back through the center hole. Secure it with the washer and nut provided in the kit. -
Attach the hands:
Press the hour and minute hands onto the shaft. Ensure they are parallel so they don’t catch on each other while turning.
Hang your timeless creation on a wall that receives distinct sunlight to let those shadows dance across the textured face.


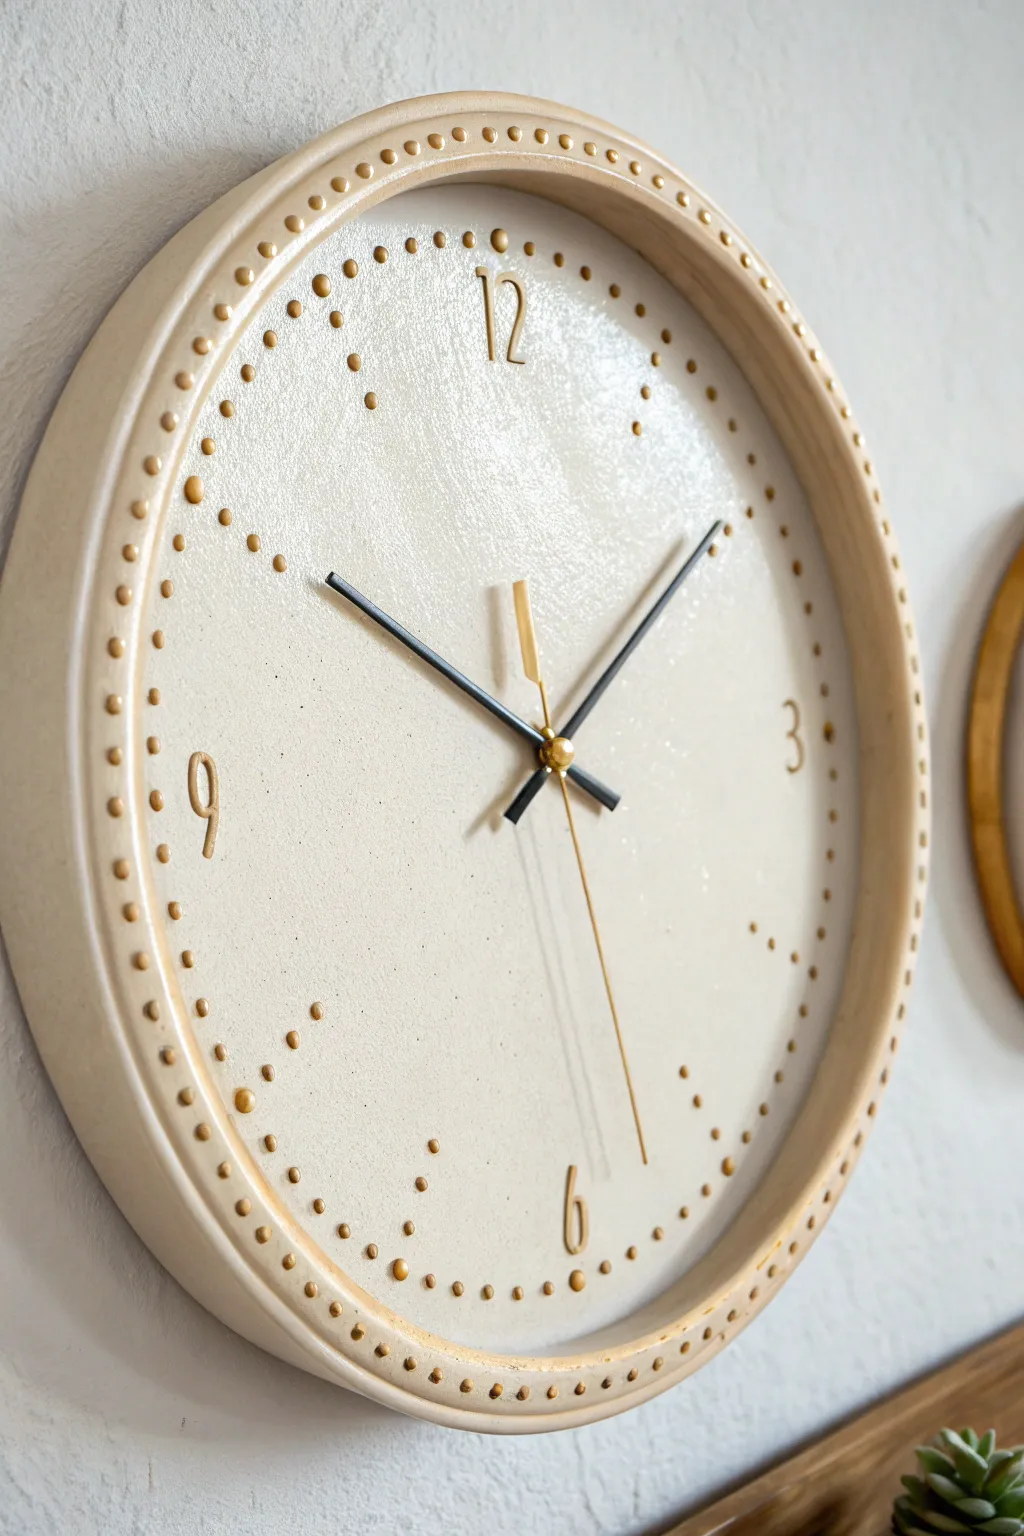
Hand-Stamped Numbers Around the Rim
Create a timeless piece of functional decor with this elegant ceramic clock project. Featuring a creamy speckled glaze and luxe gold numerals impressed directly into the clay, this design blends rustic pottery charm with modern sophistication.
Step-by-Step Guide
Materials
- Low-fire white earthenware clay
- Circular slump mold or large bowl (approx. 10-12 inch diameter)
- Rubber alphabet/number stamp set (large serif font)
- Rolling pin and canvas mat
- Pottery needle tool
- Sponge
- White speckled glaze (bottle)
- Pebeo Porcelaine 150 gold paint (or gold luster overglaze)
- Fine liner brush
- Clock movement kit (shaft length dependent on clay thickness)
- Drill with masonry bit (if hole shrinks too much)
- Clear acrylic sealant (optional)
Step 1: Shaping the Base
-
Prepare the slab:
Begin by wedging your white earthenware clay to remove air bubbles. Roll it out on a canvas mat to a consistent slab thickness of about 1/4 inch. Ensure the slab is large enough to cover your mold with some overhang. -
Cut the circle:
Place your slump mold upside down on the slab or use a large circular template. Cut a clean circle using your needle tool, leaving an extra inch around the edge to form the rim later. -
Form the shape:
Gently lift the clay circle and drape it into your slump mold. Press it carefully against the bottom and up the sides to establish the clock’s concave shape and upright rim. -
Smooth the surface:
Using a slightly damp sponge, smooth the interior surface of the clock face. Pay special attention to the rim edge, softening any sharp angles left by the cutting tool. -
Create the center hole:
Find the exact center of your circle. Use a drinking straw or a hole cutter to punch a hole for the clock mechanism. Remember that clay shrinks during firing, so make the hole slightly larger than the clock shaft requires.
Uneven Impressions?
If a stamp doesn’t transfer cleanly, don’t re-stamp over it (which causes ‘ghosting’). Smooth the area with a wet finger to erase the mistake, let it dry slightly, and try again.
Step 2: Stamping and Glazing
-
Map out the numbers:
Lightly mark the positions for numbers 12, 3, 6, and 9 first to ensure symmetry. Then, spacing them evenly, mark the spots for the remaining numbers. -
Impress the numerals:
Take your rubber number stamps and gently press each numeral into the soft leather-hard clay at your marked spots. Press deep enough to create a clear impression but not so hard that you deform the clock shape. -
Add texture dots:
Use the back of a small paintbrush or a rounded tool to embrace the speckled look by pressing small divots or dots randomly around the rim and between numbers. -
Bisque fire:
Allow the clay to dry slowly under plastic for a few days to prevent warping, then bisque fire it according to your clay body’s specifications (usually Cone 04). -
Apply the base glaze:
Pour a white speckled glaze over the bisque-fired piece, or brush on three even coats. I prefer brushing to ensure the glaze doesn’t pool too thickly inside the stamped numbers, which would obscure the detail. -
Glaze fire:
Fire the piece again to the maturation temperature of your glaze. This creates that durable, glossy finish seen in the photo.
Add Real Luster
For a truly professional finish, use a real gold luster overglaze instead of paint. This requires a third, low-temperature firing (Cone 018) but results in genuine 22k gold shine.
Step 3: Finishing Touches
-
Paint the numerals:
Once the ceramic is cool, use a fine liner brush and liquid gold paint (like Pebeo Porcelaine 150) to carefully fill in the debossed numbers. The indentation acts as a guide, making it easier to stay within lines. -
Bake the paint:
If using heat-set porcelain paint, let it dry for 24 hours, then bake it in a standard home oven according to the bottle’s instructions to set the gold permanently. -
Install the mechanism:
Insert the clock movement shaft through the center hole from the back. Secure it with the washer and hex nut on the front side. -
Attach the hands:
Press the hour hand onto the shaft first, followed by the minute hand. Add the second hand or cap nut last. Make sure the hands are parallel so they don’t touch as they rotate.
Now you have a stunning, handmade timepiece ready to hang on the wall or prop on a shelf.


Roman Numerals in Underglaze
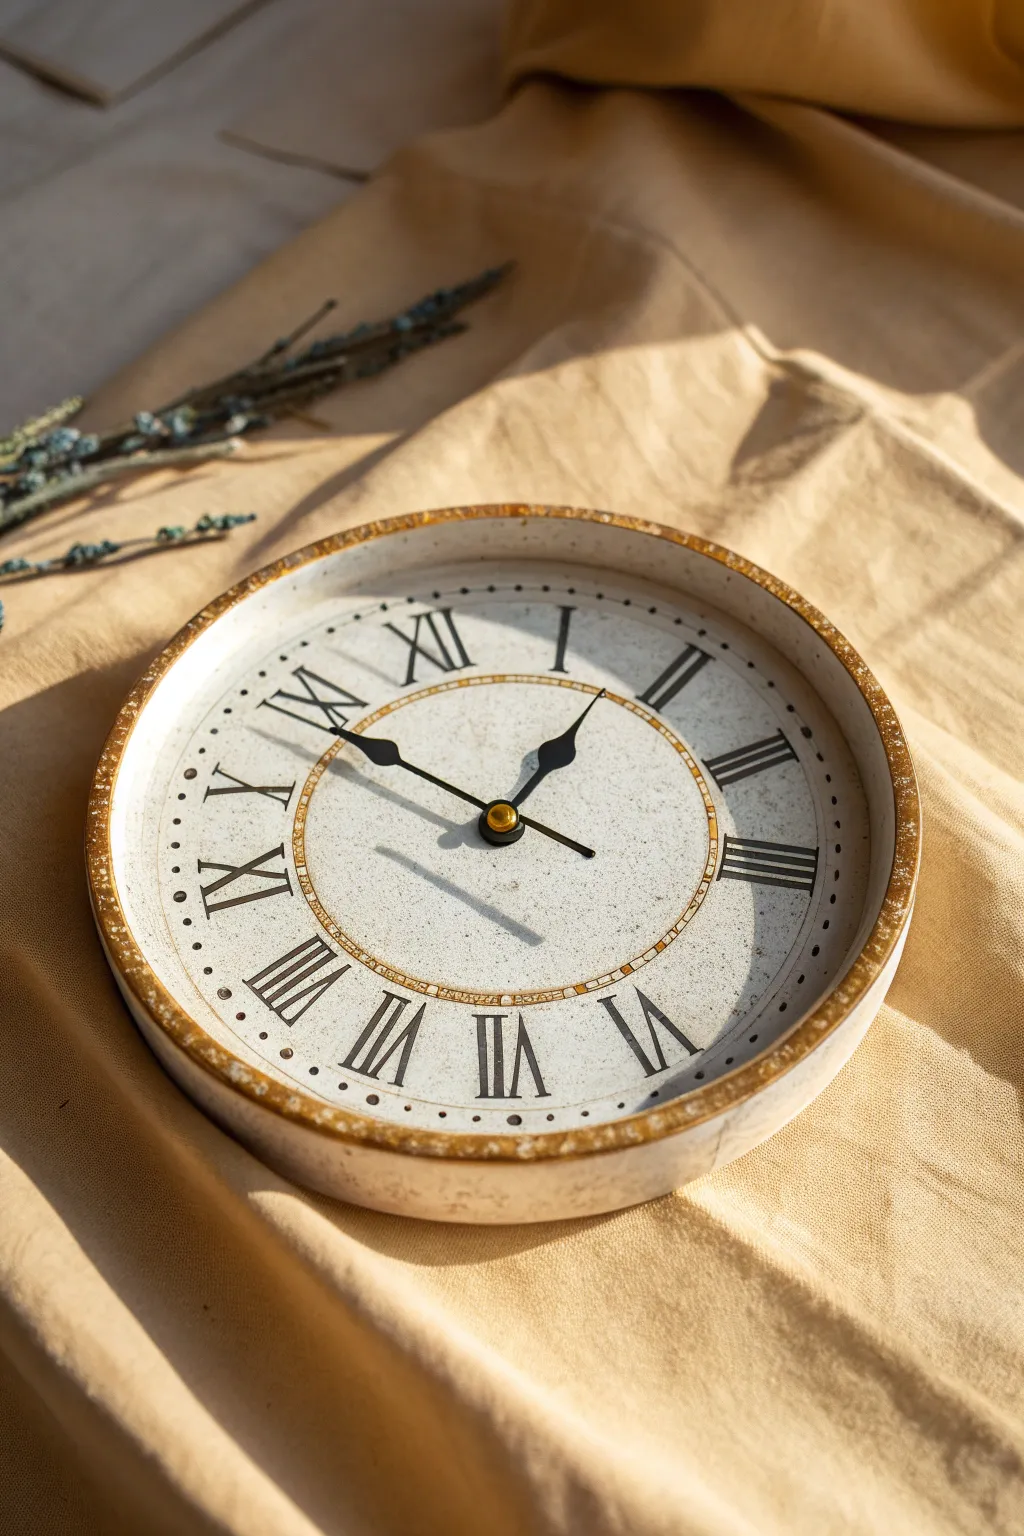
Create a stunning, functional piece of home decor with this Roman numeral ceramic clock. The combination of black underglaze numerals against a creamy, speckled clay body gives it a classic yet rustic charm that fits perfectly in any room.
Step-by-Step Guide
Materials
- Speckled cream clay body (low-fire or mid-fire)
- Rolling pin
- Canvas work surface
- Round slump mold or large plate (approx. 10-12 inches)
- Pottery wheel (optional, for trimming)
- Needle tool
- Fettling knife
- Carving tool or sgraffito tool
- Black underglaze
- Clear matte glaze
- Gold luster or metallic overglaze (for rim)
- Fine detail brush
- Clock mechanism kit (movements and hands)
- Drill with ceramic bit (or hole cutter for wet clay)
- Protractor or clock dividing template
- Sponge
Step 1: Forming the Clock Face
-
Roll the slab:
Begin by wedging your speckled clay to remove air bubbles. Roll it out into a smooth slab approximately 1/4 inch thick. Make sure to compress the clay on both sides with a rib to prevent warping during firing. -
Cut the circle:
Place your round template or slump mold over the slab. Using a needle tool, cut a perfect circle roughly 10-12 inches in diameter. Smooth the raw edges with a damp sponge. -
Create the rim:
To achieve the shallow depth seen in the photo, gently slump the clay circle into a shallow bowl mold or curve the edges upward by hand to create a small vertical rim about 1/2 inch high. -
Refine the shape:
Once leather hard, you can trim the foot or back on a pottery wheel if desired, or simply smooth the bottom with a rasp. Ensure the face is perfectly flat where the hands will sit. -
Make the center hole:
Find the exact center of your circle. Punch a hole for the clock mechanism shaft using a hole cutter or drill bit sized strictly to your specific clock movement kit (usually around 5/16 inch).
Wobbly Lines?
If your brushwork is shaky, use an underglaze-filled applicator bottle with a fine needle tip or an underglaze pencil for crisper control.
Step 2: Drafting and Underglazing
-
Draft the numerals:
Using a clock template or protractor, lightly mark the 12 hour positions. Sketch the Roman numerals (I, II, III, IV…) lightly with a pencil. The graphite will burn off in the kiln, so don’t worry about stray marks. -
Draw the inner ring:
Use a compass or a smaller round object to trace two concentric circles in the center—one for the inner decorative ring and one slightly larger to frame the minute markers. -
Mark the minutes:
Between the two inner circles, create small dots or dashes to represent minute markers. Keep these precise and evenly spaced. -
Paint the numerals:
Shake your black underglaze well. Using a very fine detail brush, carefully paint over your penciled Roman numerals. You want crisp, sharp lines, so I find it helpful to brace my hand against the table for stability. -
Detail the inner ring:
Paint the thin circular lines and the minute markers with the same black underglaze. If you make a mistake, gently scratch it off with a needle tool once dry. -
Add rim detail:
If you want the rim to have a base color before the gold, paint a thin band of iron oxide or dark underglaze along the very top edge of the rim.
Step 3: Firing and Assembly
-
Bisque fire:
Allow the piece to dry completely slowly to avoid warping. Fire to cone 04 (or your clay’s bisque temperature). -
Apply clear glaze:
Dip or brush a clear matte glaze over the entire front face of the clock. This seals the underglaze and lets the natural speckles of the clay shine through. -
Glaze fire:
Fire the piece again to your clear glaze’s maturation temperature (likely cone 5 or 6 depending on your materials). -
Apply gold luster:
Once the glaze firing is complete and the kiln is cool, apply a ring of gold luster (overglaze) to the raised outer rim and potentially the inner decorative circle line for that vintage look. -
Luster fire:
Fire the clock a third time to a much lower temperature (usually cone 018) to set the metallic gold. -
Install mechanism:
Insert the clock movement through the back hole. Secure it with the washer and nut provided in the kit. Place a rubber gasket if needed to prevent rattling against the ceramic. -
Attach the hands:
Press the hour hand onto the shaft first, followed by the minute hand, and finally the second hand or cap nut. Make sure they don’t touch each other or the clay face as they rotate.
Custom Colors
Instead of black, use a deep navy or forest green underglaze for a subtle twist on the classic look, or skip the gold rim for a modern matte finish.
Now you have a functional, handcrafted timepiece ready to hang on your wall or gift to a friend

The Complete Guide to Pottery Troubleshooting
Uncover the most common ceramic mistakes—from cracking clay to failed glazes—and learn how to fix them fast.
No-Numbers Clock With Bold Hands
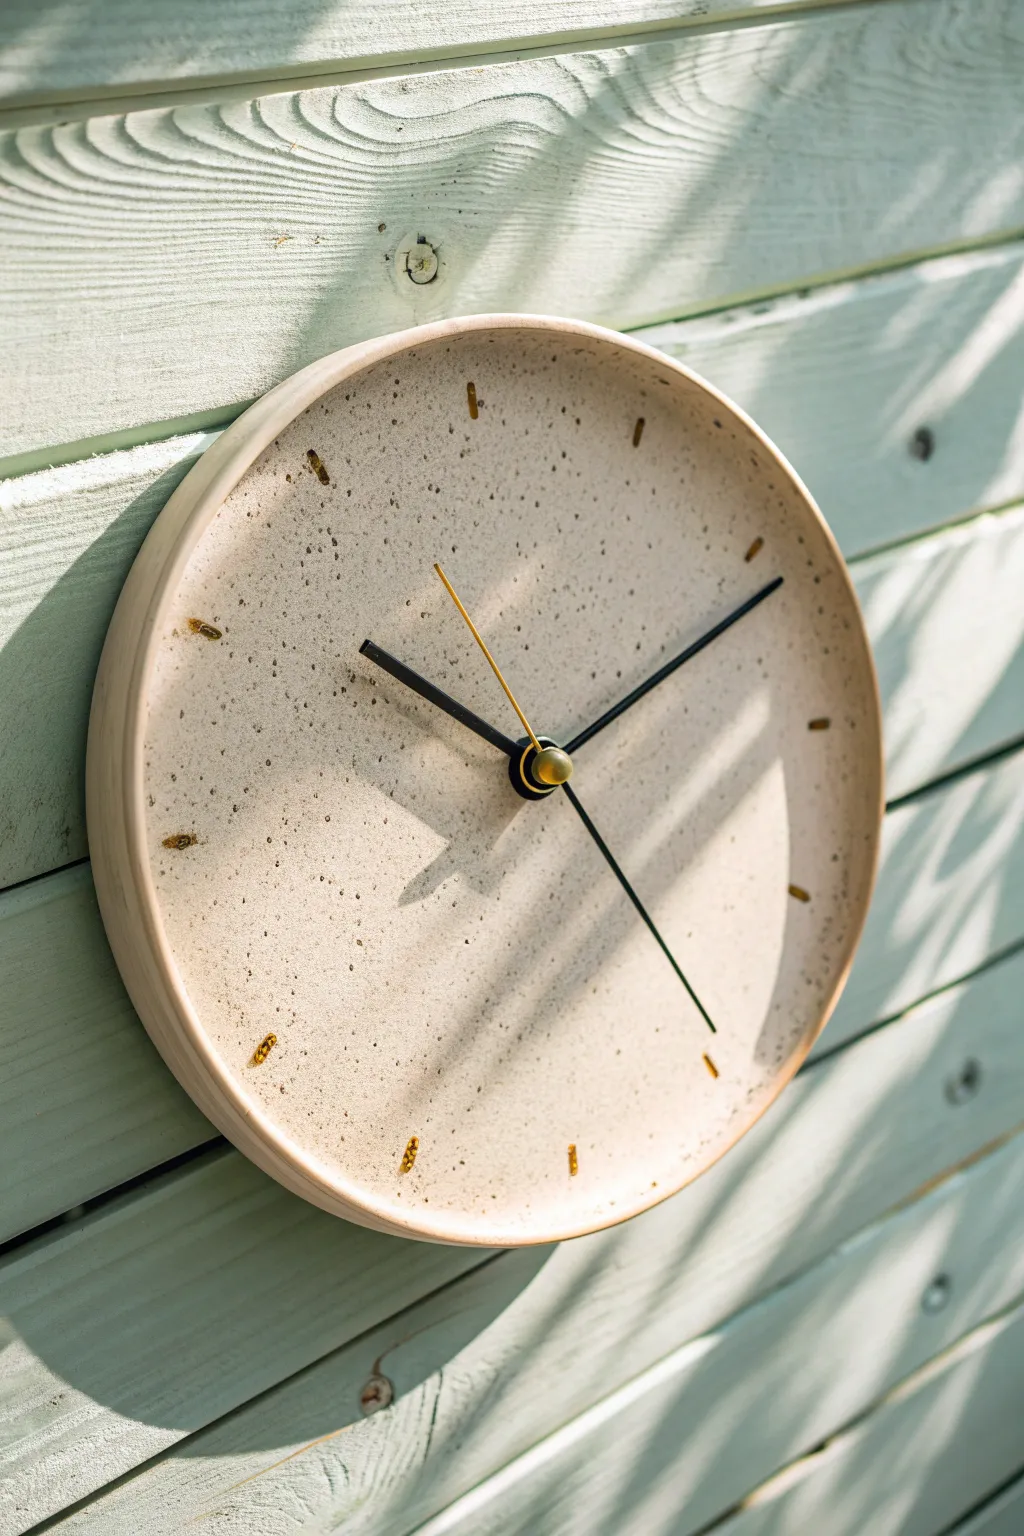
Capture the essence of organic serenity with this minimalist ceramic-style clock featuring a warm, sandy finish. The speckled texture and simple gold ticks replace traditional numbers, creating a functional piece of art that feels both modern and timeless.
Detailed Instructions
Materials
- Bisque ceramic plate or round wooden clock base (approx. 10-12 inches)
- White or cream acrylic paint (matte base)
- Stone texture spray paint or fine sand medium
- Dark brown and black acrylic paint (for speckling)
- Old toothbrush
- Small flat brush
- Gold leaf pen or fine-point metallic gold paint marker
- High-torque quartz clock movement kit
- Long minimal black clock hands
- Gold second hand (optional)
- Matte spray sealer
- Drill with bit matching your clock shaft diameter
- Ruler and pencil
Step 1: Preparing the Base
-
Find Center:
If you are using a plain ceramic plate or wooden round that hasn’t been pre-drilled, locate the exact center. Use a ruler to mark a cross-hair in the middle, ensuring your measurements are precise from multiple angles. -
Drill the Shaft Hole:
Using a drill bit that corresponds to the size of your clock mechanism’s shaft (usually around 5/16 inch), carefully drill straight through the center mark of your base. If using ceramic, use a specialized masonry bit and go slowly to avoid cracking. -
Surface Cleaning:
Wipe down the entire surface with a damp cloth to remove any dust or ceramic powder. Let it dry completely before starting the painting process to ensure good adhesion.
Paint Won’t Stick?
If using a glazed ceramic plate, rough up the surface with high-grit sandpaper first. The slick glaze resists acrylics, so sanding creates ‘tooth’ for the paint to grip.
Step 2: Creating the Stone Effect
-
Base Coat Application:
Apply a full, even coat of your matte cream or off-white acrylic paint to the face and the inner rim of the clock. I like to use a foam brush here to minimize visible brushstrokes. -
Build Opacity:
Once the first layer is dry, apply a second coat. You want a solid, opaque background that resembles unglazed stoneware. -
Apply Texture (Optional):
If you want a true stone feel, lightly mist the surface with a stone-texture spray paint in a matching neutral tone. Alternatively, mix a pinch of fine sand into your wet paint for physical grit. -
Prepare the Speckle Mix:
Dilute a small amount of dark brown paint with water until it has an inky consistency. Do the same with a tiny drop of black paint in a separate container. -
Splatter Technique:
Dip an old toothbrush into the watered-down brown paint. Hold it over the clock face and run your thumb across the bristles to flick tiny droplets onto the surface. Practice on a scrap paper first to control the spray. -
Layering Speckles:
Repeat the splatter process with the diluted black paint, but use this color more sparingly to create depth and variety in the ‘stone’ pattern. Allow the entire face to dry for at least an hour.
Step 3: Marking Time
-
Measure Hour Positions:
Place your clock face on a flat surface. Using a protractor or a printable clock template, lightly mark the 12, 3, 6, and 9 o’clock positions with a pencil on the inner curved edge of the rim. -
Fill in Remaining Hours:
Mark the remaining hour increments between your cardinal points. Ensure the spacing is perfectly even, as visual discrepancies are very noticeable on a numberless clock. -
Gilding the Hour Markers:
Take your gold leaf pen or metallic paint marker and carefully draw small, uniform rectangular dashes over your pencil marks. These should look like small gold ingots embedded in the stone. -
Sealing the Work:
To protect the paint and the delicate gold markers, spray the entire piece with a matte clear sealer. Two light coats are better than one heavy coat to prevent dripping.
Go High-Contrast
For a bolder mid-century look, paint the rim a matte black or deep charcoal while keeping the inner face sandy speckled. This frames the face beautifully.
Step 4: Assembly
-
Install the Movement:
Insert the clock movement box through the back of the hole. Secure it on the front side with the washer and hex nut provided in your kit, tightening it gently with pliers. -
Attach the Hands:
Press the hour hand onto the shaft first, pointing it to 12 o’clock. Follow with the minute hand, also pointing to 12. Finally, press the second hand cap or pin into the center. -
Final Adjustment:
Check that the hands are parallel to the clock face and not touching each other as they rotate. Insert the battery and set the time.
Hang your new timepiece in a bright spot where the natural light can catch the subtle gold details and stone texture
Color-Blocked Bullseye Glaze Clock
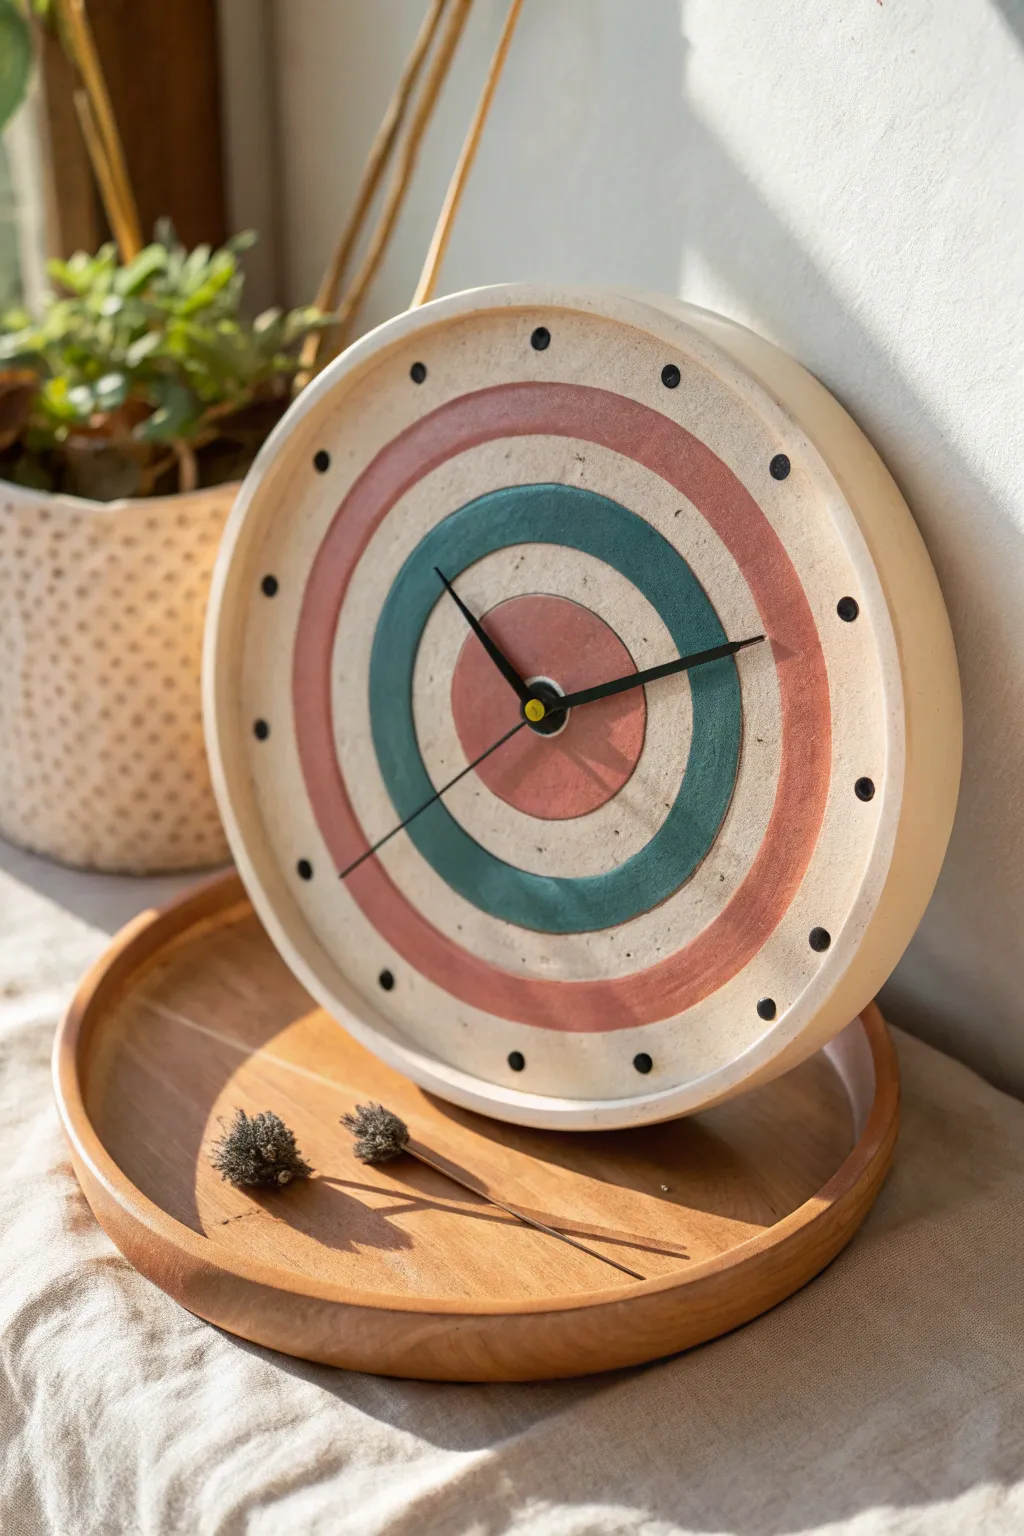
Embrace the understated charm of modern ceramics with this target-style wall clock. Featuring muted bands of terracotta and teal on a matte cream base, this piece combines precise geometric glazing with the organic warmth of hand-built pottery.
Step-by-Step Guide
Materials
- White or speckled stoneware clay
- Rolling pin and guide sticks (approx. 1/4 inch thick)
- Circular templates (various sizes) or a compass tool
- Pottery wheel (optional) or slab building tools
- Fettling knife and needle tool
- Bisque firing kiln capabilities
- Matte cream/off-white glaze
- Muted terracotta/dusty rose underglaze or glaze
- Deep teal/petrol blue underglaze or glaze
- Black underglaze pencil or fine liner bottle
- Wax resist
- Sponge and water
- Clock mechanism kit (hands and motor)
- Drill bit (sized for your clock shaft)
Step 1: Forming the Clock Body
-
Prepare the slab:
Begin by rolling out your stoneware clay into a smooth, even slab. Use guide sticks to ensure a consistent thickness of about 1/4 inch, which helps prevent warping during drying. -
Cut the circle:
Place a large circular template (around 10-12 inches diameter) onto your clay. Using a needle tool held vertically, cut around the template to create the clock face. Don’t discard the trimmings yet. -
Add a rim (optional):
For the look in the photo, create a shallow rim. You can throw a shallow plate on the wheel or, for hand-building, attach a thin coil or strip of clay along the edge, smoothing it seamlessly into the base. -
Smooth the surface:
Use a damp sponge or a soft rib tool to compress the clay surface. This removes texture from the rolling pin and creates that perfectly smooth canvas needed for the graphic design. -
Make the center hole:
Find the exact center of your circle. Punch a hole using a tool slightly larger than your clock mechanism’s shaft, as the clay will shrink significantly during firing. -
Slow drying:
Place the clock face between two boards or drywall sheets to dry slowly and evenly. This is crucial to keep it perfectly flat. Once bone dry, bisque fire the piece.
Uneven Glaze Lines?
If your hand is shaky, use wax resist. Paint wax over the areas you want to remain white. Any stray colorful glaze will bead up on the wax and can be easily wiped away.
Step 2: Glazing the Bullseye
-
Clean the bisque:
Wipe the bisque-fired piece with a damp sponge to remove any kiln dust. Let it dry for a few minutes before applying any glaze. -
Mark the rings:
Place your piece on a banding wheel. Using a pencil (the graphite will burn off), lightly mark out your concentric circles. Spin the wheel while holding the pencil steady to get perfect rings. -
Apply the base coat:
Brush two to three coats of the matte cream glaze over the entire face and rim of the clock. Let each coat dry until it’s no longer shiny before adding the next. -
Paint the center circle:
Using a soft round brush, fill in the innermost circle with the terracotta/rose glaze. I like to steady my hand on a mahl stick or stack of books to keep the edges crisp. -
Add the teal ring:
Skip a section (creating a white gap) and paint the next ring outward with the deep teal glaze. Focus on keeping the brush strokes smooth to minimize texture. -
Paint the outer ring:
Skip another section of white, then paint the largest outer ring in the same terracotta/rose shade. Ensure your glaze thickness matches the other sections for unified opacity. -
Detail the hour markers:
Using a black underglaze applicator with a fine needle tip, or a small brush, carefully dot the hour markers around the perimeter. Use a clock template to ensure accurate spacing for 12, 1, 2, etc. -
Clean up:
If any colored glaze smeared onto the white sections, gently scrape it away with an X-Acto knife or clean it up with a stiff, barely damp brush. -
Sponge the rim:
For a rustic touch, wipe back a tiny bit of glaze on the very top edge of the rim to reveal the raw clay body, or simply ensure the rim glaze is neat.
Step 3: Assembly
-
Glaze fire:
Fire the clock in the kiln according to your glaze manufacturer’s instructions (usually Cone 5 or 6 for stoneware). Ensure the piece is stilted if you glazed the back. -
Install the mechanism:
Once cool, insert the clock motor from the back. Secure it with the washer and nut provided in the kit on the front side. -
Attach the hands:
Press the hour and minute hands onto the shaft. For this design, solid black stick-style hands provide the best contrast against the colorful rings.
Texture Twist
Before the clay dries, gently press a piece of linen or canvas into the surface. The subtle woven texture will catch the glaze and add tactile depth to the cream sections.
Hang your new geometric timepiece in a sunny spot to let those matte colors warm up your space


What Really Happens Inside the Kiln
Learn how time and temperature work together inside the kiln to transform clay into durable ceramic.
Speckled Clay Clock With Carved Hour Lines
Embrace the beauty of raw texture with this minimalist ceramic clock, featuring a lovely speckled clay body and subtle carved details. The concentric circles and raised hour markers create a sophisticated tactile face that feels both modern and handmade.
Step-by-Step Tutorial
Materials
- Speckled stoneware clay (mid-fire)
- Pottery wheel (or slab roller for hand-building)
- Bat for wheel
- Wooden throwing ribs
- Pin tool
- Carving tools (loop tool or ribbon tool)
- Sponge
- Clock mechanism kit (battery operated)
- Gold clock hands
- Drill bit (for ceramic) or hole cutter tool
- Matte clear glaze (optional)
- Ruler or calipers
Step 1: Forming the Base
-
Prepare the clay:
Begin by wedging about 2-3 pounds of speckled stoneware clay to remove air bubbles. This ensures your clock face won’t crack during firing. -
Center and open:
Throw the clay onto the wheel head and center it well. Open the clay wide and flat, aiming for a plate-like form rather than a bowl. -
Compress the floor:
Use a wooden rib to firmly compress the floor of your plate. This step is crucial to prevent S-cracks during drying, as the clock face needs to be perfectly flat. -
Define the rim:
Pull up a short, vertical rim about 1 inch high. Keep the wall thickness consistent, perhaps slightly thicker than a standard dinner plate to accommodate the clock mechanism later. -
Create the concentric ridges:
While the wheel is spinning slowly, use the corner of a wooden rib or a specialized profile tool to press two distinct concentric grooves into the center of the face. Leave about 2 inches of flat space between the center hole area and the start of the ridges. -
Smooth and refine:
Use a damp sponge to soften any sharp edges on your ridges and rim. Don’t over-wet the clay, as we want to preserve that crisp definition.
Step 2: Carving Details
-
Leather hard stage:
Allow the piece to dry to a leather-hard state. It should be firm enough to handle without warping but soft enough to carve cleanly. -
Trim the foot:
Flip the piece over and center it on the wheel again. Trim a shallow foot ring or a flat bottom, ensuring the thickness in the very center is thin enough for your clock shaft (usually 1/4 inch or less). -
Mark the center:
Locate the exact center of the clock face. I prefer using a pin tool to make a tiny pilot mark while the piece is spinning. -
Create the spindle hole:
Use a hole cutter or a drill bit sized to your clock mechanism (often 8mm or 10mm) to carefully bore a hole through the center mark. Clean up any burrs on the edges. -
Mark hour positions:
Using a decorating disk or simply a clock face template, lightly mark the 12 hour positions around the outer perimeter of the inner face.
Warp Watch
To prevent warping, dry your clock face very slowly. Place it face down on a piece of drywall or foam, and weight the rim lightly with small bean bags if necessary.
Step 3: Adding the Markers
-
Form the raised dashes:
Roll out a very small, thin coil of fresh matching clay. Cut it into twelve equal segments, each about 1/2 inch long. -
Score and slip:
Score the marked positions on your clock face and the back of your small clay dashes. Apply a dab of slip to each spot. -
Attach the markers:
Press the dashes firmly onto the clock face at the hour marks. They should sit radially, pointing toward the center. -
Clean up connections:
Use a small, barely damp brush to clean up any slip that oozed out and to smooth the connection points so the markers look integrated.
Pro Tip: Shaft Sizing
Measure your clay thickness at the center hole carefully! Clock movements come with different shaft lengths. Buy a movement with a shaft 1/8″ longer than your clay thickness.
Step 4: Firing and Assembly
-
Bisque fire:
Let the piece dry completely before loading it into the kiln for a bisque firing (usually Cone 04). -
Glaze application:
For the look in the photo, apply a matte clear glaze or leave the raw clay unglazed if fully vitrified. Wipe the foot ring clean. -
Glaze fire:
Fire the piece to maturity (Cone 5 or 6 for most stoneware). This brings out the rich iron speckles. -
Install mechanism:
Once cool, insert the clock mechanism from the back. Secure it with the washer and nut on the front side. -
Attach hands:
Press the hour hand, then the minute hand onto the shaft. Ensure they are parallel so they don’t catch on each other.
Hang your new timepiece on a sunny wall to let the shadows play across those beautiful carved textures
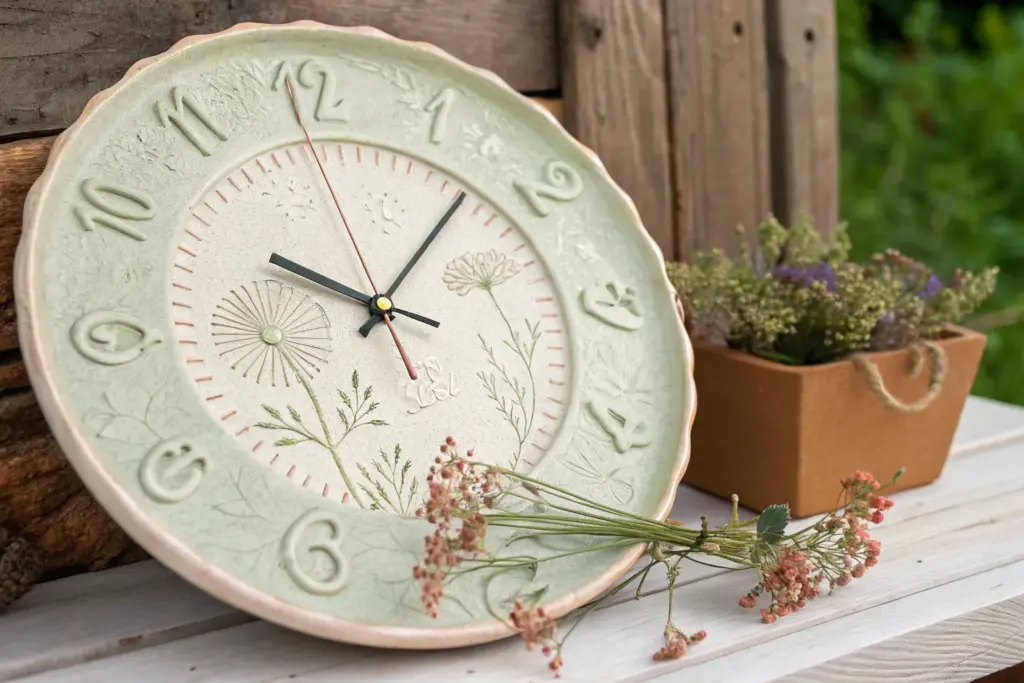
Botanical Impression Clock Face
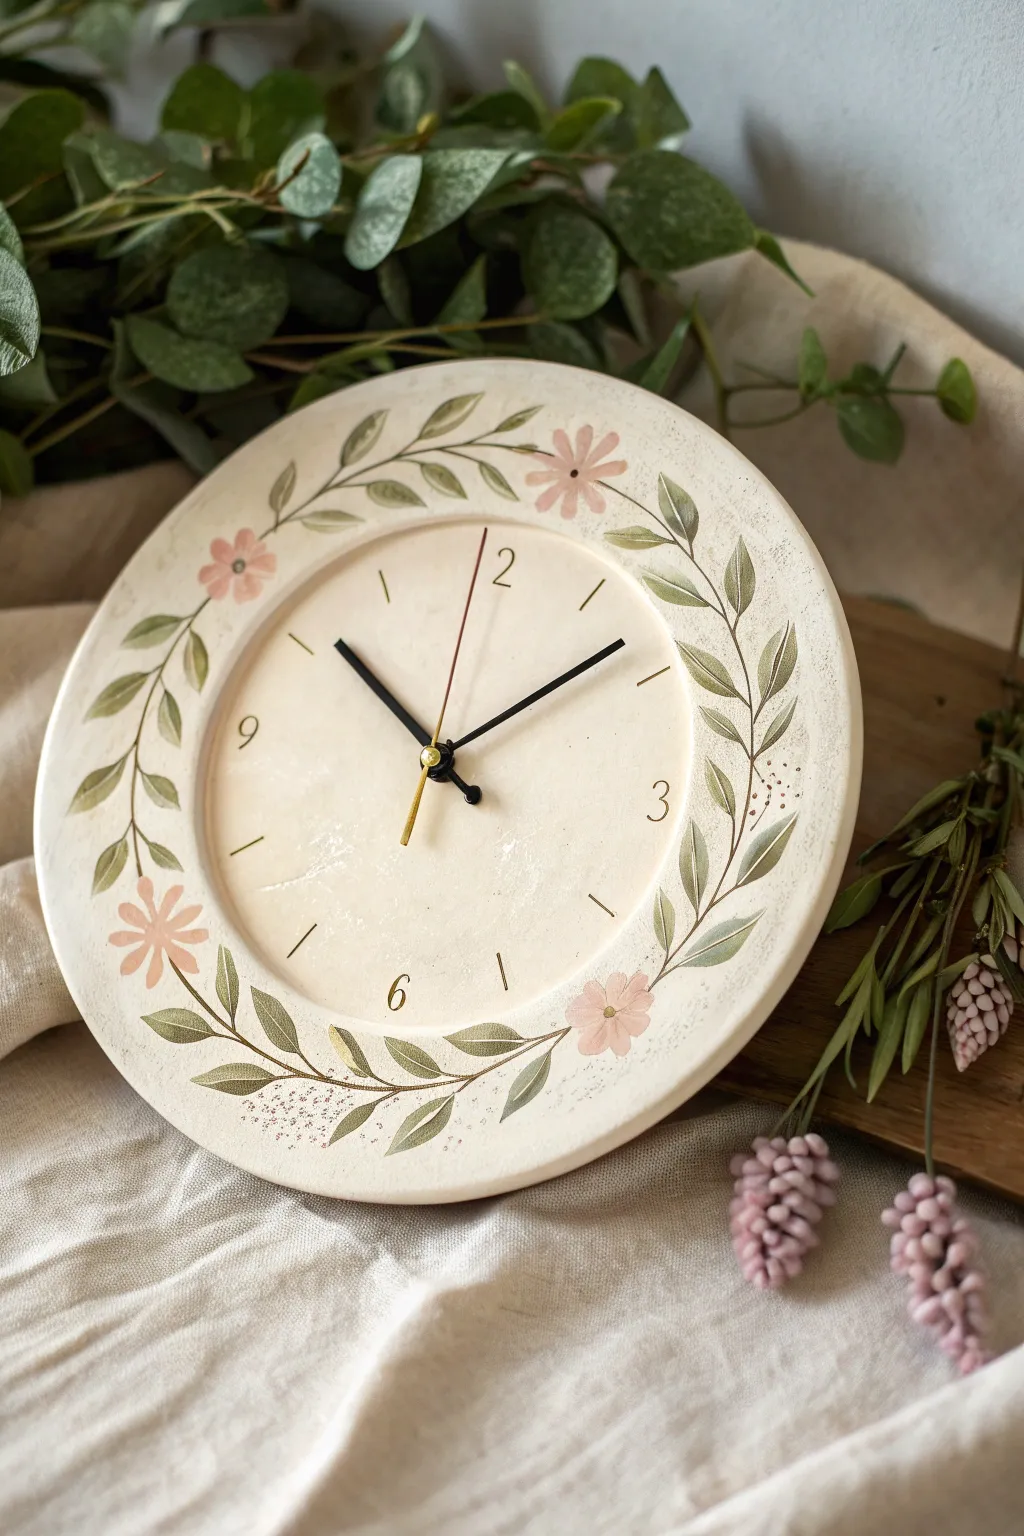
This elegant timepiece combines the rustic charm of unglazed pottery with delicate botanical illustrations, creating a functional work of art. The soft cream base, adorned with a winding vine of sage green leaves and blush pink daisies, fits perfectly into cottagecore or farmhouse decor.
Step-by-Step
Materials
- Pre-made bisque ceramic plate (approx. 10-12 inches) with a pre-drilled center hole
- Acrylic paints: Ivory/Cream, Sage Green, Olive Green, Blush Pink, Burnt Umber, Gold
- Fine grit sandpaper (400 grit)
- Round synthetic brushes (sizes 2 and 4)
- Fine liner brush (size 0 or 00)
- Pencil and eraser
- Clock mechanism kit (movement, hands, washer, nut)
- Matte spray varnish or sealant
- Palette for mixing
- Small sponge or stippling brush
Step 1: Base Preparation
-
Sand the surface:
Begin by lightly sanding your bisque ceramic plate to ensure a perfectly smooth surface. Wipe away any dust with a barely damp cloth. -
Apply base coat:
Mix ivory paint with a tiny drop of water to improve flow. Apply two even coats over the entire face and rim of the plate, letting the first coat dry completely before adding the second. Aim for a matte, bone-like finish. -
Add subtle texture:
To mimic the stone-like look in the photo, lightly sponge a very watered-down wash of pale beige or light grey in random areas. This shouldn’t look like paint, but rather like natural variations in the clay.
Uneven Numbers?
If painting numbers by hand is daunting, use a small stencil or rub-on transfers for the numerals. You can paint over them lightly to blend them in.
Step 2: Sketching the Design
-
Mark the hours:
Use a ruler or a clock template to faintly mark the positions for numbers 12, 3, 6, and 9. Mark intermediate hours with small tick marks. -
Plan the wreath:
With your pencil, sketch a light, wavy guideline around the flat rim of the plate. This will serve as the spine for your vine. -
Sketch leaves and blooms:
Draw small almond-shaped leaves branching off your vine spine. Space out four main flower clusters—I find placing them slightly off-center from the cardinal points creates a more organic flow.
Better Brushstrokes
Add a drop of flow improver or water to your green paint. Inky paint creates smoother, longer vine lines than thick paint straight from the tube.
Step 3: Painting the Botanicals
-
Paint the stems:
Using a size 0 liner brush and watered-down olive green, trace over your vine spine stems. Keep the lines thin and delicate. -
Base layer for leaves:
Fill in the leaf shapes with sage green using a size 2 round brush. Use a single stroke method: press down at the base of the leaf and lift as you pull toward the tip. -
Add leaf details:
Once the sage green is dry, use the darker olive green and your smallest brush to add a central vein to each leaf. You can also dry-brush a little dark green on one side of select leaves for shadow. -
Paint the flowers:
Mix blush pink with a touch of white. Paint five-petal daisy shapes where you sketched your flowers. Keep the paint slightly translucent to maintain a watercolor effect. -
Flower centers:
Using the back end of a brush handle or a fine dotting tool, place a small dot of burnt umber in the center of each flower. -
Pollination details:
Add tiny clusters of dots (stippling) in blush pink or light purple near the leaves to represent pollen or small berry clusters, adding airy texture to the design.
Step 4: Finishing Touches
-
Number the dial:
Using the burnt umber paint (or gold if you prefer a metallic look) and a steady hand, paint the numbers 12, 2, 3, 6, and 9. Use simple line strokes for the hour markers between them. -
Erase guidelines:
Once you are absolutely certain the paint is 100% dry (give it a few hours), gently erase any visible pencil marks. -
Seal the artwork:
Spray the entire plate with a matte varnish. This protects the acrylic from dust and moisture without creating a distracting shine. -
Install mechanism:
Insert the clock movement shaft through the back hole. Secure it with the washer and nut on the front side. -
Attach hands:
Press the hour hand onto the shaft first, followed by the minute hand, and finally the second hand (or cap). Ensure they are parallel so they don’t catch on each other.
Hang your new botanical timepiece in a bright kitchen or entryway and enjoy the natural serenity it brings to your space

TRACK YOUR CERAMIC JOURNEY
Capture glaze tests, firing details, and creative progress—all in one simple printable. Make your projects easier to repeat and improve.
Sgraffito Floral Wreath Clock
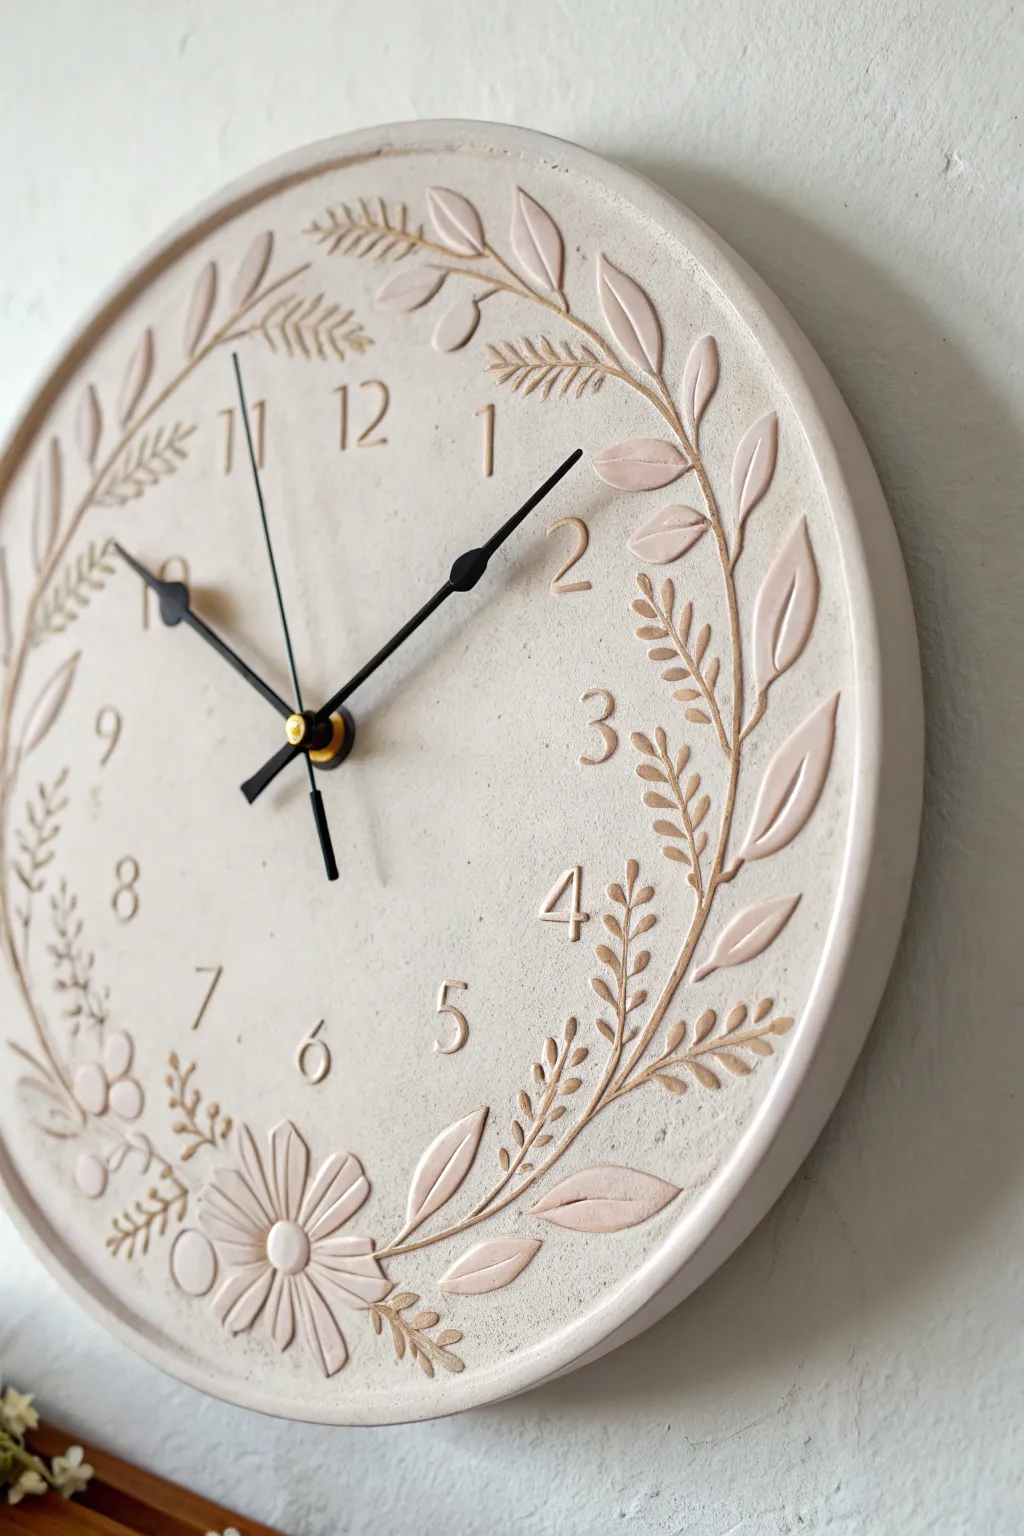
Elegance meets functionality in this soft clay clock, featuring a delicate raised floral wreath and classic numerals. By using relief carving and subtle glazing techniques, you can achieve this sophisticated, matte-finish stoneware look that perfectly balances rustic charm with modern simplicity.
Detailed Instructions
Materials
- White stoneware or porcelain clay body
- Rolling pin with guide strips (approx. 1/4 inch thick)
- Round template (approx 10-12 inches diameter) or a platter mold
- Loop tools (small and medium)
- Needle tool
- Modeling tool (spoon-shaped)
- Soft rubber rib
- Sponge
- Pale blush or warm beige underglaze
- Matte clear glaze
- Clock mechanism kit (movements and hands)
- Drill bit (sized for your clock shaft)
Step 1: Forming the Base
-
Prepare the slab:
Begin by wedging your white stoneware clay thoroughly to remove air bubbles. Roll it out into a smooth, even slab about 1/4 inch thick using guide strips to ensure uniformity. -
Cut the circle:
Place your round template over the slab. Using a needle tool, cut straight down around the perimeter to create a perfect circle. -
create the rim:
I like to gently press the slab into a shallow platter mold to give it a slight curve, or simply add a small coil around the edge, smoothing it seamlessly into the base to create that raised rim seen in the photo. -
Smooth the surface:
Take a soft rubber rib and compress the entire surface of the clock face. This removes canvas texture and creates that buttery smooth canvas needed for the carving work. -
Mark the center:
Find the exact center of your circle and make a small mark with your needle tool. Carefully punch a hole through this point using a tool that matches the diameter of your clock mechanism shaft.
Clean Lines Secret
Work when the clay is leather-hard, almost dry. If it’s too wet, the carving will be messy. If too dry, it will chip. The perfect stage cuts like cold cheddar cheese.
Step 2: Carving the Design
-
Sketch the layout:
Once the clay is leather-hard (firm but still cool to the touch), lightly sketch the positions of the numbers and the floral wreath using a needle tool or a dull pencil. Don’t dig deep yet; just map it out. -
Define the numerals:
Using a small loop tool, carefully carve around your sketched numbers (12, 1, 2, etc.) to lower the background clay slightly, leaving the numbers themselves raised. -
Outline the wreath:
Sketch the flowing vines and leaves around the perimeter. Start carving the negative space around the leaves, removing the background clay to make the floral elements pop forward. -
Add leaf details:
Use a sharp needle tool or a fine point carving tool to incise the central veins into each leaf. Keep the lines crisp and confident. -
Create the flowers:
For the daisy-like flowers at the bottom left, define the petals by carving deep grooves between them. Round off the petal edges with a modeling tool for a softer, organic look. -
Texture the background:
This clock has a stunning, slightly pebbled texture in the negative space. Use a stiff stippling brush or a texture tool to gently tap the recessed areas, avoiding your smooth raised numbers and leaves. -
Refine the edges:
Go back over the raised leaves and numbers with a damp sponge or soft brush to smooth any sharp burrs created during carving. This softness is key to the aesthetic.
Gold Leaf Glamour
For a luxe upgrade, apply gold leaf to the numerals or just the rim edges after the final firing using liquid gold leaf or sizing adhesive for a metallic pop.
Step 3: Finishing and Assembly
-
Bisque fire:
Allow the piece to dry slowly and completely under loose plastic to prevent warping. Once bone dry, bisque fire it to the appropriate cone for your clay body. -
Apply the wash:
Dilute a pale blush or warm beige underglaze with water. Brush this wash over the floral elements and the rim. -
Wipe back color:
Using a clean, damp sponge, wipe the surface of the raised elements. This leaves the color in the recessed veins and shadows while revealing the lighter clay body on the high points. -
Glaze application:
Apply a thin layer of matte clear glaze over the entire face. A matte finish is crucial here to avoid glare that would hide the subtle carving work. -
Final firing:
Glaze fire the clock according to your glaze and clay specifications. Make sure it is supported well in the kiln so it remains perfectly flat. -
Install mechanism:
Once cool, insert the clock movement through the back. Secure it with the washer and nut provided in your kit. -
Attach hands:
Press the hour and minute hands onto the shaft. The sleek, modern black hands shown contrast beautifully, so choose a simple style to let the carving shine.
Hang your new masterpiece in a well-lit spot to let the shadows play across those beautiful carved details.
Slip-Trailed Dots and Dashes Clock
This minimalist ceramic clock brings tactile beauty to timekeeping with its raised textural elements and creamy, speckled finish. By combining simple slab building with precise slip-trailing techniques, you’ll create a functional piece of art that feels earthy yet refined.
Step-by-Step Guide
Materials
- White stoneware clay body (speckled variety recommended)
- Rolling pin
- Canvas working surface
- Round template (approx 8-10 inches)
- Needle tool
- Fettling knife
- Sponge
- Slip trailer bottle with fine nozzle
- Deflocculated slip (matching your clay body)
- Underglaze (optional, warm beige tones)
- Paintbrush for dots
- Clear or satin matte glaze
- Clock movement kit with brass hands
- Drill bit (sized to your clock mechanism)
Step 1: Forming the Base
-
Roll the slab:
Begin by wedging your speckled stoneware clay to remove air bubbles. Roll it out on a canvas surface into an even slab, aiming for a thickness of about 1/4 to 3/8 of an inch. -
Cut the circle:
Place your round template on the slab. Using your needle tool held vertically, trace around the template to cut out a perfect circle. -
Create the rim:
Roll a long, thin coil of clay, roughly the thickness of a pencil. Score and slip the outer edge of your circular base, then attach the coil on top of the edge to create a raised rim. -
Blend the rim:
Using your thumb or a modeling tool, blend the inside seam where the coil meets the base until it is completely smooth and seamless. -
Refine the exterior:
Smooth the outside of the rim as well. The goal is to make the rim look like an integral part of the plate, not an added piece. Use a damp sponge to soften the lip. -
Establish the center:
Locate the exact center of your circle. Use a small hole cutter or a drill bit to create the hole for the clock shaft. Do this while the clay is leather hard to prevent cracking.
Slip Consistency Tip
Test your slip trailer on a scrap slab first. If the dots slump, the slip is too wet. Let it sit in an open bowl for an hour to thicken before filling the bottle.
Step 2: Adding the Hours
-
Mark the hours:
Lightly visualize the clock face. You can use a paper template to mark slight indentations at the 12, 3, 6, and 9 positions first, then fill in the remaining hours equally spaced between them. -
Form clay pellets:
Roll twelve small, pea-sized balls of clay. Try to keep them relatively consistent in size, though slight organic variation adds charm. -
Attach the hour markers:
Score the spots you marked on the face and add a tiny dab of slip. Press one clay ball onto each hour position. I like to flatten them very slightly so they adhere well but remain raised.
Step 3: Slip Trailing Details
-
Prepare the slip:
Fill your slip trailer bottle with smooth, deflocculated slip. It should have the consistency of heavy cream so it holds its shape when dispensed. -
Add the tertiary dots:
Squeeze tiny droplets of slip to create a ring of small dots just inside the rim’s edge. Create a pattern, such as three tiny dots between each hour marker. -
Paint secondary accents:
Using a fine paintbrush and a warm beige underglaze or a slightly darker slip, paint small dots or circles near the main hour markers to add depth and color variation. -
Dry slowly:
Cover the piece loosely with plastic to let it dry very slowly. This helps prevent the rim from warping or the added clay bits from popping off.
Add Gold Lustre
For a luxe upgrade, paint real gold lustre over the twelve main hour dots after the glaze firing. Refire at cone 018 for shiny metallic accents.
Step 4: Glazing and Assembly
-
Bisque fire:
Once bone dry, fire the piece to bisque temperature (usually cone 04 or 06) in your kiln. -
Apply glaze:
Dip or brush a clear or white satin matte glaze over the entire face. If you want the raw clay texture to show more, wipe back the glaze slightly on the high points of the hour markers. -
Glaze fire:
Fire the clock again to your clay body’s maturity temperature (e.g., cone 5 or 6). -
Install the mechanism:
Insert the clock movement shaft through the back hole. Place the washer and nut on the front side and tighten gently. -
Attach the hands:
Press the hour hand onto the shaft first, followed by the minute hand, and finally the second hand or cap nut. Ensure they are parallel so they don’t catch on each other.
Now hang your finished timepiece and enjoy the quiet, rhythmic beauty of your handmade creation
Scalloped Edge Sunburst Clock
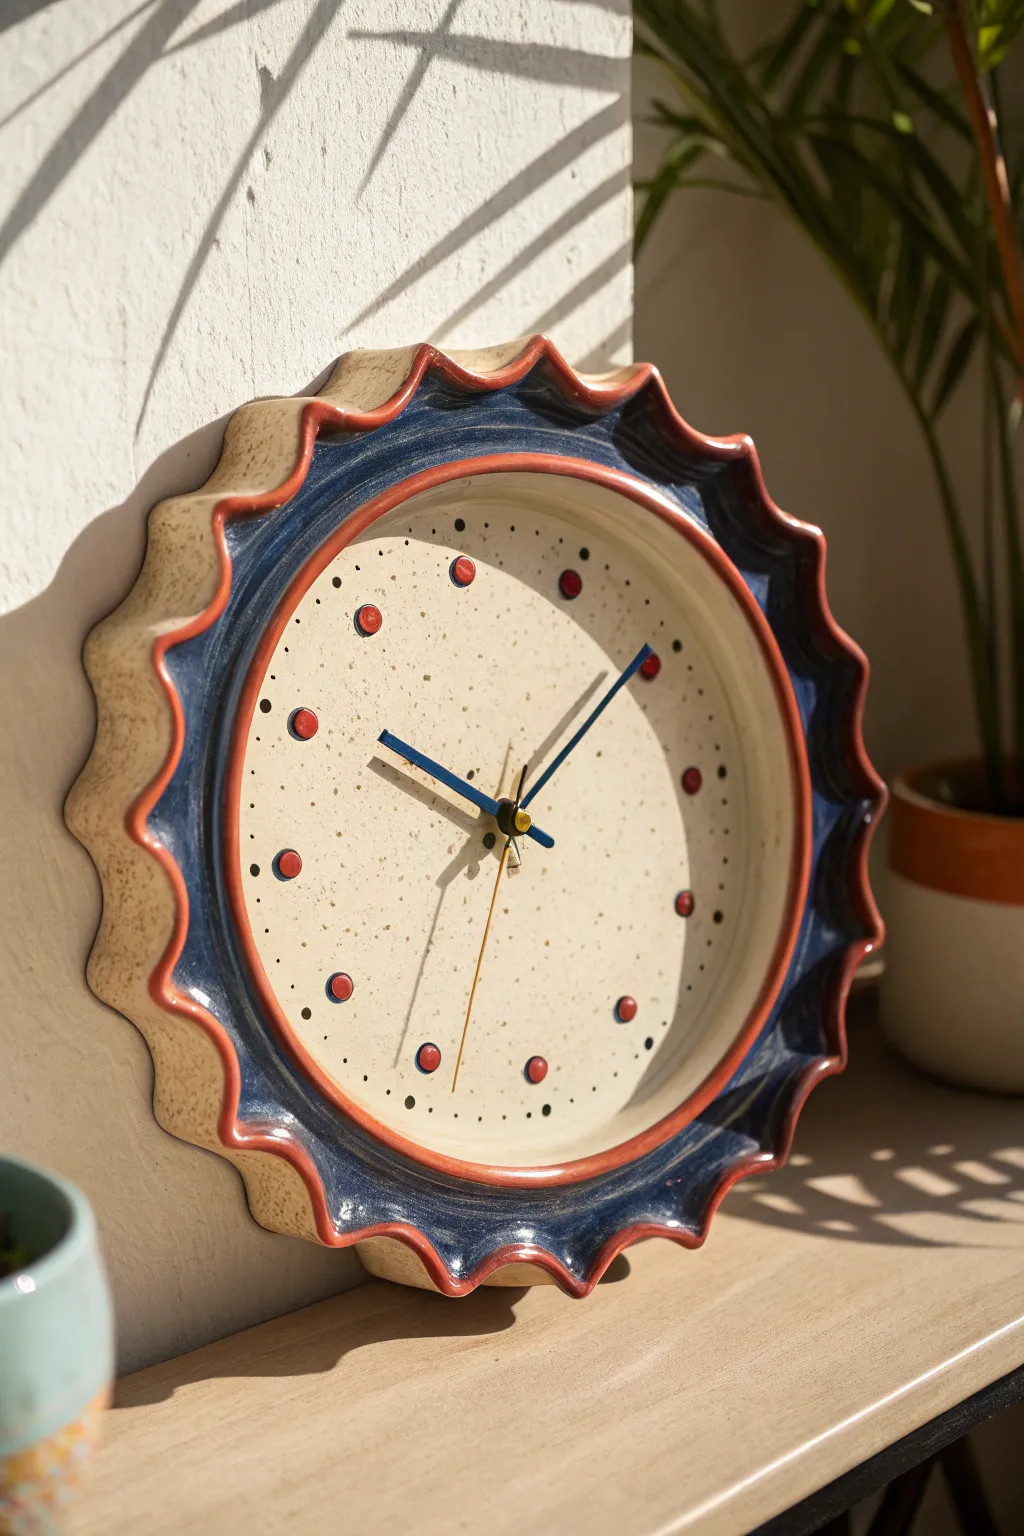
This whimsical ceramic clock combines the charm of handmade pottery with functional modern design. Featuring a distinctively deep, scalloped rim painted in cobalt blue and terracotta, it creates a striking sunburst silhouette that doubles as a piece of sculptural wall art.
Step-by-Step
Materials
- White stoneware clay or speckled clay body
- Rolling pin and guide sticks (about 3/8 inch thickness)
- Circular templates (one large for the base, one smaller for the face)
- Pottery wheel (optional, can be hand-built)
- Fettling knife and needle tool
- Sponge
- Underglazes: Deep Cobalt Blue, Terracotta/Rust Red, Black
- Clear transparent glaze (glossy or satin)
- Clock mechanism kit (battery operated)
- Clock hands (gold or black)
- High-speed drill with ceramic bit (if drilling after firing) or hole cutter tool
Step 1: Forming the Base
-
Prepare the slab:
Begin by rolling out a substantial slab of speckled or white stoneware clay. You want this to be sturdy, so aim for a consistent thickness of about 3/8 of an inch to prevent warping during drying. -
Cut the primary shape:
Use your larger circular template to cut the main backplate of the clock. This circle needs to be wider than the final clock face to accommodate the scalloped rim. -
Create the sunburst rim:
Cut a long strip of clay, approximately 2 inches wide. This will become the standing rim. Gently pinch and fold this strip into a wavy, accordion-like pattern to create the scallops. I find it helpful to shape this directly on the table first to ensure the waves are even. -
Attach the rim:
Score and slip the outer edge of your circular base. Carefully place the wavy strip onto the base, joining the seams securely. Use a modeling tool to blend the clay on the interior seam so it is completely smooth and invisible. -
Refine the edge:
Take a damp sponge and smooth the top edge of the wavy rim. It should feel soft to the touch, not sharp. The peaks of the scallops should stand proud and uniform.
Shrinkage Math
Remember clay shrinks about 12-14%. Measure your clock mechanism shaft length and ensure the clay thickness at the center hole isn’t too thick for the nut to screw on after firing.
Step 2: Creating the Face
-
Throw or build the inner face:
You now need the interior ‘bowl’ section that serves as the clock face. You can throw a shallow plate on the wheel that fits inside your scalloped rim, or hand-build a slightly smaller circle with a gentle upward curve at the edges. -
Join the components:
Join the inner face section to the center of your scalloped base. The scalloped rim should flare out from behind this central face. Ensure the bond is strong by scoring and slipping thoroughly. -
Make the center hole:
While the clay is leather hard, find the exact center of the clock face. Use a hole cutter or a drill bit to create the hole for the clock mechanism shaft. Make it slightly larger than the shaft to account for clay shrinkage. -
Dry slowly:
Place the clock on a flat board and cover it loosely with plastic. Allow it to dry very slowly over several days to prevent the large flat surface from warping or cracking. Bisque fire to cone 04 once bone dry.
Switch It Up
Try a reverse color scheme with a dark clay body, using white slip for the hour markers and a matte black glaze on the scalloped rim for a moody, celestial look.
Step 3: Glazing and Assembly
-
Apply base color:
Brush a cream-colored or clear glaze over the central face area. If you used speckled clay, a clear glaze will let those lovely natural spots shine through. -
Paint the rim:
Using a deep cobalt blue underglaze, paint the interior curve of the scalloped rim. Use a steady hand to create a clean line where the blue meets the cream face. -
Add the accent edge:
With a smaller brush, apply a terracotta or rust-red underglaze along the very top edge of the scallops and the raised lip of the inner clock face. This pinstripe defines the form beautifully. -
Mark the hours:
Using the terracotta underglaze, paint twelve small, evenly spaced circles for the hour markers. Using a clock template or protractor here is essential to ensure accurate timekeeping later. -
Add minute details:
Dip a fine-point tool or toothpick into black underglaze to add tiny dots between the red hour markers for the minutes. -
Glaze fire:
Apply a coat of clear glaze over the underglazed areas if you want a glossy finish, then fire to the maturity temperature of your clay (likely cone 5 or 6). -
Install mechanism:
Once the piece is fired and cooled, insert the clock movement from the back. Secure it with the washer and nut on the front side. -
Attach hands:
Press the hour and minute hands onto the shaft. For this design, blue or black hands provide excellent contrast against the cream face.
Hang your finished timepiece in a sunny spot where the shadows can play across the deep ridges of the rim
Square or Hexagon Slab Clock
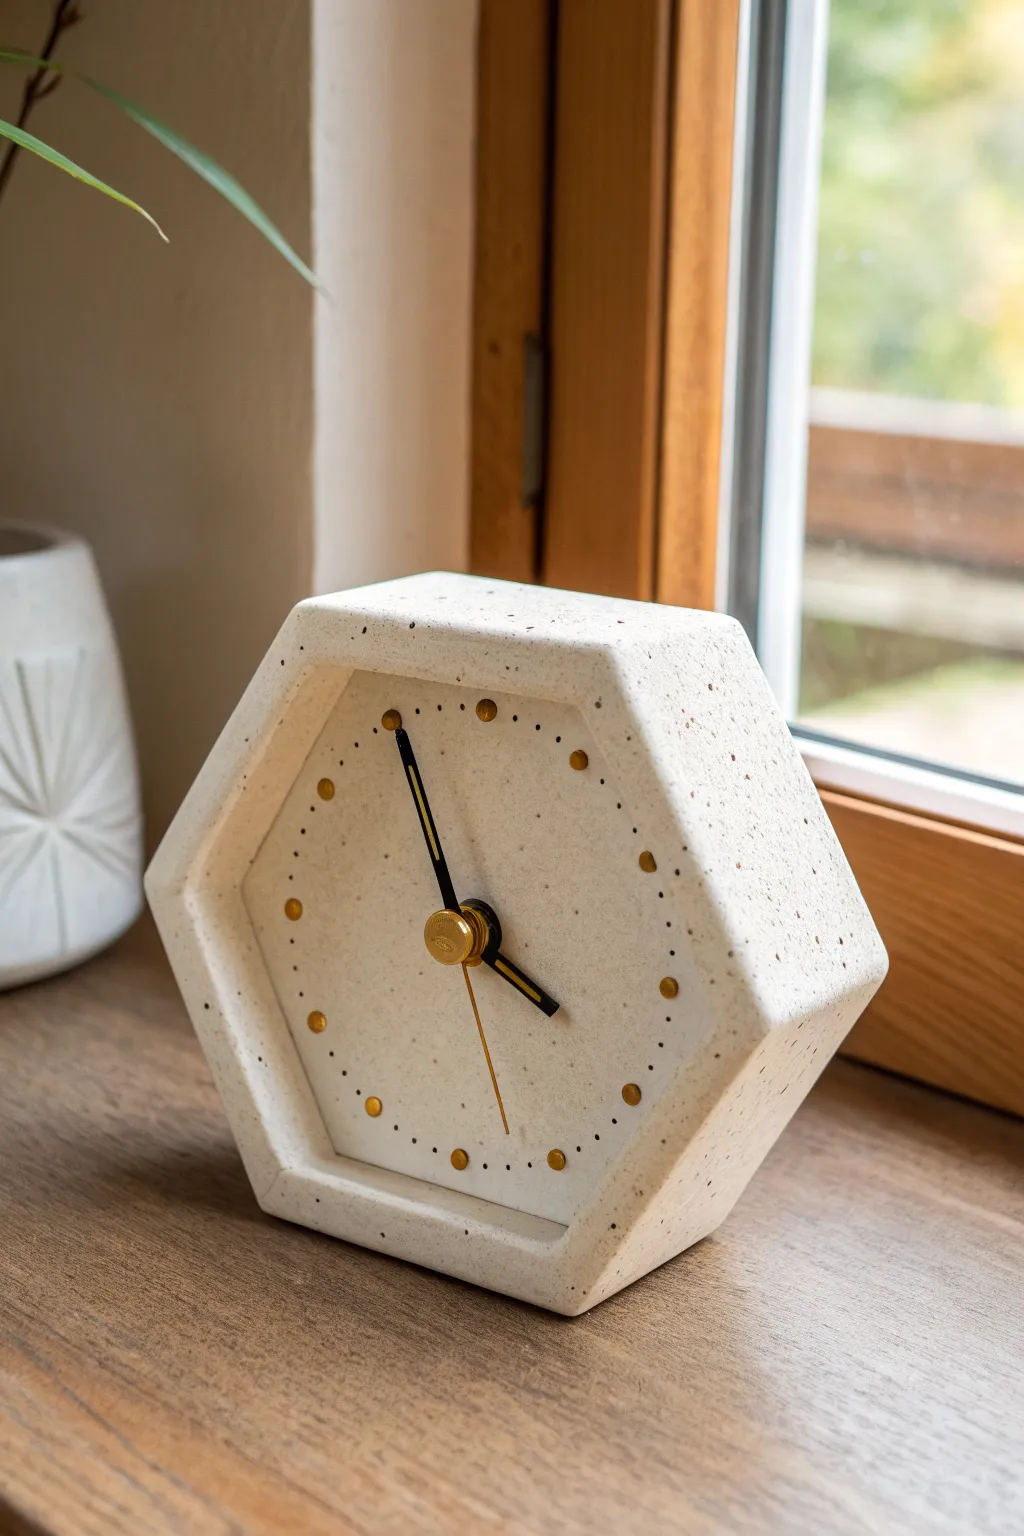
Embrace geometric simplicity with this minimalist hexagonal clock, featuring a lovely speckled finish that mimics natural stone. The clean lines and gold accents make it a timeless piece of functional decor that sits beautifully on any desk or shelf.
Detailed Instructions
Materials
- White earthenware or stoneware clay
- Speckled clay additive (e.g., ilmenite or manganese granulars) or pre-mixed speckled clay body
- Rolling pin with guide strips (approx. 1/4 inch thickness)
- Hexagon paper template or cookie cutter
- Fettling knife or needle tool
- Small circular clay cutter (or a straw) for center hole
- Sponge
- Gold luster or gold overglaze (optional for dots)
- Clear matte or satin glaze
- Clock mechanism kit (battery operated)
- Small craft paintbrush
- Ruler
Step 1: Preparing the Slab
-
Wedge the clay:
Begin by wedging your white clay thoroughly to remove air bubbles. If you are mixing your own speckled effect, knead the granular additive into the clay body during this stage until it’s evenly distributed. -
Roll out the slab:
Using guide strips or wooden slats to ensure an even thickness, roll your clay out into a smooth slab about 1/4 to 3/8 inch thick. I like to flip the slab once during rolling to compress the clay particles on both sides. -
Smooth the surface:
Take a rib tool or a slightly damp sponge and run it over the surface of the slab to remove any canvas texture or rolling pin marks, creating a pristine canvas for your clock face.
Clean Corner Tip
When joining the hexagon walls, use a barely damp paintbrush to smooth the outside corners. Don’t over-wet, or the clay might slump.
Step 2: Shaping the Hexagon
-
Trace the shape:
Place your hexagonal paper template gently onto the clay slab. Use a light touch so you don’t dent the surface. -
Cut the perimeter:
Using a fettling knife or needle tool held vertically, cut cleanly around the template. Keep the blade straight up and down to ensure the edges are crisp and not beveled. -
Create the walls:
Cut a long strip of clay from the remaining slab, measuring about 1.5 to 2 inches wide. This will form the deep sides of the clock. -
Bevel the strip edges:
Measure the six sides of your hexagon base. Cut your long strip into six equal segments matching those lengths, beveling the ends at 45-degree angles so they will fit together perfectly at the corners. -
Score and slip:
Score the outer edge of your hexagon base and the bottom edge of your wall pieces. Apply slip generously. -
Assemble the box:
Attach the walls to the base, ensuring the beveled corners meet tightly. Use a small coil of clay in the interior seams to reinforce the join, blending it smooth with a modeling tool.
Style Variation
Try marbleizing two different colored clays (like white and grey) together before rolling the slab for a faux-stone swirl effect instead of speckles.
Step 3: Refining Details
-
Cut the mechanism hole:
Find the exact center of the hexagon using a ruler. Use a small circular cutter or a straw to punch a hole for the clock shaft. Make sure the hole is slightly larger than the shaft to account for clay shrinkage. -
Clean the edges:
Once the clay is leather hard, use a damp sponge to soften the sharp outer edges slightly. This prevents chipping later and gives it a finished, professional look. -
Mark the hours:
Using a template or protractor, lightly mark the twelve hour positions. You can gently impress these spots with a tool to create slight divots where the gold dots will go later. -
Bisque fire:
Allow the clock body to dry slowly and completely under plastic initially to prevent warping. Once bone dry, fire it to bisque temperature (usually Cone 04).
Step 4: Glazing and Assembly
-
Apply clear glaze:
Dip or brush a clear matte or satin glaze over the entire piece. This will seal the clay and make the speckles pop without adding extra color. -
Glaze fire:
Fire the piece again to the maturation temperature of your specific clay and glaze (e.g., Cone 5 or 6). -
Add gold accents:
If you want the gold hour markers shown in the image, apply a small dot of gold luster or gold enamel paint to the twelve spots you marked earlier. If using ceramic luster, a third low-fire kiln run is required. -
Install the mechanism:
Once the piece is finished and cool, insert the clock movement through the back. Secure it with the washer and nut provided in your kit. -
Attach the hands:
Press the hour and minute hands onto the shaft. Ensure they are parallel so they don’t catch on each other while rotating.
Set the time, pop in a battery, and enjoy the steady, stylish tick of your handmade creation
Asymmetrical Organic-Shaped Wall Clock
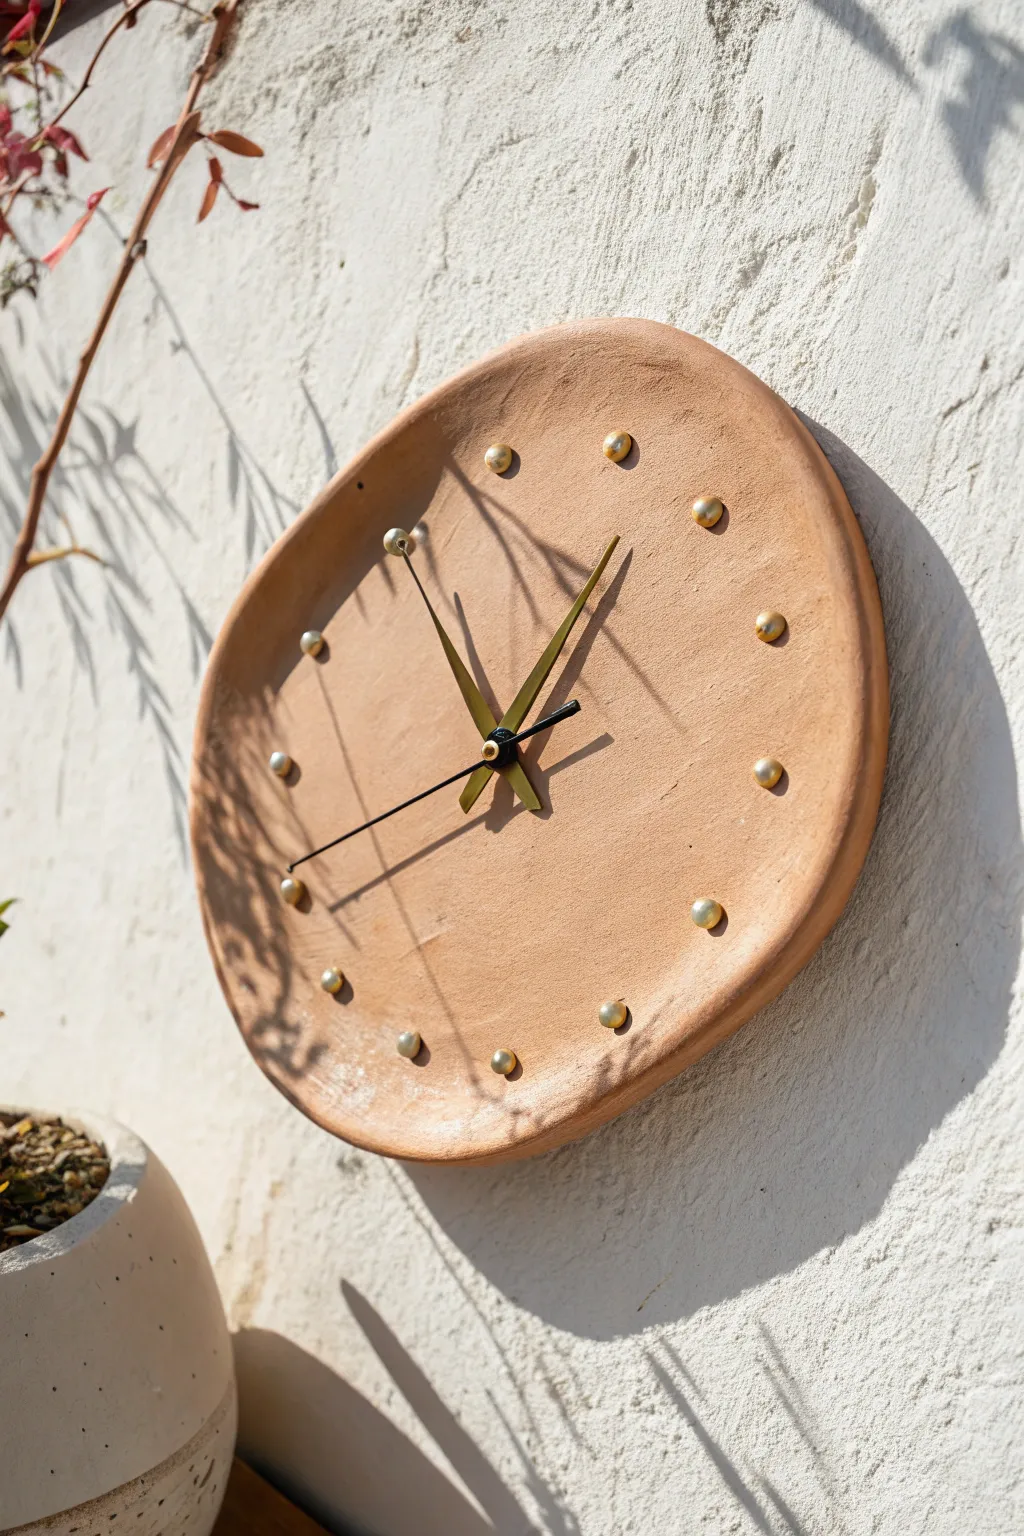
Embrace the beauty of imperfection with this stunningly simple ceramic wall clock. Featuring raw terracotta textures and glinting gold accents, its asymmetrical, basin-like shape casts distinct shadows that make it a functional piece of modern sculpture.
Step-by-Step
Materials
- Terracotta air-dry clay (or kiln-fire clay if you have access)
- Circular bat or banding wheel
- Rolling pin
- Two guide sticks (0.25 inch thick)
- Rib tool (wooden or rubber)
- Sponge
- Needle tool
- 12 small round beads (gold metal or wood painted gold)
- Strong craft glue (E6000 or similar)
- Clock movement kit (shaft length dependent on clay thickness)
- Drill with masonry bit (if firing) or standard bit
- Sandpaper (medium and fine grit)
- Matte sealant spray (optional)
Step 1: Shaping the Clay Body
-
Prepare the clay:
Begin by wedging a substantial ball of terracotta clay to remove air bubbles. You want a smooth, consistent consistency before you start rolling. -
Roll the slab:
Place your guide sticks on either side of the clay ball. Roll the clay out into a large, even slab about 1/4 inch thick. Ensuring even thickness is crucial for the clock mechanism to fit later. -
Cut the organic circle:
Using a needle tool, cut a rough circle shape. Don’t worry about being perfectly geometric; the charm of this piece lies in its organic, slightly wonky perimeter. Aim for a diameter between 10 to 12 inches. -
Form the rim:
Gently lift the edges of the slab and curve them upward to create a shallow bowl or plate shape. I like to continuously rotate the piece while I do this to keep the curve natural. -
Smooth the surface:
Use a damp sponge and a rib tool to smooth out the interior surface and the rim. Eliminate distinct finger marks, leaving a clean, matte texture. -
Identify the center:
Locate the approximate center of your organic shape. Mark it gently with your needle tool. -
Create the shaft hole:
Punch a hole directly through your center mark using a tool that matches the diameter of your clock movement’s shaft. Wiggle it slightly to ensure the hole is clean.
Warped Edges?
If the rim curls excessively while drying, weigh it down gently with sandbags or small bags of rice during the initial drying phase to encourage flatness.
Step 2: Drying and Refining
-
Slow drying:
Place the clay form on a flat board and cover it loosely with plastic functionality. Let it dry slowly over 24-48 hours to prevent warping, especially around the rim. -
Uncover and finish drying:
Remove the plastic and allow the piece to dry completely until it turns a lighter, chalky orange. This may take another day or two depending on humidity. -
Sanding:
Once bone dry, take your medium grit sandpaper to smooth any rough edges on the rim. Switch to fine grit to buff the face of the clock, maintaining that raw, earthen look. -
Firing (Optional):
If using kiln clay, fire the piece to bisque temperature now. If using air-dry clay, simply proceed to the next step after sanding.
Step 3: Assembly and Details
-
Mark hour positions:
Use a protractor or a paper clock template to lightly mark the 12 hour positions. Since the shape is organic, use the center hole as your anchor point for accuracy. -
Prepare the markers:
If your beads aren’t gold, paint them now and let them dry. Select small, spherical beads that sit high off the surface to catch the light. -
Attach the markers:
Apply a small dot of strong craft glue to each verified hour mark. Press the gold beads firmly into place, ensuring they don’t slide before the glue sets. -
Seal the surface:
To protect the piece from dust without ruining the matte finish, give it a light coat of matte spray sealant. Avoid glossy sprays as they look unnatural on terracotta. -
Install the movement:
Insert the clock movement shaft through the back of the center hole. Secure it with the washer and nut on the front side, tightening gently but firmly. -
Attach the hands:
Press the hour hand onto the shaft first, followed by the minute hand, and finally the second hand (or cap). Make sure they are parallel to the clay surface so they don’t drag.
Pro Tip: Shadow Play
When shaping the rim, exaggerate the curve slightly on one side. This intentional asymmetry creates deeper shadows when hung, emphasizing the 3D form.
Hang your new timepiece where the natural light can play across its curved surface and gold details
Hanging Pendant Clock With Dangling Tiles
This project combines the functional appeal of a wall clock with the whimsical movement of a mobile. With its raw, speckled clay finish and dangling geometric tiles, it creates a kinetic piece of art that feels earthy and modern.
Step-by-Step Tutorial
Materials
- Air-dry clay or polymer clay (stone or speckled beige effect)
- Wooden rolling pin
- Circular cookie cutter or bowl (approx. 8-10 inches)
- Small number stamps or silicone molds for numbers
- Clock mechanism kit (battery operated)
- Natural jute twine or hemp cord
- Wooden beads (assorted sizes)
- Gold geometric beads or spacers
- Craft knife or clay tool set
- Drinking straw or small dowel (for piercing holes)
- Sandpaper (fine grit)
- Strong craft glue (E6000 or similar)
- Clear matte varnish (optional)
Step 1: Shaping the Clay Components
-
Roll the base:
Begin by conditioning your clay and rolling it out on a smooth surface to a thickness of about 1/4 inch. This will be the main face of your clock. -
Cut the circle:
Using a large circular cutter or tracing around a bowl, cut out your main clock circle. Smooth the edges with a little water on your finger to remove any jagged bits. -
Create the center hole:
Find the exact center of your circle and pierce a hole large enough to fit the shaft of your clock mechanism. Test the fit now while the clay is soft. -
Make the suspension holes:
Using a straw or dowel, punch two holes at the top edge for the hanging rope, and three distinct holes along the bottom edge where the chimes will hang. -
Cut the chimes:
Roll out remaining clay and cut four semi-circle shapes. I like to make these slightly different sizes for visual interest. Punch a hole at the top of each semi-circle for hanging. -
Add texture (optional):
If you want the speckled look seen in the photo but only have plain clay, gently press heavy sand, coffee grounds, or black pepper into the surface now.
Weight Distribution
Ensure the bottom tiles aren’t too heavy. If they pull the clock tilt, stick a small coin or washer to the back of the clock at the top to act as a counterweight.
Step 2: Numbers and Drying
-
Create the numerals:
Roll out a thin snake of clay to form the numbers 12, 3, and 6, or use small clay cutters. Shape small dashes for the other hour markers. -
Attach the markers:
Score the back of your numbers and the clock face where they will sit. Apply a dab of water or liquid clay (slip) and press them firmly onto the clock face. -
Dry thoroughly:
Allow all clay pieces to dry completely. For air-dry clay, this takes 24-48 hours. Flip the pieces halfway through to ensure even drying and prevent warping. -
Sand and finish:
Once bone dry, lightly sand any rough edges. If you desire extra durability, coat the front with a matte varnish, but the raw look is lovely too.
Mixed Media Magic
Paint the semi-circle tiles with metallic gold leaf or soft pastels to contrast against the raw beige clay face for a pop of modern color.
Step 3: Assembly
-
Install the mechanism:
Insert the clock movement through the back of the center hole. Secure it with the washer and nut provided in your kit, then press the hands onto the shaft. -
Rig the chimes:
Cut three lengths of jute twine. Tie a knot at one end and thread on a decorative bead or gold spacer. Thread the twine through a semi-circle tile. -
Connect the strings:
Feed the top of each chime string through the bottom holes of the clock face. Determine your desired length, tie a secure knot behind the clock face, and trim excess string. -
Add the hanger:
Cut a thicker piece of rope for the main hanger. Thread it through the top two holes from back to front, creating a sturdy loop, and knot securely on the backside. -
Final touches:
Adjust the hands to the correct time and gently straighten your dangling tiles before finding the perfect spot on your wall.
Listen to the soft clink of ceramic as your new timepiece settles into its home on your wall
Tabletop Arch Clock With Built-In Feet
This charming ceramic timepiece combines a classic arched silhouette with a modern speckled finish that catches the light beautifully. The deep teal glaze, accented with subtle gold flecks, offers a sophisticated pop of color perfect for a mantle or bedside table.
Detailed Instructions
Materials
- White earthenware or stoneware clay (approx. 3-4 lbs)
- Clock insert (quartz movement, approx. 3-4 inch diameter)
- Slab roller or rolling pin with thickness strips
- Arch template (paper or cardstock)
- Pottery knife or needle tool
- Rib tool (kidney)
- Selection of circle cutters
- Teal underglaze or glaze
- Gold luster or gold metallic acrylic paint (if non-functional ceramic)
- Clear glaze (if using underglaze)
- Scoring tool and slip
- Sponge
- Kiln
- Clay carving tool
Step 1: Forming the Body
-
Prepare the slab:
Begin by rolling out a substantial slab of clay to a uniform thickness of about 1/2 inch. You want this thick enough to be sturdy and stand on its own without warping during the drying process. -
Cut the arch shapes:
Using your paper template, cut two identical arch shapes from the slab. These will serve as the front and back faces of the clock. -
Create the side wall:
Measure the perimeter of your arch’s curved edge. Cut a long rectangular strip of clay the same length and about 2-3 inches wide. This will create the depth of the clock body. -
Cut the clock face hole:
On the front arch piece, center your circle cutter (sized to match your clock insert slightly loosely to account for shrinkage) and remove the clay circle. Smooth the inner edges with a damp sponge. -
Assemble the structure:
Score and slip the edges of the front arch, back arch, and the long rectangular strip. Attach the strip along the curved edge of the back arch first, reinforcing the seam with a thin coil of clay on the inside. -
Attach the face:
Carefully attach the front arch to the other side of the strip, ensuring the whole form stands flat and square. Use a paddle or flat board to gently tap the bottom to ensure it sits perfectly level.
Shrinkage Check
Ceramic shrinks about 10-15%. Cut the hole for your clock insert slightly larger than the mechanism measures to ensure it fits after firing.
Step 2: Refining and Detail
-
Smooth the seams:
Use a rib tool to compress and smooth all exterior seams where the slab pieces join. The goal is to make the transition seamless so it looks like one solid block of ceramic. -
Create the decorative recess:
For the indented detail seen on the front face, use a carving tool or a smaller loop tool to gently recess the area around the clock hole, leaving a raised rim at the very edge if desired. -
Add the bottom detail:
Form a small sphere of clay and attach it to the bottom center of the front face. Press it slightly flat; this will eventually be painted gold to mimic a button or foot detail. -
Slow drying:
Cover the piece loosely with plastic and let it dry very slowly to prevent cracking at the seams. Once bone dry, bisque fire the piece in the kiln.
Step 3: Glazing and Finishing
-
Base glazing:
Apply 2-3 coats of a deep teal glaze to the entire exterior. I prefer to brush this on for even coverage, but dipping works too. -
Adding the speckle:
To achieve the terrazzo look, load a stiff bristle brush with a contrasting glaze (like a lighter blue or white) or utilize a specialty speckled glaze. Flick the bristles to spatter small dots across the surface. -
Glaze firing:
Fire the piece again according to your clay and glaze specifications (usually Cone 5 or 6 for stoneware). -
Gold accents:
Once the piece is fired and cool, apply gold luster to the small button dot at the bottom and perhaps fleck a little onto the body if you want metallic sparkle. Fire a third time at a very low temperature (around Cone 018) to set the luster. -
Install the movement:
Insert the clock mechanism into the central hole. Securing it might require a bit of glue or silicone if the fit is loose. -
Attach the hands:
Finally, press the gold hour, minute, and second hands onto the movement shaft, ensuring they don’t touch each other as they rotate.
Weighted Base
Before attaching the bottom slab, place a small coil of clay inside along the bottom seam. This adds weight to the base preventing tipping.
Now you have a timeless, handcrafted piece of functional art ready to keep you on schedule
Little Cottage-Shaped Ceramic Clock
Bring a touch of fairy-tale charm to your mantelpiece with this delightful hand-built ceramic clock shaped like a cozy cottage. Featuring raised relief windows, a scalloped roof, and sweet floral details, this functional piece of art is glazed in a soft blush pink that highlights every handcrafted imperfection.
Step-by-Step
Materials
- Light-colored stoneware clay or earthenware
- Rolling pin and guide strips (approx. 1/4 inch thickness)
- Fettling knife or craft knife
- Needle tool
- Slip and scoring tool (serrated rib)
- Paper template (house front/back, sides, roof panels)
- Clear or light pink transparent glaze
- Underglaze pencil or fine brush (black) for numbers
- Quartz clock movement kit with hands
- Drill bit (sized for clock shaft)
Step 1: Slab Building the Structure
-
Prepare your templates:
Sketch your cottage shape on cardstock first. You will need a tall pentagon for the front and back, two rectangles for the sides, a rectangular base, and two rectangular panels for the roof that are slightly wider than the house structure. -
Roll the slabs:
Roll out your clay into a smooth, even slab about 1/4 inch thick. Compress the clay with a rib on both sides to align the particles and prevent warping later. -
Cut the components:
Place your templates on the leather-hard slab and trace around them with a needle tool before cutting cleanly with your fettling knife. Save the excess clay for the decorative elements. -
Dry to leather hard:
Let these flat pieces sit until they are ‘leather hard’—stiff enough to hold their shape upright but still soft enough to join. I usually let them sit for a few hours sandwiched between drywall boards. -
Bevel the edges:
Cut 45-degree angles (miters) on the vertical edges of the walls where they will meet. This creates a stronger, cleaner corner joint than a butt joint. -
Assemble the walls:
Score the beveled edges aggressively and apply slip. Press the walls together firmly to create the rectangular box shape, reinforcing the inside seams with a thin coil of clay smoothed down. -
Attach the roof:
Score and slip the top angled edges of the front and back walls. Attach your two roof panels so they meet at a peak, allowing for a slight overhang on the sides. -
Add the base:
Attach the assembled house to the slightly larger rectangular base slab using the score-and-slip method. This gives the clock stability and a finished look.
Warping Walls?
If walls bow inward while drying, stuff the house gently with crumpled newspaper or plastic bags to support the structure until it stiffens completely.
Step 2: Adding Details & The Clock
-
Create the roof tiles:
Roll a thin snakes of clay and flatten them slightly. Drape them in scalloped lines across the roof panels, overlapping each row slightly starting from the bottom edge up to the peak. -
Form the windows and door:
Roll thin coils of clay to outline the arched windows and the main door. Carefully shape the inner muntins (window panes) and attach them to the house face using a tiny amount of slip. -
Sculpt small embellishments:
Press tiny balls of clay to form the flower designs on the side walls and near the base. Use a needle tool to impress centers into the flowers and a wheel shape for the attic window. -
Drill the center hole:
Locate the exact center of the house face where the hands will spin. Carefully drill a hole that matches the diameter of your clock movement shaft. Test the fit gently, but remove the mechanism before firing. -
Dry slowly:
Tent the entire piece loosely in plastic to dry very slowly over several days. This is crucial to prevent the seams from cracking as the clay shrinks.
Step 3: Finishing Touches
-
Bisque fire:
Once bone dry, fire the piece to bisque temperature (usually cone 04) to prepare it for glazing. -
Apply the numbers:
Using a black underglaze pencil or a very fine brush with black underglaze, carefully write the numbers 1 through 12 in a circle around the center hole. You can use a compass to lightly mark the circle first. -
Glaze application:
Dip or brush the entire piece with a transparent or semi-opaque light pink glaze. Ensure the glaze isn’t too thick in the textured areas so the relief details remain crisp. -
Final firing:
Fire the piece again to your clay’s maturity temperature (e.g., cone 5 or 6 for stoneware). -
Install the clock:
Insert the clock movement from the back (through the open bottom or a designated access hole in the back wall) and secure the washer and nut on the front. Press the hour and minute hands onto the shaft.
Make it Shine
Add 22k gold luster to the clock numbers and window frames for a luxe touch. This requires a third, low-temperature firing after the glaze firing.
Once the hands are ticking, you’ll have a timeless keepsake that adds handmade warmth to any room
Seascape Relief Clock With Waves and Boats
Capture the calm of the ocean with this beautifully textured ceramic clock featuring rolling waves and a solitary sailboat. The mix of raw clay texture and glossy teal glazes creates a stunning tactile piece that brings a coastal breeze into any room.
Step-by-Step Tutorial
Materials
- White stoneware clay slab (approx. 1/4 inch thick)
- Round slump mold or circular template (10-12 inches)
- Needle tool and fettling knife
- Carving tools (loop tools and modeling tools)
- Slip and scoring tool
- Stamps or number cutters (serif font style)
- Underglaze (Teal, Dark Green, Gold/Ochre)
- Clear transparent glaze
- Sponge and water
- Clock mechanism kit with brass hands
- Rolling pin and canvas mat
Step 1: Forming the Base
-
Prepare the slab:
Roll out your white stoneware clay to a uniform 1/4 inch thickness on a canvas mat to prevent sticking. Use a rib tool to smooth the surface, compressing the clay particles to prevent future warping. -
Cut the circle:
Place your circular template or bowl over the slab and cut around it using a needle tool. Ensure the edges are clean and smooth with a damp sponge. -
Create the center hole:
Find the exact center of your circle and punch a hole large enough for your clock mechanism’s shaft to fit through. Remember that clay shrinks, so make the hole slightly larger than the shaft.
Fixing Warp
If the clay starts to warp while drying, place a wooden board and a light weight (like a bag of rice) on top of the rim while it’s leather-hard to gently press it back to flat.
Step 2: Sculpting the Seascape
-
Draft the horizon:
Lightly sketch a curved horizon line across the lower third of the clock face using a needle tool. This will separate the sky from the sea. -
Build the waves:
Roll thin coils of clay and flatten them slightly. Attach these to the bottom section using the slip and score method causing them to overlap like rolling waves. -
Define wave texture:
Use a modeling tool to press definition into the applied clay waves, creating ridges and valleys that mimic the movement of water. -
Texture the sky:
In the upper ‘sky’ section, use a carving tool to gently gouge swirling patterns into the raw clay. I like to keep these loose and flowing to represent wind or stylized clouds. -
Add surface details:
Use a small, round tool to press indentations around the outer rim for the minute markers.
Step 3: Adding Features
-
Create the sailboat:
Cut a small triangle and a curved hull shape from a scrap piece of clay slab. Bevel the edges slightly for a 3D effect. -
Attach the boat:
Score and slip the boat onto the horizon collision line, tilting it slightly as if it is riding a wave. -
Make the numbers:
Roll out a very thin slab and use number cutters or a scalpel to cut out numbers 1 through 12. Alternatively, you can hand-model these for a more organic look. -
Attach the numbers:
Carefully score and slip each number into its correct position. Use a clock template to ensure accurate spacing, placing the numbers over the textured background. -
Slow drying:
Cover the piece loosely with plastic and let it dry slowly to the bone-dry stage to prevent warping. Once dry, bisque fire the piece.
Glow Up
For a magical night-time effect, mix a small amount of glow-in-the-dark powder into the clear glaze used on the numbers or the crests of the waves.
Step 4: Glazing and Assembly
-
Applying underglaze:
Apply a teal underglaze to the wave section. Wipe back the high points with a damp sponge so the color remains mostly in the recesses, highlighting the texture. -
Detailing the numbers:
Carefully paint the raised numbers with the teal underglaze to match the ocean. Use a steady hand and a fine brush. -
Painting the boat:
Use a touch of gold or ochre underglaze for the boat’s sails and a dark brown for the hull to make it pop against the white clay. -
Glaze firing:
Apply a clear glaze over the entire face of the clock to seal it and give it a glossy finish, or leave the sky matte for contrast. Fire to the clay body’s maturity temperature. -
Install mechanism:
Once the piece is fired and cool, insert the clock mechanism from the back. Secure it with the washer and nut provided in the kit. -
Attach hands:
Press the brass hour and minute hands onto the shaft. Add a second hand if your kit includes one, and insert a battery to start time.
Hang your handcrafted timekeeper and enjoy the soothing coastal vibes it brings to your space
Pendulum-Style Clock With a Ceramic Weight
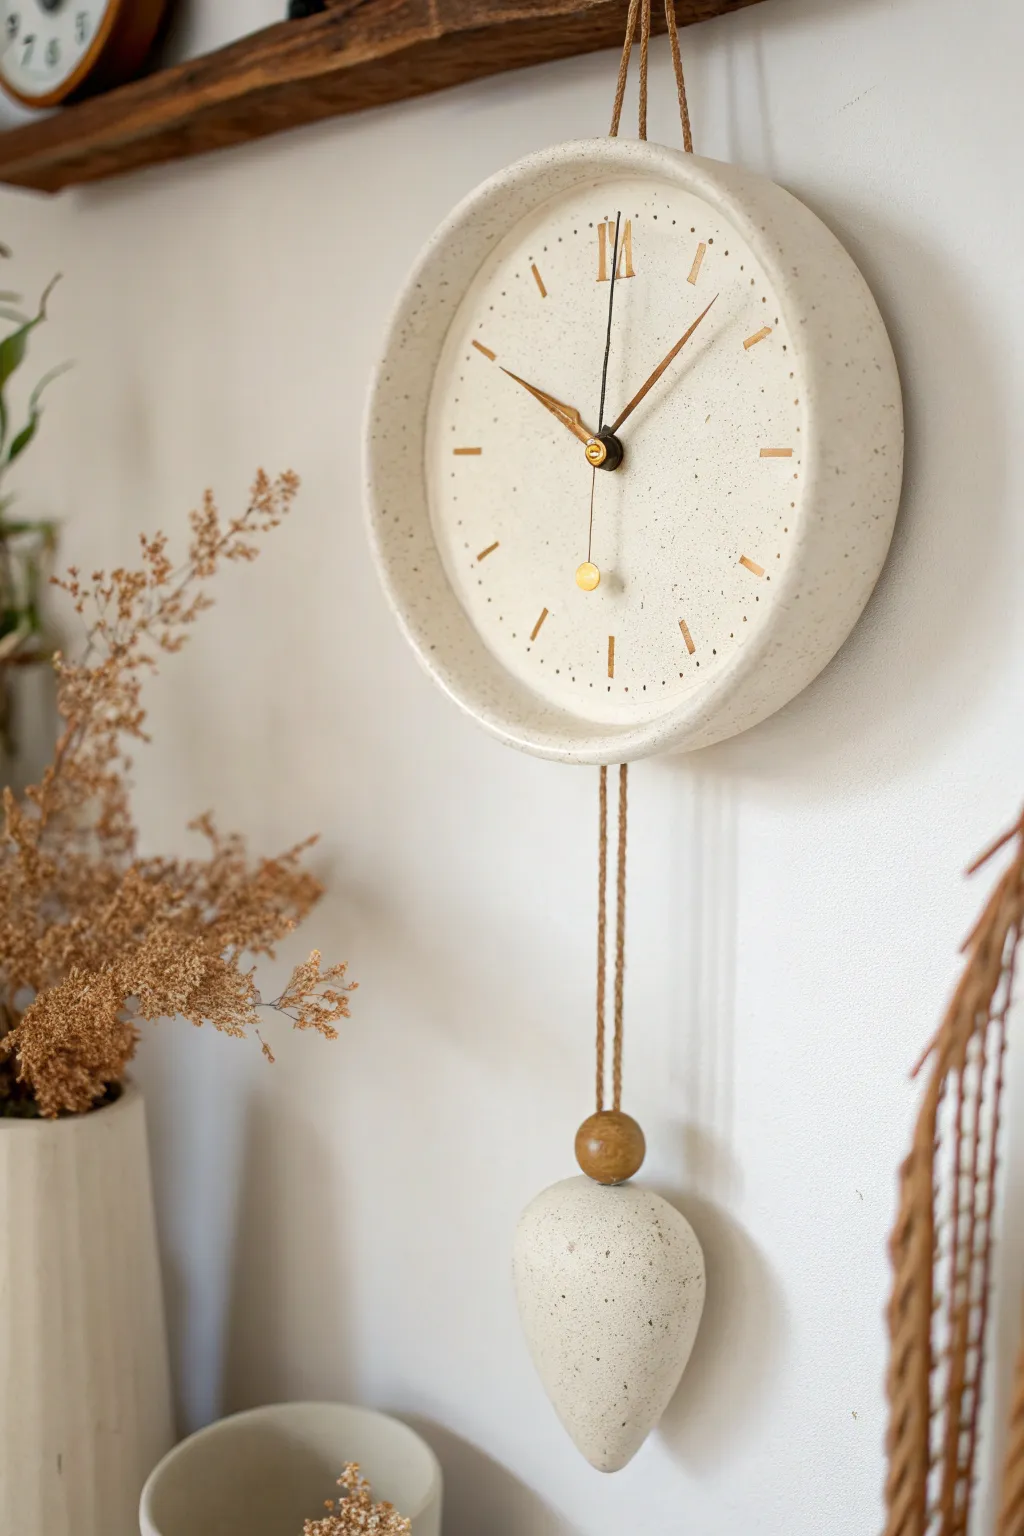
Bring a touch of organic minimalism to your wall with this handcrafted ceramic clock, featuring a soothing speckled glaze and a unique hanging pendulum weight. This project combines simple slab-building techniques with precise finishing to create a functional piece of art that keeps perfect time.
Step-by-Step Guide
Materials
- Speckled stoneware clay (white or cream)
- Rolling pin and guide strips (approx. 1/4 inch)
- Round slump mold or a large bowl
- Clock mechanism kit with pendulum attachment
- Gold leaf or metallic gold acrylic paint
- Fine-grit sandpaper
- Needle tool
- Sponge
- Clear matte glaze
- Jute twine or leather cord
- Wooden bead (approx. 1 inch)
- Small drill bit for ceramics (if firing without hole)
Step 1: Forming the Clock Face
-
Preparation:
Begin by wedging your speckled stoneware clay thoroughly to remove any air bubbles. This is crucial for a flat clock face that won’t warp in the kiln. -
Rolling the slab:
Roll out a slab of clay using guide strips to ensure an even thickness of about 1/4 inch. If you want the plate-like rim shown in the image, aim for a diameter slightly larger than your intended final size to account for shrinkage. -
Creating the rim:
Drape your slab over a shallow slump mold or a large upside-down bowl to create the gentle curve and raised rim. Gently press the clay to conform to the shape, smoothing out any texture from the canvas. -
Refining the edge:
Trim the excess clay around the rim using a needle tool for a clean, perfect circle. A potter’s wheel can be helpful here if you have one, but a steady hand works just as well. -
The center hole:
Find the exact center of your circle and punch a hole large enough for the clock mechanism’s shaft to fit through. Test the size against your mechanism, as clay shrinks during firing.
Warp prevention
To keep the clock face perfectly flat during firing, dry it slowly between two pieces of drywall board. This sandwiches the clay and prevents curling edges.
Step 2: Creating the Weight
-
Shaping the teardrop:
Using a small ball of the same clay, hand-model a teardrop or pear shape for the pendulum weight. Keep it solid but not too heavy, or hollow it out slightly if it feels too dense. -
Adding the attachment point:
Pierce a horizontal hole through the top of the weight so you can thread your cord through later. Smooth the edges of the hole so it doesn’t fray your twine.
Step 3: Detailing and Firing
-
Drying:
Allow both the clock face and the weight to dry slowly under plastic to prevent warping. Once leather hard, you can sponge the edges smooth. -
Marking the hours:
Before the clay is bone dry, lightly impress your hour markers. You can use a small rectangular tool to stamp the notches for the hours and the Roman numeral XII. -
Bisque firing:
Fire the pieces to bisque temperature according to your clay’s instructions. -
Glazing:
Apply a clear matte glaze to enhance the natural speckle of the clay without adding shine. Wipe the foot of the weight and the back of the clock clean. -
Glaze firing:
Fire the pieces a second time for the glaze setting. Ensure the clock face is supported perfectly flat on the kiln shelf.
Level Up: Texture Play
Instead of a smooth finish, try gently pressing dried flowers or heavy linen fabric into the wet clay slab for a subtle, fossil-like texture before firing.
Step 4: Assembly
-
Adding the gold:
Once fired and cooled, use a fine brush to paint the indented hour markers and numerals with liquid gold leaf or high-quality metallic paint. I find that a steady hand and a size 0 brush work best here. -
Installing the mechanism:
Insert the clock movement from the back. Place the washer and nut on the front side and tighten gently. Attach the hour and minute hands carefully. -
Preparing the pendulum cord:
The image shows a clever faux-pendulum hack. Instead of a swinging metal rod, cut two lengths of jute twine. -
Threading the weight:
Thread the twine through the ceramic weight and the wooden bead. Knot it securely or glue the bead in place just above the weight. -
Final attachment:
Attach the top of the twine cords to the swinging arm of your pendulum mechanism on the back of the clock. When the mechanism swings, the cords will move the ceramic weight gently back and forth.
Hang your new timepiece and enjoy the rhythmic, quiet beauty it adds to your space
Sculptural Animal-Inspired Table Clock
Bring a touch of playful charm to your mantelpiece with this sculpted ceramic bluebird clock. Featuring a glossy mottled blue glaze, gold luster accents, and a custom-fitted quartz movement, this functional sculpture is as timeless as it is adorable.
How-To Guide
Materials
- Stoneware clay (medium texture)
- Pottery tools (needle tool, rib tool, modeling tool)
- Bisque mold or newspaper for internal support
- Rolling pin and canvas
- Circle cutter (sized to your clock insert)
- Quartz clock movement kit (hands and mechanism)
- Glossy cobalt blue glaze
- Cream or off-white glaze
- Gold luster (low-fire overglaze)
- Fine detail brush and fan brush
- Sponge and water
- Sandpaper
Step 1: Sculpting the Body
-
Prepare the Clay Form:
Start by wedging a softball-sized amount of stoneware clay to remove air bubbles. Shape it into a smooth, elongated teardrop shape to form the bird’s body. -
Hollow the Form:
If sculpting solid, let the clay firm up to leather-hard, then cut it in half horizontally. Scoop out the insides to a uniform 1/4 inch thickness, ensuring the walls are even. Score and slip the halves back together securely. -
Refine the Silhouette:
Smooth over the join line with a rib tool. Gently pull upwards at the narrow end to form the tail feather area, and curve the top to suggest the head. -
Add Beak and Feet:
Attach a small cone of clay for the beak using slip. For the feet, add two small, flattened triangle slabs at the base to stabilize the bird so it sits flat without rolling.
Step 2: Creating the Clock Face
-
Carve the Clock Well:
Determine the placement of the clock on the bird’s side. Using a circle cutter slightly larger than your clock mechanism, mark a circle. Carve a recessed area here, creating a flat internal wall for the clock face to rest against. -
Define the Features:
Use a modeling tool to carve deep outlines for the wings on the side of the body. Incise leaf-like feather patterns inside the wing shape. -
Drill the Center Hole:
Find the exact center of your recessed clock circle and punch a hole using a tool that matches the diameter of your clock movement’s shaft. -
Clean and Dry:
Smooth all sharp edges with a damp sponge. Allow the bird to dry slowly under plastic for a few days before bisque firing to Cone 04 (or your clay’s specification).
Uneven Glaze Lines?
If your blue glaze drips into the cream area, use a wax resist over the cream glaze before applying the blue. This creates a barrier and ensures a clean, professional line.
Step 3: Glazing and Finishing
-
Base Glazing:
Once bisqued, wipe the piece down. Brush three coats of cream glaze onto the bird’s belly and the recessed clock face circle. Let each coat dry. -
Apply the Blue:
For the upper body and wings, apply a glossy cobalt blue glaze. Be careful near the belly line; I find using a steady hand and a flat brush helps create a crisp separation between the blue and cream sections. -
Detail the Beak and Eyes:
Paint the beak with a dark brown or black underglaze or glaze. Dot the eyes with black glaze. -
Fire the Glaze:
Fire the piece to the maturity temperature of your glaze (typically Cone 5 or 6 for stoneware).
Level Up: Texture
Add real texture to the cream belly by gently pressing a piece of coarse sandpaper or a textured sponge into the raw clay before firing for a ‘feathered’ look.
Step 4: Gold Luster and Assembly
-
Apply Gold Accents:
Using a dedicated brush, carefully apply gold luster to the wing carvings, the 12 hour markers on the clock face, and add small polka dots on the cream belly. -
Luster Firing:
Fire the piece one last time to Cone 018 (or per luster instructions) to set the gold. Ensure plenty of ventilation during this firing. -
Install Mechanism:
Insert the clock movement from the back (through the hollow body or a dedicated access hole if you made one). Secure it with the washer and nut. -
Attach Hands:
Press the hour, minute, and second hands onto the shaft. Make sure they clear the recessed edges of the clock face without rubbing.
Set the time and enjoy the friendly ticking of your new handcrafted companion