When I’m craving something satisfying but still totally doable, I reach for clay relief tiles—flat slabs that turn into tiny sculpted scenes with real shadow and depth. These ideas will help you play with low relief and high relief by layering, carving, and building up details that feel amazing under your fingertips.
Layered Flower Bloom Tile
Capture the timeless elegance of architectural stone carving with this detailed clay relief project. This square tile features a radiating, multi-layered bloom that sits beautifully as a standalone art piece or part of a larger mosaic installation.
Step-by-Step
Materials
- White or beige air-dry clay (or polymer clay)
- Square tile cutter or ruler and knife
- Rolling pin
- Two 1/4 inch wooden slats (for thickness guides)
- Loop carving tools
- Needle tool
- Small ball stylus tool
- Sponge and water
- Canvas or wooden board (work surface)
- Sandpaper (fine grit)
Step 1: Base Preparation
-
Prepare the slab:
Begin by wedging your clay to remove air bubbles. Place your clay between two 1/4 inch wooden slats and roll it out with a rolling pin to create a perfectly even slab. -
Cut the square:
Use a square cutter or measure a flawless square with a ruler and knife. A 6×6 inch size works well for this level of detail. Smooth the cut edges with a damp finger. -
Add the border detail:
Using a dull knife or a sculpting tool, gently press a series of small, angled dashes around the perimeter to create a decorative stitched-look border.
Step 2: Building the Flower
-
Draft the design:
Lightly etch a circle in the center of the tile with a needle tool to guide your flower placement. Divide this circle into equal segments to help with symmetry. -
Form the outer petals:
Roll thin coils of clay and flatten them into teardrop shapes. Attach these to the tile using the score and slip method (scratch both surfaces and add water/slurry) to form the widest, bottom layer of petals. -
Refine the outer layer:
Use a modeling tool to flatten these petals onto the background while keeping their edges slightly raised. Carve gentle radiating lines into each petal for texture. -
Create the inner petals:
Shape a second set of slightly smaller, thicker teardrop petals. Arrange these in an overlapping circle on top of the first layer, staggering them so they sit between the outer petals. -
Sculpt the definition:
With a fine loop tool, carve a central vein down the middle of each inner petal. Smooth the clay outwards from this vein to create a concave, cupped shape for each petal. -
Add the center:
Roll a ball of clay, flatten it into a thick disc, and adhere it securely to the very center of the flower. -
Detail the center:
Using your needle tool or a very small ball stylus, press tiny holes repeatedly into the center disc to mimic pollen textures.
Clean Cuts Pro Tip
Wipe your carving tools with a damp sponge between every few strokes. Clay build-up on the tool causes drag marks and ruins the smooth petal finish.
Step 3: Refining and Finishing
-
Clean the petals:
Use a small, slightly damp sponge to wipe away any rough crumbs of clay. Pay attention to the valleys between petals where debris collects. -
Sharpen the edges:
I like to go back in with a knife tool once the clay has stiffened slightly to re-define the separation between the petal layers, ensuring crisp shadows. -
Smooth the surface:
Gently burnish the smooth parts of the petals with the back of a spoon or a smooth stone to compress the clay and give it a slight sheen. -
Dry slowly:
Place a light plastic sheet loosely over the tile to let it dry slowly over 2-3 days. This prevents the corners from curling up. -
Sand and finish:
Once fully dry, use fine-grit sandpaper to smooth any sharp burrs on the edges. You can leave it raw for a stone look or apply a matte varnish.
Antique Stone Level Up
After baking or drying, apply a watered-down brown acrylic wash. Wipe it off immediately with a rag so the dark color stays only in the crevices.
Display your finished relief on a small easel or mount it in a shadow box to emphasize the depth of your carving


Leaf Vein Botanical Tile
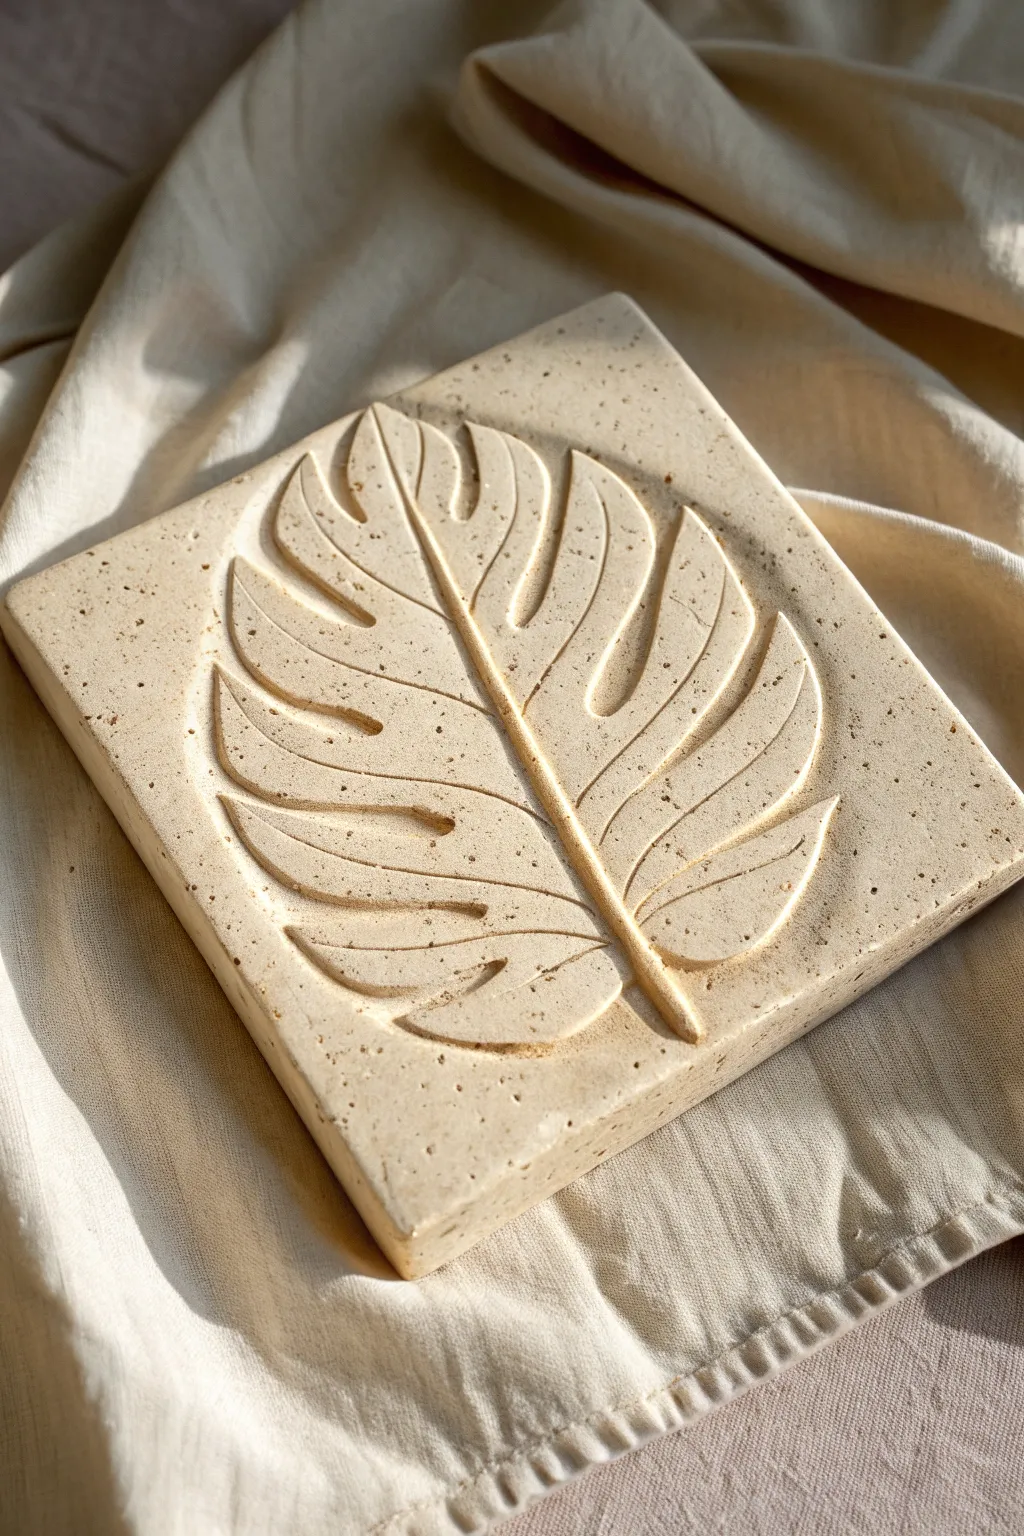
Capture the organic elegance of a Monstera leaf with this minimalist clay relief tile. The speckled, sandy texture combined with clean, deep carving lines creates a piece that feels both modern and ancient.
Step-by-Step Tutorial
Materials
- White or buff speckled stoneware clay (with grog)
- Rolling pin
- Two wooden guide strips (approx. 1.5 cm thick)
- Square tile cutter or ruler and knife
- Pin tool or needle tool
- Loop carving tools (various sizes)
- Small ribbon tool
- Soft sponge
- Pencil and paper (for template)
- Wooden board or ware board
- Plastic wrap (optional)
Step 1: Preparation and Slab Rolling
-
Wedge the clay:
Begin by wedging your speckled stoneware clay thoroughly to remove any air bubbles and ensure an even consistency. The speckles (grog) in this specific clay body are key to the final stone-like look. -
Set up guides:
Place your two wooden guide strips on either side of your workspace. These will ensure your tile has a uniform thickness, which is crucial for preventing warping. -
Roll the slab:
Roll your clay out between the guides until the rolling pin rests flat on the wood strips. Aim for a substantial thickness, around 1.5 cm, to allow deep carving without piercing through. -
Cut the square:
Using a square tile cutter or a ruler and sharp knife, cut a precise square from the slab. Clean up the edges with a slightly damp finger to smooth any cutting burrs.
Troubleshooting: Warping
If corners lift while drying, flip the tile gently every few hours and weigh down the corners with small sandbags or extra bits of clay.
Step 2: Design Transfer
-
Sketch the template:
Draw a large, stylized Monstera leaf on a piece of paper cut to the same size as your tile. Focus on symmetry and bold, simple veins. -
Position the design:
Lay the paper gently onto the fresh clay slab. Center the stem and ensure the leaf tips extend nicely toward the corners. -
Trace the outline:
Using a dull pencil or a stylus, trace over your drawing with gentle pressure. You want to leave a faint indentation on the clay surface below to guide your carving. -
Check the impression:
Peel back a corner to ensure your lines are visible. Once confirmed, remove the paper entirely.
Level Up: Oxide Wash
After bisque firing, apply a diluted iron oxide wash and wipe it back. The pigment will stick in the carving lines, enhancing depth and contrast.
Step 3: Carving the Relief
-
Define the perimeter:
Use a needle tool to lightly deepen the outline of the leaf. This establishes the boundary between the raised leaf and the background. -
Carve the main stem:
Select a medium loop tool. Carve out a V-shaped or U-shaped channel down the center to create the prominent central vein. Dig deep enough to create shadow, but stay well above the bottom of the tile. -
Lower the background:
This is the most critical step. Using a larger loop tool, shave away the clay *outside* the leaf shape. You want the leaf to stand proud, so you are essentially lowering the ‘negative space’ slightly. -
Sculpt the side veins:
Switch to a smaller ribbon tool to carve the veins radiating from the center stem. I prefer to make these deep and sharp to catch the light. -
Refine the fenestrations:
Carve the characteristic splits in the Monstera leaf. Ensure the edges of these cutouts are sharp and slope downwards slightly.
Step 4: Finishing Touches
-
Smooth the surface:
Use a very slightly damp sponge to gently wipe the high points of the leaf. This brings the grog (speckles) to the surface and softens any tool marks. -
Clean the recesses:
Use a dry, soft brush to sweep away any clay crumbs from the deep carved lines. -
Slow drying:
Place the tile on a wooden board. Cover it loosely with plastic wrap for the first 24 hours to ensure even drying and prevent corners from lifting.
Once fired, display your botanical relief on a shelf or mount it as part of a larger wall installation


Twisting Vine Border Frame
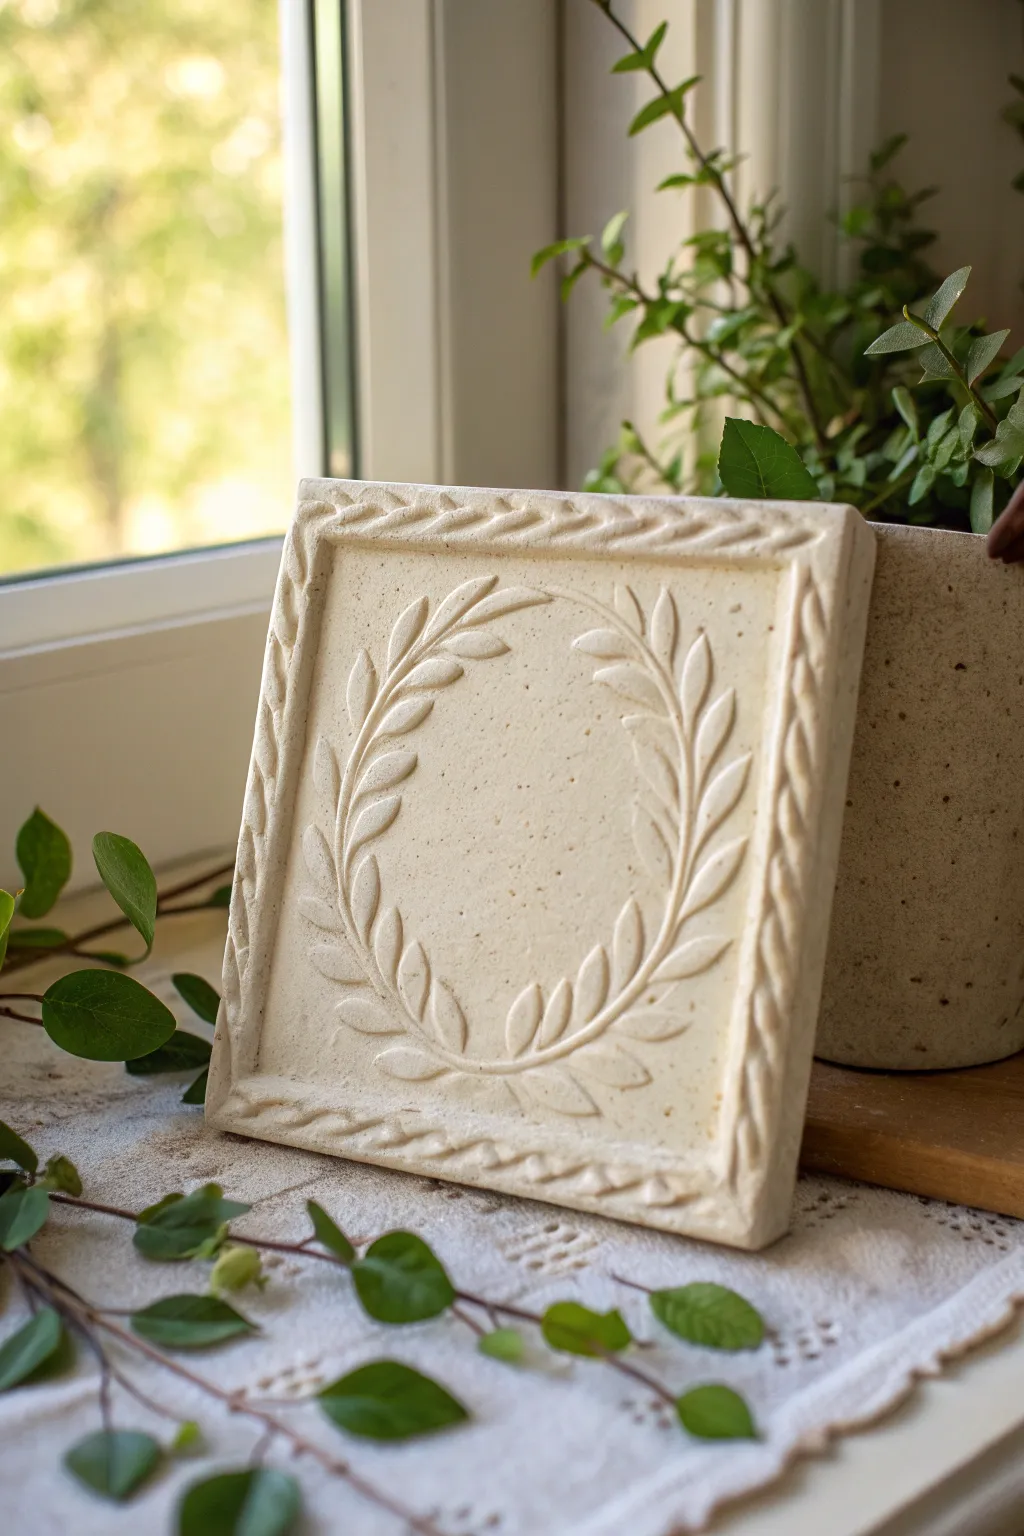
This elegant square tile features a timeless laurel wreath motif framed by a classic twisted rope border. The subtle, cream-colored finish and delicate organic details give it the look of an ancient architectural artifact.
Detailed Instructions
Materials
- Air-dry clay (white or cream) or polymer clay
- Rolling pin
- Square cookie cutter or ruler and craft knife
- Canvas mat or non-stick work surface
- Needle tool or toothpick
- Small ball stylus tool
- Rubber-tipped clay shapers (optional but helpful)
- Small bowl of water (for smoothing)
- Fine-grit sandpaper
- Matte cream acrylic paint (optional, if clay isn’t already colored)
Step 1: Base Preparation
-
Roll the Slab:
Begin by conditioning your clay until it is pliable and smooth. Roll it out on your canvas mat to an even thickness of approximately 1/4 to 3/8 inch. Ensure the surface is perfectly flat without air bubbles. -
Cut the Square:
Using a square cutter or a ruler and craft knife, cut out a perfect square. A 4×4 inch or 5×5 inch square works well for this level of detail. Smooth the cut edges with a slightly damp finger to remove any sharpness. -
Create the Border Coil:
Roll out a separate long, thin snake of clay, keeping the diameter consistent—roughly 1/8 inch thick. It needs to be long enough to wrap around the entire perimeter of your square. -
Twist the Rope:
Roll a second identical snake. Lay them side-by-side and gently twist them together to create a tight rope effect. Alternatively, for the specific look in the photo, you can use a single snake and use a modeling tool to impress diagonal notches along it, mimicking a twist. -
Attach the Frame:
Score the outer edges of your tile base and brush on a tiny bit of water or slip. Press your rope border firmly onto the edges. Miter the corners at a 45-degree angle for a sharp, professional frame join.
Fixing Cracks
If hairline cracks appear while drying, don’t panic. Mix a small amount of fresh clay with water to make a paste (slip) and fill the crack, then smooth.
Step 2: Sculpting the Wreath
-
Mark the Guide:
Lightly trace a circle in the center of the tile using a geometric compass or a round object as a guide. This line will help you keep the wreath symmetrical. -
Form the Stem:
Roll two very thin threads of clay. curve them along your guide circle to form the main stems of the wreath, leaving a small gap at the top and crossing them slightly at the bottom. -
Shape Leaves:
Roll tiny balls of clay, then flatten and pinch them into elongated teardrop shapes. You will need about 20-24 leaves total. -
Apply Lower Leaves:
Start applying leaves at the bottom center where the stems cross. Score the attachment point and press the leaf down gently. Angle them upward, following the curve of the stem. -
Layer Upwards:
Work your way up each side of the wreath, adhering leaves in pairs or alternating patterns. Slightly overlap the previous leaf’s stem with the tip of the new leaf for a natural flow. -
Detail the Veins:
Using a needle tool or a sharp craft knife, gently press a center vein into each leaf. Be careful not to slice all the way through; you just want a surface impression. -
Refine the Texture:
I find that using a rubber-tipped tool helps here to smooth the transition where the leaf attaches to the main stem, blending the clay so it looks like one continuous piece. -
Add Beading (Optional):
If you want extra detail, add tiny clay spheres between the leaves or at the top gap of the wreath.
Step 3: Finishing Touches
-
Texturize Background:
The background in the image has a subtle, porous stone texture. You can achieve this by gently tapping the empty negative space with a stiff stencil brush or a ball of aluminum foil. -
Final Smoothing:
Check the border and high points of the relief. Use a water-dampened brush to gently stroke the leaves and rope border, erasing any maker’s fingerprints. -
Dry:
Allow the tile to dry completely. For air-dry clay, this may take 24-48 hours. Flip it occasionally if possible to prevent warping. -
Sand and Paint:
Once bone dry, lightly sand any rough edges. If desired, paint with a creamy matte acrylic. For an aged look, you can apply a diluted brown wash and wipe it away, leaving color only in the crevices.
Antique Wash
Mix burnt umber paint with water (1:10 ratio). Brush over the dried tile and deeply into crevices, then immediately wipe high points with a rag for instant age.
Place your finished relief on a shelf or adhere a hook to the back for a charming wall accent


Daisy Field With Depth Layers
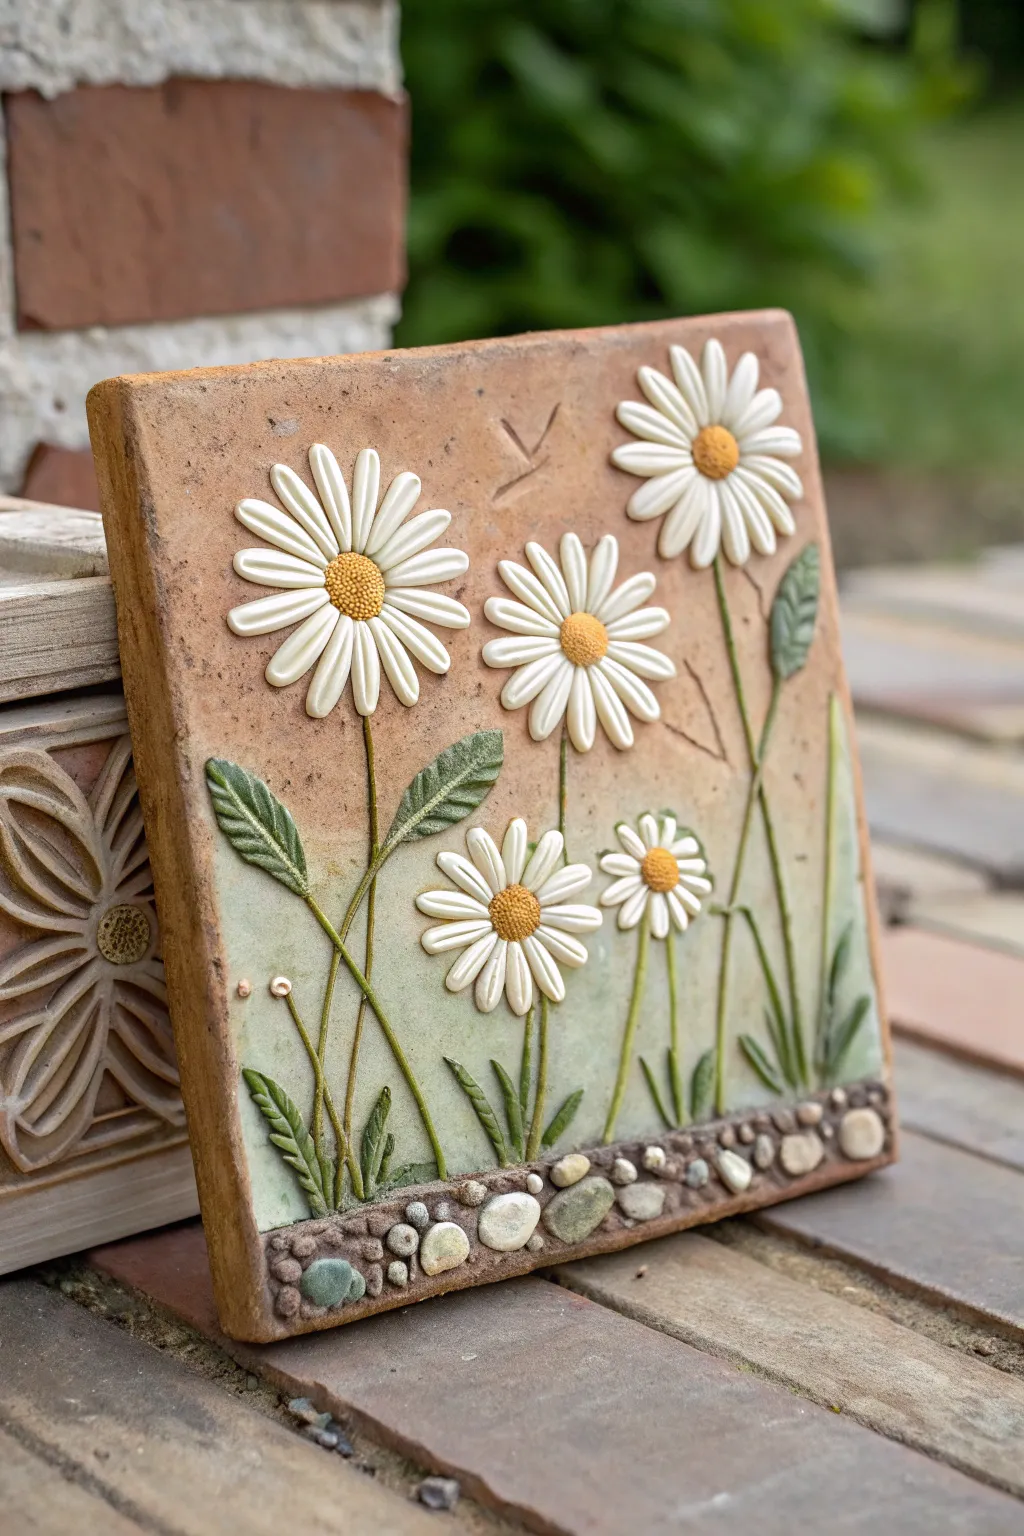
This charming garden-inspired relief tile captures the cheerful simplicity of daisies using layered clay techniques. By building up petals, stems, and a stony base on a terracotta slab, you’ll create a dimensional artwork that brings a permanent touch of spring to your space.
Step-by-Step
Materials
- Earthenware or stoneware clay (terracotta color)
- White clay slip or white underglaze/engobe
- Yellow underglaze (for centers)
- Green underglaze (for leaves/stems/background)
- Clay slab roller or rolling pin with guide sticks
- Needle tool and fettling knife
- Small loop tool for carving texture
- Slip and score tool (serrated rib or toothbrush)
- Small round paintbrush
- Sponge
Step 1: Base Preparation & Background
-
Roll the Slab:
Begin by rolling out a sturdy slab of terracotta clay, approximately 3/4-inch thick. Cut it into a precise square using a ruler and fettling knife. -
Smooth the Canvas:
Use a damp sponge or a soft rib to smooth out the surface of the tile, removing any canvas textures or imperfections. -
Create the Gradient:
Apply a wash of watered-down green underglaze to the bottom half of the tile, fading it upwards into the natural clay color to suggest a grassy field. -
Incise Guide Lines:
Lightly sketch the position of your five daisies with a needle tool. Place three large ones higher up and two smaller ones lower down.
Layering Pro-Tip
For better adhesion of the delicate petals, brush a tiny amount of vinegar onto the scored area instead of water. It acts as a stronger glue for small clay attachments.
Step 2: Sculpting the Daisies
-
Form Flower Centers:
Roll small balls of yellow-tinted clay (or plain clay you will paint later) and flatten them slightly onto your marked spots. Use a needle tool to stipple the surface for a pollen texture. -
Shape the Petals:
Roll small coils of white clay (or plain clay) and taper them at both ends. Flatten them gently to create elongated tear-drop shapes. -
Attach the Petals:
Score and slip the area around each flower center. Press the petals in a radial pattern, ensuring they overlap slightly for fullness. -
Refine Petal Texture:
Use a small modeling tool to press a central vein down the middle of each petal, giving them a realistic curve. -
Paint the Petals:
If you used plain clay for petals, carefully paint them with white underglaze now, covering the edges neatly.
Step 3: Adding Foliage & Foundation
-
Roll the Stems:
Roll very thin coils of clay for the stems. Attach them extending downward from the flower heads, allowing them to curve naturally. -
create Leaves:
Cut leaf shapes from a thin sheet of clay using a knife. Score the backs and attach them to the stems. -
Texture the Leaves:
Use your needle tool to impress vein patterns into the leaves. Paint the leaves and stems with a dark green underglaze. -
Build the Rock Bed:
Roll many small, irregular pebbles of clay. Attach them along the very bottom edge of the tile to create a ground line. -
Detail the Rocks:
Press some created pebbles deeply and others lightly to vary the depth. You can brush them with grey or brown washes for contrast.
Level Up: Grouted Look
After the final firing, rub a dark antique stain or wash over the entire piece and wipe it back. This accumulates in crevices, making the relief pop.
Step 4: Finishing Touches
-
Add Subtle Details:
Carve a small ‘V’ shape in the upper sky area to represent a distant bird, creating a sense of scale. -
Clean Up:
Wipe away any slip smudges with a clean, barely damp brush. -
Slow Drying:
Cover the tile loosely with plastic to dry slowly. I find this prevents the corners from curling up. -
Bisque Fire:
Once bone dry, bisque fire the tile according to your clay body’s specifications.
Display your finished relief on a plate stand or frame it for a rustic wall hanging

The Complete Guide to Pottery Troubleshooting
Uncover the most common ceramic mistakes—from cracking clay to failed glazes—and learn how to fix them fast.
Bee on Blossom Focal Tile
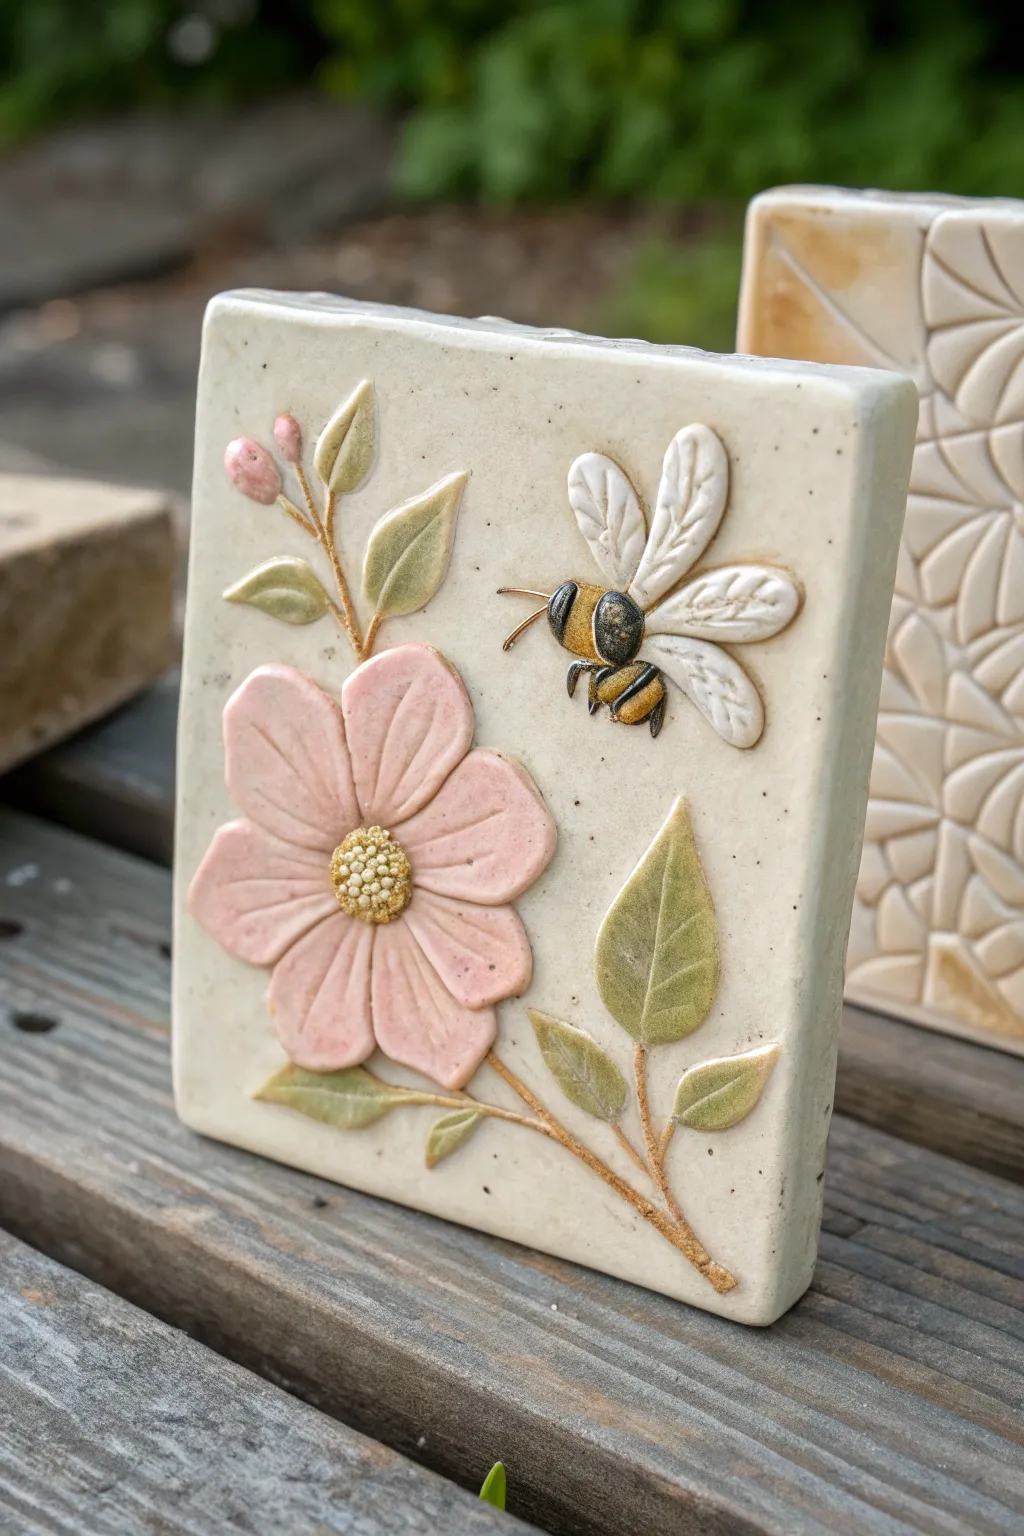
This charming ceramic relief captures the delicate interaction between a pollinator and a blooming wild rose. Using slab techniques and careful appliqué, you’ll create a dimensional piece with soft pastel glazes and subtle speckling that brings a garden vignette to life in clay.
How-To Guide
Materials
- Speckled cream stoneware clay
- Rolling pin with guide strips (approx. 1/2 inch)
- Needle tool or X-Acto knife
- Serrated rib or kidney scraper
- Clay slip (vinegar or water based)
- Small soft bristle brushes
- Underglazes: Pale pink, sage green, yellow, black, brown, white
- Modeling tools (ball styluses, wooden modeling tool)
- Clear matte or satin glaze
- Canvas work surface
Step 1: Preparing the Base Slab
-
Roll the slab:
Start by wedging your speckled stoneware clay thoroughly to remove air bubbles. Roll it out on your canvas to a uniform thickness of about 1/2 inch. This thickness is crucial to prevent warping during drying. -
Cut the tile shape:
Using a needle tool and a straight edge or a paper template, cut a clean rectangle, approximately 6×6 inches or your desired size. Smooth the cut edges with a damp sponge or your fingertip to remove sharp burrs. -
Refine the surface:
Use a soft rib to compress the surface of the tile. This aligns the clay particles and creates that smooth, professional finish you see in the background.
Warping Worries?
To keep the tile flat, dry it slowly between two pieces of drywall or wooden boards. Flip the tile daily during the drying process so both sides lose moisture evenly.
Step 2: Sculpting the Flora
-
Form the stem:
Roll very thin coils of clay for the main stem and branches. Score the tile surface lightly where the stem will go, apply slip, and press the coil down gently. Use a modeling tool to texture the bark slightly. -
Shape the petals:
Roll a small ball of clay and flatten it into a teardrop shape for each petal. You’ll need five for the main flower. I find pressing them slightly thinner at the edges gives them a more natural, delicate look. -
Attach the flower:
Score and slip the area at the end of the stem. Arrange the five petals in a circle, overlapping them slightly at the center. Press the center of the petals firmly to bond them to the tile. -
Add the flower center:
Roll a small sphere of clay and press it into the center of the petals. Using a needle tool or small ball stylus, stipple the texture extensively to resemble the flower’s stamen cluster. -
Create leaves and buds:
Cut small leaf shapes from a thin slab or hand-shape them. Score and slip them onto the branches. Use a knife tool to gently impress a central vein line. Add small round balls near the top left for the unopened buds.
Step 3: Adding the Bee
-
Body construction:
Form two small oval shapes—one slightly larger for the abdomen and a smaller one for the thorax/head. Attach these to the upper right quadrant of the tile using the score and slip method. -
Wing formation:
Create four teardrop shapes for wings (two large, two small). Flatten them significantly. Attach them to the thorax area. Use a needle tool to gently scratch vein lines into the wing surfaces. -
Legs and antennae:
Roll incredibly thin tiny coils for the legs and antennae. Carefully attach them, ensuring they look like they are interacting with the space. Be gentle, these are fragile.
Make It shine
Apply a tiny dab of luster gold overglaze to the bee’s stripes or the flower center after the final firing, then fire again at a very low temperature (Cone 018) for a metallic accent.
Step 4: Glazing and Finishing
-
Bisque firing:
Allow the tile to dry slowly under plastic to prevent warping. Once bone dry, bisque fire it according to your clay body’s specifications (usually Cone 04). -
Painting the flower:
Apply pale pink underglaze to the petals. For depth, you might wipe back a little pigment from the high points or add a second coat to the recesses. Paint the center yellow. -
Detailing the leaves:
Use a sage green underglaze for the leaves. If you want that realistic, slightly faded look, dilute the underglaze slightly with water so the clay’s speckles show through. -
Bringing the bee to life:
Paint the bee’s body with alternating stripes of yellow and black. Use a crisp white underglaze for the wings. A tiny dot of black defines the eye. -
Stem and wash:
Paint the stem with a reddish-brown underglaze. Ensure all white clay is covered on the relief elements, but leave the background raw clay untouched. -
Final glaze fire:
Coat the entire piece in a clear matte or satin glaze. This seals the work and makes the colors pop without adding distracting glare. Fire to the final temperature (likely Cone 5/6).
Display your finished tile on a small easel or mount it as a permanent backsplash feature to enjoy nature indoors
Dragonfly Over Rippled Water
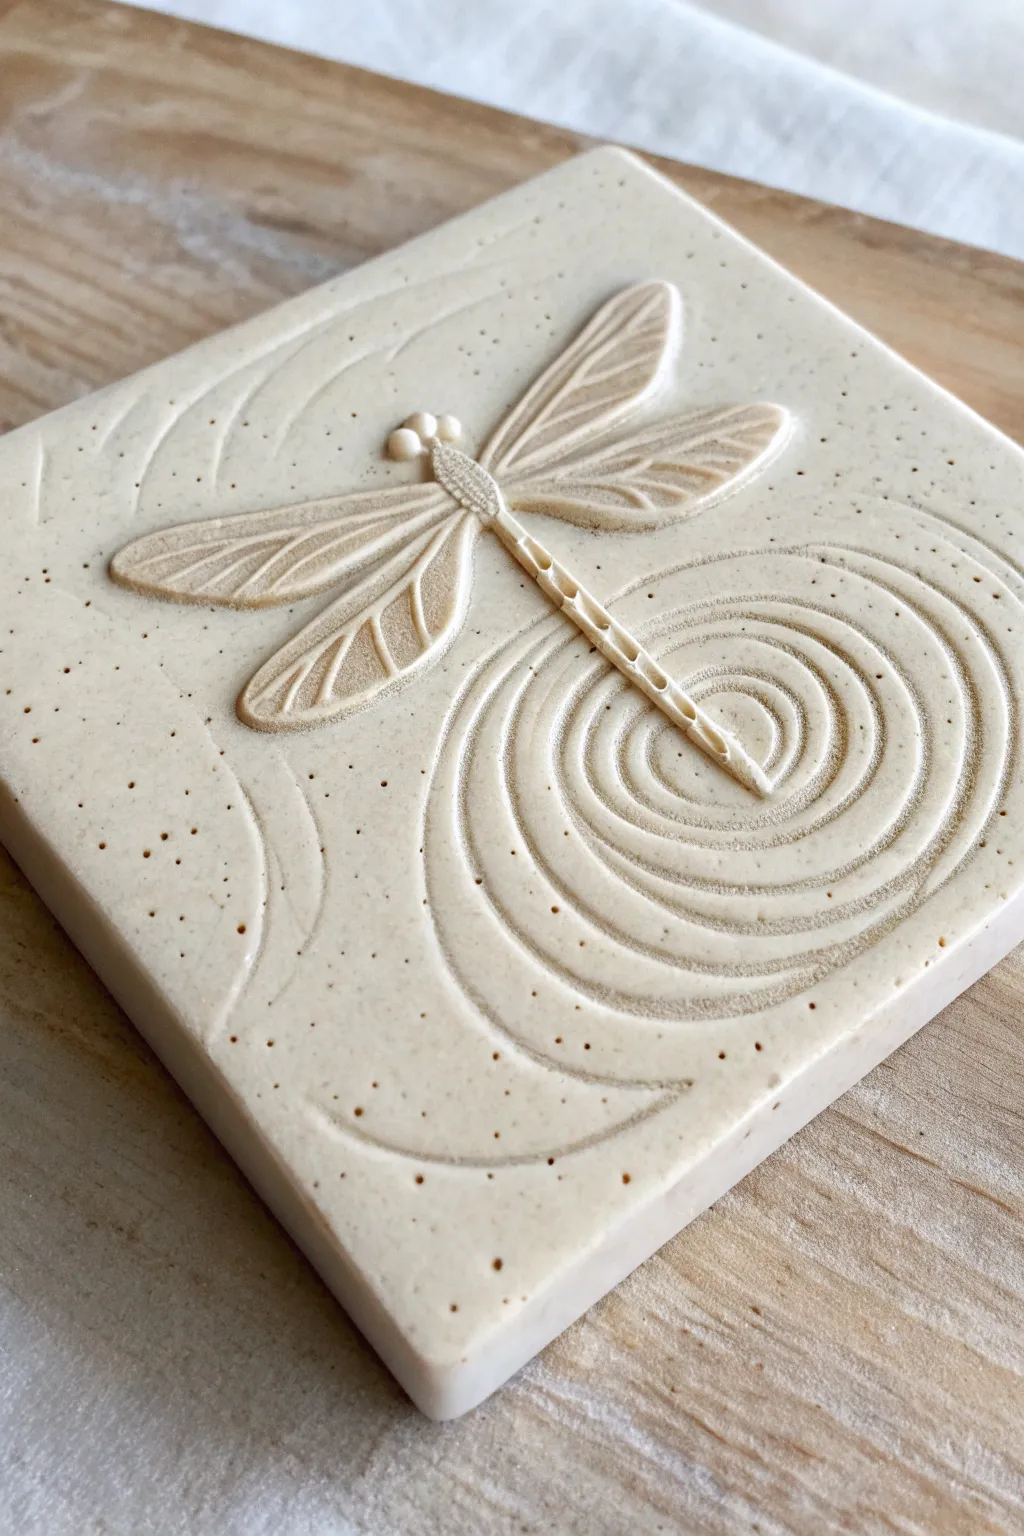
Capture the serenity of a dragonfly hovering over a pond with this elegant clay relief tile. Using speckled clay and precise carving tools, you’ll create a textured, meditative piece that celebrates clean lines and organic movement.
Step-by-Step
Materials
- Speckled cream stoneware clay (or polymer clay with faux stone effect)
- Square tile cutter or ruler and knife
- Rolling pin with guide rings (approx. 1/4 inch)
- Needle tool
- Small loop tool or carving gouge
- Rubber shaping tool (colour shaper)
- Sponge
- Canvas work surface
- Plastic wrap (optional)
Step 1: Preparation & Base
-
Prepare the Clay:
Begin by wedging your speckled clay thoroughly to remove any air bubbles. This ensures a uniform surface that won’t crack during firing or drying. -
Roll the Slab:
Roll out the clay on your canvas to a consistent thickness of about 1/4 to 3/8 inch. I find using guide rings on the rolling pin helps keep the tile perfectly level. -
Cut the Square:
Measure and cut a precise square for your tile base, roughly 4×4 or 6×6 inches depending on your preference. Smooth the cut edges gently with a damp fingertip to remove sharpness. -
Surface Smoothing:
Wipe the surface with a very lightly damp sponge or a rubber rib. You want a pristine, smooth canvas for carving, but be careful not to wash away the natural speckles of the clay.
Uneven Drying?
If your tile corners start lifting as it dries, place a small weight (like a bag of rice) gently in the center, or dry it slowly between two pieces of drywall.
Step 2: Carving the Dragonfly
-
Outline the Subject:
Using your needle tool, very faintly sketch the outline of the dragonfly in the upper center of the tile. Keep the lines barely visible so you can correct them easily. -
Define the Body:
Carve lightly around the dragonfly’s body using a small loop tool, removing a thin layer of the background clay to make the insect slightly raised. -
Sculpt the Head and Eyes:
Use a small ball tool or the tip of a wooden skewer to press two distinct round shapes for the eyes. Add a tiny texture patch between them for the head detail. -
Carve Wing Veins:
With a needle tool, incite the veins into the wings. Press gently to create grooves rather than cutting all the way through. The veins should radiate outward, mimicking the delicate structure of a real insect wing. -
Detail the Tail:
Press a series of small indentations down the length of the dragonfly’s tail using a blunt tool to create a segmented look. Alternatively, carve tiny notches along the sides.
Step 3: Creating the Ripples
-
Map the Spiral:
Lightly mark a centre point near the tail of the dragonfly. Sketch a loose, expanding spiral or concentric circles radiating from this point to represent water ripples. -
Carve the Grooves:
Using a U-shaped carving tool or loop tool, follow your spiral lines. Carve deep, confident grooves that widen slightly as they move further from the centre. -
Vary the Depth:
To create a sense of movement, vary the pressure on your carving tool. Make the ripples deeper on one side of the groove and shallower on the other to catch the light effectively. -
Connect the Elements:
Ensure the tail of the dragonfly appears to be interacting with the centre of the ripple. You might want to slightly depress the clay right where the tail touches the water. -
Texture the Edges:
For the outer ripples, you can let the lines fade out or break slightly, giving the impression of the water calming down towards the edges of the tile.
Make it Pop
After bisque firing, rub a dark oxide wash (like iron oxide) into the carved lines and wipe back the surface. This will darken the grooves and highlight the relief design.
Step 4: Refinement & Finish
-
Clean Up Crumbs:
Once carving is complete, use a soft, dry brush to sweep away any clay crumbs or ‘burrs’ created by the carving tools. -
Smooth Carved Lines:
Run a rubber shaping tool or a damp finger along the carved grooves of the ripples and the dragonfly outline to soften any harsh ridges. -
Enhance Speckles:
If smoothing has obscured the clay’s natural speckles, lightly wipe the surface with a barely damp sponge to reveal the texture again. -
Wait for Leather Hard:
Allow the tile to dry slowly to a leather-hard state. This is crucial to prevent warping. -
Final Surface Check:
Do one last inspection for sharp edges or blurred details before setting the piece aside for bone-dry drying and subsequent firing.
Once fired, this piece makes a beautiful coaster or a serene wall hanging for a quiet corner of your home


What Really Happens Inside the Kiln
Learn how time and temperature work together inside the kiln to transform clay into durable ceramic.
Garden Snail and Mushroom Tile
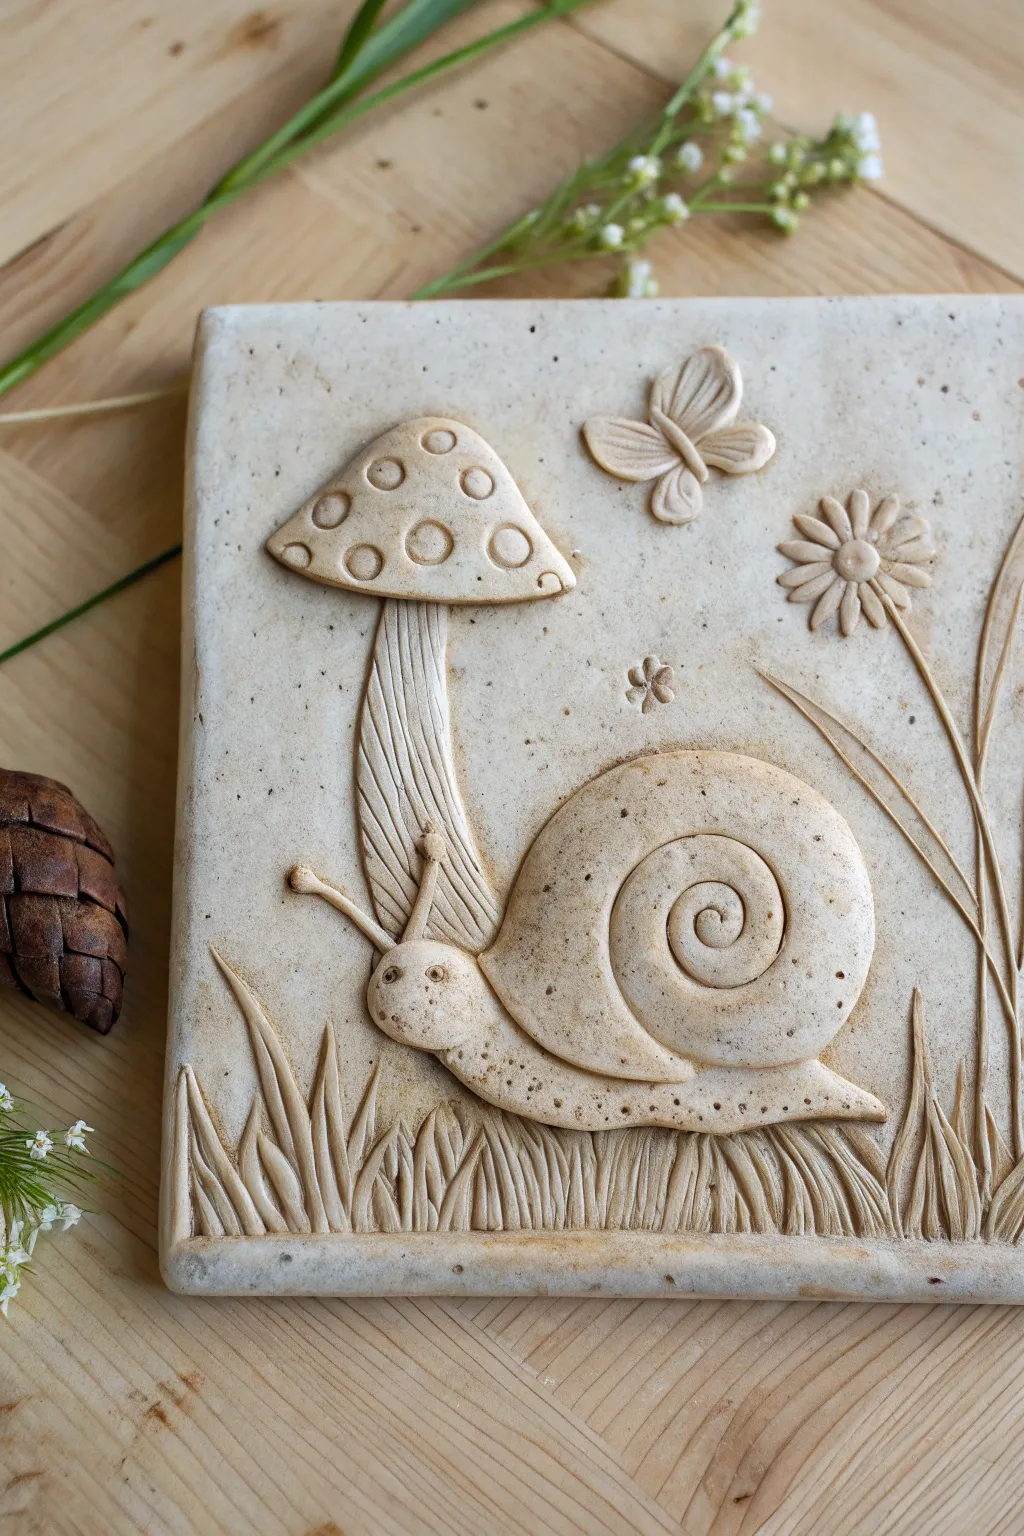
This charming ceramic tile project features a playful snail carrying a toadstool shell, surrounded by carved grass and a delicate butterfly. Utilizing simple slab-building and additive sculpting techniques, the finished piece has a lovely organic texture and warm, natural speckling.
How-To Guide
Materials
- Speckled stoneware clay (approximately 1-2 lbs)
- Rolling pin with guide strips (1/2 inch thickness)
- Canvas or heavy cloth (for rolling)
- Needle tool
- Loop tool or small carving gouge
- Rubber kidney rib
- Slip (clay slurry)
- Scoring tool or serrated kidney
- Wooden modeling tool
- Small ball stylus
- Square template (paper or flexible plastic)
- Fettling knife
Step 1: Preparing the Base
-
Roll out the slab:
Begin by wedging your clay to remove air bubbles. Roll it out on your canvas surface into a smooth, even slab about 1/2 inch thick using guide strips to ensure uniformity. -
Cut the tile shape:
Place your square template over the slab. Using a fettling knife, cut vertically around the template to create a clean square tile. -
Smooth the surface:
Use a rubber kidney rib to gently compress the clay surface, wiping away canvas textures and smoothing out edges. This compression helps prevent warping later. -
Round the edges:
Gently run a damp finger or sponge along the sharp cuts of the perimeter to soften them into a pleasing, slightly rounded border.
Warped Corners?
If the tile corners curl up during drying, weigh them down gently with small bean bags or sandbags. Drying slowly under plastic is the best prevention.
Step 2: Sculpting the Snail
-
Shape the body coil:
Roll a tapered coil of clay for the snail’s soft body. Flatten it slightly and curve it into a ‘U’ shape, placing it centrally on the lower half of your tile to check the scaling. -
Attach the body:
Remove the coil, score the tile surface and the back of the coil, apply slip, and press the body firmly into place. Blend the bottom edge of the snail body into the background tile with a wooden tool. -
Create the shell base:
Form a flat, round disc of clay. Score and slip it onto the snail body where the shell would sit, pressing down to secure it. -
Detail the spiral:
To make the spiral relief, roll a long, thin tapered coil. Starting from the center of the shell disc, spiral the coil outward. Blend the edges of the coil into the base disc so it looks like one solid carved piece rather than a prominent coil pot. -
Add the head and antennae:
Refine the front of the body coil into a rounded head. Roll two tiny, thin snakes of clay for antennae and attach them. Use a small ball stylus to press in two shallow dots for eyes.
Clean Lines
Use a little vegetable oil on your needle tool or knife when cutting clay. It glides through smoothly without dragging or creating jagged burrs.
Step 3: Adding the Mushroom & Nature Elements
-
Form the mushroom stem:
The snail’s ‘shell’ extends upward into a mushroom stem. Add a flattened, curved triangle of clay extending up from the snail’s back. Use a needle tool to scratch vertical lines into it for fibrous texture. -
Sculpt the cap:
Create a semi-circle or triangular slab for the mushroom cap. Attach it to the top of the stem. Use your thumb to softly bevel the edges downward. -
Texture the cap:
Take a circular loop tool or the end of a straw and gently press distinct circles into the mushroom cap to create the classic toadstool spots. -
Sculpt the butterfly:
Roll four small teardrop shapes—two larger for top wings, two smaller for bottom wings. Press them onto the upper right corner. Use a needle tool to impress lines radiating from the center of the wings. -
Add the flower:
On the right side, form a small ball for a flower center. Surround it with small flattened tear-drop petals. Use a modeling tool to create a stem connecting the flower to the ground.
Step 4: Refining and Drying
-
Carve the grass:
Using a sharp needle tool or small gouge, carve deep, flowing vertical cuts along the entire bottom edge of the tile. Vary the heights and angles to mimic wild grass blades overlapping the snail. -
Detail the snail body:
Along the bottom ridge of the snail’s body and head, use a needle tool to add tiny stippling dots for texture. -
Clean up debris:
Go over the piece with a soft, dry brush to sweep away any clay burrs or crumbs created during the carving process. -
Slow drying:
Place the tile on a piece of drywall or wood board. Cover it loosely with plastic sheeting to ensure the thick relief elements and the thin tile base dry at the same rate to prevent cracking. -
Final wipe:
Once bone dry, you can gently wipe the highest points with a slightly damp sponge to smooth them one last time before firing.
Once fired, the natural speckles of the clay will bring your garden scene to life without needing any glaze at all.
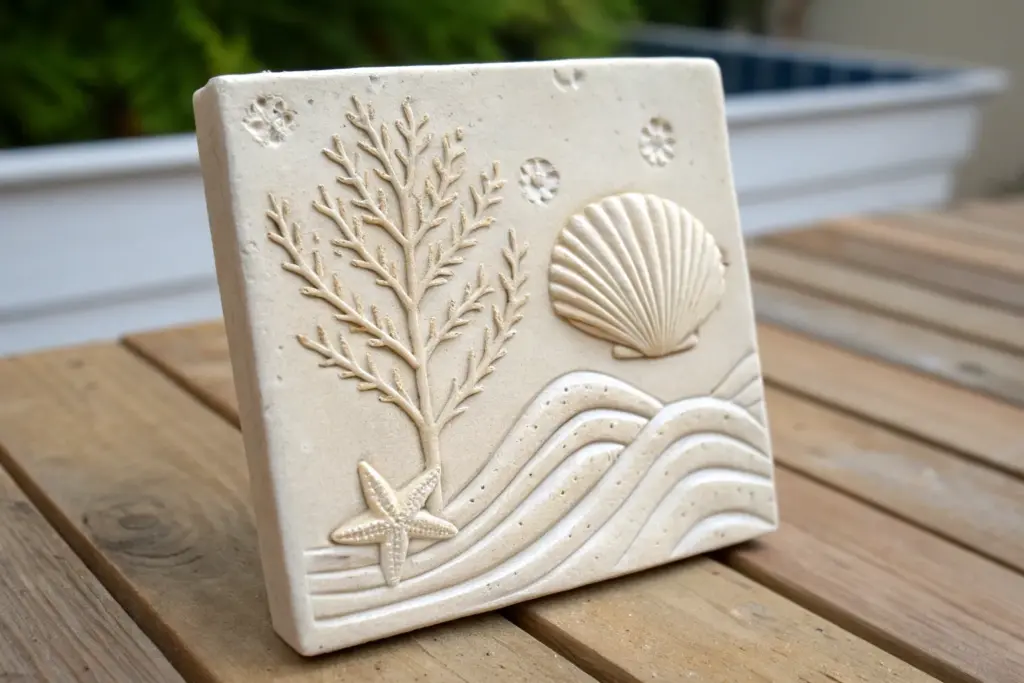
Sea Turtle Shell Texture Study
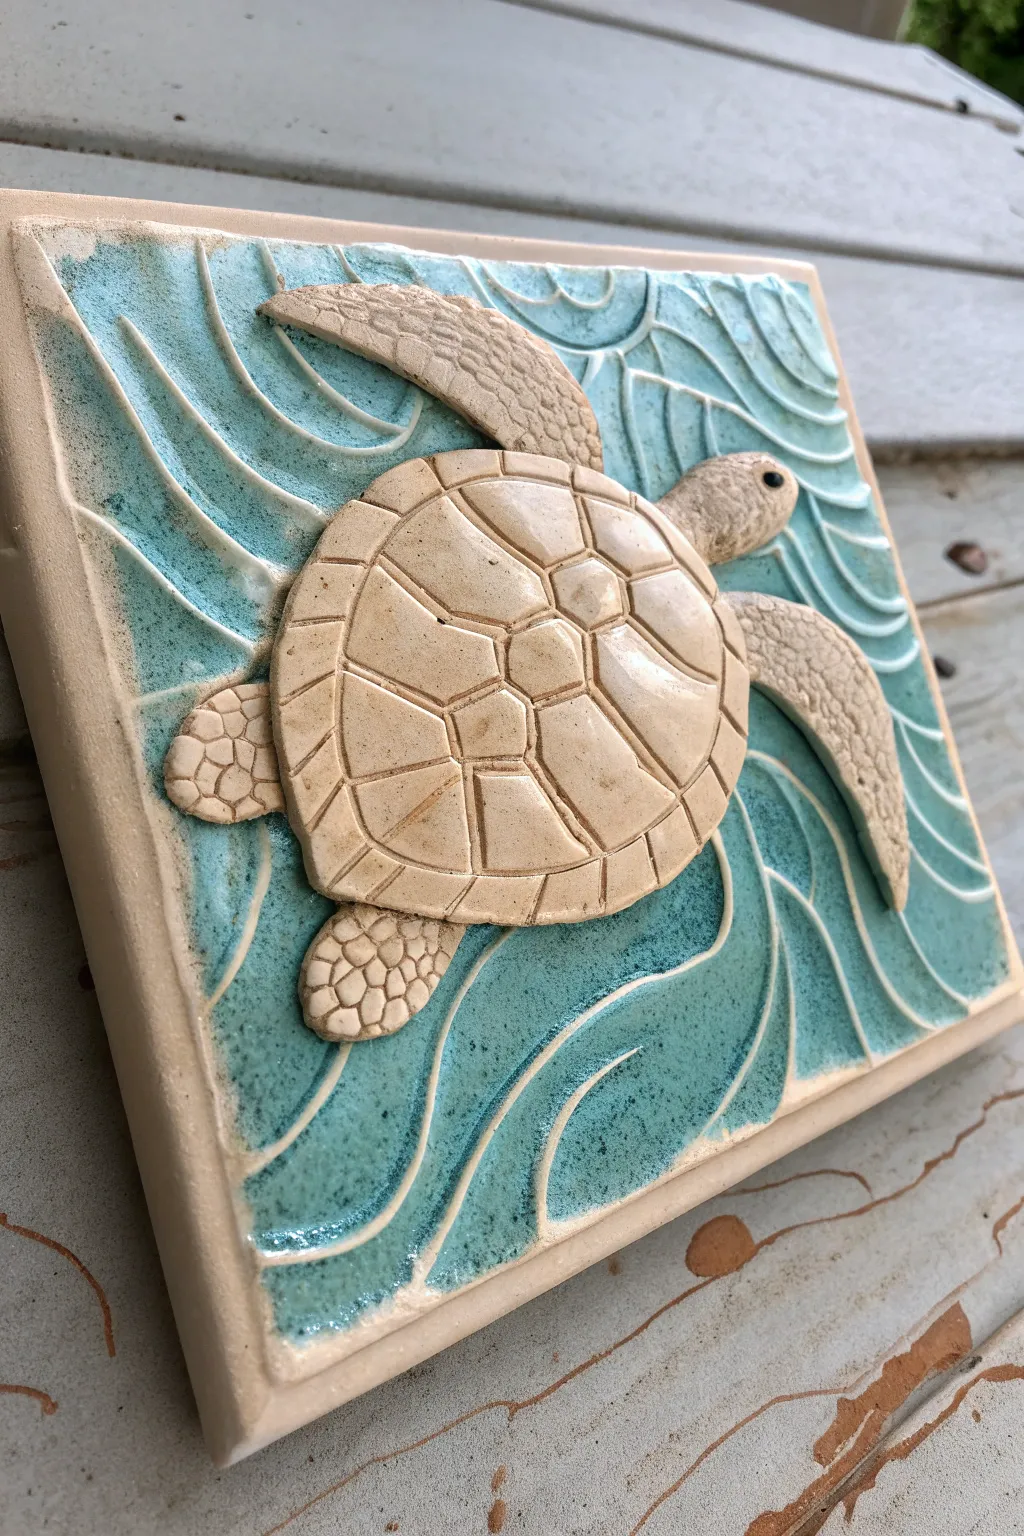
Capture the serene movement of ocean life with this textured ceramic relief tile featuring a sea turtle gliding through stylistic waves. The contrast between the matte, creamy clay of the turtle and the glossy, pooled turquoise glaze of the water creates a beautiful depth that brings the creature to life.
Step-by-Step Tutorial
Materials
- Stoneware clay slab (beige/buff firing)
- Square tile cutter or ruler and knife
- Fettling knife
- Needle tool
- Modeling tools (wooden and rubber ribs)
- Small loop tool for carving
- Slip and scoring tool
- Rolling pin with guide strips (approx. 1/2 inch thick)
- Turquoise/Sea Green gloss glaze
- Wax resist
- Small soft brush for glazing
- Sponge
Step 1: Base Construction
-
Roll the slab:
Begin by rolling out a smooth slab of stoneware clay to a uniform thickness of about 1/2 inch. Using guide strips ensures your tile will dry evenly without warping. -
Cut the shape:
Cut a perfect square for your tile base. A 6×6 inch or 8×8 inch size works well for this level of detail. Smooth the outer edges with a damp sponge. -
Create the border:
Roll a thin coil or cut narrow strips from your leftover slab. Score and slip the perimeter of your square base, then attach these strips to create a raised frame around the tile.
Step 2: Sculpting the Turtle
-
Outline the form:
Lightly sketch the turtle’s outline onto the center of the damp clay slab using a needle tool. Position it diagonally to create a dynamic sense of swimming. -
Build the shell:
Form a flattened oval dome of clay for the carapace (shell). Score the back of the clay piece and the attachment area on the tile, apply slip, and press firmly into place. -
Add limbs and head:
Shape four flippers and a head from smaller pieces of clay. Attach these to the body, ensuring the front flippers extend outwards in a swimming motion. -
Refine the shape:
Use a wooden modeling tool to blend the seams where the turtle meets the background, making it look like a cohesive relief sculpture rather than just stuck-on pieces.
Glaze Pooling
Choose a translucent glaze that ‘breaks’ over texture. It will be darker in the carved grooves and lighter on the ridges, mimicking real water depth.
Step 3: Detailing and Texture
-
Carve the scutes:
Using a needle tool or small knife, carve the geometric pattern of scutes (scales) onto the shell. Start with the central hexagonal shapes and work outward. -
Texture the skin:
For the flippers and head, use a small textured tool or the point of a needle to stipple the surface, mimicking the rough, pebbled texture of turtle skin. -
Add the eye:
Press a small, deep hole for the eye on the head. You can fill this with a dark underglaze later for contrast. -
Carve the water:
In the negative space around the turtle, use a loop tool or rib to carve deep, swirling grooves. These lines should mimic current lines, swirling around the turtle’s movement.
Sandy Texture
For a grittier look on the turtle’s skin, mix a small pinch of grog or sand into the clay used for the flippers before sculpting them.
Step 4: Glazing and Finishing
-
First firing:
Allow the tile to dry slowly between plastic sheets to prevent warping. Once bone dry, bisque fire the piece according to your clay body’s instructions. -
Apply wax resist:
Carefully paint wax resist over the entire turtle and the raised border rim. This protects these areas from the glaze, keeping them the natural matte color of the clay. -
Glaze the water:
Brush a turquoise or sea-green gloss glaze into the carved water areas. I find that pooling the glaze slightly thicker in the deep grooves enhances the water effect. -
Clean up:
Use a damp sponge to wipe away any glaze beads that might have settled on the waxed turtle or border. -
Final firing:
Glaze fire the tile. The heat will melt the glaze into the recessed water textures while leaving the turtle’s relief details crisp and matte.
Hang your finished tile on a wall or use it as a striking coaster to bring a coastal atmosphere to your room

TRACK YOUR CERAMIC JOURNEY
Capture glaze tests, firing details, and creative progress—all in one simple printable. Make your projects easier to repeat and improve.
Desert Cactus Sunset Relief Tile
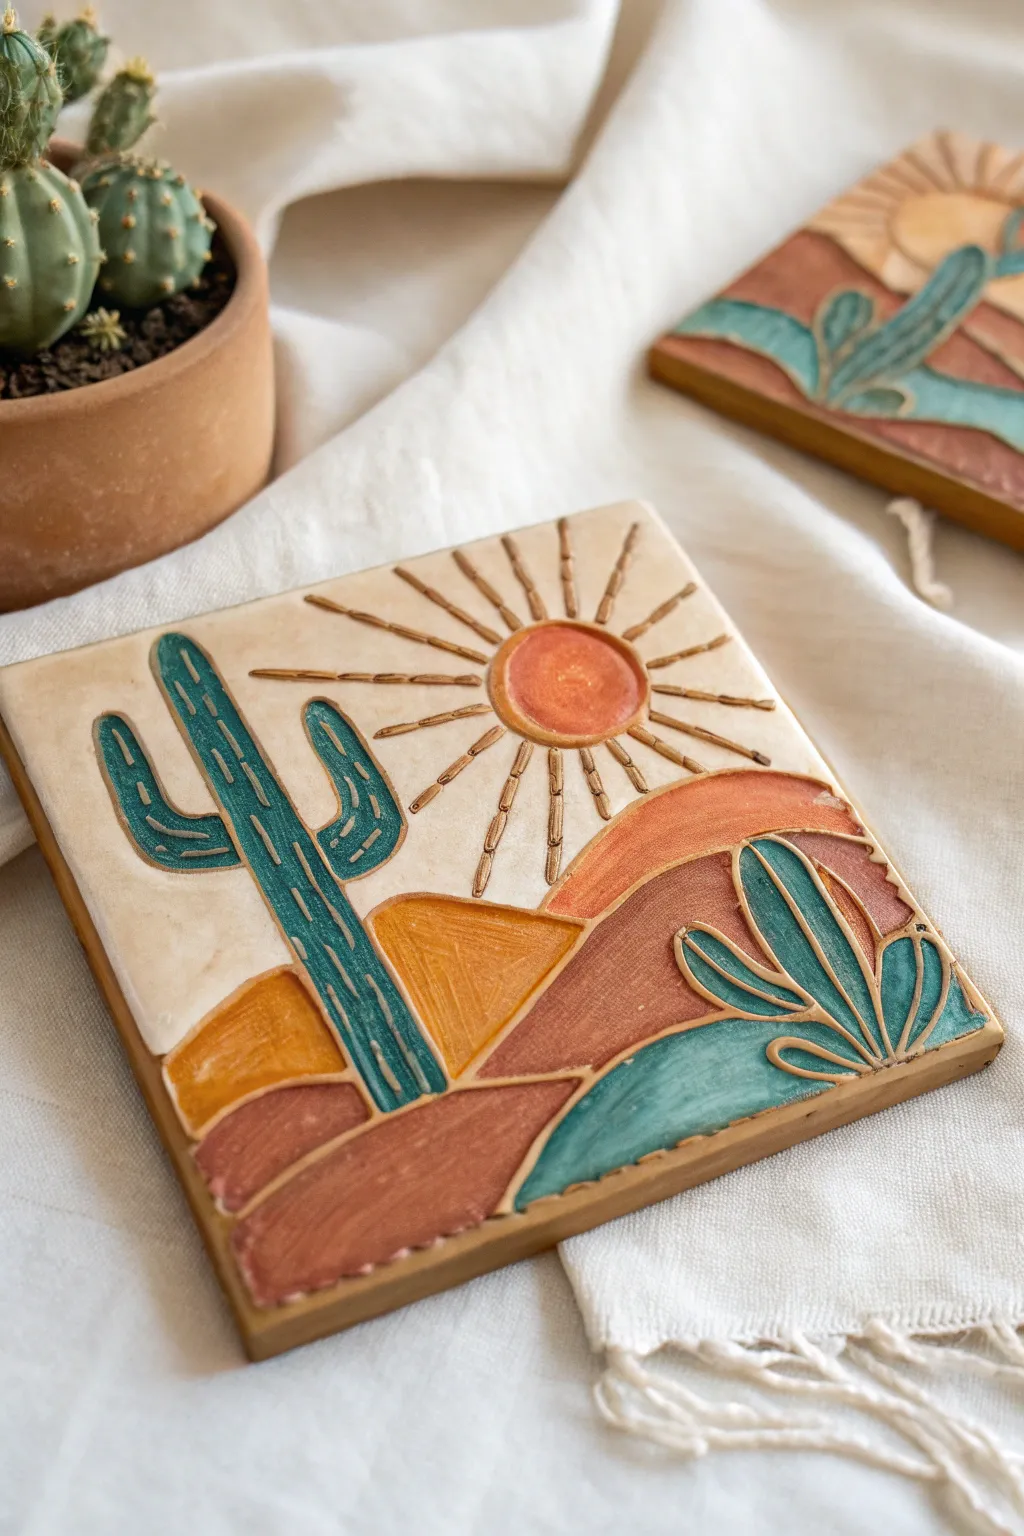
Capture the warmth of the desert with this charming clay relief tile, featuring raised contour lines and a vibrant, earthy color palette. This project combines simple sculpting techniques with strategic painting to create a dimensional piece of art that feels like a sun-baked souvenir.
Step-by-Step Guide
Materials
- White polymer clay or air-dry clay (approx. 500g)
- Square tile cutter or ruler and craft knife
- Rolling pin
- Thin sculpting needle tool or toothpick
- Acrylic paints (Teal, Rust Orange, Mustard Yellow, Cream/Off-White)
- Small flat paintbrush
- Fine detail paintbrush
- Gloss varnish or sealant
- Sandpaper (fine grit)
- Non-stick work surface or parchment paper
Step 1: Base Preparation
-
Condition the Clay:
Begin by kneading your clay until it is soft, pliable, and free of air bubbles. This ensures a smooth surface for your tile. -
Roll the Slab:
Roll out the clay to a uniform thickness of about 1/4 inch (6mm). Try to keep the pressure even so the tile doesn’t become wavy. -
Cut the Shape:
Using a square cutter or a ruler and knife, cut out a perfect square. Use your finger to gently smooth down the sharp edges of the cut clay.
Clay Cracking?
If using air-dry clay, cracks can happen during drying. Mix a tiny bit of fresh clay with water to make a paste and fill cracks, then sand smooth once dry.
Step 2: Sculpting the Design
-
Sketch the Outline:
Lightly trace your design onto the wet clay using a needle tool. Draw a tall saguaro cactus on the left, rolling hills in the foreground, and a sun in the upper right quadrant. -
Create the Relief Lines:
There are two ways to do this: either carve away the negative space (subtractive) or add thin coils of clay (additive). Looking at this piece, the raised lines look like very thin coils were pressed onto the surface. Roll extremely thin ‘snakes’ of clay. -
Apply the Outlines:
Lay these thin coils over your sketched lines. Press them down firmly enough to adhere, but gently enough to keep their rounded shape. Outline the sun rays, the sun circle, the cactus body, and the hill divisions. -
Add Cactus Details:
Inside the main cactus shape, press in short vertical lines or hash marks to simulate needles. For the smaller agave-style plant on the right, ensure the leaves overlap naturally. -
Refine and Smooth:
Use a silicone tool or your finger to smooth any seams where the coils join the base. Ensure the background areas are flat. -
Dry or Bake:
If using polymer clay, bake according to package instructions (usually 275°F/135°C for 15-30 mins). If using air-dry clay, let it sit for 24-48 hours until fully hardened.
Step 3: Painting and Finishing
-
Sand Imperfections:
Once fully cured, lightly sand any rough edges or fingerprints on the back and sides of the tile. -
Base Coat:
Paint the entire background sky area with a creamy off-white color. You may need two thin coats for full coverage. -
Paint the Hills:
Using your rust orange and mustard yellow paints, fill in the bottom hill sections. I like to alternate colors to create depth between the foreground and background dunes. -
Color the Vegetation:
Fill in the tall cactus and the foreground shrub with a deep teal or blue-green shade. Use a fine brush to get right up to the raised edges without painting over them. -
Sun Details:
Paint the central sun circle with a mix of orange and rust. Leave the raised rays unpainted (or paint them cream) to make them stand out against the background. -
Highlight the Relief:
Once the main colors are dry, use a very dry brush with a light beige or gold paint to gently graze the tops of the raised outlines. This accentuates the 3D effect. -
Seal the piece:
Apply a coat of gloss varnish over the entire front of the tile. This deepens the colors and gives it that finished ceramic look.
Faux Ceramic Look
To mimic glazed pottery, mix a small amount of gloss medium directly into your acrylic paints before applying them. It creates a translucent, glassy finish.
Display your finished tile on a small easel or use adhesive strips to mount it as part of a wall gallery
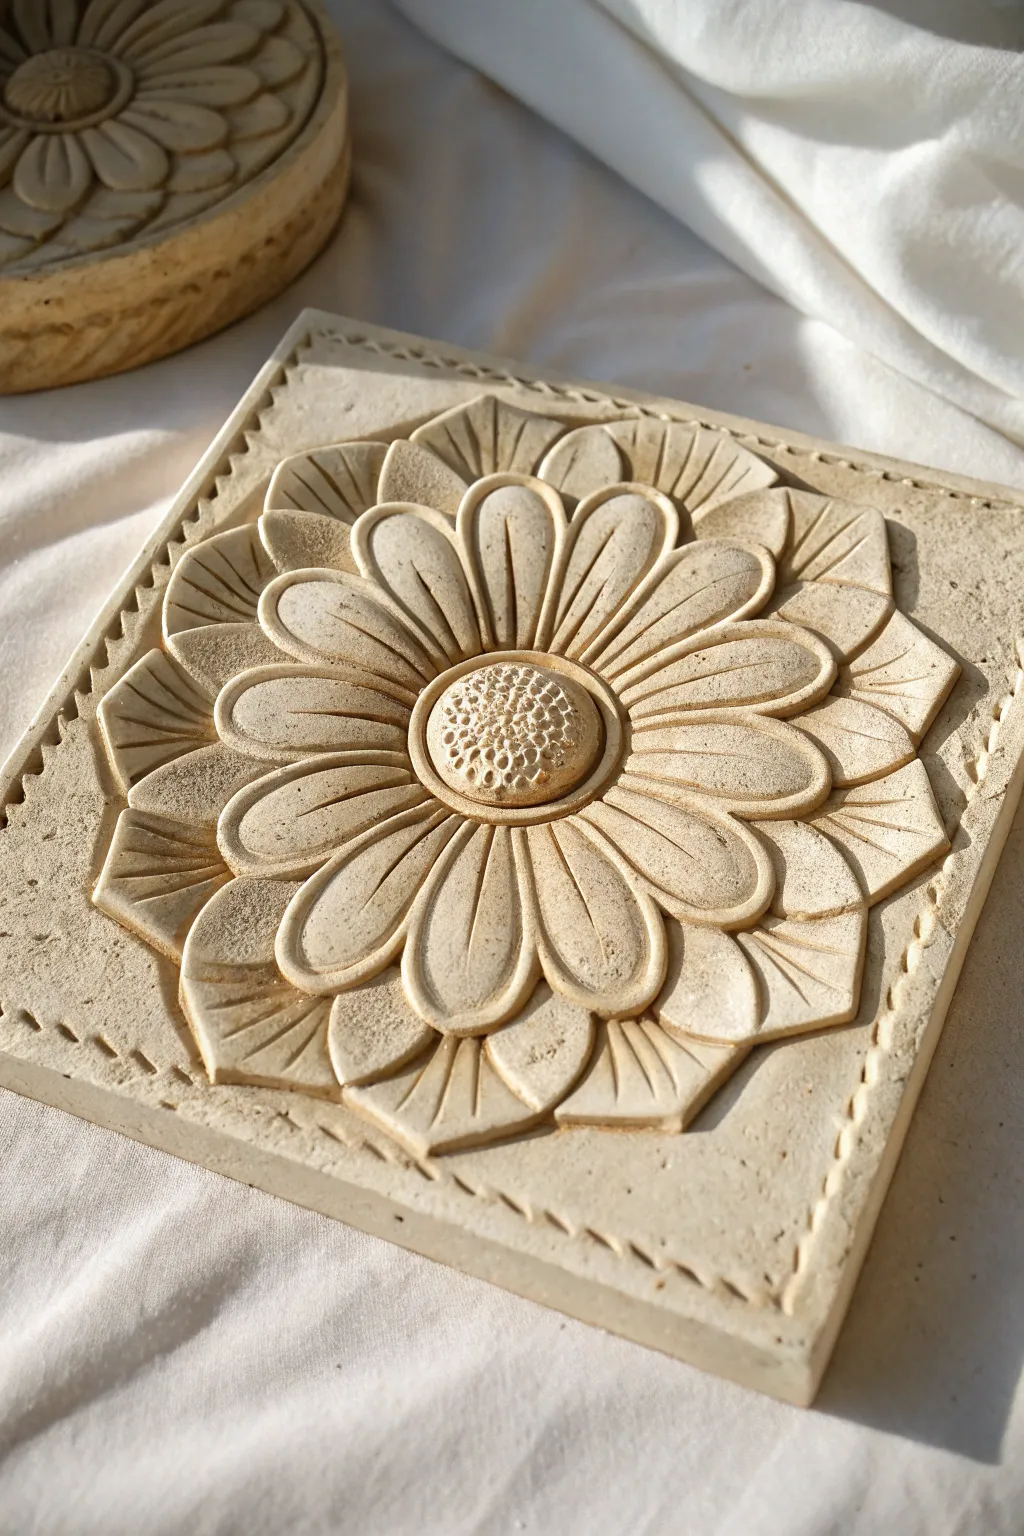
Mandala Dot-and-Ridge Relief
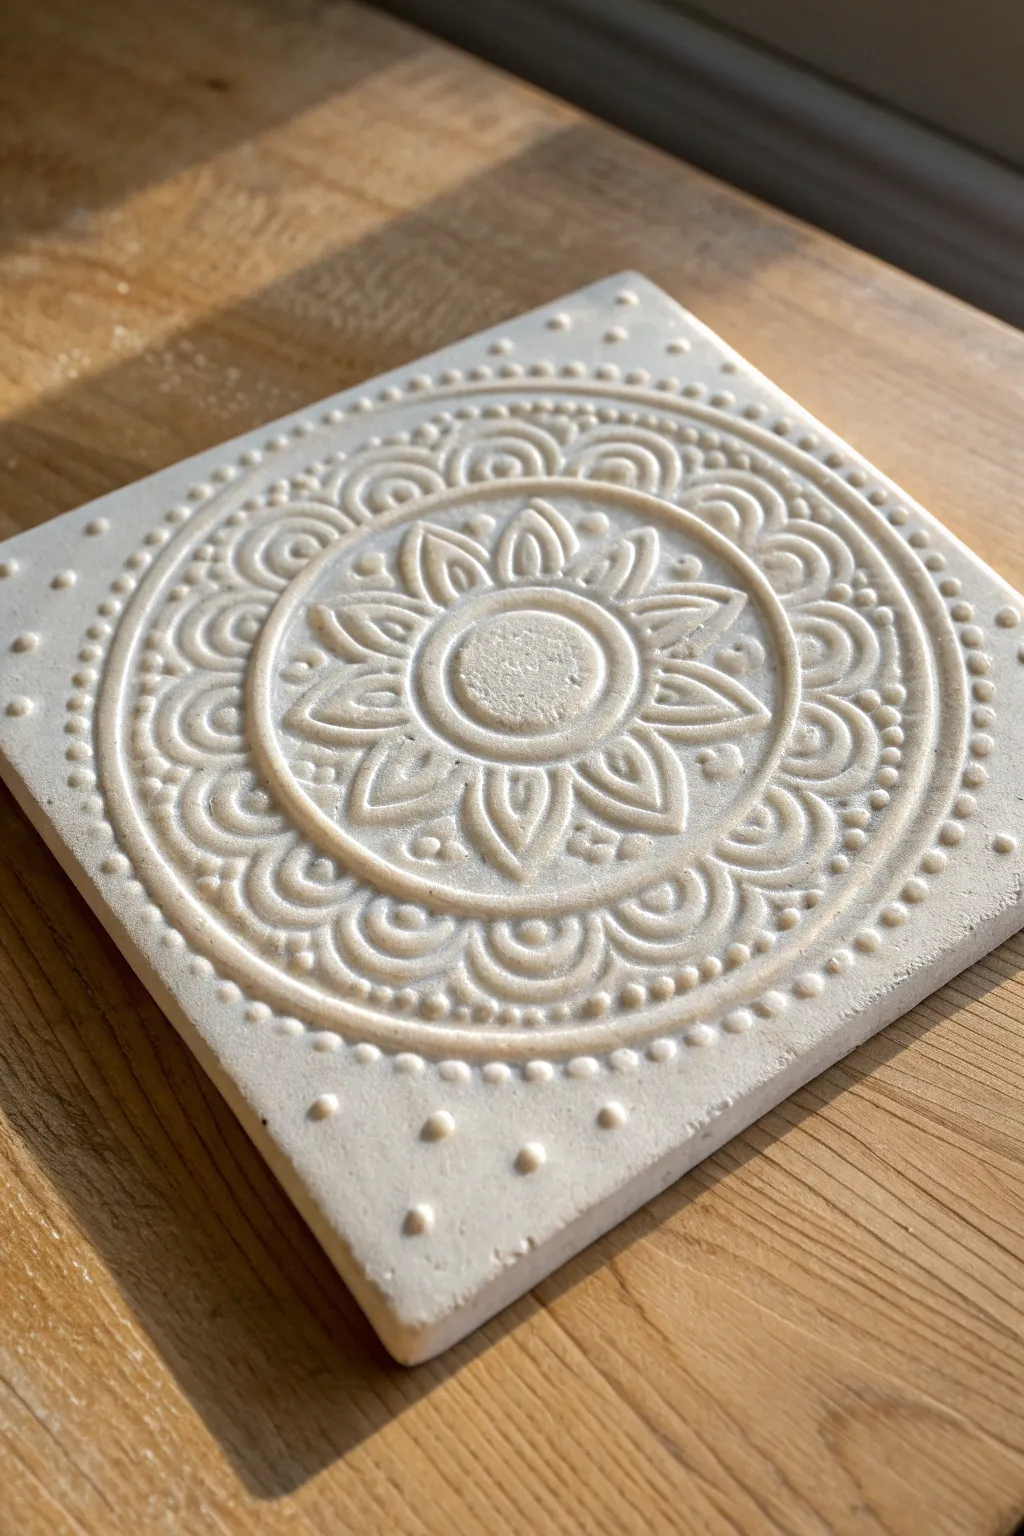
This elegant relief tile features a symmetrical mandala design raised from a smooth, square base, creating a calming tactile piece. The interplay of raised ridges, dots, and petal shapes catches the light beautifully, making it perfect for a coaster or decorative wall accent.
Step-by-Step Tutorial
Materials
- White air-dry clay or polymer clay
- Rolling pin
- Square cookie cutter or craft knife
- Detailed mandala stamp or texture heavy mold
- Alternate: Fine-point carving tools (for hand-carving method)
- Sandpaper (fine grit)
- Matte white acrylic paint or sealant
Step 1: Preparing the Base
-
Condition the clay:
Begin by taking a generous amount of white clay. Knead it thoroughly in your hands until it becomes warm, soft, and pliable, which prevents cracks from forming later. -
Roll out the slab:
Place the clay on a smooth, non-stick surface. Use a rolling pin to flatten it into an even slab, aiming for a thickness of about 1/4 to 1/2 inch to ensure durability. -
Cut the square shape:
Using a large square cookie cutter or a ruler and craft knife, cut out a perfect square. Remove the excess clay from around the edges. -
Smooth the edges:
Dip your finger in a little water and gently run it along the cut edges of the square to soften any sharp corners or roughness.
Step 2: Creating the Mandala Relief
-
Center the design source:
If using a large rubber stamp or a silicone texture mold (the easiest way to achieve this consistent look), center it perfectly over your clay square. -
Press for impression:
Apply firm, even pressure across the entire back of the stamp or mold. Ensure you press deep enough to raise the ridges clearly but not so hard that you distort the square shape. -
Lift carefully:
Peel the stamp or mold away slowly from one corner to avoid suction warping the detailed pattern. -
Alternative: Hand-carving method:
If sculpting by hand, use a compass to lightly etch concentric circles. Then, use fine loop tools to carve away the ‘background’ spaces, leaving the ridges for the petals and dots raised. -
Refine the border dots:
Use a small ball tool to deepen or clean up the dots in the corners of the tile if the impression wasn’t crisp enough.
Stamp Sticking?
If your stamp pulls the clay up, lightly dust the clay surface with cornstarch or baby powder before pressing. This acts as a release agent.
Step 3: Finishing Touches
-
Initial drying:
Let the tile sit undisturbed in a dry, room-temperature area. I prefer to flip it gently after about 6 hours so the bottom dries evenly with the top. -
Sanding imperfections:
Once fully cured and hard, check the edges and surface. Use fine-grit sandpaper to lightly buff away any burrs or sharp ridges without damaging the main design. -
Dusting off:
Use a soft, dry brush to whisk away all clay dust from the crevices of the mandala pattern. -
Sealing or painting:
To achieve the matte, stone-like finish in the photo, apply a coat of matte varnish or matte white acrylic paint. This protects the porous material from moisture.
Depth Perception
For sharper relief, lightly mist the clay with water before stamping. The moisture helps the clay flow deeper into the stamp’s crevices.
Now you have a beautifully textured tile that looks like carved stone, ready to display or use
Art Deco Fan Motif Tile
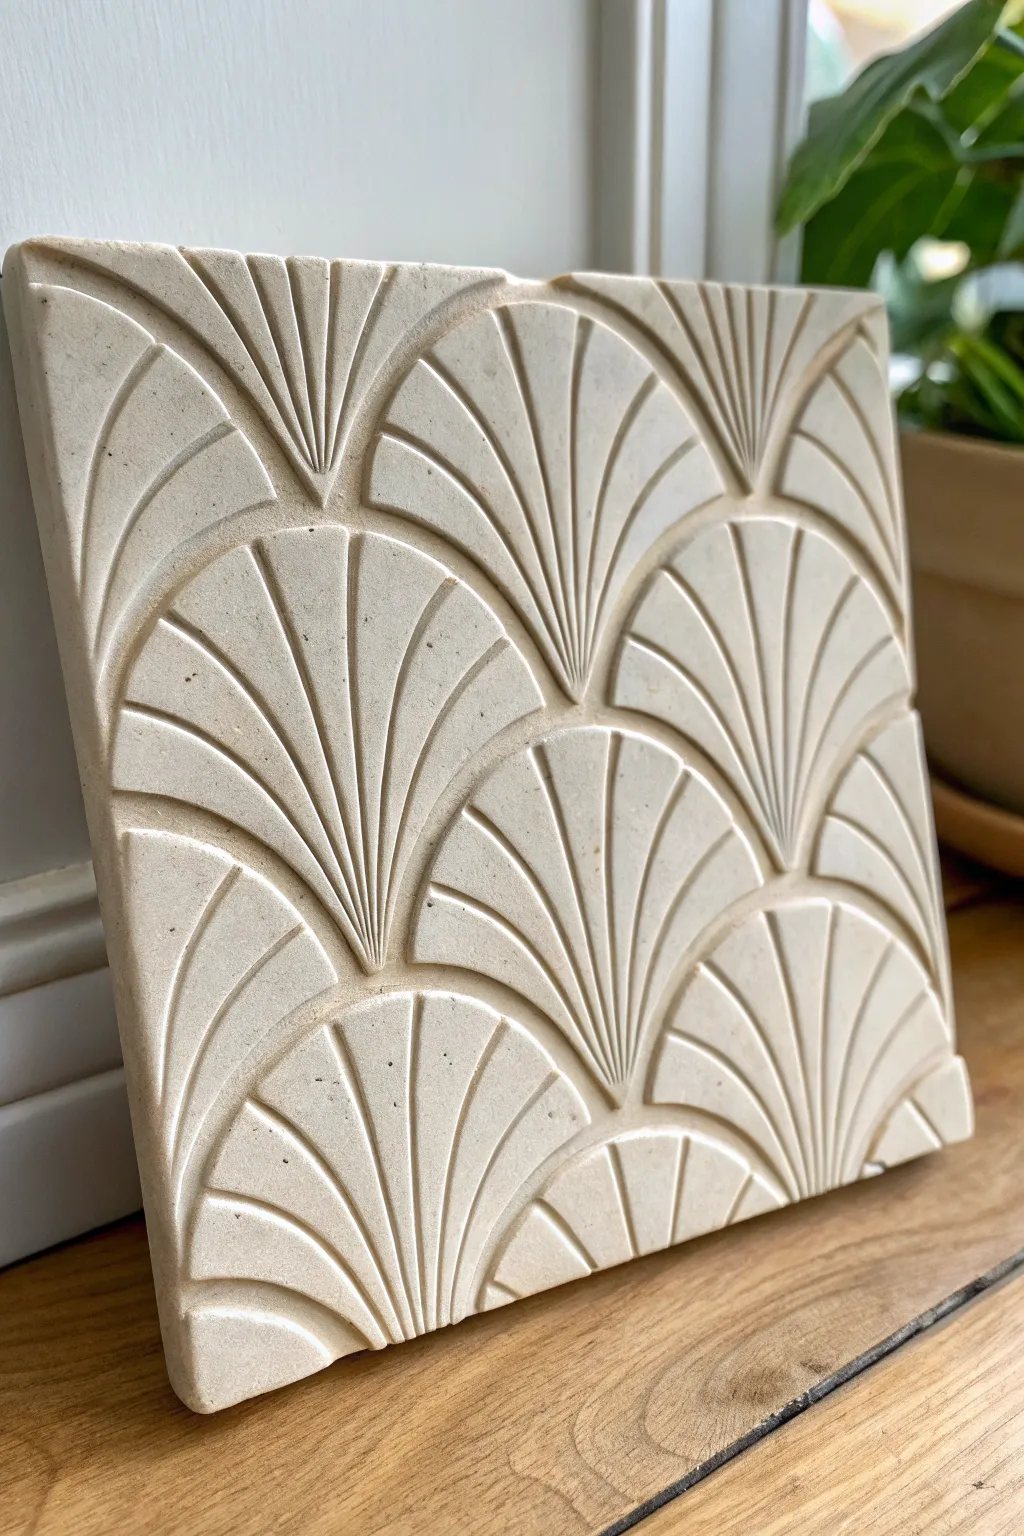
Capture the geometric sophistication of total 1920s glamour with this DIY clay relief tile. The repeating fan motif creates beautiful shadows and highlights, turning a simple slab of clay into a piece of architectural art.
How-To Guide
Materials
- High-quality air-dry clay (stone or white color) or low-fire ceramic clay
- Rolling pin
- Two 1/2-inch wooden slats (thickness guides) to ensure even slab thickness
- Square template (cardboard or paper, approx 6×6 inches)
- Fettling knife or craft knife
- Loop tool or ribbon tool (small rounded head)
- Needle tool
- Rubber kidney rib or smoothing sponge
- Clay carving tools (V-gouge or U-gouge)
- Ruler
- Compass or circular object (for tracing arcs)
- Plastic wrap/cling film
- Canvas or wooden board for working surface
- Sandpaper (fine grit)
Step 1: Preparing the Slab Base
-
Prepare your workspace:
Lay down your canvas or wooden board. Using a porous surface helps prevent the clay from sticking as you work, unlike a slick countertop. -
Roll the slab:
Place your 1/2-inch wooden slats on either side of your clay ball. Roll the clay out until the rolling pin rests on the guides, ensuring a perfectly uniform thickness across the entire piece. -
Cut the square:
Place your square paper template onto the smooth slab. Using your fettling knife or craft knife, cut vertically around the template to create a clean 6×6 inch square tile. -
Smooth the surface:
Run a rubber kidney rib gently over the surface to compress the clay particles and remove any canvas texture. This is crucial for that smooth, stone-like finish later.
Warping Woes?
If the corners start to curl up while drying, flip the tile over carefully every few hours. Weighing down the corners gently with small sandbags can also keep it flat.
Step 2: Mapping the Design
-
Mark your grid:
The Art Deco fan pattern relies on precision. Use a ruler and needle tool to lightly score a grid on your tile to guide where the center of each fan will sit. -
Trace the primary arcs:
Using a compass or a circular object, lightly impress the wide arcs of the fans into the clay surface. Don’t dig deep yet; these are just your guide lines for carving. -
Align the overlapping fans:
Ensure the rows are staggered. The bottom center of one fan should align with the point where two fans meet in the row below it, creating that classic fish-scale layout. -
Mark the internal rays:
Within each semi-circle arc, lightly score radial lines fanning out from the bottom center point. These represent the ‘rays’ of the sunburst pattern.
Go Geometric
Make a set of 4 tiles. Paint deep emerald green or navy blue inside the carved grooves after drying, leaving the high points white, for a stunning high-contrast decor piece.
Step 3: Carving the Relief
-
Initial gouging:
Select a V-gouge or a small loop tool. Carefully carve along the outlines of the main fan shapes to separate them visually from one another, removing distinct strips of clay. -
Carving the rays:
Switch to a finer ribbon tool or U-gouge. Carve out the grooves between the rays you marked earlier. I find it helps to pull the tool from the center point outward to keep lines straight. -
Defining depth:
Go back over the main separation lines between the fans and carve them slightly deeper than the internal ray lines. This hierarchy of depth makes the pattern pop. -
Clean the channels:
Little crumbs of clay will accumulate in your grooves. Use a soft, dry paintbrush to sweep these crumbs out as you work so they don’t get matted back into the surface. -
Refining the edges:
Use a damp sponge or your finger to gently soften the sharp ridges left by the carving tool. You want distinct lines, but not jagged, sharp edges.
Step 4: Finishing Touches
-
Check side profiles:
Look at the tile from the side. Ensure your carving hasn’t made any area too thin, and smooth the outer edges of the square square again if handling warped them. -
Slow drying setup:
To prevent warping—the enemy of flat tiles—place a piece of drywall or wooden board on top of the tile while it dries. Sandwiching it between two porous boards is ideal. -
Drying process:
Allow the clay to dry slowly away from direct heat or drafts. If using air-dry clay, this might take 24-48 hours depending on humidity. -
Sanding:
Once bone dry, take fine-grit sandpaper and lightly circular-sand the high points of the relief. this creates a professional, fabricated look. -
Cleanup:
Wipe away all sanding dust with a slightly damp cloth or sponge. At this stage, you can leave it raw for that matte stone look or apply a clear matte sealant.
Place your finished tile on a bookshelf or mount it in a shadow box to admire those clean lines
Pressed Texture Sampler Relief Tile
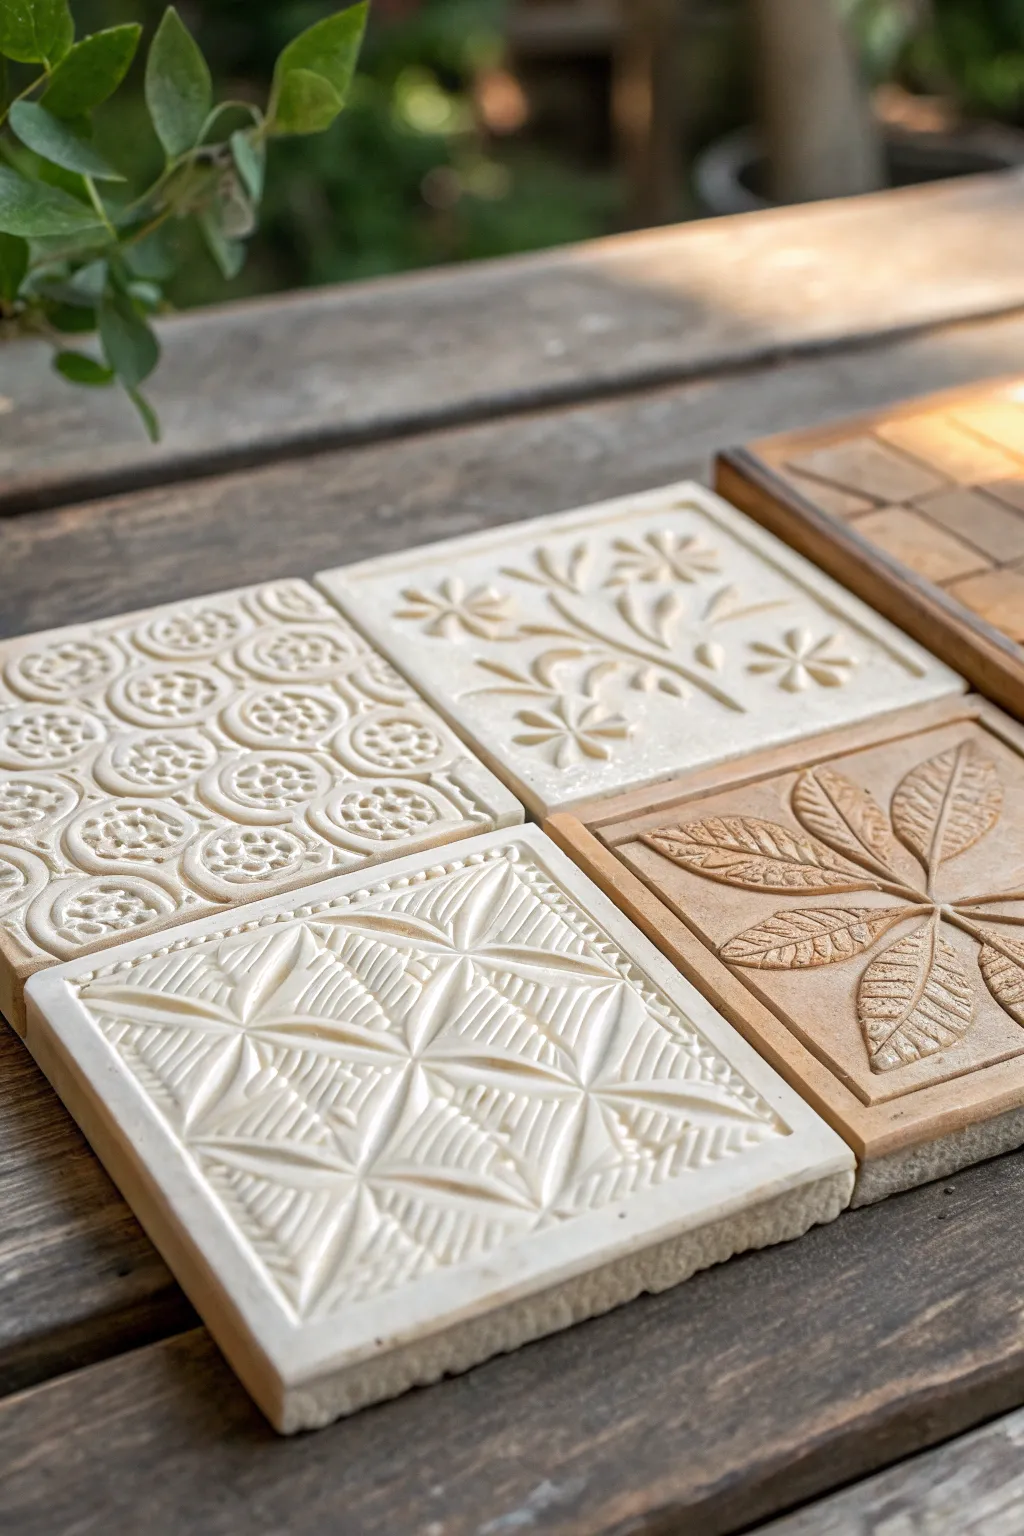
These elegant clay relief tiles showcase a beautiful variety of textures, from intricate geometric repetitions to organic botanical forms. This project explores the art of creating raised designs using simple carving and pressing techniques to transform plain clay slabs into decorative architectural elements.
Step-by-Step Guide
Materials
- White sculpture clay or stoneware clay
- Terracotta sculpture clay (optional for variation)
- Rolling pin
- Two 1/2 inch wooden guide slats (thickness strips)
- Canvas mat or heavy cloth (for rolling)
- Fettling knife
- Loop carving tools (small and medium)
- Needle tool
- Rubber kidney rib
- Carving stamps or found objects (for pressed textures)
- Sponge and water
- Kiln (if firing) or air-dry sealant (if using air-dry clay)
Step 1: Preparation & Shaping
-
Prepare the Clay:
Begin by wedging your white clay thoroughly to remove any air bubbles. If you want the color variation seen in the image, prepare a separate batch of terracotta or light brown stoneware clay as well. -
Roll the Slabs:
Place your canvas mat on the table. Set up the wooden guide slats on either side of your clay ball to ensure even thickness. Roll the clay out into a smooth, consistent slab, approximately 1/2 to 3/4 inch thick. I find checking the thickness frequently prevents uneven drying later. -
Cut the Tiles:
Using a ruler and a fettling knife, cut the slab into precise squares. For this set, 4-inch or 6-inch squares work beautifully. Carefully smooth the cut edges with a damp sponge or your finger to remove any sharp burrs.
Clean Lines
Wait until the clay is leather-hard (firm like cheddar cheese) before carving. Soft clay drags and creates messy burrs.
Step 2: Geometric Carving (Bottom Left Tile)
-
Map the Grid:
Lightly trace a grid onto the leather-hard clay surface using a needle tool. Divide the square into quadrants or smaller sections to guide your geometric pattern. -
Carve the Diagonals:
Using a small V-tip carving tool, carve deep diagonal lines originating from the center points of your grid squares, creating a starburst or cross-hatch effect. Keep your depth consistent. -
Add Texture Details:
Switch to a smaller tool to add the finer parallel lines inside the triangles created by your main cuts. These small ridges catch the light and emphasize the geometry.
Warping Woes
If corners start lifting while drying, place small weights or sandbags on the edges to hold them flat until completely bone dry.
Step 3: Botanical Relief (Top Right Tile)
-
Sketch the Flora:
On a fresh tile, lightly sketch a flowing branch design with leaves and small blossoms using your needle tool. Allow the design to flow asymmetrically across the square. -
Excavate the Background:
Instead of carving the lines, use a round loop tool to gently remove the clay *around* your sketched leaves and stems. This technique, called bas-relief, leaves the design raised above the background. -
Refine the Edges:
Smooth the area where the background meets the raised design. Use a finer tool to carve veins into the leaves and centers into the flowers for added definition.
Step 4: Pattern and Texture
-
Create Repeating Motifs:
For the circular patterned tile (top left), use a circular stamp or a found object like a marker cap. Press it firmly into the clay in evenly spaced rows. -
Detail the Impressions:
enhance the stamped circles by carving small dots or crosses inside them. Connect the circles with shallow carved lines to create a cohesive textile-like pattern. -
Leaf Pressing (Bottom Right Tile):
For the brown tile, you can carve leaf shapes or press real, sturdy leaves into the clay surface and peel them away to leave natural vein impressions. Deepen the main veins with a carving tool if the impression is too faint.
Step 5: Finishing
-
Clean Up:
Once all carving is complete, gently brush away any clay crumbs with a soft brush. Use a barely damp sponge to soften any overly sharp ridges without blurring the design. -
Slow Drying:
Place the tiles between two pieces of drywall or cover them loosely with plastic to ensure slow, even drying. This is crucial for flat tiles to prevent warping at the corners. -
Sand and Fire:
When bone dry, gently sand any rough edges. Bisque fire the tiles according to your clay body’s specifications. If glazing, apply a clear or matte glaze to protect the surface while keeping the raw clay color visible.
Once fired, these tiles make stunning coasters or can be framed together as a rustic wall installation