
When kids get their hands on modeling clay, the magic is how quickly a simple ball and a rolled “snake” can turn into something adorable. Here are my go-to easy clay ideas for kids that stay forgiving, cute, and totally doable with beginner skills.
Cute Clay Snails
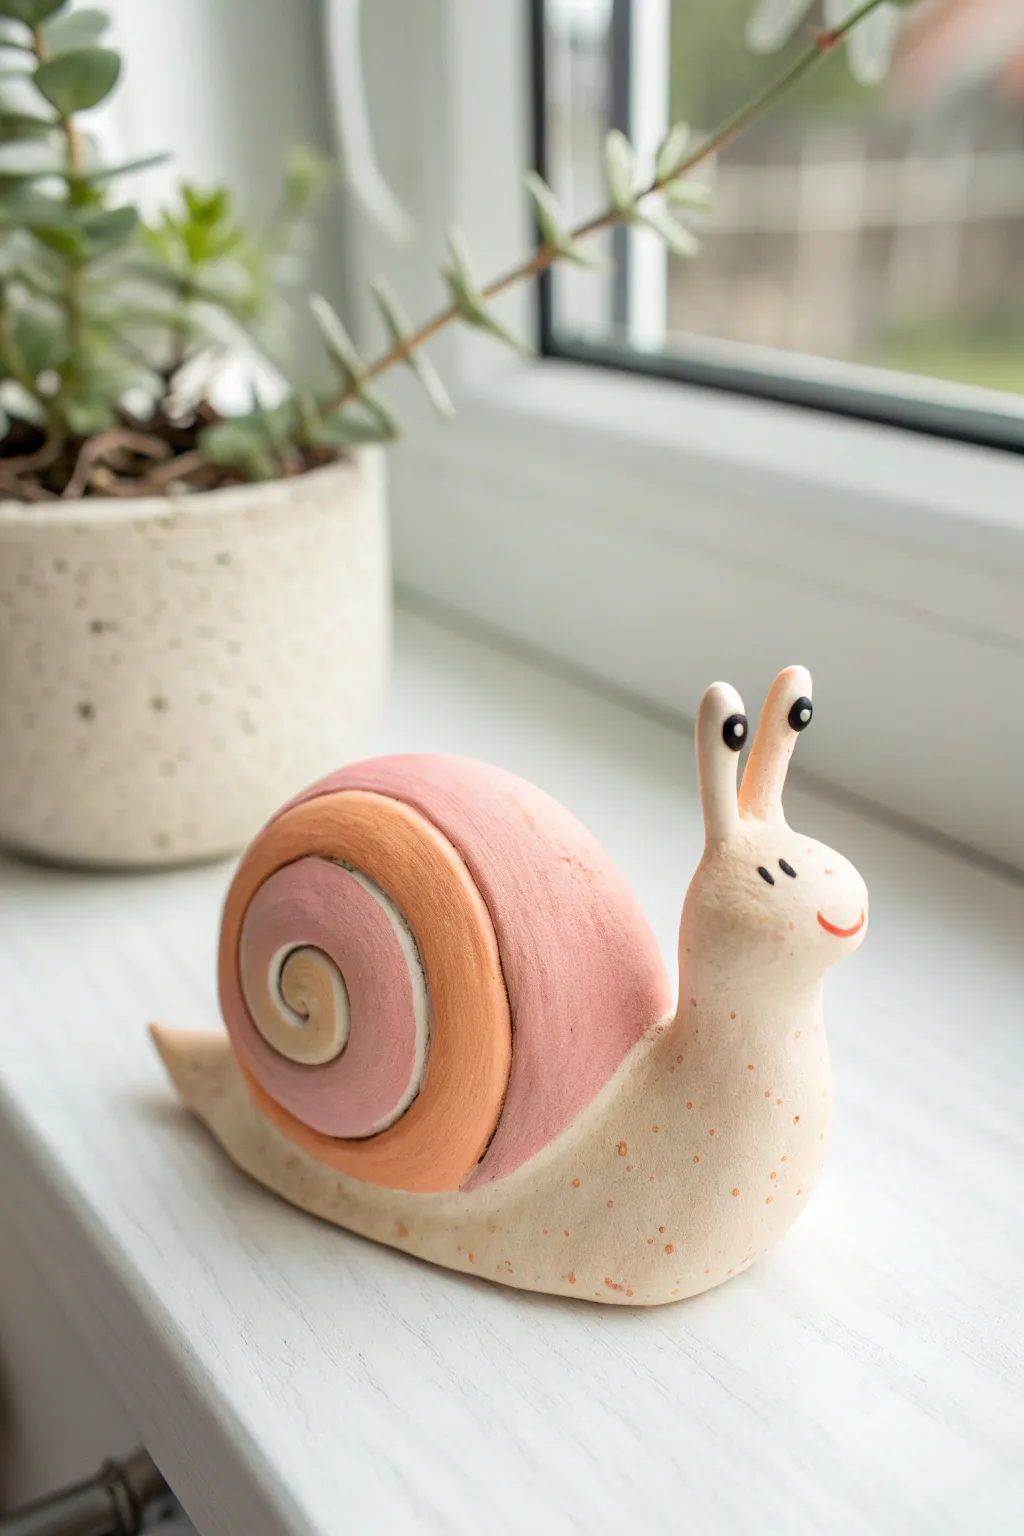
This adorable snail sculpture features a unique, layered swirl shell in soft pastel tones of pink and peach, resting on a speckled cream-colored body. Its friendly face and upright eyestalks make it a charming little companion for any windowsill garden.
Step-by-Step Tutorial
Materials
- Air-dry clay or polymer clay (White)
- Acrylic paints (Cream/Beige, Light Pink, Peach/Coral, Black, Red)
- Fine grit sandpaper
- Small paintbrush
- Clay sculpting tools or a toothpick
- Rolling pin
- Water (for smoothing)
Step 1: Sculpting the Body
-
Shape the base:
Start with a medium ball of white clay. Roll it into a thick cylinder, then gently taper one end to create a pointed tail and keep the other end rounded for the head. -
Form the head:
Bend the rounded end upwards to create the snail’s neck and head. Gently pinch and smooth the clay so it curves naturally from the flat body. -
Add eyestalks:
Roll two very small, thin coils of clay. Attach them vertically to the top of the head, blending the seams downwards with a little water or a smoothing tool so they become part of the body. -
Create the base depression:
Press your thumb gently into the center of the snail’s back to create a slight curve or indentation. This will help the shell sit securely later on.
Step 2: Creating the Shell
-
Prepare the shell segments:
Roll out a slab of clay to about 1/4 inch thickness. You will need to cut or shape three distinct circles that get progressively smaller. -
Shape the largest coil:
Instead of typical coils, we are making thick, rounded discs. Create the largest disc first for the outer shell layer, rounding off the edges so it looks puffy like a marshmallow. -
Stack the middle layer:
Make a slightly smaller, thicker disc. Attach this to the side of the first disc. I find scoring the surface slightly before attaching helps them stick better. -
Add the center spiral:
Create the smallest button-like disc for the very center. Using a sculpting tool, carve a spiral line directly into this center piece to mimic the shell’s growth pattern. -
Attach shell to body:
Score the bottom of your assembled shell stack and the indentation on the body. Press them firmly together, using a bit of water or slip (clay and water mix) as glue. -
Smooth the seams:
Check where the shell meets the body. Use a tool or your finger to ensure there are no large gaps, blending the underside slightly for stability.
Shell Falling Off?
If the shell feels too heavy, insert a short piece of toothpick or wire between the body and shell as an internal anchor before the clay dries.
Step 3: Finishing Touches
-
Dry partially:
Let the sculpture sit for a few hours. If using polymer clay, follow baking instructions now. If air-dry, wait until it’s leather-hard. -
Paint the body:
Paint the entire body and head with a creamy beige color. Apply two coats if necessary for opaque coverage. -
Paint the shell outer layer:
Paint the largest, outermost ring of the shell in a soft, dusty pink. -
Paint the middle layer:
Use a peach or coral shade for the middle ring. This contrast gives that lovely dimensional look. -
Paint the center:
Paint the smallest center spiral with a pale yellowish-cream or very light peach tone. -
Add speckles:
Dip a stiff brush or toothbrush into watered-down orange/brown paint. Use your thumb to flick the bristles, spraying tiny speckles across the body and lower shell. -
Paint the face:
Use a fine-tip brush or black marker to add two small dots for eyes on the stalks, two tiny dashes for eyebrows, and a simple black curve for a nose. -
Final smile:
Paint a small, red curved line for the mouth to give your snail a happy expression.
Puffier Shells
To keep the shell segments looking round and ‘puffy’ after painting, use a satin varnish on just the shell parts for a contrasting shine.
Place your finished snail near some greenery to watch him interact with his natural habitat


Simple Ladybug Pebbles
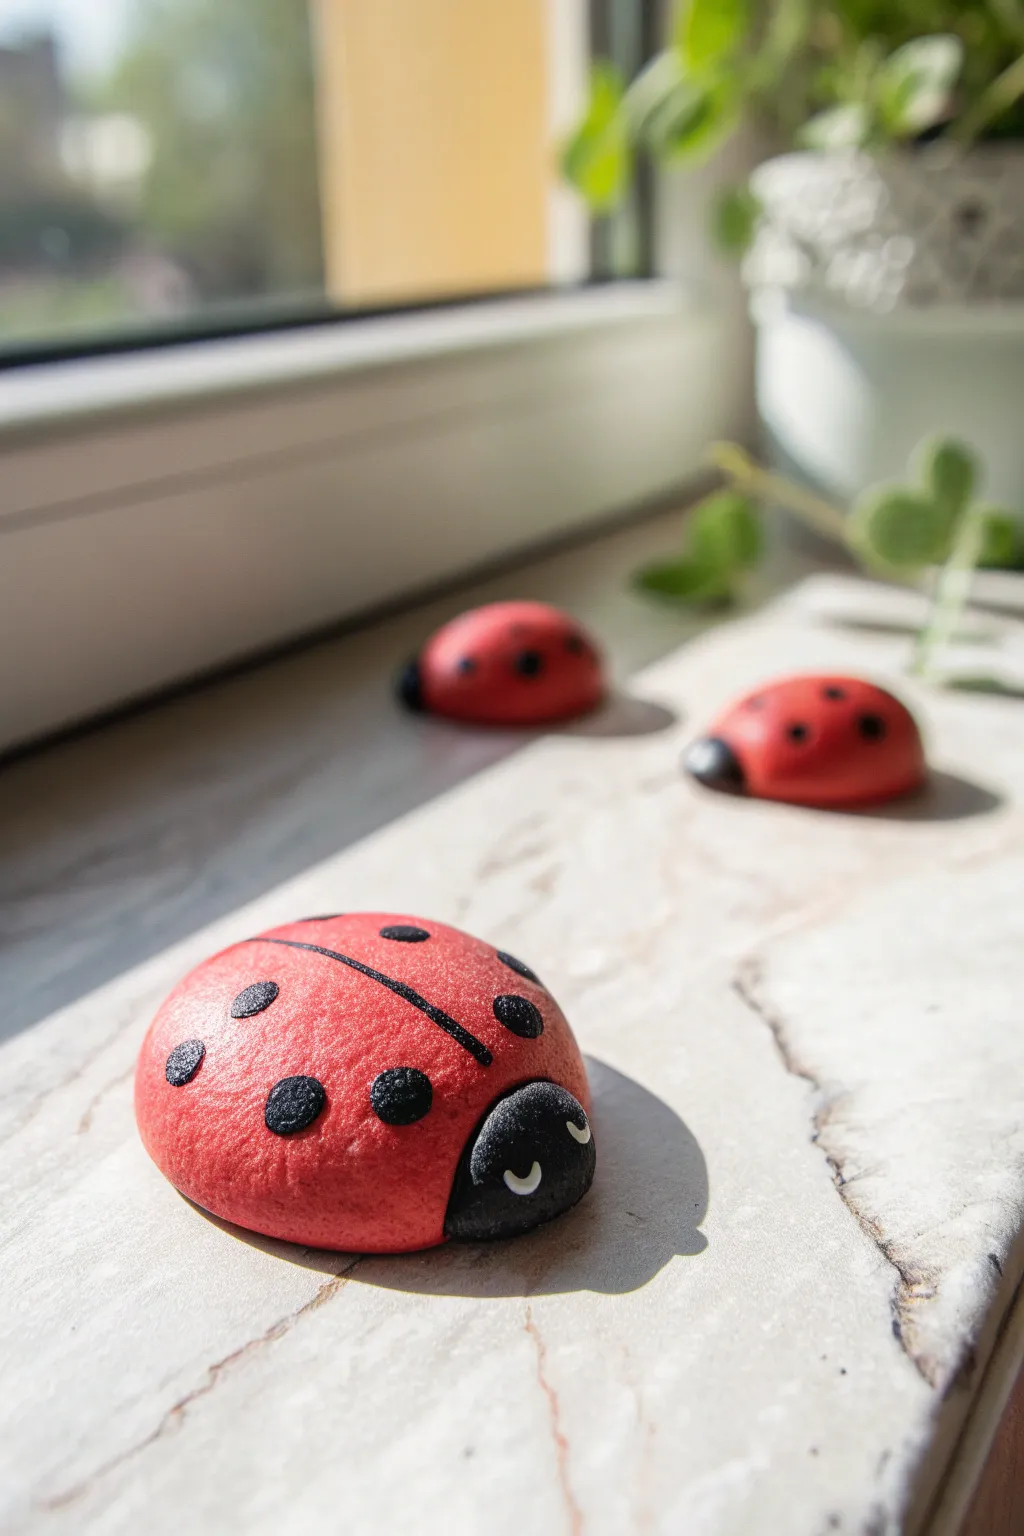
Bring a little garden charm indoors with these delightful spotted friends. Using modeling clay and smooth pebbles, you can capture the classic glossy look of ladybugs on a sunny windowsill.
Detailed Instructions
Materials
- Smooth, oval-shaped stones or pebbles (2-3 inches wide)
- Red acrylic paint
- Black acrylic paint
- White acrylic paint
- Air-dry clay or polymer clay (optional, for shaping)
- Medium flat paintbrush
- Small round detail brush
- Dotting tool or the handle end of a paintbrush
- Clear sealant (matte or glossy spray)
Step 1: Base Preparation
-
Clean the pebbles:
Start by washing your stones thoroughly with soap and water to remove any dirt or dust. Dry them completely with a towel before moving on. -
Optional clay shaping:
If you can’t find smooth stones, you can mold the entire ladybug shape out of air-dry clay. Roll a ball, flatten the bottom, and smooth out the dome. -
Prime the surface:
If your rocks are very dark, apply a thin coat of white paint first. This helps the red color pop and look more vibrant later on.
Smooth Surface Secret
If using clay instead of rocks, dip your finger in a little water and rub the surface before drying to remove fingerprints and ensure a perfect shell.
Step 2: Color Blocking
-
Paint the body red:
Using your medium flat brush, cover the top and sides of the stone with bright red acrylic paint. You might need two coats for full coverage. -
Let it dry completely:
Patience is key here. I usually wait about 20 minutes between coats to ensure the red doesn’t streak or lift. -
Mark the head:
Visualize the front quarter of your oval as the head. Using the black paint, carefully paint a semi-circle shape at the narrower end of the stone. -
Extend the black down:
Bring the black paint down slightly onto the sides to create a seamless, rounded look for the ladybug’s face.
Metallic Magic
Try using metallic or pearlescent red paint for the wings. It catches the sunlight beautifully and adds a magical, glimmering effect.
Step 3: Adding Details
-
Draw the center line:
Switch to your small detail brush. Paint a thin black line straight down the middle of the red back, starting from the black head and going to the tail. -
Create the wings:
At the very top of that center line, paint a tiny ‘V’ shape where the wings meet the head to add a touch of realism. -
Paint the spots:
Using a dotting tool or the handle end of a paintbrush dipped in black paint, stamp round spots onto the red wings. -
Vary the sizes:
Make some spots slightly larger near the center and smaller ones near the edges for a natural appearance. -
Add the eyes:
Once the black head is dry, use a clean small brush or a toothpick to add two small, slanted white ovals for the eyes. -
Give it personality:
Paint a tiny black pupil inside the white ovals, positioned toward the bottom or side, to give your ladybug a cute, looking-around expression. -
Add a mouth:
Paint a tiny, subtle white curve near the bottom of the black face area if you want a smiling bug, though simple eyes often look best.
Step 4: Sealing and Finishing
-
Check for gaps:
Look around the bottom edges where the stone meets the table. Touch up any unpainted spots with red or black to ensure it looks good from all angles. -
Final dry time:
Let the painted details sit until they are completely dry to the touch, usually at least an hour. -
Apply sealant:
Spray or brush on a clear coat sealant. A satin or glossy finish mimics the hard shell of a real beetle perfectly. -
Display your creation:
Once sealed and dry, set your new friends on a sunny windowsill next to a plant for the perfect spring scene.
Now you have a cheerful family of ladybugs to brighten up any corner of your home


Silly Clay Monsters

This adorable teal monster with a big, toothy grin is a perfect beginner project that proves monsters don’t have to be scary. With his wobbly horns and tiny feet, this little friend will sit cheerfully on your desk to keep you company.
Step-by-Step Tutorial
Materials
- Teal or turquoise modeling clay (main body)
- Pink modeling clay (horns and cheeks)
- White modeling clay (eyes and teeth)
- Black modeling clay (pupils)
- Clay modeling tools or a toothpick
Step 1: Shaping the Monster Body
-
Roll the main shape:
Start with a large chunk of teal clay and roll it into a smooth ball to warm it up and remove cracks. -
Form the cylinder:
Gently gently roll the ball back and forth on your table to elongate it into a thick, chubby cylinder shape. -
Round the top:
Use your palms to smooth the top into a nice dome shape, creating the monster’s head. -
Flatten the base:
Tap the bottom of your cylinder against the table surface so the monster stands up sturdily on its own. -
Smooth the surface:
Run your thumb over the clay to smooth out any fingerprints so the skin looks neat.
Step 2: Adding Personality & Features
-
Make the eye sockets:
Using your thumb or a ball tool, press two shallow indentations near the top where the eyes will go. -
Create the whites of the eyes:
Roll two medium-sized balls of white clay and press them firmly into the indentations you just made. They should bulge out slightly. -
Add the pupils:
Take two tiny pieces of black clay, roll them into balls, and flatten them onto the white eyes. -
Give it a smile:
Use a clay knife or the edge of a ruler to gently press a wide, curved smile into the face below the eyes. -
Create the teeth:
Roll two very small cones of white clay and attach them to the corners of the mouth, pointing downward. -
Add rosy cheeks:
Make two tiny pink dots and press them onto the face right next to the corners of the smile.
Smooth Seams
When attaching the arms and horns, use the back of your fingernail or a tool to drag a tiny bit of clay from the piece onto the body to lock it in place.
Step 3: Limbs and Horns
-
Form the arms:
Roll two sausage shapes from the teal clay, slightly tapered at one end. -
Attach the arms:
Press the arms against the sides of the body, blending the clay at the shoulder area so they don’t fall off. -
Make the feet:
Create two small semi-circles of teal clay and place them at the bottom front of the body. -
Detail the toes:
Use a toothpick or knife tool to press two lines into each foot to create little toes. -
Shape the horns:
Roll two cones of pink clay, making sure the tips are slightly curved. -
Attach the horns:
Press the pink horns firmly onto the top of the monster’s head. -
Add texture:
I like to use a stiff brush or a needle tool to poke tiny, subtle dots all over the body for a skin-like texture.
Droopy Horns?
If the horns keep flopping over, stick a small piece of toothpick inside the horn and then push the other end into the head for an invisible support structure.
Place your new goofy monster friend on a shelf where it can smile at you all day


Mini Pizza Slice Charms
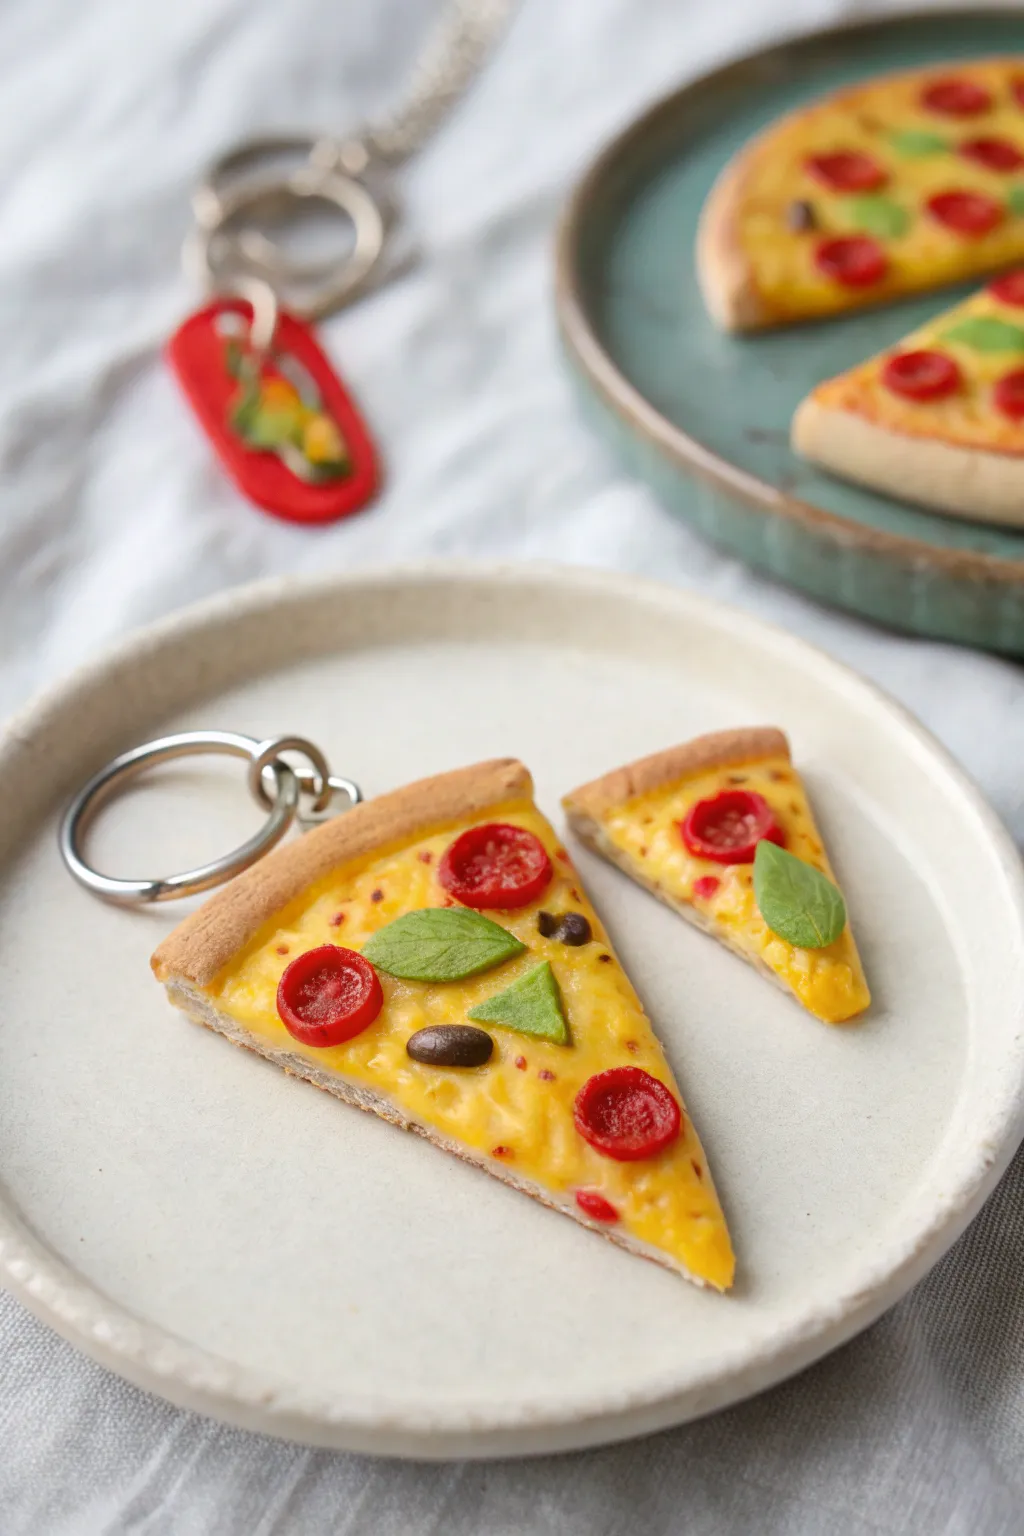
Create a mouth-watering accessory with this tiny, realistic pizza slice charm that looks good enough to eat. It’s a perfect beginner project for learning detailed texturing techniques using simple tools like toothbrushes and needles.
How-To Guide
Materials
- Polymer clay (beige/tan for crust, yellow/translucent mix for cheese, red for pepperoni, green for basil, black/brown for olive)
- Liquid polymer clay (Fimo liquid or similar)
- Chalk pastels (orange, brown, yellow)
- Small paintbrush
- Old toothbrush
- Needle tool or toothpick
- Rolling pin
- Blade or craft knife
- Eye pin
- Keychain ring
Step 1: Forming the Crust
-
Mix the dough color:
Start by conditioning your beige clay. To make it look more like baked dough, I like to mix a tiny speck of white and translucent clay into the beige. -
Roll the base:
Roll the conditioned clay into a flat sheet about 3-4mm thick. This will be the foundation of your slice. -
Cut the shape:
Using your blade, cut a clean triangle shape. The wide end will become your crust edge. -
Build the crust rim:
Roll a small snake of the same dough-colored clay. Press this gently onto the wide end of your triangle to create a raised crust edge. -
Texture the dough:
Take an old toothbrush and tap it repeatedly all over the clay, focusing especially on the raised crust rim. This mimics the porous texture of bread. -
Shade the crust:
Scrape some orange and brown chalk pastel into a powder. Using a dry brush, gently dust the outer raised crust to give it a ‘baked’ golden-brown look.
Step 2: Adding Sauce and Cheese
-
Create the cheese mix:
Mix yellow polymer clay with a significant amount of translucent clay. This key step ensures the cheese looks melty and greasy rather than like plastic. -
Apply the cheese:
Spread your cheese mixture on the triangle, right up to the raised crust. Use a needle tool to drag and roughen the surface so it isn’t perfectly smooth. -
Add ‘sauce’ shading:
Scrape some red and orange chalk pastel powder. Dab this lightly onto the cheese layer near the crust and edges to suggest tomato sauce peeking through. -
Insert the hardware:
Before adding toppings, carefully push an eye pin into the center of the raised crust. The loop should stick out just enough to attach the keychain later.
Secrets to Realism
For the most realistic pepperoni, mix a tiny bit of translucent clay into the red. It makes the ‘meat’ look cured and fatty rather than flat and opaque.
Step 3: Making the Toppings
-
Make the pepperoni:
Roll a very thin log of red-orange clay. Slice off tiny discs. -
Texture the pepperoni:
Press the toothbrush onto each tiny red disc to give it a meaty texture, then place them randomly on the cheese. -
Form the basil leaves:
Take a tiny bit of green clay and flatten it into a teardrop shape. Use a needle tool to impress a central vein down the middle and place it on top. -
Add olive slices:
Roll a tiny speck of black or dark brown clay into an oval. Press it onto the pizza and use a needle tool to create a small indentation or hole if you want it to look like a sliced olive. -
Secure the toppings:
Gently press all toppings down with your finger so they bond with the cheese layer. -
Final cheese detail:
Mix a drop of liquid polymer clay with yellow pastel shavings. Dot this sparingly over the pepperoni or edges for an extra ‘oily’ cheese effect. -
Bake:
Bake the piece according to your clay manufacturer’s instructions (usually 275°F/130°C for 15-30 minutes). Let it cool completely. -
Assemble:
Use pliers to open the jump ring on your keychain and attach it to the eye pin loop in the crust.
Fixing Loose Pins
If the eye pin feels loose after baking, pull it out, add a drop of super glue or E6000 to the shaft, and slide it back into the hole for a permanent hold.
Now you have a charming slice of pizza that stays fresh forever and adds a savory touch to your keys

The Complete Guide to Pottery Troubleshooting
Uncover the most common ceramic mistakes—from cracking clay to failed glazes—and learn how to fix them fast.
Easy Fruit Minis
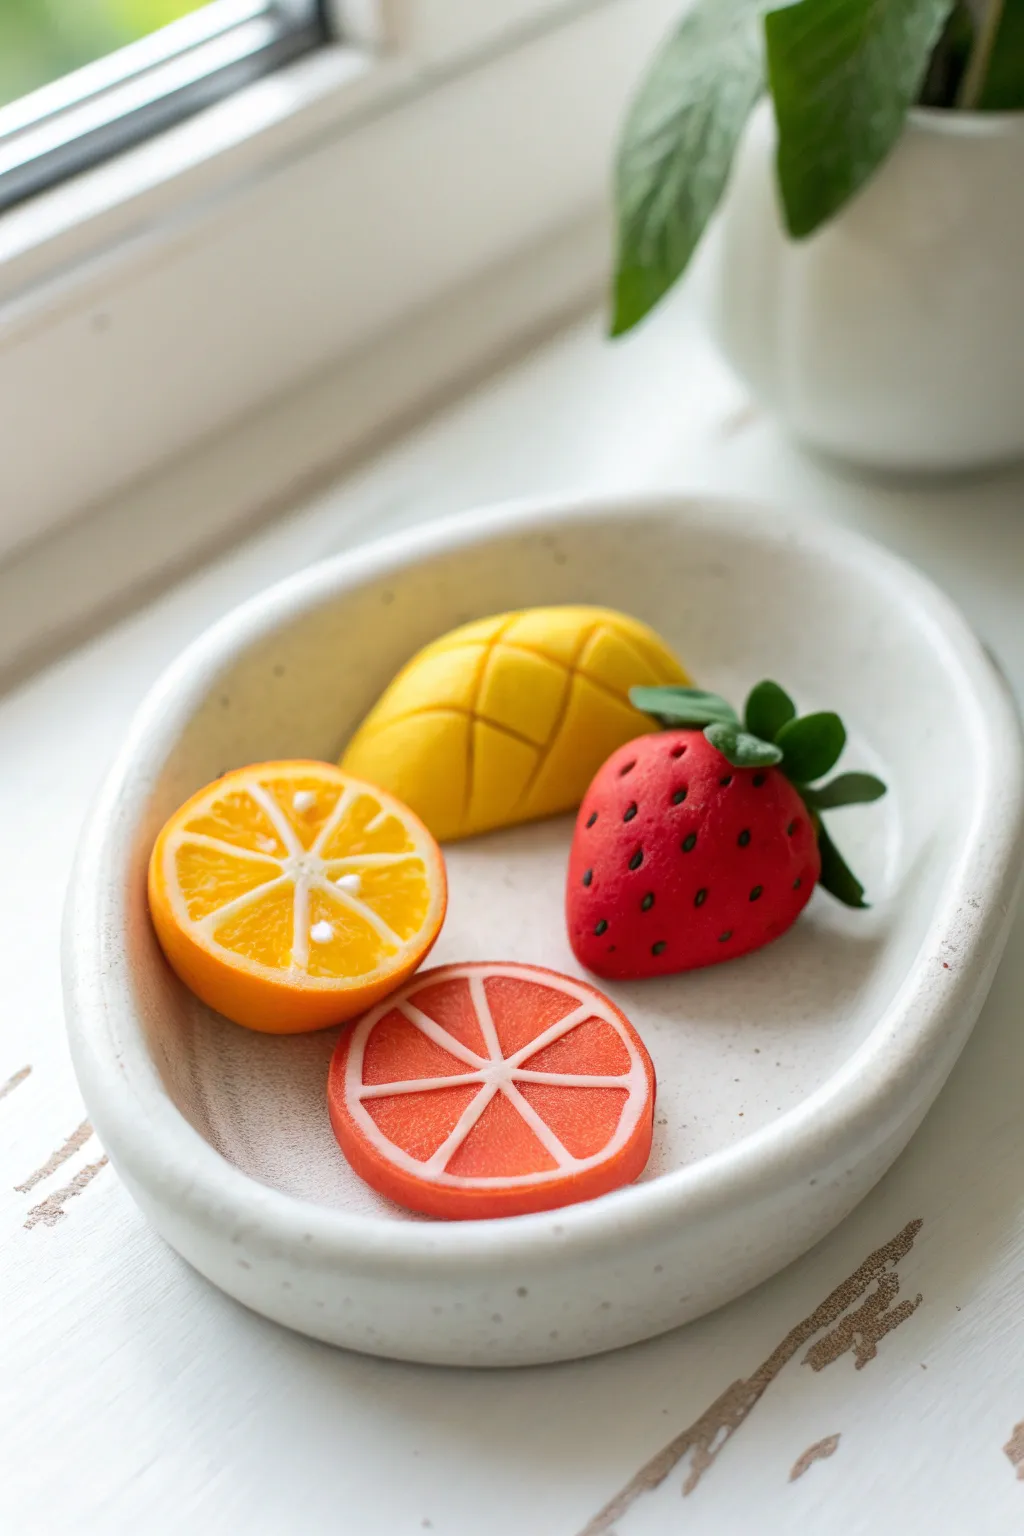
Create a deliciously cute collection of miniature fruits perfect for dollhouse play or decoration. These vibrant lemons, grapefruits, mangos, and strawberries are crafted with simple shaping and texturing techniques that look impressively realistic.
Step-by-Step Tutorial
Materials
- Polymer clay or air-dry modeling clay (yellow, orange, red, green, white)
- Plastic clay sculpting tools (knife tool, needle tool)
- Small rolling pin
- Clean work surface or mat
- Optional: Gloss glaze for a shiny finish
Step 1: Juicy Citrus Halves
-
Prepare the rind:
Start by taking a small ball of orange or yellow clay, about the size of a large marble. Flatten it slightly into a thick disc shape to form the outer skin of your fruit. -
Create the pith:
Roll out a very thin sheet of white clay. Cut a circle slightly smaller than your orange disc and press it gently onto the center. This creates the white pith layer found inside citrus fruits. -
Form the segments:
Take a slightly smaller ball of translucent or regular orange/yellow clay (matching the rind). Flatten it into a circle and place it on top of the white layer. -
Detail the sections:
Using a thin blade tool, score lines radiating from the center like wheel spokes to create the triangular fruit segments. I like to press gently to uncover the white clay beneath, creating realistic segment lines. -
Add texture:
Take a needle tool and gently prick the surface of the fruit segments to mimic the juicy texture of citrus pulp. Add a few tiny dots of white clay near the center for a ‘shining’ juice effect.
Step 2: Sliced Grapefruit Ring
-
Base shape:
Roll a flat, circular slab of reddish-pink clay for the grapefruit flesh. It should be thinner than the orange half you just made. -
Add the rim:
Roll a thin snake of white clay and wrap it around the entire circumference of the pink circle. -
Outer skin:
Roll a slightly thicker snake of orange clay and wrap it around the white layer to finish the skin. -
Segment lines:
Roll very thin threads of white clay. Lay them across the pink center in a star pattern to divide the fruit into equal wedges. -
Smooth it out:
Gently roll over the slice with your rolling pin just once to flatten the white threads into the pink clay so the surface is unified and smooth.
Smudged Colors?
If red clay stains your white clay, clean your hands and tools with a baby wipe or rubbing alcohol between colors. Work from lightest to darkest colors.
Step 3: Textured Mango
-
Shape the body:
Form a smooth oval shape from yellow clay, slightly flattening one side so it sits stably. It should look like a mango cheek that has been sliced off the pit. -
Score the grid:
Using a plastic knife tool, cut deep crisscross lines into the rounded top surface. Do not cut all the way through the bottom; you just want to create the classic diced mango grid pattern. -
Open the cubes:
Gently bend the clay piece slightly backwards to make the cut squares pop open and separate slightly.
Make it Wearable
Before baking or drying, insert a metal eye pin into the top of your fruits. Once hard, add jump rings to turn them into vibrant summer earrings or charms.
Step 4: Sweet Strawberry
-
Mold the berry:
Roll red clay into a ball, then pinch one end to create a tapered teardrop shape. -
Seed texture:
Using a needle tool or toothpick, poke small, shallow holes all over the surface of the strawberry to create the seed indentations. -
Fill the seeds (optional):
For extra detail, you can press tiny specks of black or dark brown clay into the holes, or just leave the indentations as they are for a simpler look. -
Leafy top:
Flatten a small piece of dark green clay. Use a small cutter or blade to cut out a star shape for the calyx. -
Attach the stem:
Place the green star on the wide end of the strawberry. Add a tiny green cylinder in the center for the stem and gently press everything together to secure it.
Arranging these colorful minis in a small dish makes for a delightful display that looks good enough to eat
Smiley Rainbow Plaques
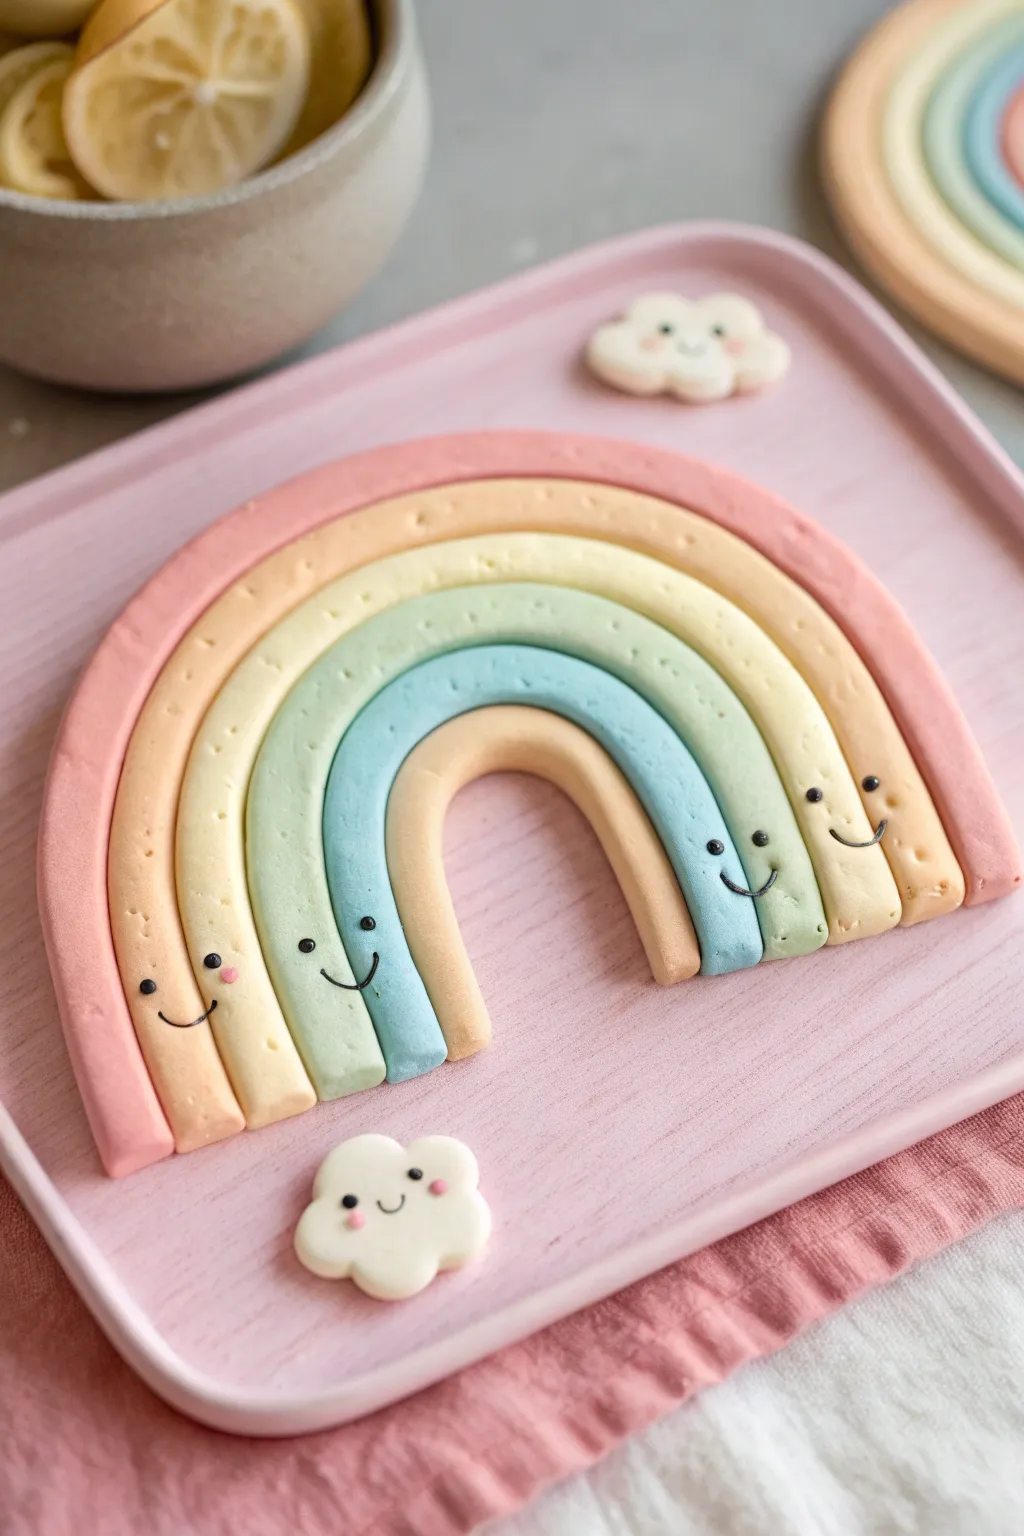
This adorable pastel rainbow isn’t just colorful; it’s beaming with happiness. With soft, rounded edges and tiny smiling faces, this modeling clay project makes a perfect decoration for a nursery or a cheerful gift for a friend.
How-To Guide
Materials
- Polymer clay or air-dry clay (pastel pink, peach, pale yellow, mint green, light blue, soft orange, white)
- Black clay or a fine-tip permanent marker
- Rolling pin or acrylic roller
- Clay knife or plastic cutting tool
- Work surface (silicone mat or parchment paper)
- Small dotting tool or toothpick
- Pink chalk pastel or blush (optional for cheeks)
Step 1: Forming the Arches
-
Prepare your colors:
Start by conditioning your clay. If you don’t have pastel shades pre-mixed, mix a tiny amount of your bright colors into a large ball of white clay until you achieve those soft, milky hues seen in the photo. -
Roll the first snake:
Take a piece of the smallest inner color (soft orange) and roll it into a neat, even snake about 1/4 inch thick. This will form the smallest arch. -
Shape the arch:
Curve the orange snake into a tight ‘U’ shape on your work surface. Gently press the ends to flatten them slightly so they aren’t perfectly round. -
Create the blue layer:
Roll out a snake of light blue clay. Place it directly over the orange arch, molding it snugly against the previous curve so there are no gaps. -
Add the green layer:
Repeat the process with the mint green clay. I like to make each snake slightly longer than the last so they line up perfectly at the bottom. -
Continue layering:
Add the pale yellow snake next, followed by the peach/light orange snake. Press them gently together sideways to help them adhere without flattening the top rounded profile. -
Finish the rainbow:
Add the final, largest arch using the pastel pink clay. Ensure the entire rainbow looks cohesive and the strips are touching firmly. -
Trim the base:
Take your clay knife and make a straight cut across the bottom of all the legs so the rainbow sits perfectly flat and flush.
Smooth Seams
To keep the arches from separating after baking, run a thin smear of liquid clay or water (for air-dry) between the coils before pressing them together.
Step 2: Adding Faces and Clouds
-
Add the eyes:
Using a tiny dotting tool, press small indentations near the bottom of each color strip where you want the face to be. Fill these with microscopic balls of black clay, or wait until dry to draw them on. -
Create the smiles:
Roll extremely thin, thread-like strings of black clay. Use a needle tool or toothpick to gently curve them into smiles and press them onto the clay strips below the eyes. -
Blush the cheeks:
For the rosy cheeks, you can either press on tiny flattened dots of pink clay or gently brush on a little crushed pink chalk pastel. -
Shape the clouds:
Roll two small balls of white clay. Flatten them slightly and use your tooling to press in scalloped edges, creating a fluffy cloud shape. -
Add cloud faces:
Give the clouds their own personalities by adding tiny wide-set eyes and a small smile in the center, just like the rainbow. -
Texture the surface:
If you want a rustic look, you can lightly tap the surface with a toothbrush to add a subtle stone-like texture, or leave it smooth for a modern finish. -
Final cure:
Bake the project according to your polymer clay package instructions, or let it sit in a dry, airy spot for 24-48 hours if using air-dry clay.
Make it a Magnet
Once your rainbow is fully dry or baked and cooled, glue strong round magnets to the back. It makes the cutest fridge decor for holding artwork.
Once fully set, your cheerful rainbow plaque is ready to brighten up any corner of the room


What Really Happens Inside the Kiln
Learn how time and temperature work together inside the kiln to transform clay into durable ceramic.
Pinch Pot Treasure Bowls
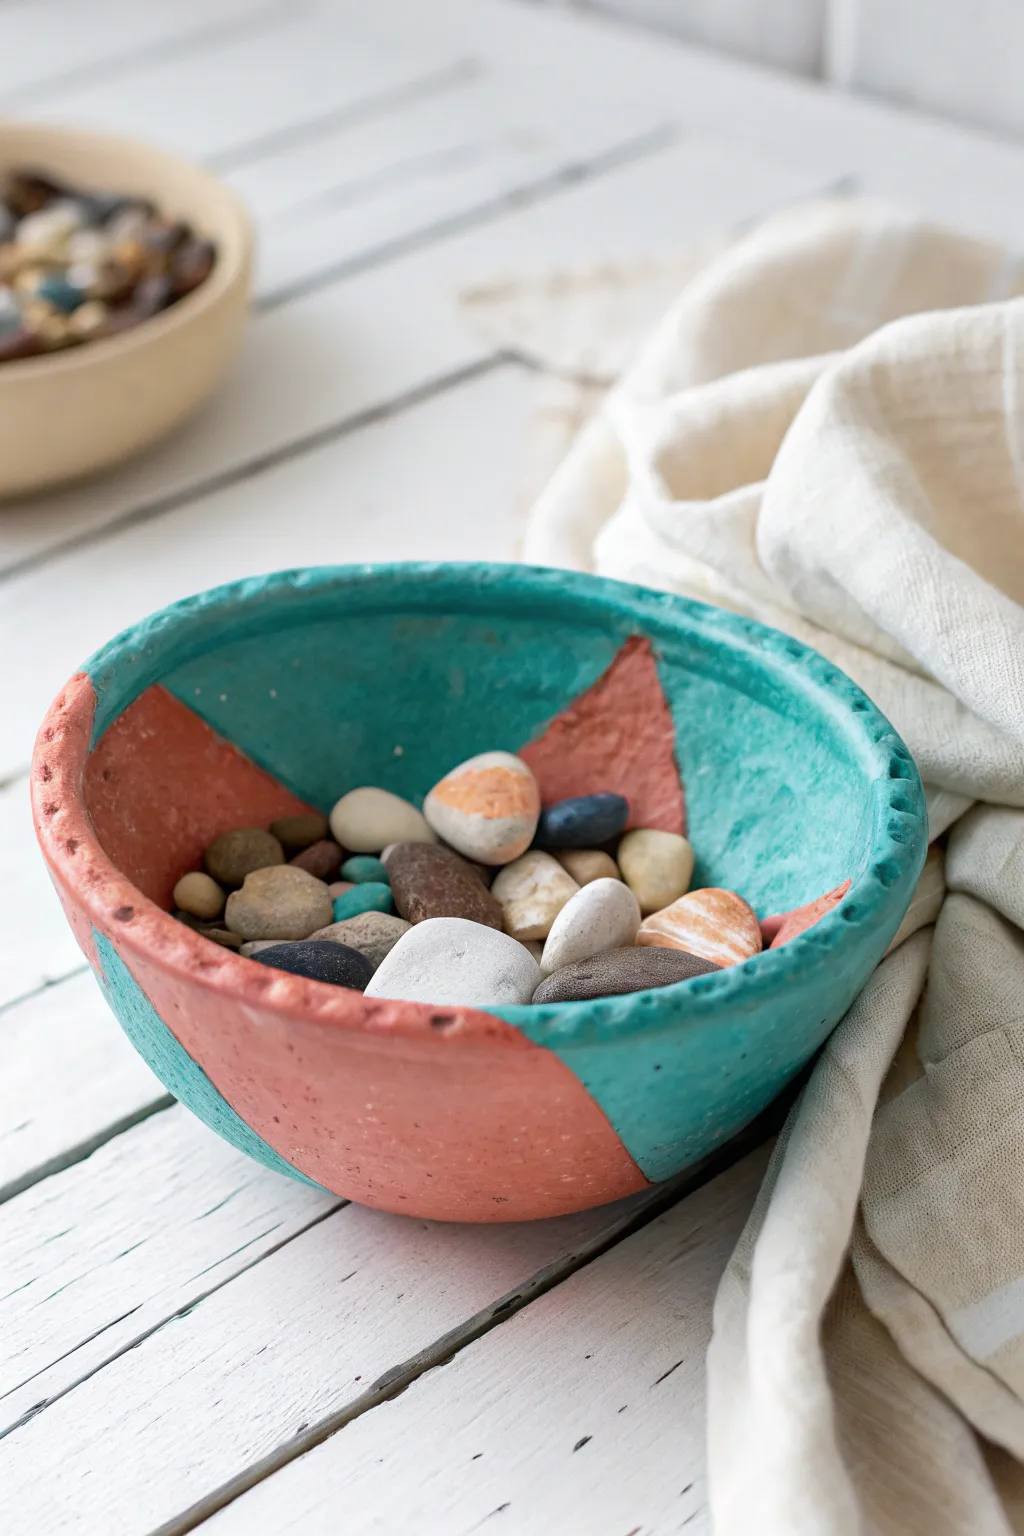
These charming, rustic bowls are perfect for storing tiny collectibles like buttons, beads, or special rocks found on a walk. This project combines simple hand-building techniques with a bold, geometric paint job that turns ordinary air-dry clay into a modern keepsake.
Step-by-Step Tutorial
Materials
- White or terracotta air-dry clay (approximately 1 cup per bowl)
- Small bowl of water
- Acrylic paints: Teal/Turquoise and Terracotta/Coral
- Paintbrushes: Medium flat brush and a fine detail brush
- Washi tape or masking tape (optional)
- Small river stones or pebbles
- Mod Podge or clear acrylic sealer (matte finish)
Step 1: Shaping the Clay
-
Form a ball:
Start by taking a lump of air-dry clay about the size of a tennis ball. Knead it in your hands for a minute to warm it up, then roll it between your palms until you have a smooth, round sphere. -
Open the pot:
Hold the clay ball in one hand. With the thumb of your other hand, push gently into the center of the ball. Don’t go all the way through the bottom; leave about a half-inch of thickness at the base. -
Pinch the walls:
Using your thumb on the inside and your fingers on the outside, start pinching the clay walls gently. Rotate the ball slightly after every pinch to ensure even thickness all the way around. -
Widen the bowl:
Continue pinching and turning until the opening gets wider and the walls become thinner. Aim for a wall thickness of about a quarter-inch—too thin and it might crack, too thick and it takes ages to dry. -
Tap the base:
Once you are happy with the size, gently tap the bottom of the bowl on your table surface. This creates a flat base so your treasure bowl won’t wobble. -
Smooth the imperfections:
Dip your finger in a little bit of water and rub it over any large cracks on the rim or outside surface. Don’t worry about getting it perfectly smooth; the texture adds character. -
Let it dry:
Set your finished pinch pot aside in a safe, dry place. I like to flip mine upside down or gently rotate it every few hours for even drying. Leave it for 24-48 hours until it turns fully white and feels hard.
Step 2: Applying Design and Color
-
Plan your sections:
Look at your dry bowl and imagine dividing it into large triangular sections. You can lightly sketch these lines with a pencil if you want distinct guides. -
Paint the first color:
Load your medium brush with the teal (or turquoise) paint. Fill in two large, opposing triangular sections on the outside of the bowl. Carry this color over the rim and down the inside wall of those same sections. -
Paint the second color:
Wash your brush thoroughly. Dip into the terracotta paint and fill in the remaining unpainted sections. Make sure the colors meet neatly at the edges. -
Refine the lines:
If the edges where the colors meet look a bit messy, use your fine detail brush to carefully straighten them out. A slightly wobbling line actually looks great with the organic shape of a pinch pot. -
Dry the paint:
Allow the paint to dry completely to the touch, which usually takes about 20 to 30 minutes depending on how thick you applied it. -
Add a protective coat:
Apply a thin layer of matte Mod Podge or clear sealer over the entire bowl. This protects the paint from chipping and gives the clay a finished look.
Smooth Rim Trick
If the rim of your bowl is cracking too much while you pinch, dip your finger in water and run it along the edge immediately to heal the clay before it dries out.
Step 3: Creating the Treasures
-
Select smooth stones:
Find a handful of small, smooth river rocks that fit nicely inside your new bowl. Wash and dry them thoroughly to remove any dust. -
Add painted details:
Using your leftover paint, decorate a few of the stones. You can paint a simple stripe across the middle or dip just the end of a stone into the paint for a dipped look. -
Assemble your display:
Once the stones are dry, arrange them inside your pinch pot. Mix the painted stones with the natural ones for a beautiful contrast.
Cracks While Drying?
If a small crack appears as the clay dries, make a paste of clay and water (slip) and fill the crack. Smooth it over and let it dry again before painting.
Your beautiful, handmade vessel is now ready to hold all your tiny discovered treasures on a desk or shelf
Coiled Snake Pots
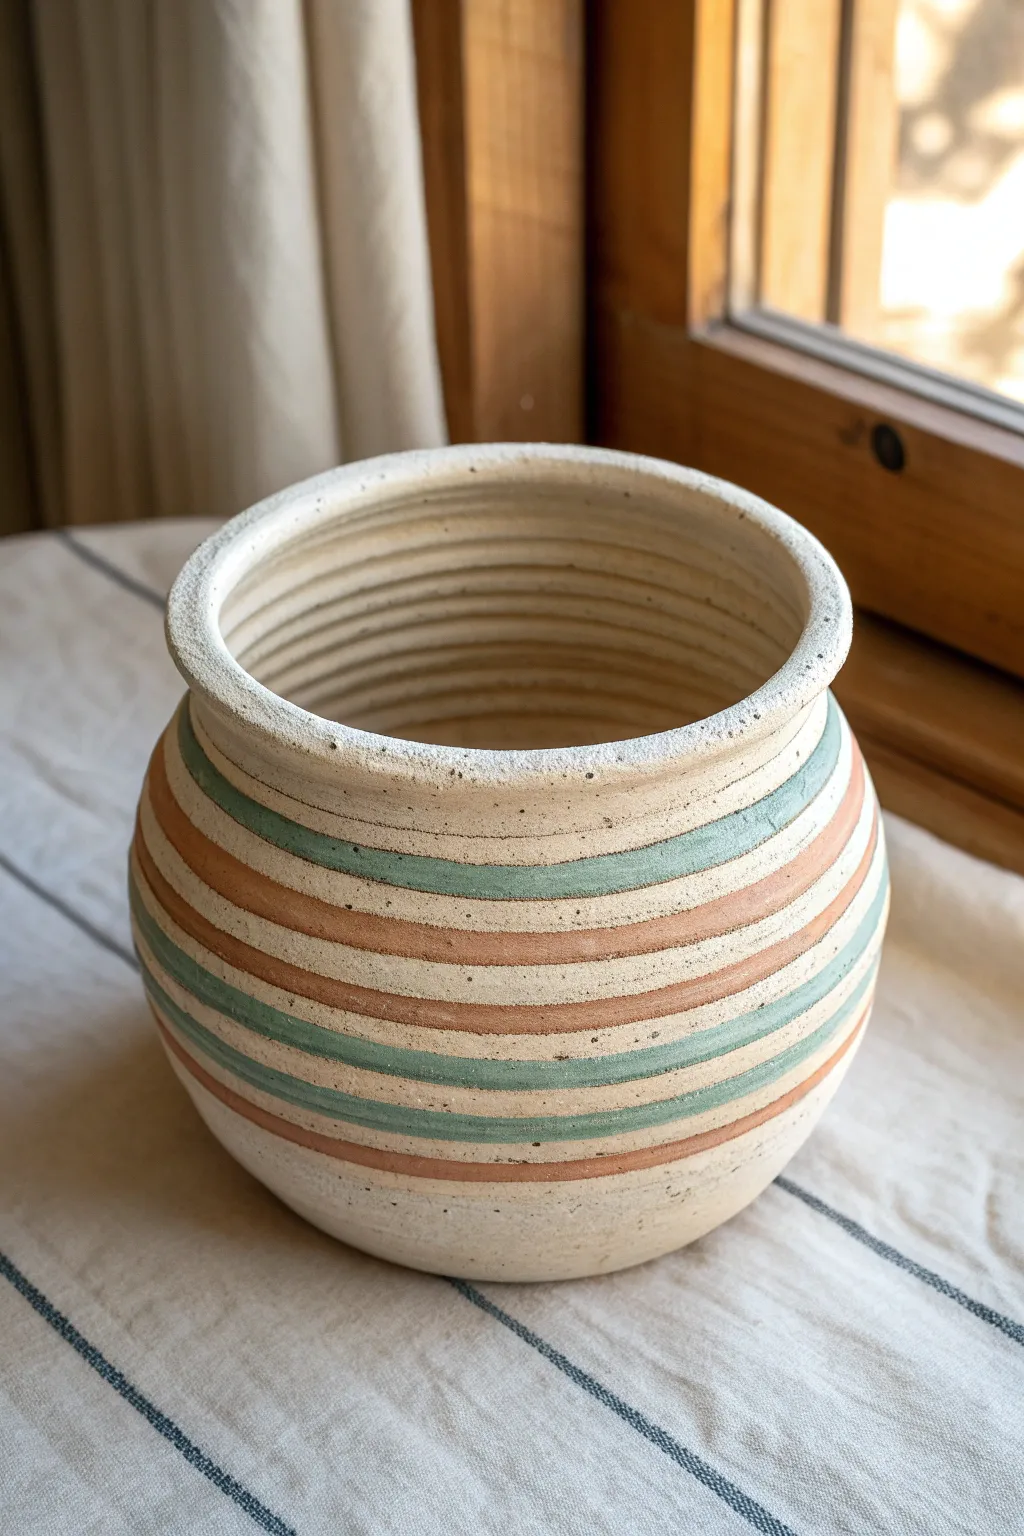
Transform simple clay coils into a stunning, textured vessel with soft bands of teal and terracotta. This project teaches the classic coil-building technique while creating a functional piece perfect for holding pencils or small succulents.
How-To Guide
Materials
- Air-dry clay (white or cream)
- Acrylic paints (teal, terracotta, extra cream/white)
- Rolling pin or smooth cylinder
- Small cup of water
- Pointed modeling tool or plastic knife
- Paintbrushes (small round and medium flat)
- Canvas or wax paper work surface
- Sponge
Step 1: Creating the Base
-
Prepare the slab:
Start by pinching off a ball of clay about the size of a tangerine. Flatten it on your work surface using your palm or a rolling pin until it is about a quarter-inch thick. -
Cut a circle:
Find a circular object like a large cup or small bowl to use as a template. Place it on the slab and trace around it with your modeling tool to cut out a perfect circle base. -
Smooth the edges:
Dip your finger in a little bit of water and run it around the edge of your circle to smooth out any rough cuts.
Pro Tip: Hidden Seams
Stagger the seams where your coil ends meet. If they all line up perfectly on one side, that side of the pot becomes weak and might crack while drying.
Step 2: Building the Coils
-
Roll your snake:
Take a hunk of clay and begin rolling it back and forth on the table with the palms of your hands. Aim for a long, even ‘snake’ about the thickness of a thick pencil or pinky finger. -
Score and slip:
Using your pointed tool, make small scratch marks (scoring) around the top edge of your base. Dab a little water (slip) on the scratches. This acts like glue for the clay. -
Attach the first coil:
Lay your clay snake gently on top of the scored edge of the base. When you complete the circle, trim the excess and gently smudge the two ends together so the seam disappears. -
Build upwards:
Continue rolling snakes and stacking them one on top of the other. The image shows about 10-12 layers of coils. -
Shape the belly:
To get the rounded shape seen in the photo, place each new coil slightly further outward than the one below it for the first few layers. -
Taper the neck:
Once you pass the middle section, start placing the coils slightly inward to bring the shape back in towards the top opening.
Step 3: Refining and Drying
-
Blend the exterior:
For a smoother look like the finished project, use your thumb or a modeling tool to gently smudge the coils together on the outside surface vertically. This bonds the layers stronger. -
Leave ridges visible:
While blending, don’t smooth it completely flat. The charm of this pot is seeing the horizontal lines where the coils meet. Leave the inside un-smoothed so the coil texture stays distinct. -
Rim finish:
Use a damp sponge to gently round over the top lip of the pot so it isn’t sharp or jagged. -
Dry thoroughly:
Let your pot sit in a safe, dry place for at least 24-48 hours. It needs to be completely hard and white before painting.
Level Up: Glossy Glaze
For a true ceramic look, coat only the inside and lip with a high-gloss varnish or Mod Podge, leaving the outside matte for a sophisticated texture contrast.
Step 4: Painting the Stripes
-
Base wash:
I like to water down a bit of cream or white paint and give the whole pot a thin wash first. This seals the clay and provides a uniform background color. -
Plan your pattern:
Look at the horizontal ridges created by your coils. Choose which ‘stripes’ will be colored. The example alternates between two unpainted bands, one painted band, and so on. -
Apply the teal:
Using a small round brush, carefully paint the teal stripes. Follow the natural groove of the coil; it makes painting straight lines much easier. -
Add the terracotta:
Rinse your brush and paint the orange-brown bands. Notice how the colors have a slightly ‘washed’ look? You can achieve this by thinning your acrylic paint with a drop of water. -
Speckled finish:
To mimic the ceramic clay look, load an old toothbrush with thinned brown paint and flick the bristles with your thumb to mist tiny speckles over the entire pot.
Fill your beautiful new pot with dried flowers or pencils to enjoy your handiwork every day

TRACK YOUR CERAMIC JOURNEY
Capture glaze tests, firing details, and creative progress—all in one simple printable. Make your projects easier to repeat and improve.
Big, Chunky Clay Beads
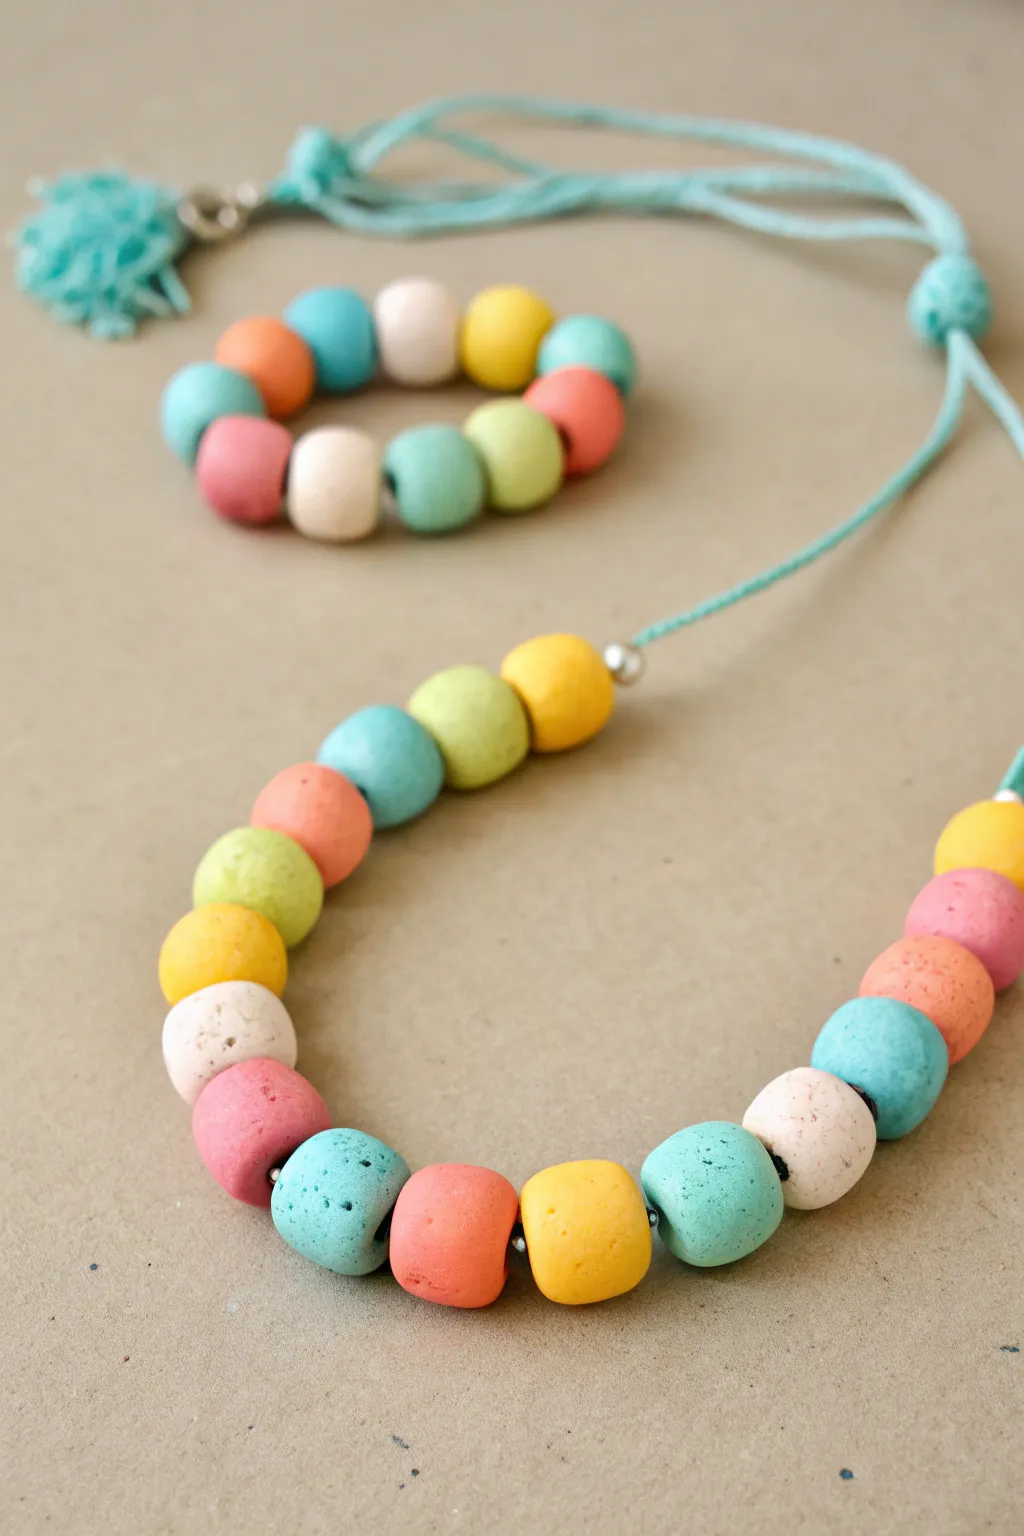
Create a bold fashion statement with these oversized, colorful beads that look surprisingly chic. The soft, matte finish and pastel palette give this jewelry set a modern, crafted feel that is fun to wear and even more fun to make.
Detailed Instructions
Materials
- Air-dry clay or polymer clay (white base)
- Acrylic paints (pastel pink, coral, yellow, mint, light blue)
- Small paintbrush
- Bamboo skewer or knitting needle
- Waxed cotton cord (turquoise or mint)
- Sandpaper (fine grit)
- Seed beads (silver)
- Optional: Clay roller
- Scissors
Step 1: Shaping the Beads
-
Prepare the Clay:
Start by conditioning your clay until it is soft and pliable. If you are using white clay to paint later, simple kneading is enough. If you are using pre-colored clay, mix your colors now to achieve those soft pastel hues. -
Roll a Log:
Roll the clay into a thick, even snake or log shape, approximately 3/4 of an inch in diameter. Try to keep the thickness consistent from end to end. -
Section the Clay:
Use a clay blade or a plastic knife to cut the log into equal segments. For the look in the photo, you want pieces that are slightly wider than they are tall, creating a chunky, rounded-cube aesthetic. -
Refine the Shape:
Take each segment and gently roll it in your palm to soften the cut edges. You aren’t aiming for a perfect sphere; instead, gently tap the ends on your work surface to flatten them slightly back into a barrel shape. -
Texture the Surface:
To mimic the stone-like texture seen in the image, lightly dab the surface of the wet clay with an old toothbrush or a piece of crumpled foil. This adds a lovely organic grit. -
Create the Bead Holes:
While the clay is still soft, carefully insert a bamboo skewer or knitting needle through the center of each bead. Rotate the tool as you push through to prevent the bead from squashing. -
Double Check the Holes:
Make sure the hole is wide enough for your specific cord. I always wiggle the skewer a bit to widen the opening just in case the clay shrinks slightly during drying. -
Dry the Beads:
Set your beads aside to dry completely according to the package instructions. For air-dry clay, rotating them occasionally ensures they dry evenly on all sides.
Pro Tip: Clean Holes
To keep the bead holes clean while painting, slide the beads onto a skewer and prop the skewer up between two objects. This lets you paint the entire surface without touching it.
Step 2: Decorating and Assembly
-
Sand for Smoothness:
Once fully cured, use fine-grit sandpaper to gently smooth out any fingerprints or sharp ridges around the bead holes. -
Painting Time:
If you used white clay, paint each bead in your chosen pastel colors. Apply 2-3 thin coats for opaque coverage, letting the paint dry between layers. Leave one or two white specifically for a speckled effect. -
Add Speckled Details:
For the stone effect shown on the white and blue beads, dilute a tiny bit of grey or black paint with water. Dip a stiff brush in it and flick the bristles with your finger to spray tiny speckles onto the dry beads. -
Seal the Beads:
Apply a matte varnish or sealant to protect the paint. A matte finish is key to achieving the soft, chalky look seen in the example photo. -
Cut the Cord:
Cut a length of turquoise waxed cotton cord. For a necklace, measure it against your neck to find your preferred drop length, leaving extra room for tying knots. -
Start Stringing:
Begin threading your beads onto the cord. Create a pattern by alternating colors—try placing a yellow next to a mint, then a coral, to keep the sequence vibrant. -
Add Metal Spacers:
Between select clay beads, or at the ends of the beaded section, add a small silver seed bead. This adds a professional finish and a tiny bit of shine. -
Secure the Necklace Beads:
To keep the beads centered like in the picture, tie a simple overhand knot in the cord immediately before the first bead and immediately after the last bead. -
Make the Bracelet:
Repeat the stringing process on a shorter piece of cord for the bracelet. Pack the beads tighter here so they form a complete circle around the wrist. -
Create the Closures:
Finish both pieces by tying adjustable sliding knots or simple secure bows at the ends of the cords. You can attach a decorative tassel to the necklace ties for extra flair.
Troubleshooting: Cracking Clay
If you see cracks forming as the air-dry clay cures, it might be drying too fast. Dip your finger in a little water and smooth the crack over, then cover the beads loosely with plastic wrap to slow the drying.
Now you have a stunning, colorful set of jewelry ready to brighten up any outfit
Animal Face Magnets
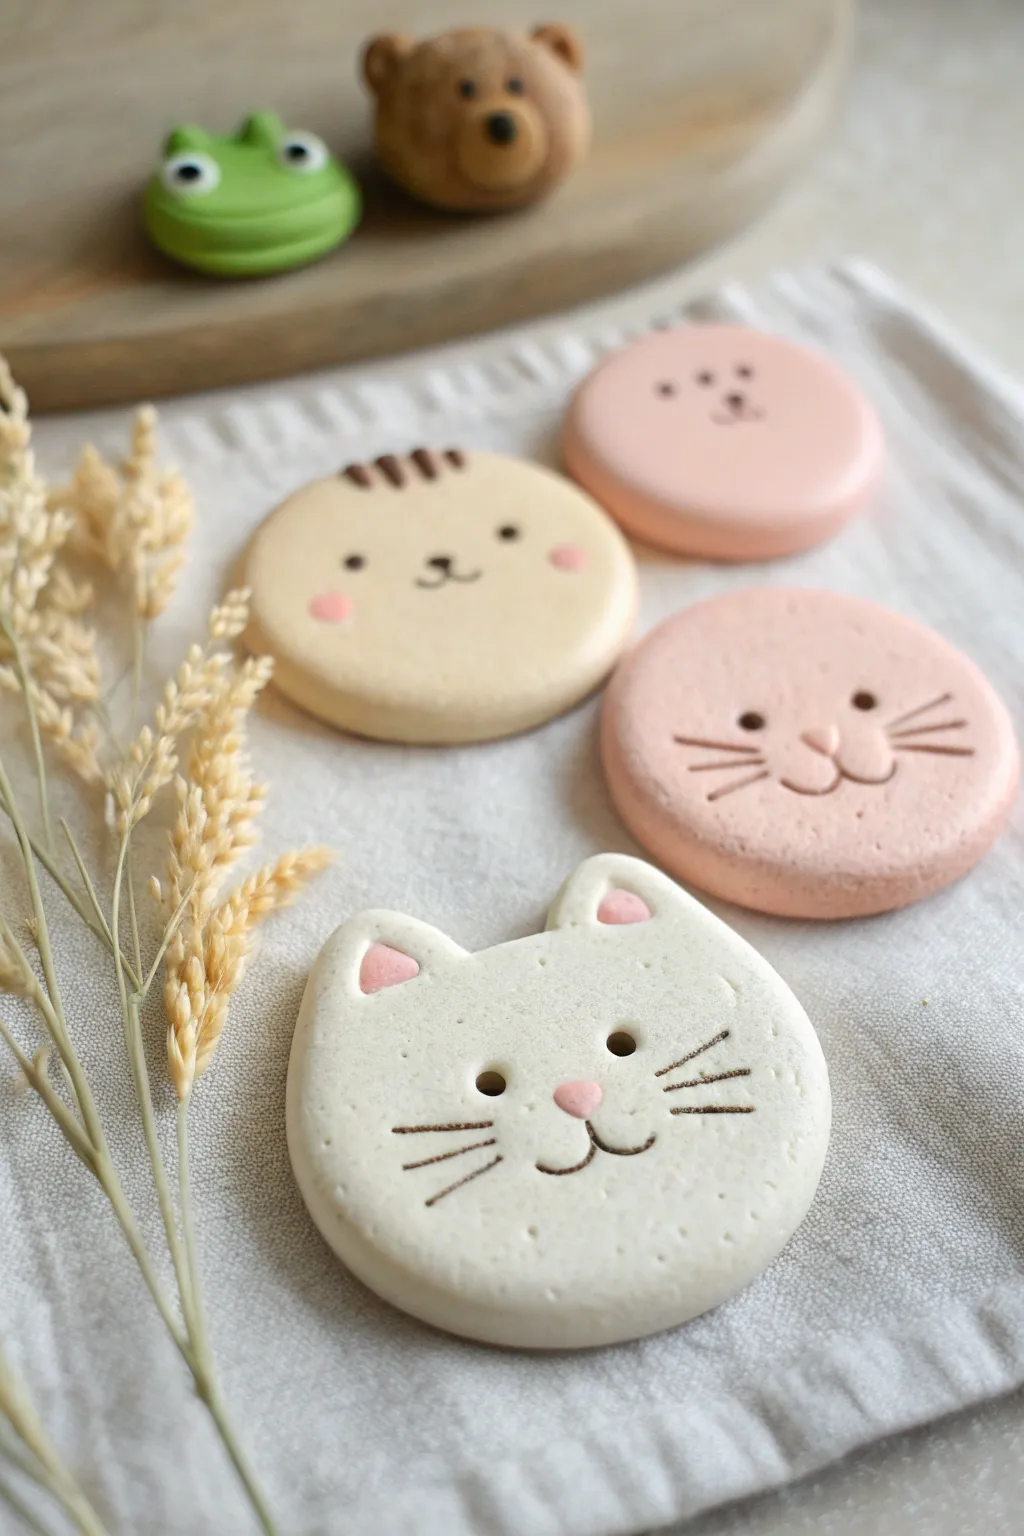
Transform simple lumps of air-dry clay into a charming menagerie of animal faces. These smooth, matte-finish magnets feature adorable cats, bears, and bunnies perfect for brightening up any fridge or locker.
Step-by-Step Guide
Materials
- White air-dry clay (or polymer clay)
- Acrylic paints (white, soft pink, beige/tan, dark brown)
- Rolling pin
- Circle cookie cutters (various sizes)
- Cat face cookie cutter (optional, or shape by hand)
- Small magnets
- Strong craft glue (like E6000)
- Needle tool or toothpick
- Very fine detail paintbrush
- Sandpaper (fine grit)
- Matte varnish (optional)
Step 1: Shaping the Clay Base
-
Condition the clay:
Begin by kneading a handful of clay until it is warm, soft, and pliable. This prevents cracks from forming later. -
Roll it out:
Roll your clay out on a smooth surface to an even thickness of about 1/4 inch (6mm). You want them sturdy, but not too heavy for the magnets. -
Cut the circles:
Use a round cookie cutter to punch out perfect circles for the bear and bunny faces. Gently push them out of the cutter if they stick. -
Create the cat shape:
If you have a cat-head cutter, use it now. If not, cut a circle and gently pinch the top two corners upwards to form triangular ears. -
Smooth the edges:
Dip your finger in a tiny bit of water and run it along the cut edges of the clay to smooth out any roughness or loose bits. -
Dry completely:
Place your clay shapes on a flat surface away from direct heat. Let them dry usually for 24-48 hours, flipping them occasionally to ensure even drying. -
Sand for perfection:
Once fully hard, lightly sand the surface and edges with fine-grit sandpaper to get that porcelain-smooth finish shown in the photo.
Smooth Surface Secret
To get that ultra-smooth finish before painting, wipe the raw wet clay with a baby wipe. It removes fingerprints instantly.
Step 2: Painting the Base Colors
-
Mix your palette:
Prepare your base colors. You’ll need a creamy beige for the bear, a soft pastel pink for one cat, and plain white for the main cat. -
Paint the beige face:
Apply the creamy beige paint to one of your round discs. Use long, even strokes to avoid brush marks. I like to apply two thin coats rather than one thick one. -
Paint the pink face:
Paint the second round disc with the soft pastel pink. Ensure the color looks opaque and solid. -
Paint the white cat:
Even if your clay is white, giving the cat shape a coat of white acrylic paint creates a more uniform, finished look. -
Let the base dry:
Allow all the base coats to dry completely before attempting any detail work.
Step 3: Adding Charming Details
-
Paint the inner ears:
For the white cat, mix a tiny amount of pink and paint small triangles inside the ear shapes. -
Dot the eyes:
Dip the non-brush end of a paintbrush into dark brown paint. Dot two wide-set eyes onto each face. Keep them relatively small for a cute look. -
Paint the noses:
Using a very fine detail brush, paint small rounded triangles or ovals for noses. Use pink for the white cat and pink circle, and dark brown for the beige bear. -
Draw the mouths:
With the finest point on your brush or even a fine-tip permanent marker, draw the ‘w’ shape for the mouth extending down from the nose. -
Add whiskers:
Add three short, horizontal lines on each cheek for the cats. Keep lines thin and delicate. -
Add blushing cheeks:
For the beige bear, dip a fingertip or q-tip into pink paint, dab almost all of it off, and gently stamp rosy cheeks under the eyes. -
Attach the magnets:
Flip the dried faces over. Apply a strong dab of craft glue to the back and press a magnet firmly into the center. Let the glue cure fully.
Brushstroke Blues
If you see brushstrokes in your dried paint, lightly sand them down with fine sandpaper and apply a final watered-down coat.
Once dry, these sweet little faces are ready to hold up your notes and photos with style
Tiny Pencil Topper Buddies
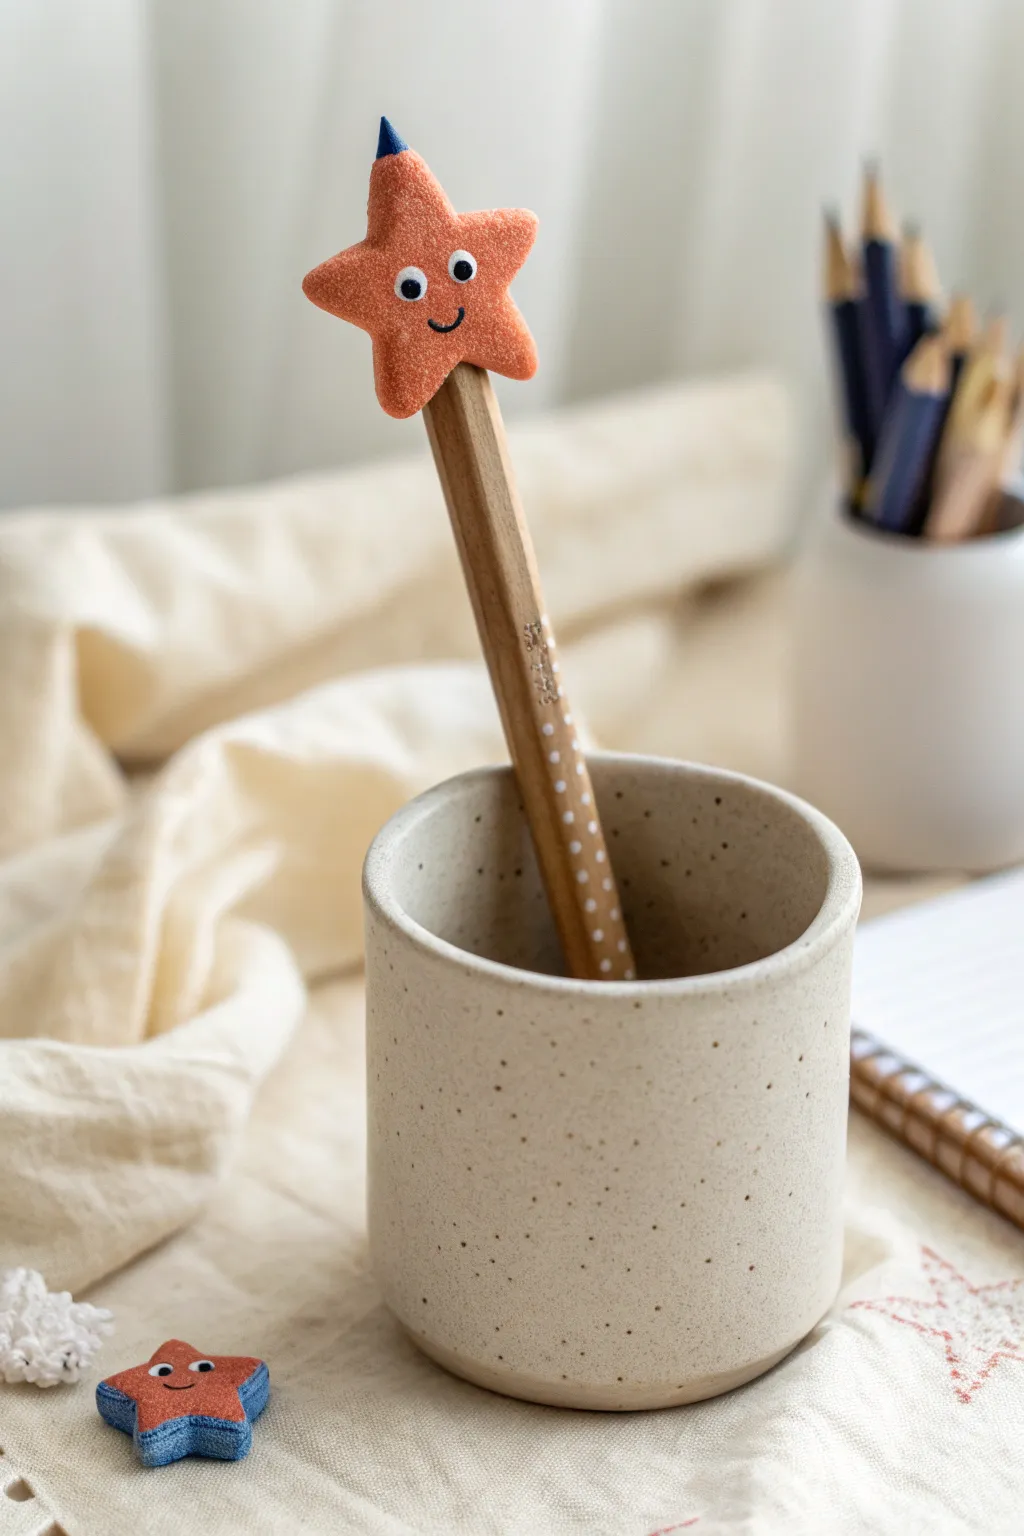
Transform a plain pencil into a cheerful desk companion with this adorable star-shaped topper. Using speckled clay gives it a unique, organic texture that looks deceptively professional but is easy for kids to achieve.
How-To Guide
Materials
- Orange speckled polymer clay (or plain orange mixed with glitter/sand)
- Blue polymer clay
- Wooden pencil
- Googly eyes (small adhesive type)
- Black fine-point permanent marker
- Modeling tool or toothpick
- Baking sheet and parchment paper
- Oven (for baking polymer clay)
Step 1: Fitted Base Creation
-
Condition the clay:
Start by kneading a small amount of blue polymer clay until it is soft and pliable. This warmth makes it easier to shape without cracking. -
Shape the cone:
Roll the blue clay into a small ball, then gently taper one end to create a cone shape about half an inch tall. -
Create the pencil socket:
Take your wooden pencil and press the non-sharpened end into the flat bottom of the blue cone. Gently twist the pencil to widen the hole until the clay sits snugly on top like a hat. -
Smooth the edges:
Remove the pencil carefully so the hole doesn’t collapse. Use your fingers to smooth out any distortion around the opening.
Step 2: Sculpting the Star
-
Prepare the orange clay:
Knead a larger piece of orange speckled clay. If you don’t have speckled clay, I like to mix a pinch of fine craft sand or glitter into plain orange clay to mimic the texture shown in the photo. -
Roll and flatten:
Roll the clay into a ball, then flatten it slightly into a thick pancake, about 1/4 inch thick. -
Cut the star shape:
You can use a small star cookie cutter or shape it by hand. To do it by hand, pinch five points outwards from the center of the disk. -
Round the points:
Gently tap and rub the tips of the star points to make them rounded and soft rather than sharp. -
Attach to the base:
Place the orange star flat on top of the pointy end of your blue cone. Press them together firmly so the layers bond. -
Blend the seam:
If desired, use a modeling tool to slightly blend the underside of the star onto the cone for extra stability, or just ensure the contact area is wide enough to hold.
Topper Won’t Stay On?
If the hole is too loose after baking, wrap a tiny piece of masking tape around the end of the pencil to create a tighter fit for the clay cap.
Step 3: Finishing Details
-
Check the fit:
Briefly slide the topper back onto the pencil to ensure the hole hasn’t warped during the sculpting of the star. Remove the pencil before baking. -
Bake the clay:
Place your clay piece upright on a baking sheet lined with parchment paper. Bake according to the specific instructions on your package of clay (usually around 275°F for 15-30 minutes). -
Cool down completely:
Let the star cool completely before touching it. Polymer clay hardens as it cools. -
Add the smile:
Once cool, use a fine-point permanent black marker to draw a small, U-shaped smile right in the center of the star. -
Apply the eyes:
Peel the backing off two small adhesive googly eyes and stick them just above the smile. If they aren’t self-adhesive, a tiny dot of superglue works perfectly. -
Final assembly:
Slide your finished star topper onto the pencil end. If it feels loose, a dab of glue inside the hole will keep it permanently attached.
Textured Effect
Use a toothbrush to gently tap the surface of the unbaked clay. This creates a store-bought, stony texture that hides fingerprints perfectly.
Now your writing tasks will be overseen by a friendly little star buddy
Handprint Keepsake Tiles
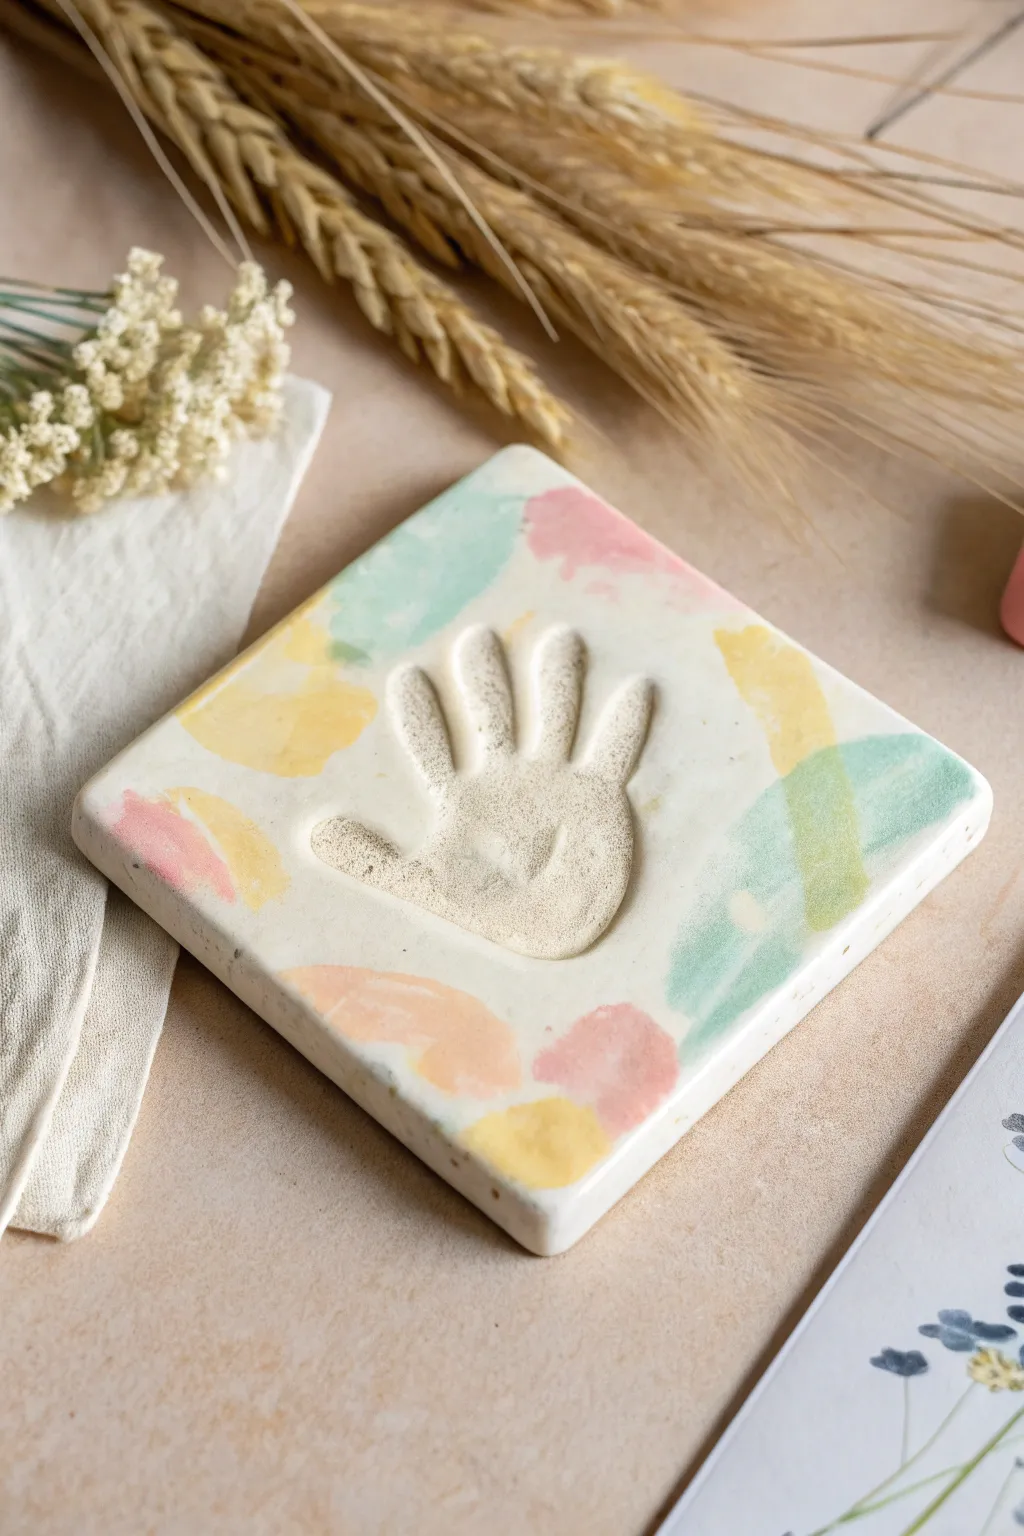
Capture a moment in time with this charming, square clay tile featuring a soft, impressed handprint. The design is elevated with gentle, abstract dabs of pastel colors, creating a modern and sweet decorative piece ideal for gifting or display.
Step-by-Step Tutorial
Materials
- White air-dry modeling clay or polymer clay
- Rolling pin
- Square cookie cutter (large) or a knife and ruler
- Parchment paper or non-stick craft mat
- Acrylic paints (pastel pink, soft yellow, mint green, peach)
- Small round paintbrush
- Fine-grit sandpaper (optional)
- Clear matte varnish or sealant
Step 1: Shaping the Base
-
Preparing the clay:
Begin with a large ball of white modeling clay. Knead it thoroughly in your hands until it becomes warm, soft, and pliable, which helps prevent cracks from forming later. -
Rolling it out:
Place the clay on a sheet of parchment paper to prevent sticking. Using your rolling pin, roll the clay out into an even slab that is approximately 1/2 to 3/4 inch thick. Aim for a thickness that feels substantial enough to hold an impression without breaking. -
Checking uniformity:
Inspect the surface for any air bubbles or uneven spots. If you see bubbles, gently prick them with a pin and smooth the area over with your fingertip. -
Cutting the square:
Use a large square cookie cutter to press down firmly into the clay slab. If you don’t have a cutter large enough to fit a hand, measure a square with a ruler and carefully cut it out using a craft knife or plastic modeling tool. -
Smoothing edges:
Once strong shapes are cut, dip your finger in a tiny bit of water and run it along the cut edges of the square to smooth out any sharpness or roughness.
Cracks while drying?
Mix a tiny amount of water with fresh clay to make a paste (slip). Fill the crack with this paste, smooth it over with your finger, and let it dry again slowly away from direct heat.
Step 2: Creating the Impression
-
Positioning the hand:
Help the child place their hand gently in the center of the square tile. Ensure their fingers are spread slightly apart for a clear definition. -
Pressing down:
Applying even pressure, press down strictly on the palm first, and then firmly on each individual finger and the thumb. I like to hold their wrist steady with one hand while pressing their fingers with my other hand to avoid wiggling. -
Releasing the hand:
Carefully lift the child’s hand straight up and away from the clay to avoid smudging the sides of the impression. Check the depth; if it’s too shallow, you can carefully re-align and press again, or just ball up the clay and restart the rolling process. -
Refining the print:
Inspect the edges of the handprint. If the clay has pushed up slightly around the fingers, gently tap those ridges down with a damp finger for a cleaner look. -
Drying process:
Allow the clay to dry completely according to the package instructions. For air-dry clay, this usually takes 24-48 hours. Flip the tile over halfway through the drying time to ensure the bottom dries evenly and prevents warping.
Cleaner Impressions
Before pressing the hand into the clay, lightly dust the child’s palm with cornstarch or baby powder. This acts as a release agent and prevents the clay from sticking to the skin.
Step 3: Decorating
-
Smoothing the surface:
Once fully dry, if you notice any rough spots on the flat surface or edges, lightly buff them with fine-grit sandpaper until smooth. Wipe away any dust with a dry cloth. -
Mixing pastels:
Prepare your palette with pastel pink, muted yellow, mint green, and soft peach acrylic paints. If your colors are too bright, mix in a little white paint to soften them. -
Applying the first color:
Dip a small round brush into the pastel green. Paint organic, kidney-bean-shaped blotches near the corners and sides of the tile, keeping the paint fairly sheer or ‘washy’ for a watercolor effect. -
Adding warm tones:
Clean your brush and switch to the peach and yellow tones. Add similar abstract blobs in the remaining negative spaces around the handprint. Let some shapes gently touch or slightly overlap. -
Adding pink accents:
Finish with the pastel pink, adding small accents near the edges. Crucially, leave the actual handprint impression unpainted; the white clay contrast highlights the texture of the print beautifully. -
Sealing the keepsake:
After the paint is completely dry, apply a coat of clear matte varnish or sealant over the entire top surface. This protects the clay from moisture and preserves the colors for years to come.
This lovely little tile is now ready to be displayed on a shelf or gifted to a loved one
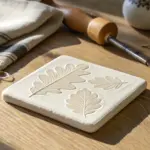
Leaf Print Nature Tags
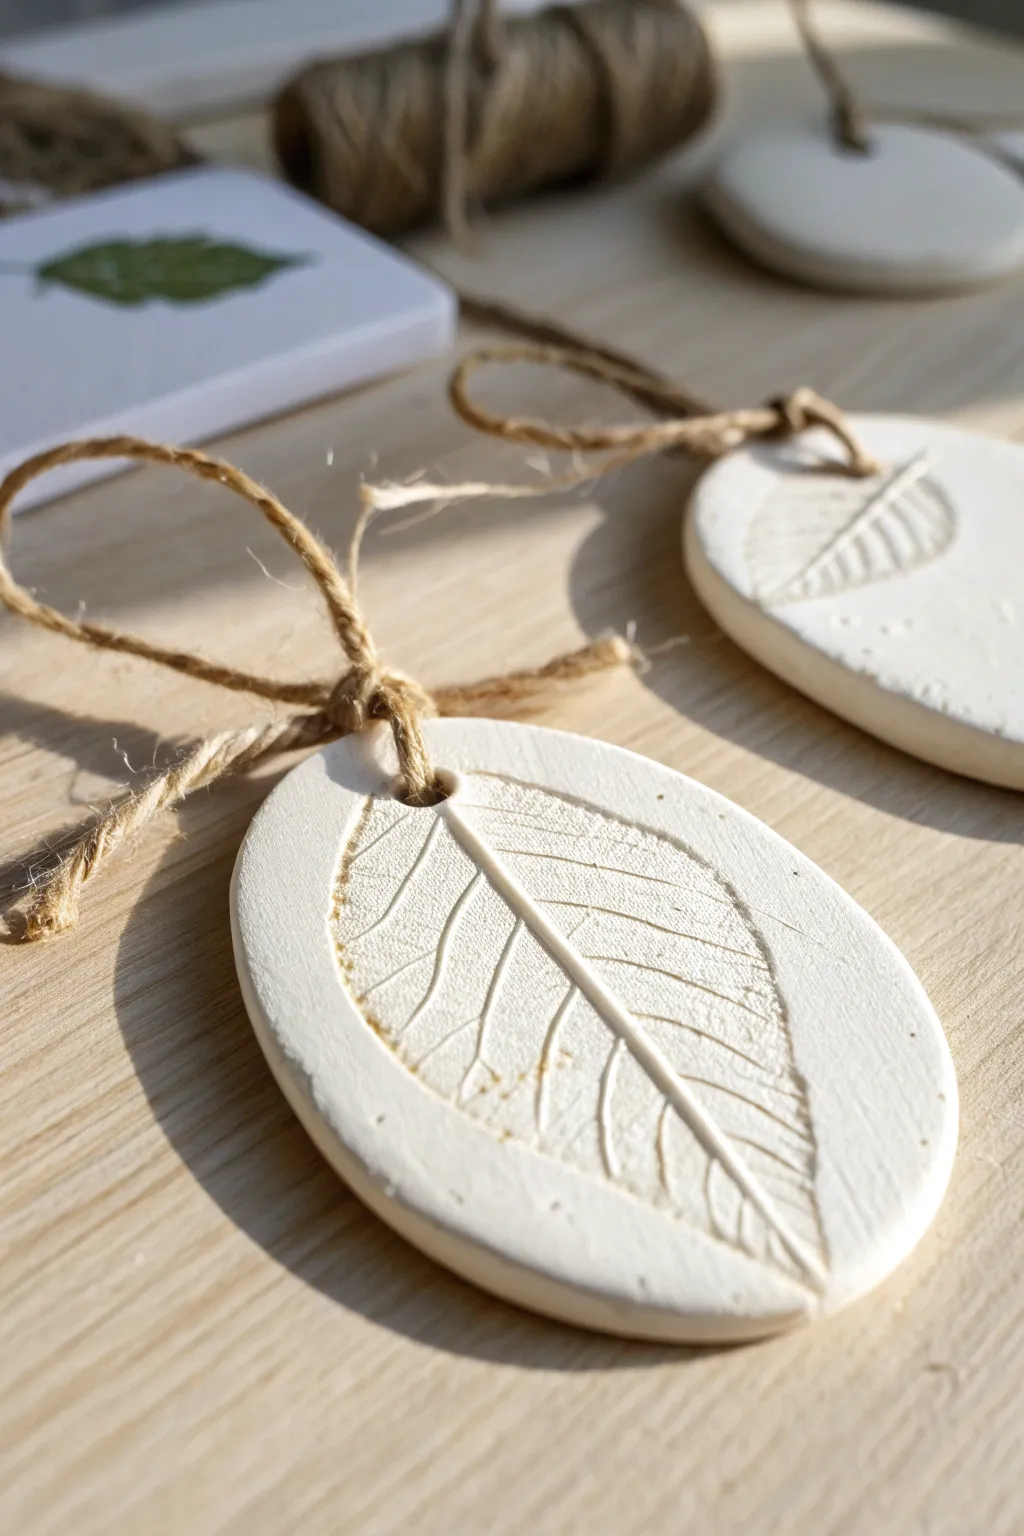
Create beautiful, rustic nature tags by pressing real leaves into soft modeling clay to capture their intricate vein patterns. These elegant white clay ovals make perfect gift toppers, ornaments, or unique labels for organizing your home.
How-To Guide
Materials
- White air-dry modeling clay
- Fresh leaves with prominent veins (like sage, mint, or small tree leaves)
- Rolling pin or smooth glass jar
- Oval cookie cutter (or a round glass rim)
- Parchment paper or craft mat
- Straw or skewer (for making the hole)
- Fine-grit sandpaper (optional)
- Jute twine or rustic string
- Scissors
Step 1: Preparation & Rolling
-
Prepare your workspace:
Lay down a sheet of parchment paper or a smooth craft mat. This prevents the clay from sticking to your table and makes cleanup much easier. -
Condition the clay:
Take a handful of white air-dry modeling clay and knead it in your hands for a minute until it feels soft, warm, and pliable. This helps prevent cracks later on. -
Roll it out:
Place the ball of clay on your mat and use a rolling pin to flatten it. Aim for an even thickness of about 1/4 inch (approx. 5-6mm). If it’s too thin, the tags might crack; too thick, and they will take forever to dry. -
Smooth the surface:
Run your fingers gently over the clay slab to remove any potential bumps or fingerprints. A smooth canvas ensures the leaf texture will really pop.
Sticky Leaf Fix
If the leaf sticks to the clay and won’t peel off cleanly, let the clay dry for about 10-15 minutes with the leaf on it. As the clay hardens slightly, the moisture changes and the leaf often peels away easier.
Step 2: Impressing & Cutting
-
Select your leaf:
Choose a fresh leaf that fits within the size of the shape you intend to cut. Leaves with raised, stiff veins on the back work best for clear impressions. -
Position the leaf:
Place the leaf face-down onto the clay slab so that the veiny backside is pressing into the clay. -
Roll the impression:
Gently roll over the leaf with your rolling pin once or twice. Use firm, even pressure to embed the leaf slightly without distorting the clay slab too much. -
Reveal the print:
Carefully find the stem of the leaf and slowly peel it away from the clay. I love this part—seeing the detailed skeleton of the leaf left behind is magical. -
Cut the shape:
Position your oval cookie cutter over the leaf impression, centering the design nicely. Press down firmly to cut the shape. If you don’t have an oval cutter, you can gently squeeze a round glass rim into an oval shape or just cut freehand with a craft knife. -
Remove excess clay:
Lift away the scrap clay from around your cut shape. You can ball this up and store it in an airtight container for another project.
Watercolors & Wax
Once dry, paint a light wash of green watercolor over the impression to highlight the veins, or rub a bit of antique wax over the surface for an aged, vintage pottery look.
Step 3: Refining & Drying
-
Create a hanging hole:
Take a drinking straw or a skewer and poke a hole near the top edge of the tag. Make sure it’s not too close to the edge, or the clay might break when you tie the string. -
Smooth the edges:
Dip your finger in a tiny bit of water and run it along the cut edges of the oval to smooth out any roughness or jagged bits left by the cutter. -
Let it dry:
Transfer the clay tag to a wire rack or leave it on the parchment paper in a dry, safe spot. Let it air dry completely, which usually takes 24 to 48 hours depending on humidity. -
Flip occasionally:
To prevent curling, flip the tag over every few hours during the drying process so both sides contact the air evenly.
Step 4: Finishing Touches
-
Sand for perfection:
Once the clay is bone dry and hard, use a piece of fine-grit sandpaper to gently buff the edges if there are still any rough spots. -
Cut the twine:
Cut a length of jute twine, about 8-10 inches long. -
Thread the tag:
Feed one end of the twine through the hole in your clay tag. -
Tie the knot:
Bring the two ends of the twine together and tie a decorative knot or bow near the top of the tag to complete the rustic look.
Your delicate leaf tags are now ready to add a handmade touch to your gifts or decor
Easy Dinosaur Fossils
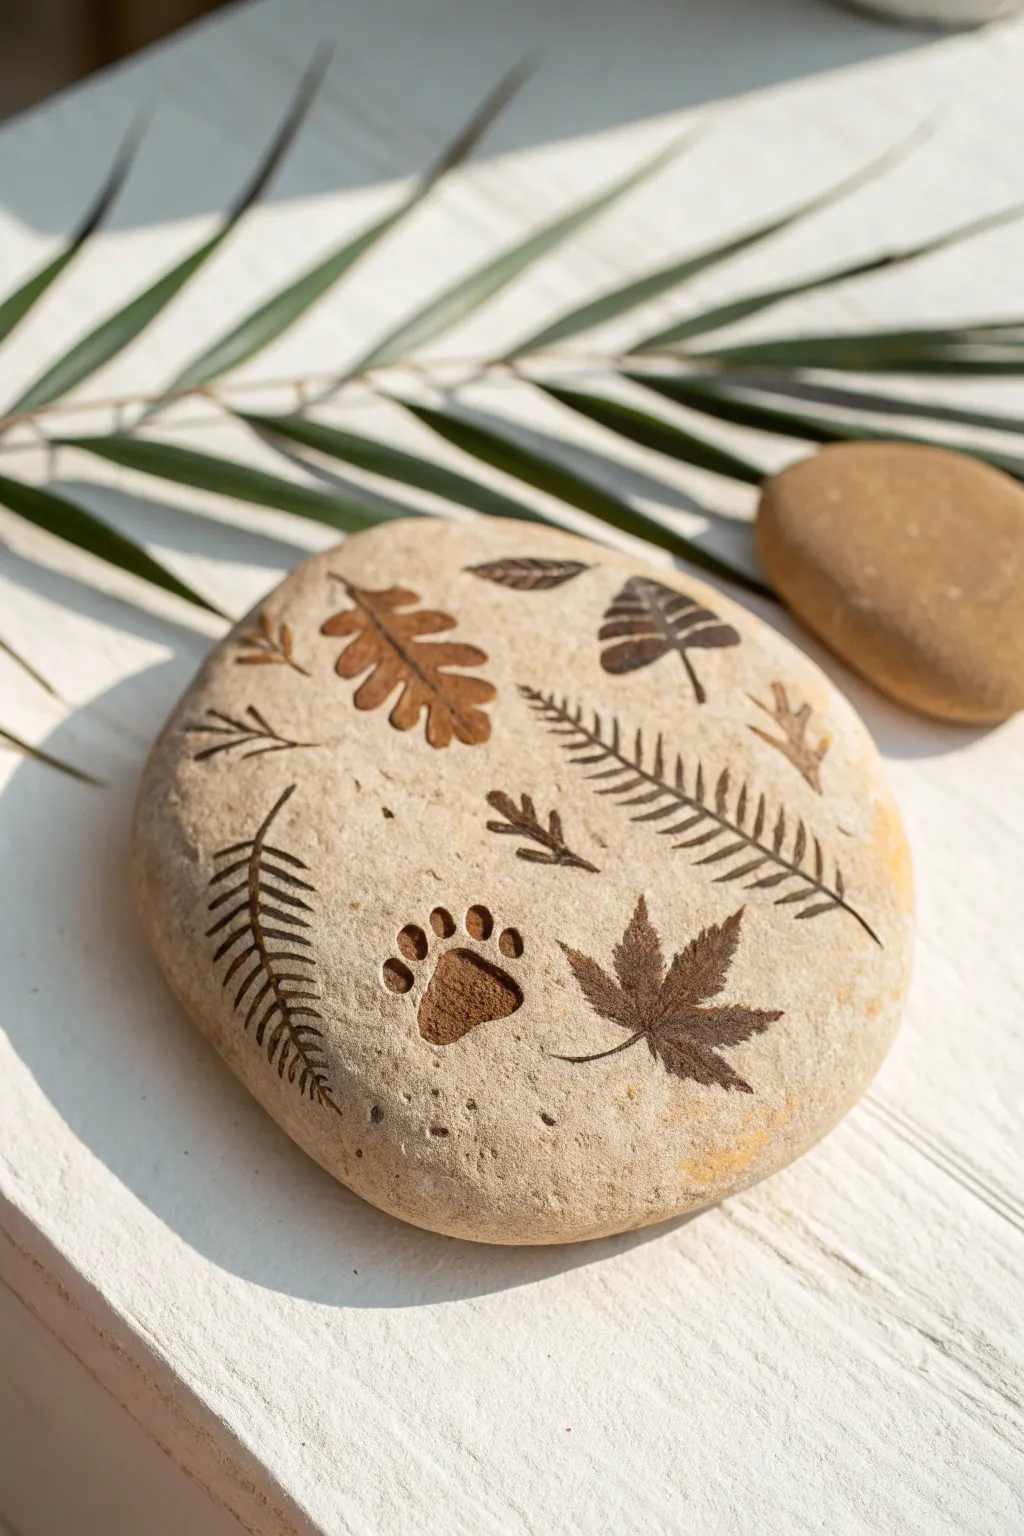
These charming clay stones capture the quiet beauty of a forest floor with delicate impressions of leaves, ferns, and animal tracks. By staining the clay, you achieve a realistic, stone-like fossil effect that looks like it was just discovered on a riverbank.
Step-by-Step Tutorial
Materials
- Air-dry clay (white or light beige)
- Small rolling pin
- Various small leaves (ferns, maple, oak)
- Rubber animal track stamps (or a sculpted eraser)
- Brown acrylic paint (burnt umber or raw sienna)
- Water
- Paper towels or a sponge
- Fine grit sandpaper (optional)
- Matte sealant spray
Step 1: Shaping the Stone Base
-
Condition the clay:
Begin by taking a handful of air-dry clay and kneading it thoroughly until it is soft and pliable. If the clay feels dry, I like to dampen my fingertips slightly to work moisture back in. -
Form a ball:
Roll the clay between your palms to create a smooth, seamless ball. It shouldn’t have any major cracks or creases. -
Flatten into a disc:
Gently press the ball down against your work surface. Use the palm of your hand or a small rolling pin to flatten it into a thick, irregular disc shape, mimicking the organic look of a river rock. -
Smooth the edges:
Dip your finger in water and run it along the edges and surface of the clay disc to smooth out any fingerprints or sharp ridges. The goal is a worn, naturally eroded appearance.
Step 2: Creating the Impressions
-
Arrange your composition:
Before pressing anything down, lay your chosen leaves and stamps gently on top of the wet clay to plan where each element will go. Ensure you have a nice variety of shapes like the ferns and oak leaves shown. -
Press leaf one:
Take a larger leaf, like the maple or oak leaf, and place it vein-side down onto the clay. Press it firmly with your fingers or roll over it gently with your rolling pin so the veins transfer clearly. -
Remove the leaf:
Carefully peel the leaf backward using the stem or a pair of tweezers. Lift slowly to avoid distorting the delicate impression left in the clay. -
Add delicate ferns:
Repeat the process with fern fronds or thinner botanical elements. These often require a gentler touch; press just enough to capture the individual leaflets. -
Stamp the paw print:
Position your animal track stamp in the lower section of the stone. Press straight down firmly and lift straight up to create a cleanliness akin to a muddy track. -
Incorporate small details:
Fill any large gaps with smaller simple leaf shapes or tiny textured marks to balance the composition, just like the smaller scattered leaves in the reference image.
Sticky Leaf Issues?
If leaves stick to the clay and tear when removing, lightly dust the clay surface with cornstarch before pressing. It acts as a release agent without ruining the detail.
Step 3: Staining and Finishing
-
Allow to dry completely:
Set your clay stone aside in a dry, ventilated area. Depending on the thickness, this usually takes 24 to 48 hours. The clay must be bone dry before painting. -
Sand imperfections:
Once dry, you might notice rough edges or unwanted bumps. Lightly use fine-grit sandpaper to smooth the surface, being careful not to sand away your stamped designs. -
Prepare the wash:
Mix a small amount of brown acrylic paint with plenty of water. You want a watery ink consistency, not thick paint, to act as an antiquing stain. -
Apply the stain:
Brush the brown wash over the entire surface of the stone, ensuring the liquid pools into the deep recesses of the leaf and paw print impressions. -
Wipe back surface paint:
Immediately take a damp paper towel or sponge and wipe the surface of the stone. This removes the paint from the high points while leaving dark pigment in the engraved grooves. -
Adjust contrast:
If the impressions aren’t dark enough, repeat the wash process specifically in those areas. The contrast creates that laser-etched look. -
Seal the work:
To protect your fossil and keep the paint from smudging, finish with a light coat of matte spray sealant once the paint is fully dry.
Golden Edge Upgrade
For a magical artifact look, dab a tiny bit of metallic gold paint on the rough outer edges of the stone or sparingly on the leaf tips after staining.
Place your finished fossils in the garden or on a shelf to enjoy a piece of natural history made by hand
Happy Octopus Friends

Dive into creativity with these adorable pink octopuses that brighten up any shelf. Made with soft modeling clay and expressive eyes, this simple sculpting project is perfect for little hands to practice rolling and shaping.
Detailed Instructions
Materials
- Pink modeling clay (foam clay, Play-Doh, or air-dry clay)
- Small googly eyes (self-adhesive sticky back)
- Black marker or fine-tip paint pen
- Modeling tool with a small rounded tip (or a dull pencil point)
- Smooth work surface
Step 1: Shaping the Head and Body
-
Prepare the clay:
Start by taking a generous handful of pink clay. Check that it is soft and pliable by kneading it in your hands for a minute until it feels warm and smooth. -
Create the main sphere:
Roll the clay between your palms to create a single, large round ball. This will serve as the combined head and body of your octopus. -
Smooth the surface:
Inspect your sphere for any cracks or lines. Rub them gently with your thumb to smooth them out so the octopus has a nice, clean finish. -
Form the base:
Gently tap the bottom of the ball onto your work surface to flatten it slightly. This helps the octopus sit upright without rolling away.
Smoother Surfaces
If using air-dry clay, dip your finger in a tiny bit of water to smooth out cracks instantly. Don’t use too much or it gets slimy.
Step 2: Creating the Tentacles
-
Portion the legs:
Pinch off eight smaller, equal-sized pieces of pink clay from your remaining supply. I usually aim for pieces about the size of a large marble. -
Roll the coils:
Roll each small piece into a tapered shape, famously known as a ‘snake’ or coil. Make one end slightly thicker (to attach to the body) and the other end pointy. -
Arrange the legs:
Place the eight legs in a starburst pattern on your work surface, with all the thicker ends meeting in the center. -
Attach the body:
Set your large head sphere directly onto the center where all the tentacle ends meet. Press down gently to fuse the clay pieces together. -
Seamless blending:
Use your thumb or a smoothing tool to gently blend the clay from the top of the legs into the bottom of the head so they don’t fall off. -
Shape the movement:
Curl the pointy ends of the tentacles slightly upwards or sideways to give your octopus a sense of movement, like it’s swimming.
Step 3: Adding Details and Personality
-
Texture the tentacles:
Using a small rounded tool or the dull point of a pencil, press rows of small indentations along the top or sides of each tentacle to look like suction cups. -
Vary the texture:
Don’t worry about being perfectly symmetrical; random patterns often look more organic and fun. -
Place the eyes:
Firmly press two small googly eyes into the front of the head. Placing them wider apart makes the face look cuter and more innocent. -
Draw the mouth:
Use a black marker or fine-tip paint pen to draw a small, U-shaped smile right between and slightly below the eyes. -
Final check:
Look over your little sea creature and smooth out any accidental fingerprints before setting it aside to display or dry.
Ocean Accessories
Create a tiny top hat, a clay starfish friend, or use blue paper underneath to simulate water for a complete scene.
Now you have a cheerful desk buddy ready to keep you company while you work or play
Mini Cactus Pinch Pots
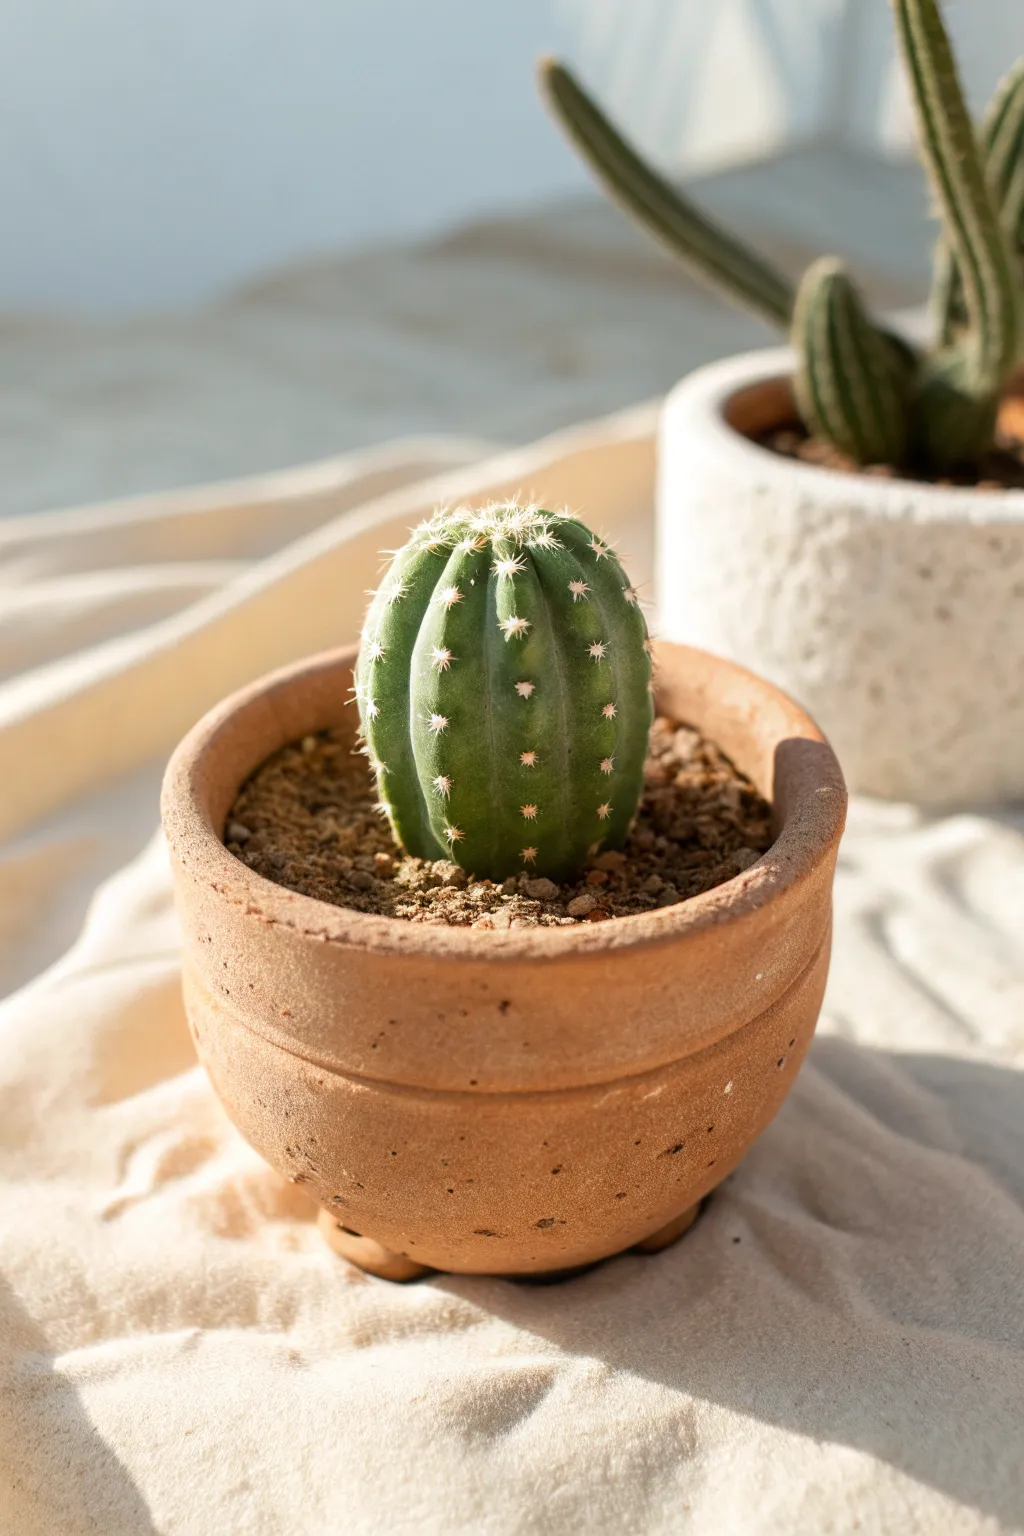
Create your own unkillable desert companion with this adorable clay project that looks almost like the real thing. This technique combines making a simple pinch pot with a textured cactus sculpture, perfect for a sunny windowsill decoration.
How-To Guide
Materials
- Terracotta-colored air-dry clay (or polymer clay)
- Green air-dry clay (or polymer clay)
- Brown/dark grey clay (for the soil)
- White clay or white acrylic paint
- Pointed sculpting tool or toothpick
- Small stiff-bristled brush (like an old toothbrush)
- Fine detail paintbrush (optional)
Step 1: Shaping the Planter
-
Form the base:
Start by taking a golf-ball-sized amount of terracotta-colored clay and rolling it into a smooth, crack-free sphere. -
Open the pot:
Gently press your thumb into the center of the sphere, pinching and turning the clay to open up a bowl shape. Keep the walls somewhat thick for a rustic pottery look. -
Refine the shape:
Flatten the bottom slightly by tapping the pot on your work surface so it stands upright without wobbling. -
Add rim details:
Using a sculpting tool or the back of a knife, gently press a horizontal groove around the outside of the pot, about a third of the way down from the rim, to mimic the detail seen in real ceramic pots. -
Texture the surface:
Tap the exterior lightly with a stiff-bristled brush or crumpled foil to give it that gritty, earthen texture rather than leaving it perfectly smooth. -
Add feet:
Roll three tiny balls of terracotta clay and attach them in a triangle formation to the base of the pot to create little feet, pressing them firmly to adhere.
Natural Texture
For realistic ‘soil’, mix some actual dried coffee grounds or sand into your brown clay before pressing it into the pot.
Step 2: Sculpting the Cactus
-
Create the cactus body:
Roll a piece of green clay into a smooth ball that is slightly smaller than the opening of your pot. -
Elongate slightly:
Gently roll the ball between your palms to elongate it just a little into a chubby oval shape. -
Define the ribs:
Use the side of a toothpick or a modeling tool to press vertical indentations from the top center down the sides, creating the segmented ‘ribs’ of the cactus. -
Soften the edges:
I prefer to gently smooth the ridges with my finger so they look plump and organic, not sharp. -
Make the soil base:
Fill the bottom of your terracotta pot with dark brown or grey clay, pressing it down to create a flat ‘dirt’ surface about half an inch below the rim. -
Texturize the soil:
Rough up the surface of the dark clay with an old toothbrush or needle tool to make it look like loose potting soil. -
Plant the cactus:
Press your green cactus firmly onto the center of the soil base. You can add a drop of water or liquid clay (slip) if the clay is feeling dry to help it stick.
Clay Cracking?
If you see cracks forming as you shape the pot, dip your finger in water and smooth them out immediately before continuing.
Step 3: Final Details
-
Add the spines:
If using white clay, roll incredibly tiny, thin strings and press small ‘stars’ of clay onto the ridges of the cactus. Alternatively, wait until dry to paint them. -
Painting method (Optional):
For a finer look, once the green clay is dry, take a fine detail brush with white acrylic paint and dab tiny star-shaped clusters of dots along the vertical ribs. -
Dusting effect:
To make the cactus look naturally dusty, you can lightly brush a tiny bit of white chalk pastel powder onto the green clay before sealing. -
Let it cure:
Allow your creation to dry completely according to the clay package instructions—usually 24 hours for air-dry clay.
Place your tiny sculpture near a window to enjoy some desert vibes without ever needing to water it
Tiny Fairy Door Wall Plaques
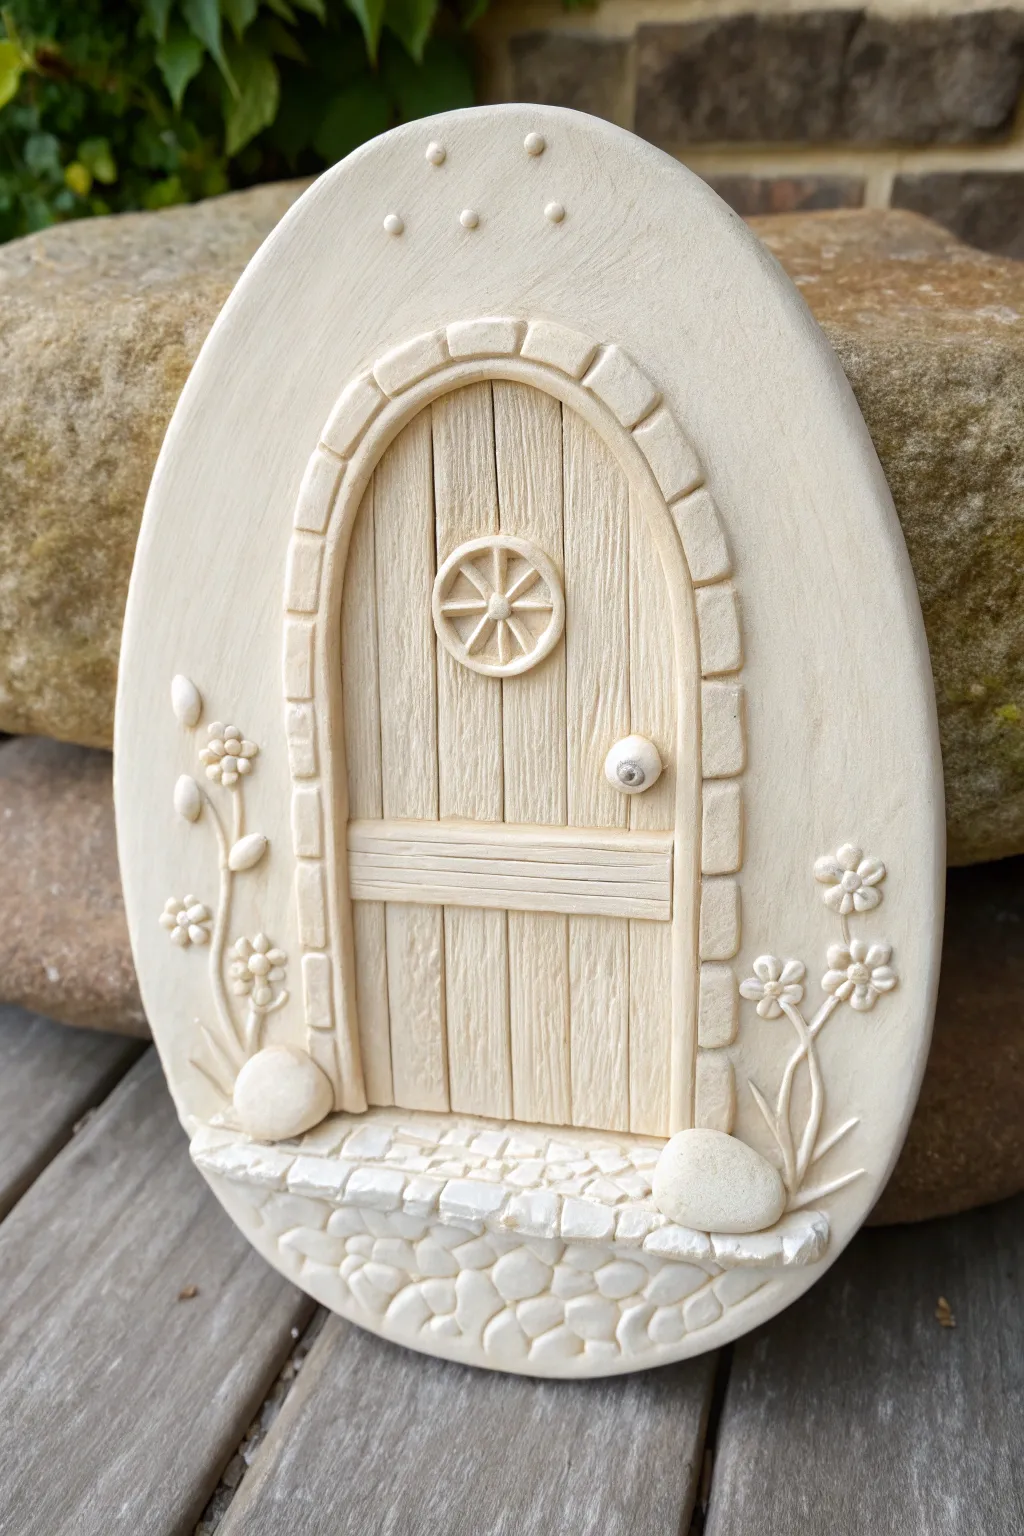
Create an enchanting entryway for magical creatures with this lovely oval wall plaque. You’ll use simple sculpting techniques to build a textured wooden door, a stone archway, and delicate floral details all on a single piece of clay.
Detailed Instructions
Materials
- White or cream-colored air-dry clay (or polymer clay)
- Rolling pin
- Oval cookie cutter (or a knife and paper template)
- Clay carving tools or a toothpick
- Ruler or straight edge
- Small round piping tip or straw (optional, for circles)
- Water bonding slip (for joining pieces)
- Fine-grit sandpaper (optional)
Step 1: Base and Door Structure
-
Shape the base:
Begin by rolling out a thick slab of clay, roughly 1/4 inch thick. Use an oval cutter or cut around a paper template to create the main plaque shape. Smooth the edges with a wet finger to remove any sharpness. -
Mark the door outline:
Lightly trace an arch shape in the center of the oval using a needle tool. This will be the outline for your door. -
Create the door planking:
Within that arch, use a ruler to press vertical lines into the clay. Don’t press all the way through; just deep enough to look like individual wooden planks. Add tiny, irregular scratches for wood grain texture. -
Add the arch frame:
Roll a thin snake of clay and flatten it slightly. Curve it over the top of your door outline to create the stone arch frame. Press it gently onto the base. -
texture the bricks:
Use a knife or blade tool to press vertical indentations into the arch snake, spaced evenly apart, to simulate individual stones or bricks.
Step 2: Door Details
-
Sculpt the crossbeam:
Roll out a small rectangle of clay that fits the width of the door. Place it horizontally about one-third of the way up from the bottom. Mark horizontal lines on it to match the wood texture. -
Make the window:
Form a small circle of clay and place it in the upper center of the door. Use a tool to indent the center, leaving a raised rim. -
Add window spokes:
Roll extremely thin threads of clay and arrange them like wheel spokes inside the window circle. -
Attach the doorknob:
Roll a tiny ball of clay and press it onto the right side of the door. Use a small dotting tool to make an indentation in the center. -
Decorative dots:
Roll three or four graduated tiny balls of clay and arrange them in an arc near the top of the plaque for a magical touch.
Sticky Situation?
If your clay won’t stick together, score both surfaces (scratch them up a bit) and add a tiny drop of water or liquid clay slip to act as glue.
Step 3: Cobblestones and Florals
-
Build the doorstep:
Add a strip of clay at the very bottom of the door. Use a tool to carve irregular pebble shapes, creating a stone step effect. -
Texture the base stones:
Below the doorstep, carve a honeycomb or random stone pattern directly into the bottom curve of the oval plaque to simulate a foundation. -
Form the flower stems:
Roll very thin, worm-like snakes of clay. Press them gently onto the sides of the oval, curving upwards like growing vines. -
Create blossoms:
Make five tiny teardrop shapes for each flower and arrange them in a circle. Press the center with a tool to bond them together. -
Add accent stones:
Place two slightly larger, smooth rounded lumps of clay on either side of the doorstep to act as decorative boulders. -
Final smoothing:
Check all joined areas. I find dipping a paintbrush in a little water helps blend seams invisibly without leaving fingerprints.
Make it Shine
Once fully dry, paint the door with acrylics! Try a dark brown wash for the wood grain and wipe it back to make the texture pop.
Let your beautiful relief sculpture dry completely before displaying it on a shelf or wall
Galaxy Planets Set
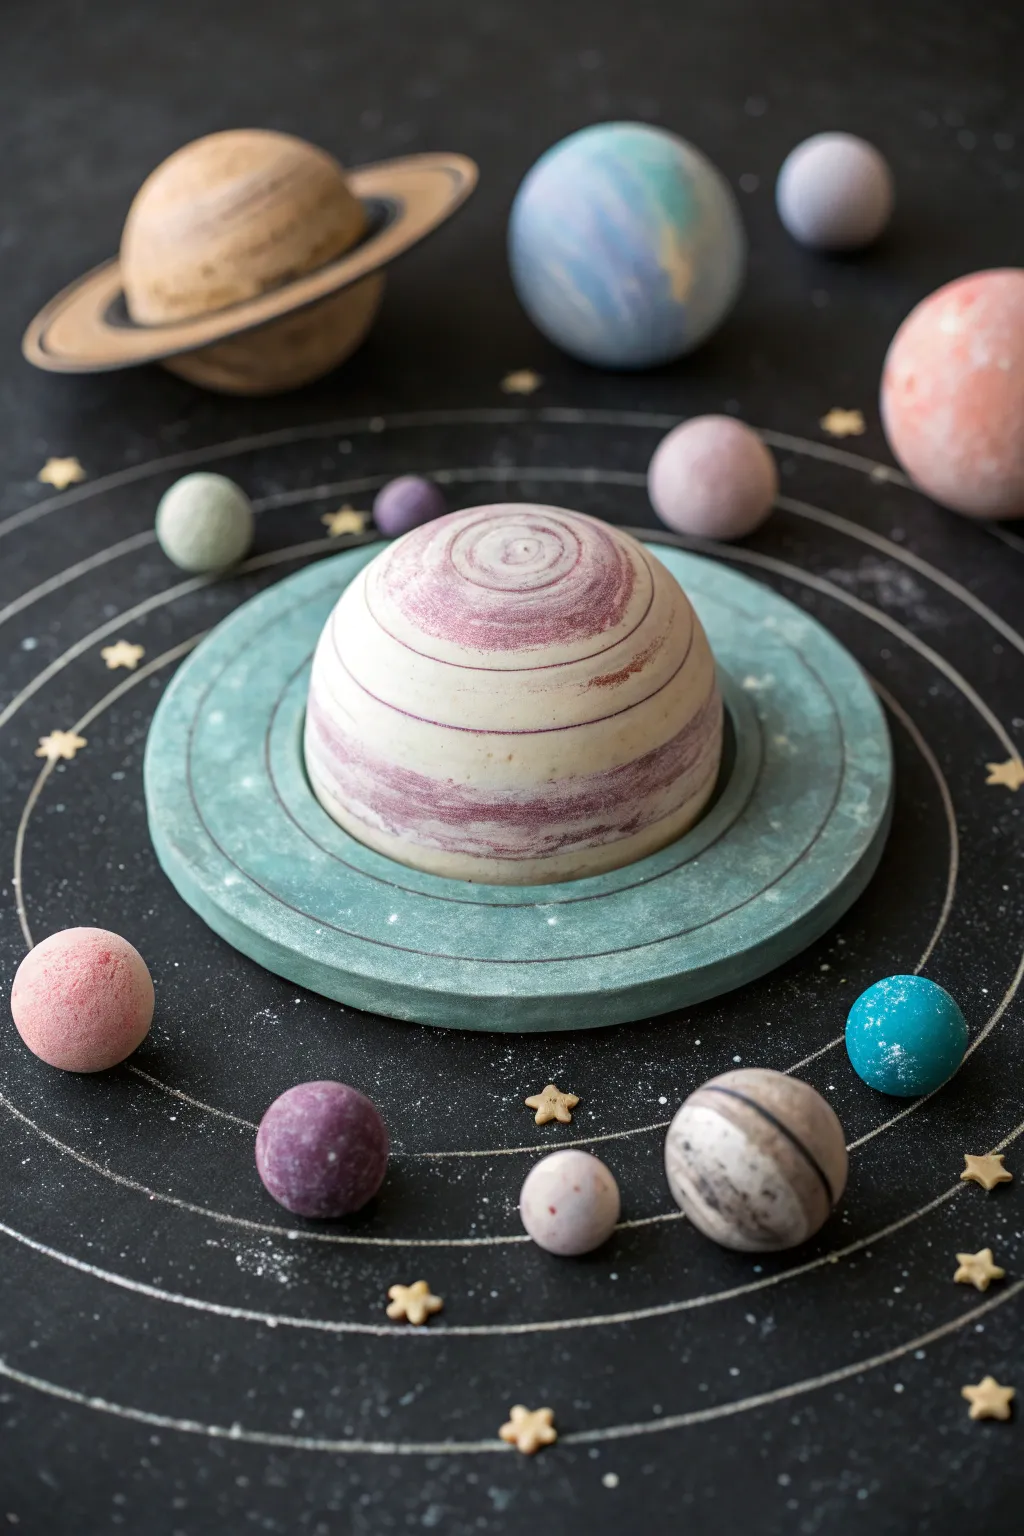
Bring the cosmos down to earth with this stunningly textured modeling clay solar system. Using simple marbling techniques and a clever ring base, you’ll create a centerpiece planet surrounded by a fleet of orbiting satellites.
How-To Guide
Materials
- White or cream modeling clay (polymer or air-dry)
- Colored modeling clay (purple, blue, pink, turquoise, brown)
- Black foam board or thick cardstock for the base
- White paint pen or gel pen
- Rolling pin
- Clay cutting tool or plastic knife
- Small star-shaped cookie cutter (optional)
- Gold or yellowish clay for stars
Step 1: Creating the Centerpiece Planet
-
Prepare the base colors:
Start by conditioning a large amount of white clay until it is soft and malleable. You will also need smaller amounts of purple and light brown clay for the atmospheric bands. -
Create color strips:
Roll your purple and brown clay into thin, long snakes. Flatten them slightly with your fingertips so they look more like ribbons than ropes. -
Layer the clay:
Take a large ball of white clay and wrap the colored ribbons around it horizontally. Don’t worry about being perfect; overlap is good for a natural look. -
Roll to integrate:
Gently roll the ball between your palms. The heat and pressure will press the ribbons into the white base. Keep rolling until the surface is smooth but the distinct bands of color remain visible. -
Shape the dome:
Once you are happy with the marbling, slice the bottom third of the sphere off with your cutting tool so it sits flat. Retain a dome shape for the top.
Marble Master Tip
Don’t over-mix your clay colors! Stop rolling as soon as the stripes look smooth. If you knead too much, the colors will blend into a single muddy hue instead of distinct bands.
Step 2: Forming the Orbital Ring
-
Mix turquoise clay:
To get that speckled cosmic look, mix a little white clay into a turquoise block, but don’t blend it fully. Leave small streaks of white visible. -
Roll out the slab:
Use a rolling pin to flatten the turquoise clay into a sheet about a quarter-inch thick. Ensure it is wide enough to extend past your central planet. -
Cut the ring shape:
Place your central planet dome gently in the center to measure, then cut a large circle around it. You can trace around a bowl to get a perfect circle. -
Create the texture:
Use a tool to lightly etch concentric circles into the flat ring surface, mimicking orbital paths. Place the central planet firmly onto the center of this ring.
Step 3: Crafting Small Planets
-
Mix diverse colors:
For the orbiting planets, use a variety of marbling techniques. Try mixing blue and white for an ice giant, or pink and cream for a rocky world. -
Roll spheres:
Roll various sizes of spheres. Aim for at least 8-10 planets of different diameters ranging from marble-sized to ping-pong ball sized. -
Add stripe details:
For a gas giant look, wrap a thin thread of brown clay around a grey sphere and roll it flush, just like you did for the main planet. -
Texture rocky planets:
For simpler planets, I like using a stiff brush or a crumpled ball of foil to gently tap the surface, giving it a porous, rocky texture. -
Bake or dry:
Follow the instructions on your specific clay package to bake or air-dry all your planet spheres and the main centerpiece. Let them cool completely before handling.
Cosmic Glitter
Brush a tiny amount of mica powder or pearlescent eyeshadow over the planet surfaces before baking. This gives them a magical, shimmering space-dust finish.
Step 4: Assembling the Galaxy
-
Prepare the background:
Take your black foam board. Using a white paint pen, draw several large concentric circles to represent the orbital paths. -
Add star dust:
Dot the black board with the white pen to create distant stars. You can flick the tip of the pen or a toothbrush for a fine mist of galaxies. -
Arrange the system:
Place your large ringed planet in the absolute center. Set the smaller planets along the white drawn lines. -
Make clay stars:
Use a tiny cutter or a knife to cut small star shapes from yellow clay. Allow them to dry or bake. -
Scatter the stars:
Scatter these little gold stars around the black board to add dimension to the flat surface.
Now you have a miniature universe ready for display on a desk or bookshelf
Story Stones With Stamped Icons
Transform simple scraps of clay into a beautiful set of storytelling tokens that feel as smooth as river rocks. These charming pieces feature earthy, stamped motifs like trees, houses, and hearts, inviting hours of imaginative play.
Step-by-Step
Materials
- Air-dry modeling clay (white and stone-grey)
- Rubber stamps with simple icons (foliage, nature, homes)
- Ink pads in muted, earthy tones (rust, deep blue, olive green, mustard yellow)
- A smooth rolling pin or acrylic roller
- Fine-grit sandpaper (optional)
- Matte spray varnish or Mod Podge (for sealing)
- Parchment paper or a silicone mat
Step 1: Preparing the ‘Stones’
-
Condition the clay:
Start by taking a small handful of white air-dry clay. Knead it in your warm hands for a minute until it becomes soft, pliable, and free of cracks. -
Create variation:
To mimic the natural variety seen in the photo, mix a tiny drop of black paint into some white clay to create grey stones, or use pre-colored grey clay for about a third of your batch. -
Roll into spheres:
Divide your clay into balls roughly the size of a walnut or a golf ball. They don’t need to be perfectly identical sizes; natural variation adds character. -
Shape the stone:
Gently press a clay ball between your palms to flatten it slightly. You want a thick, rounded disc shape—aim for about 1/2 inch thickness so they feel substantial in the hand. -
Smooth the edges:
Dip your finger in a little water and run it around the perimeter of the clay disc. This smooths out any tiny cracks or sharp edges, giving that water-worn river stone look. -
Check the surface:
Ensure the top surface is relatively flat and smooth. If it’s too lumpy, the stamp impression won’t be clean. I find giving it one final, gentle tap with an acrylic block helps flatten just the stamping area.
Clean Impressions
If the stamp sticks to the clay, lightly dust the clay surface with cornstarch before stamping. The ink will still show through, and the powder brushes off later.
Step 2: Stamping the Designs
-
Ink the stamp:
Choose a stamp with a bold, simple silhouette—like a leaf or a sun. Press it firmly into your ink pad. For this look, stick to one color per stone, choosing deep blues, rust reds, or mustard yellows. -
The first impression:
Carefully align the stamp over the center of your wet clay stone. Press down gently but firmly. You want the ink to transfer, and you also want a very slight indentation in the clay for texture. -
Lift carefully:
Pull the stamp straight up to avoid smudging the ink or distorting the clay shape. Inspect the impression; it should look slightly weathered and printed. -
Repeat with variety:
Continue the process with different stamps. Try a house on a grey stone, a sun on a white one, and various tree shapes. Rotate your ink colors so you have a balanced collection. -
Freehand details (optional):
If you don’t have a specific stamp, like the heart with the sprout, you can use a small brush or the end of a toothpick dipped in ink to draw simple shapes directly onto the clay.
Step 3: Finishing Touches
-
Let them dry:
Place your finished stones on a sheet of parchment paper. Allow them to dry undisturbed for at least 24 to 48 hours. Turn them over halfway through to ensure the bottom dries evenly. -
Sand for smoothness:
Once fully cured, feel the edges. If there are any rough burrs, gently buff them away with fine-grit sandpaper until the stone feels pleasant to hold. -
Seal the ink:
Because air-dry clay is porous, the ink can smudge if it gets wet. Lightly coat each stone with a matte spray varnish or a thin layer of matte Mod Podge to lock in the design. -
Final cure:
Let the sealer dry completely according to the bottle instructions before placing them in a bag or bowl for storage.
Fixing Smudges
Did a stamp slide? Don’t panic. While the clay is wet, you can wipe the surface with a damp wipe to remove the top layer of clay and ink, then re-smooth and try again.
Gather your new collection in a small drawstring bag and get ready to tell some wonderful stories