Clay lamps are one of my favorite projects because they’re equal parts cozy home decor and satisfying clay play. Here are some clay lamp ideas you can actually picture on your nightstand, shelf, or dining table—ranging from super simple to delightfully extra.
Classic Perforated Clay Votive Lamp
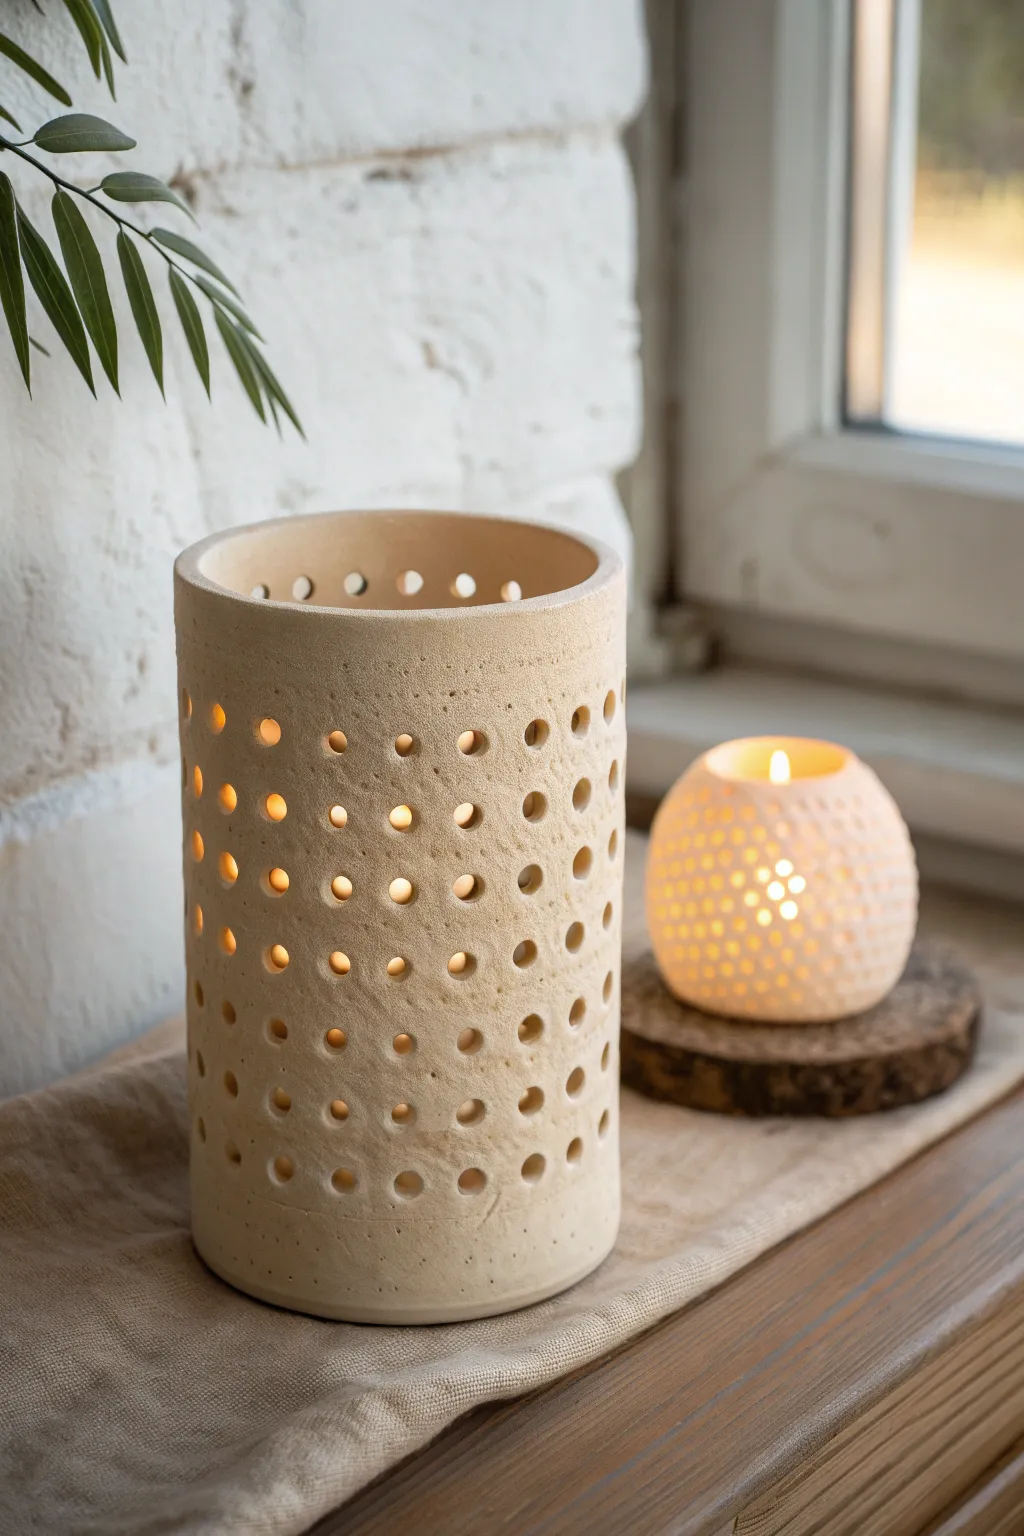
These classic candle holders bring a warm, textural glow to any corner with their natural biscuit finish and rhythmic perforations. Simple to construct yet visually striking, the project relies on slab-building techniques to create a sturdy, elegant lantern perfect for votives or LED candles.
Detailed Instructions
Materials
- Light stoneware or earthenware clay (groggy texture recommended)
- Rolling pin
- Canvas or heavy fabric mat
- Wooden guide strips (approx. 5-7mm thick)
- Ruler
- Fettling knife or needle tool
- Cylindrical form (PVC pipe, sturdy cardboard tube, or large jar)
- Paper template (optional)
- Hole cutters or drill bits (various sizes)
- Serrated rib or scoring tool
- Slip (clay mixed with water)
- Sponge
Step 1: Preparing the Slab
-
Roll the clay:
Begin by wedging your clay to remove air bubbles, then flatten it onto a canvas mat. Use wooden guide strips on either side of the clay to roll out a perfectly even slab, about 5 to 7mm thick. -
Measure the circumference:
If you are using a specific mold like a PVC pipe, measure its circumference. Add about 1-2cm to this measurement to account for the overlap needed for the seam. -
Cut the rectangle:
Using a ruler and your fettling knife, cut a clean rectangle from the slab. For the taller lantern shown, a height of 15-20cm works well, with a width matching your circumference calculation. -
Smooth the surface:
Before bending the clay, use a rib tool to compress and smooth both sides of the slab. This removes canvas texture and strengthens the clay particles, preventing cracks later on.
Clean Cuts Tip
When punching holes, twist the cutter as you pull it out. This shears the clay cleanly instead of dragging it, reducing the cleanup needed on the edges later.
Step 2: Punching the Design
-
Mark the grid:
Lightly etch a grid pattern onto the surface of the slab using a ruler and a needle tool. Spacing the lines about 1.5cm apart creates a dense, attractive pattern. -
Start punching holes:
Using a circular hole cutter, punch out the clay at the grid intersections. I prefer to do this while the slab is flat rather than after forming the cylinder, as it prevents the walls from deforming. -
Clean the edges:
As you punch, small burrs of clay will form on the underside. Wait until the clay stiffens slightly, then gently wipe the back with a damp sponge to remove these rough edges. -
Add variety (optional):
For the smaller spherical companion piece, you can cut varying hole sizes. However, for the main cylinder, keeping the holes uniform creates that minimal, classic look.
Make it Glow
For a warmer light, use a clay body that fires to a toasted stoneware or terracotta color. White clay reflects light brightly, while darker clays create a moody ambiance.
Step 3: Assembly
-
Prepare the seam:
Score the two short ends of your rectangle heavily with a serrated rib. Apply a generous amount of slip to these scored areas to act as glue. -
Form the cylinder:
Wrap the slab around your cylindrical form (shrink-wrap the form first if you’re worried about sticking). Press the scored ends together firmly to create the vertical seam. -
Blend the join:
Use a wooden modelling tool to smear the clay across the seam line, blending it until the join is invisible. Smooth it over with a slightly damp sponge. -
Cut the base:
Roll a small separate piece of slab for the floor. Place your cylinder on top of it, trace around the bottom, and cut out the circle. -
Attach the base:
Score and slip the bottom edge of the cylinder and the outer edge of the base circle. Press them together firmly and blend the clay upwards from the base to the wall to seal it. -
Refine the rim:
Run a damp chamois or sponge around the top rim to soften the edge. A sharp, square edge can chip easily, so a slight curve is better for longevity.
Step 4: Finishing
-
Slow drying:
Cover the piece loosely with plastic to let it dry slowly. Uneven drying can cause the seam to crack or the cylinder to warp into an oval. -
Bisque fire:
Once bone dry, fire the piece to a bisque temperature (usually cone 04). This hardens the clay but leaves it porous. -
Glazing (optional):
To achieve the look in the photo, leave the outside unglazed to show the natural clay texture. You might choose to apply a clear matte glaze to the inside for easier cleaning. -
Final firing:
Fire the piece a second time to the maturity temperature of your specific clay body. Sand the bottom lightly after firing if it feels rough to the touch.
Place a tea light inside and watch how the perforated patterns cast dancing shadows across your room


Cutout Starburst Tealight Lantern
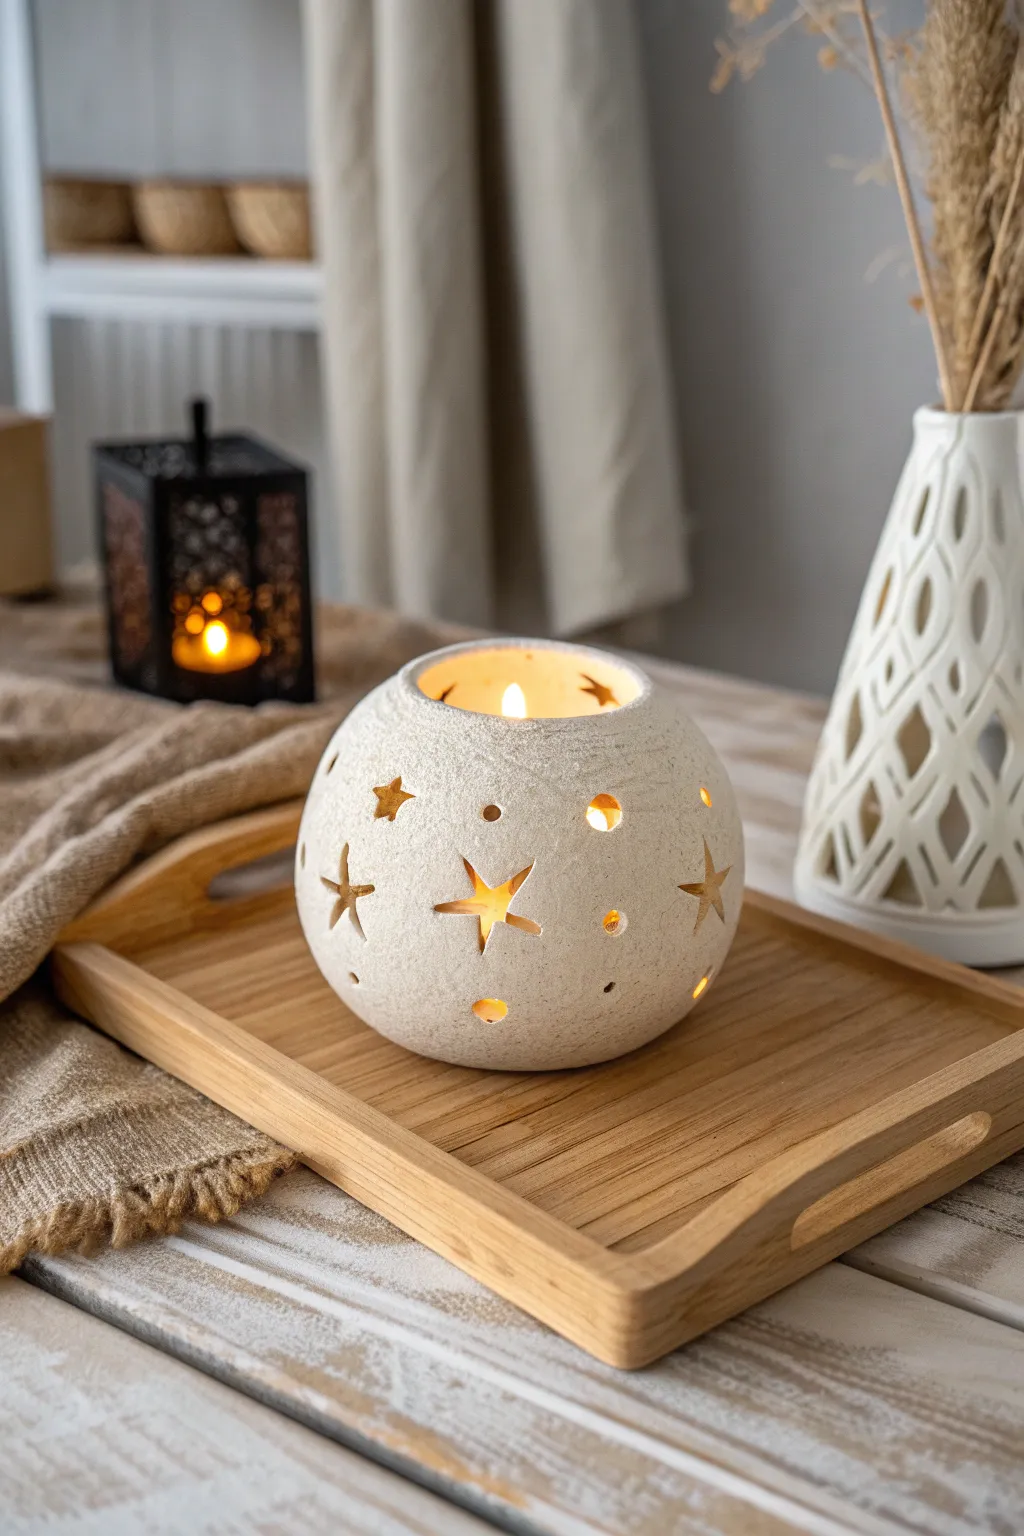
Bring a touch of starlight into your home with this charming spherical lantern, featuring whimsical star and dot cutouts that cast a warm, dancing glow. The textured, speckled clay finish gives it an organic, handmade feel perfect for cozy evenings.
Step-by-Step Tutorial
Materials
- Air-dry clay (white or off-white)
- Speckled clay additive (e.g., fine sand or dried tea leaves) if using plain clay
- Rolling pin
- Two small bowls (for molds)
- Plastic wrap
- Star-shaped mini cookie cutters (various sizes)
- Straw or small circular cutter
- Sponge
- Water
- Craft knife
- Fine-grit sandpaper
- Matte sealant spray
Step 1: Preparing the Clay Sphere
-
Prepare the clay body:
Start by kneading your air-dry clay. If your clay isn’t pre-speckled, I like to knead in a small amount of fine sand or even crushed dried tea leaves at this stage to achieve that organic, stone-like texture seen in the photo. -
Roll slab:
Roll out the clay on a flat surface to a uniform thickness of about 1/4 inch. Ensure it is wide enough to cover your bowl molds. -
Prepare the molds:
Take two small bowls of the same size to act as your internal support. Cover the outside of both bowls tightly with plastic wrap to prevent the clay from sticking. -
Form the halves:
Drape the rolled clay over the bottom of each bowl, gently smoothing it down to take the spherical shape. Trim the excess clay at the rim of the bowl with a craft knife so you have two perfect half-spheres. -
Initial drying phase:
Let these halves dry on the bowls for about 2-4 hours until they are leather-hard—firm enough to hold their shape but still soft enough to cut and join.
Sagging Sphere?
If the clay sphere starts to collapse while cutting, stuff the inside lightly with plastic bags or dry paper towels to support the walls while you work.
Step 2: Joining and Shaping
-
Create the opening:
On one of the halves, use a larger circular cutter or a knife to cut a neat round hole at the very top. This will be the chimney for the candle heat to escape. -
Score and slip:
Remove the clay halves from the bowls. Score (scratch) the rim of each hemisphere and apply a little water or clay slip (watery clay) to act as glue. -
Join the sphere:
Press the two rims together firmly to form a ball. Gently smooth over the seam with your fingers and a little water until the join is invisible. -
Refine the shape:
If the sphere got slightly warped during joining, gently pat it back into a round shape. Use a damp sponge to smooth out the entire surface, erasing any fingerprints.
Step 3: Carving the Design
-
Plan your stars:
Before cutting, lightly mark where you want your stars to go. A random, scattered pattern looks best for this celestial theme. -
Cut the large stars:
Use your mini star cutters to punch out shapes. Support the wall of the sphere from the inside with one hand while pressing the cutter gently from the outside to prevent collapsing. -
Add circular details:
Use a drinking straw or a small circular tool to punch out tiny dots between the stars. This variety in shape sizes creates a more interesting light pattern. -
Clean the edges:
Once the shapes are cut, use a slightly damp brush or your finger to smooth the raw edges of the cutouts so they look polished rather than sharp. -
Create stability:
Gently tap the bottom of the sphere on a flat table to create a slightly flattened base so the lantern sits securely without rolling.
Project Level Up
Before the clay dries, gently press a piece of coarse linen fabric onto the surface to imprint a woven texture that catches the light beautifully.
Step 4: Finishing Touches
-
Full dry:
Allow the finished sphere to dry completely. This usually takes 24-48 hours depending on humidity. Turn it occasionally to ensure even airflow. -
Sanding:
Once bone dry, use fine-grit sandpaper to buff away any remaining roughness or uneven areas, paying attention to the rim of the top opening. -
Texture enhancement:
If you want to emphasize the stone texture, scrub the surface very lightly with a dry, stiff brush to knock back any overly smooth spots. -
Seal the piece:
Spray the lantern with a matte sealant. This protects the clay from humidity and soot while keeping that natural, unglazed look. -
Light it up:
Place an LED tealight or a small candle inside to test your new light fixture.
Now dim the lights and enjoy the starry galaxy you’ve created right on your table


Speckled Stoneware Lamp With Simple Shade
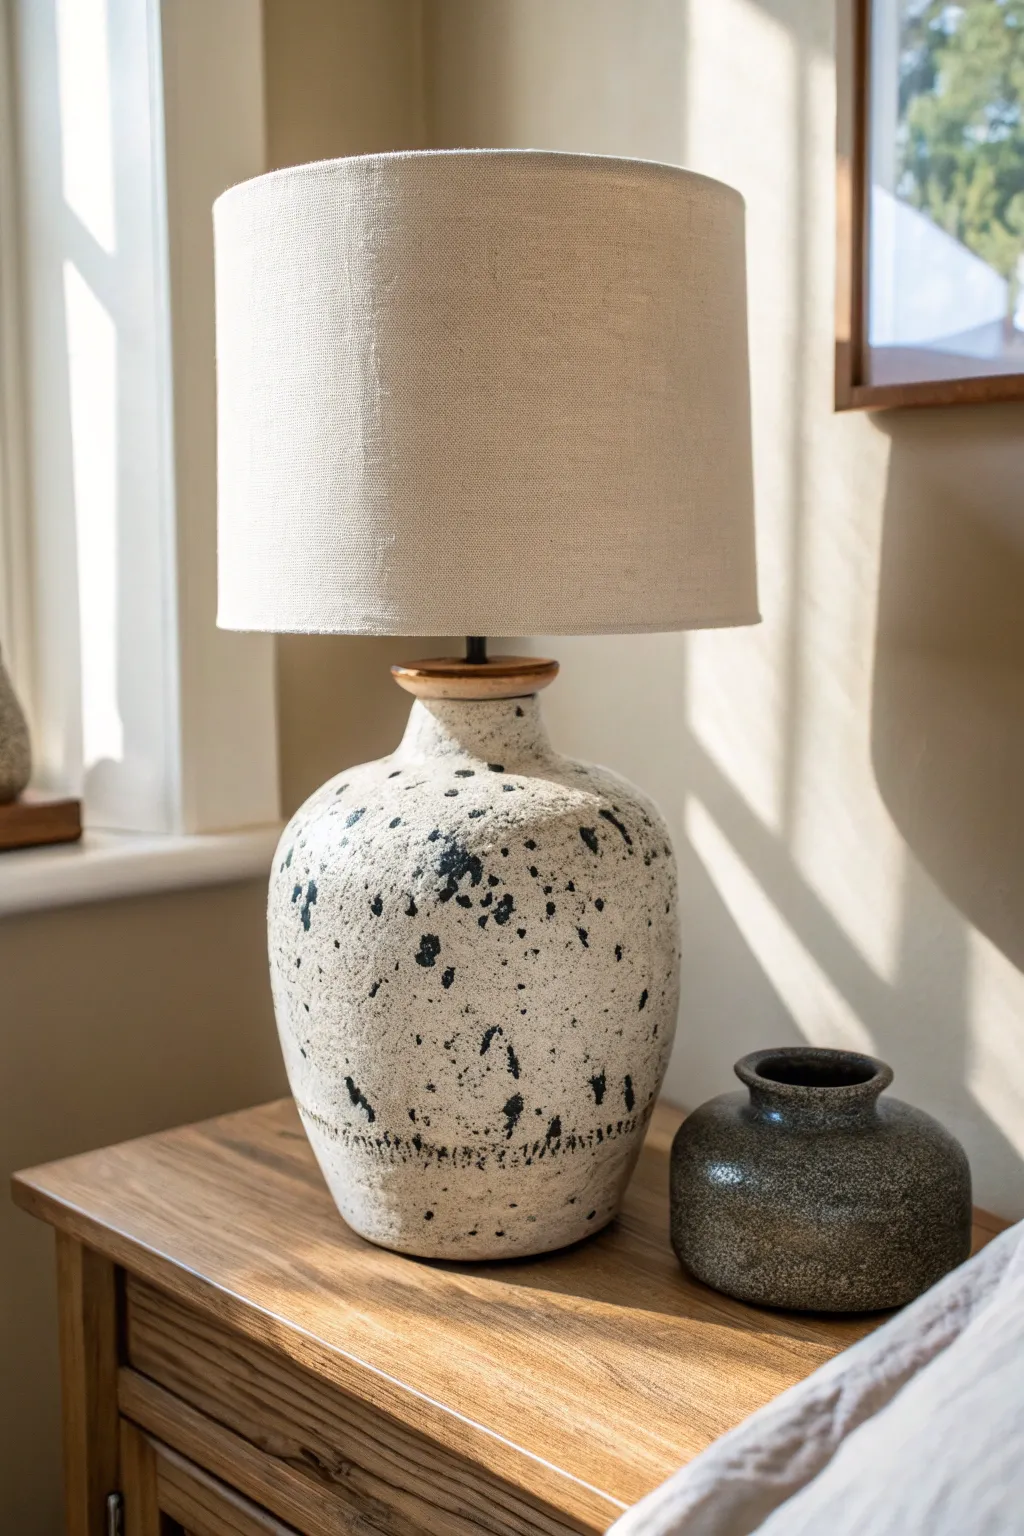
Bring organic warmth to your bedside with this handcrafted stoneware lamp featuring a distinctive black-on-white speckled glaze. The raw, textured finish combined with a simple linen shade creates a perfect balance of rustic charm and modern minimalism.
Step-by-Step Guide
Materials
- White stoneware clay body (cone 6)
- Pottery wheel
- Throwing tools (sponge, rib, wire cutter)
- Trimming tools
- Wooden bat
- White matte glaze
- Black underglaze
- Stiff bristle brush or toothbrush (for spattering)
- Sea sponge (natural)
- Lamp hardware kit (socket, harp, finial)
- Wooden cap/lid component (pre-made or turned wood)
- Drill with ceramic bit
- Epoxy adhesive
Step 1: Throwing the Form
-
Center the Clay:
Begin with about 4-5 lbs of white stoneware clay. Center it firmly on the wheel, ensuring the base is wide enough to support the intended height of the vessel. -
Open and Pull:
Open the clay and begin pulling the walls up into a cylinder. Aim for an even thickness throughout, keeping the bottom slightly thicker to allow for trimming later. -
Shape the Belly:
Using a rib tool on the outside and your hand on the inside, gently push the clay outward to form a bulbous, rounded belly. Maintain a smooth curve that tapers gradually back in toward the top. -
Narrow the Neck:
Collar the clay in at the top to create a narrow neck. Ensure the opening is sized appropriately to fit your wooden cap or lamp hardware later. -
Refine the Lip:
Smooth and compress the rim of the vase. A slight flare or a flat rim works well to seat the hardware cap securely. -
Dry to Leather Hard:
Cut the pot from the bat with a wire tool and set it aside to dry until leather hard. This is when the clay is firm enough to handle without deforming but still holds moisture.
Splatter Control
Is the splatter too fine? Move the brush closer to the pot. For larger, more dramatic globs, load the brush heavily and flick continuously from a greater distance.
Step 2: Trimming and Texturing
-
Invert and Center:
Place the vessel upside down on the wheel head. Use lugs of soft clay to secure it in place, making sure it spins perfectly on center. -
Trim the Foot:
Use a trimming tool to remove excess weight from the bottom and carve a clean foot ring. This lifts the form and gives it a professional shadow line. -
Add Texture Band:
While the pot is still leather hard, use a toothed rib or a scoring tool to scratch a horizontal band of texture near the bottom third of the vessel. This creates the decorative ‘stitched’ effect seen in the reference. -
Drill the Cord Hole:
Carefully drill a hole near the base for the electrical cord to exit. Clean up any burrs around the hole with a damp sponge. -
Bisque Fire:
Allow the piece to dry completely (bone dry) before loading it into the kiln for the bisque firing (usually Cone 04).
Dual Texture
Before the bisque fire, leave the bottom inch of the base unglazed raw clay. This creates a beautiful contrast between the smooth glaze and the rough, sandy stoneware.
Step 3: Glazing and Finishing
-
Apply Base Glaze:
Dip the bisque-fired lamp base into a matte white glaze. Ensure an even coat and wipe the foot ring clean with a damp sponge. -
Create the Speckle:
Dilute black underglaze slightly with water. Load a stiff brush or toothbrush with the mixture. -
Splatter Technique:
Flick the bristles to splatter the black underglaze onto the white surface. I prefer to do this outdoors or inside a spray booth to contain the mess. -
Sponge Dabbing:
For heavier black marks, dip a small piece of natural sea sponge into the black underglaze and dab it randomly onto the surface, focusing on areas where you want more contrast. -
Glaze Fire:
Fire the piece again to the maturation temperature of your clay and glaze (typically Cone 6 for stoneware). -
Assemble Hardware:
Once cool, feed the lamp cord through the bottom hole and up through the neck. Thread it through the wooden cap and wire the socket according to the kit instructions. -
Secure the Cap:
Use a strong epoxy to bond the wooden cap to the ceramic neck if the hardware tension isn’t sufficient to hold it steady. -
Final Setup:
Attach the harp and secure the drum shade with a finial. Add a warm-tone bulb to complete the cozy aesthetic.
Now illuminate your favorite reading nook with your custom handcrafted stoneware lamp


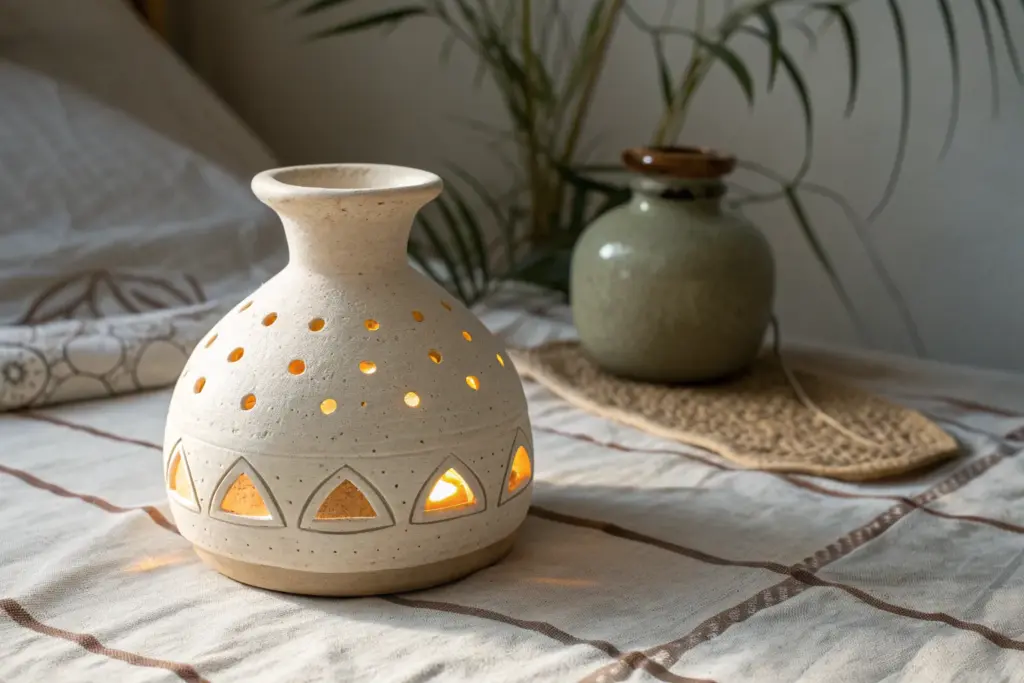
Terrazzo-Style Clay Lamp Base
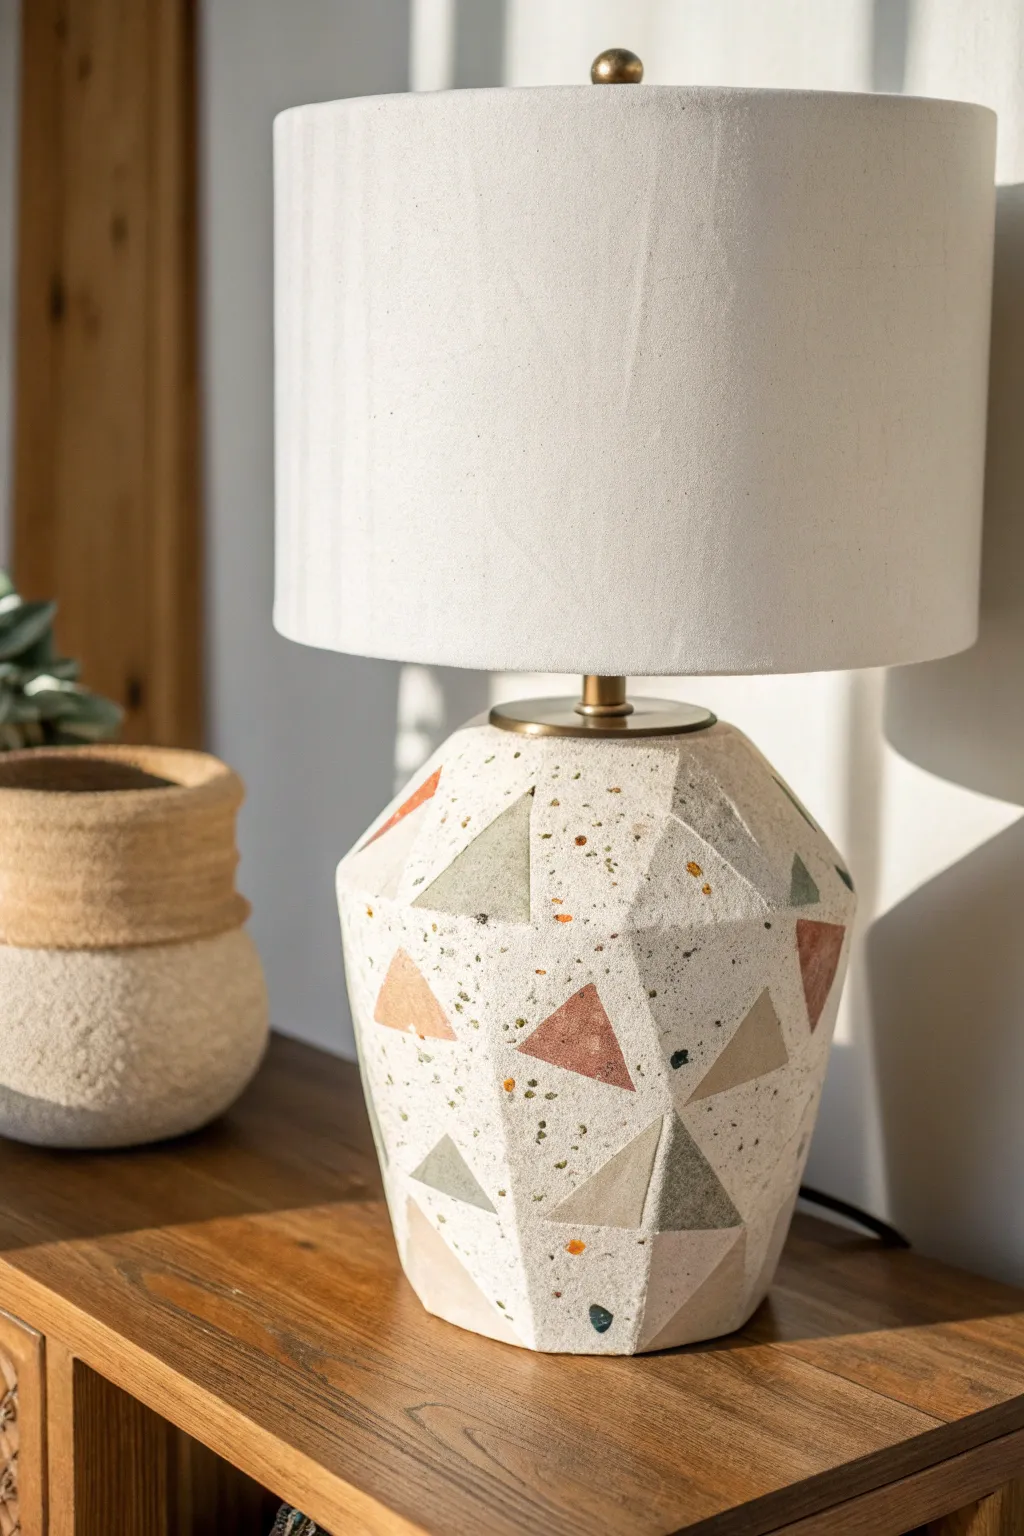
This stunning DIY project mimics the high-end look of geometric stone pottery by combining air-dry clay with a clever terrazzo painting technique. The faceted shape creates modern shadows, while the muted earth-tone triangles and speckles add warmth and organic charm.
Step-by-Step
Materials
- Existing lamp base (ceramic or glass, medium ginger jar shape)
- Air-dry clay (white or cream, approx. 2-3 lbs)
- Acrylic paints (terracotta, sage green, cream, taupe, black)
- Rolling pin
- Craft knife or clay cutter
- Sandpaper (fine and medium grit)
- Mod Podge or matte sealant
- Small flat paintbrush
- Old toothbrush (for splattering)
- Strong craft glue (E6000)
- Ruler
- Bowl of water
- Painters tape (optional)
Step 1: Prepping the Form
-
Prepare your base:
Clean your existing lamp base thoroughly with rubbing alcohol to remove any oils or dust. If the surface is very slick glass, lightly sand it first to give the clay something to grip. -
Roll out the clay:
Knead your air-dry clay until it is pliable and smooth. Roll it out on a flat surface to a consistent thickness of about 1/4 inch. Creating a large rectangular slab is easiest for wrapping. -
Wrap the base:
Apply a thin layer of craft glue to the lamp base. Carefully lift your clay slab and wrap it around the lamp. Trim away excess clay where the seam meets, then smooth the seam together using a little water on your finger until it disappears.
Crack Control
If small cracks appear as the clay dries, don’t panic. Mix a small amount of fresh clay with water to make a paste (slip) and fill the cracks. Sand smooth once dry.
Step 2: Sculpting the Facets
-
Mark geometric guides:
While the clay is still soft, use a ruler edge to lightly press a grid of intersecting diagonal lines into the surface. These don’t need to be perfect; you are just creating a map for where to flatten the clay. -
Slice planer surfaces:
Use a long, sharp blade or a dedicated clay slicer to shave off thin sections of clay along your guidelines. You want to create flat planes rather than a round curve. Alternatively, use a flat wooden paddle to beat the clay flat in specific areas. -
Refine the triangles:
As the facets emerge, use your fingers and a little water to sharpen the edges between the planes. The lamp should look like a low-poly 3D model with distinct triangular faces. -
Let it cure:
Allow the clay to dry completely. This is crucial for the next steps. Depending on humidity and thickness, this usually takes 24 to 48 hours. I find flipping the lamp upside down halfway through helps the bottom dry evenly.
Step 3: Creating the Terrazzo Look
-
Sand for smoothness:
Once fully dry, sand the entire piece. Start with medium grit to fix any major bumps, then switch to fine grit to get a stone-like finish on the faceted planes. -
Base coat:
Paint the entire base with a creamy off-white or light beige acrylic paint. This unifies the clay tone and serves as the background for your terrazzo design. -
Paint geometric inlays:
Select specific triangular facets to paint in solid colors. Use sage green, terracotta, and soft beige. Scatter these colored triangles randomly around the base, leaving plenty of the cream background visible. -
Add larger chips:
using a small flat brush, paint irregular, angular ‘chips’ of color onto the cream sections. Use the same palette (green, terracotta, beige) to simulate large chunks of stone aggregate. -
Create the splatter effect:
Dilute a small amount of black, dark grey, and burnt orange paint with water. Dip an old toothbrush into the mixture and run your thumb across the bristles to flick tiny speckles onto the lamp. This mimics the fine grit found in real terrazzo. -
Seal the work:
After the paint is bone dry, apply two coats of matte sealant or Mod Podge. This protects the finish and gives it that authentic, non-glossy stone texture.
Faux Stone Texture
add baking soda to your base coat of acrylic paint. This creates a gritty, tangible texture that makes the finished lamp feel more like carved sandstone than painted clay.
Step 4: Final Assembly
-
Clean hardware:
If any clay or paint got onto the metal neck or electrical socket of the lamp, carefully scrape it off or clean it with a damp cloth. -
Attach the shade:
Screw in your lightbulb and attach the harp and finial. Place your neutral drum shade on top to complete the earthy, modern aesthetic.
Plug in your new lamp and enjoy the warm, artisanal vibe it brings to your space

The Complete Guide to Pottery Troubleshooting
Uncover the most common ceramic mistakes—from cracking clay to failed glazes—and learn how to fix them fast.
Carved Geometric Pattern Lamp Shade
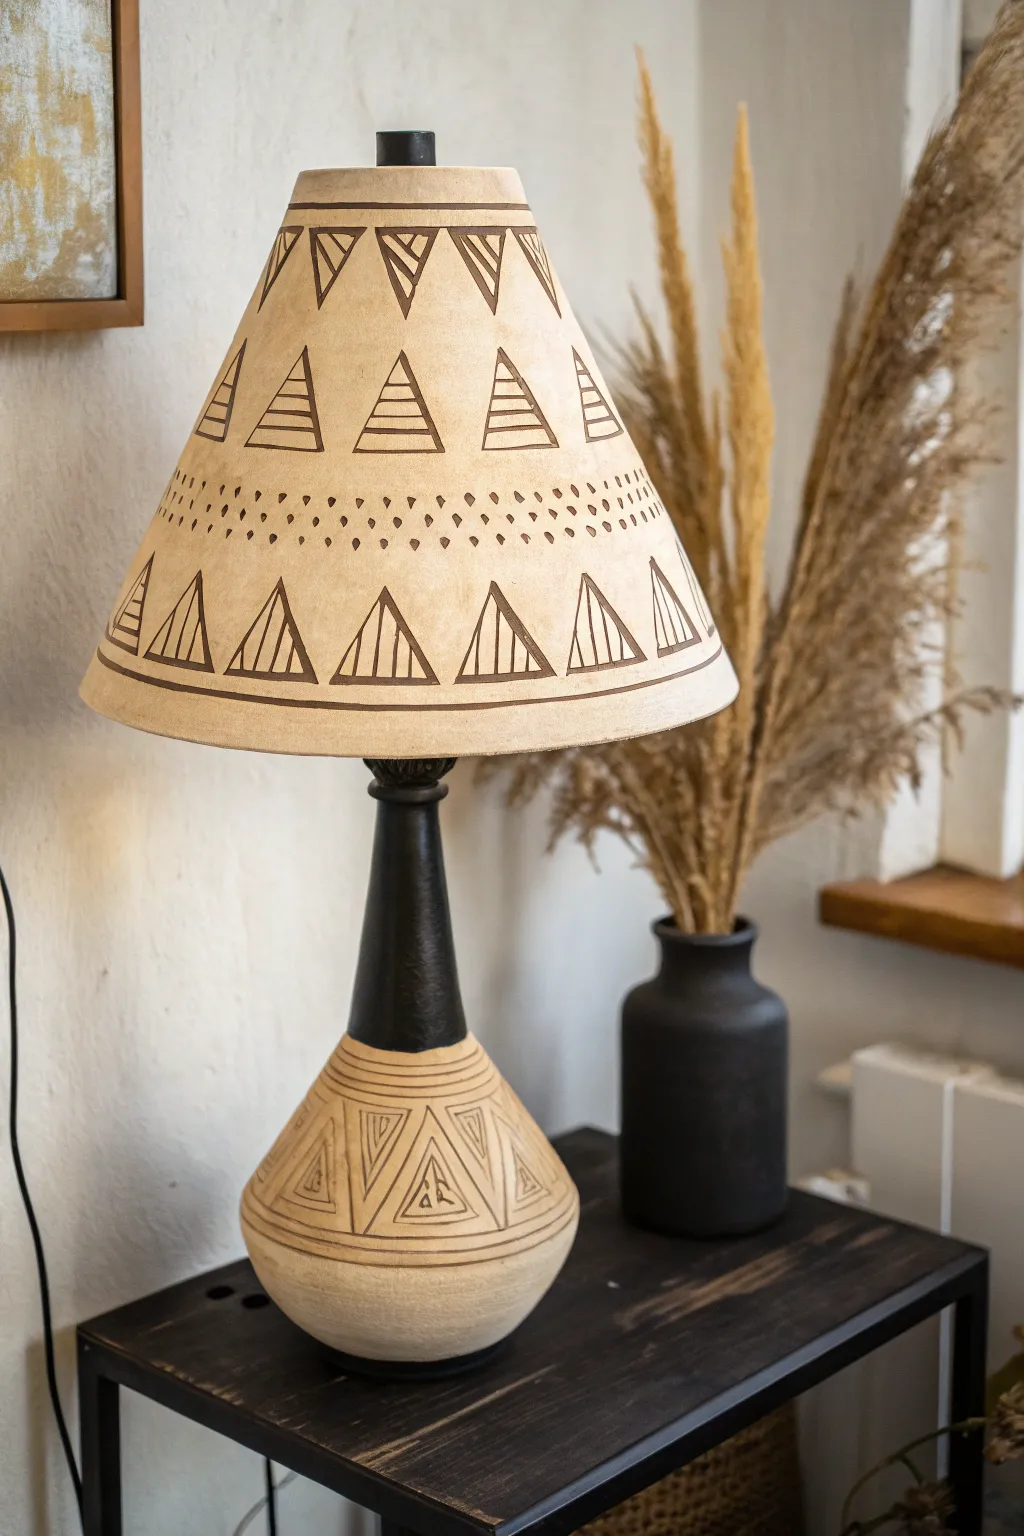
Transform a simple lamp base and shade into a cohesive, earthy statement piece using carving techniques and geometric patterns. This project combines the raw, tactile appeal of etched clay with bold black accents for a look that feels both ancient and modern.
How-To Guide
Materials
- Bisque-fired ceramic lamp base (alternatively, a smooth thrifted base you can prime)
- Plain conical lamp shade (paper or fabric with a paper backing)
- Matte black acrylic paint or ceramic glaze
- Fine-point permanent marker or black paint pen (for the shade)
- Pencil and eraser
- Ruler or flexible measuring tape
- Carving tool or linoleum cutter (if working with wet clay) or black paint pen (if skipping the actual carving)
- Medium and fine paintbrushes
- Masking tape
- Clear matte sealer spray
Step 1: Preparing and Painting the Base
-
Clean surface:
Ensure your lamp base is completely clean and free of dust or oils. If you are reusing an old lamp, give it a light sanding to help the paint adhere. -
Tape off sections:
Decide on the dividing line between the black neck and the patterned base. Use masking tape to create a crisp, level line where the neck creates a natural bottleneck shape. -
Paint the neck:
Apply matte black acrylic paint to the upper neck portion of the lamp. Use a medium brush for coverage and a finer brush near the hardware. Let it dry completely before adding a second coat for opacity. -
Draft the base pattern:
On the lower, raw-colored bulb of the base, lightly sketch your geometric triangles using a pencil. Create a band of triangles pointing upward and downward, interlocking them around the circumference. -
Detail the triangles:
Inside each large triangle, draw smaller concentric triangles or vertical line fills to mimic the tribal look seen in the photo.
Pro Tip: Steady Hands
Rest your pinky finger on the surface as a pivot point while drawing lines. It stabilizes your hand and prevents smudging wet ink.
Step 2: Creating the Faux-Resist or Carved Look
-
Define the lines:
If you are working with a finished ceramic piece, simulate the carved look by carefully tracing over your pencil lines with a thin brush and watered-down brown or dark grey paint. The goal is to make it look like an etched groove. -
Add texture:
For a more authentic ‘etched’ feel on a DIY clay base, you would use a carving tool to physically scratch these lines into leather-hard clay before firing. For this upcycle, try using a fine-point brown marker to create the main outlines, keeping the lines slightly shaky for a hand-hewn feel. -
Horizontal banding:
Paint or draw two horizontal parallel lines encircling the widest part of the base to frame your triangle pattern. -
Clean up:
Once the ink or paint is dry, gently erase any visible pencil marks to leave a clean pattern.
Step 3: Designing the Lamp Shade
-
Plan the layout:
Lightly mark the shade with a pencil to divide it into horizontal bands. You will need a top band, a middle ‘fill’ area, and a bottom band. -
Draw top border:
Near the top rim, draw two parallel horizontal lines. Below this, sketch a row of inverted triangles. -
Fill top triangles:
Using a black paint pen or permanent marker, fill these inverted triangles with alternating patterns—some with vertical stripes, others with diagonal cross-hatching. -
Create the middle motif:
In the large central space, draw three evenly spaced rows of horizontal triangles. These should be striped horizontally. I find using a ruler here helps keep the stripes parallel. -
Add the dot detail:
Below the middle triangles, create a dense band of stippling. Start with larger dots or dashes and transition to smaller, sparser dots as you move downward. -
Execute the bottom border:
For the bottom-most design, draw large, upright triangles. Fill these with vertical stripes, similar to the base of the lamp, to tie the two pieces together visually. -
Finalize lines:
Go over all your pencil lines with the black paint pen. Press firmly to get a saturated, opaque black line that mimics the look of burnt wood or heavy ink.
Level Up: Texture
Mix baking soda into the beige base paint before applying it to a generic lamp. This adds a gritty, clay-like texture for realism.
Step 4: Assembly
-
Seal the base:
Protect your paint job on the base with a light coat of clear matte sealer spray. This makes dusting easier later on. -
Attach hardware:
Screw the bulb socket back onto the base if you removed it, and attach the harp. -
Mount Shade:
Place your newly patterned shade onto the lamp and secure it with a finial, preferably a simple black one to match the neck.
Now turn on the light and enjoy the warm, artisanal atmosphere your new lamp brings to the room
Slab-Built Box Lantern With Windows
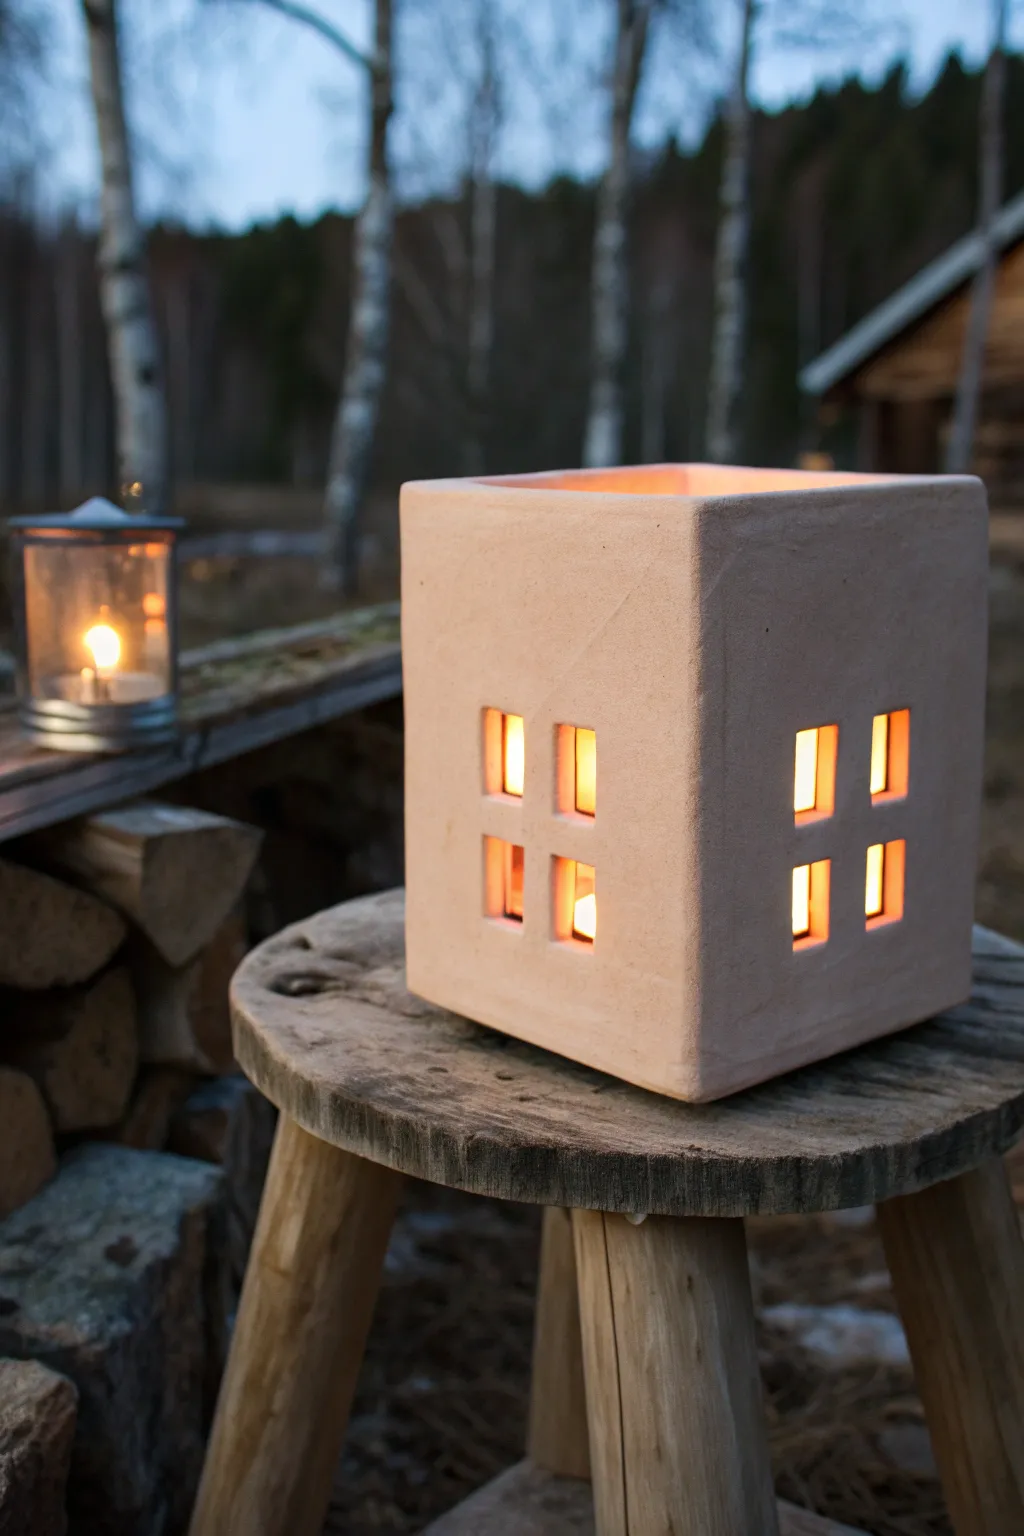
This rustic, cube-shaped lantern brings a warm, cozy glow to any outdoor evening with its simple cutout windows and textured clay surface. Built from sturdy clay slabs, its geometric simplicity pairs perfectly with the flickering light of a candle inside.
Step-by-Step Guide
Materials
- Stoneware clay with grog (toast or terracotta color recommended)
- Rolling pin
- Two wooden guide strips (approx. 1/4 inch thick)
- Canvas mat or cloth
- Fettling knife or sharp craft knife
- Ruler or straight edge
- Scoring tool (serrated rib or needle tool)
- Slip (clay and vinegar/water mix)
- Square cookie cutter (approx. 1 inch) or template
- Wooden paddle
- Sponge
Step 1: Preparing the Slabs
-
Wedge the clay:
Start by thoroughly wedging your clay to remove air bubbles and ensure an even consistency. This is crucial for slab building to prevent warping later. -
Set up the rolling station:
Place your canvas mat on a flat work surface. Position the two wooden guide strips parallel to each other, slightly wider than the width of your desired walls. -
Roll the slabs:
Place the clay between the guide strips and use the rolling pin to flatten it. The strips ensure your slab is a uniform thickness suitable for standing walls. -
Smooth the surface:
Before cutting, run a soft rib or smooth damp sponge over the clay surface to compress the particles. I like to do this here rather than later, as it’s easier to smooth while flat.
Step 2: Cutting and Drying
-
Measure the walls:
Using a ruler, measure and cut four identical square panels for the walls (e.g., 6×6 inches) and one slightly smaller square for the base. -
Create the window layout:
On each of the four wall panels, lightly trace a 2×2 grid of small squares. Center this grouping so there is ample solid clay border around the edges. -
Excise the windows:
Use a sharp fettling knife or a small square cookie cutter to remove the clay from your traced window shapes. Keep your cuts clean and vertical. -
Let the slabs stiffen:
This step is vital: allow the cut slabs to dry to a ‘leather-hard’ state. They should be stiff enough to hold their shape without bending but still dark with moisture.
Keep it Clean
Clean up ‘crumbs’ inside the window cutouts immediately with a soft brush. Once the clay dries hard, these little bits become incredibly difficult to remove cleanly.
Step 3: Assembly and Finishing
-
Bevel the edges:
For a seamless 90-degree corner, cut the vertical edges of your wall slabs at a 45-degree angle. This creates a mitre joint. -
Score and slip:
Aggressively score (scratch) the beveled edges and the perimeter of the base. Apply a generous amount of slip to these rough areas. -
Join the first corner:
Attach one wall to the base, then attach a second wall adjacent to it. Press the scored beveled edges together firmly to create the first corner. -
Complete the box:
Continue adding the remaining walls, ensuring all corners are squared. Use a coil of soft clay on the interior seams for reinforcement. -
Paddle the form:
Gently tap the exterior walls with a wooden paddle. This helps bond the joints and gives the lantern that slight, organic texture seen in the photo. -
Clean the windows:
Use a damp sponge or finger to smooth the sharp edges of the window cutouts so they look finished but not overly rounded. -
Top rim smoothing:
Run a chamois or sponge along the top rim of the lantern to ensure it is level and comfortable to the touch. -
Slow drying:
Loosely cover the finished lantern with plastic to let it dry very slowly. This prevents the corners from cracking as the clay shrinks. -
Bisque fire:
Once bone dry, fire the piece in a kiln. For the look in the image, you can leave it unglazed or use a clear matte glaze to protect the surface.
Texture Twist
Before assembling, roll a piece of rough canvas or hessian over the wet slabs. This imprints a subtle fabric texture that catches the candlelight beautifully.
Place a tea light or small pillar candle inside your dried lantern to verify the fit before the final firing


What Really Happens Inside the Kiln
Learn how time and temperature work together inside the kiln to transform clay into durable ceramic.
Tripod Leg Clay Lamp Base

This rustic yet modern lamp base features organic, tripod-style legs and a beautiful faux-stone finish. Creating this sculptural piece from air-dry clay adds an earthy, artisanal touch to any room without needing a kiln.
Step-by-Step
Materials
- High-quality air-dry clay (stone or white color)
- Lamp wiring kit (socket, cord, threaded nipple, washers, nut)
- Rolling pin
- Aluminum wire (12-gauge) for armature
- Aluminum foil
- Masking tape
- Ceramic sculpting tools (needle tool, rib tool)
- Sanding sponge (medium grit)
- Coarse sea salt, sand, or dried coffee grounds (for texture)
- Acrylic paint (cream, beige, dark brown)
- Matte spray varnish
- E-6000 or strong epoxy glue
- Water spray bottle
Step 1: Building the Armature
-
Form the core structure:
Cut three equal lengths of thick aluminum wire, each about 16 inches long. Twist the top 4 inches of all three wires together tightly to form a central neck, splaying the remaining lengths outward to create a tripod stand. -
Bulking out the form:
Crumple aluminum foil tightly around the wire legs and the central neck. You want to build up the volume so you don’t use inches of solid clay, which takes forever to dry and cracks easily. -
Define the shape:
Shape the foil so the legs are thickest near the bottom and taper slightly as they meet the neck. Wrap the entire foil structure in masking tape to smooth out sharp edges and give the clay a surface to grip. -
Install the hardware channel:
Before adding clay, tape the threaded nipple (the metal pipe from your lamp kit) securely into the top of the twisted wire neck. Ensure it stands perfectly straight, leaving the threaded top exposed for the socket later.
Cracks happen!
If hairline cracks appear while drying, create a ‘slip’ by mixing clay and water into a paste. Fill the cracks, smooth over, and let dry again before sanding.
Step 2: Sculpting the Clay Base
-
Prepare the texturizing mix:
Knead a generous amount of air-dry clay with a handful of sand or dried coffee grounds. This creates that internal grittiness that mimics natural limestone or travertine. -
Sheet the clay:
Roll out slabs of your textured clay to about 1/4 inch thickness. I like to keep a spray bottle handy to mist the clay lightly if it starts feeling too dry or leather-hard. -
Cover the legs:
Wrap the clay slabs around each foil leg, pressing firmly to adhere. Smooth the seams where the clay edges meet by dragging a portion of clay across the join with a sculpting tool. -
Model the junction:
Add extra clay where the legs merge into the neck. This area needs to be strong, so blend the clay thoroughly to ensure there are no air pockets or weak seams between the legs. -
Refine the surface:
Use a damp sponge or a rubber rib tool to smooth the overall form, but don’t polish it perfectly. The charm of this lamp lies in its slight irregularities. -
Add surface texture:
While the clay is still wet, gently press coarse sea salt or larger grains of sand into the surface. Poke small, varying holes with a needle tool to simulate porous rock. -
Check balance:
Stand the lamp up on a flat surface. Gently press down to ensure all three legs sit flush and the threaded pipe at the top is vertical.
Step 3: Finishing and Wiring
-
Allow to dry:
Let the sculpture dry completely. This can take 48 to 72 hours depending on humidity. Rotate it precisely once a day so all sides get airflow. -
Sand for stone effect:
Once bone dry, sand the surface with a sanding sponge. This will knock off any sharp peaks and, importantly, reveal the coffee grounds or sand speckles buried inside the clay. -
Base coat painting:
Paint the entire piece with a matte cream or off-white acrylic paint. You may need two coats for full coverage. -
Create the splatter:
Dilute dark brown paint with water. Dip a toothbrush in it and run your thumb across the bristles to flick tiny speckles over the lamp base. This replicates the mineral inclusions seen in the reference. -
Seal the piece:
Spray the lamp with two coats of matte varnish. This seals the clay and prevents the ‘stone’ texture from crumbling away over time. -
Wire the lamp:
Thread the lamp cord up through the bottom center (between the legs) and through the threaded nipple. Screw the socket base onto the nipple and wire the connections according to your kit’s instructions. -
Secure the socket:
Snap the socket shell into place. If feel slightly wobbly, a dab of E-6000 glue at the base of the threaded tube can add extra stability.
Try a darker mood
Swap the cream paint for a charcoal grey or terracotta orange, then use light beige splatters for a dramatic, volcanic stone aesthetic.
Top your new creation with a linen shade and enjoy the warm, organic glow it brings to your space
Air-Dry Clay Wrapped Lamp Makeover
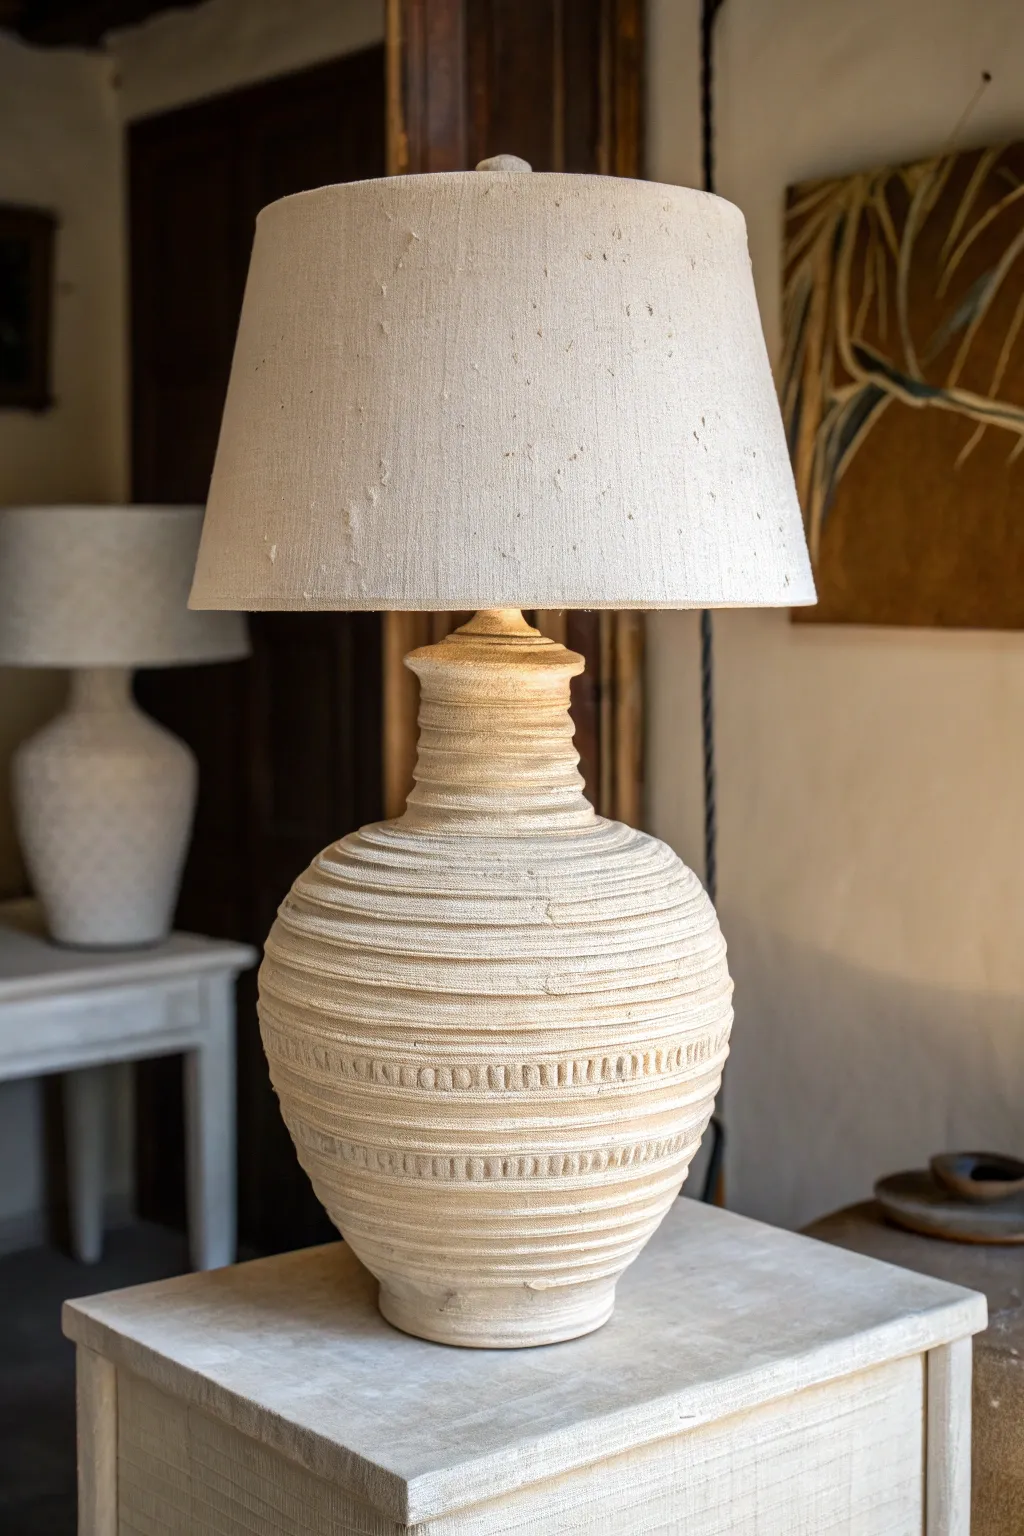
Transform a plain or outdated lamp base into a high-end, artisan-style piece using nothing but air-dry clay. This makeover mimics the look of hand-thrown pottery with organic horizontal ridges and subtle stamped detailing for a rustic, minimalist aesthetic.
Step-by-Step Guide
Materials
- Old ceramic or glass lamp base (preferably rounded)
- Air-dry clay (white or natural stone color)
- Rolling pin
- Water in a small bowl
- Sponge
- Pottery rib tool or old credit card
- Sculpting tools or a butter knife
- Textured fabric (like linen or burlap)
- Sandpaper (medium and fine grit)
- Clear matte sealant spray
- Acrylic paint (optional, for aging)
Step 1: Preparing the Base
-
Clean surface:
Begin by thoroughly cleaning your lamp base with soapy water or rubbing alcohol to remove any grease or dust. This ensures the clay adheres properly. -
Scuff sanding:
If your base is very glossy ceramic or glass, scuff it lightly with medium-grit sandpaper to give it some ‘tooth’ for the clay to grip. -
Tape hardware:
Use painter’s tape to completely cover the socket, cord, and switch area. You do not want clay getting into the electrical components.
Slip & Score Secret
When joining two pieces of clay, scratch both surfaces (scoring) and add water (slip). This acts like glue and prevents seams from splitting as they dry.
Step 2: Applying the Clay
-
Roll slabs:
Roll out your air-dry clay into long, flat slabs approximately 1/4 inch thick. Don’t worry about perfect edges; we’ll be blending them. -
Apply first section:
Wrap a slab around the bottom of the lamp base. Press it firmly against the surface to remove any trapped air bubbles. -
Continue wrapping:
Work your way up the lamp, adding more clay slabs. Overlap the edges slightly and smooth the seams together using your fingers and a little water. -
Cover completely:
Ensure the entire base is covered up to the neck. If the clay feels heavy or starts sliding, let the bottom section firm up for 30 minutes before adding the top layers. -
Smooth the surface:
Use a damp sponge or a pottery rib to smooth out the major bumps and seams, creating a unified surface. It doesn’t need to be perfectly smooth, as we will add texture next.
Cracks Repair
If a large crack appears during drying, don’t panic. Fill it with a mix of white glue and clay dust, then sand smooth once hardened. It’s an invisible fix.
Step 3: Sculpting Texture
-
Create ridges:
Using a sculpting tool or the edge of a butter knife, gently press into the clay while rotating the lamp to create horizontal distinct ridges. Vary the pressure slightly for an organic look. -
Refine the neck:
Pay special attention to the neck area. I like to make the ridges slightly tighter here to mimic the narrowing of a thrown pot. -
Add stamped details:
Find a small, blunt tool (like the end of a paintbrush or a carved eraser) to stamp a repetitive pattern into one of the wider central bands of the lamp. -
Texture the surface:
Take a piece of rough linen or burlap and press it gently against random sections of the wet clay. This adds a subtle fabric grain that makes the ‘ceramic’ look aged and authentic. -
Check symmetry:
Step back and look at the silhouette. If one side looks too bulky, use your damp sponge to press it down and redistribute the clay.
Step 4: Finishing Touches
-
Slow drying:
Allow the lamp to dry slowly away from direct heat or sunlight. This usually takes 24-48 hours. Drape a loose plastic bag over it for the first night to prevent cracking. -
Fill cracks:
Once fully dry, you may see small shrinkage cracks. Mix a tiny amount of fresh clay with water to make a paste (slip) and fill these gaps, then let dry again. -
Sand gently:
Lightly sand any overly sharp peaks or rough patches with fine-grit sandpaper, but be careful not to remove the texture you created. -
Sealing:
Protect your work with two coats of clear matte sealant spray. This prevents the dried clay from absorbing moisture or dusting over time. -
Optional wash:
If you want an antique look, brush on a watered-down brown acrylic paint and immediately wipe it off with a rag, letting the color settle only in the deep crevices.
Place your reimagined lamp on a side table to add instant artisanal warmth to your room

TRACK YOUR CERAMIC JOURNEY
Capture glaze tests, firing details, and creative progress—all in one simple printable. Make your projects easier to repeat and improve.
Textured Pinecone-Inspired Clay Lamp
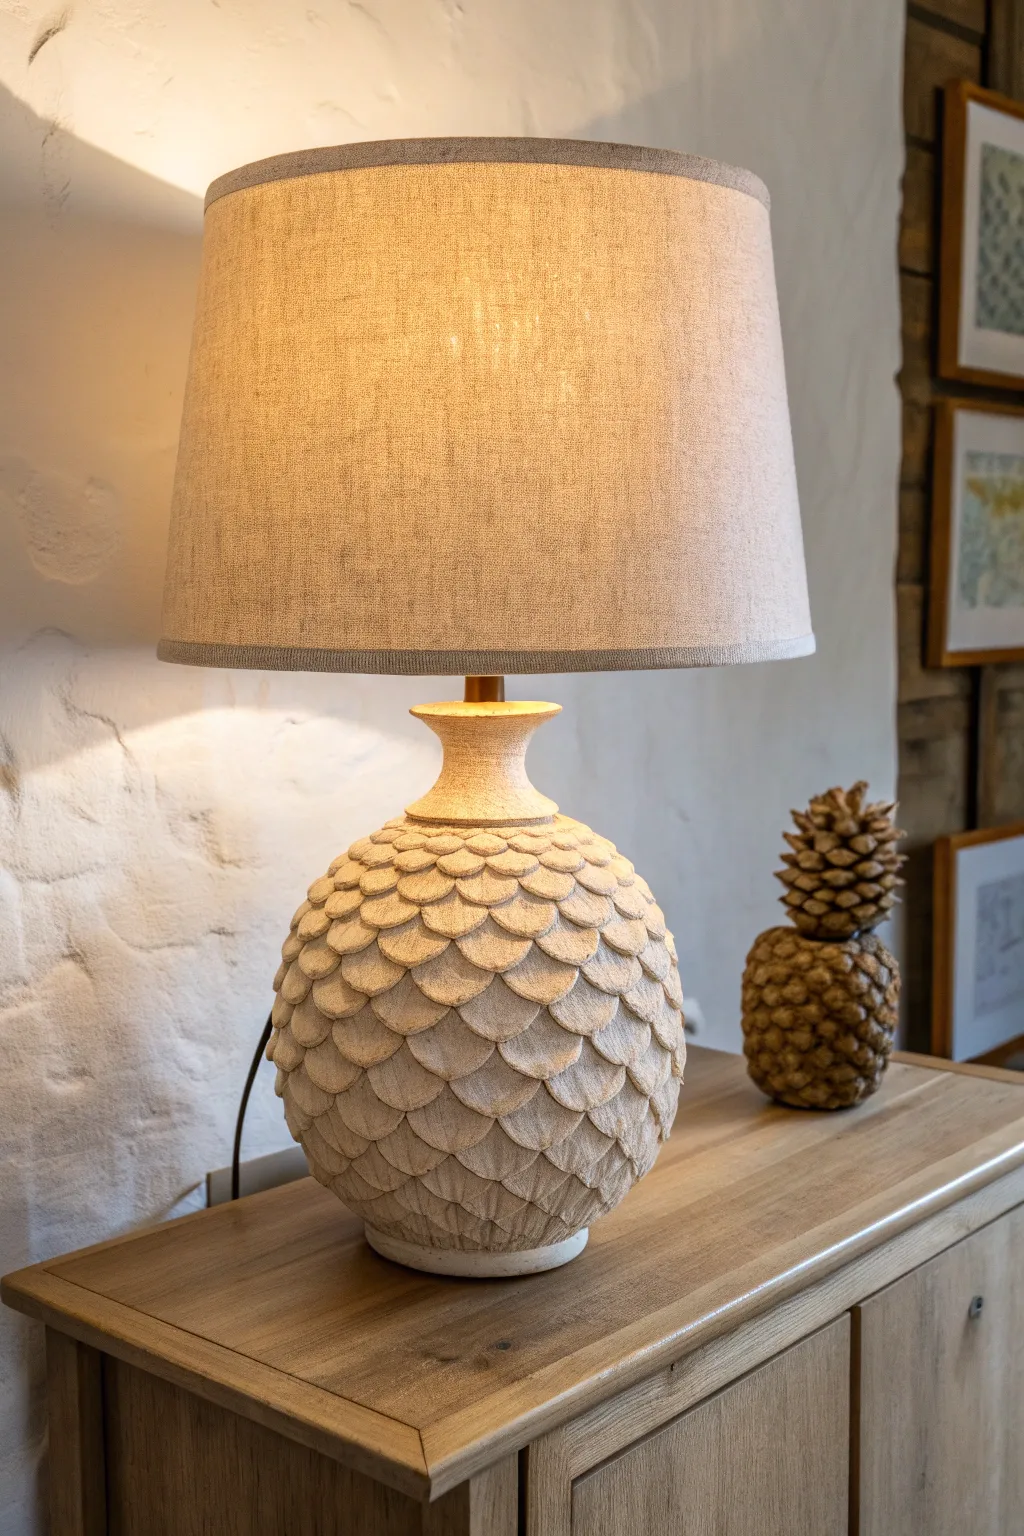
Create a stunning organic centerpiece for your side table using air-dry clay to mimic the natural, overlapping texture of a pinecone or artichoke. This project transforms a simple lamp kit into a high-end sculptural piece with a soft, matte finish that diffuses light beautifully.
Step-by-Step Tutorial
Materials
- Large ballon or styrofoam ball (for the core structure)
- Cardboard tube (for the neck)
- White or cream air-dry clay (approx. 2-3kg)
- Rolling pin
- Circle cookie cutter or teardrop cutter (approx. 2 inches)
- Lamp wiring kit with bulb socket
- Sponge and water
- Sculpting tools (needle tool mostly)
- Strong craft glue or slip
- Fine-grit sandpaper
- Matte cream acrylic paint (optional)
- Clear matte sealant spray
Step 1: Building the Armature
-
Prepare the core:
Begin by establishing the round shape of the lamp base. If you are using a styrofoam ball, cut a small flat section at the bottom so it stands stable. -
Add the neck:
Attach a sturdy cardboard tube to the top of the sphere using hot glue or strong adhesive. This will form the neck of the vase shape and hold the lamp hardware later. -
Cover with a base layer:
Roll out a slab of clay to about 1/4 inch thickness. Wrap this layer entirely around your sphere and neck structure, smoothing the seams with a little water until you have a seamless, blank vase shape.
Scales Falling Off?
If dry scales detach, your slip wasn’t wet enough. Reattach using a mix of white PVA glue and a tiny bit of water for a bond stronger than clay alone.
Step 2: Creating the Scales
-
Cut the shapes:
Roll out a fresh slab of clay. Use a circular cutter to punch out dozens of circles. If you prefer the slightly pointed look in the photo, gently pinch one side of each circle to form a teardrop shape. -
Texture individual scales:
For that organic, stone-like feel, take a piece of coarse sandpaper or a textured fabric and press it lightly onto each clay scale before attaching it. -
Start at the bottom:
Apply a small amount of slip (clay mixed with water) to the back of your first row of scales. Press them onto the very bottom of the base, slightly overlapping the bottom edge. -
Layer upwards:
Begin the next row, placing each new scale in the gap between the two scales below it, brick-laying style. This creates the classic pinecone pattern. -
Refine the edges:
As you attach each scale, I like to gently curl the unattached edge outward just a tiny fraction. This gives the lamp depth and creates those lovely shadows when lit. -
Navigate the curve:
As you move up to the widest part of the sphere, you may need to slightly stretch your clay scales horizontally so they cover the area without gaps. -
Taper the neck:
When you reach the neck, transition to smaller scales if necessary, or simply overlap them more tightly to accommodate the narrower circumference.
Step 3: Finishing and Assembly
-
Smooth the rim:
At the very top of the neck, add a final ring of clay to cover the raw edges of the last row of scales, creating a flat platform for the lamp hardware. -
Dry thoroughly:
Let the sculpture dry completely. Because it’s thick with multiple layers, this might take 48-72 hours in a dry, ventilated area. -
Refine surface:
Once bone dry, use fine-grit sandpaper to gently smooth any sharp burrs on the edges of the scales or accidental fingerprints. -
Paint or seal:
If the natural clay color matches your decor, simply seal it with a matte clear spray. If you want a more uniform look, sponge on a layer of diluted cream acrylic paint to get into the crevices before sealing. -
Install hardware:
Feed the lamp cord through the central channel (make sure you left a hole through the clay when building the neck!). Secure the socket assembly to the top according to your kit’s instructions. -
Add the shade:
Finish by attaching a textured linen shade that complements the organic feel of the base.
Pro Tip: Rustic Texture
Mix a teaspoon of used coffee grounds or fine sand into your clay before rolling it out. This adds subtle speckling and genuine grit to the surface.
Plug in your new lamp and enjoy the warm, textured atmosphere it brings to your room
Rippled Wave Lamp Base
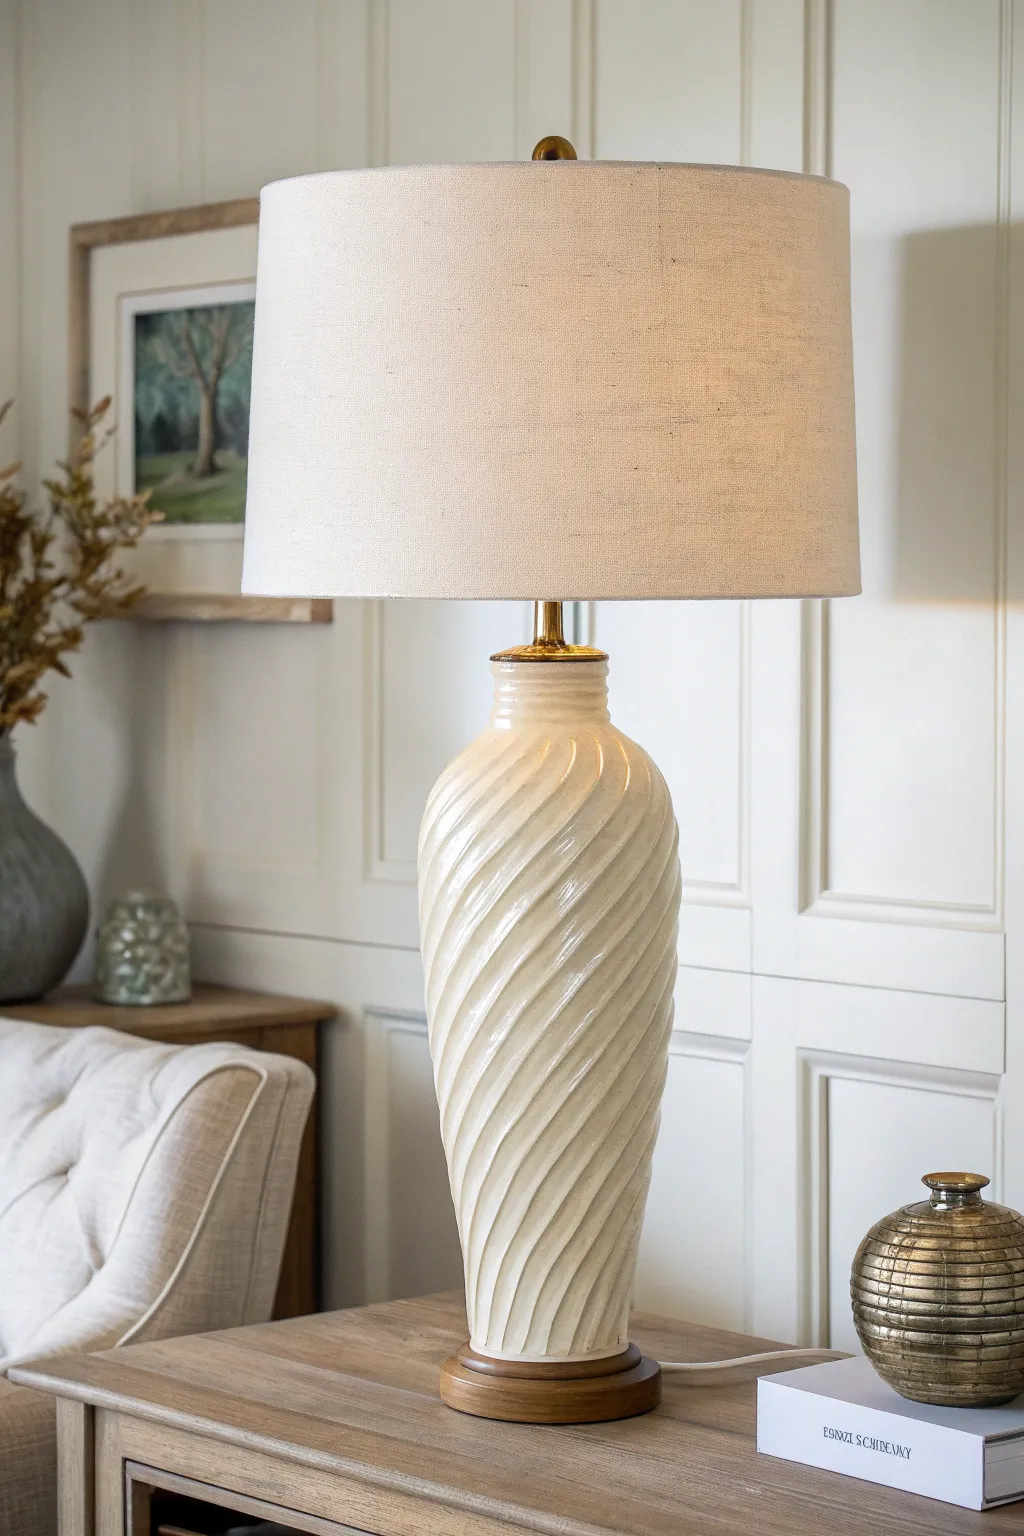
This elegant lamp base features a mesmerizing twisted flute texture that catches the light beautifully, finished with a creamy gloss glaze to mimic high-end pottery. The organic spiral form adds movement and sophistication to any side table, complemented by a warm wooden base.
Step-by-Step
Materials
- White stoneware clay (approx. 5-7 lbs)
- Pottery wheel
- Throwing tools (sponge, needle tool, wire cutter)
- Ribs (wooden and metal)
- Fluting tool or loop tool (medium size)
- Heat gun or torch (optional, for stiffening)
- Clear gloss glaze
- Cream or ivory underglaze (optional if clay isn’t white enough)
- Wooden circular base (pre-made or cut from wood)
- Lamp kit (harp, socket, cord, nipple)
- Epoxy adhesive
Step 1: Throwing the Cylinder
-
Center the Clay:
Begin by wedging your white stoneware clay thoroughly to remove air bubbles. Slam the ball onto the center of the wheel head and use firm pressure with watered hands to center it perfectly. -
Open and Pull:
Open the clay down to the bat, leaving about half an inch for the floor. Start pulling up the walls to create a tall, narrow cylinder. Focus on gaining height rather than width, aiming for a consistent wall thickness of about 3/8 inch. -
Shape the Form:
Once you have height, gently collar the neck inward to create that bottleneck shape. Use a wooden rib on the outside and your hand on the inside to belly out the main body slightly, creating a soft curve that tapers at the bottom and top. -
Smooth the Surface:
Use a metal rib to compress the outside wall, removing all throwing lines and slip. The surface needs to be pristine and smooth before you add the texture. -
Create a Neck Gallery:
At the very top rim, create a small, flat gallery or ledge where the lamp hardware cap will eventually sit. This ensures a professional fit later.
Smoother Spirals
Work when the clay is leather hard—not too wet, not too dry. If it’s too soft, the walls will collapse; too dry, and the tool will chatter.
Step 2: Carving the Spiral Flutes
-
Mark Guidelines:
While the wheel is spinning slowly, lightly trace a spiral guideline with a dull pencil or needle tool—this helps keep your angle consistent. Alternatively, you can freehand it if you trust your rhythm. -
Begin Fluting:
Using a loop tool or specialized fluting tool, start at the bottom of the form. Drag the tool upward in a diagonal, spiral motion following the curve of the pot. I prefer to maintain consistent pressure to keep the depth uniform. -
Maintain Spacing:
Continue carving parallel spiral grooves all the way around the lamp. -
Refine the Ridges:
Once the initial cuts are made, use a damp sponge or a soft rib to gently smooth the sharp edges of the raised ridges between your cuts. You want them defined but soft to the touch. -
Dry Slowly:
Cover the piece loosely with plastic to let it dry slowly to leather hard, then uncover to reach bone dry. Uneven drying can cause warping in tall forms like this.
Step 3: Firing and Glazing
-
Bisque Fire:
Load the bone-dry lamp base into the kiln and bisque fire it to Cone 04. This prepares the clay to accept the glaze without disintegrating. -
Apply Glaze:
Pour a creamy white or ivory gloss glaze inside the vessel first, swirling to coat, and pour out the excess. For the exterior, dipping is best for an even coat, but brushing three distinct layers works if you don’t have a large bucket. -
Clean the Foot:
Wipe the bottom edge of the lamp completely clean of glaze with a wax resist or a wet sponge to prevent it from fusing to the kiln shelf. -
Glaze Fire:
Fire the piece again to the maturation temperature of your specific clay and glaze (likely Cone 5 or 6 for stoneware). Let the kiln cool completely before opening.
Wobble Worries
If your tall cylinder starts to wobble on the wheel while throwing, slow the wheel speed down immediately and use a heat gun to stiffen the lower walls before continuing upward.
Step 4: Assembly
-
Prepare the Base:
While firing, stain or seal your wooden disc base. Drill a center hole for the lamp pipe (nipple) and a side channel for the cord to exit if your base doesn’t have legs. -
Attach Base:
Once the ceramic is cool, center it on the wooden base. Use strong two-part epoxy to bond the ceramic font to the wood. -
Wire the Lamp:
Thread the threaded rod (nipple) through the lamp base. Secure it with a nut and washer underneath. Thread the cord through the pipe. -
Install Socket:
Attach the harp saddle and socket cap to the top of the rod. Wire the socket connections (hot to gold screw, neutral to silver screw), snap the shell into place, and add your bulb and shade.
Plug in your new creation and enjoy the sophisticated shadows the fluted texture casts across your room.
Candle-Safe Dome Lamp With Vent Holes
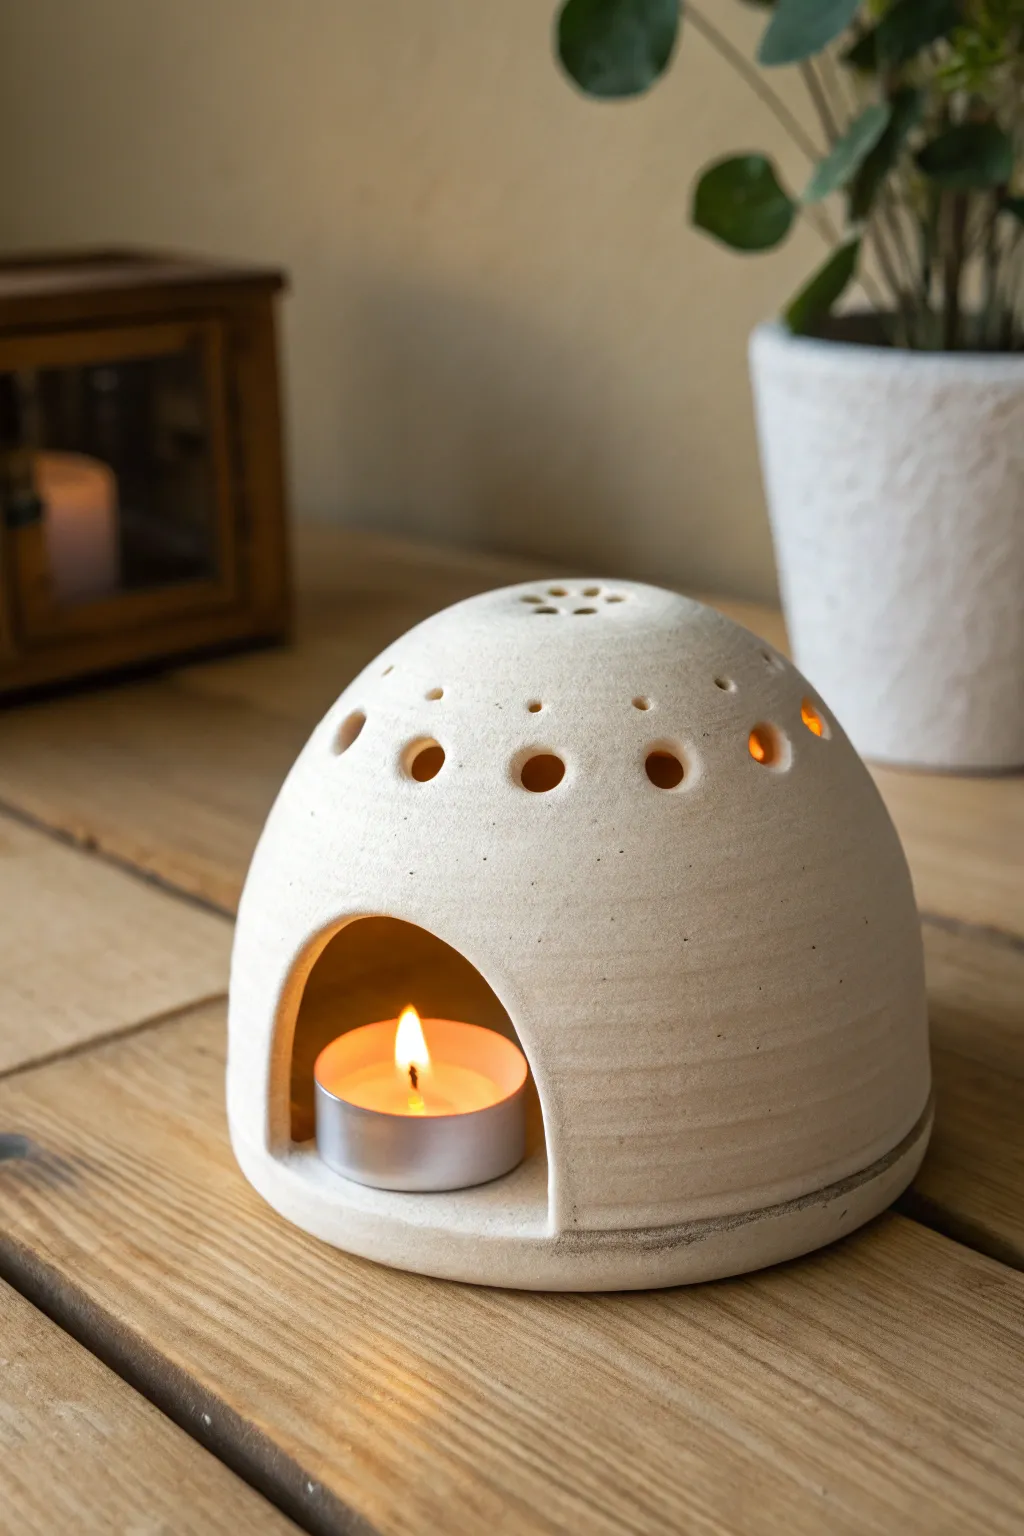
This charming, dome-shaped candle holder features a rustic, textured surface and a series of delicate vent holes that cast playful shadows when lit. It’s a wonderful beginner-friendly pottery project that combines functional design with simple, elegant form.
Step-by-Step
Materials
- White or speckled stoneware clay
- Rolling pin
- Canvas mat or slab roller
- Small bowl (approx. 5-6 inches diameter) to use as a slump mold
- Plastic wrap
- Needle tool or sharp knife
- Hole punch tool (circular clay cutters) or a straw
- Sponge
- Rib tool (wooden or silicone)
- Small bowl of water
- Tealight candle (for testing size)
Step 1: Forming the Dome
-
Prepare the slab:
Begin by wedging your clay to remove air bubbles, then roll it out into a smooth slab about 1/4 inch thick. Ensure the thickness is even across the entire surface for consistent drying. -
Prepare the mold:
Find a small, round bowl to serve as your slump mold. Cover the outside of the bowl tightly with plastic wrap to prevent the clay from sticking to it later. -
Drape the clay:
Gently lift your clay slab and drape it over the plastic-covered bowl. Smooth the clay down the sides with your hands, pressing gently to take the shape of the dome without stretching it too thin. -
Trim the excess:
Using your needle tool, trim the excess clay around the rim of the bowl. You can use the bowl’s edge as a guide to get a clean, straight bottom edge for your dome. -
Smooth the surface:
With a slightly damp sponge or a soft rib tool, smooth the outside surface of the dome. If you want the subtle spiral texture seen in the photo, you can gently drag a serrated rib or a stiff brush around the dome while turning it. -
Initial drying:
Let the clay sit on the mold until it becomes leather hard. This usually takes a few hours depending on humidity, but avoid rushing it or the dome might collapse when removed.
Step 2: Carving and detailing
-
Remove from mold:
Once leather hard, carefully lift the clay dome off the bowl and peel away the plastic wrap. The shape should hold firm on its own now. -
Mark the door:
Decide where you want the main opening. Use a needle tool to lightly sketch a wide, arched doorway. Make sure it’s large enough to easily slide a tealight candle in and out. -
Cut the opening:
Carefully cut along your sketched line with a sharp knife or fettling knife to create the door. Smooth the cut edges immediately with a damp finger to remove any sharpness. -
Plan vent holes:
Lightly mark spots for the vent holes. In the example, there is a row of medium holes midway up the dome and a small cluster at the very top center. -
Punch the holes:
Using a circular clay hole cutter or a sturdy straw, punch out the marked holes. Twist the tool gently as you push through to get a clean cut without warping the dome. -
Clean the edges:
After punching, you’ll likely have rough bits of clay on the inside. I like to wait a few minutes for these burrs to stiffen slightly, then rub them away gently with a dry finger or sponge. -
Create the base plate:
Roll out a small separate piece of clay, slightly larger than the footprint of your dome, to act as a saucer. This protects surfaces from heat. -
Attach or fit:
You can either score and slip the dome directly onto this base plate to make a one-piece unit, or simply fire the plate separately as a coaster for the removeable dome.
Clean Cuts Every Time
When punching holes, support the clay wall from the inside with your other hand. This prevents the dome from caving in under the pressure of the tool.
Step 3: Finishing
-
Final smoothing:
Give the entire piece one last wipe with a very well-squeezed sponge to remove any fingerprints or stray crumbles. -
Slow drying:
Place the dome loosely covered in plastic for a day to equalize moisture, then uncover and let it dry completely to bone dry stage. -
Bisque fire:
Fire the piece in a kiln to bisque temperature (usually cone 04 or 06). This hardens the clay and prepares it for glazing or final use if leaving raw. -
Glaze or leave raw:
For the look in the photo, leave the exterior unglazed to show off the clay’s grainy texture. You might apply a clear matte glaze to the inside to make cleaning soot easier. -
Final firing:
Fire the piece once more to the maturation temperature of your specific clay body (e.g., cone 6). Once cool, add a tealight and enjoy the glow.
Slumping Issues?
If your dome starts to sag after removing the mold, the clay was likely too wet. Put it back on the mold immediately and let it dry for another hour or two.
Enjoy the cozy atmosphere created by the flickering light dancing through your handmade luminary
Layered Petal Shade Clay Lamp
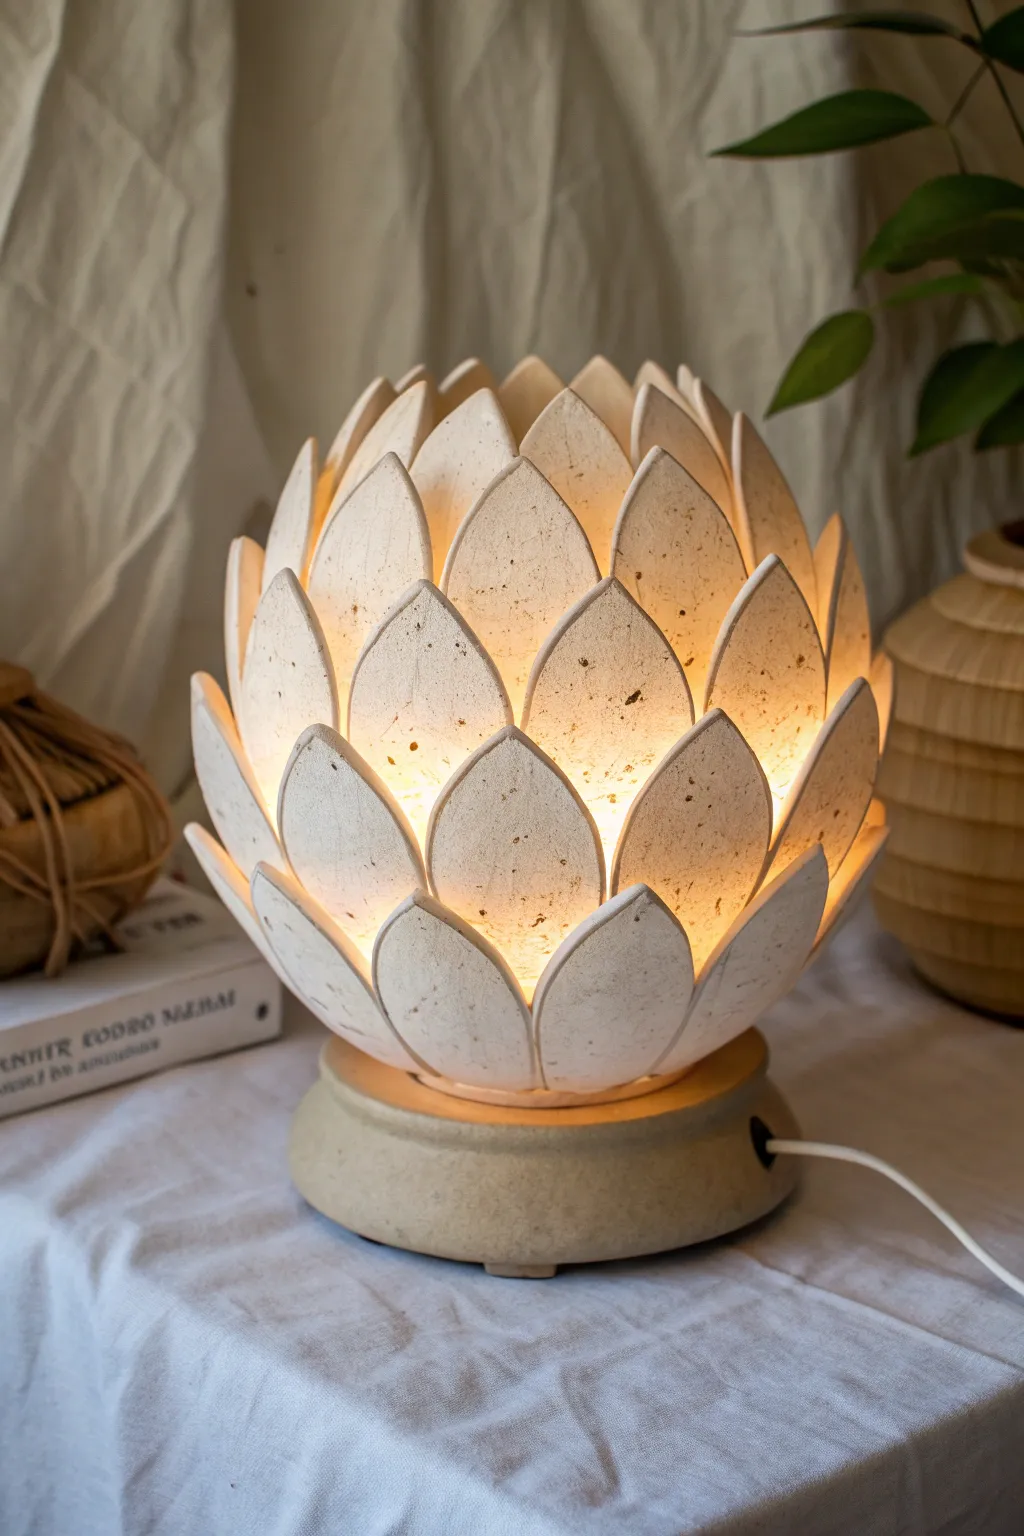
This stunning clay lamp mimics the organic beauty of an blooming lotus or artichoke, casting a warm, layered glow through its overlapping petals. Its textured, stone-like finish brings an earthy elegance to any room, making it a perfect functional centerpiece.
How-To Guide
Materials
- White specialized sculpting clay (air-dry or kiln-fire depending on preference)
- Circular wooden or sturdy cardboard base (for structure)
- LED puck light or corded lamp kit with socket
- Rolling pin
- Leaf-shaped cookie cutter (or parchment paper template)
- Pottery sponge
- Slip (clay and water mixture)
- Sculpting tools (needle tool, rib tool)
- Fine-grit sandpaper
- Matte sealant or varnish
- Texturing tool (old toothbrush or stiff bristle brush)
Step 1: Base Construction
-
Prepare the foundation:
Begin by rolling out a thick slab of clay, approximately 3/4 inch thick. Cut a perfect circle that is slightly wider than your intended light source. This will serve as the heavy, stabilizing foot of the lamp. -
Create the cord aesthetic:
If using a corded bulb, carefully cut a small channel or notch on the side of the base slab to allow the cord to exit cleanly without making the lamp wobble. -
Build the central cylinder:
Roll out a rectangular slab of clay and form it into a cylinder that fits centrally on your base. This cylinder will hold shape of the lamp and support the petals. Score and slip the bottom edge to attach it firmly to the base slab. -
Verify light fit:
Before proceeding, place your lighting kit or LED puck inside the cylinder to ensure it fits comfortably with room for heat dissipation (if necessary).
Stone Effect Tip
Mix a small amount of coffee grounds or black pepper into your clay body before rolling. When fired or dried, this creates organic speckles that mimic real stone.
Step 2: Crafting the Petals
-
Roll the clay thin:
Roll out a large sheet of clay to a uniform thickness of about 1/4 inch. If the clay is too thick, the lamp will be heavy and less light will filter through; too thin, and the petals may droop. -
Cut the shapes:
Using a leaf-shaped cutter or a hand-cut template, produce approximately 30-40 petal shapes. Keeping them uniform is key to the symmetry of the final piece. -
Add texture:
While the petals are flat, lightly tap them with a stiff bristle brush or a crumpled ball of foil to create the speckled, stone-like texture visible in the reference image. -
Shape the curves:
Gently cup each petal in your palm to give it a slight concave curve. I like to let these rest for about 15-20 minutes so they firm up slightly and hold their shape better during assembly.
Sagging Petals?
If upper petals droop while wet, tuck small balls of crumpled paper towel or cling film behind them. Leave these supports in place until the clay is leather-hard.
Step 3: Assembly Layer by Layer
-
Attach the bottom row:
Score the back of the first set of petals and the bottom of your cylinder. Apply slip and press the first row of petals around the base, ensuring the bottoms touch the base slab. -
Start the overlapping pattern:
Begin the second row. Place these petals in the gaps between the petals of the first row (brick-lay pattern). Position them slightly higher so they overlap the seams of the layer below. -
Build upward:
Continue adding rows, moving upward. As you get closer to the top, slightly angle the tips of the petals inward to create a closed, bulb-like silhouette. -
Refine the edges:
After every two rows, pause to smooth any rough edges with a slightly damp sponge. This keeps the look clean and intentional. -
Finish the crown:
For the final top row, ensure the tips are neatly arranged. They shouldn’t touch completely; leave an opening at the very top to allow heat and light to escape upwards.
Step 4: Finishing Touches
-
Drying phase:
Loosely cover the lamp with plastic wrap to slow down the drying process. Uneven drying can cause cracks. Let it dry slowly for at least 48-72 hours. -
Refining the surface:
Once fully bone dry (or fired, if using kiln clay), use fine-grit sandpaper to gently smooth any sharp burrs on the petal tips, being careful not to remove your textured surface. -
Protecting the piece:
Apply a clear matte varnish or sealant. This protects the clay from dust and moisture without adding an artificial gloss. -
Install the light:
Insert your light source through the top or lock it into the base. Turn it on to reveal the beautiful contrast between the opaque centers and the glowing gaps.
Now step back and admire the soft, ambient atmosphere your handcrafted sculpture creates