If you’ve already got a basic cup shape, the fun part is turning it into something that feels totally you. Here are my favorite clay cup design ideas—from classic textures and floral relief to playful, bold add-ons that make your cup the star of the shelf.
Classic Stamped Texture Band
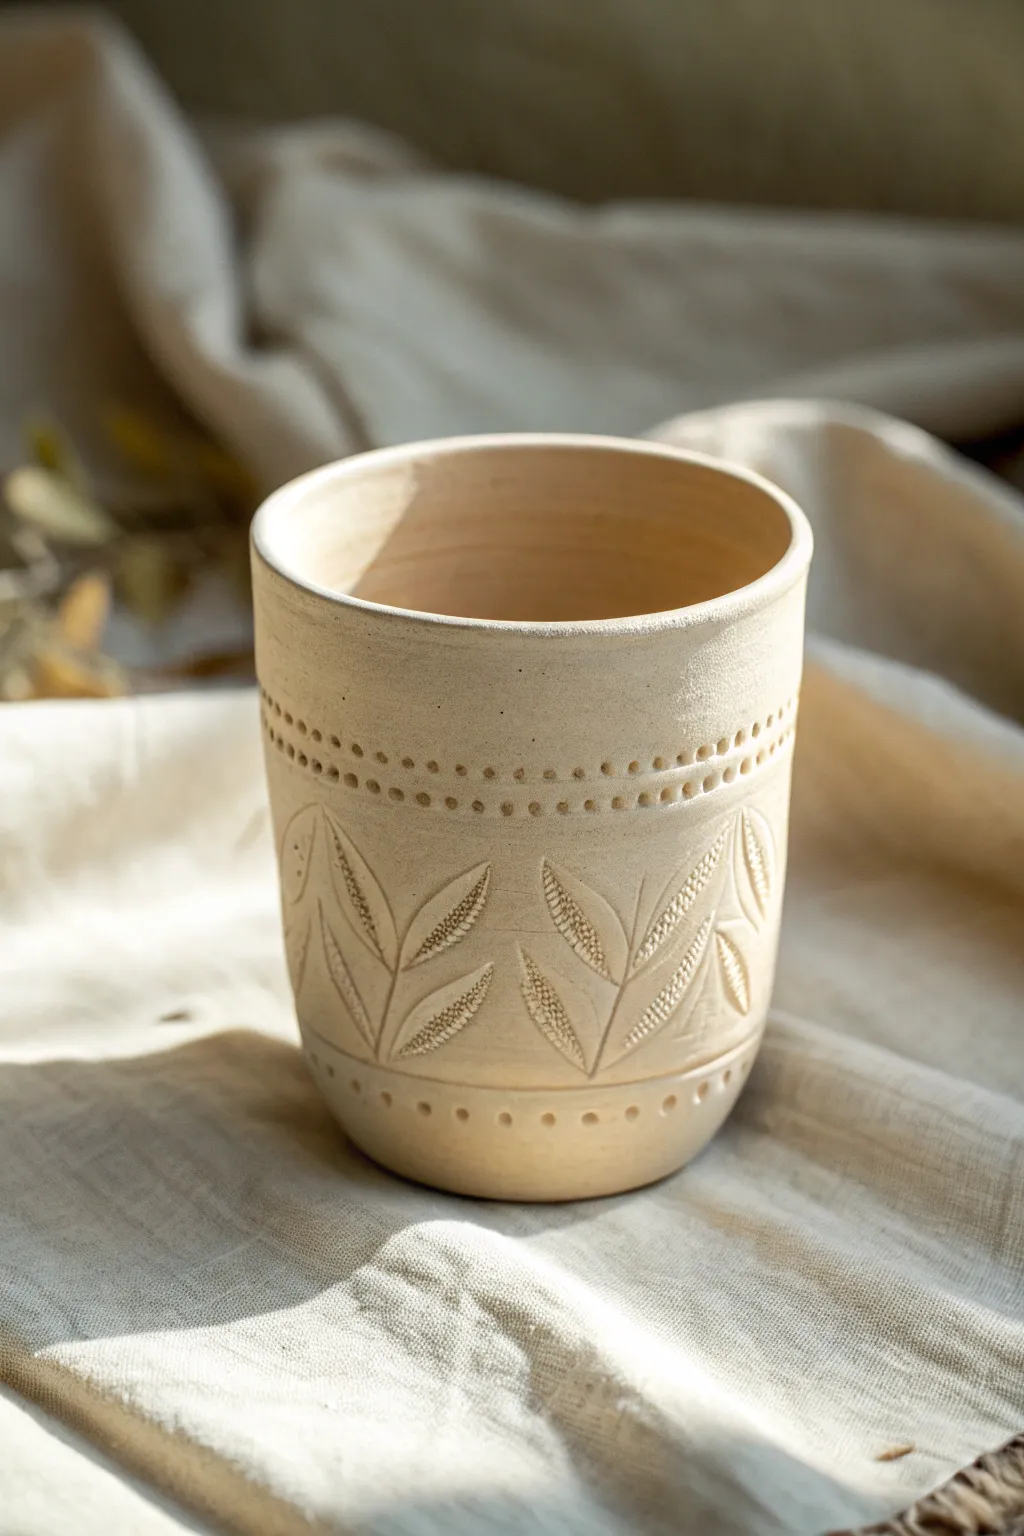
This project transforms simple clay into a textured drinking vessel that feels wonderful in the hand. By combining rhythmic dot patterns with delicate leaf carvings, you’ll create a cup that balances rustic charm with refined detail.
Step-by-Step Tutorial
Materials
- Light-colored stoneware or earthenware clay
- Rolling pin
- Canvas work surface
- Template or ruler
- Needle tool
- Fettling knife
- Serrated rib or scoring tool
- Slip (clay slurry)
- Small round hole punch or dull pencil/dowel
- Loop tool or carving tool
- Sponge
Step 1: Forming the Cylinder
-
Roll your slab:
Begin by rolling out your clay on a canvas surface until it is universally about 1/4 inch thick. Aim for an even consistency to ensure your cup walls are uniform. -
Cut the rectangle:
Using a ruler and needle tool, cut a long rectangle. A good standard size is roughly 10-11 inches long by 4-5 inches tall, depending on how large you want your finished cup. -
Create the beveled edges:
On the shorter ends of your rectangle, cut 45-degree bevels in opposite directions. This allows the seam to overlap smoothly without creating a thick lump. -
Score and slip:
Rough up the beveled edges using a serrated rib or needle tool, then apply a generous amount of slip to both scored areas. -
Join the seam:
Curve the slab into a cylinder and press the beveled edges together firmly. Support the wall from the inside with one hand while smoothing the outside seam with a rib or your thumb. -
Attach the base:
Place your cylinder on a fresh piece of slab. Trace around the bottom, remove the cylinder, score and slip the contact areas, and then firmly press the cylinder onto the base. -
Trim the excess:
Use your fettling knife to trim the excess clay from the base, flush with the cylinder wall. Smooth the join with a modeling tool or your finger. -
Refine the rim:
Gently smooth the top rim with a damp sponge or a piece of chamois to make it pleasant for drinking.
Clean Lines Tip
Wait until the clay is ‘leather hard’ before carving the leaves. If the clay is too wet, the needle tool will drag and create messy burrs on the edges.
Step 2: Adding Texture & Detail
-
Mark your guidelines:
Use a needle tool to lightly scratch horizontal lines around the cup where you want your pattern bands to sit. I usually mark one band near the top lip and another near the base. -
Stamp the upper dots:
Using a small round tool—like the back of a drill bit or a specialized clay stamp—press a row of dots into the clay just below the rim. Repeat for a second row directly underneath. -
Stamp the lower dots:
Repeat the dot process near the bottom of the cup to frame the central design area. Keep your spacing consistent for a clean look. -
Outline the leaves:
In the central band, lightly sketch leaf shapes using a needle tool. Create stems that branch outward with paired leaves. -
Carve the relief:
Once happy with the placement, use a small carving tool to deepen the outline of the leaves. Angle your tool slightly to give the edges definition. -
Texture the leaves:
Inside each leaf shape, use a sharp needle tool to scratch a cross-hatch or stippled texture. This contrast between smooth clay and rough interior texture really pops after firing. -
Burnish the surface:
Once the clay is leather-hard, rub the smooth uncarved areas with the back of a spoon or a smooth stone to create a soft sheen. -
Final drying:
Allow the cup to dry slowly under loose plastic to prevent the handle or rim from warping before it is bone dry. -
Bisque fire:
Fire the piece to cone 04 (or your clay’s specific bisque temperature) to prepare it for glazing or finishing. -
Finishing touch:
For the look in the photo, leave the exterior unglazed (or use a matte clear glaze) to show off the raw clay texture, glazing only the interior for food safety.
Level Up: Oxide Wash
Apply an iron oxide wash over the carvings and wipe it back with a sponge. The dark oxide will stay in the textures, highlighting the leaf details beautifully.
Enjoy the tactile pleasure of holding a cup where every detail was placed by your own hand


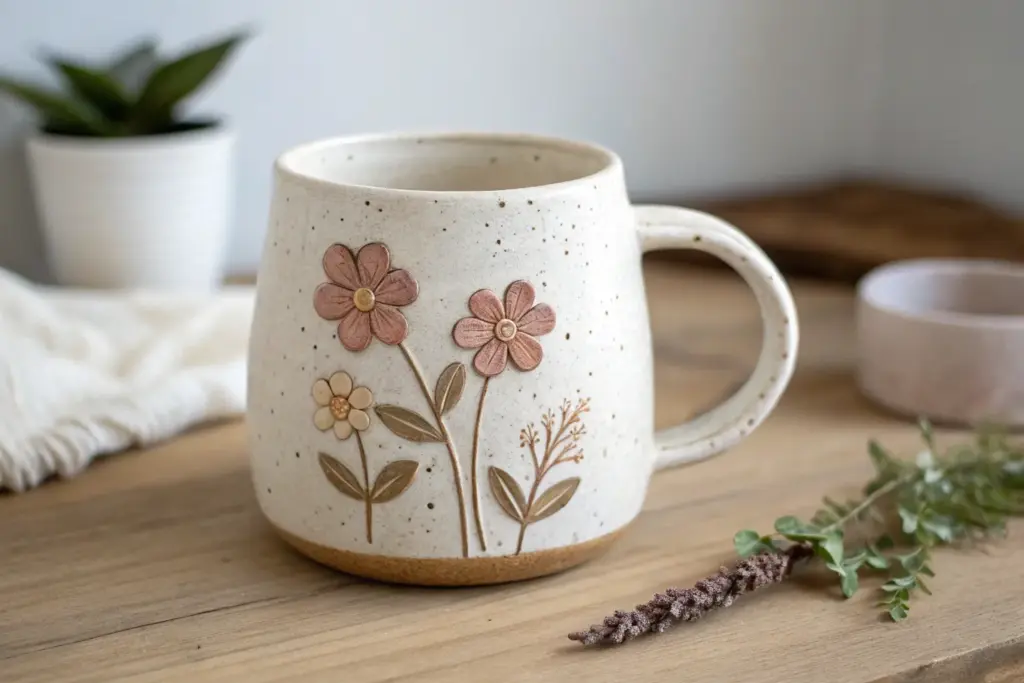
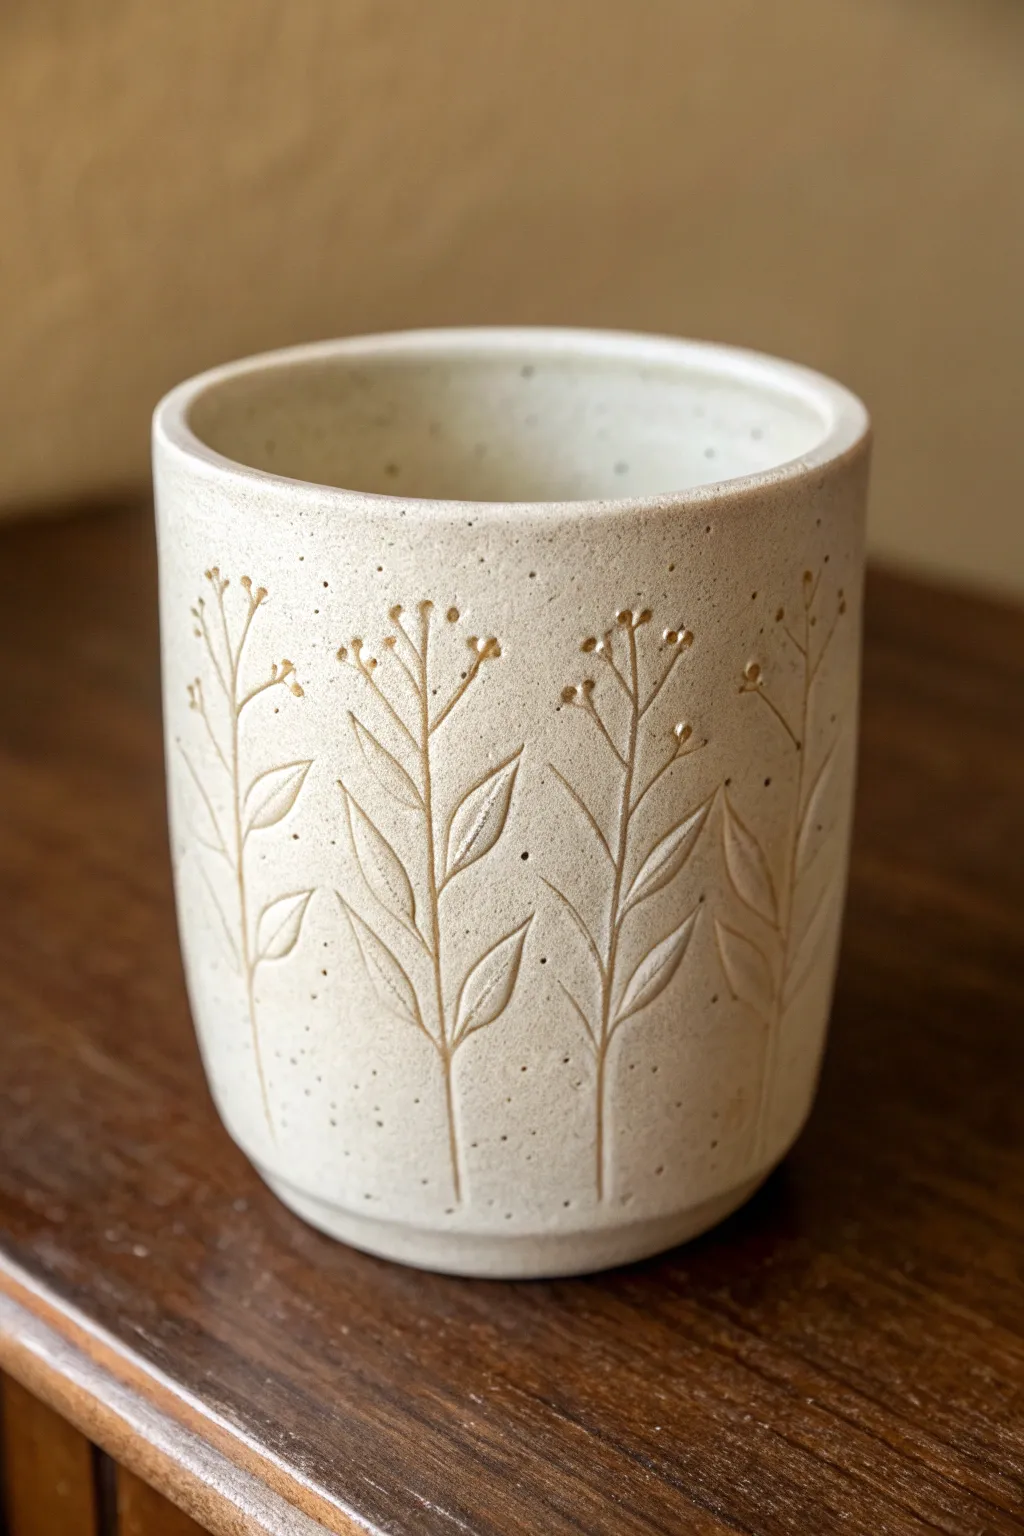
Soft Floral Relief Vines
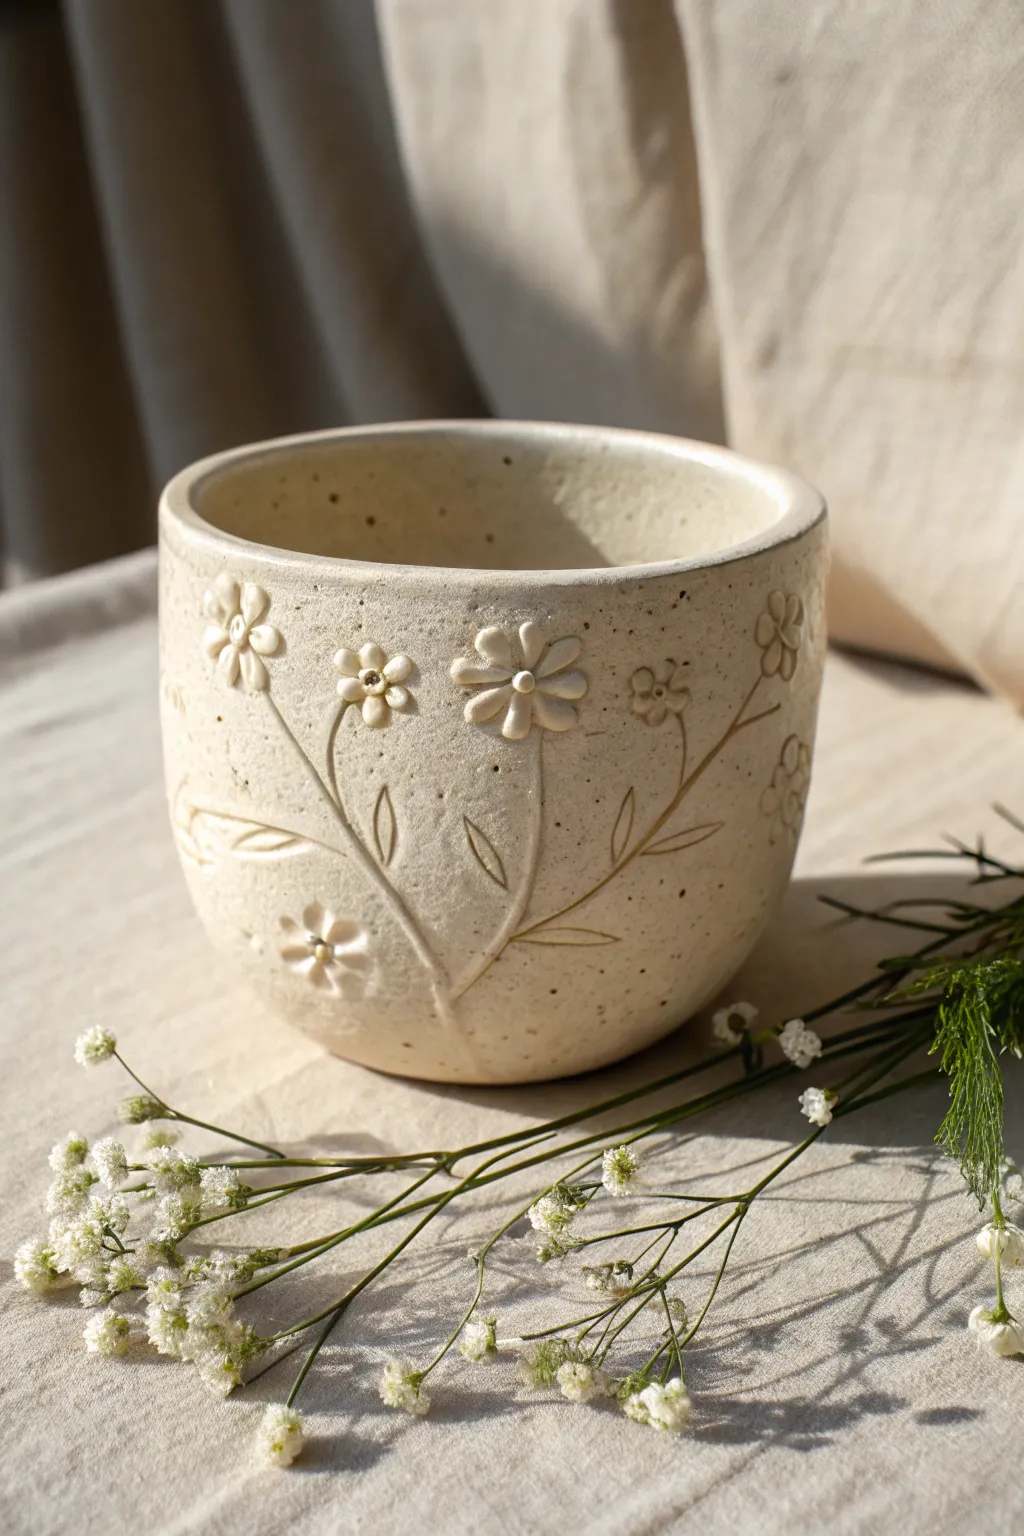
This charming ceramic cup features delicate raised daisies climbing up organic, hand-carved vines, all unified by a soft, speckled cream glaze. The subtle texture of the relief work combined with the earthy speckling creates a piece that feels both rustic and refined.
Step-by-Step
Materials
- Stoneware clay (speckled or buff)
- Fettling knife
- Pin tool or needle tool
- Rib tool (kidney)
- Small loop tool
- Slip (made from the same clay body)
- Scoring tool (or serrated rib)
- Rolling pin
- Sponge
- Soft brush
- Matte or satin creamy white glaze
Step 1: Forming the Base
-
Prepare the Clay:
Begin by wedging your speckled stoneware clay thoroughly to remove air bubbles. Roll out a slab approximately 1/4 inch thick, or prepare a ball of clay if you prefer throwing on the wheel. -
Shape the Cup Body:
Construct a simple cylinder. If hand-building, cut a rectangular slab and a circular base. Score and slip the edges, then join them securely to form the cup walls. -
Smooth the Form:
Use a rib tool to smooth the seam gently until it disappears. Refine the shape by slightly ballooning the walls outward from the inside to create a soft, rounded curve rather than straight sides. -
Refine the Rim:
Compress the rim with a damp sponge or a piece of chamois leather to ensure it is smooth and pleasant to drink from. Allow the cup to dry to a leather-hard state.
Clean Relief Pro-Tip
When smoothing the attached flowers, use a barely damp brush. Too much water will weaken the slip bond and could cause your relief petals to detach as they dry.
Step 2: Creating the Floral Relief
-
Plan the Vine Layout:
Take your needle tool and very lightly sketch the path of your main vine stems directly onto the leather-hard clay surface. Aim for a flowing, S-curve composition. -
Make the Flower Petals:
Roll tiny, pea-sized balls of fresh clay. Gently flatten them into teardrop shapes to form the petals for your daisies. You will need about five to six petals per flower. -
Make the Flower Centers:
Roll slightly smaller balls for the flower centers and set them aside. I find it helpful to make a few extra petals and centers just in case. -
Attach the First Flower:
Select a spot near the top of a sketched stem. Score the area and apply a dab of slip. Press the petals into a circle, ensuring the pointed ends meet in the middle. -
Add the Center:
Score the meeting point of the petals and press the center ball firmly into place. Use the back of a small paintbrush or a rounded tool to gently indent the center. -
Repeat the Blooms:
Continue attaching flowers along the vine, varying their sizes slightly. Place some lower down and others near the rim for a natural look. Ensure all attachments are secure so they don’t pop off during firing.
Glaze Level Up
Wipe the glaze back slightly on just the raised flower centers with a damp sponge. This exposes the raw clay speckles more clearly, adding contrast to the blooms.
Step 3: Carving Details and Finishing
-
Descriptive Stem Carving:
Using a sharp needle tool or a very fine loop tool, carve over your original sketched vine lines. Press deep enough to create a distinct groove connecting the flowers. -
Outline the Leaves:
Draw simple, elongated leaf shapes branching off the main stem. Instead of adding clay here, we are carving the outlines into the cup surface. -
Define the Petals:
Take a modeling tool and gently press a central line into each raised petal to give it dimension and softness. -
Clean Up Edges:
Wait for the added flowers to firm up slightly. Then, use a damp soft brush to smooth away any sharp burrs or slip residue around the attachments. -
Bisque Fire:
Allow the piece to dry slowly and completely before bisque firing it to cone 04 (or your clay’s specific bisque temperature). -
Glaze Application:
Dip the cup into a matte or satin cream glaze. The glaze should be thin enough to pool slightly in the carved stems but not so thick that it obscures the raised flower details. -
Final Firing:
Fire the cup to cone 5/6 (or your clay’s maturity temperature). The heat will draw out the iron specks in the clay, creating that lovely spotted texture through the cream glaze.
Once cooled, your cup is ready to bring a touch of garden elegance to your morning routine


Carved Botanical Linework
This project celebrates the raw beauty of speckled clay with delicate, carved floral motifs that add texture and elegance to a simple vessel. The process relies on precise timing and steady linework to create organic botanical silhouettes that feel both modern and timeless.
Detailed Instructions
Materials
- Speckled stoneware clay (e.g., cone 5/6)
- Pottery wheel or slab-building supplies
- Pin tool or needle tool
- Small loop carving tool or stylus
- Sponge
- Rib tool (metal or wood)
- Clear matte or satin glaze
- Kiln
- Clean paintbrush
Step 1: Forming the Vessel
-
Prepare the Clay:
Begin by thoroughly wedging about 1 to 1.5 pounds of speckled stoneware clay to remove air bubbles and ensure a consistent texture. -
Center and Throw:
Center the clay on your wheel and throw a simple cylinder. Aim for straight, vertical walls with a slightly rounded bottom edge, keeping the rim smooth and even. -
Refine the Surface:
Use a metal or wood rib to compress the outside walls while the wheel is spinning slowly; this removes throwing lines and creates a perfect blank canvas for your carving. -
Dry to Leather Hard:
Let the cup dry slowly until it reaches a firm leather-hard stage. It should be stiff enough to hold its shape without warping but soft enough to carve into easily. -
Trim the Foot:
Turn the cup over and trim a defined foot ring. This elevates the form and gives a professional finish to the bottom of your piece.
Fixing Jagged Lines
If your carving tool drags and creates jagged edges, your clay is likely too dry. Mist it lightly with water, wrap it in plastic for an hour to rehydrate, and try again.
Step 2: Carving the Botanical Design
-
Plan the Layout:
Lightly sketch four to five vertical lines evenly spaced around the cup using a dull pencil or very light touch with a needle tool to mark where the main stems will go. -
Carve the Main Stems:
Using a stylus or a fine carving tool, incise the central vertical stem lines, stopping about an inch from the bottom and an inch from the top rim. -
Add Leaf Structure:
Carve pairs of upward-curving lines stemming from the main stalk to create leaf shapes. Keep the strokes fluid and confident for a natural look. -
Define the Leaves:
Connect the tips of the leaf curves back to the stem, creating pointed, lance-shaped leaves. I find that varying the size of the leaves slightly makes the plant look more organic. -
Carve the Berries:
At the top of the stem, carve small branching lines that end in tiny circular depressions to represent buds or berries. -
Create Depth:
Go back over your main lines with a slightly deeper pressure to ensure the carving is visible and distinct against the smooth background. -
Clean Up Burrs:
Once the clay is bone dry (or very close to it), gently brush away any clay crumbs or ‘burrs’ created by the carving tool with a stiff paintbrush. -
Smooth Edges:
Run a very slightly damp sponge or your finger over the carved areas to soften any sharp edges that might be uncomfortable to hold later.
Tool Selection Pro-Tip
For the cleanest lines, use a ‘sgraffito’ tool with a small wire loop tip rather than a needle. The loop scoops clay out cleanly rather than just pushing it aside.
Step 3: Glazing and Firing
-
Bisque Fire:
Load the bone-dry cup into the kiln and bisque fire it to the appropriate cone (usually Cone 04 or 06) to prepare it for glazing. -
Prepare for Glazing:
Wipe the bisque-fired cup with a damp sponge to remove dust. Wax the foot ring to prevent glaze from adhering to the bottom. -
Apply Liner Glaze:
Pour a food-safe clear or white liner glaze into the interior of the cup, swirl to coat, and pour out the excess. -
Glaze the Exterior:
Dip the exterior of the cup into a translucent satin or matte clear glaze. Tongs are helpful here to ensure an even coat without finger marks. -
Reveal the Texture:
If the glaze looks too thick over the carving, you can gently sponge it back slightly so it settles in the recesses but leaves the high points thinner, highlighting the speckled clay. -
Final Fire:
Fire the cup to maturity (Cone 5 or 6 depending on your clay body). The heat will interact with the iron specks in the clay, often causing them to bleed slightly through the glaze for that beautiful speckled effect.
Once cooled, your cup is ready to hold your morning coffee, showcasing the lovely tactile contrast between the smooth clay and the carved design


Sweet Heart Motif Medallions
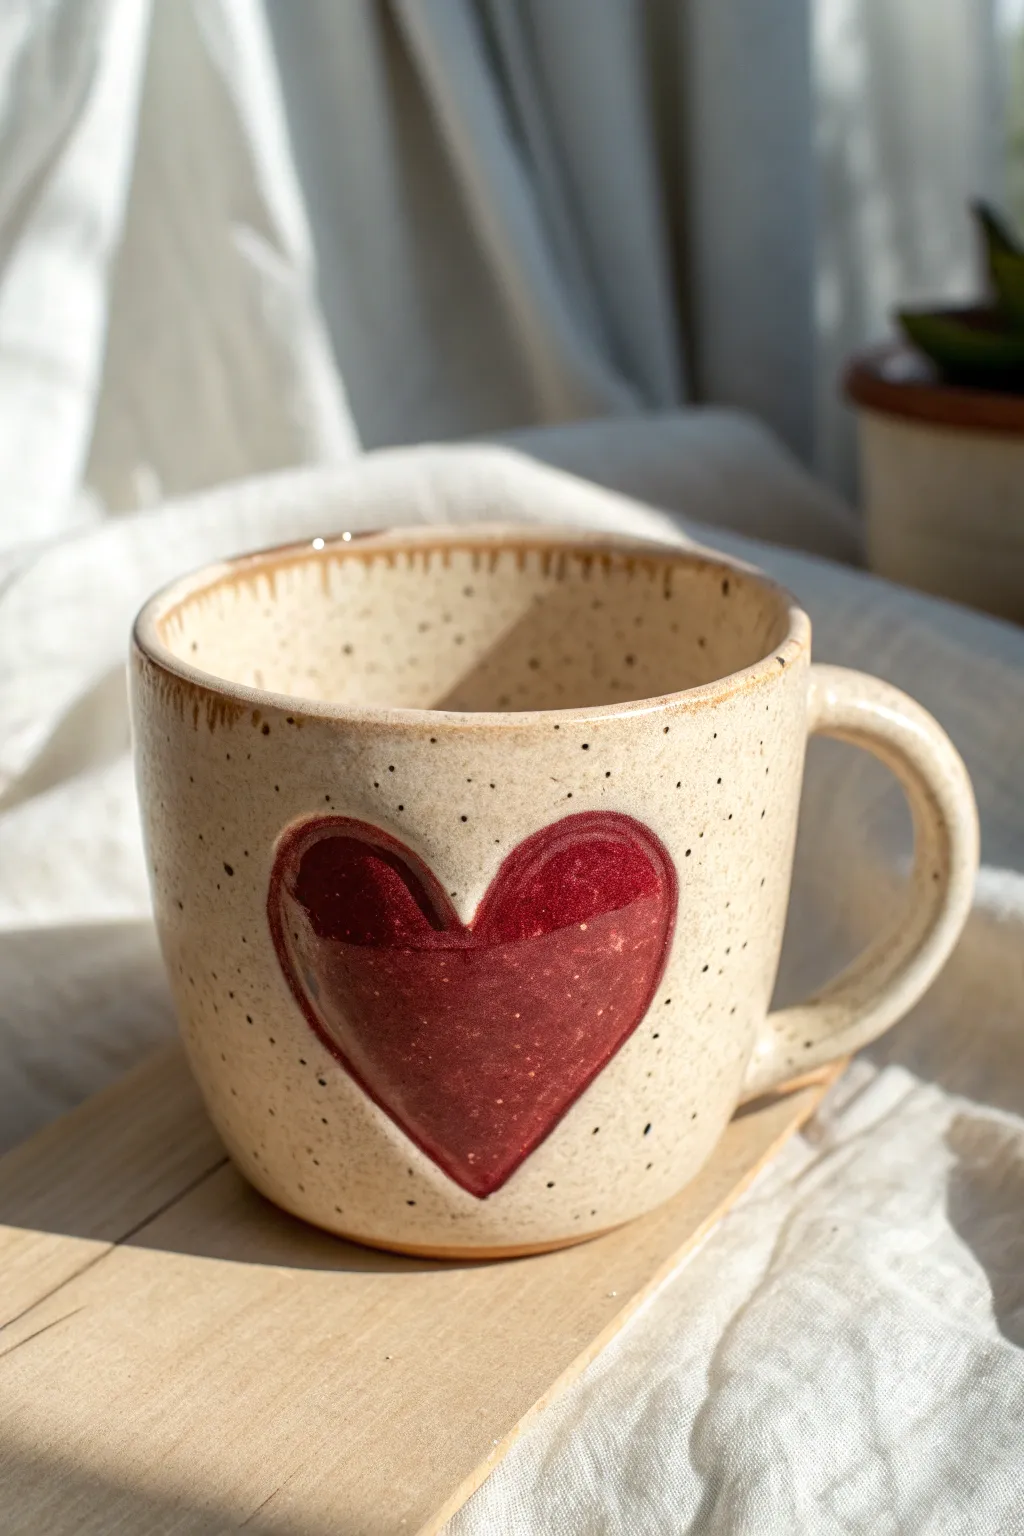
This cozy, handmade mug features a warm, speckled cream clay body with a charming, deeply embossed heart motif. The contrast between the matte finish of the clay and the glossy, rich red glaze inside the heart gives it a lovely tactile quality perfect for your morning coffee.
Step-by-Step Tutorial
Materials
- Speckled stoneware clay (buff or cream color)
- Potter’s wheel (or tools for slab building)
- Rib tool (wood or metal)
- Needle tool
- Sponge
- Heart-shaped cookie cutter (medium size)
- Modeling tool or smooth stone
- Wax resist
- Clear matte glaze
- Glossy red glaze (cranberry or crimson)
- Iron oxide wash (optional for rim)
- Small paintbrush
- Kiln
Step 1: Forming the Mug Body
-
Throw the Cylinder:
Begin by centering about 1 pound of speckled stoneware clay on your wheel. Open the center and pull up the walls to create a standard cylinder shape, keeping the rim slightly thicker for comfort. -
Shape the Belly:
Using a rib tool on the inside, gently push the clay outward to create a subtle curve or ‘belly’ for the mug, narrowing slightly again at the rim. -
Smooth the Surface:
Run a metal rib or a smooth sponge up the exterior to remove throwing lines if you want a cleaner look, or leave them for texture. Just make sure the surface is even where the heart will go. -
Let it Stiffen:
Allow the mug to dry to a soft leather-hard stage. The clay needs to be firm enough to handle without warping, but soft enough to alter.
Step 2: Creating the Handle and Heart
-
Emboss the Heart:
Gently press your heart-shaped cookie cutter into the side of the mug. Don’t cut all the way through; press just deep enough to create a distinct outline. -
Sculpt the Indentation:
Using a modeling tool or your thumb, gently compress the clay *inside* the heart outline. You want to create a recessed area that dips inward, smoothing the edges so they slope gently into the heart. -
Smooth the Edges:
Dip your finger in a tiny bit of water and refine the ridge of the heart so it feels soft to the touch, removing any sharp burrs left by the cutter. -
Pull a Handle:
Pull a handle from a small lug of clay. Aim for a classic ‘C’ shape or an ear shape that complements the roundness of the mug. -
Attached the Handle:
Score and slip the attachment points on both the handle and the mug (opposite the heart). Press the handle firmly into place and smooth the seams with a damp sponge. -
Bisque Fire:
Allow the mug to dry completely (bone dry) before loading it into the kiln for a bisque firing (usually Cone 04 or 06).
Uneven Glaze?
If the red glaze looks patchy, apply 3 coats, letting each dry fully. Red glazes are notoriously translucent and need thickness for depth.
Step 3: Glazing and Firing
-
Wax the Foot:
Apply wax resist to the bottom foot of the mug to prevent glaze from sticking to the kiln shelf. -
Glaze the Interior:
Pour a clear or liner glaze inside the mug, swirl it around to coat completely, and pour out the excess. -
Paint the Heart:
Using a small brush, carefully apply the glossy red glaze into the recessed heart area. I find that dabbing the glaze on thickly works better than brushing for deep color. -
Clean the Edges:
If any red glaze got onto the main body of the mug, wipe it away cleanly with a damp sponge so the heart shape remains crisp. -
Apply Outer Glaze:
Dip the exterior of the mug into a clear matte or satin glaze. This will seal the clay while letting those beautiful brown speckles show through. -
Accent the Rim:
For that rustic edge seen in the photo, brush a very light coat of iron oxide wash or a toasted brown glaze just along the very tip of the rim. -
Final Fire:
Load the mug into the kiln for the final glaze firing (temperature depends on your specific clay and glaze, typically Cone 5 or 6 for stoneware).
Heart Shape Tip
To prevent the mug wall from warping when you press the cutter, hold a firm sponge or your hand against the *inside* wall for support.
Once cooled, your mug is ready to hold your favorite warm beverage and brighten your morning routine

The Complete Guide to Pottery Troubleshooting
Uncover the most common ceramic mistakes—from cracking clay to failed glazes—and learn how to fix them fast.
Two-Tone Dip Glaze Look
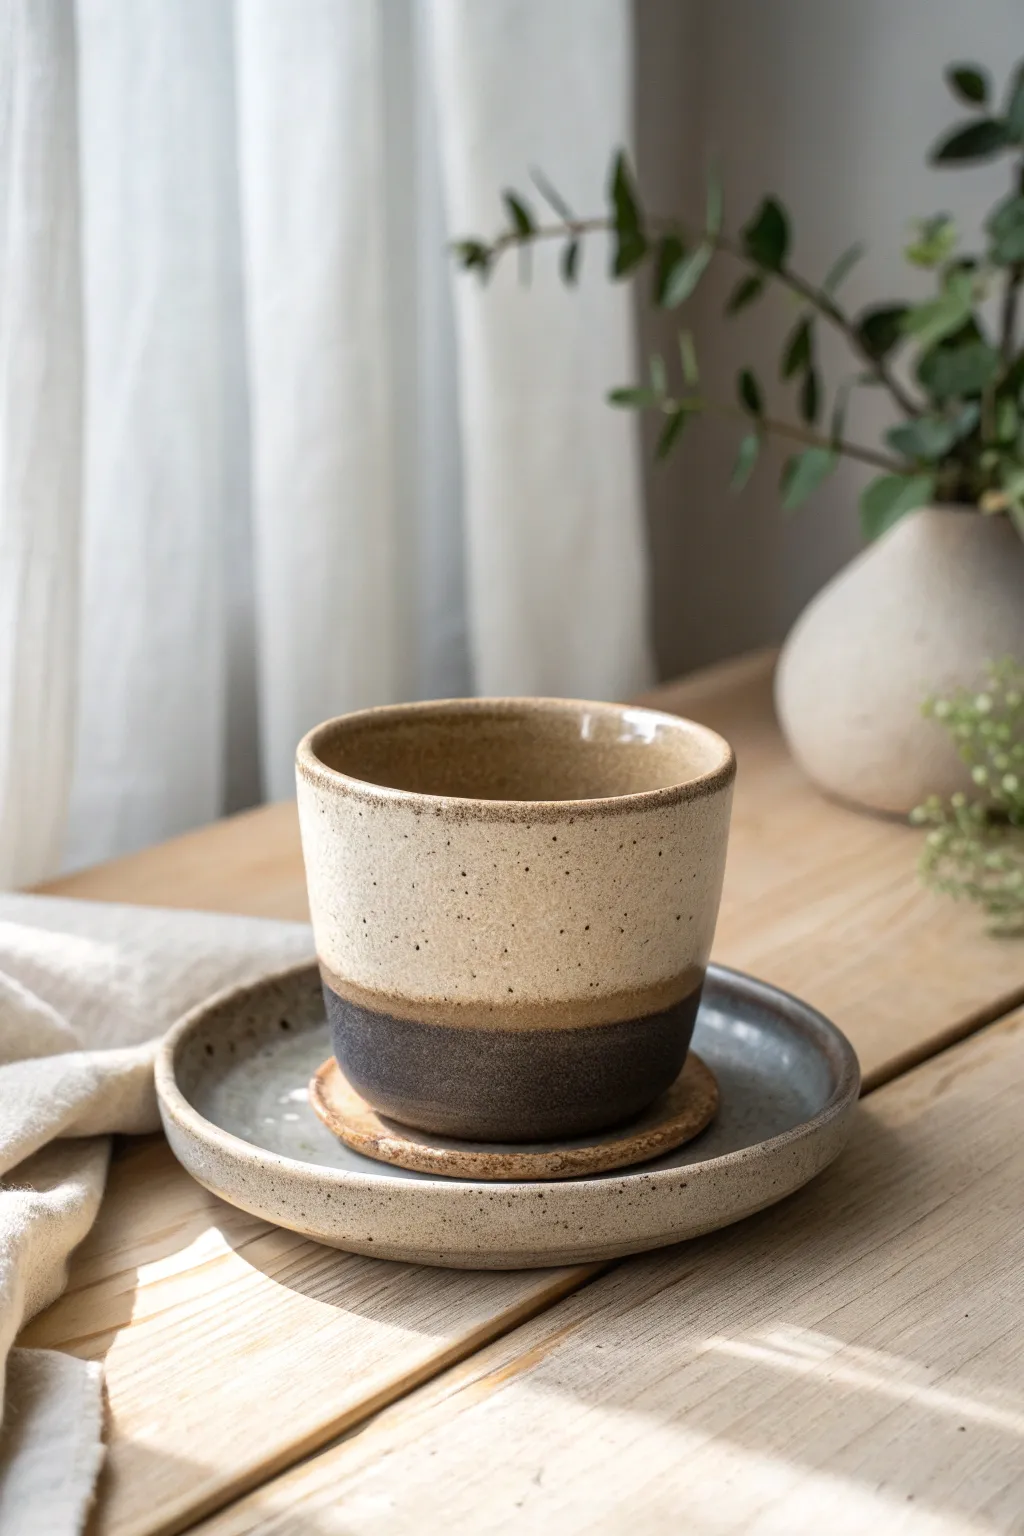
This project captures the warmth of a cozy morning with a hand-thrown cup featuring a distinct two-tone aesthetic. The earthy stoneware clay, speckled matte cream glaze, and rich mocha dip create a tactile, rustic feel that is perfect for your favorite brew.
Step-by-Step
Materials
- Stoneware clay body (specifically a speckled buff clay)
- Pottery wheel
- Throwing tools (sponge, rib, wire cutter)
- Trimming tools
- Kiln
- Matte cream or oatmeal glaze (speckled)
- Dark brown or mocha matte glaze
- Wax resist
- Clean bucket for dipping
- Soft brush
Step 1: Throwing the Form
-
Prepare the clay:
Begin by wedging about 1 to 1.5 pounds of speckled stoneware clay to remove air bubbles. Ensure the consistency is uniform, as this helps maintain stability while centering on the wheel. -
Center and open:
Center the clay on your wheel head. Open the form down to the bat, leaving about a quarter-inch for the floor. Compress the floor well with a flat tool or your fingers to prevent future S-cracks. -
Pull the walls:
Pull the clay upward to create a cylinder. This particular cup has a slight taper, wider at the top than the bottom, so gently ease your hands outward as you rise. -
Shape the rim:
Once you have your height, compress the rim with a chamois or sponge. Slightly flair the lip outward just a touch to make it comfortable for drinking. -
Refine the surface:
Use a smooth rib to clean up the exterior walls, removing excess slurry. This step is crucial for the unglazed portions to look crisp later. -
Create the coaster:
With a smaller amount of clay (about 0.5 lbs), throw a simple, flat disk for the coaster. Keep it slightly wider than the base of your cup to catch drips.
Pro Tip: Overlap Magic
The line where the brown glaze overlaps the cream creates a third color. Test your overlap on a tile first to ensure the two glazes don’t run excessively when combined.
Step 2: Trimming and Bisque Firing
-
Leather hard stage:
Allow the cup and coaster to dry to a leather-hard state. The clay should be firm enough to handle without deforming but still cool to the touch. -
Trim the foot:
Invert the cup on the wheel. Trim away excess weight from the bottom, creating a subtle foot ring. I like to keep the bottom corner slightly rounded to match the soft glaze aesthetic. -
Dry completely:
Place your pieces on a ware board and cover loosely if dragging out drying time, or let air dry completely until bone dry. -
Bisque fire:
Load the bone-dry greenware into the kiln and fire to Cone 04 (or your clay body’s specific bisque temperature). This prepares the ceramic for glazing.
Troubleshooting: Running Glaze
If the dark bottom glaze runs onto the kiln shelf, your dip was too thick. Thin the brown glaze slightly with water or hold the dip for a shorter duration next time.
Step 3: The Two-Tone Glazing
-
Clean the bisque:
Wipe the bisque-fired cup with a damp sponge to remove any dust. Dust can prevent glaze from adhering properly. -
Wax the foot:
Apply wax resist to the very bottom dry foot ring of the cup and the coaster. This saves you from having to wipe glaze off later. -
Dip the top section:
Hold the cup by the base and dip it upside down into your matte cream/oatmeal glaze. Submerge it almost to the bottom, leaving about an inch of raw clay exposed near the base. -
Clean the interior:
If you are dipping the outside only, pour the cream glaze inside first, swirl to coat, and pour out. Ensure the rim is fully covered. -
The mocha dip:
Once the cream glaze is dry to the touch, hold the cup right-side up. Dip the bottom third of the cup into the dark brown mocha glaze. You want this layer to overlap the cream glaze slightly to create a soft transition line. -
Glaze the coaster:
Dip the coaster in the cream glaze entirely (except the waxed bottom). Alternatively, leave it unglazed raw clay for a rougher texture if you prefer. -
Clean up drips:
Check the wax resist areas. If any glaze beads up on the wax, wipe it away cleanly with a sponge.
Step 4: Final Firing
-
Load the kiln:
Place the glazed ware into the kiln. Make sure the cup is not touching the coaster or any other pots. -
Glaze fire:
Fire the kiln to Cone 6 (or the maturation temperature for your specific clay and glaze combo). Slow cooling can help matte glazes develop nice micro-crystals. -
Sand the bottom:
After unloading, use a diamond sanding pad to smooth the unglazed foot ring so it doesn’t scratch your table.
Enjoy the humble beauty of your new two-tone cup, ready for a quiet moment of reflection.
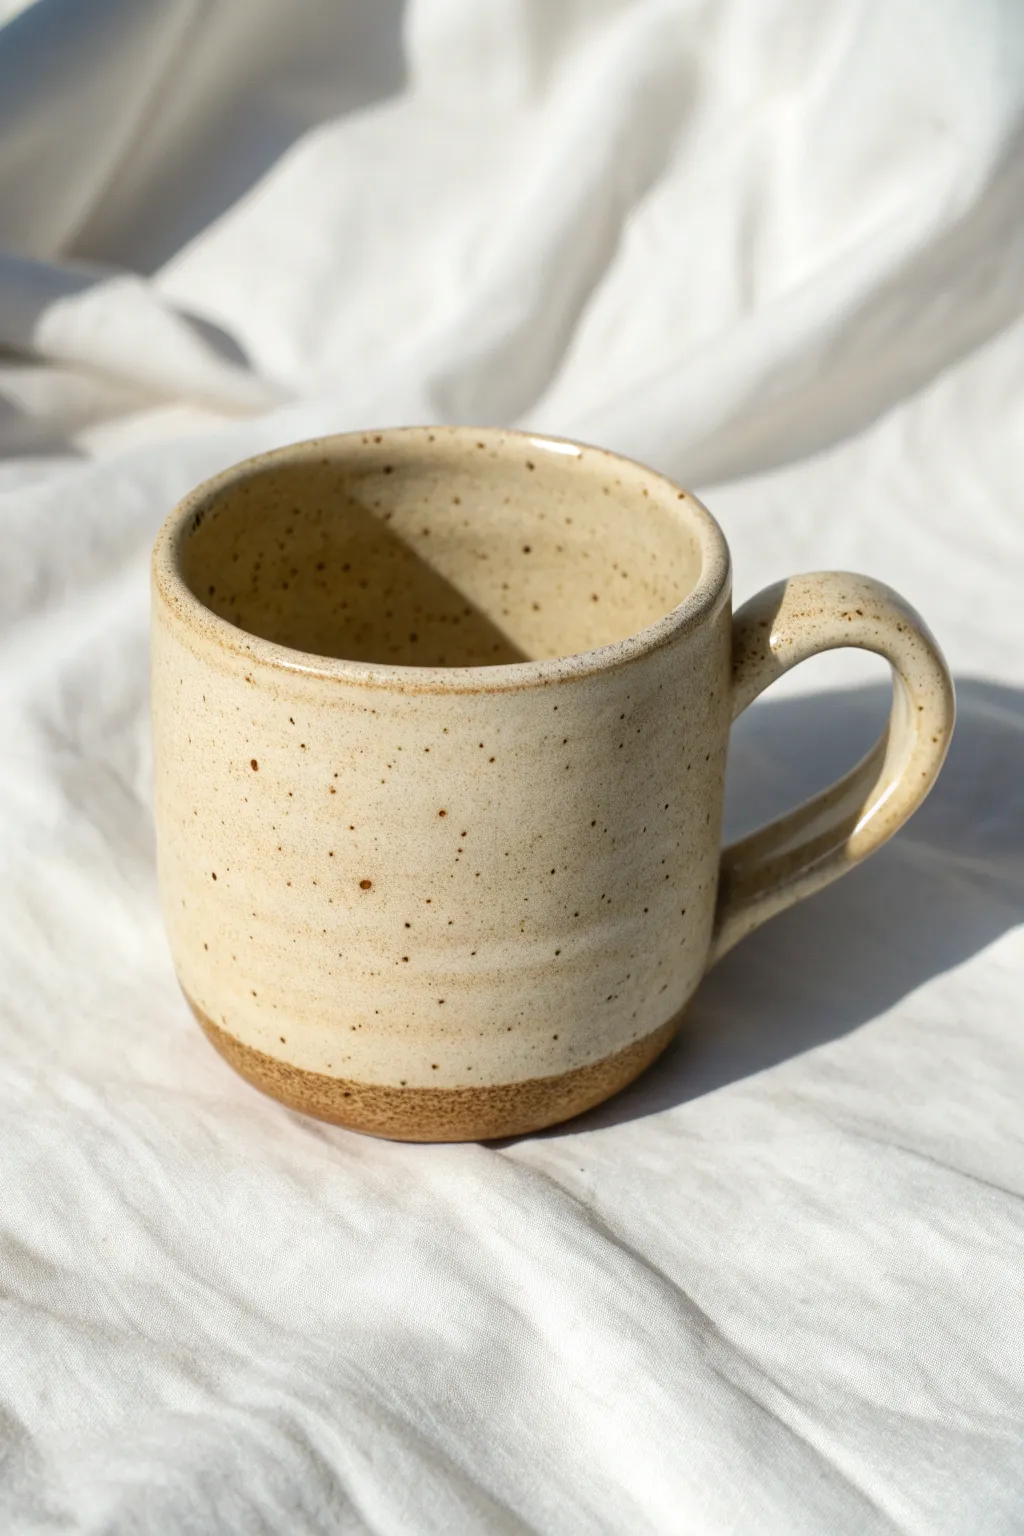
Speckled Cozy Stoneware Style
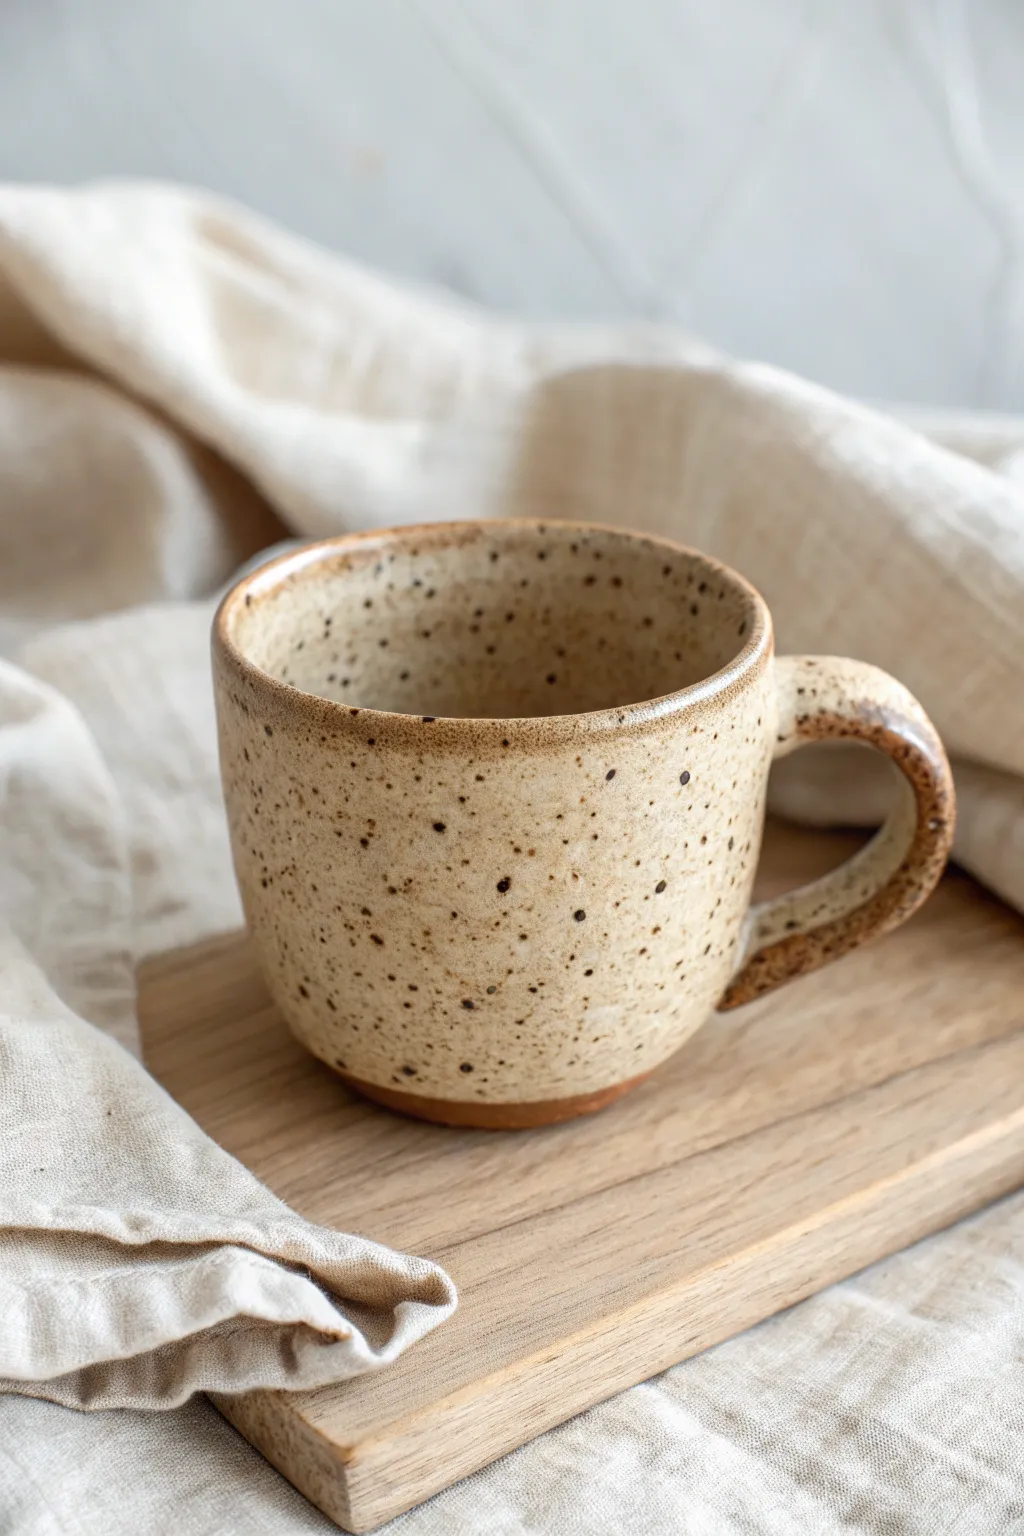
Embrace the warmth of handmade pottery with this charming speckled stoneware mug, featuring a natural, earthy aesthetic and a comfortable, rounded handle. The beautiful spotting effect is achieved through the clay body itself, creating a cozy, rustic finish perfect for your morning coffee rituals.
Detailed Instructions
Materials
- Speckled stoneware clay (mid-fire range, usually Cone 5-6)
- Pottery wheel
- Throwing sponge
- Wire cutter tool
- Pin tool
- Wooden rib tool
- Metal kidney rib
- Trimming tools (loop tools)
- Serrated rib or scoring tool
- Slip (clay mixed with water)
- Clear or transparent matte glaze
- Kiln
Step 1: Throwing the Body
-
Center the clay:
Start with a ball of well-wedged speckled stoneware clay, roughly 1 to 1.5 pounds depending on your desired size. Focus on centering it firmly on the wheel head. -
Open the form:
Create the opening by pressing your thumbs into the center of the spinning clay, leaving about a half-inch of thickness for the floor so you can trim a foot later. -
Establish the floor:
Pull the clay outward to establish the width of your interior floor. I like to compress the floor thoroughly with a flat wooden tool to prevent cracking during firing. -
Pull the walls:
Begin pulling the walls upward. For this cozy shape, aim for a straight cylinder initially, ensuring even thickness from bottom to top. -
Shape the curve:
Once you have the height, gently belly out the walls slightly by applying pressure from the inside, creating that subtle, comforting curve. -
Refine the rim:
Use a chamois or a damp sponge to round off and compress the rim. A rounded rim feels much nicer on the lips than a sharp one. -
Dry slightly:
Wire the pot off the wheel and let it dry to a leather-hard state. This is crucial for the next steps involving trimming and handle attachment.
Step 2: Trimming and Handling
-
Trim the foot:
Center your leather-hard cup upside down on the wheel. Use a sharp loop tool to carve away excess clay at the base, creating a defined foot ring that mirrors the curve of the walls. -
Expose the speckled texture:
While trimming, you’ll notice the grog or speckles in the clay becoming more prominent. Use a metal metal rib to smooth the surface without erasing those beautiful natural specks. -
Pull a handle strap:
Take a separate lug of moist clay and pull a traditional handle. Use plenty of water and pull a long, tapered strip that feels comfortable in your hand. -
Form the handle arc:
Cut the strap to the desired length and arch it into a ‘C’ or ear shape. Let it stiffen up slightly on a board until it holds its curve but is still flexible. -
Score and slip:
Score the attachment points on both the mug body and the handle ends deeply with a serrated tool. Apply a generous amount of slip to both surfaces. -
Attach the handle:
Press the handle firmly onto the mug. Support the wall from the inside to prevent warping the cup’s shape while attaching. -
Clean the joints:
Use a small, damp sponge or a wooden tool to blend the seams where the handle meets the cup, ensuring a smooth transition that looks seamless.
Rough Rim?
If the rim feels sandy due to the speckles after bisque firing, lightly sand it with 200-grit sandpaper before glazing for a smoother finish.
Step 3: Firing and Glazing
-
Bisque fire:
Allow the mug to dry completely, which may take several days. Once bone dry, load it into the kiln for a bisque fire (usually Cone 06 or 04). -
Wax the foot:
After the firing, apply wax resist to the bottom foot ring to keep it free of glaze, preventing the mug from sticking to the kiln shelf. -
Apply clear glaze:
Dip the mug into a clear or semi-transparent matte glaze. This is the secret to letting the clay’s natural speckles shine through without covering them up. -
Clean the rim:
Check the rim for any drips or overly thick glaze application and smooth them out with your finger to ensure a perfect sip. -
Glaze fire:
Fire the mug a second time to the maturation temperature of your specific clay and glaze combination (typically Cone 5 or 6 for stoneware).
Level Up: Thumb Rest
Add a small clay button or flatten the top of the handle curve slightly while wet. This creates a dedicated ‘thumb rest’ for extra comfort.
Once cooled, your new favorite mug is ready to be filled with steamy coffee or tea


What Really Happens Inside the Kiln
Learn how time and temperature work together inside the kiln to transform clay into durable ceramic.
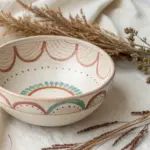
Scalloped Rim Detail
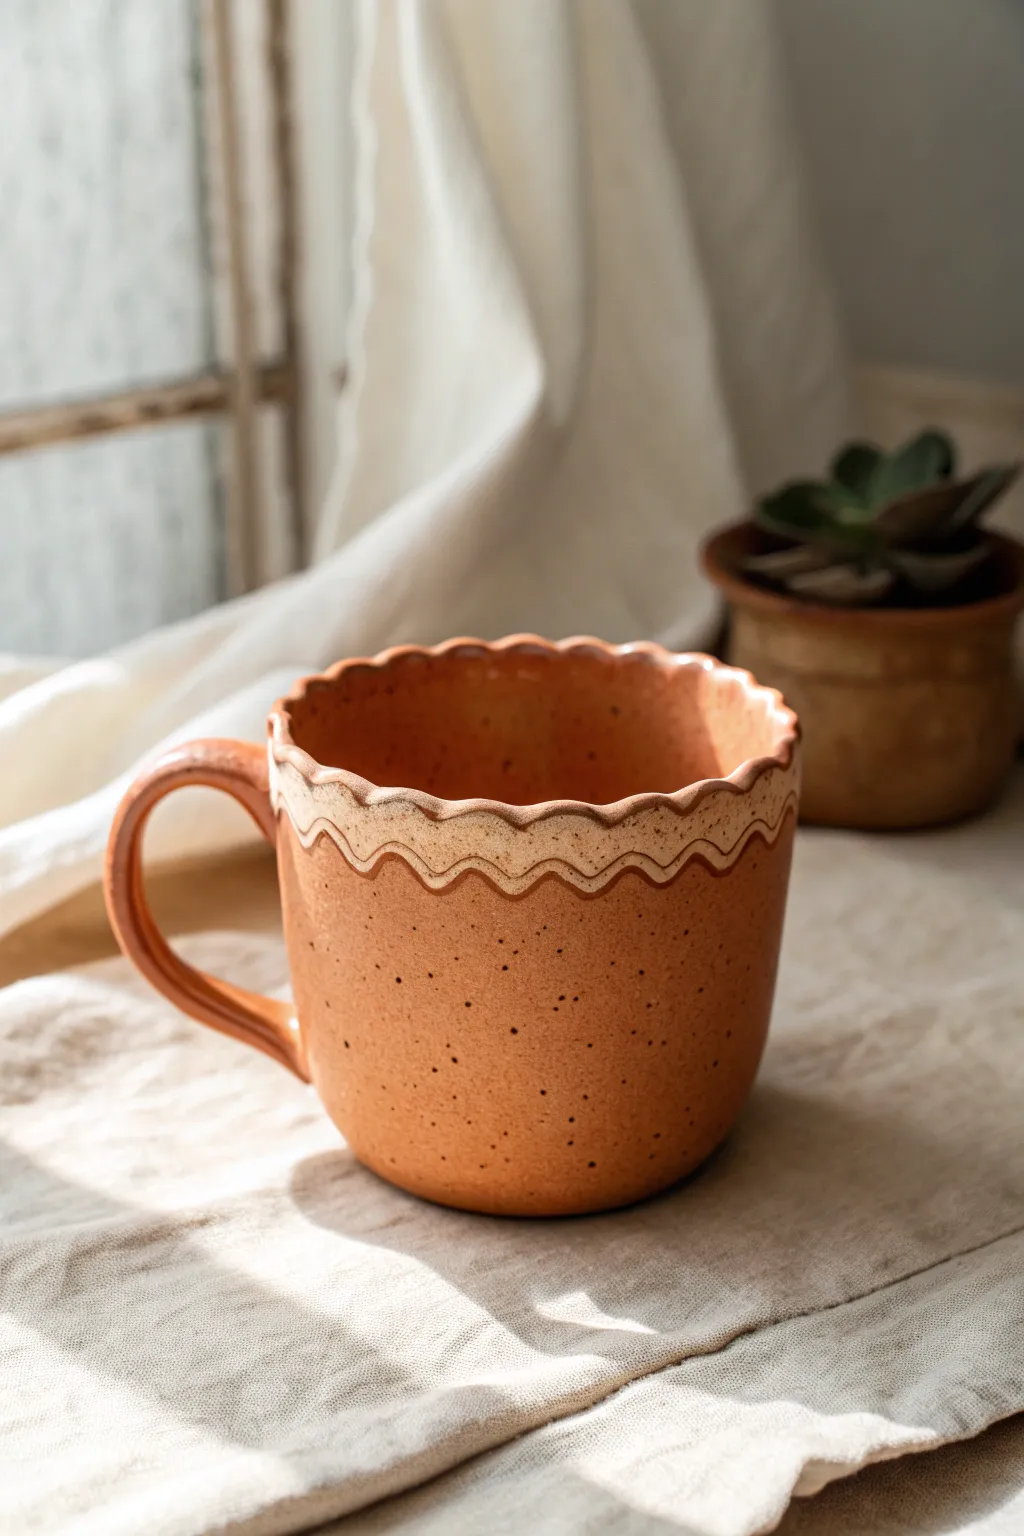
This charming handmade mug features a playful scalloped rim and a delicate etched wave pattern that celebrates the raw beauty of terracotta clay. The speckled finish and glossy interior make it a cozy, rustic addition to any morning routine.
Step-by-Step Guide
Materials
- Terracotta stoneware clay (speckled variety preferred)
- Pottery wheel (or rolling pin for hand-building)
- Needle tool
- Rib tool (wooden or silicone)
- Small loop tool or carving tool
- Sponge
- Scallop rim template (cardstock) or freehand skill
- Clear glossy glaze
- White or cream underglaze (optional, for inlay)
- Kiln
Step 1: Forming the Cup Body
-
Prepare the clay:
Start by wedging about 1 to 1.5 lbs of speckled terracotta clay to remove air bubbles. Ensure the consistency is uniform and pliable. -
Throw the cylinder:
Center the clay on the wheel and open it up. Pull the walls to create a straight-sided cylinder, aiming for a consistent thickness of about 1/4 inch. -
Shape the belly:
Gently push the walls outward from the inside using a rib tool to create a slight curve or ‘belly’ at the bottom, tapering slightly inward toward the rim. -
Refine the rim area:
Leave the top inch of the clay slightly thicker than the rest of the wall; this excess clay provides structure for the scalloping process later. -
Smooth the surface:
Run a metal or rubber rib along the outside to compress the clay and remove throwing lines, giving you a smooth canvas for the texture.
Smooth Sipping Tip
Double-check your rim smoothness after the bisque fire. A quick rub with 400-grit sandpaper can fix any sharp scallop points before glazing.
Step 2: Creating the Scallops & Handle
-
Mark specific points:
Once the rim is leather-hard, lightly mark even intervals around the circumference where the peaks of your scallops will be. -
Cut the scallops:
Using a needle tool or a sharp fettling knife, gently cut curved semi-circles between your markings. I find that moving the tool decisively creates cleaner lines than hesitant sawing motions. -
Soften the edges:
Use a damp chamois or a very slightly wet finger to round over the cut edges of the scallops so they are comfortable to drink from. -
Pull a handle:
Pull a strap of clay for the handle, keeping it relatively simple and round in profile to match the mug’s aesthetic. -
Attach the handle:
Score and slip the attachment points on both the mug and handle. Press firmly to join, smooth the seams, and allow the mug to dry to a firm leather-hard stage.
Uneven Scallops?
If your freehand scallops look wonky, cut a strip of paper the length of the circumference, fold it equally, cut a curve, and use it as a stencil.
Step 3: Adding the Wave Detail
-
Carve the wave channel:
About half an inch below the lowest point of your scallops, use a small loop tool to carve a shallow, continuous wavy line around the mug. -
Add secondary waves:
Carve a second wavy line parallel to the first, creating a ribbon-like band that mimics the rhythm of the rim above. -
Clean up burrs:
Once bone dry, gently brush away any clay crumbs or sharp burrs left from the carving process using a stiff brush. -
Apply contrasting slip (optional):
If you want the lighter contrast shown in the reference, paint a cream slip into the carved area and wipe away the excess on the surface with a damp sponge.
Step 4: Glazing and Firing
-
Bisque fire:
Load the bone-dry mug into the kiln and bisque fire it to Cone 04 (or your clay body’s recommendation). -
Glaze the interior:
Pour a clear glossy glaze inside the mug, roll it around to coat completely, and pour out the excess. -
Dip the rim:
Hold the mug by the foot and dip just the scalloped rim into the clear glaze, or brush it on carefully to ensure the lip is sealed and smooth. -
Glaze the exterior:
For the exterior body, you can either leave it raw (unglazed) to highlight the terracotta texture or apply a very thin matte clear coat to seal the speckles. -
Final firing:
Fire the mug to maturity (likely Cone 5/6 depending on your stoneware). Let the kiln cool completely before unloading.
Once cooled, your custom cup is ready for a warm beverage and a cozy spot by the window
Statement Handle Shapes
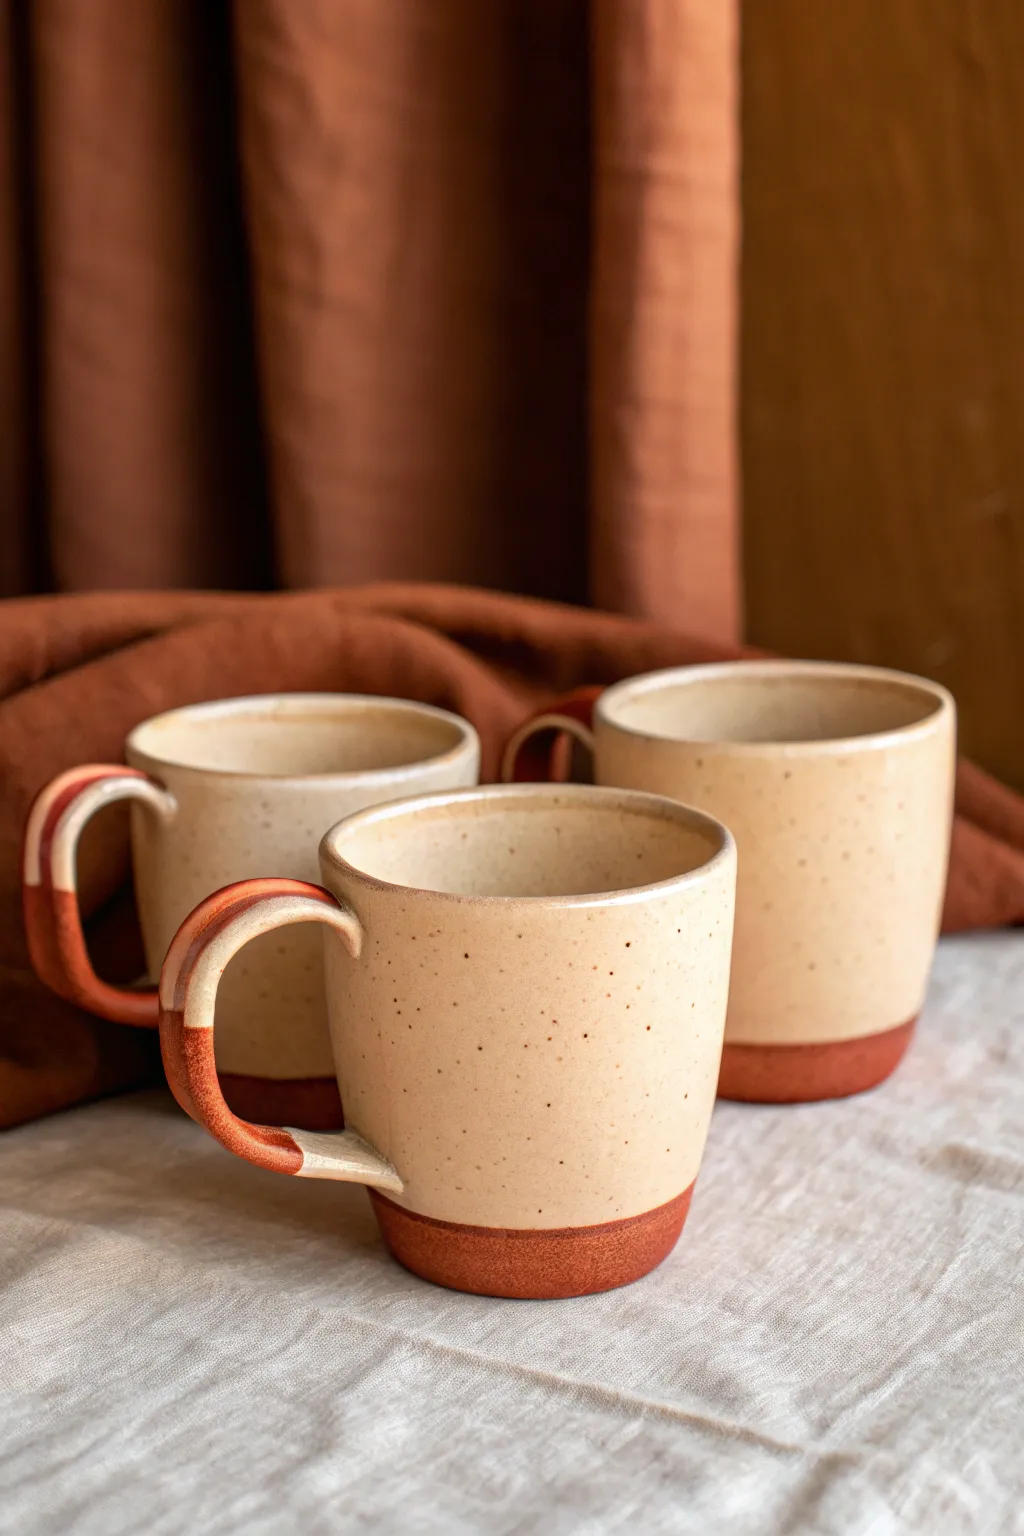
These wheel-thrown mugs balance rustic charm with modern design, featuring a warm, exposed terracotta base and a creamy, speckled glaze. The highlight is the wide, flat strap handle that leaves the raw clay exposed at the connections, creating a striking visual contrast.
Detailed Instructions
Materials
- Terracotta stoneware clay (or any red stoneware)
- Pottery wheel
- Throwing tools (sponge, wire cutter, rib, needle tool)
- Trimming tools
- Serrated rib or scoring tool
- Slip (made from the same clay body)
- Cream or oatmeal speckled glaze (cone 5/6)
- Wax resist
- Kiln
Step 1: Throwing the Form
-
Center and Open:
Begin with about 1 – 1.25 lbs of terracotta clay. Center it firmly on the wheel head and open the clay, establishing a flat interior bottom rather than a bowl curve. -
Pull the Walls:
Pull the walls up into a simple cylinder. Aim for a height of about 3.5 to 4 inches. Keep the walls even, tapering slightly inward at the rim for a cozy shape. -
Refine the Profile:
Use a metal or wooden rib to smooth the exterior and define the straight-sided profile shown in the image. Remove excess slurry to leave the surface clean. -
Create the Gallery:
Slightly round the rim with a chamois or sponge for comfortable sipping. Wire the pot off the bat and let it firm up to leather-hard.
Pro Tip: Clean Lines
For a super crisp line between the glaze and raw clay, apply masking tape before waxing. Peel it off, then dip. It creates a sharper transition than freehand waxing.
Step 2: Trimming & Handle Making
-
Trim the Base:
Once leather-hard, center the mug upside down on the wheel. Trim the bottom to create a distinct foot or a flat base, sharpening the angle where the wall meets the floor to define that unglazed bottom section later. -
Pull a Strap:
To make the statement handle, pull a wide, flat strap of clay directly from a lump, or roll a slab and cut a strip about 1 inch wide. The key is maintaining a rectangular cross-section rather than round. -
Shape the Curve:
Lightly curve the strap into a large ‘C’ or ear shape. Let it stiffen slightly on a board until it holds its shape without collapsing but is still flexible enough to attach. -
Score and Slip:
Identify attachment points on the mug wall. Score these areas thoroughly and apply slip. Do the same to the ends of your handle strap. -
Attach the Handle:
Press the handle firmly onto the mug. Smoothing the clay at the join is crucial; I like to use a small wooden tool to blend the seams completely flush so it looks integrated. -
Refine the Handle:
Wipe away excess slip with a damp sponge. Ensure the handle profile remains wide and flat, reinforcing that ‘statement’ look. -
Slow Dry:
Cover the mugs loosely with plastic to let them dry slowly. This prevents the handle from cracking away from the body due to uneven shrinkage.
Troubleshooting: Cracks
If hairline cracks appear at the handle join during drying, score deeper next time and compress the join more. Wrap handles in plastic while the body dries to equalize moisture.
Step 3: Glazing & Firing
-
Bisque Fire:
Once bone dry, fire the mugs in a bisque kiln to approximately Cone 04 (check your clay specifications). -
Wax the Base:
Apply wax resist to the bottom inch of the mug’s exterior and the foot. This reserves the raw red clay area seen in the photo. -
Wax the Handle accents:
Carefully paint wax resist on the handle attachments or leave them unglazed by wiping. In the image, the handle connections reveal the terracotta warmth, so wax specifically where the handle meets the body if you want that specific detail, or dip carefully. -
Dip Glaze:
Stir your cream speckled glaze thoroughly. Hold the mug by the foot (or use glazing tongs) and dip it into the glaze bucket, stopping right at your wax line near the base. -
Clean Up:
Immediately wipe away any glaze beads that formed on the waxed areas with a damp sponge. Ensure the handle is glazed on the loop but clean at the connection points if desired. -
Glaze Fire:
Load the mugs into the kiln and fire to the maturity temperature of your clay and glaze (likely Cone 5 or 6). Allow the kiln to cool naturally.
Enjoy your morning coffee with the satisfaction of holding a mug that is truly yours

TRACK YOUR CERAMIC JOURNEY
Capture glaze tests, firing details, and creative progress—all in one simple printable. Make your projects easier to repeat and improve.
Comfy Thumb Indent Grip
Embrace the warmth of handmade pottery with this cozy, speckled mug featuring an earthy finish and a comfortable handle. The simple cylindrical form highlights the rustic beauty of iron-rich clay and a creamy, matte glaze.
Step-by-Step
Materials
- Speckled stoneware clay (mid-fire)
- Pottery wheel
- Throwing tools (sponge, needle tool, rib, wire cutter)
- Trimming tools
- Scoring tool or serrated rib
- Slip
- Sponge
- Transparent or cream matte glaze
- Kiln
Step 1: Throwing the Form
-
Centering:
Start with about 1 pound of speckled stoneware clay. Wedge it thoroughly to remove air bubbles, then slam it onto the center of the wheel batt. Use water and steady pressure to cone up and center the clay perfectly. -
Opening:
Press your thumbs into the center of the clay mound, opening it up until there is about a half-inch of clay left at the bottom for the floor. Maintain a steady speed. -
Pulling the Walls:
Slow the wheel down slightly. Create a groove at the base and gently pull the clay upward, keeping the walls even. Aim for a simple cylinder that stands about 4 inches tall. -
Shaping:
Use a metal or wooden rib on the outside while supporting the inside with your hand to smooth the throwing lines and create a straight, vertical profile. I like to gently compress the rim with a chamois or sponge here to prevent sharpness. -
Creating the Foot:
Use a wooden knife tool to undercut the base slightly, removing excess clay from where the wall meets the wheel head. This pre-defines the raw clay exposed area. -
Cutting Off:
Run a wire cutter underneath the mug to separate it from the batt. Carefully lift it off and place it on a ware board to dry to leather-hard.
Handle Cracking?
If your handle cracks away from the body during drying, the clay was likely too dry when attached. Always score deeply and use plenty of slip
Step 2: Trimming and Handle
-
Trimming the Base:
Once leather-hard, center the mug upside down on the wheel. Trim away excess weight from the bottom, carving a distinct foot ring. This unglazed area at the bottom provides a beautiful texture contrast. -
Pulling a Handle:
Take a separate carrot-shaped lug of clay and hold it vertically. With a wet hand, pull downwards firmly but gently to stretch it into a long strap. Curve it slightly and let it stiffen up on a board until it holds its shape. -
Attaching the Handle:
Score the mug surface where the handle will attach and score the contact points of the handle. Apply slip to both areas. -
Securing the Bond:
Press the handle firmly onto the mug. Use a modeling tool to blend the clay seams completely so the connection is invisible. Ensure the loop is large enough for a comfortable grip. -
Thumb Indent:
For that extra ‘comfy’ factor, lightly press your thumb into the top of the handle curve while the clay is still malleable. This creates a natural resting spot for the user. -
Drying:
Cover the mug loosely with plastic to ensure the handle and body dry at the same rate. After a day, uncover it and let it dry to bone-dry state.
Enhance the Speckle
Use a clear glaze over iron-rich stoneware to really make the natural specks pop out, or brush iron oxide wash lightly over the clay before glazing
Step 3: Glazing and Firing
-
Bisque Fire:
Load the bone-dry mug into the kiln for a bisque firing (usually to Cone 04). This hardens the clay and prepares it for glazing. -
Waxing the Foot:
Apply wax resist to the bottom half-inch of the mug and the underside. This is crucial for achieving that defined line between the glaze and the raw clay foot. -
Glazing:
Dip the mug into a cream or translucent matte glaze. Hold it upside down for a few seconds to let excess glaze drip off, then turn it right side up and wipe any rogue droplets off the waxed area with a damp sponge. -
Glaze Firing:
Fire the mug again to the maturity temperature of your clay body (likely Cone 5 or 6 for stoneware). This melts the glaze and vitrifies the clay. -
Finishing Touch:
Once the kiln cools, sand the unglazed foot lightly with 400-grit sandpaper if it feels rough against the table.
Now brew your favorite tea and enjoy the feeling of your handmade mug
Faceted Geometric Cup
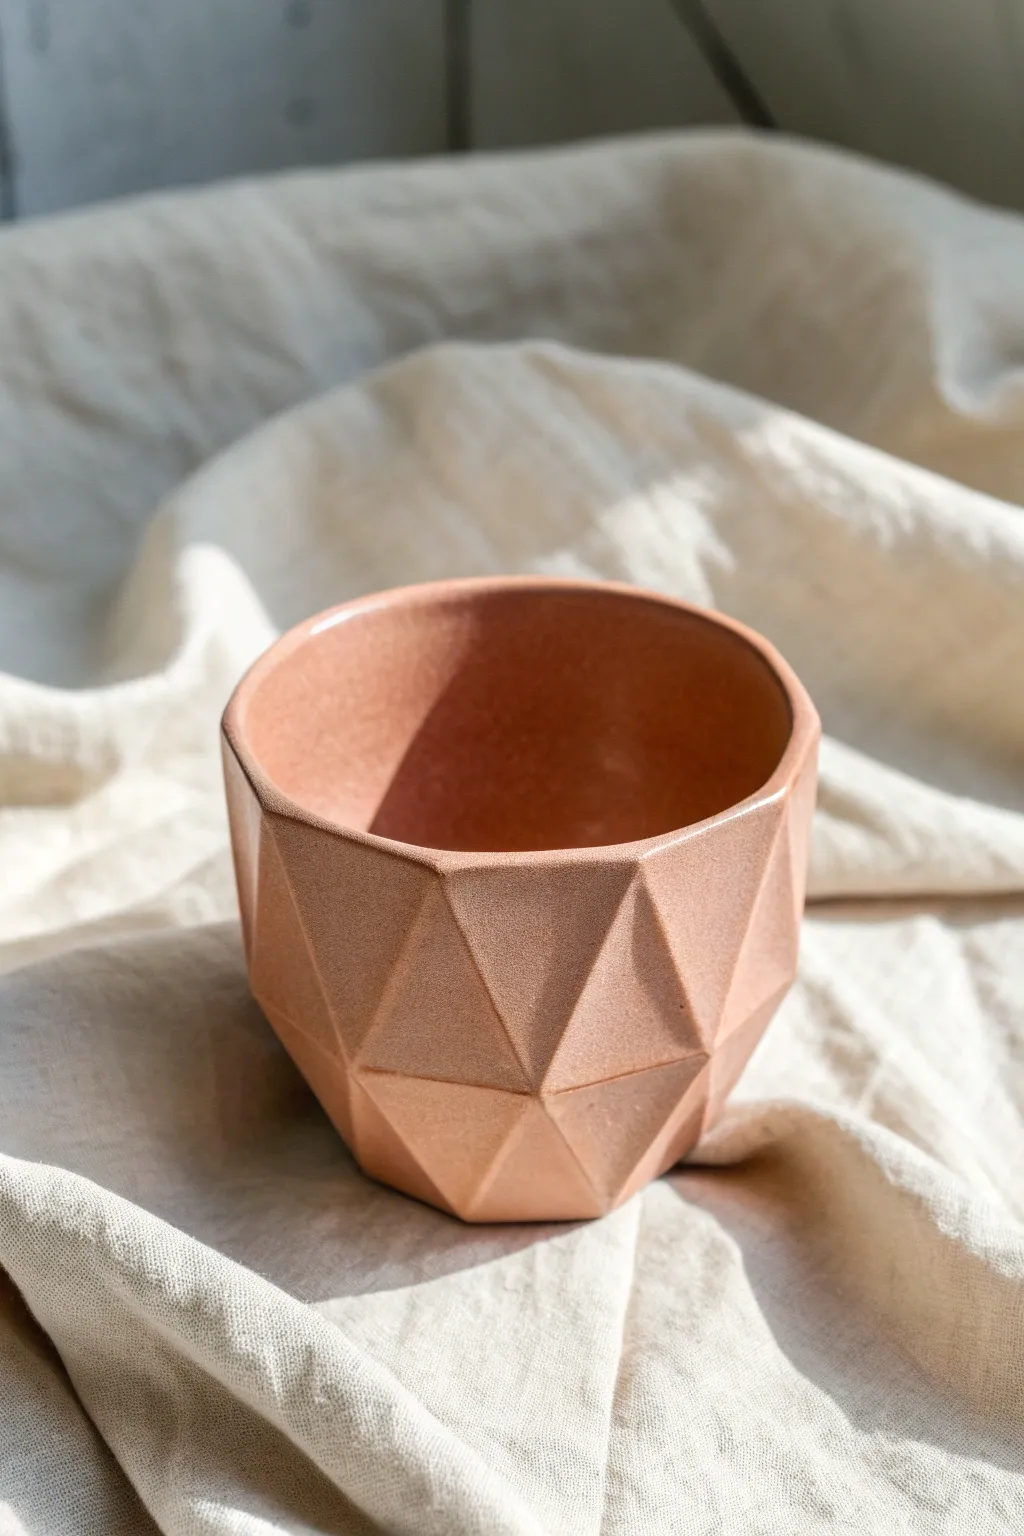
This contemporary cup features a striking low-poly design where light plays beautifully off sharp triangular facets. The warm terracotta tone and smooth finish give it a refined, architectural look perfect for minimalist decor.
How-To Guide
Materials
- Warm terracotta or salmon-colored polymer clay (or earthenware ceramic clay)
- Sharp clay slicing blade (rigid)
- Rolling pin or slab roller
- Circular cookie cutter (approx. 3-4 inches)
- Small cup or glass (to use as a slump mold)
- Smoothing tool or rib
- Cornstarch or baby powder (release agent)
- Sanding sponges (medium to fine grit)
- Matte glaze or sealant (food safe if intended for drinking)
Step 1: Forming the Base
-
Condition the clay:
Begin by thoroughly conditioning your terracotta polymer clay until it is pliable and warm, ensuring no air bubbles are trapped inside. -
Roll a thick slab:
Roll your clay into a consistent slab that is slightly thicker than you would normally use, about 1/2 inch thick. This extra thickness is crucial because you will be carving material away later. -
Cut the base disc:
Use your circular cookie cutter to punch out a perfect circle for the base of the cup. -
Create the walls:
Roll a rectangular strip of the thick clay, ensuring the height matches your desired cup size plus a little extra for trimming. -
Join base and wall:
Wrap the rectangular strip around the circular base. Carefully score and slip (if using ceramic clay) or blend the seams together (if using polymer) until the join is invisible. -
Shape the cylinder:
Place your clay cylinder over a glass or cup covered in cornstarch to help maintain its shape while you work. Smooth the outside walls perfectly so you have a clean canvas for carving.
Uneven Cuts?
If you accidentally slice too deep, don’t patch it. Instead, slice the surrounding facets slightly deeper to match. It’s easier to reduce the whole volume than to hide a patch.
Step 2: Carving the Facets
-
Let it firm up:
This is the most critical step: allow the clay to firm up significantly. For polymer, you can pop it in the fridge for 20 minutes; for ceramic, wait for a leather-hard state. -
Map your cuts:
Lightly mark a horizontal line around the middle of the cup. This will be the ‘equator’ where your upper and lower triangles meet. -
First heavy slices:
Taking your sharp rigid blade, slice upward from the ‘equator’ line toward the rim to create triangular planes. I find it easiest to angle the blade inward to remove a wedge of clay. -
Create the lower facets:
Now slice downward from the ‘equator’ to the base. Position these cuts so the point of the downward triangle lands directly between the wide parts of the upper triangles. -
Refine the geometry:
Continue slicing around the cup, ensuring the ridges where the cuts meet are sharp and distinct. The deepness of the cut determines the contrast of the facet. -
Level the rim:
Once the body is faceted, use your blade to slice the rim horizonal again to ensure it is perfectly flat and even. -
Smooth the interior:
While keeping the outside sharp, use a damp finger or sponge to perfectly smooth the interior and the very top edge of the lip for comfortable drinking.
Marble Effect
Before rolling your slab, mix a small amount of white or grey clay into the terracotta. Don’t fully blend it; stop when streaky to create a faux-stone marble look.
Step 3: Finishing
-
Bake or Fire:
Follow manufacturer instructions. For polymer clay, bake typically at 275°F (130°C). If using ceramic clay, fire it in the kiln. -
Initial sand:
Once cooled, use a medium-grit sanding sponge on the facets. Keep the sponge flat against the plane to avoid rounding over those crisp edges you worked so hard to create. -
Refining the surface:
Switch to a fine-grit sponge and sand under running water to remove any clay dust and create a velvety smooth finish. -
Cleaning:
Wash the cup thoroughly with soap and water to remove all sanding residue and let it dry completely. -
Sealing:
Apply a matte sealant or glaze. A matte finish is preferable here as it prevents glare from obscuring the geometric shadows.
Enjoy the interplay of light and shadow on your new geometric creation
Terrazzo Speck Inlay
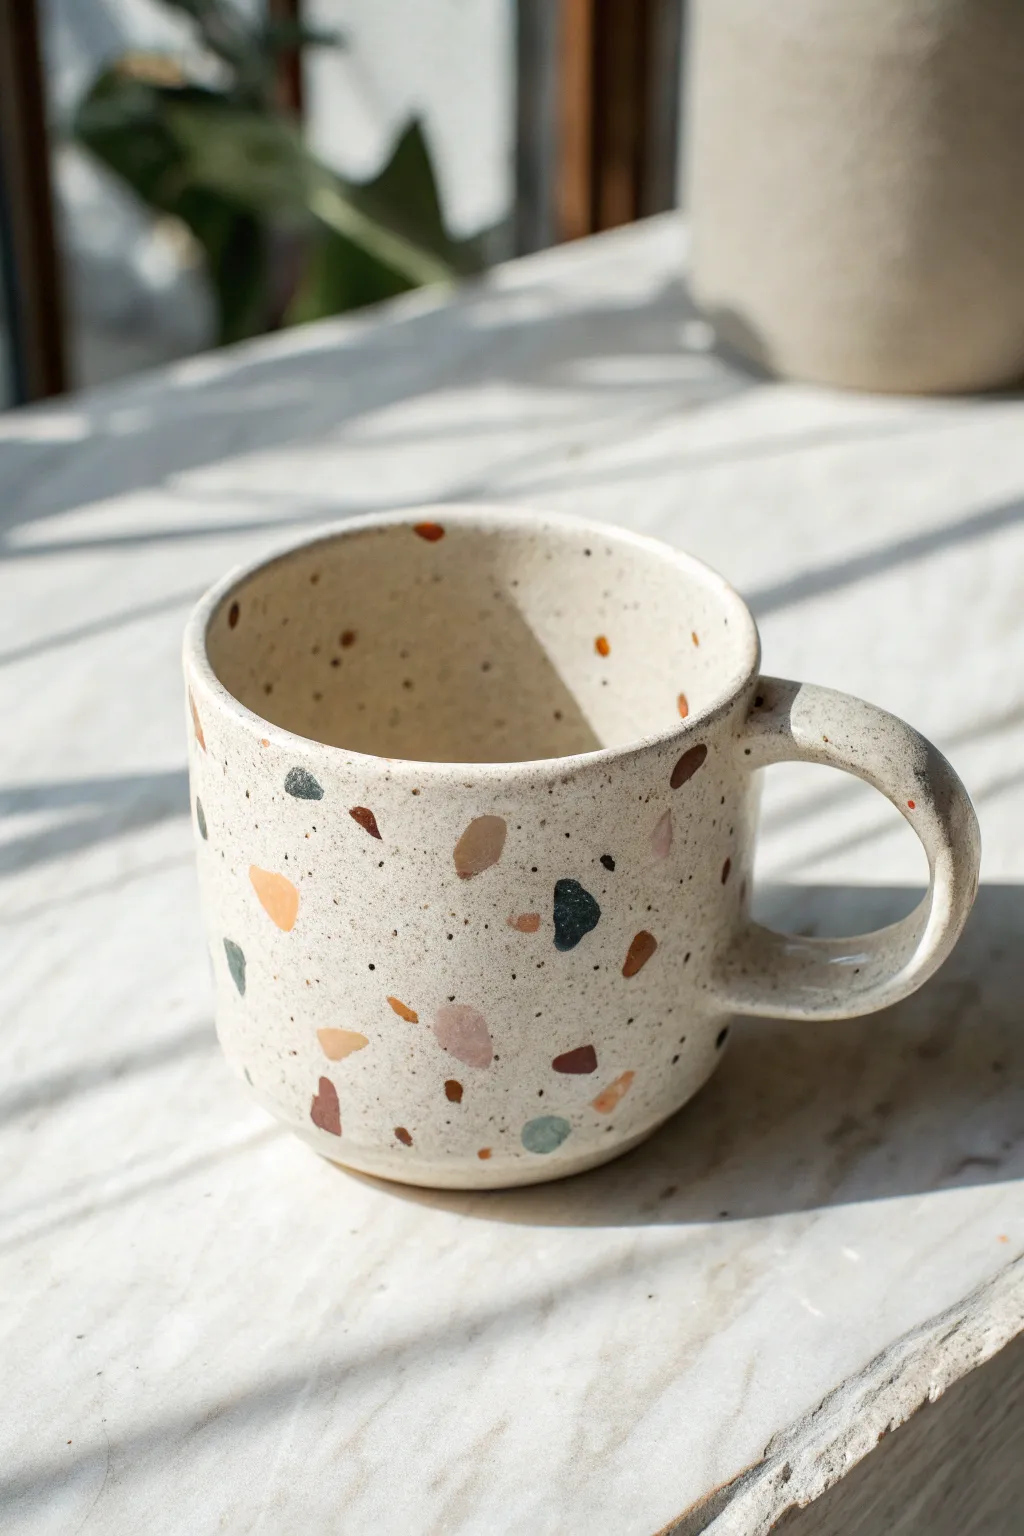
This project masters the trendy terrazzo aesthetic by embedding colorful clay fragments directly into a neutral stoneware body. The result is a delightfully speckled, smooth-finished mug that feels organic yet polished.
Step-by-Step Tutorial
Materials
- Light-colored stoneware clay (white or cream)
- Small amounts of colored clay or mason stains mixed into slip
- Rolling pin
- Canvas work surface
- Mug template (paper or cardstock)
- Fettling knife
- Scoring tool or serrated rib
- Slip (liquid clay)
- Soft rubber rib
- Sponge
- Clear transparent glaze
- Wooden modeling tool
Step 1: Preparing the Terrazzo Chips
-
Create Colored Clay:
Mix mason stains into small balls of your base clay to create a palette of 4-5 earthy tones like mustard, terracotta, sage green, and charcoal. Alternatively, use pre-colored commercial clays. -
Make Thin Sheets:
Roll your colored clay balls into very thin sheets, about 1-2mm thick. The thinner they are, the easier they will be to integrate later. -
Create Fragments:
Once the sheets are leather hard, break or cut them into jagged, irregular shards of varying sizes. Aim for a mix of tiny specks and larger accent pieces. -
Mix Aggregates:
I like to gently toss these chips together in a bowl to randomise the colors before placement.
Air Pockets?
If chips don’t adhere well, air can get trapped. Use a needle tool to pierce stubborn bubbles, then re-compress firmly with a rib to seal.
Step 2: Forming the Slab
-
Roll Base Slab:
Roll out your main white clay body onto canvas to a thickness of about 1/4 inch (6mm). Ensure it’s large enough for your mug body and handle. -
Scatter the Chips:
Randomly scatter your prepared colored chips across the surface of the wet slab. Don’t overthink the placement; irregularity looks pivotal here. -
Embed the Inlay:
Use your rolling pin to firmly press the chips into the slab. You want them flush with the surface. Roll in multiple directions to ensure the slab stays even. -
Smooth the Surface:
Run a soft rubber rib over the slab to compress the clay and ensure a seamless bond between the chips and the base. -
Cut the Shape:
Lay your mug template over the speckled slab and cut out the rectangular body and a circular base using a fettling knife.
Sharper Edges
After the final firing, sand the unglazed foot or rim lightly with wet-dry sandpaper to make the terrazzo inclusions feel perfectly smooth.
Step 3: Assembling the Mug
-
Bevel the Edges:
Cut a 45-degree angle on the short ends of your rectangular slab where they will join to form the cylinder. -
Score and Slip:
Rough up the beveled edges and the perimeter of the circular base. Apply a generous amount of slip to these areas. -
Form the Cylinder:
Carefully lift the slab and curl it into a cylinder, pressing the beveled edges together firmly. Smooth the seam inside and out. -
Attach the Base:
Place the cylinder onto the scored base. Use a wooden tool to blend the clay from the base up onto the wall of the mug to seal the join. -
Add Black Sands (Optional):
For the tiny black speckles seen in the image, you can gently pat heavy iron sand or granular illmenite into the surface while the clay is still damp.
Step 4: Handle and Finish
-
Pull a Handle:
Using remaining speckled clay, pull or roll a strap for the handle. Curve it into a ‘C’ shape and let it stiffen slightly. -
Attach Handle:
Score and slip the attachment points on the mug body and handle. Press firmly to attach the handle, checking for straight alignment. -
Clean and Dry:
Once leather hard, sponge the entire mug to reveal the terrazzo colors clearly. This removes surface drag and brightens the inlaid clay. -
Bisque Fire:
Slowly dry the mug and fire to cone 04 (or your clay’s specific bisque temperature). -
Glaze and High Fire:
Dip the mug in a clear transparent glaze to seal the surface and make the colors pop, then fire to maturity (usually cone 5/6).
Enjoy your morning coffee in a custom vessel that feels like holding a piece of modern art
Marbled Clay Swirl Body
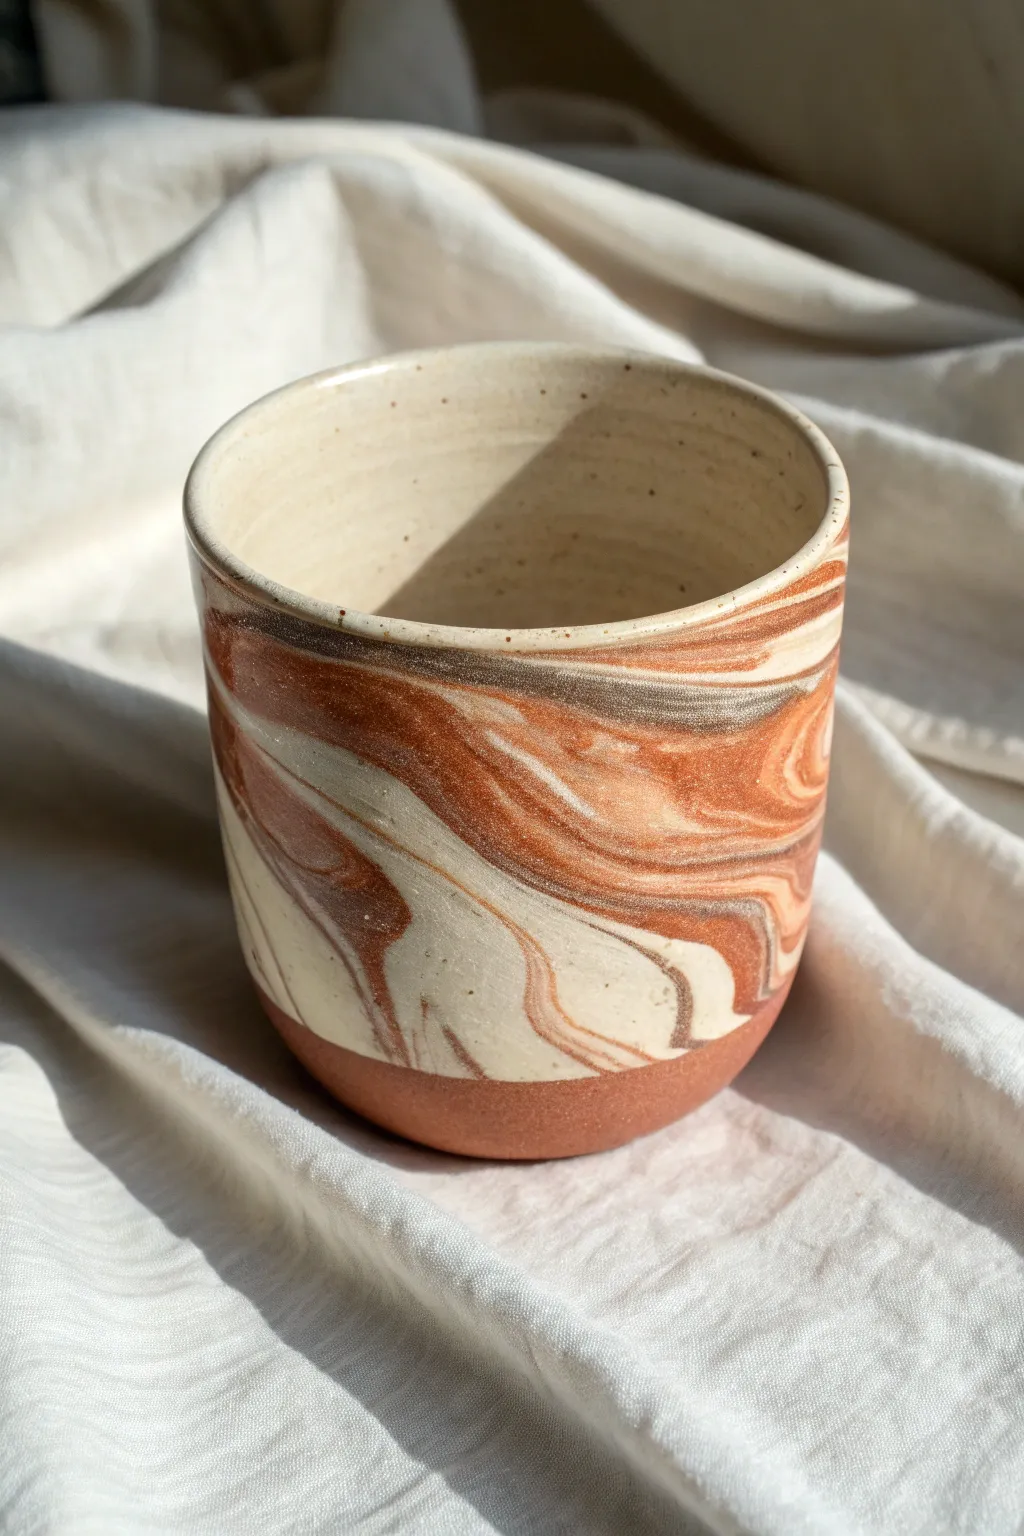
This stunning ceramic cup achieves a natural, geological look by marbling two distinct clay bodies together directly on the wheel. The result is a fluid, organic pattern of cream and terracotta ribbons that contrast beautifully against a solid, unglazed base.
Step-by-Step Guide
Materials
- White stoneware clay (speckled if available)
- Red earthenware or terracotta clay
- Pottery wheel
- Throwing sponge
- Wire cutting tool
- Rib tool (metal or wood)
- Needle tool
- Trimming tools
- Clear glaze (cone appropriate for your clay mix)
- Kiln
Step 1: Preparing the Marbled Clay
-
Measure your clay:
Cut off a larger chunk of white stoneware (about 3/4 lb) and a smaller chunk of red clay (about 1/4 lb). The ratio should be roughly 3:1 in favor of the white clay to maintain structural integrity and color balance. -
Stack the layers:
Flatten the white clay slightly and place the red clay on top, or cut both into thick slices and stack them alternately like a sandwich. -
Begin wedging:
Wedge the combined lump strictly 4-5 times. Do not over-wedge, or the colours will blend into a solid muddy pink instead of distinct distinct swirls. You want visible streaks. -
Form the ball:
Pat the wedged clay into a round ball, ensuring the different colors are visible on the surface in thick bands.
Clay Compatibility
Verify your white and red clays have the same shrinkage rate and firing temperature. If they shrink differently, your cup will crack.
Step 2: Throwing on the Wheel
-
Center the clay:
Slam the ball onto the wheel head. Center the clay quickly and efficiently. The more you manipulate the clay during centering, the more the marble pattern will blur. -
Open the form:
Open up the center of the clay to create the floor of your cup. Compress the bottom well with your sponge to prevent S-cracks later. -
Pull the walls:
Begin pulling up the walls. As you pull, the spinning motion will naturally stretch the clay layers, elongating the marble globs into those beautiful striations seen in the photo. -
Shape the cylinder:
Shape the cup into a simple cylinder with a slightly wider rim. Keep the walls even, aiming for about 1/4 inch thickness. -
Clean the surface:
Use a metal rib to gently scrape the outside while the wheel turns. This removes the ‘slurry’ (the muddy water) on the surface that obscures the pattern, revealing the crisp marbling underneath. -
Cut from wheel:
Run your wire tool underneath the pot to separate it from the bat, then carefully set it aside to dry to a leather-hard state.
Step 3: Trimming and Finishing
-
Center for trimming:
Once leather hard, place the cup upside down on the wheel. Secure it with clay lugs to keep it centered. -
Define the base:
Trim away the excess clay at the bottom. Carve a distinct line or ‘step’ where the marbled body ends and the foot begins, mimicking the solid base look in the image. -
Reveal more pattern:
I find that trimming slightly up the side of the wall can uncover even more intricate swirls that were hidden inside the wall thickness, so feel free to shave off a thin layer on the lower or middle section. -
Smooth the rim:
Flip the cup over and use a damp chamois or sponge to round off the rim, making it comfortable for drinking. -
Bisque fire:
Let the cup bone dry completely, then load it into the kiln for a bisque firing.
Nerikomi Style
Add a third clay body, like a dark brown or black stoneware, to the wedge for a more complex, agate-like stone pattern.
Step 4: Glazing
-
Wax the base:
Apply wax resist to the bottom inch of the cup (the solid terracotta-heavy area). This ensures the raw earthy texture remains visible. -
Dip in clear:
Dip the entire cup into a clear glaze. A shiny clear glaze will amplify the contrast between the white and red clays and make the colors pop. -
Final fire:
Fire the cup to the maturity temperature of your clay mixture (usually Cone 5/6 or 10).
Pour your favorite drink into your new creation and enjoy following the intricate paths of the clay rivers you guided by hand
Wax-Resist Polka Dots

Achieve a sophisticated, tactile finish with this wax-resist project that highlights the natural beauty of dark clay bodies. By blocking out simple circles before glazing, you create a striking contrast between the matte, raw clay and the smooth, dark satin glaze.
Step-by-Step
Materials
- Dark brown or black stoneware clay
- Pottery wheel (or slab roller/hand-building tools)
- Ribs and trimming tools
- Sponge
- Cold wax resist (emulsion)
- Small round foam pouncer or circular brush
- Satin charcoal or black glaze
- Kiln
Step 1: Forming the Body
-
Prepare the Clay:
Wedge your dark stoneware clay thoroughly to remove air bubbles. Center about 1 pound of clay on the wheel if throwing, or roll out a consistent slab if hand-building. -
Throw the Cylinder:
Pull the walls to create a straight-sided cylinder with a wide, stable base. Aim for a slightly shorter, wider proportion typical of a cappuccino mug rather than a tall coffee cup. -
Shape the Curve:
Using a rib on the interior, gently push the walls outward to create a soft, rounded belly while keeping the rim defined. -
Refine the Rim:
Compress the rim with a chamois or sponge. This area will be unglazed or thinly glazed, so smoothness here is crucial for mouthfeel.
Glaze sticking to wax?
If glaze beads up heavily on the wax, wait until it’s nearly dry, then dab gently with a barely-damp sponge. Rubbing too hard while wet can smear glaze onto the raw clay spot.
Step 2: Handling and Trimming
-
Dry to Leather Hard:
Allow the mug body to dry slowly until it reaches a leather-hard state, firm enough to handle without deforming but still cool to the touch. -
Trim the Foot:
Flip the mug and trim a clean, defined foot ring. This elevates the form and gives a professional finish to the bottom. -
Pull the Handle:
Pull a strap of clay for the handle. For this design, a simple C-shape that accommodates two fingers works best. Let it stiffen slightly before attaching. -
Attach the Handle:
Score the mug body and handle ends, apply slip, and firmly attach the handle. Smooth the connection points seamlessly so it looks like it grew out of the mug.
Texture Twist
Before bisque firing, gently press a textured stamp or coarse fabric into the spots where you plan to put the wax later. The glaze will break beautifully over the depression.
Step 3: Applying Resist and Glaze
-
Bisque Fire:
Once the mug is bone dry, bisque fire it according to your clay body’s specifications (usually Cone 04 or 06). -
Clean the Bisque:
Wipe the bisque-fired mug with a damp sponge to remove any kiln dust or oils from handling, which can interfere with glaze adhesion. -
Prepare the Applicator:
Select a round foam pouncer or a specialized circle brush. The foam pouncers often give the most consistent, perfectly round dot. -
Apply the Dots:
Dip your tool into the wax resist and stamp circles onto the exterior of the mug. I find a staggered grid pattern looks best, but random placement works too. -
Handle Detail:
Don’t forget to add a single dot or a small pattern near the top of the handle for a cohesive look. -
Let the Wax Set:
Allow the wax resist to dry completely. It should feel tack-free and solid before you introduce any liquid glaze. -
Prepare the Glaze:
Stir your satin charcoal glaze thoroughly. A satin mat finish works better than high gloss here, as it complements the texture of the raw clay. -
Dip the Mug:
Using glazing tongs or your hand (if the interior is already glazed), dip the entire mug into the bucket for 3-4 seconds. Lift it out and let the excess drip off. -
Wipe the Resist:
As the glaze dries (but before it’s powdery), use a damp sponge or your fingertip to gently wipe any glaze beads off the waxed circles. The wax repels the glaze, revealing the clay beneath. -
Check the Bottom:
Ensure the foot ring is completely free of glaze to prevent it from fusing to the kiln shelf. -
Final Firing:
Glaze fire the piece to the maturity temperature of your clay and glaze (such as Cone 5, 6, or 10).
Pour your favorite warm drink and enjoy the earthy feel of the raw clay against your hands
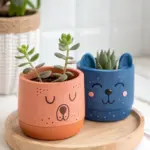
Cute Animal Face Cup
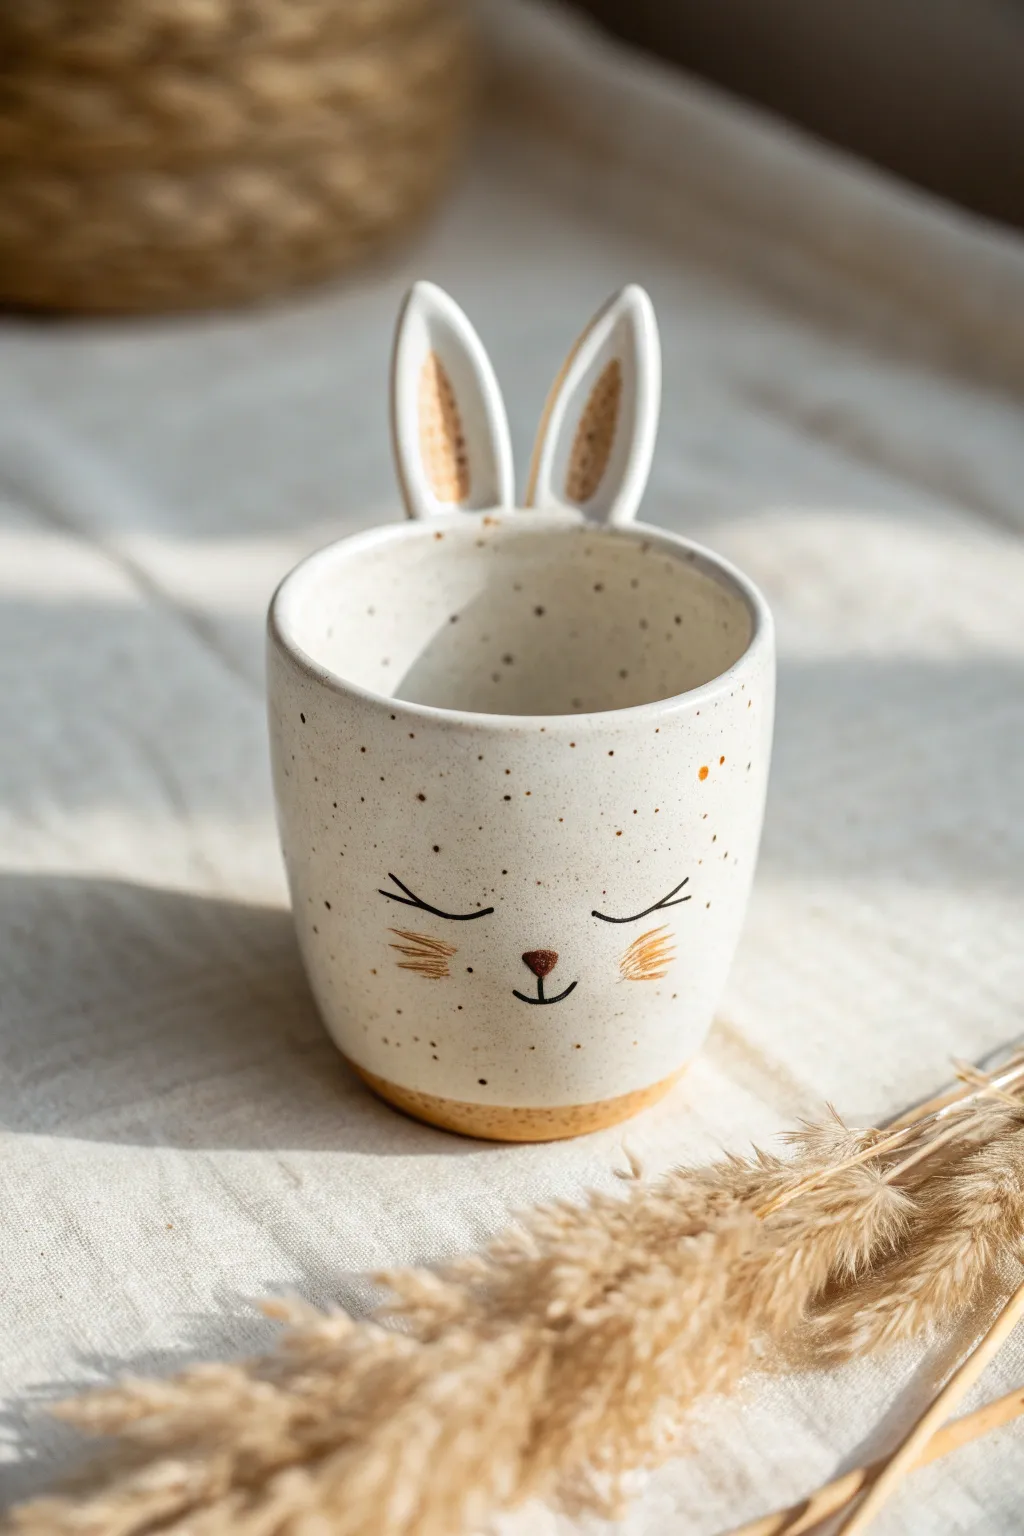
Embrace the charm of handmade ceramics with this adorable bunny-themed cup, featuring upright ears molded directly onto the rim. Its speckled clay body and delicate hand-painted face give it a warm, rustic personality perfect for morning tea.
How-To Guide
Materials
- Speckled stoneware clay (mid-fire recommended)
- Pottery wheel or rolling pin (for slab building)
- Needle tool
- Scoring tool (or serrated rib)
- Slip (clay and water slurry)
- Underglaze pencil or fine brush
- Black underglaze
- Brown/Tan underglaze
- Clear food-safe glaze
- Sponge
- Kiln
Step 1: Forming the Cup Body
-
Prepare the clay:
Begin by wedging your speckled stoneware clay thoroughly to remove air bubbles. This specific look relies on a clay body that already contains manganese speckles, so choosing the right raw material is key. -
Throw or build the cylinder:
You can wheel-throw a simple cylinder, aiming for straight walls with a slight curve at the bottom. Alternatively, roll out a slab to about 1/4 inch thickness and form a hand-built cylinder, smoothing the seam completely. -
Refine the shape:
If throwing, rib the outside to smooth it. You want a clean canvas for the face later. Trim the bottom once it’s leather hard to create a slight foot or just a clean edge. -
Smooth the rim:
Using a damp chamois or sponge, compress the rim of the cup. It needs to be rounded and smooth, as this is where you will attach the ears.
Step 2: Sculpting & Attaching Ears
-
Roll coils for ears:
Take a small amount of leftover clay and roll two thick, short coils. Flatten them slightly with your thumb to create the elongated oval shape characteristic of rabbit ears. -
Shape the inner ear:
Use a modeling tool or your pinky finger to gently press an indentation into the center of each ear, leaving a raised border around the edge. -
Score and slip:
Score the bottom of the ears and the corresponding spots on the interior rim of the cup. Apply a generous amount of slip to both surfaces. -
Attach firmly:
Press the ears onto the inside of the rim so they peek over the top. Use a small wooden tool to smudge the clay from the base of the ear into the cup wall to create a seamless, strong bond. -
Check symmetry:
Step back and look at the mug from the front. Adjust the tilt of the ears while the clay is still pliable so they look perky and evenly spaced.
Pro Tip: Ear Stability
Make the base of the ears slightly thicker where they attach to the rim. This taper adds structural support and prevents them from snapping off during use.
Step 3: Decoration & Glazing
-
Bisque fire:
Allow the mug to dry slowly to prevent the ears from cracking at the joint. Once bone dry, bisque fire it in the kiln according to your clay body’s specifications. -
Sanding:
After firing, briefly sand the bottom and any rough spots on the rim to ensure a pleasant drinking experience. -
Map out the face:
Lightly sketch the sleeping eyes, nose, and whiskers with a pencil. The graphite will burn off in the kiln, so don’t worry about mistakes. -
Paint facial features:
Using a very fine liner brush and black underglaze, paint the curved lines for the sleeping eyes and the small mouth. Keep your hand steady and the lines thin. -
Add color accents:
Dilute some brown or tan underglaze. Paint a small heart or oval for the nose, and gently brush on the whiskers. Use this same color to fill the indentations inside the ears. -
Wax resist (optional):
If you want the raw, speckled clay texture on the bottom inch (as shown in the photo), apply wax resist to the exterior base of the mug. -
Clear glaze application:
Dip the entire mug into a clear, food-safe glaze. If you waxed the bottom, wipe away any glaze beads that stuck to the wax. -
Final firing:
Load the kiln carefully, ensuring the ears don’t touch any shelves or posts. Fire to the maturity temperature of your clay and glaze (usually Cone 5 or 6 for stoneware).
Troubleshooting: Smudged Lines
If your black underglaze lines smudge, let them dry completely, then gently scratch the mistake away with a needle tool before re-painting.
Once cooled, your charming bunny mug is ready to add a touch of sweetness to your daily coffee routine
Rainbow Handle Accent
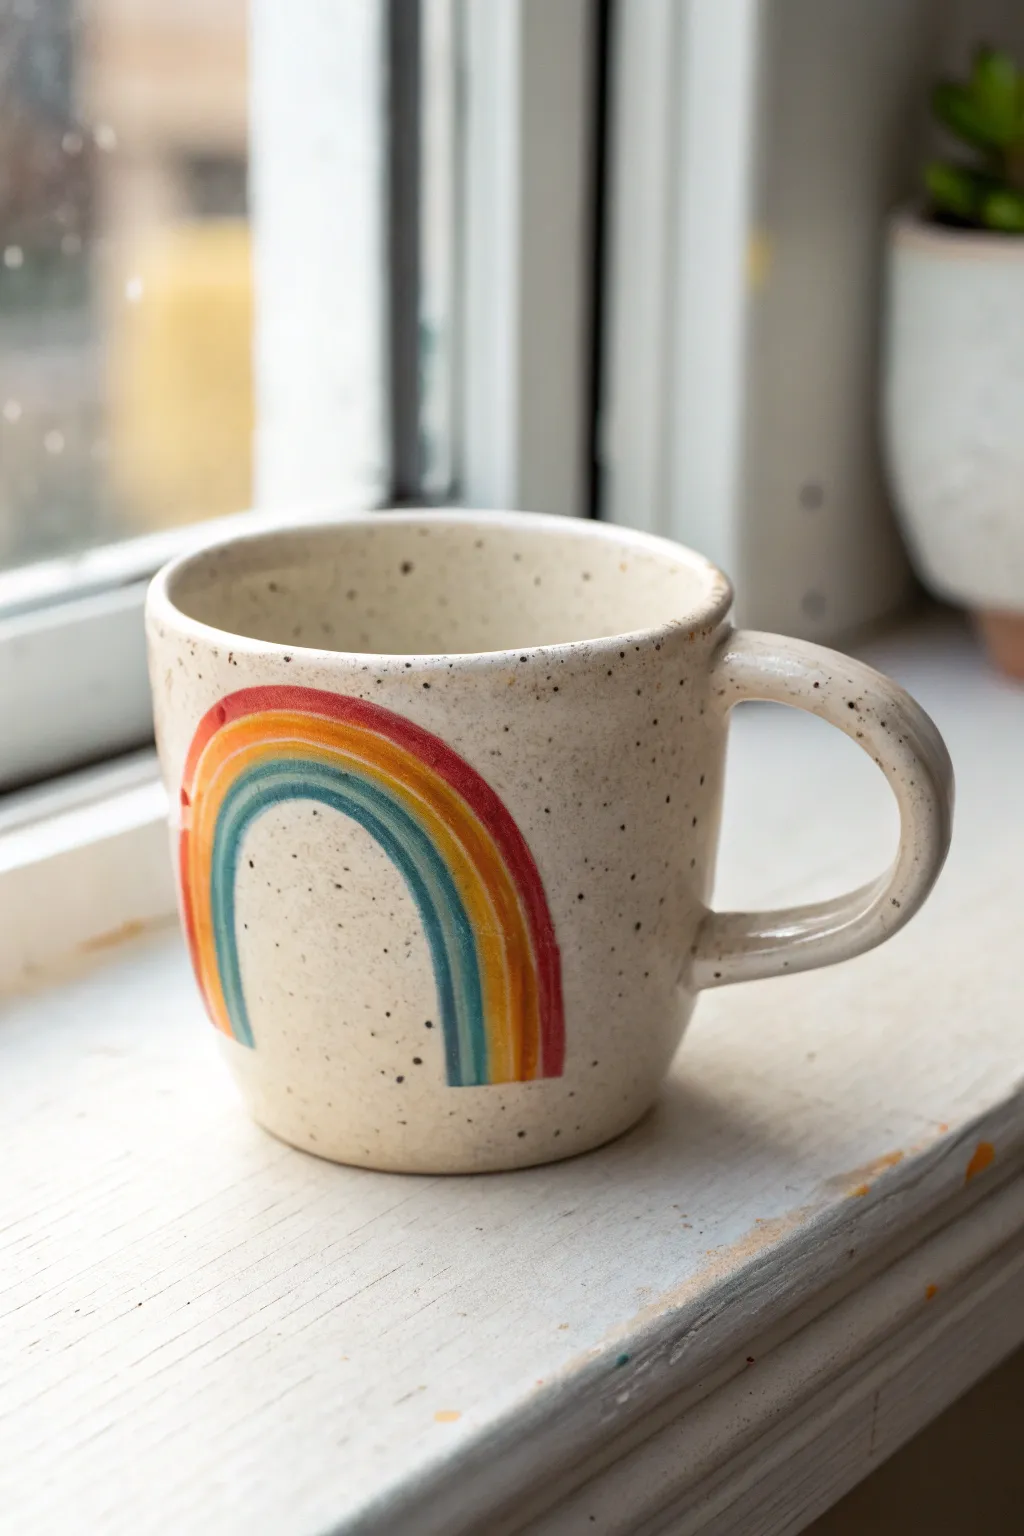
Brighten your morning coffee routine with this charming handmade mug featuring a playful, hand-painted rainbow arch. The natural speckled clay body provides a beautiful rustic canvas for the vibrant underglaze colors, creating a piece that feels both modern and cozy.
Step-by-Step
Materials
- Speckled stoneware clay (Cone 5/6)
- Pottery wheel (or rolling pin for hand-building)
- Pottery trimming tools
- Rib tool
- Sponge
- Scoring tool or fork
- Slip
- Underglazes (Red, Orange, Mustard Yellow, Teal, Sky Blue)
- Small liner brushes (sizes 0 and 2)
- Clear transparent glaze (zinc-free recommended for best colors)
- Kiln
Step 1: Forming the Mug Body
-
Prepare the Clay:
Begin by wedging about 1 to 1.5 pounds of speckled stoneware clay to remove any air bubbles and ensure the particles are aligned. -
Center and Open:
Throw the clay onto the wheel head and center it. Open the clay to create the floor of your mug, compressing the bottom well to prevent cracking. -
Pull the Walls:
Pull the walls up into a cylinder shape. Aim for an even thickness and gently curve the belly of the mug outwards slightly for a comfortable hold. -
Refine the Rim:
Use a chamois or a small piece of plastic to compress and smooth the rim, making it pleasant to drink from. -
Dry to Leather Hard:
Wire the mug off the bat and let it dry slowly until it reaches a leather-hard state where it is firm but still cool to the touch. -
Trim the Foot:
Place the mug back on the wheel, center it, and trim away excess clay from the bottom to create a neat foot ring.
Smudged Lines?
If you accidentally smudge underglaze outside the lines, don’t wipe it while wet! Let it dry completely, then gently scrape the mistake away with a needle tool.
Step 2: Handle and Decoration
-
Pull the Handle:
Pull a strap of clay for the handle. Allow it to curve into a smooth ‘C’ shape and let it set up until it holds its form without drooping. -
Attach the Handle:
Score and slip both the attachment points on the mug and the handle ends. Firmly press the handle onto the mug opposite where you plan to paint the rainbow, smoothing the seams. -
Outline the Rainbow:
Lightly sketch the rainbow arch on the side of the mug using a dull pencil. The graphite will burn off in the kiln, so don’t worry about erasing mistakes. -
Paint the Red Arch:
Using a size 2 brush, paint the outermost arch with red underglaze. Apply smooth, confident strokes to keep the edges clean. -
Add Orange and Yellow:
Moving inward, paint the next stripe orange, followed by a mustard yellow. Leave a tiny sliver of raw clay between colors to prevent them from bleeding into each other. -
Finish with Cool Tones:
Complete the rainbow with a stripe of teal and finally a small inner arch of sky blue. I find using a size 0 liner brush helps with these tighter interior curves. -
Apply Second Coats:
Once the underglaze is touch-dry, apply a second (and potentially third) coat to each stripe to ensure the colors are opaque and vibrant after firing.
Step 3: Glazing and Firing
-
Bisque Fire:
Once the mug is bone dry, load it into the kiln for a bisque fire (usually Cone 04 or 06) to harden the clay. -
Wax Resist:
Wipe the bisque-ware with a damp sponge to remove dust. Apply wax resist to the bottom foot ring to prevent glaze from sticking to the kiln shelf. -
Apply Clear Glaze:
Dip the entire mug into a clear transparent glaze. A quick dip is usually sufficient; holding it too long can make the glaze too thick and cloud your design. -
Clean the Foot:
Use a sponge to wipe away any glaze droplets that may have beaded up on the waxed foot ring. -
Glaze Fire:
Load the mug into the kiln for the final glaze firing (Cone 5 or 6, depending on your clay body). Allow the kiln to cool completely before opening.
Vibrant Colors Pro-Tip
Test your clear glaze over underglazes first. Some clears contain Zinc, which can turn certain browns or greens muddy. A Zinc-free clear glaze keeps colors brightest.
Now handle your new favorite mug with care as you enjoy a cozy beverage
Mushroom Garden Appliqué
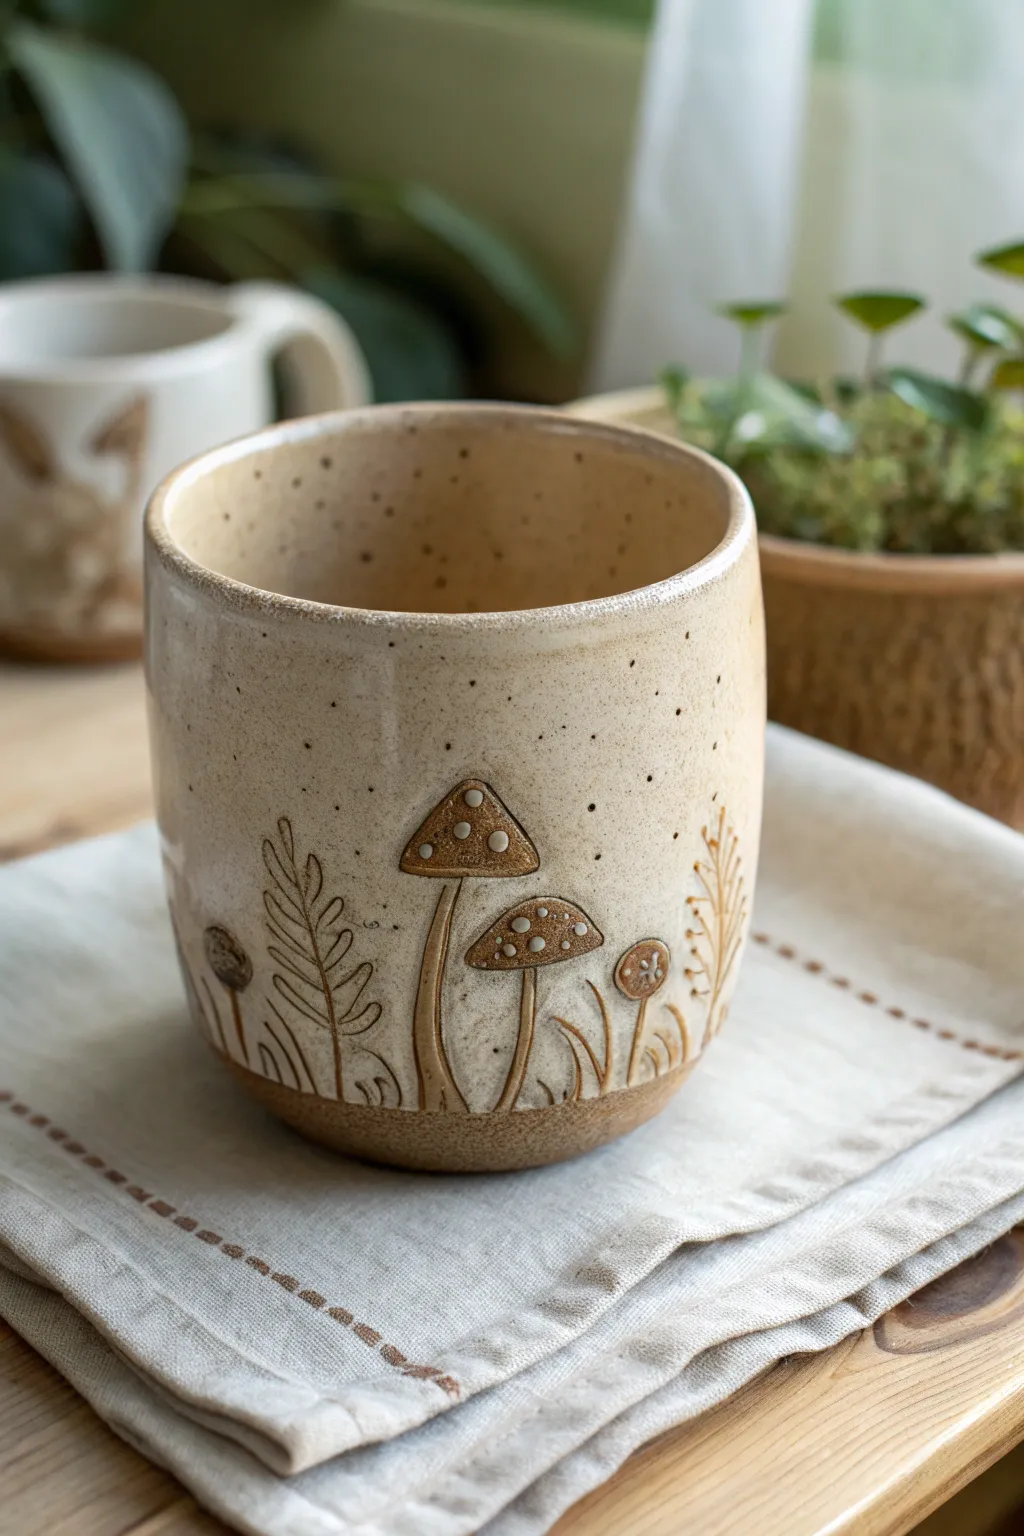
Bring a touch of woodland whimsy to your morning coffee with this endearing handmade ceramic mug. Featuring a raw clay texture at the base and a creamy, speckled glaze finish, the design highlights charming sgraffito-style mushrooms and ferns.
Step-by-Step Guide
Materials
- Speckled stoneware clay body
- Pottery wheel (or slab roller/rolling pin for hand-building)
- Throwing tools (sponge, wire cutter, rib)
- Needle tool
- Small loop tool or carving set
- Underglaze (dark brown or black)
- White slip or white underglaze (for mushroom dots)
- Wax resist
- Cream or transparent matte glaze
- Small paintbrush
- Damp sponge
Step 1: Forming the Vessel
-
Prepare the Clay:
Begin by thoroughly wedging about 1 to 1.5 pounds of speckled stoneware clay to remove air bubbles and ensure consistency. -
Throw the Cylinder:
Center your clay on the wheel and throw a simple, straight-sided cylinder. Aim for a height of about 4-5 inches and a width of 3.5 inches. -
Refine the Shape:
Use a rib tool to smooth the exterior walls, creating a slight curve at the bottom where the wall meets the floor of the pot. -
Trim the Lip:
Compress the rim with a chamois or your sponge to ensure it is smooth and comfortable for drinking. -
Primary Drying:
Wire the pot off the wheel bat and set it aside until it reaches leather-hard consistency. This is crucial for carving crisp details without warping the cup.
Clean Lines Tip
When wiping back the oxide wash, rinse your sponge frequently. A dirty sponge will smear the dark color across the light clay body rather than revealing the clean surface.
Step 2: Carving the Garden
-
Trim the Base:
Flip the leather-hard cup over and trim the foot. I prefer to leave the bottom half-inch feeling slightly weighty to ground the visual design. -
Sketch the Design:
Using a needle tool, very lightly scratch the outline of your mushrooms and ferns directly onto the clay surface. Vary the heights of the mushrooms for interest. -
Carve the Outlines:
Use a small, sharp carving tool or needle tool to incise the main lines of the stems, caps, and leaves. Press deep enough to create a groove that will hold glaze or oxide later. -
Detail the Ferns:
For the fern leaves, use short, repetitive strokes branching off a central stem. Keep these strokes fluid and slightly curved. -
Add Texture:
Press the needle tool gently into the background area periodically to add tiny dots or ‘spores’ floating around the mushrooms. -
Bisque Fire:
Allow the mug to dry completely to the bone-dry stage (usually several days) and fire it in a bisque kiln (typically Cone 04).
Add a Handle
Before drying, pull a simple C-shaped handle and attach it opposite the main mushroom design to turn this vessel into a proper teacup or coffee mug.
Step 3: Glazing and Finishing
-
Apply Oxide Wash:
Mix a dark brown underglaze or iron oxide wash with a bit of water. Brush this liberally into all the carved lines of your mushroom garden. -
Wipe Back:
Using a clean, damp sponge, wipe away the excess oxide from the surface, leaving the color trapped only in the carved recesses to define the drawing. -
Add White Accents:
With a fine-point brush, dab small dots of white underglaze or slip onto the mushroom caps to create their distinctive spotted look. -
Wax the Base:
Apply wax resist to the bottom inch of the mug (the textured raw clay area) and the foot ring to prevent glaze form adhering there. -
Dip Glazing:
Dip the top 3/4 of the mug into a cream or clear matte glaze. The wax will protect your raw clay base line. -
Clean Up:
Check the wax line and wipe off any stray glaze droplets that may have beaded up on the waxed area. -
Final Fire:
Fire the mug to maturity (Cone 5 or 6 depending on your clay body). The heat will melt the glaze, revealing the speckles in the clay.
Once cooled, fill with your favorite warm beverage and enjoy the earthy charm of your handmade creation
Moon-Crater Texture Cup

This striking ceramic cup combines a deep, shadowy glaze with a tactile dimpled surface reminiscent of lunar craters. The metallic bronze highlights catch the light beautifully against the organic indentations, making it a joy to hold and behold.
Step-by-Step Guide
Materials
- Stoneware clay (dark or buff body recommended)
- Pottery wheel (or slab roller/rolling pin for hand-building)
- Small loop tool involved
- Ball-ended stylus or rounded wooden tool
- Sponge
- Wire cutter
- Rib tool
- Tenmoku or metallic bronze reactive glaze
- Kiln
Step 1: Forming the Vessel
-
Prepare the clay:
Begin by thoroughly wedging about 1 to 1.5 pounds of stoneware clay to remove air bubbles and ensure a uniform consistency. -
Center on the wheel:
Throw the clay onto the wheel head and center it. This cup has a simple cylindrical form, so focus on getting a stable, even base. -
Open and pull the walls:
Open the clay and pull the walls up to create a cylinder. Aim for a height of about 4-5 inches, keeping the walls slightly thicker than usual (around 1/4 inch) to accommodate the deep texture we will add later. -
Shape the profile:
Use a rib tool to smooth the outside and refine the shape. You want a gentle curve that tapers slightly inward at the bottom and has a vertical rim. -
Refine the rim:
Compress the rim with a chamois or sponge. A slightly rounded rim feels best against the lips and matches the rounded texture we are about to create. -
Wire off and dry:
Wire the cup off the bat and set it aside to dry until it reaches a sturdy leather-hard stage. It needs to be firm enough to press into without warping the shape.
Pro Tip: Tool Selection
Don’t have a ball tool? The rounded end of a wooden handle on a paintbrush often makes the perfect size crater divot.
Step 2: Texturing and Trimming
-
Trim the foot:
Once leather-hard, place the cup back on the wheel (or use a Giffin Grip) to trim the excess weight from the bottom and define a clean foot ring. -
Map out the texture:
Support the inside of the cup with one hand. Using a ball-ended wooden tool or a large stylus, gently press the first row of indentations just below the rim. -
Create the crater pattern:
Continue pressing indentations in offset rows moving down the cup. I find that staggering them like a honeycomb creates the most organic, dense look. -
Vary the pressure:
Press firmly enough to create deep shadows, but be careful not to puncture the wall. The clay should displace slightly, creating raised ridges between the craters. -
Smooth the ridges:
Once the entire exterior is textured, lightly run a damp sponge or a soft rib over the surface to knock down any sharp burrs created by the clay displacement. -
Slow drying:
Cover the cup loosely with plastic to dry slowly. Uneven drying can cause warping, especially with heavily textured walls. -
Bisque fire:
Fire the completely dry cup to cone 04 (or your clay’s specific bisque temperature).
Step 3: Glazing and Finishing
-
Clean the bisque:
Wipe the bisqueware down with a damp sponge to remove any kiln dust and ensure clean glaze adhesion. -
Select the glaze:
Choose a glaze known for ‘breaking’ over texture—Tenmoku, metallic bronze, or iron-rich glazes work best for this effect. -
Dip the cup:
Dip the entire cup into the glaze bucket for about 3 seconds. Shake off excess glaze gently as you pull it out. -
Check not to over-glaze:
Ensure the glaze isn’t too thick in the deep dimples, or it might crawl or obscure the texture. You can sponge a little out of the deepest pits if necessary. -
Clean the foot:
Wipe the foot ring completely clean of glaze to prevent it from sticking to the kiln shelf. -
Glaze fire:
Fire to the maturation temperature of your glaze (typically cone 5 or 6 for stoneware). The heat will cause the glaze to flow into the craters and thin out on the rims, creating that stunning bronze highlight.
Troubleshooting: Warping
If the cup warps while pressing the texture, your clay is too soft. Let it dry longer or keep a support hand firmly inside.
Once cooled, your cup is ready for your morning coffee, showcasing a surface that feels as unique as it looks