Whenever you’ve got a little lump of molding clay, you’re only a few simple shapes away from something adorable. I’m talking easy rolls, balls, and coils that turn air-dry clay or polymer clay into cute little projects you can finish in one cozy crafting session.
Mini Food Charms With Sweet Faces

These adorable mini food charms blend the sweetness of baked goods with playful character faces. You’ll create a trio of kawaii cuties—a frosted donut, a happy star cookie, and a whimsical taiyaki fish—all hanging together on a gold keychain.
Detailed Instructions
Materials
- Polymer clay (tan/beige, white, pink, yellow, black)
- Gold keychain hardware with jump rings
- Eye pins (gold)
- Liquid polymer clay (white and pink)
- Glazing medium (glossy)
- Detailing needle tool
- Ball stylus tool
- Small circle cutter
- Star or flower mini cutter
- Oven for baking
- Pliers
Step 1: Shaping the Happy Star Cookie
-
Base shape:
Start by conditioning a ball of tan clay until soft. Flatten it slightly into a thick disc, roughly 1/4 inch thick, to mimic a sugar cookie base. -
Cut the form:
Use a mini star or scalloped flower cutter to punch out the main shape. Gently soften the sharp edges with your fingertip so it looks like baked dough rather than a sharp cutout. -
Frosting layer:
Roll out a very thin sheet of white clay. Use the same cutter to cut a matching shape, then gently stretch it with your fingers to make it slightly amorphous and ‘drippy’ before pressing it onto the tan base. -
Adding the face:
Roll two tiny specks of black clay for eyes and press them into the white frosting. Use a needle tool to create a small indentation for the mouth, then fill it with a tiny thin snake of black clay curved into a smile. -
Finishing touches:
Add tiny pink dots for cheeks. Insert a gold eye pin into the top of the cookie before baking.
Texturing Tip
Before baking, gently tap the tan ‘cookie’ parts with a clean toothbrush. This creates a realistic baked texture that looks just like real dough.
Step 2: Creating the Sprinkle Donut
-
Donut base:
Roll a snake of tan clay and join the ends to form a ring, or flatten a ball and use a small circle cutter to remove the center. Smooth the seams until perfect. -
Pink icing:
Mix a small amount of pink clay with liquid polymer clay (or use pre-made pink liquid clay) to create a thick, icing-like consistency. -
Glazing:
Carefully drape or spread the pink ‘icing’ over the top of the donut, allowing the edges to be uneven and organic. -
Sprinkle time:
While the icing is wet, sprinkle on real clay sprinkles (tiny cured chips of colored clay) or microbeads. Keep the colors pastel for a soft look. -
Hardware:
Insert your gold eye pin securely into the top of the donut.
Step 3: Sculpting the Taiyaki Fish
-
Fish body:
Shape a piece of pale yellow clay into an elongated oval for the body. Flatten it slightly. -
Adding the tail:
Form a fan shape from pink clay. Use a needle tool to press vertical lines into the fin for texture, then attach this to the bottom of the yellow oval. -
Scale texture:
Mix pink clay with a drop of liquid clay to make a pipeable paste. Use a needle tool or very fine piping bag to draw a diagonal grid pattern across the yellow body for scales. -
Fish face:
Add two small black clay balls for eyes near the top of the yellow body. I sometimes like to place them slightly wide apart for extra cuteness. -
Secure pin:
Insert the final eye pin into the top of the fish head.
Eye Pin Security
If an eye pin feels loose after baking, pull it out, add a dab of superglue to the shaft, and slide it back in for a permanent hold.
Step 4: Baking and Assembly
-
Baking:
Place all three charms on a tile or baking sheet. Bake according to your clay manufacturer’s instructions (usually around 275°F/135°C for 15-30 minutes). -
Cooling:
Let the pieces cool completely before handling. The clay is fragile while hot. -
Varnishing:
Coat the ‘icing’ parts (the white star frosting, pink donut glaze, and pink fish scales) with a glossy glaze to make them shine like real sugar. -
Assembly:
Using pliers, open the jump rings on your keychain. Attach the star and donut to the main chain links. -
Final connection:
The fish charm looks great hanging separately or slightly lower, so attach it to the bottom link or alongside the others depending on how much jingle you want.
Clip your new charms onto a bag or keys and enjoy the sweet addition to your day


Watermelon Slice Wedges
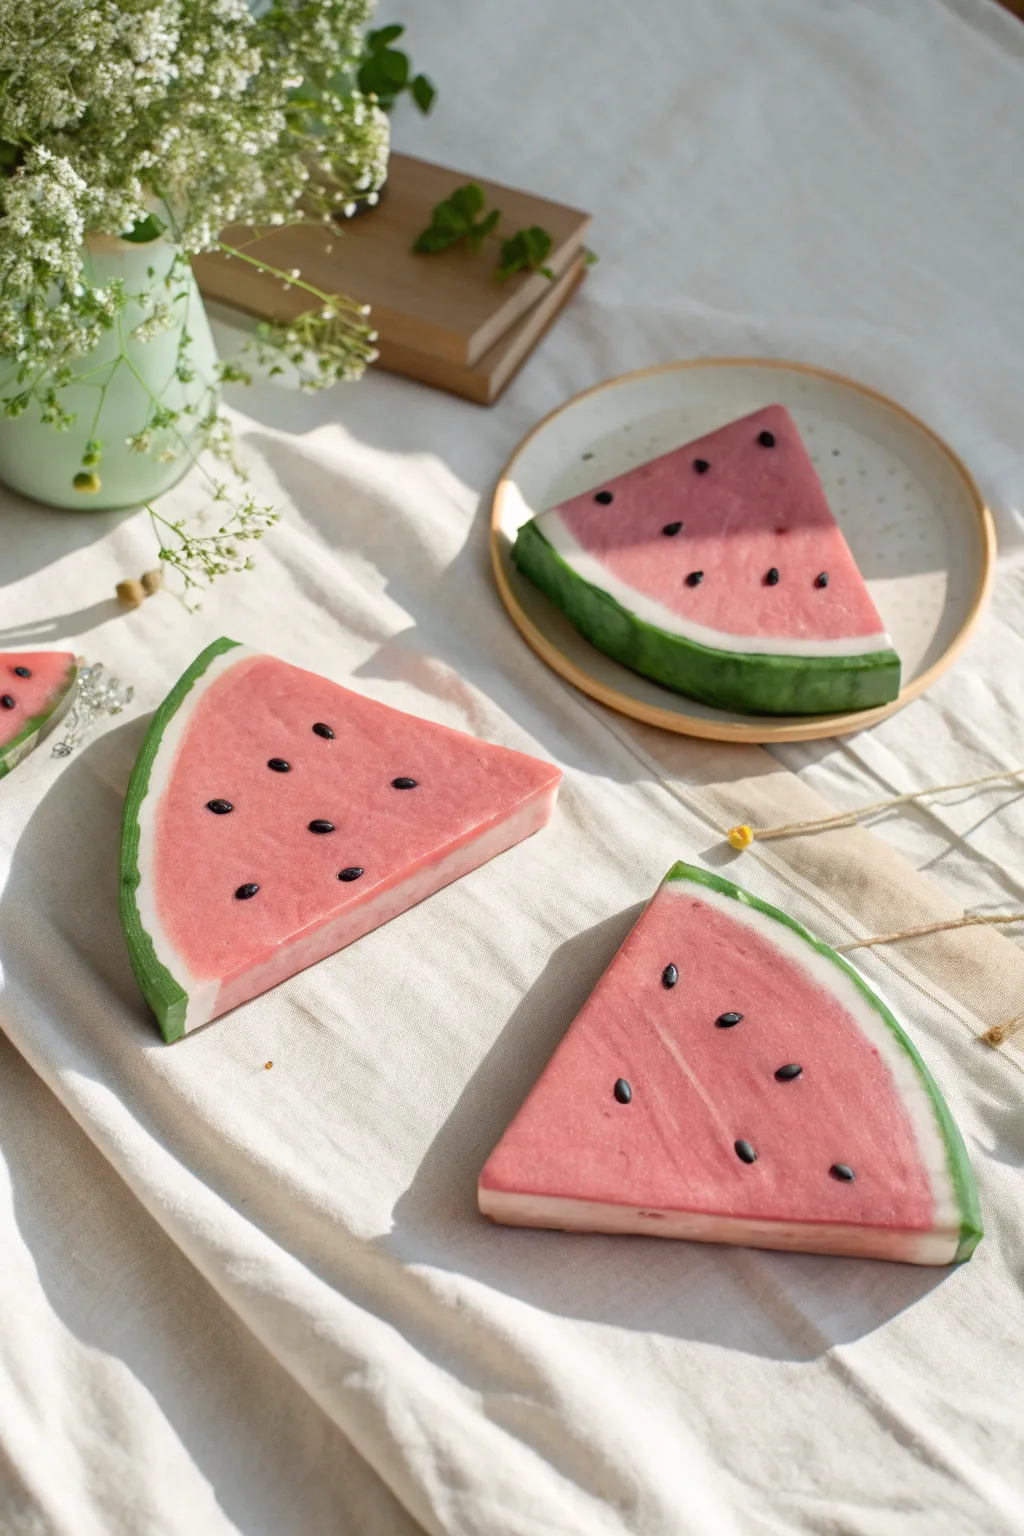
Capture the essence of summer with these chunky, delightful clay watermelon slices that look almost good enough to eat. With their translucent reddish-pink flesh and distinct rind layers, they make for charming seasonal decor or playful paperweights.
Step-by-Step Guide
Materials
- Translucent polymer clay (white or colorless)
- Opaque white polymer clay
- Green polymer clay (a mix of dark and lime roughly)
- Red alcohol ink or clay dye
- Black polymer clay
- Rolling pin or clay machine
- Sharp tissue blade or X-Acto knife
- Sandpaper (various grits)
- Gloss glaze (optional)
Step 1: Preparing the Flesh
-
Tint the Clay:
Begin by conditioning a large block of translucent polymer clay until it is soft and pliable. Add a few drops of red alcohol ink or a very small amount of red clay to tint it; you want a soft, semi-transparent watermelon pink, not an opaque block. -
Form the Base:
Shape the pink clay into a thick, flat disc or a large triangle, depending on how many slices you plan to make. Aim for a thickness of about half an inch to give the final pieces a substantial, realistic feel. -
Add Texture:
Gently press a piece of coarse sandpaper or an old toothbrush onto the surface of the pink clay to simulate the juicy, fibrous texture of fruit flesh.
Step 2: Creating the Rind
-
Roll the White Layer:
Condition your opaque white clay and roll it into a long, flat strip. It should be thinner than the pink section, perhaps around 1/8th of an inch thick. -
Attach the White Rind:
Wrap this white strip snugly around the curved edge of your pink clay wedge (or the circumference if you made a circle). Trim any excess and smooth the seam where the white clay meets the pink, ensuring no air bubbles are trapped. -
Prepare the Green Skin:
Mix a little dark green clay with leaf green to get a natural rind color. Roll this out into a strip of similar thickness to the white layer. -
Attach the Green Skin:
Wrap the green strip over the white layer. Press firmly to bond the layers together. -
Texturing the Skin:
I like to lightly drag a stiff brush or crumpled foil over the green ‘skin’ to give it that organic, imperfect melon texture rather than leaving it perfectly smooth.
Fixing Smears
If red clay smears onto the white rind while slicing, wipe it gently with a baby wipe or a Q-tip dipped in rubbing alcohol before baking to keep the layers crisp.
Step 3: Slicing and Seeding
-
Slice the Wedges:
If you started with a circle, use your sharp tissue blade to cut the round evenly into wedges (like a pizza). If you started with a triangle, trim the edges to reveal sharp, clean cross-sections of the layers. -
Make the Seeds:
Take a tiny amount of black clay and roll it into a very thin snake. Cut tiny segments and roll them into teardrop shapes to form seeds. -
Embed the Seeds:
Press the black seeds into the pink flesh of each wedge. Don’t just place them on top; push them in slightly so they look embedded within the fruit. -
Refine the Surface:
After inserting the seeds, you might need to re-texture the area slightly with your toothbrush or sandpaper to hide any fingerprints or tool marks.
Bite Marks
Before baking, use a scalloped cookie cutter or a crafting knife to remove a jagged chunk from the tip of a wedge to make it look like someone took a big bite.
Step 4: Baking and Finishing
-
Bake:
Bake the clay pieces according to the manufacturer’s instructions for the specific brand you are using, usually around 275°F (130°C) for 15-30 minutes depending on thickness. -
Cool Down:
Let the wedges cool completely before handling. The translucent clay often looks clearer once fully cooled. -
Sanding:
For a professional finish, wet sand the flat sides of the wedge using increasing grits of sandpaper (400 up to 1000). This removes fingerprints and enhances the translucency. -
Buffing:
Rub the sanded surfaces vigorously with a piece of denim or a soft cotton cloth to bring out a natural sheen. -
Optional Glaze:
If you want a ‘wet’ juicy look, apply a thin coat of gloss glaze or varnish only to the pink section and the seeds, leaving the rind matte.
Display your vibrant slices on a sunny windowsill to let the light shine through the translucent clay


Peas in a Pod Buddy
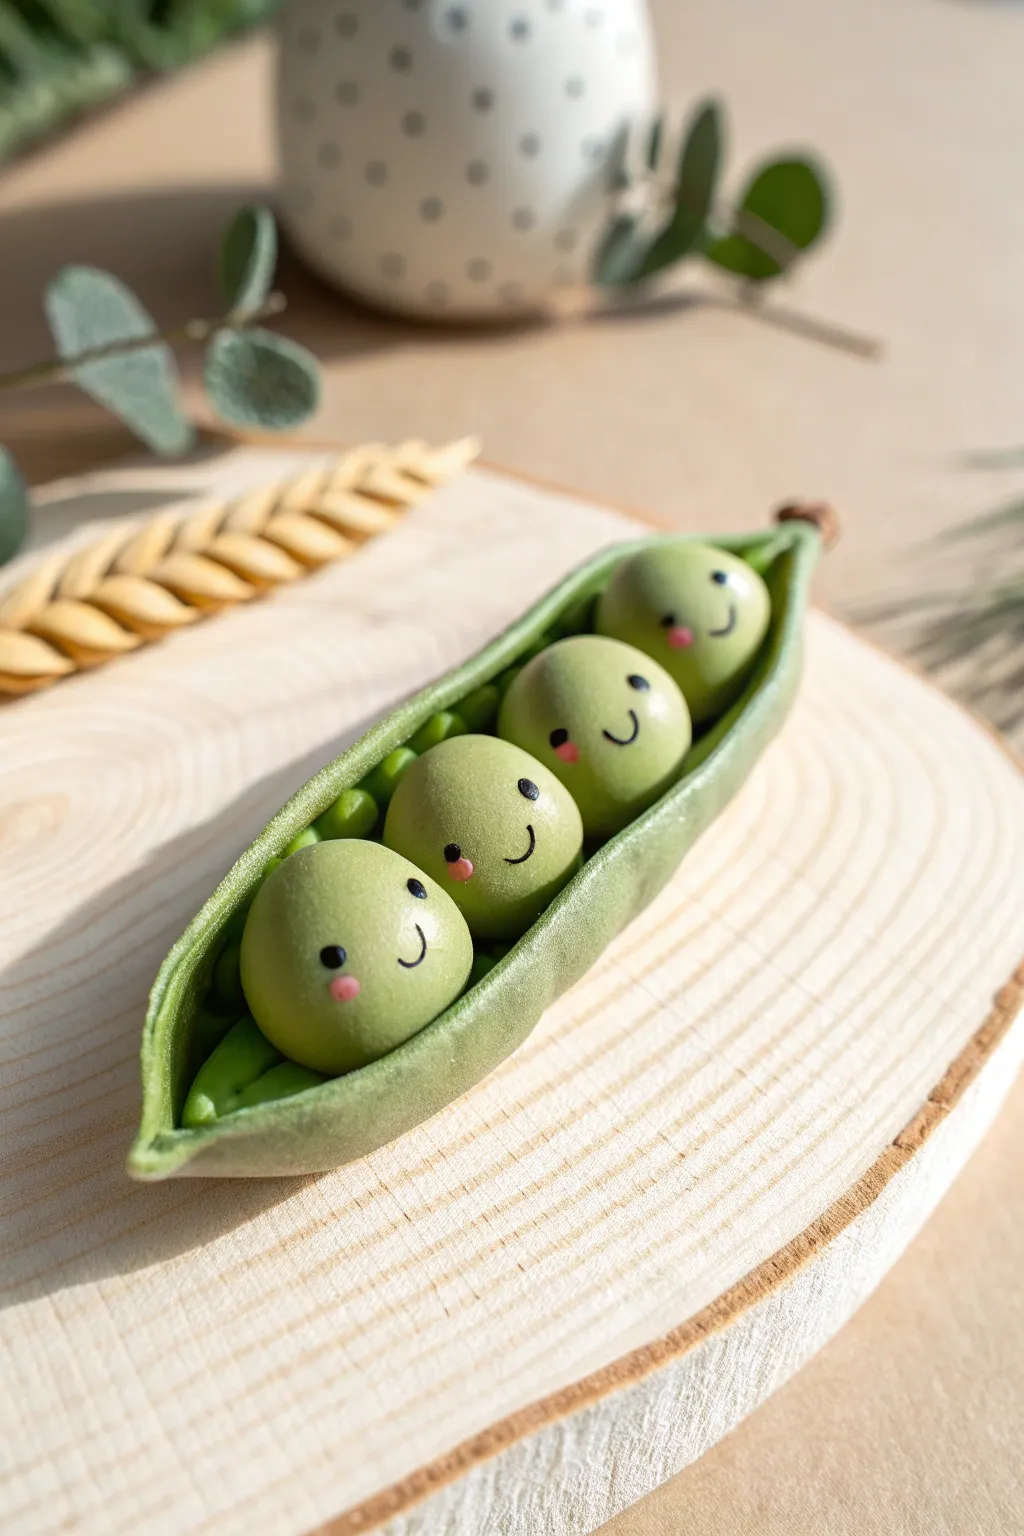
Create an adorable miniature keepsake featuring four little pea friends nestled safely together in their textured shell. This charming project combines simple spherical shapes with subtle facial details for a uniquely heartwarming result.
Step-by-Step Tutorial
Materials
- Polymer clay (light sage green, moss green, and black)
- Pink chalk pastel or blush powder
- Sculpting tools (needle tool, small ball tool)
- Black acrylic paint (optional alternative to clay for eyes)
- Fine-tipped paintbrush or toothpick
- Texturing sponge or sandpaper
- Small piece of aluminum foil
- Rolling pin
- Gloss glaze (optional)
Step 1: Shaping the Peas
-
Prepare the Clay:
Start by conditioning a small amount of light sage green clay in your hands until it becomes soft and pliable. -
Roll the Spheres:
Divide the clay into four equal portions and roll them into perfect, smooth balls about the size of a marble. -
Add Cheeks:
Before adding features, use a small brush to lightly dust pink chalk pastel onto the lower sides of each pea for blushing cheeks. -
Create Eye Sockets:
Use a small ball tool to make very shallow indentations where the eyes will go, keeping them wide-set for a cute expression. -
Form the Eyes:
Take microscopic bits of black clay, roll them into tiny dots, and press them firmly into the indentations. -
Adding the Smile:
Roll a nearly invisible, thin snake of black clay and curve it into a ‘U’ shape for the mouth, or simply draw it on later with a fine black marker. -
Set Aside:
Place your finished pea characters on a clean tile or surface so they don’t get squished while you work on the pod.
Keep it Clean
Keep baby wipes or hand sanitizer nearby when switching from green to black clay. Dark pigments transfer easily and can smudge your pristine green peas.
Step 2: Sculpting the Pod
-
Roll the Base:
Take a larger chunk of moss green clay and roll it into a thick log, tapering the ends to points. -
Flatten the Shape:
Use your rolling pin or thumb to flatten the log into a long, canoe-like oval shape, ensuring it’s wide enough to hold the peas. -
Texturing the Skin:
Gently press a piece of coarse sandpaper or a texture sponge against the outside of the pod to mimic the organic, matte texture seen in the photo. -
Creating the Cavity:
Press a small cylinder of aluminum foil or your finger down the center length of the pod to create a deep trough. -
Add Inner Peas (Optional):
I sometimes place tiny, un-detailed balls of darker green clay in the bottom of the trough to act as a riser so the faces peek out properly.
Make it a Magnet
Flatten the back of the pod slightly before baking and glue a strong neodymium magnet on after it cools for adorable fridge decor.
Step 3: Assembly and Finish
-
Position the Friends:
Gently press your four decorated peas into the pod, arranging them snugly so they are touching. -
Curl the Edges:
Carefully curl the side walls of the pod upward and slightly inward, hugging the peas to secure them. -
Refine the Tips:
Pinch the very ends of the pod to create sharp, realistic points, twisting the stem end slightly for a natural look. -
Final Texture Check:
Inspect the pod for any smooth spots where your fingerprints might have erased the texture, and re-apply lightly if needed. -
Bake the Piece:
Bake the sculpture according to your polymer clay package instructions, usually around 275°F (135°C) for 15-20 minutes. -
Gloss the Eyes:
Once cool, apply a tiny dot of gloss glaze only to the black eyes to give them a lively sparkle.
Now you have a sweet little family of veggies to brighten up your desk or shelf


Chubby Cat From Two Balls
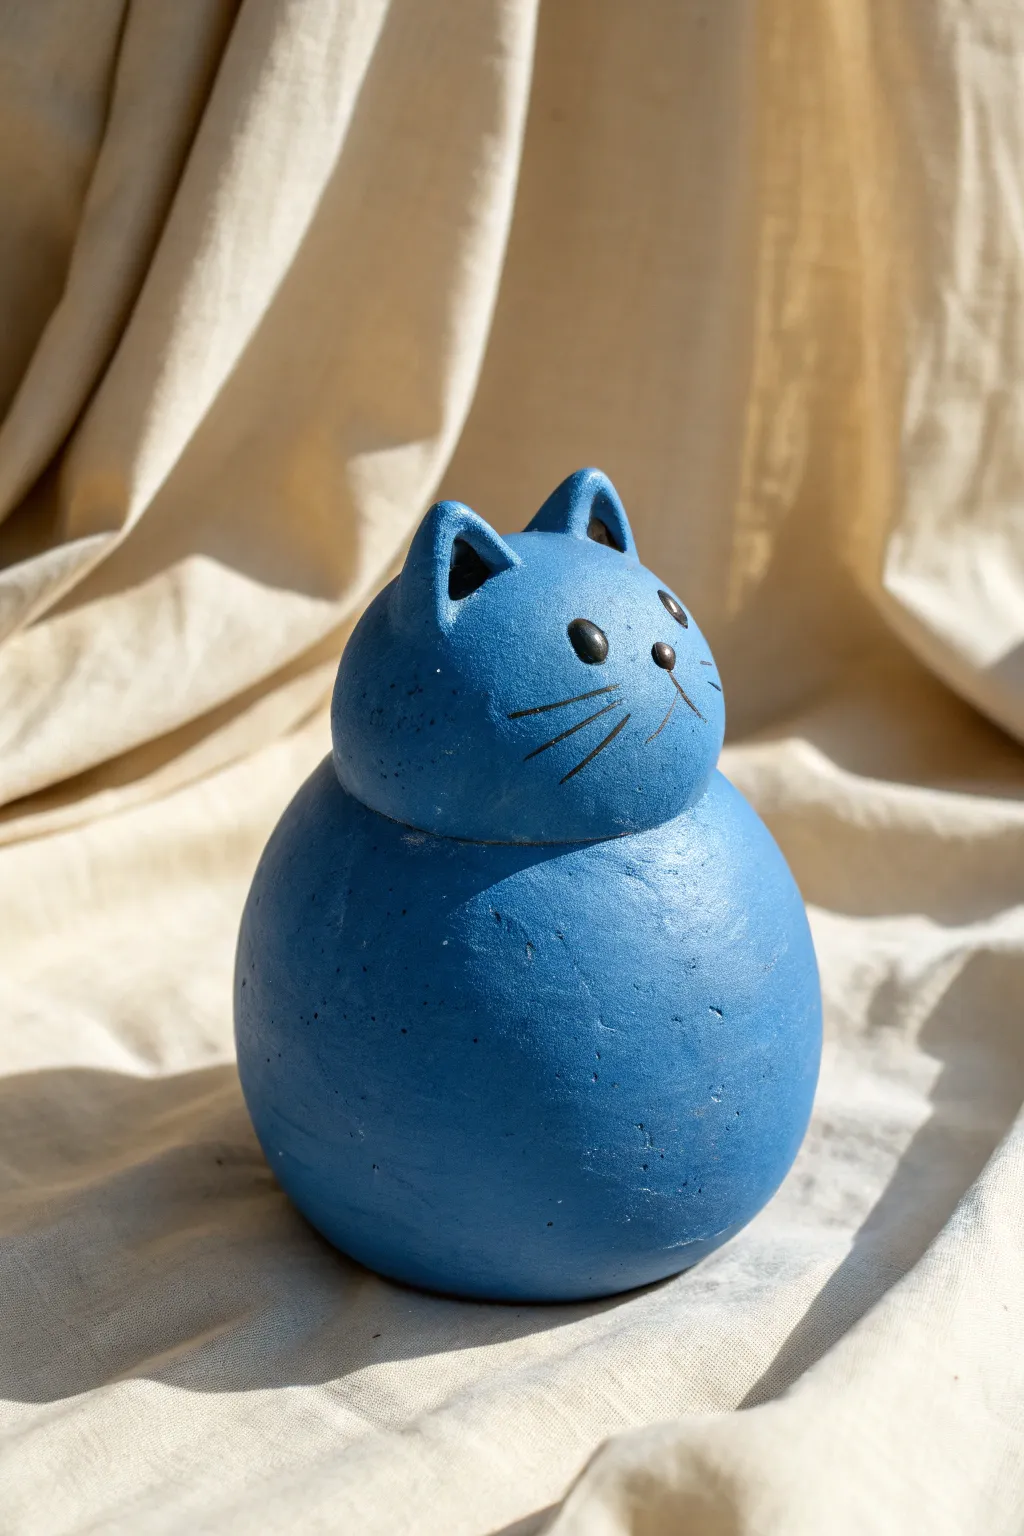
This charmingly chubby feline is a perfect beginner project, relying on two basic spheres to create a satisfyingly round silhouette. With its vivid matte blue finish and sweet, minimalist face, it makes for a delightful desk companion or shelf accent.
Detailed Instructions
Materials
- Air-dry clay or polymer clay (white or grey base)
- Acrylic paint (bright blue and black)
- Matte varnish or sealant
- Water and a small bowl
- Clay carving tool or toothpick
- Fine-point paintbrush
- Fine-grit sandpaper
Step 1: Shaping the Base Guide
-
Roll the Body Sphere:
Start with a generous handful of clay and roll it between your palms to create a large sphere. This will be the cat’s belly, so give it a good size, roughly the dimensions of an orange. Tap the bottom gently on your table to create a flat base so it won’t roll away. -
Form the Head:
Take a second, slightly smaller portion of clay—about two-thirds the size of the first ball. Roll this into a sphere as well, then gently press it down just a fraction so it isn’t a perfect circle. -
Attach the Shapes:
Score the top of the body sphere and the bottom of the head with a carving tool or old toothbrush to roughen the surfaces. Dab a little water (slip) onto the rough spots and press the head firmly onto the body. I find smoothing the seam just slightly with a wet finger helps lock them together. -
Blend the Neck:
While the connection is fresh, use your thumb or a modeling tool to smooth the clay slightly at the neck seam, but keep the definition between the head and body distinct—you want it to look like stacked snowballs, not a snowman.
Pro Tip: Weighted Base
Before sealing the bottom hole of your clay sphere, tuck a small, smooth rock or a ball of aluminum foil inside. This adds weight and stability so your cat won’t tip over easily.
Step 2: Sculpting Details
-
Create Ear Triangles:
Pinch off two small, grape-sized pieces of clay. Roll them into balls, then flatten them into thick triangles. These will be the ears. -
Hollow the Ears:
Use the back of a paintbrush or your pinky finger to press an indentation into the front of each triangle, creating the inner ear depth. -
Attach the Ears:
Score and slip the top of the head where the ears will sit. Press the ears on firmly, blending the clay at the back of the ears down into the head so they don’t pop off later. -
Smooth Everything Out:
Dip your finger in water and run it over the entire sculpture. Remove any fingerprints or cracks. The smoother the surface now, the better the paint will look later. -
Dry Completely:
Let the sculpture dry. If using air-dry clay, this might take 24 to 48 hours depending on thickness. If using polymer, bake according to package instructions. -
Sand for Perfection:
Once fully cured, use fine-grit sandpaper to gently buff away any remaining lumps or rough textures, paying attention to the roundness of the belly.
Step 3: Painting and Finishing
-
Apply Base Color:
Paint the entire cat with a bright, opaque blue acrylic paint. You will likely need two or three coats to get that rich, solid coverage shown in the photo. Let each coat dry fully before adding the next. -
Paint the Features:
Using a very fine-point brush and black acrylic paint, add two small ovals for the eyes. Position them roughly in the center of the face, slightly wide set. -
Add the Nose:
Paint a tiny, inverted triangle or small dot just below and between the eyes for the nose. -
Detail the Whiskers:
With the thinnest brush you have (or a black paint marker), draw three lines fanning out from each side of the cheeks. Keep the lines thin and tapered at the ends. -
Seal the Work:
To achieve the specific look from the workshop image, finish your piece with a matte varnish. Avoid glossy sealants, as the charm of this piece comes from its soft, velvety texture.
Level Up: Texture Play
Instead of a smooth finish, while the clay is wet, firmly press a piece of rough linen or canvas against the surface to give the cat a subtle, fabric-like texture before painting.
Place your little blue companion on a sunny windowsill where its bright color can really pop

The Complete Guide to Pottery Troubleshooting
Uncover the most common ceramic mistakes—from cracking clay to failed glazes—and learn how to fix them fast.
Round Penguin With Belly Patch
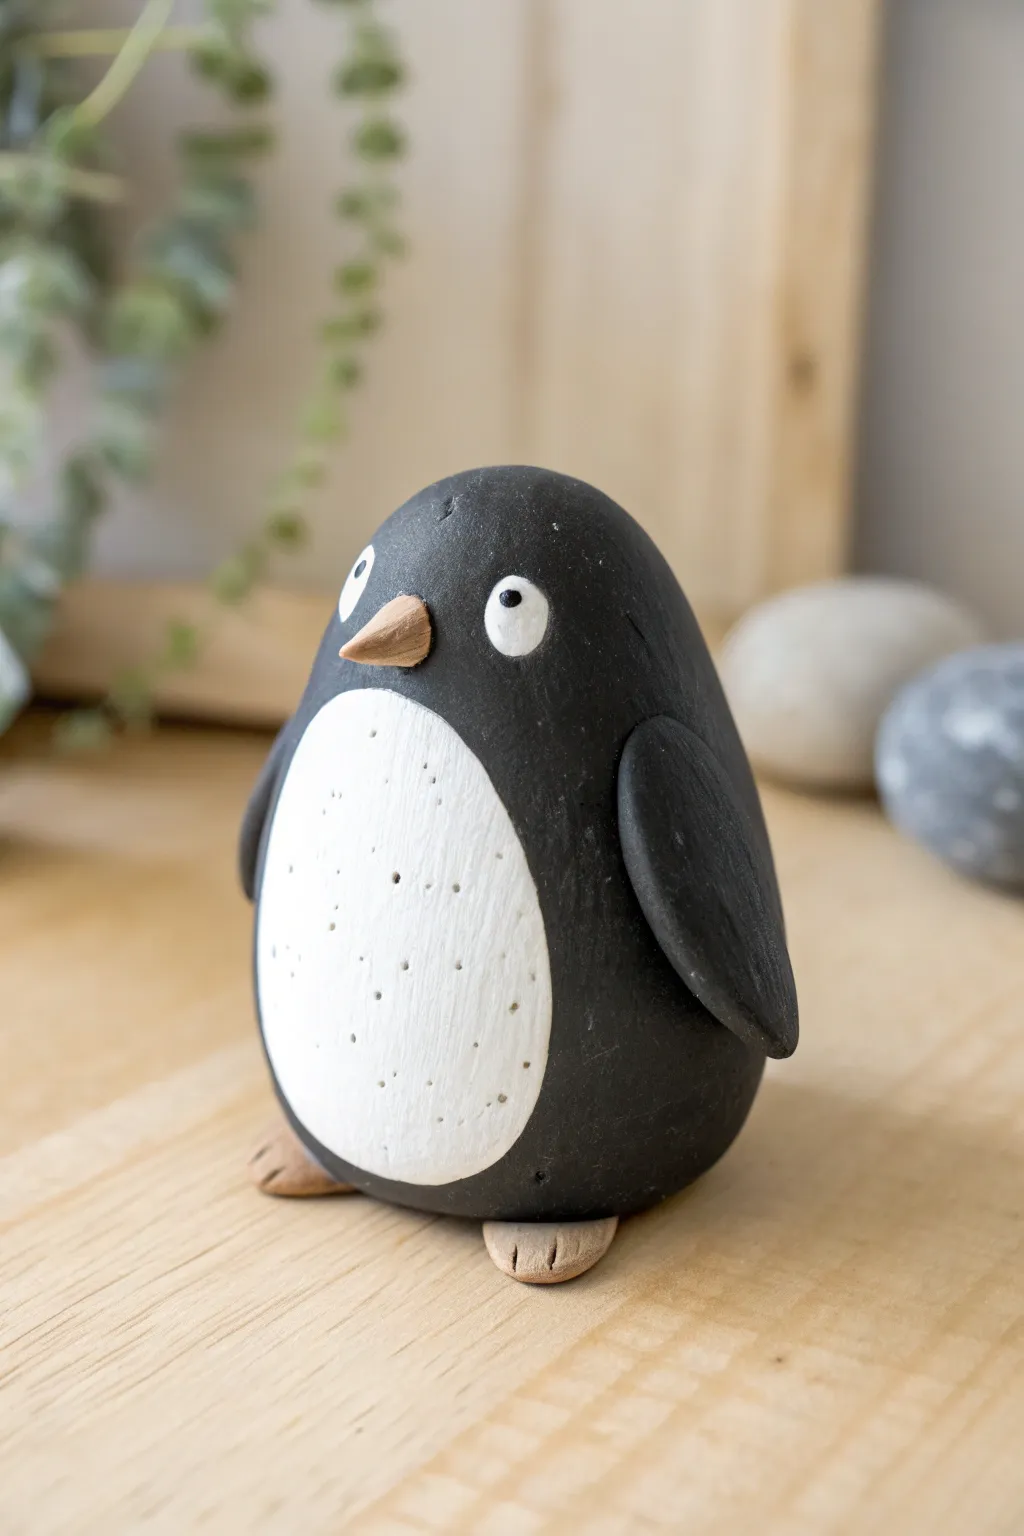
This charming little penguin is a perfect project for beginners, featuring a simple egg-shaped body and adorable detailing. The matte finish and speckled white belly give it a modern, whimsical look that makes it a great desk companion or shelf decoration.
Step-by-Step Tutorial
Materials
- Air-dry clay or polymer clay (black and white)
- Small amount of beige or orange clay (for beak/feet)
- Acrylic paint (black and white)
- Fine-grit sandpaper
- Small paintbrush
- Needle tool or toothpick
- Clay roller (optional)
- Water (for smoothing)
Step 1: Shaping the Base
-
Create the body:
Start with a generous lump of black clay and roll it into a smooth ball between your palms. Gently taper the top slightly to create an egg shape that is wider at the bottom for stability. -
Flatten the bottom:
Tap the wider end of your egg shape firmly against your work surface. This creates a flat base so your penguin stands upright without wobbling. -
Smooth the surface:
Dip your finger in a little bit of water and run it over the clay to remove any fingerprints or cracks. Getting the surface perfectly smooth now saves sanding time later.
Cracks Appearing?
If you see small cracks forming as the clay dries, mix a tiny amount of fresh clay with water to create a paste (slip) and stroke it into the cracks with a brush to seal them.
Step 2: Adding Features
-
Form the wings:
Take two smaller pieces of black clay and flatten them into teardrop shapes. These should be roughly the length of the penguin’s side. -
Attach the wings:
Press the teardrop shapes onto the sides of the body, blending the top edge into the shoulder area while leaving the bottom tip slightly lifted for dimension. -
Create the beak:
Roll a very tiny piece of beige or light orange clay into a small cone. Gently curve the tip downward slightly for a natural look. -
Position the beak:
Press the beak onto the upper third of the face. Use your needle tool to blend the back edge of the beak into the head so it doesn’t fall off. -
Make the feet:
Create two small, flat ovals from the beige clay. Use a knife or needle tool to press two indentations into the front edge of each oval to create toes. -
Attach the feet:
Place the body on top of the feet so they stick out just slightly from the bottom front edge. Press gently to secure the bond.
Step 3: Finishing Touches
-
Dry the clay:
Allow your sculpture to dry completely according to the package instructions. For air-dry clay, this usually takes 24-48 hours. I like to rotate it occasionally so the bottom dries evenly. -
Sand for smoothness:
Once fully hard, inspect the surface. Use fine-grit sandpaper to gently buff away any remaining roughness or fingerprints on the black body. -
Paint the belly patch:
Using white acrylic paint, create a large oval shape on the front of the body. You may need two coats to get solid coverage over the black clay. -
Add texture:
While the white paint is wet or after it dries, use a needle tool to poke tiny, shallow holes or dots into the belly patch for a speckled texture. -
Paint the eyes:
Dip the handle end of a paintbrush into white paint and dot two eyes above the beak. Let them dry, then add tiny black pupils in the center using a toothpick. -
Final clear coat:
If desired, protect your work with a matte varnish. Avoid glossy finishes if you want to maintain the natural, stone-like look shown in the inspiration photo.
Winter Scarf
Give your penguin some personality by rolling a thin snake of red or green clay. Wrap it around the neck and flatten the ends to look like a tiny knitted scarf before drying.
Set your finished penguin on a shelf or gift it to a friend to brighten their day
Easy Frog With Big Eyes
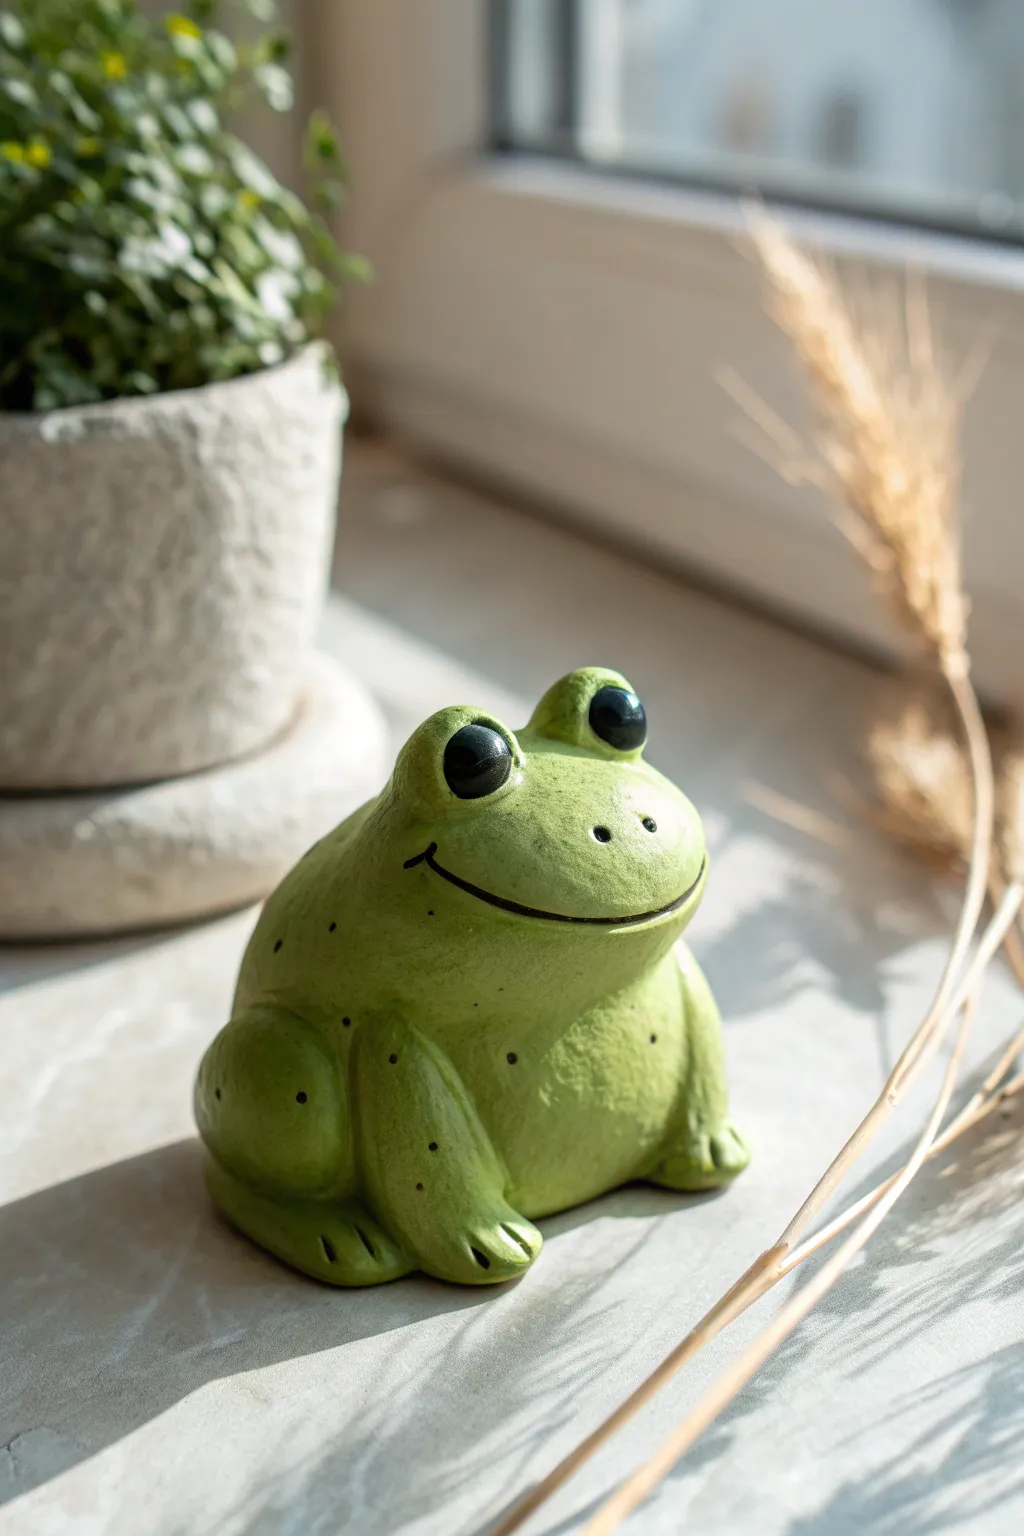
This charming little amphibian brings a touch of whimsy to any windowsill or desk with its cheerful smile and oversized eyes. Its simple, rounded shapes make it a delightfully accessible project for beginners using air-dry or polymer clay.
Step-by-Step Guide
Materials
- Green polymer clay or air-dry clay (olive or meadow green)
- Black acrylic paint
- Small ball tool or dotting tool
- Modeling tool or plastic knife
- Gloss varnish or clear sealant
- Fine-grit sandpaper (optional)
- Fine-tip paintbrush or toothpick
Step 1: Shaping the Base Body
-
Condition the Clay:
Begin by kneading your green clay thoroughly in your hands until it becomes soft, pliable, and free of cracks. Warm clay is much easier to work with and ensures a smoother finish. -
Form the Main Torso:
Roll a large portion of clay into a smooth ball about the size of a tangerine. Gently press it down onto your work surface to flatten the bottom, creating a stable base. -
Shape the Head:
Instead of adding a separate head, gently pinch and mold the top third of your clay ball to narrow it slightly, creating a pear-like shape where the top is the head and the bottom is the belly. -
Create the Eye Sockets:
Use your thumbs to press two shallow indentations on the top of the head where the eyes will eventually sit. This helps integrate the eyes rather than just sticking them on top.
Step 2: Adding Features and Limbs
-
Make the Eye Mounds:
Roll two smaller balls of green clay. Attach them firmly to the indentations you made on the head. Blend the seams at the back and sides so they look like natural bumps on the frog’s skull. -
Carve the Smile:
Using a modeling tool or the edge of a plastic knife, press a long, wide curve into the clay to create the mouth. Deepen the corners slightly to give him a permanent grin. -
Form the Rear Legs:
Roll two thick sausages of clay for the back legs. Bend them into a ‘V’ shape to mimic the folded leg of a sitting frog. -
Attach the Rear Legs:
Press these folded legs onto the sides of the body towards the back. The ‘knee’ should point upward. Blend the clay where it meets the body so it looks seamless. -
Create the Front Arms:
Roll two shorter logs for the front arms. These shouldn’t be too thin; keep them chunky to match the style. -
Shape the Feet:
Flatten the ends of the arm logs slightly. Use your knife tool to cut two small notches into the flattened ends to create three simple toes. -
Attach the Front Arms:
Place the arms vertically on the front of the belly, emerging from just under the ‘chin’ area. Press them on firmly, letting the toes rest flat on the ground.
Cracks Appearing?
If using air-dry clay, surface cracks can happen if it dries too fast. Patch them with a sloppy mix of clay and water (slip) before painting.
Step 3: Refining and Painting
-
Smooth the Surface:
Dip your finger in a tiny bit of water (for air-dry clay) or baby oil (for polymer) and gently rub out any fingerprints or rough seams. -
Add Nostrils:
Use a small dotting tool or a toothpick to poke two tiny holes right above the mouth line for the nose. -
Bake or Dry:
Follow the instructions for your specific clay. If using air-dry clay, let it sit for at least 24-48 hours. If polymer, bake according to the package directions. -
Sand Imperfections:
Once fully cured, I like to use a bit of fine-grit sandpaper to buff away any stray bumps, though you can skip this if your smoothing was thorough. -
Paint the Eyes:
Using black acrylic paint and a steady hand, paint large, glossy circles onto the front of the eye mounds. Leave the green eyelid area visible around the edges. -
Detail the Smile:
Run a very thin line of diluted black paint (a wash) inside the groove of the mouth to define the smile. -
Add the Speckles:
Dip a toothpick or fine brush into black paint and add tiny, random dots scatter across the back, legs, and cheeks for texture. -
Seal the Project:
Finish by coating the entire frog with a gloss varnish. This gives it that wet, ceramic look shown in the photo and protects the paint.
Make it a Planter
Before drying, press a small pinch pot into the back of the frog to create a hollow space suitable for holding a tiny air plant or succulent.
Now you have a cheerful desk companion ready to brighten your workspace.


What Really Happens Inside the Kiln
Learn how time and temperature work together inside the kiln to transform clay into durable ceramic.
Bunny With Long Ears
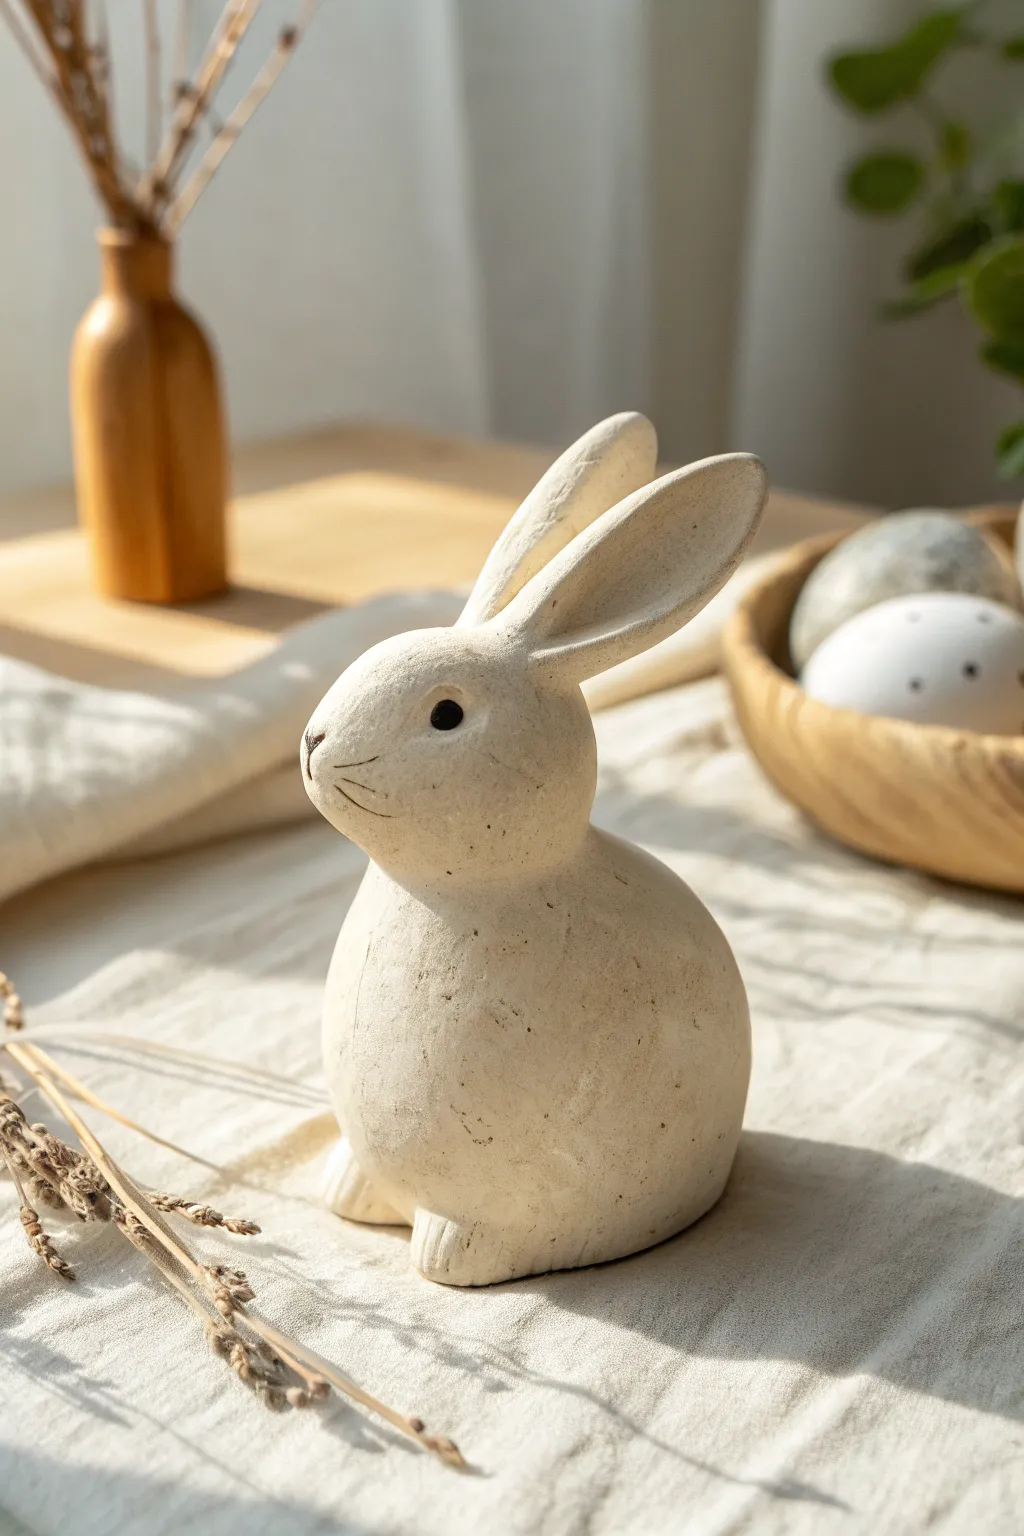
Capture the charm of spring with this elegant, minimalist bunny figurine crafted from air-dry clay. Its soft, rounded form and stone-like texture make it a timeless decoration perfect for subtle Easter styling.
Step-by-Step
Materials
- Stone-effect air-dry clay (e.g., La Doll or a white clay mixed with fine sand)
- Small cup of water
- Pointed sculpting tool or needle tool
- Small round bead or black paint for eyes
- Fine-grit sandpaper
- Acrylic matte varnish (optional)
- Sponge or textured cloth
Step 1: Forming the Body
-
Create the base:
Start by taking a large handful of clay and rolling it into a smooth, solid ball. This will be the main body, so ensure it sits flat on your work surface by gently tapping the bottom against the table. -
Shape the teardrop:
Gently gently roll the upper third of the ball between your palms to taper it slightly, creating a very fat teardrop shape. This suggests the bunny’s chest and neck area without creating a separate head yet. -
Add the head:
Roll a second, smaller ball of clay for the head. It should be roughly one-third the size of the body. Flatten the connection points slightly and score them with your needle tool before pressing the head onto the tapered neck. -
Blend the seams:
Dip your finger in water and smooth the clay where the head meets the body. You want a seamless transition, so drag the clay across the join until the neck looks natural and sturdy.
Cracking Up?
If small cracks appear while drying, don’t panic. Mix a tiny bit of fresh clay with water to make a paste (slip) and fill the cracks, then smooth over.
Step 2: Sculpting Features
-
Make the ears:
Roll two equal logs of clay, tapering them at both ends to look like long leaves. Flatten them gently with your thumb to create the inner ear depression. -
Attach the ears:
Score the top of the head and the base of the ears. Press the ears firmly onto the head, angling them slightly backward for a relaxed look. I like to blend the clay at the base thoroughly so they don’t snap off later. -
Define the face:
Using your thumb, press gently into the sides of the face to create a slight snout shape. The nose area should be slightly raised compared to the cheeks. -
Add the cottontail:
Roll a tiny ball of clay and attach it to the lower back of the body. You can rough it up with a toothbrush or needle tool to give it a fluffy texture. -
Carve the paws:
At the very base of the front, use your sculpting tool to carve two small distinct bumps for feet. Add three vertical lines on each bump to represent toes.
Antique Look
Once dry, try a ‘black wash.’ Paint the bunny with watered-down black paint, then immediately wipe it off with a rag. The dark color will stay in the textures.
Step 3: Detailing and Finish
-
Create the heavy texture:
To get that stone-like finish seen in the photo, gently pat the entire surface of the bunny with a damp sponge or a crumpled textured cloth. Avoid smoothing it perfectly; imperfections add character here. -
Add whiskers:
With a very sharp needle tool, gently etch three long, thin lines on each cheek for whiskers. Keep the pressure light so you don’t displace the face shape. -
Form the eyes:
Use the end of a paintbrush to make small indentations for the eyes. You can either press a tiny black bead into the clay now or wait to paint a black dot later. -
Refine the noise:
Carve a small ‘Y’ shape at the tip of the snout to define the nose and mouth. This should be subtle and delicate. -
Slow drying:
Let the bunny dry slowly away from direct heat for at least 24-48 hours. Turn it occasionally so the bottom dries evenly. -
Final sanding:
Once fully bone dry, use fine-grit sandpaper to knock down any sharp jagged bits, but leave the overall surface texture alone. -
Painting the eyes:
If you didn’t use beads, carefully paint the small eye indentations with matte black acrylic paint using your finest brush.
Place your finished bunny on a linen cloth or wooden tray to complete the natural, rustic aesthetic
Toadstool Mushrooms in Mini Clusters
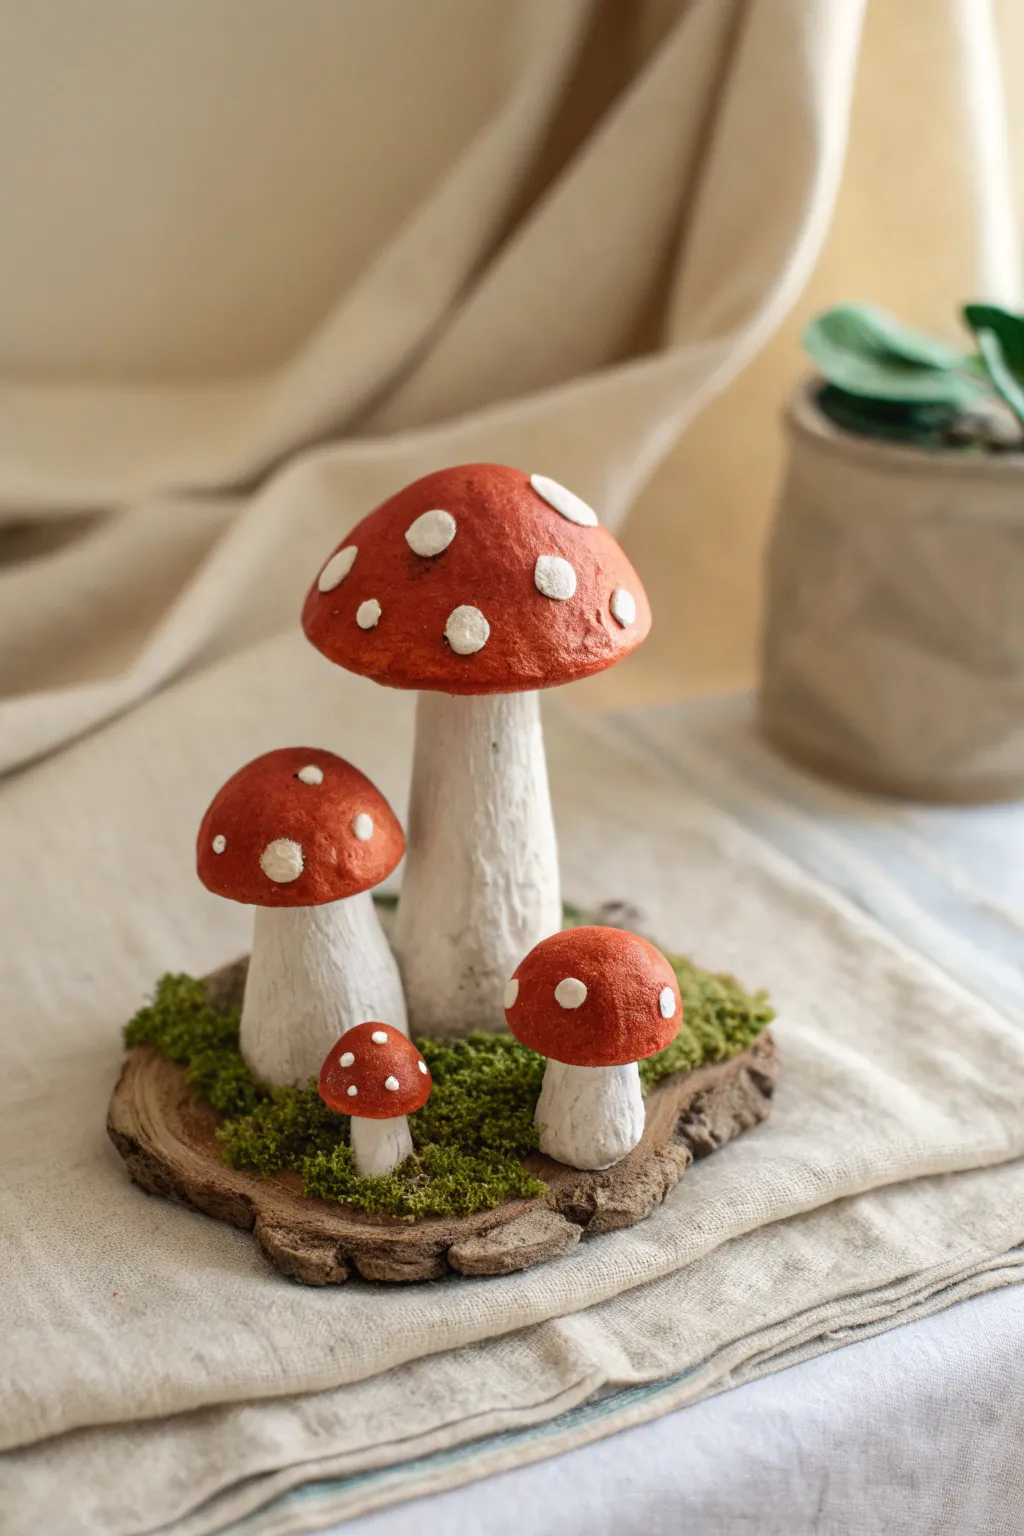
Bring a touch of forest whimsy to your shelf with this charming cluster of red-capped mushrooms. Mounted on a natural wood slice and surrounded by moss, these fungi look plucked straight from a fairy tale.
Detailed Instructions
Materials
- White sculpting clay (air-dry or polymer)
- Small wood slice base (approx. 4-5 inches)
- Red acrylic paint (matte)
- White acrylic paint
- Preserved green moss
- Craft glue or hot glue gun
- Sculpting tools or toothpick
- Paintbrushes (detail and flat)
- Aluminum foil (optional, for armature)
- Sandpaper (fine grit)
Step 1: Sculpting the Mushrooms
-
Form the Stalks:
Start by taking varying amounts of clay to create four stalks. Roll them into thick logs that flare slightly at the base so they stand on their own. Make one tall, one medium, and two quite small to match the photo’s composition. -
Texture the Stems:
Before the clay hardens, drag a sculpting tool or toothpick vertically down the sides of each stalk. This creates the striated, organic texture of a real mushroom stem rather than a perfectly smooth cylinder. -
Shape the Caps:
Roll four balls of clay corresponding to the size of your stalks. Flatten them slightly and gently pinch the edges downward to create a dome shape. The largest cap should be fuller, while the smaller ones can be rounder buttons. -
Fit Check:
Place the caps onto the stems to ensure they balance well. If they are too heavy, you can hollow out the underside of the cap slightly to reduce weight. -
Connect Cap to Stalk:
I prefer to score the top of the stalk and the underside of the cap with a needle tool to rough them up. Apply a dab of water (for air-dry clay) or liquid clay (for polymer) and press them firmly together. -
Smooth the Seam:
Use your finger or a silicone tool to smooth the connection point underneath the cap, blending the clay so it looks like one continuous growth. -
Allow to Dry or Bake:
Follow your specific clay’s instructions to harden the mushrooms. If using air-dry clay, let them sit for 24-48 hours until fully cured.
Hidden Strength
For the largest mushroom, crumple a small ball of aluminum foil and sculpt the clay cap over it. This reduces weight and drying time.
Step 2: Painting and Assembly
-
Base Coat:
Once hard, paint the stalks. Instead of pure white, mix a tiny drop of brown or beige into your white paint for an off-white, natural bone color. Apply two thin coats. -
Paint the Caps:
Paint the tops of the mushrooms with a deep, matte red acrylic. You may need two or three coats to get a solid, opaque coverage that hides the clay texture. -
Add the Dots:
Dip the end of a paintbrush handle or a dotting tool into thick white paint. Apply irregular dots on the red caps. Keep them random—some large, some tiny—to mimic the organic pattern of a fly agaric mushroom. -
Prepare the Base:
Take your wood slice and ensure it is clean and dry. Arrange your four painted mushrooms on the wood to find the most pleasing layout before gluing. -
Mount the Mushrooms:
Apply a generous amount of strong craft glue or hot glue to the bottom of the largest mushroom stalk and press it firmly onto the wood. Hold it for a few seconds until stable. -
Secure the Cluster:
Glue the remaining three mushrooms around the large one. Nestling the smaller ones slightly in front creates a nice sense of depth. -
Apply Moss Base:
Apply glue to the wood surface around the base of the stalks. Press small tufts of preserved green moss into the glue, covering the join points where the clay meets the wood. -
Fill the Gaps:
Continue adding moss until the wood slice is mostly covered, leaving just the rustic bark edge visible. Use a toothpick to tuck moss into tight spaces between the stems.
Autumn Vibes
Mix burnt orange or deep brown into your red paint for a moodier fall look, or dust the dried moss with fake snow for a winter version.
Display your new forest floor miniature on a windowsill or desk to enjoy a bit of nature indoors

TRACK YOUR CERAMIC JOURNEY
Capture glaze tests, firing details, and creative progress—all in one simple printable. Make your projects easier to repeat and improve.
Simple Daisy Flowers and Leaves
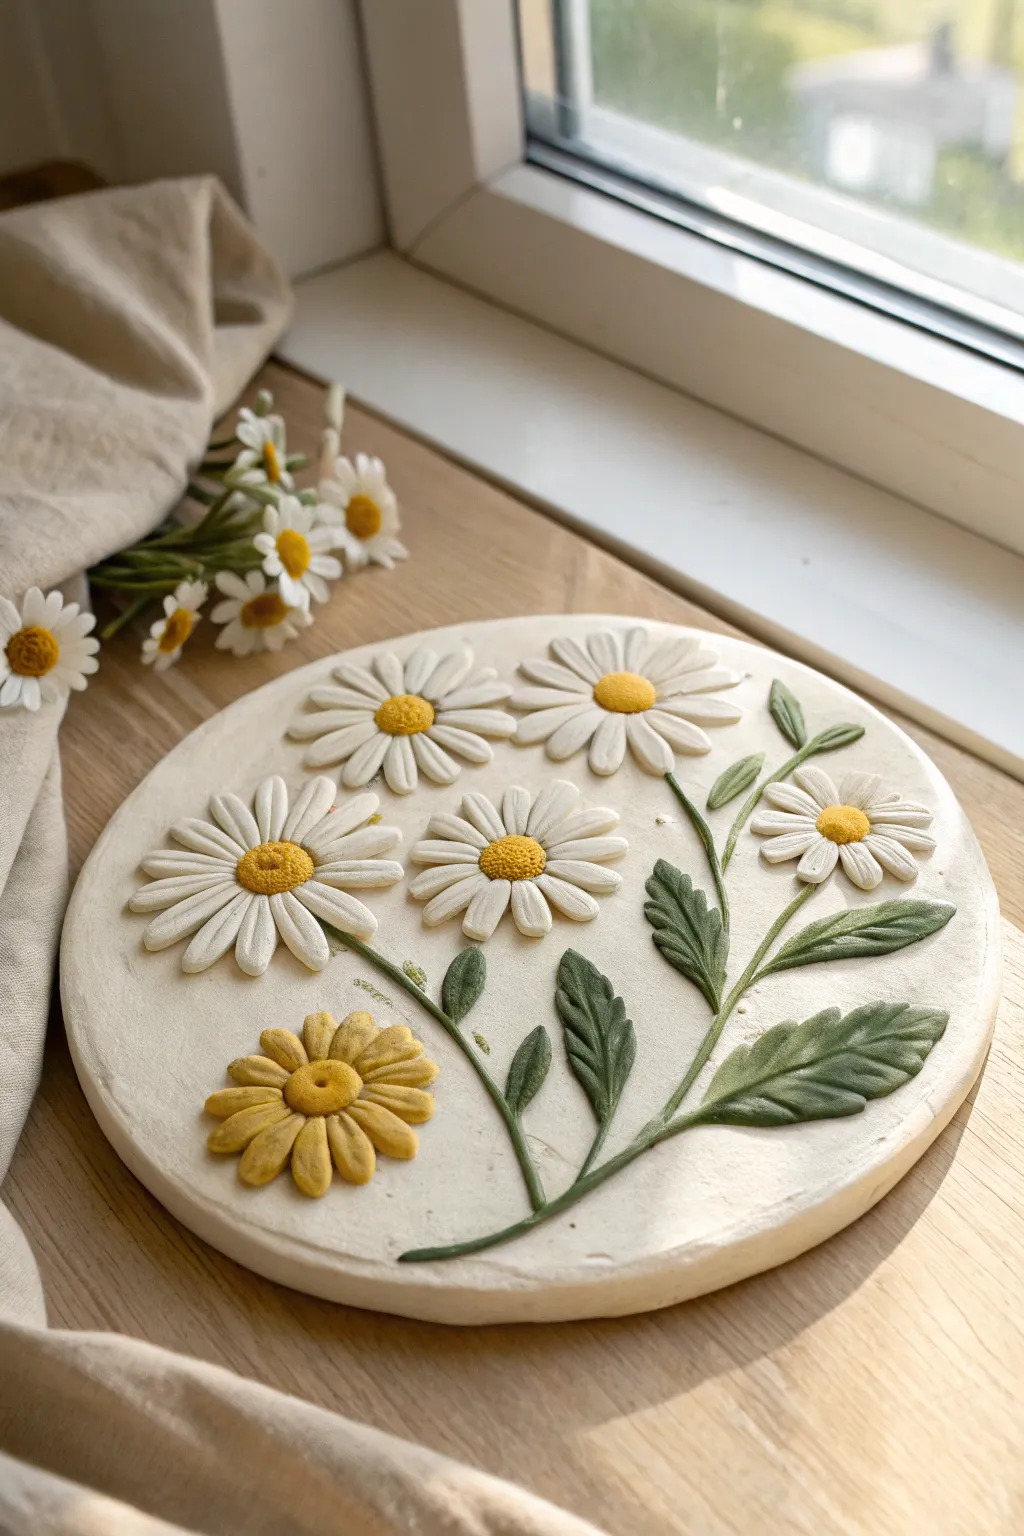
Capture the fresh beauty of a summer garden with this delicate bas-relief plaque. You will sculpt lifelike daisies and leaves onto a circular clay base for a lovely piece of wall or table decor.
Step-by-Step Guide
Materials
- Air-dry clay (white)
- Acrylic paints (yellow, olive green, deep forest green)
- Fine-point sculpting tools or a toothpick
- Small paintbrush
- Rolling pin
- Circle cutter or a bowl (approx. 6-8 inches)
- Water in a small cup
- Parchment paper or craft mat
Step 1: Preparing the Base
-
Condition the clay:
Start by kneading a large handful of air-dry clay until it is smooth, pliable, and free of cracks. If it feels too dry, add a tiny drop of water. -
Roll out the slab:
Place the clay on parchment paper. Use a rolling pin to flatten it into an even slab, about 1/4 to 1/2 inch thick. -
Cut the circle:
Use a circle cutter or place a bowl upside down on the clay as a guide to cut out a perfect circle. Smooth the edges with a damp finger to remove any roughness.
Fixing Cracks
If small cracks appear as the clay dries, don’t panic. Mix a tiny bit of fresh clay with water to make a paste and fill the cracks, smoothing it out with your finger
Step 2: Sculpting the Daisies
-
Form the petals:
Pinch off small, pea-sized pieces of white clay. Roll each one into a teardrop shape and then flatten it gently to form a petal. You will need about 10-14 petals per flower, depending on the size. -
Arrange the first blooms:
Focus on the top half of your circle. Arrange the petals in a radial pattern, pressing the narrow ends together at the center. I like to overlap them slightly for a fuller look. -
Create the centers:
Roll small balls of clay for the flower centers. Press one firmly into the middle of each petal arrangement. -
Texture the centers:
Using a toothpick or a stippling tool, poke many tiny holes into the flower center balls to mimic the pollen texture of a real daisy. -
Add petal details:
Use a sculpting tool to press a faint line down the center of each petal, starting from the center and fading out toward the tip. -
Sculpt the yellow flower:
For the bottom-left flower, repeat the petal process but make the petals slightly flatter and wider. This one will be painted fully yellow later, or you can mix yellow paint into the raw clay now.
Step 3: Adding Greenery
-
Roll out stems:
Roll very thin, long snakes of clay for the stems. Gently press these onto the base, connecting your flower heads and creating a flow downward towards the bottom center. -
Shape the leaves:
Form larger teardrop shapes for the leaves. Flatten them and pinch the tips to make them pointed. Arrange them along the stem lines. -
Detail the leaves:
Use a knife tool to score a central vein down each leaf. Then, create small diagonal indentations along the edges to give the leaves a serrated, realistic texture. -
Secure attachments:
Brush a tiny amount of water (slip) onto the back of any loose pieces if they aren’t sticking well to the base.
Pro Shape Tip
To make the leaves look more dynamic and less stiff, slightly twist the tip of the clay leaf or lift one edge before pressing it onto the base plate
Step 4: Finishing Touches
-
Initial Drying:
Allow the sculpted piece to dry for at least 24 hours. Placing a light weight (like a book on parchment paper) on the corners isn’t possible here, so just ensure it’s on a flat surface away from direct heat to prevent warping. -
Painting the centers:
Once dry, paint the textured centers of the white daisies with a bright, sunny yellow acrylic paint. -
Painting the yellow flower:
Paint the entire bottom-left flower with a more muted, ochre yellow to distinguish it from the centers. -
Painting the leaves:
Carefully paint the stems and leaves using olive green. For depth, add a touch of dark forest green into the veins and crevices while the paint is still wet. -
Seal (Optional):
If you want to protect your work, apply a matte varnish over the entire piece once the paint is fully dry.
Display your beautiful clay relief on a shelf near a window to let the natural light highlight the textures you created
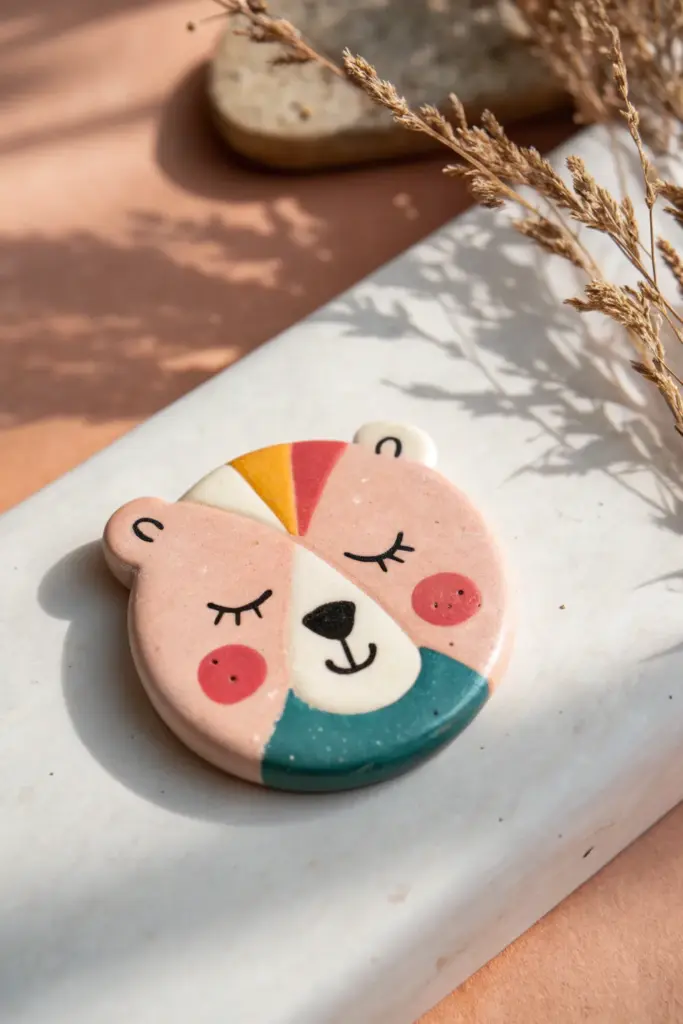
Animal Magnets With Flat Backs

Bring a touch of whimsical charm to your fridge with this adorable, flat-backed bear magnet. Its geometric color-blocking and sweet, sleepy expression make it a perfect beginner project for molding clay.
How-To Guide
Materials
- Polymer clay (dusty pink, deep teal, cream/white, mustard yellow, brick red)
- Black acrylic paint or fine-tip permanent marker
- Rolling pin or smooth glass jar
- Circle cookie cutter (approx. 2-3 inches)
- Small circle cutter (for ears/cheeks) or a straw
- Scalpel or craft knife
- Strong adhesive (E6000 or super glue)
- Round ceramic or neodymium magnet
- Small dotting tool or toothpick
- Gloss varnish (optional)
Step 1: Base Construction
-
Prepare the pink clay:
Begin by conditioning the dusty pink clay until it is soft and pliable. Roll it out into a smooth slab about 1/4 inch thick. This will be the main color for your bear’s face. -
Cut the main circle:
Use your large circle cutter to punch out a perfect round shape from the pink slab. Smooth the edges gently with your finger to remove any sharp ridges left by the cutter. -
Create the ears:
Roll two small balls of the same pink clay. flatten them slightly and attach them to the top of the circle. Use your thumb to blend the bottom seam of the ears into the main circle so they look like one cohesive piece. -
Form the snout area:
Take a piece of cream or white clay and roll it flat. Cut a specialized shape that resembles a teardrop with a wide bottom, similar to a guitar pick but rounded. This will be the muzzle. -
Attach the muzzle:
Place the cream shape onto the lower center of the pink circle. Press it down gently to adhere it without distorting the round shape of the face.
Clean Seams
To merge different clay colors seamlessly without smudging, lay a piece of parchment paper over the clay before rolling over the joints with your acrylic roller.
Step 2: Color Blocking & Details
-
Add the teal collar:
Condition a piece of deep teal clay and roll it out. Cut a curved segment that matches the bottom arc of your main circle. This should look like a bib or collar. -
Fit the collar:
Carefully place the teal piece over the bottom section of the bear, slightly overlapping the bottom of the cream muzzle. Trim any excess clay from the edges using your craft knife to keep the circle perfect. -
Create the party hat stripes:
Roll out tiny amounts of mustard yellow, brick red, and cream clay. Cut small triangles or wedges from each color to create the geometric ‘hat’ design at the top of the forehead. -
Assemble the forehead pattern:
Arrange the colored wedges between the ears at the top of the head. I find it easiest to place the center wedge first, then fit the others beside it. Gently roll over the entire surface with your rolling pin just enough to flatten the seams together. -
Add rosy cheeks:
Roll two tiny balls of brick red clay and flatten them into thin discs. Press these onto the pink cheeks on either side of the muzzle. -
Texture the cheeks:
Use a needle tool or toothpick to prick three tiny dots into each red cheek for a cute textured detail. -
Bake the piece:
Preheat your oven according to the manufacturer’s instructions on your specific brand of clay. Place the bear on a parchment-lined baking sheet and bake. Let it cool completely before moving to the painting step.
Fingerprint Fix
If you notice fingerprints on your unbaked clay, lightly brush the surface with a tiny amount of baby oil or cornstarch to smooth them away instantly.
Step 3: Finishing Touches
-
Paint the eyes:
Using a fine detail brush and black acrylic paint (or a marker), draw two curved lines for sleepy, closed eyes. Add three small lashes to the outer corner of the right eye. -
Draw the nose and mouth:
Paint a small, soft triangular nose on the cream muzzle. Draw a vertical line down from the nose, curving into a small anchor shape for the mouth. -
Detail the ears:
Add small, upside-down ‘U’ shapes inside the ears using the black paint to give them definition. -
Apply varnish:
Example: If you want a shiny finish like the photo, apply a coat of gloss varnish over the entire front surface. Allow this to dry fully. -
Attach the magnet:
Flip the bear over. Apply a dab of strong adhesive to the center of the back and press your magnet firmly into the glue. Let it cure for the time recommended on your glue bottle.
Now your charming bear is ready to hold up your grocery lists or favorite photos