When kids get their hands into clay, something clicks—suddenly they’re rolling, squishing, and inventing little worlds. Here are my go-to clay craft ideas for kids that stay simple, colorful, and genuinely fun from start to finish.
Thumbprint Pinch-Pot Bowls
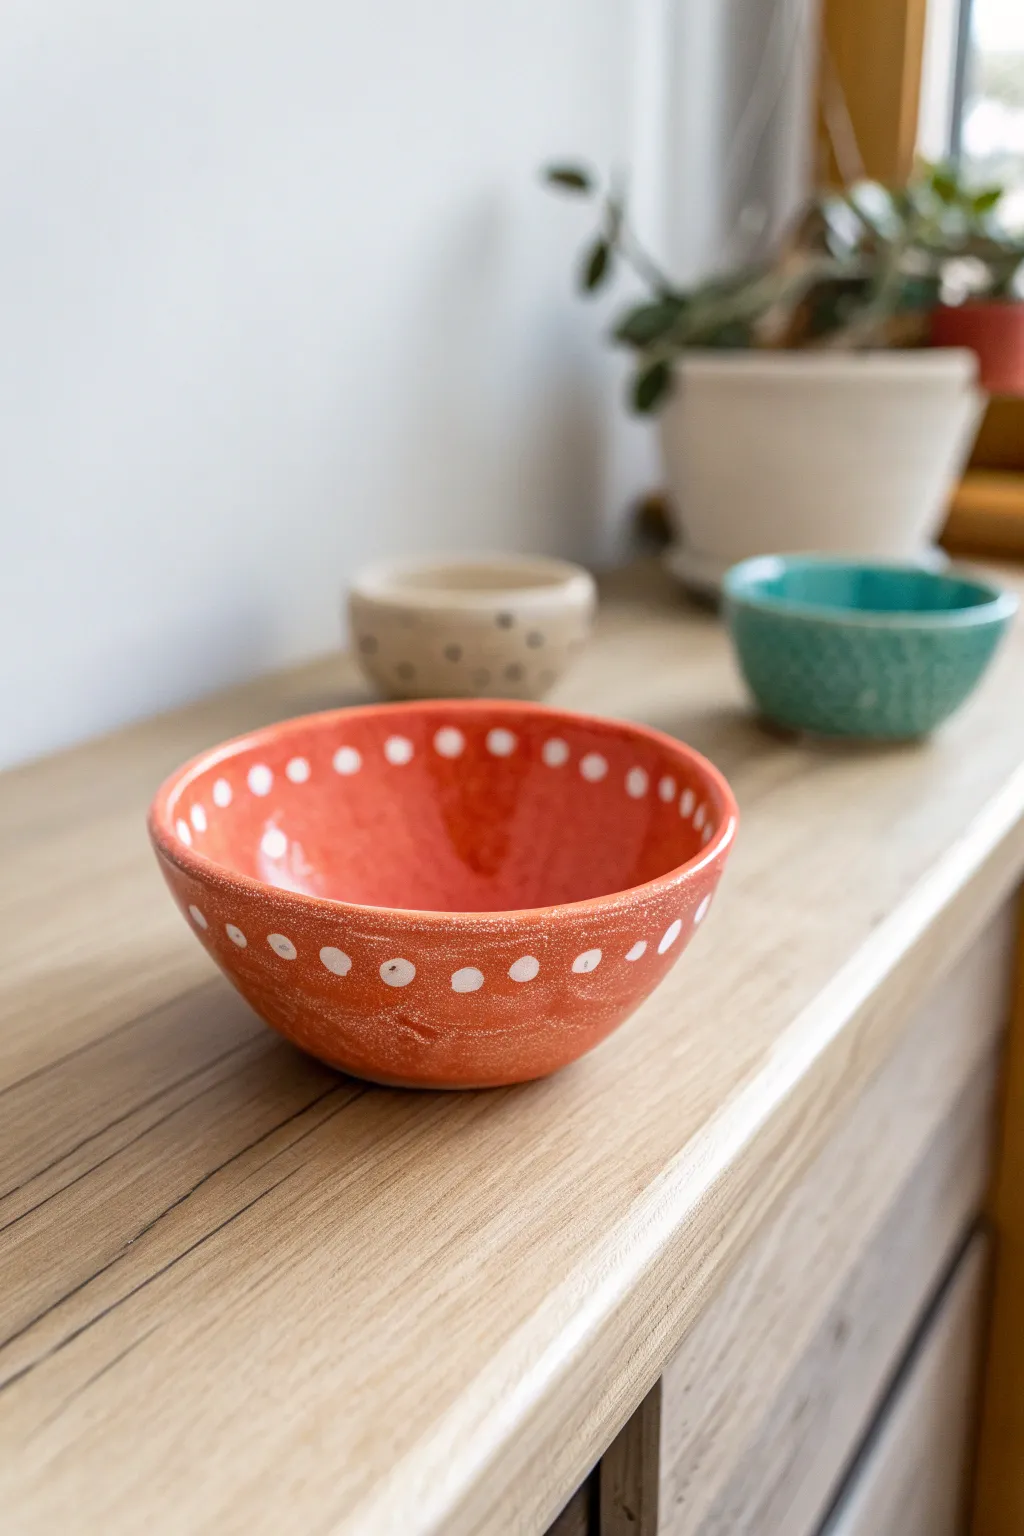
Create a charming, rustic bowl that’s perfectly sized for trinkets or snacks. This simple hand-building project results in a warm, terra-cotta colored vessel highlighted by cheerful white polka dots circling the rim.
Step-by-Step Tutorial
Materials
- Air-dry clay (white or terra cotta)
- Acrylic paints (bright orange/terra cotta color and white)
- Clear acrylic gloss sealer or Mod Podge
- Small sponge
- Bowl of water
- Fine grit sandpaper
- Small paintbrush (for glazing)
- Cotton swab or pencil eraser (for dots)
Step 1: Forming the Bowl
-
Prepare the clay:
Start with a ball of clay roughly the size of a tennis ball. Knead it in your hands for a minute to warm it up and remove any large air bubbles. -
Create the opening:
Cradle the ball in one hand and push your thumb deep into the center, stopping about a half-inch from the bottom to ensure a sturdy base. -
Pinch the walls:
Using your thumb on the inside and fingers on the outside, gently pinch the clay while rotating the ball. Work your way from the bottom up to the rim. -
Even it out:
Continue pinching and turning until the walls are an even thickness, roughly 1/4 inch thick. Don’t worry if it isn’t perfectly round; organic shapes have more character. -
Smooth the surfaces:
Dip your finger or a small sponge into water and gently run it over the clay to smooth out major cracks or fingerprints. -
Flatten the bottom:
Gently tap the pot on your table surface to create a small, flat base so the bowl will stand up straight without wobbling. -
Dry completely:
Set the bowl aside in a safe spot. Let it air dry for at least 24 to 48 hours until it is bone dry and lighter in color.
Cracks Appearing?
If you see hairline cracks while drying, make a ‘slip’ paste of clay and water. Rub it into the cracks and smooth over immediately to repair structure.
Step 2: Decorating & Finishing
-
Sand imperfections:
Once dry, use fine-grit sandpaper to gently smooth the rim and any rough bumps on the exterior. Wipe away the dust with a slightly damp cloth. -
Base coat interior:
Load a medium paintbrush with your orange or terra cotta acrylic paint. Paint the entire inside of the bowl, ensuring full coverage. -
Base coat exterior:
Paint the outside of the bowl to match the interior. Depending on your paint’s opacity, you might need a second coat after the first one dries to get that rich color. -
Prepare the dotting tool:
While the base color dries, dip the end of a cotton swab or the clean eraser of a pencil into white acrylic paint. -
Add outer dots:
Carefully stamp a row of white dots around the exterior of the bowl, about half an inch below the rim. Reload your paint often for consistent circles. -
Add inner dots:
Repeat the dot pattern on the inside of the rim, trying to stagger them slightly compared to the outside row for visual interest. -
Let paint cure:
Allow the paint to dry completely. I usually give it an hour just to be safe so the white dots don’t smear during the sealing step. -
Apply sealer:
Brush a coat of clear acrylic gloss or Mod Podge over the entire bowl. This mimics a fired glaze look and protects the paint.
Pattern Play
Instead of dots, try pressing textures into the outside clay while wet using lace, burlap, or stamps before painting for a tactile 3D effect.
Place your finished bowl on a shelf or desk to add a pop of handmade color to your room


Easy Coil Pot Cups
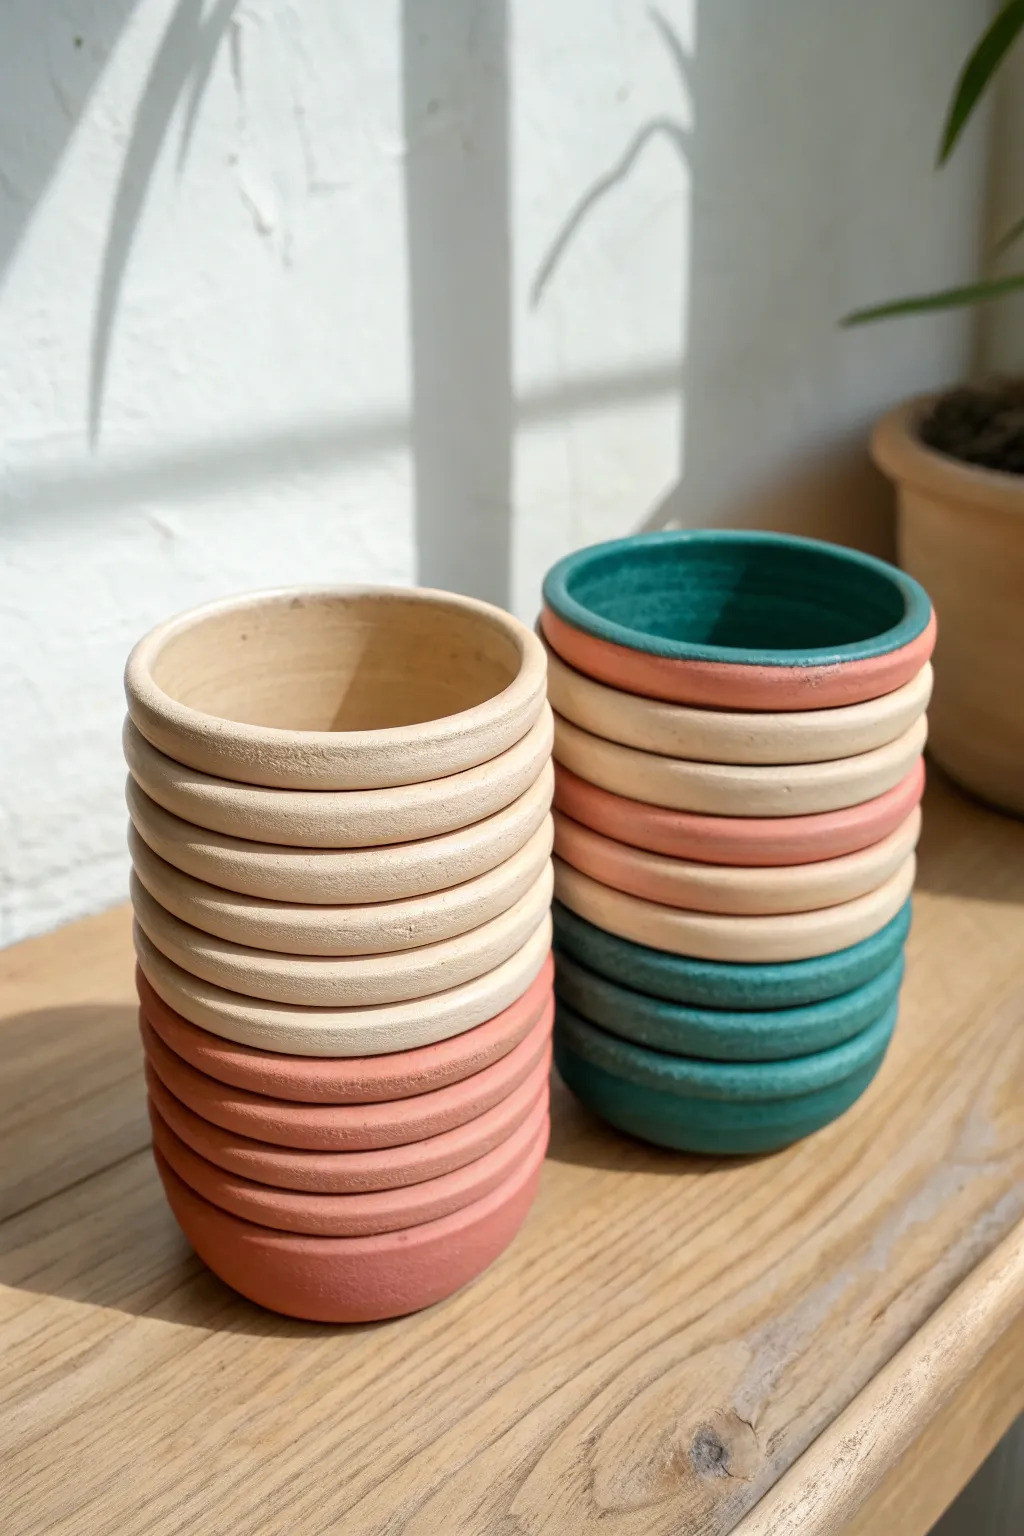
These charming little cups mimic the look of stacked rings or traditional coil pots but with a clean, modern twist. The smooth, colorful bands create a satisfyingly sturdy vessel perfect for holding pencils, dried flowers, or small treasures.
Step-by-Step
Materials
- Air-dry clay or polymer clay (in beige, terracotta, teal, and pink colors)
- Clay rolling pin or smooth jar
- Circle cutter or a round glass/cup for tracing
- Craft knife or plastic clay knife
- Small bowl of water (slip) or liquid clay adhesive
- Smoothing tool or old credit card
- Fine-grit sandpaper (optional, for finishing)
- Matte sealant or varnish (optional)
Step 1: Creating the Base
-
Prepare the Clay:
Start by kneading a small ball of your chosen bottom color (like the terracotta or teal shown) until it is soft and pliable. If you are using air-dry clay, keep a damp cloth nearby to cover unused clay so it doesn’t dry out. -
Roll the Base Slab:
Using your rolling pin, flatten the ball into an even slab about 1/4 inch thick. Aim for a uniform thickness so your cup sits flat. -
Cut the Circle:
Use your circle cutter or trace around a cup to cut out a perfect circle for the base. This will determine the width of your cup, so choose a size that feels right for you. -
Smooth the Edges:
Gently run your finger dipped in a tiny bit of water along the cut edge of the circle to smooth away any roughness or clay crumbs.
Seamless Transitions
When cutting the coil ends to join them into a ring, cut at a 45-degree angle. This slanted join prevents a visible vertical line on your finished pot.
Step 2: Building the Coils
-
Roll the First Snake:
Take a chunk of clay matching your base color and roll it on your work surface to create a long, even ‘snake’ or coil. Try to get it to the same thickness as a pencil. -
Attach the First Ring:
Score (make tiny scratches) the outer edge of your base circle and dab a little water or slip on it. Lay your first coil on top of this edge, going all the way around. -
Cut and Join:
When the ends of the coil meet, cut through both overlapping ends at a diagonal angle. Remove the excess bits and smooth the seam together so it looks like one continuous ring. -
Smooth the Interior:
I like to take a moment here to blend the coil downward on the *inside* of the cup into the base using a smoothing tool or my thumb. This makes the bottom watertight and strong. -
Stacking Up:
Continue rolling coils and stacking them directly on top of the previous ring. For the stacked look shown in the image, you won’t blend the outside seams perfectly smooth; you want those individual rings to remain visible. -
Join the Layers:
Between each layer, gently press the new coil down onto the one below it to ensure they stick. Use a tiny amount of water or liquid clay as glue between layers.
Step 3: Adding Color Intervals
-
Switching Colors:
To achieve the striped look, simply switch clay colors after a few coils. For the left cup, do about 5-6 coils of terracotta, then switch to beige clay for the upper rings. -
The Mixed Stripe Pattern:
For the cup on the right, alternate your colors more frequently. Try a deep teal base, then layer beige, a single stripe of pink, more beige, another pink ring, and finish with a teal rim. -
Checking the Shape:
As you build upward, step back occasionally to make sure your walls are going straight up and not flaring out too wide, unless a bowl shape is what you’re after. -
Finishing the Rim:
Once you reach your desired height, smooth the very top coil carefully with a wet finger to create a soft, rounded lip that is comfortable to touch.
Texture Twist
Before rolling your coils into rings, gently press a textured fabric or stamp onto the outside of the clay snake to give your pot a unique, patterned surface.
Step 4: Drying and Refining
-
Let it Dry:
Allow your beautiful creations to dry completely. For air-dry clay, this usually takes 24-48 hours. Keep them away from direct heat to prevent cracking. -
Sanding:
Once bone dry, take fine-grit sandpaper and gently rub the outside of the coils. You aren’t trying to remove the ridges, just softening any sharp bits or uneven textures. -
Final Wipe Down:
Use a slightly damp sponge to wipe away all the clay dust from sanding. This reveals the true colors of your clay. -
Sealing:
Apply a coat of matte varnish or sealant to protect the clay and give it a finished, professional ceramic look.
Place your new colorful containers on a sunny shelf to hold your favorite trinkets


Handprint Trinket Dishes
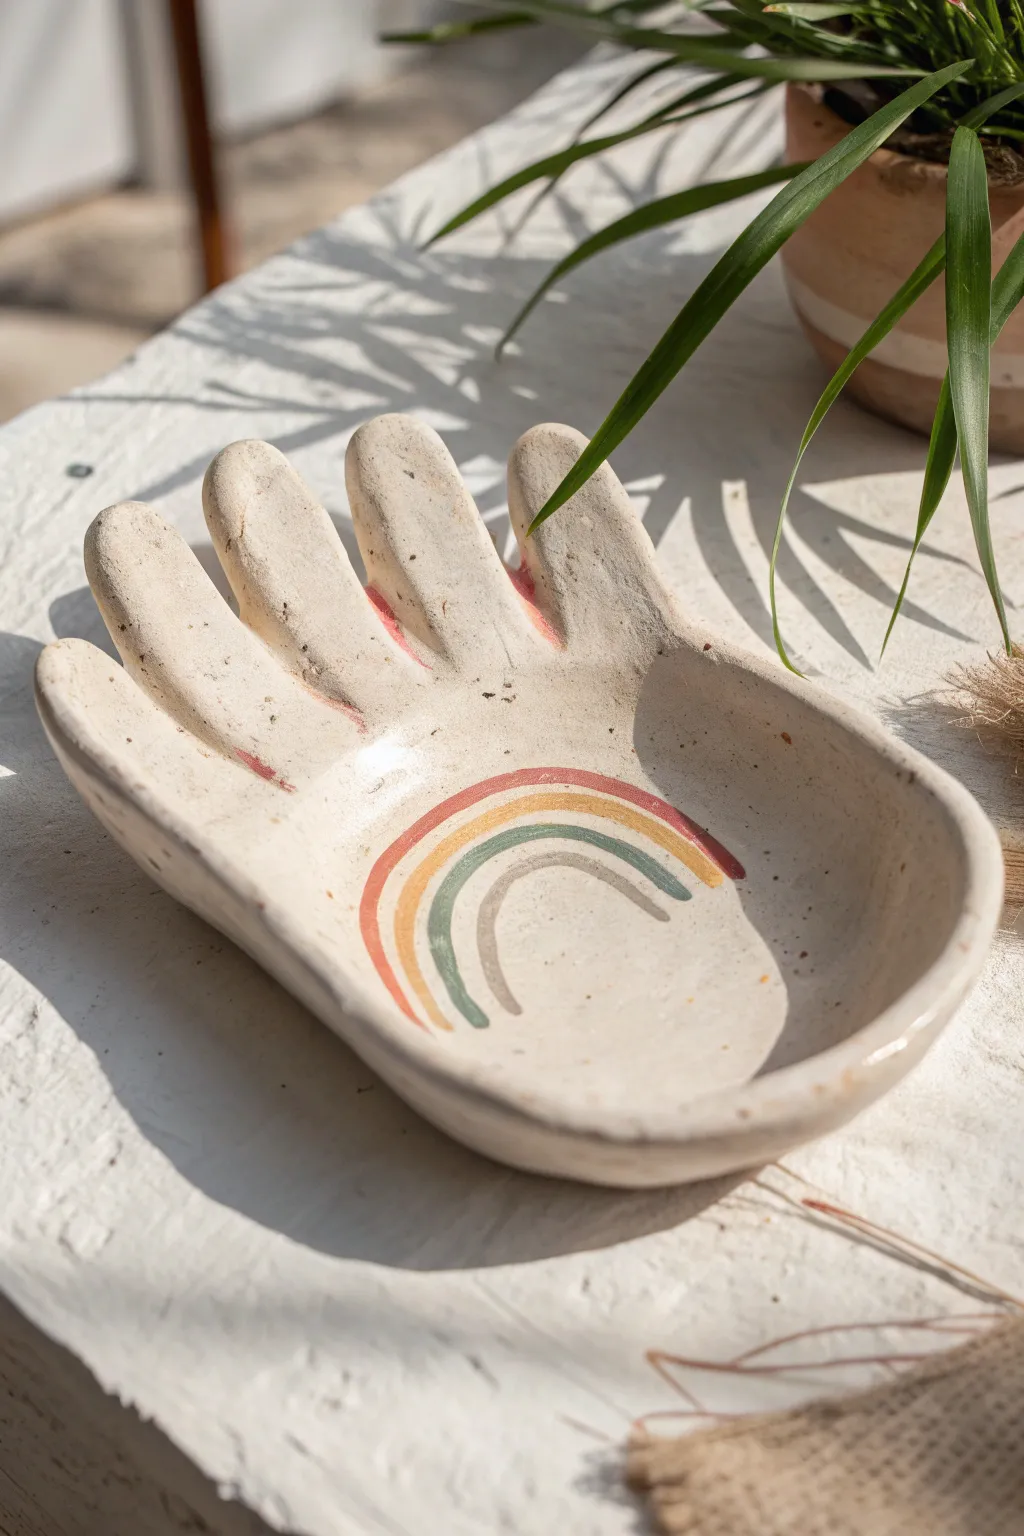
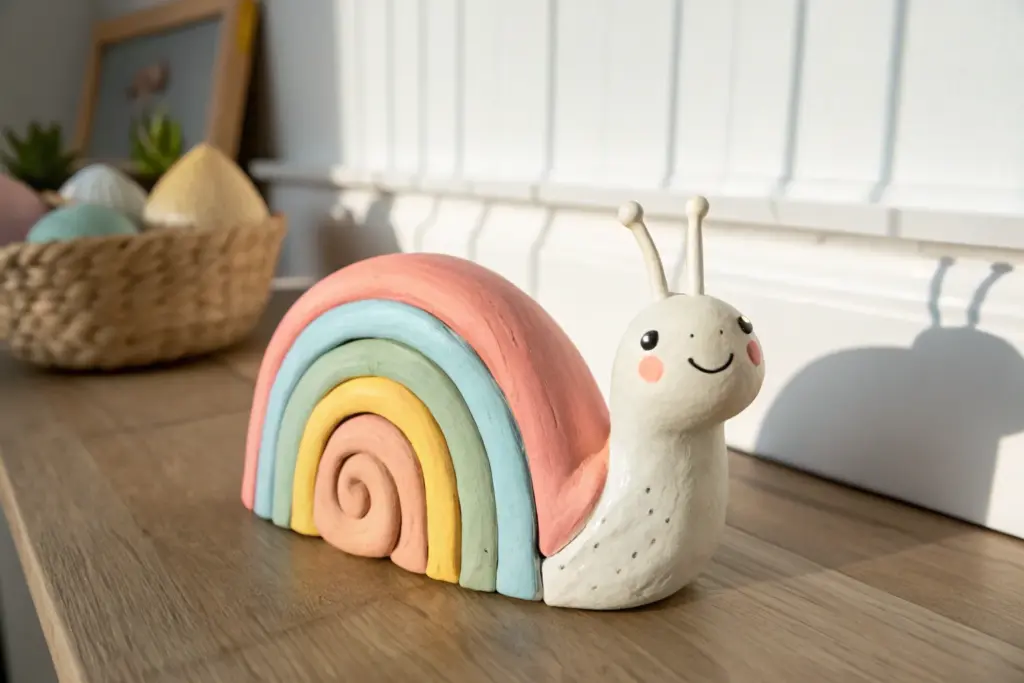
Immortalize a moment in time with this charming, functional piece of décor that turns a simple handprint into a beautiful catch-all tray. With its creamy, speckled finish and warm-toned rainbow accent, this dish brings a touch of boho whimsy to any bedside table.
How-To Guide
Materials
- Air-dry clay (white or cream)
- Rolling pin
- Parchment paper or craft mat
- Pointed craft knife or clay tool
- Small bowl (for shaping)
- Sponge and water
- Acrylic paints (terracotta red, mustard yellow, sage green, taupe)
- Fine detail paintbrush
- Glossy varnish or sealant (Mod Podge or spray acrylic)
- Sandpaper (fine grit)
Step 1: Shaping the Clay
-
Prepare your workspace:
Lay down a sheet of parchment paper on a flat surface. Take a generous handful of air-dry clay and knead it in your hands for a minute to warm it up and make it pliable. -
Roll the slab:
Using a rolling pin, flatten the clay ball into a smooth, even slab. Aim for a thickness of about 1/4 inch—too thin and it will be fragile, too thick and it will take ages to dry. -
Trace the hand:
Have your child place their hand firmly onto the clay slab with fingers spread slightly apart. Gently trace around the entire hand using a needle tool or a dull knife, keeping the cut perpendicular to the surface. -
Refine the edges:
Start by removing the excess clay from around the hand shape. Dip your finger in a little water and smooth out any rough edges or jagged cuts along the fingers and palm. -
Smooth the surface:
Use a slightly damp sponge to wipe the surface of the clay. This helps remove fingerprints and creates that silky, professional finish you see in the photo. -
Create the curve:
carefully lift the clay hand and place it onto a small overturned bowl or a curved object. Gently press the palm down and curve the fingers upward to create a slight ‘cupped’ shape that will hold trinkets later. -
Initial drying:
Let the clay sit in this curved position for about 24 hours. Placing it in a cool, dry area away from direct sunlight prevents cracking.
Cracks happen!
If small hairline cracks appear during drying, mix a tiny bit of fresh clay with water to make a paste (slip). Fill the crack, smooth it over, and let it dry again
Step 2: Decorating and Finishing
-
Sand for perfection:
Once the clay is fully dry and hard (light gray or white in color), take a piece of fine-grit sandpaper and gently buff away any remaining rough spots, especially between the fingers. -
Paint the base coat:
For that speckled pottery look, mix a tiny bit of brown paint into white acrylic, or use a ‘natural’ color. Paint the entire dishand while wet, flick a toothbrush dipped in diluted brown paint over it for speckles. -
Draft the rainbow:
Before painting the design, lightly sketch the four arches of the rainbow onto the center of the palm using a pencil. This ensures your spacing is even. -
Paint the outer arch:
Using a fine detail brush, paint the largest, outermost arch in a terracotta or burnt red shade. Keep your hand steady and move slowly for clean lines. -
Add the middle colors:
Continue painting inward. I like to use a mustard yellow for the second arch and a muted sage green for the third. Leave a tiny sliver of space between colors if you want the base color to peek through. -
Finish the rainbow:
Complete the smallest, innermost arch using a taupe or light grey color. -
Add finger accents:
If you look closely at the inspiration, there’s a faint wash of color between the fingers. Dilute a little of your red paint with water and wash it into the crevices between the fingers for depth. -
Seal the piece:
Once the paint is completely dry, apply a coat of glossy varnish or sealant. This not only protects the paint but gives it that glazed ceramic shine.
Pro Tip: Gravity Defied
To keep the fingers curved exactly how you want while drying, prop them up with crumpled balls of tissue or paper towel until the clay sets firmly
Place your favorite rings or crystals in this lovely dish and admire your handiwork


Clay Bead Bracelets and Necklaces
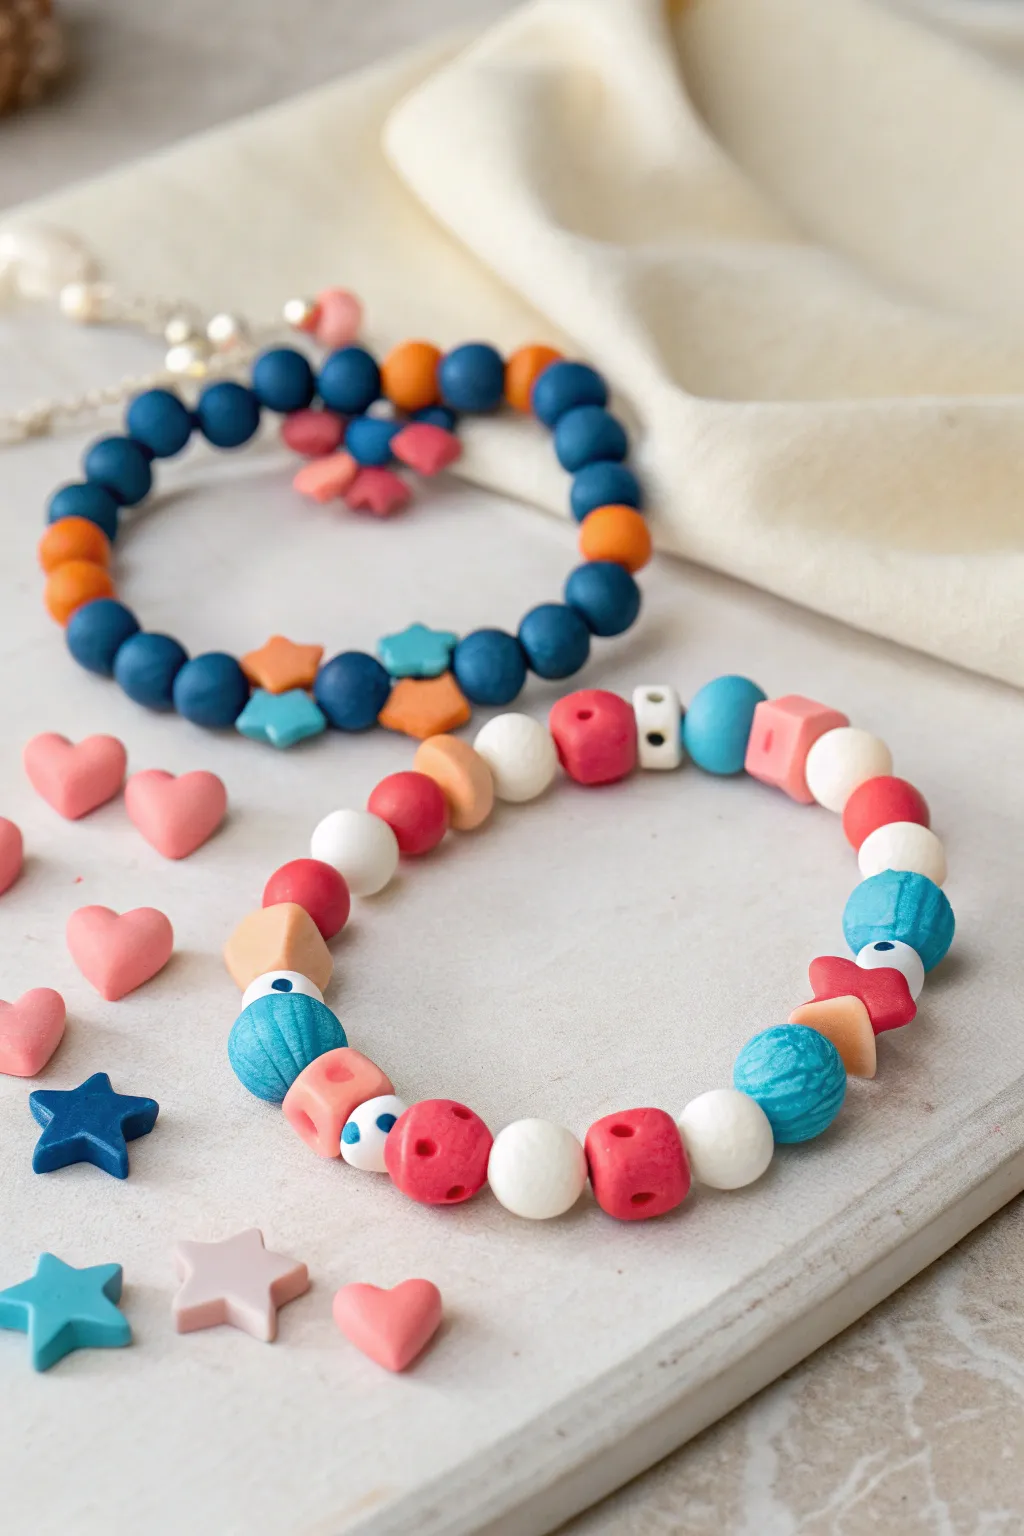
Create your own custom jewelry with these vibrant, handmade clay beads that mimic the look of classic candy necklaces but with a stylish twist. This project combines simple rolling techniques with fun geometric shapes like stars and cubes to make wearable art that is perfect for swapping with friends.
Step-by-Step Tutorial
Materials
- Polymer clay (white, red, light blue, dark blue, orange, pink, beige)
- Stretch cord or elastic jewelry thread
- Clay roller or acrylic rod
- Small star-shaped clay cutter (optional but helpful)
- Needle tool or toothpick
- Clay blade or craft knife
- Baking sheet and parchment paper
- Oven (for baking polymer clay)
- Scissors
Step 1: Forming the Basic Round Beads
-
Condition the clay:
Start by taking small portions of your chosen clay colors (dark blue, white, red, and light blue) and kneading them in your hands until they are soft and pliable. This conditioning prevents cracks later. -
Portion the clay:
Pinch off pea-sized amounts of clay. Try to keep these portions roughly the same size so your beads look uniform on the finished bracelet. -
Roll spheres:
Roll each piece of clay between your palms in a circular motion to create smooth, round spheres. Make plenty of these, as they form the bulk of your bracelet. -
Pierce the beads:
Hold a bead gently between your thumb and finger. Using a needle tool or toothpick, carefully push a hole through the center. I find twisting the tool slightly as you push helps glide through without squashing the bead’s shape.
Smooth Holes Tip
To prevent the exit hole from pushing out and looking messy, pierce the bead halfway from one side, then flip it over and pierce the rest of the way from the other side.
Step 2: Creating Texture and Geometric Shapes
-
Make the cube beads:
Take small chunks of red and pink clay and form them into rough balls. Gently press each side against your work surface to flatten them into little cubes with soft edges. -
Create textured beads:
For the larger blue beads, roll a slightly larger sphere. Use your needle tool to gently press vertical indented lines all around the outside, giving it a seashell-like texture. -
Mix swirl beads:
Take a tiny bit of blue and a tiny bit of white clay. Twist them together just enough to marble the colors, then roll into a ball for a swirled effect. -
Pierce specialized beads:
Just like the round spheres, carefully poke holes through your cubes and textured beads. Ensure the holes are large enough for your elastic cord.
Step 3: Crafting the Charms
-
Roll out a clay slab:
Flatten a piece of blue, orange, or pink clay using your acrylic roller until it is about 1/4 inch thick. -
Cut the shapes:
Use a small star cutter to punch out shapes. If you don’t have a cutter, you can hand-mold small stars or use a craft knife to cut triangles and hearts. -
Add holes to charms:
Poke a hole through the center (for spacer beads) or near the top point (if you want them to dangle) of each star and heart.
Glaze Level Up
After baking, paint select beads—like the stars or the textured blue ones—with a glossy polymer clay glaze or varnish to make them shine and stand out.
Step 4: Baking and Assembly
-
Arrange for baking:
Place all your finished beads and charms on a baking sheet lined with parchment paper. Check that none are touching so they don’t fuse together. -
Bake the clay:
Bake in the oven according to your specific brand of polymer clay’s instructions (usually around 275°F or 135°C for 15-30 minutes). Let them cool completely before handling. -
Plan your design:
Lay out your cooled beads on a table in the order you want to string them. Experiment with alternating round beads, cubes, and stars to create interesting rhythms. -
String the beads:
Cut a piece of stretch cord about 10 inches long. Tie a loose knot at one end (or use a piece of tape) to stop beads from sliding off, then thread your pattern onto the cord. -
Tie the knot:
Once the beaded section is long enough to fit your wrist comfortably, remove the tape and tie the two ends together with a strong surgeon’s knot (right over left, left over right). -
Secure and trim:
Pull the knot tight. You can add a tiny drop of clear glue to the knot for extra security. Snip off the excess cord ends, tucked closely to the beads.
Now you have a collection of custom accessories ready to wear or gift to your best friends

The Complete Guide to Pottery Troubleshooting
Uncover the most common ceramic mistakes—from cracking clay to failed glazes—and learn how to fix them fast.
Textured Cookie-Cutter Ornaments
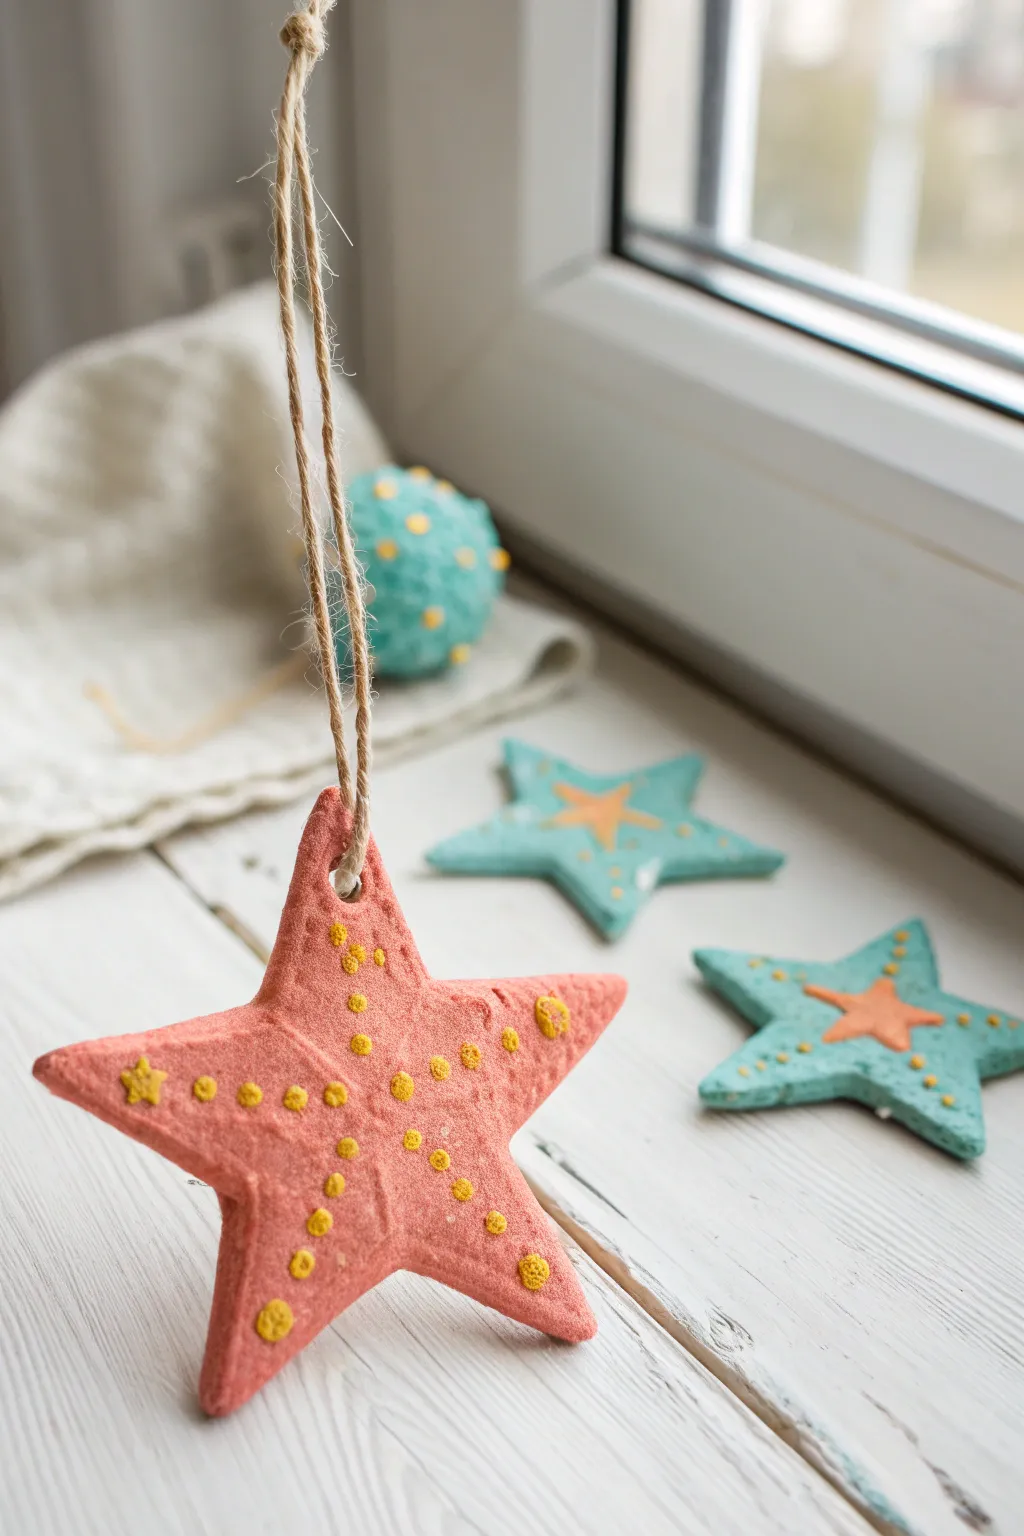
These charming, star-shaped ornaments bring a pop of color and handmade joy to any window or holiday tree. Made from simple modeling clay and decorated with playful raised dots, they mimic the look of decorated sugar cookies or sea stars.
How-To Guide
Materials
- Air-dry modeling clay (white)
- Acrylic paints (coral pink, teal blue, sunny yellow)
- Star-shaped cookie cutters
- Rolling pin
- Parchment paper or craft mat
- Drinking straw or skewer (for hole punching)
- Jute twine or rustic string
- Fine-grit sandpaper (optional)
- Small paintbrush
- Toothpick or dotting tool
- Puffy paint or 3D fabric paint (yellow and orange) for texture
Step 1: Shaping the Clay Base
-
Prepare your workspace:
Lay down a sheet of parchment paper or a clean craft mat to prevent sticking and protect your table. -
Condition the clay:
Take a handful of white air-dry clay and knead it in your hands until it becomes soft, pliable, and free of cracks. -
Roll out the slab:
Using your rolling pin, flatten the clay into an even slab. Aim for a thickness of about 1/4 inch so the stars are sturdy but not too heavy. -
Cut the shapes:
Press your star-shaped cookie cutter firmly into the clay. Give it a little wiggle to ensure clean edges, then lift it away. -
Smooth the edges:
Dip your finger in a tiny bit of water and gently run it along the cut edges of your stars to smooth out any roughness or stray bits of clay. -
Create the hanging hole:
While the clay is still wet, use a drinking straw or a skewer to punch a hole near the top point of one of the star’s arms. Make sure it’s not too close to the edge to prevent breaking. -
Let it dry completely:
Place your clay stars on a flat surface to dry. Depending on your specific clay brand and humidity, this could take 24 to 48 hours. Turning them over halfway through helps them dry evenly.
Natural Texture
Before cutting shapes, gently press a piece of lace or burlap into the rolled clay. This leaves a subtle imprinted pattern that looks great once painted.
Step 2: Painting and Detailing
-
Base coat application:
Once fully dry, paint the entire surface of the star. Use a coral pink for the main star and a teal blue for others. Let the first coat dry and apply a second for solid coverage. -
Add the center detail (for blue stars):
If you are recreating the blue stars in the background, paint a small orange star shape right in the center using a fine brush. -
Create textured dots:
For the raised yellow dots seen on the pink star, you have two options. You can use yellow puffy paint (3D fabric paint) directly from the bottle nozzle for instant texture. -
Alternative dotting method:
If you don’t have puffy paint, thick acrylic paint works well too. Dip the non-brush end of a paintbrush into yellow paint and carefully dot it onto the hardened clay. -
Connect the pattern:
Arrange your dots in lines radiating from the center to the tips of the star arms to mimic the look of a sea star. Add a few random dots for extra flair. -
Dry the details:
Let the paint dots dry completely. Puffy paint often takes longer than standard acrylics—usually a few hours—so be patient here.
Curling Edges?
If clay edges curl up while drying, flip the shape over more frequently. Using a wire cooling rack promotes better airflow and evens out drying.
Step 3: Assembly
-
Optional sanding:
If the back of your ornament feels rough, you can lightly sand it with fine-grit sandpaper for a professional finish. -
Cut the twine:
Cut a length of jute twine, about 8 to 10 inches long depending on how low you want the ornament to hang. -
Thread and knot:
Thread the twine through the hole you created earlier. Bring the two ends together and tie a secure overhand knot at the top to create a loop for hanging.
Hang your colorful creations in a sunny window and enjoy the cheerful handmade touch they add to your room
Cute Clay Animal Minis
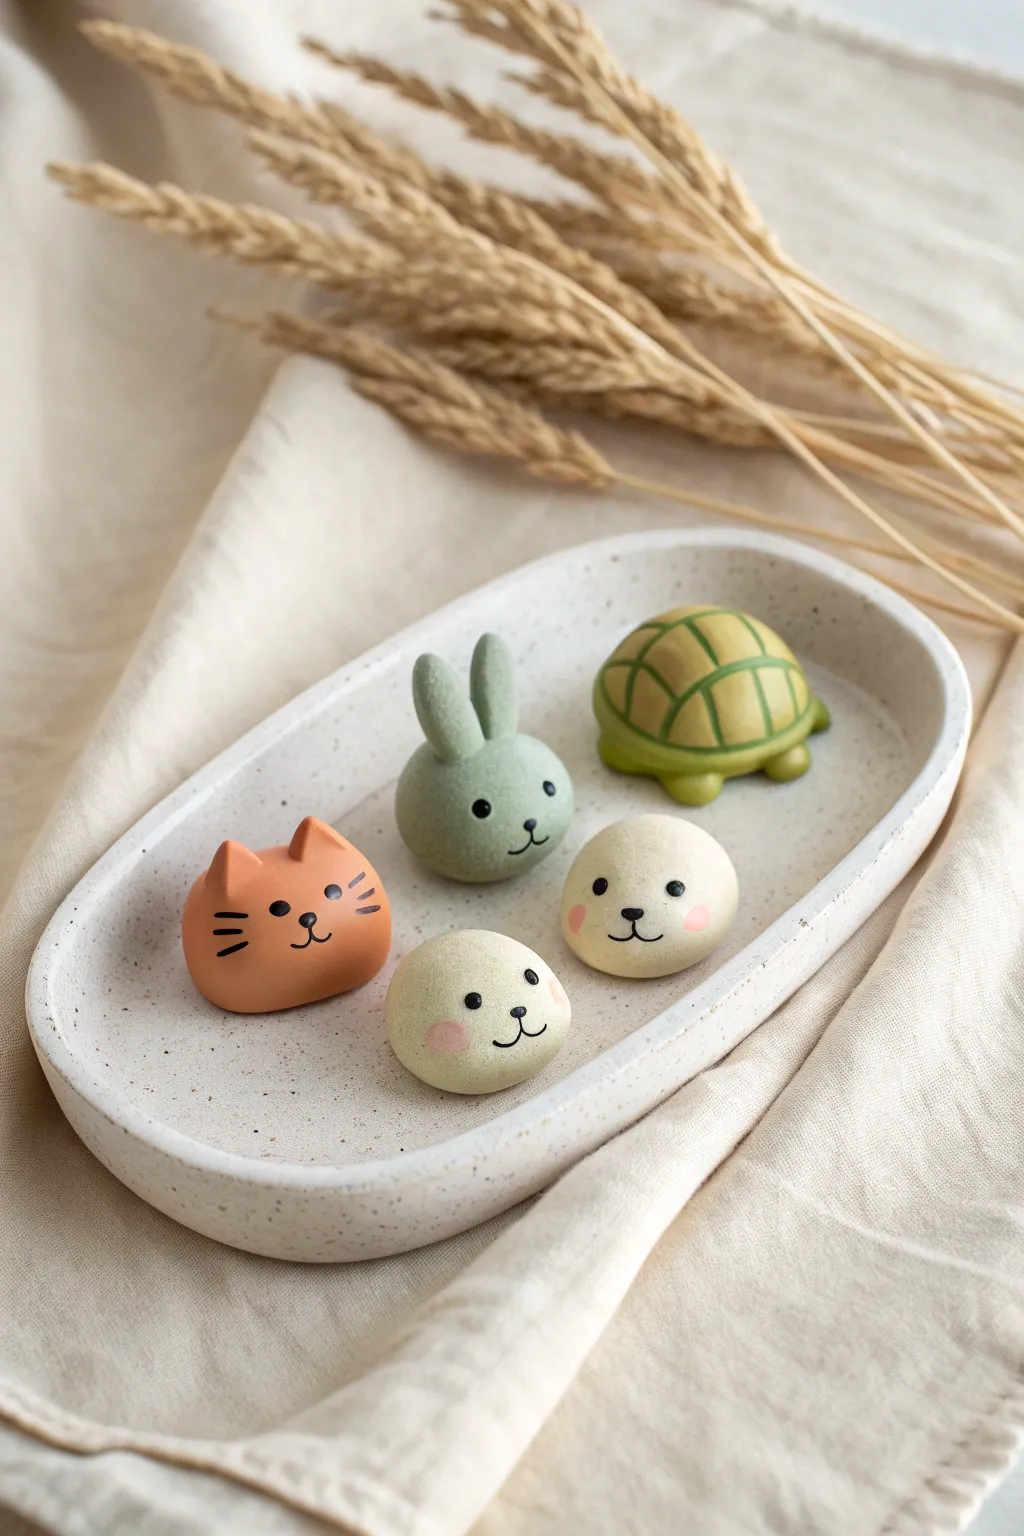
These adorable, thumb-sized clay creatures are the perfect introduction to sculpting for little hands. With their smooth, rounded shapes and minimalist expressions, you’ll create a charming menagerie that looks delightful displayed on a desk or shelf.
Detailed Instructions
Materials
- Polymer clay or air-dry clay (orange, sage green, olive green, white, cream)
- Acrylic rolling pin
- Small dotting tool or toothpick
- Black fine-point acrylic paint marker or detail brush
- Pink soft pastel chalk or blush powder
- Soft paintbrush
- Modeling tools (or a plastic knife)
- Parchment paper (work surface)
Step 1: Prepping and Shaping Bases
-
Condition the clay:
Start by warming up your clay in your hands. Knead each color separately until it is soft, pliable, and free of cracks. This ensures a smooth finish later on. -
Form the spheres:
For the bunny, seal, bear, and cat, roll small balls of clay about the size of a large marble or a walnut. Roll them against your work surface to get them perfectly round. -
Flatten the bases:
Gently tap the bottom of each sphere against the table so they sit flat without rolling away. Smooth out any fingerprints that might have appeared.
Smooth Surface Secret
Before baking, lightly brush your fingerprints with a tiny bit of baby oil or cornstarch. It smooths the clay instantly.
Step 2: Sculpting the Characters
-
Create the Cat:
Using the orange clay ball, pinch two small triangles of clay and gently press them onto the top of the head for ears. Use a modeling tool to blend the seams so the ears looked pulled from the head rather than attached. -
Assemble the Bunny:
Take two small logs of sage green clay and round off the ends. Press these vertically onto your green sphere. I find using a dotting tool to slightly indent the head first helps the ears stay put. -
Form the Turtle shell:
Roll a slightly larger ball of olive green clay and flatten it into a dome shape. This will be the shell. -
Add Turtle details:
Create four tiny balls for feet and a small rounded cone for the head using a lighter yellow-green clay. Attach these to the underside of the shell dome. -
Carve the shell pattern:
Using a plastic knife or a toothpick, gently press a grid or hexagon pattern into the top of the turtle’s shell for texture. -
Shape the Seal and Bear:
Keep the white seal and the cream bear as simple spheres. For the seal, you can slightly pinch the sides to suggest flippers effectively keeping them tucked in.
Step 3: Finishing Touches
-
Bake or Dry:
If using polymer clay, bake according to the package instructions (usually 275°F/135°C for 15-30 minutes). If using air-dry clay, let them sit undisturbed for 24-48 hours. -
Cool completely:
Ensure the figures are completely cool (or dry) before starting any painting. Painting on warm clay can make the paint tacky. -
Paint the eyes and noses:
Using a fine-point black paint pen or a toothpick dipped in black acrylic paint, add two tiny dots for eyes. Place them wide apart for that ‘kawaii’ look. -
Add mouth details:
Draw a tiny ‘w’ shape mouth between the eyes. For the cat, add three small whiskers on each cheek. -
Apply rosy cheeks:
Scrape a little pink pastel chalk into a powder. Dip a dry, soft brush into the powder and gently dab it onto the cheeks of each animal for a soft, blushing effect.
Turn Them Into Charms
Insert a metal eye screw into the top center of the head before baking or drying to turn these minis into cute keychains.
Now you have a tiny collection of clay pets ready to brighten up any corner of your room


What Really Happens Inside the Kiln
Learn how time and temperature work together inside the kiln to transform clay into durable ceramic.
Silly Monster Face Plaques
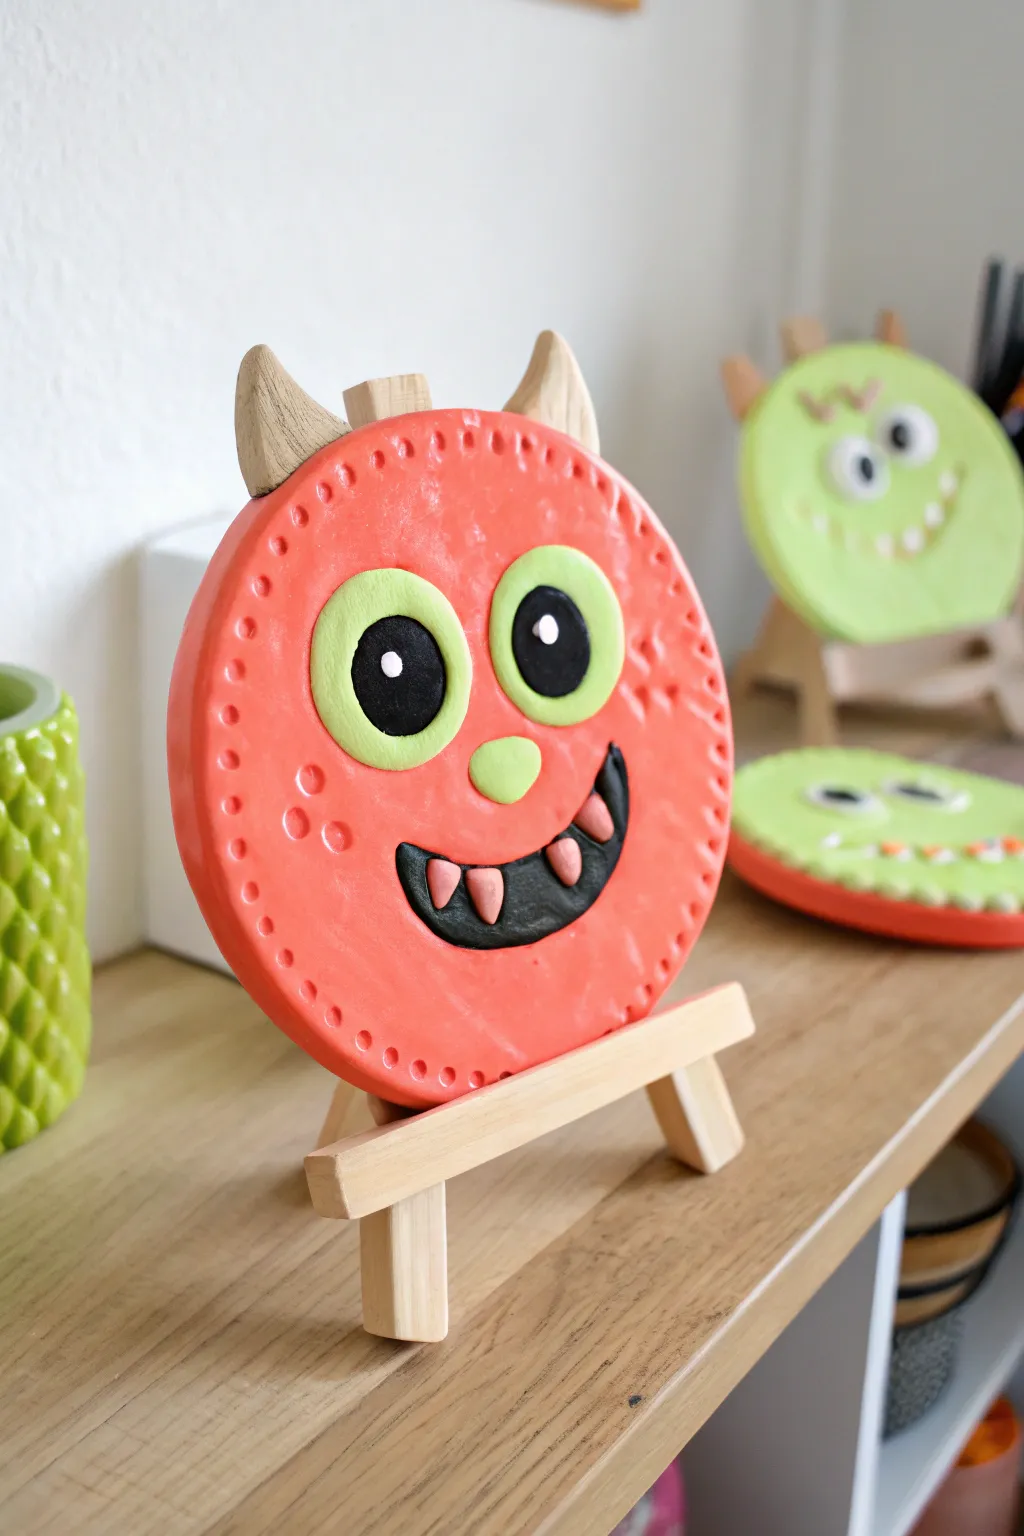
These vibrant, quirky monster plaques add a burst of personality to any kid’s room or shelf. Made from simple air-dry clay, they feature hilarious expressions with big eyes, pointy horns, and toothy grins that are easy to customize.
Step-by-Step Tutorial
Materials
- Air-dry clay (white or pre-colored)
- Acrylic paints (red-orange, lime green, black, pink, white)
- Small wooden display easel
- Rolling pin
- Round cookie cutter or bowl (approx. 4-5 inches)
- Clay modeling tools (or toothpick/skewer)
- Small paintbrush
- Water cup
- Sandpaper (fine grit)
- Clear varnish (optional)
Step 1: Shaping the Base
-
Roll out the slab:
Begin by taking a large ball of clay and rolling it out on a smooth surface until it is about 1/4 to 1/2 inch thick. Try to keep the thickness even across the entire surface to prevent cracking later. -
Cut the circle:
Use a large round cookie cutter or place a bowl upside down on the clay as a template. Cut around it with a clay tool to create a perfect circle for the monster’s head. -
Add texture:
Using a blunt tool or the end of a paintbrush, gently press small indentations around the entire outer rim of the circle. This creates a fun, stitched border effect. -
Smooth the edges:
Dip your finger in a little water and run it along the cut edge of the circle. This smooths out any harsh lines or crumbles from the cutting process.
Step 2: Creating the Features
-
Form the eye sockets:
Roll two medium-sized balls of clay and flatten them slightly into ovals. Press these firmly onto the upper half of the face to create the base for the eyes. -
Add the pupils:
Create two smaller, flatter circles of clay and press them onto the eye bases. I usually place them slightly cross-eyed or looking in different directions for a sillier look. -
Make the nose:
Roll a small ball for the nose and press it right between and slightly below the eyes. -
Sculpt the mouth:
Roll a thin snake of clay and shape it into a wide, crooked smile. Flatten it onto the lower half of the face. Alternatively, you can carve the mouth shape directly into the base if it’s thick enough. -
Add teeth:
Form tiny triangles or cones of clay. Attach them to the mouth area, pressing them gently so they bond with the underlying clay. -
Attach the horns:
Shape two cone-like horns. Score (scratch) the bottom of the horns and the top edge of the head where they will sit. Add a dab of water (slip) and press them firmly into place. -
Create warts:
For extra texture, press tiny random indentations into the cheeks or forehead using a stylus tool to look like monster warts. -
Dry completely:
Leave the plaque on a flat surface to dry. Depending on the thickness and brand of clay, this could take 24 to 48 hours. Flip it carefully halfway through to ensure the back dries too.
Cracking Up?
If small cracks appear while drying, don’t panic. Make a paste of clay and water, fill the cracks, smooth it out, and let it dry again before painting.
Step 3: Painting and Finishing
-
Base coat:
Once dry, sand any rough edges lightly. Paint the entire face (excluding the eyes, horns, and mouth interior) with a bright red-orange acrylic paint. You may need two coats for opaque coverage. -
Paint the eyes and nose:
Paint the outer eye ovals and the nose with a bright lime green. Use white for the highlight dots in the pupils later. -
Detail the mouth:
Fill the inside of the mouth shape with black paint. Carefully paint the teeth pink or white. -
Finish the pupils:
Paint the inner circles of the eyes black. Once dry, add a tiny white dot to each black pupil to bring the monster to life. -
Color the horns:
For a natural look, paint the horns a light tan or beige color, or leave them unpainted if using white clay for a bone-like effect. -
Seal (optional):
To protect your paint job and give it a glossy shine similar to a ceramic glaze, apply a coat of clear varnish or Mod Podge over the entire front surface.
Monster Mash-up
Embed small magnets into the back of the clay before it dries. Now your monster plaque can double as a fridge magnet to hold artwork!
Once fully dry, prop your friendly monster on a mini easel to guard your room with a smile
Rainbow Crayon Holders
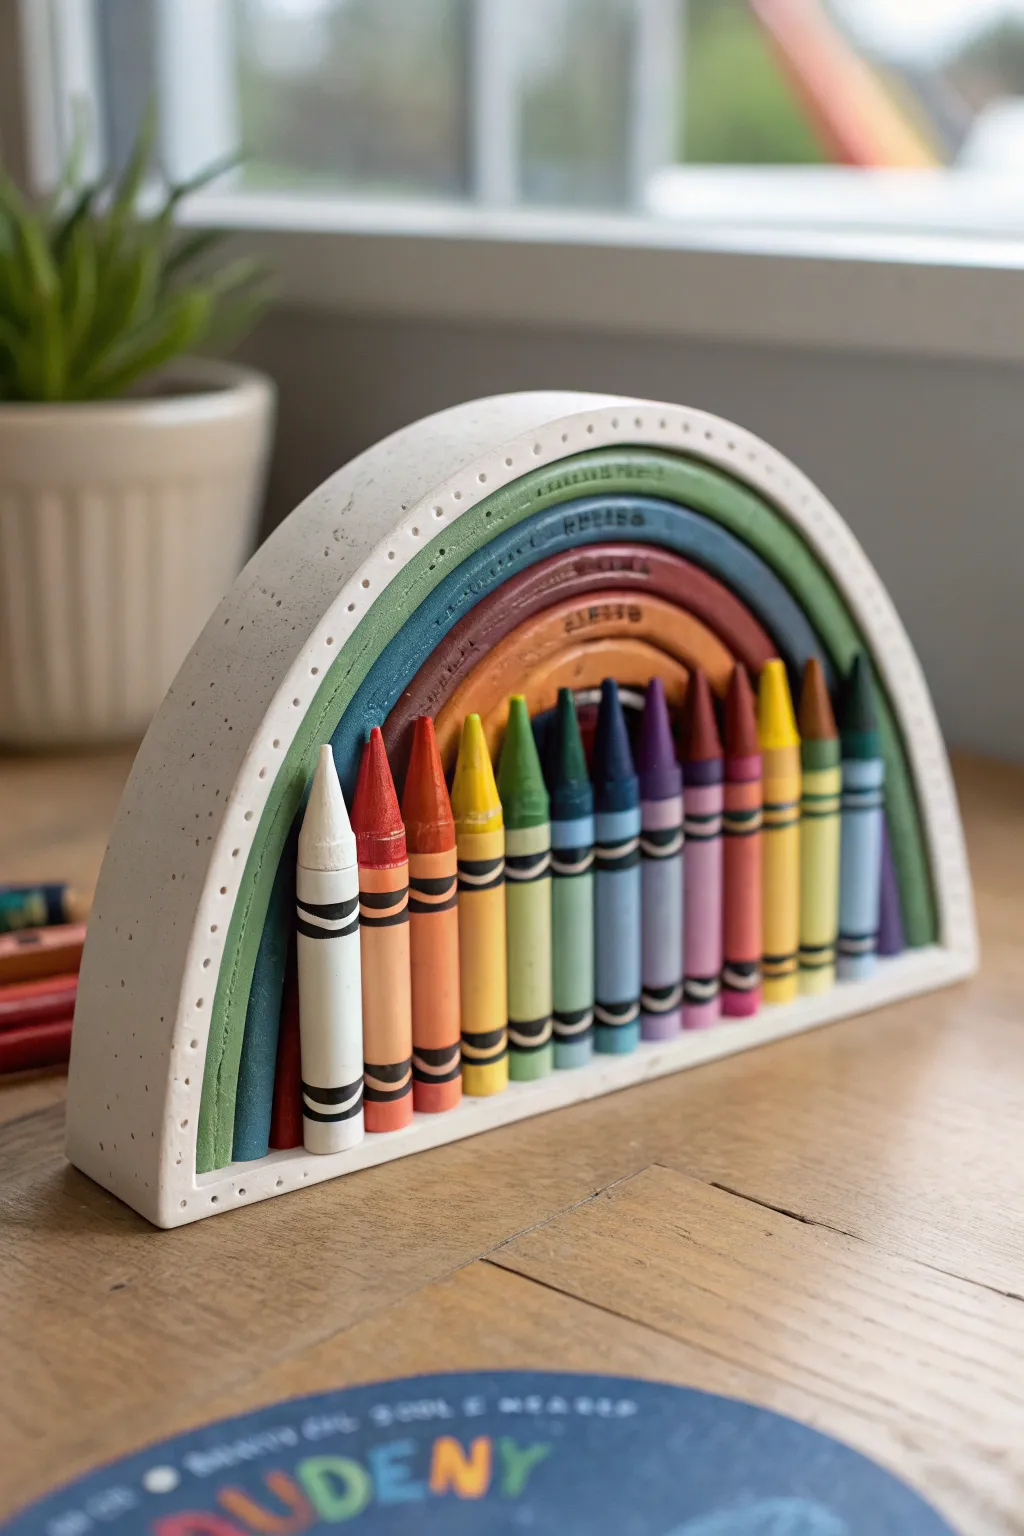
Brighten up any art station with this delightful desktop organizer, featuring a sculpted white arch that cradles a spectrum of crayons. The dual-layered design combines a sturdy holder with a colorful, recessed rainbow backdrop for a piece that is as functional as it is charming.
Step-by-Step Guide
Materials
- Air-dry white modeling clay (about 1kg)
- Rolling pin
- Craft knife or clay cutter tool
- Ruler
- Standard crayons (for seizing)
- Small dowel or sculpting tool (for texture)
- Acrylic paints (Rainbow colors)
- Fine detail paintbrush
- Fine-grit sandpaper
- Matte varnish or sealant
- Strong craft glue
- Parchment paper or craft mat
Step 1: Shaping the Base and Back
-
Prepare the Clay:
Begin by kneading a large portion of your air-dry clay to warm it up and remove air bubbles. You want a smooth consistency that won’t crack when rolled. -
Roll the Slab:
Roll the clay out on parchment paper to a uniform thickness of about 1/2 inch (1.2 cm). This thickness is crucial for stability. -
Cut the Arch Shape:
Using a craft knife, cut out a large semi-circle arch shape. You can use a round bowl as a template to get a perfect curve. This will be the back wall. -
Create the Front Ledge:
From remaining clay, cut a rectangular strip that matches the width of the bottom of your arch. It should be deep enough to hold a crayon, plus a little extra for the wall thickness. -
Form the Crayon Channels:
Take a spare crayon and press it gently into the top face of your rectangular strip to create evenly spaced divots. This ensures the crayons will stand straight later. -
Assemble the Frame:
Wrap a strip of clay around the curved edge of your back arch to create a ‘shadow box’ effect. Score and slip the edges (scratch them up and add a bit of water) to join the pieces securely. -
Attach the Base:
Attach the rectangular crayon holder strip to the bottom front of the arch using the score and slip method. Smooth the seams with your finger or a wet tool until they disappear.
Cracks Appearing?
If you spot tiny cracks as the clay dries, mix a small amount of fresh clay with water to make a paste and fill them in immediately.
Step 2: Dietails and Design
-
Sculpt the Inner Arches:
Inside the back wall, use a sculpting tool to carve concentric arches. I like to make these quite deep to create distinct sections for painting later. -
Add Texture Details:
Using a small tool or toothpick, press tiny dots along the white outer rim of the arch for a decorative, stitched look. -
Final Smoothing:
Dip your finger in a little water and smooth out any rough edges or fingerprints on the entire piece. -
Drying Phase:
Let the project dry completely for 24-48 hours. Turn it occasionally to ensure even drying and prevent warping. -
Sand for Perfection:
Once bone dry, use fine-grit sandpaper to gently buff away any remaining uneven spots, especially on the outer white shell.
Step 3: Painting and Finishing
-
Paint the Rainbow:
Using a fine detail brush, paint the recessed arches on the back wall. Start with the outermost color and work inward: green, blue, red, orange. -
Add Decorative Text:
If you carved text into the rainbow layers while wet, carefully fill these indentations with dark paint or a fine-tip marker. If not, you can paint tiny patterns now. -
Seal the Clay:
Apply a coat of matte varnish over the entire piece. This protects the clay from chipping and makes the colors pop without adding too much shine. -
Load the Crayons:
Once the varnish is dry, place your crayons into the slots you created. Arrange them to coordinate with the painted rainbow background.
Master the Fit
Make the crayon holes slightly larger than the crayons while the clay is wet. Clay shrinks as it dries, and you don’t want the fit to be too tight.
Place this lovely handmade organizer on a desk to inspire creativity every time you draw

TRACK YOUR CERAMIC JOURNEY
Capture glaze tests, firing details, and creative progress—all in one simple printable. Make your projects easier to repeat and improve.
Dinosaur Fossil Impressions
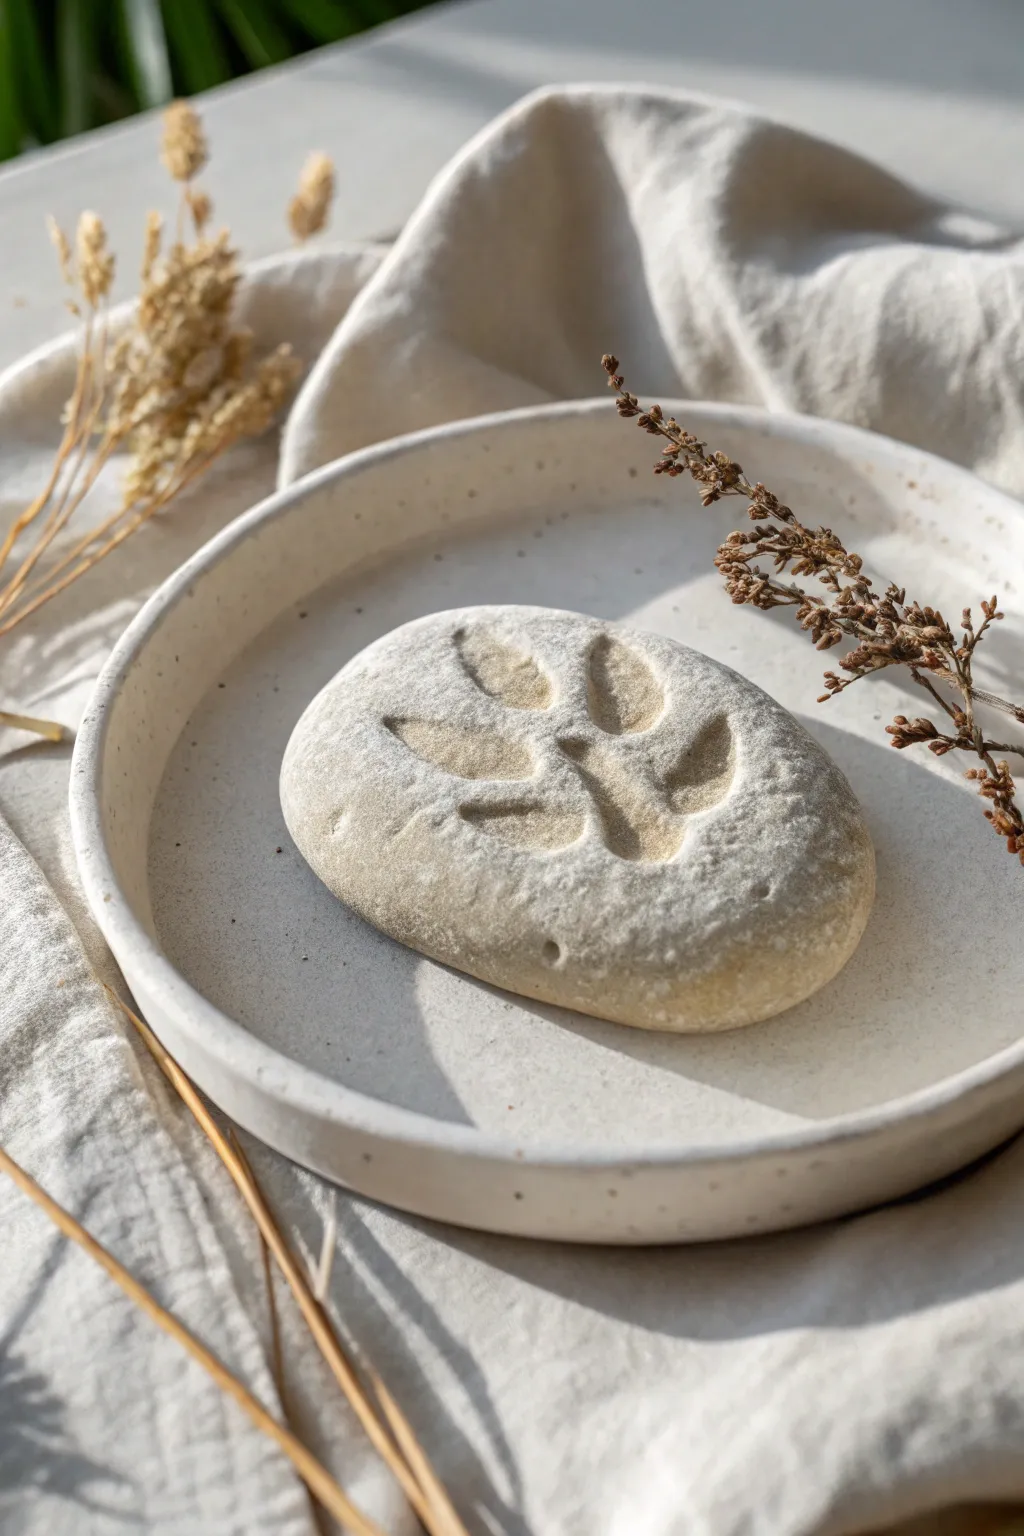
Transport your little ones back to the Jurassic era with these remarkably realistic faux fossils. By using a simple salt dough or clay mixture and natural botanicals, you can create smooth, stone-like treasures that capture the delicate details of prehistoric plant life.
Step-by-Step
Materials
- White air-dry clay or homemade salt dough (flour, salt, water)
- Fine sand (white or beige) for texture
- Coffee grounds (dried/used) for ‘aged’ speckling
- Small fern fronds or sturdy leaves with prominent veins
- Rolling pin
- Parchment paper
- Fine-grit sandpaper (optional)
- Matte sealant spray (optional)
Step 1: Preparing the ‘Stone’ Base
-
Mix the clay base:
Start by taking a handful of white air-dry clay. If you want a more natural, stony texture, knead in a teaspoon of fine sand. For that speckled, earthy look in the photo, I like to mix in a tiny pinch of dried coffee grounds. -
Warm up the material:
Knead the clay thoroughly in your hands until it is pliable and warm. This prevents cracking at the edges when you flatten it later. -
Shape the pebble:
Roll the clay into a smooth ball between your palms, aiming for a shape about the size of a tangerine. -
Flatten into an oval:
Place the ball on a sheet of parchment paper. Use the palm of your hand to gently press it down until it’s about 1/2 to 3/4 inch thick. Aim for an organic, slightly irregular oval shape rather than a perfect circle. -
Smooth the edges:
Dip your finger in a little water and run it along the perimeter of the clay oval to smooth out any small cracks or rough spots. The goal is a weather-worn river stone look.
Step 2: Creating the Impression
-
Select your botanical:
Choose a fern leaf or a plant cutting that resembles a dinosaur footprint or ancient flora. The specimen in the image has five distinct lobes arranged in a fan shape. -
Position the leaf:
Lay your chosen leaf directly in the center of the clay oval. Make sure the veiny side is facing down into the clay for the best detail transfer. -
Initial press:
Gently press the leaf into the surface with your fingertips to tack it in place so it doesn’t slide around. -
Deepen the impression:
Use a rolling pin to roll firmly over the leaf one or two times. You want the plant material to sit flush with the surface of the clay, creating a deep relief. -
Remove the botanical:
Carefully find the stem or the edge of the lead. Using tweezers or a fingernail, slowly peel the leaf up and away from the clay to reveal the fossilized print left behind. -
Refine the edges:
If the leaf pulled up any nearby clay, gently tap it back down with a clean finger to keep the impression crisp.
Sticky Leaf Fix
If the leaf sticks and won’t peel off cleanly, let the clay dry for about 30 minutes with the leaf still embedded. As the plant wilts slightly, it usually pulls away easier.
Step 3: Finishing Touches
-
Dusting for texture:
While the clay is still slightly tacky, lightly dust the surface with a pinch of extra flour or white pastel powder. This adds to the dusty, excavated look. -
Drying phase:
Leave the fossil on the parchment paper to air dry in a cool, dry place. Flip it over after 24 hours to ensure the bottom dries evenly. Complete drying may take 48-72 hours depending on thickness. -
Sanding:
Once fully hardened, inspect your stone. If the edges feel too sharp or artificial, lightly buff them with fine-grit sandpaper to soften the profile. -
Optional sealing:
To protect your fossil without adding gloss, apply a very light coat of matte spray sealant. This keeps the ‘stone’ looking dry and natural while preventing crumbling.
Antique Wash
Once dry, brush a watered-down brown acrylic paint into the crevices of the print, then immediately wipe the surface with a damp cloth. The dark color stays in the deep spots.
Display your new collection in a sunny spot and enjoy your piece of prehistoric art
Leaf and Flower Nature Prints
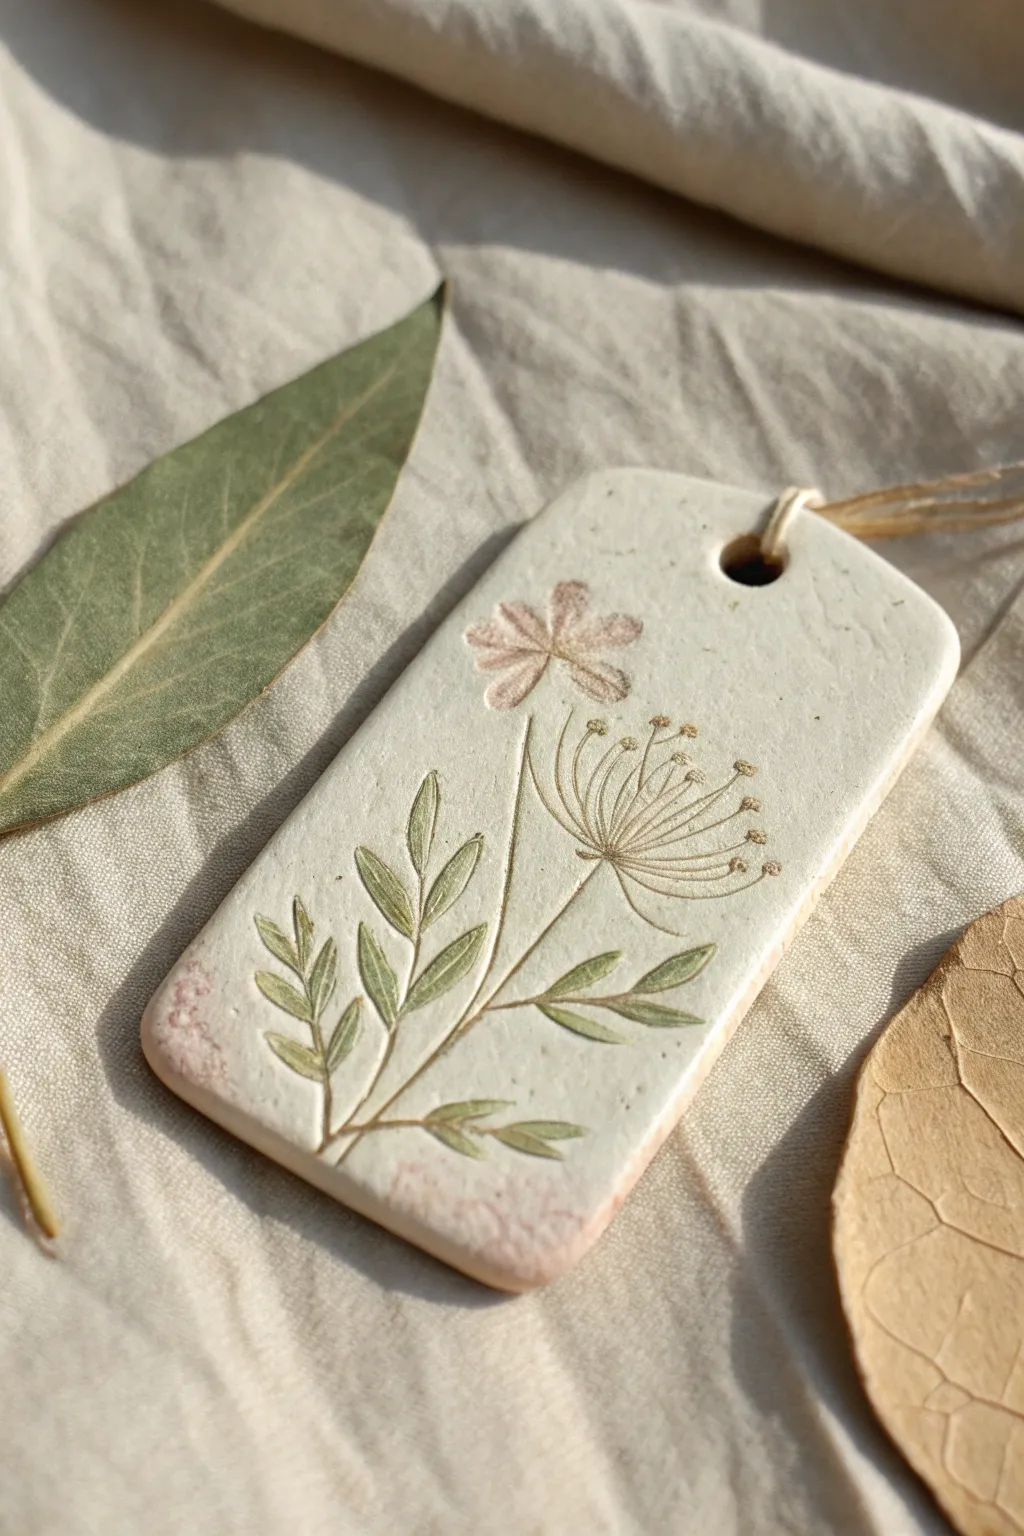
Capture the delicate beauty of nature with these elegant clay tags featuring pressed floral designs. The soft, washed-out coloring gives them a lovely vintage feel, making them perfect for gift wrapping or hanging decorations.
How-To Guide
Materials
- White air-dry clay or polymer clay
- Rolling pin
- Fresh or dried wildflowers and leaves (dill flowers and fern-like leaves work well)
- Rectangular cookie cutter or craft knife
- Straw or skewer (for the hole)
- Fine-grit sandpaper
- Watercolor paints or diluted acrylics (olive green, dusty pink)
- Small round paintbrush
- Natural twine or jute string
- Matte sealant (optional)
Step 1: Preparing the Clay Canvas
-
Roll out the clay:
Begin by kneading your white clay until it is soft and pliable. Roll it out on a smooth surface to an even thickness of about 1/4 inch (6mm). If the clay is sticky, you can lightly dust your surface with cornstarch. -
Select your botanicals:
Choose small, delicate stems that will fit nicely within a rectangular shape. For the look in the photo, I used a stem with small pointed leaves and a delicate umbrella-like flower head similar to dill or Queen Anne’s lace. -
Make the impression:
Arrange your chosen plants carefully on top of the rolled clay. Using your rolling pin, gently but firmly roll over the plants once to press them deep into the clay surface. Don’t roll back and forth, as this can create double images. -
Reveal the design:
Use tweezers or a needle tool to very carefully lift the plant material out of the clay. Pull slowly to ensure you don’t tear the clay edges where the impression is deepest.
Fixing Broken Stems
If a delicate stem impression doesn’t show up clearly, wait for the clay to dry, then use a needle tool to gently scratch the missing line back in before painting.
Step 2: Shaping and Refining
-
Cut the shape:
Using a rectangular cookie cutter or a sharp craft knife and ruler, cut out your tag shape, ensuring the botanical impression is centered or pleasingly offset. -
Create the hanging hole:
While the clay is still wet, use a drinking straw or a thick skewer to punch a clean hole at the top of the tag. Make sure it’s not too close to the edge to prevent cracking later. -
Smooth the edges:
Dip your finger in a little water and run it gently along the cut edges of the rectangle to soften any sharpness or burrs left by the cutting tool. -
Allow to dry:
Place your clay tag on a flat surface to dry completely. For air-dry clay, this usually takes 24-48 hours. Flipping it over halfway through helps prevent curling. -
Sand for perfection:
Once bone dry, use fine-grit sandpaper to lightly buff the surface and edges. This removes any final imperfections and creates a professional, smooth finish ready for paint.
Step 3: Adding Color and Texture
-
Mix a wash:
Dilute your olive green paint with plenty of water. You want a translucent ‘wash’ consistency rather than opaque paint, as this allows the texture of the clay to show through. -
Paint the leaves:
Using a small brush, carefully drop the green wash into the leaf impressions. Let the paint pool slightly in the deeper crevices of the stems and leaves to create natural shading. -
Adds floral hues:
Switch to a dusty pink or blush color wash. Gently touch the tip of your brush to the flower petals and the center of the bloom. Be sparing; the color should look soft and faded. -
Vintage distressing:
Dip a brush or small sponge into the diluted pink wash and blot most of it off on a paper towel. Gently dub this color onto the bottom corners and random edges of the tag to give it an aged, weathered look. -
Seal the piece:
If you want to protect the paint, apply a thin coat of matte varnish or sealant. This is optional but recommended if the tag will be handled frequently. -
Finishing touches:
Cut a length of natural twine or jute. Thread it through the hole at the top and tie a simple loop knot to complete your rustic botanical tag.
Scented Clay Tags
Add a few drops of essential oil like lavender or eucalyptus into the air-dry clay while kneading to turn these into beautiful, functional drawer fresheners.
Now you have a timeless piece of nature art to gift or keep
Butterfly and Ladybug Garden Bugs

These charming clay ornaments bring the vibrancy of the garden indoors, featuring a cheerful yellow butterfly and a classic red ladybug. With their rustic twine hangers and bold painted details, they make perfect hanging decorations for a nature-themed room or a sunny window.
Step-by-Step
Materials
- White air-dry clay or polymer clay
- Rolling pin
- Butterfly cookie cutter (or paper template)
- Round cookie cutter (approx 2 inches)
- Acrylic paints: Bright yellow, warm red, black
- Fine-tip paintbrushes (round and detail)
- Drinking straw or toothpick (for holes)
- Jute twine or hemp cord
- Black wooden bead (optional, for ladybug)
- Fine-grit sandpaper
- Clear matte varnish (optional)
Step 1: Shaping the Clay
-
Roll the Slab:
Begin by conditioning your clay until it is soft and pliable. Roll it out on a smooth surface to an even thickness of about 1/4 inch, ensuring it’s not too thin to prevent cracking later. -
Cut the Ladybug:
Use a round cookie cutter to stamp out a simple circle for the ladybug body. Smooth the cut edges gently with a damp fingertip to remove any harsh lines. -
Cut the Butterfly:
Press your butterfly cutter firmly into the clay. If you don’t have a cutter, I like to lightly trace a paper template onto the clay with a pin tool and carefully cut around it with a craft knife. -
Create Hanging Holes:
For the butterfly, use a straw or toothpick to poke a small hole through the top of the left upper wing. For the ladybug, poke a hole near the top edge where the head will be. -
Add Texture (Optional):
If you want the edges to look slightly rounded and organic like the example, gently press the edges inward with your thumb to soften the sharp cut angle. -
Dry or Bake:
Follow the instructions for your specific clay. If using air-dry clay, let the pieces sit for 24-48 hours, flipping halfway through for even drying. If polymer, bake according to the package directions and let cool completely.
Step 2: Painting the Ladybug
-
Base Coat:
Paint a large red circle in the center of the round clay piece, leaving a messy, artistic border of unpainted white clay around the edge. You may need two coats for a solid, opaque red. -
Define the Wings:
Once the red is fully dry, use a detail brush and black paint to draw a thick line straight down the middle of the red circle, slightly widening it at the top to suggest the thorax. -
Add Spots:
Dip the handle end of a paintbrush into black paint and stamp three large dots onto each side of the red wings. Add a smaller dot near the bottom edge for variety.
Uneven Clay Surface?
If your dried clay feels rough, gently buff the surface with fine sandpaper before painting. This helps the paint glide on smoothly.
Step 3: Painting the Butterfly
-
Yellow Wings:
Paint the inner sections of the four wing areas with bright yellow paint. Leave a bare clay border around the very outside, but also leave space between the wing sections for the black body. -
Red Accents:
Using your red paint, add a thick curved stripe along the outer edges of the yellow sections on both the top and bottom wings creates that beautiful Monarch-style border. -
The Body:
Paint the central body of the butterfly black. Extend thick black lines outward to separate the upper and lower wings, effectively outlining your yellow sections. -
Wing Veins:
With your finest brush, paint thin black lines radiating through the yellow sections to create delicate wing veins. Keep your hand steady and light pressure. -
Final Dots:
Add small black decorative dots inside the red border stripes on the wing tips to mimic the patterns found in nature.
Level Up: 3D Antennae
Glue small pieces of black wire or stiff cord behind the ladybug’s bead ‘head’ to create realistic sticking-up antennae.
Step 4: Assembly
-
Seal (Optional):
Once all paint is bone dry, applying a layer of matte varnish will protect your work and deepen the colors without making them too glossy. -
Thread the Twine:
Cut a 6-inch length of jute twine. Fold it in half and thread the loop end through the hole you made earlier. -
Secure the Loop:
Pass the loose ends of the twine through the loop and pull tight to create a lark’s head knot directly on the clay piece. -
Ladybug Bead:
For the ladybug, thread a small black wooden bead onto both strands of twine before tying the knot at the top. This acts as the ladybug’s head. -
Finish Hanger:
Tie a simple overhand knot at the ends of the twine to complete the hanging loop.
Now you have a pair of delightful garden friends ready to brighten up any corner of your home
Fairy House Mini Cottage
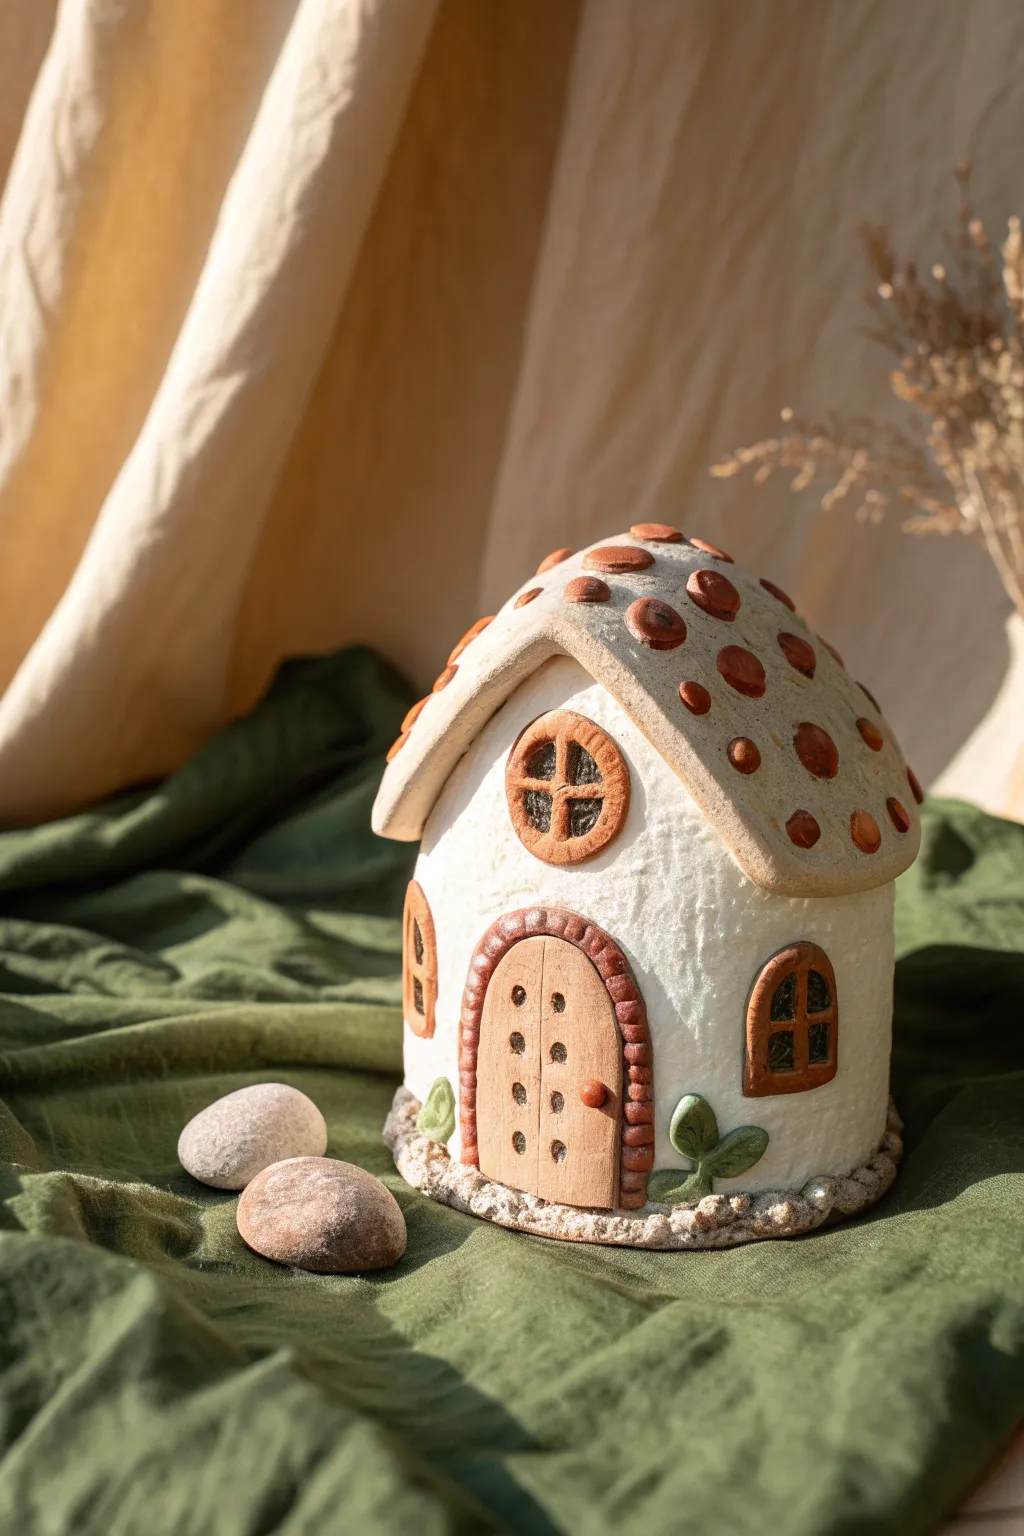
Create this enchanting miniature dwelling perfect for a garden nook or bookshelf display. This project features a charming textured roof dotted with clay pebbles and a classic arched door that looks like it came straight from a storybook.
Step-by-Step Tutorial
Materials
- White or cream air-dry clay (or polymer clay)
- Brown/terracotta colored clay
- Green clay (for leaves)
- Small rolling pin
- Craft knife or clay sculpting tool
- Toothbrush or texturing brush
- Small round cutter or bottle cap
- Water in a small cup (for smoothing)
- Aluminum foil (for armature/support)
Step 1: Forming the Structure
-
Prepare the Core:
Crumple aluminum foil into a cylinder shape with a rounded top. This will act as the internal support for your cottage and save on clay. -
Roll the Base:
Roll out a slab of white clay to about 1/4 inch thickness. Wrap this around the sides of your foil core, trimming the excess and smoothing the seam where the clay ends meet. -
Add Texture:
Using an old toothbrush or a stiff stippling brush, gently tap the entire surface of the white clay walls to give it a stucco-like, rough texture. -
Create the Roof Shape:
Roll out a thicker slab of white clay for the roof. Drape it over the rounded top of your house, allowing it to overhang slightly on the sides like eaves. -
Shape the Eaves:
Use your fingers to gently curve the edges of the roof upward, creating a soft, fairytale silhouette.
Step 2: Adding Architectural Details
-
Frame the Door:
Roll a thin snake of terracotta clay. Form it into an arch shape on the front of the house to outline where the door will go. -
Build the Door:
Create a flat arch shape from light brown or tan clay that fits inside your terracotta frame. Use a tool to gently press vertical lines into it to mimic wooden planks. -
Add Door Details:
Press tiny dark brown balls of clay down the center of the door for studs, and add a small round handle on the right side. -
Create Windows:
Roll small coils of brown clay to create window frames. Form them into arch or circle shapes and press them onto the sides and upper gable of the house. -
Window Panes:
For the glass effect inside the frames, you can either paint the clay black later or fill the space with dark clay now. Add thin cross-strips of brown clay for the mullions.
Sticky Situation
If your clay won’t stick together, score both surfaces (make tiny scratches) and add a drop of water or liquid clay (slip) to act as glue.
Step 3: Decorative Finishes
-
Roof Spots:
Roll many small balls of terracotta clay in varying sizes. Flatten them slightly into discs. -
Apply Roof Pattern:
Press these discs randomly all over the roof surface. I find spacing them irregularly makes it look more organic and whimsical. -
Base Trim:
Roll a long, thin snake of gray or speckled clay. Wrap this around the very bottom edge of the house to create a stone foundation. -
Texture the Foundation:
Use a ball tool or the end of a paintbrush to press indentations into the foundation strip, making it look like pebbled stone. -
Add Greenery:
Shape two small teardrops from green clay. Flatten them and press vein lines into them with a knife tool, then attach them to the base near the door as sprouting plants. -
Final Smoothing:
Dip your finger in a tiny bit of water and rub it gently over any rough edges on the clay dots or window frames to clean up the finish. -
Dry Time:
Let the house dry completely according to your clay package instructions. If using air-dry clay, keep it away from direct heat to prevent cracking.
Crush Prevention
Pack the aluminum foil core tightly! If the foil is too loose, the structure might sag or collapse when you press the details onto the walls.
Once fully dry, you can place this little cottage in a plant pot to welcome tiny visitors
Small World Characters for Play
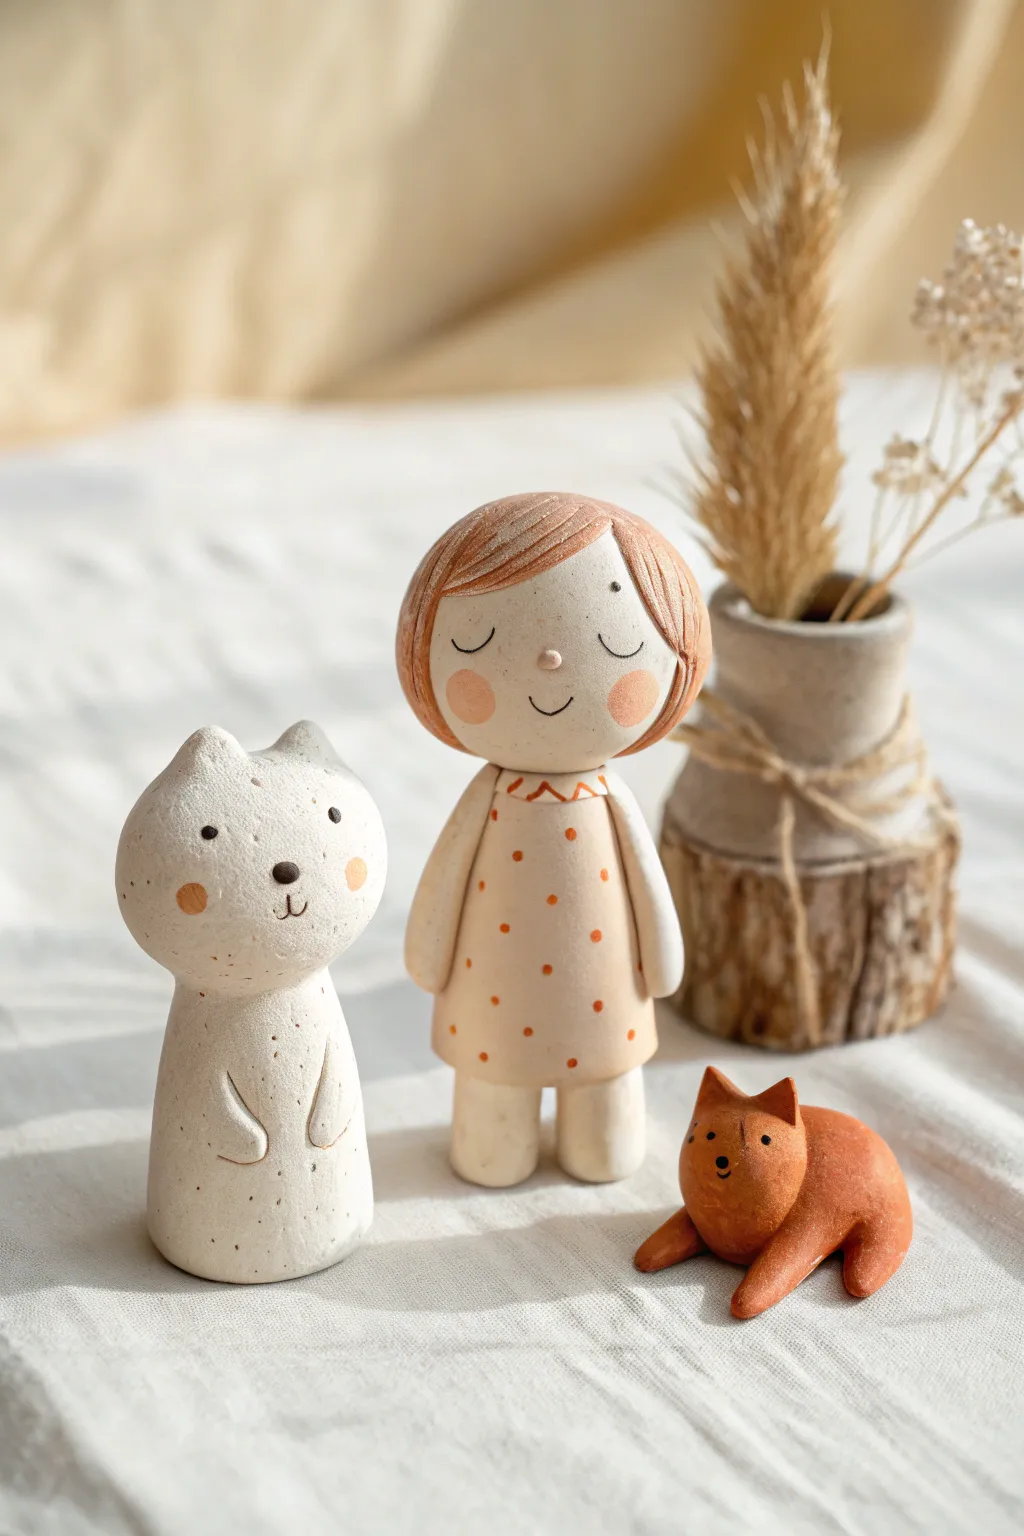
Bring your imaginative stories to life with these endearing, minimalist clay friends—a polite cat, a dreamy girl, and a restful fox. Their smooth, matte finish and soft color palette make them perfect additions to any small world play setup or nature table.
How-To Guide
Materials
- Air-dry clay (white or light beige)
- Clean work surface or silicone mat
- Rolling pin
- Small cup of water
- Sculpting tools (needle tool, small spatula)
- Acrylic paints (terracotta, cream, black, peach/blush)
- Fine detail paintbrushes (00 or 0 size)
- Matte varnish or sealant (optional)
- Sanding sponge (fine grit)
Step 1: Shaping the Girl
-
Body Base:
Start by rolling a ball of clay into a smooth cylinder, tapering slightly at the top for the neck area. Flatten the bottom gently so it stands upright securely. -
Head and Hair:
Roll a separate, slightly larger sphere for the head. Flatten a disk of clay and mold it over the top half of the sphere like a cap to create the hair base. -
Adding Texture:
Use a needle tool or knife to gently press grooved lines into the hair ‘cap’ to simulate strands, curving them naturally around the face. -
Dress:
Shape the body into a simple A-line dress form. Attach two long, slender tapered rolls of clay to the sides for arms. -
Assembly:
Score the top of the neck and the bottom of the head, dab with a little water, and press them firmly together. Smooth the seam if necessary, though a distinct neck line is fine here. -
Legs:
Create two small, sturdy cylinders for legs and attach them to the underside of the dress. Make sure to press firmly so she doesn’t wobble.
Cracks Appearing?
If you see tiny cracks while drying, mix a small amount of fresh clay with water to make a paste (slip) and fill them in with a brush.
Step 2: Sculpting the Animal Friends
-
Minimalist Cat:
Roll a smooth, thick cylinder that tapers upward into a rounded head shape—keep the head and body as one continuous piece for stability. -
Cat Details:
Pinch the top of the head gently to form two small, triangular ears. For the paws, attach two small, flat teardrop shapes to the front of the body, blending the upper edges smoothly. -
Resting Fox:
Form a sausage shape for the fox’s body and bend it slightly. Attach a round head with pinched ears to one end. Add a thicker, curved tail shape to the back. -
Fox Legs:
Use small ovals of clay to add front paws extended forward and back haunches tucked in, creating a lying-down pose. -
Baking or Drying:
Follow your clay package instructions. If air drying, let them sit for 24-48 hours until completely hard and light in color.
Seasonal Wardrobe
Paint different patterns on the girl’s dress to match the season—tiny green leaves for spring or blue snowflakes for winter.
Step 3: Painting and Finishing
-
Sanding:
Once fully dry, gently run a fine-grit sanding sponge over the figures to remove any fingerprints or rough bumps, creating that ceramic-like finish. -
Base Layers:
Paint the girl’s dress a soft cream. I personally like to mix a tiny bit of brown into the fox’s orange to make it look earthy rather than neon. -
Adding Patterns:
Using your finest brush, add tiny terracotta-colored polka dots to the dress and a zig-zag collar line around her neck. -
Facial Features:
Dip the tip of a toothpick or a very fine brush into black paint. Dot the eyes (widely spaced for a cute look) and paint simple U-shaped smiles or noses. -
Rosy Cheeks:
Dilute a tiny drop of peach or pink paint with water to make a wash. Dab on circular cheeks for the girl and the cat. -
Sealing:
Finish with a coat of matte varnish to protect the paint without making the figures too shiny, preserving their natural feel.
Once dry, these charming characters are ready to star in your child’s next quiet adventure story
Flat-Back Fridge Magnets
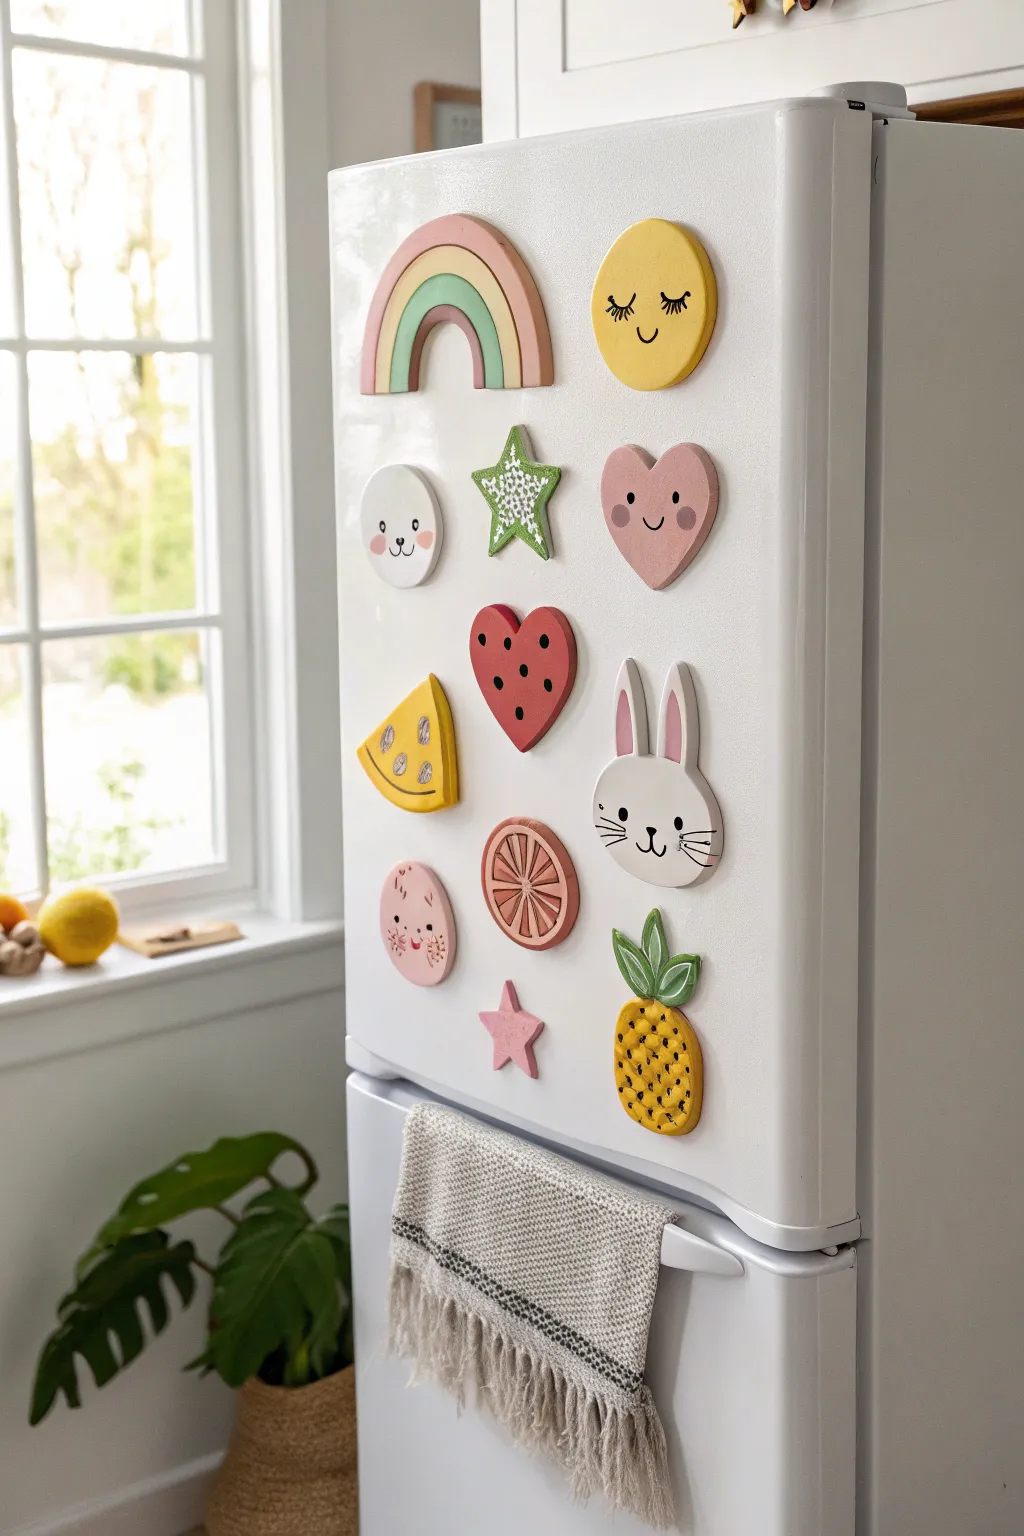
Brighten up your kitchen with this collection of adorable, chunky clay magnets featuring cheerful motifs like rainbows, bunnies, and fruits. These flat-back designs have a distinctively smooth, matte finish that gives them a modern, handcrafted charm perfect for holding up artwork or grocery lists.
Step-by-Step Guide
Materials
- Air-dry clay (white)
- Acrylic paints (pastel pink, yellow, mint green, red, black, white)
- Rolling pin
- Clay cutting tools or plastic knife
- Cookie cutters (circle, heart, star) – optional
- Fine-grit sandpaper
- Round craft magnets
- Strong craft glue (E6000 or hot glue)
- Fine detail paintbrushes
- Matte varnish or sealant (optional)
Step 1: Shaping the Clay Base
-
Roll it out:
Begin by rolling out your white air-dry clay on a clean, flat surface until it is an even slab, approximately 1/4 inch thick. You want it thick enough to be sturdy but not so heavy that it slides down the fridge. -
Cut basic shapes:
Use cookie cutters or a clay knife to cut out your base shapes. For the sun and faces, cut simple circles. For the rainbow, cut an arch. Freehand the bunny silhouette and the pineapple shape if you don’t have specific cutters. -
Add dimension:
For the rainbow, rather than just painting stripes later, try layering separate arched snakes of clay together, or use a tool to gently groove the lines between color bands while the clay is wet. -
Smooth the edges:
Dip your finger in a little water and gently run it along the cut edges of each shape to remove any roughness or stray clay crumbs. This creates that professional, polished look. -
Texture work:
For the pineapple, use a clay tool or a toothpick to press cross-hatch diagonal lines into the body. For the citrus slice, impress the segment lines deeply into the circle. -
Drying time:
Place all your shapes on a drying rack or parchment paper. Let them dry completely for 24-48 hours, flipping them halfway through to ensure the backs dry evenly.
Fixing Warped Clay
If edges curl up while drying, stick the slightly damp clay between two heavy books (with parchment paper) overnight to flatten it.
Step 2: Painting and Detailing
-
Sand for perfection:
Once fully dry, lightly sand any bumps or sharp edges with fine-grit sandpaper. I like to wipe them down with a slightly damp cloth afterward to remove the dust before painting. -
Base coats:
Paint the base colors first. Use a sunny yellow for the sun and pineapple, pastel pink for the heart, and white for the bunny. You may need two coats for opaque coverage. -
Painting the rainbow:
Carefully paint each arch of the rainbow in soft pastel tones—mint green, yellow, and blush pink—using a small flat brush to keep lines crisp. -
Adding the faces:
Using a very fine detail brush or a black paint pen, draw the facial features. Add simple closed eyes with eyelashes for the sun and sleeping moon, and a tiny nose and whiskers for the bunny. -
Fruit details:
For the watermelon heart, paint small black tear-drop seeds. On the pineapple, add small brown or black dots at the intersections of your texture lines. -
The green star:
Paint the star shape with a mossy green. Once dry, use a toothpick dipped in white paint to add tiny dots or a smaller white star pattern on top for contrast. -
Blush cheeks:
Mix a tiny amount of pink with water to create a wash, or use dry pastel dust to dab gentle rosy cheeks onto the bunny, cloud, and sun faces.
Step 3: Assembly
-
Seal the deal:
Apply a coat of matte varnish over the painted fronts. This protects the paint from chipping and makes the magnets easier to clean later. -
Attach magnets:
Flip the dried and sealed shapes over. Apply a strong dab of E6000 or hot glue to the back center of each piece. -
Press and hold:
Press a round ceramic magnet firmly into the glue. If using heavy clay pieces, ensure your magnet is strong enough to hold the weight. -
Final cure:
Allow the glue to set completely according to the manufacturer’s instructions before placing them on your refrigerator.
Make it Sensory
Mix essential oils into the clay before shaping. A lemon-scented pineapple or lavender-scented cloud adds a lovely smell to the kitchen.
Your fridge is now ready to showcase your family photos in the cutest way possible
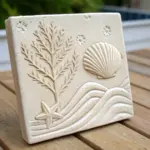
Painted Mosaic Clay Plaques
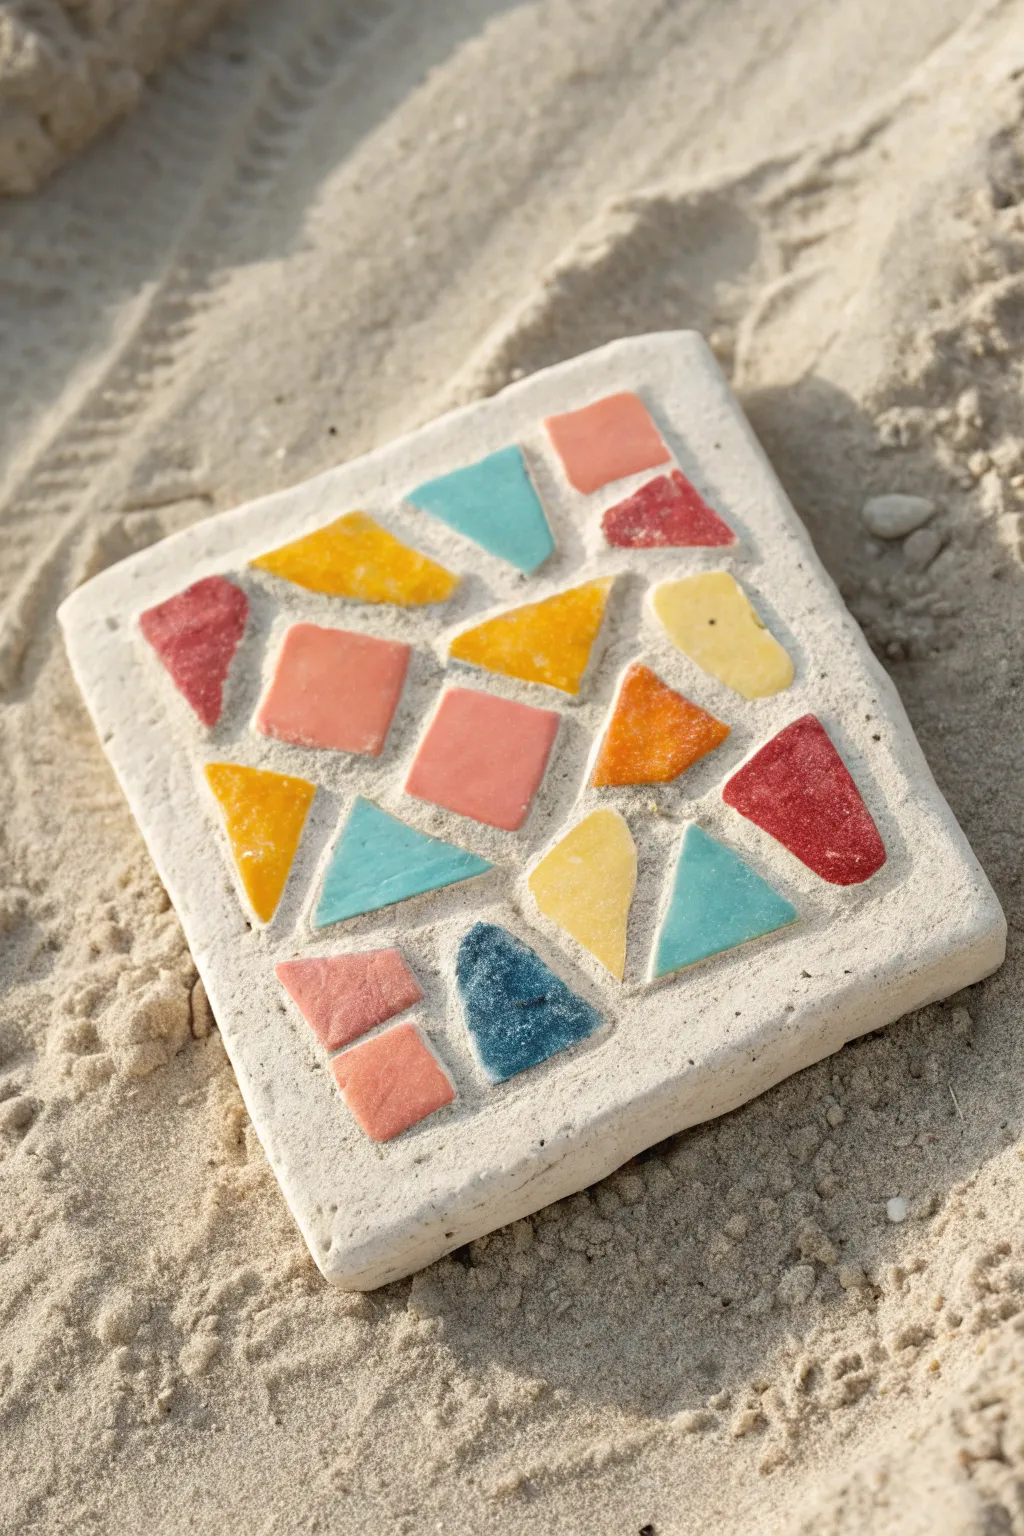
Create a charming, beach-inspired mosaic tile that captures the feel of summer with its textured, sandy base and vibrant geometric pops of color. This project combines the fun of shaping clay with the satisfaction of puzzle-piecing together a unique design.
How-To Guide
Materials
- White air-dry clay (or polymer clay)
- Small colored tiles, sea glass, or colored clay scraps
- Rolling pin
- Square cookie cutter or knife
- Sandpaper (medium grit)
- Clear acrylic sealer (matte finish)
- Parchment paper
- Small craft sponge
Step 1: Prepping the Base
-
Condition the clay:
Start by taking a handful of your white air-dry clay and kneading it thoroughly until it is warm, pliable, and free of cracks. -
Roll out the slab:
Place the clay on a sheet of parchment paper. Use a rolling pin to flatten it into an even slab, aiming for a thickness of about 3/4 inch to ensure sturdiness. -
Cut the square:
Use a large square cookie cutter or a ruler and knife to cut a perfect square shape from your clay slab. Remove the excess trim. -
Add texture:
For that authentic sandy look seen in the photo, gently dab a dry craft sponge or stiff brush all over the surface of the wet clay to create a pitted, stone-like texture.
Step 2: Creating the Mosaic pattern
-
Select your tesserae:
Gather your mosaic pieces. You can use pre-bought mini tiles, or here I prefer to use thin scraps of colored dried clay cut into varied geometric shapes like triangles and quadrilaterals. -
Dry fit the design:
Before pressing anything down, arrange your colored shapes on top of the clay square to plan your composition. Leave small gaps between each piece to mimic grout lines. -
Embed the center:
Start by pressing your central pieces into the clay first. Push them down until they are flush with the surface of the white clay base. -
Work outwards:
Continue pressing the remaining pieces into the soft clay, working from the center toward the edges. Ensure the pieces sit flat and don’t protrude too much. -
Secure the edges:
If any mosaic pieces are near the very edge, gently pinch the white clay around them to ensure they are securely held as the clay shrinks during drying. -
Smooth the surface:
Once all pieces are embedded, lightly run your rolling pin over the entire square one last time to ensure a uniform, flat surface.
Clean Edges
Keep a small bowl of water nearby while working. Dip your finger in it to smooth out any tiny cracks in the base clay immediately, before it begins to set.
Step 3: Drying and Finishing
-
Initial dry time:
Leave the plaque on the parchment paper to air dry in a cool, dry place. This usually takes 24 to 48 hours depending on the thickness. -
Flip for even drying:
Halfway through the drying process, carefully flip the square over to let the bottom breathe, preventing warping. -
Sand the edges:
Once completely bone dry, use medium-grit sandpaper to gently smooth any rough or sharp corners on the sides of the plaque. -
Clean layout lines:
If any white clay residue smeared onto your colored tiles during embedding, carefully scratch it off with a fingernail or wipe with a barely damp cloth. -
Seal the work:
Apply a thin coat of matte acrylic sealer to protect the clay from moisture and dust without making it look glossy or plastic.
Make it a Coaster
Stick adhesive cork backing or small felt pads to the bottom of your finished dry tile. This protects tables and turns your art into a functional drink coaster.
Display your finished tile on a shelf or use it as a cheerful paperweight to brighten up your desk
Under-the-Sea Coral Reef Scene
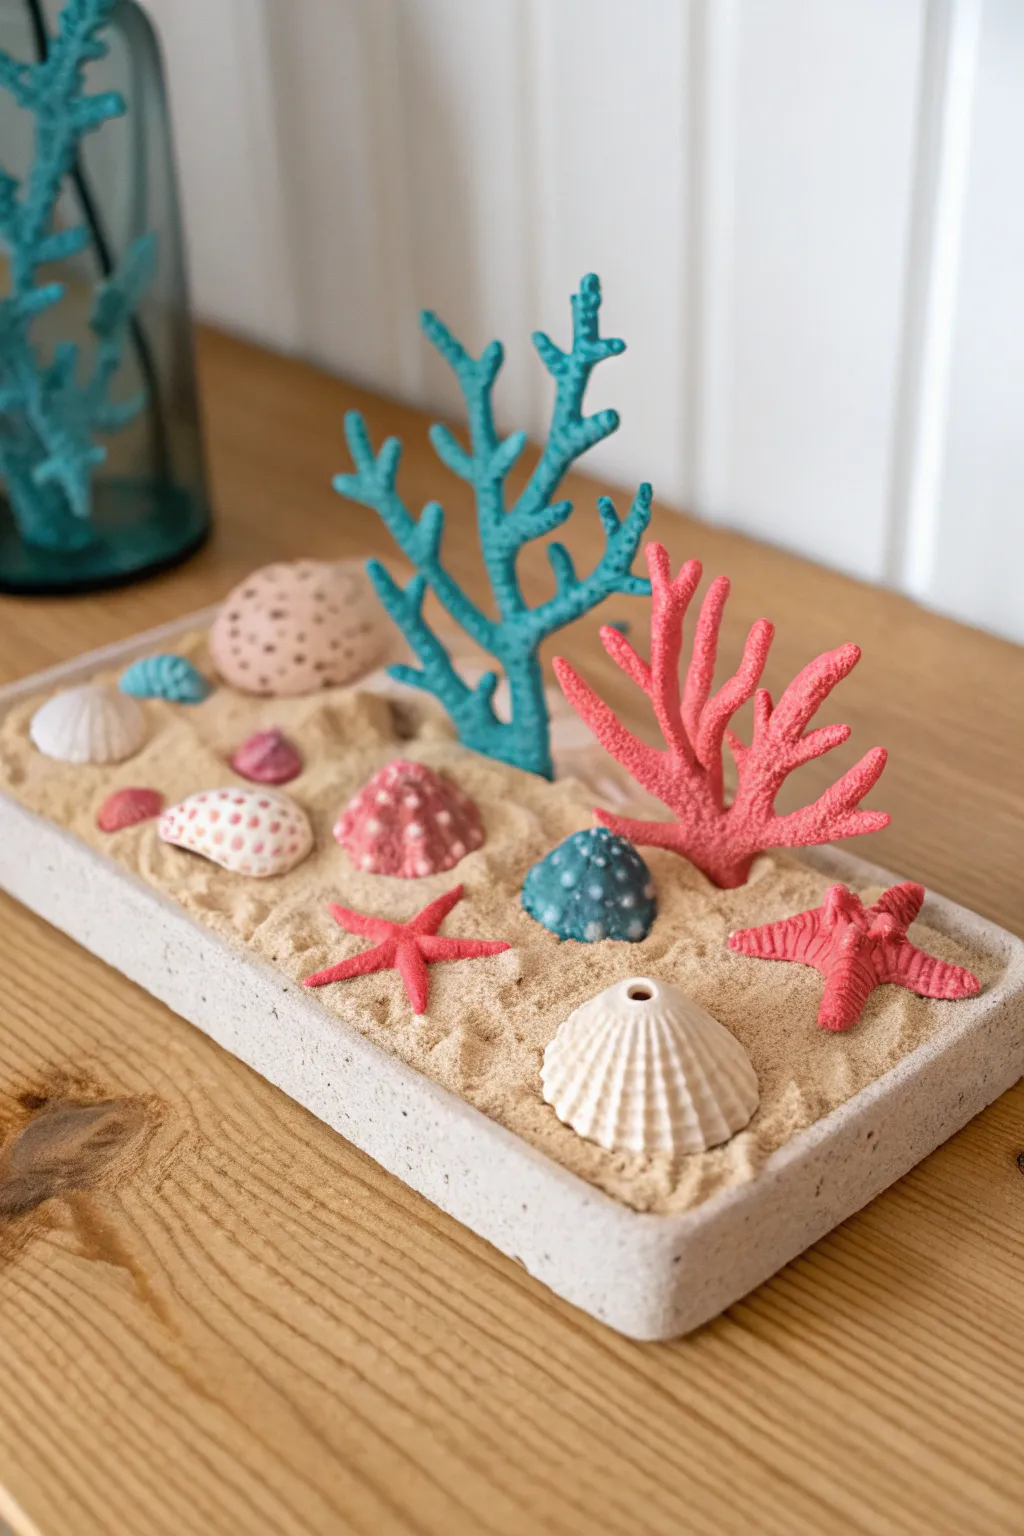
Bring the wonders of the ocean floor onto your shelf with this delightful tactile diorama. Using colorful clay and real sand, you’ll sculpt a vibrant collection of corals, shells, and starfish nestled in a permanent sandy display.
Step-by-Step
Materials
- Air-dry clay (teal, bright pink, pale pink, white)
- Small rectangular display tray (ceramic or wood)
- Fine craft sand (natural tan color)
- Detailed sculpting tools (needle tool, small ball stylus)
- White craft glue or tacky glue
- Aluminum foil (optional, for armatures)
- Rolling pin
- Texture sponge or toothbrush
Step 1: Sculpting the Corals
-
Form the teal coral base:
Start with a chunk of teal clay. Roll several thin coils of varying lengths—some for the main trunk and others for branches. Twist the main trunk piece slightly to give it an organic, underwater feel. -
Attach the branches:
Press the smaller coils onto the main trunk, branching them upward and outward. Use a small sculpting tool to smooth the seams where pieces join so they look like one continuous growth. -
Add surface texture:
Using a needle tool, poke tiny, shallow holes all over the surface of the teal coral to mimic the porous texture of real staghorn coral. -
Create the pink fan coral:
Using bright pink clay, roll similar thin snakes but arrange them in a flatter, fan-like shape rather than a tree shape. Ensure the base is thick enough to stand upright once dry. -
Texture the pink coral:
Instead of smooth holes, use the tip of your tool to create slight rough indentations along the branches, giving it a bumpy, organic surface.
Stay Upright
If your tall coral pieces keep drooping while you work, insert a piece of floral wire or a toothpick inside the main trunk for invisible structural support.
Step 2: Creating Shells & Starfish
-
Shape the large limpet shell:
Take a ball of white clay and flatten the bottom while pinching the top to form a cone. Press your finger into the base to hollow it out slightly. -
Detail the limpet ridges:
Use a knife tool or the edge of a ruler to press deep vertical lines from the peak of the shell down to the rim, creating the ribbed texture. -
Make the spotted shell:
Form a smooth dome with blue or teal clay. Roll tiny balls of white clay, flatten them, and press them onto the dome. Use a ball stylus to press the center of each white dot for a ‘barnacle’ look. -
Sculpt the starfish:
Flatten a small ball of bright pink or red clay. Use a star cutter or hand-cut five points. Gently pinch each arm to taper the ends, curling one or two slightly for movement. -
Add starfish details:
Poke lines of tiny holes down the center of each starfish arm using a needle tool to mimic their unique texture. -
Create spiral shells:
Roll a tapered snake of pale pink clay and coil it around itself, starting tight at the top and getting wider at the bottom. Use a tool to define the separation between the spirals.
Step 3: Assembly the Scene
-
Prepare the tray base:
Take your rectangular tray and spread a generous layer of craft glue across the entire inside bottom surface. -
Position the main structures:
while the bottom glue is wet, arrange your dried teal and pink coral structures. If they need help standing, add a small mound of fresh clay at their base to anchor them to the tray floor. -
Pour the sand:
Gently pour the fine craft sand over the glue layer, filling the tray until the clay bases of the corals are hidden and it looks like a natural seabed. Tilt the tray gently to ensure even coverage. -
Set the decorative elements:
I prefer to place the shells and starfish on top of the loose sand without gluing them immediately, so I can rearrange the composition until it looks perfect. -
Secure the pieces:
Once you are happy with the arrangement, lift each small shell, place a dab of glue on the sand underneath, and press the piece back down firmly to set it in place.
Ocean Sparkle
Mix a tiny pinch of fine iridescent glitter into your sand or brush a layer of pearl metallic paint onto select shells to mimic the shimmer of wet surfaces.
Now you have a peaceful slice of the ocean to admire every day, no snorkeling gear required
Galaxy Pencil Cup Wrap
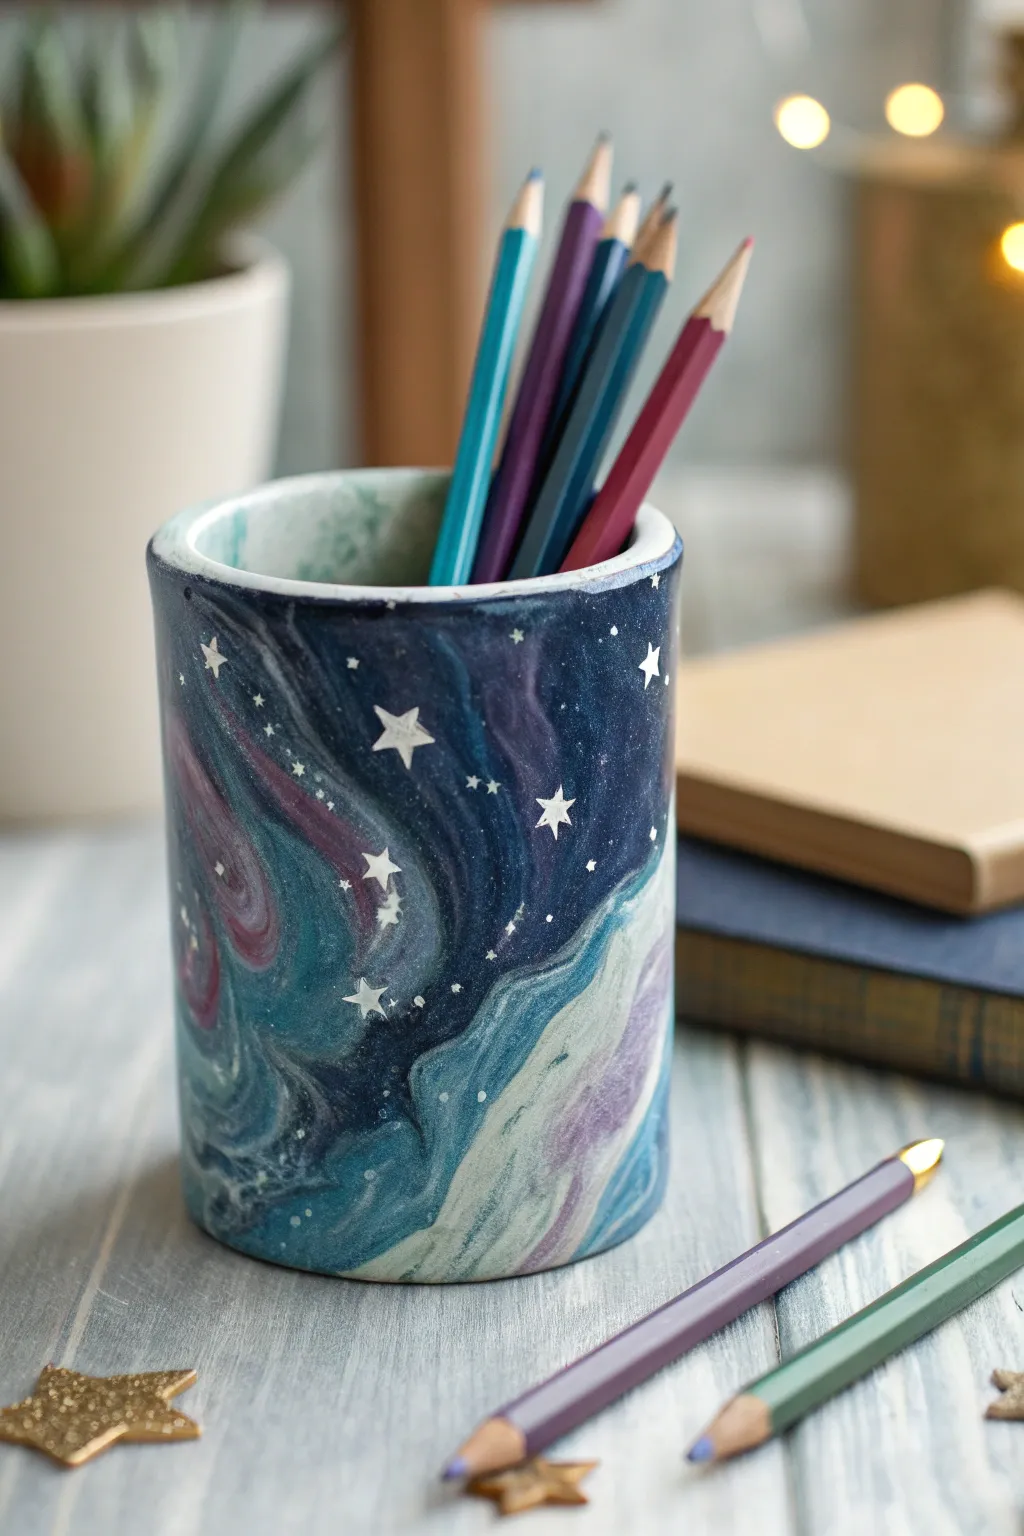
Bring the wonder of deep space to your desk with this marbled celestial pencil cup. Swirling hues of indigo, teal, and violet create a nebula effect, topped with hand-painted twinkling stars.
Step-by-Step Guide
Materials
- White air-dry clay or polymer clay (oven-bake)
- Acrylic paints: Navy blue, purple, teal, black, and white
- Rolling pin
- Empty tin can or glass jar (as a mold)
- Craft knife
- Old toothbrush
- Small detail paintbrush
- Gloss varnish or sealant
- Water cup and paper towels
Step 1: Shaping the Vessel
-
Prepare your base:
Start with a clean, dry tin can or glass jar to use as your structural form. If you want to remove the clay later, wrap the form lightly in parchment paper. -
Condition the clay:
Take a large handful of your white clay and knead it thoroughly until it is soft, pliable, and free of cracks. -
Roll it out:
Roll the clay into a flat, even slab about 1/4 inch thick. Make sure the slab is long enough to wrap fully around your chosen cylinder base. -
Wrap the cylinder:
Carefully lift the clay slab and wrap it around the tin can. Press the edges together to form a seam. -
Smooth the seam:
Use a little water on your finger (for air-dry clay) or a blending tool to smooth the vertical joining line until it disappears completely. -
Create the base:
Roll out a smaller piece of clay and cut a circle slightly larger than the bottom of your can. Press this onto the bottom, smoothing the edges up to join the side walls. -
Refine the rim:
Trim any excess clay from the top using a craft knife for a clean line, then gently use your finger to round off the sharp edge. -
Let it cure:
Allow the clay to dry fully according to the package instructions. For air-dry clay, this usually takes 24-48 hours; for polymer, bake as directed.
Step 2: Painting the Galaxy
-
Apply the base coat:
Paint the entire outside of the cup with a deep navy blue or black acrylic paint. This dark background is crucial for making the galaxy colors pop. -
Sponge on the nebula:
Dip a small piece of sponge or crumpled paper towel into purple paint. Dab it randomly in cloud-like formations around the cup. -
Layer the colors:
Repeat the sponge technique with teal and lighter blue paints. Overlap these slightly with the purple to create beautiful blended transitions. -
Add bright highlights:
Mix a tiny amount of white into your teal paint and dab it into the center of the colored clouds to create glowing, high-contrast areas. -
Blend the swirls:
While the paint is still tacky, use a soft, slightly damp brush to gently swirl the colors together, mimicking the movement seen in the photo. -
Paint the stars:
Using your smallest detail brush and pure white paint, carefully draw five-point stars in various sizes on top of the darkest blue sections. -
Create star clusters:
Dip an old toothbrush into watered-down white paint. Run your thumb over the bristles to flick tiny speckles across the cup for distant stars. -
Seal the magic:
Once all paint is completely dry, apply a coat of gloss varnish. This protects the finish and gives it that shiny, polished ceramic look.
Uneven Clay Surface?
If your dried clay feels bumpy before painting, gently sand it with fine-grit sandpaper until smooth, wiping away dust with a damp cloth.
Glow in the Dark
For a magical nighttime surprise, paint the white stars using glow-in-the-dark acrylic paint. Charge it under a lamp and watch it shine.
Now you have a stunning piece of the universe to organize your creative space
Color-Swirled Cane Slice Charms
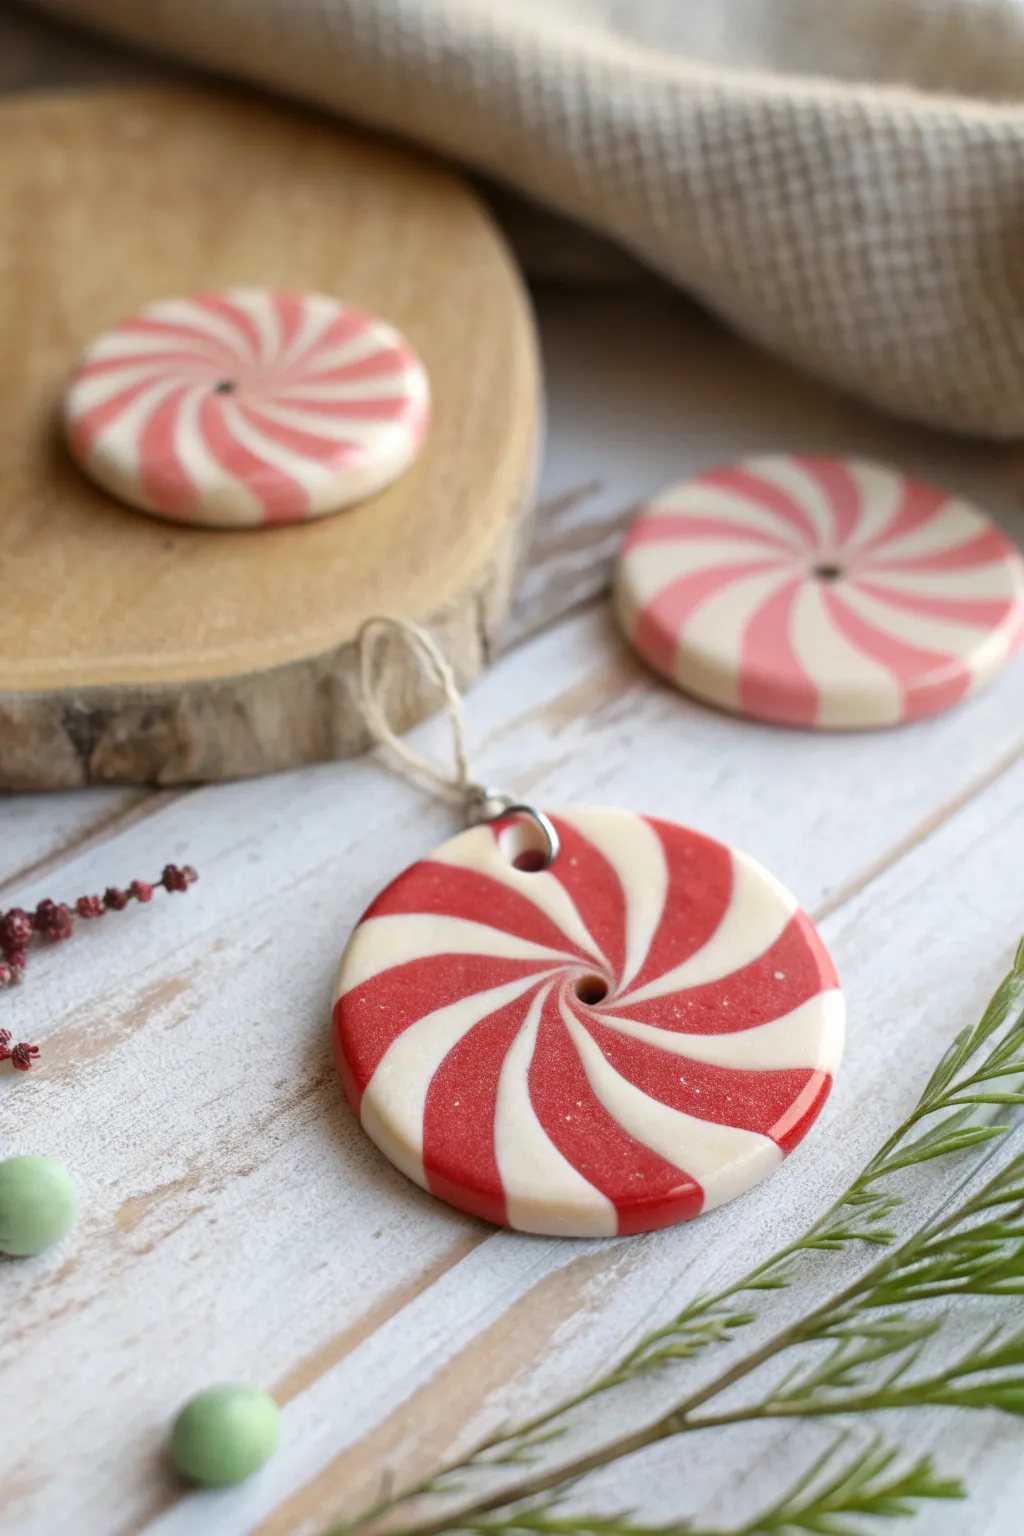
These delightful polymer clay charms look just like classic peppermint candies with their mesmerizing red and white pinwheel designs. They make perfect festive ornaments, jewelry pendants, or sweet gift toppers that are durable enough to last for years.
How-To Guide
Materials
- White polymer clay
- Red polymer clay (preferably a slightly translucent or pearlescent red for depth)
- Clay roller or pasta machine
- Flexible tissue blade or craft knife
- Small round piping tip or straw (for making the hole)
- Glossy polymer clay glaze or UV resin
- Soft paintbrush
- Jump rings and twine
- Baking sheet and parchment paper
Step 1: Creating the Candy Cane Log
-
Condition the Clay:
Begin by warming up both your white and red clay in your hands until they are soft and pliable. This conditioning step is crucial to prevent cracking later. -
Form the Base Logs:
Roll a chunk of white clay into a thick cylinder, about 1 inch in diameter. Do the same with the red clay, trying to keep them roughly the same size. -
Cut Wedges:
Cut both cylinders into 4-6 equal pie-shaped wedges lengthwise. You want alternating colors, so you’ll need an equal number of red and white triangular prisms. -
Assemble the Cylinder:
reconstruct a single cylinder by alternating the red and white wedges. Press them together gently so they stick to one another, forming a striped log. -
Reduce to Remove Air:
Squeeze the log gently from the center outwards to push out any trapped air bubbles. Roll it on your work surface to smooth the outside. -
Twisting the Pattern:
Hold one end of the log in your left hand and the other in your right. Gently twist your hands in opposite directions. This transforms the straight stripes into the dynamic swirl pattern seen in the photo. -
Check the Twist:
Continue twisting until the stripes are angled significantly. The more you twist, the tighter the spiral will be on the final face.
Smudged Colors?
If red smears onto the white while cutting, wipe your blade with rubbing alcohol between every single slice. This keeps the stark contrast crisp.
Step 2: Slicing and Shaping
-
Chill the Cane:
I highly recommend placing your twisted log in the refrigerator for about 15-20 minutes before slicing. Firm clay distorts less under the blade. -
Slice the Charms:
Using your tissue blade, slice discs from the log that are about 1/4 inch thick. Try to cut straight down rather than sawing back and forth to maintain the round shape. -
Smooth the Edges:
Pick up a slice and gently tap the edges with your finger to round them off slightly, removing any sharp angles from the cutting process. -
Add the Hanging Hole:
Use a small straw or a tool to punch a hole near the edge of the swirl. Make sure it isn’t too close to the rim, or the clay might break later. -
Center Indent (Optional):
For added realism, you can press a small dot or indentation into the very center of the swirl, mimicking how real hard candies are sometimes formed.
Pro Tip: Glitter Effect
Mix a tiny pinch of fine translucent glitter into your red clay before shaping. It mimics the sugary sparkle of real peppermint candy perfectly.
Step 3: Baking and Finishing
-
Bake the Charms:
Place your clay discs on a parchment-lined baking sheet. Bake according to your specific clay brand’s package directions (usually around 275°F or 135°C for 15-30 minutes). -
Cool Completely:
Let the charms cool down fully on the baking sheet. They are fragile while hot and harden as they return to room temperature. -
Apply Glaze:
Using a soft brush, apply a coat of glossy glaze or UV resin to the top and sides. This gives it that wet, hard-candy shine shown in the image. -
Attach Hardware:
Once the glaze is dry, open a jump ring with pliers, loop it through the hole you made, and close it securely. -
Add the Twine:
Thread a piece of rustic twine or string through the jump ring to finish your festive ornament.
Now you have a batch of sweet, non-edible treats ready to decorate your home
Alphabet Tiles for Story Games
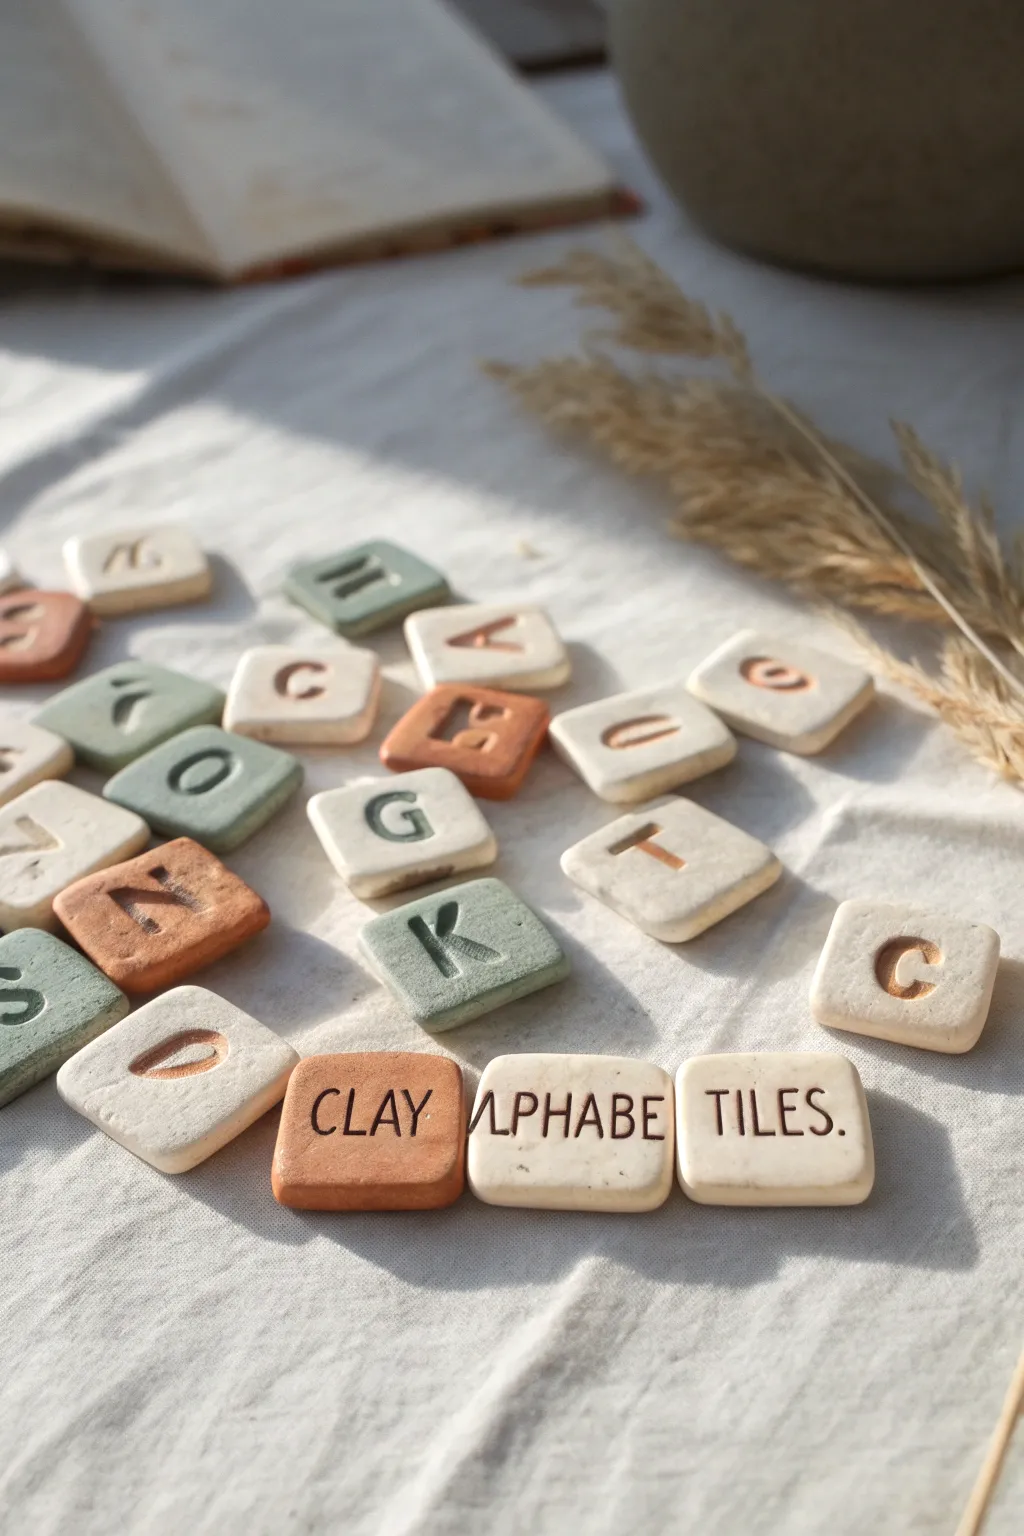
Create a charming, tactile learning tool with these rustic ceramic alphabet tiles. Made from earthy white, terracotta, and sage-green clays, these durable squares are perfect for spelling games, sensory play, or even unique home décor accents.
Step-by-Step Tutorial
Materials
- Air-dry clay or polymer clay (white, terracotta, and sage green colors)
- Small letter stamps (serif font)
- Square cookie cutter (approx. 1 inch) or a sharp craft knife
- Rolling pin
- Parchment paper or canvas mat
- Fine-grit sandpaper (optional)
- Brown acrylic paint (for antiquing)
- Paper towel or sponge
- Matte varnish or sealant
Step 1: Preparation & Shaping
-
Prepare your workspace:
Lay down a sheet of parchment paper or a canvas mat to prevent the clay from sticking to your table. If you are using polymer clay, condition it by kneading until it is soft and pliable. -
Roll out the clay:
Take your first color of clay—let’s start with the natural white—and roll it out to an even thickness of about 1/4 inch (6mm). Ensure the surface is smooth and free of air bubbles. -
Cut the squares:
Using a small square cookie cutter, cut out as many tiles as you can fit. If you don’t have a cutter, use a ruler and craft knife to measure and slice a grid of equal squares. Don’t worry if they aren’t factory-perfect; the slight irregularities add character. -
Repeat with other colors:
Repeat the rolling and cutting process with your terracotta and sage green clays. Aim for a good mix of colors so you have variety in your final alphabet set. -
Soften the edges:
Once all squares are cut, gently pick up each one and smooth the sharp cut edges with your fingertip. You want a soft, rounded ‘pillow’ look rather than sharp corners.
Step 2: Stamping & Finishing
-
Position the stamps:
Select your letter stamps. I find it helpful to lay them out alphabetically beforehand so you don’t miss any letters. Center the stamp over a clay tile. -
Impress the letters:
Press the stamp firmly and evenly into the clay. You want a deep, clear impression, but be careful not to push all the way through the tile. Rock the stamp slightly if needed to catch all the serifs. -
Create special words (Optional):
For the larger rectangular tiles seen in the project (like ‘CLAY’, ‘ALPHABET’, ‘TILES.’), cut larger pieces of clay and stamp entire words horizontally across them. -
Let them dry:
Arrange the stamped tiles on a clean, flat surface to dry. If using air-dry clay, this might take 24-48 hours. Flip them halfway through to ensure even drying. If using oven-bake clay, bake according to the package instructions. -
Sand the imperfections:
Once fully cured and hard, check for any rough edges. Use a piece of fine-grit sandpaper to gently buff away burrs or fingerprints for a professional finish. -
Design the antique look:
To make the letters pop like the ones in the photo, dilute a small amount of brown acrylic paint with water to create a wash. -
Apply the wash:
Brush the wash over the entire surface of the tile, ensuring it gets deep into the stamped letter grooves. -
Wipe away excess:
Immediately wipe the surface with a damp paper towel or sponge. The paint will stay in the recessed letters but wipe off the high points, leaving a crisp, readable character. -
Seal the tiles:
Finish by applying a coat of matte varnish or sealant. This protects the clay from moisture and dirt, making the tiles durable enough for daily play.
Stamp Release Tip
If your stamp is sticking to the clay, lightly dust the stamp surface with cornstarch or dip it in water before pressing it down. This ensures a clean release every time.
Magnetize It
Turn this game into fridge fun by gluing small, strong neodymium circular magnets to the back of each finished tile after the sealant has dried.
Enjoy spelling out stories and messages with your beautiful new set of handmade tiles