If you’ve got a block of air dry clay and a free afternoon, you’re already halfway to something adorable and useful. I pulled together my favorite fun air dry clay ideas—the kind that feel playful, look high-end, and stay totally beginner-friendly.
Simple Trinket Dishes With Wavy Edges
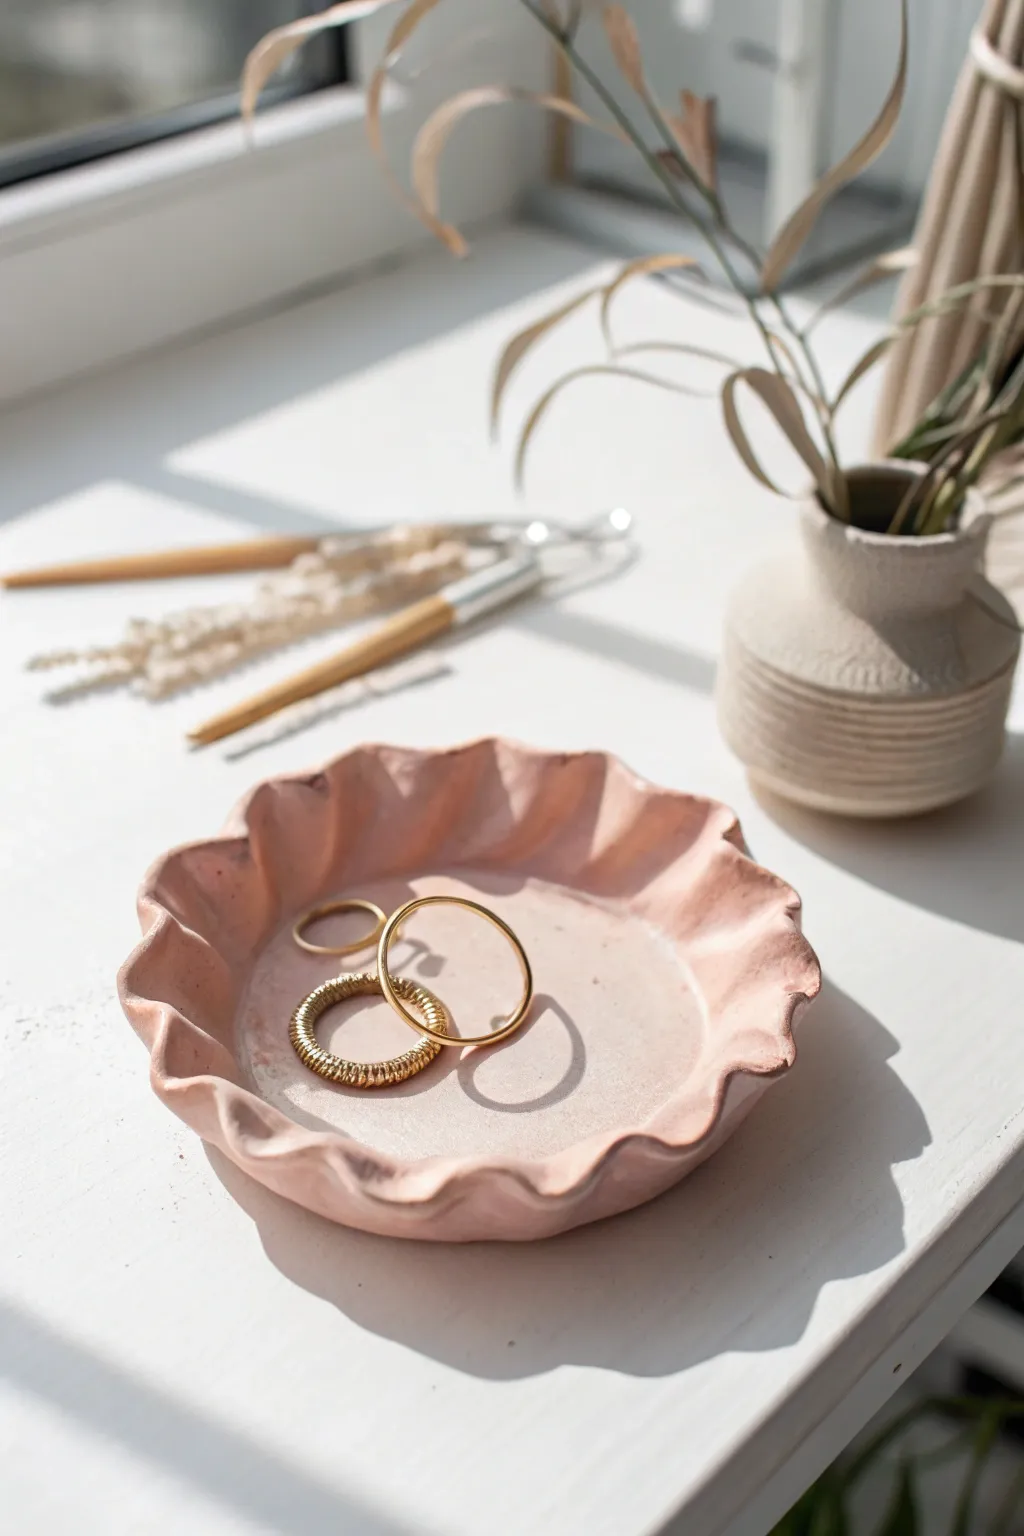
Capture the soft, organic beauty of a flower blossom with this handcrafted trinket dish. Its gentle curves and blush pink hue make it a perfect resting spot for your favorite rings and delicate jewelry.
How-To Guide
Materials
- Air dry clay (white)
- Acrylic paint (blush pink or light coral)
- Fuchsia or darker pink acrylic paint (for speckling)
- Rolling pin
- Circle cutter or small bowl (approx. 4-5 inches)
- Craft knife or needle tool
- Small bowl or cup (for molding)
- Sandpaper (fine grit)
- Paintbrush (flat shader and fan brush)
- Gloss varnish or sealant
- Water and sponge
- Canvas or silicone mat
Step 1: Shaping the Base
-
Prepare the Clay:
Begin by taking a handful of air dry clay and kneading it in your hands until it feels soft, warm, and pliable. -
Roll it Out:
Place the clay on your work mat. Use a rolling pin to flatten it into an even sheet, aiming for a thickness of about 1/4 inch. -
Cut the Circle:
Place your circle cutter or a small guide bowl onto the clay sheet. Press down firmly to cut, or trace around the bowl with a craft knife to create a perfect circle. -
Smooth the Edges:
Dip your finger in a little bit of water and run it along the cut edge of the circle to remove any sharpness or rough bits. -
Create the Waves:
Gently lift the edges of the clay circle. Pinch the edge between your thumb and forefinger at regular intervals to create a fluted, wavy pattern resembling a pie crust or flower petals. -
Form the Bowl:
Carefully transfer your wavy circle into a small bowl or cup. The curved sides of the container will help the clay hold its cupped shape while it dries. -
Refine the Shape:
While it sits in the mold, gently press the waves with your finger to ensure they look organic and soft rather than sharp. -
Initial Drying:
Let the dish sit in the mold for at least 24 hours. I usually place it in a sunlit spot, but away from direct heat sources to prevent cracking. -
Flip and Dry:
Once the top feels dry to the touch, carefully remove the clay dish from the mold and turn it upside down to let the bottom dry completely for another 12-24 hours.
Step 2: Finishing Touches
-
Sanding:
When the dish is bone dry, inspect the rim. Use fine-grit sandpaper to gently smooth out any unevenness on the waves or the rim. -
Dust Clean:
Wipe the entire dish down with a very slightly damp cloth or sponge to remove all the sanding dust before painting. -
Base Coat:
Mix a soft blush pink acrylic paint. Apply a thin, even layer to the entire dish, covering both the inside and the outside. -
Second Coat:
Allow the first layer to dry completely, then apply a second coat for a more opaque, solid finish. -
Speckling Method:
Dilute a tiny amount of darker pink or fuchsia paint with water. Load an old toothbrush or a stiff fan brush with the mixture. -
Applying Speckles:
Flick the bristles with your thumb over the dish to create a fine mist of speckles. Test on a paper towel first to control the droplet size. -
Gold Accent:
If you wish to highlight the rim, you can lightly brush a metallic gold paint along just the very tips of the wavy edge. -
Sealing:
Once all paint is fully dry, apply a coat of gloss varnish. This gives it a ceramic-like shine and protects it from moisture. -
Final Cure:
Let the varnish cure according to the bottle instructions (usually 24 hours) before placing any jewelry inside.
Fixing Cracks
If small hairline cracks appear during drying, fear not. Mix a tiny bit of fresh clay with water to make a paste (slip) and smooth it into the cracks.
Level Up: Texture
Before cutting your circle, press a piece of lace or a textured fabric into the wet clay. This leaves a subtle imprinted pattern inside the bowl.
Now you have a charming, handmade vessel ready to organize your treasures on a bedside table or vanity


Ring Cones for Sink-Side Storage

Achieve the high-end look of speckled stoneware without a kiln using clever painting techniques and air-dry clay. This chic set features a minimalist rectangular tray and two ring cones accented with elegant gold bands.
Step-by-Step Guide
Materials
- Air dry clay (white)
- Acrylic rolling pin
- Clay knife or craft knife
- Sandpaper (fine grit)
- Acrylic paint (cream/off-white, dark brown, gold)
- Old toothbrush
- Paintbrushes (flat and fine detail)
- Small bowl of water
- Ruler
- Clear matte varnish or sealant
Step 1: Sculpting the Tray
-
Roll the base:
Begin by conditioning a large ball of white air-dry clay until it is smooth and pliable. Roll it out into a slab that is approximately 1/4 inch thick. -
Cut the shape:
Using a ruler and your craft knife, cut a neat rectangle from the slab. A size of about 4×6 inches works well for a vanity tray. -
Create the walls:
Roll a long snake of clay, keeping the thickness consistent. Flatten it slightly with your fingers to create a sturdy strip for the walls. -
Attach the rim:
Score the edges of your rectangle base and the bottom of your clay strip. Apply a little water to the scored areas (slip) and attach the strip around the perimeter of the base. -
Smooth the seams:
Use your finger or a clay tool to blend the clay where the wall meets the base, both on the inside and outside, until the seam disappears completely.
Step 2: Forming the Cones
-
Shape the cones:
Take two smaller balls of clay. Roll them between your palms and the table, applying more pressure on one side to taper them into cone shapes. Make one taller and one shorter for visual interest. -
Refine the surface:
Roll the cones gently on a flat surface to ensure they are perfectly round and the sides are straight, not lumpy. Flatten the bottoms by tapping them on the table so they stand upright. -
Dry completely:
Set all pieces aside to dry. This usually takes 24-48 hours depending on humidity. Rotate the pieces occasionally to ensure even drying. -
Sand for smoothness:
Once fully dry, use fine-grit sandpaper to remove any fingerprints or rough edges. Wipe away the dust with a slightly damp cloth.
Uneven Splatter?
Practice your toothbrush flicking technique on a piece of scrap paper first. If you get large blobs on the clay, quickly blot them up with a damp paper towel.
Step 3: Painting the Faux-Ceramic Effect
-
Base coat:
Paint the tray and both cones with a coat of cream or off-white acrylic paint. You may need two coats for opaque coverage. -
Prepare the speckle:
Water down a small amount of dark brown paint until it is quite fluid, almost like ink. -
Apply the splatter:
Dip an old toothbrush into the watered-down brown paint. Hold it over your clay pieces and run your thumb across the bristles to flicker tiny specks onto the surface. -
Let the speckles dry:
Allow the splatter effect to dry completely before moving to the metallic accents to avoid smudging. -
Add gold accents:
Using a fine detail brush and gold metallic paint, carefully paint the tip of the taller cone. -
Create the gold band:
Paint a horizontal stripe of gold around the lower third of the taller cone. I find resting my hand on the table while rotating the cone helps keep the line steady. -
Seal the project:
Finish by applying a coat of clear matte varnish to all pieces to protect the paint and give it that finished ceramic feel.
Make it Functional
Before the clay dries, press your actual rings into the cones slightly to create custom grooves that hold your specific jewelry perfectly in place.
Now you have a stylish, handmade organizer ready to declutter your sink area


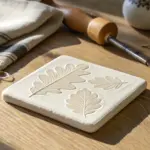
Bubble Texture Coasters
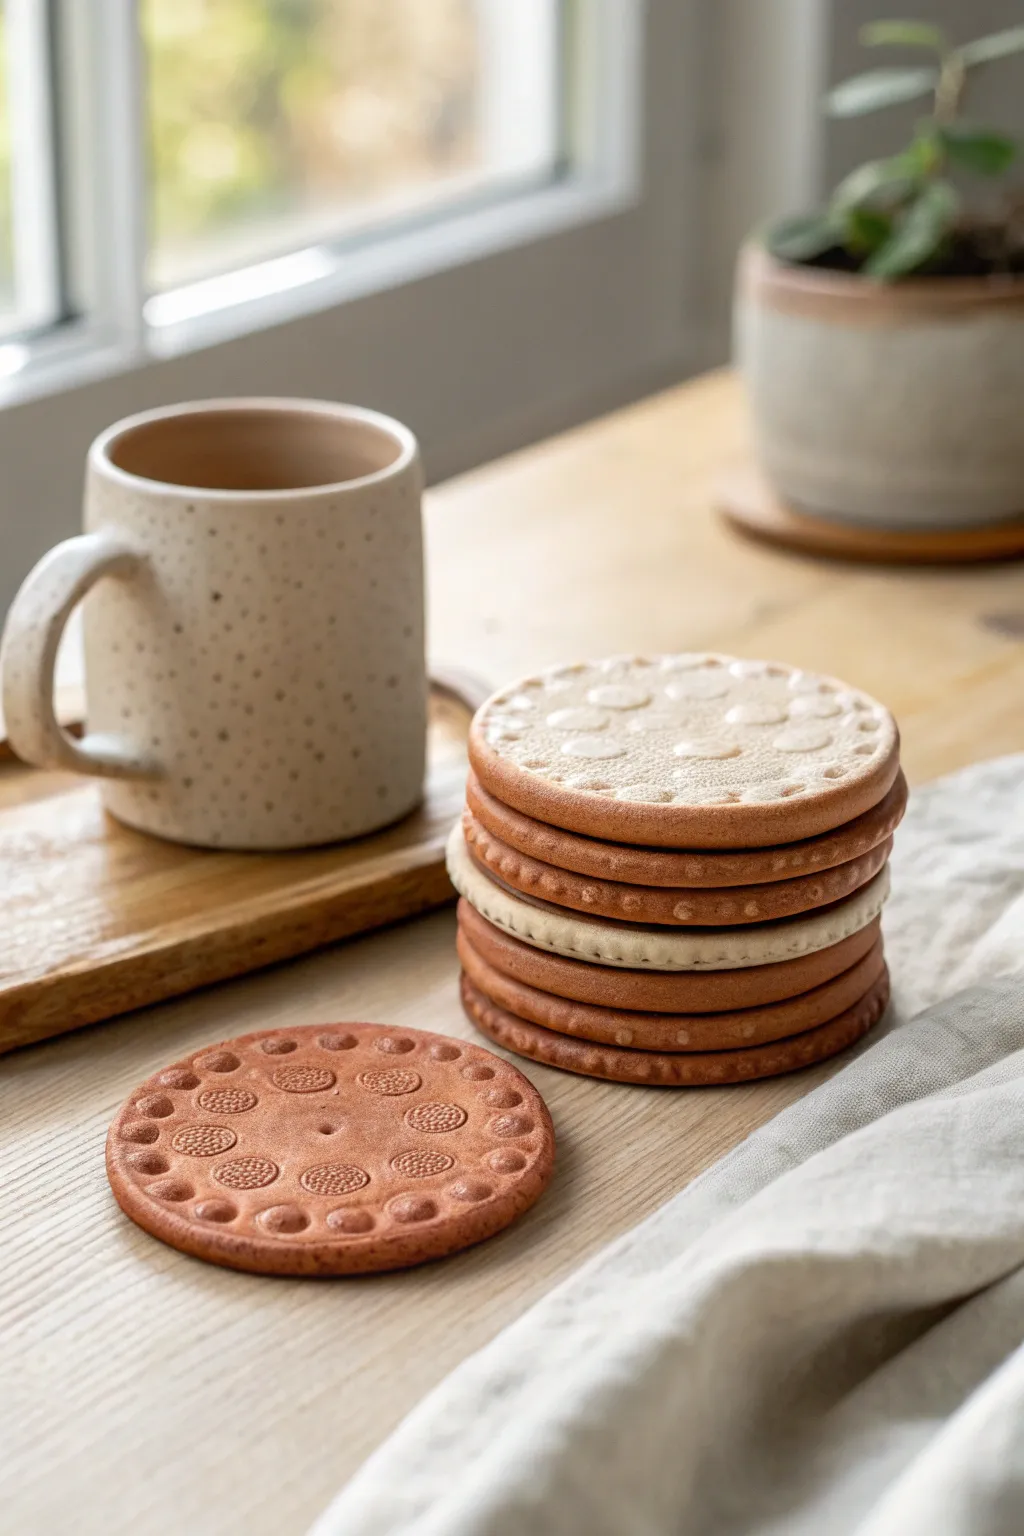
These charming coasters mimic the look of classic tea biscuits, adding a whimsical and cozy touch to your coffee table. With their satisfying tactile texture and warm, earthy tones, they are as fun to make as they are useful.
Step-by-Step
Materials
- Air dry clay (terracotta and white/cream colors)
- Rolling pin
- Circle cutter (approx. 4 inches) or a round bowl
- Bubble wrap (small bubbles)
- Straw or small piping tip (for small impressed dots)
- Modeling tool with a small ball end
- Sandpaper (fine grit)
- Acrylic varnish (matte or satin)
- Water and sponge for smoothing
Step 1: Shaping the Base
-
Roll the slab:
Begin by conditioning your terracotta air dry clay until it is pliable. Roll it out on a flat surface to an even thickness of about 1/4 inch. If you want a uniform look, use guide sticks on either side of your rolling pin. -
Cut the circles:
Use your large circle cutter or trace around a bowl to cut out your coaster shapes. Create as many bases as you need, smoothing the rough edges with a slightly damp finger or sponge to ensure a clean finish. -
Initial surface smoothing:
Before adding texture, ensure the top surface is perfectly flat. I like to run a slightly damp sponge over the surface one last time to remove any fingerprints.
Keep it Flat
To prevent warping as the clay dries, place a light book or a flat board on top of the coasters once they are ‘leather hard’ (dry to touch but not fully cured)
Step 2: Creating the Texture
-
Mark the border:
Lightly trace a smaller circle about half an inch from the edge to guide your border design. This doesn’t need to be deep, just a faint visual guide. -
Add the raised bubble rim:
For the characteristic ‘biscuit’ rim seen in the image, roll tiny balls of clay—about the size of a pea. Press these gently onto the outer rim of the coaster, flattening them slightly so they adhere but remain raised. -
Create the inner pattern:
Using a straw or a small circular piping tip, press gently into the center area of the coaster to create rings of small stamped circles. Arrange them in a repetitive geometric pattern. -
Add secondary details:
Use your small ball-ended tool to add tiny dots inside the stamped circles or in the spaces between them for extra detail. -
Refine the border:
Use the same ball tool to press a small indentation into the center of each raised bubble on the rim, giving it that classic cracker appearance.
Glazed Effect
Mix a little clear gloss varnish with white acrylic paint and dab it onto the ‘cream’ sections for a realistic, shiny icing look
Step 3: Making the Cream Variations
-
Cut the ‘cream’ layer:
For the two-tone coasters, roll out white or cream-colored clay very thinly. Cut a circle slightly smaller than your terracotta base. -
Texture the cream:
Before attaching, press a piece of bubble wrap onto the white clay circle to effect a bumpy, aerated texture. -
Attach the layers:
Score the surface of a plain terracotta base and the back of the white circle. Apply a little water or slip, then press the white layer firmly onto the base.
Step 4: Finishing Touches
-
Slow drying:
Place your coasters on a wire rack to dry. Turn them over occasionally to prevent curling. This process usually takes 24-48 hours depending on humidity. -
Sanding:
Once fully dry, use fine-grit sandpaper to gently smooth the edges and any rough spots on the rim, being careful not to sand away your texture. -
Seal and protect:
Apply two coats of matte or satin acrylic varnish to seal the clay. This protects the coasters from moisture from your mugs and deepens the terracotta color nicely.
Now you have a set of delightful coasters ready to protect your table with style


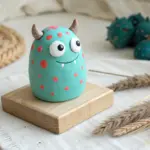
Mini Pinch Pots for Snacks and Notions
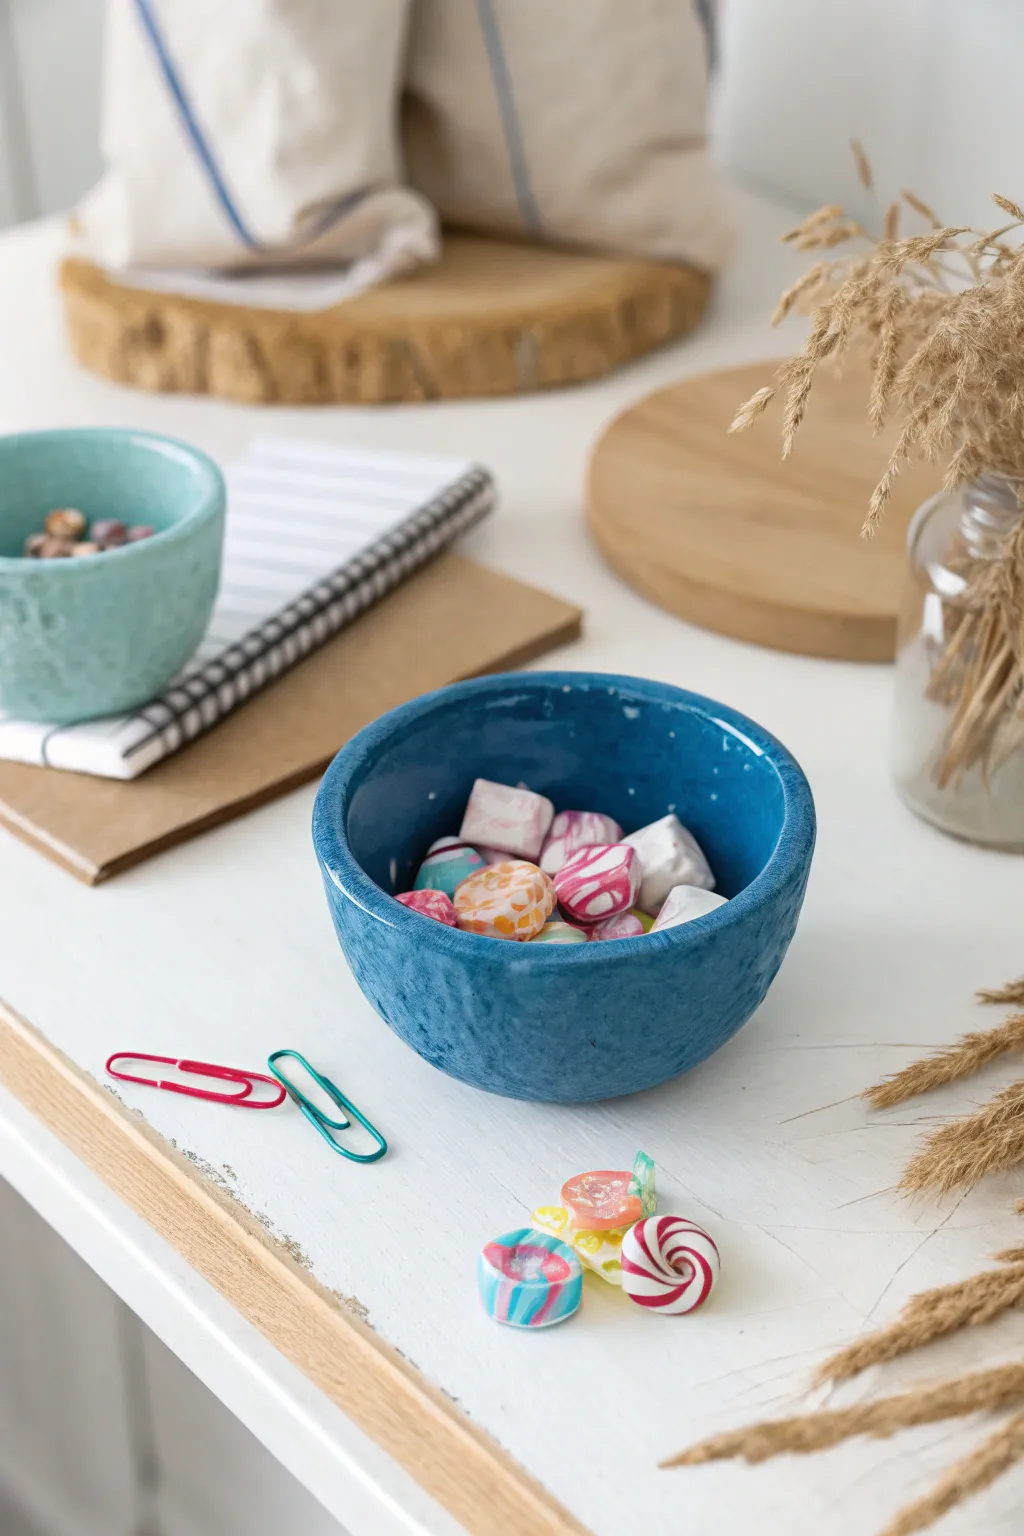
These charming little vessels prove that perfection isn’t necessary for beauty, featuring a delightful hand-formed texture and rich, solid colors. They are the perfect size for holding desk notions like paperclips or sweet treats while adding a pop of color to your workspace.
How-To Guide
Materials
- Air dry clay (white or grey)
- Acrylic paints (teal, deep ocean blue)
- Gloss or satin varnish (mod podge or polyurethane)
- Small bowl of water
- Sandpaper (fine grit)
- Paintbrushes (flat and round)
- Optional: Sponge for texturing
Step 1: Forming the Pinch Pot Base
-
Prepare the Clay:
Start by grabbing a handful of air dry clay, roughly the size of a tennis ball. Knead it in your hands for a minute to warm it up and ensure it is pliable and free of air bubbles. -
Create a Sphere:
Roll the clay firmly between your palms to create a smooth, round ball. Try to smooth out any major cracks at this stage with a dab of water. -
Open the Pot:
Hold the ball in your non-dominant hand. Take the thumb of your dominant hand and press it gently but firmly into the center of the sphere, stopping about half an inch from the bottom. -
Pinch the Walls:
With your thumb still inside the hole and your fingers on the outside, begin to pinch the clay gently. Rotate the ball in your hand as you pinch to expand the hole outward. -
Build Up Height:
Continue pinching and turning, working your way from the bottom up to the rim. Aim for an even thickness of about 1/4 inch throughout the walls.
Step 2: Refining and Texturing
-
Shape the Bottom:
Once the general shape is formed, gently tap the bottom of the pot against your work surface to create a flat, stable base so it won’t wobble. -
Even Out the Rim:
Check the rim of your bowl. If it’s very uneven, you can gently pat it down or slice off the excess with a clay knife, but keep the edge soft and rounded rather than sharp. -
Add Texture:
Instead of smoothing the clay perfectly with water, embrace the natural fingerprints and slight bumps. I actually like to dab a dry sponge against the exterior to enhance that stony, porous look seen in the photo. -
Correction Check:
Look for any deep cracks that might threaten the structure. Fill these with a tiny slip of clay and water, but leave the shallow surface imperfections for character. -
Dry Completely:
Set your pot aside in a safe place. Let it air dry for at least 24-48 hours. It should feel room temperature (not cool) and assume a chalky white appearance when fully dry.
Make it Shine
Use a high-gloss polyurethane varnish or even clear nail polish for a finish that looks genuinely kiln-fired and wet, contrasting beautifully with the rough texture.
Step 3: Painting and Finishing
-
Sand Rough Spots:
Once dry, run fine-grit sandpaper lightly over the rim to remove any sharp burrs that could catch on skin, but leave the main body textured. -
Base Coat:
Apply a coat of white acrylic paint first if your clay is grey, or jump straight to color. Painting the inside first makes it easier to handle without smudging the exterior. -
Apply Main Color:
Mix your acrylics to get a dusky teal or a deep ocean blue. Apply the paint generously, dabbing it into the textured nooks and crannies rather than just brushing over the top. -
Second Coat:
Let the first layer dry, then apply a second coat to ensure opaque coverage. The texture of the clay should still be visible through the paint. -
Add Subtle Depth:
For a more stone-like finish, you can mix a tiny drop of white into your blue and lightly dry-brush the raised areas of the texture. -
Seal the Pot:
Finish with a coat of gloss or satin varnish. This mimics a ceramic glaze and protects the paint from chipping, making it durable for holding keys or wrapped candies.
Cracks While Drying?
If hairline cracks appear during drying, mix a small amount of clay with water to make a paste (slip) and fill the crack, then smooth it over and let it dry again.
Enjoy arranging your new handmade bowls on your desk to keep your trinkets organized in style

What Really Happens Inside the Kiln
Learn how time and temperature work together inside the kiln to transform clay into durable ceramic.
Cute Face Planters for Tiny Succulents
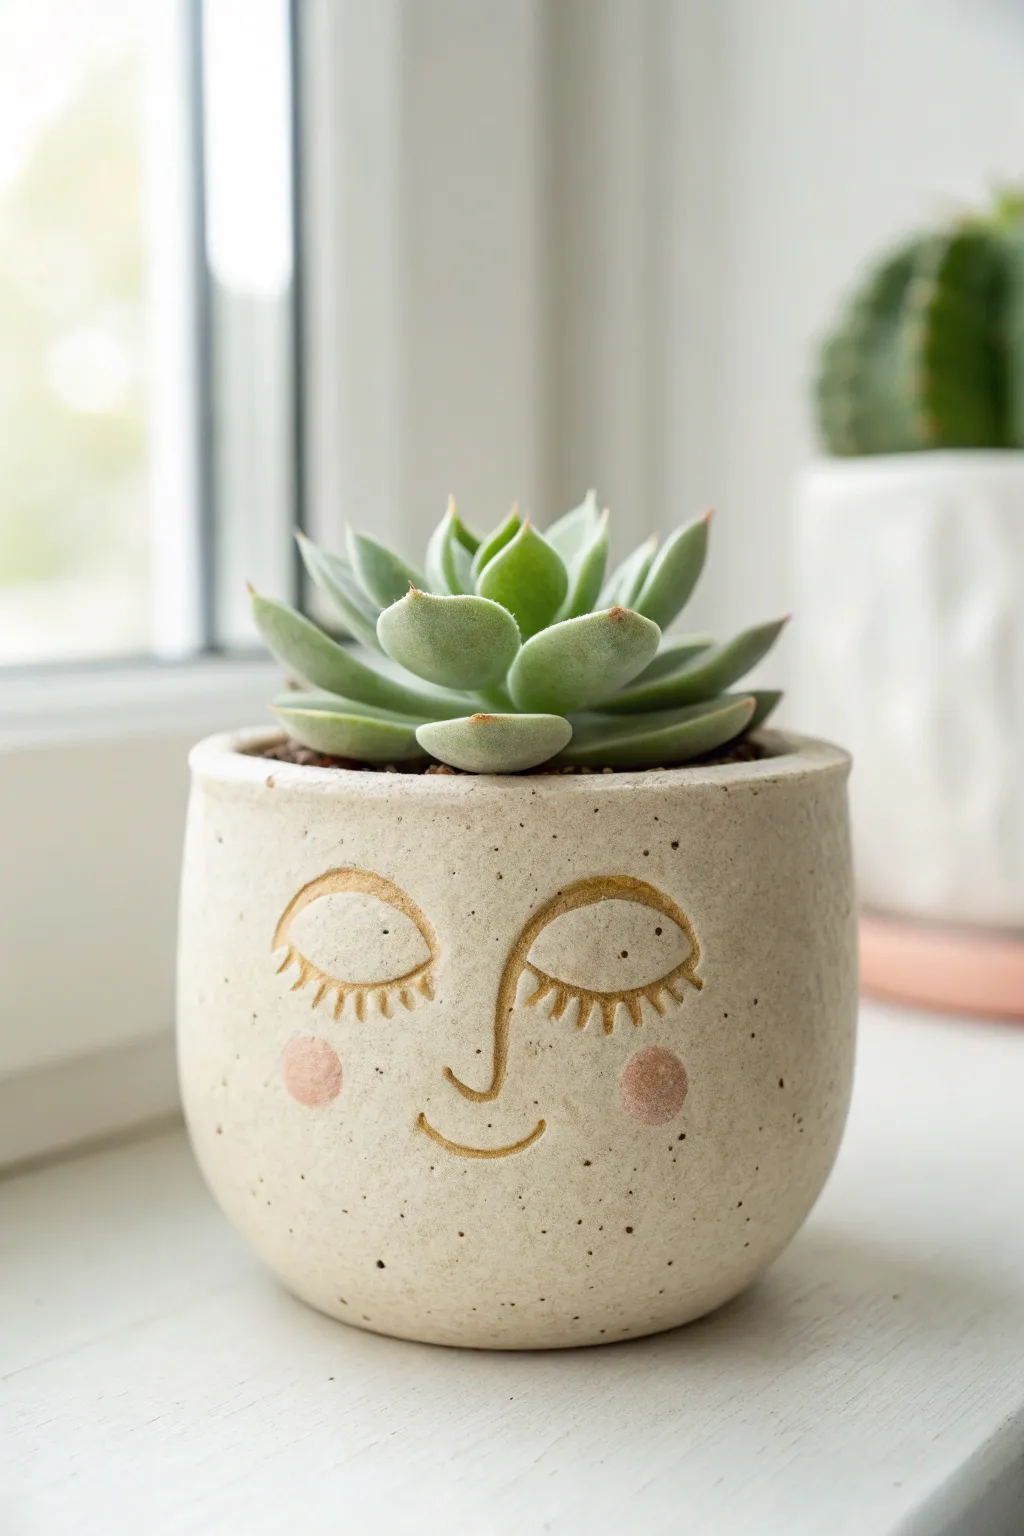
Give your tiny green friends a cozy home with this serene, speckled planter that looks just like expensive ceramic. The gentle, sleeping face design adds a touch of calm to any windowsill, while the faux-speckle finish hides any little imperfections in your clay work.
Step-by-Step Tutorial
Materials
- White air dry clay (approx. 500g)
- Small rolling pin
- sharp knife or clay blade
- Slip (clay mixed with water)
- Small bowl (to use as a mold)
- Plastic wrap
- Sponge and water
- Needle tool or toothpick
- Sandpaper (fine grit)
- Acrylic paints: Cream/Beige, Terracotta/Brown, Soft Pink, Black
- Old toothbrush (for speckling)
- Small detail paintbrush
- Matte varnish or sealant
Step 1: Forming the Pot Base
-
Prepare your mold:
Find a small bowl or cup that has the round shape you want for the bottom half of your planter. Line the inside carefully with plastic wrap to prevent sticking. -
Roll the base slab:
Roll out a portion of your clay to about 1/4 inch thickness. Cut a circle that is slightly larger than the bottom of your mold. -
Create the walls:
Roll out a long rectangular strip of clay, maintaining that same 1/4 inch thickness. Ensure the strip is long enough to wrap around the circumference of your base circle. -
Assemble the structure:
Place the circular base into your lined mold. Taking the rectangular strip, wrap it around the inside edge of the mold so it meets the base. I like to bevel the vertical seam where the wall edges meet for a cleaner join. -
Join the seams:
Score (scratch) and slip both the bottom seam where the wall meets the base and the vertical side seam. Press them firmly together. -
Smooth the interior:
While the clay is still inside the mold for support, use a damp sponge or your finger to smooth out the inside seams until they are invisible.
Crack Control
If small cracks appear while drying, don’t panic. Mix a tiny bit of fresh clay with water to make a paste and fill the cracks, then sand smooth once dry.
Step 2: Refining and Sculpting
-
Unmold and smooth outside:
Once the clay has stiffened slightly (usually after an hour), gently lift it out of the mold using the plastic wrap. Support the walls and smooth the outside seams with a little water until the pot looks seamless. -
Shape the rim:
Gently tap the top rim of the pot with a flat tool or paddle to even it out, or use a damp sponge to round off any sharp edges for a softer, ceramic look. -
Carve the features:
While the clay is leather-hard (firm but not dry), use a needle tool to gently etch the facial features. Draw two semi-circles for closed eyes, add eyelashes, a simple ‘L’ shape for the nose, and a small upward curve for the smile. -
Deepen the lines:
Go over your etched lines a second time to make the grooves slightly deeper and wider. This will help the paint settle into them later. -
Let it dry completely:
Allow the pot to dry for 24-48 hours. It should feel room temperature to the touch (not cold) and look chalky white when fully dry. -
Sand for perfection:
Use fine-grit sandpaper to buff away any fingerprints or bumps. Wipe away the dust with a slightly damp cloth.
Level Up
Before the clay dries, gently press a real leaf or piece of lace into the back of the pot to add a hidden texture that contrasts with the smooth face.
Step 3: Painting and Finishing
-
Apply the base coat:
Mix a warm cream or beige acrylic paint and cover the entire exterior and inner rim. You may need two coats for full opacity. -
Create the speckles:
Dilute a small amount of black or dark brown paint with water. Dip an old toothbrush into it, and running your thumb over the bristles, flick tiny speckles all over the pot. -
Fill the features:
Using your fine detail brush and a terracotta or golden-brown paint, carefully fill in the carved grooves of the eyes, nose, and mouth. -
Add rosy cheeks:
Mix a soft, muted pink. Paint two small circles on the cheeks. I prefer to dab this on lightly with a fingertip or sponge for a softer, blushed edge. -
Seal heavily:
Since this is for a plant, apply 2-3 coats of a robust matte varnish or sealant inside and out to protect the clay from moisture.
Pop in your favorite succulent and enjoy the peaceful vibe this little planter brings to your space
Letter and Name Ornaments
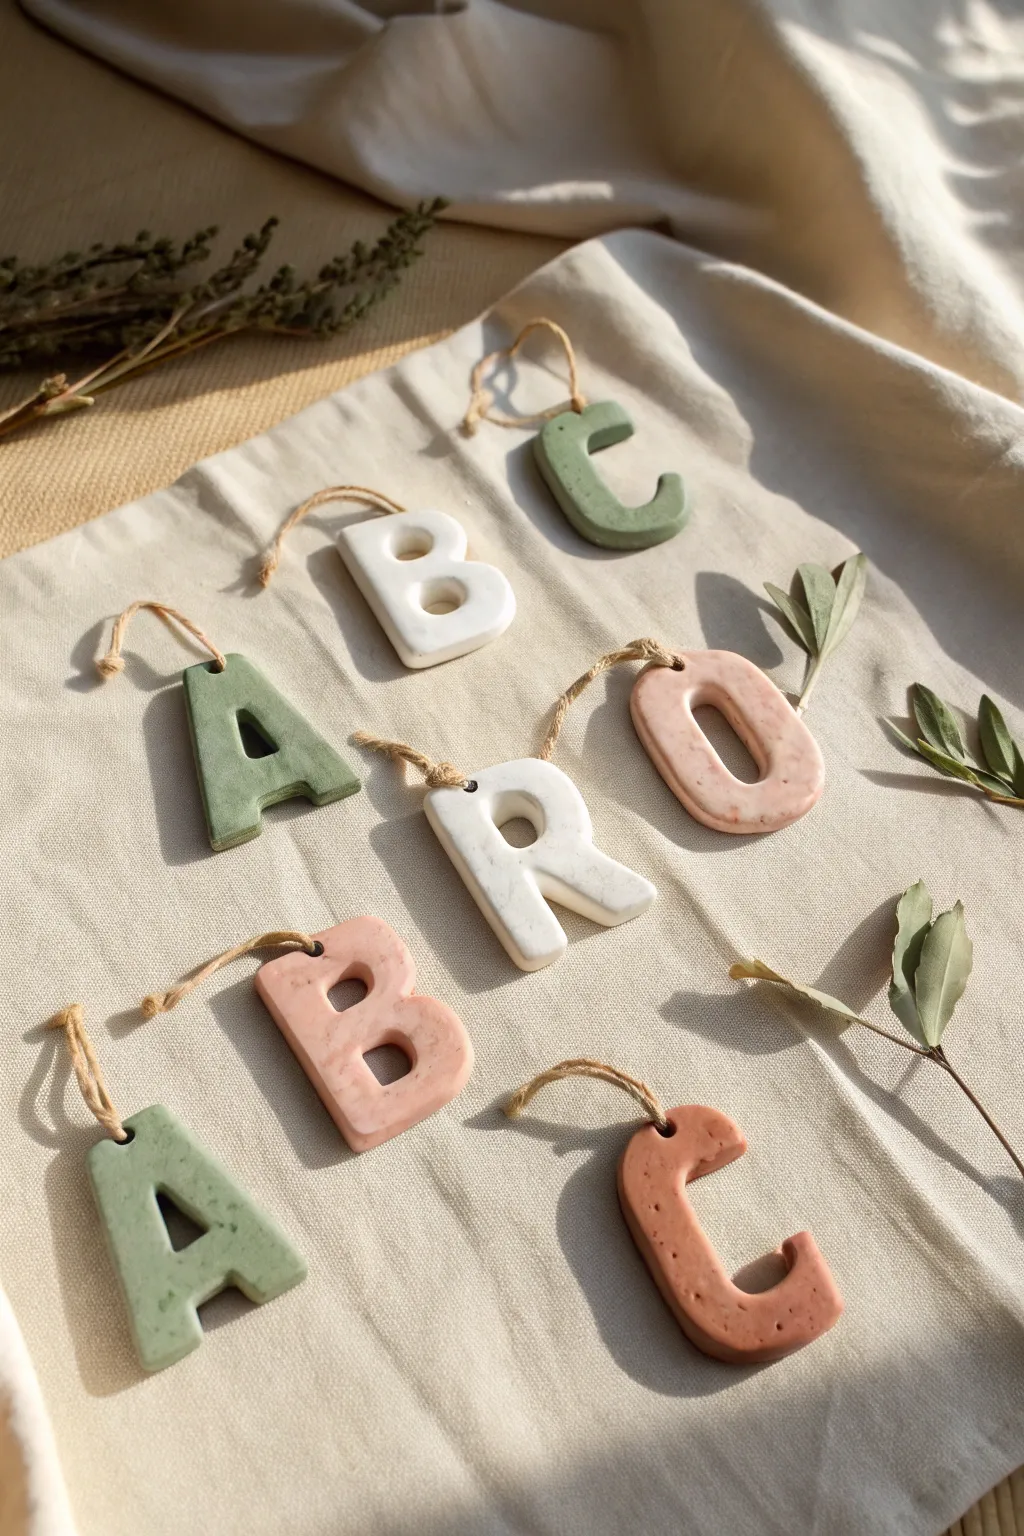
Create personalized decor with these charming, minimalist letter ornaments that mimic the look of speckled stone. Their muted earth tones and rustic twine hangers make them perfect for gift tags, holiday trees, or year-round nursery accents.
Detailed Instructions
Materials
- White air-dry clay
- Acrylic paints (sage green, dusty pink, terra cotta, beige)
- Used coffee grounds or fine black pepper (for speckling)
- Rolling pin
- Alphabet cookie cutters
- Sandpaper (fine grit)
- Straw or toothpick
- Jute twine
- Matte varnish or sealant (optional)
- Parchment paper
Step 1: Preparing the Clay
-
Create color bases:
Divide your white air-dry clay into separate balls for each color you plan to make. Leave one ball plain white if you want the ivory look. -
Mix in paint:
Make an indentation in the center of a clay ball and add a small drop of acrylic paint. Knead the clay thoroughly until the color is uniform. Repeat for your green, pink, and terra cotta shades. -
Add the texture:
To achieve that realistic stone effect, sprinkle a pinch of dried, used coffee grounds or fine black pepper onto each colored clay ball. -
Knead again:
Fold and knead the clay again so the specks are distributed evenly throughout the material. Don’t overwork it too much, just enough to scatter the texture.
Cracks while drying?
Mix a tiny amount of fresh clay with water to make a paste (slip). Fill the crack, smooth it over with a wet finger, and let it dry again.
Step 2: Shaping and Cutting
-
Roll it out:
Place a ball of clay between two sheets of parchment paper to prevent sticking. Roll it out to an even thickness, roughly 1/4 inch thick. You want them substantial enough to not crack. -
Cut the letters:
Press your alphabet cookie cutters firmly into the clay. Give the cutter a little wiggle to ensure clean edges before lifting it up. -
Remove excess:
Peel away the excess clay from around the letters first, then carefully lift the letters off the parchment. -
Smooth the edges:
Dip your finger in a tiny bit of water and run it along the cut edges of the letters to smooth out any roughness from the cookie cutter. -
Create the hole:
Using a plastic straw or a skewer, poke a hole near the top of the letter. Make sure it’s not too close to the edge to prevent breaking later.
Pro Tip: Marbling
Stop kneading the paint before it’s fully blended. Twist the clay to create swirls for a beautiful, faux-marble effect instead of a solid color.
Step 3: Finishing Touches
-
Dry thoroughly:
Lay the letters flat on a clean surface to dry. I like to flip them over after about 12 hours so the bottom gets air exposure too. Let them dry for 24-48 hours total. -
Sand for perfection:
Once fully rigid and dry, use fine-grit sandpaper to gently buff away any remaining sharp edges or fingerprints. -
Dust off:
Wipe the ornaments with a dry cloth to remove any clay dust from sanding. -
Seal (Optional):
Apply a coat of matte varnish if you want to protect the finish, though leaving them raw keeps that nice powdery stone look. -
Cut the twine:
Cut lengths of jute twine, roughly 6-8 inches long depending on how low you want them to hang. -
Attach the hanger:
Thread the twine through the hole. Bring the two ends together and tie a secure knot at the end to create a loop.
Now you have a set of personalized, stone-like letters ready to add a custom touch to any space


The Complete Guide to Pottery Troubleshooting
Uncover the most common ceramic mistakes—from cracking clay to failed glazes—and learn how to fix them fast.
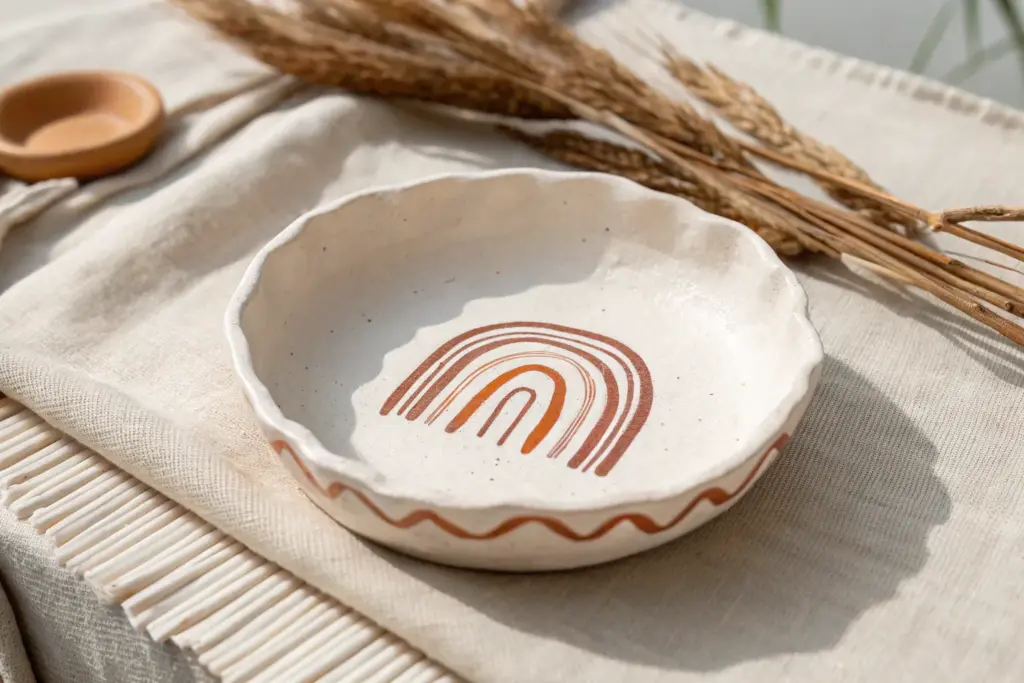
Modern Photo and Card Holders
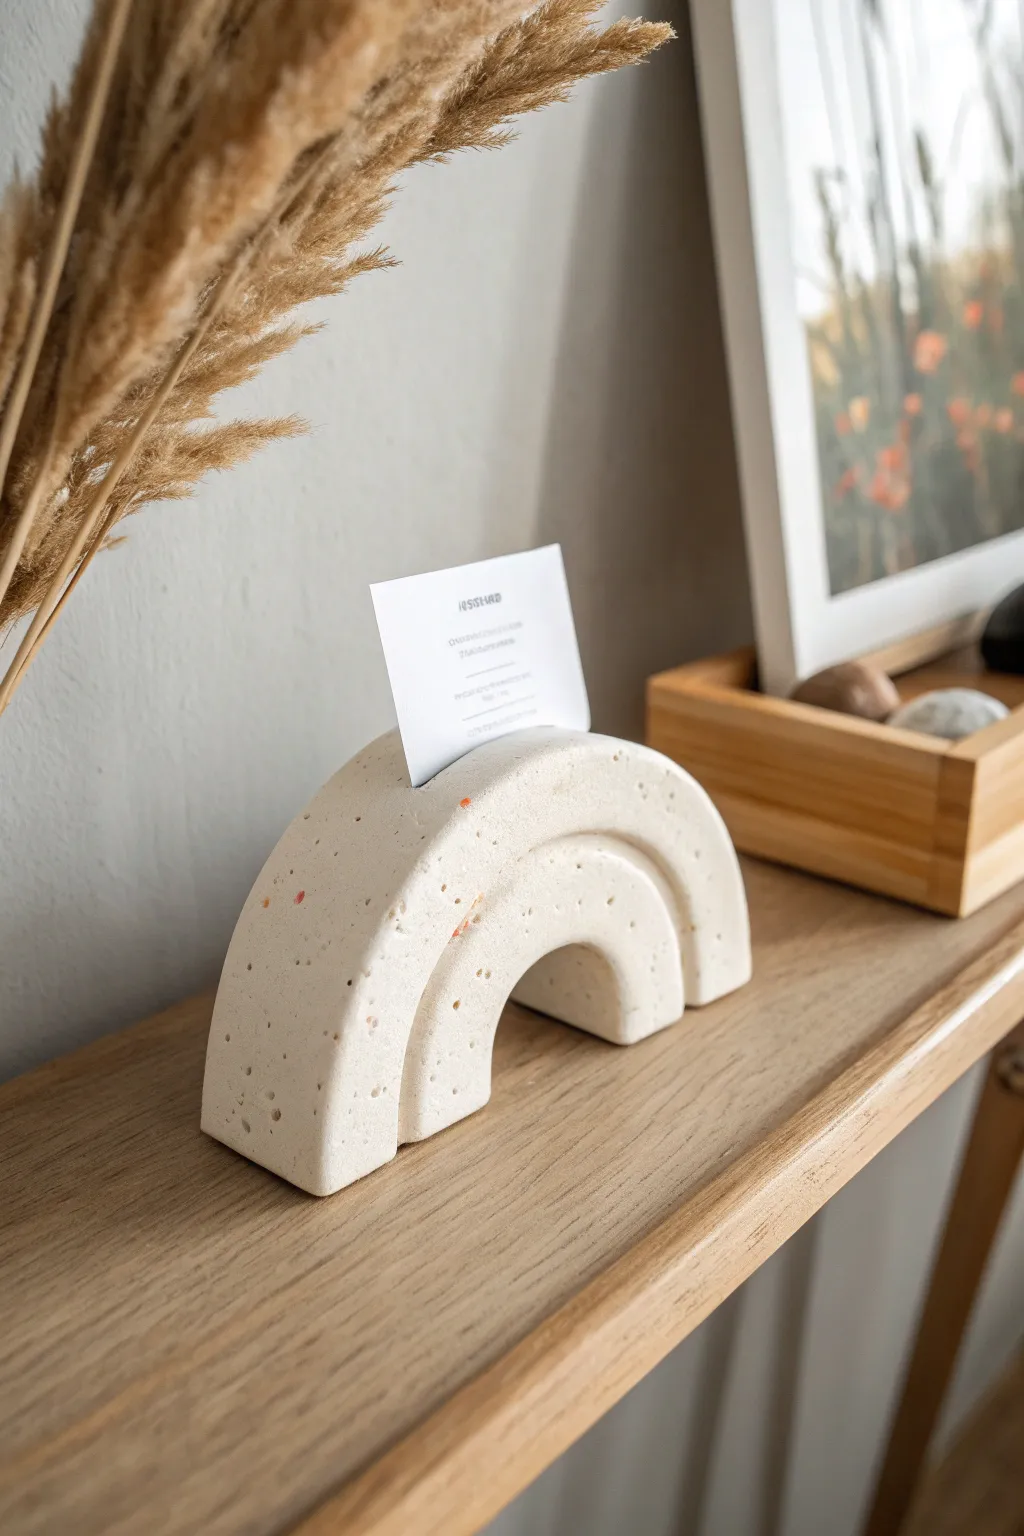
This minimalist card holder mimics the look of high-end terrazzo stone but is crafted entirely from air dry clay. With its soft, speckled finish and triple-arch design, it makes a modern and functional piece for displaying photos or business cards.
Step-by-Step Tutorial
Materials
- White smooth air dry clay
- Dried clay scraps (various warm colors like terra cotta, ochre, grey)
- Rolling pin
- Rolling guides or wooden slats (approx. 1cm thick)
- Craft knife or clay blade
- Round cookie cutters (3 descending sizes) or circle templates
- Water and a small bowl
- Ruler
- Sandpaper (medium and fine grit)
- Matte spray varnish
Step 1: Preparing the Terrazzo Clay
-
Crush color chips:
Take your dried clay scraps in various colors and crush them into small, irregular chips. Using a rolling pin to gently smash a dried sheet works well. -
Condition the base:
Knead a large chunk of white air dry clay until it is soft, pliable, and warm in your hands. -
Mix in the chips:
Flatten the white clay slightly, sprinkle the crushed colored chips onto it, and fold the clay over. Knead gently to distribute the chips throughout the block without blending the colors fully.
Terrazzo Cheat
Don’t have dried clay scraps? You can gently knead in coarse black pepper, dried herbs, or craft sand into the wet white clay to achieve a similar speckled stone effect.
Step 2: Shaping the Rainbow
-
Roll the slab:
Place your clay between two 1cm rolling guides. Roll it out into a smooth, even slab. The thickness is crucial for the holder to stand upright. -
Cut the outer arch:
Using your largest circle cutter or a paper template, cut a half-circle shape. Use your ruler to ensure the bottom edge is perfectly straight. -
Create the layers:
Use the medium and small circle cutters to gently impress concentric arches into the clay slab, or use a needle tool to lightly sketch them. -
Separate the arches:
Carefully cut along these lines with a sharp craft knife to separate the single slab into three distinct rainbow arches. -
Smooth the edges:
Dip your finger in a little water and run it along all the cut edges to smooth out any raggedness. Keep the corners relatively sharp for a modern look. -
Reassemble the rainbow:
Place the arches back together on your work surface. Create a slip by mixing a tiny bit of clay with water. -
Join the pieces:
Score the touching sides of the arches (where they nestle together) and apply a thin layer of slip. Press them firmly together so they bond into one solid unit.
Step 3: Finishing Touches
-
Create the slot:
Once the unit feels solid but not dry, use your ruler or a thick piece of cardstock to press a slot into the very top center of the rainbow. Press down about 1cm deep. -
Wiggle for width:
Slightly wiggle the ruler back and forth to widen the slot just enough to hold a card comfortably. Check the width before removing the tool. -
Allow to dry:
Let the piece dry completely on a flat surface. I recommend turning it over gently after 24 hours to ensure the bottom dries evenly. Total drying time may take 48-72 hours due to thickness. -
Sand for texture:
Once bone dry, sand the entire surface vigorously. This is the magic step—sanding reveals the colorful terrazzo chips hiding beneath the top layer of white clay. -
Refine the finish:
Switch to a fine-grit sandpaper to polish the surface until it feels smooth to the touch. -
Dust off:
Use a dry brush or cloth to wipe away all the fine clay dust from the sanding process. -
Seal:
Spray the holder with a matte varnish to protect the clay and make the speckles pop without adding an artificial sheen.
Cracking Issues?
If small cracks appear while drying, mix a tiny amount of fresh clay with water to make a paste. Fill the crack, smooth it over with a damp finger, and let it dry again.
Place your favorite photo or a daily affirmation card in the slot to complete your desk setup
Speckled Faux-Stoneware Catchall Bowls
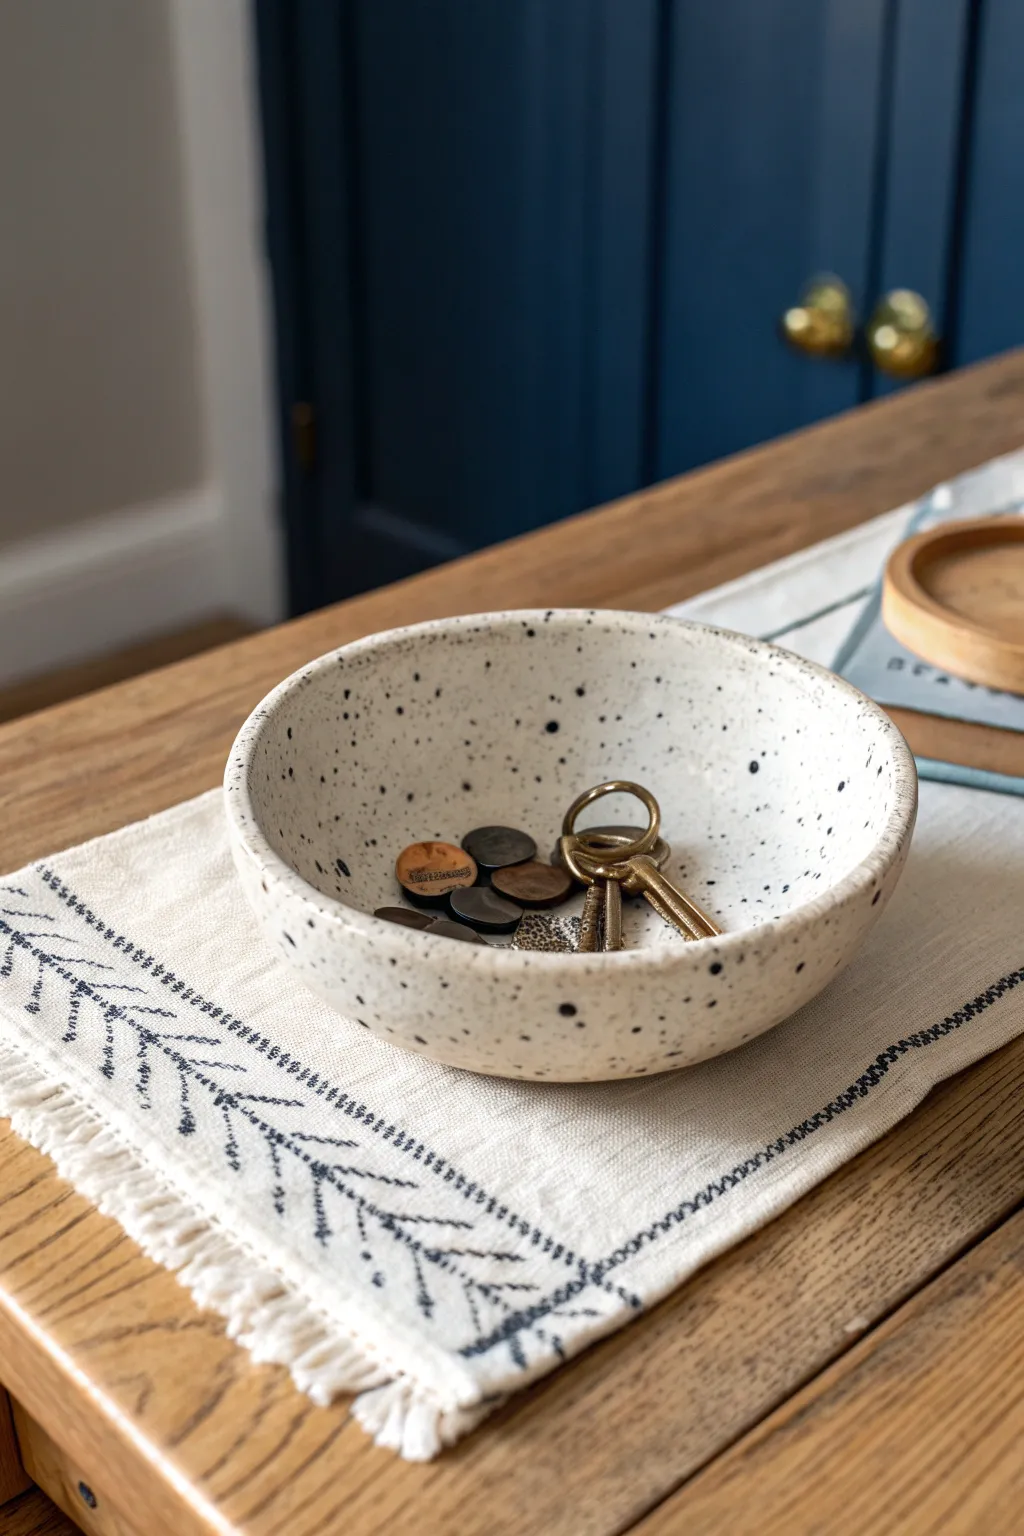
Recreate the sophisticated look of wheel-thrown pottery without a kiln using this satisfying air dry clay project. The organic shape and trendy speckled finish make this bowl perfect for holding keys, jewelry, or loose change.
How-To Guide
Materials
- White air dry clay
- Rolling pin
- Canvas or wax paper
- Bowl for mold (approx 6-inch diameter)
- Craft knife
- Smooth sponge
- Sandpaper (fine grit)
- Black acrylic paint
- Old toothbrush
- Matte or satin clear sealant
Step 1: Shaping the Bowl
-
Prepare your workspace:
Lay down your canvas or wax paper to protect your table and prevent the clay from sticking. Tape the edges down so it doesn’t slide around while you work. -
Roll out the clay:
Take a large handful of white air dry clay and knead it until soft. Roll it out into an even slab about 1/4 inch thick. Try to keep the thickness consistent for durability. -
Cut the circle:
Place your selected bowl upside down on the flattened clay to use as a template. Using a craft knife, trace around the rim to cut out a perfect circle. -
Molding the form:
Lift your clay circle carefully and drape it *inside* the bowl you used as a template. Gently press the clay against the bottom and sides to take on the curved shape. I find draping inside usually gives a smoother interior finish. -
Smooth the edges:
Dip your finger in a little water and run it along the rim of the clay to smooth out any sharp cuts or rough texture from the knife. -
Dry partially:
Let the clay sit in the mold for about 24 hours until it is leather-hard and holds its shape on its own. -
Remove and finish drying:
Carefully pop the clay form out of the bowl mold. Place it upside down on a drying rack to allow air to circulate around the bottom. Let it dry completely for another 24–48 hours.
Step 2: Finishing and Decorating
-
Sand until smooth:
Once fully dry, use fine-grit sandpaper to buff the entire surface. Focus on the rim to give it that soft, rounded stoneware look shown in the photo. Wipe away dust with a damp cloth. -
Prepare the splatter paint:
Squeeze a small amount of black acrylic paint onto a palette and dilute it slightly with water. You want it fluid enough to flick, but not so watery that it drips excessively. -
Test your splatter technique:
Dip an old toothbrush into the black paint. Point the bristles toward a scrap piece of paper and run your thumb across them to spray fine droplets. -
Apply the speckles:
Holding the toothbrush about 6–8 inches away from your bowl, flick the bristles to create the speckles. Rotate the bowl as you go to ensure even coverage on the inside and outside. -
Vary the texture:
For a natural look, vary your distance slightly or the speed of your flicking to create a mix of tiny dots and slightly larger spots. -
Let the paint set:
Allow the paint speckles to dry completely, which should only take about 10–15 minutes. -
Apply the first coat of sealant:
Using a soft brush, apply a thin layer of matte or satin sealant to the inside of the bowl. This protects the clay from moisture and gives it a finished ceramic feel. -
Seal the exterior:
Once the inside is dry to the touch, flip the bowl over and seal the exterior and bottom. -
Final cure:
Apply a second coat if desired for extra durability, then let the project cure for the time recommended on your sealant bottle.
Smoother Splatters
For finer mist-like speckles, flick the toothbrush bristles with a craft stick instead of your thumb. This keeps your hands cleaner and creates a more consistent spray pattern.
Upgrade the Rim
Paint the very rim with liquid gold leaf or a metallic brown paint to mimic an exposed clay edge often found on high-end stoneware pottery.
Place your new catchall on an entry table or nightstand and enjoy the handcrafted charm it brings to your space

TRACK YOUR CERAMIC JOURNEY
Capture glaze tests, firing details, and creative progress—all in one simple printable. Make your projects easier to repeat and improve.
Incense Holders in Abstract Shapes
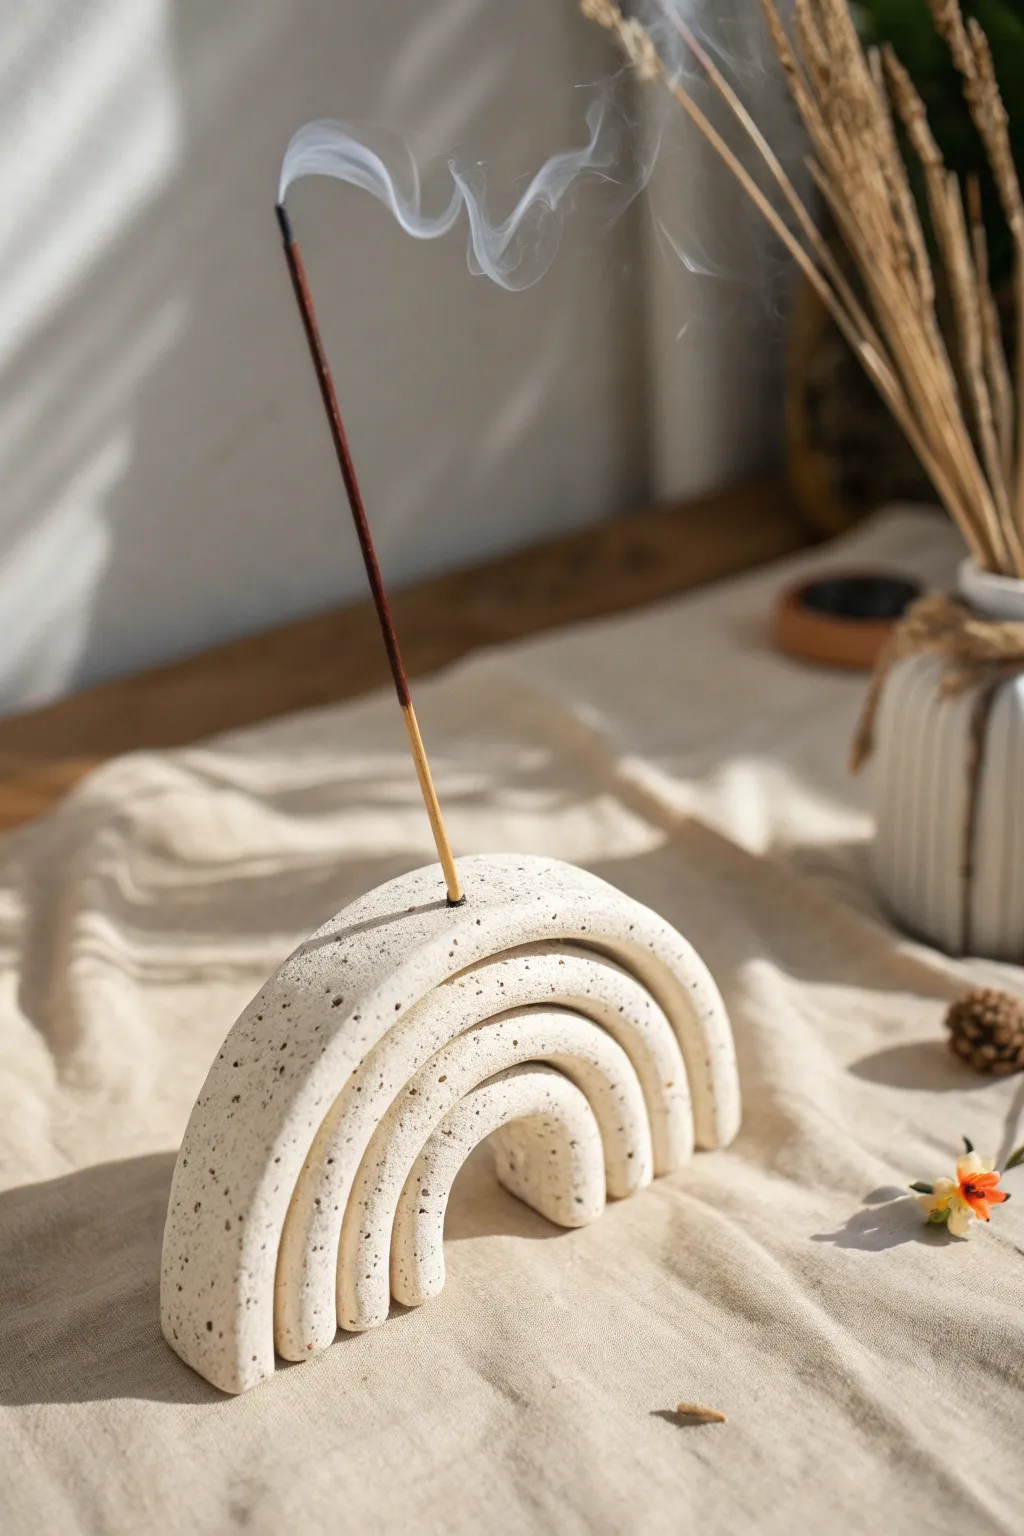
This minimalist incense holder features a soothing, stacked rainbow arch design with a natural speckled finish that mimics high-end ceramic stoneware. It’s a functional piece of art that brings a touch of modern calmness to any room while safely catching falling ash.
Detailed Instructions
Materials
- White air-dry clay
- Dried coffee grounds or fine black pepper (for speckles)
- Rolling pin
- Craft knife or clay cutter
- Ruler
- Wooden skewer or incense stick
- Small cup of water
- Sanding sponge or fine-grit sandpaper
- Matte acrylic varnish (optional)
Step 1: Preparing the Clay
-
Create the Speckle Mix:
Before you begin shaping, take a large chunk of white air-dry clay and knead in a pinch of dried coffee grounds or fine black pepper. Keep folding and pressing until the speckles are evenly distributed throughout the clay body to achieve that stone-like effect. -
Roll It Out:
Place your speckled clay on a clean, flat surface. Use a rolling pin to flatten it into an even slab, aiming for a thickness of about 1/2 inch (1.2 cm). This thickness is crucial for stability since the arches will stand upright. -
Smooth the Surface:
Wipe your finger dipped in a little water over the surface of the slab to remove any canvas textures or fingerprints, ensuring a smooth starting canvas.
Stone Effect
Use coarse black pepper for larger, dramatic spots or used (dried) coffee grounds for a subtle, earthy texture. It smells great while working!
Step 2: Cutting the Arches
-
Cut Long Strips:
Using a ruler and craft knife, cut four long, straight strips of clay from your slab. Each strip should be the same width (about 3/4 inch deep) so the final piece sits flush. -
Form the Smallest Arch:
Take one strip and gently bend it into a tight U-shape to form the innermost arch. Place it upright on your work surface to ensure it stands flat. -
Cut to Size:
Trim the ends of the U-shape so they are perfectly flat and the arch sits level. -
Layer the Subsequent Arches:
Take the next strip and drape it over the first arch. Gently press them together to check the fit, then trim the ends to match the length of the first arch. -
Bond the Layers:
Before permanently joining them, score the touching surfaces (scratch cross-hatch marks) and apply a tiny dab of water or clay slip. Press the second arch firmly onto the first. -
Repeat for Outer Layers:
Continue this process for the third and fourth strips, creating larger arches over the previous ones. Make sure to score and slip between every layer so the rainbow creates one solid unit. -
Level the Base:
Once all four arches are attached, stand the whole piece up and gently press it down onto the table to ensure the bottom feet are perfectly aligned and level.
Cracking Seams?
If layers separate while drying, fill gaps with a paste made of clay and water. Smooth over the crack and let it re-dry completely.
Step 3: Detailing and Finishing
-
Smooth the Seams:
Flip the rainbow on its side. Use a wet finger or a clay tool to blend the seams between the arches on the front and back faces if you prefer a solid look, or leave the grooves defined for that stacked aesthetic shown in the photo. -
Refine the Edges:
Run a damp finger along all sharp edges to soften them slightly, giving the piece a more organic feel. -
Drill the Incense Hole:
Using an incense stick or a skewer, poke a hole directly into the center of the top-most arch. Insert it at a slight angle or straight down, ensuring it goes deep enough (about 1/2 inch) to hold a stick securely. I like to squiggle the stick slightly to make sure the hole is wide enough for different brands. -
Dry Slowly:
Let the piece dry slowly away from direct sunlight or heat sources for 24-48 hours. Rotate it occasionally to ensure airflow reaches the bottom. -
Sand for Perfection:
Once completely bone dry, use a sanding sponge to gently buff away any rough spots or sharp corners. -
Seal (Optional):
To protect the piece from ash stains, apply a thin coat of matte acrylic varnish. This will keep the natural stone look but make it easier to wipe clean.
Now you have a serene, custom-made spot to burn your favorite scents and relax.
Tea Light Candle Holders With Cutouts
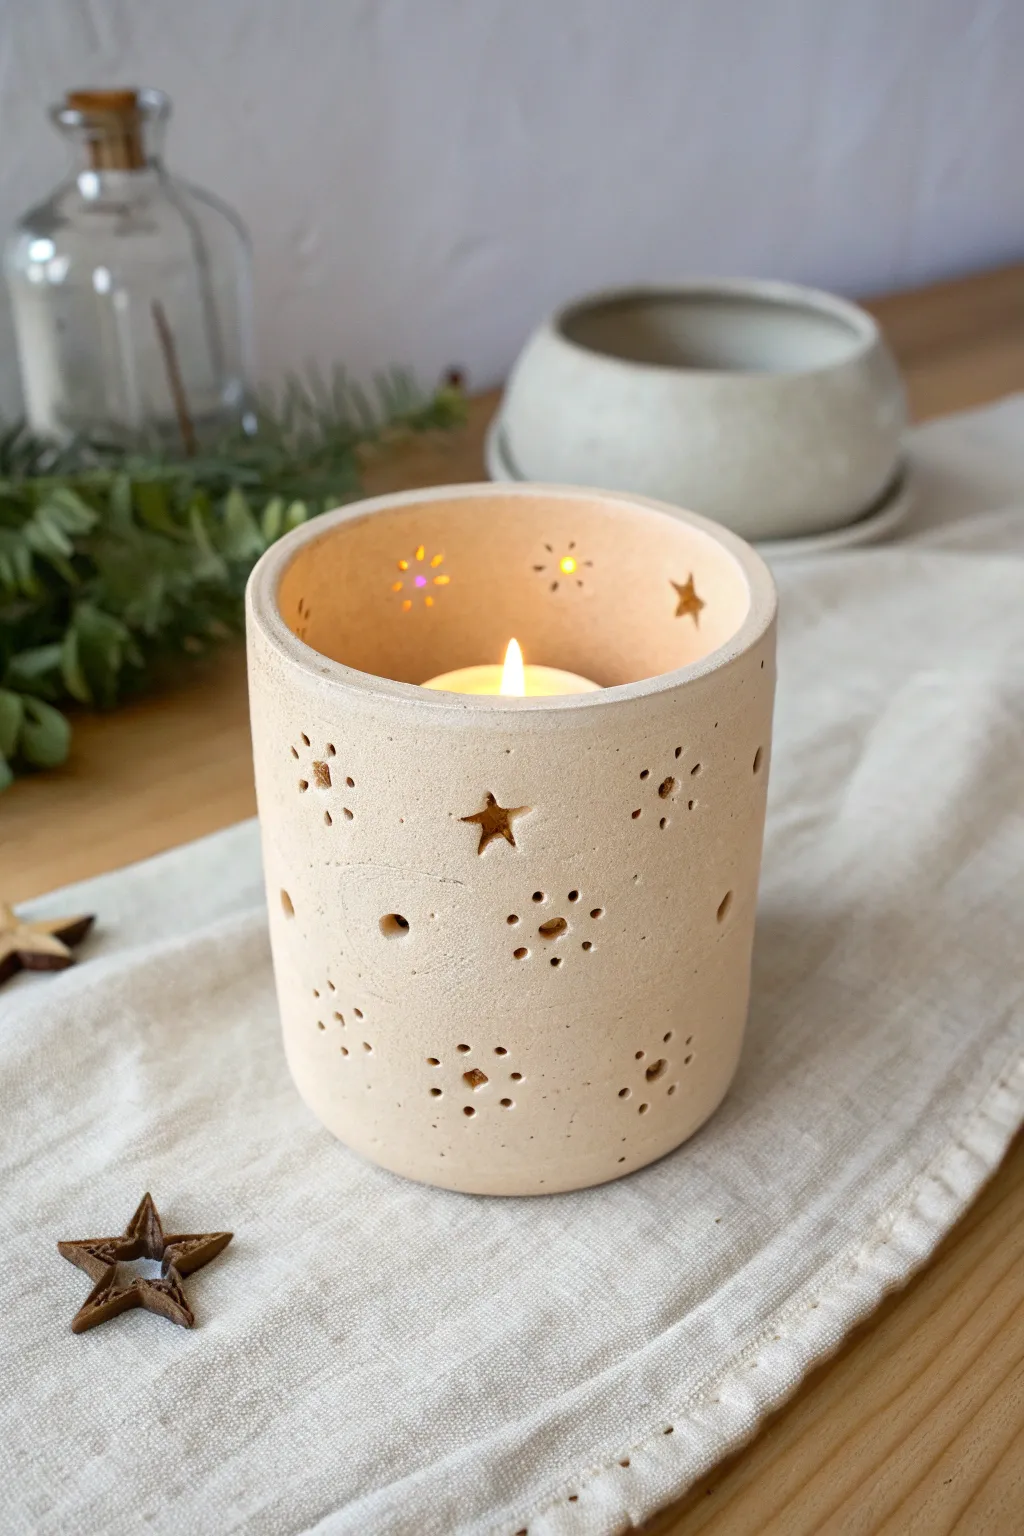
Bring a warm, celestial glow to your evenings with this charming tea light holder featuring delicate star and snowflake cutouts. The natural matte finish of the air dry clay creates a cozy, minimalist aesthetic that looks beautiful even when unlit.
Step-by-Step Guide
Materials
- Air dry clay (white or cream)
- Rolling pin with guide rings (1/4 inch thickness)
- Small circular cookie cutter or a clean can (approx. 3-4 inch diameter)
- Sharp craft knife or clay needle tool
- Small star-shaped clay cutters (various sizes)
- Toothpick or skewers (for dot details)
- Sanding sponge or fine-grit sandpaper
- Small bowl of water
- Ruler
- Parchment paper or canvas mat
- Tea light candle
Step 1: Preparing the Base
-
Roll out the slab:
Start by kneading your air dry clay to warm it up and remove air bubbles. On a piece of parchment paper, roll the clay out into a long rectangular slab. Using guide rings on your rolling pin helps ensure an even thickness of about 1/4 inch, which is crucial for structural stability. -
Measure the circumference:
To determine the length of your rectangle, decide on the diameter you want your cylinder to be (using your cookie cutter or can as a guide). Multiply that diameter by 3.14 (pi) and add a little extra for the seam overlap. -
Cut the rectangle:
Using a ruler and a sharp craft knife, cut a clean, straight rectangle from your rolled slab. A height of about 3 to 4 inches works well for standard tea lights. -
Cut the base circle:
Roll out a small separate piece of clay to the same thickness. Use your circular cutter or can to cut a perfect circle that will serve as the bottom of the holder.
Cracks happen!
If you see hairline cracks appearing while drying, mix a small amount of fresh clay with water to make a paste and fill them in immediately, then smooth over.
Step 2: Creating the Design
-
Plan your pattern:
Before assembling, it is much easier to cut your designs while the clay is flat. Plan a random scatter of stars and snowflakes. I like to leave about half an inch of solid clay at the bottom for stability. -
punch the stars:
Use your small star-shaped cutters to punch holes through the rectangular slab. Press firmly and wiggle slightly to get clean cuts, then gently push the shapes out. -
Create snowflake centers:
For the snowflake-like designs, use a slightly larger round hole cutter or the back of a paintbrush to create a central hole. -
Add radial details:
Around the central holes or scattered in empty spaces, use a toothpick or skewer to poke small holes. Arrange them in circles around a center point to mimic snowflakes or sunbursts. -
Smooth the cutouts:
Dip your finger in a little water and gently smooth around the edges of all your cutouts to remove any ragged bits of clay.
Step 3: Assembly & Finishing
-
Score the edges:
Take your rectangular slab and the circular base. Use your needle tool to rough up (score) the short ends of the rectangle and the outer edge of the circle base. -
Apply slip:
Dab a little water or ‘slip’ (clay mixed with water) onto the scored areas to act as glue. -
Form the cylinder:
Carefully lift the rectangle and wrap it around the circular base. Bring the two short ends together to close the cylinder. -
Seal the vertical seam:
Press the vertical seam together firmly. Use a modeling tool or your finger to blend the clay across the seam on both the inside and outside until the line disappears. -
Attach the base:
Gently press the cylinder walls onto the circular base. Blend the clay downwards from the wall to the base to create a watertight seal. -
Reshape:
The handling might have warped the cylinder slightly. Place your circular cutter or can gently inside just to nudge it back into a perfect round shape, then remove it immediately. -
Smooth the rim:
Run a wet finger along the top rim of the cylinder to smooth it out and soften the edge. -
Slow drying:
Place the finished piece in a cool, dry place away from direct sunlight. Let it dry slowly for 24-48 hours. Rotating it occasionally helps it dry evenly without warping. -
Sanding:
Once fully dry and white, use a sanding sponge to buff away any fingerprints or rough edges, paying special attention to the top rim.
Clean Cuts Pro Tip
Wait for the clay to dry slightly (leather hard stage) before punching intricate holes. Super wet clay drags; drier clay cuts cleanly.
Place a tea light inside and watch the star patterns dance on the table
Clay Earrings and Charm Sets
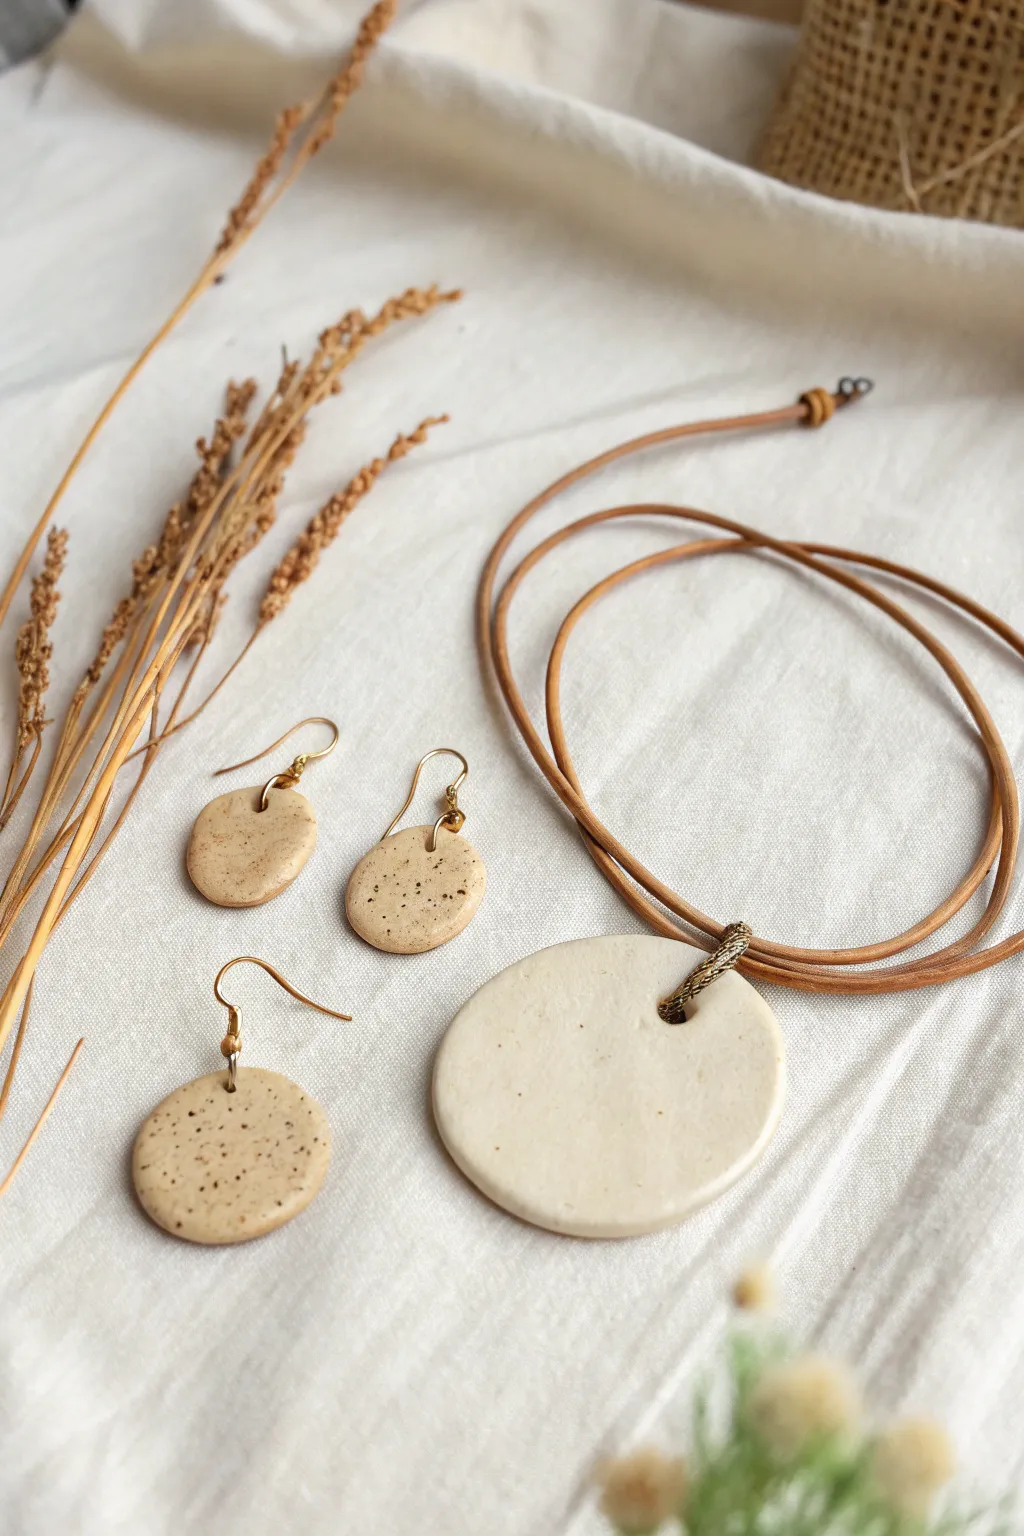
Embrace earthy textures with this organic jewellery set featuring minimal disc earrings and a statement pendant. The speckled, stone-like finish and natural leather cord create a beautifully raw aesthetic that pairs perfectly with casual linen outfits.
How-To Guide
Materials
- White or cream air dry clay
- Rolling pin or acrylic roller
- Circle cutters (approx. 2cm and 5cm)
- Sandpaper or a sanding sponge (fine grit)
- Awl, toothpick, or thick needle
- Neutral acrylic paint (beige/tan and dark brown)
- Old toothbrush
- Matte spray varnish or sealant
- Earring hooks (gold tone)
- Jump rings (gold tone)
- Leather or suede cord (tan)
- Jewelry pliers
- Textured gold bail or wire for the pendant
Step 1: Shaping the Clay
-
Condition the Clay:
Start by taking a chunk of your air dry clay and kneading it in your hands until it becomes soft, pliable, and free of cracks. Warmth from your hands helps this process significantly. -
Roll it Out:
Place the clay on a smooth, clean surface or a silicone mat. Use your rolling pin to flatten the clay to an even thickness, roughly 3mm to 4mm. Rotate the clay occasionally to ensure it doesn’t stick. -
Cut the Shapes:
Press your circle cutters firmly into the clay. You will need one large circle for the necklace pendant and two (or more) smaller circles for the earrings. Lift the excess clay away carefully. -
Smooth the Edges:
Dip your finger in a tiny bit of water and gently run it along the cut edges of your circles to smooth out any sharpness or roughness left by the cutter. -
Create Holes:
Using an awl or toothpick, pierce a hole near the top edge of each small circle for the earring hardware. For the large pendant, make a hole slightly further down from the top edge to accommodate a larger bail or cord. -
Dry Completely:
Place your clay pieces on a cooling rack or a flat, porous surface to dry. This usually takes 24-48 hours depending on humidity. Flip them halfway through to prevent curling.
Step 2: Creating the Stone Effect
-
Sand for Smoothness:
Once fully dry, lightly sand the edges and surfaces with fine-grit sandpaper. This ensures a professional, polished feel and removes any fingerprints. -
Apply Base Color:
Mix a small amount of beige or tan acrylic paint with a drop of water to create a wash. Apply this to the smaller earring discs for that warm, sandy tone seen in the image. I like to leave the large pendant its natural white clay color for contrast. -
Prepare the Splatter:
Dilute a small dab of dark brown or black acrylic paint with water until it’s quite runny, like ink. -
Add Speckles:
Dip an old toothbrush into the runny dark paint. Hold it over your clay pieces and run your thumb across the bristles to flick tiny specks of paint onto the surface. This creates the faux-stone look. -
Seal the Work:
Allow the paint to dry completely, then spray all pieces with a matte varnish. This protects the clay from moisture and prevents the paint from rubbing off.
Paint Consistentcy
Test your toothbrush splatter technique on a piece of paper first. If the blobs are too big, your paint is too thick; add a drop more water for a fine mist.
Step 3: Assembly
-
Attach Earring Hooks:
Using jewelry pliers, twist open a jump ring and thread it through the hole of a small clay disc. Add your earring hook, then twist the jump ring closed. Repeat for the other earrings. -
Prepare the Pendant Bail:
For the necklace, attach a textured metallic bail or a large jump ring through the pendant hole. The gold tone adds a nice warmth against the white clay. -
String the Necklace:
Cut a length of leather cord to your desired size. Fold it in half to create a loop if you are doing a lark’s head knot, or simply thread it through the bail. -
Add Closure:
Finish the leather cord ends with a cord end cap and clasp, or simply tie adjustable slip knots for a more rustic, bohemian finish.
Make it Organic
Instead of perfect circles, try gently pressing the clay edges with your finger after cutting to create slightly uneven, ‘found stone’ shapes.
Now you have a stunning, nature-inspired set ready to wear or gift to a friend
Tiny Bud Vases for Garden Clippings
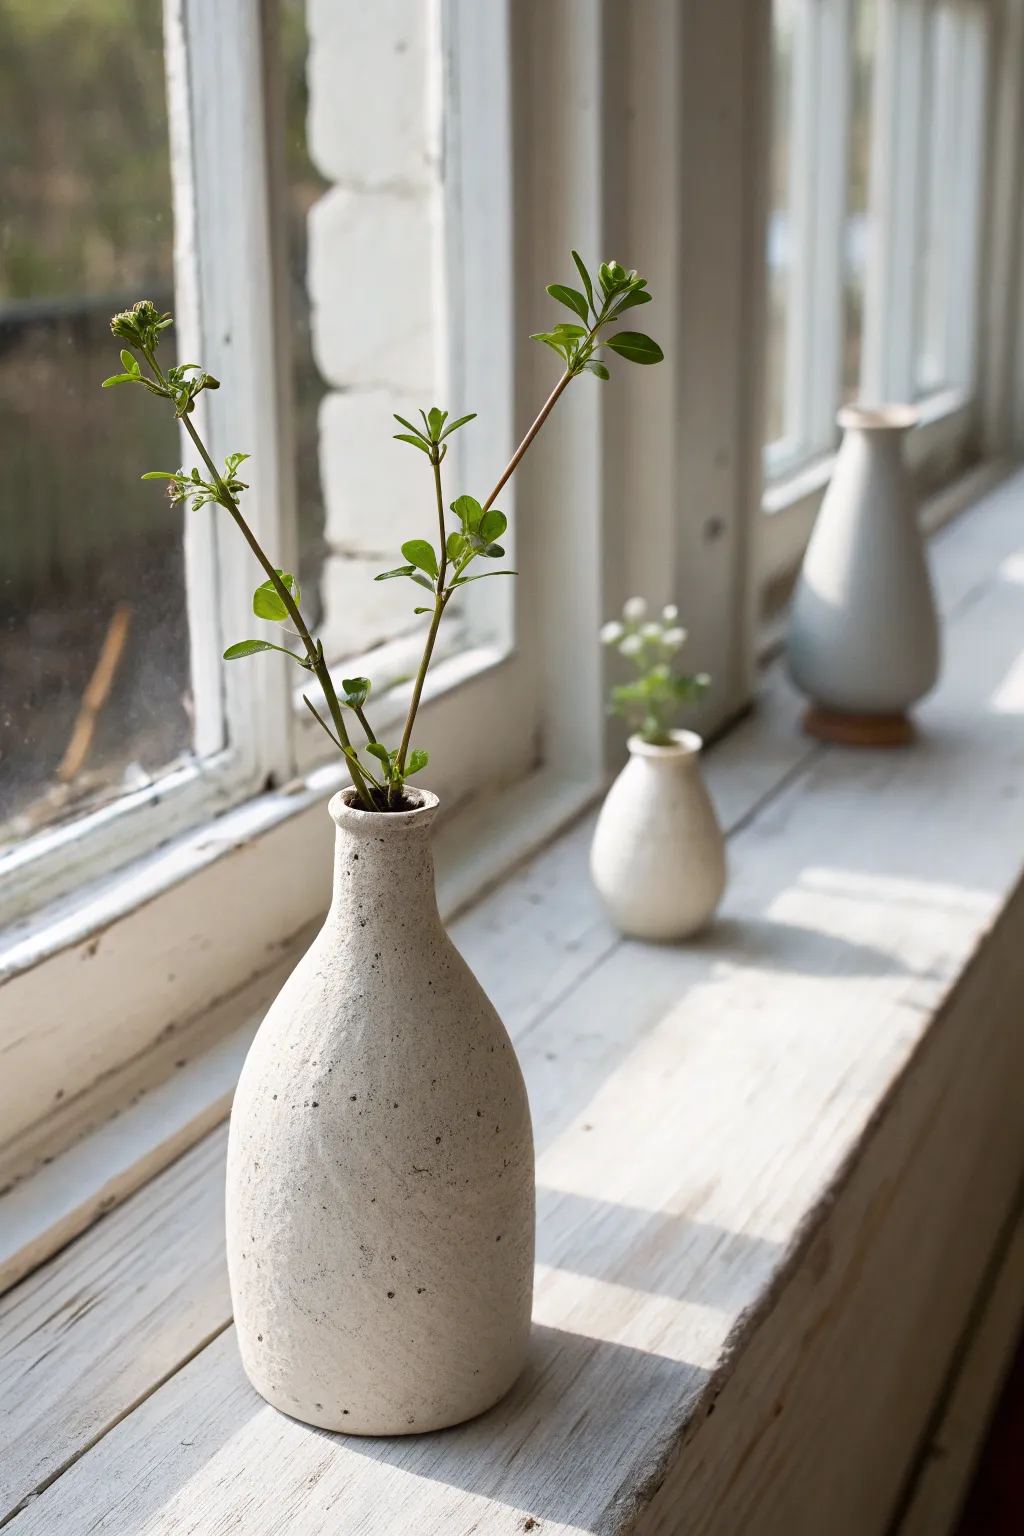
Create stunningly simple home decor that looks like high-end ceramic pottery using accessible air dry clay. These textured, organic vessels are perfect for displaying single stems or tiny garden clippings on a sunny windowsill.
Step-by-Step Guide
Materials
- White or speckled air dry clay (stone effect preferred)
- Small glass bottle or test tube (to act as the waterproof core)
- Rolling pin
- Small sponge
- Old toothbrush
- Sandpaper (fine grit)
- Water in a small cup
- Clay sculpting tools or a butter knife
- Matte sealant or varnish
Step 1: Preparing the Core
-
Choose your armature:
Select a small glass vessel to serve as the internal structure; a small spice jar, a test tube, or a miniature liquor bottle works perfectly since air dry clay isn’t waterproof on its own. -
Clean the glass:
Make sure your chosen glass container is clean and dry. Lightly sanding the outside of the glass can sometimes help the clay adhere better, though it isn’t strictly necessary. -
Condition the clay:
Take a handful of your air dry clay and knead it in your hands until it feels warm and pliable. If it feels crumbly, dip your finger in water and work it in.
Fixing Cracks
If hairline cracks appear while drying, mix a tiny bit of fresh clay with water to make a paste (slip) and fill the cracks, then smooth over.
Step 2: Building the Form
-
Roll out a slab:
Roll your clay out on a flat surface to about a quarter inch thickness. You want enough surface area to wrap completely around your glass container. -
Wrap the base:
Place your glass container on the clay and wrap the sheet around it. Cut off excess clay with a knife, but leave a little overlap to join the seam. -
Seal the seam:
Score the overlapping edges (make scratch marks), add a dab of water, and press them firmly together. Use your thumb to smooth the clay over the seam until it disappears. -
Cover the bottom:
Don’t forget the base! Add a small circle of clay to the bottom, blending it up the sides so the glass is completely enclosed. -
Shape the neck:
Add extra clay around the neck area. Gently pinch and pull the clay upwards to create that tapered, narrow opening shown in the photo. It doesn’t need to hug the glass perfectly here; you can build up volume to change the silhouette. -
Create the bulbous body:
If your glass jar is straight but you want the pear shape from the image, add coils of clay around the bottom half. Smear and blend these coils downwards to build bulk.
Step 3: Refining and Texturing
-
Smooth the shape:
Wet your fingers slightly and run them over the entire vase to even out major bumps. I prefer to keep some irregularity to maintain that hand-thrown pottery look. -
Add texture:
To achieve the stone-like finish, take an old toothbrush or a stiff bristle brush and gently tap it all over the surface of the wet clay. -
Create speckles:
If your clay isn’t pre-speckled, you can gently press coarse sand or dried coffee grounds into the surface now for that organic, gritty texture. -
Refine the rim:
Check the opening at the top. Use a wet finger or a sponge to soften the rim so it looks deliberate and finished, not sharp or jagged.
Faux Ceramic Look
Mix baking soda into white acrylic paint and dab it on your finished dry vase. This creates a gritty, matte pottery texture instantly.
Step 4: Finishing Touches
-
Let it dry:
Place your vase in a cool, dry spot away from direct sunlight. Let it dry for at least 24 to 48 hours. Turn it occasionally to ensure airflow reaches the bottom. -
Sanding:
Once bone dry, use fine-grit sandpaper to knock down any unintentionally sharp peaks or rough patches, but be careful not to smooth away your toothbrush texture. -
Dusting off:
Wipe the vase down with a slightly damp cloth or a dry brush to remove the clay dust from sanding. -
Sealing:
Apply a coat of matte sealant or varnish. This protects the clay from humidity and gives it a finished sheen without making it look too glossy or plastic.
Pop a few sprigs of greenery into your new vase and admire the serene atmosphere it brings to your space
Boho Rainbow or Moon Phase Wall Hangings

Bring a touch of cosmic boho charm to your walls with this dual-strand mobile. Featuring terracotta moon phases, textured circles, and semicircles, this piece combines earthy tones with natural wood elements for a perfectly grounded aesthetic.
Step-by-Step
Materials
- Air dry clay (terracotta color)
- Air dry clay (white or stone color)
- Rolling pin
- Circle cookie cutters (various sizes)
- Knife or clay cutting tool
- Driftwood branch (approx. 12-18 inches)
- Jute twine or heavy-duty cord
- Wooden beads (assorted sizes)
- Needle or skewer (for piercing holes)
- Sandpaper (fine grit)
- Texture tools (fabric scraps, stamps, or toothbrush)
Step 1: Shaping the Celestial Bodies
-
Roll the clay:
Begin by rolling out your terracotta clay to an even thickness of about 1/4 inch. Repeat this process with the white or stone-colored clay on a separate clean surface to avoid color transfer. -
Cut the circles:
Using your cookie cutters, press out several circles from both clay colors. You will need at least six full circles to create the various shapes shown in the project. -
Form the semicircles:
Takes three of your terracotta circles and one stone-colored circle. Use your knife to slice them perfectly in half, creating semi-circle shapes. -
Sculpt the moons:
To make the crescent moons, use a smaller circle cutter to ‘bite’ into a larger clay circle, removing a crescent shape. Create two crescents using the terracotta clay. -
Add detail:
Before the clay hardens, press a texture tool or toothbrush gently into the white clay circles to create a speckled, stony surface. Keep the terracotta pieces smooth for contrast.
Fixing Cracks
If small cracks appear as the clay dries, make a ‘slip’ paste by mixing a tiny bit of clay with water. Smooth this paste into the cracks and let it dry again.
Step 2: Prep and Assembly
-
Pierce the holes:
Using a skewer or large needle, poke a hole through the top and bottom of each shape. For the crescents, pierce the tips. These holes must be large enough for your twine to pass through. -
Dry completely:
Lay all pieces flat on a piece of parchment paper. Let them dry for 24-48 hours, flipping them halfway through to ensure even drying and prevent warping. -
Sand the edges:
Once fully cured, use fine-grit sandpaper to gently smooth any rough edges or irregularities on the sides of your shapes. -
Prepare the branch:
Tie a long piece of jute twine to both ends of your driftwood branch to act as the main hanger. Then, cut two distinct lengths of twine for your vertical strands, making them about 24 inches long each. -
Start the left strand:
Tie your first string to the left side of the branch. Thread the twine through the top hole of a terracotta crescent, then through the bottom hole. -
Add spacing beads:
Slide one large and one small wooden bead onto the twine. These act as spacers between your clay pieces. -
Layer the shapes:
Continue threading the left strand, following the pattern: terracotta semicircle, white circle, terracotta semicircle, terracotta semicircle, final bead, and ending with a terracotta crescent. -
Start the right strand:
Tie the second string to the right side of the branch. Begin threading with a small bead, a large bead, and then a vertical white circle. -
Complete the pattern:
Finish the right strand pattern: beads, green/grey semicircle (if you mixed colors), beads, white circle, beads, terracotta semicircle, white circle, and a final crescent moon at the bottom. -
Secure the ends:
Once all pieces are threaded, tie a sturdy double knot at the very bottom of each strand to secure the final shape. Trim any excess twine. -
Adjust and balance:
Hold the hanging up and gently slide the knots or beads along the driftwood to ensure the two strands hang evenly and don’t tangle.
Add Subtle Color
Knead a small drop of acrylic paint or mica powder into your white clay before rolling it out to create custom pastel marble effects.
Hang your new art piece near a window to let the natural light highlight the different textures you created