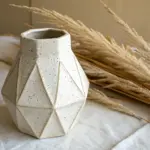
Whenever I want a quick, satisfying project, I reach for clay and make a planter—because you get functional decor and a little sculpture moment all in one. Here are my favorite clay planter ideas that feel totally doable at home, especially for cute little succulents and cacti.
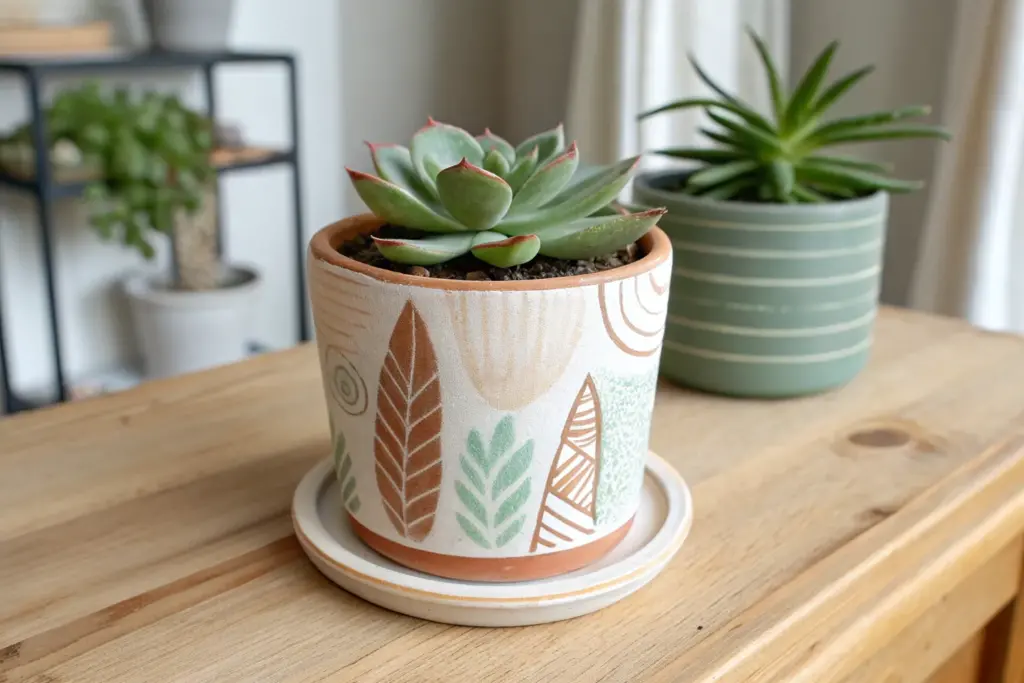
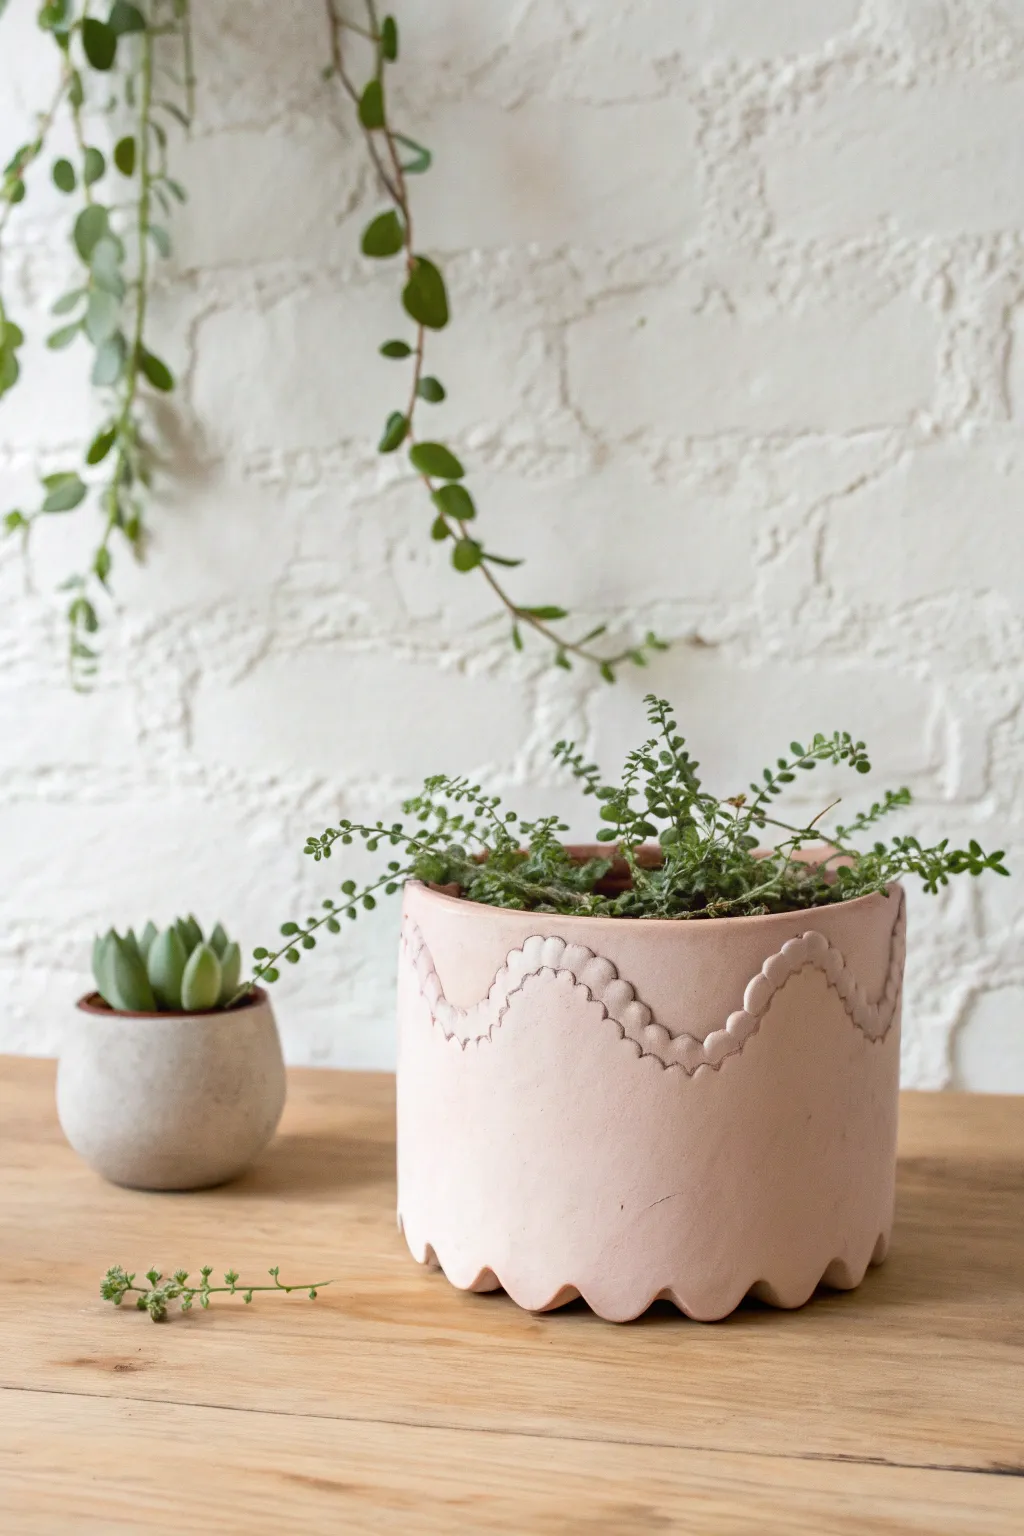
Classic Pinch-Pot Succulent Planter
Embrace the natural beauty of succulents with this handmade pinch-pot planter that features delicate, carved leaf motifs. The textured surface and warm, unglazed clay finish give it an organic, earthy feel perfect for a sunny windowsill.
Step-by-Step Guide
Materials
- Air-dry clay or polymer clay (oven-bake)
- Clay rolling pin
- Carving tools (needle tool, small loop tool)
- Sponge
- Small bowl of water
- Wire cutter or craft knife
- Ruler
- Fine-grit sandpaper
- Clear matte varnish (optional)
Step 1: Forming the Pot Base
-
Prepare the clay block:
Start with a fist-sized ball of clay. Knead it thoroughly to remove any air bubbles, which helps prevent cracks during drying or baking. -
Create the opening:
Hold the ball in one hand and push your thumb into the center, stopping about a half-inch from the bottom to create the base thickness. -
Pinch the walls:
Rotate the ball while gently pinching the clay between your thumb and fingers. Work your way from the bottom up, aiming for an even wall thickness of about 1/4 inch. -
Shape the cylinder:
Flatten the bottom by tapping it gently against your table surface. Continue shaping the walls until you have a straight-sided cylinder roughly 4 inches high. -
Smooth the surface:
Dip your finger or a sponge lightly in water and run it over the exterior and rim to smooth out fingerprints and deep ridges. -
Create the saucer:
Roll out a smaller ball of clay into a flat disc slightly wider than your pot’s base. Slightly curl up the edges to form a shallow saucer rim.
Step 2: Carving the Design
-
Plan the spacing:
Using a needle tool, lightly mark vertical guide lines around the pot’s circumference where you want the center of each leaf to be. Aim for about 4-5 leaves total. -
Outline the leaf shapes:
Lightly etch a teardrop or spade shape for each leaf. I find it helpful to start the point near the top rim and widen it towards the bottom third of the pot. -
Carve the relief:
Use a small loop tool to gently scrape away the clay *outside* the leaf shapes. This makes the leaves apper raised. Don’t dig too deep; just a slight recess is enough. -
Add leaf veins:
With a needle tool, carve a central vertical vein down each leaf. Then, add diagonal lines branching out from the center vein to create texture. -
Refine the edges:
Go back over the outlines of your leaves with the needle tool to sharpen the definition between the raised leaf and the recessed background. -
Add subtle texture:
If you want the speckled look seen in the photo, gently press a stiff bristled brush or a piece of coarse sandpaper against the smooth areas of the clay to add micro-texture.
Clean Carving Tip
Wait until the clay is leather-hard (stiff but cool to the touch) before carving. The tools will cut cleaner lines without dragging the material.
Step 3: Finishing Touches
-
Add drainage (optional):
If you plan to plant directly (rather than using a plastic nursery pot inside), poke a hole in the bottom center using a straw or tool handle. -
Dry or bake:
Follow your clay package instructions. For air-dry clay, let it sit for 24-48 hours. For polymer clay, bake at the recommended temperature. -
Sand for smoothness:
Once fully cured, use fine-grit sandpaper to smooth any rough spots on the rim or the saucer edges. Be careful not to sand away your leaf carving details. -
Apply a finish:
To mimic the matte, unglazed look in the reference, leave the clay raw or apply a very thin coat of matte varnish to seal it against moisture. -
Final assembly:
Place the pot on its matching saucer. It is now ready to house your favorite succulents.
Try a Wash
After baking, apply a watered-down brown acrylic paint wash and wipe it off quickly. The dark paint will settle into the carved veins, making them pop.
Enjoy the calming process of sculpting as you create a unique home for your green friends


Coiled Clay Planter With Soft Ridges
Bring earthy warmth to your indoor garden with this hand-built terracotta-style planter featuring distinct, soft ridge lines. The textured, coiled appearance mimics the charm of wheel-thrown pottery while being entirely achievable with simple hand-building techniques.
Detailed Instructions
Materials
- Terracotta air-dry clay or kiln-fire clay (approx. 2-3 lbs)
- Clay roller or rolling pin
- Two long wooden guide strips (approx. 1/4 inch thick)
- Circular template (cardboard or plastic lid, approx. 5-6 inches diameter)
- Needle tool or Fettling knife
- Serrated rib tool or an old fork
- Slip (clay mixed with water to a creamy consistency)
- Sponge
- Water cup
- Wooden modeling tool with a rounded edge
- Matching clay saucer (optional, can be bought or made similarly)
Step 1: Creating the Base
-
Prepare your workspace:
Set up on a canvas cloth or a wooden board to prevent sticking. Wedge your clay thoroughly to remove air bubbles and ensure a consistent texture. -
Roll the base slab:
Place your clay ball between the two wooden guide strips. Roll the clay out into a flat slab until the rolling pin rests on the guides, ensuring an even thickness. -
Cut the circle:
Place your circular template onto the slab. Using your needle tool, trace around the template to cut out a perfect circle. This will serve as the floor of your pot. -
Prepare the connection point:
The key to structural integrity is scoring. Use your serrated rib or fork to rough up the outer top edge of your circle base where the first coil will sit.
Cracks Appearing?
If you see cracks forming between coils while drying, the clay was likely too dry when joining. Create a ‘patch’ with soft clay and vinegar, then gently fill the gap
Step 2: Building the Coiled Walls
-
Roll your coils:
Take a chunk of clay and roll it on the table with the palms of your hands to create a long snake. Aim for a thickness of about half an inch. You will need many of these. -
Attach the first coil:
Apply a dab of slip to the scored edge of the base. Lay your first coil around the perimeter. Where the ends meet, cut them at an angle, score, slip, and press together. -
Blend the interior:
For strength, you must blend the coil to the base on the *inside* only. Use your thumb or a wooden tool to smear the clay from the coil downward onto the base until the seam disappears. -
Stacking upwards:
Score the top of the first coil and apply slip. Place your second coil directly on top. Repeat the internal blending process—smearing the upper coil down into the lower one on the inside wall. -
Maintain the ridges:
Crucially, do *not* blend the outside seams. This is what creates the distinct ridged look. Simply press the coils firmly together so they adhere without losing their rounded profile.
Even Ridges Tip
Roll all your coils before you start building. Lay them side-by-side to visually check that they are the exact same thickness for a symmetrical finish
Step 3: Refining and Finishing
-
Building height:
Continue stacking coils until the pot reaches your desired height. In this project, try to keep the walls vertical rather than bowing out, to match the reference image. -
Leveling the rim:
Once you reach the top, the rim might be uneven. You can gently tap the whole pot upside down on the table to flatten the rim, or slice it carefully with a wire cutter for a clean, flat edge. -
Smoothing the exterior ridges:
Dampen your sponge slightly—squeeze it out well so it’s barely wet. Gently run it horizontally along the outside grooves. This softens the sharp edges of the coils without erasing the lines. -
Refining the inside:
I prefer to take a scraper tool at this stage and run it vertically up the interior walls. This ensures the inside is completely smooth and watertight, creating a nice contrast with the textured exterior. -
Create the matching saucer:
Repeat the base-making process but cut a slightly larger circle. Add just one or two coils to the edge and blend perfectly smooth for a simple, low-profile saucer. -
Drying slowly:
Loosely cover your planter with plastic for the first 24 hours to let humidity equalize. This prevents cracking, especially where the thick coils join the base. -
Final finishing:
Once bone dry, you can fire it in a kiln or, if using air-dry clay, apply a sealant. Finish by potting a small cactus in sand to complete the desert-chic look.
Enjoy the meditative process of building your pot coil by coil as you create a beautiful home for your favorite succulent


Easy Slab-Built Box Planter
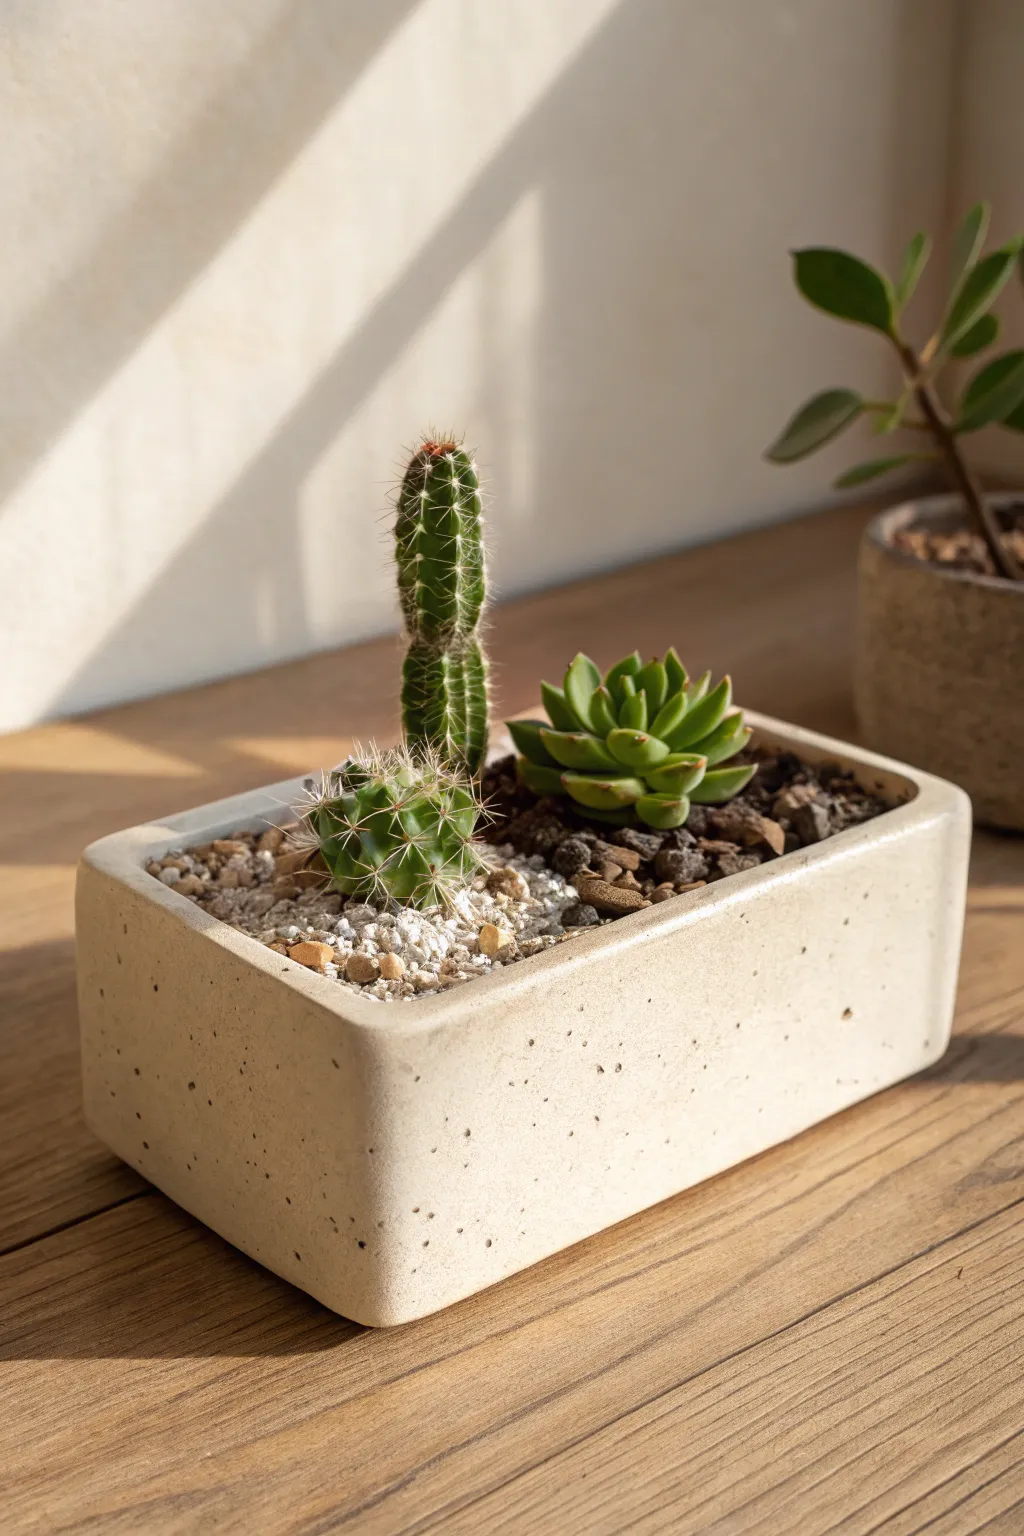
This sleek, rectangular planter features gentle curves and a charming speckled finish that perfectly complements desert flora. Using simple slab-building techniques, you can create a sturdy, modern home for your favorite cacti and succulents.
Step-by-Step Tutorial
Materials
- Speckled buff stoneware clay (or white clay with speckles added)
- Rolling pin
- Two wooden guides (1/4 inch thick)
- Fettling knife or needle tool
- Serrated rib or fork (for scoring)
- Slip (clay mixed with water)
- Wooden spoon or paddle
- Synthetic sponge
- Ruler
- Clear matte glaze
Step 1: Preparing the Slabs
-
Roll the main slab:
Begin by wedging your clay thoroughly to remove air bubbles. Place the clay between your two wooden guides and roll it out into a long rectangle. The guides ensure an even 1/4 inch thickness across the entire piece. -
Cut the base:
Using your ruler and fettling knife, measure and cut a rectangle for the base. For the size shown, aim for approximately 4 inches by 8 inches. -
Cut the walls:
Cut two long strips for the sides (8 inches long) and two shorter strips for the ends (4 inches long). Make these strips about 2 to 2.5 inches tall to achieve that shallow dish look. -
Firm up:
Let all your cut pieces sit out on a ware board for about 30-45 minutes. You want them to reach a ‘soft leather hard’ stage where they can stand up without flopping over but are still flexible.
Uneven Walls?
If your walls aren’t meeting perfectly at the corners, don’t stretch the clay. Instead, cut a tiny sliver off the longer wall to make it fit, then scoring and slipping heavily to fill the gap.
Step 2: Assembling the Box
-
Score the edges:
Use your serrated rib to scratch up the outer edges of the base slab and the bottom and side edges of all your wall pieces. This rough texture is crucial for a strong bond. -
Apply slip:
Dab a generous amount of slip onto all the scored areas. -
Attach the walls:
Press the first long wall onto the base. I usually wiggle it slightly back and forth to lock the clay particles together. Repeat with the remaining three walls. -
Reinforce corners:
Roll very thin coils of soft clay. Press these into the interior seams where the walls meet the floor and where the corners meet each other. Smooth these coils down with your thumb so they disappear.
Step 3: Refining and Shaping
-
Paddle the form:
Gently tap the outside of the box with a wooden paddle or spoon. This helps compress the joints and squares up the shape if it became distorted during assembly. -
Round the corners:
The planter in the image has soft, rounded edges rather than sharp angles. Use a damp sponge to gently rub and round over the four vertical corners and the top rim. -
Smooth the surface:
Take your rib tool or a smooth stone and burnish the exterior walls. This compresses the clay and brings those lovely speckles to the surface. -
Add drainage:
Don’t forget to poke 2-3 holes in the bottom of the planter. Cacti hate sitting in standing water.
Level Up: Texture
Before drying, gently press a piece of coarse sandpaper or a rough stone against the exterior walls. This enhances the concrete-like aesthetic and contrasts beautifully with the smooth plants.
Step 4: Firing and Glazing
-
Bisque fire:
Allow the planter to dry very slowly under loose plastic for a few days to prevent warping, then uncover it until bone dry. Fire it to cone 04. -
Wax the bottom:
Apply wax resist to the bottom of the planter so it doesn’t stick to the kiln shelf. -
Apply glaze:
Dip the planter into a clear matte glaze. A clear glaze works best to highlight the natural speckles in the clay body. -
Wipe back (optional):
If you want the texture to feel raw like stone, you can wipe the glaze off the exterior with a sponge, leaving glaze only on the inside for waterproofing. -
Final fire:
Fire the piece to the maturation temperature of your specific clay body (usually cone 5 or 6 for stoneware).
Once fired, fill your new architectural planter with gritty soil and your favorite prickly companions


Minimal Cylinder Planter With Clean Rim
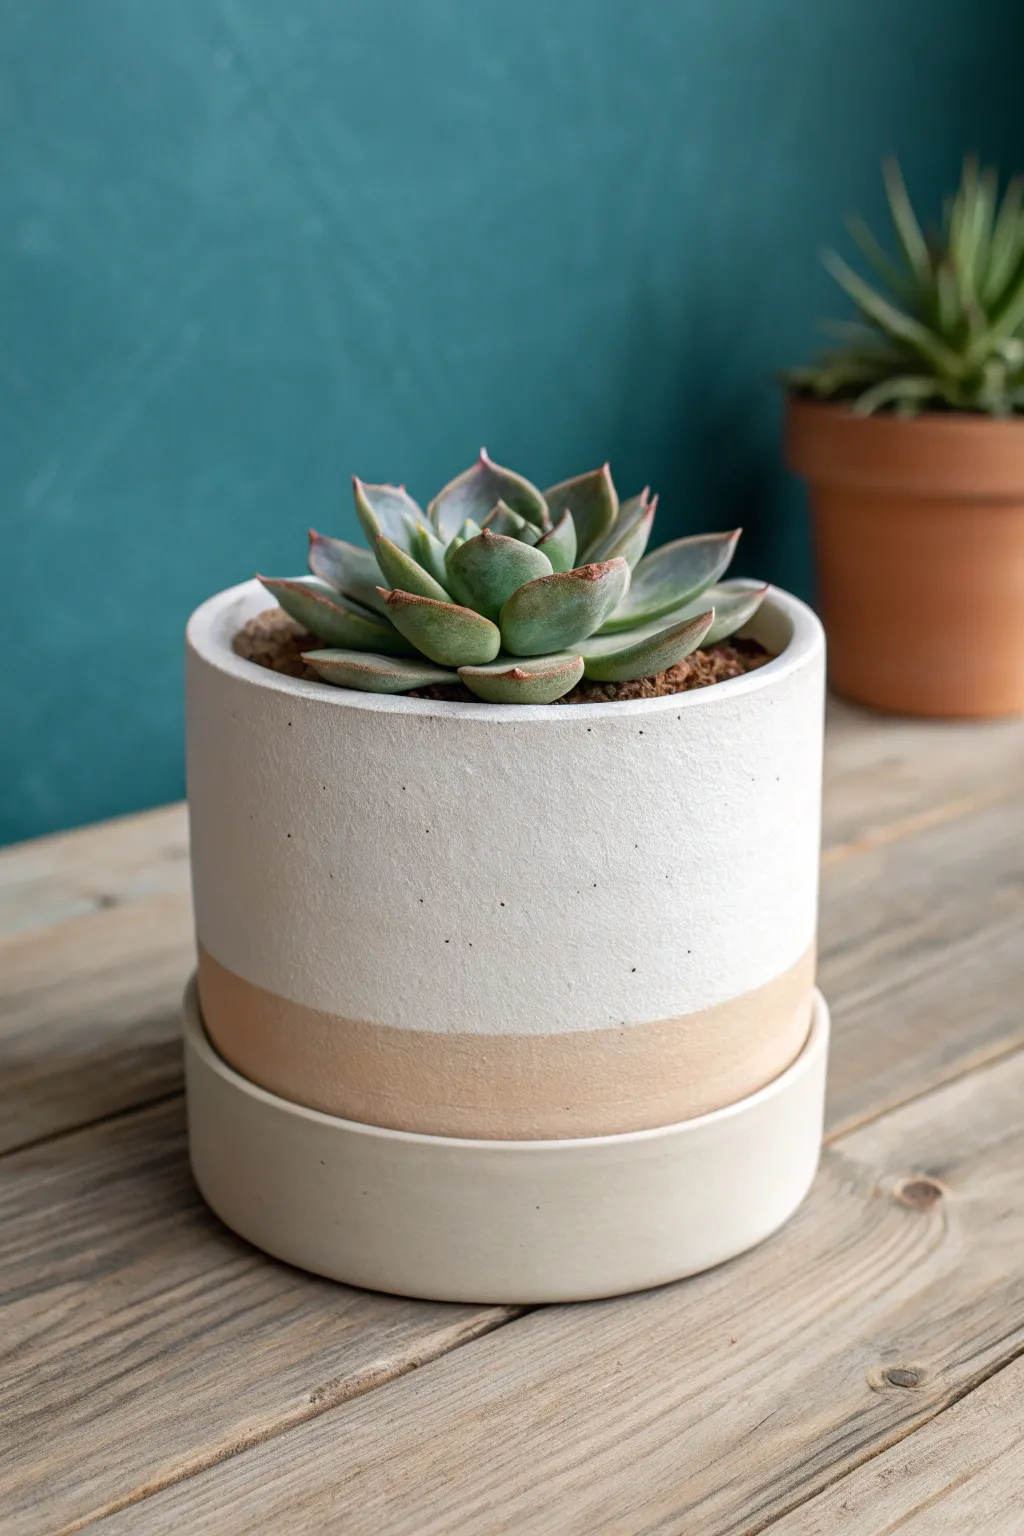
This sleek cylindrical planter combines the raw warmth of exposed clay with the crisp, modern feel of a white speckled glaze. Its straight sides and matching saucer create effortless clean lines that let your succulents take center stage.
Detailed Instructions
Materials
- White stoneware or light terracotta clay (approx. 3-4 lbs)
- Rolling pin
- Canvas mat or slab roller
- Rectangular template (paper or craft foam)
- Circular template (sized for base)
- Needle tool or fettling knife
- Serrated rib or scoring tool
- Slip (clay mixed with water)
- Wooden modeling tool
- Smooth kidney rib
- Sponge
- White matte glaze (brush-on or dipping)
- Masking tape or wax resist
- Succulent soil mix
Step 1: Creating the Cylinder Walls
-
Prepare the slab:
Begin by wedging your clay to remove air bubbles, then roll out a consistent slab about 1/4 inch thick on your canvas mat. Keep the pressure even to ensure the walls will stand straight. -
Cut the forms:
Place your rectangular template on the slab. This rectangle determines the height and circumference of your pot. Using your needle tool, cut cleanly around the template. Don’t discard the scraps yet; you’ll need them for the base. -
Cut the base:
Use your circular template to cut out the floor of the pot from the remaining slab. The circle’s diameter should match the length of your rectangle when rolled into a cylinder. -
Texture option:
If you want that subtle speckled look seen in the photo and aren’t using speckled clay, you can gently press sand or grog into the surface of the slab now before assembling. -
Bevel edges:
For a seamless join, cut the short ends of your rectangular slab at 45-degree angles in opposite directions. This allows them to overlap perfectly without creating a bulge.
Fixing a Warped Rim
If your cylinder creates an oval shape while drying, gently push it back into a perfect circle during the leather-hard stage. Place a round object inside for support if needed.
Step 2: Assembling the Form
-
Score and slip:
Generously score (scratch) the beveled edges of the rectangle and the outer rim of your circular base. Apply slip to all scored areas. -
Form the cylinder:
Carefully lift the rectangular slab and curve it into a cylinder, pressing the beveled edges together. Support the wall from the inside with one hand while gently pressing the seam closed from the outside. -
Attach the base:
Place the cylinder onto the scored circular base. Use a wooden tool to blend the clay from the wall down onto the base to seal the seam completely. -
Smooth the exterior:
Using a smooth kidney rib, go over the entire exterior surface. I find it helpful to spin the pot on a banding wheel if you have one, holding the rib steady to create that perfect, machine-like finish. -
Refine the rim:
Use a damp sponge to smooth the top rim. It should be flat and clean, matching the sharp aesthetic of the project. -
Create the saucer:
Roll a smaller slab and cut a circle slightly larger than your pot’s base, plus a long thin strip for the saucer rim. Attach the strip to the circle using the same score-and-slip method, keeping the wall low (about 1 inch).
Add Subtle Speckles
To get the exact speckled look in the photo without buying specialty clay, add 0.5% granular manganese or black iron oxide to your clear or white glaze mixture.
Step 3: Finishing and Glazing
-
Drying:
Loosely cover the pot and saucer with plastic to let them dry slowly to a leather-hard state, then uncover to bone dry. Bisque fire the pieces according to your clay’s instructions. -
Create the resist line:
Once bisque fired, you need to create the two-tone effect. Use masking tape or paint liquid wax resist around the bottom third of the cylinder’s exterior. Ensure the line is perfectly level. -
Apply the glaze:
Dip the top portion of the pot into white matte glaze, or brush it on carefully. If brushing, apply 2-3 coats for opaque coverage. Glaze the interior fully to make it waterproof. -
Glaze the saucer:
For the saucer, glaze the entire piece white to match the body, or keep the outside raw to match the bottom stripe—your choice. The photo shows a fully glazed saucer exterior. -
Clean up:
Wipe away any glaze that dripped onto the masked area or the bottom of the pot with a clean, damp sponge. -
Final firing:
Fire the piece again to the glaze temperature required for your materials. Once cool, verify the two distinct textures between the smooth glaze and the rougher raw clay base.
Once fired and cooled, pot your favorite succulent and enjoy the modern elegance this handmade piece brings to your space

The Complete Guide to Pottery Troubleshooting
Uncover the most common ceramic mistakes—from cracking clay to failed glazes—and learn how to fix them fast.
Two-Tone Color-Dipped Planter
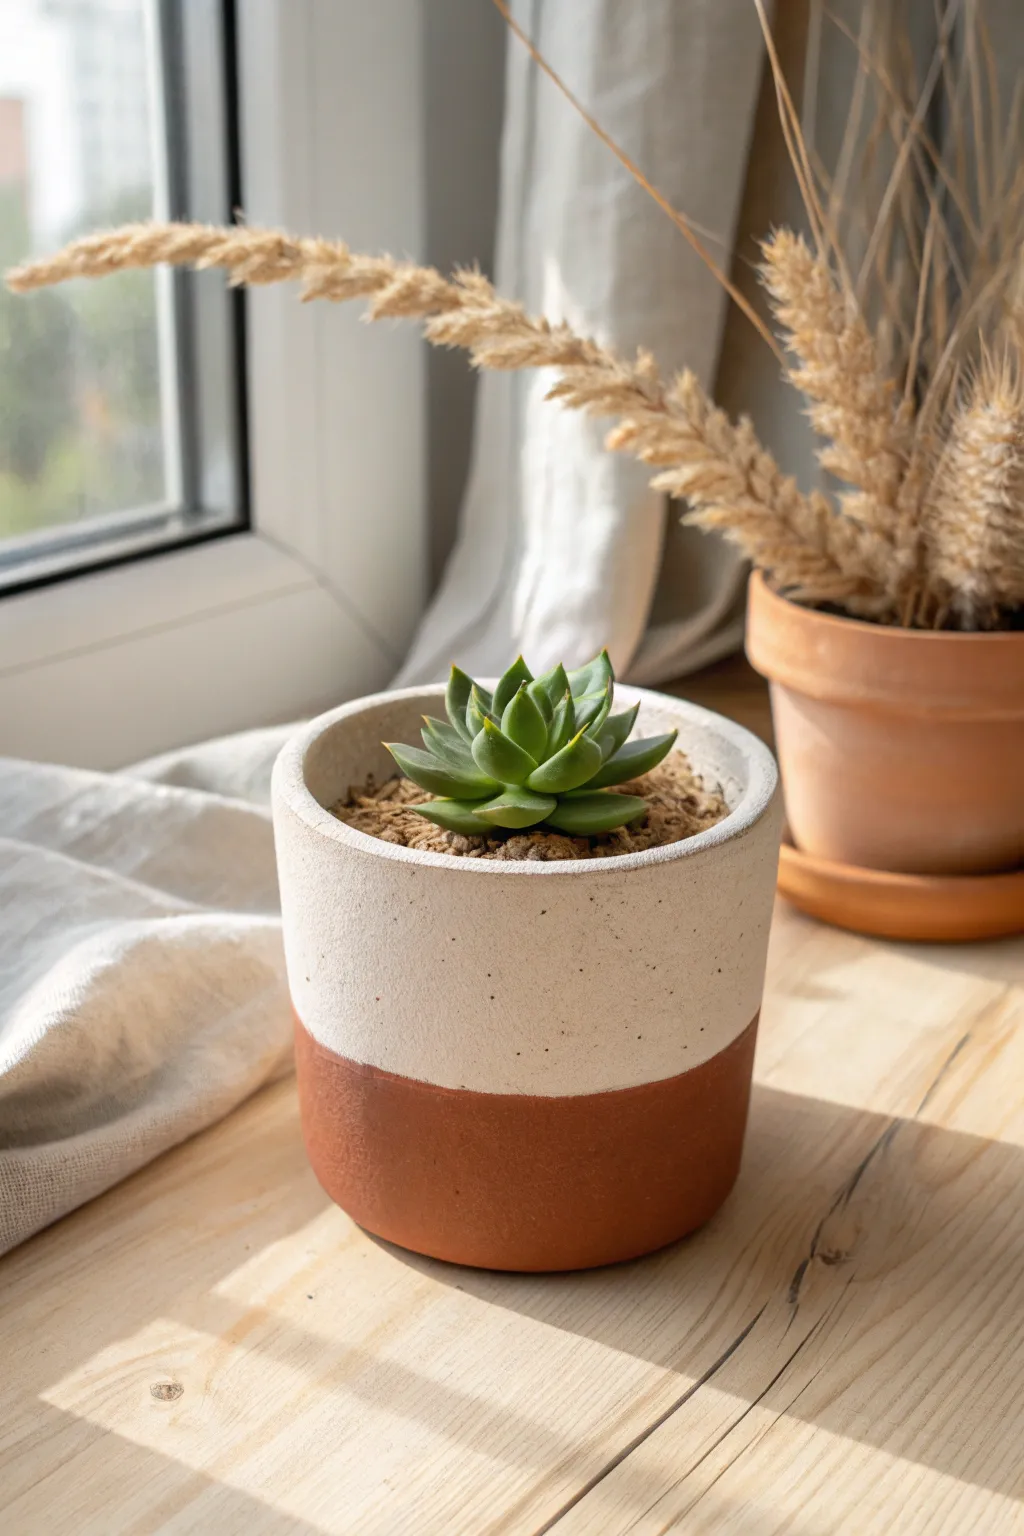
Elevate a standard terracotta pot with this sophisticated two-tone design that mimics the look of expensive ceramic ware. By combining the raw warmth of clay with a textured, speckled cream finish, you create a perfect minimalist home for your favorite succulents.
Step-by-Step
Materials
- Standard terracotta pot (4-6 inch diameter)
- White or cream matte acrylic paint
- Baking soda or plaster of paris (for texture)
- Black or brown acrylic paint (for speckling)
- Masking tape or painter’s tape
- Wide flat paintbrush
- Old toothbrush
- Matte spray sealer or clear coat
- Small mixing bowl
- Plastic drop cloth or newspaper
Step 1: Preparation & Masking
-
Clean the surface:
Begin by thoroughly wiping down your terracotta pot with a damp cloth to remove any dust or oils. Let it dry completely, as moisture will prevent the tape from sticking properly. -
Measure the line:
Decide where you want your color division to be. For the look in the image, aim for the bottom third to remain enhancing raw clay. Mark this height lightly with a pencil in a few spots around the pot. -
Apply tape:
Wrap a strip of high-quality masking tape or painter’s tape around the pot, aligning the bottom edge of the tape with your pencil marks. Ensure the tape line is straight and level all the way around. -
Seal the edge:
Press down firmly on the tape’s bottom edge with your fingernail or a credit card handle. A tight seal is crucial here to prevent paint from bleeding onto the terracotta base.
Tape peeling paint?
If lifting the tape pulls up your textured paint, run a craft knife very lightly along the tape’s edge to break the seal before peeling it off completely.
Step 2: Creating the Texture
-
Mix the textured base:
In your small mixing bowl, pour out a generous amount of your cream or white matte acrylic paint. This will be the main body color. -
Add thickening agent:
Gradually stir in baking soda or a small amount of plaster of paris into the paint. I like to aim for a ratio of about 1 part powder to 3 parts paint. -
Checking consistency:
Keep stirring until you achieve a consistency similar to fluffy frosting or thick mousse. If it’s too runny, add a pinch more powder; if it’s too clumpy, add a drop of water. -
Apply the first coat:
Using the wide flat brush, apply the thickened paint mixture to the top section of the pot, painting over the top lip and slightly inside the rim. -
Stipple for texture:
Don’t just brush back and forth; use a dabbing or stippling motion with the brush to create surface irregularity. This mimics the stone-like finish seen in the photo. -
Dry and repeat:
Let this first coat dry for about 20-30 minutes. Apply a second coat using the same stippling technique to ensure full opacity and rich texture.
Use painter’s tape
For sharper lines on curved surfaces, use automotive masking tape or flexible vinyl tape instead of standard paper tape, as it conforms better to the pot’s shape.
Step 3: Speckling & Finishing
-
Prepare the speckle paint:
Dilute a tiny drop of black or dark brown acrylic paint with water until it’s very thin and inky. -
Load the toothbrush:
Dip the bristles of an old toothbrush into this watery dark paint. Test the spray on a piece of paper first to avoid large blobs. -
Flick the paint:
Hold the toothbrush near the painted section of the pot and run your thumb across the bristles to flick tiny specks onto the cream surface. Go lightly—less is more for this subtle effect. -
Remove the tape:
While the second coat of cream paint is barely tacky (not fully cured but dry to the touch), carefully peel off the masking tape at a 45-degree angle. -
Touch up edges:
If any paint bled under the tape, carefully scrape it away with a craft knife or use a damp Q-tip to clean the terracotta line immediately. -
Wait for full cure:
Allow the pot to sit undisturbed for at least 24 hours so the textured paint hardens completely. -
Seal the work:
Finish by spraying the entire exterior with a matte clear coat. This protects both the porous clay and your paint job from water damage when you water your plant.
Pop in your favorite succulent and enjoy this chic, handmade addition to your windowsill collection
Speckled Stone-Look Planter Finish
Transform a plain terra cotta or ceramic pot into a trendy, high-end piece that mimics the look of raw terrazzo or speckled stoneware. This technique uses acrylics and a simple spatter method to achieve a natural, organic finish perfect for desert plants.
Detailed Instructions
Materials
- Terra cotta pot and saucer
- White or cream matte acrylic paint (base coat)
- Tan or beige acrylic paint
- Burnt orange or terracotta acrylic paint
- Black or dark grey acrylic paint
- Baking soda or plaster of paris (for texture)
- Old toothbrush
- Small flat paintbrush
- Medium round paintbrush
- Matte spray sealer or varnish
- Plastic drop cloth or newspaper
- Paper towels
- Small mixing bowls or palette
Step 1: Base Preparation
-
Clean the pot:
Ensure your terra cotta pot and saucer are completely clean and dry. Wipe away any dust with a damp cloth and let it air dry so the paint adheres properly. -
Create the textured mix:
In a small container, mix your white or cream acrylic paint with a tablespoon of baking soda (or plaster of paris). The ratio should be roughly 2 parts paint to 1 part powder. -
Adjust consistency:
Stir until you have a thick, gritty paste similar to cake frosting. If it’s too thick to spread, add a drop of water; if it’s too runny, add more baking soda. -
Apply the first coat:
Using a flat paintbrush, apply this textured mixture all over the outside of the pot and the rim. Don’t worry about being perfectly smooth—some brush strokes add to the organic stone look. -
Coat the saucer:
Repeat the painting process on the outer edge and rim of the saucer to match the pot. -
Let it dry completely:
Allow the base coat to dry for at least an hour. The baking soda mixture can take a bit longer than plain paint to set fully. -
Apply a second coat:
For better coverage and a more stone-like texture, apply a second layer of your textured paint mixture. Let this dry fully before moving to the detail work.
Paint Too Gloopy?
If the baking soda paint lumps up while drying, lightly sand the roughest peaks with fine-grit sandpaper for a smoother stone finish.
Step 2: Creating the Speckles
-
Prepare the workspace:
Lay down plenty of newspaper or a drop cloth. The spattering technique can be messy, and you’ll want to protect your surrounding area. -
Mix water into colors:
Put small amounts of your tan, burnt orange, and black paints onto a palette. Add a few drops of water to each to thin them down to an ink-like consistency. -
Start with tan speckles:
Dip an old toothbrush into the thinned tan paint. Hold the brush about 6 inches from the pot and run your thumb across the bristles to flick tiny droplets onto the surface. -
Vary the density:
Rotate the pot as you spatter. I like to make some areas slightly denser with speckles than others to keep it looking natural and less uniform. -
Add larger spots:
Use a small round paintbrush to manually dab on a few larger, irregular spots of tan and burnt orange. This mimics the larger aggregate found in real terrazzo. -
Spatter the black:
Clean your toothbrush (or use a fresh one) and dip it into the thinned black paint. Lightly flick black specks over the tan and orange layers for contrast. -
Detail the saucer:
Repeat the spattering process on the saucer rim. Try to match the density of the speckles on the pot so they look like a cohesive set. -
Dry the details:
Let the speckles dry completely. Since the paint was thinned with water, give this step about 30 minutes to ensure nothing smears.
Step 3: Sealing and Finishing
-
Seal the interior:
If you plan to plant directly into the pot, seal the inside with a waterproofing sealer to prevent moisture from bubbling your new paint job. -
Apply matte varnish:
Once the exterior is bone dry, spray the entire pot and saucer with a matte clear coat. This protects the textured finish and keeps the speckles from flaking off. -
Final cure time:
Allow the sealer to cure according to the manufacturer’s instructions (usually 24 hours) before potting your plant.
Level Up
Mix fine sand directly into your base coat paint instead of baking soda for a grittier, more durable texture.
Once dry, nestle your favorite succulent inside for a desert-chic display.


What Really Happens Inside the Kiln
Learn how time and temperature work together inside the kiln to transform clay into durable ceramic.
Stamped Pattern Clay Planter
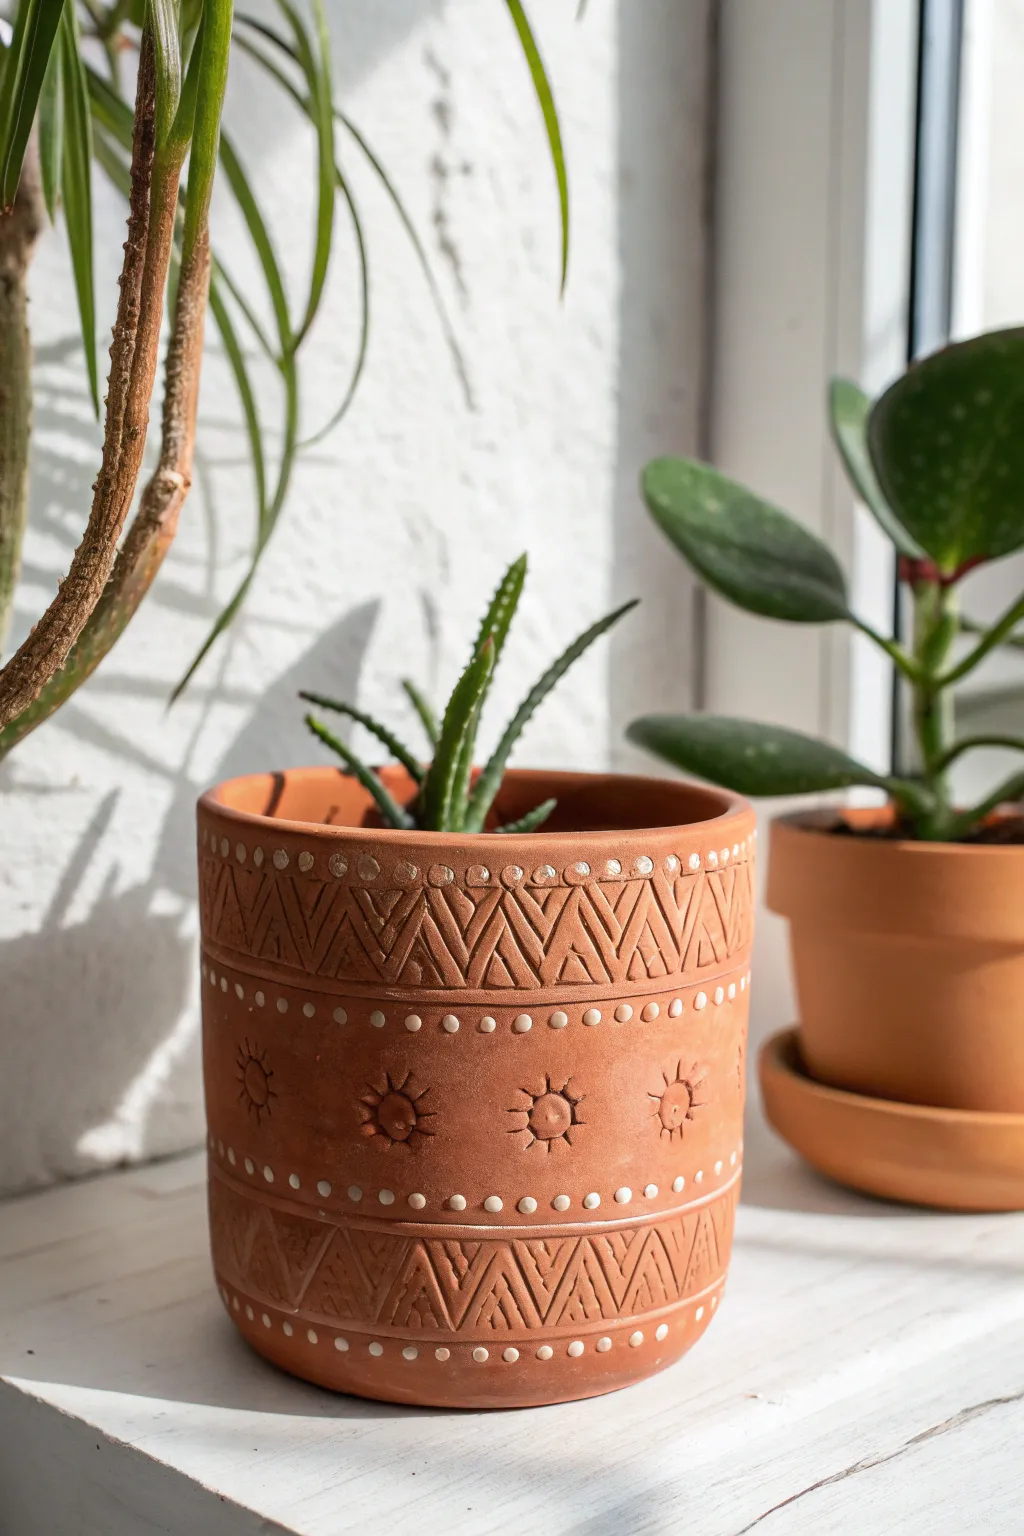
Transform a plain terra cotta vessel into a bohemian masterpiece with simple carving and stamping techniques. This project features geometric chevron bands and cheerful sunburst motifs, accented with touches of white slip for contrast.
How-To Guide
Materials
- Unfired clay cylinder pot (leather hard) or plain bisque pot if carving is not possible
- Carving tool (V-gouge or needle tool)
- Small round piping tip or straw (for circles)
- Sun stamp (custom or pre-made)
- White underglaze or white acrylic paint
- Fine detail paintbrush
- Sponge
- Clear sealant (matte or satin) if using acrylics
Step 1: Preparation and Marking
-
Assess your base:
If you are making the pot from scratch, wait until the clay is leather hard—stiff enough to hold its shape but soft enough to carve easily. If you are upcycling a store-bought terra cotta pot, you will skip the deep carving and focus on painting or using a rotary tool for etching. -
Clean the surface:
Wipe the exterior with a slightly damp sponge to remove any dust or oils that might interfere with your work. -
Mark horizontal guides:
Lightly trace three horizontal lines around the circumference of the pot to divide your design areas. You need a top band, a middle section for the suns, and a bottom band. Using a banding wheel here makes keeping the lines straight much easier.
Uneven Spacing?
Cut a strip of paper the exact length of the pot’s circumference. Fold it to divide it into equal sections, then tape it to the pot as a guide for spacing.
Step 2: Carving the Patterns
-
Create the top chevron band:
Using a V-gouge tool, carve a continuous zig-zag line between your top two guide lines. Press firmly to get a nice depth. -
Double the zig-zags:
Carve a second, smaller zig-zag pattern inside the triangles created by your first pass. This creates that intricate, nested geometric look. -
Add vertical dividers:
Carve vertical lines inside the V-shapes to fill negative space and add texture to the band. -
Replicate on the bottom:
Repeat the exact same zig-zag and vertical line process on the bottom band of the pot to create symmetry. -
Stamp the suns:
In the wide middle section, press your sun stamp firmly into the clay at even intervals. If you don’t have a stamp, use a small bottle cap for the center circle and use your carving tool to draw the radiating rays manually. -
Add texture to the suns:
If hand-carving the suns, press a small divot into the center of each sun circle to give it dimension.
Step 3: Adding the Dot Details
-
Create the dot borders:
Use the back end of a paintbrush, a small dowel, or a specialized dotting tool. Dip it into your white underglaze (if firing) or white acrylic paint. -
Dot the top rim:
Press a row of small dots just below the rim of the pot, spacing them evenly. -
Frame the central band:
Add a row of white dots immediately below the top carved band, and another row immediately above the bottom carved band. This frames your sun motifs perfectly. -
Fill the bottom border:
Finish the dot work with a final row near the very bottom edge of the planter. -
Clean up edges:
If any paint or underglaze smudged, carefully scrape it away with a craft knife or wipe with a damp Q-tip once slightly dry.
Make It Antique
Rub a diluted wash of darker bown paint over the textured areas and wipe off the excess. The dark pigment will settle in the grooves, making the carving pop.
Step 4: Finishing
-
Let it dry:
Allow the pot to dry completely. If you used real clay and underglaze, fire the pot in a kiln according to your clay’s specifications. -
Seal (for painted pots):
If you modified a store-bought pot with acrylics, apply two coats of a matte or satin clear sealant spray to protect your design from moisture and UV light. -
Plant:
Fill your new artisan planter with a gritty soil mix and add a spiky succulent like an aloe or haworthia to complement the geometric patterns.
Now your unique, handcrafted planter is ready to bring a warm, desert-inspired vibe to your windowsill
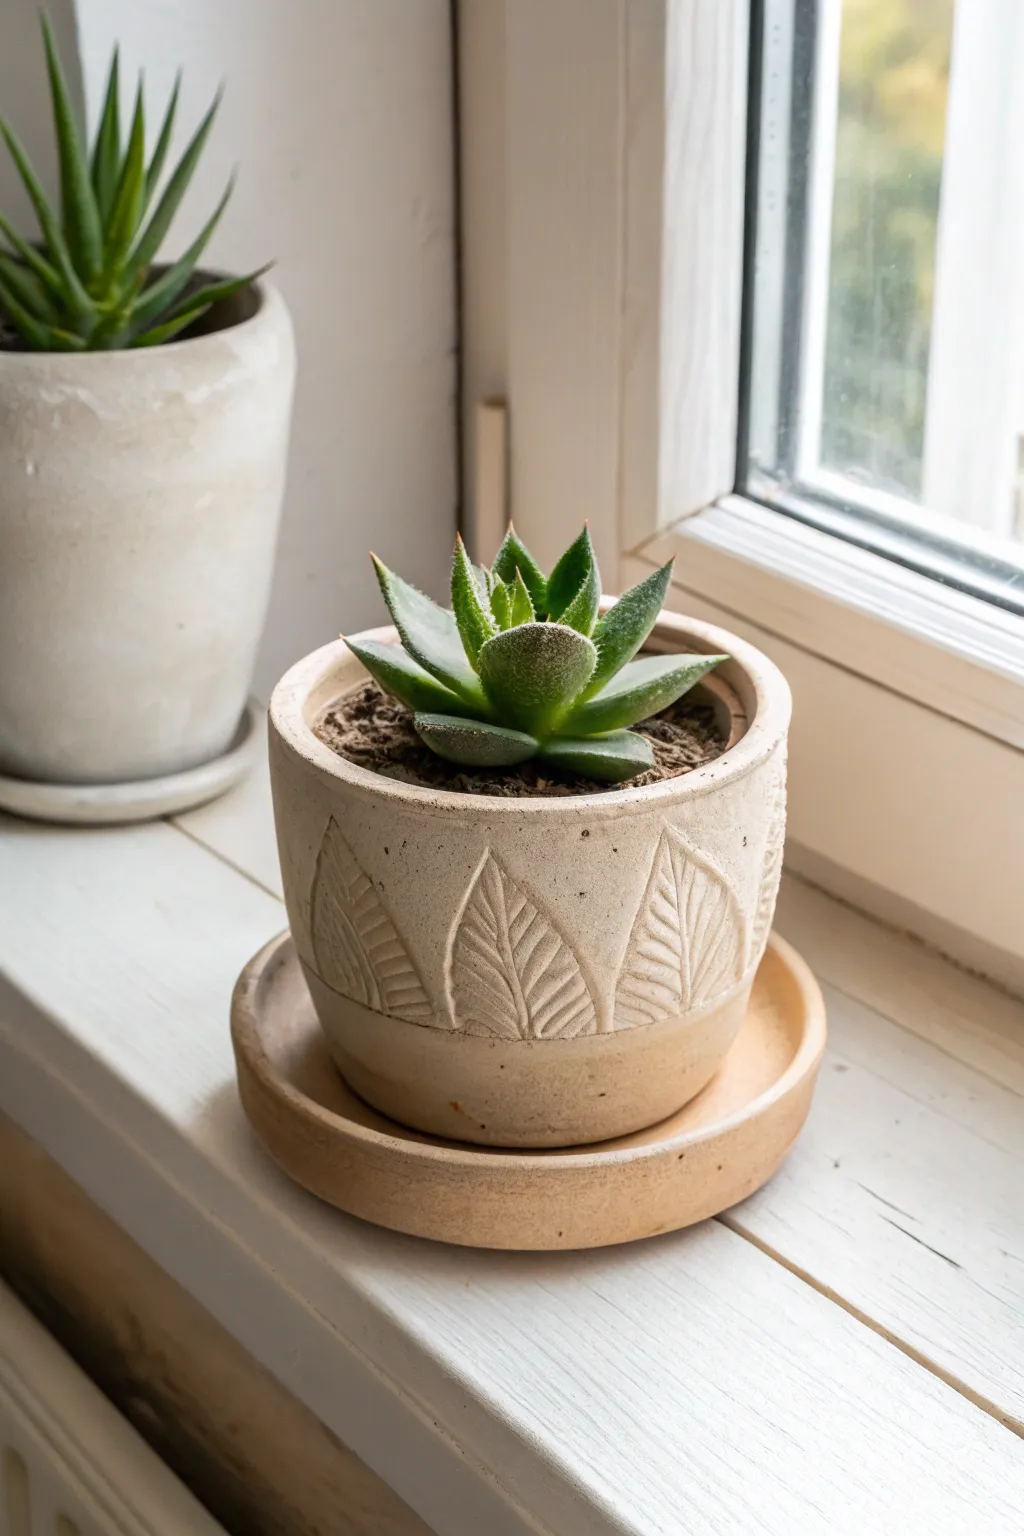
Leaf-Imprint Botanical Planter
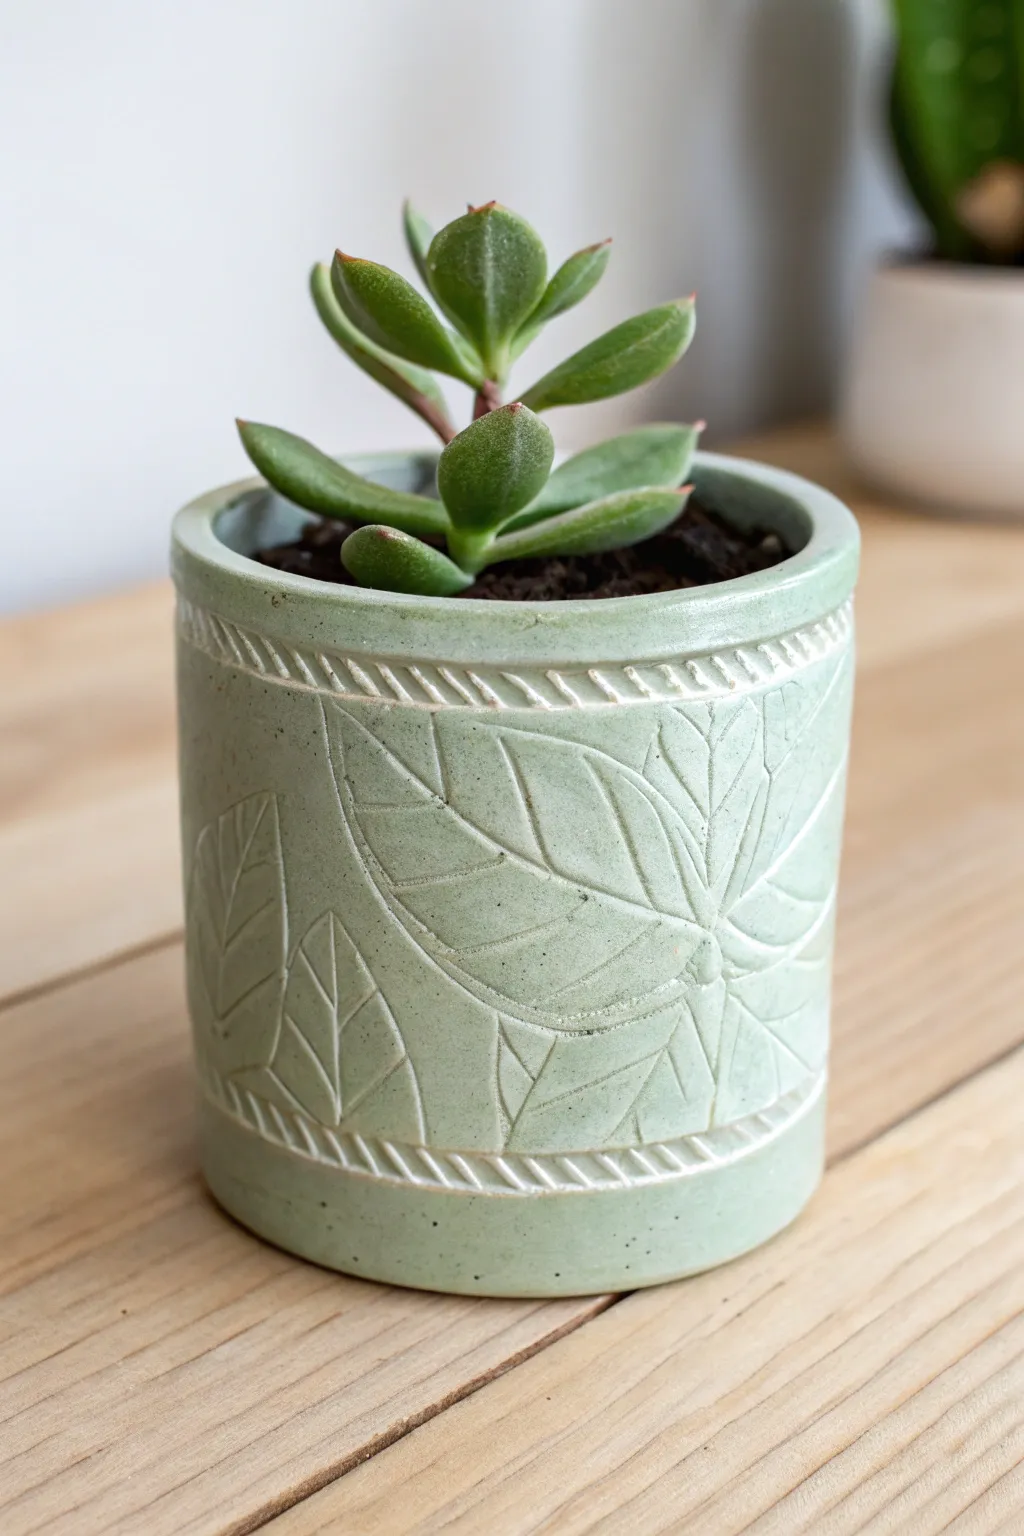
This elegant clay planter features a subtle, glossy sage green glaze that highlights a delicate pattern of overlapping leaf impressions. The design is framed by textured rope-like borders at the top and bottom, creating a nature-inspired vessel perfect for small succulents.
Step-by-Step Tutorial
Materials
- White or light-colored stoneware clay
- Rolling pin
- Canvas work surface
- Cylindrical mold (PVC pipe or bisque form)
- Natural leaves with prominent veins
- Clay carving tools (needle tool, small loop tool)
- Slip and scoring tool
- Sponge
- Sage green celadon glaze (cone 5/6 translucent)
- Kiln access
- Small paintbrush
Step 1: Preparation and Slab Rolling
-
Prepare the Clay:
Begin by wedging your stoneware clay thoroughly to remove air bubbles and ensure a consistent texture. -
Roll the Slab:
Roll out a slab of clay on your canvas to a thickness of approximately 1/4 inch. Ensure the slab is long enough to wrap around your chosen cylindrical mold with a slight overlap. -
Trim to Size:
Using a straight edge and a needle tool, cut a long rectangular strip. The height should be about 4-5 inches depending on your mold. -
Create the Base:
Roll a separate, smaller piece of clay and cut out a circle that matches the diameter of your mold to serve as the bottom of the pot.
Vein Selection Tip
Choose leaves with thick, stiff veins like hydrangea or salal. Soft leaves like spinach won’t leave a deep enough impression to catch the glaze pool.
Step 2: Creating the Texture
-
Imprint the Leaves:
Arrange your natural leaves vein-side down onto the clay slab. Gently roll over them with the rolling pin to embed the veins deep into the surface. -
Refine the Leaf Lines:
After peeling away the real leaves, I like to use a dull pencil or a modeling tool to deepen and clarify the main vein lines if the impression feels too faint. -
Create the Rope Borders:
Roll two thin coils of clay. Twist them slightly or use a tool to press diagonal hatch marks repeatedly along the length to mimic a rope texture. -
Attach the Borders:
Score and slip the top and bottom edges of your rectangular slab. Attach the textured ‘rope’ coils to these edges, blending them securely onto the back of the slab.
Seam Cracking?
If the vertical seam cracks during drying, score it deeper and use vinegar-based slip next time. Ensure the wall thickness is even throughout.
Step 3: Assembly
-
Form the Cylinder:
Wrap the textured slab around your cylindrical mold. Score and slip the vertical seam where the ends meet, smoothing it from the inside to hide the join. -
Attach the Base:
Score and slip the bottom edge of the cylinder and the circular base piece. Press them together firmly and blend the clay on the exterior seam. -
Smooth the Rim:
Use a slightly damp sponge to smooth the top rim of the pot, ensuring the rope texture isn’t flattened but the lip is comfortable to the touch. -
Dry Slowly:
Cover the pot loosely with plastic to let it dry slowly to the leather-hard stage, then remove the plastic to dry completely before the bisque fire.
Step 4: Glazing and Finishing
-
Bisque Fire:
Fire the bone-dry piece in the kiln to a bisque temperature (usually cone 04). -
Apply Glaze:
Dip the planter into a translucent sage green celadon glaze. This type of glaze is crucial because it pools in the crevices of the leaf veins, making the design pop. -
Clean the Foot:
Wipe away any glaze from the very bottom of the pot with a wet sponge to prevent it from sticking to the kiln shelf. -
Final Firing:
Glaze fire the piece to the recommended temperature for your clay and glaze (typically cone 5 or 6).
Once cooled, pot up your favorite succulent and enjoy the natural serenity this planter brings to your space

TRACK YOUR CERAMIC JOURNEY
Capture glaze tests, firing details, and creative progress—all in one simple printable. Make your projects easier to repeat and improve.
Geometric Faceted Mini Planter

Embrace modern minimalism with this sleek, faceted mini planter that looks like it came straight from a design boutique. The sharp geometric angles catch the light beautifully, while the raw concrete-style finish provides the perfect neutral backdrop for a prickly cactus.
Detailed Instructions
Materials
- White cement or hypertufa mix (or air-dry clay for a strictly indoor version)
- Cardboard or poster board (for the mold)
- Small plastic cup (for the inner void)
- Strong craft tape or packing tape
- Cooking spray or petroleum jelly (release agent)
- Mixing bowl and stir stick
- Fine-grit sandpaper (220 grit)
- Craft knife
- Ruler and pencil
- Small geometric template (printable from online)
- Cactus soil and drainage gravel
Step 1: Creating the Geometric Mold
-
Select a template:
Find a geometric polyhedron template online, specifically one with a flat base like a truncated icosahedron or a simple faceted bowl shape. Print this out on heavy cardstock or use it to trace onto poster board. -
Trace and cut:
Carefully trace the pattern onto your sturdy cardboard or poster board. Use a ruler to ensure every line is perfectly straight, as these crisp edges are crucial for the final look. -
Score the fold lines:
Using the back of your craft knife or a dedicated bone folder, lightly score all the internal lines where the paper needs to fold. This prevents the cardboard from wrinkling and ensures sharp angles. -
Assemble the exterior:
Fold along your scored lines to create the faceted shape. Secure the tabs on the outside using strong tape. I like to tape the entire exterior thoroughly to reinforce it against the weight of the wet mix. -
Check for leaks:
Hold the mold up to a light source to check for any pinhole gaps in the corners. Seal any potential leak points with extra tape to prevent the cement from dripping out.
Smooth Surface Secret
To get fewer air bubble pits on the surface, vibrate the mold on the table vigorously for a full minute after pouring the wet mix.
Step 2: Casting the Planter
-
Prepare the insert:
Take your small plastic cup—this will create the hole for the plant. Coat the outside of this cup generously with cooking spray or petroleum jelly to ensure it doesn’t get stuck in the cured cement. -
Grease the mold:
Similarly, coat the *inside* of your geometric cardboard mold with your release agent. Be thorough, especially in the sharp corners of the facets. -
Mix the medium:
Mix your white cement or concrete according to the package directions. Aim for a consistency similar to peanut butter or thick pancake batter—pourable but not watery. -
Pour the base:
Pour the mixture into the geometric mold until it is about two-thirds full. Tap the mold gently against the table several times to release trapped air bubbles. -
Insert the void:
Press the greased plastic cup into the center of the wet mix. Push it down until the mix rises to the top edge of the mold, but ensure the cup doesn’t touch the bottom cardboard. -
Weight it down:
The cup will want to float up. Place small rocks or coins inside the plastic cup to weigh it down and keep it centered while the cement sets.
Marble Effect
Add a few drops of black pigment or acrylic paint into the wet white cement and swirl just once with a stick before pouring for a chic marble look.
Step 3: Finishing and Planting
-
Let it cure:
Allow the planter to sit undisturbed for at least 24 to 48 hours. Patience is key here; unmolding too early can cause the delicate corners to crumble. -
Remove the inner cup:
Once solid, twist the inner plastic cup gently to break the seal and pull it out. If it’s stubborn, you may need to carefully cut it out with pliers. -
Peel away the mold:
Tear away the outer cardboard mold. Since you won’t reuse this cardboard, don’t worry about destroying it. Reveal your faceted creation. -
Sand the edges:
Use fine-grit sandpaper to smooth the top rim and soften any overly sharp exterior edges. You can also lightly sand the facets if you want to expose a bit of the aggregate texture. -
Drill drainage (optional):
If your mix didn’t include a drainage hole (via a straw/tube method), carefully drill a small hole in the bottom using a masonry bit, or simply rely on a gravel layer for drainage. -
Add drainage layer:
Place a small layer of pea gravel at the bottom of the pot to help keep the cactus roots from sitting in standing water. -
Plant the cactus:
Fill the rest of the void with cactus-specific potting soil and gently nestle your small cactus into its new geometric home.
Now you have a stunning, architectural home for your favorite little desert plant
Scalloped Rim Planter
Embrace soft textures and whimsical details with this planter that features sweet scalloped carving along the upper edge and a playful wavy base. The dusty pink finish gives it a modern yet earthenware feel perfect for trailing delicate succulents.
Step-by-Step Tutorial
Materials
- Air-dry clay or polymer clay (terracotta or pink tone)
- Clay roller or rolling pin
- Circle cutter or a round cup/bowl for the base
- Rectangular template or ruler
- Fettling knife or craft blade
- Small round piping tip or straw (for scalloped detail)
- Texture sponge
- Slip (clay and water mixture)
- Scoring tool or needle tool
- Clear matte sealant
Step 1: Forming the Base Structure
-
Roll the clay slab:
Start by conditioning your clay and rolling it out into a large, consistent slab about 1/4 inch thick. I like to flip the slab midway through rolling to ensure it doesn’t stick to the work surface. -
Cut the walls:
Using a ruler and a craft sharp blade, cut a long rectangle that will serve as the walls of your cylinder. The height should be roughly 4-5 inches depending on your desired pot size. -
Prepare the base:
Cut a circle for the base that matches the circumference of your rectangle. You can test the fit by loosely curling the rectangle around the circle before committing to the final cut. -
Create the wave bottom:
Before assembling, use your blade to cut a gentle, continuous wavy line along one long edge of your rectangular slab. This will become the scalloped feet of the pot. -
Score and slip:
Score (scratch) the short edges of the rectangle and the outer edge of the circular base. Apply a generous amount of clay slip to these roughened areas to act as glue. -
Assemble the cylinder:
Carefully stand the rectangle up, wrapping it around the circular base so the wavy edge is at the bottom. Press the scored seam where the walls meet firmly together. -
Blend the seams:
Use your thumb or a modeling tool to smooth the vertical seam inside and out until it disappears. Do the same for the interior seam where the wall meets the floor to ensure it’s watertight.
Slumping Walls?
If the clay cylinder won’t stand up, insert a cardboard tube or a soda can wrapped in parchment paper inside the pot to support the walls while they firm up.
Step 2: Adding the Scalloped Detail
-
Roll a decorative coil:
Roll out a very thin, long snake of clay. Flatten it gently with your finger so it becomes a narrow ribbon, about 1/2 inch wide. -
Attach the ribbon:
Score a wavy path around the upper third of the cylinder. Slip the back of your clay ribbon and press it onto this path, mimicking the wave of the bottom edge. -
Carve the scallops:
Take a small round sculpting tool, the end of a straw, or a small piping tip. Press the round edge into the bottom of the applied ribbon repeatedly to create the indented scallop pattern shown in the photo. -
Clean the edges:
Use a damp sponge or brush to gently soften any sharp burrs created by the carving tool, but be careful not to erase the nice indentation definition.
Step 3: Finishing Touches
-
Smooth the surface:
Take a slightly damp sponge and wipe down the main body of the pot to remove fingerprints. This also helps expose the grit in the clay for that lovely rustic texture. -
Dry properly:
Let the piece dry slowly away from direct heat or drafts. If using air-dry clay, rotate it occasionally so it dries evenly without warping. -
Sand imperfections:
Once bone dry (or baked, if using polymer), lightly sand the top rim to ensure it is perfectly flat and smooth. -
Seal the interior:
Apply two coats of a waterproof sealant to the inside of the pot to protect the clay from moisture when watering your plants.
Add a Wash
Before sealing, apply a watered-down white acrylic paint wash and wipe it back immediately. Ideally, the white paint will stick in the scallop grooves for high contrast.
Pop in a small succulent or fern and enjoy the charming texture this piece adds to your shelf
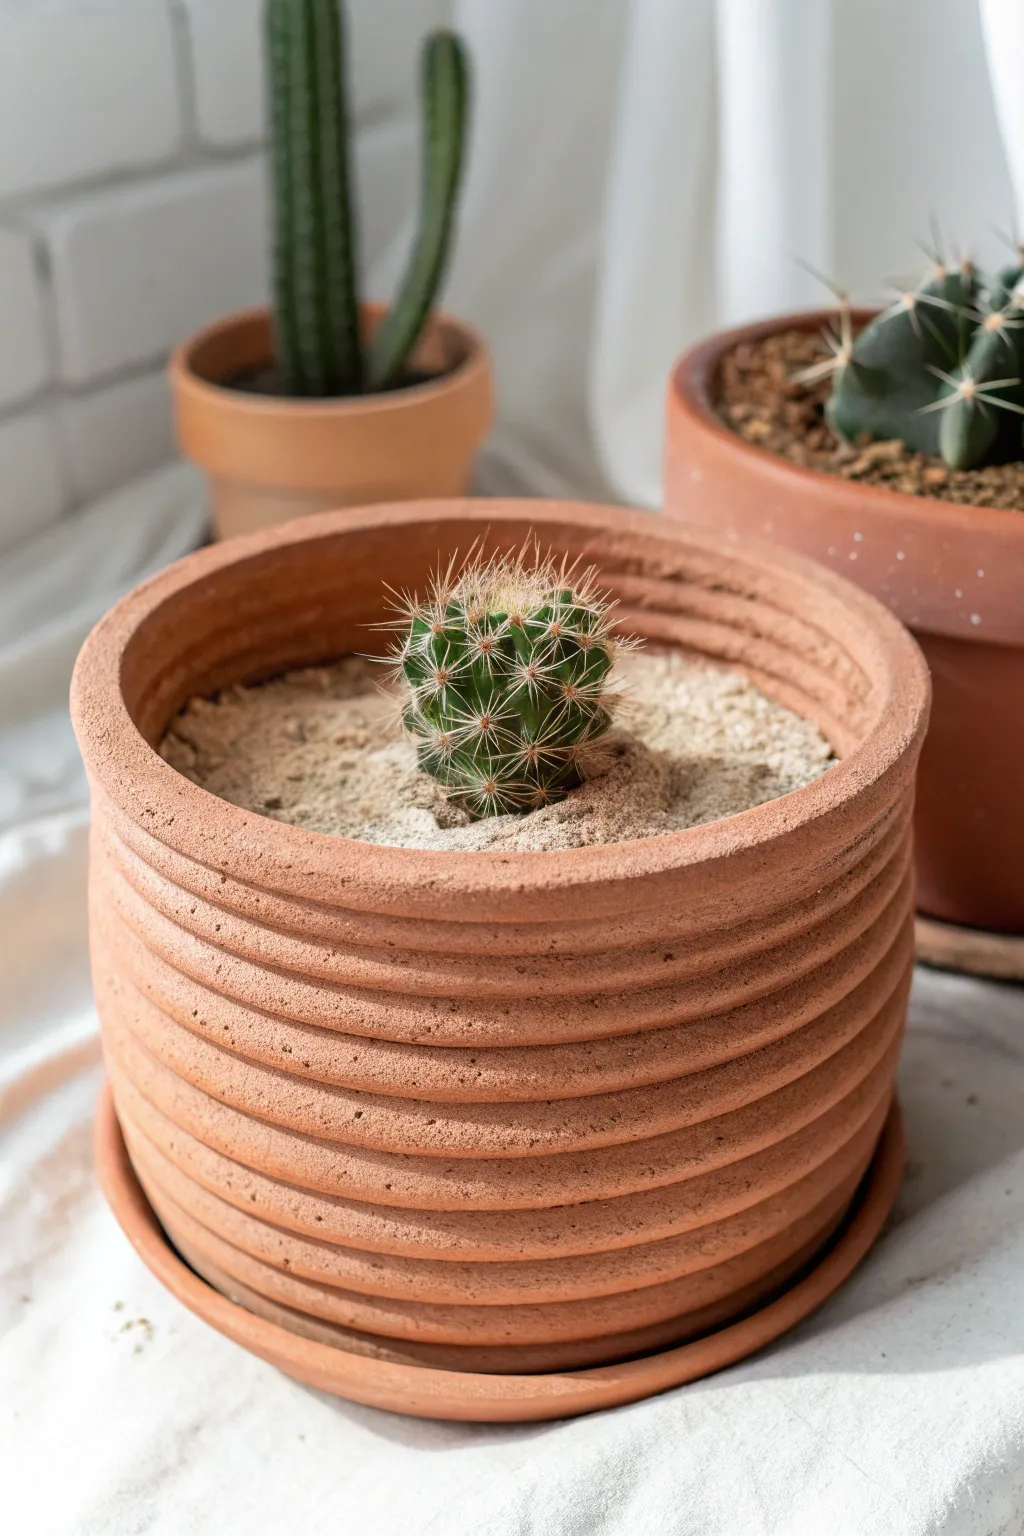
Fluted Retro Ribbed Planter
Bring a touch of mid-century charm to your windowsill with this beautifully textured fluted planter. The vertical ridges create a delightful play of shadow and light, perfectly mimicking the look of expensive ceramic boutique pots using simple air-dry clay.
Step-by-Step
Materials
- Air-dry clay (white or light terracotta)
- Empty cylindrical container (like a coffee tin or sturdy cardboard tube) to use as a mold
- Rolling pin
- Ruler
- Clay sculpting tools (specifically a loop tool or a wooden modeling tool)
- Craft knife
- Water and a small sponge
- Sandpaper (fine grit)
- Matte sealant or varnish
- Plastic wrap
Step 1: Preparation and Base Construction
-
Prepare your mold:
Begin by cleaning your chosen cylindrical container thoroughly. Wrap the exterior completely in plastic wrap, tucking the excess inside the rim. This barrier is crucial so you can remove the clay later without it sticking. -
Roll out the slab:
Take a large chunk of air-dry clay and knead it briefly to wake it up. Roll it out into a long, rectangular slab. You want a consistent thickness of about 1/4 to 1/2 inch to ensure the walls are sturdy enough to support the texture we’ll add later. -
Measure and cut:
Lay your rolling pin or ruler next to the container to check the height. Cut a long strip from your clay slab that matches the height of your tin and is long enough to wrap around the circumference with a slight overlap. -
Wrap the cylinder:
Carefully lift your clay strip and wrap it around the plastic-covered container. Where the ends meet, slice through both layers with a craft knife at an angle (a bevel cut). Remove the excess scraps. -
Join the seam:
Score the cut edges with a needle tool or fork, dab a little water on them, and press them firmly together. Use your thumb or a modeling tool to smooth the seam until it disappears completely. -
Create the base:
Roll out a separate piece of clay for the bottom. Place your wrapped cylinder on top of this slab and trace around it. Cut out the circle and attach it to the bottom of the cylinder using the same score-and-slip method, blending the clay up the sides to seal it.
Straight Line Secret
Struggling to carve straight down? Place a rubber band around the container at the bottom as a ‘stop’ line, or rest your hand against a tall book while pulling the tool down.
Step 2: Sculpting the Ribs
-
Mark your guidelines:
Before you start carving, use a ruler and a light touch with a needle tool to mark vertical lines around the top rim. I find spacing them about half an inch apart works best for this scale, but you can adjust for wider or narrower fluting. -
Begin the carving process:
Using a loop tool or a rounded wooden modeling tool, gently drag vertical grooves down the side of the pot, following your guide marks. Start at the top rim and pull straight down to the bottom edge. -
Deepen the ridges:
Go over your grooves a second time, pressing slightly firmer to create defined, rounded channels. You want a distinctive ‘in and out’ wave pattern, not just scratches on the surface. -
Smooth the channels:
Dip your finger or a small sponge in water—just a tiny bit—and run it down each groove. This smooths out any jagged bits of clay left by the carving tool and softens the edges for that organic, handmade look. -
Refine the rim:
The rim often gets a bit distorted during carving. Gently pat it flat with a ruler or paddle, then use a damp sponge to round off the sharp edge so it looks polished and professional.
Faux Stone Finish
Mix a teaspoon of baking soda or used coffee grounds into your sealant or final paint layer. This adds a speckled, gritty texture that mimics real hanging stone or concrete.
Step 3: Finishing Touches
-
Make the saucer:
While the main pot sets up, roll out a circle of clay slightly larger than your pot’s diameter. Turn up the edges slightly to create a simple saucer lip, smoothing it with water. -
Let it dry slowly:
Leave the clay on the mold for at least the first 24 hours to help it hold its shape. Loosely drape a plastic bag over it to prevent it from drying too fast and cracking. Remove the mold carefully once the clay feels leather-hard. -
Sand for perfection:
Once fully bone dry (usually 2-3 days), use fine-grit sandpaper to gently buff the surface. Focus on the rim and the ‘peaks’ of your ridges to remove any lingering imperfections or rough grain. -
Apply protection:
Since air-dry clay isn’t waterproof, apply two to three thin coats of a matte acrylic varnish or sealant inside and out. This preserves that lovely raw clay texture while protecting it from occasional moisture.
Pop in your favorite succulent or cactus and enjoy the modern, architectural vibe this piece adds to your space
Matching Set of Tiny Desk Planters
These charming, petite planters bring a soft gradient of color to any windowsill or desk, creating a cohesive and serene display. Using air-dry clay or cement, you can mold these simple cylindrical vessels and finish them with a delightful spectrum of matte pastel paints.
Step-by-Step
Materials
- Air-dry clay or quick-setting craft cement
- Small plastic cups or silicone molds (for shaping)
- Rolling pin (if using clay)
- Craft knife
- Sandpaper (fine grit)
- Acrylic paints (pale pink, peach, terracotta, sage green)
- Paintbrushes
- Painter’s tape
- Matte sealant spray
Step 1: Shaping the Planters
-
Prepare your clay:
Start by kneading your air-dry clay to warm it up and remove any air bubbles. If you prefer a more industrial look, mix your craft cement according to the package instructions instead. -
Form the base:
Pinch off a ball of clay roughly the size of a tangerine. Flatten it slightly on a clean surface to create the bottom of your pot. -
Create the walls:
Roll out a separate piece of clay into a long, rectangular strip about 1/4 inch thick. Ensuring the thickness is uniform is key for a professional look. -
Assemble the cylinder:
Wrap the rectangular strip around a small plastic cup or tube to maintain a perfect circular shape. This acts as your internal support form. -
Join the seams:
Score the edges where the clay meets, dampen them slightly with water, and press firmly to join. Smooth the vertical seam with your finger or a sculpting tool until it disappears. -
Attach the bottom:
Place your cylinder onto the flattened base piece. Use a modeling tool to blend the clay from the walls down into the base, creating a seamless connection. -
Refine the shape:
Trim away any excess clay from the bottom edge with a craft knife. Gently smooth the top rim with a wet finger to round off any sharp edges. -
Dry completely:
Carefully remove the internal plastic support if the clay is stiff enough to stand, or leave it in until partially dry. Allow the pots to cure fully for 24-48 hours.
Step 2: Sanding and Painting
-
Sand for smoothness:
Once fully dry, take fine-grit sandpaper and gently buff the exterior. Focus on the rim and any bumps on the sides to get that store-bought smooth finish. -
Dust off:
Wipe each pot down with a slightly damp cloth or a dry microfiber towel to remove all clay dust before painting. -
Mix your palette:
Prepare a range of acrylic colors. I like to mix a little white into my terracotta and sage paints to achieve that soft, chalky pastel effect seen in the photo. -
Paint the solids:
Select which pots will be solid colors. Apply two thin coats of paint—one pink, one peach, one terracotta—allowing them to dry completely between layers. -
Tape the two-tone pot:
For the feature pot in the foreground, use painter’s tape to mark a clean horizontal line about one-third down from the rim. -
Paint the top section:
Apply a soft sage green to the area above the tape, covering the rim and the inside edge for a finished look. -
Adding texture:
For the bottom half of the two-tone pot, leave it raw clay or paint it a sandy beige. To mimic the texture in the photo, you can lightly drag a stiff brush horizontally through the wet paint. -
Remove tape:
Peel off the painter’s tape while the paint is still slightly tacky to ensure a crisp, sharp line. -
Seal the deal:
Finish all your pots with a spray of clear matte sealant. This protects the paint from moisture when you water your succulents.
Pro Tip
To ensure drainage without drilling holes, mold a small ‘domed’ piece of clay at the bottom inside the pot before it dries to help water trickle down the sides.
Level Up
Instead of painting the groove texture on the two-tone pot, use a fork or a pottery wire tool to physically carve horizontal lines into the clay while it is still wet.
Now you have a serene little garden ready to brighten up your workspace
Abstract Face Planter With Plant Hair

This charming project transforms a simple vessel into a peaceful companion for your favorite succulents. The minimalist sculpted features and sand-colored finish give it a modern, meditative vibe that looks beautiful on any windowsill.
Detailed Instructions
Materials
- Air-dry clay or polymer clay (stone or white color)
- Small round bowl or balloon (as a mold)
- Clay sculpting tools (needle tool, small loop tool)
- Water and sponge (for smoothing)
- Rolling pin
- Sandpaper (fine grit)
- Succulent potting soil
- Small gravel or decorative pebbles
- Small succulent plant (e.g., Sedum or Echeveria)
Step 1: Forming the Base Vessel
-
Prepare your clay:
Start by conditioning your clay. Knead it in your hands until it is pliable and warm, which prevents cracks from forming later. -
Roll out the slab:
Using a rolling pin, flatten the clay into a slab about 1/4 inch thick. Aim for an even thickness to ensure the pot dries uniformly. -
Shape the pot:
Drape the clay slab over your chosen mold (a small overturned bowl works perfectly). Trim the excess clay at the bottom to create a flat rim, then gently press and smooth the clay against the mold to shape it into a rounded cup. -
Flatten the bottom:
Gently tap the curved bottom of the clay—which is currently facing up—to create a stable, flat base so the planter will sit upright without wobbling. -
Attach the top rim:
Carefully remove the clay from the mold once it holds its shape but is still workable. Roll a small snake of clay and adhere it to the top rim to create a slightly thicker, finished edge, blending the seam with your fingers.
Step 2: Sculpting the Features
-
Add the nose:
Roll a small, elongated triangle of clay. Score the back of it and the center of your pot face, add a dab of water (slip), and press the nose firmly into place. -
Blend the nose bridge:
Using a modeling tool or your finger, drag the clay from the top of the nose bridge smoothly into the forehead area so it looks like part of the face, not just attached. -
Carve the nostrils:
Take a small loop tool or a rounded stick and gently define the sides of the nose and the nostril area to give it dimension. -
Outline the eyebrows:
Use a needle tool to lightly sketch two large arches for the eyebrows. These will serve as the top curve of the eyes. -
Add eye definition:
Roll two very thin coils of clay. Attach them along your sketched arch lines to create raised eyelids, blending the top edge into the forehead while keeping the bottom edge distinct. -
Detail the eyelashes:
With a needle tool or knife, press small, evenly spaced lines extending downward from the eyelid curve to create the sleepy eyelashes. -
Form the lips:
Roll a tiny oval of clay and attach it below the nose. Use a needle tool to press a horizontal line across the center, creating the separation between the upper and lower lip. -
Final smoothing:
I like to dampen a sponge slightly and run it over the entire piece to soften any harsh tool marks and give the ‘skin’ a seamless texture.
Fixing Cracks
Cracks happen! Make a ‘slip’ paste by mixing a tiny bit of clay with water. Fill the crack, let it dry, then sand smooth.
Step 3: Finishing and Planting
-
Dry the clay:
Allow the planter to dry completely according to your clay manufacturer’s instructions. This usually takes 24-48 hours for air-dry clay. -
Sand the surface:
Once fully cured, use fine-grit sandpaper to buff away any remaining fingerprints or rough spots, paying attention to the rim. -
Seal the interior:
If using air-dry clay, apply a waterproof sealant to the inside of the pot to protect it from moisture when watering. -
Add drainage layer:
Place a small layer of gravel at the very bottom of the pot to help keep the roots from sitting in standing water. -
Pot the plant:
Fill the pot with succulent soil and nestle your plant inside. The leaves should spill over the top like a whimsical hairstyle. -
Top dressing:
Finish by covering the exposed soil with small decorative pebbles for a clean, professional look that matches the stone aesthetic.
Make it Blush
Before sealing, dry brush a tiny amount of pink pastel dust or diluted acrylic paint onto the cheeks for a rosy glow.
Enjoy the calm presence your new artistic planter brings to your space
Cute Animal Planter With Simple Ears
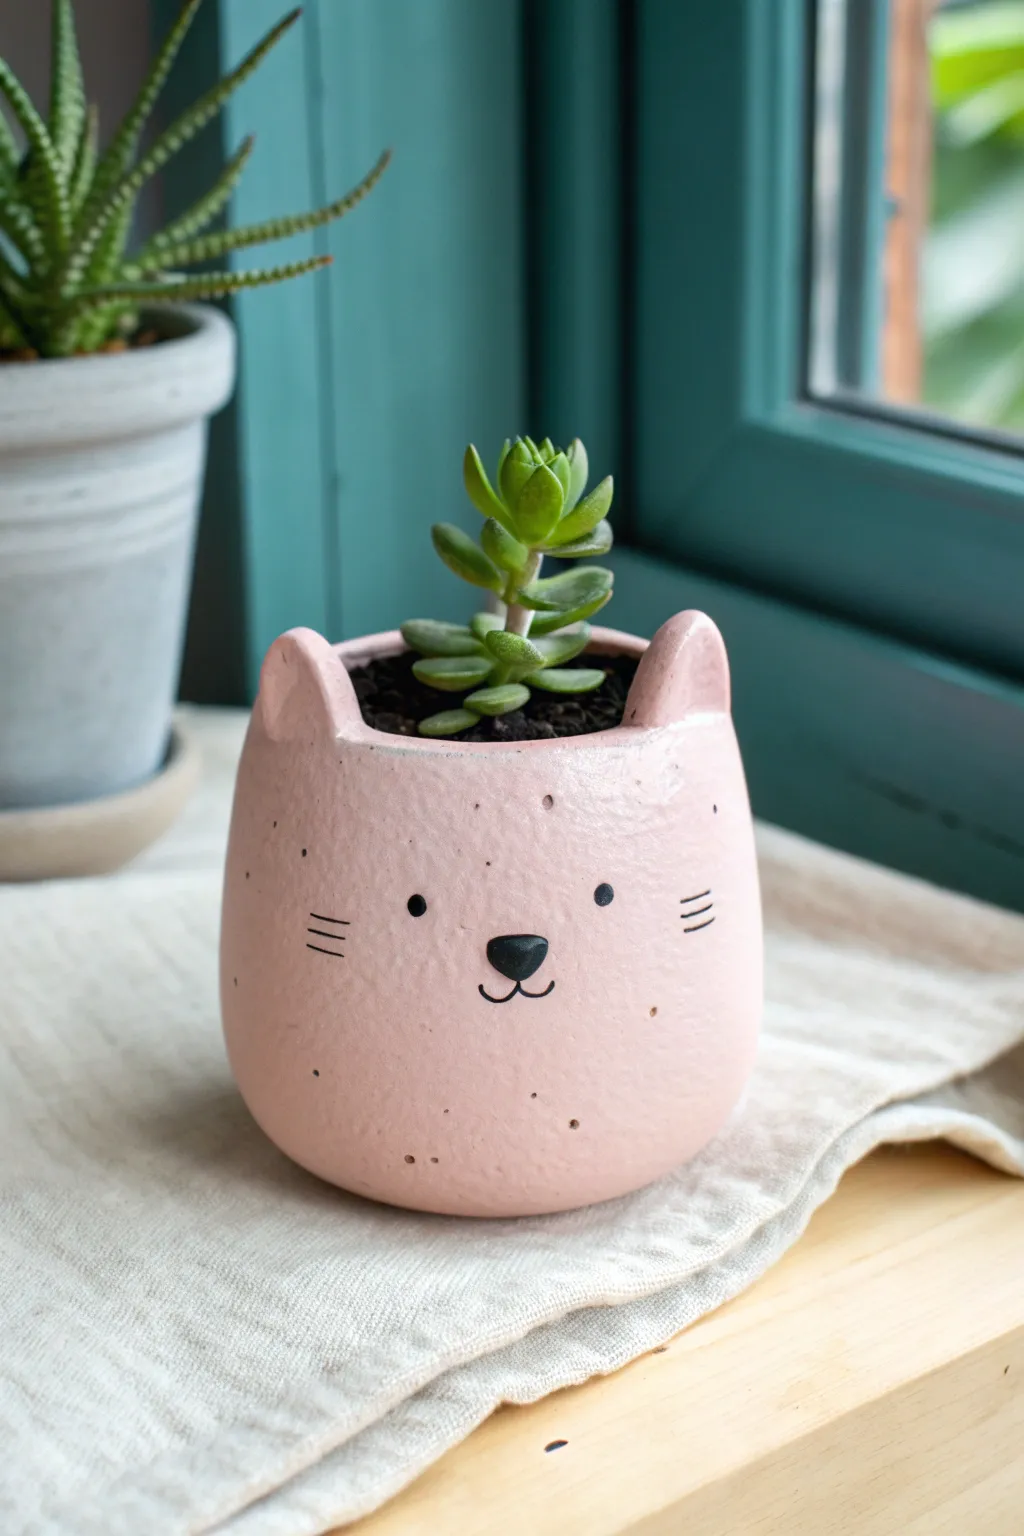
This adorable cat-shaped planter brings a touch of whimsy to any windowsill with its blush pink hue and sweet, minimalist face. The speckled, handmade finish gives it a charming ceramic look without requiring a kiln, making it perfect for holding small succulents or cacti.
Step-by-Step Guide
Materials
- Air-dry clay (white or terracotta)
- Acrylic rolling pin
- Clay knife or craft knife
- Small bowl (approx. 3-4 inches diameter) for a mold based
- Plastic wrap
- Water and a small sponge
- Pastel pink acrylic paint
- Black acrylic paint or black permanent marker
- Brown acrylic paint (optional for speckles)
- Matte or satin varnish/sealant
- Fine grit sandpaper
- Paintbrushes (medium flat and fine tip)
- Old toothbrush (optional)
Step 1: Shaping the Clay Base
-
Prepare the workspace:
Begin by covering your mold bowl with plastic wrap. This prevents the clay from sticking and makes removing the form much easier later on. -
Roll out the clay:
Take a large handful of air-dry clay and knead it until soft. Roll it out into a slab that is roughly 1/4 inch thick. Try to keep the thickness consistent so the drying time is even. -
Form the pinch pot:
Alternatively, you can start with a ball of clay and use the pinch pot method. Press your thumb into the center and pinch the walls up while rotating the ball in your hand until you have a deep bowl shape. -
Refine the shape:
If using the slab method, drape the clay over your wrapped bowl and trim the excess at the bottom. Smooth the seams with a little water. If using the pinch pot method, ensure the bottom is flat so the planter stands upright. -
Smooth the surface:
Dip your fingers or a small sponge into water and gently rub the exterior of the pot. You want to remove fingerprints and bumps, but a little unevenness adds to the organic, handmade charm.
Step 2: Adding the Feline Features
-
Create the ears:
Roll two small marble-sized balls of clay. Flatten them slightly into triangles. These will be the ears. -
Score and slip:
Use your knife to scratch cross-hatch marks (scoring) on the bottom of the ears and on the rim of the pot where you want them to sit. Dab a little water (slip) on the scored areas. -
Attach the ears:
Press the ears firmly onto the rim. Use a modeling tool or your finger to blend the clay from the ear down into the main pot body so there is no visible seam. -
Final smoothing:
Do one last pass with a damp sponge to ensure the ears are smooth and integrated. I like to gently round the tips of the ears so they aren’t too sharp. -
Let it dry:
Place the planter in a cool, dry place away from direct sunlight. Let it dry completely for 24-48 hours. It should turn white and feel room temperature (not cold) when fully dry.
Smoother Seams
Keep a small cup of ‘slip’ (clay dissolved in water to a yogurt consistency) nearby. It acts as the perfect glue for attaching ears and filling cracks.
Step 3: Painting and Finishing
-
Sand the imperfections:
Once bone dry, use fine-grit sandpaper to gently smooth out any rough patches or sharp edges on the rim. -
Apply the base color:
Paint the entire exterior (and the inner rim) with pastel pink acrylic paint. You may need two or three thin coats for full, opaque coverage. Let each coat dry before adding the next. -
Add texture (optional):
To mimic the speckled stoneware look in the photo, dilute a tiny drop of brown paint with water. Dip an old toothbrush in it and flick the bristles with your thumb to spray tiny speckles over the pink base. -
Paint the face:
Using a very fine detail brush and black paint, paint two small circles for wide-set eyes. Add a small inverted triangle for the nose and a curved ‘w’ shape for the mouth below it. -
Add whiskers:
Carefully paint three short, horizontal lines on each cheek for whiskers. If you aren’t confident with a brush, a black permanent marker works wonders here. -
Seal the planter:
Protect your work with a coat of matte or satin varnish. This is crucial for air-dry clay to prevent moisture damage. -
Waterproofing tip:
Since air-dry clay isn’t naturally waterproof, avoid planting directly into it. Place a small nursery pot inside, or seal the inside heavily with a waterproof resin.
Level Up: Tail Handle
Add a small, curved snake of clay to the back of the pot to create a cute kitty tail. It can even loop outward to act as a tiny handle!
Pop in your favorite succulent and enjoy your new feline friend
Strawberry-Inspired Clay Planter
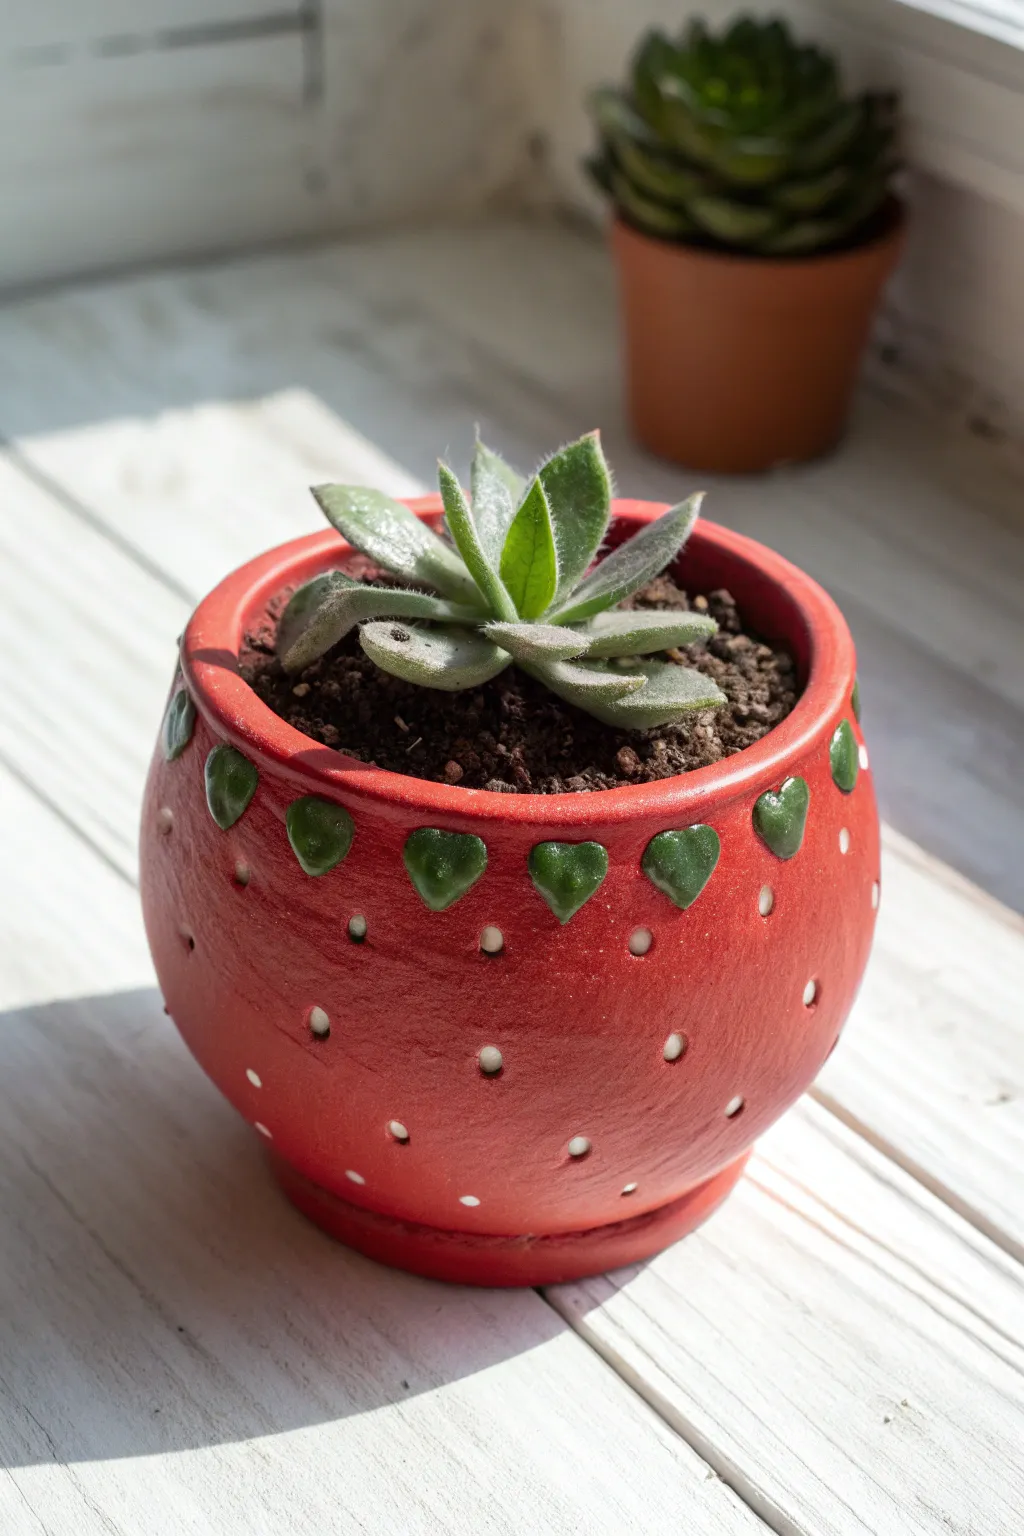
Transform a simple terracotta pot into a charming fruit-themed home for your succulents. This project uses dimensional clay detailing and vibrant acrylics to capture the whimsical look of a ripe strawberry, complete with green leafy trim and delicate white seeds.
Step-by-Step
Materials
- Small terracotta pot (approx. 3-4 inches diameter)
- Air-dry clay or polymer clay (white is best)
- Acrylic paints: Bright Red, Forest Green, White, and Brown (optional)
- Mod Podge or waterproof sealant spray
- Small round sculpting tool or toothpick
- Paintbrushes: medium flat brush and fine detail brush
- Water cup and paper towels
- Sandpaper (fine grit)
- White glue (if using air-dry clay)
Step 1: Base Preparation & Sculpting
-
Clean the Pot:
Begin by wiping down your terracotta pot with a damp cloth to remove any dust or debris. This ensures the clay and paint adhere properly. Let it dry completely. -
Create the Leaf Line:
Pinch off small, pea-sized balls of clay. You will need enough to encircle the rim of the pot completely. -
Shape the Hearts:
Flatten each clay ball slightly between your fingers, then press a dent into the top and pinch the bottom to form a small, rounded heart shape. These will act as the strawberry sepals (leaves). -
Attach the Leaves:
Apply a tiny dab of white glue to the back of each clay heart. Press them firmly onto the pot just below the rim, spacing them evenly. The pointy ends should face downward. -
Prepare Seed Indentations:
While the clay leaves are drying (or immediately if you prefer), take your sculpting tool or a toothpick. Gently poke small, shallow indentations all over the body of the pot in a staggered pattern. -
Refine the Holes:
Twist the tool slightly in each hole to ensure they are uniform circles. These divots will eventually hold the white ‘seeds’ and add texture. -
Dry the Clay:
Allow the clay details to dry or cure completely. If you used air-dry clay, wait 24 hours. If using polymer clay, bake the pot according to the clay manufacturer’s instructions.
Step 2: Painting & Detailing
-
Base Red Coat:
Paint the entire outside of the pot, avoiding the clay leaves, with Bright Red acrylic paint. Don’t worry about filling the seed holes perfectly yet; just get good coverage. -
Second Layer:
Once the first coat is dry to the touch, apply a second coat of red for a rich, opaque finish. I like to extend the red just over the rim into the inside top edge for a clean look. -
Paint the Leaves:
Using a smaller brush, carefully paint the raised heart shapes with Forest Green. Take your time around the edges where the green meets the red. -
Highlight the Leaves:
To add dimension, you can mix a tiny bit of white or yellow into your green and dab the center of each leaf, though a solid green works beautifully too. -
Fill the Seeds:
Dip your finest detail brush or a toothpick into white paint. Carefully fill each of the indentations you made earlier with a dot of white. -
Clean Up Edges:
If any white paint spilled outside the holes, or green got onto the red, do a quick touch-up with the base red color once the details are dry. -
Seal the Work:
Protect your paint job with a coat of Mod Podge or a waterproof spray sealant. This is crucial if you plan to water a real plant inside. -
Pot Your Plant:
Fill the pot with succulent soil and gently nestle a small green succulent inside to complete the strawberry crown look.
Seed Spacing Tip
To keep your strawberry seeds looking uniform, lay them out in a diagonal diamond pattern rather than straight rows. This mimics the natural growth pattern of real fruit.
Make it a Set
Make a whole fruit basket by painting other pots as pineapples (yellow with cross-hatching) or watermelons (green bottoms fading to red tops) for a colorful windowsill garden.
Now your adorable strawberry planter adds a pop of summer sweetness to your space, rain or shine