
Whenever I’m craving a project that’s both sculptural and a little musical, I reach for clay bell forms. A good bell is all about playful design plus smart construction—especially the clapper and hanging setup that makes it actually ring.
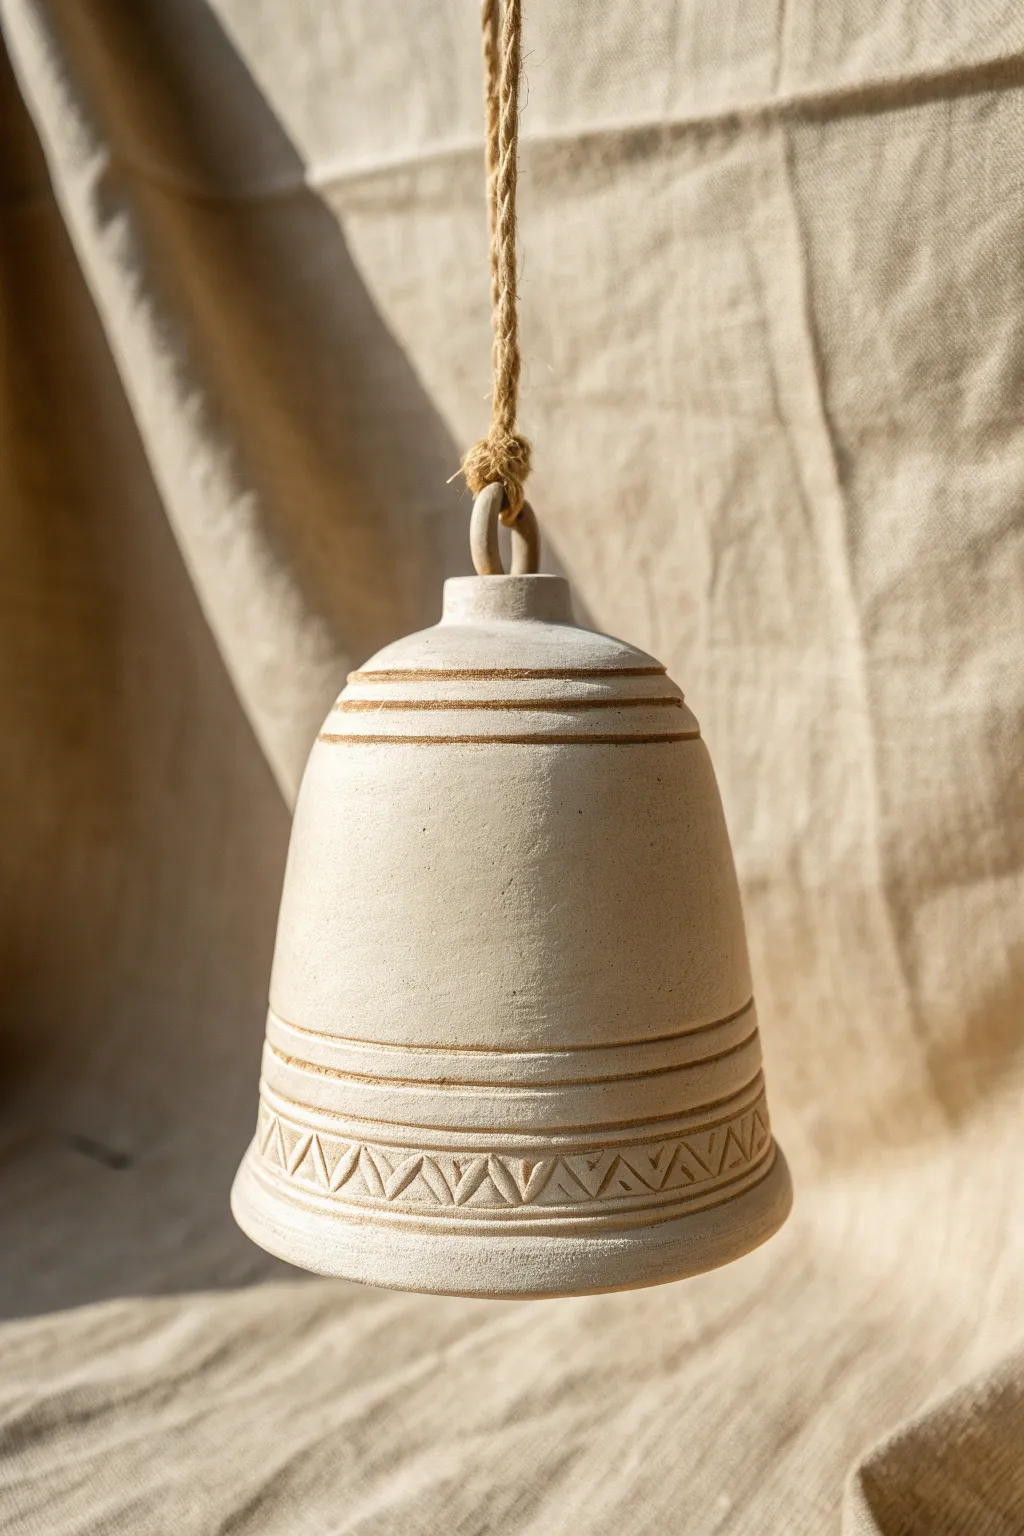
Classic Handbuilt Bell Cone
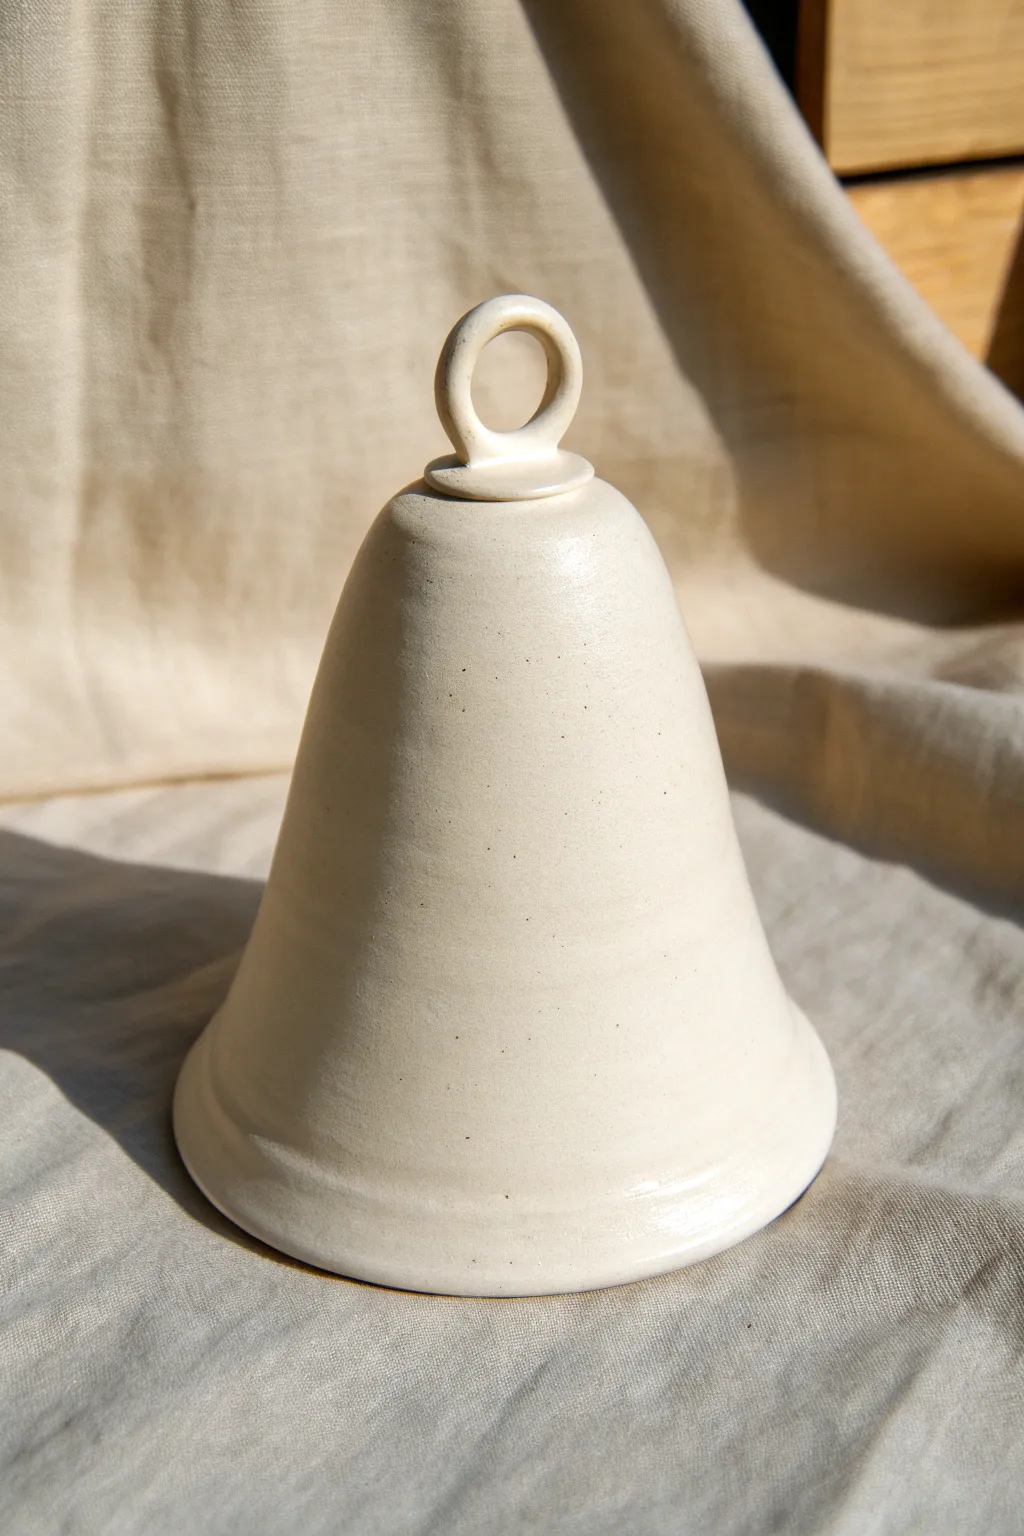
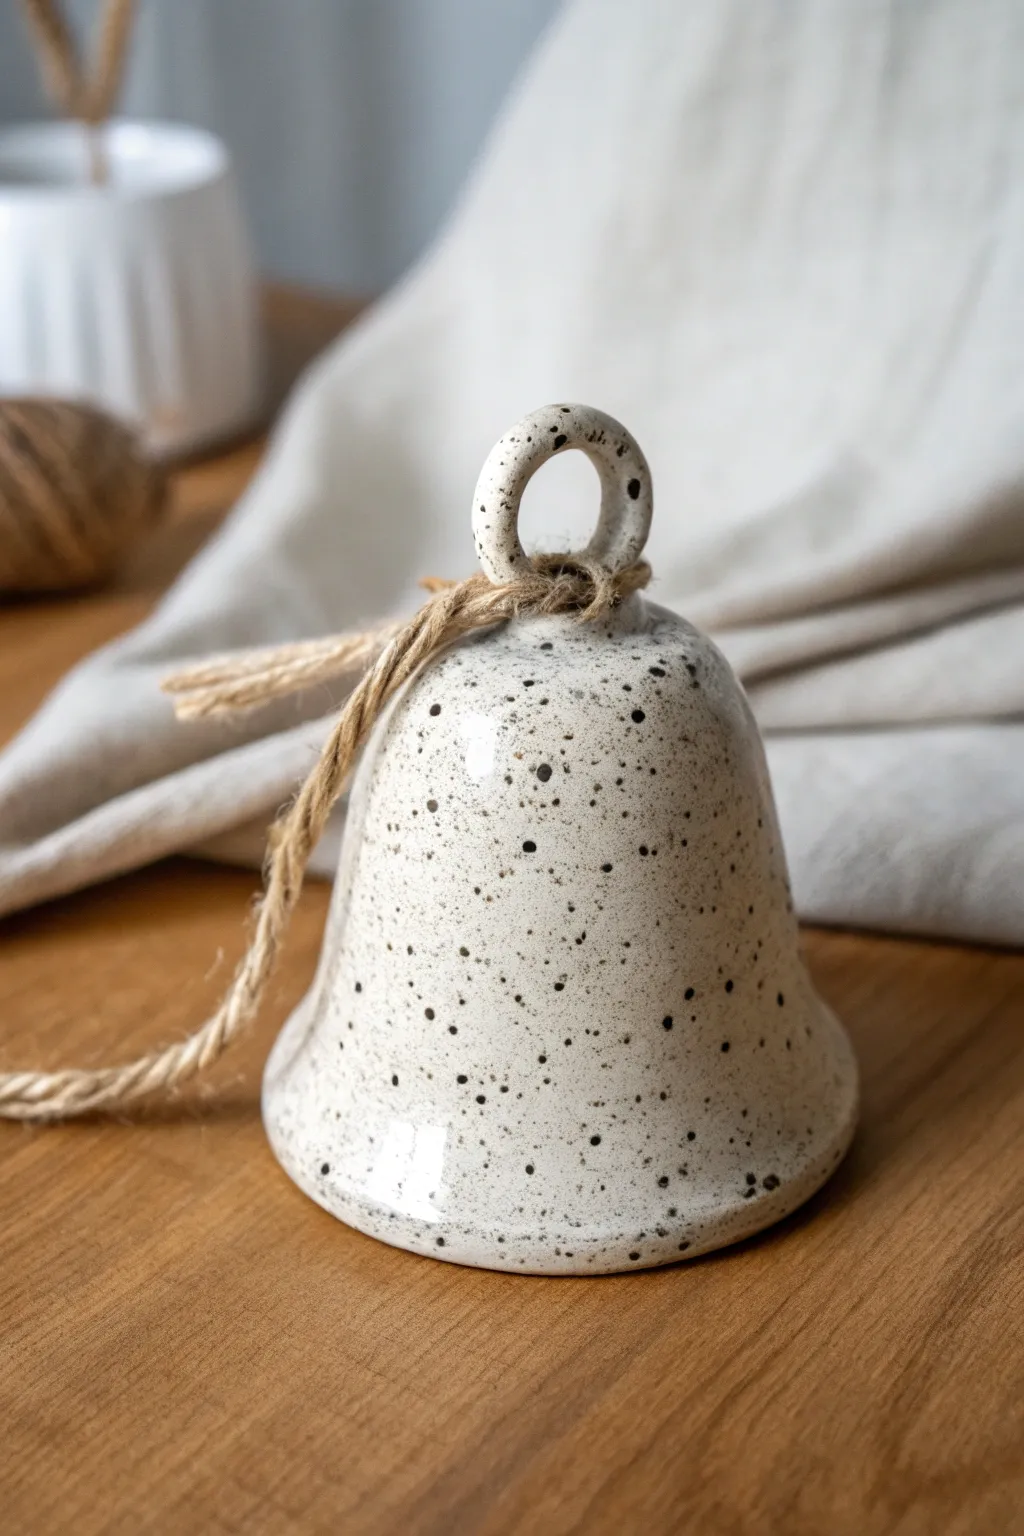
Embrace the elegance of minimalism with this wheel-thrown or handbuilt ceramic bell, featuring a classic flared silhouette and a milky white glaze. Its speckled clay body adds subtle texture, making it a charming addition to any garden or indoor space.
Step-by-Step
Materials
- Speckled stoneware clay (mid-fire)
- Pottery wheel (or slab roller for handbuilding)
- Needle tool
- Wooden rib tool
- Metal rib tool
- Wire cutter
- Sponge
- Small loop tool (for trimming)
- Clear or milky white glaze
- Small kiln-safe bead or clay clapper (to go inside)
Step 1: Forming the Body
-
Center the clay:
Start with a ball of clay about the size of a large orange. Whether throwing or using a mold, ensure your clay is wedged well to remove air bubbles. -
Open the form:
If throwing, center the clay on the wheel and open it up, leaving a floor thickness of about 1/4 inch but keeping the top narrow. -
Pull the walls:
Gently pull the clay upward into a tall, narrow cone shape. Focus on maintaining even wall thickness from bottom to top. -
Refine the shape:
Use a wooden rib on the outside and your fingers on the inside to bell out the clay slightly as you move downward. -
Flare the rim:
At the bottom widest point (which is currently the top on the wheel, unless you are throwing off the hump), gently gently flare the rim outward to create that classic bell skirt. -
Smooth the surface:
Run a metal rib over the exterior while the wheel is spinning slowly to remove throwing lines and compress the clay for a smooth finish. -
Cut from wheel:
Use your wire cutter to slice the bell from the bat. I find it helpful to let it firm up to leather-hard before attempting to move or flip it.
Rim warping?
If your bell rim warps during firing, try making the rim slightly thicker than the walls next time. You can also fire the bell on a setter or a small clay disk made of the same clay body.
Step 2: Adding the Handle
-
Trim the top:
Once leather hard, flip the bell over so the narrow end is facing up. Trim away any excess weight to create a slightly domed cap. -
make a coil:
Roll a small, even coil of clay, roughly the thickness of a pencil, for the loop handle. -
Form the loop:
Bend the coil into a small circle or arch, cutting the ends at an angle so they sit flush against the top of the bell. -
Attach the loop:
Score the top of the bell and the ends of your loop. Apply slip, press firmly into place, and smooth the join with a modeling tool so it looks seamless. -
Pierce the hole:
Don’t forget to push a small hole through the very top of the bell (under the handle, into the interior) for the clapper string later.
Level Up: Texture
Before the clay dries, press raw linen or lace into the surface. The glaze will break beautifully over the texture, highlighting the pattern while keeping the monochromatic look.
Step 3: Finishing and Glazing
-
Dry slowly:
Loosely cover the bell with plastic to ensure the handle doesn’t dry faster than the body, which can cause cracking. -
Bisque fire:
Load the bone-dry bell into the kiln for a bisque firing. -
Clean the bisque:
Wipe the fired piece with a damp sponge to remove dust, which ensures the glaze adheres properly. -
Apply glaze:
Dip or pour a milky white glaze over the entire piece. I prefer dipping for bells to get that perfectly even coat inside and out. -
Wipe the rim:
Carefully wipe the very bottom rim of the bell with a sponge so it doesn’t stick to the kiln shelf. -
Final fire:
Fire the bell to the maturation temperature of your specific clay and glaze. -
Assembly:
Once cool, tie a clapper (a ceramic bead or metal nut) to a sturdy cord and thread it through the top hole.
Hang your finished bell near a window or in the garden to enjoy its gentle chimes


Wheel-Thrown Bell With Even Walls
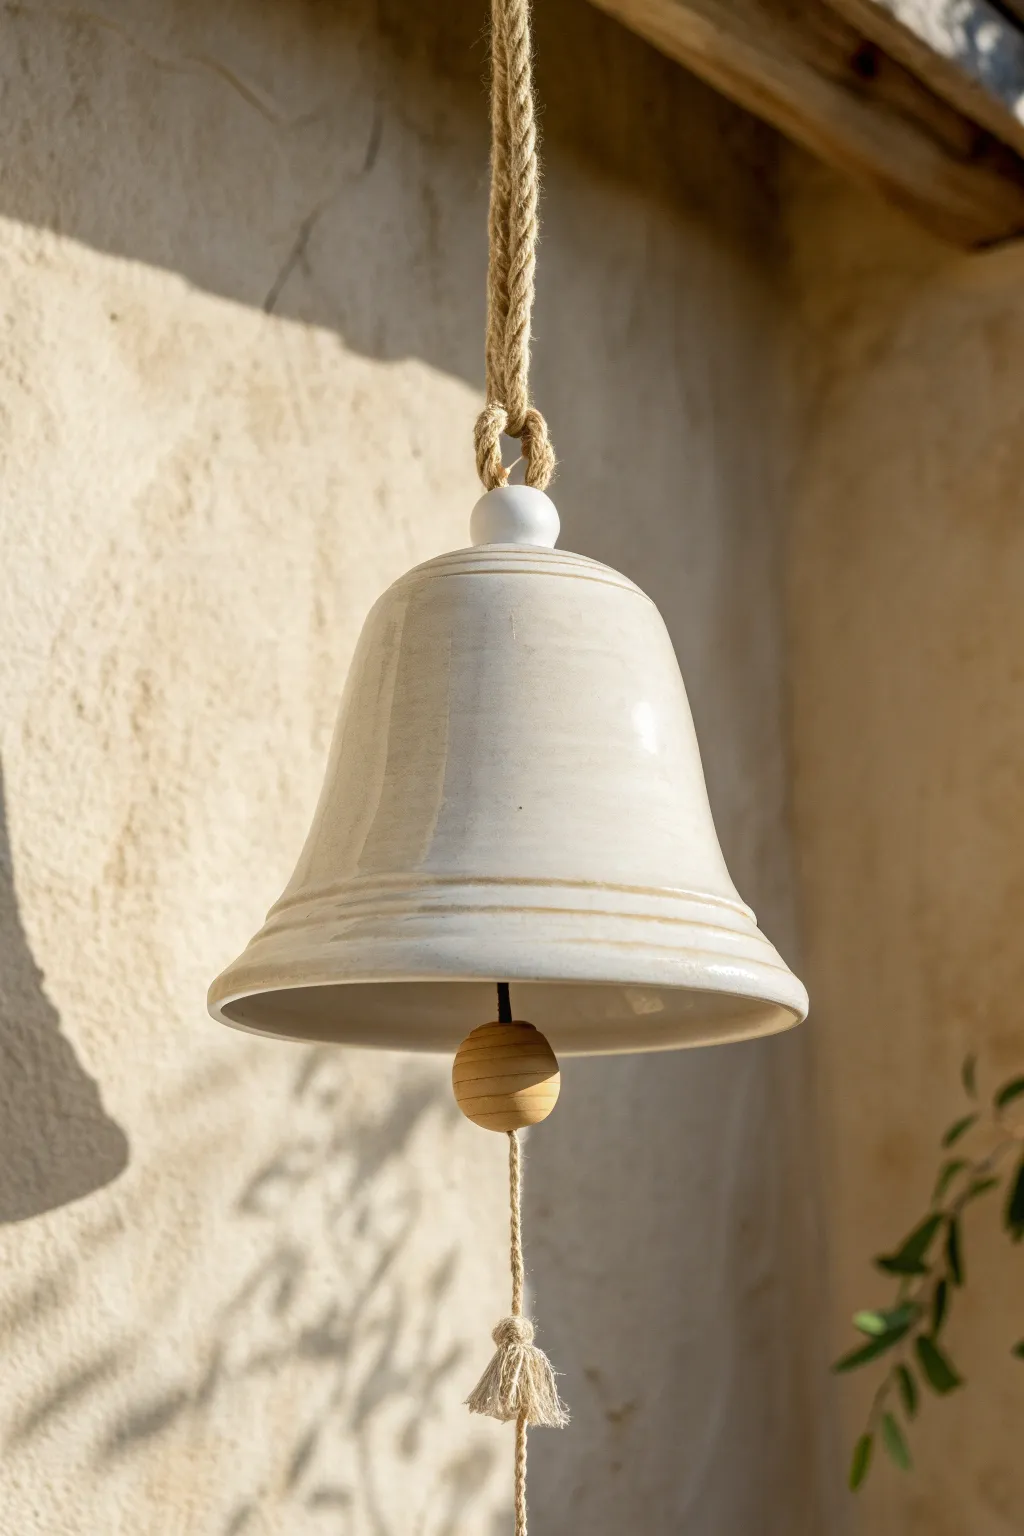
This elegant ceramic bell features a smooth, creamy glaze and a classic bell shape that rings with a gentle, earthy tone. The combination of the sleek wheel-thrown body and rustic twine/wood accents creates a perfect balance of refined and organic aesthetics.
Detailed Instructions
Materials
- Stoneware clay (smooth, light-colored body)
- Pottery wheel
- Throwing tools (sponge, needle tool, rib tool)
- Wire cutter
- Trimming tools
- Drill bit or hole punch tool
- Creamy white dipping glaze
- Thick jute or hemp rope
- Large wooden bead (approx. 1 inch)
- Thin twine for the clapper
- Kiln
Step 1: Throwing the Bell Body
-
Center and open:
Start with a ball of well-wedged clay, roughly 1-1.5 lbs depending on your desired size. Center it on the wheel head and open it as if you were making a bowl, leaving the bottom slightly thicker than usual to support the hanging loop later. -
Pull the walls:
Pull the walls upward, aiming for a tall, narrow cylinder first. As you pull, keep your wall thickness consistent from bottom to top to ensure an even ring. -
Shape the bell:
Using a rib tool on the outside and your fingers inside, gently belly out the middle of the form while collaring the neck in slightly. Flare the rim outward gracefully at the bottom to create that classic bell silhouette. -
Define the rim:
I like to use the corner of a rib or a wooden modeling tool to compress and define the rim, creating a slight double ridge or distinct lip at the bottom edge for visual interest. -
Refine the surface:
Run a smooth metal rib over the exterior while the wheel spins slowly to remove slurry and throwing lines, giving it that sleek, modern finish seen in the photo. -
Cut off:
Wire the piece off the bat but leave it on the bat or a ware board to firm up until leather hard.
Rim Resonance
Compress the rim excessively with a chamois. A compressed, dense rim is less likely to chip over time and often produces a clearer, brighter sound when struck.
Step 2: Trimming and Assembly
-
Trim the top:
Once leather hard, center the bell upside down on the wheel (you may need a chuck or a foam bat). Trim the excess clay from the ‘bottom’ (which is now the top of the bell) to create a rounded dome shape. -
Create the hanging loop:
Instead of just drilling a hole, shape a small knob at the very top during trimming. Alternatively, you can attach a small coil loop securely with slip and score marks. -
Drill the hole:
Use a hole punch or drill bit to create a clean hole through the top center of the dome. Make it large enough to accommodate your thick hanging rope—remember clay shrinks in the kiln. -
Bisque fire:
Allow the piece to dry slowly and completely before loading it for a bisque firing.
Dull Thud Sound?
If your bell sounds dull, the walls might be too thick or the clay is under-fired. High-fire stoneware usually rings better than porous earthenware.
Step 3: Glazing and Finishing
-
Apply glaze:
Dip the entire bell into a creamy white or oatmeal glaze. Let the excess run off to ensure an even coat without drips near the rim. -
Wipe the foot:
Even though it hangs, ensure the rim (which sat on the kiln shelf) is wiped clean of glaze, or stilt the piece during the glaze firing. -
Glaze fire:
Fire to the maturation temperature of your specific clay and glaze combination. -
Prepare the clapper:
Take a length of thinner twine and thread it through your wooden bead. Knot it securely underneath the bead so it serves as the striker. -
Fray the tassel:
Below the knot holding the bead, unravel the twine ends to create a fluffy tassel aesthetic. -
Attach the main rope:
Take your thick jute rope and thread it through the top hole of the fired bell. Create a sturdy loop knot at the top for hanging. -
Connect the parts:
Tie the thinner twine holding the wooden bead to the main rope inside the bell, positioning the bead so it hangs just at the rim level where it will strike the clay wall.
Hang your new bell in a breezy spot where the wind can catch the tassel and fill your space with gentle sound


Slab-Built Cylindrical Bell
This earthy, slab-built bell combines simple geometry with delicate surface carving for a timeless aesthetic. The unglazed finish highlights the natural texture of the clay, while horizontal bands and chevron patterns add just the right amount of decorative detail.
Step-by-Step
Materials
- Stoneware clay (groggy or smooth depending on preference)
- Rolling pin
- Canvas or slab mat
- Needle tool
- Fettling knife
- Ribs (metal and wooden)
- Scoring tool or serrated rib
- Slip
- Carving tool (small loop or v-tip)
- Hole punch or drinking straw
- Natural jute twine
- Sponge
Step 1: Forming the Bell Body
-
Roll the slab:
Begin by rolling out a medium-sized slab of clay to a consistent thickness, roughly 1/4 inch. Compress the clay on both sides with a rib to align the particles and prevent warping later. -
Cut the template:
Cut a rectangular strip from your slab. The height of the rectangle will be the height of your bell minus the rounded top, and the length will determine the bell’s circumference. A standard size might be 4 inches high by 10 inches long. -
Bevel the edges:
Cut a 45-degree bevel on the two short ends of your rectangle. Bevel them in opposite directions so they will overlap seamlessly to form a perfect cylinder. -
Form the cylinder:
Stand the rectangle up and curve it into a cylinder. Score and slip the beveled edges, then press them firmly together. Use your fingers or a wooden tool to blend the seam inside and out until it disappears. -
Round the top:
Gently dart the top of the cylinder or pinch the clay inward to start closing the form. I find it easiest to add a small domed cap of clay: roll a small circle, drape it over a rounded object to curve it, score the top rim of your cylinder, and attach the dome. -
Refine the shape:
Use a flexible metal rib to smooth the connection between the cylinder walls and the domed top. You want a continuous, gentle curve rather than a sharp angle. -
Add the hanger loop:
Roll a small coil of clay. Form it into a ‘U’ shape or a ring. Score and slip the very center of the bell’s top and attach this loop securely. This is where your rope will go.
Step 2: Carving and Finishing
-
Leather hard stage:
Let the bell dry slowly until it reaches a leather-hard state. The clay should be firm enough to handle without deforming but soft enough to carve cleanly. -
Clean the surface:
Wipe the surface with a barely damp sponge to smooth out any handling marks or roughness before you begin decorating. -
Mark guidelnes:
Place the bell on a banding wheel. While spinning the wheel slowly, hold a needle tool remarkably steady against the clay to lightly scribe horizontal guidelines where your bands will go—two near the top and a set near the bottom. -
Carve horizontal bands:
Using a small carving tool or the edge of a wooden tool, deepen these horizontal lines. Make them wide enough to be distinct but not so deep that they weaken the wall. -
Carve the bottom border:
Create the thicker border near the bottom rim by carving two parallel horizontal lines about an inch apart. -
Create the chevron pattern:
Inside the bottom border, carve a continuous zigzag or chevron pattern. Use confident strokes with a v-tip carving tool to remove the clay cleanly. -
Smooth the carving:
Once the carving crumbs are dry, brush them away. Run a finger over the carved areas to soften any sharp burrs. -
Make the clapper:
Roll a small ball or tear-drop shape of clay for the internal clapper. Poke a hole through the top of it for stringing. -
Final drying and firing:
Allow the bell and clapper to bone dry completely. Bisque fire the pieces. Since the finish shown is raw ceramic, you can fire to maturity without glaze to keep that matte, stone-like texture. -
Assembly:
Once fired, cut a length of jute rope. Tie the clapper to one end, thread the rope up through the inside of the bell and out the top loop, then knot it securely for hanging.
Seam Splitting?
If the vertical seam cracks during drying, score it deeply, add fresh slip, and compress hard. Wrap tightly in plastic for 24 hours to re-integrate moisture.
Clean Lines
For crisper carved lines, wait until the clay is on the firmer side of leather-hard. Soft clay tends to drag and create jagged edges.
Hang your finished bell in a breeze-way or porch to enjoy its gentle, earthy sound


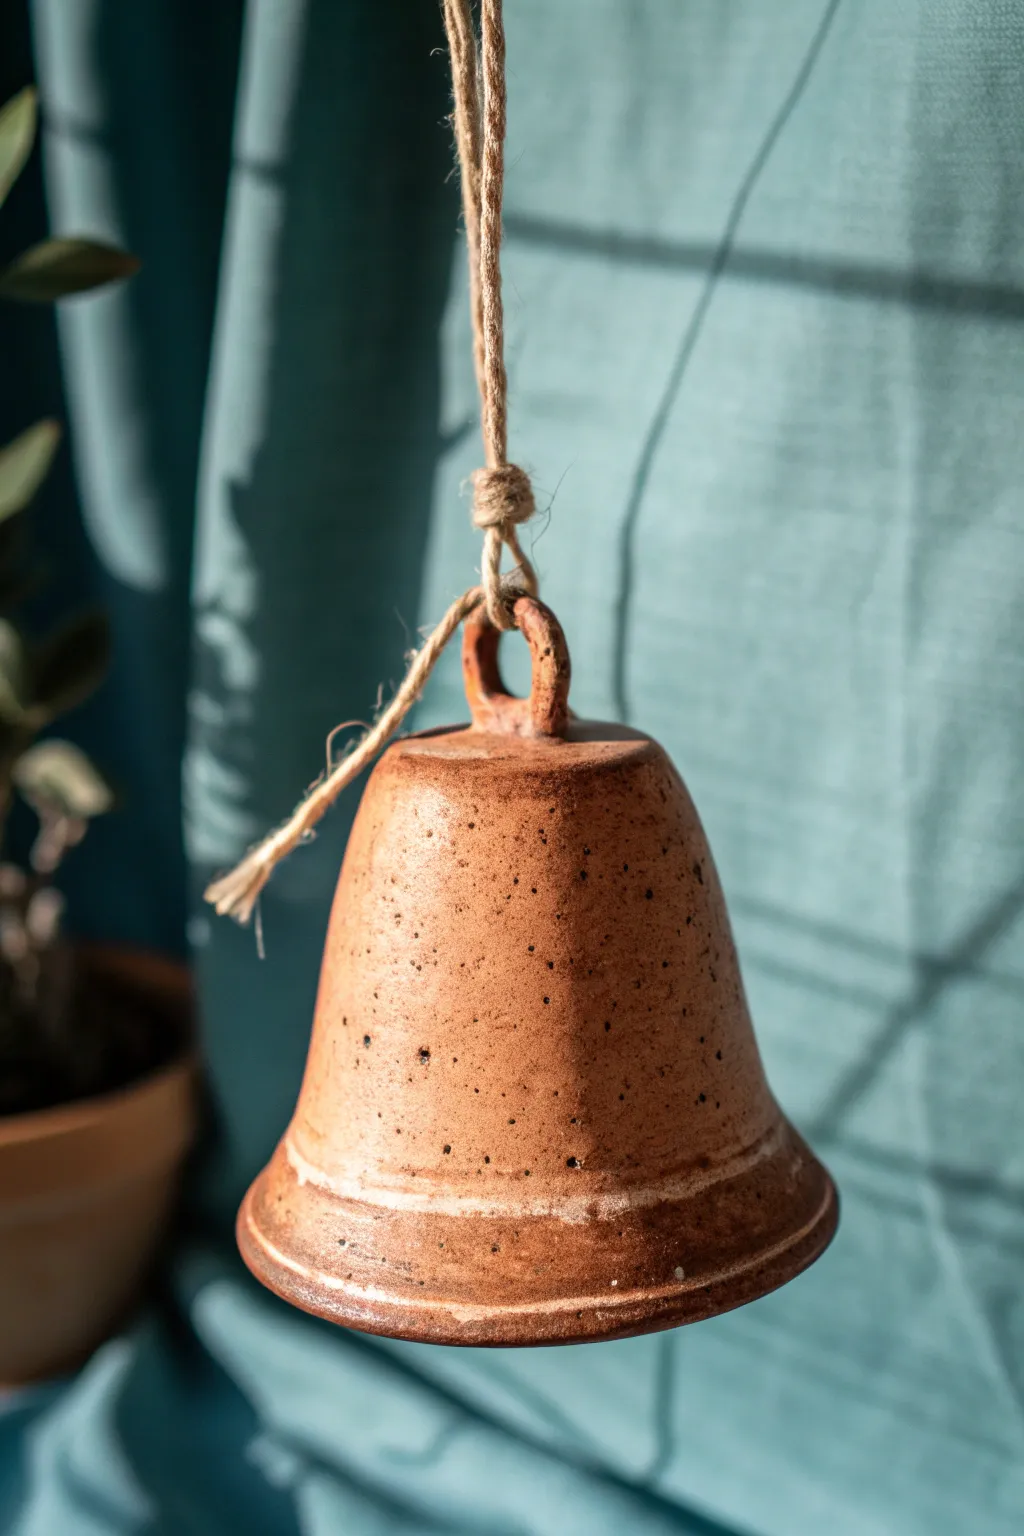
Soft Dome Bell With Rounded Edges
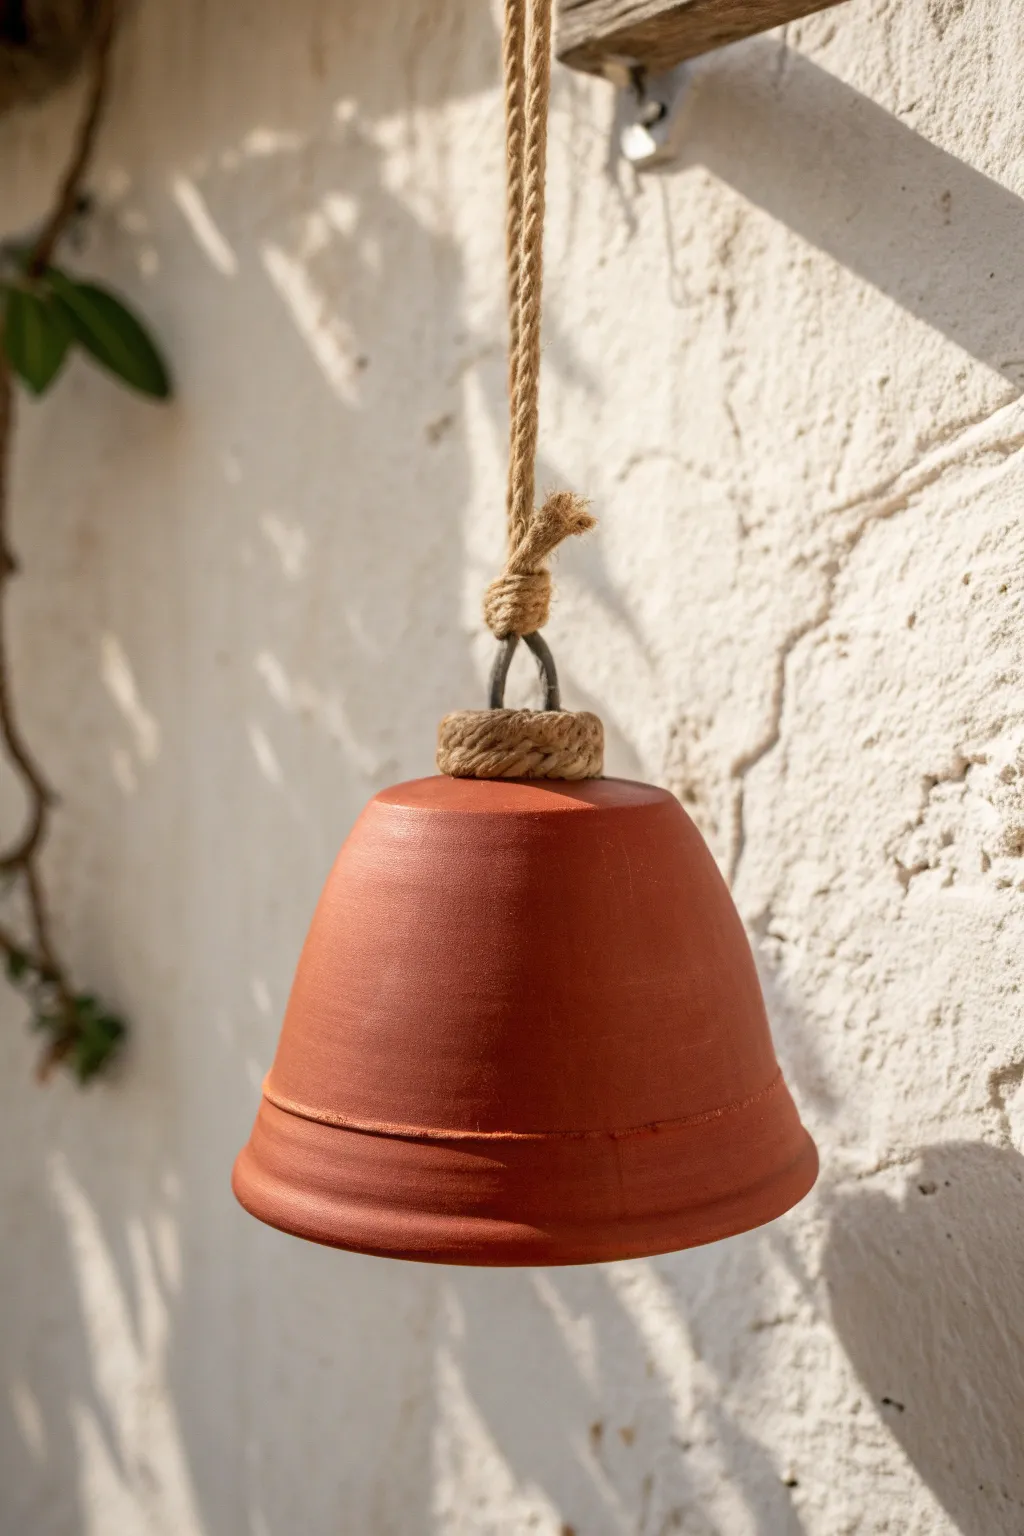
Embrace the rustic elegance of clay with this simple yet stunning dome bell project. Its smooth, rounded silhouette and natural finish bring an earthy warmth that fits perfectly in any garden or sunroom.
How-To Guide
Materials
- Terracotta clay (low-fire or air-dry depending on preference)
- Pottery wheel (optional, can be hand-built)
- Rolling pin (if hand-building)
- Needle tool
- Rib tool (metal or rubber)
- Sponge
- Wire loop tool for trimming
- Thick jute or hemp rope (approx. 1/2 inch thick)
- Metal wire (heavy gauge) for the hanging loop
- Clay adhesive or slip
- Clear matte sealer (optional)
Step 1: Forming the Bell Shape
-
Prepare the clay:
Begin by wedging your terracotta clay thoroughly to remove any air bubbles. You’ll need a ball about the size of a grapefruit for a bell of this scale. -
Center on the wheel:
If throwing on a wheel, slam the clay onto the bat and center it carefully. If hand-building, roll out a slab and form it around a dome mold instead. -
Open the clay:
Open the centered clay mound, pulling the walls up gently. Aim for a slightly thicker wall at the bottom to support the flared rim later. -
Shape the dome:
Collar the top inwards gradually to create that distinctive soft dome curve. The top needs to remain closed and fairly thick to support the hanging mechanism. -
Form the rim:
Using your fingers or a rib tool, flare the bottom edge outwards slightly. This creates the ‘lip’ seen at the base of the bell. -
Refine the curve:
Take a flexible metal or rubber rib and run it up the exterior while the wheel spins slow. This smooths out finger ridges and perfects the rounded silhouette. -
Add the definition line:
Just above the flared rim, use a needle tool or the edge of a wooden tool to press a subtle groove around the circumference. This creates the visual separation seen in the reference image.
Uneven Drying?
If the rim dries faster than the thick top, the bell might crack. Cover the rim with a strip of damp paper towel while the rest dries to even out the process.
Step 2: Creating the Hardware Mount
-
Pierce the top:
Once the basic form is set but still workable, use a needle tool to create a hole in the very center of the dome’s top. Make it large enough for your heavy gauge wire. -
Form the wire loop:
Bend a piece of heavy gauge wire into a ‘U’ shape. This will be the permanent loop embedded in the clay. -
Embed the loop:
Insert the wire loop into the top hole from the inside. Secure it with a small coil of clay on the interior ceiling of the bell to prevent it from pulling out. -
Dry slowly:
Cover the bell loosely with plastic. I like to let this dry briefly for a day or two to reach leather-hard stage, ensuring it doesn’t warp.
Step 3: Finishing Touches and Assembly
-
Sponge smooth:
Once bone dry (or fully cured if using air-dry clay), take a slightly damp sponge and wipe down the exterior to remove any sharp burrs or rough spots. -
Fire or seal:
Fire the piece in a kiln according to your clay’s specifications. If using air-dry clay, apply a matte sealant now to protect the finish. -
Attach the main rope:
Cut a long length of thick jute rope. Thread one end through the metal wire loop you embedded at the top of the bell. -
Knot the rope:
Tie a sturdy overhand knot right above the metal loop. Ensure the knot is tight and secure. -
Wrap the connection point:
Cut a separate, shorter piece of rope. Apply a strong adhesive to the top of the ceramic dome (around the wire loop base). -
Coil the decorative wrap:
Coil this shorter rope tightly around the base of the metal loop, covering the gap between the clay and the main knot. This mimics the wrapped detail in the photo. -
Secure the wrapping:
Tuck the end of the coiled rope underneath the coil itself or secure with a dab of hot glue to keep it hidden and tidy.
Add a Clapper
Before firing, create a small clay bead. Hang it inside the bell using thin twine tied to the internal wire loop so your bell actually rings.
Hang your finished terracotta bell in a sunny spot and enjoy the gentle, artistic touch it adds to your space

What Really Happens Inside the Kiln
Learn how time and temperature work together inside the kiln to transform clay into durable ceramic.
Carved Linework Bell With Clean Grooves
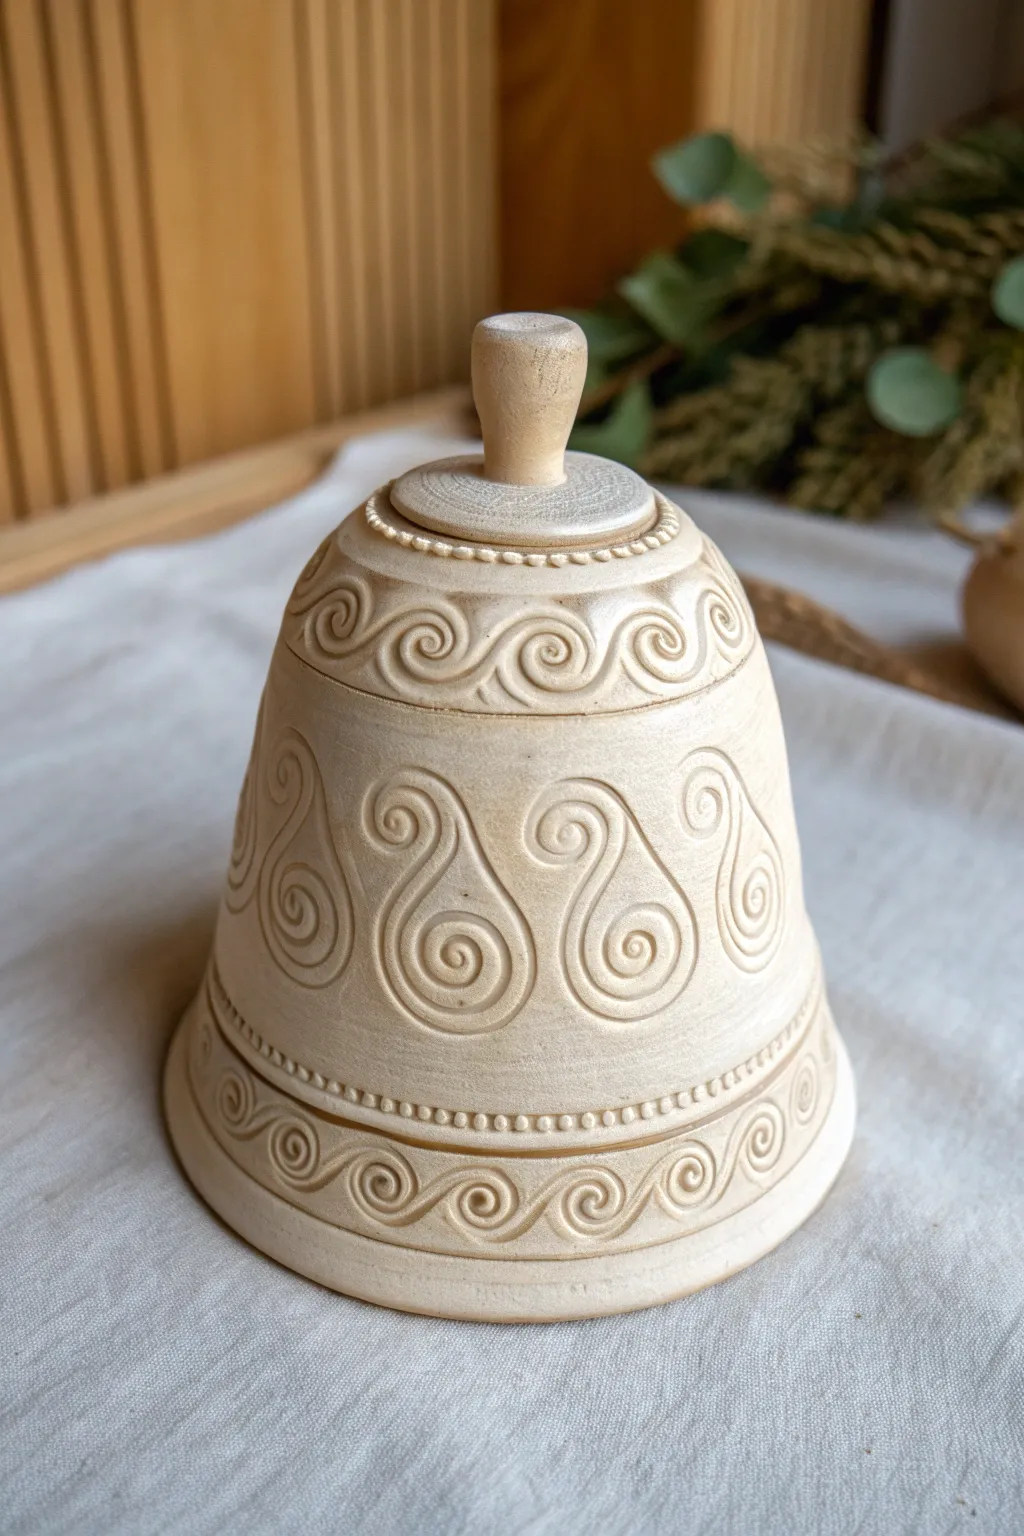
This elegant bell project combines precise wheel-throwing with meditative carving techniques to create a piece that feels both ancient and modern. The natural clay body is left largely unglazed, allowing the deep, clean grooves of the linework to create a stunning textural contrast.
Step-by-Step Tutorial
Materials
- Light-colored stoneware clay (smooth body preferred)
- Potter’s wheel
- Throwing tools (rib, sponge, wire cutter)
- Loop tools (various sizes for carving)
- Needle tool
- Sgraffito tool or ball stylus
- Wooden sculpting tool
- Clean sponge and water
- Soft brush
- Clear matte glaze (optional)
- Kiln
Step 1: Throwing the Form
-
Center and Open:
Begin with about 1.5 to 2 pounds of well-wedged clay. Center it firmly on the wheel head and open a hole in the center, leaving the floor slightly thicker than a standard bowl to support the hanging mechanism later. -
Pull the Walls:
Pull the clay upward into a tall, tapered cone shape. You want the base to be wider than the top, creating that classic bell silhouette. Aim for an even wall thickness of about 1/4 inch. -
Shape the Curve:
Use a flexible metal or rubber rib to smooth the outside and refine the curve, ensuring the bell flares gently at the bottom rim. -
Close the Top:
Collar the neck in significantly until it is nearly closed. You aren’t making a bottle, but rather a domed top. Gently flatten the very top area to prepare it for the handle/finial. -
Add the Finial:
You can either throw a small knob directly from the thick clay at the top or attach a separate small coil. Shape it into a smooth, tapered handle that narrows at the waist and flares slightly at the top. -
Create the Hanger Hole:
While the clay is still wet, use a needle tool to pierce a hole through the interior ceiling of the bell into the base of the finial. This is crucial for attaching the clapper later. -
Dry to Leather Hard:
Cut the bell from the bat and let it dry slowly until it reaches a firm leather-hard stage. This involves covering it loosely with plastic so the moisture evens out; if it’s too soft, the carving will be messy.
Clean Curves
Does your carving tool drag? Your clay might be too dry. If the tool creates rugged edges, the clay is too coarse or wet. Ideally, the clay should carve like cold cheddar cheese.
Step 2: Carving the Design
-
Map the Sections:
Place the bell on a banding wheel. Lightly use a needle tool to scribe three horizontal guidelines around the circumference: one near the top shoulder, and two near the bottom rim to define the borders. -
Divide the Space:
Vertical spacing is key for the main motif. Lightly mark vertical tick marks around the central band to ensure your paisley shapes will be evenly spaced. I usually divide the form into six or eight equal sections. -
Outline the Main Motifs:
Using a stylus or dull pencil, lightly sketch the large teardrop/paisley shapes in the central band. They should alternate, one upright and one inverted if you prefer, or all standing upright as shown in the example. -
Carve the Main Grooves:
Select a small, U-shaped loop tool. Ideally, the wire should be sharp. Carve out the outline of your paisley shapes, removing ribbons of clay to leave a clean, deep channel. -
Add Inner Spirals:
Switch to a slightly finer tool or the same loop tool. Carve the spiral ‘eye’ inside the wide part of the teardrop shape, ensuring the curve flows naturally from the outer line. -
Create the Scroll Borders:
On the top shoulder and the bottom rim, sketch a continuous wave pattern of interlocking S-scrolls. Carve these with the same consistent depth as the main motifs. -
Detail the Dividers:
Use a small ball tool or the tip of a wooden tool to press a row of small, uniform dots along the horizontal guidelines you made earlier. This beaded texture frames the carved sections beautifully. I find this creates a nice separation between the smooth and carved areas. -
Refine the Ridges:
Use a soft, slightly damp sponge to wipe over the carved areas very gently. This softens any sharp ‘burrs’ or crumbs left by the carving tools without washing away the detail.
Step 3: Finishing
-
Bisque Fire:
Allow the bell to bone dry completely. This can take several days depending on humidity. Fire the piece to cone 04 (or your clay body’s bisque temperature). -
Surface Treatment:
To maintain the natural look, you might choose to leave the outside unglazed or apply a very thin wash of iron oxide to highlight the grooves, wiping back the excess. Alternatively, a clear matte glaze works well. -
Glaze Fire:
Fire the bell to the final maturity temperature of your clay (e.g., cone 5/6 or cone 10). -
Assembly:
Once cool, tie a ceramic bead or clapper onto a durable cord. Thread the cord through the hole in the top and knot it securely within the finial or handle.
Level Up: Sound Tuning
Before firing, create multiple clappers of different sizes or shapes. The weight and contact point of the clapper drastically change the bell’s tone.
Hang your finished bell in a breeze-prone spot or a quiet corner where its texture and sound can be enjoyed
Cutout Window Bell With Shadow Details
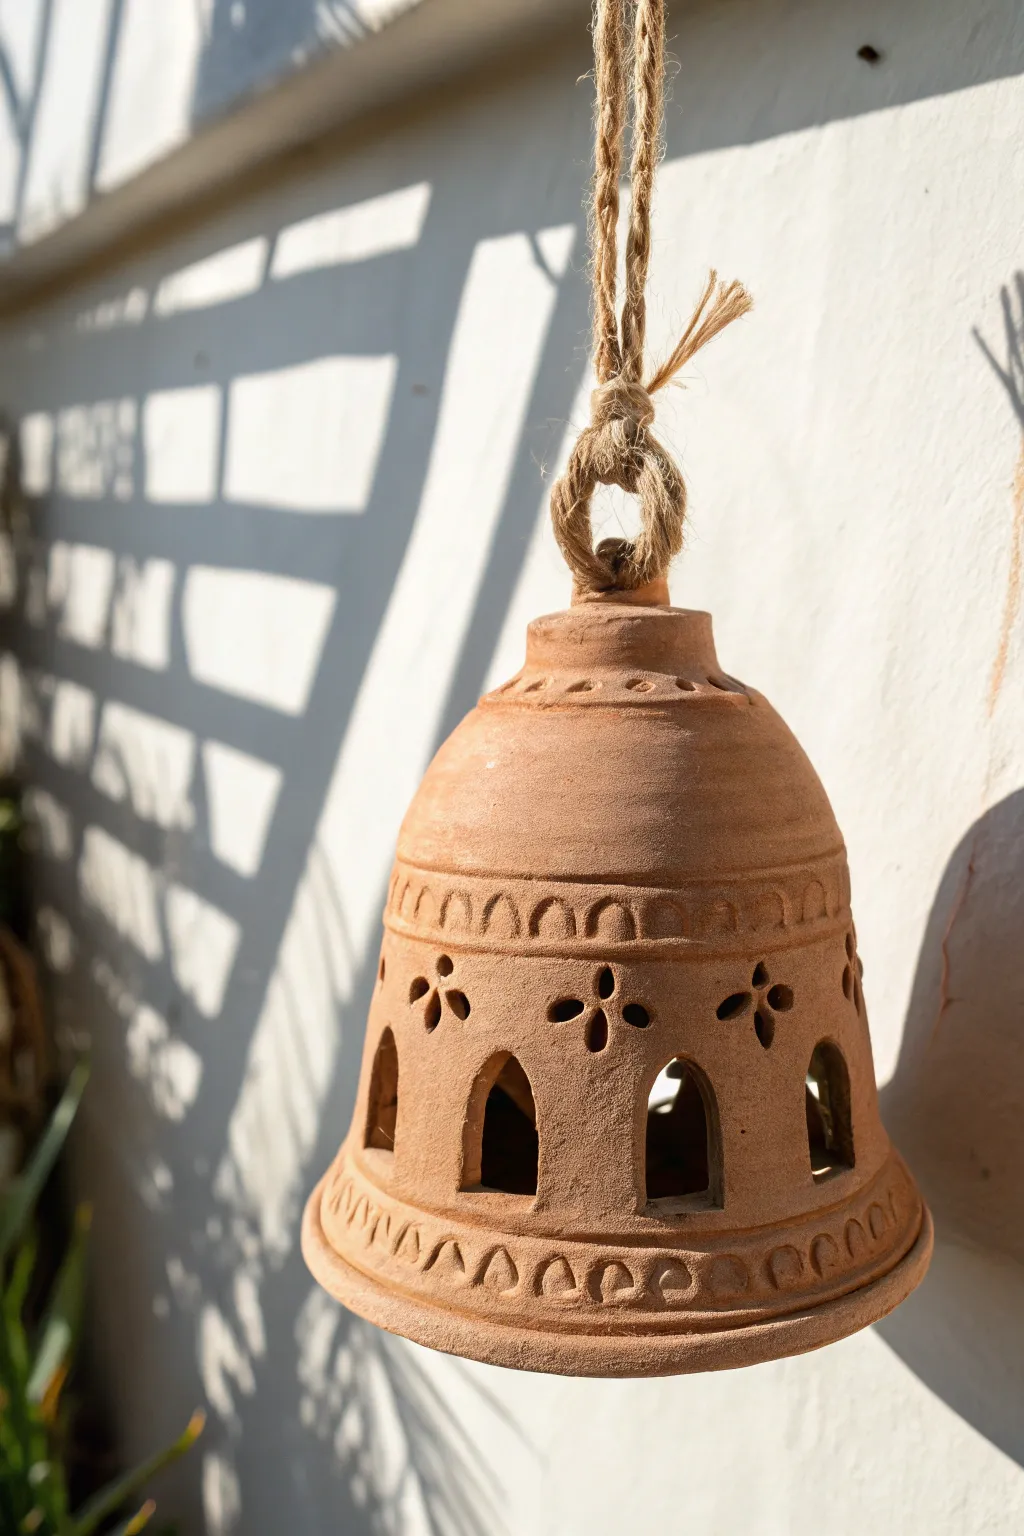
Capture the warmth of Mediterranean afternoons with this hand-built terracotta bell featuring airy window cutouts and delicate stamped textures. The unglazed finish allows the natural beauty of the clay to shine, creating intriguing shadow play when hung in a sunny spot.
How-To Guide
Materials
- Terracotta or earthenware clay (low-fire)
- Rolling pin
- Canvas or wooden board (work surface)
- Fettling knife or clay cutting tool
- Small circular cutters (straws or specialized clay cutters)
- Carving tool or loop tool
- Rib tool (wooden or silicone)
- Slip (clay and water mixture)
- Jute twine for hanging
- Sponge
Step 1: Forming the Bell Base
-
Prepare the Clay:
Begin by wedging your terracotta clay thoroughly to remove air bubbles. Roll it out into a slab approximately 1/4 inch thick, keeping the thickness consistent for even drying. -
Cut the Shape:
Cut a large semi-circle from your slab. The size of the semi-circle will dictate the size of your bell. I like to bevel the straight edges slightly to create a cleaner seam later. -
Create the Cone:
Gently curve the slab into a cone shape, bringing the straight edges together. Score the edges (scratch them up with a tool) and apply a generous amount of slip. -
Seal the Seam:
Press the scored edges firmly together. Use your rib tool to smooth the seam on both the inside and outside until it is invisible and the wall is uniform. -
Shape the Shoulder:
Gently gently press inwards near the top third of the cone to create the bell’s rounded shoulder, then flare the bottom rim slightly outward for a traditional silhouette. -
Add the Handle Loop:
Roll a small coil of clay. Attach it securely to the very top of the bell to form a sturdy loop, ensuring you score and slip the connection points well so it can support the bell’s weight.
Clean Cuts Matter
Wait until the clay is ‘leather hard’ (stiff but cool) before cutting the windows. Wet clay drags and deforms; stiffer clay cuts cleanly like cheese.
Step 2: Carving and Detailing
-
Mark Guidelines:
Lightly trace horizontal lines around the circumference of the bell to designate where your pattern bands will go. This helps keep your design symmetrical. -
Create the Arched Windows:
On the lower section, sketch out evenly spaced arch shapes. Using a sharp fettling knife or scalpel, carefully cut these windows out, removing the clay cleanly. -
Bevel the Windows:
Smooth the rough edges of your cutouts with a damp sponge or fingertip. Slightly angling the cut inward can make the clay wall look refined. -
Punch Floral Motifs:
Above the arches, create the four-petal flower designs. You can do this by pressing a small teardrop-shaped cutter four times around a center point, or by carefully carving them by hand. -
Add Texture Bands:
Create the decorative borders above the flowers and near the rim. Use a small carving loop to gouge out repeating ‘U’ shapes or scallops that mimic a rope pattern. -
Define the Top:
Press small circular indentations around the neck of the bell using the end of a paintbrush handle or a small dowel.
Warping Walls?
If the bell sags while you work, stuff the inside with crumpled newspaper or plastic bags to support the shape until it stiffens up.
Step 3: Finishing and Firing
-
Smooth the Surface:
Once the clay is leather hard, give the entire piece a final smoothing with a slightly damp sponge to remove any burrs or sharp bits from the carving process. -
Dry Slowly:
Allow the bell to dry very slowly under loose plastic for a few days to prevent warping, especially around the window cutouts. -
Bisque Fire:
Fire the piece in a kiln to the appropriate temperature for your specific terracotta clay body (usually cone 04 or 06). -
Attach the Rope:
Take a length of thick jute twine. Fold it in half and feed the loop through the clay handle at the top. -
Secure the Knot:
Pull the tails of the twine through the loop to create a girth hitch, or tie a sturdy knot that sits visually heavy on top of the bell loop as shown in the inspiration image. -
Add the Clapper (Optional):
If you want the bell to ring, tie a large ceramic bead or a smaller clay ball to a string and attach it to the inside of the main rope before hanging.
Hang your finished bell near a wall where the sunlight can cast beautiful patterned shadows through your handiwork


The Complete Guide to Pottery Troubleshooting
Uncover the most common ceramic mistakes—from cracking clay to failed glazes—and learn how to fix them fast.
Glaze-Drip Rim Bell

Capture the organic beauty of fluid ceramics with this speckled stoneware bell, featuring a rich amber glaze that seems frozen in time as it drips down the sides. The contrast between the raw, unglazed rim and the glossy, melting top creates a tactile piece that looks as lovely as it sounds.
Step-by-Step Tutorial
Materials
- Speckled buff stoneware clay
- Pottery wheel (or slab roller for hand-building)
- Small rib tool
- Pin tool
- Sponge
- Loop tool for trimming
- Glossy amber or tenmoku glaze
- Clear transparent glaze (optional)
- Kiln
- Small paintbrush
Step 1: Shaping the Bell Body
-
Center the clay:
Start with a ball of well-wedged speckled stoneware clay, about 1-1.5 lbs depending on your desired size. Secure it firmly to the center of your wheel head. -
Open the form:
Open the clay as you would for a bowl, but keep the base relatively narrow. Pull the walls upward and inward to create a tall, enclosed cone shape. -
Refine the curve:
Using a rib tool on the exterior, gently shape the walls into a smooth bell curve. The bottom rim should flare out slightly, while the top should narrow significantly without closing completely yet. -
Smooth the surface:
Run a damp sponge over the surface to reveal the clay’s natural speckling and remove any throwing lines if you prefer a smoother look. -
Separate from the wheel:
Use a wire tool to cut specifically under the bell, but don’t lift it off yet. Allow it to stiffen slightly on the bat until it reaches leather-hard consistency.
Glaze Running Too Far?
If your test tiles show the glaze runs excessively, apply the amber glaze slightly higher up on the bell than you want the final drips to end. Gravity does the rest.
Step 2: Crafting the Handle & Trimming
-
Trim the base:
Once leather hard, flip the bell over and center it on the wheel. Trim the interior of the bottom rim to define the wall thickness and give it a crisp edge. -
Close the top:
If your throwing left a small hole at the top, pinch it closed and smooth it over. The top surface needs to be flat enough to accept a handle. -
Roll a coil:
Roll a small, thick coil of the same clay. It should be roughly the thickness of your pinky finger. -
Form the loop:
Bend the coil into a small loop or arch shape. Score and slip both the attachment points on the loop and the top center of the bell. -
Attach the handle:
Press the loop firmly onto the top of the bell. Use a modeling tool to blend the seams underneath so the handle looks like it grew seamlessly out of the bell body. -
Refine the loop:
Smooth the inside of the handle loop with a damp brush or your finger to ensure it’s comfortable to hold and visually clean.
Step 3: Glazing and Firing
-
Bisque fire:
Once the piece is bone dry, fire it to cone 04 (or your clay body’s bisque temperature). -
Wax resist application:
Apply wax resist to the bottom half-inch of the bell’s exterior rim. This creates that distinct line of raw clay at the bottom shown in the project photo. -
Base glazing:
Dip the entire bell (up to your wax line) into a clear or creamy white glaze if you want to enhance the speckles, or leave the main body bare if you want a raw clay finish. -
Applying the drip:
Using a thick brush or a bulb syringe, apply a heavy coat of amber or floating red glaze to the top third of the bell, covering the handle completely. -
Encourage drips:
While the glaze is wet, I like to overload the brush and gently push excess glaze downward in vertical channels to create purposeful, long drips. -
Clean the rim:
Double-check the bottom rim. Even with wax resist, use a damp sponge to wipe away any stray droplets of glaze to ensure a clean firing. -
Final wipe:
Wipe the very top of the handle loop slightly if the glaze is too thick, preventing it from running down and fusing the loop shut. -
Glaze fire:
Fire to cone 6 (or your clay’s maturity). The high heat will cause the amber glaze to melt and travel down the sides, cementing the drip effect.
Use Cookie Setters
Always fire pieces with heavy drips on a ‘cookie’ (a flat disc of scrap clay with kiln wash). This saves your kiln shelf if a drip decides to travel all the way down.
Hang your finished bell with a sturdy cord and enjoy the gentle, earthy tones it brings to your space
Speckled Clay Bell With Clear Finish
Embrace the effortless charm of this handheld bell, crafted to highlight the natural beauty of speckled clay under a brilliant clear glaze. This project results in a sleek, modern piece that combines the rustic warmth of jute twine with a polished ceramic finish.
Detailed Instructions
Materials
- Speckled clay body (cone 5/6 stoneware recommended)
- Clear transparent glaze
- Rolling pin
- Canvas work surface
- Needle tool
- Loop tool (for trimming)
- Sponge
- Cardstock or flexible plastic (for template)
- Small bowl or form (optional for shaping)
- Slip and scoring tool
- Medium-grit sandpaper (for bisque)
- Natural jute twine
- Kiln access
Step 1: Forming the Body
-
Prepare the template:
Cut a semi-circle shape from your cardstock. The size of the semi-circle will determine the size of your bell, but a 6-inch diameter is a good starting point for a hand-sized bell. -
Roll the slab:
Roll out a portion of your speckled clay on the canvas until it is an even 1/4-inch thickness. Compress the clay with a rib tool to smooth the surface and align the particles. -
Cut the shape:
Place your semi-circle template onto the slab and trace around it with a needle tool to cut out the clay. -
Form the cone:
Gently curl the semi-circle into a cone shape so the straight edges meet. You aren’t aiming for a sharp point at the top, as we will trim that later. -
Join the seam:
Score the meeting edges thoroughly and apply a generous amount of slip. Press the edges together firmly to create a bond. -
Smooth the exterior:
Use a wooden modeling tool or your fingers to smooth the seam on the outside so it becomes invisible. I find a slightly damp sponge helps blend the clay perfectly here. -
Refine the interior:
Don’t forget the inside seam; reach in with a finger or tool to smooth it out, ensuring structurally sound walls. -
Shape the bell curve:
While holding the cone, gently flare the bottom rim outward with your fingers to create that classic bell silhouette. It doesn’t need to be perfectly straight; a slight organic wave adds character.
Step 2: Adding the Handle
-
Create the loop:
Roll a small coil of clay, about the thickness of a pencil. Form it into a ‘U’ shape or a small ring. -
Level the top:
If the top of your bell cone is pointy or uneven, slice a tiny bit off horizontally to create a small, flat platform for the handle to sit on. -
Attach the loop:
Score the flat top of the bell and the ends of your coil loop. Apply slip and press the loop firmly onto the top of the bell. -
Reinforce the join:
Take a very thin coil of wet clay and wrap it around the base of the handle where it meets the bell. Smooth this coil down to create a seamless transition.
Seam Splitting?
If the vertical seam opens during drying, you likely used too little slip. Re-hydrate the area slightly with vinegar, score deeply, and add fresh soft clay to patch it.
Step 3: Finishing and Firing
-
Dry slowly:
Let the bell dry slowly under loose plastic for a day or two to prevent the handle from cracking away from the body, then uncover to bone dry. -
Bisque fire:
Fire the piece to cone 04 (or your clay’s specific bisque temperature). -
Clean the bisque:
Wipe the fired bell with a damp sponge to remove any kiln dust. This ensures the glaze adheres without pinholing. -
Apply clear glaze:
Dip the entire bell into a clear, glossy glaze. Ensure an even coat. If brushing, apply 2-3 flowing coats, allowing them to dry in between. -
Wipe the foot:
Use a sponge to wipe the glaze completely off the bottom rim of the bell so it doesn’t fuse to the kiln shelf. -
Glaze fire:
Fire the bell to the maturity temperature of your clay and glaze (likely cone 5 or 6). This high fire will really bring out the speckles. -
Add the twine:
Once cool, wrap a length of natural jute twine around the base of the handle loop. Knot it securely to finish the rustic look.
Make it Ring
Before firing, pierce a tiny hole inside the top of the bell. After firing, thread a ceramic bead on a string through this hole to create a functional clapper.
Enjoy the gentle sound and organic texture of your new handmade ceramic bell

TRACK YOUR CERAMIC JOURNEY
Capture glaze tests, firing details, and creative progress—all in one simple printable. Make your projects easier to repeat and improve.
Unglazed Rustic Bell With Burnished Shine
Embrace the raw beauty of natural clay with this unglazed bell project, featuring a warm, speckled finish and a smooth, burnished surface. The subtle shine is achieved not through glaze, but through careful polishing, giving the piece a timeless, artifact-like quality.
How-To Guide
Materials
- Speckled stoneware or earthenware clay (terracotta color)
- Pottery wheel (optional) or rolling pin and slab mat
- Fettling knife
- Rib tool (wooden or silicone)
- Spoon or smooth stone (for burnishing)
- Pin tool
- Sponge
- Jute twine or hemp cord
- White decorative slip or under glaze (optional)
Step 1: Forming the Bell Body
-
Prepare the clay:
Begin with a ball of clay about the size of a large orange. Wedge it thoroughly to remove air bubbles and ensure even consistency. -
Shape the main form:
You can either throw a small, bottomless bowl shape on the pottery wheel or use the pinch pot method. If pinching, gently press your thumb into the center and work the walls upwards and outwards until you have a deep, inverted cup shape. -
Refine the walls:
Aim for a uniform thickness of about 1/4 inch. If the walls are too thick, the bell will be heavy and dull-sounding; too thin, and it may crack. -
Smooth the exterior:
Use a rib tool to smooth out finger marks on the outside. This is crucial for that sleek silhouette shown in the photo. -
Create the rim detail:
Gently flair the bottom rim outwards just a tiny bit. Use a damp sponge to smooth loop the edge so it isn’t sharp.
Vegetable Oil Trick
Apply a tiny drop of vegetable oil to the leather-hard clay before burnishing. It creates a smoother glide and a deeper, glossier seal on the surface.
Step 2: Adding the Handle & Details
-
Roll a coil:
Roll a small coil of clay, roughly the thickness of a pencil, for the handling loop. -
Attach the loop:
Score the top center of your bell and the ends of your coil loop. Apply a dab of slip (clay slurry) and press the loop firmly onto the top. -
Blend the seams:
Use a small wooden tool or your finger to blend the clay of the loop down into the bell body so it looks like one seamless piece. -
Pierce the hanging hole:
Ensure there is enough clearance under the loop for your twine. If the loop collapsed during attachment, reshape it carefully now. -
Add the accent line:
If you want the faint white line seen near the rim, paint a very thin band of white slip or underglaze about half an inch from the bottom edge. Alternatively, you can etch a shallow groove here.
Step 3: Finishing and Burnishing
-
Let it firm up:
Allow the bell to dry to a ‘leather hard’ state. It should be firm enough to handle without warping, but still cool to the touch. -
Begin burnishing:
I find this step meditative. Take a smooth stone or the back of a spoon and rub it over the exterior surface of the clay in small, circular motions. -
Check the sheen:
As you compress the clay particles, you’ll see a soft sheen develop. Continue until the entire surface is smooth and slightly glossy. -
Dry completely:
Let the bell dry completely. The clay will lighten in color and no longer feel cold. -
Fire the piece:
Bisque fire the bell in a kiln according to your clay body’s instructions (usually Cone 04 or 06). Since this is an unglazed project, you typically won’t need a second glaze firing.
Rim Cracking?
If small cracks appear on the rim while flaring, your clay is too dry. Compress the rim with a damp sponge and slow down the drying process with plastic.
Step 4: Assembly
-
Prepare the hanger:
Cut a long length of jute twine. Fold it in half to create a loop at the top for hanging. -
Tie the knot:
Thread the loose ends through the ceramic loop on the bell. Tie a sturdy knot right above the ceramic loop to secure it. -
Add a clapper (optional):
If you want the bell to ring, tie a ceramic bead or metal washer to a shorter string and attach it inside the bell, hanging from the same loop.
Hang your handcrafted bell near a window or in a garden nook to enjoy its earthy charm
Painted Folk-Style Floral Bell

These charming ceramic bells feature a warm beige base decorated with whimsical blue and red folk art botanicals. The rustic twine hanger and dainty scalloped border give them a timeless, handcrafted appeal perfect for holiday decor or year-round cheer.
Step-by-Step Tutorial
Materials
- Air-dry clay or polymer clay (white or beige)
- Acrylic paints (navy blue, classic red, warm white)
- Matte spray sealant or varnish
- Rolling pin
- Bell-shaped mold (or a small plastic cup/bowl)
- Craft knife
- Small round paintbrush (size 0 or 1)
- Detail liner brush
- Natural jute twine
- Large wooden bead (approx. 20mm)
- Stylus tool or toothpick
- Sandpaper (fine grit)
- Drinking straw (for piercing)
Step 1: Shaping the Bell Form
-
Prepare the Clay:
Condition your clay until it is soft and pliable. Roll it out on a smooth surface to an even thickness of about 1/4 inch. -
Drape and Shape:
Drape the rolled clay over your chosen bell mold or upside-down cup. Gently smooth the clay down the sides with your fingers to remove air pockets and conform to the shape. -
Trim the Base:
Use a craft knife to trim the excess clay around the bottom rim. You can cut a straight line for now; we will add the painted scallop effect later. -
Create the Hanger Loop:
Roll a small snake of clay and form it into a U-shape. Attach this loop firmly to the very top of the bell, blending the seams with a little water or liquid clay to ensure it doesn’t snap off. -
Smooth and Dry:
Dip your finger in water and smooth out any rough textures or fingerprints. Allow the clay to dry completely according to package instructions—usually 24-48 hours for air-dry clay. -
Sand the Surface:
Once fully dry, lightly sand the surface with fine-grit sandpaper to create a perfect canvas for your painting. Wipe away any dust with a slightly damp cloth.
Clean Lines
To keep your folk art flowers steady, anchor your pinky finger on a dry part of the bell while painting. This stabilizes your hand for delicate stems.
Step 2: Painting the Folk Design
-
Base Coat:
Mix a touch of yellow or brown into white acrylic paint to create a warm ‘biscuit’ beige color. Paint the entire exterior of the bell and let it dry. -
Paint the Scalloped Border:
Using red paint and a small round brush, paint a thick wavy line around the bottom edge of the bell to mimic a scalloped trim. Fill in the area below the wave completely with red. -
Add Border Details:
Dip the handle end of a paintbrush or a stylus tool into white paint. Dot a series of small, evenly spaced dots along the center of the red scalloped border. -
Start the Floral Centerpiece:
Choose a focal point on the bell’s face. Paint a simple red daisy-like flower with radiating petals. Keep the strokes loose and slightly imperfect for that folk-art look. -
Add Blue Botanicals:
Using a navy blue paint, add a tulip-shaped flower nearby. I prefer to paint the outline first and then fill it in. Add stylized leaves using single, sweeping brushstrokes that taper at the end. -
Fine Liner Work:
Switch to your liner brush. Paint thin stems connecting your flowers and leaves. Add tiny details like veins in the leaves or lines inside the tulip petals. -
Fill the Negative Space:
Look for empty spots and add small decorative elements like tiny red dots, blue dashes, or miniature sprigs of fern-like leaves to balance the composition. -
Top Dots:
Around the top shoulder of the bell, near the handle, paint a ring of small red dots to frame the upper section. -
Seal the Work:
Once the paint is thoroughly dry, spray the entire piece with a matte sealant to protect the design and give it a finished, ceramic feel.
Rustic Texture
Before painting, lightly dab a textured sponge with brown paint and wipe most of it off. Gently graze the bell to add an aged, antique patina.
Step 3: Assembly
-
Prepare the Cord:
Cut a length of thick jute twine (about 12-15 inches). Fold it in half to create a loop at the top. -
Thread the Bell:
Push the looped end of the twine through the clay handle on top of the bell. Pass the loose ends through the loop and pull tight to secure it (a lark’s head knot). -
Adding the Clapper:
Thread a large wooden bead onto the loose ends of the twine hanging inside or below the bell. Tie a sturdy double knot below the bead to hold it in place. -
Final Trim:
Trim any excess twine below the bead knot for a neat finish.
Hang your beautiful new folk-art bell where it can catch the light and add a touch of handmade charm to your space
Mini Bell Ornament Set
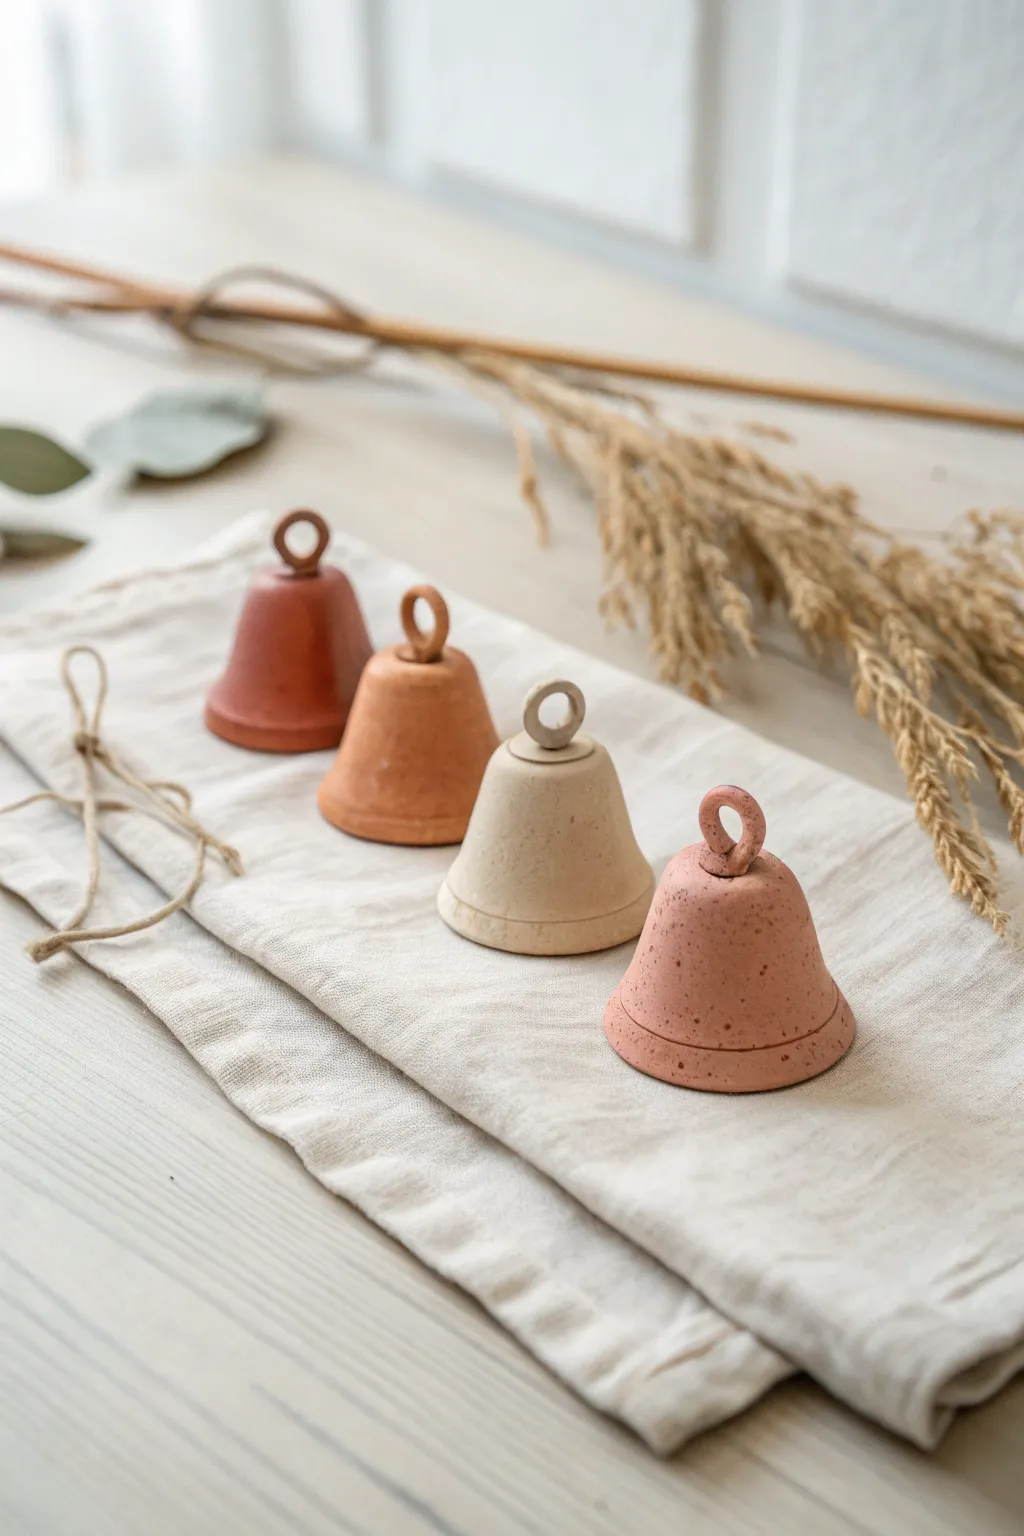
These charming mini bell ornaments bring a warm, rustic touch to your decor with their natural earth tones and subtle speckled finish. The set features a gradient of colors from deep terracotta to soft beige, all crafted with a smooth matte texture that mimics traditional pottery.
Step-by-Step
Materials
- Polymer clay or air-dry clay (terracotta, beige, burnt orange, and soft pink shades)
- Faux stone or speckle embossing powder (optional, for texture)
- Coarse black pepper or dried tea leaves (alternative for speckles)
- Small rolling pin
- Circle cutters (approx. 2-3 inches diameter)
- Small dowel or paintbrush handle (for shaping)
- Craft knife
- Sandpaper (fine grit)
- Liquid clay or slip (if joining separate pieces)
- Matte varnish (optional)
Step 1: Preparing the Clay
-
Mix Custom Colors:
Start by conditioning your clay. You’ll want four distinct shades to match the gradient in the image: a deep rust, a warm amber, a creamy beige, and a dusty rose. If you are using white clay, mix in small amounts of acrylic paint or pigment powder to achieve these earthy tones. -
Add Speckled Texture:
To achieve that organic, stoneware look, knead a small pinch of ‘granite’ polymer clay or a sprinkle of coarse black pepper into each color. This creates the tiny dark flecks visible on the bells without altering the base color too much. -
Roll Out Slabs:
Roll each color of clay into a smooth sheet, roughly 1/8 inch thick. Aim for varying thicknesses if you want a more handmade, organic feel, but try to keep it relatively uniform for even drying or baking.
Seam Splitting?
If the seam cracks open during baking or drying, fill the crack with a mix of clay and liquid clay (creating a paste), smooth it over, and bake/dry again.
Step 2: Shaping the Bells
-
Cut Circles:
Use your circle cutter to punch out rounds from each clay sheet. For the mini size shown, a 2.5-inch circle usually works well. -
Remove a Slice:
Using a craft knife, cut a small pie-slice wedge (about 1/4 of the circle) out of each round. This missing wedge allows you to pull the sides together to form a cone shape. -
Form the Cone:
Bring the two straight cut edges together to form a cone. Gently pinch the seam together. I like to use a smoothing tool or just my finger to blend the clay across the seam until it disappears completely on the outside. -
Shape the Bell Curve:
Place the cone over your thumb or a rounded tool handle. Gently press and bell out the bottom rim, flaring it slightly to give it that traditional bell silhouette rather than a straight geometric cone. -
Detail the Rim:
Use a needle tool or the back of a knife to gently impress a thin horizontal line about 1/4 inch up from the bottom rim. This adds a subtle decorative detail found on traditional metal bells.
Make Them Ring
Before baking, adhere a small wire loop inside the bell. After curing, tie a tiny wooden bead to it so the bell actually jingles.
Step 3: Creating the Handle
-
Roll Tiny Snakes:
Take a small scrap of clay matching each bell color and roll it into a short snake, about 3mm thick. -
Form the Loop:
Curl the small snake into a circle to create the top loop handle. Verify the proportion looks right against your bell body; it should be petite and secure. -
Attach the Loop:
Score the top point of your bell cone slightly and add a drop of liquid clay (or water/slip for air-dry clay). Press the loop firmly onto the top, smoothing the clay downward to bond the pieces securely.
Step 4: Finishing Touches
-
Smooth Imperfections:
Before hardening, do a final pass over the surface with your finger dipped in a little oil (for polymer) or water (for air-dry). This removes fingerprints and softens any harsh lines. -
Bake or Dry:
Follow the manufacturer’s instructions for your specific clay. If baking polymer clay, tent it with aluminum foil to prevent the light beige and pink colors from scorching. -
Sand for Matte Texture:
Once fully cured and cooled, lightly sand the surface with fine-grit sandpaper. This knocks back any plastic shine and enhances the stone-like texture. -
Seal (Optional):
The bells in the image have a very matte finish, so leaving them unvarnished is best. If you need protection, use an ultra-matte varnish sparingly. -
String Them Up:
Thread a length of natural jute twine or thin leather cord through the loop handles to prepare them for hanging.
Group these lovely little accents on a branch or tie them to gifts for a handcrafted touch that feels timeless and grounded
Tiered Bell Wind Chime Stack
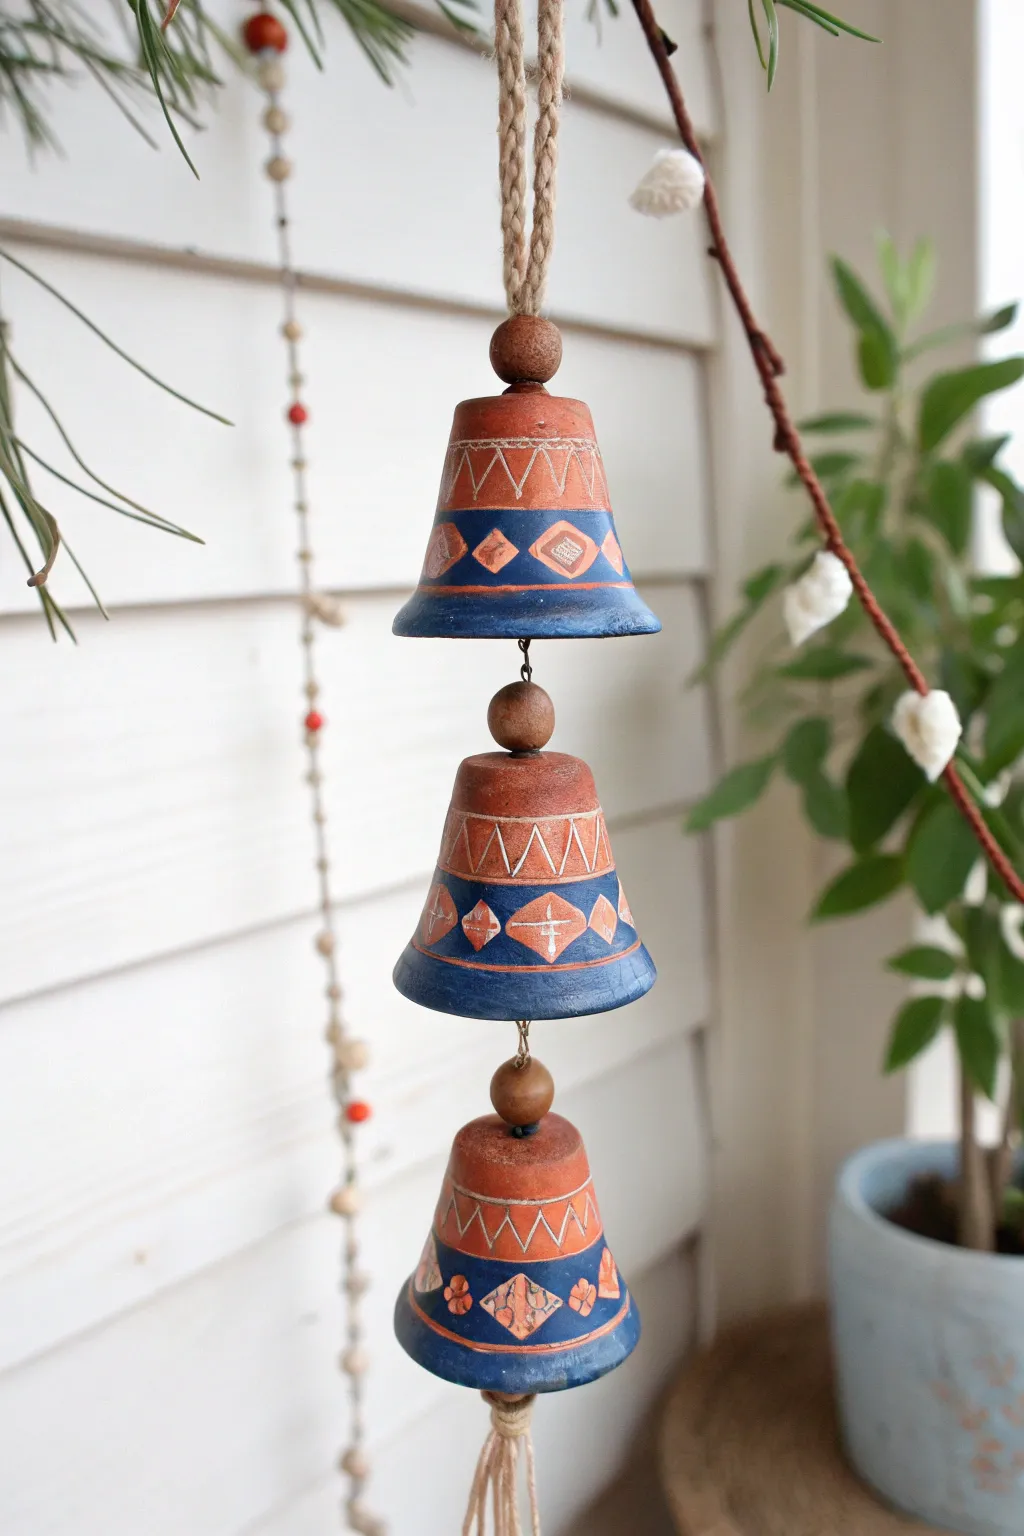
Create a charming vertical statement piece for your porch or sunroom with this stack of hand-painted clay bells. The warm terracotta tones contrasted against deep indigo blue offer a cozy, artisanal aesthetic that looks much more expensive than it is.
Step-by-Step Tutorial
Materials
- 3 Small terracotta pots (bell-shaped or standard flower pots, approx. 3-4 inches wide)
- Jute twine or thick hemp cord
- 4 Large wooden beads (natural finish, approx. 1 inch diameter)
- Navy blue acrylic paint
- Terracotta or burnt orange acrylic paint (if pots aren’t naturally the right shade)
- White paint marker (fine tip) or small detail brush
- Clear matte sealant spray
- Scissors
- Small flat paintbrush
- Painter’s tape (optional)
Step 1: Cleaning and Base Painting
-
Prep the surface:
Begin by wiping down your terracotta pots with a damp cloth to remove any manufacturing dust. Let them dry completely, as moisture will prevent the paint from adhering properly. -
Measure the bands:
Visually divide each pot horizontally. You want the top half to remain the natural terracotta color (or painted terracotta) and the bottom half to be blue. You can lightly mark this line with a pencil if you wish. -
Apply the blue base:
Using your flat brush, paint the bottom half of each pot with navy blue acrylic paint. I usually apply two thin coats rather than one thick one to avoid visible brushstrokes. Allow the first coat to dry for about 15 minutes before applying the second. -
Define the rim:
Don’t forget the very bottom lip of the pot. Paint this rim blue as well to give the bells a finished look when viewed from below. -
Dry thoroughly:
Set the pots aside for at least an hour to ensure the blue paint is fully cured and ready for detailing.
Uneven Lines?
If your hands are shaky when painting the geometric lines, use thin washi tape or painter’s tape to block out shapes. Peel it off while the paint is still slightly wet for crisp edges.
Step 2: Adding the Geometric Details
-
Draw the zigzag border:
Using a fine-tip white paint marker, draw a horizontal line separating the terracotta top from the blue bottom. Then, add a zigzag pattern just above this line on the terracotta section. -
Add vertical accents:
Inside the triangular spaces created by your zigzag line, draw small vertical lines or ‘grass’ strokes to add texture to the pattern. -
Create the central motifs:
On the blue section, paint a series of diamond shapes spaced evenly around the circumference. You can alternate these with simple flower-like clusters or smaller dots for variety. -
Detail the diamonds:
Inside each white diamond outline, you can add a small cross or leave the center blue. Adding touches of orange paint inside these diamonds ties the design back to the terracotta top. -
Border the bottom:
Draw one final thin white line near the bottom rim of the blue section to frame the design. -
Seal the design:
Once all paint is perfectly dry, take the pots outside and give them a light coat of clear matte sealant. This protects your artwork from scratching and weathering.
Aged Finish Pro-Tip
For a more weathered, antique look, wipe a very diluted layer of brown paint or dark wax over the dried white patterns. It settles into grooves and tones down the bright white.
Step 3: Assembling the Stack
-
Prepare the main cord:
Cut a long length of jute twine, roughly 4 feet long. Fold it in half to create a loop at the top for hanging, and tie a strong overhand knot about 3 inches down from the fold. -
Thread the first bead:
Thread the two loose ends of the twine through one large wooden bead. Slide it up to rest against your knot. -
Attach the top bell:
Thread the twine ends down through the drainage hole of your first (top) pot. The wooden bead will sit on top of the hole, preventing the pot from sliding up. -
Secure the first bell:
Inside the first bell, tie a knot (or add a washer made of cardboard/plastic if the hole is large) to keep the bell at the desired position, then slide on a second wooden bead below this knot for the next tier. -
Add the middle bell:
Thread the twine through the second bell. Ensure there is about 1-2 inches of space between the bottom of the first bell and the top of the second so they can swing freely. -
Repeat for the final bell:
Repeat the bead and knot process for the third and final bell at the bottom of the stack. -
Create the clapper:
At the very bottom, tie a final large knot or attach a heavy bead to act as a clapper/wind catcher. Unravel the remaining twine ends to create a rustic tassel effect.
Hang your new handcrafted chime in a breezy spot and enjoy the gentle clinking sound of clay on clay
Branch-Hung Mixed Bell Mobile
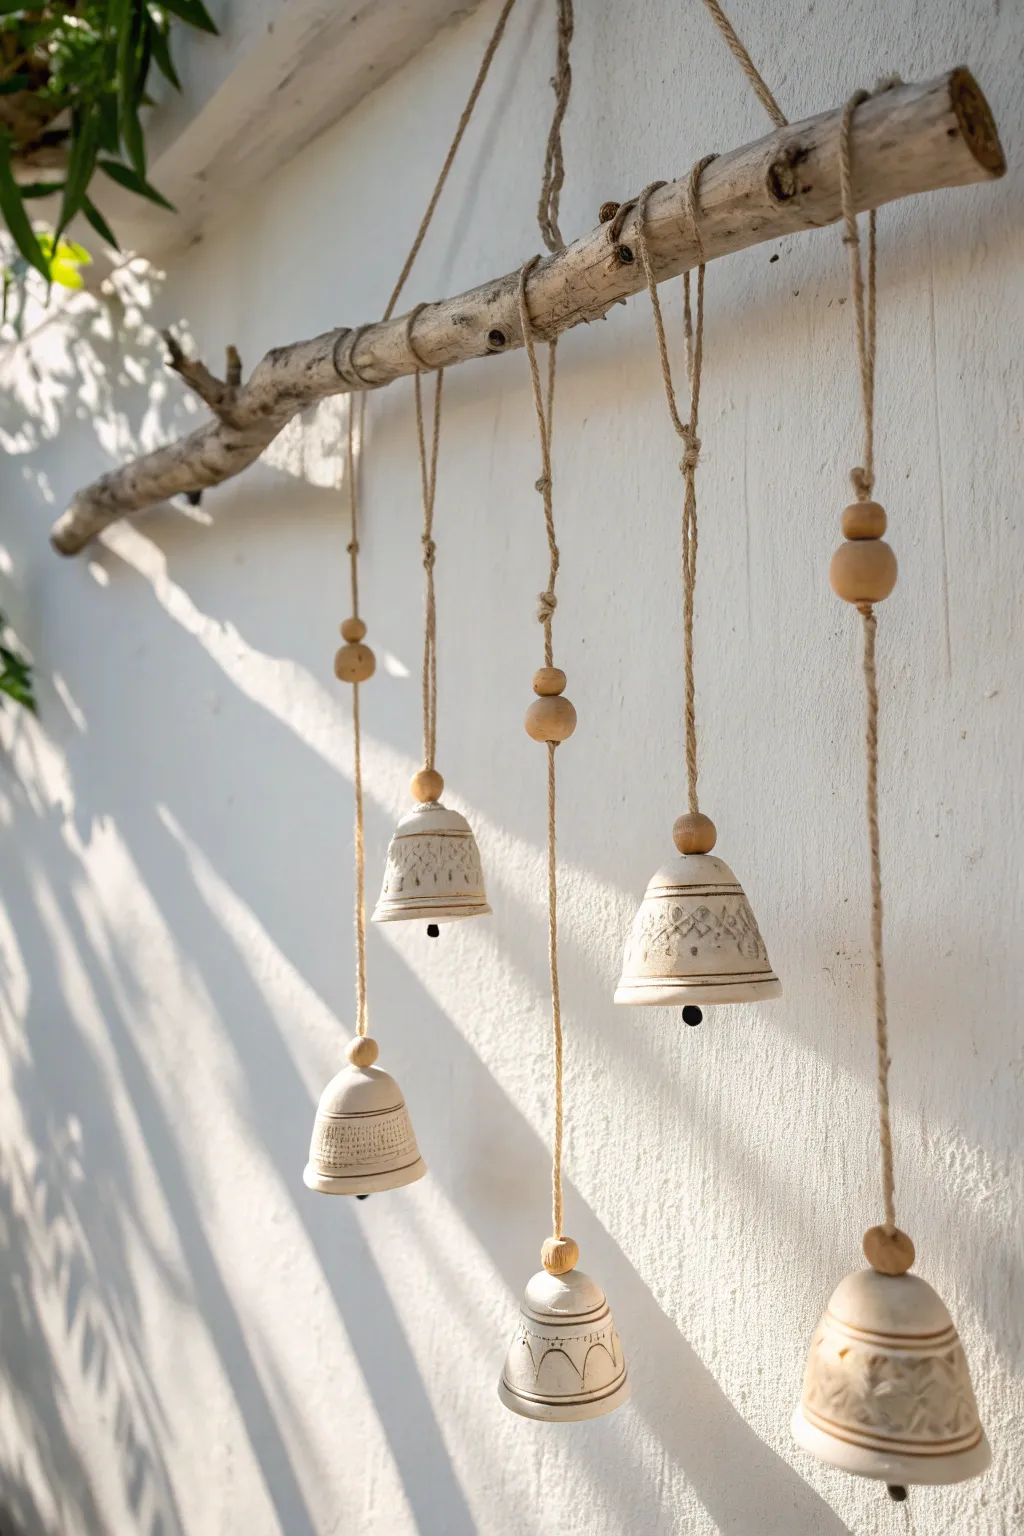
Embrace organic textures and soothing sounds with this branch-hung mobile, featuring hand-patterned clay bells suspended from a piece of weathered driftwood. The earthy palette of cream clay, natural jute, and wood beads creates a calm, bohemian focal point for any wall.
Detailed Instructions
Materials
- Air-dry clay or polymer clay (white or cream)
- Driftwood branch (approx. 18-24 inches long)
- Jute twine (natural color)
- Wooden beads (various sizes, round)
- Small wooden balls or clay beads (for clappers)
- Rolling pin
- Small geometric stamps or sculpting tools
- Cone-shaped form (cardboard or foam)
- Sandpaper (fine grit)
- Strong craft glue or hot glue
- Scissors
Step 1: Sculpting the Bells
-
Prepare the Clay Slabs:
Roll out your clay on a smooth surface until it is about 1/4 inch thick. Aim for an even thickness to ensure the bells hang straight later. -
Cut the Shapes:
Using a template or freehand, cut out five semi-circles of varying sizes. Three should be slightly larger and two slightly smaller to create visual interest. -
Form the Cones:
Wrap each semi-circle around a cone form or simply curve the edges together by hand to overlap them slightly. Pinch and smooth the seam completely so it disappears. -
Shape the Shoulders:
Gently gently press the top of the cone inward to create a rounded shoulder rather than a sharp point. This gives the bell a traditional, soft profile. -
Add Texture:
While the clay is still pliable, press small geometric stamps or use a sculpting tool to incise patterns around the rim or distinct bands around the bell’s body. I like to keep the patterns simple—triangles or hatched lines work beautifully. -
Pierce Hanging Holes:
Use a toothpick or skewer to poke a hole directly through the center of the top of each bell. Ensure the hole is wide enough to accommodate your jute twine. -
Dry and Refine:
Allow the clay to dry completely according to package instructions. Once hard, lightly sand any rough edges or uneven rims with fine-grit sandpaper.
Step 2: Assembling the Hangers
-
Cut the Twine:
Cut five lengths of jute twine of varying lengths, ranging from 12 to 20 inches, to create a staggered, cascading look. -
Attach the Clappers:
Tie a small wooden bead or clay ball to one end of each twine piece. The knot should be underneath the bead to hold it secure. This will act as the bell’s clapper. -
String the Bells:
Thread the other end of the twine up through the inside of the bell and out the top hole. Pull until the clapper sits at the desired height inside the bell rim. -
Secure Top Beads:
Create a knot immediately above the bell’s top to hold it in place. Then, thread one or two wooden accent beads onto the twine, resting them on top of that knot.
Uneven Hanging?
If a bell hangs crookedly, the knot inside might be off-center. Add a dab of hot glue inside the top of the bell to fix the twine in the absolute center.
Step 3: Mounting to the Branch
-
Arrange the Layout:
Lay your driftwood branch on a table and arrange the bells below it to finalize the spacing and length variation. -
Tie to the Branch:
Wrap the top of each twine length around the branch securely. I use a double knot on the top side of the wood for stability. -
Add Decorative Knots:
If desired, wrap the excess tail of the twine around the branch several times for a rustic, bound look before trimming. -
Create Main Suspension:
Cut a long, thicker piece of jute twine. Tie each end to the far edges of the driftwood branch to create the main hanging triangle. -
Final Adjustments:
Hang the mobile up and gently adjust the position of the knots along the branch until the weight is balanced and the bells hang freely without touching.
Weathered Finish
To age bright white clay, dilute brown acrylic paint with water (1:10 ratio) and brush it over the dried bells, then immediately wipe off with a rag.
Now you have a serene piece of kinetic art ready to bring a touch of earthy charm to your space