If you’re craving cool clay sculptures that look impressive but still feel totally doable, you’re in the right place. I pulled together my favorite ideas that range from quick, satisfying makes to bigger statement pieces you can slowly build up in your own style.
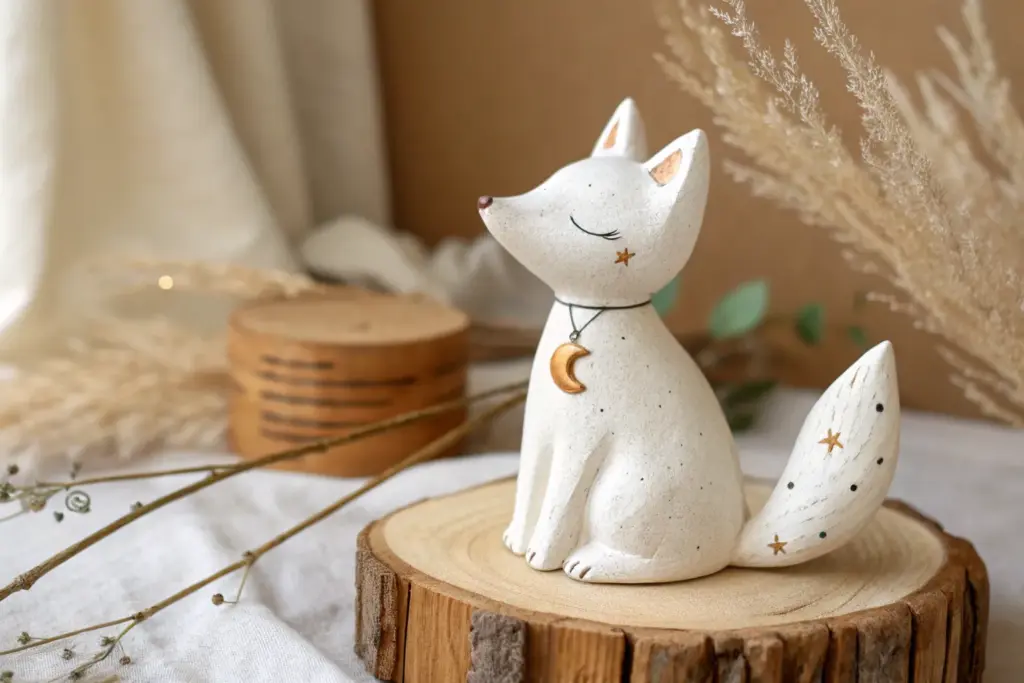
Mini Animal Figurines With Big Personality
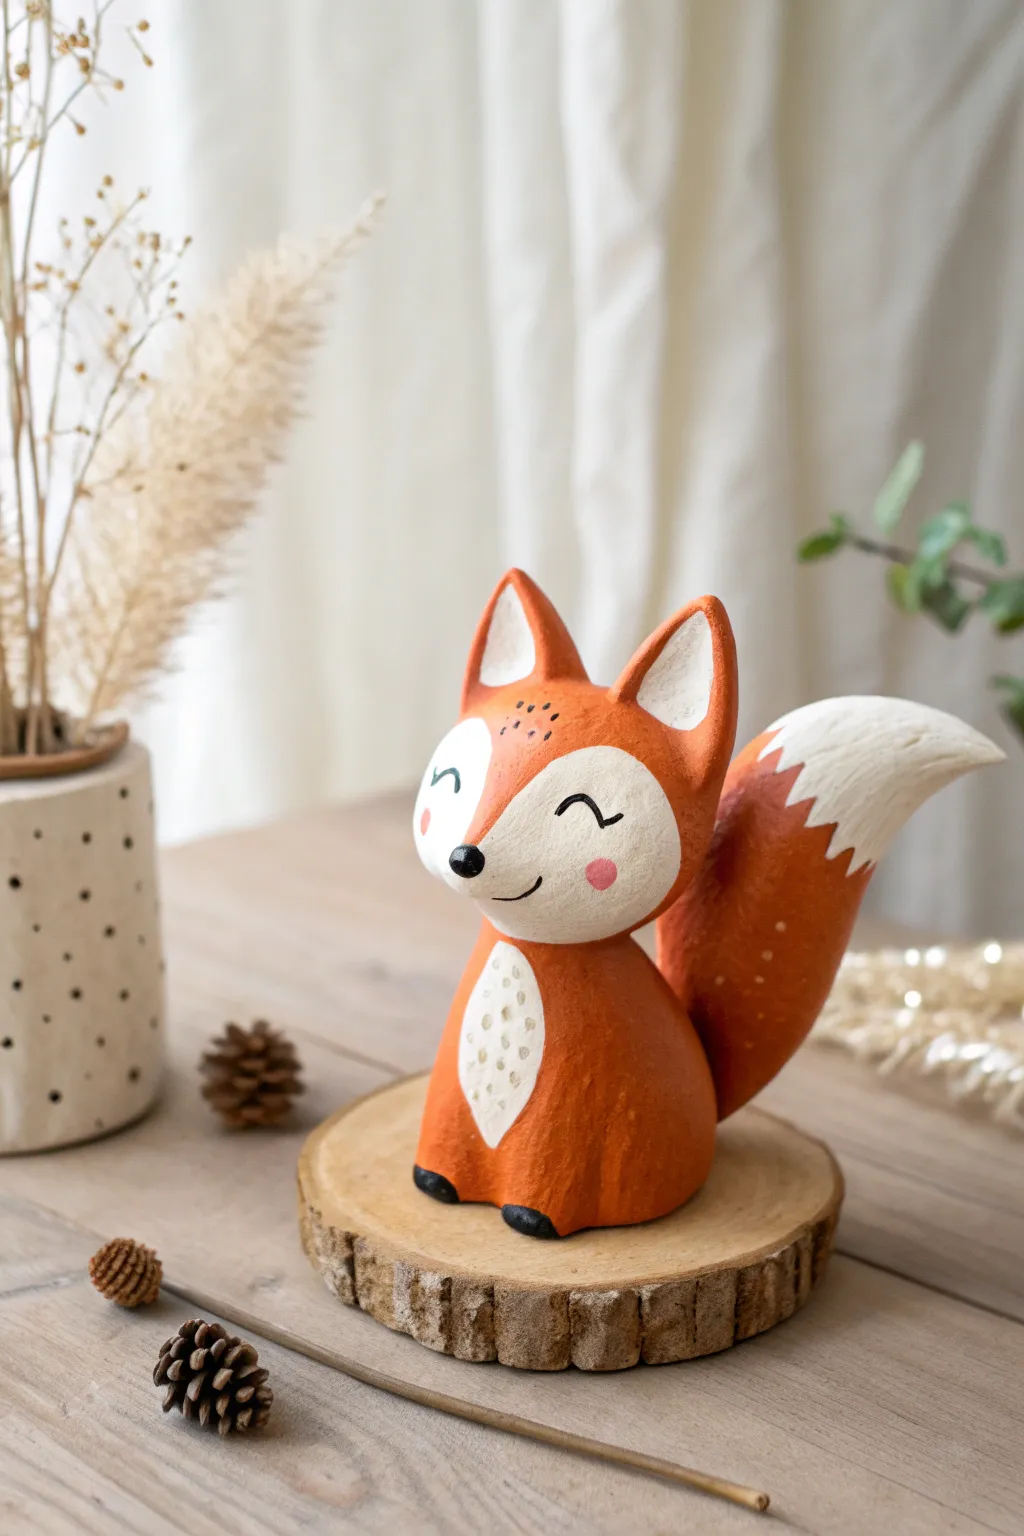
Capture the charm of the forest with this adorable fox figurine, featuring a sweet smiling expression and a sweeping tail. Its simplified shapes and gentle painted details give it a modern, folk-art feel that adds warmth to any shelf.
How-To Guide
Materials
- Air-dry clay (white or terracotta)
- Acrylic paints (bright orange, white, black, light pink)
- Small paintbrushes (flat and fine liner)
- Clay sculpting tools (needle tool, smoothing tool)
- Cup of water
- Aluminum foil (for armature)
- Sandpaper (fine grit)
- Matte varnish or sealant
Step 1: Sculpting the Base Form
-
Core construction:
Start by scrunching a piece of aluminum foil into a teardrop shape for the body and a smaller, slightly flattened sphere for the head. This armature saves clay and keeps the figurine lightweight. -
Creating the body:
Roll out a slab of clay to about 1/4 inch thickness. Wrap the foil body armature completely, smoothing the seams with a little water on your finger until the surface is uniform. -
Forming the head:
Cover the foil head armature with clay similarly. Shape it into a soft, rounded triangle, pinching gently at the sides to suggest cheeks. Attach the head to the body, blending the clay at the neck so it feels secure. -
Adding ears:
Shape two small triangles of clay for the ears. Press them onto the top of the head, blending the seams downward. Use your thumb to create a shallow indentation inside each ear for depth. -
Sculpting the tail:
Roll a large, tapered coil of clay for the tail—it should be nearly as big as the body to get that cartoonish look. Curve it upwards and attach it firmly to the lower back of the body, blending the join thoroughly.
Step 2: Refining Details
-
Refining the face:
Add a very small circle of clay to the tip of the muzzle for the nose. Smooth the entire surface with a damp sponge or finger to remove any fingerprints. -
Drying phase:
Let the sculpture dry completely in a safe spot. Air-dry clay can take 24-48 hours depending on thickness. I like to rotate it occasionally so the bottom dries evenly. -
Sanding:
Once bone dry, use fine-grit sandpaper to gently smooth out any bumps or rough patches on the surface, wiping away the dust with a slightly damp cloth.
Smooth Operator
Keep a small bowl of water nearby while sculpting. Dipping your finger in water and rubbing the clay is the best way to erase cracks and create a seamless finish.
Step 3: Painting & Finishing
-
Base coat:
Paint the entire fox with a coat of white acrylic paint. This acts as a primer and ensures your orange color will pop later. -
Applying the orange:
Paint the body, the back of the head, the outer ears, and the base of the tail with bright orange paint. Leave the face mask area, inner ears, chest, and tail tip white. -
Defining the white patches:
Carefully clean up the edges where the orange meets the white. On the tail specifically, create a zig-zag pattern to simulate fur texture where the colors meet. -
Face details:
Using a fine liner brush and black paint, draw two curved arches for the sleeping eyes and a small smile. Paint the nose tip black. Add two soft pink circles for rosy cheeks. -
Decorative accents:
Dip the end of a paintbrush handle into white or light beige paint to dot a pattern on the chest patch. Add tiny black freckles or dots on the forehead for extra character. -
Painting the feet:
Paint two small black semi-circles at the very bottom front of the body to represent the little paws. -
Sealing:
Finish with a coat of matte varnish to protect your paint job and give the fox a professional, finished look.
Woodland Base
Glue your finished fox onto a slice of raw wood or a small log coaster to enhance the rustic, natural vibe and give it a stable display platform.
Now you have a charming little forest friend to keep you company on your desk


Whimsical Monsters With Wide Mouths

This charming, wide-mouthed clay creature combines a whimsical yeti aesthetic with practical functionality as a candy dish or key holder. With its textured white fur, vibrant coral maw, and teal teeth, it adds a playful pop of color to any shelf.
Detailed Instructions
Materials
- Air-dry clay (white)
- Aluminum foil
- Sculpting tools (needle tool, loop tool)
- Acrylic paints (off-white, coral/terracotta, turquoise/teal, black)
- Fine grit sandpaper
- Paintbrushes (medium flat, small detail)
- Cup of water
- Matte varnish or sealant
Step 1: Building the Core Structure
-
Create an armature:
Ball up a large piece of aluminum foil into an elongated oval shape, roughly the size of a large mango. This saves clay and keeps the sculpture lightweight. -
Indent the mouth:
Press a deep, wide indentation into the upper middle section of your foil ball to create the cavernous mouth cavity. Ensure it is deep enough to hold small items later. -
Cover with clay:
Roll out a slab of air-dry clay to about 1/4 inch thickness. Wrap this entirely around your foil armature, smoothing the seams with a little water on your finger. -
Shape the legs:
Pinch and pull clay at the bottom to form two sturdy, stubby legs. Flatten the feet against your work surface to ensure the monster stands upright without wobbling.
Step 2: Sculpting Details
-
Define the mouth:
Refine the large mouth opening, smoothing the inner clay walls. Roll a thin snake of clay and blend it around the rim of the mouth to create a distinct lip. -
Add arms:
Form two small, sausage-shaped pieces of clay for the arms. Score and slip (scratch the surface and add water) to attach them to the sides of the body, blending the seams so they hang naturally. -
Attack of the teeth:
Roll small, chiclet-sized balls of clay. Attach them evenly along the upper and lower inner lip of the mouth to serve as teeth, pressing them firmly so they adhere. -
Horns and face:
Shape two small cones for horns and attach them to the top of the head. Add a tiny nose bump and two small indentations for the eyes just above the mouth lip. -
Texturizing:
Using a needle tool or a stiff bristled brush, scratch short, repetitive lines vertically all over the body (avoiding the horns, lips, and inside the mouth) to simulate fur. -
Drying time:
Let the sculpture dry completely for 24-48 hours. I stick it in a cool, dry spot away from direct sunlight to prevent cracking.
Cracked Clay?
If small cracks appear during drying, create a ‘slurry’ by mixing a scrap of clay with water until it’s a paste. Fill the cracks with this paste and smooth over.
Step 3: Painting and Finishing
-
Base coat:
Paint the entire body with an off-white or cream acrylic paint. Only do one thin coat initially to seal the clay. -
Painting the maw:
Paint the entire interior of the mouth and the lips with a coral or terracotta color. You may need two coats for full opacity depending on your paint quality. -
Teeth detail:
Carefully paint each individual tooth with a bright turquoise or teal paint. A small detail brush is crucial here to avoid getting blue on the coral gums. -
Defining the fur:
Once the base white is dry, use a technique called dry-brushing with a slightly lighter white shade to highlight the raised fur texture. -
Eyes and horns:
Paint the horns a pale grey or leave them the base cream color. Use a dotting tool or the back of a paintbrush to apply two solid black dots for the eyes. -
Sealing:
Finish the piece with a coat of matte varnish to protect the paint and give it a unified, professional look.
Glow Up
Make your monster functional by sculpting the mouth cavity specifically to fit a small succulent pot or an LED tealight for a spooky glowing mouth effect.
Fill your new friend’s mouth with wrapped candies or trinkets and place him on a shelf to guard your treasures


Snail on a Mushroom Fantasy Scene
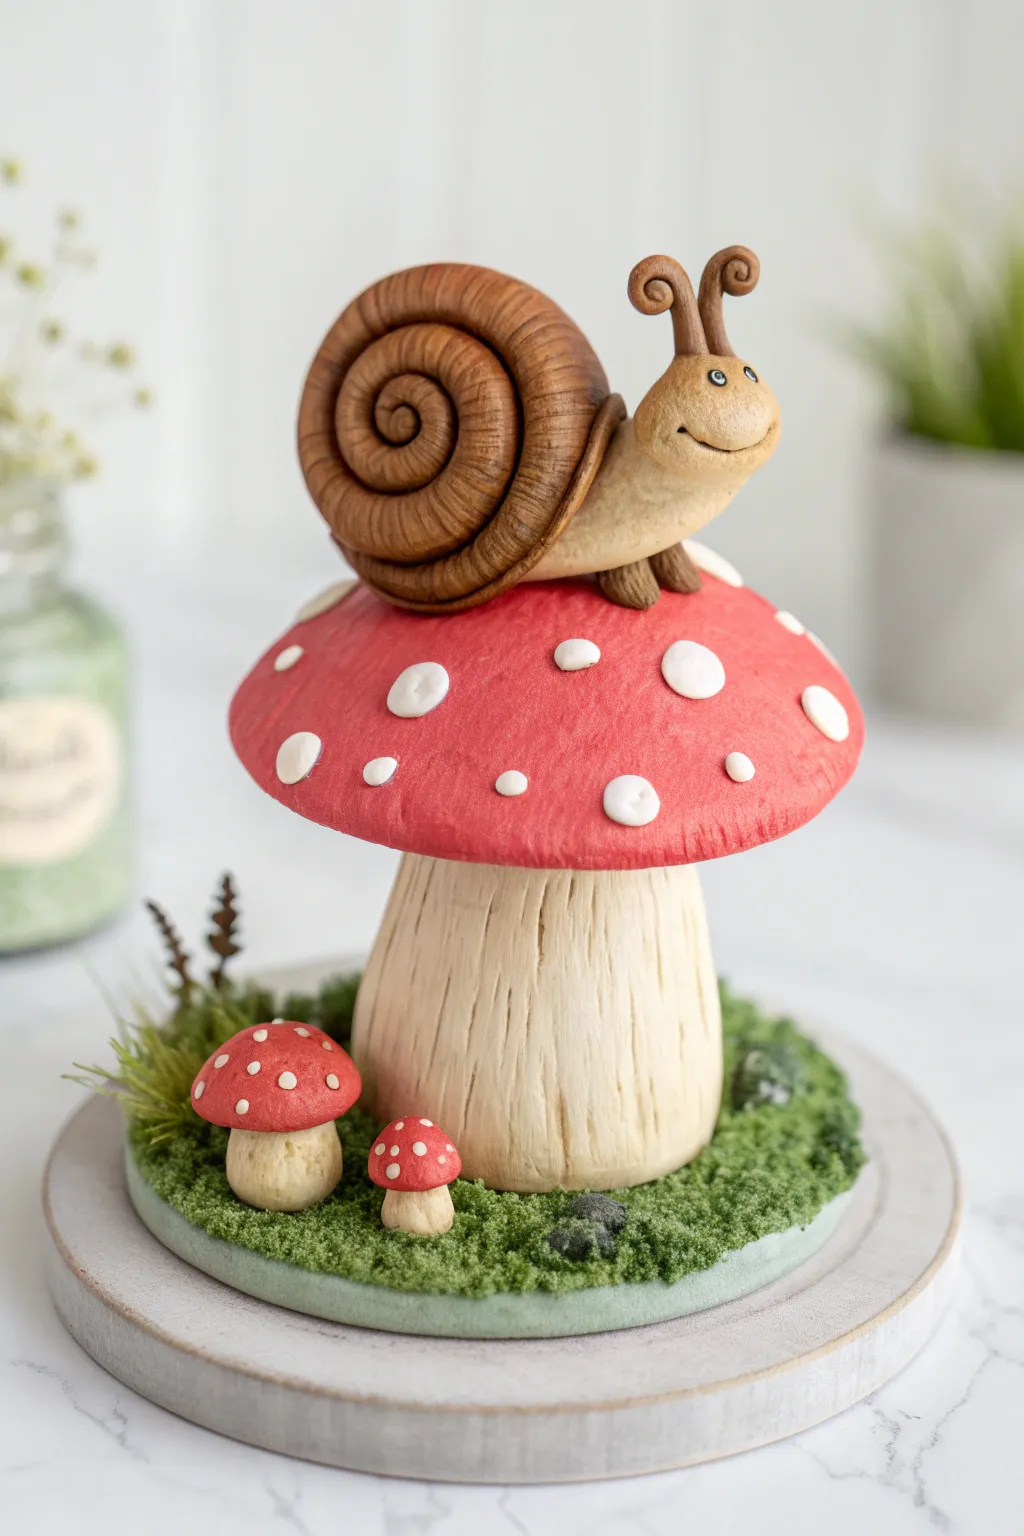
This delightful sculpture features a friendly, textured snail resting atop a classic red-capped mushroom, surrounded by a mossy forest floor. It’s a perfect beginner-to-intermediate project that combines basic shape-building with fun texturing techniques to bring the character to life.
Step-by-Step Tutorial
Materials
- Polymer clay (Brown, Beige/Tan, Red, White, Green)
- Aluminum foil (for creating the armature core)
- Sculpting tools (needle tool, ball tool, silicone shapers)
- Blade or X-Acto knife
- Liquid polymer clay or Bake & Bond
- Faux grass flocking or green embossing powder
- Short stiff-bristled brush (for texturing)
- Brown acrylic paint or dry pastels (for shading)
- Fine liner brush
Step 1: Sculpting the Main Mushroom
-
Form the armature:
Crumple a piece of aluminum foil into a shape resembling a thick mushroom stem and a separate, flattened dome shape for the cap. This saves clay and makes the sculpture lighter. -
Cover the stem:
Roll out a sheet of beige or off-white clay. Wrap it around your foil stem armature, smoothing the seams together until the foil is completely hidden. Gently flare the base slightly so it stands sturdily. -
Texture the stem:
Using a needle tool or a dull knife, lightly drag vertical lines down the length of the stem. Vary the pressure to create natural-looking grooves that mimic the fibrous texture of a mushroom stalk. -
Create the cap:
Roll out a sheet of red clay. Drape it over your foil cap armature, smoothing it down the sides. Tuck the excess clay underneath to form a neat edge. -
Add the gills:
Roll a thin circle of beige clay and attach it to the underside of the red cap. Use your needle tool to score fine lines radiating from the center to the edge to simulate gills. -
Assemble the mushroom:
Insert a piece of wire or a toothpick into the top of the stem for support. Apply a drop of liquid clay, then press the red cap firmly onto the stem. -
Add white spots:
Flatten small balls of white clay into irregular discs. Press them onto the red cap, spacing them randomly. Gently texture the surface of the red clay with a stiff brush or sponge for a matte, organic finish.
Step 2: Creating the Snail
-
Make the shell:
Roll a long, tapered snake of brown clay. Starting from the thin end, coil it tightly around itself to create a spiral shell. Ensure the thickest end remains open to attach the body later. -
Texture the shell:
Use a needle tool or knife to score lines following the spiral pattern of the shell. I like to dust a little dark brown pastel powder into these crevices now to give it instant depth. -
Form the body:
Shape a piece of tan clay into a thick teardrop for the snail’s body. Curve the wider end upwards to form the head and chest area. -
Attach head features:
Roll two small snakes for eye stalks and attach them to the top of the head using liquid clay. Curl the very tips into spirals for a whimsical look. -
Add the face:
Use a ball tool to create small indentations for eye sockets. Insert tiny white balls for eyes with black clay pupils. Use a curved tool to press in a happy smile. -
Mount the snail:
Place the shell onto the mushroom cap, securing it with liquid clay. Tuck the back end of the body into the shell opening, and drape the front of the body over the shell’s edge so the snail looks like it’s protruding.
Drooping Eye Stalks?
If the snail’s eye stalks keep drooping before baking, insert a tiny piece of thin wire or a clipped sewing pin inside each stalk to act as an internal skeleton.
Step 3: Base and Finishing Touches
-
Prepare the base:
Roll a flat disc of green clay to serve as the foundation. Place the large mushroom in the center. -
Make mini mushrooms:
Repeat the mushroom process on a tiny scale—make two small beige stumps and two small red caps with white dots. Plant them next to the main mushroom. -
Create the mossy texture:
Apply a thin layer of liquid clay over the exposed green base. Sprinkle faux grass flocking or green embossing powder over it, pressing it gently so it adheres. -
Final shading:
Before baking, you can lightly brush brown pastel chalk near the bottom of the stems and in the snail’s creases to enhance the earthy look. -
Bake the piece:
Bake according to your clay manufacturer’s instructions (usually 275°F/130°C for 15-30 minutes depending on thickness). Let it cool completely before handling.
Dew Drop Details
After baking and cooling, add small drops of UV resin or high-gloss varnish to the mushroom cap or snail shell to create the illusion of permanent morning dew.
Now you have a charming woodland friend to keep you company on your desk or shelf


Textured Peacock With Patterned Feathers
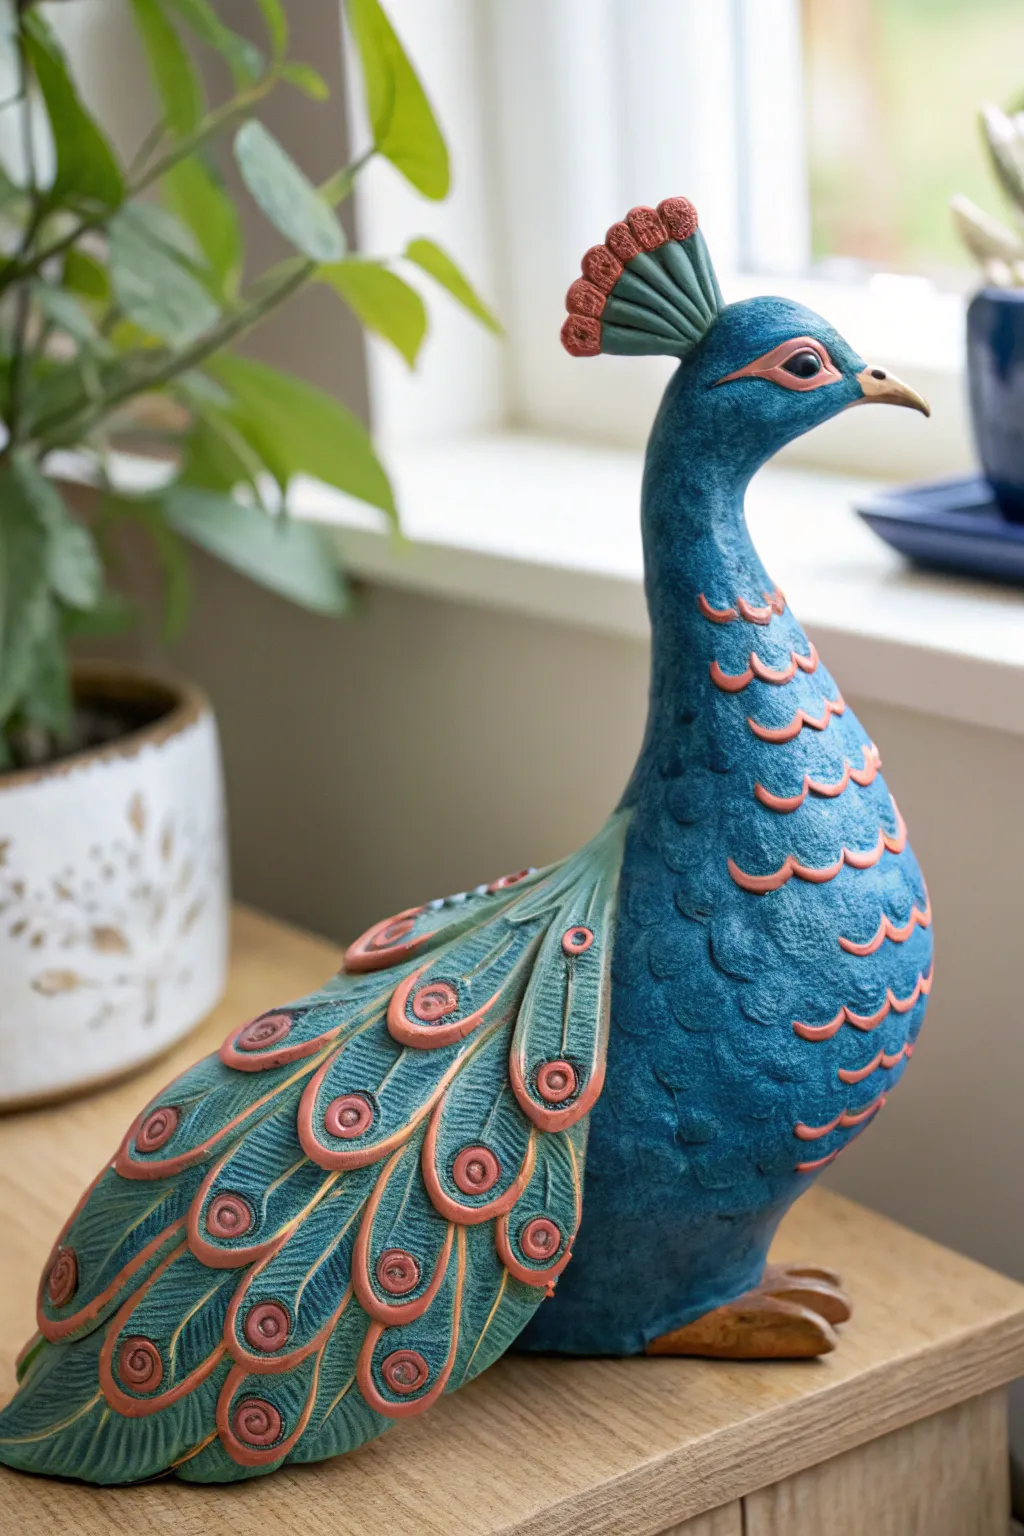
This elegant peacock sculpture combines smooth curves with intricate surface detailing for a striking decorative piece. The deep teal body contrasts beautifully with coral-pink accents, creating a project that looks sophisticated yet is approachable for intermediate sculptors.
Detailed Instructions
Materials
- Polymer clay (TEAL or dark blue)
- Polymer clay (CORAL or reddish-orange)
- Polymer clay (GOLD or brown for beak/feet)
- Armature wire (heavy gauge)
- Aluminum foil
- Sculpting tools (needle tool, ball stylus, rubber shaper)
- Rolling pin or pasta machine
- Liquid clay or bake-and-bond
- Black glass bead (small) or black clay for eyes
- Acrylic paints (optional, for enhancing details)
- Gloss varnish (optional)
Step 1: Building the Form
-
Create the armature:
Begin by twisting thick armature wire into the basic shape of the peacock: a long neck curving into a chest, and a lower loop for the tail area. Secure the wire to a temporary wooden base if you need stability while working. -
Bulk up with foil:
Crumple aluminum foil firmly around the wire armature. Shape a bulbous tear-drop for the body and a thinner, elongated cylinder for the neck. Keep the foil slightly smaller than your desired final size to leave room for the clay layer. -
Establish the initial clay layer:
Condition your teal clay until plausible. Roll it into sheets and cover the foil armature completely. Smooth the seams with your thumbs or a rubber tool until you have a seamless, smooth base form. -
Shape the head and neck:
Refine the neck so it tapers gracefully into the head. The head should be a small, rounded extension. Add a small cone of gold or brown clay to the front for the beak, blending the seam where it meets the face.
Stamp It Out
Make a custom tool for the feather ‘eyes.’ Bend a small paperclip into a teardrop loop and use it to stamp consistent shapes onto the tail feathers before filling them with color.
Step 2: Detailed Texture Work
-
Create the chest feathers:
Using a small U-shaped carving tool or a modified straw, press rows of scale-like crescents into the clay starting from the bottom of the neck down to the chest. Keep the pressure consistent for a uniform look. -
Add accent crescents:
Roll very thin snakes of coral-colored clay. Cut them into tiny segments and gently press them into the ‘u’ curves of your chest texture to create the distinct two-tone feather effect seen in the photo. -
Form the large tail feathers:
Roll a sheet of teal clay and cut out long, teardrop-shaped feathers. You’ll need enough to cover the back slope of the bird. Layer them starting from the bottom edge and working upward, overlapping them slightly like shingles. -
Detail the tail feathers:
On each tail feather, use a needle tool to score diagonal lines outward from the center, mimicking the barbs of a real feather. This creates the primary texture on the back. -
Create the eye spots:
For the iconic peacock eye spots, roll small balls of coral clay and flatten them onto the wider end of each tail feather. Use a small ball tool to press an indentation in the center of each coral spot. -
Finish the eye spots:
Press a tiny ring of teal clay inside the coral depression, or imprint a spiral/bullseye pattern using a textured stamp to replicate the intricate detail shown.
Step 3: The Crest and Final Touches
-
Sculpt the crest:
Form a small, fan-shaped piece of teal clay. Cut notches into the top edge to separate the ‘feathers.’ Use a needle tool to score lines down each segment. -
Attach the crest accents:
Place small balls of textured coral clay onto the tips of the crest fan. Attach this assembly to the top of the head using a dab of liquid clay for a secure bond. -
Insert the eyes:
Press small indentations on either side of the head. Insert a black glass bead or a ball of black clay. Roll a very thin snake of coral clay to create an outline around the eye, giving it that piercing gaze. -
Add the feet:
Sculpt varying lengths of brown/gold clay into thick toes. Position them peeking out from under the breast of the bird to stabilize the sculpture. -
Bake the sculpture:
Follow the manufacturer’s instructions for your specific brand of polymer clay regarding temperature and time. I usually tent the sculpture with foil to prevent the coral colors from darkening too much. -
Final finish:
Once cool, you can brush a little antiquing medium or diluted dark acrylic paint into the crevices of the feathers to highlight the texture, then wipe away the excess. Seal with a matte or satin varnish if desired.
Gilded Glamour
Before baking, lightly brush gold mica powder over the textured ridges of the tail feathers and crest. This adds a subtle metallic shimmer that catches the light beautifully.
Place your finished peacock near a window where natural light can show off the intricate texturing you worked so hard on

The Complete Guide to Pottery Troubleshooting
Uncover the most common ceramic mistakes—from cracking clay to failed glazes—and learn how to fix them fast.
Simple Cat Sculpture With Fur Texture
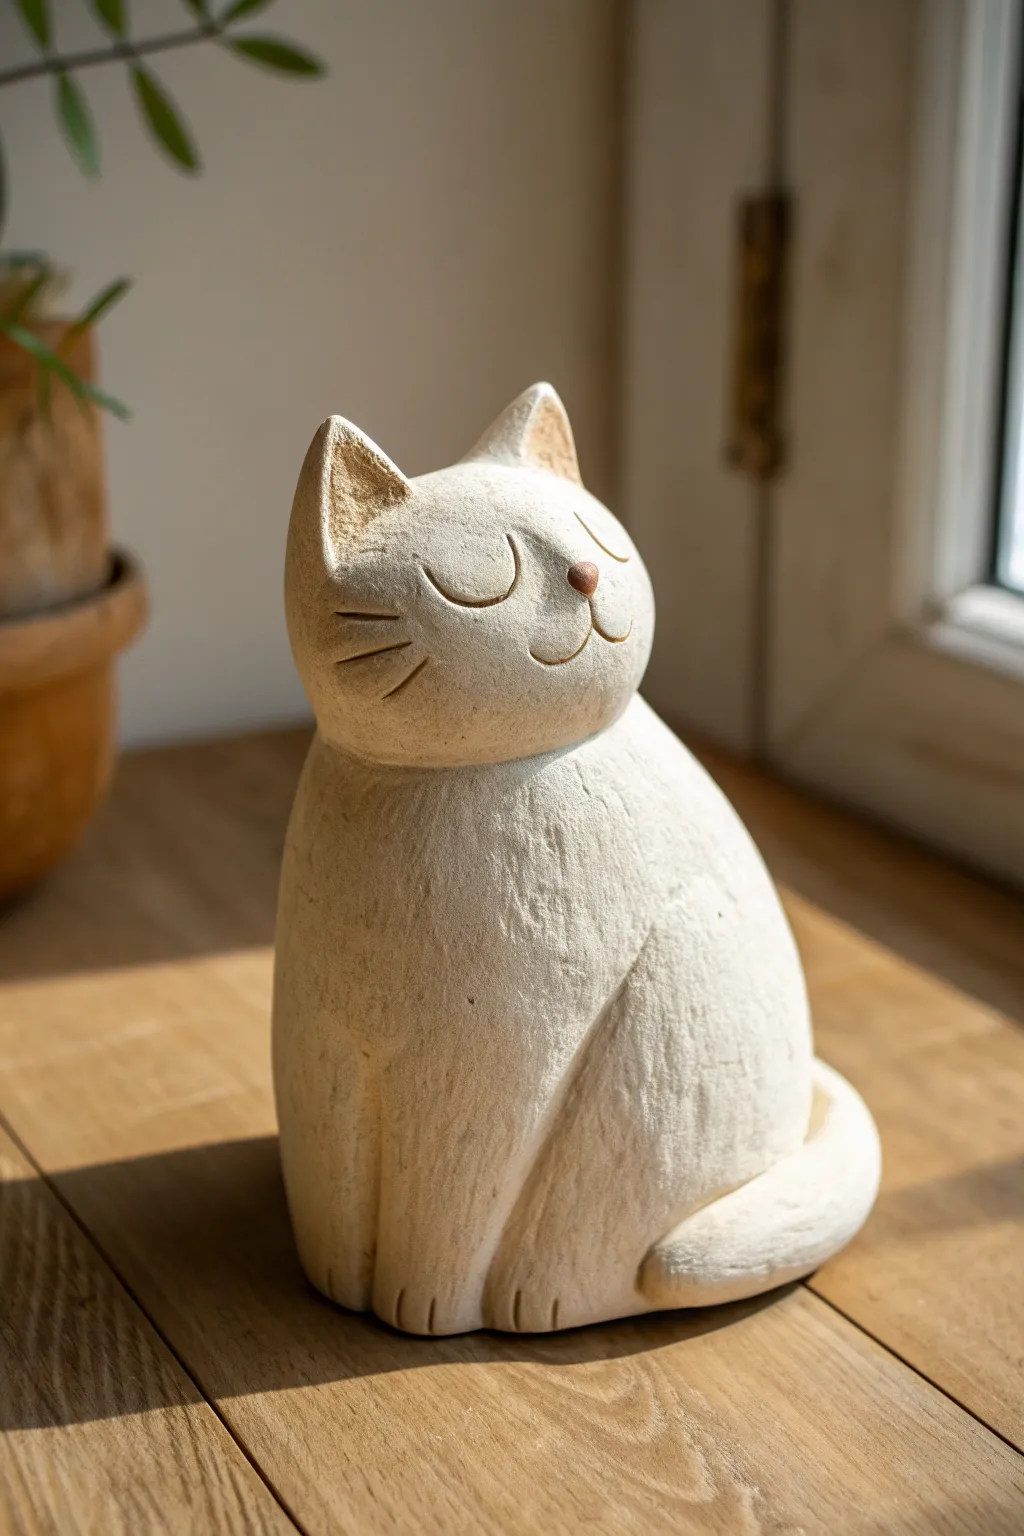
Sculpt a charming, minimalist kitty that captures the peaceful essence of a sunbathing feline. This project focuses on simple shapes combined with a rough, stone-like texture that gives the piece a timeless, rustic feel.
Step-by-Step Tutorial
Materials
- Air-dry clay (white or light grey)
- Foil (for armature)
- Texture sponge or stiff-bristled toothbrush
- Pointed sculpting tool or toothpick
- Loop tool (small)
- Water and slip (clay and water mix)
- Fine sandpaper
- Acrylic paint (cream, light beige, burnt sienna)
- Matte sealant spray
Step 1: Forming the Core
-
Build the armature:
Begin by scrunching aluminum foil into a pear-shaped cone for the body and a slightly flattened sphere for the head. This saves clay and keeps the sculpture lighter. -
Cover the body:
Roll out a sheet of clay about 1/4 inch thick. Wrap it completely around the foil body shape, smoothing the seams together with a little water until the foil is entirely hidden. -
Cover the head:
Repeat the process for the head shape. Ensure the clay is evenly distributed so the head feels solid but not too heavy. -
Join head and body:
Score (scratch) the top of the body and the bottom of the head. Add a dab of slip (clay glop) and press the head firmly onto the body. Use a small coil of clay around the neck seam and smooth it out to make the connection seamless.
Cracks Appearing?
Cracks happen if clay dries too fast. Patch them with a mix of slip and vinegar. To prevent them next time, drape a plastic bag loosely over the drying piece to slow evaporation.
Step 2: Refining the Shape
-
Shape the ears:
Form two small triangles of clay. Score and slip them onto the top of the head. Use your thumb to create the inner ear depression, blending the base of the ears smoothly into the skull. -
Create the legs:
Instead of sculpting individual legs, use a modeling tool to carve deep vertical grooves into the front of the body mass. This suggests the front paws are tucked neatly underneath. -
Add the tail:
Roll a tapered snake of clay. Attach it to the lower back of the sculpture and curve it around the side of the body, ending near the front paws. Blend the attachment point well. -
Define the face:
Gently press your thumbs into the face area to create faint eye sockets. Add a tiny triangle of clay for the nose and blend the edges.
Step 3: Adding Texture and Details
-
Apply the texture:
This is the crucial step for that stone look. Take a stiff toothbrush or a textured sponge and firmly drag it vertically across the entire surface of the clay. I find vertical strokes mimic the direction of fur best. -
Carve the expression:
Once the texture is applied, use a sharp needle tool to carve two simple, arched lines for closed eyes. Add a small ‘W’ shape under the nose for the mouth. -
Whiskers and toes:
carve three short lines on each cheek for whiskers. At the base of the front leg form, press in small lines to indicate toes. -
Final smoothing:
Check for any sharp burrs of clay created by the texturing process and gently pat them down, but leave the overall rough finish intact. -
Dry thoroughly:
Let the sculpture sit for at least 24-48 hours. Turn it occasionally to ensure the bottom dries evenly.
Stone Effect Pro Tip
For an ancient stone look, mix a pinch of used coffee grounds or fine sand directly into your clay before sculpting. It adds authentic grit and speckling without painting.
Step 4: Finishing Touches
-
Base coat:
Once dry, paint the entire cat with a cream or off-white acrylic paint. You don’t need full opacity; letting some clay color show through adds depth. -
Dry brushing:
Dip a dry brush into a tiny amount of light beige paint. Wipe almost all of it off on a paper towel, then lightly brush over the textured surface to highlight the ‘fur’ ridges. -
Detail the nose:
Mix a tiny drop of burnt sienna with white to make a soft pink-brown. Carefully paint just the nose tip for a focal point. -
Seal:
Spray the finished piece with a matte sealant to protect the paint without making it shiny.
Your peaceful stone cat is now ready to bring a sense of calm to any shelf or windowsill in your home
Tiny Gnomes for Shelf-Sized Charm
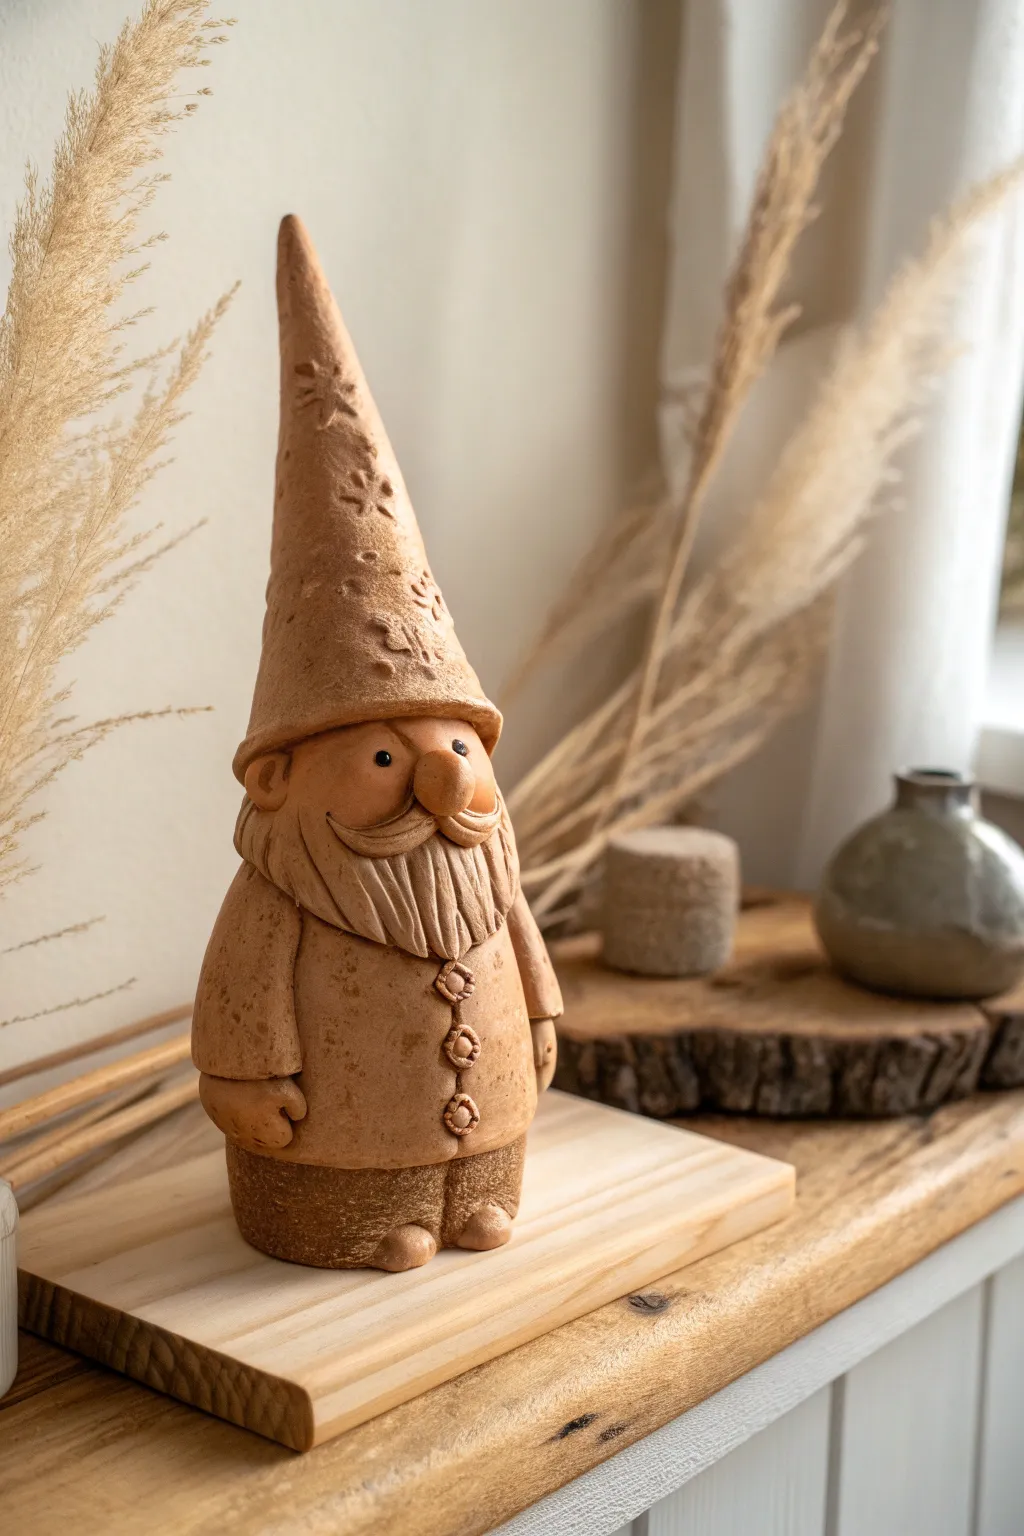
This charming, rustic figurine captures the warmth of traditional pottery with its textured terracotta finish and whimsical details. Standing tall with a distinctive conical hat, this gnome adds an earthy, handcrafted touch to any shelf or mantel.
How-To Guide
Materials
- Terracotta-colored polymer clay (or air-dry clay)
- Small rolling pin
- Modeling tools (or toothpicks/skewers)
- Foil or paper for armature
- Brown acrylic paint (for antiquing)
- Texture sponge or stiff brush
- Small circular cutters (optional)
- Black beads or paint for eyes
Step 1: Forming the Base Structure
-
Build the armature:
Start by crumpling a tight cone shape out of aluminum foil to form the core of the gnome’s body and hat. This saves clay and keeps the figurine lightweight. -
Cover the body:
Roll out a slab of terracotta clay to about 1/4 inch thickness. Wrap this around the lower half of your foil cone to create the gnome’s coat, smoothing the seam at the back. -
Shape the base:
Add a slightly thicker band of clay at the very bottom to delineate the hem or trousers, giving him a solid foundation to stand on. -
Create the head:
Roll a smooth ball of clay for the head and press it gently onto the top of the body section. Blend the clay at the neck slightly to ensure a strong bond.
Step 2: Adding the Tall Hat
-
Form the cone:
Roll a larger cone of clay that matches the shape of your foil armature’s top. It should be quite tall—almost equal to the height of the body. -
Attach the hat:
Place the cone over the head, pulling the brim down low so it covers the forehead. Flare the brim slightly outward with your fingers for a soft, folded look. -
Texture the surface:
Using a coarse sponge or a crumpled ball of foil, gently press texture into the hat’s surface to give it a weathered, felt-like appearance. I find this really helps hide fingerprints too. -
Stamp details:
Use a small stamp, toothpick, or modeling tool to impress simple snowflake or star patterns randomly up the length of the hat.
Texturing Trick
Use a piece of actual sandpaper to press texture into the clay before baking. It mimics the grit and grain of real rough-hewn stone or terracotta perfectly.
Step 3: Facial Features and Beard
-
Apply the nose:
Roll a small, round ball of clay and press it firmly into the center of the face, just under the hat’s brim. -
Sculpt the beard:
Form a flat, triangular piece of clay for the beard. Attach it under the nose, smoothing it down onto the chest. Use a sharp tool to carve deep vertical lines to simulate hair strands. -
Add the mustache:
Roll two small tapered sausages of clay. Curl the ends slightly and attach them horizontally under the nose, blending them into the beard. -
Inset the eyes:
Use a ball tool to make tiny indentations on either side of the nose. Press small black beads into these sockets, or save this step to paint them later. -
Ears and hair:
Add two small C-shaped ears to the side of the head. Add some textured clay behind them to suggest hair peeking out from the hat.
Make it a Lantern
If using polymer clay, cut small star-shaped holes in the hat before baking. Place a battery-operated LED tea light inside the hollow body to let light shine through.
Step 4: Clothing Details and Finish
-
Add the arms:
Roll two cylinders of clay for arms. Attach them to the sides of the body, curving them slightly forward. Add small balls of clay at the ends for hands. -
Button it up:
Roll three tiny balls of clay, flatten them slightly, and press them in a vertical row down the center of the coat. Poke two holes in each to look like buttons. -
Add final texture:
Go over the coat and beard one last time with a texturing tool or toothbrush to unify the matte, earthenware look. -
Bake or dry:
Follow the instructions for your specific clay. If baking polymer clay, support the tall hat with a bit of extra foil so it doesn’t droop in the oven. -
Antique finish:
Once hardened and cool, mix watery brown acrylic paint. Brush it over the entire piece and immediately wipe it off with a rag. This leaves dark color in the crevices and textures, highlighting the ‘carved’ details.
Place your finished gnome among some dried grasses or wooden accents to complete the cozy, natural aesthetic


What Really Happens Inside the Kiln
Learn how time and temperature work together inside the kiln to transform clay into durable ceramic.
Pocket-Size Dragons With Curled Tails
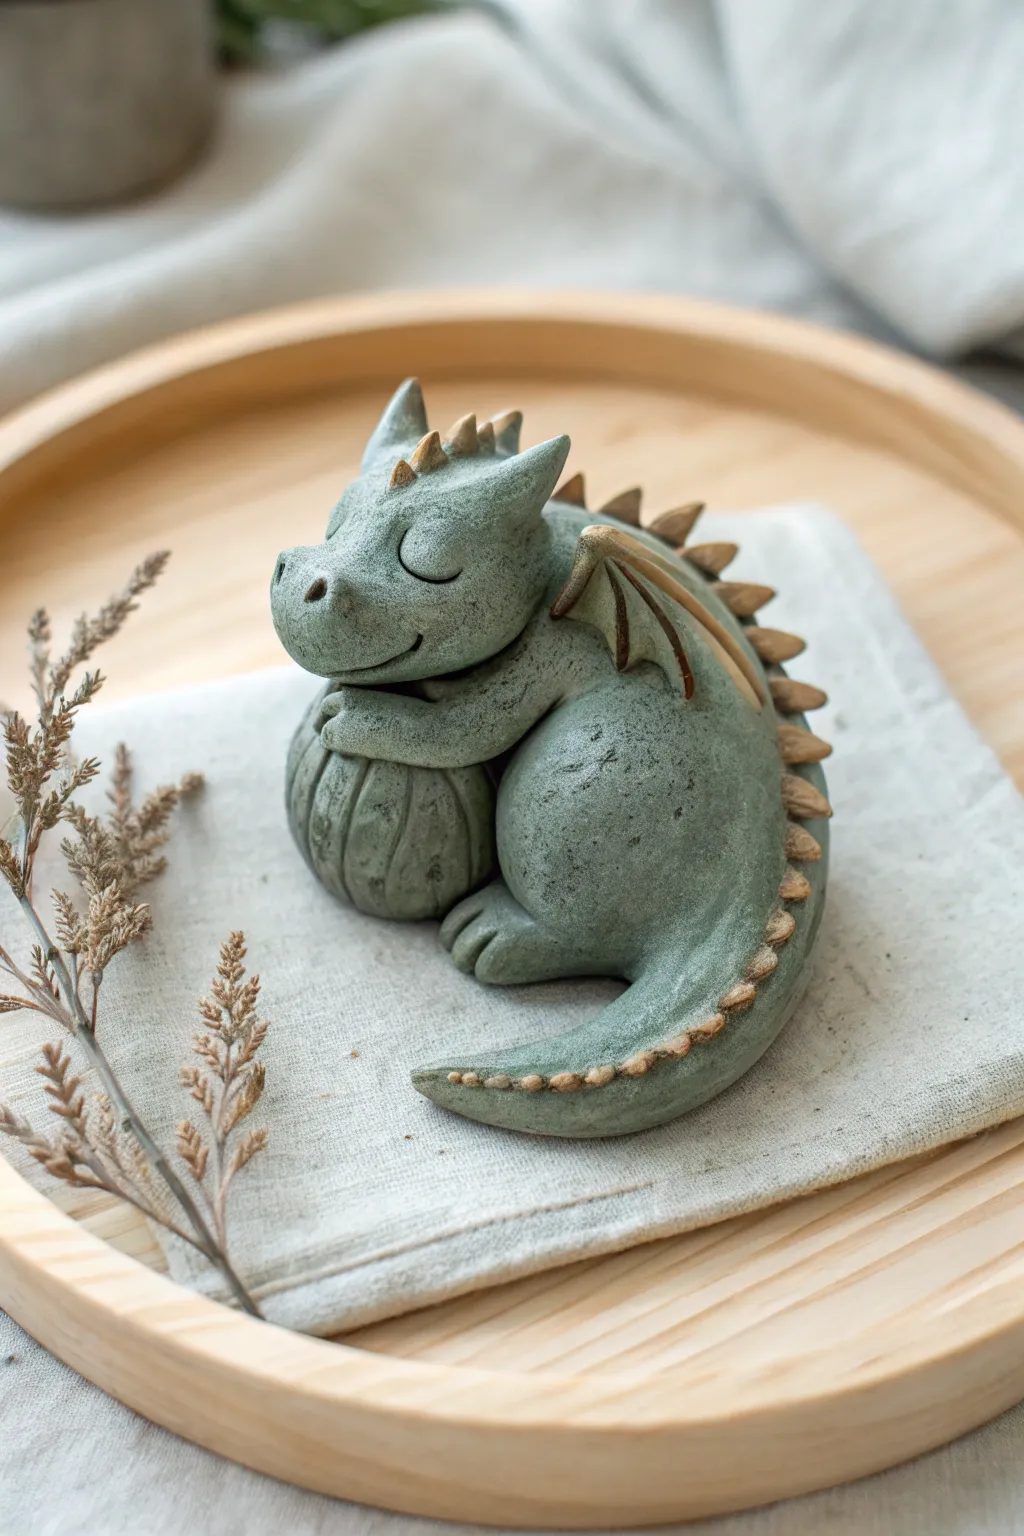
This adorable clay dragon is curled up in a peaceful slumber, hugging a textured sphere. With its stone-like finish and gentle expression, this pocket-sized companion brings a touch of magic to any desk or shelf.
Step-by-Step Guide
Materials
- Polymer clay (pale sage green or grey-green)
- Polymer clay (tan or light brown for spikes)
- Sculpting tools (needle tool, ball stylus, blending tool)
- Texture sponge or coarse sandpaper
- Wire armature or aluminum foil (for the core)
- Acrylic paints (black, white, dark green for washing)
- Small paintbrush
- Matte varnish
Step 1: Forming the Base
-
Create the core:
Start by rolling a tight ball of aluminum foil about the size of a walnut to save on clay and reduce baking time. This will be the inside of the object the dragon is holding. -
Wrap the sphere:
Sheet your green clay to a medium thickness and wrap it fully around the foil ball, smoothing the seams until you have a perfect sphere. Gently press vertical lines into it with a needle tool to give it a pumpkin-like or stone texture. -
Shape the body:
Roll a thick log of green clay for the dragon’s body. The log should taper at one end to form the tail. -
Position the dragon:
Wrap the body log around the textured sphere. The thicker end will support the head, while the tapered tail should curl around the base, resting near the front.
Keeping Textures Clean
Chill your clay in the fridge for 10 minutes before texturing. Firmer clay holds sponge impressions better without getting mushy or fingerprint-heavy.
Step 2: Sculpting the Head and Limbs
-
Form the head:
Roll a slightly flattened oval for the head. Shape a shorter snout area and attach this securely to the upper part of the body log. -
Mold the legs:
For the hind leg, shape a rounded teardrop of clay. Flatten it slightly and attach it to the side of the body, bending it so it looks like the dragon is haunched. -
Add the foot:
Form a small, flat pad for the foot and attach it to the end of the leg. Use a tool to press indentations for three toes. -
Create the arms:
Roll two smaller sausages of clay for the arms. Attach them so they look like they are hugging the top of the sphere, with the paws resting gently on the surface.
Step 3: Adding Details and Texture
-
Texture the skin:
Before adding fragile details, gently press a coarse sponge or sandpaper over the skin to create a stony, pitted texture similar to the reference image. -
Sculpt the face:
Use a ball stylus to press shallow sockets for the eyes. Then, make two crescent-shaped slits for the closed eyelids. Poke two small nostrils on the snout and carve a gentle, curved line for a smile. -
Attach the ears:
Shape two small triangles of green clay. Attach them to the sides of the head, pointing backwards. -
Make the wings:
Flatten two small triangles of green clay. Roll tiny snakes of the tan clay for the wing bones and press them onto the triangles. Attach these small wings to the dragon’s upper back. -
Add the spine scales:
Roll many tiny cones from the tan clay. Starting from the forehead and going all the way down to the tail tip, press these cones into the center of the back to form a spiky ridge.
Head Slumping?
If the heavy head droops while you sculpt, insert a short piece of toothpick or wire between the neck and body as an internal support dowel.
Step 4: Finishing Touches
-
Refine the connection points:
Use a rubber blending tool to smooth the seams where the spikes meet the body so they don’t pop off during baking. -
Pre-shading:
Lightly dust the crevices, such as around the legs and wing bones, with a bit of dark pigment powder or pastel if you want extra depth before baking. -
Bake the piece:
Bake your sculpture according to the manufacturer’s instructions for your specific brand of polymer clay. Let it cool completely. -
Apply a wash:
Dilute dark green or black acrylic paint with water. Brush it over the entire sculpture and quickly wipe away the excess with a paper towel. This leaves dark paint in the textures, highlighting the ‘stone’ look. -
Seal:
Once dry, apply a thin coat of matte varnish to protect your work and give it a finished, ceramic feel.
Place your little dragon on a bookshelf where it can nap the day away undisturbed
Emotional Human Figure Hugging Knees
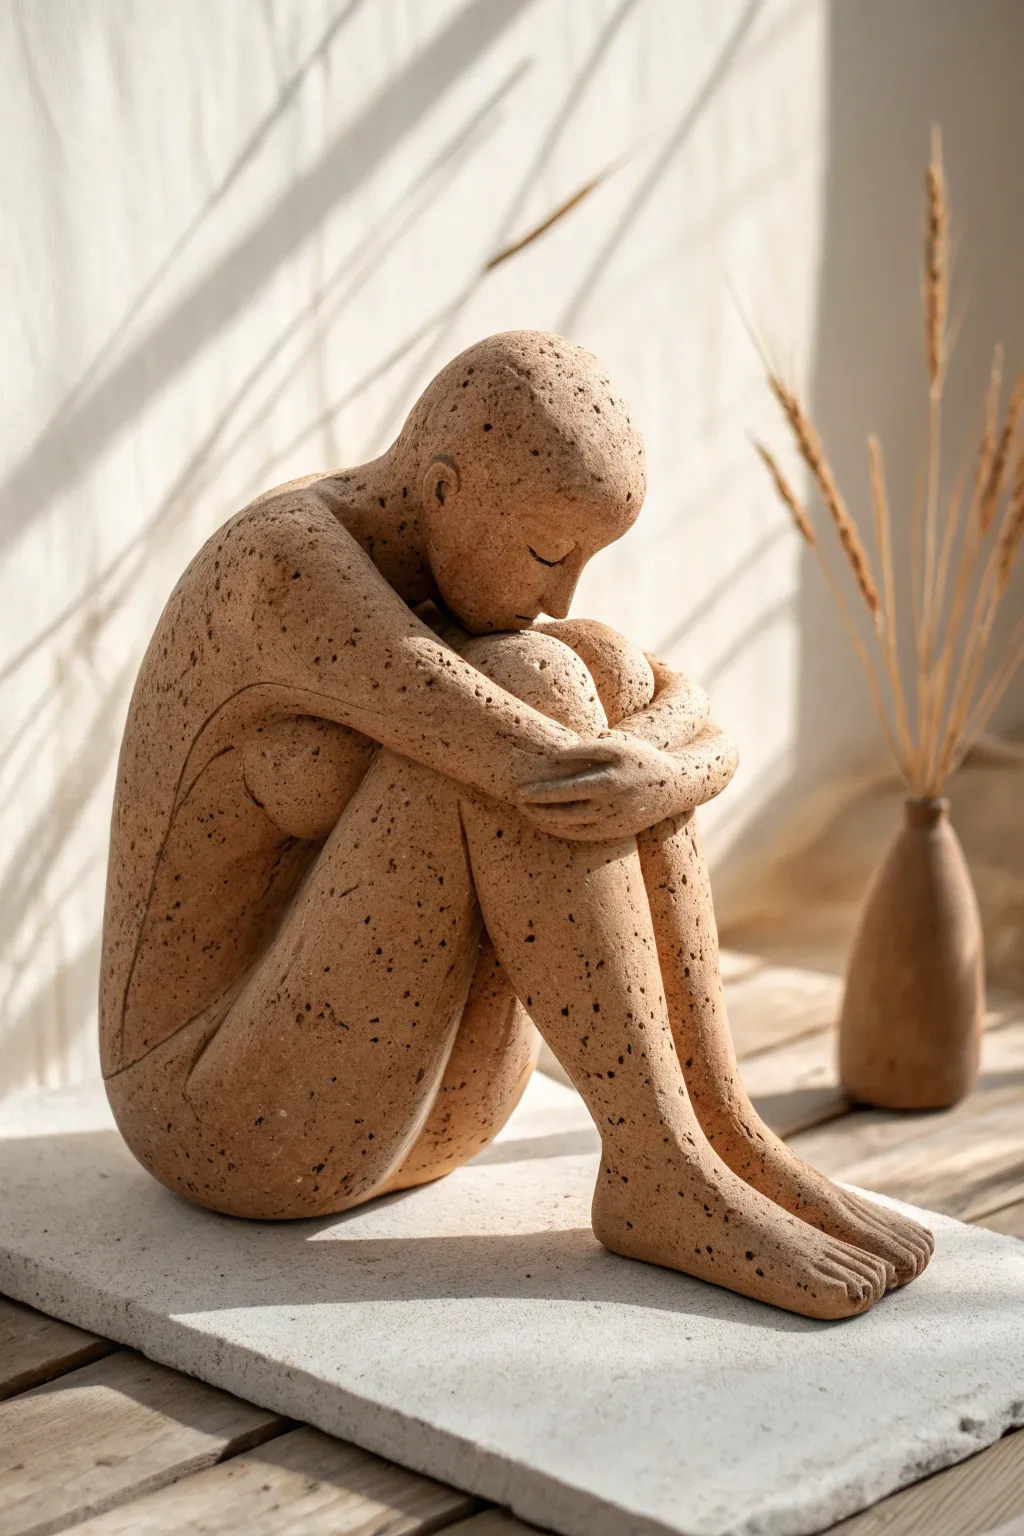
Capture a moment of quiet introspection with this emotive clay figure sculpture. The textured finish and tightly curled pose create a compelling sense of vulnerability and peace, making it a striking centerpiece for any shelf.
Step-by-Step Tutorial
Materials
- Speckled stoneware clay (medium grog)
- Clean work surface or wooden bat
- Wooden modeling tools
- Loop tool for hollowing
- Needle tool
- Serrated rib or kidney tool
- Sponge and water
- Slip (clay mixed with water)
- Plastic bag for slow drying
Step 1: Blocking Out the Form
-
Prepare the base:
Start with a substantial lump of clay, roughly the size of a grapefruit. Wedge it thoroughly to remove air pockets, then shape it into a rounded, elongated mound that will become the torso and seated bottom. -
Form the legs:
Create two thick coils for the legs. Attach them to the front of the torso base using the score and slip method. Bend them upwards at the knee joint so they will eventually tuck close to the chest. -
Rough in the head:
Roll a smaller ball of clay for the head. Attach it firmly to the top of the torso, tilting it slightly forward to suggest a downward gaze. Don’t worry about facial features yet; focus on the angle of the neck. -
Add the arms:
Roll two long coils for the arms. Position them wrapping around the outside of the bent legs. Cross them over the shins or knees, blending the clay at the shoulders seamlessly into the back.
Cracks at the seams?
If cracks appear where limbs join as it dries, score the crack deeply, add fresh slip, and compress the clay from both sides to seal it. Dry even slower to fix.
Step 2: Refining the Anatomy
-
Shape the back and spine:
Use a wooden rib or your thumb to smooth the curve of the back. You want a continuous, gentle C-curve from the neck down to the base to emphasize the curled-up posture. -
Define the limbs:
Use your fingers to press the thighs and calves together, ensuring there are no awkward gaps between the limbs and the torso. The figure should look tightly compressed. -
Sculpt the feet:
Shape the feet extending from the ankles. Instead of sculpting individual toes immediately, create a wedge shape first, then use a needle tool to gently suggest the separation of toes later. -
Refine the arm embrace:
Pay close attention to where the arms cross. Flatten the forearms slightly where they rest against the knees to show weight and pressure. -
Detail the hands:
Where the hands grasp the opposing arm or leg, define the fingers. Keep them stylized and simple, blending the palm into the arm it is holding for structural integrity.
Step 3: Facial Features and Final Texture
-
Carve the face:
For this stylized look, keep the face minimal. Use a small wooden tool to press shallow indentations for the eye sockets. Add a small wedge for the nose and blend it smooth. -
Closed eyes:
Using a very fine tool or needle, carve a simple crescent line for the closed eyes. This simple detail is crucial for conveying the emotion of the piece. -
Hollow the figure:
If your sculpture is thicker than an inch, carefully slice off the top of the head or cut a hole in the bottom to hollow out the inside with a loop tool. This prevents explosions in the kiln. Reattach and smooth any cut lines perfectly. -
Initial smoothing:
Go over the entire figure with a damp sponge to remove fingerprints and harsh tool marks. I usually like to do this gently to avoid washing away the muscle definition. -
Add texture:
To achieve the speckled, stone-like look in the image, take a serrated rib or a rough scour pad and gently pat or drag it across the skin surface. This brings the grog (grit) to the surface. -
Clean the lines:
Use a modeling tool to re-define the crevices where limbs meet—between the thigh and chest, or behind the knee—to ensure the shadows will be deep and widespread. -
Slow drying:
Cover the sculpture loosely with a plastic bag. Let it dry very slowly over the course of a week to prevent the limbs from cracking away from the body as they shrink. -
Bisque fire:
Once bone dry, fire the piece to bisque temperature (Cone 04 usually). If using speckled clay, fire to the clay’s maturity temperature (often Cone 5 or 6) without glaze to keep the raw, matte finish seen here.
Try a wash effect
After bisque firing, apply a diluted iron oxide wash and wipe it back with a sponge. The dark color will stay in the textures, enhancing the moody look.
Once fired, place your figure in a sunlit spot where the shadows can play across the textured surface

TRACK YOUR CERAMIC JOURNEY
Capture glaze tests, firing details, and creative progress—all in one simple printable. Make your projects easier to repeat and improve.
Beginner Bust With Strong Planes
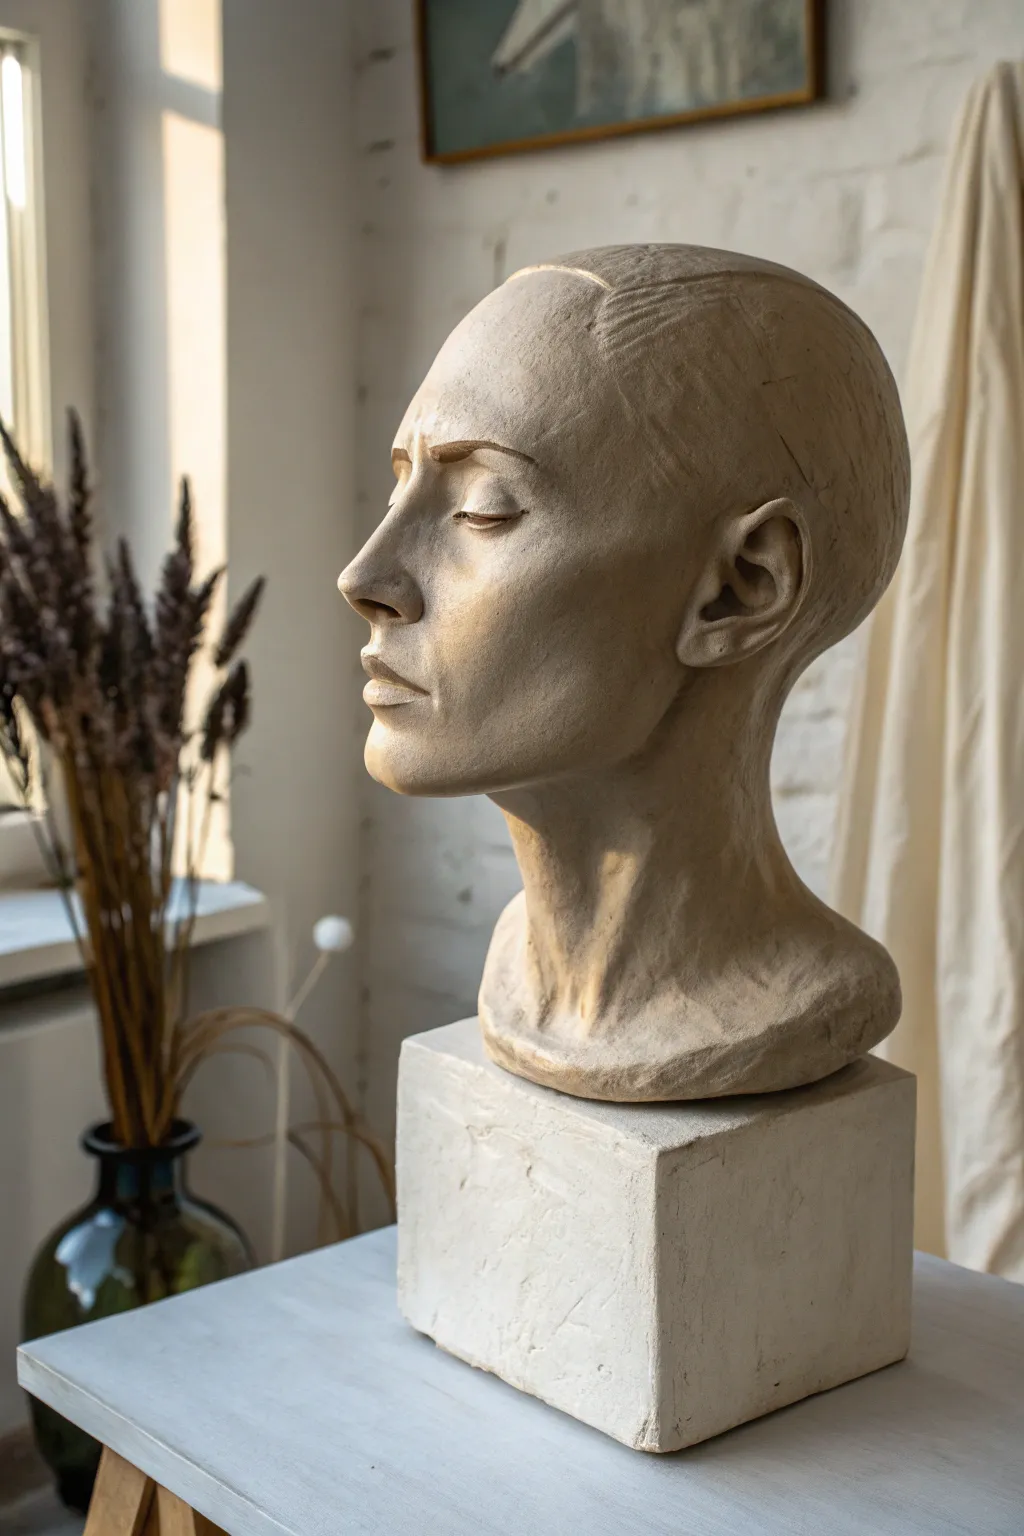
Capture the quiet dignity of the human form with this study of facial planes and structure. Using this method allows you to focus on the essential geometry of the face, resulting in a piece that feels both classical and distinctly modern.
Step-by-Step Guide
Materials
- Water-based clay or high-quality air-dry clay (grey or natural)
- Armature wire and aluminum foil
- Wooden sculpting base
- Loop tools (various sizes)
- Wooden modeling tools
- Sponge and water spray bottle
- Potter’s needle or knife tool
- Calipers (optional for measurements)
Step 1: Building the Core
-
Construct the armature:
Begin by creating a strong internal support. Twist two lengths of heavy-gauge wire together and attach them securely to your wooden base. Form a loop at the top roughly the size of a fist to support the head’s mass. -
Bulk out the volume:
Crumple aluminum foil tightly around the wire loop to create an egg shape for the skull and a cylinder for the neck. This saves clay and reduces drying weight. -
Apply the first layer:
Roll out thick slabs of clay or press thumb-sized chunks firmly onto the foil. Ensure the clay is well-compacted to avoid air pockets between the foil and the surface.
Step 2: Establishing Primary Forms
-
Define the silhouette:
Look at the sculpture from the side profile. Add clay to establish the major landmarks: the brow ridge, the nose bridge, the lips, and the chin. Keep these shapes blocky and geometric for now. -
Carve the neck column:
Build up the neck cylinder, ensuring it feels supportive. Add clay to the base to create the rectangular plinth block immediately, integrating the neck into the shoulders or chest plate. -
Locate facial features:
Mark horizontal lines for the eyes, nose base, and mouth. Use your thumbs to press deep hollows for the eye sockets, ensuring they sit deep beneath the brow ridge.
Lighting Is Key
Sculpt with a single light source from the side. This casts strong shadows, making it much easier to see the planes and depth of the facial structure.
Step 3: Refining the Planes
-
Sculpt the nose planes:
Build the nose not as a curve, but as a series of flat planes: the bridge, side planes, and the bottom plane. Keep edges distinct rather than smoothing them out too much. -
Shape the cheekbones:
Add a triangular wedge of clay for the cheekbone (zygomatic arch). I find it helpful to think of the cheek as a shelf that catches light, sweeping back towards the ear. -
Form the mouth muzzle:
Add a mound of clay for the mouth area. Cut into this mound to separate the lips, keeping the upper lip angled slightly inward and the lower lip fuller. -
Construct the ear:
Attach a ‘C’ shape of clay on the side of the head, roughly in line with the nose and brow. Carve out the inner spiral, keeping the detailing stylized and crisp.
Make It Stone
Once fully dry, apply a thin wash of diluted acrylic paint in beige or grey. While wet, wipe most off with a rag to leave pigment in the crevices for an antique look.
Step 4: Detailing and Surface Texture
-
Define the eyelids:
Roll tiny coils for the eyelids. Place them over the eyeball mound and blend the edges. Use a wooden tool to create a sharp crease for the upper lid. -
Add hair indication:
Instead of carving individual strands, gently score the clay in broad, sweeping motions across the skull to suggest the direction of pulled-back hair. Keep the texture shallow. -
Refine the jawline:
Use a flat wooden tool to sharpen the angle of the jaw, separating the face from the neck. Ensure the transition to the neck muscles is smooth but distinct. -
Sculpt the sternocleidomastoid:
Add a diagonally running muscle from behind the ear down toward the center of the collarbone area. This adds realistic tension to the neck. -
Square the base:
Use a ruler or flat board to paddle the base into a perfect cube or rectangle. Sharp, 90-degree corners on the base contrast beautifully with the organic forms above.
Step 5: Finishing Touches
-
Unified smoothing:
Use a slightly damp sponge to wipe down the surface. Don’t erase your planar edges; just remove accidental fingerprints and crumble marks. -
Check profiles:
Turn your sculpture constantly. Looking from below and above often reveals asymmetry that isn’t visible from eye level. -
Final drying prep:
If using ceramic clay, hollow out the sculpture from the bottom up to the neck (carefully removing armature). If using air-dry clay, allow it to dry slowly under a loose plastic bag to prevent cracking.
Step back and admire how the light plays across the distinct planes of your finished sculpture
Elderly Portrait Bust With Wrinkle Texture
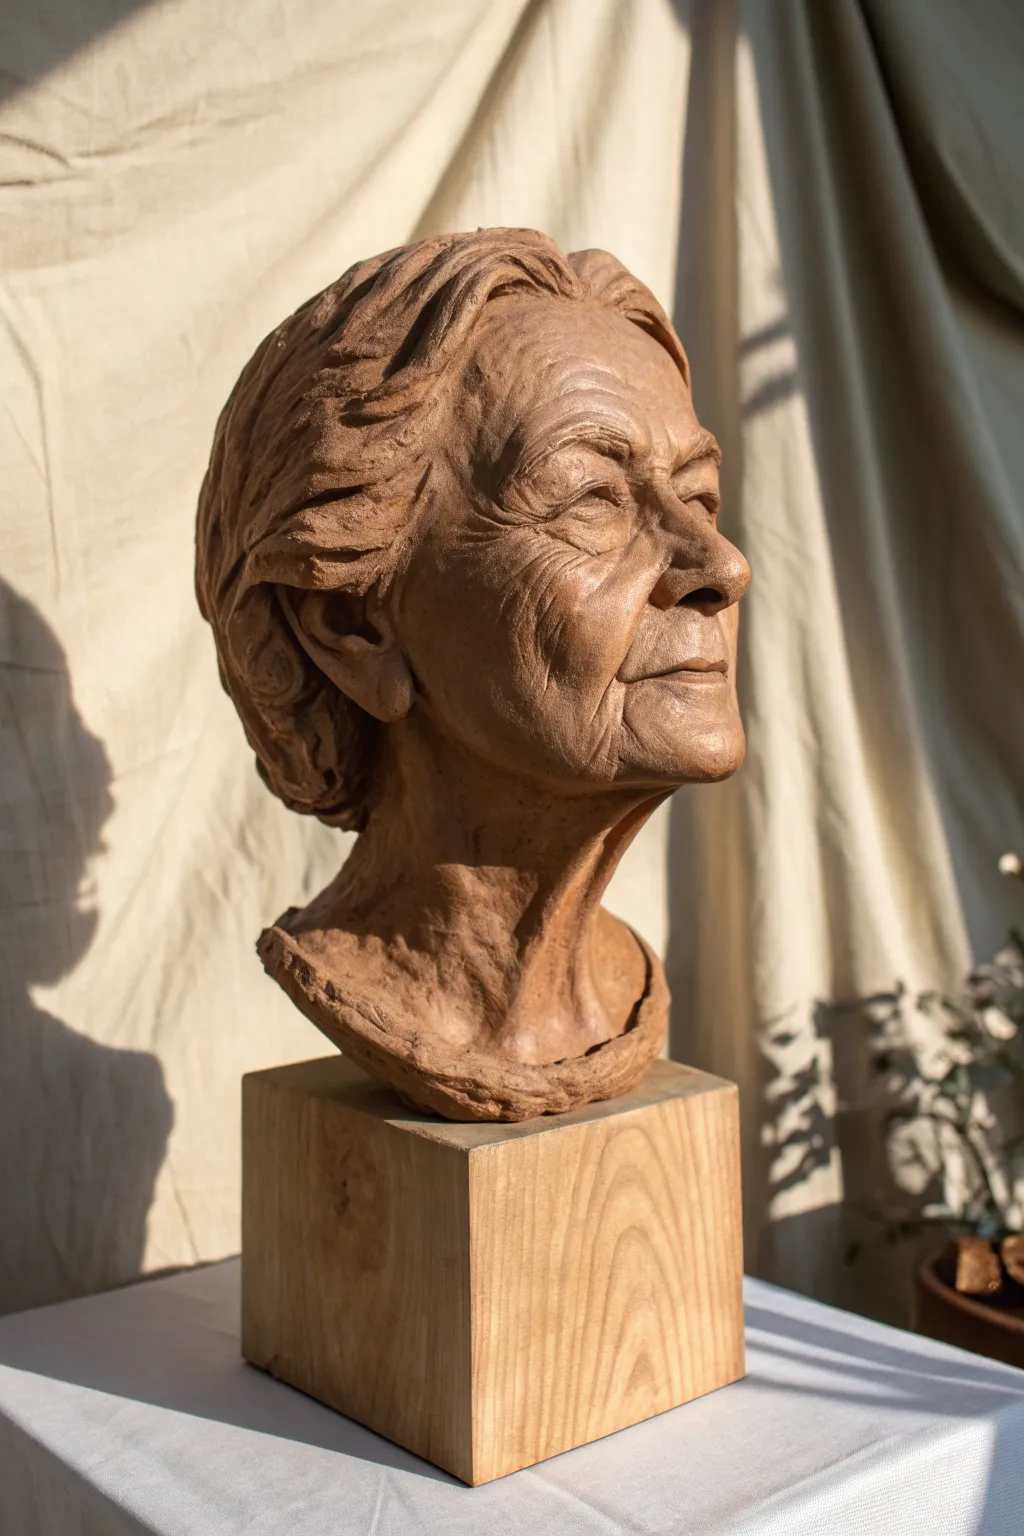
Capture the dignity and character of a life well-lived in this detailed clay sculpting project. This portrait bust focuses on rendering convincing aging textures, from deep-set wrinkles to soft, sagging skin folds, all presented on a classic wooden plinth.
How-To Guide
Materials
- Water-based clay or oil-based modeling clay (e.g., Chavant)
- Armature wire and aluminum foil
- Wooden base for mounting
- Loop tools (various sizes)
- Rake tools
- Detail modeling tools (wooden and metal)
- Sponge and water spray bottle
- Flexible rubber rib or kidney tool
- Wooden block for final display
Step 1: Building the Foundation
-
Construct the armature:
Begin by securing a strong wire armature to a temporary working base. Create a loop for the head and a wider support structure for the shoulders to ensure the heavy clay won’t slump processing. -
Establish the core volume:
Bull out the core shape using crumpled aluminum foil wrapped tightly around the wire. This saves clay and reduces weight. Cover the foil completely with a base layer of clay, pressing it firmly into the gaps. -
Block in major masses:
Add clay to define the skull shape, separating the cranium from the face mask. Build up the neck cylinder, noting how it leans forward slightly in older subjects, and rough in the shoulder line to support the head.
Don’t Over-Smooth
Beginners often over-smooth skin. Leave tool marks and small lumps! Real elderly skin has translucency and unevenness that perfect smoothness destroys.
Step 2: Developing the Anatomy
-
Map facial landmarks:
Mark the eye line, nose bottom, and mouth line. For an elderly subject, remember that gravity affects these placements; the ears may appear larger, and the nose tip might droop slightly. -
Sculpt the eyes and sockets:
Press thumbs deep to create orbital cavities. Insert small clay spheres for eyeballs, then build heavy, drooping eyelids over them. Don’t smooth the area too much yet; keep the transition between the brow bone and the socket distinct. -
Form the nose and cheeks:
Build the nose structure, emphasizing the cartilage separation at the tip. Add volume for the cheekbones, but hollow out the area below them to suggest the loss of subcutaneous fat common in aging faces. -
Shape the mouth and chin:
Form the muzzle area. Create thin lips that curve downward at the corners. Build up the chin, ensuring the jawline isn’t too sharp; add clay underneath to suggest the ‘wattle’ or loose skin of the neck.
Step 3: Texturing and Aging
-
Refine the neck anatomy:
Sculpt the sternocleidomastoid muscles (the V-shape on the neck). Overlay thin strips of clay to create the Platysma bands—the vertical cords that become prominent on aging necks. -
Carve primary wrinkles:
Using a small loop tool, carve the deep nasolabial folds running from nose to mouth. Add the ‘marionette lines’ extending down from the mouth corners, softening the edges so they look like folds of skin, not cuts. -
Detail the eyes and forehead:
Add crow’s feet radiating from the eye corners. Lightly score horizontal lines across the forehead, varying their depth. I find it helpful to squint at the sculpture here to ensure the shadows fall naturally in these crevices. -
Add skin texture:
Use a rake tool to cross-hatch the entire surface lightly, breaking up the smooth clay. Then, gentling knock back this texture with a sponge or rubber rib; this leaves tiny pores and imperfections essential for realistic skin. -
Sculpt the hair volume:
Apply chunks of clay to the skull for hair. Instead of drawing individual strands, sculpt broad, sweeping masses that flow back from the face. Create deep separations between clumps to catch shadows.
Level Up: Asymmetry
Enhance realism by breaking symmetry to add personality. Make one eyelid droop slightly more, or raise one eyebrow to give the face a skeptical look.
Step 4: Finishing Touches
-
Detail the hair:
Use a smaller tool to suggest hair direction within the larger masses. Keep the texture significantly rougher than the skin to create visual contrast. -
Refine the ears:
Ensure the ears are fully formed with lobes that may hang lower due to age. Check the connection point behind the jaw to ensure it looks organic. -
Create the bust termination:
Decide where the sculpture ends at the chest. Create a ragged, textured edge or a simulated fabric neckline to frame the portrait nicely without distracting from the face. -
Final surface check:
Look at the sculpture under a single light source. Deepen any wrinkles that look too shallow and soften any edges that look too sharp or plastic. -
Mount display block:
Once finished (and fired if using ceramic clay), mount the bust securely onto a simple, rectangular wooden block that contrasts with the organic forms of the sculpture.
Take a moment to appreciate how the play of light across the textured surfaces brings your character’s history to life
Realistic Bird Sculpture on a Simple Branch
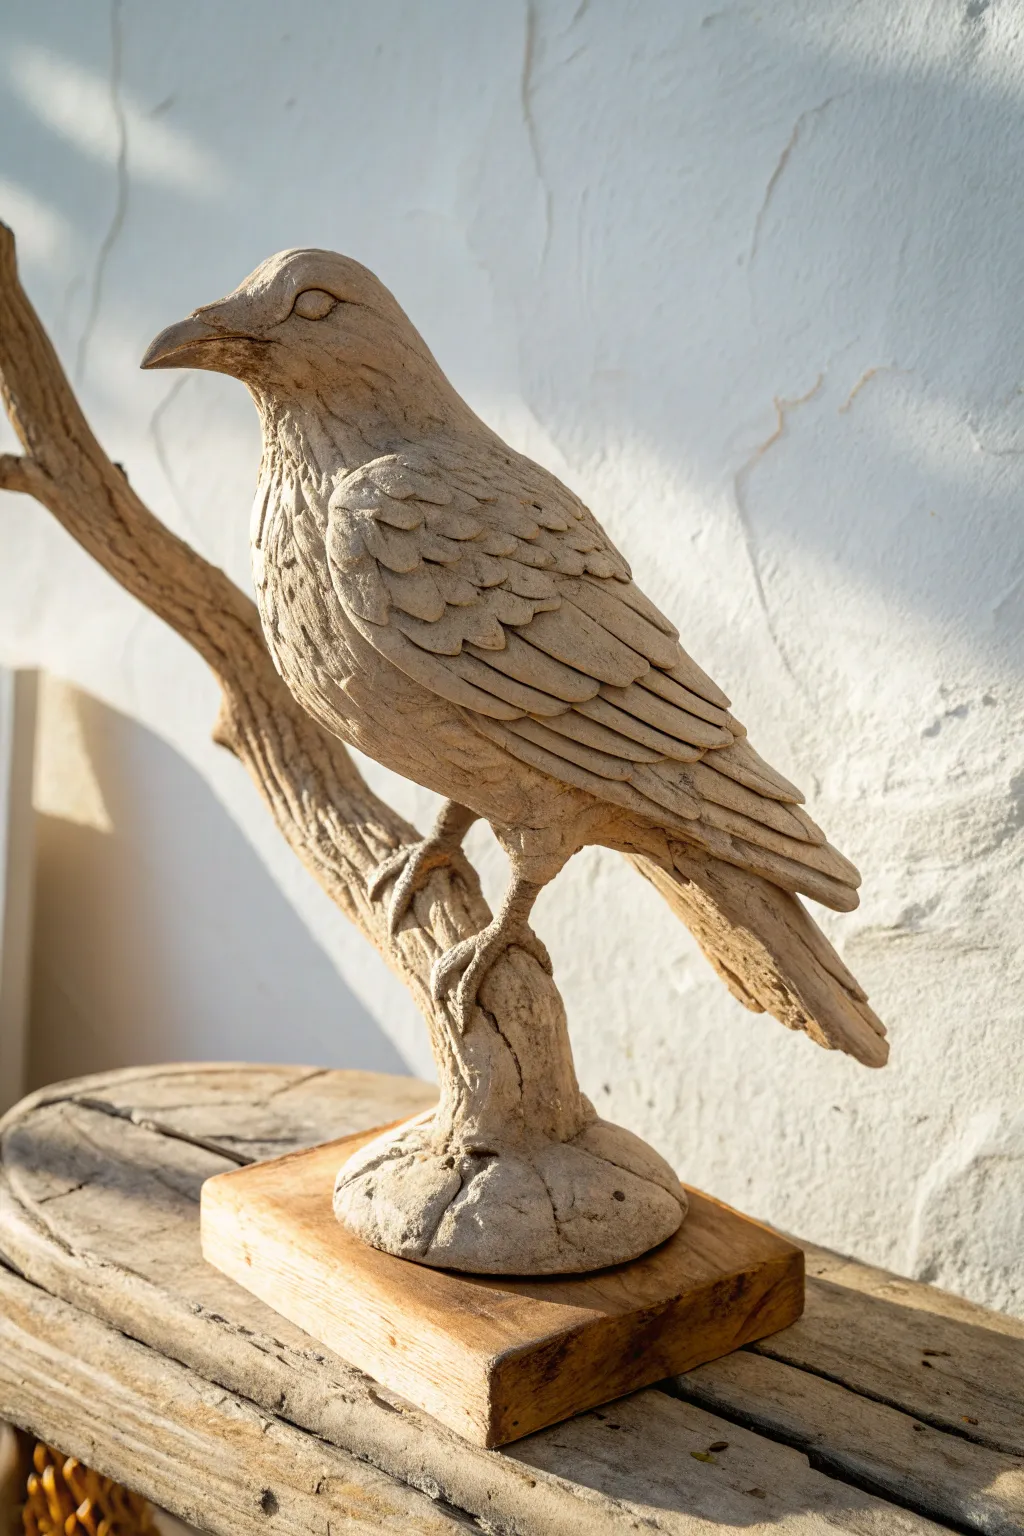
This realistic bird sculpture captures the quiet observation of a crow resting on a branch, featuring detailed feather work and natural textures. The monochromatic, earthy finish emphasizes form and shadow, making it a sophisticated addition to any rustic or nature-inspired decor.
Step-by-Step Guide
Materials
- Air-dry clay or polymer clay (stone or limestone color)
- Strong armature wire (12-gauge)
- Thinner wire (18-gauge for wrapping)
- Aluminum foil
- Wooden base block (rectangular)
- Drill with small bit
- Sculpting loop tools
- Needle tool or toothpick
- Texture sponge
- Water spray bottle (if using air-dry clay)
- Clay adhesive or slip
- Serrated rib tool
Step 1: Building the Skeleton
-
Prepare the base:
Start by selecting your wooden block base. Drill a hole near the center or slightly off-center where you want the main branch to anchor. This ensures your sculpture won’t tip over later. -
Create the wire armature:
Cut a long length of the 12-gauge wire. Twist two strands together to create the ‘branch’ section that will go into the wood, leaving a large loop at the top for the bird’s body and two smaller wires branching off for the legs. -
Bulk up with foil:
Crumple aluminum foil tightly around the bird loop to form the core body shape—an oval for the torso and a smaller rounded shape for the head. Compress it firmly so the clay layer won’t need to be too thick. -
Secure the foil:
Wrap the thinner 18-gauge wire around the foil body to keep it tight and prevent the clay from sliding off the smooth foil surface. -
Mount the armature:
Apply a strong glue (like epoxy) to the bottom wire stem and insert it firmly into the drilled hole in your wooden block. Let this set completely before adding clay.
Reference Required
Don’t guess at anatomy! Keep photos of real crow wings open while you work. Pay attention to how the primary feathers stack—the higher feathers always overlap the lower ones.
Step 2: Sculpting the Form
-
Cover the branch:
Begin adding clay to the wire branch stem first. Roll out a snake of clay, slice it open, and wrap it around the wire. Use your thumbs to blend the seam disappearing into the texture. -
Texture the wood:
Before the branch clay dries, drag a serrated tool or a fork vertically along the clay to simulate rough bark. Add a few knots or bumps for realism. -
Add the base layer:
Cover the foil bird body with a uniform layer of clay, about 1/4 inch thick. Smooth it all out with a damp sponge or finger to create a blank canvas for the details. -
Form the legs and feet:
Roll thin coils of clay for the legs and toes. Wrap the toes around the clay branch, blending them securely onto the branch so the bird looks like it’s gripping tightly. The grip is key to realism. -
Sculpt the beak:
Form a cone shape for the beak and attach it to the face. Use a knife to slice the horizontal line for the mouth, curving it slightly downward at the corner.
Step 3: Detailing the Feathers
-
Map out feather groups:
Use a needle tool to lightly sketch where the wing starts and ends. I generally mark three distinct zones: the shoulder, the mid-wing, and the long primary feathers at the tail. -
Create individual feathers:
Roll small teardrop shapes of clay and flatten them. Starting from the tail and moving upward toward the head, layer these flattened shapes like shingles on a roof. -
Refine the wing feathers:
For the main wing feathers, make longer, flatter strips. Press them onto the side of the body, overlapping them neatly. Use a tool to impress a central spine (rachis) into each feather. -
Texture the chest:
The chest feathers are softer and less defined. Instead of individual sculpted feathers, use a loop tool to carve short, shallow scoops into the clay to suggest fluffiness. -
Define the face:
Add a small ball of clay for the eye and outline it with thin eyelids. Use a texture tool to make very fine, hair-like strokes on the head and neck area. -
Final smoothing:
Inspect the sculpture for fingerprints. Use a soft brush dipped lightly in water (or baby oil for polymer) to soften any harsh tool marks while preserving the texture. -
Finishing the base:
Add a small mound of clay at the very bottom where the branch meets the wooden block to act as a transition, texturing it to look like the base of a tree or root flair.
Aged Stone Look
Once dry, apply a dark brown acrylic wash (paint diluted with water) over the whole piece. Wipe it off immediately with a rag, leaving dark paint only in the deep crevices.
Allow your sculpture to dry slowly away from direct heat to prevent cracking, and enjoy your permanent piece of nature.
Undersea Creature Sculptures With Flowing Fins
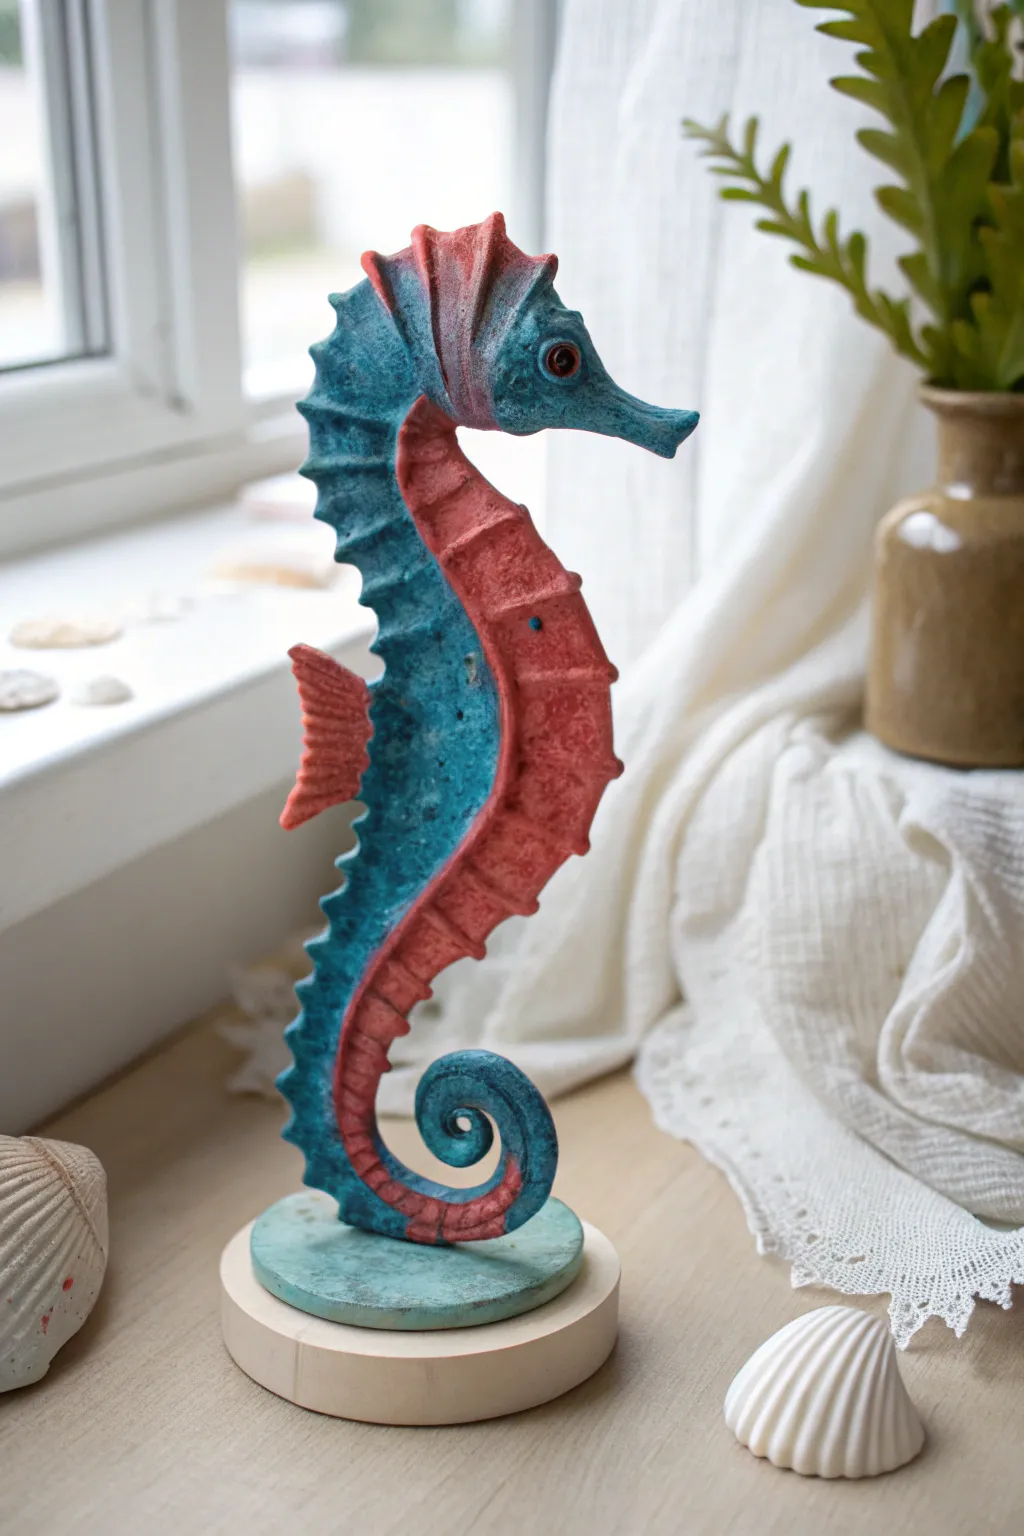
Capture the magic of the ocean with this charming seahorse sculpture, featuring a lovely contrast between rough, sandy textures and vibrant teal and coral hues. The upright pose and curled tail make it an elegant addition to any shelf, while the layered painting technique gives it an ancient, weathered artifact look.
Detailed Instructions
Materials
- Air-dry clay (stone or white)
- Strong wire for armature (12-14 gauge)
- Wooden base (round)
- Acrylic paints: Teal/Turquoise, Coral/Salmon, Dark Brown (for antiquing)
- Sculpting tools: Needle tool, looped tool, rubber shaper
- Texture tools: Stiff bristle brush, sandpaper, or sponge
- Super glue or strong craft adhesive
- Drill with small bit (matching wire gauge)
- Water spray bottle
- Sealant (matte or satin varnish)
Step 1: Building the Core
-
Prepare the Base:
Begin by drilling a hole in the center of your wooden base. Insert a length of sturdy wire (about 8-10 inches) into the hole and secure it with super glue. -
Form the Armature:
Bend the wire into the classic S-shape of a seahorse. Create a distinct curve at the top for the neck and head, and curl the bottom wire tightly for the tail. -
Bulk Out the Body:
Take a large chunk of clay and press it firmly onto the wire. Cover the entire length of the wire, tapering the clay to be thicker at the chest and thinner at the neck and tail.
Cracking at the Neck?
If the clay cracks at the neck while drying, fill the fissures with a ‘slip’ made of clay mixed with water. Smooth it over and let it dry again before painting.
Step 2: Sculpting the Form
-
Refine the Head:
Add extra clay to the top to form the head. Pinch the clay forward to create a long, pointed snout, slightly upturned at the end. -
Create the Belly Ridge:
Roll a long, thick coil of clay and attach it to the front of the body, running from under the chin down to where the tail curl begins. Blend the edges smoothly into the main body. -
Define the Dorsal Fin:
Pinch the clay along the back of the neck and spine to create a ridge. You can also attach a flattened strip of clay here if you need more height. -
Add Side Fins:
Shape a small, fan-like triangle of clay. Attach this to the middle of the back (not the side) as the dorsal fin, or create smaller pectoral fins on the side if you prefer. The reference shows a prominent back fin.
Step 3: Texturing and Details
-
Carve the Segments:
Using a looped tool or a knife, carve horizontal grooves across the belly ridge to create the segmented armored look. These should be fairly deep and evenly spaced. -
Spine Detailing:
Along the back ridge, use your fingers or a tool to pinch the clay into sharp points or scallops, mimicking the spiny texture of a seahorse. -
Add Texture:
Take a stiff bristle brush or a piece of rough sponge and press it gently all over the blue parts of the body (avoiding the segmented belly) to create a pitted, stone-like texture. -
Facial Features:
Press a small round tool into the side of the head to form the eye socket. Roll a tiny ball of clay, insert it into the socket, and poke a pupil in the center. -
Final Smooth and Dry:
Check for any unwanted fingerprints and smooth them out with a damp finger. Allow the sculpture to dry thoroughly for 24-48 hours until completely hard.
Dry Brushing Depth
After the dark wash dries, lightly dry brush a paler version of the teal over the high points of the skin texture. This makes the details pop dramatically.
Step 4: Painting and Finishing
-
Base Coat:
Paint the main body area with a rich teal or turquoise acrylic paint. Apply two coats if necessary for solid coverage. -
Paint the Accent Color:
Carefully paint the segmented belly, the fin, and the top ridge of the head in a coral or salmon pink color. -
Antiquing Wash:
Mix a small amount of dark brown paint with water to create a thin wash. Brush this over the entire sculpture, letting it settle into the grooves and texture. -
Wipe Back:
Before the wash dries, gently wipe the raised surfaces with a damp paper towel or cloth. I usually keep a few clean rags handy for this step so the colors don’t get muddy. -
Paint the Base:
Paint the wooden base. You can match the teal of the body or leave it natural wood depending on your preference. In the reference, the immediate clay base matches the body color. -
Seal:
Protect your work with a coat of matte varnish to preserve the chalky, matte finish, or use satin for a slight sheen.
Place your finished seahorse near a window to let natural light highlight those beautiful textures
Stacked Totem Creatures as One Sculpture
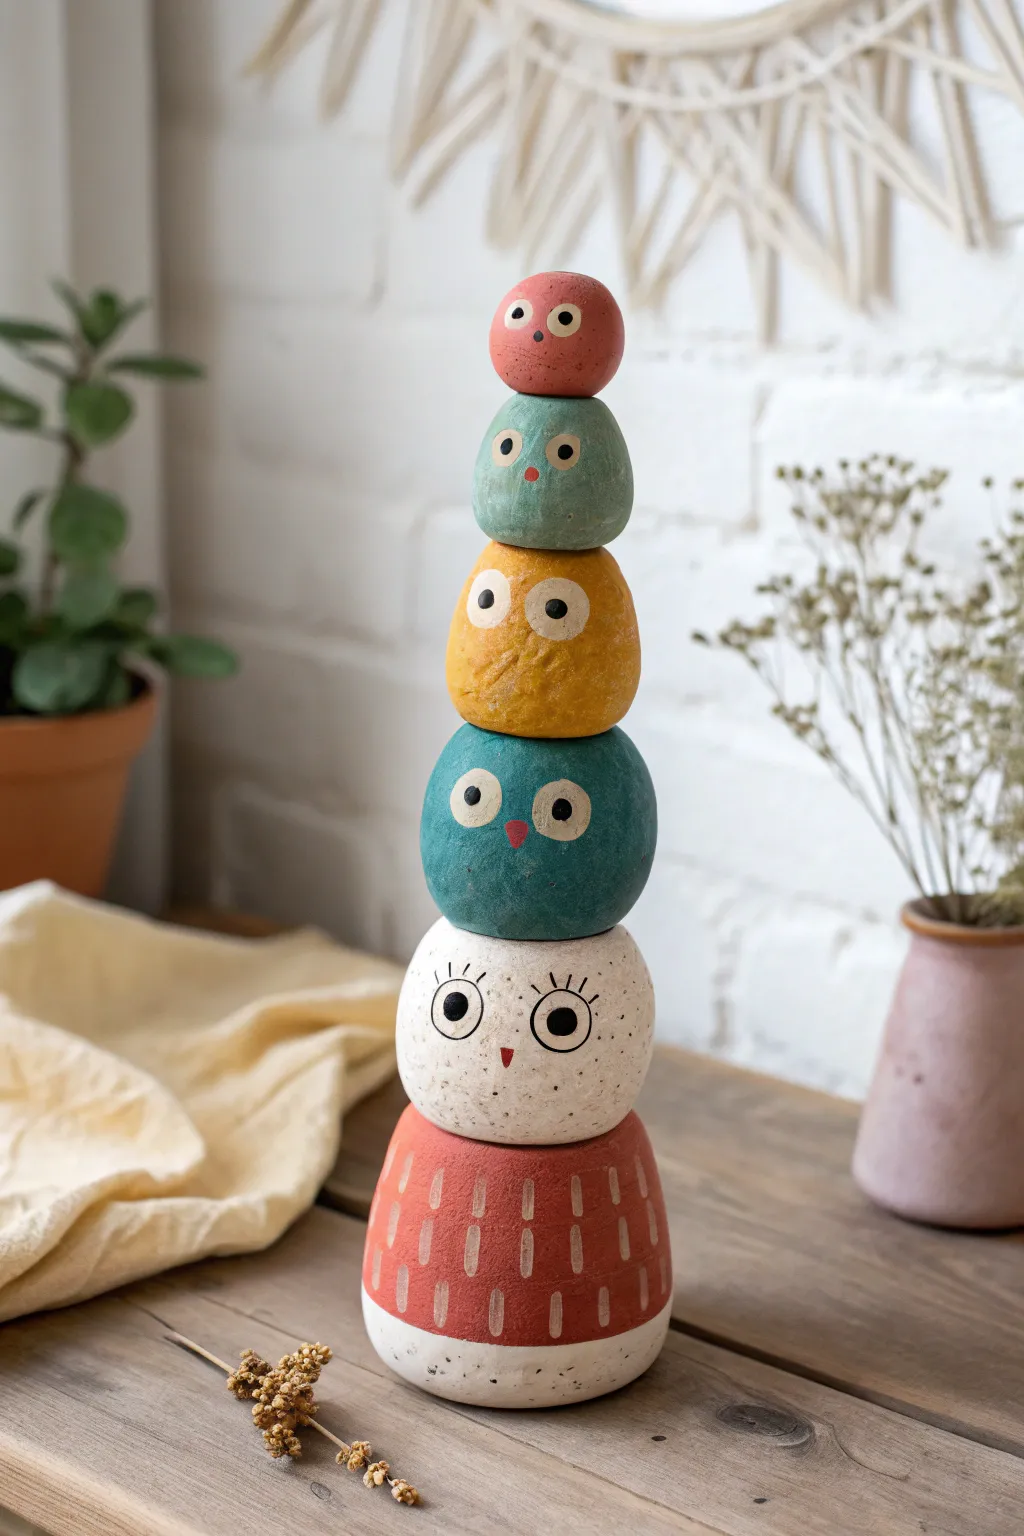
Bring a touch of playful charm to your shelf with this stacked totem of round, bird-like creatures. This project uses simple spherical forms and earthy, matte acrylics to create a delightful, vertical sculpture that feels both modern and handmade.
Step-by-Step Tutorial
Materials
- Air-dry clay or polymer clay (white or terracotta)
- Acrylic paints (coral red, teal, mustard yellow, dark teal, white)
- Small round paintbrushes (sizes 2 and 4)
- Fine-point black paint pen or liner brush
- Rolling pin
- Aluminum foil (for creating armatures)
- Water cup and sponge
- Clay sculpting tools (knife tool, smoothing rib)
- Matte spray varnish
Step 1: Forming the Bodies
-
Core Creation:
To keep the sculpture light and save clay, crumple aluminum foil into five different sized balls. Make the largest one for the base about the size of a tennis ball, decreasing in size gradually to a ping-pong ball size for the top head. -
Clay Coating:
Roll out your clay to about 1/4 inch thickness. Wrap the clay sheets around each foil ball, smoothing the seams completely with a bit of water on your finger until you have five smooth orbs. -
Shaping the Base:
Take the largest orb (the base) and gently flatten the bottom against your work surface so it stands stable. Use your hands to slightly flatten the top as well, creating a platform for the next piece. -
Sculpting the Head Stacks:
For the middle three orbs, gently flatten both the top and bottom of each sphere. This ensures they will stack securely without wobbling. Create slightly different organic variations; they don’t need to be perfect circles. -
Top Piece:
For the smallest orb at the very top, only flatten the bottom side. Keep the top rounded. -
Dry Fitting:
Stack them temporarily to check the balance. If it leans too much, adjust the flattened surfaces. I like to press them gently together while the clay is still damp to create a custom ‘seat’ for each layer. -
Drying Time:
Unstack the pieces and let them dry completely. For air-dry clay, this usually takes 24-48 hours depending on humidity. Rotate them occasionally for even drying.
Balance Check
Before gluing, insert a wooden skewer or wire through the center of all wet clay spheres (like a kabob). Leave the hole there while drying to help align them perfectly later during assembly.
Step 2: Painting & Details
-
Base Color: Bottom Segment:
Paint the bottom-most segment with a coral or terracotta red. You may need two coats for opaque coverage. Leave a thin strip of unpainted white/clay at the very bottom rim for a dipped look if desired. -
Base Color: The Large Face:
Paint the second largest orb (the main white face) a creamy off-white. Use a sponge to dab the paint if you want a stone-like texture. -
Base Color: Middle Tiers:
Paint the next orb a deep teal or petroleum blue. For the one above that, use a warm mustard yellow. Paint the second-to-last orb a soft sage green. -
Base Color: Top:
Paint the tiny top head in a varying shade of pink or coral to tie it back to the base. -
Adding Eyes:
Once the base coats are fully dry, paint large white circles for eyes on the teal, yellow, and green sections. The white owl gets black outlines instead of filled circles. -
Refining Features:
Using a tiny brush or black paint pen, add the pupils. Vary the direction of the gaze—have some looking up, some sideways. Add small triangles for beaks in contrasting colors (like a red beak on the blue bird). -
Texture Details:
On the red base, paint vertical white dashed lines to suggest feathers. On the large white owl face, add stylized eyelashes and small feather details. -
Final Assembly:
Once all paint is dry, use a strong craft glue or epoxy to permanently adhere the stack together, following your dry-fit arrangement. -
Sealing:
Finish with a coat of matte spray varnish to protect the paint and give it a unified, ceramic-like sheen.
Forest Friends
Instead of just owls, turn the stack into different animals. Make the bottom a fox with ears, the middle a bear, and the top a bird for a woodland totem aesthetic.
Place your new totem on a sunny windowsill or bookshelf where its colorful personality can shine.
Abstract Wave Sculpture With Negative Space
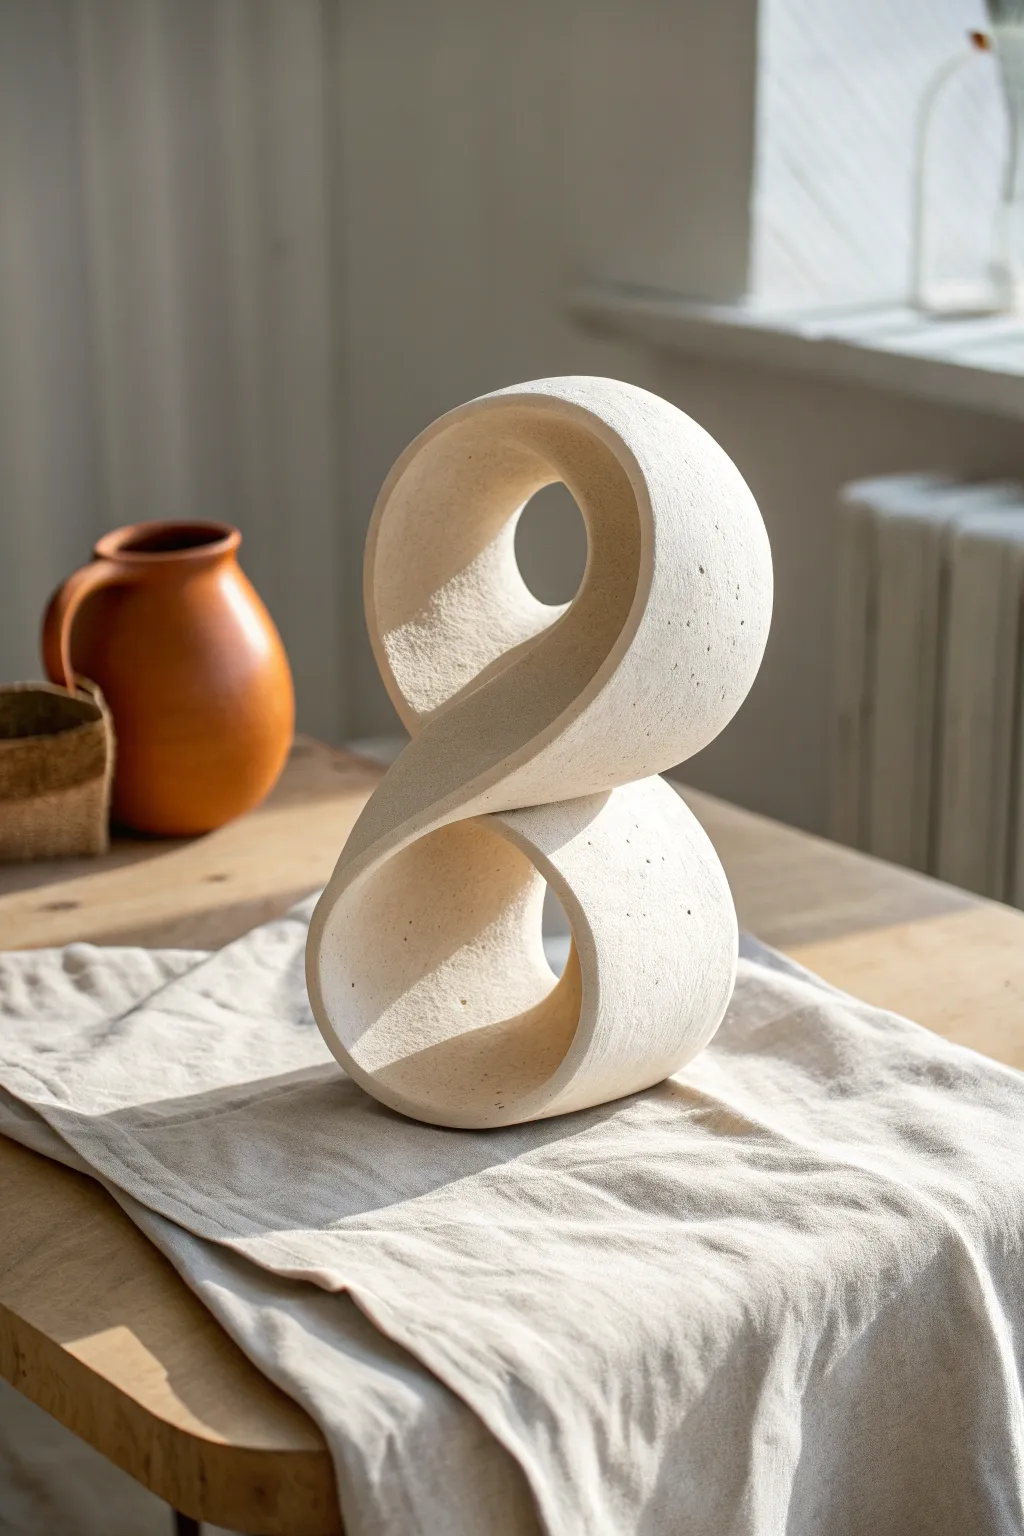
This elegant abstract sculpture captures the fluidity of a figure-eight or infinity symbol in a solid, standing form. Its smooth curves and large negative spaces create a sense of movement and balance, while the matte, textured finish gives it a timeless, organic feel.
Detailed Instructions
Materials
- White stoneware clay with grog (for texture and stability)
- Wide rolling pin
- Fettling knife
- Rib tool (wooden or rubber)
- Serrated metal rib
- Sponge
- Slip (clay and water mixture)
- Wooden modeling tool
- Canvas mat or slab board
Step 1: Preparation and Slab Rolling
-
Wedge the clay:
Start by thoroughly wedging your stoneware clay to remove any air pockets and ensure an even consistency, which is crucial for structural integrity in a standing piece. -
Roll the primary slab:
Roll out a long, rectangular slab of clay. Aim for a thickness of about 1/2 inch to 3/4 inch; it needs to be thick enough to support its own weight but not so heavy that it collapses. -
Cut the strip:
Using a straightedge and your fettling knife, cut a clean, long strip from the slab. The width will determine the depth of your sculpture, so aim for approximately 3 to 4 inches wide. The length should be roughly 18-20 inches. -
Smooth the surface:
Before bending, compress the clay on both sides of the strip using a rib tool. This aligns the clay particles and minimizes potential cracking during the forming stage.
Preventing Sagging
If your top loop starts drooping, prop it up with crumpled newspaper or a small piece of upholstery foam. Remove this prop only when the clay is leather hard.
Step 2: Forming the Figure-Eight
-
Create the base loop:
Take one end of your strip and gently curl it underneath to form the bottom circle of the figure-eight. Do not seal the ends yet; just establish the curve. -
Form the top loop:
Bring the other end of the strip up and over to form the top loop. The clay should naturally cross over itself in the middle to create that distinct ‘waist’ section. -
Adjust the proportions:
Gently manipulate the loops until you are happy with the silhouette. The bottom loop should be slightly wider to provide a stable base for the sculpture to stand on. -
Score and slip the join:
Where the two ends of the clay strip meet to close the loop (usually at the back or side of a curve), deeply score both surfaces and apply a generous amount of slip. I always ensure this joint is extra secure since it holds tension. -
Reinforce the waist:
Where the clay crosses over itself in the center, check if the surfaces are touching. If they are, score and slip this connection point as well to add significant structural strength to the piece. -
Smooth the seams:
Use a wooden modeling tool to blend the clay across the joined seam, removing any visible lines. Follow up with a rib to make the transition invisible.
Speckled Finish
To get the speckled look without special clay, flick a toothbrush loaded with iron oxide wash or manganese wash onto the raw clay before the first firing.
Step 3: Refining and Finishing
-
Stiffen the form:
Let the sculpture sit for about an hour or until it reaches a soft leather-hard stage. This makes it sturdy enough for aggressive smoothing without warping the shape. -
Clean the edges:
Use a damp sponge to round off the sharp edges of the slab strip. The look should be soft and flowing, not geometric or sharp. -
Surface texturing:
Take a serrated metal rib and gently drag it across the surface of the clay in varying directions. This opens up the clay body and exposes the grog, creating that beautiful stone-like texture seen in the reference. -
Final shaping check:
Step back and view the sculpture from all angles. If the top loop is sagging, place a small ball of paper or foam inside the negative space to support the arch while it dries completely. -
Slow drying:
Cover the piece loosely with plastic to allow it to dry very slowly over several days. This prevents the loops from pulling apart as the clay shrinks. -
Bisque fire:
Once bone dry, fire the piece to a bisque temperature suitable for your clay body (typically cone 04). -
Finish the surface:
To achieve the matte look in the photo, you can leave the raw clay unglazed if it is a high-fire stoneware, or apply a very thin, matte white wash before the final firing.
Place your finished sculpture near a window where shadows can play through the negative space, highlighting your craftsmanship
Cracked Earth Texture on Organic Forms
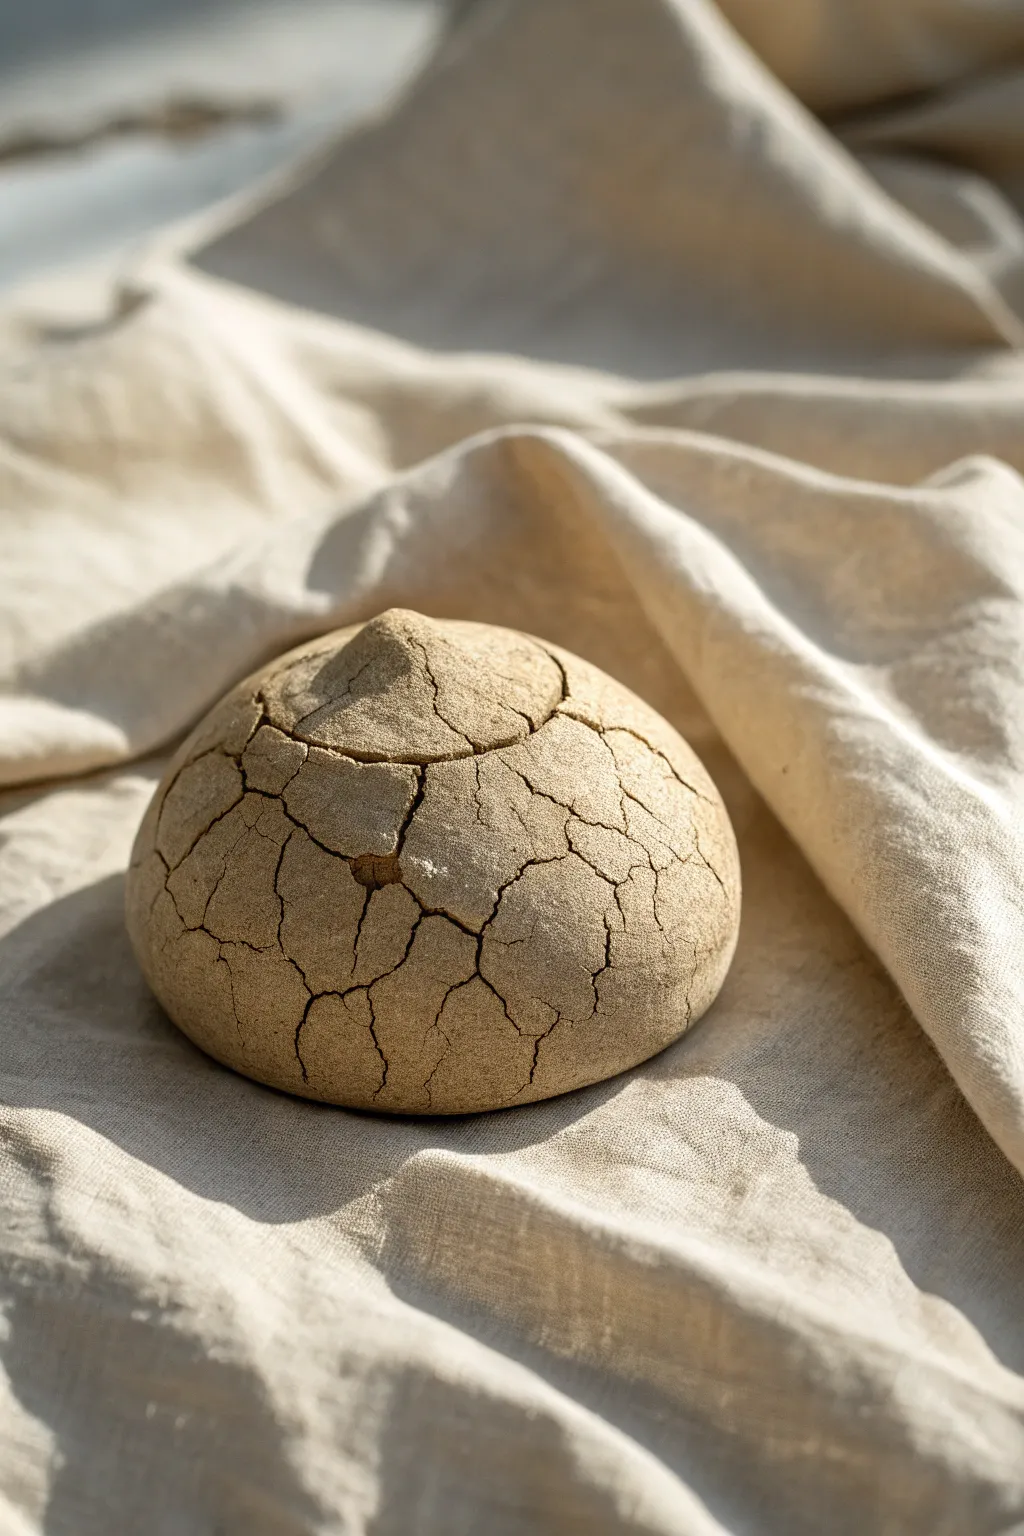
This project captures the mesmerizing beauty of parched earth in a sculptural form. By manipulating drying times and using sodium silicate, you can create a fascinating, organic texture that looks like an ancient relic found in the desert.
Step-by-Step
Materials
- Stoneware clay (buff or tan)
- Sodium silicate
- Heat gun or hair dryer
- Soft rib tool (rubber or silicone)
- Sponge
- Sculpting tool or needle tool
- Paintbrush (foam or soft bristle)
- Canvas or ware board
Step 1: Forming the Base
-
Prepare the Clay:
Begin by wedging a softball-sized piece of stoneware clay to remove air bubbles. Ensure the clay is slightly on the softer side, as this helps with the stretching process later. -
Shape into a Ball:
Roll the wedged clay into a smooth sphere. Gently pat it down on your work surface to create a flat bottom so it doesn’t roll away while you work. -
Create the Mound:
Pinch a small amount of clay from the very top center of your sphere. Gently pull and smooth this upward to create a small, conical peak or mound, blending the base of the mound smoothly into the main sphere. -
Smooth the Surface:
Using a slightly damp sponge, wipe the entire surface of the form. You want it perfectly smooth and free of fingerprints, as imperfections can interrupt the crackle pattern. -
Apply Sodium Silicate:
Brush a generous layer of sodium silicate over the entire surface of the clay, avoiding just the very bottom where it sits on the table. Be careful not to let drips run down the sides. -
Dry the Surface:
Use a heat gun or hair dryer to dry the surface. Keep the heat moving constantly. You want the sodium silicate to form a dry, hard ‘skin’ on the outside while the clay inside remains soft and pliable. Ideally, the surface should no longer be tacky to the touch. -
Second Coat (Optional):
For deeper, more dramatic cracks, I sometimes apply a second thin coat of sodium silicate and dry it again until a hard shell forms.
Step 2: Creating the Texture
-
Expand the Form:
This is the crucial moment. Gently push outwards from the inside if you made a hollow form (pinch pot method), or if working solid as shown here, gently press on the sides to deform the sphere slightly. -
Refining the Stretch:
Take your hand or a soft rib tool and firmly press against the side of the sphere, pushing the clay outward. The dried surface skin can’t stretch, so it will break apart, creating the fissure pattern. -
Work Around the Sphere:
Rotate the piece and continue pushing from the inside out (or squishing gently from top to bottom) to encourage cracks all around the form. Vary your pressure to create a mix of large, deep fissures and fine, spiderweb cracks. -
Detail the Top Mound:
Be careful around the top peak. You want cracks to radiate near it, but try to keep the peak itself relatively intact for visual contrast. -
Define the Lid Line:
Using a needle tool, carefully score a circular line around the base of the top mound. This simulates the look of a lid or separate segment, adding structure to the organic chaos. -
Deepen the Lid Cut:
Go over your scored line again, pressing slightly deeper to ensure it looks like a distinct separation, blending the edges slightly so it doesn’t look too mechanical. -
Clean Up Edges:
Check the bottom edge where the sphere meets the table. If the stretching caused jagged bits at the base, smooth them back under with your thumb.
Sticky Situation?
If the clay sticks to your hands instead of cracking, the sodium silicate layer isn’t dry enough. Apply more heat until the surface feels like a hard, dry shell before stretching.
Add Color Depth
After bisque firing, rub a dark oxide wash (like iron oxide or manganese) into the cracks and wipe away the excess. This will highlight the texture dramatically.
Allow your piece to dry slowly to preserve the delicate cracked edges before firing
Clay Mask Sculpture With Bold Expressions

Channel the bold lines of early modern art with this striking face sculpture. Mounted on a clean white pedestal, this project uses earthy tones and strong geometric features to create a sophisticated, gallery-ready statement piece.
Detailed Instructions
Materials
- Air-dry clay (white or terracotta)
- Small wooden or metal armature stand
- Aluminum foil
- Masking tape
- Acrylic paints (sand/buff, burnt sienna, deep red, navy blue, black)
- Gesso or white primer
- Matte varnish
- Sculpting tools (loop tool, needle tool)
- Wooden block (for the base)
- Paintbrushes (various sizes)
- Sandpaper (medium and fine grit)
Step 1: Building the Form
-
Prepare the armature:
Begin by securing a basic armature wire or rod into your wooden base block. It needs to be sturdy enough to hold the weight of the clay head. -
Create the foil core:
Crumple aluminum foil into an oval, egg-like shape around the top of your armature rod. Compress it tightly to remove air pockets. -
Secure with tape:
Wrap masking tape entirely around the foil core. This smooths out the crinkles and gives the clay a surface it can stick to easily. -
Apply the base layer:
Flatten a large slab of air-dry clay to about 1/4 inch thickness. Wrap this slab over the front of your foil form, smoothing the edges around the back. -
Shape the face structure:
Add a long, triangular wedge of clay down the center for the nose. Blend the edges seamlessly into the cheeks using a little water on your fingers. This strong vertical line anchors the whole face.
Smoother Transitions
Use a soft, wet paintbrush instead of your fingers to smooth clay joins. It acts like a mini mop, erasing fingerprints and blending seams perfectly.
Step 2: Sculpting the Features
-
Define the eye sockets:
Press your thumbs gently on either side of the nose bridge to create shallow depressions for the eyes. -
Add the eyes:
Roll two almond-shaped pieces of clay. Place them into the sockets and use a sculpting tool to carve the outline of the eyelids. exaggerate the shape to mirror the stylized look in the photo. -
Sculpt the mouth:
Attach a small oval of clay below the nose. Use a needle tool to slice it horizontally, creating the separation between lips, and shape the top lip into a soft bow. -
Refine the hairline:
Apply a thin strip of clay across the top forehead area to suggest a hairline, blending the bottom edge downward but keeping the top edge slightly distinct. -
Smooth and texture:
Go over the entire surface with a damp sponge. I find leaving a few subtle tool marks adds to that hand-carved aesthetic rather than making it perfectly smooth. -
Dry thoroughly:
Allow the sculpture to dry completely. This can take 24-48 hours depending on humidity. Rotate it occasionally for even drying.
Step 3: Painting and Finishing
-
Sand the surface:
Once bone dry, lightly sand any sharp burrs or rough patches, then wipe away the dust with a barely damp cloth. -
Prime the sculpture:
Apply a coat of gesso to the face and the wooden base. This seals the clay and makes the paint colors pop. -
Apply the skin tone:
Mix a ‘sand’ or ‘buff’ color with a tiny touch of burnt sienna for warmth. Paint the entire face, avoiding the eyes and lips if you have a steady hand, or just paint over them for a base. -
Paint the bold features:
Using a fine brush, paint the lips and eyelids in a deep, brick red. Use navy blue for the eyebrows—arching them high—and the hair area at the top. -
Add outlining:
Mix a very dark brown or black paint. With your finest brush, carefully outline the eyes, the nose bridge, and the lips. This ‘cloisonné’ style outline is crucial for the illustrative effect. -
Weather the finish:
Create a watery wash of brown paint. Brush it over the skin areas and immediately wipe it back with a paper towel. This settles into the texture and creates an aged, antique look. -
Finish the base:
Paint the wooden block base a crisp, matte white to contrast with the rustic mask. -
Seal the work:
Protect your art with a coat of matte varnish to prevent fading and lock in that beautiful finish.
Level Up: Gallery Display
Instead of a plain block, mount your sculpture on a piece of driftwood or raw stone for an organic, high-end interior design aesthetic.
Now you have a timeless piece of art that looks like it belongs in a museum collection
Mini Book Nook Diorama With Sculpted Details
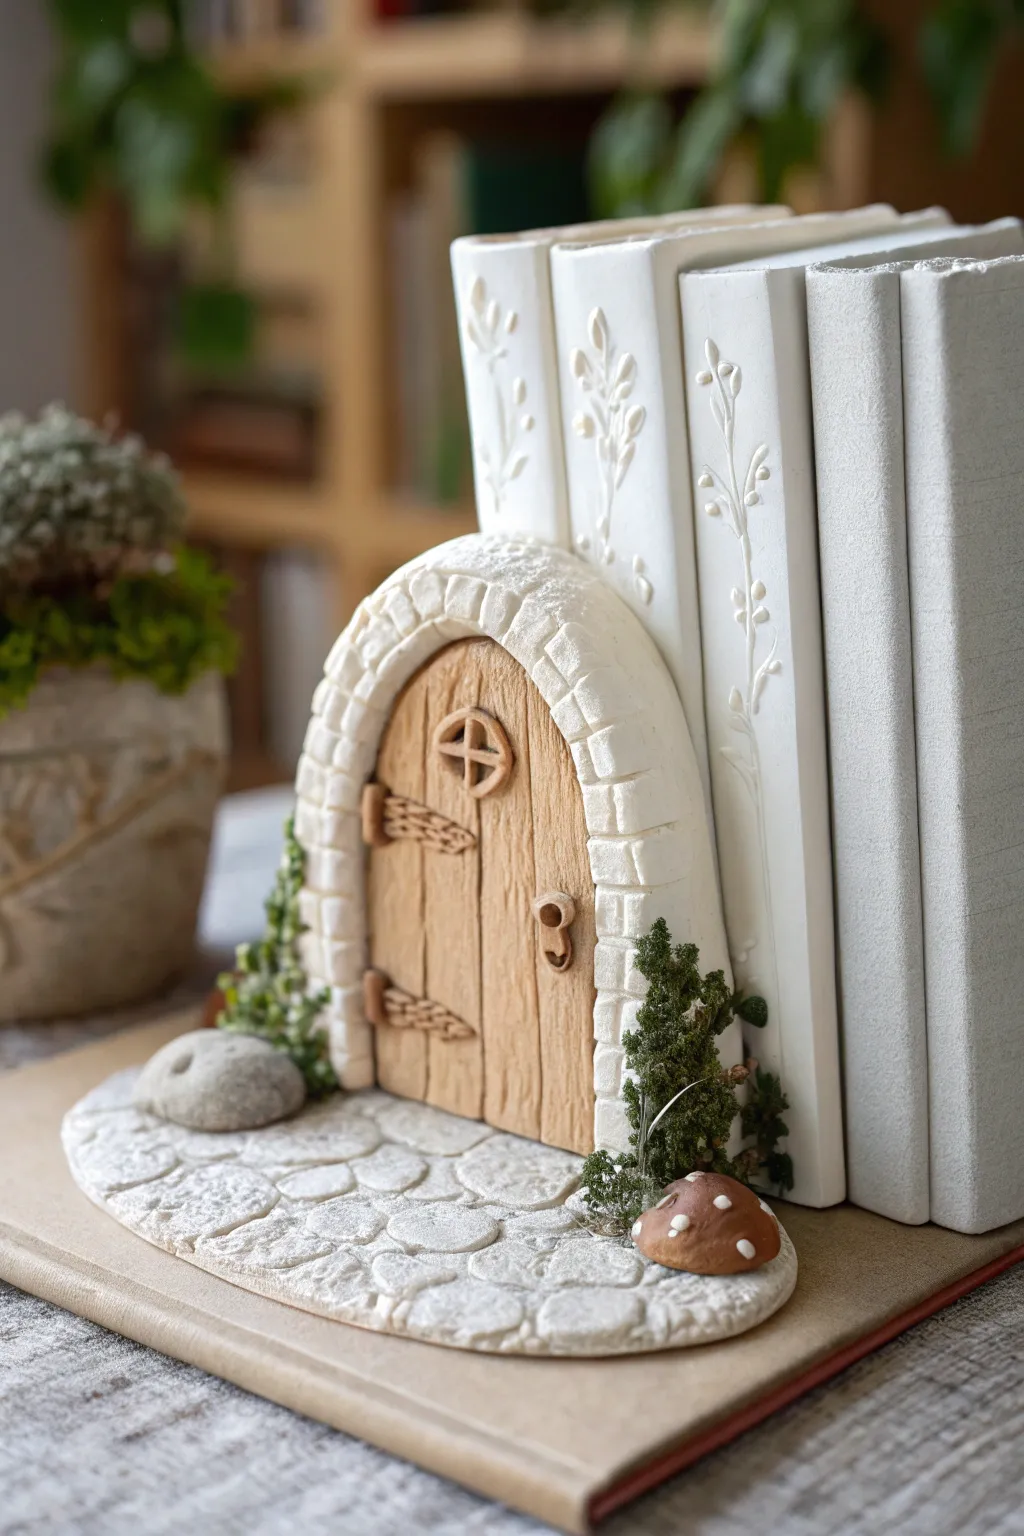
Transform a plain set of book spines into a magical portal with this charming clay relief sculpture. This project combines the texture of aged stone and wood with the clean elegance of white volumes to create a unique bookshelf insert.
Step-by-Step Tutorial
Materials
- White or light beige polymer clay
- Brown polymer clay (various shades)
- White acrylic paint
- Texturing tools (needle tool, toothbrush, ball stylus)
- Faux moss or flocking
- Rolling pin
- Strong craft glue or E6000
- Four old hardcover books (or false book blanks)
- Small pebbles or faux rocks
- Craft blade
- Matte varnish
Step 1: Preparing the Base
-
Secure the Books:
Glue four hardcover books together vertically to create a solid block. Ensure the spine edges are perfectly aligned. If you don’t want to ruin books, you use wooden blocks or false book boxes painted white. -
Prime the Surface:
Paint the spines and covers entirely white if they aren’t already. Several coats of white acrylic/chalk paint will give them that clean, plaster-like finish seen in the reference. -
Add Decorative Relief:
Using thin snakes of white clay, create delicate vine or floral patterns on the spines of the two taller books. Press them gently onto the surface so they adhere, or use a touch of liquid clay.
Step 2: Sculpting the Doorway
-
Form the Door Core:
Roll out a slab of light brown clay into an arch shape. This will be the main wooden door. Use a needle tool to score deep vertical lines to imitate wood planks. -
Detail the Wood:
Add extra texture to the ‘planks’ by scratching in wood grain knots and swirling patterns. I like to use a stiff brush to press subtle grain texture over the entire surface. -
Add Hardware:
Roll tiny bits of darker brown clay to form the window frame, hinges, and handle. Attach a small cross-hatch window near the top and two rustic strap hinges. -
Build the Stone Arch:
Roll a thick snake of white or off-white clay to frame the door. Flatten it slightly, then use a blade to impress horizontal and vertical lines, creating individual ‘stones’ or bricks. -
Texture the Stone:
Tap the surface of the clay stones with a toothbrush or a crinkled ball of aluminum foil. This removes the plastic look and mimics rough-hewn masonry.
Stone Texture Secret
For realistic white stone, mix translucent clay into your white clay (about 1:4 ratio) and add a pinch of black pepper or sand for speckled grit.
Step 3: Creating the Landscape
-
Lay the Base:
Roll a flat, irregular sheet of white clay to serve as the ground. Position this at the foot of your book block. -
Pave the Path:
Press small, flattened balls of white clay into the base to form a cobblestone path leading to the door. Vary the sizes for a natural look. -
Grout the Stones:
Gently press a texture tool between the cobblestones to define the gaps. The look should be soft and worn, not sharp. -
Sculpt the Mushroom:
Create a small mushroom cap using reddish-brown clay and a tiny white stem. Add three tiny white dots to the cap for a classic toadstool look.
Make It Glow
Install a tiny warm-white LED or fairy light behind the window grating before baking to create a cozy, inhabited feel in the evenings.
Step 4: Assembly and Finishing
-
First Assembly:
Ideally, bake your clay pieces separately according to package instructions before attaching them to the books to avoid heat damage. -
Baking:
Place the door, arch, floor base, and mushroom on a ceramic tile and bake. If using wooden blanks instead of real books, you might be able to bake directly on the wood. -
Final Glue Up:
Once cool, use strong adhesive to mount the door and arch onto the book spines. Glue the floor base underneath so the books appear to sit on the terrain. -
Add Greenery:
Apply small dabs of glue around the base of the door frame and tucked into the corners. Press clumps of dark green faux moss or flocking into the glue. -
Final Touches:
Place a smooth grey pebble near the left side of the entrance and glue the mushroom near the right side among the moss. -
Seal:
Brush a light coat of matte varnish over the clay parts (especially the path) to protect them and unify the sheen.
Now you have a secretive little world nestled right on your shelf that invites imagination every time you walk by