When you want something that looks seriously cool but doesn’t demand perfect drawing skills, clay is the best kind of magic. I’m sharing my favorite easy clay sculpture ideas that come together with simple shapes, fun texture, and a little personality.
Pinch-Pot Monster Buddy
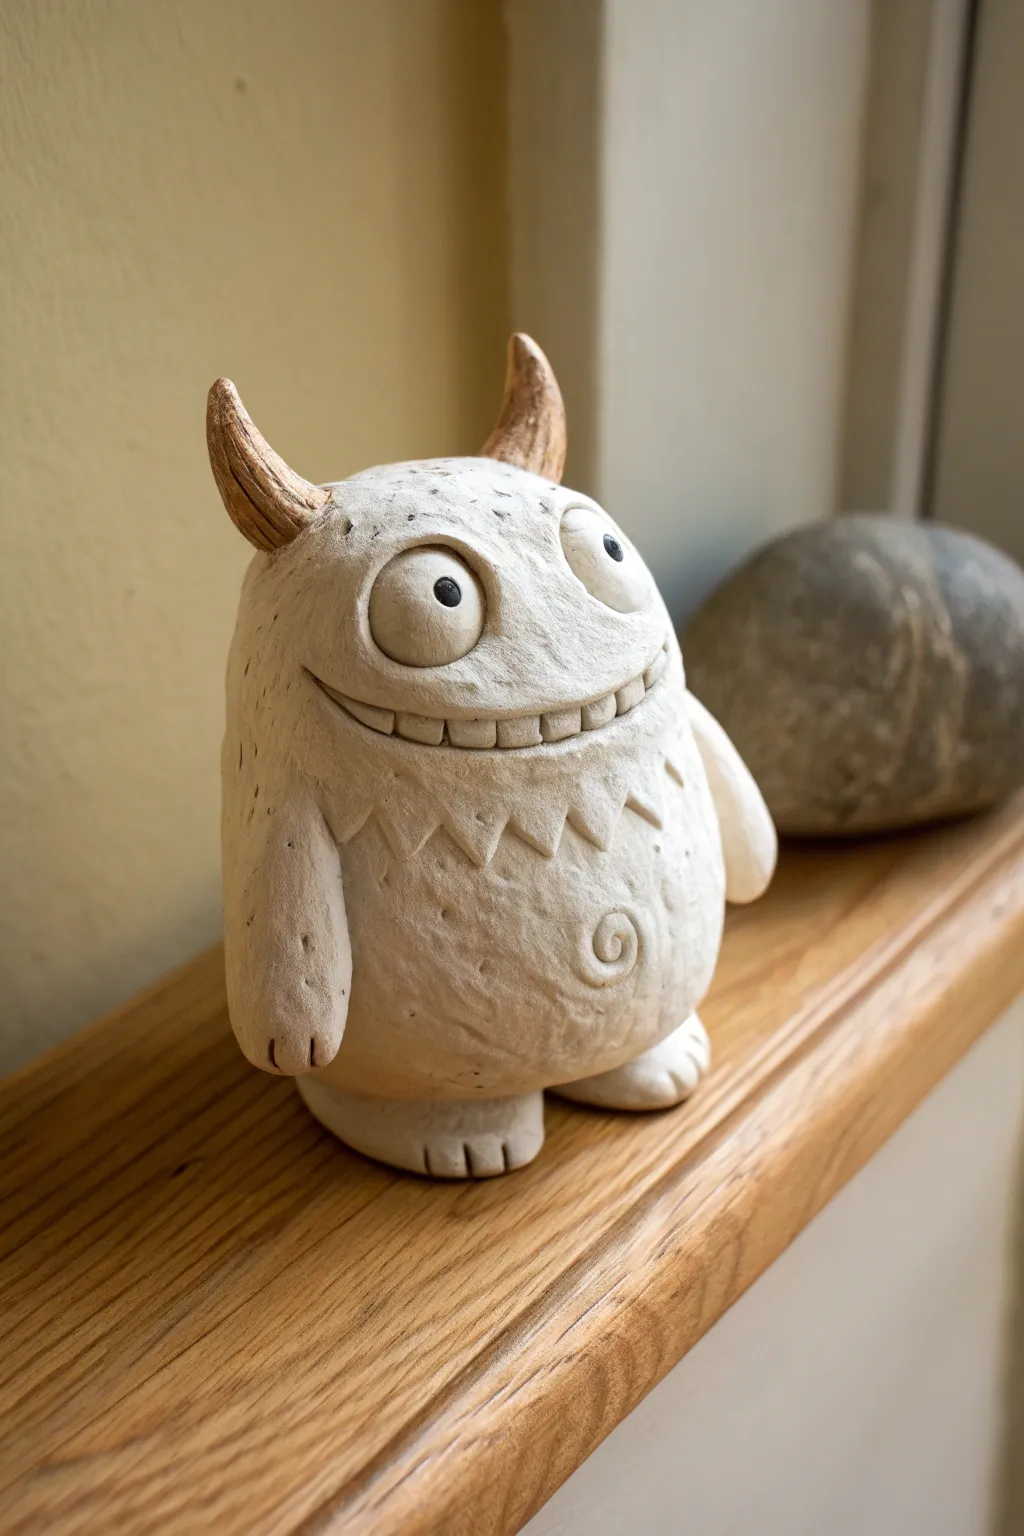
This delightful monster buddy starts life as a simple ball of clay and transforms into a character full of personality. With his wide, toothy smile, textured horns, and swirly belly button, he makes a perfect desk companion or shelf sitter.
Step-by-Step Guide
Materials
- Air-dry clay or polymer clay (white/neutral tone)
- Small dab of brown acrylic paint or clay slip (for horns)
- Black acrylic paint (for pupils)
- Modelling tools (needle tool, small loop tool)
- Small cup of water (for smoothing)
- Paintbrush (fine tip)
- Toothbrush or textured sponge (optional)
Step 1: Forming the Body
-
Create the Base:
Start with a large ball of clay roughly the size of a tennis ball. Gently push your thumb into the center to begin a pinch pot, rotating the clay as you pinch the walls to an even thickness. -
Close the Form:
Instead of leaving the pot open, gently curve the walls inward until they meet at the top. Seal the seam completely to create a hollow, enclosed egg shape. -
Shape/Flatten:
Tap the bottom of your egg shape on your work surface to create a flat base so the monster stands securely. Gently pat the sides to make him a bit stout and chubby.
Don’t Trap Air!
When closing your hollow pinch pot, ensure you poke a pinhole in the bottom. This allows hot air to escape during baking (polymer) or prevents cracking while drying (air-dry).
Step 2: Sculpting the Face
-
Carve the Mouth:
Use a needle tool or knife to slice a wide, curved line across the middle of the ‘face’ area for the mouth smile. Don’t cut all the way through; just create a deep groove. -
Open the Grin:
Press a modelling tool gently into the groove to widen it slightly, creating space where the teeth will eventually go. -
Add Teeth:
Roll a very thin snake of clay and press it into the mouth groove. Use a knife tool to press vertical lines into this strip, defining individual square teeth. -
Attach the Eyes:
Roll two medium-sized balls of clay. Score and slip the back of each ball and the forehead area, then press them firmly onto the face just above the mouth. -
Define Eyelids:
Roll two thin coils of clay. Wrap one over the top of each eyeball to create heavy eyelids, blending the top edge of the coil seamlessly into the head. -
Pupil Details:
Use the rounded end of a paintbrush handle to press small indentations into the center of each eye.
Step 3: Adding Character Details
-
Make the Horns:
Roll two cone shapes. Gently curve them so they look organic. If you are using polymer clay, you can mix a tiny bit of brown into the white for a marble effect, or paint them later. -
Attach Horns:
Score the top of the monster’s head and the base of the horns. Press them on securely, blending the clay at the seam so they look like they are growing out of the skull. -
Create Texture:
Using a needle tool, scratch vertical lines up the length of the horns to give them a rough, wood-like texture. -
Add Arms:
Roll two thick, short sausage shapes. Attach them vertically to the sides of the body. Blend the top shoulder area completely into the body, leaving the bottom hanging slightly free. -
Make Fingers:
Use a knife tool to make two small cuts at the end of each arm to suggest simple fingers or claws. -
Feet placement:
Create two flat, oval pads for feet. Attach them under the front edge of the monster’s body. Add toe lines similar to the fingers.
Make Him Fuzzy
Before baking or drying, use a needle tool to make hundreds of tiny, shallow scratches all over the body instead of the stone texture. This creates a cute ‘fur’ effect.
Step 4: Finishing Touches
-
The Belly Swirl:
Roll a tiny coil of clay into a spiral shape. Press this gently into the center of the tummy as a stylized belly button. -
Neck Fringe:
Roll a thin coil and flatten it. Cut triangles out of one edge to make a zigzag pattern. Attach this under the chin area like a collar or fur tuft. -
Surface Texture:
Lightly tap a clean toothbrush or crumpled foil over the main body (avoiding eyes and horns) to create a subtle, stone-like skin texture. -
Painting Pupils:
Once dry (if air-dry) or baked (if polymer), use a fine brush to paint the inside of the pupil indentations black. -
Horn Tinting:
Mix a watery brown wash of acrylic paint. Brush it over the horns and immediately wipe most of it off, leaving color only in the textured crevices.
Place your new smiling friend on a shelf where he can keep an eye on things


Round Penguin Pal
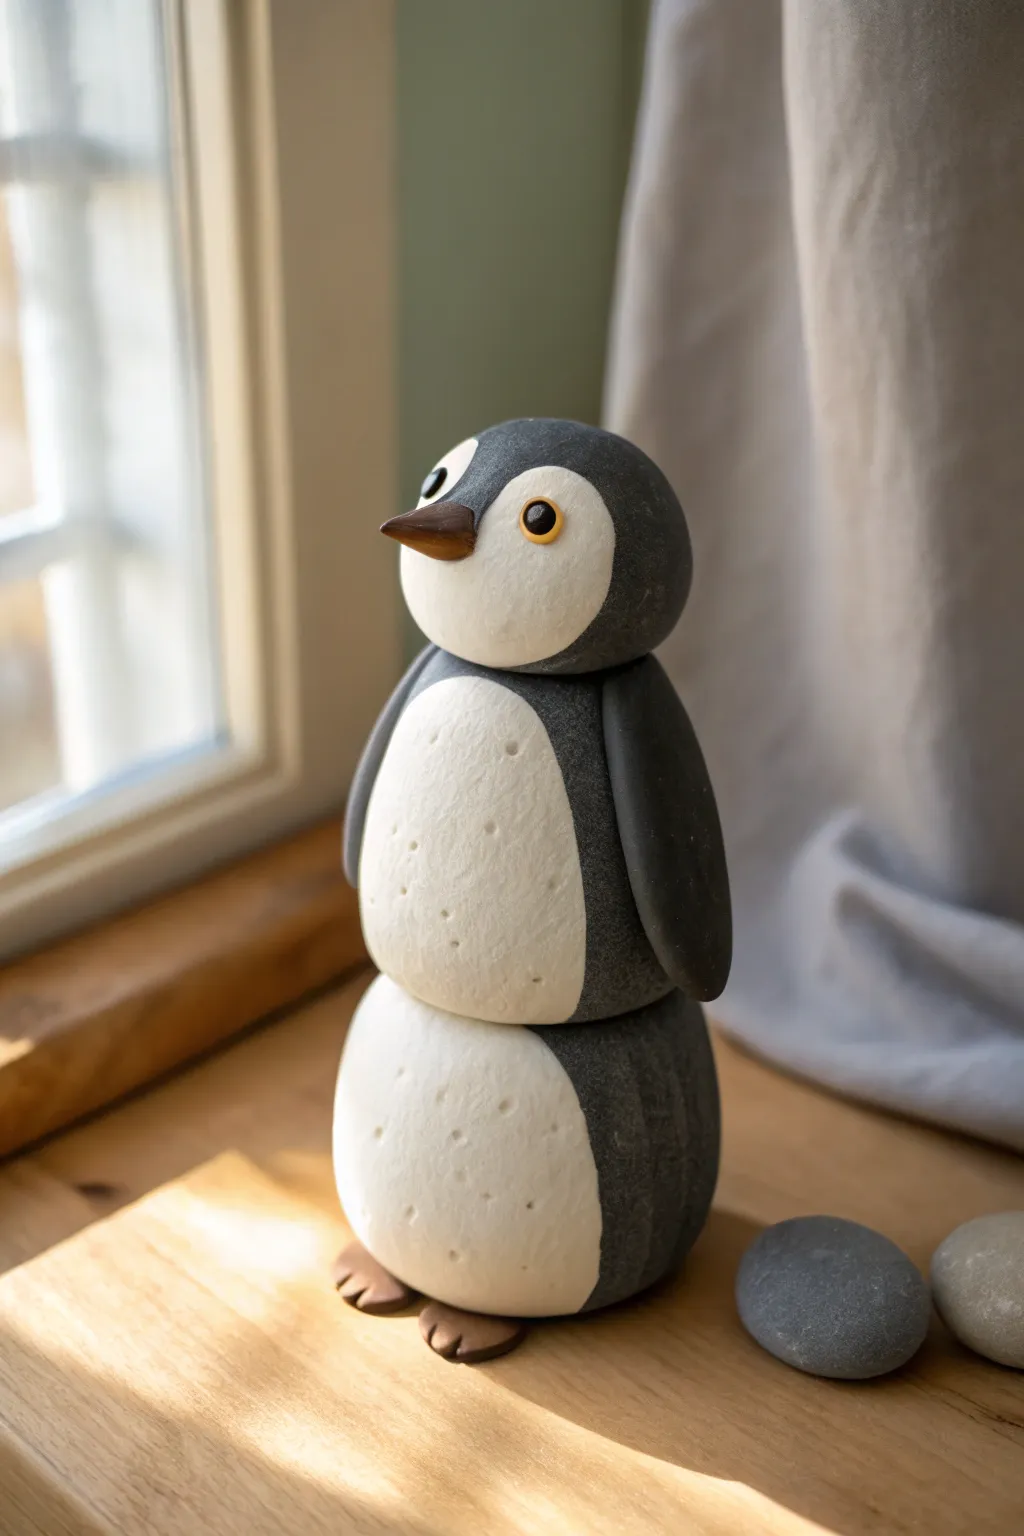
This adorable penguin uses simple geometric shapes and a stacking technique to create a charming, minimalist sculpture that looks almost like smooth river stones. The textured matte finish gives it a professional, organic look perfect for decorating a windowsill.
Step-by-Step
Materials
- Polymer clay (black, white, orange/brown)
- Aluminum foil (for armature core)
- Needle tool or toothpick
- Soft clay blending tool or silicone shaper
- Texturing tool (toothbrush or stiff bristle brush)
- Baking sheet and parchment paper
- Clay adhesive or liquid polymer clay (optional)
- Sculpting wire (optional for stability)
Step 1: Forming the Base Structure
-
Create the core armatures:
Start by crumpling aluminum foil into three distinct balls: a larger one for the base (about the size of a tangerine), a slightly smaller one for the middle, and a small one for the head (about the size of a walnut). Compress them tightly to remove air pockets. -
Condition the clay:
Take your black clay and knead it thoroughly until it is soft and pliable. Roll out three sheets of black clay, roughly 1/4 inch thick. -
Wrap the foil shapes:
Wrap each foil ball completely in the black clay sheets. Smooth the seams by gently rubbing them with your thumb until the balls are perfectly round and seamless. -
Flatten the contact points:
Gently tap the large ball on your work surface to create a flat bottom. Press the top slightly to flatten it. Do the same for the top and bottom of the middle ball, and just the bottom of the head piece. This ensures they stack securely without rolling.
Leaning Tower of Penguin?
If your rounded sections keep sliding off each other while raw, insert a piece of uncooked spaghetti or a toothpick through the center of all three balls to hold them perfectly aligned while baking.
Step 2: Adding the White Bellies
-
Prepare the white clay:
Condition your white clay and roll it into a thin sheet. Use a circular cutter or a knife to cut out two oval shapes—one larger for the bottom section and a slightly smaller one for the middle section. -
Attach the belly patches:
Press the white ovals onto the front of the bottom and middle black spheres. Use your thumbs to gently smear the edges of the white clay outward so it sits flush with the black clay rather than looking like a sticker on top. -
Shape the face mask:
For the head, create a heart-shaped piece of white clay with a rounded bottom. Attach this to the face area of the smallest sphere, wrapping it slightly around the sides where the eyes will go. -
Texture the feathers:
Before stacking, take an old toothbrush or a stiff bristle brush and gently tap it all over the white parts of the clay. This stippling creates a fluffy, feather-like texture that contrasts nicely with the smooth black clay.
Matte Finish Magic
To get that soft, stone-like quality seen in the photo, lightly sand the baked black clay with fine-grit sandpaper (1000 grit) under water. It removes the plastic shine.
Step 3: Assembly and Features
-
Stack the body:
Stack the three sections: large on bottom, medium in middle, head on top. If needed, insert a small piece of wire or use a dab of liquid clay between layers to secure them permanently. -
Sculpt the wings:
Shape two long, teardrop pieces of black clay. Flatten them slightly and curve them to fit the contour of the body. Attach these to the sides of the middle section, pointing downward. -
Add the feet:
Create two small, flat triangles from brown clay. Use a knife tool to mark two indentations on the front edge of each to denote toes. Slide these under the front of the bottom sphere so they peek out just slightly. -
Form the beak:
Roll a small cone of brownish-orange clay. Press it gently onto the center of the white face mask. I like to curve distinctively downward slightly to give the penguin a bit of character. -
Insert the eyes:
Use a ball tool to make two small indentations in the white face mask. Place tiny balls of yellow or orange clay inside, then add even tinier pupils of black clay to the center. -
Final texture check:
Inspect your sculpture for fingerprints. Smooth any unwanted marks on the black clay with a drop of baby oil on your finger, or re-texture the white areas if you accidentally smoothed them. -
Bake:
Bake the sculpture according to your clay manufacturer’s instructions (usually 275°F or 130°C for 15-30 minutes per 1/4 inch of thickness). Let it cool completely before handling.
Place your new chilly friend near a window for the best light on those textured feathers


Sleepy Cat Loaf Sculpture
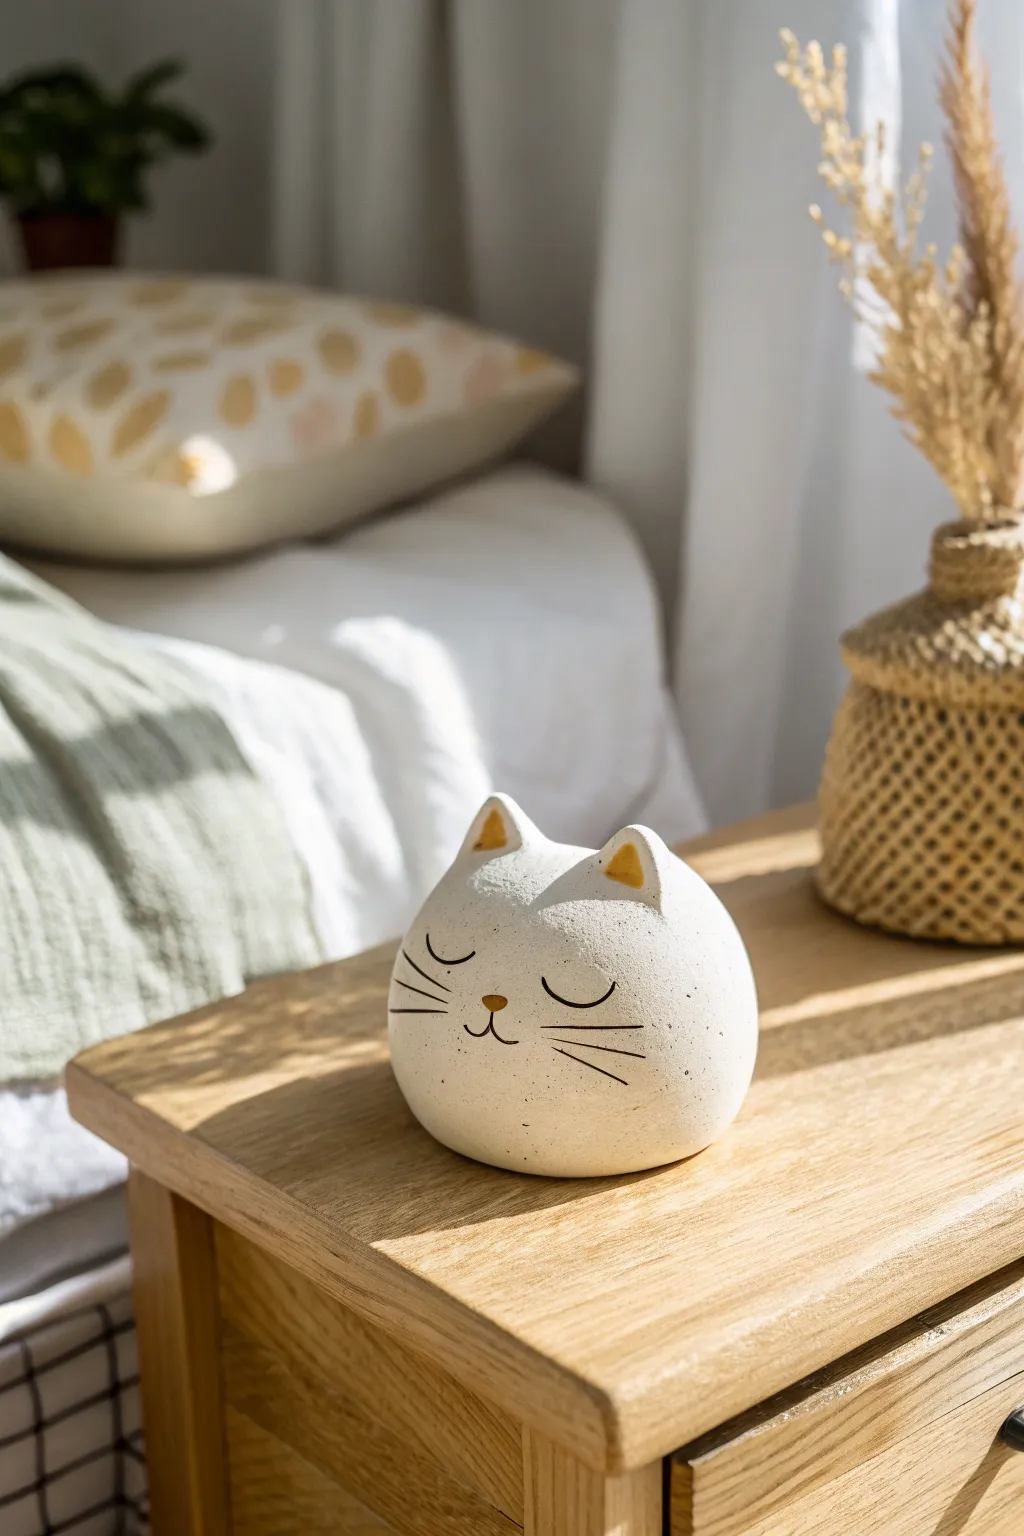
Create a calming piece of decor with this minimalist, Japanese-inspired cat sculpture. Its smooth, rounded form and speckled finish give it a charming ceramic feel, making it the perfect guardian for your bedside table.
Detailed Instructions
Materials
- Air-dry clay (white) or polymer clay
- Rolling pin
- Clay sculpting tools (needle tool, smoothing tool)
- Water and sponge (for smoothing)
- Aluminum foil (for armature)
- Acrylic paints (black, mustard yellow)
- Fine detail paintbrush
- Matte sealant or varnish
- Old toothbrush (for speckling)
- Brown watercolor or diluted brown acrylic (for speckling)
Step 1: Forming the Base
-
Create the core:
Crumple a piece of aluminum foil into a tight ball, slightly flattened at the bottom to create a ‘loaf’ shape. This saves clay and helps the sculpture dry evenly. -
Roll out the clay:
Roll your white clay into a sheet about 1/4 inch thick. Make sure it’s large enough to cover your foil core completely. -
Cover the armature:
Drape the clay sheet over the foil ball. Gently press and mold the clay around the form, sealing it at the bottom. -
Smooth the surface:
Using a little water on your fingertips or a sponge, smooth out any seams or fingerprint marks until the dome is perfectly round and seamless. -
Basic shaping:
Gently gently press the sides to ensure it isn’t a perfect sphere; you want a slightly flattened, organic oval shape that sits stable on a flat surface.
Cracks while crying?
If small cracks appear as the clay dries, mix a tiny amount of clay with water to make a paste (slip) and fill the cracks, then smooth over.
Step 2: Sculpting Details
-
Make the ears:
Pinch off two small, equal-sized pieces of clay. Roll them into balls and then shape them into small triangles. -
Attach the ears:
Score the bottom of the ears and the top of the head where you want them to sit. Add a dab of water (or slip) and press them firmly into place. -
Blend the seams:
Use a sculpting tool or your finger to smooth the clay from the base of the ears down into the head so they look like one continuous piece. -
Refining ear shape:
Use your thumb to gently press an indentation into the front of each ear to give them depth and a natural cat-ear curve. -
Final smoothing:
Give the entire piece one last pass with a damp sponge to effectively erase any tool marks before drying. -
Drying time:
Let the sculpture dry completely. For air-dry clay, this usually takes 24-48 hours depending on thickness and humidity.
Step 3: Painting and Finishing
-
Sand for smoothness:
Once fully dry, lightly sand any rough spots with fine-grit sandpaper to achieve that ceramic-smooth texture. -
Paint the inner ears:
Using a small brush and mustard yellow acrylic paint, carefully fill in the triangular indentation of the ears. -
Sketch the face:
Lightly sketch the facial features with a pencil first to ensure symmetry. Place the nose halfway down the face and draw wide, U-shaped sleeping eyes. -
Paint the features:
With a very fine detail brush and black acrylic, paint the closed eyelids, the small mouth, and three long whiskers on each cheek. Paint a tiny triangular nose in yellow. -
Create the speckled effect:
Dip an old toothbrush into diluted brown paint. Run your thumb over the bristles to flick tiny specks onto the sculpture. I like to practice on paper first to control the spray. -
Clean up:
If any specks land on the painted face details where you don’t want them, quickly wipe them away with a damp Q-tip. -
Seal the work:
Apply a coat of matte varnish or sealant to protect the paint and give the piece a finished, professional look.
Try a Function
Before drying, carve a slot in the top center of the head to turn this sculpture into a cute photo holder or business card stand.
Now you have a peaceful little companion to bring a sense of calm to any corner of your room


Mini Turtle With Stamped Shell
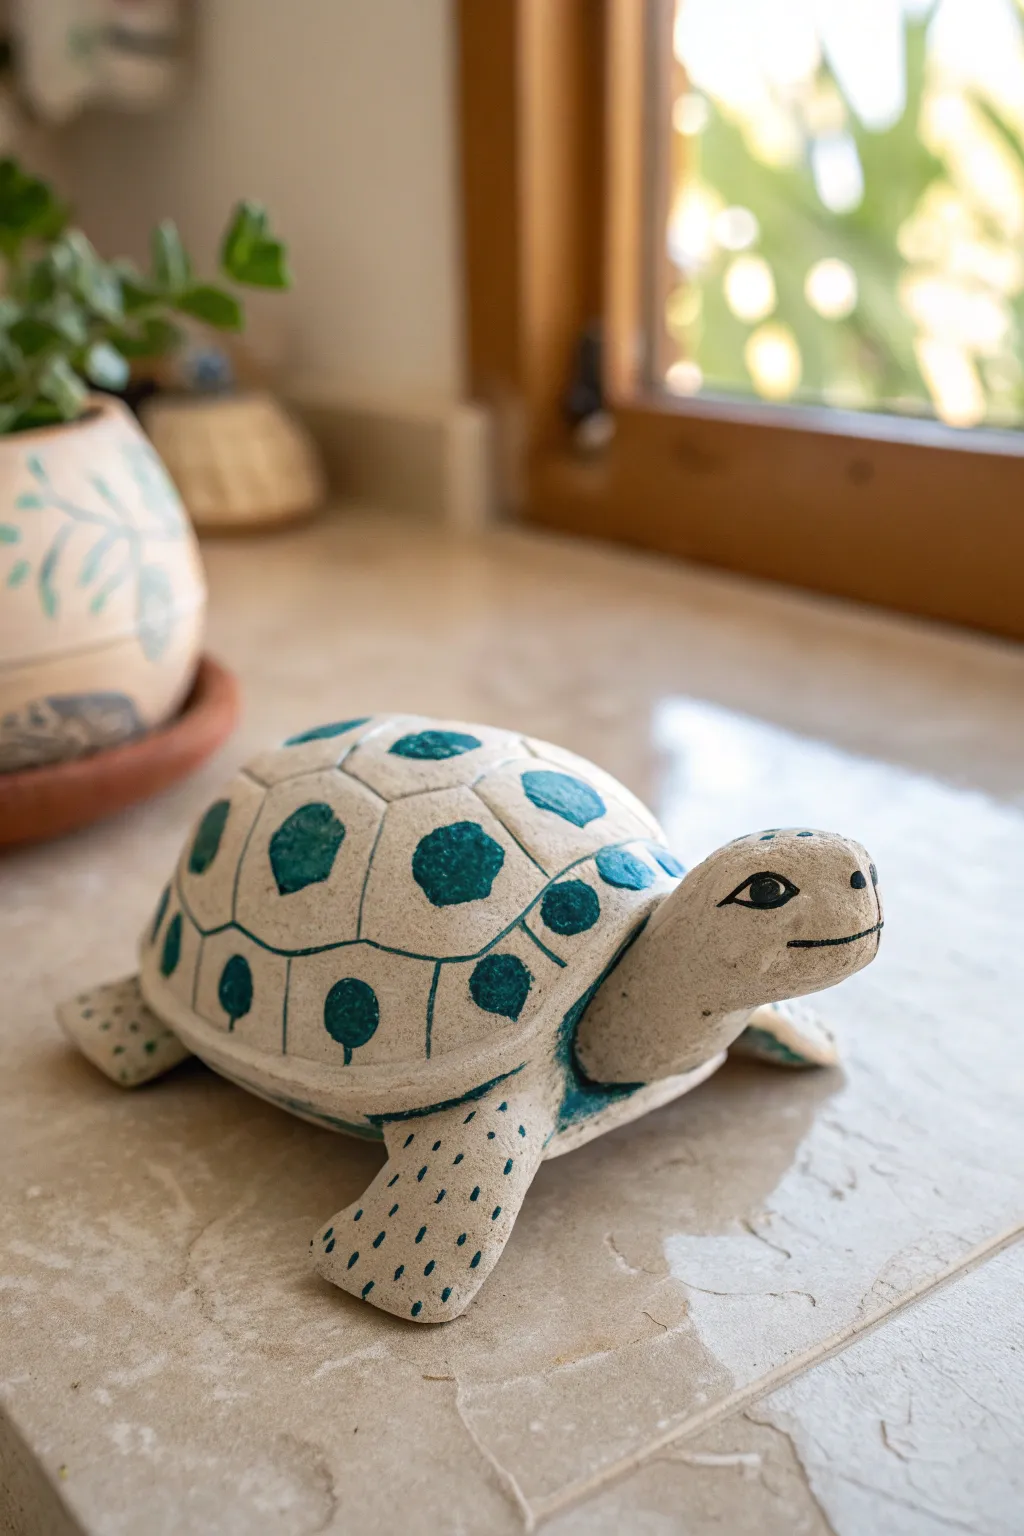
Create a charming companion for your potted plants with this stylized clay turtle, featuring a unique stamped shell pattern and delicate teal accents. The rustic, handcrafted finish comes from a simple whitewash technique that highlights the texture of the clay while letting touches of raw earth peek through.
Step-by-Step Tutorial
Materials
- White or light grey air-dry clay (or polymer clay)
- Teal or turquoise acrylic paint
- Black fine-point marker or acrylic paint
- Sculpting tools (needle tool, small ball tool)
- Small round object for stamping (pen cap, marker end, or dowel)
- Water cup and sponge
- Fine grit sandpaper
- Matte varnish (optional)
Step 1: Sculpting the Base Structure
-
Form the shell:
Start by rolling a ball of clay roughly the size of a tangerine. Gently press it onto a flat surface to create a dome shape, smoothing out any cracks with a little water on your finger. -
Shape the head and neck:
Roll a smaller cylinder of clay for the head. One end should be rounded for the face, while the other tapers slightly to attach to the body. Curve the neck upward slightly to give the turtle an alert, curious posture. -
Create the flippers:
Fashion four flat, paddle-like shapes for the flippers. The front pair should be slightly larger and longer than the back pair, bent slightly to create a sense of movement. -
Slight tail:
Roll a tiny cone shape for the tail. -
Assemble the body:
Score the clay (scratch cross-hatch marks) where the limbs, head, and tail will join the shell. Apply a tiny bit of water or liquid clay (slip) as glue and press the pieces firmly together. Smooth the seams with a modeling tool so it looks like one cohesive piece.
Step 2: Detailing the Shell
-
Define the scutes:
Using a needle tool or a dull knife, lightly carve the hexagonal pattern of the turtle’s shell. Start with a central row of hexagons running down the spine, then add the surrounding shapes to fill the dome. -
Stamp the texture:
Take your small round stamping tool (like the back of a pen) and press firmly into the center of each carved hexagon. You want a distinct circular impression in every segment. -
Detail the rim:
Around the bottom edge of the shell (the marginal scutes), press smaller indentations or simply carve a defining line to separate the main shell from the rim. -
Texture the flippers:
Use a needle tool to poke rows of small dots along the flippers. These should look like tiny scales, running in lines down the length of each limb. -
Refine the face:
Carve a simple slit for the mouth, curving it up slightly at the ends for a smile. Use a small ball tool to indent the eye sockets. -
Dry the sculpture:
Set your turtle aside to dry completely. If using air-dry clay, this usually takes 24-48 hours depending on thickness. I find rotating it occasionally helps the bottom dry evenly.
Cracking Up?
If you see small cracks forming as the clay dries, don’t panic. Mix a tiny bit of fresh clay with water to make a paste and smooth it into the cracks with your finger.
Step 3: Painting and Finishing
-
Sand imperfections:
Once fully dry, gently sand any rough fingerprints or sharp edges with fine-grit sandpaper. Wipe away the dust with a slightly damp sponge. -
Paint the impressions:
Load a small brush with teal or turquoise acrylic paint. Paint specifically inside the stamped circles on the shell and the scute separation lines. -
Wipe back technique:
Before the paint dries completely, use a damp cloth to wipe the surface. This leaves the teal color deep in the crevices and stamped holes but cleans it off the raised surfaces, creating that weathered, inlaid look. -
Detail the flippers:
Using a very fine brush or the tip of a toothpick, carefully dab teal paint into the tiny poked holes on the flippers. -
Add facial features:
Use a black fine-point marker or black paint to draw the eyes. Make an almond shape with a solid pupil, and carefully trace the mouth line to make the smile pop. -
Final touches:
If you want a bit more contrast, you can dilute some teal paint with water and wash it over the neck and underbelly, wiping most of it off immediately for a faint tint. -
Seal the work:
Protect your turtle with a coat of matte varnish. This will seal the paint and clay, making it more durable without adding an unnatural shine.
Pro Stamp Tip
Test your stamping tool on a scrap piece of clay first. Different items create different depths and wall textures, so find the one that gives the cleanest circle.
Place your little shelled friend on a windowsill or shelf where the light can catch those lovely teal details

The Complete Guide to Pottery Troubleshooting
Uncover the most common ceramic mistakes—from cracking clay to failed glazes—and learn how to fix them fast.
Puffer Fish With Poked Texture
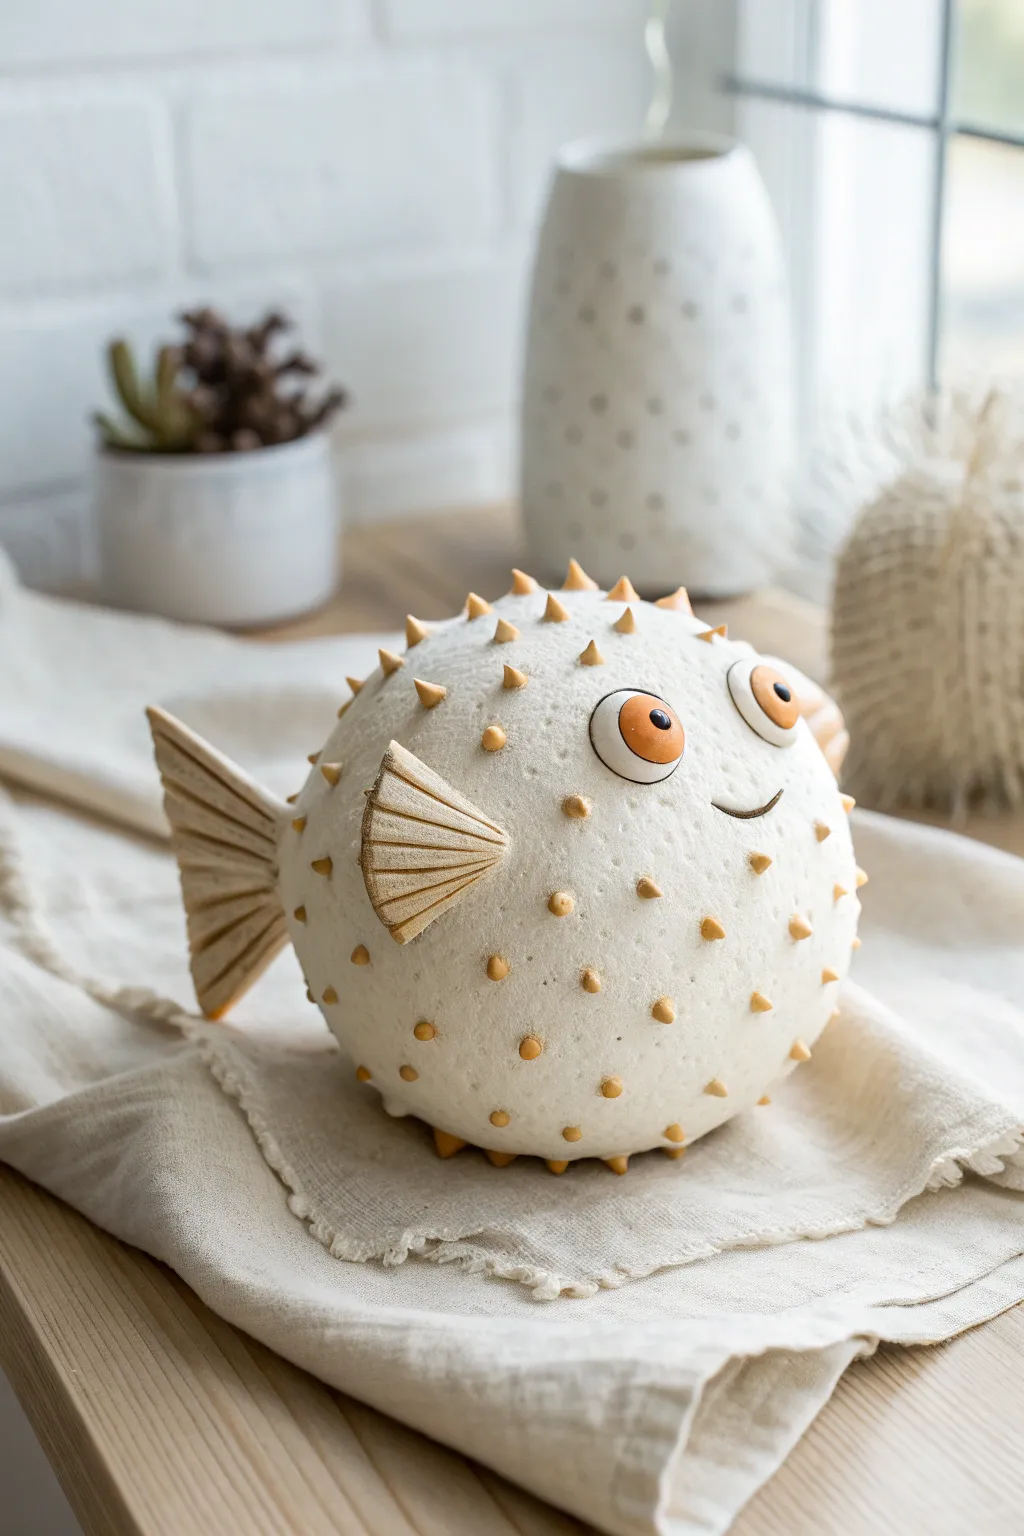
Transform a simple sphere of clay into a charming puffer fish bursting with personality. This project uses basic coil and slab techniques combined with a clever texture hack to create a whimsical sea creature that looks great on any shelf.
Step-by-Step
Materials
- Air-dry clay or polymer clay (white or cream)
- Clay sculpting tools (needle tool, modeling tool)
- Rolling pin
- Water and a small sponge (for smoothing)
- Small amount of orange/tan clay (or acrylic paint)
- Black clay (or black paint/beads)
- Fine grit sandpaper
- Pointed shaping tool or toothpick
Step 1: Forming the Body
-
Roll the base:
Start with a large chunk of your white clay and roll it into a clean, smooth ball. It should be slightly larger than a softball. Tap the bottom gently against your table to create a small flat spot so it sits without rolling away. -
Smooth the surface:
Dip your fingers or a sponge in a tiny bit of water and rub the surface to remove any cracks or fingerprints. You want a matte, stone-like finish for the base. -
Create the spike cones:
Take small pinches of the same white clay and roll them into many tiny cones—you will need about 40-50 of them. These will form the base of your spikes. -
Attach the cones:
Score the back of each cone and slip it onto the body (if using air-dry clay) or press firmly (if using polymer). Distribute them evenly all over the body, leaving the face area clear. -
Blend the seams:
Use a modeling tool to smooth the base of each cone into the main body sphere so they look like they are growing out of the skin, not just stuck on top.
Clean Connections
When attaching the spikes, dipping your tool in water helps blend the clay seams invisibly without leaving tool marks on the round body.
Step 2: Adding Details
-
Sculpt the side fins:
Flatten a piece of clay into a thick triangle shape. Use a needle tool or knife to carve deep, fan-like grooves into the surface to mimic the ribbed texture of a fin. -
Attach the fins:
Score and slip the fins onto the sides of the body, just behind where the face will be. Angle them slightly backward for a streamlined look. -
Make the tail:
Create a larger, fan-shaped triangle for the tail fin. Repeat the same deep grooving technique to match the side fins. -
Mount the tail:
Attach the tail to the center back of the sphere. You may need to prop it up with a small object while the clay dries or sets to keep it upright. -
Form the eyes:
Roll two large flat discs of white clay and press them onto the upper front of the face. They should be quite large to achieve that cartoonish look. -
Add the iris and pupil:
Place a smaller orange disc on top of the white eye base, and then a tiny black dot in the center. Adding a microscopic white speck for a highlight really brings them to life. -
Carve the mouth:
Using a curved tool or a straw cut in half, press a simple, happy smile into the clay just below the eyes.
Glow Up
Mix a tiny bit of phosphorescent powder into the white clay for the eyes to make your puffer fish glow in the dark at night.
Step 3: Refining Texture & Finish
-
Texture the skin:
Take a stiff bristle brush or a needle tool and gently poke or stipple the white skin area between the spikes. This gives it that rough, realistic puffer fish texture rather than being perfectly smooth. -
Form the sharp tips:
For the orange tips, take tiny bits of orange clay (or paint them later) and form very sharp, small points. Attach these to the very tops of your white cones. -
Enhance the fins:
Lightly brush a diluted brown wash or use tan clay to accentuate the grooves in the fins and tail, making them look almost like carved wood. -
Final smooth:
Check over the whole piece for any unwanted jagged edges (except the spikes!) and smooth them down with a damp finger. -
Dry or bake:
I usually let air-dry clay sit for at least 48 hours for a piece this thick. If using polymer, bake according to the package directions.
Place your finished puffer fish near a window to let natural light highlight those fantastic textures you created
Snail With Bold Spiral Shell
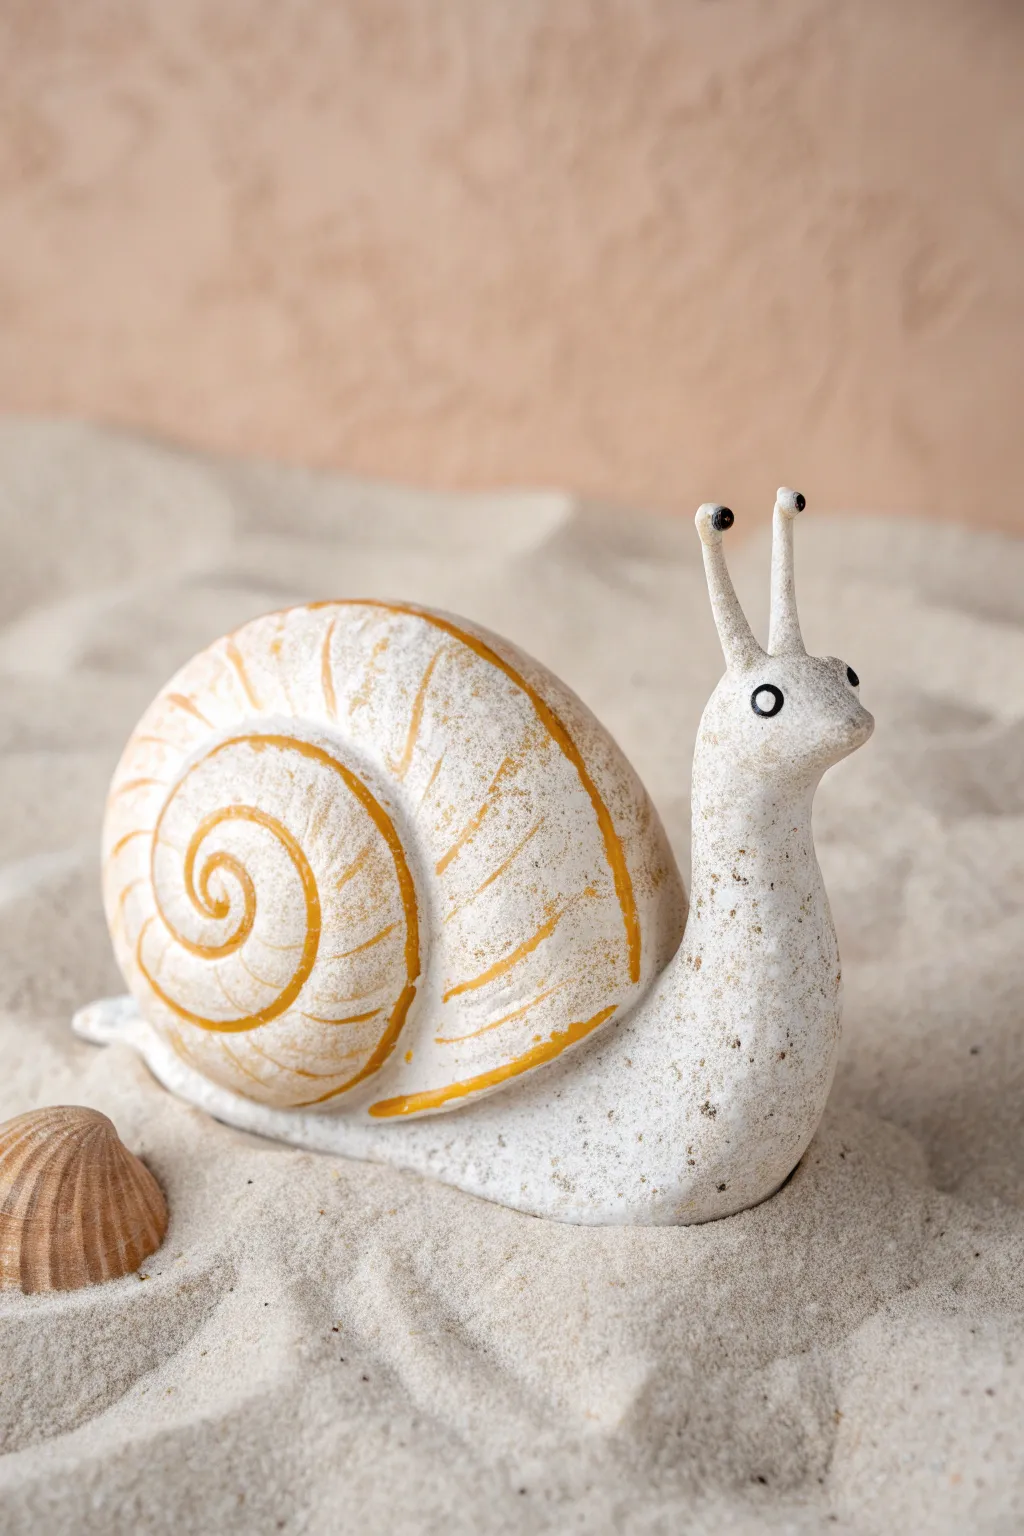
This charming snail sculpture captures a whimsical, folk-art style with its simplified shape and bold yellow spiral. The finished piece mimics the look of weathered stone, making it a perfect addition to a garden pot or bookshelf display.
Step-by-Step Tutorial
Materials
- Air-dry clay (white or light grey)
- Acrylic paints (white, antique white/cream, golden yellow, black)
- Fine-grit sandpaper
- Sculpting tools (needle tool, smoother)
- Small paintbrush
- Stiff-bristled brush (for spattering)
- Gloss varnish (optional for eyes)
- Water cup and sponge
Step 1: Forming the Body
-
Create the base:
Start with a lump of clay about the size of a lemon. Roll it into a thick log shape, tapering one end slightly to create the tail. -
Lift the neck:
On the non-tapered end, gently pinch and pull the clay upward to form the snail’s neck and head. The transition should be smooth and curved, resembling an ‘L’ shape. -
Shape the face:
Refine the head by slightly flattening the sides and pulling the very front into a small, pointed snout. -
Add the eye stalks:
Roll two very small, thin coils of clay. Attach them to the top of the head using a drop of water and blending the clay at the base so they stand upright. Add tiny balls to the tips for the eyes. -
Flatten the back:
Press a small indentation into the center of the snail’s back where the shell will sit. This creates a cradle so the shell doesn’t roll off later.
Cracks Appearing?
If you see small cracks forming as the clay dries, mix a tiny bit of fresh clay with water to make a paste. Fill the cracks, smooth with a finger, and let it dry again.
Step 2: Sculpting the Shell
-
Form the shell sphere:
Roll a second ball of clay, slightly larger than the body section. Flatten it just a little so it looks more like a bun than a perfect sphere. -
Carve the spiral:
Using a needle tool or a dull pencil, carve a deep, continuous spiral groove starting from the center of the shell and winding outward to the edge. -
Add ribbing texture:
Inside the spiral grooves you just carved, use your tool to gently scratch shorter, perpendicular lines. This gives the shell that organic, segmented look. -
Attach the shell:
Score the bottom of the shell and the indentation on the body (scratch cross-hatch marks). Apply a little water or slip, then press the shell firmly onto the body. -
Smooth the join:
Use a small amount of fresh clay or your smoothing tool to blend the underside of the shell into the body so it looks like one solid piece. -
Dry completely:
Let the sculpture dry for at least 24-48 hours. I prefer to turn it over halfway through so the bottom dries evenly.
Make it Heavy
To make your snail feel like real stone, sculpt the body around a smooth, heavy rock. This adds weight and saves you from using a huge amount of clay.
Step 3: Painting and Finishing
-
Base coat:
Paint the entire snail with a mix of white and a tiny drop of antique cream. You want an off-white, stony base color. -
Accent the spiral:
Mix a golden-yellow acrylic paint. Using a fine brush, carefully paint inside the deep spiral groove you carved earlier. -
Distress the paint:
Before the yellow paint dries completely, wipe the surface lightly with a damp paper towel. This keeps the color in the deep grooves but cleans the raised areas. -
Create the stone texture:
Dilute a tiny amount of black or dark brown paint with water. Dip a stiff-bristled brush (or toothbrush) into it and flick the bristles to spatter tiny speckles over the whole snail. -
Paint the eyes:
Use a small dot of black paint for the pupils on top of the stalks. Place larger black circles on the sides of the head for the main eyes, adding a tiny white highlight dot to each. -
Final touches:
If you want the eyes to look wet, add a drop of gloss varnish just to the black painted areas once everything is dry.
Place your stone snail in a sunny spot where the light can catch the texture of the shell


What Really Happens Inside the Kiln
Learn how time and temperature work together inside the kiln to transform clay into durable ceramic.
Chubby Dino With Tiny Arms
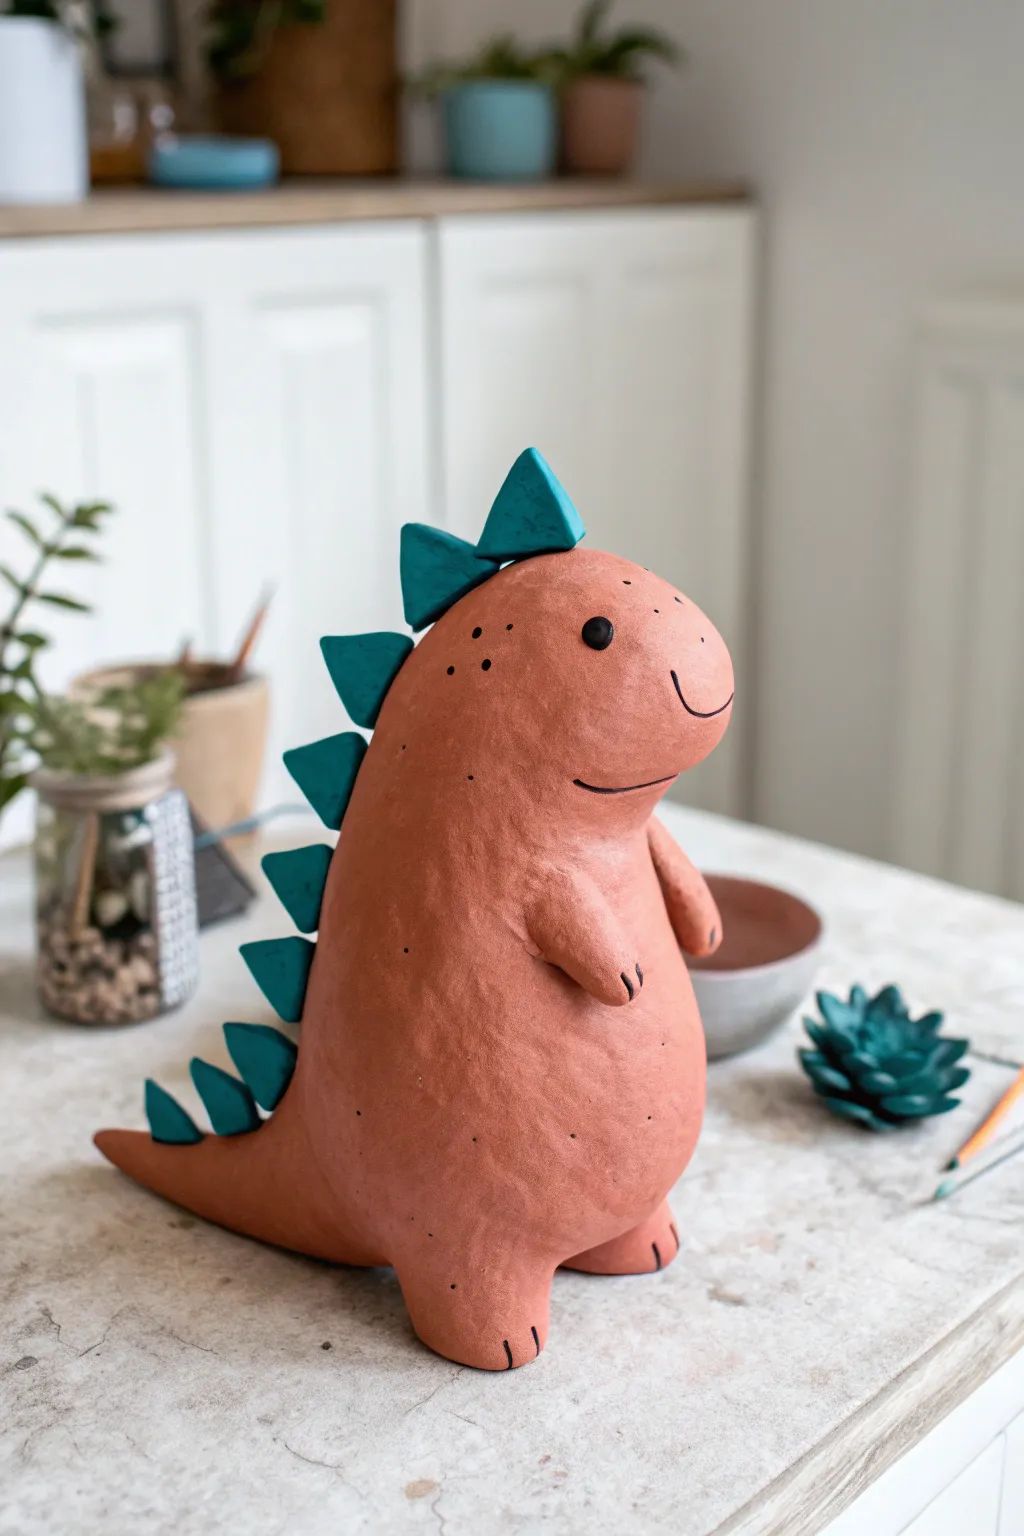
This adorable dinosaur sculpture features a wonderfully round, textured body and distinct teal spikes that pop against the earthy reddish-brown clay. The simple, charming expression and intentionally small arms give this prehistoric friend a gentle, huggable personality perfect for a shelf or desk.
How-To Guide
Materials
- Air-dry clay (terra cotta color) or polymer clay
- Air-dry clay (teal/green) or acrylic paint
- Rolling pin
- Clay sculpting tools (specifically a needle tool and a smoothing tool)
- Black fine-point marker or black acrylic paint with a fine brush
- Water bonding slip (water mixed with a little clay)
- Aluminum foil (for armature core)
- Matte sealant spray
Step 1: Shaping the Base
-
Create the core:
Crumple a piece of aluminum foil into a fat pear shape. This will act as the armature, saving clay and keeping the sculpture from getting too heavy. -
Wrap the foil:
Roll out a slab of your terra cotta colored clay to about 1/4 inch thickness. Wrap this smoothly around your foil core, pressing the seams together until they disappear. -
Smooth the body:
Use your fingers and a little water to smooth out the clay surface. Don’t aim for perfection; part of this dino’s charm is slightly uneven, organic texture. -
Form the tail:
Slightly pinch and pull the clay at the wider bottom end to extend a short, thick tail. It should taper naturally from the body to a rounded point. -
Add the feet:
Roll two small balls of clay and flatten them slightly. Attach them to the bottom front of the body using the score-and-slip method (scratching both surfaces and adding water) to ensure a sturdy bond.
Cracks Appearing?
If small cracks form while drying, mix a tiny amount of clay with water into a paste (slip). Fill the cracks with this paste and smooth it over with your finger.
Step 2: Adding Details
-
Sculpt the tiny arms:
Roll two very small sausage shapes for the arms. They need to be comically small compared to the body. -
Attach the arms:
Blend the upper part of the arms onto the chest area, leaving the little ‘hands’ sticking out. I find using the back of a sculpting tool helps blend these seams invisibly. -
Create the spikes:
Using your teal clay (or terra cotta clay you plan to paint later), roll a small slab and cut out about 8-10 triangles of graduating sizes. -
Attach the spine:
Starting from the top of the head down to the tail, attach the triangles in a row. Use slip to secure them, ensuring they stand upright. -
Refine the surface:
Take a moment to lightly press a rough sponge or simply dab your fingers over the main body to enhance that matte, earthy texture shown in the photo.
Make It Functional
Before the clay dries, cut a slot in the top (avoiding the spikes) and hollow out the belly more to turn this cute sculpture into a working coin bank.
Step 3: Defining Features
-
Sculpt the eye:
For a dimensional look, attach a tiny flattened disc of black clay for the eye, or leave the area smooth to paint later. -
Let it dry:
Allow your sculpture to dry completely. For air-dry clay of this thickness, this usually takes 24 to 48 hours. Turn it occasionally for even drying. -
Paint the spikes:
If you used terra cotta clay for the whole piece, now is the time to carefully paint the triangular spikes with a matte teal or turquoise acrylic paint. -
Draw the face:
Using a fine-point black marker or a very thin brush with black paint, draw a simple curved smile line and the nostril dots. -
Add finishing touches:
Add three small black lines to the tips of the tiny arms and the feet to represent claws. -
Add speckles:
To mimic the stone-like look, gently flick a toothbrush with diluted black paint over the body, or create tiny random dots with a marker. -
Seal the work:
Finish with a matte spray varnish to protect the surface without making it shiny.
Now you have a charming prehistoric companion ready to guard your desk with its tiny arms
Owl With Feather Marks
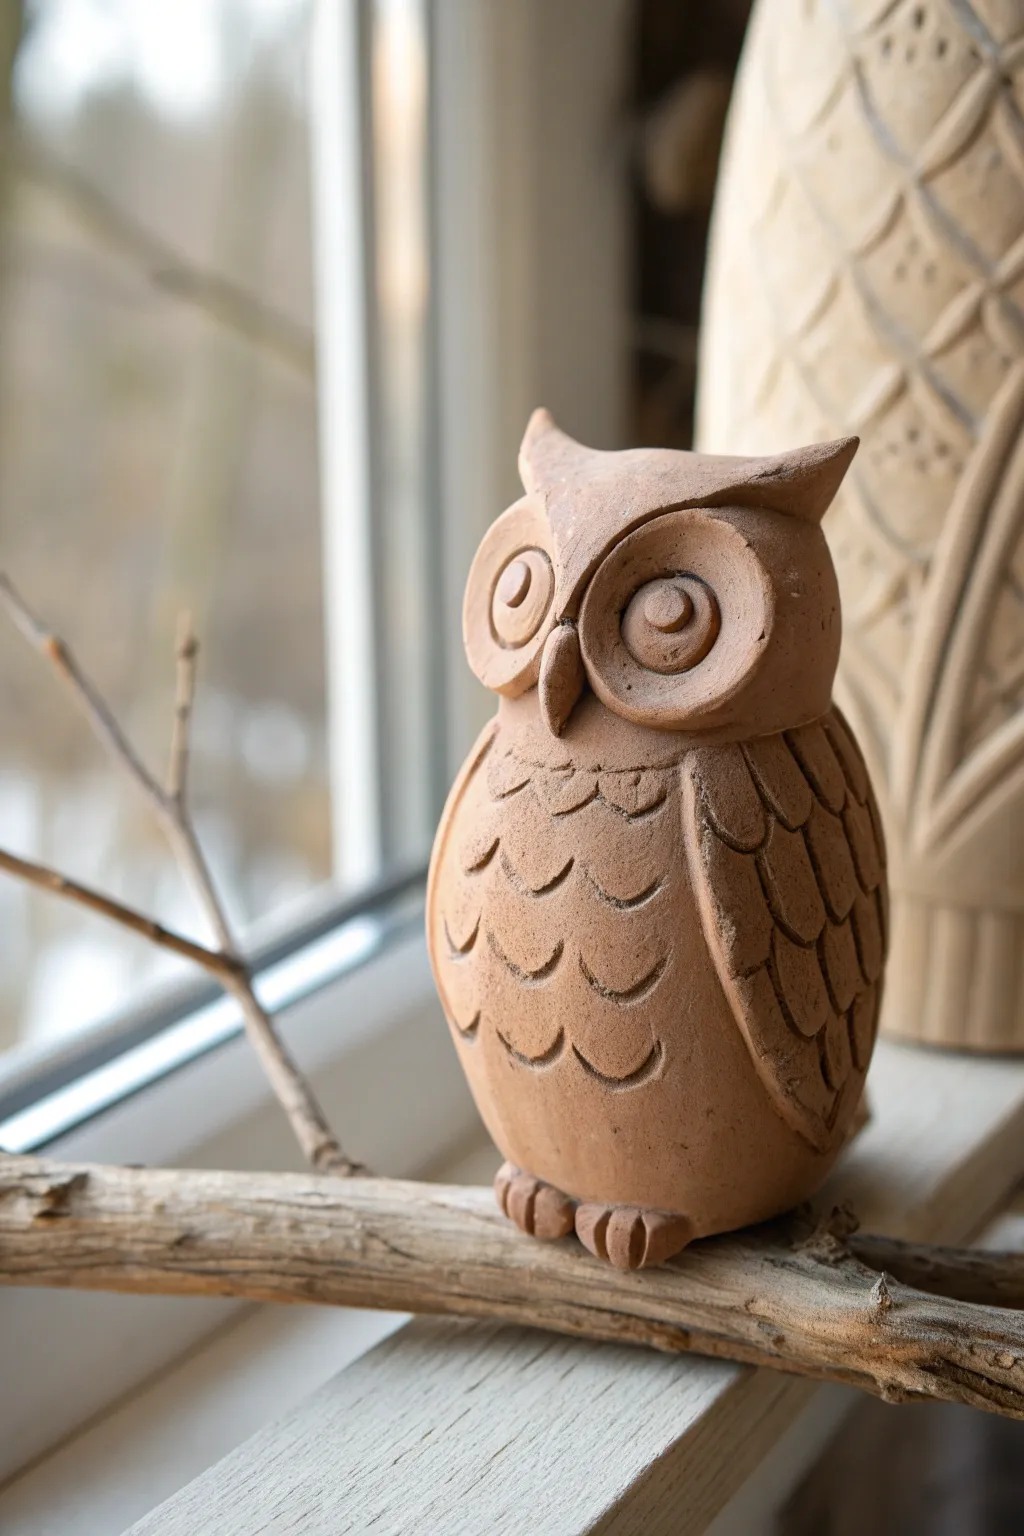
This rustic owl sculpture brings a touch of woodland charm to any shelf with its warm terracotta tone and tactile feather details. The stylized features, like the oversized eyes and patterned chest, make it an approachable project for beginners looking to practice texture techniques.
Step-by-Step Guide
Materials
- Terracotta-colored air-dry clay (or polymer clay)
- Small rolling pin
- Pointed sculpting tool or toothpick
- Loop tool or U-shaped carving tool
- Small circular cutters (optional)
- Sponge and water
- Flat work surface
Step 1: Shaping the Base Form
-
Roll the body:
Start with a large ball of clay roughly the size of a tennis ball. Gently roll it between your palms to smooth out any cracks, then elongate it slightly into an egg shape. -
Flatten the base:
Tap the wider end of your egg shape firmly against your work surface. This creates a stable, flat bottom so your owl sits upright without wobbling. -
Define the head:
About one-third of the way down from the top, gently pinch around the circumference to distinguish the head from the body. You don’t want a detached head, just a subtle neck indentation. -
Form the ears:
At the very top of the head, pinch the clay on the left and right sides to pull up two pointed ear tufts. Smooth the clay between them so the top of the head dips slightly in the center.
Step 2: Creating Facial Features
-
Eye discs:
Roll two medium-sized balls of clay and flatten them into thick discs. Press these firmly onto the face area. They should be large and touch in the middle. -
Sculpting the eyes:
Use a smaller circular cutter or your sculpting tool to press a concentric circle inside each eye disc. Place a small, flattened ball of clay in the very center of each for the pupil. -
Adding the brow:
Roll a thin coil of clay—a ‘snake’ shape—and press it across the top of both eyes. Blend the top edge of this coil into the forehead clay, but leave the bottom edge sharp to create a distinct, furrowed brow line. -
Attaching the beak:
Form a small cone or triangle of clay. Attach this securely between the eyes, pointing downward. Curve the tip slightly inward toward the chest for a raptor-like hook.
Cracks Appearing?
If you see hairline cracks while the clay dries, mix a tiny bit of fresh clay with water to make a paste and fill them in immediately.
Step 3: Wings and Texture
-
Wing shapes:
Roll out a slab of clay about 1/4 inch thick. Cut out two elongated teardrop shapes that are roughly the length of the owl’s body. -
Attach wings:
Score the sides of the owl’s body and the back of the wings with a needle tool. Add a dab of water (slip), then press the wings firmly onto the sides, blending the top shoulder area seamlessly. -
Carving wing feathers:
Using a loop tool or a U-shaped gouge, carve vertical, overlapping ‘U’ shapes down the length of the wings to simulate long flight feathers. Press deeply enough to catch shadows. -
Chest feathers:
For the chest plumage, use the same U-shaped tool to press indentations directly into the body clay. Start at the neck and work your way down in staggered rows, like shingles on a roof. -
Smoothing:
Dip your finger or a sponge in a little water and gently rub over any rough, crumbly edges on the wings or ears. I like to leave the feather marks crisp, so avoid smoothing those areas too much. -
Adding feet:
Roll six tiny sausages of clay. Group them into two sets of three and press them underneath the front edge of the body to form talons gripping the ‘ground’.
Rustic Finish
Once dry, do a ‘dry brush’ technique with white or light cream acrylic paint to highlight the feather textures and brow ridges.
Step 4: Finishing Up
-
Final check:
Rotate your sculpture and look for any unintended fingerprints. Smooth them away with a barely damp sponge. -
Drying:
Let the owl dry slowly away from direct heat or sunlight. If using air-dry clay, turn it occasionally to ensure the bottom dries evenly.
Place your finished owl on a windowsill or bookshelf where the light can play across its textured feathers

TRACK YOUR CERAMIC JOURNEY
Capture glaze tests, firing details, and creative progress—all in one simple printable. Make your projects easier to repeat and improve.
Coiled Snake With Easy Scale Pattern
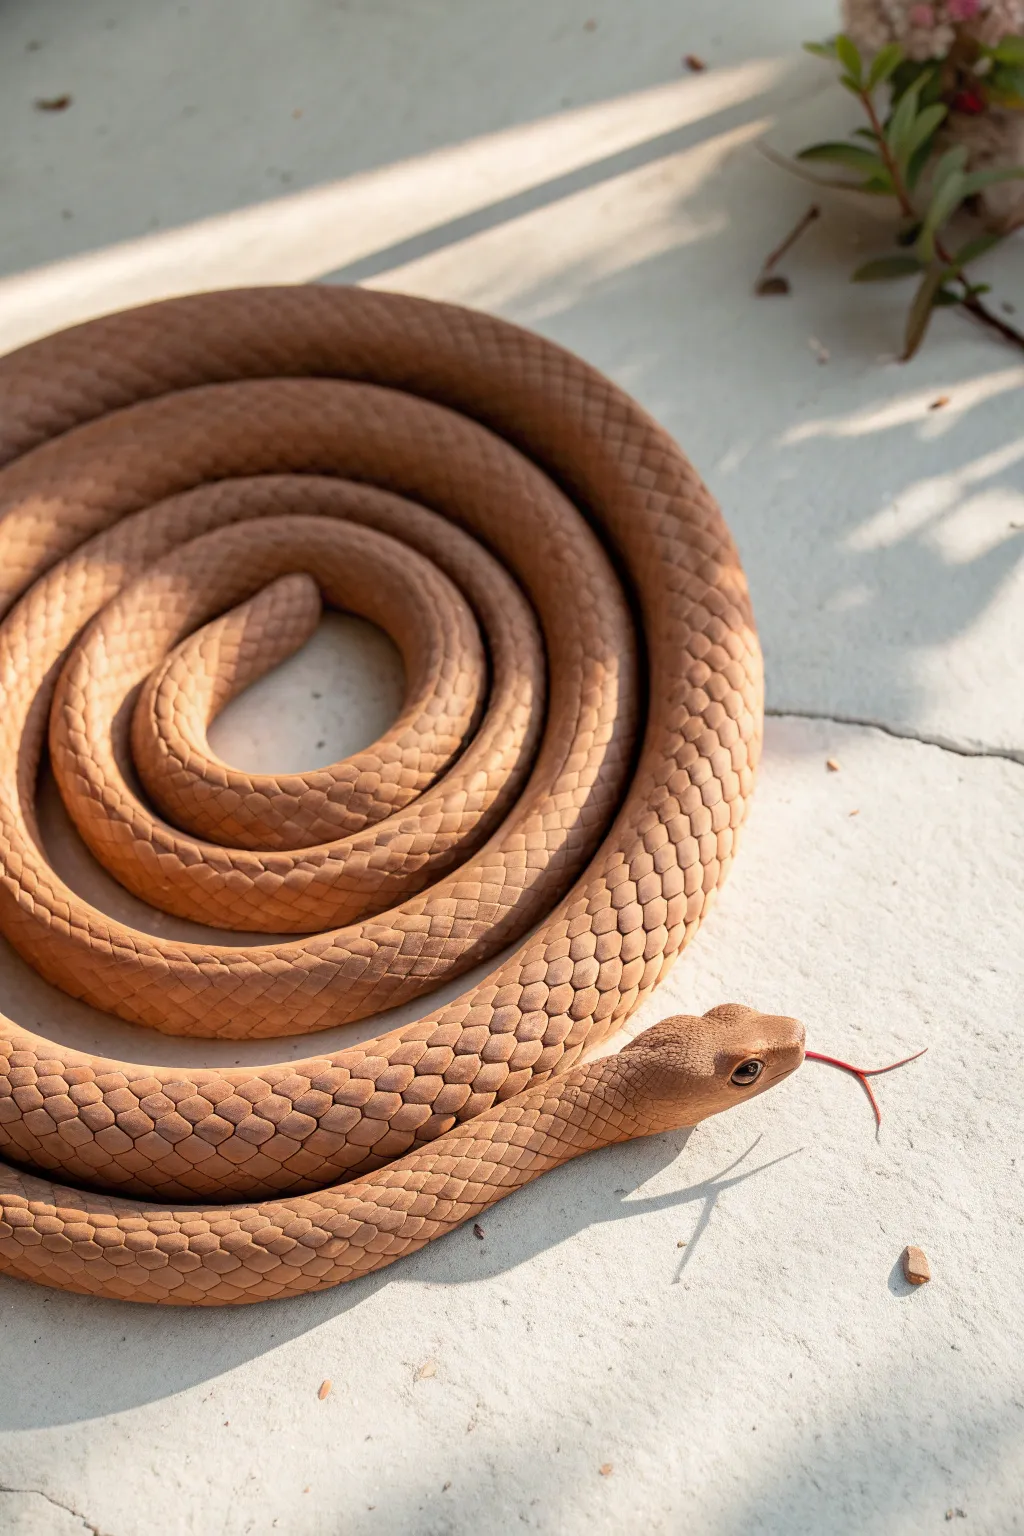
Create a striking, realistic-looking snake sculpture that coils elegantly upon itself, complete with a mesmerizing scale texture. This project uses the simple technique of rolling a long clay coil and adding details with basic tools to achieve a surprisingly lifelike finish.
Step-by-Step
Materials
- Terracotta-colored polymer clay or air-dry clay (approx. 1 lb)
- Wire mesh or aluminum foil (for armature, optional for smaller snakes)
- Red flexible wire or red clay (for the tongue)
- Small black glass beads or black clay (for the eyes)
- Plastic drinking straw or smooth semi-circle clay tool
- Modeling tools (or a toothpick and butter knife)
- Work surface/mat
- Water (if using air-dry clay) or clay softener (if using polymer)
Step 1: Forming the Body
-
Condition the clay:
Begin by kneading your terracotta clay thoroughly until it is warm, pliable, and free of cracks. If you are using polymer clay, this might take a few minutes of working it in your hands. -
Create the main coil:
Roll the clay into a very long, thick snake on your work surface. Aim for an even thickness of about 1 inch diameter, tapering gradually toward the tail end. It needs to be quite long—at least 24 inches—to create a nice coil. -
Smooth the surface:
Before coiling, run your damp fingers (for air dry) or smooth palms (for polymer) along the entire length to remove any fingerprints or imperfections. -
Begin the spiral:
Start with the tapered tail end. Curl it tightly inward to create the center of your spiral. -
Wrap the layers:
Continue wrapping the long body around that center point. Keep the coils touching but don’t press them together so hard they merge; you want distinct separation between the rings. -
Position the neck:
Leave the last 4-5 inches of the head end uncoiled. Gently lift this section so it rests on top of the outer ring, slightly raised, creating an alert posture.
Scale Secret
Work from head to tail. If you pause, cover the unfinished clay with plastic wrap to keep it from drying out before you can imprint the scales.
Step 2: Sculpting the Head
-
Shape the head:
Flatten the tip of the uncoiled end slightly into a diamond or spade shape to mimic a viper’s head. Use your thumbs to widen the ‘jaw’ area and taper the nose. -
Refine the snout:
Smooth out the transition from the neck to the head. The neck should be slightly thinner than the widest part of the jaw. -
Add eye sockets:
Use a small ball tool or the rounded end of a paintbrush to press shallow indentations where the eyes will go. -
Insert the eyes:
Press a small black bead or a tiny ball of black clay into each socket. Smooth a tiny rim of the terracotta clay over the top edge of the bead to create an angry or focused “brow” ridge. -
Create the mouth:
Use a thin blade or wire tool to slice a horizontal line around the front of the snout for the mouth opening. -
Insert the tongue:
Take a short piece of red wire (or a very thin strip of red clay), fork the end, and insert it into the center of the mouth slit.
Step 3: Adding Texture & Finishing
-
Prepare the scale tool:
Cut the tip of a plastic drinking straw at an angle to create a scoop shape, or grab a small U-shaped clay tool. I find a straw works surprisingly well for uniform scales. -
Imprint the scales:
Starting at the back of the head and working down the neck, press your tool gently into the clay to create half-moon scale impressions. -
Continue the pattern:
Work your way down the entire body, following the curve of the coil. Stagger the rows like bricks (offset each row) for a realistic pattern. -
Refine the texture:
As you get toward the tail, use a smaller tool or just the very tip of the straw to make the scales smaller, matching the tapering body. -
Final check:
Look over the sculpture for any smudged scales or fingerprints and touch them up. -
Cure the snake:
If using polymer clay, bake according to the package directions (usually 275°F for 15-30 mins per 1/4 inch thickness). If using air-dry clay, let it sit in a dry, safe spot for 24-48 hours.
Fixing Cracks
If the clay cracks while coiling, dampen your finger (water for air-dry, baby oil for polymer) and smooth the fissure immediately before texturing.
Once fully cured, your coiled creation is ready to guard your desk or bookshelf
Frog on a Lily Pad
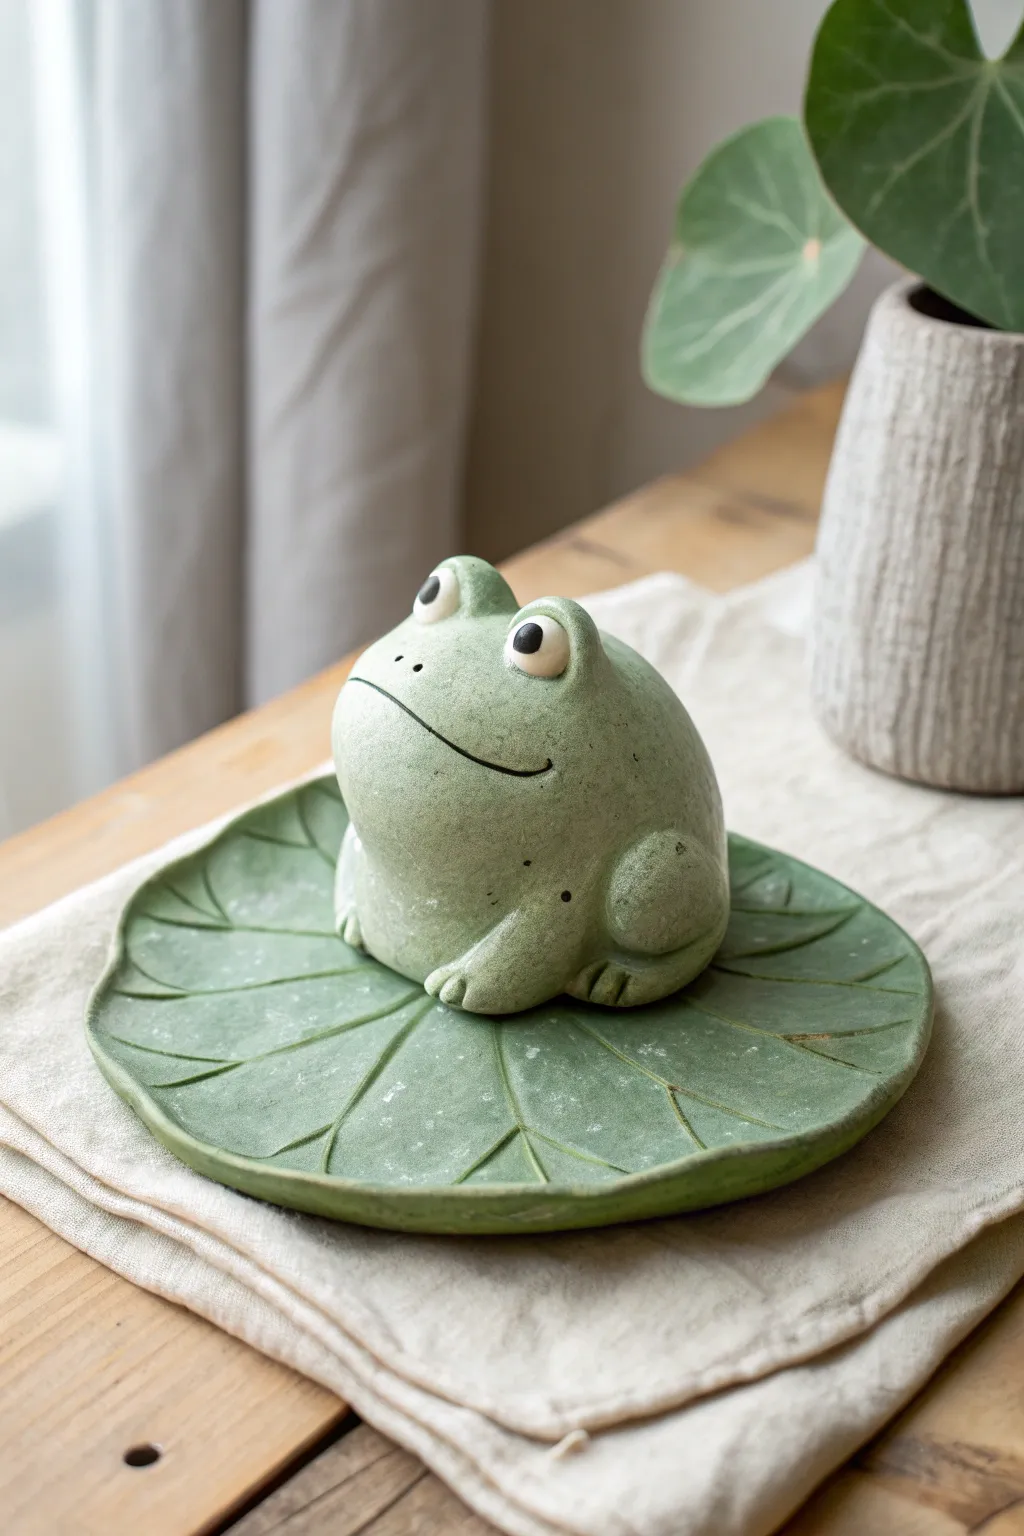
This charming project combines a functional trinket dish with an adorable sculptural element. You’ll create a smooth, stylized frog resting on a textured lily pad, perfect for holding rings or simply brightening up a shelf.
How-To Guide
Materials
- Air-dry clay or polymer clay (white or light grey)
- Rolling pin
- Clay sculpting tools (specifically a needle tool and a smoothing tool)
- Small bowl or curved surface (for shaping the lily pad)
- Acrylic paints (Sage green, pale green, white, black)
- Sponges for texture (optional)
- Matte varnish or sealant
- Water cup and slip (if using air-dry clay)
Step 1: Sculpting the Lily Pad Base
-
Roll the slab:
Start by taking a large ball of clay and rolling it out into a flat, circular slab about 1/4 inch thick. Aim for an organic, slightly imperfect circle to mimic a natural leaf shape. -
Create the wave:
Gently lift the edges of your clay circle and pinch or curve them slightly upward to create a shallow dish shape. You can let this rest inside a shallow bowl to help it hold its form while drying. -
Carve the veins:
Using a needle tool or a dull knife, lightly urge lines into the clay surface. Start from a slightly off-center point and draw radiating lines outward to the edges to represent the lily pad’s veins. -
Texture the surface:
For that realistic, organic look, gently tap the surface of the leaf with a crumpled ball of foil or a stiff paintbrush to add subtle texture before the clay hardens.
Step 2: Forming the Frog Body
-
Shape the main body:
Roll a medium-sized ball of clay into a smooth, slightly squashed teardrop or rounded egg shape. This will be the frog’s combined head and body. -
Form the eye sockets:
Using your thumbs, gently press upward from the bottom to define the chest area, and press slightly on top to create a distinct mound where the eyes will sit. -
Add the eyes:
Roll two small, equal-sized balls of clay. Score and slip (scratch and wet) the top of the head, then press these balls firmly on top. Smooth the seams where they join the head so they look integrated, not just stuck on. -
Carve the mouth:
Use a needle tool to slice a long, wide smile across the front of the face. Curve the ends slightly upward for a happy expression. -
Create the legs:
Roll two sausage shapes for the front legs and attach them to the front of the body. For the back legs, make two thick, rounded discs and attach them to the sides of the body to suggest folded haunches. -
Attach to the leaf:
Score the bottom of your frog and the center of your lily pad. Apply a little water or liquid clay, press the frog firmly onto the leaf, and smooth the connection points with a sculpting tool.
Stone Effect
Mix a tiny amount of baking soda into your acrylic paint. This creates a grainy, gritty texture that mimics the look of carved stone perfectly.
Step 3: Painting and Finishing
-
Base coat:
Once fully dry, paint the entire sculpture with a base coat of soft sage green. I find that doing two thin coats is better than one thick one to avoid brush strokes. -
Sponge texture:
To achieve the stone-like finish seen in the photo, dab a sponge into a lighter pale green or white paint. Remove most of the paint on a paper towel, then lightly stipple it over the frog and the high points of the leaf. -
Detail the eyes:
Paint the eye mounds white. Once dry, use a small detail brush or a dotting tool to add large black pupils in the center. -
Define the mouth and nose:
Using a very fine liner brush and watered-down black paint, trace the carved mouth line to make it pop. Add two tiny dots for nostrils. -
Add speckles:
For character, flick a stiff toothbrush loaded with watered-down brown or dark green paint over the piece to create tiny natural speckles. -
Seal:
Finish simply by coating the entire piece with a matte varnish to protect the paint and give it a unified, finished sheen.
Make it Functional
Before baking or drying, press an incense stick into the frog’s hand or mouth to turn this sculpture into a functional incense holder.
Now you have a serene little amphibian friend to keep your desk company
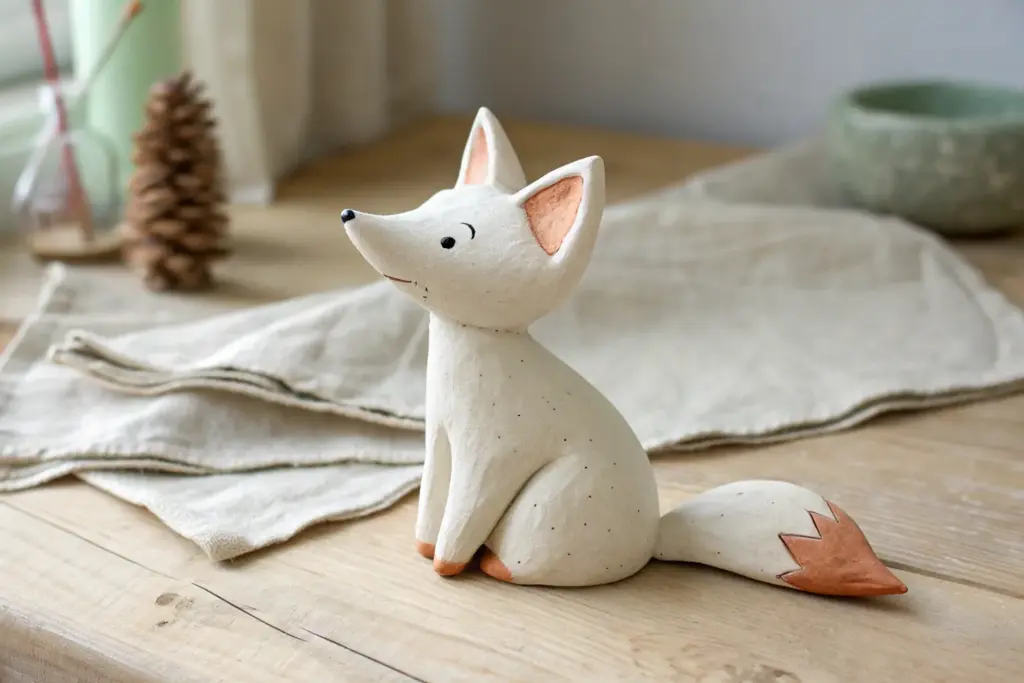
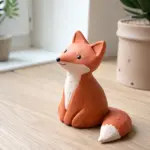
Tiny Fox With Big Tail
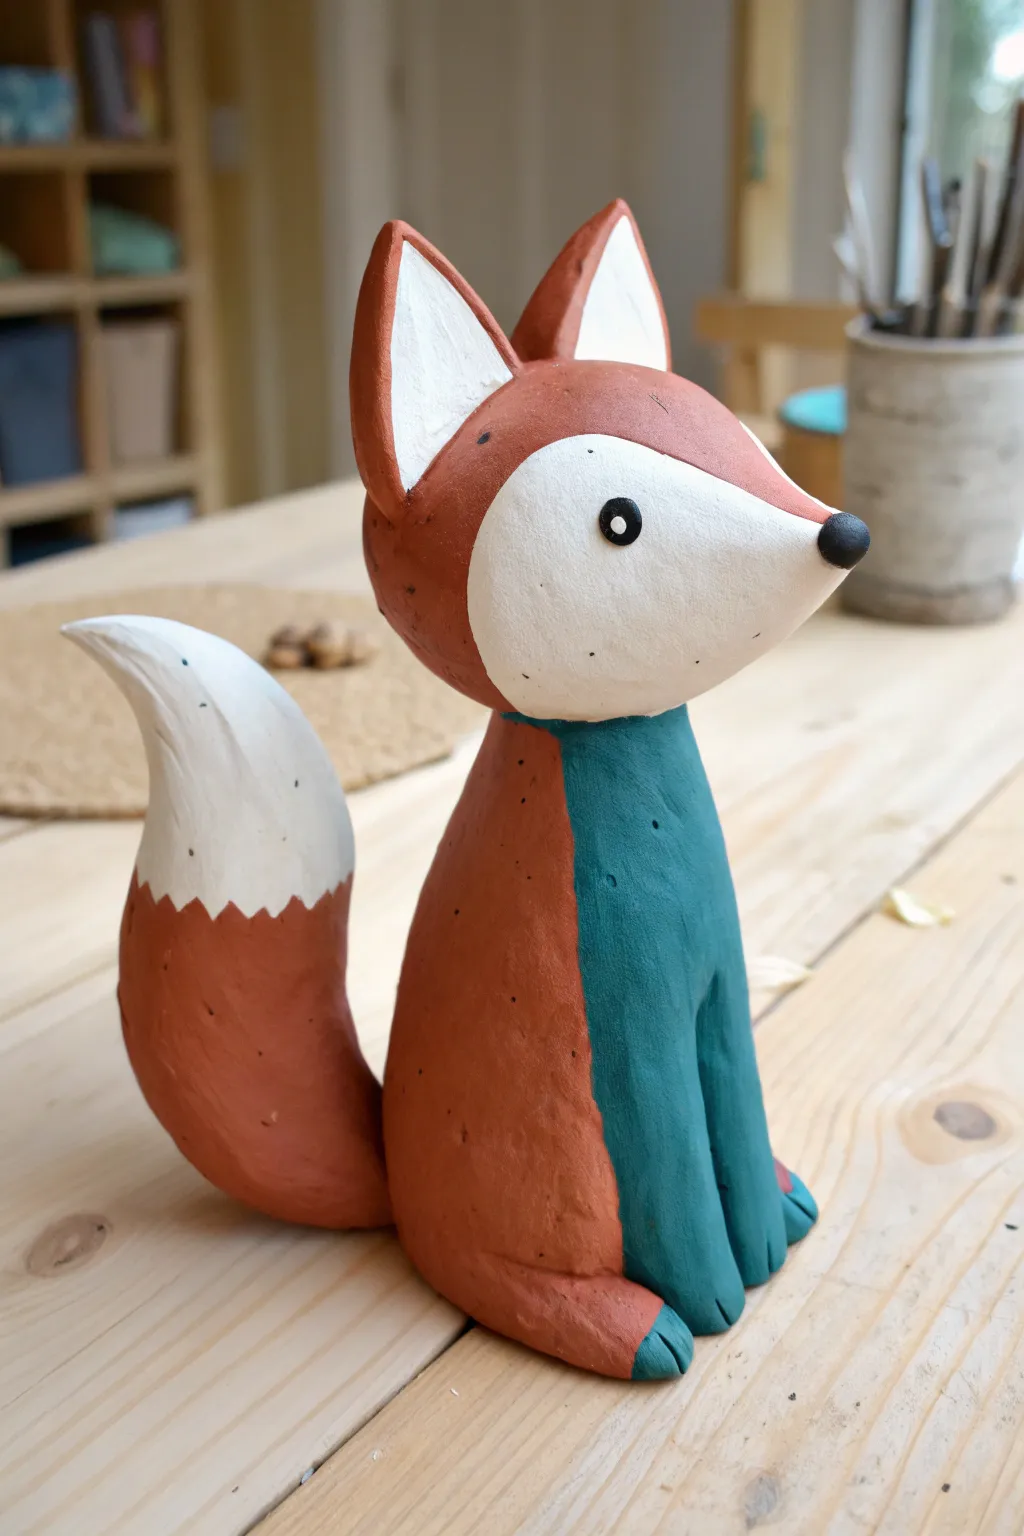
Sculpt a charming little fox that sits up attentively with a sweeping tail and distinctive color blocking. This stylized project combines simple geometric forms with bold paint choices to create a modern piece of woodland decor.
Step-by-Step Tutorial
Materials
- Air-dry clay or polymer clay (white or terracotta)
- Acrylic paints (terracotta/burnt orange, teal/dark cyan, white, black)
- Sculpting tools (needle tool, smoothing tool)
- Rolling pin
- Aluminum foil (for armature)
- Water cup (for smoothing)
- Fine grit sandpaper
- Small flat paintbrush
- Detail paintbrush
- Matte varnish (optional)
Step 1: Shaping the Clay Body
-
Core construction:
Begin by crumpling aluminum foil into a pear shape for the body and a slightly flattened teardrop for the head to save on clay and reduce weight. -
Covering the torso:
Roll out a slab of clay to about 1/4 inch thickness. Wrap the pear-shaped foil armature completely, smoothing the seams together until you have a seamless, elongated cone shape for the sitting body. -
Forming the legs:
Roll two thick coils of clay. Attach them vertically to the front of the body, blending the top seams so they merge smoothly into the chest while leaving the paws defined at the bottom. -
Creating the paws:
Use a modeling tool or knife to gently press vertical indentations into the bottom of the front legs to suggest toes. -
Sculpting the head:
Cover your head armature with clay. Refine the shape so it has a rounded back and creates a prominent, pointed snout area. -
Adding ears:
Shape two triangles of clay. Pinch them slightly to create a curve, then score and slip (or just press firmly if using polymer) to attach them to the top of the head. -
Connecting head to body:
Place the head onto the neck area of the body. Blend the clay downwards at the neck seam to ensure a strong bond, smoothing it out with a little water or clay softener.
Head Tilt Trick
When attaching the head, tilt it slightly upward or to the side. This small adjustment adds instant personality and makes the fox look curious.
Step 2: The Tail and Details
-
Shaping the big tail:
Roll a large, thick coil that tapers at both ends. Curve it into a gentle ‘S’ shape or question mark shape. -
Attaching the tail:
Attach the thicker end to the lower back of the fox. Blend the clay thoroughly so the tail looks like an extension of the body, curling it upward alongside the flank. -
Refining the surface:
Look over the entire sculpture. Use a wet finger or smoothing tool to erase fingerprints and lumps. I find taking extra time here saves a lot of sanding later. -
Drying:
Let the sculpture dry completely according to your clay’s instructions (usually 24-48 hours for air-dry clay). Turn it occasionally for even drying. -
Sanding:
Once bone dry, use fine-grit sandpaper to smooth out any rough patches, particularly around the ears and tail tip.
Step 3: Painting the Design
-
Base sketch:
Lightly use a pencil to mark the boundaries of the colors: the white tail tip, the white face mask, and the teal chest panel. -
Applying the orange:
Paint the main body, back of the head, outer ears, and the base of the tail with terracotta or burnt orange acrylic paint. Using two thin coats is better than one thick one. -
The teal accent:
Carefully paint the chest, belly, and front legs with a deep teal or dark cyan color, creating a clean line where it meets the orange fur. -
White details:
Paint the face mask (cheeks and snout), the inner ears, and the tip of the tail white. Use a zig-zag motion with your brush where the white tail meets the orange to mimic fur texture. -
Facial features:
Using a very small detail brush or a black paint pen, paint a small round nose at the tip of the snout and two round eyes. -
Final touches:
Add a tiny white highlight dot to each eye to bring the fox to life. You can also add tiny black speckles on the orange sections for texture if desired.
Texture Time
Before the clay dries, gently press a clean toothbrush against the orange sections of the clay to create a subtle, realistic fur texture without carving.
Place your finished fox on a shelf or desk for a friendly pop of woodland color
Smiling Whale Phone Rest
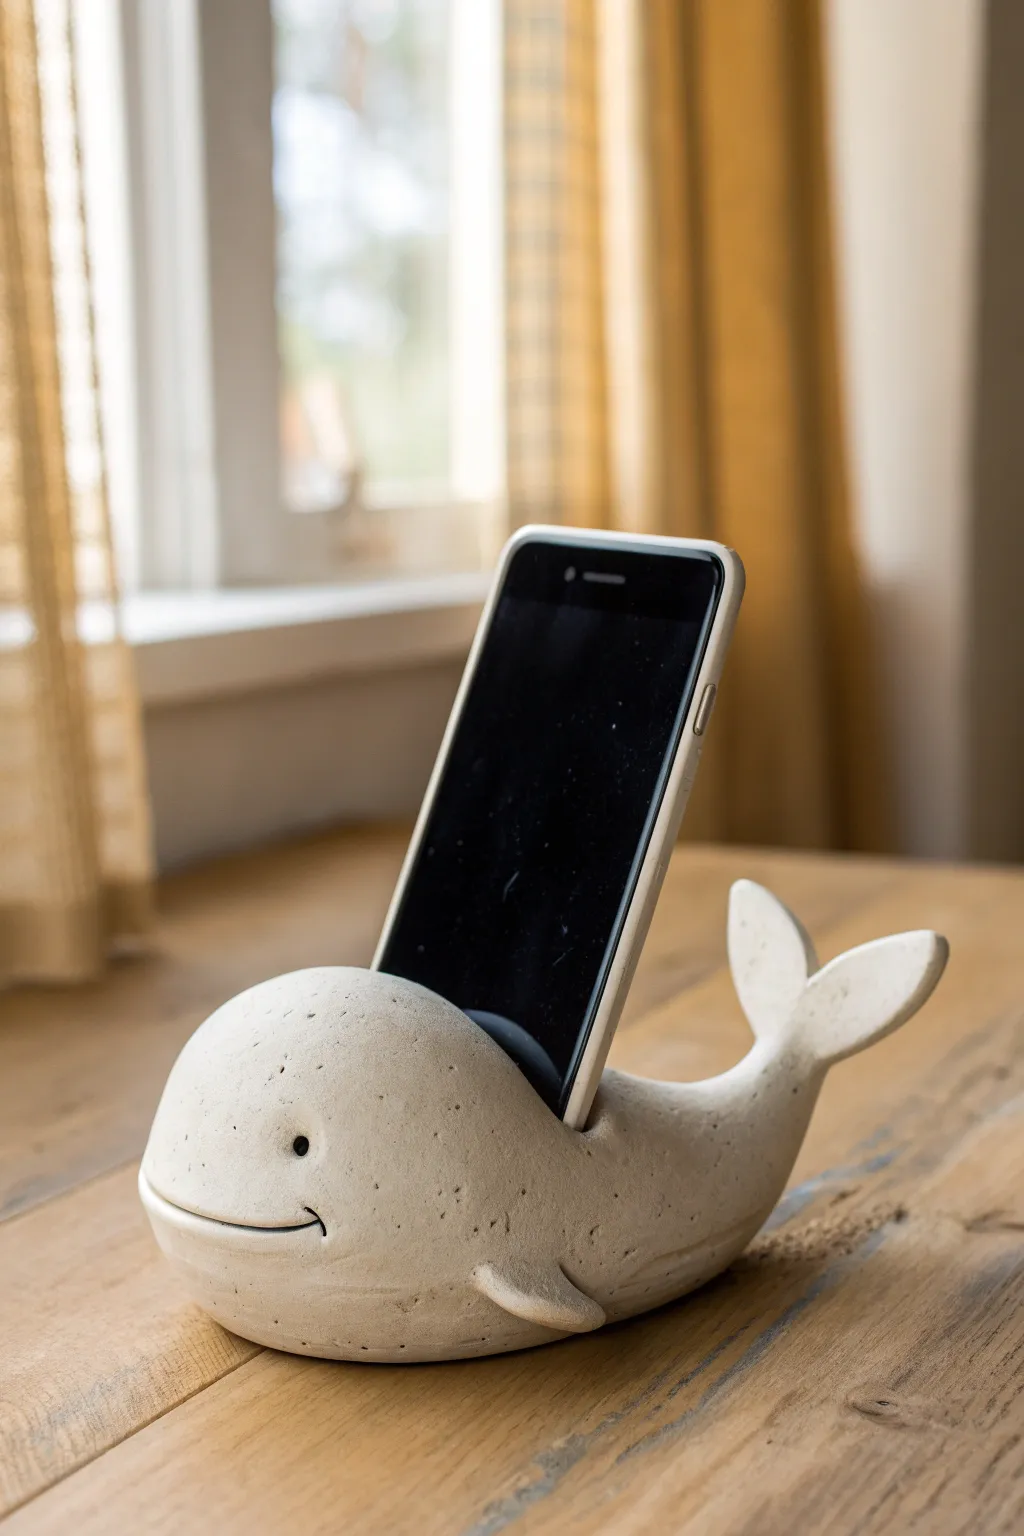
This adorable speckled whale isn’t just a cute desk companion; it serves a practical purpose as a sturdy rest for your smartphone. With its gentle curve and happy smile, this project combines simple hand-building techniques with functional design.
Step-by-Step
Materials
- White polymer clay or air-dry clay (approx. 1lb)
- Black pepper or dried tea leaves (for speckling effect)
- Acrylic rolling pin
- Modeling tools (or a butter knife and toothpick)
- Water (for smoothing air-dry clay) or Baby Oil (for polymer)
- Black acrylic paint
- Fine detail paintbrush
- Sandpaper (fine grit)
- Matte varnish/sealer
Step 1: Preparing the Clay
-
Condition the clay:
Start by warming up your clay in your hands until it is pliable and smooth. If you want that natural, speckled stone look like the original, knead in a pinch of ground black pepper or dried tea leaves until it’s evenly distributed. -
Check device width:
Before sculpting, measure the thickness of your phone (including its case). You will need this measurement later to create the correct size slot.
Phone Tipping Over?
If the whale tips when holding the phone, the slot isn’t deep enough or is angled wrong. Carve the slot deeper and angle it slightly backward toward the tail.
Step 2: Forming the Body
-
Shape the main mass:
Roll a large handful of clay into a smooth ball, then gently elongate it into a thick teardrop shape. This will form the combined head and body of the whale. -
Flatten the base:
Tap the bottom of your teardrop repeatedly against your work surface. You need a distinct flat bottom so the phone stand doesn’t roll over when holding weight. -
Curve the tail:
Gently pull the tapered end of the teardrop upwards to start forming the tail section. Create a smooth, swooping curve that rises up from the main body.
Pro Tip: Weighted Base
For an air-dry clay project, ball up a piece of aluminum foil around a heavy rock or fishing weight and use that as the core of your whale to add extra stability.
Step 3: Adding Details
-
Create the tail flukes:
Fashion a separate triangular piece of clay, flatten it slightly, and cut a notch in the wide end to make the flukes. Score the connection point on the upturned tail and blend the flukes onto it seamlessly. -
Attach the side fins:
Make two small, flattened teardrop shapes for the pectoral fins. Attach these low on the sides of the body, blending the clay where they join so they look like they grow naturally from the whale. -
Test the balance:
Set the whale on the table. It should sit rock-solid. If it wobbles, flatten the base further.
Step 4: Creating the Phone Slot
-
Mark the slot location:
Visualize where the phone needs to sit—usually right behind the head area where the body is thickest. Use a ruler to mark a straight line across the back. -
Carve the groove:
Using a clay knife or modeling tool, carefully carve out a deep rectangular slot. I find it safest to go slowly here, removing small strips of clay at a time. -
Test the fit:
Gently place your phone into the groove to ensure it’s wide and deep enough. The phone should lean back slightly against the tail section for stability. Adjust the slot width if necessary.
Step 5: Refining and Finishing
-
Smooth the surface:
Dip your finger in a little water (for air-dry) or baby oil (for polymer) and rub out any fingerprints or tool marks. The goal is a super-smooth, stone-like finish. -
Add the face:
Use a toothpick to carve a long, curving smile line into the front of the head. Use the end of a paintbrush handle to press deep indentations for the eyes. -
Dry or bake:
Follow your specific clay’s instructions. If baking polymer clay, support the tail with a crumpled piece of foil so it doesn’t sag in the oven. -
Sanding:
Once fully cured and cooled, use fine-grit sandpaper to buffer away any rough edges, particularly inside the phone slot. -
Painting details:
Using a fine detail brush and black acrylic paint, carefully fill in the smile line and the eye indentations. Wipe away any excess on the surface quickly with a damp cloth if you go outside the lines. -
Seal the piece:
Apply a coat of matte varnish to protect the clay and paint, giving it a finished ceramic look.
Now you have a charming, functional piece of art to brighten up your desk space
Mushroom-Cap Slug Friend
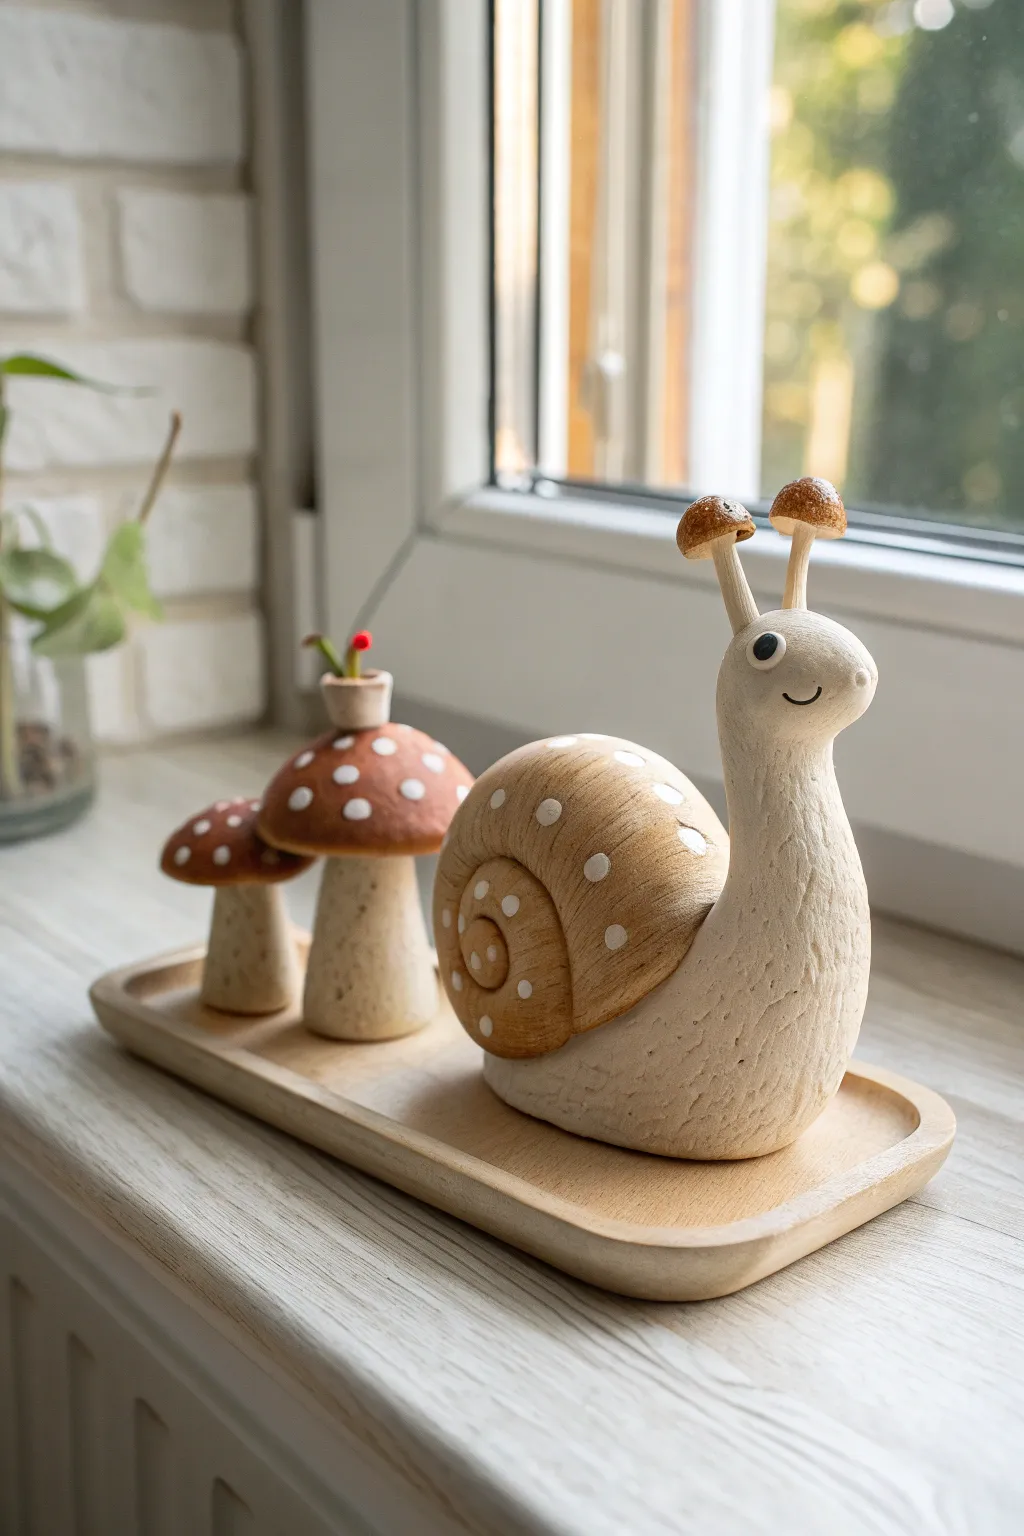
Bring a touch of forest charm indoors with this adorable stylized snail, featuring clever mushroom-cap antennae and a smooth, speckled shell. This project combines simple organic shapes with varied clay textures to create a delightful woodland friend perched on its own display tray.
Detailed Instructions
Materials
- White air-dry clay or polymer clay (approx. 500g)
- Wood-colored acrylic paint or wood stain
- White acrylic paint
- Fine-grit sandpaper
- Sculpting tools (needle tool, ball stylus)
- Small paintbrush
- Wooden tray (oval or rectangular)
- Clear matte sealant spray
- Texture sponge or toothbrush
- Strong craft glue
Step 1: Sculpting the Base Forms
-
Shape the Snail’s Body:
Start with a large fist-sized ball of clay. Roll it into a thick cylinder, bending one end upwards to form the neck and head, while flattening the bottom slightly so it sits stable. -
Refine the Head and Neck:
Smoothen the neck area, blending it seamlessly into the base. Gently press the front of the head to create a subtle snout shape, keeping the overall form rounded and soft. -
Add Texture:
Using a stiff toothbrush or a texture sponge, gently dab the surface of the snail’s body. This creates a realistic, stone-like or organic skin texture rather than leaving it perfectly smooth. -
Create the Shell Spiral:
Roll a separate, large ball of clay into a thick coil. Wind this coil into a tight spiral to form the shell. Press the center gently inwards to give it dimension. -
Attach the Shell:
Score the back of the snail body and the flat side of the shell spiral. Apply a dab of water (or slip) and press them firmly together, blending the edges at the bottom for a seamless look.
Droopy Antennae?
If the eye stalks keep bending, insert a small piece of toothpick or wire wire inside the stalk and into the head for internal structural support.
Step 2: Adding Details and Mushrooms
-
Form the Eye Stalks:
Roll two small, thin cylinders of clay for the antennae. Attach them to the top of the head using the score-and-slip method to ensure they stay upright. -
Cap the Antennae:
Shape two tiny, rounded domes—like miniature mushroom caps. Place these carefully onto the tips of the eye stalks. -
Make the Side Mushrooms:
For the separate mushrooms, form two thick stems and two wider caps. One mushroom should be slightly shorter and wider, the other taller. -
Detail the Caps:
Using a small ball tool, press tiny indentations into the mushroom caps (both on the snail’s head and the side mushrooms) to prepare them for painting later. -
Add Tiny Embellishments:
If desired, create a micro-miniature planter on top of the largest mushroom cap for extra whimsy, inserting a tiny clay stem and blossom. -
Dry Completely:
Allow all pieces to air dry for at least 24-48 hours. I prefer to turn the pieces over halfway through so the bottoms dry evenly.
Step 3: Painting and Assembly
-
Base Coat the Shell:
Dilute some wood-colored acrylic paint or stain with water to create a wash. Paint the shell spiral and the mushroom caps, letting the color settle into crevices. -
Highlight the Shell:
Once the brown wash is dry, use dry-brushing techniques with a very light tan or cream color to highlight the ridges of the spiral. -
Paint the Spots:
Using a fine-tip brush or a dotting tool, carefully apply white paint dots onto the brown shell and the mushroom caps. -
Face Details:
With a fine black marker or paint, draw a simple curved smile and place two solid black dots on the sides of the head for eyes. -
Seal the Work:
Spray the entire sculpture with a matte clear sealant. This protects the paint and unifies the matte finish of the clay. -
Final Assembly:
Arrange the snail and the two separate mushrooms on your wooden tray. Use a strong craft glue to secure them permanently in place.
Natural Texture
Before drying, gently rub the ‘skin’ areas with a damp, coarse rag. This softens tool marks and creates a lovely organic, weathered stone look.
Place your charming woodland scene on a windowsill where the light can catch the sweet details of your new friend
Dragon Egg With Crack Details
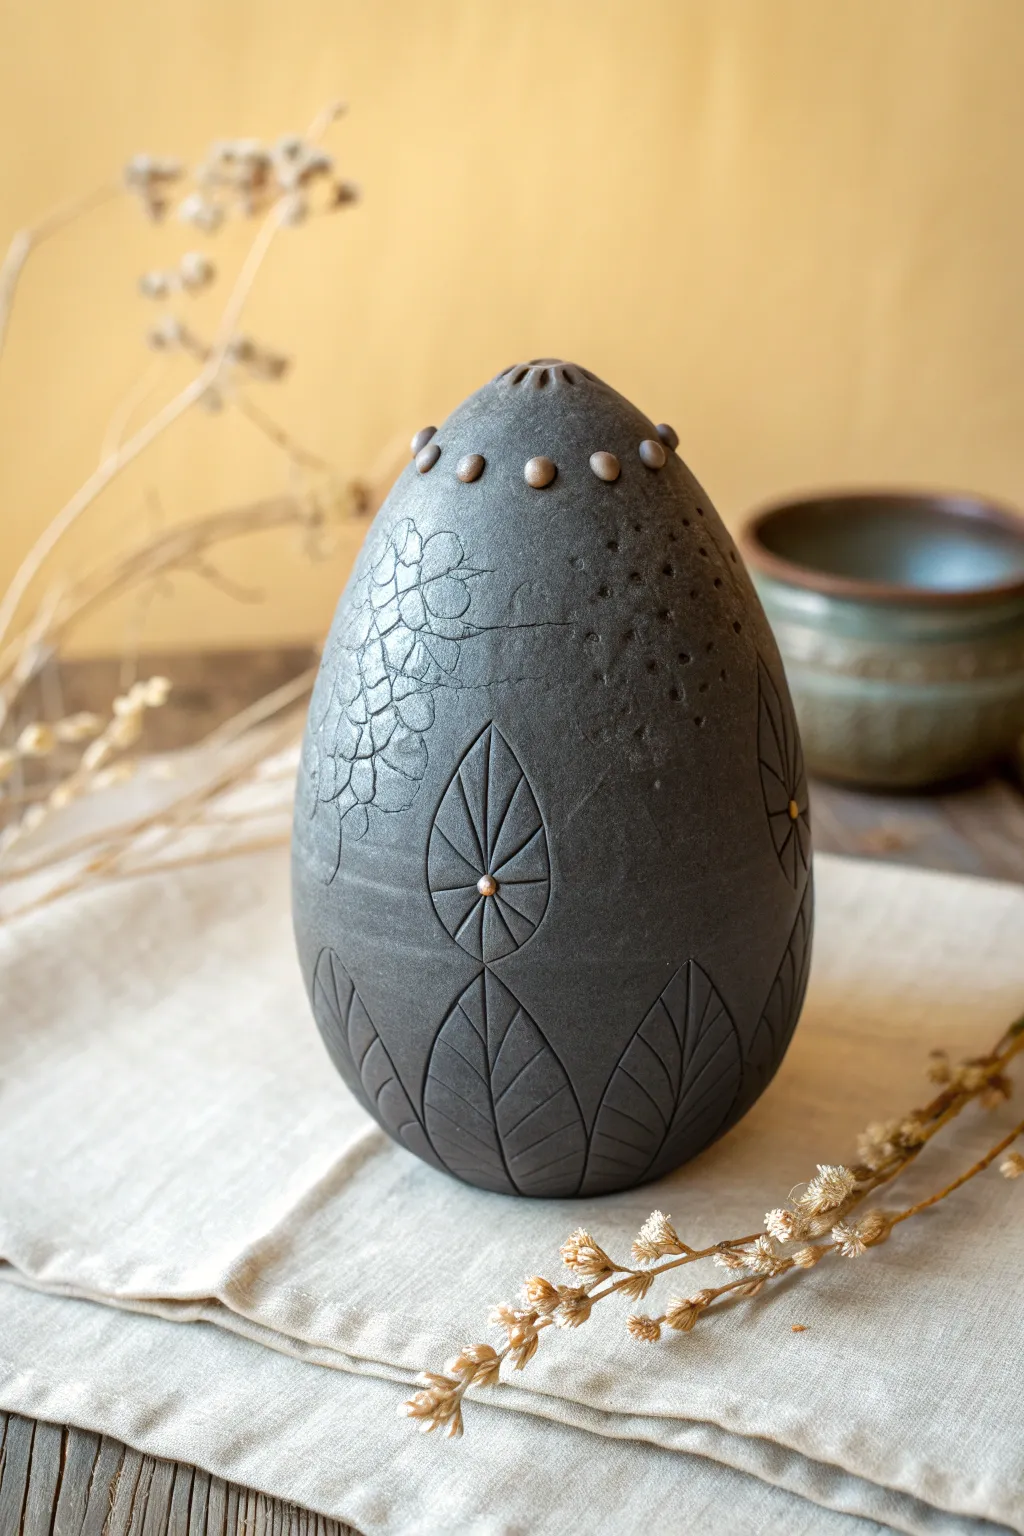
This striking ceramic egg sculpture combines deep charcoal tones with intricate surface carvings to create a modern take on a fantasy artifact. The design features alternating textures—carved leaves, floral etching, and raised dot details—that make it both tactile and visually captivating.
Step-by-Step Tutorial
Materials
- Black stoneware clay or dark air-dry clay
- Rolling pin
- Carving tools (loop tool, needle tool)
- Sponge
- Small wooden smoothing rib
- Slip (clay slurry)
- Hole punch or small straw (for raised dots)
- Small soft brush
Step 1: Forming the Base
-
Prepare the Clay:
Begin by wedging your dark clay thoroughly to remove air bubbles. This is crucial for structural integrity, especially if you plan to fire this in a kiln later. -
Shape the Main Form:
Take a substantial ball of clay (about the size of a grapefruit) and begin shaping it into an egg. You can do this by hand-building a hollow form using two pinch pots joined together, or by throwing a closed form on a wheel if you have one. -
Refine the Silhouette:
Smooth the exterior using a wooden rib. If you hand-built a hollow form, gently paddle the outside to ensure it is symmetrical and truly egg-shaped, tapering gracefully at the top. -
Vent the Piece:
If your egg is hollow and intended for kiln firing, use a needle tool to poke a discreet hole in the very bottom to allow air to escape during heating. -
Initial Smoothing:
Wipe the surface with a slightly damp sponge to remove fingerprints, creating a clean canvas for your textures. Let the clay firm up to a ‘leather hard’ state before carving.
Step 2: Carving the Leaves
-
Mark Guidelines:
Lightly sketch the placement of your bottom row of leaves using a needle tool. Spacing them evenly around the base creates a balanced foundation. -
Carve Leaf Outlines:
Using a fine V-tip carving tool or a sharp knife, firmly incise the outline of broad, pointed leaves rising from the base of the egg. -
Add Leaf Veins:
Draw a central vertical line down each leaf, then add angled veins branching off. Keep your intricate lines consistent in depth for a polished look. -
Create the Second Tier:
Above the base leaves, carve a few isolated leaf or petal medallions. I find that centering these in the gaps between the lower leaves creates a pleasing rhythm. -
Clean Up Edges:
Use a small, dry brush to sweep away the little clay crumbs (burrs) created by your carving tools. Don’t smear them; flick them off.
Fixing Dry Clay
If your clay gets too dry while carving, light mist it with water and wrap it in plastic for 30 minutes. Let the moisture redistribute before you continue detail work.
Step 3: Adding texture and Details
-
Etch Floral Patterns:
On one side of the upper egg, use your needle tool to freehand sketch delicate floral outlines. These should look like faint, fine cracks or etching rather than deep carvings. -
Stipple Texture:
On the opposite side, use a blunt tool point to press a cluster of small indentations into the clay. vary the density so it fades out as it moves down the egg. -
Make Raised Knobs:
Roll tiny balls of clay, about the size of peppercorns. Score and slip the area around the top shoulder of the egg where you want them to sit. -
Attach the “Crown”:
Press the tiny balls onto the scored areas in a ring formation near the top. Press a small indentation into the center of the medallion leaves and add a tiny clay ball there as well. -
Refine the Top:
At the very apex of the egg, carve a small sunburst or star pattern to cap off the design. -
Final Smooth:
Check the entire piece for any sharp edges or unwanted marks. A final pass with a barely damp sponge or your finger can soften harsh carving lines just enough to look organic. -
Dry Slowly:
Cover the egg loosely with plastic and let it dry slowly over several days to prevent actual cracking. Once fully dry, fire according to your clay’s instructions or seal if using air-dry clay.
Metallic Accent
Once fired or dried, rub a tiny amount of gold wax or acrylic paint over the raised dots and leaf veins. This highlights the texture and adds a magical feel.
Place your finished egg on a shelf or among plants to add a touch of mystery to your decor
Mermaid Tail Relief Tile
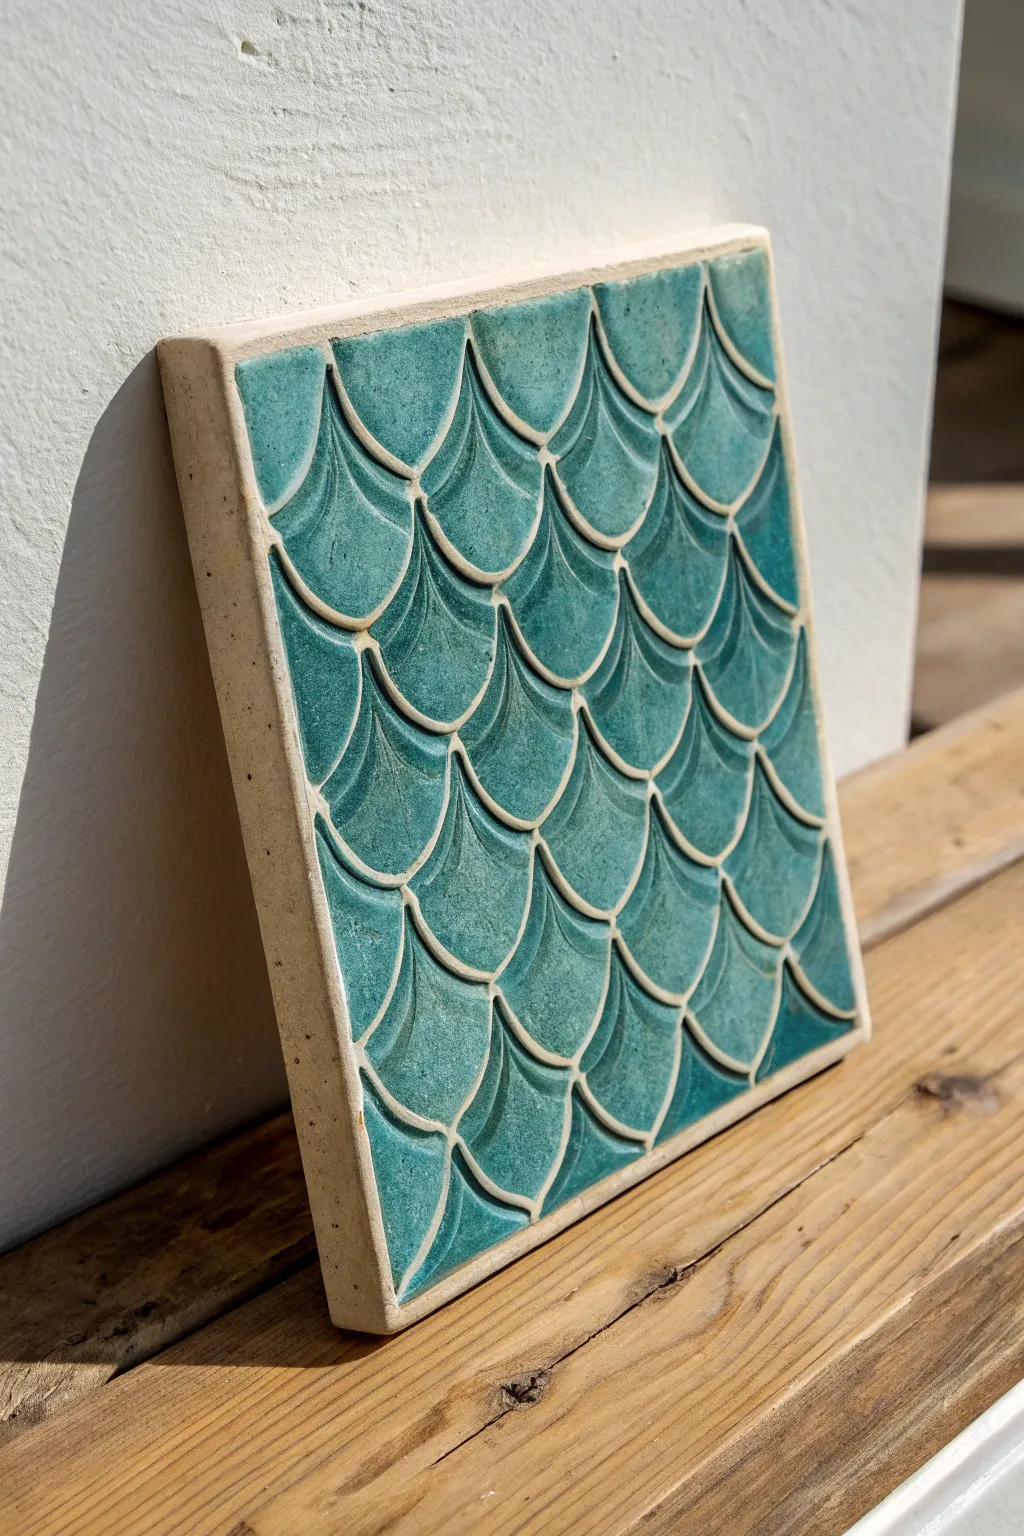
This stunning ceramic relief tile captures the iridescent beauty of the ocean with its repeating scale pattern and deep teal glaze. It is perfect for beginners wanting to practice carving techniques, resulting in a finished piece that looks like it was excavated from an underwater palace.
Step-by-Step Guide
Materials
- Grogged stoneware clay body (buff or cream)
- Rolling pin
- Two wooden guide slats (approx. 1.5 cm thick)
- Square template or ruler (approx. 15cm x 15cm)
- Needle tool or fettling knife
- Loop tool (small, rounded profile)
- Wooden modeling tool with a slightly curved edge
- Sponge
- Teal or turquoise transparent glaze
- Kiln (or access to a pottery studio)
Step 1: Slab Preparation
-
Roll the slab:
Begin by wedging your clay to remove air bubbles. Place the clay between two wooden guide slats and roll it out until it is perfectly flat and consistent in thickness, about 1.5 centimeters, to allow depth for carving. -
Cut the square:
Place your square template onto the slab. Using a needle tool or fettling knife held vertically, cut around the template to create a clean square tile. Smooth the cut sides with your finger or a damp sponge. -
Dry slightly:
Allow the clay to stiffen slightly to a ‘soft leather hard’ stage. This is crucial; if it’s too soft, your carving tools will drag, but if it’s too dry, you won’t get smooth curves.
Step 2: Carving the Scales
-
Mark the grid:
Lightly sketch a grid or a series of horizontal guidelines across the tile surface using a needle tool. These lines will help keep your rows of scales straight and uniform. -
Sketch the pattern:
Lightly draw the overlapping ‘U’ shapes of the first row of scales along the top edge. For the second row, offset the scales so the point of the new scale falls in the middle of the one above it. -
Carve the relief:
Using a small loop tool, begin carving away the clay *inside* the bottom part of each scale shape. You want to create a slope, where the top of a scale is high and flush with the tile surface, and it slopes down to meet the scale below it. -
Define the edges:
Use a wooden modeling tool to press down and sharpen the bottom edge of each scale curve. This creates the crisp ‘shelf’ effect that casts shadows and makes the pattern pop. -
Refine the surface:
Work your way down the tile, carving row by row. I like to re-trace the curved outlines with a modeling tool to ensure the separation between scales is distinct and deep. -
Clean up:
Once all carving is done, use a barely damp sponge or a soft brush to smooth away any sharp clay crumbs or burrs left by the tools, being careful not to wash away your crisp edges.
Don’t Rush Drying
Tiles love to warp. Dry them very slowly. Flip the tile over gently every day while drying, or sandwich it between two pieces of drywall to keep it perfectly flat.
Step 3: Firing and Glazing
-
Bisque fire:
Let the tile dry slowly under plastic to prevent warping, then bisque fire it according to your clay body’s instructions (usually Cone 04 or 06). -
Wax the edges:
Apply wax resist to the four outer edges and the back of the tile. This leaves the raw clay texture visible on the sides, creating a nice frame for the glazed interior. -
Apply glaze:
Pour or brush a transparent teal or turquoise glaze over the front face. A transparent glaze is essential here, as it will pool in the deep recesses, becoming darker, and break over the high points, highlighting the relief. -
Wipe the rim:
If any glaze dripped onto the waxed sides, wipe it off cleanly with a sponge. You want that crisp transition between the colorful glaze and the sandy clay body. -
Glaze fire:
Fire the tile a second time to the maturation temperature of your glaze and clay body.
Pattern Variations
Instead of round scales, try carving pointed diamond shapes or elongated teardrops. The same relief carving technique applies, but the geometry changes the vibe completely.
Once cooled, your tile is ready to be displayed on a stand or mounted as a stunning wall accent
Abstract Sitting Figure
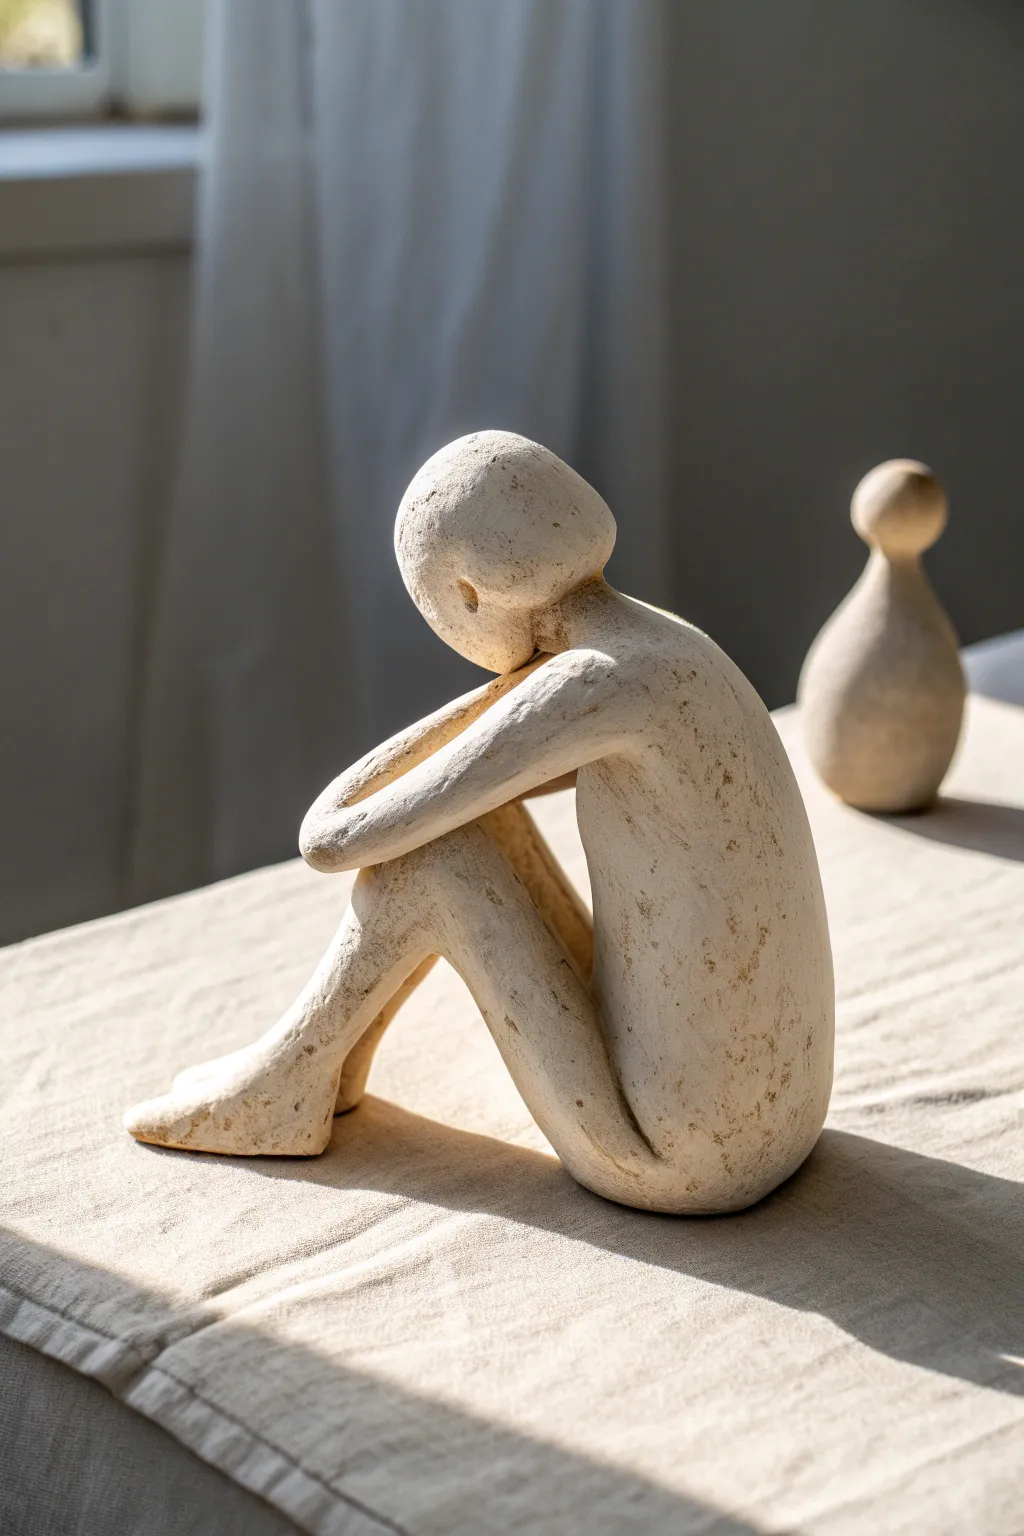
This project captures a mood of quiet introspection with a simplified, abstract human form curled into a sitting position. The finished piece features a beautiful, raw stone-like texture that makes it look like an excavated artifact rather than fresh clay.
How-To Guide
Materials
- Air-dry clay (stone or white color)
- Small cup of water
- Modeling tools (sponge, wooden sculpting tool)
- Fine-grit sandpaper
- Acrylic paints (cream, beige, warm grey)
- Old toothbrush or stippling brush
- Paper towels
- Matte varnish spray
Step 1: Forming the Base Structure
-
Prepare the Clay:
Start by kneading a large handful of air-dry clay until it is warm and pliable. Divide it roughly in half, with one portion slightly larger for the body and legs. -
Shape the Torso:
Take the larger portion and roll it into a thick sausage shape. Bend it gently into a ‘C’ curve to mimic the curvature of a spine. -
Create the Legs:
Split the bottom half of your ‘C’ shape vertically to create two legs. Bend these upwards at the ‘knee’ point so they angle sharply back toward where the chest would be. -
Refine the Feet:
Flatten the ends of the legs slightly to suggest feet resting on the ground. You don’t need detailed toes; just a flat plane that will help the figure sit stably. -
Attach the Head:
Roll a smooth sphere from your remaining clay for the head. Score the underside of the sphere and the top of the neck area, dampen with a little water, and press firmly to attach. Smooth the seams downwards into the shoulders.
Cracking Up?
If small fissures verify appear while drying, don’t panic. Mix a small amount of fresh clay with water to make a paste (slip) and fill the cracks, then sand smooth once dry.
Step 2: Connecting and Shaping
-
Position the Pose:
This is crucial for the mood: gently push the head downward so the ‘face’ area rests near or on the knees. Adjust the back’s curve so it looks natural and relaxed, not broken. -
Add the Arms:
Roll two thinner coils for arms. Attach them at the shoulders and drape them down the sides of the legs, blending them into the leg form near the ankles or feet. The limbs should feel fused together rather than separate. -
Smooth the Transitions:
Use a damp sponge or your finger to smooth out all specific muscle details. The goal is a unified, silhouetted shape where the chin, knees, and arms merge into one continuous block. -
Check Balance:
Set the figure down on a flat surface. If it tips over, gently press the bottom curve of the spine and the feet to create a flatter, more stable base. -
Add Texture:
Instead of smoothing it perfectly, take a dry toothbrush or a crumpled ball of aluminum foil and tap it gently all over the surface. This creates that weathered, stone-like pitting. -
Drying Time:
Let the sculpture dry completely. This usually takes 24-48 hours depending on humidity. Rotate it occasionally so the bottom dries evenly.
Abstract Variations
Try elongating the limbs significantly for a surreal Giacometti-style look, or omit the arms entirely to focus purely on the curve of the back and head.
Step 3: Faux Stone Finish
-
Base Coat:
Mix a creamy white acrylic paint with a tiny drop of beige. Paint the entire figure. I find that not covering every single pit fully adds to the depth. -
Create Depth:
Water down a darker warm grey paint until it’s like heavy tea. Brush this wash over the sculpture, letting it settle into the texture pits. -
Wipe Back:
Immediately use a paper towel to wipe the surface. The dark paint will stay in the crevices, highlighting the rough texture while leaving the raised areas light. -
Dry Brushing:
Dip a dry, stiff brush into your lightest cream color. Wipe most of it off on a paper towel, then lightly flick the brush over the raised edges (shoulders, knees, spine) to highlight the form. -
Speckling:
For a granite effect, load an old toothbrush with thinned brown paint and flick the bristles with your thumb to spray tiny dots onto the sculpture. -
Final Seal:
Once fully dry, spray with a matte varnish to protect the finish without adding an unnatural shine.
Now you have a serene, gallery-worthy piece that adds a touch of calm to any shelf
Face Vase Head Sculpture
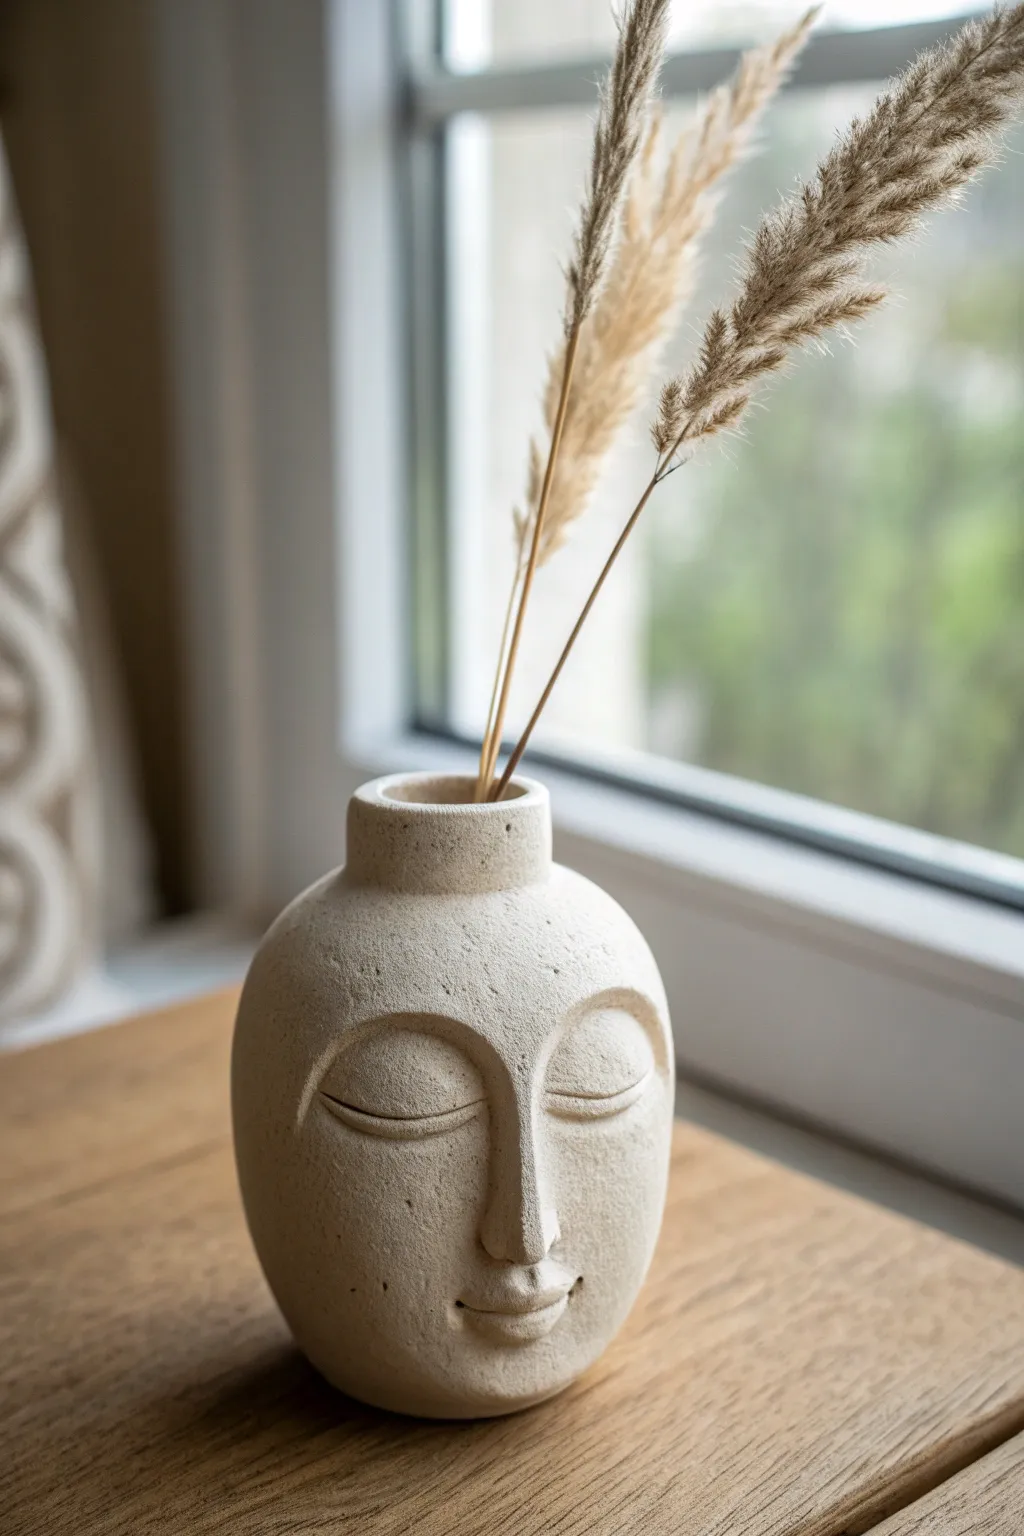
Create a calming focal point for your home with this minimalist face vase, characterized by its peaceful closed eyes and textured, sandstone-like finish. This project uses simple hand-building techniques to transform a basic clay form into an artistic vessel perfect for dried grasses or faux stems.
Step-by-Step Guide
Materials
- Air-dry clay (stone or white color)
- Small rolling pin
- Modeling tools (or a butter knife and spoon)
- Small bowl or cup (as a mold/armature)
- Sandpaper (medium grit)
- Texture sponge or old toothbrush
- Slip (clay mixed with water)
- Speckled stone spray paint or acrylic paint with sand mixed in
- Matte sealant
Step 1: Forming the Base
-
Prepare the Clay:
Warm up a large ball of air-dry clay by kneading it in your hands until it is pliable and smooth. This prevents cracks later on. -
Roll the Slab:
Roll out a portion of the clay into a flat, even slab about 1/4 inch thick. This will form the main body of the vase. -
Shape the Cylinder:
Wrap the clay slab around a cylindrical object (like a glass jar or a sturdy cardboard tube) to create the basic shape. Join the seam by scoring the edges, adding slip, and smoothing it over with your finger. -
Close the Bottom:
Cut a circle of clay for the base. Attach it to your cylinder using the score-and-slip method, ensuring a tight seal so the vase feels solid. -
Rounding the Form:
Gently push from the inside of the cylinder outwards to create a subtle curve, giving the vase a more organic, egg-like shape rather than a straight pipe. Smooth the newly curved exterior with a damp sponge. -
Create the Neck:
Add a smaller, thick coil of clay to the top opening to create the bottleneck rim. Smooth it onto the main body so it looks like one continuous piece.
Fixing Cracks
If hairline cracks appear while drying, mix a tiny amount of fresh clay with water to make a paste and fill the cracks. Smooth over and let dry again.
Step 2: Sculpting the Features
-
Map the Nose:
Roll a small snake of clay for the nose. Attach it vertically to the center of the face, blending the sides smoothly into the cheeks but leaving the bridge and tip defined. -
Define the Brow:
Extend the top of the nose bridge outward to the left and right to form the brow bone area. This structural line helps frame the eyes. -
Add the Eyelids:
I find it easiest to roll two equal-sized oval balls of clay and flatten them slightly. Attach them below the brow bone to form closed, serene eyelids. -
Carve the Eye Slit:
Using a needle tool or the edge of a knife, gently press a curved horizontal line across the center of each eyelid oval to depicit the closed lash line. -
Form the Lips:
Roll a tiny lozenge shape for the mouth. Attach it below the nose and use a sculpting tool to create the separation line between the lips, turning the corners up very slightly for a peaceful expression. -
Refine the Contours:
Use your thumbs to smooth the transition areas around the nose and eyes, ensuring the features look like they are emerging from the vase, not just stuck on top.
Make it Functional
Air-dry clay isn’t waterproof. To hold fresh flowers, hide a small glass vial or plastic cup inside the neck of the sculpture before arranging stems.
Step 3: Finishing and Texture
-
Texturize the Surface:
Before the clay dries, gently dab the entire surface with a coarse sponge or an old toothbrush. This creates the porous, stone-like texture seen in the photo. -
Initial Drying:
Let the sculpture dry slowly away from direct sunlight for 24 to 48 hours. Rotate it occasionally to ensure even drying. -
Soft Sanding:
Once fully dry, lightly sand any harsh ridges or fingerprints. Be careful not to sand away the texture you added with the sponge. -
Faux Stone Finish:
If your clay is plain white, apply a beige or stone-colored acrylic paint. To get the speckled look, dip a toothbrush in diluted dark brown paint and flick the bristles to spatter tiny dots across the face. -
Seal the Project:
Finish with a coat of matte spray sealant to protect the clay and give it a professional, non-shiny finish.
Place your new sculpture on a sunny windowsill and enjoy the peaceful vibe it brings to the room
Brain Bowl With Tiny Climber

This whimsical sculpting project features a textured bowl resembling the patterns of a brain, complete with a tiny, contemplative figure perched on the rim. The organic, creamy stone texture gives it a timeless, museum-like quality perfect for holding keys or trinkets.
How-To Guide
Materials
- Air-dry clay or polymer clay (stone or white color)
- Small bowl (for a mold support)
- Cling film
- Rolling pin
- Loop tool or carving tools
- Needle tool
- Texture sponge or stiff bristle brush
- Fine grit sandpaper
- Acrylic paints (cream, beige, diluted brown)
- Matte sealant spray
Step 1: Forming the Bowl Base
-
Prepare the workspace:
Begin by covering a small kitchen bowl with cling film. This will act as your slump mold to ensure a perfect concave shape without the clay sticking to the original dish. -
Roll the slab:
Roll out a substantial amount of clay into a slab, aiming for a thickness of about 1/4 inch or slightly thicker to allow depth for carving later. -
Drape and shape:
Gently lift your clay slab and drape it inside the cling-film-covered bowl. Press firmly but carefully against the sides to remove air pockets, smoothing the interior surface with a damp sponge. -
Trim the rim:
Use a needle tool or fettling knife to cut the excess clay away from the rim. Don’t worry about being perfectly straight; a slightly organic, uneven edge adds character to this piece. -
Initial texture:
Before the clay hardens, tap the entire surface (inside and out) with a stiff bristle brush or a rough natural sponge. This creates that lovely, pitted stone effect. -
Stiffen the form:
Let the bowl sit inside the mold for an hour or so until it holds its shape, then carefully remove it to work on the exterior.
Clean Lines
When carving the brain grooves, keep a damp sponge nearby to constantly clean clay build-up off your loop tool. This keeps the channels crisp.
Step 2: Carving the Brain Pattern
-
Drafting the design:
Using a needle tool, lightly sketch meandering, squiggly lines all over the exterior and interior surface to mimic the gyri and sulci of a brain. -
Carving the channels:
Take a small wire loop tool and carve out the lines you just sketched. I find it easiest to work in short sections, pulling the tool toward you to maintain control. -
Enhancing depth:
Go back over your carved channels and soften the sharp edges with a damp brush or your finger, making the raised areas look pillowy and rounded. -
Re-texturing:
The carving process often smooths out your initial texture, so re-tap the carved areas with your texture sponge to ensure the finish is consistent.
Gold Mind
Paint the inside of the carved grooves with metallic gold paint instead of a dark wash. It creates a stunning ‘valuable thoughts’ concept piece.
Step 3: Sculpting the Tiny Observer
-
Create an armature:
For the tiny figure, roll a very small snake of clay for the legs and torso. You don’t need wire for a figure this small, but compacting the clay well is key. -
Seat the figure:
Place the rough clay shape onto the rim of the bowl while both are still workable. Bend the legs so they dangle into the bowl and the torso leans slightly forward. -
Refine the anatomy:
Using delicately small tools, define the arms resting on the knees and shape a simple round head. Keep the features abstract and minimalist rather than detailed. -
Secure the bond:
Score and slip the contact point where the figure sits on the rim to ensure he doesn’t pop off later. Blend the clay of the figure’s bottom slightly into the bowl rim. -
Final drying:
Allow the entire piece to dry completely. If using air-dry clay, this may take 24-48 hours. If using polymer, bake according to package instructions.
Step 4: Finishing Touches
-
Sanding:
Once dry or cured, give the rim and any sharp peaks a quick pass with fine-grit sandpaper to soften the touch without removing the texture. -
Base coat:
Paint the entire sculpture with a warm, creamy off-white or light beige acrylic paint. -
Applying a wash:
Mix a very watery brown or grey paint. brush it into the carved crevices, then immediately wipe the raised surfaces with a cloth. This antiquing technique makes the brain pattern pop. -
Speckling:
Dip an old toothbrush into diluted black or dark brown paint and flick the bristles to spray tiny speckles over the piece, simulating real stone. -
Seal:
Finish with a matte spray varnish to protect the surface while keeping the natural, earthy look intact.
Place your finished sculpture on a stack of books or a desk for an instant conversation starter that looks surprisingly sophisticated.
Stacked Totem of Mini Creatures
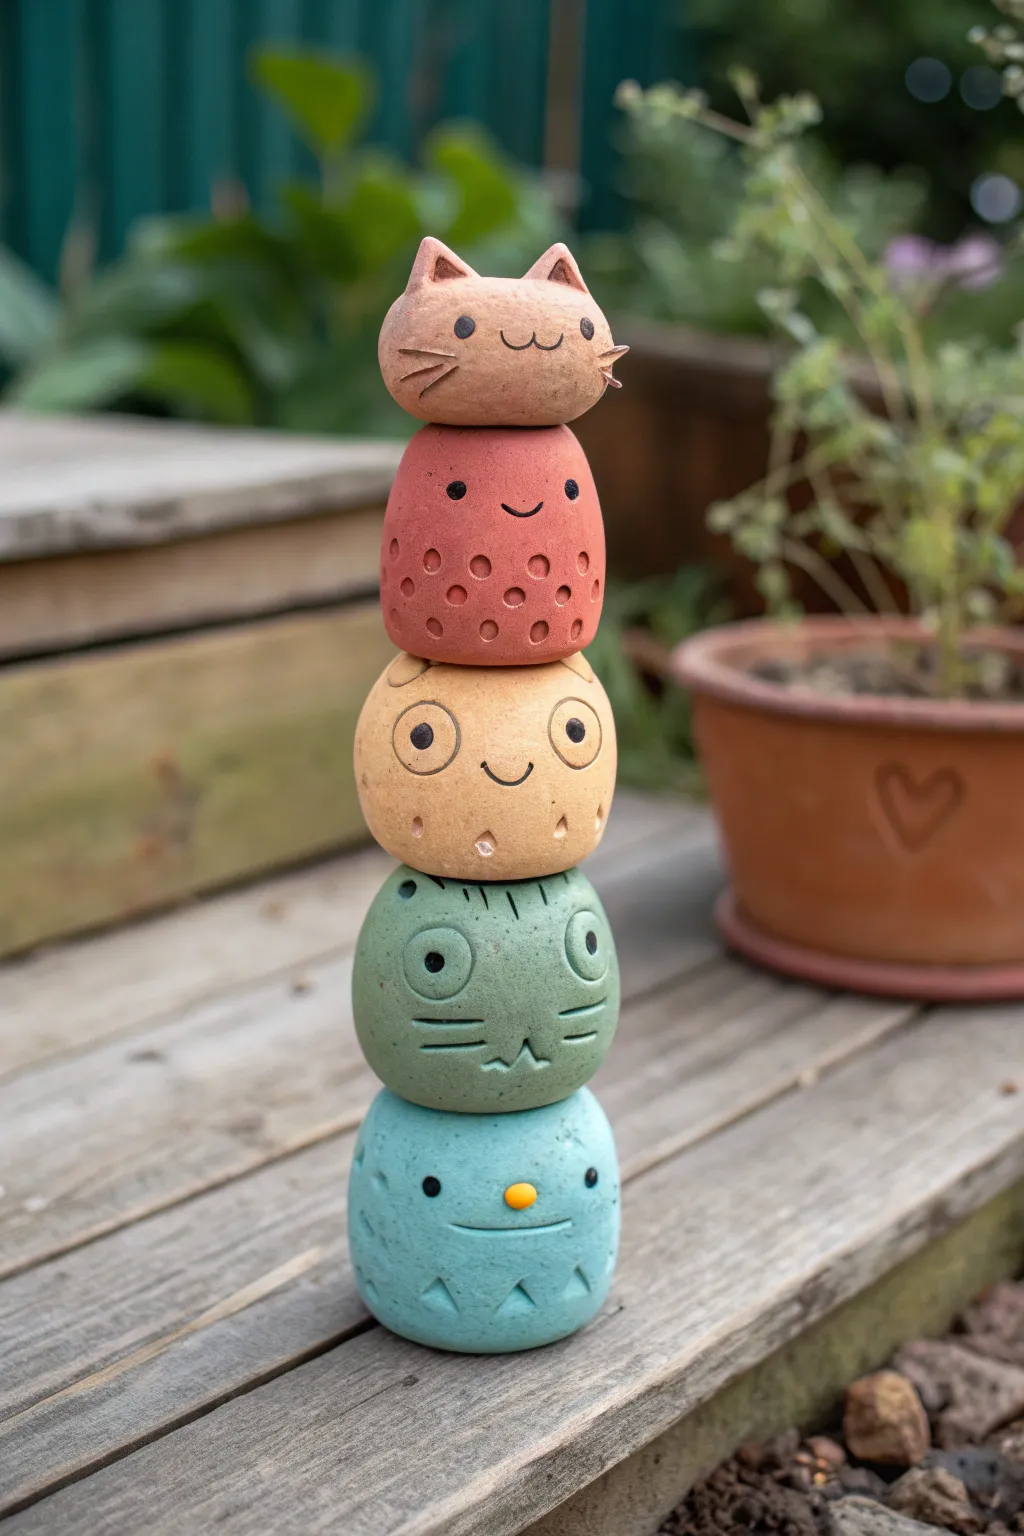
This charming garden decoration features a stacked family of five unique clay creatures, each with its own personality and color. It’s a delightful, beginner-friendly project that combines simple pinch-pot techniques with creative facial expressions to bring a corner of your patio to life.
Step-by-Step Tutorial
Materials
- Polymer clay or air-dry clay (in pink, red, yellow-ochre, sage green, and light blue)
- Black acrylic paint
- Fine detail paintbrush or dotting tool
- Small amount of yellow clay (for noses)
- Sculpting tools (needle tool, small ball stylus)
- Aluminium foil (for core structure)
- Strong adhesive (like E6000 or instant glue)
- Clear matte varnish (outdoor rated if placing outside)
Step 1: Forming the Base Creature
-
Create the core:
Start by crumpling a small amount of aluminium foil into a tight ball, roughly the size of a golf ball. This saves clay and keeps the totem lightweight. -
Wrap the clay:
Condition your light blue clay until pliable, then flatten it into a pancake. Wrap this completely around your foil ball, smoothing out seams until you have a seamless pebble shape. -
Shape the body:
Gently roll the clay ball on your work surface to flatten the top and bottom slightly. This creates stability for stacking later. -
Add texture details:
Using a triangular sculpting tool or the edge of a ruler, press small indentations around the bottom rim of the creature to create a geometric pattern. -
Sculpt the face:
Use a needle tool to press in two small eye sockets. Roll a tiny ball of yellow clay and press it into the center for a nose, then carve a simple straight line for the mouth.
Stability Secret
Before baking or drying, press the creatures gently on top of one another while raw. This creates matched depressions that act like puzzle pieces for a wobble-free stack.
Step 2: Building the Middle Characters
-
Sculpt the green cat:
Repeat the foil-wrapping process with sage green clay. Shape it into a slightly more oval form. -
Detail the green face:
Carve large circles for eyes using a round cutter or cap. Add a simple nose bridge and whiskers with your needle tool. Don’t forget to push in the eye centers. -
Create the yellow owl:
Form a yellow-ochre ball. For this one, I like to pinch tiny tufts at the top corners to suggest ears before smoothing them down slightly. -
Add owl features:
Press large, wide circular rims for the owl’s eyes. Draw a small ‘u’ shape for a beak and add tiny texture marks near the bottom for feathers. -
Form the red texture monster:
Create a red clay ball. This character is defined by texture, so use a small ball stylus to press repeated divots all over the lower half of its body. -
Finish the red face:
Keep the face simple to balance the texture—just two eye indents and a simple curved smile.
Step 3: The Crowning Cat
-
Shape the top tier:
Use pink clay to form the final creature. Since this is the top, pinch two distinctive, pointed triangles at the very top for cat ears. -
Refine the cat shape:
Smooth the ears into the body so they look integral, not attached. Gently flatten the bottom so it will sit securely on the red layer. -
Carve cat details:
Use your needle tool to sketch long whiskers and a ‘3’ shape for the mouth. Add small indents for the eyes.
Wobbly Stack?
If the dried pieces don’t sit flat, use a small piece of sandpaper to sand down the contact points until they are level before gluing them together.
Step 4: Assembly and Finishing
-
Bake or dry:
If using polymer clay, bake all pieces according to package directions (usually 275°F/135°C for 15-30 mins). If using air-dry clay, let them cure for 24-48 hours. -
Paint the eyes:
Once cool and dry, use a fine brush or dotting tool with black acrylic paint to fill in the eye sockets deeply. Paint the sculpted whiskers on the top cat black as well. -
Stack and glue:
Test your stack first to find the most stable arrangement. Then, apply strong adhesive between each layer, pressing firmly for a moment to set the bond. -
Seal for protection:
Finish by brushing on two thin coats of matte varnish. This unifies the sheen and protects your cute stack from the elements.
Place your adorable totem near a potted plant to add a friendly face to your greenery