When teens ask me what to make with clay, they usually want something that feels grown-up, cute, and actually useful. These ideas are all about trendy clay crafts that look amazing on a desk, vanity, or shelf—and still feel totally doable in an afternoon.
Aesthetic Trinket Dishes
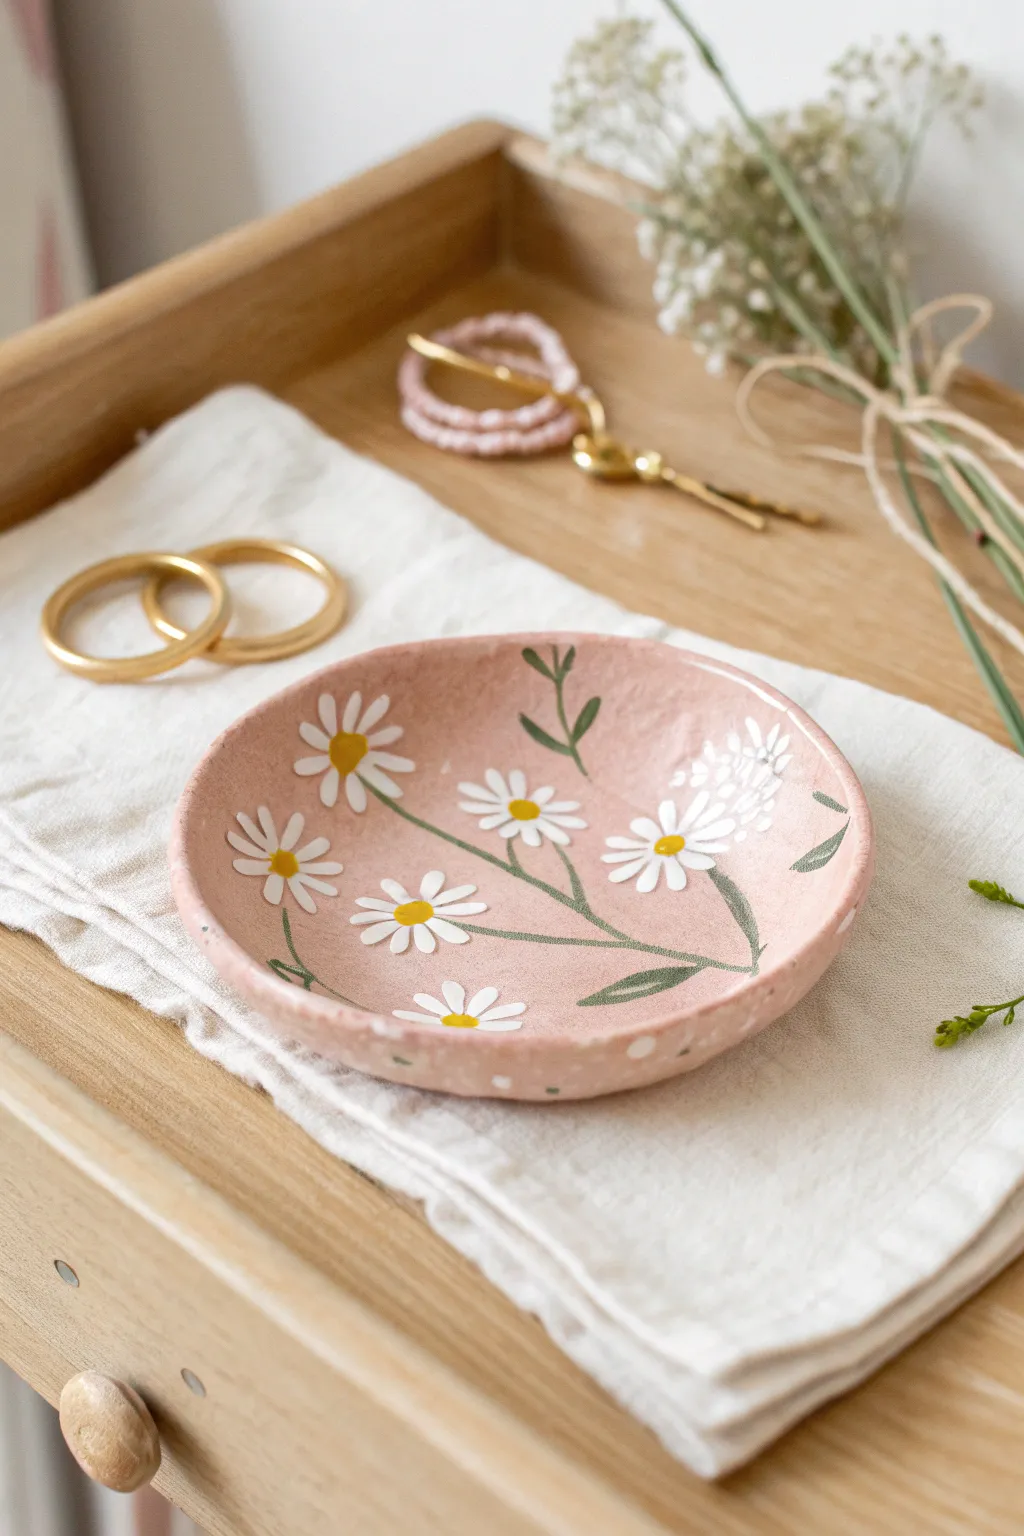
Bring a touch of cottagecore charm to your dresser with this lovely blush pink trinket dish featuring delicate white daisies. It’s the perfect size for holding rings or earrings and makes for a sweet, handmade gift.
Step-by-Step Tutorial
Materials
- Air-dry clay (white or terracotta)
- Pink acrylic paint (blush or dusty rose)
- White acrylic paint
- Mustard yellow acrylic paint
- Sage green acrylic paint (or dark green mixed with a little white)
- Rolling pin
- Small bowl or circular cutter (approx. 4-5 inches)
- Sponge or sanding block
- Fine detail paintbrushes (round size 0 and 2)
- Gloss or matte varnish (sealant)
Step 1: Shaping the Dish
-
Prepare the clay:
Start by taking a handful of air-dry clay and kneading it in your hands until it’s soft, pliable, and free of cracks. -
Roll it out:
Use your rolling pin to flatten the clay into an even slab. Aim for a thickness of about 1/4 inch so the dish is sturdy but not too chunky. -
Cut the circle:
Place a small bowl or circular template onto the clay and trace around it with a knife or clay tool to cut out a perfect circle. -
Lift the edges:
Gently curve the edges of the circle upwards with your fingers to create a shallow bowl shape. Smooth out any fingerprints or cracks with a tiny bit of water. -
Dry completely:
Let the dish dry for 24-48 hours. I like to flip it over halfway through the drying process to ensure the bottom dries evenly. -
Sand for smoothness:
Once fully dry, use a sanding block or fine sandpaper to gently smooth down any rough edges along the rim or surface bumps.
Smooth Surface Secret
Use a barely damp sponge to wipe the raw clay before it dries. This smooths fingerprints better than sanding later.
Step 2: Painting the Base
-
Apply the base coat:
Paint the entire dish—top, bottom, and rim—with your blush pink shade. You might need two coats for full, opaque coverage. -
Let it cure:
Ensure the pink base coat is completely bone dry before moving on to the floral details to prevent colors from muddying.
Step 3: Adding the Floral Design
-
Map out the stems:
Using your fine detail brush and sage green paint, paint thin, curving lines radiating from one side or the center to create the daisy stems. -
Add leaves:
Along the green stems, paint small, simple tear-drop shapes for leaves. Keep them delicate and spaced out naturally. -
Start the petals:
Dip a clean small brush into white paint. For each flower, make small dabs or strokes radiating outward from a central point to form the petals. -
Vary the flowers:
Make some full circles for open daisies and just 3-4 petals for buds or side-facing blooms. -
Paint the centers:
Once the white petals are dry, use the mustard yellow paint to add a small dot in the center of each full daisy. -
Add detail dots:
For extra flair, dip the back end of your paintbrush in white paint and add tiny dots around the flower clusters to look like baby’s breath.
Speckled Pottery Vibe
Before sealing, flick a toothbrush loaded with brown paint over the dish for a trendy, convincing faux-ceramic speckled look.
Step 4: Finishing Touches
-
Dry the design:
Allow the painted design to dry completely, ideally leaving it overnight to be safe. -
Seal the dish:
Apply a coat of gloss or matte varnish over the entire dish to protect the paint from chipping and give it a professional finish.
Now you have a charming spot for your favorite small treasures


Ring Holder Cones
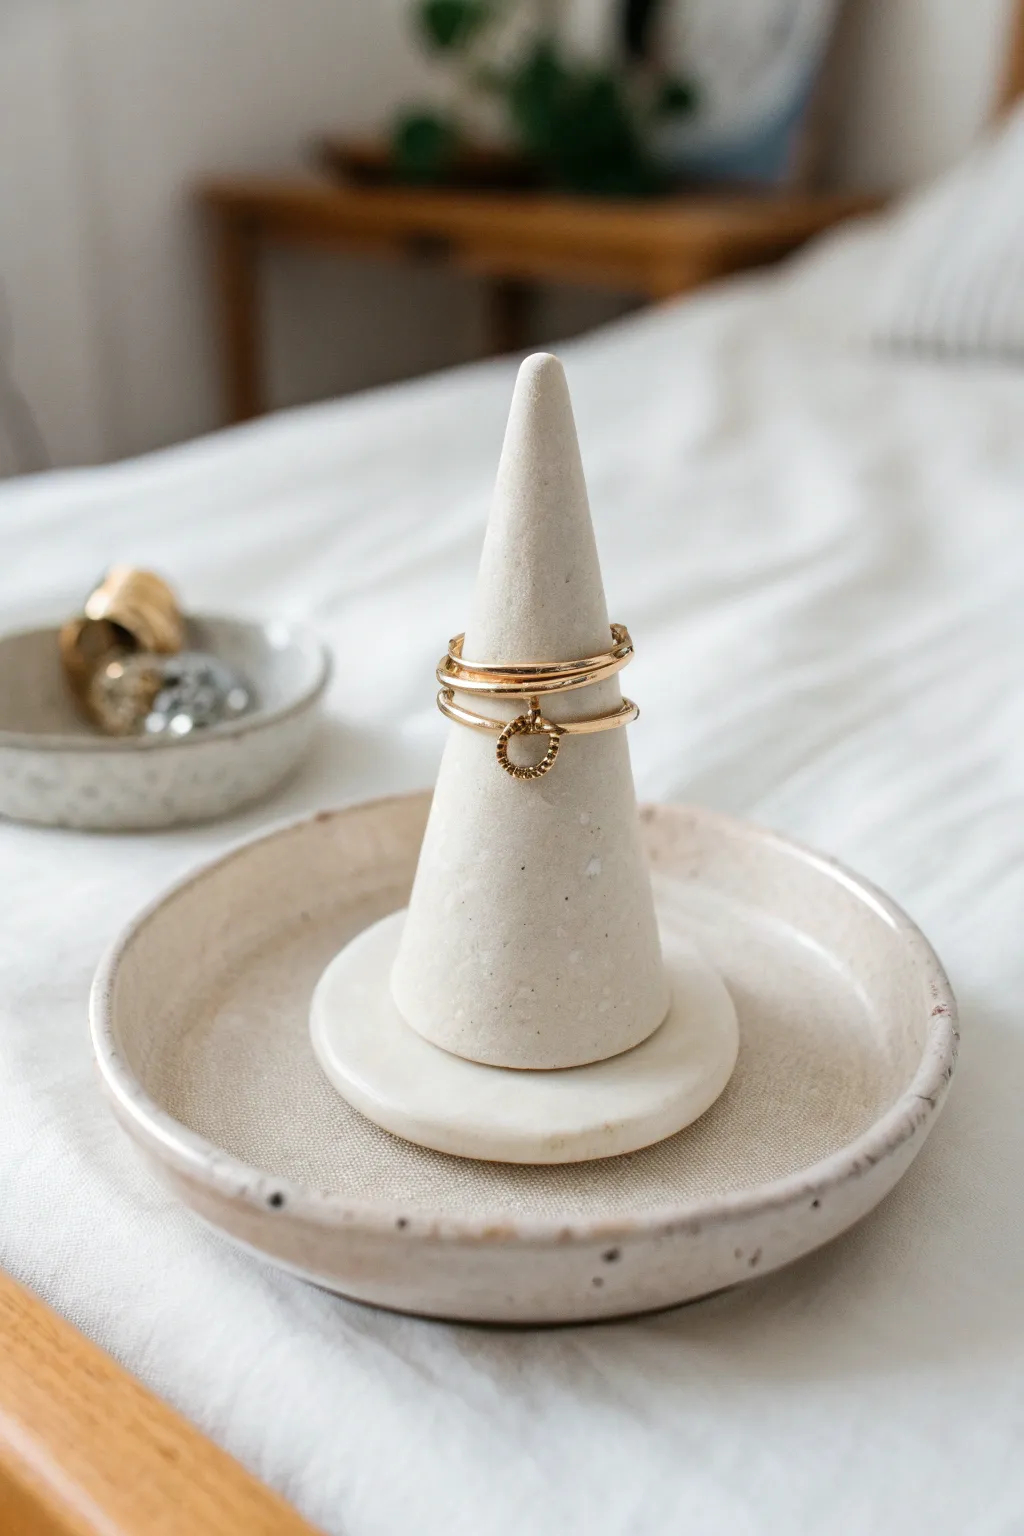
Bring boutique organization to your dresser with this sleek, two-part ring holder set. Its speckled, cream-colored finish and simple geometric shapes give it a modern, high-end pottery look without needing a throwing wheel.
Step-by-Step Guide
Materials
- White polymer clay or air-dry clay
- Rolling pin or acrylic roller
- X-acto knife or craft blade
- Paper template (circle sector)
- Small round cookie cutter (approx 2 inches)
- Medium round cookie cutter or bowl (approx 4-5 inches)
- Sandpaper (fine grit)
- Water and sponge (for smoothing)
- Speckled acrylic paint or ‘granite’ effect spray
- Clear matte varnish or glaze
- Small paintbrush
- Cardstock for cone template
Step 1: Forming the Cone
-
Create a Template:
Cut a circle out of cardstock about 4 inches in diameter. Cut a wedge out of it (removing about 1/3 of the circle) to create a shape that will roll into a cone. -
Roll the Clay:
Condition your clay until soft, then roll it out into a smooth slab about 1/4 inch thick. Ensure the thickness is even across the entire surface. -
Cut the Shape:
Place your cardstock template onto the clay slab and carefully trace around it with your craft knife to cut out the wedge shape. -
Form the Cone:
Gently lift the clay wedge and bring the straight edges together to form a cone. Pinch the seam together securely from top to bottom. -
Smooth the Seam:
Use your finger or a sculpting tool to smooth out the seam so it becomes invisible. I find a little water on my fingertip helps blend air-dry clay perfectly. -
Level the Base:
Stand the cone up. If it wobbles, gently slice the bottom with your knife to make it perfectly flat, or gently press it onto the table to level it. -
Refine the Point:
Smooth the very tip of the cone with your fingers so it isn’t too sharp or fragile. Aim for a soft, rounded point.
Step 2: Creating the Base & Dish
-
Cut the Cone Base:
Roll out a small amount of clay slightly thicker than before. Use your small round cutter to cut a circle that is slightly wider than the bottom of your cone. -
Attach the Cone (Optional):
You can leave the cone separate, or score and slip (scratch the surfaces and add water) to attach the cone permanently to this small circular base. -
Form the Catch-all Dish:
Roll a larger slab or ball of clay. Use the medium cutter or a bowl as a guide to cut a larger circle, forming the shallow dish that holds the cone. -
Shape the Rim:
Gently curve the edges of this larger circle upwards with your fingers to create a shallow lip. This keeps loose jewelry contained. -
Smooth Edges:
Dip a sponge in water and run it along the rim of the dish and the edges of the base to remove any sharpness or cracking.
Fixing Cracks
If small cracks appear while drying, don’t panic. Mix a tiny bit of fresh clay with water to make a paste and fill the cracks, then sand smooth once dry.
Step 3: Finishing Touches
-
Dry Completely:
Let all pieces dry according to your clay’s instructions. For air-dry clay, this usually takes 24-48 hours. Rotate them occasionally for even drying. -
Sand for Smoothness:
Once fully cured, use fine-grit sandpaper to buff out any fingerprints or bumps. The surface should feel like polished stone. -
Add Speckles:
Dilute a tiny bit of black or brown acrylic paint with water on a toothbrush. Run your thumb over the bristles to flick tiny speckles onto the white cone and dish. -
Seal the piece:
Apply a coat of clear matte varnish to protect the clay and give it a finished, ceramic feel.
Make it Marble
Twist grey and white clay together before rolling out your slab to create a faux-marble effect instead of painting speckles later.
Now you have a chic spot to keep your favorite rings safe and displayed.


Study Desk Pencil Pot
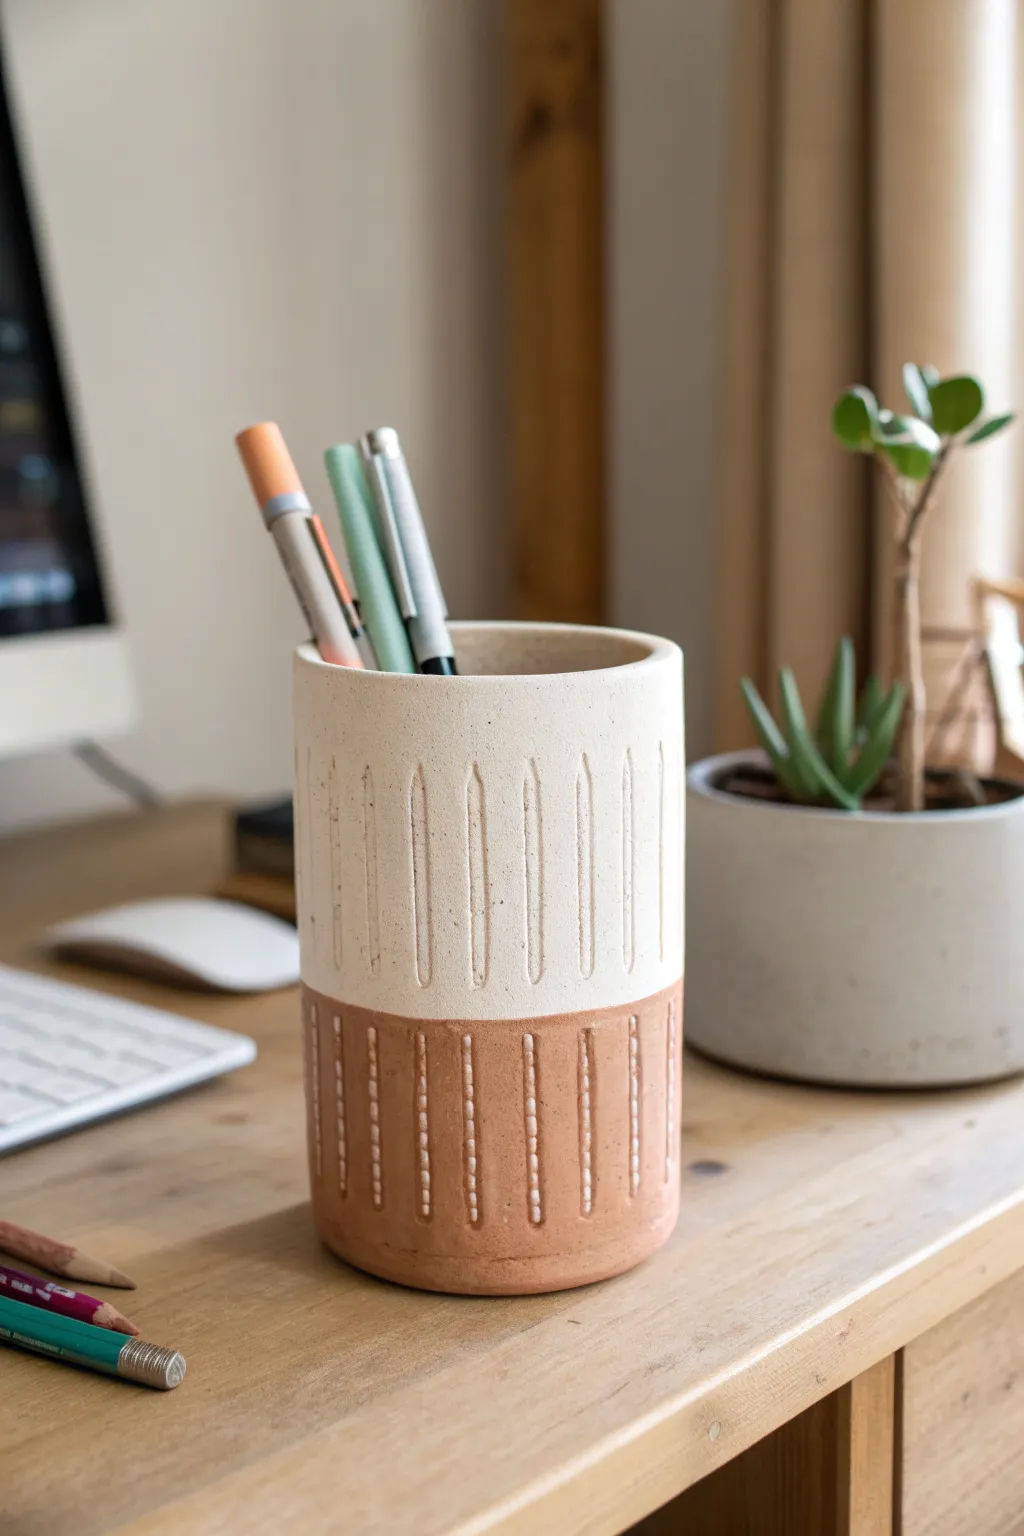
Clean up your messy desk with this stylish, two-tone pencil holder that channels effortless bohemian vibes. The combination of raw terracotta texture and smooth white glaze creates a striking contrast, while simple carved lines add just the right amount of detail.
Step-by-Step Guide
Materials
- Terracotta air-dry clay or kiln-fire clay
- Rolling pin
- Ruler
- Craft knife or clay cutter
- Clay slip (water and clay slurry)
- Small carving tool or toothpick
- White acrylic paint (for air-dry) or white glaze (for kiln-fire)
- Painter’s tape or masking tape
- Fine grit sandpaper
- Clear sealant (optional, but recommended for air-dry clay)
- A cylindrical form to wrap around (like a soda can or PVC pipe)
Step 1: Forming the Base
-
Prepare your clay slab:
Start by kneading your terracotta clay to remove any air bubbles. Roll it out into a smooth, even slab that is roughly 1/4 inch thick. Try to keep the thickness consistent so your pot stands straight. -
Measure and cut:
Determine the height you want for your pencil pot (around 4-5 inches is standard). Use a ruler to cut a clean rectangle from your slab that is long enough to wrap around your chosen cylindrical form with a tiny bit of overlap. -
Cut the base circle:
Using the same cylindrical form as a guide, cut out a circular base from the remaining clay slab. Set this aside for a moment. -
Wrap the cylinder:
Wrap your rectangular slab around your form. Where the two ends meet, score the edges (scratch them up with a tool) and apply a little water or slip. Press the seam together firmly and smooth it out with your finger so the join is invisible. -
Attach the bottom:
Score and slip the bottom edge of your cylinder and the outer edge of your circular base. Press the cylinder onto the base. -
Seal the seams:
Use a modeling tool or your finger to smooth the clay from the cylinder wall down onto the base, ensuring a tight seal. I find that running a slightly damp sponge around the bottom creates a really professional finish here. -
Remove the form:
Gently slide your form out of the clay cylinder. If you leave it in too long while the clay shrinks, it might crack, so it’s safer to remove it once the clay can support its own weight.
Uneven Seams?
If the vertical seam where you joined the clay keeps showing, roll a thin ‘snake’ of clay, press it into the seam on the inside of the pot, and smooth it flat to reinforce the wall.
Step 2: Carving and Drying
-
Smooth the surface:
Before adding texture, smooth out the exterior walls with a little water on your fingers. You want a nice clean canvas for your carving. -
Mark vertical guides:
Lightly mark vertical lines around the cylinder where you want your carved details to go. Spacing them about half an inch apart works well. -
Carve the lines:
Using a small loop tool or a toothpick, carve vertical lines into the clay. Don’t worry about being perfectly straight; a little wobble adds hand-made charm. Make the lines deep enough to see clearly but not so deep they cut through the wall. -
Add stitch details:
On the bottom half of the pot (the area that will remain unpainted), gently press small horizontal notches across the vertical lines you just carved. This creates a ‘stitched’ or dashed effect. -
Let it dry completely:
Allow the pot to dry fully. For air-dry clay, this usually takes 24-48 hours. Turn it occasionally so it dries evenly from all sides. -
Sand imperfections:
Once bone dry, take fine-grit sandpaper and gently smooth the top rim and any rough patches. Wipe away the dust with a barely damp cloth.
Step 3: Decorating
-
Tape the separation line:
Decide where you want the color split to be. Place a strip of masking tape or painter’s tape horizontally around the middle of the pot. Press the edge of the tape firmly into the carved grooves to prevent paint bleed. -
Paint the top section:
Paint the top section white. Depending on your paint coverage, you might need 2-3 coats. Let each coat dry before adding the next. -
Clean up the grooves:
If paint gets too thick inside the carved lines on the white section, use a clean toothpick to gently clear it out before it dries completely. This helps the texture stand out. -
Reveal the line:
Once the paint is tacky but not fully hardened, carefully peel off the tape. Peeling it while slightly wet helps keep a crisp, clean edge. -
Seal the project:
If you used air-dry clay, apply a matte clear sealant over the entire pot to protect it from moisture and chipping. If you used kiln-fire clay, you would fire it with clear glaze instead at this stage.
Level Up: Dip Dye
Instead of a sharp painted line, water down your acrylic paint slightly and brush it on loosely to create a blurred, ombre transition between the white top and the terracotta base.
Pop your favorite pens inside and enjoy the organized aesthetic on your desk


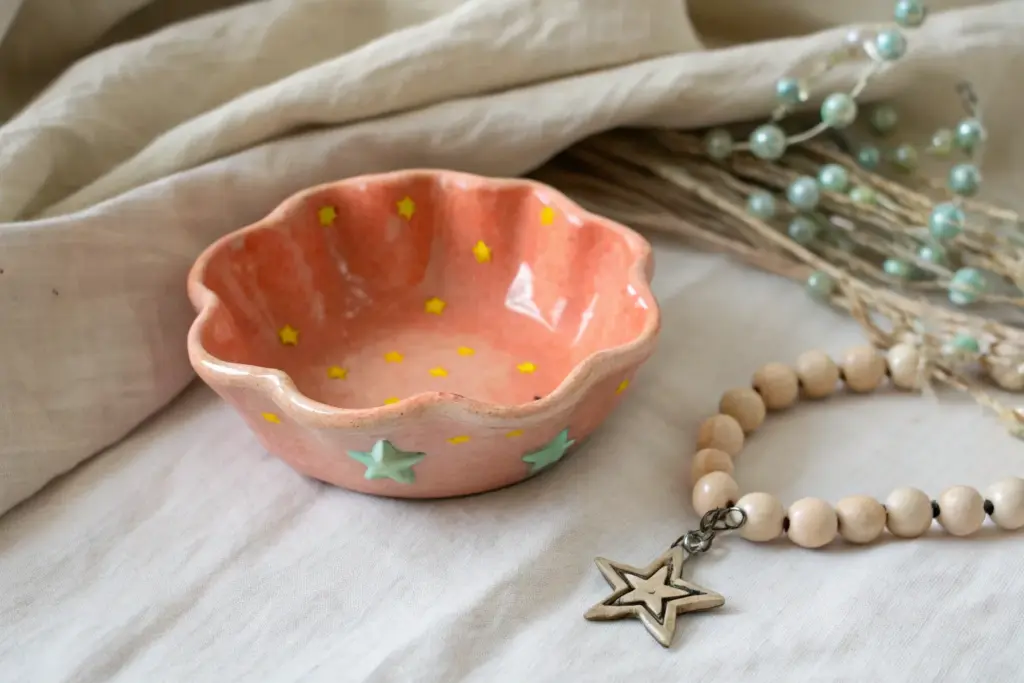
Mini Catch-All Bowls
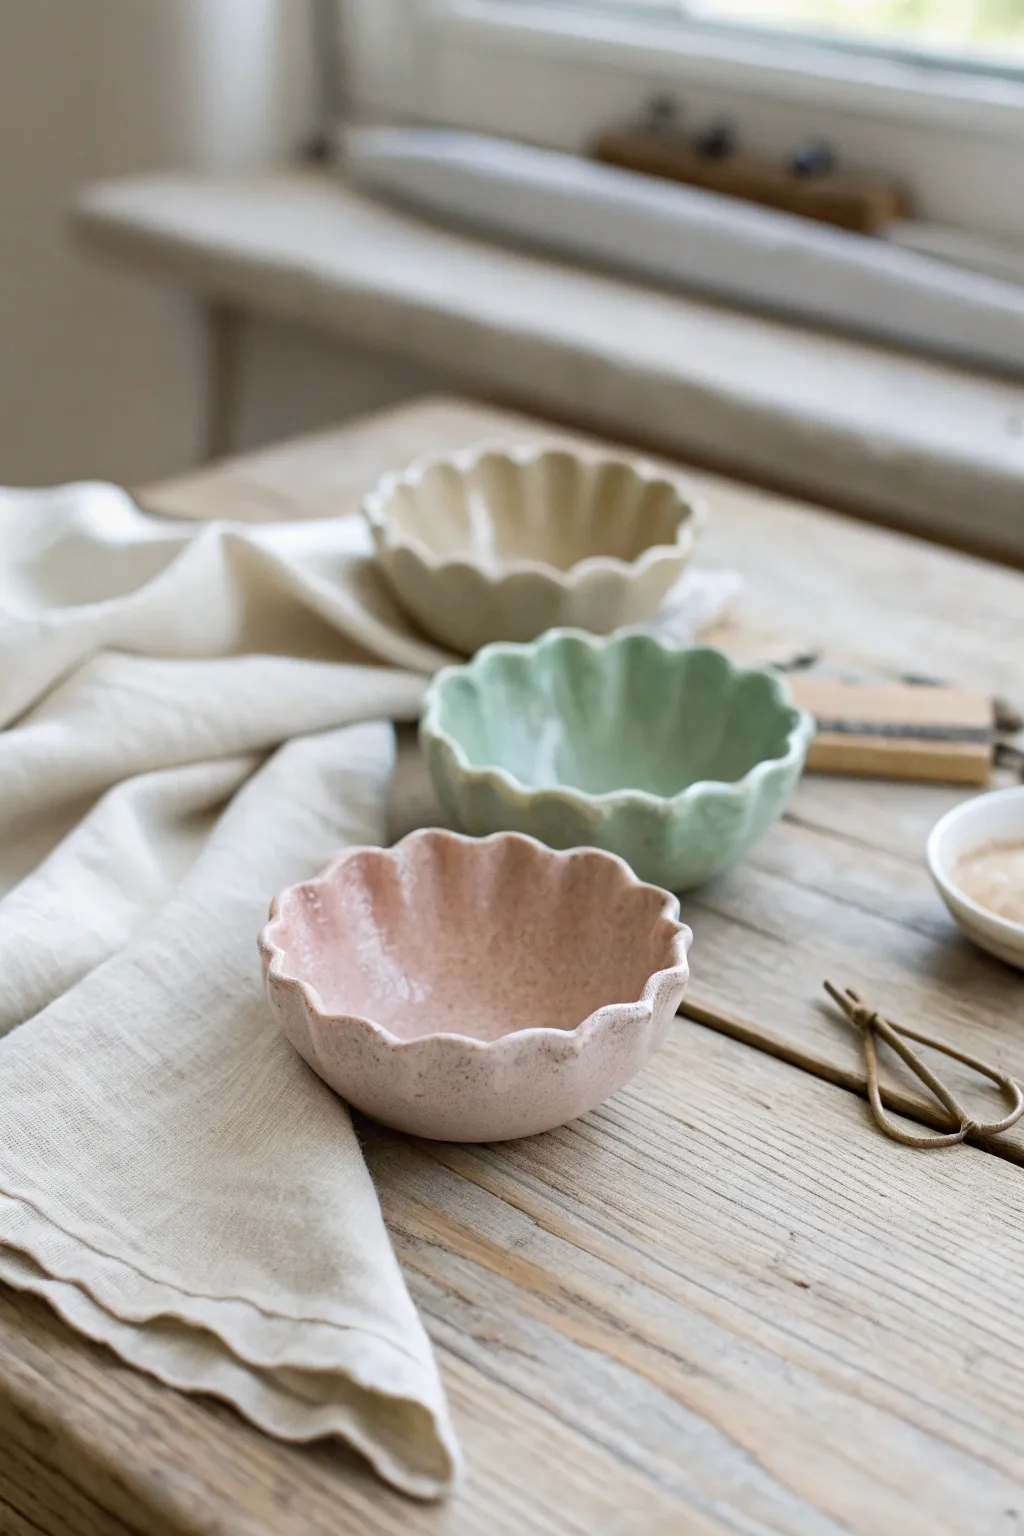
Create a set of charming, rustic bowls perfect for holding jewelry or desk trinkets. These scalloped catch-alls use a simple pinch-pot technique upgraded with delicate fluted edges and soft pastel glazes for a professional handmade look.
Detailed Instructions
Materials
- Air-dry clay (white or light grey)
- Acrylic rolling pin
- Circle cookie cutter or bowl (approx. 4-5 inches)
- Fettling knife or clay tool
- Small bowl of water
- Sponge
- High-gloss varnish or sealant
- Acrylic paints (pastel pink, sage green, cream)
- Sandpaper (fine grit)
- Canvas mat or parchment paper
Step 1: Shaping the Clay
-
Prepare your workspace:
Lay down your canvas mat or parchment paper to prevent sticking. Take a ball of air-dry clay roughly the size of a tennis ball and knead it briefly to warm it up and remove air bubbles. -
Roll out the slab:
Use your acrylic rolling pin to flatten the clay ball into an even slab. Aim for a thickness of about 1/4 inch; too thin and it will crack, too thick and it will look chunky. -
Cut the base circle:
Press your circle cutter or place an upside-down bowl onto the clay slab. Cut around it with a clay knife to create a perfect circle. Remove the excess clay and set it aside for the next bowl. -
Create the form:
Gently lift the clay circle and place it inside a small cereal bowl or round mold lined with plastic wrap. Press it down lightly so it takes on a curved, bowl-like shape. -
Mark the scallops:
Using your thumb or the rounded end of a paintbrush, make evenly spaced indentations around the top rim. I find it helpful to mark North, South, East, and West first to keep the spacing even. -
Refine the fluted edge:
Pinch the clay between your thumb and forefinger between each indentation to sharpen the peaks of the scallops. Gently pull the clay outward slightly to create that flower-petal effect visible in the photo. -
Smooth the surfaces:
Dip your finger or a small sponge into water and run it over the rim and the inside of the bowl. Smooth out any rough fingerprints or tiny cracks that formed during shaping. -
Drying face:
Let the clay dry inside the mold for at least 24 hours. Once the surface feels firm, carefully pop it out of the mold and let it air dry completely for another 24-48 hours until it’s bone dry and turns white.
Cracking Up?
If you see cracks forming while drying, mix a tiny bit of clay with water to make a ‘slip’ paste. Fill the cracks, smooth over, and let dry again.
Step 2: Finishing Touches
-
Sand imperfections:
Once fully dry, take fine-grit sandpaper and gently gently buff away any sharp edges on the rim or bumps on the bottom. Be sure to wipe away the dust with a slightly damp cloth. -
Mix pastel shades:
Prepare your palette with pastel pink, sage green, and cream acrylic paints. If you only have primary colors, mix white into red, green, or yellow to achieve those soft, milky tones. -
Apply the first coat:
Paint the entire bowl, inside and out, with your chosen color. Don’t worry if it looks streaky; air-dry clay is thirsty and absorbs the first layer quickly. -
Add a second coat:
Apply a second, thicker coat of paint to get that solid, opaque ceramic look. Let this layer dry completely before moving on. -
Create texture (Optional):
To mimic the speckled pottery glaze look, mix a tiny bit of brown paint with water. Dip an old toothbrush in it and flick the bristles to spray tiny speckles over the dried paint. -
Seal the deal:
Apply a coat of high-gloss varnish. This is crucial as it mimics the shiny look of fired ceramic glaze and protects the paint from chipping. -
Check for drips:
Watch for varnish pooling at the bottom of the bowl. Use your brush to spread out any excess liquid before it hardens.
Gold Rim Glow
Once the varnish is dry, use a metallic gold leaf pen to trace just the very edge of the scalloped rim for a luxurious, high-end finish.
Enjoy arranging these little handmade gems on your dresser or gifting them to friends

The Complete Guide to Pottery Troubleshooting
Uncover the most common ceramic mistakes—from cracking clay to failed glazes—and learn how to fix them fast.
Terrazzo Style Coasters

Bring a touch of trendy Italian design to your room with these chic faux-terrazzo coasters. By mixing colored clay chips into a white base, you’ll create a durable, polished surface that looks just like expensive stone but costs a fraction of the price.
How-To Guide
Materials
- White or translucent white polymer clay (approx. 2oz per coaster)
- Small amounts of colored polymer clay (terracotta, sage green, peach, black)
- Acrylic rolling pin or clay machine
- Square clay cutter or craft knife
- Parchment paper or ceramic tile
- Sandpaper (various grits: 400, 600, 1000)
- Water bowl (for wet sanding)
- Matte or satin polymer clay varnish (optional)
Step 1: Preparing the Chips
-
Condition the colors:
Start by conditioning your small amounts of colored clay—terracotta, sage green, and peach. Knead them until they are soft and pliable. -
Create thin sheets:
Roll each colored piece out very thinly. You want these to be paper-thin so they don’t bulk up your base layer. -
Bake the sheets:
Place these thin colored sheets on a baking tray lined with parchment paper. Bake them for about 10-15 minutes at the temperature recommended on your clay package. Use a lower time since they are thin. -
Cool and crumble:
Let the baked sheets cool completely until they are brittle. Using your fingers, crumble them into small, jagged chips of varying sizes. -
Create black specks:
For the black details, I find it easier to use raw clay since you need such tiny amounts. Finely chop a tiny bit of raw black clay into dust-like specks.
Stone Effect
Use translucent white clay for the base instead of opaque white. When sanded, it creates a visual depth that looks incredibly like real quartz or marble.
Step 2: Assembling the Slab
-
Prepare the base:
Condition your white clay thoroughly. Roll it into a thick sheet, roughly 1/4 inch thick. This needs to be sturdy enough to hold a glass. -
Scatter the chips:
Press your baked colored chips into the raw white base. Don’t be afraid to overlap slightly or leave some white space. -
Add detailed contrast:
Sprinkle the tiny raw black specks in the gaps between the larger colored chips to add depth and realistic stone texture. -
Embed the design:
Cover the slab with parchment paper to prevent sticking. Use your rolling pin to firmly press the chips down into the white base until the surface feels relatively flat. -
Smooth the surface:
Roll over the parchment paper in multiple directions to ensure the chips are fully embedded and the clay is level.
Step 3: Shaping and Finishing
-
Cut the shape:
Use a square cutter or a ruler and craft knife to cut your coaster shape. Rounded corners give it a professional, finished look. -
Refine edges:
Gently tap the sides of the coaster to smooth out any sharp cutting marks before baking. -
Final bake:
Bake the finished coaster according to the clay manufacturer’s full instructions (usually 30 minutes per 1/4 inch of thickness). -
Cool completely:
Remove from the oven and allow the coaster to cool completely on a flat surface to prevent warping. -
Wet sanding:
Dip your sandpaper in water and sand the top surface in a circular motion. Start with 400 grit to remove the top layer of white clay and reveal the sharp colors of the chips inside. -
Polish progress:
Move to 600 grit, then 1000 grit sandpaper, keeping the surface wet. This removes scratches and creates a buttery smooth stone-like finish. -
Seal:
Rinse and dry the coaster. You can leave it natural or apply a thin distinct layer of matte varnish for extra protection against moisture.
Color Pop
Add metallic gold leaf flakes into the mix along with the clay chips. The gold won’t tarnish in the clay and adds a high-end luxury feel to the final piece.
Place these on your nightstand to instantly upgrade your room decor with a functional piece of art
Photo and Card Holders
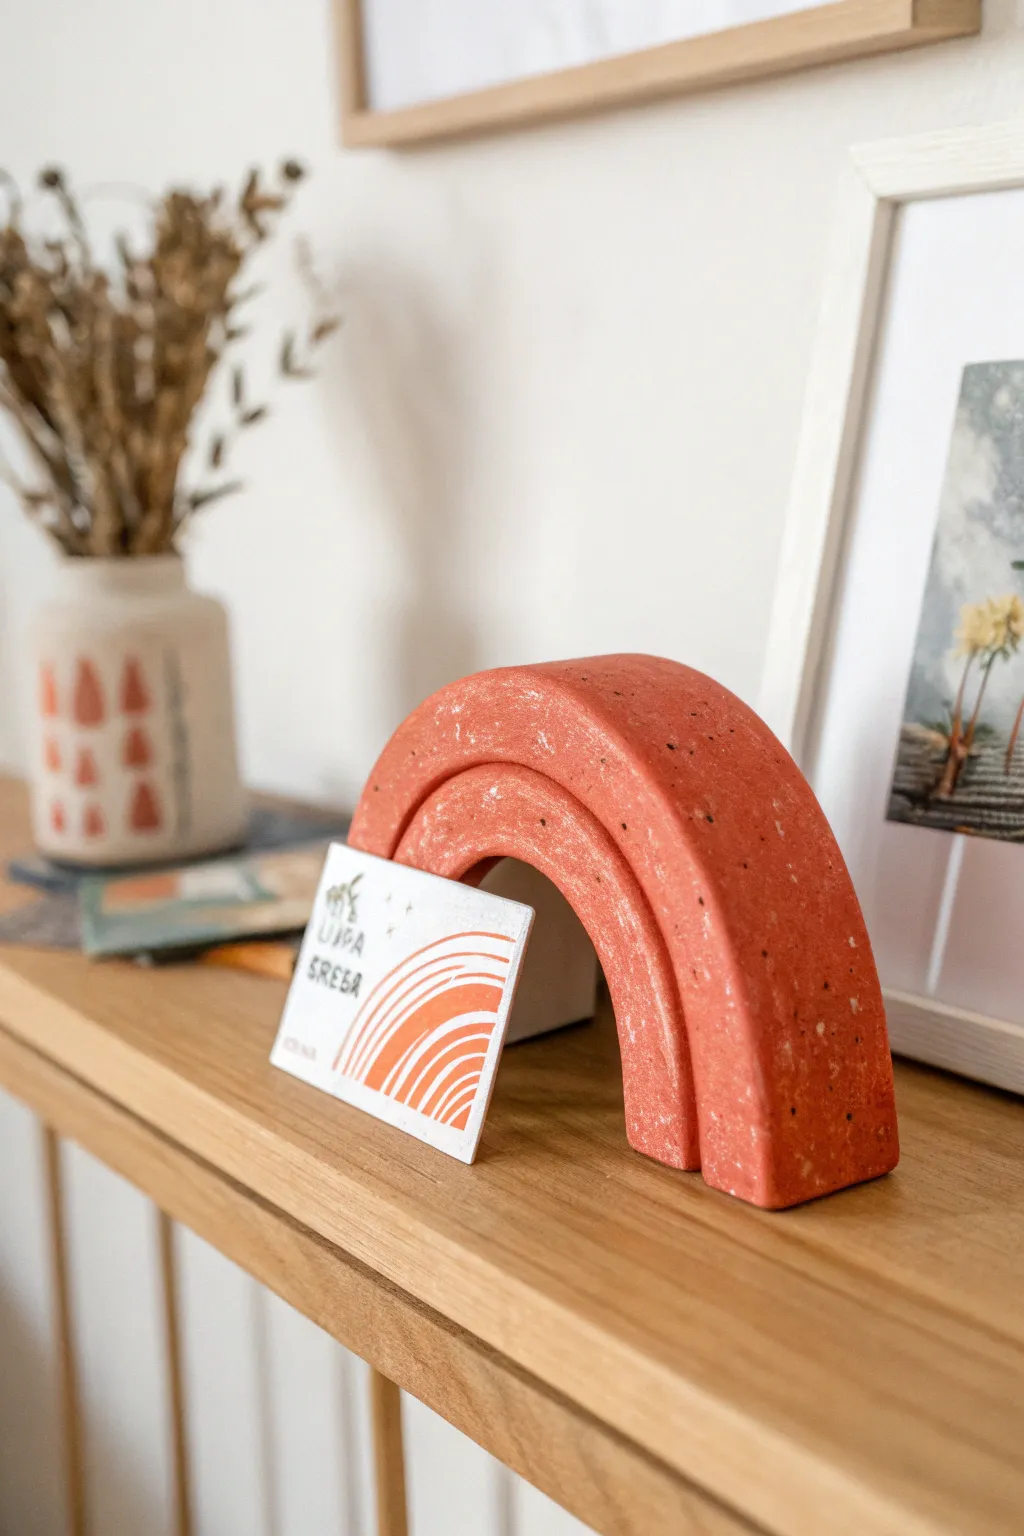
This earthy, minimalist card holder combines functional decor with a trendy terracotta aesthetic. The double-arch design creates a clever nook for displaying photos, postcards, or motivational notes, all finished with a subtle speckled texture.
Step-by-Step Guide
Materials
- Polymer clay (terracotta or rust orange)
- Polymer clay (white and black for speckling)
- Acrylic rolling pin
- Circle cutters (nested set) or craft knife
- Ruler
- Sandpaper (fine grit)
- Small paintbrush (optional)
- Matte varnish (optional)
Step 1: Preparing the Clay
-
Condition base color:
Start by warming up your terracotta or rust-colored clay in your hands. Knead it thoroughly until it is soft, pliable, and free of cracks. -
Create the speckles:
Take a tiny amount of black clay and a slightly larger amount of white clay. Finely grate them using a dedicated craft grater or chop them into microscopic bits with a craft knife. -
Mix the inclusions:
Sprinkle your chopped clay bits over the conditioned terracotta clay. Fold the clay over itself and knead until the speckles are evenly distributed throughout the block. -
Roll it out:
Using your acrylic rolling pin, flatten the clay into a thick slab. Aim for a thickness of about 1/2 to 3/4 inch to ensure the final piece stands up securely.
Stone Effect
Add dry ground spices like black pepper or nutmeg into the clay mix. They bake perfectly fine and create incredibly realistic organic speckling.
Step 2: Shaping the Arches
-
Cut the outer shape:
Use a large circle cutter to punch out a full circle from your slab. If you don’t have a cutter large enough, trace a bowl and cut carefully with a craft knife. -
Cut the inner void:
Select a smaller circle cutter (about 1 inch smaller in diameter than the first) and cut a hole directly in the center of your large circle. You now have a thick clay donut shape. -
Separate the arches:
Use your long blade or a ruler to cut the donut shape exactly in half horizontally. This will give you two indentical rainbow arches. We will use one for this project. -
Split the arch:
Now, take one of your half-circle arches and cut another curved line through the middle of the arch shape to separate it into two individual pieces: a larger outer arch and a smaller inner arch. -
Smooth the edges:
Gently run your finger dipped in a little cornstarch or water along all the cut edges to soften any sharp angles left by the blade.
Make it a Set
Use the leftover half of your ‘donut’ shape to create a second, matching holder in a reverse color scheme!
Step 3: Creating the Mechanism
-
Check the fit:
Fit the smaller arch back inside the larger one. They should nest together perfectly but might be tight. -
Create the gap:
To hold a card, you need a specific gap between the two pieces. Slice a very thin sliver of clay off the bottom straight edge of the *outer* arch. -
Alternative gap method:
I prefer to simply slice a thin strip off the curved top of the *inner* arch instead. Either way works; just ensure there is a uniform space between them for a card to slide into. -
Texture the surface:
For that stone-like look, gently tap the surface with an old toothbrush or a crumpled ball of aluminum foil. This removes fingerprints and adds realism.
Step 4: Baking and Finishing
-
Arrangement:
Place the two pieces flat on a parchment-lined baking sheet. Keep them separated slightly so they don’t fuse together during baking. -
Bake:
Bake according to your clay manufacturer’s instructions. Thicker pieces often require a lower temperature for a longer time to prevent burning. -
Cool down:
Allow the pieces to cool completely in the oven. Taking them out too early can cause thermal shock and cracking. -
Assemble:
Once cool, arrange the pieces standing up. You can glue the bases to a thin strip of clay or felt if you want them permanently attached, but gravity usually holds them well. -
Final sand:
If the bottom isn’t perfectly flat, rub the base of the arches against a piece of sandpaper placed on a table to level them out.
Slide your favorite photo or postcard into the gap and enjoy your stylish new desk accessory


What Really Happens Inside the Kiln
Learn how time and temperature work together inside the kiln to transform clay into durable ceramic.
Affirmation Quote Tiles
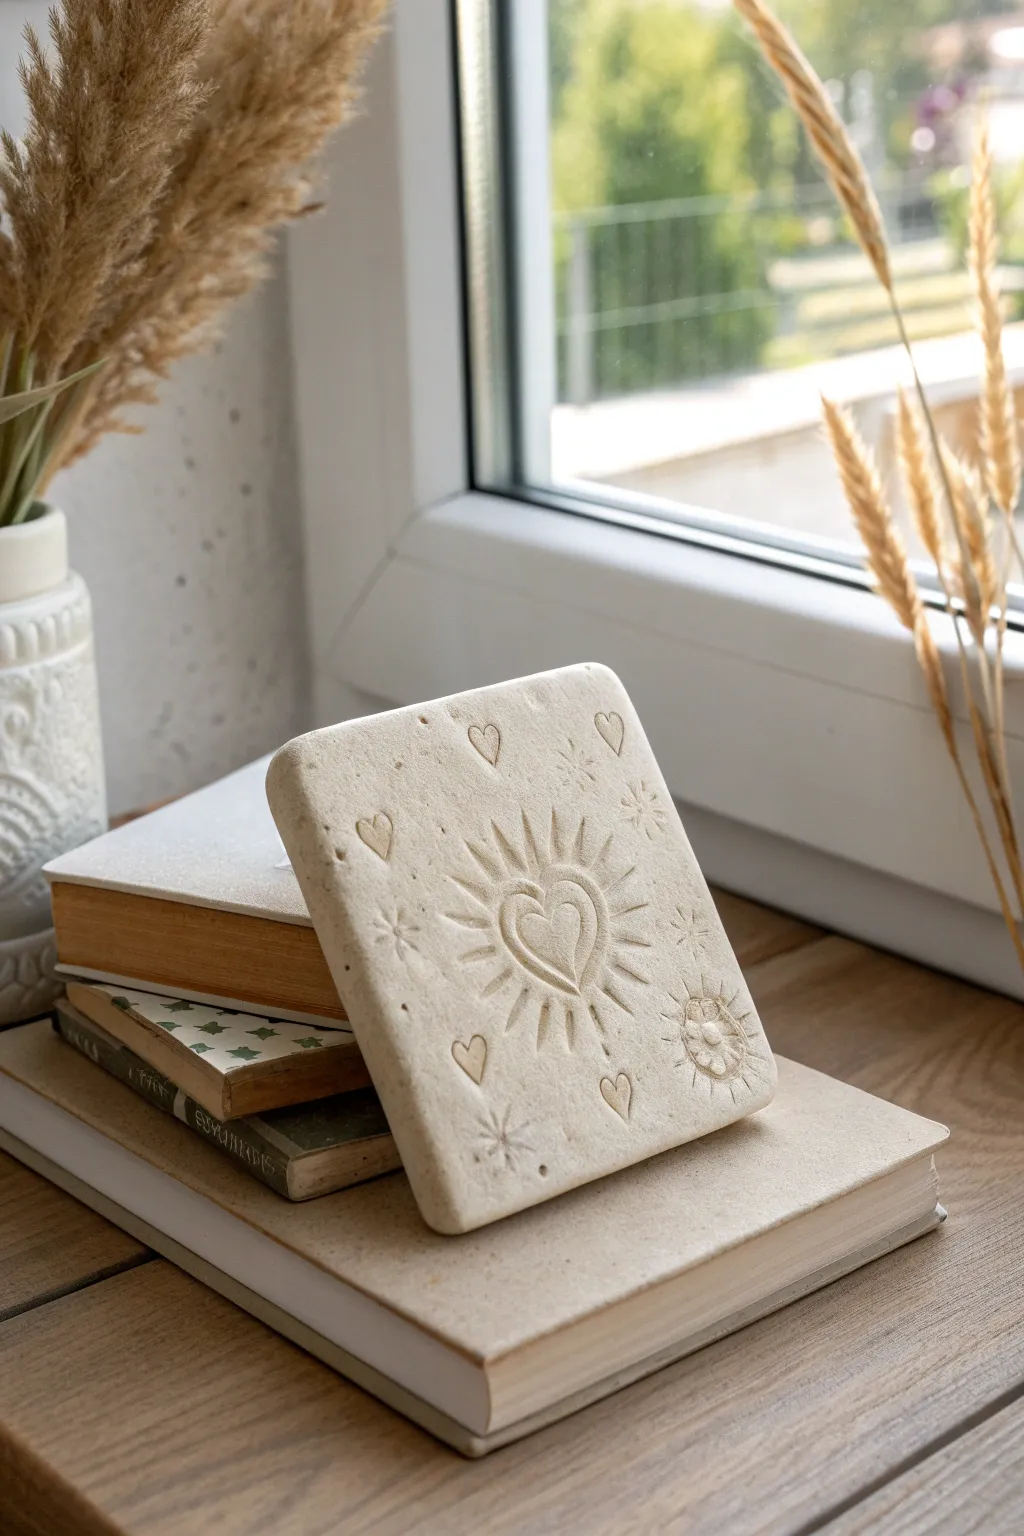
Capture the warmth of positivity with this beautifully embossed clay tile featuring a central heart radiating sun-like energy. The smooth, matte finish and subtle incised details make it a perfect minimalist décor piece or a heartfelt gift.
Step-by-Step Tutorial
Materials
- Air-dry clay (white or light beige)
- Rolling pin
- Two 1/4 inch wooden slats (for thickness guide)
- Square cookie cutter (approx. 4×4 inches) or ruler and craft knife
- Needle tool or toothpick
- Small carving loop tool (optional but helpful)
- Wooden sculpting tool with a rounded tip
- Small bowl of water
- Fine-grit sandpaper (220 grit)
- Canvas or cloth work surface
Step 1: Shaping the Base
-
Prepare the Clay:
Begin by taking a generous handful of air-dry clay. Knead it in your hands for a few minutes to warm it up and ensure there are no air bubbles trapped inside, which creates a smoother consistency. -
Roll the Slab:
Place your clay on a canvas cloth to prevent sticking. Position the two wooden slats on either side of the clay ball. Using your rolling pin, roll the clay out until the pin rests on the slats, ensuring an even 1/4 inch thickness throughout. -
Cut the Square:
Press a square cookie cutter firmly into the clay slab. If you don’t have a cutter, measure a perfect square with a ruler and carefully slice the edges with a craft knife or fettling knife. -
Smooth the Edges:
Dip your finger lightly in water and run it along the cut edges of your square. This softens the sharp corners and removes any loose clay crumbs from the cutting process.
Warping Woes?
If corners curl up while drying, the top is drying faster than the bottom. Cover the tile loosely with plastic wrap to slow the drying process for a flatter result.
Step 2: Carving the Design
-
Mark the Center:
Lightly touch the very center of your tile with your finger to identify where the main heart will go. You don’t need to make a mark, just visualize the placement. -
Outline the Heart:
Using a needle tool, very lightly sketch the central heart shape. Keep the pressure light so you can smooth it over if you need to correct the symmetry. -
Carve the Heart Interior:
Once happy with the outline, use a small loop tool or a rounded wooden tool to press into the clay inside the heart shape. Create a recessed heart within the larger heart outline. -
Create the Radiance:
Use a needle tool or a tapered wooden stick to press radiating lines extending outward from the heart. Vary the lengths slightly—alternating long and short rays gives it a lively, sun-like feel. -
Add Corner Accents:
In the corners, sketch simple starbursts or small hearts. For hearts, press the tip of a tool in twice to form the lobes. For stars, press distinct lines crossing at a center point. -
Detailing the Surface:
Add small dots or tiny etched marks randomly in the empty spaces to give the tile texture. I like to use the back of a needle tool to create clean, uniform little depressions.
Step 3: Finishing Touches
-
Refine the Carvings:
Go back over your main lines. If the clay has displaced slightly during carving, gently push it back or smooth the ridges with a damp brush. -
Initial Drying:
Place the tile on a piece of parchment paper on a flat board. Let it sit for about an hour until it is leather-hard—firm to the touch but still cool. -
Softening Edges:
Now that the clay is firmer, lightly rub a damp sponge over the entire surface. This softens the harsh carving lines, giving that worn, stone-like aesthetic seen in the photo. -
Drying Process:
Let the tile dry completely for 24 to 48 hours. To prevent warping, place a light book or board gently on top once it’s dry to the touch but still curing internally, or flip the tile occasionally. -
Sanding:
Once fully dry and chalky white, take your fine-grit sandpaper and gently sand the edges and corners to make them perfectly smooth. -
Optional Sealant:
If you want to protect the finish, apply a coat of matte varnish. This will keep the natural look while preventing dirt from settling into the grooves over time.
Gilded Glow
Mix a tiny amount of gold mica powder or gold acrylic paint into the carved grooves of the sun rays after drying for a subtle, shimmering highlight.
Place your finished tile on a bookshelf or desk as a daily reminder of radiant energy
Boho Wall Hanging Pieces
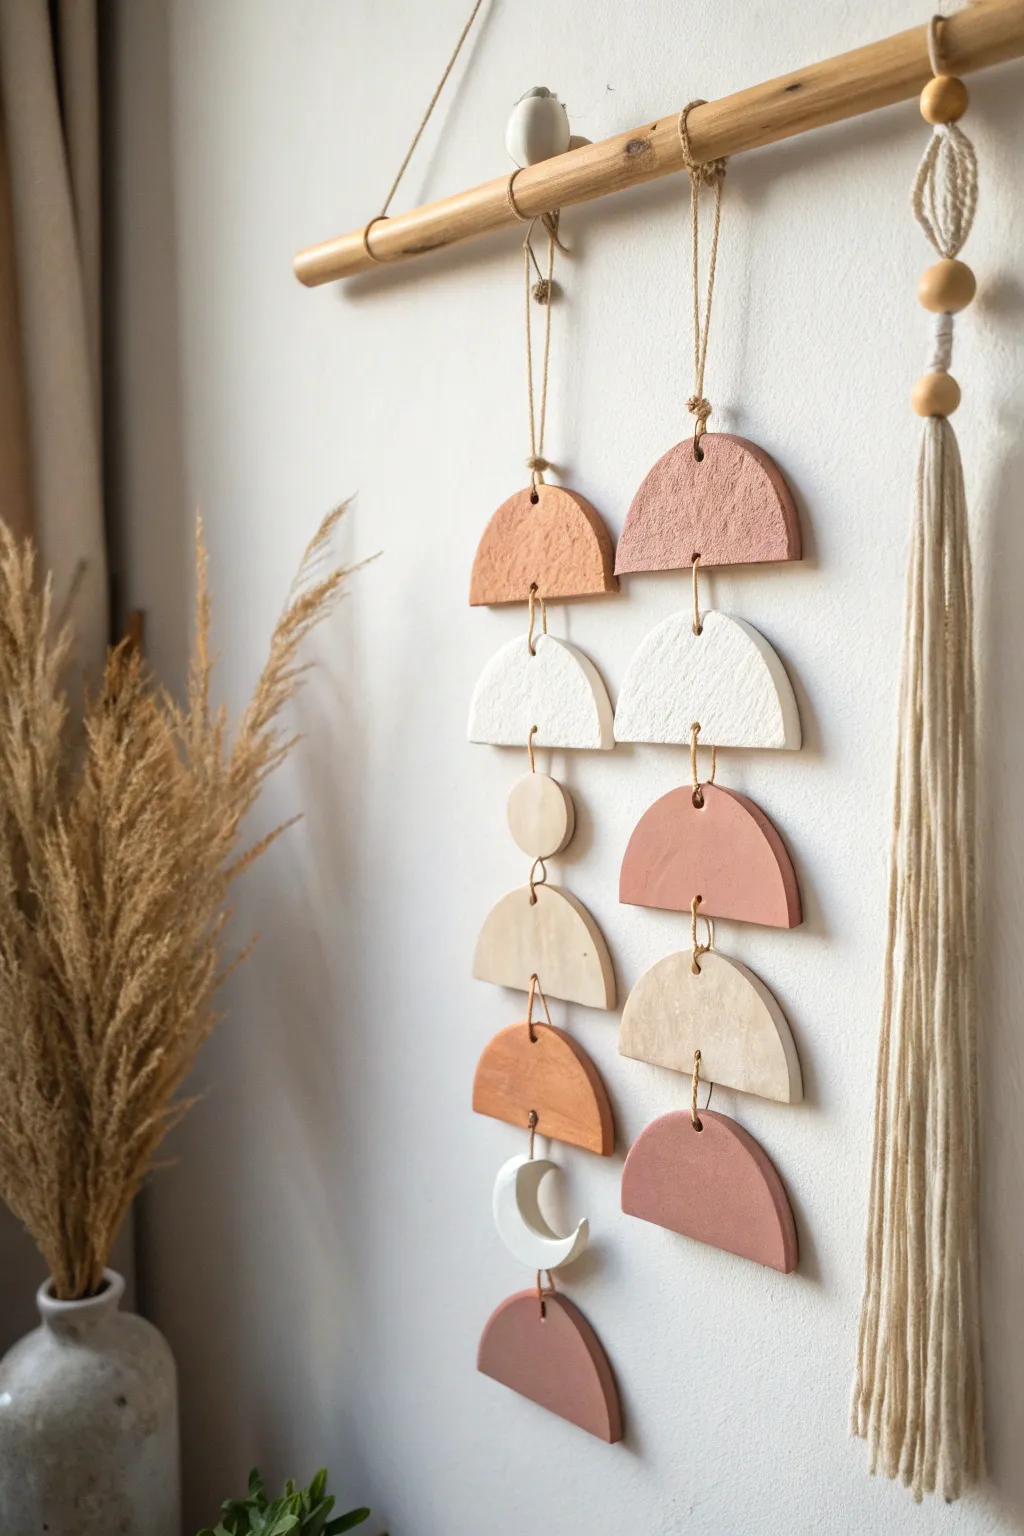
This earthy, bohemian wall hanging brings warmth to any room with its gentle movement and soft terracotta tones. The combination of geometric semicircles and a delicate crescent moon creates a calming, modern aesthetic that looks much more expensive than it is to make.
Detailed Instructions
Materials
- Air-dry clay (terracotta, white, and beige colors)
- Acrylic rolling pin
- Circle cookie cutters (approx. 3-4 inch diameter)
- Small round cutter (approx. 1 inch)
- Craft knife or clay blade
- Wooden dowel (approx. 12-14 inches long)
- Jute twine or hemp cord
- Wooden beads (assorted sizes)
- Toothpick or skewers
- Fine-grit sandpaper
- Baking parchment or wax paper
Step 1: Shaping the Clay Elements
-
Prepare your workspace:
Lay down a sheet of baking parchment or wax paper to protect your table and prevent the clay from sticking. This also makes moving the wet pieces easier. -
Roll out the terracotta clay:
Start with the terracotta-colored clay. Condition it by kneading until soft, then roll it out to an even thickness of about 1/4 inch. -
Cut the base circles:
Use your large circle cutter to punch out nice, clean rounds. For the design shown, you will need about three terracotta circles. -
Create the semicircles:
Using your clay blade or a straight edge, cut each terracotta circle exactly in half to create semicircles. -
Repeat with other colors:
Clean your roller, then repeat the process with the white and beige clay. You’ll need white semicircles and beige semicircles, plus one small full beige circle about 1 inch wide. -
Form the crescent moon:
To make the moon shape, cut partially into a white slab with your circle cutter, remove the cutter, move it over slightly, and cut again to slice off a crescent shape. -
Add texture (optional):
If you want that stone-like finish seen in the photo, gently press a piece of sandpaper or a texture sponge onto the surface of the wet clay.
Fixing Cracks
If small cracks appear as the clay dries, mix a tiny bit of fresh clay with water to make a paste (slip) and smooth it over the crack, then let dry again.
Step 2: Drilling and Drying
-
Pierce holes for hanging:
Before the clay dries, use a toothpick to poke holes. Semicircles need a hole in the top center (curve side) and bottom center (flat side). The bottom-most piece only needs a top hole. -
Check hole size:
Wiggle the toothpick gently to ensure the holes are large enough for your jute twine to pass through easily once the clay shrinks slightly. -
Let them dry:
Arrange all pieces on a flat surface and let them air dry completely. This usually takes 24-48 hours. I find flipping them over halfway through helps them dry flat. -
Smooth the edges:
Once fully hard, take fine-grit sandpaper and gently sand the edges to remove any sharp burrs or irregularities for a polished look.
Gold Accents
For a glam touch, paint the edges of your semicircles with liquid gold leaf or metallic acrylic paint after the clay is fully dry.
Step 3: Assembly
-
Prepare the dowel hanger:
Tie a long piece of jute twine to both ends of your wooden dowel to create the main hanger. -
Cut vertical strings:
Cut two long lengths of jute twine for the vertical strands. Tie them securely onto the wooden dowel, spacing them apart as desired. -
Attach the first tier:
Thread the twine through the top hole of your first semicircle. Tie a knot underneath the hole or loop it through to secure the piece in place. -
Link subsequent pieces:
Continue threading the twine down to the next piece. You can leave a gap of exposed twine between pieces or knot them closer together. -
Incorporate the moon and small circle:
For the left strand, integrate the small beige circle and the crescent moon near the bottom, alternating shapes for visual interest. -
Add the macramé tassel:
Create a simple tassel using cream yarn or macramé cord. Slide a few wooden beads onto a separate string attached to the right side of the dowel, then tie the tassel at the bottom. -
Final adjustment:
Hang the mobile on a wall hook and step back. Adjust the knots or spacing if any pieces look uneven.
Hang your mobile in a spot that gets nice light to enjoy the gentle shadows it casts

TRACK YOUR CERAMIC JOURNEY
Capture glaze tests, firing details, and creative progress—all in one simple printable. Make your projects easier to repeat and improve.
Rainbow and Arch Shelf Decor
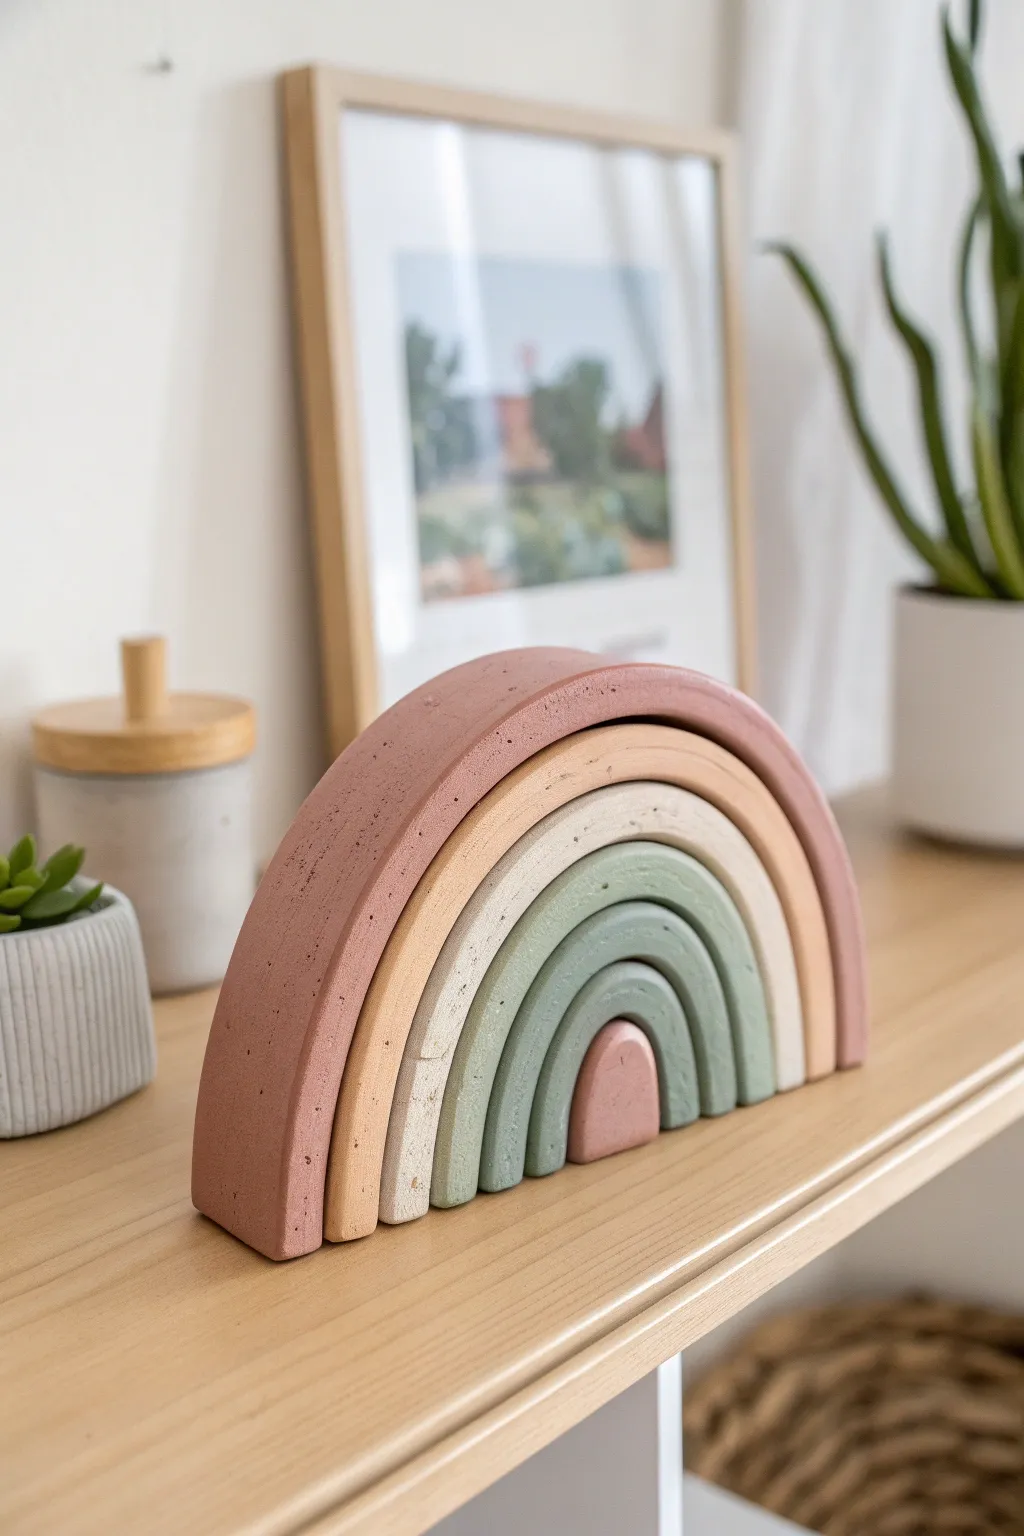
Bring warmth to any shelf with this modern, minimalist rainbow sculpture featuring a muted palette of terracotta, sand, and sage. The textured, matte finish gives it a trendy, handcrafted look that mimics stone or concrete decor.
Step-by-Step Guide
Materials
- Air-dry clay (white or grey) or polymer clay
- Rolling pin
- Sharp craft knife or clay slicer
- Ruler
- Acrylic paints (terracotta, beige, cream, sage green, light olive)
- Baking soda (for texturing paint)
- Fine-grit sandpaper
- Paintbrushes (flat and detail)
- Parchment paper or smooth work mat
- Small cup of water
Step 1: Shaping the Arches
-
Prepare the workspace:
Lay down parchment paper or a silicone mat to prevent the clay from sticking. Knead your clay thoroughly until it’s pliable and smooth. -
Roll the base slab:
Roll out a large portion of clay to a uniform thickness, ideally about 1/2 to 3/4 inch thick. Ensuring even thickness is key for the arches to stack flush against each other. -
Cut the clay strips:
Using a ruler and craft knife, cut five or six long, straight strips of clay. They should all be the same width (around 1 inch wide usually looks balanced). -
Form the smallest arch:
Take one strip and gently bend it into a tight U-shape to form the center arch. Place it flat on your work surface or stand it up to check the curve. -
Layer the subsequent arches:
Take the next strip and drape it directly over the first arch, molding it gently so it hugs the curve perfectly without gaps. I like to trim the excess length at the bottom as I go. -
Continue building the stack:
Repeat this process with the remaining strips, layering them one by one. Smooth the seams slightly with a little water on your finger if you are using air-dry clay. -
Trim the base:
Once all arches are stacked, use your long blade or ruler to make a clean, straight cut across the bottom of the entire stack so the rainbow stands flat. -
Separate for drying:
Carefully separate the arches from one another before drying. If they dry while stuck together, they might crack or bond permanently. Let them dry fully according to package instructions (usually 24-48 hours).
Stone Effect
Mix baking soda into your acrylic paint. It creates a gritty, fluffy texture that dries incredibly matte and looks just like real ceramic or stone.
Step 2: Sanding and Painting
-
Smooth the edges:
Once hardened, use fine-grit sandpaper to smooth out any rough edges or bumps on the surfaces of the arches. Wipe away the dust with a slightly damp cloth. -
Mix textured paint:
To achieve that stony, matte look seen in the photo, mix a teaspoon of baking soda into your acrylic paints. This thickens the paint and adds a lovely granular texture. -
Paint the outer arch:
Paint the largest arch in a deep terracotta or dusty rose shade. Apply the paint in dabbing motions rather than long strokes to enhance the texture. -
Paint the middle layers:
Move inward with lighter shades. Paint the second arch a warm beige or peach, and the third a creamy off-white or sand color. -
Apply cool tones:
For the inner arches, switch to cool, earthy greens. Use a sage green for the fourth arch and a slightly deeper olive or grey-green for the fifth. -
Paint the center:
Finish the smallest central piece with the original terracotta color or a soft pink to tie the palette together. -
Let dry and assemble:
Allow the paint to dry completely. Since the arches are separate pieces, you can now simply stack them together on your shelf. No glue is needed unless you want a permanent bond.
Make it a Bookend
Glue the finished arches together and attach them to a heavy creating L-bracket or a wooden block to turn this decorative piece into a functional bookend.
Now you have a serene piece of shelf decor that looks beautifully high-end and handmade
Locker and Mini Fridge Magnets
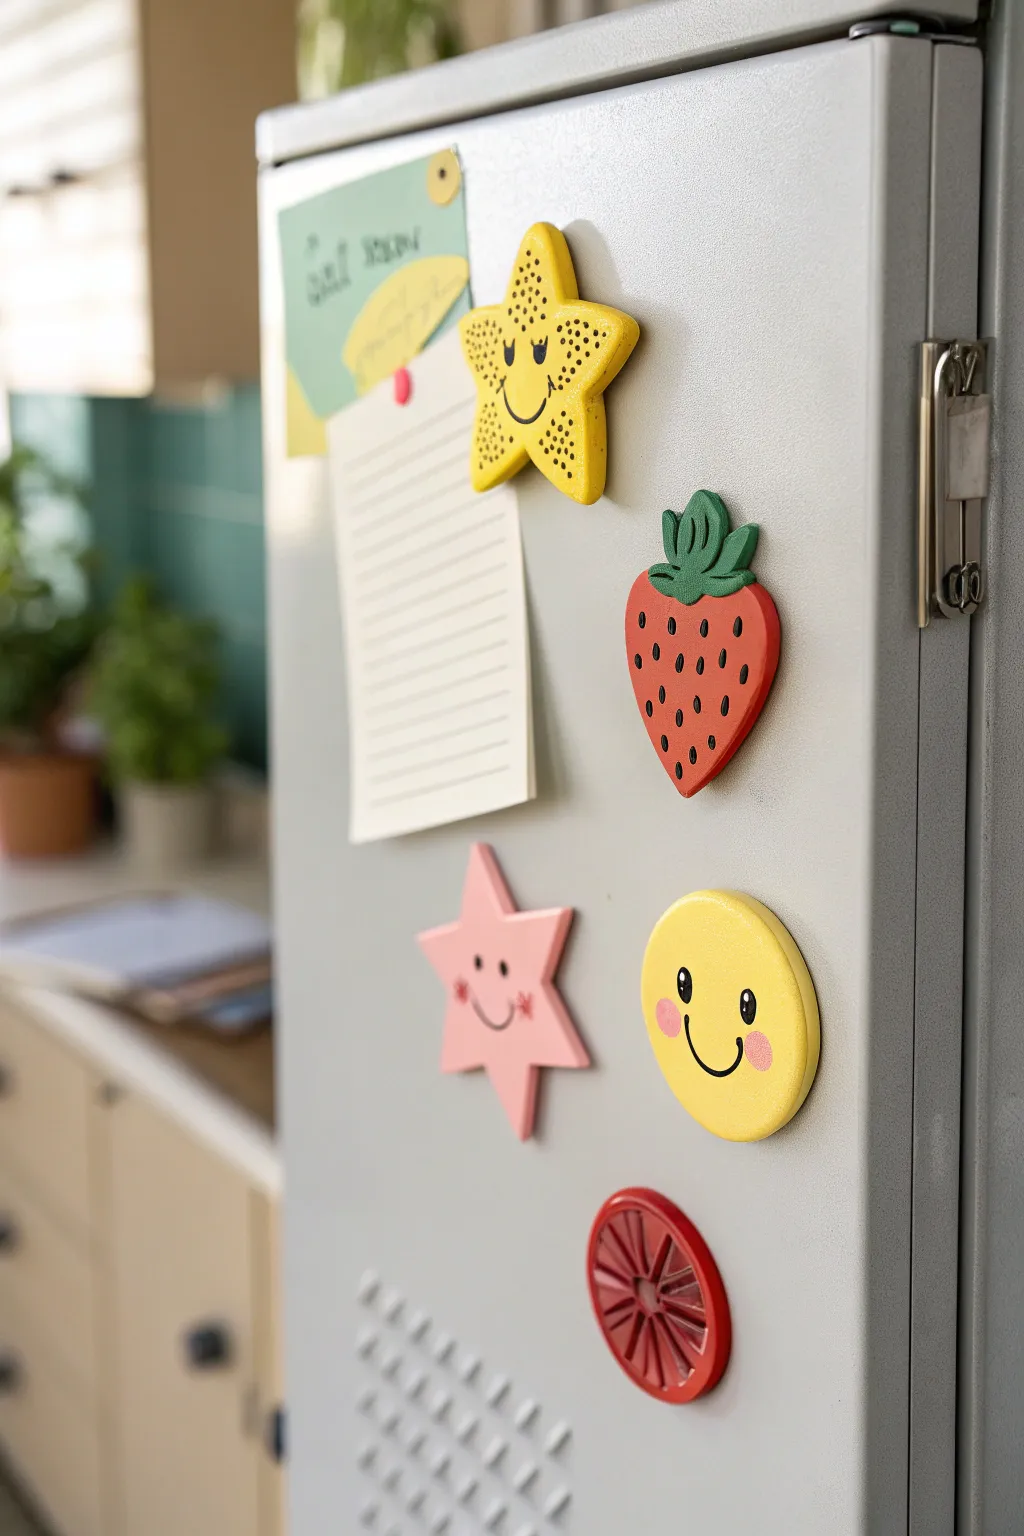
Brighten up your locker or mini fridge with this cheerful set of handmade clay magnets featuring smiling stars, juicy strawberries, and happy faces. These chunky, 3D designs add a pop of personality and color to any magnetic surface.
Detailed Instructions
Materials
- Polymer clay (yellow, pink, red, green)
- Acrylic rolling pin
- Clay cutting tools (or a craft knife)
- Small round piping tip (for texture)
- Black acrylic paint or fine-tip permanent marker
- Strong adhesive (E6000 or super glue)
- Round ceramic or neodymium magnets
- Gloss glaze (optional)
- Parchment paper or baking tile
Step 1: Shaping the Happy Star
-
Condition the clay:
Start by warming up a chunk of bright yellow polymer clay in your hands until it is soft and pliable. -
Roll and cut:
Roll the clay out to a thickness of about 1/4 inch so it feels substantial. Use a star-shaped cookie cutter or carefully hand-cut a five-point star shape using your craft knife. -
Soften the edges:
Gently tap the edges with your finger to round them off slightly, giving the star a softer, friendlier look rather than sharp angles. -
Create texture:
Using a small tool with a rounded point or a toothpick, stipple the surface of the star to create a pitted, sparkly texture, avoiding the center area where the face will go. -
Add the face:
Using a very small tool or needle, gently press an arc for a smile and two small arches for winking eyes into the smooth center area.
Sticky Situation?
If your clay is sticking to the table while rolling, try rolling onto a piece of wax paper or lightly dusting your surface with a tiny bit of cornstarch.
Step 2: Crafting the Strawberry
-
Form the base:
Take a piece of red clay and roll it into a ball, then flatten and taper one end to create a classic strawberry silhouette. -
Make the leaves:
Roll out a small amount of green clay. Cut three or four small teardrop shapes. -
Assemble the top:
Press the green shapes onto the wider top of your strawberry, curling the tips slightly for dimension. Add a small texture line down the center of each leaf. -
Add seeds:
Using a needle tool, press small, vertical dashes all over the red body of the strawberry to simulate seeds. We will paint these later.
Pro Tip: Clean edges
Before baking, use a cotton swab dipped in a little rubbing alcohol to smooth away any fingerprints or dust specks on your clay surface for a professional finish.
Step 3: Making the Smiley Face
-
Cut the circle:
Roll out more yellow clay to the same 1/4 inch thickness. Use a small round cutter or a bottle cap to punch out a perfect circle. -
Add rosy cheeks:
Take two tiny pinches of pink clay, roll them into balls, and flatten them onto the yellow circle where the cheeks should be. -
Embed the smile:
Using a curved tool or just your fingernail, press a deep, wide smile connecting the two pink cheeks.
Step 4: Baking and Finishing
-
Bake the batch:
Arrange all your creations on a parchment-lined baking sheet. Bake according to your clay package instructions (usually around 275°F/135°C for 15-30 minutes). -
Cool down:
Let the pieces cool completely before handling them; polymer clay is fragile when warm. -
Paint details:
Using a fine brush and black acrylic paint, carefully fill in the eyes and mouths on the star and smiley face. Paint small black dashes into the seed indentations on the strawberry. -
Seal (optional):
I like to add a coat of gloss glaze to the strawberry to make it look juicy, while keeping the star and smiley face matte. -
Attach magnets:
Once everything is dry, flip the pieces over. Apply a dab of strong glue to the back and press a magnet firmly into place. -
Final cure:
Allow the glue to cure fully (usually 24 hours) before sticking your new art to the fridge.
Now you have a custom set of magnets ready to hold up your most important notes and photos
Backpack Charm Keychains
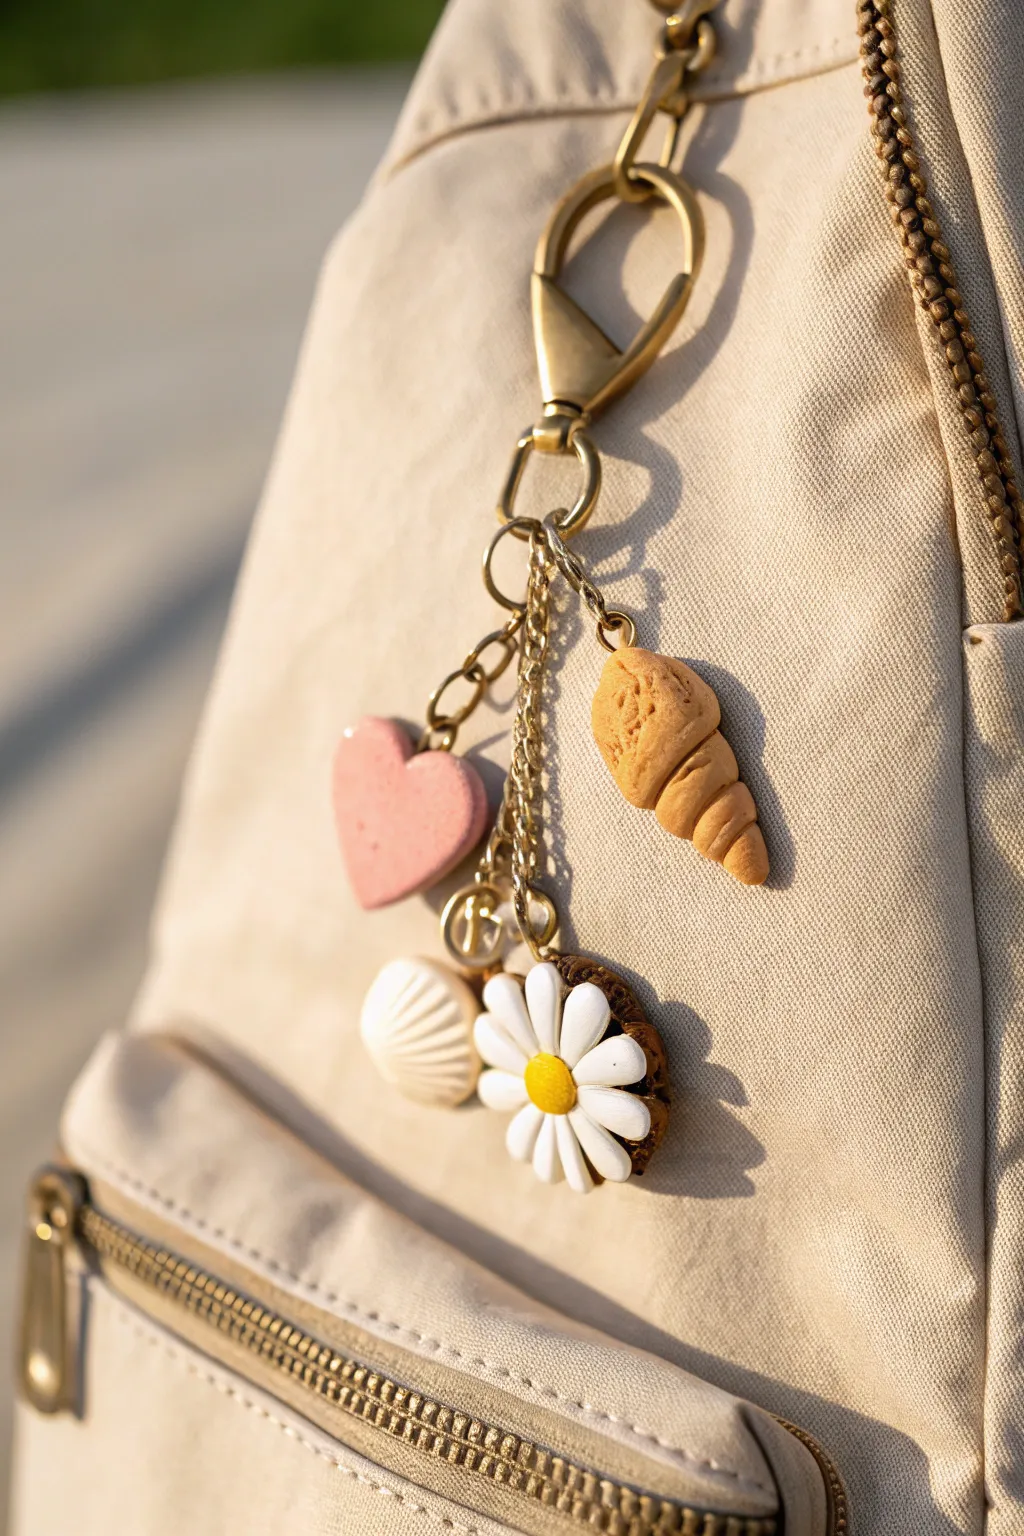
Customize your school bag with a cluster of adorable, handmade polymer clay miniatures dangling from a gold clasp. This trendy charm features a textured croissant, a sweet pink heart, a seashell, and a daisy cookie that adds a perfect pop of personality.
Step-by-Step Guide
Materials
- Polymer clay (tan, pastel pink, white, yellow, dark brown)
- Gold lobster clasp keychain with chain links and jump rings
- Pointed sculpting tool or needle tool
- Ball stylus tool
- Small eye pins (gold)
- Sandpaper or a stiff toothbrush (for texture)
- Parchment paper and baking tray
- Oven
- Jewelry pliers (round nose and flat nose)
- Gloss glaze (optional)
Step 1: Sculpting the Charms
-
Mix your colors:
Before starting, ensure your hands are clean. Condition your clay by kneading it until soft. For the croissant and cookie base, mix a bit of white into the tan clay to get a realistic baked dough color. -
Form the croissant base:
Roll a small snake of the tan dough mixture, making it thicker in the middle and tapered at the ends. Flatten it slightly. -
Roll the croissant:
Starting from the wide center, roll the flattened triangle up towards the pointy ends to create that classic crescent shape. Curve the ends inward slightly. -
Texture the pastry:
Use a toothbrush or scrunched-up aluminum foil to gently tap the surface of the croissant, giving it a flaky, baked texture. Use a needle tool to deepen the lines where the dough is rolled. -
Create the heart:
Roll a ball of pink clay and flatten it to about 1/4 inch thick. Use a small heart cutter or shape it by hand with a sculpting tool, smoothing the edges so they are rounded and soft. -
Shape the seashell:
Take a small ball of white clay and flatten one end into a fan shape. Use your needle tool to press ridges radiating from the narrow bottom point to the wide top edge. -
Make the daisy cookie base:
Roll a small disc of dark brown clay for the chocolate cookie base. Keep this relatively flat but thick enough to hold the eye pin. -
Petals and center:
Form tiny teardrops of white clay for petals and press them in a circle onto the brown base. Place a small flattened ball of yellow clay in the center. -
Secure the hardware:
Carefully trim your eye pins to the right length. Insert one eye pin into the top of each charm. I find it helpful to put a tiny dab of liquid clay or bake-and-bond on the pin shaft to ensure it stays put after baking.
Clean Clay Tip
White clay picks up dust easily. Keep a pack of baby wipes or acetone nearby to clean your hands and tools before switching to the lighter colors.
Step 2: Baking and Assembly
-
Bake the charms:
Place all your pieces on a parchment-lined baking sheet. Bake according to your brand of clay’s instructions (usually around 275°F or 130°C for 15-30 minutes). -
Cool down:
Let the pieces cool completely on the tray before handling. They are slightly soft when hot and harden as they cool. -
Add detail to the daisy:
If you want extra realism, use a needle tool to gently poke little texture holes into the yellow center of the daisy. -
Shade the croissant (Optional):
For a ‘just-baked’ look, you can lightly brush dry soft pastel chalk (in orange or brown) onto the ridges of the croissant before sealing. -
Prepare the chain:
Lay out your large gold lobster clasp. Attach varied lengths of smaller gold chain to the main ring so the charms will hang at different heights. -
Open jump rings:
Using two pairs of pliers, twist your jump rings open sideways (never pull them apart). This maintains the circle shape. -
Attach the charms:
Hook a jump ring through the eye pin of a charm, loop it onto the bottom of a chain link, and twist the ring closed securely. -
Arrange the cluster:
Attach the remaining charms to the chain links. Try to stagger them so they bunch together nicely without constantly tangling.
Add Sparkle
Mix a tiny pinch of fine iridescent glitter into the white clay for the seashell to give it a realistic, pearly shimmer in the sunlight.
Clip this onto your zipper pull and enjoy your durable, custom-made accessory every day at school
Window Suncatcher Charms

Capture the charm of cottagecore aesthetics with this simple arched window ornament. Its speckled, natural finish and rustic twine hanger make it a sweet addition to any sunny corner or gallery wall.
Detailed Instructions
Materials
- White or beige air-dry clay (or polymer clay)
- Small rolling pin
- Fettling knife or craft knife (X-Acto)
- Parchment paper or clay mat
- Ruler
- Toothpick or straw
- Fine-grit sandstone mix (or black pepper for speckles)
- Natural jute twine
- Small bowl of water
- Fine grit sandpaper
Step 1: Preparing the Clay Slab
-
Condition the clay:
Begin by kneading a ball of clay in your hands until it is warm, pliable, and free of cracks. If the clay feels too dry, dip your finger in water and work it in gradually. -
Add texture:
To achieve the speckled look shown in the photo, sprinkle a tiny pinch of fine sand or even ground black pepper into the clay. Knead thoroughly again until the speckles are evenly distributed throughout the mass. -
Roll it out:
Place the clay on parchment paper. Use your rolling pin to create an even slab that is roughly 1/4 inch thick. Try to keep the thickness consistent so it dries evenly without warping.
Warped Window?
If your clay starts curling up while drying, place a heavy book on top of it once it’s semi-dry (leather hard). This presses it flat.
Step 2: Shaping the Window
-
Cut the outline:
Use a craft knife to cut a rectangle shape first, about 2.5 inches wide by 3.5 inches tall. Then, carefully curve the top edge into a smooth semi-circle arch. -
Refine the edges:
Dip your finger in a little water and run it along the cut edges. This smooths out any jagged bits or crumbs from the cutting process, giving it a polished look. -
Mark the panes:
Using a ruler and very light pressure with your knife, gently score a cross shape in the center of the arch to guide where your window panes will go.
Step 3: Cutting the Panes
-
Cut the first square:
Carefully cut out a small square in the top left quadrant, leaving a border of clay about 1/4 inch thick around the edges and center cross. -
Remove clay:
Use the tip of your knife to gently lift the cutout square of clay away. If it sticks, nudge it from the backside. -
Complete the grid:
Repeat this process for the remaining three quadrants. You should now have a four-pane window grid shape. -
Smooth the interior:
The inside edges of the window panes will be rough. I find a damp cotton swab or a wet paintbrush creates the smoothest finish in these tight corners.
Make it Shine
Mix resin with dried flower petals and pour a thin layer into the empty window panes. It creates a stunning ‘stained glass’ suncatcher effect.
Step 4: Finishing Touches
-
Create the hanger hole:
At the very top center of the arch, use a straw or a wooden skewer to poke a hole for the string. Wiggle it slightly to ensure the opening is clean on both sides. -
Dry the piece:
Let the clay dry completely according to package instructions. For air-dry clay, this usually takes 24-48 hours. Flip it halfway through for even drying. -
Sand edges:
Once fully hard, take fine-grit sandpaper and gently buff the outer edges and the window pane openings to remove any final sharpness. -
Cut twine:
Cut a piece of natural jute twine roughly 12 inches long. -
Thread the loop:
Fold the twine in half and push the looped end through the hole from front to back. -
Secure the hanger:
Pull the loose ends of the twine through the loop and tighten gently to create a lark’s head knot right at the top of the charm. -
Tie it off:
Tie the loose ends together in a simple knot at your desired hanging length to complete the project.
Hang your new charm by a window and enjoy the simple, handmade touch it adds to your room
Succulent Planters With Personality
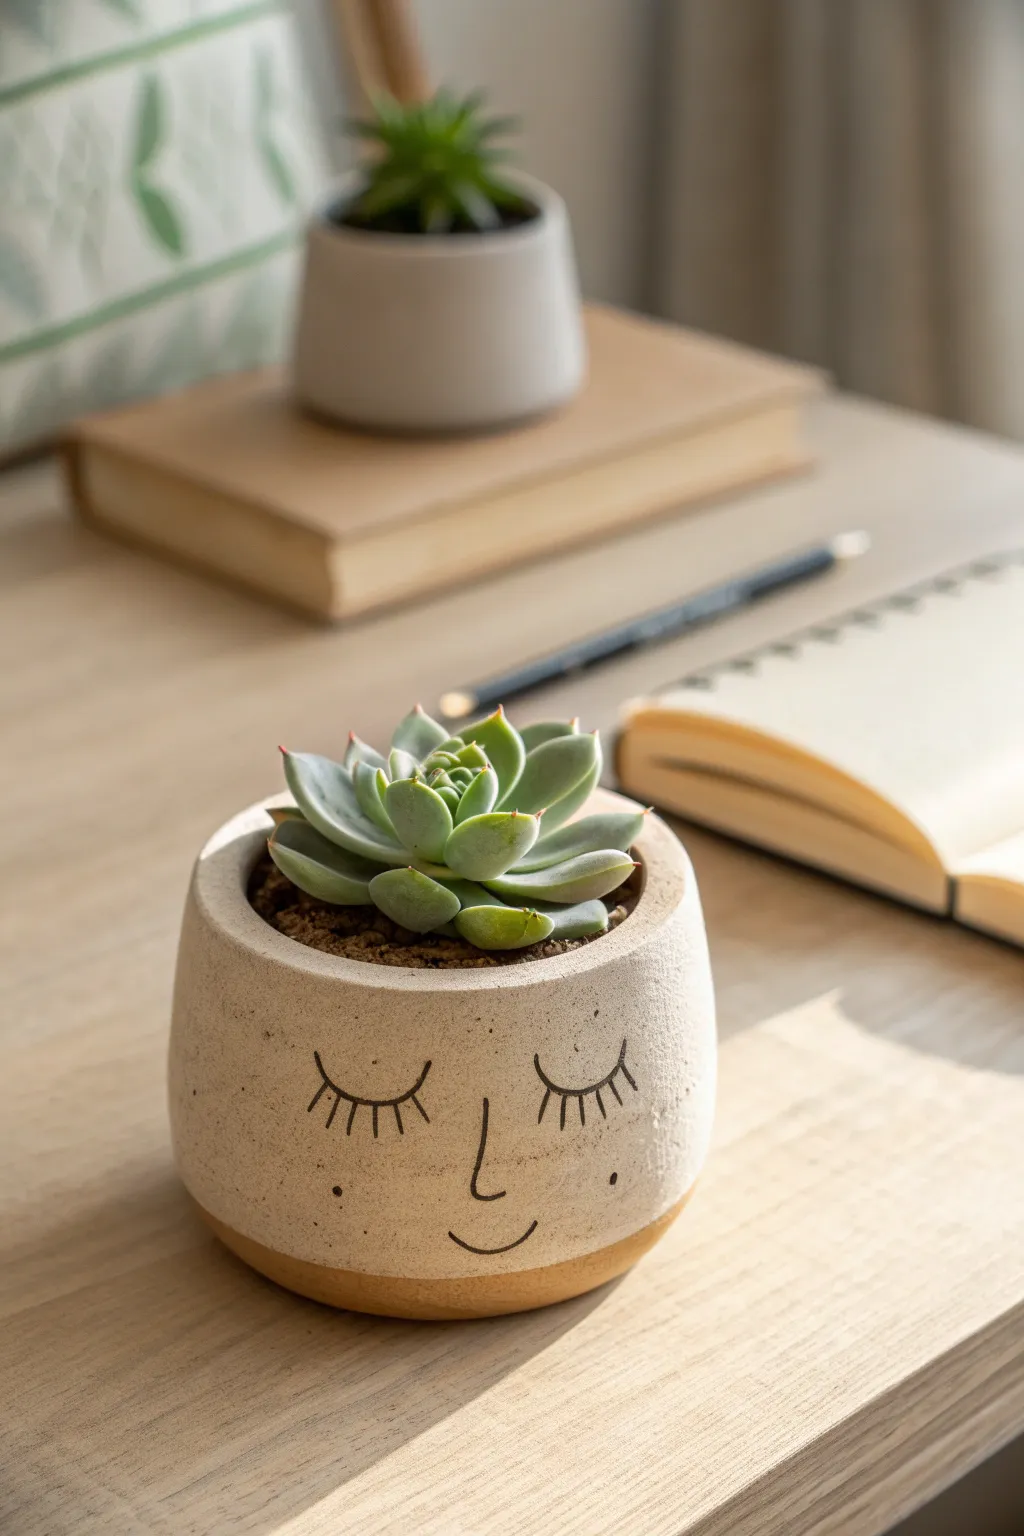
Bring a touch of whimsy to your desk with this adorable planter featuring a serene, sleepy face. The combination of speckled clay texture and simple line art creates a modern, calming piece that’s perfect for housing your favorite tiny succulent.
Step-by-Step
Materials
- White or beige stoneware clay (speckled clay recommended)
- Rolling pin
- Canvas mat or cloth
- Rectangular template (approx. 10×3 inches)
- Circular cookie cutter (approx. 3 inches diameter)
- Clay scoring tool or toothbrush
- Slip (clay mixed with water)
- Fettling knife or craft knife
- Smoothing rib (wood or rubber)
- Small sponge
- Black underglaze pencil or fine-tip underglaze applicator
- Clear matte glaze
- Masking tape or wax resist
- Kiln access (or use air-dry clay alternatives for a decorative-only version)
Step 1: Forming the Cylinder
-
Roll the slab:
Begin by rolling out your clay on a canvas mat to an even thickness of about 1/4 inch. If you want that lovely speckled look shown in the photo, make sure to choose a clay body that has grog or speckles pre-mixed. -
Cut the shapes:
Using your rectangular template and a fettling knife, cut a long strip for the walls of the pot. Then, cut a circle for the base using your cookie cutter. Ensure the circumference of the circle matches the length of your rectangle. -
Score the edges:
Take your scoring tool or an old toothbrush and rough up the short ends of the rectangular strip and the outer edge of the circular base. This rough texture acts like Velcro for the clay. -
Apply slip:
Dab a generous amount of slip onto all the scored areas. This acts as the glue that bonds your pieces together permanently. -
Assemble the wall:
Carefully curve the rectangular strip into a cylinder, overlapping the scored short ends. Press these ends together firmly to create the wall of your pot. -
Attach the base:
Place the cylinder on top of the scored circular base. Gently press the wall down onto the base to ensure a good seal. -
Smooth the seams:
Use a wooden modeling tool or your finger to smooth the vertical seam on the wall and the horizontal seam where the wall meets the base. I like to support the inside of the pot with one hand while smoothing the outside with the other.
Step 2: Refining and Shaping
-
Shape the curve:
To get that slightly rounded, bubbly shape, gently push the walls outward from the inside using a rib tool, while cupping the outside with your hand. You want the middle to look a bit wider than the rim. -
Define the rim:
Smooth the top rim with a damp sponge or a piece of chamois leather to make it soft and rounded, removing any sharp edges that might chip later. -
Create the two-tone effect:
To achieve the unglazed bottom look, you can either leave the bottom half inch unfinished or tape it off later. For now, ensure the bottom edge is clean and defined.
Cracking Seams?
If your seams crack during drying, your slip wasn’t wet enough. Try wrapping the pot in plastic for a day to rehydrate and smooth it again.
Step 3: Adding Personality and Finish
-
Dry to leather hard:
Let the pot sit until it reaches the leather-hard stage. It should be firm enough to handle without warping but still cool to the touch. -
Sketch the face:
Lightly sketch the sleepy eyes, nose, and smile using a pencil. The graphite will burn off in the kiln, so don’t worry about making mistakes. -
Apply the design:
Go over your pencil lines with a black underglaze pencil or a fine-tip underglaze applicator bottle. Draw the eyelashes with quick, confident flicks and add tiny freckle dots on the cheeks. -
Bisque fire:
Once the pot is bone dry, fire it in the kiln to bisque temperature according to your clay’s instructions. -
Wax the base:
Apply wax resist to the bottom half-inch of the pot’s exterior to create that raw clay line. This prevents glaze from adhering to that area. -
Glaze:
Dip or brush a clear matte glaze over the entire pot (except the waxed bottom). The matte finish gives it that soft, stone-like quality seen in the image. -
Final firing:
Fire the pot a second time to the glaze temperature appropriate for your clay and glaze combination.
Make it flush
Add tiny clay ears to the rim before drying to turn the sleepy face into a cat, bear, or dog for extra character.
Now your peaceful little planter is ready to be the perfect home for a new green friend
Earring Display Stands
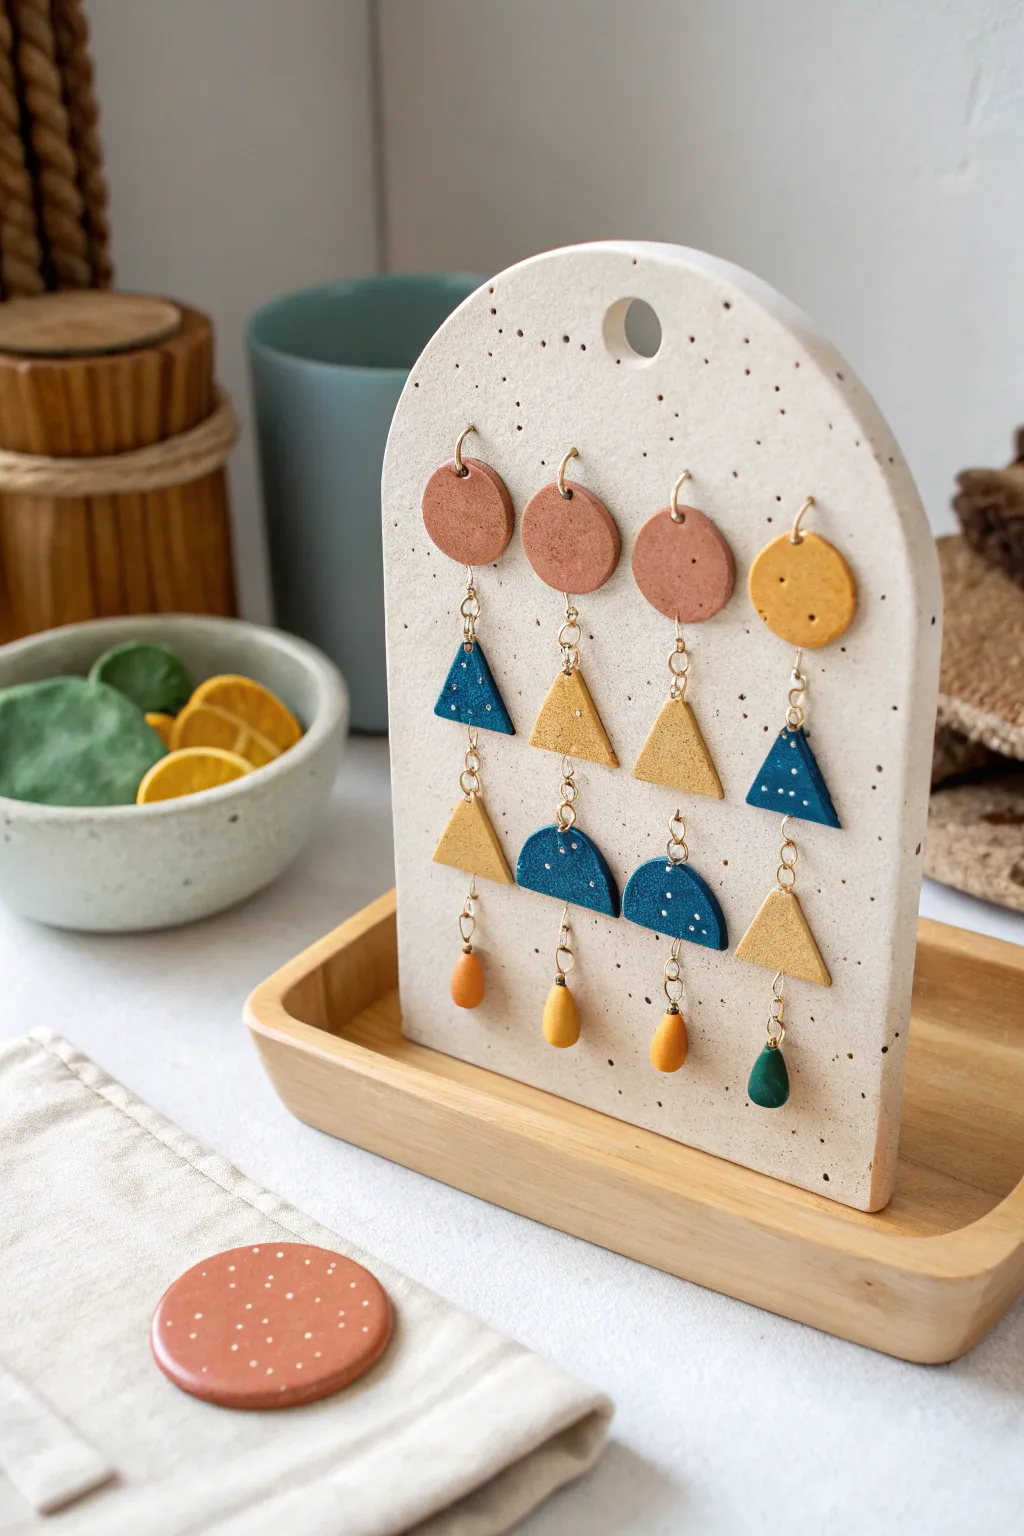
Create a professional-looking boutique display for your jewelry with this trendy ceramic-style arch stand. The set includes instructions for both the sturdy speckled holder and the dangling geometric earrings shown, creating a complete artisan collection.
Detailed Instructions
Materials
- Polymer clay (White or beige for the stand)
- Polymer clay (Various colors for earrings: terracotta, mustard, teal/navy)
- Ground black pepper or dried coffee grounds (for speckling)
- Rolling pin or acrylic roller
- Craft knife or clay blade
- Circle cutters (various sizes)
- Paper template of an arch shape
- Straw or small circle cutter (for the top hole)
- Needle tool or toothpick
- Jewelry findings (jump rings, earring hooks, eye pins)
- Jewelry pliers (flat nose and round nose)
- Baking sheet and parchment paper
- Fine-grit sandpaper (optional)
Step 1: Creating the Speckled Stand
-
Prepare the Speckled Clay:
Begin by conditioning a large block of white or beige polymer clay until soft. To achieve that faux-stone ceramic look, sprinkle in a generous pinch of ground black pepper or dried used coffee grounds and knead it thoroughly until the specks are evenly distributed. -
Roll the Slab:
Roll your conditioned clay out onto a smooth surface or parchment paper. Aim for a thickness of about 1/4 inch (6mm) to ensure the stand is sturdy enough to stand upright without bending. -
Cut the Arch:
Place your paper arch template onto the clay slab. Use your craft knife to carefully trace around the edge, cutting out the U-shape. Smooth the cut edges with your finger to remove any sharp angles. -
Add the Hanging Hole:
At the very top center of the arch, use a small circle cutter or a rigid straw to punch out a hole. This adds a nice decorative touch and allows you to hang the display later if you wish. -
Pierce the Earring Holes:
Using a needle tool, poke pairs of small holes across the face of the arch. Space them out evenly to accommodate the dangling length of your earrings. Wiggle the needle slightly to make sure the holes are large enough for earring hooks. -
Bake the Stand:
Transfer the arch to a baking sheet lined with parchment paper. Bake according to your clay manufacturer’s instructions (usually around 275°F/135°C for 30 minutes). Let it cool completely on a flat surface so it stays straight.
Clean Cuts
Place a piece of plastic cling wrap over the clay before pressing down your cutters. This creates a soft, rounded bevel on the edges, saving you sanding time later.
Step 2: Crafting the Geometric Earrings
-
Mix Custom Colors:
While the stand bakes, mix your earring colors. I like to blend a bit of gold or pearl mica powder into the teal and mustard clay to give the pieces a subtle shimmer. -
Cut the Shapes:
Roll out thin slabs of your colored clays. Use cutters or a knife to create small circles (studs), triangles, semi-circles, and teardrop shapes. Aim for three to four different components per earring for that long, dangling look. -
Add Texture Details:
Before baking the earring pieces, create the ‘starry’ texture on the blue triangles and semi-circles. Use a needle tool to gently indent tiny dots, and pierce small holes at the top and bottom of each piece for connecting them later. -
Bake the Components:
Bake these smaller pieces on a separate baking sheet. They are thinner, so check the package instructions; they may need slightly less time than the thick stand. -
Assemble the Jewelry:
Once cool, lay out your components in the desired order. Use your pliers to open jump rings and connect the shapes vertically. Attach an earring hook to the top circle component of each pair.
Step 3: Final Assembly
-
Finishing Touches:
If there are any rough edges on your stand or earring pieces, lightly sand them with fine-grit sandpaper under running water for a polished finish. -
Display Your Work:
Insert the finished earring hooks through the holes you created in the arch stand. You can now prop the stand up against a wall or shelf to show off your new jewelry collection.
Level Up
Create a wooden base for the arch! Cut a slot into a small block of wood or bake a separate rectangular clay base with a groove to hold the arch upright.
Now you have a chic, handmade display that looks great on any dresser or craft fair table
Secret Stash Trinket Boxes
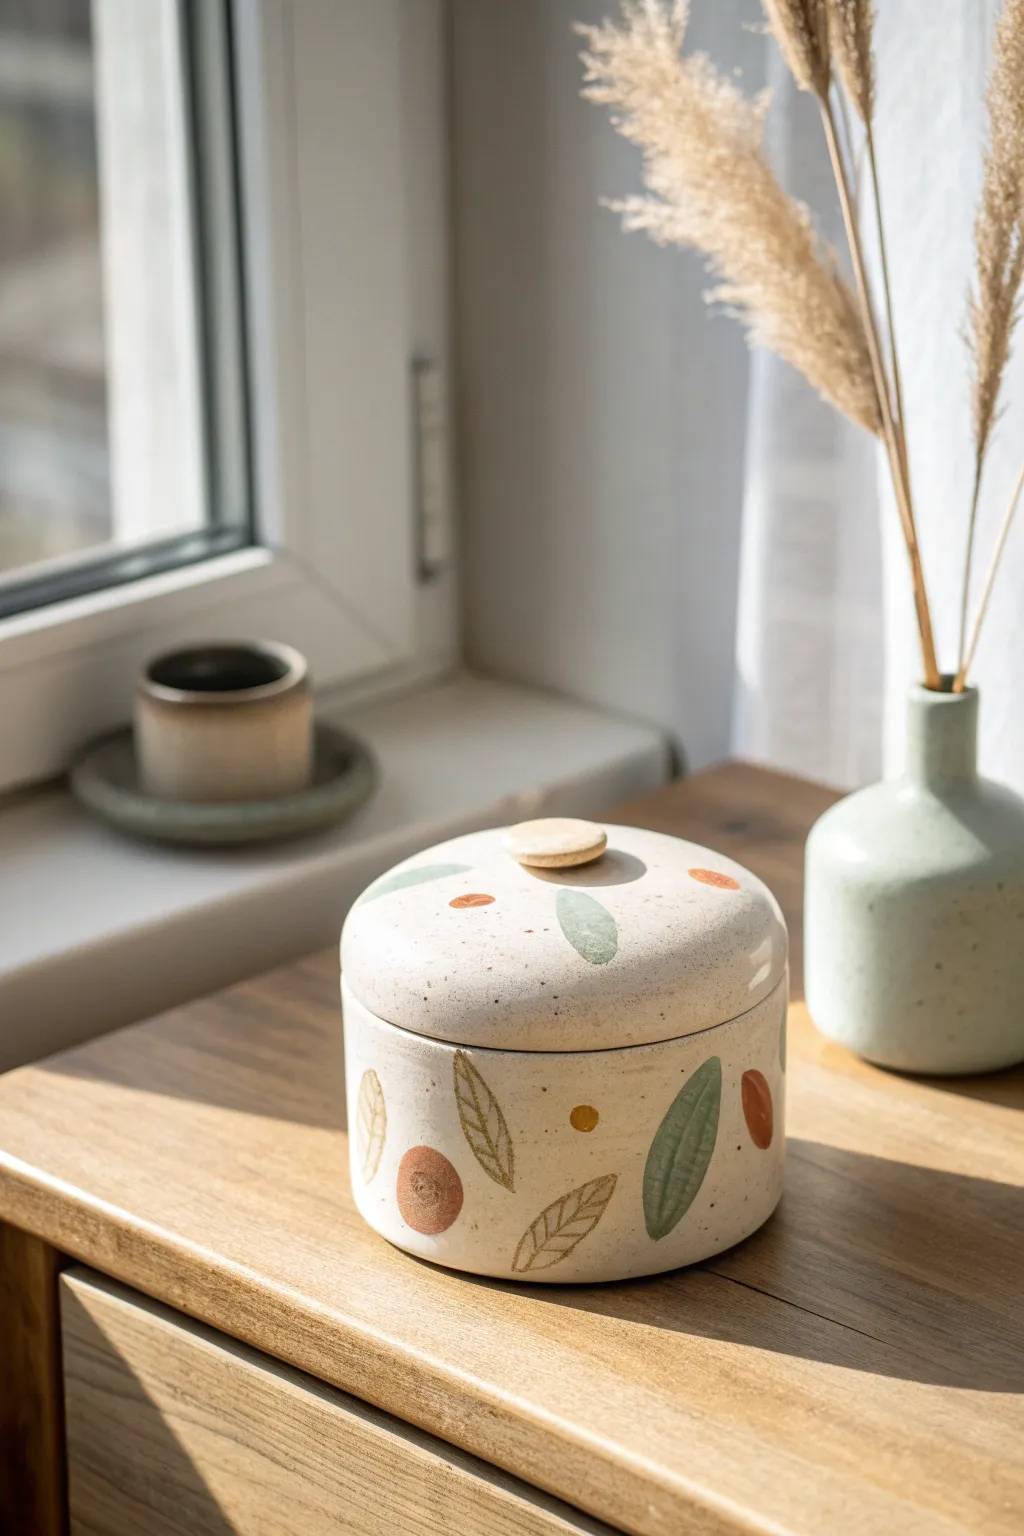
Keep your secret trinkets hidden in plain sight with this lovely lidded jar that looks like it came straight from a pottery studio. Featuring earthy leaf motifs and a cute button knob, this project uses speckled clay for that trendy, rustic finish.
Step-by-Step
Materials
- Speckled stoneware clay (or air-dry clay with faux speckles)
- Rolling pin with guide rings (1/4 inch thickness)
- Circle cutters (4-inch and 3.5-inch diameter)
- Clay knife or needle tool
- Scoring tool (or an old toothbrush)
- Slip (clay mixed with water)
- Underglazes (Sage Green, Rust Red, Mustard Yellow)
- Clear glaze (if firing) or gloss sealer (if air-dry)
- Small round paintbrush
- Needle tool for carving
- Sponge
Step 1: Building the Form
-
Roll the slab:
Begin by rolling out your clay into a smooth, even slab. If you’re using guide rings on your rolling pin, aim for about a 1/4 inch thickness to ensure the walls are sturdy but not too heavy. -
Cut the base and lid:
Using your 4-inch circle cutter, punch out two identical circles. Set one aside for the lid. For the base, take the other circle and gently smooth the edges with a damp finger. -
Measure the wall:
Cut a long rectangular strip from your remaining slab. Use a flexible measuring tape to find the circumference of your base circle, or simply wrap the strip loosely around the cutter to estimate the length needed. -
Attach the wall:
Score the outer edge of your base circle and the bottom edge of your rectangular strip thoroughly. Apply a generous amount of slip to both roughed-up areas. -
Close the seam:
Wrap the strip around the base circle, pressing it firmly onto the slipped edge. Where the two ends of the wall meet, cut through both layers at an angle for a clean bevel join, then score, slip, and smooth the vertical seam together. -
Secure the lid:
To keep the lid from sliding off, you need an inner flange. Roll a thin coil of clay and attach it to the *underside* of your lid circle, positioning it about 1/4 inch in from the edge so it fits snugly inside the box walls. -
Add the handle:
Shape a small, flat button of clay for the knob. Score the center of the lid’s top surface and the bottom of the knob, then press them together firmly. I like to smooth around the connection with a sculpting tool to make it seamless.
Keep it Snug
Dry the lid *on* the box with a piece of paper towel in between. This ensures they shrink at the same rate and stay perfectly round.
Step 2: Surface Design
-
Smoothing:
Once constructed, use a slightly damp sponge to wipe down the entire piece. This removes fingerprints and softens any sharp edges on the rim or lid. -
Drafting the pattern:
Using a needle tool, very lightly sketch your botanical design onto the leather-hard clay. Draw simple leaf shapes and various circles scattered randomly around the exterior wall and the top of the lid. -
Painting base shapes:
Dip a small round brush into your Sage Green underglaze and fill in some of the leaf shapes. Use the Rust Red for the larger circles and Mustard Yellow for smaller dot accents. -
Carving details:
Leave some leaf shapes unpainted. instead, take your needle tool and carve the outline of the leaf and the internal veins directly into the raw clay body for a textural contrast. -
Layering veins:
Once the green underglaze is dry to the touch, use a carving tool to gently scratch vein lines through the paint, revealing the speckled clay underneath. This sgraffito technique adds lovely depth. -
Drying:
Allow your box to dry slowly. Cover loosely with plastic for the first day to prevent the lid from warping, then uncover to let it dry completely bone dry. -
Finishing:
If using kiln-fire clay, bisque fire the piece, then dip in a clear transparent glaze and fire again. If using air-dry clay, simply seal the finished dried piece with a glossy varnish or acrylic sealer to protect your paint work.
Faux Speckle Hack
Using plain white air-dry clay? Knead in some coarse black pepper or used coffee grounds before rolling it out to mimic that expensive ceramic speckle.
Place this on your windowsill or desk and enjoy your beautiful, handmade secret storage