When I’m craving that quick, satisfying clay win, I always reach for small clay projects that don’t need fancy tools or a big block of time. Here are my favorite small clay project ideas—cute, useful, and totally doable whether you’re using air dry clay, polymer clay, or ceramic clay.
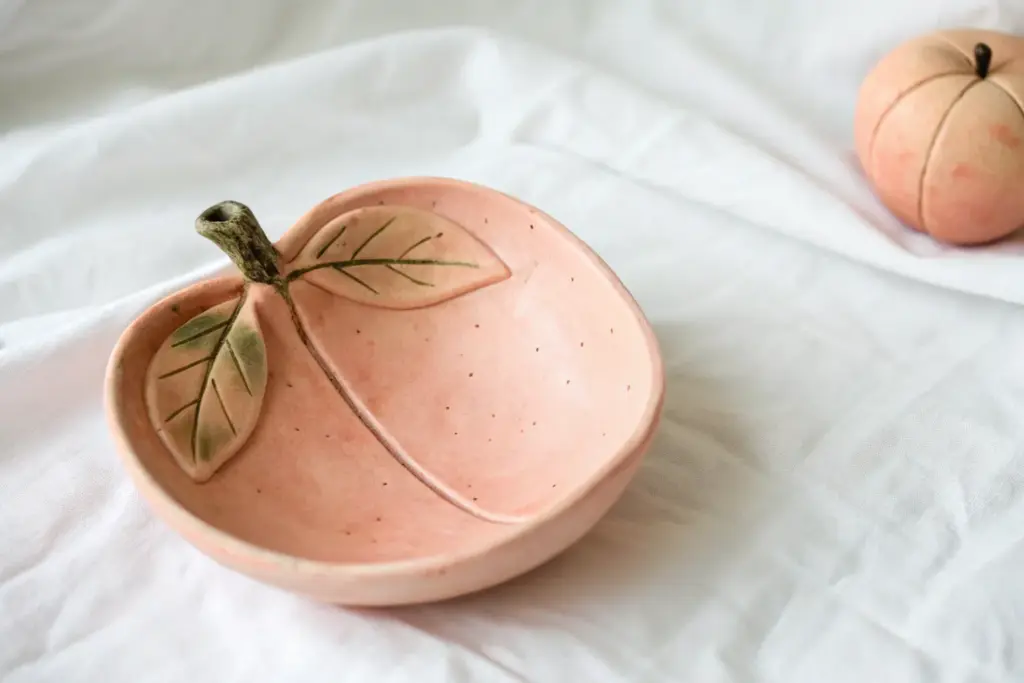
Mini Trinket Dishes
This charming oval dish brings an organic, earthy feel to your bedside table or vanity with its subtle speckling and warm, terracotta-toned rim. It’s the perfect size for holding rings, earrings, or small keepsakes while adding a touch of handmade warmth to your decor.
Step-by-Step Guide
Materials
- Air-dry clay (white or cream)
- Rolling pin
- Oval template (paper or cardboard)
- Small sponge
- Bowl of water
- Acrylic paints (cream/beige, brown, burnt orange/terracotta)
- Old toothbrush
- Fine grit sandpaper
- Gloss or satin varnish
Step 1: Shaping the Clay
-
Prepare the Clay:
Start by taking a generous handful of air-dry clay and kneading it briefly until it is soft, pliable, and free of cracks. If it feels too dry, dip your fingers in water and work the moisture in. -
Roll the Slab:
Place the clay on a smooth surface or canvas mat. Use your rolling pin to roll it out into an even slab, aiming for a thickness of about 1/4 inch (6mm). Try to keep the pressure consistent so one side isn’t thinner than the other. -
Cut the Shape:
Place your paper oval template onto the clay slab. Using a clay knife or a simple kitchen knife, carefully trace around the template to cut out your base shape. Remove the excess clay and set it aside. -
Form the Sides:
Gently lift the edges of the oval slab upward with your fingertips to create a shallow wall. You aren’t adding a coil here; you are cupping the flat slab itself to form a dish shape. -
Smooth the Transition:
Use your thumb to smooth the interior curve where the base meets the wall, ensuring there’s no sharp crease. The transition should be gentle and fluid. -
Refine the Rim:
Dip your finger in a little water and run it along the top edge of the rim. Round it over so it looks soft and finished rather than sharp or jagged. -
Wet Sponge Finish:
Take a slightly damp sponge and wipe the entire surface of the clay—both inside and out—to remove any fingerprints or distinct tool marks. This is crucial for that professional, smooth look. -
Drying:
Let the dish dry completely in a safe spot away from direct heat. This usually takes 24-48 hours depending on humidity. Flip it over halfway through the process so the bottom dries evenly.
Smoother Surfaces
Use a little vinegar on your finger when smoothing air-dry clay. It breaks down the surface just enough to create a super-smooth slurry that fills tiny cracks.
Step 2: Decorating and Sealing
-
Sand for Perfection:
Once the dish is bone dry, take fine-grit sandpaper and gently sand away any rough spots or uneven edges. Wipe away the dust with a dry cloth. -
Base Color Application:
Mix a cream or light beige acrylic paint to match the natural stoneware look. Paint the entire dish, front and back. You may need two coats for opaque coverage. -
Create the Speckles:
Dilute a small amount of dark brown paint with water until it’s inky. Dip an old toothbrush into this mixture. -
Splatter Technique:
Hold the toothbrush over the dish and run your thumb across the bristles to flick tiny specks of paint onto the surface. I like to practice on a piece of paper first to control the spray. -
Speckle the Outside:
Don’t forget to lightly speckle the exterior of the bowl as well so the design feels cohesive. -
Paint the Rim:
Mix a burnt orange or terracotta color. Using a small detail brush, carefully paint the very top edge of the rim. Allow the line to be slightly organic and imperfect for a rustic feel. -
Varnish – Coat One:
Once all paint is completely dry, apply a layer of gloss or satin varnish to seal the clay and give it a ceramic-like sheen. -
Varnish – Coat Two:
Apply a second coat of varnish for durability, paying extra attention to the rim and the center of the bowl where trinkets will sit.
Make It Look Glazed
For a high-end pottery look, use a high-gloss thick varnish or resin for the final coat. It mimics the glass-like shine of kiln-fired glaze perfectly.
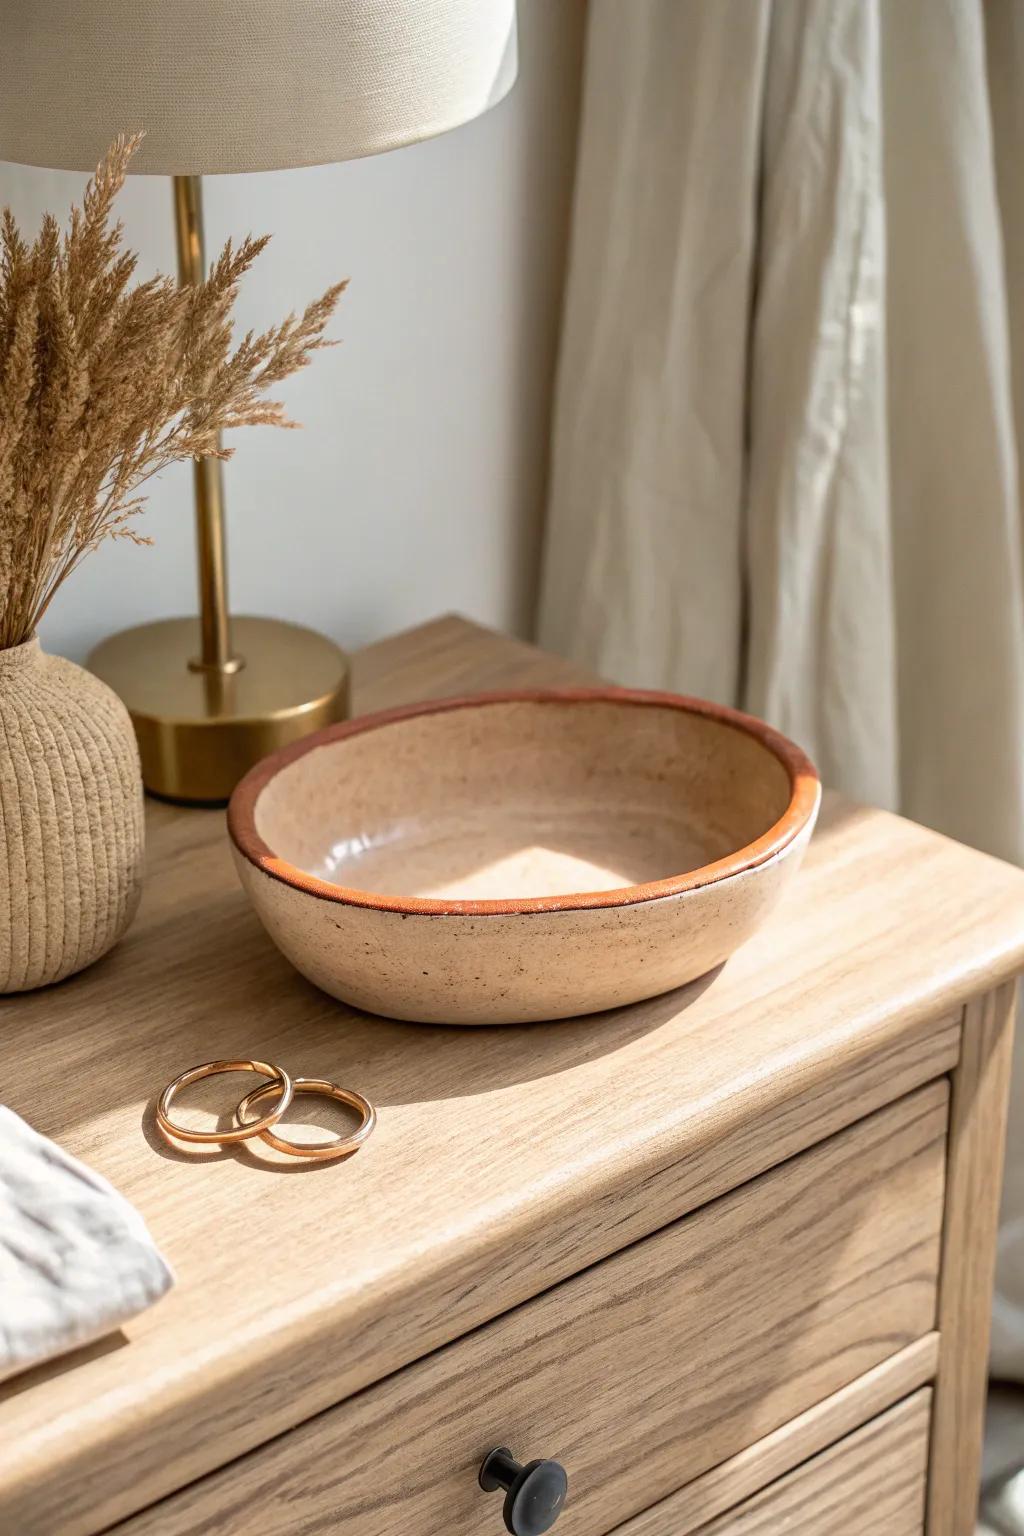
Place your finished dish on your nightstand and enjoy the organized serenity it brings to your space


Tiny Pinch Pots
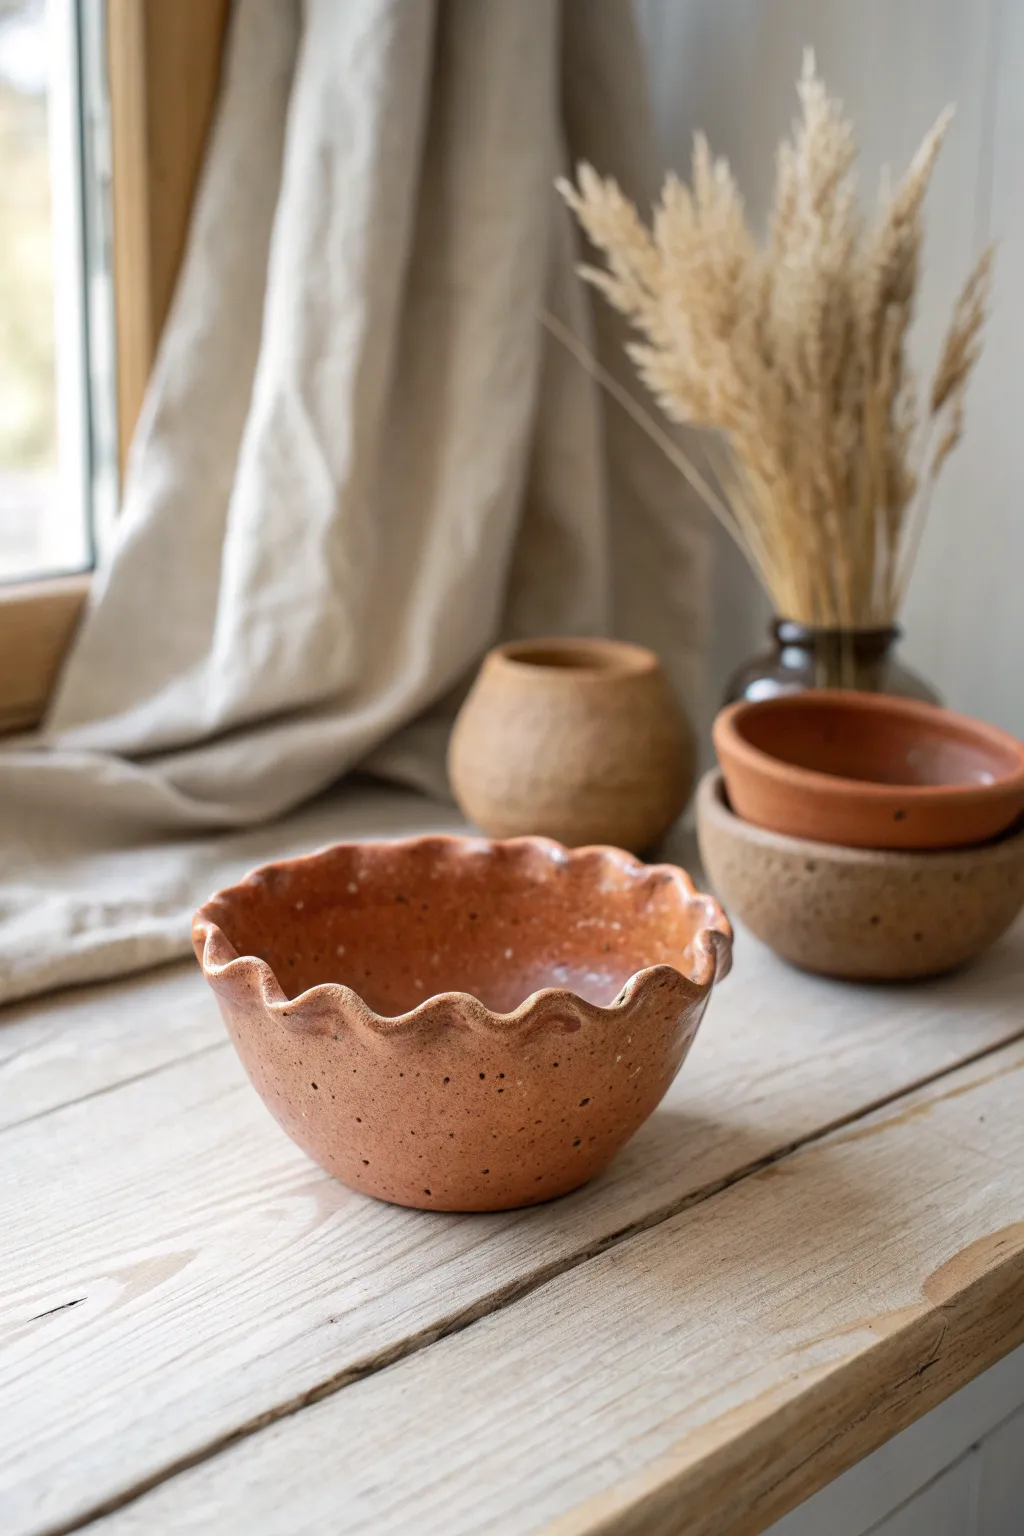
This charming little bowl features a distinctive scalloped rim that gives it a delicate, floral appearance. Its speckled clay body and warm terracotta glaze make it a perfect earthy accent for holding trinkets or simply sitting pretty on a shelf.
How-To Guide
Materials
- Speckled stoneware or terracotta clay (approx. 1 lb)
- Small sponge
- Bowl of water
- Wooden modeling tool or smooth chopstick
- Pottery wire cutter
- Clear or transparent warm-toned glaze
- Fine grit sandpaper (optional)
- Kiln (or access to firing services)
Step 1: Forming the Base
-
Prep your clay:
Cut a piece of clay roughly the size of a tennis ball. Pat and roll it in your hands until it forms a smooth, round sphere with no major cracks. -
Open the pot:
Hold the clay sphere in your non-dominant hand. Press your thumb gently into the center, stopping about a half-inch from the bottom to leave enough thickness for the base. -
Pinch the walls:
With your thumb inside and fingers outside, begin pinching the clay walls gently. Rotate the ball slightly after each pinch to ensure even thickness all around. -
Shape the curve:
Continue pinching from the bottom up towards the rim. Aim for a gentle, rounded bowl shape, similar to a cereal bowl but smaller. Keep the thickness consistent, about 1/4 inch. -
Smooth the interior:
Use your thumb or a slightly damp sponge to wipe the inside of the bowl smooth. This compresses the clay and removes any deep fingerprints or cracking that occurred during shaping.
Cracking Up?
If the rim cracks while ruffling, your clay is too dry. Dab the cracks with a tiny bit of vinegar water (slip) and smooth over. Keep clay moist!
Step 2: Creating the Ruffled Rim
-
Even out the rim:
Looking at the pot from above, check that the rim is relatively level. If it’s very uneven, you can trim the excess with a needle tool or simply pat it down gently. -
Mark your spacing:
Visualize where you want your waves to be. You want a consistent rhythm around the edge. You don’t need to measure, but keeping a steady beat helps tightness. -
Push out carefully:
Support the outside of the rim with two fingers of your left hand, spacing them about an inch apart. With your right index finger, gently push the clay rim outward between those two supporting fingers. -
Push in:
Now, move slightly to the right. Support the *inside* of the rim with two fingers, and use your outside finger to push the clay *inward* between them. -
Continue the pattern:
Alternate this push-out and push-in motion around the entire circumference. I usually like to go around twice—once to set the shape, and a second time to refine the depth of the waves. -
Smooth the edge:
The manipulation might leave rough edges. Take a damp sponge or a piece of soft plastic/leather (chamois) and run it gently over the wavy rim to soften any sharp angles. -
Refine the foot:
Tap the bowl gently on your table to flatten the bottom slightly so it sits stable. If you want a defined foot ring, use a loop tool to carve away a small ring of clay from the bottom edge once it’s leather hard.
Speckle Magic
To get the look in the photo, use a clay body specifically sold as ‘Speckled Buff’ or ‘Speckled Brown’—the spots appear only after firing.
Step 3: Drying and Finishing
-
Slow drying:
Loosely cover your bowl with plastic and let it dry slowly for a day or two to prevent warping, then uncover it to dry completely to the ‘bone dry’ stage. -
Bisque fire:
Fire the piece in a kiln to cone 04 (or whatever your specific clay requires) to harden it into bisque ware. -
Sand imperfections:
Once fired, briefly sand any sharp spots on the rim or base with fine sandpaper. Wipe away all dust with a damp sponge. -
Glaze application:
Pour a warm transparent or semi-transparent glaze into the bowl, swirl it to coat the inside, and pour out the excess. Dip the outside or brush onto the exterior to match. -
Clean the foot:
Wipe the very bottom of the bowl clean of any glaze with a sponge so it doesn’t fuse to the kiln shelf. -
Final firing:
Fire the glazed bowl to the maturity temperature of your clay and glaze (often cone 5 or 6 for stoneware).
Once cooled, your little ruffled bowl is ready to bring a touch of handmade warmth to your windowsill


Simple Clay Earrings
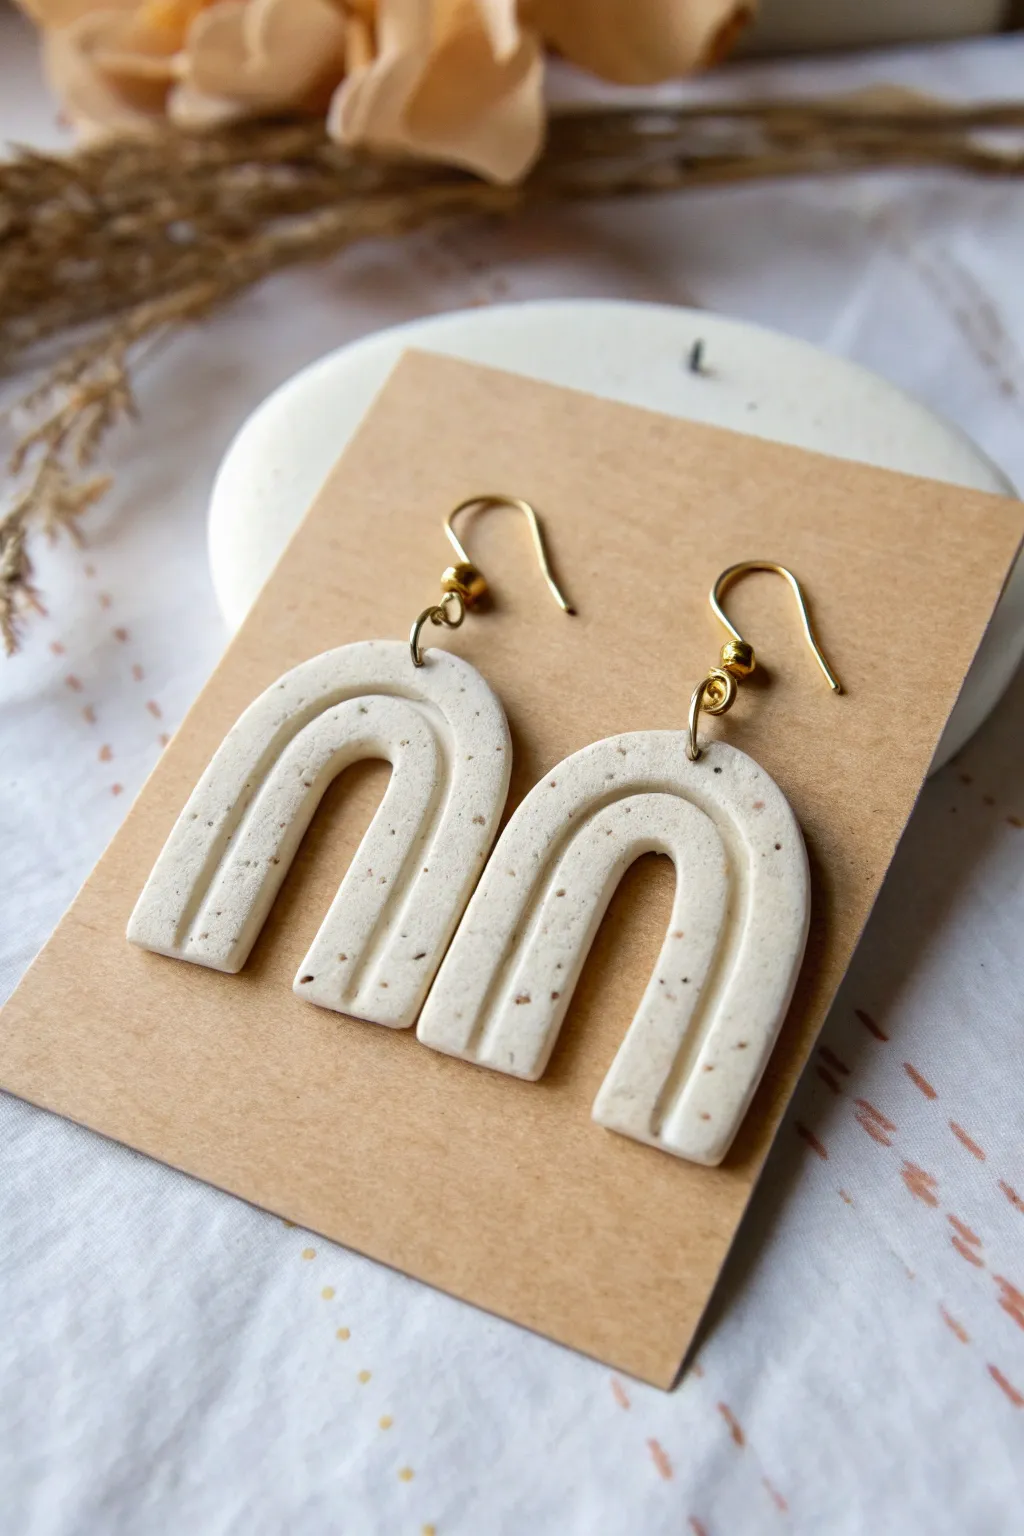
These minimalist earrings feature a classic arch shape with a subtle grooved detail that creates wonderful visual texture. Their speckled cream finish gives them a natural, stone-like appearance that pairs beautifully with everyday outfits.
How-To Guide
Materials
- Speckled cream or granite polymer clay
- Acrylic rolling pin or pasta machine
- U-shaped clay cutter (medium size)
- Small carving tool or blunt needle tool
- Hand drill or small round cutter (for jump ring holes)
- Sandpaper (400-1000 grit)
- 2 Gold-tone jump rings
- 2 Gold-tone French hook ear wires
- Jewelry pliers (flat nose and round nose)
- Ceramic tile or parchment paper for baking
- Clay oven
Step 1: Shaping the Clay
-
Condition the clay:
Begin by warming the speckled clay in your hands, kneading it until it is soft and pliable. This conditioning step prevents cracks during baking. -
Roll the slab:
Roll your clay out into an even slab. Aim for a thickness of about 3mm to 4mm—thick enough to be sturdy but thin enough to be lightweight for ears. -
Smooth the surface:
Before cutting, check for any air bubbles or fingerprints. Gently smooth the surface with your finger or roll over it lightly with a piece of paper on top to remove blemishes. -
Cut the shapes:
Press your U-shaped cutter firmly into the clay slab. Wiggle it slightly to ensure a clean cut through to the work surface, then lift the cutter. Repeat to make two matching shapes. -
Refine the edges:
Gently lift the cut shapes. If there are any rough bits of clay on the edges, smooth them down softly with your fingertip. I find a tiny drop of baby oil on my finger helps glide over the clay without leaving prints.
Step 2: Adding Detail
-
Mark the groove path:
Visualize where the central groove will go. It should follow the curve of the arch, equidistant from the inner and outer edges. -
Carve the groove:
Using a small carving tool or a blunt needle tool, press gently into the clay to create a continuous u-shaped indentation. Maintain steady pressure so the depth remains consistent. -
Smooth the groove:
If the carving created any jagged edges or ‘crumbs’ of clay, gently brush them away or smooth them down with a silicone tipped tool. -
Pierce the holes:
Use a small tool or a very small round cutter to poke a hole at the very top center of each arch. Ensure the hole is large enough for your jump rings.
Uneven Carving Lines?
If your hand is shaking while carving the groove, try resting your wrist on a stable block or book. This elevates your hand to the clay’s level for smoother control.
Step 3: Baking and Assembly
-
Bake the pieces:
Place your clay pieces on a ceramic tile or parchment-lined baking sheet. Bake according to the manufacturer’s instructions on your clay package (usually around 275°F/130°C for 15-30 minutes). -
Cool down:
Allow the pieces to cool completely in the oven or on a wire rack. They will be slightly flexible when hot but harden as they cool. -
Sand the edges:
Once cool, use fine-grit sandpaper to gently buff the edges of the earrings. This removes any lingering fingerprints or rough spots, giving them a professional finish. -
Clean the dust:
Wipe the sanded pieces with a damp cloth or rinse quickly in water to remove any clay dust before assembling. -
Open the jump rings:
Using two pairs of pliers, twist a jump ring open sideways (never pull it apart). Hook it through the hole in the clay piece. -
Attach the hook:
Slide the loop of the French hook ear wire onto the open jump ring alongside the clay piece. -
Close the ring:
Use your pliers to twist the jump ring closed again, ensuring the ends meet flush so the earring doesn’t slip off. -
Repeat for second earring:
Repeat the assembly process for the second earring to complete your beautiful new set.
Add a Glossy Finish
After baking, apply a thin layer of UV resin or glossy polyurethane varnish to the surface. It will make the speckles pop and protect the white clay from dirt.
Enjoy wearing your sophisticated yet simple handmade accessories.


Tiny Clay Charms
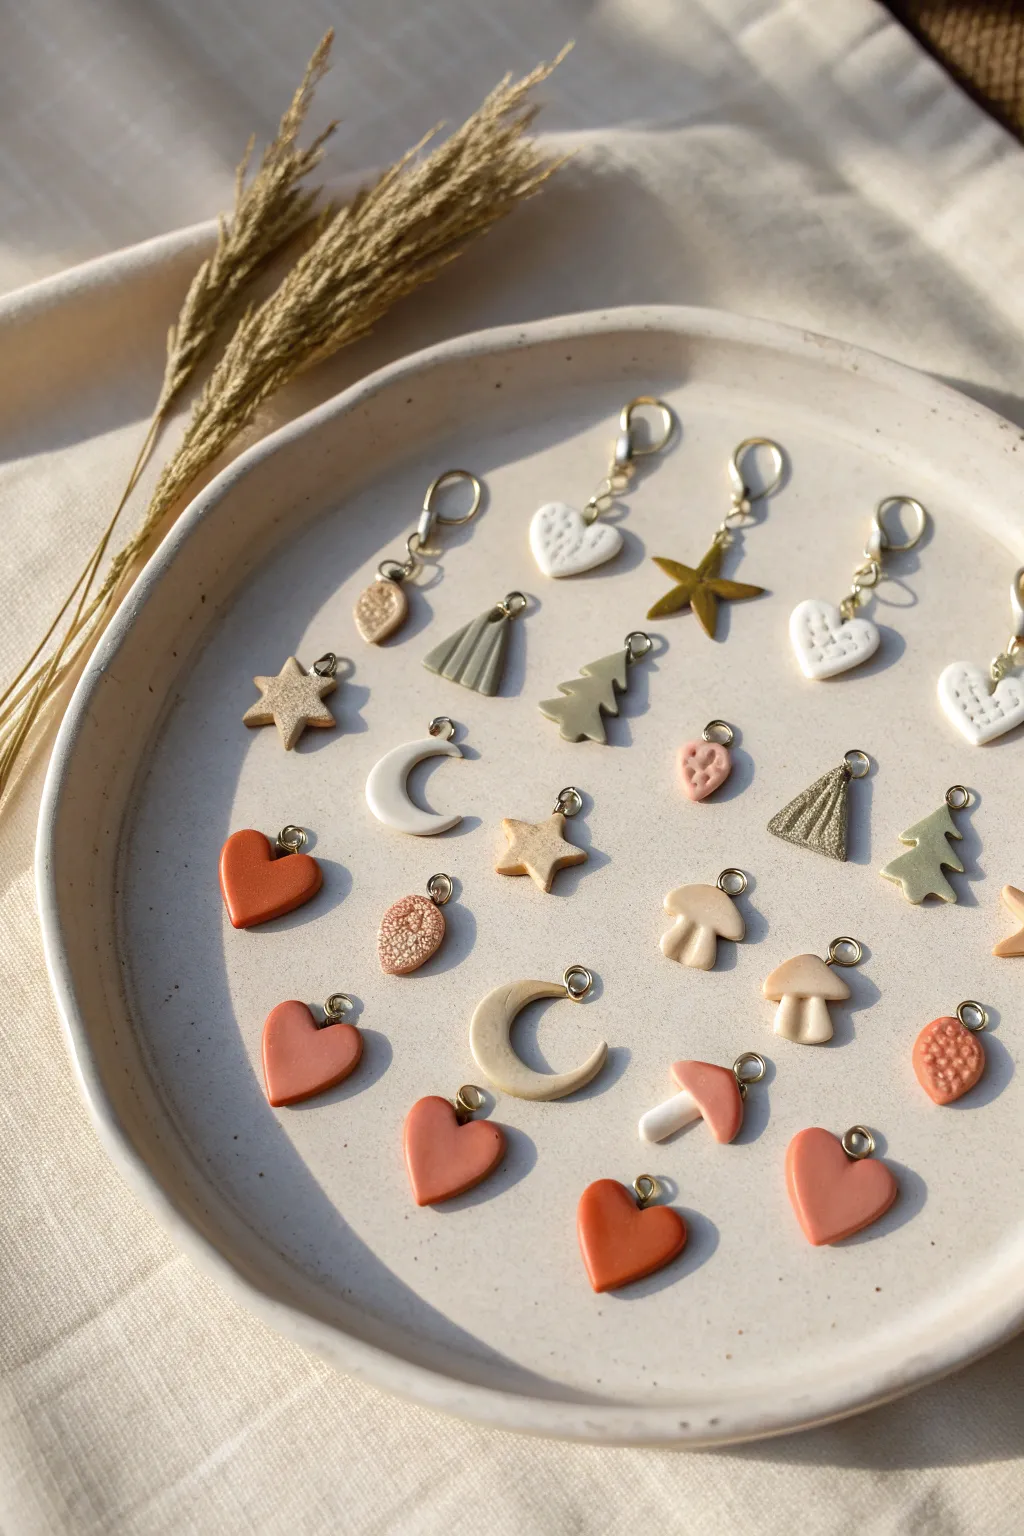
These delicate, earthy charms are perfect for stitch markers, jewelry, or simply adding a handmade touch to your day. Using a palette of terracotta, sage, and cream polymer clay, you’ll create a variety of sweet, miniature shapes with subtle textures.
Step-by-Step Tutorial
Materials
- Polymer clay in earth tones (terracotta, olive green, cream/white, beige, golden)
- Small metal jump rings (gold or brass tone)
- Small eye pins (optional alternative for hanging)
- Tiny cookie cutters (hearts, stars, moons, etc.) or a craft knife
- Texture tools (needle tool, toothbrush, sandpaper, or lace)
- Acrylic rolling pin
- Parchment paper or ceramic tile for baking
- Needle nose pliers
- Gloss glaze (optional)
Step 1: Prepping and Shaping
-
Condition the Clay:
Begin by kneading each color of polymer clay separately until it is soft and pliable. This conditioning step prevents cracking later on. Ensure your hands are clean between colors to avoid smudging. -
Roll Out Slabs:
Using an acrylic rolling pin, roll the clay into even sheets about 3-4mm thick. You want them thin enough to be lightweight but sturdy enough not to break. I like to consistently check the thickness against a stack of playing cards for uniformity. -
Texture the Clay:
Before cutting shapes, gently press texture into some of the clay sheets. Use things like sandpaper for a stone look, a clean toothbrush for stippling, or press a bit of lace into the surface for subtle patterns. -
Cut Out Hearts:
Use a tiny heart-shaped cutter to punch out several hearts from the terracotta and cream clay. If you don’t have a cutter, use a craft knife or needle tool to freehand the shape. -
Form the Mushrooms:
For the mushrooms, roll a small ball of beige clay into a thick stalk shape. Then, form a flattened cap from cream or terracotta clay and gently press it onto the stalk. Smooth the seam slightly with your finger. -
Create Moons and Stars:
Cut crescent moon shapes from the cream or beige clay. For stars, you can use a cutter or cut a five-point shape manually. Soften any sharp, cut edges by gently tapping them with your fingertip. -
Sculpt Trees and Cones:
Cut small triangles for abstract trees. You can make jagged cuts on the sides for branches or leave them as simple geometric cones. Add texture lines using a needle tool to mimic pine needles or vertical ribs.
Clean Edges Trick
Use a piece of plastic wrap over the clay before pressing your cutter down. This creates a soft, domed pillow effect on the edges, reducing the need for sanding later.
Step 2: Finishing and Assembly
-
Piercing Holes:
While the clay is still raw, carefully use a needle tool or toothpick to poke a small hole at the top of each charm. Make sure the hole is big enough for your jump rings to slide through later. -
Detailing:
Add final details, like small dots on the mushroom caps or extra stippling on the hearts. Double-check that your shapes aren’t distorted from handling; reshape gently if needed. -
Baking:
Arrange your charms on a parchment-lined baking sheet or a ceramic tile. Bake according to your clay manufacturer’s instructions (usually around 275°F/130°C for 15-30 minutes). Do not overbake. -
Cooling:
Allow the charms to cool completely in the oven or on a wire rack. They will harden fully as they cool down. -
Opening Jump Rings:
Using two pairs of pliers (or your fingers if the metal is soft enough), twist the jump rings open laterally—never pull them apart outward, as this weakens the metal. -
Attaching Rings:
Slide an open jump ring through the hole you created in each charm. If you are making stitch markers like in the photo, you might want to add a larger clasp or ring here as well. -
Closing Rings:
Twist the jump ring back into a closed position, ensuring the ends meet perfectly flush so the charm doesn’t slip off. -
Optional Glazing:
If you prefer a shiny finish, brush a thin coat of polymer clay glaze over the charms. However, leaving them matte emphasizes the natural, earthy aesthetic shown in the example.
Jewelry Upgrade
Attach these charms to gold hoops for earrings, or string several onto a delicate chain for a minimalist charm necklace.
Now you have a charming collection of miniature tokens ready to be used or gifted

The Complete Guide to Pottery Troubleshooting
Uncover the most common ceramic mistakes—from cracking clay to failed glazes—and learn how to fix them fast.
Clay Beads for Bracelets
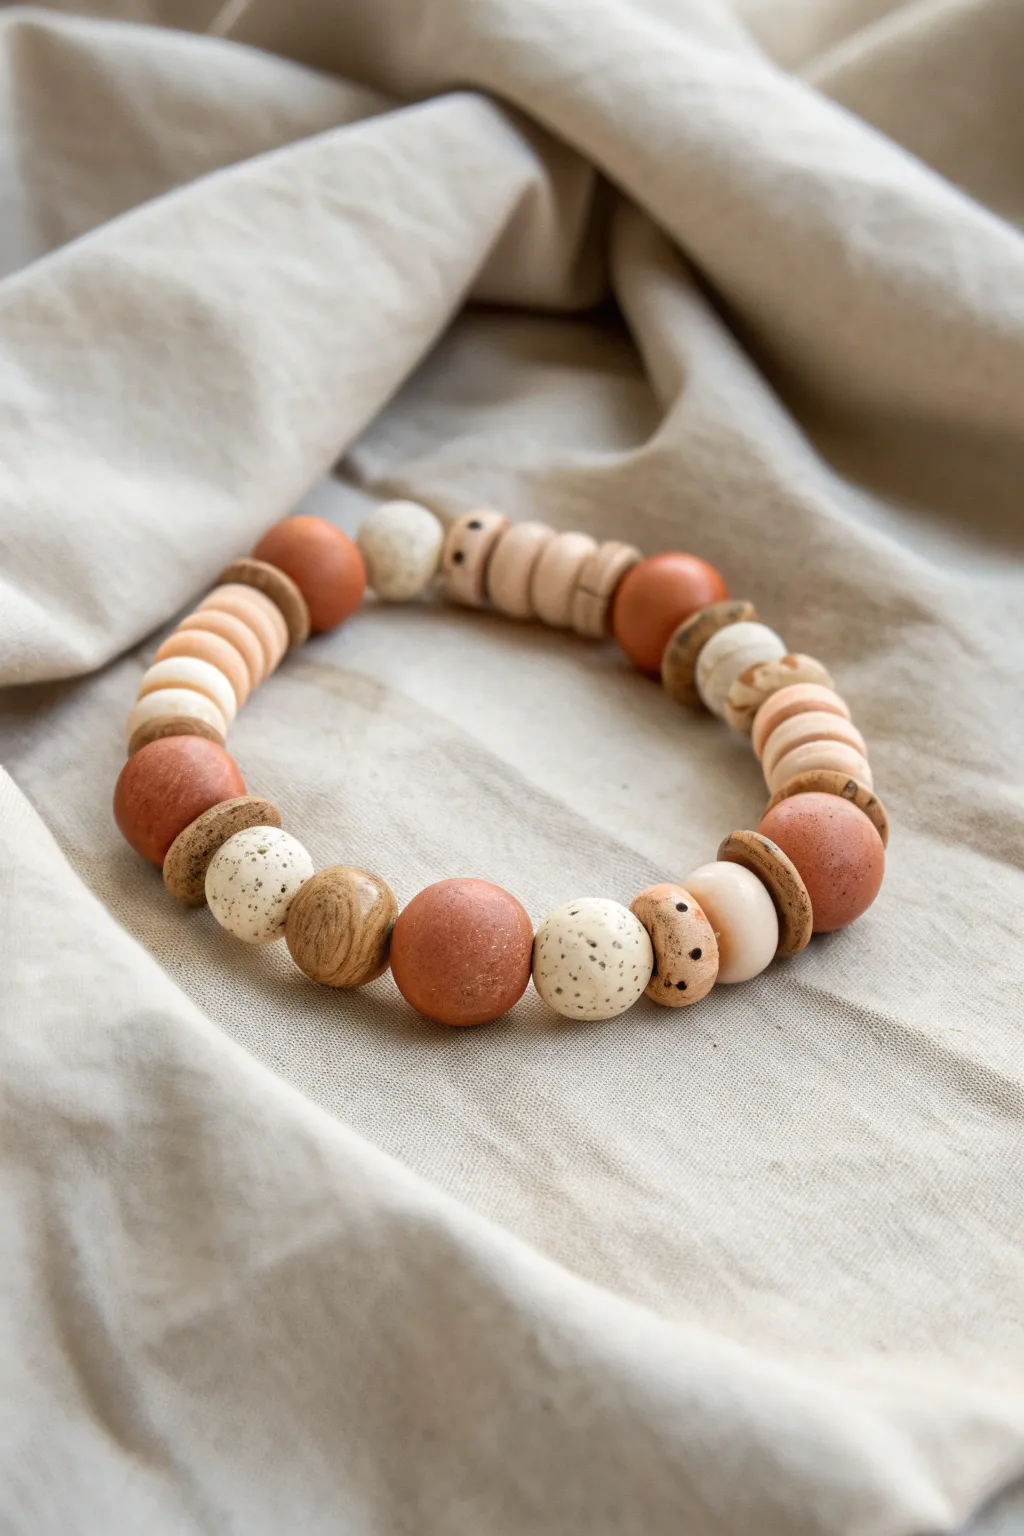
Embrace the natural beauty of polymer clay with this bracelet featuring a variety of textures and warm, earthy hues. By combining solid terracotta tones with speckled cream and natural wood effects, you’ll create a piece that feels both organic and modern.
Step-by-Step
Materials
- Polymer clay (terracotta/burnt orange, cream/beige, white, tan)
- Black pepper or dried coffee grounds (for speckling)
- Modeling tools or a toothpick
- Circle cutters (various small sizes)
- Drinking straw or piercing tool
- Sandpaper (fine grit)
- Brown acrylic paint (optional, for wood effect)
- Elastic cord (0.8mm or 1mm)
- Strong jewelry glue
- Oven for baking
Step 1: Prepping the Clay & Colors
-
Condition the base colors:
Start by thoroughly kneading your terracotta and cream clays until they are soft and pliable. This conditioning step prevents cracking later on. -
Mix the natural speckle:
Take a portion of white or cream clay and mix in a pinch of coarse black pepper or dried coffee grounds. Knead it until the specks are evenly distributed to create that organic, stone-like appearance. -
Create a marbled wood tone:
Roughly mix a bit of tan and dark brown clay (or use white with a tiny drop of brown paint kneaded in) but stop before it’s fully blended. You want streaks to mimic wood grain.
Don’t Squish Them!
To avoid flat spots on your round beads while they bake, nestle them into a pile of cornstarch or baking soda on the tray to cushion their shape.
Step 2: Forming the Beads
-
Roll the terracotta accent beads:
Pinch off chunks of the terracotta clay and roll them between your palms into perfect spheres, aiming for about 1.5 cm in diameter. -
Shape the speckled beads:
Using your pepper-flecked clay, roll slightly smaller spheres. I like to make these slightly irregular or gently pat them to look like river stones. -
Create disc beads:
Roll a snake of cream or light peach clay and slice it into even segments. Flatten these slices gently with your finger to create soft, rounded disc shapes. -
Make the wooden spacers:
Take your marbled ‘wood’ clay and form small, thicker washer-shapes. You can press these slightly flatter than the spheres to act as visual breaks between the larger beads. -
Form the stacker beads:
Create a series of graduated discs in a light peach or cream tone. These will be stacked together to create a ribbed section on the bracelet. -
Texture the flat beads:
For the darker brown, flat spacer beads, roll them into a wheel shape. Use a rough sponge or sandpaper to press texture onto the outer edge for a rustic look. -
Pierce the holes:
Using a bead piercing pin or a toothpick, carefully bore a hole through the center of each bead. Rotate the bead as you pierce to keep the shape from distorting.
Step 3: Baking and Finishing
-
Check the holes:
Double-check that your elastic cord will fit through the holes you’ve made. If using a thicker cord, you may need to widen them slightly before baking. -
Bake the beads:
Arrange your beads on a baking sheet lined with parchment paper. Bake according to your clay package instructions (usually around 275°F or 130°C for 15-30 minutes). -
Cool down:
Allow the beads to cool completely in the oven with the door cracked open. This gradual cooling makes the clay stronger. -
Sand for finish:
Once cool, lightly sand any fingerprints or rough edges with fine-grit sandpaper. For the stone-effect beads, a little extra sanding reveals more of the speckles. -
Buff the terracotta:
Take a piece of denim or a soft cloth and vigorously rub the terracotta spheres. This burnishing gives them a subtle, natural sheen without using gloss varnish.
Texture Twist
Before baking, roll your ‘wooden’ beads over a piece of coarse sandpaper or a clean rock surface to imprint a realistic, pitted texture.
Step 4: Assembly
-
Plan your pattern:
Lay out your beads on a bead board or towel. Try alternating the large terracotta spheres with the flat, textured spacers and the stack of cream discs for visual rhythm. -
String the beads:
Cut a length of elastic cord (about 10 inches). Thread your beads in the desired order, checking the fit around your wrist before tying. -
The final knot:
Tie a surgeon’s knot (looping twice instead of once) and pull it tight. Secure the knot with a dab of strong jewelry glue. -
Hide the knot:
While the glue is still slightly tacky, pull the knot inside the hole of the nearest large bead to hide it seamlessly.
Slip on your new bracelet and enjoy the grounded, artisan feel it brings to your outfit.
Cute Face Magnets
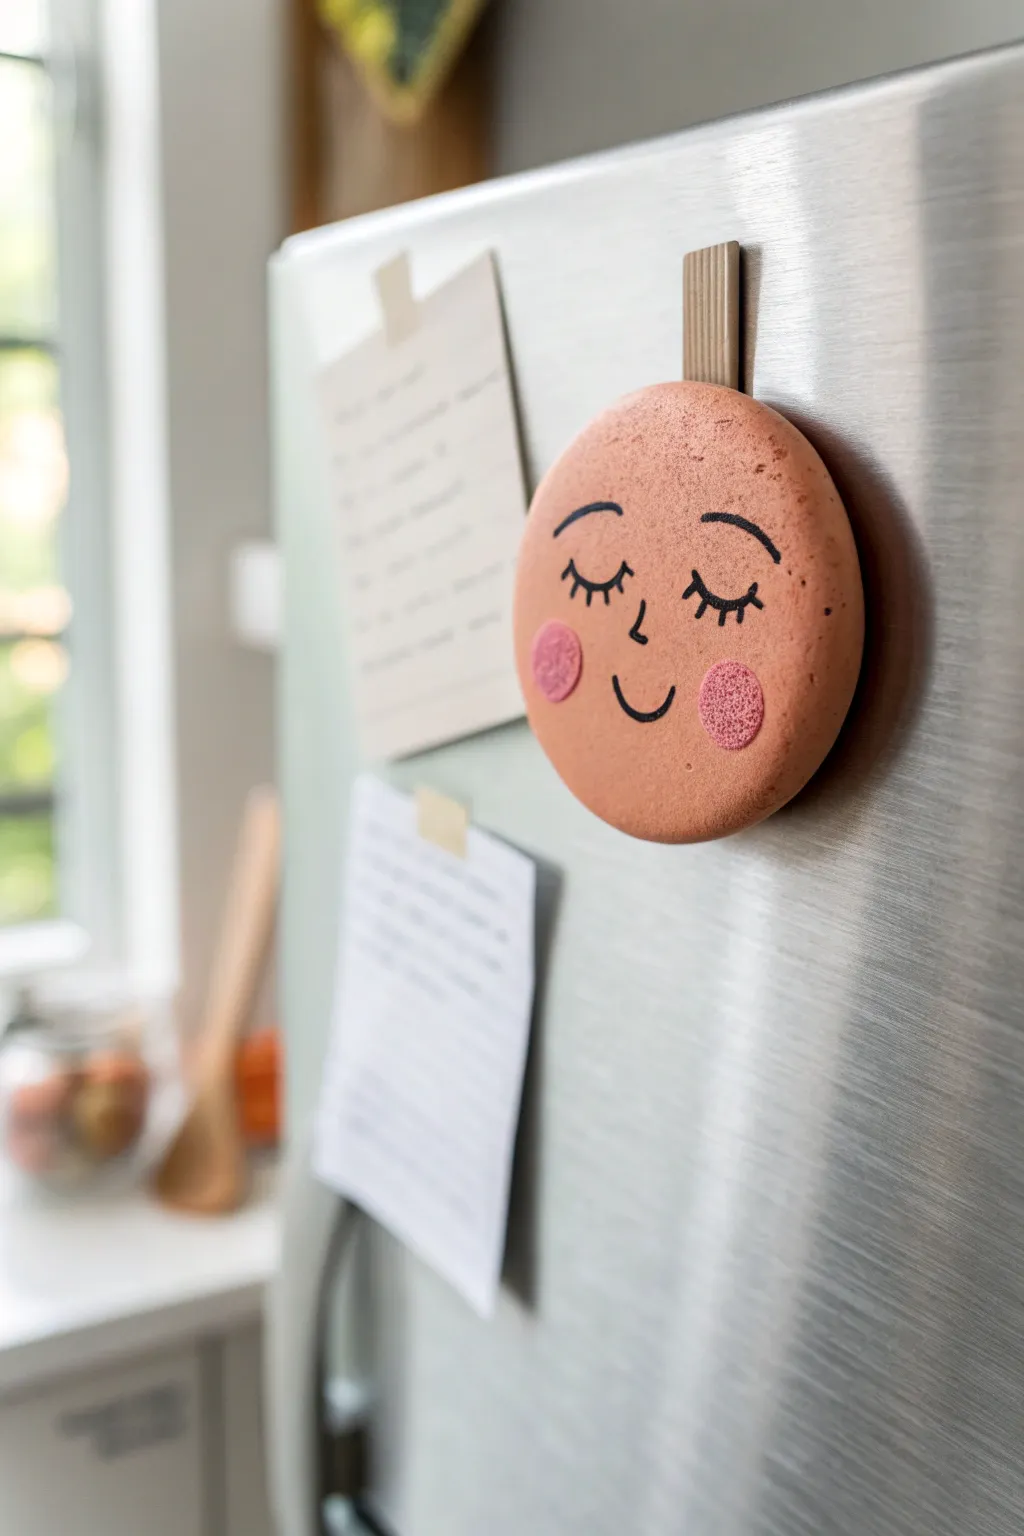
Add a touch of whimsy to your refrigerator door with these charming, textured clay magnets. With their rosey cheeks and peaceful expressions, they serve as a gentle reminder to take a moment and smile.
Step-by-Step Guide
Materials
- Air-dry clay (terra cotta or peach tone)
- Circular cookie cutter (approx. 2.5 – 3 inches)
- Rolling pin
- Rolling guides or chopsticks
- Sandpaper (fine grit)
- Black fine-point permanent marker or acrylic paint pen
- Pink acrylic paint
- Small round paintbrush or sponge dauber
- Strong craft glue (E6000 or similar)
- Round ceramic or heavy-duty magnet
- Matte sealant or varnish (optional)
Step 1: Shaping the Base
-
Condition the clay:
Start by taking a handful of air-dry clay and kneading it in your hands until it becomes soft, pliable, and free of cracks. -
Roll it out:
Place the clay on a clean, flat surface. Use a rolling pin to flatten it to an even thickness of about 1/4 inch. I find using rolling guides or chopsticks on either side helps keep the thickness perfectly consistent. -
Cut the circles:
Press your circular cookie cutter firmly into the clay to create your face shape. Twist slightly before lifting to ensure a clean cut. -
Refine the edges:
Dip your finger in a tiny bit of water and gently run it around the circumference of the circle to smooth out any rough edges or stray bits of clay left by the cutter. -
Create texture:
To mimic the stone-like look in the photo, gently dab a crumpled piece of aluminum foil or a textured sponge over the surface. Don’t press too hard; you just want a subtle, organic finish. -
Dry completely:
Lay the clay circle on a piece of parchment paper or a wire rack. Let it air dry for 24-48 hours, flipping it occasionally to ensure both sides dry evenly and to prevent curling.
Keep it Flat
To prevent the clay from curling up like a potato chip while drying, place a light book or board on top of the circle after the first few hours of drying.
Step 2: Adding Personality
-
Sand for smoothness:
Once bone dry, lightly check the edges again. If any sharpness remains, use fine-grit sandpaper to give it a soft, rounded finish. -
Draft the face:
Lightly sketch the closed eyes, nose, and smile with a pencil first. Position the features slightly lower on the circle to create that cute, ‘kawaii’ proportion. -
Draw the lashes:
Using a black fine-point marker or paint pen, trace over your pencil lines. Draw two curved arches for closed eyes, adding three small, distinct eyelashes to the outer corner of each. -
Draw the nose and mouth:
Add a small ‘L’ shape for the nose in the center, and a wide U-shape curve below it for a contented smile. -
Mix the cheek color:
Squeeze a drop of pink acrylic paint onto a palette. You can mix in a tiny bit of white if you want a softer, pastel pink. -
Apply the cheeks:
Dip a small round brush or a sponge dauber into the pink paint. Blot off the excess on a paper towel until the brush is almost dry. -
Stipple the blush:
Gently stipple or dab the paint onto the cheeks to create two rosy circles. The dry-brush technique helps maintain the textured look of the clay underneath. -
Seal the artwork:
If you want extra durability, apply a thin coat of matte varnish over the face. This protects the marker and paint from fading over time.
Add a Clip
Glue a wooden clothespin to the back instead of just a round magnet. This turns your face into a functional clip for holding photos or grocery lists.
Step 3: Final Assembly
-
Prepare the back:
Flip the dried clay face over. Ensure the center spot is clean and dust-free. -
Glue the magnet:
Apply a generous dab of strong craft glue to the back of your magnet. -
Attach:
Press the magnet firmly onto the center of the clay back. Allow the glue to cure fully according to the package instructions before sticking it to your fridge.
Now your fridge has a peaceful new friend to greet you every morning


What Really Happens Inside the Kiln
Learn how time and temperature work together inside the kiln to transform clay into durable ceramic.
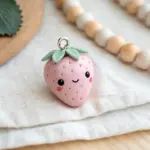
Mini Fruit or Veggie Magnets
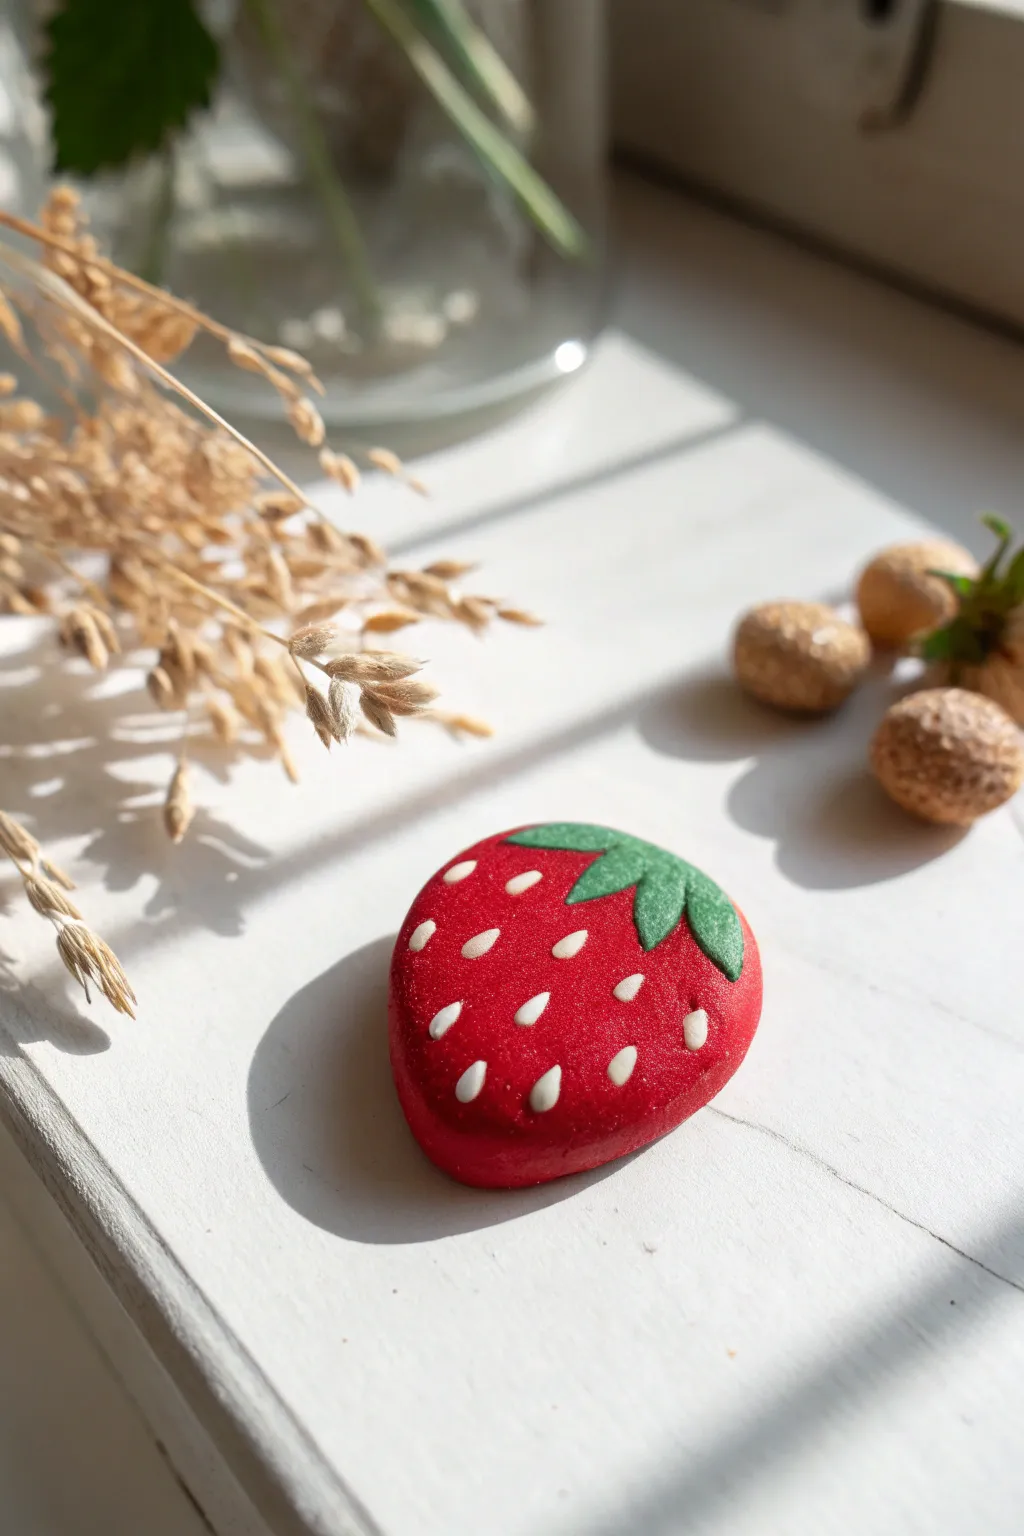
Brighten up your fridge or magnetic board with this adorable, vibrant strawberry. Using polymer clay, you’ll sculpt a stylized fruit with charmingly simple details like white seed teardrops and a leafy green cap.
How-To Guide
Materials
- Red polymer clay (bright, primary red)
- White or translucent white polymer clay
- Leaf green polymer clay
- Liquid polymer clay (optional but helpful for adhesion)
- Small round neogymium magnet
- Needle tool or toothpick
- Gloss glaze or varnish
- Small soft paintbrush
- Craft knife or clay blade
- Rolling pin or pasta machine
Step 1: Shaping the Base
-
Condition the clay:
Start by thoroughly kneading your red clay until it is soft, pliable, and free of any air bubbles or cracks. -
Form the main shape:
Roll the red clay into a smooth ball about the size of a large cherry tomato. -
Refine the strawberry silhouette:
Gently flatten the ball slightly with your palm to create a domed disk rather than a perfect sphere. Then, pinch the bottom edge gently to create a slightly tapered, rounded point, mimicking a strawberry’s natural heart shape. -
Smooth the surface:
Run your finger over the surface to ensure there are no fingerprints. If the clay is getting sticky, I find lightly dusting my finger with cornstarch helps smooth it out perfectly.
Step 2: Adding the Seeds
-
Prepare the seeds:
Take a tiny amount of white clay and roll it into a very thin snake, roughly the thickness of a toothpick. -
Slice seed segments:
Using your craft knife, slice off tiny, equal-sized bits from the white snake. You will need about 12-15 pieces. -
Shape individual seeds:
Roll each tiny white bit into a ball, then pinch one end to create a teardrop shape. -
Impress indentations:
Using a small ball tool or the rounded end of a paintbrush, make shallow indentations all over the red strawberry body where you want the seeds to sit. -
Place the seeds:
Carefully pick up the white teardrops—a needle tool is great for this—and place one into each indentation, pointing the narrow end toward the top of the berry. -
Flatten the seeds:
Gently press each seed down with your finger so they sit flush with the surface of the red clay rather than sticking out.
Problem Solver: Smudges
Red and green pigments stain! If red smears onto your white seeds, clean them gently with a cotton swab dipped in rubbing alcohol before baking.
Step 3: Creating the Greenery
-
Create the leafy cap:
Condition a small amount of green clay and flatten it into a thin sheet. -
Cut the leaves:
Use your craft knife to cut out a star-like shape or 3-4 individual small triangles. These don’t need to be perfectly symmetrical; nature is delightfully imperfect. -
Shape the leaves:
Gently curb the edges of your green triangles to make them look softer and less geometric. -
Attach the cap:
Place the green leaves onto the broad top of your red strawberry. If they don’t stick immediately, a tiny dab of liquid clay works as great glue here. -
Add texture:
Use your needle tool to gently press a central vein down the middle of each green leaf for a realistic touch. -
Blend the stem:
Roll a tiny cylinder of green clay and attach it to the center of the leaves to form the stem, smoothing the seams where it joins the leaves.
Level Up: Texture
Before baking, use an old toothbrush to gently tap the red surface. This creates a realistic, pitted skin texture typical of real strawberries.
Step 4: Finishing Touches
-
Prepare the back:
Flip your strawberry over. Press your magnet firmly into the back to create an indentation, then remove it. -
Secure the magnet:
Place a drop of baking glue (like liquid polymer clay) or verify your superglue instructions (some are for post-bake) into the indentation. If baking the magnet inside, press it back in and smooth a thin layer of clay over the edges to lock it in place. -
Bake the project:
Bake your clay piece according to the manufacturer’s instructions on the package. Usually, this is around 275°F (135°C) for 15-30 minutes. -
Cool down:
Let the piece cool completely before handling. It will be slightly soft when hot but hardens as it cools. -
Add a shine:
Once fully cool, brush on a coat of gloss glaze to give the strawberry a juicy, fresh-picked appearance.
Your juicy little strawberry is now ready to hold up your grocery lists in style
Tiny Textured Coasters
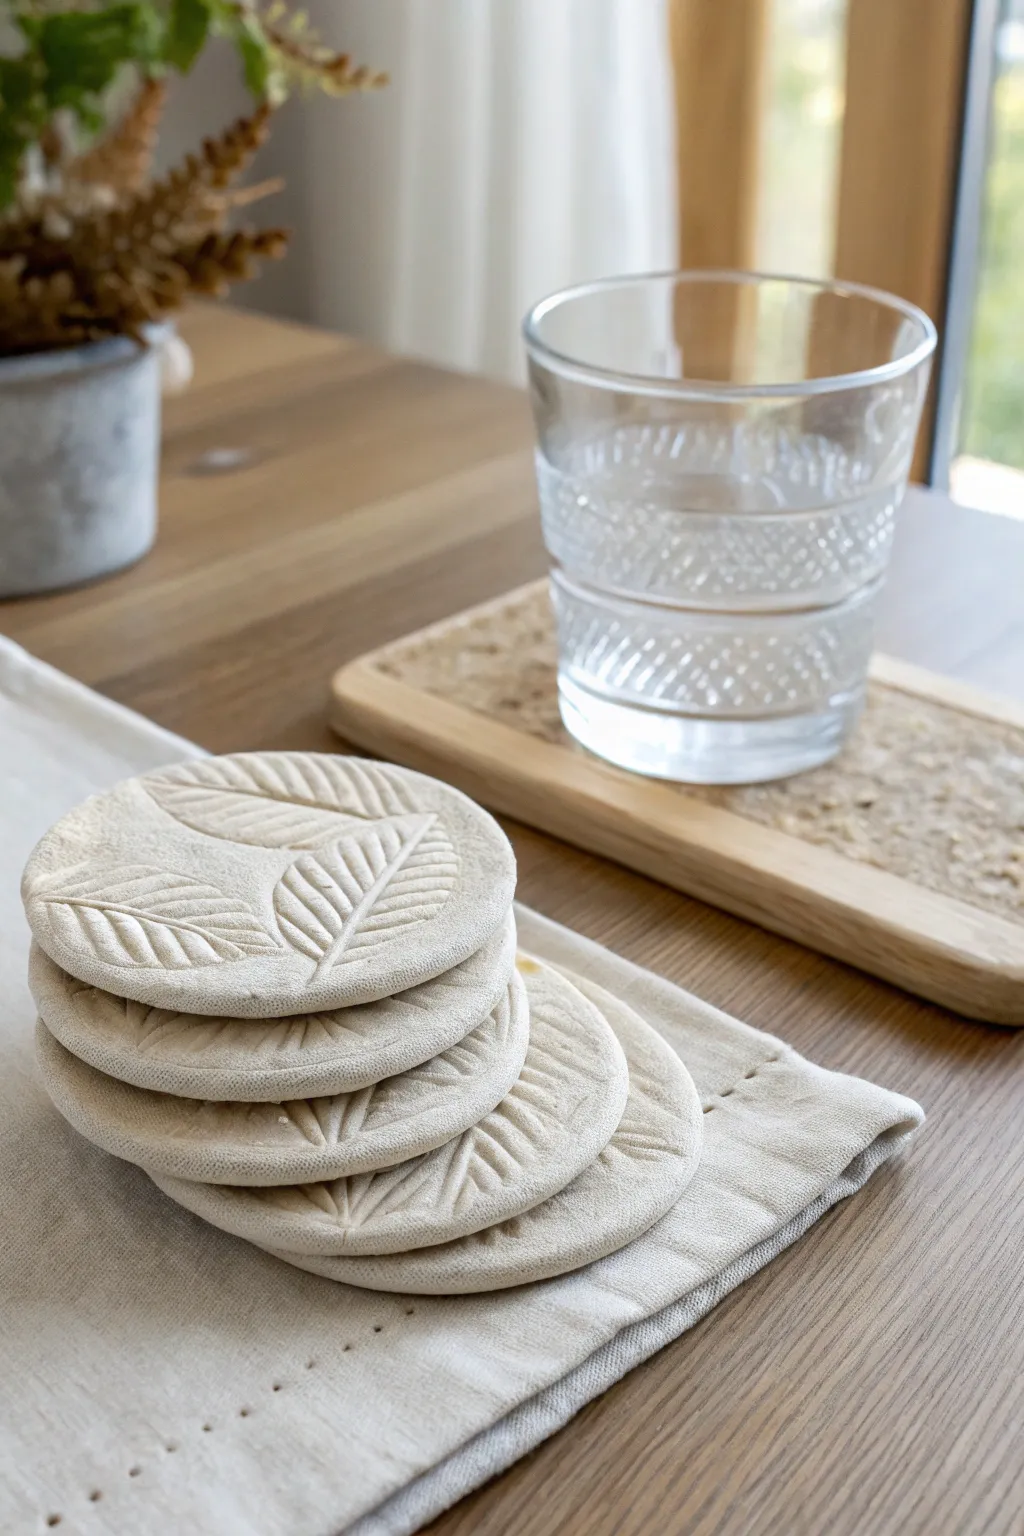
These elegant, minimalist coasters bring a touch of nature to your coffee table with their crisp leaf impressions and organic, matte finish. It is a wonderfully simple project that transforms plain clay into a functional set of home decor using just a few basic tools.
Step-by-Step Guide
Materials
- White air-dry clay or polymer clay
- Rolling pin or acrylic roller
- Real leaves (with prominent veins) or a leaf texture stamp
- Round cookie cutter (approx. 3.5-4 inches)
- Sandpaper (fine grit)
- Small bowl of water
- Matte spray varnish or sealant
- Canvas mat or parchment paper
Step 1: Preparing the Clay
-
Condition the clay:
Begin by taking a handful of your white clay and kneading it thoroughly in your hands. You want it to be warm, pliable, and free of any air bubbles before you start rolling. -
Roll out the slab:
Place the clay on a canvas mat or between two sheets of parchment paper to prevent sticking. Use your rolling pin to create an even slab that is approximately 1/4 inch thick. Try to keep the thickness consistent so your coasters sit flat. -
Smooth the surface:
Before texturing, check the surface for any little divots or fingerprints. If you are using air-dry clay, dip your finger in a tiny bit of water and gently glide it over the surface to smooth it out perfectly.
Vein Definition
Use leaves with stiff, protruding veins like hydrangea, mint, or rose leaves. Soft spinach-like leaves won’t leave a deep enough impression.
Step 2: Creating the Texture
-
Arrange your leaves:
Select your leaves or stamp. If using real leaves, place them vein-side down onto the clay slab. Arranging three overlapping leaves, as seen in the photo, creates a lovely dynamic composition. -
Press the design:
Gently roll over the leaves with your rolling pin once. Apply firm, even pressure to embed the veins deep into the clay, but be careful not to distort the slab’s overall shape too much. -
Reveal the pattern:
Carefully lift the leaves off the clay by their stems. Peel them back reveal the intricate imprinted texture left behind. If any small bits of leaf remain, use tweezers to pick them out gently.
Color Wash
Dilute acrylic paint heavily with water and brush it over the texture, then wipe the surface clean. Paint stays in the grooves for an antique look.
Step 3: Cutting and Refining
-
Cut the shape:
Position your round cookie cutter over the textured area to capture the best part of the leaf design. Press straight down firmly, then twist slightly to release the clay. -
Remove excess clay:
Lift away the excess clay from around the circle first, rather than trying to lift the circle itself, which might warp the shape. -
Smooth the edges:
Dip your finger in water again and run it along the cut edge of the coaster to round it off slightly. This removes the sharp, raw look from the cutter and gives a more finished, pottery-like appearance. -
Create a set:
Repeat the rolling, texturing, and cutting process until you have a stack of 4 or 6 coasters. Gather your scrap clay and re-roll it for the next ones.
Step 4: Drying and Finishing
-
Initial drying:
Place your coasters on a flat board to dry. To prevent curling, I like to place a light book or a flat board on top of them once they are leather-hard (partially dry) to weigh them down gently. -
Let them cure:
Allow the clay to dry completely according to the package instructions. This usually takes 24-48 hours for air-dry clay. Do not rush this step, as trapped moisture can cause cracks. -
Sand the imperfections:
Once fully dry, take your fine-grit sandpaper and gently buff the edges. You can also lightly sand the surface if there are any unwanted bumps, but avoid sanding down your beautiful leaf texture. -
Seal the piece:
Since these are coasters, protection is key. Spray them with a matte varnish or sealant. Apply two or three thin coats, letting each dry in between, to ensure they can handle a sweating glass of water. -
Apply backing (optional):
For extra furniture protection, you can glue a circle of felt or cork to the bottom of each coaster once the sealant is dry.
Now you have a stunning set of handmade coasters ready to protect your tabletops with style

TRACK YOUR CERAMIC JOURNEY
Capture glaze tests, firing details, and creative progress—all in one simple printable. Make your projects easier to repeat and improve.
Mini Photo Holders
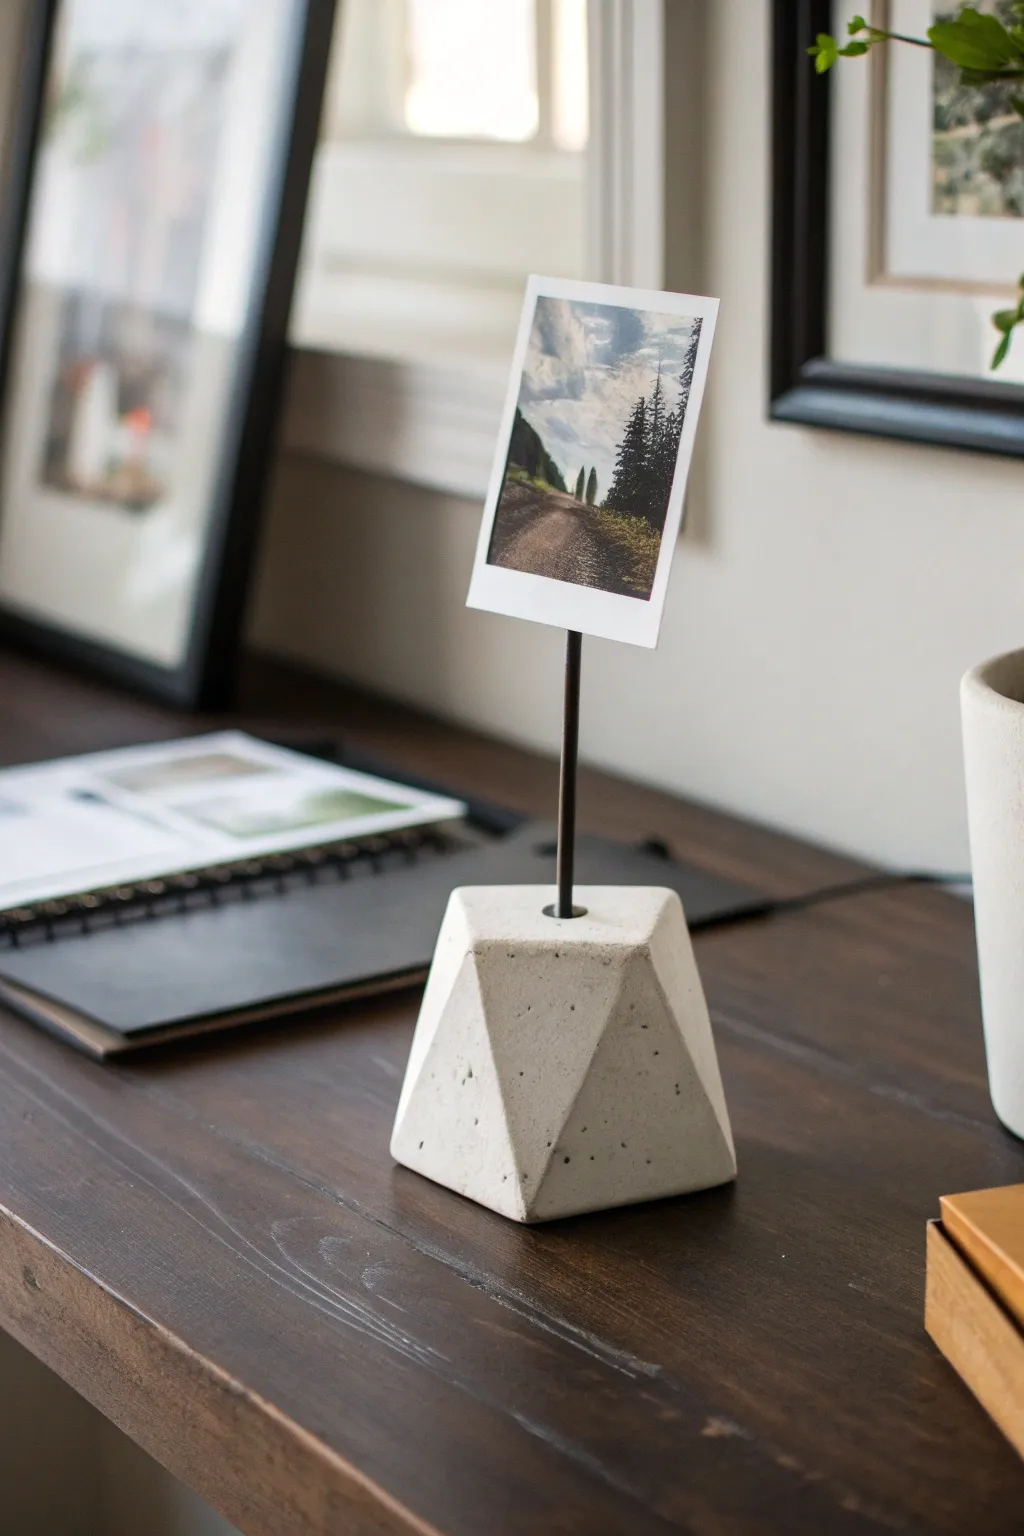
Bring a touch of modern industrial charm to your desk with this faceted geometric photo holder. Its clean lines and raw, speckled texture create the perfect understated frame for your favorite Polaroid memories.
Detailed Instructions
Materials
- White air-dry clay or polymer clay (concrete effect)
- Thick crafting wire or a metal photo clip rod
- Rolling pin
- Craft knife or clay blade
- Fine-grit sandpaper
- Black acrylic paint (optional, for speckling)
- New stiff toothbrush (for speckling)
- Small pliers
- Ruler
Step 1: Prepping the Wire
-
Cut the Rod:
Cut a piece of thick crafting wire to your desired height, typically around 4 to 6 inches tall. If you aren’t using a pre-made photo clip, make sure the wire is sturdy enough to stand straight without bending. -
Form the Clip:
Using your small pliers, create a tight double loop or a coil at the very top of the wire. This slot is where your photo will eventually sit, so ensure the loops are close enough to grip a piece of paper firmly.
Sharp Slices
Chill your clay in the fridge for 15 minutes before cutting facets. Firm clay holds sharp edges much better than warm, soft clay.
Step 2: Shaping the Base
-
Condition the Clay:
Take a handful of white clay—about the size of a tennis ball—and knead it until it’s pliable and smooth. I like to work it for a few minutes to remove any air bubbles that could crack later. -
Create a Cylinder:
Roll the clay into a thick, uniform cylinder shape, roughly 2.5 inches tall and 3 inches wide. Tap the top and bottom on your work surface to flatten them. -
Mark the Facets:
Use your clay blade to lightly score where you plan to cut. For this gem-like look, you want irregular triangles connecting around the sides, rather than perfect squares. -
Slice the Angles:
Holding your blade at an angle, slice downwards from the top edge to the middle of the cylinder to create the upper facets. Remove the excess clay as you go. -
Finish Faceting:
Repeat the slicing process starting from the bottom edge, cutting upwards to meet your previous cuts. The goal is to create a dynamic, jagged geometric band around the center. -
Smooth the Edges:
Once you are happy with the shape, dampen your fingertip slightly and run it very gently along the sharp edges to soften them just a hair. This prevents chipping later.
Wobbly Wire?
If the wire feels loose after drying, pull it out, add a drop of superglue to the hole, and reinsert it for a permanent hold.
Step 3: Assembly and Texture
-
Insert the Wire:
Carefully push the straight end of your wire rod into the exact center of the flat top face. Push it down at least halfway into the base for stability. -
Check Alignment:
Stand back and look at the holder from all sides to ensure the wire is perfectly vertical. Adjust it gently while the clay is still soft. -
Add Texture:
To mimic concrete, dilute a tiny drop of black acrylic paint with water. Dip a stiff toothbrush into the mix and flick the bristles with your thumb to spray tiny speckles over the clay. -
Drying Phase:
Let the piece dry completely according to your clay’s package instructions. For air-dry clay, turning it on its side occasionally helps the bottom dry evenly. -
Final Sanding:
Once fully cured, use fine-grit sandpaper to briefly polish the flat faces. This sharpens the geometric look and removes any fingerprints.
Place your favorite snapshot in the clip and admire your uniquely modern display piece
Tiny Bud Vases

This minimal bud vase brings a touch of calm to any windowsill with its organic speckles and calming blue band. It demonstrates how a simple shape and intentional glazing can turn a small amount of clay into a functional piece of art.
How-To Guide
Materials
- Speckled cream stoneware clay (e.g., Laguna Speckled Buff)
- Pottery wheel (or can be hand-built)
- Small sponge
- Wire cutter
- Wooden rib tool
- Pin tool
- Trimming tools
- Wax resist
- Kobalt Blue underglaze (or similar deep blue glaze)
- Clear transparent glaze
- Paintbrush (flat shader)
Step 1: Throwing the Form
-
Prepare the clay:
Wedge a small ball of speckled stoneware clay, about 1 pound, ensuring it is free of air bubbles before slamming the center onto your wheel head. -
Center the clay:
Using wet hands and firm pressure, center the clay until it spins smoothly without wobbling. -
Open the vessel:
Drill your thumbs into the center to create the opening, leaving about a quarter-inch of thickness at the bottom for the foot. -
Pull the walls:
Gently pull the clay upward to create a cylinder. Since this is a small bud vase, you are aiming for a height of about 4-5 inches initially. -
Shape the belly:
Using your inside hand to push out and your outside hand to support, gently round out the bottom half of the cylinder to create a bulbous base. -
Collar the neck:
Combine your hands around the top half of the pot and gently squeeze inward to narrow the neck. -
Refine the rim:
Use a small chamois cloth or wet fingertips to smooth and round the lip of the vase. -
Cut:
Run a wire tool under the base to separate it from the wheel head.
Collaring Cracks?
If the clay crinkles when narrowing the neck, the clay is too dry or you are squeezing too fast. Add a little water and slow down the wheel speed.
Step 2: Finishing and Glazing
-
Leather hard drying:
Allow the piece to dry to a leather-hard state where it is firm enough to handle without deforming. -
Trim the foot:
Invert the vase on the wheel and trim away excess weight from the bottom, creating a clean foot ring. -
Bisque fire:
Fire the piece in the kiln to cone 04 (or your clay’s specific bisque temperature). -
Clean the surface:
Wipe the bisque-fired vase with a damp sponge to remove any kiln dust. -
Apply the band:
Place the vase on a banding wheel. While spinning it slowly, use a flat brush loaded with blue underglaze to paint a thick, consistent band around the lower belly of the vase. Three coats usually ensures opacity. -
Wax the foot:
Apply wax resist to the very bottom of the vase to prevent glaze from sticking to the kiln shelf. -
Clear glaze:
Dip the entire vase into a clear transparent glaze. I find counting to three while submerged gives the perfect thickness. -
Clean the foot:
Wipe any glaze drips off the waxed foot with a clean sponge. -
Final firing:
Glaze fire the piece to the temperature recommended for your specific clay body (likely Cone 5 or 6).
Crisp Lines
For a razor-sharp bottom edge on your blue band, apply a strip of masking tape before painting, then peel it off immediately while the glaze is wet.
Enjoy styling your new handmade vase with a single dried bloom or a fresh wildflower from the garden
Tea Light Candle Holders
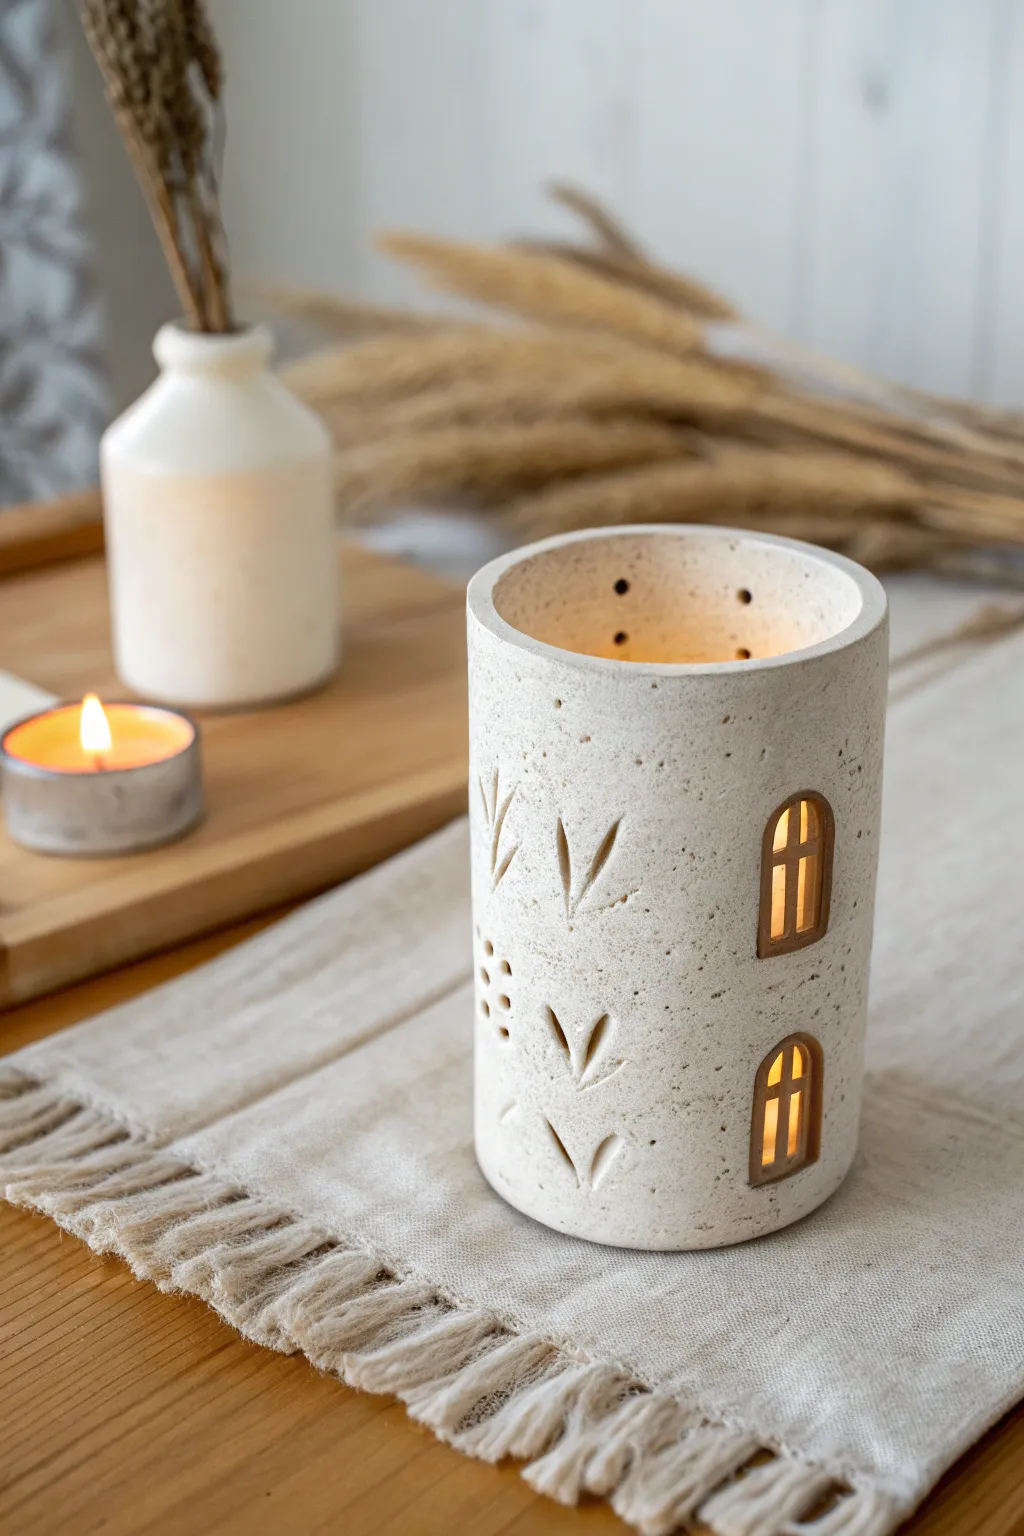
Bring a cozy, rustic charm to your home with this speckled clay luminary that mimics a tiny cottage tower. The carved windows and leaf motifs glow warmly when lit from within, creating a serene ambiance perfect for any season.
Detailed Instructions
Materials
- Speckled stoneware clay (white or light beige)
- Rolling pin
- Canvas work surface or clay mat
- Cylindrical form (like a PVC pipe or strong cardboard tube, approx. 3-4 inches diameter)
- Newspaper or paper towel
- Needle tool
- Fettling knife
- Small square or rectangular clay cutter (optional)
- Small loop tool or carving gouge
- Slip (clay mixed with water)
- Scoring tool or serrated rib
- Sponge
- Clear matte glaze or transparent satin glaze
Step 1: Preparing the Cylinder
-
Roll the Slab:
Begin by rolling out your speckled clay on a canvas surface to a uniform thickness of about 1/4 inch. Ensure the slab is long enough to wrap fully around your chosen cylindrical form with a little overlap. -
Measure and Cut:
Measure the height you want your luminary to be (around 6-7 inches works well). Use a ruler and fettling knife to cut a clean rectangle from your slab. -
Prep the Form:
Wrap your PVC pipe or tube loosely with a sheet of newspaper. This prevents the clay from sticking to the form and makes removal much easier later. -
Form the Cylinder:
Lift the clay slab and wrap it around the paper-covered form. Bring the two short ends together. -
Join the Seam:
Score both edges where they meet using your serrated tool. Apply a generous amount of slip, press the edges firmly together, and smooth the seam inside and out until it becomes invisible.
Slumping Cylinder?
If your cylinder collapses when you remove the form, wait longer! The clay must be ‘leather hard’—firm like cheddar cheese—before you attempt to carve windows.
Step 2: Carving Details
-
Let it Stiffen:
I like to let the clay sit on the form for about 30-45 minutes until it’s leather-hard. It needs to be firm enough to hold its shape when you carve, but soft enough to cut easily. -
Remove the Form:
Carefully slide the cylinder off the form. Peel away the newspaper from the inside. -
Mark the Windows:
Using a needle tool, lightly sketch the outlines of your arched windows. Place two on one side, stacked vertically with space in between. -
Cut the Openings:
Use your fettling knife to cut out the window shapes completely. Save the clay scraps to make the window mullions. -
Add Window Frames:
Roll tiny, thin coils or cut thin strips from your scraps. Score and slip them into the window openings to create the cross-shaped window panes. -
Smooth the Edges:
Use a slightly damp sponge to soften the sharp cut edges of the windows and the top rim of the cylinder.
Golden Interior
Paint the inside with a gold luster overglaze or a warm yellow underglaze before the final firing. This amplifies the candlelight glow significantly.
Step 3: Adding Texture and Ventilation
-
Carve Leaf Motifs:
Using a small loop tool or a V-gouge, carve simple three-stroke leaf patterns into the surface. Press deep enough to create texture but be careful not to puncture all the way through. -
Create Vents:
Use a small drill bit or a straw to poke a few holes near the top rim. This allows heat to escape and helps the candle burn steadily. -
Poke Decorative Holes:
Add clusters of smaller holes in the decorative areas around the leaves for extra light to shine through. -
Final Smoothing:
Give the entire piece one last wipe with a damp sponge to remove any clay crumbs or burrs created during carving.
Step 4: Firing and Glazing
-
Bisque Fire:
Allow the piece to dry slowly and completely under a loose sheet of plastic for several days. Once bone dry, bisque fire it to cone 04. -
Glaze Application:
Dip or brush the piece with a clear matte or transparent satin glaze. This protects the clay while letting the natural speckles show through. -
Wipe the Bottom:
Ensure the bottom of the cylinder is wiped clean of any glaze to prevent it from sticking to the kiln shelf. -
Final Fire:
Glaze fire the piece according to your clay body’s instructions, typically around cone 5 or 6 for stoneware.
Place a tea light inside and enjoy the soft patterns of light dancing on your walls
Little Incense Holders
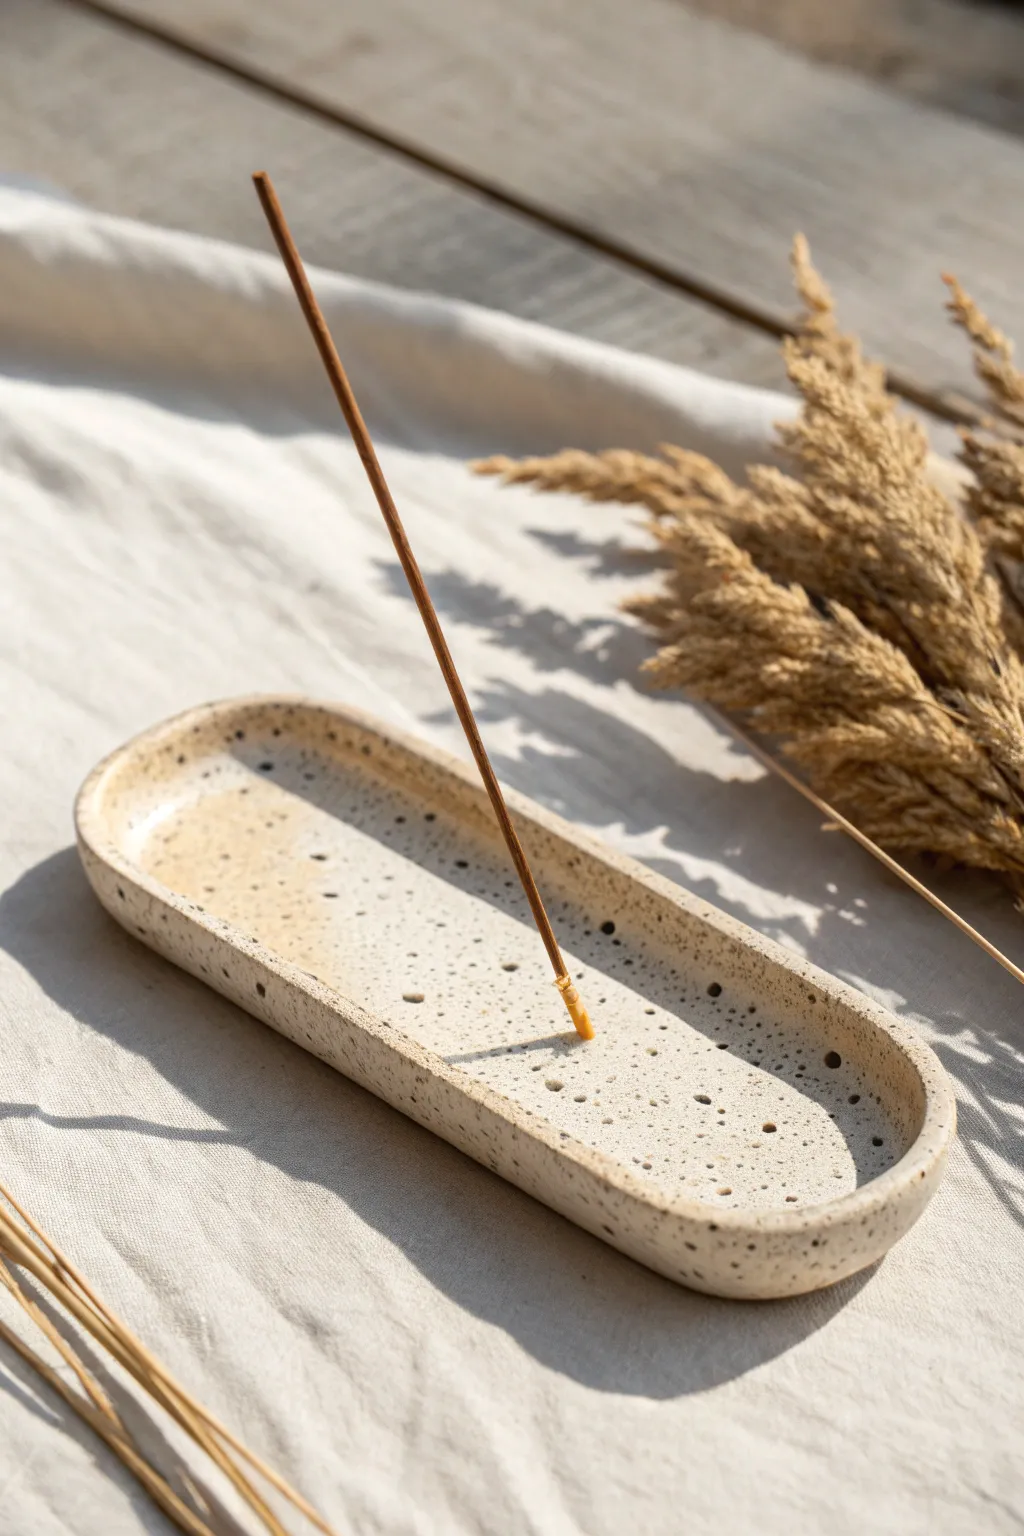
This elegant little incense holder features a minimalist boat shape and charming textural speckles that add organic warmth to any space. It’s a perfect beginner project that combines simple slab and coil building techniques with a lovely raw clay finish.
Step-by-Step
Materials
- Speckled stoneware clay (approx. 200-300g)
- Rolling pin
- Canvas mat or wooden board (to prevent sticking)
- Needle tool or fettling knife
- Oval paper template (approx. 6 inches long)
- Serrated rib tool or fork (for scoring)
- Slip (clay mixed with water)
- Small wooden modeling tool or sponge
- Wooden dowel or incense stick (for poking the hole)
- Clear matte glaze (optional)
- Kiln (if using stoneware) or finishing varnish (if using air-dry clay)
Step 1: Preparation & Base
-
Roll the slab:
Begin by wedging your speckled clay to remove air bubbles. Roll it out on your canvas mat to an even thickness of about 1/4 inch. -
Cut the base:
Place your oval paper template onto the slab. Using your needle tool or fettling knife, carefully cut around the template to create the floor of your holder. -
Prepare the rim coil:
Take the remaining clay scraps and roll out a long, even coil. Aim for a thickness slightly thinner than a pencil, as this will form the raised wall.
Step 2: Assembly & Shaping
-
Score the edges:
Using your serrated rib or a fork, scratch up the top outer edge of your oval base where the coil will sit. Do the same to one side of your long coil. -
Apply slip:
Dab a generous amount of slip onto the scored edges of the base. This acts as the glue for your clay components. -
Attach the coil:
Gently press the coil onto the base, matching the scored areas. Work your way around the oval, cutting off any excess coil and joining the ends together seamlessly. -
Blend the outside:
Using a wooden tool or your thumb, blend the coil downward onto the base on the outside edge. The seam should disappear completely. -
Refine the inside:
Repeat the blending process on the inside seam. I find using the rounded back of a wooden spoon helps create a smooth, curved transition here. -
Shape the rim:
Use a damp sponge to smooth the top rim of the coil. Pinch it gently to ensure the wall height is consistent all the way around.
Clean Hole Trick
Let the clay stiffen for 30 minutes before poking the incense hole. If the clay is too soft, the hole will deform as you pull the stick out.
Step 3: Details & Finishing
-
Create the holder hole:
Identify the spot where you want the incense to stand. Take your wooden dowel or a thick incense stick and press it into the clay floor at a slight angle. -
Check fit and angle:
Wiggle the tool slightly to ensure the hole is wide enough to accommodate different stick thicknesses, but not so loose that they flop over. -
Clean up surfaces:
Once the clay is leather hard, use a slightly damp sponge to wipe away any rough texture marks or fingerprints, revealing the natural speckles. -
Dry slowly:
Cover the piece loosely with plastic for a day, then let it air dry completely. Uneven drying can cause the flat base to warp. -
Bisque fire:
Fire the piece in the kiln to bisque temperature according to your clay’s specifications. -
Glaze application:
Dip the piece in a clear matte glaze to seal it while keeping the speckles visible, or leave the outside unglazed for a raw, tactile texture. -
Final firing:
Perform the final glaze firing to complete your incense boat.
Ash Catcher
To ensure functionality, stick a real incense stick in the wet clay to test the angle. Make sure the stick points perfectly down the center of the tray.
Place your finished holder on a bedside table to enjoy a moment of calm
Toothbrush Stand Minis
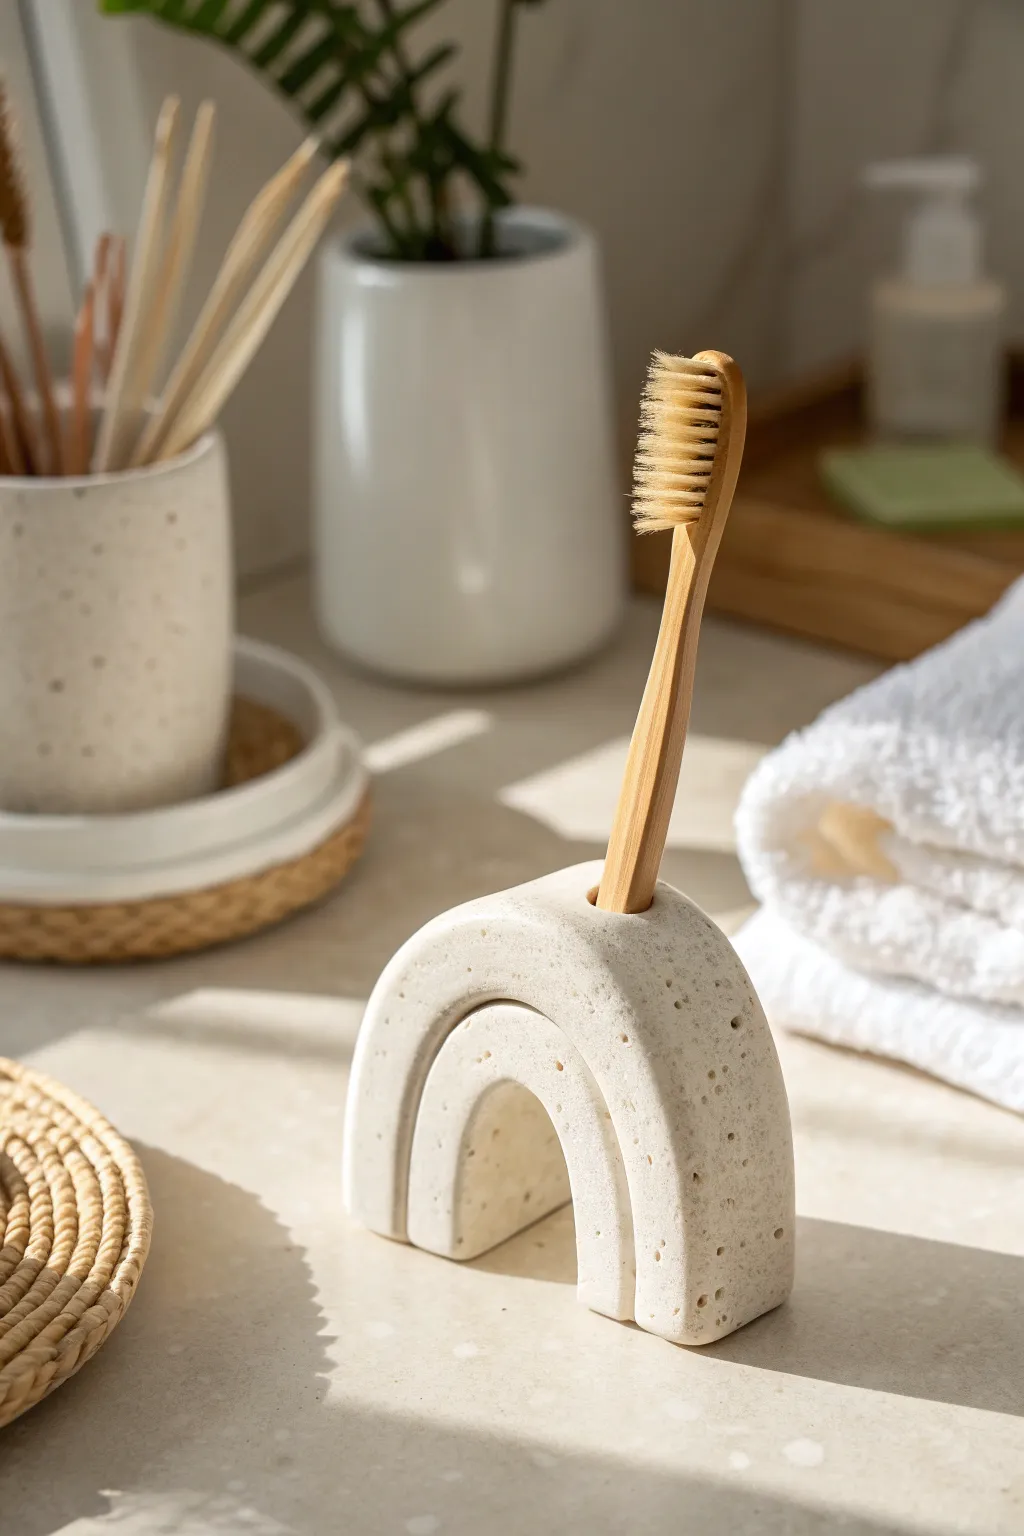
This minimalist, arch-shaped toothbrush stand combines functional design with an organic, speckled stone finish. It’s perfect for adding a touch of modern bohemian style to your bathroom while keeping your essentials organized.
Detailed Instructions
Materials
- White polymer clay (approx. 2oz)
- Speckled clay usually sold as ‘Granite’ or ‘Stone’, or coarse black pepper/sand
- Rolling pin or acrylic roller
- Clay blade or craft knife
- Toothbrush (for sizing the hole)
- Mod Podge or clay glaze (matte finish)
- Small round cutter or straw (slightly larger than toothbrush handle)
- Sandpaper (fine grit)
- Parchment paper
Step 1: Preparing the Clay
-
Condition the base:
Begin by warming up your white polymer clay in your hands. Knead it thoroughly until it is soft, pliable, and free of any cracks. -
Create the speckled effect:
If you aren’t using pre-mixed granite clay, flatten your white clay and sprinkle a pinch of coarse black pepper or fine decorative sand onto it. -
Mix thoroughly:
Fold the clay over the speckles and knead repeatedly. Continue until the specks are evenly distributed throughout the entire ball of clay.
Clean Cuts
Chill the clay in the fridge for 10 minutes before trimming the bottom. Firm clay slices much cleaner than warm clay and won’t distort the arch shape.
Step 2: Forming the Arches
-
Roll primary coil:
Roll a portion of the clay into a thick snake or log. Aim for a diameter of about 1 inch to ensure the stand is heavy enough to remain stable. -
Shape the main arch:
Bend the thick log into a tight ‘U’ shape to form the outer arch. Stand it up on your parchment paper to check stability; the bottom edges should be perfectly flat against the work surface. -
Flatten the faces:
Gently press the front and back of the arch with a flat object (like an acrylic block) to create flat vertical faces rather than a rounded tube shape. -
Roll the inner coil:
Take a smaller amount of clay and roll it into a thinner log, approximately 1/2 inch in diameter. -
Insert the inner arch:
Bend this smaller log into a ‘U’ shape and nest it snugly inside the larger arch. I find gently scratching the contact points between the two arches helps them bond better during baking. -
Trim the base:
Use your clay blade to slice across the bottom of both arches simultaneously. This ensures the entire piece sits perfectly flush and won’t wobble on your counter.
Color Pop
Mix a tiny amount of ochre or tan paint into your white clay before kneading to give the ‘stone’ a warmer, sandy undertone instead of stark white.
Step 3: Details & Baking
-
Create the holder mechanism:
Identify the center point of the top, larger arch where the toothbrush will site. -
Make the hole:
Use a round cutter, a straw, or the back of a paintbrush to bore a vertical hole straight down into the top arch. It should be deep enough to hold the brush steady but stop before hitting the inner arch. -
Test the fit:
Insert your actual toothbrush handle gently to ensure the hole is wide enough. Wiggle it slightly to create a tiny bit of clearance, as clay can shrink slightly. -
Add surface texture:
To mimic the stone look in the photo, lightly tap the surface of the clay with a toothbrush or crumpled foil. This removes fingerprints and adds a matte, porous appearance. -
Bake the piece:
Place your project on a baking sheet lined with parchment paper. Bake according to your specific clay package instructions (usually 275°F for 15-30 minutes per 1/4 inch of thickness). -
Cool down:
Turn the oven off and let the clay cool completely inside. This gradual cooling helps prevent cracking.
Step 4: Finishing Touches
-
Sand imperfections:
Once fully cool, use fine-grit sandpaper under running water to smooth out any sharp edges on the bottom or around the rim of the hole. -
Seal:
Apply a thin coat of matte glaze or Mod Podge to protect the clay from water splashes and humidity.
Now you have a stylish, custom-made accessory to brighten up your morning routine
Pocket-Size Trinket Boxes
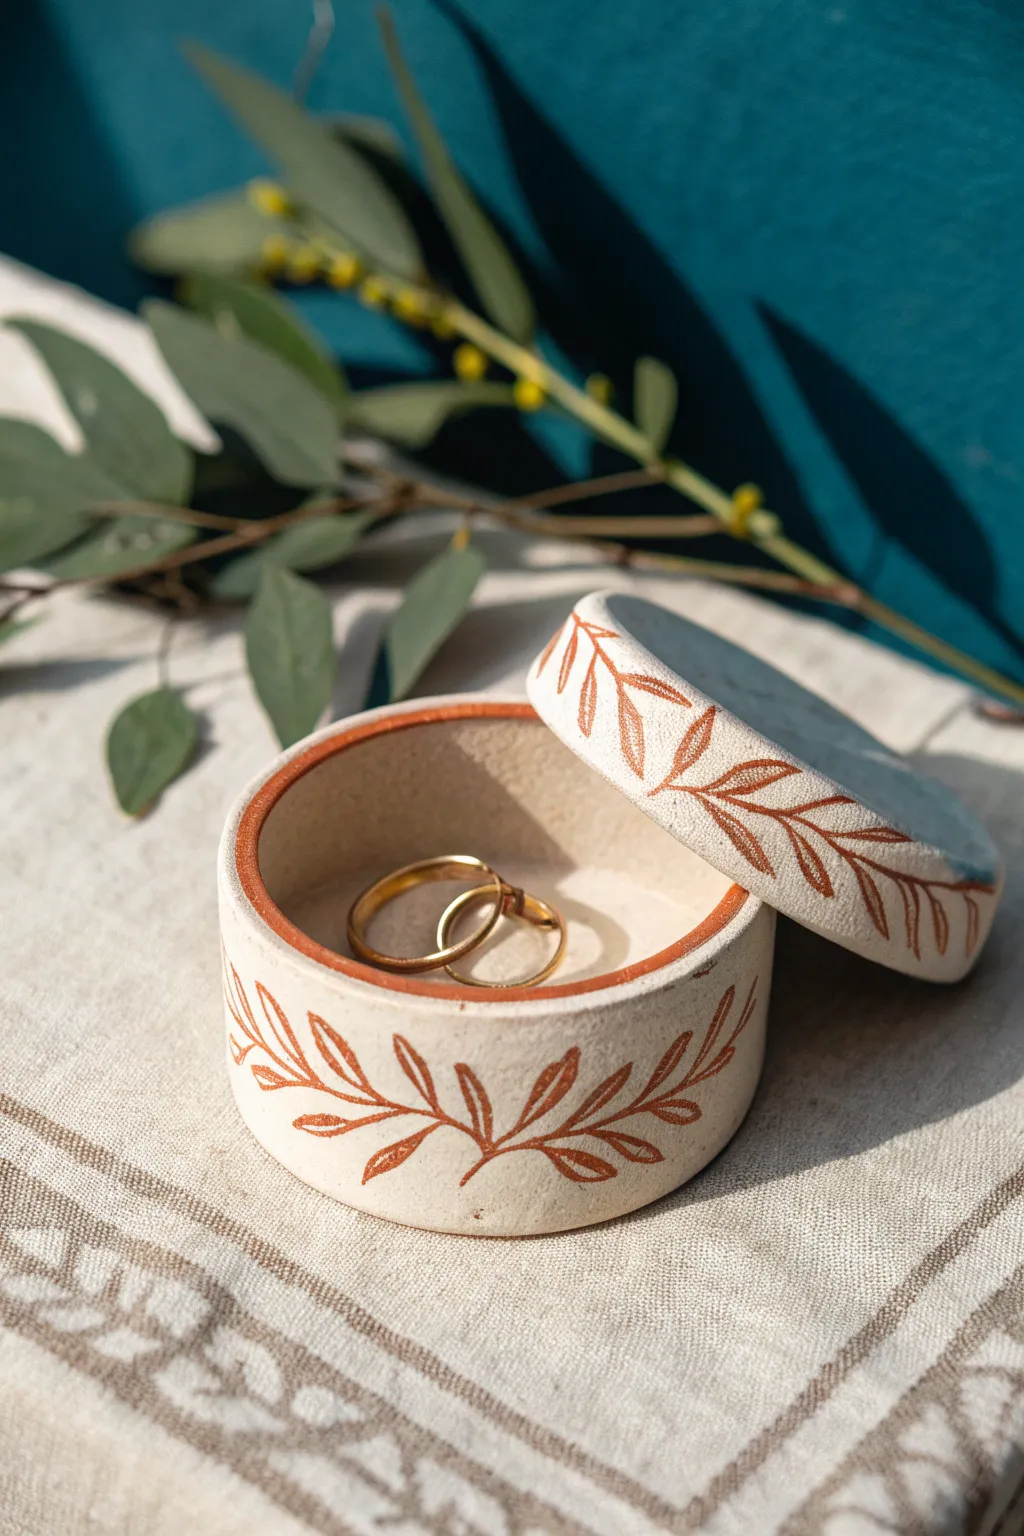
This charming, circular box features a lovely rustic aesthetic with its natural beige clay body and hand-painted winding vine motif. Perfect for holding wedding rings or small keepsakes, the earthy reddish-brown details create a warm, organic feel that is simple yet elegant.
Step-by-Step Guide
Materials
- White or beige air-dry clay (or polymer clay if preferred)
- Clay roller or rolling pin
- Circle cookie cutters (two sizes: one for the base/lid, one slightly smaller for the inner rim)
- Clay knife or craft blade
- Small sponge or sandpaper (fine grit)
- Small cup of water (for smoothing)
- Terracotta or reddish-brown acrylic paint
- Fine liner paintbrush (size 0 or 00)
- Matte varnish or sealant
Step 1: Forming the Base and Lid
-
Roll the clay:
Begin by conditioning your clay until it is soft and pliable. Roll it out on a smooth surface to an even thickness of about 1/4 inch (6mm). Using depth guides can help ensure the slab is perfectly level. -
Cut the circles:
Use your larger circle cutter to punch out two identical discs. One will be the floor of the box, and the other will serve as the top of the lid. Set the lid disc aside for now. -
Create the walls:
Roll out a long, rectangular strip of clay, keeping the same 1/4 inch thickness. The width of this strip determines the height of your box; about 1.5 inches is good for a ring box. Cut it cleanly with your craft knife. -
Attach the wall:
Score (scratch) the outer edge of the base disc and the bottom edge of your clay strip. Apply a tiny bit of water or slip to the scratched areas, then wrap the strip around the base disc, sitting it on top of the circle’s edge. -
Seamless join:
Where the two ends of the wall strip meet, cut through both layers at an angle for a clean join. Score, wet, and press the ends together gently. Smooth the seam inside and out with your finger or a damp tool. -
Add the lid rim:
To make the lid fit securely, roll a thinner strip of clay. Attach this strip to the underside of your lid disc, placing it slightly inset from the edge so it will nestle inside the box base.
Smooth Seams
If using air-dry clay, dipping your finger in a little vinegar instead of plain water helps break down the surface clay just enough to create an invisible, super-strong bond at the seams.
Step 2: Refining and Drying
-
Smooth the surfaces:
Dip a small sponge in water and gently wipe over the entire piece to remove fingerprints and harsh edges. Pay special attention to the top rim of the box base to ensure it’s flat. -
Let it dry:
Allow both pieces to dry completely. For air-dry clay, this usually takes 24-48 hours. I like to flip the pieces over halfway through so the bottoms dry evenly. -
Sand for perfection:
Once bone dry, use fine-grit sandpaper to buff away any remaining bumps or uneven textures. Wipe away the dust with a slightly damp cloth or dry brush.
Step 3: Painting the Design
-
Mix the paint:
Prepare your terracotta-colored acrylic paint. If the paint is too thick, thin it very slightly with water to help it flow smoothly from a thin brush. -
Paint the rims:
Carefully paint the top rim of the box base. Then, paint the outer vertical edge of the lid. This solid line frames the piece beautifully. -
Start the vine stem:
Using your fine liner brush, paint a continuous, wavy line around the circumference of the box wall. Repeat this process on the top surface of the lid. -
Add the leaves:
Paint small, simple leaf shapes stemming off the main vine line. Alternate the direction of the leaves—left, right, left—to mimic natural growth. Keep the strokes delicate. -
Fill the leaves:
Go back and gently fill in the leaf outlines. Leave a tiny bit of unpainted space in the center of some leaves if you want a lighter, more sketched look. -
Seal the project:
Once the paint is fully dry, apply a coat of matte varnish. This protects the clay from moisture and prevents the paint from chipping over time.
Add Texture
Before the clay dries, gently press a piece of rough linen or canvas onto the surface. This imparts a subtle fabric texture that makes the piece look like antique stone or canvas.
Place your favorite jewelry inside and enjoy this little piece of functional art on your dresser
Mini Whistles or Bells
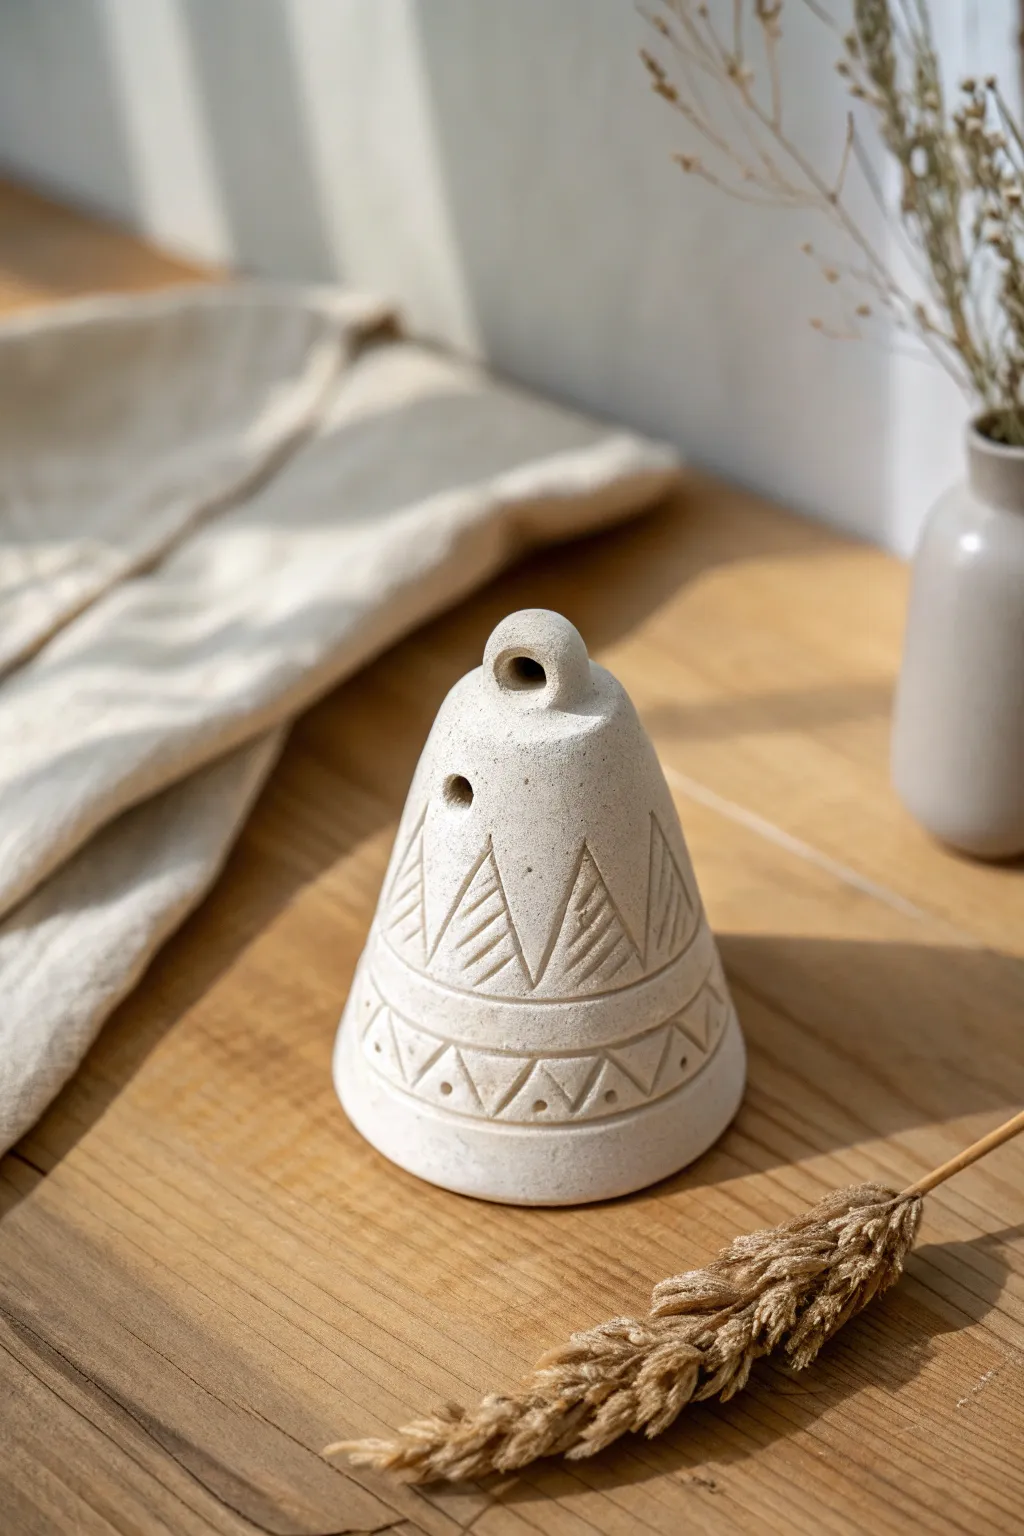
This rustic, conical clay bell features charming hand-carved geometric patterns and a natural stone-like finish. Its simple silhouette and tactile texture make it a perfect addition to a wind chime assembly or a minimalist shelf display.
How-To Guide
Materials
- White air-dry clay, polymer clay, or low-fire ceramic clay
- Rolling pin
- Small circle cutter
- Needle tool or toothpick
- Loop tool small knife
- Sponge and water
- Slip (if using ceramic clay) or water/vinegar mix (if using air-dry)
- Fine grit sandpaper
Step 1: Forming the Bell Shape
-
Prepare the clay:
Start by conditioning a ball of clay about the size of a golf ball until it is smooth and pliable. If you are using air-dry clay, keep your hands slightly moist to prevent premature cracking. -
Create the base cone:
Pinch the ball into a solid cone shape, flattening the bottom against your work surface so it stands upright securely. -
Hollow the form:
Pick up the cone and gently push your thumb into the center of the base. Rotate the clay while pinching the walls between your thumb and fingers to hollow it out, aiming for a consistent wall thickness of about 1/4 inch. -
Refine the surface:
Place the hollowed cone back on the table. Gently pat the sides to smooth out lumps and ensure the cone shape is symmetrical with a slightly rounded top. -
Add the handle loop:
Roll a small coil of clay. Form it into a ‘U’ shape and attach it to the very top of the cone. Score and slip the connection points to ensure a strong bond, blending the seams with a modeling tool until invisible. -
Create the sound hole:
Using a small circular cutter or the back of a paintbrush, punch a small hole near the top of the cone, just below the handle loop. Smooth the edges of this hole with a damp finger.
Step 2: Carving the Design
-
Mark horizontal guides:
Use your needle tool to lightly etch two horizontal bands around the lower third of the bell. These will serve as boundaries for your geometric pattern. -
Carve the main triangles:
Above the top band, carve a series of tall, upward-pointing triangles all around the circumference. Press deep enough to create texture but be careful not to puncture the wall. -
Add texture to triangles:
Inside each large triangle, etch parallel diagonal lines (hatching). This adds that lovely visual contrast seen in the reference image. -
Decorate the lower band:
Between the two horizontal bands you carved earlier, etch a continuous zigzag line to create a row of smaller triangles. -
Add final details:
Use the tip of your needle tool to press small dots into the center of each downward-pointing triangle within the lower band. -
Smooth the imperfections:
Take a slightly damp sponge and very gently wipe the surface. This softens the sharp burrs created by the carving tools without erasing the design.
Cracks Appearing?
If small fissures appear while drying, mix a tiny bit of clay with water to make a paste. Fill the cracks, smooth over, and let it dry again slowly.
Step 3: Finishing Touches
-
Dry properly:
Allow the piece to dry slowly away from direct heat or drafts. If using ceramic clay, loosely cover it with plastic for the first day. -
Sand for texture:
Once bone dry, take fine-grit sandpaper and gently sand the exterior. This enhances the stone-like matte finish and removes any remaining fingerprints. -
Final wipe down:
Use a dry, soft brush to dust off any clay powder from the etched grooves to make the pattern pop.
Make it Ring
To make a functional bell, form a small clay bead attached to a string. Tie this inside the bell through the top loop after firing or hardening.
Now your beautiful, etched bell is ready to be hung up or gifted.