There’s something instantly grounding about red clay—it already looks like finished art before you add a single glaze or drop of paint. If you’ve got a chunk of that warm terracotta color on your table, here are my favorite ideas to turn it into pieces you’ll actually use (and love showing off).
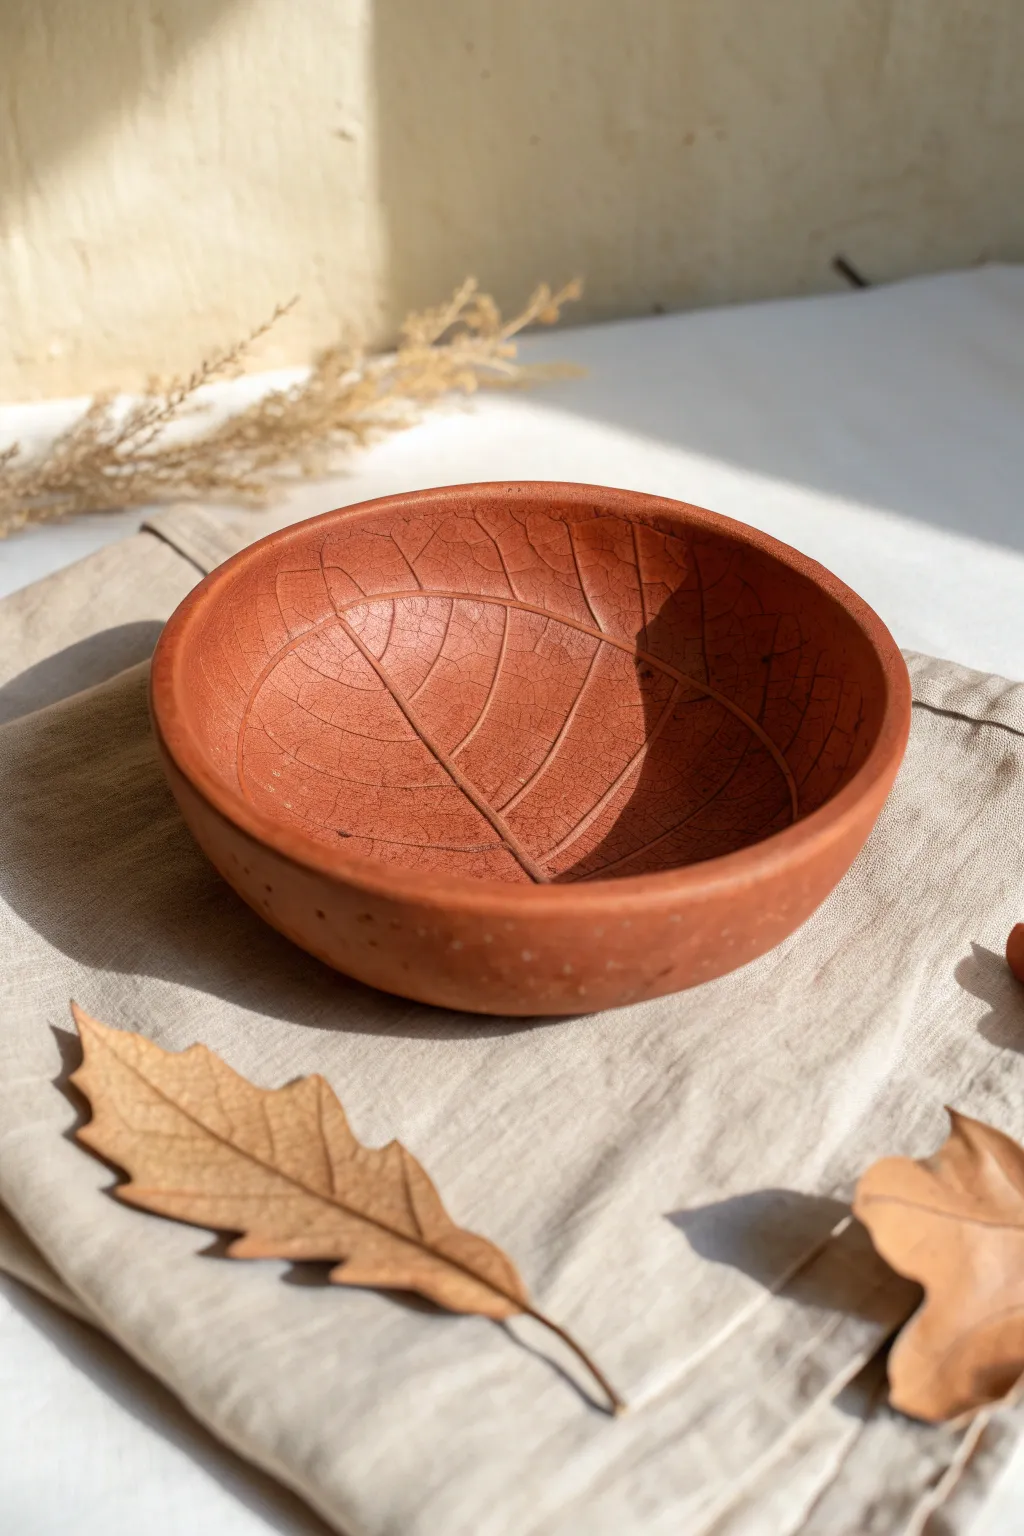
Classic Red Clay Pinch Pot Bowl
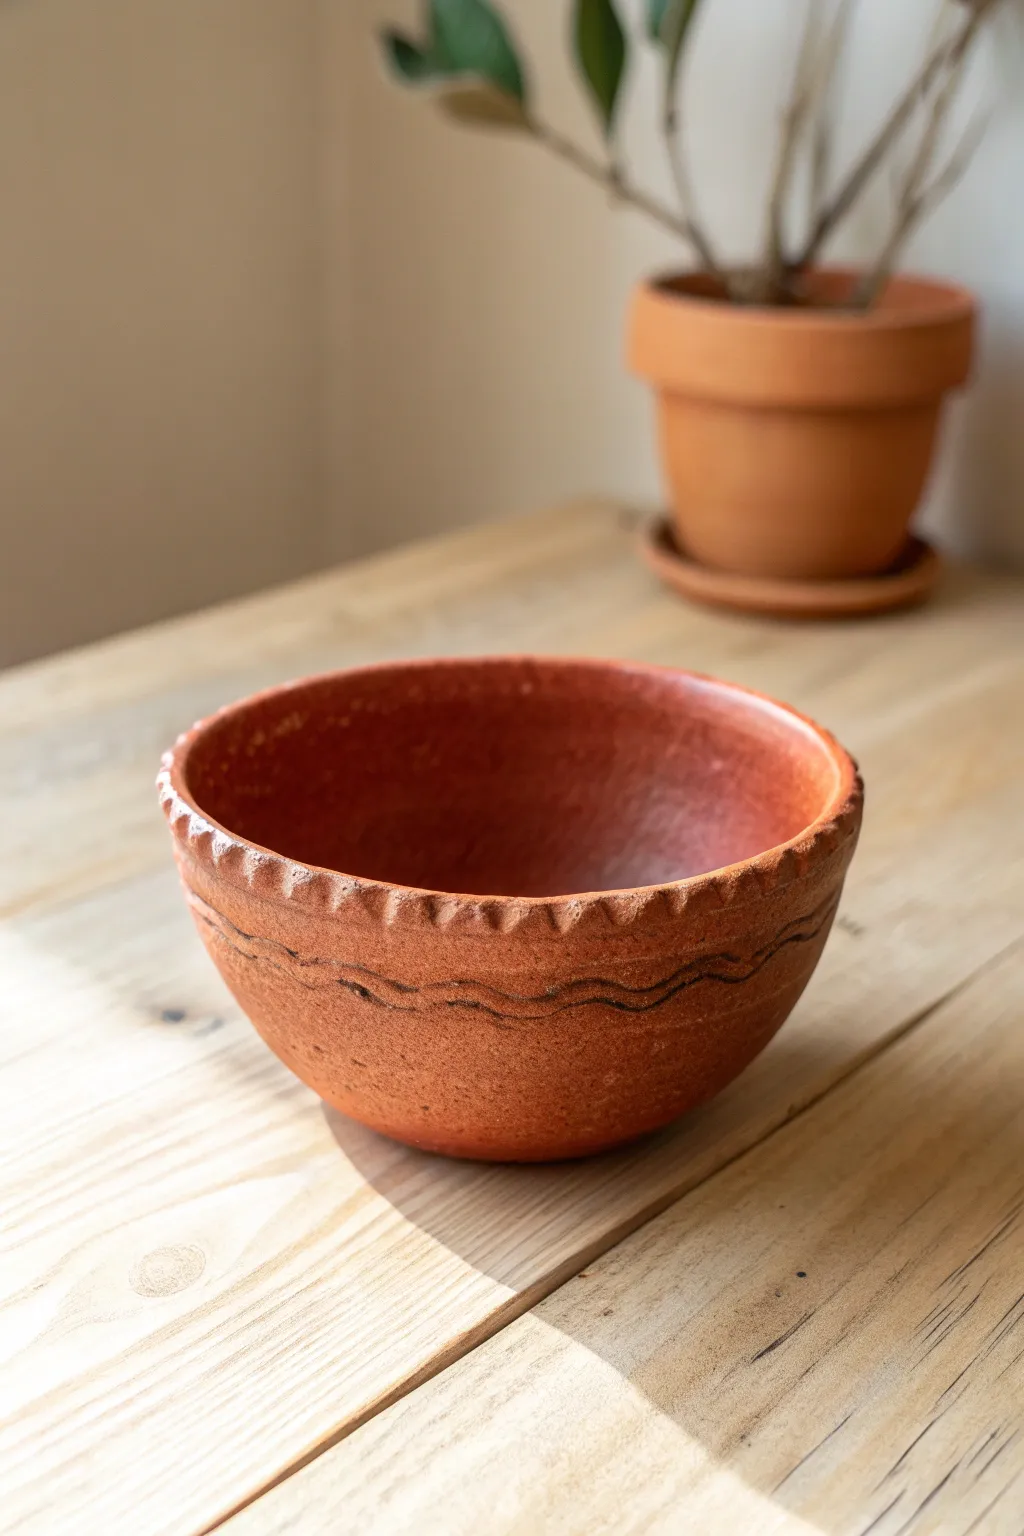
Capture the timeless warmth of terra cotta with this simple yet charming pinch pot. This rustic bowl features a distinctive crimped rim and gentle wavy carvings, perfect for holding trinkets or simply displaying organic texture.
Detailed Instructions
Materials
- Red earthenware or terra cotta clay (low fire)
- Small bowl of water
- Sponge
- Wooden modeling tool or popsicle stick
- Carving tool or needle tool
- Plastic bag (for slow drying)
- Kiln access (or oven if using polymer/air-dry alternatives, though true ceramic is depicted)
Step 1: Forming the Base
-
Prepare the Clay:
Start with a ball of red clay about the size of a large orange or grapefruit. Wedge it thoroughly on a canvas board or table to remove air bubbles, slapping it down a few times to ensure consistency. -
Open the Sphere:
Hold the clay ball in your non-dominant hand. Gently press your thumb into the center, pushing down until you are about half an inch from the bottom. -
Pinch the Walls:
Begin pinching the clay between your thumb (inside) and fingers (outside). Rotate the ball slightly with each pinch, working your way from the bottom up to the rim. -
Even Out Thickness:
Continue rotating and pinching until the walls represent a consistent thickness of roughly 1/4 to 1/2 inch. Aim for a wide, open bowl shape rather than a tall cup. -
Smooth the Surface:
Use a slightly damp sponge to wipe away fingerprints and smooth the interior and exterior surfaces. Don’t use too much water, or the clay will become weak and floppy. -
Flatten the Bottom:
Tap the bottom of the bowl gently against your work surface to create a small, flat foot so the bowl stands stable without wobbling.
Cracks on the Rim?
If the rim starts cracking while shaping, your clay might be too dry. Dip your fingers in water (sparingly) and compress the rim downwards to heal the splits.
Step 2: Adding Texture and Detail
-
Create the Crimped Rim:
Support the wall of the bowl from the outside with one hand. With your other hand, use your thumb or the side of a wooden tool to press gentle indentations into the top rim. -
Refine the Indentations:
Space these indentations evenly around the circumference. You can use your finger to smooth the edges of each divot so they look soft and worn rather than sharp. -
Mark the Wavy Line:
About an inch or two below the rim, use a needle tool to lightly sketch a horizontal wavy line along the exterior. This acts as your guide for the deeper carving. -
Carve the Decoration:
Using a carving tool or the edge of a popsicle stick, retrace your guide line, pressing deeper to create a distinct groove. I find that dragging the tool slowly creates a cleaner line than rushing. -
Clean Up Burrs:
Let the clay sit for about 30 minutes until it stiffens slightly to a ‘leather hard’ state. Then, rub away any little crumbs (burrs) created by the carving tool using a dry finger or soft brush. -
Final Surface Check:
Do one last pass over the entire piece with a barely damp sponge to ensure the red clay glows and the texture feels pleasant to the touch.
Make it Functional
To make this food-safe, apply a clear, glossy glaze to the interior after the first firing, leaving the outside raw for textural contrast.
Step 3: Drying and Firing
-
Slow Drying:
Place the bowl upside down on a clean board. Loosely drape a plastic bag over it for the first 24 hours to ensure even drying, which prevents cracks. -
Air Dry:
Remove the plastic and let the bowl dry completely in the open air for several days until it is bone dry and feels room temperature to the touch. -
Bisque Fire:
Fire the piece in a kiln to cone 04 (or according to your specific clay body instructions). This project looks beautiful left unglazed to highlight the raw clay texture.
Once fired, the distinct red hue creates a beautiful, earthy centerpiece for your table


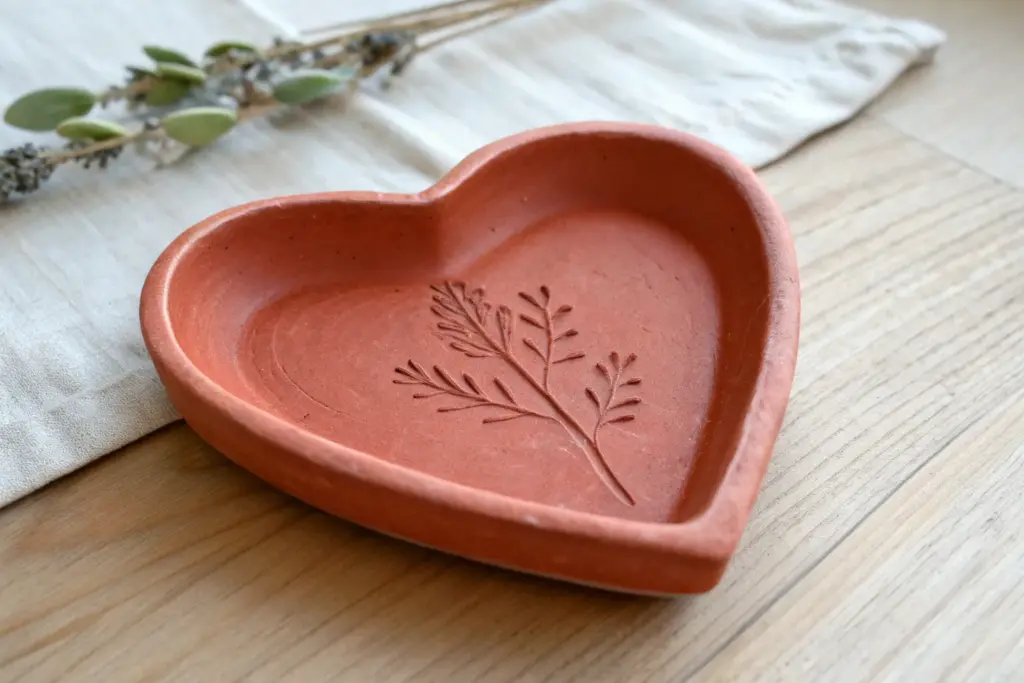
Heart-Shaped Trinket Dish
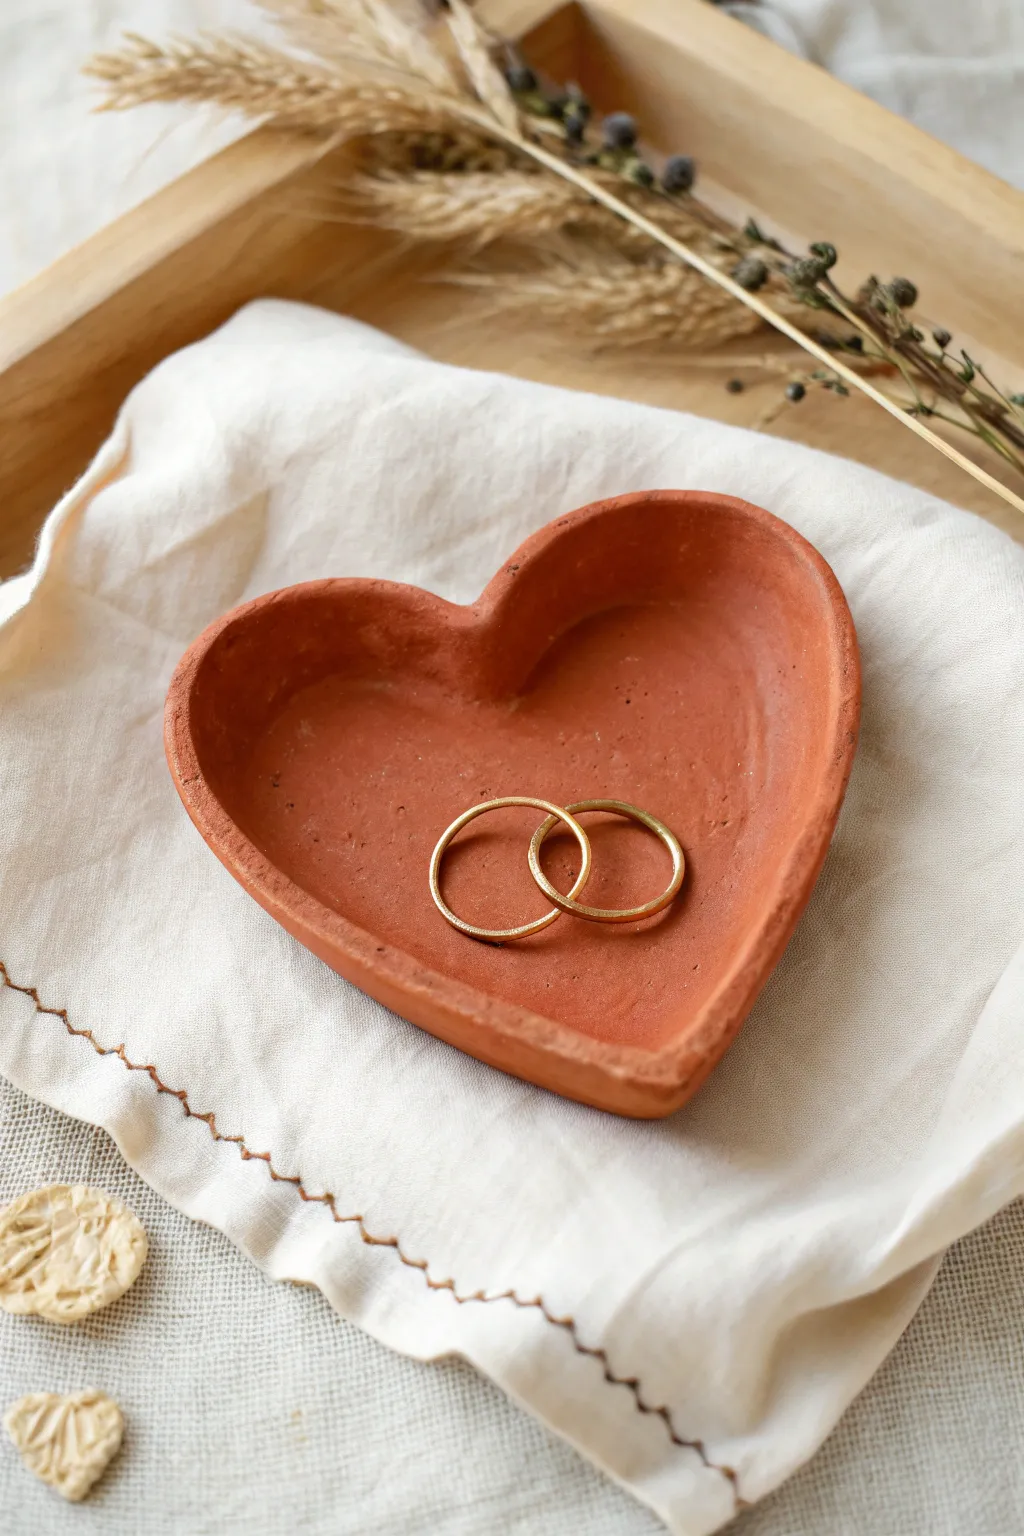
This charming heart-shaped trinket dish showcases the raw, natural beauty of red earth clay with a beautifully imperfect, handmade finish. It’s the perfect size for holding rings or small keepsakes and adds a warm, organic touch to any dresser or vanity.
Step-by-Step
Materials
- Red air-dry clay or terracotta clay
- Rolling pin
- Parchment paper or canvas mat
- Paper template of a heart
- Craft knife or clay needle tool
- Small bowl or sponge
- Water
- Fine-grit sandpaper (optional)
- Matte sealant (optional)
Step 1: Shaping the Clay
-
Prepare your workspace:
Lay down a piece of parchment paper or a canvas mat to prevent the clay from sticking to your table. Take a ball of red clay about the size of a tennis ball and knead it briefly to warm it up and remove air bubbles. -
Roll out the slab:
Use your rolling pin to flatten the clay ball into an even slab. Aim for a thickness of about 1/4 inch (approx. 6mm). If you want a uniform thickness, place two wooden rulers on either side of the clay as guides for the rolling pin. -
Cut the heart shape:
Place your paper heart template gently onto the clay slab. Using a craft knife or needle tool, trace around the template to cut out your heart shape. Peel away the excess clay and set it aside for future projects. -
Smooth the edges:
Dip your finger in a little bit of water and run it along the cut edges of the heart to smooth out any sharpness or jagged bits left by the knife.
Rim Texture
For a more rustic edge, don’t smooth the rim perfectly. Let the natural slight cracks from bending the clay remain visible for character.
Step 2: Forming the Dish
-
Lift the edges:
Gently lift the clay heart into your palm. Using your thumbs, slowly press into the center while pulling up the edges to create a shallow rim. You want to create a gentle curve rather than a sharp wall. -
Pinch and refine:
Work your way around the heart, lightly pinching the rim to define the shape. Pay special attention to the top ‘V’ of the heart to ensure it doesn’t crack or split as you bend the clay upward. -
Settle the bottom:
Place the dish back onto your parchment paper. Press strictly in the center very lightly to ensure the bottom flattens enough so the dish will sit stable without rocking. -
Smooth the interior:
Use a barely damp sponge or your wet finger to smooth the interior surface. I like to spend a little extra time here to erase my fingerprints, giving it that professional yet handmade look. -
Check symmetry:
Look at the dish from above and adjust the curves if needed. The beauty of this piece is its organic feel, so don’t worry if it isn’t mathematically perfect.
Cracking Issues?
If small cracks appear while shaping the rim, dab a tiny amount of water (or vinegar for real clay) on the crack and smooth it over with your finger.
Step 3: Finishing and Drying
-
Initial dry:
Leave the dish to dry in a cool, dry place away from direct sunlight. Direct heat can cause uneven drying and warping. -
Flip for airflow:
After about 24 hours, or when the top feels leather-hard, gently flip the dish over so the bottom gets airflow. This helps prevent the center from staying damp. -
Sand imperfections:
Once the dish is completely bone dry (this might take 2-3 days depending on humidity), you can take fine-grit sandpaper to gently smooth any rough spots on the rim. -
Clean dust:
Wipe away any clay dust with a dry cloth or soft brush. -
Optional sealing:
If you plan to use this near water or want to deepen the earthy red color, apply a coat of matte varnish or sealant. Allow it to dry completely according to the manufacturer’s instructions.
Enjoy styling your new handmade dish with fine gold jewelry to contrast against the matte clay texture


Leaf-Imprinted Catchall Bowl
Bring the effortless beauty of autumn inside with this warm terracotta catchall bowl featuring a delicate leaf skeleton imprint. The deep red clay offers a stunning, earthy backdrop for the intricate network of veins, creating a functional piece that feels like a fossilized treasure.
How-To Guide
Materials
- Red earthenware clay (terracotta)
- Rolling pin
- Large, fresh leaf with prominent veins (like hydrangea or large oak)
- Small bowl (to use as a slump mold)
- Plastic wrap or cheesecloth
- Pointed needle tool or potter’s knife
- Smoothing rib or damp sponge
- Fine-grit sandpaper
- Clear matte acrylic sealer or matte spray varnish
Step 1: Preparation & Rolling
-
Prepare your workspace:
Lay down a piece of canvas or a heavy cloth on your table to prevent the clay from sticking while you work. -
Wedge the clay:
Take a grapefruit-sized ball of red terracotta clay and knead it thoroughly to remove air bubbles and ensure an even consistency. -
Roll the slab:
Using your rolling pin, flatten the clay ball into an even slab about 1/4 inch thick. Rotate the clay periodically to keep the shape somewhat circular. -
Smooth the surface:
Run a rubber rib or a slightly damp sponge over the surface to erase any canvas texture or rolling pin marks, ensuring a pristine canvas for your print.
Vein Definition
For a deeper impression, place a piece of paper towel over the leaf before rolling. This prevents the roller from slipping and pushes the clay deeper between the veins.
Step 2: Imprinting & Shaping
-
Select your leaf:
Choose a leaf that is still fresh and pliable; dry leaves will crack and won’t leave a deep impression. A leaf with thick protruding veins on the back works best. -
Position the leaf:
Place the leaf vein-side down onto the center of your clay slab. Gently press the stem and edges down with your fingers to tack it in place. -
Roll the impression:
With the rolling pin, roll firmly over the leaf once or twice. Applying even pressure here is key to capturing the tiny capillaries without thinning the clay too much. -
Remove the leaf:
Carefully lift the stem and peel the leaf away to reveal the detailed imprint. -
Cut the shape:
Using a needle tool or small knife, cut a clean circle around the leaf imprint. You can use a bowl rim as a guide or freehand it for a more organic look. -
Smooth the edges:
Dip your finger in water and run it along the cut rim to round off the sharp edges, giving the piece a finished, professional look. -
Prepare the mold:
Cover the inside of your slump mold bowl with plastic wrap or cheesecloth to prevent the clay from sticking. -
Form the bowl:
Gently lift your clay circle and place it inside the mold, pressing it softly against the curve so it takes on the bowl shape.
Step 3: Finishing Touches
-
Dry slowly:
Let the clay sit in the mold until it is leather-hard, which usually takes about 24 hours depending on humidity. -
Remove from mold:
Once firm enough to hold its shape, pop the clay bowl out of the mold and carefully peel off the plastic wrap. -
Refine the rim:
Inspect the rim again. If any rough spots developed during drying, I like to gently rub them with a slightly damp finger to smooth them out. -
Full cure:
Allow the piece to air dry completely for another 2-3 days until it turns a lighter shade of red and feels room temperature to the touch. -
Sand for perfection:
Take your fine-grit sandpaper and lightly sand the rim and exterior to remove any burrs. Avoid sanding the interior leaf texture to keep it crisp. -
Seal the surface:
If using air-dry clay, apply a matte acrylic sealer to protect the surface. If using kiln-fire clay, fire it according to the manufacturer’s bisque schedule. -
Final wipe down:
Once the sealer is dry, wipe the bowl with a soft cloth to remove any lingering dust and prepare it for display.
Antique Wash
After initial drying, rub a dark brown acrylic paint into the veins and wipe away the excess on the surface. This darkens the crevices and makes the leaf pattern pop.
Now you have a stunning botanical vessel perfect for holding keys or displaying dried autumnal treasures


Mini Terracotta-Style Planter
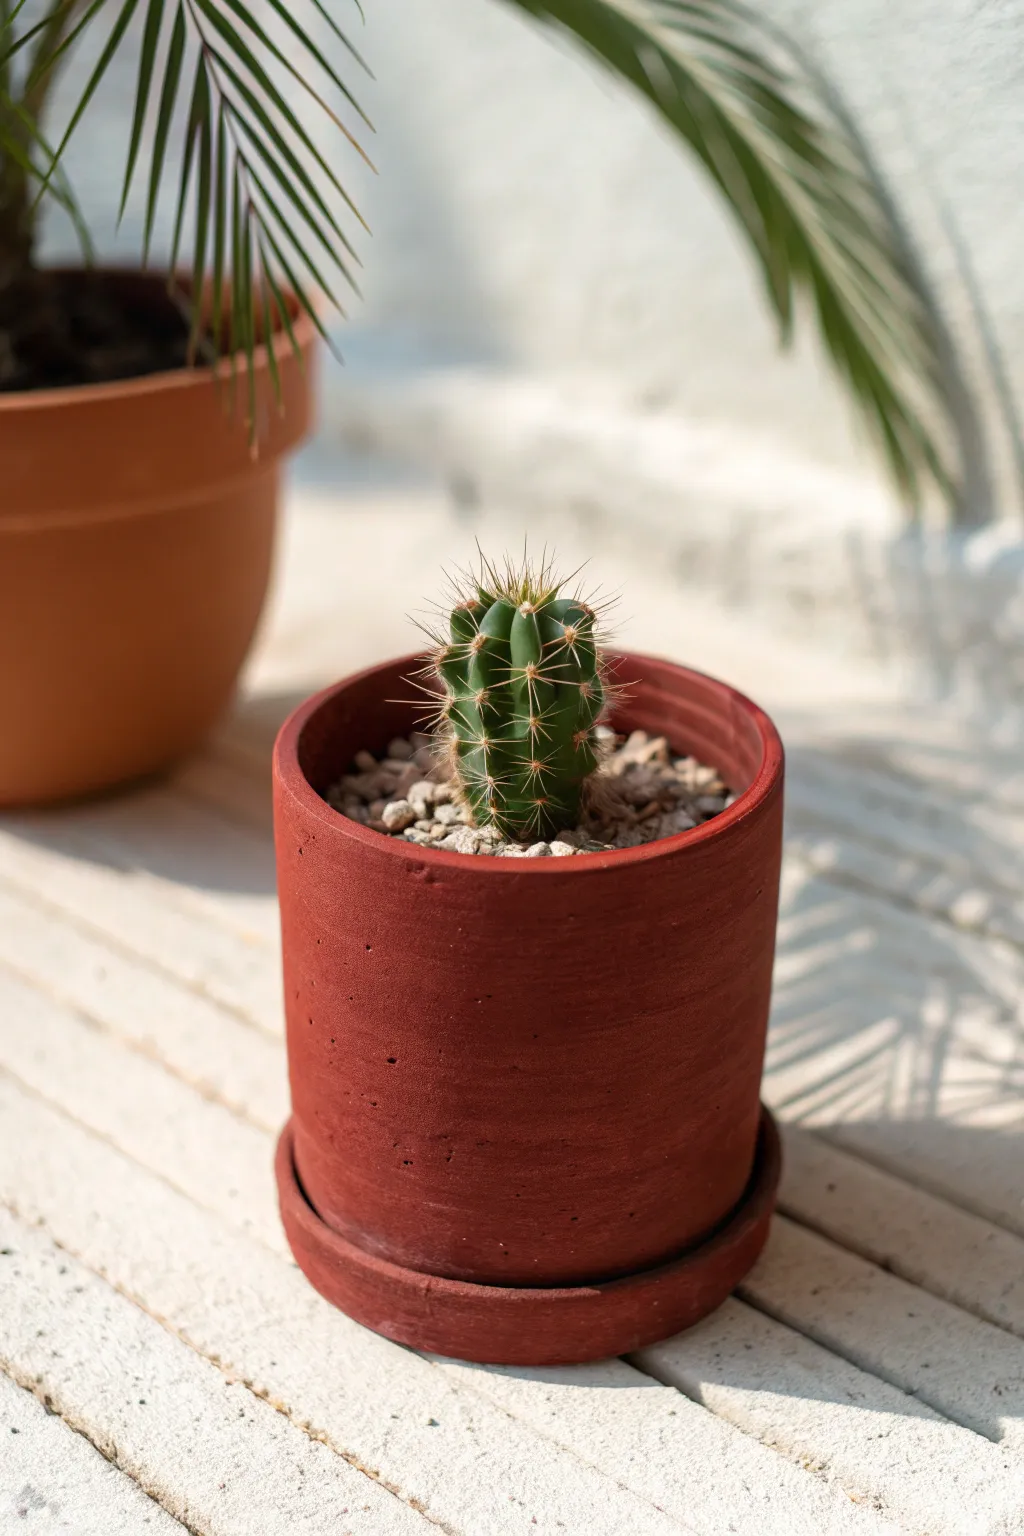
This project creates a sleek, cylindrical planter with that classic warm terracotta hue but a modern, straight-sided silhouette. Perfect for small succulents or cacti, the finished piece features a matching saucer and a lovely matte, earthen texture.
Step-by-Step Guide
Materials
- Air-dry red clay or terra cotta clay (approx. 1 lb)
- Rolling pin
- Two 1/4-inch wooden guide strips (optional but helpful)
- Craft knife or clay cutter
- Needle tool or toothpick
- Slip (small amount of clay mixed with water)
- Small sponge
- Fine-grit sandpaper
- Clear matte sealant (waterproof)
- Cylindrical form (like a sturdy cardboard tube or beverage can wrapped in paper)
- Ruler
Step 1: Preparing the Base and Body
-
Condition the clay:
Start by kneading your red clay until it is soft, pliable, and free of air bubbles. If the clay feels too dry, mist it lightly with water, but don’t overdo it or it will become sticky. -
Roll out the slab:
Place your clay between two 1/4-inch wooden guide strips if you have them. Roll the clay out into a long, even slab. I like to flip the clay over once during rolling to ensure the bottom doesn’t stick to the work surface. -
Measure the cylinder:
Determine the circumference of your cylindrical form (the can or tube). Add about 1/2 inch to this measurement to account for the seam overlap. -
Cut the rectangle:
Using a ruler and craft knife, cut a clean rectangle from your clay slab. The length should match your circumference calculation, and the height should be your desired pot height. -
Cut the circular base:
Place your cylindrical form directly onto the remaining clay slab. Trace around it with a needle tool to create the base piece, then cut it out carefully.
Step 2: Assembling the Cylinder
-
Score the edges:
Take your needle tool and make cross-hatch scratches (scoring) along the short ends of your rectangle where they will join, and around the perimeter of the circular base. -
Apply slip:
Dab a generous amount of slip onto all the scored areas. This acts as the glue that bonds the clay pieces together firmly during drying. -
Form the wall:
Wrap the rectangular clay slab around your cylindrical form. Bring the scored ends together and press them firmly to create a seam. It helps to keep the paper-wrapped form inside for support. -
Blend the seam:
Use your thumb or a modeling tool to smooth the seam on the outside and inside until it disappears. The goal is to make the walls look like one continuous piece. -
Attach the base:
Place the cylinder wall on top of the scored circular base. Press down gently to attach them. -
Seal the bottom join:
Use a small clay tool or your finger to smudge the clay from the wall down onto the base on the outside, and from the base up onto the wall on the inside, ensuring a watertight seal.
Seamless Seams
To ruin the illusion of a hand-built pot, leave the seam visible. Use the back of a spoon to burnish the seam area; compressing the clay makes the line vanish completely.
Step 3: Adding the Saucer and Finishing
-
Create the saucer base:
Roll out a small amount of remaining clay. Cut a circle that is slightly larger (about 1/2 inch wider) than your pot’s base. -
Form the saucer rim:
Cut a thin strip of clay, about 1/2 inch tall. Score and slip the edge of the new circle and attach this strip to create a low-profile lip for the saucer. -
Smooth everything out:
Dip your small sponge in water and wring it out almost completely. Gently wipe down the pot and saucer to smooth out fingerprints and slight imperfections. -
Create drainage (optional):
If you plan to plant directly into the pot, use a straw or tool to punch a drainage hole in the center of the pot’s bottom. -
Let it dry slowly:
Loosely cover the pieces with plastic wrap for the first 24 hours to prevent cracking, then uncover and let them air dry completely for 2-3 days. -
Sand for perfection:
Once fully dry and hard, use fine-grit sandpaper to gently smooth the rim and any rough spots on the exterior. -
Seal the interior:
Apply two coats of waterproof sealant to the inside of the pot and both sides of the saucer to protect the clay from moisture damage over time.
Preventing Warping
If the rim starts to warp while drying, place a lightweight object (like a square of cardboard) gently on top to encourage it to dry flat and round.
Enjoy the minimal elegance of your new handmade planter as it highlights the greenery of your favorite cactus

The Complete Guide to Pottery Troubleshooting
Uncover the most common ceramic mistakes—from cracking clay to failed glazes—and learn how to fix them fast.
Red Clay Incense Holder Tray
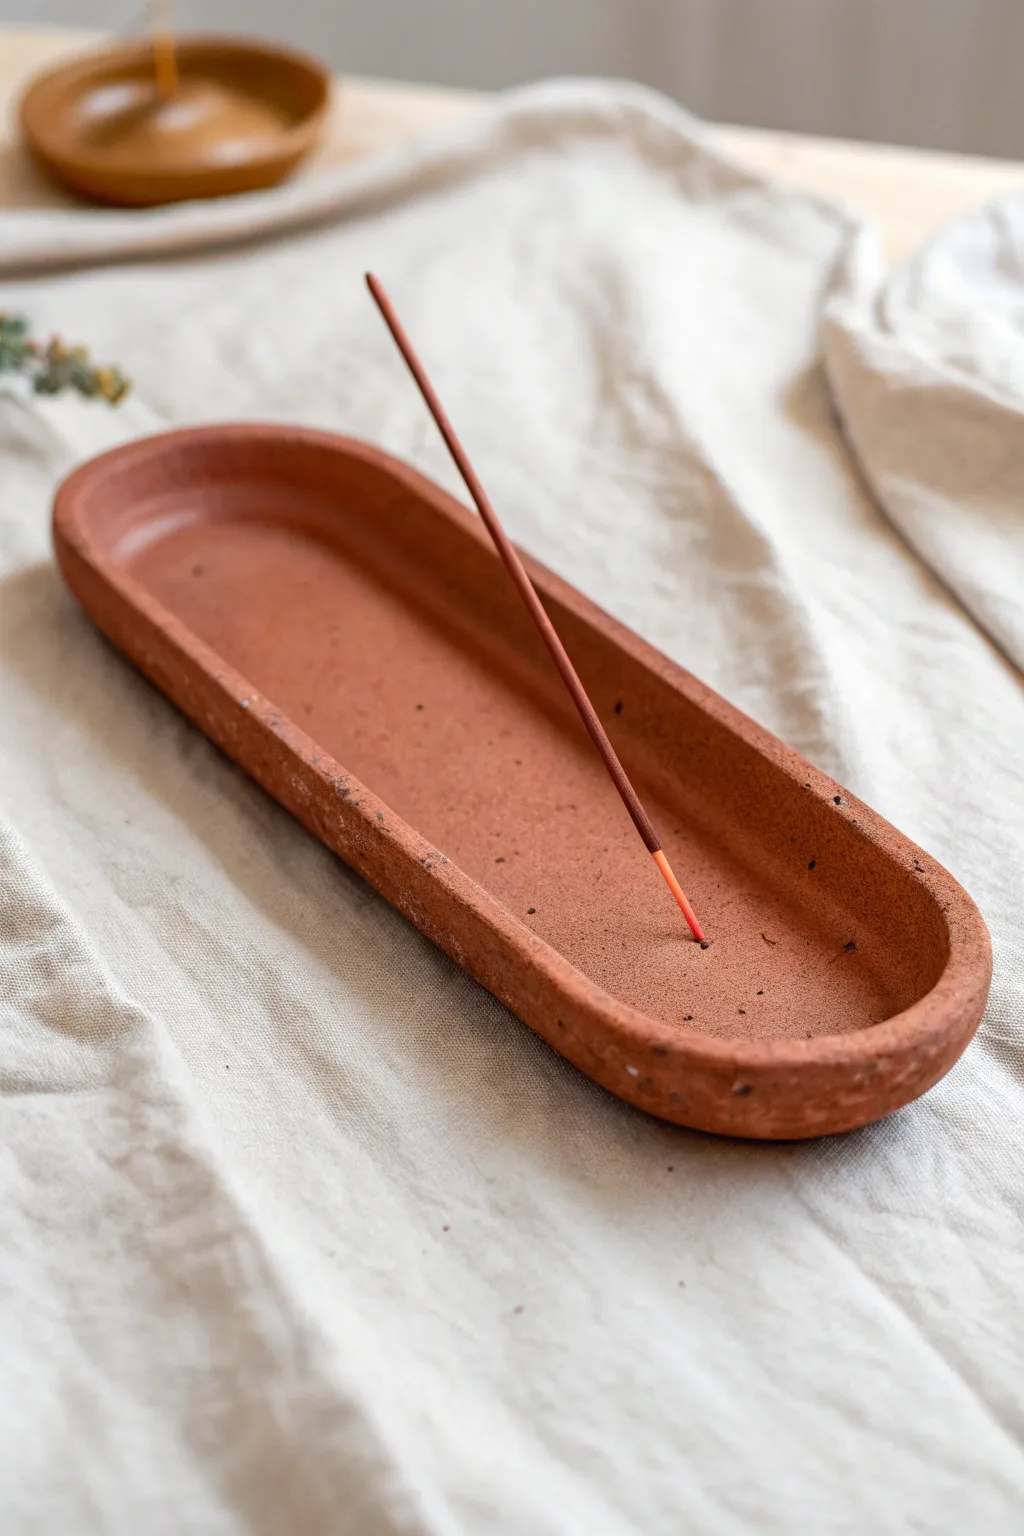
Embrace the natural warmth of unglazed terracotta with this long, oval incense holder. Its minimalist design and organic texture make it a grounding addition to any meditation space or coffee table.
Detailed Instructions
Materials
- Red earthenware clay or terracotta air-dry clay
- Rolling pin
- Clay knife or fettling knife
- Paper template (long oval shape)
- Small sponge
- Bowl of water
- Needle tool or incense stick (for hole)
- Fine-grit sandpaper
- Canvas mat or rolling surface
Step 1: Shaping the Base
-
Prepare the clay:
Start by kneading a generous handful of red clay to remove any air bubbles. You want the clay to be pliable and smooth before you begin working. -
Roll the slab:
On your canvas mat, roll the clay out into an even slab. Aim for a thickness of about 1/4 inch (6mm) to ensure the base is sturdy enough to prevent warping. -
Cut the shape:
Place your paper oval template onto the slab. Using your fettling knife, carefully trace around the template to cut out the long, pill-shaped base of your tray. -
Preparation for coils:
Score the outer perimeter of your oval base using a needle tool or serrated rib. Apply a small amount of water or slip to the scored area to act as glue.
Warped Bottom?
If the long tray starts to curl up while drying, place a small, flat weight (like a book on parchment paper) gently on top during the first drying phase.
Step 2: Building the Walls
-
Roll the coil:
Take a new piece of clay and roll it on the table to create a long, even snake (coil). Ideally, this should be slightly thicker than a pencil and long enough to wrap around the entire base. -
Attach the coil:
Gently press the coil onto the scored edge of the base. If your coil isn’t long enough, you can join two pieces by scoring and slipping the ends together. -
Blend the inside:
Using your thumb or a modeling tool, smear the inside edge of the coil down onto the base floor. This seamless connection is crucial for strength. -
Smooth the outside:
Repeat the blending process on the outside, smoothing the coil downward so the transition between the wall and base disappears entirely. -
Refine the rim:
Once the walls are attached, use your fingers to pinch and shape the rim gently. I like to keep it slightly rounded and thick to maintain that rustic, organic feel seen in the photo.
Step 3: Finishing Touches
-
Level the floor:
Use a damp sponge to wipe the inside floor of the tray smooth, removing any fingerprints or tool marks created during the blending process. -
Create the holder:
Locate the center of the tray’s short axis. Take a small ball of clay, press it slightly flat in the middle of the tray, and blend it securely to the floor. -
Pierce the hole:
Using an actual incense stick or a needle tool similar in size, poke a hole into that center mound at a slight angle. The angle ensures the ash falls into the tray, not outside it. -
Create texture:
To mimic the speckled look, you can sprinkle some dried clay crumbs or coarse sand onto the surface and lightly press them in, or just sponge the surface to bring out the natural grog. -
Slow drying:
Loosely cover the piece with plastic and let it dry slowly for 24-48 hours. Slow drying prevents the long shape from curling up at the ends. -
Sanding:
Once bone dry (or fully cured if using air-dry clay), gently sand any sharp edges or rough spots on the rim with fine-grit sandpaper. -
Final finish:
If using kiln clay, fire it according to the clay’s instructions. If using air-dry clay, wipe away dust and leave it matte, or apply a very matte varnish for protection.
Make it Speckled
Mix dried coffee grounds or crushed black pepper into your clay body before rolling. This creates gorgeous natural speckles that mimic high-fire iron spots.
Enjoy the peaceful atmosphere your handmade creation brings to your home
Stamped Red Clay Coaster Set
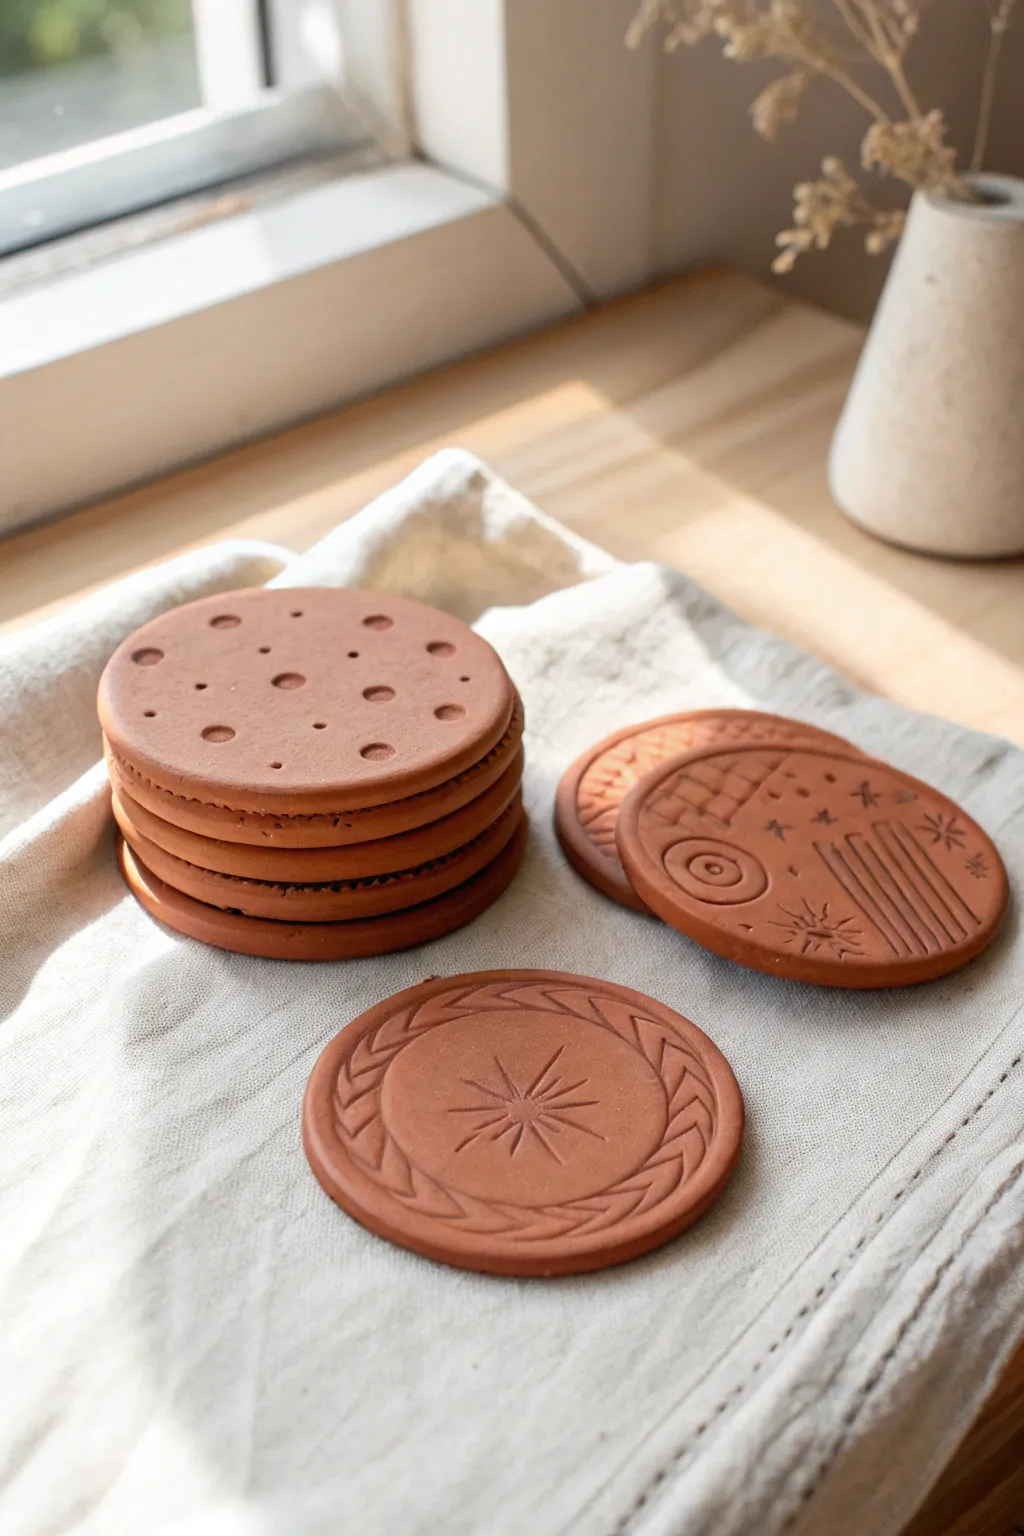
Bring earthy warmth to your coffee table with this set of hand-stamped red clay coasters. Featuring celestial motifs and geometric textures, these functional art pieces showcase the natural beauty of terracotta with a smooth, matte finish.
Step-by-Step
Materials
- Red air-dry clay or terracotta polymer clay
- Rolling pin or smooth glass bottle
- Round cookie cutter (approx. 3.5 – 4 inches)
- Parchment paper or canvas mat
- Assorted texture stamps (sunburst, stars, lines)
- Small wooden dowel or chopstick (for dot patterns)
- Fine-grit sandpaper (220-400 grit)
- Clear matte acrylic sealer or varnish
- Sponge or dusting brush
Step 1: Preparation & Rolling
-
Prep the workspace:
Lay down a piece of parchment paper or a canvas mat on a flat, stable surface to prevent the clay from sticking while you work. -
Condition the clay:
Take a large chunk of red clay and knead it thoroughly in your hands until it becomes warm, soft, and pliable without any cracks. -
Roll the slab:
Place the clay ball on your mat and use a rolling pin to flatten it into an even slab. Aim for a consistent thickness of about 1/4 inch so the coasters feel substantial but not heavy. -
Cut the shapes:
Press your round cookie cutter firmly into the slab to create your coaster circles. Depending on your slab size, cut 4-6 circles, gathering scraps to re-roll if needed. -
Smooth the edges:
Dip your finger in a tiny bit of water and run it gently along the cut edges of each circle to soften any sharp ridges left by the cutter.
Step 2: Stamping & Texturing
-
Create the celestial design:
For the first patterned coaster, lightly press a sunburst stamp into the center. Add small star stamps scattered around the upper curved edge. -
Add geometric lines:
On the same celestial coaster, use a straight edge or a line stamp to create a series of parallel lines on one side, balancing the organic stars with structure. -
Stamp the central sunburst:
For the second design, press a large sunburst stamp directly into the center of a fresh clay circle. Use a carving tool to add a chevron-like border around the rim. -
Create the minimalist dot coaster:
For the stacked design shown in the image, take a plain circle and use the end of a wooden dowel to press random indentations across the surface. -
Vary dot sizes:
I like to use tools with different diameters—like the back of a paintbrush versus a chopstick—to create visual interest with varied dot sizes. -
Check for warping:
After stamping, the clay might have spread slightly. Gently reshaping the circle with your hands or the cutter helps keep it perfectly round.
Stamp Release Trick
If your stamps are sticking to the damp clay, lightly dust the stamp surface with cornstarch or baby powder before pressing it down for a crisp, clean release.
Step 3: Finishing Touches
-
Initial drying phase:
Place the coasters on a flat wire rack or a dry sheet of parchment. Let them air dry for at least 24 hours away from direct sunlight to prevent cracking. -
Flip for even drying:
Halfway through the drying process, flip the coasters over. This ensures moisture evaporates evenly from both sides and prevents the edges from curling upward. -
Sand the imperfections:
Once fully cured and hard, take a piece of fine-grit sandpaper and gently buff the edges and surface. This removes any fingerprints or rough burrs. -
Clean the dust:
Wipe the coasters down with a slightly damp sponge or soft brush to remove all the red clay dust before sealing. -
Apply sealer:
Brush on a thin coat of matte acrylic varnish. This protects the clay from moisture condensation from cold drinks while maintaining that natural, earthy look. -
Final cure:
Allow the sealer to cure completely according to the bottle instructions before using your new coaster set.
Make Them Gift-Ready
Bundle a set of four with rustic twine and a dried sprig of lavender. It makes a stunning, handmade housewarming gift that looks professionally crafted.
Stack your finished coasters on the table to show off those beautiful, distinct edges and enjoy your handmade decor


What Really Happens Inside the Kiln
Learn how time and temperature work together inside the kiln to transform clay into durable ceramic.
Tea Light Candle Holder
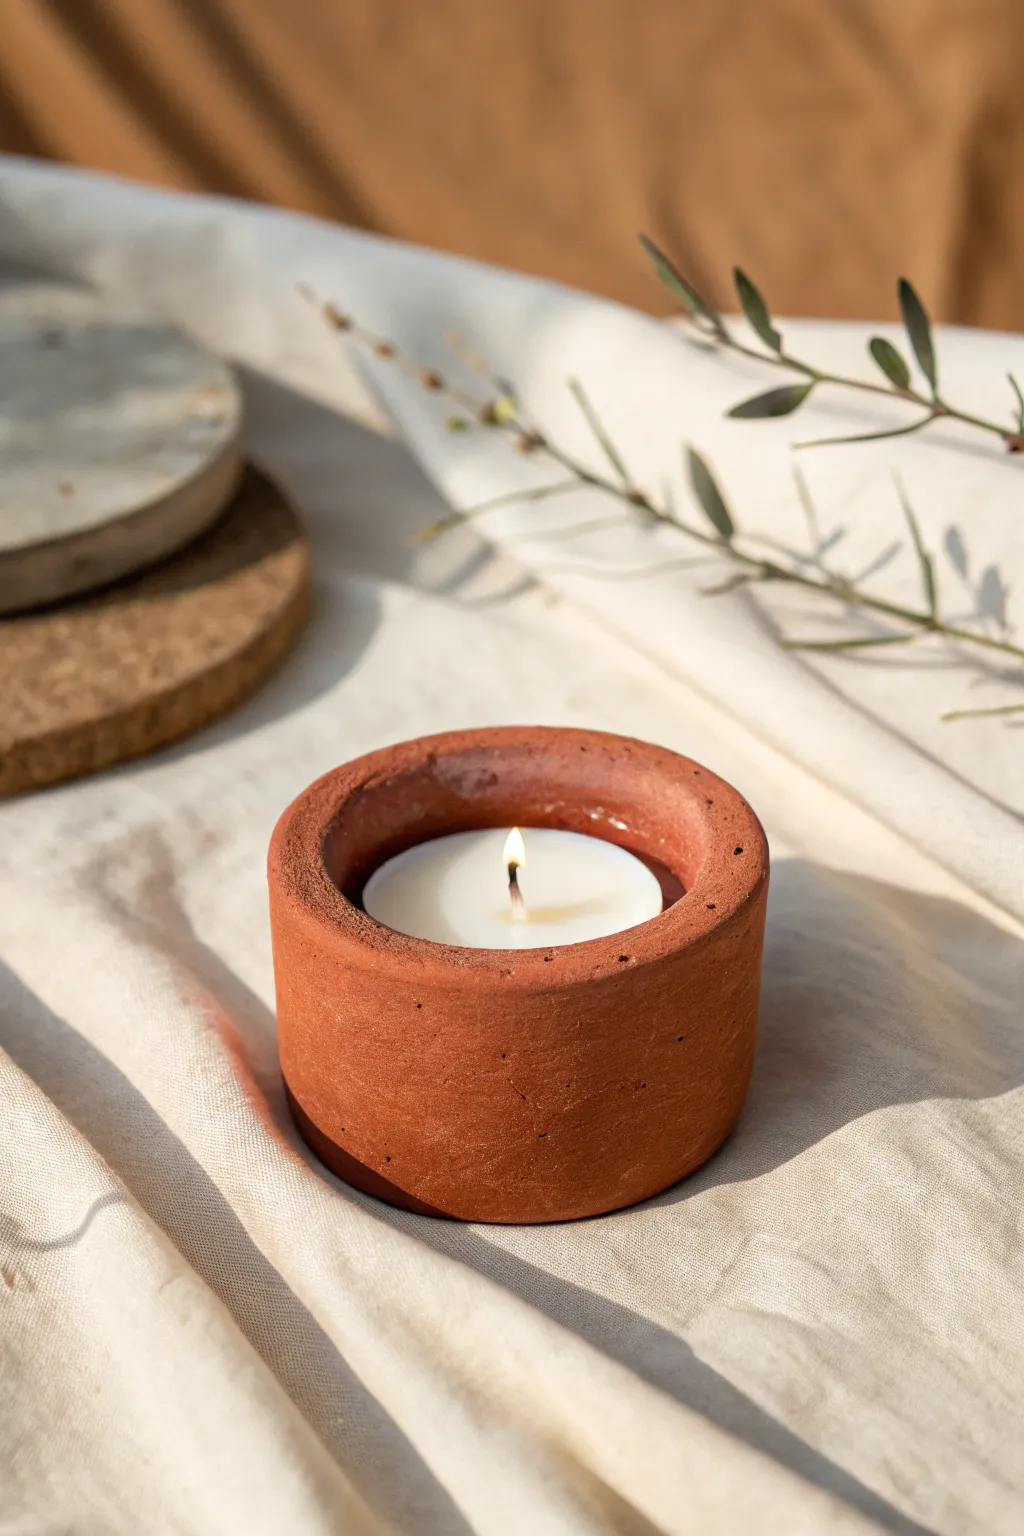
Bring a touch of organic warmth to your decor with this minimalist candle holder, featuring a rich terracotta hue and sturdy cylindrical form. Its smooth, matte finish and subtle imperfections give it a perfect handcrafted charm that elevates any table setting.
Detailed Instructions
Materials
- Air-dry red clay or terracotta polymer clay
- Rolling pin
- Circle cookie cutters (one slightly larger than a tea light, one much larger)
- Craft knife or clay blade
- Small bowl of water
- Sponge
- Fine-grit sandpaper (220-400 grit)
- Tea light candle (for sizing)
- Ruler
- Matte varnish or sealant (optional)
Step 1: Preparing the Base and Walls
-
Condition the clay:
Begin by working a fist-sized ball of red clay in your hands. Knead it thoroughly until it is warm, pliable, and free of any air bubbles. -
Roll out the slab:
Using your rolling pin, flatten the clay into an even slab. Aim for a consistent thickness of about 1/4 inch to ensure the walls are sturdy but not too chunky. -
Cut the base:
Use your larger circle cutter to stamp out the bottom of the holder. If you don’t have a cutter the exact size, trace a wide glass rim and cut around it with your craft knife. -
Measure the circumference:
To determine the length of the wall needed, you can gently wrap a string around your base circle or do a quick calculation. I like to cut a strip slightly longer than necessary just to be safe. -
Cut the wall strip:
From the remaining slab, cut a long, rectangular strip. The width of this strip will determine the height of your holder; about 1.5 to 2 inches creates the deep profile seen in the photo.
Smoother Seams
Use the back of a spoon dipped in water to burnish the vertical seam. The curve of the spoon helps compress the clay fibers for a stronger, invisible bond.
Step 2: Assembly and Shaping
-
Score the edges:
Using a needle tool or an old toothbrush, roughen (score) the outer edge of the circular base and the bottom long edge of your rectangular strip. -
Apply slip:
Dab a little water onto the roughened areas to create a slippery ‘glue’ or clay slip. This is crucial for a bond that won’t crack later. -
Attach the wall:
Carefully wrap the rectangular strip around the circular base. Press it firmly onto the base, ensuring the wall stands upright. -
Join the seam:
Where the two ends of the wall meet on the side, cut through both layers simultaneously at a diagonal for a seamless flush joint. Score, slip, and press these ends together. -
Blend the connections:
Use your thumb or a modeling tool to smudge the clay across the seams—both inside where the wall meets the floor, and along the vertical seam. The join should become invisible.
Fixing Cracks
If hairline cracks appear while drying, mix a tiny amount of dry clay dust with white glue and water to make a paste. Fill the cracks, let dry, and sand smooth.
Step 3: Testing and Refining
-
Check fit:
Gently place your tea light candle inside the cylinder to ensure it fits comfortably. There should be a small gap around the candle for heat circulation, but not too much extra space. -
Thicken the rim:
To get that substantial look seen in the image, you can gently tap the top rim with a flat piece of wood or your ruler to compress and slightly widen it. -
Smooth surfaces:
Dip a sponge in water and wring it out almost completely. Wipe the entire piece to smooth out fingerprints and soften any sharp edges. -
Create texture:
If you want those tiny organic pits visible in the photo, lightly press a coarse sandpaper or a stiff brush against the exterior for a moment.
Step 4: Finishing Touches
-
Slow drying:
Place the holder away from direct sunlight and drafts. Tent it loosely with plastic wrap for the first 24 hours to prevent it from drying unevenly and warping. -
Full cure:
Remove the plastic and let it air dry completely for another 24-48 hours until the clay turns a lighter shade and feels room temperature to the touch. -
Sanding:
Once bone dry, take your fine-grit sandpaper and gently sand the rim and exterior. You aren’t trying to remove material, just polishing the surface to a velvety matte finish. -
Seal (optional):
For durability, apply a thin coat of matte varnish. This will deepen the red color slightly and protect the porous clay from candle wax drips.
Now you have a beautifully simple piece of decor ready to hold a flickering light
Tiny Bud Vase With Red Clay Glow
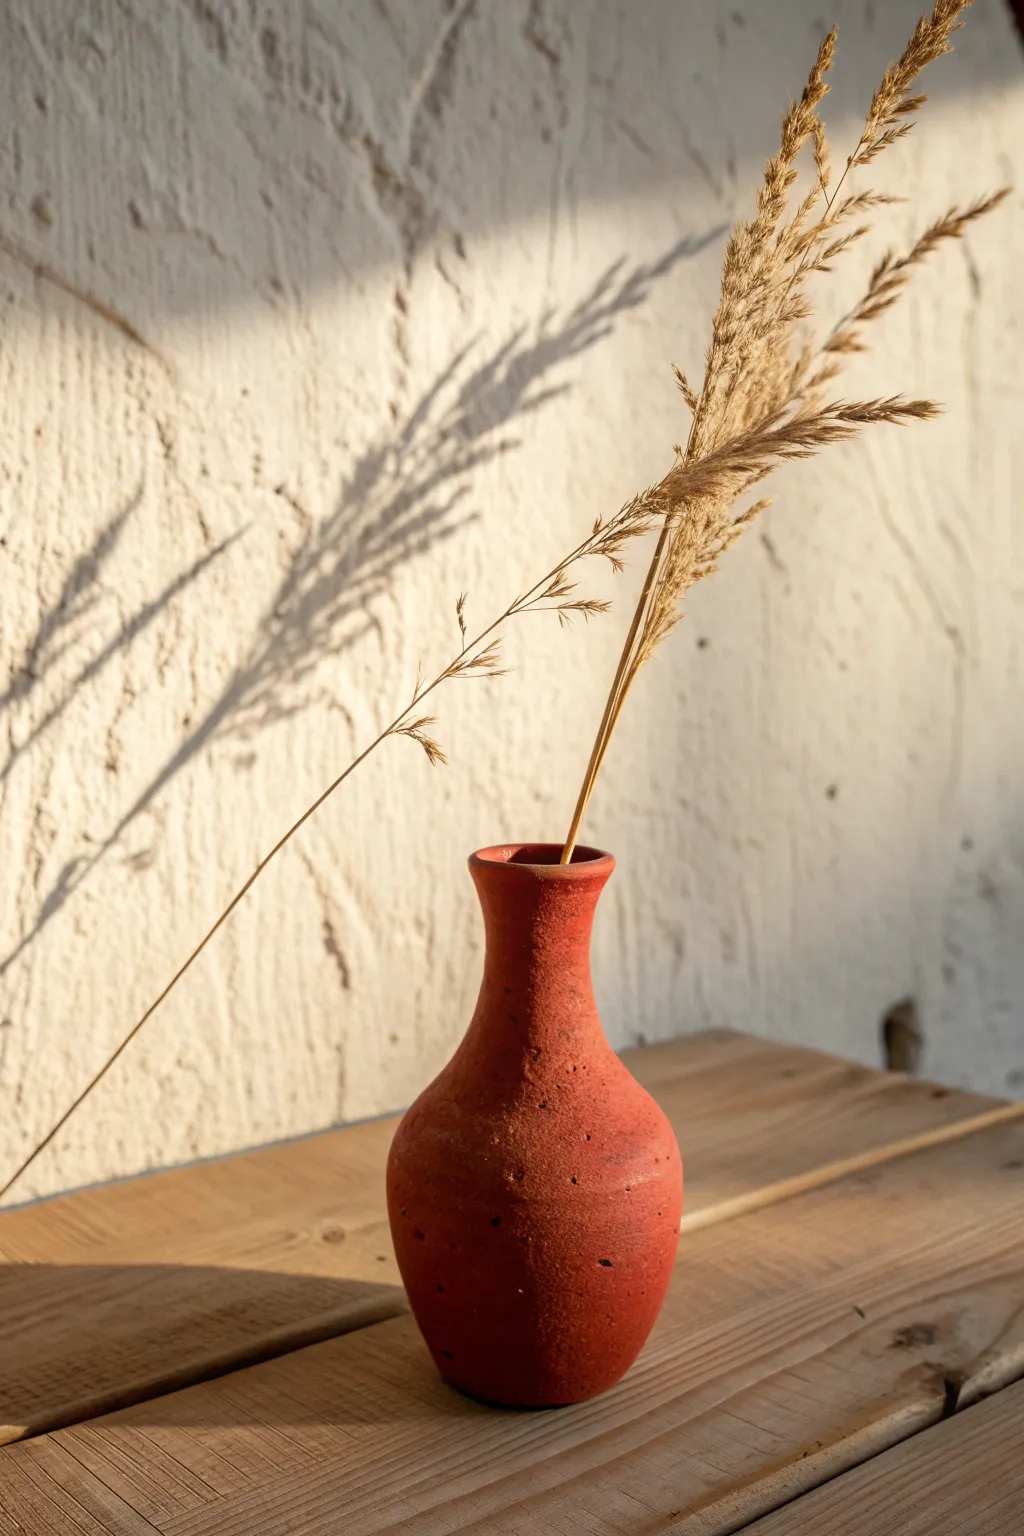
This charming project captures the raw, organic beauty of red clay in a petite form perfect for holding dried stems. With its warm, earthy tones and subtle texture, this handcrafted bud vase brings a touch of rustic elegance to any corner of your home.
Step-by-Step Tutorial
Materials
- Red earthenware clay or air-dry terra cotta clay
- Pottery wheel (optional) or turntable for hand-building
- Wooden modeling tools
- Sponge
- Needle tool
- Wire clay cutter
- Rib tool (metal or rubber)
- Water in a small container
Step 1: Shaping the Base
-
Prepare the Clay:
Begin by wedging a baseball-sized amount of red clay to remove air bubbles and ensure a uniform consistency. This prepares the clay for smooth shaping. -
Center on the Wheel:
If using a wheel, slam the clay ball onto the center of the bat. With wet hands, apply pressure to center the clay until it spins without wobbling. -
Open the Clay:
Press your thumbs into the center of the spinning clay to create an opening, stopping about a half-inch from the bottom to form the floor of the vase. -
Pull the Walls:
Gently squeeze the clay between your fingers and pull upwards to create the initial cylinder shape. Aim for even wall thickness from bottom to top. -
Form the Bulbous Belly:
Apply slight outward pressure from the inside of the cylinder with one hand while supporting the outside with the other. Gently push the clay out to create a rounded, bulbous shape at the bottom.
Step 2: Refining the Neck
-
Collar the Rim:
Place both hands around the top of the cylinder and gently squeeze inward as the wheel spins. This technique, called collaring, narrows the opening to begin forming the neck. -
Elongate the Neck:
Continue to pull the clay upwards at the narrowed top section. I find it helpful to use just my fingertips here to gently stretch the clay into a slender, elegant neck. -
Flare the Lip:
At the very top, use your index finger to gently press the rim outward, creating a slight flare that will hold your stems beautifully. -
Smooth the Surface:
Take a slightly damp sponge or a rubber rib tool and run it over the exterior. This smooths out major finger marks but leaves that lovely handmade texture visible.
Natural Speckling
Mix a small amount of coffee grounds or sand into your clay before wedging. This adds authentic grit and organic speckles to the finished surface.
Step 3: Adding Texture and Drying
-
Create Surface Interest:
While the clay is still leather-hard, gently tap it with a wooden tool or dab it with a coarse sponge to create small pits and imperfections. This mimics the stone-like texture seen in the reference. -
Trim the Base:
Use a wire tool to cut the vase from the wheel or bat. Once leather hard, you can turn it over and trim away any excess clay from the bottom for a clean finish. -
Slow Drying:
Cover the vase loosely with plastic for the first day to ensure even drying. Then, uncover it and let it dry completely until it is bone dry and lighter in color. -
Firing (If using kiln clay):
Fire the piece in a kiln according to your clay’s specific instructions. For that matte, raw look, skip the glaze firing or apply a matte clear coat only on the inside for water tightness. -
Final Touches:
If using air-dry clay, apply a matte sealant to protect the surface while preserving the natural clay look. Once dry, arrange your dried grasses inside.
Smoke Firing Effect
For a darker, smokier finish without a kiln, burnish the surface and then carefully pit fire it in a metal bin with sawdust.
Enjoy the warm simplicity of your handmade vase as it holds the last light of the afternoon sun

TRACK YOUR CERAMIC JOURNEY
Capture glaze tests, firing details, and creative progress—all in one simple printable. Make your projects easier to repeat and improve.
Textured Hanging Ornaments
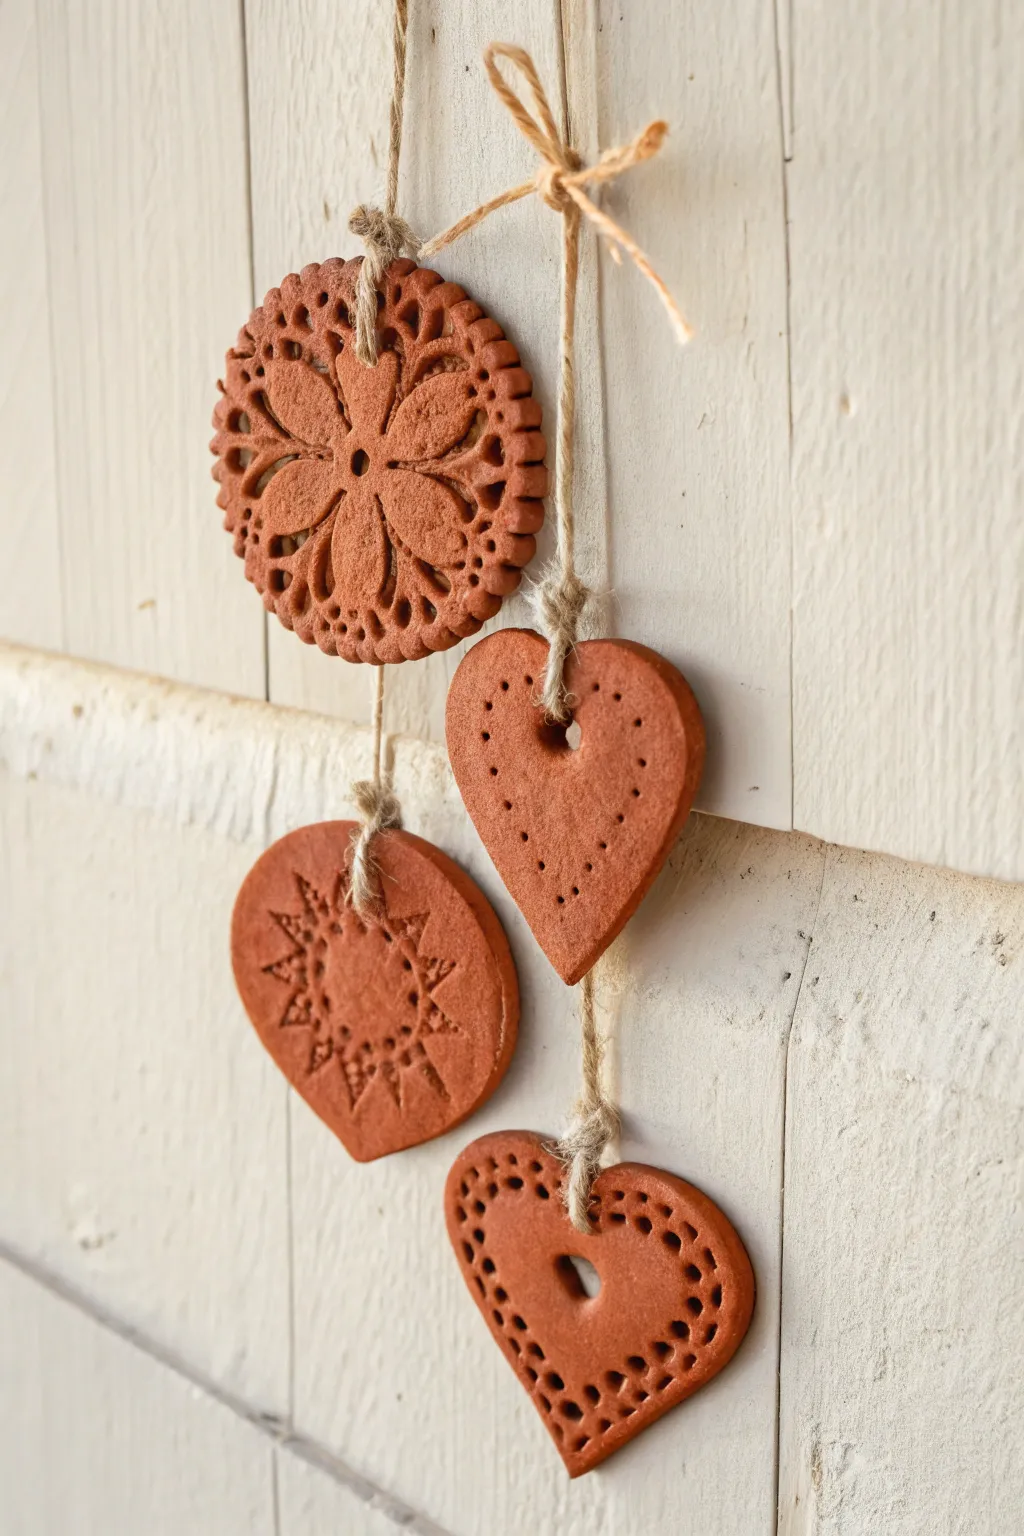
Embrace the warmth of natural materials with these charming terracotta-style ornaments. Featuring imprinted floral patterns and simple geometric shapes, hung by rustic twine, they make perfect additions to a holiday tree or a cozy wall display.
Step-by-Step
Materials
- Red air-dry clay or terracotta polymer clay
- Rolling pin
- Parchment paper or canvas mat
- Cookie cutters (scalloped circle, heart shapes)
- Textured doilies, lace, or rubber stamps
- Toothpick, skewer, or needle tool
- Jute twine or hemp cord
- Fine grit sandpaper
Step 1: Prepping and Rolling
-
Condition the clay:
Start by taking a chunk of your red clay and kneading it in your hands until it becomes soft, pliable, and warm. This prevents cracking later on. -
Set up your surface:
Lay down a sheet of parchment paper or a canvas mat to prevent the clay from sticking to your table. -
Roll out the slab:
Use your rolling pin to flatten the clay into an even slab. Aim for a thickness of about 1/4 inch (6mm) to ensure the ornaments are sturdy but not too heavy.
Use Cornstarch
Dust your lace or stamps lightly with cornstarch before pressing them into the clay. This acts as a release agent and ensures the pattern lifts off cleanly without sticking.
Step 2: Texturing and Cutting
-
Impress the texture:
Before cutting shapes, lay your texture tool (like a lace doily or a rubber stamp) onto the clay slab. -
Roll over the texture:
Gently roll your rolling pin over the lace or stamp to press the design deep into the clay surface. Be firm enough to catch the details but gentle enough not to thin the clay too much. -
Cut the main shapes:
Position your scalloped circle cutter over the most interesting part of the floral pattern and press down firmly to cut the shape. -
Cut the heart shapes:
Using a plain heart cutter, press into a smooth or lightly textured section of the clay to create the heart ornaments. -
Remove excess clay:
Carefully peel away the scrap clay from around your cut shapes using a crafting knife or just your fingers, leaving the ornaments on the mat.
Step 3: Detailing
-
Create the heart border:
For the plain heart, use a needle tool or toothpick to poke small, evenly spaced holes around the perimeter, creating a dotted border effect. -
Decorate the starburst:
For the pointed design shown in the image, use a fine tool to sketch a starburst or snowflake pattern into a smooth circle or heart shape. -
Add accent dots:
Poke deeper textural holes around the edges of the bottom heart ornament to mimic the lace-like appearance of the top ornament. -
Make the hanging hole:
Use the non-pointed end of a skewer or a straw to punch a clean hole near the top center of each ornament. Make sure it’s wide enough for your twine. -
Smoothing edges:
Dip your finger in a tiny bit of water and run it along the cut edges of the clay to smooth out any roughness.
Preventing Curling
If edges curl while drying, place a lightweight book or board on top of the ornaments once they are ‘leather hard’ (partially dry) to keep them perfectly flat.
Step 4: Finishing Up
-
Allow to dry:
Let the ornaments air dry on a flat surface for 24-48 hours. I find flipping them over halfway through helps them dry flat without warping. -
Sanding:
Once fully dry and hard, gently sand any sharp edges with fine-grit sandpaper for a professional finish. -
Cut the twine:
Cut lengths of jute twine, varying the lengths if you plan to hang them in a staggered group. -
Knot and hang:
Thread the twine through the holes and tie a secure knot at the base of the loop, creating a rustic looking hanger.
Now you have a set of beautiful, earthy ornaments ready to bring a touch of handcrafted warmth to your home
Red Clay Beads for Jewelry
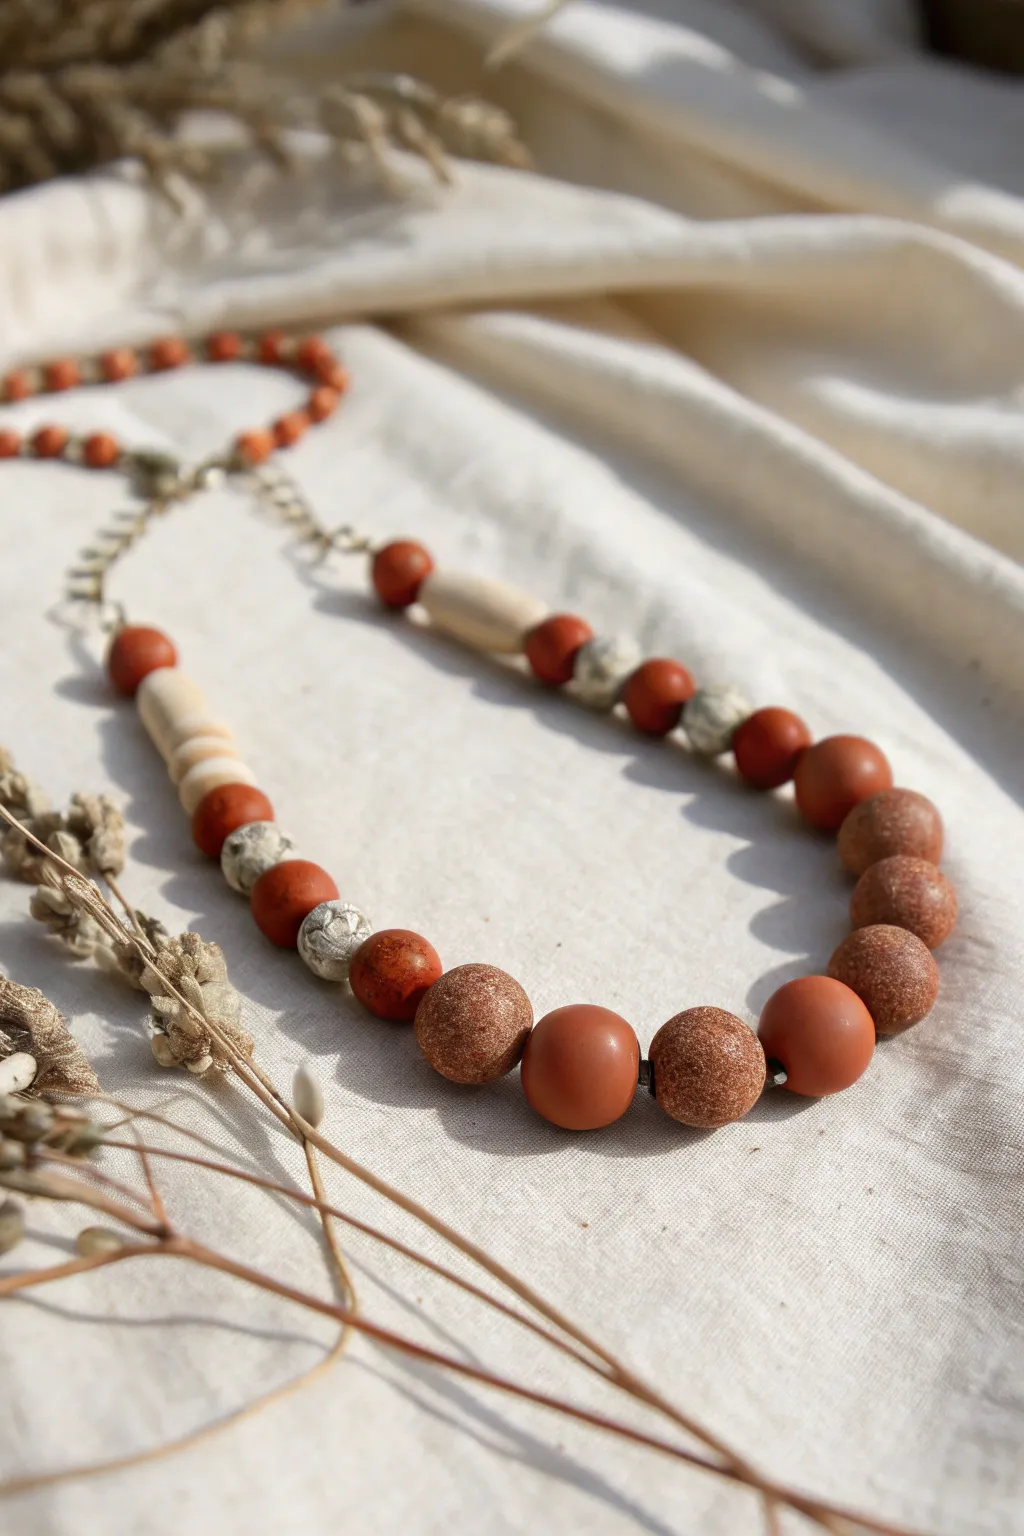
Embrace earthy elegance with this handcrafted necklace featuring a stunning mix of smooth red clay, textured speckle, and natural wood beads. The warm terracotta tones combined with organic shapes create a versatile accessory perfect for adding a touch of nature to any outfit.
Step-by-Step Tutorial
Materials
- Red polymer clay or air-dry clay (terracotta color)
- White or cream polymer clay (for marbling/texture)
- Natural unfinished wood beads (various shapes: rounds, elongated ovals)
- Coarse salt or sandpaper (for texturing)
- Jewelry wire or stronghold beading thread
- Crimp beads and crimp tool
- Jump rings and lobster clasp
- Chain extender (gold or bronze tone)
- Small round seed beads (orange/red tone for the back section)
- Needle tool or toothpick (for piercing holes)
- Oven (if using polymer clay) or drying rack
Step 1: Crafting the Clay Beads
-
Condition the Clay:
Start by warming up your red terracotta clay in your hands until it is soft and pliable. This ensures your beads won’t crack during baking or drying. -
Form the Smooth Rounds:
Roll roughly 8-10 uniform balls of red clay, aiming for about 1.5 cm in diameter. Roll them gently between your palms to remove any fingerprints and ensure they are perfectly spherical. -
Create Textured Beads:
For the textured focal beads, roll 5-6 slightly larger balls of red clay. Gently roll these balls in coarse salt or sand before baking to create a pitted, stone-like surface, or tap them with a stiff toothbrush. -
Make the Marbled Accents:
Take a small amount of white clay and mix it partially with a small ball of red clay. Don’t overmix; stop when you see distinct swirls, then shape into small round beads. -
Pierce the Holes:
Using a needle tool or toothpick, carefully pierce a hole through the center of each clay bead. Twist the tool gently as you push through to avoid deforming the round shape. -
Bake or Dry:
Place your beads on a baking sheet or foil. If using polymer clay, bake according to the package instructions (usually around 275°F/135°C for 15-30 minutes). If using air-dry clay, let them sit for 24-48 hours. -
Finish the Surface:
Once cool (or dry), if you used the salt method, rinse the beads under water to dissolve the salt, revealing the cratered texture. I like to lightly sand the smooth beads if any fingerprints remain.
Natural Polish Tip
Rub a tiny drop of olive oil or baby oil onto the baked smooth clay beads to deepen the terracotta color and give them a soft satin sheen without using varnish.
Step 2: Assembling the Necklace
-
Prepare the Wire:
Cut a length of beading wire approximately 24 inches long. Attach a crimp bead and a jump ring to one end, securing loop with your crimp tool to stop beads from falling off. -
Layout the Design:
Before stringing, lay your beads out on a mat. Place the largest textured red beads in the center, flanked by smooth red rounds, the marbled accents, and finally the wooden beads towards the ends. -
String the Focal Section:
Begin threading the beads onto the wire, starting with the central textured beads and working outwards symmetrically according to your layout. -
Incorporate Wood Elements:
Add the wooden spacer beads—combining discs or elongated ovals with small clay rounds creates a nice visual rhythm between the larger focal segments. -
Finish the Strand:
Once the main design is strung, finish the back length of the necklace using the small orange/red seed beads. This makes the section that sits on the back of the neck more flexible and comfortable. -
Attach the Clasp:
Thread a crimp bead and the lobster clasp onto the open end of the wire. Loop the wire back through the crimp bead and pull tight, leaving just a little wiggle room for movement. -
Secure the Crimp:
Flatten the crimp bead firmly with your tool. Trim any excess wire tail close to the bead for a neat finish. -
Add the Extender:
Attach the chain extender to the jump ring on the non-clasp side. This allows you to adjust the length of the necklace depending on your neckline.
Hole Deformed?
If your beads squash into ovals while piercing holes, let the clay sit for 15 minutes to firm up slightly (called ‘leeching’) before trying to pierce them again.
Enjoy styling your new handcrafted piece with linen shirts or soft knitwear for a cozy, artisanal look
Cute Red Crab Figurine
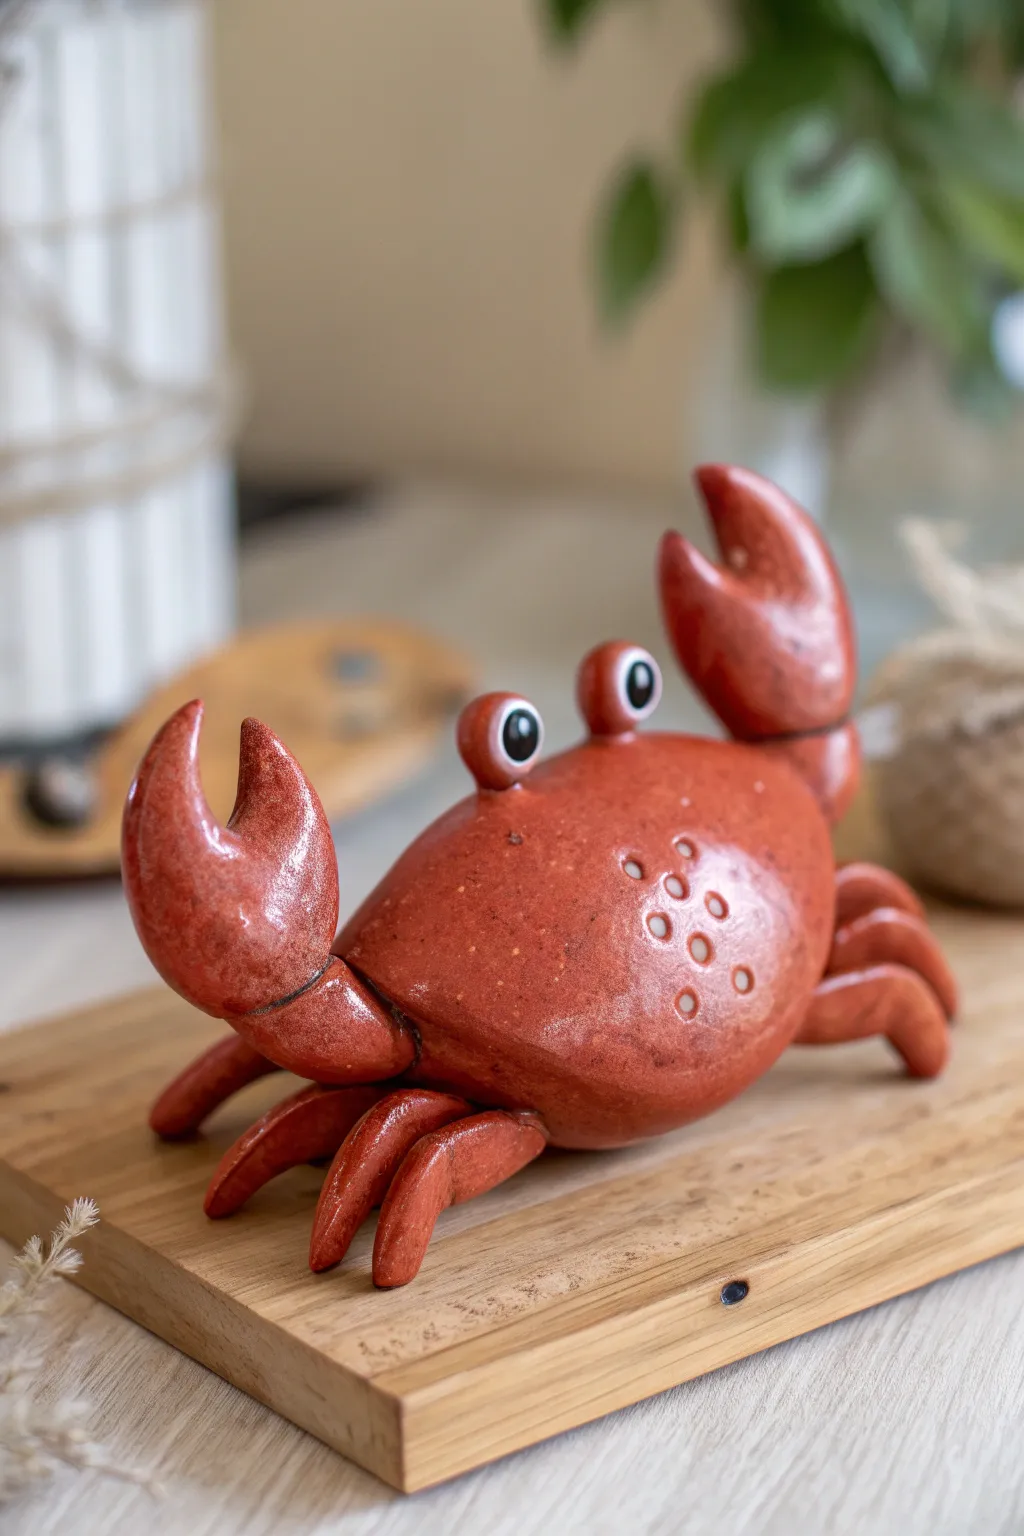
This charming red crab figurine brings a touch of seaside whimsy to any space with its shiny glazed finish and expressive eyes. The rounded, friendly shape makes it an approachable sculpting project that results in a delightful desk companion or bathroom accent.
Step-by-Step
Materials
- Red earthenware clay (or polymer clay if not firing)
- Glossy red glaze (or red acrylic paint + high-gloss varnish)
- White and black underglaze (or acrylic paint)
- Needle tool
- Small loop tool
- Scoring tool (or an old toothbrush)
- Slip (clay mixed with water)
- Small round punch or straw (for shell texture)
- Soft detail brushes
Step 1: Shaping the Main Body
-
Form the shell:
Start by taking a fist-sized ball of red clay and wedging it well to remove air bubbles. Roll it into a smooth sphere, then gently flatten it into an oval dome shape to form the main carapace. -
Smooth the surface:
Dip your finger in a little water or slip and run it over the dome to remove any fingerprints or cracks, ensuring the surface is perfectly smooth for glazing later. -
Add texture:
Using a small straw or a round hollow punch, press gently into the top center of the shell to create a cluster of small decorative circles. Don’t punch all the way through; just make impressions.
Pro Tip: Eye Placement
Make the eye stalks slightly different heights or tilt them toward each other. Asymmetry gives the crab a much goofier and more lovable personality than perfect symmetry.
Step 2: Creating Legs and Claws
-
Roll the legs:
Roll out six small coils of clay for the walking legs. Tap them gently to taper the ends, then bend them into a slight arch shape. -
Attach the legs:
Score the underside of the body and the tops of the leg coils. Apply a dab of slip and firmly press three legs onto each side of the underbelly, facing outward. -
Form the claw arms:
Create two thicker, cylindrical shapes for the arms. These need to be sturdy enough to hold the heavy pinchers. -
Sculpt the pinchers:
Shape two large teardrops. Use a needle tool to slice partially through the wider end to create the opening of the claw, gently separating the ‘thumb’ from the main claw part. -
Attach claws to body:
Score and slip the arm pieces to the front of the body, then attach the heavy pinchers to the arms. I usually prop these up with small foam scraps or crumpled paper while the clay stiffens so they don’t sag. -
Refine the joints:
Use a small modeling tool to blend the clay at the shoulder joints, ensuring a seamless and strong connection.
Level Up: Functional Art
Make the holes on the back functional! Create deeper holes all over the shell to turn this figurine into a cute salt shaker or a flower frog. Add a cork hole at the bottom.
Step 3: Details and Finishing
-
Make the eyes:
Roll two small balls of clay and place them on top of slightly thicker clay stalks. Attach these vertically to the front center of the head area. -
Clean up:
Go over the entire piece with a damp sponge to smooth any rough edges created during assembly. -
Dry and Bisque Fire:
Allow the crab to dry slowly under plastic for several days before bisque firing. If using polymer clay, bake according to package instructions. -
Apply base color:
Once fired (or baked), apply three even coats of a speckled red glaze (or red acrylic paint). Ensure you get into all the crevices of the legs. -
Paint the eyes:
Carefully paint the eyeballs white. Once dry, add a large black pupil in the center and a tiny white highlight dot for that lively expression. -
Final Glaze Firne:
If using ceramic glazes, fire the piece a final time to the clay’s specified temperature to achieve that deep, wet-look shine. If using acrylics, finish with a thick coat of high-gloss polyurethane varnish.
Enjoy displaying your cheerful ceramic crab and watching it bring a smile to everyone’s face
Single-Color Red Clay Animal Minis
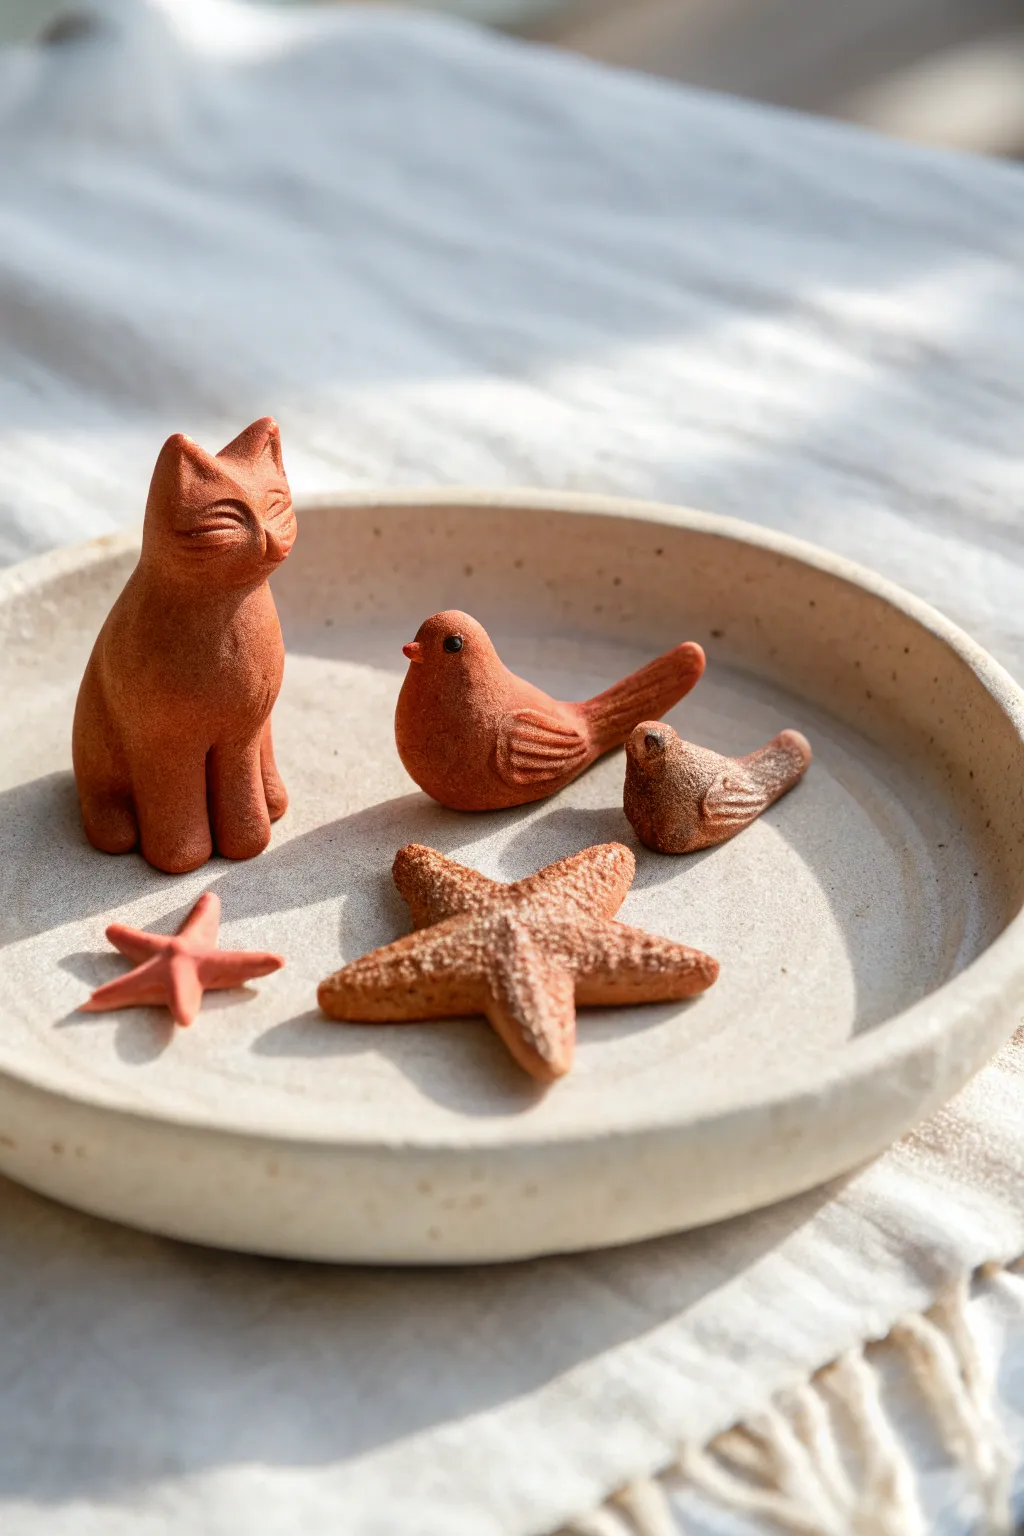
Create a charming collection of miniature animal figurines using the rich, earthy tones of natural red clay. This simple modeling project produces a delightfully cohesive set of unglazed sculptures, perfect for display on a ceramic plate or shelf.
Detailed Instructions
Materials
- Red earthenware clay (terracotta) or air-dry red clay
- Small bowl of water
- Modeling tools (or toothpicks/skewers)
- Clean work surface or mat
- Damp sponge
- Smooth ceramic plate for drying/display
Step 1: Preparation & Basic Forms
-
Condition the Clay:
Begin by taking a chunk of your red clay and kneading it thoroughly in your hands. You want to warm it up and remove any trapped air bubbles to prevent cracking later. -
Portioning:
Divide your clay into five uneven balls: a large one for the cat, a medium one for the large bird and starfish, and two smaller bits for the tiny bird and small starfish. -
Shape the Cat Body:
Take the largest ball and roll it into a smooth, upright oval or pear shape. Flatten the bottom gently against your work surface so it stands stable on its own.
Smooth Moves
Keep a damp sponge nearby. Wiping your tools frequently prevents clay build-up and ensures your carved lines stay crisp and clean.
Step 2: Sculpting the Cat
-
Form the Head:
Pinch the top third of the pear shape to define a neck and head area. Use your thumbs to gently round out the face while pulling up two small triangles for the ears. -
Detail the Face:
Using a modeling tool or toothpick, carefully carve two slanted slits for the sleeping eyes. Add a tiny nose bump and use thin lines to suggest whiskers, keeping the expression serene. -
Carve the Legs:
At the base of the body, use a rounded tool to press vertical indentations into the front. This separates the front paws from the body without needing to attach separate pieces. -
Smooth the Surface:
Dip your finger in a tiny bit of water and rub it over the clay to erase any fingerprints or rough tool marks, giving the cat a silky, matte finish.
Step 3: Crafting the Birds
-
Shape the Large Bird:
Roll the medium ball into a teardrop shape. Gently pinch the wider end to pull out a small beak and round head. -
Extend the Tail:
Squeeze and pull the tapered end of the teardrop upward to form the tail feathers. Flatten it slightly and use a tool to press in feather lines. -
Add Wing Details:
Instead of adding separate clay, use your tool to carve wing shapes directly into the sides of the body. Draw curved lines to simulate folded feathers. -
Define the Eyes:
Press a small, round indentation for the eye on each side of the head using the end of a paintbrush or tool. -
Make the Tiny Bird:
Repeat the previous steps with the smaller ball of clay, simplifying the details. A simple beak pinch and tail pull is often enough for the baby bird.
Textural Contrast
After drying, gently sand just the smooth areas (like the cat’s back) with fine grit paper, leaving the textured areas rough for visual interest.
Step 4: Sea Stars & Finishing
-
Form the Large Starfish:
Flatten a ball of clay into a thick disk. Pinch and pull five points outward from the center to create the arms. -
Texture the Surface:
I like to use an old toothbrush or a stiff brush to tap the top surface of the starfish, creating that characteristic rough, sandy texture. -
Shape the Tiny Starfish:
Create the smaller starfish similarly, but keep the arms slightly thinner and more delicate. -
Refine Edges:
Check all figures for sharp burrs or crumbs of clay. Smooth them down one last time with a slightly damp finger. -
Drying:
Arrange your figures on a flat board. Let them dry slowly away from direct heat to prevent warping. If using kiln clay, fire according to clay instructions; if air-dry, wait 24-48 hours.
Once fully dry, these warm red figures will bring a touch of earthy elegance to any corner of your home
Red Clay Mushroom Buddy Sculptures
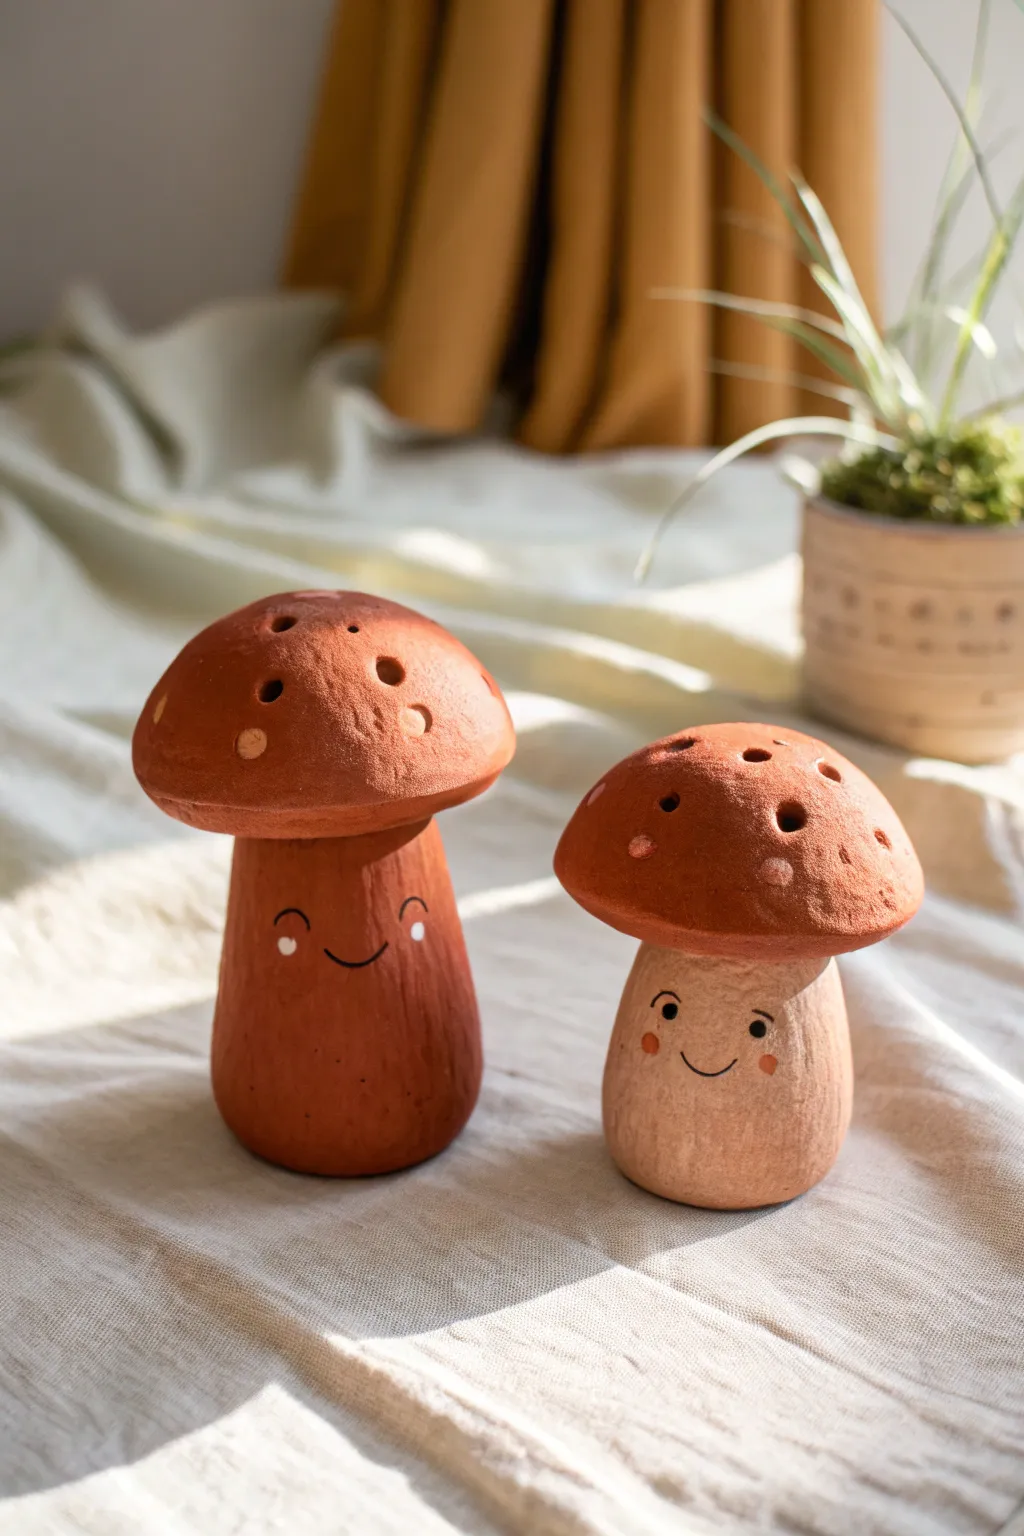
Bring a touch of forest charm into your home with these adorable, smiling mushroom sculptures. Created from red clay and finished with simple painted details, these buddies add a warm, earthy vibe to any shelf or plant display.
Step-by-Step Tutorial
Materials
- Red air-dry clay or terracotta polymer clay
- Beige or light tan air-dry clay (optional, for two-tone stem)
- Clay sculpting tools (needle tool, ball stylus)
- Small bowl of water
- Acrylic paints (black, white, blush pink)
- Fine detail paintbrush
- Matte varnish or sealant
- Rolling pin
- Aluminum foil (for armature core)
Step 1: Shaping the Stems
-
Create the core:
Crumple a small piece of aluminum foil into a cylinder shape with a slightly wider base. This saves clay and helps the mushroom stand stably while drying. -
Cover the core:
Roll out a slab of your red clay (or beige clay for the smaller mushroom) to about 1/4 inch thickness. Wrap this slab around your foil core, joining the seams by smoothing the clay with a wet finger. -
Refine the shape:
Roll the clay cylinder gently on your work surface to create a smooth, mostly straight stem. Widen the base slightly by pressing it down firmly so it won’t tip over. -
Round the top:
Smooth over the top of the stem so the foil is completely enclosed, creating a slightly domed surface where the cap will sit.
Pro Tip: Seamless Join
If the cap feels heavy or wobbly, insert a toothpick halfway into the stem before adding the cap. This acts as an internal dowel for extra stability.
Step 2: Sculpting the Caps
-
Form the cap base:
Take a ball of red clay slightly larger than a golf ball. Flatten the bottom against the table while keeping the top rounded to create a hemisphere shape. -
Hollow the underside:
Use your thumb to gently press an indentation into the flat bottom of the cap. This creates a socket that will fit securely over the stem you just made. -
Add texture:
Using a ball stylus or the end of a paintbrush, press random indentations and small holes into the top of the mushroom cap. Vary the sizes for a natural, organic look. -
Connect the pieces:
Score the top of the stem and the underside of the cap with a needle tool. Apply a little water slip to both surfaces and press the cap firmly onto the stem. I like to wiggle it slightly to ensure a tight bond.
Level Up: Functional Art
Make the holes in the cap deeper and larger to turn your mushroom sculpture into a functional incense stick holder or a dry flower vase.
Step 3: Detailing and Finishing
-
Smooth the texture:
Use a damp sponge or finger to smooth out any harsh fingerprints on the stem and cap, but leave the cute indentations sharp. -
Let it dry:
Allow the sculptures to dry completely. For air-dry clay, this usually takes 24-48 hours depending on thickness. Flip them occasionally if the bottom stays damp. -
Paint the eyes:
Using a very fine brush and black acrylic paint, add two small, widely spaced dots for eyes. Add tiny white highlights to the top corner of the black dots for extra cuteness. -
Add the smile:
Paint a thin, small ‘u’ shape between the eyes for a simple smile. Keep the line weight delicate. -
Apply rosy cheeks:
Dip a rounded brush or a cotton swab into blush pink paint. Dab off most of the paint on a paper towel, then gently stamp rosy cheeks on either side of the smile. -
Highlight the cap spots:
Mix a small amount of watered-down lighter clay slip or use tan paint to fill in some of the indentations on the cap, giving them definition. -
Seal the work:
Once the paint is fully dry, apply a coat of matte varnish to protect the clay and give it a finished, professional look.
Place your happy mushroom duo near a window or potted plant to enjoy their cheerful company
Chili Pepper and Tomato Miniatures
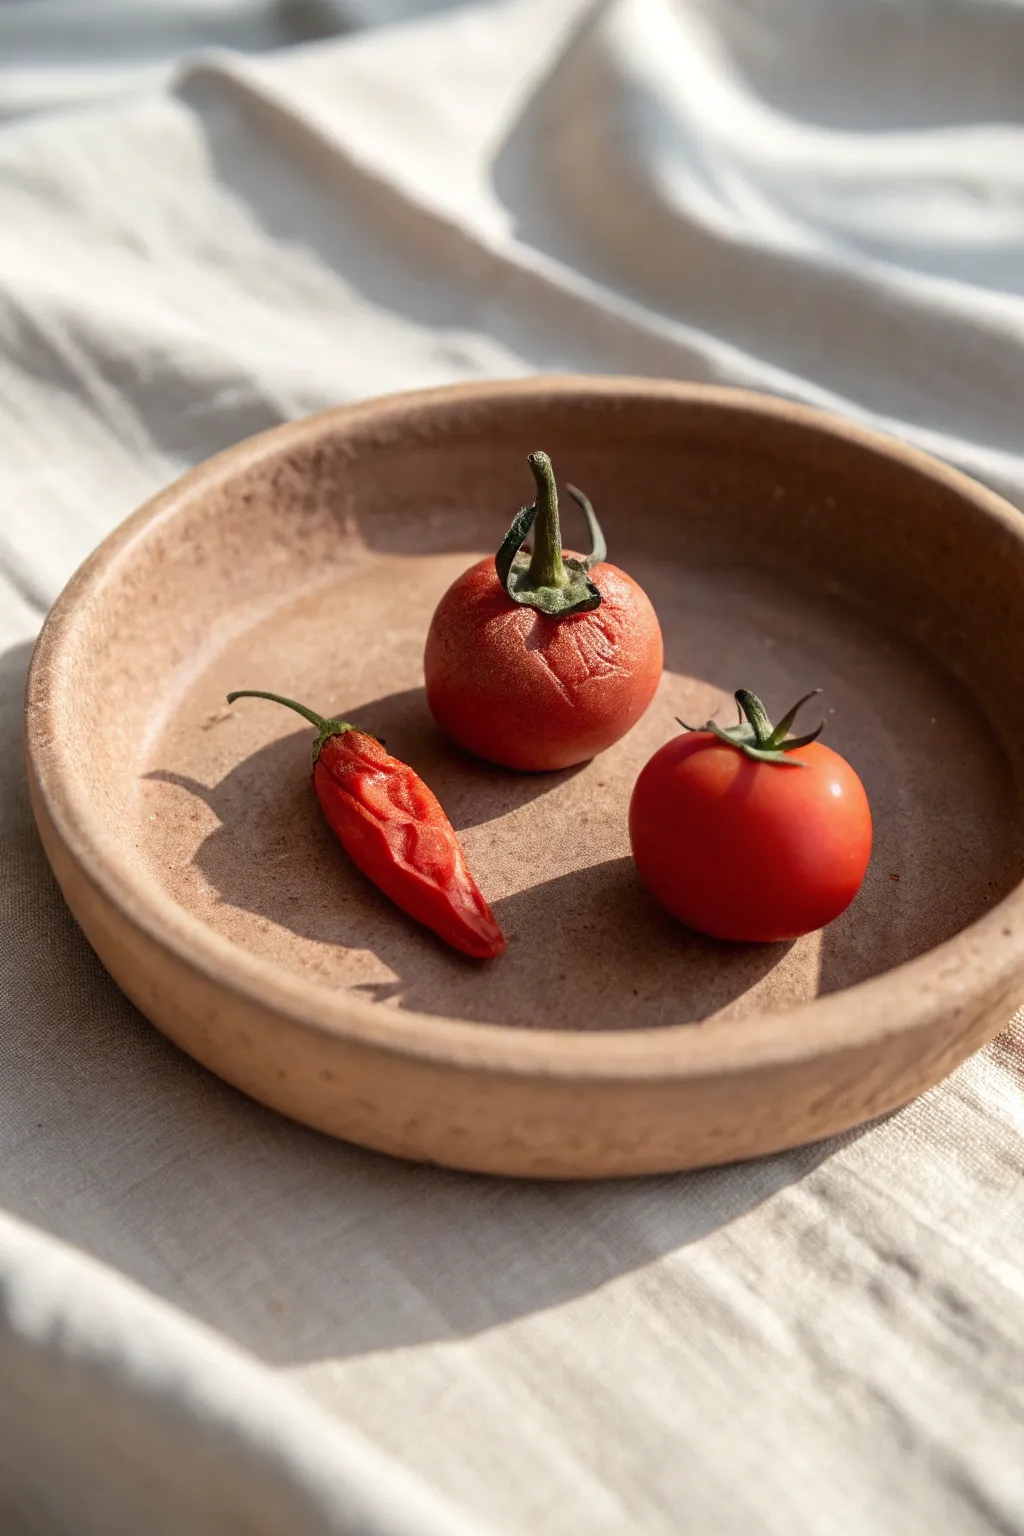
Capture the rustic beauty of the garden with these trompe-l’œil clay vegetables. By combining textured sculpting with careful shading, you can transform simple red clay into incredibly lifelike miniature tomatoes and a dried chili pepper displayed in a shallow dish.
How-To Guide
Materials
- Red polymer clay (terracotta or brick red color)
- Green polymer clay (leaf green)
- Translucent liquid clay or bake-and-bond
- Acrylic paints (dark red, brown, black, white, yellow-green)
- Fine detail paintbrush
- Needle tool or toothpick
- Ball stylus tool
- Coarse sandpaper or texture sponge
- Soft pastel chalks (red, orange, brown)
- Matte varnish
Step 1: Sculpting the Tomatoes
-
Create the base:
Start by conditioning your red clay until it is soft and pliable. Roll two balls of clay, making one slightly larger than the other; aim for the size of a large cherry tomato. -
Shape the larger tomato:
Take the larger ball and gently press it down slightly so it isn’t a perfect sphere. Use your finger to create a small indentation at the top center where the stem will attach. -
Add texture:
For a realistic look, roll the tomato gently over coarse sandpaper or dab it with a texture sponge to give it a skin-like texture rather than perfect smoothness. I like to add a subtle crease or dent on one side to mimic natural growth imperfections. -
Form the smaller tomato:
Repeat the shaping process for the smaller red ball. Keep this one smoother and tauter to represent a fresher, firmer tomato. -
Sculpt the calyx (star stem):
Using a tiny amount of green clay, flatten it into a thin disk. Use a needle tool or craft knife to cut out a star shape with five slender points. -
Attach the stems:
Place a tiny drop of liquid clay into the indentation of each tomato. Press the green star shape into the top, curling the tips of the leaves slightly upward for realism. -
Create the stalk:
Roll a very thin snake of green clay for the main stem. Attach a short piece to the center of the green star on each tomato, texturing it slightly with a needle tool.
Too Smooth?
If your dried chili looks too plastic, use the side of a needle tool to aggressively re-indent wrinkles before baking. Real dried peppers are very uneven.
Step 2: Crafting the Dried Chili
-
Shape the pepper body:
Roll a small amount of red clay into an elongated cone shape, about the length of your thumb nail. -
Create the withered effect:
This is crucial for realism: pinch and twist the cone gently. Use a needle tool to press deep wrinkles and folds along the length of the pepper to mimic the dried, shriveled skin. -
Bend the form:
Gently curve the tip of the pepper to one side. A dried chili is rarely perfectly straight. -
Add the chili stem:
Use a tiny bit of green clay mixed with a pinch of brown paint or clay to create a duller, dried stem color. Attach a short, twisted stem to the top of the pepper.
Step 3: Sculpting the Dish
-
Form the bowl base:
Roll a larger ball of red clay (or terracotta air-dry clay if you prefer a rougher texture). Flatten it into a disk about 3-4 inches in diameter. -
Raise the rim:
Pinch the edges of the disk upwards to create a shallow rim, smoothing the clay with your thumbs as you rotate the piece. -
Texture the bowl:
Dab the entire surface with a stiff brush or crumbled foil to create a gritty, earthenware stone texture.
Natural Stem Tips
For hyper-realism, dab a tiny dot of brown paint on the very cut end of the green stems to simulate where the plant was snipped from the vine.
Step 4: Finishing Touches
-
Bake the project:
Arrange the vegetables inside the bowl or bake them separately according to your clay manufacturer’s instructions (usually 275°F/130°C for 15-30 minutes). -
Apply shading washes:
Once cool, mix a very watery wash of dark red and brown acrylic paint. Brush it into the deep wrinkles of the chili pepper and the crevices of the larger tomato, then wipe away the excess with a paper towel to highlight the texture. -
Highlight the stems:
Dry brush a tiny bit of white or yellow-green paint onto the raised edges of the tomato stems to make details pop. -
Dusting:
Shave some brown and white pastel chalk into infinite dust. Brush this sporadically over the tomatoes and the bowl’s rim to give them a dusty, harvested-from-the-earth appearance. -
Seal:
Finish with a coat of matte varnish to protect the paint and pastels without making the vegetables look unnaturally glossy.
Place your finished miniature bowl on a linen cloth to complete the rustic countryside aesthetic.
Red Clay Rose Sculpture
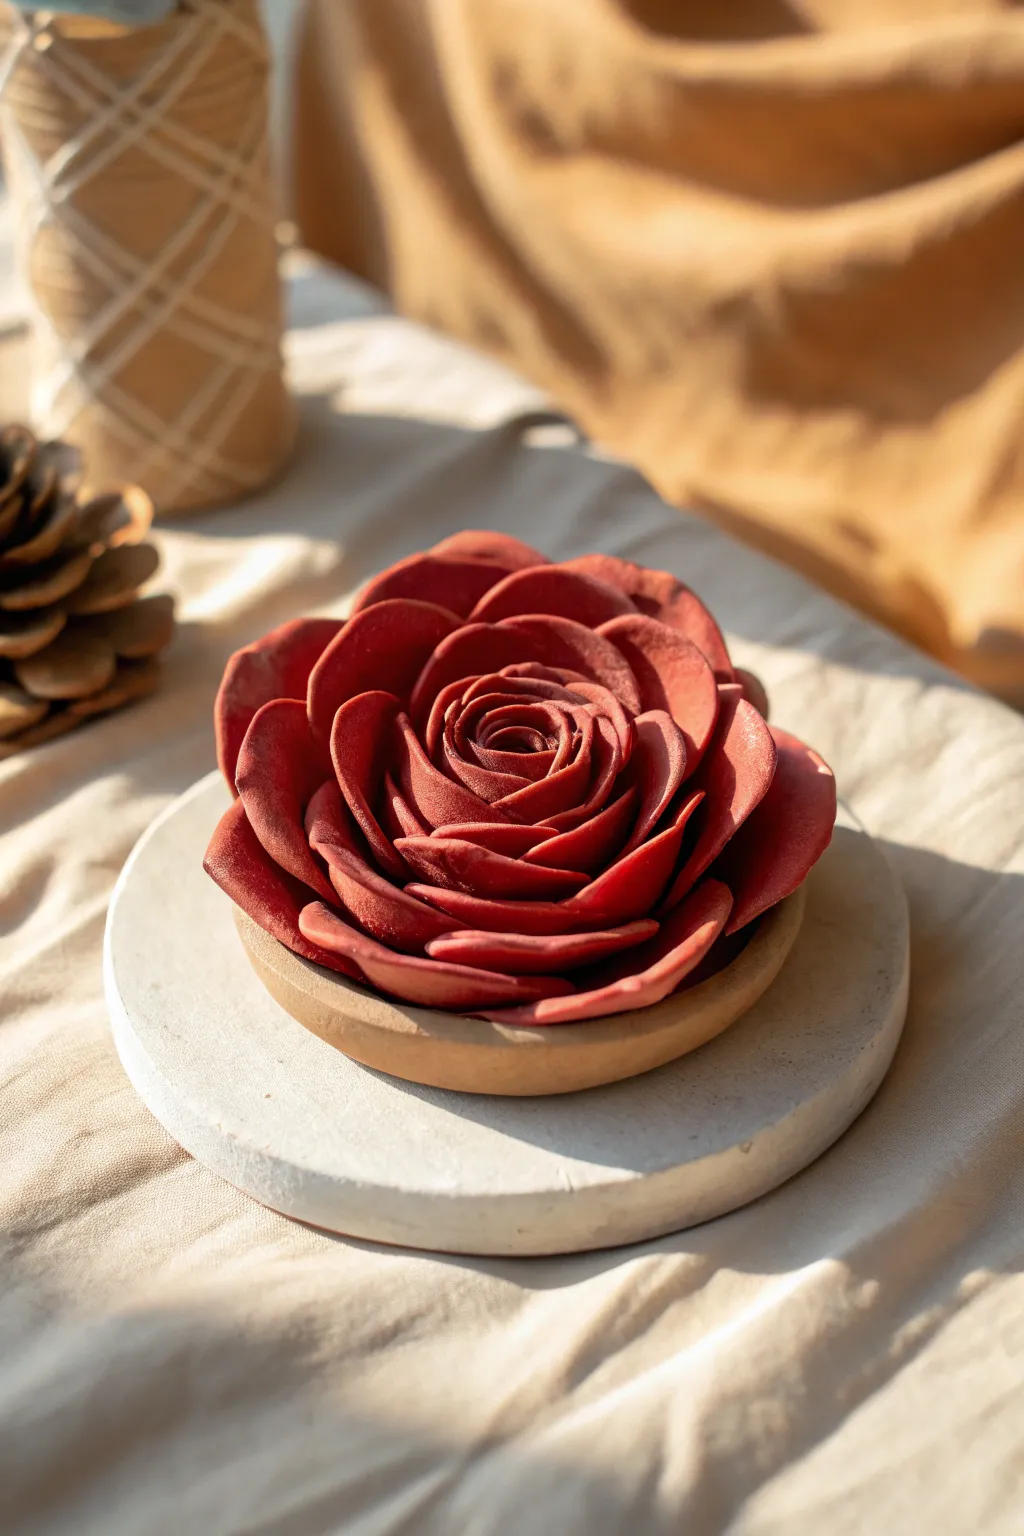
Capture the timeless beauty of a blooming rose using smooth red clay to create this striking sculptural piece. The detailed petals and warm terra cotta tones make for an elegant decoration that never fades, perfect for adding an organic touch to any tabletop.
Step-by-Step Guide
Materials
- Red pottery clay (terra cotta) or red oven-bake polymer clay
- Rolling pin or acrylic roller
- Clay cutting tool or craft knife
- Small cup of water (slip) or liquid clay adhesive
- Round cookie cutter (approx. 2 inches)
- Small round clay base or shallow saucer (optional)
- Modeling tool with a ball end
- White circular display base (concrete or plaster coaster)
Step 1: Preparing the Foundation
-
Condition the clay:
Begin by kneading your red clay until it is soft, pliable, and free of air bubbles. If using natural clay, ensure it has the right moisture content; for polymer, warm it in your hands until smooth. -
Create the base:
Roll out a small ball of clay and flatten it into a thick disc, or use a shallow clay saucer as seen in the image. This will serve as the anchor for your petals. -
Establish the center bud:
Take a small pinch of clay and roll it into a short, tapered cone shape. This will be the very core of your rose.
Cracking Clay?
If edges crack while shaping, your clay is too dry. Dip your finger in water (or baby oil for polymer) and smooth the crack immediately before continuing.
Step 2: Forming the Inner Petals
-
Roll out petal sheets:
Roll a sheet of clay to a consistent thickness of about 1/8th of an inch. Using your round cutter, punch out several circles. -
Thin the edges:
Take one circle and gently press the edges between your thumb and forefinger to taper them. The edges should be thinner than the center of the petal for a realistic look. -
Wrap the first petal:
Wrap this first flattened circle tightly around your center cone, overlapping the edges so the cone is completely hidden. -
Add the second layer:
Prepare two more petals. Attach them opposite each other around the center bud, slightly higher than the base using a dab of water or adhesive to secure them. -
Curl the tips:
Before moving to the next layer, gently curl the very top edge of these inner petals outward slightly to mimic a slightly opening bud.
Step 3: Expanding the Bloom
-
Prepare larger petals:
Cut out 5-7 more circles. Gently flatten them slightly more than the previous batch so they appear larger and wider. -
Apply the middle layer:
Attach these petals in a spiral pattern around the bud. Each new petal should start at the midpoint of the previous one. -
Shape while attaching:
As you press the base of each petal onto the main mass, use your thumb to curve the body of the petal outwards, creating a cup shape. -
Create the outer layer:
Roll out your final, largest set of petals (about 7-9 pieces). I like to make the edges of these slightly ragged or uneven for a more organic feel. -
Attach outer petals:
Press these onto the base, angling them more openly than the previous layers. They should lay almost flat against the clay saucer base. -
Refine the edges:
Use your ball tool or finger to gently roll the outer edges of the largest petals downward and outward, maximizing the volume of the flower.
Fingerprint Eraser
Before baking or drying, lightly brush the entire sculpture with a soft brush and a tiny bit of baby oil or water to melt away accidental fingerprints.
Step 4: Finishing Touches
-
Smooth the connections:
Check the underside of the rose where the petals meet the base. Smooth out any harsh seams with a modeling tool or a bit of slip. -
Add texture:
Lightly brush a dry sponge or textured fabric against the petals if you want a subtle matte texture rather than a smooth finish. -
Dry or Bake:
If using air-dry or kiln clay, let it dry slowly under plastic to prevent cracking. If using polymer clay, bake according to the package instructions. -
Final Display:
Once fully cured or fired, place your rose sculpture onto the white circular coaster base to contrast with the deep red tones.
Enjoy the permanent bloom of your handmade sculpture as it brings warmth to your decor
Carved Red Clay Wall Tile
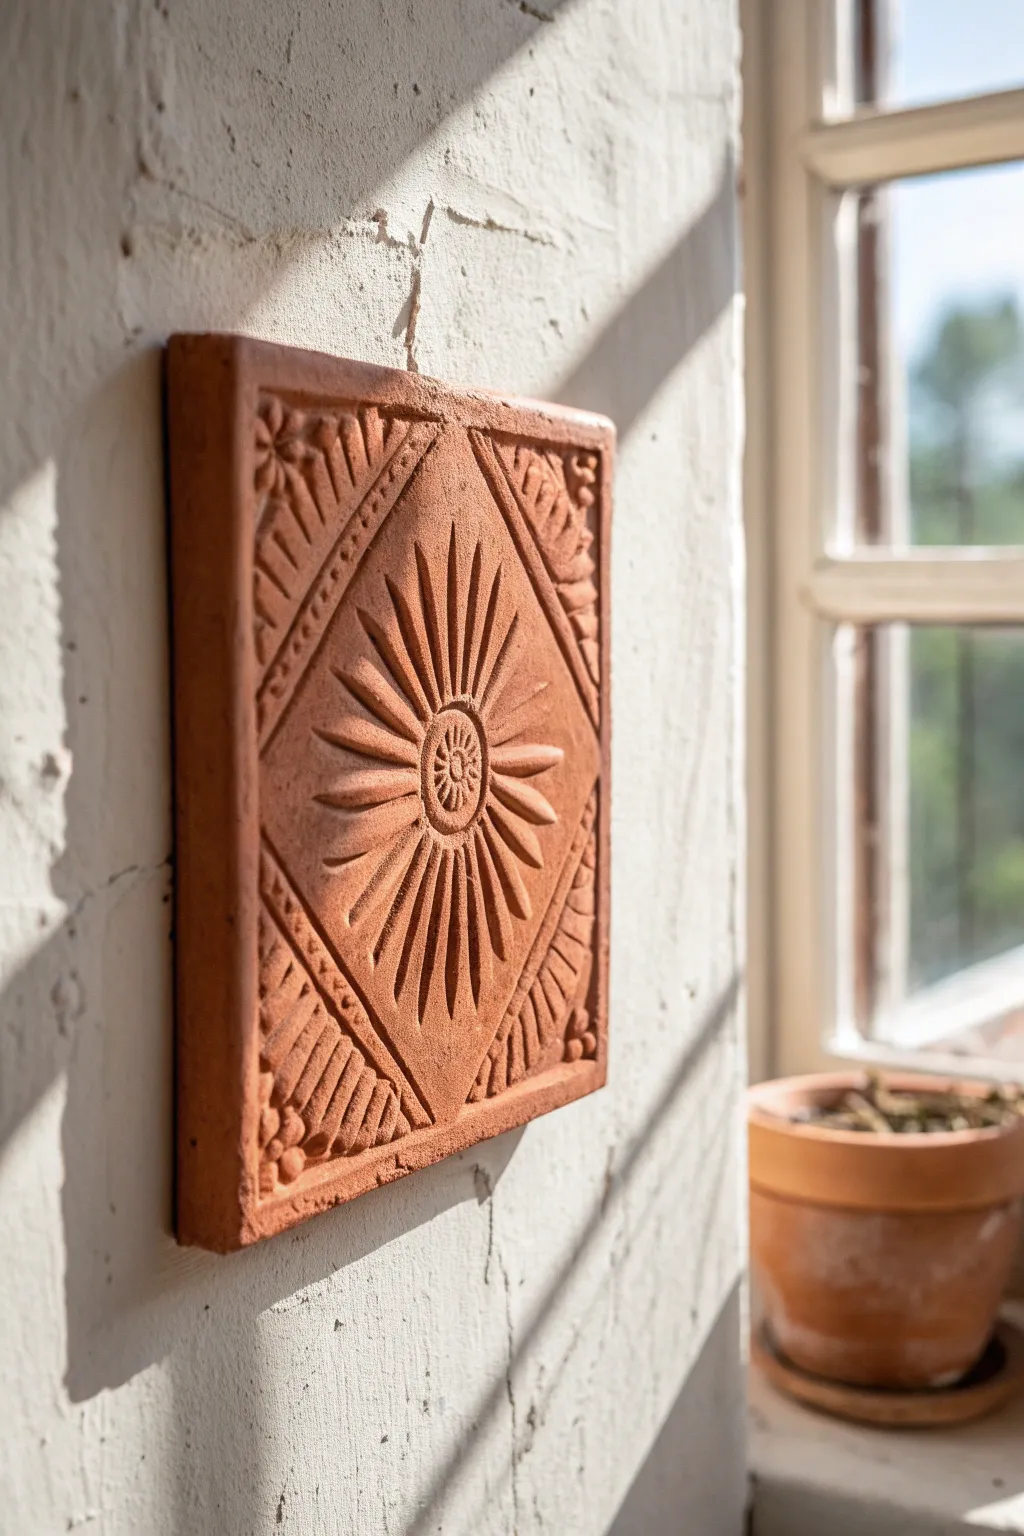
Bring the warmth of the sun indoors with this hand-carved terracotta wall tile, featuring a classic sunburst motif and detailed geometric borders. The natural red clay offers an earthy, rustic charm that looks stunning against textured white walls.
Step-by-Step
Materials
- Red earthenware clay (terracotta), grogged for strength
- Rolling pin
- Two wooden guide strips (approx. 1/2 inch thick)
- Canvas mat or heavy cloth (to prevent sticking)
- Needle tool
- Loop tool or ribbon tool (small)
- Fettling knife
- Ruler or straight edge
- Small round piping tip or straw (for circles)
- Rubber kidney rib
- Scoring tool or old toothbrush
- Slip (clay mixed with water)
- Strong mounting adhesive or tile hanger mechanism
Step 1: Preparation and Shaping
-
Prepare the slab:
Begin by wedging your red earthenware clay thoroughly to remove air bubbles. Place the clay on your canvas mat between two wooden guide strips. Roll the clay out until it is a uniform slab, level with your guide strips—about 1/2 inch thickness is ideal for durability. -
Cut the square:
Using a ruler and a fettling knife, measure and cut a precise square. An 8×8 inch square works well for this level of detail. Keep your knife perpendicular to the table for straight, clean edges. -
Smooth the surface:
Take a rubber kidney rib and gently compress the surface of the clay. This aligns the clay particles and creates a smooth canvas for your carving. Don’t forget to smooth the cut edges as well. -
Mark the design:
Lightly trace your design onto the fresh clay using a needle tool. Draw an inner square rotated 45 degrees to form a diamond. Mark the center point of the diamond for your sunburst.
Step 2: Carving the Relief
-
Define the diamond border:
Using a ruler as a guide, press a tool with a blunt edge into the clay along the diamond lines to create a recessed channel. I like to use the back of a small paintbrush for this to get a smooth, rounded groove. -
Create the central medallion:
Press a small round object or circle cutter into the exact center. Inside this circle, use your needle tool to scribe small petal shapes to create the inner flower detail. -
Carve the sun rays:
From the central medallion, lightly score lines radiating outward toward the edges of the diamond. Using a small loop tool, carve out the negative space between the rays. The rays should be raised, so you are removing the clay *between* them. -
Bevel the rays:
Use a modeling tool to smooth and bevel the edges of each sun ray, making them sharp and distinct. They should taper slightly as they move away from the center. -
Detail the corners:
Move to the four triangular corners outside the central diamond. Use your tool to incise diagonal lines or stylized leaf patterns. Carve these slightly less deeply than the central sunburst to keep the focus in the middle. -
Add decorative texture:
Along the border of the diamond, use a needle tool to poke small, evenly spaced dots. In the outer corners, add small spheres of clay using slip and score, or stamp small floral motifs if you have stamps available.
Clean Lines
Wait until the clay is ‘leather hard’ (firm like cheese) before doing final cleanup. Crumbs carve away much cleaner than on wet clay.
Step 3: Finishing and Firing
-
Hollow or groove the back:
Carefully flip the tile over. If you plan to hang it on a nail, carve a small keyhole notch. Alternatively, score a cross-hatch pattern on the back to help adhesive grip better later. -
Slow drying:
Loosely cover the tile with plastic. Let it dry very slowly over several days to prevent warping, especially at the corners. Flip the tile occasionally to ensure even airflow. -
Bisque fire:
Once bone dry, fire the piece in a kiln to cone 04 (or the specific temperature required for your red body clay). This permanently sets the shape. -
Mounting:
After firing, the tile can be left unglazed for that raw, sandy texture shown in the photo. Attach a heavy-duty picture hanger to the back using strong two-part epoxy, or mount directly to the wall using construction adhesive.
Antique Wash
Apply a diluted black underglaze wash after bisque firing and wipe it back with a sponge. The dark color stays in the crevices to highlight the carving.
Hang your finished tile near a window where shadows can dance across the relief work throughout the day
Whimsical Red Clay Creature Duo
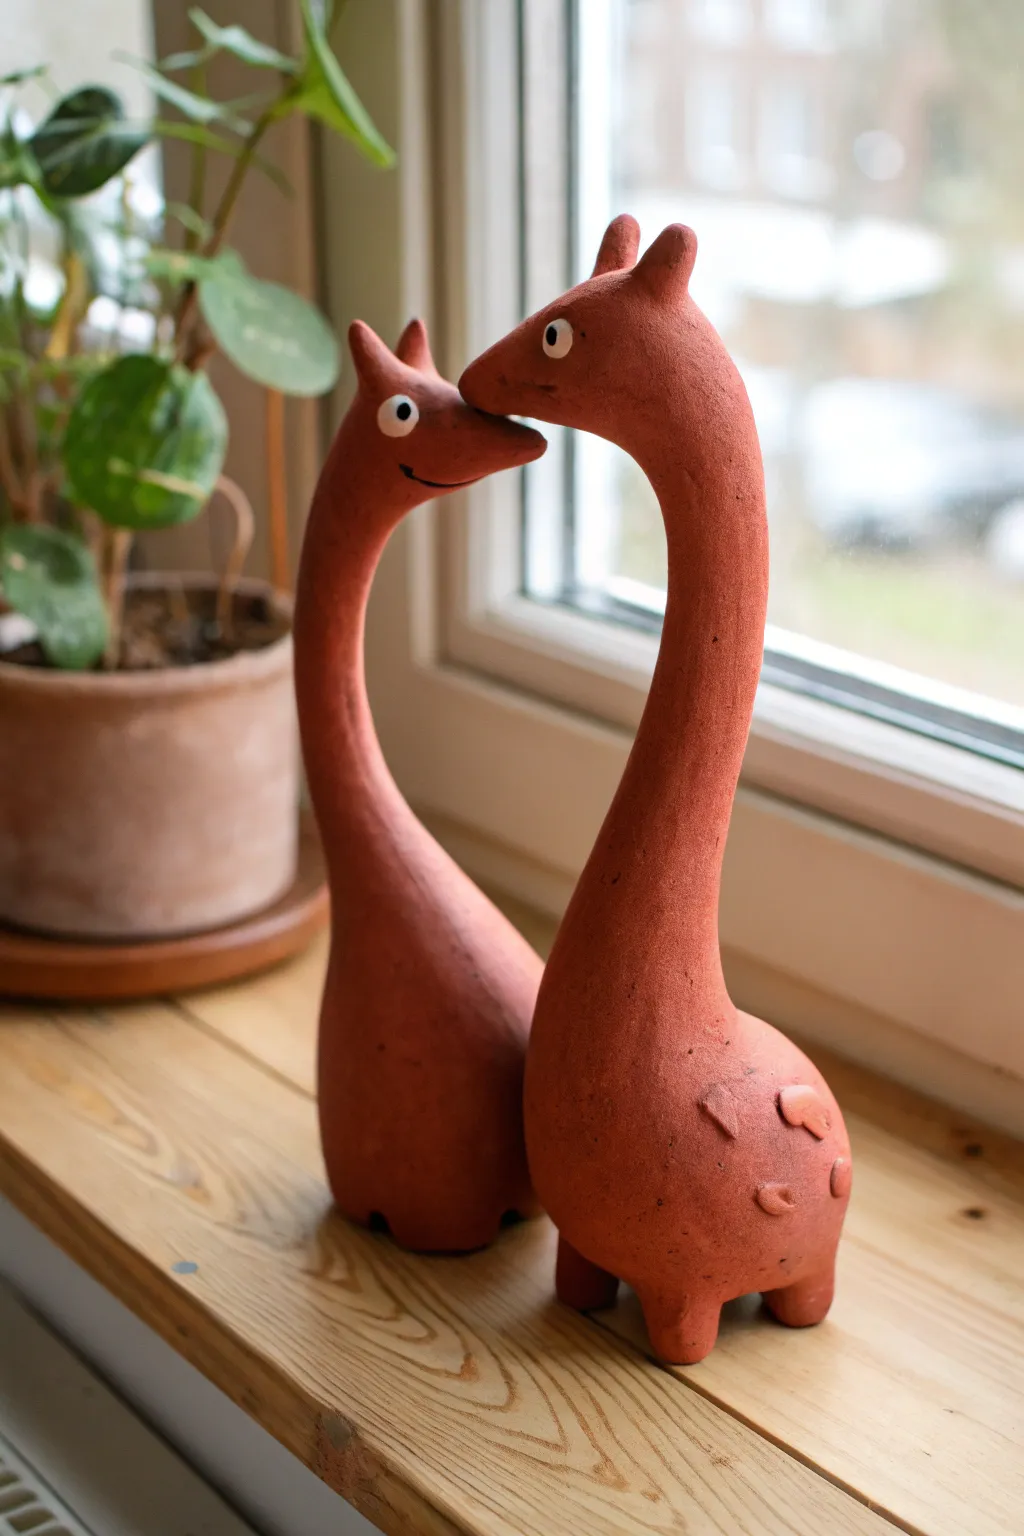
Bring a touch of playful charm to your windowsill with this adorable duo of red clay creatures. These stylized figures feature elongated necks, simple bodies, and expressive little faces that seem to engage in a silent, loving conversation.
Step-by-Step Guide
Materials
- Red terracotta clay (air-dry or kiln-fire)
- Clay carving tools or a craft knife
- Small cup of water (for smoothing)
- Small sponge
- White acrylic paint (for eyes)
- Black acrylic paint or fine brush (for pupils/mouth)
- Toothpick or needle tool
- Rolling pin (optional)
- Score and slip tool (or an old toothbrush)
Step 1: Shaping the Bodies
-
Prepare the Clay:
Start with two lumps of well-conditioned red clay. One lump should be slightly larger than the other to create the size difference between the two figures. -
Form the Bases:
Roll each lump into a smooth ball in your palms. Gently tap the bottom on your work surface to create a flat base so the figures will stand securely. -
Shape the Torsos:
Begin gently elongating the top of each ball, pinching and pulling upwards to start forming the transition into the neck. Keep the body rounded and bulbous. -
Neck Extension:
Roll a thick coil of clay for each neck. Since the necks need to support the heads, ensure the base of the coil is thick enough to blend seamlessly into the body. -
Attach the Necks:
Score the top of the body and the bottom of the neck coil. Apply a little slip (water and clay mixture) and press them together firmly. Smooth the seam with your thumb or a modeling tool until the join is invisible.
Necks drooping?
If the long necks start to sag while working, insert a stiff wire or toothpick into the center of the body and neck as an internal armature for support.
Step 2: Sculpting Details
-
Modeling the Heads:
Shape the top of the neck into a head. Gently bend the clay forward to create a snout. For the taller figure, curve the neck slightly downward; for the shorter one, curve it slightly upward so they appear to be nuzzling. -
Adding Ears:
Pinch two small triangles of clay for each figure. Score and slip the top of the heads, then attach the ears. Blend the clay at the base of the ears so they look like organic extensions of the head. -
Refining the Connection:
Place the two figures together to check their interaction. Adjust the neck curves while the clay is still pliable so their noses just barely touch or overlap comfortably. -
Creating Legs:
Roll four tiny balls of clay for each creature’s feet. Flatten them slightly and attach them to the bottom corners of the body using the score and slip method. -
Textural Details:
On the taller figure, add a few small, flattened patches of clay to the lower back to suggest spots or texture. Blend the edges slightly so they look embossed.
Step 3: Finishing Touches
-
Smoothing Surface:
Dip your finger or a small sponge in water and gently rub the entire surface of both figures. This removes fingerprints and creates that smooth, matte finish seen in the photo. -
Drying Time:
Allow the clay to dry completely. If using air-dry clay, this usually takes 24-48 hours. If using kiln clay, follow your specific firing schedule once bone dry. -
Painting the Eyes:
Using a fine brush and white acrylic paint, add two small circles for eyes on each head. Let this layer dry completely before moving on. -
Adding Pupils:
With a toothpick or very fine brush, dot a tiny amount of black paint into the center of the white circles to bring the characters to life. -
The Smile:
I prefer to use a fine-tip black marker or a very steady hand with black paint to draw a simple, curved line for the mouth just under the snout.
Make it Rugged
Before drying, gently press a piece of rough canvas or coarse sandpaper against patches of the body. This adds a subtle, earthy texture that catches the light.
Place your finished duo near a window where the natural light can highlight their warm, terracotta tones
Little Figure in a Red Hood
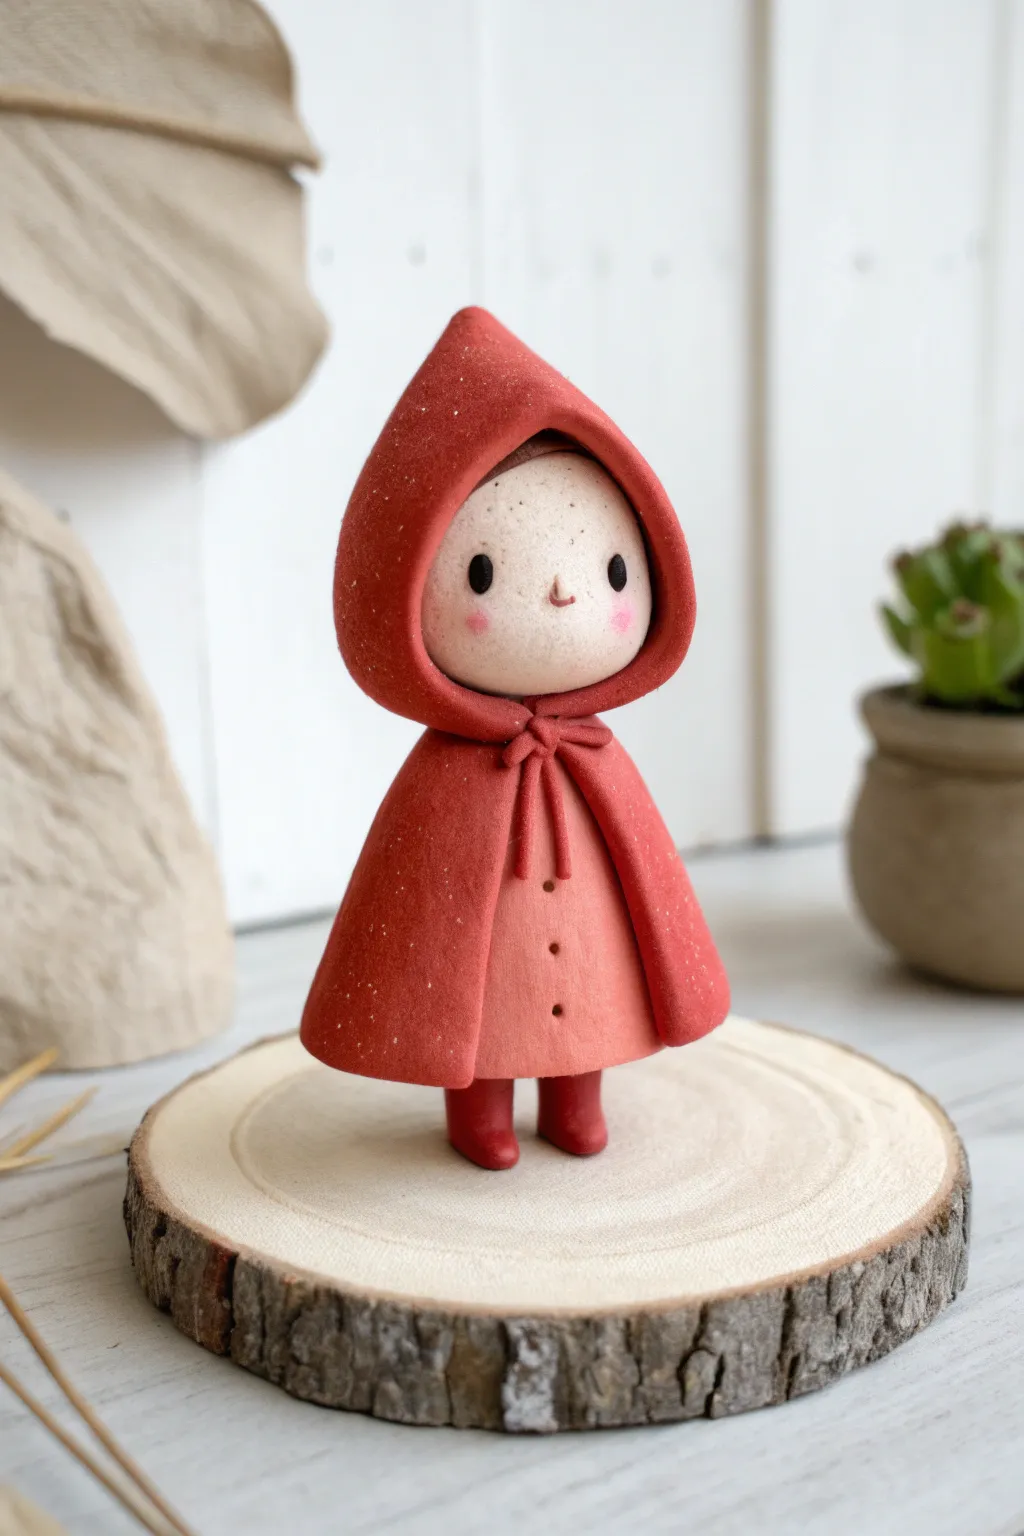
Capture the charm of a fairytale with this adorable figurine featuring a signature red hood and cape. The character’s simplified, minimalist face and soft, rounded forms make it a perfect project for mastering smooth blends and draping fabric effects in clay.
Step-by-Step
Materials
- Red polymer clay (crimson or deep red)
- Beige or skin-tone polymer clay
- Light red or pink polymer clay (for dress)
- Black acrylic paint or clay (for eyes/boots)
- Pastel chalks (pink for cheeks)
- Sculpting tools (needle tool, ball stylus)
- Rolling pin
- Aluminum foil (for armature core)
- Liquid clay or bake and bond
- Oven and baking sheet
- Toothpick or wire for structural support
- Matte varnish (optional)
Step 1: Shaping the Head and Body
-
Form the core:
Start by rolling a small ball of aluminum foil, about the size of a large grape, to serve as the lightweight core for the head. This saves clay and ensures even baking. -
Cover the head:
Roll out a sheet of beige or skin-tone clay. Wrap it smoothly around your foil ball, rolling it gently between your palms to remove any seams or fingerprints until you have a perfect sphere. -
Create the body shape:
Take a piece of light red or coral-toned clay and roll it into a cone shape. The top of the cone should be flat enough to support the head. -
Connect head and body:
Insert a short length of wire or a toothpick halfway into the top of the body cone. Apply a dab of liquid clay, then gently press the head onto the wire to secure it. -
Refine the face shape:
Gently press the front of the head to flatten the face area slightly. This creates a focused canvas for those tiny features later.
Step 2: Dressing the Character
-
Form the dress front:
Using a needle tool, create three small indentations vertically down the center of the dress body to mimic buttons. -
Add boots:
Roll two small cylinders of deep red clay for the boots. Flatten the bottoms so the figure stands securely, and attach them to the underside of the dress cone. -
Prepare the hood:
Roll out a sheet of the deep red clay. Use a circular cutter to create a round piece, then gently stretch one side to form a slight point or teardrop shape. -
Drape the hood:
Place the red sheet over the head, aligning the point at the top. Gently smooth the clay around the sides of the face, ensuring it frames the beige area nicely without covering too much. -
Create the cape:
Roll a larger semi-circle of red clay. Wrap this around the back of the figure’s neck, bringing the corners to the front under the chin. -
Blend the fabric:
Use a silicone shapers or your finger to smooth the seam where the hood meets the cape at the back of the neck, making it look like one continuous garment. -
Secure the tie:
Roll two tiny, thin snakes of red clay. Attach these at the neck area where the cape meets, fashioning them into a simple bow shape.
Clean Clay Hygiene
Red pigment bleeds easily! Wash your hands thoroughly or switch gloves after handling the red clay before touching the beige face clay to avoid pink smudges.
Step 3: Detailing and Finishing
-
Add facial texture:
Before baking, I like to take an old toothbrush or stiff bristle brush and very lightly tap the surface of the clay to give it a speckled, organic texture rather than a plastic-smooth finish. -
Paint the eyes:
Using a small ball stylus or the end of a paintbrush, dip into black acrylic paint and dot two wide-set eyes onto the face. -
Sculpt the nose:
Take a microscopic crumb of beige clay and place it centrally below the eyes for a tiny nose, or draw a small ‘L’ shape with a fine darker marker. -
Blush the cheeks:
Scrape a bit of pink pastel chalk into a fine powder. Use a soft, dry brush to gently dust rosy circles onto the cheeks. -
Bake:
Bake the figure according to your clay manufacturer’s instructions. Usually, this is around 230°F to 275°F (110°C to 135°C) for 15-30 minutes. -
Cool and display:
Let the figure cool completely inside the oven to prevent cracking. Once cool, you can mount it to a small wood slice for stability.
Basket Upgrade
Level up by sculpting a tiny woven basket from brown clay snakes to hang on the figure’s arm, completing the classic storybook look.
Place your finished wanderer on a shelf or among your houseplants for a touch of whimsy