
If you’re craving a color that feels instantly sunny and cheerful, orange clay is where it’s at. I pulled together my favorite orange clay ideas—starting with the classics everyone loves, then sliding into some extra-fun twists.
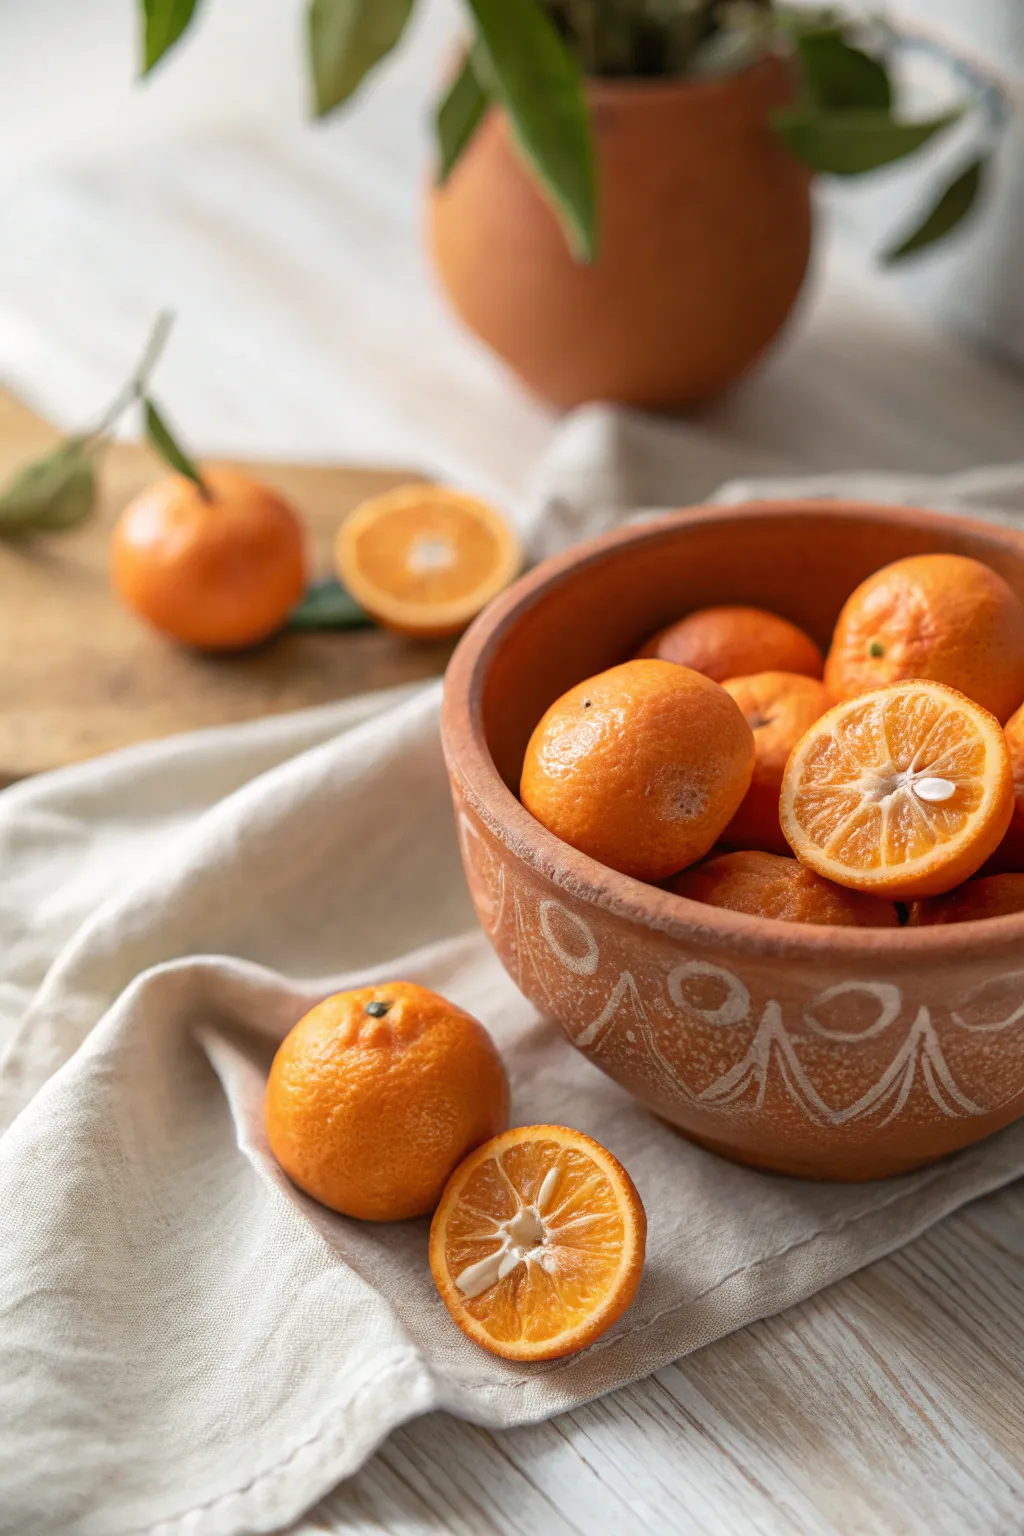
Mini Whole Oranges With Textured Peel
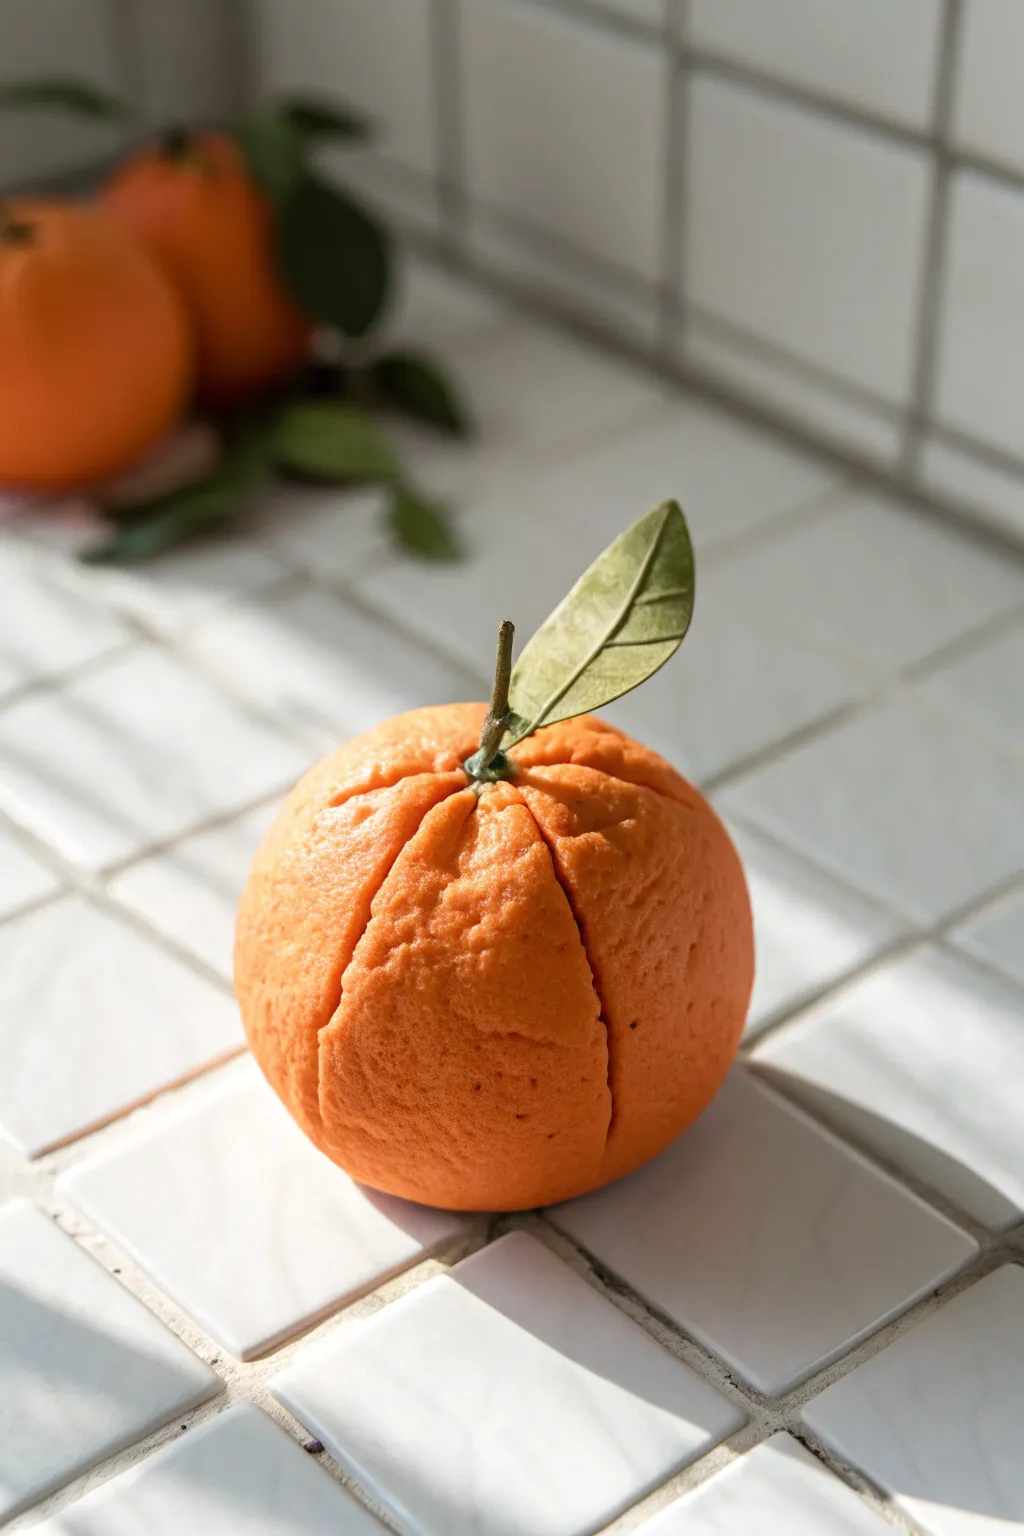
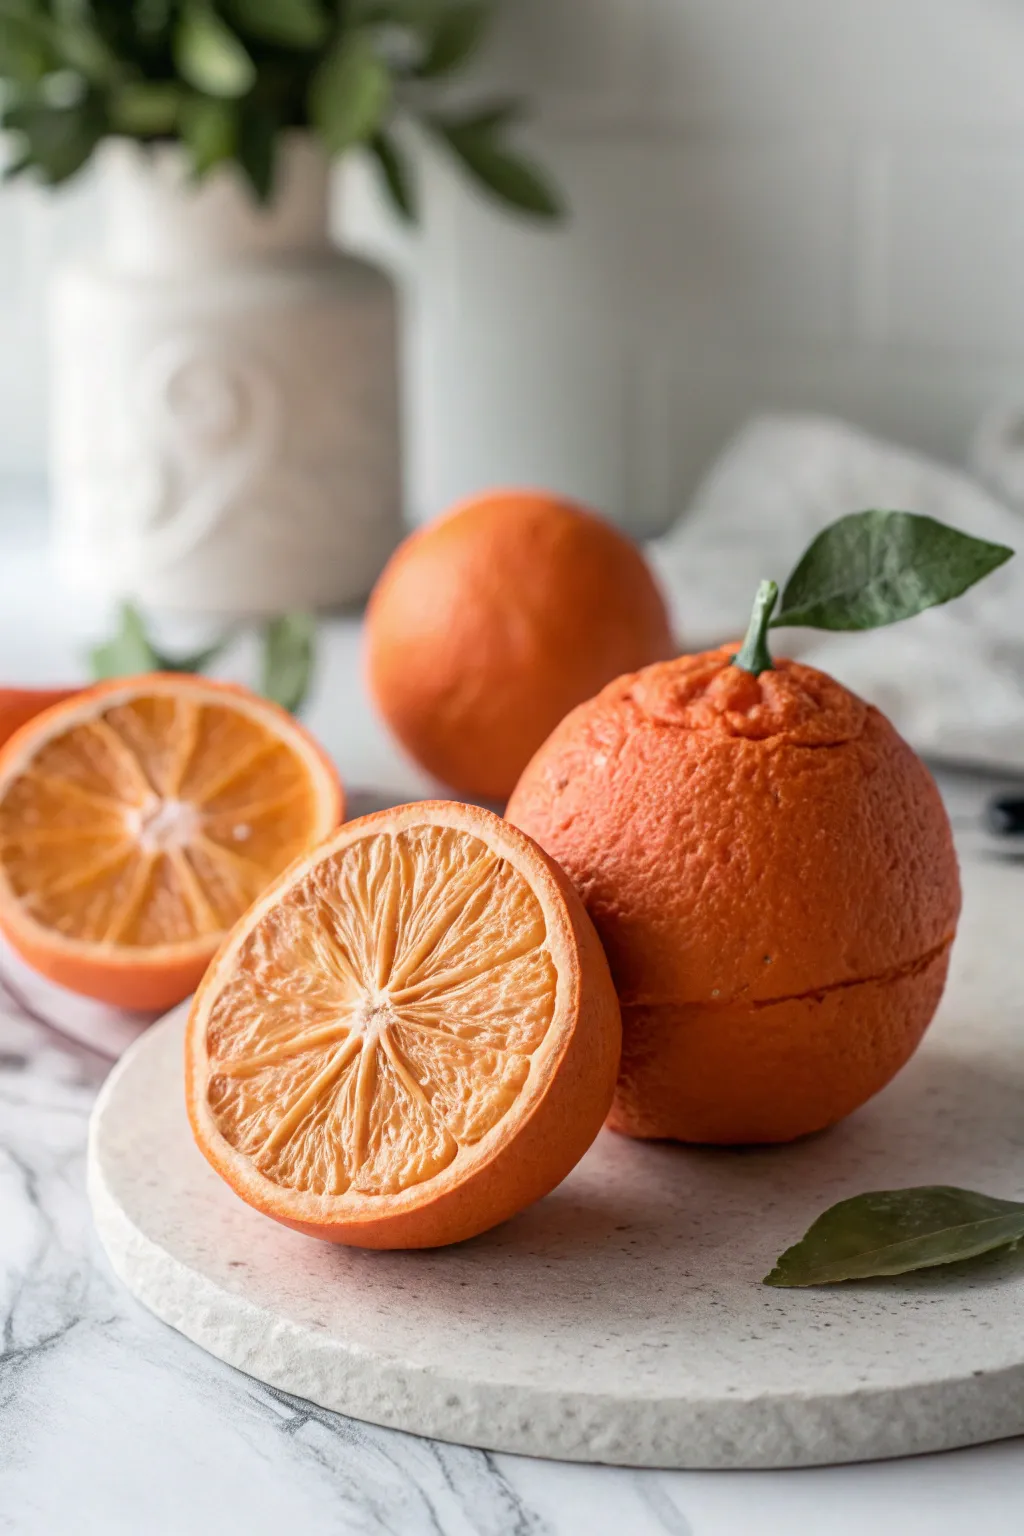
Achieve a hyper-realistic look with this textured clay orange project, perfect for miniature displays or unique decor. The secret lies in the meticulous skin texture and subtle surface indentations that mimic the natural irregularities of citrus fruit.
Step-by-Step Tutorial
Materials
- Orange polymer clay (translucent and opaque mix recommended)
- Green polymer clay (for leaf)
- Brown polymer clay (for stem)
- Liquid polymer clay (optional)
- Aluminum foil
- Toothbrush or stiffness bristle brush
- Needle tool
- Ball stylus tool
- Soft pastel chalks (orange, red, brown)
- Paintbrush for pastels
- Craft knife
- Gloss or satin varnish (optional for leaf)
Step 1: Forming the Base
-
Create a foil core:
Crumple a piece of aluminum foil into a tight ball, slightly smaller than your desired finished orange size. This saves clay and keeps the sculpture lightweight. -
Condition the clay:
Mix your opaque and translucent orange clays until fully conditioned. The translucent clay adds a waxy depth that makes the fruit look juicy rather than plastic. -
Cover the core:
Flatten the orange clay into a sheet and wrap it completely around the foil ball. Roll it briskly between your palms to smooth out any seams and ensure a perfect sphere. -
Add initial segments:
Using a blunt knife tool or the side of a needle tool, gently press vertical indentations into the sphere to suggest the internal segments. These shouldn’t be deep cuts, just subtle depressions that run from top to bottom.
Fingerprint Fix
If you accidentally squash the texture with a fingerprint while holding it, cover the spot with a piece of plastic wrap and re-texture lightly with the toothbrush.
Step 2: Texturing the Skin
-
Establish the peel texture:
Take a stiff toothbrush or a dedicated texture brush and firm tap it all over the surface of the clay. Move in small circles to prevent a uniform pattern. -
Refine the pores:
Go back over specific areas with a needle tool, poking singular, slightly deeper holes to mimic the larger pores often seen on citrus rinds. -
Soften the surface:
Use your fingertip to very lightly graze over the textured surface. You want to smooth down any sharp ‘peaks’ created by the brush while leaving the ‘valleys’ intact. -
Shade with pastels:
Shave a small amount of orange and red soft pastels into a powder. With a dry soft brush, dust the clay, focusing slightly more color into the indentations and texture pits for depth.
Natural Imperfections
Don’t aim for a perfect sphere. Real oranges are slightly lumpy. Add a tiny brown clay speck to the skin to mimic a ‘bruise’ or natural blemish.
Step 3: Stem and Leaf Details
-
Form the stem connection:
Create a small depression at the top center of the orange using a ball stylus. This is where the stem will emerge. -
Create the stem:
Roll a tiny snake of brown mixed with a touch of green clay. Insert it into the depression, flaring the bottom slightly so it looks naturally attached to the fruit skin. -
Shape the leaf:
Flatten a small teardrop of green clay. Use a needle tool to etch a central vein and smaller lateral veins. -
Detail the leaf edges:
I find that gently pinching and twisting the edges of the leaf makes it look dried and organic rather than perfectly flat. -
Attach the leaf:
Press the leaf onto the stem. You can use a tiny drop of liquid clay here to ensure a permanent bond during baking. -
Add final weathering:
Dust the leaf and stem with a tiny bit of brownish-green pastel powder to dull the shine and add realism.
Step 4: Baking and Finishing
-
Bake the project:
Place your orange on a piece of cardstock or a bed of cornstarch (to prevent flat spots) and bake according to your clay manufacturer’s instructions. -
Cool down:
Allow the orange to cool completely inside the oven if possible, or usually just on the counter, to prevent thermal shock cracking. -
Varnish the leaf:
If desired, apply a thin coat of satin or semi-gloss varnish only to the leaf to replicate its natural waxy sheen, leaving the orange peel matte.
Now you have a marvellously textured fruit piece ready to brighten up any bowl or display


Orange Slice Cane for Citrus Chips
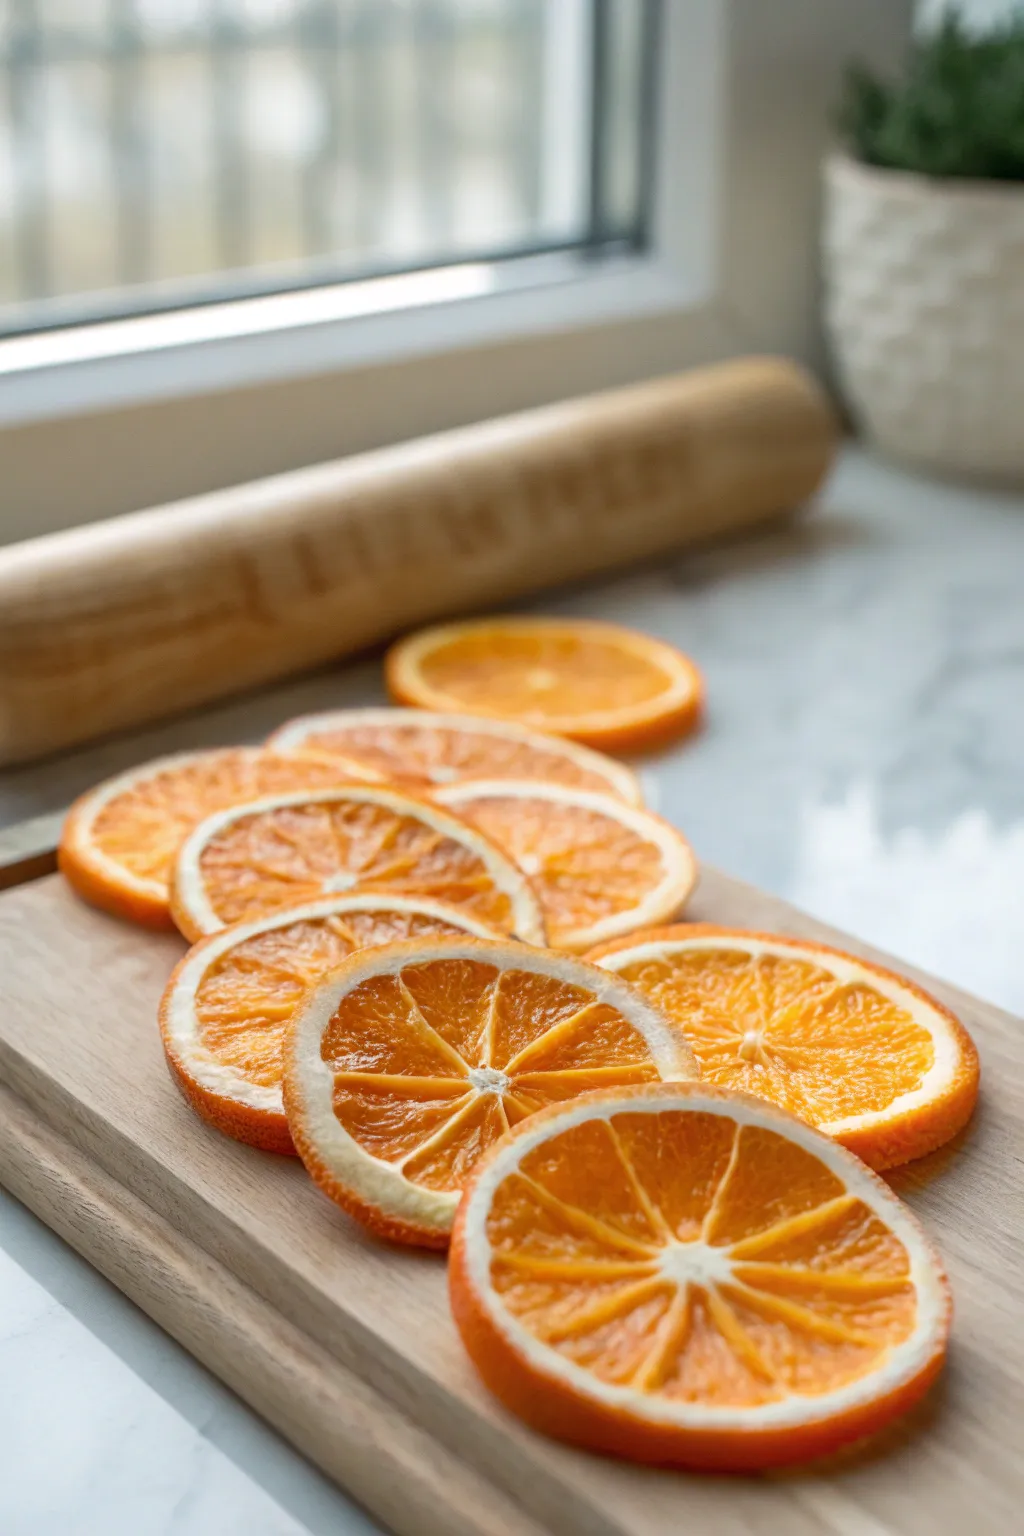
Capture the juicy translucence of fresh fruit with this deceptively simple polymer clay cane technique. These realistic orange slices feature a detailed pith and segmented center, perfect for making non-edible citrus chips or summer jewelry.
Step-by-Step
Materials
- Translucent polymer clay
- Orange alcohol ink
- Opaque white polymer clay
- Orange polymer clay (standard opaque)
- Pasta machine or acrylic roller
- Tissue blade or very sharp craft knife
- Needle tool or toothbrush (for texturing)
- Tile or glass work surface
Step 1: Creating the Juicy Center
-
Tint the Translucent:
Begin by conditioning your translucent clay until it is soft and pliable. I like to add just a few drops of orange alcohol ink to tint it a vibrant, glassy orange without making it opaque. -
Form the Segments:
Roll your tinted translucent clay into a thick log, about 1 inch in diameter. Pinch one side of the log along its entire length to create a teardrop cross-section shape. -
Prepare the Pith:
Condition the opaque white clay and run it through your pasta machine on a thin setting (around #4 or #5). You want a thin, consistent sheet. -
Wrap the Teardrop:
Lay the orange teardrop log onto the white sheet. Wrap the white clay around the teardrop, trimming the excess carefully so the seams butt up against each other rather than overlapping. -
Reduce the Cane:
Gently squeeze and stretch this wrapped log to reduce its size. Keep the teardrop shape intact. Extend it until it’s about 10-12 inches long. -
Cut Segments:
Using your tissue blade, cut the long cane into 8 equal lengths. These will become the individual juice segments of your orange.
Rest is Best
Don’t rush slicing! Let the finished cane sit in the fridge for 20 minutes. Firm clay distorts much less under the blade, giving you perfectly round slices.
Step 2: Assembling the Orange
-
Build the Center:
Roll a very thin snake of white clay to act as the central core. Arrange your 8 teardrop segments around this core, with the pointy ends facing inward. -
Fill the Gaps:
If there are significant gaps between the wide outer edges of the teardrops, insert tiny triangles of translucent orange clay to keep the circle round. -
Wrap the Whole Cane:
Wrap the entire assembled circle in another layer of the thin opaque white sheet. This forms the main pith layer between the fruit and the rind. -
Create the Rind:
Condition the opaque orange clay and roll it into a medium-thickness sheet. Wrap this around the white layer to create the outer skin of the orange. -
Texture the Skin:
Before reducing, take a moment to gently tap a toothbrush or sandpaper against the orange outer layer to mimic the porous texture of citrus zest.
Make it Zesty
Mix a tiny pinch of translucent clay into your opaque orange rind color. It adds a waxy, natural depth to the skin that flat opaque color lacks.
Step 3: Slicing and Finishing
-
Final Reduction:
Compress the large cane from the center out, rolling and stretching it until it reaches your desired diameter. Let the cane rest for at least 30 minutes to firm up. -
Slice Thinly:
Use your sharpest tissue blade to cut thin, even slices. Rotate the cane slightly after each cut to prevent one side from flattening. -
Add Texture Details:
For added realism, use a needle tool to drag tiny lines from the center of each segment outward, creating that fibrous fruit look. -
Bake:
Arrange your slices on a tile or parchment-lined tray. Bake according to your clay manufacturer’s instructions, usually at 275°F (135°C) for flat pieces. -
Cool and Quench:
Once baked, immediately plunge the hot slices into ice water. This shock helps increase the clarity of the translucent clay.
Enjoy arranging your everlasting citrus slices in a fresh display that will never spoil


Citrus Wedge Charms With Pith Detail
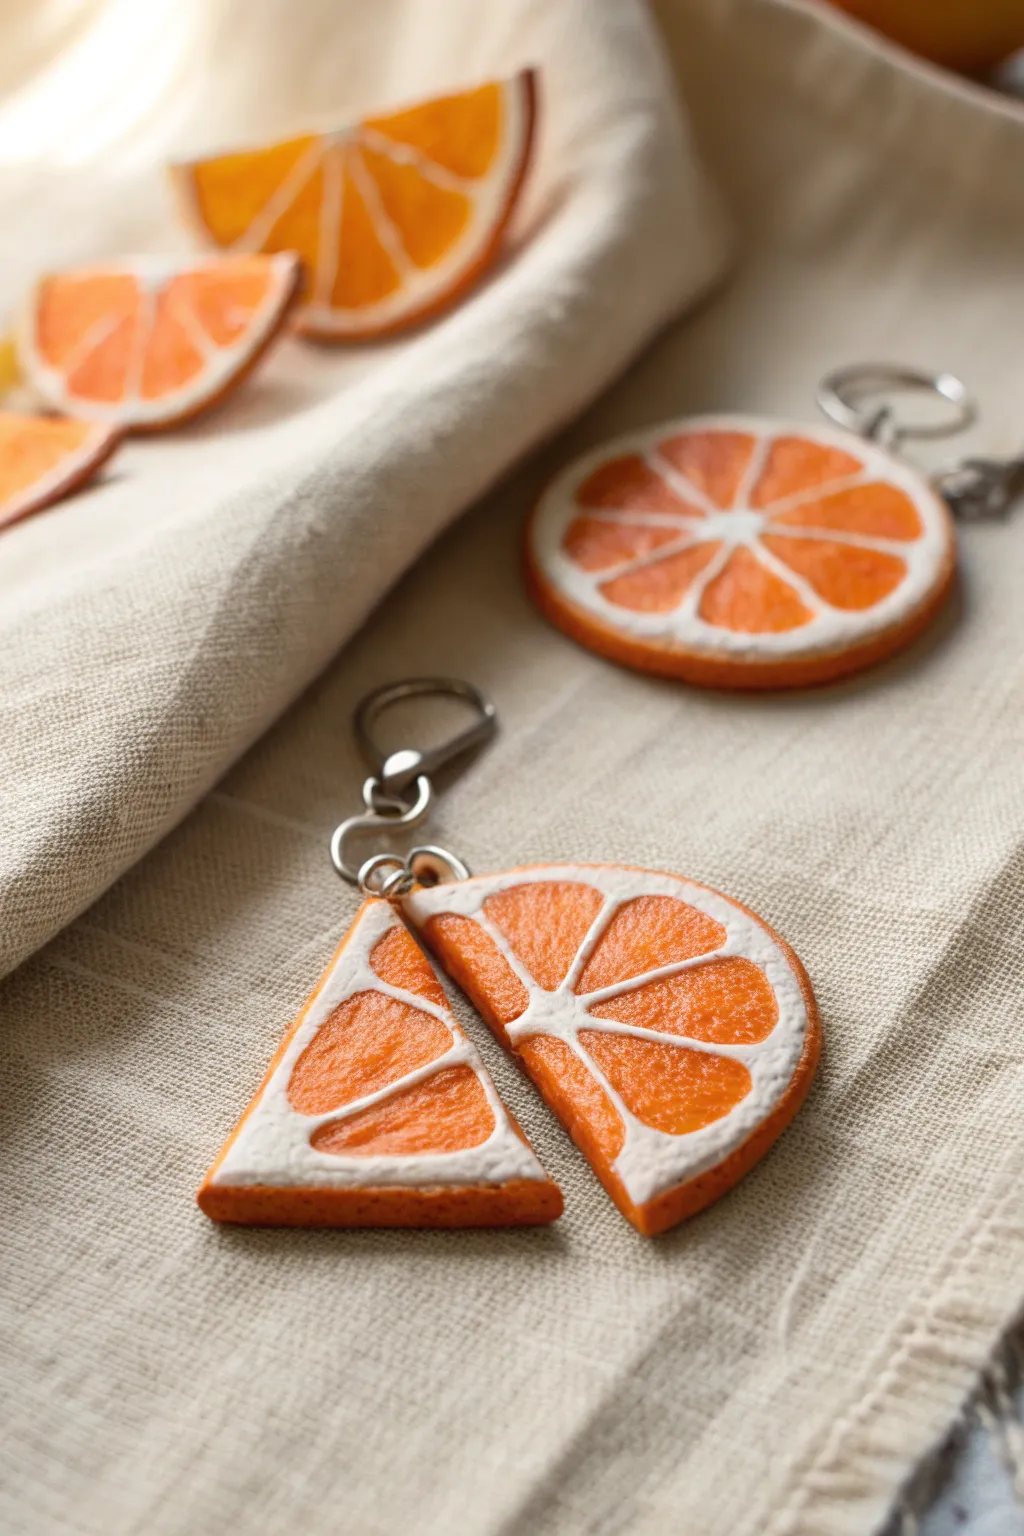
Capture the zest of summer with these hyper-realistic orange accessories that look good enough to squeeze. By layering translucent and opaque clays, you’ll create a convincing rind and juicy pulp texture that transforms simple wedges into charming keychains.
Detailed Instructions
Materials
- Translucent orange polymer clay
- Opaque white polymer clay
- Opaque orange polymer clay (for the rind)
- Liquid polymer clay (translucent or orange)
- Texture tool (needle tool or toothpick)
- Round clay cutter
- Sharp tissue blade
- Sandpaper (fine grit)
- UV resin or glossy varnish
- Jump rings and keychain hardware
- Small eye pins
Step 1: Creating the Cane
-
Prepare the pulp:
Begin by conditioning the translucent orange clay until it is soft and pliable. Roll it into a smooth log about 1 inch in diameter. -
Wrap the segments:
Roll out a very thin sheet of opaque white clay. It should be paper-thin for the most realistic pith lines. Wrap this sheet around your orange log, trimming the excess creates a seamless join. -
Shape the cane:
Gently squeeze and stretch the log (reducing the cane) until it’s about 1/2 inch in diameter. Let it rest for 10 minutes to cool down, which prevents distortion when cutting. -
Form the segments:
Slice the log into 8 equal lengths. Pinch one side of each length into a teardrop shape to mimic natural citrus segments. -
Assemble the center:
Roll a very thin snake of white clay to act as the central core. Arrange your 8 teardrop segments around this core, with the pointed ends facing inward. The white wrapping on the segments will now create the radiating white lines.
Step 2: Adding the Rind
-
Outer pith layer:
Once your segments are arranged into a circle, wrap the entire bundle in another thin sheet of white clay. This forms the inner white rind. -
Orange zest layer:
Roll out a slightly thicker sheet of opaque orange clay. Wrap this around the white layer to create the bumpy outer skin of the orange. -
Consolidate and reduce:
Gently compress the entire cane to ensure all layers adhere. If you want smaller charms like the wedges in the photo, reduce the cane further by rolling it gently on your work surface.
Smearing Colors?
If your white pith looks smudged after slicing, your clay was too warm. Next time, pop the cane in the fridge for 20 minutes before cutting for crisp, clean lines.
Step 3: Slicing and Texturing
-
Cut the slices:
Use your sharp tissue blade to cut slices about 4-5mm thick. For wedges, cut a full slice in half or quarters depending on your desired design. -
Texturing the pulp:
This step is crucial for realism. Use a needle tool to gently poke and drag the translucent orange areas. I like to work in small circles to disturb the smoothness and mimic fluid sacs. -
Texturing the rind:
Take a piece of fine-grit sandpaper or a stiff brush and press it gently against the outer orange edge to create a porous, zest-like texture. -
Insert hardware:
Since these are charms, insert a small eye pin into the top of your wedge or slice. Ensure it goes deep enough into the clay to be secure.
Pro Tip: Juicier Look
Mix a tiny drop of translucent liquid clay with your gloss varnish. Dab it onto the textured pulp areas to create physical droplets that look perpetually wet.
Step 4: Finishing Touches
-
Bake the clay:
Bake your pieces according to the clay manufacturer’s instructions. Usually, this means around 275°F (130°C) for 15-30 minutes per 1/4 inch of thickness. -
Cool and inspect:
Allow the pieces to cool completely. The translucent clay will become clearer as it cools. -
Add the shine:
To make them look juicy, coat just the orange pulp areas with UV resin or a gloss varnish. Leave the white pith and outer rind matte for contrast. -
Assembly:
Once the glaze is cured or dry, attach your jump rings and keychain hardware to the eye pin.
Enjoy your fresh and fruity accessories that bring a little vitamin C to your style


Partly Peeled Orange Mini Sculpture

Create a hyper-realistic illusion with this delicate clay project that captures the vibrant zest and soft pith of a mandarin orange. You’ll layer textures and colors to sculpt a fruit that looks freshly peeled and ready to eat, resting artfully in a handmade dish.
Step-by-Step
Materials
- Polymer clay (translucent, orange, white, and speckle/granite)
- Liquid polymer clay (translucent)
- Chalk pastels (orange, red, yellow)
- Texture tools (needle tool, toothbrush, sandpaper)
- Small roller or pasta machine
- Craft knife or scalpel
- Small round cutter
- Gloss glaze or UV resin
- Matte varnish
Step 1: Creating the Fruit Segments
-
Mix the colors:
Begin by blending translucent clay with a small amount of orange clay. You want a semi-transparent look that mimics juicy fruit flesh, so keep the pigment subtle. -
Form the segments:
Roll the mixed clay into a ball, then divide it into roughly 8-10 equal wedge shapes. Round the outer edges while keeping the inner edges (where they meet the center) sharper. -
Texturizing the flesh:
Using a needle tool, gently scratch radiating lines onto the flat sides of each wedge to simulate the internal juice sacs. -
Adding the pith:
Roll out a very thin sheet of white clay mixed with a tiny bit of translucent. Wrap each individual segment in this thin ‘skin,’ smoothing the seams carefully so no bulk is added. -
Assemble the core:
Press the segments back together into a spherical shape. Don’t fuse them completely at the top; let them separate slightly to look natural. -
Rough up the surface:
Take an old toothbrush or stiff brush and tap it over the white exterior of your assembled sphere to give it that fibrous, pithy texture.
Uneven Texture?
If the peel texture looks too uniform, press a real orange peel onto the raw clay instead of sandpaper. The natural irregularities transfer perfectly for a superior finish.
Step 2: Sculpting the Peel
-
Prepare the orange skin:
Mix orange clay with a pinch of red or yellow to get a vibrant zest color. Roll this into a sheet about 2-3mm thick. -
Prepare the inner rind:
Roll a sheet of white clay (slightly thicker than the orange sheet) and press it firmly onto the back of the orange sheet. This creates the two-tone peel effect. -
Texture the zest:
Press piece of coarse sandpaper or a texture sponge onto the orange side of your clay sheet. This replicates the porous surface of citrus skin. -
Shape the cup:
Cut a rough circle from your textured sheet. Mold this around the bottom half of your assembled fruit segments, cupping it upwards. -
Tear the edges:
I find using tweezers works best here to gently rip and curl the edges of the orange clay downwards, exposing the white pith and fruit inside, just like the reference photo. -
Create loose pieces:
Tear off irregular scraps from your remaining textured sheet to create the discarded peel alongside the fruit. Curve them naturally as if they were just tossed there. -
Sculpt loose segments:
Make two additional single wedges using the method from phase one, creating one larger wedge and a smaller ‘half’ slice to sit on the table.
Scent Infusion
Add a drop of orange essential oil to the raw clay while kneading. The scent won’t last forever, but it adds a delightful sensory experience while you work.
Step 3: The Bowl and Finishing Touches
-
Form the bowl:
Using a speckled or granite-effect clay, mold a simple, shallow bowl shape. Keep the walls thick and the rim rounded for that rustic ceramic look. -
Arrangement:
Place the main peeled orange inside the bowl. Arrange the loose peel and extra segments nearby on your baking tile. -
Shading with pastels:
Brush powdered orange and red chalk pastels into the crevices of the textured peel and the center of the fruit segments to add depth. -
Baking:
Bake all pieces according to your clay package instructions. Let them cool completely before handling. -
Glazing:
Apply a thin coat of matte varnish to the white pith and the outside peel. Then, carefully dab gloss glaze or UV resin only on the exposed orange flesh to make it look wet and juicy.
Display your sculpture on a textured linen cloth to complete the rustic, sun-drenched aesthetic

The Complete Guide to Pottery Troubleshooting
Uncover the most common ceramic mistakes—from cracking clay to failed glazes—and learn how to fix them fast.
Dollhouse Orange Bowl With Tiny Fruit
Create a breathtakingly realistic miniature centerpiece with this rustic clay bowl filled with tiny tangerines. The project combines textured earth tones with vibrant citrus details, resulting in a charming farmhouse-style accessory for any dollhouse kitchen.
Step-by-Step Guide
Materials
- Terracotta-colored polymer clay
- Translucent orange polymer clay
- White polymer clay
- Translucent liquid clay
- White acrylic paint
- Fine-point paintbrush
- Texture tools (sandpaper, toothbrush, needle tool)
- Gloss varnish
- Matte varnish
- Small round cutter or mold
- Blade or X-Acto knife
Step 1: Crafting the Rustic Bowl
-
Condition the clay:
Begin by conditioning a marble-sized amount of terracotta-colored clay until it is soft and pliable, ensuring there are no air bubbles trapped inside. -
Form the base shape:
Roll the clay into a smooth ball, then gently press your thumb into the center to create a hollow, widening it while pinching the walls to form a bowl shape. -
Refine the rim:
Flatten the rim slightly so it looks thick and sturdy like earthenware, rather than fine china. You want a slightly handcrafted, imperfect look. -
Add texture:
Gently press sandpaper or a coarse sponge against the outside of the bowl -
Create the pattern:
Using a needle tool or a very fine brush, scratch or paint a simple geometric pattern of zig-zags and circles around the exterior. If painting, use white acrylic paint sparingly for a weathered effect. -
Pre-bake the bowl:
Bake the bowl alone for about 10 minutes at the temperature recommended by your clay manufacturer to set its shape before filling.
Realism Pro-Tip
Mix a tiny amount of ground chalk pastel into your texture varnish. It settles into the crevices of the bowl’s pattern, making it look authentically aged and dusted with flour.
Step 2: Creating the Whole Oranges
-
Mix citrus color:
Blend equal parts translucent orange clay with a tiny speck of white to create a realistic, slightly cloudy tangerine skin tone. -
Roll spheres:
Roll several small balls of the orange mixture, varying the sizes slightly for realism. They should fit comfortably inside your pre-baked bowl. -
Texture the skin:
Roll the raw clay balls gently over fine-grit sandpaper or tap them with a toothbrush to replicate the dimpled texture of citrus peel. -
Add detail:
Use a needle tool to poke a tiny indentation for the stem area on each fruit. You can add a speck of green clay for a stem if desired.
Smudged Cane?
If your orange segments are smearing when you slice the cane, the clay is too warm. Place the cane in the refrigerator for 15 minutes before cutting for crisp, clean lines.
Step 3: Making the Cut Fruit and Assembly
-
Prepare the cane:
To make the sliced oranges, form a log of translucent orange clay wrapped in a very thin sheet of white clay (the pith). -
Form segments:
For higher detail, you can shape this log into a teardrop, cut it into 8 lengths, and reassemble them around a thin white center snake to form segments. -
Wrap the cane:
Wrap the entire segmented log in a thicker sheet of the orange skin mixture you created earlier. -
Slice the fruit:
Carefully slice thin cross-sections from your cane. For half-oranges, attach a slice to the flat side of a clay hemisphere. -
texture the pulp:
I like to gently prick the orange segments with a needle tool to mimic juicy pulp texture before baking. -
Arrange the bowl:
Fill the bowl with your whole oranges, using a drop of liquid clay to secure them. Place one or two cut halves on top or to the side. -
Final bake:
Bake the entire piece again for the full duration recommended on your clay package. -
Add juicy shine:
Once cool, apply gloss varnish specifically to the cut surfaces of the oranges to make them look wet and juicy. Use matte varnish on the bowl and the orange skins.
Place this delightful bowl on a tiny wooden table to instantly warm up your miniature scene
Orange-and-Leaf Magnets as a Mini Set
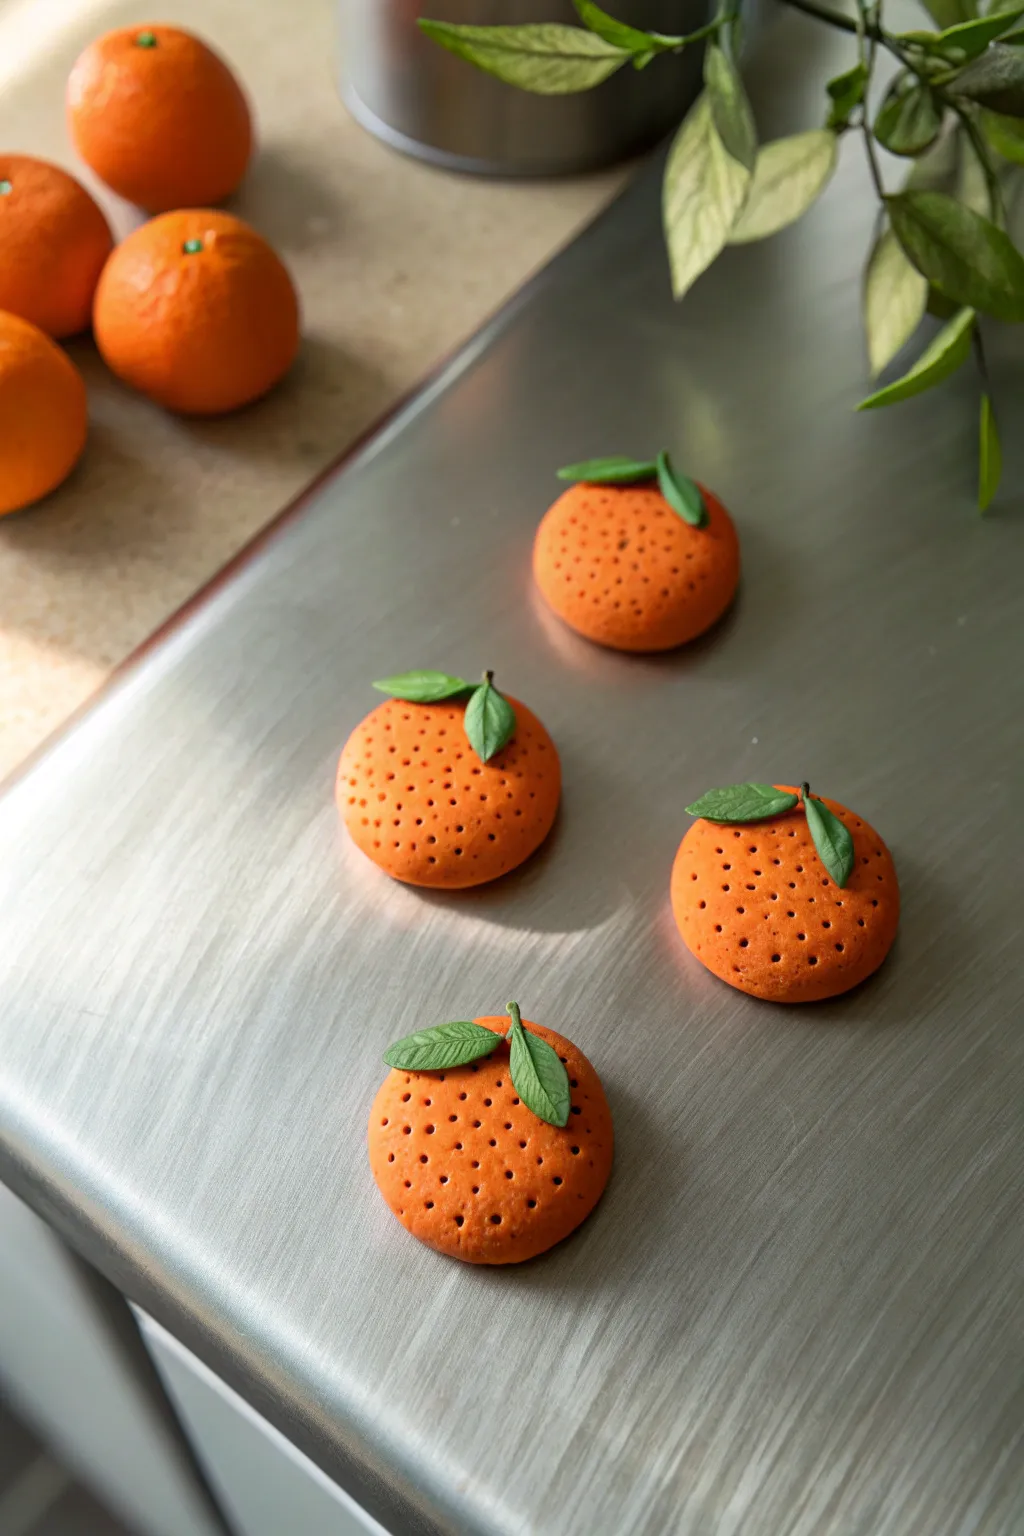
Bring a squeeze of freshness to your kitchen with these miniature flat-back orange magnets. Their distinct textural details and vibrant leaves make them look like tiny slices of summer, perfect for holding up your grocery lists.
Detailed Instructions
Materials
- Orange polymer clay
- Green polymer clay
- Small round magnets
- Needle tool or toothpick
- Clay roller or pasta machine
- Small circle cutter (approx. 1-1.5 inches)
- Hobby knife (X-ACTO)
- Strong craft glue (e.g., E6000)
- Parchment paper
- Baking sheet
Step 1: Prepping and Shaping
-
Condition the orange clay:
Start by warming up your orange polymer clay in your hands until it is soft and pliable. This prevents cracks later on. -
Roll out the base:
Roll the orange clay into a sheet approximately 1/4 inch thick. You want them hefty enough to hold a magnet but not too heavy to slide down the fridge. -
Cut the circles:
Use your small circle cutter to punch out four or five discs. If edges look sharp, gently tap them with your finger to round them off slightly. -
Flatten the top:
Press each disc gently against your work surface to flatten the back completely, causing the top to dome slightly for a more organic fruit shape.
Natural Texture
For a hyper-realistic orange peel texture, gently roll a ball of aluminum foil or sandpaper over the clay before poking the deeper holes.
Step 2: Texturing the Fruit
-
Create the pore texture:
Take your needle tool or a toothpick and begin poking shallow holes all over the top surface of the orange discs. -
Vary the density:
To make it look realistic, vary the spacing slightly. I find that avoiding a perfect grid pattern makes the ‘peel’ texture look much more natural. -
Smooth the disruption:
If the poking raised any sharp bits of clay, lightly glide your finger over the surface to smooth them back down without erasing the dimples.
Leaves Won’t Stick?
If the leaves keep falling off the orange before baking, use a tiny drop of ‘Bake & Bond’ or liquid polymer clay as an adhesive bridge.
Step 3: Leaf Details
-
Condition the green clay:
Clean your hands to avoid orange transfer, then condition a small amount of green clay. -
Form tiny teardrops:
Roll tiny bits of green clay into teardrop shapes, roughly the size of a grain of rice or slightly larger. -
Flatten into leaves:
Press the teardrops flat between your fingers to create the leaf shape. Aim for two leaves per orange. -
Score the veins:
Use your hobby knife or needle tool to gently score a center line down each leaf, followed by tiny diagonal lines for the veins. -
Attach the leaves:
Press the base of the leaves onto the top center of each orange disc. You can use a tiny dot of liquid clay for extra bond if you have it, but firm pressure usually works. -
Add a stem (optional):
Roll a microscopic snake of green or brown clay and place it right between the leaves for a tiny stem detail.
Step 4: Baking and Assembly
-
Bake the pieces:
Place your clay oranges on a parchment-lined baking sheet. Bake according to your specific brand of clay’s instructions (usually around 275°F or 135°C for 15–30 minutes). -
Cool completely:
Allow the clay to cool fully before handling. It hardens as it cools, so don’t test for firmness while it’s hot. -
Select the magnets:
Choose magnets that are slightly smaller than the diameter of your clay discs so they remain hidden. -
Apply adhesive:
Place a dab of strong craft glue on the center of the flat back of each orange. -
Secure the magnet:
Press the magnet firmly into the glue. Let them dry undisturbed for at least 24 hours to ensure a permanent hold.
Enjoy arranging your little orchard on the refrigerator door


What Really Happens Inside the Kiln
Learn how time and temperature work together inside the kiln to transform clay into durable ceramic.
Citrus Rind Pinch Pot Trinket Bowl
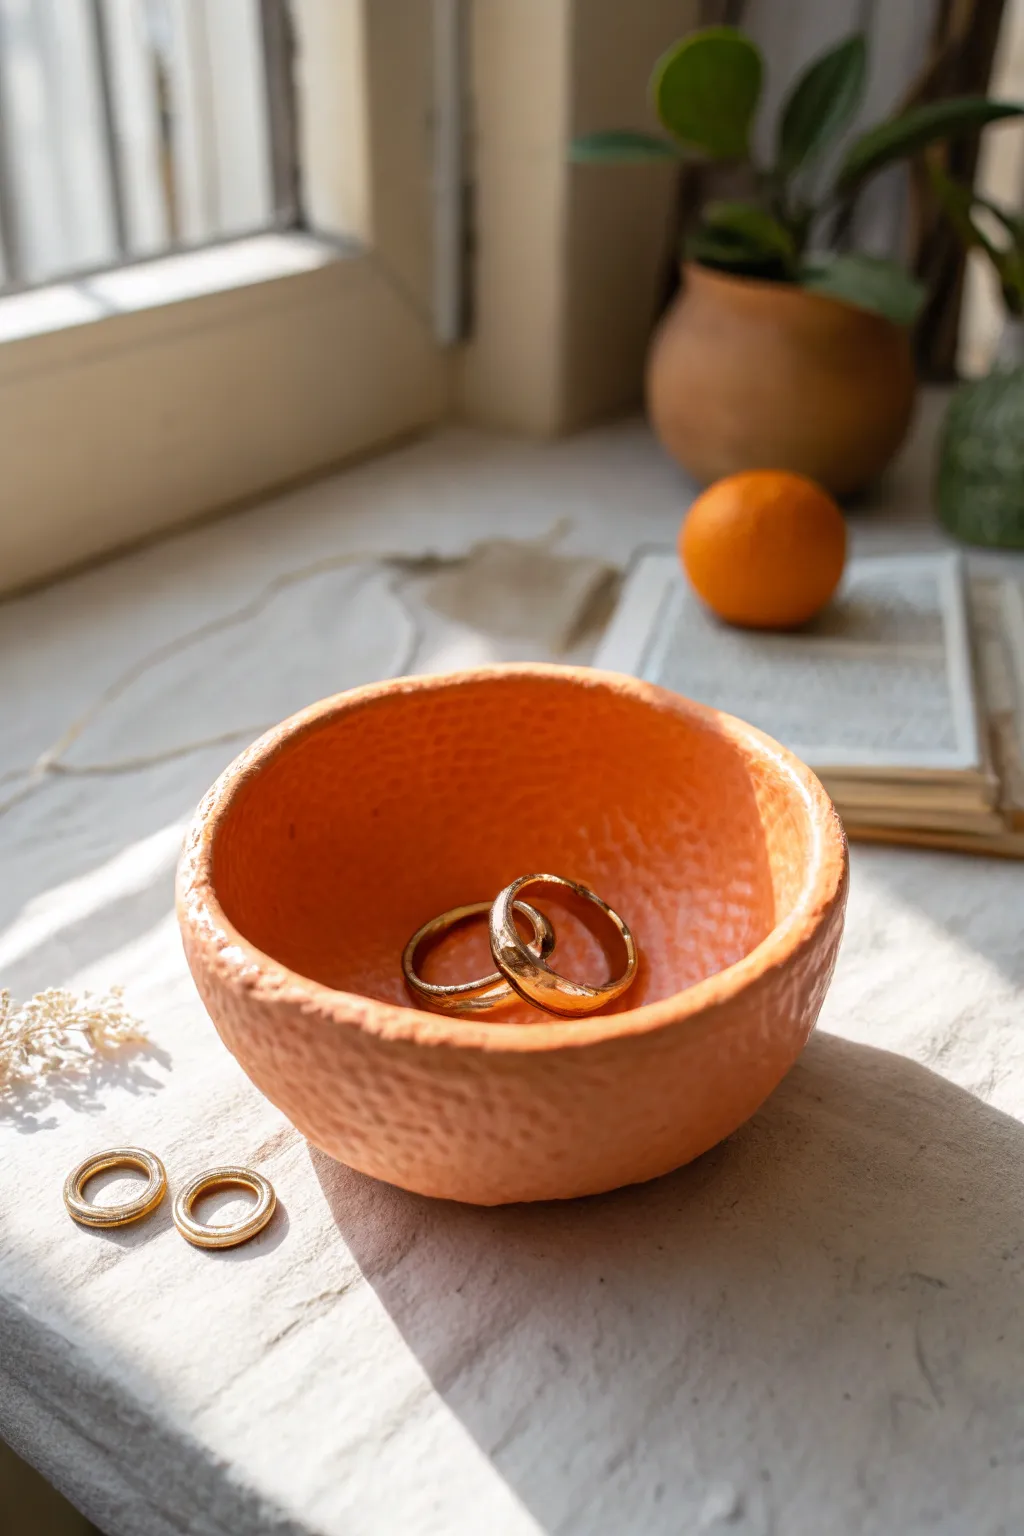
Bring a zest of creativity to your dresser with this adorable trinket dish that mimics the texture and color of a fresh orange peel. It’s a simple, delightful pinch pot project that creates the perfect catch-all for your favorite rings and small jewelry.
Detailed Instructions
Materials
- Air-dry clay or polymer clay (white or light-colored)
- Acrylic paint (bright orange, yellow, and a touch of red)
- Gloss or satin varnish (optional, for a juicy look)
- A real orange or lemon (for texture)
- Fine grit sandpaper
- Small paintbrush
- Rolling pin (optional)
- Small bowl of water (for smoothing)
Step 1: Shaping the Clay
-
Prepare your clay:
Start with a ball of clay roughly the size of a tangerine. Knead it in your hands until it is warm, pliable, and free of cracks. -
Form the base sphere:
Roll the clay between your palms to create a smooth, tight sphere. The smoother this ball is now, the easier the final shaping will be. -
Start the pinch pot:
Hold the sphere in your non-dominant hand. Gently press your thumb into the center of the ball, stopping before you push all the way through the bottom. -
Shape the walls:
Using your thumb on the inside and fingers on the outside, gently pinch and rotate the clay. Work your way upward from the bottom, thinning the walls evenly. -
Refine the thickness:
Aim for a uniform thickness of about 1/4 inch throughout the bowl. If the rim gets too thin or jagged, gently tap the bowl upside down on your work surface to blunt the edge. -
Smooth the interior:
Dip your finger in a little water and run it along the inside of the bowl to smooth out any fingerprints or cracks. The inside should be fairly smooth, unlike the outside.
Use a toothbrush
Don’t have a real orange handy? A stiff-bristled toothbrush or a crumpled ball of aluminum foil pressed into the clay creates a nearly identical citrus rind texture.
Step 2: Texturing and Drying
-
Create the zest texture:
Take a real orange or lemon and verify it is clean and dry. Gently press the fruit’s skin against the outside of your clay bowl. Rock it back and forth to transfer that distinct porous texture. -
Detail the rim:
Ensure the texture reaches all the way up to the rim. I like to lightly tap the fruit skin right along the top edge so it doesn’t look too manufactured. -
Touch up the shape:
Texturing might have warped your circle slightly. Gently cup the bowl in your hands to restore its roundness without smudging the pattern you just created. -
Dry the bowl:
Set the bowl aside to dry completely. If using air-dry clay, this may take 24-48 hours. If using polymer clay, bake according to the package instructions. -
Light sanding:
Once fully cured, check the rim for any sharp or snaggy bits. Use fine-grit sandpaper gently just on the rim, being careful not to sand away your ‘zest’ texture.
Step 3: Painting and Finishing
-
Mix your base color:
Mix a vibrant orange acrylic paint. You want a color that screams ‘fresh fruit,’ so adding a dab of yellow can brighten a dull orange. -
Apply the first coat:
Paint the entire exterior and rim of the bowl. Use a stabbing motion (stippling) with your brush to get paint deep into the little texture pits. -
Paint the interior:
Paint the inside of the bowl with the same orange mixture. You can make the inside slightly lighter by adding a touch of white if you want to mimic the pith. -
Add depth:
Once the base is dry, mix a slightly darker, reddish-orange wash (heavily diluted with water). Brush this over the texture and immediately wipe the surface with a paper towel, leaving the darker color only in the pores. -
Highlighting:
Dry brush a tiny amount of pale yellowish-orange just on the raised parts of the texture to make the ‘peel’ pop. -
Seal the piece:
Finish with a coat of satin or gloss varnish. A slight sheen mimics the waxy skin of citrus fruit beautifully and protects your jewelry from any clay residue.
Add a leaf accent
Before baking or drying, attach a small green clay leaf and a tiny brown stem to the rim for an extra pop of color and realism.
Now you have a refreshing little accent piece perfect for holding your daily treasures
Citrus Segment Dish Shaped Like a Slice
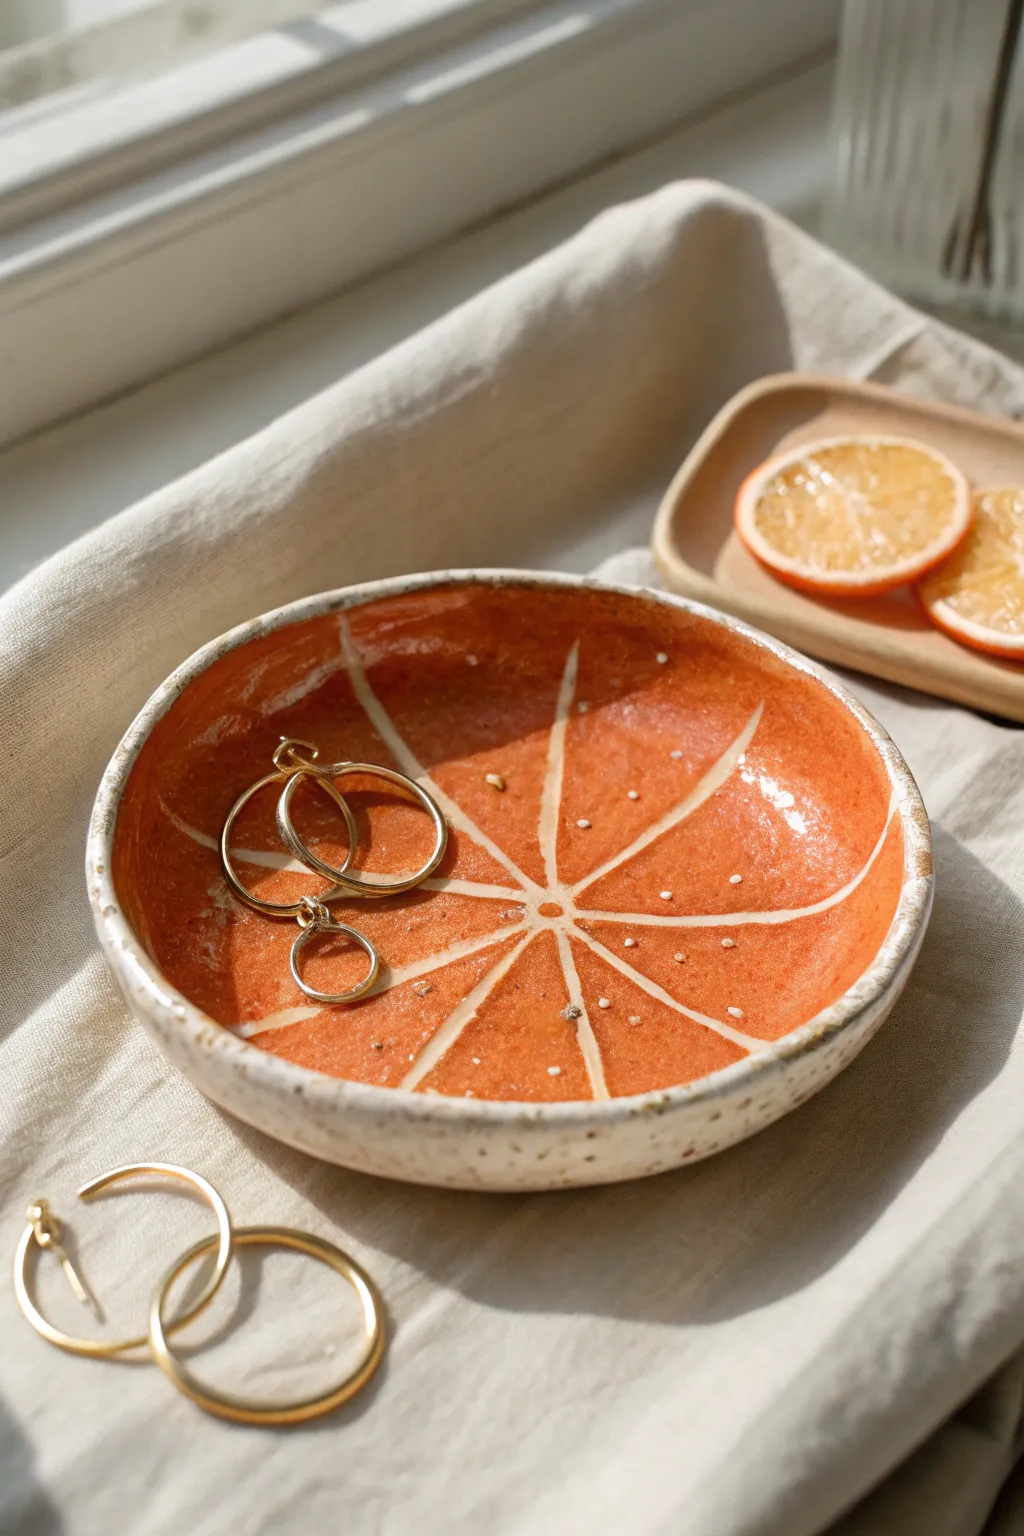
Capture the fresh, vibrant energy of a summer morning with this playful citrus-inspired dish. Featuring a speckled clay body and a juicy orange interior divided by hand-carved pith lines, it’s the perfect spot to rest your favourite earrings or rings.
Detailed Instructions
Materials
- Speckled stoneware clay (white or buff)
- Rolling pin
- Canvas/cloth mat for rolling
- Circular template or bowl (approx. 5-6 inches)
- Needle tool or fettling knife
- Sponge
- Small carving loop tool (or sgraffito tool)
- Underglaze (bright orange)
- Underglaze (white, optional for enhancing lines)
- Clear glossy glaze
- Small paintbrush
- Kiln (or air-dry clay alternatives if not firing)
Step 1: Shaping the Form
-
Prepare the slab:
Begin by wedging your speckled stoneware clay to remove air bubbles. Roll it out into a smooth, even slab about ¼ inch thick on your canvas mat to prevent sticking. -
Cut the circle:
Place your circular template or an overturned bowl onto the clay slab. Use your needle tool to trace and cut out a perfect circle, keeping the knife vertical for a clean edge. -
Smooth the edges:
Dip your finger or a small sponge in a little water and gently run it around the cut rim of the circle to compress the clay and smooth out any sharpness. -
Form the curve:
Gently lift the clay circle and place it into a shallow bowl mold or curve the edges upward with your hands to create a gentle dish shape. Avoid making the walls too steep; you want a shallow, open form. -
Refine the rim:
Once curved, check the rim again. It should have a slightly organic, handmade feel but still be relatively even in thickness.
Pulp Texture Tip
When applying the orange underglaze, dab the brush straight up and down (stippling) rather than smoothing it out. This creates a pitted texture that looks just like real fruit pulp.
Step 2: Carving the Citrus Design
-
Dry to leather hard:
Allow the dish to dry until it reaches the leather-hard stage. It should be firm enough to handle without deforming but soft enough to carve into. -
Mark the center:
Using your needle tool, make a very tiny indentation in the exact center of the dish interior to serve as your guide. -
Sketch the segments:
Lightly sketch radiating lines from the center to the rim, dividing the circle into roughly 8 to 10 equal pie slices. Don’t worry about perfection; a little irregularity adds charm. -
Sketch the rim border:
Draw a circle about 1/8th of an inch inside the outer rim. This creates the ‘rind’ border where the pith meets the skin. -
Carve the dividing lines:
Using your carving loop tool or a sgraffito tool, carefully carve out the sketched lines. I prefer to make these shallow grooves rather than deep cuts. -
Clean up burrs:
Once carved, use a dry, soft brush or your finger to gently sweep away any clay crumbs (burrs) created by the tool.
Step 3: Glazing and Finishing
-
Bisque fire:
Let the dish dry completely to the bone-dry stage, then fire it in the kiln to cone 04 (or your clay’s specific bisque temperature). -
Wax the lines (optional):
If you want extremely crisp white lines, apply wax resist carefully into the carved grooves. Alternatively, you can just paint carefully. -
Paint the segments:
Dip your brush into the bright orange underglaze. Paint the triangular ‘fruit’ segments, being careful to avoid filling in the carved radiating lines. -
Apply second coat:
Let the first layer dry, then apply a second and third coat of orange to ensure a vibrant, opaque color. The texture of the brushstrokes can mimic citrus pulp. -
Leave lines bare:
Leave the carved lines and the outer rim unpainted so the natural speckled clay body shows through, representing the white pith. -
White accent dots:
For extra detail, use a fine tip tool to add tiny dots of white underglaze randomly within the orange segments to simulate juicy highlights. -
Apply clear glaze:
Once the underglaze is dry, dip the entire piece in a clear glossy glaze or brush it on. This will seal the clay and make the orange color pop. -
Final fire:
Fire the piece again to your clay’s maturity temperature (e.g., cone 5/6) to finish the piece.
Try a Lime Twist
Make a whole citrus set by strictly changing the underglaze colors. Use bright green for lime, pale yellow for lemon, or a deep ruby red for a blood orange variation.
Now you have a refreshing burst of color to brighten up your dresser or coffee table

TRACK YOUR CERAMIC JOURNEY
Capture glaze tests, firing details, and creative progress—all in one simple printable. Make your projects easier to repeat and improve.
Sunset Ombre Orange Slab Earrings
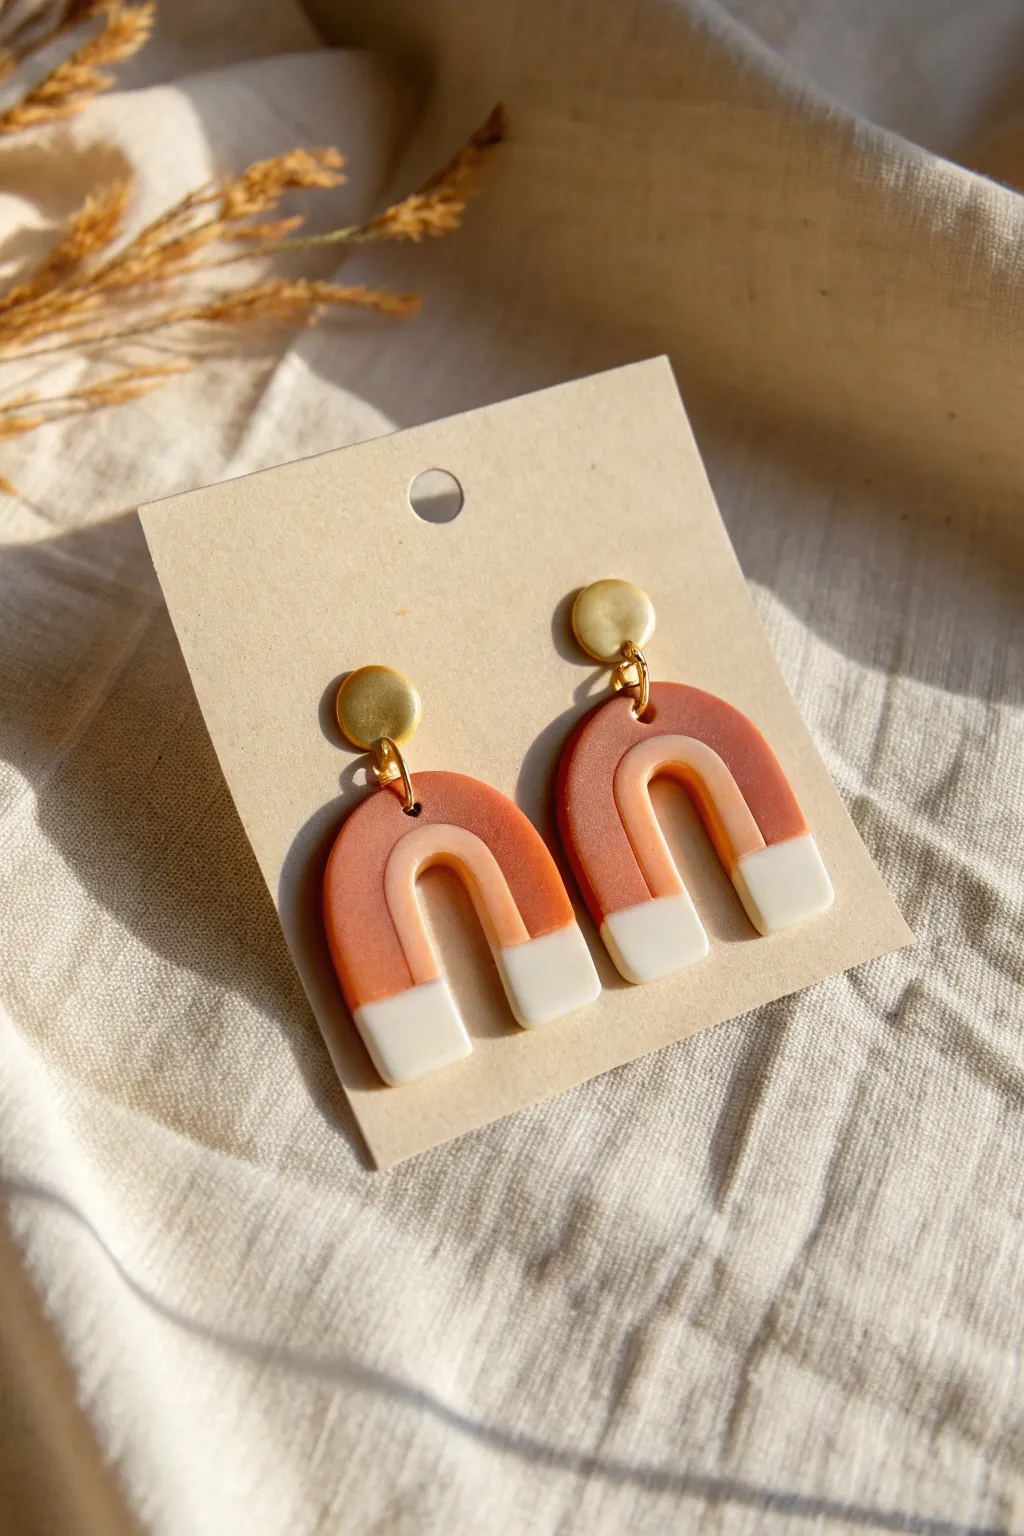
Capture the golden hour with these geometric arch earrings featuring a stunning, warm color palette. The design combines deep terracotta, soft peach, and crisp white in a modern U-shape that mimics the glow of a setting sun.
Detailed Instructions
Materials
- Polymer clay in Terracotta (burnt orange)
- Polymer clay in Peach or Light Orange
- Polymer clay in White
- Pasta machine or acrylic roller
- Clay cutting blade (flexible tissue blade)
- U-shaped clay cutter (medium size)
- Detail needle tool or toothpick
- Small circle cutter (approx. 5mm)
- Gold ball studs with loop
- Gold jump rings (6-8mm)
- Jewelry pliers (flat nose and round nose)
- Super glue (gel formula recommended)
- Fine-grit sandpaper (optional)
- Oven and baking sheet
Step 1: Preparing the Clay Slab
-
Condition the Clay:
Start by warming up your terracotta, peach, and white clay separately in your hands. Knead them until they are soft and pliable, ensuring there are no air bubbles trapped inside. -
Roll Out Base Sheets:
Using your pasta machine on a medium-thick setting (or an acrylic roller with depth guides), roll out a sheet of the terracotta clay. This will be the main body color. -
Create the Peach Strip:
Roll out a smaller piece of the peach clay to the same thickness. Use your blade to cut a long, clean strip, approximately 3-4mm wide. -
Create the White Strip:
Repeat the previous step with the white clay, cutting a strip that is slightly wider, perhaps around 5-6mm, to create the distinct bottom block effect seen in the design. -
Assemble the Slab Design:
This design uses a precise splicing technique rather than surface application. Lay your large terracotta sheet on your work surface. Use your flexible blade to cut a curved ‘U’ channel out of the center where the peach stripe will go. -
Insert the Peach Curve:
Carefully place your peach strip into the gap you just created. Gently press the seams together with your fingers to bond them without distorting the shape too much. -
Add the White Tips:
At the bottom of the U-shape legs, cut away the terracotta and peach straight across. Replace these bottom sections with blocks of your white clay strip, pressing the seams firmly to join the colors. -
Smooth the Slab:
Place a piece of parchment paper over your assembled multi-colored slab. Gently use your roller to smooth the entire surface, ensuring all the clay joins are seamless and the slab is of uniform thickness.
Step 2: Cutting and Baking
-
Cut the Arch Shapes:
Position your U-shaped cutter over the pattern so the white blocks sit perfectly at the bottom tips and the peach stripe follows the curve of the arch. Press down firmly to cut your shapes. -
Refine the Edges:
Before lifting the shapes, use your finger to gently rub the edges of the clay while it’s still on the tile to smooth any sharp drag marks from the cutter. -
Pierce the Holes:
Using your needle tool or a very small circle cutter, create a hole at the top center of the arch. Make sure the hole is large enough for your jump ring but not too close to the edge. -
Bake the Pieces:
Transfer your clay pieces to a baking sheet lined with paper. Bake according to your specific clay brand’s instructions—usually around 275°F (135°C) for 30-45 minutes to ensure durability. -
Cool and Sand:
Allow the pieces to cool completely in the oven. Once cool, I like to use fine-grit sandpaper to buff the edges if there are any remaining imperfections.
Seamless Smooth Tip
To erase fingerprints before baking, lightly brush the raw clay surface with a little cornstarch or baby powder. It prevents sticky residue and buffs off easily after baking.
Step 3: Assembly
-
Open the Jump Rings:
Using two pairs of pliers, twist your gold jump ring open laterally (front-to-back, not pulling apart). -
Connect the Components:
Slide the open jump ring through the hole in your clay arch and through the loop on the gold ball stud. -
Close the Ring:
Use your pliers to twist the jump ring back into a closed position, ensuring the ends meet perfectly flush so the ring doesn’t slip off. -
Final Polish:
Wipe the clay gently with a soft cloth or a tiny bit of baby oil to bring out the richness of the terracotta color.
Level It Up
Coat the finished baked pieces with UV resin for a high-gloss, glass-like finish that makes the colors pop, or use a matte varnish for a velvety, stone-like texture.
Wear your warm, sunset-inspired creations with pride and enjoy the lightweight feel of your handmade art
Orange Fruit Cluster Wall Hanging Tiles

Bring a splash of Mediterranean sunshine to your walls with this rustic three-tiered hanging project. Featuring speckled clay tiles connected by natural jute, these hand-painted citrus motifs offer a delightful burst of warm orange hues.
How-To Guide
Materials
- White or cream air-dry clay (or polymer clay with a stone effect)
- Acrylic paints (bright orange, burnt orange, dark green, brown)
- Fine grit sandpaper
- Rolling pin
- Square cookie cutter (approx. 3-4 inches) or ruler and craft knife
- Straw or small circular tool (for punching holes)
- Natural jute twine
- Fine detail paintbrushes (sizes 0 and 2)
- Old toothbrush (for speckling)
- Matte spray sealant or varnish
Step 1: Shaping the Canvas
-
Roll the clay:
Begin by conditioning your clay and rolling it out on a non-stick surface to a uniform thickness of about 1/4 inch. If you want that rustic, stone-like texture right from the start, mix in some coarse black pepper or dried tea leaves into the white clay before rolling. -
Cut the squares:
Using a square cutter or a sharp knife and ruler, cut out three identical squares. Smooth the edges with a little water on your finger to remove any sharp burrs or dragging marks. -
Punch connecting holes:
While the clay is still wet, you need to create the suspension points. Use a straw to punch two holes at the top and two holes at the bottom of the first and second tiles. For the third (bottom) tile, only punch two holes at the top. -
Refine the surface:
Check that your holes are aligned vertically so the tiles hang straight. Gently tap the surface with your palm to flatten any distortions caused by the hole-punching process. -
Dry completely:
Let the tiles dry according to your clay’s package instructions. For air-dry clay, turn them over every few hours to prevent curling. This usually takes 24-48 hours. -
Sand and prep:
Once fully cured, use fine-grit sandpaper to smooth out the edges and flat surfaces. Wipe away the dust with a slightly damp cloth.
Step 2: Painting the Citrus
-
Create the speckled base:
Mix a very watery brown paint. Dip an old toothbrush into it, and using your thumb, flick the bristles to spray fine speckles across all three tiles. I find practicing on a scrap piece of paper first helps control the spray intensity. -
Sketch the outlines:
Lightly sketch your design with a pencil. Draw a large centered circle on the top two tiles for the orange slices. On the bottom tile, draw two crescent wedge shapes ‘floating’ in the center. -
Base coat the fruit:
Fill in the circular shapes and wedges with a base coat of bright orange acrylic paint. Isolate the rind by painting the outer edge, leaving a very thin gap of unpainted clay between the rind and the juicy center. -
Add segment details:
Using a fine brush and slightly darker orange or burnt orange paint, draw the radial lines to create the fruit segments. Keep these lines delicate and slightly organic, not perfectly straight. -
Highlight the flesh:
Add tiny dashes of white or pale yellow within the orange segments to mimic the texture of citrus pulp. This adds juicy depth to the flat color. -
Paint the leaves:
With dark green paint, add small clusters of leaves. For the top tile, place them on the right; for the middle, place them on the bottom right. Keep the strokes simple and pointed. -
Add floral accents:
On the top tile, paint a small three-petaled orange flower near the top right corner. On the middle tile, add a tiny two-petaled accent on the bottom left. -
Seal the work:
Once the paint is thoroughly dry, apply a coat of matte spray varnish. This protects the paint and gives the tile a finished, professional look without making it too glossy.
Uneven Hanging?
If the tiles tilt to one side, the connecting knots likely aren’t aligned. Adjust the knot positions carefully so the length of rope between holes is identical on both left and right sides.
Step 3: Assembly
-
Cut the twine:
Cut four short lengths of jute twine (about 4 inches each) to connect the tiles, and one longer piece for the top hanger. -
Connect the tiles:
Thread a short piece of twine through the bottom left hole of the top tile and the top left hole of the middle tile. Tie a secure knot at the front or back depending on your preference (the example shows knots on the front). Repeat for the right side. -
Attach the bottom tile:
Repeat the tying process to connect the bottom of the middle tile to the top of the final tile using the remaining short twine pieces. -
Add the hanger:
Take your long piece of twine, thread the ends through the top holes of the first tile, and knot them securely. Bring the loop up to a point and tie a knot at the very top to create the triangular hanging shape.
Citrus Scent Surprise
Add a few drops of sweet orange essential oil to the unsealed back of the air-dry clay. The porous material acts a diffuser, releasing a subtle citrus aroma.
Hang your new fruity creation near a window to let the natural light highlight those juicy painted details
Juicy Gloss Finish for Realistic Oranges
Learn to capture the vibrant zest of citrus with this realistic clay sculpting project. By combining distinct texturing techniques with careful color layering, you’ll create fruit slices that look juicy enough to squeeze.
Detailed Instructions
Materials
- Polymer clay (translucent, white, and orange)
- Acrylic paints (orange, yellow, white, burnt umber)
- Texture sponge or stiff toothbrush
- Needle tool or dental pick
- Gloss varnish or UV resin
- Wire for internal structure (optional)
- Green clay or floral tape (for stem/leaves)
- Craft knife
- Soft pastel chalks in orange/red tones
Step 1: Sculpting the Base Form
-
Mix your base color:
Start by mixing translucent polymer clay with a small amount of orange pigment or clay. You want a color that looks slightly milky and waxy, rather than opaque plastic. -
Form the spheres:
Roll the clay into a smooth, perfect sphere about the size of a clementine or small orange. If you want to make a half-orange, use a sharp craft knife to slice the sphere cleanly in half while the clay is still raw. -
Texture the rind:
For the whole orange and the outer skin of the slice, use a coarse texture sponge or a ball of crumpled aluminum foil. Roll the curved surface gently against the texture tool to create that characteristic pitted citrus skin. -
Refine the pores:
Go back over the skin with a needle tool to accentuate deeper pores randomly. Real oranges aren’t perfectly uniform, so vary the depth and density of your marks.
Step 2: Creating the Juicy Interior
-
Define the segments:
On the flat face of your sliced orange, use a needle tool to lightly sketch the radial segments. Leave a small circle in the very center for the pith core. -
Sculpt the membrane walls:
Roll extremely thin snakes of white clay. Lay these gently along your sketched lines to create the segment dividers (membranes) and a tiny circle in the center. -
Texture the flesh:
This is the most critical step for realism. Inside each segment, use your needle tool to tease and rough up the clay. Dig in and pull up tiny bits of clay to simulate the individual juice vesicles or pulp sacs. It should look fibrous and uneven. -
Soften the edges:
Gently press down on the textured pulp near the white membrane lines so they integrate naturally, rather than looking like they are floating on top. -
Add the rind edge:
Roll a thin sheet of white clay and wrap it around the circumference of the slice to form the pith layer (albedo). Then, take your textured orange skin clay and wrap it over that white layer to finish the exterior. -
Add the stem:
For the whole orange, push a small indentation into the top. Insert a small green clay snake with a tiny wire core for strength, shaping it into a clipped stem.
Pro Tip: Translucency is Key
Mix a tiny bit of translucent clay into your pulp color. This allows light to penetrate the surface, mimicking the way real fruit flesh holds light.
Step 3: Coloring and Creating the Juice
-
Pre-bake shading:
Before baking, brush a little orange pastel chalk dust onto the center of the pulp segments to deepen the color, leaving the white membranes clean. -
Bake the clay:
Bake your pieces according to the clay manufacturer’s instructions. I usually tent them with foil to prevent scorching the white parts. -
Wash for depth:
Once cool, mix a very watery wash of burnt umber and orange acrylic paint. Brush it over the textured rind and wipe it off almost immediately. The dark paint will stay in the pores, highlighting the texture. -
Dry brush highlights:
Lightly dry brush a mix of yellow and white paint over the highest points of the rind to make the skin texture pop. -
The juicy glaze:
Mix a tiny drop of orange ink or translucent liquid clay into a high-gloss varnish or UV resin. Carefully pool this onto the flesh of the sliced orange. -
Curing the gloss:
Use a toothpick to guide the glossy liquid into the nooks and crannies of the pulp, ensuring it doesn’t cover the white membrane lines entirely. Cure or let dry until it looks permanently wet. -
Final leaf detail:
If you made a clay leaf, paint it with a mix of sap green and a touch of brown for realism. Glue it securely next to the stem.
Troubleshooting: Cloudy Gloss?
If your gloss finish turns cloudy or milky, you likely applied it too thick. Apply multiple thin coats, letting each dry fully, rather than one thick puddle.
Place your finished citrus sculptures in a bowl or use them as sunny decor accents to brighten up any room