
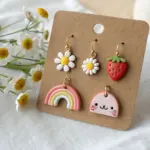
If you’re craving a Valentine project that’s cute, quick, and actually giftable, polymer clay is the sweetest little playground. I love how you can go from simple heart shapes to convincing faux treats and personalized keepsakes in one cozy crafting session.
Classic Heart Stud Earrings
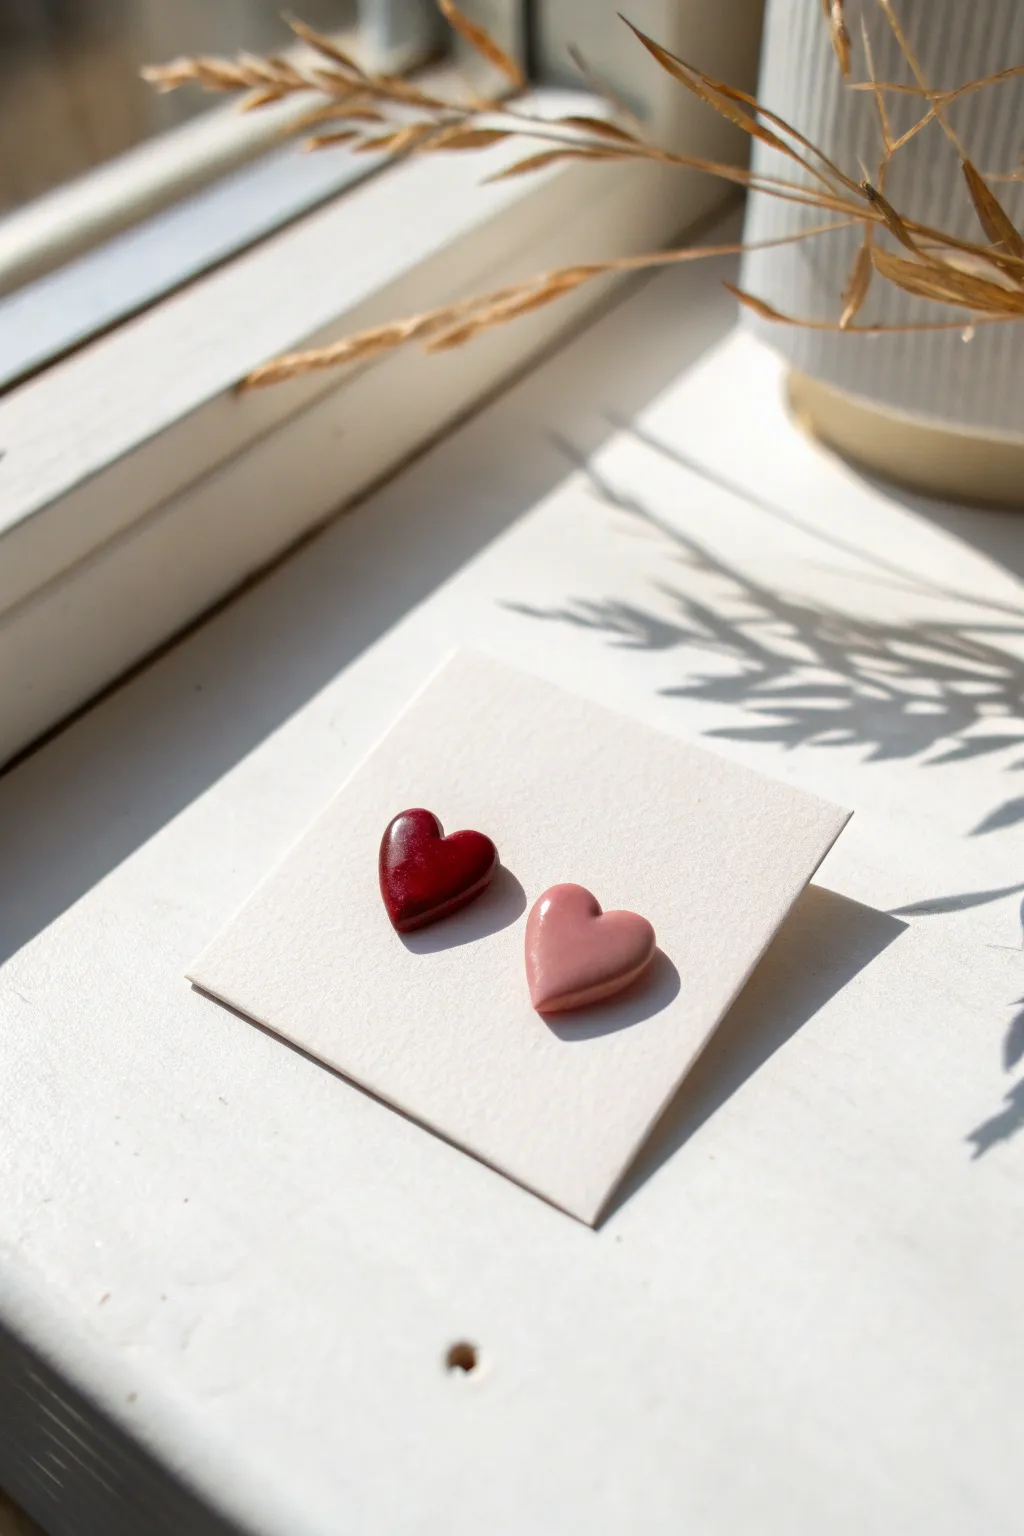
Simple yet undeniably elegant, these tiny heart stud earrings strike the perfect balance between classic romance and modern minimalism. You’ll create a mismatched pair featuring a deep crimson and a dusty rose, both finished with a high-gloss shine that catches the light beautifully.
Detailed Instructions
Materials
- Polymer clay in deep red (e.g., Alizarin Crimson or Pomegranate)
- Polymer clay in dusty pink (or mix white with a tiny dot of red and brown)
- Tiny heart-shaped cutter (approx. 0.8 – 1cm)
- Acrylic rolling pin
- Ceramic tile or glass work surface
- UV resin or high-gloss polyurethane varnish
- UV light (if using resin)
- Small paintbrush (synthetic bristles)
- Earring posts (surgical steel or sterling silver)
- Industrial strength glue (like E6000) or liquid clay
- Wet wipes or rubbing alcohol
- Toothpick (optional)
Step 1: Prepping and Cutting
-
Condition the clay:
Start by warming the deep red clay in your hands. Knead and roll it repeatedly until it feels soft, pliable, and free of cracks. Repeat this process separately for the dusty pink clay, wiping your hands in between colors to prevent staining. -
Roll out the slabs:
Using your acrylic rolling pin, roll both colors out onto your work surface. Aim for a thickness of about 3mm—thick enough to hold the earring post but light enough to be comfortable. -
Check for bubbles:
Inspect the surface of your clay slabs. If you see any tiny air bubbles, gently pierce them with a needle tool or toothpick and smooth the area with your finger. -
Cut the shapes:
Press your tiny heart cutter firmly into the red clay. Give it a tiny wiggle to ensure a clean cut before lifting. Repeat with the pink clay. I like to cut a few extras of each color just in case one gets dinged during baking. -
Smooth the edges:
Gently lift the hearts off the surface. Use your fingertip to very lightly smooth the raw edges where the cutter went through. This softens the look and makes the final product look more professional.
Sticky Situation?
If your clay sticks inside the tiny cutter, dip the cutter into a small pile of cornstarch or water before pressing it into the clay. This acts as a release agent.
Step 2: Baking and Assembly
-
Bake the clay:
Place your clay hearts on a dedicated baking tile or a baking sheet lined with parchment paper. Bake according to the manufacturer’s instructions for your specific brand of clay (usually around 275°F/135°C for 15-30 minutes). -
Cool down:
Once baked, remove them from the oven and let them cool completely. Do not try to handle them while warm, as the clay is still slightly fragile. -
Clean the surface:
Wipe the front of the cooled hearts with a little rubbing alcohol on a lint-free cloth. This removes any finger oils and ensures the gloss finish adheres perfectly. -
Apply the gloss:
Place the hearts on a non-stick mat. Using a small brush or a toothpick, carefully pull a drop of UV resin (or gloss varnish) over the top surface. Use the tip of the tool to guide the liquid exactly to the edge without letting it spill over the sides. -
Cure the finish:
If using UV resin, place the pieces under a UV lamp for 60-120 seconds until hard and non-tacky. If using varnish, allow it to air dry for the recommended time in a dust-free area. -
Attach the posts:
Turn the hearts over. Apply a tiny dot of industrial glue (like E6000) or a drop of liquid clay to the flat pad of your earring post. -
Secure the backing:
Press the post firmly onto the center of the back of the heart. If using glue, let it cure for 24 hours. If using liquid clay, you will need to bake the pieces again for about 15 minutes to set the bond.
Domed Effect
To get that high, rounded ‘domed’ look with resin, rely on surface tension. Add resin to the center and gently push it outward; don’t brush it on like paint.
Now you have a charming set of glossy hearts ready to become your go-to everyday accessory


Marbled Valentine Heart Pendants
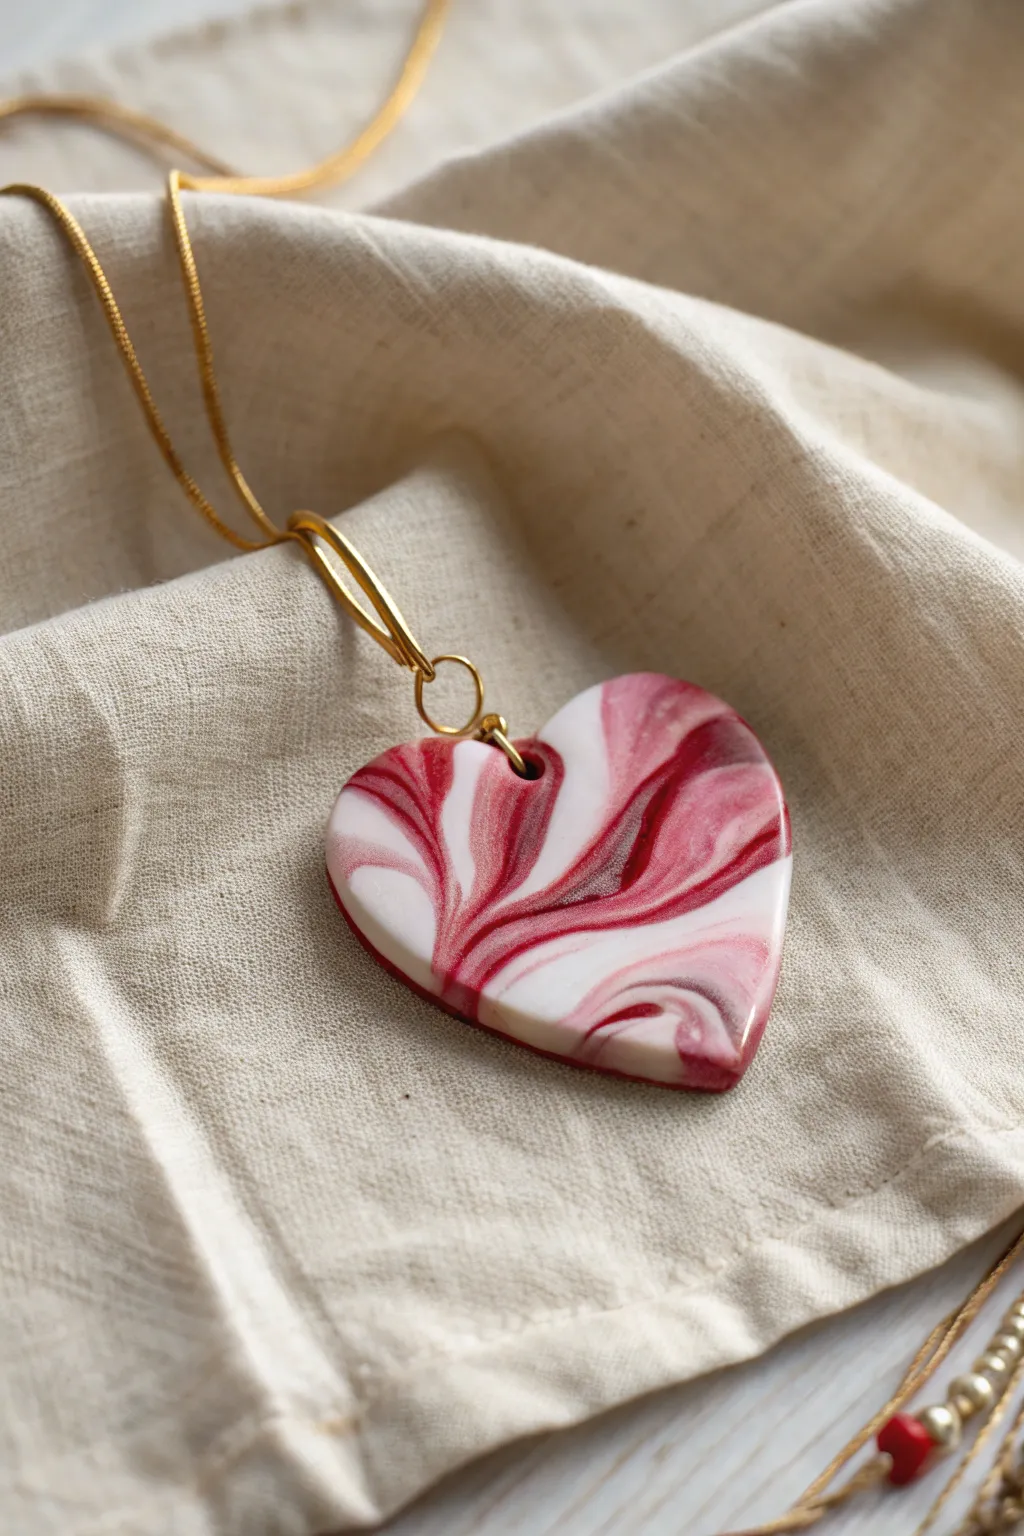
Capture the swirling romance of Valentine’s Day with this stunning marbled heart pendant. By blending opaque white with deep maroon and pearlescent clays, you can create a sophisticated, one-of-a-kind jewelry piece that looks far more complex than it actually is.
Detailed Instructions
Materials
- Polymer clay (Bright White)
- Polymer clay (Deep Maroon or Alizarin Crimson)
- Polymer clay (Pearl White or Translucent)
- Heart-shaped clay cutter (medium size)
- Clay roller or pasta machine
- Tissue blade or X-Acto knife
- Ceramic tile or baking sheet
- Hand drill or pin vibe
- Needle tool
- Gold jump rings (6mm)
- Gold bail
- Gold necklace chain
- Gloss glaze or UV resin (optional)
- Wet/dry sandpaper (400-1000 grit)
Step 1: Conditioning and Mixing
-
Condition the white clay:
Start by taking a block of bright white polymer clay. Knead it thoroughly in your hands until it becomes soft, pliable, and warm to the touch. -
Prepare the colored clay:
Repeat the conditioning process with your deep maroon clay and the pearl white clay separately. Ensure each color is equally soft to prevent cracking during mixing. -
Create logs:
Roll each color into a long, thin log or ‘snake’. You should have one white log, one maroon log, and a slightly thinner pearl log. -
Twist the colors:
Align the three logs side-by-side and twist them together tightly to form a single, rope-like strand. -
Fold and twist again:
Fold the twisted rope in half and twist it again. I usually repeat this fold-and-twist motion about 3-4 times to create thinner striations of color without fully blending them into a muddy pink.
Clean Breaks Only
Use a piece of plastic wrap between the clay and the cutter. This creates a soft, domed pillow effect on the edges, minimizing the need for sanding later.
Step 2: Creating the Slab
-
Form a ball:
Roll your twisted clay rope into a smooth ball. You should see interesting swirls of color on the surface. -
Flatten the clay:
Place the ball on your work surface or ceramic tile. Using your acrylic roller, flatten the ball into a slab approximately 1/4 inch thick. -
Check the pattern:
Inspect both sides of your slab. Typically, one side will have a more pleasing marble pattern than the other. Choose your favorite side to face up. -
Cut the shape:
Position your heart-shaped cutter over the most beautiful section of the marbling. Press down firmly to cut out the pendant shape. -
Smooth the edges:
Gently lift the heart from the excess clay. Use your finger to softly smooth the sharp edges created by the cutter for a more professional finish.
Gilded Edges
Before baking, gently tap the edges of the raw clay heart into fine gold glitter or brush the edges with gold mica powder for a luxurious, framed effect.
Step 3: Finishing and Assembly
-
Create the hole:
Using a needle tool, carefully pierce a hole near the top center of one of the heart’s lobes or directly in the center dip, depending on how you want it to hang. Ensure the hole is wide enough for your jump ring. -
Bake the pendant:
Place the heart on a ceramic tile or parchment-lined baking sheet. Bake according to the manufacturer’s instructions for your specific brand of clay (usually around 275°F/135°C for 30 minutes). -
Cool down:
Allow the pendant to cool completely in the oven before handling. Removing it while hot can cause warping or fingerprints. -
Sand for smoothness:
Once cool, dip your sandpaper in water and gently sand the edges and surface of the heart to remove any lint or fingerprints. -
Buff or glaze:
Rub the pendant briskly with a denim cloth to bring out a natural sheen, or apply a thin coat of gloss glaze for a high-shine, ceramic look. -
Attach the hardware:
Open a gold jump ring using two pairs of pliers. Thread it through the hole in your heart pendant. -
Add the bail:
Before closing the jump ring, slide on the gold bail. Close the jump ring securely so the gap is flush. -
Hang it up:
Thread your gold chain through the bail to complete your necklace.
Wear your new marbled heart with pride or gift it to someone special to brighten their day


Cupid Arrow Heart Pins
This chic little pin combines a soft matte pink finish with a striking modern arrow graphic, perfect for adding a subtle romantic touch to a denim jacket. It’s a beginner-friendly project that uses simple shapes to create a polished, wearable piece of art.
Step-by-Step
Materials
- Polymer clay (dusty rose or pale pink)
- Polymer clay (white)
- Small heart-shaped cutter (approx. 1.5 – 2 inches)
- Sharp craft knife or scalpel blade
- Rolling pin or acrylic roller
- Pin back mechanism using a strong adhesive (e.g., E6000)
- Oven for baking
- Fine-grit sandpaper (optional)
- Parchment paper or ceramic tile
Step 1: Prepping the Base
-
Condition the clay:
Start by thoroughly kneading your dusty rose polymer clay. Warm it up in your hands until it is pliable and smooth, ensuring there are no air bubbles trapped inside. -
Roll it out:
Using your acrylic roller, flatten the pink clay into a sheet. Aim for a thickness of about 4-5mm; you want the pin to be sturdy but not overly heavy on delicate fabrics. -
Cut the heart shape:
Place your heart cutter onto the clay and press down firmly and evenly. Give it a tiny wiggle before lifting to ensure clean edges, then carefully remove the surrounding excess clay. -
Smooth the edges:
Gently run your finger around the perimeter of the heart to soften the sharp cut edge. This gives it a more finished, professional look akin to a smooth stone.
Clean Lines Tip
Keep baby wipes nearby to clean your blade between cuts. White clay picks up pink residue easily, and a dirty blade will muddy your crisp white arrow lines.
Step 2: Creating the Arrow Design
-
Prepare white clay:
Clean your hands or wear gloves to keep the white clay pristine. Condition a very small amount of white clay and roll it out into an extremely thin sheet, roughly 1mm thick. -
Slice the shaft strip:
With your sharp craft knife, cut a very thin, straight strip for the arrow’s shaft. It should be long enough to span most of the heart’s width. -
Place the shaft:
Gently lift the white strip and place it diagonally across the pink heart. I find using a needle tool helps position it perfectly without smudging the pink clay. -
Cut the arrowhead:
From your thin white sheet, cut a tiny triangle. Place this at the lower left end of your shaft strip to form the point of the arrow. -
Create the fletching:
Cut three or four tiny, short strips of white clay. Arrange them at the upper right end of the shaft in a parallel slanted pattern to mimic the feathers or fletching of an arrow. -
Secure the design:
Once you are happy with the placement, cover the heart with a piece of parchment paper and roll over it very gently with your roller. This helps embed the white design into the pink base so it doesn’t pop off later.
Sinking Arrow?
If your white clay sinks too deep or smears when rolling it in, let the pink base ‘rest’ and firm up for 20 mins in the fridge before applying the design.
Step 3: Baking and Assembly
-
Bake carefully:
Transfer your heart on a ceramic tile or parchment-lined tray to your oven. Bake according to your clay manufacturer’s specific instructions, usually around 275°F (130°C) for 30 minutes. -
Cool down:
Let the piece cool completely in the oven with the door slightly ajar. Sudden temperature changes can make polymer clay brittle. -
Sand for smoothness (optional):
If there are any fingerprints or rough spots, you can lightly wet-sand the surface with fine-grit sandpaper, being careful not to rub off the white arrow details. -
Prepare the back:
Clean the back of your baked heart with a little rubbing alcohol to ensure a grease-free surface for gluing. -
Attach the pin:
Apply a dab of strong adhesive like E6000 to the flat side of your metal pin back. Press it firmly onto the center of the heart’s back. -
Final cure:
allow the glue to cure fully for at least 24 hours before pinning it onto your favorite jacket to ensure maximum durability.
Now you have a charming, minimalist accessory ready to pin onto your collar or gift to a friend


Beaded Heart Phone Charm
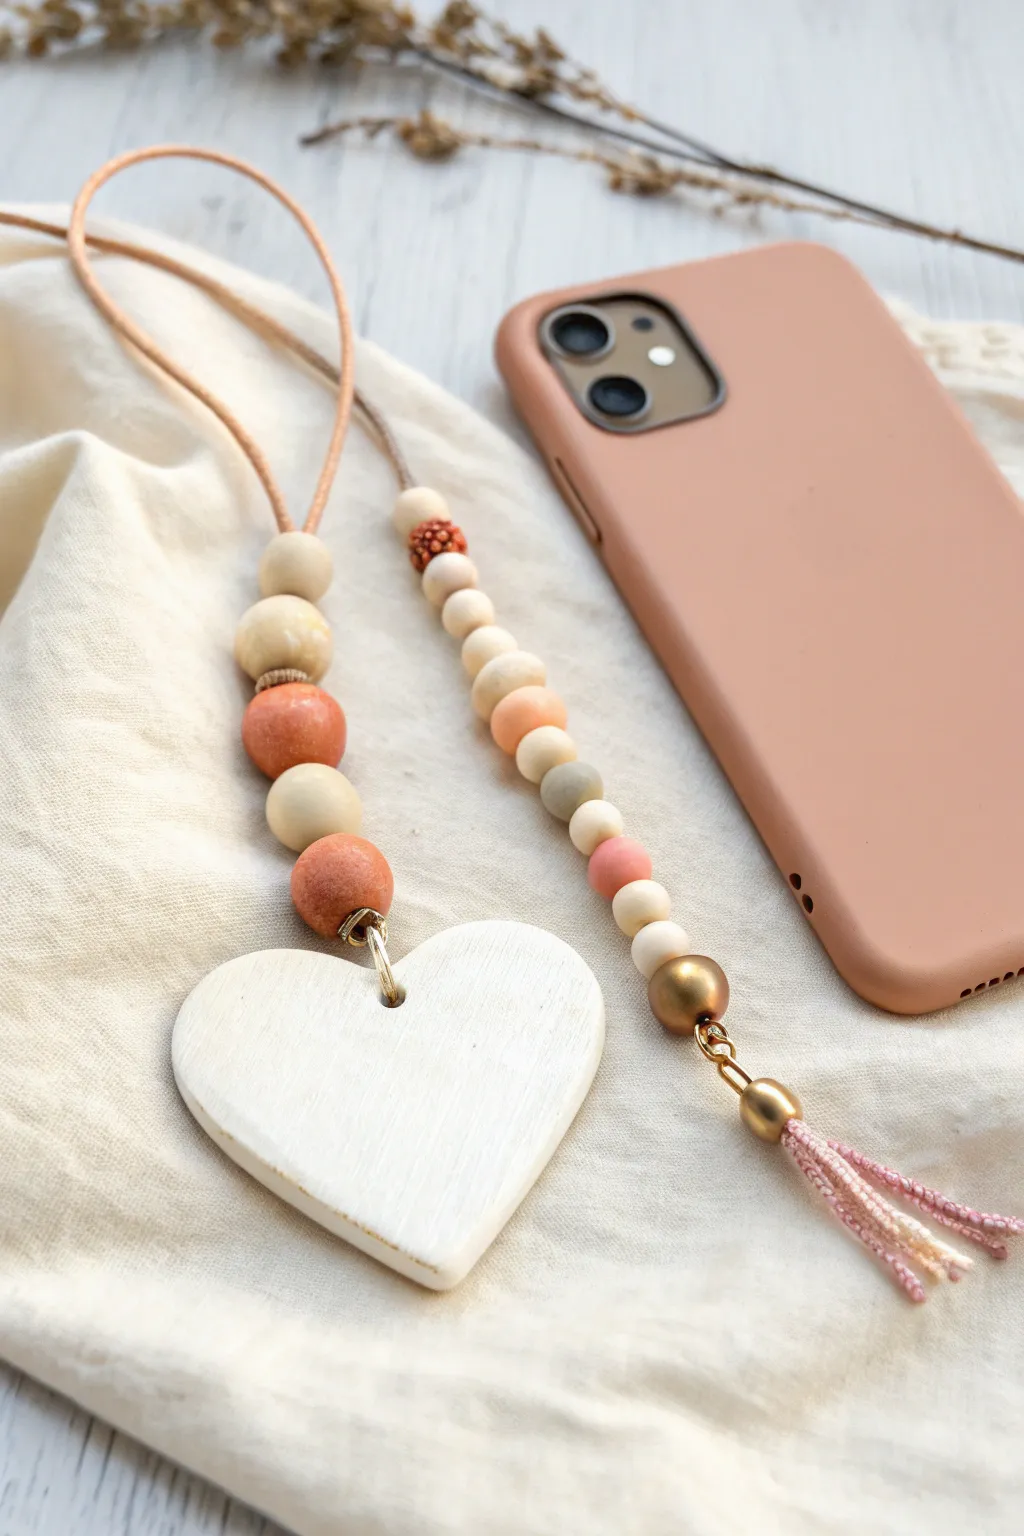
Embrace a soft, bohemian aesthetic with this delicate phone charm featuring a handcrafted clay heart pendant. The mix of muted terracotta, cream, and blush tones combined with natural wood textures creates a trendy accessory that adds a personal touch to your tech.
Step-by-Step
Materials
- White or translucent polymer clay
- Polymer clay in muted tones (terracotta, blush pink, beige, light grey)
- Acrylic paint (white or cream)
- Gold acrylic paint or gold beads
- Waxed cotton cord or durable jewelry string (beige/tan)
- Gold jump ring (large)
- Gold crimp beads or knot covers
- Sandpaper or texturing sponge
- Clay roller and heart cutter
- Toothpick or piercing tool
- Tassel (embroidery floss in blush pink)
- Clear varnish (matte or satin)
Step 1: Crafting the Heart Pendant
-
Condition the base clay:
Start by conditioning a chunk of white polymer clay until it’s soft and pliable. Roll it out to a thickness of about 4-5mm—you want it sturdy enough to withstand daily use. -
Cut the shape:
Use a medium-sized heart cutter to punch out your main shape. Alternatively, you can sketch a heart on paper and trace it onto the clay with a craft knife for a more organic, hand-carved look. -
Add texture:
Before baking, gently press a piece of coarse sandpaper or a texturing sponge onto the surface. This creates that faux-wood or stone grain effect visible in the reference. -
Pierce the hole:
Use a toothpick or a small piercing tool to create a hole at the top center of the heart. Wiggle the tool slightly to ensure the hole is large enough for your heavy-duty jump ring. -
Bake the heart:
Bake the heart according to your clay manufacturer’s instructions (usually 275°F/135°C for 15-30 minutes). Let it cool completely. -
Create the whitewashed finish:
Dilute a small amount of white or cream acrylic paint with water. Brush it over the cooled heart, getting into the texture grooves, then immediately wipe off the excess with a paper towel to highlight the grain.
Clean Bead Holes
If you struggle with bead holes closing up during baking, leave the bead on the piercing pin while baking. Just prop the pins on a foil rack so the beads hang freely.
Step 2: Creating Custom Beads
-
Roll your beads:
Using your colored clays (terracotta, blush, beige), roll various sizes of round beads. Aim for a few larger ‘statement’ beads (10-12mm) and a collection of smaller spacer beads (4-6mm). -
Texture the large beads:
To mimic the organic look in the photo, lightly roll the larger terracotta beads on sandpaper or poke them gently with a toothbrush bristles to give them a stone-like texture. -
Pierce bead holes:
Carefully pierce holes through the center of each bead using a needle tool. Ensure the holes are wide enough for your cord to pass through, possibly twice for the end beads. -
Bake the beads:
Bake all your beads. I suggest arranging them on a bed of cornstarch or accordion-folded paper to prevent flat spots from forming on the bottom.
Step 3: Assembly
-
Attach the jump ring:
Open a large gold jump ring with pliers and thread it through the hole in your finished heart pendant. Close it securely. -
Prepare the cord:
Cut a long piece of waxed cotton cord (about 12-14 inches). Fold it in half to create a loop at the top; this loop is what will attach to your phone case. -
Start the main strand:
Tie a knot about 2 inches down from the loop to secure the top section. Begin threading beads onto both cords together for the first few centimeters if desired, or separate them immediately into two asymmetric strands like the photo. -
Design Strand A (Left):
On the left cord, thread a sequence of larger beads: a wood-tone bead, a marbled beige bead, and a large textured terracotta bead. Finish with a smaller bead and tie a knot securely around the jump ring on the heart pendant. -
Design Strand B (Right):
On the right cord, create a longer, thinner pattern. Use smaller beads in a gradient—starting with small spacers, moving into creams and blush pinks, and ending with a tiny grey bead. -
Add the gold accent:
Towards the end of the right strand, add a larger gold bead or paint a clay bead with metallic gold paint for that pop of shine seen near the tassel. -
Make the tassel:
Create a mini tassel using blush pink embroidery floss. Wrap the floss around two fingers about 10 times, tie off the top, cut the bottom loops, and wrap a piece of floss around the neck. -
Finish the right strand:
Tie the end of the right bead strand to the top loop of your handmade tassel. Secure the knot with a dab of super glue and trim any excess cord.
Level Up: Scented Charm
Since the heart pendant is unglazed textured clay or wood, add a drop of essential oil to the back. It acts as a passive diffuser, carrying your favorite scent with you.
Attach the loop to your phone case and enjoy your stylish new accessory

The Complete Guide to Pottery Troubleshooting
Uncover the most common ceramic mistakes—from cracking clay to failed glazes—and learn how to fix them fast.
Sweetheart Locket-Style Pendant
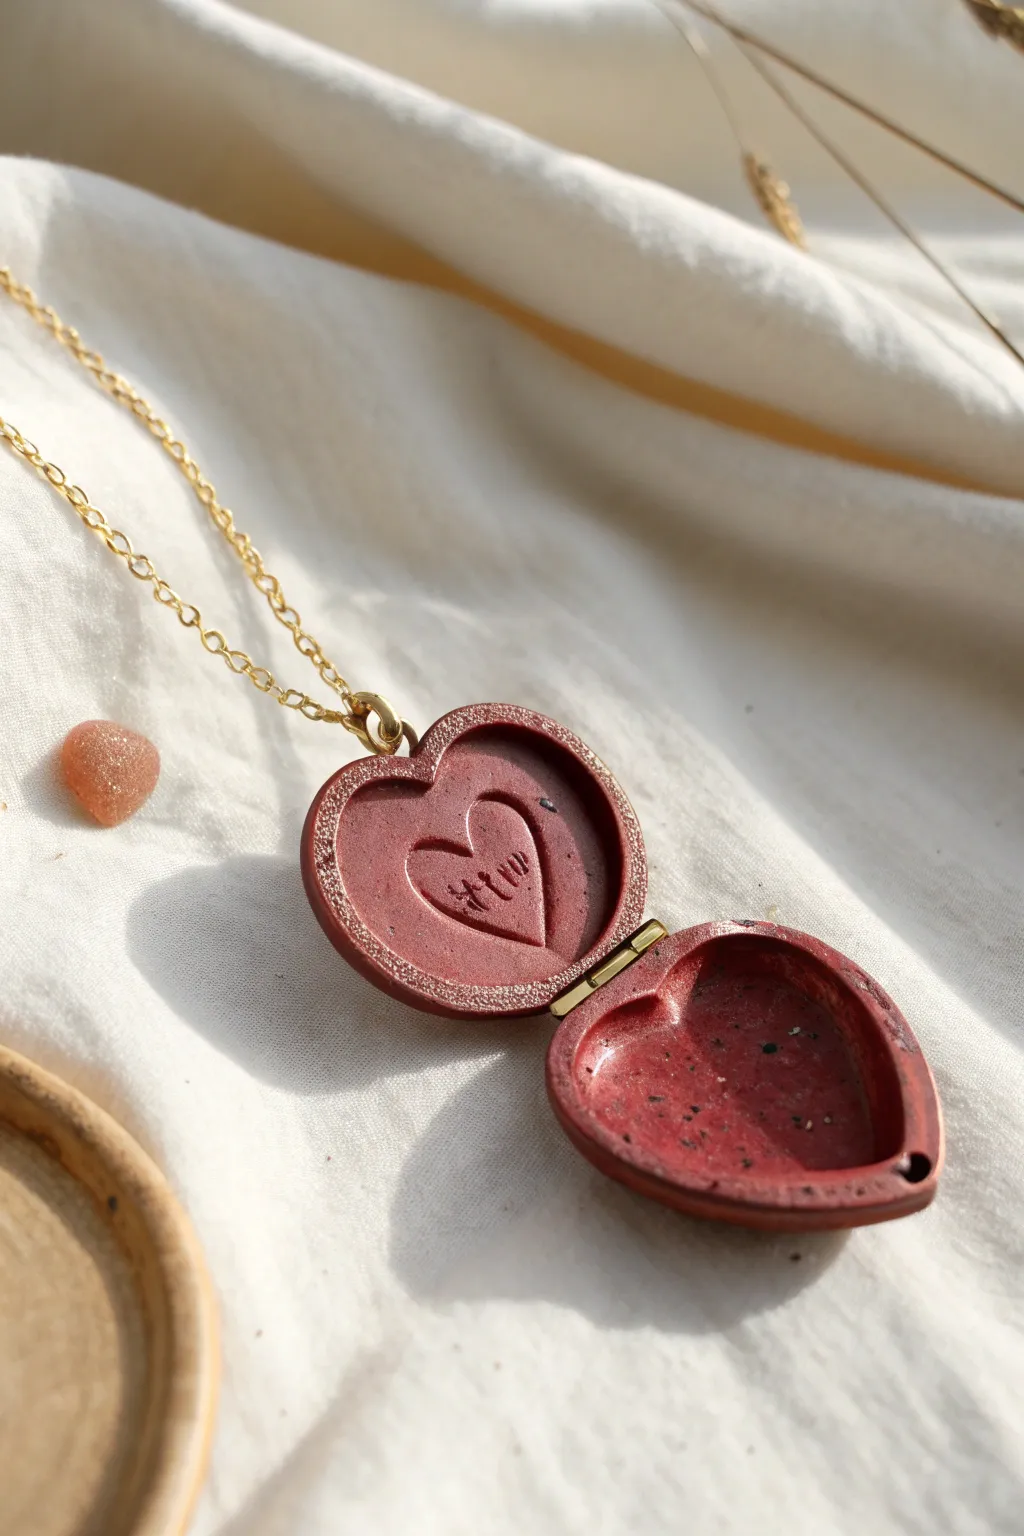
Capture the charm of an antique keepsake with this clever faux-locket pendant made entirely from polymer clay. The reddish-brown clay mimics the look of aged ceramic or leather, revealing a hidden heart imprinting inside this romantic, hinged-style accessory.
How-To Guide
Materials
- Reddish-brown or terracotta polymer clay
- Small heart-shaped cutter
- Miniature jewelry hinge (gold or brass finish)
- Strong cyanoacrylate glue (Super Glue) or 2-part epoxy
- Texture sponge or sandpaper
- Small needle tool or toothpick
- Gold jewelry bail and jump ring
- Gold chain
- Cornstarch (release agent)
- Black acrylic paint (for antiquing)
- Paper towel or wet wipe
- Detail knife or scalpel
Step 1: Shaping the Locket Halves
-
Condition the clay:
Begin by conditioning your terracotta-colored polymer clay until it is soft and pliable, ensuring there are no air bubbles trapped inside. -
Roll the slab:
Roll the clay out to a medium thickness, approximately 4mm or slightly thicker than a standard coin, to ensure the locket has enough depth. -
Cut the shapes:
Using your main heart cutter, punch out two identical heart shapes. If the clay sticks, lightly dust the cutter with cornstarch first. -
Hollow the halves:
Carefully press a slightly smaller heart cutter or use a sculpting tool to create a depression in the center of both hearts, leaving a raised rim about 2-3mm wide around the edge. -
Texture the surface:
Gently tap the exterior and the raised rim of the hearts with a texture sponge or coarse sandpaper to give it a stone-like, matte finish rather than a shiny plastic look.
Step 2: Adding Details and Baking
-
Create the inner engraving:
Inside the left half of the locket (the top lid), use a needle tool to scratch a simple heart drawing or initials directly into the flat center area. -
Fit the hinge:
Before baking, carefully press the actual metal hinge into the side rims of both clay hearts to create an indentation where it will sit later. -
Refine the indentation:
Remove the hinge and slightly deepen that slot with a blade so the hardware will sit flush against the clay. -
Add the bail loop:
Insert a small metal eye pin or fashion a loop from wire and press it securely into the top of the heart that will serve as the back of the locket. -
Smooth the edges:
Check all edges for fingerprints or sharp ridges, smoothing them down with a fingertip dipped in a tiny bit of clay softener or baby oil. -
Bake the pieces:
Bake the two separate heart halves according to your clay manufacturer’s instructions, typically between 230°F and 275°F (110°C – 135°C). -
Cool down:
Allow the pieces to cool completely inside the oven or on a wire rack to prevent thermal shock and cracking.
Hinge Troubles?
If the tiny hinge keeps popping out, scratch the metal tabs with sandpaper before gluing properly to give the adhesive a better ‘tooth’ to grip onto.
Step 3: Assembly and Antiquing
-
Apply the wash:
Dilute a small drop of black acrylic paint with water and brush it over the entire surface, especially into the ‘engraved’ heart and textured areas. -
Wipe away excess:
Immediately wipe the high points with a paper towel or wet wipe, leaving the dark paint only in the recesses to create an aged, speckled look. -
Glue the hinge:
I find it best to use a toothpick to apply a tiny amount of super glue or epoxy into the prepared side slot, then press the metal hinge firmly into place. -
Secure the joint:
Repeat the gluing process for the other half of the locket, holding the pieces aligned until the glue sets so the locket opens and closes correctly. -
Attach the chain:
Open a gold jump ring using two pairs of pliers, hook it through your bail loop, and thread your chain through to complete the necklace.
Secret Message Idea
Instead of scratching a design, print a tiny photo or write a note on paper, then seal it inside the locket with a thin layer of liquid clay or resin.
Now you have a sentimental, handcrafted piece of jewelry ready to hold a secret close to your heart
Candy Ribbon Bow Heart Brooch
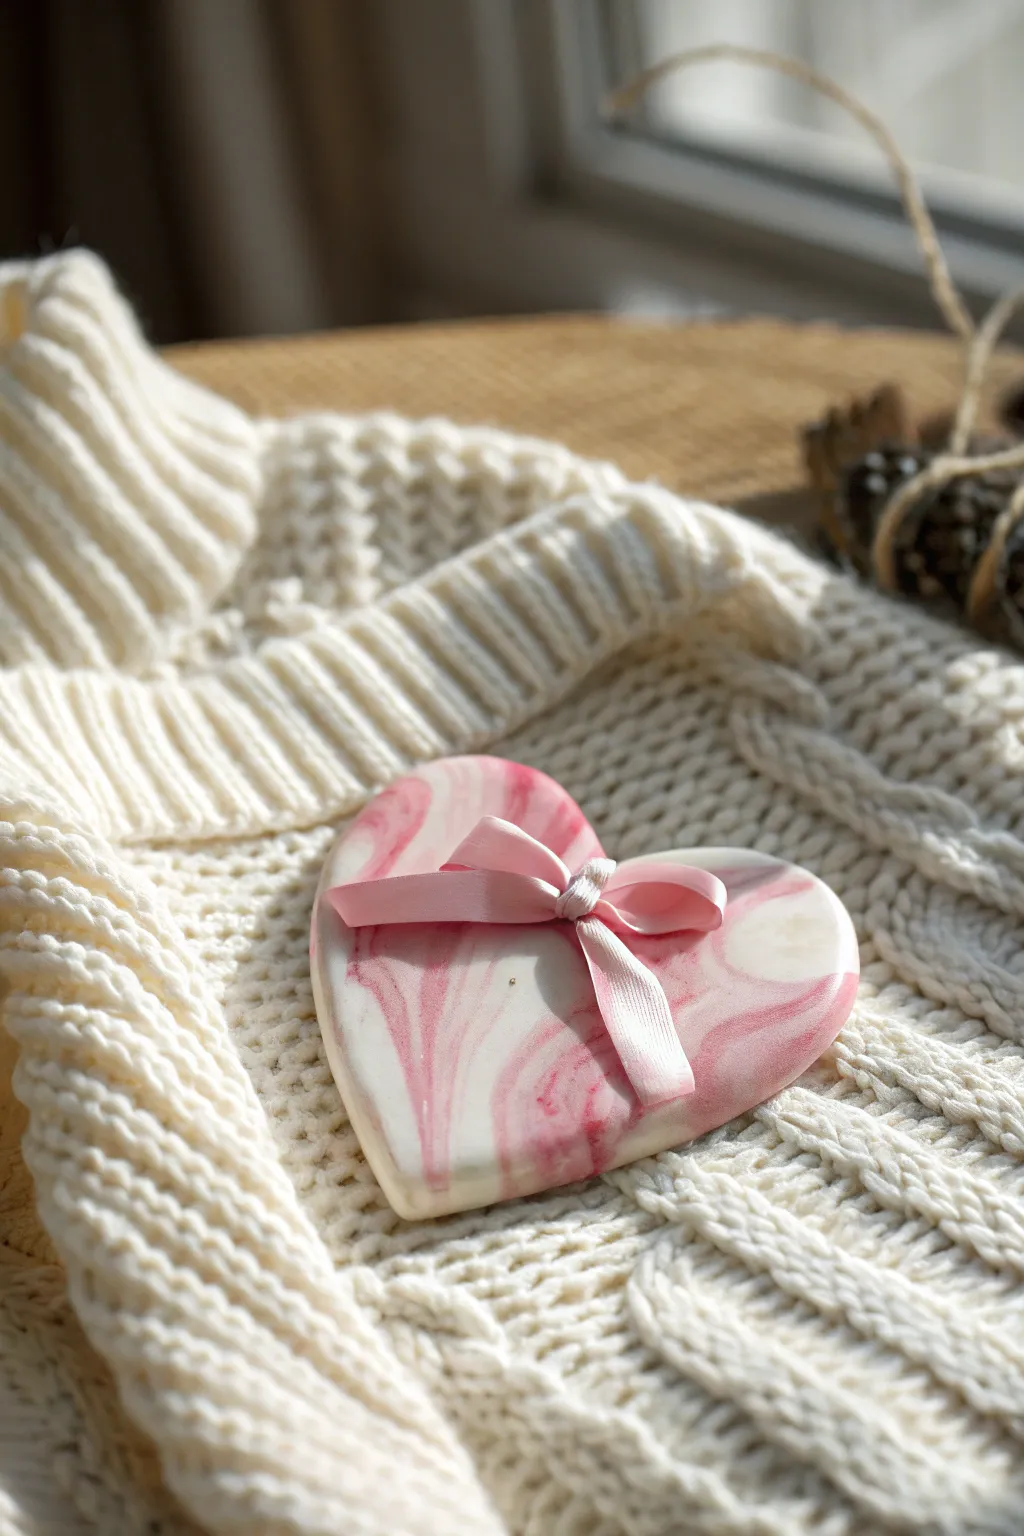
Capture the sweetness of Valentine’s Day with this delightful polymer clay brooch that mimics the look of swirled strawberry cream candy. The soft pink and white marbling creates an elegant backdrop for a dainty ribbon bow, making it a perfect accessory for cozy winter sweaters.
Detailed Instructions
Materials
- White polymer clay
- Translucent polymer clay
- Pink polymer clay (rose or magenta shade)
- Small heart-shaped cutter (approx. 2-3 inches)
- Acrylic rolling pin or pasta machine
- Thin pink satin ribbon (1/8 inch width)
- Liquid polymer clay or strong craft glue
- Brooch pin back
- Gloss glaze or resin (optional)
- Soft brush
- Blade or craft knife
- Wet sanding formatting paper (400-1000 grit)
Step 1: Creating the Marble Effect
-
Condition the clay:
Start by thoroughly conditioning your white, translucent, and pink polymer clays separately until they are soft and pliable. Use a ratio of about 50% white, 30% pink, and 20% translucent to get that creamy, candy-like depth. -
Form logs:
Roll each color into a long, thin snake or log. They don’t need to be perfectly even, as irregularity helps the natural look. -
Twist together:
Gather your three logs and twist them together into one large rope. Fold this rope in half and twist again. Repeat this ‘fold and twist’ process only 3-4 times to avoid muddying the colors. -
Ball it up:
Roll the twisted rope into a smooth ball. You should see distinct swirls of pink and white on the surface. -
Flatten the slab:
Using your acrylic roller, flatten the ball into a sheet approximately 1/4 inch thick. I find that rolling in different directions helps spread the marbling pattern more organically.
Clean Clay Tip
White clay picks up dust easily. Keep a pack of baby wipes nearby to clean your hands and roller frequently, ensuring your white swirls stay crisp and bright.
Step 2: Shaping and Refining
-
Cut the heart:
Position your heart cutter over the section of the clay sheet with the most pleasing swirl pattern. Press down firmly to cut out your shape. -
Soften the edges:
Gently embrace the edges of the heart with your fingertips to smooth the sharp cut lines, giving the piece a rounded, ‘pillowy’ look similar to a candy lozenge. -
Create the ribbon channel (optional):
If you want the ribbon to sit flush, you can use a modeling tool to verify a very shallow horizontal indentation across the front where the ribbon will lay, though this isn’t strictly necessary for the look. -
Bake the clay:
Place your heart on a ceramic tile or baking sheet lined with parchment paper. Bake according to your brand of clay’s instructions (usually 275°F/135°C for 30 minutes per 1/4 inch thickness). -
Cool down:
Allow the piece to cool completely inside the oven or on a wire rack before handling. Moving it while hot can cause warping.
Step 3: Finishing Touches
-
Sand for smoothness:
Once cool, use wet sandpaper starting at 400 grit and moving to 1000 grit to buff the surface until it feels like smooth sea glass. -
Buff or glaze:
Vigorously buff the piece with a denim cloth for a natural sheen, or apply a thin layer of gloss glaze if you prefer a ‘wet candy’ appearance. -
Prepare the ribbon:
Cut a length of your thin pink satin ribbon. Tie a small, neat bow separately, trimming the tails to a length that fits nicely within the heart shape. -
Attach the ribbon band:
Cut a separate small strip of ribbon to wrap specifically across the front of the heart. Glue the ends of this strip to the *back* of the heart using strong craft glue or liquid clay. -
Adhere the bow:
Place a dot of glue on top of the ribbon band you just attached, slightly off-center or right in the middle depending on your preference. Press your pre-tied bow onto this spot. -
Secure the hardware:
Flip the heart over. Using strong adhesive or a dab of liquid clay (which would need a quick re-bake), attach the brooch pin back securely to the center rear. -
Final dry:
Let all adhesives cure completely for at least 24 hours to ensure your wearable art is durable enough for regular use.
Scented Variation
Mix a tiny drop of vanilla or strawberry essential oil into the clay during conditioning. The scent will linger subtly after baking for a multi-sensory brooch.
Pin this sweet accessory to your favorite scarf or sweater to carry a little love with you wherever you go


What Really Happens Inside the Kiln
Learn how time and temperature work together inside the kiln to transform clay into durable ceramic.
Patchwork Valentine Hearts With Tiny Patterns
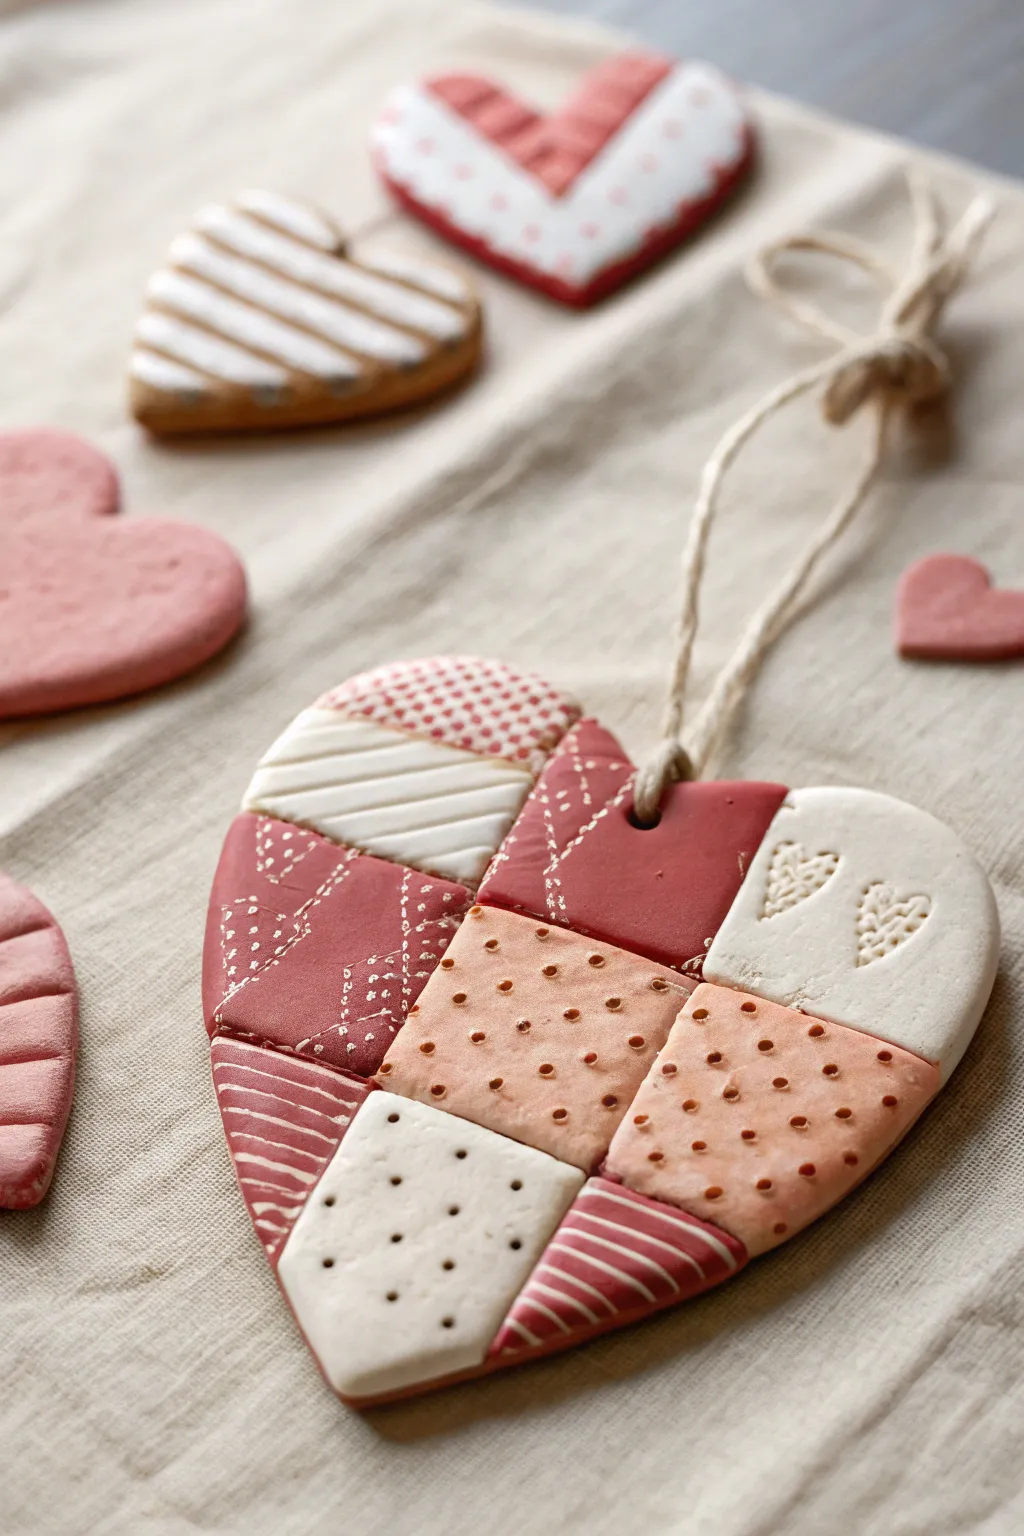
Capture the cozy charm of a vintage quilt with this intricately patterned polymer clay heart. Using a simple patchwork technique, you’ll unite textures and warm hues into a keepsake perfect for hanging on a Valentine’s branch.
How-To Guide
Materials
- Polymer clay (Deep red, coral/pink, antique white, terracotta)
- Small heart cookie cutter (approx 3-4 inches wide)
- Blade or X-Acto knife
- Rolling pin or pasta machine
- Texture tools: Toothpicks, needle tool, small stamps, or fabric scraps
- White acrylic paint (for ‘stitching’)
- Fine detail paintbrush
- Jute twine or rustic string
- Baking sheet and parchment paper
- Gloss or matte varnish (optional)
Step 1: Creating the Miniature Tiles
-
Condition the colors:
Begin by conditioning each block of polymer clay in your hands until it plays soft and pliable. You’ll need four distinct shades: a deep cranberry red, a soft coral pink, a terracotta orange, and an antique white. -
Roll out sheets:
Roll each color into a flat sheet, aiming for a consistent thickness of about 3-4mm. A pasta machine set to a medium setting works perfectly here, but a rolling pin with guides works just as well. -
Cut small squares or rectangles:
Using your sharp blade, cut freeform ‘fabric’ scraps from your clay sheets. You aren’t aiming for perfect geometric squares; slightly varied rectangles and trapezoids will give it that authentic, handmade quilt look. -
Pre-texture the pieces:
Before assembly, add specific textures to some pieces. For the ‘polka dot’ coral pieces, press the round end of a toothpick gently into the soft clay. For the striped pieces, gently press the side of a needle tool into the surface.
Stubborn Seams?
If your patchwork pieces aren’t sticking together during the initial fuse, brush a tiny amount of liquid polymer clay (Bake & Bond) on the edges before pressing them together.
Step 2: Assembling the Quilt Block
-
Arrange the patchwork:
Lay out your small clay tiles on a clean work surface, fitting them together like a puzzle. Alternate colors so no two identical shades touch. Press the seams gently together so they stick without distorting the shapes. -
Roll to fuse:
Once your patchwork sheet is large enough to accommodate your heart cutter, very gently roll over the entire surface with your roller. Do this just enough to bond the seams together and create a single flat sheet, but not so hard that you loose your textures. -
Cut the heart shape:
Position your heart-shaped cutter over the most pleasing area of your pattern. Press down firmly to cut out the final shape. If you don’t have a cutter large enough, trace a paper template and cut around it with your knife. -
Create the hanging hole:
Using a straw or a larger stylus tool, punch a clean hole near the top center dip of the heart. Ensure it’s not too close to the edge to prevent tearing later.
Step 3: Detailing and Finishing
-
Add final textures:
Now that the shape is cut, look for any ‘plain’ tiles. I like to use a tiny heart stamp or a needle tool to scratch delicate little hearts into the white sections for extra romance. -
Add faux stitching lines:
For the ‘stitched’ look seen on the red pieces, refine the lines with a needle tool. You can lightly drag the tool across the surface in a dashed pattern to simulate thread. -
Smooth the edges:
Run your finger lightly around the outer rim of the heart to soften the cut edge. This gives the finished piece a more polished, ceramic-like feel. -
Bake the clay:
Transfer your heart to a parchment-lined baking sheet. Bake according to your specific brand’s temperature instructions (usually around 275°F/135°C) for 30 minutes to ensure it is durable. -
Cool completely:
Allow the heart to cool completely on the baking sheet. It will be slightly flexible while hot and needs to harden fully before painting. -
Paint the details:
Dip a fine detail brush into white acrylic paint. Carefully paint into the textured lines of the ‘stitching’ or striped areas. Let the paint sit for a moment, then wipe the surface gently with a damp paper towel, leaving paint only in the recessed grooves. -
Seal (Optional):
If you want a shinier finish or extra protection for the paint, apply a thin coat of matte or satin varnish. -
Add the hanger:
Cut a length of jute twine or rustic string. Fold it in half, push the loop through the hole from front to back, pass the tails through the loop, and pull tight to secure.
Scented Ornament
After baking and cooling, place a drop of essential oil (like rose or lavender) on the unsealed back of the porous clay. It acts as a diffuser, adding a lovely scent to your Valentine gift.
Hang this charming patchwork heart on a door handle or gift it to add a handmade touch of love to someone’s day
Gradient Ombre Heart Stacks
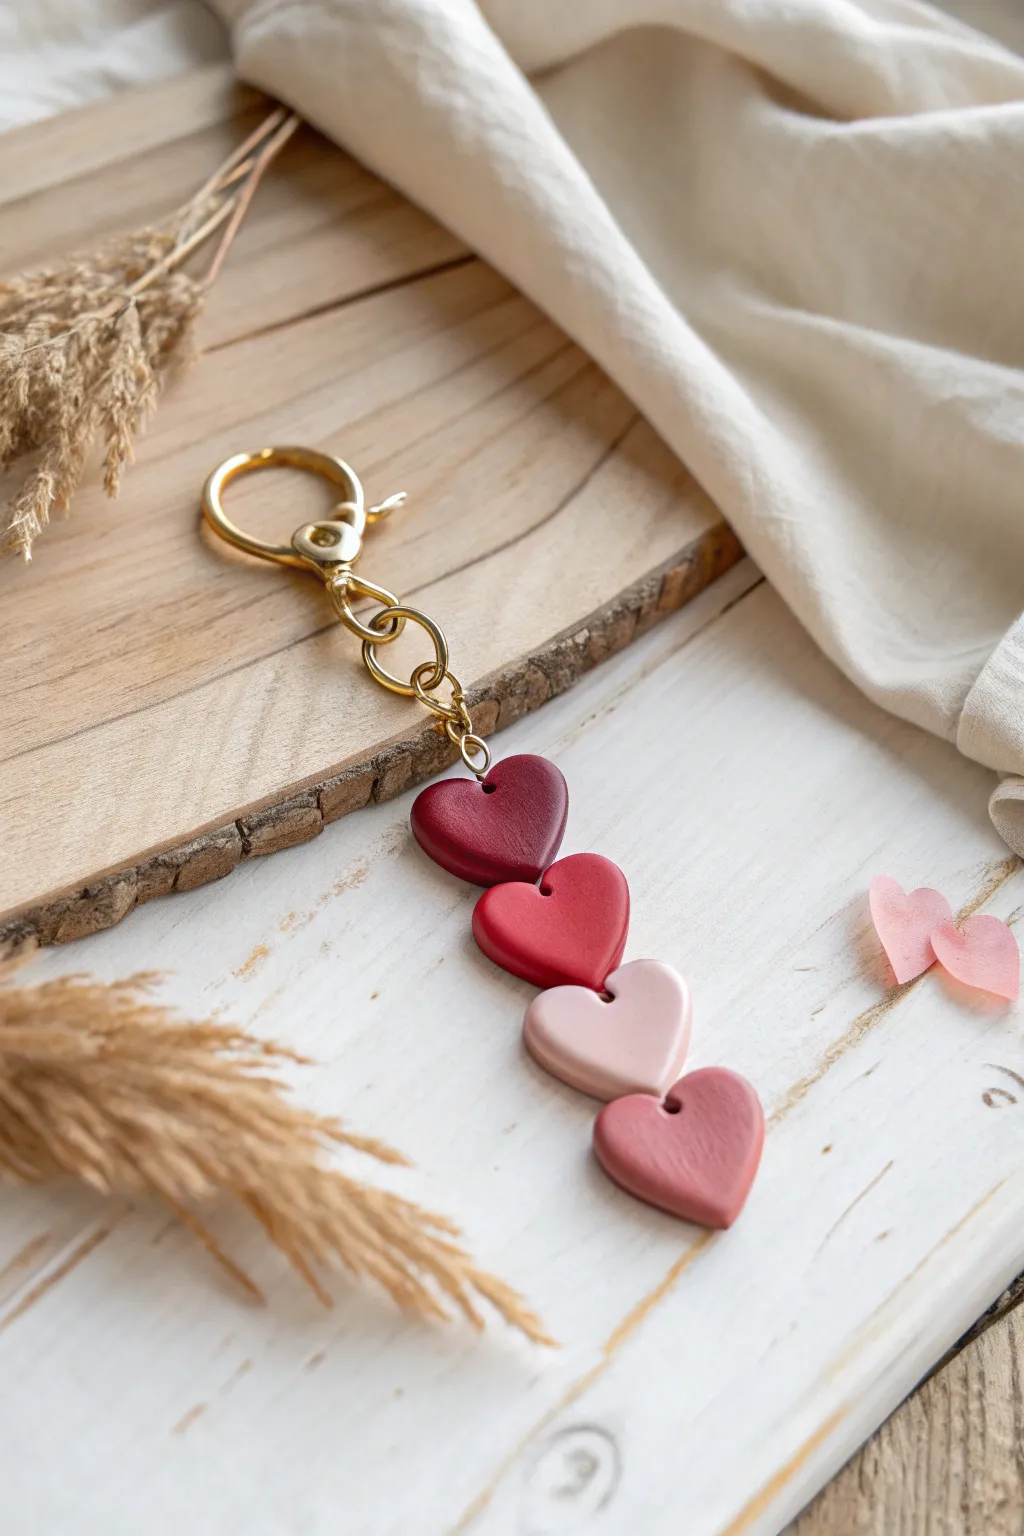
Show off your love for color with this elegant polymer clay keychain featuring a cascading stack of hearts. The gradient transition from deep maroon to soft pink creates a sophisticated accessory that’s perfect for gifting or keeping for yourself.
Step-by-Step Tutorial
Materials
- Polymer clay in four shades (Deep Burgundy, True Red, Pale Pink, Dusty Rose)
- Small heart-shaped cutter (approx. 1 inch)
- Acrylic roller or pasta machine
- Gold tone keychain clasp with swivel
- Gold tone jump rings (7-8mm)
- Needle tool or small drill bit
- Jewelry pliers (flat nose and round nose)
- Baking sheet and parchment paper
- Fine grit sandpaper (optional)
Step 1: Clay Preparation
-
Condition the clay:
Start by thoroughly conditioning each color of polymer clay until it is soft and pliable. This prevents cracks during baking. -
Roll out sheets:
Using your acrylic roller or pasta machine on a medium setting (approx 3-4mm thick), roll out a small sheet for each color. Aim for consistent thickness across all sheets for a uniform look. -
Cut the shapes:
Use your heart-shaped cutter to punch out one heart from each color. If you want smoother edges, you can place a piece of plastic wrap over the clay before cutting to create a domed effect. -
Smooth the edges:
Gently pick up each heart and use your fingertip to smooth down any sharp clay burrs left by the cutter. I find a light circular motion works best to soften the perimeter.
Smooth Finishing Touch
Before baking, lightly brush the clay with a little baby oil or cornstarch to remove any fingerprints and achieve that flawless matte surface.
Step 2: Constructing the Pieces
-
Pierce the top holes:
Using a needle tool, carefully pierce a hole at the top center of every heart (in the dip between the two arches). Ensure the hole is large enough for your jump rings. -
Pierce bottom holes:
For the top three hearts (Burgundy, Red, Pink), pierce a second hole at the very bottom point. The final bottom heart (Dusty Rose) only needs the top hole. -
Check alignment:
Lay the hearts in a vertical line to ensure your holes line up straight. The order should be Burgundy, Red, Pale Pink, then Dusty Rose. -
Bake the clay:
Place all hearts on a parchment-lined baking sheet. Bake according to your specific clay manufacturer’s instructions (usually 275°F/135°C for 15-30 minutes). -
Cool down:
Let the hearts cool completely on the baking sheet before handling. Polymer clay is slightly soft when hot and hardens as it cools.
Step 3: Assembly
-
Open jump rings:
Using two pairs of pliers, twist your jump rings open laterally. Never pull them apart, as this weakens the metal and distorts the circle. -
Attach the clasp:
Loop a jump ring through the top hole of the Burgundy heart and connect it to the gold keychain clasp. Close the ring securely. -
Link first hearts:
Insert a jump ring through the bottom hole of the Burgundy heart and the top hole of the True Red heart. Close the ring. -
Continue the chain:
Connect the bottom of the Red heart to the top of the Pale Pink heart using another jump ring. -
Final connection:
Attach the final Dusty Rose heart to the bottom of the Pale Pink heart to complete the gradient stack.
Add Sparkle
Mix translucent clay with gold leaf flecks and create a fifth, smaller heart to dangle at the very bottom for a bit of extra shine.
Clip this lovely handmade charm onto your purse or keys to carry a little love wherever you go

TRACK YOUR CERAMIC JOURNEY
Capture glaze tests, firing details, and creative progress—all in one simple printable. Make your projects easier to repeat and improve.
Tiny “Candy Gram” Tag Gift Toppers
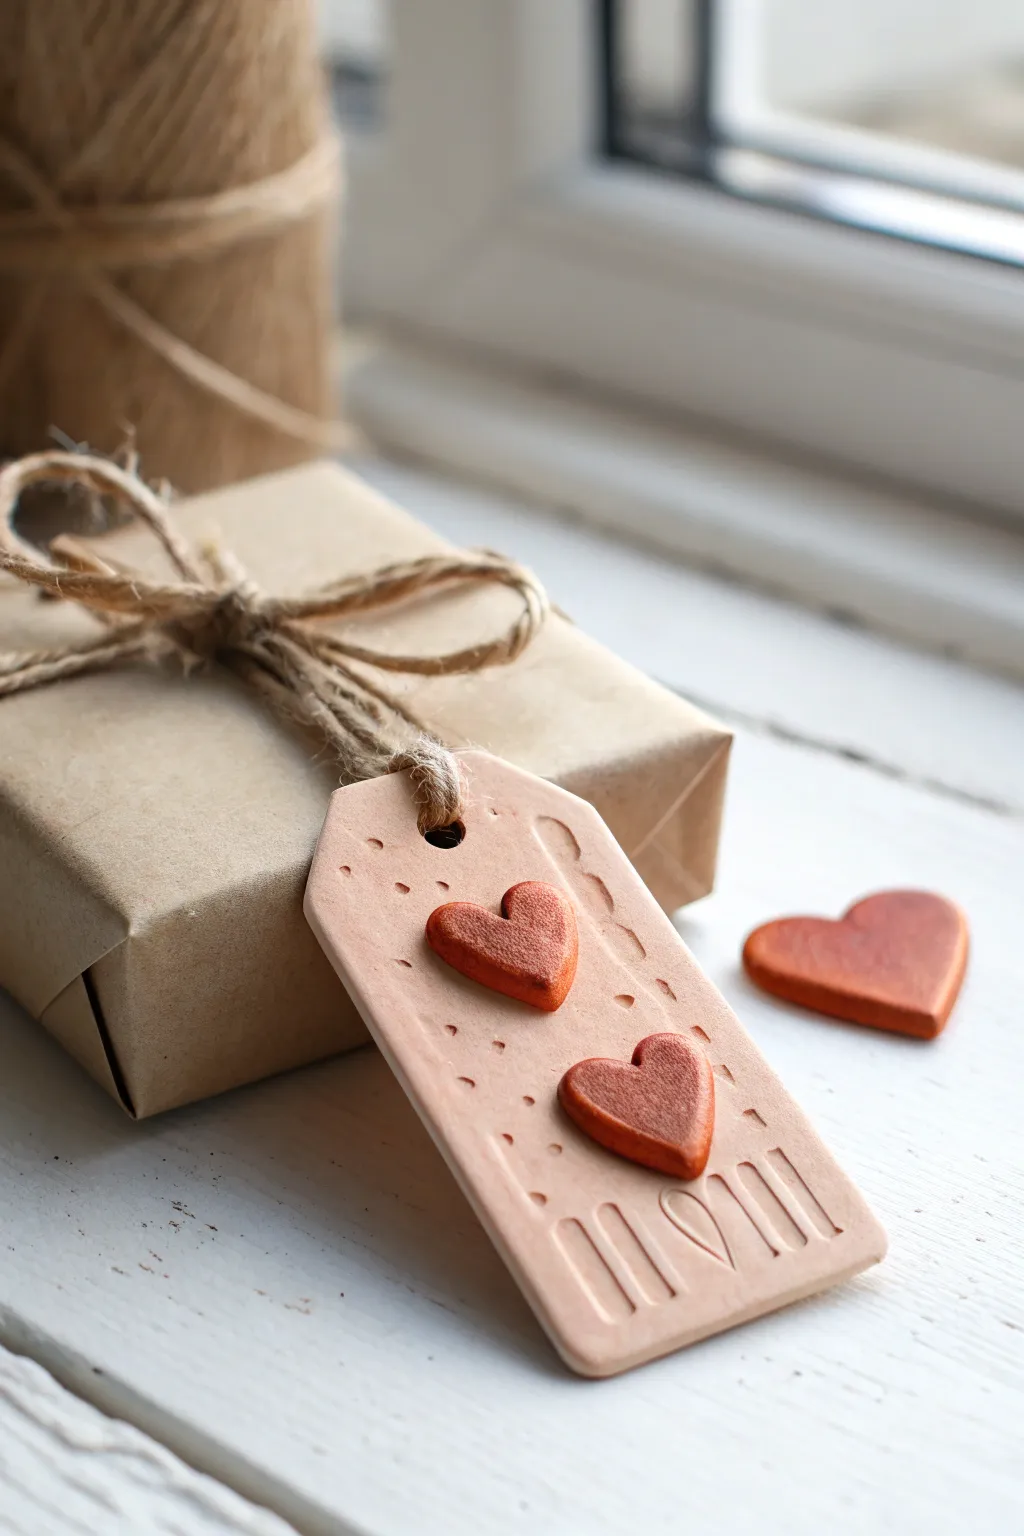
Elevate simple kraft paper wrapping with a handcrafted polymer clay tag that feels as special as the gift inside. This dusty pink tag features charming raised hearts and subtle indentations for a beautifully textured, rustic finish.
Step-by-Step Guide
Materials
- Polymer clay (dusty beige/pink and terracotta red)
- Acrylic rolling pin
- Rectangular clay cutter (or craft knife)
- Small heart-shaped cutter
- Needle tool or toothpick
- Small straw or piping tip (for the hole)
- Liquid polymer clay (Bake and Bond)
- Parchment paper
- Baking sheet
- Oven
- Jute twine
- Optional: Fine-grit sandpaper
Step 1: Shaping the Base
-
Condition the clay:
Start by thoroughly conditioning your dusty beige clay until it is soft and pliable. Ensure there are no air bubbles trapped inside by folding and rolling it repeatedly. -
Roll the slab:
Roll the beige clay out on parchment paper to a uniform thickness of about 3mm (1/8 inch). A consistent thickness ensures the tag won’t crack easily after baking. -
Cut the rectangle:
Using a rectangular cutter or a craft knife and ruler, cut out your tag shape. A size of roughly 1.5 x 3 inches works well for most small gifts. -
Soften the corners:
Gently tap the corners with your finger to round them off slightly. This prevents sharp edges and contributes to the soft, ceramic look of the finished piece. -
Create the hole:
punch a hole near the top center using a small straw or piping tip. Make sure the hole is wide enough to accommodate your jute twine.
Uneven Texture?
If your needle dots create raised ridges, lightly run a finger dipped in baby oil over the surface before baking to smooth the ‘volcano’ edges.
Step 2: Adding Texture & Hearts
-
Prepare the hearts:
Condition a small amount of terracotta or deep red clay. Roll it slightly thinner than your base tag. -
Cut out hearts:
Use your small heart cutter to punch out two heart shapes. If the edges catch, gently smooth them with your fingertip. -
Attach the hearts:
Place a tiny drop of liquid polymer clay on the back of each heart. Position them diagonally on the tag—one slightly higher and to the left, the other lower and to the right. -
Secure the bond:
Press the hearts down gently but firmly to ensure they adhere well without squashing their shape. -
Add dotted texture:
Take your needle tool and gently prick the surface of the beige clay around the hearts. Keep the dots random and light for a subtle, speckled effect. -
Impress the bottom design:
Use the side of a credit card or a clay blade to press vertical lines into the bottom edge of the tag. I like to group them in threes or vary the lengths for visual interest. -
Final smooth:
Check the edges of your tag one last time to remove any fingerprints. Lightly brushing with a little cornstarch can help smooth imperfections if the clay is sticky.
Step 3: Baking & Assembly
-
Bake the tag:
Transfer the parchment paper to a baking sheet. Bake according to your clay manufacturer’s instructions—usually around 275°F (135°C) for 15-30 minutes. -
Cool completely:
Allow the tag to cool completely in the oven with the door slightly ajar. This helps prevent thermal shock and brittleness. -
Sand edges (optional):
If there are any rough spots on the edges after baking, gently buff them away with fine-grit sandpaper under running water. -
Wrap the gift:
Wrap your gift box in plain kraft paper, creating crisp creases for a neat appearance. -
Attach the tag:
Cut a length of jute twine. Thread it through the hole in your tag, then wrap the twine around the gift box multiple times. -
Tie the bow:
Secure the twine with a simple knot, positioning the tag so it lays flat against the paper, then finish with a rustic bow.
Variation Idea
Before baking, rub a little brown acrylic paint or mica powder into the indented lines at the bottom to antique the piece and make the details pop.
This charming handmade tag adds a permanent keepsake to your wrapping that the recipient can cherish long after opening the gift