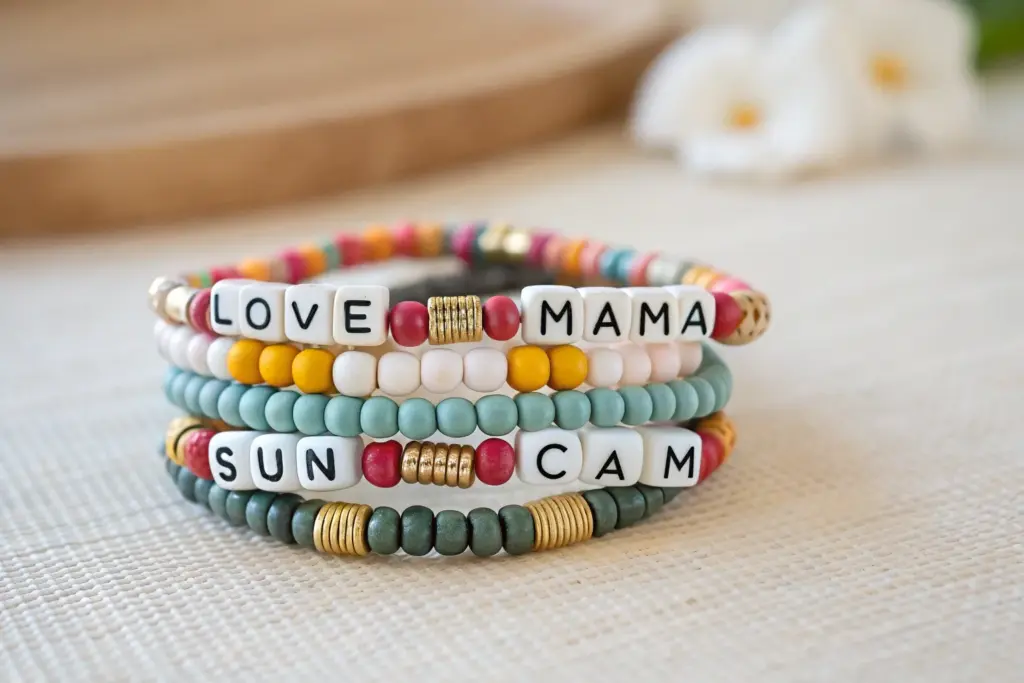
I’m a little obsessed with clay bead bracelets with words because they’re equal parts cute and meaningful, like tiny pep talks you can wear. Once you start playing with letter beads and color combos, you’ll have a whole lineup of wordy bracelets that feel totally you.
Classic Name Centerpiece
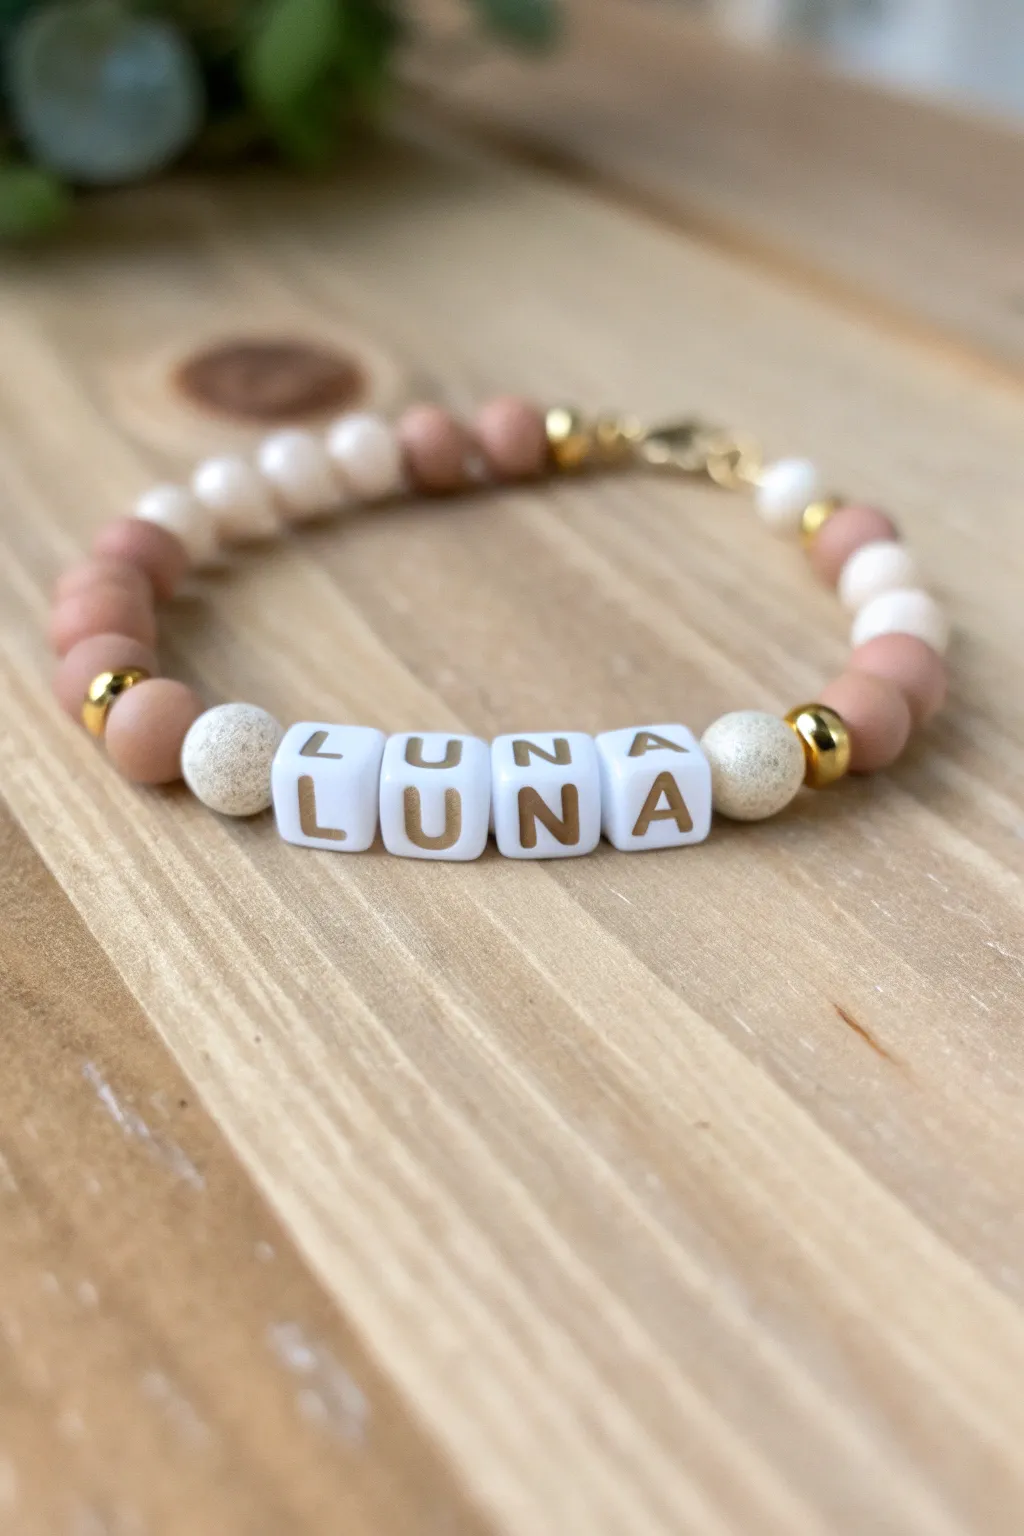
This elegant bracelet design combines soft mauve and cream tones with striking gold accents for a sophisticated take on the classic friendship bracelet. Using square letter beads as the focal point creates a clean, personalized centerpiece that looks beautiful stacked or worn solo.
Step-by-Step
Materials
- Elastic jewelry cord (0.7mm or 0.8mm)
- Square white alphabet beads with gold lettering (L, U, N, A)
- 6mm round matte polymer clay or stone beads in dusty pink/mauve
- 6mm round matte beads in cream or off-white
- 4mm or 5mm gold spacer beads (round or saucer shape)
- Two 8mm textured sparkly accent beads (gold or champagne color)
- Jewelry glue (GS Hypo Cement recommended)
- Scissors
Step 1: Planning the Layout
-
Measure your wrist:
Before cutting any string, lightly wrap a piece of cord around your wrist to find your size, then add about 3-4 inches of extra length to allow for comfortable tying later. -
Arrange the centerpiece:
Lay out your bead board or a soft towel. Place your four alphabet beads (‘L’, ‘U’, ‘N’, ‘A’) in the center of your workspace to establish the focal point. -
Add the framing beads:
On the immediate left side of the ‘L’ and the immediate right side of the ‘A’, plan to place one of the larger textured sparkly accent beads. These will act as bookends for the name. -
Start the side pattern:
Moving outward from the textured beads, place a gold spacer bead on each side to add a flash of metallic shine. -
Establish the color rhythm:
Create the main pattern for the strap: I like to use three dusty pink beads followed by a gold spacer, then three cream beads, then another gold spacer. Lay this pattern out on both sides until you reach your desired length.
Knot Slipping?
If your elastic knot feels slick or keeps coming undone before gluing, try a ‘surgeon’s knot.’ Loop the string through twice on the first pass instead of once for extra friction.
Step 2: Stringing the Design
-
Secure the end:
Attach a bead stopper or a piece of tape to one end of your cut elastic cord to prevent beads from sliding off while you work. -
Begin creating the left side:
Start stringing from the far left end of your planned layout. Feed the pattern of pinks, creams, and gold spacers onto the cord. -
Add the name segment:
Once the first half of the patterned strap is on, slide on the first large textured accent bead. -
Orient the letters:
Carefully thread the ‘L’, ‘U’, ‘N’, and ‘A’ beads. Double-check that all letters are facing the correct direction and aren’t upside down relative to the first letter. -
Finish the name segment:
Slide on the second textured accent bead to close the bracket around the name. -
Complete the right side:
Continue stringing the remaining pattern of creams, pinks, and spacers to mirror the left side perfectly. -
Check the fit:
Bring the two ends of the cord together (carefully, so beads don’t drop!) and wrap the bracelet around your wrist to ensure it isn’t too tight or too loose. Add or remove a few spacer beads at the ends if adjustments are needed.
Step 3: Finishing Touches
-
Pre-stretch the cord:
Gently pull tightly on both ends of the elastic a few times. This pre-stretching step is crucial because it prevents the bracelet from sagging shortly after you start wearing it. -
Tie the knot:
Tie a standard square knot (right over left, left over right). Pull the strands tight and repeat with a second square knot for extra security. -
Apply adhesive:
Dab a tiny droplet of jewelry glue directly onto the knot. You don’t need much; just enough to saturate the threads of the knot itself. -
Hide the knot:
While the glue is still wet, gently slide one of the larger beads (or a bead with a large hole) over the knot to conceal it inside the bead channel. -
Trim the excess:
Once the glue has set for a minute or two, use your scissors to snip the excess cord ends close to the bead, being careful not to cut the main knot.
Make It Glossy
Swap the matte stone beads for polished quartz or glass pearls to transform this from a casual day accessory into an elegant evening piece that catches the light beautifully.
Slip your new personalized bracelet on and enjoy the bespoke touch it adds to your outfit


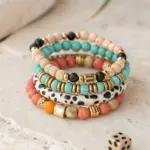
Mama And Mini Set
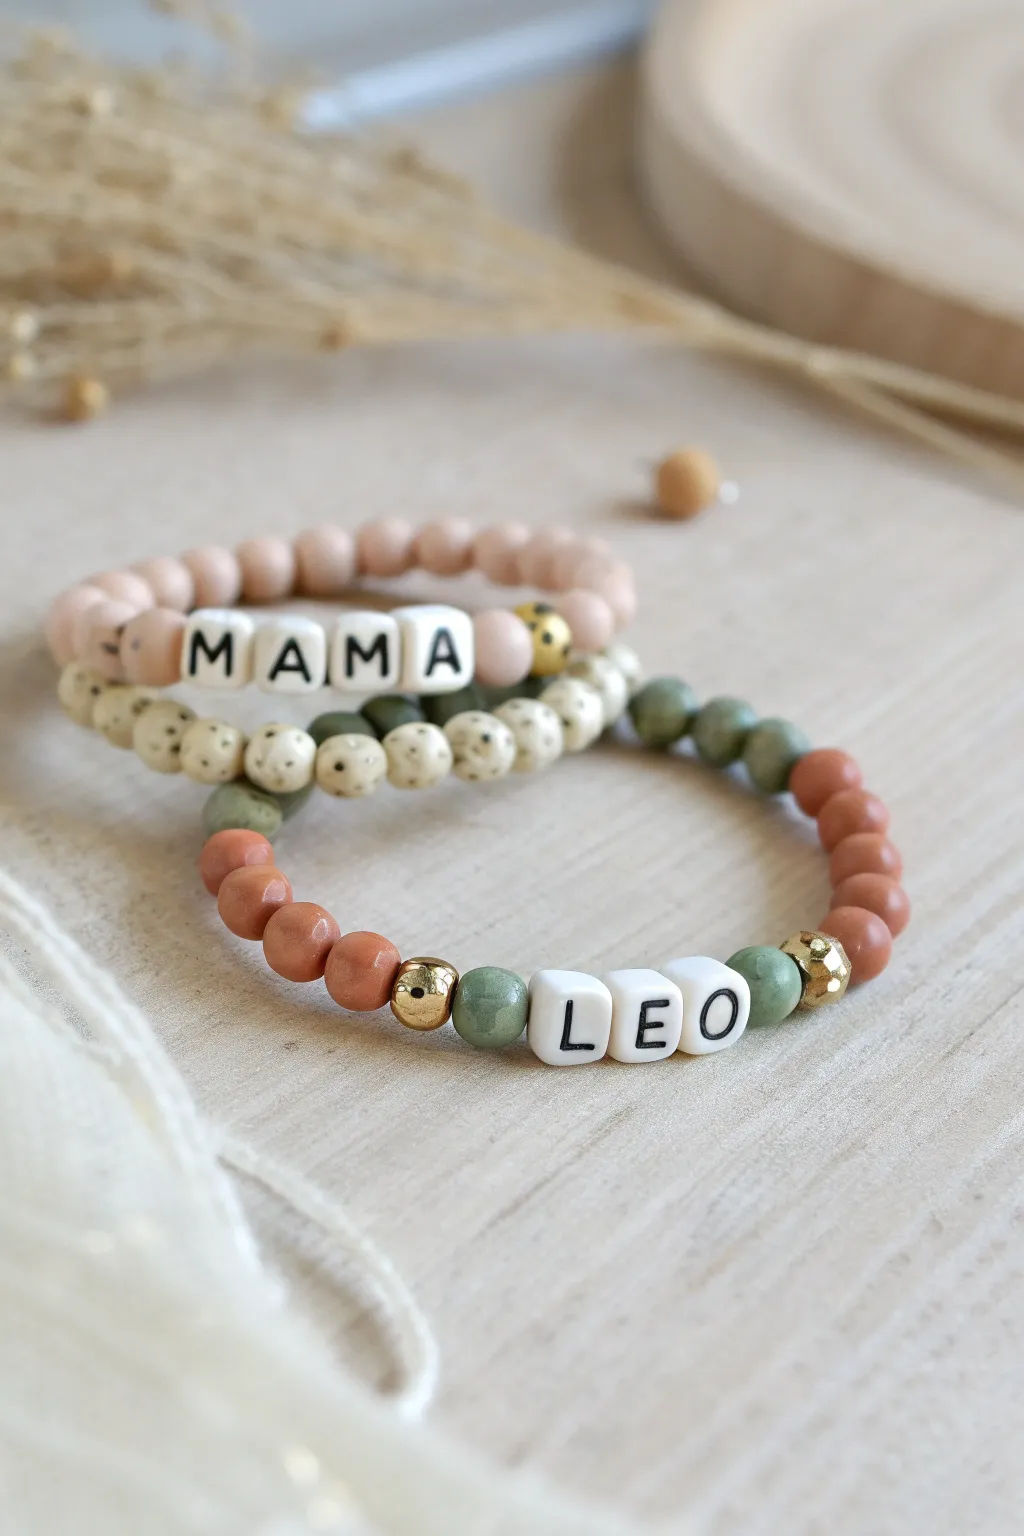
Create a heartfelt connection with this set of coordinating bracelets featuring earthy tones and personalized messages. The combination of matte clay-style beads, speckled accents, and bright gold touches gives these pieces a modern, organic look that is perfect for everyday wear.
Step-by-Step
Materials
- Stretch cord (0.8mm or 1mm depending on bead hole size)
- 6mm or 8mm matte round beads in pale blush/dusty rose
- 6mm or 8mm round beads in speckled cream/off-white
- 6mm or 8mm round beads in terracotta/rust color
- 6mm or 8mm matte round beads in sage green
- White cube letter beads with black text
- Gold faceted spacer beads (hexagon or round shape)
- Small gold round spacer beads (optional)
- Scissors
- Jewelry glue or clear nail polish
- Bead stopper or tape
Step 1: Planning the Design
-
Measure your wrist:
Before cutting any cord, measure your wrist and decide if you are making a standard adult size (usually around 7 inches) or a child’s size. Add about 3-4 inches of extra cord to your measurement to allow plenty of room for tying knots later. -
Layout the MAMA bracelet:
On a bead board or a soft towel, lay out the ‘MAMA’ design. Start with the four letter beads in the center. Flank them with your pale blush/dusty rose matte beads. Decide where you want your accent bead—in the photo, a single gold faceted bead sits opposite the letters. -
Plan the speckled stacker:
For the middle bracelet, create a pattern using the speckled cream beads. You might choose to alternate them with sage green beads or simply create a solid strand of speckled beads for texture. -
Arrange the LEO or name bracelet:
For the named bracelet (shown here as ‘LEO’), lay out the letter beads first. Create a color block pattern: place a gold faceted bead on either side of the name, followed by two sage green beads, and finish the rest of the strand with the terracotta/rust colored beads.
Hiding the Knot
If using a large-hole bead to hide the knot is tough, try widening the hole of a single bead gently with a bead reamer, or plan your design so the knot lands inside one of the larger square letter beads.
Step 2: Stringing the Beads
-
Prepare the cord:
Cut your stretch cord to length. Pre-stretch the cord by pulling it firmly several times; this prevents the bracelet from stretching out permanently after the first wear. Secure one end with a bead stopper or a piece of tape. -
String the MAMA strand:
Begin threading the blush beads. When you reach the midpoint, thread the ‘M’, ‘A’, ‘M’, ‘A’ cube beads. Continue with the remaining blush beads. Add the gold faceted spacer bead last if you want it to hide near the knot, or place it halfway through the plain beads for asymmetry. -
Check the fit:
Wrap the unfinished strand around your wrist to check the sizing. It should sit comfortably without pinching. Add or remove a bead or two if necessary to get the perfect fit. -
Assemble the name bracelet:
Using a fresh piece of cord, start with the terracotta beads. When you are ready for the focal point, thread a gold faceted bead, two sage green beads, then the name (‘LEO’), followed by two sage green beads and the second gold faceted bead. -
Complete the pattern:
Finish the strand with the remaining terracotta beads until you match the length of your first bracelet. -
Create the middle layer:
String your third bracelet using the speckled cream beads. You can intersperse sage green beads every 3-4 speckled beads for a subtle pattern, or keep it simple as shown in the reference image.
Level Up: Texture Mix
Swap the round terracotta beads for wooden beads or lava stones. Lava stones are porous, so you can add a drop of essential oil to turn your stack into a personal minimalist diffuser.
Step 3: Finishing Touches
-
Tie the first knot:
Remove the bead stopper or tape. Bring the two ends of the cord together and tie a simple overhand knot, pulling it tight to bring the beads together without deliberate gaps. -
Secure with a Surgeon’s Knot:
Tie a surgeon’s knot for extra security. Cross the lines, loop one end through twice, and pull tight. I find pulling all four strands (the two tails and the two loop sides) helps seat the knot firmly. -
Apply adhesive:
Dab a tiny drop of jewelry glue or clear nail polish onto the knot. Be careful not to get glue on the neighboring beads, as it can spoil the matte finish. -
Hide the knot:
While the glue is still slightly tacky but not wet, slide the nearest generous-holed bead over the knot to conceal it. If your beads have small holes, simply trim the tails close to the knot after the glue dries completely. -
Repeat for the set:
Follow the same tying and gluing process for the remaining two bracelets. Let them cure for at least 15-20 minutes before wearing to ensure the knots hold their strength.
Pair these lovely bracelets together for a chic stack or gift distinct sets to loved ones for a personalized touch


Love In Black And White
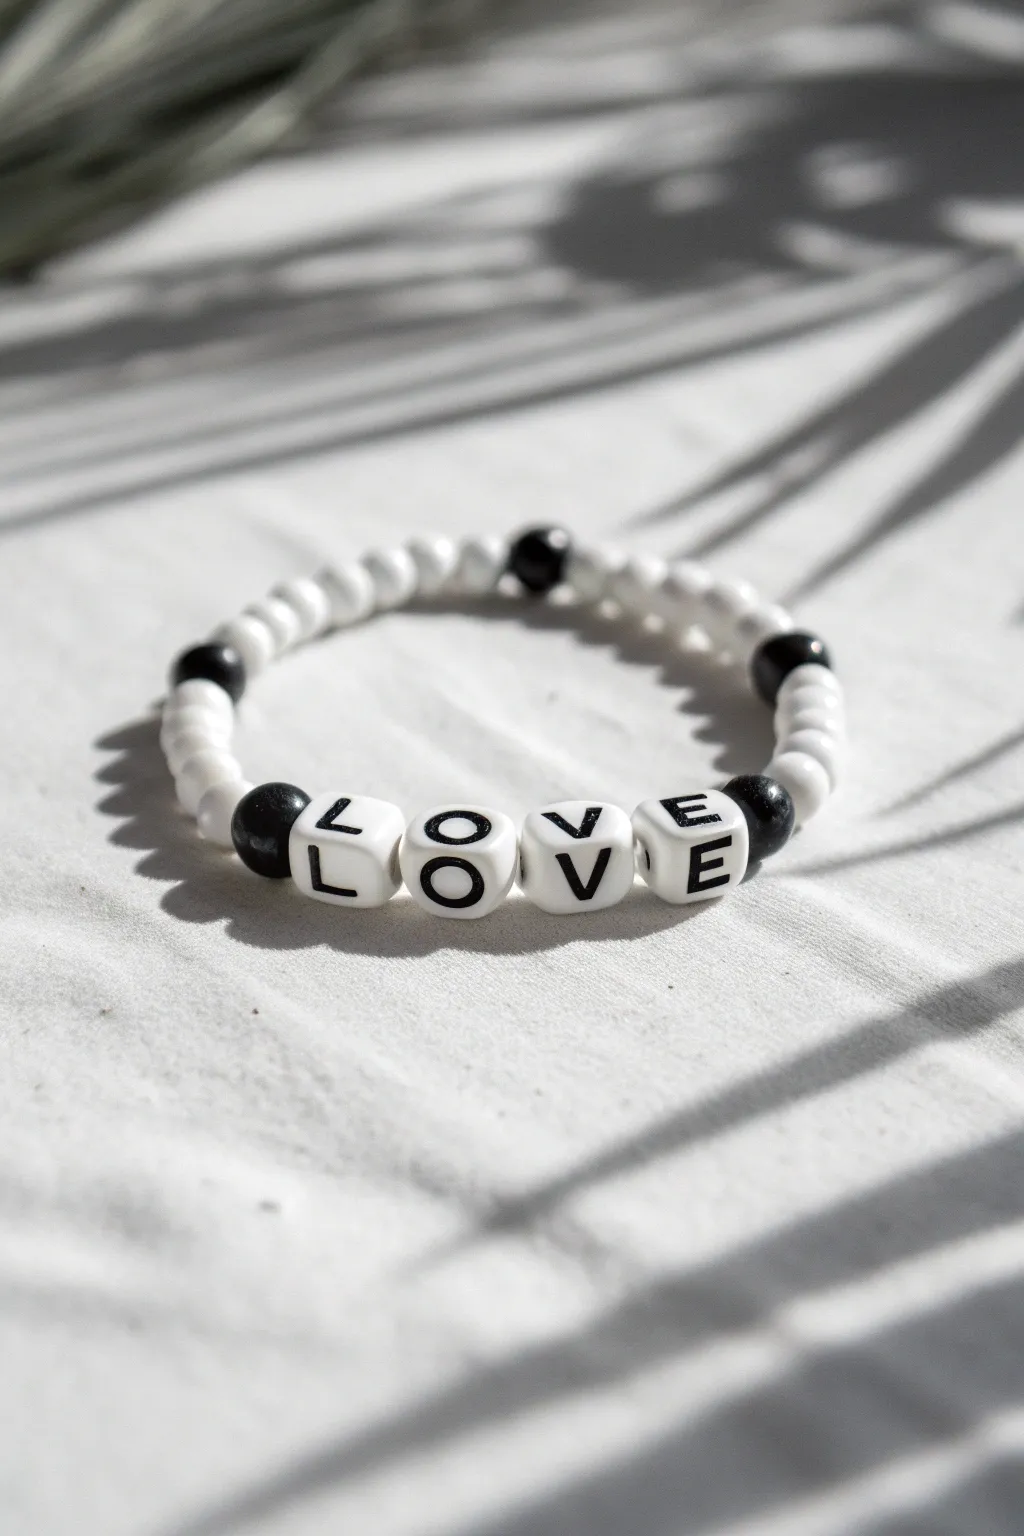
Embrace simplicity with this high-contrast black and white bracelet that spells out L-O-V-E on classic cube beads. The alternating pattern of spherical beads creates a clean, rhythmic look perfect for stacking or wearing as a subtle statement piece.
Step-by-Step Guide
Materials
- Elastic beading cord (0.5mm clear or white)
- White polymer clay heishi beads or small spherical acrylic beads (approx. 4-6mm)
- Black spherical beads (same size as white, wood or acrylic)
- White cube letter beads with black lettering (L, O, V, E)
- Scissors
- Hypo-cement or jewelry glue
- Bead stopper or tape
Step 1: Planning the Design
-
Measure your wrist:
Wrap a piece of string around your wrist to find your size, then add about half an inch for a comfortable fit. -
Cut the cord:
Cut a length of elastic cord about 10-12 inches long. Having extra length makes tying the final knot much easier. -
Secure one end:
Place a bead stopper or a piece of tape on one end of the cord to prevent your beads from sliding off while you work. -
Lay out the pattern:
Visualize the bracelet before stringing. The design features a central word section flanked by repeating segments of white beads separated by single black spacer beads.
Step 2: Stringing the Centerpiece
-
Start the center:
Pick up your first black spherical bead and slide it onto the cord. This will act as the left ‘bookend’ for your word. -
String ‘L’:
Slide on the ‘L’ cube bead. Ensure the letter is facing the correct direction relative to how you want to read it. -
Add ‘O’ and ‘V’:
Theme your next two letters onto the cord. I always double-check at this stage that the letters aren’t upside down. -
Finish with ‘E’:
Slide on the ‘E’ cube bead to complete the word. -
Cap the word:
Add another black spherical bead. Your centerpiece is now framed: Black Bead – LOVE – Black Bead.
Knot Security
When tying elastic, pull the cord taut *while* you are making the knot loops. This tension keeps the beads snug against each other without gaps showing.
Step 3: Building the Band
-
Create the first white section:
String approximately 6 to 8 white spherical beads. The exact number depends on your wrist size, but keep the count consistent for symmetry. -
Add a spacer:
Slide on one black spherical bead. -
Create the second white section:
Add another set of 6 to 8 white spherical beads. -
Add another spacer:
Slide on a second black spherical bead. -
Create the third section:
String your final set of 6 to 8 white beads. Check the total length against your wrist now. -
Determine final spacer:
Look at your starting end. If your very first bead was the black one next to the ‘L’, you typically won’t need a final black bead here, as the knot will join the white section to the start.
Add Gold Accents
Replace the single black spherical spacer beads with small gold or silver heavy-metal beads for a slightly more upscale, mixed-media aesthetic.
Step 4: Finishing Touches
-
Pre-stretch the cord:
Gently pull tightly on both ends of the elastic. This pre-stretching prevents the bracelet from becoming loose after the first few wears. -
Tie the knot:
Remove the bead stopper and tie a surgeon’s knot (right over left, left over right) or a strong square knot. Pull it tight. -
Secure with glue:
Dab a tiny drop of hypo-cement onto the knot. This is crucial for longevity. -
Hide the knot:
If the hole of an adjacent bead is large enough, gently tug the elastic to pull the knot inside a bead to hide it. -
Trim excess:
Once dry, use your scissors to snip the excess cord close to the knot.
Now you have a stylish monochromatic accessory ready to wear or gift to someone special


Peaceful Neutrals With “Breathe”
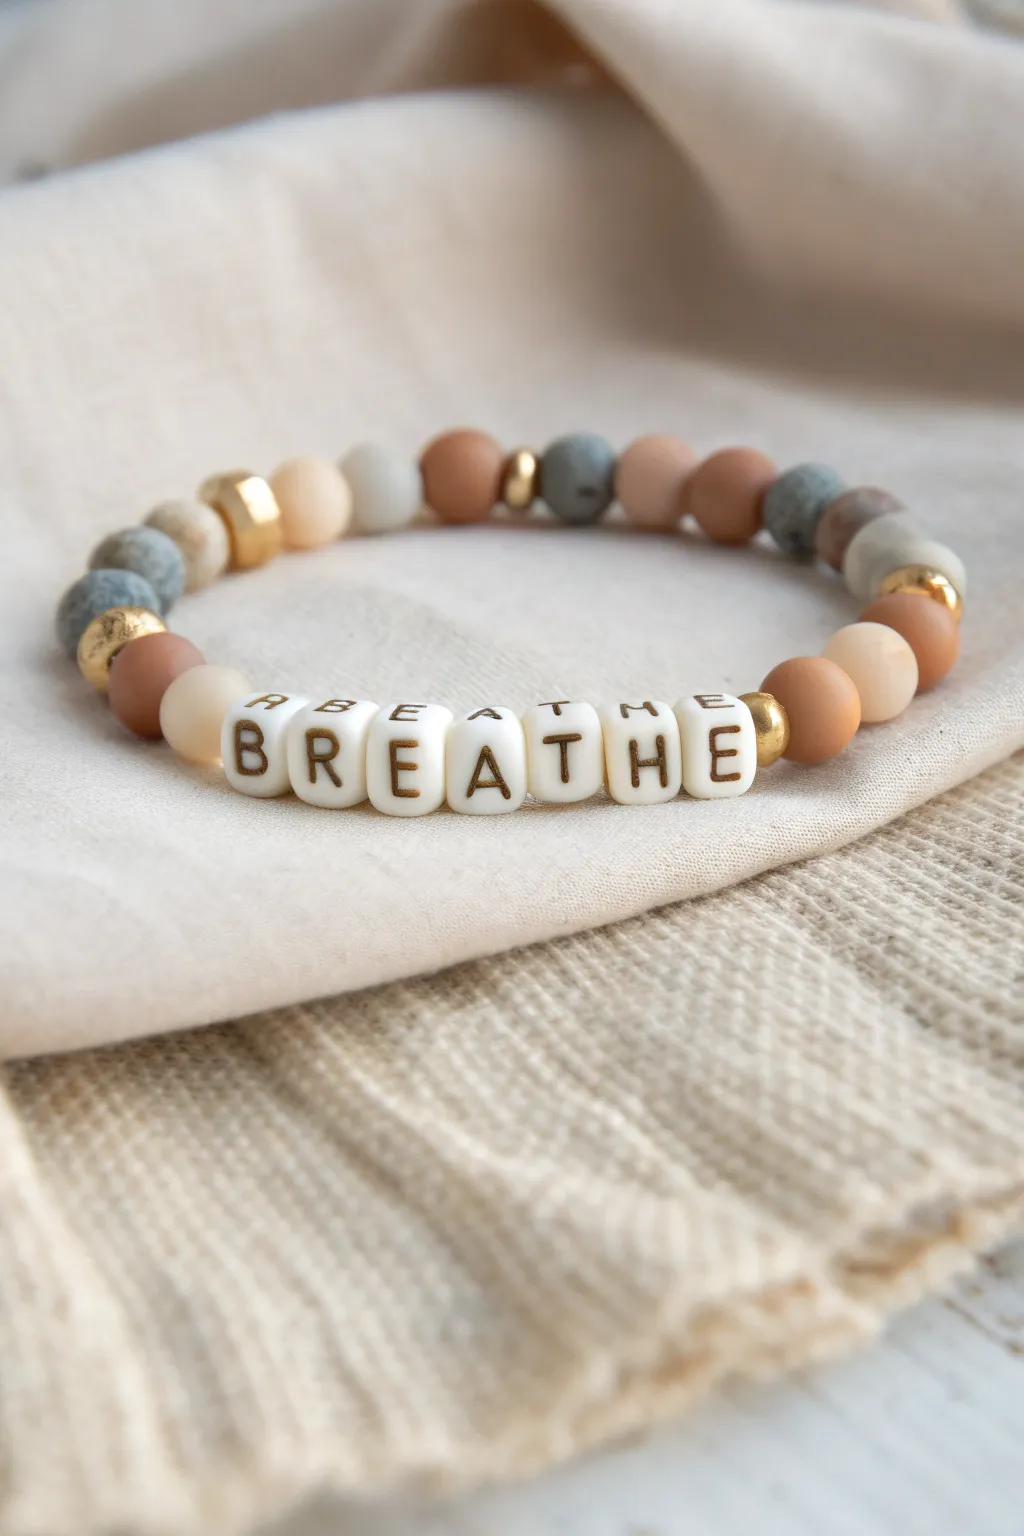
Find your center with this calming beaded bracelet featuring soothing earth tones and a gentle reminder to pause. The combination of matte clay-tone beads, rustic stone textures, and gold accents creates a grounded, sophisticated accessory perfect for daily wear.
Step-by-Step Tutorial
Materials
- Elastic stretch cord (0.7mm or 0.8mm)
- White square alphabet beads with gold lettering (B, R, E, A, T, H, E)
- 6mm or 8mm round matte beads in cream/peach
- 6mm or 8mm round matte beads in terracotta/clay
- 6mm or 8mm round beads in textured grey-blue stone (like matte agate or jasper)
- Gold tone textural spacer beads (rounded or heishi style)
- Small gold bead caps or mini spacers (optional)
- Bead stopper or masking tape
- Scissors
- Jewelry glue or clear nail polish
Step 1: Planning Your Design
-
Select the palette:
Gather your beads, focusing on a neutral ‘desert’ palette. You want a mix of warm terracotta, soft cream, and cool grey-blue tones to achieve that balanced, earthy look. -
Measure the cord:
Cut a piece of elastic cord about 10-12 inches long. This extra length makes tying the final knot much easier than fighting with short ends. -
Secure the end:
Attach a bead stopper to one end of the cord, or simply tape it down to your table so your beads don’t slide off while you work. -
Lay out the word:
Find your alphabet beads to spell out ‘BREATHE’ and center them on your workspace or bead board. Check that all letters are upright and facing the same direction.
Pro Tip: Hole Sizes
Check bead hole sizes before starting. Stone beads often have smaller holes; ensure your elastic fits through twice if you plan to hide the knot inside one.
Step 2: Stringing the Beads
-
Start the center sequence:
Begin stringing with the alphabet beads. Thread B-R-E-A-T-H-E onto the cord first. -
Add gold accents:
Immediately flank the word ‘BREATHE’ with a gold spacer bead on each side. The metallic shine frames the text beautifully. -
Create the gradient:
On the right side of the word, add a soft cream bead followed by a terracotta bead. I like to graduate the colors subtly from light to dark. -
Mirror the pattern:
Repeat that same sequence on the left side: one cream bead, then one terracotta bead. -
Introduce texture:
Next, add the grey-blue stone beads. Place 2-3 of these on each side. Their speckled texture adds visual interest against the smooth matte beads. -
Incorporate spacers:
Insert a gold spacer bead after the grey-blue section on both sides to break up the color blocks. -
Fill the length:
Continue adding beads to reach your desired length (usually about 6.5 to 7 inches for an average wrist). Alternate between the terracotta, cream, and stone beads randomly for an organic feel. -
Check the fit:
Wrap the unfinished strand around your wrist. The ends should meet comfortably without stretching the elastic too much.
Troubleshooting: Kinking
If the bracelet looks rigid or kinks, you’ve tied it too tight. Restring and leave a tiny 1-2mm gap of slack before knotting to let beads roll freely.
Step 3: Finishing Touches
-
Pre-stretch the cord:
Gently pull tightly on both ends of the elastic cord a few times. This pre-stretching prevents the bracelet from sagging later. -
Tie the knot:
Remove the bead stopper and tie a surgeon’s knot. This is a simple overhand knot, followed by a second overhand knot where you loop the end through twice before pulling tight. -
Secure with glue:
Apply a tiny dot of jewelry glue or clear nail polish directly onto the knot. This ensures it won’t slip undone over time. -
Hide the knot:
While the glue is still slightly tacky, slide an adjacent bead (preferably one with a larger hole) over the knot to hide it inside. -
Trim excess:
Once the glue is fully dry, trim the excess cord ends close to the bead using sharp scissors, being careful not to nick the main knot.
Step 4: Styling
-
Final adjustment:
Give the bracelet a gentle roll between your palms to help the beads settle into a perfect circle.
Now you have a serene, stylish reminder to take a moment for yourself every time you glance at your wrist

The Complete Guide to Pottery Troubleshooting
Uncover the most common ceramic mistakes—from cracking clay to failed glazes—and learn how to fix them fast.
Hope Pastels That Pop
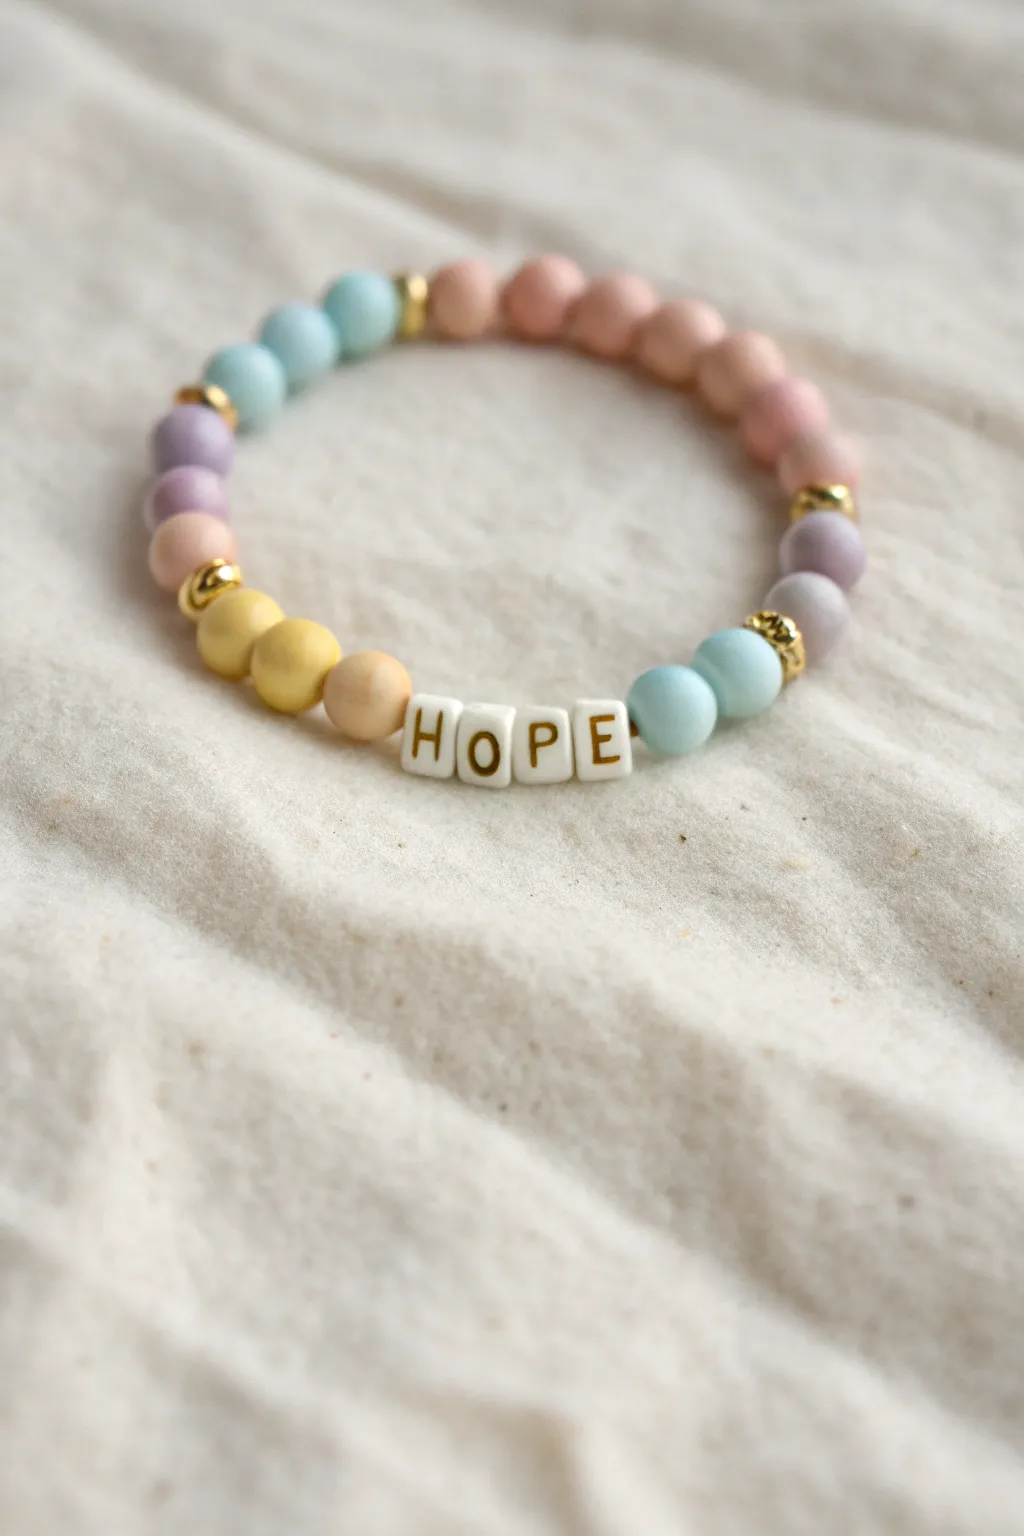
Embrace a sense of optimism with this gentle, candy-colored accessory featuring a classic pastel rainbow palette. The smooth matte beads pair beautifully with gold accents to frame a central message of hope, making it a perfect gift or personal reminder.
Step-by-Step
Materials
- Elastic beading cord (0.7mm or 0.8mm clear)
- Matte round beads (8mm) in: pastel pink, lavender, baby blue, yellow, and peach
- Square white letter beads with gold lettering (H, O, P, E)
- Small gold nugget floral spacer beads (4mm or 5mm)
- Beading needle (optional but helpful)
- Scissors
- Hypo-cement or clear nail polish (for knot security)
Step 1: Preparation
-
Measure your cord:
Cut a piece of elastic cord about 10-12 inches long. This generous length gives you plenty of room to tie knots comfortably at the end without struggling. -
Pre-stretch the elastic:
Before stringing a single bead, give your cut cord a few firm tugs. This crucial step prevents the finished bracelet from sagging or stretching out permanently after the first wear. -
Plan your pattern:
Lay out your beads on a bead board or a soft towel to visualize the gradient. The pattern moves from warm tones (pinks) to cools (purples/blues) and back to warm (yellow/peach) to create a seamless flow.
Gold Preservation
To keep those gold spacers bright, avoid wearing the bracelet in the shower or pool. Even plated beads last longer when kept dry.
Step 2: Stringing the Design
-
Start the center sequence:
Begin by threading the letter beads spelling ‘HOPE’ onto the middle of the cord. Ensure they are facing the correct direction so the word reads clearly. -
Frame the word:
Add one matte bead to the immediate left of the ‘H’ (a peach bead shown here) and one to the immediate right of the ‘E’ (a blue bead). -
Add first accents:
Wait on the gold spacers for a moment; instead, string two matte blue beads to the right side, and two matte yellow beads to the left side. -
The cool side gradient:
Working on the right side of the bracelet (after the blue beads), slide on a small gold spacer bead. -
Continue the cool tones:
Add two lavender matte beads next to that gold spacer. -
Finish the cool section:
Add another gold spacer, followed by a sequence of pink beads. I like to check the length against my wrist periodically here. -
The warm side gradient:
Switch to the left side of the bracelet (after the peach/yellow section). Slide on a gold spacer bead. -
Continue the warm tones:
Add two lavender/pinkish transitional beads, followed by another gold spacer. -
Complete the circle:
Fill in the remaining space at the back of the bracelet with your pastel pink and blue beads until the strand measures approximately 6.5 to 7 inches for an average wrist.
Knot Slipping?
If the elastic feels too slick while tying, dab a tiny bit of glue on the cord ends *before* tying the knot to create friction.
Step 3: Finishing Touches
-
Check the fit:
Wrap the unfinished strand around your wrist one last time to ensure it isn’t too tight or too loose, adding or removing a spacer bead if necessary. -
Tie the surgeon’s knot:
Bring the two ends together. Cross right over left, then left over right and loop it through twice (instead of once) before creating the second part of the knot. -
Tighten securely:
Pull the elastic ends firmly to cinch the knot down. You should feel the elastic stretch slightly as the knot tightens. -
Seal the deal:
Apply a tiny dab of hypo-cement or clear nail polish directly onto the knot. Let it dry for a few minutes to ensure longevity. -
Hide the knot:
Trim the excess cord close to the knot, then gently tug the bracelet so the knot pops inside one of the larger matte beads to hide it from view.
Now you have a charming, wearable reminder to keep looking forward
Brave Bold Color Blocks
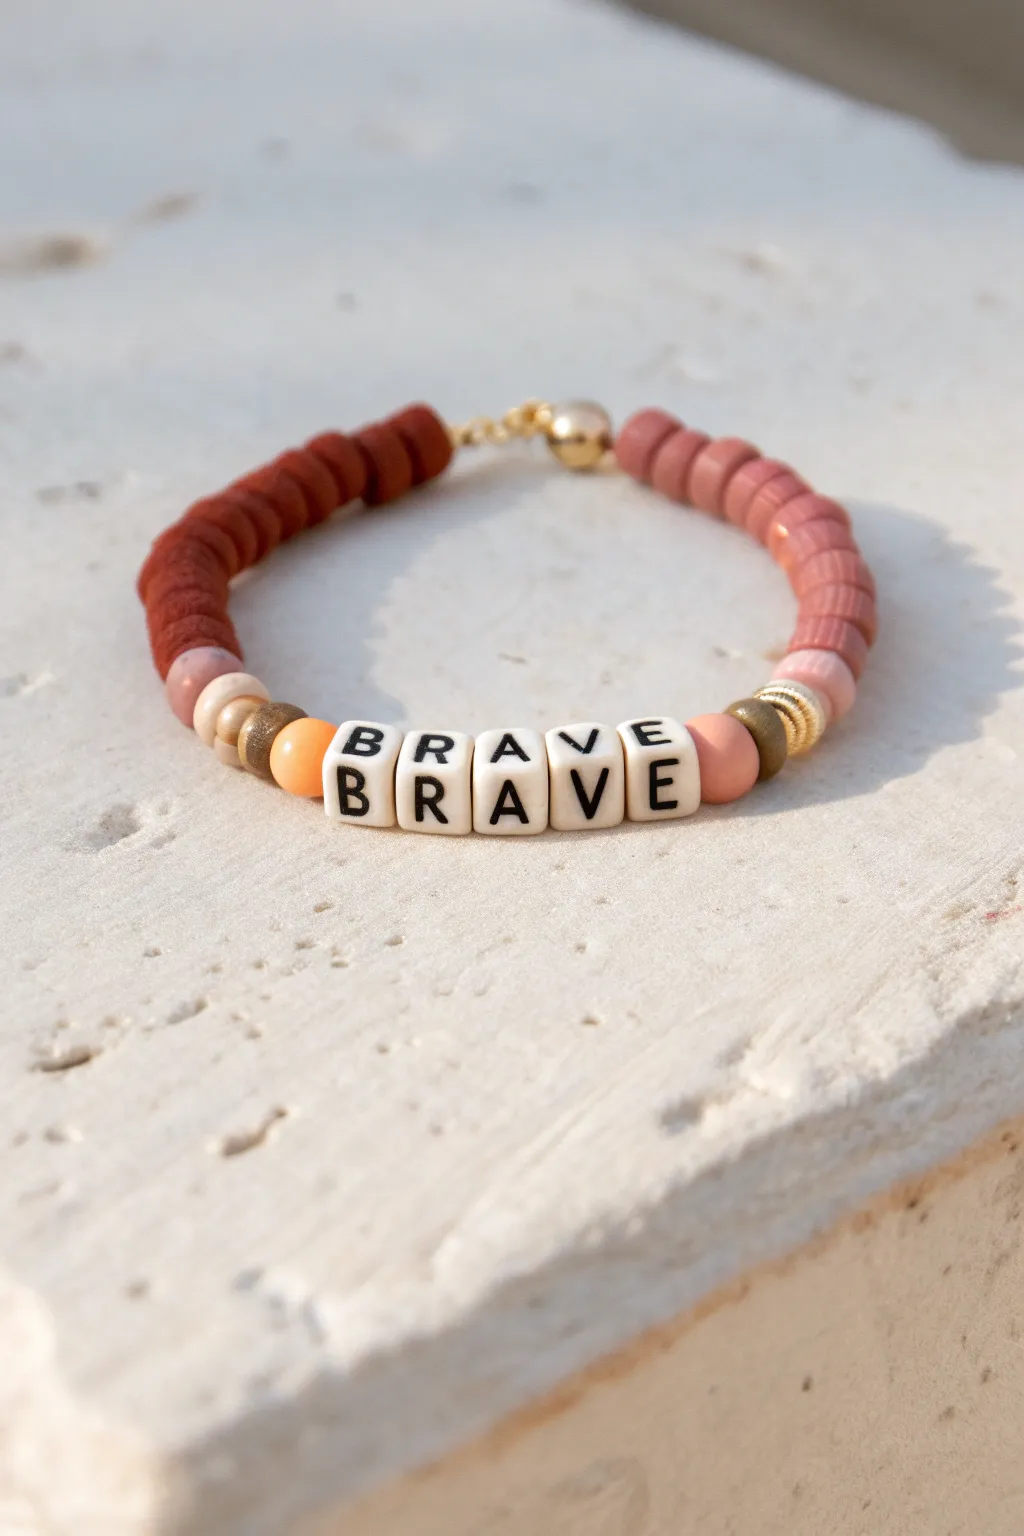
Embrace warm, earthy tones with this confidence-boosting accessory featuring rich terracotta and dusty rose hues. The classic ‘BRAVE’ lettering sits front and center, framed by metallic accents and soft heishi textures for a piece that feels both grounding and inspiring.
Step-by-Step Tutorial
Materials
- Stretch cord (0.8mm or 1mm)
- 6mm Polymer clay heishi beads (Dark Terracotta/Rust Red)
- 6mm Polymer clay heishi beads (Dusty Rose/Mauve)
- 6mm White cube letter beads spelling ‘B-R-A-V-E’
- 4mm-6mm Round accent beads (Peach or Cream ceramic/stone)
- Gold tone spacer beads (various: flat discs, small ribbed rounds)
- Gold tone crimp cover or knot cover
- Gold tone clasp (optional, or just tie a knot)
- Small gold jump rings and clasp (if not using stretch method)
- Scissors or jewelry snips
- Super glue or jewelry adhesive
Step 1: Preparation
-
Measure your wrist:
Wrap a flexible measuring tape around your wrist to find your size, then add about half an inch for a comfortable fit. Cut a piece of stretch cord about 3-4 inches longer than this measurement to give yourself plenty of room for tying knots later. -
Pre-stretch the cord:
Hold both ends of your cut cord and give it a few gentle tugs. This pre-stretching step encourages the elastic to hold its shape better over time so your bracelet doesn’t become loose after only a few wears. -
Secure one end:
Place a piece of tape around one end of the cord or attach a bead stopper clips to prevent your beads from sliding off while you work.
Tight Fit?
If the clay beads feel stiff on the cord, they are strung too tightly. Remove one or two discs to give the bracelet flexibility to curve around your wrist naturally.
Step 2: Designing the Centerpiece
-
String the message:
Thread the white cube letter beads onto the cord in the correct order to spell ‘BRAVE’. It helps to lay them out flat on your workspace first to ensure no letters are upside down. -
Add inner accents:
On the left side of the ‘B’, slide on one peach-colored round bead. On the right side of the ‘E’, slide on a matching peach round bead. These softer rounds smooth the transition from the sharp cube edges. -
Add metallic texture (Left):
Next to the left peach bead, add a gold spacer bead—I used a textured, darker gold rondelle here for contrast. -
Add metallic texture (Right):
Mirror this on the right side next to that peach bead. Add a gold spacer, followed by a ribbed gold ring bead for a touch of distinct shine.
Pattern Pro Tip
Mix metallic spacers with matte clay beads. The contrast between the dull clay surface and the shiny gold creates a high-end, boutique aesthetic.
Step 3: Building the Heishi Blocks
-
Begin the terracotta section:
On the left side of your centerpiece, start stringing the dark terracotta (rust red) heishi beads. Before the main block starts, you might want to add a single lighter pink spacer bead as a subtle transition. -
Complete the left block:
Continue adding the terracotta clay discs until this section covers about half of the remaining length needed for your wrist size. The uneven texture of clay beads adds to the handcrafted charm. -
Begin the dusty rose section:
Switch to the right side of your centerpiece. Thread on a single flat gold disc spacer first, then start adding the dusty rose (mauve) heishi beads. -
Complete the right block:
Thread the dusty rose beads until this side matches the length of the terracotta side. Periodically hold the ends together around your wrist to check the fit.
Step 4: Finishing Touches
-
Prepare for closure:
Once you’re happy with the length, add your closure hardware. In this project, a gold ball-style clasp is used. Thread a crimp bead onto one end, followed by one half of the clasp. -
Secure the clasp end:
Loop the cord back through the crimp bead and use flat-nose pliers to flatten the crimp bead securely. Repeat this process on the other end with the second half of the clasp. -
Alternative knot method:
If you prefer a simpler finish without hardware, simply tie a surgeon’s knot (right over left, left over right) with the two cord ends pulled tight. -
Apply adhesive:
Place a teeny tiny drop of super glue or jewelry cement directly onto the knot or inside the crimp bead for extra security. Let it dry completely before trimming. -
Trim excess cord:
Use your precision scissors to snip off the extra cord tails close to the knot or crimp bead. If you tied a knot, you can try to gently tug it inside one of the adjacent heishi beads to hide it.
Now you have a daily reminder to be brave on your wrist


What Really Happens Inside the Kiln
Learn how time and temperature work together inside the kiln to transform clay into durable ceramic.
Dream Big Rainbow Stack
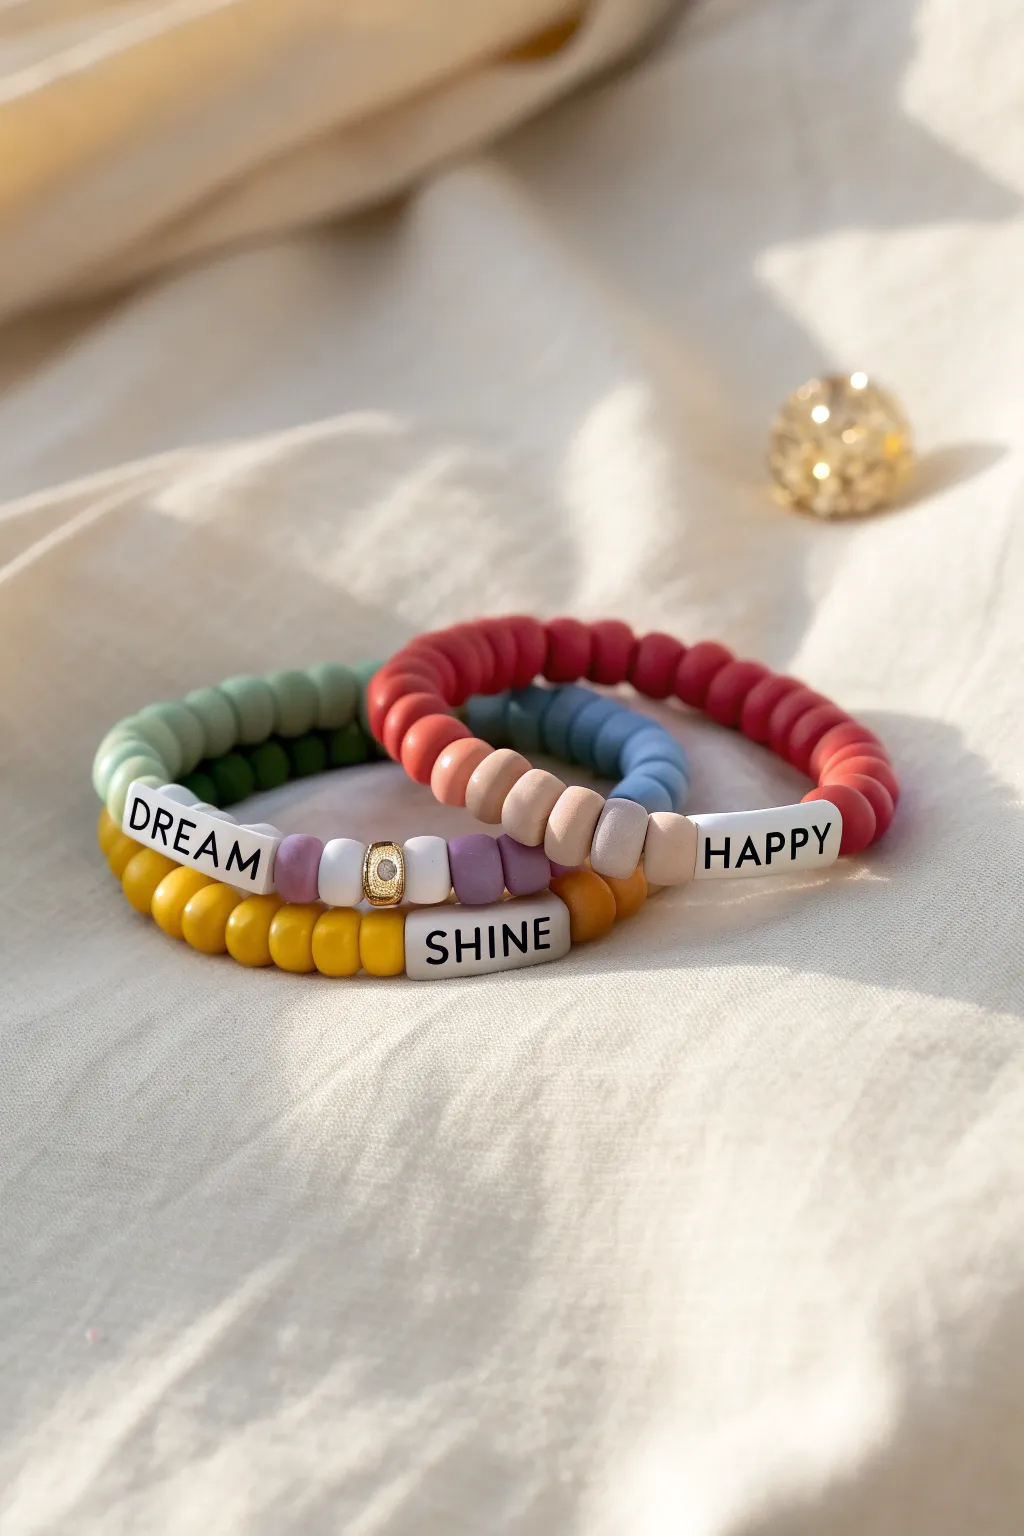
Bring a burst of positivity to your wrist with this trio of clay bead bracelets, featuring empowering words and a unique matte texture. The soft gradients of coral, green, and mustard yellow create a cohesive yet vibrant stack perfect for everyday wear.
How-To Guide
Materials
- Polymer clay Heishi beads (disk beads) in matte finish: Coral red, dusty pink, beige, sage green, forest green, purple, lavender, mustard yellow, and golden yellow
- White flat round alphabet beads with black text (D, R, E, A, M, S, H, I, N, E, H, A, P, P, Y)
- Small gold spacer bead with rhinestone inlay (optional, used in the DREAM bracelet)
- Strong elastic cord (0.7mm or 0.8mm)
- Scissors or jewelry cutters
- Super glue or jewelry cement
- Bead stopper or tape
- Ruler or measuring tape
Step 1: Planning Your Stack
-
Measure your wrist:
Before stringing, wrap a piece of string or flexible measuring tape around your wrist to find your size. Add about half an inch to this measurement for a comfortable fit. -
Sort your beads:
Lay out your clay heishi beads in color groups. This project uses color-blocking, so group your corals with pinks, greens with purples, and yellows together to visualize the gradients. -
Prepare the cord:
Cut three strands of elastic cord, each about 10-12 inches long. This extra length makes tying the final knots much easier. Secure one end of each strand with a bead stopper or a piece of tape.
Knot Hiding Pro-Tip
Make your finish invisible by hiding the knot inside one of the letter beads since they usually have larger holes than the clay disks.
Step 2: The ‘HAPPY’ Bracelet
-
Start the red gradient:
Begin stringing with your deep coral red beads. Thread about 2 inches of just this color. -
Transition to softer tones:
Switch to a lighter dusty pink or salmon color for the next section, stringing about 1.5 inches. -
Add the neutral section:
Complete the first half of the bracelet with beige or light tan beads until you reach the center point. -
Insert the word:
Thread the white letter beads to spell ‘HAPPY’. Double-check that they are facing the correct direction. -
Finish the pattern:
Continue the pattern in reverse or create a color-block style by filling the rest of the strand with the beige/tan beads until the bracelet fits your wrist measurement.
Step 3: The ‘DREAM’ Bracelet
-
Begin with green:
On your second string, start with dusty sage green beads. Thread a substantial section, roughly 2.5 inches. -
Contrast with dark green:
Add a small section of darker forest green beads for depth. -
Place the first word part:
Slide on the letters ‘D’, ‘R’, ‘E’, ‘A’, ‘M’. The design in the image places the word slightly off-center or uses it as a divider between the green and purple sections. -
Add the decorative spacer:
Right after the letter ‘M’, thread three lavender clay beads, then your gold rhinestone spacer bead, followed by three white clay beads. -
Complete with purple:
Finish the strand using purple clay beads to create a cool-toned split design.
Sticky Beads?
If your clay beads stick together like a coin roll, gently flex the strand back and forth between your fingers to separate them.
Step 4: The ‘SHINE’ Bracelet
-
Create the yellow base:
For the final bracelet, start stringing with rich mustard yellow beads. Thread about 3 inches. -
Brighten it up:
Switch to a slightly lighter, golden yellow hue for variety. -
Center the word:
Thread the letters ‘S’, ‘H’, ‘I’, ‘N’, ‘E’ alongside three purple beads to tie it visually to the ‘DREAM’ bracelet. -
Check fit:
Wrap the strand around your wrist to ensure the ‘SHINE’ beads sit nicely on top of your wrist alongside the other two bracelets.
Step 5: Finishing Touches
-
Pre-stretch the cord:
Before tying, give each bracelet a gentle tug. This pre-stretches the elastic so it won’t sag later. -
Tie the knots:
Remove the bead stopper and tie a surgeon’s knot (right over left, left over right, looping through twice) for maximum security. -
Secure with glue:
Place a tiny dot of super glue or jewelry cement directly onto the knot. I usually let this dry for a few minutes before trimming. -
Trim excess:
Once the glue is fully cured, cut the excess tail of the cord closely to the knot. Tuck the knot inside a neighboring bead if the hole is large enough.
Enjoy wearing your colorful new stack to remind yourself to dream big
Color-Matched Word Meaning
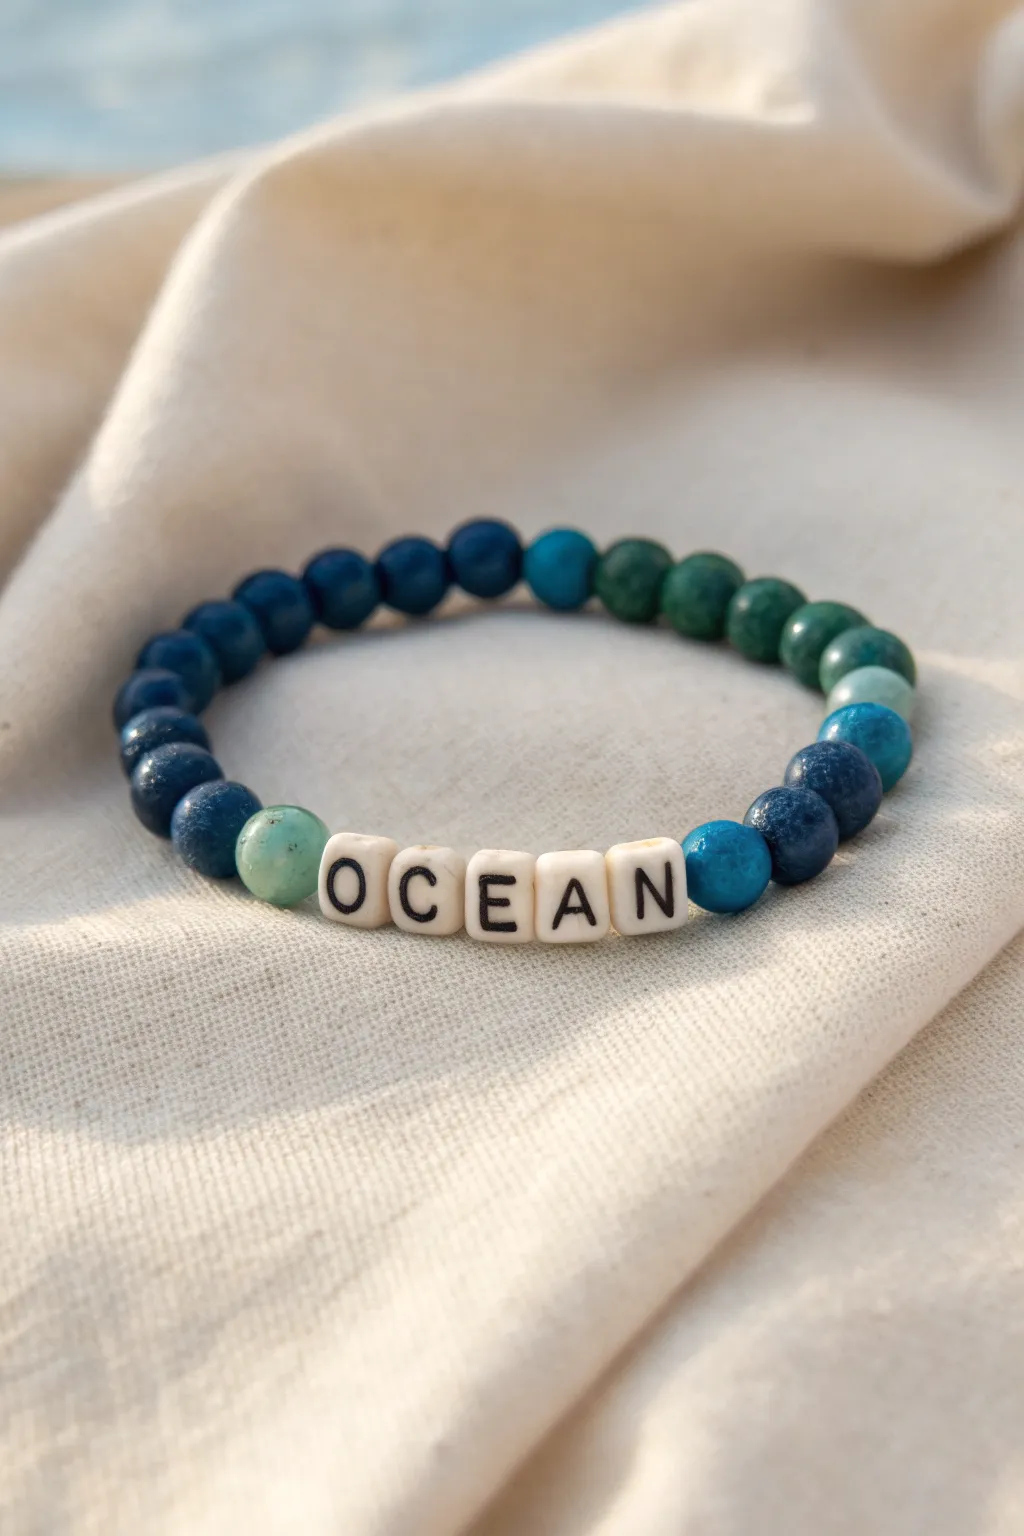
Capture the shifting hues of the sea with this stunning beaded bracelet that transitions from deep navy to bright teal. Using natural stone beads alongside classic letter cubes creates a piece that feels both grounded and personalized.
Step-by-Step Guide
Materials
- 8mm round stone beads in deep navy blue (approx. 6-8)
- 8mm round stone beads in teal or turquoise (approx. 4-6)
- 8mm round stone beads in sea green or moss green (approx. 4-6)
- 8mm round stone beads in pale blue/grey (approx. 2)
- 6mm white square acrylic letter beads (spelling OCEAN)
- 0.8mm clear elastic stretch cord
- Jewelry crafting glue or clear superglue
- Scissors
Step 1: Preparation and Design
-
Measure your wrist:
Before you begin, wrap a piece of string around your wrist to find your size, then add about half an inch for a comfortable fit. This usually equates to about 7 inches for an average adult wrist. -
Cut the cord:
Cut a length of your elastic cord that is about 10-12 inches long. Having this extra length makes the final tying process much less fumbly than working with a short tail. -
Pre-stretch the elastic:
Give your cut piece of elastic a few gentle tugs. This is a crucial step that prevents the bracelet from stretching out and becoming loose immediately after you wear it for the first time. -
Layout your gradient:
Lay your stone beads out on a bead board or towel. Arrange them to create a color transition: start with the darkest navy beads, move into the teals, then the greens. This visual check ensures you like the flow before threading.
Step 2: Stringing the Beads
-
Start the sequence:
I prefer to start stringing from the back of the bracelet so the knot ends up hidden opposite the word. Begin threading your darkest navy beads onto the elastic cord. -
Transition colors:
After the navy section, add your teal or turquoise beads. Watch how the color shifts; you want the change to look natural, like water deepening. -
Add the greens:
Continue the gradient by adding your green tone beads. Depending on your wrist size, this section will wrap around toward the front of the wrist. -
Insert accent beads:
Place one pale blue or lighter accent bead. This acts as a visual punctuation mark before the word starts. -
Spell the word:
Thread your letter beads in order: O-C-E-A-N. Double-check that they are all facing the right direction so the word is readable. -
Finish the symmetry:
Add the second pale blue accent bead immediately after the ‘N’ to balance the design. -
Complete the circle:
If you have any remaining navy or teal beads needed to reach your measured length, add them now to close the loop back to the start.
Knot Security
Use a flexible jewelry glue like G-S Hypo Cement rather than superglue; superglue can sometimes make elastic brittle and prone to snapping.
Step 3: Securing the Bracelet
-
Check the fit:
Carefully bring the two ends of the elastic together and wrap the beads around your wrist to ensure it fits comfortably without pinching. -
Tie the first knot:
Tie a simple overhand knot to bring the beads together, pulling it tight enough that there are no gaps between the beads. -
Tie a surgeon’s knot:
For security, follow up with a surgeon’s knot. Loop the elastic through twice before pulling tight. This creates a much stronger hold than a standard knot. -
Apply adhesive:
Place a tiny drop of jewelry glue directly onto the knot. This prevents the slick elastic from slipping undone over time. -
Hide the knot:
While the glue is still slightly tacky but not wet, pull the elastic so the knot slides inside the hole of the nearest large stone bead. This hides the mechanics completely. -
Trim the ends:
Once the glue is fully dry, use your small scissors to trim the excess elastic tails as close to the bead hole as possible without cutting the knot.
Golden Hour
Review the bracelet design: Replace the pale accent beads near the word with small gold or brass spacer beads for a warmer, sunset-on-the-water vibe.
Now you have a serene accessory that carries the calming energy of the ocean wherever you go

TRACK YOUR CERAMIC JOURNEY
Capture glaze tests, firing details, and creative progress—all in one simple printable. Make your projects easier to repeat and improve.
Night Sky Words With Glow Beads
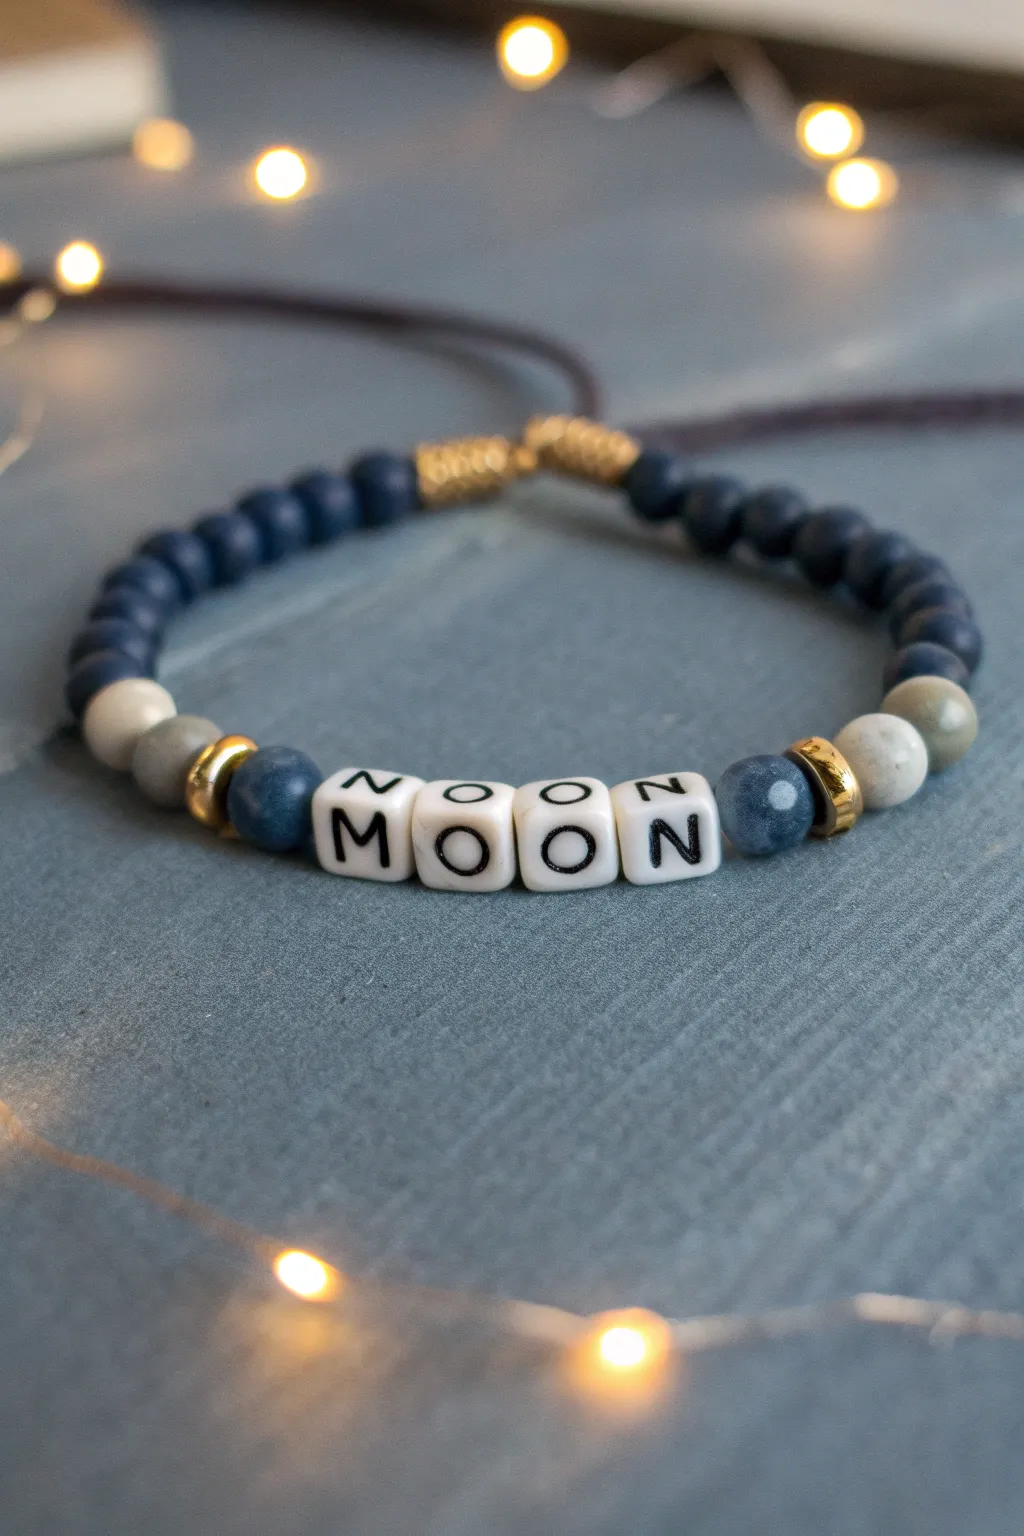
Capture the magic of the night sky with this elegant beaded bracelet featuring deep midnight blues and shimmering gold accents. The centerpiece is a simple “MOON” sentiment flanked by galaxy-inspired stones, making it a perfect accessory for stargazers.
Step-by-Step Tutorial
Materials
- Navy blue matte round beads (approx. 6mm)
- White square letter beads (M, O, O, N)
- Blue/grey speckled accent beads (approx. 8mm)
- Cream/grey jasper or agate beads (approx. 8mm)
- Gold tone spacer rings or rondelle beads
- Dark grey or black nylon cord (0.8mm or 1mm thickness)
- Gold crimp ends (optional, for cord ends)
- Scissors
- Lighter (to seal cord ends)
- Tape or clipboard
Step 1: Preparation and Center Section
-
Measure and cut cord:
Cut a piece of nylon cord approximately 12-14 inches long. This generous length makes it easier to tie the knots later. -
Secure the end:
Tape one end of your cord down to a table or clipboard to prevent beads from sliding off while you work. -
String the sentiment:
Thread the four white letter beads onto the center of the cord to read “MOON”. -
Add first accents:
On the left side of the ‘M’, slide on one speckled blue/grey bead. Repeat this on the right side of the ‘N’. -
Place gold spacers:
Next, add a gold spacer ring on both sides, sitting directly against those speckled blue beads to add a touch of starlight shimmer. -
Add secondary accents:
Thread a cream or light grey stone bead next to the gold spacer on both the left and right sides. This creates a beautiful gradient effect away from the center word.
Step 2: Main Beading and Closure
-
Fill the sides:
String the navy blue matte beads onto the remaining cord on both sides. You’ll likely need about 8-10 beads per side, depending on your wrist size. -
Check fit:
Wrap the unfinished strand around your wrist to check the sizing. The beads should cover most of your wrist, leaving a small gap of cord for the sliding knot. -
Secure the ends:
Once satisfied with the length, tie a simple overhand knot tightly against the last bead on each end to keep everything in place. -
Prepare for the slider:
Cross the two tail ends of the cord so they overlap parallel to each other. Temporarily tap or hold them in this crossed position. -
Start the sliding knot:
Cut a separate small piece of cord (about 5-6 inches). Lay it underneath the overlapped tail sections. -
Tie macramé square knots:
Using this new short cord, tie a series of square knots (macramé style) over the two main bracelet strands. Create a section of knots about 1/2 inch long. -
Finish the knot:
Trim the excess from your knotting cord (not the bracelet tails!) and carefully singe the ends with a lighter to melt them into the knot so it doesn’t unravel. -
Add decorative ends:
Thread a small gold crimp bead or tie a knot at the very end of each bracelet tail pull-cord so they don’t slip through the slider. -
Trim tails:
Trim any excess length from the tail cords, ensuring they are even on both sides.
Knot Security
When melting nylon cord ends, flatten the melted plastic with the side of your lighter immediately to fuse it securely against the knot.
Uneven Sizing?
If the bracelet sits crooked, make sure you have the exact same number of navy beads on the left and right sides of the “MOON” centerpiece.
Slide your new bracelet on and enjoy the way the beads catch the light like a small piece of the night sky
Mixed-Font Letter Bead Collage
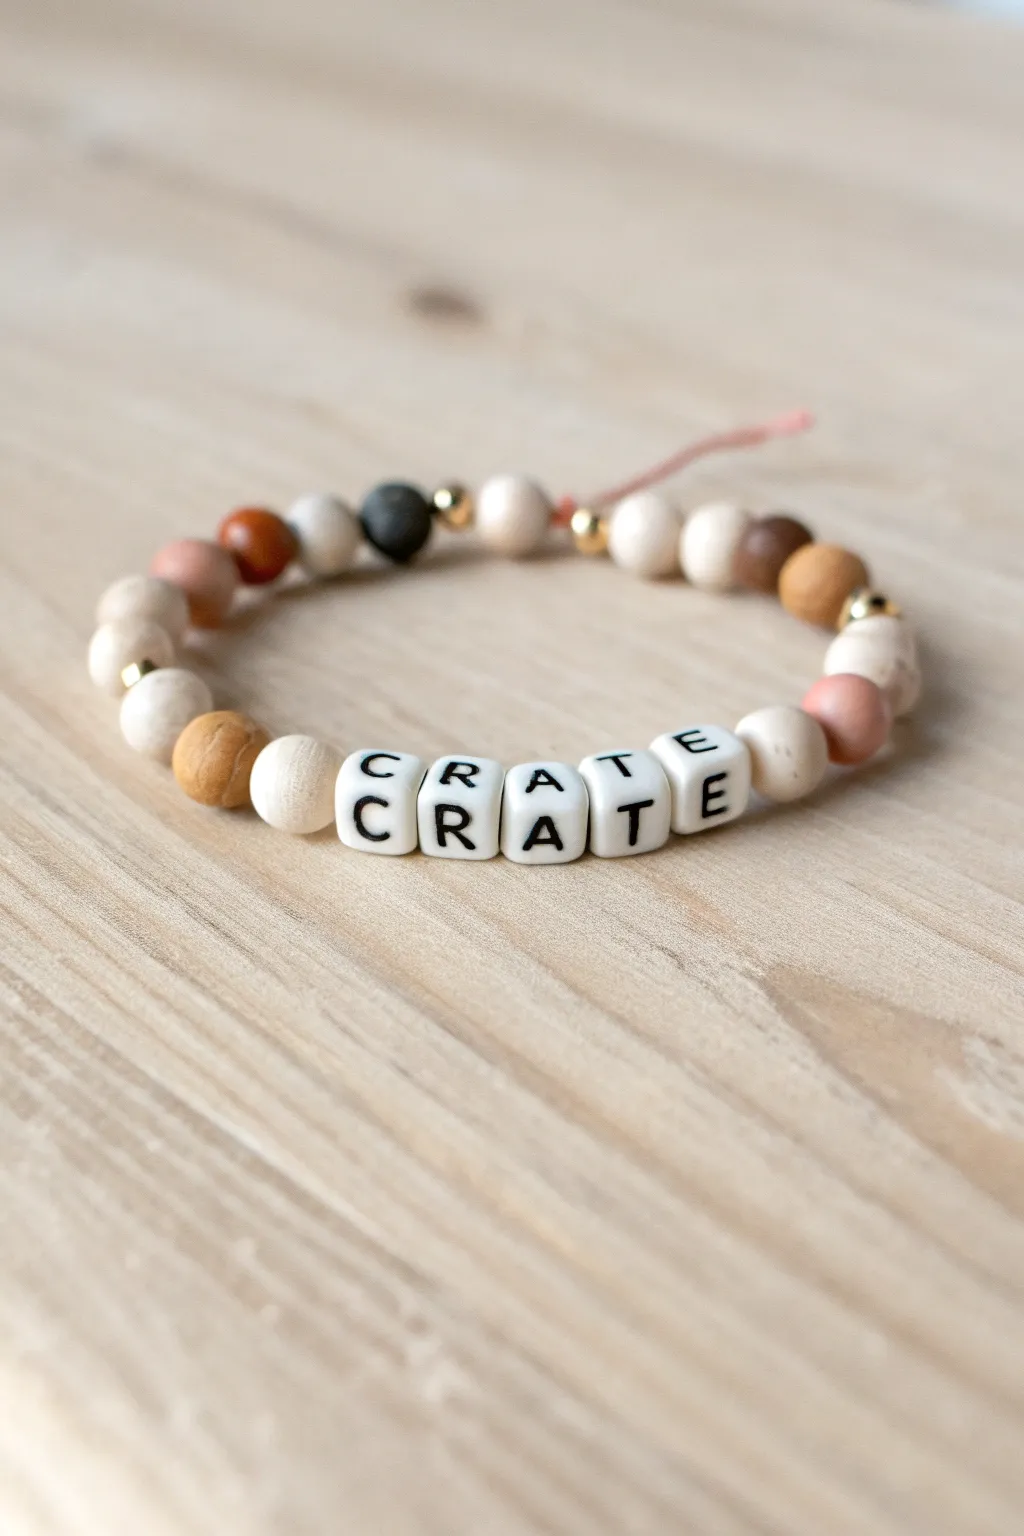
This project combines the modern trend of letter beads with a grounded, natural color palette for a sophisticated take on friendship jewelry. The result is a simple yet stylish bracelet perfect for stacking or wearing as a subtle statement piece.
Step-by-Step Guide
Materials
- Elastic cord (0.7mm or 0.8mm clear stretch string)
- Square white alphabet beads (letters C, R, A, T, E)
- Round beads (6mm or 8mm) in earthy tones: cream, tan, brown, terracotta, black
- Small gold seed beads or spacer beads (2-3mm)
- Scissors
- Bead stopper or tape
- Jewelry glue or clear nail polish
Step 1: Planning and Preparation
-
Measure your wrist:
Cut a piece of elastic cord about 10-12 inches long. This generous length gives you plenty of room to tie knots later without struggling with slippery ends. -
Secure the end:
Attach a bead stopper to one end of your cord, or simply tape it down to your workspace so your beads don’t slide off while you design. -
Arrange your message:
Locate your square alphabet beads. For this specific look, search for ‘C’, ‘R’, ‘A’, ‘T’, and ‘E’ beads. Using mixed fonts (some serif, some sans-serif) adds a quirky, collage-like charm. -
Select your palette:
Pull out round beads in neutral, earthy shades. You’ll want a mix of textures—perhaps smooth wooden beads combined with matte stone or clay beads in beige, rust, and coffee tones.
Natural Bead Tip
Mix materials for texture. Combine wooden beads with matte amazonite or clay beads. The contrast between wood grain and matte stone makes the piece feel artisanal.
Step 2: Stringing the Design
-
Start the pattern:
Begin stringing the left side of the bracelet. Start with a light cream bead, followed by a gold spacer, then a tan bead. This variety prevents the design from looking too uniform. -
Add visual weight:
Add a few darker or bolder beads, like a terracotta or charcoal-colored round bead, to anchor the design visually before reaching the letters. -
Insert the centerpiece:
Thread your prepared letter beads onto the cord in order: C-R-A-T-E. Double-check that all letters are facing the correct way up so your word isn’t upside down. -
Mirror the style:
Start the second half of the bracelet. While you don’t need to mirror the bead order exactly, try to balance the color distribution. If you used a pinkish bead on the left, place one on the right as well. -
Incorporate gold accents:
Scatter 2-3 small gold spacer beads throughout this second section. I find these tiny metallic flashes really elevate the natural matte finish of the other beads. -
Check the fit:
Wrap the unfinished strand around your wrist to check the size. Add or remove round beads from the ends until it fits comfortably without stretching the elastic.
Step 3: Finishing Touches
-
Pre-stretch the cord:
Gently pull on both ends of the elastic a few times. This pre-stretching step is crucial to prevent the bracelet from sagging or becoming loose after you wear it. -
Tie the first knot:
Remove the bead stopper and bring the ends together. Tie a simple overhand knot, pulling tight to bring the beads snugly together. -
Secure with a surgeon’s knot:
Tie a surgeon’s knot for extra security. Loop the right strand over the left, creates a loop, and pass the end through the loop twice before pulling tight. -
Apply adhesive:
Dab a tiny drop of jewelry glue or clear nail polish directly onto the knot. This seals the fibers and prevents slipping. -
Hide the knot:
While the glue is still tacky, gently slide an adjacent large bore bead over the knot to hide it inside. This creates a seamless, professional finish. -
Trim the excess:
Once the glue is fully dry, use sharp scissors to trim the excess cord ends as close to the bead/knot as possible.
Knot Slipping?
If your elastic keeps slipping while tying, try crossing your legs and holding the first loop between your knees to keep tension while you tie the second loop.
Slip your new bracelet on and enjoy the earthy, customized touch it adds to your outfit