White clay has this magic way of looking instantly calm, clean, and intentionally designed—even when the project is super simple. If you’re craving that minimalist white vibe with a little texture and personality, these ideas will keep your hands busy in the best way.
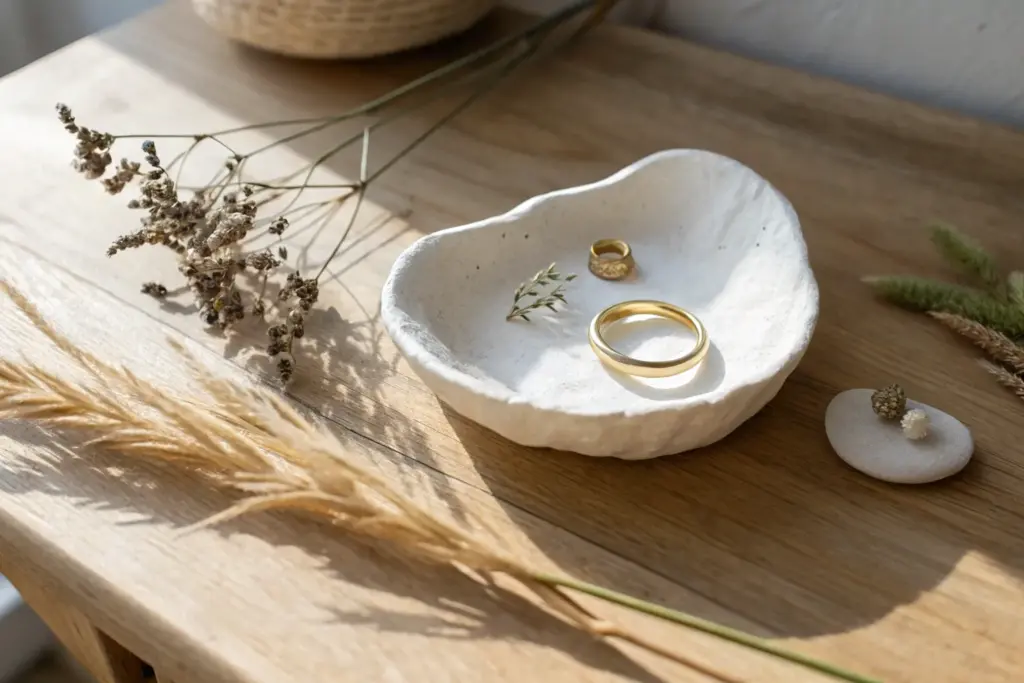
Classic White Trinket Dish
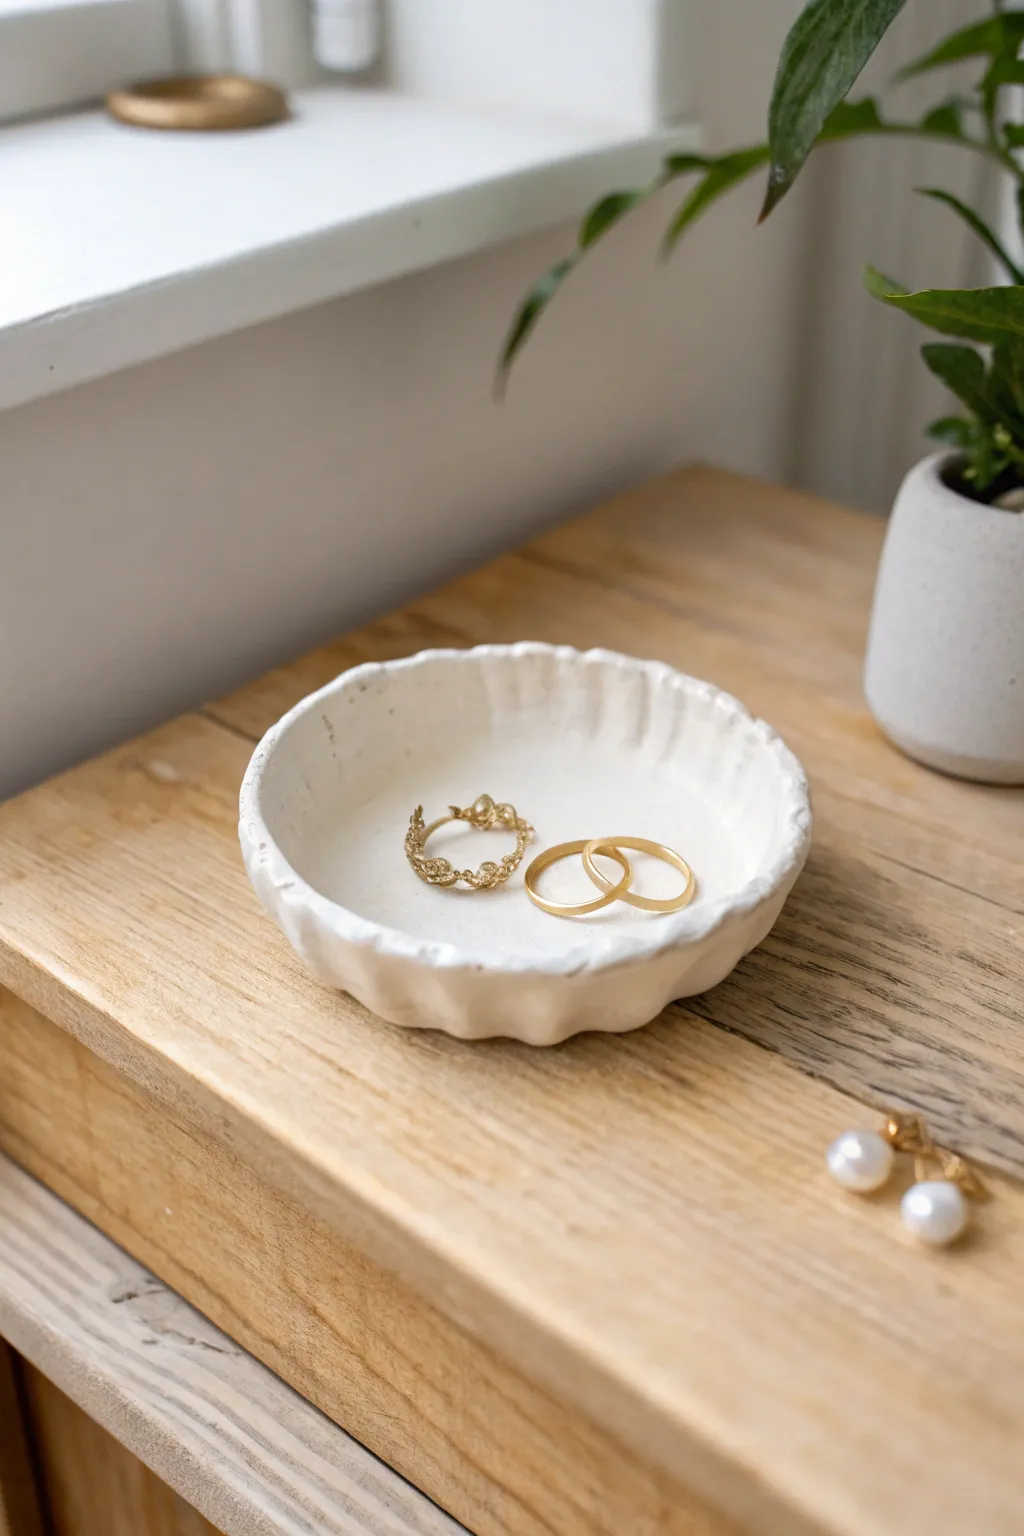
This charmingly rustic trinket dish embraces the beauty of imperfection with its organic edges and soft, scalloped details. It’s the perfect minimalist catch-all for your favorite rings or dainty stud earrings, adding a touch of handmade elegance to any nightstand.
Step-by-Step Guide
Materials
- Air-dry white clay or polymer clay
- Rolling pin (acrylic or wooden)
- Small bowl or cookie cutter (approx. 4-5 inches diameter)
- Craft knife or needle tool
- Sponge
- Small bowl of water
- Fine-grit sandpaper (400-600 grit)
- Matte or satin sealant (optional)
Step 1: Shaping the Base
-
Prepare your clay:
Start by taking a ball of white clay about the size of a tangerine. Knead it in your hands for a minute or two to warm it up and make it pliable, which helps prevent cracks later on. -
Roll it out:
Place your clay on a smooth surface or a silicone mat. Using your rolling pin, flatten the ball into an even slab that is roughly 1/4 inch thick. Try to keep the thickness consistent across the entire piece. -
Cut the circle:
Place your small bowl upside down on the clay to act as a template, or simply use a large circular cookie cutter. Use your craft knife or needle tool to trace around the edge and cut out a perfect circle. -
Lift the edges:
Gently peel the clay circle off your work surface. Hold it in your palm and use your other hand to slowly and gently curve the edges upward to create a shallow bowl shape. -
Smooth the interior:
Dip your finger lightly in water and run it along the inside bottom of the dish to smooth out any fingerprints or texture left from the rolling process. I find this is the best time to ensure the base is perfectly flat.
Water Wisdom
Use water sparingly when smoothing! Too much water can weaken air-dry clay and cause it to crack as it shrinks during the drying process.
Step 2: Creating the Scalloped Rim
-
Pinch the first curve:
To start the fluted design, place your index finger on the inside of the rim and your thumb and middle finger on the outside. Gently press together to form a soft wave. -
Continue around the edge:
Move roughly half an inch to the right and repeat the pinching motion. Continue this process all the way around the circumference of the dish. -
Refine the shape:
Once you have completed the circle, go back around and adjust the spacing. If some scallops look uneven, gently massage the clay to uniform them, maintaining that organic, hand-built aesthetic. -
Soften the lip:
The rim might feel a bit sharp or jagged after pinching. Use a damp sponge to gently dab and wipe the very top edge of the rim to round it off. -
Check the profile:
Set the dish down on your table and crouch down to look at it from eye level. Ensure the sides rise up relatively evenly and the dish isn’t leaning significantly to one side.
Gilded Edge
After the sealant dries, use a small detail brush to paint the very top rim of the scallops with liquid gold leaf for a luxe, high-end finish.
Step 3: Finishing Touches
-
Let it dry:
Place your dish in a safe, dry spot away from direct sunlight. Let it air dry completely. This usually takes 24-48 hours depending on humidity and clay thickness. -
Initial look check:
When the clay turns chalky white and feels room temperature to the touch (not cold), it is fully dry. -
Sand imperfections:
Take your fine-grit sandpaper and very gently buff the edges and the surface. Focus on smoothing out any rough spots on the rim or the underside where it sat drying. -
Dust off:
Use a dry brush or a soft cloth to wipe away all the clay dust created by sanding. You want a clean surface for the final step. -
Seal the piece:
Apply a thin layer of matte or satin sealant to protect the clay from moisture and stains. This is especially helpful if you plan to keep jewelry on it that might tarnish or transfer oils.
Place your finished dish on a sunny windowsill or wooden dresser to let the light catch those lovely handmade curves


Leaf-Impressed White Bowl
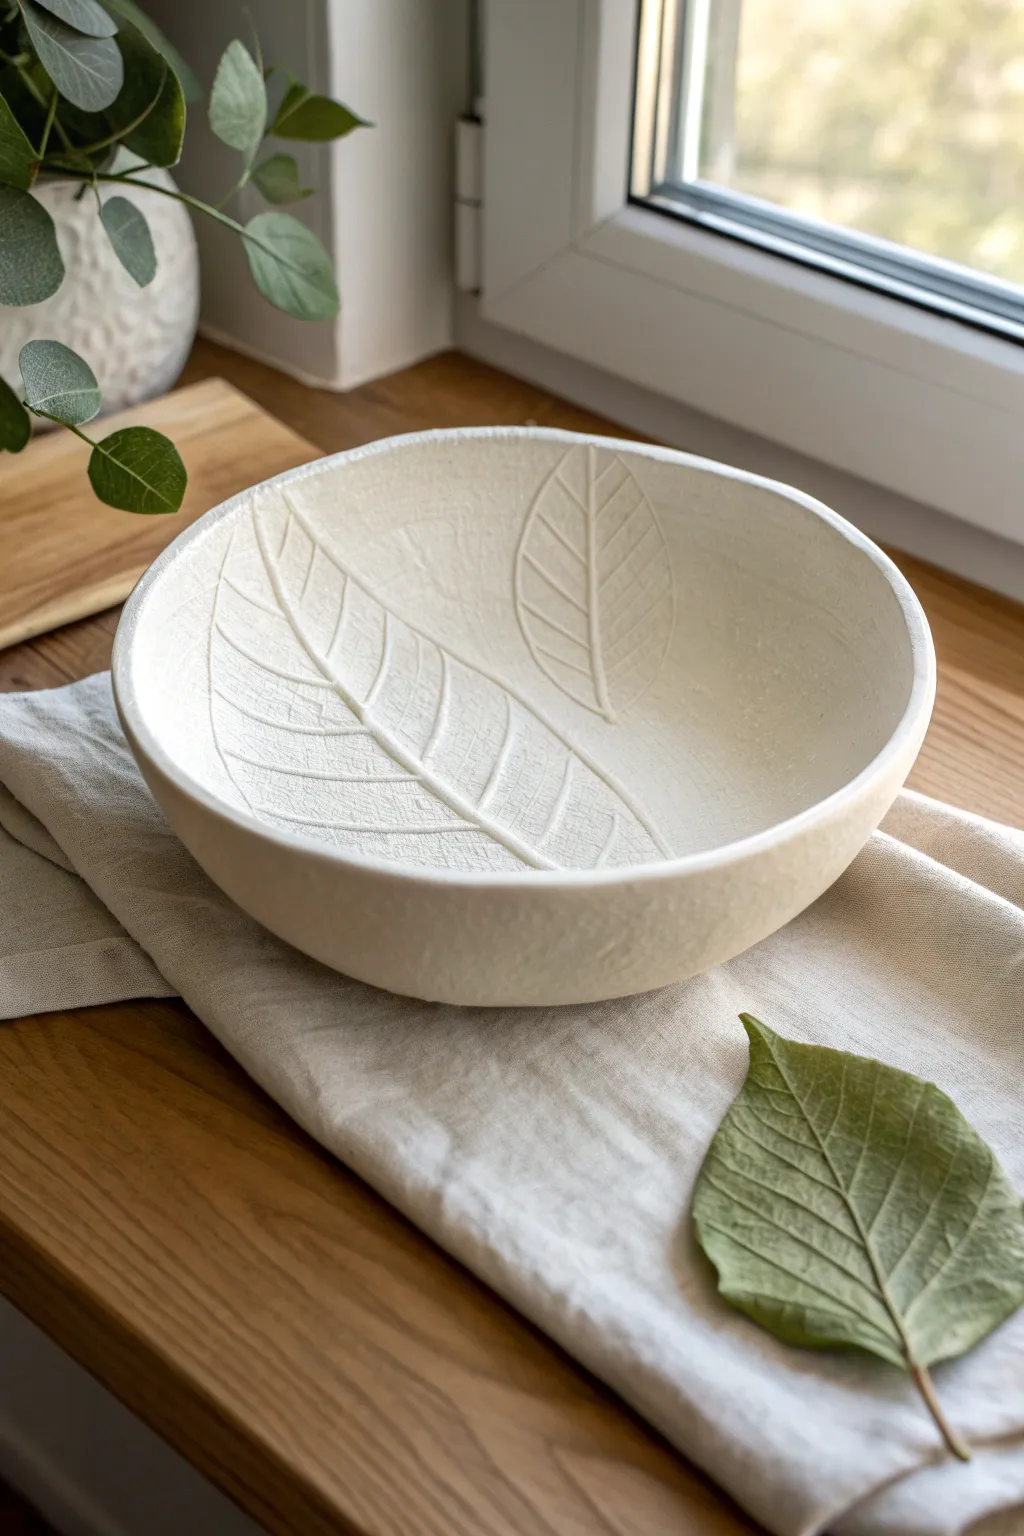
Capture the delicate beauty of nature with this textured clay bowl, featuring deep, lifelike leaf impressions on the interior. The finished piece has a clean, matte white aesthetic that feels both rustic and modern, perfect for holding trinkets or simply displaying on a shelf.
Detailed Instructions
Materials
- White sculpting clay (air-dry or kiln-fire)
- Large, heavily veined leaves (real or artificial)
- Rolling pin
- Canvas mat or parchment paper
- Large bowl (to use as a mold)
- Sponge
- Clay knife or needle tool
- Sandpaper (fine grit)
- White acrylic paint (if using air-dry clay)
- Matte sealant or clear glaze
Step 1: Preparation and Rolling
-
Prepare your workspace:
Lay down a piece of canvas or parchment paper on a flat surface. This prevents the clay from sticking and adds a subtle texture to the outside of the bowl. -
Condition the clay:
Take a generous handful of white clay and knead it until it’s soft, pliable, and free of air bubbles. Warm clay is much easier to work with than cold clay straight from the bag. -
Roll the slab:
Use your rolling pin to flatten the clay into a large, even circle. Aim for a thickness of about 1/4 inch (6mm) to ensure the bowl is sturdy but refined. -
Smooth the surface:
Run a slightly damp sponge or your fingers over the surface of the clay slab to remove any rolling pin marks or small cracks before adding texture.
Vein Definition Tip
If using fresh leaves, choose ones with thick, stiff veins like hydrangea or magnolia. Soft leaves won’t leave a deep enough impression to show up clearly after drying.
Step 2: Creating the Leaf Texture
-
Position the leaves:
Arrange your chosen leaves on top of the clay slab. I like to place them vein-side down, as the veins are usually more prominent on the back, which gives a deeper impression. -
Press the texture:
Gently glide the rolling pin over the leaves using firm, even pressure. You want to press the leaves flush into the clay without thinning the slab too much further. -
Ensure detail checks:
Before removing the leaves, lift a small edge to check if the veins have transferred clearly. If not, carefully lay it back down and press harder with your fingers in specific areas. -
Reveal the design:
Carefully peel the leaves away from the clay to reveal the imprinted texture. Go slowly to avoid tearing fine edges.
Step 3: Shaping and Refining
-
Cut the shape:
Using a needle tool or clay knife, cut a large circle around your imprinted design. You can keep the edges slightly organic or use a plate as a template for a perfect circle. -
Slump into the mold:
Gently lift your clay circle and drape it *inside* a large bowl found in your kitchen. This creates the concave shape. Press it gently against the sides so it takes the form of the bowl. -
Smooth the rim:
While the clay is in the mold, run a damp finger along the top rim to smooth out any sharp angles left by your cutting tool. A rounded rim looks more professional. -
Initial drying:
Allow the clay to dry inside the mold for roughly 24 hours until it is leather hard. This helps it hold the curved shape without collapsing. -
Remove and finish drying:
Once stiff enough to hold its shape, carefully pop the clay bowl out of the mold. Let it continue drying upside down on a rack for another 24-48 hours until completely bone dry.
Natural Wash Effect
After the white base coat dries, apply a very watered-down gray or brown paint, then wipe it off immediately. The dark color stays in the veins, highlighting the texture.
Step 4: Finishing Touches
-
Sand imperfections:
Once fully dry, use fine-grit sandpaper to gently smooth any rough spots on the rim or the exterior. Be careful not to sand over the interior leaf texture. -
Clean dust:
Wipe the entire piece with a slightly damp cloth or a soft brush to remove all sanding dust. -
Paint (optional):
If your air-dry clay isn’t perfectly white, apply a coat of white acrylic paint. Dab it into the deep veins of the leaf impression to ensure full coverage. -
Seal the piece:
Finish by applying a matte sealant or varnish. This protects the clay from moisture and gives the bowl that soft, unglazed ceramic look shown in the image.
Now you have a stunning, organic centerpiece ready to display in your home


Minimal White Ring Cone
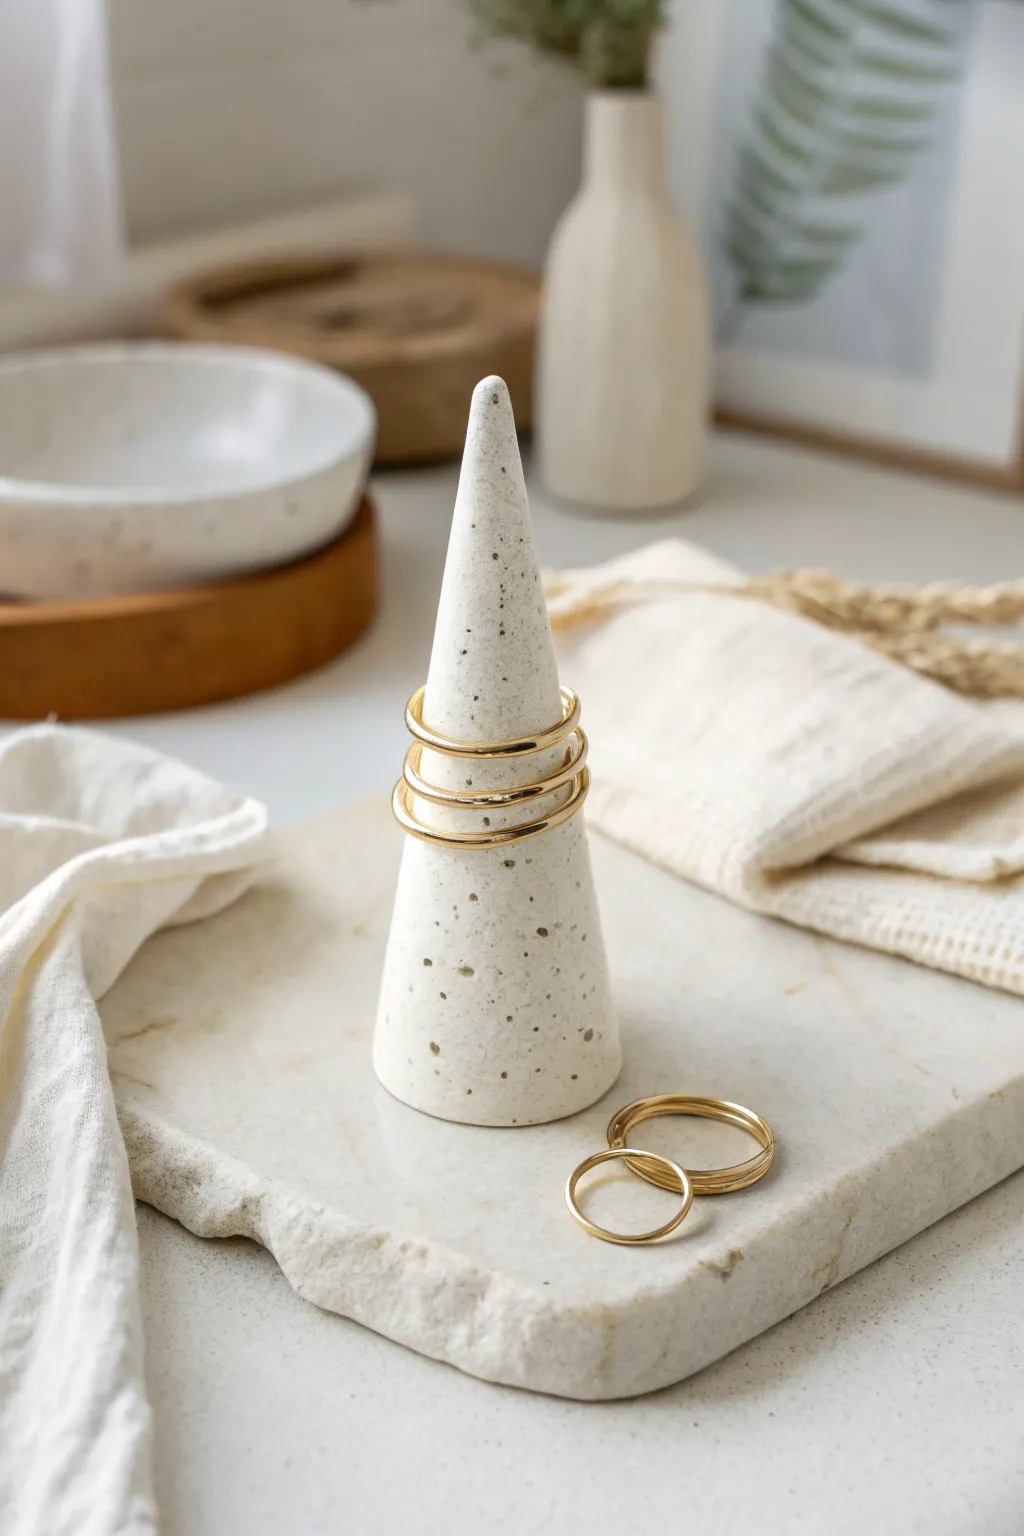
This minimalist ring holder combines the clean, modern look of white clay with organic, stone-like speckling. It is a functional piece of décor that keeps your jewelry organized while adding a touch of understated elegance to your vanity.
Step-by-Step Tutorial
Materials
- White polymer clay (or air-dry clay)
- Black pepper or dried coffee grounds (for speckles)
- Acrylic rolling pin
- Sharp craft knife or clay blade
- Gloss or matte glaze (optional)
- Fine grit sandpaper (400-600 grit)
- Baking sheet and parchment paper (if using polymer clay)
- Ruler
Step 1: Preparing the Clay
-
Condition the clay:
Start by taking a block of white polymer clay and kneading it thoroughly in your hands until it becomes soft, pliable, and warm. -
Create the speckles:
Flatten the conditioned clay into a pancake shape. Sprinkle a small pinch of ground black pepper or dried coffee grounds onto the surface. -
Mix the inclusions:
Fold the clay over the speckles and knead it again until the particles are evenly distributed throughout the white base. Add more if you want a denser stone effect. -
Form a ball:
Once mixed, roll the clay between your palms to form a smooth, perfect sphere with no visible seams or cracks.
Fixing Cracks
If tiny cracks appear while smoothing, dip your finger in a drop of clay softener or baby oil and massage the area until the crack blends back together.
Step 2: Shaping the Cone
-
Initial shaping:
Place the ball on your work surface and gently begin rolling one side of it back and forth with the palm of your hand, applying more pressure on one end to create a teardrop shape. -
Refining the point:
Stand the teardrop up on its fat end. Using your fingers, gently pull and smooth the clay upwards to elongate the tip, creating a taller cone silhouette. -
Smoothing the sides:
Roll the cone gently on the table to ensure the sides are perfectly round and symmetrical. I find looking at it from eye level helps spot any lopsided areas. -
Flattening the base:
Press the cone firmly onto the table to flatten the bottom. Pick it up and inspect the base to ensure it stands completely straight without wobbling. -
Final smoothing:
Use your thumb to lightly stroke the clay surface, smoothing out any fingerprints or subtle ridges.
Step 3: Finishing Touches
-
Baking (or drying):
If using polymer clay, bake according to the package instructions (usually 275°F/135°C for 15-30 minutes). If using air-dry clay, let it sit undisturbed for 24-48 hours. -
Cool down:
Allow the cone to cool completely on the baking sheet before handling it to prevent accidental warping while it’s still soft. -
Sanding:
Once cool and hard, take your fine-grit sandpaper and gently buff the surface under running water (wet sanding) to remove any lint or tiny bumps. -
Cleaning:
Wash off any milky residue from sanding and dry the piece thoroughly with a clean cloth. -
Sealing (optional):
For a glossy ceramic look, apply a thin coat of glaze. For the matte look shown in the photo, you can leave the clay raw or use a matte varnish.
Level Up: Marble Effect
Mix a tiny snake of grey or translucent clay into your white base before rolling. Twist it slightly but don’t over-mix for a swirled marble look.
Place your favorite rings on your new modern holder and enjoy the organized simplicity


Modern White Arch Photo Holder
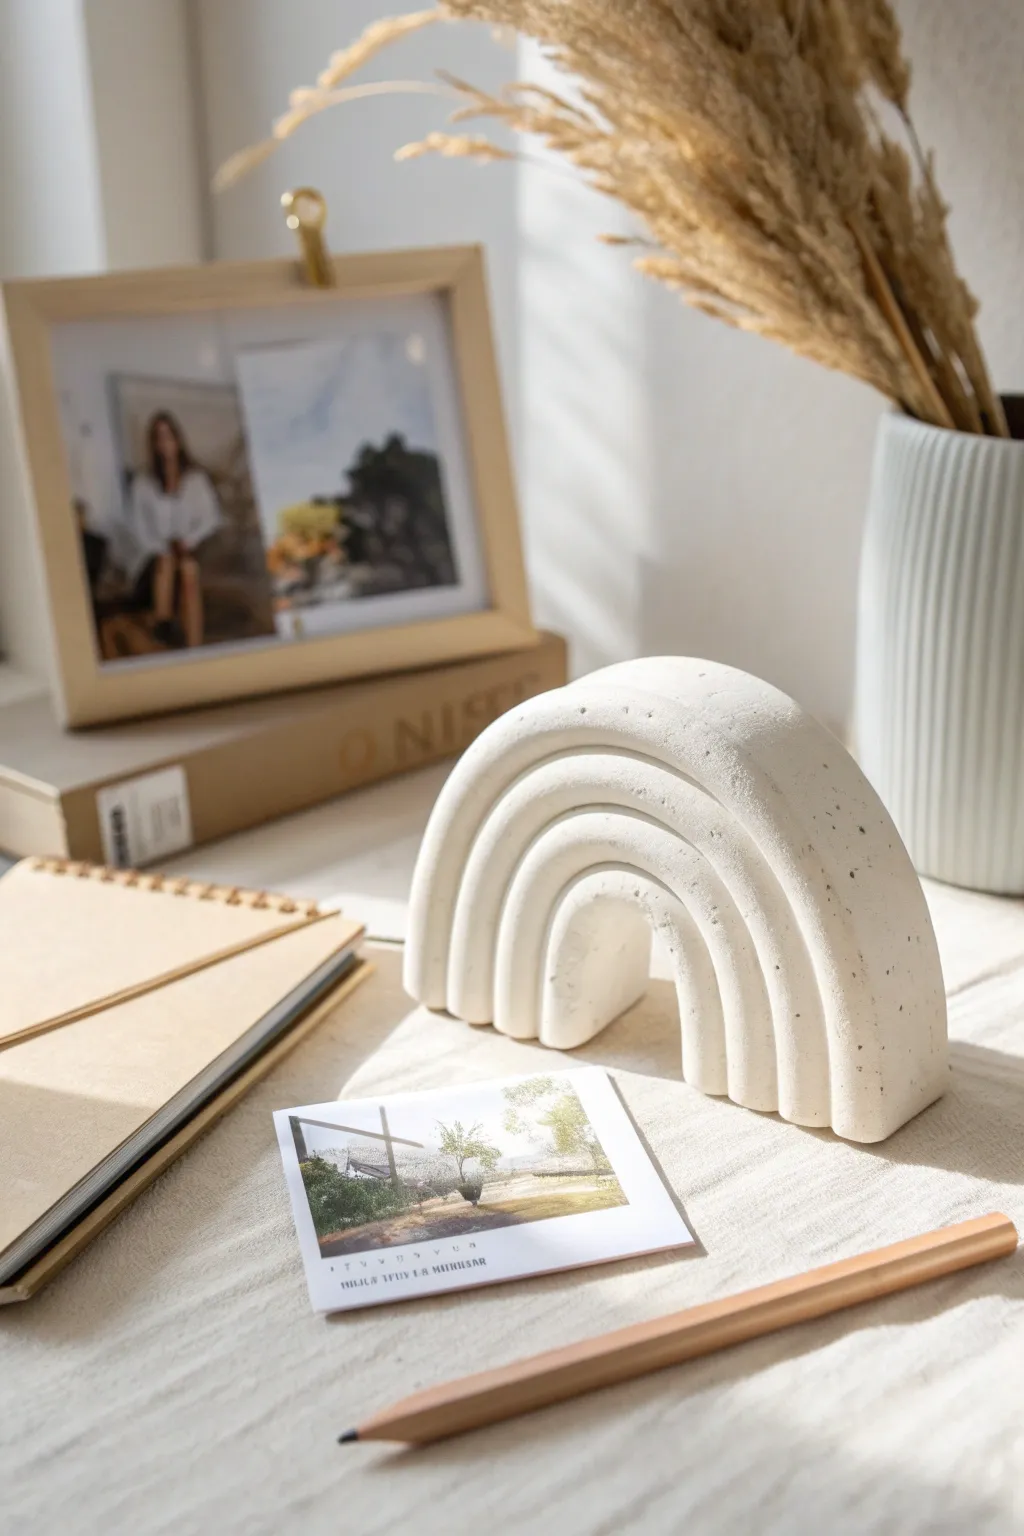
This sculptural white arch adds a touch of modern gallery style to your desk while serving as a functional photo or card stand. The textured, matte finish mimics the look of raw sandstone or concrete, creating a piece that feels both grounded and elegant.
Step-by-Step
Materials
- Air-dry clay (white or stone effect)
- Arch mold (silicone or custom cardboard form)
- Fine-grit sandpaper (220 and 400 grit)
- Modeling knife or clay wire cutter
- Rolling pin
- Acrylic sealant (matte finish)
- Small bowl of water
- Non-stick work mat
- Ruler
Step 1: Shaping the Tiers
-
Condition the materials:
Begin by kneading a large block of air-dry clay until it is warm, pliable, and free of any air pockets. If you want that speckled look shown in the photo, now is the time to mix in a pinch of sand or dried coffee grounds. -
Roll the base slabs:
Roll out the clay on your non-stick mat into a thick slab, approximately 1 inch deep. Uniform thickness is key for that architectural look. -
Cut the largest arch:
Using a large circular cutter or a paper template, cut out your primary, largest arch shape. This will be the outermost layer. Use a little water to smooth the cut edges immediately. -
Create the inner tiers:
Roll out a second slab, slightly thinner than the first. Cut a smaller arch that fits nested inside the shape of your first one. Repeat this for a third, smallest arch. -
Stack and score:
Arrange the three arches flat on your workspace to test the fit. Before joining, use your needle tool or knife to cross-hatch (score) the back face of the smaller arches and the front face of the larger ones where they will connect.
Step 2: Assembly and Refining
-
Bond the layers:
Apply a small amount of slip (clay mixed with water) to the scored areas. Press the layers firmly together, front to back, to create that stepped, extruded effect. -
Level the base:
Stand the arch upright on your table. Press firmly down to ensure the bottom is perfectly flat and the piece can stand on its own without wobbling. -
Create the photo slot:
While the clay is still soft, use a ruler or a thick piece of card stock to press a slot into the top center of the arch. Wiggle it slightly to ensure the gap is wide enough for a photo. -
Smooth the seams:
Dip your finger in water and run it along the seams where the layers meet. I like to use a soft, damp paintbrush here to get into the tight corners without leaving fingerprints. -
Initial texture check:
Look over the piece for any accidental gouges. Smooth them out now, but leave the natural variations that give the clay its character. -
Drying phase:
Place the arch in a cool, dry place away from direct sunlight. Let it dry slowly for 24-48 hours. Rotate it occasionally to ensure even drying and prevent warping.
Clean Lines
For perfectly concentric arches, use nesting cookie cutters or bowls from your kitchen as templates rather than freehanding the curves.
Step 3: Finishing Touches
-
Sand for smoothness:
Once fully cured and bone dry, take your 220-grit sandpaper and gently sand the flat faces and rounded edges to remove any sharp peaks. -
Refine the surface:
Switch to 400-grit sandpaper for a final polish. This creates that velvety, soft-touch matte finish that makes the piece look professional. -
Clean dust:
Wipe the entire sculpture down with a slightly damp cloth or a dry microfiber towel to remove all the sanding dust. -
Seal the work:
Apply a thin coat of matte acrylic sealant. This protects the white clay from yellowing and keeps it safe from moisture without adding unwanted shine.
Cracking Issues?
If small cracks appear while drying, mix a tiny amount of fresh clay with water to make a paste and fill the cracks, then sand smooth once dry.
Place your favorite instant photo or art print in the slot and enjoy your new modern display piece

The Complete Guide to Pottery Troubleshooting
Uncover the most common ceramic mistakes—from cracking clay to failed glazes—and learn how to fix them fast.
White Bud Vase Trio
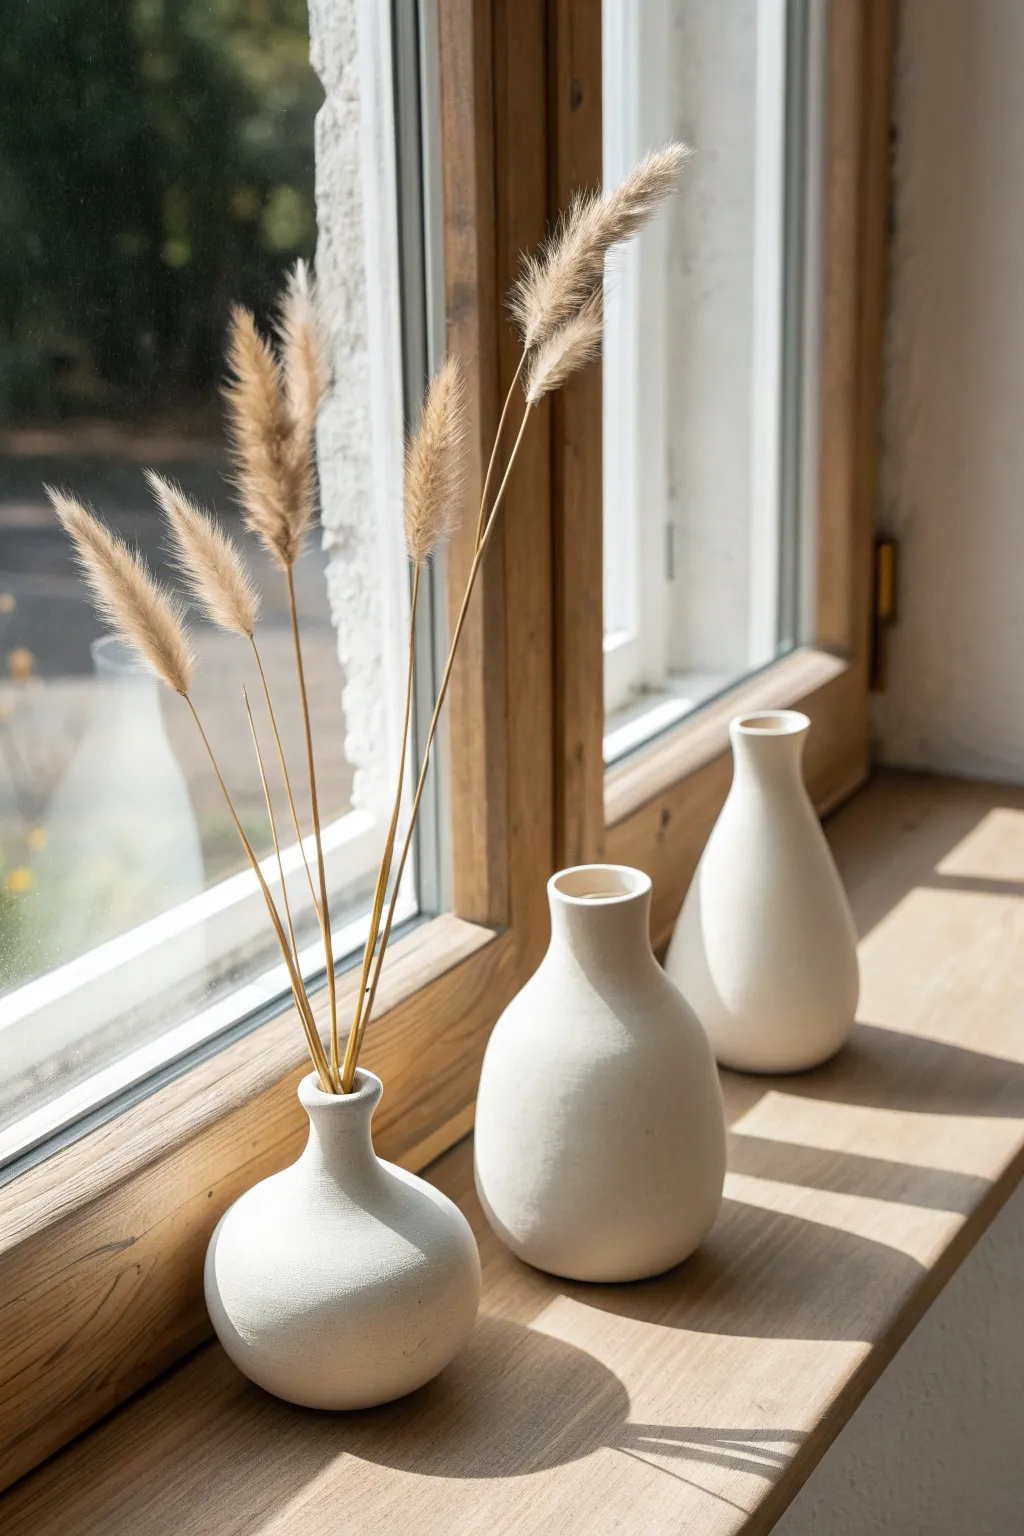
Embrace the serene beauty of pure form with this trio of handcrafted bud vases, designed to bring a touch of warm minimalism to any windowsill. Using white clay with a matte finish, you’ll create soft, organic shapes that are perfect for displaying delicate dried grasses or single stems.
How-To Guide
Materials
- White stoneware or porcelain clay body (grogged for texture if desired)
- Pottery wheel (or can be hand-built with coils)
- Ribs (metal and wooden)
- Wire cutter
- Sponge
- Trimming tools
- Transparent matte glaze (optional only for interior)
- Kiln
- Sandpaper or sanding sponge
Step 1: Shaping the Trio
-
Prepare your clay:
Begin by wedging your white clay thoroughly to remove air pockets. Divide it into three balls of slightly varying weights—for example, 1 pound, 1.25 pounds, and 1.5 pounds—to achieve the graduated sizes seen in the trio. -
Center the first ball:
Throw the first ball onto the wheel head. Use water and steady pressure to center the clay until it spins perfectly smooth without wobbling. -
Open and pull:
Open the centered clay down to about a quarter-inch from the bat. Pull up the walls into a cylinder first, ensuring an even thickness from bottom to top. -
Belling the belly:
Using a rib on the inside and your hand on the outside, gently push the clay outward at the bottom third to create a bulbous, round ‘belly.’ This creates that grounded, organic weight. -
Collar the neck:
As you move upward, gently collar the clay inward with both hands to narrow the form significantly into a tight neck. I find it helpful to wet my hands slightly here to prevent friction drag. -
Refine the rim:
Trim the top rim with a needle tool to make it even, then use a damp chamois or sponge to round it off softly. The goal is a smooth, clean opening, not a sharp edge. -
Repeat with slight variations:
Repeat the throwing process for the other two balls of clay. Aim for similar visual language—round bottoms and narrow necks—but allow slight variations in height and belly width to create a dynamic grouping. -
Dry to leather hard:
Wire the vases off the wheel carefully and let them dry to a leather-hard state. This usually takes a day or two depending on humidity.
Pro Tip: Liquid Quartz
If you want a raw exterior but worry about stains, seal the outside with ‘Liquid Quartz’ after firing. It waterproofs unglazed ceramic invisibly.
Step 2: Trimming and Finishing
-
Trim the foot:
Place the leather-hard vase upside down on the wheel. Secure it with clay lugs or a chuck. Use a trimming tool to refine the curve of the bottom so it feels continuous, removing any excess weight. -
Create a seamless bottom:
Carve a small recessed foot ring if desired, or simply smooth the bottom flat for a very modern, grounded look. -
Smooth the surface:
While the pot is spinning, use a smooth metal rib to compress the surface and remove any throwing lines or finger marks. You want a very clean, uniform canvas. -
Burnish for texture:
Rub the exterior surface gently with a soft cloth or the back of a spoon if you want a subtle sheen without glaze. This compresses the clay particles. -
Bisque fire:
Once bone dry, load the vases into the kiln for a bisque firing (typically Cone 04). This hardens the clay and prepares it for the next step. -
Glaze the interior:
Pour a clear or white liner glaze inside the vase and swirl it around to coat the interior completely, then pour out the excess. This ensures the vase is watertight. -
Leave exterior unglazed:
To replicate the matte, stone-like texture in the photo, leave the exterior completely bare. Wipe away any stray glaze drips with a damp sponge. -
High fire:
Fire the pieces to maturity (Cone 5, 6, or 10 depending on your clay body). Since the outside is unglazed, the clay itself becomes the finish. -
Final sanding:
After the final firing, use high-grit wet/dry sandpaper to gently polish the unglazed exterior surface if it feels too rough. This gives it that soft, touchable ‘stone’ feel.
Troubleshooting: Neck Collapse
If the neck twists or collapses while collaring, you are likely pushing too hard or the clay is too thin. Collaring adds thickness, so start with thinner walls.
Arranged together on a sunlit ledge, these vases offer a peaceful focal point for your favorite dry botanicals
White Textured Candle Holder
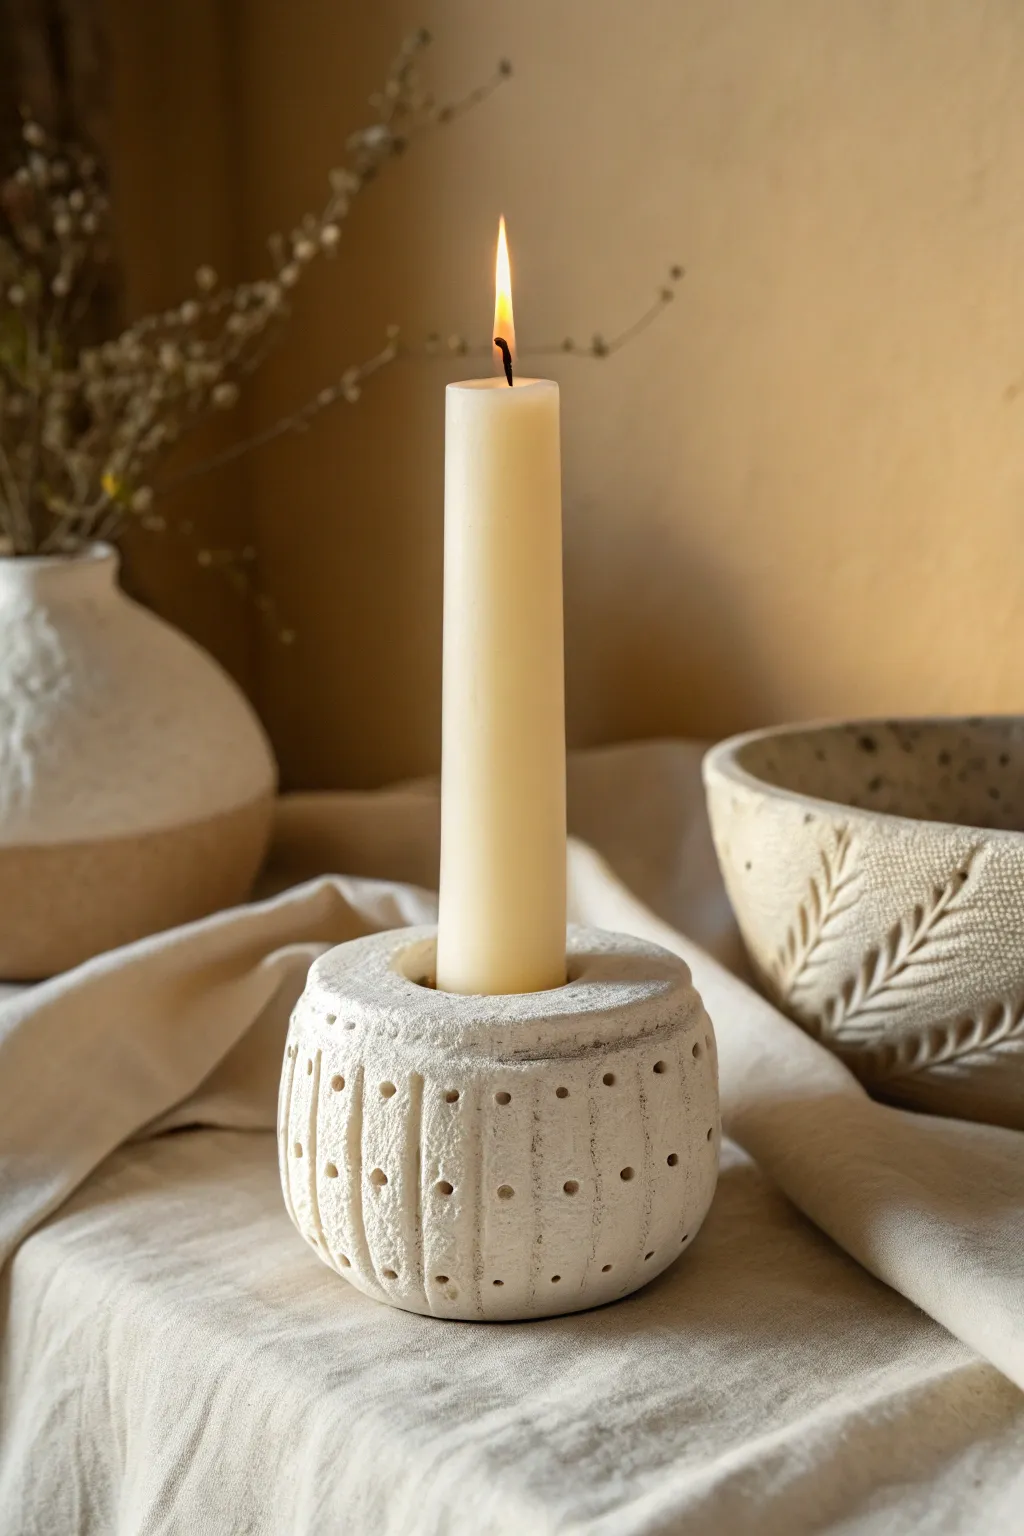
Embrace the beauty of imperfection with this earthy, white clay candle holder. Its distinctive, hand-carved texture and sturdy rounded shape make it a minimalist centerpiece that brings a cozy, organic warmth to any table setting.
Step-by-Step
Materials
- Air-dry clay (white or off-white) or polymer clay
- Rolling pin
- Sharp clay knife or fettling knife
- Circular cookie cutter (approx. 4 inches)
- Small circular cutter (sized to your taper candle)
- Needle tool or toothpick
- Small sponge
- Water bowl
- Sandpaper (fine grit)
- Matte white acrylic paint (optional, for finish)
- Clear matte varnish or sealant
Step 1: Shaping the Base
-
Prepare the Clay:
Start by conditioning a large chunk of clay, kneading it until it is soft, pliable, and free of air bubbles. You want a smooth starting consistency so it doesn’t crack as you form the shape. -
Form the Initial Ball:
Roll the clay between your palms or on your work surface to create a solid, smooth sphere. Aim for a ball roughly the size of a grapefruit or large orange, depending on how substantial you want the final holder to be. -
Flatten the Top and Bottom:
Gently press the sphere down onto your work surface to flatten the bottom so it sits stable. Then, use a flat object or your hand to gently press down the top, creating a squat, rounded puck shape rather than a perfect ball. -
Create the Candle Well:
Take your taper candle or a small circular cutter that matches its diameter. Press it firmly into the center of the top flat surface, sinking it down about 1-1.5 inches deep to ensure the candle will stand straight. Carefully remove the extra clay from the hole. -
Refine the Edges:
Using a slightly damp finger, smooth the rim of the hole you just created. Ensure the top ledge is relatively flat and the transition to the sides is rounded, preserving that organic, handmade look.
Pro Tip: Custom Fitting
Twist your taper candle slightly as you press the hole into the wet clay. This helps create a threaded texture inside, giving the candle better grip once dry.
Step 2: Adding Texture & Detail
-
Marking Vertical Guidelines:
To keep your pattern somewhat regular, lightly sketch vertical lines around the circumference of the hold using a needle tool. These don’t need to be deep; they are just guides for where your texture will go. -
Carving the Grooves:
Use a carving tool or a modeling stick to press deep, vertical grooves into the sides of the holder. I like to space them about a half-inch apart, allowing the clay to bulge slightly between the lines for a ribbed effect. -
Adding Punctures:
Using a needle tool or a small stylus, press rows of small dots or holes between the vertical grooves. In the reference image, these are arranged in vertical columns, adding a lovely perforated detail. -
Distressing the Surface:
Take a stiff-bristled brush or a crumpled ball of foil and gently tap it over the entire surface. This creates a stone-like, porous texture that mimics aging plaster or sandstone. -
Smoothing Imperfections:
Dip a small sponge in water and wring it out extensively. Lightly dab the surface to soften any sharp burrs from the carving without erasing the texture you just worked hard to create.
Step 3: Finishing Touches
-
Drying Process:
If using air-dry clay, let the piece sit in a cool, dry place for 24-48 hours. Turn it occasionally to ensure the bottom dries evenly. If using oven-bake clay, bake according to the manufacturer’s instructions. -
Sanding:
Once completely hardened, use fine-grit sandpaper to smooth out the flat bottom and the very top rim. Be gentle on the textured sides to preserve the detail. -
Painting (Optional):
If your clay isn’t naturally the exact shade of white/cream you desire, water down some matte acrylic paint (a ‘whitewash’) and brush it over the piece. Let it settle into the grooves and wipe off the excess on the high points. -
Sealing:
Apply a coat of clear matte varnish or sealant to protect the clay from dust and moisture. This is especially important for the inside of the candle holder to prevent wax from staining the porous material. -
Testing Fit:
Once the sealant is dry, insert your taper candle. If it’s a bit loose, wrap a small piece of foil or masking tape around the candle base until it sits snugly and safely.
Troubleshooting: Cracking Clay
If you see small cracks forming while air-drying, mix a tiny bit of fresh clay with water to make a paste (slip) and fill them in immediately with your finger.
Now you have a stunning, artisanal candle holder ready to add warmth to your home decor


What Really Happens Inside the Kiln
Learn how time and temperature work together inside the kiln to transform clay into durable ceramic.
Soft-Edge White Coasters
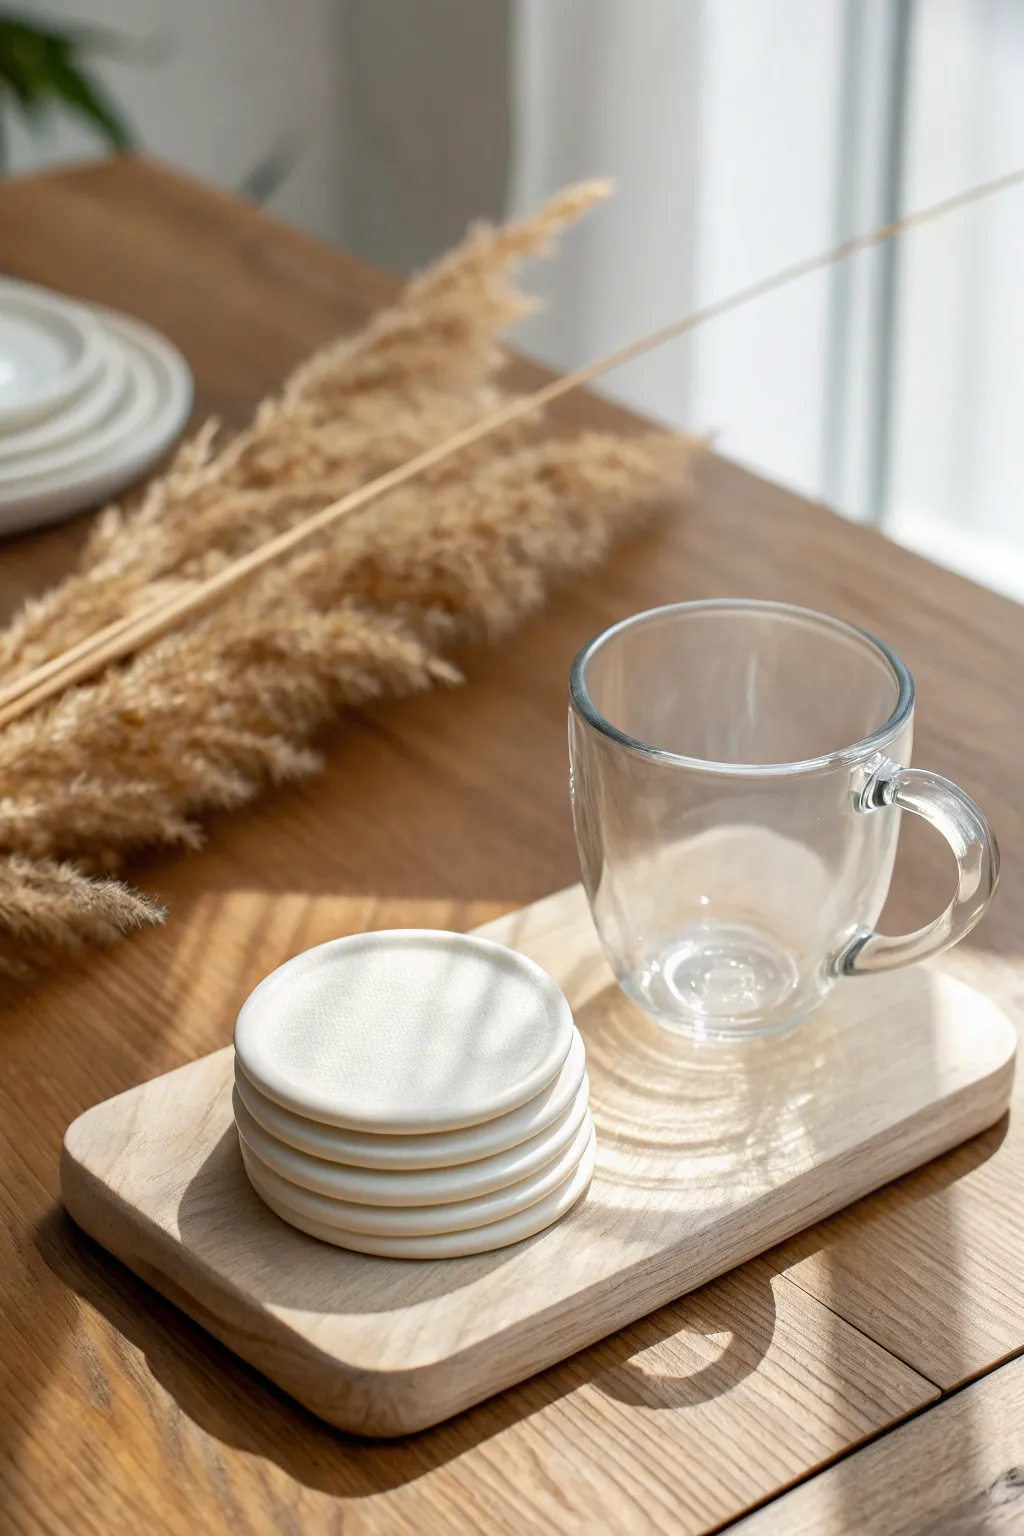
Bring a touch of minimalist elegance to your coffee table with these softly contoured white clay coasters. Their slight lip and smooth, matte finish make them perfect for catching drips while adding a serene, handmade aesthetic to your home decor.
Step-by-Step Guide
Materials
- White polymer clay or air-dry clay (approx. 500g for a set of 4)
- Rolling pin or pasta machine
- Round cookie cutter (approx. 3.5 – 4 inches diameter)
- Parchment paper or silicone baking mat
- Fine-grit sandpaper (400 and 800 grit)
- Small bowl of water
- Pottery sponge or soft cloth
- Clay sealant or matte varnish
- Soft paintbrush
Step 1: Shaping the Clay
-
Condition the clay:
Start by kneading your white clay thoroughly in your hands. You want it warm and pliable to prevent cracks during the rolling process, especially if using polymer clay. -
Roll out the slab:
Place the clay between two sheets of parchment paper or directly on a silicone mat. Roll it out to an even thickness of about 1/4 inch (6mm). Try to keep the thickness consistent across the entire slab for a level resting surface. -
Cut the circles:
Using your round cookie cutter, press firmly into the clay to cut out your coaster shapes. Create as many as your clay allows, typically four to six for a standard set. -
Smooth the cut edges:
Gently lift the circles away from the excess clay. Dip your finger in a little bit of water and run it along the cut edge to soften any sharp lines or plastic burrs left by the cutter.
Step 2: Creating the Lip
-
Indent the center:
To create the raised rim, you need to compress the center. Find a flat-bottomed glass or jar that is slightly smaller than your clay circle (leaving about a 1/4 inch border). -
Press gently:
Center the glass on the clay circle and press down gently but firmly. You don’t want to cut through the clay, just compress the middle area to create a slight depression. -
Refine the rim:
Use your thumbs to smooth the transition between the depressed center and the raised outer rim. I like to gently pinch and round the outer rim to give it that ‘soft-edge’ look seen in the photo. -
Final smoothing:
Take a slightly damp pottery sponge and wipe the entire surface to remove fingerprints and ensure a uniform texture.
Avoiding Warping
To keep air-dry clay perfectly flat, place a light book on top of the coasters (sandwich them in parchment paper first) once they are halfway dry.
Step 3: Drying and Finishing
-
Dry or bake:
If using air-dry clay, let the coasters sit on a wire rack for 24-48 hours, flipping them halfway through to prevent warping. If using polymer clay, bake according to the manufacturer’s instructions on your package. -
Initial sanding:
Once fully cured or dry, take your 400-grit sandpaper and gently sand the edges and the rim. This removes any minor imperfections or lint that settled during drying. -
Fine sanding:
Follow up with the 800-grit sandpaper for a silky smooth finish. Wipe away all dust with a slightly damp cloth. -
Apply sealant:
Using a soft brush, apply a thin coat of matte varnish or clay sealant. This is crucial for coasters, as it protects the clay from moisture rings caused by cold drinks. -
Let it cure:
Allow the first coat of sealant to dry completely before applying a second coat for extra durability. -
Add protective feet:
Optional: Stick small felt or cork pads to the bottom of each coaster to protect your wooden furniture surfaces from scratches.
Filling Cracks
If you see hairline cracks after drying, mix a tiny bit of fresh clay with water to make a paste, fill the crack, let it dry, and sand smooth.
Enjoy styling your minimalist coasters with your favorite mug and seeing how they elevate your space
White Mini Planter With Feet
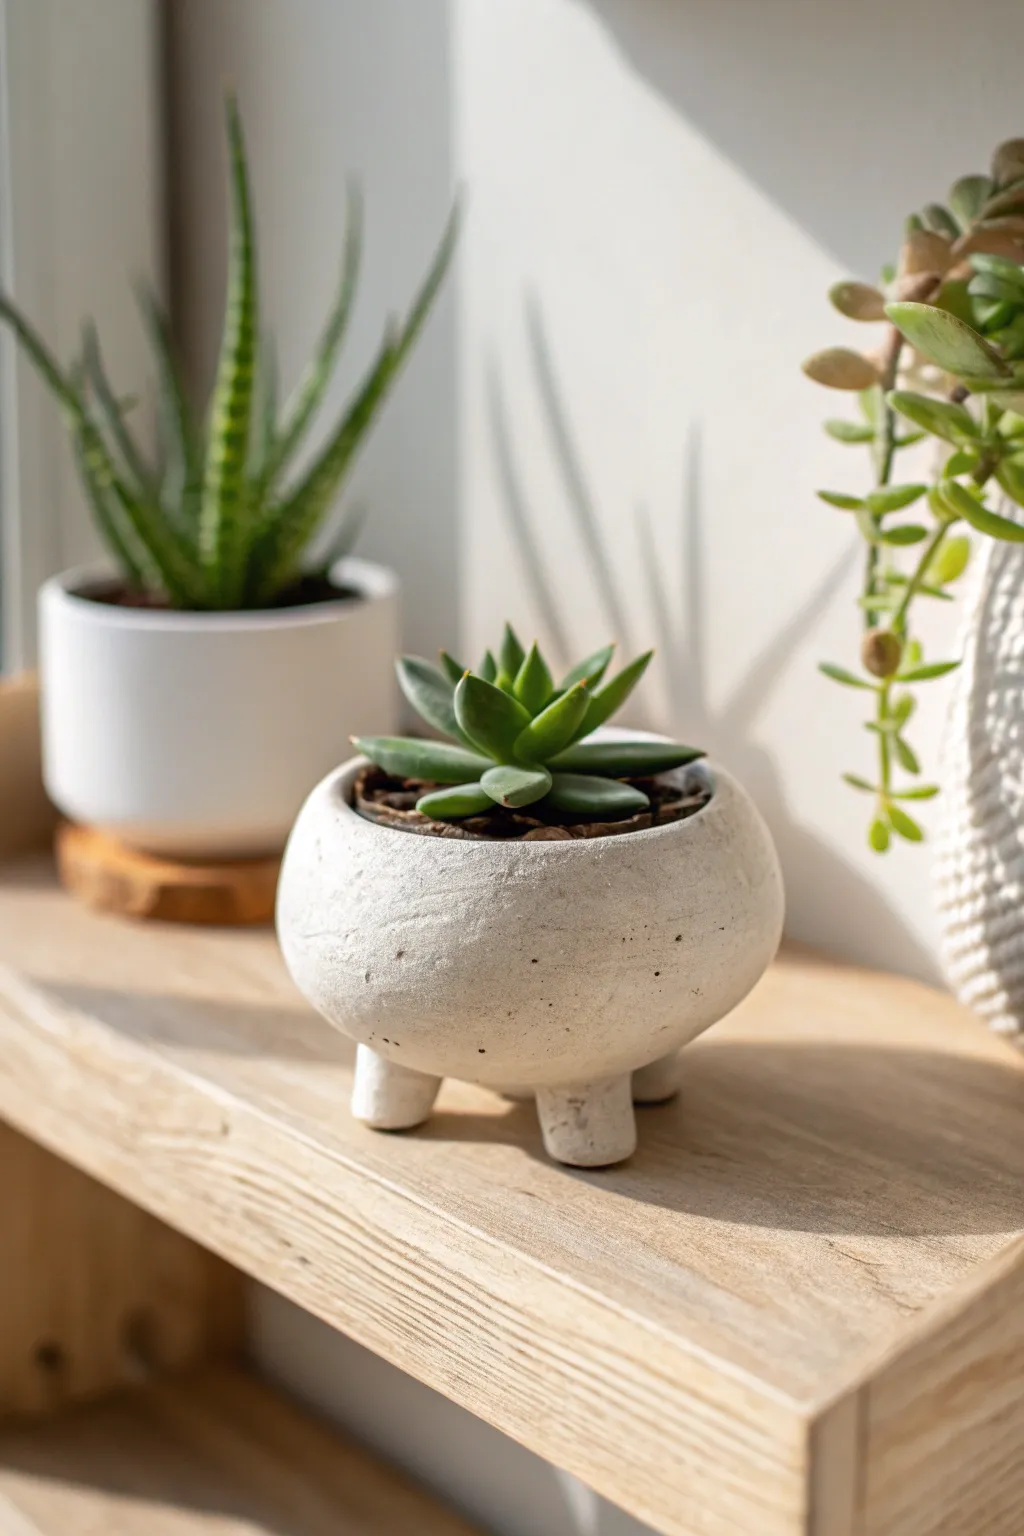
This charming little tripod pot adds personality to any shelf with its playful, stout legs and organic stone-like texture. It is a perfect beginner-friendly project that turns simple white clay into a modern, minimalist home for your favorite succulent.
Step-by-Step Guide
Materials
- White air-dry clay (or polymer clay)
- Small rolling pin
- Circle cutter (approx. 4 inches) or a bowl to trace
- Knife or clay cutting tool
- Small bowl for molding (to use as a form)
- Plastic wrap
- Slip (clay mixed with water) or scoring tool
- Fine-grit sandpaper
- Matte white acrylic paint (optional)
- Matte sealant or varnish
Step 1: Creating the Bowl Base
-
Prepare the Clay:
Start by conditioning a ball of white clay in your hands until it is smooth, pliable, and free of cracks. If the clay feels dry, adding a tiny drop of water can help get it workable. -
Roll the Slab:
Using your rolling pin, flatten the clay ball into an even slab about 1/4 inch thick. Try to keep the thickness consistent so the walls of your planter dry evenly. -
Cut the Circle:
Place your circle cutter or an overturned bowl onto the clay slab and cut out a perfect circle. -
Prepare the Mold:
Take a small bowl that has a rounded bottom—this will be your form. Cover the outside of the bowl with plastic wrap to prevent the clay from sticking. -
Form the Shape:
Gently drape your clay circle over the plastic-covered bowl. Press down softly with your palms to mold the clay to the curve of the bowl without thinning it too much. -
Smooth the Edges:
While the clay is on the mold, use a slightly damp finger or a sponge to smooth the rim edge so it is rounded and neat.
Uneven Wobble?
If your pot rocks after drying, tape a sheet of sandpaper to a flat table. Rub the bottom of the pot’s feet securely across the abrasive surface until they are ground down to a perfect level.
Step 2: Adding the Feet
-
Make the Legs:
Roll three small balls of clay, roughly the size of large marbles. Slightly taper one end of each ball to create a short, stubby cone shape. -
Check for Size:
Stand the three legs up on your work surface to ensure they are all exactly the same height. This is crucial for a stable pot. -
Score the Surfaces:
Use a needle tool or toothpick to scratch up (score) the wider end of each leg and three corresponding spots on the bottom of your clay bowl. -
Apply Slip:
Dab a little bit of water or clay slip onto the scored areas to act as glue. -
Attach the Legs:
Press the legs firmly onto the bottom of the bowl. wiggle them slightly to ensure a strong bond. -
Blend the Seams:
Using a modeling tool or your finger, drag a little clay from the leg onto the bowl body to seamlessly blend the join. Smoothing this connection prevents cracks later. -
Level Check:
Carefully flip the pot right-side up (keep the bowl mold inside if needed for support) and set it on the table to check that it sits level. Adjust the legs now while the clay is soft.
Step 3: Refining and Finish
-
Add Texture:
To mimic the stone look in the photo, gently tap the outside surface with a crumpled ball of aluminum foil or a stiff bristle brush. -
Dry Slowly:
Let the pot dry slowly away from direct sunlight or heat sources. I like to loosely cover mine with a plastic bag for the first day to prevent warping. -
Remove Mold:
Once the clay is visibly lighter and stiff (about 24 hours), carefully remove the inner bowl mold and plastic wrap. -
Sand Imperfections:
After the pot is bone dry, lightly sand any rough spots on the rim or feet with fine-grit sandpaper. -
Paint (Optional):
If your clay dried off-white, you can apply a coat of matte white acrylic paint to get that crisp, clean look. -
Seal:
Finish with a matte waterproof sealant, especially on the inside, to protect the clay from moisture when watering your plant.
Texture Tip
For an organic, stone-like pitted texture, mix a small amount of dried coffee grounds or sand into your clay body before rolling it out. This adds speckles and natural grip.
Pop in a small succulent and enjoy the charm this little handmade vessel adds to your corner

TRACK YOUR CERAMIC JOURNEY
Capture glaze tests, firing details, and creative progress—all in one simple printable. Make your projects easier to repeat and improve.
White Alphabet Tag Ornaments
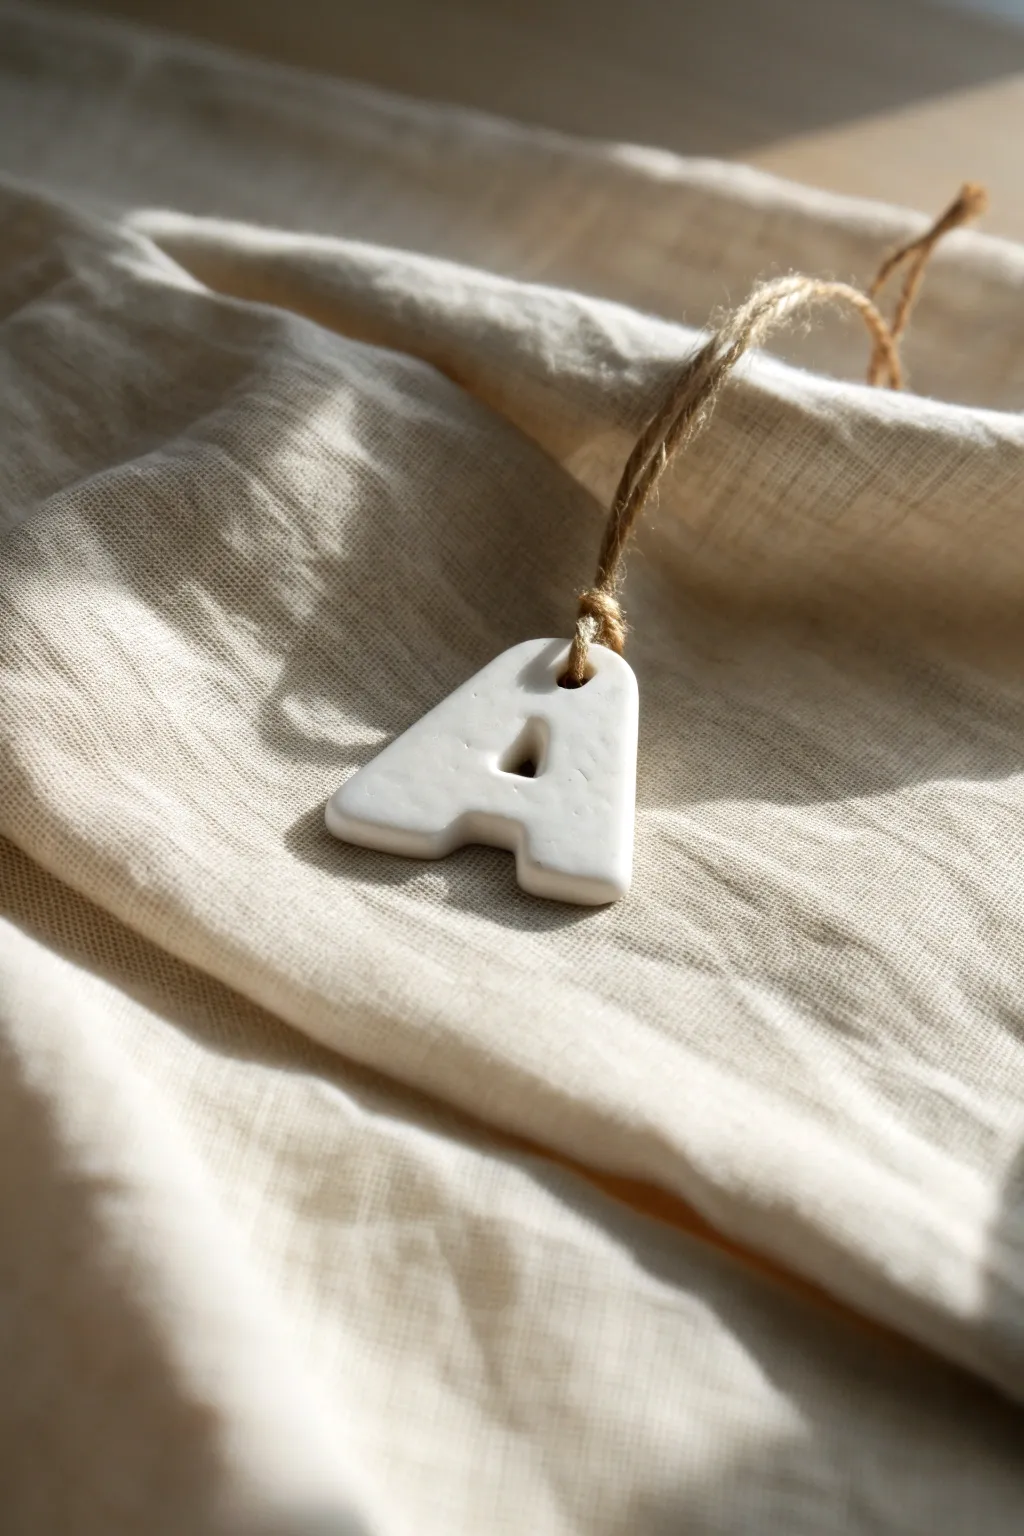
These simple yet elegant initial tags add a personalized touch to gifts, stockings, or even table settings. The beauty lies in their imperfect, handmade texture and the contrast between the smooth white clay and rustic jute twine.
Step-by-Step Guide
Materials
- White air-dry clay (or polymer clay)
- Small rolling pin
- Alphabet cookie cutters
- Parchment paper or craft mat
- Bamboo skewer or plastic straw
- Fine-grit sandpaper (optional)
- Jute twine
- Small bowl of water
- Matte sealant (optional)
Step 1: Preparation and Rolling
-
Prepare your workspace:
Lay down a sheet of parchment paper or a silicone craft mat to prevent the clay from sticking to your table. Clean hands are essential here, as white clay shows every speck of dust. -
Condition the clay:
Take a chunk of white clay and knead it in your hands for a minute or two until it becomes soft, pliable, and warm. -
Roll it out:
Place the clay ball on your surface and use the rolling pin to flatten it. Aim for a thickness of about 1/4 inch (6mm) to ensure the final tag is sturdy but not too chunky. -
Check consistency:
Ensure the clay is rolled evenly. If you see air bubbles, gently prick them with a pin and smooth over the area with your finger.
Smooth Perfection
Water is your best friend when working with air-dry clay. Keep a damp sponge nearby to wipe your fingers, ensuring you don’t transfer dirt or lint onto the pristine white surface.
Step 2: Cutting and Shaping
-
Cut the letter:
Press your chosen alphabet cookie cutter firmly into the rolled clay. Wiggle it very slightly to ensure a clean separation from the surrounding clay, then lift the cutter. -
Remove excess:
Peel away the excess clay from around the letter first, rather than trying to lift the letter immediately. This prevents distortion of the shape. -
Smooth the edges:
Dip your finger into a small bowl of water and gently run it along the cut edges of the letter. This softens the sharp cutter lines and gives it that lovely handmade ceramic look. -
Create the hanging hole:
Using a bamboo skewer or a small straw, poke a hole near the top of the letter. Make sure it’s not too close to the edge to prevent breaking, but large enough for your twine to pass through later. -
Double-check the back:
Sometimes the hole-punching creates a rough exit wound on the back. Flip the letter over gently and smooth down any pushed-out clay around the hole.
Add Texture
Before cutting the letter shape, press a piece of lace, a leaf, or a textured fabric into the rolled clay. This leaves a subtle imprinted pattern for a more detailed look.
Step 3: Drying and Finishing
-
Let it dry:
Move the clay letter to a clean, flat surface to dry. I prefer to let this air dry for at least 24-48 hours, flipping it over halfway through to ensure even drying. -
Sanding (Optional):
Once fully dry and hard, if there are any rough spots you missed while smoothing, you can gently buff them away with fine-grit sandpaper. -
Seal the surface:
For longevity, brush a thin coat of matte sealant or varnish over the tag. This isn’t strictly necessary but helps keep the white clay from picking up stains over time. -
Cut the twine:
Cut a piece of jute twine to your desired length, usually about 8-10 inches depending on where you plan to hang it. -
Attach the hanger:
Thread one end of the twine through the hole in the clay letter. -
Secure the loop:
Bring the two ends of the twine together and tie a simple overhand knot near the ends to create a loop. -
Alternative knot:
Alternatively, you can use a lark’s head knot directly on the ornament if you prefer the string to hang double.
Now you have a charming set of personalized tags ready to elevate your gift wrapping or holiday decor
White Ghost Mini Figurines
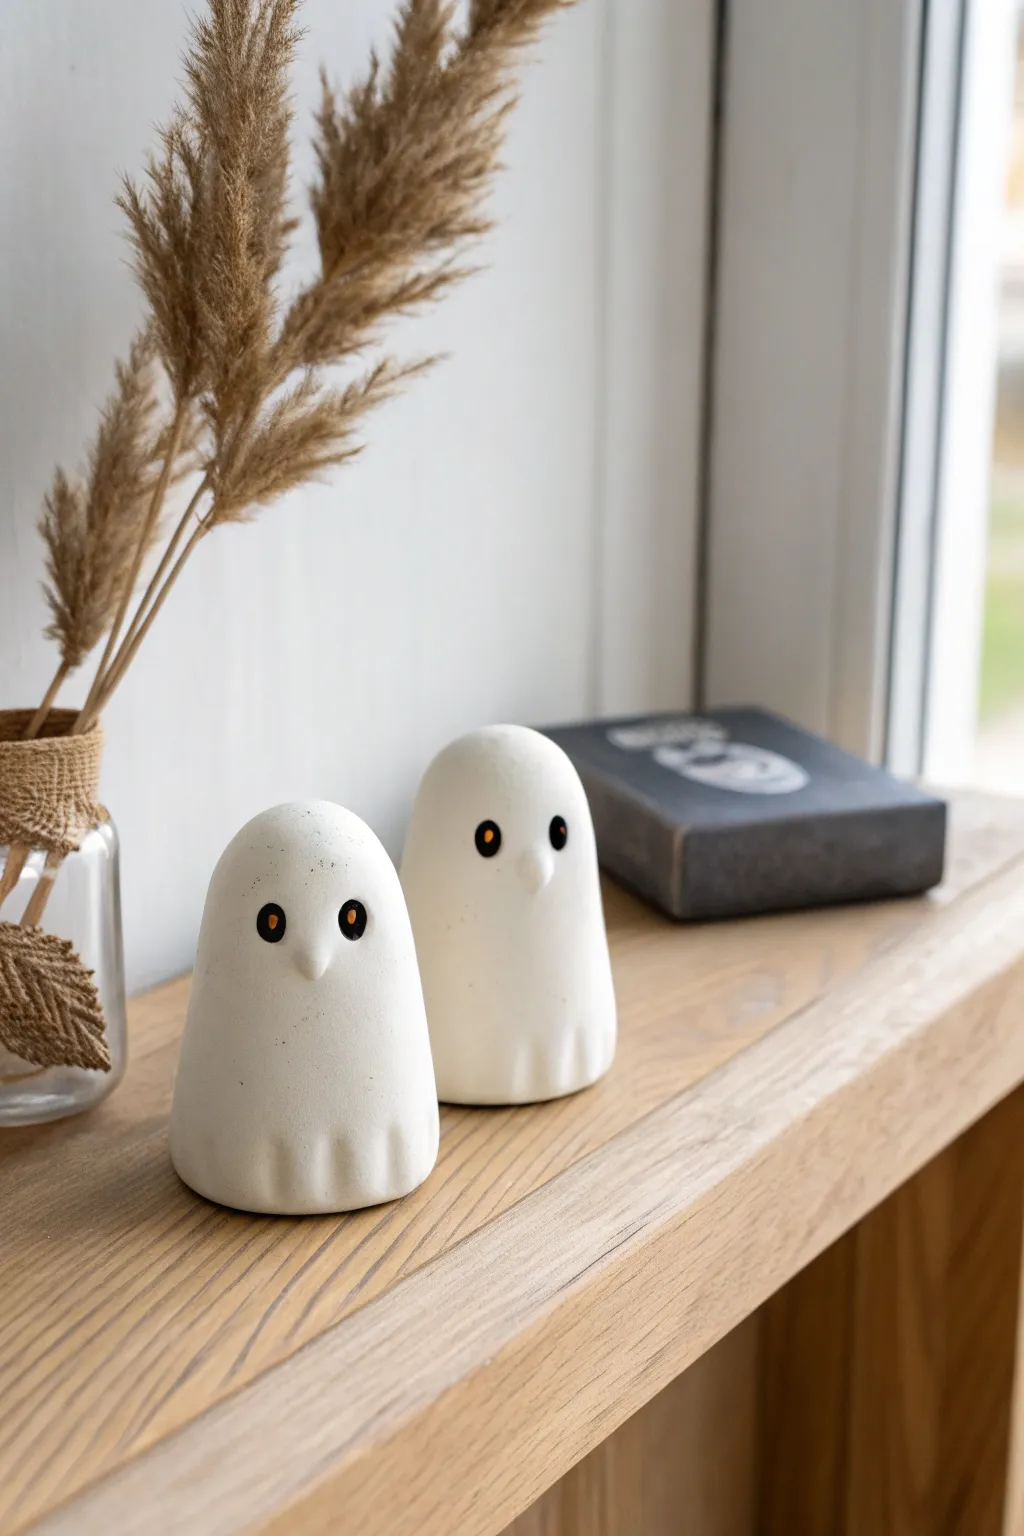
Embrace the spooky season with these adorable, minimalist ghost figurines that add a touch of charm to any shelf. Crafted from white clay, they feature a smooth, matte finish and subtle ruffled hems that mimic floating fabric.
How-To Guide
Materials
- White air-dry clay or polymer clay
- Rolling pin
- Clay sculpting tools (specifically a ball stylus and a needle tool)
- Aluminum foil (for armature)
- Black acrylic paint
- Orange acrylic paint
- Fine detail paintbrush (size 0 or 00)
- Matte varnish or sealant
- Water and sponge (for smoothing)
- Sandpaper (fine grit)
Step 1: Shaping the Base
-
Prepare the core:
Start by crumpling a small piece of aluminum foil into a cone shape with a rounded top. This saves clay and keeps the figurine lightweight. -
Condition the clay:
Take a handful of your white clay and knead it until it is soft, warm, and pliable. This prevents cracks from forming later. -
Cover the armature:
Flatten the clay into a pancake about 1/4 inch thick. Wrap this sheet over your foil core, pressing it gently to adhere. -
Ideally shape the ghost:
Roll the clay-covered form between your hands to smooth it into a classic ghost shape—rounded at the head and slightly wider at the base. -
Flatten the bottom:
Tap the bottom of the ghost firmly against your work surface so it stands upright securely without wobbling.
Pro Tip: Weighted Base
Before sealing the bottom, push a small washer or coin into the clay base. This lowers the center of gravity and prevents tipping.
Step 2: Sculpting Details
-
Refine the surface:
Dip your finger in a little water and rub it over the clay to remove any fingerprints or seams. The surface should be perfectly smooth. -
Create the nose:
Pinch a tiny amount of clay right in the center of the ‘face’ area to form a very subtle, beak-like nose. Soften the edges so it merges seamlessly with the head. -
Mark the eyes:
Before painting, use a ball stylus to gently indent two small sockets where the eyes will go. This adds depth to the final look. -
Sculpt the ruffled hem:
At the very bottom edge of the ghost, use a modeling tool or the handle of a paintbrush to press vertical indentations every half-inch. -
Soften the folds:
Gently rub between the indentations you just made to create soft, pillowy folds that look like draped fabric. -
Final smoothing:
Give the entire piece one last check. Use a slightly damp sponge to buff out any remaining imperfections before letting it dry. -
Drying time:
Allow the ghosts to dry completely. For air-dry clay, I usually wait 24-48 hours; for polymer, bake according to package instructions.
Troubleshooting: Cracks
If tiny cracks appear while air-drying, mix a small amount of fresh clay with water to make a paste (slip) and fill them in before painting.
Step 3: Finishing Touches
-
Sand imperfections:
Once fully cured, lightly sand any rough spots with fine-grit sandpaper to achieve a porcelain-like finish. -
Paint the eyes:
Use your fine detail brush and black acrylic paint to fill in the eye sockets. Paint a simple oval shape. -
Add the highlight:
Dip the very tip of your brush (or a toothpick) into orange paint. Place a tiny dot in the center of each black eye for a spooky glow. -
Speckle effect (optional):
To mimic the stone look in the photo, you can flick a tiny amount of watered-down grey paint onto the body using an old toothbrush. -
Seal the piece:
Apply a coat of matte varnish over the entire ghost to protect the clay and paint without making it shiny.
Place your new ghostly friends on a shelf or windowsill to enjoy their quiet, spooky company
White Bunny Shelf Buddy
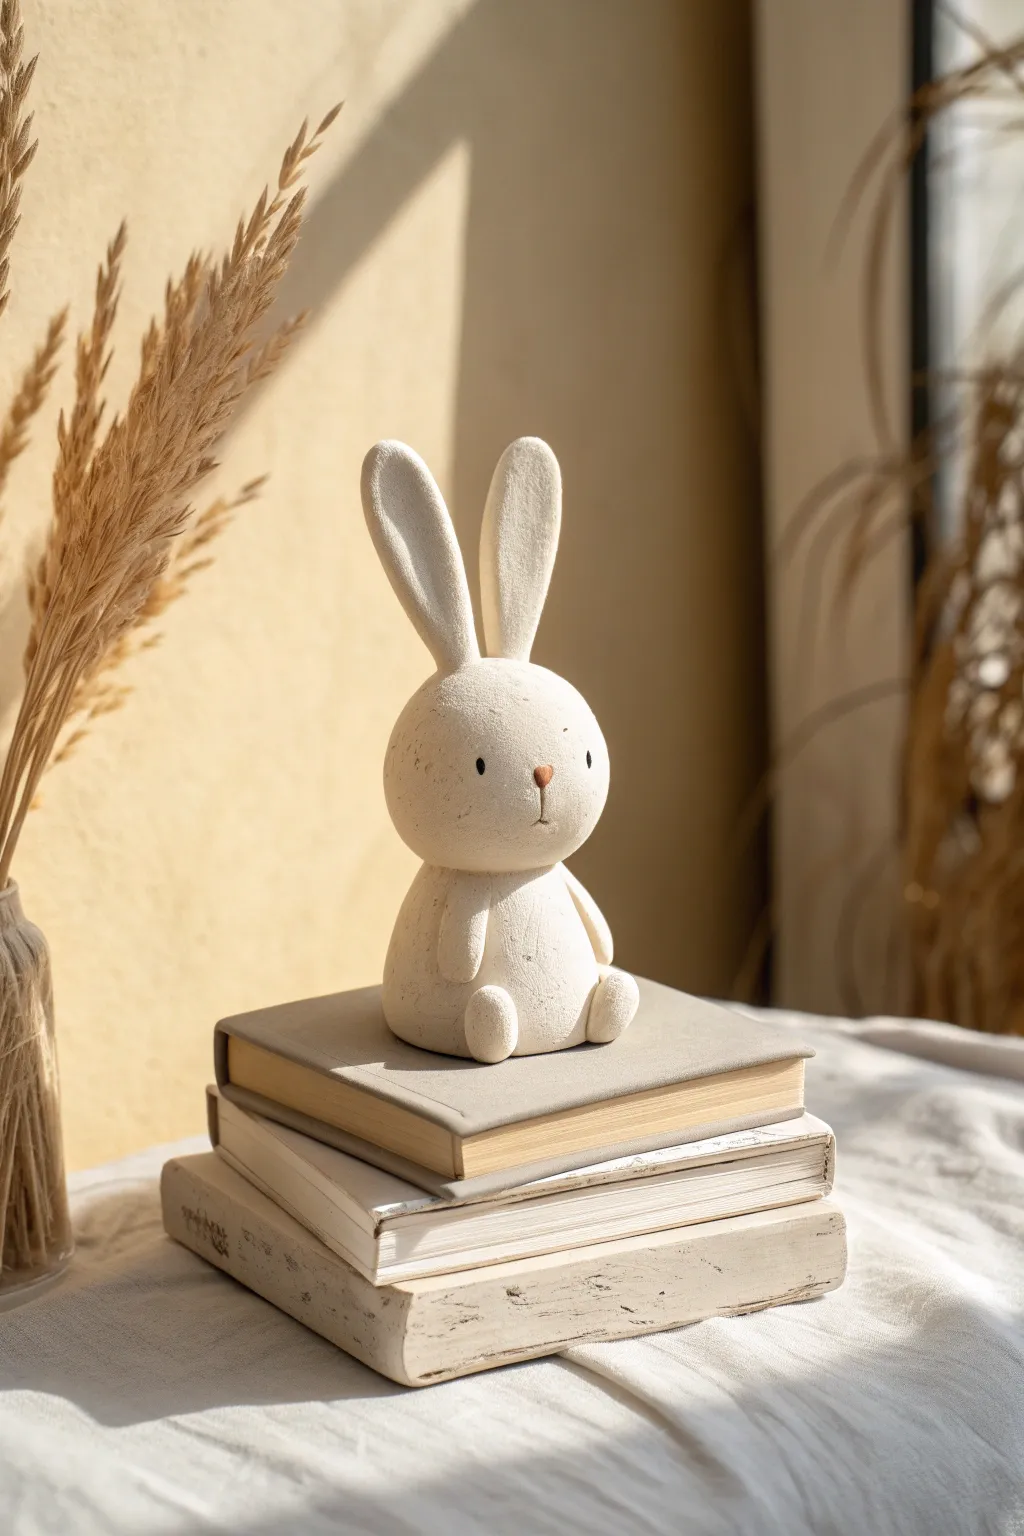
This adorable, matte-finish bunny figurine is a perfect beginner sculpture project, featuring clean lines and a charmingly simple expression. The smooth, marshmallow-like aesthetic makes it a calming addition to any bookshelf or desk decor.
Step-by-Step
Materials
- Air-dry clay (white) or polymer clay (white)
- Aluminum foil (for armature)
- Clay sculpting tools (specifically a smoothing tool and a needle tool)
- Water cup and sponge (for air-dry clay)
- Fine-grit sandpaper (220-400 grit)
- Acrylic paint (black and soft pink/terracotta)
- Fine detail paintbrush or dotting tool
- Matte varnish or sealant spray
Step 1: Forming the Core Structure
-
Create the core armatures:
To save clay and keep the figure lightweight, tightly ball up two pieces of aluminum foil. Make one slightly larger oval for the body and a smaller sphere for the head. -
Condition the clay:
Knead your white clay thoroughly until it is warm and pliable. If using air-dry clay, keep your hands slightly damp to prevent cracking. -
Cover the body:
Flatten a sheet of clay and wrap it around the larger foil ball. Roll it repeatedly between your palms to smooth out seams until you have a perfect, slightly flattened egg shape. -
Cover the head:
Repeat the process for the head, wrapping the smaller foil ball. Roll it into a smooth sphere, then gently press it to flatten the bottom slightly where it will join the body. -
Join the main sections:
Score the top of the body and bottom of the head with a needle tool (scratch cross-hatch marks). Apply a dab of water or liquid clay (for polymer) and press them firmly together. Blend the clay across the seam at the back using a modeling tool.
Cracks Appearing?
If air-dry clay cracks while drying, mix a small amount of fresh clay with water to make a paste (slip). Fill the cracks, smooth it over, and let dry again.
Step 2: Sculpting the Features
-
Shape the ears:
Roll two equal logs of clay. Flatten them slightly into long, rounded tongue shapes. I like to gently hollow out the inner ear just a tiny bit with a rounded tool for depth. -
Attach the ears:
Score the top of the head and the base of the ears. Press the ears onto the head, positioning them upright but slightly angled. Use a small tool to blend the clay at the base so the transition is seamless. -
Make the arms:
Roll two small sausage shapes for the arms. Press them vertically against the sides of the body, blending the top of the arm into the shoulder area while leaving the bottom round and distinct. -
Add the feet:
Create two small balls of clay and flatten them slightly into ovals. Attach these to the bottom front of the body so the bunny looks like it is sitting. -
Add the tail:
Roll a small sphere of clay for the tail. attach it to the lower back of the bunny, blending the edges so it stays secure.
Step 3: Finishing Touches
-
Smooth the surface:
Before the clay dries or bakes, take a damp sponge or your finger and gently buff out any fingerprints or tool marks. The goal is a velvety smooth texture. -
Dry or Bake:
For air-dry clay, let it sit in a cool, dry place for 24-48 hours. For polymer clay, bake according to the package instructions (usually 275°F for 15-30 minutes). -
Sand for perfection:
Once fully cured and hard, use fine-grit sandpaper to gently remove any remaining bumps or uneven spots. Wipe away the dust with a barely damp cloth. -
Paint the face:
Using a dotting tool or the back of a paintbrush, dip into black acrylic paint and dab two small eyes widely spaced on the face. Paint a tiny triangular nose in pink or terracotta. -
Draw the mouth:
With a very fine liner brush or a fine-tip marker, draw a tiny vertical line descending from the nose to create the classic bunny mouth. -
Seal the piece:
To protect the surface and keep that stone-like look, spray the entire figure with a matte varnish. Avoid glossy finishes to maintain the natural aesthetic.
Textured Fur Effect
Instead of smoothing the clay perfectly, tap the surface gently with an old stiff toothbrush before drying. This creates a subtle pitted texture closer to stone.
Now you have a serene little companion to guard your favorite novels
White Village House Luminary
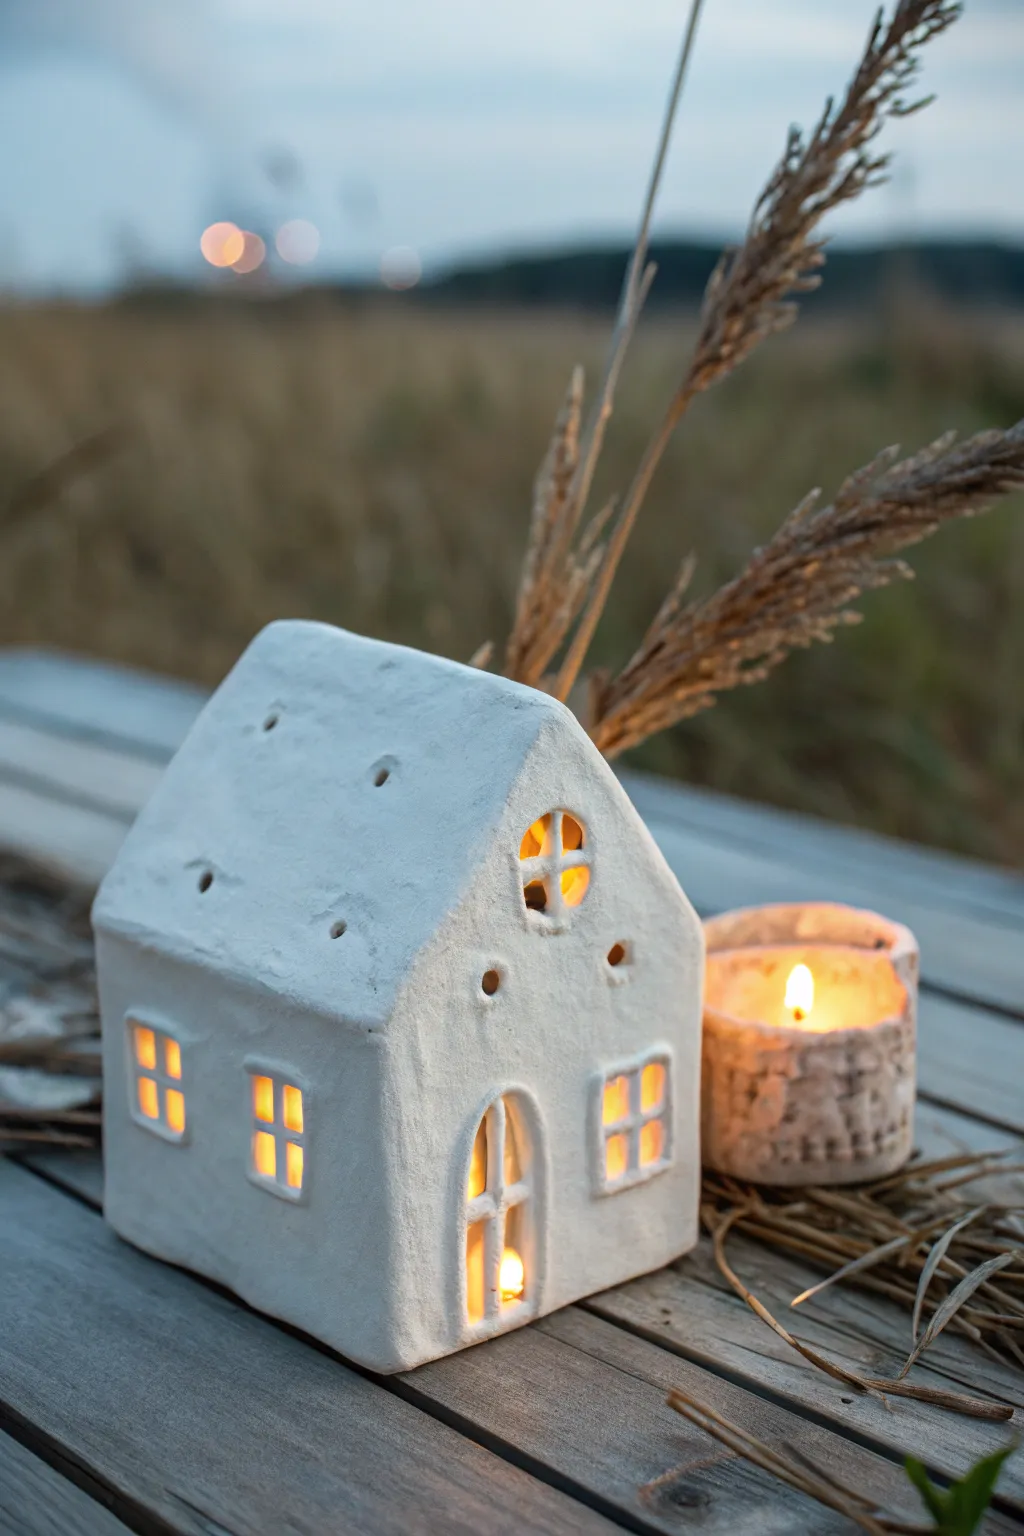
Create a cozy, luminous atmosphere with this handcrafted white clay house, featuring charming cutout windows and a textured, rustic finish. This simple slab-building project results in a beautiful piece of decor that glows warmly when illuminated from within.
Step-by-Step Tutorial
Materials
- White air-dry clay or polymer clay (oven-bake)
- Non-stick rolling pin
- Parchment paper or craft mat
- Craft knife or scalpel (X-Acto)
- Ruler
- Small square and round clay cutters (optional)
- Water and a small bowl
- Sponge or paintbrush
- Sandpaper (fine grit)
- Paper templates (roof, walls, sides)
- Slip (clay mixed with water so it’s muddy)
Step 1: Preparation & Cutting
-
Design your template:
Begin by sketching simple house shapes on paper or cardstock. You will need two rectangular side walls, two pentagonal pieces for the front and back gables, and two rectangular roof pieces that are slightly wider than the house body. -
Roll out the slab:
Working on parchment paper, roll out your white clay to an even thickness of about 1/4 inch (6mm). Ensure it’s not too thin, or the walls will buckle. -
Cut the main shapes:
Place your paper templates onto the clay slab. Using a sharp craft knife held vertically, carefully trace around the templates to cut out all your wall and roof pieces. -
Add texture:
Before lifting the pieces, gently pat the surface with a crumpled ball of aluminum foil or a textured sponge to give the walls that rustic, stone-like appearance seen in the photo.
Step 2: Creating Details
-
Mark window placement:
Lightly sketch the position of windows and the door on your front and side wall panels using a needle tool or toothpick. -
Cut the openings:
Carefully cut out the window squares. For the arched doorway and upper attic window, take your time carving the curves. Save the clay scraps. -
Form the muntins:
Roll tiny, thin snakes of clay. Place these inside the window openings to create the cross-shaped muntins (window panes). Gently press the ends into the interior wall to secure them. -
Add roof details:
Using a small round cutter or a straw, poke several small holes in the roof pieces. These act as little chimneys and allow more candlelight to escape. -
Partial dry:
I like to let the pieces sit for about 30-45 minutes. This ‘leather hard’ stage makes the clay stiff enough to stand up without sagging during assembly.
Sagging Roof?
If the roof starts cave in, crumple a ball of paper towel or newspaper and place it inside the house to support the roof while the clay dries and hardens.
Step 3: Assembly
-
Score the edges:
Use a needle tool or old toothbrush to scratch cross-hatching marks (scoring) on all edges that will be joined together. -
Apply slip:
Dab a little water or slip onto the scored edges. This acts as the glue for your clay. -
Construct the walls:
Stand up the front gable and one side wall. Press the corners together firmly from the inside. Repeat until all four walls are connected in a box shape. -
smooth the seams:
Roll a very thin coil of clay and press it into the interior corners for support. On the outside, smooth the vertical seams with your finger or a damp tool so they disappear. -
Attach the roof:
Score and slip the top edges of the walls and the underside of the roof panels. Generally, I attach one roof panel first, then the second, joining them at the peak. -
Refine the surface:
Once assembled, do a final check. Smooth any fingerprints with a damp sponge, but be careful not to erase your rustic texture.
Cleaner Windows
Dip your craft knife into a bit of water or cornstarch before cutting the windows. This helps the blade glide through the clay without dragging or tearing edges.
Step 4: Finishing
-
Dry completely:
Allow the house to dry slowly away from direct heat or sunlight for 24-48 hours. Turn it occasionally if possible to ensure even airflow. -
Sand edges:
Once fully dry, use fine-grit sandpaper to gently smooth any sharp burrs around the windows or roof edges. -
Paint (Optional):
If your clay isn’t bright white, apply a coat of white matte acrylic paint. Dab it on rather than brushing to preserve the stone-like texture. -
Light it up:
Place a battery-operated tea light or a string of fairy lights inside to see your cottage glow.
Enjoy the gentle warmth this little handmade dwelling adds to your space
White Star-Cut Luminary Cone
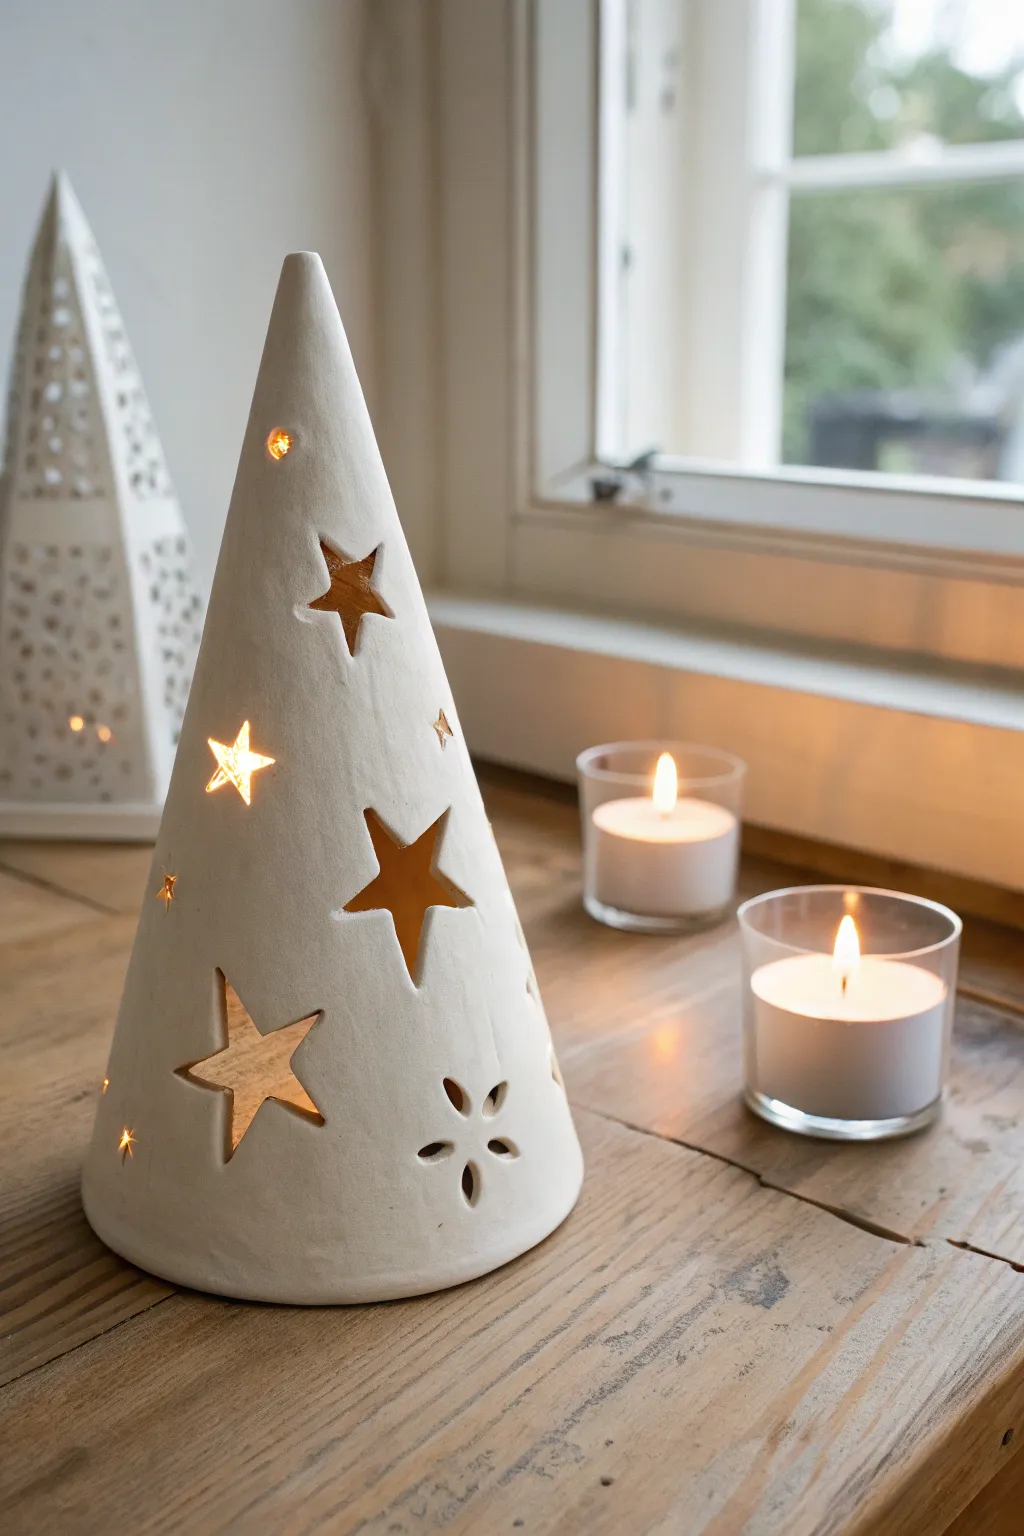
Bring a warm, celestial glow to your windowsill with this elegant white clay luminary cone. Featuring crisp star cutouts and delicate floral accents, this project creates a serene atmosphere perfect for cozy evenings.
Step-by-Step Guide
Materials
- White air-dry clay or polymer clay (approx. 500g)
- Rolling pin
- Parchment paper or canvas mat
- Cone template (cardstock or thick paper)
- Star-shaped cookie cutters (various sizes)
- Small circular cutters or a drinking straw
- Craft knife or scalpel used for clay
- Bowl of water and a sponge
- Slip (clay and water mixture) for joining
- Fine-grit sandpaper (220-400 grit)
- LED tea light or small candle
- Straight edge or ruler
Step 1: Preparing the Cone Shape
-
Condition the clay:
Begin by kneading your white clay thoroughly until it is soft, pliable, and free of air bubbles. If using polymer clay, the warmth of your hands is essential here. -
Roll the slab:
Place the clay on parchment paper or a canvas mat. Using a rolling pin, roll the clay out into a large, even slab approximately 4mm to 5mm thick. Avoid rolling too thin, as the cone needs structural integrity. -
Create a template:
Cut a cone template from cardstock. A simple quarter-circle shape usually works best, measuring about 8-10 inches along the straight edge. -
Cut the clay:
Lay your cardstock template gently over the rolled clay slab. Using your craft knife, trace around the template to cut out the definitive cone shape. Save the excess clay for another project.
Clean Cuts Every Time
To prevent cutouts from sticking inside the cutter, dip the cutting edge into cornstarch or a bit of water before pressing into the clay.
Step 2: Designing the Cutouts
-
Plan your placement:
Before cutting, hover your cutters over the flat clay shape to visualize a balanced arrangement. Ensure you leave enough solid clay between shapes so the structure doesn’t collapse. -
Cut the large stars:
Press the larger star-shaped cutters firmly into the clay. Remove the cutout clay carefully. I like to scatter these randomly rather than in strict rows for a more organic look. -
Add detail stars:
Fill in some of the larger gaps with smaller star cutters. Varying the orientation of the stars adds a whimsical touch. -
Create floral accents:
Near the bottom edge, use a very small tear-drop cutter or just a craft knife to cut petal shapes around a central point to create a flower motif, as seen in the inspiration image. -
Clean the edges:
If the cutters left any ragged edges, gently smooth them with a slightly damp fingertip or a soft, rubber-tipped clay tool.
Step 3: Assembling the Form
-
Score the edges:
Take your craft knife and score cross-hatch marks along the two straight edges of the clay where they will meet to form the seam. -
Apply slip:
Dab a small amount of slip (watered-down clay) or liquid polymer adhesive onto the scored areas to act as glue. -
Form the cone:
Gently lift the clay slab and curve it around until the scored edges meet. This step requires a delicate touch to avoid distorting your star cutouts. -
Seal the seam:
Press the seam together firmly from the inside and outside. Use a modeling tool or your finger to smooth the clay over the join line so it becomes invisible. -
Check the symmetry:
Stand the cone upright on your work surface to ensure it sits flat. If the top point is slightly open, pinch it gently to close it.
Help, It’s Sagging!
If the cone collapses while forming, create a temporary support cone from stiff cardboard covered in parchment paper. Build the clay around this form until it stiffens.
Step 4: Refining and Finishing
-
Smooth the surface:
Wipe the entire outer surface with a slightly damp sponge to remove fingerprints and smooth out any uneven texture. -
Dry or bake:
If using air-dry clay, loosely cover with plastic and let it dry slowly for 24-48 hours to prevent cracking. If using polymer clay, bake according to the manufacturer’s instructions. -
Sand for perfection:
Once fully cured or dry, use fine-grit sandpaper to buff away any remaining imperfections or sharp edges around the cutouts. -
Light it up:
Place an LED tea light inside your finished cone to see the beautiful patterns cast by your star cutouts.
Now you can enjoy the calming ambiance of your handmade luminary as twilight falls
Abstract White Body-Form Vase
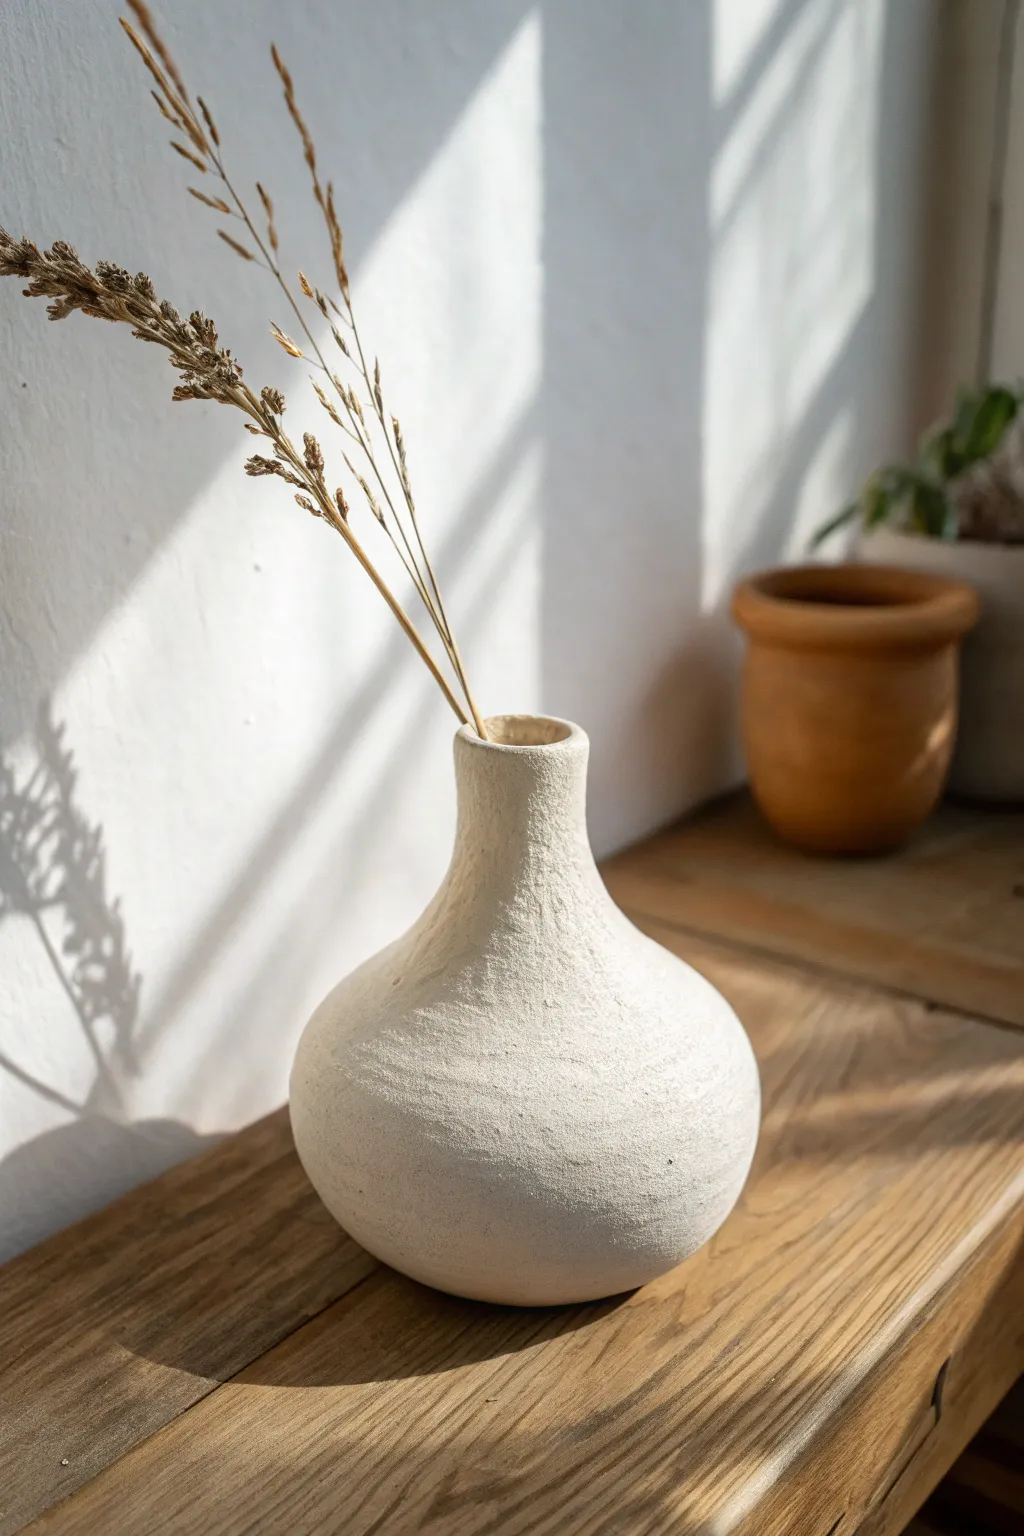
Embrace the beauty of imperfection with this charming hand-built bud vase, featuring a beautifully textured, raw surface. Its organic, bulbous shape and narrow neck make it a perfect minimalist vessel for displaying dried grasses or single stems.
Step-by-Step
Materials
- White stoneware clay or air-dry clay (approx. 1-2 lbs)
- Small sponge
- Water cup
- Wooden modeling tool or old spoon
- Metal rib or old credit card
- Needle tool or toothpick
- Serrated metal rib or textured stone (for surface finish)
- Rolling pin (optional)
- Clear matte sealer (if using air-dry clay)
Step 1: Forming the Base
-
Start the pinch pot:
Begin with a ball of clay roughly the size of a grapefruit. Holding it in one palm, press your thumb into the center, stopping about a half-inch from the bottom. -
Build the walls:
Gently pinch and rotate the clay ball, working from the bottom up. Aim to create a rounded bowl shape with even wall thickness, approximately 1/4 inch thick. -
Refine the curve:
Continue pinching until you have a closed, bulbous form. Don’t worry about the opening yet; focus on getting a nice, symmetrical roundness for the belly of the vase. -
Smooth the interior:
Use your fingers or a slightly damp sponge to smooth out any cracks inside the pot while you can still reach them easily.
Step 2: Creating the Neck
-
Collar the opening:
Place both hands around the top opening of your sphere. Gently squeeze inward while rotating the pot to narrow the opening, a technique called ‘collaring’. -
Extend the height:
As you narrow the opening, the clay will thicken. Pinch this excess clay upwards to form a short cylinder neck. -
Shape the transition:
Use your thumb to blend the clay where the neck meets the body, ensuring a smooth, sloping transition rather than a sharp angle. -
Level the rim:
Once the neck is about 1.5 to 2 inches tall, use a needle tool to slice the rim horizontally for a clean, flat top edge. -
Smooth the lip:
Run a damp chamois or your finger over the cut rim to soften the sharp edge.
Texturing Secret
Wait until the clay is ‘leather hard’ (firm like cheese) before adding the final texture. The marks will be cleaner and won’t deform the shape.
Step 3: Texturing and Finishing
-
Initial smoothing:
Use a flexible metal rib or an old credit card to scrape the exterior. This removes major finger marks and refines the silhouette. -
Add texture:
This is crucial for the rustic look. I like to take a serrated metal rib or a rough stone and gently scrape the surface in various directions to create a subtle, scratchy texture. -
Flatten the bottom:
Tap the vase gently on your work surface to create a flat, stable base so it won’t wobble. -
Slow drying:
Cover the vase loosely with plastic so it dries slowly. This prevents the neck from cracking away from the body. -
Refining dry clay:
Once bone dry (or fully dry for air-dry clay), you can gently sand any overly sharp peaks from your texturing process. -
Seal or fire:
If using ceramic clay, fire to bisque temperature. If using air-dry clay, apply a matte sealant to protect the surface while keeping that raw, earthy look.
Natural Stain
For depth, dilute a bit of brown acrylic paint or iron oxide with water, brush it over the texture, and wipe it back with a sponge.
Place a few dried wildflowers or stems inside to complete your rustic display