When I’m craving a quick win in the studio, I reach for flat clay projects because they’re beginner-friendly, fast to finish, and super satisfying to decorate. These ideas focus on thin slabs and low-relief details so your pieces dry (or bake) nicely without needing complicated builds.
Texture-Stamped Coasters
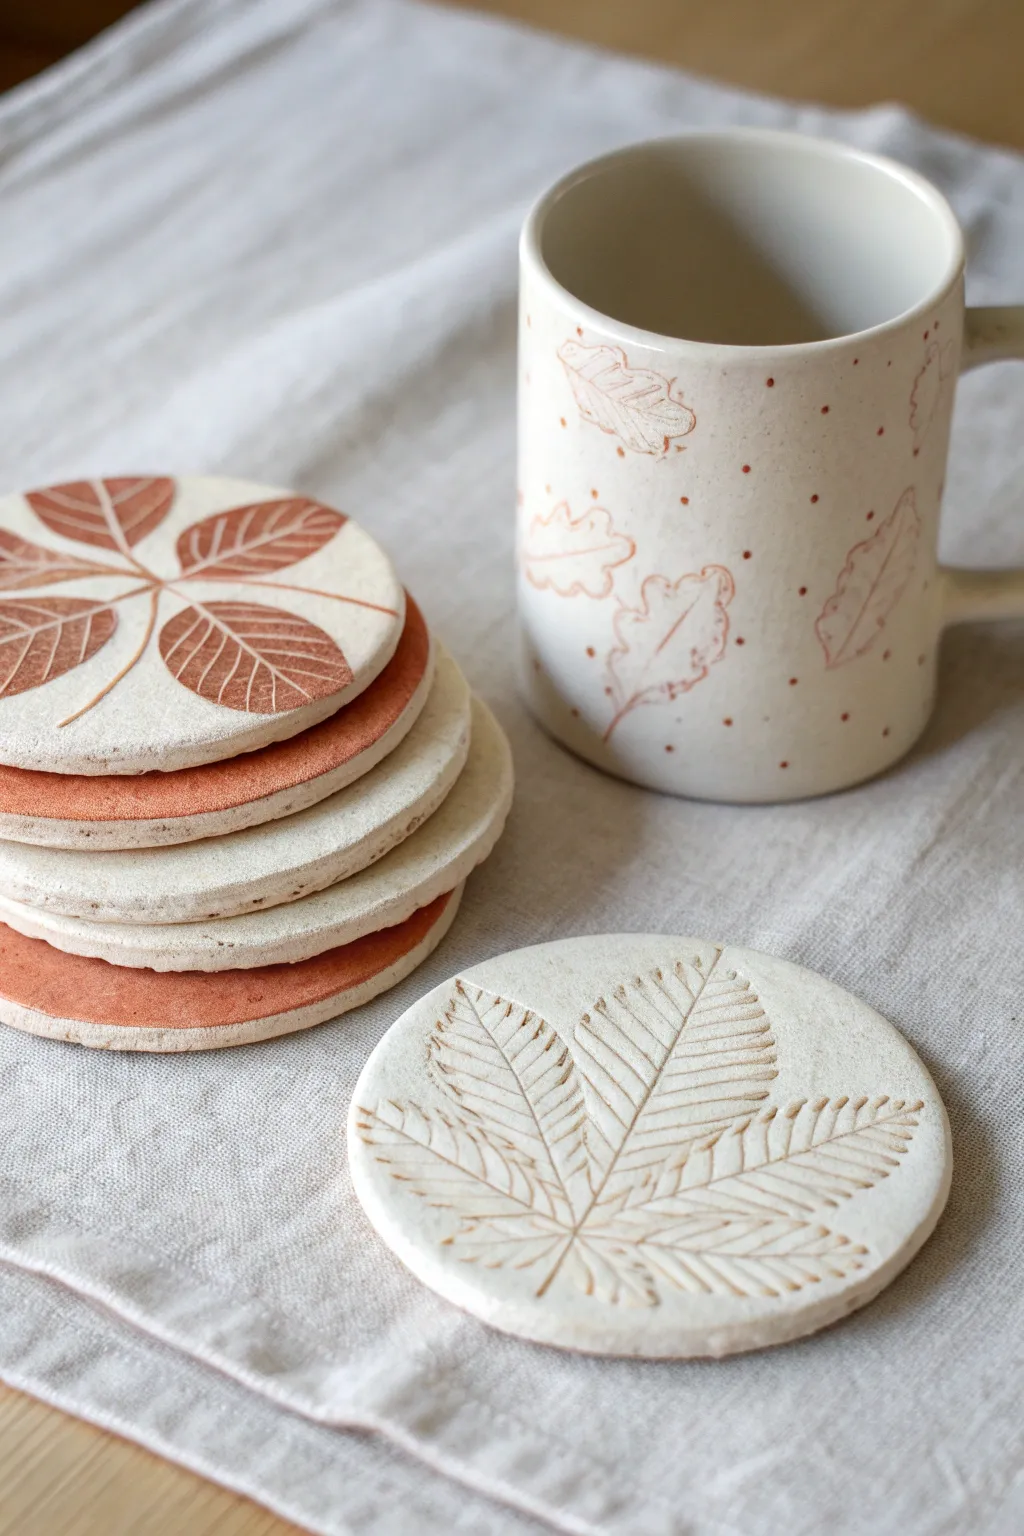
Capture the delicate details of nature with these charming ceramic coasters showcasing imprinted leaf skeletons. The contrasting reddish-brown leaf motifs against a creamy white surface create a rustic yet modern aesthetic perfect for any coffee table.
Step-by-Step
Materials
- White or speckled stoneware clay
- Rolling pin
- Canvas or cloth work surface
- Circular cookie cutter (approx. 4 inches)
- Fresh leaves with prominent veins (chestnut, oak, or maple work well)
- Red iron oxide wash or terracotta-colored underglaze
- Small brush or sponge for inlay
- Clear or matte white glaze
- Kiln (if firing yourself) or access to a pottery studio
- Clean sponge and water
- Pottery needle tool
- Rib tool (for smoothing)
Step 1: Preparation & Rolling
-
Prep the clay:
Begin by wedging your stoneware clay thoroughly to remove any air bubbles. You want a smooth, consistent consistency before you start rolling. -
Roll out a slab:
On your canvas board, roll the clay out into an even slab. Aim for a thickness of about 1/4 inch (6mm). Using guide sticks or slats on either side of your rolling pin helps ensure perfectly even thickness. -
Smooth the surface:
Take a soft rib tool and gently compress the surface of the slab. This removes the canvas texture and aligns the clay particles, which helps prevent warping later.
Warping Woes
If coasters curl up while drying, flip them over every few hours. Consistent drying on both sides is the secret to flat perfection.
Step 2: Texturing & Cutting
-
Arrange your botanicals:
Select your leaves. Place them vein-side down onto the smooth slab. I find that leaves with thicker veins create deeper, more defined impressions. -
Imprint the leaves:
Gently roll over the leaves with your rolling pin one final time. Apply firm, even pressure to embed the veins into the clay surface without making the slab too thin. -
Remove the leaves:
Carefully peel the leaves away by lifting the stem. If a leaf tears, use a needle tool to gently pick out the remaining pieces. -
Cut the shapes:
Position your circular cutter over the most interesting part of the leaf imprint. Press down firmly to cut the coaster shape. -
Refine the edges:
Once you’ve lifted the circles, slide a finger or a slightly damp sponge around the rim to smooth any sharp edges left by the cutter.
Step 3: Decoration & Firing
-
Slow drying:
Place your coasters on a ware board. To keep them perfectly flat, sandwich them between two pieces of drywall or weigh down the corners of a plastic sheet covering them. Let them dry completely to the bone-dry stage. -
Bisque fire:
Fire the completely dry coasters in the kiln to cone 04 (or according to your clay’s bisque schedule). -
Apply the oxide:
Once bisqued, brush a red iron oxide wash or terracotta underglaze liberally over the leaf impressions. You want the color to get into every tiny vein. -
Wipe back:
Dampen a clean sponge and wipe across the surface of the coaster. The goal is to remove the color from the raised surface while leaving it trapped in the recessed leaf veins. -
Glazing:
Dip the coasters into a transparent or translucent satin white glaze. Alternatively, leave the raw clay texture exposed and just glaze the top face if you prefer a rougher feel. -
Clean the bottoms:
Ensure the bottom of each coaster is completely free of glaze so it doesn’t fuse to your kiln shelf. A quick wipe with a sponge usually does the trick. -
Glaze fire:
Fire the coasters again to the maturation temperature of your specific clay and glaze body (typically cone 5 or 6 for stoneware).
Matching Set
Use the same leaf stamping technique on a slab-built mug body before assembling it to create a perfectly coordinated coffee set.
Enjoy using your new handcrafted coasters that bring a permanent touch of autumn to your home


Simple Slab Trinket Tiles

Create a stunning modular centerpiece or a set of chic coasters with these hexagonal slab tiles. Featuring a palette of soft earth tones and matte finishes, this project is a perfect introduction to working with colored clay for a modern, minimalistic look.
Step-by-Step Guide
Materials
- Polymer clay or air-dry clay (terracotta, white, sage green, beige, grey)
- Speckled clay variant (or black pepper/sand for DIY speckles)
- Non-stick rolling pin
- Hexagon cookie cutter (approx. 3-4 inches wide)
- Depth guide rings or wooden slats (approx. 1/4 inch thick)
- Parchment paper or baking mat
- Fine-grit sandpaper (400 and 600 grit)
- Smooth ceramic tile or acrylic sheet (for flattening)
- Clarified butter or baby oil (optional, for smoothing)
- Matte spray varnish (optional)
Step 1: Preparing the Clay
-
Condition the clay:
Begin by warming up your clay in your hands. Knead each color block separately until it is soft, pliable, and free of cracks. If the clay feels stiff, keep working it to activate the plasticizers. -
Mix custom shades:
To achieve the muted pastel look shown in the image, you may need to mix colors. Try blending bright orange with a little brown and white for the terracotta, or green with a touch of grey for the sage. Aim for a cohesive, dusty palette. -
Create speckles:
For the speckled white tiles, take a block of white clay and mix in a very small amount of coarse black pepper, dried coffee grounds, or dedicated granite-effect clay. Knead thoroughly until the speckles are evenly distributed. -
Set up your workspace:
Lay down a sheet of parchment paper or a silicone baking mat. This prevents the clay from sticking to your table and makes moving the shapes easier later.
Warped Edges?
If your hexagons look distorted after lifting the cutter, let the clay rest on the mat for 10 minutes before peeling away the scraps. The clay will firm up slightly.
Step 2: Rolling and Cutting
-
Roll the slab:
Place your depth guides on either side of a clay ball. Roll the clay out into a smooth, even slab. I find that 1/4 inch thickness gives the tiles a substantial, high-quality feel without being too heavy. -
Check for bubbles:
Inspect the surface of your slab. If you see any air bubbles trapped under the surface, gently pierce them with a needle tool and smooth the area down with your finger. -
Cut the shapes:
Press the hexagon cutter firmly into the clay. Give it a tiny wiggle to ensure it cuts all the way through to the mat, then lift the cutter straight up. Repeat for as many tiles as you need. -
Remove excess clay:
Carefully peel away the scrap clay from around your hexagon shapes, leaving the cut tiles on the parchment paper. Don’t try to lift the tiles yet, as this can warp their straight edges. -
Smooth the edges:
Dip your finger in a tiny bit of baby oil or water and gently run it along the cut edges and the top surface to remove any sharp ridges or fingerprints.
Level Up: Felt Backing
Glue a hexagon of cork or stiff felt to the underside of each tile. This protects your table surfaces and gives the coasters a pleasing ‘soft’ landing when set down.
Step 3: Refining and Curing
-
Prepare for baking or drying:
If using polymer clay, transfer the parchment paper with the tiles onto a baking sheet. Place a smooth ceramic tile or a heavy piece of paper on top of the clay shapes to weigh them down slightly; this ensures they bake perfectly flat. -
Cure the tiles:
Bake according to your clay manufacturer’s instructions (usually around 275°F for 15-30 minutes). If using air-dry clay, allow them to dry for 24-48 hours, flipping them occasionally for even airflow. -
Cool down:
Once baked, turn off the oven and open the door slightly, letting the tiles cool down slowly inside. This helps prevent thermal shock and cracking. -
Sand the edges:
After the tiles are fully cool and hard, take your 400-grit sandpaper and wet-sand the edges under a trickle of water. This creates an incredibly professional, stone-like finish. -
Final polish:
Switch to 600-grit sandpaper to briefly buff the top surface if you want it extra smooth. Rinse the tiles to remove any dust residue and dry them with a lint-free cloth. -
Seal the surface:
To protect your tiles from stains while maintaining the matte aesthetic, apply a light coat of matte spray varnish. Let it dry completely before arranging your new decor.
Arrange your finished tiles in a honeycomb pattern on your coffee table for a functional piece of modern art


Botanical Relief Magnets
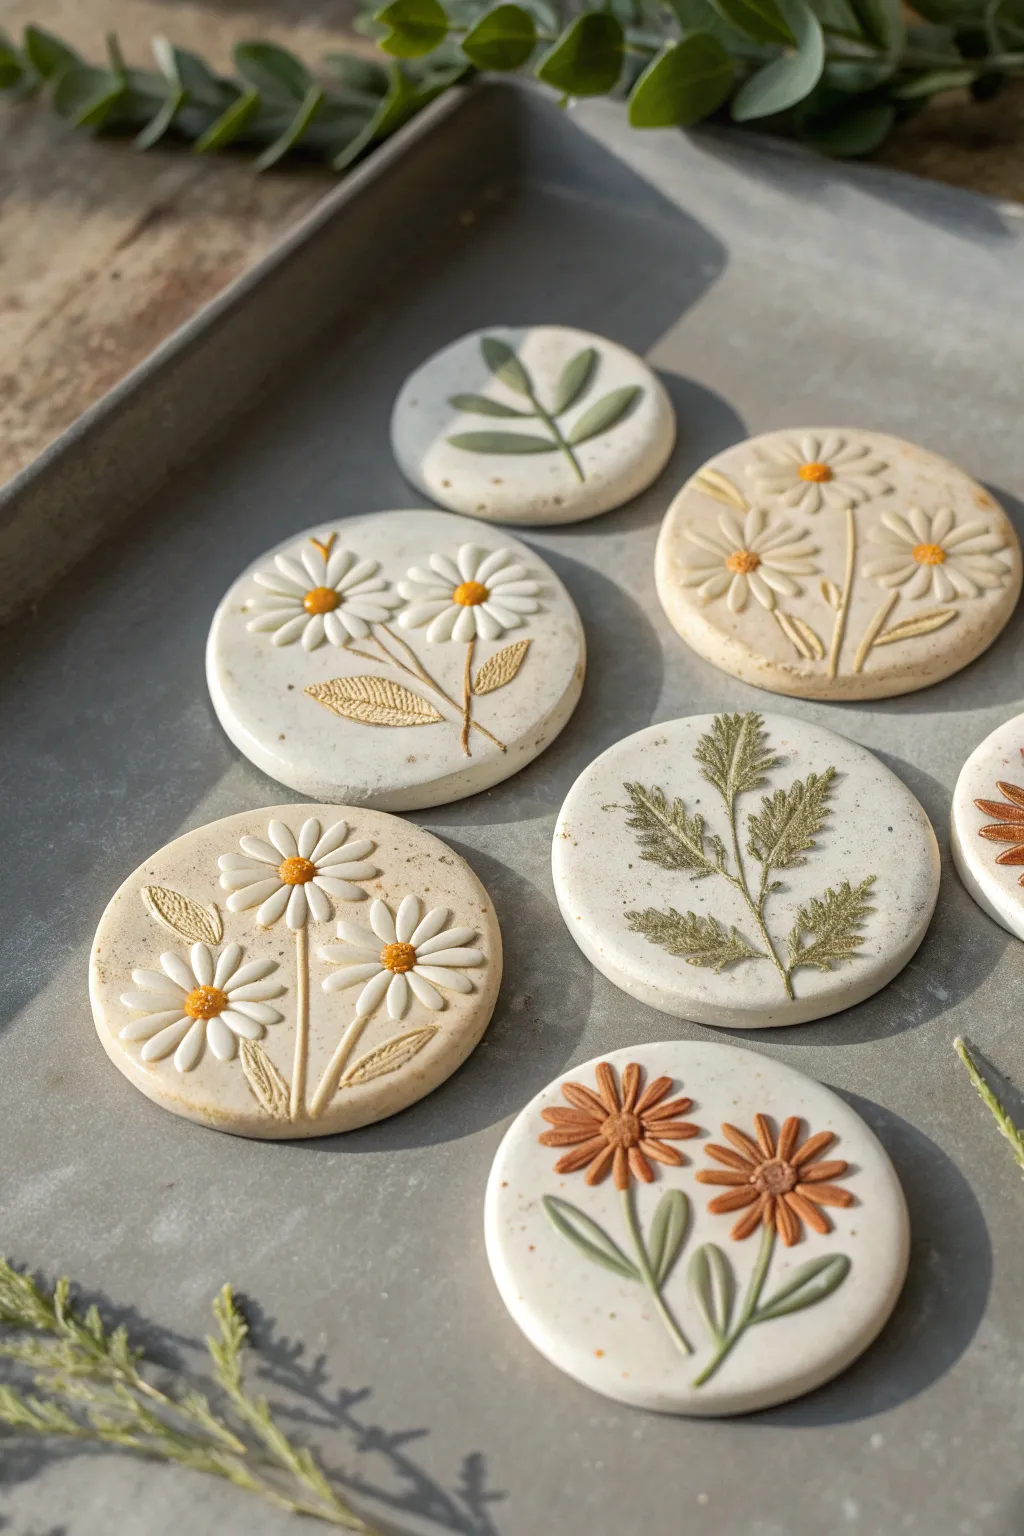
Capture the delicate beauty of nature with these simple yet elegant clay discs. Using polymer or air-dry clay, you’ll create lasting botanical impressions that can be turned into magnets, coasters, or wall art.
How-To Guide
Materials
- White air-dry clay or polymer clay (white/porcelain finish)
- Rolling pin
- Circle cookie cutter (approx. 3-4 inches)
- Fresh or dried botanical sprigs (thicker stems work best for impressions)
- Modeling tools or clay sculpting set
- Yellow and brown acrylic paint or gouache
- Fine detail paintbrush (size 0 or 00)
- Sandpaper (fine grit)
- Matte varnish or sealant
- Small magnets and strong glue (optional)
Step 1: Preparing the Clay Base
-
Condition the Clay:
Begin by kneading your white clay until it is soft, pliable, and free of air bubbles. If using polymer clay, warm it in your hands thoroughly to prevent cracking. -
Roll Out the Slab:
Roll the clay out on a smooth, non-stick surface to an even thickness of about 1/4 inch. Keep the rolling pin level to ensure the discs are uniform. -
Cut the Circles:
Use your circle cookie cutter to punch out clean shapes. Gently push the clay out of the cutter if it sticks, and smooth the edges with a fingertip dipped in a little water.
Fixing Cracks
If air-dry clay cracks while drying, mix a tiny bit of fresh clay with water to make a paste (slip) and fill the cracks. Smooth over and let dry again.
Step 2: Creating the Designs
-
Technique 1: Floral Relief Sculpting:
For the raised daisy designs, take tiny pinches of fresh clay and roll them into small teardrops. Flatten them slightly to form petals. -
Build the Flower:
Arrange the petals in a circle directly onto the clay disc. Use a sculpting tool to press the inner end of each petal onto the base, blending the clay so it adheres securely. -
Add Centers and Stems:
Roll a tiny ball of clay for the flower center and texture it by stippling with a needle tool. Roll very thin snakes of clay for stems and gently press them onto the disc. -
Technique 2: Botanical Impressions:
For the fern-like designs, select a sturdy sprig or leaf. Place it carefully onto the wet clay surface. -
Press the Design:
Use your rolling pin to firmly roll over the plant material once. This embeds the texture deep into the clay without distorting the circle shape too much. -
Reveal the Imprint:
Carefully peel the plant material away using tweezers or a needle tool to lift the edge. This leaves a crisp, negative impression of the botanical. -
Add Textural Details:
If you are sculpting leaves for the relief flowers, use a knife tool or needle to score vein lines gently into the clay leaves for realism.
Speckled Stone Look
Mix black pepper or used coffee grounds into your white clay before rolling. This creates a natural, speckled stone effect without painting.
Step 3: Fring and Finishing
-
Drying or Baking:
If using air-dry clay, let the pieces dry on a wire rack for 24-48 hours. I find turning them over halfway through prevents curling. If using polymer, bake according to package instructions. -
Sand the Edges:
Once fully cured, use fine-grit sandpaper to smooth out any rough edges on the rim of the discs for a polished look. -
Painting Details:
Using a very fine brush, paint the centers of the daisies with yellow ochre acrylic paint. Use a darker shade of green or brown for the stems if desired, or keep them white for a minimalist look. -
Highlighting Impressions:
For the impressed discs, you can do a subtle wash. Dilute some brownish-green paint with water, brush it into the crevices, and wipe the surface immediately with a damp cloth to highlight the texture. -
Seal the Work:
Apply a coat of matte varnish to protect the clay from moisture and dust. Allow this to dry completely. -
Add Magnets (Optional):
Flip the discs over and glue a strong magnet to the center of the back using industrial-strength craft glue.
Arrange your beautiful botanical discs on the fridge or package them as a thoughtful handmade gift set


Fruit Slice Charms
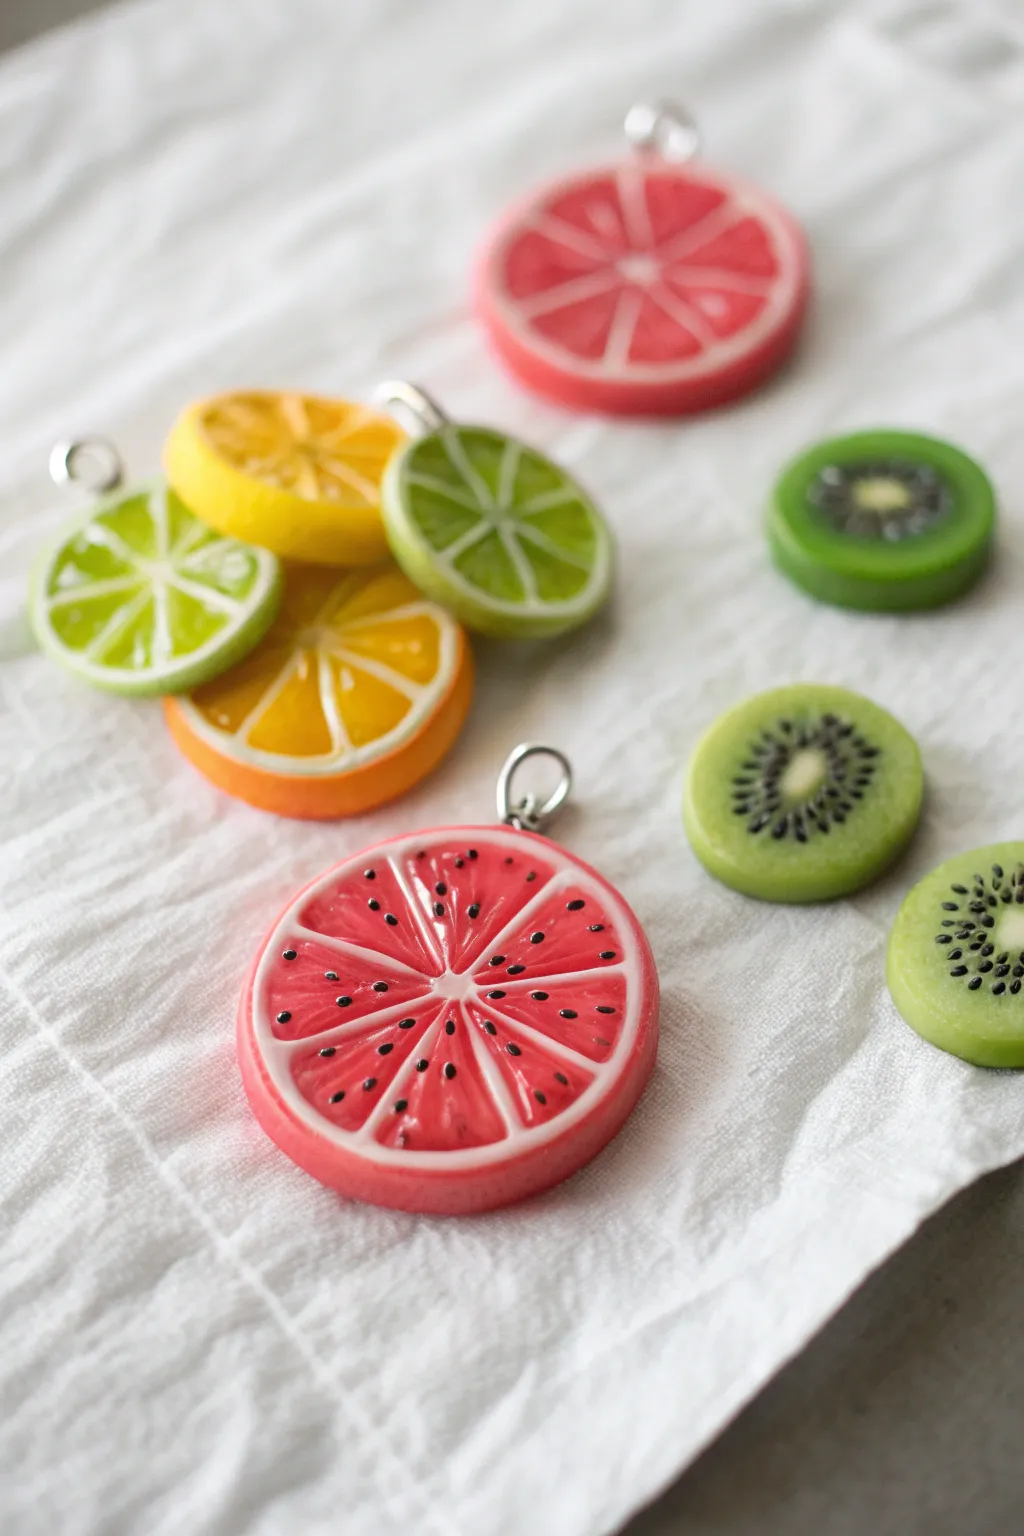
These vibrant fruit slice charms look good enough to eat with their glossy finish and realistic details. Perfect for necklaces, keychains, or bracelet dangles, this project mimics the translucent juiciness of real fruit using clever clay techniques.
Step-by-Step Guide
Materials
- Polymer clay (translucent, red, orange, yellow, green, white, black)
- Liquid polymer clay (translucent)
- Eye pins or small screw eyes
- Rolling pin or pasta machine
- Circle cutters (approx. 1 inch diameter)
- X-acto knife or craft blade
- Needle tool or toothpick
- UV resin or high-gloss varnish
- UV lamp (if using resin)
- Small paintbrush
- Ceramic tile or glass work surface
- Oven for baking
Step 1: Citrus Cane Base
-
Mix Translucent Colors:
Begin by mixing small amounts of colored clay (red for grapefruit/watermelon, orange for orange, yellow-green for lime) with equal parts of translucent clay. This creates that realistic, juicy flesh look once baked. -
Form the Wedges:
Roll your mixed translucent clay into a thick log. Then, pinch one side of the log along its entire length to create a teardrop cross-section shape. -
Wrap the Wedges:
Roll out a very thin sheet of white clay. Wrap this sheet around your teardrop log, trimming away any excess. This white layer represents the rind separating the fruit segments. -
Stretch and Slice:
Gently stretch and roll the cane to reduce its size until the teardrop face is quite small. Slice this long cane into 8 equal lengths. -
Assemble the Segments:
Arrange the 8 teardrop logs into a circle, with the pointy ends meeting in the center. Gently press them together so they fuse without distorting the shape too much. -
The Outer Rind:
Roll a sheet of white clay and wrap it around the entire circle of wedges. Follow this with a slightly thicker sheet of the corresponding colored clay (e.g., green for lime rinds, orange for oranges) to create the skin.
Clean Cuts Only
Chill your clay canes in the fridge for 20 minutes before slicing. If the clay is too warm, the intricate pattern will smush and drag when you cut it.
Step 2: Alternative: The Kiwi
-
Create the Center:
Roll a small snake of white clay. Wrap a thick layer of translucent green clay around it. -
Add Seeds:
Roll tiny, hair-thin snakes of black clay. Press these lengthwise into the side of your green log, spaced evenly around the circumference. Cover with another layer of translucent green. -
Final Wrap:
Wrap the log in a thin layer of brownish-green clay for the fuzzy skin. Reduce the cane by rolling it until it matches the diameter of your citrus canes.
Level Up: Earrings
Make smaller versions of these canes (reduce to 1cm) to create matching stud earrings, or slice the charms in half before baking for semicircles.
Step 3: Finishing the Charms
-
Slice Disks:
Once your canes (citrus or kiwi) are rolled to the desired size—about 1 inch thick works well—Use your sharpest blade to slice even disks. About 3-4mm thickness is sturdy enough for jewelry. -
Refine Edges:
Gently tap the edges of your slices to round them slightly so they aren’t too sharp. If you prefer a simpler method than cane-making, you can simply fill a circle cutter with clay and paint the details on top, but the cane method yields better depth. -
Texture the Citrus:
For the oranges, limes, and grapefruits, take a needle tool and gently poke the translucent flesh sections repeatedly. This roughens the surface to mimic juice sacs. -
Watermelon Variation:
For the watermelon charm shown, start with a solid pinkish-red disk. Add thin snakes of white clay in a starburst pattern, then wrap the edge in white and pink. Use a needle tool to create divots for seeds. -
Add Seeds:
For the watermelon, roll tiny teardrops of black clay and press them into the seed divots you created. Press them down firmly so they bond. -
Insert Eye Pins:
Carefully push a metal eye pin into the top edge of each fruit slice. If the clay distorts, gently reshape it with your fingers. I find twisting the pin slightly as you insert helps it grip. -
Bake:
Bake the charms according to your clay package instructions (usually 275°F/130°C for 15-30 minutes). Let them cool completely. -
Secure the Pin:
Once cool, gently tug the eye pin. If it’s loose, pull it out, add a dab of superglue, and reinsert it. -
Glazing:
Apply a coat of UV resin or high-gloss varnish to the face of the fruit slice. This enhances the translucency and gives it that fresh-cut wet look. -
Cure:
If using resin, cure under a UV lamp for 2-3 minutes until hard and glossy. Your charms are now ready to string.
Now you have a refreshing set of fruit accessories ready to brighten up any outfit

The Complete Guide to Pottery Troubleshooting
Uncover the most common ceramic mistakes—from cracking clay to failed glazes—and learn how to fix them fast.
Geometric Statement Earrings
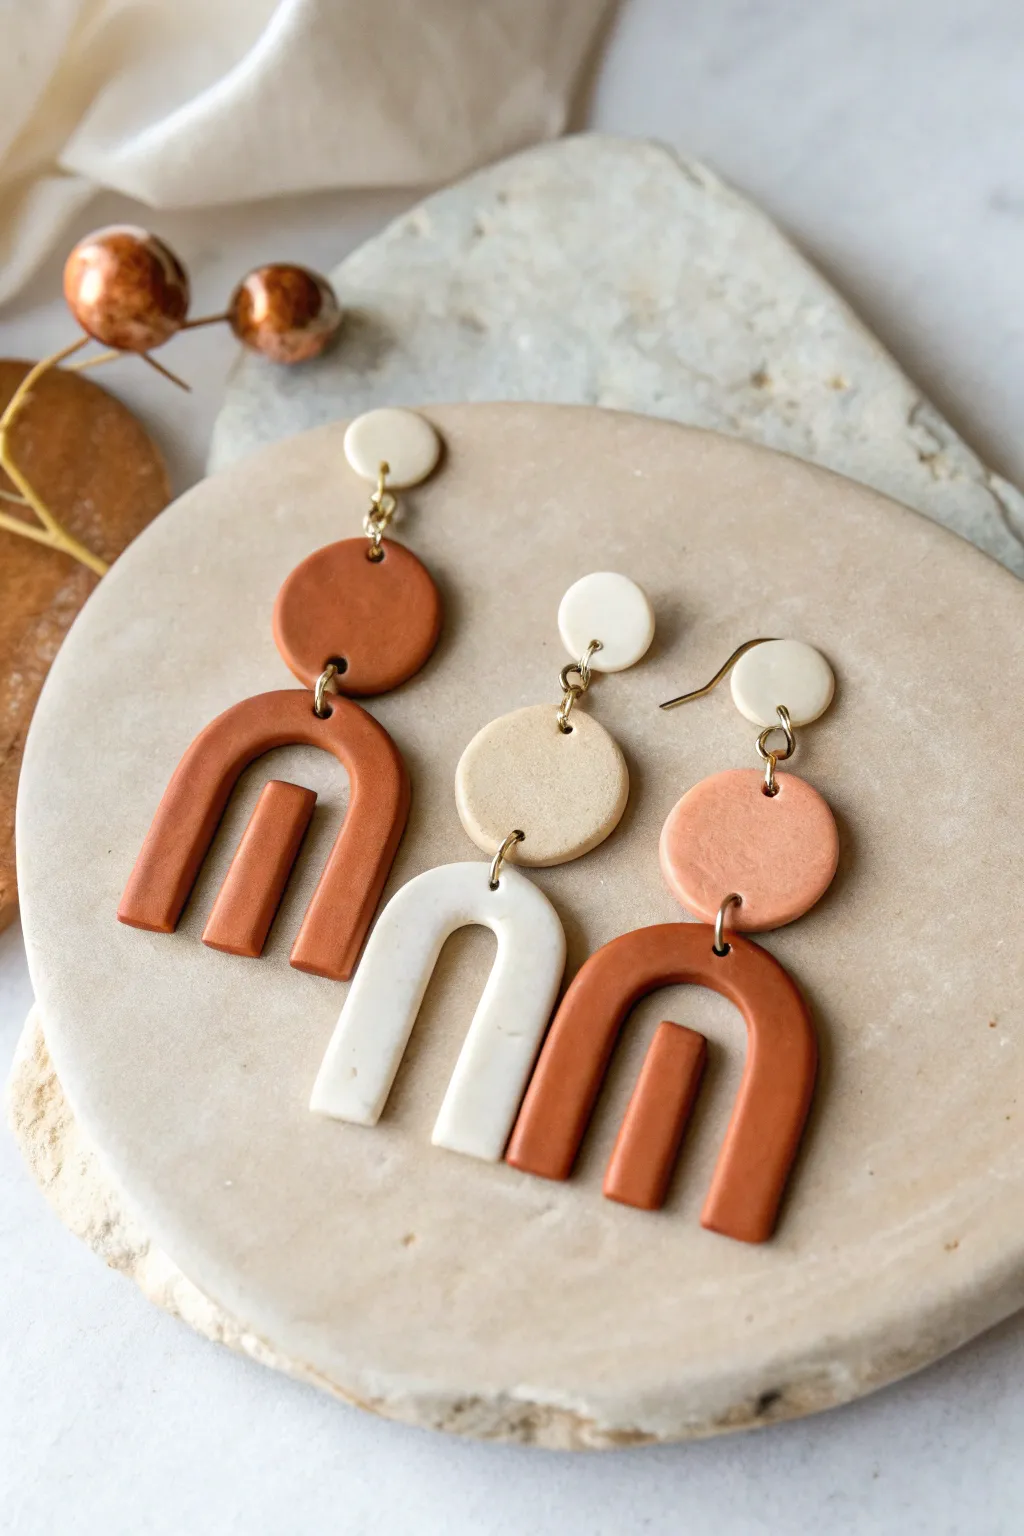
Embrace earthy tones and modern shapes with these stunning geometric statement earrings. Featuring a mix of warm terracotta, soft beige, and crisp white polymer clay, this project combines simple circle cutouts with elegant arch elements for a sophisticated bohemian look.
Step-by-Step Tutorial
Materials
- Polymer clay (terracotta/rust, beige/sand, and white)
- Acrylic rolling pin or pasta machine
- Tissue blade or sharp clay knife
- Small circle cutters (approx. 10mm and 20mm)
- Arch-shaped clay cutters (or template)
- Small rectangular cutter (for the inner bar detail)
- Hand drill or pin vibe with small bit
- Jump rings (gold, 6mm and 8mm)
- Earring posts or fishhook wires
- Flat-nose jewelry pliers
- Parchment paper or ceramic tile for baking
- Fine grit sandpaper (400-1000 grit) or buffing tool
Step 1: Clay Conditioning & Mixing
-
Prepare your colors:
Start by conditioning your clay blocks until they are soft and pliable. You’ll need three distinct colors: a deep rust or terracotta orange, a speckled beige (you can add black pepper or sand for texture), and a pure white. -
Roll out slabs:
Using your acrylic roller or pasta machine on a medium setting (approx. 3mm thick), roll out each color into smooth, even slabs. Ensure there are no air bubbles trapped in the clay.
Smooth Moves
To remove fingerprints before baking, lightly brush the clay surface with a tiny amount of baby oil or acetone on a cotton swab.
Step 2: Cutting the Shapes
-
Cut the top studs:
For the stud components, use your smallest circle cutter to punch out two white circles and one beige circle. These will connect directly to the earlobe. -
Create the connector pieces:
For the middle tier, punch out medium-sized circles. You need one in terracotta and one in beige. Notice in the design that the large terracotta earring has just two parts, while the tri-color one has three distinct sections. -
Form the large arches:
Use your arch cutters on the terracotta slab to create two large arch shapes. If you don’t have a cutter, print a paper template, lay it on the clay, and carefully trace around it with a needle tool. -
Form the medium arch:
Repeat the arch cutting process with the white clay, making one slightly smaller arch if you want variation, or keeping it uniform with the others. -
Add the inner bars:
This design features a floating bar inside the arch. Use a small rectangular cutter or freehand cut small strips of terracotta clay that fit neatly inside the negative space of the arches without touching the sides.
Step 3: Refining & Baking
-
Smooth the edges:
Before baking, gently run your finger dipped in a little cornstarch or water along the cut edges of all pieces to soften distinct ridges and remove any fingerprints. -
Pierce holes:
Use a needle tool to create holes for your jump rings. Crucially, verify the hole placement: top and bottom for the connector pieces, and just the top for the arches and floating bars. -
Bake the clay:
Arranging pieces on a ceramic tile or parchment-lined baking sheet. Follow the temperature instructions on your specific brand of clay, usually baking for 45-60 minutes to ensure durability. -
Cool and sand:
Allow the pieces to cool completely in the oven. Once hard, use fine-grit sandpaper under running water to perfect any rough edges or uneven surfaces.
Uneven Thickness?
If your hand-rolled slabs are uneven, place playing cards on either side of the clay as guide rails for your roller to ensure perfect uniform thickness.
Step 4: Assembly
-
Drill the floating bars:
For the inner rectangular bars, carefully drill a hole horizontally through the top thickness of the bar if you want it invisible, or simply use a jump ring through a front-to-back hole if simpler. -
Connect the floating element:
I usually tackle this tricky part first: Attach the inner terracotta bar to the main clay arch using a jump ring. The ring should loop through the top of the bar and the center of the arch curve. -
Link vertical tiers:
Using your flat-nose pliers, twist open jump rings sideways (never pull them apart). Connect the arches to the middle circle components, and then connect those to the top stud circles. -
Attach earring hardware:
Finally, glue flat pad posts to the back of the top geometric circles using strong jewelry glue or resin. Alternatively, attach fishhook wires using a small jump ring through the hole of the top piece.
Now you have a chic, lightweight set of earrings ready to wear or gift.
Letter and Initial Key Tags
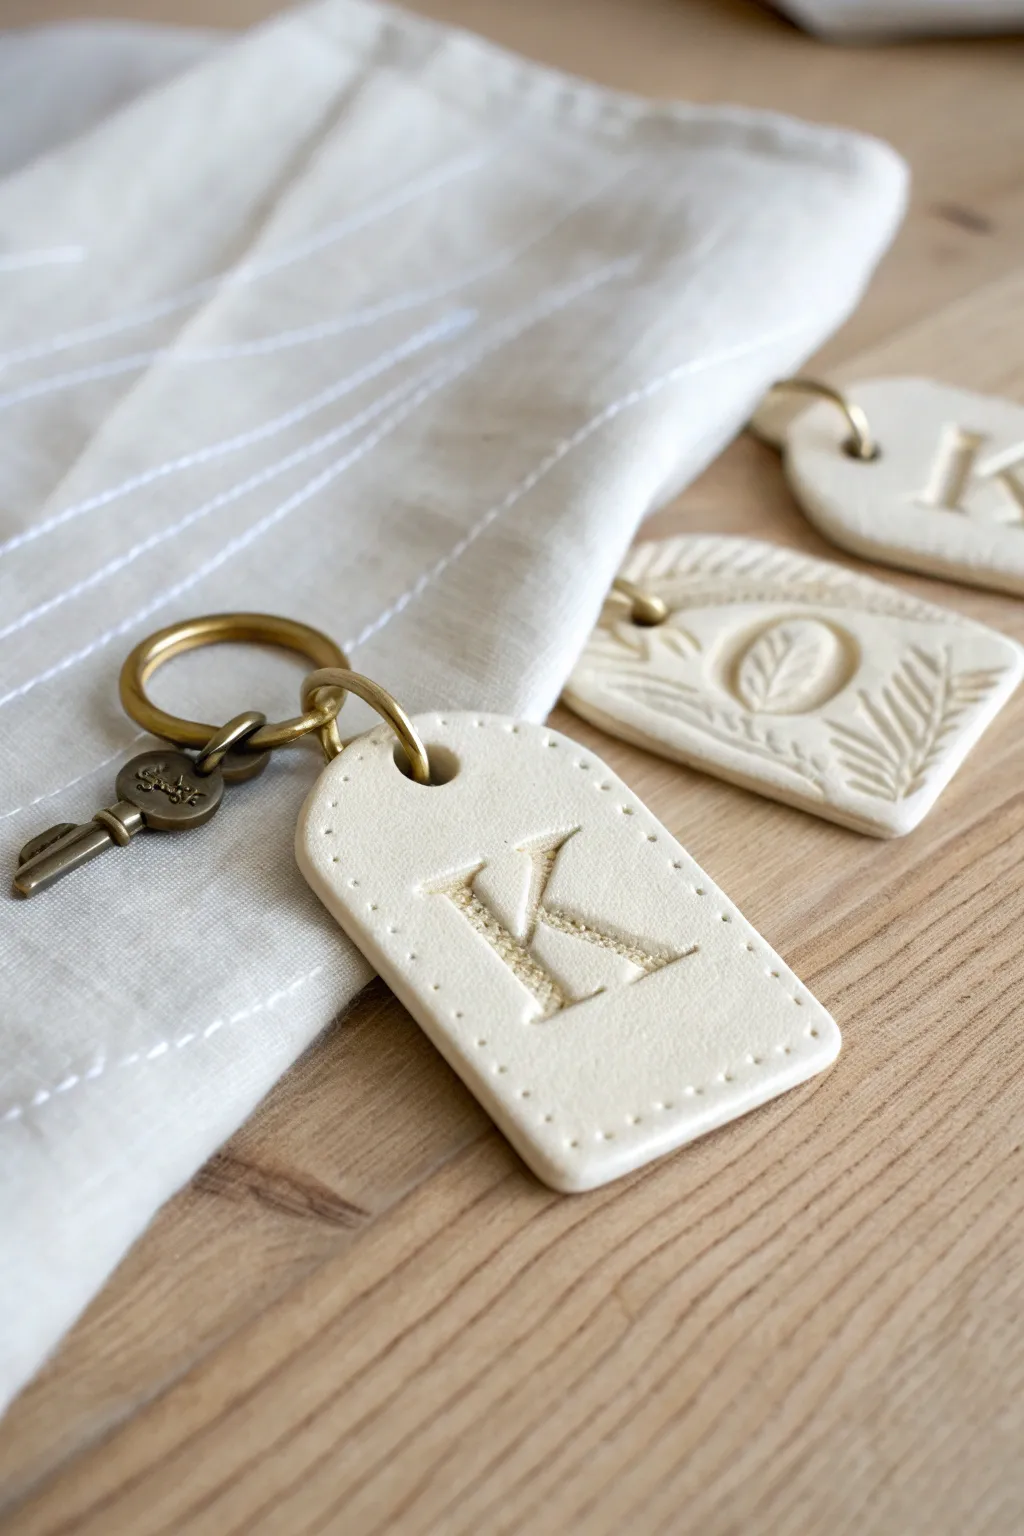
These sophisticated key tags turn simple air-dry or polymer clay into boutique-worthy accessories with a custom touch. Featuring a clean, stamped initial and faux-stitched detailing, they make perfect personalized gifts or stylish organizers for your own keyring.
Step-by-Step
Materials
- White polymer clay or air-dry clay (smooth textured)
- Rolling pin
- Parchment paper or clay mat
- Rectangular clay cutter (approx. 1.5″ x 2.5″) with rounded corners
- Letter stamp or 3D printed letter mold (serif font)
- Small needle tool or toothpick
- Straw or small circle punch (for the hardware hole)
- Fine-grit sandpaper (400-600 grit)
- Brass jump rings (10mm or larger)
- Brass key ring
- Flat-nose jewelry pliers
- Optional: Antique brass skeleton key charm
- Optional: Can of clear matte sealant
Step 1: Shaping the Tag
-
Condition the Clay:
Begin by warming a chunk of white clay in your hands. Knead it thoroughly until it is pliable and completely smooth, ensuring there are no air bubbles trapped inside. -
Roll It Out:
Place the clay onto parchment paper to prevent sticking. Use your rolling pin to flatten the clay into an even slab, aiming for a consistent thickness of about 1/4 inch (6mm) to ensure durability. -
Smooth the Surface:
Before cutting, gently run your finger over the surface to smooth out any minor rolling lines or fingerprints. A pristine surface now means less sanding later. -
Cut the Shape:
Simply press your rectangular cutter firmly into the clay slab. If you don’t have a rounded-corner cutter, you can cut a rectangle with a blade and gently smooth the sharp corners with your finger. -
Punch the Hole:
Using a straw or a small circular cutter, punch a hole centered near the top edge of the tag. Leave enough margin above the hole so the clay doesn’t crack under tension later.
Step 2: Adding Details
-
Stamp the Initial:
Position your letter stamp directly in the center of the tag below the hole. Press down firmly and evenly, then lift straight up to leave a deep, crisp impression of the letter. -
Create the Faux Stitching:
Take your needle tool or a dull toothpick. Carefully poke a series of small, evenly spaced holes around the entire perimeter of the tag, about 1/8 inch from the edge, mimicking the look of leather stitching. -
Check Edges:
I like to gently tap the sides of the tag with my finger one last time to soften any sharp ridges created by the cutter. -
Bake or Dry:
If using polymer clay, bake according to the package instructions (usually at a low temperature around 275°F for 15-30 minutes). If using air-dry clay, allow it to dry fully for 24-48 hours, flipping occasionally.
Clean Impressions
Dust your letter stamp lightly with cornstarch or baby powder before pressing it into the clay. This acts as a release agent and prevents the clay from sticking inside the crevices of the letter.
Step 3: Finishing Touches
-
Sand for Smoothness:
Once fully cured and cooled, dip fine-grit sandpaper in a little water and gently sand the edges and flat surfaces to remove any lint or rough spots. -
Seal (Optional):
For extra longevity, especially with air-dry clay, apply a light coat of matte sealant spray. Let it dry completely before handling. -
Prepare Jump Ring:
Locate the split in your brass jump ring. Using two pairs of pliers (or pliers and your fingers), twist the ring open sideways—never pull it apart outwards, as this weakens the metal. -
Attach the Charm:
Slide the optional skeleton key charm onto the open jump ring first, then thread the jump ring through the hole in your clay tag. -
Secure the Key Ring:
Before closing the jump ring, loop the large brass key ring onto it as well. Now, use your pliers to twist the jump ring back into a closed circle, ensuring the ends meet perfectly flush.
Add Subtle Color
Before sealing, lightly brush diluted brown or gold acrylic paint into the stamped letter and stitching holes, then wipe the surface clean. This highlights the textures beautifully.
Step 4: Alternative Texture (Bonus)
-
Carved Patterns:
If you want to create the leaf design seen in the background, skip the letter stamp. Instead, use a carving tool to gently etch leaf veins or geometric lines into the clay surface before curing.
Enjoy the satisfying weight and minimalist beauty of your new custom keychain every time you head out the door


What Really Happens Inside the Kiln
Learn how time and temperature work together inside the kiln to transform clay into durable ceramic.
Mini Wall Tiles With Hangers
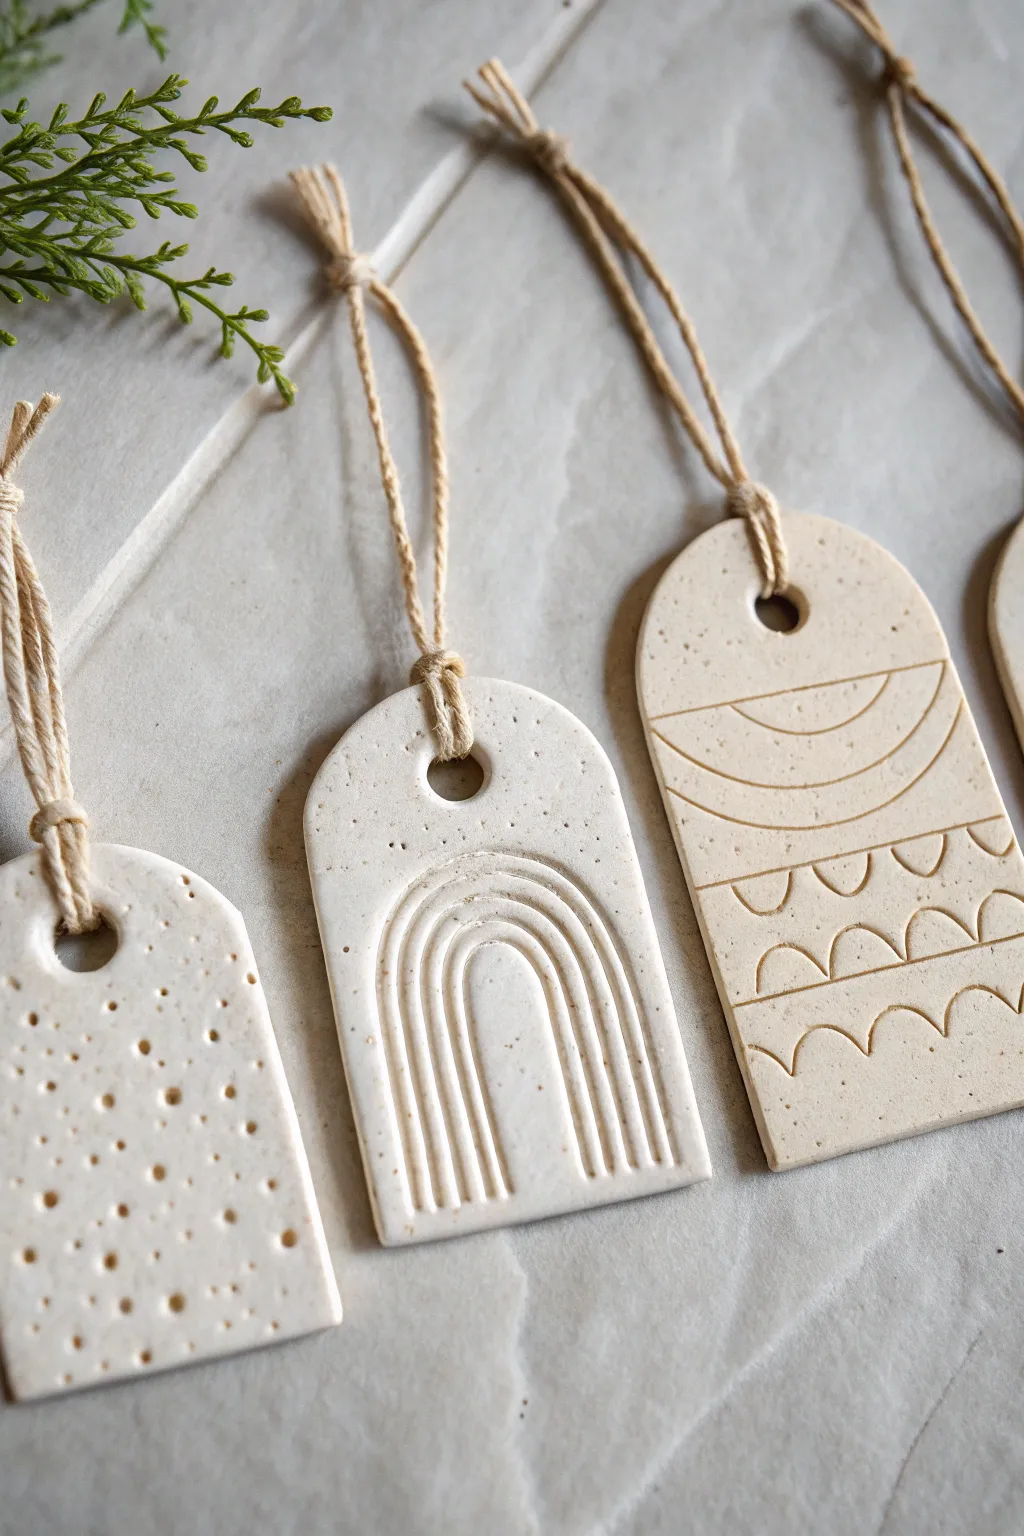
These charming, miniature arch tiles bring a touch of earthy, bohemian elegance to any space, featuring subtle speckles and impressed geometric patterns. Perfect as gift toppers, mini wall art, or unique ornaments, they maintain a raw, matte finish that highlights the beauty of natural stone textures.
Step-by-Step Tutorial
Materials
- Polymer clay (colors: granite, beige, or white with added faux speckles)
- Acrylic rolling pin
- Arch-shaped clay cutter (approx. 2-3 inches tall)
- Small circle cutter or straw (for the hanging hole)
- Detailed texture tools (needle tool, small ball stylus, or dedicated clay stamps)
- Modeling tool or dull knife
- Parchment paper or ceramic tile (for baking)
- Jute twine or hemp cord
- Fine-grit sandpaper (optional)
- Oven
Step 1: Preparation & Shapes
-
Condition the Clay:
Begin by warming the clay in your hands to condition it. If you are using plain white or beige clay, distinctively, you can mix in a very small amount of black pepper or craft sand to create that organic speckled ceramic look shown in the photo. -
Roll out a Slab:
Place your clay on a flat working surface or parchment paper. Use your acrylic roller to roll it out to an even thickness, aiming for about 1/4 inch (6mm) so the tiles feel substantial like stone. -
Cut the Arches:
Press your arch-shaped cutter firmly into the slab. Wiggle it slightly to ensure a clean cut, then lift. Repeat this to create as many blank tiles as you need. -
Smooth the Edges:
Gently run your finger along the cut edges of the clay to smooth down any sharp ridges or loose bits left by the cutter. A little water on your finger can help if the clay is stubborn. -
Create the Hole:
Use a small circle cutter or a sturdy straw to punch a hole near the top center of the arch. Make sure the hole is large enough to accommodate your jute twine later.
Fixing Cracks
If you notice tiny surface cracks after baking, mix a small amount of liquid clay with your original clay color. Smoosh it into the crack, rebake briefly, and sand smooth.
Step 2: Texturing & Design
-
Design 1: The Dotted Texture:
For the first textural style, take a small ball stylus or a dull modeling tool. Randomly press creating shallow indents all over the surface. Vary the pressure slightly for a more organic feel. -
Design 2: The Rainbow Arch:
For the rainbow motif, use a needle tool or a U-shaped carving tool. Start by drawing a small inner U-shape in the lower half of the tile. Carefully carve parallel lines radiating outward, creating concentric arches. -
Refine the Rainbow:
The carved lines might have raised ridges; gently pat them down with a fingertip to soften the look without erasing the groove. -
Design 3: Scallops and Lines:
Use a straight edge or knife to gently impress horizontal lines across the tile, dividing it into sections. Do not cut all the way through. -
Add Pattern Details:
Within the sections you just created, use a small U-shaped cutter or draw freehand semicircles to create a scallop pattern. Add concentric curved lines in the top section to mimic a sunrise. -
Final Inspection:
Check all your textural work. If any debris or ‘crumbs’ of clay are stuck in the grooves, gently brush them away with a soft paintbrush.
Add a Wash
To make the textures pop, brush diluted brown acrylic paint over the baked clay and quickly wipe the surface with a damp cloth, leaving paint only in the grooves.
Step 3: Baking & Assembly
-
Bake the Tiles:
Transfer your parchment paper with the clay pieces onto a baking sheet. Bake according to your specific clay brand’s instructions (usually around 275°F or 130°C for 15-30 minutes). -
Cool Down:
Allow the pieces to cool completely in the oven with the door slightly ajar to prevent cracking from sudden temperature changes. -
Sand for Perfection:
Once cool, inspect the edges. If there are any sharp spots or fingerprints, lightly buff them away with fine-grit sandpaper under running water. -
Prepare the Twine:
Cut a length of jute twine, roughly 6-8 inches long. Fold it in half to create a loop. -
Attach the Hanger:
Push the folded end of the loop through the hole in the clay tile from front to back. Pull the loose ends through the loop and tighten to create a lark’s head knot. -
Tie it Off:
Knot the two loose ends of the twine together at the top to close the loop, completing your hanger.
Hang your new mini tiles on a branch arrangement or use them to make your next gift extra special.
Pressed Wildflower Medallions
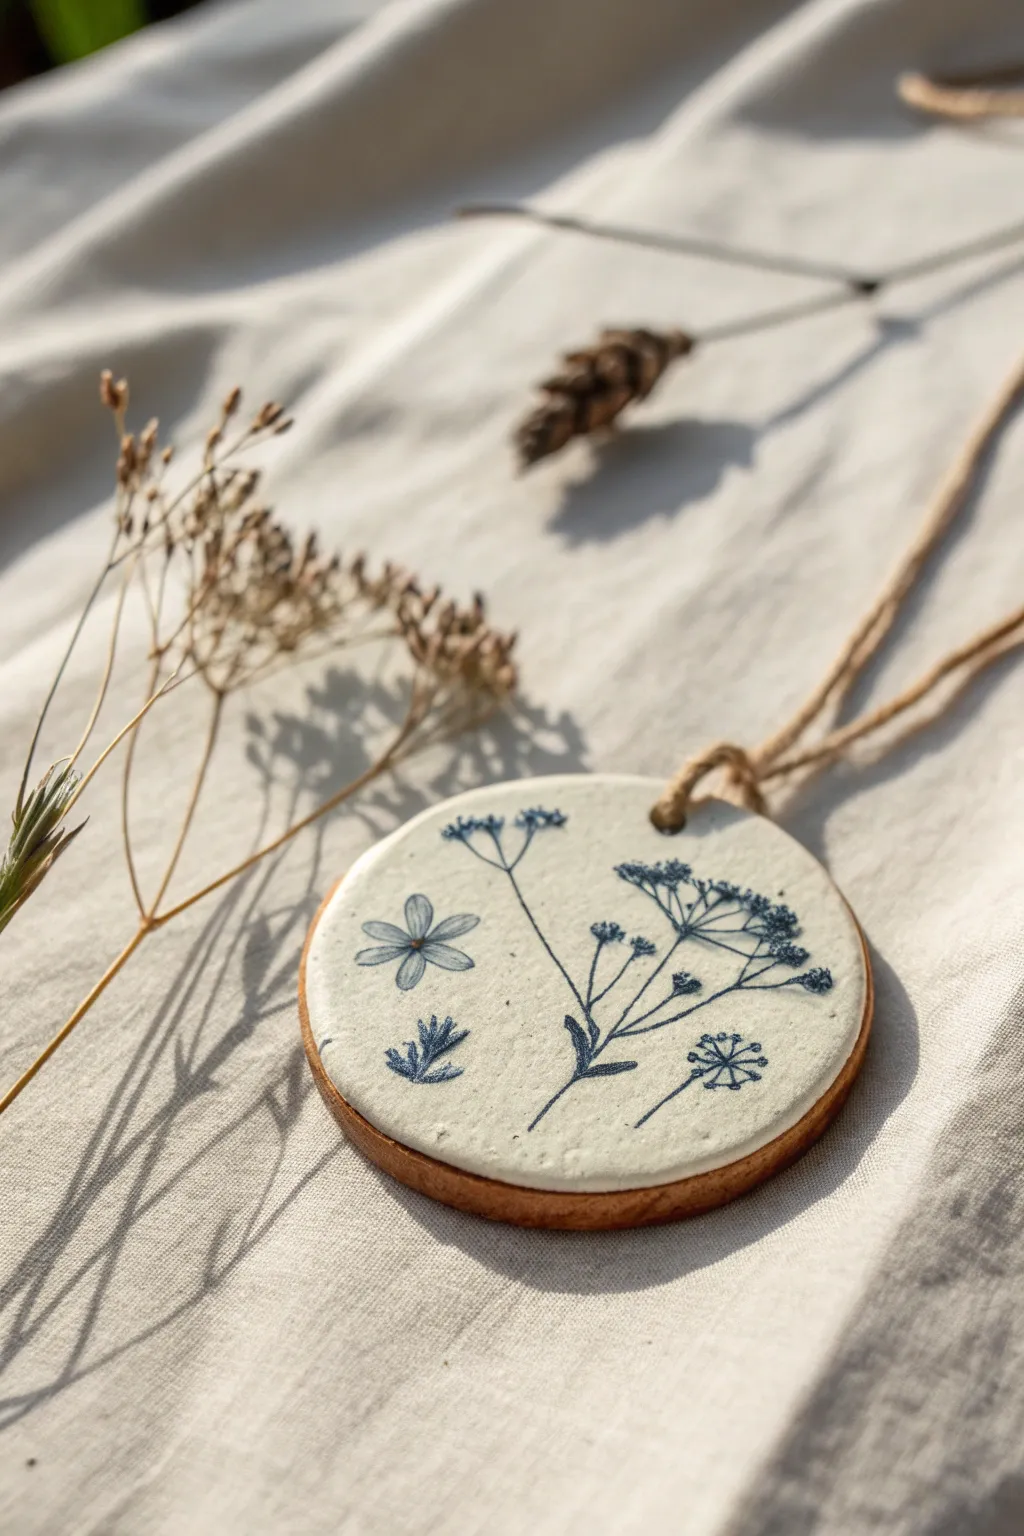
Capture the delicate beauty of nature with this rustic yet elegant clay project. These ceramic-style medallions feature intricate wildflower imprints and a subtle blue-inked finish, hanging from natural twine for a timeless aesthetic.
Step-by-Step
Materials
- White or cream-colored air-dry clay (or polymer clay if preferred)
- Rolling pin
- Circle cookie cutter (approx. 3-4 inches diameter)
- Fresh wildflowers or delicate herbs (dill, cilantro, small ferns)
- Parchment paper or a non-stick work mat
- Blue fine-tip permanent pen, archival ink pen, or very fine detail paintbrush with blue acrylic paint
- Water and a small bowl
- Straw or skewer (for creating the hole)
- Fine grit sandpaper (optional)
- Natural jute twine
- Brown watercolor paint or diluted tea (for distressing the edges)
- Soft cloth or paper towel
Step 1: Shaping the Base
-
Prepare your workspace:
Lay down parchment paper or a non-stick mat on a flat surface to prevent the clay from sticking during rolling. -
Condition the clay:
Take a handful of air-dry clay and knead it in your hands until it becomes warm, soft, and pliable. This removes air bubbles and prevents cracks. -
Roll the slab:
Using your rolling pin, roll the clay out to an even thickness of about 1/4 inch. I like to rotate the clay periodically to ensure it doesn’t stick. -
Cut the medallion:
Press the circle cookie cutter firmly into the clay to create a clean, round shape. Remove the excess clay from around the edges before lifting the cutter. -
Smooth the edges:
Dip your finger in a little water and gently run it along the cut edge of the circle to smooth out any roughness or burrs left by the cutter. -
Create the hanging hole:
Use a straw (for a larger hole) or a skewer to punch a hole near the top edge of the circle. Make sure it’s not too close to the edge to prevent tearing later.
Step 2: Imprinting Nature
-
Arrange the botanicals:
Select your fresh wildflower sprigs. Lay them gently on top of the cut clay circle in a pleasing arrangement, leaving some negative space. -
Press designs:
Gently roll over the plants with your rolling pin just once, using light but firm pressure to embed them into the clay surface without distorting the circle shape. -
Reveal the texture:
carefully peel the plant material away using tweezers or your fingernails. You should be left with a crisp, indented impression of the stems and flowers. -
Allow to dry:
Set the medallion aside on a flat drying rack or sheet of parchment. Let it dry completely according to the package instructions (usually 24-48 hours for air-dry clay).
Use Fresh, Not Dried
For the crispest impressions, use fresh plant stems instead of dried ones. Dried plants tend to crumble into the clay and are difficult to remove cleanly.
Step 3: Decoration and Finishing
-
Refine the surface:
Once fully dry, lightly sand any rough spots on the edges with fine-grit sandpaper if needed. Wipe away dust with a dry cloth. -
Inking the design:
This is the crucial step for the look in the photo. Using a blue fine-tip archival pen or a very fine brush with blue paint, carefully trace the indented lines left by the plants. -
Add details:
Don’t worry about perfect tracing; slightly sketchy lines add to the botanical illustration feel. You can add extra cross-hatching to the leaves for shading. -
Distress the edges:
Dip a soft cloth or sponge into diluted brown watercolor or strong tea. Gently dab it along the outer rim of the medallion to give it that toasted, vintage cookie appearance. -
Blend the pigment:
Immediately wipe off any excess brown pigment that strays too far onto the face of the medallion so the center remains bright and clean. -
Seal (Optional):
If you want extra durability, apply a matte spray varnish over the piece. This protects the ink and clay from humidity. -
Attach the twine:
Cut a length of natural jute twine. Fold it in half, push the loop through the hole, and thread the loose ends through the loop to create a lark’s head knot.
Scented Decor
Add renewed life to your medallion by dropping essential oils onto the unsealed back of the clay. The porous material acts as a natural diffuser.
Hang your finished botanical art piece in a sunlit window or on a cabinet knob to enjoy a touch of nature indoors

TRACK YOUR CERAMIC JOURNEY
Capture glaze tests, firing details, and creative progress—all in one simple printable. Make your projects easier to repeat and improve.
Incised Line Art Plaques
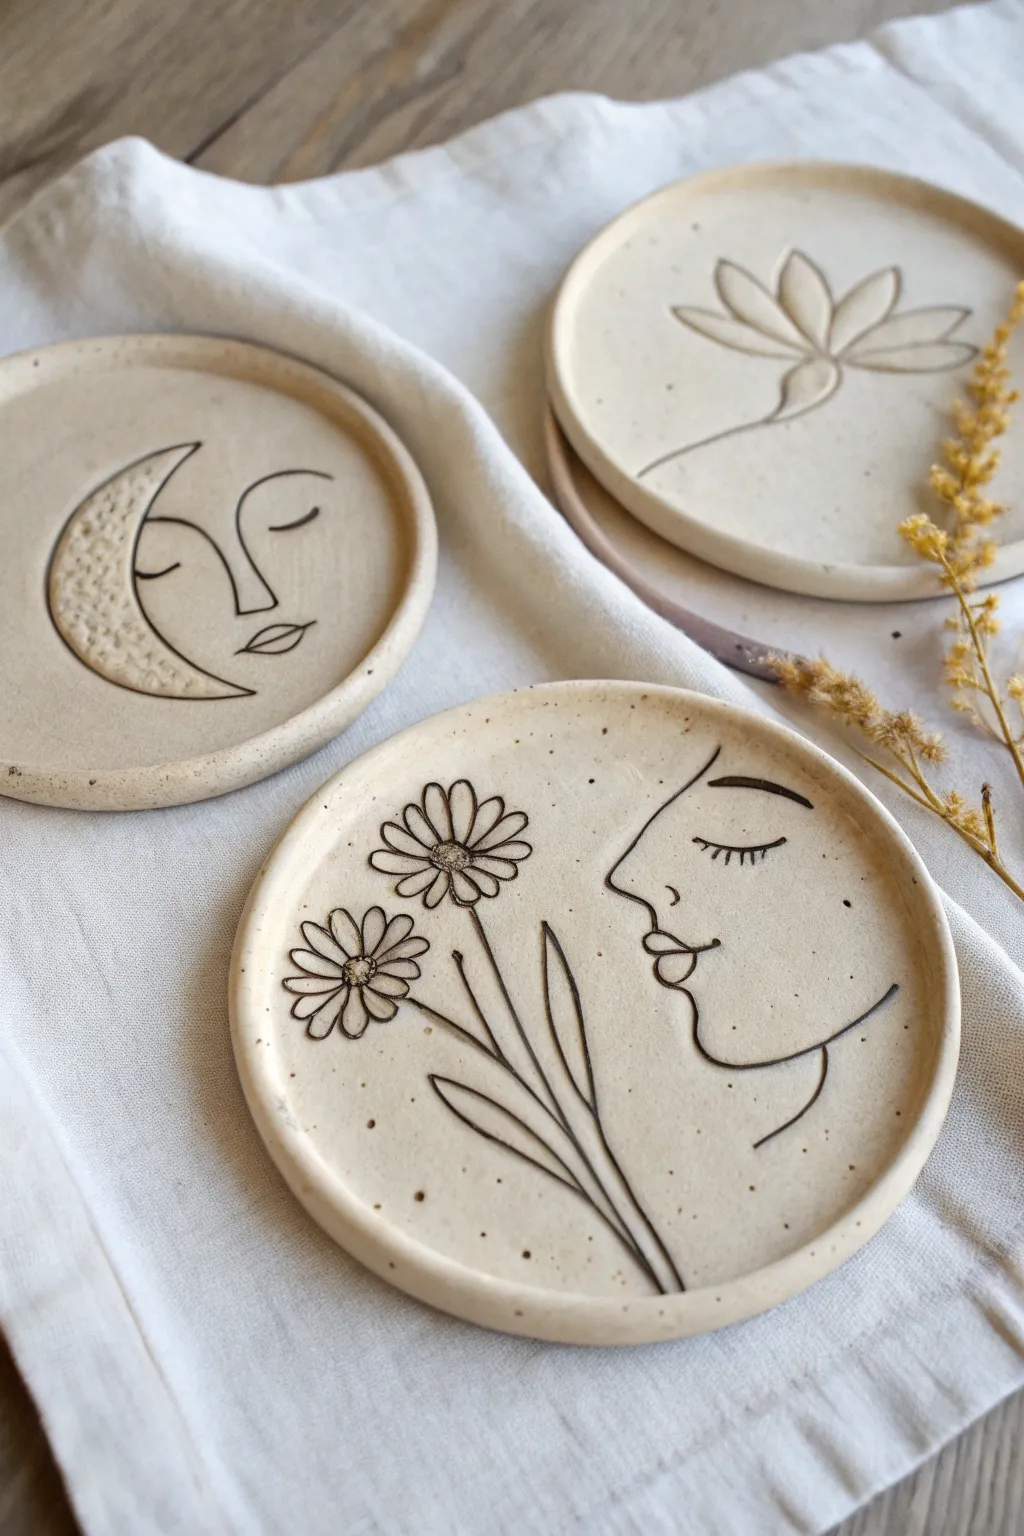
These elegant coasters combine the earthy texture of speckled clay with the delicate sophistication of etched line art. The simple, flowing designs are carved directly into the surface, creating a beautiful contrast that feels both modern and timeless.
Step-by-Step Guide
Materials
- Speckled stoneware clay (white or light beige)
- Circular clay cutter (approx. 4-5 inches)
- Rolling pin
- Guide strips or slab roller (1/4 inch thickness)
- Needle tool or sgraffito tool
- Small loop tool (optional)
- Underglaze (black or dark brown)
- Small paintbrush
- Sponge
- Clear matte glaze (optional)
- Canvas board or ware board
Step 1: Preparing the Canvas
-
Wedge the clay:
Begin by thoroughly wedging your speckled stoneware clay to remove any air bubbles and ensure an even consistency. -
Roll out the slab:
Place your clay on a canvas board between two guide strips. Roll the clay out into a smooth slab about 1/4 inch thick, ensuring the surface is perfectly flat. -
Smooth the surface:
Before cutting, take a slightly damp rib tool or a smooth sponge and gently compress the clay surface. -
Cut the circles:
Using your circular cutter, press firmly into the slab to cut out your coaster shapes. Gently release them from the surrounding clay. -
Refine the edges:
Run a damp finger or soft sponge around the rim of each circle to smooth down any sharp edges left by the cutter. -
Initial drying phase:
Let the discs sit on a ware board until they reach a ‘leather-hard’ state. This is crucial; if the clay is too sticky, your lines won’t be crisp.
Clean Lines Hack
If your lines look messy or have burrs, don’t pick at them while wet! Wait until the clay is bone dry, then lightly sand the surface. The crumbs will fall right off.
Step 2: Artistic Carving
-
Sketch the design:
Using a needle tool with very light pressure, barely scratch your intended design onto the surface. You can freehand faces, flowers, or celestial bodies like the moon shown in the image. -
Carve the main lines:
Once satisfied with the placement, use a needle tool or specialized carving tool to incise the lines deeper. I prefer pressing firmly enough to create a distinct groove but not so deep that it weakens the slab. -
Add texture details:
For areas like the crescent moon, use a small tool to stipple the surface, creating a cratered texture that contrasts with the smooth face. -
Clean up burrs:
Carving often creates little crumbs or ‘burrs’ of clay. Wait until the clay is a bit drier, then gently brush them away with a soft, dry brush.
Gold Luster Accent
After the final glaze firing, paint real gold luster into just the flower petals or the moon crater details and re-fire at a low temperature for a touch of luxury.
Step 3: Inlaying & Finishing
-
Apply underglaze:
Paint black or dark brown underglaze liberally over the carved lines. Don’t worry about staying inside the lines; you want the liquid to fill the grooves completely. -
Wipe back:
Once the underglaze is touch-dry, take a slightly damp sponge and wipe across the surface. This removes the excess surface color while leaving the pigment trapped inside your carved lines. -
Slow drying:
Place a light sheet of plastic over the coasters to let them dry slowly. This prevents warping, which is common with flat slab pieces. -
Bisque fire:
Fire the bone-dry pieces in a kiln to bisque temperature (usually Cone 04). -
Glazing (Optional):
For a functional coaster, apply a clear matte glaze to seal the clay and protect the design from condensation. -
Final firing:
Fire the pieces a final time according to your clay and glaze specifications (typically Cone 5 or 6 for stoneware).
Enjoy using your new handcrafted coasters or bunch them together for a thoughtful, personalized gift set
Color-Block Slab Bookmarks
Elevate your reading experience with these sleek, minimalist bookmarks featuring a trendy color-block design in earthy tones. The matte finish and soft tassels give them a modern, high-end feel that makes for a perfect handmade gift.
Step-by-Step Tutorial
Materials
- Polymer clay (terracotta, white, sage green, beige)
- Acrylic rolling pin or clay machine
- Tissue blade or sharp craft knife
- Ruler
- Small circular clay cutter or straw (for the hole)
- Parchment paper or ceramic tile
- Fine-grit sandpaper (400-600 grit)
- Cotton twine or embroidery floss
- Oven (for curing)
Step 1: Preparing the Clay Slab
-
Conditioning:
Start by thoroughly conditioning your polymer clay colors individually until they are soft and pliable. This prevents cracking later. -
Rolling out base colors:
Roll out your chosen colors into sheets of equal thickness—about 2-3mm is ideal for bookmarks so they are sturdy but thin enough for a book. -
Creating the joins:
Using your tissue blade, cut straight edges on two different colored sheets of clay that you want to join together. -
Merging the seam:
Place the two cut edges flush against each other on your work surface. Gently push them together so there is no gap. -
Smoothing the connection:
Place a piece of parchment paper over the seam and gently rub over it with your finger or a roller to bond the clay without distorting the straight line too much. -
Cutting the shape:
Measure a rectangle approximately 1.5 inches wide by 6 inches long. Use a ruler to ensure your cuts are perfectly straight across the joined colors. -
Refining the edges:
Lift the rectangle carefully. If the edges are sharp or dragged, gently tap them with your finger to smooth them down.
Straight Seams Tip
To get perfectly flush joins, overlap your two clay colors slightly and slice through both layers simultaneously. Remove excess for a perfect fit.
Step 2: Finishing and Baking
-
Adding the hole:
Use a small circular cutter or a plastic straw to punch a hole centered at the top of the bookmark, about half an inch from the edge. -
Surface texture:
Check for fingerprints. A little trick I use is to lightly wipe the raw clay with a bit of cornstarch or baby oil before baking to get it perfectly smooth. -
Baking:
Place your bookmarks on a parchment-lined baking sheet or ceramic tile. Bake according to your clay manufacturer’s specific instructions (usually 275°F for 15-30 minutes). -
Cooling:
Allow the clay to cool completely in the oven or on a flat surface. Do not flex them while they are still warm. -
Sanding:
Once cool, dip your sandpaper in water and wet-sand the edges and corners to remove any burrs or sharp spots. -
Buffing:
Rub the surface briskly with a piece of denim or a soft cloth to give it a velvety matte finish.
Uneven Baking?
If your bookmarks warp in the oven, place a heavy ceramic tile on top of them immediately after removing them from the heat while they cool.
Step 3: Making the Tassel
-
Wrapping the twine:
Wrap your cotton twine around four fingers about 15-20 times to create a bundle. -
Tying the top:
Thread a separate piece of twine through the top loop of the bundle and double knot it tightly. -
Creating the neck:
Take another piece of twine and wrap it horizontally around the bundle, about half an inch down from the top loop, to create the tassel ‘head’. -
Cutting the ends:
Cut the bottom loops of the bundle and trim them evenly so the tassel looks neat. -
Attaching:
Loop the top string of the tassel through the hole in your bookmark and secure it with a simple lark’s head knot.
Now you have a set of stylish, durable accessories ready to mark your place in your next favorite read
Terrazzo-Style Flat Tags
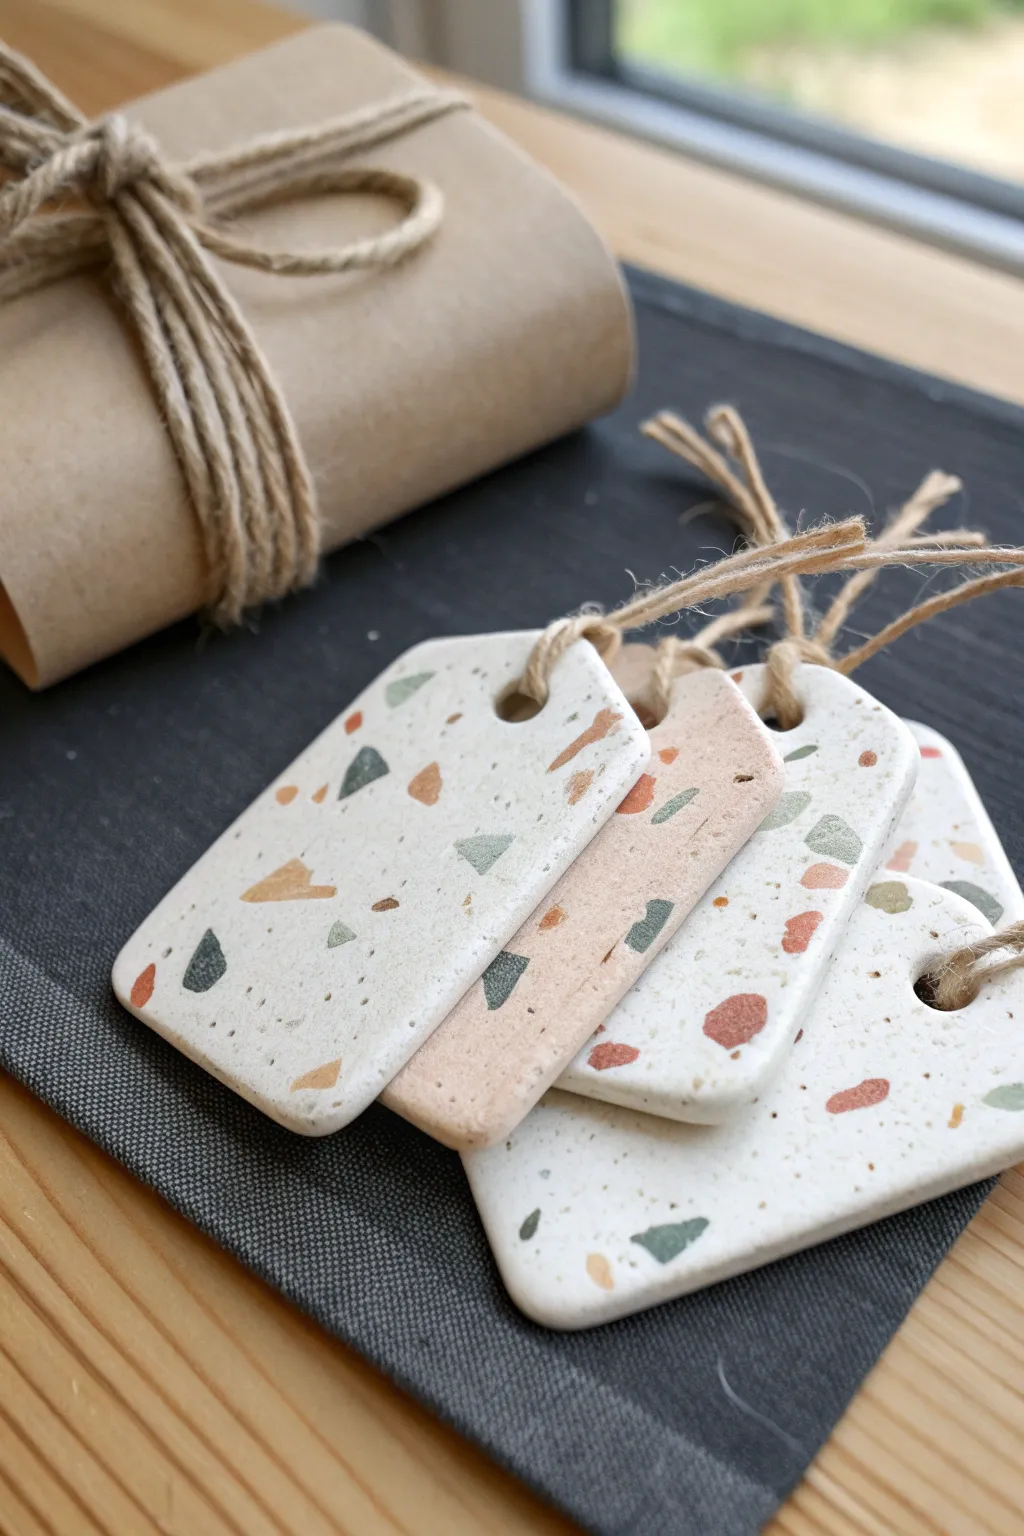
Elevate your gift wrapping with these charming faux-terrazzo clay tags, featuring organic speckles of earthy greens and terracottas against a smooth matte base. This project mimics the high-end look of stone using simple clay techniques, perfect for thoughtful presenters.
Step-by-Step
Materials
- Polymer clay (White or light beige for base)
- Polymer clay (Terracotta, moss green, grey, and ochre for chips)
- Acrylic rolling pin or pasta machine
- Rectangle clay cutter (with rounded corners) or craft knife
- Small circle cutter or straw (for the hole)
- Parchment paper or ceramic tile
- Craft blade or flexible tissue blade
- Cardstock (optional template)
- Jute twine
Step 1: Preparing the ‘Chips’
-
Roll thin sheets:
Begin by conditioning your colored clays (terracotta, moss green, grey, ochre). Roll each color out individually until they are extremely thin, almost paper-like. -
Bake the sheets:
Place these thin colored sheets on a baking tray lined with parchment paper. Bake them for about 10-15 minutes at the temperature recommended on your clay package. They should be hard but not burnt. -
Cool down:
Remove the sheets from the oven and let them cool completely. They need to be brittle for the next step. -
Create the terrazzo chips:
Once cool, use your fingers or a craft blade to chop up the baked sheets into tiny, jagged irregular confetti pieces. Aim for a variety of sizes, from dust-like specks to small chunks.
Smearing Colors?
If your colored chips are smearing into the white base while rolling, your chips weren’t baked enough initially or the base clay is too soft. Chill the slab briefly before rolling.
Step 2: Creating the Slab
-
Condition base clay:
Take your white or light beige clay and knead it until soft and pliable. This will form the main body of your tags. -
Initial rolling:
Roll the base clay out to a medium thickness (about 4-5mm). It doesn’t need to be perfect yet. -
Distribute the chips:
Generously sprinkle your chopped colored chips over the surface of the raw base clay. Don’t be shy; cover a good portion of the white space for a dense terrazzo look. -
Embed the chips:
Gently gently go over the surface with your acrylic roller once to press the chips into the clay, rather than stretching them out immediately. -
Roll to finish thickness:
Continue rolling the slab until it reaches your desired tag thickness (approx 3mm). Roll in different directions to ensure the chips spread organically without distorting too much. -
Smooth the surface:
If the surface looks uneven, lay a piece of parchment paper over the clay and burnish it with the roller or a smooth stone to ensure the chips are flush with the base.
Pro Tip: Depth effect
Mix some ‘chips’ into the white clay block *before* rolling it out, then add more on top. Then when you sand later, you’ll reveal hidden layers of color for a 3D stone effect.
Step 3: Cutting and Finishing
-
Cut the shapes:
Use your rectangle cutter to punch out the tag shapes. If you don’t have a cutter, place a cardstock template on the clay and trace around it with a sharp craft knife. -
Pierce the hole:
Use a small circular cutter, a straw, or a toothpick to create a hole at the top center of each tag for the twine. -
Soften edges:
Gently run your finger around the cut edges of the raw clay to smooth out any sharpness or burrs left by the cutter. -
Final bake:
Place your finished raw tags on the baking sheet. Bake according to the manufacturer’s instructions (usually 275°F/130°C for 15-30 minutes depending on brand). -
Cool and sand:
Let the tags cool completely. For a truly professional finish, lightly sand the surface under running water with fine-grit sandpaper (400 to 1000 grit) to reveal the sharp edges of the colored chips. -
Buff (optional):
Rub the dry tags with a piece of denim or a soft cloth to give them a slight matte sheen. -
Add twine:
Cut a length of jute twine, thread it through the hole, and tie a simple loop knot to finish your rustic tag.
Tie these onto your packages for a handmade touch that feels modern and timeless
Ocean-Inspired Relief Shapes
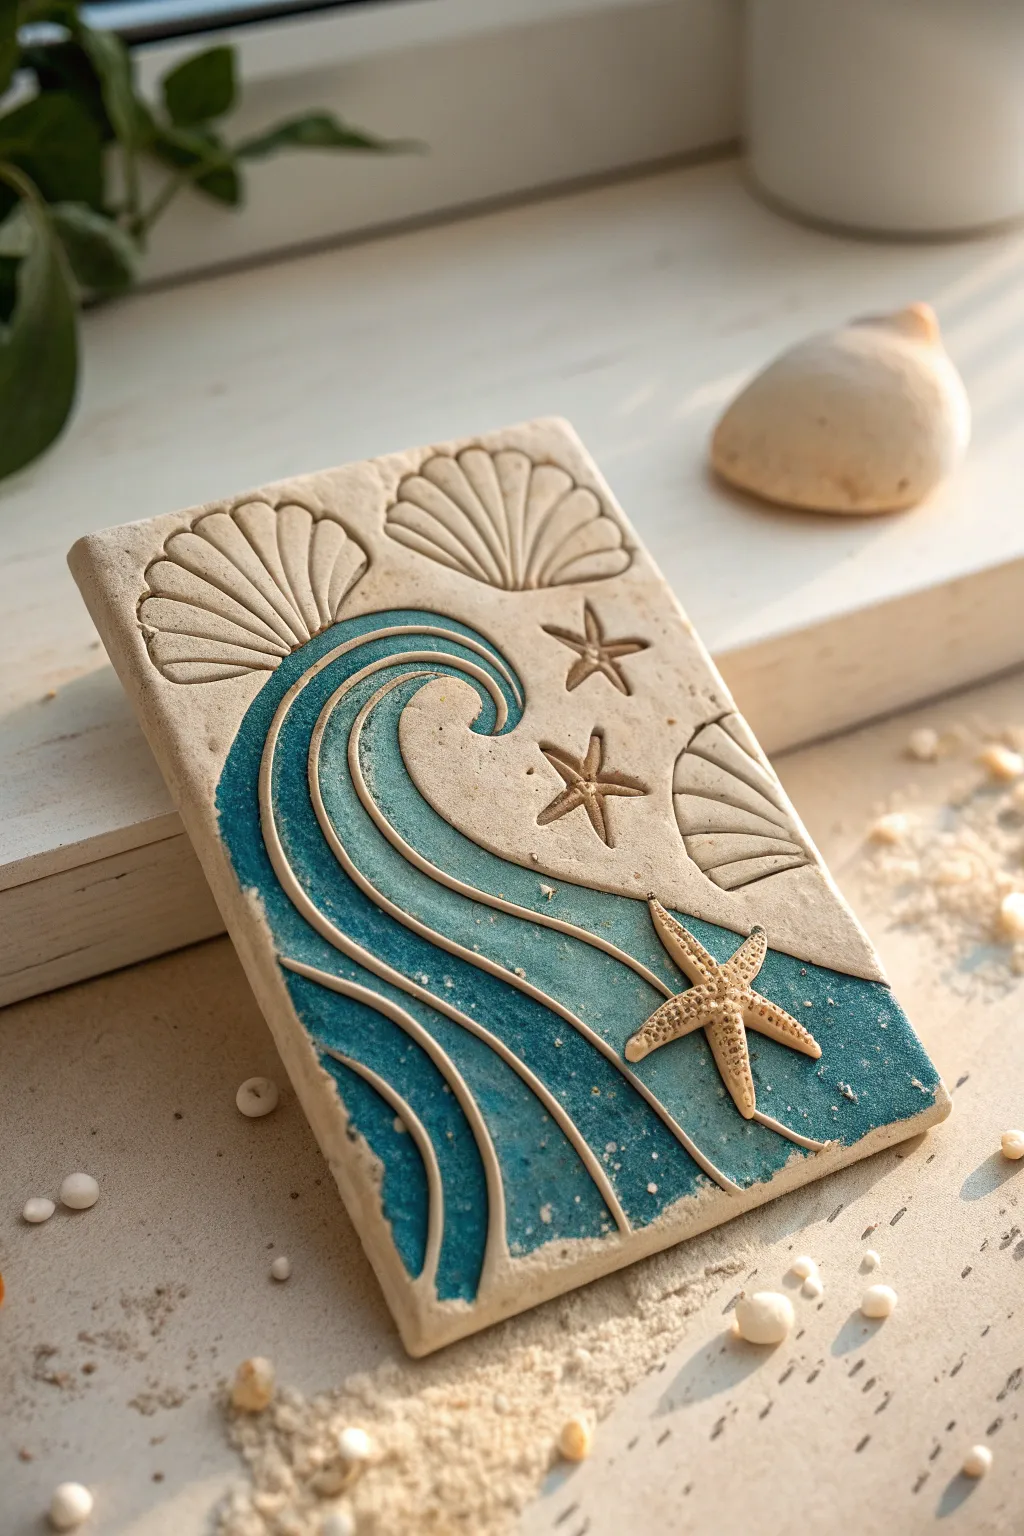
Capture the rhythm of the ocean with this charming relief tile that combines organic carving with deep teal glazing. This project explores the fun of subtractive sculpting and adding relief elements, resulting in a stunning piece of shelf decor or a functional coaster.
Step-by-Step Guide
Materials
- White or light beige air-dry clay (or polymer clay)
- Rolling pin
- Square clay cutter or craft knife
- Carving tools (loop tool, needle tool)
- Small scallop shell texture mold (or real shell)
- Starfish silicone mold
- Acrylic paints (Teal, Deep Blue, White, Sand/Beige)
- Small paintbrush
- Gloss varnish or clear sealant
- Water and sponge for smoothing
Step 1: Preparing the Base
-
Roll out the slab:
Begin by conditioning your clay and rolling it out into an even slab, approximately 1/4 to 1/2 inch thick. Try to keep the thickness consistent so it dries flat. -
Cut the shape:
Using a rectangular cutter or a ruler and craft knife, cut a clean rectangle from the slab. Smooth the cut edges with a damp finger or sponge to remove any sharp burrs.
Clean Lines Pro Tip
To keep the raised ridges perfectly free of blue paint, apply a liquid masking fluid to the ridges before you start painting and peel it off when dry.
Step 2: Designing the Wave
-
Sketch the wave lines:
Lightly trace the outline of a large, curling wave using a needle tool. Start from the bottom left corner and curve upwards toward the top center. -
Carve the relief channels:
Uses a small loop tool or a U-shaped carving tool to gouge out the spaces between your wave lines. You want to create deep grooves that separate the ‘water’ sections, leaving raised ridges that act as the foam lines of the wave. -
Create background texture:
In the carved-out ‘water’ sections, gently press a coarse sponge or crumpled foil to give the clay a slightly pitted texture. This contrasts beautifully with the smooth, raised ridges. -
Refine the ridges:
Go back over your raised wave lines with a damp finger or rubber shaper tool to ensure they are smooth and rounded.
Step 3: Adding Details
-
Stamp the shells:
Using a scallop shell stamp or a clean real shell, firmly press impressions into the top corners and along the right edge of the tile. Angle them differently for a natural look. -
Impress the starfish:
Use a small starfish stamp or tool to press two indented starfish shapes into the smooth upper right area of the clay. -
Create the 3D starfish:
Press a small amount of fresh clay into a starfish mold. Carefully remove it and score the back. Score the spot on the wave where you want to place it, add a dab of water or liquid clay, and press the 3D starfish firmly onto the tile. -
Final drying:
Set the tile aside on a flat board to dry completely. For air-dry clay, I typically wait 24-48 hours, flipping it occasionally to prevent warping.
Level Up: Texture
Mix actual fine sand into your beige acrylic paint before applying it to the upper section for an authentic gritty beach texture.
Step 4: Painting & Finishing
-
Base coat the water:
Once dry, paint the carved-out ‘water’ sections with a rich teal acrylic paint. Don’t worry if it’s a bit messy near the edges; we can clean it up. -
Add depth:
While the teal is wet, dab a darker blue into the deepest recesses of the carving to create shadows. -
Highlighting boundaries:
Carefully paint the raised ridges and the rest of the tile with a sandy beige or off-white color. Use a steady hand to keep the border between the blue water and the beige ridges crisp. -
Enhancing the texture:
Use a dry-brushing technique with white paint over the 3D starfish and the shell impressions to make the details pop. -
Speckling effect:
Dip an old toothbrush into diluted white paint and flick it gently over the blue water sections to mimic sea spray and foam. -
Seal the piece:
Protect your work with a coat of matte varnish for a natural stone look, or use a gloss varnish just on the blue water sections to make them look wet.
Now you have a serene piece of coastal art ready to display on your shelf or desk
Mushroom and Frog Flat Pins
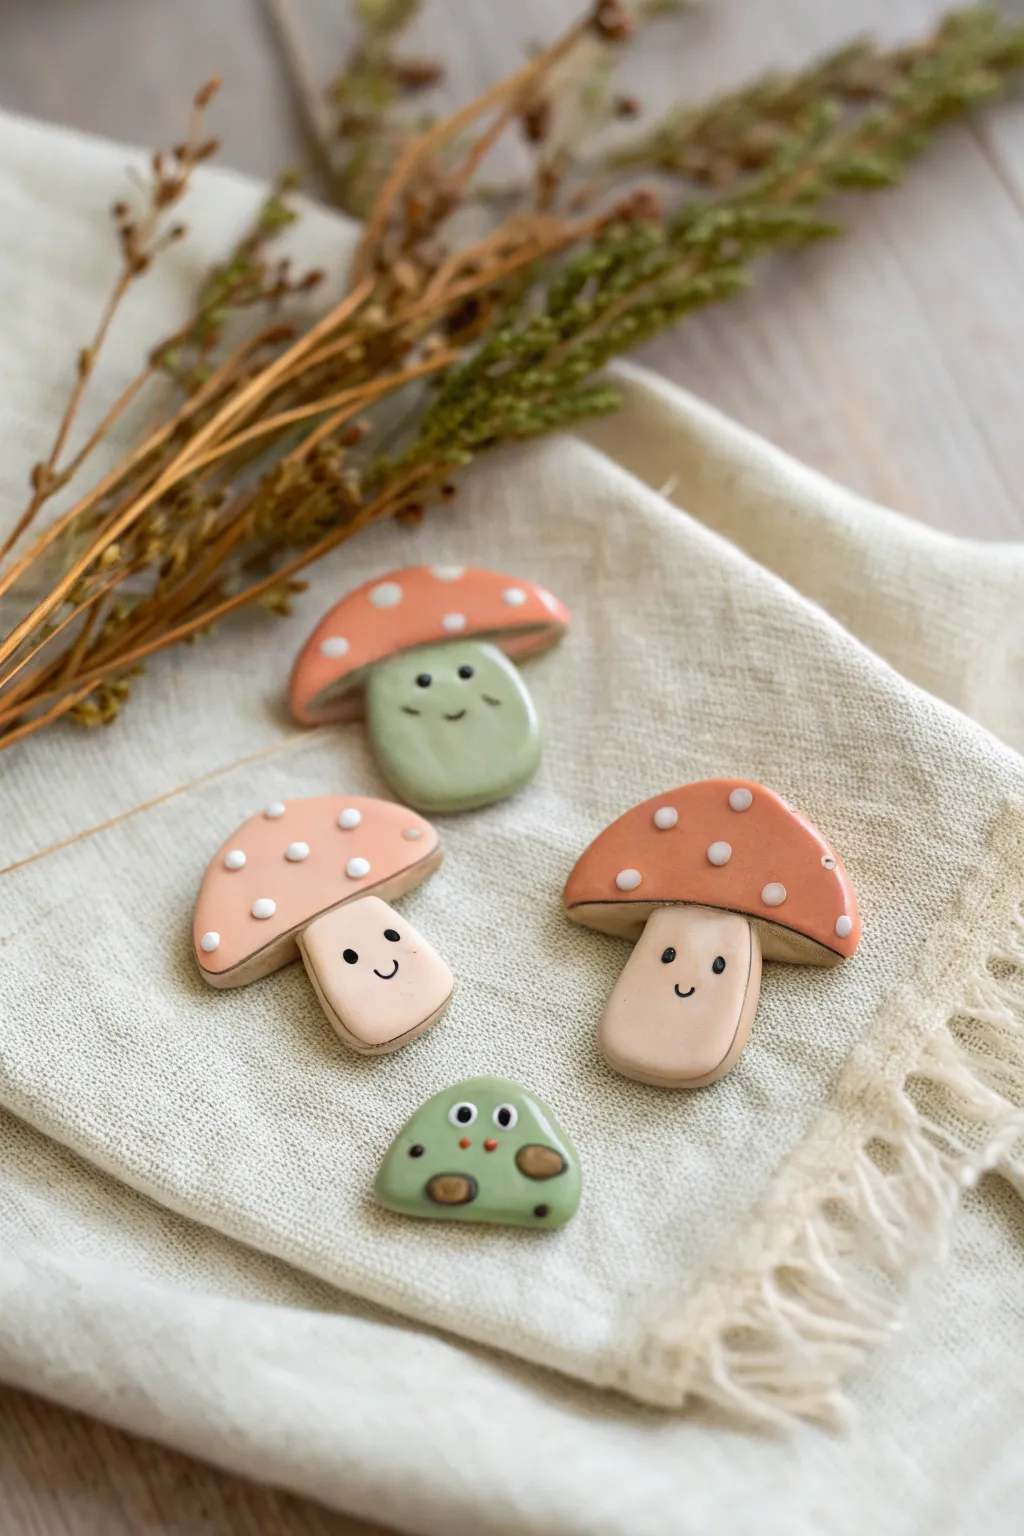
These charming little mushroom and frog characters are crafted from flat clay slabs and painted with simple, cheerful expressions. With their glossy finish and soft pastel colors, they make perfect additions to tote bags or jacket lapels.
How-To Guide
Materials
- White polymer clay or air-dry clay
- Rolling pin or pasta machine
- Clay cutting blade or craft knife
- Needle tool or toothpick
- Circle cutters (various small sizes)
- Acrylic paints (terracotta, peach/tan, sage green, dark brown/black, white)
- Small paintbrush
- Gloss varnish or UV resin
- Pin backs and strong adhesive (like E6000)
- Sandpaper (fine grit)
Step 1: Shaping the Clay
-
Condition the clay:
Start by kneading your white clay until it is soft, pliable, and free of air bubbles. If you are using polymer clay, the warmth of your hands will help condition it. -
Roll out a slab:
Roll the clay out into a smooth, even slab about 1/4 inch (6mm) thick. You want it substantial enough to be durable but not too heavy for a pin. -
Cut the mushroom caps:
For the mushrooms, use a circle cutter to punch out a circle, then use the same cutter to slice off the bottom third, creating a dome shape for the cap. Gently soften the cut edge with your finger. -
Form the stems:
Cut small rectangles or rounded shapes for the stems. Press them gently against the bottom of the caps. You can blend the seam on the back side of the pin to secure them together. -
Shape the frog:
For the frog, shape a small, rounded triangle or gumdrop shape. Soften all edges so it looks smooth and organic like a river stone. -
Smoothing:
Dip your finger in a tiny bit of water (for air dry) or baby oil (for polymer) and gently run it over the edges of your shapes to remove any sharp angles or burrs.
Sticky Situation
Is your clay sticking to the table? Roll it out on a piece of parchment paper or a silicone mat so you can lift the shapes easily without distorting them.
Step 2: Baking and Painting
-
Bake or dry:
Follow your clay manufacturer’s instructions to dry or bake the pieces. If using polymer clay, place them on a ceramic tile or baking sheet and bake at the recommended temperature. -
Sand edges:
Once fully cured and cooled, use fine-grit sandpaper to gently smooth any rough spots on the edges. -
Base coat the stems:
Using a creamy tan or peach color, paint the stems of the mushrooms. For the green mushroom, paint the stem a soft sage green. -
Paint the caps:
Paint the caps of two mushrooms with a terracotta or coral color. Paint the third mushroom cap (the green one) with the same sage green as its stem, perhaps slightly darker. -
Paint the frog:
Cover the entire frog shape with the sage green paint. Let all base coats dry completely. -
Add frog details:
Paint two small brown ovals for the frog’s cheeks or spots. I like to place them low and wide for a cuter look. -
Paint the faces:
Using a very fine detail brush and black or dark brown paint, carefully add the facial features. Paint small, wide-set eyes and a tiny ‘U’ shape for the smile. -
Add the dots:
Dip the non-brush end of your paintbrush or a dotting tool into white paint. Add polka dots to the mushroom caps involved. For the frog, add larger white circles for eyes, then add tiny black pupils once the white is dry.
Step 3: Finishing
-
Seal the pieces:
Apply a thick, even coat of high-gloss varnish or UV resin over the front and sides of each piece. This gives them that ceramic-like shine shown in the photo. -
Cure the finish:
Let the varnish dry fully (24 hours is best) or cure the resin under a UV lamp. -
Attach the pin back:
Flip the pieces over and use a strong adhesive like E6000 to glue a flat pad pin back to the center of each shape. Let the glue cure for at least 24 hours before wearing.
Shiny & Smooth
For a glass-like finish without resin, apply 2-3 thin coats of gloss polyurethane varnish, letting each layer dry for an hour in between.
Now you have a set of adorable forest companions ready to decorate your favorite bag or collar
Layered Paper-Cut Style Scenes
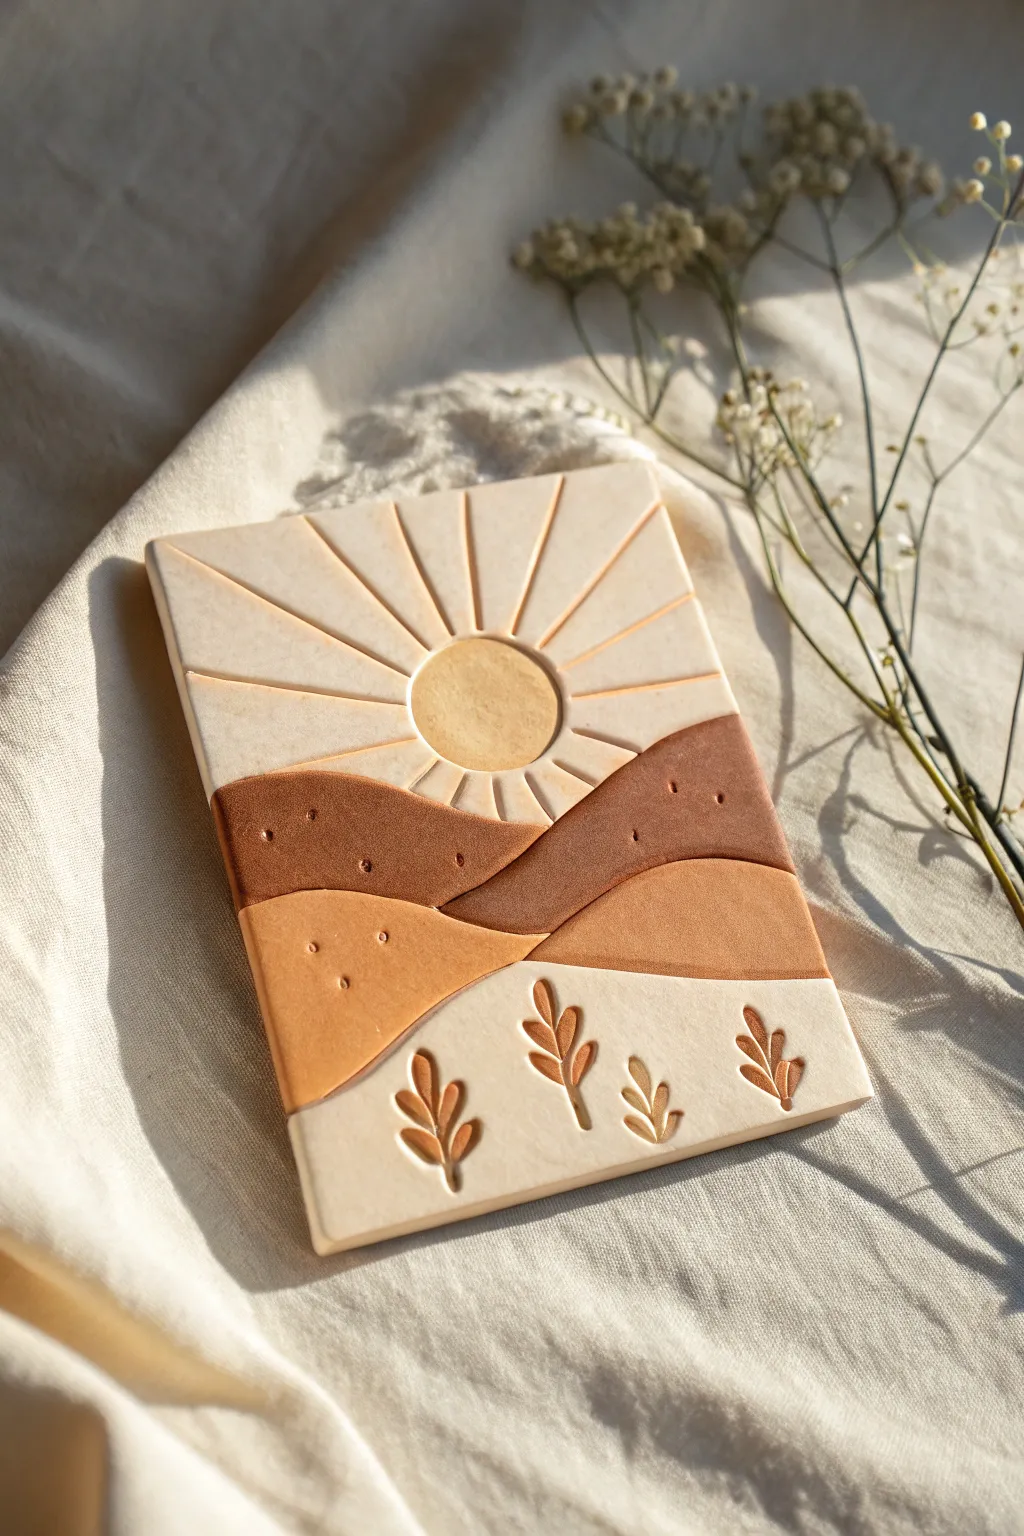
Capture the warmth of a desert sunrise with this beautiful layered clay project that mimics the dimensional look of paper-cut art. Soft terracotta tones and engraved details come together to create a peaceful, warm-toned wall hanging or decorative tile.
Detailed Instructions
Materials
- Polymer clay (white/beige, terracotta, dark brown, mustard yellow)
- Rolling pin or pasta machine
- Sharp craft knife or clay blade
- Rectangle clay cutter (approx. 3×4 inches)
- Needle tool or detailing pick
- Small circle cutter (approx. 1 inch)
- Smooth work surface (ceramic tile or glass mat)
- Oven (for baking)
- Fine grit sandpaper (optional)
Step 1: Base Preparation
-
Condition the Clay:
Begin by conditioning your polymer clay until it is soft and pliable. You’ll need four distinct colors: a creamy beige base, a deep chocolate brown, a warm terracotta, and a muted mustard yellow for the sun. -
Create the Base Slab:
Roll out a thick sheet of the creamy beige clay. This will serve as your canvas. Use your rectangular cutter to punch out a clean, crisp rectangle. Keep this base fairly thick, about 3-4mm, to support the layers. -
Sketch the Composition:
Lightly trace your design onto the beige slab with a needle tool. Mark a horizon line about halfway down, and indicate where your sun and hills will go. These lines will be covered later, so don’t worry about being too perfect.
Fixing Smudges
If colors smear during the layering process, use a cotton swab dipped in nail polish remover (acetone) to gently clean the surface of the raw clay before baking.
Step 2: Creating the Landscape
-
Roll Colored Sheets:
Roll out your brown and terracotta clays into thinner sheets than your base, roughly 1-2mm thick. These need to be delicate enough to look like paper layers but sturdy enough to handle. -
Cut the Dark Hills:
Using your craft knife, freehand cut a wavy, organic shape from the dark brown clay to form the back range of hills. Place this across the middle of your rectangular base, gently pressing it down to adhere. Trim the excess from the sides. -
Add Texture Details:
Before adding the next layer, use a needle tool to add tiny dot textures or small indentations to the dark brown hills for visual interest. -
Layer the Terracotta:
Cut another wavy shape from the lighter terracotta clay. This layer should sit lower than the brown hills, creating depth. Position it overlapping the bottom of the brown layer and trim the edges flush with the rectangle. -
Smooth the Seams:
Gently rub the clay layers with your finger or a soft tool to ensure they are fully bonded to the base slab without trapping air bubbles.
Step 3: Sky and Sun Details
-
Carve the Sky:
On the upper beige portion (the sky), locate where the sun will sit. Using a needle tool or a specialized carving tool, firmly carve radiating lines outward from that center point to the edges of the rectangle to simulate sun rays. -
Create the Sun Pocket:
Use your small circle cutter to gently press an indentation where the sun goes, or carefully cut out a circular shallow recess if you want it inlaid perfectly flush. -
Insert the Sun:
Roll out a small piece of mustard yellow clay. Cut a circle with that same cutter and adhere it into the center of your radiating lines. I like to texture this yellow circle slightly with a piece of sandpaper or fabric to give it a matte, stone-like finish.
Make it a Wall Hanging
Before baking, use a straw to punch a small hole in the top center of the sky. After baking, thread a leather cord or ribbon through to hang your art.
Step 4: Foreground and Finishing
-
Carve the Foliage:
In the bottom beige section below the hills, use a small gouge tool or a curved blade to carve out leaf shapes. Press deeply to create negative space. -
Fill the Leaves:
Take tiny amounts of the terracotta or brown clay and press them into these carved leaf recesses, creating an inlay effect. Alternatively, you can leave them as deep relief carvings. -
Final Clean Up:
Wipe the surface gently with a baby wipe or a bit of rubbing alcohol to remove any fingerprints or lint before baking. -
Bake:
Bake the piece according to your specific brand of polymer clay’s instructions—usually around 275°F (130°C) for 30 minutes. Let it cool completely.
Display your finished slab on a small easel or frame it to bring a touch of eternal sunshine into your home
Portable Tic-Tac-Toe Tile Set
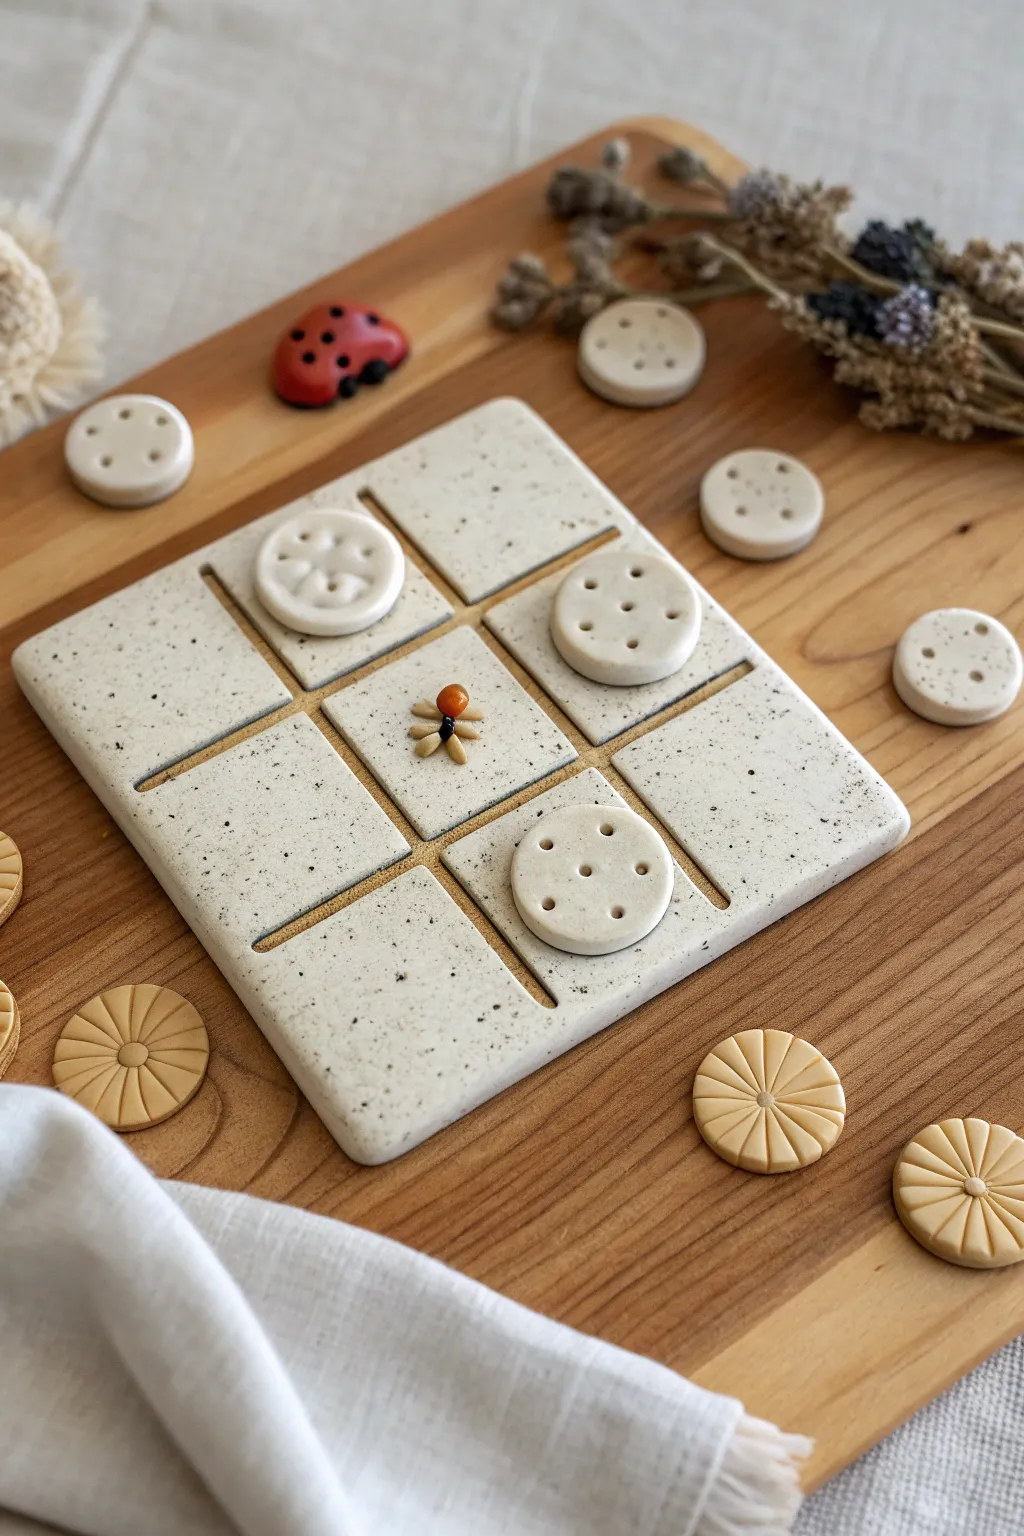
Bring a touch of whimsical charm to game night with this handcrafted clay tic-tac-toe set. Featuring a speckled ‘cookie dough’ finish and adorable biscuit-themed playing pieces, this portable board is as beautiful to display as it is fun to play.
Step-by-Step Tutorial
Materials
- Polymer clay (white or beige)
- Black pepper or dried tea leaves (for speckling)
- Rolling pin or acrylic roller
- Square clay cutter (approx. 4-5 inches) or craft knife
- Small round cutter (approx. 1 inch)
- Needle tool or toothpick
- Clean toothbrush (for texturing)
- Small ball tool
- Acrylic paints (red, black, warm brown)
- Fine detail paintbrush
- Sandpaper (fine grit)
- Matte varnish or sealant
- Parchment paper
Step 1: Preparing the Clay Base
-
Mix the Speckles:
Start by conditioning your white or beige polymer clay until soft. To achieve that organic, stoneware look, knead in a generous pinch of ground black pepper or dried tea leaves. Fold and roll the clay repeatedly until the speckles are evenly distributed throughout the batch. -
Roll the Slab:
Roll out the speckled clay on a piece of parchment paper to a thickness of about 1/4 inch. It needs to be thick enough to hold its shape but sturdy enough not to crack. -
Cut the Board:
Using a large square cutter or a ruler and craft knife, cut a perfect square for your game board base. Smooth out the edges with your finger to remove any sharp cuts. -
Grid Lines:
Use a ruler to lightly mark the board into a 3×3 grid. I like to use the back of a knife or a specialized clay tool to press deep, straight channels into these lines. Make them wide enough to be distinct but don’t cut all the way through. -
Texturing:
Gently tap the surface of the board with a clean toothbrush or crumpled foil. This removes the plastic sheen and gives it a baked ceramic texture.
Clean Cuts Pro-Tip
Before using your cookie cutters, dip them into a bit of cornstarch or baby powder. This prevents the clay from sticking to the metal and ensures crisp, clean edges without distortion.
Step 2: Creating the Game Pieces
-
Cut the Tokens:
Roll out more of your speckled clay (slightly thinner than the board) and use a small round cutter to punch out at least 10 circles—5 for ‘X’s and 5 for ‘O’s. -
Design Player One:
For the first set of pieces, create a ‘cracker’ look. Use a needle tool to poke a pattern of holes into the surface. A simple 5-dot or 4-dot pattern works beautifully. -
Design Player Two:
For the opposing pieces, you can create a different texture. Press a small stamp into the center or use a knife to indent radial lines like a flower or wagon wheel. -
The Center Marker:
Using a tiny bit of leftover clay, sculpt a small bug (like the ladybug or spider shown) or a tiny flower. This acts as a cute decorative element for the center square when the game isn’t in play. -
Refining Edges:
Inspect all your pieces. If the edges are sharp, gently tap them down with your fingertip to give them a softened, handmade feel.
Step 3: Baking and Finishing
-
Bake:
Arrange the board and all pieces on a parchment-lined baking sheet. Bake according to your specific clay manufacturer’s instructions (usually 275°F for 15-30 minutes). -
Cool and Sand:
Allow everything to cool completely. Once hard, use fine-grit sandpaper to smooth any rough bottom edges or uneven sides on the board. -
Paint the Details:
For the center bug marker, use a fine detail brush and acrylic paint. Paint the body black and add a pop of red or orange for the shell. Let the paint dry thoroughly. -
Antique the Lines:
To make the grid lines pop, dilute a small amount of warm brown acrylic paint with water. Brush it into the grooves and immediately wipe the surface with a damp paper towel, leaving the darker color only in the crevices. -
Seal the Set:
Finish everything with a coat of matte varnish. This removes the ‘plastic’ feel of the polymer clay and protects your paintwork from scratches during intense gaming sessions.
Color Variation Level-Up
Instead of identical colors, mix a tiny drop of yellow ochre into half the clay batch. This creates a subtle ‘vanilla’ vs. ‘honey’ tone difference between opposing player pieces.
Once sealed and dry, set your lovely new board on the coffee table and challenge a friend to a round
Tiny Bas-Relief Landscape Tiles
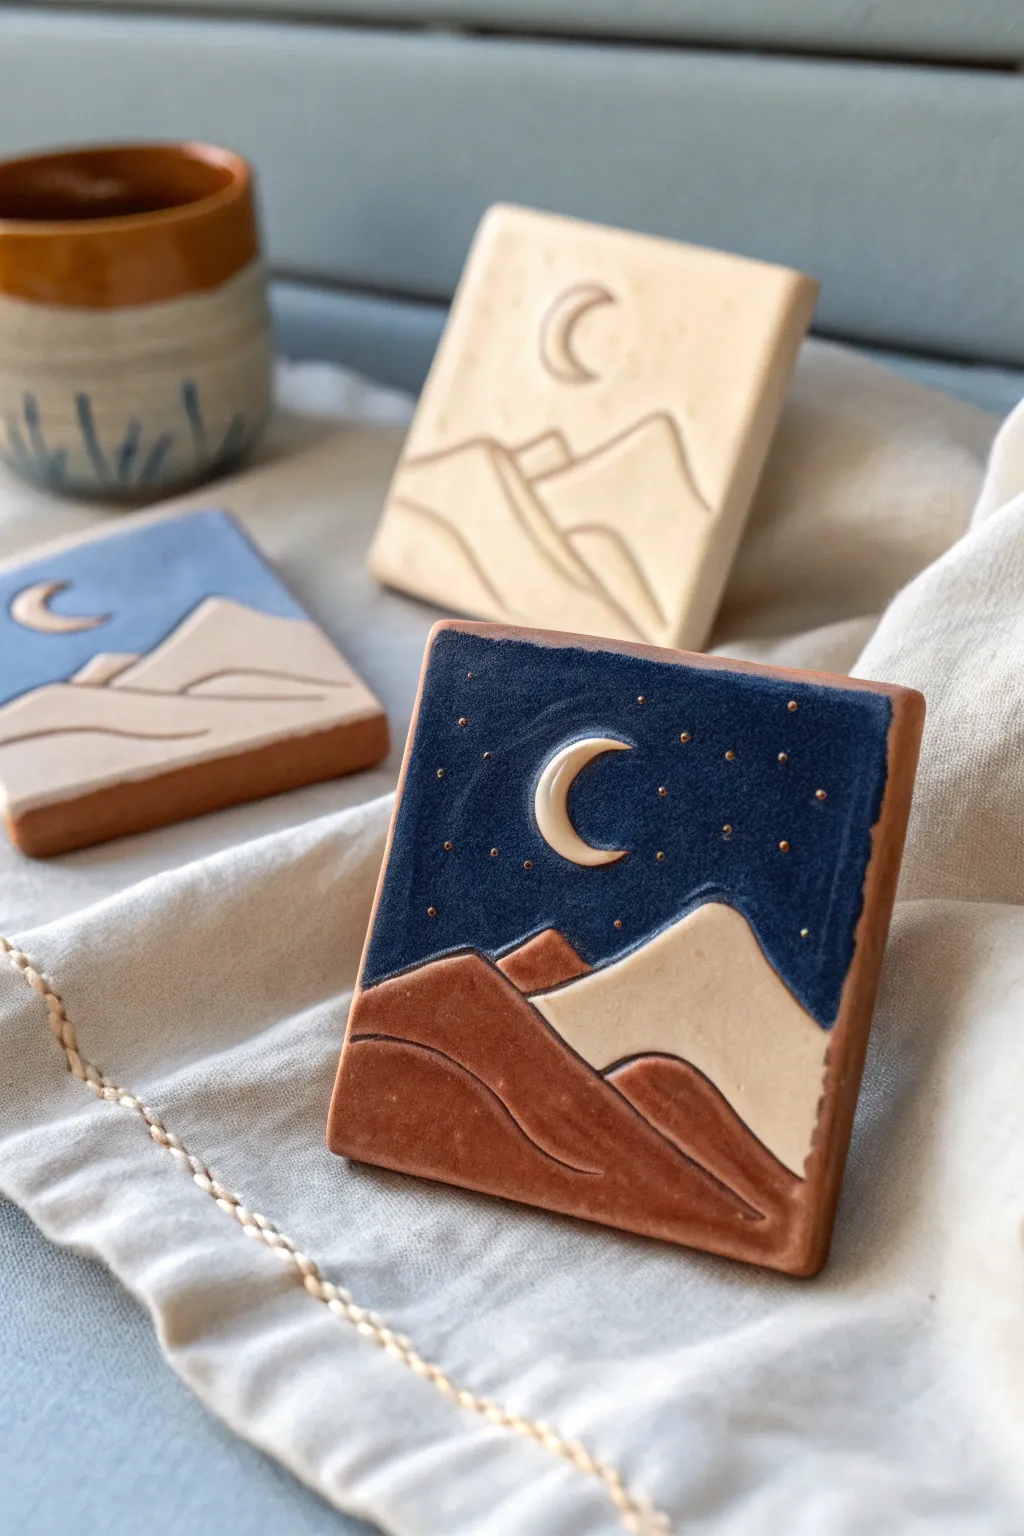
Create a miniature world with these charming bas-relief clay tiles, featuring serene mountain ranges under a crescent moon. Using simple carving techniques and targeted glazing, you can turn a small slab of clay into a peaceful, tactile landscape.
Step-by-Step Guide
Materials
- White or light-colored stoneware clay
- Rolling pin
- Guide sticks or slats (approx. 1/4 inch thick)
- Square cookie cutter (or ruler and needle tool)
- Needle tool
- Small carving tool or loop tool
- Rib tool (rubber or metal)
- Underglaze (Dark Blue, Burnt Orange/Terracotta, White)
- Fine detail brushes
- Clear glaze (transparent)
- Gold luster (optional)
- Kiln access
Step 1: Shaping the Canvas
-
Roll the Slab:
Begin by wedging your clay to remove air bubbles. Place the clay between two guide sticks and roll it out into a smooth, even slab about 1/4 inch thick. -
Smooth the Surface:
Take a rubber rib tool and gently compress the clay surface. This removes texture from the canvas rolling pin and aligns the clay particles to prevent warping later. -
Cut the Squares:
Using a square cookie cutter or a ruler and needle tool, cut out your tile shapes. If you are using a knife, aim for clean, straight cuts. -
Soften the Edges:
Run a damp finger or a sponge very lightly along the sharp edges of the square to soften them just slightly, giving the tile a finished, professional look.
Step 2: Carving the Landscape
-
Sketch the Design:
Wait until the clay is leather-hard. Using a needle tool, very lightly sketch your mountain range and crescent moon directly onto the surface. Don’t dig deep yet; just mark your composition. -
Carve the Outlines:
Go over your sketch lines with the needle tool, pressing slightly deeper to define the separation between the mountains and the sky. -
Remove Background Clay:
Using a small loop tool, gently carve away a thin layer of clay from the sky area around the moon. This makes the moon and mountains physically raised (bas-relief) compared to the sky. -
Detail the Mountains:
Carve flowing lines inside the mountain shapes to suggest slopes and valleys. I like to keep these lines simple and graphical rather than overly realistic. -
Smooth and Clean:
Use a soft, dry brush to sweep away any clay crumbs. If there are rough carving marks, smooth them down gently with a fingertip or a slightly damp brush.
Warping Worries?
If your tiles curl up while drying, flip them over daily or dry them slowly between two pieces of drywall to keep them perfectly flat.
Step 3: Glazing and Finishing
-
Bisque Fire:
Allow the tiles to dry completely (bone dry), then bisque fire them according to your clay’s specifications. -
Paint the Sky:
Apply 2-3 coats of deep blue underglaze to the sky area. Be careful to paint around the raised crescent moon, keeping it creamy white. -
Paint the Mountains:
Apply a burnt orange or terracotta underglaze to the lower mountain range. Leave the upper mountain (the ‘snowy’ peak) unpainted to show the raw clay body. -
Add the Stars:
Using a very fine detail brush or a needle tool dipped in glaze, add tiny dots of white or gold to the blue sky for stars. -
Clear Glaze Application:
Once the underglaze is dry, apply a coat of transparent clear glaze over the entire front surface of the tile to seal it and make the colors pop. -
Final Fire:
Fire the tile again to the glaze temperature appropriate for your materials. -
Optional Gold Accent:
For extra sparkle, apply small dots of gold luster to the stars after the glaze firing and fire a third time at a much lower luster temperature.
Magnetize It
Glue a strong neodymium magnet to the back of the finished tile with E6000 glue to turn your art into a beautiful fridge magnet.
Display your finished tiles on a small stand or group them together for a beautiful ceramic mosaic